

Page 1
Microtek LightLidTM 35
Installing and Getting Started
The LightLid 35 is a bonus accessory
included with your Microtek scanner. It gives
you the versatility to scan 35mm slides and
filmstrips on your flatbed scanner.
Microtek recommends the use of this
accessory to scan slides for on-screen display
purposes or where high resolution is not
critical. For high-quality print reproduction,
we recommend purchasing a dedicated slide
scanner or a Microtek scanner with built-in
film-scanning features.
Please note: Scanning of color transparencies may vary, depending on the quality of
your film original.
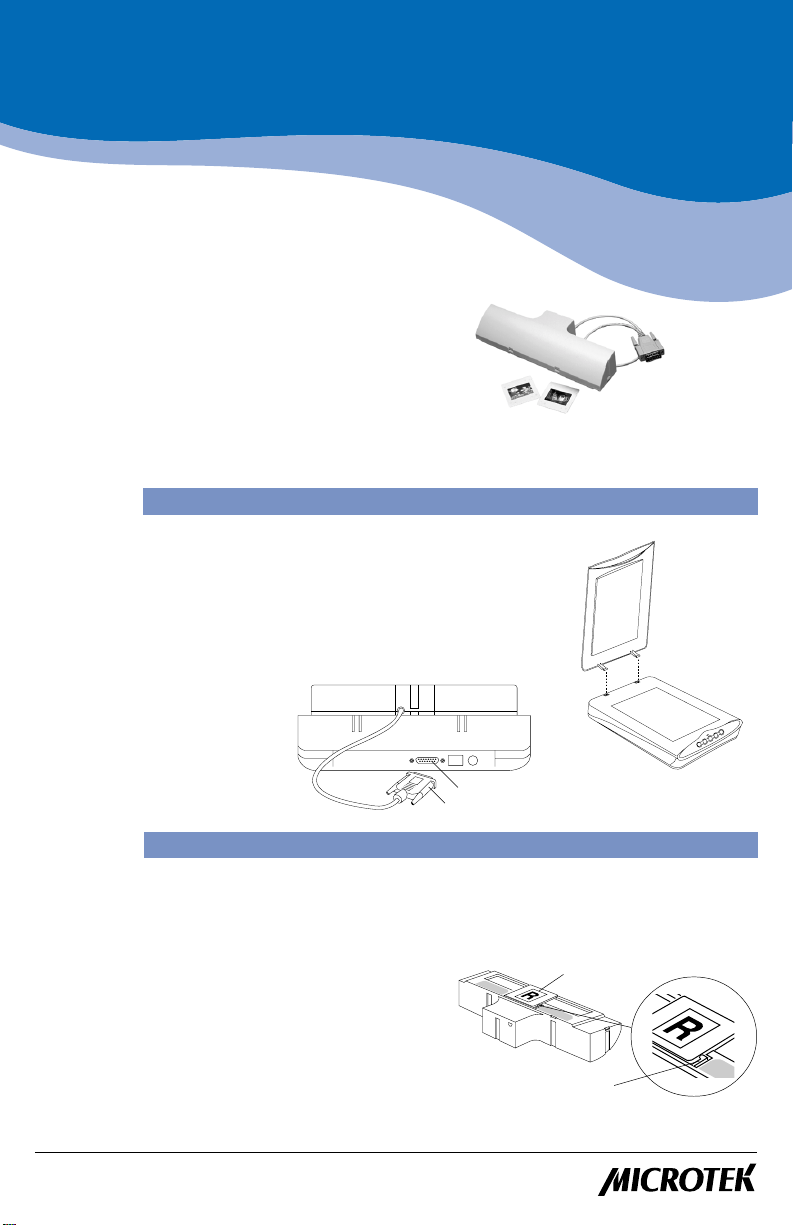
A. Installing the LightLid 35
1. Unpack the LightLid 35.
2. Remove the scanner lid.
3. Connect the LightLid 35 to your scanner. To do this:
Connect the 15-pin connector (A in diagram) of your
LightLid 35 to the accessory port (B) at the back panel
of your scanner.
B
A
B. Operating the LightLid 35
1. Mount the 35mm slide or filmstrip on the LightLid 35.
A. Mounting a slide:
Turn the LightLid 35 over. Insert the
35mm slide front side up into the
recessed area at the center of the
LightLid. Secure the slide by gripping it
with the grip prong provided at the
connector side of the recessed area. For
added stability, you may wish to secure
the slide with a piece of adhesive tape.
Copyright©2002 Mi crotek International, Inc. http://www.microtek.com
I49-003502 A, December 2002
Insert slide front side up
Grip prong for securing slide
Page 2
B. Mounting filmstrips:
Turn the LightLid 35 over. Insert the
35mm filmstrip front side up along the
recessed area, with one perforated side
Mylar
sheets
Filmstrip front side up
of the filmstrip tucked under the mylar
sheets. For added stability, secure the
other perforated side of the filmstrip
with a piece of adhesive tape.
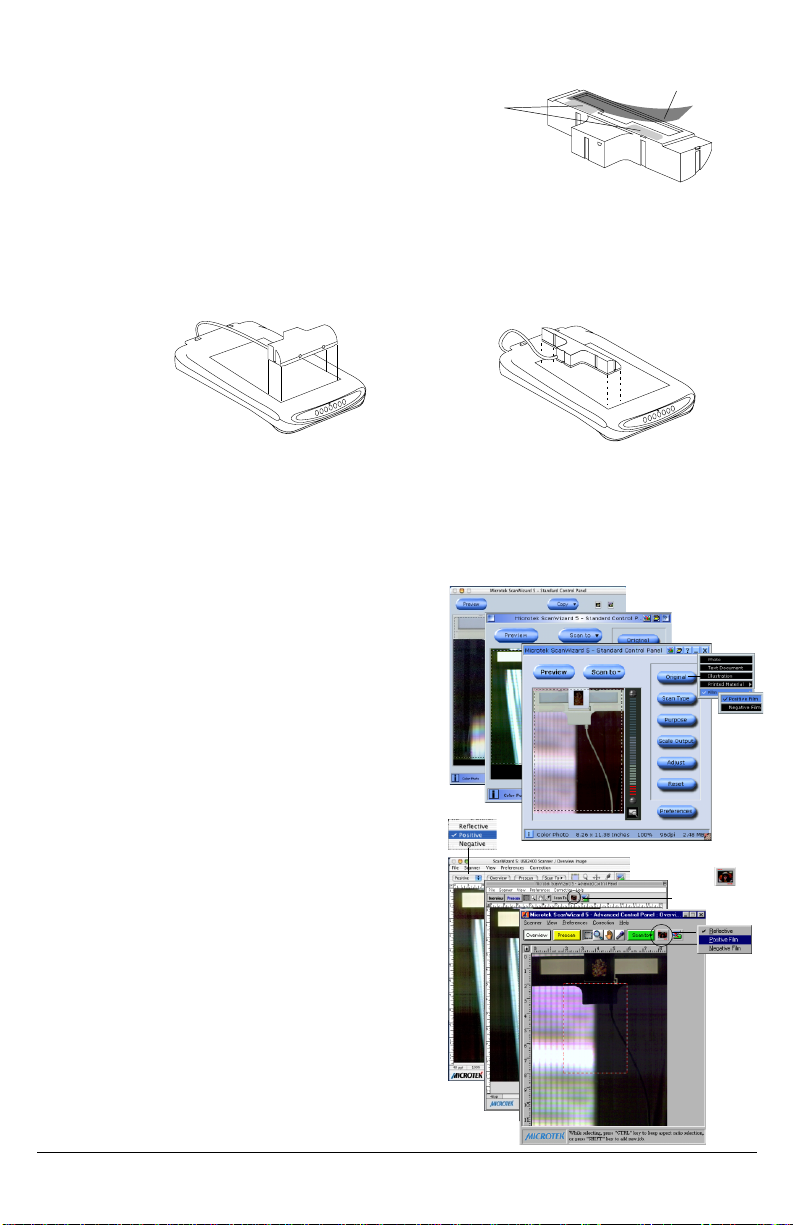
2. Place the LightLid 35 (with the secured filmstrip or slide to be scanned) on the glass
surface of the scanner. The LightLid 35 can be placed horizontally at the front edge
of the scanner glass bed, or vertically at anywhere on the glass surface, as shown
below.
Horizontal
Vertical
3. Select your Scan Material and start scanning.
Launch the ScanWizard 5 scanning software in stand-alone mode or from your
image-editing software, then select your scan material and start scanning. For details
on how to do this, see other documentation included in your scanner package.
ScanWizard 5 has two modes — Standard and Advanced — and each mode has its own
way of selecting the scan material and scanning. Each mode of operation is shown
below.
• Standard Control Panel: In the
Preview window, click the Original
button, and choose Positive Film or
Negative Film, depending on the
material you are scanning. When you
are ready to scan, click on the Scan
To button, and select where the
scanned image will be sent (to image
or OCR editing application, to disk, to
printer, or to e-mail or website
program). For more details, see your
ScanWizard 5 documentation.
• Advanced Control Panel: In the
Preview window, click on the Scan
Material icon, and choose Positive
Film or Negative Film, depending on
Scan
Material icon
the material you are scanning; for
Mac OS X, select Positive or Negative
from the Scan Material drop-down
menu. When you are ready to scan,
click the Scan to button, and select
where the scanned image will be sent
(to image or OCR editing application,
to disk, to printer, or to e-mail or
website program ). For more details,
see your ScanWizard 5
documentation.
2 M icrotek LightLid 35 Installing and Getting Started
Page 3

C. Getting the best results
To obtain the best results when scanning with the LightLid 35, set the scan Resolution
to a minimum 600 dpi and the Scaling to 100%. Refer to the diagrams below for more
information on how to set these values in ScanWizard 5 Standard and Advanced Control
Panels.
ScanWizard 5 - Standard Control Panel
Click the Purpose button to
select your Resolution value.
When the drop-down menu
appears, select Custom and
type 600 at the dpi box, as
shown below.
Set Scaling here to 100%
ScanWizard 5 - Advanced Control Panel
Settings window
in Mac OS X
Set Resolution here to
600 dpi
Set Scaling here to
100%
Settings window
in Mac OS 9.x
Settings window in Windows
Microtek LightLid 35 Installing and Getting Started 3
Page 4

D. Using the LightLid 35 Calibrator
The LightLid 35 Calibrator is a program designed for calibrating your LightLid 35 to
ensure that it captures colors accurately when scanning slides and filmstrips. Calibration
is strongly recommended as a procedure for optimizing your scanned image.
A. Install the LightLid 35 Calibrator.
On PC:
1. Place the Microtek CD into your CD-ROM drive. When the Installer screen
comes up, click Exit.
2. Double-click the My Computer icon on the desktop.
3. Locate your CD-ROM drive icon, and right-click the icon to bring up the
Context menu.
4. Choose Open, then double-click the LL35 Calibrator folder to open it.
5. Double-click the setup.exe icon to install the Calibrator. Follow the on-screen
instructions until installation is complete.
On Mac OS 9.x:
1. Place the Microtek CD into your CD-ROM drive. When the Microtek CD icon
appears on the desktop, double-click it.
2. Double-click “For OS 9.x” icon to open Installer screen.
3. Open the folder “LightLid 35 Calibrator”, and double-click the Installer icon.
Follow the on-screen instructions until installation is complete. Once the
Calibrator is successfully installed, the “LightLid 35 Calibrator” icon appears on
the desktop.
On Mac OS X:
1. Place the Microtek CD into your CD-ROM drive. When the Microtek CD icon
appears on the desktop, double-click it.
2. Double-click “For OS X” icon to open the Installer screen.
3. Double-click “LightLid 35 Calibrator” to mount the LightLid 35 Calibrator on
the desktop.
4. Open the “LightLid 35 Calibrator” on the desktop, and double-click “LightLid
35 Calibrator.pkg”.
5. Enter the administrator's name and password when the installation dialog box
comes up. Follow the on-screen instructions until installation is complete. Once
the Calibrator is successfully installed, the “LL35 Calibrator” icon appears on
the desktop.
B. Launch the LightLid 35 Calibrator.
Make sure that ScanWizard 5 is already installed on your system and that your scanner
is powered up. Launch the LightLid 35 Calibrator (Mac OS 9.x) or LL35 Calibrator
(Mac OS X) from your desktop. Alternatively, you
can launch the LightLid 35 Calibrator from the
LightLid 35 Calibrator folder (PC and Mac OS 9.x)
or from the Applications/ScanWizard 5 Folder
(Mac OS X).
Follow the on-screen instructions as shown in the
Calibrator window right (sample taken from
Windows version, which is identical to the
Macintosh except for the Title bar).
Click the Calibrate button
to start calibration
4 M icrotek LightLid 35 Installing and Getting Started
 Loading...