

Page 1
Page 2
Safety Precautions
Before you use the digital video camera (DV camera), be
sure to read the following safety precautions, which detail
the proper operation of the DV camera and its accessories
to prevent injuries or damage to users or equipment.
This symbol indicates situations where improper use of
the digital video camera may result in harm to the
camera operator.
This symbol indicates situations where improper use
of the DV camera may result in damage to the DV
camera.
Children should not be allowed to have access to the
DV camera. They could injure themselves with inappropriate
use of the DV camera or by becoming entangled in the
carrying strap. If a child swallows a camera battery, get the
child medical attention.
Subjecting the DV camera to water or any other liquid,
or allowing condensation to form, may start a fire or give
the user an electrical shock.
• If liquid gets inside the DV camera, turn the camera
power off by removing the battery or unplugging the
power cord (with dry hands).
• Allowing the DV camera to slowly adjust to temperature
changes (as in transferring the unit from outdoors to
indoors) will help to prevent condensation. Let any
condensation evaporate before using the DV camera.
It is not advisable to leave the DV camera in a car on a
hot day for any length of time. Exposing the DV camera to
too much heat may warp the camera casing or damage the
batteries. Battery damage may result in fire, burns or
electrical shock.
Another source of possible burns is heat from the flash or
DV camera itself.
2
• Touching the flash after it has been used extensively can
cause burns.
• The camera body itself may burn your hands if the DV
camera has been operated for a lengthy period of time.
Do not drop batteries or let them be banged around. This
could damage the casings, causing the batteries to leak.
• If the internal parts or components of the battery come
into contact with your eyes or your mouth, flush the
affected site with water and get medical help.
• Do not short-circuit the battery terminals, and be sure
to cover the terminals before you throw batteries away.
If the terminals contact metal, they may overheat and
explode, causing a fire.
Black or bright (red, green, blue, and white) dots may
sometimes appear on the LCD screen. These are merely
misfiring pixels, and have no effect on the recorded image.
If you aim the DV camera at the sun, or shoot the flash
close to someone’s eyes, you may injure your eyesight or
that of someone else.
If you see smoke or smell a burning odor coming from
your DV camera, turn the DV camera off. If you continue to
operate the DV camera, it could cause a fire or give you an
electrical shock.
Do not clean the DV camera with flammable liquids, as
these may cause a fire.
Do not leave the DV camera in humid or dusty areas.
Dust and humidity can cause the DV camera to short
circuit, leading to a fire.
If the DV camera gets anywhere near a strong magnetic
field, it may not work correctly, or the pictures taken may
be ruined or adversely affected.
Use a soft, absorbent cloth to clean the surface of your
DV camera.
Page 3
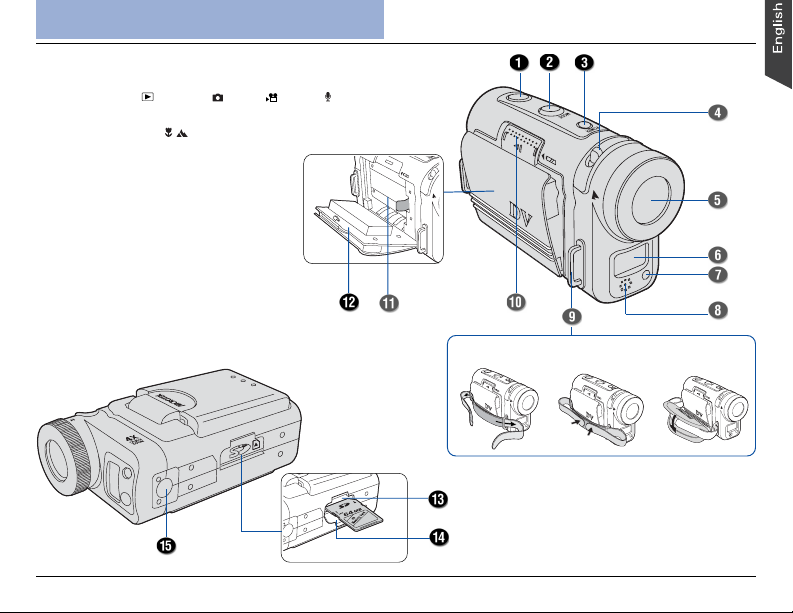
DV camera Components
Front/Bottom View
1. Shutter button
2. MODE button ( Playback/ Photo/ Video / Audio)
3. POWER button
4. Macro focus lever ( / )
5. Lens
6. Flash
7. Self-timer indicator
8. Microphone
9. Strap ring(s)
10. Battery door latch
11. Battery compartment
12. Battery door
13. Secure Digital (SD) compartment*
14. SD card compartment cover
15. Tripod mount
* SD card is optional and is not included with your purchase.
Attach the Strap
3
Page 4
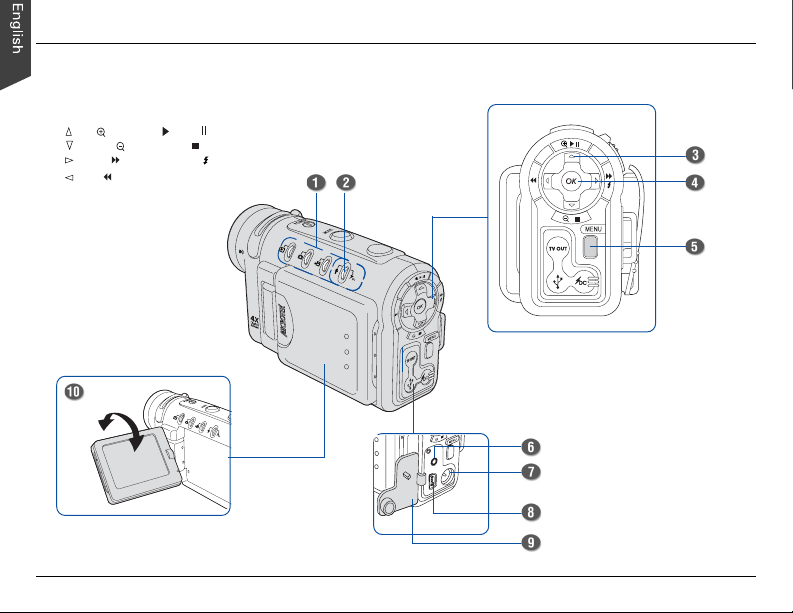
Rear/Side View
1. Mode indicators/READY LEDs
2. Charger LED/Audio mode indicator
3. Multifunction/4-way arrow button
• Up/ Zoom In/ Play/ Pause
• Down/ Zoom Out/ Stop
• Right/ Fast Forward/ Flash
• Left/ Rewind
4. OK/Pan button
5. MENU button
6. TV-out connector
7. DC-in connector
8. USB connector
9. Connector cover
10. LCD screen
4
Page 5
Introduction
The Microtek Take-it MV320 is a digital video (DV)
camera that applies the ASF (MPEG 4) recording video
format to capture motion pictures at a resolution of 640
x 480 or 320 x 240 pixels, offering superior image
quality and super audio. Equipped with a large 2.0"
color LCD screen, the DV camera allows you to focus
clearly on the images you want and to review live
images as shots are being taken.
Key features:
• 1/2” 3.21-megapixel CMOS sensor
• 7 megapixels interpolated resolution
• 2.0" LTPS LCD screen with 270° rotation
• 4X Digital Zoom/4X Playback Zoom
• 16MB internal flash memory
• Secure Digital (SD) media external memory support
• Plug-and-play USB 1.1 and Video connection
• Macro function
• 5 flash modes with selectable Red-eye Reduction
• 10 sec. self-timer delay
• Functions as Digital still camera/Digital audio recorder
• Functions as Web Cam/Mass storage device
• Picture/video player
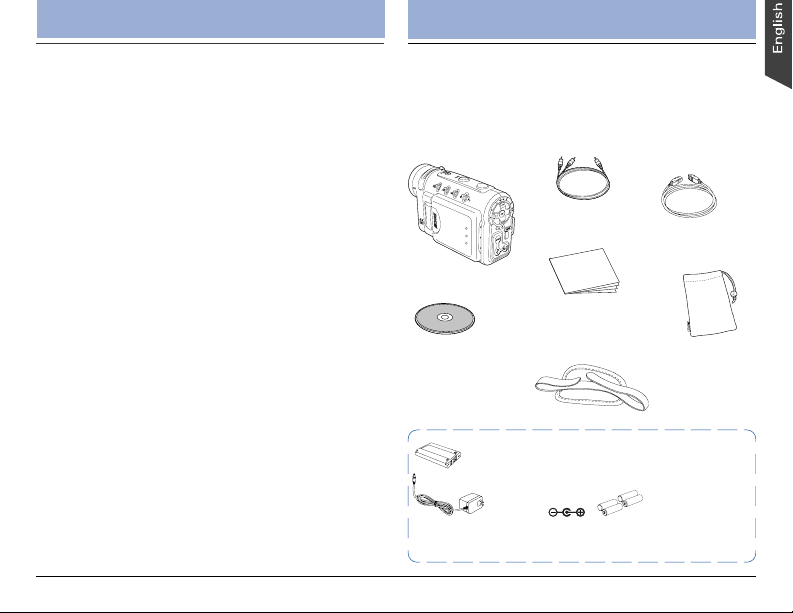
Unpacking
Unpacking the DV Camera
Open your DV camera package and check that you
have all of the components listed below.
If any component is missing, call Microtek Customer
Service immediately.
Video cable
DV camera
Documentation:
Includes Quick Start
Microtek CD-ROM:
Includes bundled
software and
camera driver
*Rechargeable Lithium ion battery (Nokia 8210
compatible)
* Power accessories you receive depend on the configuration of the
DV camera purchased.
Guide and other inserts
*AC adapter
(5V,2A; )
USB cable
Pouch
Strap
*Four AAA-sized
alkaline batteries
5
Page 6
Getting Started
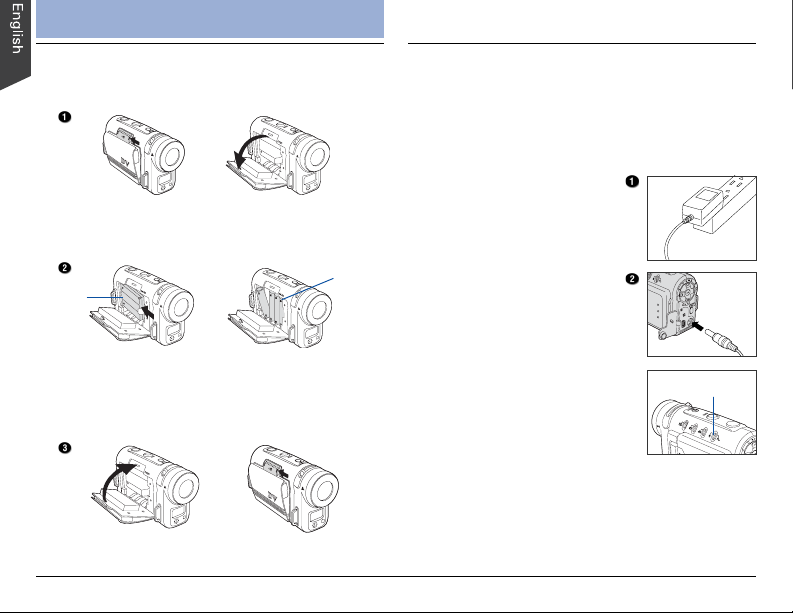
1. Loading the Battery
1. Push the battery door latch in the direction indicated
by the arrow to open the battery door.
2. Insert the battery into the compartment.
Ensure that the battery is inserted properly with the
Mylar pull tab held down.
Li-ion
battery
or
3. Hold the battery in place and close the battery door
securely.
Push the battery door latch in the direction indicated by
the arrow to close.
NOTE: Power accessories you receive depends on the
configuration of the DV camera purchased.
6
AAA
batteries
2. Charging the Battery
If your DV camera is supplied with a Lithium ion battery,
charge the Lithium ion battery first before using the DV
camera. This battery charging procedure is not suitable
for alkaline batteries users.
Follow the procedures below to charge the battery:
1. Plug the supplied AC
adapter (5V, 2A) into the
power source.
2. Ensure that the DV camera
is turned off; then connect
the DC plug of the AC
adapter to the DV camera’s
DC-in connector.
When the DV camera is
connected, the battery starts
to charge, and the charger
LED (Audio mode indicator)
lights up red. After charging
for several hours, the red light
disappears, indicating that the
battery is fully charged.
NOTE:
• Use only the AC adapter supplied with the DV camera to
charge the Lithium ion battery (Nokia 8210 compatible
only). Using any other adapter may damage the DV
camera.
• To minimize the risk of fire and/or explosion, DO NOT
use the AC adapter to charge alkaline batteries.
Charger LED
Page 7

3. Inserting the SD Card*
A Secure Digital (SD) card can be used to increase the
DV camera’s memory capacity. When a card is installed,
images and video/audio clips are stored directly onto the
SD card. If a card is not installed, image and video/audio
clips are stored in the DV camera’s internal memory.
To install an SD card:
1. Ensure that the DV camera is
turned off, then open the SD
card cover.
2. Insert and push the SD card
into the compartment until
you hear a “click”.
Ensure that the orientation of
the SD card matches the SD
card marking in the SD
compartment.
3. Close the SD card
compartment cover securely.
* SD card is optional and is not included with your purchase.
4. Turning the DV camera On/Off
Press the POWER button to turn the DV camera on.
When the DV camera is turned on, the green Mode
indicators start blinking and will stay on steady in the
Video mode, and the LCD screen is activated as well.
To turn off the DV camera, press the POWER button
again. When the DV camera is turned off, the LCD
screen is turned off as well.
Power button
Video Indicator
Using the Flash
The flash allows you to take pictures
in environments with insufficient
lighting. It works only in Photo mode.
Press the Flash (
desired flash mode appears on the
LCD screen, then press the Shutter button to shoot. The
available flash modes include Auto ( ), Auto with Redeye reduction (
Red-eye reduction (
NOTE: The flash is designed to fire twice in order to detect
correct shooting distance of the subject. When you press
the Shutter button with the flash enabled, you will see the
flash fire twice and hear a sound to indicate that a still
image has been taken (unless the sound is disabled).
) button until the
), Forced flash ( ), Forced flash with
), and Flash off ( ).
7
Page 8

Using the DV Camera
Using the Multifunction Button
The Multifunction/4-way arrow button
provides Up, Down, Left, and Right
arrow selections for navigating the Menu
screens. In addition, the button can
perform different functions depending on
the selected camera mode, as shown by
the accompanying table.
Button Playback Photo Video
Zoom In / Play / Pause / Pan Zoom In Zoom In
Next / Fast Forward / Pan Flash —
Zoom Out / Stop / Pan Zoom Out Zoom Out
Previous / Rewind / Pan — —
* OK button – switches between nine-image display and single image
display in Playback mode.
Switching Between Modes
Press the MODE button to select the
desired camera mode by using the
4-way arrow button.
• Video Mode
Press to enter Video mode; this
allows you to record video clips of
unlimited length (maximum length
dependent on the size of available
memory).
• Photo Mode
Press to enter Photo mode; this
allows you to capture images in JPEG format with
automatic exposure, providing a full selection of manual
controls over all camera settings.
8
Audio Mode
•
Press to enter Audio mode; allows you to record audio
clips of unlimited length (maximum length dependent on
the size of available memory).
• Playback Mode
Press to enter Playback mode; allows you to browse
and delete images and video/audio clips.
Using the Menus
Press the MENU button to display a menu for the
selected mode. The Setup menu appears in all modes.
To access the menus:
1. Press the MODE button to select
a camera mode.
2. Press the MENU button.
The selected mode menu is
displayed on the LCD screen.
a) Use the / button to enter the
function menu.
b) Use the / button to navigate
through function items.
c) Use the button to enter the function options menu.
d) Use the / button to toggle through options.
The selected function/option is highlighted with
color.
e) Use the button to confirm your selection.
3. Press the MENU button to exit the menu.
Page 9

Setting the Date and Time
The DV camera allows you to adjust the date and time
setting. It is advisable to set the date and time before
using the DV camera for the very first time.
To adjust the date setting:
1. Press the MENU button.
2. Press
3. Use the / button to select “ ”
4. Use the / button to toggle through the “YYYY”,
5. Use the / button to enter a new value for the
6. Press the
7. Press the MENU button to exit the menu.
to select the Setup ( )
menu option at the top.
When selected, the settings are
shown on the LCD screen and
display the current state of the DV
camera.
– Date, then press the button.
A Date adjustment screen appears
on the screen, allowing you to set
the date.
“MM”, and “DD” formats.
The selected option is highlighted with color.
selected option.
button to confirm your changes and to
return to the Setup menu screen.
To adjust the time setting:
1. In the Setup (
) menu, use the
/ button to select “ ” – Time,
then press the button.
A Time adjustment screen appears
on the screen, allowing you to set
the time.
2. Use the / button to toggle
through the “HH”, “MM”, and
“SS” formats.
The selected option is highlighted
with color.
3. Use the / button to enter a new value for the
selected option, then press the button.
NOTE: The date and time setting may be shown incorrectly
if the DV camera has not been in use for a long time. Please
check the date and time setting and adjust accordingly.
Selecting the Language
The DV camera allows you to select
the on-screen display language.
1. In the Setup menu, use the
button to select “ ” – Language.
2. Press the
button to display the
available language options.
3. Use the
/ button to select the
language you require, then press
the button to confirm your
selection.
/
9
Page 10

Shooting
Shooting Video
Video mode allows you to record video clips, the length
of which is determined only by the size of your available
memory. Video clips are recorded in ASF or AVI file
format at a resolution of 640 x 480 or 320 x 240
pixels.
1. Press the MODE button and
then the button to enter
Video mode ( ).
The video standby recording
screen appears.
2. Compose your shot using the
LCD screen.
3. Press the Shutter button and
release to shoot.
Recording begins, with the
elapsed recording time shown on
the LCD screen.
4. Press the Shutter button once
more to stop.
The video has been recorded,
and the DV camera is ready to
shoot another video.
NOTE: The flash is inactive in Video mode.
10
Shooting Still Images
Photo mode allows you to capture still images with
automatic exposure, providing a full selection of manual
controls over all camera settings.
1. Press the MODE button and
then the button to enter Photo
mode ( ).
Information related to the shoot
(e.g., photo size, photo quality,
flash, etc.) appears on the LCD
screen automatically.
2. Compose your shot using the
LCD screen.
3. Press the Shutter button.
When you press the Shutter
button, you will hear a sound to
indicate that the still image has
been taken (unless the sound is
disabled), and the captured image
remains on the screen for two
seconds.
The DV camera is ready to take another still image when
the “Busy” message vanishes from the LCD screen.
Page 11

Recording Audio
Audio mode allows you to record audio clips of
unlimited length in the WAV file format (limited by the
size of available memory).
1. Press the MODE button and
then the
Audio mode (
The audio standby recording
screen appears on the LCD screen.
2. Press and release the Shutter
button.
Audio recording begins, with
the elapsed time shown on the
LCD screen.
3. Press the Shutter button once
more to stop recording.
The audio clip has been recorded.
button to enter
).
Specifying the Startup Image
The DV camera allows you to specify a captured image
as a new startup image of the DV camera if desired.
To specify a new startup image:
1. Press the MODE button and then the
enter Playback mode ( ).
The recorded video, audio, or still image appears on the
LCD screen as a composite display of nine images.
2. Use the 4-way arrow button to
select a captured still image
you require.
3. Press the MENU button.
4. Use the 4-way arrow button to
” –Startup Image,
select “
then choose “Select”.
5. Press the OK button to return
to playback mode.
The selected image will be
displayed at startup automatically
when you turn on the DV
camera the next time.
button to
11
Page 12

Playback
Playing Back Video/Audio/Still Images
The video, audio, or still images made with the DV
camera are available for viewing on the LCD screen.
1. Press the MODE button and then
button to enter Playback
the
mode ( ).
The recorded video, audio, or still
image appears on the LCD screen as
a composite display of nine images.
2. Use the 4-way arrow button to
select the recording you want to
play.
The selected recording is enclosed
by a yellow border.
3. Press the OK button.
The selected recording appears on the LCD screen as a
single image display.
In this display mode, you can use the / ( / )
button to toggle forwards/backwards through all the
recordings.
12
4. Press the ( ) button to start the video/audio
playback.
During the playback, do the
following if required:
• Press ( ) to pause video/audio
playback.
• Press ( ) to continue video/
audio playback.
• Press / ( / ) to advance or
rewind the playback with a speed
setting. The speed can be
adjusted from -4 to +4 in 2-step
increments.
• Press ( ) to stop video/audio playback.
5. Press the OK button to return to a nine-image
display.
Playback Zoom
This feature lets you enlarge a captured still image at up
to four times the original viewing size.
1. Select an image you want to magnify.
2. Press the
button to zoom out.
( ) button to zoom in and the ( )
Page 13

Deleting
This Erase function lets you remove still images or
video/audio clips from the memory, allowing you to free
up space in which to store future recordings.
Deleting Current
1. Select a recording in Playback mode, then press the
MENU button.
2. Use the 4-way arrow button to
3. Choose “Erase One” in the Erase
4. Use the / button to select
Deleting Selected
1. Choose “Erase Select” in the
2. Use the 4-way arrow button to
” – Erase.
select “
options menu, then press the OK
button.
A confirmation screen appears,
allowing you to erase or to cancel.
“OK”, then press the OK button.
The selected file or displayed recording is permanently
removed from memory and will no longer be available
for playback.
Erase options menu, then press
the OK button.
A nine-image display appears.
select the unwanted recording,
then press the OK button.
A trash icon ( ) appears, and the
selected recording’s border color
changes to red, indicating that the
selected recording is checked and
can be deleted.
Use the 4-way arrow button to
select more recordings to delete
if so desired.
3. Press the OK button once more.
A confirmation screen appears,
allowing you to delete the
selected recordings or to cancel
the checked recording.
4. Use the / button to select “Delete checked”, then
press the OK button.
The selected recordings are removed from memory and
will no longer be available for playback.
Deleting All
1. Choose “ ” – Erase All in the
Erase options menu, then press
the OK button.
A confirmation screen appears,
allowing you to erase all or to cancel.
2. Use the / button to select
“OK”, then press the OK button.
All images and audio are removed
from memory and will no longer be
available for viewing.
f
13
Page 14

Printing
This feature lets you add a DPOF (Digital Print Order
Format) print mark on stored still images for professional
print services or for a DPOF printer.
1. In Playback mode, press the
MENU button.
2. Use the 4-way arrow button to
3. Press the
Printing Selected
1. In the Print options menu, choose
2. Use the 4-way arrow button
3. Use the / button to set the
14
” – Print.
select “
button.
A Print options menu appears,
allowing you to print all images,
to print the selected images,
or to cancel.
“Select”, then press the OK
button.
A nine-image display appears.
to select the still image you wish
to print.
The selected image is enclosed in a
yellow border and comes with a
confirmation screen of the number
of copies to be printed.
number of copies if desired.
4. Select more files to print if
desired, and set the number of
copies.
5. Press the MENU button twice to
exit the playback menu.
Printing All
1. In the Print options menu, choose
“All”, then press the OK button.
A confirmation screen appears.
2. Use the / button to set the
number of copies, then press the
OK button.
All stored still images appear in a
nine-image display, with each image
bearing a DPOF print mark.
3. Press the MENU button twice to
exit the playback menu.
f
Page 15

Viewing on a Television Set
In addition to being viewed on the camera’s LCD
screen, recorded video clips or still images can be
viewed on a TV screen. The TV screen can be used to
frame the subject during video recording.
To view images on a TV set, select the video output
system first.
B. Viewing the Image on a TV Set
1. Make sure that both TV set and DV camera are
turned off.
2. Connect the DV camera to your TV set, using the
provided Video cable.
• Connect one end of the Video
cable to the DV camera’s TVoutput connector.
• Connect the other end of the
cable to the Video-In jack of the
TV set.
A. Selecting a Video Output System
1. Press the MENU button to enter
the Setup mode ( ).
2. Use the 4-way arrow button to
3. Press the button, then the MENU
” – Video Out, then
select “
select “NTSC” or “PAL”.
NTSC: For USA, Canada, Mexico,
Taiwan, Korea, Japan, etc.
PAL: For Europe, Australia, China,
Singapore, etc.
button to exit the menu.
3. Turn on the TV set, and select the channel through
the Video Input.
4. Power on the DV camera, then press the MODE
button.
To play back, press the button to enter Playback
mode ( ).
To use the TV screen to frame the subject during video
shooting, press the button to enter Video mode ( ).
The image will appear on the TV monitor.
15
Page 16

Downloading Files
System Requirements
• Color display with 24-bit color output capability
• CD-ROM drive (for installing software)
• 128MB RAM or more recommended
PC
• Windows 98SE/2000/Me/XP
• Pentium PC or higher with USB port
Mac
• Mac OS 9.x; Mac OS 10.1.3 or later
• Apple Macintosh series with built-in USB port
NOTE: If you are using Windows 98SE, please install the
camera driver contained in the Microtek CD-ROM first.
Restart your computer after you have successfully installed
the camera driver.
To view the recorded images on your computer, follow
the steps as outlined below in sections A, B, C, and D.
16
A. Getting the DV Camera Ready
1. Make sure the SD card* containing the recordings
you wish to download is inserted in the DV camera.
And note that recordings stored in the DV camera’s
internal memory can be downloaded as well.
2. Make sure that the USB Switch is switched to
“USB Mode”.
If the USB Switch is set to the
incorrect mode, you will need to do
the following:
a) Press the MENU button to enter
the Setup mode ( ).
b) Select “ ” – USB Switch, then select “USB Mode”.
c) Press the button to confirm your selection, then
the MENU button to exit the menu.
B. Connecting the DV Camera
1. Make sure your computer is
turned on.
2. Connect the DV camera to the
computer using the provided USB
cable.
• Connect one end of the USB
cable to the DV camera’s USB
connector.
• Connect the other end of the
USB cable to a free USB
connector on your PC.
In a few moments, your computer will
automatically detect the DV camera. A “USB Mode” screen
appears, indicating that USB connection is complete.
Page 17

C. Copying Files
1. Windows users: Double-click the “My Computer”
icon, then double-click ‘Removable Disk’.
Windows 98SE/2000/Me Windows XP
Mac users: Double-click the newly created icon on
the desktop.
Mac OS X
Mac OS 9.X
Without an SD card installed
A folder (DCIM) containing the contents of the DV
camera’s internal memory or the SD card on the
computer appears.
2. Double-click the “DCIM” icon, then double-click the
folder named “100_MTDV” to display the files.
File names vary, depending upon the type of
recording being described.
Mac OS X Mac OS 9.X
With an SD card installed
NOTE: When the SD card is inserted in the DV camera,
the system reads both contents of the DV camera’s
internal memory and SD card. When the SD card in not
inserted, the system reads the contents of the DV
camera’s internal memory alone.
3. Drag and drop the files into any
folder on your hard disk.
D. Browsing Files
Double-click a file in the folder that contains the files
downloaded from the DV camera. The file opens with
your system’s default image, audio or video application.
NOTE:
• If you cannot play the transferred video files (e.g.*.ASF)
with your system’s default application, follow the
procedures below.
For Windows users: Install the bundled Ulead
VideoStudio application contained in the Microtek
CD-ROM.
For Macintosh users: Visit the
“http://www.videolan.org/vlc” website to download the
video player application.
• The software bundled with your DV camera provides
user-friendly tools for image editing and management,
allowing you to open, view, print, email, upload to web
or manage transferred images. For more details, refer to
the CD-ROM accompanying your DV camera.
17
Page 18

Web Cam (Windows Only)
You can use the DV camera as a Web Cam, allowing
you to send live video streams to a Web page. To use
the DV camera as a Web Cam, you will need a
computer, Web conference software (not provided by
Microtek), and an Internet connection.
To set up the DV camera for use as a Web Cam, follow
the steps outlined below.
1. Install the “Camera Driver”.
a) Turn on your computer, and insert the supplied
Microtek CD-ROM into the CD-ROM drive.
b) When the Microtek Software Installer screen comes
up, click “Camera Driver”, then follow the on-screen
instructions to install.
c) Click “EXIT” on the Microtek Software Installer
screen when the driver has been installed.
d) Restart your computer.
2. Set the DV camera to Web Cam mode.
a) Press the MENU button to enter
the Setup mode ( ).
b) Select “ ” – USB Switch, then
select “Web Cam”.
c) Press the button, then the
MENU button to exit the menu.
18
3. Connect the DV camera to your computer, using the
provided USB cable.
• Connect one end of the USB
cable to the DV camera’s USB
connector.
• Connect the other end of the
USB cable to the USB connector
of your computer.
In a few moments, your computer will automatically
detect the DV camera.
A “Web Cam” screen appears, indicating that
connection is complete.
4. Position your DV camera on the person or object to
be broadcast.
5. Launch your Web camera software (e.g., Microsoft
Net Meeting) and start the video conferencing
function. If the software permits video recording,
you can save the recorded video in a file for later
use.
6. When finished, disconnect your DV camera from the
computer.
Page 19

Menu Items and Factory Defaults
Video/Photo Menu Options Description
Video Format , Selects the file format for video clips
Size , *, , , / *, Selects the pixel recording size for images
Quality , *, Adjusts the compression rate for images
Drive Mode** , *, Toggles among Self-timer, Single shot, and Continuous shot modes
EV Compensation -2.0, -1.5, -1.0, -0.5, 0.0*, +0.5, +1.0, Compensates for extreme differences between background and foreground lighting
White Balance *, , , , Adjusts the White Balance according to light conditions for recording
Sharpness** , *, Adjusts the image outline for images
Voice Memo** On, Off* Records a voice memo for a captured image
Color Mode *, , Toggles among Normal, Black & White, and Classic color modes
Playback Menu Options Description
Erase Erase One, Erase Select, Erase All Erases recorded images and video/audio clips
Slide Show Cancel, 2S, 5S Plays back stored files in a continuous slide show
Rotate Cancel, 90°, 180°, 270° Rotates pictures up to 270 degrees
Print Cancel, Select, All Adds a DPOF print mark on the recording for professional print services to determine
Startup Image Default, Cancel, Select Specifies the startup image for the DV camera
Setup Menu Options Description
Brightness , , , , Adjusts the brightness level of the LCD screen
Beep On*, Off Toggles camera beep sounds on and off
Date yyyy/mm/dd Sets the date for the DV camera
Time 00:00:00 (hr/min/sec) Sets the time for the DV camera
Date Stamp On, Off* Stamps the time on captured images
Video Out NTSC*, PAL Selects your video output system
Format Cancel, OK Formats the SD card
Reset Cancel, OK Resets the function settings to their default configurations
Copy to SD Cancel, OK Copies the data stored in internal memory to the SD card
Frequency 50HZ, 60HZ* Sets the power frequency to accommodate local AC power
Power Saving On*, Off Sets the camera to power off after two minutes of inactivity
Language English*, Japanese, Korean, Simplified Chinese, Sets the LCD screen display language
USB Switch Web Cam, USB Mode* Toggles between standard USB Mode and Web Cam modes
001001001
File No Reset Cancel, OK Resets the file number to zero
* Default setting
** For Photo menu only
+1.5, +2.0
which prints are to be printed at a photofinisher
Traditional Chinese, German, French, Italian, Spanish
19
Page 20

Specifications
Image Sensor 3.21 megapixels CMOS
Sensor Size 1/2”
Resolution
Video clips 640x480 pixels (ASF:12 fps; AVI: 30 fps)
Still image 3072x2304 (7 megapixels, interpolated)
File Formats • Video clips: ASF (MPEG 4), AVI
Image Ratio (w:h) 4 : 3
Lens Aperture F 3.0
Focal Length f=8.3 mm
Digital Zoom 4X
Playback Zoom 4X
Focus Range • Normal: 3.28 ft. (1 m) to infinity
LCD screen 2.0" LTPS LCD (153,600 pixels)
White Balance Auto, Daylight, Cloudy, Tungsten,
Exposure
Exposure Adjustment -2.0 EV to +2.0 EV in 1/2 step
Exposure Metering Full-zone Average
Shutter Speed 1/20 – 1/4000 sec.
Sensitivity Equivalent ISO 100
Flash
Built-in Flash Fixed
Flash Modes Auto, Auto with Red-eye reduction,
320x240 pixels (30 fps)
2048x1536, 1600x1200, 1280x960
640x480 pixels
• Still images: JPEG (Exif 2.2)
• Audio clips: WAV
• Macro: 0.5 - 0.8 ft. (15 - 25 cm)
(270° rotation)
Fluorescent
Forced flash, Forced flash with Redeye reduction, Flash off
20
Self-timer 10 sec. delay
Audio Clip Unlimited length (maximum length
Print Format DPOF (Digital Print Order Format)
Quality Levels Best, Fine, Normal
Storage Media (External) SD (Secure Digital) card support
Storage Included 16 MB internal flash memory
Driver USB mass storage device driver
I/O Terminals (Connectivity) USB 1.1, AV output (Video Out)
Video Output NTSC, PAL
Power Saving 2 min.
Power Source* Four AAA-sized alkaline batteries, or
Weight Approx. 5.8 oz. (170 g)
Dimensions 4.4” x 2.6” x 2.0”
Tripod Mount Yes
Microphone Yes
Speaker Yes
Environment
Operating Temperature: 32° to 104° F (0° to 40° C)
Relative Humidity: 0 to 85%
Storage Temperature: 14° to 140° F (-10° to 60° C)
dependent on SD card)
rechargeable Lithium ion battery
(Nokia 8210 compatible) with
Adapter (5V, 2A)
* Power accessories depend on the
configuration of the DV camera
purchased
(112 x 67 x 50 mm)
 Loading...