

Page 1
Page 2
21
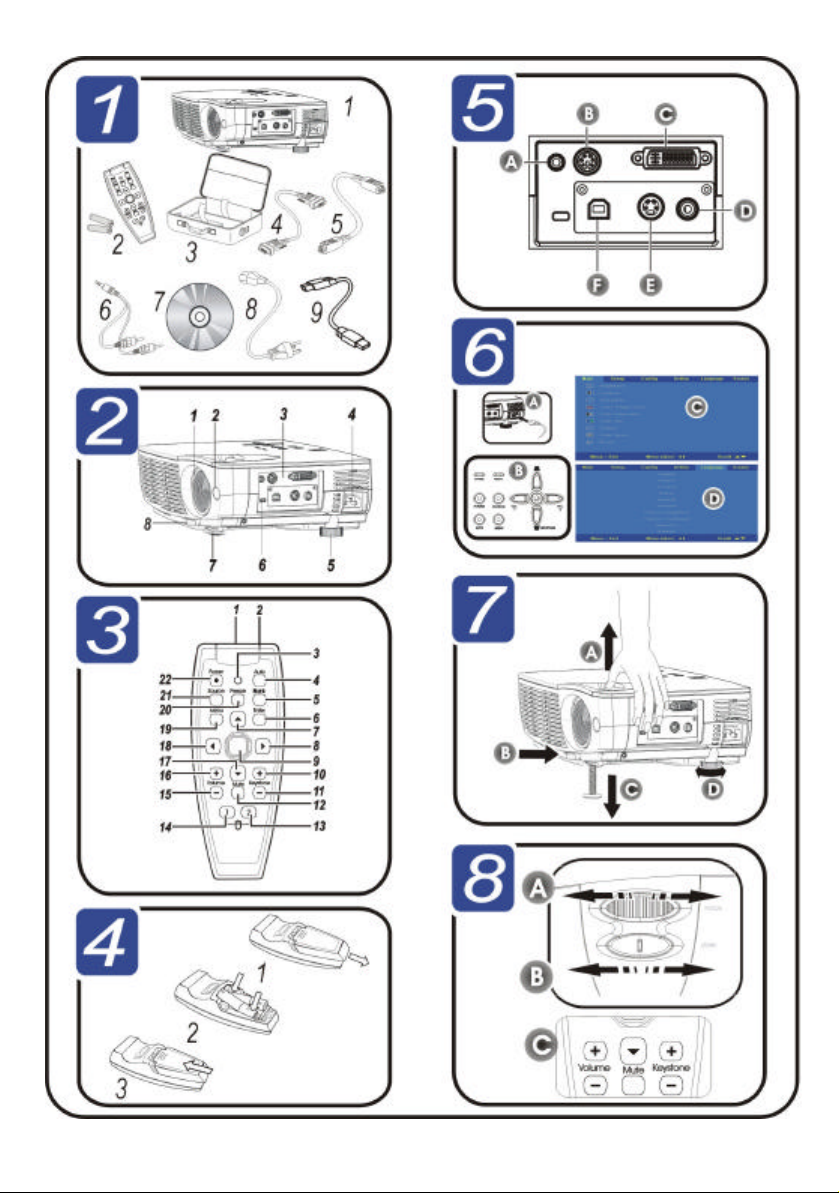
CHECK PACKING LIST
Congratulations on your purchase! Be
sure to check the following items are
included with your projector.
Main Parts Description
1.
Projector
2. Remote with battery
3. Carrying case
4. Computer cable (DVI-DB15)
5. S-video cable
6. Audio cable (mini jack-to-RCA x 2)
7. CD-ROM (User’s manual)
8. Power cord
9 USB cable
Contact your dealer immediately if any
parts are missing or damaged.
2
I DENTIFY PROJECTOR PARTS
Main Parts Description
1. Turn lens to focus
2. IR receiver
3. Connect input/output devices
4. Socket for power cable
5. Side foot—adjusts level of projector
6. Kensington security lock
7. Height adjuster—adjusts level of
projector
8. Height adjuster button—push to
adjust height
Caution:
Overheating can damage the projector.
Do not block any of the air vents
around the unit.
23
I DENTIFY REMOTE PARTS
Remote Buttons Description
1.
Laser
2.
IR transmitter
3.
Status LED
4.
Auto
5.
Blank
6.
Enter
7.
Up cursor
8.
Right cursor
9.
Cursor pad
10.
Keystone top
11.
Keystone bottom
12.
Mute
13.
Right mouse
14.
Left mouse
15.
Volume down
16.
Volume up
17.
Down cursor
18.
Left cursor
19.
Menu
20.
Freeze
21.
Source
22.
Power
4
I NSERT REMOTE BATTERY
1.
Remove the battery
compartment cover by
sliding the cover in the
direction of the arrow.
2.
Insert the supplied
batteries taking note
of the polarity (+/-) as
shown here.
3.
Replace the cover.
—— QQuuiicckk SSttaarrtt GGuuiiddee ——
Page 3

25
E
MAKE CONNECTIONS
6
SET L ANGUAGE
Warning:
As a safety precaution, disconnect all
power to the projector and connecting
devices before making connections.
Label Description
Audio-in
A
B
RS-232
C
DVI-I
D
Video
S-video
E
USB
Connect an audio cable
(not supplied) from the
computer’s audio-out
connector.
Connect the supplied
audio cable (mini jackto-RCA x 2) from a
video device.
Reserved service port
for firmware upgrades.
Connect the supplied
DVI cable from a co mputer.
Connect a composite
video cable (not supplied) from a video
device.
Connect the supplied
S-video cable from a
video device.
Connect the USB cable
(supplied) from a co mputer
Connect the power cord to the
1.
projector (A). Connect the
other end to a wall outlet.
The Power LED and Lamp ready LED turn on.
Turn on the connected de-
2.
vices.
Ensure the Lamp-ready LED is
3.
orange (not flashing) and then
press the Power button to turn
on the projector (B).
The projector splash screen
displays and connected
devices are detected.
Press the Menu button and
4.
then press the cursor
button until Language is
highlighted (C).
Press the cursor button
5.
until the language you want is
highlighted (D).
Press the cursor or
6.
button to select the language.
Press the Menu button twice to
7.
close the OSD.
To finish your presentation,
8.
turn off the projector.
—— QQuuiicckk SSttaarrtt GGuuiiddee ——
Page 4

7
ADJUST PROJECTOR LEVEL
To raise the level of the
1.
projector, lift the projector (A)
and press the height adjuster
button (B).
The height adjuster drops
down (C).
To make minor adjustments,
2.
rotate the side foot (D).
To lower the level of the
3.
projector, press the height
adjuster button [B] and push
down [A] on the top of the
projector.
28
ADJUST I MAGE
Use the Image-focus control
1.
(on the projector only) to
sharpen the projected image
(A).
Use the Image-zoom control
2.
(on the projector only) to resize
the projected image and
screen size (B).
Use the Keystone buttons to
3.
correct image-trapezoid (wider
top or bottom) effect (C).
NEED MORE I NFORMATION?
The CD-ROM that shipped with your
projector features a detailed user’s
manual in a printer -friendly format. The
user’s manual includes detailed hardware, operation, and maintenance
descriptions. You will also find troubleshooting procedures and instructions
on securing the projector by means of
the Kensington security lock.
The projector has an On-Screen Display (OSD) that lets you make image
adjustments and change various settings. To open the OSD, press the
Menu button on the remote control.
Use the remote Cursor buttons to navigate and make changes to the projector
settings.
Refer to the “On-Screen Display Settings” section of the CD-ROM user’s
manual for more information.
—— QQuuiicckk SSttaarrtt GGuuiiddee ——
 Loading...