

Page 1

Microtek
ScanWizard Pro TX
User's Guide
for Windows & Mac OS
Page 2

Copyright
2001 by Microtek International, Inc.
All rights reserved.
Trademarks
Microtek™, Artix™, ScanWizard™ Pro TX, and ArtixScan™ are trademarks of Microtek International, Inc.
Macintosh® and Apple® are trademarks or registered trademarks of Apple Computer , Inc. W indows® is a registered
trademark of Microsoft Corporation. All other products or name brands are trademarks of their respective holders.
Important
Documents that you scan may be protected under copyright law . The unauthorized use of such documents could
be a violation of the rights of the copyright holder. Micr otek bears no responsibility for the unauthorized use of
copyrighted materials.
T o obtain optimal results fr om the Microtek scanning software and user's manual, you should be familiar with such
Windows concepts as pointing, clicking, dragging, and selecting from menus and dialog boxed. If these things are
new to you, refer to your Microsoft Windows User's Guide.
May 2001
I49-003047 A
Photo Credits: Hon F. Lee, photo on pages 4-7, 4-8, 4-10, 4-12, 4-14, 4-20, 4-22;
Calvin Chen, photo on page 4-18; Microtek Lab, Inc., file photo on page 4-16.
Microtek Lab, Inc.Microtek Lab, Inc.
Microtek Lab, Inc.
Microtek Lab, Inc.Microtek Lab, Inc.
3715 Doolittle Drive
Redondo Beach, CA 90278-1226
Main: 310-297-5000
Sales: 800-654-4160
FAX: 310-297-5050
BBS: 310-297-5102
T echnical Support: 310-297-5151
AutoT ech fax back system: 310-297-5101
http://www.microtekusa.com
Microtek International, Inc.Microtek International, Inc.
Microtek International, Inc.
Microtek International, Inc.Microtek International, Inc.
6, Industry East Road 3
Science Based Industrial Park
Hsinchu, 30077, Taiwan
TEL: 886-3-5772155
FAX: 886-3-5772598
http://www.micr otek.com
ii
MicrMicr
otek Eurotek Eur
Micr
otek Eur
MicrMicr
otek Eurotek Eur
Max Euwelaan 68
NL-3062 MA Rotterdam
The Netherlands
TEL: 31-10-2425688
FAX: 31-10-2425699
http://www.micr otek.nl
ope B.Vope B.V
ope B.V
ope B.Vope B.V
..
.
..
Page 3

Contents
1 Introduction 1-1
What is ScanWizard Pro? ...........................................................................................1-1
A Powerful New Software...................................................................................1-1
The ScanWizard Pro TX Interface.....................................................................1-2
Settings window (LCH mode) .........................................................................1-2
Job Panel window............................................................................................1-2
Information window ......................................................................................... 1-2
Preview window................................................................................................1-3
System Requirements ..................................................................................................1-4
Installing ScanWizard Pro TX ....................................................................................1-4
About this Manual ........................................................................................................1-5
2 Getting Started 2-1
Using the Scan Mode..................................................................................................2-1
Using the Batch Mode ................................................................................................ 2-1
Exiting ScanWizard Pro TX .........................................................................................2-2
Color Matching .............................................................................................................. 2-3
3 Basic Scenarios 3-1
How to Scan a Color Positive Slide...........................................................................3-2
How to Scan Image from a Color Negative Filmstrip ............................................3-4
How to Scan Images from the APS Film Cartridge.................................................3-6
4 Using the Advance Image Correction Tools 4-1
The LCH Color Model ...................................................................................................4-2
Selecting LCH or Native Color Space.......................................................................4-3
Workflow for Optimizing Images ................................................................................4-4
Adding a Custom Setting ............................................................................................ 4-5
How to Choose the Correct Image Category ..........................................................4-6
Using the Dynamic Range Tool ..................................................................................4-8
Using the White & Black Points Tool.....................................................................4-10
Using the Gradation Tool (LCH Mode only) ..........................................................4-12
Using the Color Cast Tool (LCH Mode Only)..........................................................4-14
Using the Saturation Curve Tool (LCH Mode Only) .............................................4-16
Using the Selective Color Tool (LCH Mode Only) .................................................4-18
Using the Tone Curve Tool ........................................................................................4-20
Using the Filter Tool ................................................................................................... 4-22
iii
Page 4

5 Special Features & Advanced Scenarios 5-1
How to Edit and Scan Multiple Scan Jobs .............................................................5-2
How to Use the ScanWizard Pro TX Working Folders ..........................................5-4
How to Use the Magic Diamonds .............................................................................5-8
How to Customize Negative Film .............................................................................5-10
Appendix
A Color Matching for Advanced Users 1
For Macintosh users
Calibrating your monitor................................................................................................. 2
Setting up the System (Monitor) Profile ..................................................................... 2
Using images in third-party applications ................................................................... 3
For Windows users
System Monitor Profile Setup ....................................................................................... 5
ICC Profile-Aware vs. non-ICC Profile-Aware applications .................................... 6
Color Matching Setup using ICC Profile-Aware applications................................ 7
Color Matching Setup using non-ICC Profile-Aware applications ....................... 8
Color Matching Setup dialog button functions........................................................ 9
B Available File Formats for "Scan to File" Function 10
iv
Page 5
1 Introduction
What is ScanWizard Pro TX?
ScanWizard Pro TX is an advanced scanner controller program that provides many
powerful, professional-level features for film and slide scanning.
One important feature of ScanWizard Pro TX is that it lets you work in the LCH
color space, which is based on the LCH (Lightness, Chroma, Hue) model of colors.
The LCH model is a more intuitive way of editing and working with colors because
it defines colors the way we understand them-- based on the properties of
brightness (how light or dark a color is), saturation (how rich or dull a color is),
and hue (“red” as opposed to “blue”).
Another important function of ScanWizard Pro TX is the batch scan feature, a
separate but integrated program that lets you create and manipulate specific
“Working Folders” or batches of jobs. With Batch Scanning, you can lay out your
jobs beforehand, make adjustments to each scan, then start the scan when you are
ready. The result? A tremendously improved workflow and savings in time, with the
additional advantage of being able to retrieve the various “Working Folders” or
batch jobs when required.
ScanWizard Pr o TX is also ColorSync™-savvy, allowing you to use standard ICC
color profiles for accurate color matching when outputting your images under the
Macintosh environment.
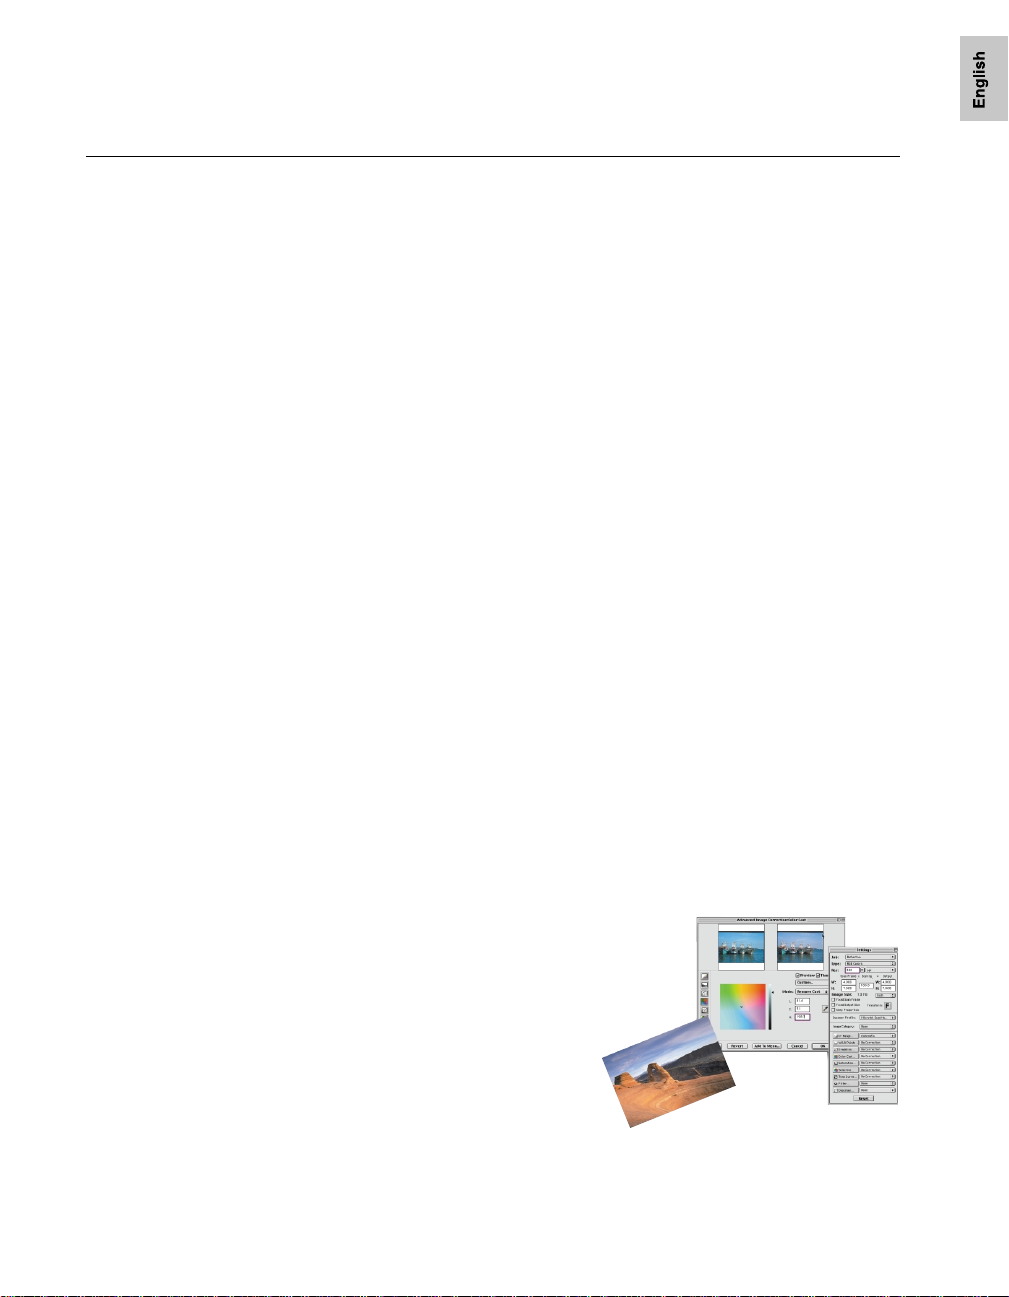
A Powerful New Software
With ScanWizard Pro TX, you can achieve
a new level of efficiency in scanning. The
many powerful tools of the program work
together to help you obtain the superior
color images you need, as well as provide
you with the flexibility to adjust or improve
the images as needed.
As you become increasingly familiar with
the program, you will also see how
ScanWizard can open up a whole new vista
for organizing your workflow and boosting
your scanning productivity in as many
ways as your creative imagination will
allow.
Introduction 1-1
Page 6
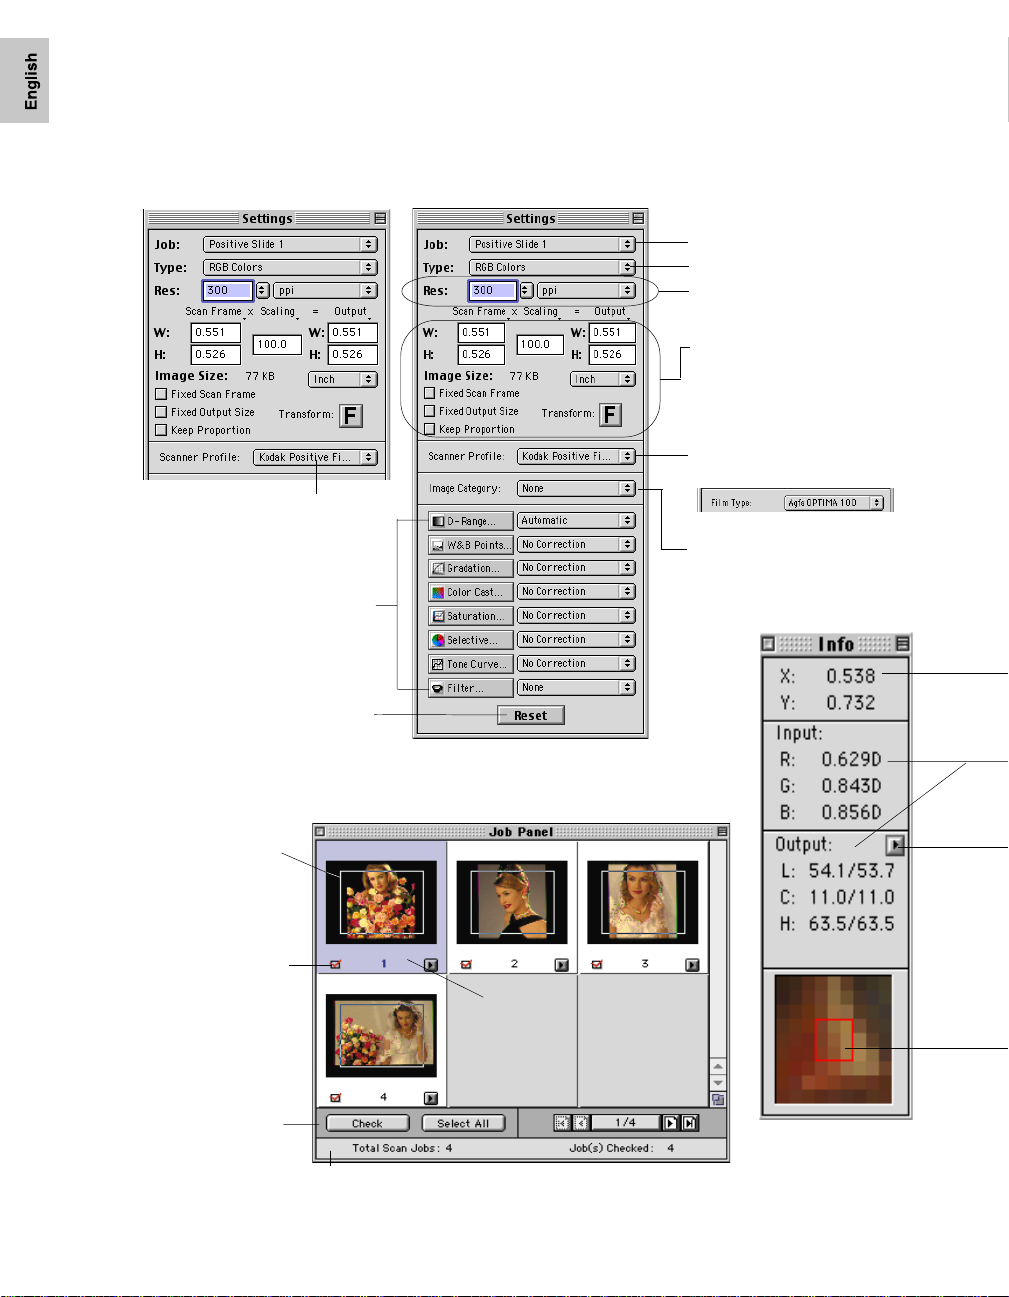
Settings window (LCH mode)
Film Type setup
(Negative film scan material only)
The ScanWizard Pro TX Interface
Shows the current scan job
Current scan job Image Type
Resolution settings
Scan Frame, Scaling, Output controls,
Scan Frame options, Unit of
measurement, Transform
Scanner profile setup and info
(Available only for Positive slide scan
material. Item changes to show film
type status when scan material is
negative film)
Image category selections
Advanced Image Correction (AIC)
controls for adjusting and
enhancing image quality
Reset custom settings
Adjusted scan frame
for cropped pre-
scanning
Check mark: Indicates job
will be scanned when you
press the Scan button
Tool bar with
Function buttons for
manipulating scan
jobs
Information
window
Job Panel window
(showing overview images)
Selected scan job, which is the
highlighted job. There can be multiple
selected scan jobs (several highlighted)
Status bar showing scan jobs status
1-2 ScanWizard Pro TX User’s Guide
Page 7
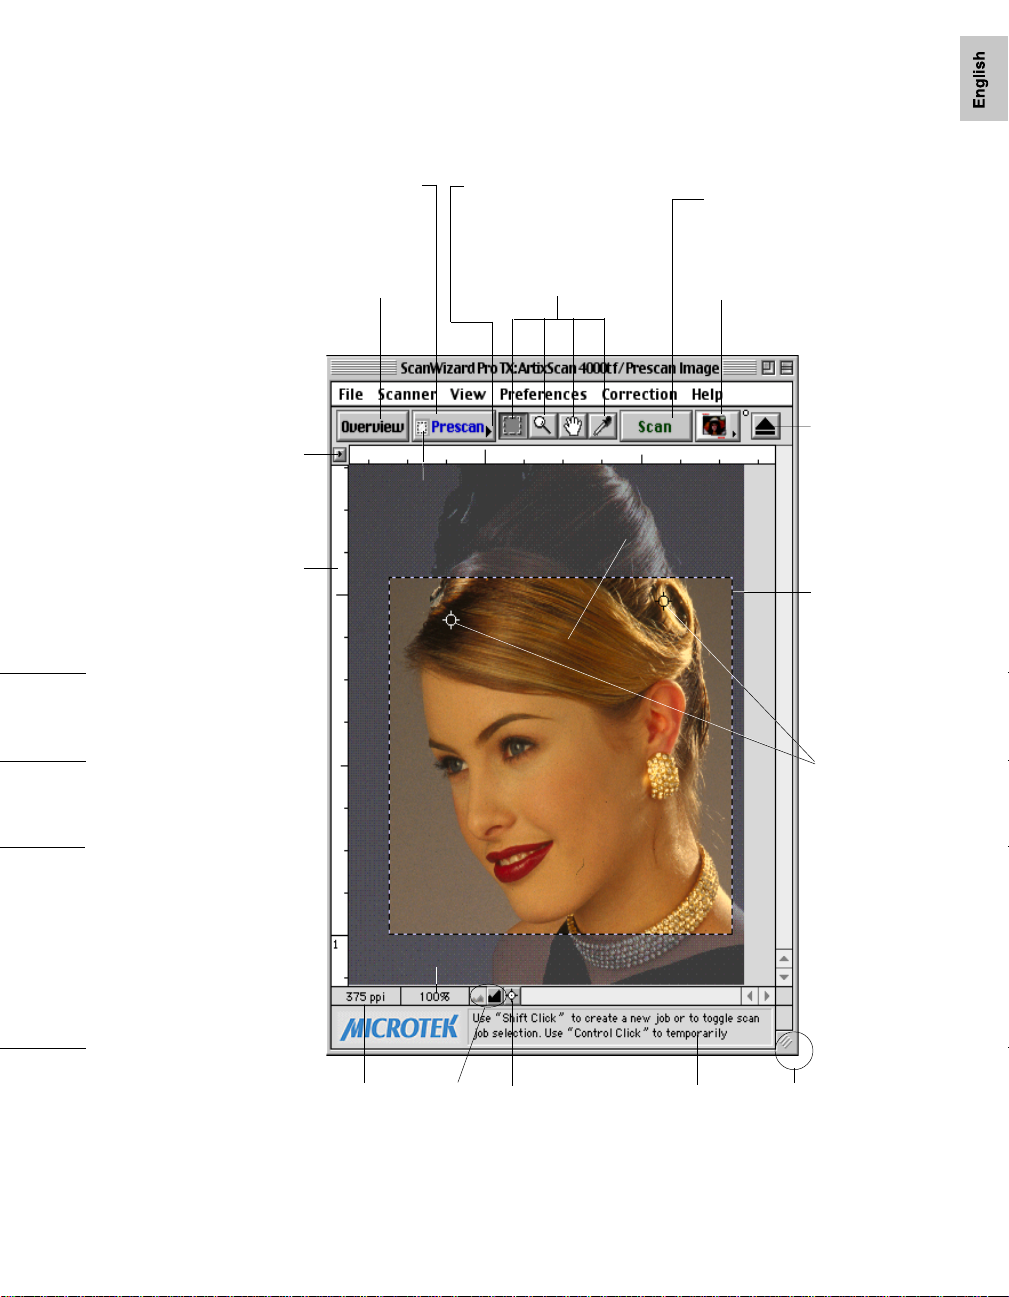
The ScanWizard Pro TX Interface
Prescan button: Previews a
high-resolution image of the
selected scan job
Prescan Frame Option: When
option is set to “Scan Frame,”
only the area enclosed by Scan
Frame is prescanned
Scan button: Starts the
scanning process.
Overview button: Previews
the entire film holder in Job
Preview window
(showing prescan image)
Unit of
Measurement:
Choose from inch,
cm, mm, point, pica,
& pixel
Ruler
Cursor Locator: Shows x, y
position of mouse cursor on
the current prescan image on
preview.
Color Meter Display: Displays
input and output pixel values of
the selected area in the prescan
image on preview
Color Meter Options: Provides
further options for the Sample
Display of the Information
window (see below)
Toolbar: (Left to right) Scan Frame,
Panel
Prescan Frame option
showing “Scan Frame”
setting icon
Zoom, Pane, and Dropper Tools
Scan Material icon: Selects the
type of scan material (Negative
or Positive Film)
Preview of prescan image or the
currently selected scan job in
Job Panel
Eject button:
Ejects the
filmstrip/slide/
APS cartridge
holder from the
scanner
Scan Frame:
Selects the area
for final scan.
Drag on corner/
side to resize
High & Low
(White & Black)
Points Markers:
Pinpoint to the
white & black
points of
current prescan
image
Pixel Sample Preview area: Shows
pixelized display of the spot in the
prescan image where mouse
pointer is pinpointed
Prescan image
resolution
Zoom in/out ratio
status
Handy
buttons for
Zoom in/out
Switch for
momentary flashing
of White & Black
Points Markers
Status bar: Provides tips
relative to the selected
tool in the Toolbar
Window Corner:
Drag to proportionally resize the
Preview window
Introduction 1-3
Page 8

System Requirements
• Power Mac (except iMac) or IBM-PC Pentium III; or their equivalent compatibles
• System 8.6 or later for Power Mac; Windows 95/98/2000 or Windows
NT4.0SP3 or later for PC.
• 128 MB RAM required
• Free hard disk space as required by the size of your scanned images and for
additional working files
• CD-ROM drive (internal or external)
• “Thousands of color” display or better
• Microtek ArtixScan 4000t scanner and other scanner models that are
supported by ScanWizard Pro TX
Installing ScanWizard Pro TX
For Macintosh users
1. Insert the Microtek ScanWizard Pro TX CD-ROM into your CD-ROM drive.
2. Double-click the CD-ROM icon when it appears on your desktop to open it.
3. When the CD-ROM opens, double-click the
follow screen instructions to install the desired profiles.
NOTE
: If the ICC profile for your monitor is not found, contact your monitor
manufacturer. You may skip Step #3 and install the ICC pr ofiles later.
4. Next, double-click the
instructions to install the program.
NOTE
: When Step #4 is run, some profiles will be installed as the default.
5. Restart your computer.
ScanWizard Pro TX InstallerScanWizard Pro TX Installer
ScanWizard Pro TX Installer icon, and follow screen
ScanWizard Pro TX InstallerScanWizard Pro TX Installer
ICC Profile Installer ICC Profile Installer
ICC Profile Installer icon, and
ICC Profile Installer ICC Profile Installer
For Windows users
1. Insert the Microtek ScanWizard Pro TX CD-ROM into your CD-ROM drive. The
Microtek Software Installer screen will come up automatically.
2. Double-click the installation button following the
option, and follow screen instructions until the installation is completed.
3. Next, double-click the
follow screen instructions until the installation is completed.
NOTE
: If the ICC profile for your monitor is not found, contact your monitor
manufacturer. You may skip Step #3 and install the ICC pr ofiles later.
4. Restart your computer.
1-4 ScanWizard Pro TX User’s Guide
Microtek ScanWizard Pro TXMicrotek ScanWizard Pro TX
Microtek ScanWizard Pro TX
Microtek ScanWizard Pro TXMicrotek ScanWizard Pro TX
Microtek Scanner ICC Profiler Microtek Scanner ICC Profiler
Microtek Scanner ICC Profiler installation button and
Microtek Scanner ICC Profiler Microtek Scanner ICC Profiler
Page 9

About this Manual
This manual provides basic information on the program and sketches out a variety
of scenarios that illustrate ScanWizard Pro TX’s versatility and how best to use the
program for specific scanning tasks on either Power Macintosh or PC platform.
The User Interface (UI) graphics shown in this manual are derived mostly from the
Macintosh version of ScanWizard Pro TX, and the UI for the Mac version is almost
identical to that of the PC version. Where the UI for both versions differ
significantly, these differences will be clearly emphasized. For a comprehensive
listing of individual features, please refer to the companion Reference Guide included
in your documentation package.
Introduction 1-5
Page 10

2 Getting Started
ScanWizard Pr o TX operates in two operating modes, namely,
modes:
1) The
2) The
ScanScan
Scan (or scan-to-application) mode , where ScanWizard Pro TX is “ac-
ScanScan
quired” through an image-editing software program like Adobe Photoshop. The
output images are scanned and directly delivered (individually or in batches) to
the image-editing application for further processing.
BatchBatch
Batch (or scan-to-file) mode launches ScanWizard Pro TX as a stand-alone
BatchBatch
application from the desktop program icon (and/or from the Apple menu for
Mac / Windows Start menu for PC). The output images are scanned and saved to
files individually or in batches.
Scan Scan
Scan and
Scan Scan
BatchBatch
Batch
BatchBatch
Using the Scan mode
Scan Scan
The
Scan mode refers to launching ScanWizar d Pro TX fr om a TW AIN-compatible
Scan Scan
image-editing software such as Adobe Photoshop.
T o operate ScanW izar d Pro TX in the
software. When the software program is ready, go to the File menu, and choose
Import Import
Import or
Import Import
This will automatically launch ScanWizard Pro TX. The four major windows that
form the interface of ScanWizard Pro TX will then appear on your screen.
AcquireAcquire
Acquire (depending on the software you are using) from its submenu.
AcquireAcquire
ScanScan
Scan mode, launch your image-editing
ScanScan
Using the Batch mode
BatchBatch
The
Batch mode of operating ScanWizard Pro TX allows you to set up scan jobs
BatchBatch
individually or in “batches.” It auto scans multiple selections of your originals and
directly save them to a predesignated file.
For more details, refer to How to Do Multiple Scan Jobs scenarios and information
presented in Chapter 5 (Special Features & Advanced Scenarios) of this manual.
T o launch ScanW izard Pro TX in the
For Macintosh users
Click the ScanWizard Pro TX application icon on your desktop or the Applet
located in the ScanWizard Pr o TX folder. You can also start the program from the
Apple menu.
BatchBatch
Batch mode-
BatchBatch
Getting Started 2-1
Page 11
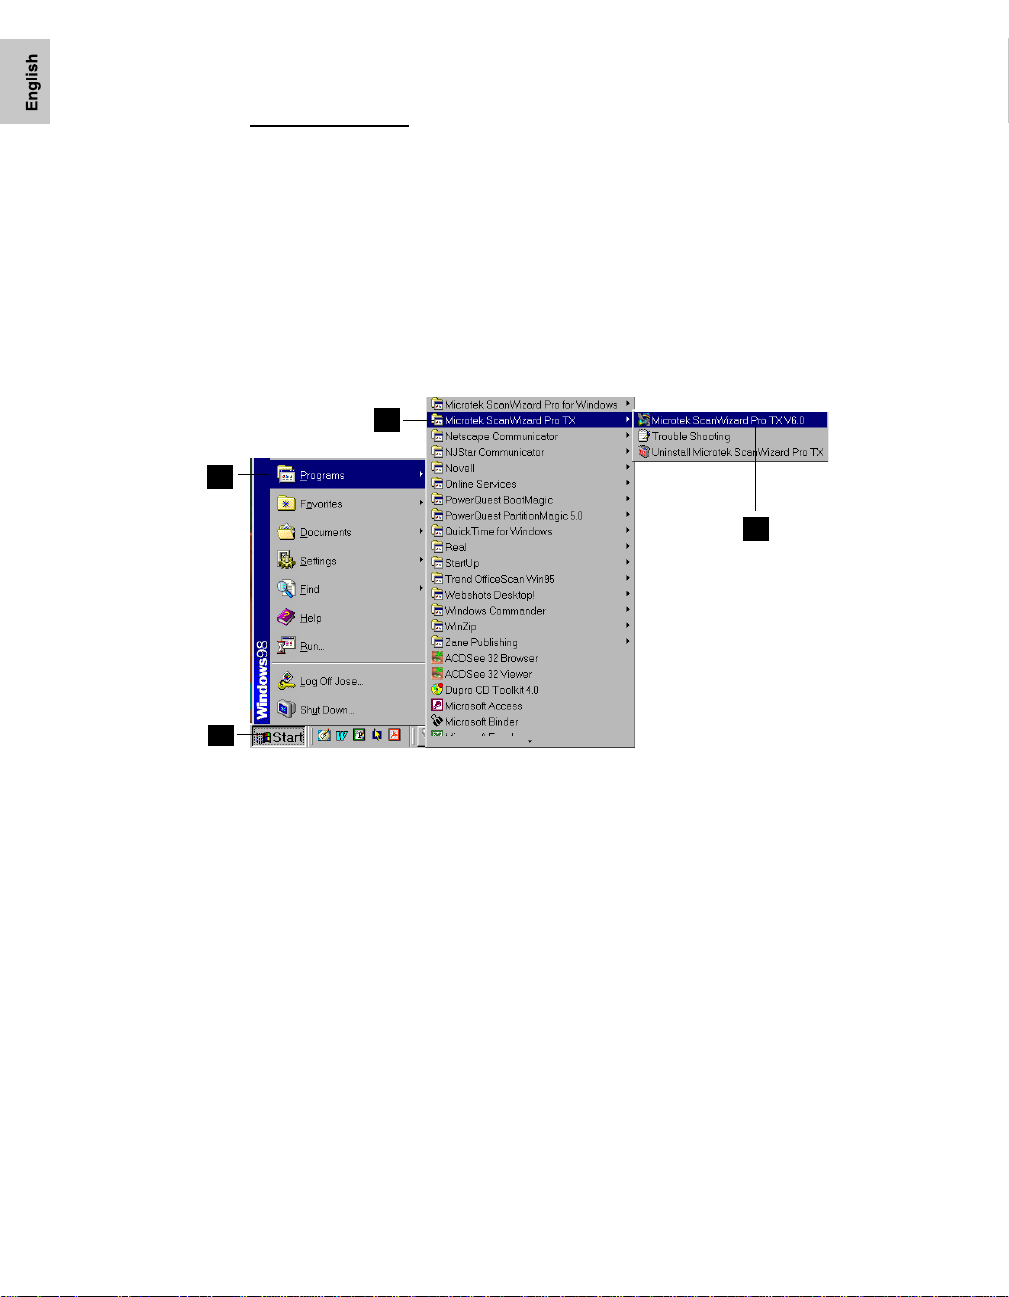
For Windows users
Click on the ScanWizard Pro TX program icon on your desktop or go to the Start
menu and simply follow the steps as illustrated below .
1. Start button
2. Program
3. Microtek Scanwizard Pro TX
4. Microtek ScanWizard Pro TX 6.0
3
2
4
1
Exiting ScanWizard Pro TX
T o exit ScanW izard Pro TX, go to the
choose the Quit command. You may also quit fr om the pr ogram by-
Mac users:Mac users:
Mac users: Press the
Mac users:Mac users:
PC users:PC users:
PC users: Click on the
PC users:PC users:
2-2 ScanWizard Pro TX User’s Guide
PrPr
evieweview
Pr
eview window, and from the File menu,
PrPr
evieweview
Apple+QApple+Q
Apple+Q combination keys on your keyboard.
Apple+QApple+Q
CloseClose
Close b ut t o n at t h e to p -right corner of the
CloseClose
PrPr
Pr
PrPr
evieweview
eview window.
evieweview
Page 12
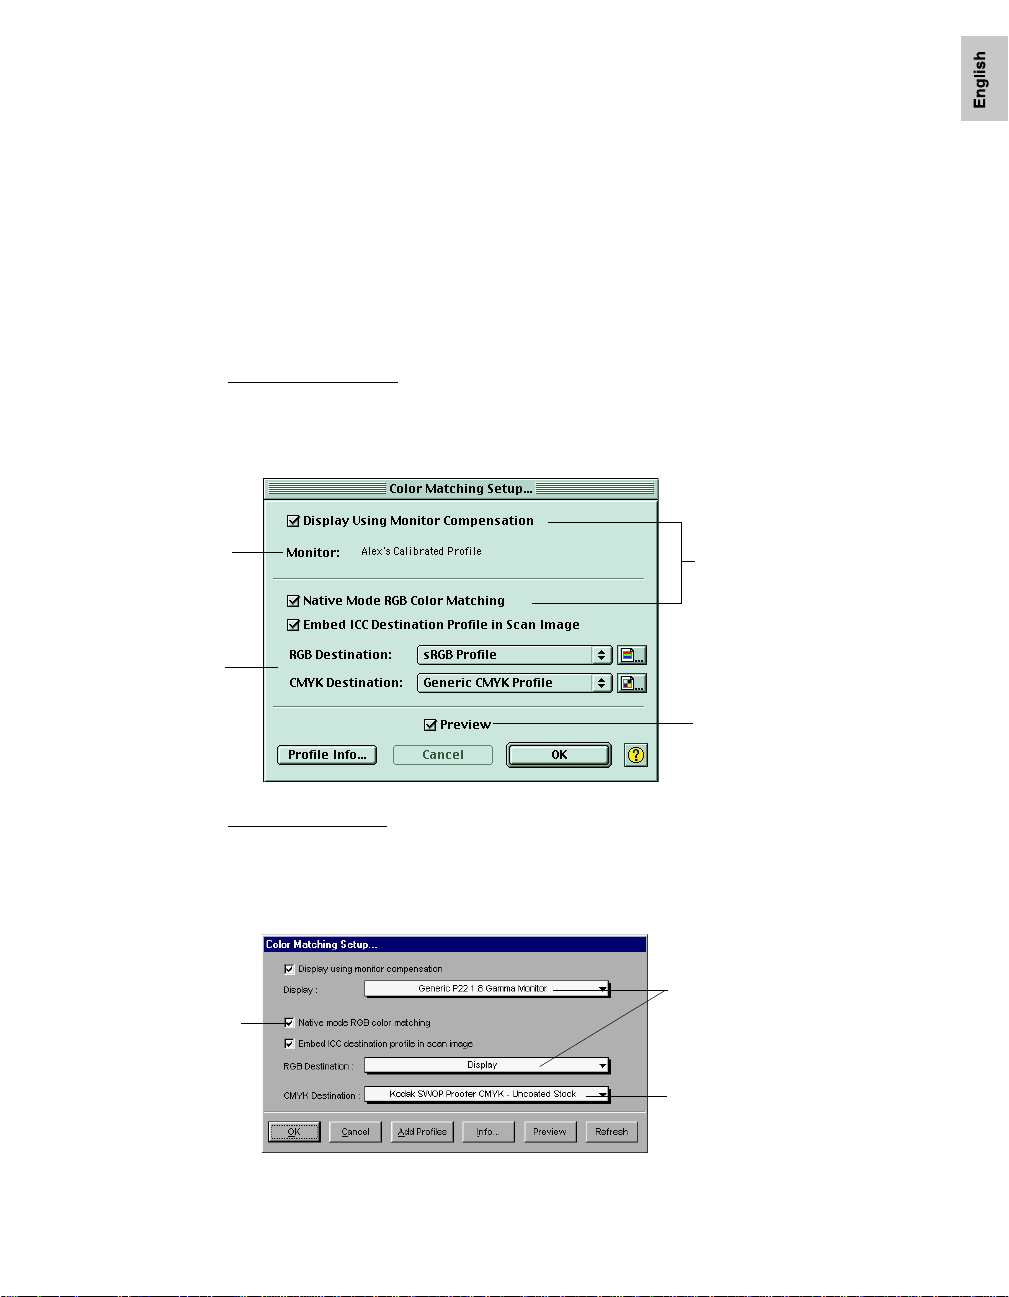
Monitor selection
shown here is set in
ColorSync™ Control
Panel.
Color Matching
features
Color Matching
Color Matching is an important feature of ScanWizard Pro TX that ensures color
consistency — from the initial input phase when an image is captured by the
scanner, to the final output pr ocess when the image is output to your monitor or
printer. Color Matching allows you to gain the assurance that the colors captured
by the scanner are the same when they are displayed on your monitor and will be
reproduced as closely as possible when they are printed.
To use Color Matching:
For Macintosh users
Y ou will be prompted to select color matching settings immediately after you
launch ScanWizard Pro TX the first time.
See the
Appendix A
section of the manual for
more details.
Immediately updates the
Preview window image when
a new setting is selected.
This will reflect colors
consistent with the newly
selected profile.
This is dimmed when
operating under LCH
mode
For Windows users
Y ou will be prompted to select color matching settings immediately after
ScanWizard Pro TX
installation.
Monitor selection shown
here is set at default
profiles for monitor and
printer
CMYK printer profile. No
default provided. Must
select one if required.
Getting Started 2-3
Page 13

At any point in the future, you may redefine color matching settings whenever
PrPr
eferefer
required to change your color profile. To do this, go to the
Preview window , and choose the
Color Matching Setup Color Matching Setup
Color Matching Setup command.
Color Matching Setup Color Matching Setup
encesences
Pr
efer
ences menu in the
PrPr
eferefer
encesences
For more detailed information on color matching, see Color Matching for Advanced
Users in Appendix A of this manual.
2-4 ScanWizard Pro TX User’s Guide
Page 14

3 Basic Scenarios
This section of the manual sets out a few scenarios on how to do some basic scans
of an image from a positive slide, negative filmstrip, and APS film cartridge. The
basic steps are laid out on the left-hand column of the page, and supplementary
information for each scenario can be found in a shaded sidebar next to the
procedures. Information on multiple scanning and on how to enhance or adjust
images, as well as more advanced scanning scenarios, are provided in Chapter 5 of
this manual.
Basic Scenarios:
• How to Scan a Color Positive Slide
• How to Scan a Color Negative
• How to Scan Color Negative Film from APS Cartridge
Basic Scenarios 3-1
Page 15

How to Scan a Color Positive Slide
1. Place the color slide to be scanned on the slide
holder, and insert the holder into the scanner.
2. Go to the
Material Material
Material icon. From the submenu that appears,
Material Material
choose
PreviewPreview
Preview window and click the
PreviewPreview
Positive FilmPositive Film
Positive Film. You will notice the change in
Positive FilmPositive Film
ScanScan
Scan
ScanScan
the appearance of the icon if the submenu was
previously set for negative film.
3. Click the
OverviewOverview
Overview button to start a thumbnail
OverviewOverview
overview of your original.
NOTE
: If you do not need to overview the original, skip
Steps 3 & 4 and directly pr escan the original after selecting
its frame position in the
Job Panel Job Panel
Job Panel window.
Job Panel Job Panel
4. Select the image you want to scan by clicking on its
thumbnail in the
Job PanelJob Panel
Job Panel window (at the same time,
Job PanelJob Panel
making sure the corresponding checkbox is
checked). The selected image is highlighted. Before
you perform the actual scan, you need to do a
prescan to see the zoom-in and clearer view of the
image.
5. Click the
escanescan
Pr
escan button in the
PrPr
escanescan
PrPr
eview eview
Pr
eview window. At
PrPr
eview eview
PrPr
the end of the prescanning process, the zoom-in
PrPr
image will appear in the
evieweview
Pr
eview window. The image
PrPr
evieweview
is now ready for image editing.
6. Click the
Scan FrameScan Frame
Scan Frame tool from the
Scan FrameScan Frame
Preview Preview
Preview window
Preview Preview
T oolbar, and adjust the flashing scan frame (mar quee) around the selected area of the image that you
wish to scan. Alternatively, you can click and hold
pointer inside the frame and drag the frame to the
selected area.
7. If you like what you see in the Preview window , click
ScanScan
the
Scan button to start scanning.
ScanScan
If you want to....
Before the Final Scan
• Select an output image type (after step 2)
Go to the
TT
ypeype
T
yp e box, choose the appropriate output
TT
ypeype
type for the image to be scanned.
• Specify output dimensions (after step 2)
Go to the
the desired output dimensions (width
and height) in the output dimension edit
boxes. The scan frame may change
slightly, and you may want to go back to
the
frame for the selected area.
• Change output image resolution
(after step 6)
Go to the
the resolution value in the
edit box.
• Fine-tune preview image with Advanced
Image Correction (AIC) tools (after step 6)
Go to the
the desired image-processing option
from the
appropriate AIC tool from the
window. The dialog box for the
corresponding AIC tool will then
appear. Details on usage for each tool is
discussed in the next chapter, Using the
Advanced Image Correction T ools .
• See a preview image of the selected/fine
tuned image in scan frame (after step 6)
Go to the
Frame Option Frame Option
Frame Option (arrow located at right
Frame Option Frame Option
end of
“Scan Frame” option from the resulting
menu. Then click the
again.
SettingsSettings
Settings window, and from the
SettingsSettings
SettingsSettings
Settings window, and enter
SettingsSettings
PreviewPreview
Preview wi ndow to readjust the scan
PreviewPreview
SettingsSettings
Settings window, and enter
SettingsSettings
PrPr
eview eview
Pr
eview window, and select
PrPr
eview eview
Correction Correction
Correction menu, or click an
Correction Correction
PreviewPreview
Preview window and click the
PreviewPreview
PrescanPrescan
Prescan button) and select the
PrescanPrescan
ResolutionResolution
Resolution
ResolutionResolution
SettingsSettings
Settings
SettingsSettings
PrescanPrescan
Prescan button
PrescanPrescan
3-2 ScanWizard Pro TX User’s Guide
Page 16
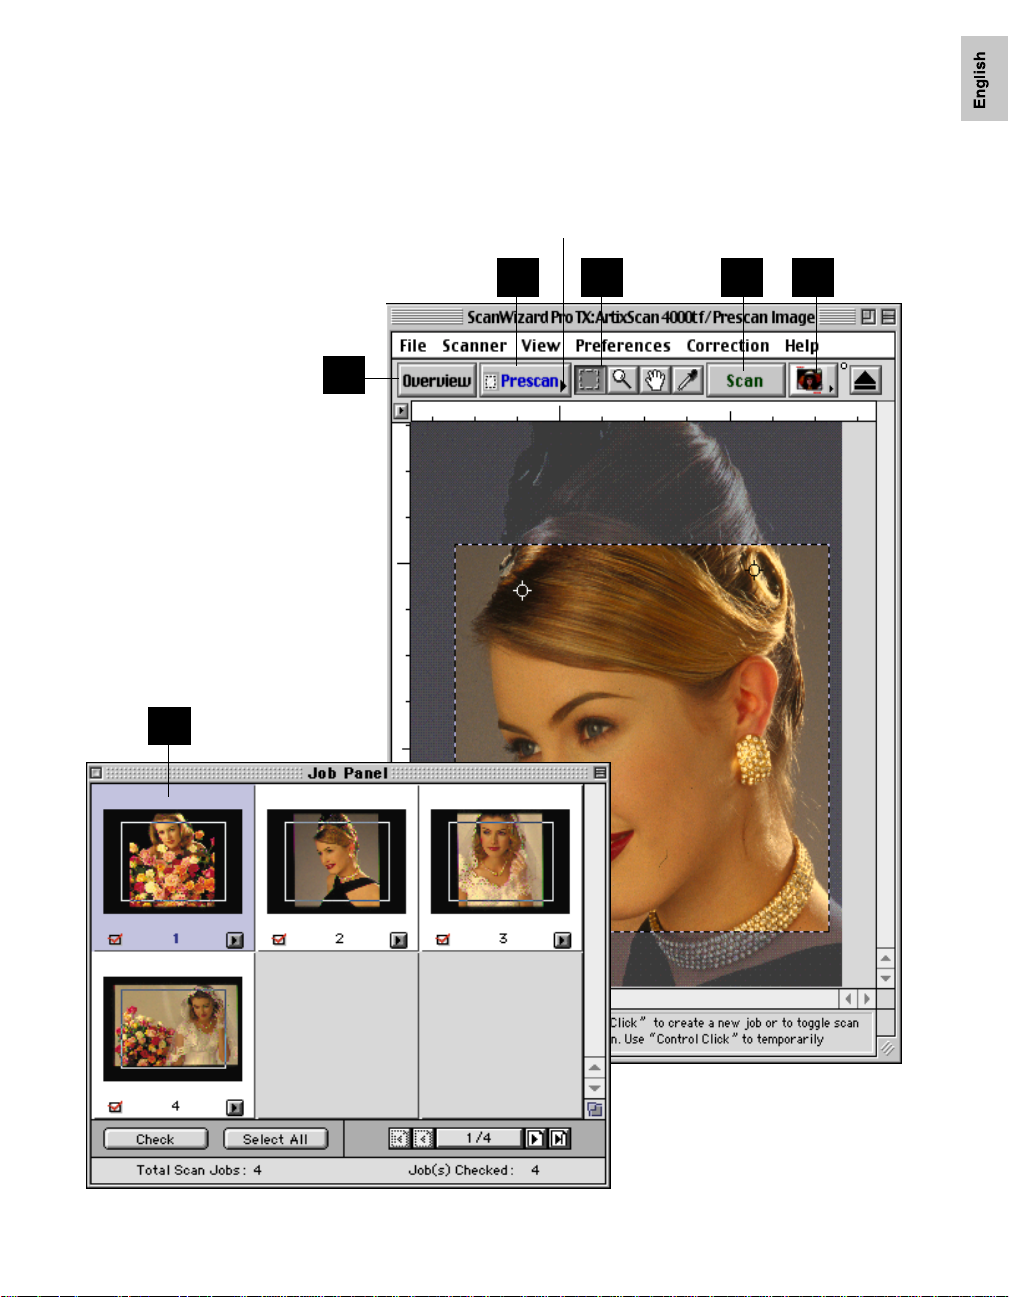
Scanning a Color Positive Slide
3
Frame Option: When set to “Scan Frame,” only the
area enclosed by the scan frame is prescanned
and previewed. “Full Frame” prescans and
previews the whole image
65 27
4
Basic Scenarios 3-3
Page 17

How to Scan Images from a Color Negative Flimstrip
1. Place the 35mm color negative filmstrip (6frame length maximum) to be scanned on the
filmstrip holder, and insert the holder into the
scanner.
2. Go to the
Material Material
Material icon. From the submenu that appears,
Material Material
choose
PreviewPreview
Preview window and click the
PreviewPreview
Negative FilmNegative Film
Negative Film. You will notice the
Negative FilmNegative Film
ScanScan
Scan
ScanScan
change in the appearance of the icon if the
submenu was previously set for positive film.
3. Click the
OverviewOverview
Overview button to start a thumbnail
OverviewOverview
overview of your original.
NOTE
: If you do not need to overview the original,
skip Steps 3 & 4 and directly pr escan the original
after selecting its frame position in the
Job PanelJob Panel
Job Panel
Job PanelJob Panel
window.
4. Select the image you want to scan by clicking on
its thumbnail in the
Job PanelJob Panel
Job Panel window (at the
Job PanelJob Panel
same time, making sure the corresponding
checkbox is checked). The selected image is
highlighted. Before you perform actual scan, you
need to do a prescan to zoom-in and see a
clearer view of the image.
5. Click the
escanescan
Pr
escan bu tton in the
PrPr
escanescan
PrPr
eview eview
Pr
eview window.
PrPr
eview eview
PrPr
At the end of the prescanning process, the
zoom-in image will appear in the
PreviewPreview
Preview
PreviewPreview
window . The image is now r eady for image
editing.
6. Click the
Scan FrameScan Frame
Scan Frame tool from the
Scan FrameScan Frame
PreviewPreview
Preview
PreviewPreview
window T oolbar , and adjust the flashing scan
frame (marquee) around the selected area of the
image that you wish to scan. Alternatively, you
can click and hold pointer inside the frame and
drag the frame to the selected area.
7. If you like what you see in the Preview window ,
click the
ScanScan
Scan button to start scanning.
ScanScan
If you want to....
Before the Final Scan
• Select an output image type (after step 2)
Go to the
box, choose the appropriate output type for
the image to be scanned.
• Specify output dimensions (after step 2)
Go to the
desired output dimensions (width and height)
in the output dimension edit boxes. The scan
frame may change slightly, and you may want
to go back to the
the scan frame for the selected area.
• Adjust Film T ype (after step 6)
If you need to adjust the film type setting or
create a customized film profile, go to the
TT
ype ype
T
ype list box in the
TT
ype ype
select a new film type from the list; or click
CustomCustom
Custom (at the bottom of the list) to create a
CustomCustom
new customized film profile.
• Change output image resolution (after step 6)
Go to the
resolution value in the
• Fine-tune preview image with Advanced
Image Correction (AIC) tools (after step 6)
Go to the
desired image-processing option from the
Correction Correction
Correction menu, or click an appropriate AIC
Correction Correction
tool from the
for the corresponding AIC tool will then
appear. Details on usage for each AIC tools
are discussed in the next chapter, Using the
Advanced Image Correction Tools.
• See a preview image of the selected/fine
tuned image in scan frame (after step 6)
Go to the
Frame Option Frame Option
Frame Option (arrow located at right end of
Frame Option Frame Option
PrescanPrescan
Prescan button) and select the “Scan Frame”
PrescanPrescan
option from the resulting menu. Then click the
PrescanPrescan
Prescan button again.
PrescanPrescan
SettingsSettings
Settings window, and from the
SettingsSettings
SettingsSettings
Settings window, and enter the
SettingsSettings
PreviewPreview
Preview window to readjust
PreviewPreview
Settings Settings
Settings window and
Settings Settings
SettingsSettings
Settings window, and enter the
SettingsSettings
PrPr
eview eview
Pr
eview window, and select the
PrPr
eview eview
SettingsSettings
Settings window. The dialog box
SettingsSettings
PreviewPreview
Preview window and click the
PreviewPreview
ResolutionResolution
Resolution edit box.
ResolutionResolution
TT
T
TT
ypeype
ype
ypeype
FilmFilm
Film
FilmFilm
3-4 ScanWizard Pro TX User’s Guide
Page 18

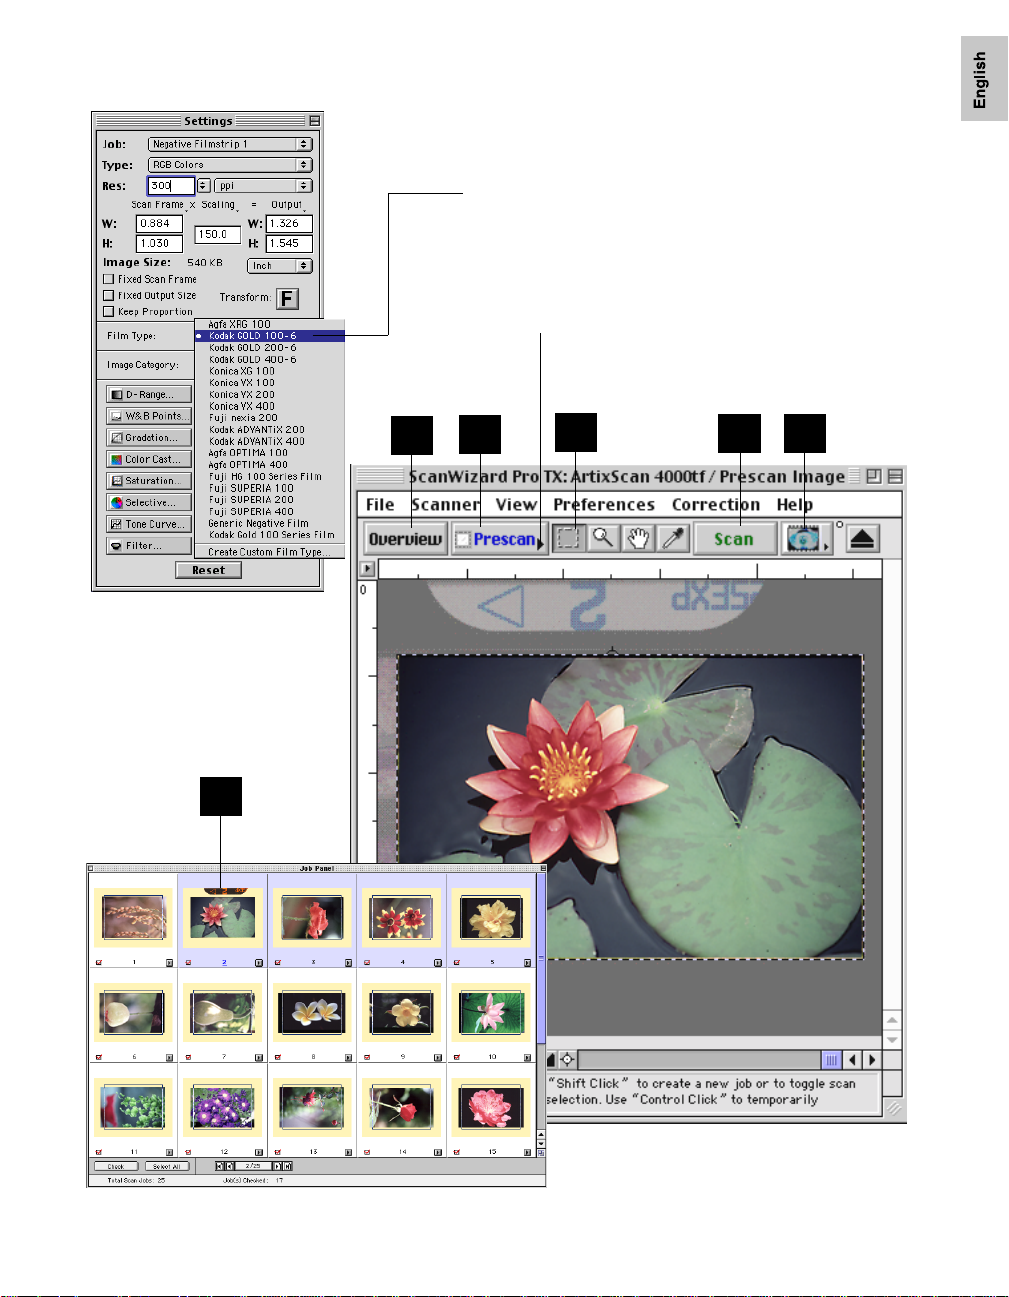
Scanning a Color Negative
Frame Option: When set to “Scan Frame,” only the area
enclosed by the scan frame is prescanned and previewed.
“Full Frame” will prescan and preview the whole image
3
5
6
2
7
4
Film Type: Sets film type to conform with actual filmstrip
type of original. If your film type is not listed, create a
customized film profile by clicking on Create Custom Film
Type at the bottom of the list
Basic Scenarios 3-5
Page 19

How to Scan Images from the APS Film Cartridge
1. Place the APS cartridge holder into the scanner.
Scan Material Scan Material
2. The
Scan Material icon in the
Scan Material Scan Material
will automatically change to
Preview Preview
Preview window
Preview Preview
Negative FilmNegative Film
Negative Film
Negative FilmNegative Film
status. Y ou will notice the change in the appear ance of the icon if the submenu was previously
set for positive film.
3. Click the
overview of all your originals in the
OverviewOverview
Overview button to start a thumbnail
OverviewOverview
Job PanelJob Panel
Job Panel
Job PanelJob Panel
window.
NOTE
: If you do not need to overview the originals,
skip Steps 3 & 4 and directly pr escan the original
after selecting its frame position in the
Job Panel Job Panel
Job Panel
Job Panel Job Panel
window.
4. Select the image you want to scan by clicking on
its thumbnail in the
Job PanelJob Panel
Job Panel window (at the
Job PanelJob Panel
same time, making sure the corresponding
checkbox is checked). The selected image is
highlighted. Before you perform the actual scan,
you need to do a prescan to zoom-in and see a
clearer view of the image.
5. Click the
escanescan
Pr
escan bu tton in the
PrPr
escanescan
PrPr
eview eview
Pr
eview window.
PrPr
eview eview
PrPr
At the end of the prescanning process, the
zoom-in image will appear in the
PreviewPreview
Preview
PreviewPreview
window . The image is now r eady for image
editing.
6. Click the
Scan FrameScan Frame
Scan Frame tool from the
Scan FrameScan Frame
PreviewPreview
Preview
PreviewPreview
window T oolbar , and adjust the flashing scan
frame (marquee) around the selected area of the
image that you wish to scan. Alternatively, you
can click and hold pointer inside the frame and
drag the frame to the selected area.
7. If you like what you see in the Preview window ,
click the
ScanScan
Scan button to start scanning.
ScanScan
If you want to....
Before the Final Scan
• Select an output image type (after step 2)
Go to the
TT
ypeype
T
yp e box, choose the appropriate output type
TT
ypeype
for the image to be scanned.
• Specify output dimensions (after step 2)
Go to the
desired output dimensions (width and height)
in the output dimension edit boxes. The scan
frame may change slightly, and you may want
to go back to the
the scan frame for the selected area.
• Adjust Film T ype (after step 6)
If you need to adjust the film type setting or
create a customized film profile, go to the
Film TFilm T
Film T
Film TFilm T
and select a new film type from the list; or
click
create a new customized film profile.
• Change output image resolution (after step 6)
Go to the
resolution value in the
• Fine-tune preview image with Advanced
Image Correction (AIC) tools (after step 6)
Go to the
desired image-processing option from the
Correction Correction
Correction menu or click an appropriate AIC
Correction Correction
tool from the
box for the corresponding AIC tool will then
appear. Details on usage for each AIC tools
are discussed in the next chapter, Using the
Advanced Image Correction T ools .
• See a preview image of the selected/fine
tuned image in scan frame (after step 6)
Go to the
Frame Option Frame Option
Frame Option (arrow located at right end of
Frame Option Frame Option
PrescanPrescan
Prescan button) and select the
PrescanPrescan
option from the resulting menu. Then click
the
SettingsSettings
Settings window, and from the
SettingsSettings
SettingsSettings
Settings window, and enter the
SettingsSettings
PreviewPreview
Preview window to readjust
PreviewPreview
ype ype
ype list box in the
ype ype
CustomCustom
Custom (at the bottom of the list) to
CustomCustom
SettingsSettings
Settings window, and enter the
SettingsSettings
PrPr
eview eview
Pr
eview window, and select the
PrPr
eview eview
SettingsSettings
Settings window. The dialog
SettingsSettings
PreviewPreview
Preview window and click the
PreviewPreview
PrescanPrescan
Prescan button again.
PrescanPrescan
Settings Settings
Settings window
Settings Settings
ResolutionResolution
Resolution edit box.
ResolutionResolution
Scan FrameScan Frame
Scan Frame
Scan FrameScan Frame
3-6 ScanWizard Pro TX User’s Guide
Page 20
Film Type: Sets film type to conform with actual filmstrip type
of original. If your film type is not listed, create a customized
film profile by clicking on Create Custom Film Type at the
bottom of the list
Frame Option: When set to “Scan Frame,” only the area
enclosed by scan frame is prescanned and previewed. “Full
Frame” will prescan and preview the whole image
3
5
6
7
2
4
Basic Scenarios 3-7
Page 21

4 Using the Advanced Image Correction Tools
This section of the manual describes the use of the various Advanced Image
Correction (AIC) tools, which form an integral part of ScanWizard Pro TX. All the
tools are available when you work in the default LCH color space, but a different
set of tools is available when you choose to work in the Native color space.
Included at the beginning of this section is a brief discussion of the LCH color
model vs. the Native color model, as well as other concepts important to optimizing
your workflow. The scenarios pr ovided ar e based on the Advanced Image
Correction tools available through the LCH color model.
• The LCH Color Model
• LCH vs. Native Color Mode
• W orkflow for Optimizing Images
• Adding a Custom Setting
• How to Choose the Right Image Category
• Using the Dynamic Range T ool
• Using the Black / White Points T ool
• Using the Gradation T ool
• Using the Color Cast T ool
• Using the Saturation T ool
• Using the Selective Color T ool
• Using the T one Curve Tool
• Using the Filter T ool
Using the AIC Tools 4-1
Page 22

The LCH Color Model
One of ScanWizard Pr o TX’s strengths is its ability to let you work in the LCH color
space. Unlike the RGB color model, which corresponds to the color space as
defined in monitors and printers, the LCH color model is a more intuitive way of
working with colors, based on the values of Lightness (the “L” in LCH), Chroma
(C), and Hue (H). For instance, if you wish to change the color of the sky in an
image to a darker blue, your own eye — and your own judgment — will be the
guide to making those color changes. This is easier than, say, knowing the
mathematical equivalent in RGB or CMYK values that would correspond to a “dark
sky blue”.
The LCH model, in effect, makes it easier to comprehend colors as they are
couched in the terms we are familiar with: Lightness (how dark or light a color is),
Chroma or saturation (how rich or dull a particular hue of green is), and Hue (the
property that distinguishes, say, the color red from the color blue.)
In the LCH color model, colors of equal brightness lie on a single plane of the
model, as shown below. Red and green lie opposite each other on the horizontal
axis, as blue and yellow lie opposite each other on the vertical axis.
On the color sphere shown below, you can see how the different LCH properties
play out:
• The different hues (red, green, yellow, blue) are spread around the sphere.
• The chroma (saturation) for each hue increases from the center of the sphere
outward, with the most saturated colors lying on the edge of the sphere.
• The brightness values increase from the bottom of the model to the top.
4-2 ScanWizard Pro TX User’s Guide
Page 23

Selecting LCH or Native Color Space
ScanWizard Pro TX lets you choose the color space in which you wish to edit and
work with color images.
• Select LCH mode if you wish to edit or correct images in terms of color perception according to the human eye, based on the properties of Lightness, Chroma,
and Hue. This is the default mode.
• Select Native mode if you wish to edit or correct the individual RGB / CMYK
channels of an image.
LCH mode is the default working color space when you first starts ScanWizard Pro
TX. T o switch to Native mode, click on
MorMor
menu bar. Then click
MorMor
e Pre Pr
eferefer
Mor
MorMor
e Pr
e Pre Pr
ences ences
efer
ences dialog box comes up, go to the
eferefer
ences ences
and choose Native mode. The same procedure applies in switching from Native
back to the LCH color space mode.
e... e...
Mor
e... command fr om the bottom of the menu. When the
MorMor
e... e...
PrPr
eferefer
encesences
Pr
efer
ences from the
PrPr
eferefer
encesences
PrPr
eview eview
Pr
eview window
PrPr
eview eview
WW
orking Color Spaceorking Color Space
W
orking Color Space option,
WW
orking Color Spaceorking Color Space
Mac
“Memory Usage” & “Scratch Directory” not
available with IBM PC version
PC
“Keep Overview Image” option not available with
Power Mac version
Using the AIC Tools 4-3
Page 24
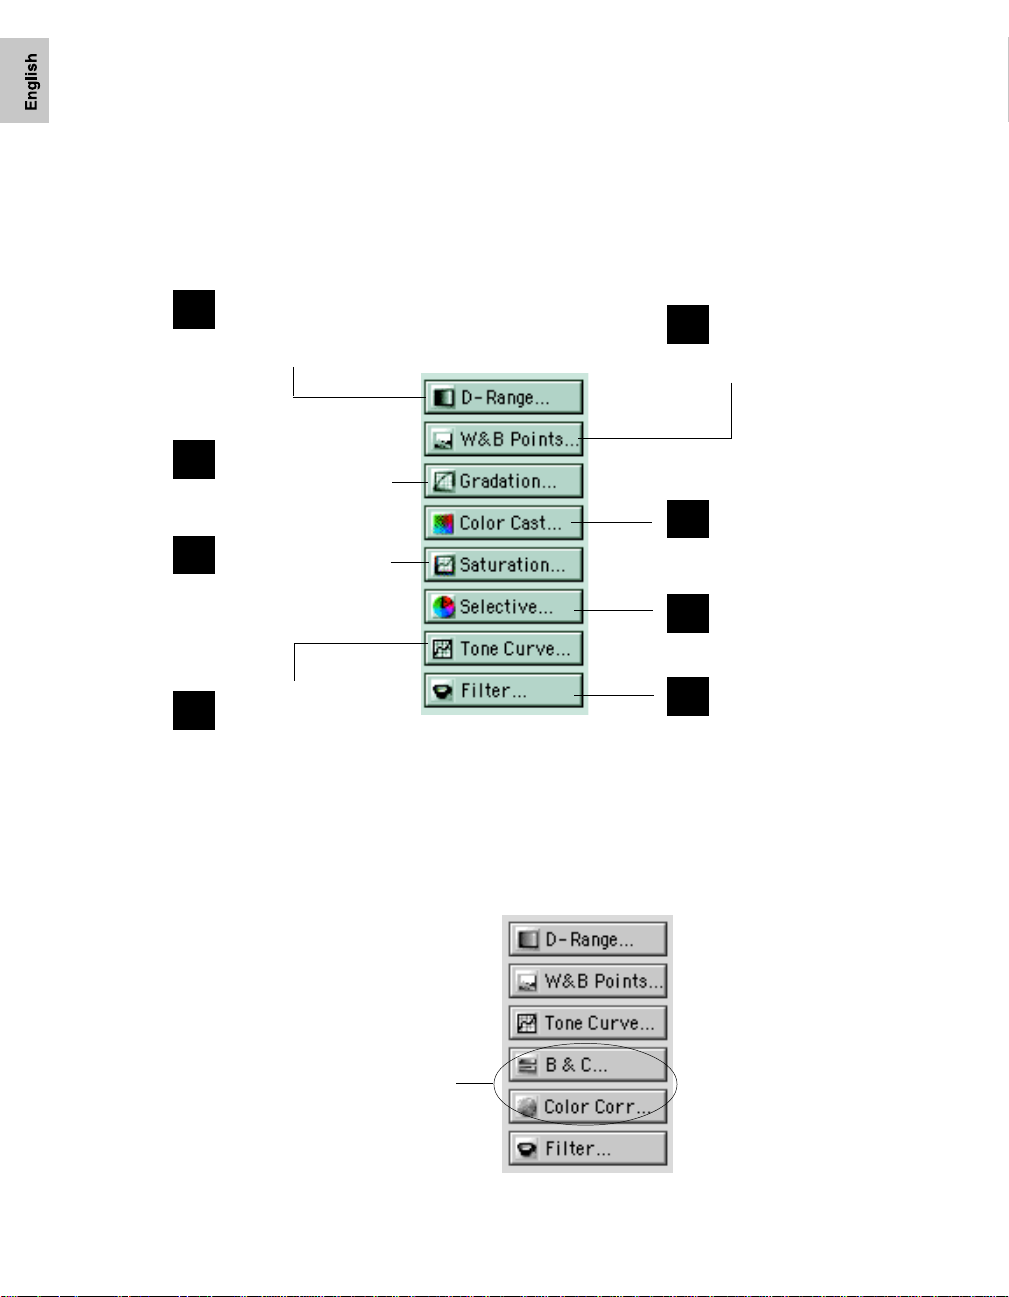
Workflow for Optimizing Images
To prepare and optimize images for the final scan, it is recommended that the AIC
tools are used in accordance with the sequence in which they appear in the LCH
Settings Settings
Mode
Settings window shown below . Following this order will significantly
Settings Settings
enhance the overall quality of your images.
Dynamic Range
1
Manual or auto determine
image density range (darkest
tone to lightest tone)
Gradation
3
Manual or auto-adjust
midtones of the Lightness
(Channel "L")
Saturation Curve
5
Adjust image saturation
by manipulating the
saturation curve
Tone Curve
7
Adjust tonal distribution of
each CMYK/RGB channel in
an image
The sequence is the same if you are working in Native color mode. However, the
GradationGradation
Gradation,
GradationGradation
be available. The
their place.
LCH Mode AIC Tools
Color CastColor Cast
Color Cast,
Color CastColor Cast
SaturationSaturation
Saturation, and
SaturationSaturation
Brightness & Contrast Brightness & Contrast
Brightness & Contrast and
Brightness & Contrast Brightness & Contrast
White & Black Points
2
Manual or auto-adjust
shadow & highlight points,
and neutral gray
Color Cast
4
Adjust gray balance by adding or
removing color cast
Selective Color
Manipulate a specific
6
color range without
affecting other colors
Filter & USM
8
Apply special effects to image
and sharpen focus of blurry
images with USM (unsharp
masking)
Selective Color Selective Color
Selective Color tools (#3 to #6) will not
Selective Color Selective Color
Color Correction Color Correction
Color Correction tools are offered in
Color Correction Color Correction
Native Mode AIC Tools
The Brightness &
Contrast and Color
Correction tools are
offered in the Native
color mode
4-4 ScanWizard Pro TX User’s Guide
Page 25
Adding a Custom Setting
To the right of each AIC (Advanced Image Correction) tool status box is a
Setting Setting
Setting pull-down menu that features predefined settings for the AIC tool. For
Setting Setting
instance, some of these settings include
add your own custom image correction setting to each AIC tool. The custom setting
can then be retrieved or loaded, and applied to your scan job at any time in the
future.
Automatic Automatic
Automatic or
Automatic Automatic
No CorNo Cor
No Cor
No CorNo Cor
TT
oolool
T
ool
TT
oolool
rr
ectionection
r
ection. You can also
rr
ectionection
To do this, choose an AIC tool (click on a tool icon or
Setting Setting
Setting pull-down menu). When the AIC tool dialog box appears, apply the
Setting Setting
adjustments you desire to the image. Then click the
bottom of the AIC tool dialog box. When the
name for the new custom setting.
The adjustments you have just made and saved becomes your custom-made setting
and will appear in the
next time you access the menu. Choose it to apply the particular custom
adjustment to a new image.
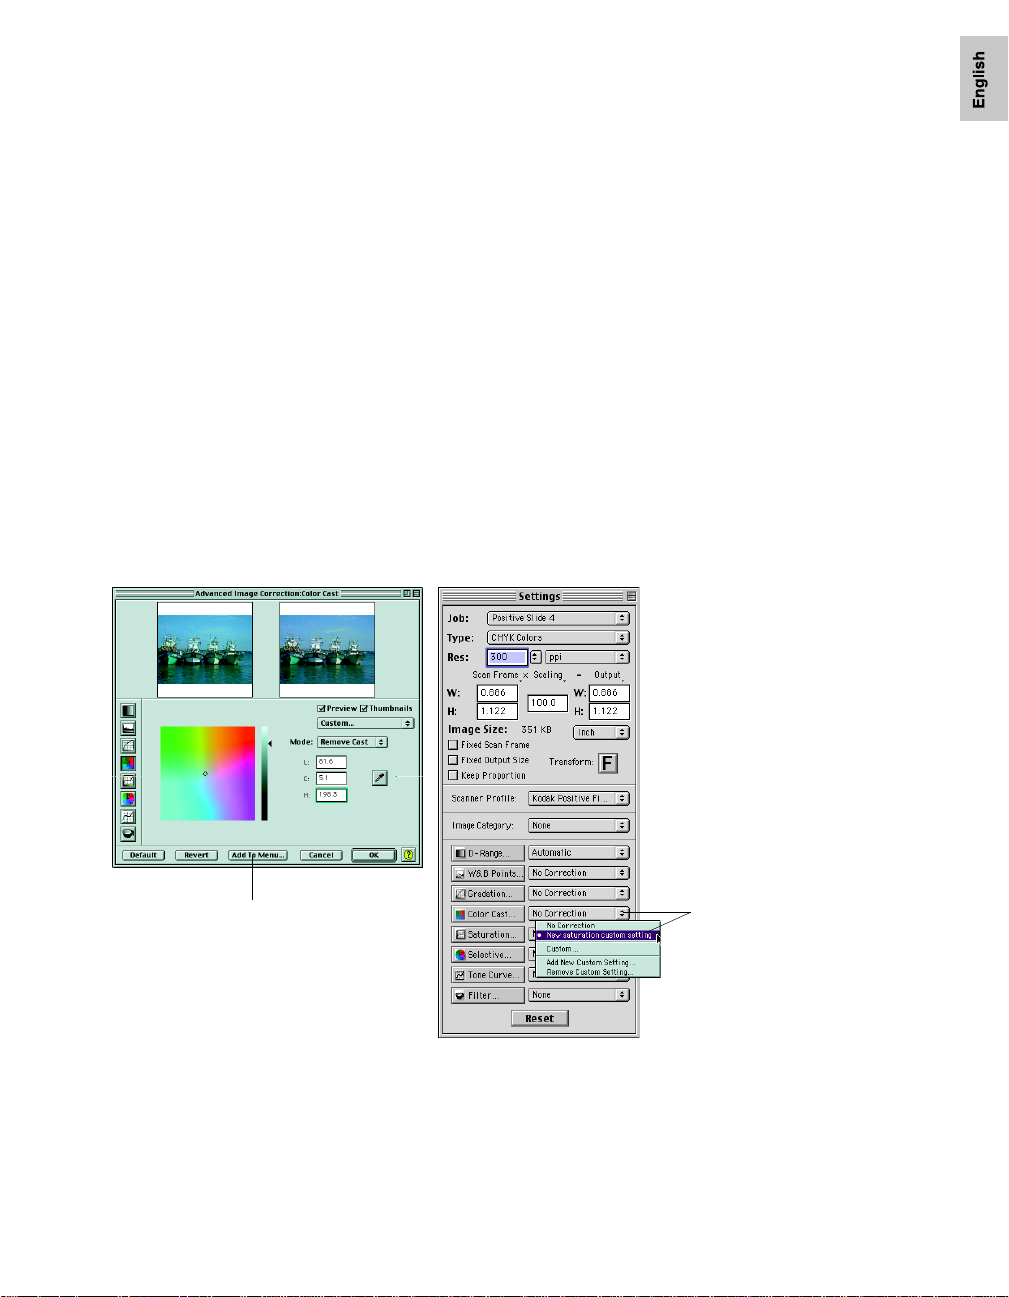
Click to save current custom setting
and add to AIC (Color Cast in this
example) predefined settings menu in
the Settings window (see figure at
right)
Custom Custom
Custom from the
Custom Custom
Add to Menu Add to Menu
Add to Menu button at the
Add to Menu Add to Menu
Save Save
Save di alog box comes up, enter a
Save Save
TT
ool Setting ool Setting
T
ool Setting pull-down menu for that particular AIC tool the
TT
ool Setting ool Setting
Saved custom setting (e.g.,
saturation custom setting
in the Tool Setting menu.
To apply the Color Cast
setting
to a new image, click on
this expansion arrow and choose
New saturation custom setting
from the menu
TT
T
TT
oolool
ool
oolool
New
) is listed
custom
Using the AIC Tools 4-5
Page 26

How to Choose the Correct Image Category
ScanWizard Pro TX provides several image categories to choose from, which can
influence the auto-correction function and provide a more accurate output image.
To select the correct image category, go to the
option you wish from the
corresponds most closely to the image characteristics of your original. The selected
image category provides a starting point for predefined settings that can be applied
to your image to bring out characteristics specific to that image type.
NoneNone
•
None: No image category conversion.
NoneNone
StandarStandar
•
Standar
StandarStandar
Y ou can also use this category for images of good quality (neither underexposed
nor overexposed, with accurate color and tones).
LandscapeLandscape
•
Landscape: A n image with cool atmosphere, broad tonal variation and a wide
LandscapeLandscape
hue range. Examples include natural scenery, skyline with an expanse of blue sky,
mountains and fields.
PorPor
•
Por
PorPor
Examples include portraits and objects with fleece- or skin-like surfaces.
JewelrJewelr
•
Jewelr
JewelrJewelr
include gold and silver jewelry, silverware.
SunsetsSunsets
•
Sunsets: A n i mage with warm reddish hues or a color cast reminiscent of
SunsetsSunsets
sunsets. Examples include scenes at dusk or twilight and images of the Grand
Canyon.
Metallic SubjectsMetallic Subjects
•
Metallic Subjects: A n image with broad highlight and shadow details but have
Metallic SubjectsMetallic Subjects
very narrow mid-tone details. Examples include audio equipment, TV sets,
cameras, etc.
dd
d: An image that does not fall into any of the categories described below .
dd
traits (Skin Ttraits (Skin T
traits (Skin T
traits (Skin Ttraits (Skin T
y (Gold Ty (Gold T
y (Gold T
y (Gold Ty (Gold T
Image CategoryImage Category
Image Category menu. Select the image category that
Image CategoryImage Category
ones)ones)
ones): A n i mage with dominant skin tones and mid-tone details.
ones)ones)
ones)ones)
ones): An image featuring dominant gold / silver hues. Examples
ones)ones)
SettingsSettings
Settings window and choose the
SettingsSettings
High KeysHigh Keys
•
High Keys: A n image with broad highlight tonal variation but has less shadow
High KeysHigh Keys
detail. Examples include snow-covered landscapes, wedding gowns and whitewashed structures.
Low KeysLow Keys
•
Low Keys: A n image with broad shadow tonal variation but has less highlight
Low KeysLow Keys
detail. Examples include nighttime scenery , a coal pit, dark suits and clothing.
UnderexposedUnderexposed
•
Underexposed: A n image with compressed tonal variation particularly in the
UnderexposedUnderexposed
shadow areas, characterized by an overall dark appearance typical of underexposed positive film.
OverexposedOverexposed
•
Overexposed: An image with compressed tonal variation particularly in the
OverexposedOverexposed
highlight areas, characterized by an overall bright appearance typical of overexposed positive film.
4-6 ScanWizard Pro TX User’s Guide
Page 27

Selecting the correct Image Category
Click to display Image
Category settings
menu
In the sample images at the right, an
overexposed original is shown in two
different image categories. Because
the original was overexposed to
begin with, choosing the
OverexposedOverexposed
Overexposed image category
OverexposedOverexposed
transforms the image with a
neutralized exposure, resulting in a
better image.
Image assigned with “ Overexposed” image category
The same original did not fare as well
when it was assigned the
StandardStandard
Standard
StandardStandard
image category (too bright overall,
not enough contrast), because this
image category is best used for
originals of fairly good quality
(sharp, neither underexposed nor
overexposed) which is not the case
with this original.
Image assigned with “ Standard” image category
This example then shows the importance of
choosing the correct image category that
corresponds most closely to your original to
obtain optimal results.
Using the AIC Tools 4-7
Page 28
Using the Dynamic Range Tool
Original image and its
lightness histogram
before density
correction, showing
narrow tonal range
Dynamic RangeDynamic Range
The
Dynamic Range tool is used to set the density
Dynamic RangeDynamic Range
capture range of the scanner and displays the
density distribution (histogram) of the image to be
scanned.
The Auto range (default) feature automatically
determines the Dmin (minimum density , lightest
tone) and Dmax (maximum density, darkest tone) of
the image, and sets the scanner capture range.
In the example here, the original image has low
contrast and a limited range of tones, as can be seen
in the narrow image histogram. The solution: T o
narrow the scanner’s range of density capture to the
density range of the image (or smaller). This would
then redistribute the small density range of the
image to the maximum range of the scanner output,
and thus restore contrast to the image.
1. Insert the film holder with the image to be
corrected into your scanner.
Same image and its
lightness histogram after
density correction,
showing a broader tonal
range
4-8 ScanWizard Pro TX User’s Guide
2. Click the
overview of all your originals in the
OverviewOverview
Overview button to start a thumbnail
OverviewOverview
Job PanelJob Panel
Job Panel
Job PanelJob Panel
window, then click on the thumbnail to select the
image. If thumbnail overview is not required
OverviewOverview
(
Overview skipped), click directly on the image-
OverviewOverview
less frame position in the
Prescan Prescan
the
Prescan button to obtain a prescan image.
Prescan Prescan
3. Click the AIC
window . The
Dynamic Range Dynamic Range
Dynamic Range tool in the
Dynamic Range Dynamic Range
AIC:Dynamic Range AIC:Dynamic Range
AIC:Dynamic Range dialog will then
AIC:Dynamic Range AIC:Dynamic Range
Job PanelJob Panel
Job Panel. Then click
Job PanelJob Panel
appear.
4. Adjust the
DminDmin
Dmin and
DminDmin
Dmax Dmax
Dmax values to an opti-
Dmax Dmax
mized range. T o do this, compr ess the density
space in the histogram by moving the sliders
toward each other stopping only at the steep
boundaries of the histogram.
5. Check the
in the
PreviewPreview
Preview box so that the prescan image
PreviewPreview
PreviewPreview
Preview window is updated with the latest
PreviewPreview
correction. The update is done in the background
and so may take a few moments to show.
6. Click
OKOK
OK to confirm the correction.
OKOK
SettingsSettings
Settings
SettingsSettings
Page 29

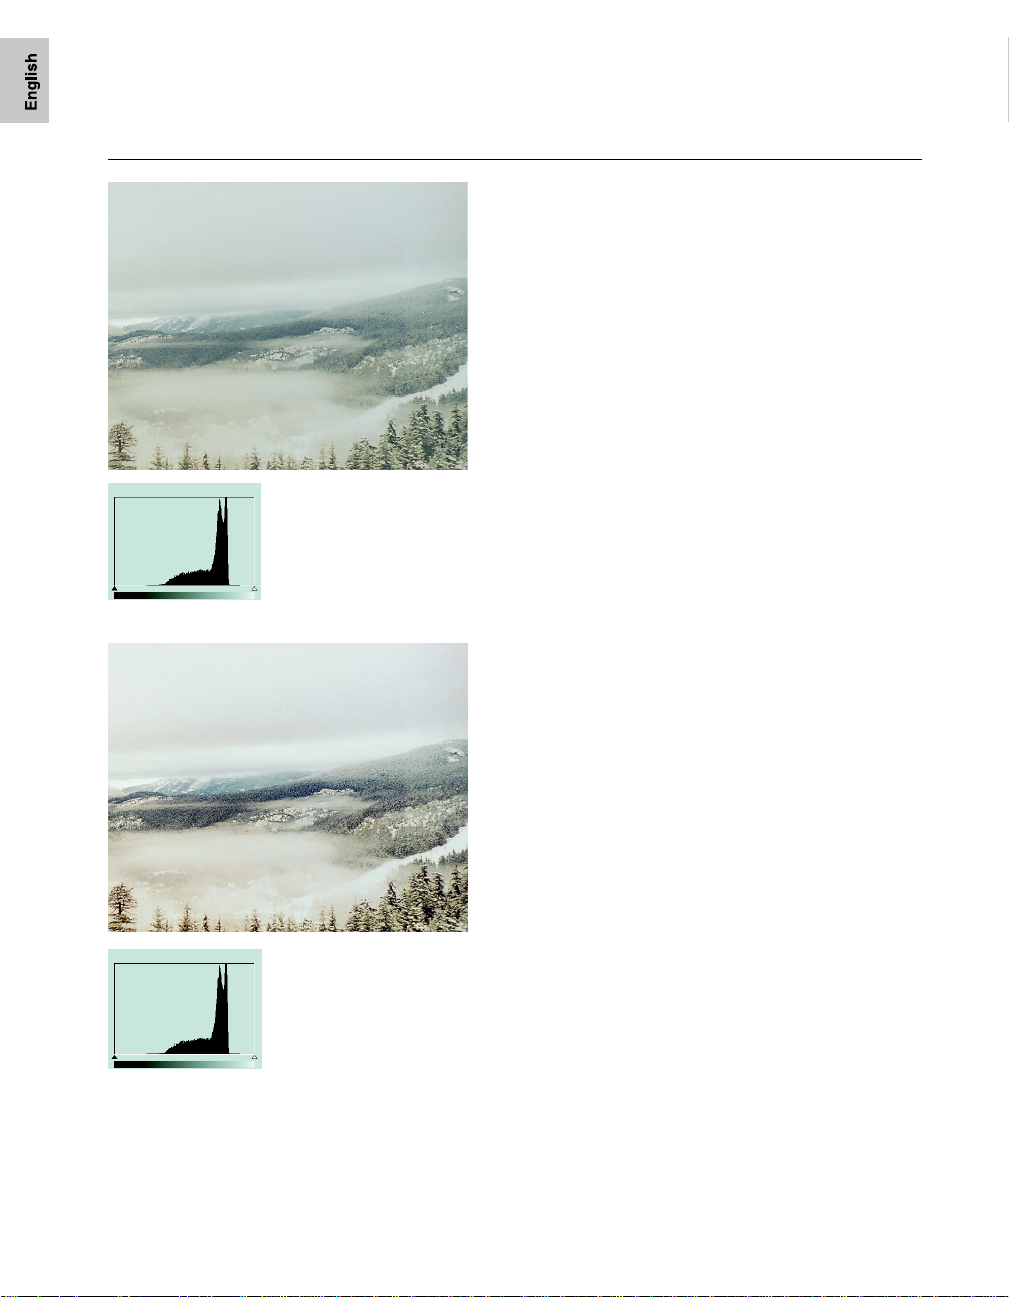
Using the Dynamic Range tool
Use the
the density capture range of your
scanner.
In the example below , the original
has a narrow image histogram
skewed heavily to the right. In the
corrected version, the dynamic
range is adjusted, restoring
contrast to the image.
Dynamic Range Dynamic Range
Dynamic Range tool to set
Dynamic Range Dynamic Range
3
6
4
5
NOTE:
In the default Automatic setting, ScanWizard Pro TX optimizes density capture
range automatically. You only need to use the Dynamic Range tool if you wish to further
enhance image contrast.
6
Using the AIC Tools 4-9
Page 30

Using the White & Black Points Tool
White & Black PointsWhite & Black Points
The
White & Black Points tool is used to change the
White & Black PointsWhite & Black Points
shadow and highlight points of an image. (See note on
next page for additional descriptions.)
By using this tool, you can manipulate an image to either
bring out the highlights in a very dark image, or bring out
more of the shadows in a very light image.
White & Black Points White & Black Points
The
White & Black Points tool can also be used to
White & Black Points White & Black Points
neutralize the color cast in the highlight and shadow
regions.
In the example here, we need to set the shadows and
highlights, as well as correct the color cast on both
highlight and shadow regions.
1. Insert the film holder with the image to be corrected
into your scanner.
Original image
Image corrected with White & Black Points tool
2. Click the
overview of all your originals in the
OverviewOverview
Overview button to start a thumbnail
OverviewOverview
Job Panel Job Panel
Job Panel window,
Job Panel Job Panel
then click on the thumbnail to select the image. If
thumbnail overview is not required (
OverviewOverview
Overview
OverviewOverview
skipped), click directly on the imageless frame position
Job PanelJob Panel
in the
Job Panel. T hen click the
Job PanelJob Panel
Prescan Prescan
Prescan button to
Prescan Prescan
obtain prescan an image.
3. Click the
window . The
White & Black PointsWhite & Black Points
White & Black Points tool in the
White & Black PointsWhite & Black Points
AIC:White & Black PointsAIC:White & Black Points
AIC:White & Black Points dialog
AIC:White & Black PointsAIC:White & Black Points
SettingsSettings
Settings
SettingsSettings
appears.
4. Be sure that the
Auto Neutralize Auto Neutralize
under
Auto Neutralize options are “On” (default).
Auto Neutralize Auto Neutralize
Shadows Shadows
Shadows and
Shadows Shadows
Highlights Highlights
Highlights check boxes
Highlights Highlights
This helps neutralize the color cast in the shadow and
highlight areas of the image.
5. Click the
Auto Auto
Auto button. This will automatically optimize
Auto Auto
the highlight and shadow points for the image.
6. Check the
the
PreviewPreview
Preview box so that the prescan image in
PreviewPreview
PreviewPreview
Preview window is updated with the latest
PreviewPreview
correction. The update is done in the background and
so may take a few moments to show.
7. Click
OKOK
OK to confirm the correction.
OKOK
4-10 ScanWizard Pro TX User’s Guide
Page 31

Using the White & Black Points tool
Use the
White & Black White & Black
White & Black Points tool to
White & Black White & Black
set the shadow and highlight points of an
image, as well as to neutralize the color
cast in shadow/highlight regions.
In the example below, the original has a
slight color cast in the shadow and
highlight portions of the image. With the
use of the auto neutralizing and auto
adjustment features, the color cast is
removed, and the shadows and
highlights are remapped accordingly.
3
NOTE:
The shadow point is defined as the lightness
value “L” in an image that is output as black (mapped
to the Minimum Output Level), while the highlight
point is defined as the lightness value “L” that is output
as white (mapped to the Maximum Output Level).
The default values of the Minimum Output Level and
Maximum Output Level are L=5.0 and L=95.0,
respectively.
4
76 5
Using the AIC Tools 4-11
Page 32

Using the Gradation Tool (LCH Mode only)
Gradation Gradation
The
Gradation tool lets you adjust the midtones
Gradation Gradation
(the mid-level grays) of the lightness channel “L”
of an image without altering the color itself. This
is because even with changes to the luminance
or lightness value, the chroma and hue values
are kept constant.
To prevent color images from losing saturation
when adjusting the lightness, ScanWizard Pro TX
provides a Saturation Range option. With this
option, colors outside of a given chroma range
are not affected by the manipulation of the
gradation curve.
Original image
Image corrected with Gradation tool
In the example here, the original image is
underexposed, with the middle tones of the
image being too dark. The solution: Lighten the
tones to brighten up the image.
1. Insert the film holder with the image to be
corrected into your scanner.
2. Click the
nail overview of all your originals in the
Panel Panel
Panel window , then click on the thumbnail to
Panel Panel
select the image. If thumbnail overview is not
required (
on the imageless frame position in the
PanelPanel
Panel. Then click the
PanelPanel
obtain a prescan image.
3. Click the
window . The
appear.
4. Move the pointer over the curve, and drag the
center of the curve to the left. This will
brighten up the midtones of the image.
5. Check the
image in the
the latest correction. The update is done in
the background and so may take a few
moments to show .
6. Click
OverviewOverview
Overview button to start a thumb-
OverviewOverview
OverviewOverview
Overview skipped), click directly
OverviewOverview
Prescan Prescan
Prescan button to
Prescan Prescan
Gradation Gradation
Gradation tool in the
Gradation Gradation
AIC:GradationAIC:Gradation
AIC:Gradation dialog will
AIC:GradationAIC:Gradation
PreviewPreview
Preview box so that the prescan
PreviewPreview
PreviewPreview
Preview wi ndow is updated with
PreviewPreview
OKOK
OK to confirm the correction.
OKOK
SettingsSettings
Settings
SettingsSettings
JobJob
Job
JobJob
JobJob
Job
JobJob
4-12 ScanWizard Pro TX User’s Guide
Page 33

Using the Gradation tool
Use the
midtones of the lightness channel “L” of
an image.
In the example below , the original is
underexposed, with the middle tones of
the image being too dark. The corrected
image shows the middle tones being
brightened, but the saturation and hues
of the image remain untouched.
GradationGradation
Gradation tool to adjust the
GradationGradation
3
4
5
6
Using the AIC Tools 4-13
Page 34

Using the Color Cast Tool (LCH Mode only)
Color Cast Color Cast
The
Color Cast tool is used to eliminate any
Color Cast Color Cast
unwanted color casts in an image, as well as to
add a color cast without altering the lightness
channel “L” values.
In the example here, the original has a slight
cyan cast that makes the image look cold and
unappealing. The solution: Remove the
undesirable color cast.
1. Insert the film holder with the image to be
corrected into your scanner.
2. Click the
thumbnail overview of all your originals in
Original image
Image corrected with Color Cast tool
the
thumbnail to select the image. If thumbnail
overview is not required (
skipped), click directly on the imageless
frame position in the
the
image.
3. Click the
window. The
4. For Macintosh users
Click the
Advanced Image Correction screen.
For Windows users
Simply move he mouse pointer inside the
prescan image and observe the pointer
turning into a
5. W ith the
cast that you wish to remove. In the example
here, we click on the watchtower of the
fishing boat to remove the unwanted cyan
cast.
6. Check the
image in the
with the latest correction. The update is
done in the background and so may take a
few moments to show.
7. Click
OverviewOverview
Overview button to start a
OverviewOverview
Job Panel Job Panel
Job Panel window, then click on the
Job Panel Job Panel
OverviewOverview
Overview
OverviewOverview
Job PanelJob Panel
Job Panel. Then click
Job PanelJob Panel
Prescan Prescan
Prescan button to obtain a prescan
Prescan Prescan
Color Cast Color Cast
Color Cast tool in the
Color Cast Color Cast
Color Cast Color Cast
Color Cast dialog will appear .
Color Cast Color Cast
Neutral Eyedropper Neutral Eyedropper
Neutral Eyedropper tool in the
Neutral Eyedropper Neutral Eyedropper
Neutral EyedrNeutral Eyedr
Neutral Eyedr
Neutral EyedrNeutral Eyedr
EyedrEyedr
opper opper
Eyedr
opper pointer, click the color
EyedrEyedr
opper opper
PreviewPreview
Preview box so that the prescan
PreviewPreview
PreviewPreview
Preview window is updated
PreviewPreview
OKOK
OK to confirm the correction.
OKOK
SettingsSettings
Settings
SettingsSettings
opper opper
opper pointer.
opper opper
4-14 ScanWizard Pro TX User’s Guide
Page 35

Using the Color Cast tool
Use the
unwanted color cast or to add a color cast
without altering the lightness channel “L”
values.
In the example below, the original has a
slight cyan cast to it. Using the
Eyedropper Eyedropper
Eyedropper too l and clicking it on the
Eyedropper Eyedropper
fishing boat watchtower removes the
unwanted cyan cast from the image.
Color CastColor Cast
Color Cast tool to remove an
Color CastColor Cast
NeutralNeutral
Neutral
NeutralNeutral
3
Eyedropper
pointer
(for Mac only)
4
5
6
7
Using the AIC Tools 4-15
Page 36

Using the Saturation Curve Tool (LCH Mode only)
Saturation Curve Saturation Curve
The
Saturation Curve tool lets you increase or
Saturation Curve Saturation Curve
decrease the color intensity (chroma or
saturation) of an image without altering its hue
and lightness values.
In the example here, the colors in the original
are not as intense or saturated as they should
be, resulting in a dull, lifeless image. The
solution: Increase the saturation or intensity of
the colors and provide vibrancy to the image.
1. Insert the film holder with the image to be
corrected into your scanner.
Original image
Image corrected with Saturation Curve tool
2. Click the
OverviewOverview
Overview button to start a
OverviewOverview
thumbnail overview of all your originals in
Job Panel Job Panel
the
Job Panel window, then click on the
Job Panel Job Panel
thumbnail to select the image. If thumbnail
overview is not required (
OverviewOverview
Overview
OverviewOverview
skipped), click directly on the imageless
frame position in the
Prescan Prescan
the
Prescan button to obtain a prescan
Prescan Prescan
Job PanelJob Panel
Job Panel. Then click
Job PanelJob Panel
image.
3. Click the
SettingsSettings
Settings window . The
SettingsSettings
Saturation Curve Saturation Curve
Saturation Curve tool in the
Saturation Curve Saturation Curve
AIC:Saturation CurAIC:Saturation Cur
AIC:Saturation Cur
AIC:Saturation CurAIC:Saturation Cur
dialog will appear.
4. Move the pointer over the curve, and drag
the center of the curve to the left. This
increases the saturation of the image.
5. Check the
image in the
PreviewPreview
Preview box so that the prescan
PreviewPreview
PreviewPreview
Preview window is updated
PreviewPreview
with the latest correction. The update is
done in the background and so may take a
few moments to show.
6. Click OK to confirm the correction.
veve
ve
veve
4-16 ScanWizard Pro TX User’s Guide
Page 37

Using the Saturation Curve tool
Use the
decrease the color intensity (chroma or
saturation) of an image without altering
the hue and lightness values.
In the example below, the colors of the
original are not as rich as they should be
(notice the slightly muddied wash to the
overall image). The corrected image
shows deeper, richer tones, resulting in a
more vibrant, lifelike image.
Saturation Curve Saturation Curve
Saturation Curve to increase or
Saturation Curve Saturation Curve
3
4
5
6
Using the AIC Tools 4-17
Page 38

Using the Selective Color Tool (LCH Mode only)
Selective Color Selective Color
The
Selective Color tool is used to perform color
Selective Color Selective Color
alteration to a specific color range without affecting
the other colors in an image. This is done either to
increase the visual impact of a color or to completely
change the relationship of the targeted color(s) with
other colors in the image.
In the example here, we want to increase the
saturation of the sky and change the boat color but
leave everything else untouched.
1. Insert the film holder with the image to be
corrected into your scanner.
2. Click the
overview of all your originals in the
window, then click on the thumbnail to select the
image. If thumbnail overview is not required
OverviewOverview
(
Overview skipped), click directly on the image-
OverviewOverview
less frame position in the
Prescan Prescan
Prescan button to obtain a prescan image.
Prescan Prescan
3. Click the
window. The
OverviewOverview
Overview button to start a thumbnail
OverviewOverview
Job PanelJob Panel
Job Panel
Job PanelJob Panel
Job PanelJob Panel
Job Panel. Then click the
Job PanelJob Panel
Selective Color Selective Color
Selective Color tool in the Settings
Selective Color Selective Color
AIC:Selective ColorAIC:Selective Color
AIC:Selective Color dialog appears.
AIC:Selective ColorAIC:Selective Color
Original image
4. Click to select the
FromFrom
From color mode label from the
FromFrom
dialog and pinpoint the color to be corrected on
prescan image with following procedure:
For Macintosh users
Click the left side
Eyedropper Eyedropper
Eyedropper tool in the
Eyedropper Eyedropper
AIC dialog. Move the pointer to the prescan
image and click on the color to be corrected.
For Windows users
Simply move the mouse pointer inside the
prescan image and observe the pointer
turning into
a Neutral Eyedra Neutral Eyedr
a Neutral Eyedr
a Neutral Eyedra Neutral Eyedr
opper opper
opper pointer.
opper opper
In the example, move the pointer (eyedropper)
over the blue sky in the Preview window, then
click on the blue sky.
Click the
New New
New button to define a second color.
New New
(Steps 4 to 8 are repeated for the change in the
ship’ s color).
4-18 ScanWizard Pro TX User’s Guide
Image corrected with Selective Color tool
5. Check the
Show Affected AreasShow Affected Areas
Show Affected Areas option to
Show Affected AreasShow Affected Areas
see the area to be affected by the color
change.
6. Adjust the color range to be affected (the
Delta LCH values). T o do this, drag the ar c
of the color wheel and the sliders of the
lightness bar until only the sky’ s blue color
is affected.
For Macintosh users
Y ou may also use the right side
Eyedropper Eyedropper
Eyedropper tool to increase (click)
Eyedropper Eyedropper
or decrease (click + Option key) the
area of the color to be corrected.
Page 39

Using the Selective Color tool
Use the
Selective Color Selective Color
Selective Color tool to perform color
Selective Color Selective Color
correction to a specific color range without altering the
other colors in an image.
In the example below, the color of the blue sky is
changed with an increase in saturation, but all other
colors in the image are held
constant and remain unchanged.
Be sure that the “ From” color
label is highlighted when
selecting the color to be
4
corrected
3
6
7
New button for
defining
succeeding
colors to be
changed
For Windows users
Shift + Click the
Neutral EyedropperNeutral Eyedropper
Neutral Eyedropper
Neutral EyedropperNeutral Eyedropper
pointer to increase, or Ctrl + Click to
decrease area of the color to be
corrected.
TT
7. Enable the
oo
T
o color mode label to enter the
TT
oo
color that will take the place of the affected
color in the original. Then click on the Color
TT
Wheel and move the
oo
T
o color marker to the
TT
oo
desired color and chroma position.
Use this Eyedropper to
pinpoint the color to be
corrected
Use this Eyedropper to
adjust the color range
to be affected (Delta
LCH values)
5 8
8. Uncheck the
6
9
Show Affected Areas Show Affected Areas
Show Affected Areas option to
Show Affected Areas Show Affected Areas
see the corrected result, displayed on the
right thumbnail.
9. Check the
image in the
PreviewPreview
Preview box so that the prescan
PreviewPreview
PreviewPreview
Preview wi ndow is updated with
PreviewPreview
the latest correction. The update is done in
the background and so may take a few
moments to show. Click
OKOK
OK to confirm the
OKOK
correction.
Using the AIC Tools 4-19
Page 40

Using the Tone Curve Tool
Original image
TT
The
one Curone Cur
T
one Cur
TT
one Curone Cur
veve
ve tool is used to adjust the tonal
veve
distribution of each channel of an image. It functions
very much like the Gradation tool, except that it
provides additional functions to allow separate
adjustments of the tones in each RGB or CMYK
channel, depending on the image type. This tool is
especially useful for correcting the “ink percentage”
distribution (i.e., dot gain correction) in CMYK
images.
In the example here, the original image looks cold,
with a decidedly blue-green cast to it. The solution:
Increase the “ink percentage” of the yellow and
magenta channels to bring out the warmer tones.
1. Insert the film holder with the image to be cor -
rected into your scanner.
Image corrected with Tone Curve tool
2. Click the
overview of all your originals in the
OverviewOverview
Overview button to start a thumbnail
OverviewOverview
Job PanelJob Panel
Job Panel
Job PanelJob Panel
window, then click on the thumbnail to select the
image. If thumbnail overview is not required
OverviewOverview
(
Overview skipped), click directly on the imageless
OverviewOverview
frame position in the
Prescan Prescan
Prescan button to obtain a prescan image.
Prescan Prescan
TT
3. Click the
The
4. Select
5. Select
one Curone Cur
T
one Cur
TT
one Curone Cur
AIC:TAIC:T
one Curone Cur
AIC:T
one Cur
AIC:TAIC:T
one Curone Cur
CurveCurve
Curve a s your “Method”.
CurveCurve
Yellow Yellow
Yellow as your “Channel”, and adjust the
Yellow Yellow
Job PanelJob Panel
Job Panel. Then click the
Job PanelJob Panel
ve ve
ve tool in the
ve ve
veve
ve dialog appears.
veve
Settings Settings
Settings window.
Settings Settings
yellow channel by moving the curve slightly higher
and towards the left, as shown in the figure on next
page.
6. Select
MagentaMagenta
Magenta a s your next “Channel”, and do the
MagentaMagenta
same thing you did with the yellow channel, moving the curve slightly higher and towards the left.
7. Check the
in the
PreviewPreview
Preview box so that the prescan image
PreviewPreview
PreviewPreview
Preview window is updated with the latest
PreviewPreview
correction. The update is done in the background
and so may take a few moments to show.
8. Click OK to confirm the correction.
4-20 ScanWizard Pro TX User’s Guide
Page 41

Using the Tone Curve tool
TT
Use the
tones separately or as a whole for RGB/
CMYK images.
In the example below, the original looks
cold, with a preponderance of bluegreen tones. The corrected version
shows the image with adjusted tones in
the yellow and magenta channels,
resulting in a rosier , warmer look.
one Curone Cur
T
one Cur
TT
one Curone Cur
veve
ve tool to adjust the
veve
3
7
4
5
7
6
8
Using the AIC Tools 4-21
5
6
Page 42

Using the Filter Tool
The Filter tool is used to apply special effects to your
images. Several filters are provided in ScanWizard
Pro TX, including Blur / Blur More, Sharpen /
Sharpen More, Emboss, and Edge Enhancement.
In the example here, the original is a bit blurry to
begin with. The solution: Use the Unsharp Masking
filter to increase sharpness in an image.
1. Insert the film holder with the image to be
corrected into your scanner.
Original image
Image corrected with Unsharp Masking filter tool
2. Click the
overview of all your originals in the
OverviewOverview
Overview button to start a thumbnail
OverviewOverview
Job PanelJob Panel
Job Panel
Job PanelJob Panel
window, then click on the thumbnail to select the
image. If thumbnail overview is not required
OverviewOverview
(
Overview skipped), click directly on the image-
OverviewOverview
less frame position in the
Prescan Prescan
the
Prescan button to obtain a prescan image.
Prescan Prescan
3. Click the
AIC:FilterAIC:Filter
AIC:Filter dialog appears.
AIC:FilterAIC:Filter
Filter Filter
Filter tool in the
Filter Filter
4. Check the option,
on Preview Imageson Preview Images
on Preview Images.
on Preview Imageson Preview Images
5. Check the option,
channel onlychannel only
channel only.
channel onlychannel only
6. Select
Unsharp MaskingUnsharp Masking
Unsharp Masking from the Filter drop-
Unsharp MaskingUnsharp Masking
down menu. The
Unsharp MaskingUnsharp Masking
Unsharp Masking dialog
Unsharp MaskingUnsharp Masking
Job PanelJob Panel
Job Panel. Then click
Job PanelJob Panel
Settings Settings
Settings window . The
Settings Settings
Simulate Unsharp Mask EffectSimulate Unsharp Mask Effect
Simulate Unsharp Mask Effect
Simulate Unsharp Mask EffectSimulate Unsharp Mask Effect
Apply Filter to LightnessApply Filter to Lightness
Apply Filter to Lightness
Apply Filter to LightnessApply Filter to Lightness
appears.
7. Adjust the
Strength Strength
Strength and
Strength Strength
Mask Size Mask Size
Mask Size parameters
Mask Size Mask Size
until you are satisfied with the effect displayed by
the thumbnail.
8. Click
9. Check the
OKOK
OK button to return to the Filter screen.
OKOK
PreviewPreview
Preview box so that the prescan image
PreviewPreview
PreviewPreview
in the
Preview window is updated with the latest
PreviewPreview
correction. The update is done in the background
and so may take a few moments to show.
4-22 ScanWizard Pro TX User’s Guide
10.Click
OKOK
OK to confirm the correction.
OKOK
Page 43

Using the Filter tool
FiltersFilters
The
Filters tool applies special effects to
FiltersFilters
your images.
In the example below , the Unsharp
Masking filter is used to increase
sharpness in the image and improve
image quality .
3
9
4
5
7
6
10
8
Using the AIC Tools 4-23
Page 44

5 Special Features & Advanced Scenarios
This section of the manual touches on the special features of ScanWizard Pro TX
and provides more advanced scenarios on how to use the program.
• How to Edit and Scan Multiple Scan Jobs
• How to Use ScanWizard Pro TX Working Folders
• How to Use the Magic Diamonds
• How to Customize Negative Film
Special Features & Advanced Scenarios 5-1
Page 45

How to Edit and Scan Multiple Scan Jobs
When you need to adjust settings and scan several
images at a time or find yourself wanting to scan and
save images in batches, refer to the sample scenario
below.
NOTE
: Start Scan Wizard Pro TX from the Apple menu (for Mac)
or Start menu (for PC) if you want to batch scan images to file.
1. After inserting the color slide holder (used in this
example) into the scanner, choose
Positive FilmPositive Film
Positive Film as
Positive FilmPositive Film
your scan material.
2. Click the
ginals appear in the
3. Select the thumbnail images from the
OverviewOverview
Overview button. The images of all ori-
OverviewOverview
Job Panel Job Panel
Job Panel wi ndow as thumbnails.
Job Panel Job Panel
Job PanelJob Panel
Job Panel that
Job PanelJob Panel
you want to include as part of the batch scan as
::
follows
:
::
••
• T o select all originals, click the
••
••
• T o select randomly, click on the image while
••
pressing the
users, press
••
• T o select a range of originals, (e.g., thumbnails 2 to
••
CtrlCtrl
Ctrl key if you are a PC user. For Mac
CtrlCtrl
ShiftShift
Shift key instead.
ShiftShift
4), for PC users, press and
Select All Select All
Select All button.
Select All Select All
ShiftShift
hold
Shift key while
ShiftShift
clicking on the start image (2), and then the last
image (4) of your selected range. For Mac users,
drag pointer across the selected thumbnails.
Notice that the selected thumbnails are highlighted.
4. Click the
escan escan
Pr
escan button in the
PrPr
escan escan
PrPr
eview eview
Pr
eview window . The
PrPr
eview eview
PrPr
selected thumbnails images are prescanned. The last
PrPr
selected image will display in the
evieweview
Pr
eview window . To
PrPr
evieweview
view the other prescanned images, click their
corresponding thumbnail in the
5. Highlight the thumbnails in the
Job PanelJob Panel
Job Panel.
Job PanelJob Panel
Job Panel Job Panel
Job Panel window for
Job Panel Job Panel
which new settings are to be applied (note that these
thumbnails represent the prescan images). When new
settings from the
Settings Settings
Settings window are applied to the
Settings Settings
images, the adjustments are applied simultaneously to
all the selected images.
PrPr
6. If you like what you see in the
Scan Scan
the
Scan bu tt o n t o st a r t scanning. All thumbnails in
Scan Scan
Job PanelJob Panel
the
Job Panel with a check mark will be scanned.
Job PanelJob Panel
eview eview
Pr
eview window , click
PrPr
eview eview
If you want to....
Before the Final Scan
• Select an output image type (after step 5)
Go to the
TT
ypeype
T
yp e box, choose the appropriate image
TT
ypeype
type for the individual image on preview or
for all highlighted scan jobs in the
Panel Panel
Panel simultaneously.
Panel Panel
• Specify output dimensions (after step 5)
Go to the
desired output dimensions (width and
height) in the output dimension edit boxes
for individual the image on preview or for
all highlighted scan jobs in the
simultaneously. The scan frame may change
slightly, and you may want to go back to the
Preview Preview
Preview window to readjust the scan frame.
Preview Preview
• Change output image resolution
(after step 5)
Go to the
resolution value in the
for the individual image on preview or for
all highlighted scan jobs in the
simultaneously.
• Fine-tune the preview image with Advance
Image Correction (AIC) tools (after step 5)
Go to the
desired image-processing option from the
Correction Correction
Correction menu, or click an appropriate
Correction Correction
AIC tool from the
corrections to the individual image on
preview. If all your images are of the same
TT
ypeype
T
yp e, you can apply image cor rections to
TT
ypeype
all highlighted scan jobs in the
simultaneously. The dialog box for the
corresponding AIC tool will then appear.
Details on usage for each tool is discussed
in the preceding chapter, Using the Advanced
Image Correction Tools.
Settings Settings
Settings window, and from the
Settings Settings
JobJob
Job
JobJob
Settings Settings
Settings window, and enter the
Settings Settings
Job PanelJob Panel
Job Panel
Job PanelJob Panel
Settings Settings
Settings window, and enter the
Settings Settings
PrPr
eview eview
Pr
eview window, and select the
PrPr
eview eview
Resolution Resolution
Resolution edit box
Resolution Resolution
Job PanelJob Panel
Job Panel
Job PanelJob Panel
Setting Setting
Setting window. Apply
Setting Setting
Job PanelJob Panel
Job Panel
Job PanelJob Panel
5-2 ScanWizard Pro TX User’s Guide
Page 46
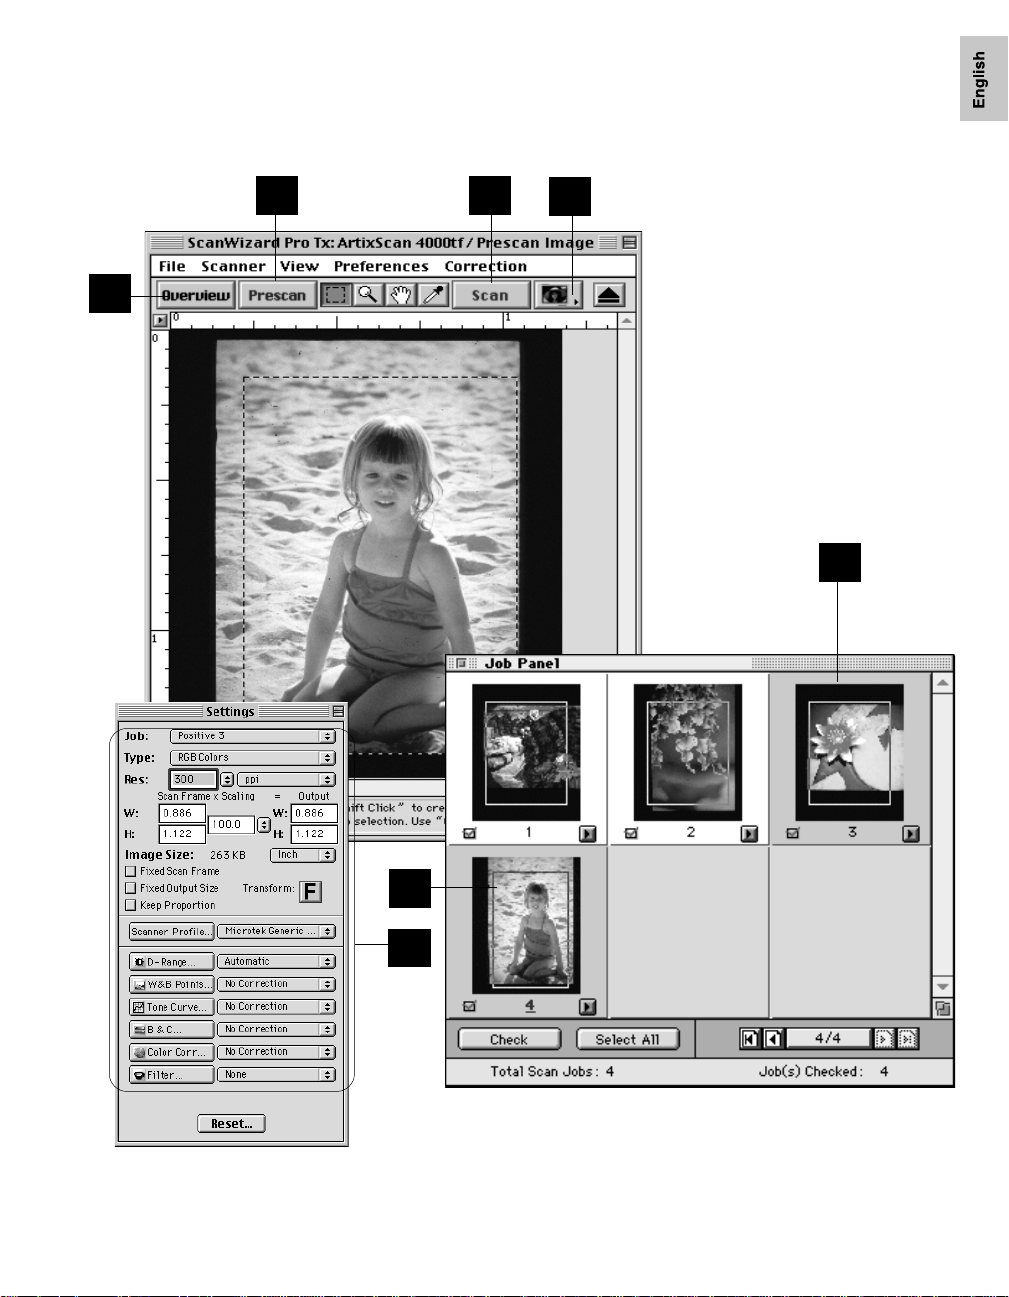
Editing and Scanning Multiple Scan Jobs
6 64
1
2
3
3
5
Special Features & Advanced Scenarios 5-3
Page 47
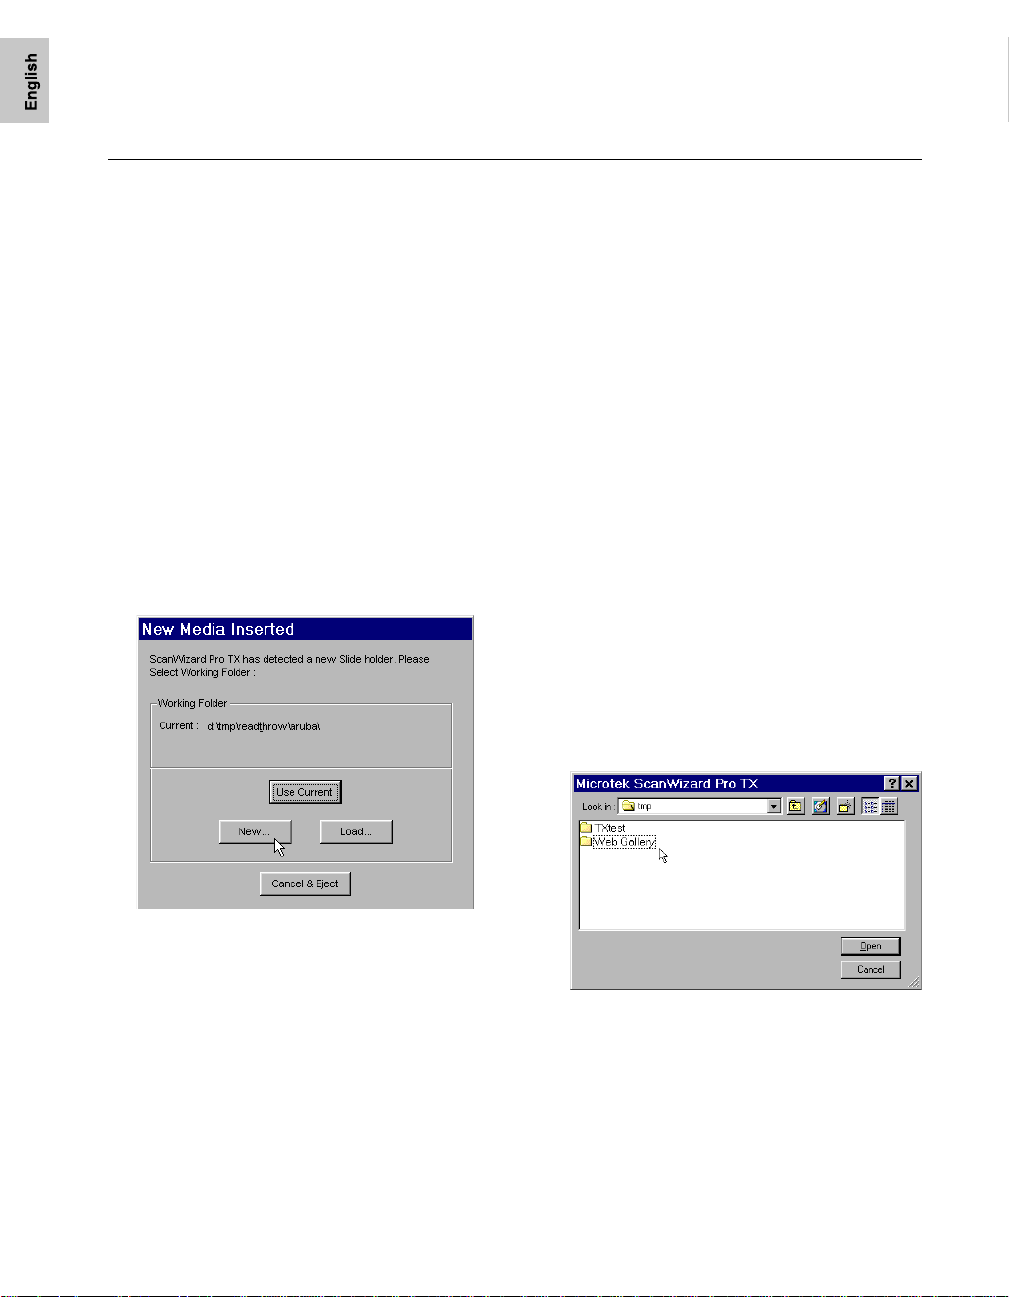
How to Use the ScanWizard Pro TX Working Folders
The ScanWizard Pro TX Working Folder is a tool that helps you enhance scanning productivity of
your scanning, especially when you have to perform several scanning jobs of the same type of
originals. All of your favorite image setting contexts for previews or prescans, including AIC adjustments, are automatically saved and kept in a default or user-defined Working Folder. Several sets of
setting contexts may be saved. The accumulated settings are then retrieved and loaded into ScanWizard Pro TX, and auto-applied to a new set of originals (of the same film and holder type) during
subsequent scanning sessions. This saves you time from performing needless repetitive adjustments.
The following simple scenario is presented as an example. Suppose you often scan 35 millimeter
slides for posting in a website image gallery. The required image size for posting is approximately 370
by 550 pixels at 300 ppi resolution. This is a perfect scenario where the ScanWizard Pro TX Working
Folder feature can be utilized to cut back your scanning time.
At initial scanning session:
NewNew
1. Place the color slides on the slide holder and
insert the slide holder into the scanner .
2. When the following dialog appears-
• Click the
image settings in a new separate userdefined folder. You will be prompted to
define a new folder in your disk.
If the dialog does not appear, click the
menu of the
New WNew W
New W
New WNew W
that follows, enter a folder name, e.g., “Web
Gallery” as your new working folder. Then
click the
......
New
... button if you wish to save
NewNew
......
Preview Preview
Preview window and choose
Preview Preview
orking Folderorking Folder
orking Folder. In the dialog box
orking Folderorking Folder
Open Open
Open button.
Open Open
FileFile
File
FileFile
• Click
5-4 ScanWizard Pro TX User’s Guide
Use Current Use Current
Use Current bu t t on i f you wish to
Use Current Use Current
save image settings in the default
W orking Folder located in your
ScanWizard Pro TX directory, or the folder
you have created in the previous scanning
session.
NOTE
: Each W orking Folder may contain thr ee
sets of defined settings, one each for 35mm
positive slides, 35 mm color negative strip and
APS negative film cartridge.
DataData
Data
DataData
3. Make sure that you have the correct
Material Material
Material type (Positive Film) in the
Material Material
OverOver
window , then click the
Observe thumbnail overview images appear in
Job Panel Job Panel
the
Job Panel window.
Job Panel Job Panel
Over
view button.
OverOver
view view
view view
ScanScan
Scan
ScanScan
PreviewPreview
Preview
PreviewPreview
Page 48

4. Click the
Panel Panel
Panel window . With all the Scan Jobs (#1 to
Panel Panel
#4) highlighted, go to the
Select AllSelect All
Select All button from the
Select AllSelect All
Settings Settings
Settings window.
Settings Settings
Select 300 ppi as your resolution,
JobJob
Job
JobJob
pixelpixel
pixel as
pixelpixel
your unit of measurement, then type the
desired output dimensions (approximately,
W=550, H=370 in this example). Next, check
Fixed Output Size Fixed Output Size
the
Fixed Output Size option to preserve the
Fixed Output Size Fixed Output Size
output dimensions when you decide later to
change the scan frame size.
The defined settings are applied to all scan
jobs. Note that as you define width, the height
value may vary a bit (or the other way
around) to keep the aspect ratio of the scan
frame.
5. Select the
in the
Scan Frame Scan Frame
Scan Frame tool from the Toolbar
Scan Frame Scan Frame
PrPr
evieweview
Pr
eview window , and adjust the Scan
PrPr
evieweview
Frame flashing marquee as you would like it
to fit or crop the image of the highlighted scan
job. Observe the scan frame being simulated
in the scan job overview image as you adjust
PrPr
the scan frame in the
evieweview
Pr
eview w indow.
PrPr
evieweview
6. If desired, prescan the jobs by highlighting
each or all selected jobs in the
Job PanelJob Panel
Job Panel
Job PanelJob Panel
window for a clearer preview of each job. To
prescan, click the
PrPr
eview eview
Pr
eview window.
PrPr
eview eview
NOTE
: If you want to crop and pr escan the ar ea
PrescanPrescan
Prescan b u tt o n in t h e
PrescanPrescan
enclosed by the scan frame only , you have to
initially click the
the right end of the
Scan Frame Scan Frame
Scan Frame option.
Scan Frame Scan Frame
Frame Option Frame Option
Frame Option (arrow icon) at
Frame Option Frame Option
PrescanPrescan
Prescan button and select the
PrescanPrescan
7. Make image enhancements to each or all of
the highlighted jobs with the
Settings Settings
Settings window
Settings Settings
Advanced Image Correction (AIC) tools.
NOTE
: If image correction adjustment is made
individually to each highlighted scan job, the
adjustments setting will remain effective for that
particular scan job only when applying the
W orking Folder to subsequent scanning sessions.
Multiple adjustments with all scan jobs
highlighted is feasible.
At this stage, all the adjustments you have
made in Steps 4, 5, and 7 are automatically
saved in the “W eb Gallery” working folder.
8. When you are satisfied with your adjustments
to the prescan images, click the
ScanScan
Scan button
ScanScan
to scan each or all of the highlighted jobs.
9. Click the
EjectEject
Eject icon to eject the slide holder
EjectEject
when you are done with scanning with the
current set of slides.
You are now ready to scan another set of
slides using the stored settings from the
Working Folder you have just created.
NOTE
: The individual scan frame adjustments will
remain effective for each cor responding Scan Job
number when applying the W orking Folder to
subsequent scanning sessions for 35mm positive
slides.
Special Features & Advanced Scenarios 5-5
Page 49
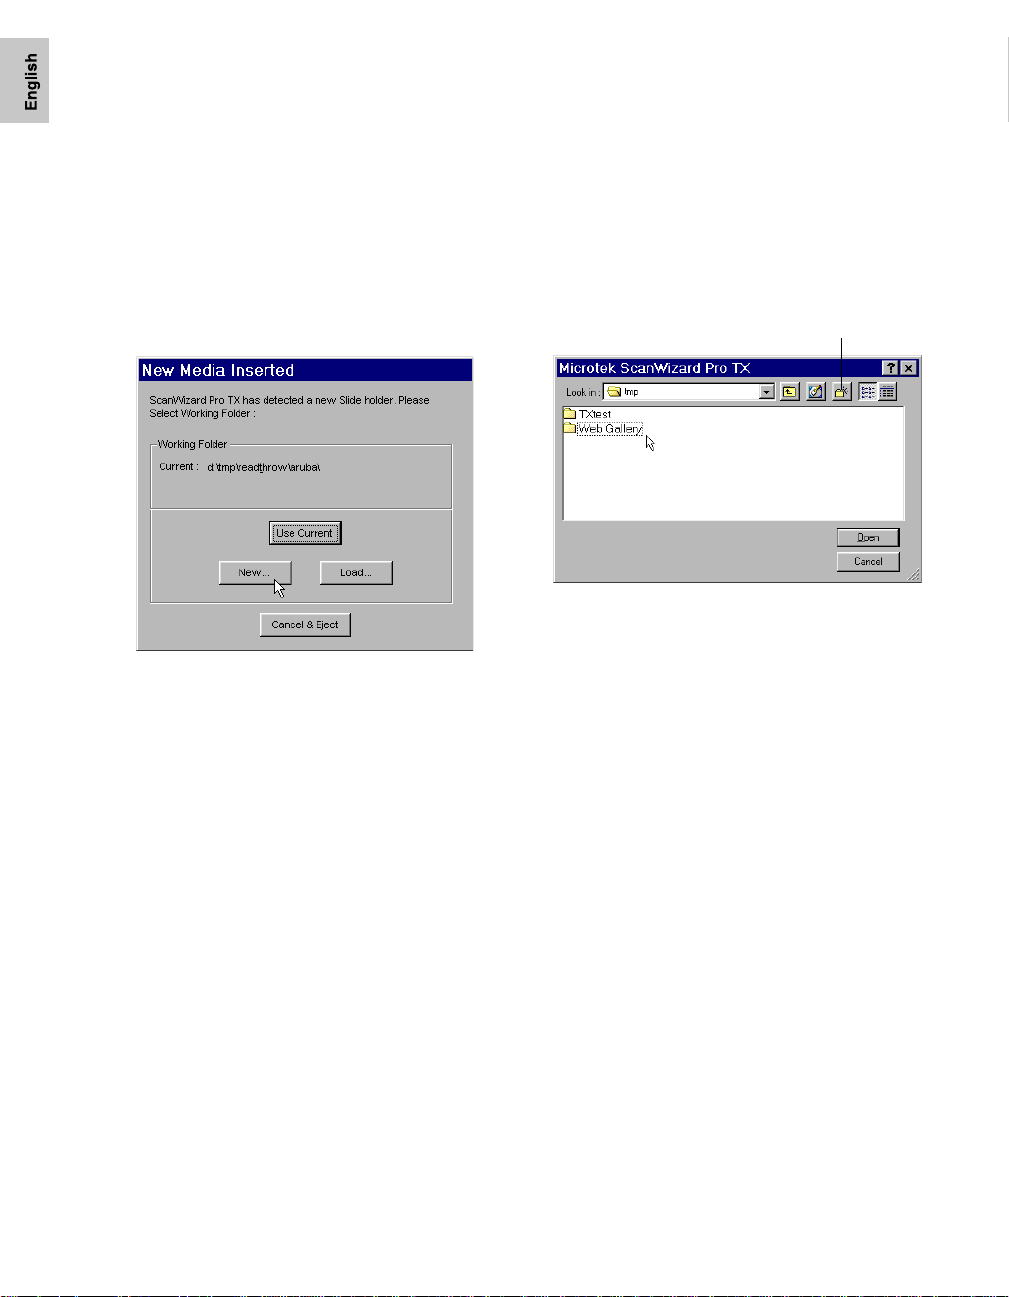
At subsequent scanning sessions:
1. Place the new set of slides into the same
holder, and insert the holder into the scanner.
NOTE
: Using a separate slide holder may
sometimes mislead ScanWizard Pro TX to detect
the holder as a new media type of holder and
causes it to display the
dialog. When this condition occurs, choose
CurCur
rr
entent
Cur
r
ent option as your working folder .
CurCur
rr
entent
2. Click the
Overview Overview
Overview button to see a Preview
Overview Overview
image of the new slides. Observe that settings
of the thumbnails are auto-adjusted with the
same settings from the “Web Gallery” working
folder you have created.
New Media InsertedNew Media Inserted
New Media Inserted
New Media InsertedNew Media Inserted
UseUse
Use
UseUse
Go to the
and choose
File File
File menu in the
File File
Save WSave W
Save W
Save WSave W
PreviewPreview
Preview window
PreviewPreview
orking Folder As...orking Folder As...
orking Folder As... from
orking Folder As...orking Folder As...
the drop-down menu. Y ou will be prompted
by a dialog to save the new context settings
under “W eb Gallery.” To overwrite, click on the
Save Save
Save button. Otherwise, create a new
Save Save
working folder by clicking on the
Folder Folder
Folder button.
Folder Folder
Create New Folder button
Create NewCreate New
Create New
Create NewCreate New
5. If you like what is shown in the prescan
images, click the
Scan Scan
Scan button to scan all the
Scan Scan
jobs.
3. If desired, prescan the scan jobs by highlighting the jobs in the
clicking the
Job PanelJob Panel
Job Panel window and
Job PanelJob Panel
PrescanPrescan
Prescan button in the
PrescanPrescan
PreviewPreview
Preview
PreviewPreview
window.
4. If required, you may perform image enhancement adjustments to each job by using the
Advanced Image Correction (AIC) Advanced Image Correction (AIC)
Advanced Image Correction (AIC) tools.
Advanced Image Correction (AIC) Advanced Image Correction (AIC)
When new adjustments are made, settings will
differ with those previously available in the
“W eb Gallery” Working Folder. Y ou have the
option to either overwrite the context
contents of “Web Gallery,” or create a separate
W orking Folder for the new settings.
5-6 ScanWizard Pro TX User’s Guide
Page 50

Loading working folder when resuming
work on the same media:
Whenever you want to use the same “Web
Gallery” working folder to apply to a new set of
positive slides after a period of working with
other media (such as negative filmstrips or APS
films), do the following:
1. Place the new set of slides into the same slide
holder, and insert the holder into the scanner.
Observe that the output image resolution,
unit of measurement, and dimension for your
new set of slides are already preset in the
Settings Settings
Settings window as you have previously
Settings Settings
defined in the “W eb Gallery” working folder .
4. Continue to work with your new scan jobs as
discussed in the previous section of this
chapter.
2. When the following dialog appears, click
button.
NOTE
: If the dialog does not display, go to the
menu in the
WW
orking Folder orking Folder
W
orking Folder from the dr op-down menu.
WW
orking Folder orking Folder
3. When the Load Working Folder dialog
displays, locate and select “W eb Gallery” and
click the
PreviewPreview
Preview window and choose
PreviewPreview
OpenOpen
Open button.
OpenOpen
LoadLoad
Load
LoadLoad
LoadLoad
Load
LoadLoad
FileFile
File
FileFile
Special Features & Advanced Scenarios 5-7
Page 51

How to Use the Magic Diamonds
TT
The “Magic Diamonds” that are a part of the
Windows Windows
Windows feature in ScanWizard Pro TX let you set the
Windows Windows
white and black points, as well as remove any unwanted
color casts in an image without having to bring up the
color adjustment/correction screens.
In the example here, the image has a slightly grayish cast
(i.e., less contrast), which can be removed easily with the
use of the Magic Diamonds.
1. Place the originals into the appr opriate holder, and
insert the holder into the scanner.
2. Go to the
PreviewPreview
Preview window and click the
PreviewPreview
icon. From the submenu that appears, choose the
appropriate film scan material type.
3. Click the
thumbnail images appear in your
4. Click the
OverviewOverview
Overview button, and you will see the
OverviewOverview
Job PanelJob Panel
Job Panel window. .
Job PanelJob Panel
TT
ag Wag W
indows indows
T
ag W
indows tool.
TT
ag Wag W
indows indows
5. Click a white ar ea in the image. A “T ag Window” will
appear with the color strip on the bottom of the T ag
window appearing as white, indicating the spot where
you had clicked. Move the T ag W indow to a desired
location.
agag
T
ag
TT
agag
Scan MaterialScan Material
Scan Material
Scan MaterialScan Material
If you want to....
Before the Final Scan
• Select an output image type (after
step 2)
Go to the
the Type box, choose the appropriate
image type for the image to be
scanned. For monitor display of
images, choose RGB, Grayscale, or
Web /Internet colors.
• See a more detailed preview image
(after step 3)
Go to the
the scan job you wish to see in detail,
and click the
• Fine-tune the preview image with
image processing options
(after step 10)
Go to the Preview window, and select
the desired image-processing option
from the
tively, you can go to the
window and click on any of the AIC
image processing buttons.
SettingsSettings
Settings window, and from
SettingsSettings
PrPr
evieweview
Pr
eview window, highlight
PrPr
evieweview
Prescan Prescan
Prescan button.
Prescan Prescan
Correction Correction
Correction menu. Alterna-
Correction Correction
SettingsSettings
Settings
SettingsSettings
6. Next, click a black ar ea in the image. A “T ag W indow”
will appear with the color strip on the bottom of the T ag
window appearing as black, indicating the spot where
you had clicked.
7. Now, click the area where you wish to remove the
unwanted color cast. In the example here, we clicked
the gray color on the boy’s T -shirt.
8. For Tag Window #1, click the white diamond to set the
white point.
9. For Tag Windows #2, click the black diamond to set the
black point.
10.For Tag Window #3, click the center diamond to
remove the color cast and neutralize the image.
5-8 ScanWizard Pro TX User’s Guide
Page 52

Using the Magic Diamonds
4
3
2
10
9 8
Special Features & Advanced Scenarios 5-9
Page 53

How to Customize Negative Film
With ScanWizard Pro TX, you can create a
customized film profile for your negative film,
based on an existing negative film profile. This
lets you create film profiles at will or as the need
arises, and allows you to use the profiles for
subsequent scans as well.
1. Place the negative filmstrip or cartridge to be
customized in the proper film holder and
insert into your scanner.
2. Go to the
Material Material
Material icon. From the submenu that
Material Material
appears, choose
3. Go to the
TT
ype ype
T
ype bu tton. Select
TT
ype ype
Film Film
Film Type for Mac) at the bottom of the
Film Film
menu.
4. When a dialog box appears, follow the steps
outlined. First, click the
the dialog box. When the overview image
appears in the dialog box window, select the
film base (the perimeter just outside the image
exposure area).
5. Click the
image appears, fine-tune the selection area
you made in step #4 to make sure that the
film base is properly selected.
PreviewPreview
Preview window and click the
PreviewPreview
Negative FilmNegative Film
Negative Film.
Negative FilmNegative Film
SettingsSettings
Settings window , and click the
SettingsSettings
Custom Custom
Custom (
Custom Custom
PrescanPrescan
Prescan option. When the prescan
PrescanPrescan
CrCr
eate Customeate Custom
Cr
eate Custom
CrCr
eate Customeate Custom
Overview Overview
Overview option in
Overview Overview
ScanScan
Scan
ScanScan
FilmFilm
Film
FilmFilm
6. Choose the base film type on which the
custom negative film profile will be based. In
general, select an existing film profile closest
to your new film type. In this example, we
chose Kodak Gold 100-6.
7. Click the
8. When the customization process is completed, enter a file name for the new negative
film profile and a description. Take note that
the new film will appear in the
Window Film Type menu by description, not
by file name.
9. Click the
now appear in the Film Type menu in the
SettingsSettings
Settings window.
SettingsSettings
10.Click the
Negative Film TNegative Film T
Negative Film T
Negative Film TNegative Film T
the
11.Select the newly created customized profile
from the
negative film type. In this example, it is Kodak
Gold 100 New.
CustomizeCustomize
Customize option in the dialog box.
CustomizeCustomize
SettingsSettings
Settings
SettingsSettings
SaveSave
Save button. The saved profile will
SaveSave
Close Close
Close button in the
Close Close
PrPr
eview eview
Pr
eview window.
PrPr
eview eview
Film TFilm T
Film T
Film TFilm T
ype ype
ype dialog box to return to
ype ype
ypeype
ype menu to scan your new
ypeype
CustomizeCustomize
Customize
CustomizeCustomize
5-10 ScanWizard Pro TX User’s Guide
Page 54

Customizing Negative Film
2
4
5
6
10
7
Prescan image showing film base selected
3
11
8
9
Special Features & Advanced Scenarios 5-11
Page 55

Appendix
The following information can be found in this section:
A Color Matching for Advanced Users
B Available File Formats for “Scan to File” Function
Appendix-1
Page 56

Appendix A: Color Matching for Advanced Users
This section contains important information on how to achieve color matching
across your devices. If you need more details on ColorSync or any of the thirdparty application programs discussed in this section, refer to the respective user
guides of those programs.
For Macintosh users
Calibrating your monitor
Calibrating your monitor to obtain the proper monitor profile is important for
achieving higher precision in color matching. ICC profiles for your monitor may be
created specifically by profiling your monitor through the following utilities:
• The Calibration function of the Monitor Control Panel for ColorSync 2.5 or later.
• The Adobe Gamma utility, from Adobe Photoshop 5.0 or later package.
• Any third-party calibration programs or hardware calibrator
Y ou can also obtain your monitor profile by checking with the manufacturer of
your monitor.
Setting up the System (Monitor) Profile
After creating or identifying the monitor profile, you need to select the monitor
profile to make sure the image is displayed correctly.
Make sure you always update your ColorSync program to the most recent version.
If you have ColorSync earlier than version 2.5, please update it to the most recent
version available.
To select the system monitor profile, bring up the Monitor Control Panel. An
example is shown below .
Appendix-2 ScanWizard Pro TX User’s Guide
Page 57

After selecting your monitor profile, you will see the profile changed in the
ColorSync Control Panel, as shown in the example below.
Using images in third-party applications
Y ou should know if the image-editing or page-layout application you use to edit
or process scanned images is ColorSync-savvy or not. This is because the
settings in the Color Matching Setup dialog box will vary, depending on the
image-editing application you are using.
A. Using ColorSync-savvy applications
Adobe Photoshop 5.0 or later is a good example of a ColorSync-savvy
application. If you are using Photoshop 5.0, we recommend that you update to
version 5.0.2, or you may upgrade to version 5.5; do not use version 5.0. In the
Color Matching Setup dialog box of ScanWizard Pro TX, you will need to do the
following:
• Check the Display using monitor compensation check box. If you are using
Adobe Photoshop 5.0.2 or later , make sure that you also check the Display
using monitor compensation check box in Photoshop’ s File | Color Settings... | RGB
dialog box. This will ensure that the scanned images displayed in Photoshop
match the preview images shown in the Preview window of ScanWizard Pro
TX.
• Check the RGB Color Matching check box. Take note that if this box is not
checked, your RGB images will not go through the color matching process,
and you may obtain inaccurate color as a result.
• Check the Embed ICC destination profile in scan image check box. This feature
will enable ScanWizard Pro TX to embed the ICC profile of the currently
selected color space in the image data. The information will then be properly
interpreted by Photoshop or any ColorSync-savvy application.
Appendix-3
Page 58

• Select Scanner RGB as your RGB destination profile. This is the best choice as
your RGB destination profile because there is one less color space conversion in
the process of color matching (which means the original color data is preserved
better). This is especially important for users who demand minimal loss of data
during color-space conversion.
B. Using non-ColorSync-savvy applications
Adobe Photoshop 4.0 or earlier is a non-ColorSync-savvy application. Other thirdparty applications may also not be ColorSync-savvy, which means that these
programs do not know how to read or handle embedded ICC profile information.
In this case, the ICC profile data is ignored.
If you are processing images with a non-ColorSync-savvy application, you need to
do the following in the ScanWizard Pro TX Color Matching Setup dialog box:
• Uncheck the Embed ICC destination profile in scanned image check box, if this
feature causes any kind of problem.
• Uncheck the Display using monitor compensation check box. If this box is checked,
display of image data is “compensated”, resulting in a difference between the
image shown in the Preview window from the scanned image that is delivered to
your image-editing application. T ake note that the image data itself is not altered;
only the image display is affected.
• Select your desired RGB destination profile. This is the desired color space in
which the application wishes to work in relation to RGB color images. In many
cases, you can select your monitor profile or the sRGB profile, which will usually
provide satisfactory results.
Appendix-4 ScanWizard Pro TX User’s Guide
Page 59
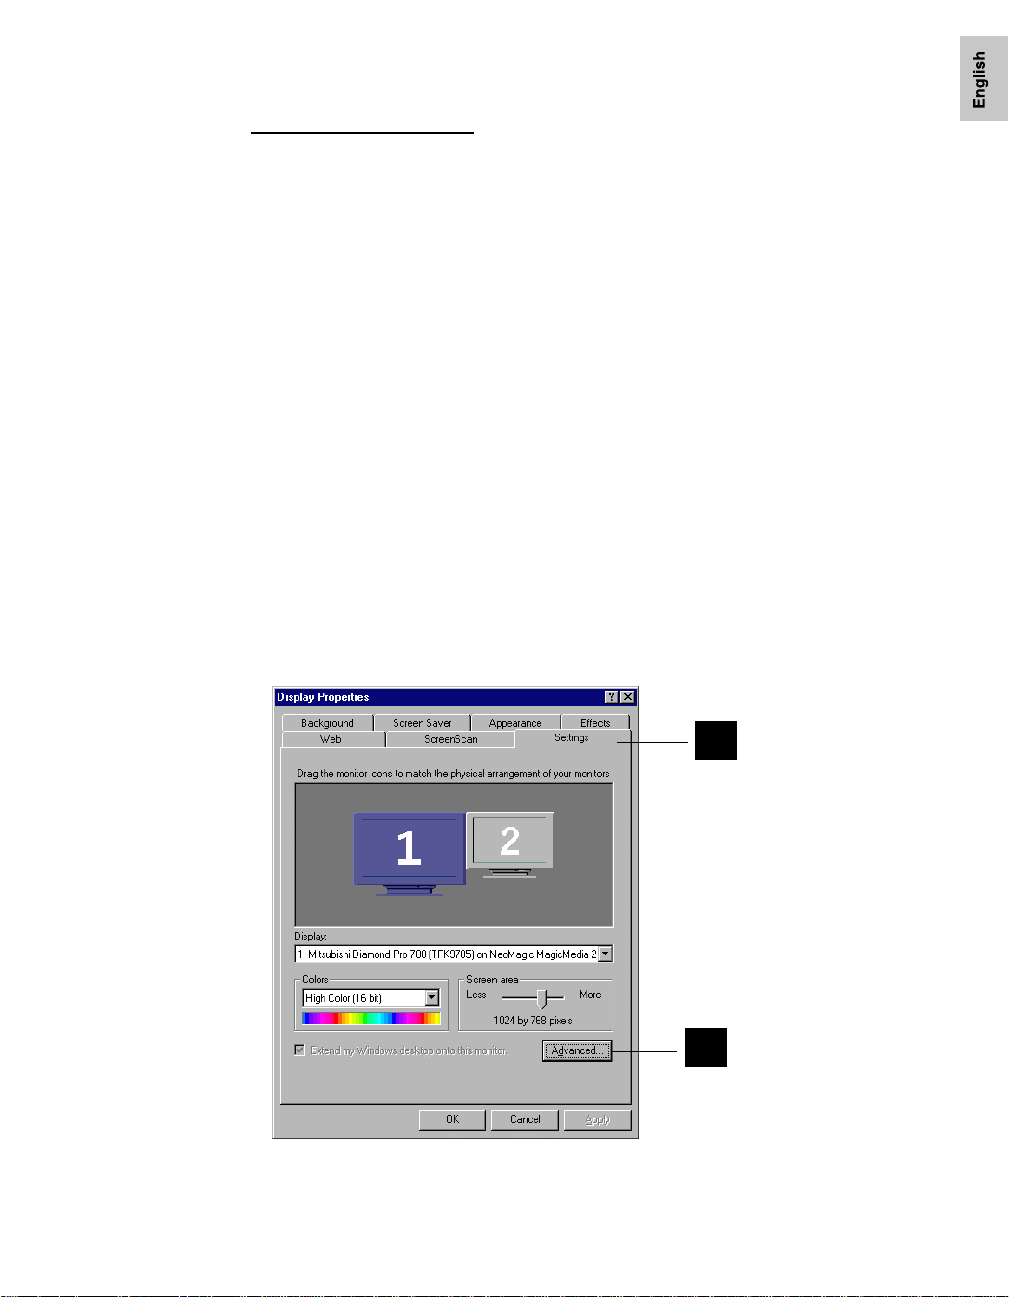
For Windows users
The ICC color profile of your monitor has to be calibrated in order to achieve
optimum color display and color consistency between the scanner and your
monitor. To accomplish this, you need to calibrate your monitor and create a
profile with a third-party calibration program or har dware calibrator. The Adobe
Gamma utility provided with the Adobe Photoshop 5.0 (or later) is a good
example of such a program.
You can also use the monitor pr ofile utility pr ovided by the monitor
manufacturer to calibrate your monitor. Contact or visit the manufacturer’s
website if you cannot find one.
System Monitor Profile Setup
After creating or identifying the monitor profile (Diamond Compatible 9300K
G2.2 in this example), you need to locate and select the monitor profile to make
it as your default system monitor profile. Select the monitor profile as follows:
1. Choose “Control Panel” from the “Start > Settings” menu.
2. Click the “Display” icon to bring up the “Display Properties” dialog box.
3. Click the “Settings” tab from the “Display Properties” dialog box.
4. Click the “Advanced…” button from the “Display Properties” dialog box.
3
4
Appendix-5
Page 60
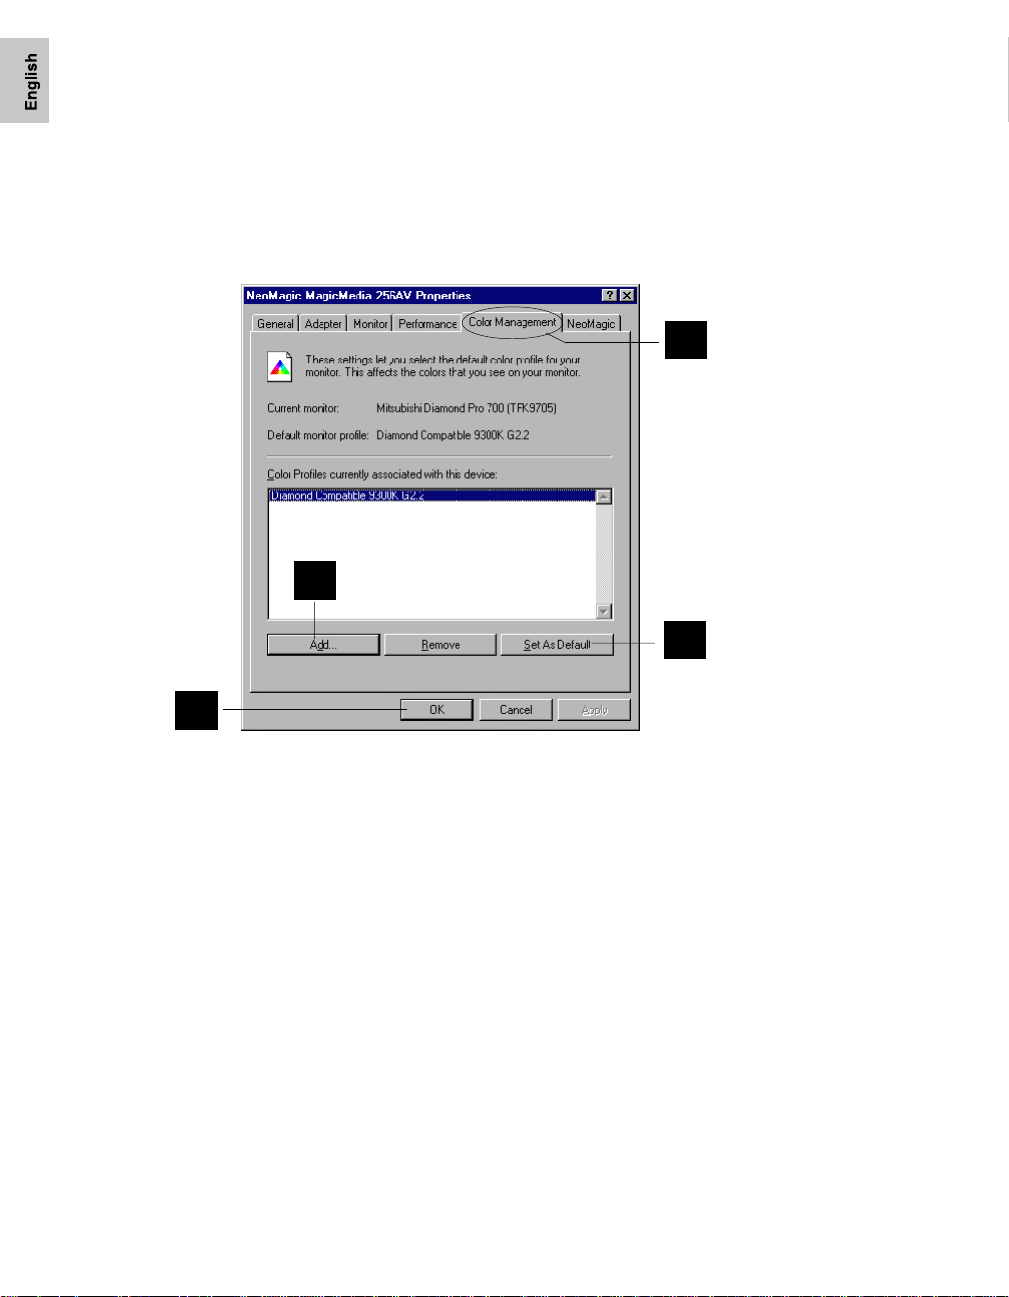
5. Click the “Color Management” tab from the Display Properties dialog box.
6. Click the “Add…” button to add your monitor profile from the Profile List.
7. Select the monitor profile “Diamond Compatible 9300K G2.2”, and click “Set As
Default” button.
8. Click the “OK” button to close the dialog box.
5
6
7
8
After selecting your monitor profile, you will see the same profile being applied to
ScanWizard Pro TX, as well as to your image editing application, e.g., Photoshop 5.0 (or
later).
NOTE
: You must restart your application and ScanWizard Pro TX to have the new monitor profile take
effect.
ICC Profile-Aware vs. non-ICC Profile-Aware applications
It is important that you know whether the image-editing or page-layout application you
are using to edit or process scanned images is ICC profile-aware or not. This is because
the Color Matching Setup dialog box of ScanWizard Pro TX needs to be setup to match
the profile type of the image-editing application you are using.
Appendix-6 ScanWizard Pro TX User’s Guide
Page 61
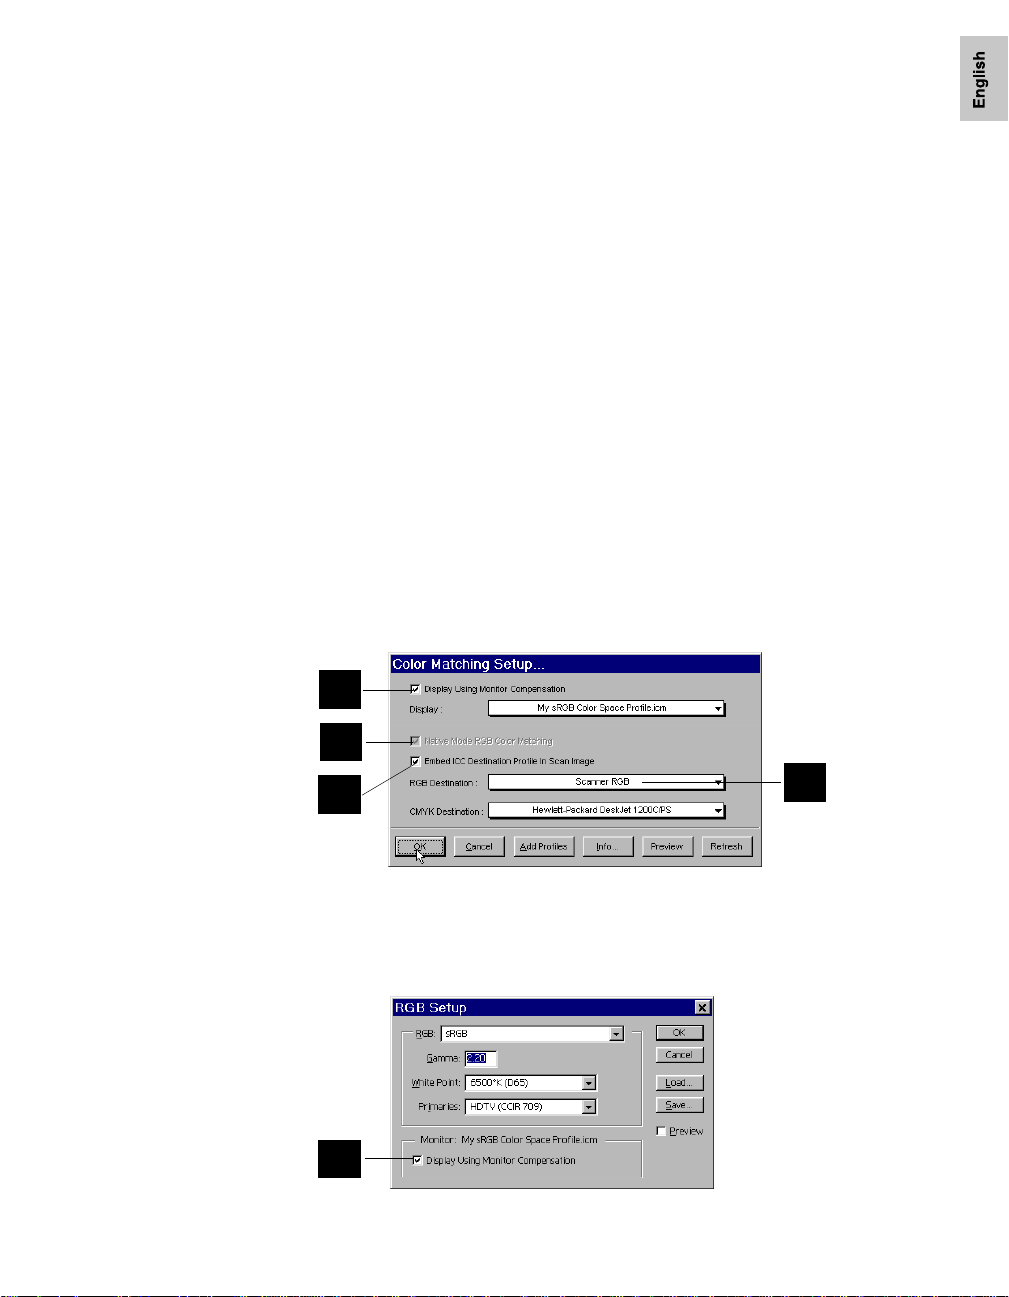
Color Matching Setup using ICC Profile-Aware applications
When using an ICC Profile-A ware application (Adobe Photoshop 5.0 or later is a
good example), you need to perform the following in the Color Matching Setup
dialog box of ScanWizard Pro TX
1. Check the Display using monitor compensation check box.
2. If you are running ScanWizard Pro TX under Native Mode, check the Native
Mode RGB Color Matching check box. This check box is permanently checked
and dimmed when ScanWizard Pro TX is operating under LCH Mode.
NOTE
: If this box is not checked, your RGB images will not go through the color
matching process, and you may obtain inaccurate color as a r esult.
3. Check the Embed ICC destination profile in scan image check box. This feature will
enable ScanWizard Pro TX to embed the ICC profile of the currently selected
color space in the image data. The information will then be properly interpreted
by Photoshop or any ICC profile-aware application.
4. Select Scanner RGB as your RGB destination profile. This is the best choice as
your RGB destination profile because there is one less color space conversion in
the process of color matching (which means the original color data is preserved
better). This is especially important for users who demand minimal loss of data
during color-space conversion.
::
:
::
1
2
3
5. If you are using Adobe Photoshop 5.0 or later, make sure that you also check the
Display using monitor compensation check box in Photoshop. From the Photoshop
menu bar, click File > Color Settings > RGB Setup. When the RGB Setup dialog box
displays, check the RGB Color Matching check box (at the bottom of the dialog).
4
5
Appendix-7
Page 62
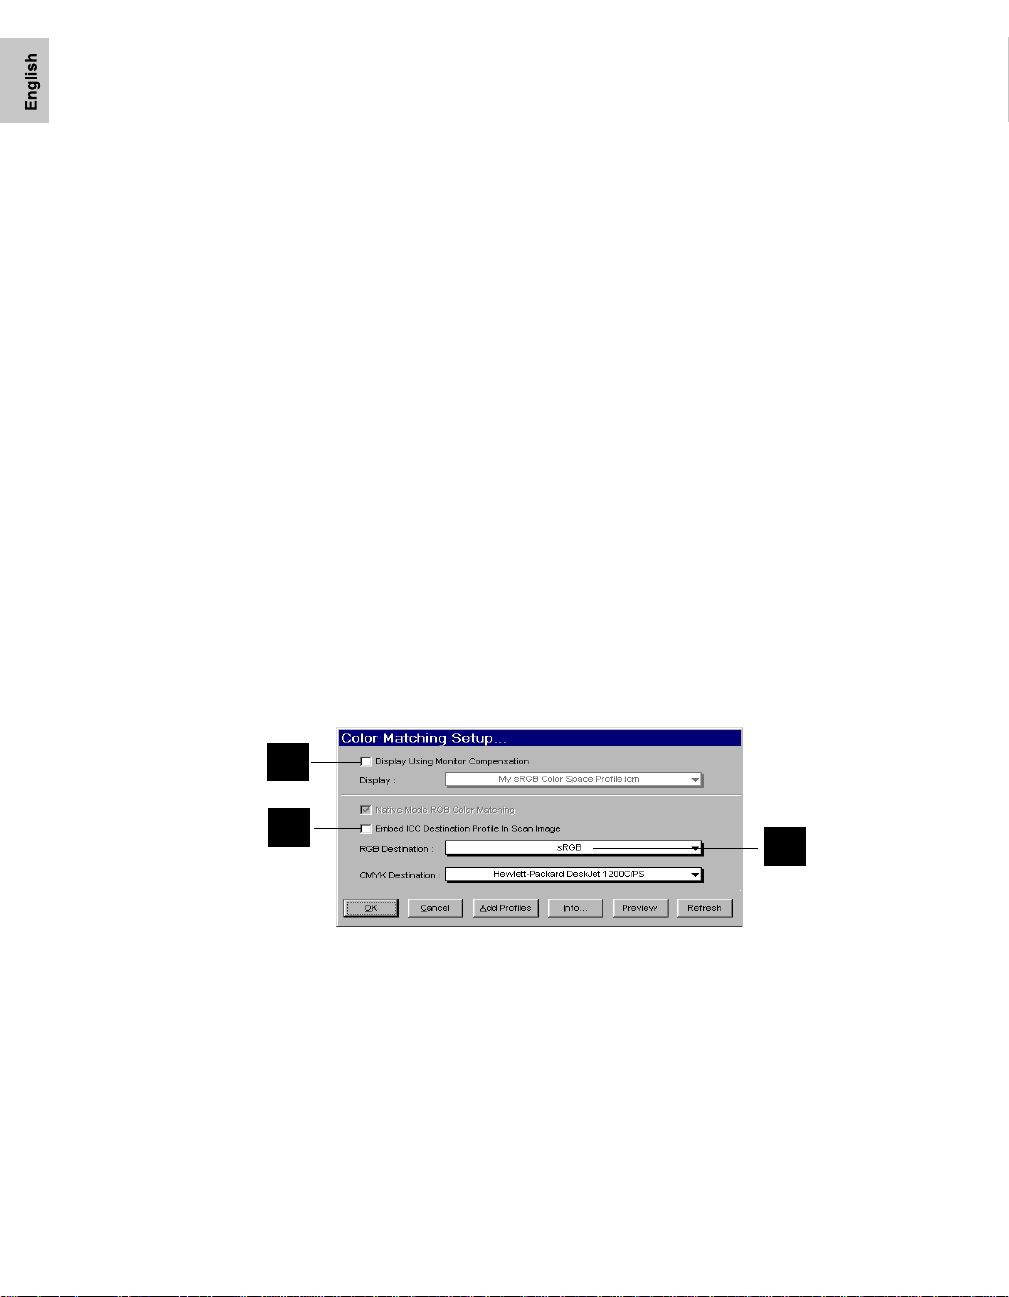
NOTE
: Checking this check box will ensure that the scanned images displayed in Photoshop match
the preview images shown in the Preview window of ScanWizard Pro TX.
Color Matching Setup using non-ICC Profile-Aware applications
When a third-party application is non-ICC profile-aware (Adobe Photoshop 4.0 or
earlier versions are typical examples), it means that the program is incapable of
reading nor processing embedded ICC profile information. In this case, the ICC
profile data is ignored.
If you are processing images with a non-ICC profile-aware application, configure
the Color Matching Setup dialog box in the ScanWizard Pro TX as follows
1. Uncheck the Display using monitor compensation check box. If this box is checked,
display of image data is “compensated,” resulting in a disparity of image between
the one shown in the Preview window and the scanned image that is delivered to
your image-editing application. T ake note that the image data itself is not altered;
only the image display is affected.
2. Uncheck the Embed ICC destination profile in scanned image check box if enabling
this feature causes any problem.
3. Select your desired RGB destination profile. This is the desired color space in
which the application wishes to work in relation to RGB color images. In many
cases, you can select your monitor profile or the sRGB profile, which will usually
provide satisfactory results.
::
:
::
1
2
Appendix-8 ScanWizard Pro TX User’s Guide
3
Page 63

Color Matching Setup dialog button functions
Add Profiles button
Add ProfilesAdd Profiles
The
Add Profiles bu tt on i s p ro vi ded which will allow you to add additional ICC
Add ProfilesAdd Profiles
profiles that normally come with your device (e.g., display monitor or printer). Y ou
may add profiles when you cannot find the ICC profile for your device from those
provided with the ScanWizard Pro TX.
You may also source
additional ICC profiles from
web sites as some device
suppliers (e.g., HP, Kodak,
etc.) have made their ICC
profiles available on the
Internet.
Select the profiles you need,
then click on the Open
button to load the
additional profiles into
ScanWizard Pro TX. This
may take awhile to process.
NOTE
: When you purchase a color monitor or color printer, check to make sure yhat your supplier
provides the corresponding ICC profiles.
Info button
This button displays basic
profile information for the
current selected devices.
Preview button
Clicking on the
PreviewPreview
Preview
PreviewPreview
button immediately updates
the Preview window image
when a new color profile is
selected. This will reflect colors consistent with the newly selected profile.
Refresh button
Clicking on the
RefreshRefresh
Refresh button updates the ICC profiles stored in the \Windows\
RefreshRefresh
System\color and \Windows\System32\color folder. This command is required only if
you have removed obsolete ICC profiles from the above-mentioned folder to save
disk space.
Appendix-9
Page 64

Appendix B: Available File Formats for “Scan to File function”
ScanWizard Pr o TX’s “Scan to File” features the batch-scanning function, allowing
you to scan and save images in various file formats. Not all file formats are
available for different image types, and you should select the proper file format
with the image type that meets your requirements. For details, see the following
cross-reference table.
For Macintosh users
TIF EPSF DCS2 PICT JPEG
RGB Colors ььььь
RGB Colors (48-bit) üüü
Gray Scale ььььь
Gray Scale (16-bit) üüü
CMYK Colors üüü ü
Lab Colors üüü
Web/Internet Colors
256 Colors üüüü
Line art
B & W Diffusion üüüü
Appendix-10 ScanWizard Pro TX User’s Guide
Page 65

For Windows users
TIF EPS BMP PSD SCT JPG
RGB Colors üüüü ü
RGB Colors (48-bit) ü
Gray Scale ьььььь
Gray Scale (16-bit) ü
CMYK Colors ü üüü
Lab Colors ü
Web/Internet Colors
256 Colors (Default) üüü
256 Colors (Custom)
Line art üüüü
B & W Diffusion
Appendix-11
 Loading...