

Page 1

Welcome!
The latest Microtek scanners are equipped with smart-buttons for easier
access to scanner functions. Scanners with the smart-buttons have these
configurations:
● 3 one-touch buttons: Scan, Copy, and E-mail.
● 5 one-touch buttons: Scan, Copy, E-mail, OCR, and Scan-to-Web or
Scan, Copy, E-mail, Setup, and Cancel.
● 7 one-touch buttons: Cancel/Setup, Scan, Copy, E-mail, OCR, Scan-
to-Web, and Custom.
Microtek scanners assist users by simplifying scanning tasks and increasing
productivity with just the touch of a button. These "smart buttons" provide
an intuitive and easy method to quickly and easily scan images.
For example, to copy a stack of documents, simply place the first page on
the scanner bed, and press the Copy button. Once the first page has been
scanned, place the next page and press the Copy button again. The
scanner will work like a copier with your printer, printing the documents
one after another with no interruption.
The parameters for each button can be defined through the
Microtek
Scanner Configuration (MSC) utility. When you have completed specifying
your scan setting requirements, you can then perform several tasks
continuously with just a simple touch.
Launching and exiting the Microtek Scanner Configuration (MSC) utility
How the scanner buttons work
file:///D|/msc/WebHelp/Welcome.htm [8/20/03 2:26:44 AM]
Page 2

Launching and Exiting the MSC
utility
Launch your Microtek Scanner Configuration (MSC) utility by:
● Double-clicking the Microtek Scanner Configuration (MSC) icon
from the desktop.
● Pressing the Cancel/Setup button on your scanner (if your scanner is
not working).
To exit the Microtek Scanner Configuration (MSC) utility:
● Click the Exit button located at the top-right corner (OK button on
the bottom-right corner for the Mac) of the Microtek Scanner
Configuration (MSC) panel.
Using the Microtek Scanner Configuration (MSC) utility
file:///D|/msc/WebHelp/Launching_exiting_MSC.htm [8/20/03 2:27:15 AM]
Page 3
Using the MSC utility
When you launch the MSC, the Microtek Scanner Configuration (MSC)
panel appears. Depending on the scanner model you are using, you will
see 3 tabs (
Scan, Copy or E-mail), 5 tabs (Scan, Copy, E-mail, OCR, or To
Web), or 6 tabs (Scan, Copy, E-mail, OCR, To Web, or Custom). Click any
of the tabs to view or customize the button settings according to your
specific requirements.
Click either of the thumbnails below to get a closer view of the Microtek
Scanner Configuration (MSC) panel.
Windows
Macintosh
file:///D|/msc/WebHelp/Using_the_MSC_utility.htm (1 of 2) [8/20/03 2:28:07 AM]
Page 4
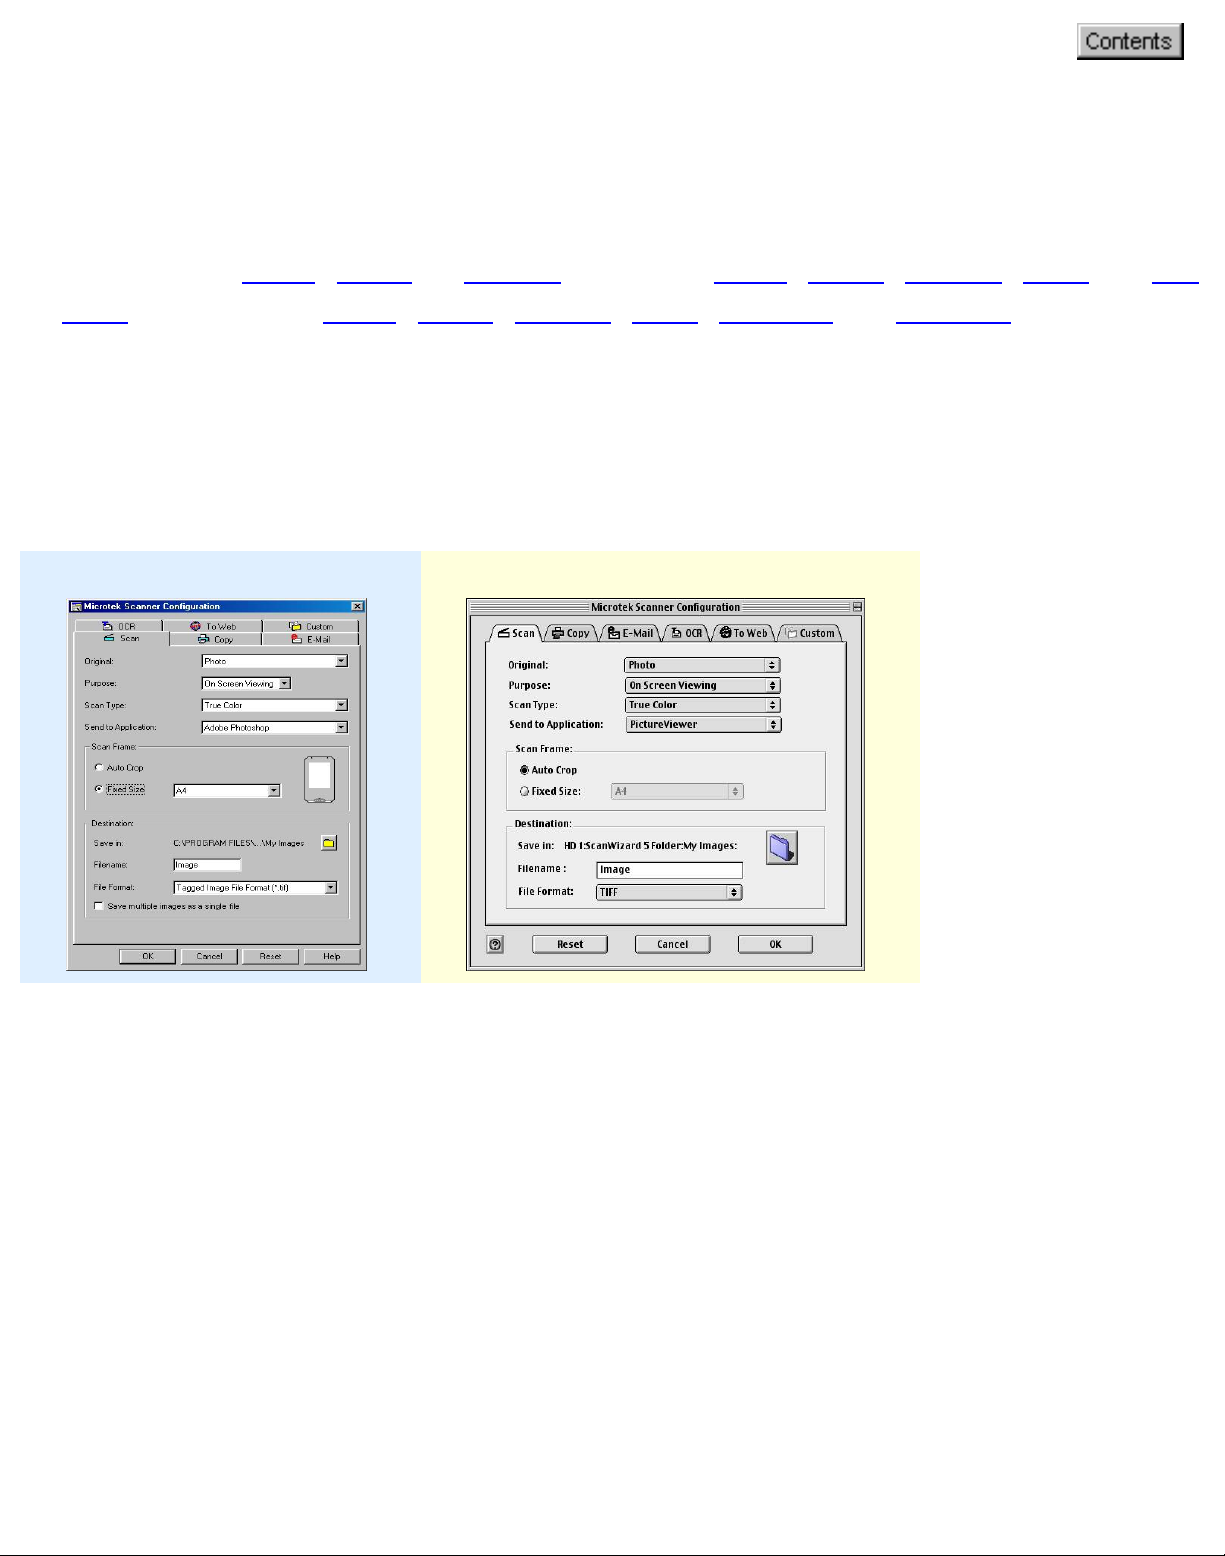
Customizing the Scan panel
To obtain a larger view of the Scan panel, click either of the thumbnails below:
Windows Macintosh
Select the topic you wish to view from the links below:
Original
Purpose
Scan Type
Send to Application
Scan Frame
Destination
OK button
Cancel button
Reset button
Help button
Original
Defines the type of your scan material. To scan printed matter (e.g., newspapers, art
books, flyers, or magazines), choose Magazine. To scan graphics, choose Illustration.
file:///D|/msc/WebHelp/panel_Scan.htm (1 of 4) [8/20/03 2:28:28 AM]
Page 5

Purpose
Defines the destination of the scanner output. For viewing purposes alone, choose On
Screen Viewing. Choose Custom if you want to set a specific resolution. It is
recommended that the resolution not be set higher than the scanner’s optical resolution.
Scan Type
Defines the color output for your document. Make sure you choose the correct image
type; it is always best to choose the right image type. For instance, if you choose True
Color to scan a gray-level image, a bigger file size and longer scanning time results with
little improvement to image quality. Likewise, if your original is text only without images,
choose Black & White to achieve better quality than Gray.
Some scanner models support JPEG output color format. Take note that for JPEG image
format, the better the image quality, the greater the disk space required. If your
Microtek scanner does not support the JPEG format, the JPEG selections will not appear
under Scan Type.
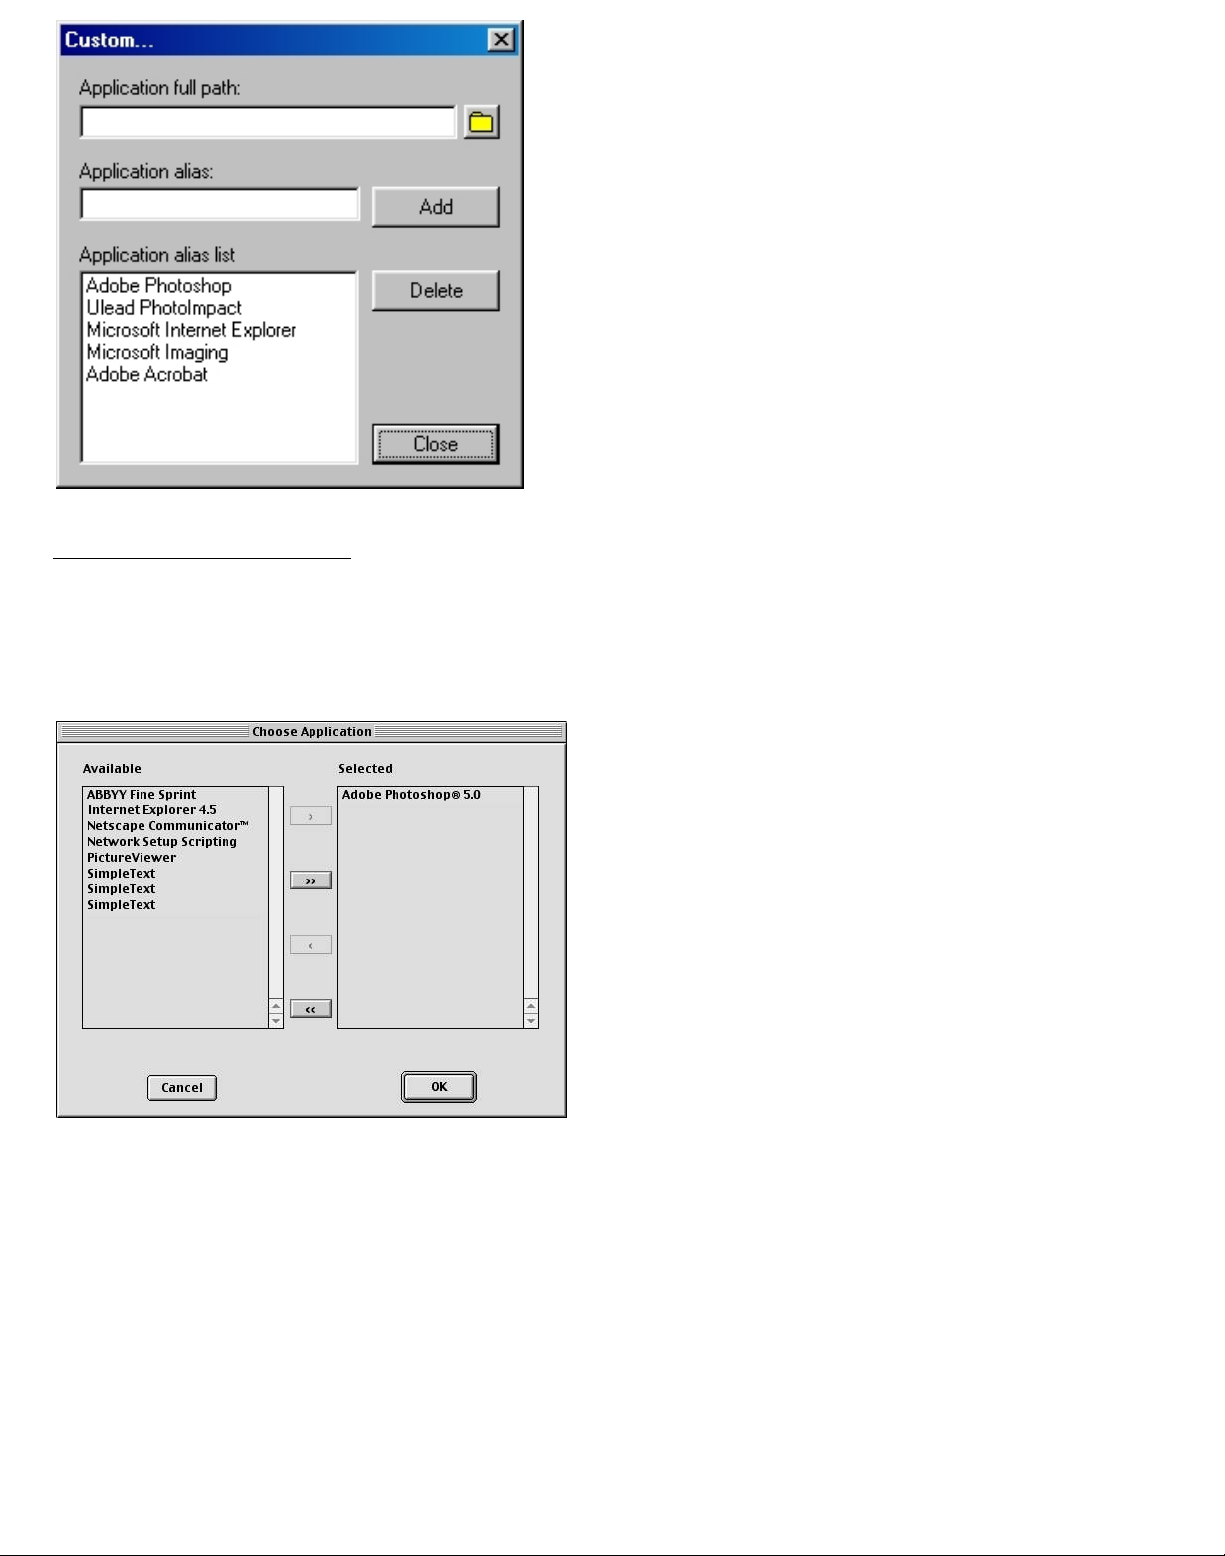
Send to Application
Defines the application that will edit and save the scanned image; the application can be
an image editor, web browser, or Acrobat program available on your disk.
If the application you prefer to use is not shown on the list yet, add it to the list by –
For Windows users:
Choose Custom from the bottom of the list. Use the resulting dialog box to search and
add the new application to the list.
Application full path: Enter the full path
name, or click the yellow folder icon to
browse and search for the new
application.
Application alias: Enter an alias for the
application to be added.
Add: When you have located your new
application, click Add to include the new
application to the Application alias list.
Then click Close.
Delete: If you want to remove an existing
application from the Application alias list,
file:///D|/msc/WebHelp/panel_Scan.htm (2 of 4) [8/20/03 2:28:28 AM]
Page 6
select the application, then click Delete.
For Macintosh users:
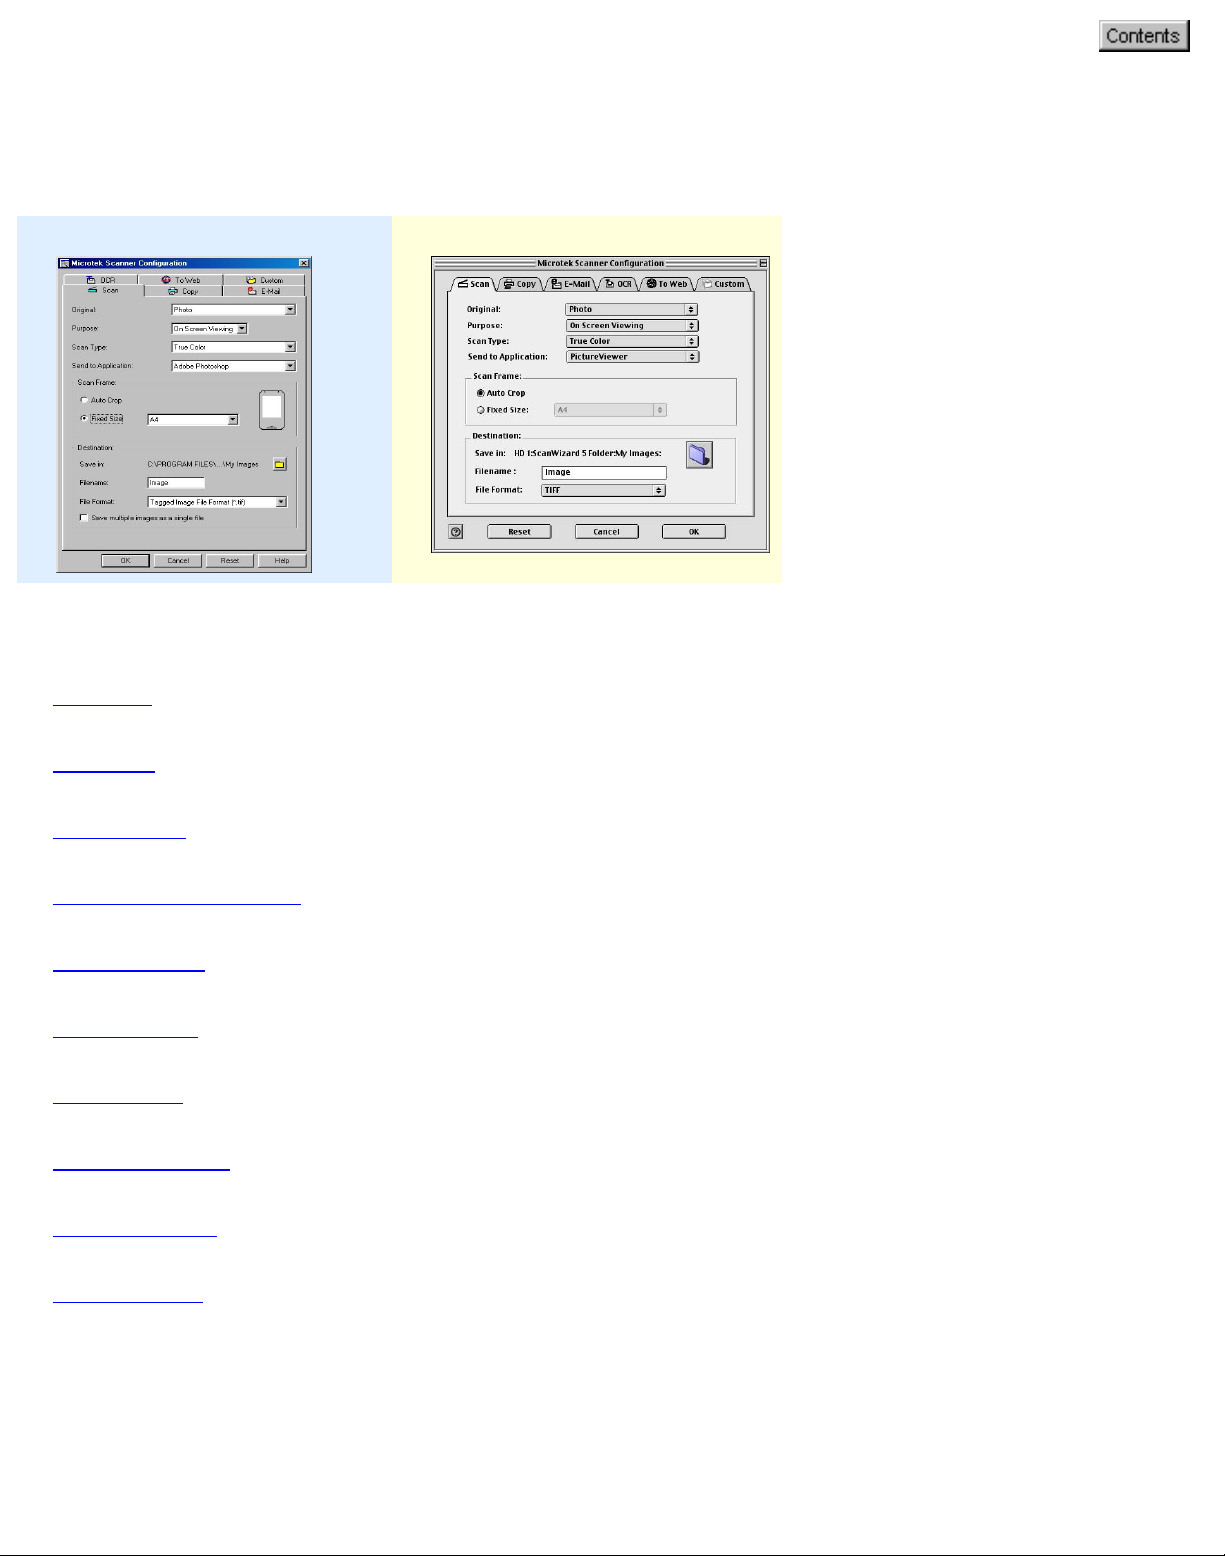
Choose Custom from the bottom of the list to bring up "Choose Application" window. The
MSC utility starts to search for the available software programs in your disk and displays
them on the left panel of the window.
> or >> : Select and Add a particular
software or all the available software from
the "Available" panel to the "Selected"
panel.
< or << : Select and Delete a particular
software or all the software from the
"Selected" panel to the "Available" panel.
When you are done with your software
selection. click OK to update the changes
made, or Cancel to abandon the selection
you've just made.
Scan Frame
Select either Auto Crop or Fixed Size.
Auto Crop: If Auto Crop is selected, the scanner first executes a preview, tries to
determine the size of the original image, then performs the scan and crops the full scan
frame to fit the image automatically.
Fixed Size: If Fixed Sized is selected, the Auto Crop function is disabled and instead,
you select the image size from the list. When a scan is performed, the selected scan
frame size is framed on the top-center of the glass bed. Thus, it is the important that
you position the original on the top-center of the glass bed. A centering marker is
provided on the top ruler to guide you with alignment.
Thumbnail of the Scan frame: Shows the selected scan frame. If Auto Crop is
selected, the selected scan frame of the thumbnail is disabled.
Destination
Defines the folder for saving and storing the scanned images.
Save in: Saves the image to the current folder destination. To change the folder
location, click the folder icon at the right end of the existing path.
file:///D|/msc/WebHelp/panel_Scan.htm (3 of 4) [8/20/03 2:28:28 AM]
Page 7

Filename: Refers to the prefix or root name in a series of filenames. By default, the root
filename is "Image". If the TIFF file format is selected, the scanned images will be
automatically identified as "Image001.tif", "Image002.tif", etc. You can change the
default root filename to uniquely label your scan jobs.
File Format: PDF is the default image file format.
Save multiple images as a single file: Allows you to save the scanned images into a
single file. You can enable this option if the scan frame is "Fixed Size" and the output
image file format is DCX, PDF, or TIF. When enabled, MSC will prompt you to place the
next page as you scan from the scanner bed, then click the Continue button to scan; or
click the Close button to save multiple images as a single file. If you scan through ADF,
the scanning originals are sequentially scanned until paper out; when finished, all the
scanned images are saved as a single file.
OK button
Confirms and saves the parameters currently specified for the Scan Smart-Touch button
on your scanner. The next time you press the Scan button, the defined and saved
settings are retrieved as your current settings.
Cancel button
Abandons the parameters you have just made under the Scan tab panels; all the
parameters are restored to their previous settings.
Reset button
Clears all the parameters you have just made under the Scan tab panel; all the
parameters are reset to their default settings.
Help (?) button
Provides answers to any queries regarding the MSC utility and scanner button functions.
Simply click the Help (?) button located at the bottom right (bottom left for Mac) corner
of the MSC panel. To search for a topic, click the Index tab, then type a word associated
with your question. You will be prompted for a short definition that will link you to a
related topic.
file:///D|/msc/WebHelp/panel_Scan.htm (4 of 4) [8/20/03 2:28:28 AM]
Page 8
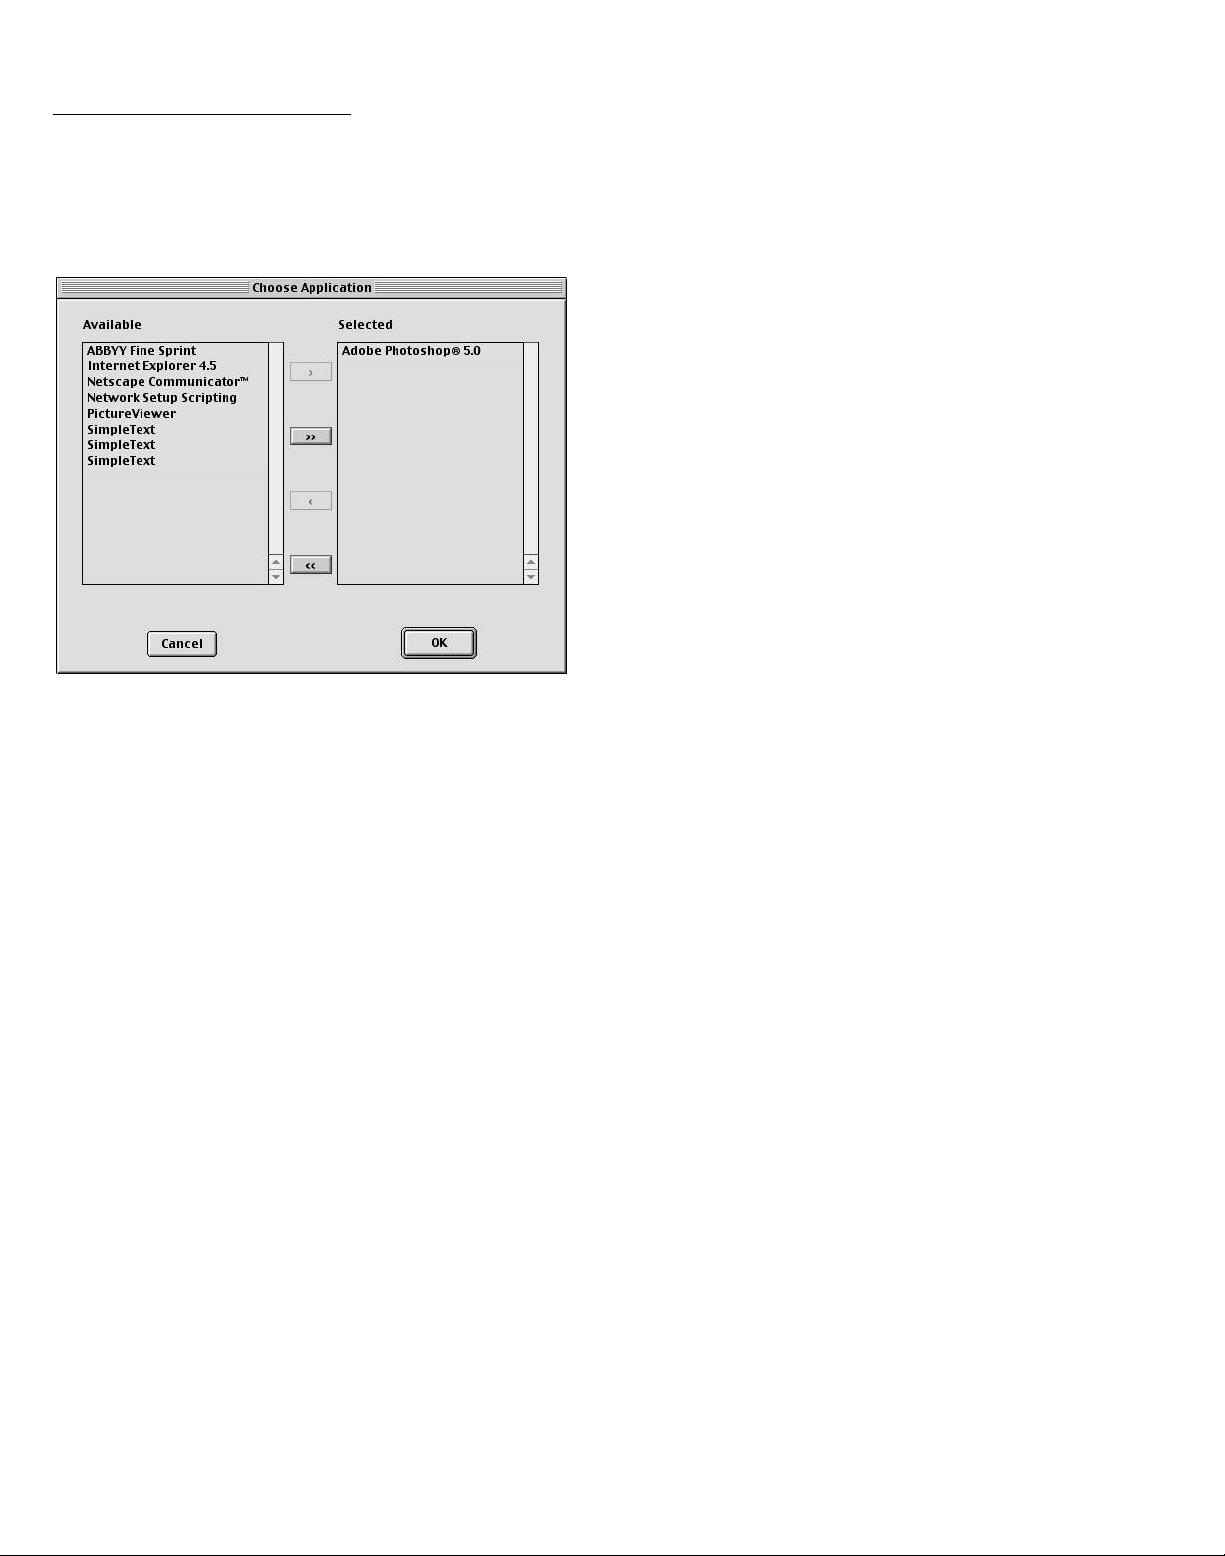
Customizing the Copy panel
To obtain a larger view of the panel, click either of the thumbnails below:
Windows Macintosh
Select the topic you wish to view from the links below:
Original
Color Copy
Scan Frame
Copy Quality
Scaling
Copies
Show printer setting dialog box before scan
Setup button (Windows only)
OK button
file:///D|/msc/WebHelp/panel_Copy.htm (1 of 4) [8/20/03 2:28:50 AM]
Page 9

Cancel button
Reset button
Help button
Original
Defines the type of your scan material. To scan printed matter (e.g.,
newspapers, art books, flyers, or magazines), choose Magazine. To scan
graphics, choose Illustration.
Color Copy
Check this option if you are using color printer to print your scanned
images.
Scan Frame
Selects either Auto Crop or Fixed Size.
Auto Crop: If Auto Crop is selected, the scanner first executes a preview,
tries to determine the size of the original image, then performs the scan
and crops the full scan frame to fit the image automatically.
Fixed Size: If Fixed Sized is selected, the Auto Crop function is disabled
instead, you select the image size from the list. When a scan is performed,
the selected scan frame size is framed on the center-top of the glass bed.
Thus, it is the important that you position the original on the top-center of
the glass bed. A centering marker is provided on the top ruler to guide you
with alignment.
Thumbnail of the Scan frame: Shows the selected scan frame. If Auto
Crop is selected, the selected scan frame of the thumbnail is disabled.
Copy Quality
Selects your printout quality. The higher the image quality, the longer the
scanning time and the greater disk space required. Microtek recommends
file:///D|/msc/WebHelp/panel_Copy.htm (2 of 4) [8/20/03 2:28:50 AM]
Page 10

that you to choose "Normal" quality for 150 dpi printing, "Best" for 600 or
300 dpi printing, and "Draft" for 100 dpi printing.
Scaling
Enlarges or reduces an image. Specifying scaling parameters above 100%
will enlarge the scanned image, while specifying scaling parameters below
100% will reduce the scanned image. Scaling range is between 25% and
400%.
Copies
Defines the number of printout (1 to 99) copies required for a current scan
job. This setting can be superseded with setting in your Printer Setup
dialog box if you have checked the check box on "Show printer setting
dialog box before scan."
Show printer setting dialog box before scan
Check this option if you want to display the printer dialog box before you
start to print. Number of printout copies may be redefined in this dialog
box. Uncheck this option if you do not want to bring up the printer dialog
box and make printout quantity based on "Copies" setting.
Current Printer: Displays the currently selected printer.
Setup button (Windows only)
Selects one of the installed printer drivers as your default printer driver, or
changes the currently selected printer driver.
OK button
Confirms and saves the parameters currently specified for the Copy SmartTouch button on your scanner. The next time you press the Copy button,
the defined and saved settings are retrieved as your current settings.
Cancel button
file:///D|/msc/WebHelp/panel_Copy.htm (3 of 4) [8/20/03 2:28:50 AM]
Page 11

Abandons the parameters you have just made under the Copy tab panels;
all the parameters are restored to their previous settings.
Reset button
Clears all the parameters you have just made under the Copy tab panel;
all the parameters are reset to their default settings.
Help (?) button
Provides answers to any queries regarding the MSC utility and scanner
button functions. Simply click the Help (?) button located at the bottom
right (bottom left for Mac) corner of the MSC panel. To search for a topic,
click the Index tab, then type a word associated with your question. You
will be prompted for a short definition that will link you to a related topic.
file:///D|/msc/WebHelp/panel_Copy.htm (4 of 4) [8/20/03 2:28:50 AM]
Page 12
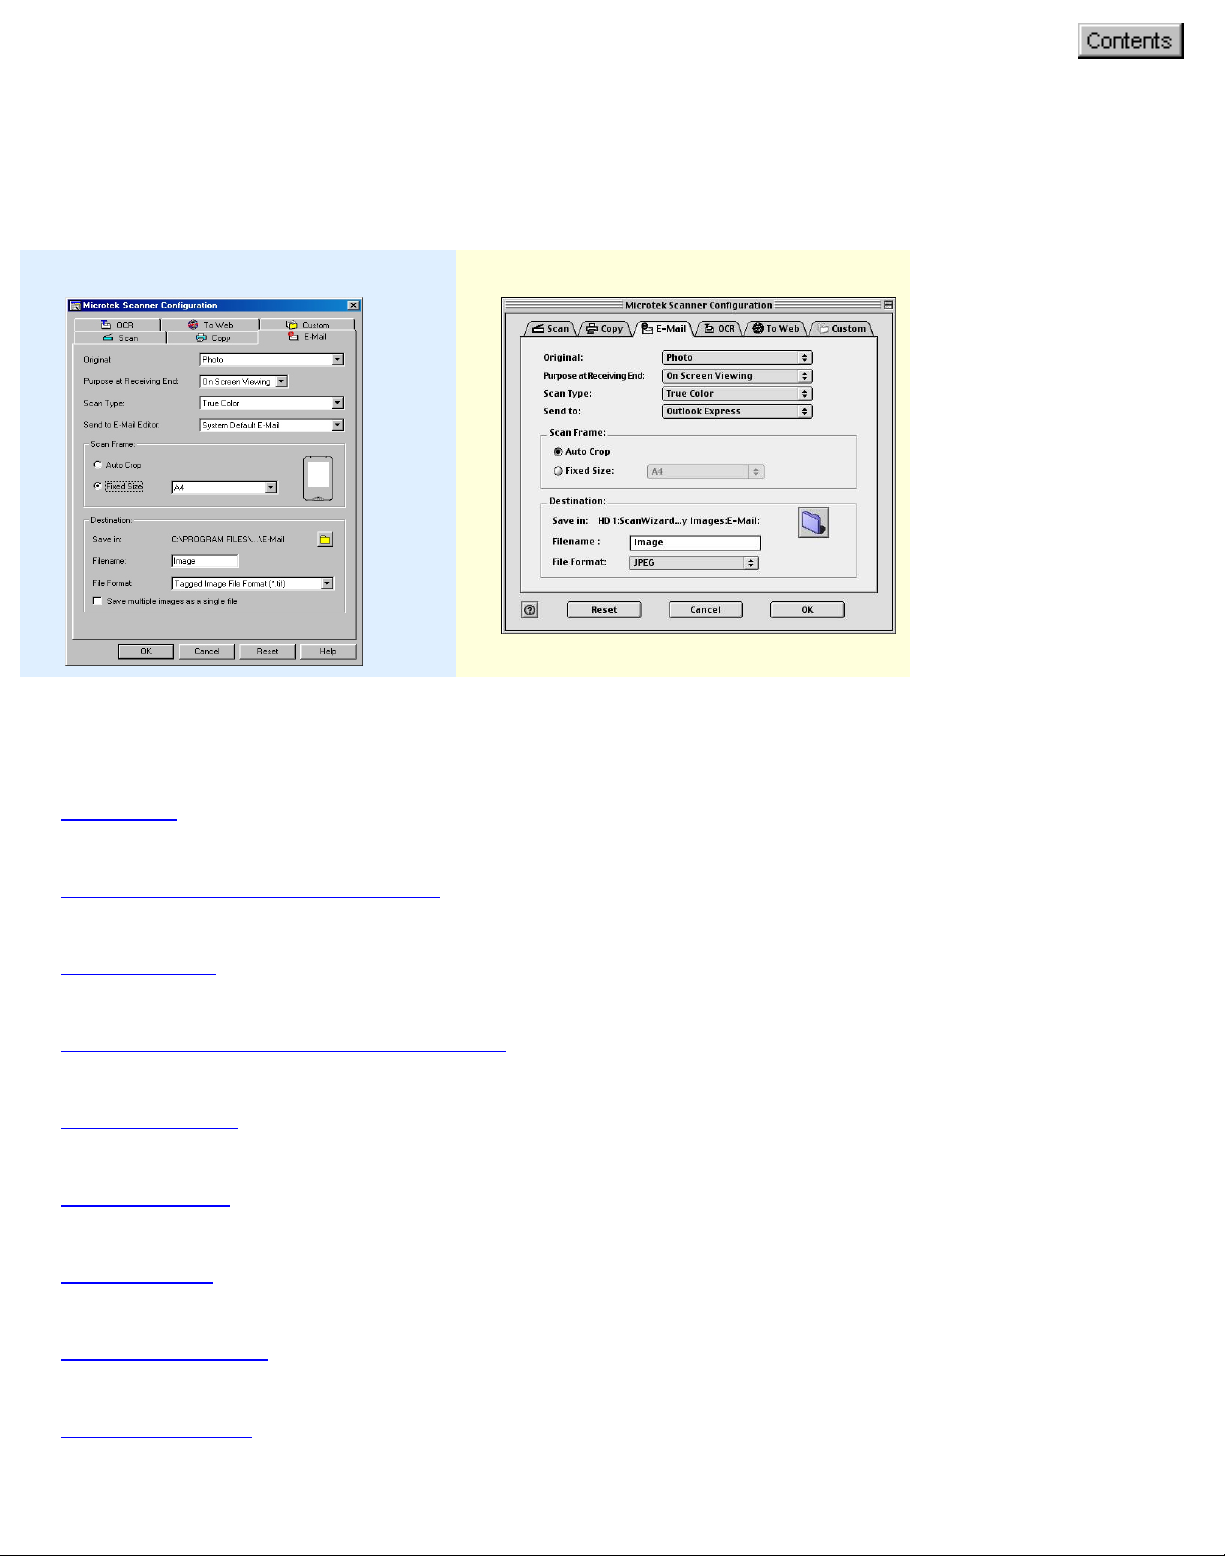
Customizing the E-mail panel
To obtain a larger view of the panel, click either of the thumbnails below:
Windows Macintosh
Select the topic you wish to view from the links below:
Original
Purpose at Receiving End
Scan Type
Send to E-Mail Editor/Send to
Scan Frame
Destination
OK button
Cancel button
Reset button
file:///D|/msc/WebHelp/panel_E-mail.htm (1 of 4) [8/20/03 2:29:08 AM]
Page 13

Help button
Original
Defines the type of your scan material. To scan printed matter (e.g.,
newspapers, art books, flyers, or magazines), choose Magazine. To scan
graphics, choose Illustration.
Purpose
Defines the ultimate disposition of the scanned image by the email
recipient. For email-viewing purposes alone, choose On-Screen Viewing.
Choose Custom if you want to set the resolution by yourself. It is
recommended that the resolution not be set higher than the scanner’s
optical resolution.
Scan Type
Defines the color output for your document. Make sure you choose the
correct image type; it is always best to choose the right image type. For
instance, if you choose True Color to scan a gray-level image, a bigger file
size and longer scanning time results with little improvement to image
quality. Likewise, if your original is text only without images, choose Black
& White to achieve better quality than Gray.
Some scanner models support JPEG output color format. Take note that for
JPEG image format, the better the image quality, the greater the disk space
required. If your Microtek scanner does not support the JPEG format, the
JPEG selections will not appear under Scan Type.
Send to E-Mail Editor
Sets the E-Mail editor that will send the scanned image. The application is
the E-Mail editor currently available in your disk.
Scan Frame
Select either Auto Crop or Fixed Size.
Auto Crop: If Auto Crop is selected, the scanner first executes a preview,
file:///D|/msc/WebHelp/panel_E-mail.htm (2 of 4) [8/20/03 2:29:08 AM]
Page 14

tries to determine the size of the original image, then performs the scan
and crops the full scan frame to fit the image automatically.
Fixed Size: If Fixed Sized is selected, the Auto Crop function is disabled
and instead, you select the image size from the list. When a scan is
performed, the selected scan frame size is framed on the top-center of the
glass bed. Thus, it is the important that you position the original on the topcenter of the glass bed. A centering marker is provided on the top ruler to
guide you with alignment.
Thumbnail of the Scan Frame: Shows the selected scan frame. If Auto
Crop is selected, the selected scan frame of the thumbnail is disabled.
Destination
Defines the folder for saving and storing the scanned images.
Save in: Saves the image to the current folder destination. To change the
folder location, click the folder icon at the right end of the existing path.
Filename: Refers to the prefix or root name in a series of filenames. By
default, the root filename is "Image". If the TIFF file format is selected, the
scanned images will be automatically identified as "Image001.tif",
"Image002.tif", etc. You can change the default root filename to uniquely
label your scan jobs.
File Format: TIFF is the default image file format.
Save multiple images as a single file: Allows you to save the scanned
images into a single file. You can enable this option if the scan frame is
"Fixed Size" and the output image file format is DCX, PDF, or TIF. When
enabled, MSC will prompt you to place the next page as you scan from the
scanner bed, then click the Continue button to scan; or click the Close
button to save multiple images as a single file. If you scan through ADF, the
scanning originals are sequentially scanned until paper out; when finished,
all the scanned images are saved as a single file.
OK button
Confirms and saves the parameters currently specified for the E-mail Smart-
file:///D|/msc/WebHelp/panel_E-mail.htm (3 of 4) [8/20/03 2:29:08 AM]
Page 15

Touch button on your scanner. The next time you press the E-mail button,
the defined and saved settings are retrieved as your current settings.
Cancel button
Abandons the parameters you have just made under the E-mail tab panels;
all the parameters are restored to their previous settings.
Reset button
Clears all the parameters you have just made under the E-mail tab panel;
all the parameters are reset to their default settings.
Help (?) button
Provides answers to any queries regarding the MSC utility and scanner
button functions. Simply click the Help (?) button located at the bottom
right (bottom left for Mac) corner of the MSC panel. To search for a topic,
click the Index tab, then type a word associated with your question. You
will be prompted for a short definition that will link you to a related topic.
file:///D|/msc/WebHelp/panel_E-mail.htm (4 of 4) [8/20/03 2:29:08 AM]
Page 16
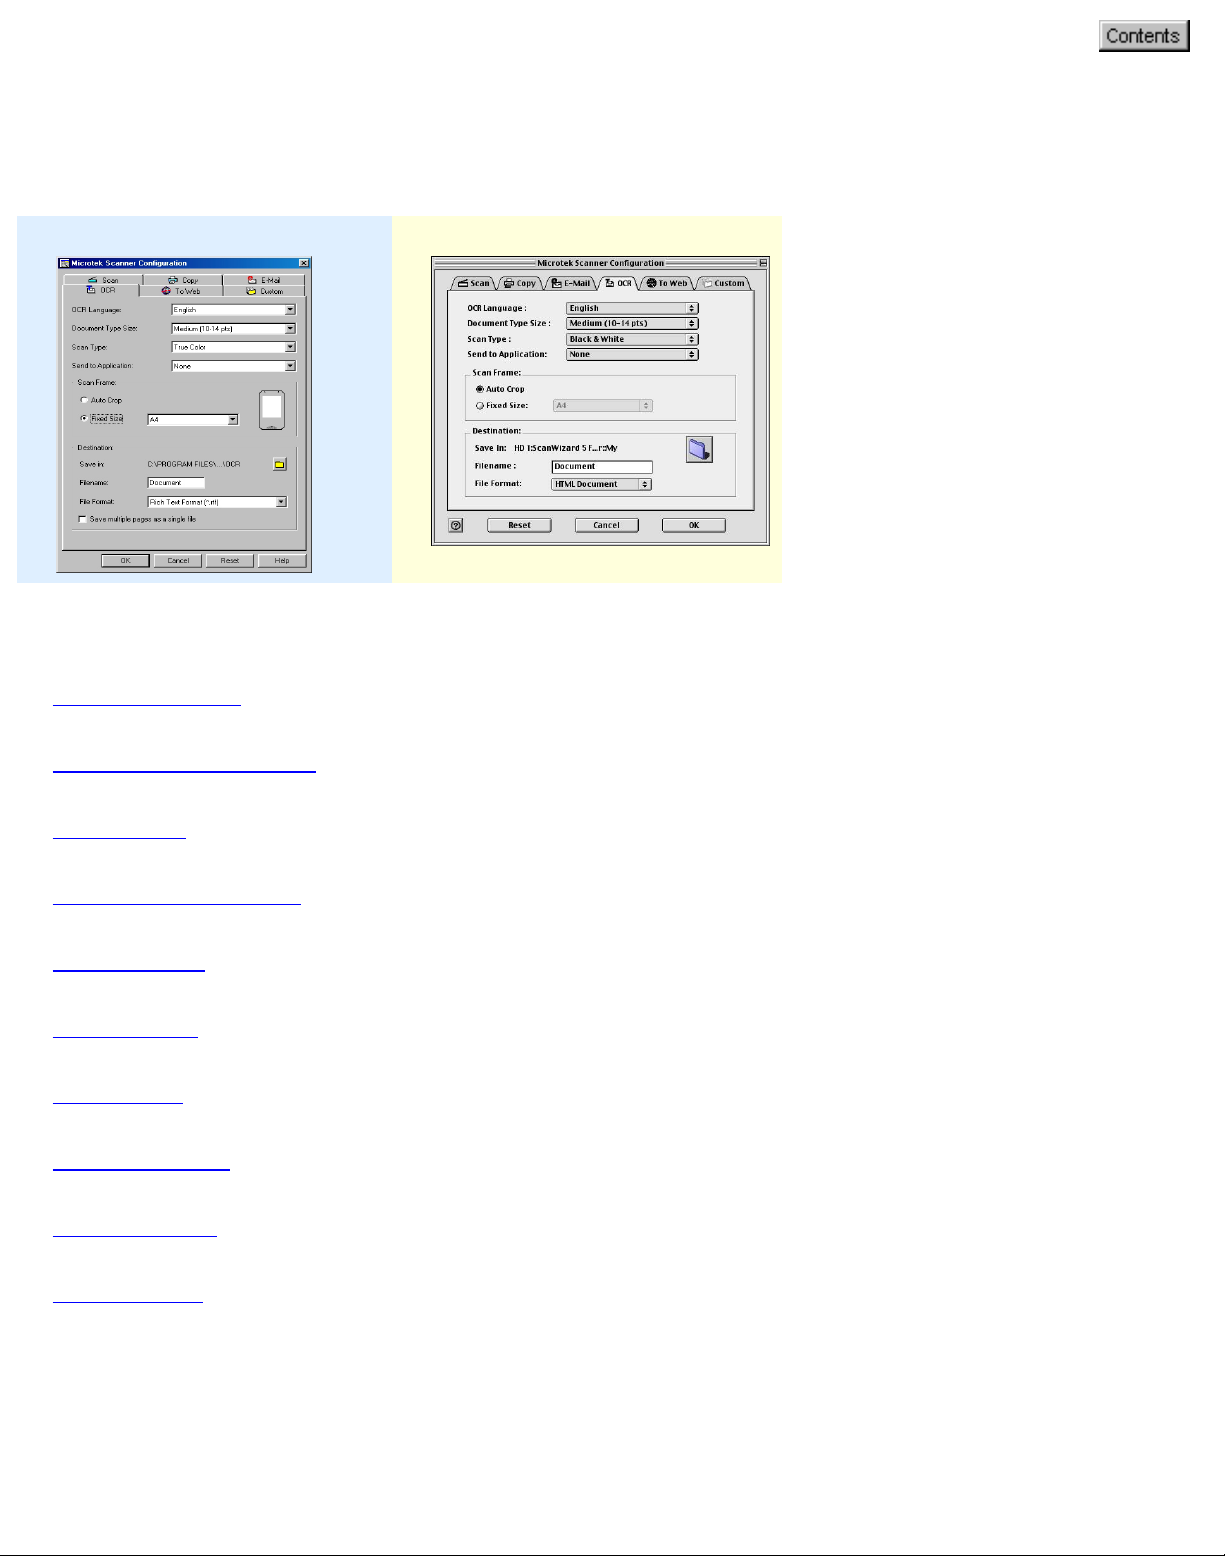
Customizing the OCR panel
To obtain a larger view of the panel, click either of the thumbnails below:
Windows Macintosh
Select the topic you wish to view from the links below:
OCR Language
Document Type Size
Scan Type
Send to Application
Scan Frame
Destination
OK button
Cancel button
Reset button
Help button
OCR Language
The language with which the original text document is written. Options consist of major
selection for multi-lingual formats. There are a number of languages available to choose
file:///D|/msc/WebHelp/panel_OCR.htm (1 of 5) [8/20/03 2:29:22 AM]
Page 17

from, i.e., English, French, German, Italian, Spanish.
Document Type Size
Defines the font size of your final output – available selections include : Small (6-9 pts.),
Medium - Default (10-14 pts.), and Large (15 pts and above).
Scan Type
Defines the color output for your document. Make sure you choose the correct image
type; it is always best to choose the right image type. For instance, if you choose True
Color to scan a gray-level image, a bigger file size and longer scanning time results with
little improvement to image quality. Likewise, if your original is text only without images,
choose Black & White to achieve better quality than Gray.
Send to Application
Defines the application that will edit and save the scanned document. .RTF, .XLS, or .TXT
format is used if an "extensive text editing" is required. It will automatically open your
default or selected word processing application after scanning.
If .PDF with hidden text is selected from the list – it will directly open Adobe Acrobat
Reader, allowing you to view and print the scanned material in its original form. Plain
.PDF supports viewing, printing, and minor editing.
.HTM is another file format also available from the list – this supports standard web
formatting especially when incorporating scanned materials to a website.
If the application you prefer to use is not shown on the list yet, add it to the list by –
For Windows users:
Choose Custom from the bottom of the list. Use the resulting dialog box to search and
add the new application to the list.
Application full path: Enter the full path
name, or click the yellow folder icon to
browse and search for the new application.
Application alias: Enter an alias for the
application to be added.
Add: When you have located your new
application, click Add to include the new
application to the Application alias list.
Then click Close.
file:///D|/msc/WebHelp/panel_OCR.htm (2 of 5) [8/20/03 2:29:22 AM]
Page 18
Delete: If you want to remove an existing
application from the Alias List, select the
application, then click Delete.
For Macintosh users:
Choose Custom from the bottom of the list to bring up "Choose Application" window. The
MSC utility starts to search for the available software programs on your disk and then
displays them on the left panel of the window.
> or >> : Select and Add a particular
software or all the available software from
the "Available" panel to the "Selected"
panel.
< or << : Select and Delete a particular
software or all the software from the
"Selected" panel to the "Available" panel.
When you are done with your software
selection. click OK to update the changes
made, or Cancel to abandon the selection
you've just made.
Scan Frame
Select either Auto Crop or Fixed Size.
Auto Crop: If Auto Crop is selected, the scanner first executes a preview, tries to
determine the size of the original image, then performs the scan and crops the full scan
frame to fit the image automatically.
Fixed Size: If Fixed Sized is selected, the Auto Crop function is disabled and instead,
you select the image size from the list. When a scan is performed, the selected scan
file:///D|/msc/WebHelp/panel_OCR.htm (3 of 5) [8/20/03 2:29:22 AM]
Page 19

frame size is framed on the top-center of the glass bed. Thus, it is the important that
you position the original on the top-center of the glass bed. A centering marker is
provided on the top ruler to guide you with alignment.
Thumbnail of the Scan Frame: Shows the selected scan frame. If Auto Crop is
selected, the selected scan frame of the thumbnail is disabled.
Destination
Defines the folder for saving and storing the scanned images.
Save in: Save the document to the current folder destination. To change the folder
location, click the folder icon at the right end of the existing path.
Filename: Refers to the prefix or root name in a series of filenames. By default, the root
filename is "Document". If the .RTF file format is selected, the scanned images will be
automatically identified as "Document001.rtf", "Document002.rtf", etc. You can change
the default root file name to uniquely label your scan jobs.
File Format: RTF is the default file format for OCR.
Save multiple pages as a single file: Allows you to save the scanned pages into a
single file. You can enable this option if the scan frame is "Fixed Size" and the output
document file format is RTF, TXT, XLS, or HTM. When enabled, MSC will prompt you to
place the next page as you scan from the scanner bed, then click the Continue button to
scan; or click the Close button to save multiple pages as a single file. If you scan through
ADF, the scanning originals are sequentially scanned until paper out; when finished, all
the scanned images are saved as a single file.
OK button
Confirms and saves the parameters currently specified for the OCR Smart-Touch button
on your scanner. The next time you press the OCR button, the defined and saved
settings are retrieved as your current settings.
Cancel button
Abandons the parameters you have just made under the OCR tab panels; all the
parameters are restored to their previous settings.
Reset button
Clears all the parameters you have just made under the OCR tab panel; all the
parameters are reset to their default settings.
Help (?) button
file:///D|/msc/WebHelp/panel_OCR.htm (4 of 5) [8/20/03 2:29:22 AM]
Page 20

Provides answers to any queries regarding the MSC utility and scanner button functions.
Simply click the Help (?) button located at the bottom right (bottom left for Mac) corner
of the MSC panel. To search for a topic, click the Index tab, then type a word associated
with your question. You will be prompted for a short definition that will link you to a
related topic.
file:///D|/msc/WebHelp/panel_OCR.htm (5 of 5) [8/20/03 2:29:22 AM]
Page 21
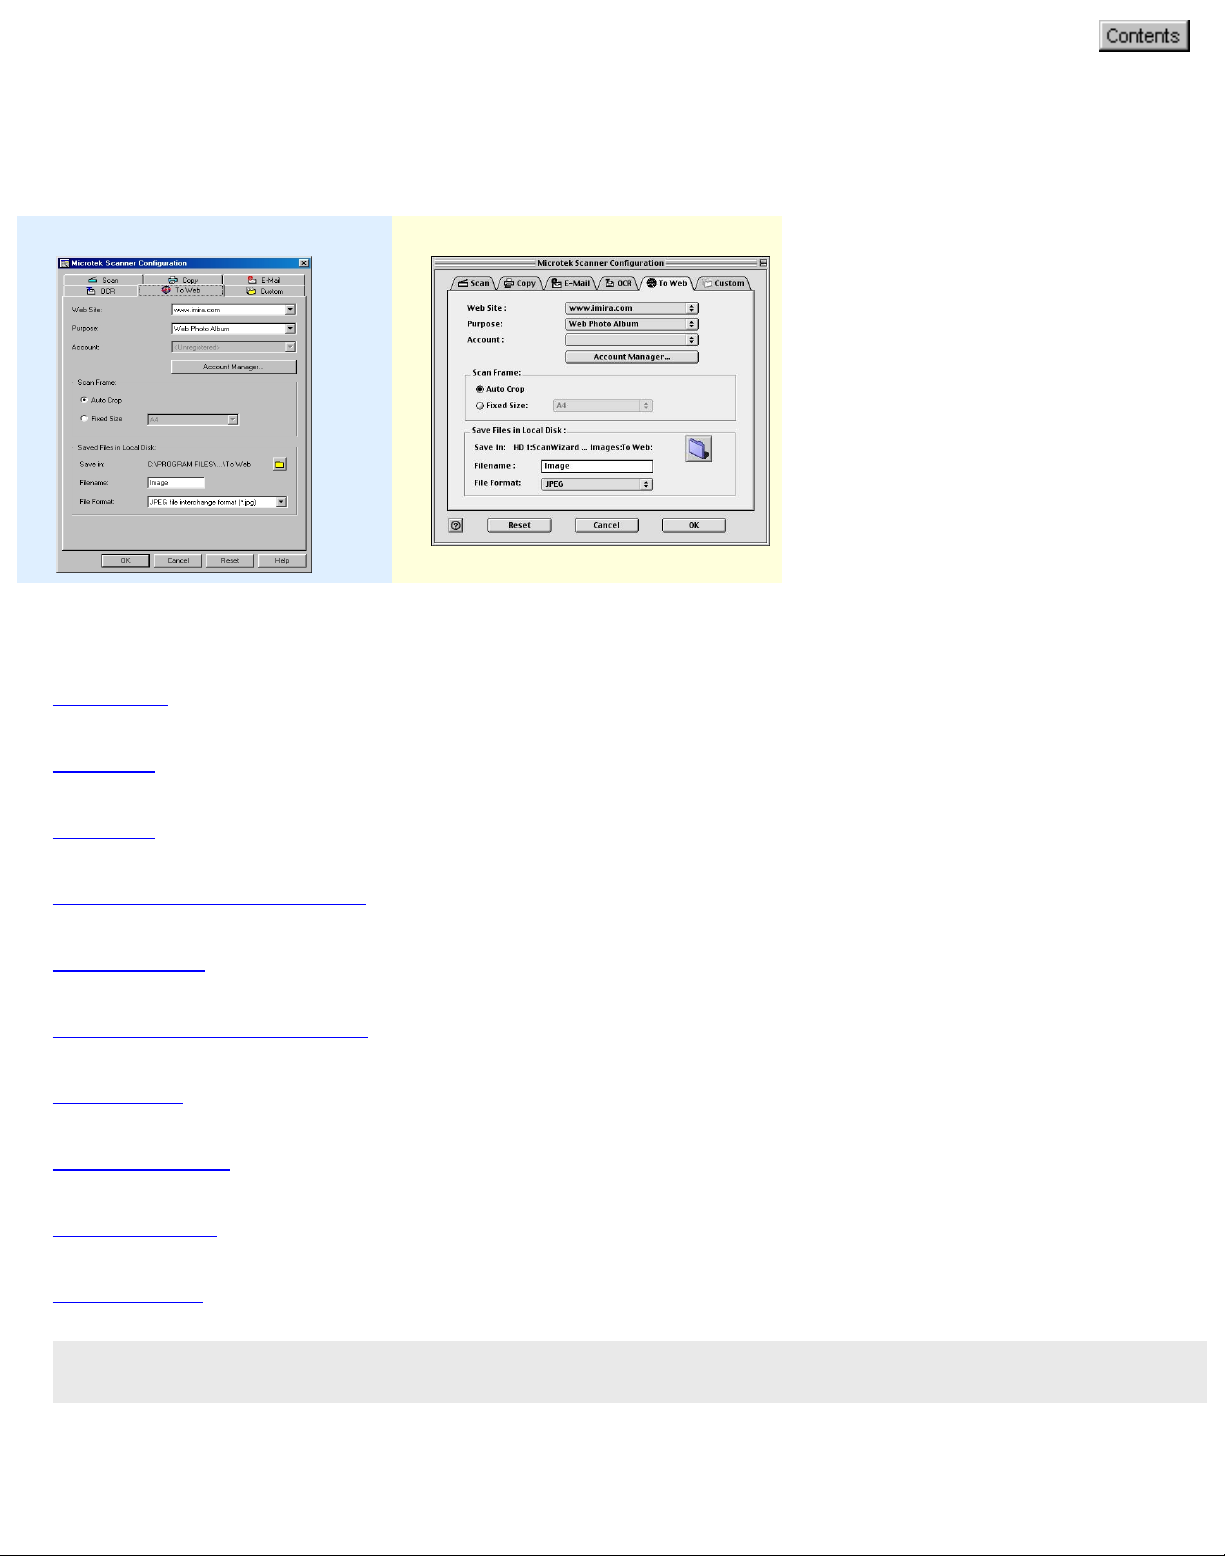
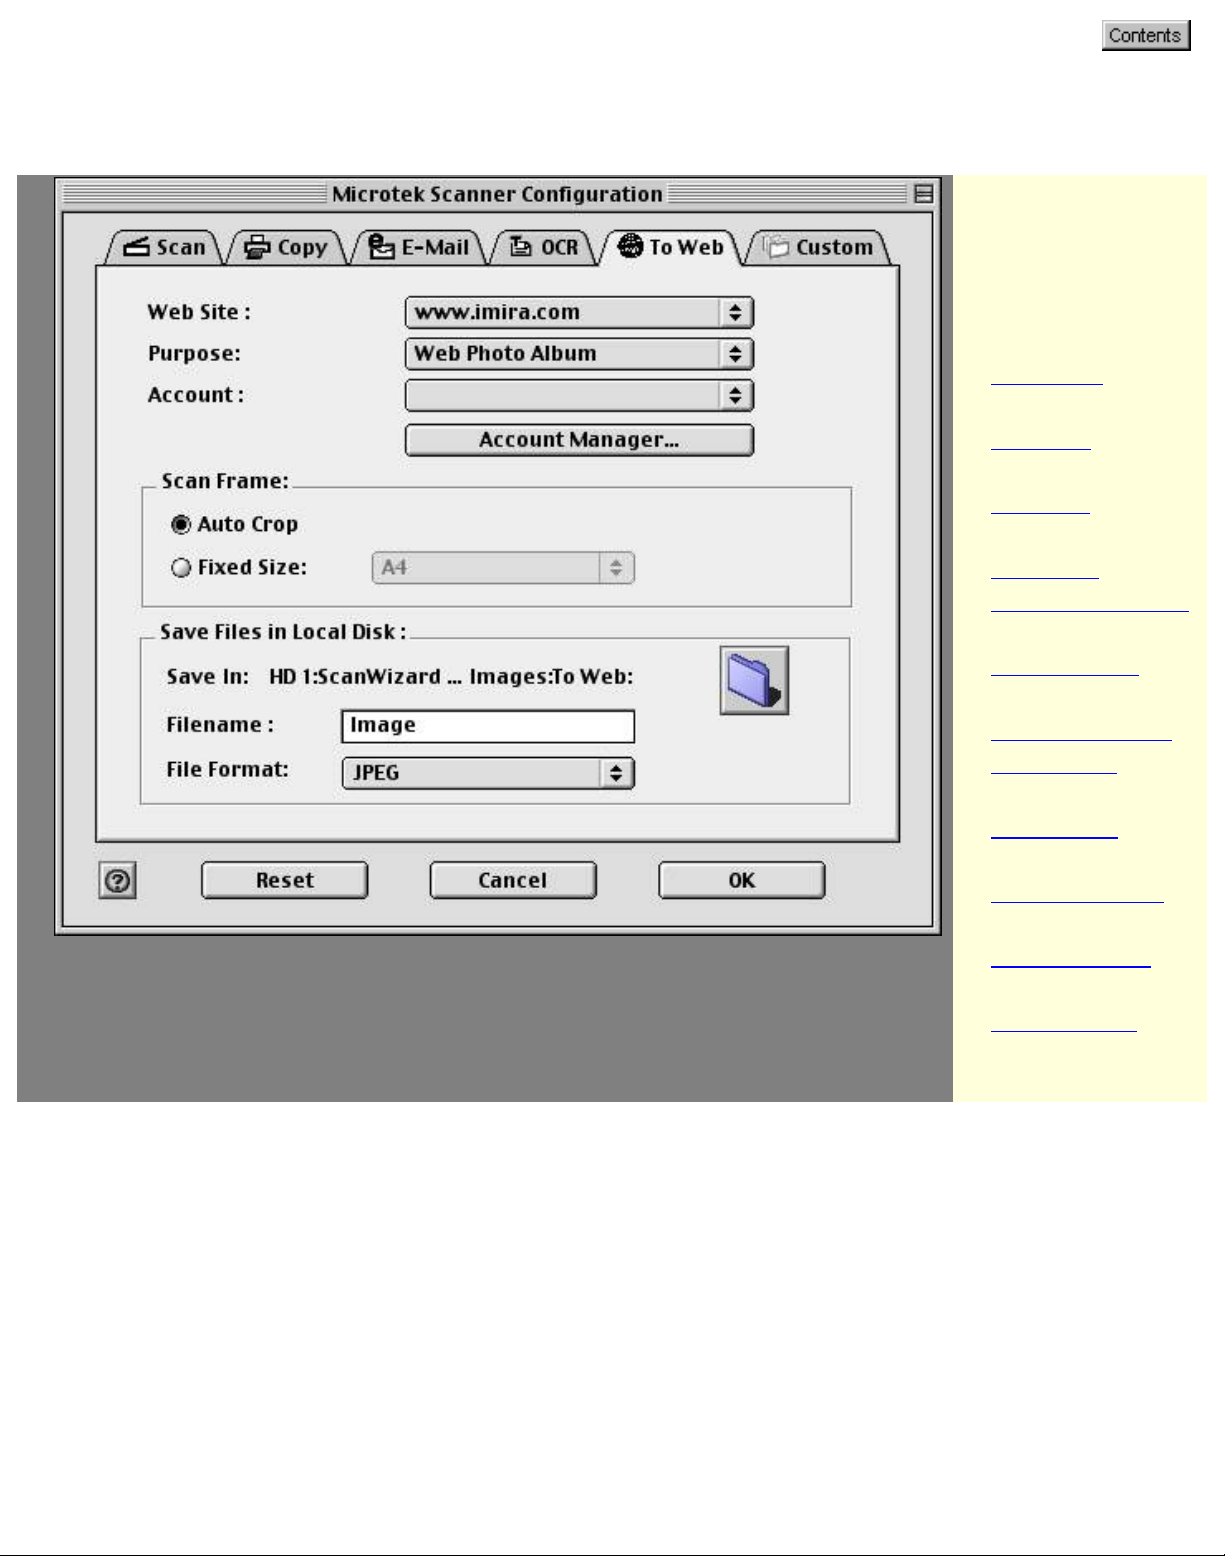
Customizing the To Web panel
To obtain a larger view of the panel, click either of the thumbnails below:
Windows Macintosh
Select the topic you wish to view from the links below:
Web Site
Purpose
Account
Account Manager button
Scan Frame
Saved Files in Local Disk
OK button
Cancel button
Reset button
Help button
Note: Make sure that you are currently connected to the Internet (connection is
active/operational), before you attempt to activate the actual Scan-to-Web button.
Web Site
file:///D|/msc/WebHelp/panel_To_Web.htm (1 of 5) [8/20/03 2:29:53 AM]
Page 22

Options for selecting your Photo-Sharing website where you can directly upload your
scanned images into the Internet website photo album and/or order for prints.
Purpose
Defines the purpose of uploading the scanned image into the Web. If you want to place
or add the scanned image into your website photo album for viewing, choose Web Photo
Album. If you wish to order prints for the scanned image, choose Photo Printing.
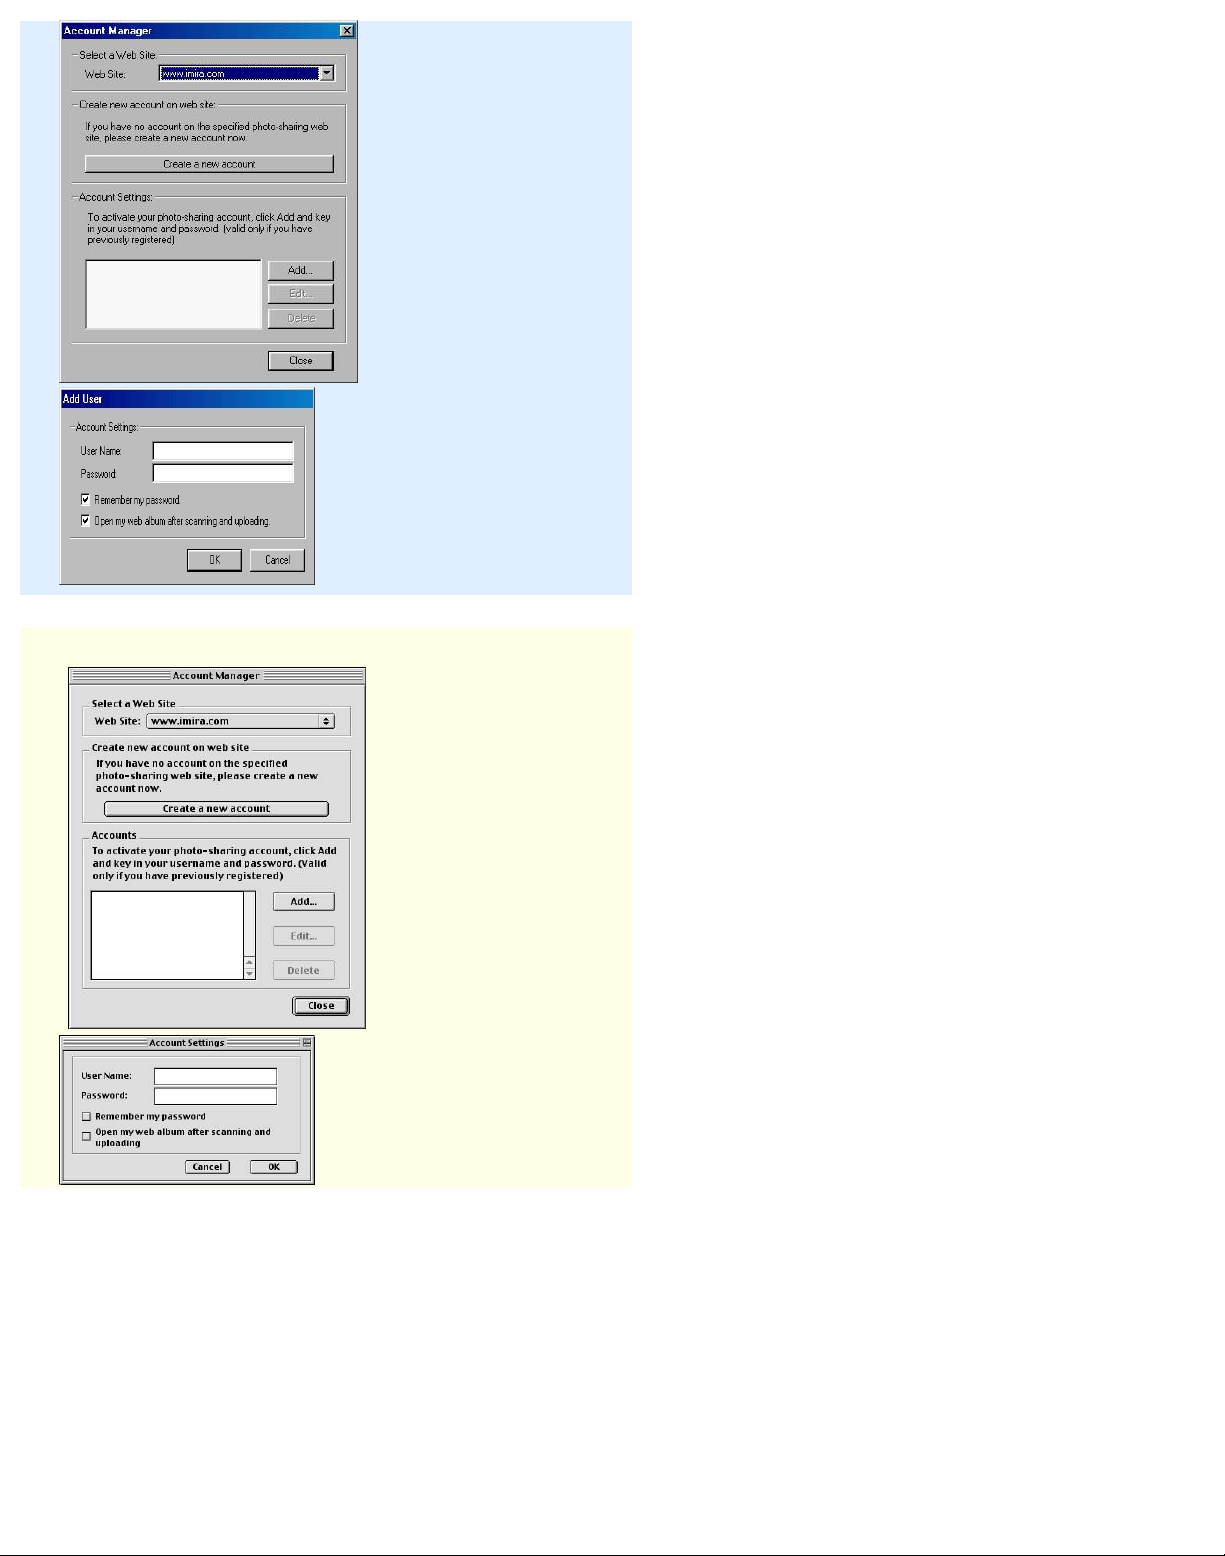
Account
If you have an existing account and/or a registered member of any Microtek provided
Photo-sharing website -- select your current user name under this option.
If you are a new user, the option box is grayed. You need to register in order to access
the Photo-Sharing website. To register, click on the Account Manager button.
Account Manager
The Account Manager button is used for managing your exclusive photo-sharing
account from a Microtek provided website.
To register for a free photo-sharing account, click the Account Manager button. When
the Account Manager dialog box appears, select a photo-sharing website from the Web
Site option, then click the Create a new account button. Follow the online registration,
then close the Internet browser after you have completed the registration process and
you will return to the Account Manager dialog box. You will need to activate your photosharing account (under the Account Settings) pane after you have successfully
completed the online registration.
To activate a new account and/or add an existing account, click the Add button, key in
your username and password, and then click Close. When you return to the MSC panel's
"To Web" tab -- click OK to apply the settings that you have just made.
Windows
Web Site
Options for selecting your Internet PhotoSharing website for uploading images
directly to a specific website photo album.
Create a new account
If you do not have an existing Microtek
provided photo-sharing account, you are
required to register before you can upload
images to this website. Simply click the
"Create a new account" button, and then
follow the online registration instructions.
Add
file:///D|/msc/WebHelp/panel_To_Web.htm (2 of 5) [8/20/03 2:29:53 AM]
Page 23
Macintosh
To add an existing account and/or activate a
new account, click the Add button, key in
your username and password, and then click
OK in the dialog box that follows.
Edit
Click this button if you need to
change/modify your current username and
password.
Delete
Click this button to delete a particular
account previously added under the Account
Settings.
Scan Frame
Select either Auto Crop or Fixed Size.
Auto Crop: If Auto Crop is selected, the scanner first executes a preview, tries to
determine the size of the original image, then performs the scan and crops the full scan
frame to fit the image automatically.
file:///D|/msc/WebHelp/panel_To_Web.htm (3 of 5) [8/20/03 2:29:53 AM]
Page 24

Fixed Size: If Fixed Sized is selected, the Auto Crop function is disabled instead, you
select the image size from the list. When a scan is performed, the selected scan frame
size is framed on the top-center of the glass bed. Thus, it is the important that you
position the original on the top-center of the glass bed. A centering marker is provided
on the top ruler to guide you with alignment.
Thumbnail of the Scan Frame: Shows the selected scan frame. If Auto Crop is
selected, the selected scan frame of the thumbnail is disabled.
Saved files in Local Disk
Scanned image(s) will be saved under the default "My Images" folder or a specified local
disk first before it is uploaded to the Photo-Sharing website.
Save In: Saves the image to the current folder destination. To change the folder
location, click the folder icon at the right end of the existing path.
Filename: Refers to the prefix or root name in a series of filenames. By default, the root
filename is "Image" and default format is JPEG. The scanned images will be
automatically identified as "Image001.jpg", "Image002. jpg ", etc. You can change the
default root file name to uniquely label your scan jobs.
File Format: JPEG is the file format available -- as this is the standard image format
widely used on the web.
OK button
Confirms and saves the parameters currently specified for the Scan-to-Web Smart-Touch
button on your scanner. The next time you press the Scan-to-Web button, the defined
and saved settings are retrieved as your current settings.
Cancel button
Abandons the parameters you have just made under the To Web tab panels; all the
parameters are restored to their previous settings.
Reset button
Clears all the parameters you have just made under the To Web tab panel; all the
parameters are reset to their default settings.
Help (?) button
Provides answers to any queries regarding the MSC utility and scanner button functions.
Simply click the Help (?) button located at the bottom right (bottom left for Mac) corner
of the MSC panel. To search for a topic, click the Index tab, then type a word associated
with your question. You will be prompted for a short definition that will link you to a
file:///D|/msc/WebHelp/panel_To_Web.htm (4 of 5) [8/20/03 2:29:53 AM]
Page 25

related topic.
file:///D|/msc/WebHelp/panel_To_Web.htm (5 of 5) [8/20/03 2:29:53 AM]
Page 26

Customizing the Custom panel
The Custom panel provides 4 custom functions (Power Saving, Scan,
Fax, Launch Application) allowing you to specify the Custom button
function on the scanner. The Power Saving page is the default page of
Custom panel. For more details on each function, see the function page
you wish to view from the links below.
Power Saving
Scan
Fax
Launch Application
file:///D|/msc/WebHelp/panel_custom.htm [8/20/03 2:30:13 AM]
Page 27

Power Saving page
Select "Power Saving" from the Custom Function option menu. The Power
Saving function allows you to select the sleep mode of the scanning lamp
by pressing the Custom button on your scanner.
Windows Macintosh
Lamp Status
For Windows: When you select the Power Saving function as your
scanner's Custom button function, press the Custom button for the
scanner and the TMA to switch over to "lamp sleep" mode.The scanner
lamp or TMA lamp (e.g., Light Plate, TMA, LL35) can then be turned Off or
On, or both Off. The Lamp Status reflects the current power saving mode.
For Macintosh: When you select the Power Saving function as your
scanner's Custom button function, press the Custom button on the scanner
to switch the scanner to the sleep mode (scanning lamp turned off), or
ready for scanning (scanning lamp turned on).
Note: When the lamp status is "Off," performing a scan will change the
lamp status to "On."
OK button
Confirms and saves the parameters currently specified for the Custom
file:///D|/msc/WebHelp/Custom_Power_Saving_page.htm (1 of 2) [8/20/03 2:30:55 AM]
Page 28

Smart-Touch button on your scanner. The next time you press the Custom
button, the defined and saved settings are retrieved as your current
settings.
Cancel button
Abandons the parameters you have just made under the Custom tab
panels; all the parameters are restored to their previous settings.
Reset button
Clears all the parameters you have just made under the Custom tab panel;
all the parameters are reset to their default settings.
Help (?) button
Provides answers to any queries regarding the MSC utility and scanner
button functions. Simply click the Help (?) button located at the bottom
right (bottom left for Mac) corner of the MSC panel. To search for a topic,
click the Index tab, then type a word associated with your question. You
will be prompted for a short definition that will link you to a related topic.
file:///D|/msc/WebHelp/Custom_Power_Saving_page.htm (2 of 2) [8/20/03 2:30:55 AM]
Page 29

Scan page
Select "Scan" from the Custom Function option menu. The Scan function allows you to
define the Custom button as another set of scan settings that is different from the
settings of the Scan panel of the MSC utility. This function is helpful if you require an
additional Scan button that will be using a different set of scan attributes.
To obtain a larger view of the page, click either of the thumbnails below:
Windows Macintosh
Select the topic you wish to view from the links below:
Original
Purpose
Scan Type
Send to Application
Scan Frame
Destination
OK button
Cancel button
Reset button
Help button
file:///D|/msc/WebHelp/Custom_Scan_page.htm (1 of 5) [8/20/03 2:31:16 AM]
Page 30

Original
Defines the type of your scan material. To scan printed matter (e.g., newspapers, art
books, flyers, or magazines), choose Magazine. To scan graphics, choose Illustration.
Purpose
Defines the destination of the scanner output. For viewing purposes alone, choose On
Screen Viewing. Choose Custom if you want to set a specific resolution. It is
recommended that the resolution not be set higher than the scanner’s optical resolution.
Scan Type
Defines the color output for your document. Make sure you choose the correct image
type; it is always best to choose the right image type. For instance, if you choose True
Color to scan a gray-level image, a bigger file size and longer scanning time results with
little improvement to image quality. Likewise, if your original is text only without images,
choose Black & White to achieve better quality than Gray.
Some scanner models support JPEG output color format. Take note that for JPEG image
format, the better the image quality, the greater the disk space required. If your
Microtek scanner does not support the JPEG format, the JPEG selections will not appear
under Scan Type.
Send to Application
Defines the application that will edit and save the scanned image; the application can be
an image editor, web browser, or Acrobat program available on your disk.
If the application you prefer to use is not shown on the list yet, add it to the list by –
For Windows users:
Choose Custom from the bottom of the list. Use the resulting dialog box to search and
add the new application to the list.
file:///D|/msc/WebHelp/Custom_Scan_page.htm (2 of 5) [8/20/03 2:31:16 AM]
Page 31

Application full path: Enter the full path
name, or click the yellow folder icon to
browse and search for the new application.
Application alias: Enter an alias for the
application to be added.
Add: When you have located your new
application, click Add to include the new
application to the Application alias list.
Then click Close.
Delete: If you want to remove an existing
application from the Application alias list,
select the application, then click Delete.
For Macintosh users:
Choose Custom from the bottom of the list to bring up "Choose Application" window. The
MSC utility starts to search for the available software programs on your disk and then
displays them on the left panel of the window.
> or >> : Select and Add a particular
software or all the available software from
the "Available" panel to the "Selected"
panel.
< or << : Select and Delete a particular
software or all the software from the
"Selected" panel to the "Available" panel.
When you are done with your software
selection, click OK to update the changes
made, or Cancel to abandon the selection
you've just made.
Scan Frame
Select either Auto Crop or Fixed Size.
Auto Crop: If Auto Crop is selected, the scanner first executes a preview, tries to
determine the size of the original image, then performs the scan and crops the full scan
frame to fit the image automatically.
Fixed Size: If Fixed Sized is selected, the Auto Crop function is disabled and instead,
you select the image size from the list. When a scan is performed, the selected scan
file:///D|/msc/WebHelp/Custom_Scan_page.htm (3 of 5) [8/20/03 2:31:16 AM]
Page 32

frame size is framed on the top-center of the glass bed. Thus, it is the important that
you position the original on the top-center of the glass bed. A centering marker is
provided on the top ruler to guide you with alignment.
Thumbnail of the Scan frame: Shows the selected scan frame. If Auto Crop is
selected, the selected scan frame of the thumbnail is disabled.
Destination
Defines the folder for saving and storing the scanned images.
Save in: Saves the image to the current folder destination. To change the folder
location, click the folder icon at the right end of the existing path.
Filename: Refers to the prefix or root name in a series of filenames. By default, the root
filename is "Image". If the TIFF file format is selected, the scanned images will be
automatically identified as "Image001.tif", "Image002.tif", etc. You can change the
default root filename to label your scan jobs uniquely.
File Format: PDF is the default image file format.
Save multiple images as a single file: Allows you to save the scanned images into a
single file. You can enable this option if the scan frame is "Fixed Size" and the output
image file format is DCX, PDF, or TIF. When enabled, MSC will prompt you to place the
next page as you scan from the scanner bed, then click the Continue button to scan; or
click the Close button to save multiple images as a single file. If you scan through ADF,
the scanning originals are sequentially scanned until paper out; when finished, all the
scanned images are saved as a single file.
OK button
Confirms and saves the parameters currently specified for the Custom Smart-Touch
button on your scanner. The next time you press the Custom button, the defined and
saved settings are retrieved as your current settings.
Cancel button
Abandons the parameters you have just made under the Custom tab panels; all the
parameters are restored to their previous settings.
Reset button
Clears all the parameters you have just made under the Custom tab panel; all the
parameters are reset to their default settings.
Help (?) button
file:///D|/msc/WebHelp/Custom_Scan_page.htm (4 of 5) [8/20/03 2:31:16 AM]
Page 33

Provides answers to any queries regarding the MSC utility and scanner button functions.
Simply click the Help (?) button located at the bottom right (bottom left for Mac) corner
of the MSC panel. To search for a topic, click the Index tab, then type a word associated
with your question. You will be prompted for a short definition that will link you to a
related topic.
file:///D|/msc/WebHelp/Custom_Scan_page.htm (5 of 5) [8/20/03 2:31:16 AM]
Page 34

Fax page
Select "Fax" from the Custom Function option menu. The Fax function
allows you to launch an installed fax driver by pressing the scanner's
Custom button.
If you have already installed the fax driver in your computer but the fax
driver cannot be found, or if the fax driver has never been installed in your
computer, please follow the on-screen message to complete the fax driver
setup.
To obtain a larger view of the page, click either of the thumbnails below:
Windows Macintosh
Select the topic you wish to view from the links below:
Original
Color Fax
Scan Frame
Fax Quality
Scaling
file:///D|/msc/WebHelp/Custom_Fax_page.htm (1 of 4) [8/20/03 2:31:34 AM]
Page 35

Show fax printer setting dialog box before scan
Setup button
OK button
Cancel button
Reset button
Help button
Original
Defines the type of your scan material. To scan printed matter (e.g.,
newspapers, art books, flyers, or magazines), choose Magazine. To scan
graphics, choose Illustration.
Color Fax
Check this option if both you and your fax receiver use color fax to transmit
color images.
Scan Frame
Selects either Auto Crop or Fixed Size.
Auto Crop: If Auto Crop is selected, the scanner first executes a preview,
tries to determine the size of the original image, then performs the scan
and crops the full scan frame to fit the image size automatically.
Fixed Size: If Fixed Sized is selected, the Auto Crop function is disabled
and instead, you select the image size from the list. When a scan is
performed, the selected scan frame size is framed on the center-top of the
glass bed. Thus, it is the important that you position the original on the topcenter of the glass bed. A centering marker is provided on the top ruler to
guide you with alignment.
Thumbnail of the Scan frame: Shows the selected scan frame. If Auto
file:///D|/msc/WebHelp/Custom_Fax_page.htm (2 of 4) [8/20/03 2:31:34 AM]
Page 36

Crop is selected, the selected scan frame of the thumbnail is disabled.
Fax Quality
Selects your printout quality. The higher the image quality, the longer the
scanning time and the greater disk space required. Microtek recommends
that you to choose "Fine" quality for 200-dpi faxing and "Standard" for 100dpi faxing.
Scaling
Enlarges or reduces an image. Specifying scaling parameters above 100%
will enlarge the scanned image, while specifying scaling parameters below
100% will reduce the scanned image. Scaling range is between 25% and
400%.
Show fax printer setting dialog box before scan
Check this option if you want to display the printer dialog box before you
start to fax. Uncheck this option if you do not want to bring up the printer
dialog box.
Current Fax Printer: Displays the currently selected fax driver.
Setup button
Selects one of the installed fax drivers as your default fax driver, or
changes the currently selected fax driver.
OK button
Confirms and saves the parameters currently specified for the Custom
Smart-Touch button on your scanner. The next time you press the Custom
button, the defined and saved settings are retrieved as current settings.
Cancel button
Abandons the parameters you have just made under the Custom tab
panels; all the parameters are restored to their previous settings.
file:///D|/msc/WebHelp/Custom_Fax_page.htm (3 of 4) [8/20/03 2:31:34 AM]
Page 37

Reset button
Clears all the parameters you have just made under the Custom tab panel;
all the parameters are reset to their default settings.
Help (?) button
Provides answers to any queries regarding the MSC utility and scanner
button functions. Simply click the Help (?) button located at the bottom
right (bottom left for Mac) corner of the MSC panel. To search for a topic,
click the Index tab, then type a word associated with your question. You
will be prompted for a short definition that will link you to a related topic.
file:///D|/msc/WebHelp/Custom_Fax_page.htm (4 of 4) [8/20/03 2:31:34 AM]
Page 38

Launch Application page
Select "Launch Application" from the Custom Function option menu. The Launch
Application function allows you to launch the installed application by pressing the
scanner's Custom button.
Your application for launching can be an image editor, web browser, Acrobat program or
any other application available on your disk. The default application for launching is
ScanWizard 5.
To obtain a larger view of the page, click either of the thumbnails below:
Windows Macintosh
Application
Shows the selected application for launching.
Application Path
Shows the application’s file location in your computer.
Custom button
Adds or deletes the application from the Application alias list. Please take note that you
should retain at least one application on the list; otherwise, the Custom button on the
scanner will not work.
For Windows users:
Click the Custom button. Use the resulting dialog box to search and add the new
applications to the list.
file:///D|/msc/WebHelp/Custom_Launch_App_page.htm (1 of 3) [8/20/03 2:31:54 AM]
Page 39

Application full path: Enter the full path
name, or click the yellow folder icon to
browse and search for the new application.
Application alias: Enter an alias for the
application to be added.
Add: When you have located your new
application, click Add to include the new
application to the Application alias list.
Then click Close.
Delete: If you want to remove an existing
application from the Application alias list,
select the application, then click Delete.
For Macintosh users:
Click the Custom button to bring up the "Choose Application" window. The MSC utility
starts to search for the available software programs on your hard disk and displays them
in the left panel of the window.
> or >> : Select and Add a particular
software or all the available software from
the "Available" panel to the "Selected"
panel.
< or << : Select and Delete a particular
software or all the software from the
"Selected" panel to the "Available" panel.
When you are done with your software
selection, click OK to update the changes
made, or Cancel to abandon the selection
you've just made.
OK button
Confirms and saves the parameters currently specified for the Custom Smart-Touch
button on your scanner. The next time you press the Custom button, the defined and
saved settings are retrieved as current settings.
Cancel button
Abandons the parameters you have just made under the Custom tab panels; all the
parameters are restored to their previous settings.
file:///D|/msc/WebHelp/Custom_Launch_App_page.htm (2 of 3) [8/20/03 2:31:54 AM]
Page 40

Reset button
Clears all the parameters you have just made under the Custom tab panel; all the
parameters are reset to their default settings.
Help (?) button
Provides answers to any queries regarding the MSC utility and scanner button functions.
Simply click the Help (?) button located at the bottom right (bottom left for Mac) corner
of the MSC panel. To search for a topic, click the Index tab, then type a word associated
with your question. You will be prompted for a short definition that will link you to a
related topic.
file:///D|/msc/WebHelp/Custom_Launch_App_page.htm (3 of 3) [8/20/03 2:31:54 AM]
Page 41

How the scanner buttons work
Microtek's smart-touch scanning buttons provide an intuitive and easy
method to quickly and easily scan images through one-touch scanning:
1. Place your image on the scanner bed.
2. Press the Scan button -- scans an image to a file; Copy -- sends an
image to a printer; E-mail -- attaches an image to an E-mail
message; OCR -- scans a document and converts it to editable text;
or Scan-to-Web -- uploads a scanned image directly to the web;
Custom -- customizes 4 commonly used functions: Power Saving,
Fax, Scan, and Launch Application.
3. To restore the default settings for each button, launch your Microtek
Scanner Configuration (MSC) utility, and then click the Reset button
on your MSC panel. Specify and customize a brand new configuration
for your next scanning task.
Back to Welcome
Using the Microtek Scanner Configuration
file:///D|/msc/WebHelp/How_the_buttons_work.htm [8/20/03 2:32:24 AM]
Page 42

Button Configuration
The operational parameters for each button can be set through the
Microtek Scanner Configuration (MSC) Utility.
To carry out a specific action (Scan, Copy, E-mail, OCR, Scan-to-Web or
Custom), press the corresponding button on the scanner. The scan will be
performed in accordance with the designated button function using the
parameters configured in this MSC utility.
Scan button - How it works
Captures high resolution images with outstanding quality that can
automatically be saved as files or sent to another application for further
processing.
Copy button - How to make copies
Scans the image and sends it to your printer, transforming your scanner
and printer into a convenient copy station. Simply specify the number of
copies you want.
E-mail button - How to send an image
Scans the image and delivers it directly to your email editor.
OCR button - How to scan and turn documents into editable files
The built-in OCR (Optical Character Recognition) is capable of recognizing
multilingual documents and converting it into fully editable digital files.
Scan-to-Web button - How to scan and upload images on the web
Scans the image and posts it instantly onto a Photo-Sharing website.
Cancel/Setup - How to abort scanning or launch the MSC utility
Cancels an ongoing scan job, or launches the MSC utility when the scanner
is idle.
Custom- How to customize the four most commonly used functions
Power Saving - defines the on/off status for the scanning lamp
Scan - defines another Scan button on your scanner
file:///D|/msc/WebHelp/Button_Configuration.htm (1 of 2) [8/20/03 2:32:59 AM]
Page 43

Fax - launches a fax driver installed in your computer
Launch Application - defines an application to be launched.
file:///D|/msc/WebHelp/Button_Configuration.htm (2 of 2) [8/20/03 2:32:59 AM]
Page 44

Scan button
1. Press the Scan button on your scanner. This will automatically scan
and save your image, based on the MSC settings. The saved images
are stored in your local disk. They also appears as a shortcut under
My Images folder on your desktop.
2. To scan another image or successive images using the same setting,
press the Scan button again. Repeat this until all scanning tasks are
completed, or until you need to specify new settings for the next job.
3. To customize the parameters for the Scan button, specify your
settings (Scan Type, Purpose, Destination, etc.) under the
Scan tab
of this MSC utility.
file:///D|/msc/WebHelp/b_Scan.htm [8/20/03 2:33:15 AM]
Page 45

Copy button
1. Click the Copy button on your scanner. This will scan the image and
send it directly to your default printer for printing a "hard copy"
similar to what a photocopier does.
2. To customize the parameters for the Copy button, specify your
preferred settings (No. of copies, Printer destination, etc.) under the
Copy tab of this MSC utility.
file:///D|/msc/WebHelp/b_Copy.htm [8/20/03 2:33:24 AM]
Page 46

E-mail button
1. Press the E-mail button on your scanner. This will automatically scan
and deliver your image(s) to your e-mail editor, based on the MSC
settings. The saved images are stored in your local disk. They also
appears as a shortcut under My Images folder on your desktop.
2. To scan another image or successive images using the same setting,
press the E-mail button again. Repeat this until all scanning tasks
are completed, or until you need to specify the settings for the next
job.
3. To customize the parameters for the E-mail button, specify your
settings (Scan Type, Purpose, Destination, etc.) under the
E-mail tab
of this MSC utility.
file:///D|/msc/WebHelp/b_E-mail.htm [8/20/03 2:37:18 AM]
Page 47

OCR button
1. Press the OCR button on your scanner. This will automatically scan,
recognize and convert the document, save it to a file, and delivers it
to a specified application for editing -- fully based on the MSC
settings. The saved images are stored in your local disk. They also
appears as a shortcut under My Images folder on your desktop.
2. To OCR another document or multiple documents/pages using the
same setting, press the OCR button again. Repeat this until all OCR
tasks are completed, or until you need to specify new settings for the
next job.
3. To customize the parameters for the OCR button, specify your
settings (OCR Language, Document Type Size, Scan Type,
Application, Destination, File Format etc.) under the
OCR tab of this
MSC utility.
file:///D|/msc/WebHelp/b_OCR.htm [8/20/03 2:33:45 AM]
Page 48

Scan-to-Web button
1. Make sure that you are connected to the Internet and you have
already registered/sign-in for a free photo-sharing account from a
Microtek provided website, before pressing the Scan-to-Web button
on your scanner.
2. Press the Scan-to-Web button on your scanner -- this will
automatically scan, save the scanned image to file, connect, and
instantly upload it to your Photo-sharing website – fully based on the
MSC settings. The saved images are stored in your local disk. You can
also retrieve the saved images by double-clicking the default folder
icon labeled "My Images" on your Windows desktop.
3. To upload another image or several images using the same setting,
press the Scan-to-Web button again. Repeat this until all the photos
have been uploaded to your web album, or until you need to specify
new settings for the next job. Note that all uploaded photos are
automatically saved in your hard disk before they are sent to website.
4. To customize the parameters for the Scan-to-Web button, specify
your settings (Web Site, Purpose, Scan Frame, Filename, File Format
etc.) under the tab "
To Web" of this MSC utility.
file:///D|/msc/WebHelp/b_scan_to_Web.htm [8/20/03 2:33:59 AM]
Page 49

Setup button
1. Press the Setup* button on your scanner. This will automatically
launch Microtek Scanner Configuration (MSC) utility.
2. When you launch the MSC, the Microtek Scanner Configuration
(MSC) panel appears. Click any of the tabs to view or customize the
button settings according to your respective requirements.
*The Setup (not Cancel/Setup) button is applicable only to earlier Microtek
scanner models.
file:///D|/msc/WebHelp/b_Setup.htm [8/20/03 2:34:14 AM]
Page 50

Cancel button
Press the Cancel* button on your scanner. This will quickly stop and
abandon any scan job action and exit ScanWizard 5. While activating the
MSC, pressing this button will exit the MSC utility.
*The Cancel (not Cancel/Setup) button is applicable only to earlier
Microtek scanner models.
file:///D|/msc/WebHelp/b_Cancel.htm [8/20/03 2:34:25 AM]
Page 51

Cancel/Setup button
Press the Cancel/Setup button on your scanner. This will automatically
launch Microtek Scanner Configuration (MSC) utility when the scanner is
not performing any scan job, or it stops and abandons any scan job.
file:///D|/msc/WebHelp/b_Cancel_Setup.htm [8/20/03 2:34:42 AM]
Page 52

Custom button
When you press the Custom button on your scanner, your scanner starts
to perform the function that was previously defined in the Custom Panel of
the MSC utility.
Note: Make sure that you have closed and exited ScanWizard 5 before
pressing the Custom button to carry out a specific task you defined on the
Custom button.
Power Saving function button
Press the Custom button on your scanner. This will change the lamp
current status. The lamp current status can be checked by choosing the
"
Power Saving" function under "Custom" in the MSC utility.
Scan function button
1. Press the Custom button on your scanner. This will automatically
scan and save your image, based on the "Scan" function settings
under "Custom" in the MSC utility.
2. To customize the parameters for the Custom button - Scan function,
specify your "
Scan" function settings under "Custom" in the MSC
utility.
Fax function button
1. Press the Custom button on your scanner. This will scan the image
and send it directly to your default installed fax for faxing similar to
what a fax machine does.
2. To customize the parameters for the Custom button - Fax function,
specify your "
Fax" function settings under "Custom" in the MSC
utility.
Launch Application function button
file:///D|/msc/WebHelp/b_Custom.htm (1 of 2) [8/20/03 2:44:21 AM]
Page 53

1. Press the Custom button on your scanner. This will automatically
launch an installed application, based on the "Launch Application"
function settings under "Custom" in the MSC utility.
2. To customize the parameters for the Custom button - Launch
Application function, specify your "
Launch Application" function
settings under "Custom" in the MSC utility.
file:///D|/msc/WebHelp/b_Custom.htm (2 of 2) [8/20/03 2:44:21 AM]
Page 54

How to setup MAPI application as your system default Email
(for Windows only)
Setting Microsoft Outlook Express
1. Launch Outlook Express.
2. On the Tools menu, click Options. When the Options dialog box
appears, click the General tab.
3. From the General tab, select the check boxes: Make Outlook Express
my default e-mail program and Make Outlook Express my default
Simple MAPI, then click Apply and OK to save the settings made.
Setting Microsoft Outlook 97
1. Microsoft Outlook 97 doesn’t have the option for setting MAPI
application.
2. ScanWizard 5 will send the scanned image to Microsoft Outlook 97 if it
is the default MAPI application in your system. For example, if you
have two MAPI-compatible applications, Outlook Express and Microsoft
Outlook 97, in your system, but Outlook Express was not set as your
default MAPI application, therefore; ScanWizard 5 will send the
image(s) to Microsoft Outlook 97.
Setting Netscape Messenger
ScanWizard 5 only supports Netscape version 4.5 or later.
1. Launch Netscape Messenger.
2. On the Edit menu, select the Preferences item. The Preferences dialog
box appears.
3. In this dialog box, select Use Netscape Messenger from MAPI-based
applications checkbox, then click OK.
file:///D|/msc/WebHelp/qa_E-mail.htm (1 of 2) [8/20/03 2:44:52 AM]
Page 55

Setting Eudora Light/Qualcomm Eudora Pro 3.x
1. Launch Eudora Light.
2. From the Tools menu, click Options. The Options dialog box appears.
3. In the Category list select (highlight) MAPI, then under Use Eudora
MAPI server select Always and then click OK.
file:///D|/msc/WebHelp/qa_E-mail.htm (2 of 2) [8/20/03 2:44:52 AM]
Page 56

When I chose Auto Crop under the MSC utility, the
scanner was unable to recognize or detect my scan
material.
Rather than using the “Auto Crop” function under the Scan Frame
category, you can select Fixed Frame instead, and choose the closest size
that matches your scan material from the Fixed frame options. If you can’t
find anything from the list of options, Microtek recommends that you close
the MSC utility and launch ScanWizard 5.
file:///D|/msc/WebHelp/qa_Auto_Crop_.htm [8/20/03 2:45:10 AM]
Page 57

When I first connected my scanner, I got a message that said
ScanWizard cannot find the scanner.
If you encounter an error message like this, the connection between your
scanner and PC may not be secure. This causes the system not to “see”
the scanner. In this case, check all cables and make sure your scanner is
on. You may also want to turn the scanner and computer off, wait for 5
seconds, then turn them on again to reset everything OR follow these
simple steps:
1. Turn your scanner on.
2. For windows 95/98: Right click My Computer, then select Properties.
3. For Windows 2000: Double click the following in succession: My
Computer--Control Panel—System, Select the Hardware tab, then
click the Device Manager button.
4. Click the Refresh button
5. To verify proper connection has been accomplished between scanner
and ScanWizard 5, right click the scanner icon in the Status Bar.
From the resulting menu, click "Find Scanners". Then click "Next>"
button from the "Scanner Finder" dialog box that follows. If your
scanner is listed in the resulting "Scanners found" list box, then you
have a successful connection.
You may also use the Scanner Test utility from ScanWizard 5 folder to
verify proper linkage of your scanner to the ScanWizard 5. The utility can
also be used to test serviceability of your scanner at the same time.
file:///D|/msc/WebHelp/qa_cannot_find_scanner.htm [8/20/03 2:45:59 AM]
Page 58

My printer keeps on producing the wrong number of copies. What
should I do?
Your MSC Copy tab panel setting for number of copies is in conflict with
that of your printer's setup dialog box. If you want your printer to follow
the MSC setting for number of copies, then do NOT check the "Show
printer setting dialog box before scan" check box in the Copy tab panel.
Otherwise, check the check box and your printer will ignore your MSC
settings and follow the number of copies set in the printer setup dialog
box.
file:///D|/msc/WebHelp/qa_printer.htm [8/20/03 2:46:26 AM]
Page 59

Scan panel
For more details,
select the topic you
wish to view from
the links below:
Original
Purpose
Scan Type
Send to Application
Scan Frame
Destination
OK button
Cancel button
Reset button
Help button
file:///D|/msc/WebHelp/panel_Scan_pc.htm (1 of 2) [8/20/03 2:50:22 AM]
Page 60

file:///D|/msc/WebHelp/panel_Scan_pc.htm (2 of 2) [8/20/03 2:50:22 AM]
Page 61

Scan panel
For more details,
select the topic
you wish to view
from the links
below:
Original
Purpose
Scan Type
Send to
Application
Scan Frame
Destination
OK button
Cancel button
Reset button
Help button
file:///D|/msc/WebHelp/panel_Scan_mac.htm [8/20/03 2:50:48 AM]
Page 62

Copy panel
For more details,
select the topic you
wish to view from
the links below:
Original
Color Copy
Scan Frame
Copy Quality
Scaling
Copies
Show printer
setting dialog box
before scan
Setup button
OK button
Cancel button
Reset button
Help button
file:///D|/msc/WebHelp/panel_Copy_pc.htm (1 of 2) [8/20/03 2:51:42 AM]
Page 63

file:///D|/msc/WebHelp/panel_Copy_pc.htm (2 of 2) [8/20/03 2:51:42 AM]
Page 64

Copy panel
For more details,
select the topic
you wish to view
from the links
below:
Original
Color Copy
Scan Frame
Copy Quality
Scaling
Copies
Show printer
setting dialog
box before scan
OK button
Cancel button
Reset button
Help button
file:///D|/msc/WebHelp/panel_Copy_mac.htm [8/20/03 2:51:50 AM]
Page 65

E-mail panel
For more details,
select the topic you
wish to view from
the links below:
Original
Purpose at
Receiving End
Scan Type
Send to E-Mail
Editor
Scan Frame
Destination
OK button
Cancel button
Reset button
Help button
file:///D|/msc/WebHelp/panel_E-mail_pc.htm (1 of 2) [8/20/03 2:52:04 AM]
Page 66

file:///D|/msc/WebHelp/panel_E-mail_pc.htm (2 of 2) [8/20/03 2:52:04 AM]
Page 67

E-mail panel
For more details,
select the topic
you wish to view
from the links
below:
Original
Purpose at
Receiving End
Scan Type
Send to
Scan Frame
Destination
OK button
Cancel button
Reset button
Help button
file:///D|/msc/WebHelp/panel_E-mail_mac.htm [8/20/03 2:52:12 AM]
Page 68

OCR panel
For more details,
select the topic you
wish to view from
the links below:
OCR Language
Document Type
Size
Scan Type
Send to Application
Scan Frame
Destination
OK button
Cancel button
Reset button
Help button
file:///D|/msc/WebHelp/Panel_OCR_pc.htm [8/20/03 2:52:18 AM]
Page 69

OCR panel
For more details,
select the topic
you wish to view
from the links
below:
OCR Language
Document Type
Size
Scan Type
Send to
Application
Scan Frame
Destination
OK button
Cancel button
Reset button
Help button
file:///D|/msc/WebHelp/Panel_OCR_mac.htm [8/20/03 2:52:25 AM]
Page 70

To Web panel
For more details,
select the topic you
wish to view from
the links below:
Web Site
Purpose
Account
Account Manager
button
Scan Frame
Saved Files in
Local Disk
OK button
Cancel button
Reset button
Help button
file:///D|/msc/WebHelp/panel_Web_pc.htm [8/20/03 2:52:34 AM]
Page 71
To Web panel
For more details,
select the topic
you wish to view
from the links
below:
Web Site
Purpose
Account
Account
Manager button
Scan Frame
Saved Files in
Local Disk
OK button
Cancel button
Reset button
Help button
file:///D|/msc/WebHelp/panel_Web_mac.htm [8/20/03 2:52:42 AM]
Page 72

Power Saving page
For more details,
select the topic you
wish to view from
the links below:
Lamp Current
Status
OK button
Cancel button
Reset button
Help button
file:///D|/msc/WebHelp/page_Power_Saving_pc.htm [8/20/03 2:52:53 AM]
Page 73

Power Saving page
For more details,
select the topic
you wish to view
from the links
below:
Lamp Current
Status
OK button
Cancel button
Reset button
Help button
file:///D|/msc/WebHelp/page_Power_Saving_mac.htm [8/20/03 2:53:02 AM]
Page 74

Scan page
For more details,
select the topic you
wish to view from
the links below:
Original
Purpose
Scan Type
Send to Application
Scan Frame
Destination
OK button
Cancel button
Reset button
Help button
file:///D|/msc/WebHelp/page_Scan_pc.htm (1 of 2) [8/20/03 2:53:22 AM]
Page 75

file:///D|/msc/WebHelp/page_Scan_pc.htm (2 of 2) [8/20/03 2:53:22 AM]
Page 76

Scan page
For more details,
select the topic
you wish to view
from the links
below:
Original
Purpose
Scan Type
Send to
Application
Scan Frame
Destination
OK button
Cancel button
Reset button
Help button
file:///D|/msc/WebHelp/page_Scan_mac.htm [8/20/03 2:53:30 AM]
Page 77

Fax page
For more details,
select the topic you
wish to view from
the links below:
Original
Color Fax
Scan Frame
Fax Quality
Scaling
Show fax printer
setting dialog box
before scan
Setup button
OK button
Cancel button
Reset button
Help button
file:///D|/msc/WebHelp/page_Fax_pc.htm (1 of 2) [8/20/03 2:53:37 AM]
Page 78

file:///D|/msc/WebHelp/page_Fax_pc.htm (2 of 2) [8/20/03 2:53:37 AM]
Page 79

Fax page
For more details,
select the topic
you wish to view
from the links
below:
Original
Color Fax
Scan Frame
Fax Quality
Scaling
Show fax printer
setting dialog
box before scan
Setup button
OK button
Cancel button
Reset button
Help button
file:///D|/msc/WebHelp/page_Fax_mac.htm [8/20/03 2:53:41 AM]
Page 80

Launch Application page
For more details,
select the topic you
wish to view from
the links below:
Application
Application Path
Custom button
OK button
Cancel button
Reset button
Help button
file:///D|/msc/WebHelp/page_Launch_App_pc.htm [8/20/03 2:53:44 AM]
Page 81

Launch Application page
For more details,
select the topic
you wish to view
from the links
below:
Application
Application Path
Custom button
OK button
Cancel button
Reset button
Help button
file:///D|/msc/WebHelp/page_Launch_App_mac.htm [8/20/03 2:53:49 AM]
Page 82

MSC panel
To obtain information for each panel configuration, position the
arrow pointer
Web, or Custom), and then click the grabber pointer to activate
its associated panel.
over any of the 6 tabs (Scan, Copy, E-mail, OCR, To
Page 83

Page 84

MSC panel
To obtain information for each panel configuration, position the arrow
pointer
Custom), and then click the grabber pointer to activate its associated
panel.
over any of the 6 tabs (Scan, Copy, E-mail, OCR, To Web, or
 Loading...