

Page 1

User Guide
Microtek, International, Inc.
March 1999
Page 2

2
COPYRIGHT NOTICE
Microtek makes no warranty of any kind with regard to this material, including, but not limited to, implied
warranties of merchantability and fitness for a particular purpose.
Microtek shall not be liable for errors contained herein or for incidental consequential damages in connection
with the furnishing, performance, or use of this material.
This document is protected by copyright. No part of this documentation may be reproduced, transmitted,
transcribed or translated into another languages, in any form or by any means, without the express written
permission of Microtek, Inc.The information contained in this document is subject to change without notice.
Copyright 1999 by Microtek International, Inc.
TRADEMARKS
Microtek and EyeStar Mail v3.0 are trademarks or registered trademarks of Microtek, Inc.
Microtek International, Inc.
6, Industry East Road 3, Science-based Industrial Park, Hsinchu 300,
Taiwan, R.O.C.
Page 3

3
Welcome to EyeStar Mail V3.0
Congratulations and thank you for using EyeStar Mail v3.0, the complete package
for capturing live actions and cool snapshots that you can easily and quickly send
to your family and friends over the Internet. This consumer video mail product
allows you to record video and audio clips that can be saved in a self-executable
file format, which is compatible in all types of mail clients that run on Windows 98
and NT. Keeping in touch with your loved ones has never been as easy as recordand-send.
And not only that, create personalized greeting cards with your favorite pictures in
it. You can capture a snapshot of yourself and place it on a card with your special
message. Then, send the card online so that the person who will receive it will get
this extraordinary surprise in no time at all.
Page 4

What's Inside
➫
➫
➫
➫
➫
➫
➫
➫
➫
Introduction............................................................................... 5
Getting User Support................................................................ 6
System Requirements .............................................................. 6
Installing EyeStar Mail v3.0
.........................................................
Getting Started - before connecting to the Internet .................. 9
To run Send Mail ................................................................................. 9
To define your default mail settings .....................................................9
Get Your Work Done Quickly .................................................. 10
Sending a video mail ......................................................................... 10
Sending a audio only mail ................................................................. 10
Sending a greeting card mail.............................................................11
Preparing Your Audio, Video, and Image Files........................ 15
To run Video Panel ............................................................................ 15
Defining Your Video Settings .................................................. 17
Creating Live Messages......................................................... 18
Recording a video/audio clip ............................................................. 18
Capturing a single image frame ........................................................ 19
7
➫
➫
➫
➫
➫
Creating a Personalized Card ................................................ 21
To run Card Maker............................................................................. 21
Working on a card project ................................................................. 24
Sending Messages Online ..................................................... 28
Using the Send Mail program............................................................ 29
Managing Your Files Visually .................................................. 30
To run Album ..................................................................................... 30
To save files to an album, you can .................................................... 31
License Agreement ................................................................ 32
Technical Support................................................................... 34
Page 5
5
Introduction
EyeStar Mail v3.0 is a complete consumer video package for recording audio and
video clips that you can send to your family and friends. This package includes all
the software you will need for capturing, creating personalized cards, and sending
messages online. You can also visually organize your files as they get bigger. EyeStar
Mail v3.0 offers:
VV
ideo Panelideo Panel
V
ideo Panel - Serves as your video, audio, and image data source. Capture
VV
ideo Panelideo Panel
those data using your video or digital camera and microphone. Here, you
can also play back video and audio files.
CarCar
d Makerd Maker
Car
d Maker - Creates unique greeting cards using images of your choice.
CarCar
d Makerd Maker
Simply take snapshots from Video Panel using your digital camera and send
them directly to Card Maker.
AlbumAlbum
Album - Allows you to organize your files more efficiently by using visual
AlbumAlbum
representation of the source files.
Send MailSend Mail
Send Mail - Allows you to send messages and files to virtually anybody and
Send MailSend Mail
anywhere in the Internet world.
Page 6

6
Getting User Support
The different programs that are included in this package are all easy-to-use. In
any case, you may have some questions that you want to ask about certain
features. To find out more about EyeStar Mail v3.0, you can use the following
resources:
☞
☞
☞
☞
User Guide - Offers an overview of the whole package and also
basic information on the function of each program. This will help
you get started right away .
Online Help - Offers explanations of the different buttons and
items you will find in each program. It also contains additional
information on how to complete various tasks.
Readme T ext File - Contains additional information about the
program that are not included in the User Guide or Online Help.
Via E-mail - Contact any of our support centers. Before sending
your inquiries, please provide us information about the system
you are working on and a complete description of the situation of
the problem. You can find the e-mail addresses in the Readme
text file.
System Requirements
OS: Windows 95
PC: IBM PC compatibles
CPU: Pentium or higher (133MHz or higher recommended)
RAM: 16 MB (32MB recommended)
Monitor: 256 color or more (16-bit High Color recommended)
HDD: 25 MB or more
V oice: Sound Blaster compatible sound card
Video: Digital video camera or analog video camera with video capture
board.
Network: Network environment such as telephone line, ISDN, and LAN to
connect to Internet.
Note: Please make sure that all your hardware are correctly installed. For more
information about them, please refer to your vendor’s manual.
Page 7
7
Installing EyeStar Mail v3.0
The EyeStar Mail v3.0 installation program runs from within Windows and
contains complete instructions on the installation process. Make sure you use this
program to install EyeStar Mail v3.0 as some files require decompression during
the installation process and may need to be copied to a specific destination.
To install EyeStar Mail v3.0:
1. Read the license agreement found on page 32 as it contains various legal
requirements that you need to be aware of before continuing the installation
process. If you agree to abide by it, continue with the installation.
2. Insert the EyeStar Mail v3.0 CD into your CD-ROM drive.
3. Windows should detect the CD and automatically run the installation
program.if automatic detection fails, please run disk1\Esmail\Setup.exe
directly from the insatllation CD.
4. Once the installation program is running, you will see the Welcome page on
the screen. Please read the important recommendation and warning before
continuing the Setup process. Click Next to continue or Cancel to quit
installation.
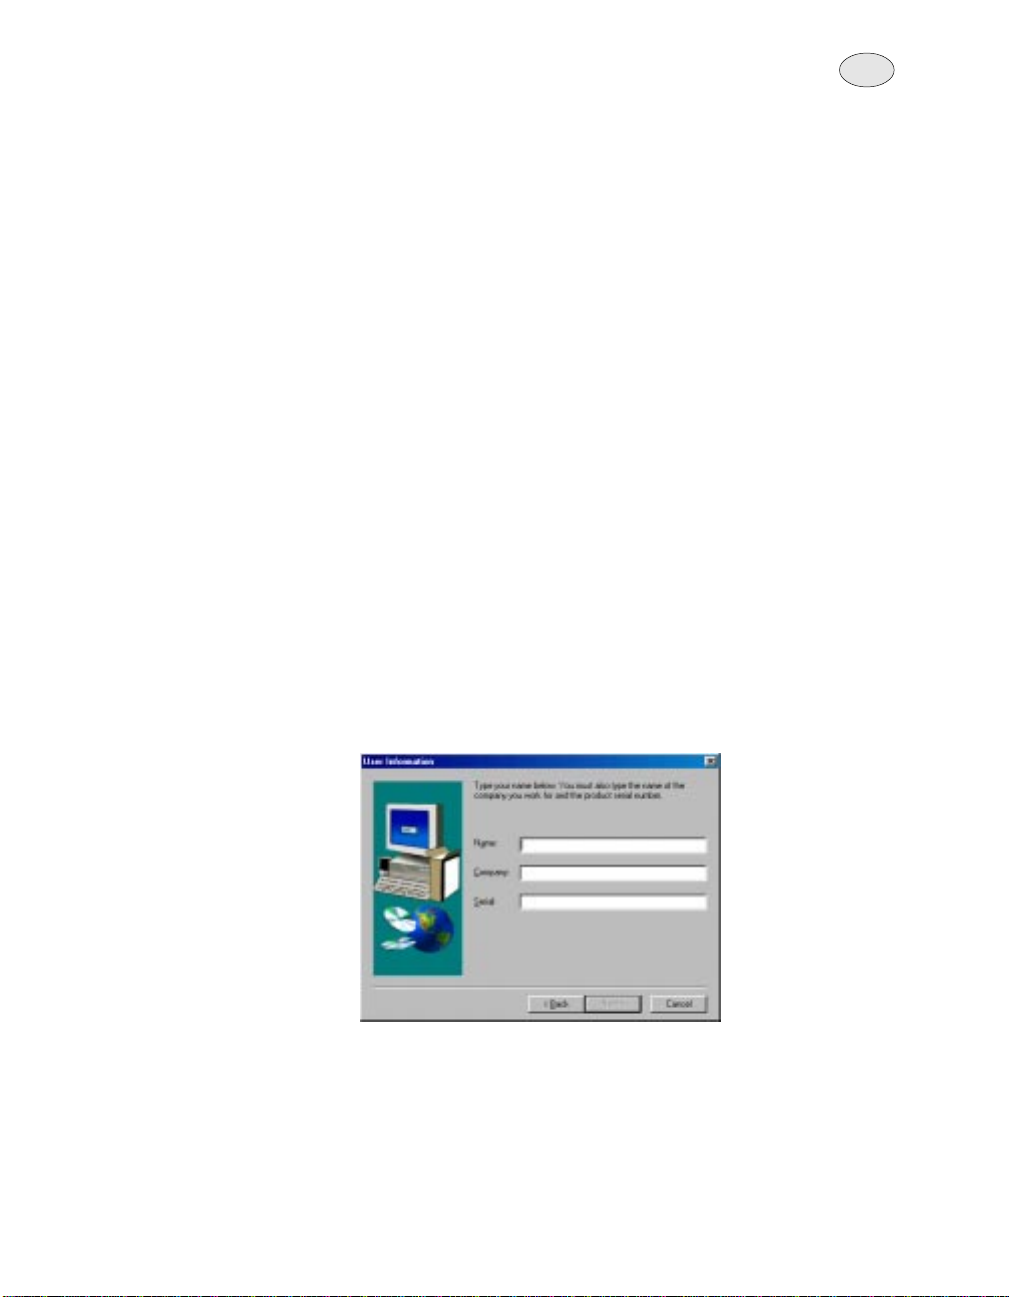
5. Please enter the user’s information and most importantly, the serial number
to enable the Next button and continue the installation. (Your serial number
is printed on the back of CD jacket.)
Page 8
8
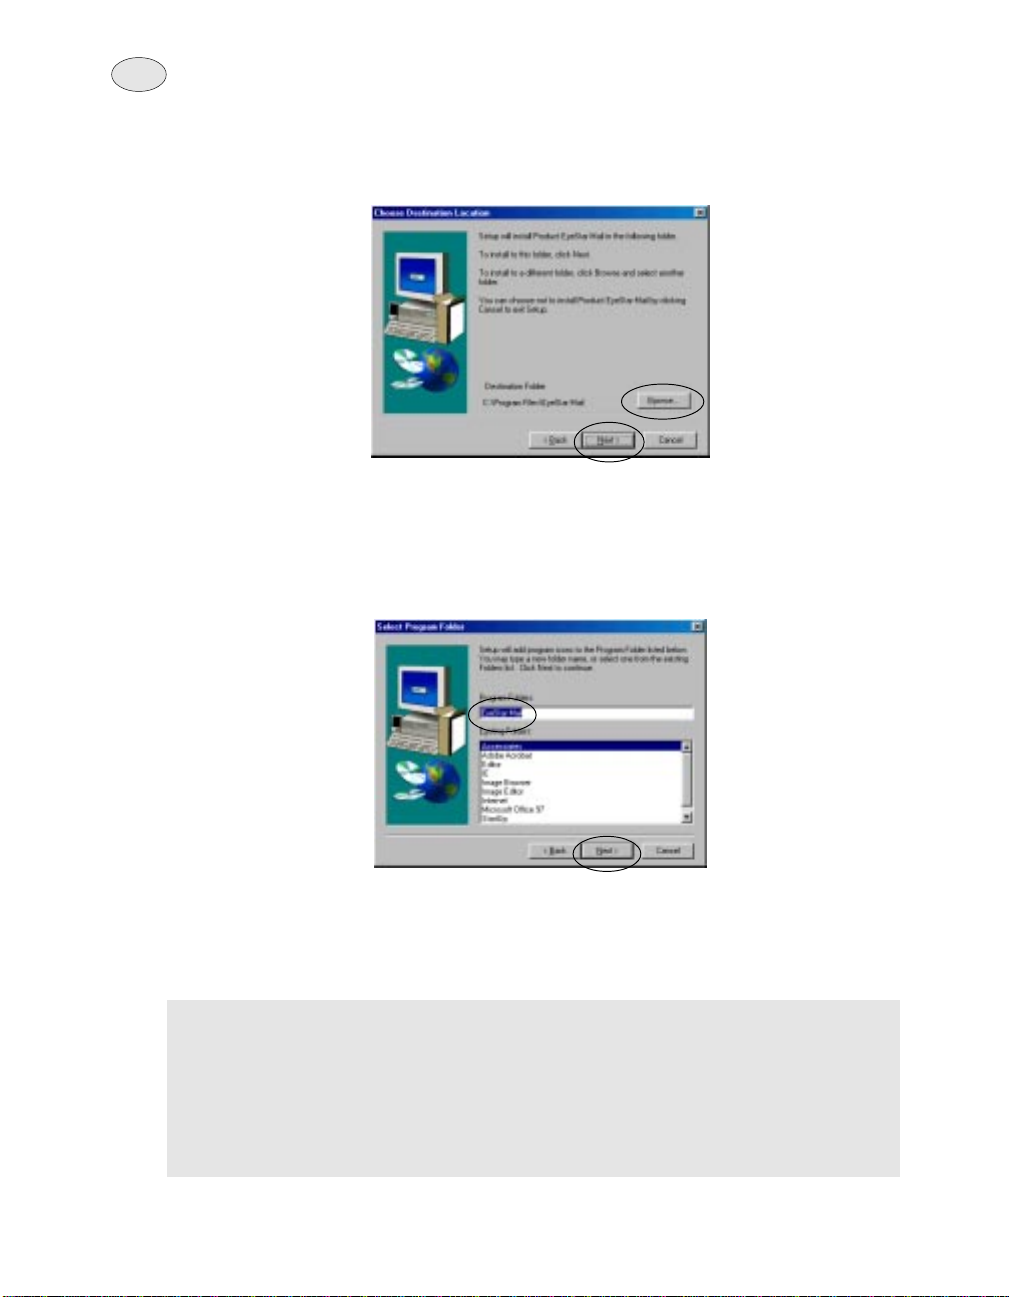
6. Locate the target destination where to copy the program files. Click the
Browse button if you want to store the program files to another location
other than the default destination.
7. Click the Next button to continue the installation process or Back if you
want to change any information that you previously provided.
8. In the Select Program Folder dialog box, specify a name for the Program
folder. This will determine the name of the folder where the program files
are going to be saved.
9. EyeStar Mail v3.0 installation program will then start copying the program
files to the target destination and also create a program folder for shortcuts
in the Windows Start menu. Once you see the message that Setup is
complete, click OK to finish.
Tips: To move between entry boxes in the installation program, use your mouse
or press Tab (not Enter).
It is recommended that you close other applications that are running in the
background during insatllation.
You can switch to other programs anytime during the installation process
by clicking Alt+Tab.
Your serial number is printed on the back of CD jacket.
Page 9

9
Getting Started - before connecting
to the Internet
Now that you have installed EyeStar Mail v3.0 into your system, it is time to get
you up and going. But first, in order to make sure that your line of communication
in the Internet world is always available and ready , it is recommended that you set
up your work environment first before doing anything else.
To run Send Mail:
1. Click Start on the Taskbar and locate the EyeStar Mail v3.0 program folder.
2. From the submenu, select Send Mail to run it.
To define your default mail settings:
1. In the Send Mail program window, click the Mail Setup button to open the
Mail Setting dialog box.
2. Specify the following necessary information about your mail server.
➪ Mail encoding - Select from MIME or UUCode. MIME is
the default and is commonly used by most mail clients.
➪ Character set - Select from US-ASCII or ISO-1
➪ Mail server - Specify the SMTP mail server you area
connected to.
➪ User name - Specify the name of your internet account.
➪ Reply address - Specify the e-mail address to which you
want the recipient to reply to. This will automatically
appear in the “From” entry box when you are sending an
e-mail.
➪ Waiting time - Specify how long to que the e-mail
message before actually sending it to out to your mail
server.
➪ Keep copies - Select to save a copy of the e-mail
message to your hard drive after sending it out.
3. Click OK to close the dialog box.
Notes:An IP (Internet Provider) account is required before you can set up the
above-mentioned options.
You can directly run the Send Mail program from either Video Panel or
Card Maker. Simply click the appropriate button on the program window.
Whatever you are working on at that moment will be sent to the Send Mail
program as an attachment.
On the left-hand side of the Send Mail program, you may sometimes see
one or more icons appearing on the panel. These may indicate video,
audio, and/or snapshot file attachments coming from Video Panel or Card
Maker.
For more information on sending messages online, please refer to page
28.
Page 10
10
Get Your Work Done Quickly
EyeStar Mail v3.0 offers everything you need to help you get the work done as
easy and as fast as it can be. Sending messages, images, videos, and audio
have never been as convenient as before. The following topics will give you a
quickest way of completing the most common tasks you probably will want to do it
such a short period of time.
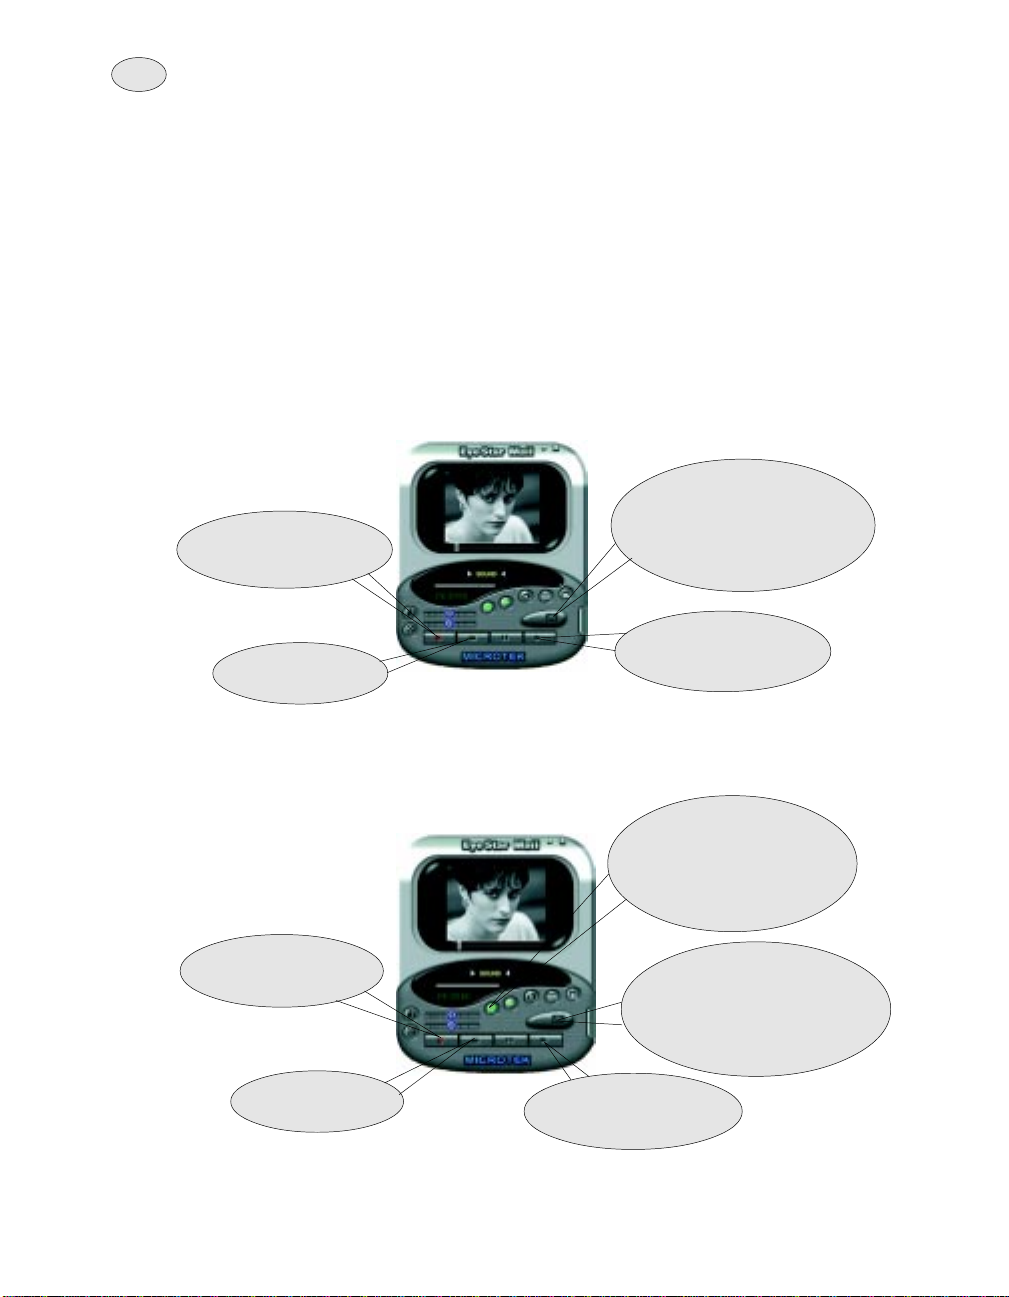
Sending a video mail:
Create and send a video mail using the Video Panel program. Run Video Panel
and adjust your camera to the desired view that you want to capture.
4. Click Send Mail to run
the Send Mail program
1. Click Record to start
capturing video and
audio data.
2. Click Stop to end
recording.
with the captured data
automatically attached to
your e-mail message.
3. Click Play to preview
what you have just
recorded.
Sending a audio only mail:
If you prefer, you can just record audio data and disable the video capture feature.
From the Video Panel program:
1. Click Video Channel to
disable the video capture
feature. (It should then
change to gray to indicate
that it’s inactive.)
2. Click Record to start
recording audio data.
3. Click Stop to end
recording.
4. Click Play to listen to
what you have just
recorded.
5. Click Send Mail to run the
Send Mail program with
the captured audio data
automatically attached to
your e-mail message.
Page 11
Sending a greeting card mail:
Create a greeting card in no time at all and send it through the Internet so that the
person on the other end will get your card right away . Here’ s how:
Run the Video Panel program. Then from the Video Panel program interface:
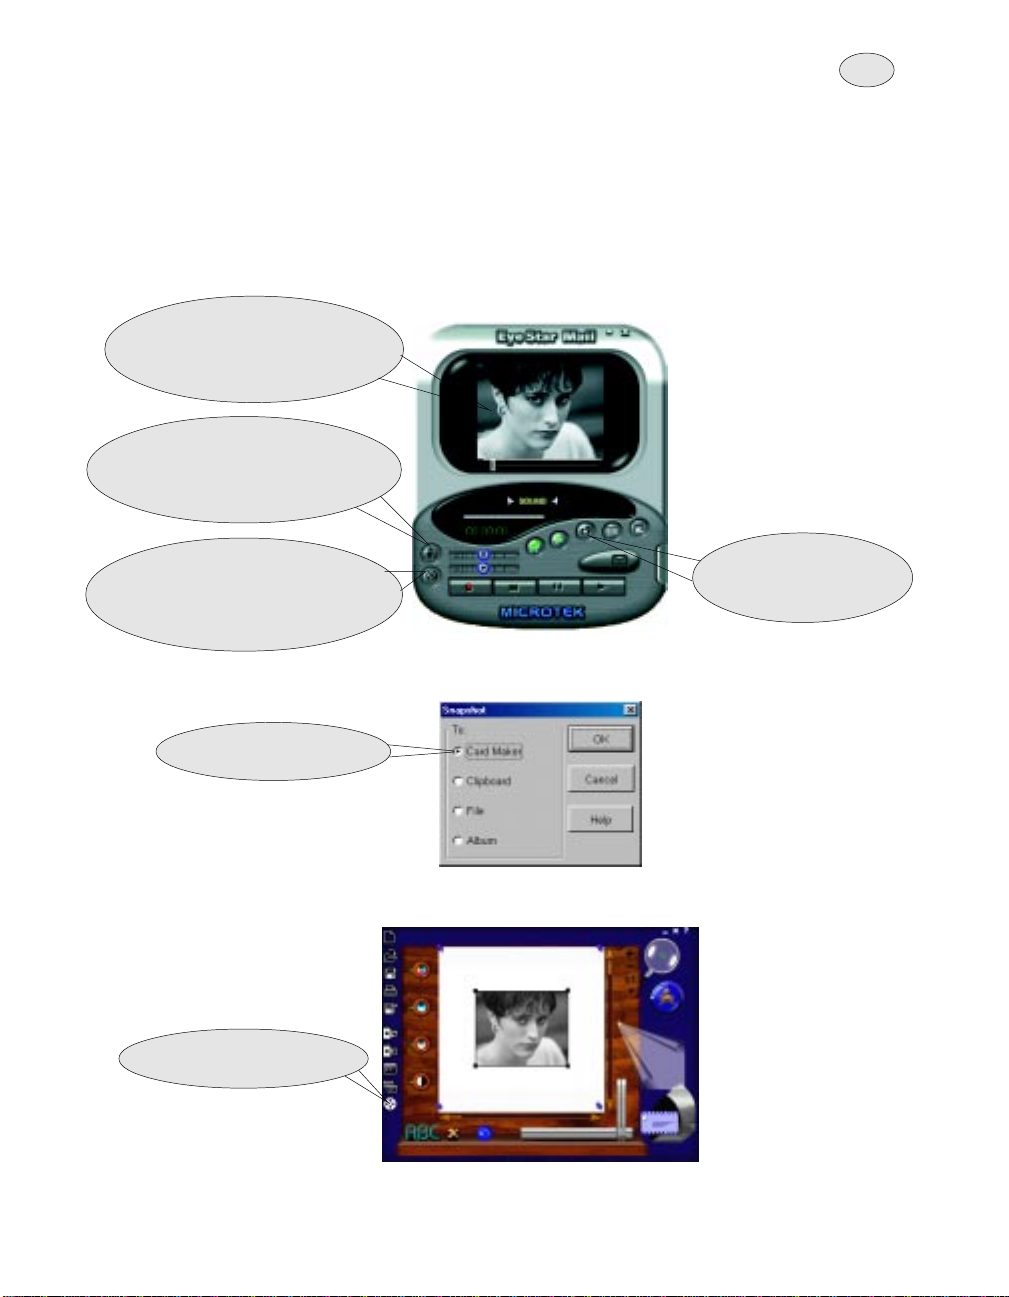
1. Watch the preview on the Video
Capture panel to determine if
your camera is focused properly.
2. Runs the Card Maker program
for creating personalized
greeting cards that you can send
to your family and friends.
11
3. Opens the Album dialog box for
choosing an album where to
save the captured image frame
to and also give its item name.
5. Select the Card Maker
option and click OK.
6. Click the Album button to
run the Album program.
4. Click the Snapshot
button to open the
Snapshot dialog box.
Page 12

12
6. Double-click the
5. Select the Templates ablum to
display pre-defined templates.
This template will then open in the Card Maker program. With Card Maker and
Album running alongside each other, you can finish everything really fast using
drag-and drop operations.
template you want
to use.
After inserting your image, you can now make the image look like it’s part of the
background. You can do this by using a mask to soften the edges of the image
and create seamless blending between the image and the selected template.
Page 13

13
8. Click and drag the
desired mask files on
the Card Maker
workspace (or doubleclick).
7. Select the Masks album to
display the available mask
files on the Filmstrip.
Note: If you want to change the orientation of your image click the Rotate button.
Each click turns the image 90 degree counterclockwise.
10. Finally, click Send Mail to send
your finished greeting card in
the Send Mail program as an
attachment file.
9. Click the Text button to add your
personal greeting or messages.
Once the Send Mail program is running, check the Snapshot icon on the side bar
to make sure that the greeting card file you have just created is attached to your
mail.
Note: If you want to find out more about using Card Maker, please refer to page
25.
Page 14

14
Phase 1
Phase 1
Phase 1
Note: If you encounter any problem while sending your e-mail, please refer back
to page 9 on how to check your mail settings. Or, for more information on
sending messages online, please refer to page 28.
Page 15

15
Preparing Your Audio, Video, and Image
Files
Now that you have everything installed and have properly set up your work
environment, it’s time to collect the data that you will want to send online. Video
Panel is the program you can use to do this for you.
To run Video Panel:
1. Click Start on the Taskbar and locate the EyeStar Mail v3.0 program folder.
2. From the submenu, select Video Panel to run it. Below is the Graphical
User Interface (GUI) of the Video Panel program.
3
2
1
4
16
12
6
5
1 Video Capture panel - This is where video and image data are displayed.
2 Info - Connects to Microtek website for more information.
3 Exit - Closes the Video Panel program.
4 Minimize - Minimizes the Video Panel program window .
5 Speaker volume control - Determines how loud the output sound is on the
6 Microphone volume control - Determines the pickup level of your
8
11
13
17
speakers during playbacks.
microphone when recording audio files.
10
14
7
15
9
Page 16

16
7 Show/Hide Options panel - Toggles between displaying the commonly
used commands for capturing and the options for defining the video
source’s capture and display settings.
8 Open Card Maker - Runs the Card Maker program for creating
personalized greeting cards that you can send to your family and friends.
9 Snapshot - Captures an image frame and automatically sends it to your
preferred destination:
Card Maker - Opens the captured image frame directly in Card Maker.
Clipboard - Copies image data onto the clipboard and makes the image
data content ready for pasting to any other documents or application.
File - Saves the captured image frame to disk. You can specify a file name
and location where to save the resulting image file.
Album - Opens the Album dialog box for choosing an album where to save
the captured image frame to and also give its item name.
10 Save an video/audio file - Creates a file of a captured audio/video or
audio only (*.exe and *.wav) and saves it to disk.
11 Open Album - Runs the Album program that helps you organize all your
files visually .
12 Open an video/audio file - Opens a previously saved video/audio or audio
only files (*.exe and *.wav) to play back.
13 Open Send Mail - Runs the Send Mail program where you can send
messages and, at the same time, attach image, video/audio, audio only
files, etc. for your family and friends online.
14 Video channel - Allows you to choose whether or not to include video data
from your video source when capturing.
15 Audio channel - Allows you to choose whether or not to include audio data
from your audio source when capturing.
16 Audio meter Displays the loudness level of the input/output audio data.
17 Control buttons
Record - Captures video and audio files using your input devices
(microphone and/or camera).
Stop - Stops capturing from your input device or playing a video sequence.
Pause - Stops temporarily a playback at a frame. Click again to continue.
Play - Plays back recently captured video file or a previously saved ones.
Page 17

17
Defining Your Video Settings
The Video Panel program allows you to define the video source’s capture and
display settings. For more information about your video options, please refer to
the user’s manuals that came with video capture board and the capture device.
Below is the Video Panel GUI displaying the basic video settings you can define.
3
1 Show/Hide Video Options panel - Toggles between displaying the
commonly used commands for capturing and this Video Options panel for
defining the video source’s capture and display settings.
2 Video quality - Adjusts the level of compression to apply. Setting a high
value high does produce better output display but in effect creates larger file
sizes as you increase it.
3 Frame rate - Specifies how many frames to record per second when
capturing. The black square indicates the current frame rate.
4 Video source - Opens the Video Source dialog box for adjusting the colors
of your capture device, zoom level, and other settings to improve capture
and device display capabilities. This dialog box varies depending on the
type of video capture driver and device you have installed in your system.
5 Video format - Opens the Video Format dialog box for specifying video
compression, frame size, color channels, and other settings. This dialog
box varies depending on the type of capture driver and device you have
installed in your system. (Note: Video Panel can only display four video
frame sizes; 160x120, 176x144(QCIF), 320x240, and 352x288(CIF).
2
1
4
5
Page 18

18
Creating Live Messages
The Video Panel program is the tool you need for creating video and audio files
that can contain your important messages.
Recording a video/audio clip:
Before you start recording your message, be sure to check your video settings in
the Video Options panel. Click the Show/Hide Video Options panel button to
define your video settings. These options vary depending on the type of video
capture device that is connected to your machine.
1. Click Start on the Taskbar and locate the EyeStar Mail v3.0 program folder
or click the EyeStar Mail icon over the desktop.
2. Check the Video and Audio channel buttons to see if they are active.
Selecting the desired channels will determine whether to record both video
and audio data or audio only .
Note: When recording audio data, adjust the microphone level on the Capture
Options panel to set the pickup sensitivity of our audio source device.
3. Adjust the video source device’s (e.g. video camera) focus to ensure that
everything you want to record appears on the Video capture panel.
4. Click the Record button to start the capturing process. The Video capture
panel will display what’s being recorded, as well as the timecode and file
size information.
5. When finished with your message, click the Stop button to end the
recording session.
6. To preview the recorded clip, click the Play button. You can also adjust the
audio playback volume by adjusting the Speaker volume control.
Note: Make sure that you save the recently recorded clip to a file first before
starting another recording session. This way , you will not overwrite the one
you have just recorded.
7. When satisfied with the preview, you can then either save the recorded clip
to a file or send it online right away . Otherwise, start recording again.
Note: For more information on how to send files via e-mail, please refer to page
28.
Page 19

19
Capturing a single image frame:
You may sometimes want to take a snap photo of yourself or something else to
put on a personalized card. To do this, you can use your capture video device to
take the shot.
1. Adjust the camera to the desired view. Check the preview on the Video
capture panel.
2. Click the Snapshot button.
3. From the resulting dialog box, select where to send the captured image
frame:
Card Maker - Opens the captured image in the Card Maker program for
creating unique cards.
Clipboard - Copies the image data onto the Windows clipboard and makes
it available for pasting into other programs.
File - Saves the image data to a file with your preferred file name. Unlike
sending it to Album, you can give a specific file name for the captured
image frame yourself.
Album - Adds a thumbnail (small image representation) of the captured
image frame to an album for quick access. This will server as a shortcut to
the source file of the captured image.
4. If you have chosen either one of the first two options, Video Panel program
starts capturing after you click the OK button.
For File and Album options, the capturing process starts after you have
specified the necessary information in their related dialog boxes.
Page 20

20
4.a In the File: Save As dialog box. locate the folder as to where you want to
save the image file and then specify a file name for it. Click Save to start
the process.
4.b In the Album dialog box, specify a name for the captured image where a
thumbnail representing the file will be added to the specified album. Click
OK to start the process.
Notes:
The Video Capture panel displays a preview of the captured image frame.
Check if you are satisfied with the shot. Otherwise, repeat the process
again until you get the shot that you want.
For more information on how to send files via e-mail, please refer to page
27.
Page 21

21
Creating a Personalized Card
Card Maker is the tool for creating unique cards and putting your favorite photos
in them. Once you have your image file ready , you can open it in Card Maker and
express your own creativity .
To run Card Maker:
There are several ways on how you can run the Card Maker program. You can
choose from:
Clicking Start on the Taskbar to locate the EyeStar Mail v3.0 program folder
☞
and then , selecting Card Maker from the resulting submenu.
Using the Video Panel program interface, click the Open Card Maker button
and this will automatically open an image of what is currently being
captured by your video source.
Clicking the Snapshot button from Video Panel and then sending the
captured image frame directly to Card Maker.
Double-clicking an image file from an album’s filmstrip on the Album
☞
program interface.
Below is the Graphical User Interface of the Card Maker program.
23 22 21
1
2
3
4
5
6
7
8
9
10
11 12 13
14
15
16
20
19
18
17
Page 22

22
1 Create a new project - Creates a new card project in the workspace. It
opens the New template dialog box for choosing a solid color or a
predefined background. If a project is currently open in the workspace, it
prompts you to save the project first before inserting a new template.
2 Open a project - Opens a previously saved Card Maker project. This
opens a dialog box for locating the file.
3 Save project - Saves the project you are currently working on to a project
file(*.ICM). This format allows you to do more editing in the future without
merging all your objects in your card project into one image. This way , you
can still work on the objects independently . You can also save the file to an
album for better file management.
4 Print - Sends the image data to the printer. This opens a preview window
displaying how your card will be printed on paper. You can also print
multiple copies of the currently open card on a single sheet by selecting the
Tile option when in Print mode.
5 Save As - Saves the current project into an image file. Card Maker merges
all objects to the background and saves the project data to an image file.
You can also have the option to save the image file to an album for better
file management.
6 Change template - Allows you to change the current background in the
card project. This opens a dialog box for choosing another template.
7 Insert an image - Insert an image to the current project as an image
object.
8 Select TWAIN source - Opens a dialog box for selecting the TWAIN
source to use an input device (i.e. scanners or digital cameras) for
acquiring an image. Fir more information on acquiring images, see the
Online Help.
9 Acquire - Allows you to get your photos into your computer. This means
that photo data are digitized so that you can work on them on your
computers. Y ou can then create personalized eye-catching greeting cards.
10 Open Album - Runs the Album program. This program helps you organize
your photos efficiently . You can store your photos to different albums just
like the real-life photo albums where you can separate your photos
according to different categories. You can also drag and drop image files
from an album onto the Card Maker workspace.
11 Add text - Opens a dialog box for adding text as an object into a card
project. In this dialog box, you can define the text attributes such as type,
size, style, alignment, and color of the font. Check out how the font looks
like with the current settings in the preview window of the same dialog box.
Page 23

23
12 Delete - Deletes the currently selected object from the card project.
13 Undo - Reverses the previously applied action.
14 Horizontal/Vertical scroll bars - Adjust the focus on a particular area
when the image is larger than the workspace window. Click and drag the
scroll bar slider to quickly find a spot in an image that is not currently visible.
You have to zoom in the image to activate the scroll bar .
15 Resize - Changes the size of the selected image object. Clicking the
rectangular slider opens the Dimensions dialog box for specifying the new
size. Selecting the Keep aspect ratio option keeps the original image
proportions. Double-clicking an image object also opens the same dialog
box. Y ou can also click and drag the slider upwards or to the left to resize
the image. Pressing the Shift while dragging will retain the original
proportions of the image.
16 Send Mail - Opens the Send Mail program for sending your personalized
card to your friends and relatives online.
17 Add mask - places a mask over an image object. This opens a dialog box
for choosing a mask to create transparent areas that will make the
background show through the image. It can be a simple shape or keying
certain colors out that will make the image blend seamlessly with the
background or the currently selected template.
Notes:You need to make an image object active before using this feature. If you
decide to remove the mask later, click the mask button again and then the
Reset button in the resulting dialog box.
18 Rotate - Changes the orientation of the selected image. Each time you click
the octagon, the image object rotates 90 degree counterclockwise.
19 Current zoom ratio - Displays the current magnification of the image that
is being displayed on the workspace.
20 Help - Opens the Card Makers online help.
21 Exit - Closes the Card Maker program.
22 Minimize - Minimizes the program window.
23 Zoom controls - Allows you to change the magnification of the image that
is being displayed on the window. By clicking:
The “+” icon ( or pressing “+” on the keyboard), you can get a more
detailed view of the image.
The “-” icon (or pressing “-” on the keyboard), the image displayed
gets smaller.
1x1 resizes the image to 1x(100%) magnification.
Fit in Window resizes the current image to fit the largest window that
can be displayed in the workspace.
Page 24

24
Working on a card project:
1. After you get the Card Maker running, you are now ready to start creating
your card. Click the New Template button and select a background for your
card project in the dialog box. (To see a preview of what each template
looks like, click through the list.)
Note: In the initial use of the Card Maker program, the workspace will open with
a black background. For the succeeding sessions, the background color is
determined in the settings you had the last time you used it. To change a
background color, select Blank from the list of available templates and
then click the color square found at the lower left-hand side of any Template dialog box and select the new color.
2. Click the Insert image button for choosing the image to put on the card.
(Y ou can also change the orientation of your image using the Rotate button
or resize it using the Resize slider.)
Page 25

3. Adjust the display of colors in your image by using the four color control
buttons. By dragging the little green square around of each of the buttons,
you can adjust the hue, saturation, brightness, and contrast of the colors in
the image. (This is only available if you have an image object selected.)
25
Hue Brightness
Saturation Contrast
4. To seamlessly blend your image with the background, click the mask button
for specifying whether to use a Key color for creating the mask area or an
image file. (This is only available if you have an image object selected.)
Page 26

26
5. Click the Load button to locate the folder where the mask file you want is
saved.
6. In the Load Mask File dialog box, select the mask file you want to use and
then click the Open button.
7. Click OK to close the insert Mask dialog box and apply it on the image in
your card project.
Tips: Using a mask helps you blend the images with the background making it
appear as part of the whole image. A mask allows you to make the
background show through certain portions of your image. EyeStar Mail
v3.0 provides predefined masks that you can choose from. Simply open
the Album program and find the Templates album. From the Filmstrip that
displays the thumbnails of available mask files, select one and then drag
and drop it into the Card Maker workspace.
Page 27

27
8. Click the Insert text button for adding in your greeting or any messages, as
well as, define the text attributes. If you want to edit your text again, doubleclick the next object to open the Text dialog box.
9. When satisfied with the overall appearance, you are now ready to output
your card to a file or send it online.
Note: Check out the next section on how to send e-mail messages. Once the
Send Mail program is running, check the Snapshot icon on the side bar to
make sure that the greeting card file you have just created is attached to
your mail.
Page 28

28
Sending Messages Online
Once you have finished recording your video and/or audio messages, taking a
snapshot or creating, your own card, you may want to send them through the
Internet. There are different ways on how to run the Send Mail program. You can
choose from:
Clicking Start on the Taskbar to locate the EyeStar Mail v3.0 program folder
☞
and then selecting Send Mail from the resulting submenu.
Using the Video Panel program interface, click the Send Mail button.
Depending on the data (video, audio or image) that is currently in the Video
Panel, the corresponding file will be attached to your e-mail message. Icons
appears on the side bar indicating the type of data that are currently
attached.
Using the Card Maker program interface, click the mailbox button found at
the lower right-hand side to attach the card you are currently working on as
an image file in your e-mail.
Below is the Graphical User Interface (GUI) of the Send Mail program.
1
15
14
1 Send Mail button - Starts sending your messages and attachments online.
2 From - Displays reply back e-mail address. This option can be set in the
Mail Setup dialog box opened by clicking Mail Setup button (item #9).
3 To - Specifies the e-mail address of your recipient. If there is more than one
recipient, separate addresses by commas. (Note: The drop-down list can
recall up to 30 e-mail addresses you have already used.)
5432
7
8
9
10
11
12
13
Page 29

29
4 Carbon Copy (Cc) - Includes anybody you want to inform that you have
sent an e-mail to the specified recipient. If there is more than one recipient,
separate addresses by commas. (Note: The drop-down list can recall up to
30 e-mail addresses you have already used.)
5 Subject - Gives the recipient an idea of what your entire e-mail is about.
6 Minimize - Minimizes the program window.
7 Exit - Closes the Send Mail program.
8 Help - Opens the Send Mail online help.
9 Mail Setup - Opens a dialog box for setting up your mail server and related
options before sending e-mail.
10 Add attachments - Choose the files to send with your message.
11 Clear attachments - Deletes all attached files.
12 Message - Contains the message you want to send to your recipient.
13 Attachments list - Displays all files that you have selected to send with
your message. Right-click to choose from the available display options.
14 Open/Close letter sheet - Toggles between displaying or not the letter
body (Message) and attachment list.
15 Image file attachment - Attaches image data online to go with your e-mail
message. This maybe a personalized card you have designed earlier or a
captured image frame. Click the icon to toggle between attaching or
detaching the file.
16 Video/audio and audio only file attachments - The first icon indicates
that a self-executable video/audio file (*.exe) is currently attached with your
e-mail message. The other one indicates an audio file (*wav). *Note:)
These files come from recorded video/audio or audio only files from Video
Panel and sent directly to the Send Mail program. Click any icon to toggle
between attaching and detaching the file.)
Using the Send Mail program:
1. Click any of the entry boxes to specify needed information about your e-
mail message (i.e. sender, recipient, and others). If you have more than one
address for an item, you can separate them using commas. You can also
click the drop-down arrow to display the last few e-mail addresses that you
have used. The Cc (Carbon Copy) and Subject entries are optional.
2. Type in your message in the letter body.
3. Click the Add attachment button to send more files with your message.
4. Click the Send Mail stamp-like button to start the process.
Note: If you encounter any program while sending your e-mail, please refer back
to page 9 on how to check your mail settings.
Page 30

30
Managing Your Files Visually
Collecting image, video, and audio files can sometimes get out of hand if you
don’t organize your files efficiently. It is also helpful if you can see a visual
representation of a file rather than just depending on its file name. This is why a
small (thumbnail), that isabout the size of the thumb, is used to represent your
files in an album. A thumbnail resembles the appearance of the actual file it is
representing (e.g. an image file or an image frame of a video file). By saving files
to albums, you can group them according to their purpose so you can easily
locate them. More so, you can use these files with ease by performing drag-anddrop operations. Simply click a thumbnail and then drag-and-drop it to Card
Maker or Send Mail. Y ou can also double-click a thumbnail to open the file directly
in the appropriate application.
To run Album:
There are several ways on how you can run the Album program. You can choose
from:
Clicking the Start button on the Taskbar to locate the EyeStar Mail program
☞
folder and then selecting Album from the resulting submenu.
Using the Video Panel program interface, click the Album button. You can
select a self-executable video file (*.exe) from Album and drag and drop it
into the Video capture panel. This file will then be available for previewing.
Using the Card Maker program interface, click the Album button. Using
Card Maker along side the Album program will make your work easier as
Album provides quick access to image and mask files that you may want to
use in your project.
Below is the Graphical User Interface (GUI) of the Album program.
16
17
15
5
4
1
2
14
13
3
12
11
10
6
7
8
9
Page 31

31
1 Scroll preceding album - Moves back to the previously displayed albums.
2 Available albums - Displays a set of three albums per view. Each album
contains previously saved files that you can work on in Card Maker or open
in Video Panel for viewing.
3 Scroll - Moves to the next available album.
4 Frame item - Displays a thumbnail representation of a file. Double-click an
item’s name to change it.
5 Scroll up - Shows the previously displayed thumbnail image that is
included in the active album.
6 Scroll down - Shows the next thumbnail image that is included in the
active album.
7 Show/Hide filmstrip - Shows or hides the filmstrip that displays thumbnail
representations of all the files that are included the currently selected
album.
8 Delete frame item - Permanently deletes the currently selected image or
video file from disk.
9 Open selected item - Allows you to open the currently selected item in its
appropriate application.
10 Active album - Displays the name of the currently selected album.
11 Insert an image file - Opens a dialog box for locating a new album.
12 Create a new album - Opens a dialog box for creating a new album.
Specify a name for the new album.
13 Delete album - Displays the name of an album. Double-click to rename.
14 Album’s name - Displays the name of an album. Double-click to rename.
15 Help - Opens the Album online help.
16 Minimize - Minimizes the program window.
17 Exit - Closes the Album program.
To save files to an album, you can:
☞
Select the “Save to album” option in any Save dialog boxes. The drop-down
list of existing albums is enabled and you can choose which album to save
a file to.
Click the Snapshot button in Video Panel and select the Album option.
Tip: It is recommended that you keep the Album program running on the side
while working in Card Maker for quicker access to files and also get an
idea right away of what a certain image file looks like.
Page 32

32
Microtek International, Inc. Software License
Agreement
This document is a legal Agreement between you, the licensee, and Microtek Inc. Please
read this Agreement carefully before installing the Software. If you do not agree to the
terms of this Agreement, you should not continue installing and destroy the CD and all
accompanying items in the package.
License. Microtek Inc. grants you, and you accept, alimited, nonexclusive and
revocable license to use the Software only as authorized in this License Agreement. You
may make one copy of the Software for backup purposes, provided that you reproduce all
copyright and other proprietary notices that are on the original copy of the Software.
Ownership of Software. The Software is owned exclusively by Microtek Inc. an/or its
licensors, and the valuable secrets of Microtek Inc. and/or its licensors. The Software is
protected under copyrights and other intellectual property laws of Japan and International
copyright treaties. The Software is licensed to you for use under the terms of this Agreement, and Microtek Inc. reserves all rights not expressly granted to you. You may not use,
copy or modify the Software, or any copy thereof, in whole or in part, except as expressly
provided for in this Agreement. You may not reverse engineer, disassemble, decompile,
or translate the Software, or otherwise attempt to derive the source code of the Software.
You may not rent, loan, resell, or distribute the Software, or any part thereof.
Term. This license will become effective on the date you acquire the Software and
will remain in force until terminated. This license will automatically terminate if you breach
any of the terms and conditions set out in this License Agreement. You agree to remove
the Software from your computer, to destroy the original Software, all copies of the
Software and documentation.
Limited Warranty. Microtek Inc. warrants to you that the Software will perform
substantially in accordance with the user documentation for the ninety (90) day period
immediately following receipt of the Software. If the Software does not perform substantially in accordance with the documentation during this period and you notify Microtek Inc.
or its licensor, Microtek Inc. or its licensor will replace the Software. your remedy for
breach of this warranty will be limited to replacement and will not encompass any other
damages.
Except as expressly provided above, the Software is provided to you “as is” and Microtek
Inc. and its licensors expressly disclaim all other warranties including the implied warranties or conditions of merchantability, fitness for a particular purpose, and non-infringement. No oral or written information or advice given by Microtek Inc. and its licensors shall
not create any new warranties.
Page 33

33
Limitation of Liability and Remedies. In no event shall Microtek Inc. and its
licensors be liable for any loss of profit or any other commercial damage, including but not
limited to special, incidental, consequential, punitive or other damages arising out of the
use or inability to use the software, even if Microtek Inc. and its licensors are advised, in
advance, of the possibility of such loss or damage and whether or not such loss or
damage are foreseeable. Some jurisdictions do not allow the exclusions or limitation of
incidental, consequential or special damages, so the above limitations may not apply to
you.
Export Law. The software and related technology may be subject to export or import
regulations of Taiwan and other countries. You agree to strictly comply with all such laws
and regulations and agree that the Software will not be shipped, transferred, or exported
into any country, or used in any manner prohibited by any export laws, restrictions or
regulations, and acknowledge that you have the responsibility to obtain such license to
export, reexport or import as may be required.
Update. To receive notification of the future Software upgrades and technical support
from Microtek Inc., please complete and return the registration card with the serial
number of your copy of the Software.
General. This Agreement will be governed by the laws of Japan without regard to or
application of conflicts of law rules or principles. If any provision of this Agreement is held
to be unenforceable, that provision will be removed and the remaining provisions will
remain in full force. This Agreement is the complete and exclusive statement of the
agreement between Microtek Inc. and you which supersedes any proposal or prior
agreement, oral or written, and any other communications between Microtek Inc. and you
in relation to the subject matter of this Agreement.
If you have any questions concerning this agreement, please contact Microtek
INternational, Inc. at
Microtek International, Inc.
6, Industry East Road 3,
Science-based Industrial Park,
Hsinchu 300, Taiwan, ROC
or its regional distributors
Page 34

34
Technical Support
All registered users of EyeStar Mail v3.0 are entitled to technical support from
Microtek Inc., Inc. You can contact our support centers by e-mail or fax and these
information are provided for in the Readme.txt file found in your EyeStar Mail v3.0
program folder. Please prepare the following information first before contacting a
support center:
☞ EyeStar Mail v3.0 serial number
☞ Name and Company
☞ E-mail address
☞ Your computer’s information (CPU type, RAM, & free Hard disk space)
☞ Network environment such as telephone line, ISDN, or LAN
☞ MODEM type
☞ Sound Card
☞ Capture Card
☞ Video Camera
Note: Please make sure that you have given the correct serial number and also
meet the minimum system requirements in order to run EyeStar Mail v3.0.
E-mail: camera@microtek.com.tw
Fax: 886-3-5772598
 Loading...