

Page 1

Color Management
Software Engineering,
RDC
Microtek International Inc.,
Inside ScanWizard Pro for Macintosh August 8, 2000
Page 2

Microtek RDC Software Documentation
1 Introduction
Every color input or output device has its own gamut, i.e.
the range of colors they can produce. A successful artwork for
print or for online use relies on accurate color reproduction.
ScanWizard Pro provides complete color management solution for
scanning to let you achieve color consistency for your application.
To reproduce color accurately, you will have to setup your
color management system properly depending on the operating
system and the applications you’re using. It is not difficult process
but a bit tedious. You’ll need to consult their documentation for
more information.
ScanWizard™ Pro for Macintosh provides complete
scanning color management solution by being compatible with
common profile standards put by forth by the InterColor
Consortium (ICC), an association of major software developers.
ScanWizard Pro for Macintosh allows you to:
Ø Profile your scanner and create various scanner ICC profiles
Ø Select and apply scanner profiles to scan jobs
Ø Specify destination RGB and CMYK profile
Ø Support soft proof by compensating destination profile
with monitor display
Ø Embed ICC profile to scanned images
Ø Deliver uncorrected “raw” image data
with ScanWizard Pro entirely. Or you may scan and then process
image with your favorite applications.
Macintosh color management features and workflow in detail. You
will learn how all these features works together and how you can
take advantage of them.
2 Calibrating Your Monitor
profile is the first step to achieve high color consistence and
precision of color management. This will ensure the closest
possible match between your colors on-screen and those produced
by a scanner, a printer, a video display, or a different computer
monitor, and also between your colors in ScanWizard Pro and
other programs such as Adobe Photoshop™ 5.
With all these features, you may manage color by working
This document will explain the ScanWizard Pro for
Calibrating your monitor to obtain the proper monitor
Monitor ICC profiles may be created specifically by using
either one of the following utilities:
Subject: ScanWizard Pro Color Management Page 1
Page 3
Microtek RDC Software Documentation
Ø The Calibration function of the Monitor Control Panel for
ColorSync 2.5 or later.
Ø Adobe Gamma utility, from Adobe Photoshop 5.0 or later.
Ø Any third-party monitor calibration programs or hardware
calibrator
You can also obtain your monitor profile by checking with
the manufacturer of your monitor.
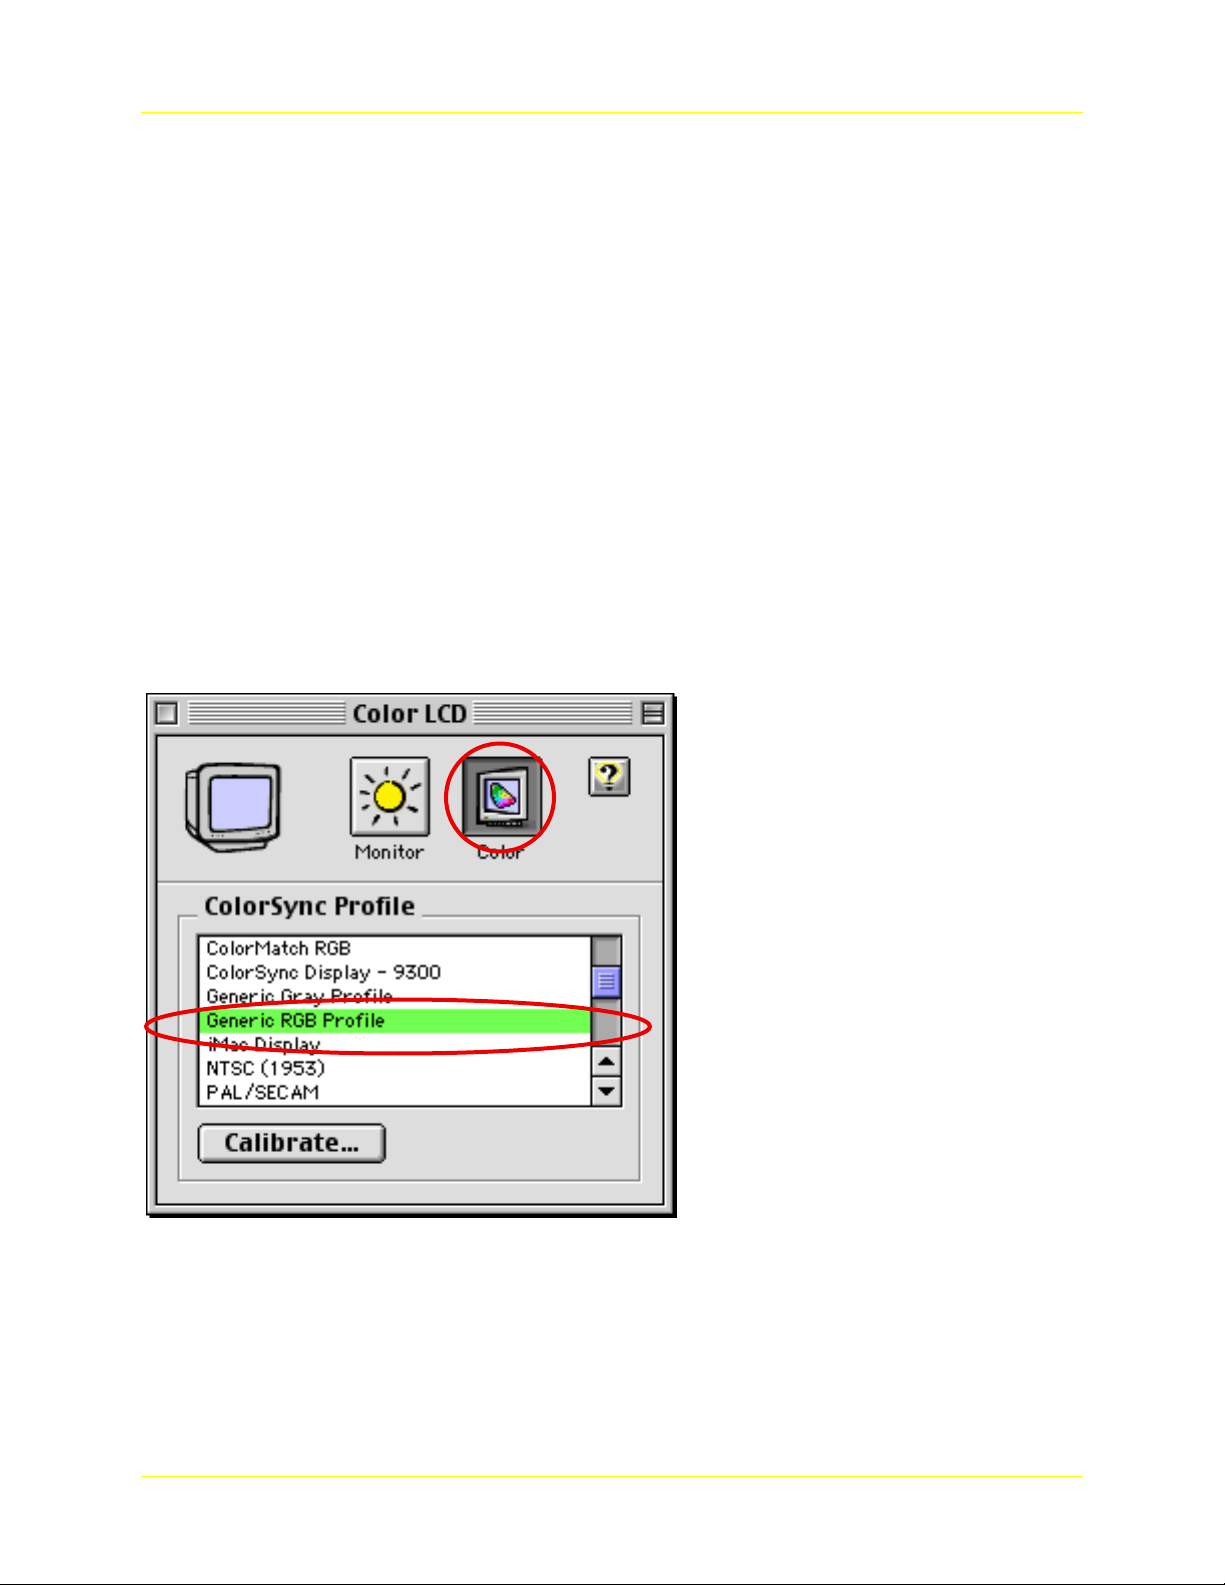
3 Selecting Display (or System) Profile
After creating or identifying the proper monitor profile,
you need to select the display profile to make sure the images will
be displayed consistently on the monitor.
It is strongly suggested to always update your Apple
ColorSync system software to the most up-to-date version. If you
have ColorSync earlier than version 2.5, please update it to the
most recent version available.
To select the display profile, bring up the Monitor control
panel. An example is shown below:
Figure 1. Mac OS Monitor Control Panel
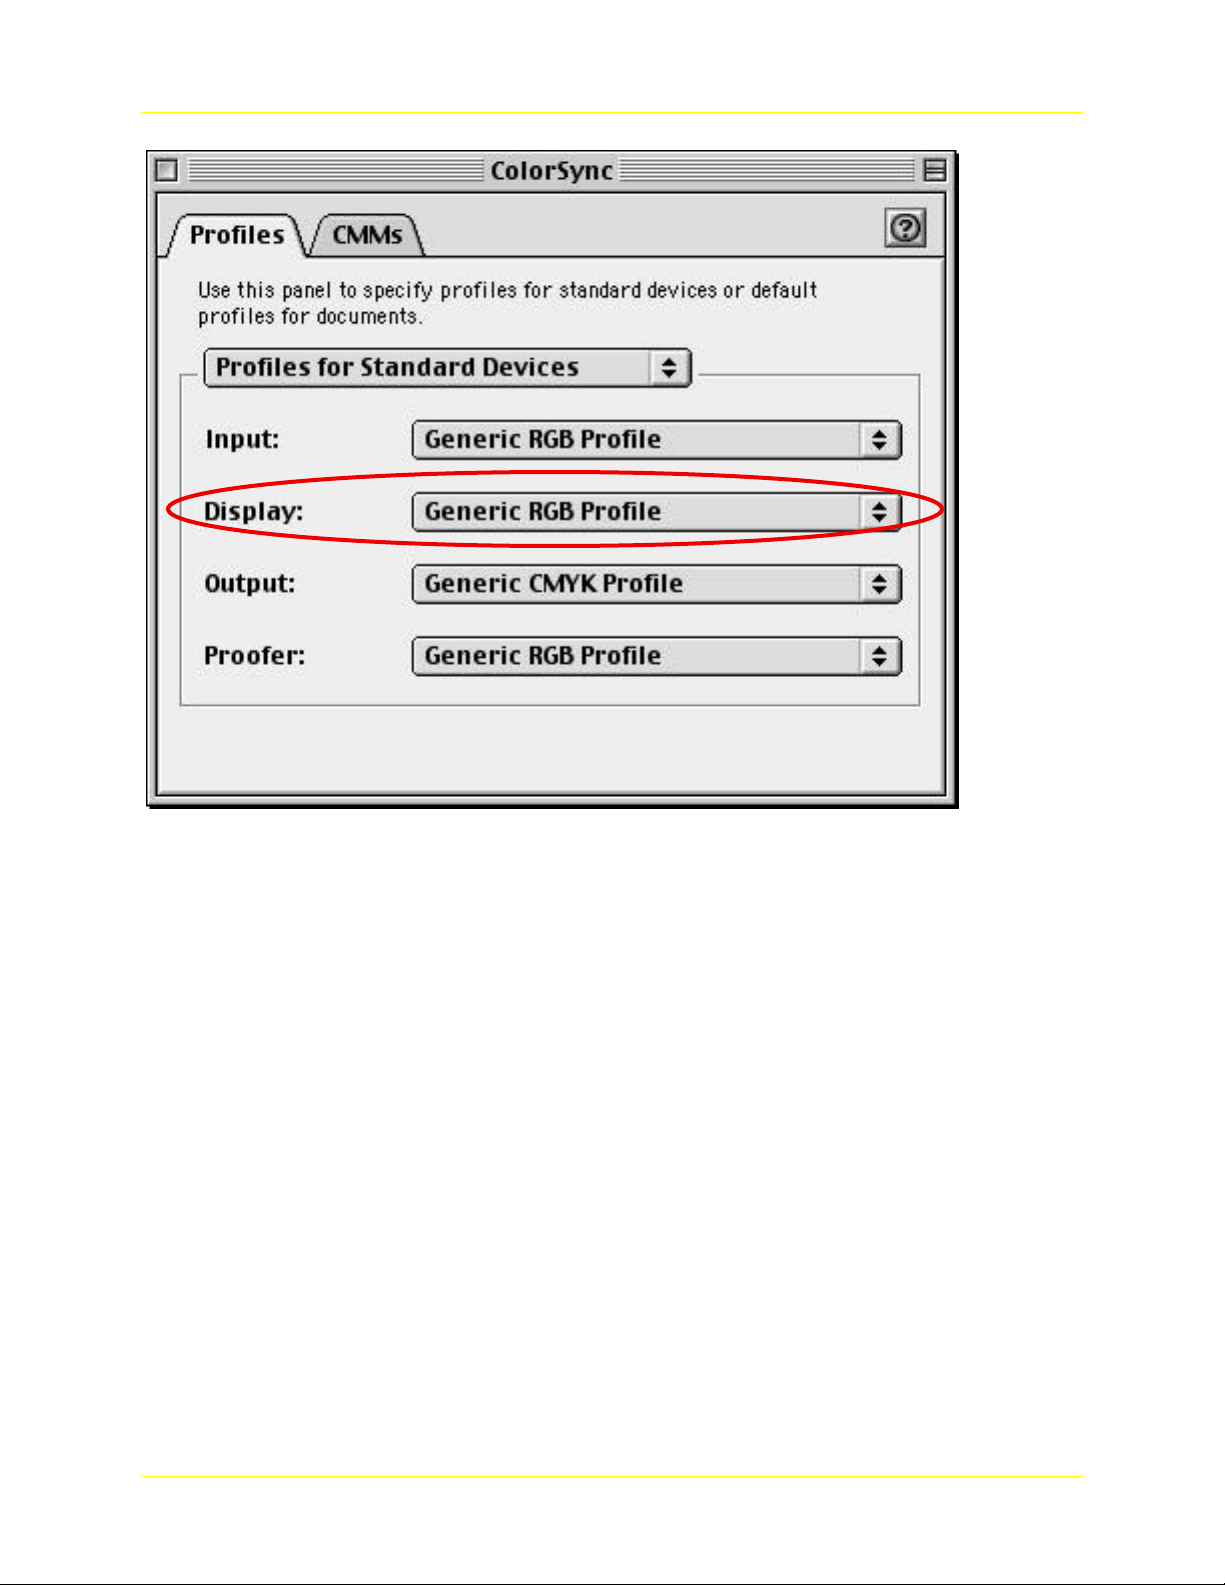
After selecting your monitor profile, you may verify the
selection in the ColorSync control panel, as shown in the example
below.
Subject: ScanWizard Pro Color Management Page 2
Page 4
Microtek RDC Software Documentation
Figure 2. Mac OS ColorSync Control Panel
The Display profile is the only setting that ScanWizard Pro
will be using in the ColorSync control panel. You should not
change the display profile in the middle of running ScanWizard
Pro, which recognizes the profile during its start up time.
Whenever you change the display profile, your must restart
ScanWizard Pro.
If you have more than one monitor, each monitor has its
own display profile selection. However, ScanWizard Pro only
works with the main display, where the menu bar is displayed. In
this case, do not move the Preview Window to any secondary
monitor. Otherwise, the colors will be not correctly displayed.
4 ScanWizard™ Pro Color Management
ScanWizard Pro delivers full set of color management
function to give you the best possible image quality as well as
maximum flexibility. You don’t need other 3rd party utilities or
program to get satisfactory results. ScanWizard Pro package
contains everything you need.
Also, you may scan and then defer the color matching
process to your favorite applications. It is totally up to you.
Subject: ScanWizard Pro Color Management Page 3
Page 5

Microtek RDC Software Documentation
The color management functions are accessible from a few
various places, discussed in the following sections.
1.0 Microtek Scanner Profiler
The color space of a scanned image is "described" by a
scanner profile, i.e. a scanner profile is used as the "source"
profile in the color matching process. Every Microtek scanner
comes with a set of default 16-bit resolution look up table
scanner profile.
Microtek Scanner Profiler uses Kodak’s color management
engine to characterize scanner. Unlike many third party scanner
profilers, scanner profiles created by Microtek Scanner Profiler
contains additional private tags, which contain proprietary
information to allow ScanWizard Pro to deliver more accurate
color rendering and detail tonal range reproduction.
The default profile is the best settings from manufacturer.
You may use default scanner profile. Also, you may create your
own scanner profile by using Microtek Scanner Profiler, or known
as MSP. Profile your scanner regularly guarantees accurate color
consistency for your scanner. Please refer to the MSP user’s guide
for recommended profiling period.
screen, you may create a scanner profile in no time. You may also
create various scanner profiles of different settings for your needs.
Make sure you specify a clear description because most
applications ask you to select a profile by descriptions, not by
filename.
ColorSync Profiles folder of the System Folder. They are labeled as
scanner profile and ScanWizard Pro will recognize them
automatically. You don’t have to move them around to use them.
Please note that the scanner profile is scanner model dependent.
You can not use a scanner profile for a different model of scanner.
used by third party applications. However, you have to be very
careful about the settings you're using to scan. Please refer to the
section of “Using 3rd Party Scanner Profiles With ScanWizard
Pro.”
profiler with ScanWizard Pro.
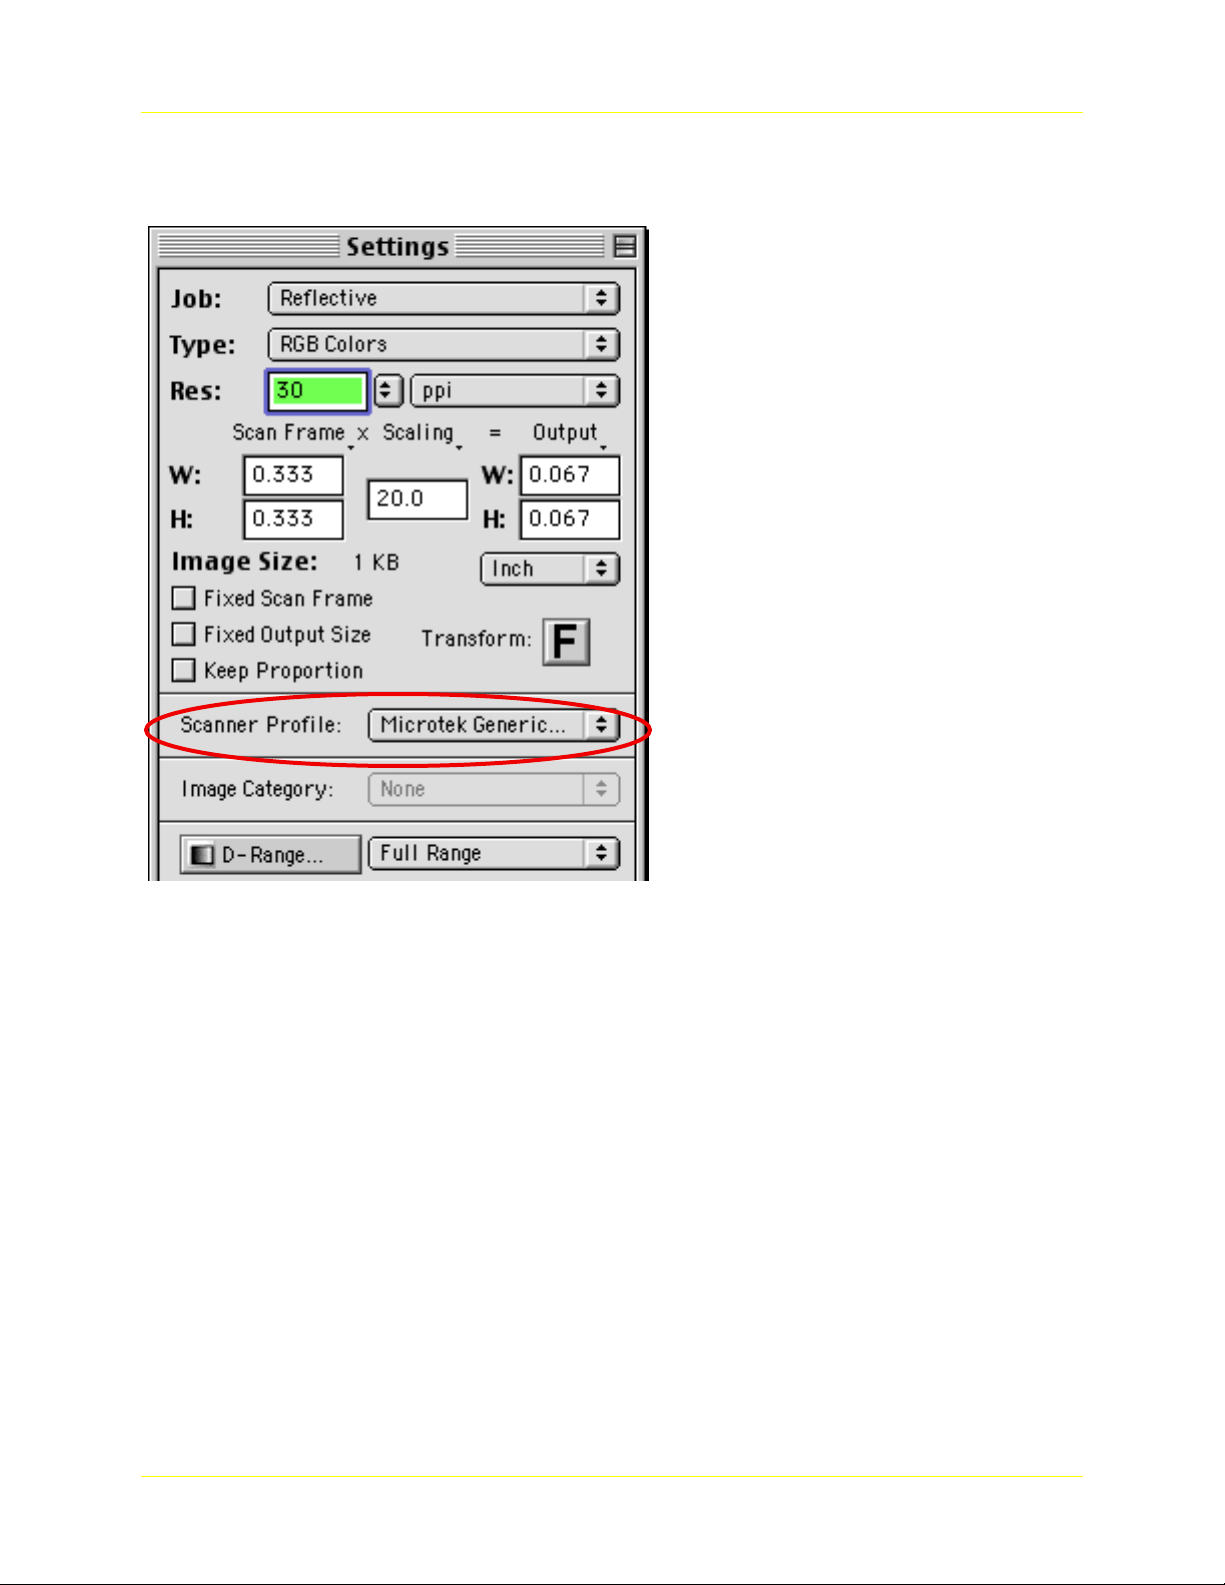
1.1 Selecting Scanner Profiles
MSP is an easy to use program. Follow the instructions on
After scanner profiles are created, they are placed in the
Please note the MSP generated scanner profiles can be also
You may use scanner profiles created by 3rd party scanner
In the ScanWizard Pro, the scanner profile is selected from
the Settings Window. The scanner profile of the current scanner
models can be accessed through Scanner Profile popup menu.
Subject: ScanWizard Pro Color Management Page 4
Page 6
Microtek RDC Software Documentation
Please note that you may use different scanner profiles for each
scan job; this adds up more flexibility.
Figure 3. Scanner Profile Popup Menu
1.2 Color Matching Setup Dialog Box
When ScanWizard Pro is started for the very first time, the
Color Matching Setup dialog box is displayed to ask you setup your
color management parameters; unlike scanner profile discussed
earlier, these parameters are applied to all scan jobs. You may also
access the dialog box afterward by running Preferences | Color
Matching Setup command.
Subject: ScanWizard Pro Color Management Page 5
Page 7

Microtek RDC Software Documentation
Figure 4. Color Matching Setup Dialog Box
In the Color Matching Setup dialog box, you will be able to:
Ø Enable or disable soft proof
Ø View the current system display profile
Ø Enable or disable RGB color matching
Ø Enable or disable embedding ICC profile to scanned images
Ø Select output destination profile.
1.2.0 Display Using Monitor Compensation
This function is applicable to RBG images only. For CMYK
and LAB images, this function will be done implicitly, i.e.
compensating to the system Display profile. This process of
matching or compensate to your display, also known as soft proof,
allows you to preview the results of color images on your display
without actually outputting to your output device, e.g. a color
printer.
The whole idea can be demonstrated by using a simple
diagram:
Subject: ScanWizard Pro Color Management Page 6
Page 8

Microtek RDC Software Documentation
Scanner RGB
Data
User’s
Monitor
Destintation
RGB Data
Data
Figure 5. Monitor Compensation and Non-Compensation Paths
To enable this feature, check the Display Using Monitor
Compensation check box; the image is displayed through the green
path. If this check box is unchecked, RGB image is directly
dumped to the display without performance any color matching;
the image is displayed through the yellow path. In this case, the
Preview Window redraw will be slightly faster, by frictions of a
second but you won’t be able to tell the difference.
Monitor RGB
Please note this setting only changes the way image is
displayed on the monitor; the image data itself is not altered.
1.2.1 Monitor
This item shows the current system display profile, which
is selected in the ColorSync control panel. You may only view the
selection.
1.2.2 Native Mode RBG Color Matching
This function is applicable to RGB images in the Native
color mode only. Please note that in the LCH color mode, color
images must go through color matching process in order to
generate LCH image data. To change the color mode settings, run
the Preferences | More… command.
If this check box is unchecked, uncorrected RGB images
data will be returned. Usually, the images look darker on the
monitor comparing to those with color matching on.
This feature is useful if you want to obtain “raw” image
data from scanner. It is highly recommended not to turn off this
check box unless you have a special need for it.
Subject: ScanWizard Pro Color Management Page 7
Page 9

Microtek RDC Software Documentation
1.2.3 Embed ICC Destination Profile In Scan Image
Enable this function to embed the RGB Destination or the
CMYK Destination ICC profile (depends on the image type) in
image data. If native mode RGB color matching function is not
enabled, RGB destination profile will not be embedded.
It is highly suggested to enable this check box so that color
profile information can be embedded and delivered to the target
application unless your target application can not take the profile
information. Otherwise, images may be compensated incorrectly.
1.2.4 RGB Destination
This feature lets you select the correct profile for
outputting images to the RGB color space. The RGB Destination
profile usually pertains to a monitor (since all monitors are RGB
devices), but an RGB printer profile may also be used as a
selection if the RGB color space in which you choose to work is an
RGB printer.
To specify the RGB Destination profile: choose from the
profiles provided in the list, or choose your own profile if you have
others stored in your system.
ScanWizard Pro enumerates all the ICC profiles found in
the ColorSync Profiles folder and displays the found RGB profiles.
If you have ICC RGB profiles that are installed somewhere else,
click at the button at the right to browse and select your desired
profile.
Please pay special attention to the Scanner RGB menu item
in the popup menu. With this selection, ScanWizard Pro returns
RGB image data scanned with “linear” condition, which is the
same condition that MSP uses to profile scanner. In other words,
scanner RGB means image data uses the scanner profile as its
destination profile, instead of profiles such as monitor or printer.
There is a great advantage of this because it is one less
color space conversion in the color matching process. The net
results are the original scanner RGB data is preserved better. This
is especially important for those who demand the minimal loss of
data during color space conversion.
Also, if you want to apply MSP profile in other application,
you must select Scanner RGB as your RGB destination color space.
This setting has no relationship with any settings in
ColorSync control panel.
1.2.5 CMYK Destination
This feature lets you specify the correct profile for
outputting images to the CMYK color space.
Subject: ScanWizard Pro Color Management Page 8
Page 10

Microtek RDC Software Documentation
To specify the CMYK Destination profile, choose from the
profiles provided by ScanWizard Pro, or choose your own profile if
you have others stored on your system.
ScanWizard Pro comes with a rich set of CMYK profiles for
various applications. They are not installed as default and you
must run the ICC Profile Installer from your ScanWizard Pro CD.
ScanWizard Pro enumerates all the ICC profiles found in
the ColorSync Profiles folder and displays the found CMYK
profiles. If you have CMYK ICC profiles that are installed
somewhere else, click at the button at the right to browse and
select your desired profile.
This setting has no relationship with any settings in
ColorSync control panel.
1.2.6 Preview
This check box immediately updates the Preview Window
image when a new setting is selected. This will reflect colors
consistent with the newly selected profiles and settings. This check
box does not change the image data itself.
1.2.7 Profile Info…
To view information of current selected profiles, click the
“Profile Info…” button.
2 Scan Images To 3rd Party Applications
There are a few things that you need to pay attention when
using ScanWizard Pro with 3rd party applications. You should
know if your applications (image editing or page layout program)
are ColorSync-savvy or not. This is because the settings in the
Color Matching Setup dialog box will vary, depending on the
image-editing application you’re using. Check your application
documentation for the availability of color management function.
Make sure you have ScanWizard Pro installed and setup
properly. When installed, scanner profiles are placed in the
ColorSync Profiles folder in the System folder. You may use MSP
(Microtek Scanner Profiler) to profile your scanner, optionally.
2.0 ColorSync Savvy Applications
There are many ColorSync-savvy applications in the
market. Adobe Photoshop is used as an example. This should give
you some good idea how everything works.
Adobe Photoshop 5.0 or later is a good example of a
ColorSync–savvy application. If you’re using Photoshop 5.0, we
recommend that you update to version 5.0.2 or later; don’t use
version 5.0.
Subject: ScanWizard Pro Color Management Page 9
Page 11

Microtek RDC Software Documentation
In the Color Matching Setup dialog box of ScanWizard Pro,
you will need to do the following:
Ø Display Using Monitor Compensation: On
If you’re using Photoshop 5.0.2 or later, make sure that you
also check the Display Using Monitor Compensation check
box in Photoshop’s File | Color Settings… | RGB dialog box.
This will ensure that the scanned images displayed in the
Photoshop match the preview images shown in the Preview
Window of ScanWizard Pro. Please note that this function
only effect the way images are view on the monitor and
does not modify the image content.
Ø RGB Color Matching: On
Take note that if this box is not checked, your RGB images
will not go through the color matching process, and you
may obtain inaccurate colors as a result.
Ø Embed ICC Destination Profile In Scan Image: On
This feature will enable ScanWizard Pro to embed the ICC
profile of the currently selected color space in the image
data. The ICC information will be properly interpreted by
Adobe Photoshop or any ColorSync-Savvy applications.
Ø RGB Destination: Scanner RGB
The Scanner RGB is the best choice because there is one
less color space conversion in the color matching process
than other selections. Minimal loss of data is resulted
during color-space conversion.
If you wish ScanWizard Pro to output directly to the
Photoshop internal working color space, you may do so in a
few simple steps: 1) in the File | Color Settings… | RGB dialog
box, choose the desired RGB space, 2) click the Save…
button to save the profile (preferably to ColorSync Profile
folder), 3) bring up Color Matching dialog box and select
the profile in the RGB Destination menu.
When the settings are specified correctly, scanned images
will appear consistently in the Preview Window of ScanWizard Pro
as well as in Photoshop.
Please note that, depending on the Photoshop settings,
Photoshop may ask you to convert scanned images if the image
profile (color space) is not the same as Photoshop’s working color
space. In this case, you should choose to convert to ensure the
color consistency.
2.1 Non-ColorSync Savvy Application
Most of early day applications are not ColorSync-savvy
applications. Non-ColorSync-savvy applications do not know to
read or handle embedded ICC profile information or RGB image is
Subject: ScanWizard Pro Color Management Page 10
Page 12

Microtek RDC Software Documentation
dumped to the monitor without monitor compensation. In other
words, they don’t have standard color matching mechanism to
ensure color consistency across devices.
Adobe Photoshop 4.0 or earlier is a good example of a nonColorSync–savvy application.
In the Color Matching Setup dialog box of ScanWizard Pro,
you will need to do the following:
Ø Display Using Monitor Compensation: Off
If this box is checked, display of image data is
“compensated”, resulting in a difference between the image
shown in the Preview Window of ScanWizard Pro from the
image that is delivered to your image-editing application.
Ø RGB Color Matching: On
Even for non-ColorSync-savvy applications, you still need
ScanWizard Pro to perform color matching to deliver good
image quality.
Ø Embed ICC Destination Profile In Scan Image: On
Ø RGB Destination: Your Desired Color Profile
3 Using 3rd Party Profilers
ScanWizard Pro to perform color matching for you. However, if
you prefer, you may use 3rd party profilers (e.g. Monaco and
PraxiSoft) to profile your scanner. You must be very careful with
some settings of the ScanWizard Pro in order to get the correct
results. Especially, you can not use any image processing functions
to alter images (e.g. in the Advanced Image Correction dialog box.)
scan-to-profile (for your profiler) are exactly the same as scan-toapply-profile (in your image editing or page layout application.)
Otherwise, the results will not be correct.
You may leave this box on. You should only turn off this
check box if your application can not read or handle
embedded ICC profile data.
Choose your desired color space in which the application
wishes to work. In many cases, you can select your monitor
profile or the sRGB profile, will usually provide satisfactory
results.
Unlike working with ColorSync-savvy application, do not
choose Scanner RGB.
To get the best results, we recommend you use MSP and
The rule of thumb is to always make sure the settings of
The profiling process usually is divided into two steps:
scanning target and profiling.
Subject: ScanWizard Pro Color Management Page 11
Page 13

Microtek RDC Software Documentation
3.0 Settings Window
In ScanWizard Pro, you must do the followings in the
Settings Window:
Ø Select the proper image type and resolution; consult your
profiler documentation. Select 48-Bit RGB Colors if possible,
which contains most color information.
Ø Click the Reset button to reset all settings.
Ø Select Full Range in the D-Range popup menu.
Please note that the default of D-Range popup menu is
Automatic, which must not be used to create profiles nor to scan
and apply profile.
3.1 Scanning with Scanner RGB
We recommend you profile scanner with Scanner RGB
data because this is how Microtek Scanner Profiler (MSP) profile
scanners. You may also select and use the profiles with
ScanWizard Pro as those created by MSP.
profiles. In the Color Matching Setup dialog box, the key settings
are:
Ø RGB Color Matching: On
Ø Embed ICC Destination Profile In Scan Image: On
Ø RGB Destination: Your Desired Color Profile
3.2 Scanning Raw Image Data
ScanWizard Pro to the profiler. This is suggested by most 3rd party
profilers, which is not quite applicable to ScanWizard Pro. As we
recommended earlier, you should scan with Scanner RGB to
profile.
does not profile the scanner with raw data. Therefore, you should
not use your 3rd party profiles in ScanWizard Pro. Otherwise,
image will not appear right.
These settings should be always used if you’re using these
Enable this option.
This item will not effect your operation as long as it is not a
problem for your profiler.
Select Scanner RGB.
If you want to, you may also scan “raw” data from
The difference is that Microtek Scanner Profiler (MSP)
However, it is OK to use your 3rd party profiles with other
applications as long as the images are also scanned as raw data
and then apply with your profile.
Subject: ScanWizard Pro Color Management Page 12
Page 14

Microtek RDC Software Documentation
To scan raw data, you need to go through two steps. First,
run the Preferences | More… command to bring up the More
Preferences dialog box. In the Color Space Mode popup menu,
select Native mode. The default setting is LCH mode.
Secondly, run Preferences | Color Matching Setup… and
select the followings:
Ø RGB Color Matching: Off
With this option disabled, ScanWizard Pro will scan and
deliver raw image data to you.
3.3 Create Profiles
Consult your profiler user’s guide for the steps of profiling
your scanner.
4 Using 3rd Party Scanner Profiles With ScanWizard Pro
You may use scanner profiles created by 3rd party scanner
profiler with ScanWizard Pro.
4.0 How ScanWizard Pro Handles Scanner Profiles
This section describes how ScanWizard Pro handles
scanner profiles. You may skip this section if you are not
interested in technical details.
Scanner profiles created by 3rd party profilers will not be
listed in ScanWizard Pro because these profiles does not include
some required basic information required such as scanner model
code and the media type.
Scanner model code (in the "Device Model" field of the ICC
profile header) is a unique code for every Microtek scanner model
and the media type (in the "Device Attributes" field of the ICC
profile header) is what the scanner profile is used for: reflective or
transmissive.
The filtering mechanism is necessary to avoid possible
error of choosing an incorrect scanner profile.
4.1 Select 3rd Party Scanner Profiles
You may not select 3rd scanner profiles directly from the
Scanner Profile menu in the Settings window since they are not
listed automatically. Follow the following steps:
Figure 6. Select Scanner Profile
Subject: ScanWizard Pro Color Management Page 13
Page 15

Microtek RDC Software Documentation
First, select “Select Scanner Profile…” menu item to bring
up Scanner Profile Menu.
Figure 7. Scanner Profile Dialog Box
Secondly, click the Import button at the top right corner to
bring up the profile selection dialog box.
Figure 8. Scanner Profile Selection Dialog Box
Subject: ScanWizard Pro Color Management Page 14
Page 16

Microtek RDC Software Documentation
Thirdly, go to the folder and check the “Show All Files” to
display all files in the folder. Otherwise, the 3rd party scanner
profile will not be displayed. Select the profile and click Open
button to select it.
Please note that you may also select the 3rd party scanner
profiles in the RGB Destination popup menu in the Color
Matching Setup dialog box. This will work fine.
4.2 Special Notes of Using Monaco EZ Profiles
During our tests, we discovered that an error is displayed
in the following settings when using a Monaco scanner profile:
Ø LCH working color space (in the More Preferences dialog
box,) and
Ø Scanner RGB in the RGB Destination popup menu (in the
Color Matching Setup dialog box)
This is because Monaco scanner profile does not support a
reverse transform from LAB to Scanner RGB space, which is
required by ScanWizard Pro.
However, this is not necessarily a fault of Monaco;
according to ICC input profile specification, this reverse transform
is an addition to a basic profile standard.
To avoid this problem, you may do either of the followings:
Ø Select Native working color space (in the More Preferences
dialog box,) or
Ø Choose any RGB Destination profile other than Scanner
RGB (in the Color Matching Setup dialog box)
5 Using Scanner Profiles with 3rd Party Applications
In some occasions, you may want use your favorite
application to perform color management functions. For example,
you may want to scan an image, run a script to duplicate the
images, apply various color matching settings and post image
processing to them.
ScanWizard Pro is very flexible in these kinds of scenarios
but you have to be careful the settings to get what you want.
5.0 Adobe Photoshop’s Profile-to-Profile
As mentioned earlier, you may defer the color matching
processing to your favorite application. There are applications,
capable of converting color space of images, available in the
market. We’ll use Photoshop 5.0 as an example.
We don’t recommend you to defer the color matching
processing. In fact, ScanWizard Pro delivers the best possible
image quality through the use of 16 Bit ICC profile and the
Subject: ScanWizard Pro Color Management Page 15
Page 17

Microtek RDC Software Documentation
sophisticated color management engine. Also, you retain the
flexibility of using all image processing functions.
If you defer the color matching process, you can not apply
any image processing function and yet you have to be very careful
how the image is scanned with ScanWizard Pro. Otherwise, the
image will be matched incorrectly.
5.0.0 Using MSP Profiles
If you’re using profiles created by MSP, you must scan
images using Scanner RGB color space. Please refer to “Error!
Reference source not found.” section for more information.
All image processing parameters must be reset to defaults
(by using the Reset button) and the D-Range may be set to
Automatic or Full Range.
5.0.1 Using Third Party Profile s
If you’re using profiles created by 3rd party profiler, you
must scan images under the exact same condition as you scan to
create profiles with the 3rd party profiler.
5.0.2 Profile to Profile Dialog Box
by running the Image | Mode | Profile to Profile… command. Consult
your Photoshop 5 manual for more details.
In Photoshop 5, you may perform color space conversion
Figure 9. Adobe Photoshop 5 Profile to Profile dialog box
Subject: ScanWizard Pro Color Management Page 16
Page 18

Microtek RDC Software Documentation
In the From popup menu, select the scanner profile. The
following example lists a few Microtek scanner profile:
Figure 10. Microtek Scanner Profiles
For the Intent pop-up menu, you should select “Perceptual
(Images)” for scanned images. ScanWizard use perceptual
internally.
For the Engine, using the Apple Built-in is fine. You may
also install Kodak CMM if you install ColorSync package
separated. Kodak CMM is not installed as default. ScanWizard Pro
uses Kodak color matching engine.
Subject: ScanWizard Pro Color Management Page 17
 Loading...