


Xbox media player 2.4
Index
1. Introduction ............................4
1.1 The XboxMediaPlayer Project 4
1.2 History 4
1.3 Features 5
2. Basic installation ......................6
2.1 Set up the config.xml file 6
2.2 Using from HDD 9
2.3 Using from CD/DVD 9
2.4 Using XBMP as a Dashboard 9
2.5 Controller Setup 10
2.6 DVD Remote Setup 11
3. Optional Features ................... 13
3.1 Relax XNS Server 13
3.2 SMB Shares 14
3.3 XBMSP 15
3.4 FTP Server 16
3.5 ISO 9660 16
3.6 File/Folder Thumbnails 16
3.7 Subtitles 17
3.8 Filename Filters 17
3.9 Multi File Stacking 17
3.10 DLL Codec's 18
3.11 IMDb support 18
3.12 Skins 18
4. My Programs.......................... 19
4.1 Shortcuts 19
4.2 Program Bookmarks 20
4.3 Hierarchy Flattening 20
5. My Music .............................. 21
5.1 Playlist 21
5.2 Shoutcast 22
5.3 Audio Visualizations 22
6. My Pictures ........................... 23
6.1 Slideshow 23
6.2 Using Background Music 23
7. My Videos ............................. 24
7.1 During Playback 24

Control Panel 25
7.2
7.3 On Screen Display (OSD) 25
7.4 Video bookmarks 25
7.5 Playlist 25
7.6 IMDb Information 25
8. Settings ............................... 26
8.1 Decoder 26
8.2 General 27
8.3 Screen 28
8.4 Slideshow 29
8.5 Sound 29
8.6 System 29
9. Advanced Configuration............ 30
9.1 Fine Tuning XBMP 30
9.2 Upgrading XBMP 31
10. Tips .................................... 32
11. Trouble Shooting .................... 33
12. Useful Links .......................... 34
13. Greetings ............................. 35
14. Disclaimer ............................ 36

Go back to Index
1. Introduction
1.1 The XboxMediaPlayer Project
XboxMediaPlayer is a free open source (GPL) multimedia player for the Xbox™ from Microsoft.
(XboxMediaPlayer is also known as "Xbox Media Player", "XBMP", "XMP" & "XBPLAYER"). Currently
the XboxMediaPlayer can be used to play and view supported video/audio/picture formats
such as MPEG, DivX, XviD, MPG, MP3, JPG and more direct from a CD/DVD in the Xbox™ DVD-ROM
or of the Xbox™ hard disk drive, it can also play files from a PC over a LAN / network via an XNS
(XStream Server) software or from a windows (SMB) share. It has playlist and slideshow function,
ability to work as a replacement Xbox™ dashboard. These and more features enable the Xbox™
running XboxMediaPlayer to fully function as a multi-media jukebox.
Note! XBMP is a hobby project that is only developed by volunteers in their spare-time for free.
(Remember XboxMediaPlayer does require a modded Xbox to work).
1.2 History
The XboxMediaPlayer was created by d7o3g4q (a.k.a. duo) & RUNTiME. It started out as two
separate players by the two original developers each working on their own design d7o3g4q's
player was called XboxMediaPlayer & RUNTiME's player was called XBPLAYER, they began by
sharing some code & coordinating features to not duplicate efforts & by XboxMediaPlayer beta 5
the two player where totally integrated into one. In beta 5 they also started using FFMPEG as the
video codec & in beta 6 they also added XviD support with code from the XviD project. The
development & beta testing was done "behind closed doors" for this project (d7o3g4q & RUNTiME
promising that when version 1.0 was made they would release the source code to the public, but
after beta 6 was done there where a lot of complaining from many why the developers did not
release the source code for the player sooner as they where using FFmpeg & XviD code which are
under the (L)GPL license. Even though the project was closed d7o3g4q & RUNTiME released the
source code for beta 6 (Inc. a few bug fixes, SVCD/MPEG-2 & limited ISO 9660 caching support)
on the 15th of October 2002. In the November 2002 Frodo (the founder of "YAMP - Yet Another
Media Player") joined the Xbox Media Player team as the XboxMediaPlayer & YAMP project
merged, the first release of the merged projects is called "Xbox Media Player 2.0" & source code
for it was release on the 14 December 2002. (XboxMediaPlayer 2.0 is a complete re-write using a
new core based on the Mplayer project still using FFmpeg/XviD codec code). On the 28 December
2002 the source code of XboxMediaPlayer 2.1 was released with many bug fixes and a couple of
new features like true AC3 5.1 output, volume normalizer/amplification and an additional post
processing filter. Two weeks later on the 12 of January 2002 XboxMediaPlayer 2.2 source code
was released with new features like dashboard mode to launch other applications, separate
national language files, streaming media from windows shares (SMB), audio-playlist, playing
media on-the-fly from ISO9660-Mode1 CD's and Windows DLL support for WMV 7,8,9. We have not
yet had a point release since then but subtitle/GUI TTF support, SHOUTcast streaming, IFO
playback, IMDb service, ISO9660-Mode2, video playlist, blank screensaver and a build-in FTP
server has been added to the CVS.
XNS protocol and the first XStream Streamer/Server software was created by RUNTIME to share
media to the player over a network. Since then it is being worked on by Pope-X, Jeff33, Ziki, jkw
& Tusse/nonSense (with support from RUNTiME, d7o3g4q & frodo), a draft for a new XNS protocol
has also been put together by PuhPuh. Some of the streamers also host additional functions like
SHOUTcast support.
(Of course the ultimate goal is to make this the best available media player for the Xbox™).

Go back to Index
1.3 Features
XboxMediaPlayer 2.4 point release source code supports/features the following:
- AVI, OGM, Matroska & MPG/MPEG multimedia containers
- DivX;-) 3.11 and OpenDivX 4.0 playback (uses FFmpeg lib)
- DivX 5.0 - 5.03 Pro playback inc. B-frames, GMC & QPel (uses FFmpeg lib)
- XviD playback support (uses XviD codec library)
- MP3 and MPEG-1/2 audio playback (uses libmad lib)
- OGG/OGM Support (uses libvorbis/FFmpeg/XviD libs)
- Windows Media Files WMA/WMV/ASF (inc. WMV9 via DLL's)
- BivX (multiple audio streams/tracks) support
- MSMpeg4 v1, MSMpeg4 v2 & MSMpeg4 v3 support (uses FFmpeg lib)
- AC3 (Dolby Digital 5.1) support (real AC3 5.1 output or down-mixed to stereo)
- MPEG-1 and MPEG-2 (inc. .DAT & .BIN VCD/SVCD files) (uses FFmpeg lib)
- Unencrypted VOB playback (uses libmpeg2 lib) & encrypted via IFO parsing from DVD
- Subtitle support (MicroDVD, srt, smi, vplayer, rt, ssa, aqt, sub, jss, mpl & VobSub)
- True FFWD/RWD during AVI, OGM, Matroska (DivX/XviD) & MPEG playback
- Seeking during AVI (DivX/XviD) & MPEG playback
- Audio Visualization (using Goom visual effects generator)
- Playlist's for audio & video files (inc. save & play playlist to/from M3U)
- Video bookmarking (so can resume a movie later, even after reboot)
- Post-Processing filters for better video quality
- Audio amplifying & normalization filters
- Video resizing/scaling and zooming functions
- ISO 9660 - Mode1 CD-R/RW compatibility (caching or on-the-fly)
- ISO 9660 - Mode2 CD-R/RW compatibility (caching or on-the-fly) (VCD/SVCD)*
- JPG, GIF, BMP, PNG, TIFF, TGA & PCX picture/image viewing (uses FFmpeg lib)
- Picture slideshow of JPG, GIF, BMP, PNG, TIFF, TGA & PCX (using CxImage)
- Thumbnails (media files, folders and applications) for easy localization
- Picture thumbnails (automatically generated)
- Launch XBE's (dashboard replacement mode)
- Build-in FTP Server (using XBFileZilla module)
- IMDb information (The Internet Movie Database)
- Internet Radio - SHOUTcast/Icecast support (native or streaming via RelaX)
- OSD (On Screen Display) with various of settings during video playback
- File streaming from a PC or Server over a network from a XNS (XStream Server) software
- File streaming from a PC or Server over a network from Windows SMB (Samba) share/s*
- Stream video/audio/pictures directly from a ISO/BIN/IMG/ZIP files via RelaX
- 8092Kb memory buffer for video/audio playback (can be configured)
- NTSC playback on PAL Xbox/TV and PAL playback on NTSC Xbox/TV
- Control XboxMediaPlayer via Xbox™ controller or the Xbox™ DVD Remote
- Language files for translated user interface (over 20 languages so far)
- International subtitle fonts (manually exchangeable using TTF fonts)
- International GUI fonts (manually exchangeable using TTF fonts)
*Some of them may have problems, but they are constantly being worked on. Please, feel free to
report bugs and problems in the bug reporting forums.

Go back to Index
2. Basic installation
XBMP requires a modded Xbox; any modchip/exploit will work with XBMP.
XBMP can be run either from the Xbox’s HDD or from CD/DVD media.
2.1 Set up the config.xml file
Now, to set up the “config.xml”, open the file with an XML or Text Editor, like Notepad, and
change like explained:
- Map local drives
This configuration will map all the drives, XBMP will automap the DVD-ROM as of version 2.4. The
C:\, E:\, and F:\ are the only recommended drives to use.
- Local Settings
*Address: Specifies the Xbox’s IP Address.
*Subnet: If needed, specifies the subnet mask for the network.
*Gateway: Specifies the network gateway.
*Place an “*”at the end of each of these tags to auto detect settings.
<address*> </address*> | <subnet*> </subnet*> | <gateway*> </gateway*>
Nameserver
TimeServer
Playlists
Remember
: DNS IP Address, used for SMB shares.
: XBMP can synchronize the Clock/Date from external (NT SNTP) Time Servers
: The folder in which saved playlists will be placed.
to Share this folder in the Music/Video Sections in order to be able to load them.
Thumbnails: Configure this folder to auto add TBN to files without covers (like CD/DVD
Compilations). Filename must match.
Bookmarks
IMDB
Subtitles
Home
: Folder used to save BMK files, used to navigate the file. (Info in Section 7.2)
: Folder to save cached IMDB information for offline use.
: Folder to place supported subtitle files, filename must match the video filename.
: XBMP’s home folder; set to where XBMP is stored.
<map>C:,Harddisk0\Partition2</map>
<map>E:,Harddisk0\Partition1</map>
<map>F:,Harddisk0\Partition6</map>
<map>X:,Harddisk0\Partition3</map>
<map>Y:,Harddisk0\Partition4</map>
<ma
p>Z:,Harddisk0\Partition5</map>
<local>
<address>192.168.0.30</address>
<subnet>255.255.255.0</subnet>
<gateway>192.168.0.1</gateway>
<nameserver>192.168.0.12</nameserver>
<playlists>e:\apps\xbmp\playlists</playlists>
<thumbnails>e:\ apps\xbmp\thumbs</thumbnails>
<bookmarks>e:\ apps\xbmp\bookmarks</bookmarks>
<subtitles>e:\apps\xbmp\subtitles</subtitles>
<IMDB>e:\ apps\xbmp\IMDB</IMDB>
<Home>e:\apps\xbmp</Home>
<
/local>

Go back to Index
-Shares
To specify individual shares to each section (Music, Pictures, Videos) edit the configuration file
like this:
<music>
<visible>true</visible>
<share>
<name>HD</name>
<url>f:\music</url>
<cachesize>256</cachesize>
</share>
<share>
<name>UDF</name>
<url>D:</url>
</share>
<share>
<name>ISO9660</name>
<url>iso9660:</url>
</share>
</music>
Visible Tag: The <visible> tag (true/false) determines if this particular section will be visible from
the GUI.
Share Tag: Each <share> tag specifies a different location: local, network path, or DVD Drive.
Name Tag: The text between the <name> tags is the text that will be displayed in the GUI when
selecting shares.
URL Tag: The <URL> tags are the actual location of the folder, such as an SMB share, a RelaX
share or Local path.
There are three different types of local shares; the Xbox hard drive, the DVD ROM drive (UDF)
and ISO9660. To access the local HD folder, place the local path such as f:\music. To call for DVD
(UDF) place “D:” on the URL tag. For ISO9660, place “iso9660:” (3). Other shares include SMB
(Windows file sharing), XNS (a peer to peer protocol) and XBMSP (Xbox Media Streaming
Protocol). SMB, XNS and XBMSP will be discussed later in the document. The Cache
Cachesize Tag: The <cachesize> tag is used to define the buffer size for the share. Cachesize is
useful to increase the buffer when connecting to remote servers in the case of SMB (Windows file
sharing), XNS or XBMSP streaming methods.
Size tag (<cachesize>) is used to define cache per share, use this function to increase cache on
large files, like videos, when connecting to SMB or RelaX shares.
The same goes for Pictures (<pictures>) and Videos (<videos>). This way it’s possible to access
several XNS servers over a network, and SMB servers. For applications, only add the HD share,
SMB/Relax doesn’t work with applications.

Go back to Index
-Other Config.xml tags:
Dashboard Tag: The <dashboard> tag specifies the file on C:\ to load when the Dashboard button
is pressed (Orange button in the lower part of the main menu).
Shutdown Time Tag: The <shutdowntime> tag specifies how long the Xbox will be idle before
automatically shutting down. Setting this tag to 0 disables the auto shut down. Time input is in
minutes.
Sensitivity Tag: The <sensitivity> tag changes the DVD Remote Sensitivity. A range from 0.2 to
0.4 gives a good result.
Screensaver Tag: The <screensaver> tag specifies how long the player waits to activate the
Screensaver, the time input is in seconds (0=Disabled).
Subtitle Encoding Tag: To use localized subtitles, put the Subtitle Encoding code in the
<subtitleencoding> tag. A list of all supported encodings is available at:
http://www.gnu.org/software/libiconv/documentation/libiconv/iconv_open.3.html
Then Choose a TTF font from your Windows font directory (C:\Windows\fonts) that can display
your language. Rename it to subtitle-font.ttf and upload it to your XBMP\Media\ directory.
The most common codes are:
- UTF-8: English characters.
- ISO-8859-1: Contains most European characters (бйнуъдлпць and so on).
Use TTF UI: This <usettfuifont> tag enables a TTF Font to be used in the GUI Text to enable
regional characters. A “common-font.ttf” is needed in \Media\ for it to work.
Resolution Tag: Use the <resolution> tag to determine the resolution XBMP runs in. Higher
resolution, appropriate to your aspect ratio might result in better video quality. (See valid
options in config.xml)
Language Tag: Choose a language from the locale specified in the Locale folder e.g. English is 1,
Japanese is 2, etc. For a full listing of supported languages, see Languages.txt in the Locale
folder.
Autolaunch Tag: If set to true, enables launching of original Xbox games, Audio CD’s and DVD
Movies upon insertion into the DVD-ROM.

Go back to Index
2.2 Using from HDD
This is the best and easiest way to use the XBMP; just FTP all the player files (after editing the
“config.xml”) to the Xbox using any FTP server/client application for Xbox, for example,
Avalaunch, Evolution-X or MediaXMenu.
For more information on how to set up FTP on the Xbox, please visit Xbox-Scene Tutorials Page
To add the XBMP item to your default dashboard, please consult their documentation. Here are
some guides available on Xbox-Scene:
Evolution-X configuration
Basic overview of installing an application
.
(Evolution-X).
2.3 Using from CD/DVD
To run XBMP from a CD/DVD, place all the files in the disc compilation after editing the
“config.xml”. For the disc to be readable by the Xbox, it has to be either XDFS or UDF. The main
file must be named “default.xbe” and needs to be in the root of the disc.
Once XBMP has loaded -and if your BIOS has the “No eject on Reset” hack- you can eject the
tray, change the disc and go to the desired section to load the files. If you have a first generation
modchip (Ejects on Reset), you will need to burn the media files along with the player files to use
the player.
For XBMP to read ISO9660/UDF CD-R’s your Xbox DVD Drive MUST be able to do so, Being able to
read different CD types is a hardware limitation and not a software limitation.
A recommended application to burn UDF compliant CD/DVD’s is “Record Now Max”
from Stomp Inc. Nero Burning ROM has UDF compatibility issues so it’s not recommended.
For information on how to burn XDFS (XISO) discs, please refer to Xbox-Scene tutorials.
.
2.4 Using XBMP as a Dashboard
XBMP can run as the default dashboard of the Xbox. With an FTP Server, XBE launch function, and
easy to use design, it’s a great option. There are some points to take in consideration when doing
so.
Mode 1 – Using XBMP as a dashboard, using all files in C:\
Note: This is the intended way to use XBMP when running as a dashboard.
This is a clean way to use XBMP as a dashboard; you only need 2 files in C: ROOT:
The XBE and the .cut file.
The XBE file also needs to be named to something your BIOS can boot to. But this time, the
“XBOX Media Player.cut” will point to another location, in where you have XBMP.
i.e. You have XBMP in E:\utils\media\xbmp\xbplayer.xbe and wish to use those files.
-Open a text editor.
-Type in: <shortcut><path>Harddisk0\Partition1\utils\media\xbplayer.xbe</path></shortcut>
-Then save as “XBOX Media Player.cut” (go to save as and type the name with quotes to force
save as .cut) and place in C: ROOT.

Go back to Index
This time, it will read the XBOX Media Player.cut file and then use the files in the selected
folder, leaving the C: partition as clean as possible.
Mode 2 – Using XBMP as a dashboard, using all files from another partition.
To use this set-up, you need to place all the files that come in the package, including the XBE, in
the ROOT of the boot drive (usually C:). Then, the XBE must be renamed to something your BIOS
can boot to.
-Normal BIOS’ boot to “evoxdash.xbe”, or “neXgen.xbe” as well as to “xboxdash.xbe”.
You need to rename to either one of these, according to your BIOS.
Also the “XBOX Media Player.cut” file needs to be set up like this:
-Open a text editor.
-Type in: <shortcut><path>Harddisk0\Partition2\xboxdash.xbe</path></shortcut>
Remember to change the name to whatever you Xbox boots to, like “evoxdash.xbe”.
-Then save as “XBOX Media Player.cut” (go to save as and type the name with quotes to
force save as .cut) and place in C: ROOT.
After all is set, and the .cut file is in place and the config.xml file is edited. You can boot your
Xbox with XBMP as a default dashboard.
2.5 Controller Setup
The button configuration can’t be changed, but this is a list of the current button setup:
Navigation:
- X button: Toggle between played file and Player GUI.
- A button: Play/Open selection.
- B button: Go back 1 folder.
- Y button: Queue file to playlist
- Back Button: Go back to Main screen.
- D Pad: Move cursor.
- White Button: Display IMDb Info (active internet connection needed).
- Left/Right Triggers: Next/Previous Page.
During Music Playback:
- X button: Toggle Visualization On/Off.
- A button: Show Control Panel (w/Visualization On).
- White button: Go to OSD (w/Visualization On).
During Video Playback:
- X button: Toggle between played file and Player GUI.
- A button: Show Control Panel.
- D Pad LEFT/RIGHT: Change subtitle Offset.
- D Pad UP/DOWN: Change AV Sync.
- White button: Go to OSD (On Screen Display).
- Black button: Show File information.
- Right (R-Thumb): Next Playlist Item.
- Left (R-Thumb): Previous Playlist Item.

Go back to Index
- Y button: Create Bookmark.
- B button: Cycle through bookmarks (only if available).
- Slider Bar: Step up/down in the file.
- B button: Cycle through bookmarks (only if available).
- Left/Right Triggers: Create Thumbnail.
During Video Playback, In Control Panel:
- D Pad: Highlight function.
- B button: Back to Video.
- A button: Select highlighted function.
- Left/Right Triggers: FFWD/RWD (When Selected).
- Left/Right Triggers: VOL +/- (When Selected).
During Video Playback, On Screen Display:
- D Pad: Highlight function.
- White button: Back to Video.
- A button: Select highlighted function.
- D Pad RIGHT: Activate function selection.
- D Pad LEFT: Back one step.
- D Pad UP/DOWN: Change selected option.
Special Slideshow Settings:
- Right Trigger: Speed up Slideshow Time (Visual Display of Increment).
- Left Trigger: Slow down Slideshow Time (Visual Display of Delay).
- Back/B: Stop Slideshow.
- Right (R-Thumb): Next Song.
- Left (R-Thumb): Previous Song.
- D-Pad Right: Next Picture.
- D-Pad Left: Previous Picture.
- Y button: Rotate Picture.
2.6 DVD Remote Setup
This is the DVD Remote button setup:
Navigation:
- Display Key: Toggle between played file and Player GUI.
- Select Key: Play/Open selection.
- Back Key: Go back 1 folder.
- Title Key: Queue file to playlist
- Menu Key: Go back to Main screen.
- Arrow Keys: Move cursor.
- Info Key: Display IMDb Info (active internet connection needed).
During Music Playback:
- Display Key: Toggle Visualization On/Off.
- Select Key: Show Control Panel (w/Visualization On).

Go back to Index
- Title Key: Go to OSD (w/Visualization On).
- Extra DVD Keys: Play, Stop, Pause accordingly.
During Video Playback:
- Display Key: Toggle between played file and Player GUI.
- Select Key: Show Control Panel.
- Left/Right Key: Change subtitle Offset.
- Up/Down Key: Change AV Sync.
- RWD Key: RW file (for controller, choose option on the Control Panel).
- FWD Key: FFWD file (for controller, choose option on the Control Panel).
- Title Key: Go to OSD (On Screen Display).
- Info Key: Show File information.
- Skip +: Next Playlist Item.
- Skip -: Previous Playlist Item.
- Play Key: Cycle through bookmarks (only if available).
- Skip +/-: Step up/down in the file.
- Skip +/-: Cycle through bookmarks (only if available).
- Extra DVD Keys: Play, Stop, Pause accordingly.
During Video Playback, In Control Panel:
-D Pad/Arrow Keys: Highlight function.
-B button/Back Key: Back to Video.
-A button/Select Key: Select highlighted function.
-Left/Right Triggers: FFWD/RWD (When Selected).
-Left/Right Triggers: VOL +/- (When Selected).
During Video Playback, On Screen Display:
- Arrow Keys: Highlight function.
- Title Key: Back to Video.
- Select Key: Select highlighted function.
- Arrow Keys Right: Activate function selection.
- Arrow Keys Left: Back one step.
- Up/Down Keys: Change selected option.
Special Slideshow Settings:
- FWD Key: Speed up Slideshow Time (Visual Display of Increment).
- RWD Key: Slow down Slideshow Time (Visual Display of Delay).
- Pause Key: Pause Slideshow.
- Stop/Menu: Stop Slideshow.
- Skip +: Next Song.
- Skip -: Previous Song.
- Right Key: Next Picture.
- Left Key: Previous Picture.
- Title Key: Rotate Picture.
- Numbers (0-9): Zoom Picture (0 restores picture)

Go back to Index
3. Optional Features
The next features are not needed by everyone, but they come with the player. They can be used
at any time without major changes.
3.1 Relax XNS Server
RelaX sets up your home computer as a server and then uses the XNS protocol to stream files over
the network. RelaX can share files stored in a folder, or from zip and image files, such as ISO, BIN
or IMG. It will list all the files inside a folder, but if an image file is pressed it will then navigate
to it as it would do with a regular folder.
First configure RelaX to share only the desired folders.
To add folders in RelaX first delete the ones that come as an example, then create your own
personal shares, such as Video, Music and Pictures. Inside each share, drag & drop the desired
files or folders, this will be shared only in the section you select (Music/Pictures/Videos).
To add a single folder as a shared folder, edit the Config.xml:
To add a complete share from RelaX:
<share>
<name>RelaX</name>
<url>d:\videos@192.168.1.2</url>
</share>
<share>
<name>Network (XNS)</name>
<url>$ROOT$Music@192.168.0.10</url
>
</share>
*Change IP*
After setting all the paths on the XBMP configuration file, upload the edited “config.xml” to your
Xbox and then run RelaX, when you wish to access to your RelaX shares, go to My
Music/Pictures/Videos and select the proper share.
The RelaX documentation states that when RelaX is installed as a service (c:\relax.exe –
install) that it may have problems starting. It has been observed that if the service fails to
start go into the service properties (Control Panel -> Administrative Tools -> Services -> RelaX)
and select ‘Allow service to interact with desktop’ in the ‘Log On’ tab as shown in the figure
below.

Go back to Index
3.2 SMB Shares
To use SMB Shares you need to have shared folders on your network. To share a folder under
Windows
- Browse to the folder that you wish to share;
- Right click on the folder and select 'Properties';
- Select the 'Sharing' tab.
To Use SMB Shares (SAMBA), you first need to change the <nameserver> tag in the config.xml file.
In this tag put your Domain Name Server (DNS) IP :
<nameserver>192.168.1.3</nameserver>
Then, under the <URL> Tag inside the <Share> tags edit the remote path:
<share>
<name>SMB</name>
<url>smb://user:password@domain/computername/sharename</url>
</share>
When you wish to access to your RelaX shares, go to My Music/Pictures/Videos and select the
proper share.

Go back to Index
3.3 XBMSP
The Xbox Media Streaming Protocol (XBMSP) was developed as a lightweight protocol to be used
explicitly with the Xbox. Instead of a peer-to-peer protocol it is a server/client protocol meaning
you should be able to connect multiple Xboxes to one XBMSP server.
CCXstream is a program that has been compiled for Linux as well as Windows. The Windows port
of CCXstream is compiled using Cygwin. Currently there is a 2GB limitation to the file sizes under
Cygwin.
A simple way to start the XBMSP server with CCXstream is as follows:
prompt> ccxstream -f -r /u/media
With the –f option CCXstream will run in the background. The –r option shares the specified
server directory as the root share for the client.
Under Windows the server’s shared directories need to have ‘/cygdrive/drive_letter’ appended.
For example, if you want to share your C:\Media directory than the path for CCXstream will be
/cygdrive/c/Media. Note that the ‘forward slash’ / is still used under Windows instead of the
‘back slash’ \.
CCXstream may have a hard time resolving the server’s IP address under Windows. To resolve
this problem specify the server’s IP address with the –l option:
C:\ccxstream.exe -f –l 192.168.1.100 -r /cygdrive/c/Media
For the client (the Xbox) configure the config.xml file as follows:
<share>
<name>Network (XBMSP)</name>
<url>xbmsp://ipaddress:port/directory</url>
<cachesize>8192</cachesize>
<share>
Where IP Address is the server address. If no port is specified then the Xbox will default to port
1400. Note that if no port is specified for the XNS protocol that the Xbox will default to 1400 as
well so if you have XNS configured using the default 1400 port be sure to choose a unique port for
XBMSP.
The directory in the config.xml will be a directory in that exists in the root share directory. For
example C:\Media is the root share and C:\Media\videos is a directory that exists then the
config.xml will be:
<share>
<name>Network (XBMSP)</name>
<url>xbmsp://ipaddress:port/videos</url>
<cachesize>8192</cachesize>
<share>
Go back to Index
3.4 FTP Server
XBMP includes a fully functional FileZilla FTP server. You can connect to your Xbox with an FTP
client from any PC using the IP address set in config.xml. The default username and password is
xbox:xbox. The FTP settings can be configured via the FileZilla Server.xml.
3.5 ISO 9660
To use an ISO9660 CD, place your CD on the tray (your DVD-Drive must be able to read CD-R)
and select the ISO9660 share (see shares information), it will then read the CD-R.
To enable On-The-Fly playback from ISO9660 CD-R’s, go to Settings, then in General Settings,
enable/disable “Cache ISO9660 files”.
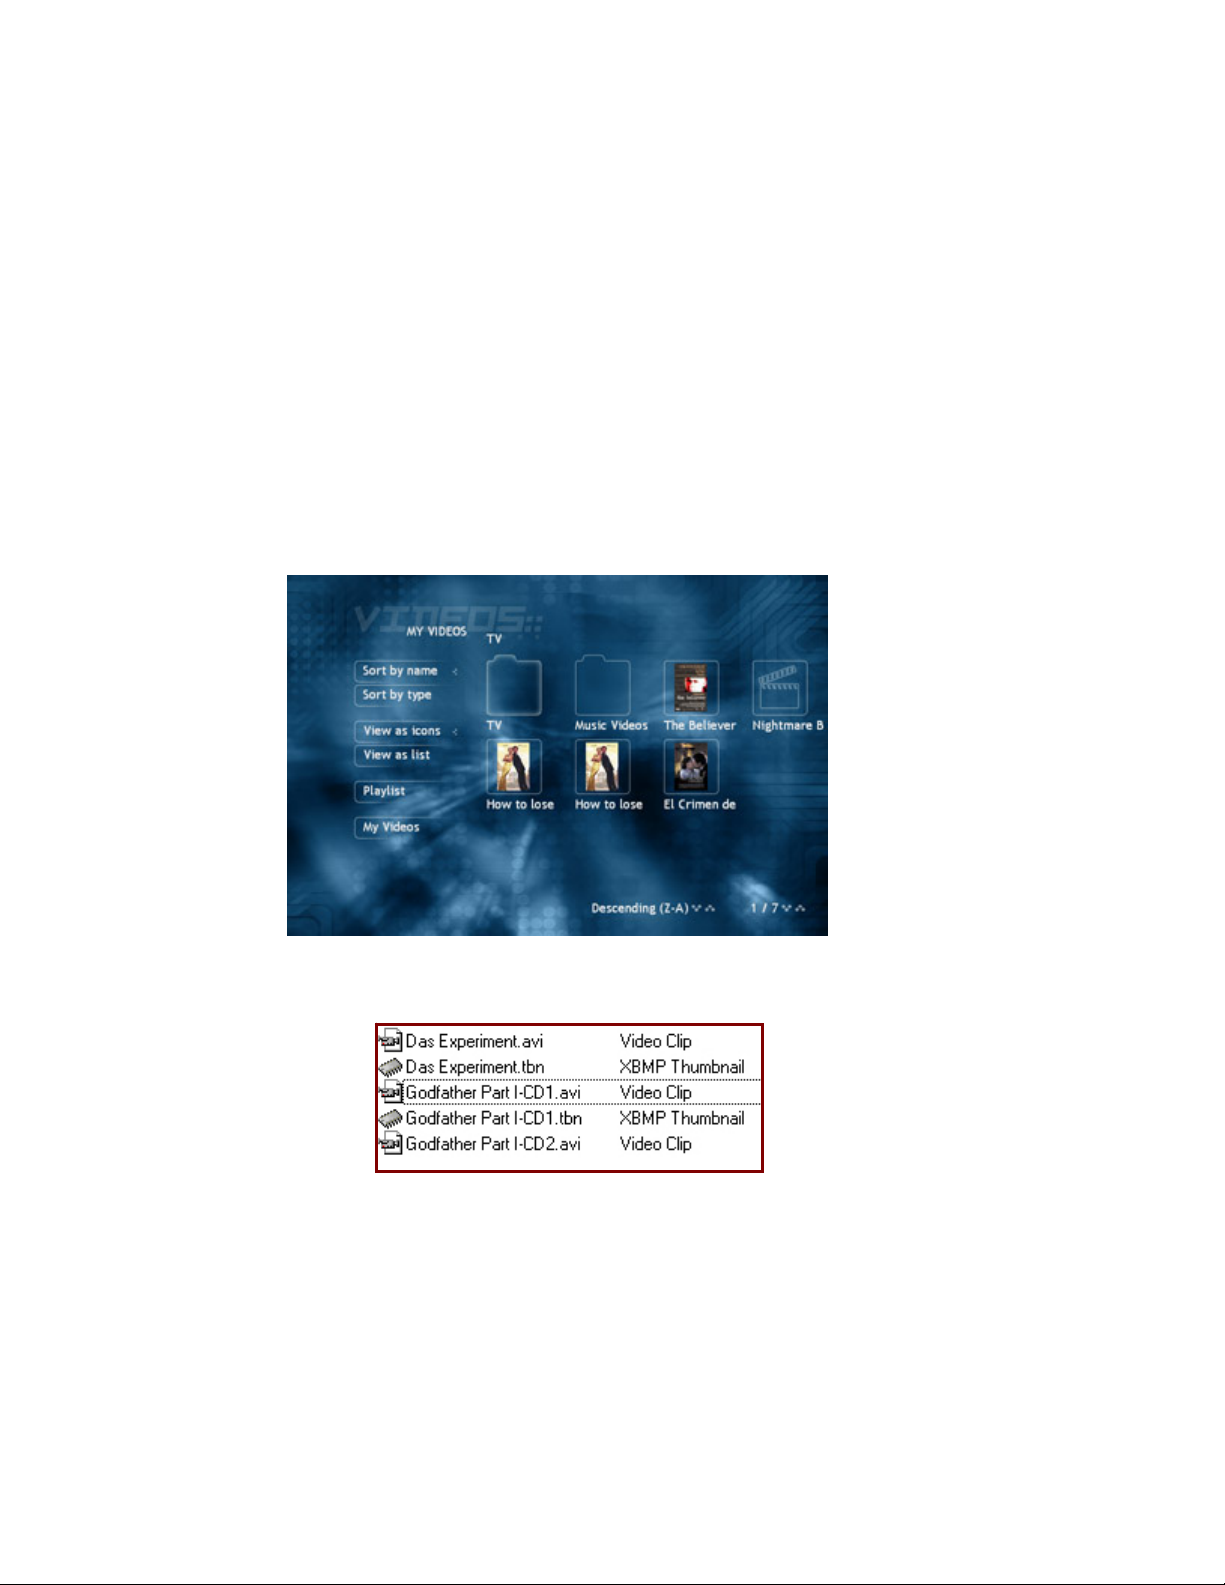
3.6 File/Folder Thumbnails
To enable file/folder thumbnails, like this screenshot shows
Make a 64x64 image (JPG, PNG, BMP) and rename it to filename.tbn or foldername.tbn, like in
this example:
In My Pictures, selecting “Generate Thumbnails” will make a proper TBN file out of every picture
in the folder.
For Videos, if you have a IMDb connection, you can generate a thumbnail for the file from the
IMDB dialogue (See more in 7.6 IMDb Information)
You can either choose to store TBN files in the configured XBMP Thumbs folder, or in the same
folder as the target folder/file.
Go back to Index
If a TBN is supplied for a folder, all the files inside the folder will have the same TBN unless a
specific TBN is supplied per archive.
3.7 Subtitles
XBMP supports SRT, SUB, TXT, SMI, SSA, AQT, JSS, MPL and VobSub subtitles. To use them with
video files place the subtitle file in the subtitles folder under XBMP, or alternatively use the same
folder as the video file.
The subtitle and video files must have the same name, for example:
Video File: The Matrix.avi
Subtitle: The Matrix.srt
After that, the subtitle will show up when “The Matrix.avi” is played.
If no subtitle is provided, playback will continue without problems.
To enable or disable subtitles, go to the General Settings and select/deselect the option.
To edit the subtitle font size in Mplayer subtitles, open “font.desc” with a text editor and
change:
size: 18.0 pixels to something higher (20-28)
For TTF subtitles, open skin.xml and change:
<fontheight>23</fontheight> to some other value. Change this value on all instances.
To use localized font, place a subtitle-font.ttf file inside the MEDIA Folder, and uncheck the “Use
MPlayer subs” option in General Settings.
XBMP also supports compressed VobSub subtitles (rar) (Small files only (~6MB) because of memory
constraints!)
3.8 Filename Filters
Under General Settings, there is an option called “Filter using video and music file name
conventions”. When selected, this option will change filenames to something more easy to read.
The conventions can be applied to both music and video files.
i.e. “dvd-dvl-star_wars_ii.avi” to “star wars ii”
“Hoobastank – 10 – Crawling in the Dark.mp3” to “Crawling in the dark”
Note. Everything before the last hyphen will not be displayed.
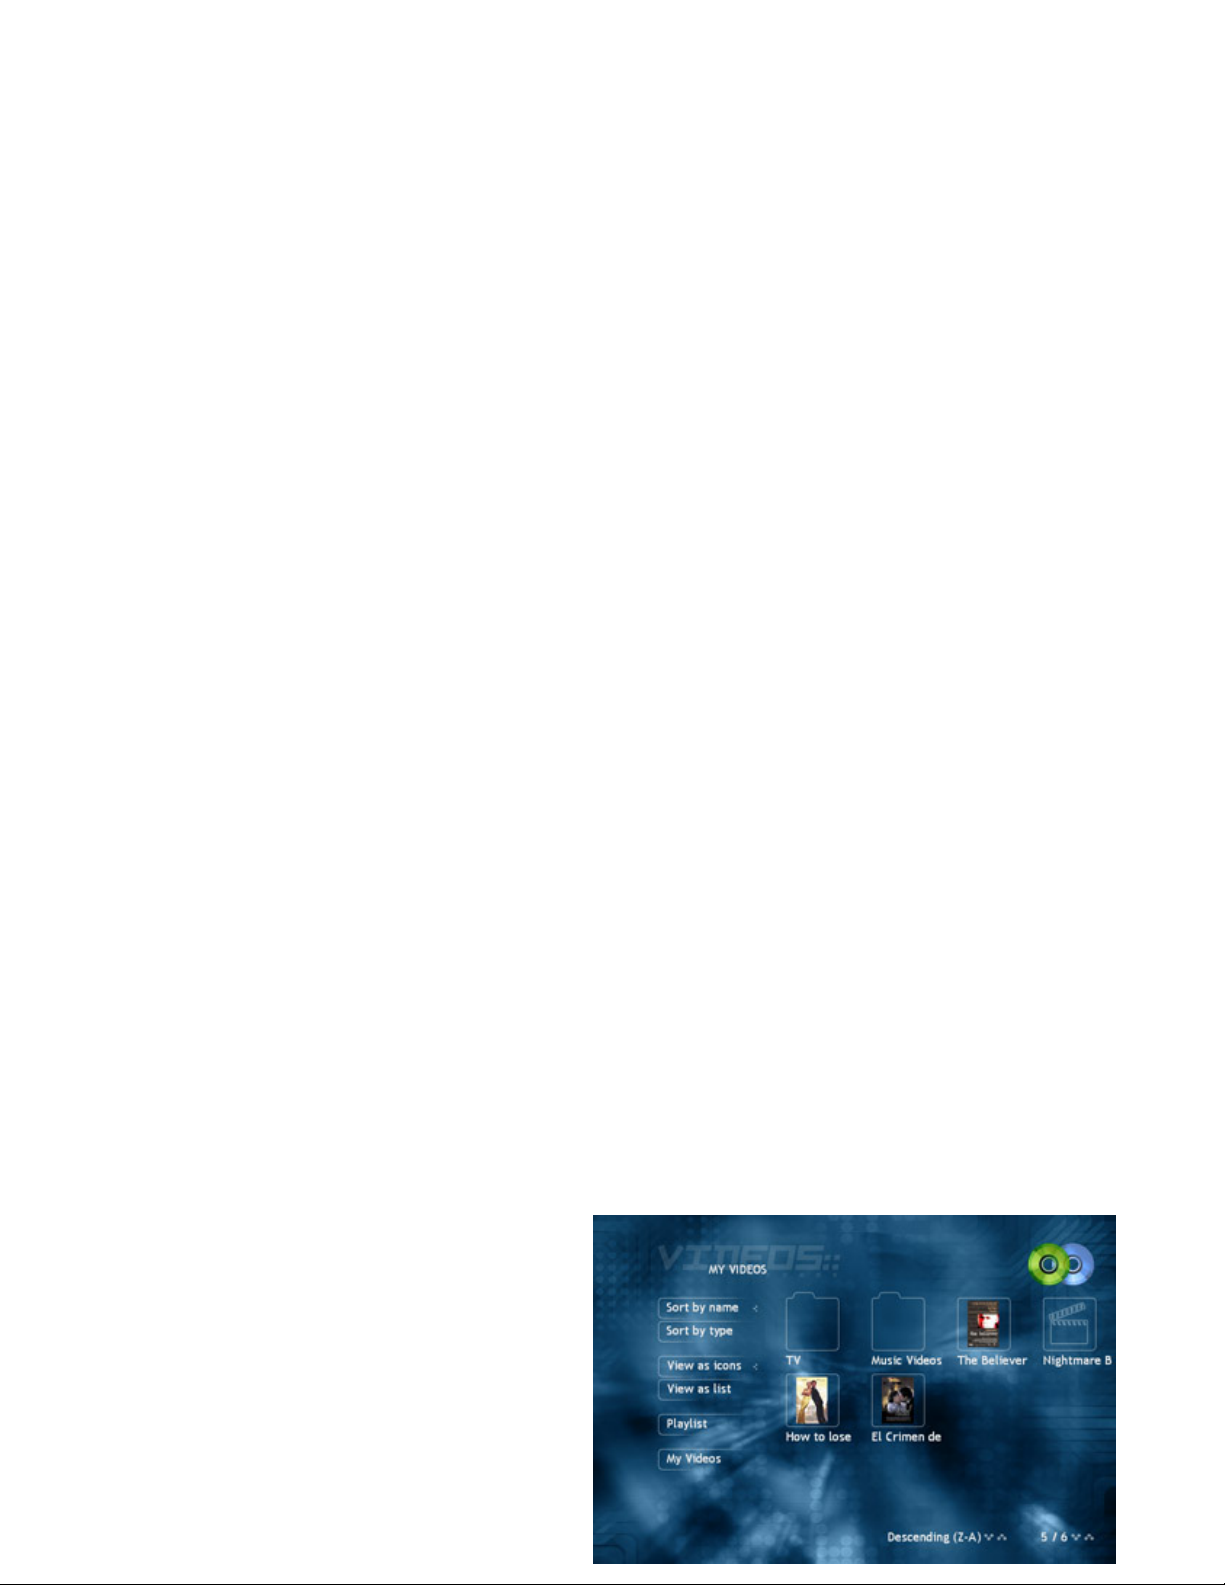
3.9 Multi File Stacking
Multi-file stacking is used to play multi part clips as a single file, this way it’s not needed to
manually change to the next part when the first one ends. To use this, Multi-file stacking first
must be enabled under Settings, in the General Settings, and then, the filename must be XX–
CD1.avi and XX–CD2.avi (note there is no
space between the “-” and the “CD#”)

Go back to Index
Once a file is properly named, the player will only show the first part, but give an option to play
the desired part of the movie (as indicated by the CD icons, top right).
3.10 DLL Codec's
Some files, such as QuickTime, Real Media or Windows Media 9, require DLL’s to be played. At
this moment, Windows Media files are played and QT and RM have limited playback.
3.11 IMDb support
If you have an active internet connection on your Xbox, you can access information on movies
from “the Internet Movie Database” (See more in 7.6 IMDb Information).
3.12 Skins
You can now alter the look and feel of your XBMP installation by changing its skin. You simply
overwrite the appropriate files with ones from your preferable skin. To download new skins
please refer to AllXboxSkins
.

Go back to Index
4. My Programs
My Programs is used to launch XBE files, real useful if using XBMP as a dashboard replacement.
With XBMP’s cover function, programs are easy to identify, as you can specify a cover for any XBE
or Shortcut as you would for a Music/Video clip.
The “Play DVD-ROM” tries to launch D:\default.xbe, this way you can easily launch games. If a
disc is not present, it will then load the default dashboard.
4.1 Shortcuts
Shortcuts are used to ‘call’ programs located in other drives/folders (Evox, or the MS Dash for
example). Shortcuts can also make My Programs look less cluttered, as it will only show the files
you wish.
To make a shortcut file, open a text editor and edit like this:
<shortcut>
<path>Harddisk0\Partition1\apps\xbplayer\default.xbe</path>
</shortcut>
After editing the Path, save as “Filename.cut”. Place the file on the application folder, it will
show up as an ordinary file, but when selected it will run the specified XBE.
Partition1 = E: | Partition2 = C: | Partition6 = F:

Go back to Index
4.2 Program Bookmarks
Bookmarks let you have different folders for My Programs in different drives or paths. To make
different bookmarks edit the config.xml like in the next example:
<applications>
<bookmark>
<name>Utils</name>
<path>f:\apps\Utils</path>
</bookmark>
</applications>
This will bookmark F:\apps\utils as “Utils” in the side bar.
4.3 Hierarchy Flattening
Hierarchy flattening will only display “default.xbe” files and display the name associated with
the XBE file instead of the XBE file names inside of the My Programs folders.
Example:
“E:\apps\boxplorer\default.xbe” will show up as “boXplorer”
“E:\apps\xbp\default.xbe” will show up as “Xbox Media Player”
“E:\apps\xbp\xbplayer.xbe” will not show up.
This way, XBMP will only show the files to launch, and not every single folder inside the main
folder.
Before Hierarchy Flattening After Hierarchy Flattening
Go back to Index
5. My Music
The “My Music” section explains how to use different options under this menu.
While playing files, pressing A or Select, will bring up the Control Panel, from here, it is possible
to Pause, Stop, Rewind, Forward and Mute the file. All of them can be accessed with the DVD
Remote (except mute).
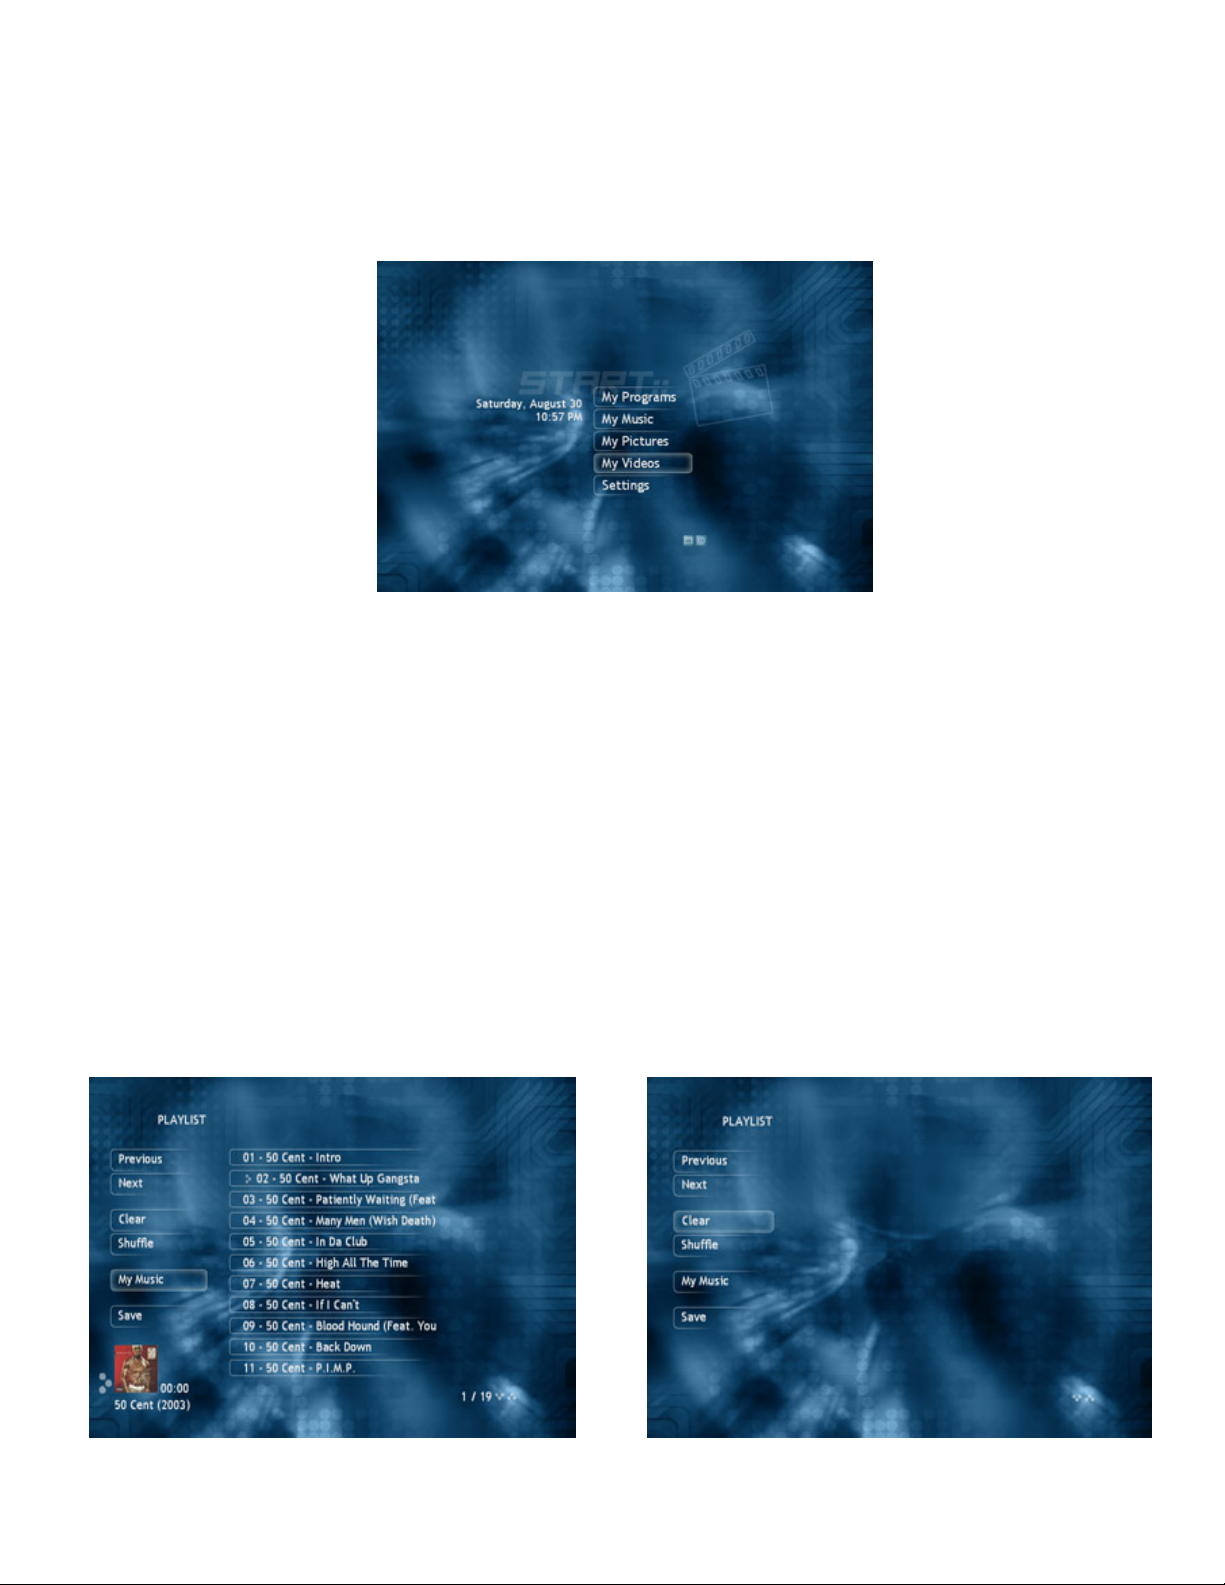
5.1 Playlist
Playlists in XBMP are created while browsing My Music. To add single files or folders to the
playlist, press the Y button on the controller or the Title Key on the remote
To check the current playlist, go to the main Music screen, in there, select Playlist. Once inside,
you can change the file order, using the Left/Right Triggers, and with Skip +/- with the remote.
The side panel will give you 4 different options, Previous, Next, Clear and Shuffle.
- Previous goes back 1 track.
- Next will skip to the following track.
- Clear will remove all the items from the playlist.
- Shuffle will randomize all the files in the playlist.
To stop the playlist, press Stop from the DVD Remote, or stop from the Control Panel (first press
X).

Go back to Index
To save the current playlist, press “Save” it will save it as “Playlist0.m3u” inside the Playlist
folder. The number will increment every time a new playlist is created.
To launch m3u playlists, simply select the file and it will start to play. Folders and filenames in
the m3u playlist must match the ones on drive.
Note: The playlist folder (default \xbmp\playlists) must be shared in each section (music/video)
for you to be able access and launch them.
5.2 Shoutcast
XBMP now supports Internet Radio via SHOUTcast
/Icecast (native or streaming via RelaX).
Shoutcast files are stored by default under XBMP\Shoutcast. (Note that the folder has to be
shared in config.xml)
Shoutcast streams can also be recorded to the harddrive, for it to work you have to specify a
recording path in config.xml, the default is “e:\apps\xbmp\recordings” (via the <recordingpath>
tag, note the directory must exist on your Xbox for this feature to work)
To create SC files (to use with Shoutcast) with Notepad (or any text editor), create a new file
called myshoutcaststream.sc with the following syntax:
shoutcast://205.188.209.193:80/stream/1003
first goes the IP (205.188.205.193), then the Port (80), and in the end the stream
(/stream/1003). Some Shoutcast streams only have the format http://ipaddress:port.
XBMP also now supports natively SHOUTcast & Icecast playlists (.pls)
5.3 Audio Visualizations
XBMP includes Audio Visualization (using Goom visual effects generator). You can press the X
controller button or the Display button on the remote to start the visualization effects. While in
this mode you can seek/rewind/fast forward in audio files.

Go back to Index
6. My Pictures
This section is for image displaying; all the images must be placed in the folder that was selected
for images in the configuration file.
To Generate Thumbnails, press the “Generate Thumbnails” option inside the folder with pictures,
it will create 1 thumbnail file per picture.
6.1 Slideshow
To use the slideshow function, just go to the folder, and then click the “Slideshow” button, this
will show all the files inside that folder.
To set the duration for each slide, go to Settings, then, in Slideshow select the time from 0-60
seconds (If 0 is selected then XBMP waits for manual change by selecting the A button on the
controller or the Select button on the DVD remote, otherwise the images will change
automatically. You can still manually change to the next image if the time for the current
picture has not elapsed.
6.2 Using Background Music
To use Back Ground Music while watching images, first select the album/file you wish to play,
then go to the My Pictures section and select the files you wish to display, the music will keep
playing after selecting the image file (note file playing on lower left corner).

Go back to Index
7. My Videos
My Videos is used to store and reproduce video files,
such as DivX, XviD, MPG and others. The files must be
placed in the folder selected in the configuration.
To start playback of any file, select the desired file,
and then press the A/Select button.
7.1 During Playback
All the screen settings can be changed while playing a video file, just press the black button and
it will then display the Screen Settings. In here the Calibration can be changed, or alter the
Aspect ratio of the file. The video will not stop playing while you change any of these settings; it
will place a thumbnail size video in the lower left corner.
To toggle between the video and the player interface, press the X button or Display on the
remote.
If you are experiencing AV Out of sync, pressing the
D-Pad Up and Down or the Arrows on the DVD Remote
to change the sync by +/- 25ms for each press.
If using subtitles and they show up out of sync, press
the D-Pad Left or Right or the Arrows in the DVD
Remote, allows you to change the Subtitle Offset by
+/- 100ms for each press.
To navigate to a specific minute of the movie, input
the time in the HH:MM format with the DVD Remote.
Since the controller has no numbers, this option is
only available for DVD Remote users.
A new change in this function is that if you press a
high number, like 40:00, and the movie is only 01:00,
it will continue playing instead of stopping.

Go back to Index
7.2 Control Panel
While playing video files, pressing A or Select, will bring up a VCR like Control Panel on the lower
half of the screen. From there, it is possible to Pause, Stop, Rewind, Forward and Mute the
video. Most of these options can also be accessed by pressing the corresponding keys on the DVD
Remote.
7.3 On Screen Display (OSD)
By pressing the White button/Title key you can also
invoke the On Screen Display.
This is an icon driven settings menu, where you can
adjust playback settings for video, sound and
subtitles. For example some of the settings affecting
playback are Zoom, Stretch, Volume and Subtitles,
and various Bookmark options.
7.4 Video bookmarks
Video bookmarks save the current location in the video playback allowing you to resume the
video playback from the saved location.
To enable bookmarks, the <bookmark> tag must be properly setup in the “config.xml” file.
To create a bookmark in the currently playing file, go to the Video settings in OSD and select
Create Bookmark. Alternatively you can go back to the Video menu and select Create Bookmark
from the Bookmark menu.
To cycle through the bookmarks, press the B button, or use the Skip +/- keys.
7.5 Playlist
My Videos has the option to create a playlist the same way as with My Music (see 5.2). Simply
press the Title key or Y on the controller to add files to the current playlist while in the video
playback GUI.
7.6 IMDb Information
You can access information from the “Internet Movie Database” on any movie by pressing the
White button or Info key on your remote while having the movie highlighted in the GUI. XBMP
will use the filename to match it to an entry in the Internet Movie Database. There you will get
information on the movie, director, actors, ratings, picture, etc. From there you can also create
a thumbnail picture from the corresponding IMDb movie entry.

Go back to Index
8. Settings
In My Settings you can change most of the player different options, like Decoder Settings, Audio
Streams, Multi-File Stacking, and Screen Settings.
8.1 Decoder
*For Better Results When Playing Video Files, Do a “Reset to Default Settings” *
In the Decoder settings you can change:
a. Drop Frames
This option makes playback smoother, by dropping frames when the player needs to,
producing a better result.
b. Force Frame Rate (FPS)
This makes all the video files output to a same Frame rate, regardless of the source file.
c. Use PTS from BPS
The decoder threads always mark each frame with a PTS, a presentation time stamp, that
indicates at which media playback time the frame is supposed to be shown. This option gets
the PTS from the BPS (bits per second).
d. Use PAL60 where available
If your TV supports PAL60, enable this option to improve playback quality on NTSC based
video files (29.x, or 60 Hz).
e. Anamorphic source
A video that is encoded anamorphically is one in which the pixel ratio used is not square.
If this option is selected, XBMP will squish the image vertically (or expand horizontally) in
order to set the correct aspect ratio of the film. Note that if Stretch is enabled, it will
override the anamorphic setting, as the picture is stretched to fill the entire frame anyway.
f. Deinterlace
Use for interlaced video (when there are fast movements, you can see every second line of
the image displaced, creating a comb effect).
g. Reset to default settings
Resets Decoder settings to defaults
h. Auto Sync
If you are having sync issues, increasing this value optimizes the auto correction from the
player, giving a near perfect sync. Default value is 10, but if you get sync problems, change to
something higher.
i. Max PTS correction/frame
Maximum Audio/Video time correction per frame
j. DVD Audio/Subtitles
This option allows user to select automatically audio and subtitle language to use when
playing DVD movies.

Go back to Index
8.2 General
This is the default Settings entry in XBMP.
a. Browse my Videos as list
If enabled, this setting makes all videos in My Videos appear in a directory listing instead of
icons/thumbnails.
b. Browse my Music as list
Same as above, only for Music icons/thumbnails.
c. Enable Subtitles
Enables subtitles for videos with associated subtitle files.
d. Use MPlayer subtitles
Use MPlayer font's for displaying subtitles, when disabled the TTF font is used for subtitles
instead.
e. Filter Using video filename conventions
This option enables the filename filter described in 3.6 Filename Filters.
f. Filter Using music filename conventions
Same as above but for music (described in 3.6 Filename Filters).
g. Flatten My Programs hierarchy
See 4.3
h. Stack multi-file videos
If a video file has more that one file, and they are named correctly, XBMP will play them as
one video transparently to the user (a slight pause will occur). See 3.7
i. Cache ISO 9660 files
Enables On-The-Fly playback from ISO9660 CD’s
j. Clear playlist when done
Normally when playing a playlist, it will loop when it reaches the end, if this is enabled
playing will stop and the list will be cleared.
k. Show ID3 tag info
Displays the ID3 tag information in the lower left of the screen when playing a MP3 file.
l. AM/PM Clock
When enabled XBMP displays an AM/PM clock, otherwise it uses a 24h format.
m. DVD Navigation
This function is only partially implemented.

Go back to Index
8.3 Screen
a. Calibrate
The Calibrate setting is one of the most important settings
in XBMP which it lets you adjust how much of the screen
can you see. This setting gets saved when configured.
b. Aspect Ratio
This setting lets you adjust the Output AR compared to the Source AR.
c. Clipping
Clipping changes the AR by each side, and adjusts the Output video as you edit it.
d. Post Processing #1
This enables the default MPlayer post-processing filters, which improve the video picture
quality, especially for low quality DivX and MPEG-1 files.
e. Post Processing #2
Enables XviD PP filters, Note it’s not recommended to have both on at the same time.
f. Soften
Enables soften option; it makes the image displayed a lot softer. Disable to get a sharper
image.
g. Stretch
Makes the video fill the screen completely, ignoring the output aspect.
h. Zoom
Fills the screen by changing the aspect ratio and, unlike Stretch, it won’t deform the output
image.
Stretch Zoom
Go back to Index
8.4 Slideshow
a. Show time (secs)
This setting determines for how long each picture is displayed during slideshow.
8.5 Sound
a. Output to all speakers in stereo
For sources with 4 or less channels, makes the output sound go to all speakers if available.
(Make sure this is disabled if you use an external decoder on optical-out)
b. Normalize Audio
Normalizes the output audio from the source, making the volume level on the entire file equal.
c. Extra stereo effect
Amplifies the differences between the Left & Right channels.
d. Amplify Audio
Increases the audio from the source file, useful for bad encoded audio tracks (or simply with
low volume).
e. Auto Shuffle playlist on load
Automatically shuffles the files in a playlist during play.
f. Use Audio Stream
Selects the audio stream to play, only available when the file has multiple audio tracks.
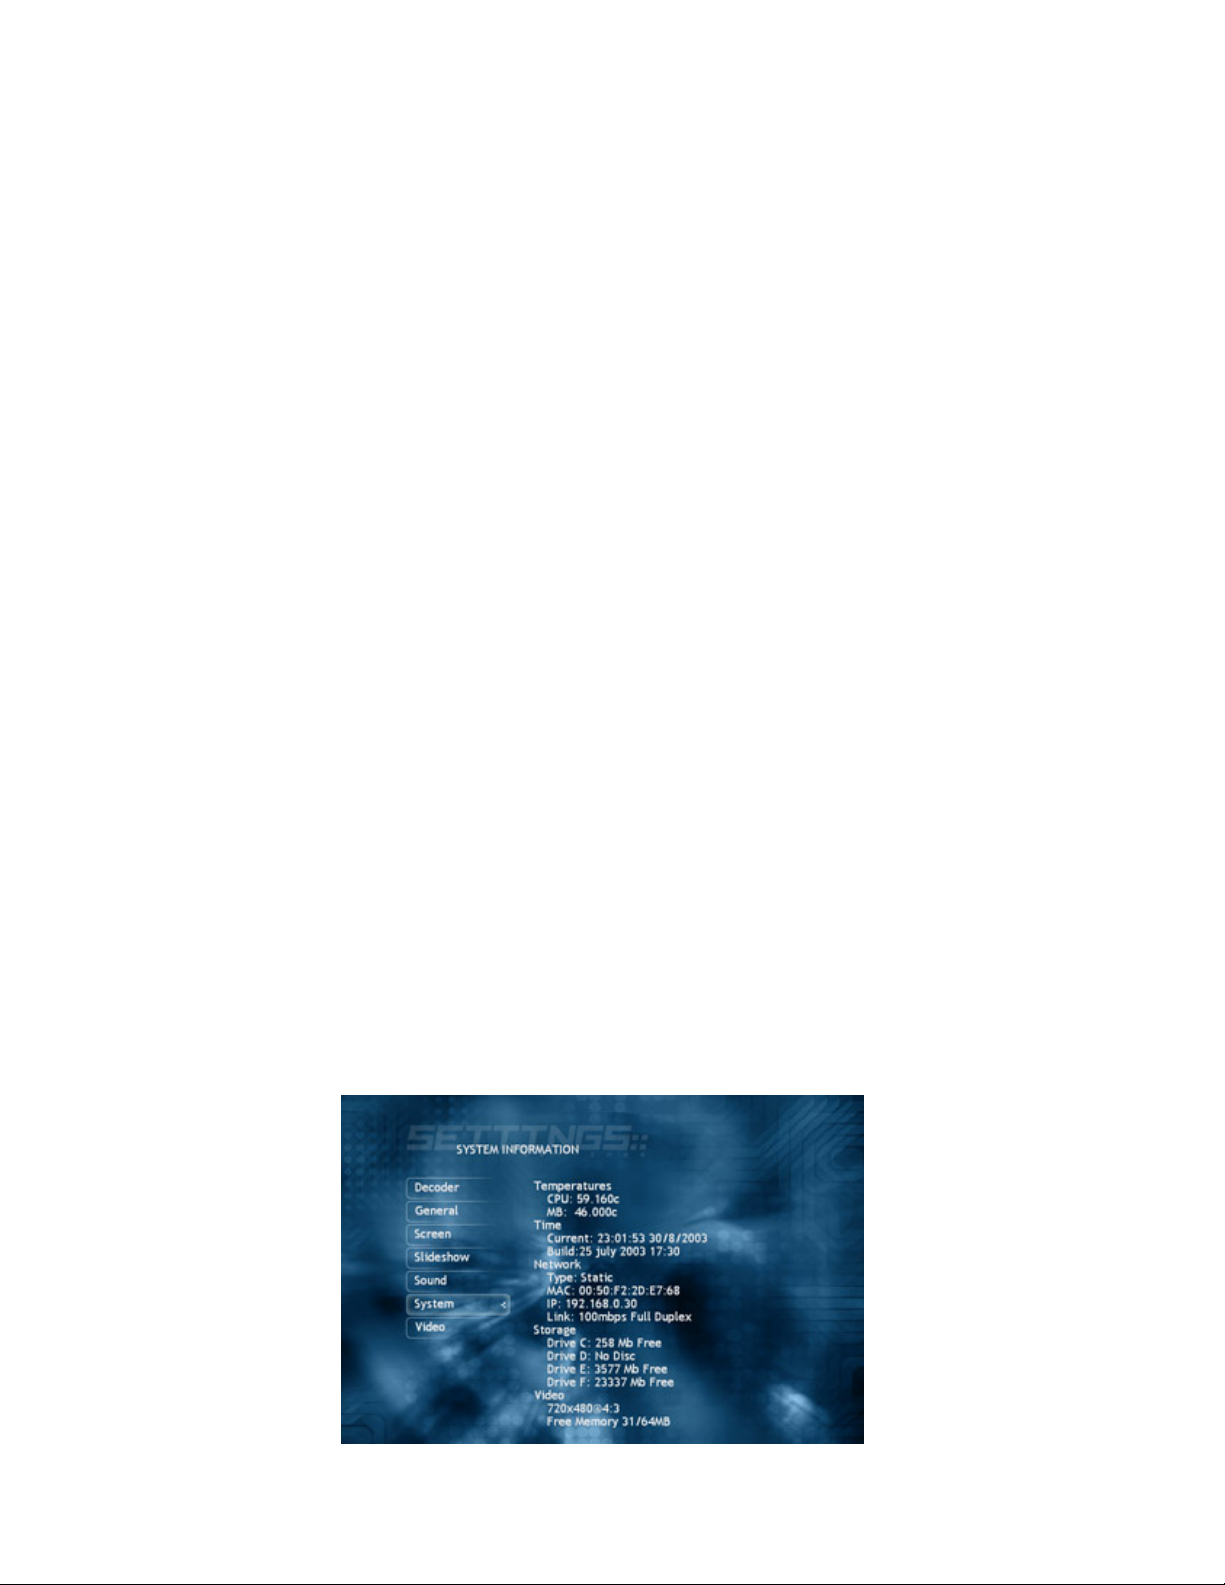
8.6 System
Here you can see various parameters concerning your Xbox and XBMP
e.g. XBMP build date, temperature (CPU and mainboard), space left on hard drive partitions and
IP & MAC addresses.

Go back to Index
9. Advanced Configuration
9.1 Fine Tuning XBMP
Smooth playback
The defaults of XBMP's AV sync parameters aren't fine-tuned for perfect files.
They are set to match most (average) files. If you have high-quality videos, you may want to limit
AV sync correction in order to get smoother playback.
The most important AV sync parameter is "Max PTS correction/frame". It means "max AV time
correction per frame", and defaults to 0.01. Smaller values make playback smoother, but slow
down reaction time to fix AV desynchronization (broken/skipped frames, etc). Higher values
make playback choppier, but fix AV desync issues faster.
Because the sound driver is not perfect, you should also smooth its timer a bit; try setting
autosync to 30 for a start. Higher values mean more smoothing, but avoid using numbers too
high, as they will cause independent timing from the sound card and may result in an AV desync.
Disable any post processing filter. Post processing takes up a lot of CPU time and is only needed
for poor quality movies. Disabling the post processing filters usually results in much smoother
playback.
Also check your cache % during playback. This can be seen by pressing the black button on your
controller it should be at 99%, if not then increase the cachesize in your config.xml
Video Quality/Filtering
If your video source is imperfect (noisy, interlaced, blocky artifacts) and you have a few
percentages of idle CPU, try some of XBMP's filters.
For interlaced video (when there are fast movements, you can see every second line of the image
displaced, creating a comb effect), try the deinterlace filter.
For blocky video (most common with low-bitrate DivX/WMV or poor-quality (S)VCD), enable the
post processing #1 or # 2 filters. As a general rule, do not use post processing unless the movie is
low quality DivX (less than 800kbps) or MPEG1. In some cases enabling post processing filters can
cause the video playback to look worse.
A/V sync issues
First try to see if this can be fixed with the "Max PTS correction/frame", for example, most
MPEG’s only play nicely when Max PTS correction/frame is set to -1 and most DivX movies seem
to play nicely when Max PTS correction/frame is set to 0.0 or 0.1
If that doesn’t help, try decreasing autosync. Higher values mean more smoothing, but avoid
using numbers too high, as they will cause independent timing from the sound card and may
result in an AV desync.

Go back to Index
9.2 Upgrading XBMP
Note: There is no support for CVS builds, sometimes things can be broken. Use CVS builds at
your own risk.
When upgrading/downgrading XBMP build level you need to delete the “0face007” folders under
E:\UDATA & E:\TDATA on your Xbox (including the system.bin file), alternatively delete "Xbox
Media Player" save from the original Xbox™ dashboard in the Memory Manager. This will restore
XBMP to its default settings which are needed each time changing build version.
Always update important files such as “codecs.conf” and “config.xml”. Check the config.xml for
new or modified tags, and always keep a backup.

Go back to Index
10. Tips
- Codec’s can be turned on and off by editing the “codecs.conf” file. This is needed by some files
in order to be displayed properly.
- To easily create SC files (to use Shoutcast streams) use “XNSPls Edit”, a tool that helps to
create SC files. This tool is available at the XBMP web site.
- Always calibrate your Screen before playing files, this way XBMP knows how much of the screen
you can see.
- Increase the <cachesize> tag for each share depending on the file type, music files are short,
and don’t need as much cache as video files. To prevent any kind of choppy playback from
CD/DVD, also put a cache tag.
- Although DHCP works fine for many users, if you experience XBMP hanging while loading with
the network connected, try using a static IP address instead.
- If you don’t use XBMP as a dashboard you should delete the XBOX Media Player.cut file from the
C: drive. Doing so seems to resolve various problems with XBMP.
- DVD support is only partially implemented, if DVD Navigation is enabled in settings you have to
manually browse the DVD movie, go under the VIDEO_TS folder and click on the video_ts.ifo and
it will start/activate the DVD's menu. Highlights in the menu do not work yet so you have to guess
which item you are on and then select. A good rule is that it often defaults on the 'Play' item.
Another thing that does not work on DVD's is stills/pictures which are a special feature of some
DVD discs. PS! DVD menu only works from the DVD-ROM, not from HDD or network. Also note that
playing any encrypted DVD/VOB only works if you start a .IFO from the DVD-ROM. (Again .IFO
won’t work from HDD or network, so if you want to play from HDD or network the only option is
to play unencrypted VOB files one by one, menu's do not work from HDD or network).
- When using XBMP from CD/DVD, configure the local folders (config.xml) somewhere inside
“E:\UDATA\0face007”, this way you can delete the folders within the MS Dash.

Go back to Index
11. Trouble Shooting
This section tries to aid you fix some of the most common problems with XBMP.
• Can’t load XBMP –
- IGR enabled in Evolution-X, disable IGR on EvoX to fix; if this doesn’t help
- XBOX Media Player.cut present and not running as a dashboard, delete file to fix.
• Can’t log to FTP Server –
- Check your <home> tag in the config.xml, this should point to the folder in which XBMP is
stored.
- Missing FileZilla Server.xml in the local folder, get the file from the package and place it
in XBMP’s folder.
• Video only shows on the small preview –
- Delete XBMP’s settings, E:\TDATA\0face007 folder or MS Dash XBMP’s Game Save, and
then recalibrate.
• No Video, only audio (General, not only XBMP) –
- Use “Video Mode Switch Disc” to change between PAL/NTSC.
- Blindly restore settings; please refer to this forum thread
.

Go back to Index
12. Useful Links
Xbox Media Player - Official Website
http://www.xboxmediaplayer.de
Xbox Media Player - Official Forums
http://www.xboxmediaplayer.de/cgi-bin/ib31/ikonboard.cgi
Xbox Media Player @ SourceForge.NET
http://sourceforge.net/projects/xbplayer
Xbox Media Player @ XboxDeveloper.NET
http://www.xboxdeveloper.net/index.php?mode=viewproj&id=77
Xbox-Scene - Tutorials.
http://www.xbox-scene.com/tutorials.php
RelaX XStream Streamer - Official Website
http://www.raforce.nl
Xbox™ Official website
http://www.xbox.com
Stomp Inc. – Record Now Site
http://www.stompinc.com
For bug reporting please post a bug report on both of these sites:
http://sourceforge.net/tracker/?group_id=64793&atid=508678
"Bug Report" on
http://www.xboxmediaplayer.de/cgi-bin/ib31/ikonboard.cgi
XBMP @ IRC
Server: EFNet
Channel: #xbplayer

Go back to Index
13. Greetings
Huge thanks & credits go to everyone that has contributed:
d7o3g4q, RUNTiME & Frodo for taking the time to create & maintain this great player
All other developers that helped like; void, GeXX, xboxamped13, Chocobo, elDany and others
Pope-X, Jeff33, Steff, Ziki, ravemax and jkw for working on the XStream Servers.
nooodle & MomDad for the graphical designs on the Xbox Media Player skins
fan2 who registered www.xboxmediaplayer.com
MrX for hosting the main site at www.xboxmediaplayer.de
xANTAL for registering and hosting the www.xboxmediaplayer.it mirror/upload site
Gamester17 for maintaining and administrating the XboxMediaPlayer websites
RobotDan for the website/forums design, forums configuration and administrating
All the people that submitted code changes, great help!
Shadow_Mx for writing the manual for Xbox Media Player.
Sigurdur H. Olafsson (aka Sho) and Steven Elzinga for this manual update support.
All the beta testers involved in the project. To name some, xANTAL, Gamester17,
Shadow_Mx, void_, poing, Obstler, Kuo, pike, Nuendo and many others.
Gurjinder Singh a.k.a. GodAmongDucks for the RelaX (XStream) user guide
troll123 for coordinating much of the support/bug-reports and feature requests
All the forums Tech Support Mods and everyone that give support to XboxMediaPlayer
The manual and language resources translators, helping the world wide community understand
better.
bluecap, T-Money & everyone who creating covers for the XboxMediaPlayer
Team X-Ecuter for their X2Pro modchips donation.
XboxHacker.net & Xbox-Scene for providing their great sites & forums.
SourceForge.NET & XboxDeveloper.NET for hosting the XBMP development
The FFmpeg, ffdshow & XviD author's & contributors for their work on their codecs
MPlayer author's, developers & contributors for their work on the MPlayer project
Microsoft for making such a great game (and now multimedia) console, the Xbox.
Our sponsors plus everyone who has donated money/time to help the project progress
All people who submitted code changes, features and bug fixes
...and all others we missed that have provided help & support

Go back to Index
14. Disclaimer
By downloading or using anything of this site you agree & have to comply with this disclaimer:
All Rights Reserved XboxMediaPlayer © 2002. This project and its website do NOT condone piracy.
All source code from this project is marked to be freely distributed, and SHALL NOT be sold to a
mass market. The XboxMediaPlayer (also known as Xbox Media Player, XBMP & XBPLAYER) is Open
Source, its source code is released under the GNU General Public License (GPL) and by
downloading or using anything of its code you have to comply with the GPL License it is bound
under. The XboxMediaPlayer source code has been debugged before each release, and should
NOT have any defects, however the authors of the XboxMediaPlayer project, this website & it's
authors is not responsible for any damages or loss resulting from any information or code
obtained from the XboxMediaPlayer source or other code/software obtained/originated from the
XboxMediaPlayer project/websites. All names & anything shown on the XboxMediaPlayer
documents & websites that shows a trademark, character, copyrights, or symbol belonging to any
company belongs to their respective owners. The XboxMediaPlayer project, its authors & its
websites is not affiliated with Microsoft corp. in any way. If opening your Xbox™, you will void its
"WARRANTY"! All files on this site have been checked for viruses, but we recommend you check
everything & anything you download yourself as we hold no responsibility for damages or loss
caused to data or hardware as a result of a virus from the XboxMediaPlayer websites or any of the
links provided on this site. The authors of the XboxMediaPlayer, everyone affiliated with the
XboxMediaPlayer project & the XboxMediaPlayer websites does NOT distribute any software
compiled by Microsoft Xbox™ SDK (XDK), nor do we condone doing so.
SUPPORT THE COMPANIES THAT PRODUCE QUALITY SOFTWARE & HARDWARE!
IF YOU ENJOY A PRODUCT, BUY IT! ITS CREATORS DESERVE SUPPORT!
XboxMediaPlayer, XBMP & XBPLAYER is trademarks of the XboxMediaPlayer project.
All Rights Reserved XboxMediaPlayer © 2002 xboxmediaplayer.com
The XboxMediaPlayer project is not affiliated with Microsoft corp. in any way.
"Microsoft", "XDK", "Xbox" & the Xbox™ logo/s are trademarks of Microsoft corp.
Dolby Digital is a trademark of Dolby Laboratories, Inc.
FFMPEG is a trademark of the FFMPEG Project
MPlayer is a trademark of the MPlayer Project
DivX is a trademark of DivXNetworks Inc.
XviD is a trademark of XviD Project
XBMP2 Manual by Shadow_Mx. Updated by SHO & Steven Elzinga
 Loading...