

Page 1

Nokia C5–04 User Guide
11/09/2010
FCC Draft
Issue 1
Page 2

Contents
11/09/2010
FCC Draft
Safety...........................................5
About your device......................................5
Network services.......................................6
Find help......................................7
In-device help............................................7
Accessibility solutions...............................7
Support.......................................................7
Settings.......................................................8
Access codes...............................................8
Prolong battery life...................................9
Increase available memory......................9
Insert the memory card............10
Get started.................................11
Insert the SIM card and battery.............11
Insert the memory card..........................13
Remove the memory card......................14
Charge the battery..................................15
Keys and parts.........................................16
Switch the device on...............................17
Home screen............................................17
Lock the keys and touch screen.............18
Access the menu......................................18
Touch screen actions...............................19
Change the ringing tone.........................20
Nokia support..........................................20
Your device................................20
Display indicators....................................20
Contacts bar.............................................22
Antenna locations...................................22
Offline profile...........................................23
Shortcuts..................................................23
Volume and loudspeaker control...........23
Sensor settings and display rotation.. . .24
Remote lock.............................................24
Headset.....................................................24
Attach a wrist strap.................................25
Make calls..................................25
Touch screen during calls.......................25
Voice calls ................................................25
During a call.............................................26
Voice and video mailboxes ....................27
Answer or reject a call.............................27
Make a conference call............................27
Speed dial a phone number...................28
Call waiting..............................................28
Voice dialling...........................................29
Hearing.....................................................29
Log ...........................................................30
Hearing......................................31
Write text..................................32
Virtual keyboard......................................32
Handwriting.............................................33
Alphanumeric keypad.............................34
Touch input settings...............................36
Contacts.....................................37
Save and edit names and numbers.......37
Contacts toolbar......................................37
Manage names and numbers.................37
Assign default numbers and
addresses.................................................38
Ringing tones, images, and call text for
contacts....................................................38
Copy contacts...........................................39
SIM services..............................................39
Messaging.................................40
Messaging main view.............................40
Write and send messages.......................41
Messaging inbox......................................42
Set up e-mail............................................43
Mailbox.....................................................43
View messages on a SIM card................45
Service commands..................................46
Messaging settings..................................46
Page 3

Personalise your device............48
11/09/2010
FCC Draft
Change the look of your device..............48
Profiles......................................................48
Music folder...............................49
Music player.............................................49
Nokia Podcasting.....................................52
Radio.........................................................53
Camera......................................54
Activate the camera................................54
Image capture.........................................54
Video recording.......................................57
Gallery.......................................58
View and organise files...........................58
View images and videos.........................59
Organise images and video clips...........59
Nokia Video Centre....................60
View and download video clips.............60
Video feeds...............................................61
My videos..................................................61
Transfer videos from your PC.................62
Video settings..........................................62
Audio Postcard..........................62
Send an audio postcard..........................63
Register and sign in..................63
Create a Nokia account...........................63
Sign in to Ovi Store..................................63
Edit the Ovi Store settings......................63
About Ovi Store.........................64
About Ovi Store........................................64
Web browser.............................64
Browse the web.......................................64
Browser toolbar.......................................65
Navigate pages........................................66
Web feeds and blogs...............................66
Widgets....................................................66
Content search.........................................67
Download and purchase items..............67
Contents
Bookmarks...............................................67
Empty the cache......................................68
Connection security.................................68
Maps..........................................69
Maps overview.........................................69
View your location and the map............69
Map view..................................................70
Change the look of the map...................71
Download and update maps..................71
About positioning methods...................72
Find a location.........................................72
Plan a route..............................................73
Save and view places or routes..............74
View and organise places or routes......75
Send places to your friends....................75
Synchronise your Favourites..................75
Get voice guidance..................................76
Drive to your destination........................76
Navigation view......................................77
Get traffic and safety information.........78
Walk to your destination........................78
Connectivity...............................79
Data connections and access points......79
Network settings.....................................79
Access points............................................80
View your active data connections........82
Bluetooth connectivity............................82
Transfer data using a USB cable.............86
PC connections.........................................87
Administrative settings..........................87
Download!.................................88
About Download!.....................................88
Purchase and download items..............88
Other applications.....................89
Clock..........................................................89
Calendar....................................................90
File manager............................................90
Application manager...............................92
RealPlayer ................................................94
Recorder...................................................96
Write a note.............................................96
Page 4

Contents
11/09/2010
FCC Draft
Make a calculation...................................96
Converter..................................................97
Dictionary.................................................97
Settings.....................................97
Phone settings.........................................97
Call settings............................................102
Troubleshooting.....................104
Protect the environment.........106
Save energy............................................106
Recycle....................................................107
Product and safety
information.............................107
Index.......................................117
Page 5

Safety
11/09/2010
FCC Draft
About your device
The wireless device described in this guide is approved for use on the WCDMA
900/1700/2100 and GSM QB 850/900/1800/1900. Contact your service provider for more
information about networks.
Your device supports several connectivity methods and like computers may be exposed
to viruses and other harmful content. Exercise caution with messages, connectivity
requests, browsing, and downloads. Only install and use services and software from
trustworthy sources that offer adequate security and protection, such as applications
that are Symbian Signed or have passed the Java Verified™ testing. Consider installing
antivirus and other security software on your device and any connected computer.
Your device may have preinstalled bookmarks and links for third-party internet sites
and may allow you to access third-party sites. These are not affiliated with Nokia, and
Nokia does not endorse or assume liability for them. If you access such sites, take
precautions for security or content.
Warning: To use any features in this device, other than the alarm clock, the
device must be switched on. Do not switch the device on when wir eless device use may
cause interference or danger.
When using this device, obey all laws and respect local customs, privacy and legitimate
rights of others, including copyrights. Copyright protection may prevent some images,
music, and other content from being copied, modified, or transferred.
Make back-up copies or keep a written record of all important information stored in
your device.
When connecting to any other device, read its user guide for detailed safety instructions.
Do not connect incompatible products.
The images in this guide may differ from your device display.
Refer to the user guide for other important information about your device.
© 2010 Nokia. All rights reserved. 5
Page 6

Safety
11/09/2010
FCC Draft
Network services
To use the device you must have service from a wireless service provider. Some features
are not available on all networks; other features may require that you make specific
arrangements with your service provider to use them. Network services involve
transmission of data. Check with your service provider for details about fees in your
home network and when roaming on other networks. Your service provider can explain
what charges will apply. Some networks may have limitations that affect how you can
use some features of this device requiring network support such as support for specific
technologies like WAP 2.0 protocols (HTTP and SSL) that run on TCP/IP protocols and
language-dependent characters.
Your service provider may have requested that certain features be disabled or not
activated in your device. If so, these features will not appear on your device menu. Your
device may also have customized items such as menu names, menu order, and icons.
© 2010 Nokia. All rights reserved.6
Page 7

Find help
11/09/2010
FCC Draft
In-device help
Your device contains instructions to help to use the applications in your device.
To open help texts from the main menu, select Menu > Help and the application
for which you want to read instructions.
When an application is open, to access the help text for the current view, select
Options > Help.
When you are reading the instructions, to change the size of the help text, select
Options > Decrease font size or Increase font size.
You may find links to related topics at the end of the help text. If you select an
underlined word, a short explanation is displayed. Help texts use the following
indicators:
discussed.
When you are reading the instructions, to switch between help texts and the
application that is open in the background, select Options > Show open apps.
and the desired application.
Accessibility solutions
Nokia is committed to making mobile phones easy to use for all individuals,
including those with disabilities. For more information, visit the Nokia website at
www.nokiaaccessibility.com.
Link to a related help topic. Link to the application being
Support
When you want to learn more about how to use your product or you are unsure
how your device should function, go to www.nokia.com/support, or using a mobile
device, nokia.mobi/support. You can also select Menu > Help in your device.
If this does not resolve your issue, do one of the following:
● Restore the original factory settings.
● Update your device software.
© 2010 Nokia. All rights reserved. 7
Page 8

Find help
11/09/2010
FCC Draft
If your issue remains unsolved, contact Nokia for repair options. Go to
www.nokia.com/repair, or in Latin America, www.nokia-latinoamerica.com/
centrosdeservicio. Before sending your device for repair, always back up the data
in your device.
Settings
Your device normally has MMS, GPRS, streaming, and mobile internet settings
automatically configured in the device, based on your network service provider
information. You may have settings from your service providers already installed
in your device, or you may receive or request the settings from the network service
providers as a special message.
Access codes
● PIN code — This code protects your SIM card against unauthorised use. The PIN
code (4 - 8 digits) is usually supplied with the SIM card.
● PIN2 code — This code (4 - 8 digits) is supplied with some SIM cards, and is
required to access some functions in your device.
If you forget an access code, contact the network service provider whose SIM card
is in your device. After three consecutive incorrect PIN or PIN2 code entries, the
code is blocked, and you need the PUK code to unblock it.
● PUK code and PUK2 code — These codes (8 digits) are required to change a
blocked PIN code or PIN2 code, respectively. If the codes are not supplied with
the SIM card, contact the network service provider whose SIM card is in your
device.
● IMEI number — This number (15 or 17 digits) is used to identify valid devices in
the GSM network. Devices that are, for example, stolen, can be blocked from
accessing the network.
● Lock code (also known as security code) — The lock code helps you to protect
your device against unauthorised use. You can create and change the code, and
set the device to request the code. Keep the new code secret and in a safe place
se parat e from y our de vice. If you f orget the c ode an d your d evice is loc ked, yo ur
device will require service. Additional charges may apply, and all the personal
data in your device may be deleted. For more information, contact a Nokia Care
point or your device dealer.
© 2010 Nokia. All rights reserved.8
Page 9

Find help
11/09/2010
FCC Draft
Prolong battery life
Many features in your device increase the demand on battery power and reduce
the battery lifetime. To save battery power, note the following:
● Features that use Bluetooth connectivity, or allowing such features to run in the
background while using other features, increase the demand on battery power.
Deactivate Bluetooth connectivity when you do not need it.
● If you have selected Packet data connection > When available in the
connection settings, and there is no packet data coverage (GPRS), the device
periodically tries to establish a packet data connection. To prolong the operating
time of your device, select Packet data connection > When needed.
● The Maps application downloads new map information when you move to new
areas on the map, which increases the demand on battery power. You can
prevent the automatic download of new maps.
● If the signal strength of the cellular network varies much in your area, your
device must scan for the available network repeatedly. This increases the
demand on battery power.
If the network mode is set to dual mode in the network settings, the device
searches for the 3G network. To set the device to use only the GSM network,
select Menu > Settings and Connectivity > Network > Network mode >
GSM.
● The backlight of the display increases the demand on battery power. In the
display settings, you can adjust the display brightness and change the time-out
period after which the backlight is switched off. Select Menu > Settings and
Phone > Display > Brightness or Light time-out.
● Leaving applications running in the background increases the demand on
battery power. To access the applications you are not using, press and hold the
menu key, and select an application.
Increase available memory
Do you need more available device memory for new applications and content?
View how much space is available for different data types — Select Menu >
Applications > Office > File mgr..
Many features of the device use memory to store data. The device notifies you if
the memory in different memory locations is low.
© 2010 Nokia. All rights reserved. 9
Page 10

Insert the memory card
11/09/2010
FCC Draft
Increase available memory — Transfer data to a compatible memory card (if
available) or to a compatible computer.
To remove data you no longer need, use File manager or open the respective
application. You can remove the following:
● Messages in the folders in Messaging and retrieved e-mail messages in the
mailbox
● Saved web pages
● Contact information
● Calendar notes
● Applications shown in Application manager that you do not need
● Installation files (.sis or .sisx) of applications you have installed. Transfer the
installation files to a compatible computer.
● Images and video clips in Photos. Back up the files to a compatible computer.
Insert the memory card
Use only compatible memory cards approved by Nokia for use with this device.
Incompatible cards may damage the card and the device and corrupt data stored
on the card.
1. Remove the back cover.
2. M ak e su re th e c on ta ct a re a o f a co mpatibl e m em or y c ard i s f ac in g d own ,
and insert it into the memory card slot.
© 2010 Nokia. All rights reserved.10
Page 11

Get started
11/09/2010
FCC Draft
3. Push the card in, until you hear a click.
4. Replace the back cover.
Get started
Insert the SIM card and battery
Safe removal. Always switch the device off and disconnect the charger before
removing the battery.
A SIM card may be already inserted in the device. If not, do the following:
1. Remove the back cover.
© 2010 Nokia. All rights reserved. 11
Page 12

Get started
11/09/2010
FCC Draft
2. Remove the battery, if inserted.
3. Slide the SIM card holder, to unlock it.
4. Lift the SIM card holder up.
5. Make sure the contact area of the SIM card is facing toward
the device, and slide the SIM card into the SIM card holder.
© 2010 Nokia. All rights reserved.12
Page 13

Get started
11/09/2010
FCC Draft
6. Lower the SIM card holder into place. Slide
the SIM card holder, to lock it.
7. Line up the battery contacts, and insert
the battery.
8. To replace the cover, direct the top locking
catches toward their slots, and press
down until the cover locks into place.
If the SIM card is not properly in place, the
device can only be used in the offline profile.
Only replace the battery with a battery that is
compliant with the IEEEstd-1725-200x standard.
Insert the memory card
Use only compatible memory cards approved by Nokia for use with this device.
Incompatible cards may damage the card and the device and corrupt data stored
on the card.
1. Remove the back cover.
© 2010 Nokia. All rights reserved. 13
Page 14

Get started
11/09/2010
FCC Draft
2. Make sure the contact area of a compatible memory card
is facing down, and insert it into the memory card slot.
3. Push the card in, until you hear a click.
4. Replace the back cover.
Remove the memory card
Important: Do not remove the memory card when an application is using
it. Doing so may damage the memory card and the device, and corrupt data stored
on the card.
1. If the device is switched on, before you remove the card, press the power key,
and select Remove memory card.
© 2010 Nokia. All rights reserved.14
Page 15

Get started
11/09/2010
FCC Draft
2. When Remove memory card? Some applications will be closed. is
displayed, select Yes.
3. When Remove memory card and press 'OK' is displayed, remove the back
cover of the device, and push the card in, until you hear a click.
4. Pull out the memory card, and replace the back cover. If the device is switched
on, select OK.
Charge the battery
Your battery has been partially charged at the factory, but you may need to
recharge it before you can switch on your device for the first time. If the device
indicates a low charge, do the following:
1. Connect the charger to a wall outlet.
2. Connect the charger to the device.
3. When the device indicates a full charge, disconnect the charger from the device,
then from the wall outlet.
You do not need to charge the battery for a specific length of time, and you can
use the device while it is charging. If the battery is completely discharged, it may
take several minutes before the charging indicator appears on the display or before
any calls can be made.
Tip: Disconnect the charger from the wall outlet when the charger is not in
use. A charger that is connected to the outlet consumes power even when it
is not connected to the device.
USB charging
You can use USB charging when a wall outlet is not available. Data can be
transferred while charging the device. The efficiency of USB charging power varies
significantly, and it may take a long time for charging to start and the device to
start functioning.
© 2010 Nokia. All rights reserved. 15
Page 16

Get started
11/09/2010
FCC Draft
1. Use a compatible USB data cable to connect your device to a compatible USB
device.
Depending on the type of the device that is used for charging, it may take a
while for charging to start.
2. If the device is switched on, select the appropriate USB mode.
The phone shall only be connected to products that bear the USB-IF logo or have
completed the USB-IF compliance program.
Keys and parts
1 — Wrist strap hole
2 — Nokia AV connector (3.5 mm)
3 — USB connector
4 — Volume/Zoom key
5 — Lock switch
6 — Proximity sensor
7 — Touch screen
8 — Call key
9 — Menu key
10 — Power/End key
© 2010 Nokia. All rights reserved.16
Page 17

Get started
11/09/2010
FCC Draft
During extended operation such as an active high speed data connection, the
device may feel warm. In most cases, this condition is normal. If you suspect the
device is not working properly, take it to the nearest authorised service facility.
Do not cover the area above the touch screen, for example,
with protective film or tape.
Switch the device on
1. Press and hold the power key.
2. If the device asks for a PIN code or lock code, enter it,
and select OK. To delete a number, select
factory setting for the lock code is 12345.
3. Select your location. If you accidentally select the wrong
location, select Back.
4. Enter the date and time. When using the 12-hour time
format, to switch between a.m. and p.m., select any
number.
. The
Home screen
The home screen is your starting point where you can collect all your important
contacts or application shortcuts.
© 2010 Nokia. All rights reserved. 17
Page 18

Get started
11/09/2010
FCC Draft
Interactive display elements
To open the clock application, select the clock (1).
To open the calendar, or to change the profile, select the date or
the profile name (2).
To view or modify connectivity settings (
events, tap the top right corner (3).
To make a phone call, select
To open the contacts list, select Contacts or
To open the main menu, press the menu key (6).
Change the home screen theme
To change the home screen theme or the shortcuts, select
Menu > Settings and Personal > Home screen.
Music keys
When music or the radio is playing in the background, music keys (play/pause, skip
backward, and skip forward) are displayed in the home screen.
(4).
), or to view missed
(5).
Lock the keys and touch screen
To lock the touch screen and the keys, press the lock key on the side of the device.
To unlock, press the lock key on the side of the device, and select the unlock icon
on the screen.
When the touch screen and keys are locked, the touch screen is switched off and
the keys are inactive.
The screen and keys may be locked automatically after a period of inactivity. To
change the settings for automatic screen and key locking, select Menu >
Settings and Phone > Phone mgmt. > Auto. keyguard > Keypad autolock
period.
Access the menu
To access the menu, press the menu key.
To open an application or folder in the menu, select the item.
© 2010 Nokia. All rights reserved.18
Page 19

Get started
11/09/2010
FCC Draft
Touch screen actions
Tap and double-tap
To open an application or other element on the touch screen, you normally tap it
with your finger. However, to open the following items, you must tap them twice.
● List items in an application, such as the Drafts folder in the folder list in
Messaging
Tip: When you open a list view, the first item is already highlighted. To
open the highlighted item, tap it once.
● Applications and folders in the menu when using the list view type
● Files in a file list, for example, an image in the images and videos view in Gallery.
If you tap a file or similar item once, it is not opened, it becomes highlighted.
To see the options available for the item, select Options or, if available, select
an icon from a toolbar.
Select
In this user documentation, opening applications or items by tapping them once
or twice is called "selecting". If you need to select several items in a sequence, the
menu items to select are separated by arrows. To select Options > Help, tap
Options, and then tap Help.
Drag
To drag, place your finger on the screen, and slide it across the screen. To scroll up
or down on a web page, drag the page with your finger.
Swipe
To swipe, slide your finger quickly left or right on the screen. When viewing an
image, to view the next or previous image, swipe the
image left or right, respectively.
Scroll
To scroll up or down in lists that have a scroll bar,
drag the slider of the scroll bar.
In some list views, you can scroll by placing your
finger on a list item and dragging up or down. To scroll through contacts, place
your finger on a contact, and drag up or down.
Tip: To view a brief description of an icon, place your finger on the icon.
Descriptions are not available for all icons.
© 2010 Nokia. All rights reserved. 19
Page 20

Your device
11/09/2010
FCC Draft
Touch screen backlight
The touch screen backlight is turned off after a period of inactivity. To turn the
screen backlight on, tap the screen.
If the touch screen and keys are locked, tapping the screen does not turn the screen
backlight on. To unlock the screen and keys, slide the lock switch.
Change the ringing tone
Select Menu > Settings and Personal > Profiles.
You can use profiles to set and customise the ringing tones, message alert tones,
and other tones for different events, environments, or caller groups. To personalise
a profile, go to the profile, and select Options > Customize.
Nokia support
To find the latest version of this guide, additional information, downloads, and
services related to your Nokia product, see www.nokia.com/support or your local
Nokia website.
Configuration settings service
To download configuration settings such as MMS, GPRS, e-mail, and other services
for your phone model, see www.nokia.com/support.
Nokia Care services
If you need to contact Nokia Care services, check the list of local
Nokia Care contact centres at www.nokia.com/customerservice.
Maintenance
For maintenance services, find your nearest Nokia Care point at www.nokia.com/
repair.
Your device
Display indicators
The device is being used in a GSM network (network service).
The device is being used in a UMTS network (network service).
© 2010 Nokia. All rights reserved.20
Page 21

Your device
11/09/2010
FCC Draft
You have one or more unread messages in the Inbox folder in Messaging.
You have received new e-mail in the remote mailbox.
There are messages waiting to be sent in the Outbox folder.
You have missed calls.
The ringing type is set to Silent, and the message and e-mail alert tones are
turned off.
A timed profile is active.
The touch screen and keys are locked.
A clock alarm is active.
The second phone line is being used (network service).
All calls to the device are diverted to another number (network service). If
you have two phone lines, a number indicates the active line.
Your device is connected to a network via wireless LAN or UMTS (network
service) and ready for an internet call.
A compatible headset is connected to the device.
A compatible text phone is connected to the device.
A data call is active (network service).
A GPRS packet data connection is active (network service). indicates that the
connection is on hold and
A packet data connection is active in a part of the network that supports EGPRS
(network service).
connection is available. The icons indicate that EGPRS is available in the network,
but your device is not necessarily using an EGPRS connection to transfer data.
A UMTS packet dat a connection is active (network service ). indicates that the
connection is suspended and
that a connection is available.
indicates that the connection is on hold and that a
that a connection is being established.
Bluetooth connectivity is activated.
Data is being transmitted using Bluetooth connectivity. When the indicator is
blinking, your device is trying to connect with another device.
© 2010 Nokia. All rights reserved. 21
Page 22

Your device
11/09/2010
FCC Draft
A USB connection is active.
Synchronisation is in progress.
GPS is active.
Contacts bar
To add a contact to the home screen, in the home screen, select > Options >
New contact, and follow the instructions.
To communicate with a contact, select the contact and from the following:
the contact.
Refresh the contact's web feeds.
To view past communication events with a contact, select the contact. To view the
details of a communication event, select the event.
To close the view, select
Send a message to the contact. Modify the contact's details.
.
Call
Antenna locations
Avoid touching the antenna area unnecessarily while the antenna is transmitting
or receiving. Contact with antennas affects the communication quality and may
cause a higher power level during operation and may reduce the battery life.
Cellular antenna
GPS antenna
Bluetooth antenna
© 2010 Nokia. All rights reserved.22
Page 23

Your device
11/09/2010
FCC Draft
Offline profile
The offline profile lets you use the device without connecting to the wireless
cellular network. When the offline profile is active, you can use your device without
a SIM card.
Activate the offline profile — Press the power key briefly, and select Offline.
When you activate the offline profile, the connection to the cellular network is
closed. All radio frequency signals to and from the device to the cellular network
are prevented. If you try to send messages using the cellular network, they are
placed in the Outbox folder to be sent later.
Important: In the offline profile you cannot make or receive any calls, or
use other features that require cellular network coverage. You may be able to call
the official emergency number programmed into your device.To make calls, you
must first change to another profile.
Shortcuts
To switch between open applications, press and hold the menu key. Leaving
applications running in the background increases the demand on battery power
and reduces the battery life.
To start a web connection (network service), in the dialler, tap and hold 0.
To access applications available in the media bar, such as the music player and web
browser, in any view, press the media key.
To change the profile, press the power key, and select a profile.
To call your voice mailbox (network service), in the dialler, tap and hold 1.
To open a list of last dialled numbers, in the home screen, press the call key.
To use voice commands, in the home screen, press and hold the call key.
Volume and loudspeaker control
Adjust the volume of a phone call or sound clip — Use the volume keys.
The built-in loudspeaker allows you to speak and listen
from a short distance without having to hold the device
to your ear.
© 2010 Nokia. All rights reserved. 23
Page 24

Your device
11/09/2010
FCC Draft
Use the loudspeaker during a call — Select Activate loudsp..
Turn off the loudspeaker — Select Activate handset.
Sensor settings and display rotation
When you activate the sensors in your device, you can control certain functions by
turning the device.
Select Menu > Settings and Phone > Sensor settings.
Select from the following:
● Sensors — Activate the sensors.
● Turning control — Select Silencing calls and Snoozing alarms to mute calls
and snooze alarms by turning your device so that the display faces down. Select
Auto-rotate display to rotate the display content automatically when you turn
the device on its left side or back to a vertical position. Some applications and
features may not support rotating the display content.
Remote lock
You can lock your device remotely using a predefined text message. You can also
lock the memory card remotely.
Enable remote locking
1. Select Menu > Settings and Phone > Phone mgmt. > Security > Phone
and SIM card > Remote phone locking > Enabled.
2. Enter the text message content (5-20 characters), verify it, and enter the lock
code.
Lock your device remotely — Write the predefined text message, and send it to
your device. To unlock your device, you need the lock code.
Headset
You can connect a compatible headset or compatible headphones to your device.
You may need to select the cable mode.
© 2010 Nokia. All rights reserved.24
Page 25

Make calls
11/09/2010
FCC Draft
Attach a wrist strap
Make calls
Touch screen during calls
Your device has a proximity sensor. To extend battery life and prevent accidental
selections, the touch screen is disabled automatically during calls, when you place
the device next to your ear.
Do not cover the proximity sensor, for example, with
protective film or tape.
Voice calls
1. In the home screen, select Dialer to open the dialler, and enter the phone
number, including the area code. To remove a number, select C.
For international calls, select * twice for the + character (which replaces the
international access code), and enter the country code, area code (omit the
leading zero if necessary), and phone number. The + character as a replacement
© 2010 Nokia. All rights reserved. 25
Page 26

Make calls
11/09/2010
FCC Draft
for the international access code may not work in all regions. In this case, enter
the international access code directly.
2. To make the call, press the call key.
3. To end the call (or to cancel the call attempt), press the end key.
Pressing the end key always ends a call, even if another application is active.
To make a call from the contacts list, select Menu > Contacts. Go to the desired
name. Or, select the search field, enter the first letters or characters of the name,
and go to the name. To call the contact, press the call key. If you have saved several
numbers for a contact, select the desired number from the list, and press the call
key.
During a call
Mute or unmute the microphone — Select or .
Put an active voice call on hold — Select
Activate the loudspeaker — Select
headset with Bluetooth connectivity, to route the sound to the headset, select
Options > Activate BT handsfree.
Switch back to the handset — Select
End a call — Select
Switch between active and held calls — Select Options > Swap.
Tip: To put an active call on hold, press the call key. To activate the held call,
press the call key again.
Send DTMF tone strings
1. Select Options > Send touch tones.
2. Enter the DTMF string or search for it from the contacts list.
3. To enter a wait character (w) or a pause character (p), press * repeatedly.
4. To send the tone, select OK. You can add DTMF tones to the phone number or
DTMF field in contact details.
End an active call and replace it with another incoming call — Select
Options > Replace.
End all calls — Select Options > End all calls.
Many of the options that you can use during a voice call are network services.
.
. If you have attached a compatible
or .
.
© 2010 Nokia. All rights reserved.26
Page 27

Make calls
11/09/2010
FCC Draft
Voice and video mailboxes
To call yo ur voi ce or v ide o mail box (ne twork services, video mailbox available only
in UMTS networks), in the home screen, select Dialer, select and hold 1, and select
Voice mailbox or Video mailbox.
1. To change the phone number of your voice or video mailbox, select Menu >
Settings and Calling > Call mailbox, a mailbox, and Options > Change
number.
2. Enter the number (obtained from your network service provider), and select
OK.
Answer or reject a call
Answer a call —
Mute the ringing tone of an incoming call — Select
Send a reject call text message — Select Send msg., edit the message text, and
press the call key. With the reply message you can inform the caller that you cannot
answer the call.
Reject a call — Press the end key. If you activate the Call forwarding > Voice
calls > If busy function in phone settings, rejecting an incoming call also diverts
the call.
Activate the reject call text message feature — Select Menu > Settings and
Calling > Call > Decline call with msg. > Yes.
Write a standard reject call text message — Select Menu > Settings and
Calling > Call > Message text, and write the message.
.
Make a conference call
Your device supports conference calls between a maximum of six participants,
including yourself.
Conference calling is a network service.
1. Make a call to the first participant.
2. To make a call to another participant, select Options > New call. The first call
is put on hold.
© 2010 Nokia. All rights reserved. 27
Page 28

Make calls
11/09/2010
FCC Draft
3. When the new call is answered, to add the first participant to the conference
call, select
Add a new participant to a conference call — Make a call to another participant,
and add the new call to the conference call.
Have a private conversation with a conference call participant — Select
Go to the participant, and select
device. The other participants continue the conference call. To return to the
conference call, select
Drop a participant from a conference call — Select
and select
End an active conference call — Press the end key.
.
. The conference call is put on hold on your
.
, go to the participant,
.
Speed dial a phone number
To activate speed dialling, select Menu > Settings and Calling > Call > 1-touch
dialing.
1. To assign a phone number to one of the number keys, select Menu >
Settings and Calling > 1-touch dialing.
2. Go to the key to which you want to assign the phone number, and select
Options > Assign.
1 and 2 are reserved for the voice and video mailboxes.
To call in the home screen, press the assigned key and the call key.
To call in the home screen, select Dialer and the assigned key, and press the call
key.
To call in the home screen when speed dialling is active, select Dialer, and select
and hold the assigned key.
.
Call waiting
With call waiting (network service), you can answer a call when you have another
call in progress.
Activate call waiting — Select Menu > Settings and Calling > Call > Call
waiting.
Answer a waiting call — Press the call key. The first call is put on hold.
© 2010 Nokia. All rights reserved.28
Page 29

Make calls
11/09/2010
FCC Draft
Swap between an active call and a call on hold — Select Options > Swap.
Connect the call on hold to the active call — Select Options > Transfer. You
disconnect yourself from the calls.
End an active call — Press the end key.
End both calls — Select Options > End all calls.
Voice dialling
Your device automatically creates a voice tag for contacts.
Listen to a voice tag for a contact
1. Select a contact and Options > Voice tag details.
2. Go to a contact detail, and select Options > Play voice tag.
Make a call with a voice tag
Note: Using voice tags may be difficult in a noisy environment or during an
emergency, so you should not rely solely upon voice dialling in all circumstances.
When you use voice dialling, the loudspeaker is in use. Hold the device at a short
distance away when you say the voice tag.
1. To start voice dialling, in the home screen, press and hold the call key. If a
compatible headset with the headset key is attached, press and hold the
headset key to start voice dialling.
2. A short tone sounds, and Speak now is displayed. Say clearly the name that is
saved for the contact.
3. The device plays a synthesised voice tag for the recognised contact in the
selected device language, and displays the name and number. To cancel the
voice dialling, select Quit.
If several numbers are saved for a name, you can say also the name and the number
type, such as mobile or telephone.
Hearing
Some wireless devices may interfere with some hearing aids.
Your mobile device complies with FCC rules governing hearing aid compatibility.
These rules require an M3 microphone or higher. The M value of your device
microphone is marked on the device sales package. To determine the M-rating of
© 2010 Nokia. All rights reserved. 29
Page 30

Make calls
11/09/2010
FCC Draft
your hearing aid and compatibility with this device, consult your hearing health
professional. For more information about accessibility, see
www.nokiaaccessibility.com.
Log
The Log application stores information about the communication history of the
device. The device registers missed and received calls only if the network supports
these functions, and the device is switched on and within the network service area.
Recent calls
You can view information about your recent calls.
Select Menu > Log and Recent calls.
View missed, received, and dialled calls — Select Missed calls, Received
calls, or Dialed numbers.
Tip: To open the dialled numbers list in the home screen, press the call key.
Select Options and from the following:
● Save to Contacts — Save a phone number from a recent calls list to your
contacts.
● Clear list — Clear the selected recent calls list.
● Delete — Clear an event in the selected list.
● Settings — Select Log duration and the length of time that the communication
information is saved in the log. If you select No log, no information is saved in
the log.
Packet data
Select Menu > Log.
You may be charged for your packet data connections by the amount of data sent
and received.
Check the amount of data sent or received during packet data
connections — Select Data counter > All sent data or All received data.
Clear both sent and received information — Select Data counter > Options >
Clear counters. You need the lock code to clear the information.
© 2010 Nokia. All rights reserved.30
Page 31

Hearing
11/09/2010
FCC Draft
Call duration
You can view the approximate duration of your last call, dialled and received calls,
and all calls.
Select Menu > Log and Call duration.
Monitor all communication events
In the general log, you can view information on communication events, such as
voice calls, text messages, or data connections registered by your device.
Select Menu > Log.
Open the general log — Open the general log tab
text message sent in more than one part and packet data connections, are logged
as one communication event. Connections to your mailbox, multimedia messaging
centre, or web pages are shown as packet data connections.
View the packet data connection details — Go to an incoming or outgoing
packet data connection event indicated with GPRS, and select Options > View.
Copy a phone number from the log — Select Options > Use number >
Copy. You can, for example, paste the phone number to a text message.
Filter the log — Select Options > Filter and a filter.
Define the log duration — Select Options > Settings > Log duration. If you
select No log, all the log contents, recent calls register, and messaging delivery
reports are permanently deleted.
. Subevents, such as a
Hearing
Some wireless devices may interfere with some hearing aids.
Your mobile device complies with FCC rules governing hearing aid compatibility.
These rules require an M3 microphone or higher. The M value of your device
microphone is marked on the device sales package. To determine the M-rating of
your hearing aid and compatibility with this device, consult your hearing health
professional. For more information about accessibility, see
www.nokiaaccessibility.com.
© 2010 Nokia. All rights reserved. 31
Page 32
Write text
11/09/2010
FCC Draft
Write text
The on-screen keyboards allow you to enter characters by tapping them with your
fingers.
Tap any text input field to enter letters, numbers, and special characters.
Your device can complete words based on the built-in dictionary for the selected
text input language. The device also learns new words from your input.
Virtual keyboard
You can use the virtual keyboard in landscape mode.
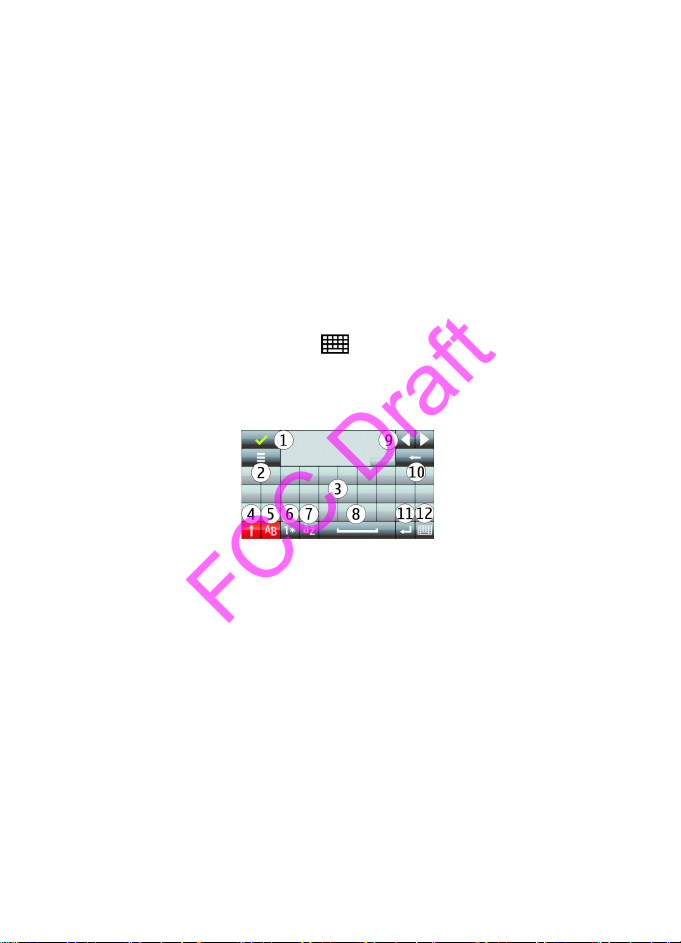
To activate the virtual keyboard, select
'qtn_input_switcher_fs_qwerty.peninputcommonctrls' in language 'en'}.
When using the virtual keyboard in full screen mode, you can select keys with your
fingers.
1 — Close - Close the virtual keyboard.
2 — Input menu - Open the touch input options menu to access commands such
as {Missing display text mapping for
'text_pup_option_input_language.avkon' in language 'en'}.
3 — Virtual keyboard
4 — Shift and caps lock - To enter an uppercase character when writing in
lowercase, or vice versa, select the key before entering the character. To activate
the caps lock, select the key twice. A line under the key indicates that the caps lock
is activated.
5 — Letters
6 — Numbers and special characters
7 — Character accents
8 — Space bar
> {Missing display text mapping for
© 2010 Nokia. All rights reserved.32
Page 33
Write text
11/09/2010
FCC Draft
9 — Move - Move the cursor.
10 — Backspace
11 — Enter - Move the cursor to the next row or text input field. Additional functions
are based on the current context (for example, in the web address field of the web
browser, it acts as the Go icon).
12 — Input mode - Select the input method. When you tap an item, the current
input method view closes, and the selected one opens.
Handwriting
The input methods and languages supported by the handwriting recognition vary
by region and may not be available for all languages.
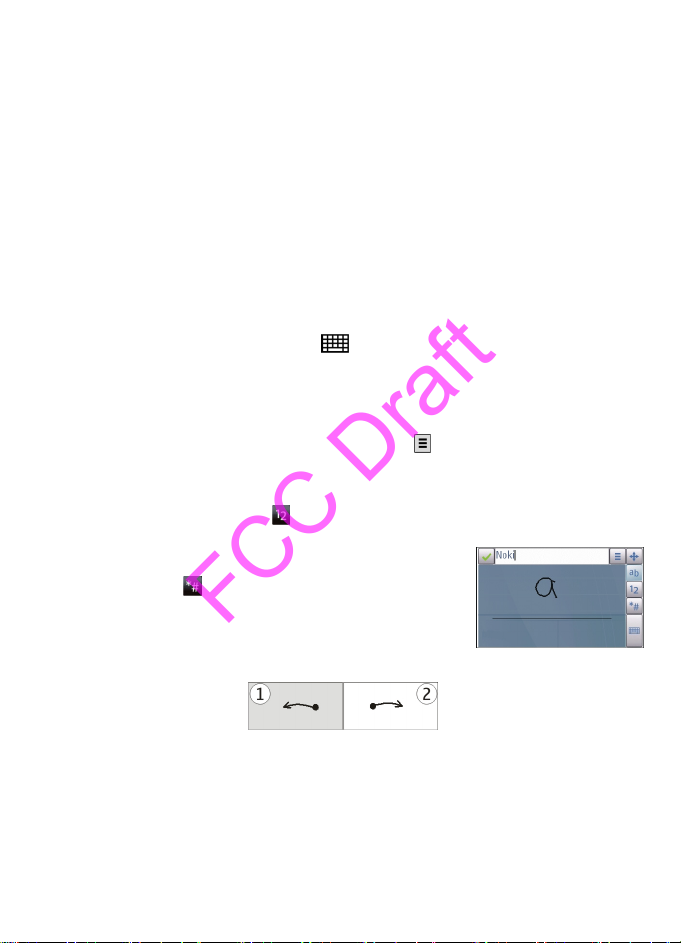
To activate handwriting mode, select
'qtn_input_switcher_hwr.peninputcommonctrls' in language 'en'}.
Write legible, upright characters on the text input area, and leave a space between
each character.
To teach the device your handwriting style, select
mapping for 'qtn_hwrt_om_training.trui' in language 'en'}.
To enter letters and numbers (default mode), write words as you would normally.
To select number mode, select
corresponding icon, if available.
To enter special characters, write them as you would
normally, or select
To delete characters or move the cursor back, swipe
backwards (see Figure 1).
To insert a space, swipe forwards (see Figure 2).
and the desired character.
> {Missing display text mapping for
> {Missing display text
. To enter non-Latin characters, select the
© 2010 Nokia. All rights reserved. 33
Page 34
Write text
11/09/2010
FCC Draft
Alphanumeric keypad
Virtual keypad
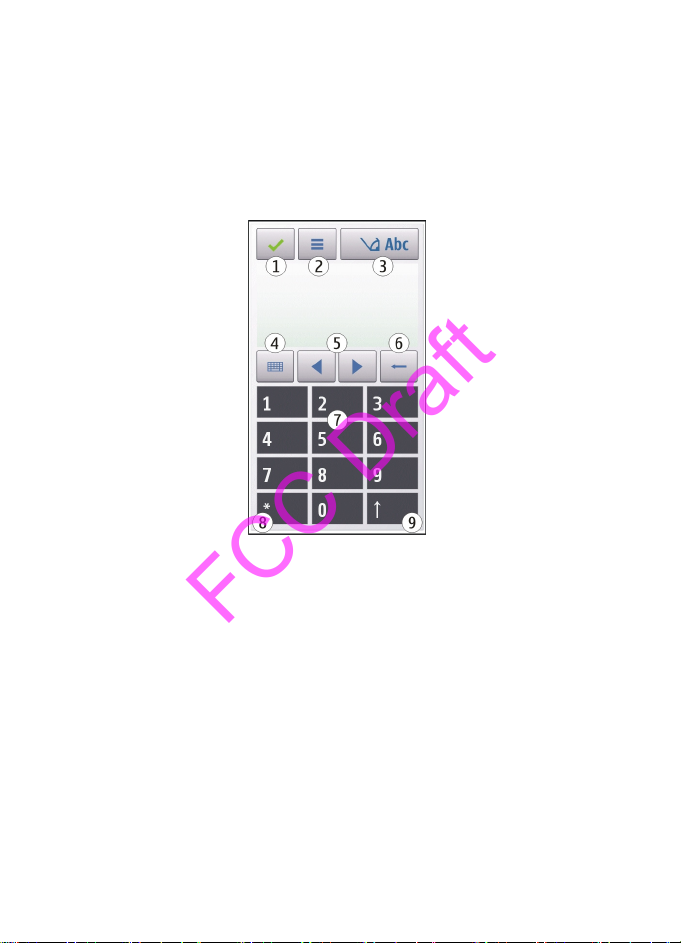
With the virtual keypad ({Missing display text mapping for
'qtn_input_switcher_itu_t.peninputcommonctrls' in language 'en'}), you can
enter characters like you would with a traditional physical keypad with numbers
on the keys.
1 — Close - Closes the virtual keypad ({Missing display text mapping for
'qtn_input_switcher_itu_t.peninputcommonctrls' in language 'en'}).
2 — Input menu - Opens the touch input menu, which includes commands such as
{Missing display text mapping for 'qtn_options_t9_on.avkon' in language
'en'} and {Missing display text mapping for
'text_pup_option_input_language.avkon' in language 'en'}.
3 — Text input indicator - Opens a pop-up window, in which you can activate or
deactivate predictive text input modes, change the character case, and switch
between letter and number modes.
4 — Input mode - Opens a pop-up window, in which you can select the input mode.
When you tap an item, the current input method view closes, and the selected one
opens. The availability of input modes may vary depending on whether the
automatic input mode (sensor settings) is activated or not.
5 — Arrow keys - Scroll left or right.
© 2010 Nokia. All rights reserved.34
Page 35

Write text
11/09/2010
FCC Draft
6 — Backspace
7 — Numbers
8 — Star - Opens a special characters table.
9 — Shift - Changes the character case, activates or deactivates predictive text input
modes, and switches between letter and number modes.
Traditional text input
Tap a number key (1-9) repeatedly until the desired character appears. There are
more characters available for a number key than are visible on the key.
If the next letter is located on the same key as the present one, wait until the cursor
appears (or move the cursor forward to end the time-out period), and enter the
letter.
To insert a space, tap 0. To move the cursor to the next line, tap 0 three times.
Predictive text input
With predictive text input, you can enter any word with a single key selection.
Predictive text input is based on a built-in dictionary to which you can add new
words. Predictive text input is not available for all languages.
1. To activate predictive text input for all editors on the device, select
{Missing display text mapping for
'qtn_editing_state_indicator_list_prediction_on.avkon' in language 'en'}.
You can also select
'qtn_options_t9_on.avkon' in language 'en'}.
2. To write the desired word, use the keys 2-9. Select each key only once for one
letter. For example, to write "Nokia" when the English dictionary is selected,
select 6 for N, 6 for o, 5 for k, 4 for i, and 2 for a.
The word suggestion changes after each key selection.
3. When you finish writing the word correctly, move the cursor right to confirm
it, or select 0 to add a space.
If the word is not correct, select * repeatedly to view the matching words the
dictionary has found one by one.
If the ? character is displayed after the word, the word is not in the dictionary.
To add a word to the dictionary, select {Missing display text mapping for
'text_softkey_spell.avkon' in language 'en'}, enter the word using
> {Missing display text mapping for
>
© 2010 Nokia. All rights reserved. 35
Page 36

Write text
11/09/2010
FCC Draft
traditional text input, and select OK. The word is added to the dictionary. When
the dictionary is full, a new word replaces the oldest added word.
4. Start writing the next word.
Switch between text modes
To deactivate predictive text input for all editors in your device, select >
{Missing display text mapping for
'qtn_editing_state_indicator_list_prediction_off.avkon' in language 'en'}, or
quickly double-tap #. Alternatively, you can select
{Missing display text mapping for 'qtn_t9_off.gslangplugin' in language
'en'}.
> Predictive text >
Touch input settings
Select Menu > Settings and Phone > Touch input.
To modify text input settings for the touch screen, select from the following:
● {Missing display text mapping for
'qtn_cp_hwr_training.gspeninputplugin' in language 'en'} — Open the
handwriting training application. Train the device to recognise your
handwriting better. This option is not available in all languages.
● Writing language — Define which language-specific characters in your
handwriting are recognised and how the virtual keyboard is laid out.
● {Missing display text mapping for
'qtn_tin_settings_writing_speed.gspeninputplugin' in language 'en'}
— Select the writing speed.
● {Missing display text mapping for
'qtn_tin_settings_guiding_line.gspeninputplugin' in language 'en'}
— Display or hide the guiding line in the writing area. The guiding line helps
you write in a straight line, and it also helps the device recognise your writing.
● {Missing display text mapping for
'qtn_tin_settings_pen_trail_width.gspeninputplugin' in language 'en'}
— Select the pen trail width for the text written with the stylus. The stylus is
sold separately.
● {Missing display text mapping for
'qtn_tin_settings_pen_trail_colour.gspeninputplugin' in language 'en'}
— Select the colour of the text written with the stylus. The stylus is sold
separately.
© 2010 Nokia. All rights reserved.36
Page 37

Contacts
11/09/2010
FCC Draft
● {Missing display text mapping for
'qtn_as_settings_input_method_for_find.gspeninputplugin' in language
'en'} — Activate adaptive search.
● Touch screen calibration — Calibrate the touch screen.
Contacts
You can save and update contact information, such as phone numbers, home
addresses, or e-mail addresses of your contacts. You can add a personal ringing
tone or a thumbnail image to a contact. You can also create contact groups, which
allow you to send text messages or e-mail to many recipients at the same time.
To open the contacts list, in the home screen, depending on the home screen
theme, select Contacts or
Save and edit names and numbers
Select Menu > Contacts.
Add a new contact to the contacts list
1. Select .
2. Tap a field to enter information. To close the text input, select
appropriate fields, and select Done.
Edit contacts — Select a contact and Options > Edit.
.
. Fill in the
Contacts toolbar
Select Menu > Contacts.
Call a contact — Go to a contact, and select
Send a message to a contact — Go to a contact, and select
Create a new contact — Select
.
.
.
Manage names and numbers
To copy or delete a contact, or to send a contact as a business card to another
device, tap and hold a contact, and select Copy, Delete, or Send business card.
© 2010 Nokia. All rights reserved. 37
Page 38

Contacts
11/09/2010
FCC Draft
To delete several contacts at the same time, select Options > Mark/Unmark to
mark the desired contacts, and to delete, select Options > Delete.
To listen to the voice tag assigned to a contact, select the contact and Options >
Voice tag details > Options > Play voice tag.
When entering contacts or editing voice commands, do not use very short or similar
names for different contacts or commands.
Note: Using voice tags may be difficult in a noisy environment or during an
emergency, so you should not rely solely upon voice dialling in all circumstances.
Assign default numbers and addresses
If a contact has several numbers or addresses, a default number or address makes
it easier for you to call or send a message to the contact. The default number is
also used in voice dialling.
1. Select Menu > Contacts.
2. Select a contact and Options > Defaults.
3. Select a default to which you want to add a number or an address, and select
Assign.
4. Select a number or an address you want to set as a default.
5. To exit the Defaults view and save the changes, tap outside the view.
Ringing tones, images, and call text for contacts
You can define a ringing tone for a contact or contact group, and an image and call
text for a contact. When the contact calls you, the device plays the selected ringing
tone and shows the call text or image (if the caller’s phone number is sent with
the call and your device recognises it).
Select Menu > Contacts.
Add more fields to a contact details view — Select the contact and Options >
Edit > Options > Add detail.
Define a ringing tone for a contact or contact group — Select the contact or
contact group and Options > Ringing tone, and select a ringing tone.
© 2010 Nokia. All rights reserved.38
Page 39

Contacts
11/09/2010
FCC Draft
Remove the ringing tone from a contact — Select Default tone from the list
of ringing tones.
Add an image for a contact — Select a contact saved in the device memory and
Options > Add image, and select an image from Gallery
Define a call text for a contact — Select the contact and Options > Add call
alert text. Enter the call text, and select
View, change or remove the image from a contact
1. Select a contact and Options > Edit.
2. Go to Image, and select Options and the desired option.
.
Copy contacts
When you open the contacts list for the first time, the device asks if you want to
copy names and numbers from the SIM card to your device.
To start copying, select OK.
If you do not want to copy the contacts from the SIM card to your device, select
Cancel. The device asks if you want to view the SIM card contacts in the contacts
directory. To view the contacts, select OK. The contacts list opens, and the names
stored on your SIM card are indicated with
.
SIM services
For availability and information on using SIM card services, contact your SIM card
vendor. This may be the network service provider or other vendor.
SIM contacts
The number of contacts that can be stored on the SIM card is limited.
Display contacts stored on the SIM card in the contacts list — Select
Options > Settings > Contacts to display > SIM memory.
The numbers you save in the contacts list may not be automatically saved to your
SIM card.
Copy contacts to the SIM card — Go to a contact, and select Options > Copy >
SIM memory.
© 2010 Nokia. All rights reserved. 39
Page 40

Messaging
11/09/2010
FCC Draft
Select the default memory where to save the new contacts — Select
Options > Settings > Default saving memory > Phone memory or SIM
memory.
Contacts stored in the device memory can contain more than one phone number
and an image.
Fixed dialling
With the fixed dialling service, you can restrict calls from your device to certain
phone numbers. Not all SIM cards support the fixed dialling service. For more
information, contact your service provider.
Select Menu > Contacts and Options > SIM numbers > Fixed dial contacts.
You ne ed your PIN 2 code to acti vate a nd deactiv ate fi xed diall ing or e dit yo ur fixed
dialling contacts. Contact your service provider for your PIN2 code.
Select Options and from the following:
● Activate fixed dialing or Deactivate fixed dialing — Activate or deactivate
fixed dialling.
● New SIM contact — Enter the contact name and phone number to which calls
are allowed.
● Add from Contacts — Copy a contact from the contacts list to the fixed dialling
list.
To send text messages to the SIM contacts while the fixed dialling service is active,
you need to add the text message centre number to the fixed dialling list.
Messaging
Messaging main view
Select Menu > Messaging (network service).
Create a new message — Select New message.
Tip: To avoid rewriting messages that you send often, use saved messages
in the Templates folder in My folders. You can also create and save your own
templates.
Messaging contains the following folders:
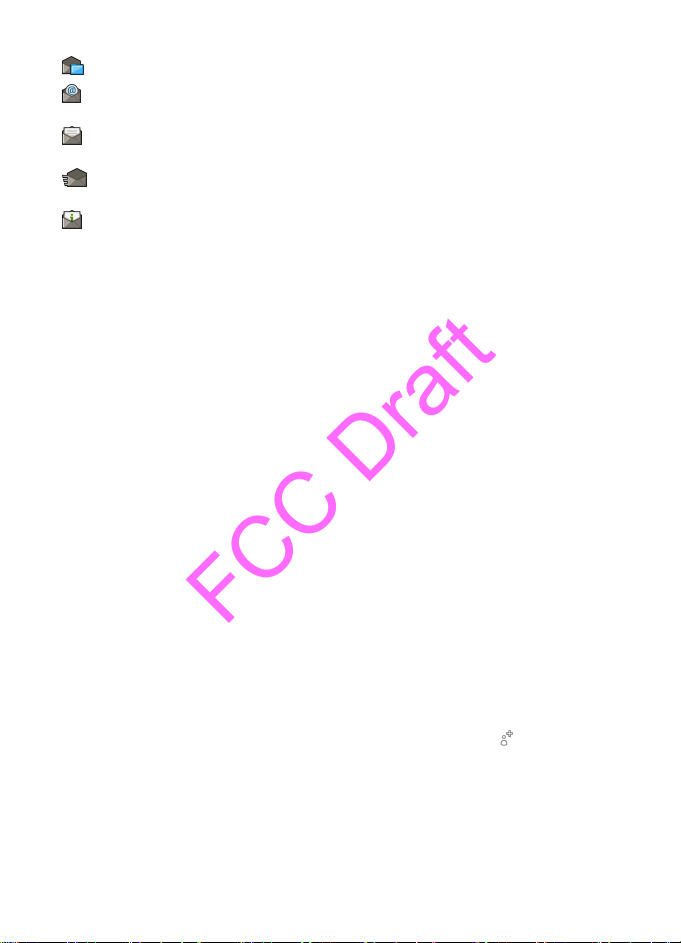
●
Inbox — Received messages, except e-mail and cell broadcast messages.
© 2010 Nokia. All rights reserved.40
Page 41
Messaging
11/09/2010
FCC Draft
● My folders — Organise your messages into folders.
Mailbox — Connect to your remote mailbox to retrieve your new e-mail
●
messages, or view your previously retrieved e-mail messages offline.
●
Drafts — Draft messages that have not been sent.
●
●
Outbox — Messages waiting to be sent are temporarily stored in the
Outbox, for example, when your device is outside network coverage.
●
Delivery reports — Request the network to send you a delivery report of
the text messages and multimedia messages you have sent (network service).
Write and send messages
Select Menu > Messaging.
Before you can create a multimedia message or write a mail, you must have the
correct connection settings defined.
If the item you inserted in a multimedia message is too large for the network, the
device may automatically reduce the size.
Only compatible devices can receive and display multimedia messages. Messages
may look different in different devices.
Check the size limit of mail messages with your service provider. If you attempt to
send a mail message that exceeds the size limit of the mail server, the message is
left in the Outbox folder, and the device attempts to resend it periodically. Sending
a mail requires a data connection, and continuous attempts to resend the mail
may incur charges from your service provider. In the Outbox folder, you can delete
such a message or move it to the Drafts folder.
Messaging requires network services.
Send a text or multimedia message — Select New message.
Send an audio or mail message — Select Options > Create message, and the
relevant option.
Select recipients or groups from the contacts list — Select
Enter the number or mail address manually — Tap the To field.
Enter the subject of the mail or multimedia message — Enter it in the Subject
field, . If the Subject field is not visible, select Options > Message header
fields to change the fields that are visible.
from the toolbar.
© 2010 Nokia. All rights reserved. 41
Page 42

Messaging
11/09/2010
FCC Draft
Write the message — Tap the message field.
Add an object to a message or mail — Select
The message type may change to multimedia message based on the inserted
content.
Send the message or mail — Select
You can send text messages that are longer than the character limit for a single
message. Longer messages are sent as two or more messages. Your service
provider may charge accordingly.
Characters with accents, other marks, or some language options, take more space,
and limit the number of characters that can be sent in a single message.
and the relevant type of content.
, or press the call key.
Messaging inbox
Receive messages
Select Menu > Messaging and Inbox.
An unread text message
An unread multimedia message
An unread audio message
Data received through Bluetooth connectivity
When you receive a message,
screen.
Open a message from the home screen — Select Show.
Open a message in the Inbox folder — Select the message.
Reply to a received message — Select Options > Reply.
and 1 new message are displayed in the home
Multimedia messages
Select Menu > Messaging.
Retrieve multimedia messages — Select Options > Retrieve. A packet data
connection is opened to retrieve the message to your device. You may receive a
notification that a multimedia message is waiting in the multimedia message
centre.
© 2010 Nokia. All rights reserved.42
Page 43

Messaging
11/09/2010
FCC Draft
When you open a multimedia message ( ), you may see an image and a message.
indicates that a sound clip is included. indicates that a video clip is included.
Play the sound or video clip — Select the indicator.
View the media objects that have been included in a multimedia
message — Select Options > Objects.
If the message includes a multimedia presentation,
Play the presentation — Select the indicator.
is displayed.
Data, settings, and web service messages
Your device can receive many kinds of messages that contain data, such as business
cards, ringing tones, operator logos, calendar entries, and e-mail notifications. You
may also receive settings from your service provider in a configuration message.
Save the data in a message — Select Options and the corresponding option.
Web service messages are notifications (for example, news headlines), and may
contain a text message or a link. For availability and subscription, contact your
service provider.
Set up e-mail
To set up e-mail from your home screen, select @Set up your email and follow the
onscreen instructions.. Alternatively, to set up an e-mail account, select Menu >
Applications > Sett. wizard.
Mailbox
Define e-mail settings
To use e-mail, you must have defined a valid internet access point (IAP) in your
device and have defined your e-mail settings correctly.
You must have a separate e-mail account. Follow the instructions given by your
remote mailbox and internet service provider (ISP).
If you select Messaging > Mailbox, and have not set up your e-mail account, you
are prompted to do so. To start defining the e-mail settings with the mailbox guide,
select Start.
© 2010 Nokia. All rights reserved. 43
Page 44

Messaging
11/09/2010
FCC Draft
When you create a new mailbox, the name you give to the mailbox replaces Mailbox
in the Messaging main view. You can have up to six mailboxes.
Open the mailbox
Select Menu > Messaging and a mailbox.
When you open the mailbox, the device asks if you want to connect to the mailbox.
Connect to your mailbox and retrieve new e-mail headers or messages —
Select Yes. When you view messages online, you are continuously connected to a
remote mailbox using a data connection.
View previously retrieved e-mail messages offline — Select No.
Create a new e-mail message — Select Options > Create message > E-
mail.
Close the data connection to the remote mailbox — Select Options >
Disconnect.
Retrieve e-mail messages
Select Menu > Messaging and a mailbox.
If you are offline, select Options > Connect to open a connection to the remote
mailbox.
Retrieve messages when you have an open connection to a remote mailbox
— Select Options > Retrieve e-mail > New to retrieve all new messages,
Selected to retrieve only selected messages, or All to retrieve all messages from
the mailbox. To stop retrieving messages, select Cancel.
Close the connection and view the e-mail messages offline — Select
Options > Disconnect.
Open an e-mail message offline — To open an e-mail message, select the
message. If the e-mail message has not been retrieved and you are offline, you are
asked if you want to retrieve this message from the mailbox.
View e-mail attachments — Open the message, and select the attachment field
indicated with
Options > Retrieve.
Retrieve e-mail messages automatically — Select Options > E-mail
settings > Automatic retrieval.
. If the attachment has not been retrieved to the device, select
© 2010 Nokia. All rights reserved.44
Page 45

Messaging
11/09/2010
FCC Draft
Setting the device to retrieve e-mail automatically may involve the transmission
of large amounts of data through your service provider's network. Contact your
service provider for information about data transmission charges.
Delete e-mail messages
Select Menu > Messaging and a mailbox.
Delete the content of an e-mail from the device only — Select Options >
Delete > Phone only. The e-mail is not deleted from the remote mailbox.
The device mirrors the e-mail headers in the remote mailbox. If you delete the
message content, the e-mail header stays in your device. If you want to remove
the header as well, you must be connected to the server when deleting the
message from your device and the remote mailbox. It there is no connection to
the server, the header is deleted when you make a connection from your device to
the remote mailbox again to update the status.
Delete an e-mail from the device and the remote mailbox — Select Options >
Delete > Phone and server.
Cancel deleting an e-mail that has been marked to be deleted from the
device and server
— Select Options > Restore.
Disconnect from the mailbox
When you are online, to end the data connection to the remote mailbox, select
Options > Disconnect.
View messages on a SIM card
You can view messages that are stored on a SIM card.
Select Menu > Messaging and Options > SIM messages.
Before you can view SIM messages, you must copy them to a folder in your device.
1. Mark the messages. Select Options > Mark/Unmark > Mark or Mark all.
2. Open a list of folders. Select Options > Copy.
3. Select a folder to copy.
4. To view the messages, open the folder .
© 2010 Nokia. All rights reserved. 45
Page 46

Messaging
11/09/2010
FCC Draft
Service commands
With service commands (network service) you can enter and send service requests
(also known as USSD commands), such as activation commands for network
services, to your service provider. This service may not be available for all regions.
Select Menu > Messaging and Options > Service commands.
Messaging settings
The settings may be preconfigured in your device, or you may receive them in a
message. To enter settings manually, fill in all fields marked with Must be
defined or an asterisk.
Some or all message centres or access points may be preset for your device by your
service provider, and you may not be able to change, create, edit, or remove them.
Text message settings
Select Menu > Messaging and Options > Settings > Text message.
Select from the following:
● Message centers — View a list of all text message centres that have been
defined.
● Message center in use — Select which message centre to use to deliver text
messages.
● Character encoding — To use character conversion to another encoding
system when available, select Reduced support.
● Receive report — Request the network to send you a delivery report of the
text messages you have sent (network service).
● Message validity — Select for how long the message centre resends your
message if the first attempt fails (network service). If the message cannot be
sent within this time period, the message is deleted from the message centre.
● Message sent as — To find out if your message centre is able to convert text
messages into these other formats, contact your service provider.
● Preferred connection — Select the connection to use.
● Reply via same center — Reply to messages using the same text message
centre number (network service).
Multimedia message settings
Select Menu > Messaging and Options > Settings > Multimedia message.
© 2010 Nokia. All rights reserved.46
Page 47

Messaging
11/09/2010
FCC Draft
Select from the following:
● Image size — Define the size of the image in a multimedia message.
● MMS creation mode — If you select Guided, the device informs you if you try
to send a message that may not be supported by the recipient. If you select
Restricted, the device prevents you from sending messages that may not be
supported. To include content in your messages without notifications, select
Free.
● Access point in use — Select which access point is used as the preferred
connection.
● Multimedia retrieval — Select how you want to receive messages, if available.
To receive messages automatically in your home network, select Auto in home
netw.. Outside your home network, you receive a notification that there is a
message to retrieve in the multimedia message centre. If you select Always
automatic, your device automatically makes an active packet data connection
to retrieve the message both in and outside your home network. Select
Manual to retrieve multimedia messages from the message centre manually,
or Off to prevent receipt of any multimedia messages. Automatic retrieval may
not be supported in all regions.
● Allow anonymous msgs. — Reject messages from anonymous senders.
● Receive ads — Receive multimedia message advertisements (network service).
● Receive reports — Display the status of sent messages in the log (network
service).
● Deny report sending — Prevent your device from sending delivery reports of
received messages.
● Message validity — Select for how long the message centre resends your
message if the first attempt fails (network service). If the message cannot be
sent within this time period, the message is deleted from the message centre.
The device requires network support to indicate that a sent message has been
received or read. Depending on the network and other circumstances, this
information may not always be reliable.
E-mail settings
Manage mailboxes
Select Menu > Messaging and Options > Settings > E-mail.
Select which mailbox you want to use to send and receive e-mail — Select
Mailbox in use and a mailbox.
© 2010 Nokia. All rights reserved. 47
Page 48

Personalise your device
11/09/2010
FCC Draft
Remove a mailbox and its messages from your device — Select Mailboxes,
go to the desired mailbox, and select Options > Delete.
Create a new mailbox — Select Mailboxes > Options > New mailbox. The
name you give to the new mailbox replaces Mailbox in the Messaging main view.
You can have up to six mailboxes.
Change the connection settings, user settings, retrieval settings, and
automatic retrieval settings — Select Mailboxes and a mailbox.
Personalise your device
You can personalise your device by changing the home screen, tones, or themes.
Change the look of your device
You can use themes to change the look of the display, such as background
image and main menu layout.
Select Menu > Settings and Personal > Themes.
Preview a theme — Select General, go to the theme, and wait for a few seconds.
Activate the theme — Select Options > Set.
Change the layout of the main menu — Select Menu.
Change the look of the home screen — Select Home scr. theme.
Set an image or a slideshow as the background in the home screen — Select
Wallpaper > Image or Slide show.
Change the image displayed in the home screen when a call is received —
Select Call image.
Profiles
You can use profiles to set and customise the ringing tones, message alert
tones, and other tones for different events, environments, or caller groups. The
name of the selected profile is displayed in the home screen. If the general profile
is in use, only the date is displayed.
Select Menu > Settings and Personal > Profiles.
© 2010 Nokia. All rights reserved.48
Page 49
Music folder
11/09/2010
FCC Draft
Music folder
Music player
Music player supports file formats such as AAC, AAC+, eAAC+, MP3, and WMA. Music
player does not necessarily support all features of a file format or all the variations
of file formats.
You can also use Music player to listen to podcasts. Podcasting is a method for
delivering audio or video content over the internet using either RSS or Atom
technologies for playback on mobile devices and computers.
You can transfer music from other compatible devices to your device.
Play a song or a podcast
To open Music player, select Menu > Media > Music player.
You may have to refresh the music and podcast libraries after you have updated
the song or podcast selection in your device. To add all available items to the
library, select Options > Refresh library.
To play a song or a podcast:
1. Select categories to navigate to the song or podcasts you want to hear.
2. To play an item, select the item from the list.
To pause playback, tap
; to resume, tap .
© 2010 Nokia. All rights reserved. 49
Page 50
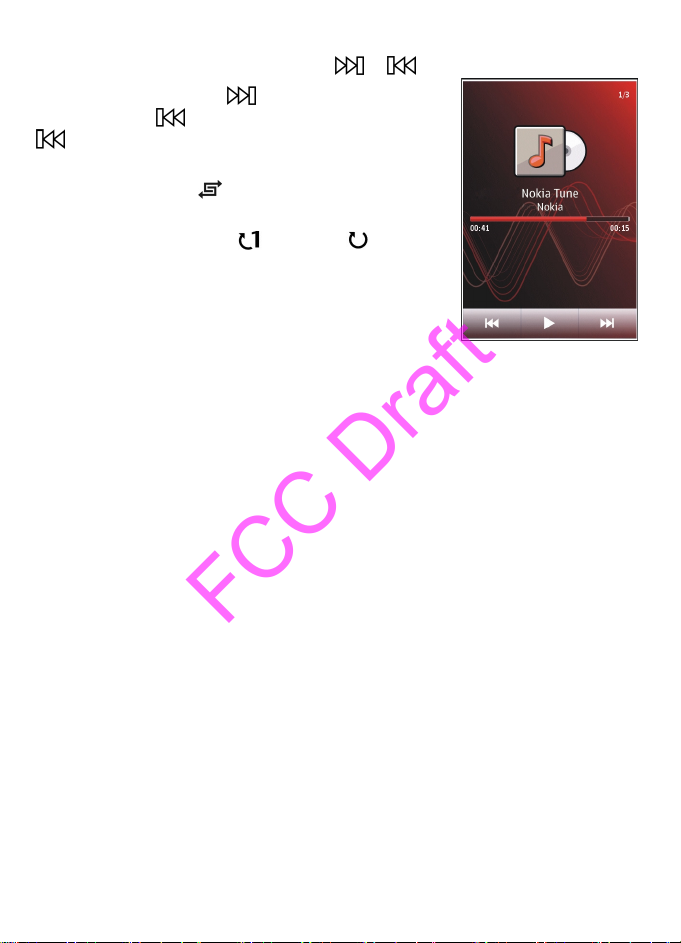
Music folder
11/09/2010
FCC Draft
To fast-forward or rewind, tap and hold or .
To go to the next item, tap
of the item, tap
again within 2 seconds after a song or podcast has
started.
To turn random play (
Shuffle play.
To repeat the current item (
repeat off, select Options > Repeat.
If you play podcasts, shuffle and repeat are automatically
turned off.
To adjust the volume, press the volume key.
To modify the tone of the music playback, select
Options > Equalizer.
To modify the balance and stereo image or to enhance the bass, select Options >
Settings.
To return to the home screen and leave the player playing in the background, press
the end key.
To close the player, select Options > Exit.
. To skip to the previous item, tap
. To return to the beginning
) on or off, select Options >
), all items ( ), or to turn
Playlists
Select Menu > Media > Music player and Playlists.
To view details of the playlist, select Options > Playlist details.
Create a playlist
1. Select Options > New playlist.
2. Enter a name for the playlist, and select OK.
3. To add songs now, select Yes; or to add the songs later, select No.
4. If you select Yes, select artists to find the songs you want to add to the playlist.
Select Add to add items.
To show the song list under an artist title, select Expand. To hide the song list,
select Collapse.
5. When you have made your selections, select Done.
© 2010 Nokia. All rights reserved.50
Page 51

Music folder
11/09/2010
FCC Draft
The playlist is saved to the mass memory of your device.
To add more songs later, when viewing the playlist, select Options > Add
songs.
To add songs, albums, artists, genres, and composers to a playlist from the different
views of the music menu, select an item and Options > Add to playlist > Saved
playlist or New playlist.
To remove a song from a playlist, select Options > Remove. This does not delete
the song from the device; it only removes it from the playlist.
To reorder songs in a playlist, select the song you want to move, and Options >
Reorder playlist. To grab a song and drop it to a new position, select the song in
the desired position and Drop. To finish reordering the playlist, select Done.
Podcasts
Select Menu > Media > Music player and Podcasts.
The podcast menu displays the podcasts available in the device.
Podcast episodes have three states: never played, partially played, and completely
played. If an episode is partially played, it plays from the last playback position the
next time it is played. If an episode has never been played or completely played,
it plays from the beginning.
Transfer music from a computer
You can use the following methods to transfer music.
Manage and organise your music files with Nokia Music — Download the PC
software from www.music.nokia.com/download, and follow the instructions.
Synchronise music with Windows Media Player — Connect a compatible USB
data cable, and select Media transfer as the connection mode.
Use your device as a mass memory — To view your device on a computer as a
mass memory device where you can transfer any data files, make the connection
with a compatible USB data cable or Bluetooth connectivity. If you are using a USB
data cable, select Mass storage as the connection mode.
Change the default USB connection mode — Select Menu > Settings and
Connectivity > USB > USB connection mode.
© 2010 Nokia. All rights reserved. 51
Page 52

Music folder
11/09/2010
FCC Draft
Nokia Podcasting
With the Nokia Podcasting application (network service), you can search, discover,
subscribe to, and download podcasts over the air, and play, manage, and share
audio and video podcasts with your device.
Podcasting settings
Select Menu > Music > Podcasting.
To start using Podcasting, define your connection and download settings.
Connection settings
Select Options > Settings > Connection and from the following:
● Default access point — Select the access point to use to connect to the internet.
● Search service URL — Define the podcast search service web address, to use
to search for podcasts.
Download settings
Select Options > Settings > Download and from the following:
● Save to — Define where to save podcasts.
● Update interval — Define how often podcasts are updated.
● Next update time — Define the time of the next automatic update.
Automatic updates only occur if a specific default access point is selected and
the Podcasting application is open.
● Download limit (%) — Define the percentage of memory that is reserved for
podcast downloads.
● If limit exceeds — Define what to do if the download limit is exceeded.
Setting the application to retrieve podcasts automatically may involve the
transmission of large amounts of data through your service provider’s network.
For information on data transmission charges, contact your service provider.
Restore default settings — Select Options > Restore default.
Download podcasts
After you have subscribed to a podcast, you can download, play, and manage the
podcast episodes.
Select Menu > Music > Podcasting.
View a list of subscribed podcasts — Select Podcasts.
© 2010 Nokia. All rights reserved.52
Page 53

Music folder
11/09/2010
FCC Draft
View individual episode titles — Select the podcast title. An episode is a
particular media file of a podcast.
Start a download — Select the episode title. You can download multiple episodes
at the same time.
Start playing a podcast before the download is complete — Go to a podcast,
and select Options > Play preview.
Successfully downloaded podcasts are stored in the Podcasts folder, but may not
be displayed immediately.
Radio
Listen to the radio
Select Menu > Media > Radio.
To listen to the radio, you need to attach a compatible headset to the device. The
headset acts as an antenna.
When you open the application for the first time, you can choose to have the local
stations tuned automatically.
To listen to the next or the previous station, select
To mute the radio, select
Select Options and from the following:
● Stations — View saved radio stations.
● Tune stations — Search for radio stations.
● Save — Save the radio station.
● Activate loudspeaker or Deactivate loudspeaker — Turn the loudspeaker on
or off.
● Alternative frequencies — Select whether you want the radio to automatically
search for a better RDS frequency for the station if the frequency level becomes
low.
● Play in background — Return to the home screen with the radio playing in
the background.
.
or .
Manage radio stations
Select Menu > Media > Radio.
© 2010 Nokia. All rights reserved. 53
Page 54

Camera
11/09/2010
FCC Draft
To listen to saved stations, select Options > Stations, and select a station from
the list.
To remove or rename a station, select Options > Stations > Options >
Delete or Rename.
To set the desired frequency manually, select Options > Tune stations >
Options > Manual tuning.
Camera
Your device supports an image capture resolution of 1600x1200 pixels. The image
resolution in this guide may appear different.
Activate the camera
To activate the camera, press the capture key.
Image capture
Still image controls and indicators
The still image viewfinder displays the following:
Capture settings
The capture settings view provides you with shortcuts to different items and
settings before capturing an image or recording a video clip.
The capture settings return to the default settings after you close the camera.
To open the capture settings view before capturing an image or recording a video,
select
Select from the following:
.
Select the scene
or — to switch between video and image mode
or — Show or hide the viewfinder grid (images only)
— Activate the self-timer (images only).
— Go to Gallery
© 2010 Nokia. All rights reserved.54
Page 55
Camera
11/09/2010
FCC Draft
Image settings:
— Select a colour effect
— Adjust the white balance. Select the current lighting conditions. This allows
the camera to reproduce colours more accurately.
— Adjust the exposure compensation (images only). If you are shooting a dark
subject against a very light background, such as snow, adjust the exposure to +1
or +2 to compensate for the background brightness. For light subjects against a
dark background, use -1 or -2.
— Adjust light sensitivity (images only). Increase the light sensitivity in low
light conditions to avoid too dark images and blurry images. Increasing the light
sensitivity may also increase the image noise.
— Adjust contrast (images only). Adjust the difference between the lightest
and darkest parts of the image.
— Adjust sharpness (images only)
The screen display changes to match the settings you define.
The capture settings are shooting-mode specific. Switching between the modes
does not reset the defined settings.
If you select a new scene, the capture settings are replaced by the selected scene.
You can change the capture settings after selecting a scene if needed. .
Saving the captured image may take longer if you change the zoom, lighting, or
colour settings.
Capture an image
When capturing an image, note the following:
● Use both hands to keep the camera steady.
● The quality of a digitally zoomed image is lower than that of a non-zoomed
image.
● The camera goes into battery saving mode after about a minute of inactivity.
● Keep a safe distance when using the flash. Do not use the flash on people or
animals at close range. Do not cover the flash while taking a picture.
1. To switch from video mode to image mode, if necessary, select
2. To lock the focus on an object, press the capture key halfway down (not
available in landscape or sport scene modes). A green locked focus indicator is
displayed. If the focus was not locked, a yellow focus indicator is displayed.
> .
© 2010 Nokia. All rights reserved. 55
Page 56
Camera
11/09/2010
FCC Draft
Release the capture key, and press it halfway down again. You can also capture
an image without locking the focus.
3. Press the capture key. Do not move the device before the image is saved and
the final image displayed.
Zoom in or out when capturing an image — Use the zoom slider.
Leave the camera open in the background and use other applications —
Press the menu key. To return to the camera, press and hold the capture key.
After capturing an image
After you capture an image, select from the following options (available only if you
have selected Options > Settings > Show captured image > Yes):
●
— Send the image in a multimedia or e-mail message, or through
connection methods such as Bluetooth connectivity.
To send the image to the person you are talking to, select
●
— Upload the image to a compatible online album.
●
Delete — Delete the image.
Use the image as wallpaper in the home screen — Select Options > Use
image > Set as wallpaper.
Set the image as a default call image — Select Options > Use image > Set
as call image.
Assign the image to a contact — Select Options > Use image > Assign to
contact.
Return to the viewfinder to capture a new image — Press the capture key.
during a call.
Self-timer
Use the self-timer to delay the capture, so that you can include yourself in the
image.
Set the self-timer delay — Select
is captured.
Activate the self-timer — Select Activate. The stopwatch icon on the screen
blinks and the remaining time is displayed when the timer is running. The camera
captures the image after the selected delay elapses.
Deactivate the self-timer — Select
> and the delay desired before the image
> > .
© 2010 Nokia. All rights reserved.56
Page 57
Camera
11/09/2010
FCC Draft
Tip: To keep your hand steady when capturing an image, try using a delay
of 2 seconds.
Capture images in a sequence
Select Menu > Media > Camera.
To start capturing images in a quick sequence, select Menu > Media >
Camera and
the window. Press and hold the capture key. The device captures images until you
release the key or until the memory runs out. If you press the capture key briefly,
the device captures 18 images in a sequence.
The captured images are displayed in a grid. To view an image, select the image.
To return to the sequence mode viewfinder, press the capture key.
You can also use sequence mode with the self-timer.
To deactivate sequence mode, select
> Sequence. To close the settings window, tap the screen above
> Single shot.
Video recording
Record a video
Besides taking pictures with your device, you can also capture your special
moments as videos.
Press and hold
1. To switch from image mode to video mode, if necessary, select
2. To start recording, press
3. To pause recording, select Pause. If you pause recording and do not press any
key within one minute, the recording stops.
To zoom in or out, use the volume keys.
4. To stop recording, press
.
.
. A red record icon is displayed.
. The video is automatically saved in Gallery.
Video recording controls and indicators
The video viewfinder displays the following:
© 2010 Nokia. All rights reserved. 57
Page 58
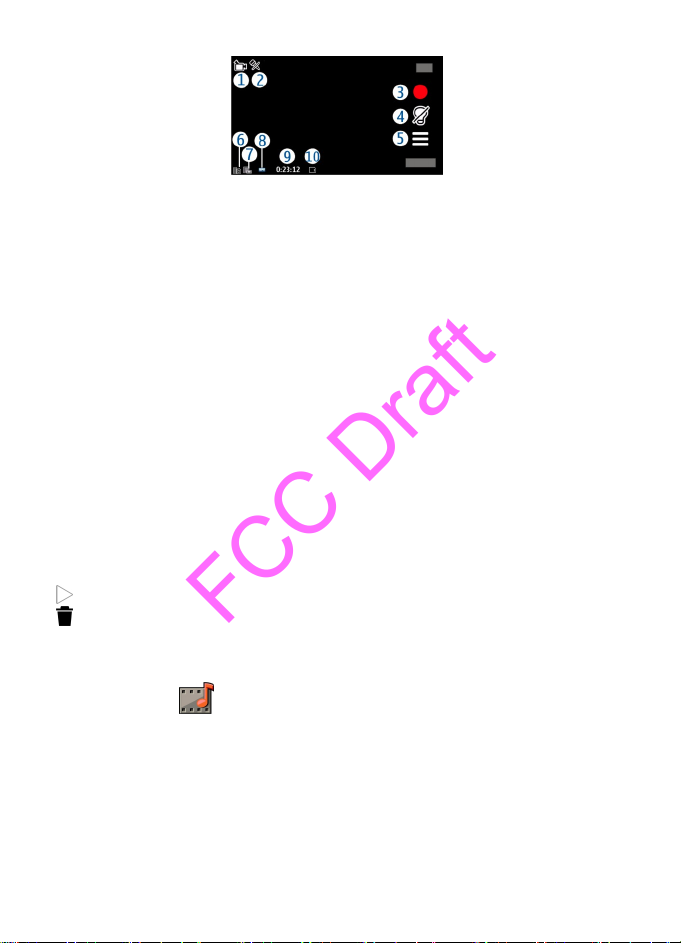
Gallery
11/09/2010
FCC Draft
1 — Mode indicator
2 — Audio mute indicator
3 — Record icon
4 — Recording settings
5 — Battery charge level indicator
6 — Video quality indicator. To modify this setting, select Options > Settings >
Video quality.
7 — Video clip file type
8 — Available recording time. When you are recording, the current video length
indicator also shows the elapsed and remaining time.
9 — The location to which the video clip is saved
10 — Scene modes
After recording a video clip
After you record a video clip, select from the following options (available only if
you have selected Options > Settings > Show last captured video > Yes):
●
Play — Play the video clip you just recorded.
●
Delete — Delete the video clip.
To return to the viewfinder to record a new video clip, press the capture key.
Gallery
To store and organise your images, video clips, sound clips, and streaming links,
select Menu > Gallery.
View and organise files
Select Menu > Gallery and from the following:
© 2010 Nokia. All rights reserved.58
Page 59
Gallery
11/09/2010
FCC Draft
● Images & videos — View images in the image viewer and videos in Video
centre.
●
Songs — Open Music player.
●
Sound clips — Listen to sound clips.
●
Other media — View presentations.
You can browse, open, and create folders; and mark, copy, move, and add items
to folders.
To open a file, select a file from the list. Video clips and files with the .ram file
extension open and play in Video centre, and music and sound clips in Music player.
View images and videos
Select Menu > Gallery and Images & videos.
By default, the images, video clips, and folders are organised by date and time.
To open a file, select a file from the list. To zoom in an image, use the volume key.
To edit a video clip or an image, select Options > Edit.
Select Options > Use file and from the following:
● Set as wallpaper — Use the image as wallpaper in the home screen.
● Set as call image — Set the image as a generic call image.
● Assign to contact — Set the image as a call image for a contact.
The toolbar helps you select frequently used functions with images, video clips,
and folders.
From the toolbar, select from the following:
●
Send — Send an image or a video clip.
●
Edit — Edit an image or a video clip.
●
Delete — Delete an image or a video clip.
Organise images and video clips
Select Menu > Gallery.
Create a new folder — Select Images & videos > Options > Folder
options > New folder.
Move a file — Select the file and Options > Organize > Move to folder.
© 2010 Nokia. All rights reserved. 59
Page 60

Nokia Video Centre
11/09/2010
FCC Draft
Nokia Video Centre
With Nokia Video Centre (network service), you can download and stream video
clips over the air from compatible internet video services using a packet data
connection. You can also transfer video clips from a compatible PC to your device
and view them in Video centre.
Using packet data access points to download videos may involve the transmission
of large amounts of data through your service provider's network. Contact your
service provider for information about data transmission charges.
Your device may have predefined services.
Service providers may provide free content or charge a fee. Check the pricing in the
service or from the service provider.
View and download video clips
Connect to video services
1. Select Menu > Media > Video center.
2. To connect to a service to install video services, select Add new services and
the desired video service from the service catalogue.
View a video clip
To browse the content of installed video services, select Video feeds.
The content of some video services is divided into categories. To browse video
clips, select a category. To search for a video clip in the service, select Video
search. Search may not be available in all services.
To view information about the selected video clip, select Options > Video
details.
Some video clips can be streamed over the air, but others must be first downloaded
to your device. To download a video clip, select Options > Download. Downloads
continue in the background if you exit the application. The downloaded video clips
are saved in My videos. To stream a video clip or view a downloaded one, select
Options > Play. To adjust the volume, use the volume key.
Schedule downloads
Setting the application to download video clips automatically may involve the
transmission of large amounts of data through your service provider's network.
© 2010 Nokia. All rights reserved.60
Page 61

Nokia Video Centre
11/09/2010
FCC Draft
For information about data transmission charges, contact your service provider.
To schedule an automatic download for video clips in a service, select a category
and Options > Schedule downloads. Video centre automatically downloads
new video clips daily at the time you define.
To cancel scheduled downloads for a category, select Manual download as the
download method.
Video feeds
Select Menu > Media > Video center.
The content of the installed video services is distributed using RSS feeds. To view
and manage your feeds, select Video feeds.
Select Options and from the following:
● Feed subscriptions — Check your current feed subscriptions.
● Feed details — View information about a video.
● Add feed — Subscribe to new feeds. Select Via Video directory to select a feed
from the services in the video directory.
● Refresh feeds — Refresh the content of all feeds.
● Manage account — Manage your account options for a particular feed, if
available.
● Move — Move video clips to a desired location.
To view the videos available in a feed, select a feed from the list.
My videos
To adjust the volume, press the volume key.
Select Options and from the following:
● Resume download — Resume a paused or failed download.
● Cancel download — Cancel a download.
● Video details — View information about a video clip.
● Find — Find a video clip. Enter a search text that matches the file name.
● Memory status — View the amount of free and used memory.
● Sort by — Sort video clips. Select the desired category.
● Move and copy — Move or copy video clips. Select Copy or Move and the
desired location.
© 2010 Nokia. All rights reserved. 61
Page 62

Audio Postcard
11/09/2010
FCC Draft
Transfer videos from your PC
Transfer your own video clips from compatible devices using a compatible USB data
cable. Only video clips which are in a format supported by your device are shown.
1. To view your device on a PC as a mass memory device where you can transfer
any data files, connect using a USB data cable.
2. Select Mass storage as the connection mode.
3. Select the video clips you want to copy from your PC.
4. Transfer the video clips to E:\My Videos in the mass memory of your device, or
to F:\My Videos in a compatible memory card, if available.
The transferred video clips appear in the My videos folder.
Video settings
Select Menu > Media > Video center.
Select Options > Settings and from the following:
● Video service selection — Select the video services that you want to appear
in the main view. You can also add, remove, edit, and view the details of a video
service. You cannot edit preinstalled video services.
● Network connection — Define the network destination used for the network
connection. To select the connection manually each time a network connection
is opened, select Always ask.
● Preferred memory — Select where to save downloaded videos. If the selected
memory becomes full, the device saves the videos in another memory.
● Thumbnails — Select whether to download and view thumbnail images of
video feeds.
Audio Postcard
Your device allows you to create audio postcards. Capture an image, and then
record a message. Use the arrow keys to scroll through a variety of picture frames,
and then send to a contact.
© 2010 Nokia. All rights reserved.62
Page 63

Register and sign in
11/09/2010
FCC Draft
Send an audio postcard
An audio postcard is a combination audio message and image that you can send
to a contact.
1. Select Audio PostCard.
2. Select Options > Use image > Set as wallpaper.
3. Select the capture icon. If you are satisfied with the image, select it.
4. Select
Stop.
5. To change the frame for your audio postcard, select the left or right arrow icon.
6. Select Options →Send.
7. Select a contact and OK.
, and start saying your audio message. To finish the recording, select
Register and sign in
Create a Nokia account
When you create a Nokia account, you can access Ovi and all its services with a
single user name and password.
You cannot change your user name after you have created the account.
Sign in to Ovi Store
Sign in — Select Sign in, and enter your Nokia account user name and password.
Retrieve a forgotten user name or password — Select the appropriate link
under the Sign in icon.
Edit the Ovi Store settings
Change your Nokia account details — Select Options > Account > Settings >
Account info.
Change your Nokia account password — Select Options > Account >
Settings > Change password.
© 2010 Nokia. All rights reserved. 63
Page 64

About Ovi Store
11/09/2010
FCC Draft
About Ovi Store
About Ovi Store
In Ovi Store, you can download mobile games, applications, videos, images,
themes, and ringing tones to your device. Some items are free of charge; others
you need to pay for with your credit card or in your phone bill. The availability of
payment methods depends on your country of residence and your network service
provider. Ovi Store offers content that is compatible with your mobile device and
relevant to your tastes and location.
Web browser
With the web browser, you can view hypertext markup language (HTML) pages on
the web as originally designed (network service). You can also browse web pages
that are designed specifically for mobile devices, and use extensible hypertext
markup language (XHTML), or the wireless markup language (WML).
To browse the web, you need to have an internet access point defined in your
device.
Browse the web
Select Menu > Internet > Web.
To browse the web, select
web address.
By default, the browser is in full screen mode. To exit full screen mode, select the
arrow icon in the bottom right corner.
Some web pages may contain material, such as graphics or video clips, that
requires a large amount of memory to view. If your device runs out of memory
while loading such a web page, insert a memory card. Otherwise, the video clips
are not displayed.
To browse web pages with graphics disabled, to save memory and increase the
page loading speed, select Options > Settings > Page > Load content > Text
only.
Go to web address from the toolbar, and enter a
© 2010 Nokia. All rights reserved.64
Page 65
Web browser
11/09/2010
FCC Draft
To refresh the content of the web page, select Options > Web page options >
Reload.
To save the current web page as a bookmark, select Options > Web page
options > Save as bookmark.
To view snapshots of the web pages you have visited during the current browsing
session, select Back (available if History list is activated in the browser settings
and the current web page is not the first web page you visit).
To prevent or allow the automatic opening of multiple windows, select Options >
Web page options > Block pop-ups or Allow pop-ups.
To zoom in on a web page, double-tap the display.
Tip: To send the browser to the background without exiting the application
or connection, press the end key once.
Browser toolbar
The browser toolbar helps you select frequently used functions of the browser.
From the toolbar, select from the following:
●
Expand toolbar — Expand the toolbar to access more toolbar functions.
●
Go to web address — Enter a new web address.
●
Show zoom — Zoom in or out on the web page.
To use the expanded toolbar, select
Go to feeds — View your current feed subscriptions.
●
●
Full screen — Switch to the full screen view.
●
Subsc. feeds — View a list of available web feeds on the current web page,
and subscribe to a web feed.
Expand toolbar and from the following:
●
●
●
●
●
●
●
© 2010 Nokia. All rights reserved. 65
Settings — Edit the settings.
Save bkmrk. — Save the current web page as a bookmark.
Reload — Refresh the web page.
Overview — View an overview of the current web page.
Homepage — Go to the homepage (if defined in the settings).
Bookmarks — Open the bookmarks view.
Find keywd. — Search on the current web page.
Page 66

Web browser
11/09/2010
FCC Draft
Navigate pages
When you are browsing a large web page, you can use Page overview to view the
page at a glance.
Select Menu > Internet > Web.
See an overview of a page
1. Select Expand toolbar.
2. Select
3. Move on the miniature image by dragging up, down. left, or right .
4. Tap the section you want to view. The web page opens at that section.
Overview. A miniature image of the current web page opens.
Web feeds and blogs
Web feeds are XML files on web pages that are used to share, for example, the
latest news headlines or blogs. Blogs or weblogs are web diaries. It is common to
find web feeds on web, blog, and wiki pages.
The web browser application automatically detects if a web page contains web
feeds.
To subscribe to a web feed, select a feed and Options > Subscribe to web
feeds.
To update a web feed, select a feed and Options > Refresh. You can also update
web feeds from the Contacts bar.
To define how web feeds are updated, select Options > Settings > Web
feeds.
Widgets
Widgets bring more content to your device! Widgets are small, downloadable web
applications that deliver multimedia, news feeds, and other information, such as
weather reports, to your device. Installed widgets appear as separate applications
in the Applications folder.
You can download widgets from the web.
The default access point for widgets is the same as in the web browser. When
active in the background, some widgets may update information automatically in
your device.
© 2010 Nokia. All rights reserved.66
Page 67

Web browser
11/09/2010
FCC Draft
Using widgets may involve the transmission of large amounts of data through your
service provider's network. For information about data transmission charges,
contact your service provider.
Content search
Select Menu > Internet > Web.
To search for text within the current web page, select Options > Find
keyword.
To go to the next match, from the toolbar, select
To go to the previous match, from the toolbar, select
Find next.
Find previous.
Download and purchase items
You can download items such as ringing tones, images, operator logos, themes,
and video clips. These items can be provided free of charge, or you can purchase
them. Downloaded items are handled by the respective applications in your device,
for example, a downloaded photo can be saved in Gallery.
To download an item:
1. Select the link.
2. Select the appropriate option to purchase the item (for example, Buy).
3. Carefully read all the information provided.
4. To continue or cancel the d ownload, select the appropriate option (for example,
Accept or Cancel).
When you start a download, a list of ongoing and completed downloads from the
current browsing session is displayed.
To modify the list, select Options > Downloads. In the list, select an item and
Options to cancel ongoing downloads, or open, save, or delete completed
downloads.
Bookmarks
The bookmarks view opens when you open the Web application. You can select
web addresses from a list or from a collection of bookmarks in the Recently visited
pages folder.
© 2010 Nokia. All rights reserved. 67
Page 68

Web browser
11/09/2010
FCC Draft
The toolbar helps you select frequently used functions of the browser.
On the toolbar, select from the following:
●
Add bookmark — Add a new bookmark.
●
Go to web address — Enter a new web address.
●
Delete — Delete a bookmark.
Select Options and from the following:
● Go to — Enter a new web address, go to the previous web page, or view saved
links to web feeds and blogs.
● Bookmark options — Send and add bookmarks, and set bookmarks as a
homepage.
● Bookmark manager — Edit, move, and delete bookmarks.
Web also keeps track of the web pages you visit during browsing. In the Recently
visited pages folder, you can view the list of the visited web pages.
Empty the cache
The information or services you have accessed are stored in the cache memory of
the device.
A cache is a memory location that is used to store data temporarily. If you have
tried to access or have accessed confidential information requiring passwords,
empty the cache after each use.
To empty the cache, select Options > Clear privacy data > Cache.
Connection security
If the security indicator ( ) is displayed during a connection, the data transmission
between the device and the internet gateway or server is encrypted.
The security icon does not indicate that the data transmission between the
gateway and the server where the data is stored is secure.
Security certificates may be required for some services, such as banking services.
You are notified if the identity of the server is not authentic or if you do not have
the correct security certificate in your device. For more information, contact your
service provider.
Important: The existence of a certificate considerably reduces risks involved
in remote connections and software installation. To benefit from increased
© 2010 Nokia. All rights reserved.68
Page 69

Maps
11/09/2010
FCC Draft
security, certificates must be used correctly, and they must be correct, authentic,
or trusted. Certificates have a restricted lifetime. If they are expired or invalid, check
that the current date and time in your device are correct.
Before changing any certificate settings, you must trust the owner of the certificate
and that the certificate does belong to the listed owner.
Maps
Maps overview
Select Menu > Ovi Maps.
Welcome to Maps.
Maps shows you what is nearby, helps you plan your route, and guides you where
you want to go.
● Find cities, streets, and services.
● Find your way with turn-by-turn directions.
● Synchronise your favourite locations and routes between your mobile device
and the Ovi Maps internet service.
● Check weather forecasts and other local information, if available.
Some services may not be available in all countries, and may be provided only in
selected languages. The services may be network dependent. For more
information, contact your network service provider.
Using the service or downloading content may cause transfer of large amounts of
data, which may result in data traffic costs.
Almost all digital cartography is inaccurate and incomplete to some extent. Never
rely solely on the cartography that you download for use in this device.
Some content is generated by third parties and not Nokia. The content may be
inaccurate and is subject to availability.
View your location and the map
See your current location on the map, and browse maps of different cities and
countries.
Select Menu > Ovi Maps and My position.
© 2010 Nokia. All rights reserved. 69
Page 70
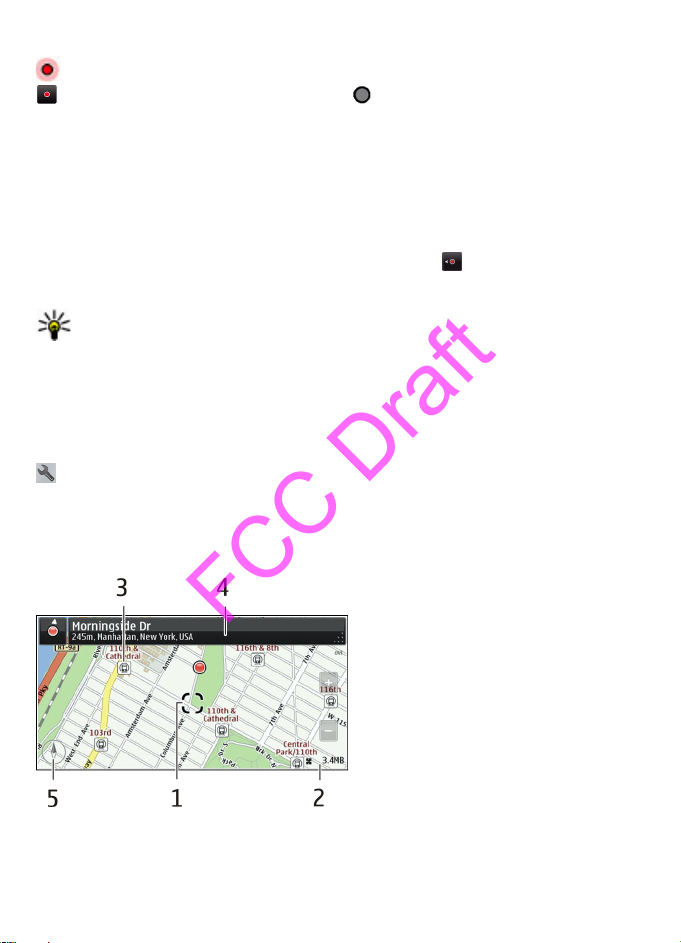
Maps
11/09/2010
FCC Draft
indicates your current position, if available. When searching for your position,
blinks. If your position is not available, indicates your last known position.
If accurate positioning is not available, a red halo around the positioning icon
indicates the general area you might be in. In densely populated areas, the
accuracy of the estimate increases, and the red halo is smaller than in lightly
populated areas.
Browse the map — Drag the map with your finger. By default, the map is oriented
north.
View your current or last known location — Select
Zoom in or out — Select + or -.
Tip: To zoom, you can also place two fingers on the map, and slide your
fingers apart to zoom in or together to zoom out. Not all devices support this
feature.
If you browse to an area not covered by the street maps that are stored on your
device, and you have an active data connection, new street maps are automatically
downloaded.
To prevent downloading new street maps automatically, in the main menu, select
> Internet > Connection > Offline.
Map coverage varies by country and region.
.
Map view
1 — Selected location
2 — Indicator area
© 2010 Nokia. All rights reserved.70
Page 71

Maps
11/09/2010
FCC Draft
3 — Point of interest (for example, a railway station or a museum)
4 — Information area
5 — Compass
Change the look of the map
View the map in different modes, to easily identify where you are.
Select Menu > Ovi Maps and My position.
Select
● Map view — In the standard map view, details such as location names or
● Satellite view — For a detailed view, use satellite images.
● Terrain view — View at a glance the ground type, for example, when you are
● 3D view — For a more realistic view, change the perspective of the map.
● Landmarks — Display prominent buildings and attractions on the map.
● Night mode — Dim the colours of the map. When travelling at night, the map
and from the following:
motorway numbers, are easy to read.
travelling off-road.
is easier to read in this mode.
Download and update maps
To avoid mobile data transfer costs, download the latest street maps and voice
guidance files to your computer, and then transfer and save them to your device.
Use the Nokia Ovi Suite application to download the latest street maps and voice
guidance files to your compatible computer. To download and install Nokia Ovi
Suite, go to www.ovi.com.
Tip: Save new street maps to your device before a journey, so you can browse
the maps without an internet connection when travelling abroad.
If you have an older version of the Maps application installed on your device, when
you update to the latest version, the country or region maps are deleted. Before
using Nokia Ovi Suite to download new country or region maps, open and close
the Maps application.
Make sure you have the latest version of Nokia Ovi Suite installed on your computer.
© 2010 Nokia. All rights reserved. 71
Page 72

Maps
11/09/2010
FCC Draft
About positioning methods
Ma ps di sp la ys your l oc at io n o n the ma p u si ng GP S, A-GP S, or ne tw ork (ce ll ID ) b as ed
positioning.
The global positioning system (GPS) is a satellite-based navigation system used for
calculating your location. Assisted GPS (A-GPS) is a network service that sends you
GPS data, improving the speed and accuracy of the positioning.
With network (cell ID) based positioning, the position is determined through the
antenna system your mobile device is currently connected to.
When you use Maps for the first time, you are prompted to define the internet
access point to use to download map information or use A-GPS.
To avoid network service costs, you can disable A-GPS and network (cell ID) based
positioning in your device positioning settings, but calculating your location may
take much longer. For more information about positioning settings, see the user
guide of your device.
Depending on the available positioning methods, the accuracy of positioning may
vary from a few metres to several kilometres.
Find a location
Maps helps you find specific locations and businesses.
Select Menu > Ovi Maps and Search.
1. Enter search words, such as a street address or place name.
2. Select
3. Select an item from the list of proposed matches.
The location is displayed on the map.
Return to the list of proposed matches — Select Search.
Search for different types of nearby places — Select Categories and a category,
such as shopping, accommodation, or transport.
If no search results are found, make sure the spelling of your search words is
correct. Problems with your internet connection may also affect results when
searching online.
.
Tip: In the search view, you can also select from the list of your previous
search words.
© 2010 Nokia. All rights reserved.72
Page 73

Maps
11/09/2010
FCC Draft
I f y o u h a ve m ap s of t he s ea r ch e d a r ea s to r e d o n yo u r d e vi c e, y ou c an a ls o ge t se a rc h
results without an active internet connection, to avoid data transfer costs, but the
search results may be limited.
Plan a route
Plan your journey, and create your route an d vie w it o n the map before sett ing o ff.
Select Menu > Ovi Maps and My position.
Create a route
1. Tap the location of your starting point. To search for an address or place, select
Search.
2. Tap the location's information area.
3. Select Add to route.
4. To add another route point, select Add new route point and the appropriate
option.
Change the order of the route points
1. Select a route point.
2. Select Move.
3. Tap the place where you want to move the route point to.
Edit the location of a route point — Tap the route point, and select Edit and the
appropriate option.
View the route on the map — Select Show route.
Navigate to the destination — Select Show route > Options > Start
driving or Start walking.
Change the settings for a route
The route settings affect the navigation guidance and the way the route is
displayed on the map.
1. In the route planner view, open the Settings tab. To get to the route planner
view from the navigation view, select Options > Route pts. or Route point
list.
2. Set the transportation mode to Drive or Walk. If you select Walk, one-way
streets are regarded as normal streets, and walkways and routes through, for
example, parks and shopping centres, can be used.
3. Select the desired option.
© 2010 Nokia. All rights reserved. 73
Page 74

Maps
11/09/2010
FCC Draft
Select the walking mode — Open the Settings tab, and select Walk > Preferred
route > Streets or Straight line. Straight line is useful on off-road terrain as it
indicates the walking direction.
Use the faster or shorter driving route — Open the Settings tab, and select
Drive > Route selection > Faster route or Shorter route.
Use the optimised driving route — Open the Settings tab, and select Drive >
Route selection > Optimized. The optimised driving route combines the
advantages of both the shorter and the faster routes.
You can also choose to allow or avoid using, for example, motorways, toll roads,
or ferries.
Save and view places or routes
Save addresses, places of interest, and routes, so they can be quickly used later.
Select Menu > Ovi Maps.
Save a place
1. Select My position.
2. Tap the location. To search for an address or place, select Search.
3. Tap the location's information area.
4. Select Save place.
Save a route
1. Select My position.
2. Tap the location. To search for an address or place, select Search.
3. Tap the location's information area.
4. To add another route point, select Add to route.
5. Select Add new route point and the appropriate option.
6. Select Show route > Options > Save route.
View your saved places — In the main view, select Favorites > Places, the
place, and Show on map.
View your saved routes — In the main view, select Favorites > Routes and the
route.
© 2010 Nokia. All rights reserved.74
Page 75

Maps
11/09/2010
FCC Draft
View and organise places or routes
Use your Favourites to quickly access the places and routes you have saved.
Group the places and routes into a collection, for example, when planning a trip.
Select Menu > Ovi Maps and Favorites.
View a saved place on the map
1. Select Places.
2. Go to the place.
3. Select Show on map.
To return to the list of saved places, select List.
Create a collection — Select Create new collection, and enter a collection name.
Add a saved place to a collection
1. Select Places and the place.
2. Select Organize collections.
3. Select New collection or an existing collection.
If you need to delete places or routes, or add a route to a collection, go to the Ovi
Maps internet service at www.ovi.com.
Send places to your friends
When you want to share place information with your friends, send these details
directly to their devices.
Select Menu > Ovi Maps and My position.
Send a place to your friend's compatible device — Select a location, its
information area, and Send. If your friend's device has a compatible version of
Maps, your friend can view the location on the map.
Synchronise your Favourites
Plan a trip on your computer at the Ovi Maps website, synchronise the saved places
and routes with your mobile device, and access the plan on the go.
To synchronise places or routes between your mobile device and the Ovi Maps
internet service, you need to be signed in to your Nokia account.
© 2010 Nokia. All rights reserved. 75
Page 76

Maps
11/09/2010
FCC Draft
Synchronise saved places and routes — Select Favorites > Synchronize with
Ovi. If you do not have a Nokia account, you are prompted to create one.
Set the device to synchronise Favourites automatically — Select
Synchronization > Synchronization > At start-up and shut-d.. The device
starts the synchronisation when you open or close the Maps application.
Synchronising requires an active internet connection, and may involve the
transmission of large amounts of data through your service provider’s network.
For information about data transmission charges, contact your service provider.
To use the Ovi Maps internet service, go to www.ovi.com.
>
Get voice guidance
Voice guidance, if available for your language, helps you find your way to a
destination, leaving you free to enjoy the journey.
Select Menu > Ovi Maps and Drive or Walk.
When you use drive or walk navigation for the first time, you are asked to select
the language of the voice guidance, and download the appropriate files.
If you select a language that includes street names, also the street names are said
aloud. Voice guidance may not be available for your language.
Change the voice guidance language — In the main view, select
Navigation > Drive guidance or Walk guidance and the appropriate option.
Deactivate voice guidance — In the main view, select
Drive guidance or Walk guidance and None.
Repeat the voice guidance for car navigation — In the navigation view, select
Options > Repeat.
Adjust the volume of the voice guidance for car navigation — In the
navigation view, select Options > Volume.
and Navigation >
and
Drive to your destination
When you need turn-by-turn directions while driving, Maps helps you get to your
destination.
Select Menu > Ovi Maps and Drive.
Drive to a destination — Select Set destination and the appropriate option.
© 2010 Nokia. All rights reserved.76
Page 77
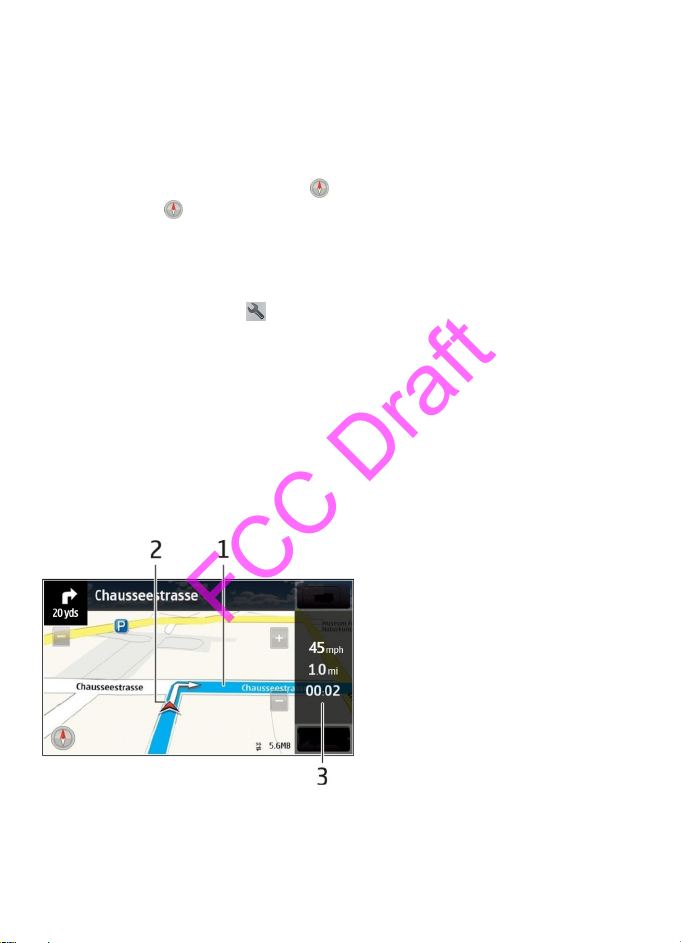
Maps
11/09/2010
FCC Draft
Drive to your home — Select Drive home.
You can start driving without a set destination. The map follows your location, and
traffic information is automatically displayed, if available. To set the destination
later, select Destination.
By default, the map rotates to your driving direction.
Orient the map to north — Select
direction, select
When you select Drive home or Walk home for the first time, you are prompted
to define your home location.
Change your home location
1. In the main view, select .
2. Select Navigation > Home Location > Redefine.
3. Select the appropriate option.
Change views during navigation — Swipe left to select 2D view, 3D view,
Arrow view, or Route overview.
Obey all local laws. Always keep your hands free to operate the vehicle while
driving. Your first consideration while driving should be road safety.
.
. To rotate the map back to your driving
Navigation view
1 — Route
2 — Your location and direction
3 — Information bar (speed, distance, time)
© 2010 Nokia. All rights reserved. 77
Page 78

Maps
11/09/2010
FCC Draft
Get traffic and safety information
Enhance your driving experience with real-time information about traffic events,
lane assistance, and speed limit warnings, if available for your country or region.
Select Menu > Ovi Maps and Drive.
View traffic events on the map — During drive navigation, select Options >
Traffic info. The events are displayed as triangles and lines.
Update traffic information — Select Options > Traffic info > Update traffic
info.
When planning a route, you can set the device to avoid traffic events, such as traffic
jams or roadworks.
Avoid traffic events — In the main view, select
due to traffic.
The location of speed cameras may be shown on your route during navigation, if
this feature is enabled. Some jurisdictions prohibit or regulate the use of speed
camera location data. Nokia is not responsible for the accuracy, or the
consequences of using speed camera location data.
> Navigation > Reroute
Walk to your destination
When you need directions to follow a route on foot, Maps guides you over squares,
and through parks, pedestrian zones, and even shopping centres.
Select Menu > Ovi Maps and Walk.
Walk to a destination — Select Set destination and the appropriate option.
Walk to your home — Select Walk home.
You can start walking without a set destination.
By default, the map is oriented to north.
Rotate the map to your walking direction — Select
to north, select
When you select Drive home or Walk home for the first time, you are prompted
to define your home location.
Change your home location
1. In the main view, select .
2. Select Navigation > Home Location > Redefine.
.
. To rotate the map back
© 2010 Nokia. All rights reserved.78
Page 79
Connectivity
11/09/2010
FCC Draft
3. Select the appropriate option.
Connectivity
Your device offers several options to connect to the internet or to another
compatible device or PC.
Data connections and access points
Your device supports packet data connections (network service), such as GPRS in
the GSM network. When you use your device in GSM and UMTS networks, multiple
data connections can be active at the same time, and access points can share a
data connection. In the UMTS network, data connections remain active during voice
calls.
To establish a data connection, an access point is required. You can define different
kinds of access points, such as the following:
● MMS access point to send and receive multimedia messages
● Internet access point (IAP) to send and receive e-mail and connect to the internet
Check the type of access point you need with your service provider for the service
you want to access. For availability and subscription to packet data connection
services, contact your service provider.
Network settings
Select Menu > Settings and Connectivity > Network.
Your device can automatically switch between GSM and UMTS networks. GSM
networks are indicated with
Select from the following:
● Network mode — Select which network to use. If you select Dual mode, the
device uses the GSM or UMTS network automatically, according to the network
parameters and the roaming agreements between the wireless service
providers. For details and roaming costs, contact your network service provider.
This option is shown only if supported by the wireless service provider.
. UMTS networks are indicated with .
© 2010 Nokia. All rights reserved. 79
Page 80

Connectivity
11/09/2010
FCC Draft
A roaming agreement is an agreement between two or more service providers
to enable the users of one service provider to use the services of other service
providers.
● Operator selection — Select Automatic to set the device to search for and
select one of the available networks, or Manual to manually select the network
from a list. If the connection to the manually selected network is lost, the device
sounds an error tone and asks you to reselect a network. The selected network
must have a roaming agreement with your home network.
● Cell info display — Set the device to indicate when it is used in a cellular
network based on microcellular network (MCN) technology and to activate cell
info reception.
Access points
Create a new access point
Select Menu > Settings and Connectivity > Destinations.
You may receive access point settings in a message from a service provider. Some
or all access points may be preset for your device by your service provider, and you
may not be able to change, create, edit, or remove them.
1. Select
2. The device asks to check for available connections. After the search, connections
that are already available are shown and can be shared by a new access point.
If you skip this step, you are asked to select a connection method and to define
the settings needed.
To view access points stored in your device, select an access point group. The
different access point groups are the following:
Internet access points
Multimedia messaging access points
WAP access points
Uncategorised access points
The different access point types are indicated with the following:
Protected access point
Packet data access point
Access point.
© 2010 Nokia. All rights reserved.80
Page 81

Connectivity
11/09/2010
FCC Draft
Manage access point groups
To avoid selecting a single access point every time the device makes a network
connection, you can create a group that contains various access points to connect
to that network and define the order in which the access points are used.
Select Menu > Settings and Connectivity > Destinations.
Create a new access point group — Select Options > Manage > New
destination.
Add access points to an access point group — Select the group and Options >
New access point.
Copy an existing access point from another group — Select the group, go to
the access point to copy, and select Options > Organize > Copy to other
dest..
Change the priority of an access point within a group — Select Options >
Organize > Change priority.
Packet data access point settings
Select Menu > Settings and Connectivity > Destinations > Access point, and
follow the instructions.
Edit a packet data access point — Select an access point group and access point
marked with
Select from the following:
● Access point name — The access point name is provided by your service
provider.
● User name — The user name may be needed to make a data connection, and
is usually provided by your service provider.
● Prompt password — If you must enter the password every time you log in to
a server, or if you do not want to save your password in the device, select Yes.
● Password — A password may be needed to make a data connection, and is
usually provided by your service provider.
● Authentication — To always send your password encrypted, select Secure. To
send your password encrypted when possible, select Normal.
● Homepage — Depending on the access point you are setting up, enter the web
address or the address of the multimedia message centre.
● Use access point — Set the device to connect to the destination using this
access point after confirmation or automatically.
. Follow the instructions from your service provider.
© 2010 Nokia. All rights reserved. 81
Page 82

Connectivity
11/09/2010
FCC Draft
Modify advanced packet data access point settings — Select Options >
Advanced settings.
Select from the following:
● Network type — Select the internet protocol type to transfer data to and from
your device. The other settings depend on the selected network type.
● Phone IP address (for IPv4 only) — Enter the IP address of your device.
● DNS addresses — Enter the IP addresses of the primary and secondary DNS
servers, if required by your service provider. To obtain these addresses, contact
your internet service provider.
● Proxy server address — Enter the address of the proxy server.
● Proxy port number — Enter the port number of the proxy server.
View your active data connections
Select Menu > Settings and Connectivity > Connection mgr..
In the active data connections view, you can see your data connections:
data calls
packet data connections
Close a connection — Select Options > Disconnect.
Close all open connections — Select Options > Disconnect all.
View the details of a connection — Select Options > Details.
Bluetooth connectivity
About Bluetooth connectivity
With Bluetooth connectivity, you can make a wireless connection to other
compatible devices, such as mobile devices, computers, headsets, and car kits.
You can use the connection to send items from your device, transfer files from your
compatible PC, and print files with a compatible printer.
Select Menu > Settings and Connectivity > Bluetooth.
Since devices with Bluetooth wireless technology communicate using radio waves,
they do not need to be in direct line-of-sight. However, they must be within 10
metres (33 feet) of each other, although the connection may be subject to
interference from obstructions such as walls or from other electronic devices.
© 2010 Nokia. All rights reserved.82
Page 83

Connectivity
11/09/2010
FCC Draft
This device is compliant with Bluetooth Specification 2.0 + EDR supporting the
following profiles: Advanced Audio Distribution Profile (A2DP), Audio/Video
Remote Control Profile (AVRCP), Basic Imaging Profile (BIP), Basic Printing Profile
(BPP), Device ID Profile (DI), Dial-up Networking Profile (DUN), File Transfer Profile
(FTP), Generic Audio/Video Distribution Profile (GAVDP), Generic Access Profile
(GAP), Generic Object Exchange Profile (GOEP), Handsfree Profile (HFP), Human
Interface Device Profile (HID), Headset Profile (HSP), Object Push Profile (OPP),
Phone Book Access Profile (PBAP), Serial Port Profile (SPP). SIM Access Profile
(SAP).. To ensure interoperability between other devices supporting Bluetooth
technology, use Nokia approved accessories for this model. Check with the
manufacturers of other devices to determine their compatibility with this device.
When the device is locked, only connections to authorised devices are possible.
Warning: For hearing aid compatibility, you must turn off Bluetooth
connectivity.
Bluetooth settings
Select Menu > Settings and Connectivity > Bluetooth.
Select from the following:
● Bluetooth — Activate Bluetooth connectivity.
● My phone's visibility — To allow your device to be visible to other Bluetooth
devices, select Shown to all. To set a length of time, after which the visibility
is set from shown to hidden, select Set visibility period. To hide your device
from other devices, select Hidden.
● My phone's name — E dit the name of y our d evic e. T he na me is sho wn to oth er
Bluetooth devices.
● Remote SIM mode — Allow another device, such as a compatible car kit
accessory, to use the SIM card in your device to connect to the network.
Security tips
Select Menu > Settings and Connectivity > Bluetooth.
When you are not using Bluetooth connectivity, to control who can find your device
and connect to it, select Bluetooth > Off or My phone's visibility > Hidden.
Deactivating the Bluetooth function does not affect other functions in your device.
Do not pair with or accept connection requests from an unknown device. This helps
to pr otec t you r dev ice f rom h armf ul co ntent. Ope rati ng th e dev ice i n hid den m ode
is a safer way to avoid malicious software.
© 2010 Nokia. All rights reserved. 83
Page 84
Connectivity
11/09/2010
FCC Draft
Send data using Bluetooth connectivity
You can have several Bluetooth connections active at a time. For example, if you
are connected to a compatible headset, you can also transfer files to another
compatible device.
1. Open the application where the item you want to send is stored.
2. Go to an item, and select Options > Send > Via Bluetooth.
Devices with Bluetooth wireless technology that are wi thin range are displayed.
Device icons are as follows:
computer
phone
audio or video device
other device
To interrupt the search, select Stop.
3. Select the device with which you want to connect.
4. If the other device requires pairing before data can be transmitted, a tone
sounds, and you are asked to enter a passcode. The same passcode must be
entered in both devices.
When the connection is established, Sending data is displayed.
Tip: When searching for devices, some devices may show only the unique
address (device address). To find the unique address of your device, in the
home screen, enter *#2820#.
Pair devices
You can pair your device with a compatible device to make subsequent Bluetooth
connections between the devices quicker. Before pairing, create your own
passcode (1 to 16 digits), and agree with the owner of the other device to use the
same code. Devices that do not have a user interface have a factory-set passcode.
The passcode is used only once.
Select Menu > Settings and Connectivity > Bluetooth.
1. Open the Paired devices tab.
2. Select Options > New paired device. Devices that are within range are
displayed.
3. Select the device.
© 2010 Nokia. All rights reserved.84
Page 85
Connectivity
11/09/2010
FCC Draft
4. Enter the passcode on both devices.
indicates a paired device in the device search view.
Connect to an accessory after pairing — Select Options > Connect to audio
device. Some audio accessories connect automatically to your device after pairing.
Set a device as authorised — Select Set as authorized. Connections between
your device and the authorised device can be made without your knowledge. Use
this only for your own devices, such as your compatible headset or PC, or devices
that belong to someone you trust.
devices view.
Cancel a pairing with a device — Select Options > Delete.
Cancel all pairings — Select Options > Delete all.
indicates authorised devices in the paired
Receive data using Bluetooth connectivity
When you receive data using Bluetooth connectivity, a tone sounds, and the device
asks you if you want to accept the message. If you accept,
you can find an informative message about the data in the Inbox folder in
Messaging. The received data is automatically saved to the device memory.
Messages received using Bluetooth connectivity are indicated with
is displayed, and
Block devices
You can prevent devices from establishing a Bluetooth connection to your device.
Select Menu > Settings and Connectivity > Bluetooth.
Block a device — On the Paired device s tab , go to a dev ice y ou wa nt to block , and
select Options > Block.
Unblock a device — On the Blocked devices tab, go to a device, and select
Options > Delete.
Unblock all blocked devices — Select Options > Delete all.
If you reject a pairing request from another device, you are asked if you want to
block all future connection requests from this device. If you accept the query, the
device is added to the list of blocked devices.
© 2010 Nokia. All rights reserved. 85
.
Page 86
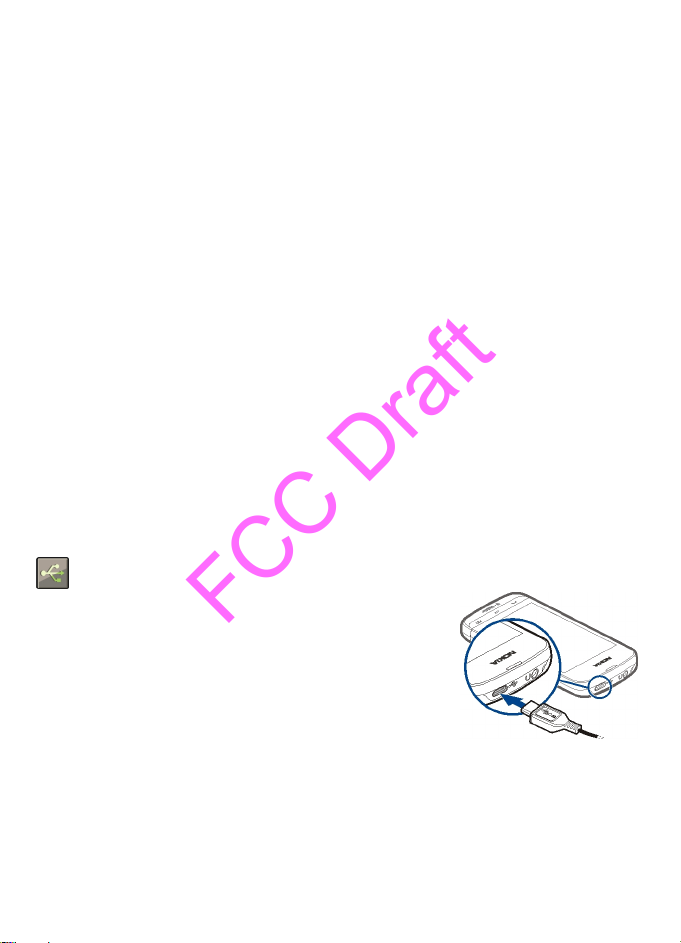
Connectivity
11/09/2010
FCC Draft
Remote SIM mode
With remote SIM mode, you can use a compatible car kit accessory. Before remote
SIM mode can be activated, the two devices must be paired and the pairing
initiated from the other device. When pairing, use a 16-digit passcode, and set the
other device as authorised.
Select Menu > Settings and Connectivity > Bluetooth.
Activate remote SIM mode
1. Activate Bluetooth connectivity. Select Bluetooth.
2. Activate remote SIM mode in your device. Select Remote SIM mode.
3. Activate remote SIM mode in the other device.
When remote SIM mode is activated, Remote SIM mode is displayed in the home
screen. The connection to the wireless network is closed, and you cannot use SIM
card services or features that require cellular network coverage.
When your device is in remote SIM mode, you can only make or receive calls using
the connected accessory. Your device can only make calls to the emergency
numbers programmed into your device.
Deactivate remote SIM mode — Press the power key, and select Exit remote
SIM mode.
Transfer data using a USB cable
Select Menu > Settings and Connectivity > USB.
Select the USB mode every time a compatible data
cable is connected — Select Ask on connection >
Yes.
If the Ask on connection option is not active, or you
want to change the USB mode during an active
connection, select USB connection mode and from the
following:
● PC Suite — Use Nokia PC applications such as Nokia
Ovi Suite or Nokia Software Updater.
● Mass storage — Transfer data between your device and a compatible PC.
● Image transfer — Print images using a compatible printer.
© 2010 Nokia. All rights reserved.86
Page 87
Connectivity
11/09/2010
FCC Draft
● Media transfer — Synchronise music with Nokia Music or Windows Media
Player.
PC connections
You can use your mobile device with a variety of compatible PC connectivity and
data communications applications. With Nokia Ovi Suite you can, for example,
transfer files and images between your device and a compatible computer.
To use Ovi Suite with USB connection mode, select PC Suite.
For more information about Ovi Suite, see the support area at www.ovi.com.
Administrative settings
Select Menu > Settings and Connectivity > Admin. settings.
To set the online time for the data call connection, select Data call. The data call
settings affect all access points that use a GSM data call.
Packet data settings
Select Menu > Settings and Connectivity > Admin. settings > Packet data.
The packet data settings affect all access points using a packet data connection.
Open a packet data connection whenever the network is available — Select
Packet data connection > When available. It is quicker, for example, to send
an e-mail, if the connection is always open. If there is no network coverage, the
device periodically tries to open a packet data connection.
Open a packet data connection only when needed — Select Packet data
connection > When needed. Every time you, for example, send an e-mail, the
connection needs to be opened first.
Use HSDPA (network service) in UMTS networks — Select High speed packet
access.
You can use your device as a modem for your computer, to access the internet over
a packet data connection.
Define the access point to use when using your device as a modem — Select
Access point.
© 2010 Nokia. All rights reserved. 87
Page 88

Download!
11/09/2010
FCC Draft
Download!
Some features may not be available in your region. Please check the availability
with local operator.
About Download!
Select Menu > Apps & Games > Download!.
With Download!, you can discover, preview, buy, download, and upgrade content,
services, and applications. Games, ringing tones, wallpapers, applications, and
much more are easily accessible. The items are categorised under catalogues and
folders from different service providers. The available content depends on your
service provider.
Download! uses your network services to access the most up-to-date content. For
information on additional items available through Download!, contact your service
provider or the supplier or manufacturer of the item.
Download! receives updates continuously and provides you with the latest content
your service provider offers for your device.
Items may be chargeable, but you can usually preview them free of charge. For
more information about the charges, contact your service provider or the provider
of the item.
To update the content in Download! manually, select Options > Refresh
content.
The Download! service is gradually replaced with the Ovi Store service. Ovi Store
also replaces Download! in the main menu of your device.
Purchase and download items
To buy the selected item in the main view, a folder, or a catalogue, select
Options > Buy. A submenu opens where you can select the version of the item
and view price information. The available options depend on the service provider.
To download an item that is free of charge, select Options > Get.
© 2010 Nokia. All rights reserved.88
Page 89

Other applications
11/09/2010
FCC Draft
Other applications
Clock
Set time and date
Select Menu > Apps & Games > Tools > Clock.
Select Options > Settings and from the following:
● Time — Set the time.
● Date — Set the date.
● Automatic time update — Set the network to automatically update the time,
date, and time zone information for your device (network service).
Alarm clock
Select Menu > Apps & Games > Tools > Clock.
Set a new alarm
1. Select New alarm.
2. Set the alarm time.
3. Select Repeat to set whether and when the alarm is repeated.
4. Select Done.
View your alarms — Select Alarms.
repeated alarm.
Remove an alarm — Select Alarms, go to the alarm, and select Options >
Remove alarm.
Stop the alarm — Select Stop. If your device is switched off when an alarm
expires, your device switches itself on and starts sounding the alarm tone.
Set the alarm to snooze — Select Snooze.
Define the snooze time — Select Options > Settings > Alarm snooze time.
Change the alarm tone — Select Options > Settings > Clock alarm tone.
indicates an active alarm. indicates a
World clock
With the world clock, you can view the current time in different locations.
© 2010 Nokia. All rights reserved. 89
Page 90
Other applications
11/09/2010
FCC Draft
Select Menu > Apps & Games > Tools > Clock.
View the time — Select World clock.
Add locations to the list — Select Options > Add location.
Set your current location — Go to a location, and select Options > Set as
current location. The time in your device is changed according to the selected
location. Ensure that the time is correct and matches your time zone.
Calendar
To open the calendar, select Menu > Calendar.
Calendar views
To switch between the month, week, day, and to-do note views, select Options >
Change view and the desired view.
To change the starting day of the week or the view that is displayed when you
open the calendar, or to modify calendar alarm settings, select Options >
Settings.
To go to a certain date, select Options > Go to date.
Calendar toolbar
Select Menu > Calendar.
From the calendar toolbar, select from the following:
●
Next view — Select the month view.
●
Next view — Select the week view.
●
Next view — Select the day view.
●
Next view — Select the to-do view.
●
New meeting — Add a new meeting reminder.
●
New to-do note — Add a new to-do note.
File manager
About File manager
Select Menu > Applications > Office > File mgr..
© 2010 Nokia. All rights reserved.90
Page 91

Other applications
11/09/2010
FCC Draft
With File manager, you can browse, manage, and open files on your device or a
compatible external drive.
Find and organise files
Select Menu > Applications > Office > File mgr..
Search for a file — Select Options > Find. Enter search text that matches the
file name.
Move and copy files and folders — Select Options > Organize and the desired
option.
Sort files — Select Options > Sort by and the desired category.
Edit the memory card
You can format a memory card to erase the data on it, or you can protect the data
on the memory card with a password.
Select Menu > Applications > Office > File mgr..
Rename or format a memory card — Select Options > Memory card
options and the desired option.
Password protect a memory card — Select Options > Memory card
password.
These options are available only if a compatible memory card is inserted in the
device.
Back up files
Select Menu > Applications > Office > File mgr..
It is recommended that you back up the device memory regularly to a memory
card or a compatible computer.
Back up data from the device memory to a memory card — Select Options >
Back up phone memory.
Restore data from the memory card to the device memory — Select
Options > Restore from mem. card.
You can also connect your device to a compatible computer, and use Nokia Ovi
Suite to back up data.
© 2010 Nokia. All rights reserved. 91
Page 92
Other applications
11/09/2010
FCC Draft
Format the mass memory
1. Select Menu > Applications > Office > File mgr..
2. Select Options > Format mass memory. Do not format the mass memory
using PC software because it may cause degraded performance.
When the mass memory is reformatted, all data in the memory is permanently
deleted. Back up data you want to keep before formatting the mass memory. You
can use Nokia Ovi Suite to back up data to a compatible computer. Digital rights
management (DRM) technologies may prevent some backup data from being
restored. For more information about DRM used for your content, contact your
service provider.
Formatting does not guarantee that all confidential data stored in the device mass
memory is permanently destroyed. Standard formatting only marks the formatted
area as available space and deletes the address to find the files again. The recovery
of formatted or even overwritten data may still be possible with special recovery
tools and software.
Application manager
About Application manager
Select Menu > Settings and Application mgr..
With Application manager, you can see the software packages installed in your
device. You can view details of installed applications, remove applications, and
define installation settings.
You can install the following types of applications and software:
● JME applications based on Java™ technology with .jad or .jar file extensions
● Other applications and software suitable for the Symbian operating system
with .sis or .sisx file extensions
● Widgets with the .wgz file extension
Only install software that is compatible with your device.
Install applications
You can transfer installation files to your device from a compatible computer,
download them during browsing, or receive them in a multimedia message, as an
© 2010 Nokia. All rights reserved.92
Page 93
Other applications
11/09/2010
FCC Draft
e-mail attachment, or using other connectivity methods, such as Bluetooth
connectivity.
You can use Nokia Application Installer in Nokia Ovi Suite to install an application
to your device.
Select Menu > Settings and Application mgr..
Icons in Application manager indicate the following:
SIS or SISX application
Java application
widgets
application installed on the memory card
application installed in the mass memory
Before installing an application, check the following:
● View the application type, version number, and the supplier or manufacturer of
the application. Select Options > View details.
● View the security certificate details of the application. Select Details: >
Certificates: > View details. Control the use of digital certificates in Certificate
management.
If you install a file that contains an update or repair to an exi sting application, you
can only restore the original application if you have the original installation file or
a full backup copy of the removed software package. To restore the original
application, remove the application, and install the application again from the
original installation file or the backup copy.
The JAR file is required for installing Java applications. If it is missing, the device
may ask you to download it. If there is no access point defined for the application,
you are asked to select one.
Install an application
1. Locate the installation file in Application manager, or search for it in File
manager or your Inbox in Messaging.
2. In Application manager, select Options > Install. In other applications, select
the installation file to start the installation.
During installation, the device shows information about the progress of the
installation. If you install an application without a digital signature or
certification, the device displays a warning. Continue installation only if you are
sure of the origin and contents of the application.
© 2010 Nokia. All rights reserved. 93
Page 94

Other applications
11/09/2010
FCC Draft
Open an installed application — Select the application in the menu. If the
application does not have a default folder defined, it is installed in the Installed
apps. folder in the main menu.
See which software packages are installed or removed — Select Options >
View log.
Remove applications
You can remove applications that you have installed, for example, to increase the
amount of available memory.
Select Menu > Settings.
1. Select Application mgr..
2. Select Installed apps. > Options > Uninstall.
3. Select Yes.
If you remove an application, you can only reinstall it if you have the original
so ftw are p ack age o r a f ull b acku p of the remo ved soft war e pac kag e. If you rem ove
a software package, you may no longer be able to open documents created with
that software.
If another software package depends on the software package that you removed,
the other software package may stop working. See the documentation of the
installed software package for details.
Application manager settings
Select Menu > Settings and Application mgr..
Select Installation settings and from the following:
● Software installation — Allow or deny installation of Symbian software that
does not have a verified digital signature.
● Online certificate check — Check online certificates before installing an
application.
● Default web address — Set the default web address used to check online
certificates.
RealPlayer
With RealPlayer, you can play video clips or stream media files over the air without
saving them to the device first.
© 2010 Nokia. All rights reserved.94
Page 95

Other applications
11/09/2010
FCC Draft
RealPlayer does not necessarily support all file formats or all the variations of file
formats.
Select Menu > Media > RealPlayer.
RealPlayer toolbar
Select Menu > Media > RealPlayer.
In the Video clips, Streaming links, and Recently played views, the following toolbar
icons may be available:
●
Send — Send a video clip or streaming link.
●
Play — Play a video clip or video stream.
●
Delete — Delete a video clip or streaming link.
●
Remove — Remove a file from the recently played list.
Play a video clip
Select Menu > Media > RealPlayer.
Play a video clip — Select Video clips and a video clip.
List recently played files — In the main view, select Recently played.
Go to a video clip, and select Options and from the following:
● Use video clip — Assign a video clip to a contact or set it as a ringing tone.
● Mark/Unmark — Mark or unmark an item, to send or delete multiple items at
the same time.
● View details — View details, such as format, resolution, and duration.
● Settings — Edit settings for video playback and streaming.
Stream content over the air
Select Menu > Media > RealPlayer.
Streaming content over the air is a network service. Select Streaming links and a
link. You can also receive a streaming link in a text or multimedia message, or open
a link on a web page.
Before live content begins streaming, your device connects to the site and starts
loading the content. The content is not saved in your device.
In RealPlayer, you can only open RTSP links. However, RealPlayer can also play a
RAM file if you open a HTTP link to it in a browser.
© 2010 Nokia. All rights reserved. 95
Page 96
Other applications
11/09/2010
FCC Draft
Recorder
You can use the recorder to record voice memos and telephone conversations.
You can also send sound clips to your friends.
Select Menu > Media > Recorder.
Record a sound clip — Select
Stop recording a sound clip — Select
Listen to the sound clip — Select
Send a sound clip as a message — Select Options > Send.
Record a telephone conversation — Open the recorder during a voice call, and
select
Select the recording quality or where to save sound clips — Select Options >
Settings.
You cannot use the recorder during a data call or when a GPRS connection is open.
. Both parties hear a tone at regular intervals during recording.
.
.
.
Write a note
1. Select Menu > Applications > Office > Notes.
2. Select Options > New note.
3. Enter text in the note field.
4. Select
.
Make a calculation
1. Select Menu > Apps & Games > Tools > Calculator.
2. Enter the first number of the calculation.
To delete a number, press the clear key. To delete a number, press the backspace
key.
3. Select a function, such as add or subtract.
4. Enter the second number of the calculation.
5. Select =.
© 2010 Nokia. All rights reserved.96
Page 97

Settings
11/09/2010
FCC Draft
Converter
With Converter, you can convert measures from one unit to another.
The converter has limited accuracy, and rounding errors may occur.
Select Menu > Apps & Games > Tools > Converter.
Dictionary
Select Menu > Apps & Games > Tools > Dictionary.
To translate words from one language to another, enter text in the search field. As
you enter text, suggestions of words to translate are displayed. To translate a word,
select the word from the list. All languages may not be supported.
Select Options and from the following:
● Listen — Listen to the selected word.
● History — Find previously translated words from the current session.
● Languages — Change the source or target language, download languages from
the internet, or remove a language from the dictionary. You cannot remove the
English language from the dictionary. You can have two additional languages
installed, besides English.
Settings
Some settings may be preset for the device by your service provider, and you may
not be able to change them.
Phone settings
Date and time settings
Select Menu > Settings and Phone > Date and time.
Select from the following:
● Time — Enter the current time.
● Time zone — Select your location.
● Date — Enter the current date.
● Date format — Select the date format.
© 2010 Nokia. All rights reserved. 97
Page 98

Settings
11/09/2010
FCC Draft
● Date separator — Select the symbol that separates days, months, and years.
● Time format — Select the time format.
● Time separator — Select the symbol that separates hours and minutes.
● Clock type — Select the clock type.
● Clock alarm tone — Select the tone for the alarm clock.
● Alarm snooze time — Adjust the snooze time.
● Workdays — Select your working days. You can then set an alarm only for
working day mornings, for example.
● Automatic time update — Set the device to update the time, date, and time
zone automatically. This network service may not be available on all networks.
Language settings
Select Menu > Settings and Phone > Language.
Change the device language — Select Phone language.
Change the writing language — Select Writing language.
Activate predictive text input — Select Predictive text.
Display settings
Select Menu > Settings and Phone > Display.
Select from the following:
● Brightness — Adjust the brightness of your device display.
● Font size — Select the size of text and icons on the display.
● Welcome note / logo — Set a note or image to be displayed when you switch
on the device.
● Light time-out — Set how long the light stays on when you stop using the
device.
Voice commands
Activate voice commands — Press and hold the call key in the home screen, and
say a command. The voice command is the name of the application or profile
displayed in the list.
To view the list of voice commands, select Menu > Settings and Phone > Voice
commands.
Select Options and from the following:
● Change command — Edit the voice commands.
© 2010 Nokia. All rights reserved.98
Page 99

Settings
11/09/2010
FCC Draft
● Playback — Listen to the synthesised voice tag.
● Remove voice command — Remove a voice command that you added
manually.
● Settings — Adjust the settings.
● Voice command tutorial — Open the tutorial for voice commands.
Accessory settings
Select Menu > Settings and Phone > Accessories.
Some accessory connectors indicate which type of accessory is connected to the
device.
Select an accessory and from the following:
● Default profile — Set the profile you want activated each time you connect a
certain compatible accessory to your device.
● Automatic answer — Set the device to answer an incoming call automatically
after 5 seconds. If the ringing type is set to Beep once or Silent, automatic
answer is disabled.
● Lights — Set the lights to remain on after the time-out.
The available settings depend on the type of accessory.
Application settings
Select Menu > Settings and Phone > Application sett..
In application settings, you can edit the settings of some of the applications in your
device.
To edit the settings, you can also select Options > Settings in each application.
Device updates
With Device updates, you can connect to a server and receive configuration settings
for your device, create new server profiles, view existing software version and
device information, or view and manage existing server profiles.
Select Menu > Settings and Phone > Phone mgmt. > Device updates.
You may receive server profiles and different configuration settings from your
service providers and company information management department. These
configuration settings may include connection and other settings used by different
applications in your device.
© 2010 Nokia. All rights reserved. 99
Page 100

Settings
11/09/2010
FCC Draft
Receive configuration settings
1. Select Options > Server profiles.
2. Go to a profile, and select Options > Start configuration.
Create a server profile — Select Options > Server profiles > Options > New
server profile.
Delete a server profile — Select Options > Delete.
Security settings
Phone and SIM
Select Menu > Settings and Phone > Phone mgmt. > Security > Phone and
SIM card.
Select from the following:
● PIN code request — When active, the code is requested each time the device
is switched on. Deactivating the PIN code request may not be allowed by some
SIM cards.
● PIN code andPIN2 code — Change the PIN and PIN2 code. These codes can only
include numbers. Avoid using access codes similar to the emergency numbers
to prevent accidental dialling of the emergency number. If you forget the PIN
or PIN2 code, contact your service provider. If you forget the lock code, contact
a Nokia Care point or your service provider.
● Lock code — The lock code is used to unlock the device. To avoid unauthorised
use of your device, change the lock code. The preset code is 12345. The new
code can be 4-255 characters long. Alphanumeric characters and both uppercase
and lowercase characters can be used. The device notifies you if the lock code
is not properly formatted. Keep the new code secret and separate from your
device.
● Phone autolock period — To avoid unauthorised use, you can set a time-out
after which the device automatically locks. A locked device cannot be used until
the correct lock code is entered. To turn off autolock, select None.
● Lock if SIM card changed — Set the device to ask for the lock code when an
unknown SIM card is inserted into your device. The device maintains a list of SIM
cards that are recognised as the owner’s cards.
● Remote phone locking — Enable or disable remote lock.
● Closed user group — Specify a group of people to whom you can call and who
can call you (network service).
© 2010 Nokia. All rights reserved.100
 Loading...