

Page 1
Hotkeys
These are the default settings for common hotkeys. To view a complete list of hotkeys or
to customize the settings, click the Options button on the Main menu (or click the Menu
button within the game, and then click Options), click Input, and then click Hotkeys.
General controls
SPACEBAR or PAUSE Pause game.
F9 Quick save game.
CTRL+S Save game.
F11 Quick load game.
CTRL+L Load game.
Z Collect items on the ground.
ALT View/Hide labels for items on the ground.
W Minimize/Maximize Weapons Panels.
TAB Open/Close Megamap.
N View/Hide Field Commands.
ESC Skip cinematics; close any open screen.
X View/Hide Health Level and Mana Level indicators
on characters.
\ View/Hide multiplayer stats.
J Open/Close Journal.
ENTER Chat in multiplayer.
SHIFT+ENTER Chat with team in multiplayer.
CTRL+ENTER Chat globally in multiplayer.
F10 Open Game Options.
Character/Party controls
I Open/Close Inventory.
B Open/Close Spell Book.
Q Cycle through equipped
weapons and active spells.
H Drink health potion.
Camera controls
– or mouse wheel back Zoom camera out.
= or mouse wheel forward Zoom camera in.
Left screen edge or LEFT ARROW Rotate camera to left.
Right screen edge or RIGHT ARROW Rotate camera to right.
Top screen edge or UP ARROW Tilt camera.
Bottom screen edge or DOWN ARROW Tilt camera.
Hold down middle mouse button Rotate/tilt camera.
Formation controls
Hold down right mouse button, and then left-click Cycle through formations.
Hold down right mouse button, and then move Change formation orientation.
mouse left and right
Hold down right mouse button, and then rotate Change formation spacing.
mouse wheel
M Drink mana potion.
L View/Hide character labels.
CTRL+A Select all party members.
G Guard the selected character.
S Stop current action.
TM
0302 Part No. X08-79464
Page 2
1
Safety Warning
Photosensitive Seizure Warning
A very small percentage of people may experience a seizure when
exposed to certain visual images, including fl ashing lights or patterns that
may appear in video games. Even people who have no history of seizures or
epilepsy may have an undiagnosed condition that can cause these “photosensitive
epileptic seizures” while watching video games.
These seizures may have a variety of symptoms, including lightheadedness,
altered vision, eye or face twitching, jerking or shaking of arms or legs,
disorientation, confusion, or momentary loss of awareness. Seizures may
also cause loss of consciousness or convulsions that can lead to injury from
falling down or striking nearby objects.
Immediately stop playing and consult a doctor if you experience any of these
symptoms. Parents should watch for or ask their children about the above
symptoms—children and teenagers are more likely than adults to experience these
seizures.
The risk of photosensitive epileptic seizures may be reduced by taking the following precautions:
• Play in a well-lit room.
• Do not play when you are drowsy or fatigued.
If you or any of your relatives have a history of seizures or epilepsy, consult a
doctor before playing.
Information in this document, including URL and other Internet Web site references, is subject
to change without notice. Unless otherwise noted, the example companies, organizations,
products, domain names, e-mail addresses, logos, people, places and events depicted herein
are fi ctitious, and no association with any real company, organization, product, domain name,
e-mail address, logo, person, place or event is intended or should be inferred. Complying with
all applicable copyright laws is the responsibility of the user.
© 2002 Gas Powered Games Corp. All rights reserved. Gas Powered Games, the GPG logo,
and Dungeon Siege are the exclusive trademarks of Gas Powered Games Corp. The copyrights
in this manual are the property of Gas Powered Games Corp. and are protected by U.S.
and International copyright laws. This manual may not be copied, reproduced, translated,
or reduced to any electronic medium or machine-readable form without the prior consent of
Gas Powered Games Corp.
Published by Microsoft Corporation. Portions © 2002 Microsoft Corporation. All rights
reserved.
Microsoft, MS-DOS, Windows, Windows NT, and ZoneMatch are either registered trademarks
or trademarks of Microsoft Corporation in the United States and/or other countries.
Uses Bink Video. © 1997-2002 by RAD Game Tools, Inc.
The names of actual companies and products mentioned herein may be the trademarks of
their respective owners.
0302 Part No. X08-79464
CContents
Lore
Map of the Kingdom of Ehb...........2
History of the Kingdom of Ehb......4
Crypt of the Sacred Blood ............ 11
Stonebridge................................ 16
Wesrin Cross ..............................20
Glitterdelve ................................24
Glacern....................................... 28
Fortress Kroth ............................ 32
Dragon’s Rathe............................ 36
Castle Ehb...................................42
Getting Started
Installing .....................................5
Starting........................................5
Setting out on your journey..........6
Survival tips................................. 8
Customizing game options,
hotkeys, and the status bar...10
Creating your own
Dungeon Siege world............ 10
Navigating
Moving your character................12
Controlling the camera............... 12
Using the Megamap ................... 12
Adventuring
Selecting a weapon or spell........ 13
Attacking ................................... 14
Opening containers and
doors.................................... 14
Picking up treasure .................... 15
Drinking potions........................ 15
Managing your Inventory ...........17
Equipping weapons and
armor...................................18
Equipping spells ........................21
Nature Magic .............................22
Combat Magic............................23
Skills
Increasing your skills .................25
Character attributes ...................26
Unconsciousness and death.......26
Other Characters
Talking to other characters......... 29
Pursuing quests .........................29
Adding a character or
packmule to your party.........29
Dismissing a character from
your party.............................30
Buying and selling items............ 31
Managing your party..................33
Setting movement, attack,
and targeting orders .............33
Moving your party in
formation ............................. 35
Multiplayer Games
Playing a multiplayer game........37
Joining or hosting a
multiplayer game..................37
Dying.........................................40
Chatting.....................................40
Trading items with other
players .................................40
Viewing team information .........41
Credits .......................................43
Page 3
3
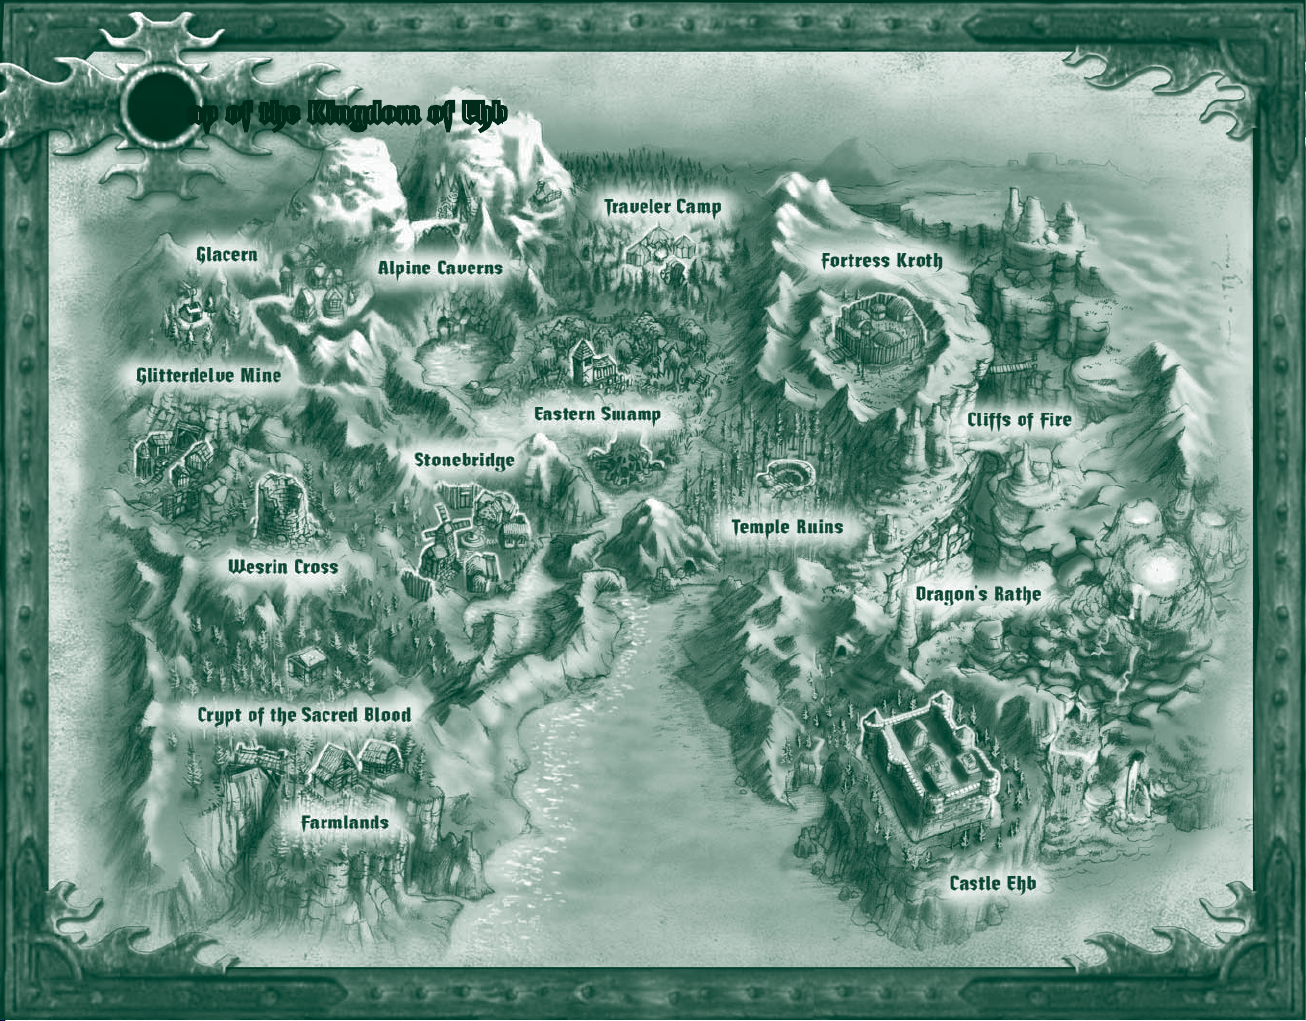
MMap of the Kingdom of Ehb
2
Page 4
5
HHistory of the Kingdom of Ehb
Only three hundred years old, the Kingdom of
Ehb is one of the youngest states bordering
the Plain of Tears. First settled as a trading outpost on the fringes of
the Empire of Stars, Ehb later achieved temporary status as a military
protectorate and province when the 10
After the catastrophic War of Legions led to the collapse of the
Empire, the stunned province of Ehb was set on an irrevocable course
toward independence and kingship. Protected by a ring of superb
fortifi cations and heir to the 10
trained armies in the world—the Kingdom of Ehb has, so far, been
shielded from the raids and invasions that have devastated many of its
neighboring states on the Plain.
Within Ehb’s borders, there is an astonishing diversity in geography
and cultures. Most inhabitants worship Azunai, an ancient god of
the pre-Imperial Agallan Peaks. Dwarves and humans live together in
harmony and bow to the same king. Sorcerers are also more accepted
than in other countries, thanks in large part to the efforts of Merik,
Grand Mage and Warden of Shadows of the 10
the heart of the kingdom, a strange and often contrary race called
the Droog is allowed a degree of autonomy, despite its sometimes
troublesome alliances.
It is a country in search of an identity, caught between the glories of a
fallen past and the potential for an even greater future. Despite several
crises, Ehb has never fallen to an enemy. But at any time the course of
events could turn down a bleaker path.
th
Legion migrated westward.
th
Legion—arguably one of the best
th
Legion. And in
Installing
Insert Dungeon Siege™ CD 1 into the CD-ROM drive, and then follow
the instructions on the screen. If Setup does not begin automatically,
follow these steps:
1. Click Start, point to Settings, and then click Control Panel.
2. Double-click Add or Remove Programs.
3. In the Add or Remove Programs dialog box, select Add New Pro-
grams, click the CD or Floppy button, then follow the instructions
on the screen.
Starting
To start Dungeon Siege
✦ Click Start, point to Programs, point to Dungeon Siege, and then click
Dungeon Siege.
Single Player
To venture through the land of Ehb
by yourself
1. Click Single Player.
2. Click Start New Game.
3. Click the arrow buttons to
select your character’s gender
and appearance. Males and
females are equally
strong and skilled.
4. Type a name for your character,
and then click Next.
5. Set the diffi culty level. You can use the
Options menu to change the diffi culty
level later.
Multiplayer
To play with other players across the Internet
or a local area network (LAN), see “Playing a
multiplayer game” in this manual.
4
Page 5
7
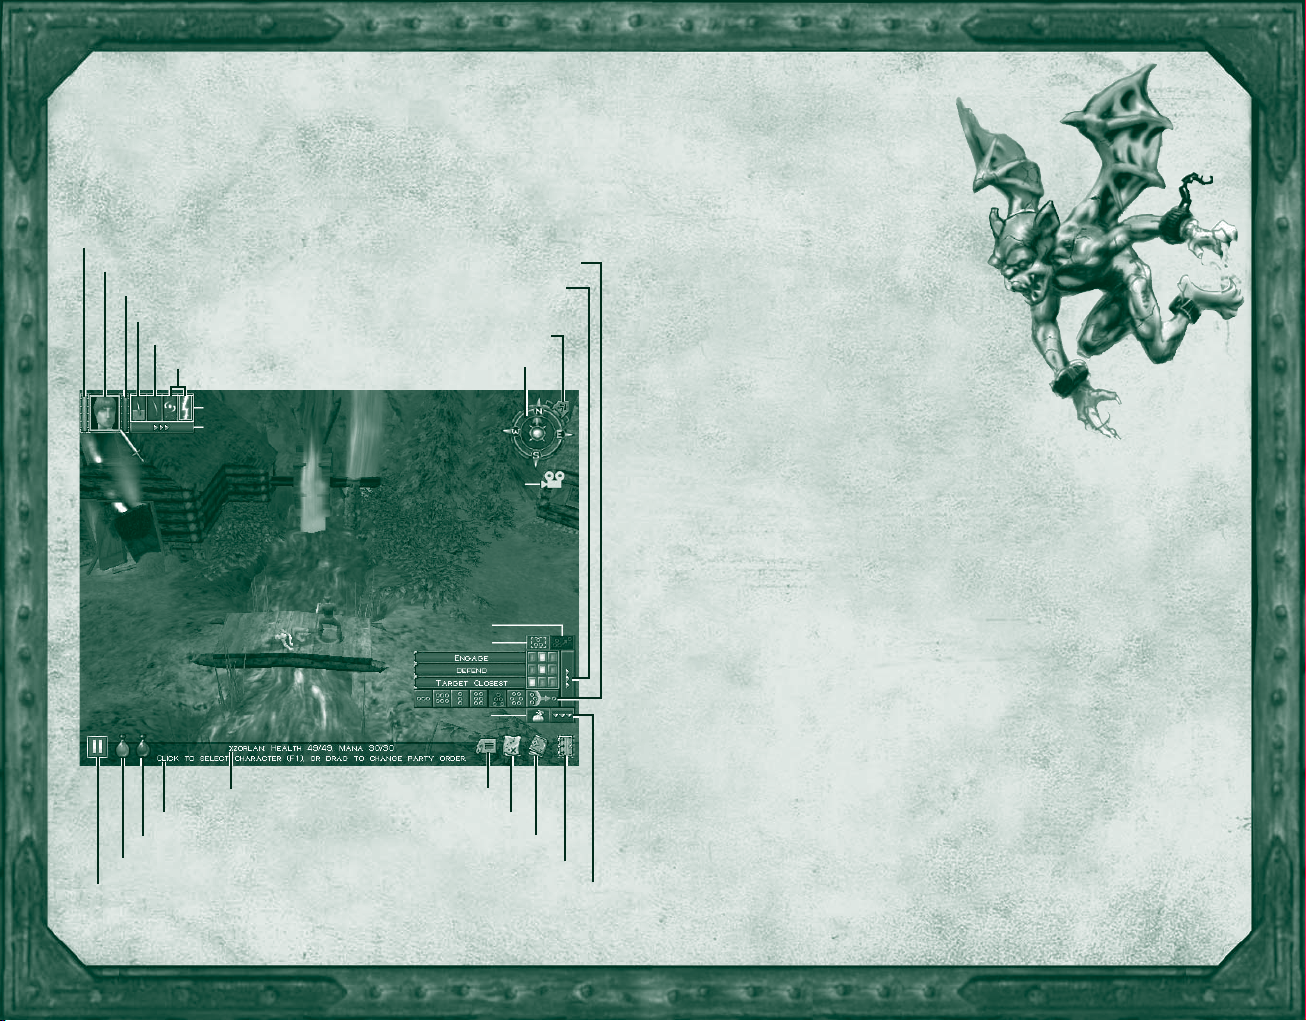
Setting out on your journey
With your world thrust into turmoil, you embark upon a harrowing
journey through the Kingdom of Ehb—hoping to defeat whatever evil has
befallen the land and, along the way, becoming a heroic fi ghter, archer,
or mage.
Health Level indicator
Character Portrait
Mana Level indicator
Melee Weapon
Ranged Weapon
Spells
Weapons Panel
View/Hide Inventory button
Description Text
Status Bar
Drink Mana Potion button
Drink Healing Potion button
Pause/Resume Dungeon Siege button
Formation Standing Orders button
Disband Party Member button
View/Hide Item Labels button
Open/Close Megamap button
Follow Party Leader button
View/Hide Engagement and
Minimize Compass
Compass
Camera Follow Mode Off
Select Party button
Collect Items button
Open/Close Journal button
Open/Close Game Menu button
View/Hide Field Commands button
Here’s a quick overview of what
you need to know as you set off on
your adventure. For a list of hotkeys,
see the back cover.
✦ To move your character, left-click a
location on the screen.
✦ To rotate the camera, move the
pointer to the edge of the screen.
✦ To zoom the view in or out, rotate the
mouse wheel, or press the minus (–) or
equals (=) key.
✦ To attack a creature, left-click it. You only
need to click once. You automatically fi ght back
if a creature attacks you.
✦ To use a weapon or spell, click one of the weapon or spell slots in
the Weapons Panel, beside the Character Portrait. The weapons you
use determine whether you develop your skills as a fi ghter, archer,
or mage.
✦ To equip a spell, click the View/Hide Inventory button beside the
Character Portrait to open your Inventory, and then right-click the spell
to equip it in your Spell Book.
✦ To drink a health potion from your Inventory, click the Drink Health
Potion button. To drink a mana potion from your Inventory, click the
Drink Mana Potion button. You drink only as much potion as you
need, so none is wasted.
✦ To open a container or door, left-click it.
✦ To view an item’s name, point to it and its name appears on the
status bar. To display on-screen labels for all nearby items, click the
View/Hide Item Labels button on the status bar or press ALT. To hide
the labels, click the button again or press ALT again.
✦ To add an item to your Inventory, left-click it.
✦ To open your Inventory, click the View/Hide Inventory button below
the Character Portrait.
6
Page 6
9
Survival tips
✦ Watch your health level (red bar beside the Character
Portrait). If you’re wounded and your health level drops to
zero, you’ll lose consciousness and may die. Your health
level slowly recovers over time.
✦ Watch your mana level (blue bar beside the Character
Portrait). When you cast a spell, your mana level drops.
If you run out of mana, you can’t cast spells. Your mana
level slowly recovers over time.
✦ Save the game periodically. If you’ve just survived a big
battle or are about to enter an area that looks dangerous,
save the game. If you die, you can load the saved game
so you don’t have to start over from the beginning. To
quick-save a game, press F9.
✦ Pause the game. To avoid surprise attacks, pause the
game while you’re managing your Inventory or Spell Book.
To pause the game, press SPACEBAR or PAUSE.
✦ Keep your bearings. Use the compass and Megamap,
pay attention to natural landmarks, and follow the beaten
path.
✦ Avoid ambushes. You may be able to see creatures before
they notice you and attack. If you see a large group, be
sure you’re prepared for battle before you engage them.
✦ If you fl ee, remember to retreat. Don’t run into unex-
plored territory or you may be attacked by even more
creatures.
✦ Exploit your enemy’s weakness. If you’re battling a crea-
ture that must get close to strike you, use a bow or spell to
attack it from a distance. On the other hand, if a creature
attacks you with a bow, you might want to charge it with
a melee weapon.
✦ Use the best weapon for the situation. Melee weapons,
such as axes and swords, are effective in hand-to-hand
combat. Ranged weapons, such as bows, are effective
from a distance. Press Q to cycle through equipped weapons or use keys 1-4 as shortcuts for selecting your
weapon of choice.
✦ Use formations to protect weak party members. Keep
packmules and weak characters at the back of your party
or in the center of a formation.
Krug
For as long as anyone can remember, there
have been Krug. They peer from the darkness,
gaping at our mastery of fi re, terrifi ed by our
magic—their minds too dim to grasp what is
common sense to a child. Their culture is a
mosaic of traditions from other civilizations,
and they communicate primarily with grunts
and gestures. The Krug consider themselves
inferior to the mysterious and often feuding
gods who stride the earth, directing their des-
tinies. If not for the forbearance and mercy
of other races, the Krug might long ago have
become extinct. Although not inherently evil,
the Krug all too often are used as tools
of darkness. In exchange for their unquestion-
ing obedience, malevolent races sometimes
give them basic instruction in sorcery and tra-
decrafts—skills the Krug are incapable of devel-
oping on their own.
8
Page 7
11
CCrypt of the Sacred Blood
Customizing game options, hotkeys,
and the status bar
You can set the video, audio, mouse, and hotkey options according to
your preference.
To customize the game options
✦ Click Options on the Main menu. Or click the Game Menu button on
the status bar, and then click Options.
For information about an option, point to it. Help text appears on the
screen.
The default hotkeys are listed on the back of this manual.
The status bar is an area where messages appear when you point to
certain items on the screen. The status bar is on the bottom of the
screen by default.
To move the status bar
✦ Drag it to the top of the screen.
Just southwest of Stonebridge lies the Crypt
of the Sacred Blood—site of one of the bloodiest
battles of the Liberation, and the most honored burial place in all
of Ehb.
Interred there alongside the kings and queens of Ehb are the martyrs
of Azunai and the heroes, commanders, and grand mages of the
th
10
Legion, many of whom fell during the last days of the War of
Legions.
The site was consecrated with the blood of the 10th Legion soldiers
who sacrifi ced their lives to free Ehb during the Seck Rebellion. In
a single day of battle, nearly a quarter of the Legion’s forces died
fi ghting a hardened corps of Seck warriors. Surveying the corpses
strewn over the battlefi eld, Legion Commander Karese Noanni ordered
the site cleared and excavated for a crypt. “By my oath, they shall
be remembered and revered, or nothing we do hath a spark of honor
in it.”
There is no greater honor than to be laid to rest in this sacred ground,
and no greater duty than making a pilgrimage to pay respect to the
heroes lying within.
“From this day forth, all that is achieved
shall be purchased with the blood of these
valiant hearts.”
—Karese Noanni, 10
10
th Legion Commander
Page 8
13
Moving your character
To move your character
✦ Left-click a location on the screen to move your character to that
location.
Note: The instructions in this manual assume you’re using left-click (the
default mouse setting) to issue commands.
Controlling the camera
The compass indicates which direction the camera is facing.
To rotate the camera
✦ Move the pointer to the left or right edge of the screen or use the
arrow keys.
To tilt the camera
✦ Move the pointer to the top or bottom edge of the screen. You can also
hold down the mouse wheel or the middle mouse button, and then
move the mouse to rotate or tilt the camera.
To zoom the camera view in or out
✦ Rotate the mouse wheel or press the minus (–) or equals (=) key.
To turn the camera follow mode off
✦ Press T.
Using the Megamap
The Megamap lets you get your bearings from a long-range, top-down
view. Areas you haven’t explored are not visible. Various icons represent
nearby characters and treasure, so you can continue to play using the
Megamap. Enemies appear in a red circle when you point to them.
Containers, doors, and secret areas are not visible.
To open or close the Megamap
✦ Click the Megamap button on the status bar or press TAB.
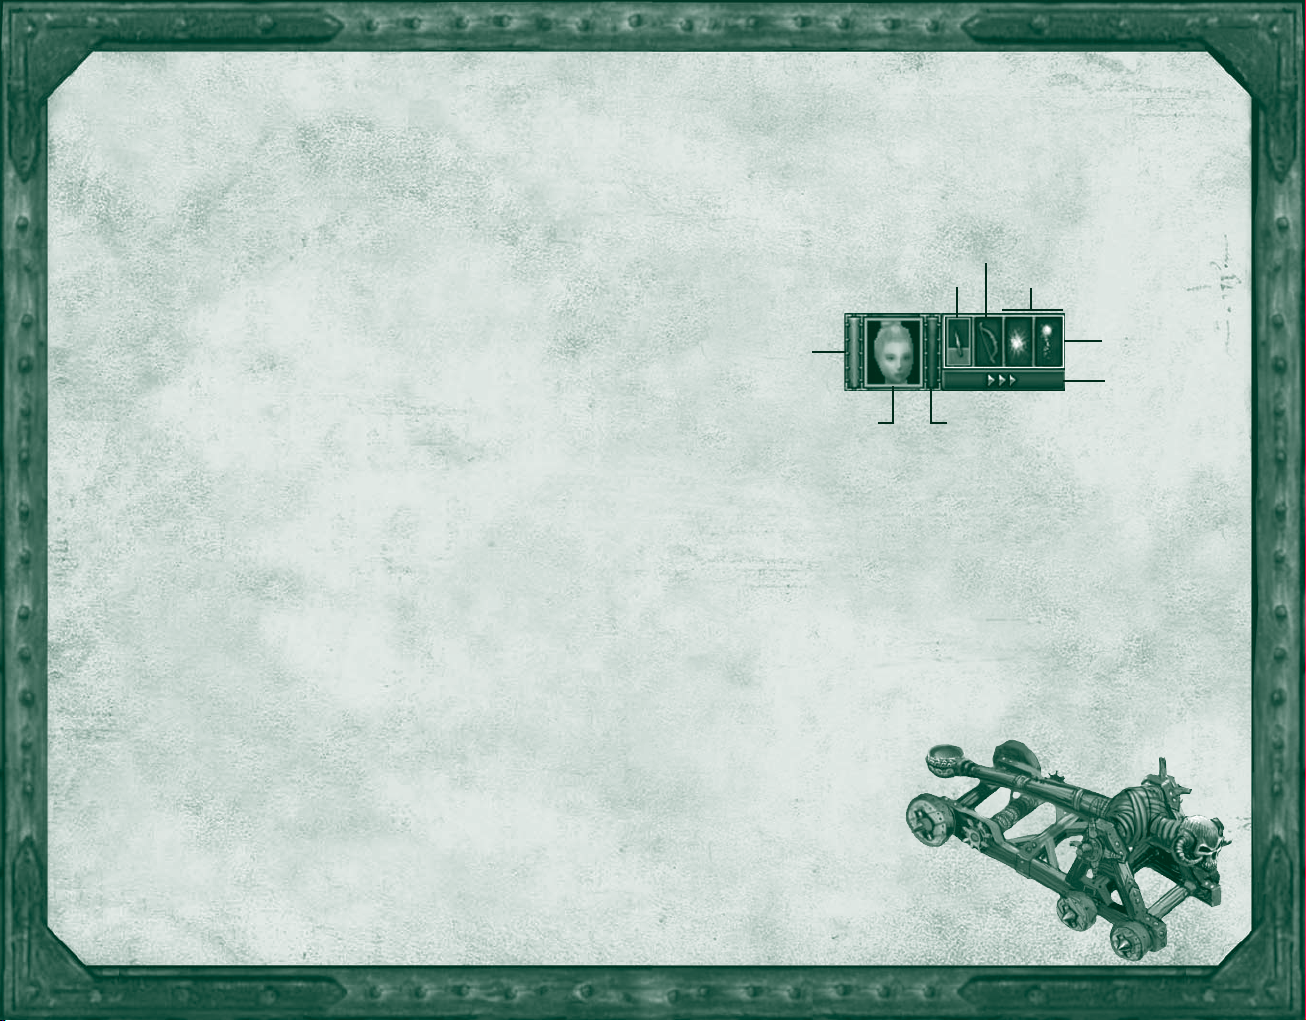
Selecting a weapon or spell
The weapons and spells you have equipped are shown in the Weapons
Panel beside the Character Portrait, so you can easily select which one
to use. For more about which weapons and spells are displayed, see
“Equipping weapons and armor” and “Equipping spells” in this manual.
Ranged Weapon
Melee Weapon
Health Level
indicator
Character Portrait
To select a weapon or spell
✦ In the Weapons Panel, click the weapon or spell you wish to use.
Note: If you select an empty melee weapon slot, you fi ght with your fi sts.
Press Q to cycle through equipped weapons or use keys 1-4 as shortcuts
for selecting your weapon of choice.
To display the spells in your Spell Book
✦ In the Weapons Panel, click one of the spell slots, hold down the
mouse button, and then select a spell from the drop-down list.
To minimize or maximize the Weapons Panel
✦ Press W. When the Weapons Panel is minimized, only the active
weapon or spell is shown. You can still press Q to cycle through
the weapons and spells or
use keys 1-4 as shortcuts
for selecting your weapon
of choice.
Spells
Weapons Panel
View/Hide
Inventory button
Mana Level indicator
12
Page 9

15
Attacking
You automatically fi ght back if a creature attacks you. If you’re using a
bow or ranged spell, you automatically attack when a hostile creature
enters the range of your weapon. To change your character’s attack
behavior, see “Setting movement, attack, and targeting orders” in this
manual.
You cannot directly attack other characters in your party.
To attack
✦ Left-click a creature. You only need to click once.
If you exhaust your mana while casting spells during battle, you automatically switch to your melee weapon and attack (if one is equipped
and the movement orders allow it). For more about this, see “Setting
movement, attack, and targeting orders” in this manual.
Opening containers and doors
Barrels, chests, and other containers sometimes contain treasure when
you break or open them. When you point to a breakable object,
the pointer changes to a hammer. When you point to a container
or door that can be opened, the pointer changes to a hand.
To open a container or door
✦ Left-click the object. To close an open
door, left-click it again.
Picking up treasure
When you kill a creature or open a container, treasure such as weapons, armor, spells, gold, or other items may fall to the ground.
To view an item’s name
✦ Point to the item. Its name appears on the status bar. To display or
hide on-screen labels for all nearby items, click the View/Hide Items
Labels button on the status bar.
To pick up an item and add it to your Inventory
✦ Left-click the item. You can also right-click to attach the item to your
pointer, and then drop the item on the character to which you want
to give the item.
To pick up multiple items
✦ Drag the pointer around the items, and then left-click. Or, hold down
CTRL and then left-click each item. Or, click the Collect Items button
on the status bar.
Drinking potions
When you drink a health or mana potion, you sip only as much as
you need to fully restore your health or mana. The rest of the potion
remains in the bottle and can be used later.
To consolidate the contents of partial bottles
✦ In your Inventory Panel, drag one partial bottle to another.
Note: When you drag a potion to the Character Portrait, it is placed in
the Inventory; the character does not drink it.
To drink a health potion
✦ Click the Drink Health Potion button on the status bar. All party
members that are selected and have a health potion in their inventories drink the potion. In combat, only members below 50% health
will drink.
To drink a mana potion
✦ Click the Drink Mana Potion button on the status bar. All party
members that are selected and have a mana potion in their inventories drink potion. In combat, only members below 50% mana will
drink.
14
Page 10

17
SStonebridge
When Imperial trader Etan Stonebridge
founded his town, it was little more than a
rough patch in the road south of Wesrin Cross. To most, it didn’t look
like much. But it was close to a shallow bay and an Azunite Shrine
of Passion that had recently been erected by Dwarven traders hailing
from the Agallan Peaks. The shrine was already a popular stopping
place for traders heading farther south, and it would likely attract
settlers if Etan could ensure the public peace. So, hiring passing
craftsmen, he began the laborious process of erecting a protective
village wall, while sending ridiculous sums of gold to infl uence and
support his old friends in the 2
Two years later, the village population of 20 marveled as two ancient
catapults, pulled by large teams of mules wearing the colors of
the 2
The catapults, Gravemaker and Godhammer,
had played critical roles in the history of the
Empire of Stars, and Stonebridge knew they
would lend his fl edgling community physical
and psychic protection. Furthermore, the mules
that pulled the catapults were among the toughest bred in the 2
in short supply in the mountainous west. The
village soared to prominence in the region and
Etan Stonebridge’s great gamble began to pay
nd
Legion.
nd
Legion, creaked through the city gates.
nd
Legion, and pack animals were
off; unfortunately, he never lived to see its
ultimate success.
Managing your Inventory
When you pick up an item from the ground, it is added to your Inventory
and you carry it with you until you use it, sell it, give it to another
character, or drop it on the ground. Each item you pick up occupies
space in your Inventory. When your Inventory is full, you cannot carry
any more items; however, you can still right-click an item to pick it up.
For information about buying packmules to carry your excess items, see
“Adding a packmule to your party” in this manual.
To open your Inventory
✦ Click the View/Hide Inventory button beside the Character Portrait.
To open multiple Inventories
✦ Hold down CTRL, select the party members, and then press I. When
you’ve selected more than one character, each character’s Inventory
opens in reduced size.
To open all Inventories
✦ Click the Select Party button to select your whole party, then
press I.
When you point to an item in your Inventory, the item’s name and
description appear. The description shows the minimum and maximum
Auto-arrange Inventory button Total Party Gold
Character
Attributes
Skills
Active Spells
Character Panel
16
Inventory Panel
Spell Book Panel
Page 11

19
damage a weapon can infl ict (depending on how well the enemy creature
is armored) and, if it is a ranged weapon, how far it fi res.
The amount of gold you have is shown at the top of your Inventory. All
members of your party use gold from the same account.
To arrange your Inventory
✦ Click the Auto-arrange Inventory button at the top of your Inventory.
To drop an item or give it away
✦ Click the item in your Inventory and then click the ground or click
another character’s Character Portrait (or drag and drop the item to
the ground or to another character’s Character Portrait).
To drop an item directly to the ground
✦ Hold down CTRL and then click an Inventory item. If more than one
Inventory is open, the item moves to the next Inventory.
Note: When you drag a potion to the Character Portrait, it is placed in
that character’s Inventory; the character does not drink it.
Equipping weapons and armor
There are two types of weapons: melee weapons and ranged weapons.
✦ Melee weapons are used in hand-to-hand combat to stab, slash, or
bash the enemy. You hold a melee weapon in your hand while attacking. Common melee weapons include axes, clubs, swords, daggers,
hammers, maces, scepters, scythes, and staffs.
✦ Ranged weapons are used to attack from a distance by fi ring a
projectile. Common ranged weapons include bows, crossbows, and
fi rearms. Bows never run out of arrows.
✦ Armor reduces the amount of damage you suffer during battle. There
are various types of armor, including body armor, shields, helmets,
boots, and gloves, all of which are made from a variety of materials.
In general, the harder the armor, the more protection it offers.
Some items are imbued with magical properties that offer additional
protection. You cannot wield shields simultaneously with two-handed
weapons; however, equipped shields will still provide magical bonuses
when you are using two-handed weapons.
Before you can use weapons, spells, armor, and other items, you must
equip your character by placing the items in the Equipment Panel (to
the lower-left of your Inventory). If you pick up a melee weapon, ranged
18
weapon, or armor and don’t already have that type of item equipped,
it automatically equips so you can use it immediately. However, spells
do not auto-equip when you pick them up. For more about this, see
“Equipping spells” in this manual.
Ranged Weapon Helmet
Equipment Panel
Melee Weapon
Spell Book
Open/Close Spell
Book button
Gloves
Amulet
Body Armor
Rings
Shield
Boots
View button
To equip or unequip items
✦ Click the View/Hide Inventory button beside the Character Portrait
and then drag an item from your Inventory to the Equipment Panel (to
the lower-left of the Inventory). The item equips in the correct place
regardless of where you drop it on the Equipment Panel.
One melee and one ranged weapon can be equipped at the same
time so you can quickly switch between them. To cast magic spells,
you must have a Spell Book equipped. For more about spells, see
“Equipping spells” in this manual.
To view your character with equipped items
✦ Click the View button (at the bottom of the Equipment Panel), hold
down the mouse button, and then move the mouse to the left or
right.
Page 12

21
wwesrin Cross
The lonely ruins of Wesrin Cross bear silent
witness to some of the darkest hours of Ehb’s
turbulent history.
Originally constructed as an inn by Fiola Wesrin, the building was
heavily fortifi ed when the 10
same time, the path through the Green Ridge hillside was moved
to an underground tunnel to restrict the passage of people and
goods. During the War of Legions, the Seck briefl y occupied the
fortress, where they housed droves of Guild spiders. Although the
subterranean confi nement pens were torn out after the 10
reoccupation, a magical homing taint remains to this day and continues to attract the descendants of the Seck-controlled Arakun spiders.
Despite the best efforts of successive mages throughout Ehb’s history,
no one has been able to break the spell that attracts the spiders.
th
Legion came from the east. At the
th
Legion’s
Equipping spells
When you pick up or buy a spell, it is placed in your Inventory. Before
you can cast the spell, you must have a Spell Book equipped, and then
you must add the spell to the Spell Book.
You can carry multiple Spell Books in your Inventory, but only one can
be equipped at a time. Each Spell Book can contain 12 spells. Spells in
the fi rst two spell slots are equipped and appear in the spell slots beside
the Character Portrait. You cannot add multiple copies of the same spell
to the same Spell Book. Some spells require that you reach a certain Skill
Level in either Nature or Combat magic before you can cast them.
To equip a Spell Book
✦ Drag a Spell Book from your Inventory to the Equipment Panel (to the
lower-left of the Inventory).
To add a spell to your Spell Book
✦ Right-click the spell or drag it to your
Spell Book.
To remove a spell from your Spell Book
✦ Drag the spell from your Spell Book Panel
back to your Inventory.
There are two types of spells: Nature and
Combat. When you cast each type of spell, your
Nature magic or Combat magic skills increase. As
you become more skilled at using magic, the
spells you’ve learned become more powerful.
You cannot directly attack other party members
with offensive spells. You can cast benefi cial
spells, such as Healing Hands and Resurrect,
upon other party members.
Active Spells
Spell Book Panel
20
Page 13

23
Nature Magic
Nature mages dole out damage with pinpoint accuracy, which minimizes
danger to bystanders and the nearby terrain. They are masters of spells
that support and enhance the members of your party, and they are
invaluable where brute force alone cannot prevail. A few of the spells that
beginning Nature mages can use are:
Zap
Arcs a small bolt of electricity from the spell caster
to injure an enemy creature.
Combat Magic
Combat mages are masters of destruction, who can wreak havoc on wide
areas. They are also capable of wielding powerful spells that enhance the
party. A few of the spells that beginning Combat mages can use are:
Fireshot
Hurls a small globe of fi re at an enemy creature.
Healing Hands
Heals the injuries of a single character. The amount
of healing is based on the spell caster’s Skill Level.
Magic Armor
Creates a shell of magical energy that increases a single character’s armor rating for protection against all types of attack.
Spark
Sends forth two small, high-speed globes of electricity
that track and injure an enemy creature.
Resurrect
Restores the life of a dead character. The higher the dead character’s Skill Level, the greater the amount of mana required to
perform the resurrection.
Leech Life
Heals light wounds by drawing life from an enemy creature.
Firespray
A more powerful version of Fireshot, in which several globes of
fi re fan out from the spell caster’s hand.
Summon Gargoyle
Summons a gargoyle of living rock that
guards the caster.
Weaken
Instantly causes an enemy creature
to age and atrophy, thus reducing
the amount of damage it can infl ict
in battle.
22
Page 14

25
GGlitterdelve
The area now known as the Glitterdelve Mine
was fi rst recorded in the journals of famed
Agallan cartographers Fedwyrr and Klars, who noted a network
of cramped caverns winding through miles of mineral-bearing rock.
The caverns provided the only means of traversing the Green
Range and passing between the eastern and western halves of the
kingdom.
Exploratory shafts dug in the eighth century revealed the presence of
iron, which drove Imperial traders to push harder for Droog trading
concessions. Later, the discovery of gold and coal fueled the expansion
of the early kingdom, and mine shafts shored up the unpredictable
interior of Mount Frostspire.
Almost daily, miraculous discoveries are unearthed with each cartload
of gold ore, some of which shatter long-held notions about the lands
and people of Aranna. In a section known as the Wyrm’s Hole,
miners excavated the spine of a creature three-quarters of a mile long
that terminated in a skull the size of three hay wagons. Elsewhere,
the sound of an underground waterfall thunders through the lower
chambers, though no one has ever found its source.
In addition to the natural wonders of the Glitterdelve, elevators and
conveyors move miners and materials between levels with astonishing
rapidity. Sluices running with ice-melt from Glacern provide fresh
drinking water and a means for separating gold from the rocky silts.
Even the circulation of air is maintained by a series of magically
powered fans engineered to prevent the build up of explosive vapors
like those that triggered the Great Blast of 943.
Increasing your skills
Your character develops into a fi ghter, archer, Nature mage, or Combat
mage, depending on the weapons you use. Each time you kill a creature,
your skill with a particular weapon increases. You can develop skills in
more than one area. For example, if you use both a sword and a bow,
your character will develop both melee skills and ranged skills and will
become either a fi ghter or archer, depending on the highest Skill Level.
✦ Melee Skill. Using melee weapons, such as swords, axes, or maces
develops your melee skill and you become a fi ghter.
✦ Ranged Skill. Using projectile weapons, such as bows, develops your
ranged skill and you become an archer.
✦ Nature Magic Skill. Casting Nature magic spells develops your Nature
magic skill and you become a Nature mage.
✦ Combat Magic Skill. Casting Combat magic spells increases your
Combat magic skill and you become a Combat mage.
To view your skills
✦ Click the View/Hide Inventory button
beside the Character Portrait. The
Inventory Panel opens displaying the
Character Panel. The gray progress
bars in each skill indicate how far
you’ve advanced toward the next Skill
Level. When you achieve a new Skill
Level, a message appears on the screen
and the Level column of the Skills
Panel is updated.
24
Page 15

27
Character attributes
The skills you develop determine your character’s attributes. Magic weapons, armor, or other items you’ve equipped can also (positively or
negatively) affect your character’s attributes. Attributes are shown in blue
if they are increased due to a magic item and are shown in red if they
are decreased.
✦ Strength determines a character’s physical power. Strength increases
with melee skill. It lets you use larger weapons and wear heavier
armor, and it provides a damage bonus during melee combat. Some
armor and weapons require that you have a certain level of Strength
before the character can use the item.
✦ Dexterity determines a character’s agility and aiming accuracy. Dex-
terity increases with ranged skill. It lets you aim weapons more
accurately and provides an armor bonus.
✦ Intelligence determines a character’s mental aptitude. Intelligence
increases when you use Nature magic and Combat magic spells and
lets you draw mental energy from a larger pool of mana when you
cast spells. Some items require that you have higher Intelligence to
use them.
✦ Melee Damage shows the minimum/maximum damage infl icted when
you attack with the currently equipped melee weapon. This value is
based on your Strength and the equipped weapon’s damage rating.
✦ Ranged Damage shows the minimum/maximum damage infl icted
when you attack with the currently equipped ranged weapon. This
value is based on the ranged weapon’s damage rating.
✦ Armor Rating shows your resistance to damage in battle before health
declines. The higher this value, the more damage you can absorb.
Unconsciousness and death
Your health level decreases when you’re wounded in battle, however, you
slowly heal when you’re no longer sustaining injuries. Your health is
instantly restored when your skill increases or when you drink a health
potion or use a healing spell. The color of the Character Portrait indicates
the state of your health.
✦ Wounded. When your health is reduced to one-third of maximum,
your Character Portrait turns yellow. If you’re engaged in battle,
you should immediately heal yourself or fl ee, or you may become
unconscious and possibly die.
✦ Unconscious. When your health drops to zero, your character becomes
unconscious and the Character Portrait turns red. If you’re the only
character in your party, the game ends and you must restart or load a
saved game. If there are other conscious humanoid characters in your
party when you become unconscious, you fall to the ground but the
game continues. You retain all of your possessions but cannot open
your Inventory or drink health potions. You can wait for your health to
gradually regenerate or another character can heal you with a healing
spell.
✦ Dead. When your character dies, the contents of your Inventory scatter
on the ground so the other members of your party can pick them up. If
you die, another character can resurrect you with a resurrection spell.
Goblins
Since the founding of this kingdom,
what creature hath plagued us more
than that foul nemesis we name
Goblin?! Goblins have long warred
against the good folk of Ehb. From their
stronghold in the fetid swamps of Gonsiir, Goblins have plotted unceasingly to
drive humanity from Western Aranna.
Ingenious artifi cers of magic, Goblins
have created many mechanisms of
death and mayhem, and it is said
they gleefully provided their services to
hasten the fall of the ancient Empire of
Stars. Thankfully for Ehb, their enmity
for each other is nearly as legendary
as their hatred for humanity. Constant
blood feuds within their confederacy
have thus far prevented them from
posing any serious risk to the welfare
of the kingdom.
26
Page 16

29
GGlacern
The fi rst Imperial visitors to this snow-swept
northern town reported fi nding a lone statue
of a human warrior, bearing a nameplate that read only ‘Glacern.’ The
statue emanated magical warding. Because neither Droog nor Krug
would venture near the statue, the natural protection it offered made
early settlement easier in the otherwise harsh surroundings. Although
the statue has been subjected to much magical scrutiny, its origins
remain a mystery and are a source of continuing curiosity to mages
across Ehb.
With the establishment of mining and trade in the region, Glacern’s
Stone Tower was erected as a way station for messengers and couriers. Defended by Ibsen Yamas and a small band
of traders and 10
played a pivotal role during the affair of the
Goblin Pretender. The town’s fortifying walls
were erected to prevent Yeti from the ice
caves from wandering into town seeking
food. The other buildings in Glacern provide shelter, goods, and
supplies for travelers
moving between the eastern and western halves of
the kingdom.
th
Legion archers, the Tower
Talking to other characters
You will meet a variety of characters as you travel through the Kingdom
of Ehb. Some may provide you with information or assign you a quest,
some may offer to join your party, and some may offer to sell you
weapons, armor, and other items.
To talk to a character
✦ Point to a character. If you can talk to the character, the pointer
changes to a bubble with an exclamation mark (!) in it. When you see
the exclamation point, click on it to speak with the character.
Pursuing quests
Some of the characters you meet assign you quests, such as escorting
them to a town or fi nding a person or item. When you receive a new
quest (or complete an existing quest), your Journal is updated.
To display the Journal
✦ Click the Journal button on the status bar.
The Journal lists your current and completed quests in the order you
received them, with a brief description of the quest and the name of the
character who gave it to you. To replay spoken dialog to refresh your
memory of a quest, click the Show Dialog button in the Journal.
Adding a character or packmule to your party
Some characters that you meet may offer to join your party and some
may offer to do so for a certain amount of gold. Characters who demand
gold for their services are typically skilled fi ghters, archers, or mages who
are useful in battle and may be worth the money. You can also add
packmules to your party to carry excess inventory. Packmules have large
inventories and can carry much more than human characters. You can
buy packmules from mule traders in some towns.
To add a character to your party
✦ Talk to a character. If he or she offers to join your party, click Accept
or Decline.
28
Page 17

31
If you don’t have enough gold to hire a character, collect more by
adventuring or selling excess items from your Inventory. When you have
the required amount of gold, talk to the character again.
To add a packmule to your party
✦ Talk to a mule trader and then click Buy Packmule.
Dismissing a character from your party
Your party can include up to eight characters. If there are already eight
characters in your party, you must dismiss one of the existing members
before a new character can join. You might also dismiss a party member
who is not contributing adequately in battle. Before dismissing a party
member, you may want to distribute the character’s Inventory to the
other members of your party.
There must be at least one human or humanoid character in your party;
for example, you cannot have a party consisting only of packmules.
If your character dies, you can disband all but one of the human or
humanoid characters
remaining in
your party.
Droog
The original inhabitants of the land
of Ehb, the Droog believe they are
descended from the heavens and were
banished to the earth to atone for the
misdeeds of their forefathers. A reclusive race, the Droog live in homes dug
into the Cliffs of Fire. Annoyed by an
infl ux of Imperial, Goblin, and Seck traders making unreasonable demands for
their goods, the Droog Circle of the First
devised a scheme to set the other races
against each other. The Droog promised
to trade goods to multiple buyers and
then claimed that they could not recall
to whom the goods actually belonged.
As planned, instead of turning on
the Droog, the Imperials, Seck, and Goblins fought violently among themselves,
sparking a war that raged across the
Green Range for years.
To dismiss a character from your party
✦ Click the character to dismiss and then click the Disband Party
Member button.
The Character Portrait of the dismissed party member is removed from
the screen and the character no longer travels with your party. If you want
the character to rejoin your party later, talk to the character again.
Buying and selling items
There are various shops throughout the
land where you can sell items you’ve found
during your adventure. You can also buy
weapons, armor, potions, spells, and other
items. A store may have new items in stock
if you haven’t shopped there for awhile.
To browse a shop’s wares
✦ Left-click a shopkeeper, click Shop, click
the category of items you want to view
(armor, weapons, etc.), and then point
to an item to display its description and
cost.
Some items can only be used by char-
acters that have particular Strength, Dexterity, Intelligence, or Skill Levels. For
example, an item that requires “Strength 12” can only be used by a
character whose Strength is 12 or higher. This requirement is shown
in red if a character lacks the skill to use the item.
To buy or sell an item
✦ Drag the item from the store to your Inventory, or vice versa. Gold is
deducted from or added to your Total Party Gold.
If you don’t have enough gold to buy an item, you cannot select
it. Items are the same price regardless of whether you’re buying or
selling. For example, if you buy a sword for 10 pieces of gold and then
change your mind, you can sell it for 10 pieces gold. This is true as
long as you are shopping. Once you close the Shop panel, the value of
your weapons can depreciate
30
Page 18

33
FFortress Kroth
Built by the Seck to repel Droog aggression
following the Great Relocation, Fortress Kroth
is the only remnant of Seck architecture in the kingdom.
During the Seck Rebellion, the 10
which the surviving Seck leaders had taken refuge. Legion commander
Noanni offered generous terms for peace, only to have the severed
heads of slain Legionnaires rain down from Kroth’s walls. The 10
destroyed the fortress and seized the surviving leadership. After a
swift trial, they were found guilty of 20 counts of treason and
formally executed at a promontory of judgment known as Dragon’s
Rathe.
Although the fortress has been intermittently occupied by Legion
detachments for centuries, it is still very much haunted by its original
occupants. Strange lights are rumored to be seen in the western
guard towers, and human screams are said to come from the Hall
of Skulls—a terrifying echo of the horrors committed during the brief
rebellion.
th
Legion surrounded the fortress, in
th
Managing your party
Your party can include up to eight characters. All characters in the party
move together at the same speed, regardless of their race or class. For
example, human characters and packmules move at the same speed.
To select a single character
✦ Click the Character Portrait or the character.
To select (or deselect) multiple characters
✦ Hold down CTRL and then click each character or Character Portrait,
or drag the pointer around a group of characters. When multiple party
members are selected and an action such as opening a door, breaking
a barrel, or talking to someone is initiated, the party member with
the circle beneath them will be the one to perform the action. This
will be the member that was selected fi rst when selecting multiple
characters.
To select your entire party
✦ Click the Select Party button.
Setting movement, attack, and targeting orders
The Field Commands let you control how a character moves, attacks,
and targets enemies during battle. The settings you select determine the
character’s default behavior. If you directly order a character to attack,
you override the default settings and the character attacks. You can set
different orders for each character in your party.
To select a character’s attack behavior
✦ Select one or more characters, click the View/Hide Field Commands
button, and then select the movement, attack, and targeting orders.
32
Page 19

35
Movement orders
Movement orders control how characters engage the enemy.
✦ Move Freely. Characters are free to move anywhere to engage the
enemy, even if the enemy fl ees across the world.
✦ Engage. Default setting. Characters engage in battle but remain in the
vicinity of where they were last ordered to move.
✦ Hold Ground. Characters remain in position and cannot initiate an
attack, but they can fi ght back. If you order an attack, the character
then remains in the new location.
Attack orders
Attack orders control how characters attack during battle.
✦ Attack Freely. Characters are free to attack enemy creatures.
✦ Defend. Default setting. Characters cannot initiate an attack but can
fi ght back. This setting is useful when you don’t want to provoke
enemy attack.
✦ Hold Fire. The character does not fi ght back, even
if attacked.
Targeting orders
Targeting orders control how
characters target during battle.
✦ Target Closest. Default set-
ting. The character targets the
closest enemy in view.
✦ Target Weakest. The character
targets the weakest enemy in
view.
✦ Target Strongest. The character targets
the strongest enemy in view.
Moving your party in formation
When there are several characters in your party, you can use formations
to control how they arrange themselves in battle. For example, you might
want all party members to follow your strongest fi ghter.
When the party engages in battle, each character’s behavior is determined by the Field Command settings. For more information, see “Setting movement, attack, and targeting orders” in this manual.
To select a formation
✦ Select the characters you want to include in the formation, then click
one of the formation pattern buttons.
The characters move into formation based on the order of their Character
Portraits. The formation leader’s Character Portrait is at the top of the
screen, and the other party members fall into position to the left and
right of the leader. The circle with the arrow inside it indicates the
leader’s position.
To change the order of party members
✦ Click and drag the Character Portraits into a different order. (A
character portrait will turn green when you click on it and hold the
mouse button down, indicating that you can drag it to a different
position.)
To change the formation spacing
✦ Select your party, hold down the right mouse button, and then rotate
the mouse wheel.
To rotate a formation
✦ Select your party, hold down the right mouse button, then move the
mouse left or right.
34
Page 20

37
DDragon’s Rathe
Just beyond the walls of Castle Ehb is a great
blackened crevice where the worst criminals in
the kingdom are sentenced to death. This tradition goes back to the
ancient Droog practice of sacrifi cing lawbreakers in hope that their
gods would reduce the Droogs’ sentence of exile and call them back
to the heavens.
Later, the kings and queens of Ehb adopted the Rathe as their favorite
method of execution, as it allowed prisoners a slim chance of escape if
their guilt was in doubt. Given a sword, a bag of gold, and sometimes
a shield, a criminal was escorted to the Rathe to face old Scorch,
the fi ve-hundred-year-old dragon. If the criminal slew the dragon, he
was free to leave the Kingdom with all that he could carry from the
dragon’s lair. Otherwise …
Only once in the history of the Kingdom has anyone survived—and
that was on a technicality. Hurggis Bogg limped from the hole with
singed hair, a fi stful of gold, and a missing left eye. But he had slain a
dragon … a lame, four-day-old hatchling that would not have survived
to adulthood. To this day, “the luck of Hurggis” refers to someone
who’s been very lucky but at
high cost.
Playing a multiplayer game
Dungeon Siege provides multiplayer gaming for up to eight players. You
can connect across the Internet, on a network (local area network or
LAN), or through ZoneMatch™.
In a multiplayer game, non-player characters (NPCs) from the single
player game cannot join your party, and creatures and treasure reappear
if you leave the game and later return to an area you’ve already explored.
Teams or individuals can compete against each other for the number of
kills (monsters, players, or a combination of both).
Note: If Allow players to pause the game is selected in the Game
Settings, the game pauses for all players when one player pauses a
multiplayer game.
Joining or hosting a multiplayer game
To create a multiplayer game that others can join, you need a host. The
host creates a multiplayer game and selects the game settings. The host’s
computer acts as the server for the game; therefore, if you’re playing
with friends, the person with the fastest computer should host the game.
If the host exits, the game ends. The host can also eject players from
the game.
To join a multiplayer game
1. Click Multiplayer on the Main menu.
2. Select the appropriate type of connection:
✦ ZoneMatch lets you connect to an Internet server where Dungeon
Siege players meet to chat and play. To join a ZoneMatch game,
click the Games List button, click a game in the list, and then
click Join Game.
✦ Internet lets you connect across the Internet directly to a host
computer through an IP address. To join an Internet game, enter
the IP address of the player hosting the game, and then click
Connect. The host IP address is displayed at the bottom of the
host’s Multiplayer Internet screen.
✦ Network lets you connect across a local area network using the
TCP/IP protocol. To join a Network game, click a game in the list,
and then click Join Game.
36
Page 21

39
3. Select a character, create a new character, or import an existing
character from a saved single player game. In a multiplayer game,
you can choose to play a human, dwarf, or skeleton. All players must
select a character.
4. Click I’m Ready to Begin. A check mark appears beside the names of
players who are ready. All players must click the I’m Ready to Begin
button before the game can start.
To host a multiplayer game
1. Click Multiplayer on the Main menu.
2. Select the appropriate type of connection:
✦ ZoneMatch lets you connect to an Internet server where Dungeon
Siege players meet to chat and play.
✦ Internet lets you host a game (across the Internet) directly on your
computer through your computer’s IP address. Your IP address is
displayed at the bottom of the host’s Multiplayer Internet screen.
✦ Network lets you host a game across a local area network using
the TCP/IP protocol.
3. Click the Host Game button.
4. Select a character, create a new character, or import an existing character from a saved single player game. In a multiplayer game, you can
choose to play a human, dwarf, or skeleton. All players must select a
character.
5. Once all the
players are
ready, click
Start Game.
Limiting a multiplayer game to specifi c players
When hosting a multiplayer game, you can limit the game to certain
players by setting a password.
To create a password
1. Click the Host Game button.
2. In the Host Game dialog box, select the Password button and then
enter a password for the game.
3. Give the password to all the players you want to allow into your game.
An easy way to provide other players with the game password or a
host IP address is to use a chat program.
To disable password protection on a multiplayer game
✦ Click the Change Game Password button (in Game Settings), remove
your game password from the Change Game Password box (leaving
it blank), click OK to confi rm the change, then click Accept to exit
Game Settings.
Map Settings
The host selects the map and world diffi culty settings in the Staging
Area. The maps are the locations in which the session is played. The
world diffi culty selected by the host varies the strength, experience, and
inventory of monsters. It also increases the interactive content, such as
containers, shops, and quest items.
✦ Regular–No minimum level requirement. This is multiplayer at the
normal level. The monsters are of the same strength and skill as in
single player mode.
✦ Veteran–Requires a minimum skill level of 54. The monsters’ skill
and strength are increased above Regular level.
✦ Elite–Requires a minimum skill level of 83. The monsters’ skill and
strength are even higher than Veteran level.
Once the host launches the game, the world diffi culty cannot be adjusted.
However, the Game Settings diffi culty still applies, so the host can adjust
that as needed.
Multiplayer Staging Area
38
Page 22

41
Game Settings
The host selects the game settings in the Staging Area. For information
about the options in Game Settings, point to any item and read the text
that appears on the screen.
Join in Progress
If you select Join in Progress, guest players can join your game after
you’ve already begun. If you want players to join the game near your
current location, send them a message telling them where you are using
a chat program or e-mail. You must select Allow Players to Choose Start
Locations to enable players to choose their location.
To give another player gold
✦ Open your Inventory, click the gold amount, select how much gold
to give the other player, and then click the other player’s Character
Portrait.
To trade items
✦ Open your Inventory, click the item you want to give to another player,
and then click the other player’s Character Portrait.
Note: To complete the trade, both players must click Accept. To cancel the
trade, either player can click Cancel. If the trade is cancelled, the item
you’ve offered returns to your Inventory.
Teams
If you select Enable Team Play in Game Settings, you can form a team
to fi ght monsters. If you select Enable Team Play and Enable Player vs.
Player, you can form teams to fi ght against other teams of players.
Dying
If your character dies, you can continue to play as a ghost and seek a
shrine or object to restore your life. If the host exits, the game ends. If
you or the host exits, character’s attributes, skills, and Inventory items
are saved. If the Drop on Death option in Game Settings is set to
Nothing, your Inventory items are also saved. However, if this option is
set to make Inventory items drop when characters die, you’ll have to stay
in the game and recover the items if you want them saved on exit.
Chatting
To chat with other players
✦ Press ENTER to display the chat screen, type your message, and then
press ENTER to send it.
Trading items with other players
You can give gold or items to other players. You can also trade items
for gold or other items.
Viewing team information
In multiplayer games, players can quickly identify other players and their
alliances by viewing the Character Name labels and shields displayed
above the player’s character. The label color differs based on the Game
Settings.
✦ Team Play disabled, Player vs. Player disabled: Other player’s labels
are green, no Team Shields overhead.
✦ Team Play enabled, Player vs. Player disabled: Teammate’s labels
are green; other team’s labels are blue. All characters have Team
Shield overhead.
✦ Team Play disabled, Player vs. Player enabled: Other player’s labels
red, no Team Shields overhead.
✦ Team Play enabled, Player vs. Player enabled: Teammate’s labels
are green, other team’s labels are red. All players show Team Shield
overhead.
To hide or display label or shield identifi ers
✦ Press the apostrophe (‘) key.
To display Health and Mana indicators for all team members.
✦ Press X.
To view multiplayer stats
✦ Press the BACKSLASH (\) key. This displays a list of players, teams,
and statistics relevant to the goal of the game.
40
Page 23

43
CCastle Ehb
Not far from the Droog Cliffs of Fire stands
Castle Ehb, deemed the only impenetrable
castle other than the legendary Palace of Night in the Empire of the
Stars. Designed by 10
of solid granite and commands a view for miles in all directions.
Originally occupied by the soldiers of the 10
now the principal residence of the crowned ruler of the Kingdom of
Ehb. The Legion command staff is quartered below the palace levels of
the royal family, and in the deepest levels of the castle, prisoners of
various stripes serve their sentences in the bleak, lightless dungeons.
Like most castles, Ehb has its share of secrets. It is riddled with
hidden passages and bandit holes—and few know where all of the
corridors lead. Stories abound of lost chambers that, once located,
can never be found again. Some believe these are ghost rooms, left
over from renovations to the castle over the centuries. Others, mostly
sorcerers, believe the lost chambers bear the hallmarks of complex
confusion spells.
Hidden deep in the castle is the Chamber of Stars. Under penalty
of death, only the king, queen, or grand mage of the 10
may enter this mysterious chamber, which is rumored to house
exotic magical artifacts brought back from the
War of Legions—some of which are said to
be more powerful than even the greatest
sorcerers can fathom.
th
Legion engineers, Castle Ehb is built on a hill
th
Legion, the castle is
th
Legion
Credits — Gas Powered Games
Designer and Project
Leader
Chris Taylor
Producer and Designer
Jacob McMahon
Tech Lead
Bartosz Kijanka
Art Directors
Steven Thompson, Mark
Peasley
Engineering
Mike Biddlecombe, Scott
Bilas, Bartosz Kijanka,
James Loe, Chad Queen,
Rick Saenz, Adam
Swensen
Network Admin. and
Assistant Producer
Marsh Macy
Concept Artists
Joe Kresoja, Kevin Pun,
Darren Lamb, Dave
Dunniway
Terrain and World
Modeling
Dave Dunniway, Kevin
Pun, Brett Johnson
Animation, Modeling,
and Texturing
David “Lee” Phemister,
Joe Kresoja, John
Gronquist, Carlos
Naranjo
Textures and Foliage
Darren Lamb
World Designers
Sarah Boulian, Jason
“Ernsie” Ernsdorff, Brett
Johnson
Scripting Engineer
Jason “Ernsie” Ernsdorff
Special Effects and
Content Engineering
Eric Tams
Offi ce Administrator
Michelle Lloyd
Production Assistants
Carlos Naranjo, Michelle
Lloyd
Level Designers
David Tomandl, Greg
Romaszka, Christopher
Burns, Erik Johnson,
Ruth Tomandl
Production Coordinator
Bert “Sleepy” Bingham
Story and Dialog
Neal Hallford, Sarah
Boulian, Bert “Sleepy”
Bingham, Evan Pongress
In-Game Story Sequences
Evan Pongress
Technical Documentation
Jeremy “Snooker” Snook
Community Coordinator
Darren “Guttyr” Baker
Original Music
Composition
Jeremy Soule, Julian
Soule
Sound Design
Frank Bry
Earthgate Team
Richard Smith, Steve
Parrott, Pasha Smith,
Beau Brennen, Kalev
Tait, Travis Gray,
Laureen Hart
GPG Test Team
Jeremy “Snooker” Snook
(Lead), Jason “Freeze”
Moerbe (Test Lab Lead),
Jonathan Burns, Jason
Clark, Jim “Corpse”
Clark, Steve “BK”
Crawford, Paul Dahlke,
Joshua Drollman, Doug
Jacobs, Jason Kies, Brian
Moore, Buddy Phillips,
Ted Snook, Eric
“Guideon” Snyder, Matt
Szuch, TJ Wright
Special Thanks
in Alphabetical Order
Amy Baker, Staci Cearns,
Stephanie Dunniway,
Jennifer Kijanka, Eddie
Lloyd, Collin Martin,
Tami McMahon, Deb
Meyer Snook, Donna
Morina, Carolyn Prentice,
Sophie Pun, Lindsay
Saenz, Misty Silver, Jessy
Tams, Kimberly Taylor
Additional Thanks
Cheryl Askeland, Don
“Argyle” Jacques,
Microsoft Hardware
Division, Casey Muratori,
Brett “Bam Bam”
Parsons, Steve Rabin,
Steve Snow, Paul Tozour
Uses Bink Video.
© 1997-2002 by RAD
Game Tools, Inc.
Uses Miles Sound
System. © 1991-2002
by RAD Game Tools, Inc.
All voices recorded at
Bad Animals in Seattle.
42
Page 24

45
Microsoft
Project Leads
Bartosz Gulik
- Program Manager
Christopher Liu II
- Test Lead
Jon Grande
- Lead Product Planner
Testing
Andrew Aleshire, Larry
Bridges, Daland Davis,
Sean Epperson, Sharon
Evans, Mark Grimm,
Greg Hertager, Bryce
Jones, Mark Medlock,
Slava Mikhailiouk, Scott
Murray, Darryl Shannon,
Jeff Waibel, Brian
Warris, Jason York
ZoneMatch and Strike
Team Development
Andy Glaister (Dev Mgr),
John Smith (Lead),
Richard Tsao (Lead),
Denise Mak, Leon Pryor,
Curt Carpenter, Brian
Chapman, Chris Haddan,
Michael Moore, Randy
Shedden, Michael
Warning, Shaun Cooper,
Mike Truty (Lead) Rich
Bonny, Michael DuPas,
Eric Lee
Recon Testing
Jason Mangold (Lead),
Brandon Anthony,
Brandon Baker, Yancy
Burns, Jason Collins,
Stephen Davies,
Jeremiah Foco, Craig
Marshall, Joshua
Ockman, Michael
Osgood-Graver, Josh
Priggs, Mike Puzio,
Charles Roberts, Aaron
Schmitt, Benjamin
Steenbrock, Michael
Sworgger
Multiplayer Testing
Brian Lemon (Lead),
Jaime Pirnie (Multiplayer
Lab Lead), Scott Bell,
Brad Catlin, TJ Duez,
Bret Fenton, Shawn
Johnson, John Laughlin,
Bryan Wood
Confi guration Testing
Paul Gradwohl (Lead),
Brady Burns, Kevin
Connolly, Jeff Felker,
Dan Hitchcock, Tysan
James, Mario Vera, Eric
Johnson, Yaqub Bandry
Art
Corey Dangel (Art
Director), Kevin Loza,
Ryan Wilkerson
User Education
Marty Blaker (Lead),
Laura Hamilton, Brian
Hunt, Chris Lassen, Pat
Rytkonen, Jeannie Voirin
Localization Development
Victoria Olson (Lead),
Jim Reichart, Kazuyuki
Shibuya
User Testing
Michael Medlock (Lead),
Ben Babcock, Lance
Davis, Kyle Drexel,
Jerome Hagen
Marketing
Michelle Jacob, Lisa
Krost, Christopher Lye,
Darren Trencher
Special Thanks to
Matt Alderman, Kelly
Bell, Scott Cooper, Eric
Elders, Ed Fries, Scott
Gerlach, Joseph Getty,
Matt Gradwohl, Kristofer
Hall, Jon Kimmich, Stuart
Moulder, Kathy Osborne,
Matt Ployhar, Dave
Steele, Adam Waalkes,
Yvette Wagner, Matt
Whiting, Matt Wilson
Ireland
Suzanne Boylan, JeanPhilippe Chassagne, Paul
Delany, Paul Lydon,
Declan Murray, John
O’Sullivan, John
Pritchard, Rita Thiede,
Kevin Young, Ian Walsh
Japan
Kazuyuki Kumai,
Takayoshi Asahina,
Yutaka Hasegawa,
Hiroshi Ogura, Yuki
Harima, Sachio
Horikoshi, Hiroko Isogai,
Haruko Murata, Kaoru
Ito
Korea
Ji Young Kim, Kyoung Ho
Han, Han Baek Choi, In
Goo Kwon, Joon Ho Lee
Taiwan
Ming-I Peng (Group Mgr),
Robert Lin, Wen Chin
Deng, Andy Liu, Julia
Hao
Microsoft Worldwide Services
Product Name: Dungeon Siege
Support Info Online:
http://support.microsoft.com/directory/productsupportoption.asp
In Canada, visit http://www.microsoft.ca/support
Phone Support: (425) 637-9308 in the U.S., or (905) 568-3503 in
Canada (toll charges may apply).
TTY users can reach Microsoft text telephone (TTY/TDD) services at
(800) 892-5234 in the U.S. or may call (905) 568-9641 in Canada.
Worldwide: Support options, hours, and cost in your country or region
may differ from the U.S. Please visit
http: //support.microsoft.com/directory/ww.asp
to contact your local offi ce for details. If there is no Microsoft subsidiary
offi ce in your country or region, please contact the establishment from
which you obtained your Microsoft product.
Conditions: Microsoft’s support services are subject to then-current
prices, terms, and conditions, which are subject to change without notice.
44
 Loading...