

Page 1

(NOTE! T his document is DRAFT)
Nokia Connectivity Card DTL-1
User’s guide
Page 2

For your safety
Read these simple guidelines. Breaking the rules may be dangerous or illegal . Further detailed information
is given in this user’s guide.
Road safety
Do not use the Nokia Connectivity Card while driving; park the vehicle first.
Inter fer en ce
All Nokia Connectivity Cards may receive interference, which could affect performance.
Hospitals and aircraft's
Nokia Conn ectivity Cards can cause interference. Observe restrictions for use in these areas.
Switch off when refuelling
Do not use the Nokia Connectivity Card at a refuelling point. Do n ot use near fuel or chemicals.
Switch off near blastin g
Do not use the Nokia Connectivity Card where blasting is in progress. Observe restrictions, and follow any
regulations or rules.
Use sensibly
Use only in the normal operating position.
Use qualified service
Onl y qualified service personnel must repair equipment.
Accessories
Use approved accessories only. Do not connect incompatible products.
Water resistance
Your Nokia Connectivity Card is NOT water-resistant. The Nokia Connectivity Card is not covered under
warranty for damage by any liquid substance.
Make backup copies
Remember to make backup copies of all important data.
Connecting to other devices
When connecting to any other device, read its u ser's guide for detailed safety instructions. Do not connect
incompatible products.
Page 3

DECLARATION OF CONFORMITY
We, NOKIA MOBILE PHONES Ltd declare under our sole responsibility that the product DTL-1 is in
conformity with the provisions of the following Council Directive: 1999/5/EC.
Copyright © Nokia Mobile Phones 2000. All rights reserved.
Reproduction, transfer, distribution or storage of part or all of th e contents in this document in any form
without the prior written permission of Nokia is prohibited.
Nokia and Nokia Con nectin g People are registered trademarks of Nokia Corporation. Other product and
company names mentioned herein may be trademarks or tradenames of their respective owners.
Nokia operates a policy of continuous development. Nokia reserves the righ t to make changes and
improvements to any of the products described in this document w ithout prior notice.
Under no circumstances shall Nokia be respon sible for any loss of data or income or any special,
incidental, consequential or indirect damages howsoever caused.
The contents of this document are provided “as is”. Except as required by applicable l aw, no warranties of
any kind, either express or implied, inclu ding, but not limited to, the implied warranties of merchantability
and fitness for a particular purpose, are made in relation to the accuracy, reliability or contents of th is
document. Nokia reserves the right to revise this documents or withdraws it at any time without prior notice.
The availability of particular products may vary by region. Please check with the Nokia dealer nearest to
you.
Page 4

Introduction
No kia Co nnectivi ty Card i s a P C C ard (and a Compact Flash) device that establishes a wireless radi o link
(Bluetooth) between PCs with PC card or Compact Flash™ (CF+™) slot using Bluetooth wireless
technology. Bluetooth wireless techno logy pro vides a virtual netwo rk o f devices that can exchange data
usin g microwave radio frequency, 2.4 GHz unlicensed ISM band.
The purpose of this product is to enhance people’s daily data co mmunication lif e by remo ving c ables and
thus adding freedom and flexibility. With Nokia Connectivity Card and Bluetooth compatible phones or
other devices user can handle emails, web browsing, fax and calendar and contact synchronizing file
transfer easily without physical cable connection and direct line-of-sight.
Bluetoot h is a global standard fo r wireless connectivity. T he main members of B luet oo th conso rtium are
Nokia, Ericsson, IBM, Intel and To shiba. Af terwards companies like 3Com, P sion, Dell, Compaq, Casio
and Seiko-Epso n have also joined to Bluetooth. Bluetooth technology allows f or the replacement of the
many proprietary cables that c o nnect one device to another with one universal short-range radio link (radio
range
instance, phone number and calendar data can be easily transferred from mobi le phone to laptop and vice
versa. Bluetooth technology doesn’t require line-of-sight connection as infrared does. 360 degrees of
freedo m makes Bluetoot h devices extremely flexible and eas y to use. To ac hieve real benefit f o r user, the
key characteristics of Bluetooth devices woul d be interoperability, reliability and simplicity.
up to 10m). This enlarges freedom and flexibility of using different devices and peripherals. For
Bluetooth Connectivity
The Nokia Connectivity Card employs the data tran smission capabilities of a Bluetooth Connectivity in
order to send an d receive data, to browse the Internet, and to establish con nections with other computers,
for example.
Data connections can be made from most locations where your Nokia Connectivity Card operates.
However, it is recommended that you move the Nokia Connectivity Card to a location where the strongest
possible signal can be obtain ed. When the signal is strong, data transmission is efficient.
The following factors may impair w irele ss connections:
Noise
Electronic appliances and equipmen t can cause radio interference. Also in areas where Nokia Connectivity
Cards are prevalent, other Nokia Connectivity Cards can impair the wireless connection.
Electrostatic discharge
A disch arge of static electricity from a finger or a conductor may cause erroneous functions in electrical
devices. The discharge may resu lt in unstable software operation. Network conn ections may become
unreliable, data may be corrupted, and the transmission halted. In th is case, end the existing connection (if
any) , stop the Nokia Connectivity Card, and remove it from the PC card slot. Then re-insert the Nokia
Connectivity Card into the PC card slot and try connectin g again.
Dead spots and dropouts
Dead spots are areas where radio signals can not be received. Dropouts occur when the Nokia
Connectivity Card user passes through an area where the radio signal is blocked or reduced by
geographical or struct ural obstructions, such as concrete walls.
Signal impairment
Distance and obstacles can cause out-of-phase reflected signals that result in a loss of signal strength.
Page 5

Low signal strength
Due to either distance or obstacles, the radio signal stren gth from an access point may not be strong or
stable enough to provide a reliable wireless connection for communication. Therefore, to ensure the best
possible communication, remember to consider the following points:
• Data connection works best when th e Nokia Connectivity Card is in a stationary position.
• Do not place the Nokia Connectivity Card on a metal surface.
Important!
Warning
it may cause interference or dan ger. Note that the Nokia Con nectivity Card may cause similar interference
as a cellular device and must not be used in areas where the use of a cellular device is prohibited.
Warning
of the inserted Nokia Connectivity Card.
Warning:
Belgium, Denmark, Fin land, Germany, Greece, Ireland, Ital y, Luxembourg, Netherlands, Portugal, Spain,
Sweden, and United Kingdom. This equipment can also be used in Norway and Switzerland.
Warning
Card in any other country or with an incorrect country setting may be illegal.
Note
about security in data transmission, please visit www.nokia.com.
: Do n ot use the Nokia Connectivity Card when the use of a wireless device is prohibited or when
: Be careful when moving your computer so that you do not cause damage to th e protruding end
In Europe, this equipment is intended to be used in the following EU Member States: Austria,
: Use the Nokia Connectivity Card in the specified countries only. Using th e Nokia Connectivit y
: The Nokia Connectivity Card does n ot encrypt Transmitted data by default. For more information
Security
The Bluetooth specification includes security features at th e link level. It supports authentication
(unidirection al or mutual) and en cryption. These features are based on a secret link key that is shared by a
pair of devices. To generate this key a pairing procedure is used when the two devices communicate for
the first time.
Antennas
The Nokia DTL-1 Nokia Conn ectivity Card is equ ipped with one internal antenna. As with any other radio
transmitting device, do not touch the antenna unnecessarily when the Nokia Connectivity Card is in use.
Contact with the antenna affects the quality of the transmission and may cause the Nokia Connectivity Card
to not operate properly.
Note
: Do not cover th e a ntenna.
Warning
Nokia Connectivity Card and may be dangerous.
Note
: The use of any other type of accessories wil l invalidate any approval or warranty applying to the
: For availability of approved accessories, please check with you r dealer.
Page 6

Getting started
Installati on
For instructions on installing the Nokia DTL-1, please see the separate Installation guide on the CD-ROM.
Bluetooth Neighborhood Int roduction
With the Bluetooth Software Suite, you can establish wireless links between your computer an d other
Bluetooth enabl ed devices. Without using a cable, you can for example:
• Transfer objects and files
• Access the Internet by means of dial-up networking;
• Connect to local are a networks
• Send fax messages, using the fax software of your computer;
• Establish Bluetooth ad hoc networks consisting of two or more Bluetooth devices;
• Connect to serial devices (legacy applications).
Most operations are carried out from an application called the Bluetooth Neigborhood. The basic functions
of the Bluetooth Neighborhood include three steps:
1. Carrying out device discovery, i.e. finding out which remote Bluetooth devices are available within your
range
2. Carrying out service discovery, i.e. finding out which services/applications a remote device facilitates
3. Establishing links to remote devices.
The Bluetooth Neighborhood should be seen as an equivalent to the Network Neighborhood. The latter is
an ordinary netw ork, the Bluetooth Neighborhood is a wirel ess network of the Bluetooth devices within
range.
Opening Bluetooth Neighborhood
The Bluetooth Neighborhood and Windows Expl orer are highly integrated. Therefore, Windows Explorer is
the natural place to open the Bluetooth Neighborhood: Open Windows Explorer, and select the Bluetooth
Neighborhood among the folders in Windows. Alternatively, you can open the Bluetooth Neighborhood
from the shortcut placed on your desktop during the installation.
Page 7
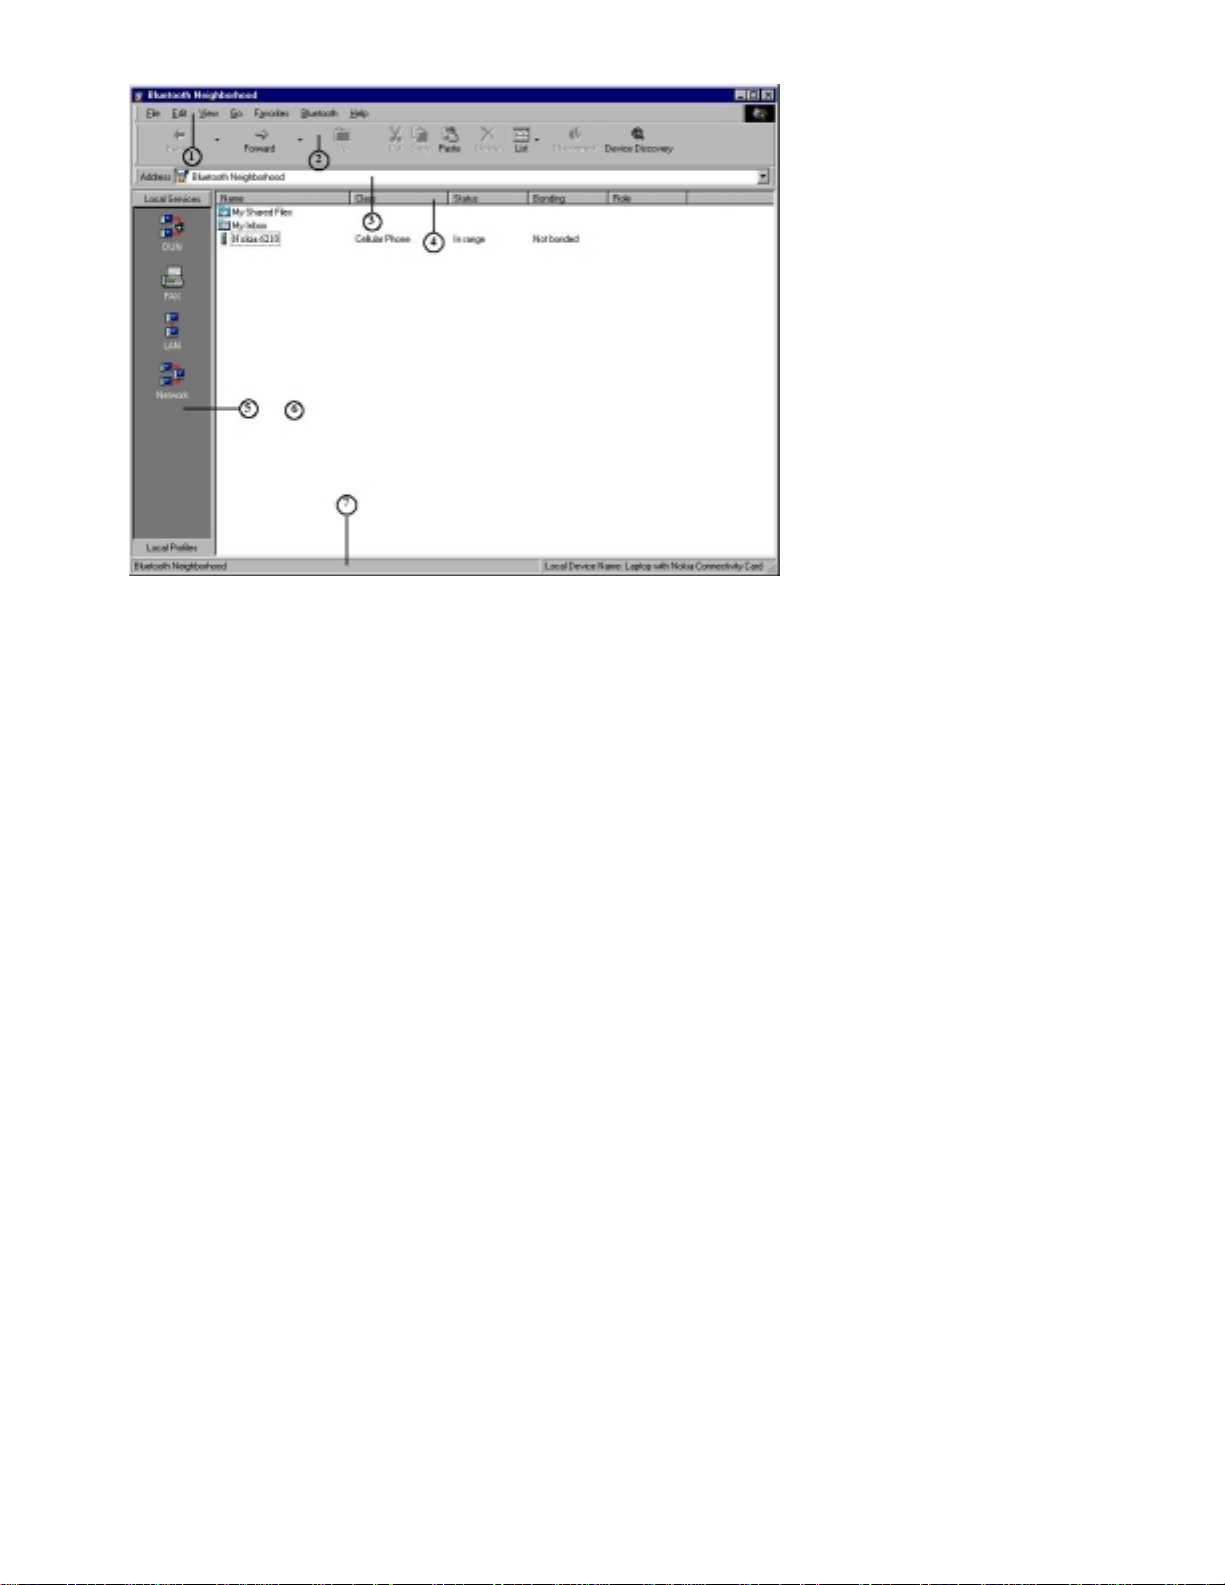
Bluetooth Neighborhood window
When you open the Bluetooth Neighborhood, the following win dow appears * :
The figures 1-7 refer to the following expl anations:
* The first time you open the Bluetooth Neighborhood, you will n ot see any remote Bluetooth devices. To
discover the remote devices within range, press F5. For information on the contents of the list view, see the
section “List view”. Note also that as the setup of th e window depends on your Windows Explorer setup,
the components in the above example may not be exactly the ones shown on your screen.
Menu bar:
1:
Bluetooth menu in later sections. Furthermore, from the menu bar, you can access the Bluetooth Software
Suite online help.
Tool bar:
2:
such Bluetooth tool s as Device Discovery an d Disconnect.
Addr ess bar:
3:
Explorer.
View details:
4:
various informations on the items in the list view. For more information, see the section "View details".
Local Prof iles/Local Services bar :
5:
device supports. For more information, see the section "Profiles and services".
Status bar:
6:
List view:
7:
"List view".
Contains standard Windows pu ll-down men us and a Bluetooth menu. We will deal with th e
Contains standard Windows tools like Back, Forward, View, etc. In addition, the bar contains
Shows which item is cu rrently sele ct ed. Also, from this bar you can browse in Windows
Appears when on the View menu you have selected the item View Details. You will see
Shows the local profiles or the local services that your Bluetooth
Provides information on the item currently selected in the Bluetooth Neighborhood.
Shows you the contents of the folder, remote device, etc. currently selected. See the section
The setup of the Bluetooth Neighborhood win dow depends on your Windows Explorer setup. Thus, the
above example does not sh ow all the standard Windows components th at may be added to the window.
Profiles and servi ces
Interoperability depends on profiles
Any Bluetooth device has at least one profile, i.e. an application that you can use the device for. When two
devices are to interoperate, i.e. communicate with each other, th ey must have a shared profile. If, for
instance, you want to transfer a file from one Bluetooth enabled computer to another, both computers must
support the profile OBEX File Transfer. The Bluetooth Softw are Suite supports a numb er of profiles, call ed
your Local Profiles. You w ill find these on the Local Profiles bar.
Page 8

Services are used for link establishment
While the function of the Local Profiles bar is to display the profiles your device supports, the Local
Services bar is what you w ill actually be using when operating the Bluetooth Neighborhood. Facilitated by a
profile, each of the services represents a specific operation that your device can carry out. An example of
a service is file transfer. You can transfer files between§ between your computer and other Bluetooth
devices supportin g the File Transfer profile.
For the Local Profiles bar, click
For the Local Services bar, click
For a complete list of the profiles that your Bluetooth device supports, including which services each profile
facilitates, see “Appendix A: Profiles”.
Local Prof iles.
Local Services.
List view
The list view in the main w indow contains three elements: My Inbox, My
Shared Files, and a list of
discovered remote devices. When an item is selected in the Bluetooth
Neighborhood, for instance My Inbox or a remote device, th e list view will
display the contents of that item. (In this connection, the con tents of a
remote device are the services it supports).
My Inbox:
This is where your device receives objects like electronic business cards,
messages, notes, and calendar objects. My Inbox is a folder of files like
any other Windows folder, and its contents can be copied, renamed,
dragged and dropped etc. (For more information, see the section
“Receiving objects”.)
My Shared F iles:
In this folder, you can make files available to remote users. When a
remote user has carried out service discovery on your device, he wil l be
able to open your folder My Shared Files and the files you have placed in
it. Also, remote users can place files in your folder My Shared Files and – if allowed – delete files (see “File
Transfer Settings” for information on the security aspects of receiving files). Finally, if a remote device
sends a file to your device, it is received in My Shared Files. Like My Inbox, you can manipulate My Sh ared
Files like any Windows folder. For more information, see the section “File transfer”.
Remote devices or services:
The devices shown in the main window list view are the remote Bluetooth devices that you r device h as
discovered during device discovery. The icons show what kind of device each remote device is (device
class), like the desktop and laptop computer icons in the followin g example:
A question mark is used to show that the device class is unknown:
Page 9
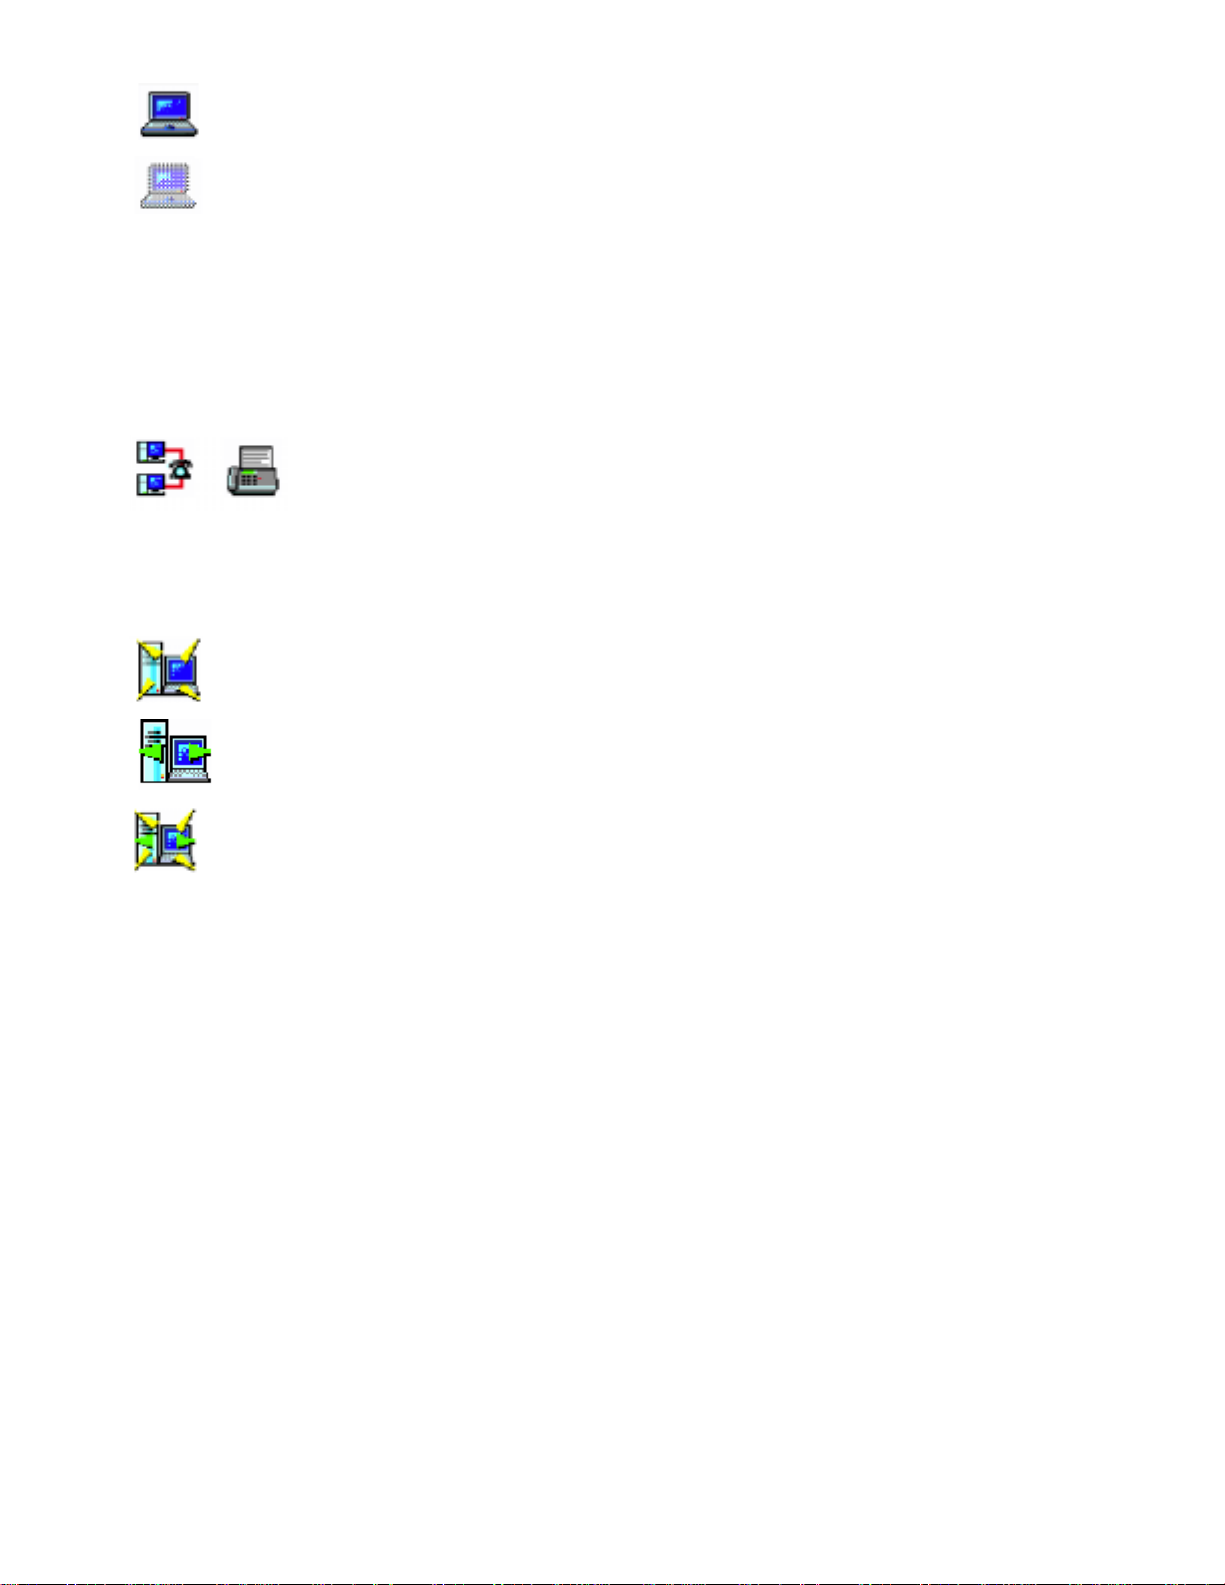
Furthermore, the icons indicate it whether or not a device is with in range as follows:
Note:
When service discovery has been carried out on a remote device, the list view will change to showing the
services facilitated by the remote device in question. Each service is represented by an icon, for instance
DUN (dial-up networking) and FAX:
Appendix B contains a complete list of the various remote device and service icons.
Final ly, the icons will indicate “linked” and “bonded” as follows:
Within range
Out of range
The list view does not show your l ocal device, only remote ones.
Link ed
Bon ded
Link ed and bonded
The list view settings can be ch anged like other Windows list view settings; you can for instance change the
size of the icons or have the elements displayed as a list. For information on settings specifically relevant in
connection with the Bluetooth Software Suite, see the section “View details”.
Basic functions
Naming your local device
Before you start communicating with remote users, you should select the na me tha t you want your device
to present itself with when discovered by remote devices. To do so:
1. On the Bluetooth menu, click
Bluetooth Neighborhood Properties
:
Page 10
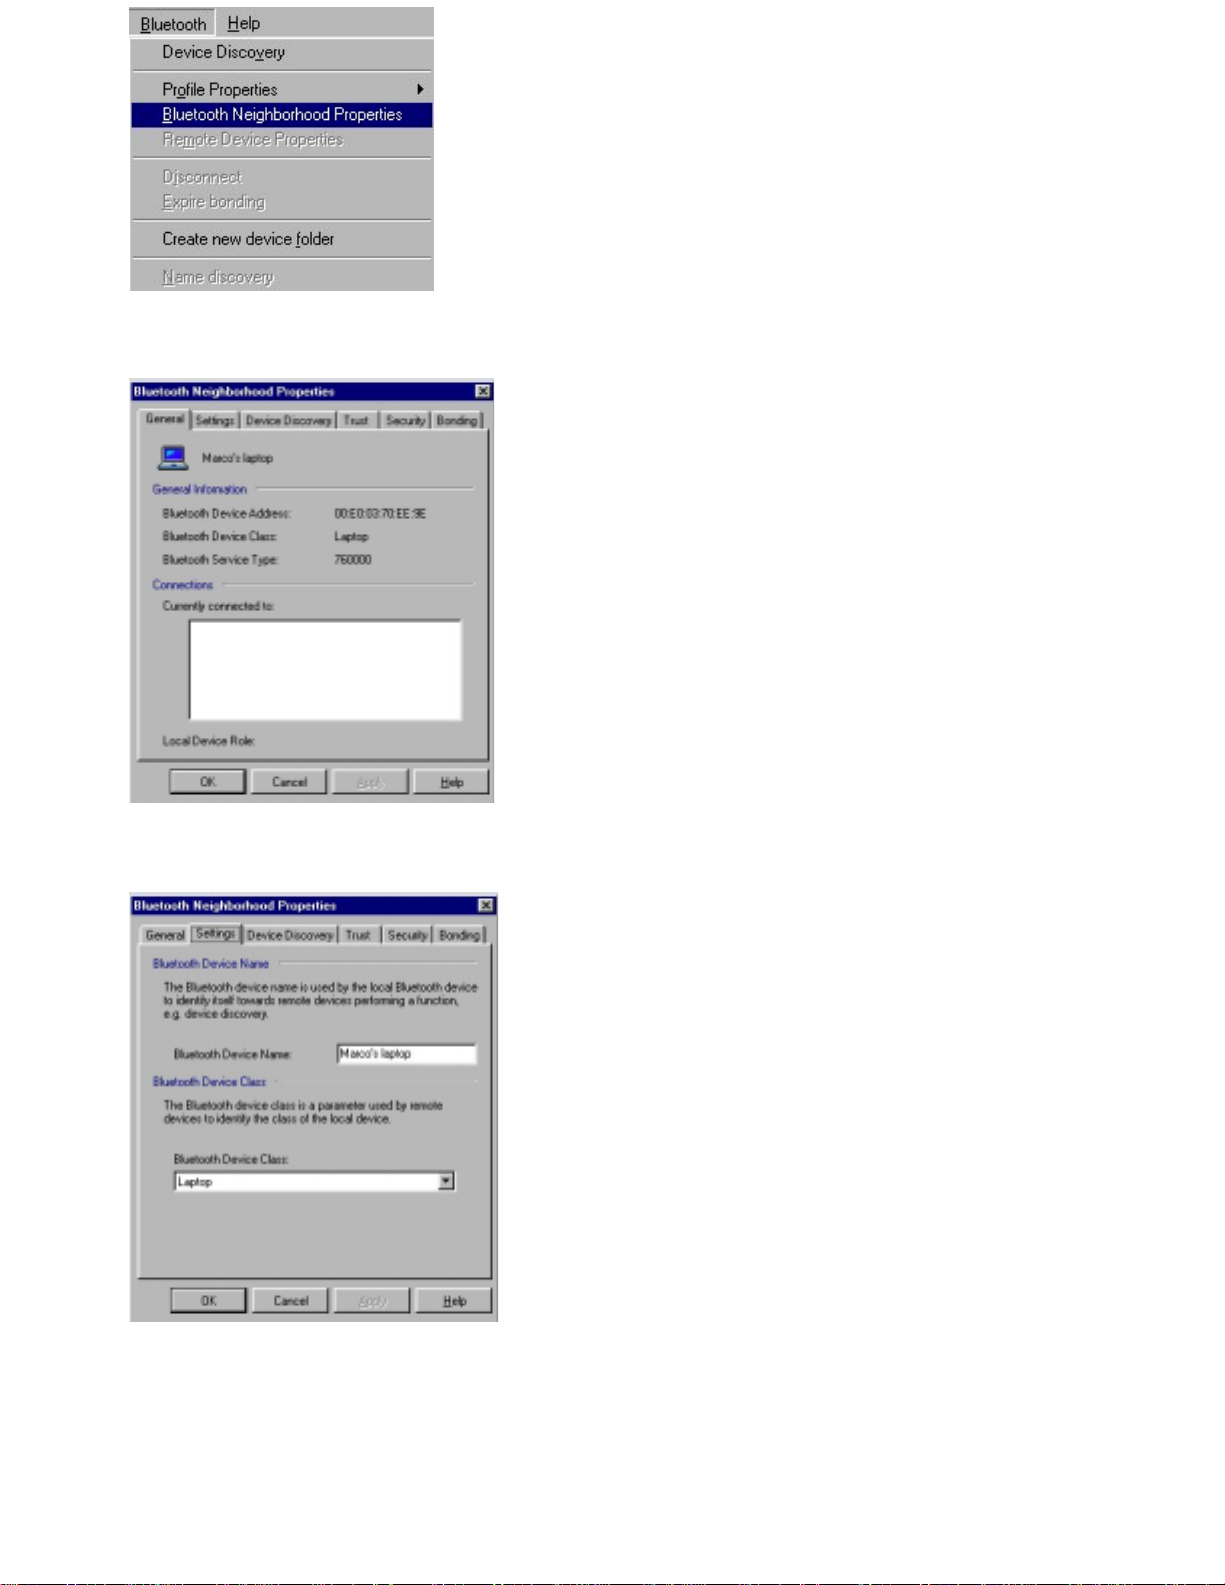
The following dialog box opens:
2. At the top of the dialog box, click the tab
3. In the item
discovered by devices, for instance “Nokia DTL-1”:
Bluetooth Device Name
Settings
, type the name you want your d e vice to present itself with when
.
4. Click OK.
Other Bluetooth devices discovering your device will now see it as "Marco's laptop".
Page 11

For information on the item
“Bluetooth Neigh borhood properties” – “Settings”.
Bluetooth Device Class
in the dialog box shown above, see the section
Device discovery
Before your l ocal device can get to communicate with a remote Bluetooth device, it needs to discover the
remote devices that are available within range. This activity is called device discovery.
To carry out device discovery: On the Bluetooth menu, click
Or click Device Discovery button on the menubar.
Devi ce Discovery
.
While your device is looking for remote devices, the following dialog box will sh ow the progress of the
device discovery:
When the device discovery has been carried out, the list view will show which remote devices within range
are currently available. Also, you can see the previou sly discovered devices that are no longer available (cf.
th e section "List view"):
Page 12
Note:
Alternative ways of carrying out device discovery:
The main w indow list view does not show your local device, only the discovered remote ones.
• When the main window list view (with discovered devices) is displayed, press F5. This will update
th e list view.
• On the tool bar, click the tool button
Devi ce Discovery
.
Service discover y
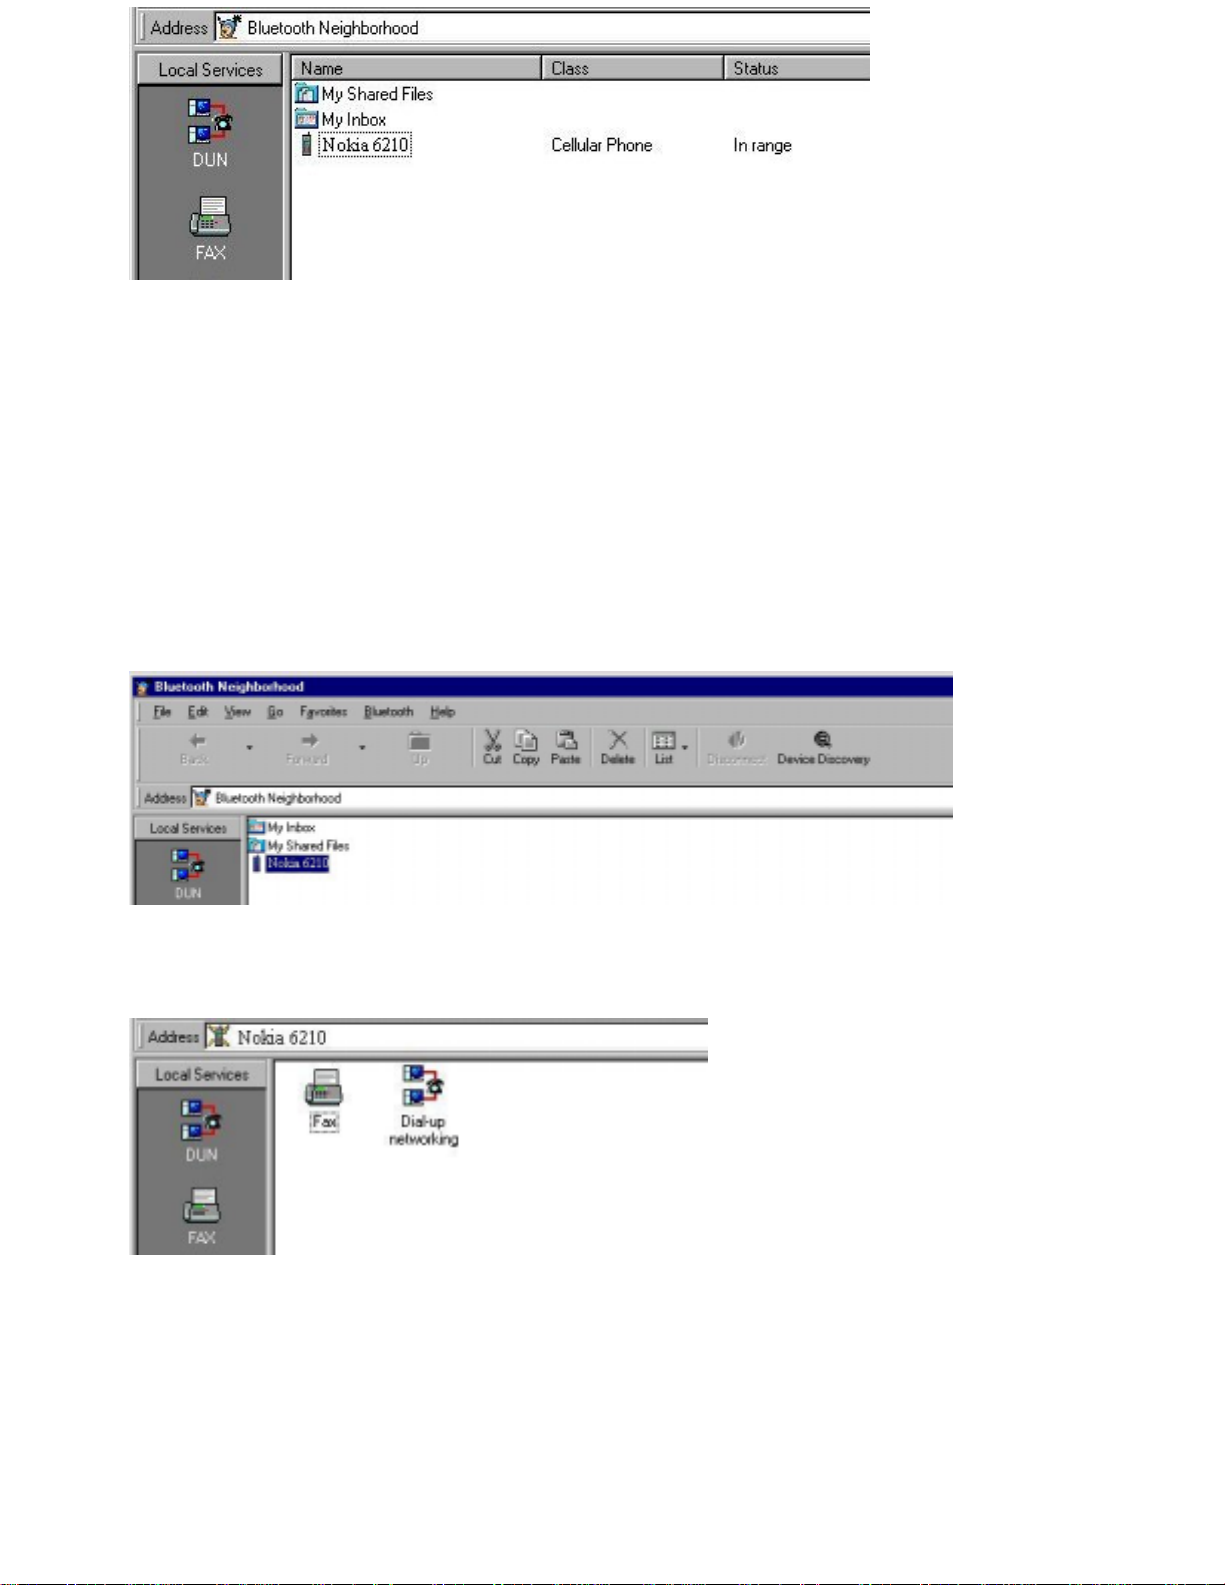
Before tryin g to establish a link to a remote device, it may be useful to know which services the device
facilitates. To find out, you can carry out service discovery. Double-click the remote device in the main
window list view, for instance the one named "Nokia 6210":
When the service discovery has been carried out, the list view will show the services that the remote device
supports:
In some cases, it may not be possible to carry out service discovery. There could be a number of reasons
for th is: Th e remote user may have set up his device to reject l ink establishment attempts (cf. “Trust”), the
distance between the two devices may be too far, etc. If service discovery (or an y other activity) is not
carried out successfully, a message box will let you know w hat went wrong.
Page 13
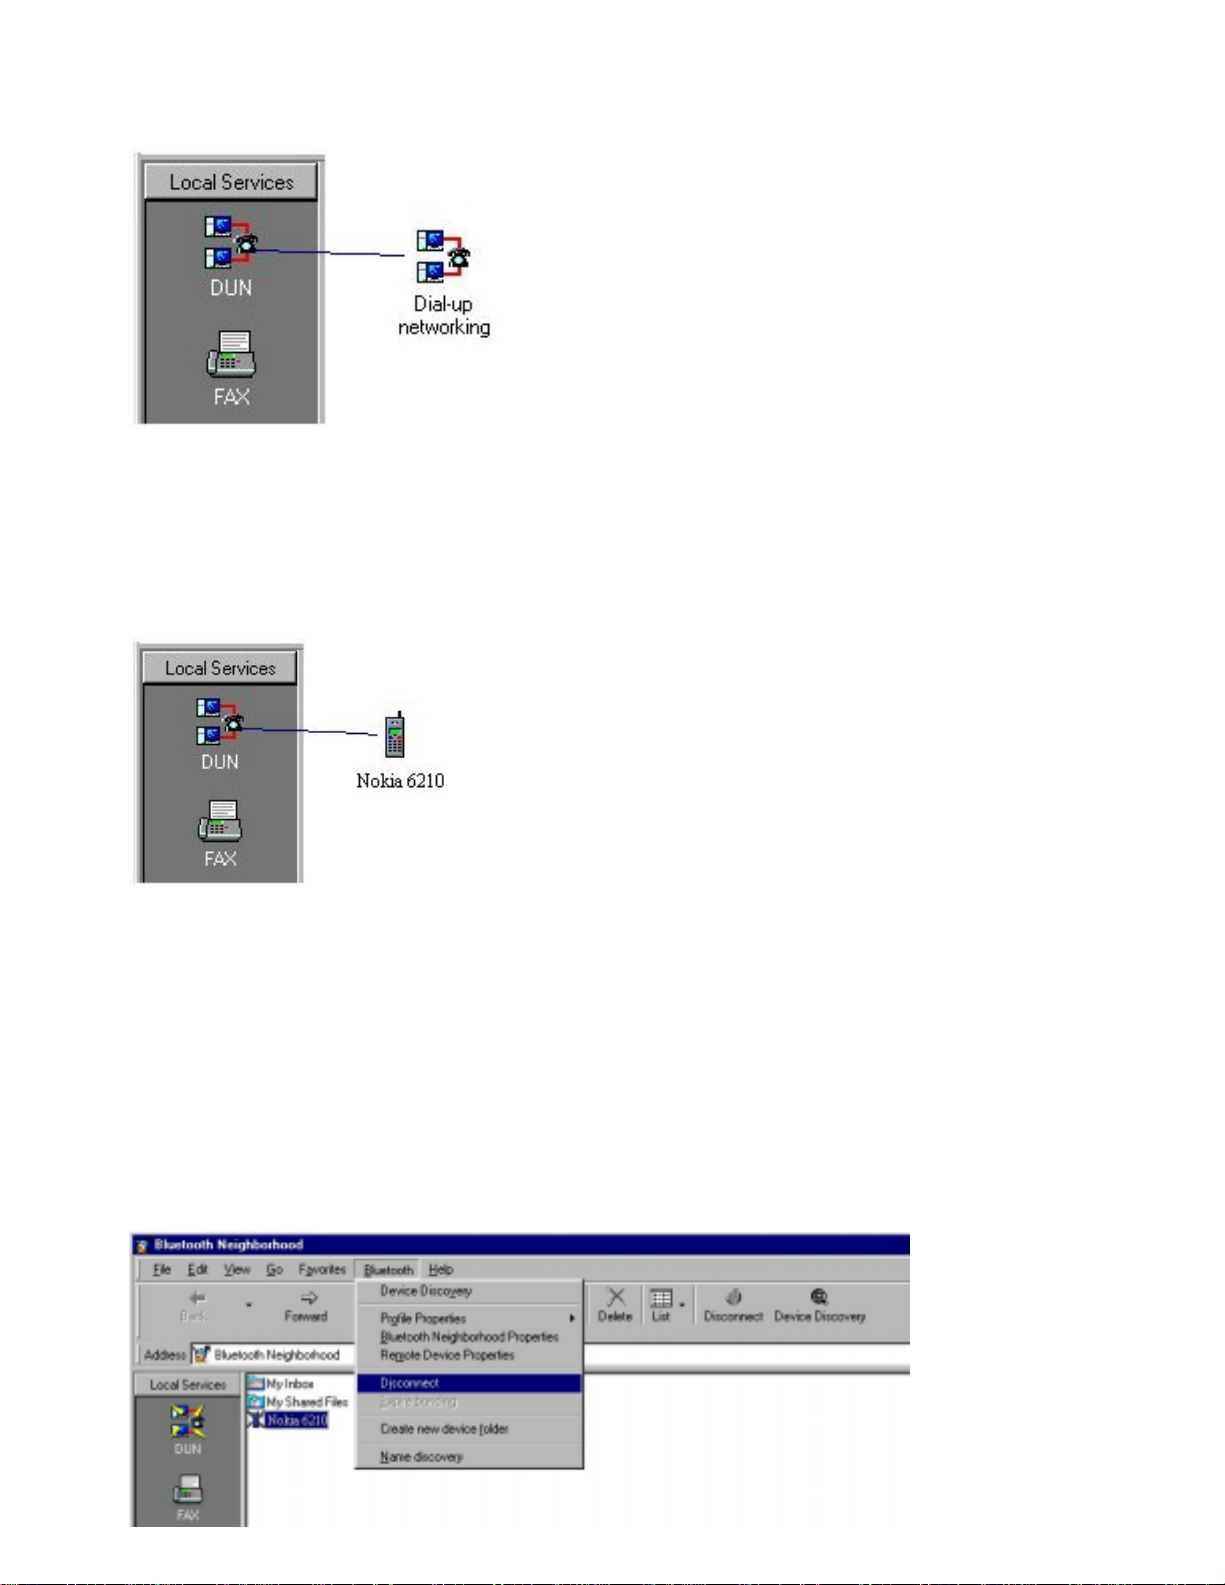
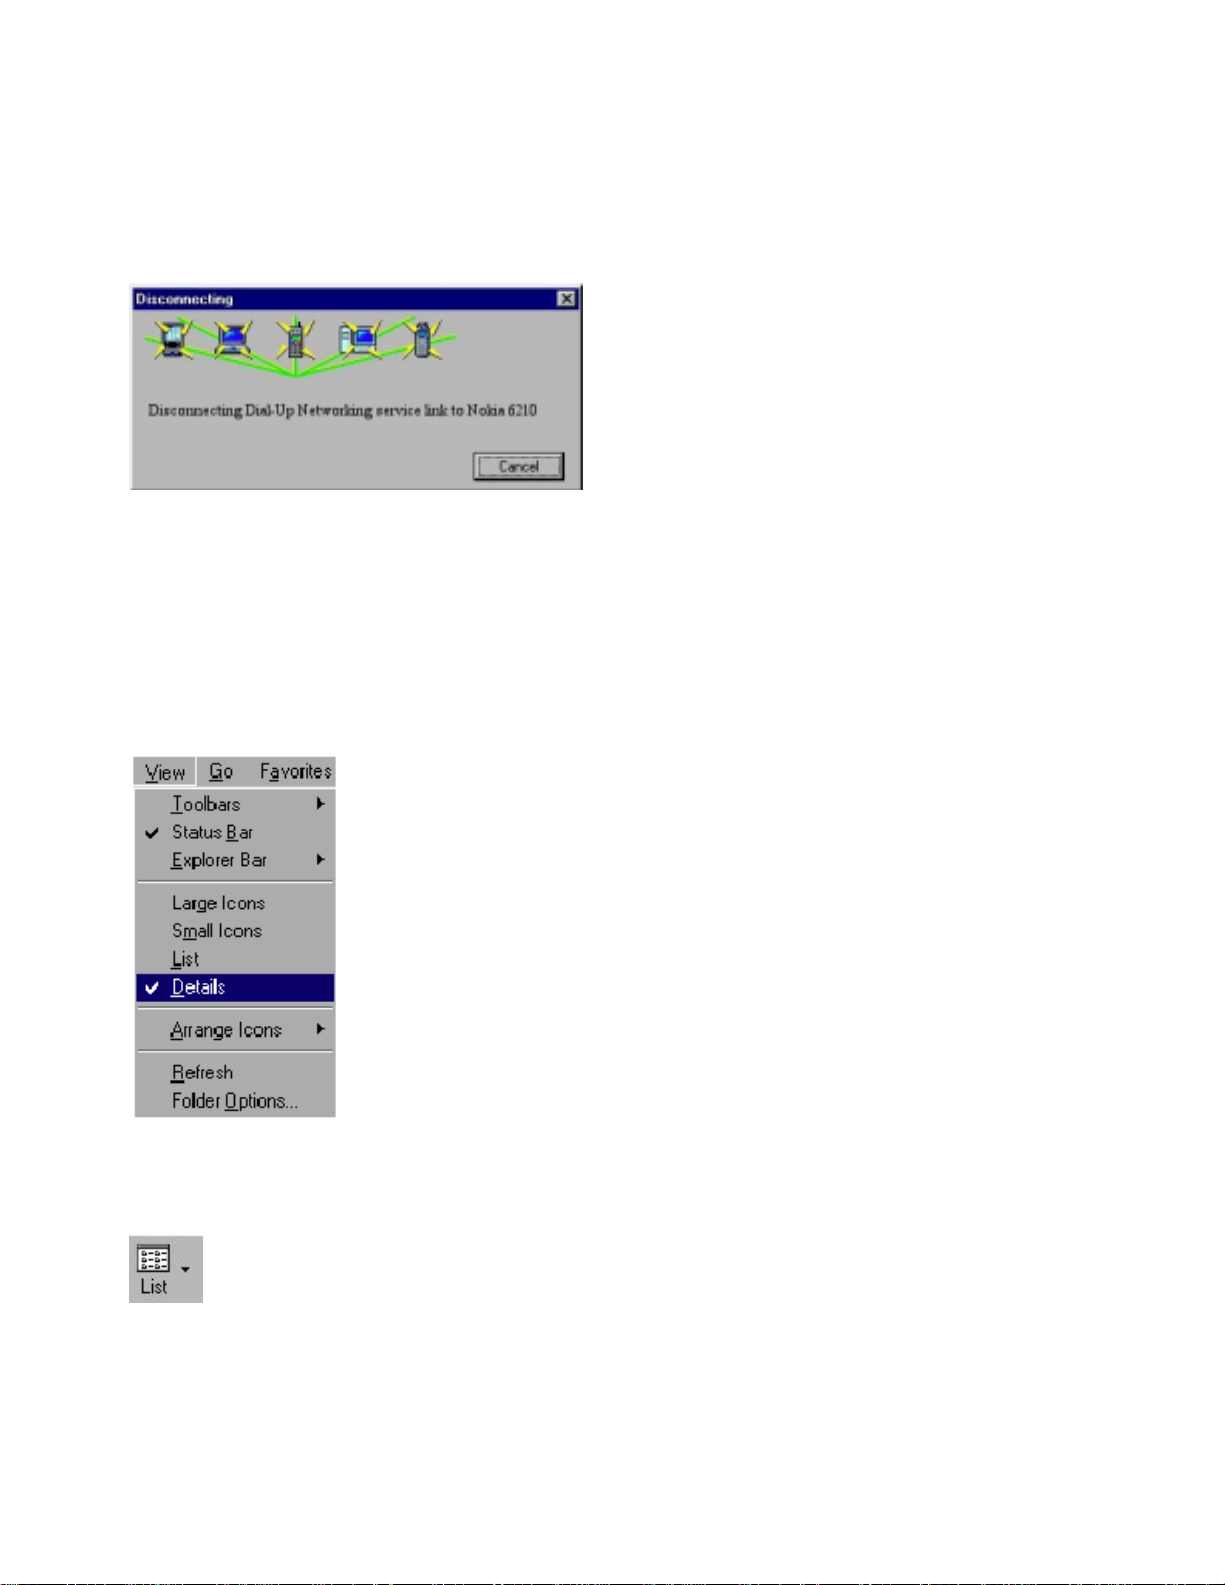
Link establi shment
When you have carried out service discovery, you can establish a link to the remote device. You can make
use of any service th at both your device and the remote device support. Drag the local service to the
corresponding remote service:
In the above exa mple, a DUN (dial-up networking) link is being established by dragging the local DUN
service to the remote DUN service. (The remote device could be a c ompu ter with acces s to a modem,
which would allow you to access th e Internet.)
Alternatively, if you know in advance th at a remote device supports a particular service, you can skip
service discovery. Just drag the local service to the remote device:
In this examp le, a DUN link is being esta blished by dragging the local DUN service to the remote device.
For information on how to make use of each of the local services when a link has been established, refer to
the section about the local service inquestion. If link establish ment is not carried out successfully: The
remote user m a y have set up his device to reject l ink establishment attempts (cf. “Trust”), the distance
between the tw o devices may be too far, etc. A message box will let you know what went wrong.
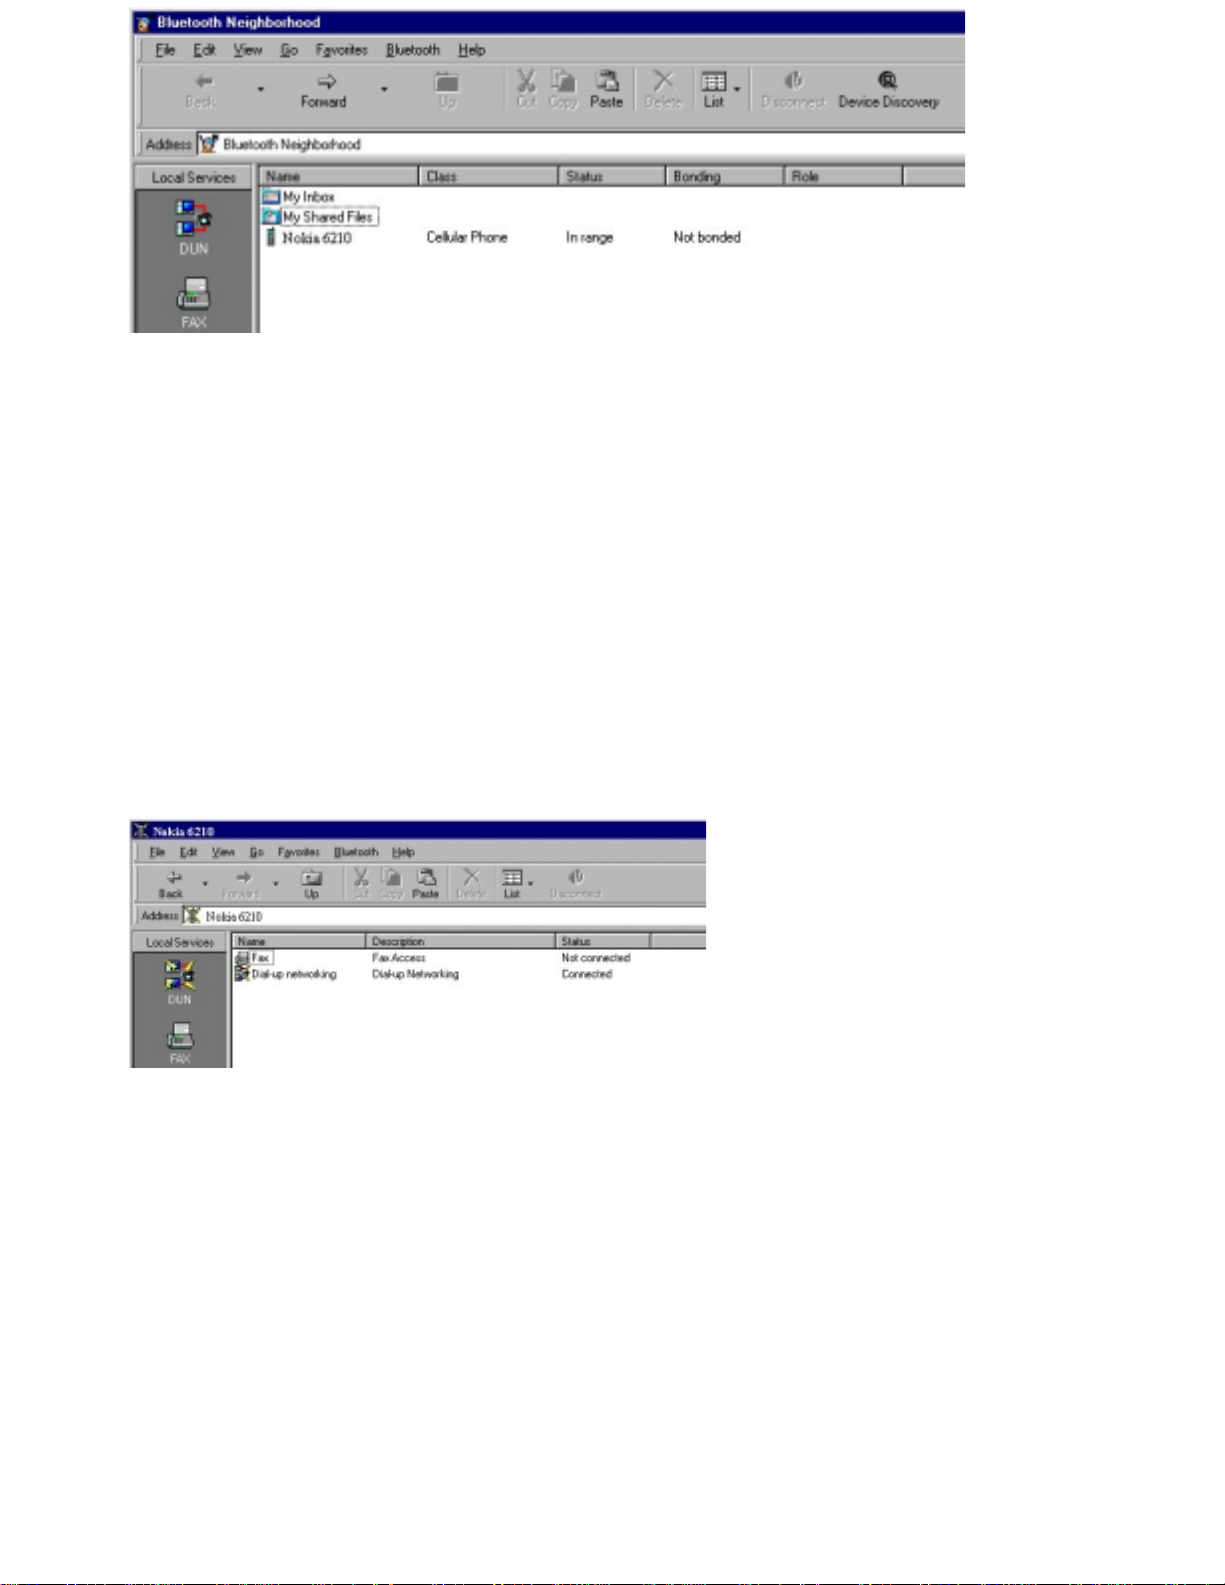
Disconnecting
To disconnect a link established to a remote device:
1. Select (click) the remote device or services that you want your device to disconnect from.
2. On the Bluetooth menu, click the item
Disconnect
:
Page 14
Alternatively, double-click the remote service that you r local device is connected to. The link will now be
disconnected.
Status information
The Bluetooth Neighborhood status bar provides you with information on the item currently selected in the
Bluetooth Neighborhood, like the name of a remote device (“Marko’s Laptop”) or My Inbox. Also, message
boxes keep you informed of the progress of any activity, and let you know if anything goes wrong. The
following example is a message box showing that the local device is being disconnected from a remote
one:
View details
One of the Windows-like features of the Bluetooth Software Suite is the possibility of changing the settings
of the list view. What is of special interest, however, is the
1. On the menu bar, click
2. Click
Alternatively, on the tool bar, cl ick the
displayed:
Details
.
View
.
List
icon the appropriate number of times until the details are
Details
information of the list view:
The type of details displayed depends on the contents of the list view: remote devices, remote services, or
the con te nts of My Inbox or My Sha r ed Files.
Details concerning remote devices
In the main w indow, the list view can displa y information on each of the remote devices discovered:
Page 15
Name:
•
by other devices.
Class:
•
a mobile phone.
Status:
•
Bonding:
•
“Bonding”.
Role:
•
Detail s co ncerni ng remote services
When you have carried out service discovery on a remote device, the list view can display the following
information on the services that the remote device supports:
The name the remote user h as chosen for his device to present itself with when discovered
The type of the remote device (device class), for in stance a desktop computer, a laptop, or
Whether the remote device is within range or not.
Whether or not your local device and the remote one have bonded. See the section
Shows if the remote device is the master or a slave in th e piconet.
Name:
•
Description:
•
same profile, interoperability between the two devices is possible.
Status:
•
Details concerning My Inbox and My Shared Files
If you h ave opened My Inbox or My Shared Files, you can get the same information on each of the
received objects or files that you can get in standard Windows folders:
The name of the remote service.
The name of the profile that supports the remote service. If your device features the
Whether or not the remote service is con nected to your device.
Page 16

Name:
•
Size:
•
Type:
•
above example.
Modified:
•
The name given to the object or file when it was saved.
The size of the object or folder.
The type of the object or folder, for instance “vCard File” or like the busine ss card in the
The date when the object or file was last saved.
Device folders
What is a device folder?
In the Bluetooth Neighborhood main list view, you can create device folders: folders con tainin g a number of
remote devices. You can communicate with a device folder as with any sin gle remote device. When doing
so, you will be commun icating with all the devices in the folder at the same time. This feature makes it easy
to distribute objects and files to more than one device at a time.
How to create a device folder:
1
. Open the Bluetooth Neighborhood main window.
2
. On the Bluetooth menu, click
A new folder will appear in the list view:
The default name of the folder is New Folder. However, you can rename the folder like any Windows folder
by sel ecting it, clicking F2, and typing the name you wan t.
3
. Drag the remote devices you want to the device folder. This is a standard Windows drag-and-drop
operation; to move a number of remote devices at the same time, hold down the CTRL key, click each
remote device, and then drag the selected remote devices to the folder.
You can create as many device folders as you like, and you can include as many devices in each folder as
you l ike.
Communicating with a device folder is done in exactly the same way as with a single remote device. In the
following example, a business card is being dragged to the device folder named “Conference”.
Each of the remote devices included in the device folder “Conference” will now receive the business card.
Create New Device Folde
r.
Local services
Object transfer
With the Bluetooth Neighborhood, you can transfer such objects as business cards, e-mail messages,
calendar objects, and notes. If Microsoft Outlook is installed on you r computer, that is where you cr e ate
and send objects. If Microsoft Outlook is not installed on you r computer, you can use the Object Editor
included in the Bluetooth Software Su ite.
Page 17
Making default business card available
Before your business card can be transferred to a remote device, it needs to be included as a service on
your Local Services bar. This will allow remote users to pull your business card, i.e. transfer it to their
devices. Also, you can push the business card yoursel f, i.e. transfer it to remote devices. Finally, pulling
and pushing can take place in one and the same operation: exchanging business cards. Both you and a
remote user can do this. If Microsoft Outlook is installed on your computer, you can create a business card
in Contacts, and then drag it into the Bluetooth Neighborhood. If Microsoft Outlook is not installed, you can
use the Object Editor. Both ways of makin g your default bu siness card available on th e Local Services bar
will be explained in the following.
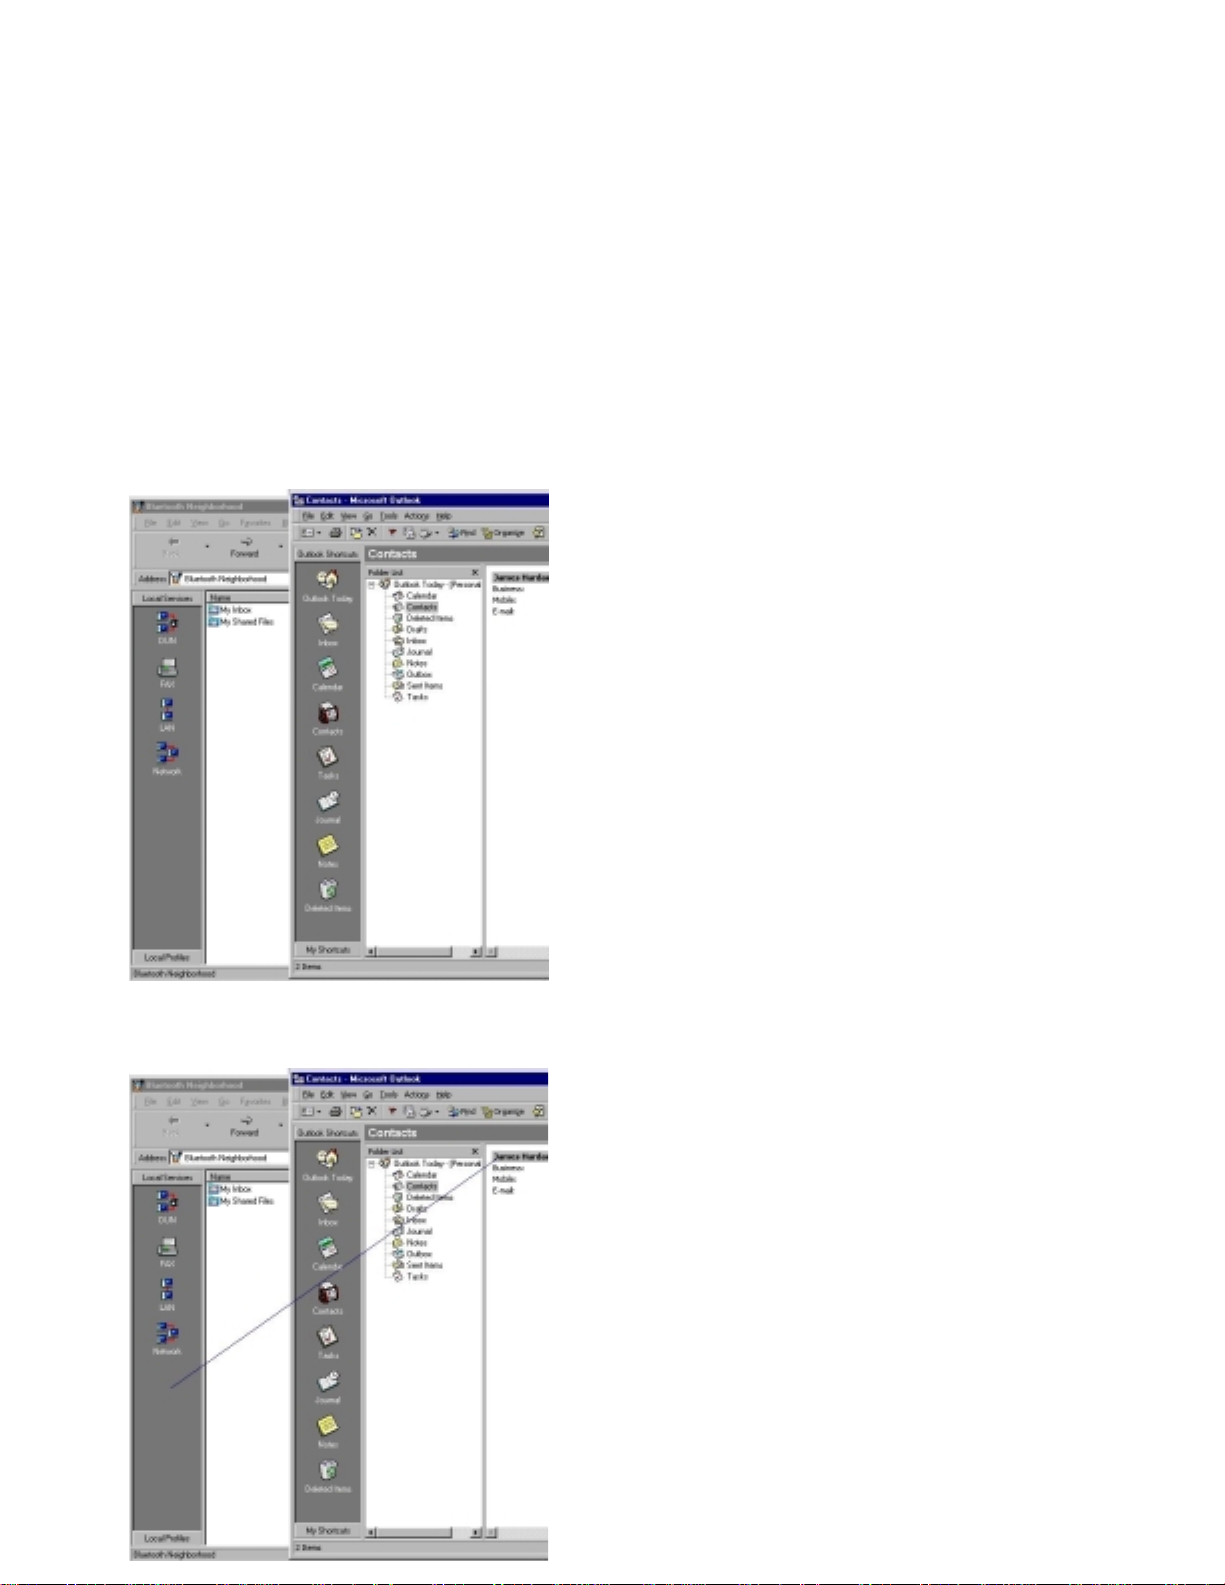
From Microsoft Outlook
1
. Open b oth the Bluetooth Neighborhood and Microsoft Outlook.
2
. Arrang e the Bluetooth Neigh borhood and Microsoft Ou tlook, Contacts windows so that both are visible
on the screen:
3. Drag the item containing your own contact information into the Local Services bar:
Page 18

A new icon on the Local Services bar sh ows that your default business card is now available for transfer to
remote devices:
From the Object Editor
An alternative way of registering your default business card is by mean s of the Object Editor. To open the
Object Editor:
1. On the Bluetooth menu, point to
The OBEX Object Push Properties dialog b ox opens:
Profile Propertie
s, and click
OBEX Object Pus
h.
2. At the top of the dialog box, click the tab
Object Push Settings
.
Page 19

3. In the item
Default Business Card
, click the button
Create New.
The Object Editor opens:
4. In the Object Editor, type the information you wan t to include in you r default b usiness card. You can
include information about your name and one or more e-mail addresses, telephone numbers, and
addresses.
5. To save the business card: On the Obj e ct Editor
File
menu, click
Save.
Page 20

6. To quit the Object Editor: Click the
Properties – Object Push Settin g s. Here you wil l see the name of your default b usiness card, which is the
same as the name typed in the Obj ect Editor.
OK
button. You will now retu rn to the dialog box OBEX Obj ect Push
If you want to view or edit the default location of the business card, click the “
7. To complete the creation of the new default business card: Click the
A new icon on the Local Services bar sh ows that your default business card is now available for transfer to
remote devices:
Editing an existing business card in the Object Editor:
As appears from the information above, the Object Editor can be u sed to create a new default business
card. Furthermore, you can use the Object Editor to edit an existing business card. The procedure is almost
the same as that described above; however, in step 3, click
Business card transfer
Before your default busin ess card can be transferred to remote devices, you must make it available among
your local services as described in the section "Making defaul t business card available".
To send your business card to a remote device, drag the card icon to the remote Inbox folder or remote
device (or device folder). In the following example, the business card is being dragged to a remote device
named “John's laptop”:
Edit
(instead of
OK
...
“ button.
button.
Create Ne
w).
If the link is establ ished successfully, the re mote device wil l now rece ive your business card in its Bluetooth
Neighborhood Inbox.
For the choice of sending, receiving, or exchanging business cards with another user, right-click th e remote
device, and point to Business Card:
Page 21

You can now choose:
• To transfer your busin ess card (incl uded on the Local Services bar) to the remote device: Click
Push business car
d.
• To transfer the remote user’s business card to your device: Click
• To exchange business cards with the remote user: click
Sending objects dir ectl y from MS Outlook
Microsoft Outlook users can send objects (like messages or notes) directly from Microsoft Ou tlook: Drag
the object either to the remote Inbox folder or to the remote device (or device folder):
Exchange business card
Pull business car
d.
s.
In the above example, an e-mail message is being forwarded from the Microsoft Outlook inbox to the
remote Bluetooth device.
Receiving objects
When your local Bluetooth device receives an object (a default business card, message, note, or calendar
object) from a remote device, the object is placed in My Inbox.
Page 22

If you have Microsoft Outlook: When you double-click a received object, it will open in Microsoft
Outlook.
If you do not have Microsoft Outlook: When you double-click a received object, it will open in the Object
Editor.
You can open a received object directly from My Inbox, or you can drag the object to wherever you want to
store it. In the following example, an object is being dragged from My Inbox to the Desktop:
Creating objects in the Object Edit o r
If Microsoft Outlook is not installed on your computer, you may use the Object Editor to create objects –
messages, notes, and cards. Note that objects created in the Object Editor are not saved as objects but as
file
s. You can then transfer these files as you would any file in th e Bluetooth Neighborhood (cf. “File
transfer”).
1. To open the Object Editor: Click
Object Edito
click
r:
Star
t, point to
Program
s, point to
Bluetooth Software Suite ..
., and
The Object Editor opens:
Page 23

2. To create an object in the Object Editor:
Fil
Click
Cards are created in the Object Editor itself (by typing the in formation you want to include); messages and
notes are created in a new win dow. The following example shows the window that pops up on clicking
VMessage
3. Type the information you wan t to be included in the object.
4. To save the obj ect:
a. If it is a
b. If it is a
exampl e, a
5. Select the location and name of the ne w file.
e, point to New, and click th e kind of object you want to create, for instance a
as shown above:
message
car
d, in the Object Editor, click
message
not
or a
is about to be saved:
e, in th e window where you typed the contents, click
File
and
Sav
e. A new dialog box pops up. In th e following
File
VMessag
Save A
and
e:
s.
6. Click
When you have saved the file, you can transfer it like any file using the Bluetooth Neighborhood. For more
information, see “File transfer”.
Sav
e.
File transfer
File tra nsfer is a way of sharing files with others. In the Bluetooth Neighborhood, you can make a file
available to a remote user by pl acing it in the folder My Shared Files:
Page 24

When a remote user has carried out service discovery on your device, he can open your folder My Sh ared
Files and the files in it. Furthermore, he can add and delete files if he is allowed to do so (for information on
the security aspects of My Shared Files, see the section “File Transfer Settings”).
Final ly, if a remote device sends a file to your local device, it is received in My Shared Fil es.
Making a file available in My Shared Fi les
Placing a file in My Sh ared Files is easily done by dragging the file from where it is stored to the folder My
Shared Files. Or you can open My Shared Files first, and then drag the file to the list view displaying the
contents of My Shared Files.
In the above example, a file is being dragged from the desktop to the list view displaying the contents of My
Shared Files.
When a remote user open s your folder My Shared Files, he will have access to th e file you placed in it.
Sending a file to a remote device
If you want to transfer a file to the Shared Files folder of a remote device, you can do so in a number of
ways:
• Drag the file from where it is stored to the remote device (or device folder):
In the above example, a file is being dragged from My Documents to the remote device.
• First carry out service discovery on the remote device; then open th e remote Shared Files folder;
Page 25

In the above example, a file is being dragged from My Documents to the Shared Files folder of the remote
device.
• First carry out service discovery on the remote device; then open th e remote Shared Files folder;
fin ally drag the file from where it is stored to the list view displaying the contents of the remote
Shared Files folder: finally drag the file from where it is stored to the list view displaying the contents
of the remote Shared Files folder.
In the above example, a file is being dragged from the Desktop into the contents of the remote Shared
Files folder.
No matter which way you choose to transfer a file to a remote device, the user of that device will receive
the file in his Shared Files folder.
Receiving files
When your local Bluetooth device receives a file sent from a remote device, the file is placed in My Shared
Files.
You can then open the received file directly from My Shared Files, or you can drag the file to wherever you
want to store it. In the following example, a file is being dragged from My Shared Files to My Documents.
Page 26

Bluetooth COM ports
General information
What is a Bluetooth COM port?
Physical commu nications (COM) ports are used when two serial devices are connected by means of a
cable. A Bluetooth COM port, however, is a virtual COM port providing a wireless alternative to a physical
one. Bluetooth COM ports make it possible to connect to almost any Bluetooth enabl ed serial application
(legacy application) that would otherwise have been connected using a cabl e and a physical COM port.
Some profiles require a Bluetooth COM port
As Bluetooth links are wireless, you need no physical COM port to connect to a remote device. However,
in connection with some of your l ocal profiles, you need a Bluetooth COM port. This provides an address,
so to speak, needed by your legacy application to establish a link to a remote device.
Note:
use all your Local Services with out having to make an y Bluetooth COM port settings.
The followin g services are supported by profiles that are associated with a Bluetooth COM port:
Furthermore, the
Except for the Serial Port Profile, the above-mention ed profiles are associated with the
ports 7, 8, and 9
section “Blu etooth COM port settings”.
New Bluetooth COM ports and interoperability
Most users need not worry about Bluetooth COM ports at all; the default settings ensure that you can
• DUN (Dial-up Networking Profile)
• FAX ( Fax Profile)
• LAN (LAN Access Profile)
• Default busine ss card (OBEX Object Push)
• File transfer (OBEX Fil e Transfer)
Seri al Port Pro file
by default. You can change th e se settings, if you like. For more information, see the
is used in connection with Bluetooth COM ports.
Bluetooth COM
Some users may want to add one or more additional Bluetooth COM ports to the computer. This is
necessary if you want to make use of the Serial Port Profile, for instance to use a serial application like
HyperTerminal to transfer data between two Bluetooth enabled computers.
The same profile must be associated with the local Bluetooth COM port and the remote one you want to
connect to. Therefore, before you can establish a serial Bluetooth COM port link to a remote device, you
must associate the Serial Port Profile with a Bluetooth COM port, and then add the Bluetooth COM port to
your compu ter. For lin k establishment to be possible, the remote device must have a Bluetooth COM port
with the Serial Port associated with it, too.
In "Blu etooth COM port settings" we will look into how you can add and remove Bluetooth COM ports, and
change the settings concernin g which profiles are associated with w hich Bluetooth COM ports.
Bluetooth COM port set tings
Before you can make use of a Bluetooth COM port lin k, you must associate one or more appropriate
profiles with a Bluetooth COM port and then add the COM port to you r Local Services bar (cf. “Bluetooth
COM ports” – “General information”). These settings are made by means of the Bluetooth Configuration
Opening the Bluetooth Configuration Tool:
Tool.
Page 27

1. Open the Microsoft Control Panel.
2. Double-click
The Bluetooth Configuration Tool dialog box opens:
Adding Bluetooth COM ports
Bluetooth Configuration Too
l.
To add a Bluetooth COM port:
1. In the Bluetooth Configuration Tool window, click
2. Use the arrows to go to the Bluetooth COM port you want to add and th e profile you want to associate
with it. In the above example, the Serial Port Profile is being associated with Bluetooth COM port 10.
Note:
You wil l only be allowed to add Bluetooth COM ports that are not already in use. On ly available Bl uetooth
COM ports will appear on the list in th e above dialog box.
3. To confirm the settings, click Add. The new Bluetooth COM port will now be inclu ded on the Bluetooth
Neighborhood Local Services bar:
Some programs (like HyperTerminal) cannot detect COM ports higher than 4.
Add.
The following dialog box opens:
Note:
Note: Windows NT
computer has been restarted.
Before you can use the new Bluetooth COM port, you have to
users will not see the new Bluetooth COM port icon on the local services bar until the
restart
your computer.
Page 28

Deleting Bluetooth COM ports
If you want to delete a Blu etooth COM th at you no longer need:
1. In the Bluetooth Configuration Tool window, highlight the Bluetooth COM port you want to delete, for
instance COM6:
2. Click
3. To confirm that you want to delete the Bluetooth COM port, click Yes.
The Bluetooth COM port will now be removed from the Local Services bar.
Note: Windows NT
Associating and removing profiles from existing Bluetooth COM ports
In the Bluetooth Configuration Tool, you can see which profiles are associated with which Bluetooth COM
ports. You change these settings so as to associate the profiles you need with an existing Bluetooth COM
port. Also, you can remove a profile from a Bluetooth COM port.
In the following example, it appears th at the Dial-Up Networking Profile is associated with Bluetooth COM
port 8:
Remov
e. The following dialog box opens:
user s have to restart the computer for the chan g e s to take effect.
Page 29

To change the settings:
Existing COM port
1. In
Associated Profile
2. In
remove the ones you no longer want to be associated with it.
3. Click OK.
s, click the Bluetooth COM port in question.
s, check the profiles you want to associate with the Bluetooth COM port, or
Note: Windows NT
user s have to restart the computer for the chan g e s to take effect.
Bluetooth COM port link establishment
When you have added a Bluetooth COM port to the Local Services bar (as described in the section
“Bluetooth COM port settings”), you can establish a lin k to a remote device.
Drag the Bluetooth COM port icon to the remote device (or device folder):
Alternatively, carry ou t service discovery, then drag the local Bluetooth COM port icon to a remote
Bluetooth COM port icon:
The link establish ed between your local device and the remote one can now be u sed exactly as if it were a
wired link.
Page 30

LAN
The LAN service is used for accessin g a Local Area Network through a dial-up networking gatew ay. You
can use this service to establish a link to a remote Bluetooth enabled computer that has access to a LAN.
The LAN service provides a Bluetooth COM port prepared for Bluetooth dial-up networking. You can use
the LAN COM port with Microsoft dial-up n etworking in order to establish a LAN connection. Please refer
to the Windows online help for instructions in how to use Microsoft dial-up networking.
Link s can be established by dragging an d dropping in the Bluetooth Neighborhood: Drag the LAN icon from
the Local Services bar to one of the following in the list view:
• The remote device (or device folder), or
• The remote LAN service.
In the following example, a link is being established by dragging the local LAN service to a remote LAN
service:
For information on how to set up the program to dial up a utomatical ly when a LAN link is established, see
“LAN Access settings”.
Note:
Bluetooth COM port 7. For more information, see “Bluetooth COM ports”.
The LAN Access Profile requires a Bluetooth COM port. By default, the profile is associated with
DUN
The DUN s ervice, i.e. dial-up n etw orking, is used for accessing the In ternet th rou gh a DUN gateway. You
can use this service to establish a l ink to a Bluetooth enabled modem or computer, which has access to a
modem.
The DUN s ervice provides a Bluetooth COM port prepared for Bluetooth dial-up networking. You can use
the DUN COM port with Microsoft DUN in order to establish a DUN connection . Please re fer to the
Windows online help for instructions in how to u s e Microsoft DUN.
Link s can be established by dragging an d dropping in the Bluetooth Neighborhood: Drag the DUN icon
from the Local Services bar to one of the following in the list view:
• The remote device (or device folder), or
• The remote DUN service.
In the following example, a link is bein g established by dragging the local DUN service to a remote DUN
service:
Page 31

For information on how to set up the program to dial up automatically when a DUN link is established, see
“DUN Access settings”.
Note:
with Bluetooth COM port 7. For more information, see “Bluetooth COM ports”.
The Dial-up Networking Profile requires a Bluetooth COM port. By default, the profile is associated
FAX
The FAX service is used for sending fax messages, using the fax software on your computer. You can u se
this service to establish a link to a remote Bluetooth enabled fax machine or computer which has access to
a fax machine.
The FAX service provides a Bluetooth COM port prepared for Bluetooth faxing. You can use th e fax
COM port in connection with the Microsoft fax software or a third party application such as Symantec
WinFax Pro in order to establish a fax connection. Please refer to the relevant documentation, like the
Windows online help (if you use the Microsoft fax software).
Link s can be established by dragging an d dropping in the Bluetooth Neighborhood: Drag the FAX icon from
the Local Services bar to one of the following in the list view:
• The remote device (or device folder), or
• The remote FAX service.
In the following example, a link is being establ ished by dragging the local FAX service to a remote FAX
service:
Note:
COM port 7. For more in formation, see “Bluetooth COM ports”.
The FAX Profile requires a Bluetooth COM port. By default, th e profile is associated with Bluetooth
Network
In this section, we will focus on setting up and establishing Bluetooth networks.
have some previous experience i n or dinary, i.e. wired networks using Microsoft networking. If that is
not the case, please refer to the Microsoft Windows onli n e help for information on Microsoft
networking.
Setting up networks
During the installation of the Bluetooth Software Suite, th e installation program assigned a static IP address
to the TCP/IP protocol bound to the Bluetooth Ethernet adapter.
The settings made during the installation will be used when you establish a network link as described in th e
section "Network link establishment". You can, of course, chan ge these settings as you like.
The Bluetooth network works in the same way as if the computers were connected through a hub using a
wired Ethernet. The settings made in Windows are used, exactly as if using Microsoft networking.
We will assume that you
Page 32

Network link establishment
Establishing a Bluetooth ad hoc network link is done in the same way as you establish other Bluetooth links:
In the Bluetooth Neighb orhood main window, dr a g the local service Network to the remote device, device
folder, or service:
When a network link has been established between a master and its slaves, this network is similar to
connecting the same computers through a hub using a wired Ethernet. The settings made in Windows are
used, ex actly as if using Microsoft networking.
Local device settings
Local pr ofile properties
General information
The Bluetooth Software Suite provides you with general information on the profiles that your device
supports. For each profile, you can see:
• Which version of the profile your device features;
• A description, i.e. the name of the profile;
• The company name;
• The copyright holder.
This information is included in the Profile Properties dialog box. To open this: On the Bluetooth menu, point
Profile Propertie
to
s, and click the profile in question, for instance Serial Port:
Page 33

The mentioned information appears from the item
General Information:
Enabling/disabling profile
You can enable or disable each of the profiles that your device supports. If you enable a profile,remote
users wil l be allowed to access the services associated with the profile. If you disablea profile, remote
users wil l not be allowed to access the services associated with the profile.
Enabling/disabling a profile is done from the Profile Properties dialog box. To open this: On the Bluetooth
menu, point to
In the item
Profile Propertie
Activate Profil
s, and click t he profile in question, for instance OBEX File Transfer :
e, you can now en able or disable the profile.
Page 34

Note:
Object Push Settings
The profile OBEX Object Push i s used for tr ansferring obj ects: messages, notes, cards (including the
default bu siness card), and calendar objects. In the Object Push Settings dialog box, you can view or edit
the location of the physical Inbox folder and th e default business card.
To open the Object Push Setting s dialog box:
You can only disable a profile when your computer is not conn ected to any remote device.
1. On the Bluetooth menu, point to
2. At the t op of the OBEX Object Push Properties d ialog box, click the tab
Profile Propertie
s, and click
OBEX Object Pus
h.
Object Push Setting
s.
Object Inbo
•
Bluetooth . However, you ca n move the Inbox to any location you wa nt. To browse for a different
location, click the
Default Busin ess Card:
•
named Bluetooth. However, like the Inbox, you can browse usin g the
busine ss card where you want.
If you h ave not already created a business card, clicking
you can register your d efault business card. Click
more information, see “Making default business card available”.
Object Push - Security
The profile OBEX Object Push i s used for tr ansferring obj ects: messages, notes, cards, and calendar
objects. In the Security dialog box, you can make de cisions concerning th e security aspects of receiving
and sendin g objects.
To open the Security dialog box:
1. On the Bluetooth menu, point to
2. At the t op of the OBEX Object Push Properties d ialog box, click the tab
x: By default, the physical Inbox folder is placed in My Documents in a folder named
“..
.“ button.
The physical default business card is placed in My Documents in a folder
“..
.” button, and place th e
Edit
Profile Propertie
Create New
if you wan t to edit an existing busin e ss card . For
s, and click
will open the Ob ject Editor, where
OBEX Object Push.
Securit
y.
Page 35

Incoming Objects:
•
– Accept incoming objects of any type; or
– Reject all incoming objects; or
– Only accept incoming objects of certain types: Business cards, calendar objects, messages,
and/or notes.
Outgoing Objects:
•
default business card.
By default, you r device will automatically accept incoming objects, and it will allow remote users to pull your
default business card.
File Transfer Settings
The profile OBEX File Transfer is used for trans ferrin g files. In the File Transfer Settings dial og box, you
can view or edit the location of the physical My Shared Files folder. Furthermore, you can mak e decisions
concerning the security a spects of remote users’ acce ss t o the files in “My Shared Files”.
To open the Fil e Transfer Settings dialog box:
Here you can decide if your device should:
Here you can select for remote devices to be allowed/not allowed to pull your
1. On the Bluetooth menu, point to
2.
At the top of the OBEX File Transfer Prope rties dialog box, click the tab
Profile Propertie
s, and click
OBEX File Transfe
r.
File Transfer Setting
s.
Page 36

Shared Files Folde
•
However, you can move it to any location you want. To browse for a different location, click the
button.
Security :
•
have to your local My Sh ared Files folder, i.e. wh ether they will be allowed to read, edit, and delete
the conten ts of the folder. You can choose among:
– Read only access; or
– Read and wr ite access; or
– Read, write, and delete access.
Furthermore, if you select “Remote users are requ ire d to be authen ticated..." remote users will have to
enter a password before they can access your shared files. In the field at the bottom of th e dialog box, you
can type the password you require remote users to enter.
The default settings are as shown in the above illustration.
LAN Access settings
In connection with LAN link establishment, the Bluetooth Software Su ite can establish a dial-up connection
automatically. Setting up the program for this is done from the LAN Access Properties dialog box.
From this item you can make settings regarding w hich kind of access remote users wil l
r: By defaul t, this folder is placed in My Documents in a folder named Bluetooth.
"..
."
1. On the Bluetooth menu, point to
2. At the top of the LAN Access Properties dialog box, click th e tab
dialog box appears:
Profile Propertie
s, and click
LAN Acces
s.
LAN Access Settin g
s. The following
3. Select the option
establishe
4. Follow the on-screen instructions to select wh ich recipient should be dialed. Y ou can add new recipients
to the list by clicking
When you establish a LAN link as described in the section "LAN”, the Bl uetooth Software Suite will now
automatically establish a dial-up connection.
For more information on LANs, please refer to the Windows online help.
d.
Automatically establish Di al-up connection when Bluetooth link has been
Create New
or edit th e selected recipient by clicking
Edit Selecte
d.
Page 37

Dial-up Networking settings
In connection with DUN link establishment, the Bluetooth Software Suite can establish a dial-up connection
automatically. Setting up the program to do so is done from the Dial-up Networking Properties dialog box.
1. On the Bluetooth menu, point to
2. At the top of the Dial-up Networking Properties dialog box, click the tab
The following dialog box appears:
Profile Properties,
and cl ick
Dial-up Networkin
g.
Dial-up Networking Settings.
3. Select the option
establishe
4. Follow the on-screen instructions to select wh ich recipient should be dialed. Y ou can add new recipients
to the list by clicking
When you establish a DUN link as described in the section "DUN", the Bluetooth Software Suite will now
automatically establish a dial-up connection to the selected recipient.
For more information on dial-up networking, please refer to the Windows online help.
d.
Automatically establish Di al-up connection when Bluetooth link has been
Create New
or edit th e selected recipient by clicking
Edit Selecte
d.
Bluetooth Neighborhood propertie s
General
The Bluetooth Software Suite provides information on the properties of the Bluetooth neighborhood. This
information is accessed from the Bluetooth Neighborhood Properties dialog box. To open this:
On the Bluetooth menu, click
Bluetooth Neighborhood Properties.
The Bluetooth Neighborhood Properties – General dialog box opens:
Page 38

At the top of th e dialox box you can see the name of your local device, in this case “John's desktop”. (For
information on how to name your local device, see “Naming your local device”.)
Furthermore, the dialog box contain s the items
General Information
•
be sent to remote devices carrying out device or service discovery on your device. The device
address and service class are determined by the Bluetooth hardware, the device class you can set
yourself (see “Settings”).
A connection shows
•
can see which role your l ocal device plays in the piconet: master or slave.
As appears, from this dialog box you can access a number of other dialog boxes: Settings, Device
Discovery, Trust, Security, and Bonding. We will deal with each of these in the following.
Settings
In the Bluetooth Neighb orhood Properties – Settings dialog box, you can set such identity information a s
the name and class of your local device. To open the dialog box:
1. On the Bluetooth menu, click
2. Click the tab
Settings.
shows the identity information that, in addition to the name of your device, will
which remote devices your device is cur rently connected to, if any. Also, you
Bluetooth Neighborhood Properties.
General Information
Connections:
and
Page 39

Bluetooth Device Name:
•
device”).
Bluetooth Device Class:
•
which class of device your computer belongs to: is it a desktop, laptop or server-class computer?
This information will be given to remote devices having carried out device discovery on your local device.
Devi ce discovery
In connection with device discovery, you can make a number of settings in the Bluetooth Neighborhood
Properties – Device Discovery dialog box. To open this dialog box:
Here you ca n select a name for you r device (cf. “Naming you r local
Here you can provide the Bluetooth Software Suite with information on
1. On the Bluetooth menu, click
2. Click the tab
The Bluetooth Neighborhood Properties – DeviceDiscovery dialog box opens:
Devi ce Discover
Bluetooth Neighborhood Propertie
y.
s.
Devi ce Discovery
• In
function m a nually (which is th e d efault setting), or for device discovery to be initiated automatically
at certain intervals. If you select the latte r option so th a t d e vice discovery will take place
automatically, you can set the duration of the interval between device discovery sessions in the item
Devi ce Discovery Perio
Device Discovery Length
• In
last. The default settin g is 10 second s, which should be enough in most cases. However, if for
some reason it is difficult for two devices to discover each other, you can increase th e duration.
Devi ce Discovery Period
• In
automatic device discovery sessions to last. This function is active when in the item
Discovery
you have set automatic device discovery to take place periodically.
you can choose for device discovery to take place only wh en you activate the
d.
you can set the number of seconds t hat you want device discovery to
you can set the number of minutes that you want the intervals between
Device
Page 40

Previously Di scovered Devices
• In
remote devices discovered during previous device discovery sessions. (This item is selected by
default). If this item is not selected, the list view will only display the remote devices discovered
during the latest session.
Expire Di scovered Devices
• In
automatically from the Bluetooth Neighborhood list view when they have not been seen for a
specified period of time. Note that if the dialog box item
selected, the list view will only display the remote devices discovered during the latest device
discovery.
Trust
The Bluetooth Neighborhood Properties – Trust dialog box concerns the trust relationship you want your
local device to apply to newl y discovered remote devices: How do you want your local device to react if a
newly discovered remote device tries to establish a link to it? To open this dialog box:
you can have the Bluetooth Neighborhood list view display
you can decide to have discovered remote devices removed
Previously Di scovered Devices
is not
1. On the Bluetooth menu, click
2. Click the tab
You can decide whether your device should:
Trus
t.
Bluetooth Neighborhood Propertie
s.
– Reject a link establishment attempt; or
– Prompt you before accepting lin k establishment; or
– Accept link establish m ent automaticall y. (This is the default setting).
To have the default trust relationship settings applied to all existing discovered devices as well as the newly
discovered ones, click
Note:
remote devices – you can do so from the Remote Device Properties – Trust dialog box. For information
on how to open this, see "Remote device properties” – “Trust".
Advanced link policy
To view or cha nge the trust relationship settings for on e or more discovered remote devices, click
If you want to make trust relationship settings for a particul a r remote device – rath e r than for all
Apply to all device
s.
Page 41

Advanced Setting
s:
In this dialog box, each discovered remote device is located in one of three boxes:
establishment attempt, Prompt before accepting link establishment,
establishment.
relationship settings have been selected for it.
To change the trust relationship setting for a device in the Advanced Link Policy dialog box:
Drag the device from its present position into the box representin g the trust relationship you wan t for the
device. The new settings will now be appl ied to the remote device next time it attempts to connect to you r
local device.
Security
In the Bluetooth Neighborhood Properties –Security dialog box, you can make a number of decisions
concerning the secu rity of your local device. To open this dialog box:
1. On the Bluetooth menu, click
2. Click the tab
The location of each remote device (i.e. the box it is placed in) indicates which default trust
Securit
Bluetooth Neighborhood Propertie
y.
s.
Automatically accept link
or
Reject link
Security Mode
•
can be set to eith e r
No Security
Link level securit
or
y.
Page 42

If a device has selected link level security, no remote device can conn e ct to it without bond ing (see
“Bonding”. ) Furthermore, only when you have selected link level se curity can you use encryption (see
below).
Encryption M ode
•
be enabled when link l evel security has been selected (see above).
If encryption is enabled: When your device is communicating, only the l inked devices will be able to
understand the data sent between them.
Connectability Mode
•
be allowed to establish a link to it. In other words, selecting non-connectable mode is a way of
ensuring that no remote device can connect to your device.
can be enabled or disabled. Based on the use of a link key, this feature can only
refers to whether or not remote devices having discovered your device will
Discoverability Mode
•
device. In other words, selecting non-discoverable mode is a way of preventing remote devices
from discovering your device.
The default settings are as shown in the examples (the illustrations) above.
Bonding
Bonding refers to the creation of a link key –a bond – between two devices. Bonding is used wh en a device
requires link level secur ity (see “Security” for information on how to do so). When a remote device
attempts to connect to the device requiring link level security, the users of both devices will be prompted for
a password. They must then enter the same password.
The purpose of bonding is for two devices to be able to identify each other so that no remote device can
connect with out knowing the right password. This may be convenient if for instance you do not want any
other device than your own Bluetooth enabled phone to be able to connect to your computer. Oth er devices
trying to connect will be prompted for the password, which prevents them from interfering in the connection.
The duration of the bonding can be set to last beyond the current link; if so, the two devices will only be
prompted for th e password the first time they connect, i.e. when creating the bond. Both when creatin g the
bond and when making use of an existing one, both devices must be in bondable mode. Below you will find
information on how to set both bonding mode and duration.
refers to whether or not other devices will be allowed to discover your
Settings concerning bonding are done in the Bluetooth Neighborhood Properties – Bonding dialog box. To
open this:
1. On the Bluetooth menu, click
2. Click the tab
Bonding.
Bluetooth Neighborhood Propertie
s.
Page 43

Bluetooth Bondin
• In
devices.
The default setting is bondable mode. Both to be able to establish a new bond and to make use of an
existing one, your device has to be in bondable mode.
Default Bluetooth Bonding Expirati o
• In
disconnected; after a specified period of time; or never. (The default setting is: Never).
g, you can decide whether or not your device should be able to bon d to other
n, you can set bonding to expire when the link is
Note:
settings that will be applied to all remote devices. For information on how to make settings for the duration
of a bond between your device and a particu lar remote device, see the section "Remote Device
Properties” – “Trust".
The settings you make in the Bluetooth Neighborhood Properties – Bonding dialog box are default
Bluetooth unit settings
The settings of the Bluetooth unit are controlled from the Bluetooth Control Center. From this application,
which is located in the lower right corner of the screen, you can enable/disable the Bluetooth unit. Also, the
Bluetooth Control Center icon indicates the state of the Bluetooth unit.
Enabling/disabling Bluetooth unit
From the Bluetooth Con trol Cen ter, you can enable or disable the Bluetooth unit.
1. Right-click the Bluetooth Control Center icon in the lower right corner of the screen .
2. Click
Indi cati on of Bluetooth unit state
Enabl e ... or Disabl e ...:
Located in the lower right corner of the screen, th e Bluetooth Control Center displays one of three icons to
show the state of the Bluetooth unit:
• Disabled:
Page 44

In this state, your Blue tooth device cannot communicate with other devices.
• Enabled but n ot transmitting:
Your device is ready to communicate with other devices.
• Enabled and transmitting:
Your device is communicating with one or more remote devices, or an attempt is being made to establish a
link.
Remote device settings
Remote device properties
General
For information on the properties of a remote device:
1. Right-click the remote device.
2. Click
The Remote Device Properties – General dialog box opens.
Propertie
s.
At the top of this dialog box, you will see the name of the remote device.
In addition, the box contains th e items
General Information, Historical Information,
Services used.
and
Page 45

General Information
•
device class, and service class.
Historical Information
•
linked to it.
Services used
•
device, if any. Also, you can see w hich role the remote device plays in the piconet, i.e. master or
slave.
Trust
In the Remote Device Properties – Trust dialog box, you can make settings for the individual rem ote
device concerning:
Trust relationshi
•
establish a l ink to it.
Bonding expiratio
•
last? (cf. "Bonding").
You can make similar settings in th e dialog boxes Bluetooth Neighborhood Properties – Tru st (cf.
provides such identity information on the remote device as its address,
tells you w hen the device was l ast seen by your device, and when it was last
show s which services of the remote device are currently connected to your local
p, i.e. the way your local device will react if the remote device attempts to
n, i.e. if your local device and the remote one bond, how long should the bonding
"Trust") and Bluetooth Neighborhood Properties –Bonding (cf. "Bonding"). However, while the settings
made in those dialog boxes concern all remote devices discovered, th e settings in the
Remote Device Properties – Trust dialog box concern a particular remote device.
To open this dialog box:
1. Right-click the remote device in question.
2. Click
3. In the Gen eral dialog box, click the tab
Propertie
s.
Trus
t.
Trust Relationship
•
wants to establish a link to you r device:
– Reject link establishm ent, or
– Prompt before accepting link establishment, or
– Automatically accept link establishment. (This is the default setting).
allows you to define the trust relationship to be applied when the remote device
Page 46

If you lik e, you can apply the selected trust rel ationsh ip to all remote devices (as in the Bluetooth
Neighborhood Properties –Trust and Bonding dialog boxes). To do so, click
Device Bonding Expiration
•
between your device and the remote one. You can set the bonding to expire when the link is
disconnected, after a specified period of time, or never. (The default settings is: Never).
For more information on bonding, see "Bonding".
allows you to make settings concerning the duration of bonding
Apply to all devices
Hardware
Diagnostics
After the installation, you have possibility to ch e ck that the ha rdware for the Bluetooth Software Suite (i.e.
either a PC card or a USB adapter) h as been installed properly. This is done by performing a loopback
test. The test is carried out from the Bluetooth Configuration Tool :
1. Open the Microsoft Control panel.
2. Double-click
3. Click the tab
Bluetooth Configuration Tool.
Diagnostic
s. The following window opens:
The Bluetooth Configuration Tool dialog box opens:
You can now perform a loopback test to check that the hardware is working properly:
Loop Mod
4. In
loops). We recommend that you choose th e latter (which is also the default setting).
5. To start the test, click Run. When in the loop mode Infinite Loops, the test w ill run un til you click
e, select either
Single Loop
(to test a s ingle loop ) or
Infinite Loops
(to test a number of
Sto
p.
Page 47

Loop Count
6. In
the test shows one or more errors, your hardware has probably not been installed correctly. We
recommend that you:
• Ensure that the hardware is installed correctly, whether a matter of inserting a PC card (cf. the
Installation Manual).
• Restart you r computer.
you can see the number of loops tested. The number of
Errors
shoul d always be: 0. If
Appendices
Appendix A: Profiles
The followin g table sh ows which profiles the Blu etooth Software Suite currently supports and
which role each profile pl ays:
The profile: Supports the following:
Ethernet Network Network service
OBEX Fi le Transfer File transfer
OBEX Ob ject Push Object transfer
Serial Port Bluetooth COM port service
Generic Access All other p rofile s
Service Discovery Application Service discovery
Dial -up Networking DUN service (as data terminal)
Fax FAX service (as data terminal
LAN Access LAN service (as data terminal
Generic Objec t Exchange OBEX Fi le Transfer and OBEX Object Push profiles
Appendix B: List view icons
In the Bluetooth Neigh borhood list view, the following icons are used to represent remote devices and
remote services respectively:
Remote d evice
Desktop computer
s:
Laptop computer
Server-class computer
Handheld PC/PDA
Palm sized PC/PDA
Cellular phone
Cordless phone
Smart phone
Page 48

Unclassified phone
LAN access point
LAN access point, 33-50% utilized
Unclassified audio
Modem
Peripheral
Unclassified
Remote services:
Audio
Bluetooth COM port
LAN
DUN
FAX
Business card
Network
Inbox
Shared Files
Device fol der
Appendix C: Regulatory statements
General
This produ ct complies with any man datory product specification in any country where the product is sold.
In addition, the product complies with the following.
Page 49

European Union (EU) and EFTA
This equipment complies with the R&TTE directive 1999/5/EC and has been provided with the CE mark
accordingly. Note that the radio frequency band used by this equipment has not been harmonized in all of
the EU.
United States of A merica and Canada
Tested To Comply with FCC Standards FOR HOME OR OFFICE USE. This device complies with part 15
of the FCC rules an d with RSS-210 / RSS-139 of the Industry Canada. Operation is subject to the following
two conditions: (1) This device may not cause harmful interference, and (2) this device must accept any
interference received, inclu ding interference that may cause u ndesired operation. Note that any changes or
modifications to th is equipment not expressly approved by the manufacturer may void the FCC
authorization to operate this equipment.
Card specifications
Physical specifications
Type Compact Flash size PC card
dimensions 36 mm x 43 mm x 3,3mm
weight 9g
standards Bluetooth
Antennas Integrated T-shaped patch antenna
Security According to Bluetooth specification
Power consumption (3.3 V/5 V) Sleep: < 1 mA/ 1mA
Receive: < 105 mA / 105 mA
Transmit: < 75 mA/ 75 mA
Operating temperature 0°C...+60°C
Radio specifications
Channels 79 channels
Modulation technique GFSK (Gaussian Frequency Shift Keying),
frequency hopping
Output power 1 mW
Receiver sen sitivity Min. –70 dBm
Coverage area Up to 10 m
Page 50

Important safety information
Important inform ation
Traffic safety
Do not use the Nokia Connectivity Car d while driving a vehic le. If using the Nokia Conn ectivity Card, park
the vehicle first. Do not place the Nokia Connectivity Card on the passenger seat or where it can break
loose in a collision or sudden stop.
Remember: road safety always comes first!
Operatin g environment
Remember to foll ow any special regulations in force in any area an d always power off your Nokia
Connectivity Card when ever it is forbidden to use it, or when it may cause interference or dan ger. Note that
the Nokia Connectivity Card may cause similar interference as a cellular terminal and must not be used in
areas where the use of a cellular terminal is prohibited.
When connecting the Nokia Connectivity Card or any accessory to another device, read its user's guide for
detailed safety instru ctions. Do not connect incompatible products.
As with other mobile radio transmitting equipment, users are advised that for the satisfactory operation of
the equipmen t and for the safety of personnel, it is recommended that the Nokia Connectivity Card should
only be u sed in th e normal operating position.
Electronic devices
Most modern electronic equipmen t is shiel ded from radio frequency (RF) signal s. However, certain
electronic equipmen t may not be shielded again st the RF signals from you r Nokia Connectivity Card.
Pacemakers
Pacemaker manufacturers recommend that a min imum separation of 20 cm (6 inches) be maintained
between a Nokia Connectivity Card and a pacemaker to avoid potential interference with the pacemak er.
These recommendation s are consistent with the independent research by and recommendations of
Wireless Technology Research. Persons with pacemakers should always keep the Nokia Connectivity
Card more than 20 cm (6 inches) from their pacemaker when the Nokia Conn ectivity Card is powered on. If
you have an y reason to suspect that interference is taking pl ace, power off your Nokia Connectivity Card
immediately.
Hearing aids
Some digital wireless devices may interfere with some h earing aids. In the event of such interference, you
may want to consult your service p rovider.
Other medical devices
Operation of any radio transmitting equipment, including Nokia Connectivity Cards, can cause interference.
Observe restrictions for use. Power off your Nokia Con nectivity Card in healt h care facilities when any
regulations posted in these areas instru ct you to do so.
Vehicles
RF signals may affect improperly installed or inadequately shielded electronic systems in motor veh icles
(e.g. electronic fuel injection systems, electronic anti-skid (anti-lock) braking syst ems, electronic speed
control syste ms and air bag system s). Ch eck with the manufactur er or its represent ative regarding your
vehicle. You should also consult the man ufacturer of any equipmen t that has been added to your vehicle.
Do not store or carry flammable liquids, gases, or explosive materials in th e same compartment as the
Nokia Connectivity Card, its parts, or accessories.
For vehicles equipped with an air bag, remember that an air bag inflates with great force. Do not place
objects in the area over the air bag or in the air bag deployment area. If the in-veh icle Nokia Connectivity
Card is improperly placed and the air bag inflate, serious injury could result.
Page 51

Remove your Nokia Conn ectivity Card from the PC card slot before boarding an aircraft. The use of Nokia
Connectivity Cards in an aircraft may be dangerous to the operation of the aircraft and may be illegal.
Failu r e to observe th ese instructions may be illegal and lead to legal action.
Posted f acilities
Power off your Nokia Connectivity Card in any facility where posted n otices so require.
Potentially explosive atmospheres
Power off your Nokia Connectivity Card when located in any area with a potentially explosive atmosphere
and obey all sign s and instruction s. Sparks in such areas cou ld cause an explosion or fire resultin g in bodily
injury or even death.
Users are advised to power off the Nokia Conn ectivity Card when at a refuelling point (service station).
Users are reminded of the need to observe restrictions on the use of radio equipment in fuel depots (fuel
storage and distribution areas), chemical plants, or where blasting operation s are in progress.
Areas with a potentially ex plosive atmosphere are often but not always clearly marked. These inclu de the
area below deck on boats; chemical transfer or storage facilities; vehicles using liquefied petroleum gas
(such as propane or butane); areas where the air contains chemicals or particles, such as grain, dust, or
metal powders; and any other area where you would normally be advised to turn off your vehicle engin e.
Page 52

FCC Declaration of Conformity Statement
Name: Nokia Connectivity Card
Responsibl e party: Nokia Mobile Phones Ltd.
P.O. Box 100
FIN-00045 Nokia Group
Finland
This device complies with part 15 of the FCC Rules. Operation is subject to the following two con ditions:
(1) This device may not cause h armful interference, and (2) this device must accept any interference
received, inclu ding interference that may cause undesired operation.
Note
: This equipment has been tested and found to comply with the limits for a Class B digital device,
pursuant to part 15 of the FCC Rules. These limits are design ed to provide reasonable protection again st
harmful interference in a residential installation. This equipment generates, u ses and can radiate radio
frequency en ergy and, if not installed and used in accordan ce with the instructions, may cause harmful
interference to radio communications. However, there is no guarantee that interference will not occur in a
particular installation. If this equipment does cause harmful interference to radio or television reception,
which can be determined by turning the equipment off and on, the user is encouraged to try to correct the
interference by one or more of the following measures:
• Reorient or relocate the r e ceiving antenna
• Increase the separation between the equipment and receiver.
• Connect the equipment into an outlet on a circuit different from that to which the re ceiver is connected.
• Consul t the dealer or an experienced radio/TV techn ician for help.
Caution
the user's au thority to operate this device.
: Any changes or modifications not expressly approved by Nokia Mobile Phones Ltd. could void
Page 53

Care and maintenance
Your Nokia Connectivity Card is a product of superior design and craftsmanship and sh ould be treated with
care. The suggestions below will help you to fulfill any warranty obligations and to enj oy this product for
many years. When using you're Nokia Connectivity Card or any accessory:
• Keep it and all its parts and accessories out of small children's reach.
• Keep it dry. Precipitation, humidity, and liquids contain minerals that wil l corrode electronic circuits.
• Do not use or store it in dusty, dirty areas.
• Do not store it in hot areas. High temperatures can shorten the life of electronic devices, damage
batteries, and warp or melt certain plastics.
• Do not store it in cold areas. When the Nokia Connectivity Card warms up (to its normal temperature),
moisture can form inside the Nokia Connectivity Card, which may damage el ectronic circuit boards.
• Do not attempt to open it. Non-expert handling of the Nokia Connectivity Card may damage it.
• Do not drop, knock, or shake it. Rough handling can break internal circuit boards.
• Do not use harsh chemicals, cleaning solvents, or strong detergents to clean it. Wipe it with a soft, dry
cloth.
• Do not pain t it. Paint can prevent proper operation.
• Use only the suppl ied or an approved extern al antenna. Unauthorised antennas, modifications, or
attachmen ts could damage the Nokia Connectivity Card an d may violate regulation s governing radio
frequency devices.
If th e Nokia Connectivity Card or any accessory is not working properly, contact your dealer.
Page 54

Glossary
Ad hoc
One of the two operating modes that can be selected when using the Nokia DTL-1. With this configuration
option, users can set up a wireless network where wireless stations can send and receive data directly with
each other without access points. This type of network is sometimes called a peer-to-peer network.
Bandwidth
Quantitative difference between the limiting frequencies of a frequency band.
Channel
A specified frequency band for the transmission and reception of signals.
Coverage area
Geographical area within which service from a radio communications facility can be received.
Bluetooth
Bluetooth is a global standard for wireless connectivity. The main members of Bluetooth consortium are
Nokia, Ericsson, IBM, In t el and Toshiba. Afterwards companies like 3Com, Psion, Dell, Compaq, Casio
and Seiko-Epson have also joined to Bluetooth. Bluetooth technology allows for the replacement of the
many proprietary cables that connect one device to another with one universal short-range radio link (radio
range
instance, phone number and calendar data can be easily transferred from mobile phone to laptop and vice
versa. Bluetooth technology doesn’t require line-of-sight connection as infrared does. 360 degrees of
freedom makes Blu etooth devices extremely flexible an d easy to use.
Profile
Any Bluetooth device has at least one profile, i.e. an application that you can use the device for. When two
devices are to interoperate, i.e. communicate with each other, th ey must have a shared profile. If, for
instance, you want to transfer a file from one Bluetooth enabled computer to another, both computers must
support the profile OBEX File Transfer.
Range
The distance that radios signal travels from a radio transmitter before becoming too weak for a radio
receiver to identify it.
up to 10m). This enlarges freedom an d flexibility of using different devices and peripheral s. For
 Loading...