

Page 1
ISA Server 2004 Configuration Guide
For the latest information, please see http://www.microsoft.com/isaserver/
Page 2

Contents
Chapter 1
How to Use the Guide
Chapter 2
Installing Certificate Services
Chapter 3
Installing and Configuring the Microsoft Internet Authentication Service
Chapter 4
Installing and Configuring Microsoft DHCP and WINS Server Services
Chapter 5
Configuring DNS and DHCP Support for Web Proxy and Firewall Client Autodiscovery
Chapter 6
Installing and Configuring a DNS Caching-only DNS Server on the Perimeter Network
Segment
Chapter 7
Installing ISA Server 2004 on Windows Server 2003
Chapter 8
Backing Up and Restoring Firewall Configuration
Chapter 9
Simplifying Network Configuration with Network Templates
Chapter 10
Configuring ISA Server 2004 SecureNAT, Firewall and Web Proxy Clients
Chapter 11
Configuring ISA Server 2004 Access Policy
Chapter 12
Publishing a Web and FTP Server on the Perimeter Network
Chapter 13
Configuring the Firewall as a Filtering SMTP Relay
Chapter 14
Publishing the Exchange Outlook Web Access, SMTP Server and POP3 Server Sites
Chapter 15
Configuring the ISA Server 2004 Firewall as a VPN Server
Chapter 16
Creating a Site-to-Site VPN with ISA Server 2004 Firewalls
Page 3
ISA Server 2004 Configuration Guide:
How to Use the Guide
Chapter 1
For the latest information, please see http://www.microsoft.com/isaserver/
ISA Server 2004 Configuration Guide 1
Page 4

Introduction
Welcome to the ISA Server 2004 Configuration Guide! This guide was designed to help you
get started using ISA Server 2004 firewalls to protect your network and allow secure remote
access to your network. While the Guide isn’t a comprehensive set of documentation of all
network scenarios, it will expose you to many of the most commonly used features of ISA
Server 2004.
Firewalls have traditionally been among the most difficult network devices to configure and
maintain. You need to have a basic understanding of TCP/IP and networking services in order
to fully understand how a firewall works. The good news is that you don’t need to be a
network infrastructure professional to use ISA Server 2004 as your network firewall. ISA
Server 2004 is designed from the ground up to secure your network and it does so right out of
the box.
This chapter of the ISA Server 2004 Configuration Guide will:
• Help you learn about ISA Server 2004 features
• Provide advice on how to use the Guide to configure the ISA Server 2004 firewall
• Describe the details of the ISA Server 2004 Configuration Guide Lab Configuration
ISA Server 2004 Configuration Guide 2
Page 5

Learn about ISA Server 2004 features
ISA Server 2004 is designed to protect your network from intruders located on the inside of
your network and those outside of your network. The ISA Server 2004 firewall does this by
controlling what communications can pass through the firewall. The basic concept is simple: if
the firewall has a rule that allows the communication through the firewall, then it is passed
through. If there is no rule that allows the communication, or if there is a rule that explicitly
denies the connection, then the communication is stopped by the firewall.
The ISA Server 2004 firewall contains dozens of features you can use to provide secure
access to the Internet and secure access to resources on your network from machines
located on the Internet. While this Guide can’t provide comprehensive step-by-steps for all the
possible features included with ISA Server 2004, we have provided for you a number of stepby-step walkthroughs that will allow you to learn how the most common, and most popular,
features of the ISA Server 2004 work.
Firewalls do not work in a vacuum. There are a number of networking services required to
assist the firewall protect your network. This guide provides you with detailed information on
how to install and configure these services. It’s critical that the network is set up properly
before you install and configure the firewall. Proper network service support will help you
avoid the most common problems seen in ISA Server 2004 firewall deployments.
This guide will walk you through setup and configuration of the following network services and
ISA Server 2004 firewall features:
• Install and configure Microsoft Certificate Services
• Install and configure Microsoft Internet Authentication Services (RADIUS)
• Install and configure the Microsoft DHCP and WINS Services
• Configure WPAD entries in DNS to support autodiscovery and autoconfiguration of Web
Proxy and Firewall clients
• Install the Microsoft DNS server on a perimeter network server
• Install the ISA Server 2004 firewall software
• Back up and restore the ISA Server 2004 firewall configuration
• Use ISA Server 2004 Network Templates to configure the firewall
• Configure ISA Server 2004 clients
• Create Access Policy on the ISA Server 2004 firewall
• Publish a Web Server on a Perimeter network
• Use the ISA Server 2004 firewall as a spam filtering SMTP relay
• Publish Microsoft Exchange Server services
• Make the ISA Server 2004 firewall into a VPN server
• Create a site to site VPN connection between two networks
ISA Server 2004 Configuration Guide 3
Page 6

Practice configuring the ISA Server 2004 firewall
The firewall is your first line of defense against Internet attackers. A misconfigured firewall can
potentially allow Internet attacks access to your network. For this reason, it’s very important
that you understand how to configure the firewall for secure Internet access.
By default, the ISA Server 2004 prevents all traffic from moving through the firewall. This is a
secure configuration because the firewall must be explicitly configured to allow network traffic
through it. However, this level of security can be frustrating when you want to get connected
to the Internet as quickly as possible.
We strongly encourage you to create a test lab and perform each of the walkthroughs in this
guide. You will learn how to configure the ISA Server 2004 firewall correctly and become
familiar with the ISA Server 2004’s configuration interface. You can make mistakes in the
practice lab and not worry about attackers taking control of machines on your network. On the
lab network, you’ll be able to learn from your mistakes instead of suffering from them.
ISA Server 2004 Configuration Guide 4
Page 7

The ISA Server 2004 Configuration Guide Lab Configuration
We will use a lab network configuration to demonstrate the capabilities and features of ISA
Server 2004 in this ISA Server 2004 Configuration Guide. We recommend that you set up a
test lab with a similar configuration. If you do not have the resources to create a physical test
lab, you can use operating system virtualization software to create the test lab. We
recommend that you use Microsoft’s Virtual PC software to create your test lab. You can find
more information about Virtual PC at
In this section we will review the following:
• The ISA Server 2004 Configuration Guide network
• Installing Windows Server 2003 on the domain controller machine and then promoting the
machine to a domain controller
• Installing Exchange Server 2003 on the domain controller and configuring the Outlook
Web Access site to use Basic authentication
http://www.microsoft.com/windowsxp/virtualpc/
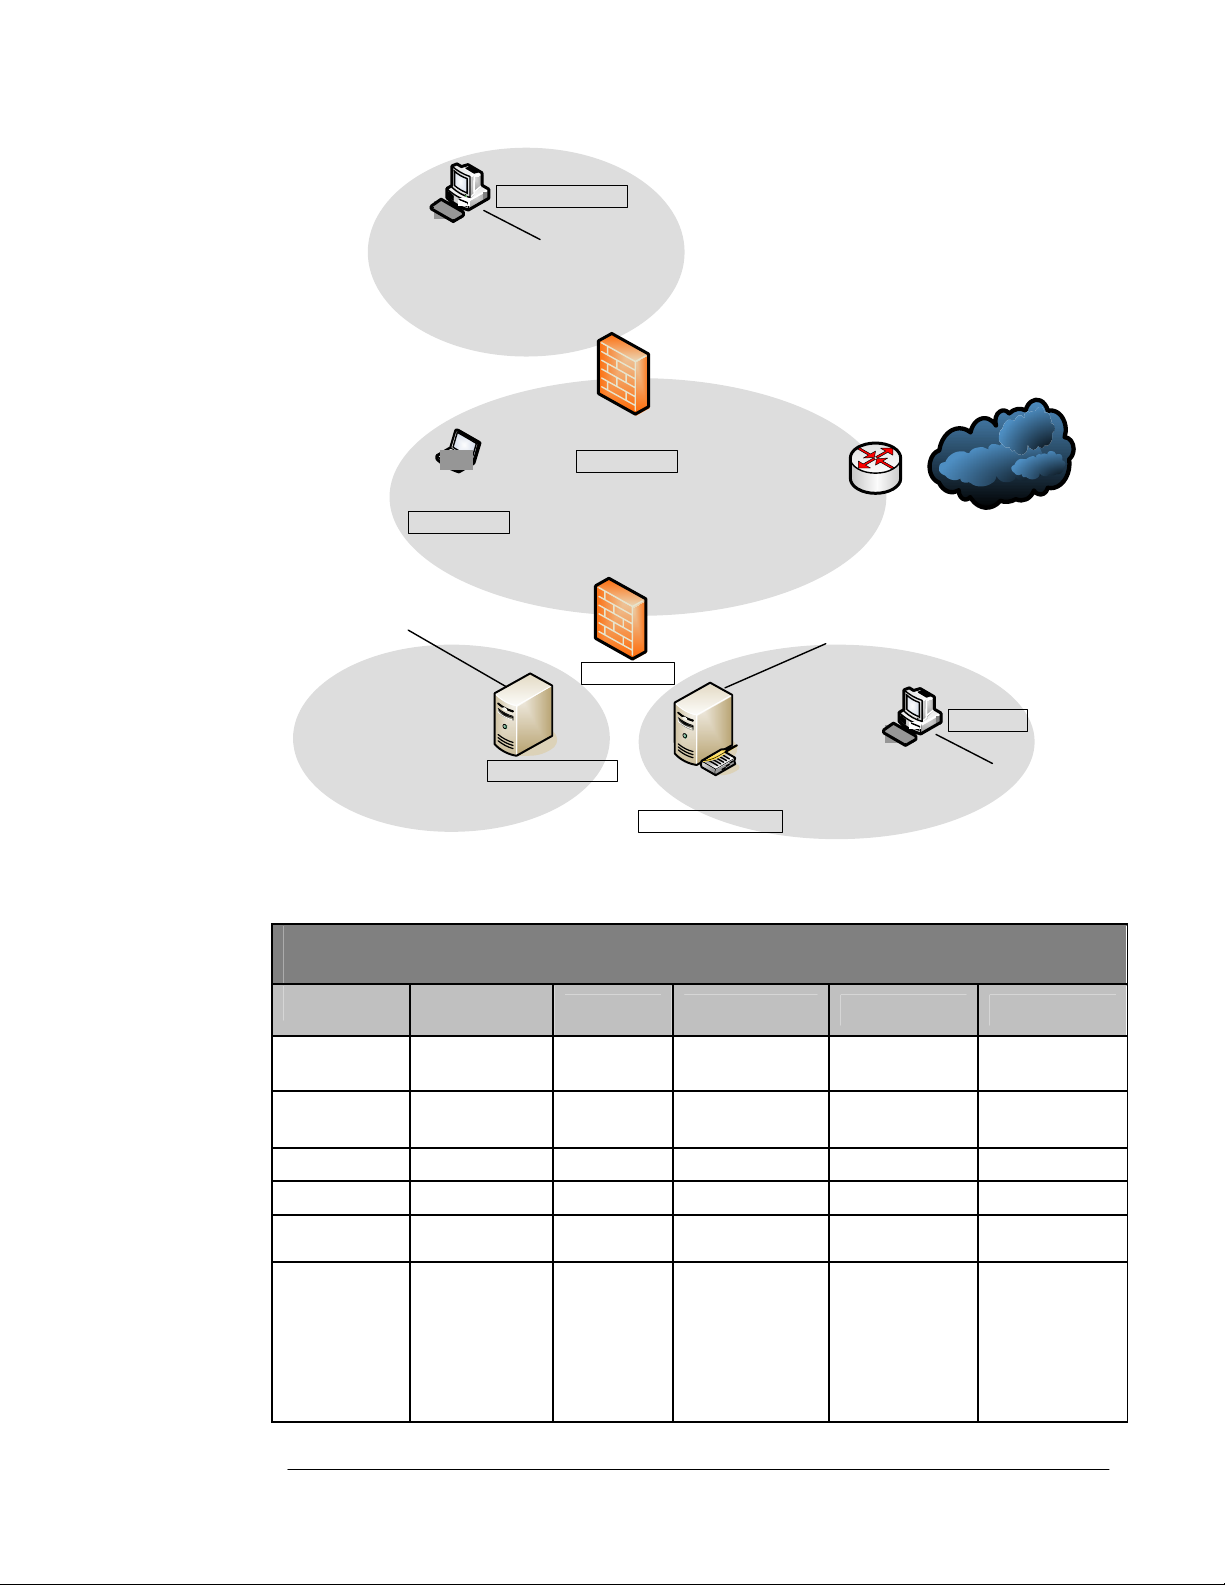
ISA Server 2004 Configuration Guide Network Diagram
The figure below depicts the lab network. There are 7 computers on the lab network.
However, none of the scenarios we will work with in this ISA Server 2004 Configuration
Guide requires all the machines to be running at the same time. This will make it easier for
you to use operating system virtualization software to run your lab network.
.
The network has a local network and a remote network. There is an ISA Server 2004 firewall
at the edge of the local and remote networks. All the machines on the local network are
members of the msfirewall.org domain, including the ISA Server 2004 firewall machine. No
other machines on the lab network are members of the domain.
On our lab network, the external interfaces of the ISA Server 2004 firewalls connect to the
production network, which allows them access to the Internet. You should create a similar
configuration so that you can test actual Internet connectivity for the clients behind the ISA
Server 2004 firewalls.
If you are using operating system virtualization software, then you should note that there are
three virtual networks in this lab setup. The Internal network (which contains the domain
controller) is on a virtual network, the TRIHOMELAN1 machine on a perimeter network is on
another virtual network, and the REMOTECLIENT machine is on a third virtual network.
Make sure you separate these virtual networks by placing the machines on different virtual
switches so as to prevent Ethernet broadcast traffic from causing unusual results.
ISA Server 2004 Configuration Guide 5
Page 8
`
10.0.1.0/24
REMOTECLIENT
IP: 10.0.1.2/24
DG: 10.0.1.1
IP: 10 .0.1.1/24
DNS: 192.168.1.34
IP: 172.16.0.2/16
DG: 172.16.0.1
DN S: 172.16.0.2
Caching-only DNS
Setting
IP Address
Default
Gateway
DNS
WINS
OS
Services
IP: 192.168 .1.71 /24
DG: 192.168.1. 60
REMOTEISA
IP: 192.168. 1.X/24
DG: 192. 168.1.60
EXTCLIEN T
IP: 192.168.1.70 /24
DG: 192.168.1. 60
ISALOCAL
IP: 10.0.0.1/24
IIS 6.0
TRIHOMEDLAN1
172.16. 0.0/16
EXCHANGE2003 BE
Table 1: Details of the Lab Network Configuration
Lab Network Details
EXCHANGE
2003BE
10.0.0.2 10.0.0.3
10.0.0.1
10.0.0.2
10.0.0.2
Windows Server
2003
DC
DNS
WINS
DHCP
RADIUS
Enterprise CA
EXTCLIENT LOCALVPNISA REMOTEVPN REMOTECLIENT
10.0.0.1
10.0.0.2 10.0.0.2 NONE NONE
10.0.0.2 10.0.0.2 NONE
Windows
2000
IIS:
WWW
SMTP
NNTP
FTP
Public
IP: 192.168 .1.60 /24
IP: 10.0.0.2/24
DG: 10.0.0.1
DNS: 10. 0 .0 .2
WINS: 10.0.0.2
RADIUS
DHCP
DNS
WINS
Domain Controller
Enterpris e CA
Exchange 2003 Server
Int: 10.0.0.1
Ext: 192.168.1.70
192.168.1.60
Windows Server
2003
10. 0.0 .0/ 24
Int: 10.0.1.1
Ext: 192.168.1.71
192.168.1.60
Windows Server
2003
`
IP: 10.0.0.3/24
DG: 10.0.0.1
DNS: 10.0.0.2
WINS: 10.0.0.2
ISA Server 2004 ISA Server 2004
CLIENT
10.0.1.2
10.0.1.1
Windows 2000
IIS:
WWW
SMTP
NNTP
FTP
ISA Server 2004 Configuration Guide 6
Page 9

Lab Network Details
Setting
IP Address
Default
Gateway
DNS
WINS
OS
Services
TRIHOMELAN1
172.16.0.2 10.0.0.3
10.0.0.1
10.0.0.2
10.0.0.2
Windows Server 2003
DC
DNS
WINS
DHCP
RADIUS
Enterprise CA
CLIENT
10.0.0.1
10.0.0.2
10.0.0.2
Windows 2000
IIS:
WWW
SMTP
NNTP
FTP
Installing and Configuring the Internal Network Domain Controller
Other than the ISA Server 2004 firewall computer itself, the second most influential machine
used in the scenarios discussed in the ISA Server 2004 Configuration Guide is the domain
controller. The domain controller computer will also be used to support a number of network
services that are used in the variety of ISA Server 2004 scenarios discussed in this guide. It is
for this reason that we will walk through the installation and configuration of the domain
controller together.
You will perform the following steps to install and configure the Windows Server 2003 domain
controller:
• Install Windows Server 2003
• Install and Configure DNS
• Promote the machine to a domain controller
The machine will be a functioning domain controller by the time you have completed these
steps and will be ready for you to install Microsoft Exchange Server 2003.
Installing Windows Server 2003
Perform the following steps on the machine that acts as your domain controller computer:
1. Insert the CD into the CD-ROM tray and restart the computer. Allow the machine to boot
from the CD.
2. Windows setup begins loading files required for installation. Press ENTER when you see
the Welcome to Setup screen.
3. Read the Windows Licensing Agreement by pressing the PAGE DOWN key on the
keyboard. Then press F8 on the keyboard.
4. On the Windows Server 2003, Standard Edition Setup screen you will create a partition
for the operating system. In the lab, the entire disk can be formatted as a single partition.
Press ENTER.
ISA Server 2004 Configuration Guide 7
Page 10

5. On the Windows Server 2003, Standard Edition Setup screen, select the Format the
partition using the NTFS file system by using the up and down arrows on the keyboard.
Then press ENTER.
6. Windows Setup formats the hard disk. This can take quite some time if the disk is large.
Setup will copy files to the hard disk after formatting is complete.
7. The machine will automatically restart itself after the file copy process is complete.
8. The machine will restart in graphic interface mode. Click Next on the Regional and
Language Options page.
9. On the Personalize Your Software page, enter your Name and Organization and click
Next.
10. On the Your Product Key page, enter your 25-digit Product Key and click Next.
11. On the Licensing Modes page, select the option that applies to the version of Windows
Server 2003 you have. If you have per server licensing, enter the value for the number of
connections you have licensed. Click Next.
12. On the Computer Name and Administrator Password page, enter the name of the
computer in the Computer Name text box. In the walkthroughs in this Guide, the domain
controller/Exchange Server machine is named EXCHANGE2003BE, so we will enter that
into the text box. Enter an Administrator password and Confirm password in the text
boxes. Be sure to write down this password so that you will remember it later. Click Next.
13. On the Date and Time Settings page, set the correct date, time and time zone. Click
Next.
14. On the Networking Settings page, select the Custom settings option.
15. On the Network Components page, select the Internet Protocol (TCP/IP) entry in the
Components checked are used by this connection list and click Properties.
16. On the Internet Protocol (TCP/IP) Properties dialog box, select the Use the following
IP address option. In the IP address text box, enter 10.0.0.2. In the Subnet mask text
box enter 255.255.255.0. In the Default gateway text box enter 10.0.0.1. In the
Preferred DNS server text box, enter 10.0.0.2.
17. Click the Advanced button on the Internet Protocol (TCP/IP) Properties dialog box. In
the Advanced TCP/IP Settings dialog box, click the WINS tab. On the WINS tab, click
the Add button. In the TCP/IP WINS Server dialog box, enter 10.0.0.2 and click Add.
18. Click OK in the Advanced TCP/IP Settings dialog box.
19. Click OK in the Internet Protocol (TCP/IP) Properties dialog box.
20. Click Next on the Networking Components page.
21. Accept the default selection on the Workgroup or Computer Domain page. We will later
make this machine a domain controller and the machine will be a member of the domain
we create at that time. Click Next.
22. Installation continues and when it finishes, the computer will restart automatically.
23. Log on to the Windows Server 2003 using the password you created for the Administrator
account.
24. On the Manage Your Server page, put a checkmark in the Don’t display this page at
logon checkbox and close the window.
ISA Server 2004 Configuration Guide 8
Page 11

Install and Configure DNS
The next step is to install the Domain Naming System (DNS) server on the machine that will
be the domain controller. This is required because the Active Directory requires a DNS server
into which it registers domain-related DNS records. We will install the DNS server and then
create the domain into which we will promote the machine.
Perform the following steps to install the DNS server on the domain controller machine:
1. Click Start and point to Control Panel. Click Add or Remove Programs.
2. In the Add or Remove Programs window, click the Add/Remove Windows
Components button on the left side of the window.
3. In the Windows Components dialog box, scroll through the list of Components and
click the Networking Services entry. Click Details.
4. Place a checkmark in the Domain Name System (DNS) checkbox and click OK.
5. Click Next in the Windows Components page.
6. Click Finish on the Completing the Windows Components Wizard page.
7. Close the Add or Remove Programs window.
Now that the DNS server is installed, we can add forward and reverse lookup zones to
support our network configuration. Perform the following steps to configure the DNS server:
1. Click Start and then click Administrative Tools. Click DNS.
2. In the DNS console, expand the server name and then click on the Reverse Lookup
Zones node. Right click on the Reverse Lookup Zones and click New Zone.
3. Click Next on the Welcome to the New Zone Wizard page.
4. On the Zone Type page, select the Primary zone option and click Next.
5. On the Reverse Lookup Zone Name page, select the Network ID option and then enter
10.0.0 in the text box below it. Click Next.
6. Accept the default selection on the Zone File page, and click Next.
7. On the Dynamic Update page, select the Allow both nonsecure and secure dynamic
updates option. Click Next.
8. Click Finish on the Completing the New Zone Wizard page.
Now we can create the forward lookup zone for the domain that this machine will be promoted
into. Perform the following steps to create the forward lookup zone:
1. Right click the Forward Lookup Zone entry in the left pane of the console and click New
Zone.
2. Click Next on the Welcome to the New Zone Wizard page.
3. On the Zone Type page, select the Primary zone option and click Next.
4. On the Zone Name page, enter the name of the forward lookup zone in the Zone name
text box. In this example, the name of the zone is msfirewall.org. We will enter
msfirewall.org into the text box. Click Next.
5. Accept the default settings on the Zone File page and click Next.
6. On the Dynamic Update page, select the Allow both nonsecure and secure dynamic
updates. Click Next.
7. Click Finish on the Completing the New Zone Wizard page.
ISA Server 2004 Configuration Guide 9
Page 12

8. Expand the Forward Lookup Zones node and click on the msfirewall.org zone. Right
click on the msfirewall.org and click New Host (A).
9. In the New Host dialog box, enter the value EXCHANGE2003BE in the Name (uses
parent domain name if blank) text box. In the IP address text box, enter the value
10.0.0.2. Place a checkmark in the Create associated pointer (PTR) record checkbox.
Click Add Host. Click OK in the DNS dialog box informing you that the record was
created. Click Done in the New Host text box.
10. Right click on the msfirewall.org forward lookup zone and click Properties. Click the
Name Servers tab. On the Name Servers tab, click the exchange2003be entry and click
Edit.
11. In the Server fully qualified domain name (FQDN) text box, enter the fully qualified
domain name of the domain controller computer, exchange2003be.msfirewall.org. Click
Resolve. The IP address of the machine appears in the IP address list. Click OK.
12. Click Apply and then click OK on the msfirewall.org Properties dialog box.
13. Right click the server name in the left pane of the console and point to All Tasks. Click
Restart.
14. Close the DNS console.
The machine is now ready to be promoted to a domain controller in the msfirewall.org
domain. Perform the following steps to promote the domain to a domain controller:
1. Click Start and click the Run command.
2. In the Run dialog box, enter dcpromo in the Open text box and click OK.
3. Click Next on the Welcome to the Active Directory Installation Wizard page.
4. Click Next on the Operating System Compatibility page.
5. On the Domain Controller Type page, select the Domain controller for a new domain
option and click Next.
6. On the Create New Domain page, select the Domain in a new forest option and click
Next.
7. On the New Domain Name page, enter the name of the domain in the Full DNS name
for new domain text box. Enter msfirewall.org in the text box and click Next.
8. On the NetBIOS Domain Name page, accept the default NetBIOS name for the domain,
which is in this example MSFIREWALL. Click Next.
9. Accept the default settings on the Database and Log Folders page and click Next.
10. On the Shared System Volume page, accept the default location and click Next.
11. On the DNS Registration Diagnostics page, select the I will correct the problem later
by configuring DNS manually (Advanced). Click Next.
12. On the Permissions page, select the Permissions compatible only with Windows
2000 or Windows Server 2003 operating system option. Click Next.
13. On the Directory Services Restore Mode Administrator Password page, enter a
Restore Mode Password and then Confirm password. Click Next.
14. On the Summary page, click Next.
15. The machine now starts to configure itself as a domain controller.
16. Click Finish on the Completing the Active Directory Installation Wizard page.
ISA Server 2004 Configuration Guide 10
Page 13

17. Click Restart Now on the Active Directory Installation Wizard page.
18. Log on as Administrator after the machine restarts.
Installing and Configuring Microsoft Exchange on the Domain Controller
The machine is ready for installing Microsoft Exchange. In this section we will perform the
following steps:
• Install the IIS World Wide Web, SMTP and NNTP services
• Install Microsoft Exchange Server 2003
• Configure the Outlook Web Access Web Site
Perform the following steps to install the World Wide Web, SMTP and NNTP services:
1. Click Start and point to Control Panel. Click Add or Remove Programs.
2. In the Add or Remove Programs window, click the Add/Remove Windows
Components button on the left side of the window.
3. On the Windows Components page, select the Application Server entry in the
Components page. Click the Details button.
4. In the Application Server dialog box, put a checkmark in the ASP.NET checkbox. Select
the Internet Information Services (IIS) entry and click Details.
5. In the Internet Information Services (IIS) dialog box, put a checkmark in the NNTP
Service checkbox. Put a checkmark in the SMTP Service checkbox. Click OK.
6. Click OK in the Application Server dialog box.
7. Click Next on the Windows Components page.
8. Click OK in the Insert Disk dialog box.
9. In the Files Needed dialog box, enter the path to the i386 folder for the Windows Server
2003 CD in the Copy file from text box. Click OK.
10. Click Finish on the Completing the Windows Components Wizard page.
11. Close the Add or Remove Programs window.
Perform the following steps to install Microsoft Exchange:
1. Insert the Exchange Server 2003 CD into the machine. On the initial autorun page, click
the Exchange Deployment Tools link under the Deployment heading.
2. On the Welcome to the Exchange Server Deployment Tools page, click the Deploy
the first Exchange 2003 server link.
3. On the Deploy the First Exchange 2003 Server page, click the New Exchange 2003
Installation link.
4. On the New Exchange 2003 Installation page, scroll down to the bottom of the page.
Under step 8, click the Run Setup now link.
5. On the Welcome to the Microsoft Exchange Installation Wizard page, click Next.
6. On the License Agreement page, select the I agree option and click Next.
7. Accept the default settings on the Component Selection page and click Next.
ISA Server 2004 Configuration Guide 11
Page 14

8. Select the Create a New Exchange Organization option on the Installation Type page
and click Next.
9. Accept the default name in the Organization Name text box on the Organization Name
page, and click Next.
10. On the Licensing Agreement page, select the I agree that I have read and will be
bound by the license agreement for this product and click Next.
11. On the Installation Summary page, click Next.
12. In the Microsoft Exchange Installation Wizard dialog box, click OK.
13. Click Finish on the Completing the Microsoft Exchange Wizard page when installation
is complete.
14. Close all open windows.
The Exchange Server is now installed and you can create user mailboxes at this point. The
next step is to configure the Outlook Web Access site to use Basic authentication only. This is
a critical configuration option when you want to enable remote access to the OWA site. Later,
we will request a Web site certificate for the OWA site and publish the site using a Web
Publishing Rule, which will allow remote users to access the OWA site.
Perform the following steps to configure the OWA site to use Basic authentication only:
1. Click Start and point to Administrative Tools. Click Internet Information Services (IIS)
Manager.
2. In the Internet Information Services (IIS) Manager console, expand the server name
and then expand the Web Sites node. Expand the Default Web Site node.
3. Click on the Public node and then right click on it. Click Properties.
4. In the Public Properties dialog box, click the Directory Security tab.
5. On the Directory Security tab, click the Edit button in the Authentication and access
control frame.
6. In the Authentication Methods dialog box, remove the checkmark from the Integrated
Windows authentication checkbox. Click OK.
7. Click Apply and then click OK.
8. Click on the Exchange node in the left pane of the console and right click on it. Click
Properties.
9. On the Exchange Properties dialog box, click the Directory Security tab.
10. On the Directory Security tab, click the Edit button in the Authentication and access
control frame.
11. In the Authentication Methods dialog box, remove the checkmark from the Integrated
Windows authentication checkbox. Click OK.
12. Click Apply and then click OK in the Exchange Properties dialog box.
13. Click on the ExchWeb node in the left pane of the console, then right click on it. Click
Properties.
14. In the ExchWeb Properties dialog box, click the Directory Security tab.
15. On the Directory Security tab, click the Edit button in the Authentication and access
control frame.
16. In the Authentication Methods dialog box, remove the checkmark from the Enable
anonymous access checkbox. Place a checkmark in the Basic authentication
ISA Server 2004 Configuration Guide 12
Page 15

(password is sent in clear text) checkbox. Click Yes in the IIS Manager dialog box
informing you that the password is sent in the clear . In the Default domain text box,
enter the name of the Internal network domain, which is MSFIREWALL. Click OK.
17. Click Apply in the ExchWeb Properties dialog box. Click OK in the Inheritance
Overrides dialog box. Click OK in the ExchWeb Properties dialog box.
18. Right click the Default Web Site and click Stop. Right click the Default Web Site again
and click Start.
ISA Server 2004 Configuration Guide 13
Page 16
Conclusion
In this ISA Server 2004 Configuration Guide document we discussed the goals of this guide
and suggested methods you can use to get the most out of this guide. The remainder of this
ISA Server 2004 Configuration Guide provided detailed step-by-step instructions on how to
install and configure the domain controller computer on the internal network. In the next
chapter of this guide, we will go over the procedures required to install Microsoft Certificate
Services on the ISA Server 2004 firewall machine.
This is a preliminary document and may be changed substantially prior to final commercial release of the software described herein.
The information contained in this document represents the current view of Microsoft Corporation on the issues discussed as of the
date of publication. Because Microsoft must respond to changing market conditions, it should not be interpreted to be a commitment
on the part of Microsoft, and Microsoft cannot guarantee the accuracy of any information presented after the date of publication.
This white paper is for informational purposes only. MICROSOFT MAKES NO WARRANTIES, EXPRESS OR IMPLIED, IN THIS
DOCUMENT.
Complying with all applicable copyright laws is the responsibility of the user. Without limiting the rights under copyright, no part of this
document may be reproduced, stored in, or introduced into a retrieval system, or transmitted in any form or by any means (electronic,
mechanical, photocopying, recording, or otherwise), or for any purpose, without the express written permission of Microsoft
Corporation.
Microsoft may have patents, patent applications, trademarks, copyrights, or other intellectual property rights covering subject matter in
this document. Except as expressly provided in any written license agreement from Microsoft, the furnishing of this document does
not give you any license to these patents, trademarks, copyrights, or other intellectual property.
© 2004 Microsoft Corporation. All rights reserved.
The example companies, organizations, products, domain names, e-mail addresses, logos, people, places, and events depicted
herein are fictitious. No association with any real company, organization, product, domain name, e-mail address, logo, person, place,
or event is intended or should be inferred.
Microsoft, Windows, Windows 2000, Windows 2000 Server, Windows Server 2003, Windows Server System, ISA Server, and ISA
Server 2004 are either registered trademarks or trademarks of Microsoft Corporation in the United States and/or other countries.
The names of actual companies and products mentioned herein may be the trademarks of their respective owners.
ISA Server 2004 Configuration Guide 14
Page 17

ISA Server 2004 Configuration Guide:
Installing Certificate Services
Chapter 2
For the latest information, please see http://www.microsoft.com/isaserver/
ISA Server 2004 Configuration Guide 15
Page 18

Introduction
Microsoft Certificate Services can be installed on the domain controller on the internal
network and issue certificates to hosts within the internal network domain, as well as to hosts
that are not members of the Internal network domain. We will use certificates in a variety of
configuration scenarios in this ISA Server 2004 Configuration Guide series, including to
accomplish the following:
• Allow the ISA Server 2004 firewall to use the L2TP/IPSec VPN protocol for a site-to-site
VPN link
• Allow the ISA Server 2004 firewall to use the L2TP/IPSec VPN protocol for a VPN client
connection from a remote access VPN client
• Enable remote users to access the Outlook Web Access site using highly secure SSL-toSSL bridged connections
• Publish secure Exchange SMTP and POP3 services to the Internet
The certificates enable us to use SSL/TLS security. The SSL (Secure Sockets Layer) protocol
is a session layer protocol that encrypts data moving between the client and server machines.
SSL security is considered the current standard for providing secure remote access to Web
sites. In addition, certificates can be used to confirm the identity of VPN clients and servers so
that mutual machine authentication can be performed.
In this document we will discuss the following procedures:
• Installing Internet Information Services 6.0 to support the Certificate Authority’s Web
enrollment site
• Installing Microsoft Certificate Services in Enterprise CA mode
ISA Server 2004 Configuration Guide 16
Page 19
Install Internet Information Services 6.0
The Certificate Authority’s Web enrollment site uses the Internet Information Services World
Wide Publishing Service. Because Exchange 2003 has already been installed on this
machine, we will not need to manually install the IIS Web services. The Exchange 2003 setup
routine requires that you install the IIS Web services so that the Outlook Web Access site
functions properly. However, you should confirm that the WWW Publishing Service is enabled
before starting installation of the Enterprise CA.
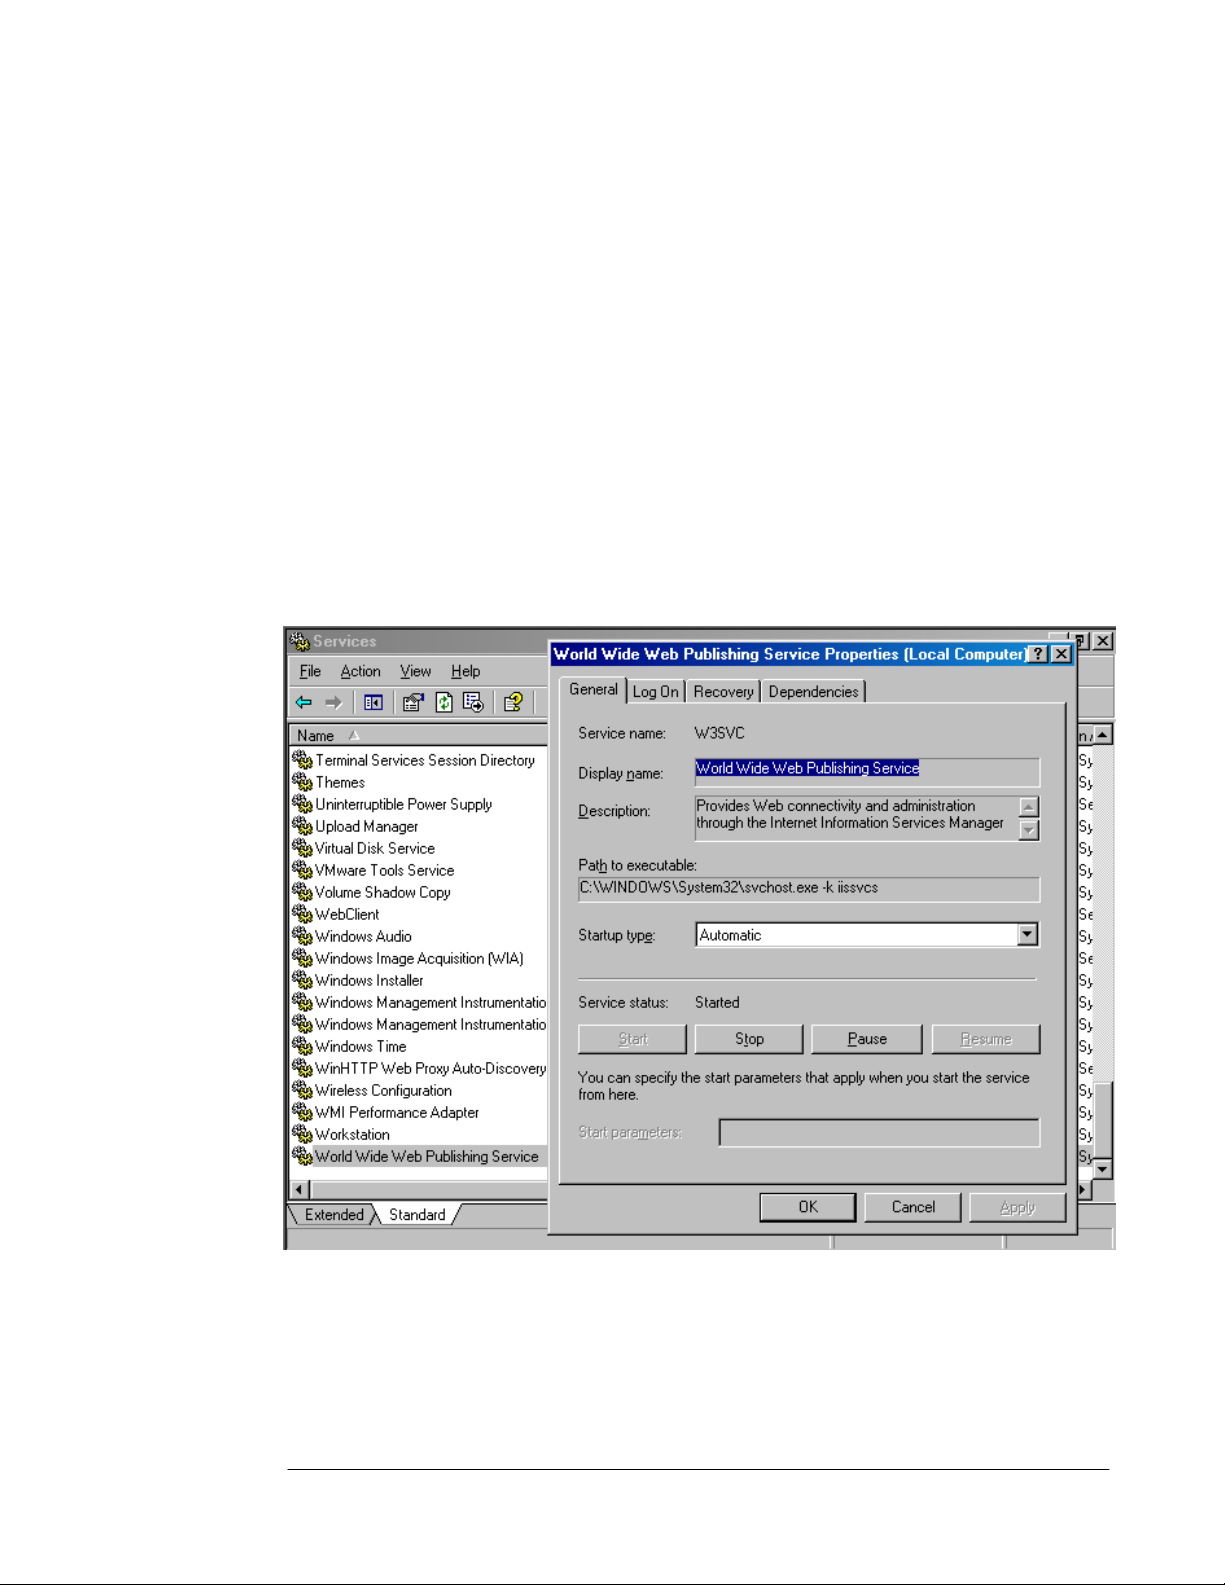
Perform the following steps to confirm that the WWW Publishing Service is running on the
domain controller:
1. Click Start and point to Administrative Tools. Click on Services.
2. In the Services console, click on the Standard tab in the right pane. Scroll down to the
bottom of the list and find the World Wide Web Publishing Service entry. Double click
on that entry.
3. In the World Wide Web Publishing Server Properties dialog box, confirm that the
Startup type is set to Automatic, and that the Service status is Started.
4. Click Cancel and close the Services console.
Now that we’ve confirmed that the WWW Publishing Service is started, the next step is to
install the Enterprise CA software.
ISA Server 2004 Configuration Guide 17
Page 20

Install Microsoft Certificate Services in Enterprise CA Mode
Microsoft Certificate Services will be installed in Enterprise CA mode on the domain
controller. There are several advantages to installing the CA in enterprise mode versus
standalone mode. These include:
• The root CA certificate is automatically entered into the Trusted Root Certification
Authorities certificate store on all domain member machines
• You can use the Certificates MMC snap-in to easily request a certificate. This greatly
simplifies requesting machine and Web site certificates
• All machines can be assigned certificates using the Active Directory autoenrollment
feature
• All domain users can be assigned user certificates using the Active Directory
autoenrollment feature
Note that you do not need to install the CA in enterprise mode. You can install the CA in
standalone mode, but we will not cover the procedures involved with installing the CA in
standalone mode or how to obtain a certificate from a standalone CA in this ISA Server 2004
Configuration Guide series.
Perform the following steps to install the Enterprise CA on the EXCHANGE2003BE domain
controller computer:
1. Click Start, then point to Control Panel. Click on Add or Remove Programs.
2. In the Add or Remove Programs window, click the Add/Remove Windows
Components button on the left side of the window.
3. On the Windows Components page, scroll through the list and put a checkmark in the
Certificate Services checkbox. Click Yes in the Microsoft Certificate Services dialog
box informing you that you may not change the name of the machine or the machine’s
domain membership while it is acting as a CA. Click Yes to continue.
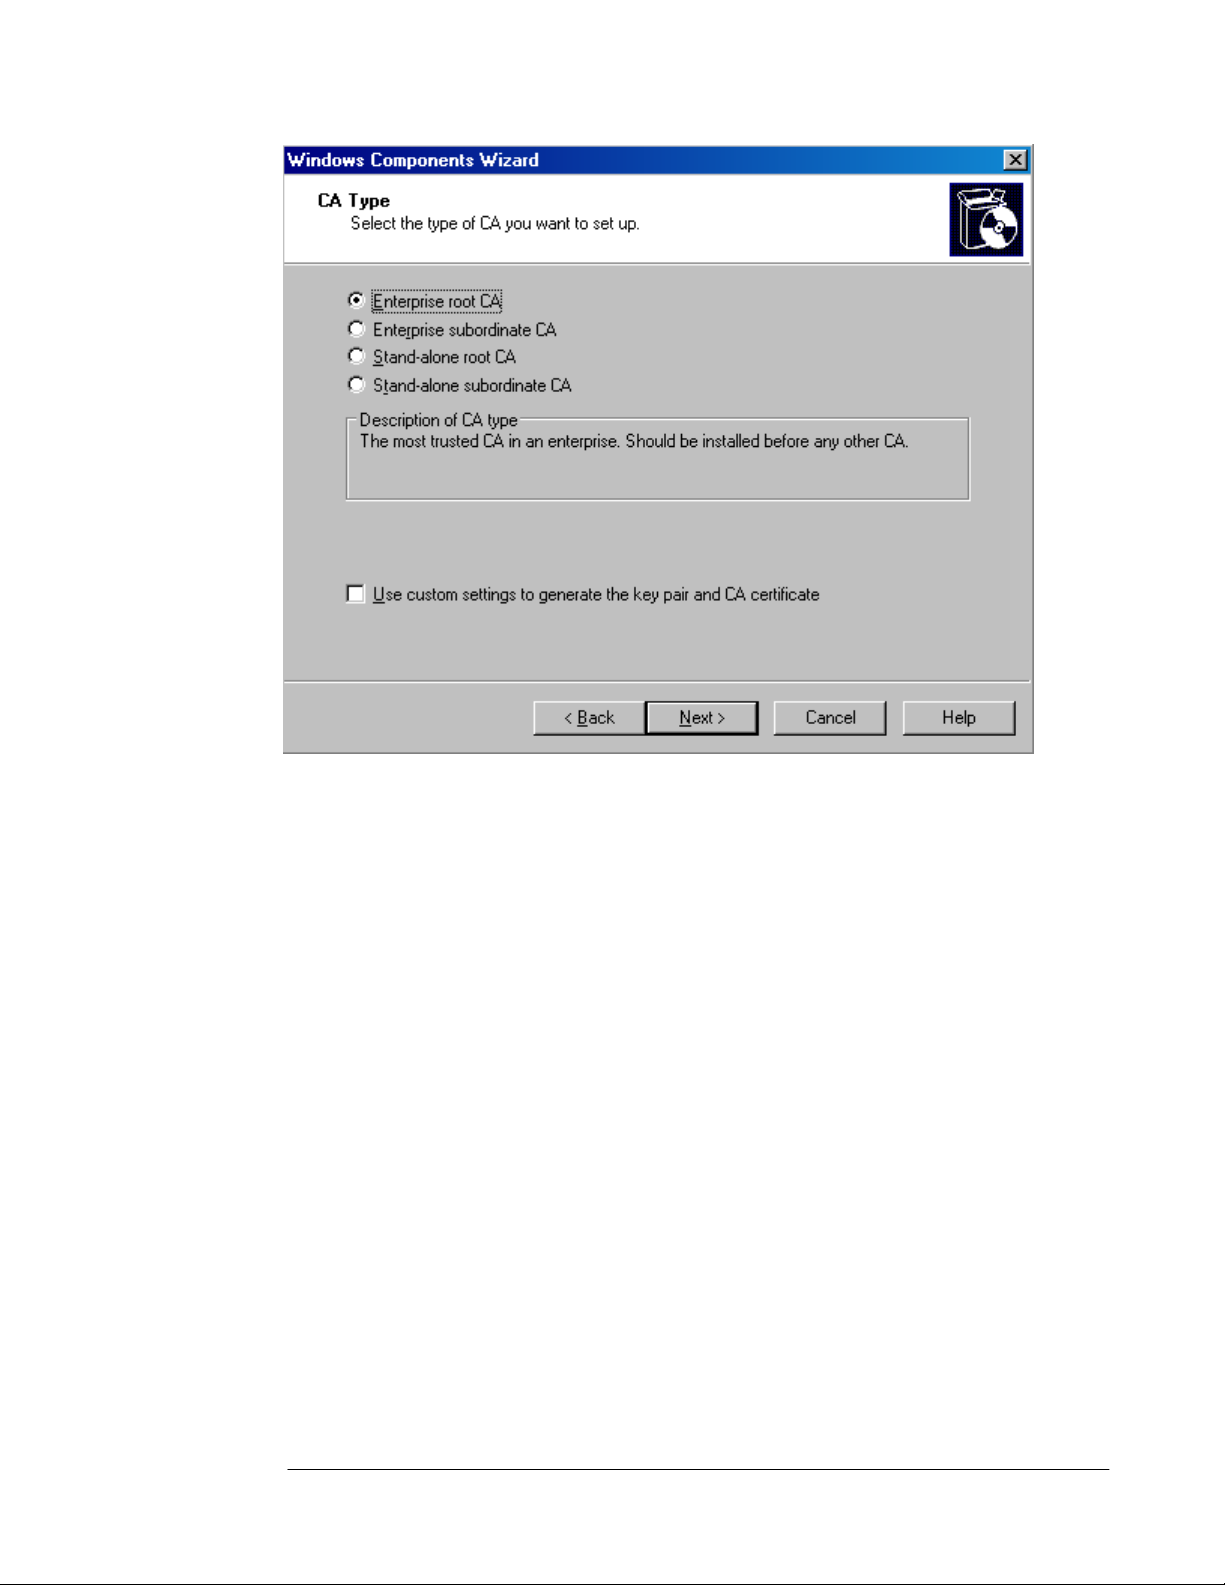
4. Click Next on the Windows Components page.
5. On the CA Type page, select the Enterprise root CA option and click Next.
ISA Server 2004 Configuration Guide 18
Page 21
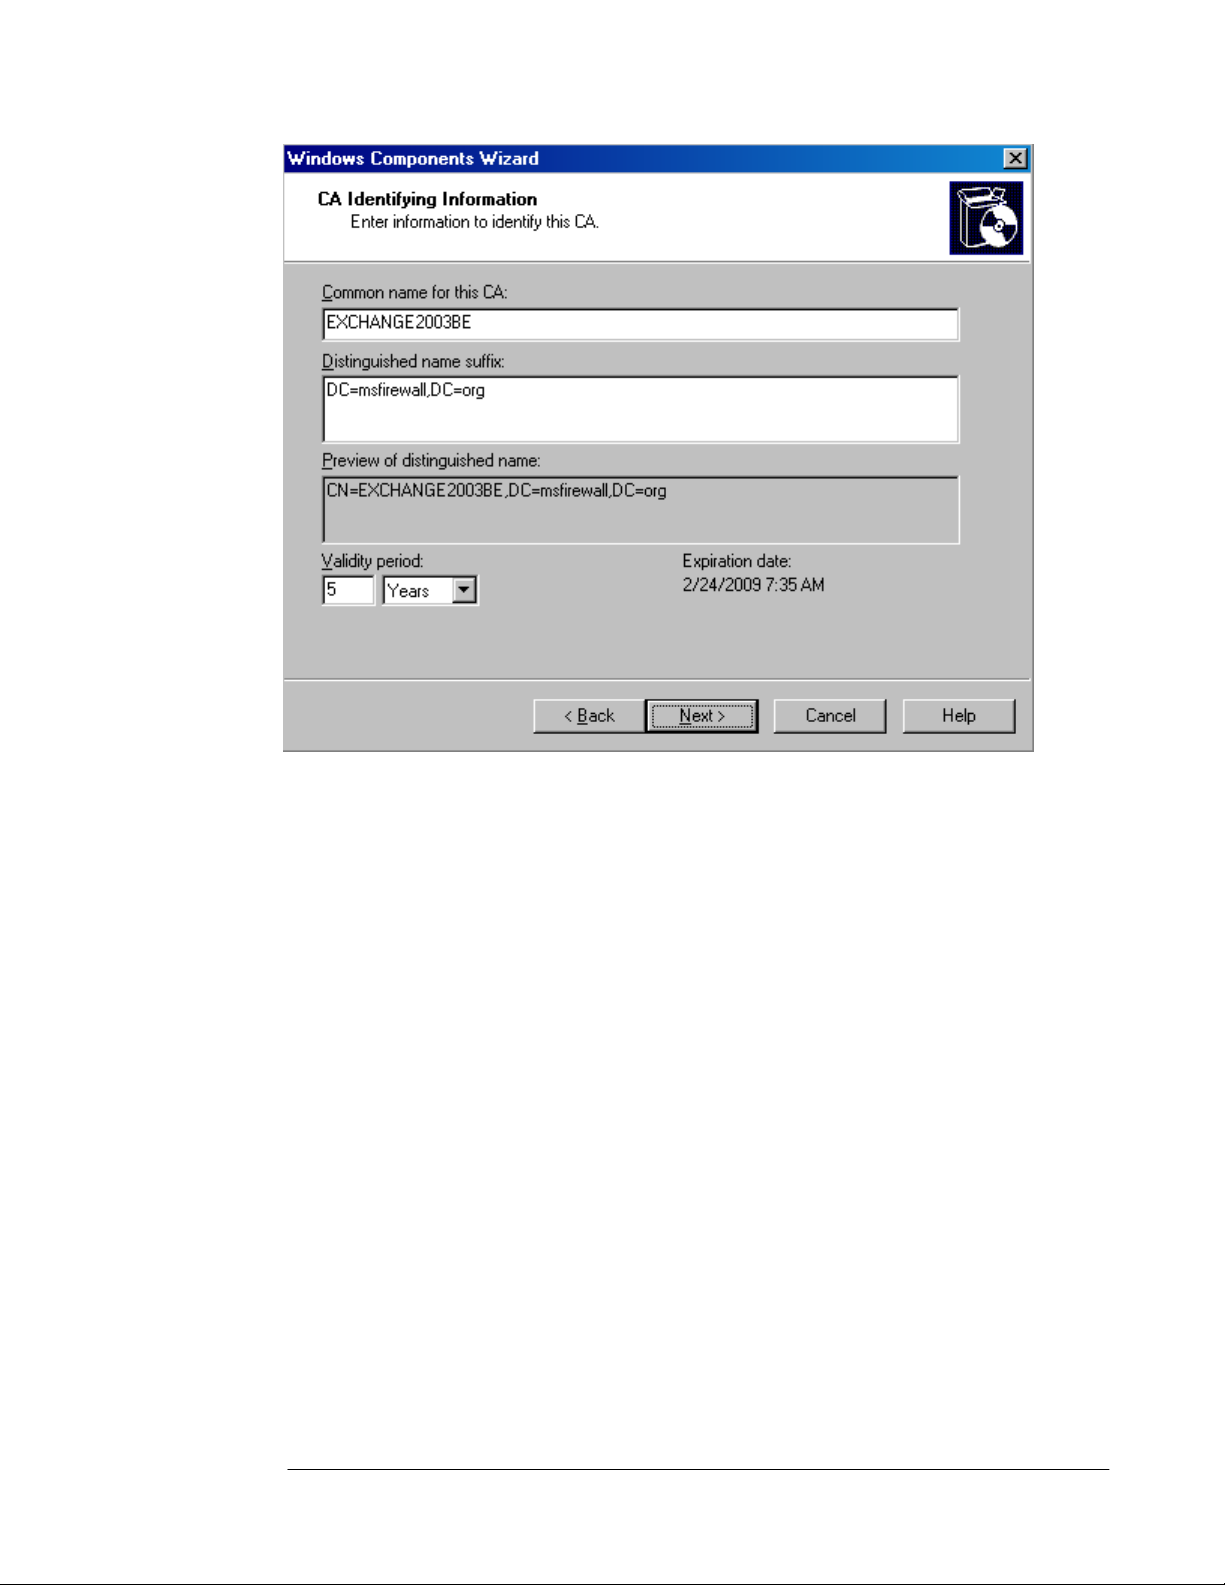
6. On the CA Identifying Information page, enter a name for the CA in the Common name
for this CA text box. This should be the DNS host name for the domain controller. Ideally,
you will have configured a split DNS infrastructure and this name will be accessible from
internal and external locations, so that external hosts will be able to check the certificate
revocation list. We will not cover the issue of a split DNS infrastructure in this document.
You can find more information about designing and configuring a split DNS infrastructure
in the ISA Server 2000 Branch Office Kit document “DNS Considerations for ISA Server
2000 Branch Office Networks” at
http://www.tacteam.net/isaserverorg/isabokit/9dnssupport/9dnssupport.htm. In this
example we will enter the domain controllers NetBIOS name, EXCHANGE2003BE. Click
Next.
ISA Server 2004 Configuration Guide 19
Page 22
7. If the same machine had been configured as a CA in the past, you will be presented with
a dialog box asking if you wish to overwrite the existing key. If you have already deployed
certificates to hosts on your network, then do not overwrite the current key. If you have
not yet deployed certificates to hosts on your network, then choose to overwrite the
existing key. In this example, we have not previously installed a CA on this machine and
we do not see this dialog box.
8. In the Certificate Database Settings page, use the default locations for the Certificate
Database and Certificate database log text boxes. Click Next.
9. Click Yes in the Microsoft Certificate Services dialog box informing you that Internet
Information Services must be restarted. Click Yes to stop the service. The service will be
restarted for you automatically.
10. Click OK in the Insert Disk dialog box. In the Files Needed dialog box, enter the path to
the i386 folder in the Copy file from text box and click OK.
11. Click Finish on the Completing the Windows Components Wizard page.
12. Close the Add or Remove Programs window.
At this point, the Enterprise CA is able to issue certificates to machines via autoenrollment,
the Certificates mmc snap-in, or via the Web enrollment site. Later in this ISA Server 2004
Getting Start Guide series, we will issue a Web site certificate to the OWA Web site and also
issue machine certificates to the ISA Server 2004 firewall computer and to an external VPN
client and VPN gateway (VPN router) machine.
ISA Server 2004 Configuration Guide 20
Page 23
Conclusion
In this ISA Server 2004 Configuration Guide document we discussed the uses of a
certificate authority and how to install an Enterprise CA on the domain controller on the
internal network. Later in this guide, we will use this Enterprise CA to issue machine
certificates to VPN clients and servers and issue a Web site certificate to the Exchange
Server’s Outlook Web Access Web site.
This is a preliminary document and may be changed substantially prior to final commercial release of the software described herein.
The information contained in this document represents the current view of Microsoft Corporation on the issues discussed as of the
date of publication. Because Microsoft must respond to changing market conditions, it should not be interpreted to be a commitment
on the part of Microsoft, and Microsoft cannot guarantee the accuracy of any information presented after the date of publication.
This white paper is for informational purposes only. MICROSOFT MAKES NO WARRANTIES, EXPRESS OR IMPLIED, IN THIS
DOCUMENT.
Complying with all applicable copyright laws is the responsibility of the user. Without limiting the rights under copyright, no part of this
document may be reproduced, stored in, or introduced into a retrieval system, or transmitted in any form or by any means (electronic,
mechanical, photocopying, recording, or otherwise), or for any purpose, without the express written permission of Microsoft
Corporation.
Microsoft may have patents, patent applications, trademarks, copyrights, or other intellectual property rights covering subject matter in
this document. Except as expressly provided in any written license agreement from Microsoft, the furnishing of this document does
not give you any license to these patents, trademarks, copyrights, or other intellectual property.
© 2004 Microsoft Corporation. All rights reserved.
The example companies, organizations, products, domain names, e-mail addresses, logos, people, places, and events depicted
herein are fictitious. No association with any real company, organization, product, domain name, e-mail address, logo, person, place,
or event is intended or should be inferred.
Microsoft, Windows, Windows 2000, Windows 2000 Server, Windows Server 2003, Windows Server System, ISA Server, and ISA
Server 2004 are either registered trademarks or trademarks of Microsoft Corporation in the United States and/or other countries.
The names of actual companies and products mentioned herein may be the trademarks of their respective owners.
ISA Server 2004 Configuration Guide 21
Page 24
ISA Server 2004 Configuration Guide:
Installing and Configuring the Microsoft
Internet Authentication Service
Chapter 3
For the latest information, please see http://www.microsoft.com/isaserver/
ISA Server 2004 Configuration Guide 22
Page 25

Introduction
The Microsoft Internet Authentication Server (IAS) is an industry standard RADIUS server that
can be used to authenticate users connecting to the ISA Server 2004 firewall machine. You
can use IAS to authenticate Web Proxy clients on the internal network and VPN clients and
VPN gateways calling in from an external network location. In addition, you can use RADIUS
authentication to remote users who connect to Web servers published using ISA Server 2004
Web Publishing rules.
The major advantage of using RADIUS authentication for Web proxy and VPN connections is
that the ISA Server 2004 firewall computer does not need to be a member of the domain to
authenticate users whose accounts are contained in the Active Directory on the internal
network. Many firewall administrators recommend that the firewall not be a member of the
user domain. This prevents attackers who may compromise the firewall from taking
advantage of the firewall’s domain member status to amplify an attack against the internal
network.
One major drawback to not making the ISA Server 2004 firewall a member of the internal
network domain is that you cannot use the Firewall client to provide authenticated access to
all TCP and UDP protocols. For this reason, we make the ISA Server 2004 firewall computer
a member of the domain in this ISA Server 2004 Configuration Guide series. However, if
you choose to not join the firewall to the domain, you can still use IAS to authenticate your
VPN and Web Proxy clients.
We will discuss the following procedures in this document:
• Installing the Microsoft Internet Authentication Service
• Configuring the Microsoft Internet Authentication Service
ISA Server 2004 Configuration Guide 23
Page 26
Installing the Microsoft Internet Authentication Service
The Microsoft Internet Authentication Service server is a RADIUS server. We will use the
RADIUS server later in this ISA Server 2004 Configuration Guide to enable RADIUS
authentication for Web Publishing Rules and investigate how RADIUS authentication can be
used to authenticate VPN clients.
Perform the following steps to install the Microsoft Internet Authentication Server on the
domain controller EXCHANGE2003BE on the internal network:
1. Click Start and point to Control Panel. Click on Add or Remove Programs.
2. In the Add or Remove Programs window, click the Add/Remove Windows
Components button in the left pane of the console.
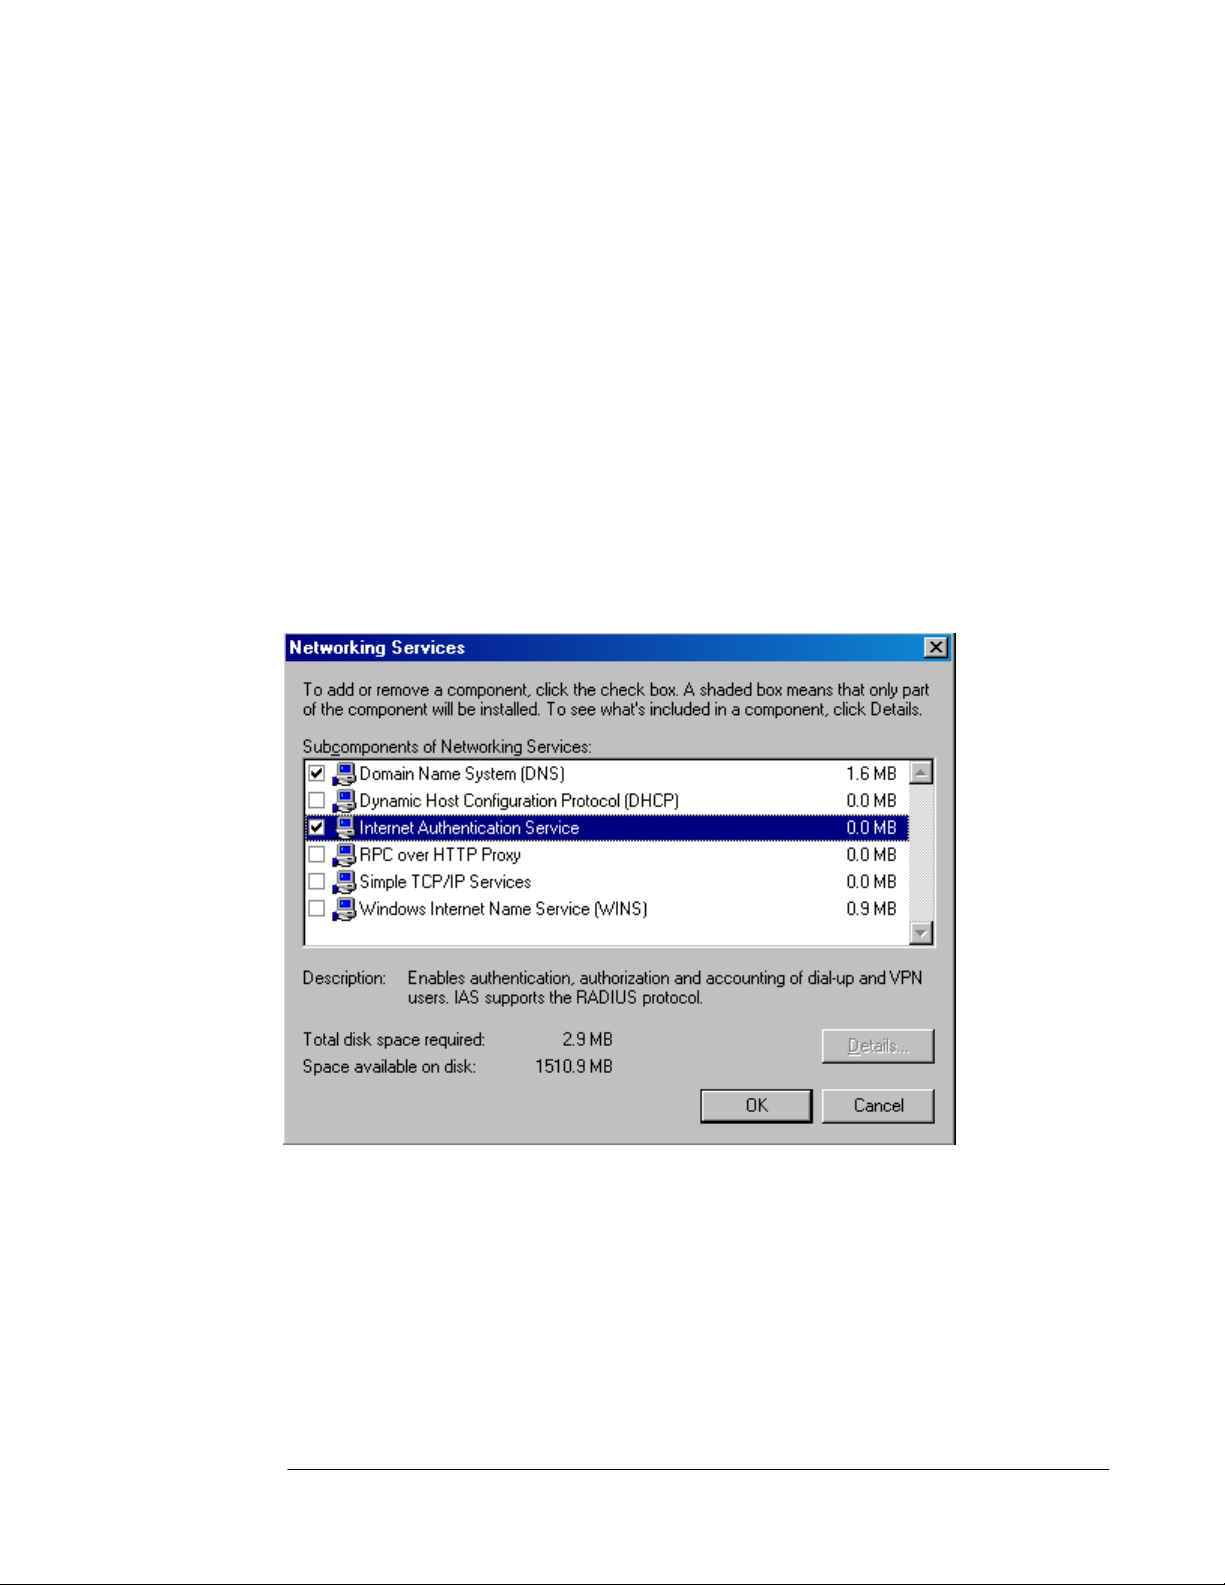
3. On the Windows Components page, scroll through the Components list and select the
Networking Services entry. Click Details.
4. Place a checkmark in the Internet Authentication Service checkbox and click OK.
5. Click Next on the Windows Components page.
6. Click Finish on the Completing the Windows Components Wizard page.
7. Close the Add or Remove Programs window.
The next step is to configure the Internet Authentication Service.
ISA Server 2004 Configuration Guide 24
Page 27
Configuring the Microsoft Internet Authentication Service
You need to configure the IAS server to work together with the ISA Server 2004 firewall
computer so that they can communicate properly. At this time, we will configure the IAS
Server to work with the ISA Server 2004 firewall. Later we will configure the firewall to
communicate with the IAS server.
Perform the following steps on the domain controller on the internal network to configure the
IAS server:
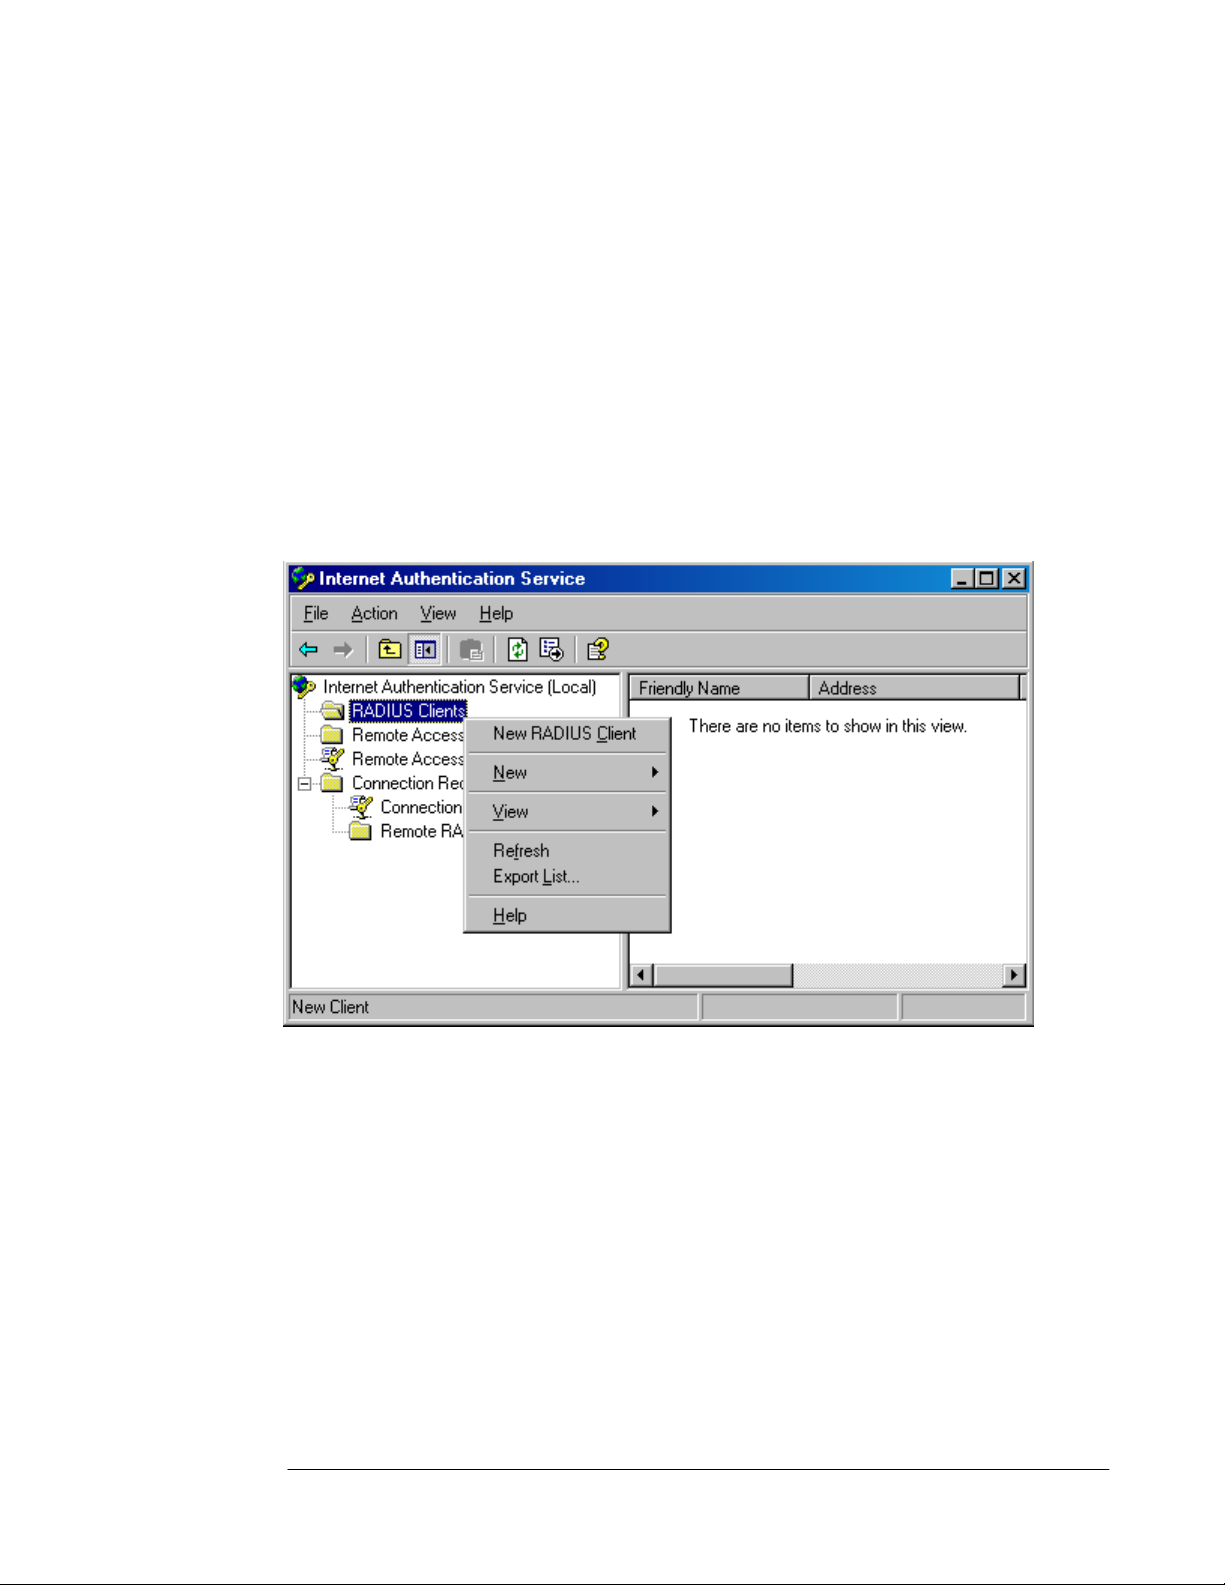
1. Click Start and point to Administrative Tools. Click Internet Authentication Service.
2. In the Internet Authentication Service console, expand the Internet Authentication
Service (Local) node. Right click on the RADIUS Clients node and click New RADIUS
Client.
3. On the Name and Address page of the New RADIUS Client wizard, enter a friendly
name for the ISA Server 2004 firewall computer in the Friendly name text box. This
name is used to identify the RADIUS client and not used for operational purposes. Enter
the fully qualified domain name of the ISA Server 2004 firewall computer in the Client
address (IP or DNS) text box.
ISA Server 2004 Configuration Guide 25
Page 28

4. Click the Verify button. In the Verify Client dialog box, the fully qualified domain name of
the ISA Server 2004 firewall computer will appear in the Client text box. Click the
Resolve button. If the RADIUS server is able to resolve the name, the IP address will
appear in the IP address frame. If the RADIUS server is not able to resolve the name,
this indicates that the ISA Server 2004 firewall’s name has not been entered into the
DNS. In that case, you can choose to enter the name of the ISA Server 2004 firewall
computer into the DNS server on the domain controller, or you can use the IP address on
the internal interface of the ISA Server 2004 firewall in the Client address (IP and DNS)
text box on the Name or Address page (as seen above). Click OK in the Verify Client
dialog box.
ISA Server 2004 Configuration Guide 26
Page 29
5. Click Next on the Name and Address page of the New RADIUS Client wizard.
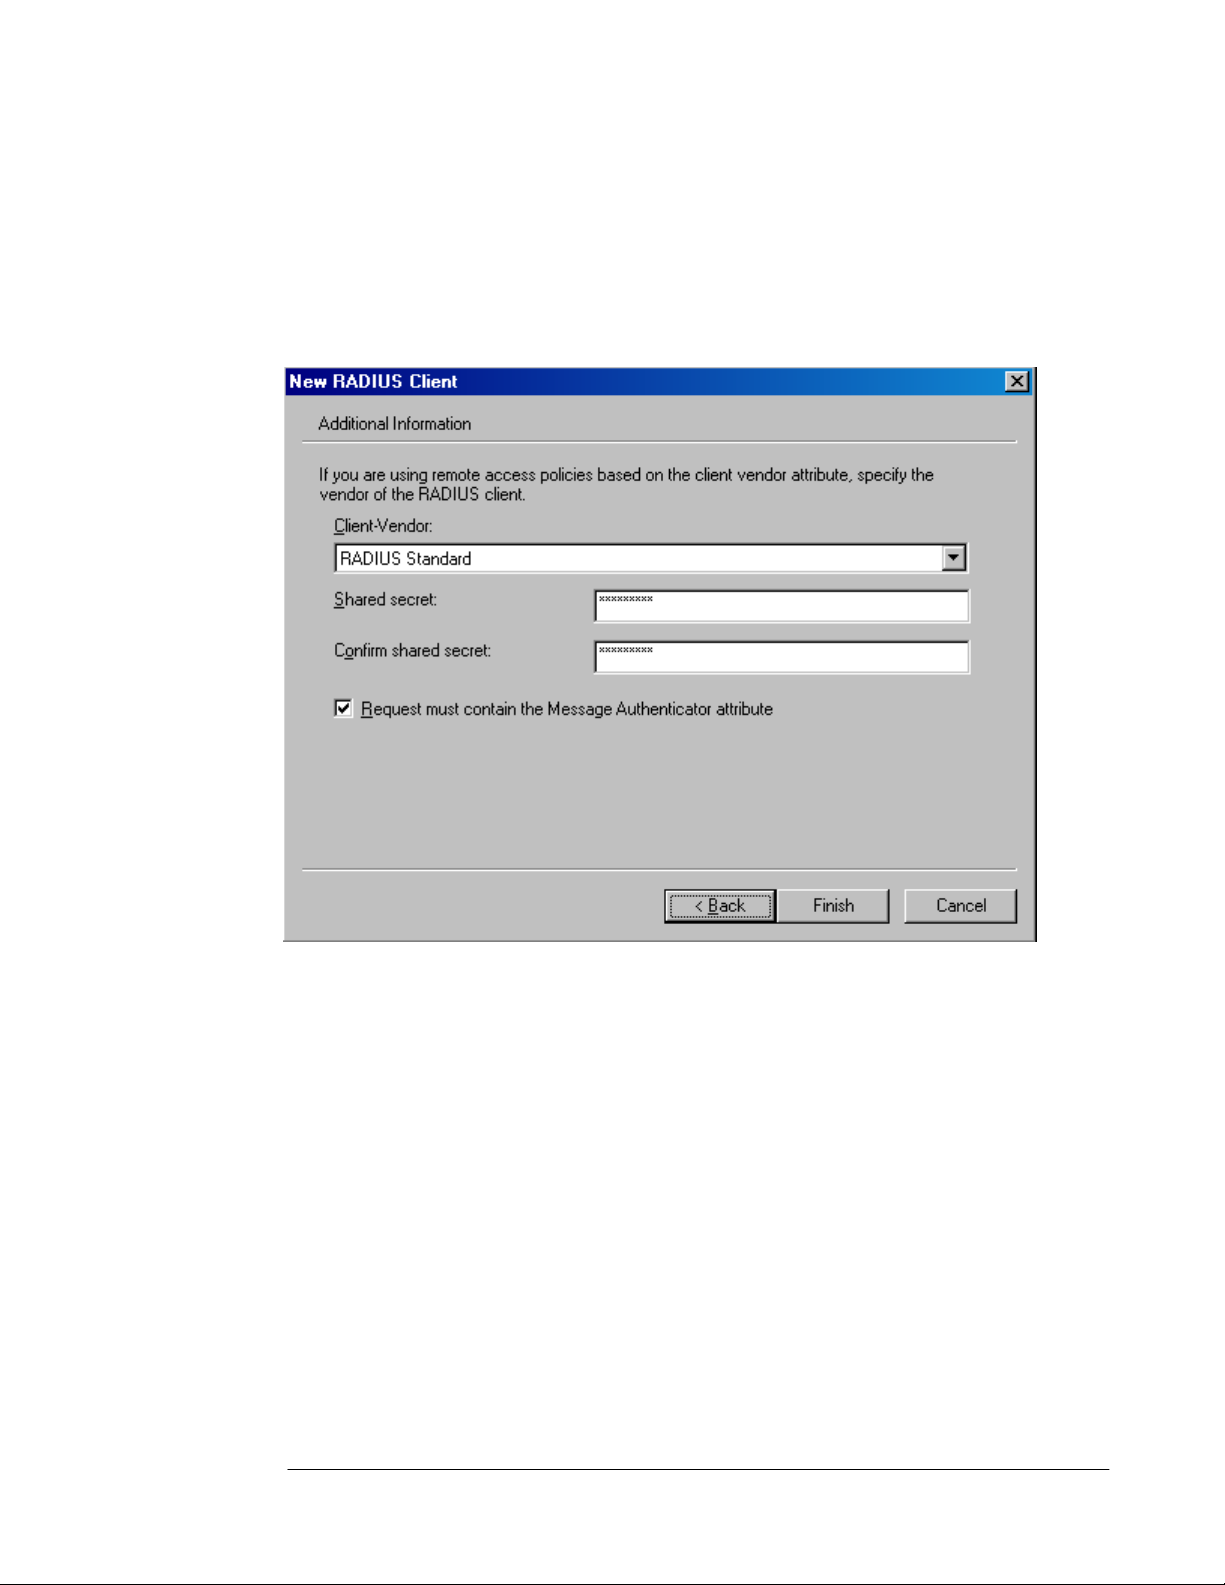
6. On the Additional Information page of the wizard, use the default Client-Vendor entry,
which is RADIUS Standard. Enter a password in the Shared secret text box and confirm
the password in the Confirm shared secret text box. This shared secret will allow the
ISA Server 2004 firewall and the RADIUS server to confirm each other’s identities. The
shared secret should contain at least 8 characters and include mixed case letters,
numbers and symbols. Place a checkmark in the Request must contain the Message
Authenticator attribute check box. Click Finish.
7. The new RADIUS client entry appears in the right pane of the console.
ISA Server 2004 Configuration Guide 27
Page 30
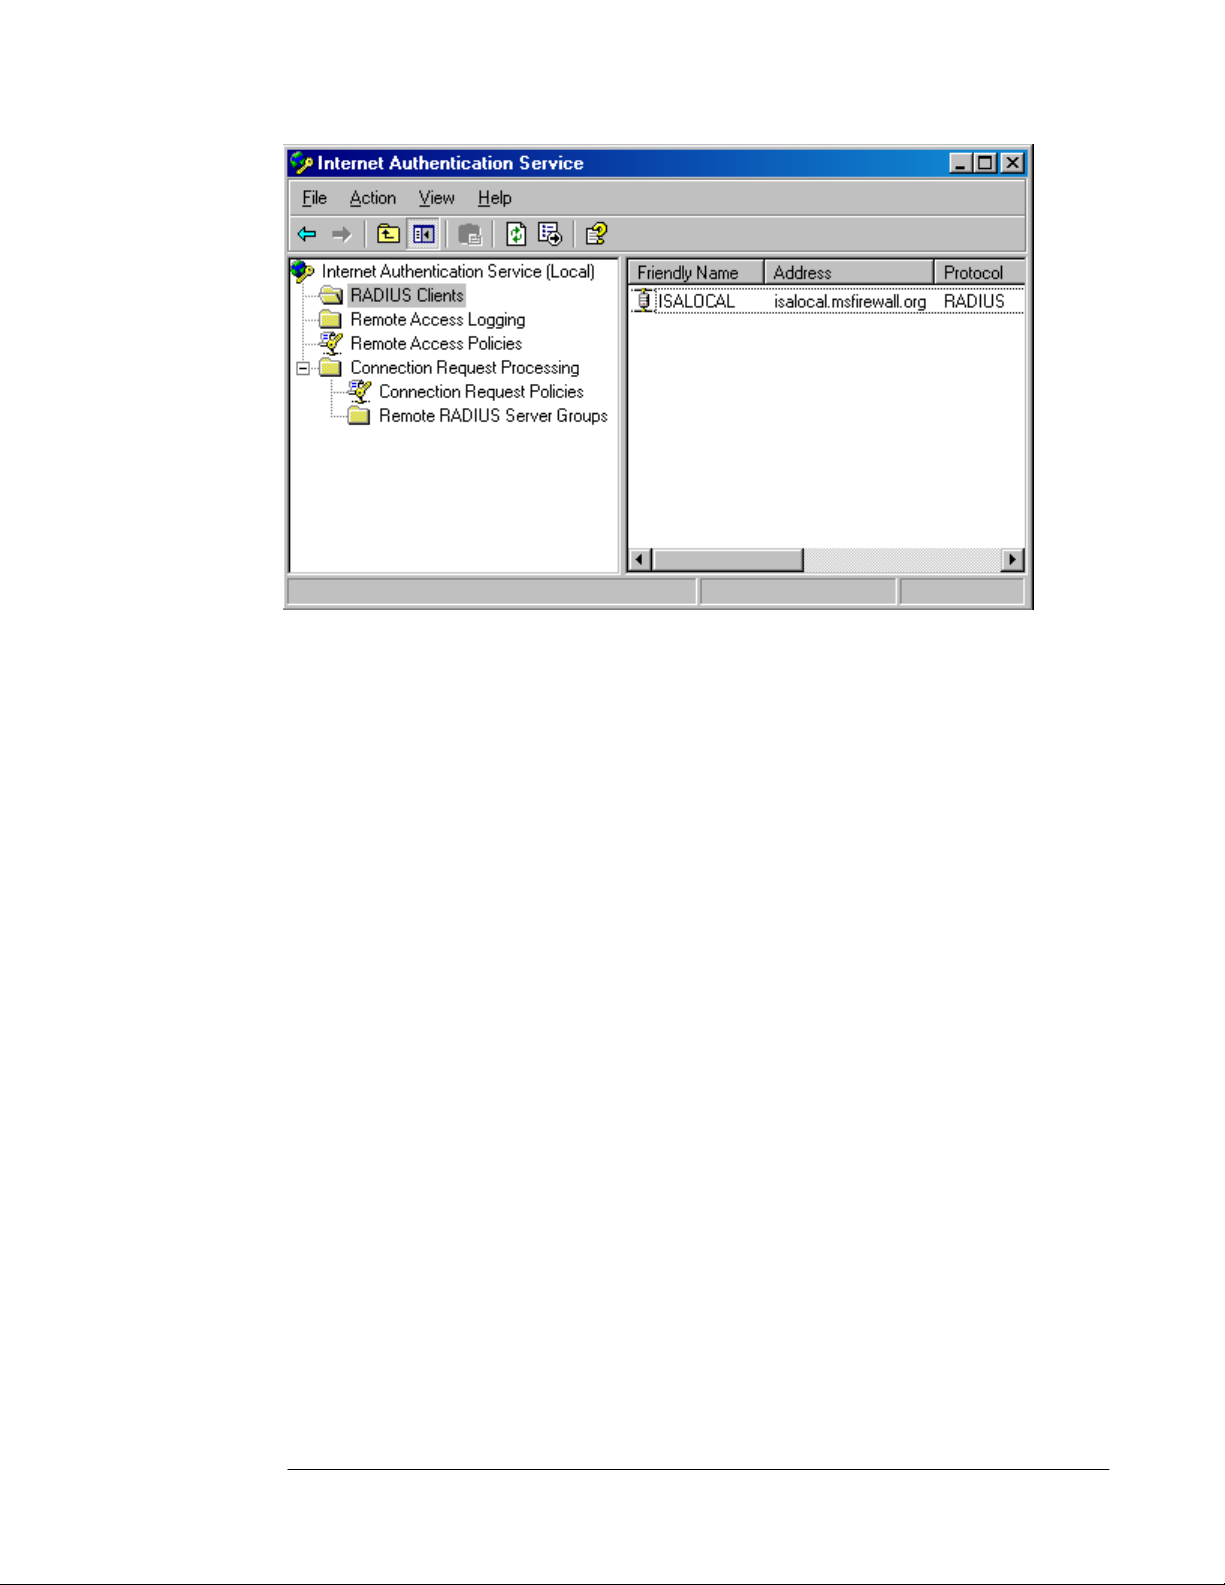
8. Close the Internet Authentication Service console.
Later in this ISA Server 2004 Configuration Guide series we will configure a RADIUS server
entry in the Microsoft Internet Security and Acceleration Server 2004 management
console and use that entry for Web and VPN client requests.
ISA Server 2004 Configuration Guide 28
Page 31

Conclusion
In this ISA Server 2004 Configuration Guide document we discussed the uses of a
Microsoft Internet Authentication Server and how to install and configure the IAS server on
the domain controller on the internal network. Later in this guide we will use this IAS server to
authenticate incoming Web and VPN client connections.
This is a preliminary document and may be changed substantially prior to final commercial release of the software described herein.
The information contained in this document represents the current view of Microsoft Corporation on the issues discussed as of the
date of publication. Because Microsoft must respond to changing market conditions, it should not be interpreted to be a commitment
on the part of Microsoft, and Microsoft cannot guarantee the accuracy of any information presented after the date of publication.
This white paper is for informational purposes only. MICROSOFT MAKES NO WARRANTIES, EXPRESS OR IMPLIED, IN THIS
DOCUMENT.
Complying with all applicable copyright laws is the responsibility of the user. Without limiting the rights under copyright, no part of this
document may be reproduced, stored in, or introduced into a retrieval system, or transmitted in any form or by any means (electronic,
mechanical, photocopying, recording, or otherwise), or for any purpose, without the express written permission of Microsoft
Corporation.
Microsoft may have patents, patent applications, trademarks, copyrights, or other intellectual property rights covering subject matter in
this document. Except as expressly provided in any written license agreement from Microsoft, the furnishing of this document does
not give you any license to these patents, trademarks, copyrights, or other intellectual property.
© 2004 Microsoft Corporation. All rights reserved.
The example companies, organizations, products, domain names, e-mail addresses, logos, people, places, and events depicted
herein are fictitious. No association with any real company, organization, product, domain name, e-mail address, logo, person, place,
or event is intended or should be inferred.
Microsoft, Windows, Windows 2000, Windows 2000 Server, Windows Server 2003, Windows Server System, ISA Server, and ISA
Server 2004 are either registered trademarks or trademarks of Microsoft Corporation in the United States and/or other countries.
The names of actual companies and products mentioned herein may be the trademarks of their respective owners.
ISA Server 2004 Configuration Guide 29
Page 32

ISA Server 2004 Configuration Guide:
Installing and Configuring the Microsoft
DHCP and WINS Server Services
Chapter 4
For the latest information, please see http://www.microsoft.com/isaserver/
ISA Server 2004 Configuration Guide 30
Page 33

Introduction
The Windows Internet Name Service (WINS) enables machines to resolve NetBIOS names of
hosts on remote networks. Machines configured as WINS clients register their names with the
WINS server. WINS clients are also able to send name queries to a WINS server to resolve
the names to IP addresses. Windows clients can send a broadcast to the local network to
resolve NetBIOS names, but when hosts are located on remote networks (networks that are
on different network segments or NetBIOS broadcast domains), the broadcasts for name
resolutions fail. The only solution is a WINS server.
The WINS server is especially important for VPN clients. The VPN clients are not directly
connected to the internal network, and they are not able to use broadcasts to resolve internal
network NetBIOS names. (An exception is when you use Windows Server 2003 and enable
the NetBIOS proxy, which provides very limited NetBIOS broadcast support.) VPN clients
depend on a WINS server to resolve NetBIOS names and to obtain information required to
populate the browse list that appears in the My Network Places applet.
The Dynamic Host Configuration Protocol (DHCP) is used to automatically assign IP
addressing information to DHCP clients. The DHCP server should be configured on an
internal network server and not on the firewall itself. When you configure the DHCP server on
the internal network, the ISA Server 2004 firewall can automatically obtain IP addresses from
the DHCP server and dynamically assign VPN clients to a special “VPN Clients Network.”
Access controls and routing relationships can be configured between the VPN Clients
network and any other network defined on the ISA Server 2004 firewall machine.
In the ISA Server 2004 Configuration Guide document, we will go over the procedures
required to install the Microsoft WINS and DHCP services. We will then configure a DHCP
scope with DHCP scope options.
We will discuss the following procedures in this document:
• Installing the WINS service
• Configuring a DHCP scope
ISA Server 2004 Configuration Guide 31
Page 34
Installing the WINS Service
The Windows Internet Name Service (WINS) is used to resolve NetBIOS names to IP
addresses. On modern Windows networks, the WINS service is not required. However, many
organizations want to use the My Network Places applet to locate servers on the network.
The My Network Places applet depends on the functionality provided by the Windows
Browser service. The Windows Browser service is a broadcast-based service that depends
on a WINS server to compile and distribute information on servers on each network segment.
In addition, the WINS service is required when VPN clients wish to obtain browse list
information for internal network clients. We will install the WINS server on the internal network
to support NetBIOS name resolution and the Windows browser service for VPN clients.
Perform the following steps to install WINS:
1. Click Start and point to Control Panel. Click Add or Remove Programs.
2. In the Add or Remove Programs window, click the Add/Remove Windows
Components button.
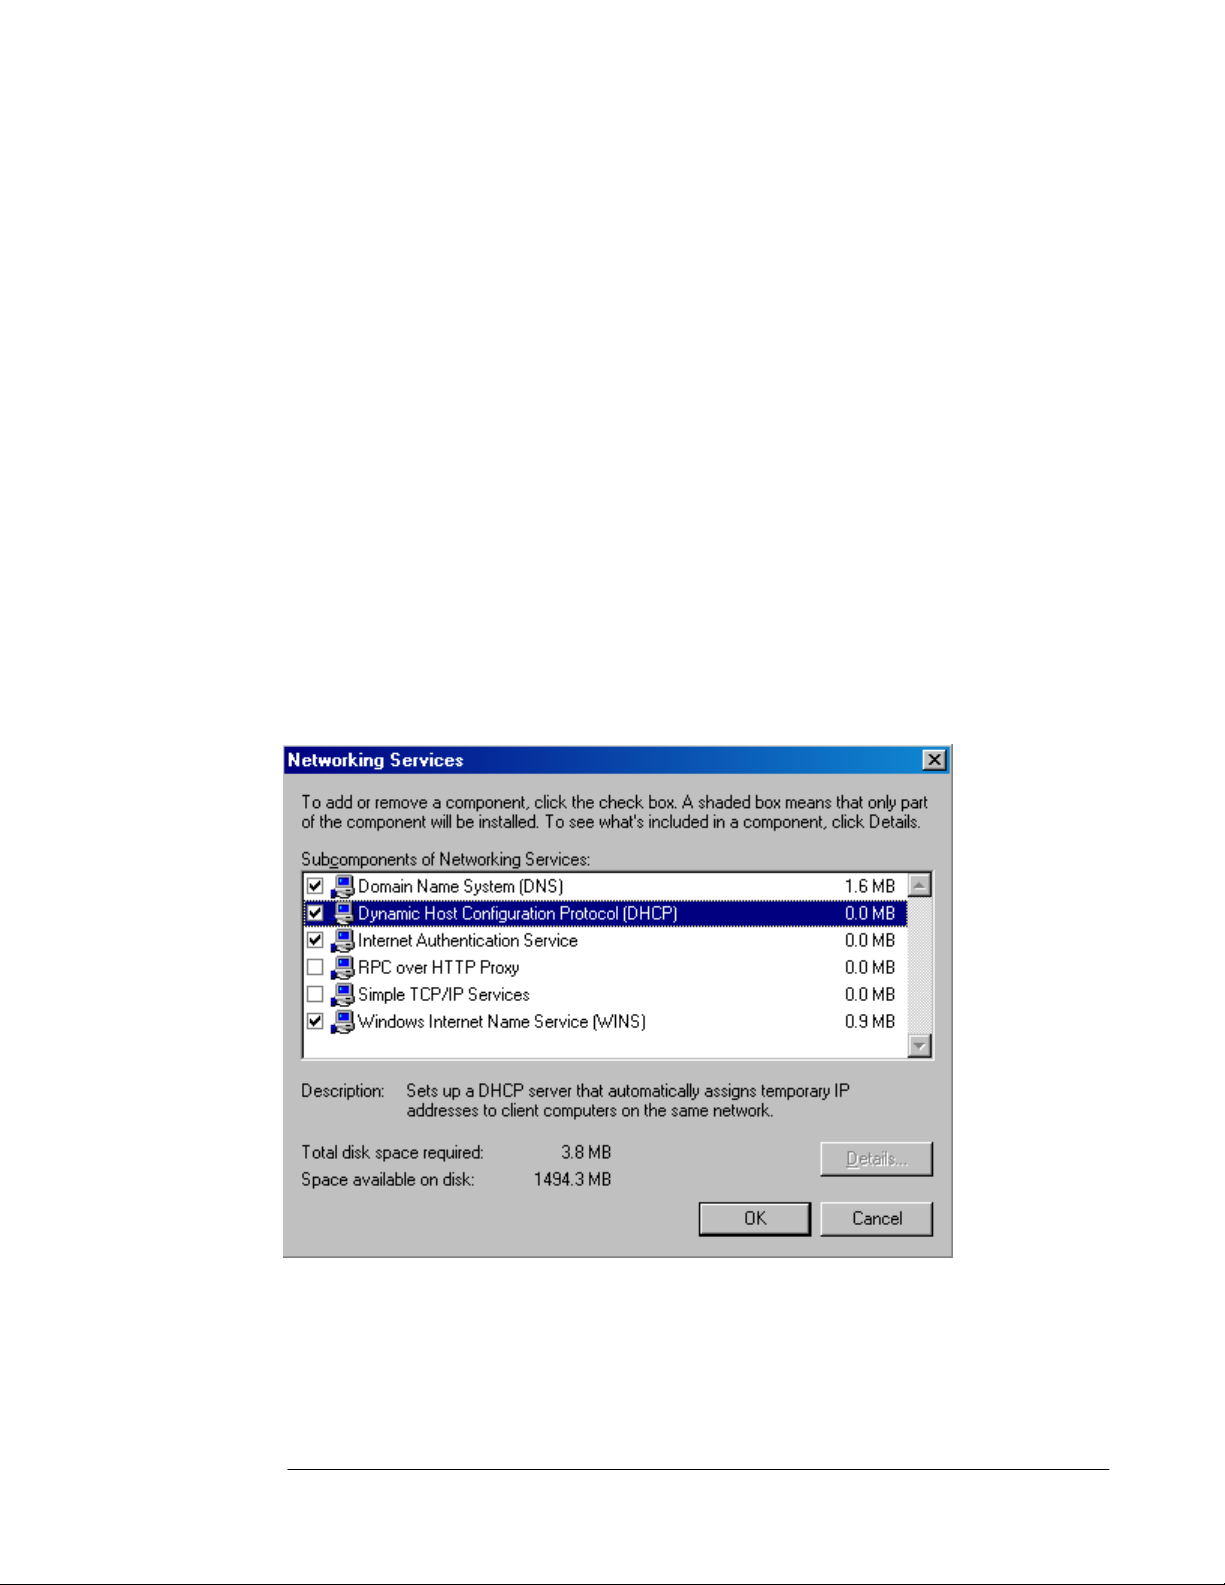
3. On the Windows Components page, scroll through the list of Components and select
the Networking Services entry. Click Details.
4. In the Network Services dialog box, put a check in the Windows Internet Name
Service (WINS) check box. Next, put a check in the Dynamic Host Configuration
Protocol (DHCP) check box. Click OK.
5. Click Next on the Windows Components page.
6. Click OK in the Insert Disk dialog box. In the Files Needed dialog box, enter the path to
the i386 folder in the Copy files from text box and click OK.
7. Click Finish on the Completing the Windows Components Wizard page.
8. Close the Add or Remove Programs window.
ISA Server 2004 Configuration Guide 32
Page 35

The WINS server is ready to accept NetBIOS name registrations immediately. The ISA Server
2004 firewall, the domain controller, and the internal network clients are all configured to
register with the WINS server in their TCP/IP Properties settings.
ISA Server 2004 Configuration Guide 33
Page 36

Configuring the DHCP Service
The Dynamic Host Configuration Protocol (DHCP) is used to automatically assign IP
addressing information to internal network clients and VPN clients. In the scenarios covered
in the ISA Server 2004 Configuration Guide, the DHCP server will be used primarily to
assign IP addressing information to the VPN clients network. Note that in a production
network, you should configure all machines that do not require a static IP address to be
DHCP clients.
The DHCP server service has already been installed according to the procedures you
performed in Chapter 1 of this Guide. The next step is to configure a DHCP scope that
includes a range of IP addresses to assign DHCP clients and DHCP options.
Perform the following steps to configure the DHCP scope:
1. Click Start and point to Administrative Tools. Click on DHCP.
2. In the DHCP console, right click on the server name in the left pane of the console and
click Authorize.
3. Click the Refresh button in the mmc button bar. Notice that the icon on the server name
in the left pane of the console changes from a red, down-pointing arrow to a green, uppointing arrow.
ISA Server 2004 Configuration Guide 34
Page 37
4. Right click on the server name in the left pane of the console and click the New Scope
command.
5. Click Next on the Welcome to the New Scope Wizard page.
6. On the Scope Name page, enter a name for the scope in the Name text box and enter an
optional description in the Description text box. In this example, we will name the scope
Scope1 and will not enter a description. Click Next.
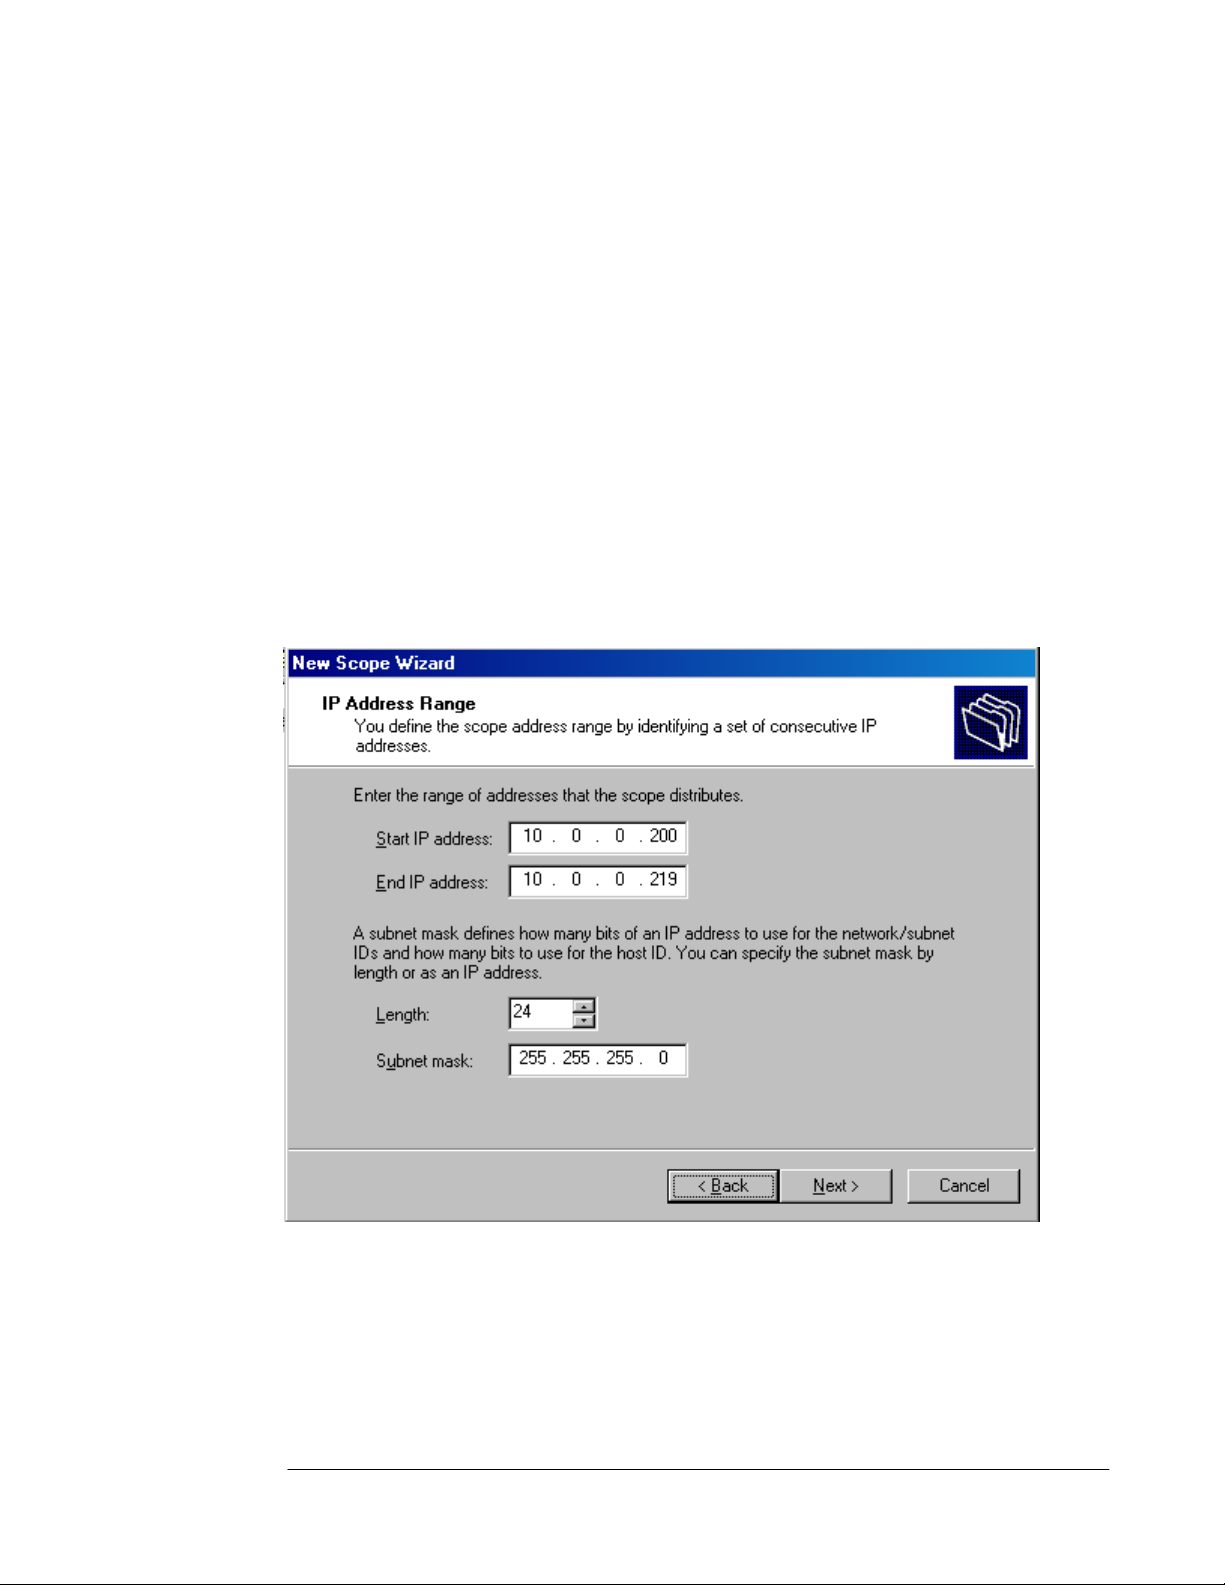
7. On the IP Address Range page, enter a Start IP address and a End IP address in the
text boxes provided. The start and end addresses represent the beginning and end of a
range of addresses you want available for DHCP clients. In this example, we will enter the
start address as 10.0.0.200 and the end address as 10.0.0.219. This provides twenty
addresses for DHCP clients. The ISA Server 2004 firewall will later be configured to allow
up to 10 concurrent VPN connections, so it will automatically take 10 of these addresses
and use one of them for itself, with the remainder available to assign to the VPN clients.
The ISA Server 2004 firewall will be able to obtain more IP addresses from the DHCP
server if they are required. You can configure the subnet mask settings in either the
Length or Subnet mask text boxes. In our current example, the addresses will be on the
same network ID as the internal network, so we will enter the value 24 into the Length
text box. The Subnet mask value is automatically added when the Length value is
added. Click Next.
8. Do not enter any exclusions on the Add Exclusions page. Click Next.
9. Accept the default lease duration of 8 Days on the Lease Duration page. Click Next.
10. On the Configure DHCP Options page, select the Yes, I want to configure these
options now option and click Next.
11. On the Router (Default Gateway) page, enter the IP address of the internal interface of
the ISA Server 2004 firewall machine in the IP address text box and click Add. Click
Next.
ISA Server 2004 Configuration Guide 35
Page 38

12. On the Domain Name and DNS Servers page, enter the domain name used on the
internal network in the Parent domain text box. This is the domain name that will be used
by DHCP clients to fully qualify unqualified names, such as the wpad entry that is used for
Web Proxy and Firewall client autodiscovery. In this example, the domain name is
msfirewall.org and we will enter that value in the text box. In the IP address text box,
enter the IP address of the DNS server on the internal network. In this example, the
domain controller is also the internal network’s DNS server, so we will enter the value
10.0.0.2 into the IP address text box and then click Add. Click Next.
ISA Server 2004 Configuration Guide 36
Page 39

s
13. On the WINS Servers page, enter the IP address of the WINS server in the IP address
text box and click Add. In this example, the WINS server is located on the domain
controller on the internal network, so we will enter 10.0.0.2. Click Next.
14. On the Activate Scope page, select the Yes, I want to activate this scope now option
and click Next.
15. Click Finish on the Completing the New Scope Wizard page.
16. In the left pane of the DHCP console, expand the Scope node and then click on the
Scope Options node. You will see a list of the options you configured.
17. Close the DHCP console.
At this point the DHCP server is ready to provide DHCP addressing information to DHCP
clients on the internal network and to the VPN clients network. However, the ISA Server 2004
firewall will not actually lease the addresses until we have enabled the VPN server on the
firewall.
ISA Server 2004 Configuration Guide 37
Page 40
Conclusion
In this ISA Server 2004 Configuration Guide document we discussed the uses of the
Microsoft WINS and DHCP servers, installed the server services on the domain controller,
and configured a scope on the DHCP server. Later in this guide we will see how the addition
of the WINS and DHCP service help enhance the VPN client experience.
This is a preliminary document and may be changed substantially prior to final commercial release of the software described herein.
The information contained in this document represents the current view of Microsoft Corporation on the issues discussed as of the
date of publication. Because Microsoft must respond to changing market conditions, it should not be interpreted to be a commitment
on the part of Microsoft, and Microsoft cannot guarantee the accuracy of any information presented after the date of publication.
This white paper is for informational purposes only. MICROSOFT MAKES NO WARRANTIES, EXPRESS OR IMPLIED, IN THIS
DOCUMENT.
Complying with all applicable copyright laws is the responsibility of the user. Without limiting the rights under copyright, no part of this
document may be reproduced, stored in, or introduced into a retrieval system, or transmitted in any form or by any means (electronic,
mechanical, photocopying, recording, or otherwise), or for any purpose, without the express written permission of Microsoft
Corporation.
Microsoft may have patents, patent applications, trademarks, copyrights, or other intellectual property rights covering subject matter in
this document. Except as expressly provided in any written license agreement from Microsoft, the furnishing of this document does
not give you any license to these patents, trademarks, copyrights, or other intellectual property.
© 2004 Microsoft Corporation. All rights reserved.
The example companies, organizations, products, domain names, e-mail addresses, logos, people, places, and events depicted
herein are fictitious. No association with any real company, organization, product, domain name, e-mail address, logo, person, place,
or event is intended or should be inferred.
Microsoft, Windows, Windows 2000, Windows 2000 Server, Windows Server 2003, Windows Server System, ISA Server, and ISA
Server 2004 are either registered trademarks or trademarks of Microsoft Corporation in the United States and/or other countries.
The names of actual companies and products mentioned herein may be the trademarks of their respective owners.
ISA Server 2004 Configuration Guide 38
Page 41

ISA Server 2004 Configuration Guide:
Configuring DNS and DHCP Support for
Web Proxy and Firewall Client
Autodiscovery
Chapter 5
For the latest information, please see http://www.microsoft.com/isaserver/
ISA Server 2004 Configuration Guide 39
Page 42

Introduction
The Web Proxy Autodiscovery Protocol (WPAD) can be used to allow Web browsers and the
Firewall client application to automatically discover the address of the ISA Server 2004
firewall. The client can then download autoconfiguration information from the firewall after the
Web Proxy or Firewall client discovers the address.
WPAD solves the problem of automatically provisioning Web browsers. The default setting on
Internet Explorer 6.0 is to autodiscover Web proxy client settings. When this setting is
enabled, the browser can issue a DHCPINFORM message or a DNS query to find the
address of the ISA Server 2004 from which it can download autoconfiguration information.
This greatly simplifies Web browser setup so that it automatically uses the firewall to connect
to the Internet.
The ISA Server 2004 Firewall client can also use the wpad entry to find the ISA Server 2004
firewall and download Firewall client configuration information.
In this ISA Server 2004 Configuration Guide document, we discuss how to:
• Configure DHCP WPAD support, and
• Configure DNS WPAD support
After the wpad information is entered into DHCP and DNS, Web Proxy and Firewall clients
will not require manual configuration to connect to the Internet through the ISA Server 2004
firewall machine.
ISA Server 2004 Configuration Guide 40
Page 43
Configure DHCP WPAD Support
The DHCP scope option number 252 can be used to automatically configure Web Proxy and
Firewall clients. The Web Proxy or Firewall client must be configured as a DHCP client, and
the logged on user must be a member of the local administrators group or Power users group
(for Windows 2000). On Windows XP systems, the Network Configuration Operators group
also has permission to issue DHCP queries (DHCPINFORM messages).
Note:
•
For more information about the limitations of using DHCP for autodiscovery with Internet
Explorer 6.0, please see KB article Automatic Proxy Discovery in Internet Explorer
with DHCP Requires Specific Permissions at
http://support.microsoft.com/default.aspx?scid=kb;en-us;312864
Perform the following steps at the DHCP server to create the custom DHCP option:
1. Open the DHCP console from the Administrative Tools menu and right click your server
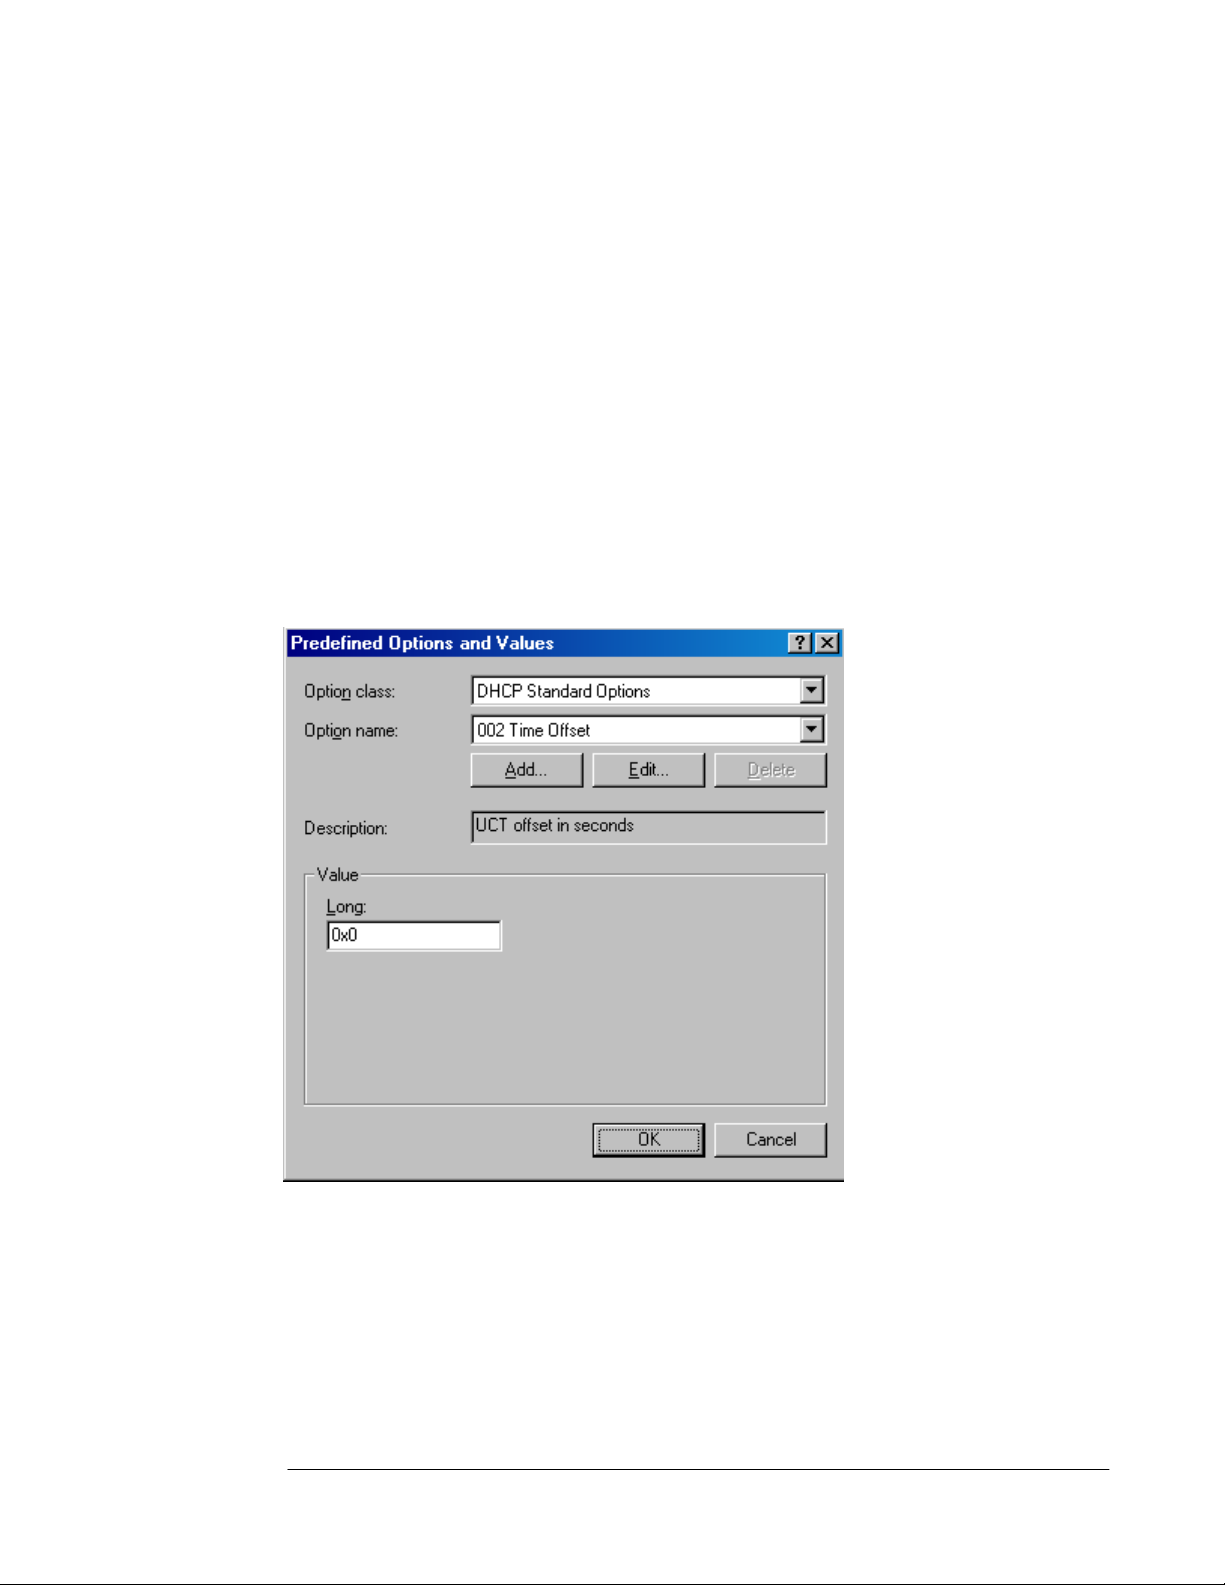
name in the left pane of the console. Click the Set Predefined Options command.
2. In the Predefined Options and Values dialog box, click Add.
3. In the Option Type dialog box, enter the following information:
Name: wpad
Data type: String
Code: 252
Description: wpad entry
Click OK.
ISA Server 2004 Configuration Guide 41
Page 44

4. In the Value frame, enter the URL to the ISA Server 2000 firewall in the String text box.
The format for this value is:
http://ISAServername:AutodiscoveryPort Number/wpad.dat
The default autodiscovery port number is TCP 80. You can customize this value in the
ISA Management console. We will cover this subject in more detail later.
In the current example, enter the following into the String text box:
http://isalocal.msfirewall.org:80/wpad.dat
Make sure to enter wpad.dat in all lower case letters. For more information on this
problem, please refer to KB article "Automatically Detect Settings" Does Not Work if
You Configure DHCP Option 252 at
http://support.microsoft.com/default.aspx?scid=kb;en-us;307502
Click OK.
ISA Server 2004 Configuration Guide 42
Page 45

5. Right click the Scope Options node in the left pane of the console and click the
Configure Options command.
6. In the Scope Options dialog box, scroll through the list of Available Options and put a
checkmark in the 252 wpad check box. Click Apply and then click OK.
7. The 252 wpad entry now appears in the right pane of the console under the list of Scope
Options.
8. Close the DHCP console.
At this point a DHCP client that has a logged on user who is a local administrator will be able
to use DHCP wpad support to automatically discover the ISA Server 2004 firewall and
subsequently autoconfigure itself. However, the ISA Server 2004 firewall must be configured
to support publishing autodiscovery information. We will do this configuration later in this ISA
Server 2004 Configuration Guide.
ISA Server 2004 Configuration Guide 43
Page 46

Configure DNS WPAD Support
Another method that used to deliver autodiscovery information to Web Proxy and Firewall
clients is DNS. You can create a wpad alias entry in DNS and allow browser clients to use
this information to automatically configure themselves. This is in contrast to the situation we
saw with the DHCP method, where the logged-on user needed to be a member of a specific
group in the Windows operating system.
Name resolution is a pivotal component to make this method of Web Proxy and Firewall client
autodiscovery work correctly. In this case, the client operating system must be able to fully
qualify the name wpad since the Web Proxy and Firewall client only knows that it needs to
resolve the name wpad. It does not know what specific domain name it should append to the
query to resolve the name wpad. We will cover this issue in detail later in the chapter.
• Note:
In contrast to the DHCP method of assigning autodiscovery information to Web Proxy and
Firewall clients, you do not have the option to use a custom port number to publish
autodiscovery information when using the DNS method. You must publish autodiscovery
information on TCP 80 when using the DNS method.
You need to perform the following steps to configure DNS support for Web Proxy and Firewall
client autodiscovery of the ISA Server 2004 firewall:
• Create the wpad entry in DNS
• Configure the client to use the fully qualified wpad alias
• Configure the client browser to use autodiscovery
ISA Server 2004 Configuration Guide 44
Page 47

Create the Wpad Entry in DNS
The first step is to create a wpad alias entry in DNS. This alias (also known as a CNAME
record) points to a Host (A) record for the ISA Server 2004 firewall. The Host (A) record
resolves the name of the ISA Server 2004 firewall to the Internal IP address of the firewall.
Create the Host (A) record before you create the CNAME record. If you enable automatic
registration in DNS, the ISA Server 2004 firewall’s name and IP address will already be
entered into a DNS Host (A) record. If you have not enabled automatic registration, you will
need to create the Host (A) record for the ISA Server 2004 firewall yourself.
In the following example, the ISA Server 2004 firewall has automatically registered itself with
DNS because the Internal interface of the ISA Server 2004 firewall is configured to do so, and
the DNS server is configured to accept unsecured dynamic registrations.
Perform the following steps on the DNS server on the domain controller on the Internal
network:
1. Click Start and select Administrative Tools. Click the DNS entry. In the DNS
management console, right click on the forward lookup zone for your domain and click the
New Alias (CNAME) command.
2. In the New Resource Record dialog box, enter wpad in the Alias name (uses parent
domain if left blank) text box. Click the Browse button.
3. In the Browse dialog box, double click on your server name in the Records list.
ISA Server 2004 Configuration Guide 45
Page 48
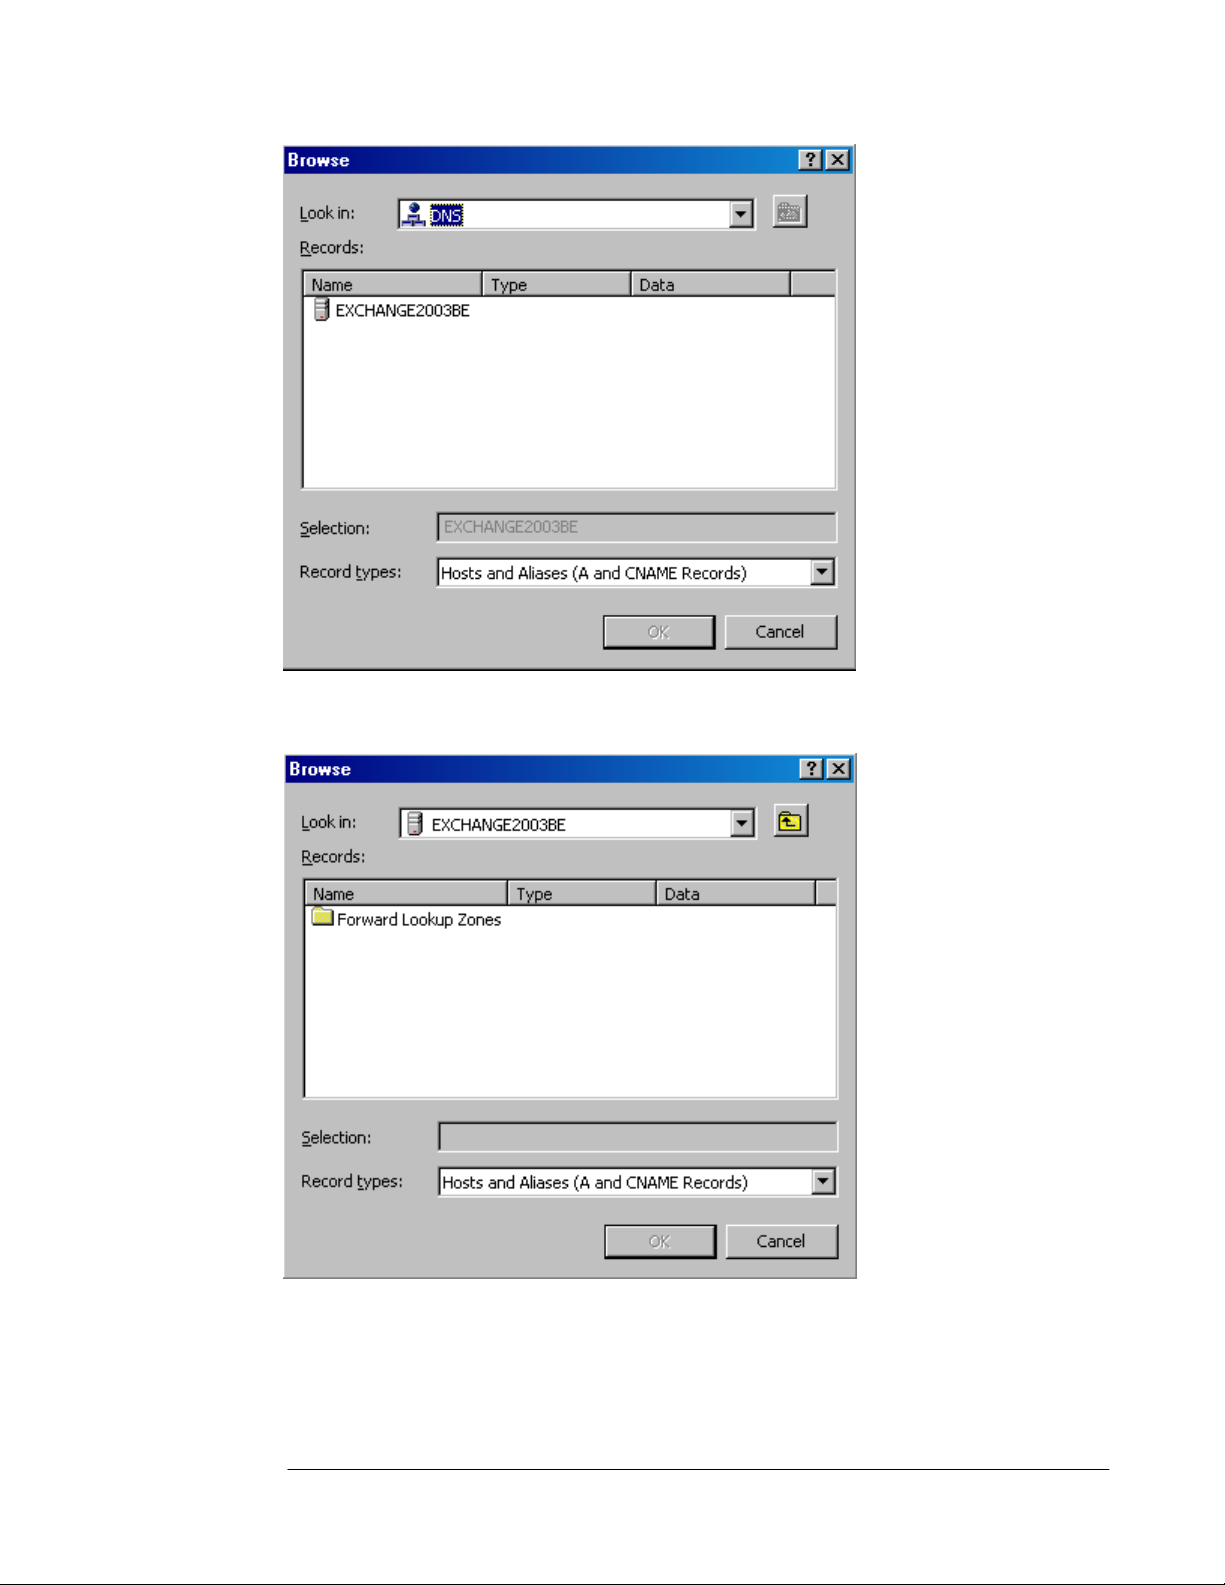
4. In the Browse dialog box, double click on the Forward Lookup Zone entry in the
Records frame.
5. In the Browse dialog box, double click on the name of your forward lookup zone in the
Records frame.
ISA Server 2004 Configuration Guide 46
Page 49

6. In the Browse dialog box, select the name of the ISA Server 2000 firewall in the Records
frame. Click OK.
7. Click OK in the New Resource Record dialog box.
ISA Server 2004 Configuration Guide 47
Page 50
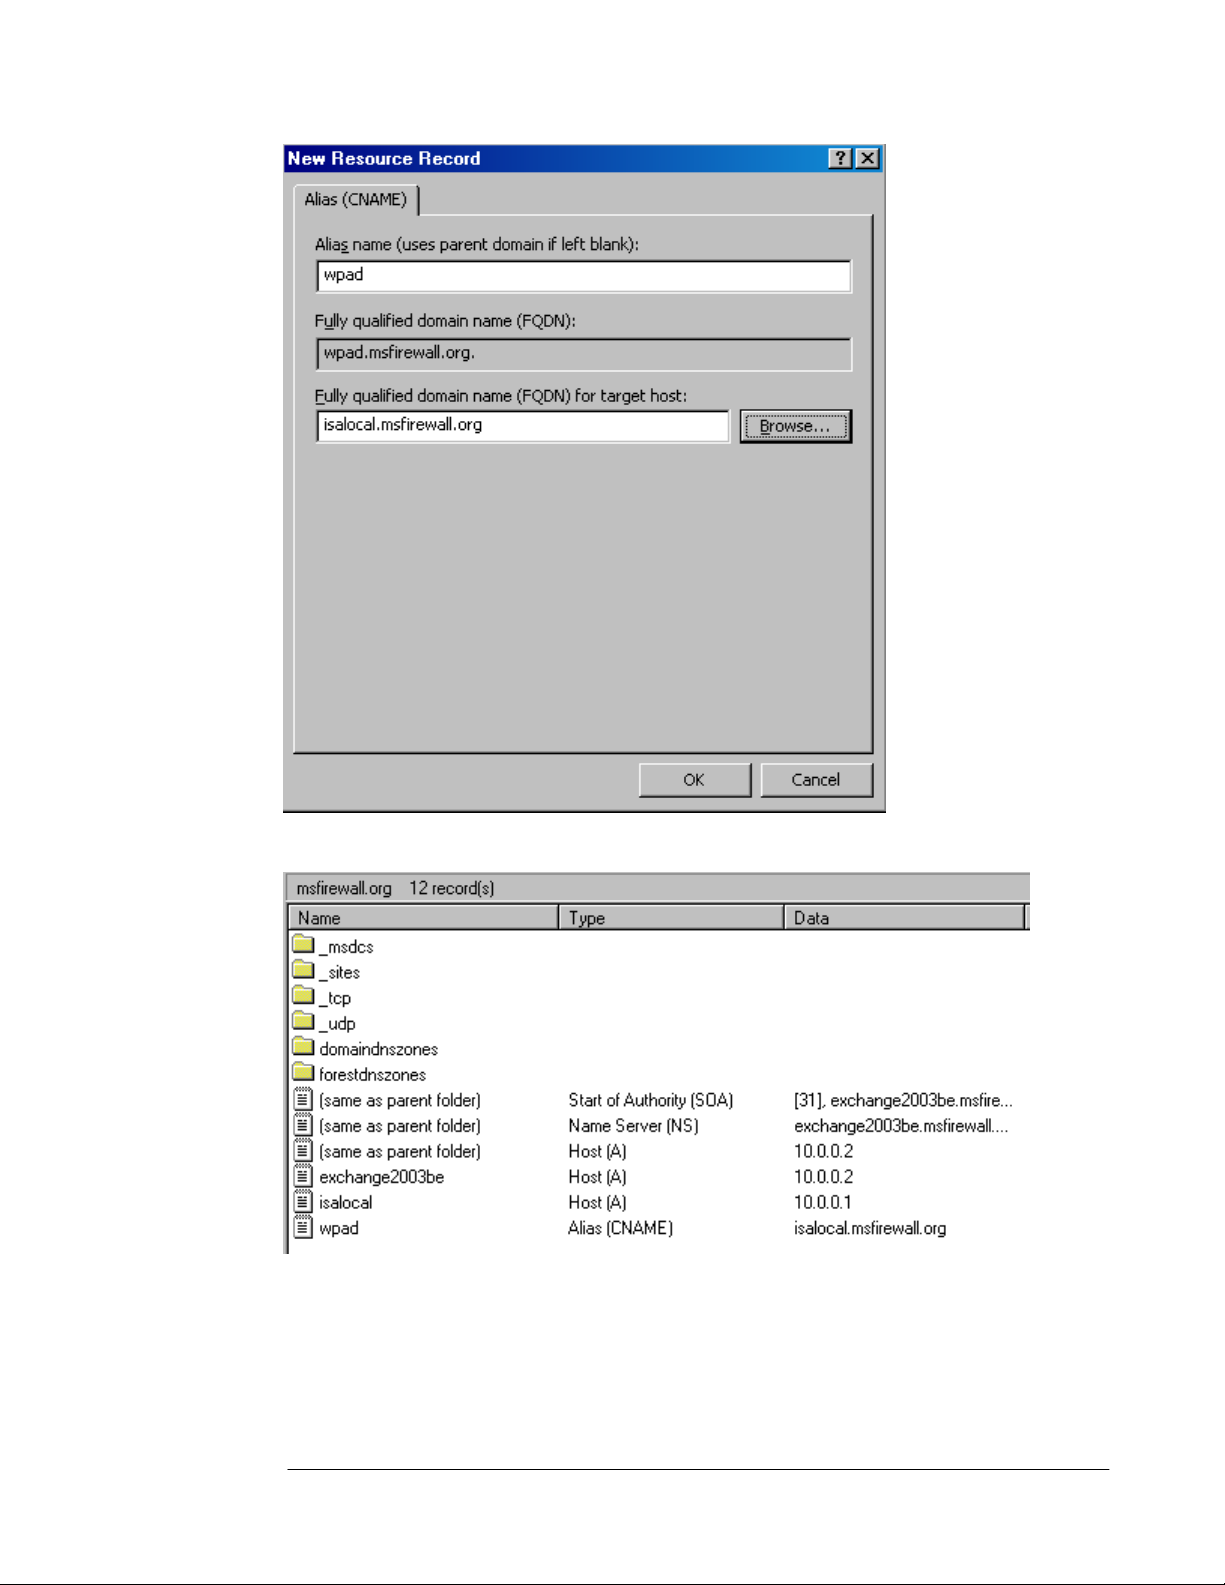
8. The CNAME (alias) entry appears in the right pane of the DNS management console.
9. Close the DNS Management console.
ISA Server 2004 Configuration Guide 48
Page 51

Configure the Client to Use the Fully Qualified wpad Alias
The Web Proxy and Firewall client need to be able to resolve the name wpad. The Web Proxy
and Firewall client configurations are not aware of the domain containing the wpad alias. The
Web Proxy and Firewall client operating system must be able to provide this information to
the Web Proxy and Firewall client.
DNS queries must be fully qualified before sending the query to the DNS server. A fully
qualified request contains a host name and a domain name. The Web Proxy and Firewall
client only know the host name portion. The Web Proxy and Firewall client operating system
must be able to provide the correct domain name, which it appends to the wpad host name,
before it can send a DNS query to the DNS server.
There are a number of methods you can use to insure that a proper domain name is
appended to wpad before the query is sent to the DNS server. Two popular methods for doing
this include:
• Using DHCP to assign a primary domain name
• Configuring a primary domain name in the client operating system’s network identification
dialog box.
We already configured a primary DNS name to assign DHCP clients when we configured the
DHCP scope. The following steps demonstrate how to set the primary domain name to
append to unqualified DNS queries:
Note:
•
You do not need to perform these steps on the client machine on the Internal network in
our example network. The reason for this is that the client is a member of the Active
Directory domain on the Internet network. However, you should go through the following
steps to see how the primary domain name is configured on non-domain member
computers.
1. Right click My Computer on the desktop and click Properties.
2. In the System Properties dialog box, click the Network Identification tab. Click the
Properties button.
3. In the Identification Changes dialog box, click the More button.
ISA Server 2004 Configuration Guide 49
Page 52
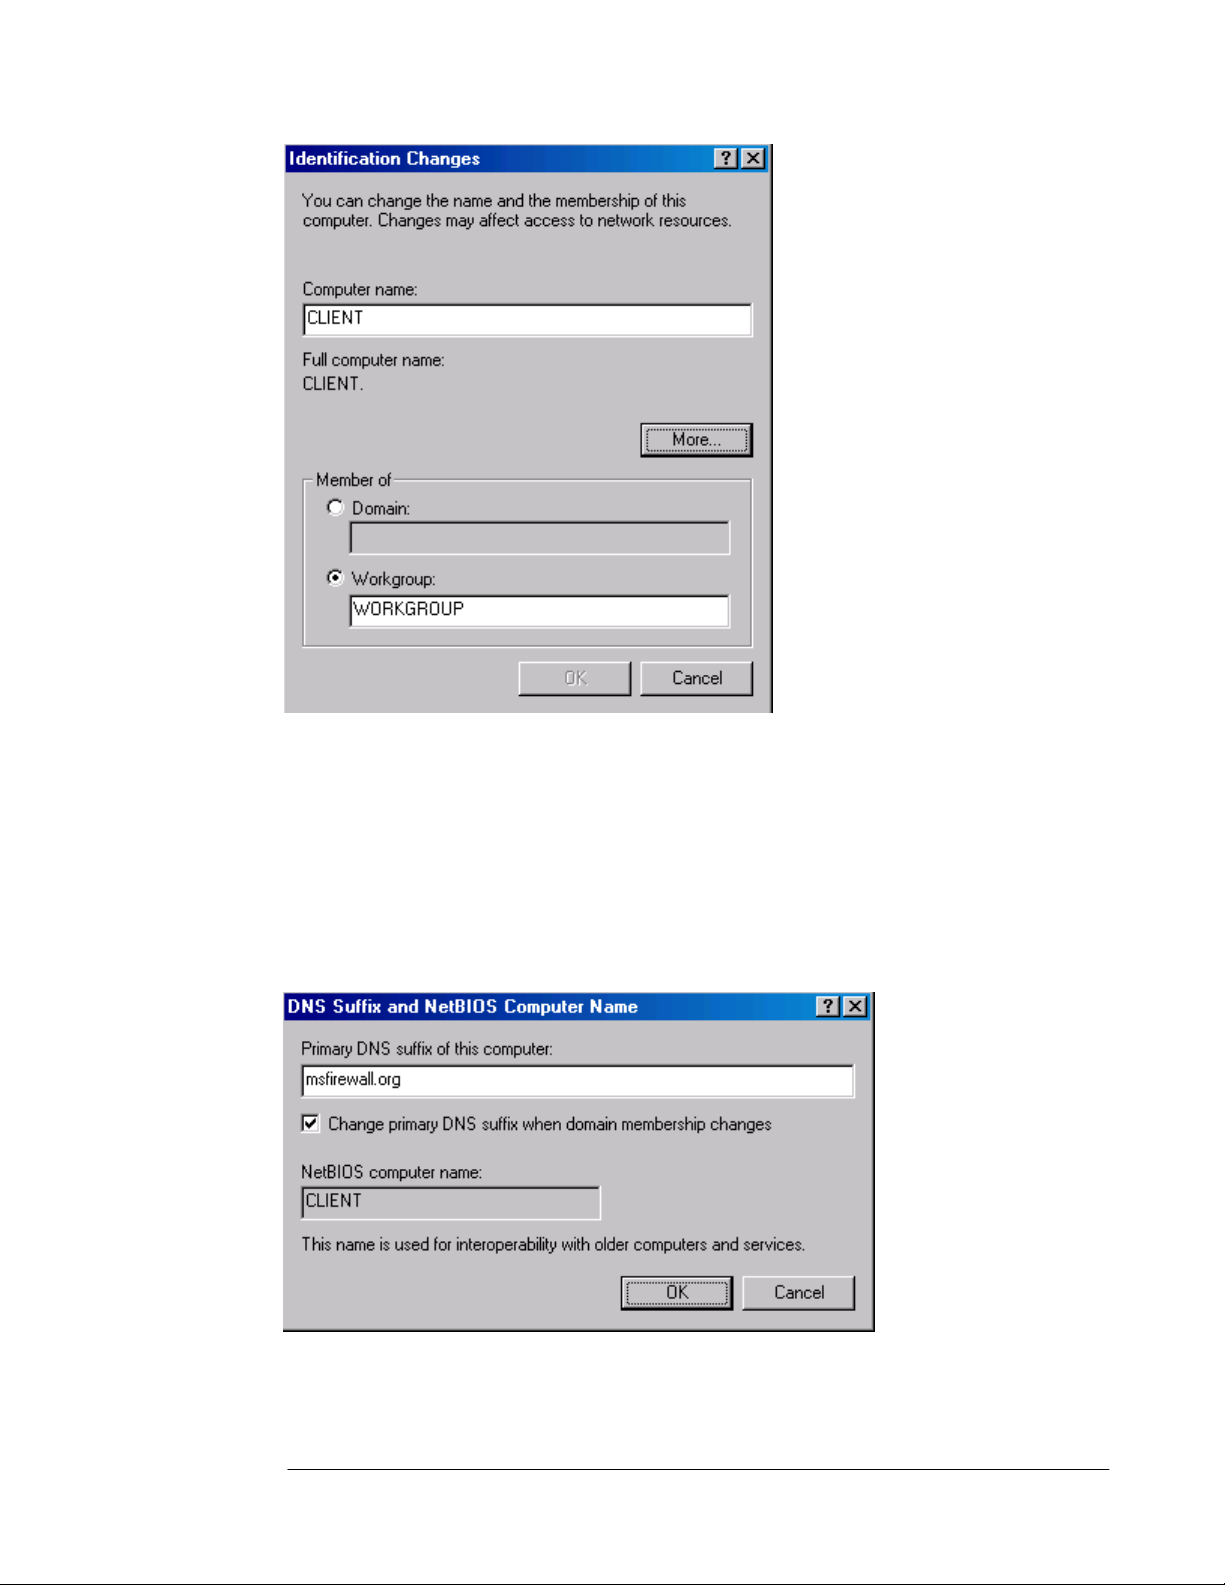
4. In the DNS Suffix and NetBIOS Computer Name dialog box, enter the domain name
that contains your wpad entry in the Primary DNS suffix of this computer text box. The
operating system will append this domain name to the wpad name before sending the
DNS query to the DNS server. By default, the primary domain name is the same as the
domain name the machine belongs to. If the machine is not a member of a domain, then
this text box will be empty. Note the Change primary DNS suffix when domain
membership changes is enabled by default. In the current example, the machine is not a
member of a domain.
Cancel out of each of the dialog boxes so that you do not configure a primary domain
name at this time.
Note that if you have multiple domains and clients on your Internal network that belong to
multiple domains, you will need to create wpad CNAME alias entries for each of the domains.
ISA Server 2004 Configuration Guide 50
Page 53

Configure the Client Browser to Use Autodiscovery
The next step is to configure the browser to use autodiscovery. To configure the Web browser
to use autodiscovery to automatically configure itself to use the ISA Server 2000 firewall’s
Web Proxy service:
1. Right click on the Internet Explorer icon on the desktop and click Properties.
2. In the Internet Properties dialog box, click the Connections tab. Click the LAN Settings
button.
3. In the Local Area Network (LAN) Settings dialog box, put a checkmark in the
Automatically detect settings check box. Click OK.
4. Click Apply and then click OK in the Internet Properties dialog box.
The next step is to configure the ISA Server 2000 firewall publish autodiscovery information
for autodiscovery Web Proxy and Firewall clients.
ISA Server 2004 Configuration Guide 51
Page 54

Conclusion
In this ISA Server 2004 Configuration Guide document we discussed the uses of a
Microsoft Internet Authentication Server and how to install and configure the IAS server on
the domain controller on the Internal network. Later in this guide, we will use this IAS server to
authenticate incoming Web and VPN client connections.
This is a preliminary document and may be changed substantially prior to final commercial release of the software described herein.
The information contained in this document represents the current view of Microsoft Corporation on the issues discussed as of the
date of publication. Because Microsoft must respond to changing market conditions, it should not be interpreted to be a commitment
on the part of Microsoft, and Microsoft cannot guarantee the accuracy of any information presented after the date of publication.
This white paper is for informational purposes only. MICROSOFT MAKES NO WARRANTIES, EXPRESS OR IMPLIED, IN THIS
DOCUMENT.
Complying with all applicable copyright laws is the responsibility of the user. Without limiting the rights under copyright, no part of this
document may be reproduced, stored in, or introduced into a retrieval system, or transmitted in any form or by any means (electronic,
mechanical, photocopying, recording, or otherwise), or for any purpose, without the express written permission of Microsoft
Corporation.
Microsoft may have patents, patent applications, trademarks, copyrights, or other intellectual property rights covering subject matter in
this document. Except as expressly provided in any written license agreement from Microsoft, the furnishing of this document does
not give you any license to these patents, trademarks, copyrights, or other intellectual property.
© 2004 Microsoft Corporation. All rights reserved.
The example companies, organizations, products, domain names, e-mail addresses, logos, people, places, and events depicted
herein are fictitious. No association with any real company, organization, product, domain name, e-mail address, logo, person, place,
or event is intended or should be inferred.
Microsoft, Windows, Windows 2000, Windows 2000 Server, Windows Server 2003, Windows Server System, ISA Server, and ISA
Server 2004 are either registered trademarks or trademarks of Microsoft Corporation in the United States and/or other countries.
The names of actual companies and products mentioned herein may be the trademarks of their respective owners.
ISA Server 2004 Configuration Guide 52
Page 55
ISA Server 2004 Configuration Guide:
Installing and Configuring a DNS
Caching-only DNS Server on the
Perimeter Network Segment
Chapter 6
For the latest information, please see http://www.microsoft.com/isaserver/
ISA Server 2004 Configuration Guide 53
Page 56

Introduction
DNS servers allow client systems to resolve names to IP addresses. Internet applications
need to know the IP address of a destination host before they can connect. A caching-only
DNS server is a special type of DNS in that is it not authoritative for any domain. This means
the caching-only DNS server does not contain any domain resource records. Instead, the
caching-only DNS server accepts DNS queries from DNS client systems, resolves the name
in the request, caches the answer and returns the cached answer to the client that made the
initial DNS query.
A caching-only DNS server is an optional component. You do not need to use a caching-only
DNS server. You can move to the next document in this ISA Server 2004 Configuration
Guide if you do not plan to use a perimeter network segment. If you do choose to use a
perimeter network segment, you should follow the procedures outlined in this document.
DNS servers located in the perimeter network are used for two primary purposes:
• name resolution for domains under your administrative control
• caching-only DNS services for internal network clients, or as forwarders for internal
network DNS servers
A perimeter network DNS server can contain DNS zone information about publicly accessible
domains. For example, if you have implemented a split DNS infrastructure, the public records
for your domain would be contained on the perimeter network DNS server. Internet-located
hosts can query this DNS server and obtain the IP addresses required to connect to
resources you have published through the ISA Server 2004 firewall.
The DNS server on the perimeter network can also act as a caching-only DNS server. In this
role, the machine contains no DNS resource record information. Instead, the caching-only
DNS server resolves Internet host names and caches the results of its queries. It can then
return answers from cache if it has already resolved the name. If not, it can query other DNS
servers on the Internet and cache the results before returning the answer to the client.
In this document we will discuss the following procedures:
• Installing the DNS server service
• Configuring the DNS server as a secure caching-only DNS server
ISA Server 2004 Configuration Guide 54
Page 57

Installing the DNS Server Service
The first step is to install the DNS server service on the perimeter network host. This machine
will act as both a secure caching-only DNS server and a publicly accessible Web and SMTP
relay machine.
Perform the following steps to install the DNS server service on the perimeter network host
computer, TRIHOMELAN1:
1. Click Start; point to Control Panel. Click Add or Remove Programs.
2. In the Add or Remove Programs window, click the Add/Remove Windows
Components button on the left side of the window.
3. On the Windows Components page, scroll through the list of Components and select
Networking Services. Click the Details button.
4. In the Networking Services dialog box, put a checkmark in the Domain Name System
(DNS) check box and click OK.
5. Click Next on the Windows Components page.
6. Click OK in the Insert Disk dialog box. In the Files Needed dialog box, enter the path to
the i386 folder in the Copy files from text box and click OK.
7. Click Finish on the Completing the Windows Components Wizard page.
The next step is to configure the DNS server as a secure caching-only DNS server.
ISA Server 2004 Configuration Guide 55
Page 58
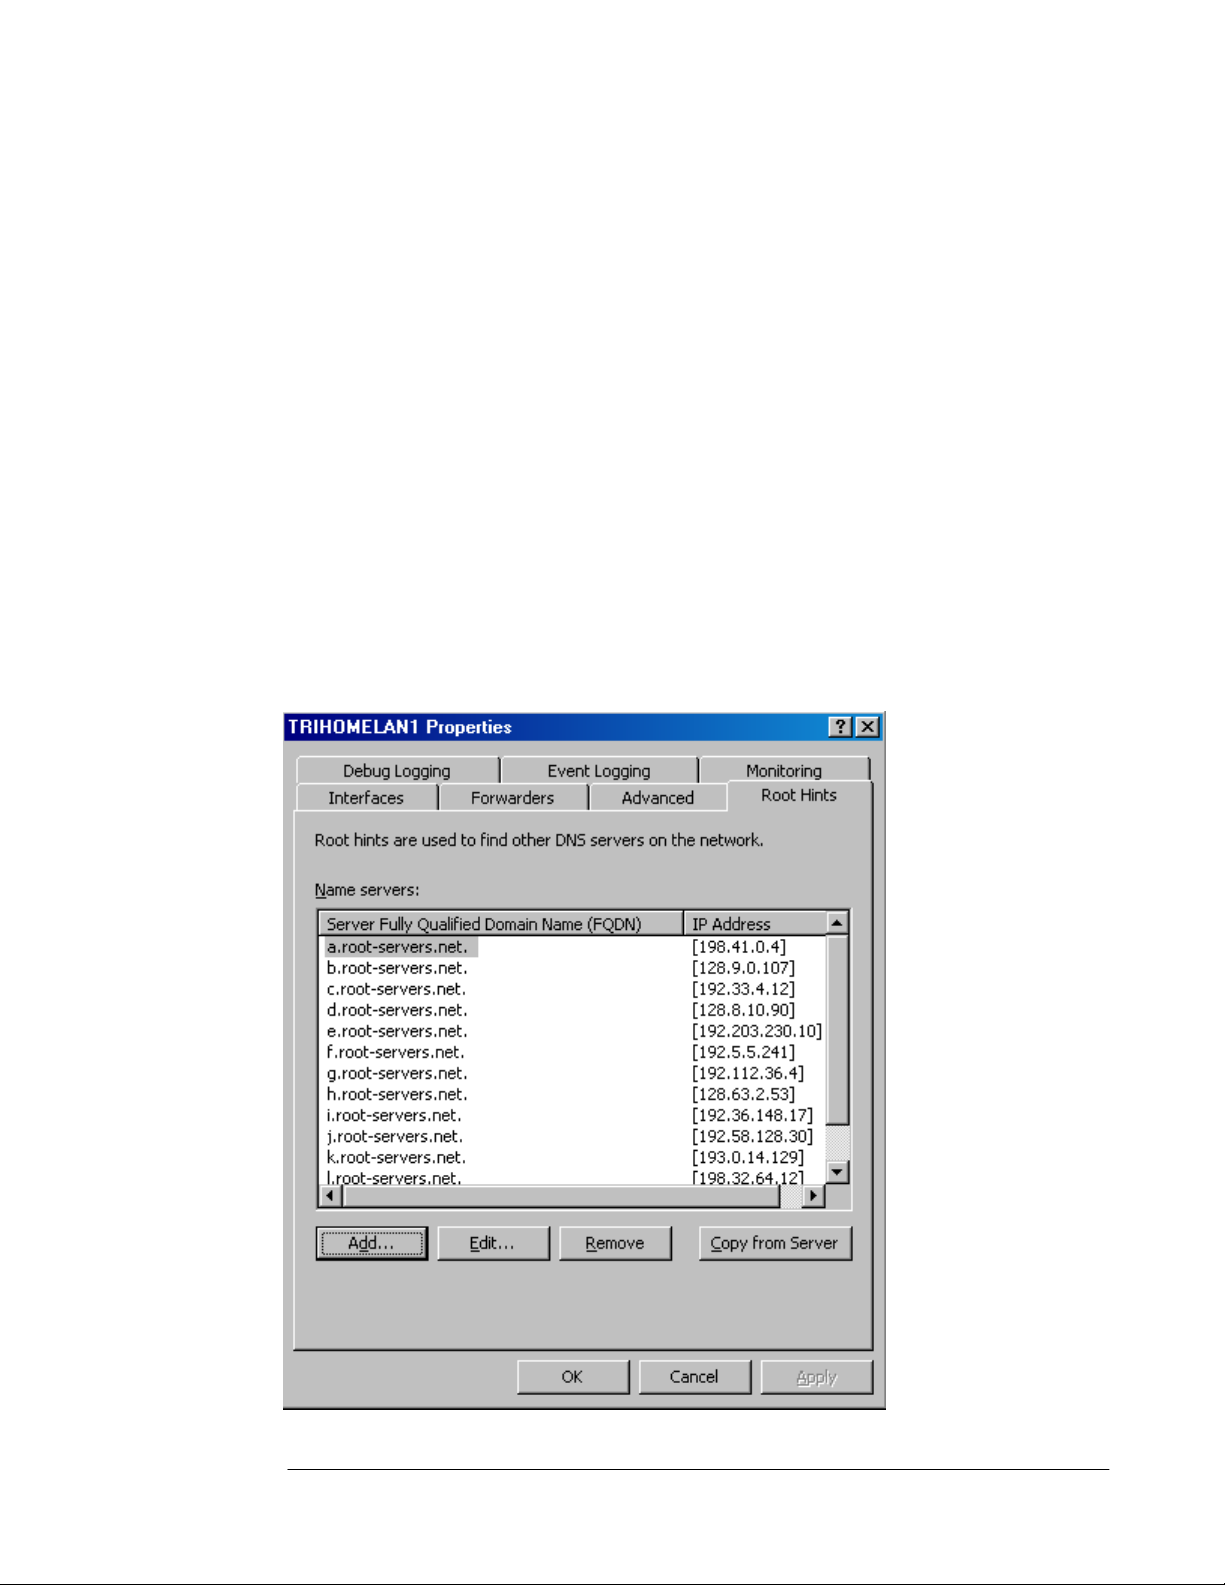
Configuring the DNS Server as a Secure Caching-only DNS Server
The DNS server on the perimeter network will be in direct contact with Internet hosts. These
hosts can be DNS clients that query the perimeter network DNS server for addresses of
publicly accessible domain resources. They can also be DNS servers on the Internet that the
caching-only DNS server contacts to resolve Internet host names for internal network clients.
In this example, the DNS server will act as a caching-only DNS server and will not host public
DNS records for the domain.
Perform the following steps on the perimeter network DNS servers to configure it as a secure
caching-only DNS server:
1. Click Start and point to Administrative Tools. Click on DNS.
2. In the DNS management console, right click on the server name in the left pane of the
console and click Properties.
3. In the DNS server’s Properties dialog box, click on the Root Hints tab. The entries in the
Name servers list are for Internet root name servers that the caching-only DNS server
uses to resolve Internet host names. Without this list of root DNS servers, the cachingonly DNS server will not be able to resolve the names of machines located on the
Internet.
ISA Server 2004 Configuration Guide 56
Page 59
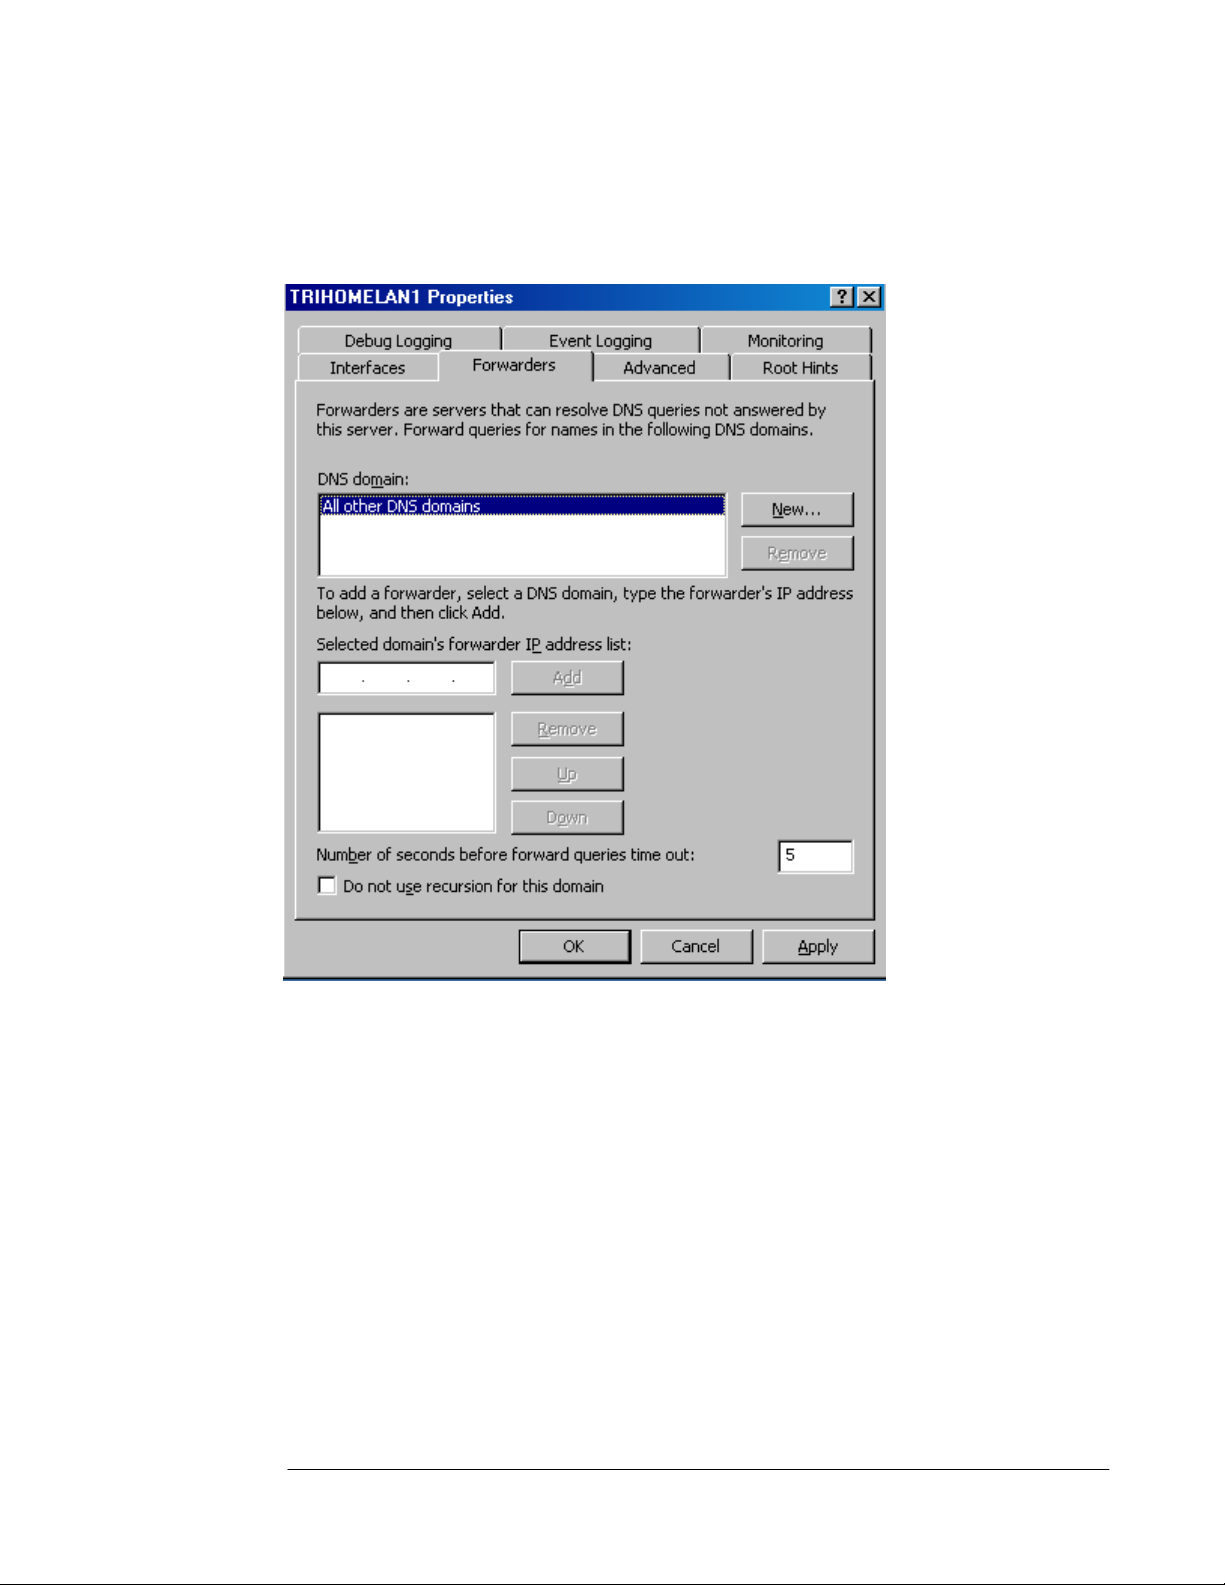
4. Click on the Forwarders tab. Make sure there is not a checkmark in the Do not use
recursion for this domain check box. If this option is selected, the caching-only DNS
server cannot use the root hints list of the root Internet DNS server to resolve Internet
host names. Select this option only if you decide to use a forwarder. In this case, we do
not use a forwarder.
5. Click the Advanced tab. Confirm that there is a checkmark in the Secure cache against
pollution check box. This prevents Internet DNS servers and attackers from inserting
additional records in a DNS response. These additional records could be used as part of
a co-coordinated DNS attack.
ISA Server 2004 Configuration Guide 57
Page 60

6. Click the Monitoring tab. Put checkmarks in the A simple query against this DNS
server and A recursive query to other DNS servers check boxes. Then click the Test
Now button. Note in the Test results frame that the Simple Query shows a Pass, while
the Recursive Query displays a Fail. The reason is that an Access Rule has not been
created that allows the caching-only DNS server access to the Internet. Later, we will
create an Access Rule on the ISA Server 2004 firewall that allows the DNS server
outbound access to DNS servers on the Internet.
ISA Server 2004 Configuration Guide 58
Page 61
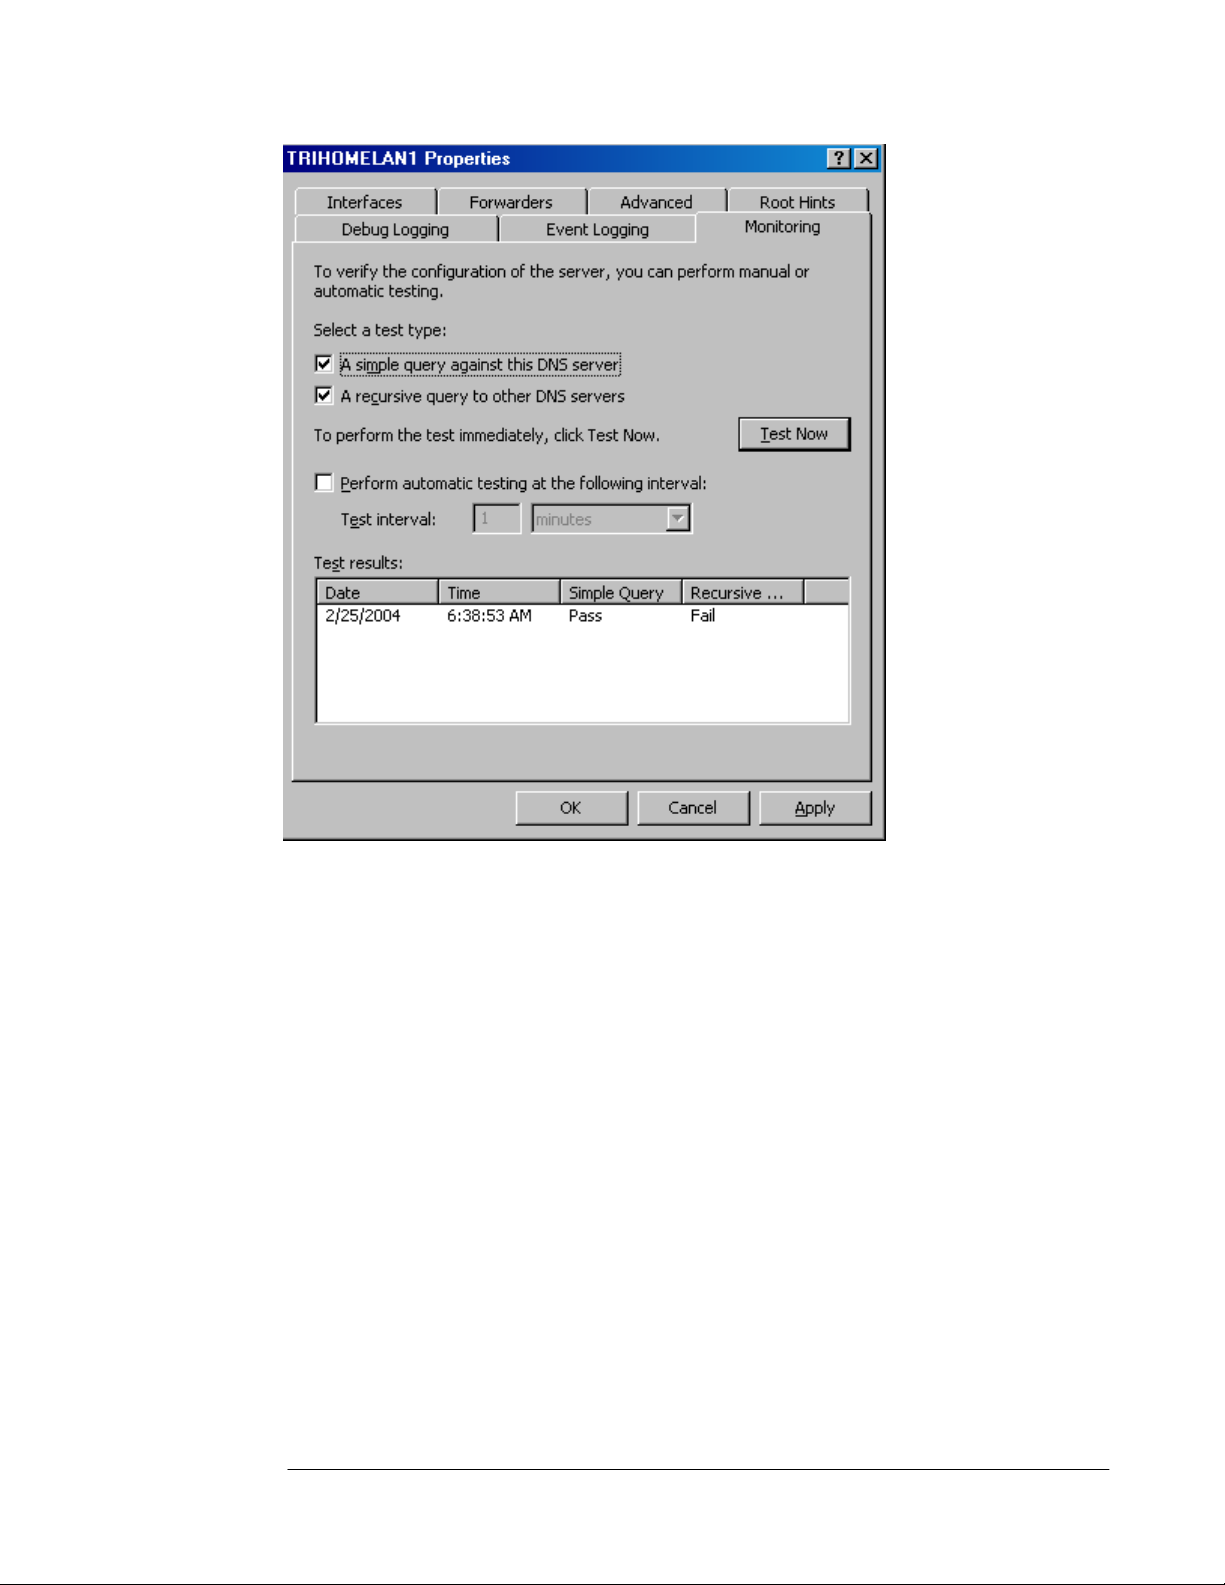
7. Click Apply and then click OK in the DNS server’s Properties dialog box.
8. Close the DNS management console.
At this point, the caching-only DNS server is able to resolve Internet host names. Later, we
will create Access Rules allowing hosts on the internal network to use the caching-only DNS
server to resolve Internet host names.
ISA Server 2004 Configuration Guide 59
Page 62

Conclusion
In this ISA Server 2004 Configuration Guide document we discussed the uses of a cachingonly DNS server and how to install and configure the Microsoft DNS server service. Later in
this guide we will configure Access Policies that allow hosts on the internal network to use this
DNS server and allow the caching-only DNS server to connect to the Internet.
This is a preliminary document and may be changed substantially prior to final commercial release of the software described herein.
The information contained in this document represents the current view of Microsoft Corporation on the issues discussed as of the
date of publication. Because Microsoft must respond to changing market conditions, it should not be interpreted to be a commitment
on the part of Microsoft, and Microsoft cannot guarantee the accuracy of any information presented after the date of publication.
This white paper is for informational purposes only. MICROSOFT MAKES NO WARRANTIES, EXPRESS OR IMPLIED, IN THIS
DOCUMENT.
Complying with all applicable copyright laws is the responsibility of the user. Without limiting the rights under copyright, no part of this
document may be reproduced, stored in, or introduced into a retrieval system, or transmitted in any form or by any means (electronic,
mechanical, photocopying, recording, or otherwise), or for any purpose, without the express written permission of Microsoft
Corporation.
Microsoft may have patents, patent applications, trademarks, copyrights, or other intellectual property rights covering subject matter in
this document. Except as expressly provided in any written license agreement from Microsoft, the furnishing of this document does
not give you any license to these patents, trademarks, copyrights, or other intellectual property.
© 2004 Microsoft Corporation. All rights reserved.
The example companies, organizations, products, domain names, e-mail addresses, logos, people, places, and events depicted
herein are fictitious. No association with any real company, organization, product, domain name, e-mail address, logo, person, place,
or event is intended or should be inferred.
Microsoft, Windows, Windows 2000, Windows 2000 Server, Windows Server 2003, Windows Server System, ISA Server, and ISA
Server 2004 are either registered trademarks or trademarks of Microsoft Corporation in the United States and/or other countries.
The names of actual companies and products mentioned herein may be the trademarks of their respective owners.
ISA Server 2004 Configuration Guide 60
Page 63
ISA Server 2004 Configuration Guide:
Installing ISA Server 2004 on Windows
Server 2003
Chapter 7
For the latest information, please see http://www.microsoft.com/isaserver/
ISA Server 2004 Configuration Guide 61
Page 64

Introduction
In this ISA Server 2004 Configuration Guide document we will install the ISA Server 2004
software onto the Windows Server 2003 computer we installed and configured in Chapter 1.
Installing ISA Server 2004 is straightforward as there are only a few decisions that need to be
made during installation.
The most important configuration made during installation is the Internal network IP address
range(s). Unlike ISA Server 2000, ISA Server 2004 does not use a Local Address Table
(LAT) to define trusted and untrusted networks. Instead, the ISA Server 2004 firewall asks for
the IP addresses defining a network entity known as the Internal network. The internal
network contains important network servers and services such as Active Directory domain
controllers, DNS, WINS, RADIUS, DHCP, firewall management stations, and others. These
are services the ISA Server 2004 firewall needs to communicate with immediately after
installation is complete.
Communications between the Internal network and the ISA Server 2004 firewall are controlled
by the firewall’s System Policy. The System Policy is a collection of pre-defined Access Rules
that determine the type of traffic allowed inbound and outbound to and from the firewall
immediately after installation. The System Policy is configurable, which enables you can
tighten or loosen the default System Policy Access Rules.
In the document we will discuss the following procedures:
• Installing ISA Server 2004 on Windows Server 2003
• Reviewing the Default System Policy
ISA Server 2004 Configuration Guide 62
Page 65

Installing ISA Server 2004
Installing ISA Server 2004 on Windows Server 2003 is relatively straightforward. The major
decision you make during setup is what IP addresses should be part of the Internal network.
The Internal network address configuration is important because the firewall’s System Policy
uses the Internal network addresses to define a set of Access Rules.
Perform the following steps to install the ISA Server 2004 software on the dual-homed
Windows Server 2003 machine:
1. Insert the ISA Server 2004 CD-ROM into the CD drive. The autorun menu will appear.
2. On the Microsoft Internet Security and Acceleration Server 2004 page, click the link
for Review Release Notes and read the release notes. The release notes contain useful
information about important issues and configuration options. After reading the release
notes, close the release notes window and then click the Read Setup and Feature
Guide link. You don’t need to read the entire guide right now, but you may want to print it
out to read later. Close the Setup and Feature Guide window. Click the Install ISA
Server 2004 link.
3. Click Next on the Welcome to the Installation Wizard for Microsoft ISA Server 2004
page.
4. Select the I accept the terms in the license agreement option on the License
Agreement page. Click Next.
5. On the Customer Information page, enter your name and the name of your organization
in the User Name and Organization text boxes. Enter Product Serial Number. Click
Next.
6. On the Setup Type page, select the Custom option. If you do not want to install the ISA
Server 2004 software on the C: drive, then click the Change button to change the location
of the program files on the hard disk. Click Next.
ISA Server 2004 Configuration Guide 63
Page 66
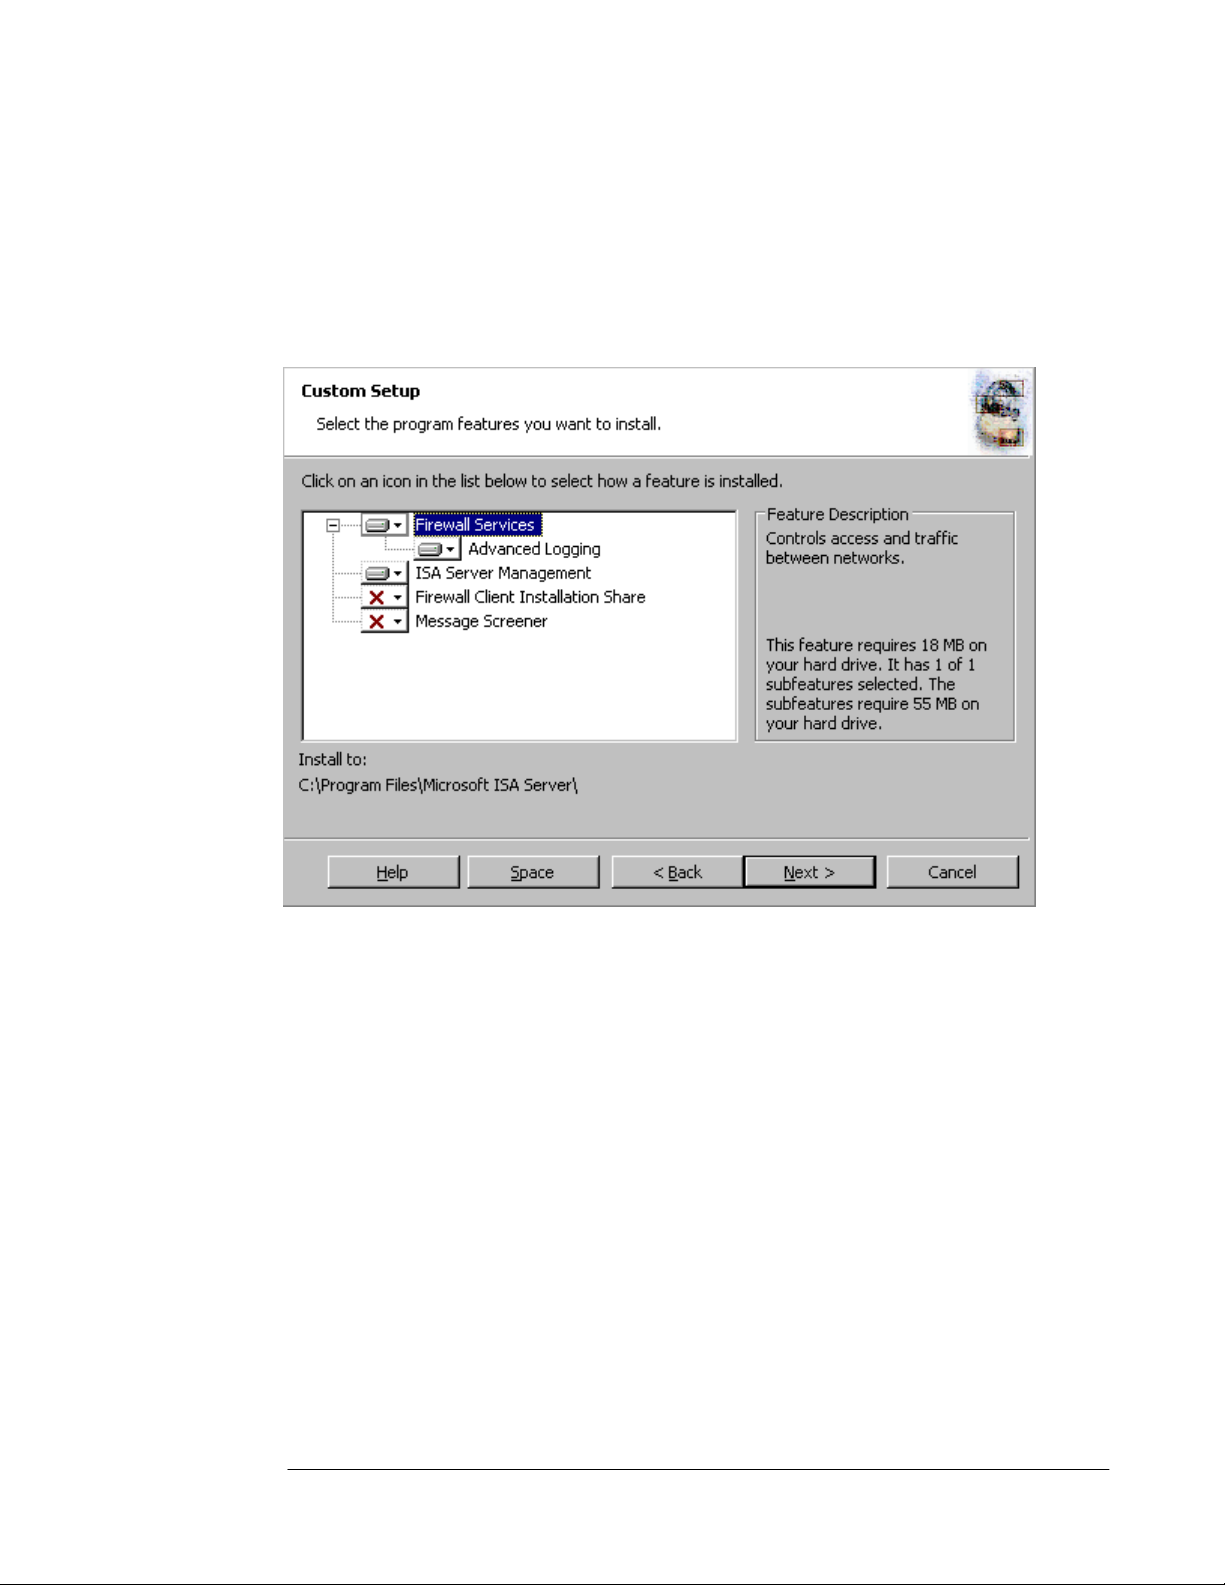
7. On the Custom Setup page you can choose which components to install. By default, the
Firewall Services and ISA Server Management options are installed. The Message
Screener, which is used to help prevent spam and file attachments from entering and
leaving the network, is not installed by default; neither is the Firewall Client Installation
Share. You need to install the IIS 6.0 SMTP service on the ISA Server 2004 firewall
computer before you install the Message Screener. Use the default settings and click
Next.
8. On the Internal Network page, click the Add button. The Internal network is different
than the LAT, which was used in ISA Server 2000. In the case of ISA Server 2004, the
Internal network contains trusted network services the ISA Server 2004 firewall must be
able to communicate. Examples of such services include Active Directory domain
controllers, DNS, DHCP, terminal services client management workstations, and others.
The firewall System Policy automatically uses the Internal network. We will look at the
System Policy later in this document.
ISA Server 2004 Configuration Guide 64
Page 67
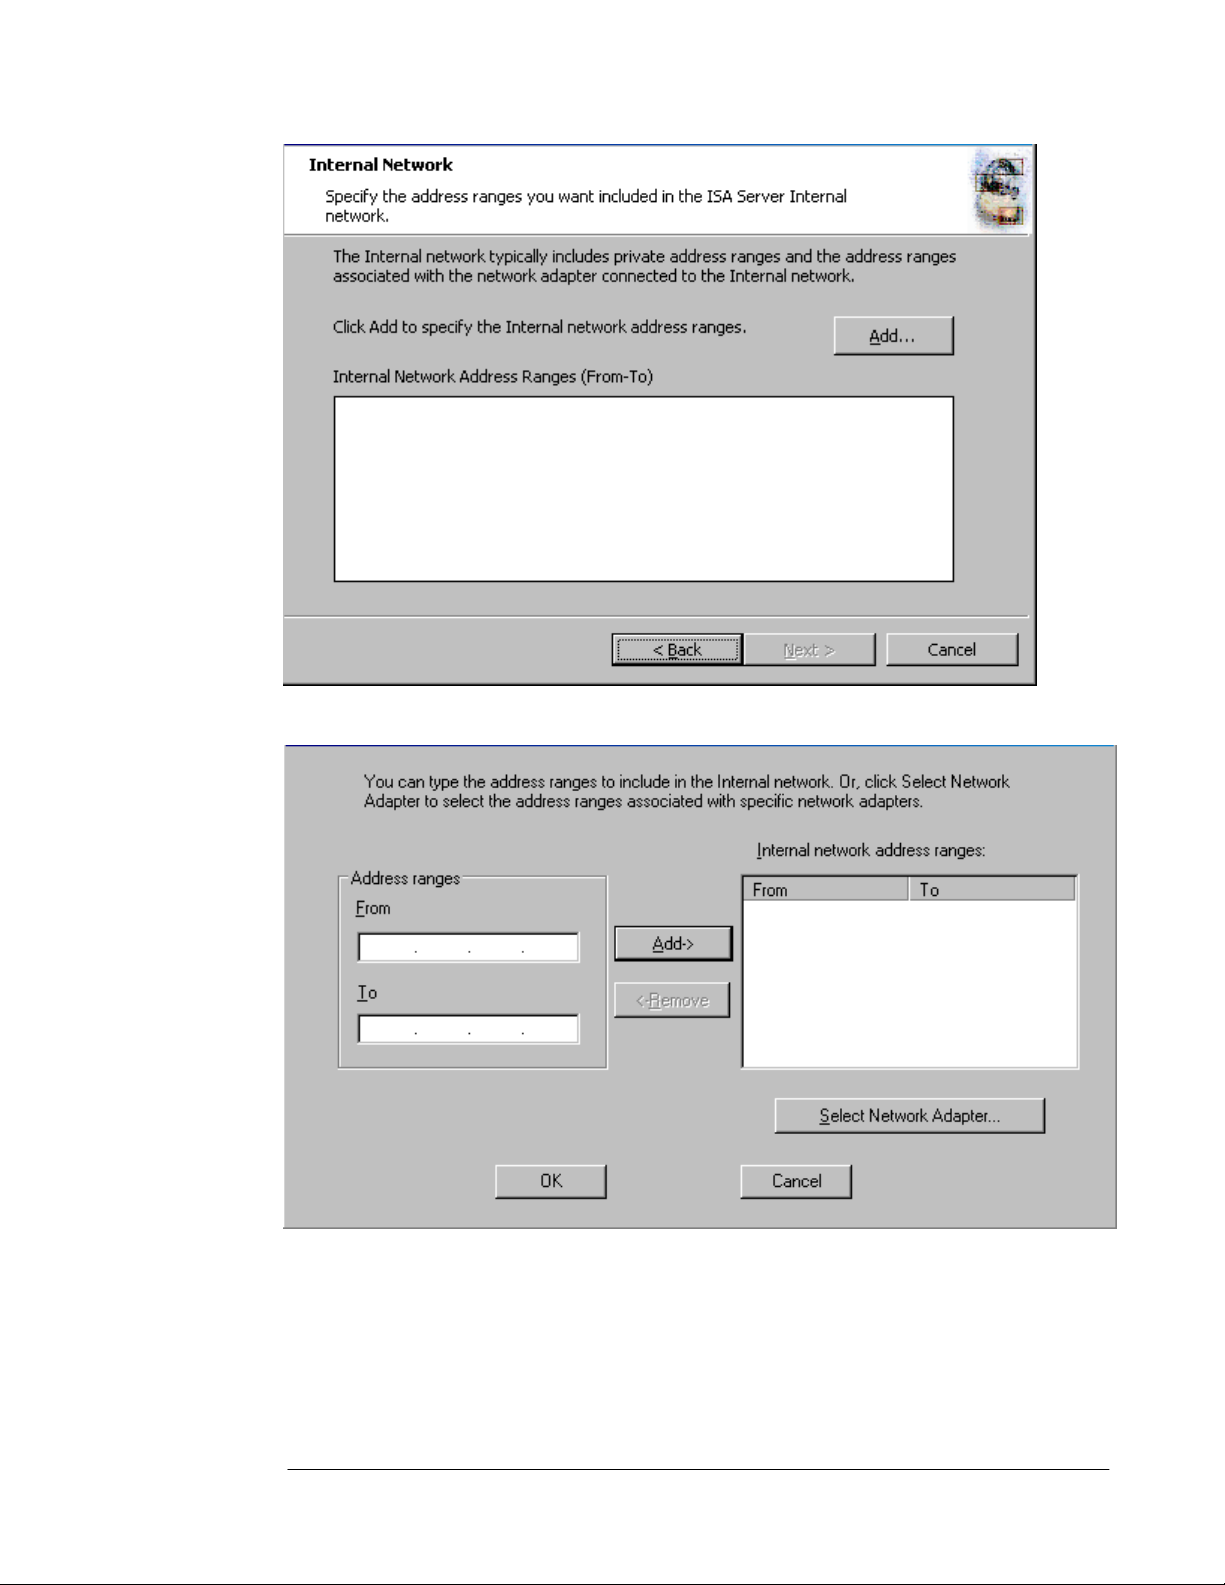
9. In the Internal Network setup page, click the Select Network Adapter button.
10. In the Select Network Adapter dialog box, remove the checkmark from the Add the
following private ranges… checkbox. Leave the checkmark in the Add address ranges
based on the Windows Routing Table checkbox. Put a checkmark in the checkbox next
to the adapter connected to the Internal network. The reason why we remove the
checkmark from the add private address ranges checkbox is that you may wish to use
these private address ranges for perimeter networks. Click OK.
ISA Server 2004 Configuration Guide 65
Page 68

11. Click OK in the Setup Message dialog box informing you that the Internal network was
defined, based on the Windows routing table.
12. Click OK on the Internal network address ranges dialog box.
13. Click Next on the Internal Network page.
ISA Server 2004 Configuration Guide 66
Page 69

14. On the Firewall Client Connection Settings page, place checkmarks in the Allow non-
encrypted Firewall client connections and Allow Firewall clients running earlier
versions of the Firewall client software to connect to ISA Server checkboxes. These
settings will allow you to connect to the ISA Server 2004 firewall using downlevel
operating systems and from Windows 2000/Windows XP/Windows Server 2003 operating
systems running the ISA Server 2000 version of the Firewall client. Click Next.
15. On the Services page, click Next.
ISA Server 2004 Configuration Guide 67
Page 70
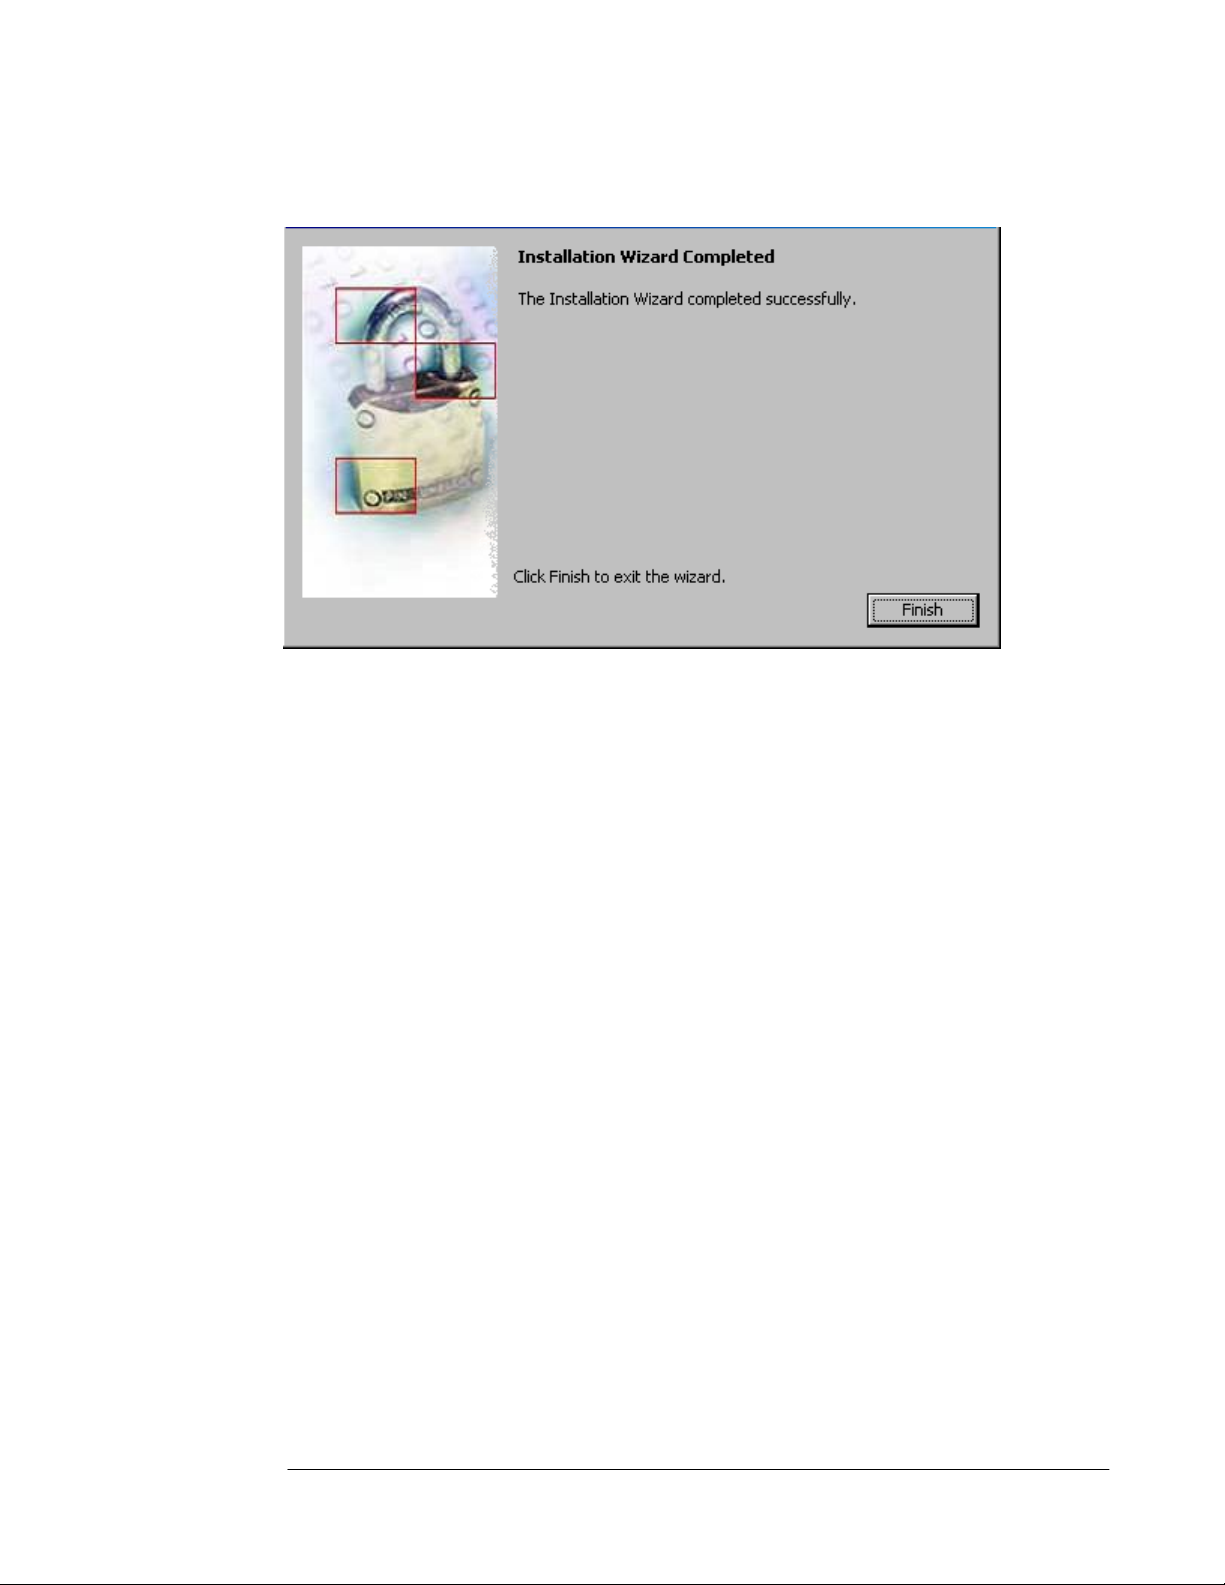
16. Click Install on the Ready to Install the Program page.
17. On the Installation Wizard Completed page, click Finish.
18. Click Yes in the Microsoft ISA Server dialog box informing you that the machine must be
restarted.
19. Log on as Administrator after the machine restarts
ISA Server 2004 Configuration Guide 68
Page 71

Viewing the System Policy
By default, ISA Server 2004 does not allow outbound access to the Internet from any
protected network and it does not allow Internet hosts access the firewall or any networks
protected by the firewall. However, a default firewall System Policy is installed that allows
network management tasks to be completed.
Note:
•
A protected network is any network defined by the ISA Server 2004 firewall that is not part
of the default External network.
Perform the following steps to see the default firewall System Policy:
1. Click Start and point to All Programs. Point to Microsoft ISA Server and click ISA
Server Management.
2. In the Microsoft Internet Security and Acceleration Server 2004 management
console, expand the server node in the scope pane (left pane) and click on the Firewall
Policy node. Right click on the Firewall Policy node, point to View and click Show
System Policy Rules.
3. Click the Show/Hide Console Tree button and then click the Open/Close Task Pane
arrow (the little blue arrow on the left edge of the task pane on the right side of the
console). Notice that the ISA Server 2004 Access Policy represents an ordered list.
Policies are processed from top to bottom, which is a significant departure from how ISA
Server 2000 processed Access Policy. The System Policy represents a default list of
rules controlling access to and from the ISA Server 2004 firewall by default. Note that the
System Policy Rules are ordered above any custom Access Policies you will create, and
therefore are processed before them. Scroll down the list of System Policy Rules. Notice
that the rules are defined by:
ISA Server 2004 Configuration Guide 69
Page 72
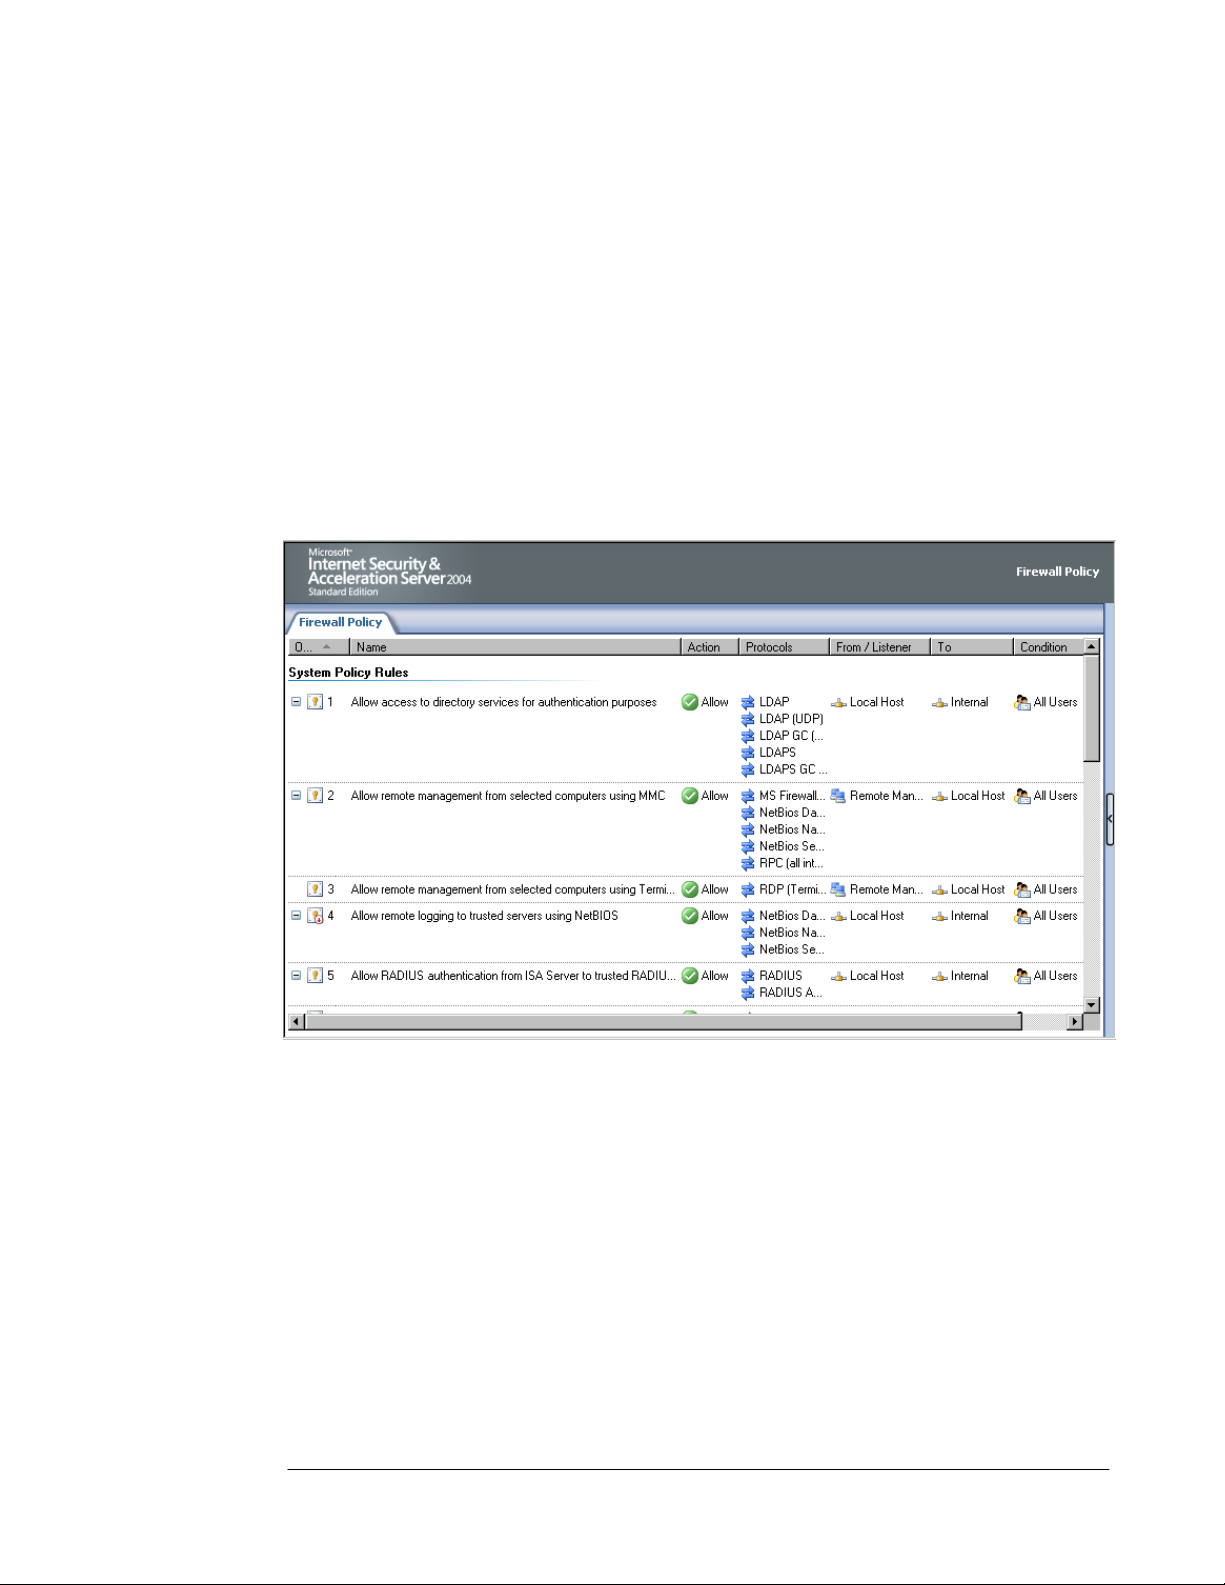
Order number
Name
Action (Allow or Deny)
Protocols
From (source network or host)
To (destination network or host)
Condition (who or what the rule applies to)
You may want to widen the Name column to get a quick view rule the rule descriptions.
Notice that not all the rules are enabled. Disabled System Policy Rules have a tiny downpointing red arrow in their lower right corner. Many of the disabled System Policy Rules will
become automatically enabled when you make configuration changes to the ISA Server 2004
firewall, such as when you enable VPN access.
Notice that one of the System Policy Rules allows the firewall to perform DNS queries to DNS
servers on all networks.
4. You can change the settings on a System Policy Rule by double clicking on the rule.
ISA Server 2004 Configuration Guide 70
Page 73

5. Review the System Policy Rules and then hide the rules by clicking the Show/Hide
System Policy Rules button in the console’s button bar. This is the depressed (pushed
in) button seen in the figure below.
The following table includes a complete list of the default, built-in System Policy:
Table 1: System Policy Rules
Order Name Action Protocols From To Condition
1 Allow access to
directory services
for authentication
purposes
2 Allow Remote
Management
using MMC
Allow LDAP
Allow MS Firewall
LDAP(GC)
LDAP(UDP)
LDAPS
LDAPS(GC)
Control
RPC(all
interfaces)
NetBIOS
Datagram
NetBIOS Name
Service
Local Host Internal All Users
Remote
Management
Computers
Local
Host
All Users
ISA Server 2004 Configuration Guide 71
Page 74

Order Name Action Protocols From To Condition
NetBIOS
Session
3 Allow Remote
Management
using Terminal
Server
4 Allow remote
logging to trusted
servers using
NetBIOS
5 Allow RADIUS
authentication
from ISA Server
to trusted
RADIUS servers
6 Allow Kerberos
authentication
from ISA Server
to trusted servers
7 Allow DNS from
ISA Server to
selected servers
8 Allow DHCP
requests from ISA
Server to all
networks
9 Allow DHCP
replies from
DHCP servers to
ISA Server
10 Allow ICMP
(PING) requests
from selected
computers to ISA
Server
11 Allow ICMP
requests from ISA
Server to
selected servers
121 Allow VPN client
traffic to ISA
Server
132 Allow VPN site-to-
site to ISA Server
142 Allow VPN site-to-
site from ISA
Allow RDP(Terminal
Allow NetBIOS
Allow RADIUS
Allow Kerberos-
Allow DNS Local Host All
Allow DHCP(request) Local Host Anywhere All Users
Allow DHCP(reply) Anywhere Local
Allow Ping Remote
Allow ICMP
Allow PPTP External Local
Allow External
Allow Local Host External
Services)
Datagram
NetBIOS Name
Service
NetBIOS
Session
RADIUS
Accounting
Sec(TCP)
KerberosSec(UDP)
Information
Request
ICMP
Timestamp
Ping
Remote
Management
Computers
Local Host Internal All Users
Local Host Internal All Users
Local Host Internal All Users
Management
Computers
Local Host All
IPSec
Remote
Gateways
Local
Host
Networks
Host
Local
Host
Networks
Host
Local
Host
IPSec
All Users
All Users
All Users
All Users
All Users
All Users
All Users
All Users
ISA Server 2004 Configuration Guide 72
Page 75

Order Name Action Protocols From To Condition
Server Remote
Gateways
15 Allow Microsoft
CIFS protocol
from ISA Server
to trusted servers
167 Allow Remote
logging using
Microsoft SQL
protocol from
firewall to trusted
servers
17 Allow
HTTP/HTTPS
requests from ISA
Server to
specified sites
183 Allow
HTTP/HTTPS
requests from ISA
Server to
selected servers
for HTTP
connectivity
verifiers
198 Allow access from
trusted computers
to the Firewall
Client installation
share on ISA
Server
209 Allow remote
performance
monitoring of ISA
Server from
trusted servers
21 Allow NetBIOS
from ISA Server
to trusted servers
22 Allow RPC from
ISA Server to
trusted servers
23 Allow
HTTP/HTTPS
from ISA Server
Allow Microsoft
Allow Microsoft
Allow HTTP
Allow HTTP
Allow Microsoft
Allow NetBIOS
Allow NetBIOS
Allow RPC(all
Allow HTTP
CIFS(TCP)
Microsoft
CIFS(UDP)
SQL(TCP)
Microsoft
SQL(UDP)
HTTPS
HTTPS
CIFS(TCP)
Microsoft
CIFS(UDP)
NetBIOS
Datagram
NetBIOS Name
Service
NetBIOS
Session
Datagram
NetBIOS Name
Service
NetBIOS
Session
Datagram
NetBIOS Name
Service
NetBIOS
Session
interfaces)
HTTPS
Local Host Internal All Users
Local Host Internal All Users
Local Host System
Policy
Allowed
Sites
Local Host All
Networks
Internal Local
Host
Remote
Management
Computers
Local Host Internal All Users
Local Host Internal All Users
Local Host Microsoft
Local
Host
Error
Reporting
All Users
All Users
All Users
All Users
All Users
ISA Server 2004 Configuration Guide 73
Page 76

Order Name Action Protocols From To Condition
to specified
Microsoft Error
Reporting sites
244 Allow SecurID
protocol from ISA
Server to trusted
servers
255 Allow remote
monitoring from
ISA Server to
trusted servers,
using Microsoft
Operations
Manager (MOM)
Agent
266 Allow HTTP from
ISA Server to all
networks for CRL
downloads
27 Allow NTP from
ISA Server to
trusted NTP
servers
28 Allow SMTP from
ISA Server to
trusted servers
29 Allow HTTP from
ISA Server to
selected
computers for
Content
Download Jobs
Allow SecurID Local Host Internal All Users
Allow Microsoft
Operations
Manager Agent
Allow HTTP Local Host All
Allow NTP(UDP) Local Host Internal All Users
Allow SMTP Local Host Internal All Users
Allow HTTP Local Host All
Local Host Internal All Users
1 This policy is disabled until the VPN Server component is activated
sites
Networks
Networks
All Users
System and
Network
Service
2 These two policies are disabled until a site to site VPN connection is configured
3 This policy is disabled until a connectivity verifier that uses HTTP/HTTPS is configured
4
This policy is disabled until the SecureID filter is enabled
5 This policy must be manually enabled
6 This policy is disabled by default
7
This policy is disabled by default
8 This policy is automatically enabled when the Firewall client share is installed
9
This policy is disabled by default
At this point the ISA Server 2004 firewall is ready to be configured to allow inbound and
outbound access through the firewall. However, before you start creating Access Policies, you
should back up the default configuration. This allows you to restore the ISA Server 2004
firewall to its post-installation state. This is useful for future troubleshooting and testing.
ISA Server 2004 Configuration Guide 74
Page 77
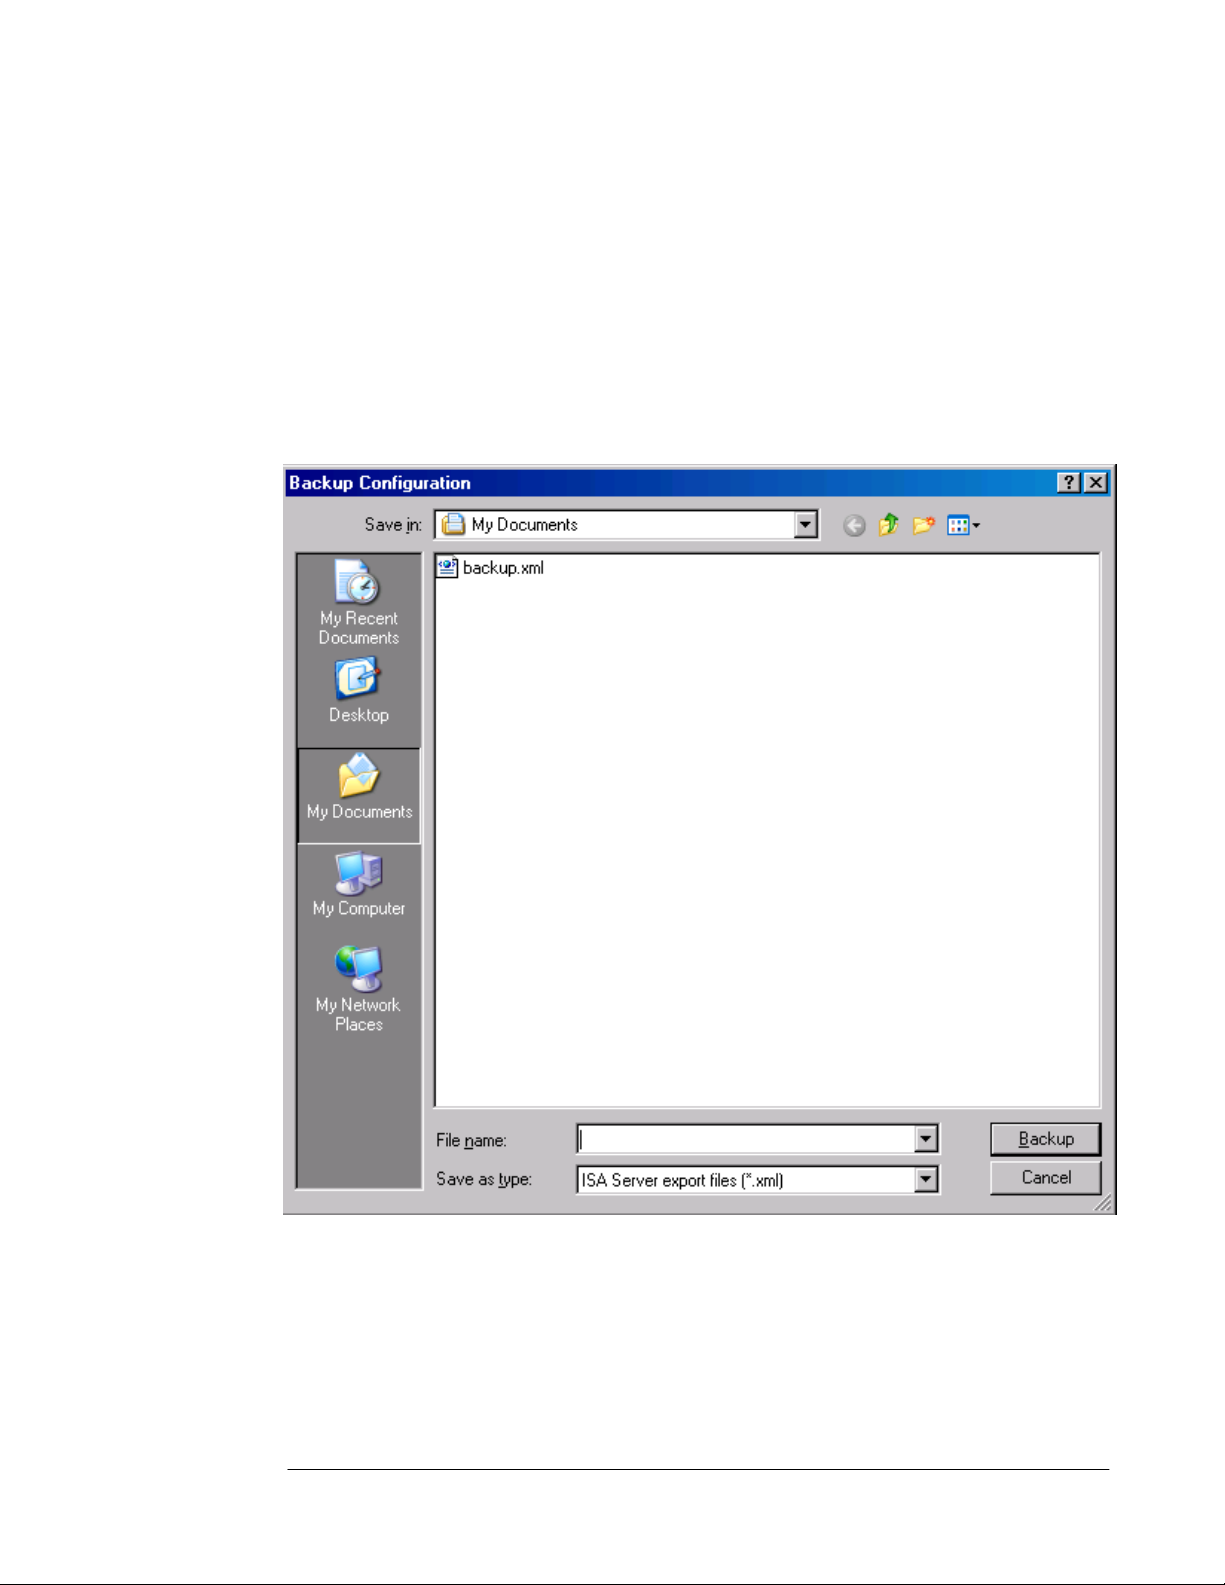
Backing Up the Post-Installation Configuration
Perform the following steps to back up the post installation configuration:
1. Open the Microsoft Internet Security and Acceleration Server 2004 management
console and right click on the server name in the left pane of the console. Click the Back
Up command.
2. In the Backup Configuration dialog box, enter a name for the backup file in the File
name text box. Be sure to note where you are saving the file by checking the entry in the
Save in drop down list. In this example we will call the backup file backup1. Click the
Backup button.
3. In the Set Password dialog box, enter a password and confirm the password in the
Password and Confirm password text boxes. The information in the backup file is
encrypted because it can potentially contain passwords and other confidential information
that you do not want others to access. Click OK.
ISA Server 2004 Configuration Guide 75
Page 78

4. Click OK in the Exporting dialog box when you see the The configuration was
successfully backed up message.
Make sure to copy the backup file to another location on the network after the backup is
complete. The backup file should be stored off-line on media that supported NTFS formatting
so that you can encrypt the file
ISA Server 2004 Configuration Guide 76
Page 79

Conclusion
In this ISA Server 2004 Configuration Guide document we discussed the procedures
required to install the ISA Server 2004 software on a Windows Server 2003 computer. We
also examined the firewall System Policy that is created during installation. Finally, we
finished up with step by step procedures required to back up the post-installation firewall
configuration. In the next document in this ISA Server 2004 Configuration Guide series, we
will enable the VPN remote access server.
This is a preliminary document and may be changed substantially prior to final commercial release of the software described herein.
The information contained in this document represents the current view of Microsoft Corporation on the issues discussed as of the
date of publication. Because Microsoft must respond to changing market conditions, it should not be interpreted to be a commitment
on the part of Microsoft, and Microsoft cannot guarantee the accuracy of any information presented after the date of publication.
This white paper is for informational purposes only. MICROSOFT MAKES NO WARRANTIES, EXPRESS OR IMPLIED, IN THIS
DOCUMENT.
Complying with all applicable copyright laws is the responsibility of the user. Without limiting the rights under copyright, no part of this
document may be reproduced, stored in, or introduced into a retrieval system, or transmitted in any form or by any means (electronic,
mechanical, photocopying, recording, or otherwise), or for any purpose, without the express written permission of Microsoft
Corporation.
Microsoft may have patents, patent applications, trademarks, copyrights, or other intellectual property rights covering subject matter in
this document. Except as expressly provided in any written license agreement from Microsoft, the furnishing of this document does
not give you any license to these patents, trademarks, copyrights, or other intellectual property.
© 2004 Microsoft Corporation. All rights reserved.
The example companies, organizations, products, domain names, e-mail addresses, logos, people, places, and events depicted
herein are fictitious. No association with any real company, organization, product, domain name, e-mail address, logo, person, place,
or event is intended or should be inferred.
Microsoft, Windows, Windows 2000, Windows 2000 Server, Windows Server 2003, Windows Server System, ISA Server, and ISA
Server 2004 are either registered trademarks or trademarks of Microsoft Corporation in the United States and/or other countries.
The names of actual companies and products mentioned herein may be the trademarks of their respective owners.
ISA Server 2004 Configuration Guide 77
Page 80

ISA Server 2004 Configuration Guide:
Backing Up and Restoring Firewall
Configuration
Chapter 8
For the latest information, please see http://www.microsoft.com/isaserver/
ISA Server 2004 Configuration Guide 78
Page 81

Introduction
ISA Server 2004 includes a new and enhanced backup and restore feature set. In ISA Server
2000, the integrated backup utility could back up the ISA Server 2000 firewall configuration.
That backup file could be used to restore the configuration to the same installation on the
same machine. However, if the operating system or hardware experienced a catastrophic
problem requiring disaster recovery, the backup file could not be used to restore the firewall
configuration.
In contrast, the ISA Server 2004 backup utility allows you to back up the entire firewall
configuration or just selected elements. You can restore the configuration to the same ISA
Server 2004 firewall installation on the same machine, or restore it to another ISA Server
2004 firewall on another machine. Backups should be done after performing one or more of
the following procedures:
• Changing cache size or location
• Changing firewall policy
• Changing rule base
• Changing system rules
• Making changes to networks, such as, changing network definition or network rules
• Delegating administrative rights or removing delegation
The import/export feature allows you to export selected components of the firewall
configuration and use them on the same machine at another time, or install those
components to another machine. The import/export functionality can also be used to export
the entire configuration of the machine as a method of cloning for more widespread
distribution.
It is a good practice to perform a backup operation immediately after installing the ISA Server
2004 firewall software. This makes it easier to restore the firewall components to their postinstallation state in the event that you want to completely remove an existing configuration
and start from the beginning without reinstalling the software.
In this ISA Server 2004 Configuration Guide section, we will describe the following
procedures:
• Backing up the Firewall Configuration
• Restoring the Firewall Configuration from the Backup File
• Exporting Firewall Policy
• Importing Firewall Policy
ISA Server 2004 Configuration Guide 79
Page 82

Backing up the Firewall Configuration
The ISA Server 2004 integrated backup utility makes saving the firewall configuration very
easy. There are only a handful of steps required to backup and restore the configuration.
Perform the following steps to back up the entire firewall configuration:
5. Open the Microsoft Internet Security and Acceleration Server 2004 management
console and right click on the server name in the left pane of the console. Click the Back
Up command.
6. In the Backup Configuration dialog box, enter a name for the backup file in the File
name text box. Be sure to note where you are saving the file by checking the entry in the
Save in drop down list. In this example, we will call the backup file backup1. Click the
Backup button.
7. In the Set Password dialog box, enter a password and confirm the password in the
Confirm password text box. The information in the backup file is encrypted because it
can potentially contain passwords and other confidential information that you do not want
others to access. Click OK.
ISA Server 2004 Configuration Guide 80
Page 83
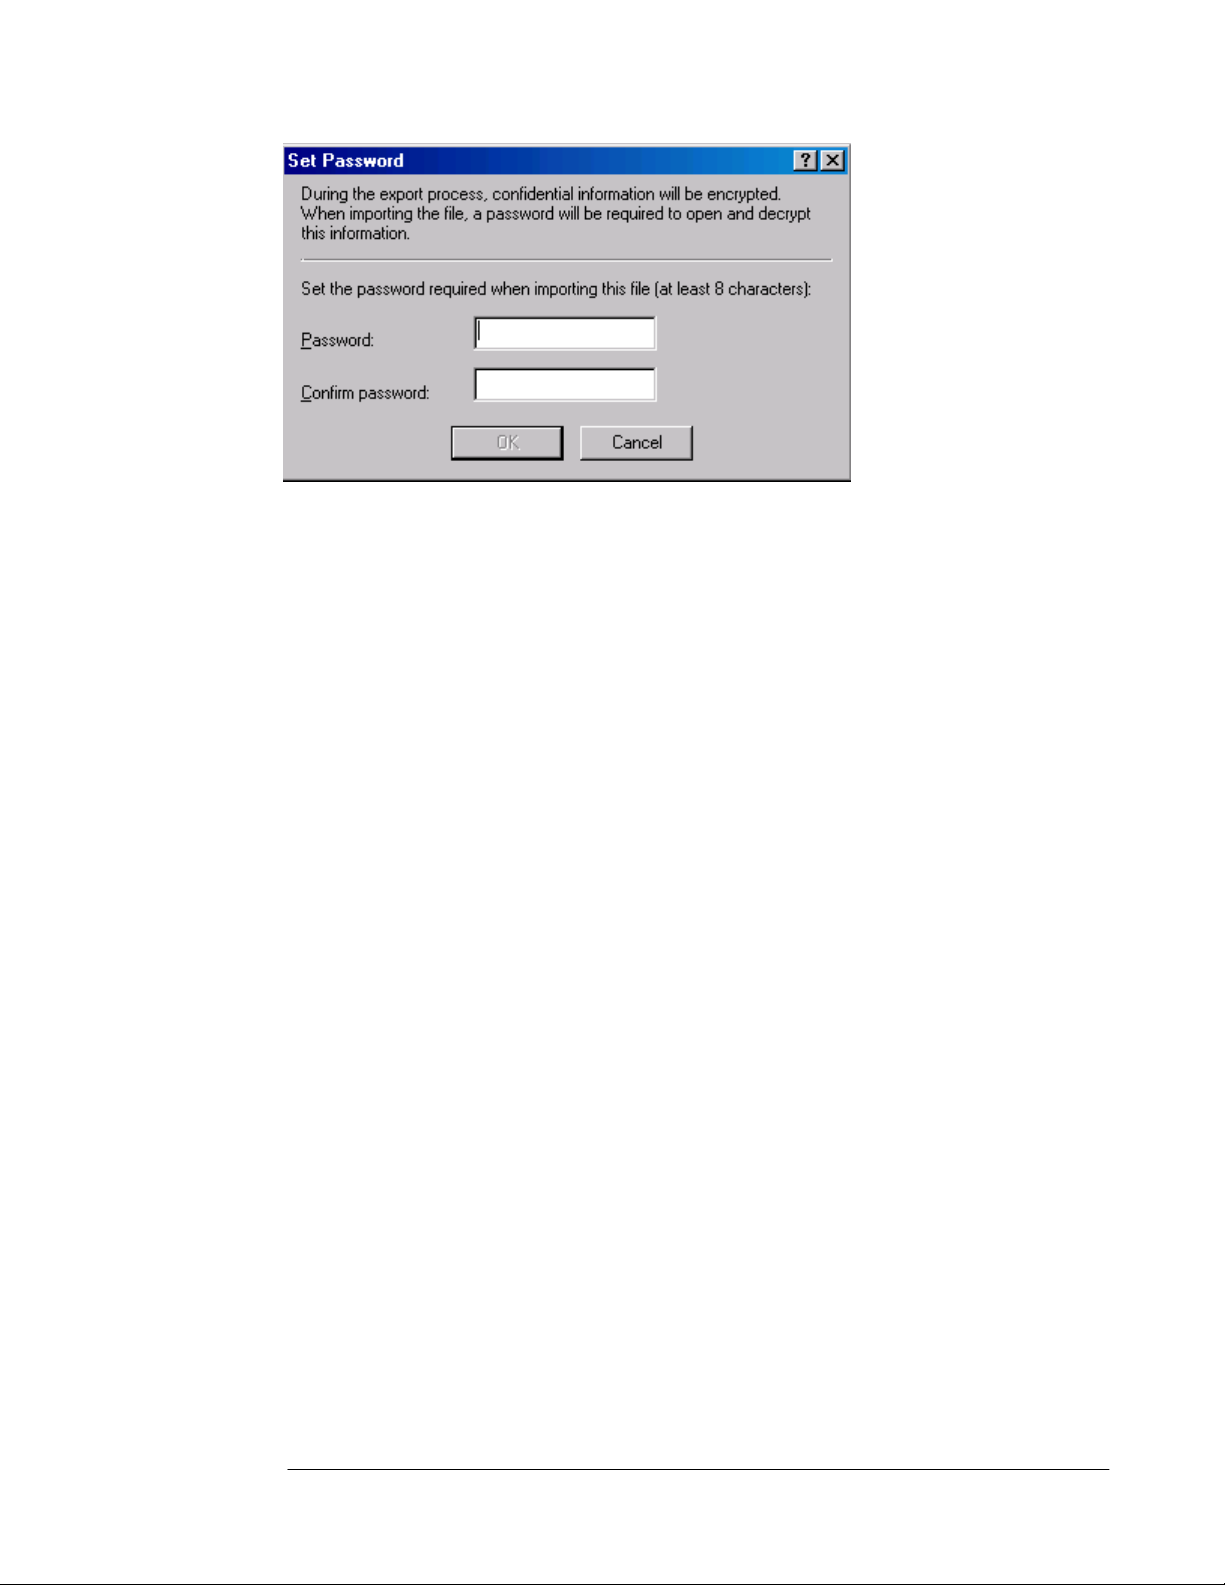
8. Click OK in the Exporting dialog box when you see the The configuration was
successfully backed up message.
Make sure to copy the backup file to another location on the network after the backup is
complete. The backup file should be stored off-line on media that supported NTFS formatting
so that you can encrypt the file.
ISA Server 2004 Configuration Guide 81
Page 84

Restoring the Firewall Configuration from the Backup File
You can use the backup file to restore the machine configuration. The restore can be to the
same machine and same ISA Server 2004 firewall installation, the same machine and a new
ISA Server 2004 firewall installation, or to a completely new machine.
Perform the following steps to restore the configuration from backup:
1. Open the Microsoft Internet Security and Acceleration Server 2004 management
console and right click on the computer name in the left pane of the console. Click the
Restore command.
2. In the Restore Configuration dialog box, navigate to the backup file you created. In this
example, we will use the backup file named backup1.xml. Click the Restore button after
selecting the file.
3. Enter the password you assigned to the file in the Type Password to Open File dialog
box, then click OK.
ISA Server 2004 Configuration Guide 82
Page 85

4. Click OK in the Importing dialog box when it shows the The configuration was
successfully restored message.
5. Click Apply to save the changes and update firewall policy.
6. Select the Save the changes and restart the service(s) option in the ISA Server
Warning dialog box (note that this is not the selected option in the figure, please select
the appropriate option).
7. Click OK in the Apply New Configuration dialog box informing you that the Changes to
the configuration were successfully applied.
ISA Server 2004 Configuration Guide 83
Page 86
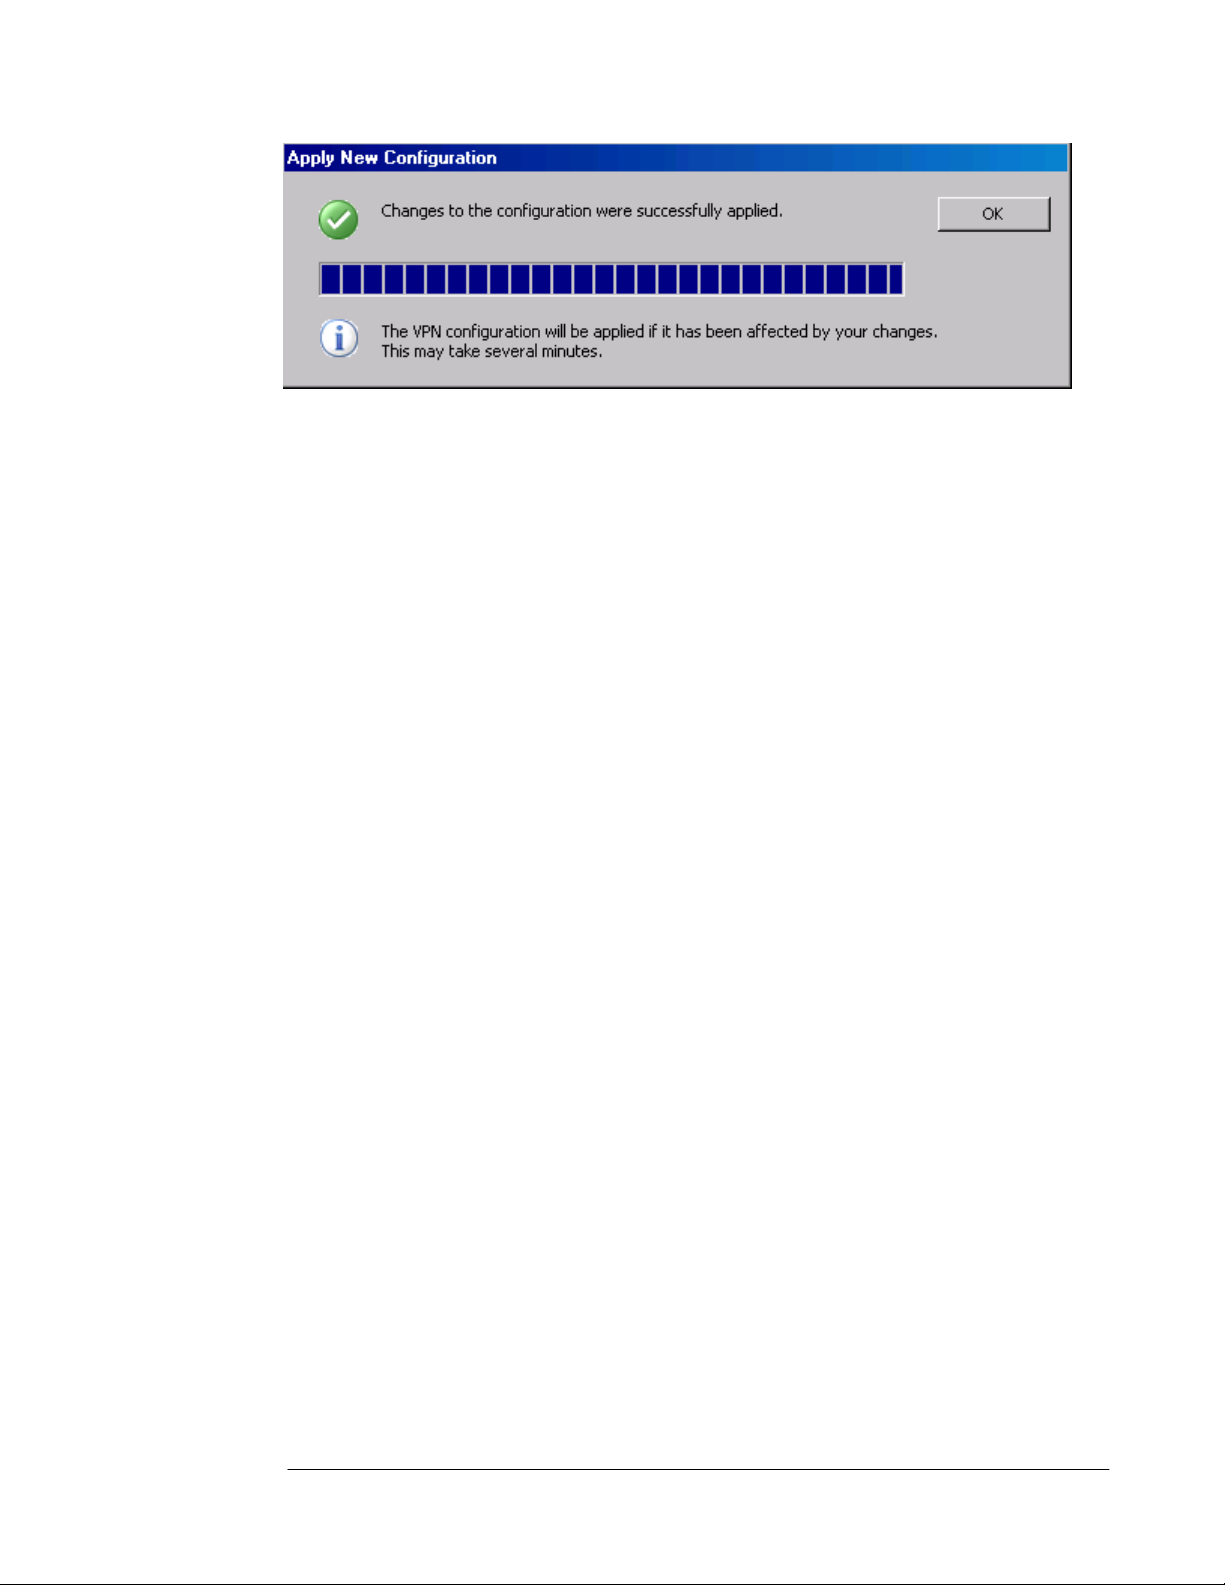
The restored configuration is now fully functional and the previous firewall policies are now
applied.
ISA Server 2004 Configuration Guide 84
Page 87

Exporting Firewall Policy
You may not always want or need to export all aspects of the ISA Server 2004 firewall
configuration. For example, you may have problems with your Access Policies and want
someone to view them for you. You can export the firewall’s current Access Policies and send
the export file to an ISA Server 2004 professional who can quickly import the policies into a
test machine and troubleshoot the problem.
In the following example we will export the VPN Clients configuration to a file. Perform the
following steps to export the VPN Clients configuration:
1. In the Microsoft Internet Security and Acceleration Server 2004 management
console, expand your server name in the left pane of the console and then right click on
the Virtual Private Networks (VPN) node. Click on the Export VPN Clients
Configuration command.
2. In the Export Configuration dialog box, enter a name for the export file in the File name
text box. Make a note of where you are storing the file, which is displayed in the Save in
drop down list. Put checkmarks in the Export user permission settings and Export
confidential information (encryption will be used) check boxes if you want to save the
private information included in the VPN Clients configuration (such as IPSec shared
secrets). In this example we will call the file VPN Clients Backup. Click Export.
ISA Server 2004 Configuration Guide 85
Page 88

3. In the Set Password dialog box, enter a password and confirm the password in the
Confirm password text box. Click OK.
4. Click OK in the Exporting dialog box when you see the message Successfully
exported the configuration.
ISA Server 2004 Configuration Guide 86
Page 89
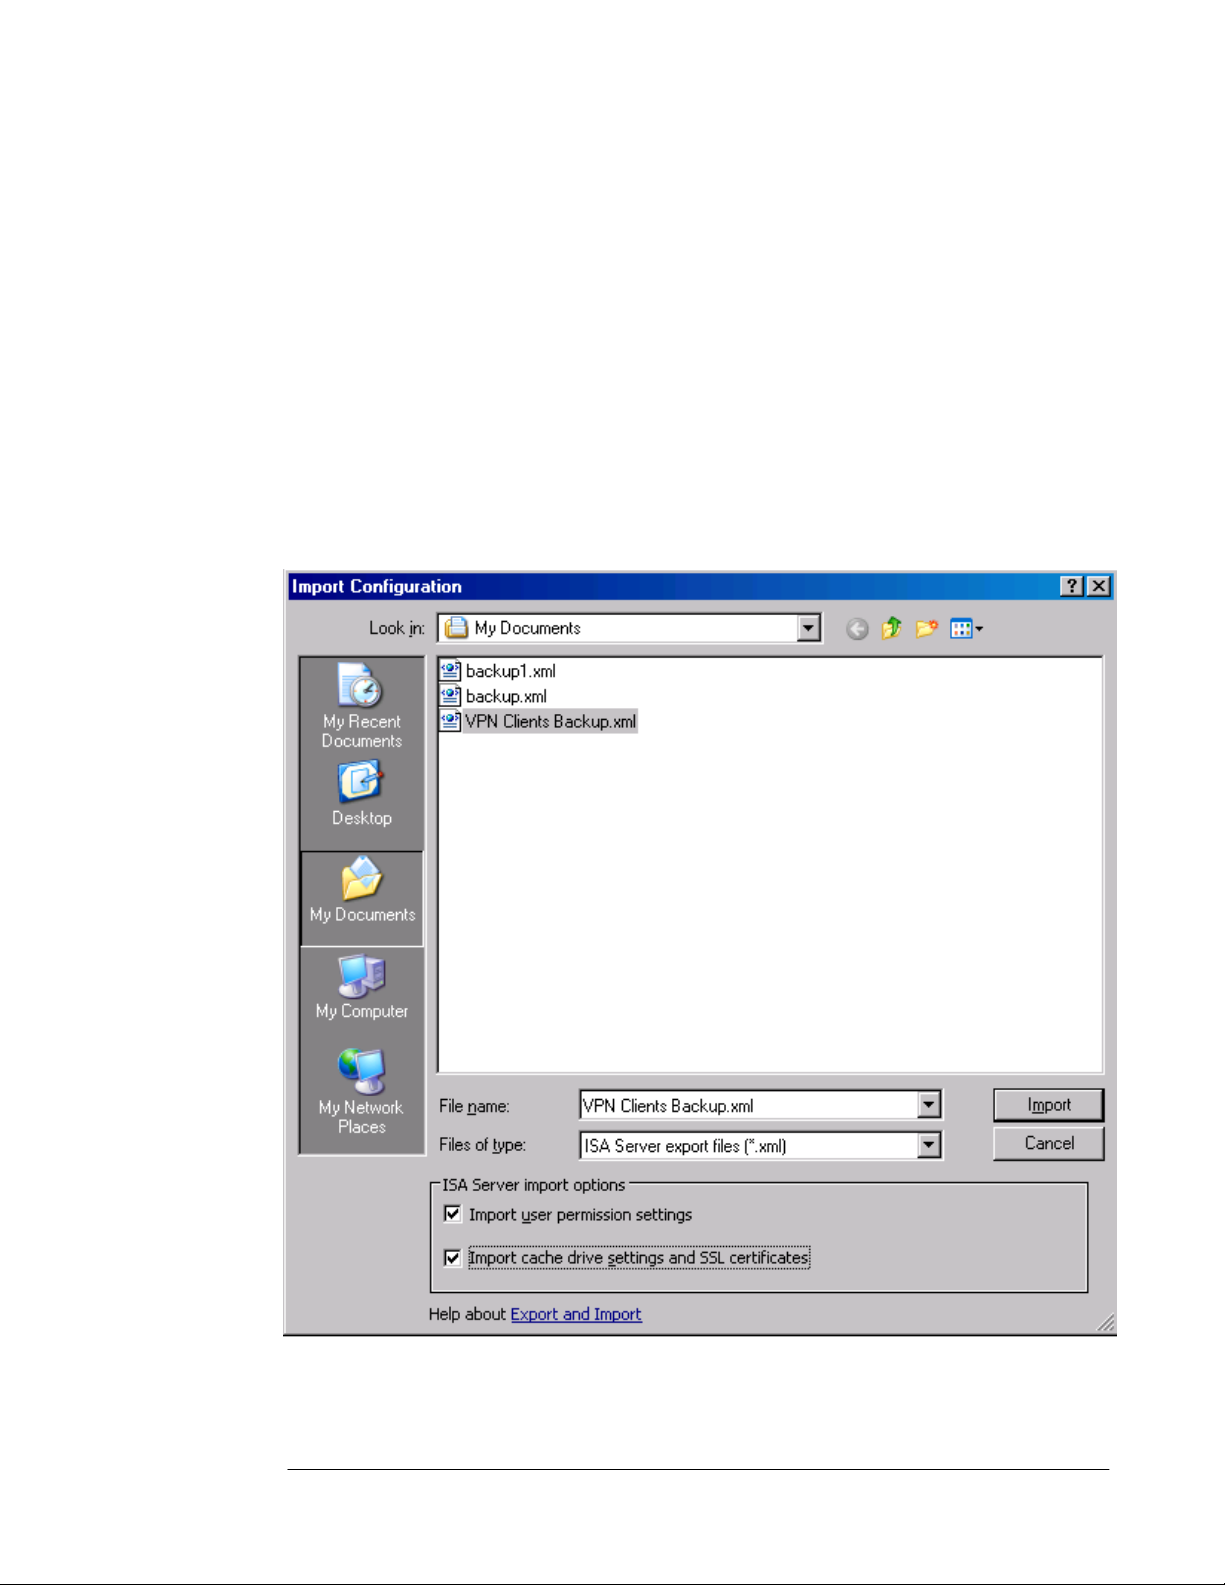
Importing Firewall Policy
The export file can be imported to the same machine or another machine that has ISA Server
2004 installed. In the following example, we will import the VPN Clients settings that were
exported in the previous exercise.
Perform the following steps to import the VPN Clients settings from the export file:
1. In the Microsoft Internet Security and Acceleration Server 2004 management
console, expand the server name and right click on the Virtual Private Networks (VPN)
node. Click Import VPN Clients Configuration.
2. In the Import Configuration dialog box, select the VPN Clients Backup file. Put a
checkmark in the Import user permission settings and Import cache drive settings
and SSL certificates checkboxes. In this example, the cache drive settings are not
important, but the SSL certificates are helpful if you want to use the same certificates that
are used for IPSec or L2TP/IPSec VPN connections. Click Import.
3. Enter the password you assigned to the file in the Type Password to Open File dialog
box. Click OK.
ISA Server 2004 Configuration Guide 87
Page 90
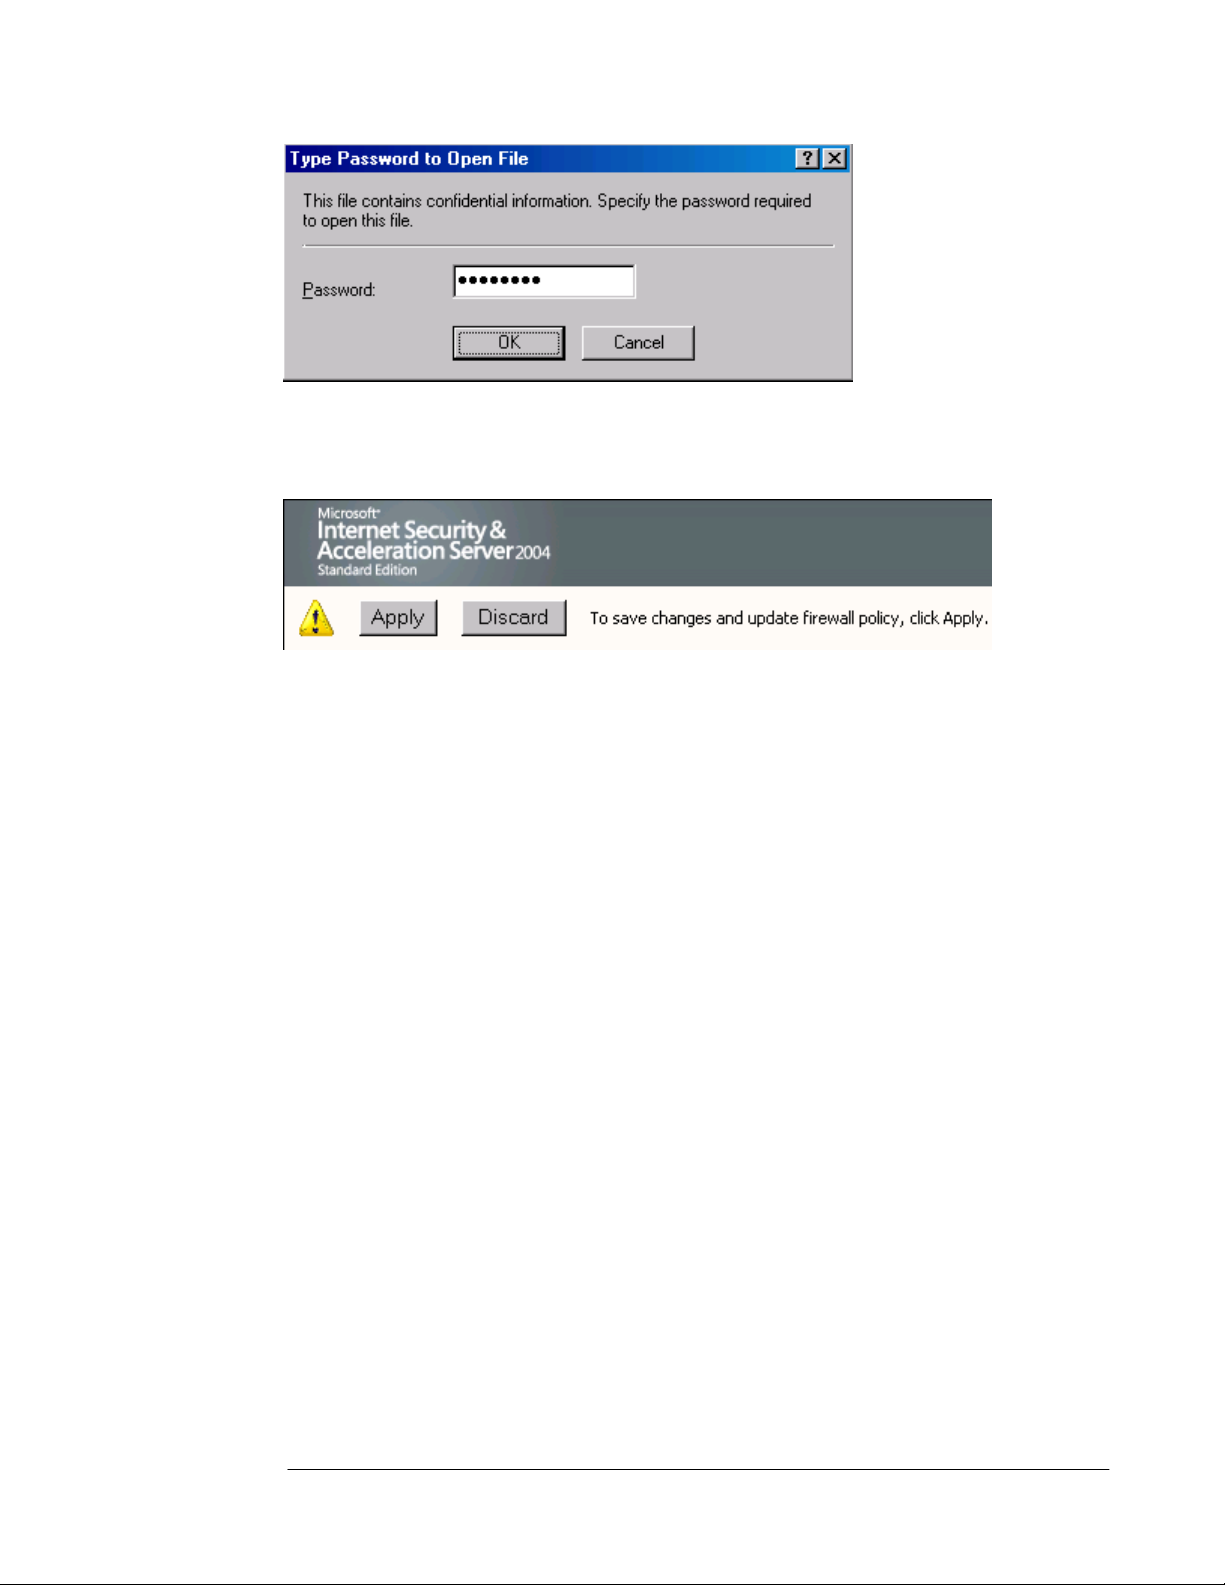
4. Click OK in the Importing Virtual Private Networks (VPN) dialog box when you see the
Successfully imported the configuration message.
5. Click Apply to apply the changes and update firewall policy.
6. Click OK in the Apply New Configuration dialog box when you see the message
Changes to the configuration were successfully applied. Note that changes in the
VPN configuration may take several minutes as they are updated in the background.
ISA Server 2004 Configuration Guide 88
Page 91

Conclusion
In this ISA Server 2004 Configuration Guide section, we discussed the procedures for
backing up and restoring the ISA Server 2004 firewall configuration. We also explored the
export and import feature that allows you to back up selected elements of the firewall
configuration. In the next section of the ISA Server 2004 Configuration Guide series, we will
examine how you can use the ISA Server 2004 Network Templates to simplify the initial
configuration of Networks, Network Rules and firewall Access Policies.
This is a preliminary document and may be changed substantially prior to final commercial release of the software described herein.
The information contained in this document represents the current view of Microsoft Corporation on the issues discussed as of the
date of publication. Because Microsoft must respond to changing market conditions, it should not be interpreted to be a commitment
on the part of Microsoft, and Microsoft cannot guarantee the accuracy of any information presented after the date of publication.
This white paper is for informational purposes only. MICROSOFT MAKES NO WARRANTIES, EXPRESS OR IMPLIED, IN THIS
DOCUMENT.
Complying with all applicable copyright laws is the responsibility of the user. Without limiting the rights under copyright, no part of this
document may be reproduced, stored in, or introduced into a retrieval system, or transmitted in any form or by any means (electronic,
mechanical, photocopying, recording, or otherwise), or for any purpose, without the express written permission of Microsoft
Corporation.
Microsoft may have patents, patent applications, trademarks, copyrights, or other intellectual property rights covering subject matter in
this document. Except as expressly provided in any written license agreement from Microsoft, the furnishing of this document does
not give you any license to these patents, trademarks, copyrights, or other intellectual property.
© 2004 Microsoft Corporation. All rights reserved.
The example companies, organizations, products, domain names, e-mail addresses, logos, people, places, and events depicted
herein are fictitious. No association with any real company, organization, product, domain name, e-mail address, logo, person, place,
or event is intended or should be inferred.
Microsoft, Windows, Windows 2000, Windows 2000 Server, Windows Server 2003, Windows Server System, ISA Server, and ISA
Server 2004 are either registered trademarks or trademarks of Microsoft Corporation in the United States and/or other countries.
The names of actual companies and products mentioned herein may be the trademarks of their respective owners.
ISA Server 2004 Configuration Guide 89
Page 92

ISA Server 2004 Configuration Guide:
Simplifying Network Configuration with
Network Templates
Chapter 9
For the latest information, please see http://www.microsoft.com/isaserver/
ISA Server 2004 Configuration Guide 90
Page 93

Introduction
The ISA Server 2004 firewall comes with a number of pre-built Network Templates you can
use to automatically configure Networks, Network Rules and Access Rules. The Network
Templates are designed to get you started quickly by creating a base configuration on which
you can build. You can choose from one of the following Network Templates:
• Edge Firewall
The Edge Firewall Network Template is used when the ISA Server 2004 firewall has a
network interface directly connected to the Internet and a network interface connected to
the Internal network
• 3-Leg Perimeter
The 3-Leg Perimeter Network Template is used when you have an external interface,
Internal interface and a perimeter network segment (DMZ) interface. This template
configures the addresses and relationships between these networks.
• Front Firewall
The Front Firewall Template is used when the ISA Server 2004 firewall serves as a frontend firewall in a back-to-back firewall configuration.
• Back Firewall
The Back Firewall Template is used when the ISA Server 2004 firewall is located behind
another ISA Server 2004 firewall, or a third-party firewall.
• Single Network Adapter
The Single Network Adapter Template is a special configuration that removes the ISA
Server 2004 firewall’s network firewall capabilities. Instead, the Single Network Adapter
template configures the machine as a unihomed Web caching server.
In this ISA Server 2004 Configuration Guide document, we outline the procedures to carry
out two scenarios:
• Scenario 1: The Edge Firewall Configuration
• Scenario 2: The 3-Leg Perimeter Configuration
You only need to go through the section that applies to your current setup. If you followed the
complete instructions in the first chapter of this guide, then you should perform the
procedures in the second scenario. Otherwise, you can use the procedures provided in the
first scenario.
ISA Server 2004 Configuration Guide 91
Page 94

Scenario 1: The Edge Firewall Configuration
The Edge Firewall template configures the ISA Server 2004 firewall to have a network
interface directly connected to the Internet and a second network interface connected to the
Internal network. The network template allows you to quickly configure firewall policy Access
Rules that control access between the Internal network and the Internet.
Table 1 shows the firewall policies available to you when using the Edge Firewall template.
Each of these firewall policies has its own set of Access Rules that it creates, ranging from an
all open access policy between the Internal network and Internet to a Block All policy that
prevents all access between the Internal network and the Internet.
Table 1: Network Edge Firewall Template Firewall Policy Options
Firewall Policy Description
Block all
Block all network access through ISA Server.
This option does not create any access rules other than the default
rule which blocks all access.
Use this option when you want to define firewall policy on your
own.
Block Internet access,
allow access to ISP
network services
Allow limited Web
access
Allow limited Web
access and access to
ISP network services
Block all network access through ISA Server, except for access to
network services such as DNS. This option is useful when your
Internet Service Provider (ISP) provides these services.
Use this option when you want to define firewall policy on your
own.
The following access rules will be created:
1. Allow DNS from Internal Network and VPN Clients Network to
External Network (Internet)
Allow Web access using HTTP, HTTPS, FTP only. Block all other
network access.
The following access rules will be created:
1. Allow HTTP, HTTPS, FTP from Internal Network to External
Network
2. Allow all protocols from VPN Clients Network to Internal
Network
Allow limited Web access using HTTP, HTTPS, and FTP, and
allows access to ISP network services such as DNS. Block all
other network access.
The following access rules will be created:
1. Allow HTTP, HTTPS, FTP from Internal Network and VPN
Clients Network to External Network (Internet)
2. Allow DNS from Internal Network and VPN Clients Network to
External Network (Internet)
3. Allow all protocols from VPN Clients Network to Internal
Network
Allow unrestricted
ISA Server 2004 Configuration Guide 92
Allow unrestricted access to the Internet through ISA Server. ISA
Page 95

Firewall Policy Description
access
Perform the following steps to configure the firewall using the Edge Firewall Network
Template:
1. In the Microsoft Internet Security and Acceleration Server 2004 management
console, expand the server name and then expand the Configuration node. Click on the
Networks node.
2. Click on the Templates tab in the Task Pane. Click on the Edge Firewall network
template.
Server will prevent access from the Internet.
The following access rules will be created:
1. Allow all protocols from Internal Network and VPN Clients
Network to External Network (Internet)
2. Allow all protocols from VPN Clients Network to Internal
Network
ISA Server 2004 Configuration Guide 93
Page 96

3. Click Next on the Welcome to the Network Template Wizard page.
ISA Server 2004 Configuration Guide 94
Page 97

4. On the Export the ISA Server Configuration page, you are offered the opportunity to
export the current configuration. You can return the ISA Server 2004 firewall to the state it
was in prior to using the Edge Firewall network template using this file. We have already
backed up the system configuration, so we will not need to export the configuration at this
time. Click Next.
ISA Server 2004 Configuration Guide 95
Page 98
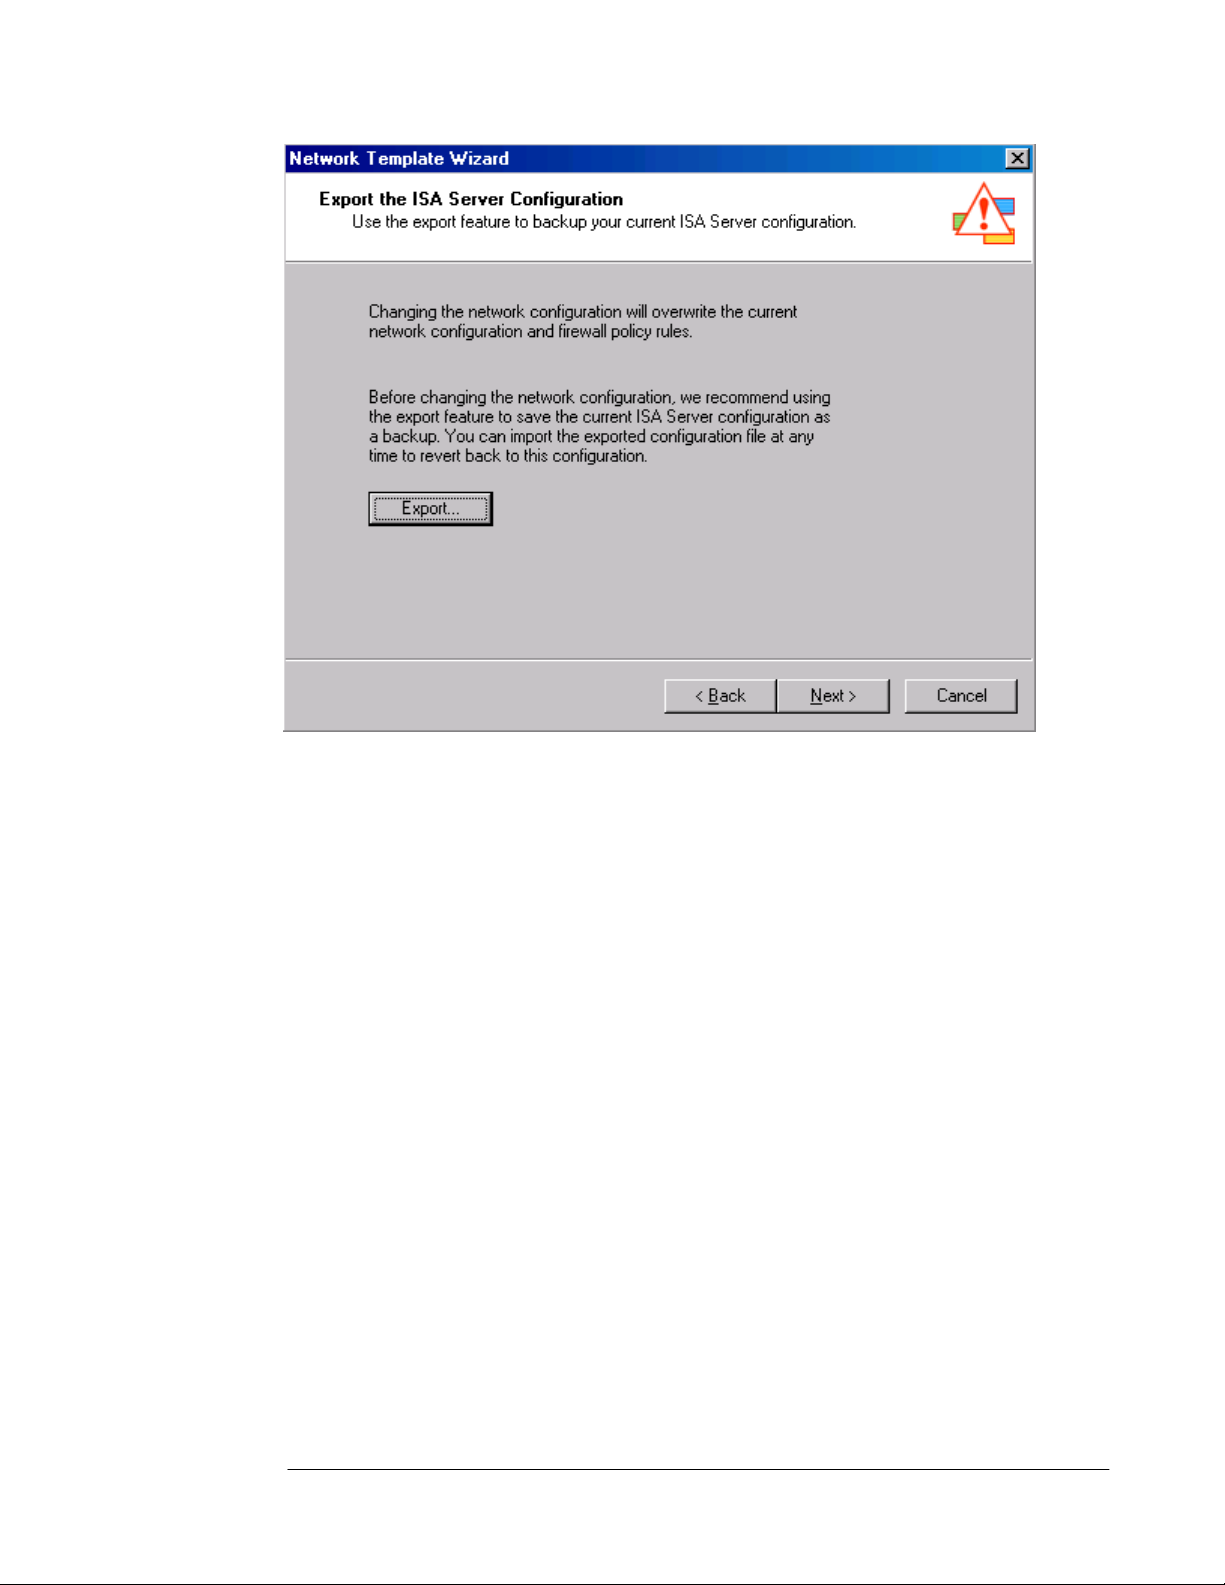
5. On the Internal Network IP Addresses page, you define the Internal network addresses.
The current Internal network address range is automatically included in the Address
ranges list. You can use the Add, Add Adapter and Add Private button to expand this
list of addresses. In our current example we will keep the current Internal network
address range. Click Next.
ISA Server 2004 Configuration Guide 96
Page 99

6. On the Select a Firewall Policy page you can select a firewall policy and a collection of
Access Rules. In this example, we want to allow Internal network clients access to all
protocols to access all sites on the Internet. After you become more familiar with the ISA
Server 2004 firewall, you should increase the level of security for outbound access
control. But at this point, general Internet access is more important. Select the Allow
unrestricted access policy from the list and click Next.
ISA Server 2004 Configuration Guide 97
Page 100
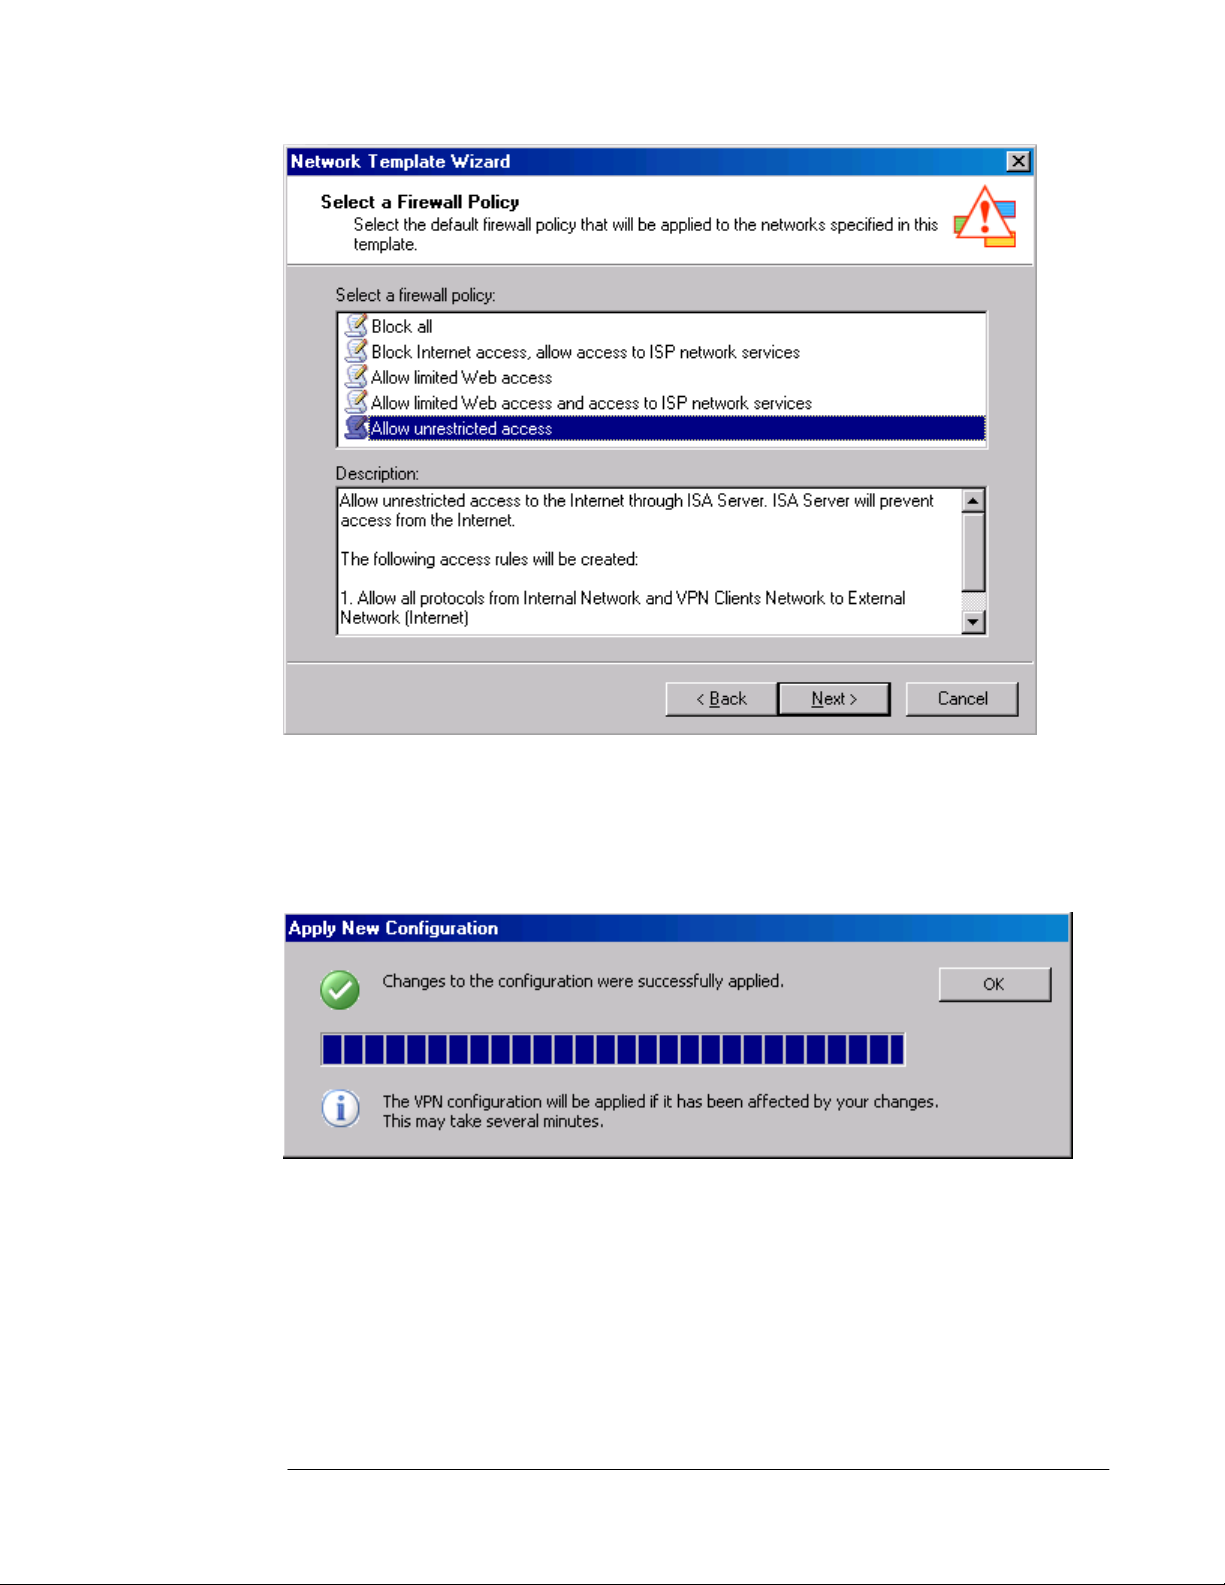
7. Review your settings and click Finish on the Completing the Network Template Wizard
page.
8. Click Apply to save the changes and update firewall policy.
9. Click OK in the Apply New Configuration dialog box after you see the message
Changes to the configuration were successfully applied.
10. Click on the Firewall Policies node in the left pane of the console to view the policies
created by the Edge Firewall network template. These two Access Rules allow Internet
network and VPN clients full access to the Internet, and the VPN clients are allowed full
access to the Internal network.
ISA Server 2004 Configuration Guide 98
 Loading...