

Micro Motion NET OIL COMPUTER SOFTWARE AND NOC SYSTEM CONFIGURATION AND USE MANUAL Manuals & Guides
Page 1

Instruction Manual
P/N 20006444, Rev. A
Ma
y 2007
Micro Motion®
Net Oil Computer Software
and NOC System
Configuration and Use Manual
Page 2

©2007, Micro Motion, Inc. All rights reserved. ELITE and ProLink are registered trademarks, and MVD and MVD Direct Connect
are trademarks of Micro Motion, Inc., Boulder, Colorado. Micro Motion is a registered trade name of Micro Motion, Inc., Boulder,
Colorado. The Micro Motion and Emerson logos are trademarks and service marks of Emerson Electric Co. All other trademarks
are property of their respective owners.
Page 3

Contents
Chapter 1 Before You Begin . . . . . . . . . . . . . . . . . . . . . . . . . . . . . . . . . . . . . 1
1.1 Overview . . . . . . . . . . . . . . . . . . . . . . . . . . . . . . . . . . . . . . . . . . . . . . . . . . . . . . . . . . . 1
1.2 Safety . . . . . . . . . . . . . . . . . . . . . . . . . . . . . . . . . . . . . . . . . . . . . . . . . . . . . . . . . . . . . 1
1.3 About the Net Oil Computer Software and the NOC system . . . . . . . . . . . . . . . . . . . 1
1.3.1 NOC system components . . . . . . . . . . . . . . . . . . . . . . . . . . . . . . . . . . . . . 1
1.3.2 Communication tools . . . . . . . . . . . . . . . . . . . . . . . . . . . . . . . . . . . . . . . . . 2
1.4 Documentation resources . . . . . . . . . . . . . . . . . . . . . . . . . . . . . . . . . . . . . . . . . . . . . . 2
1.5 Configuration overview . . . . . . . . . . . . . . . . . . . . . . . . . . . . . . . . . . . . . . . . . . . . . . . . 3
1.6 Using and maintaining the NOC system . . . . . . . . . . . . . . . . . . . . . . . . . . . . . . . . . . . 3
1.7 Customer service . . . . . . . . . . . . . . . . . . . . . . . . . . . . . . . . . . . . . . . . . . . . . . . . . . . . 4
Chapter 2 NOC System Overview . . . . . . . . . . . . . . . . . . . . . . . . . . . . . . . . . 5
2.1 Overview . . . . . . . . . . . . . . . . . . . . . . . . . . . . . . . . . . . . . . . . . . . . . . . . . . . . . . . . . . . 5
2.2 Terminology. . . . . . . . . . . . . . . . . . . . . . . . . . . . . . . . . . . . . . . . . . . . . . . . . . . . . . . . . 5
2.3 Internal structure of the Net Oil Computer Software . . . . . . . . . . . . . . . . . . . . . . . . . . 7
2.4 Sensor input to the Net Oil Computer Software . . . . . . . . . . . . . . . . . . . . . . . . . . . . . 7
2.4.1 Mapping NOC Meters to MMI sensors. . . . . . . . . . . . . . . . . . . . . . . . . . . . 9
2.4.2 Water leg measurement versus liquid leg measurement. . . . . . . . . . . . . 10
2.5 Operation modes. . . . . . . . . . . . . . . . . . . . . . . . . . . . . . . . . . . . . . . . . . . . . . . . . . . . 11
2.6 Required well data . . . . . . . . . . . . . . . . . . . . . . . . . . . . . . . . . . . . . . . . . . . . . . . . . . 11
2.7 Water cut determination . . . . . . . . . . . . . . . . . . . . . . . . . . . . . . . . . . . . . . . . . . . . . . 12
2.8 Temperature correction . . . . . . . . . . . . . . . . . . . . . . . . . . . . . . . . . . . . . . . . . . . . . . . 12
2.9 Pressure correction . . . . . . . . . . . . . . . . . . . . . . . . . . . . . . . . . . . . . . . . . . . . . . . . . . 12
2.10 Pressure compensation . . . . . . . . . . . . . . . . . . . . . . . . . . . . . . . . . . . . . . . . . . . . . . 13
2.11 Transient bubble remediation (TBR) . . . . . . . . . . . . . . . . . . . . . . . . . . . . . . . . . . . . . 13
2.11.1 Correct Density option . . . . . . . . . . . . . . . . . . . . . . . . . . . . . . . . . . . . . . . 14
2.12 Using NOC data . . . . . . . . . . . . . . . . . . . . . . . . . . . . . . . . . . . . . . . . . . . . . . . . . . . . 15
2.13 Using the Recalculation feature . . . . . . . . . . . . . . . . . . . . . . . . . . . . . . . . . . . . . . . . 16
2.14 Using event and alarm data . . . . . . . . . . . . . . . . . . . . . . . . . . . . . . . . . . . . . . . . . . . 16
2.15 Planning the configuration. . . . . . . . . . . . . . . . . . . . . . . . . . . . . . . . . . . . . . . . . . . . . 17
Chapter 3 Setting Up the ROC809 Platform. . . . . . . . . . . . . . . . . . . . . . . . . . 19
3.1 About this chapter . . . . . . . . . . . . . . . . . . . . . . . . . . . . . . . . . . . . . . . . . . . . . . . . . . . 19
3.2 Configuring the ROC809 platform. . . . . . . . . . . . . . . . . . . . . . . . . . . . . . . . . . . . . . . 19
3.3 Verifying the Net Oil Computer Software. . . . . . . . . . . . . . . . . . . . . . . . . . . . . . . . . . 20
3.4 Verifying the startup configuration file . . . . . . . . . . . . . . . . . . . . . . . . . . . . . . . . . . . . 20
Configuration and Use Manual i
Page 4

Contents
Chapter 4 Net Oil Computer Software Displays . . . . . . . . . . . . . . . . . . . . . . . 23
4.1 About this chapter . . . . . . . . . . . . . . . . . . . . . . . . . . . . . . . . . . . . . . . . . . . . . . . . . . . 23
4.2 NOC Station display . . . . . . . . . . . . . . . . . . . . . . . . . . . . . . . . . . . . . . . . . . . . . . . . . 23
4.2.1 NOC Station display – General panel . . . . . . . . . . . . . . . . . . . . . . . . . . . 23
4.2.2 NOC Station display – Units panel . . . . . . . . . . . . . . . . . . . . . . . . . . . . . 26
4.2.3 NOC Station display – Totals panel . . . . . . . . . . . . . . . . . . . . . . . . . . . . . 27
4.2.4 NOC Station display – Averages panel . . . . . . . . . . . . . . . . . . . . . . . . . . 29
4.2.5 NOC Station display – Well Selection panel . . . . . . . . . . . . . . . . . . . . . . 31
4.2.6 NOC Station display – Alarms panel . . . . . . . . . . . . . . . . . . . . . . . . . . . . 32
4.3 MMI Interface display . . . . . . . . . . . . . . . . . . . . . . . . . . . . . . . . . . . . . . . . . . . . . . . . 32
4.3.1 MMI Interface display – Comm Setup panel . . . . . . . . . . . . . . . . . . . . . . 33
4.3.2 MMI Interface display – Registers panel . . . . . . . . . . . . . . . . . . . . . . . . . 34
4.3.3 MMI Interface display – Alarms panel . . . . . . . . . . . . . . . . . . . . . . . . . . . 35
4.3.4 MMI Interface display – Pressure Compensation panel . . . . . . . . . . . . . 36
4.4 NOC Meter display . . . . . . . . . . . . . . . . . . . . . . . . . . . . . . . . . . . . . . . . . . . . . . . . . . 37
4.4.1 NOC Meter display – General panel . . . . . . . . . . . . . . . . . . . . . . . . . . . . 37
4.4.2 NOC Meter display – Inputs panel . . . . . . . . . . . . . . . . . . . . . . . . . . . . . . 38
4.4.3 NOC Meter display – TBR panel . . . . . . . . . . . . . . . . . . . . . . . . . . . . . . . 40
4.4.4 NOC Meter display – Instant Values panel . . . . . . . . . . . . . . . . . . . . . . . 41
4.4.5 NOC Meter display – Totals panel . . . . . . . . . . . . . . . . . . . . . . . . . . . . . . 43
4.4.6 NOC Meter display – Averages panel . . . . . . . . . . . . . . . . . . . . . . . . . . . 45
4.4.7 NOC Meter display – Alarms panel . . . . . . . . . . . . . . . . . . . . . . . . . . . . . 46
4.4.8 NOC Meter display – Density Determination panel . . . . . . . . . . . . . . . . . 48
4.5 Well Data display . . . . . . . . . . . . . . . . . . . . . . . . . . . . . . . . . . . . . . . . . . . . . . . . . . . 50
4.5.1 Well Data display – Configuration panel . . . . . . . . . . . . . . . . . . . . . . . . . 50
4.5.2 Well Data display – History panel . . . . . . . . . . . . . . . . . . . . . . . . . . . . . . 51
4.6 NOC Recalc display . . . . . . . . . . . . . . . . . . . . . . . . . . . . . . . . . . . . . . . . . . . . . . . . . 54
4.6.1 NOC Recalc display – General panel . . . . . . . . . . . . . . . . . . . . . . . . . . . 54
4.6.2 NOC Recalc display – Totals panel . . . . . . . . . . . . . . . . . . . . . . . . . . . . . 55
4.6.3 NOC Recalc display – Averages panel . . . . . . . . . . . . . . . . . . . . . . . . . . 57
4.6.4 NOC Recalc display – Recalculable Tests panel. . . . . . . . . . . . . . . . . . . 58
Chapter 5 Configuring the NOC System . . . . . . . . . . . . . . . . . . . . . . . . . . . . 61
5.1 About this chapter . . . . . . . . . . . . . . . . . . . . . . . . . . . . . . . . . . . . . . . . . . . . . . . . . . . 61
5.2 General procedure . . . . . . . . . . . . . . . . . . . . . . . . . . . . . . . . . . . . . . . . . . . . . . . . . . 61
5.3 Configuring the NOC Station . . . . . . . . . . . . . . . . . . . . . . . . . . . . . . . . . . . . . . . . . . 62
5.4 Configuring the wells. . . . . . . . . . . . . . . . . . . . . . . . . . . . . . . . . . . . . . . . . . . . . . . . . 63
5.5 Configuring the MMI Interface(s) . . . . . . . . . . . . . . . . . . . . . . . . . . . . . . . . . . . . . . . 63
5.6 Configuring an NOC Meter . . . . . . . . . . . . . . . . . . . . . . . . . . . . . . . . . . . . . . . . . . . . 64
Chapter 6 Special Topics in Configuration . . . . . . . . . . . . . . . . . . . . . . . . . . 67
6.1 About this chapter . . . . . . . . . . . . . . . . . . . . . . . . . . . . . . . . . . . . . . . . . . . . . . . . . . . 67
6.2 Setting up gas measurement . . . . . . . . . . . . . . . . . . . . . . . . . . . . . . . . . . . . . . . . . . 67
6.3 Configuring water cut measurement using water cut probes (WCPs) . . . . . . . . . . . 69
Chapter 7 Density Determination Routines. . . . . . . . . . . . . . . . . . . . . . . . . . 71
7.1 About this chapter . . . . . . . . . . . . . . . . . . . . . . . . . . . . . . . . . . . . . . . . . . . . . . . . . . . 71
7.2 About the density determination routines . . . . . . . . . . . . . . . . . . . . . . . . . . . . . . . . . 71
7.3 Preparing for density determination . . . . . . . . . . . . . . . . . . . . . . . . . . . . . . . . . . . . . 71
7.4 Density determination for oil . . . . . . . . . . . . . . . . . . . . . . . . . . . . . . . . . . . . . . . . . . . 72
7.5 Density determination for water . . . . . . . . . . . . . . . . . . . . . . . . . . . . . . . . . . . . . . . . 72
ii Micro Motion® Net Oil Computer Software and NOC System
Page 5

Contents
Chapter 8 Using the NOC System . . . . . . . . . . . . . . . . . . . . . . . . . . . . . . . . 75
8.1 About this chapter . . . . . . . . . . . . . . . . . . . . . . . . . . . . . . . . . . . . . . . . . . . . . . . . . . . 75
8.2 Operation mode . . . . . . . . . . . . . . . . . . . . . . . . . . . . . . . . . . . . . . . . . . . . . . . . . . . . 75
8.2.1 Changing operation mode . . . . . . . . . . . . . . . . . . . . . . . . . . . . . . . . . . . . 75
8.2.2 Managing well tags when changing modes . . . . . . . . . . . . . . . . . . . . . . . 76
8.3 Using Continuous mode . . . . . . . . . . . . . . . . . . . . . . . . . . . . . . . . . . . . . . . . . . . . . . 76
8.3.1 Starting Continuous mode measurement . . . . . . . . . . . . . . . . . . . . . . . . 76
8.3.2 Using Force End of Day. . . . . . . . . . . . . . . . . . . . . . . . . . . . . . . . . . . . . . 77
8.3.3 Changing parameters during Continuous mode measurement . . . . . . . . 77
8.3.4 Viewing Continuous mode current data . . . . . . . . . . . . . . . . . . . . . . . . . . 78
8.3.5 Viewing Continuous mode contract period data . . . . . . . . . . . . . . . . . . . 78
8.4 Performing a well test . . . . . . . . . . . . . . . . . . . . . . . . . . . . . . . . . . . . . . . . . . . . . . . . 79
8.4.1 Pausing or stopping a well test . . . . . . . . . . . . . . . . . . . . . . . . . . . . . . . . 79
8.4.2 Changing parameters during a well test . . . . . . . . . . . . . . . . . . . . . . . . . 80
8.4.3 Viewing current well test data . . . . . . . . . . . . . . . . . . . . . . . . . . . . . . . . . 80
8.4.4 Viewing stored well tests . . . . . . . . . . . . . . . . . . . . . . . . . . . . . . . . . . . . . 80
8.5 Viewing flow and status alarms . . . . . . . . . . . . . . . . . . . . . . . . . . . . . . . . . . . . . . . . . 80
8.6 Viewing gas data . . . . . . . . . . . . . . . . . . . . . . . . . . . . . . . . . . . . . . . . . . . . . . . . . . . . 81
8.7 Using the Recalculation feature . . . . . . . . . . . . . . . . . . . . . . . . . . . . . . . . . . . . . . . . 81
8.7.1 For well tests . . . . . . . . . . . . . . . . . . . . . . . . . . . . . . . . . . . . . . . . . . . . . . 81
8.7.2 For contract periods . . . . . . . . . . . . . . . . . . . . . . . . . . . . . . . . . . . . . . . . . 82
Chapter 9 History and Modbus Interface . . . . . . . . . . . . . . . . . . . . . . . . . . . 85
9.1 About this chapter . . . . . . . . . . . . . . . . . . . . . . . . . . . . . . . . . . . . . . . . . . . . . . . . . . . 85
9.2 History on the ROC809 platform. . . . . . . . . . . . . . . . . . . . . . . . . . . . . . . . . . . . . . . . 85
9.3 Modbus interface on the ROC809 platform . . . . . . . . . . . . . . . . . . . . . . . . . . . . . . . . 86
9.3.1 Predefined Modbus register ranges . . . . . . . . . . . . . . . . . . . . . . . . . . . . . 86
Chapter 10 Maintenance and Troubleshooting . . . . . . . . . . . . . . . . . . . . . . . . 97
10.1 About this chapter . . . . . . . . . . . . . . . . . . . . . . . . . . . . . . . . . . . . . . . . . . . . . . . . . . . 97
10.2 Connecting from ROCLINK 800 to the ROC809 platform . . . . . . . . . . . . . . . . . . . . . 97
10.3 Alarms. . . . . . . . . . . . . . . . . . . . . . . . . . . . . . . . . . . . . . . . . . . . . . . . . . . . . . . . . . . . 98
10.3.1 Status alarms . . . . . . . . . . . . . . . . . . . . . . . . . . . . . . . . . . . . . . . . . . . . . . 98
10.4 Checking process variables and test points . . . . . . . . . . . . . . . . . . . . . . . . . . . . . . . 99
10.5 Checking slug flow . . . . . . . . . . . . . . . . . . . . . . . . . . . . . . . . . . . . . . . . . . . . . . . . . 102
10.6 Checking the characterization. . . . . . . . . . . . . . . . . . . . . . . . . . . . . . . . . . . . . . . . . 102
10.7 Checking the calibration . . . . . . . . . . . . . . . . . . . . . . . . . . . . . . . . . . . . . . . . . . . . . 102
10.8 Diagnosing wiring problems . . . . . . . . . . . . . . . . . . . . . . . . . . . . . . . . . . . . . . . . . . 103
10.8.1 Checking the power supply wiring . . . . . . . . . . . . . . . . . . . . . . . . . . . . . 103
10.8.2 Checking the sensor-to-ROC809 wiring . . . . . . . . . . . . . . . . . . . . . . . . 103
10.8.3 Checking grounding . . . . . . . . . . . . . . . . . . . . . . . . . . . . . . . . . . . . . . . . 103
10.9 Checking the test points . . . . . . . . . . . . . . . . . . . . . . . . . . . . . . . . . . . . . . . . . . . . . 104
10.9.1 Evaluating the test points . . . . . . . . . . . . . . . . . . . . . . . . . . . . . . . . . . . . 104
10.9.2 Drive gain problems . . . . . . . . . . . . . . . . . . . . . . . . . . . . . . . . . . . . . . . . 104
10.9.3 Low pickoff voltage. . . . . . . . . . . . . . . . . . . . . . . . . . . . . . . . . . . . . . . . . 105
10.10 Checking the core processor . . . . . . . . . . . . . . . . . . . . . . . . . . . . . . . . . . . . . . . . . 105
10.10.1 Checking the core processor LED . . . . . . . . . . . . . . . . . . . . . . . . . . . . . 106
10.10.2 Core processor resistance test . . . . . . . . . . . . . . . . . . . . . . . . . . . . . . . 106
10.11 Checking sensor coils . . . . . . . . . . . . . . . . . . . . . . . . . . . . . . . . . . . . . . . . . . . . . . . 107
Configuration and Use Manual iii
Page 6

Contents
Appendix A User-Defined Points . . . . . . . . . . . . . . . . . . . . . . . . . . . . . . . . . 111
A.1 About this appendix . . . . . . . . . . . . . . . . . . . . . . . . . . . . . . . . . . . . . . . . . . . . . . . . 111
A.2 NOC Station parameters (UDP 67). . . . . . . . . . . . . . . . . . . . . . . . . . . . . . . . . . . . . 111
A.3 NOC Meter parameters (UDP 68). . . . . . . . . . . . . . . . . . . . . . . . . . . . . . . . . . . . . . 115
A.4 Well Data parameters (UDP 69) . . . . . . . . . . . . . . . . . . . . . . . . . . . . . . . . . . . . . . . 120
A.5 NOC Recalculation parameters (UDP 70) . . . . . . . . . . . . . . . . . . . . . . . . . . . . . . . 124
A.6 MMI Interface parameters (UDP 71) . . . . . . . . . . . . . . . . . . . . . . . . . . . . . . . . . . . . 129
Index . . . . . . . . . . . . . . . . . . . . . . . . . . . . . . . . . . . . . . . . . . . . . . . . . . . . 137
iv Micro Motion® Net Oil Computer Software and NOC System
Page 7

Chapter 1
Before You Begin
1.1 Overview
This chapter provides an orientation to the Micro Motion
manual, including configuration, use, and troubleshooting.
1.2 Safety
Safety messages are provided throughout this manual to protect personnel and equipment. Read each
safety message carefully before proceeding to the next step.
1.3 About the Net Oil Computer Software and the NOC system
The Net Oil Computer Software is one component in a net oil measurement system (NOC system)
The Net Oil Computer Software is a user program designed to run on the ROC809 Remote Operations
Controller from Remote Automation Solutions. The Net Oil Computer Software performs net oil
measurements and calculations and provides a variety of real-time, average, summary, and historical
net oil data, using functionality provided by the ROC809 platform.
®
Net Oil Computer Software and this
NOC System Overview NOC DisplaysROC809 SetupBefore You Begin
1.3.1 NOC system components
The NOC system includes the following components:
• ROC809 platform
• Net Oil Computer Software
• One to four Micro Motion sensors
- Up to three Micro Motion sensors may be used for NOC measurement
- One Micro Motion sensor may be used for gas measurement (optional)
Optional components include:
• Water cut probe(s)
• Pressure sensor, temperature sensor, level sensor, conventional (orifice plate or turbine) gas
meter
See the manual entitled Micro Motion Net Oil Computer Software and NOC System: Installation
Manual for illustrations of several different NOC systems.
Configuration and Use Manual 1
Page 8

Before You Begin
1.3.2 Communication tools
During installation, two software programs were installed on the PC for use as communication tools:
•ProLink
®
II – used to configure the core processor, and also used for some maintenance and
troubleshooting functions
• ROCLINK
™
800 from Micro Motion – used to configure the ROC809 controller and the Net
Oil Computer Software, and typically also used to operate the NOC system. ROCLINK 800
from MMI is also used for most maintenance and troubleshooting functions
Note: A standard version of ROCLINK 800 is available from Remote Automation Solutions. This
software can be used for all ROC809 functions. However, Micro Motion recommends using the
version of ROCLINK 800 supplied with the Net Oil Computer Software. Throughout this manual, the
term “ROCLINK 800” refers to ROCLINK 800 from Micro Motion. Information specific to the
ROC809 platform is provided in the standard ROCLINK 800 manual from Remote Automation
Solutions: ROCLINK 800 Configuration Software: User Manual
If desired, a customer-written Modbus or ROC Plus program may be used to communicate with the
ROC809 platform and the Net Oil Computer Software.
1.4 Documentation resources
This manual covers only topics that are specific to the Net Oil Computer Software and the
NOC system. General configuration, administration, and troubleshooting of the ROC809 platform is
provided in the manual entitled ROCLINK 800 Configuration Software: User Manual.
Table 1-1 lists other documentation resources for required or useful information.
.
Tabl e 1-1 Documentation resources
Topic Document Location
Net Oil Computer Software and
NOC system installation
ROC809 platform configuration and
administration
ProLink II installation and use ProLink II Software for Micro Motion
Point (TLP) system
Writing host programs using ROC Plus
protocol
Using the Modbus host user program Modbus Host User Program Manual Remote Automation Solutions
Micro Motion Net Oil Computer Software
and NOC System: Installation Manual
ROCLINK 800 Configuration Software:
User Manual
Transmitters: Installation and Use
Manual
ROC Plus Protocol: Specification
Manual
Shipped with Net Oil Computer
Software
Shipped with Net Oil Computer
Software
ProLink II CD
Installed with product
Micro Motion web site
Remote Automation Solutions
web site
web site
2 Micro Motion® Net Oil Computer Software and NOC System
Page 9

Before You Begin
1.5 Configuration overview
To configure the NOC system:
1. Review the information about system and configuration options in Chapter 2, and collect the
information required for your NOC system.
2. Prepare the ROC809 platform as described in Chapter 3.
3. Referring to Chapter 4 for detailed parameter definitions, configure the Net Oil Computer
Software as described in Chapter 5.
4. If your NOC system includes gas measurement, configure gas measurement as described in
Chapter 6.
5. If your NOC system uses water cut probes, configure water cut measurement as described in
Chapter 6.
6. If required for well configuration, perform density determination as described in Chapter 7.
To write a Modbus or ROC Plus program to communicate with the Net Oil Computer Software, see
the information in Chapter 9 and Appendix A.
1.6 Using and maintaining the NOC system
To use the NOC system:
1. Review the information about system and configuration options in Chapter 2.
NOC System Overview NOC DisplaysROC809 SetupBefore You Begin
2. Follow the instructions in Chapter 8.
To perform maintenance and troubleshooting tasks, see Chapter 10.
Configuration and Use Manual 3
Page 10

Before You Begin
1.7 Customer service
The best source for customer service on your NOC system is the overall system supplier. Please
contact your system supplier first to ensure the fastest resolution. To contact Micro Motion for direct
support on the flowmeter components, phone the support center nearest you:
• In the U.S.A., phone
800-522-MASS (800-522-6277) (toll-free)
• In Canada and Latin America, phone +1 303-527-5200
•In Asia:
- In Japan, phone 3 5769-6803
- In other locations, phone +65 6777-8211 (Singapore)
•In Europe:
- In the U.K., phone 0870 240 1978 (toll-free)
- In other locations, phone +31 (0) 318 495 555 (The Netherlands)
Customers outside the U.S.A. can also email Micro Motion customer service at
International.MMISupport@EmersonProcess.com.
4 Micro Motion® Net Oil Computer Software and NOC System
Page 11

Chapter 2
NOC System Overview
2.1 Overview
This chapter discusses various topics that should be reviewed and considered before beginning
configuration of the Net Oil Computer Software and the NOC system. Topics include:
• Terminology – see Section 2.2
• Internal structure of the Net Oil Computer Software – see Section 2.3
• Sensor input to the Net Oil Computer Software – see Section 2.4
• Operation mode – see Section 2.5
• Required well data – see Section 2.6
• Water cut determination – see Section 2.7
• Temperature correction – see Section 2.8
• Pressure correction – see Section 2.9
NOC System Overview NOC DisplaysROC809 SetupBefore You Begin
• Pressure compensation – see Section 2.10
• Transient bubble remediation (TBR) – see Section 2.11
• Using data from the NOC system – see Section 2.12
• Using the Recalculation feature – see Section 2.13
• Using event and alarm data – see Section 2.14
This chapter also includes a list of questions that should be answered before beginning configuration.
See Section 2.15.
2.2 Terminology
The terminology used in the NOC system and the NOC documentation is defined in Table 2-1.
Tabl e 2-1 NOC system terminology
Term Also called Definition
ROC809 platform The ROC809 remote operations controller with all I/O and communications
modules
NOC system The ROC809 platform with the Net Oil Computer Software, and all sensors
Configuration and Use Manual 5
Page 12

NOC System Overview
Tabl e 2-1 NOC system terminology continued
Term Also called Definition
Production fluid The process fluid as produced initially from the well. Contains oil, gas, free water,
Three-phase
separator
Two-phase
separator
Oil leg The oil layer of a three-phase separator, or the process stream from that layer
Water leg The water layer of a three-phase separator, or the process stream from that layer
Gas leg The gas layer of a separator, or the process stream from that layer
Liquid leg Oil leg
Transition The point at which a substance changes from one phase or flow regime to
Interface The boundary between two layers in a separator
Rag layer Slang term for the interface between the oil leg and the water leg
Oil The general term applying to oil in any form
Live oil Fluid that is predominantly oil at process pressure and unspecified temperature
Dead oil Weathered oil Live oil that has been exposed to atmospheric pressure for sufficient time to
Wet oil Oil that contains water, either in a mixture or as free water, or both, at unspecified
Dry oil Oil that has been treated so that only very small quantities of water and other
Net oil Dry oil by volume, corrected to reference temperature and pressure
Liquid Oil/water mixture
Total water Produced water All water in the production fluid; the sum of free water and mixture water
Free water The water produced with oil that settles out quickly in a three-phase separator;
Mixture water The water dispersed in the liquid
Uncorrected Field measurements at process temperature and pressure
Corrected,
correction
Process
temperature
Process pressure The pressure at process conditions
Reference
temperature
Reference
pressure
Compensation Modification of density and mass measurements as required to compensate for
Oil/water leg
Emulsion
Base temperature The temperature to which field measurements are corrected
Base pressure The pressure to which field measurements are corrected
mixture water, and possibly various solids (e.g., sand).
A separator that separates the production fluid into three distinct streams: gas,
oil, and water
A separator that separates the production fluid into two distinct streams: gas and
liquid (oil/water mixture)
The liquid layer of a two-phase separator, or the process stream from that layer
another
allow the light ends to evaporate
temperature and pressure
extraneous materials remain in it. This is the oil that is considered to be pure oil
in net oil measurements.
The production fluid after gas has been removed, or the process stream from the
liquid leg of a two-phase separator. Contains oil and water.
the water in the water leg of a three-phase separator; the fluid stream that is
considered to be pure water in net oil measurements
Field measurements converted to the equivalent values at reference temperature
and pressure. If a pressure value is not available, only temperature correction is
applied.
The temperature of the process fluid at process conditions
the effect of pressure on the sensor flow tubes
6 Micro Motion® Net Oil Computer Software and NOC System
Page 13

NOC System Overview
Tabl e 2-1 NOC system terminology continued
Term Also called Definition
Water cut Percentage of water in the liquid, usually measured by volume
Density-based
water cut
Water cut probe Any of a variety of technologies that produces a direct measurement of water cut
Applied water cut The water cut value used in NOC measurements: either the density-based water
Oil density at
reference
Water density at
reference
Water cut value derived from measured density values
cut or the water cut probe value is used
The density of dry oil corrected to reference temperature and 1 ATM pressure
The density of water corrected to reference temperature and 1 ATM pressure
2.3 Internal structure of the Net Oil Computer Software
The Net Oil Computer Software is a ROC809 user program. It was loaded onto the ROC809 platform
during installation (see the manual entitled Micro Motion Net Oil Computer Software and NOC
System: Installation Manual). The Net Oil Computer Software has the following structure:
• NOC Station display – Station configuration and data, and gas measurement configuration and
data (optional). The NOC system performs NOC measurement for one station.
• Well Data display – Well configuration and history for each well.
• MMI Interface display – Sensor configuration and process data for Micro Motion sensors.
NOC System Overview NOC DisplaysROC809 SetupBefore You Begin
• NOC Meter display – NOC measurement configuration and real-time calculated data. Each
NOC measurement sensor is configured and monitored separately.
• NOC Recalc display – Recalculation functions for the ten most recent contract periods
(Continuous mode) or for the ten most recent well tests performed within the ten most recent
contract periods (Well Test mode)
2.4 Sensor input to the Net Oil Computer Software
Figures 2-1 and 2-2 illustrate two possible implementations of the Net Oil Computer Software,
supporting two different sensor input options:
• In Figure 2-1, two MMI sensors are installed on the oil leg, one MMI sensor is installed on the
water leg, and one MMI sensor is installed on the gas leg.
• In Figure 2-2, one MMI sensor is installed on the oil leg, one MMI sensor is installed on the
water leg, and a conventional meter is installed on the gas leg.
Note: These figures illustrate all sensor types, but do not illustrate all possible combinations.
Configuration and Use Manual 7
Page 14

NOC System Overview
NOC Station
NOC Meter #1 NOC Meter #2
NOC Meter #3
MMI sensor
(Oil leg)
MMI sensor
(Oil leg)
MMI sensor
(Water leg)
ROC809 gas
station
NOC Meter
data roll-up
Net Oil Computer Software
MM #1
MM #2 MM #3
MMI sensor
(Gas leg)
Sensor data
MM #4
NOC Gas Station Processed gas data
ROC809 Platform
Raw gas data
Sensor dataSensor data
Sensor data
As shown in these figures:
• The NOC Station, NOC Meters, MMI Interface, and Gas Station are structures in the Net Oil
Computer Software.
• Each MMI sensor has a corresponding MMI Interface.
• Each MMI sensor used for NOC measurement has a corresponding NOC Meter.
• All NOC Meter data is rolled up to the NOC Station.
• Gas data is handled separately from oil data. Raw gas data is input to a gas station which is
defined on the ROC809 platform using standard ROCLINK methods. The ROC809 gas station
applies AGA (or other) calculations to the gas data, and the results are input to the NOC Gas
Station in the Net Oil Computer Software. The Net Oil Computer Software reports the gas data
but does not perform any additional processing.
- If an MMI sensor is used for gas measurement, MMI Interface #4 is used to accept input
- If a conventional meter is used for gas measurement, an analog input is used to accept
Figure 2-1 Conceptual view #1
from the sensor and route data to the ROC809 gas station (see Figure 2-1).
input from the meter and route data to the ROC809 gas station (see Figure 2-2).
8 Micro Motion® Net Oil Computer Software and NOC System
Page 15

NOC System Overview
NOC Station
NOC Meter #1 NOC Meter #2
MMI sensor
(Oil leg)
MMI sensor
(Water leg)
NOC Meter
data roll-up
Net Oil Computer Software
MM #1
MM #2
Conventional
meter
(Gas leg)
ROC809 gas
station
NOC Gas Station
Processed
gas data
ROC809 Platform
Sensor data
Sensor data
Raw gas data
via analog input
Figure 2-2 Conceptual view #2
NOC System Overview NOC DisplaysROC809 SetupBefore You Begin
2.4.1 Mapping NOC Meters to MMI sensors
Figure 2-3 illustrates the standard method for mapping NOC Meters to MMI sensors. You may be
using one, two, or three NOC Meters.
As shown in Figure 2-3:
• A Modbus device address is assigned to each MMI sensor. This address resides in the sensor’s
core processor. Typically, this configuration step is performed at the factory, and device
addresses 1, 2, and 3 are assigned. If the device addresses are not preconfigured:
- The default Modbus address for a core processor is 1.
- If you need to change the default address, use ProLink II to connect directly to the core
• All MMI sensors communicate with the ROC809 and the Net Oil Computer Software through
processor.
the RS-485 sensor communications module, which is typically installed in ROC809 COM 4
(also called COMM3 or DNOC).
• An MMI Interface must be configured for each MMI sensor. The MMI Interface must identify:
- The comm port where the RS-485 sensor communications module is installed
- The Modbus device address of the Micro Motion sensor to use
• The NOC Meters are automatically mapped to the corresponding MMI Interfaces:
- NOC Meter #1 → MM #1
- NOC Meter #2 → MM #2
- NOC Meter #3 → MM #3
Configuration and Use Manual 9
Page 16

NOC System Overview
ROC809 Platform
MMI Sensor
Device Address 1
MMI Sensor
Device Address 2
MMI Sensor
Device Address 3
NOC Meter display
RS-485 Sensor Communications Module
COM 4 or DNOC (COMM 3 in Slot 1)
Sensor wiring through I.S. barriers
NOC Meter #1
· Device Address: 1
· Port: COMM 3
NOC Meter #2
· Device Address: 2
· Port: COMM 3
NOC Meter #3
· Device Address: 3
· Port: COMM 3
MMI Interface display
MM #1
· COM Port: COM 4, TAG
· Device Address: 1
MM #2
· COM Port: COM 4, TAG
· Device Address: 2
MM #3
· COM Port: COM 4, TAG
· Device Address: 3
Net Oil Computer Software
Figure 2-3 Mapping NOC Meters to MMI sensors
2.4.2 Water leg measurement versus liquid leg measurement
The default NOC Meter configuration assumes that the NOC Meter is associated with an MMI sensor
installed on the liquid or oil leg. In this configuration:
To use a NOC Meter on the water leg, set the Free Water Setpoint to 0. As a result:
• The process fluid is assumed to be a mixture of oil and water.
• The “applied” water cut value is determined according to water cut configuration (see
Section 2.7), and this value is applied to process fluid measurements.
• The applied water cut value is compared to the configured Free Water Setpoint (see
Section 4.2.1) to determine how instant values, totals, and averages are updated:
- When the applied water cut is equal to or below the Free Water Setpoint, the process fluid
is treated as a combination of oil and water. Values for free water are not updated from this
stream. Values for mixture water and total water will be updated.
- When the applied water cut is above the Free Water Setpoint, the process fluid is treated as
water. Only values for free water and total water are updated from this stream. Values for
mixture water are not updated.
• The process fluid is assumed to be water.
• No water cut options and calculations are applied.
• Only free water and total water values will be updated from this stream.
10 Micro Motion® Net Oil Computer Software and NOC System
Page 17

NOC System Overview
One well to
test separator
Test separator
Other wells to
production separator
From production
wells
To production separator
MMI sensor(s)
ROC809 with
Net Oil Computer Software
Liquid leg
To production separator
MMI sensor(s)
ROC809 with
Net Oil Computer Software
Wellhead separator
From single well Liquid leg
2.5 Operation modes
The NOC system operates in either Well Test mode or Continuous mode:
• In Well Test mode, well tests can be performed on up to 50 wells. A manifold system is used to
ensure that output from a single well is routed through the test separator and the NOC system.
See Figure 2-4.
• In Continuous mode, one well is measured continuously. See Figure 2-5.
After initial configuration, you can change the operation mode. However, changing modes affects
current measurement, data collection, and tags. Before changing modes, see Sections 8.2.1 and 8.2.2.
Figure 2-4 Well Test mode
NOC System Overview NOC DisplaysROC809 SetupBefore You Begin
Figure 2-5 Continuous mode
2.6 Required well data
If you will use the density-based water cut, the following information is required for each well that
will be tested or measured by the NOC system:
• Density of dry oil from this well, at reference temperature and 1 ATM pressure
• Density of the water from this well, at reference temperature and 1 ATM pressure
• Purge time (Well Test mode only)
Configuration and Use Manual 11
Page 18

NOC System Overview
If the density values are not known, you can perform an in-line density determination for oil, water, or
both (see Chapter 7), or you can enter default values at initial configuration and recalculate
measurement data at a later time when well-specific density values are known (see Section 8.7).
If you will use only water cut probes for water cut data, these density values are not required.
2.7 Water cut determination
You must configure water cut options for each NOC Meter that is measuring oil (i.e., each MMI
sensor installed on the liquid leg). Do not configure water cut options for a NOC Meter that is
measuring free water (i.e., the MMI sensor installed on the water leg).
There are two methods available for water cut determination:
• Density-based – The NOC equations are applied to derive water cut from measured density
values.
• Water cut probe (WCP) – One or two water cut probes are used to measure the process stream
directly. For example, you might use a capacitance probe at the low end and a microwave
probe at the high end. Typically, the NOC system software receives data from these probes via
an analog input.
If no water cut probe is installed, you must use the density-based water cut value. If one or two water
cut probes are installed, you may:
• Ignore the WCP values for all NOC measurements
• Use the WCP values for all NOC measurements
• Define specific water cut ranges (a high end and/or a low end). Then:
- If the water cut value falls within a specified range, the value from the associated WCP is
used for NOC measurements.
- If the water cut falls outside defined ranges, the density-based water cut value is used.
In all cases, the water cut value used in NOC measurements is called the “applied” value.
2.8 Temperature correction
Temperature correction refers to the conversion of the observed process temperature to the equivalent
value at reference temperature.
The Net Oil Computer Software automatically applies temperature correction to NOC data. To
perform temperature correction, the Net Oil Computer Software requires a value for the current
process temperature. This value can be sourced from:
• The RTD built into the Micro Motion sensor
•An external RTD
You must configure the temperature input separately for each NOC Meter in the system.
2.9 Pressure correction
Pressure correction refers to the conversion of the observed process pressure to the equivalent value at
reference pressure.
Note: Do not confuse pressure correction with pressure compensation. See Section 2.10 for a
definition of pressure compensation.
12 Micro Motion® Net Oil Computer Software and NOC System
Page 19

NOC System Overview
Pressure correction will be automatically applied to NOC data if pressure data from an external
pressure device is input to the Net Oil Computer Software. You must configure the pressure input
separately for each NOC Meter in the system.
2.10 Pressure compensation
Pressure compensation refers to the modification of raw mass or density measurements as required to
compensate for the effect of pressure on the sensor’s flow tubes.
Note: Do not confuse pressure compensation with pressure correction. See Section 2.9 for a definition
of pressure correction.
Pressure compensation for mass or density is implemented in the Net Oil Computer Software, in the
MMI Interface and NOC Meter displays.
Note: To avoid applying pressure compensation twice to one set of data, ensure that the pressure
compensation factors in the core processor are set to 0 (see the manual entitled Micro Motion Net Oil
Computer Software and NOC System: Installation Manual).
Typically, pressure compensation should be implemented for all Micro Motion sensors in the
NOC system. To implement pressure compensation, the following sensor-specific information is
required:
• Compensation coefficient for mass flow – the percent change in the flow rate per psi
• Compensation coefficient for density – the change in fluid density, in g/cm
These values are provided in the product data sheet for your sensor. Use the pressure effect values
calculated in PSI.
Note: Do not reverse the sign. Unlike other Micro Motion products, the Net Oil Computer Software
reverses the sign in its internal calculations.
Note: Not all sensors require pressure compensation. See the sensor’s product data sheet.
2.11 Transient bubble remediation (TBR)
Because density is used to calculate water cut, which is used to calculate net oil, transient bubbles
have a negative effect on NOC measurement accuracy. Figure 2-6 shows the effect of transient
bubbles on density.
3
/psi
NOC System Overview NOC DisplaysROC809 SetupBefore You Begin
Configuration and Use Manual 13
Page 20

NOC System Overview
Drive gain (%)
Density (measured)
Drive gain (actual)
Figure 2-6 Effect of transient bubbles on density
TBR is used to handle occasional gas bubbles or slugs in the process fluid. A transient bubble
condition is defined in terms of the sensor’s drive gain: if the drive gain exceeds the configured
threshold for more than three seconds, the configured TBR actions are performed. The transient
bubble interval persists until drive gain is below the configured threshold for three seconds.
The Net Oil Computer Software can perform several different actions if transient bubbles are
detected:
• Substituting a retrieved density value for the measured density value in NOC calculations (the
Correct Density option). This option is described in Section 2.11.1.
• Logging an alarm
• Energizing a discrete output
• All of the above
2.11.1 Correct Density option
The Correct Density option directs the Net Oil Computer Software to retrieve the measured density
value from an earlier point in the process. The earlier point is identified by the Lookback Period (see
Figure 2-7). The density values from a three-second period around this point are averaged, and this
retrieved density average is then used in NOC calculations. Figure 2-8 shows how the Correct Density
action affects the density measurement.
Note: If the Lookback Period happens to fall into a previous transient bubble interval, the Net Oil
Computer Software automatically extends the lookback interval as required to retrieve an averaged
value from measured density values rather than substituted density values.
14 Micro Motion® Net Oil Computer Software and NOC System
Page 21

NOC System Overview
Density (measured)
Drive gain (actual)
Drive gain setpoint
Lookback Period
(seconds)
Density values
(retrieved and averaged)
Density
(used in NOC calculations)
Drive gain (actual)
Averaged retrieved
density value
Drive gain setpoint
Figure 2-7 Correct Density option
NOC System Overview NOC DisplaysROC809 SetupBefore You Begin
Figure 2-8 Correct Density effect on density measurement
2.12 Using NOC data
NOC data is stored in the internal history database:
• In Well Test mode, the database can store data for 50 wells, six tests per well. As additional
well tests are performed, older tests are overwritten.
• In Continuous mode, data for a single well is stored. In the default configuration, data for the
35 most recent contract periods (typically, days) may be stored. Older data is stored in
summary form, and the detailed data is overwritten.
Micro Motion recommends accessing NOC data through the Net Oil Computer Software instead of
the ROCLINK 800 history interface. Be sure that you view all required data before it is overwritten.
See Chapter 8 for information.
Configuration and Use Manual 15
Page 22

NOC System Overview
Note: The organization of NOC data in history is designed to support NOC calculations rather than
user access. Although you can view data, it is not easy to interpret.
For archival purposes, history data can be retrieved through the ROCLINK 800 history interface.
Information on the default history configuration and on accessing history data is provided in the
manual entitled ROCLINK 800 Configuration Software: User Manual.
2.13 Using the Recalculation feature
The Recalculation feature is used to convert existing NOC data to:
• Different measurement units
• A different time base
• A different reference temperature
• A different oil density at reference temperature
• A different water density at reference temperature
The Recalculation feature uses the periodic (15-minute) history records. Accordingly:
• You cannot perform recalculation for well tests or contract periods for which no periodic
record was written. If the well test or contract period was shorter than 15 minutes, it cannot be
recalculated.
• Periodic records are kept in history for ten days. After this time, they are deleted. Be sure to
perform all required recalculations while the periodic records are still available.
When a well test or contract period is recalculated, new NOC data can be saved to history if desired.
The original NOC data is not overwritten. NOC data produced by recalculation is shown along with
the original data on the Well History panel (see Figure 4-21).
Only one set of recalculated data is saved. If you recalculate the same well test or contract period
more than once, the most recent recalculated data overwrites the previous recalculated data.
For ease in comparison, the recalculated data is saved to history in the units used for the original data.
However, all changes resulting from new values for oil density at reference temperature and water
density at reference temperature are preserved.
2.14 Using event and alarm data
The 240 most recent events and 240 most recent alarms are stored in an internal database. Several
methods are available for using event and alarm data:
• Contents of the databases can be viewed, printed, saved to a file, or exported for use in an
external program.
• A host system can connect to the ROC809 platform and retrieve the data.
Information on accessing event and alarm data is provided in the manual entitled ROCLINK 800
Configuration Software: User Manual. Be sure that you retrieve all required data before it is
overwritten.
16 Micro Motion® Net Oil Computer Software and NOC System
Page 23

NOC System Overview
2.15 Planning the configuration
This section contains a set of questions that you should answer before beginning basic configuration
of the Net Oil Computer Software and the NOC system.
Note: These questions are specific to implementation of the NOC system. They do not address basic
system configuration (e.g., configuring the system clock, security, communications, etc.).
• Will this system be used for well testing or for continuous measurement?
• If it will be used for well testing, what wells will be tested?
• For all wells that will be measured:
- What is the oil density at reference temperature? If not known, will you perform a density
determination?
- What is the water density at reference temperature? If not known, will you perform a
density determination?
- (Well Test mode only) What is the well’s purge time?
• How many MMI (Coriolis) sensors will be used for NOC measurement on the liquid leg?
• Is an MMI sensor installed on the water leg?
• Does the system include gas measurement? If so, is an MMI sensor or a conventional meter
used?
• What are the Modbus device addresses of the MMI sensors?
• What measurement units will be used for NOC measurement?
NOC System Overview NOC DisplaysROC809 SetupBefore You Begin
• Will TBR be configured? If yes, for each MMI sensor, what drive gain will be used as a TBR
threshold?
• What method will be used for water cut determination? If you will use a water cut probe, what
is its effective range?
• Will pressure compensation be configured?
• What inputs will be configured on this system? Possible inputs include:
- External temperature sensor (RTD input)
- Water cut probe (analog input)
- Pressure sensor (analog input)
- Level sensor (analog input)
- External alarm indication (discrete input)
• What outputs will be configured on this system? Possible outputs include:
- Valve control (analog output)
- Pump or device control (discrete output or discrete output relay)
- Alarm indication (discrete output or discrete output relay)
- TBR implementation (discrete output or discrete output relay)
- Frequency or pulse output simulation (discrete output or discrete output relay)
Configuration and Use Manual 17
Page 24

18 Micro Motion® Net Oil Computer Software and NOC System
Page 25

Chapter 3
Setting Up the ROC809 Platform
3.1 About this chapter
This chapter describes the procedures required to set up the ROC809 platform before you begin
configuring the Net Oil computer software. Topics include:
• Configuring the ROC809 platform – see Section 3.2
• Verifying the Net Oil Computer Software – see Section 3.3
• Verifying the startup configuration file – see Section 3.4
3.2 Configuring the ROC809 platform
Configuration of the ROC809 platform includes all configuration that is external to the Net Oil
Computer Software. This includes items such as:
• Basic configuration
-ROC clock
- Configuring security for ROCLINK 800
NOC System Overview NOC DisplaysROC809 SetupBefore You Begin
- Configuring security for the ROC809 platform
- Defining devices and groups
- Configuring device information
- Configuring display options
- Configuring ROC809 comm ports
- Configuring ROCLINK 800 communications parameters
- Configuring I/O
- Calibrating analog and RTD inputs
• Advanced configuration
- Configuring FSTs
- Configuring PID control loops
For information on configuring the ROC809 platform, see the manual entitled ROCLINK 800
Configuration Software: User Manual. When configuring the ROC809 platform, follow
recommended practices such as saving the configuration file to flash memory during configuration,
and saving to both flash memory and a file after configuration is complete.
Note: You may want to return to specific configuration tasks after the NOC system is configured. For
example, you may want to modify I/O configuration or add an FST.
Configuration and Use Manual 19
Page 26

Setting Up the ROC809 Platform
3.3 Verifying the Net Oil Computer Software
To verify that the Net Oil Computer Software is installed and running:
1. Start ROCLINK 800.
2. Connect to the ROC809.
3. Click
Utilities > User Program Administrator. The window shown in Figure 3-1 is displayed.
4. The Net Oil Computer Software should be displayed in the list. Highlight the Net Oil
Computer Software. If its status is shown as
change to
5. Click
Running.
Close.
If you do not see the Net Oil Computer Software, load the software as described in the manual
entitled Micro Motion Net Oil Computer Software and NOC System: Installation Manual.
Figure 3-1 User Program Administrator window
Loaded, click the Start button. The status will
3.4 Verifying the startup configuration file
NOC system configuration must begin with one of the two startup configuration files shipped with the
Net Oil Computer Software. During installation, the selected file was downloaded to the ROC809. To
verify:
1. Start ROCLINK 800.
2. Connect to the ROC809.
3. Click
20 Micro Motion® Net Oil Computer Software and NOC System
Device > Comm Ports.
Page 27

Setting Up the ROC809 Platform
4. Open the list of comm ports, and check the name of the fourth port.
• If it is named DNOC, a startup configuration file was loaded. Both startup configuration
files use this port and rename it for user convenience.
• If it is named COMM3, a startup configuration file was not loaded. Download the
appropriate startup configuration file, as described in the manual entitled Micro Motion
Net Oil Computer Software and NOC System: Installation Manual.
5. Click
Close.
Figure 3-2 Verifying the startup configuration file
NOC System Overview NOC DisplaysROC809 SetupBefore You Begin
Configuration and Use Manual 21
Page 28

22 Micro Motion® Net Oil Computer Software and NOC System
Page 29

Chapter 4
Net Oil Computer Software Displays
4.1 About this chapter
This chapter is designed to be used for reference. It describes all of the displays and panels that are
available for the Net Oil Computer Software via ROCLINK 800, including:
• NOC Station display – see Section 4.2
• MMI Interface display – see Section 4.3
• NOC Meter display – see Section 4.4
• Well Data display – see Section 4.5
• NOC Recalc display – see Section 4.6
For information on using these displays and panels to configure the Net Oil Computer Software, see
Chapter 5. For information on using these displays and panels for NOC measurement or recalculation,
see Chapter 8.
For a detailed listing of the user-defined points in the Net Oil Computer Software, see Appendix A.
NOC System Overview NOC DisplaysROC809 SetupBefore You Begin
4.2 NOC Station display
The NOC Station display includes six panels:
• General – see Section 4.2.1
• Units – see Section 4.2.2
• Totals – see Section 4.2.3
• Averages – see Section 4.2.4
• Well Selection – see Section 4.2.5
• Alarms – see Section 4.2.6
4.2.1 NOC Station display – General panel
There are two versions of the NOC Station General panel: the version displayed depends on the
configured Operation Mode. See Figures 4-1 and 4-2 and Table 4-1.
Operation Mode can be configured from any point in the NOC Station display, using the dropdown
list at the top of the display. For more information about Operation Mode, see Section 2.5 and
Section 8.2.
Configuration and Use Manual 23
Page 30

Net Oil Computer Software Displays
Figure 4-1 NOC Station display – General panel, Well Test mode
Figure 4-2 NOC Station display – General panel, Continuous mode
24 Micro Motion® Net Oil Computer Software and NOC System
Page 31

Net Oil Computer Software Displays
Tabl e 4-1 NOC Station parameters – General panel
Parameter Description Comments
Point Tag Name of this NOC Station This name is not the same as the
Station Tag defined in the
ROCLINK 800 Meter menu (used
for gas measurement).
Assoc Gas Station Specifies the point from which gas flow data will be read
(the ROC809 gas station)
Current Gas Flow Displays the current gas flow rate Only if gas measurement is
Contract Hour (Operation Mode = Continuous) Specifies the hour, in a
24-hour period, at which values are totaled for a single day’s
production, totals are reset, and data is logged to the Daily
History database
Force End Of Day (Operation Mode = Continuous) Used to perform
Well Selected (Operation Mode = Well Test) Displays the tag of the
Test Start Time (Operation Mode = Well Test) Displays the start time of the
Well Configuration
Oil Density at
Reference Temp
Water Density at
Reference Temp
Configured Well Densities at Process Temperature and Pressure
Water Density Displays the water density configured for the selected well,
Oil Density Displays the configured live oil density for the selected well,
Instant Values All instant values are rolled up from the NOC Meters.
Liquid Density Displays the current measured density of the process
Temperature Displays the current measured temperature of the process
Liquid Mass Flow Displays the current mass flow rate for the process stream
Uncorrected
Liquid Vol Flow
Uncorrected
Reverse Liquid
Vol F low
Corrected Liquid
Volu me F low
Water Cut –
Density-Based
Water Cut – From
Probe
Applied Water
Cut
contract-hour actions manually
currently selected well
current test
Displays the oil density at reference temperature for the
selected well
Displays the water density at reference temperature for the
selected well
converted to process temperature and pressure
converted to process temperature and pressure
stream
stream
Displays the current volume flow rate, forward flow only, for
the process stream, uncorrected for temperature or
pressure
Displays the current volume flow rate, reverse flow only, for
the process stream, uncorrected for temperature or
pressure
Displays the current volume flow rate, forward flow only, for
the process stream, corrected for temperature and pressure
Displays the current water cut derived from density values
by the Net Oil Computer Software
Displays the current water cut as measured by the relevant
water cut probe (high end or low end)
Displays the water cut currently being used for NOC
measurement
Required only for systems that
include a gas measurement meter
configured
Default: 0 (midnight)
Range: 0 to 23 (11 p.m.)
See Section 8.3
If no test is in progress, displays
the start time of the most recent
test
Read only; value configured on
Well Data display, Configuration
panel (see Section 4.5.1)
Read only; value configured on
Well Data display, Configuration
panel (see Section 4.5.1)
See Section 2.7
See Section 2.7
See Section 2.7
NOC System Overview NOC DisplaysROC809 SetupBefore You Begin NOC System Overview NOC DisplaysROC809 SetupBefore You Begin NOC System Overview NOC DisplaysROC809 SetupBefore You Begin NOC System Overview NOC DisplaysROC809 SetupBefore You Begin
Configuration and Use Manual 25
Page 32

Net Oil Computer Software Displays
4.2.2 NOC Station display – Units panel
The NOC Station Units panel is used to select the units that will be used in NOC calculations and
measurement, and to specify the reference temperature. See Figure 4-3 and Table 4-2.
Figure 4-3 NOC Station display – Units panel
Tabl e 4-2 NOC Station parameters – Units panel
Parameter Description Comments
Mass The mass unit to be used in NOC calculations
Pressure The pressure unit to be used in NOC calculations
Liquid Volume The liquid volume unit to be used in NOC calculations
Gas Volume The gas volume unit to be used in NOC calculations
Density The density unit to be used in NOC calculations
Reference
Temperature
Temperature The temperature unit to be used in NOC calculations
Time Base The time unit to be used in NOC calculations
The reference temperature to which oil density and water
density will be corrected during NOC calculations
If you change the reference
temperature, update the Oil
Density at Ref and Water Density
at Ref values for all wells. See
Table 4-16.
26 Micro Motion® Net Oil Computer Software and NOC System
Page 33

Net Oil Computer Software Displays
4.2.3 NOC Station display – Totals panel
The NOC Station Totals panel displays current NOC totals, rolled up from the NOC Meters. See
Figure 4-4 and Table 4-3. In this panel, values are totaled for the current period:
• In Continuous mode, the current period runs from the most recent contract hour to the present
moment.
• In Well Test mode, the current period runs from the beginning of the well test to the present
moment.
Figure 4-4 NOC Station display – Totals panel
NOC System Overview NOC DisplaysROC809 SetupBefore You Begin NOC System Overview NOC DisplaysROC809 SetupBefore You Begin NOC System Overview NOC DisplaysROC809 SetupBefore You Begin NOC System Overview NOC DisplaysROC809 SetupBefore You Begin
Configuration and Use Manual 27
Page 34

Net Oil Computer Software Displays
Tabl e 4-3 NOC Station parameters – Totals panel
Parameter Description Comments
Time
Current Test The duration of the current test If more than one NOC Meter is
Pause Time The duration of all pauses during the current test
TBR Time The total number of hours, minutes, and seconds that the
NOC system has detected a transient bubble condition.
TMR Time Not implemented in current version. Will be used to track Transient Mist
Purge Time (Operation Mode = Well Test) The total number of hours,
minutes, and seconds that the NOC system has spent in
purge state
Mass Totals All mass totals are rolled up from the NOC Meters.
Forward Mass The total mass, forward flow only, measured by the
NOC system in the current period
Reverse Mass The total mass, reverse flow only, measured by the
NOC system in the current period
used, all meters start, stop, and
pause at the same time. The
individual meter values are not
totaled. For example, if three
meters are used in a test that lasts
one hour, this field will report one
hour rather than three hours.
Summed across NOC Meters.
• If TBR is disabled, this field
shows zeros.
• If TBR is enabled, this field
shows total TBR time,
independent of the configured
TBR action.
Remediation
Displayed only if Operation Mode
is set to Well Test
28 Micro Motion® Net Oil Computer Software and NOC System
Page 35

Net Oil Computer Software Displays
Tabl e 4-3 NOC Station parameters – Totals panel continued
Parameter Description Comments
Volume Totals All volume totals are rolled up from the NOC Meters
Gas The amount of gas measured by the NOC system in the
current period
Uncorrected Oil The amount of oil, uncorrected for temperature or pressure,
measured by the NOC system in the current period
Uncorrected Total
Water
Uncorrected Free
Water
Uncorrected
Liquid
Uncorrected
Reverse Liquid
Corrected Oil The amount of oil, corrected for temperature and pressure,
Corrected Total
Water
Corrected Free
Water
Corrected Liquid The amount of all liquid, corrected for temperature and
The amount of total water, uncorrected for temperature or
pressure, measured by the NOC system in the current
period
The amount of free water, uncorrected for temperature or
pressure, measured by the NOC system in the current
period
The amount of liquid, forward flow only, uncorrected for
temperature or pressure, measured by the NOC system in
the current period
The amount of liquid, reverse flow only, uncorrected for
temperature or pressure, measured by the NOC system in
the current period
measured by the NOC system in the current period
The amount of total water, corrected for temperature and
pressure, measured by the NOC system in the current
period
The amount of free water, corrected for temperature and
pressure, measured by the NOC system in the current
period
pressure, measured by the NOC system in the current
period
NOC System Overview NOC DisplaysROC809 SetupBefore You Begin NOC System Overview NOC DisplaysROC809 SetupBefore You Begin NOC System Overview NOC DisplaysROC809 SetupBefore You Begin NOC System Overview NOC DisplaysROC809 SetupBefore You Begin
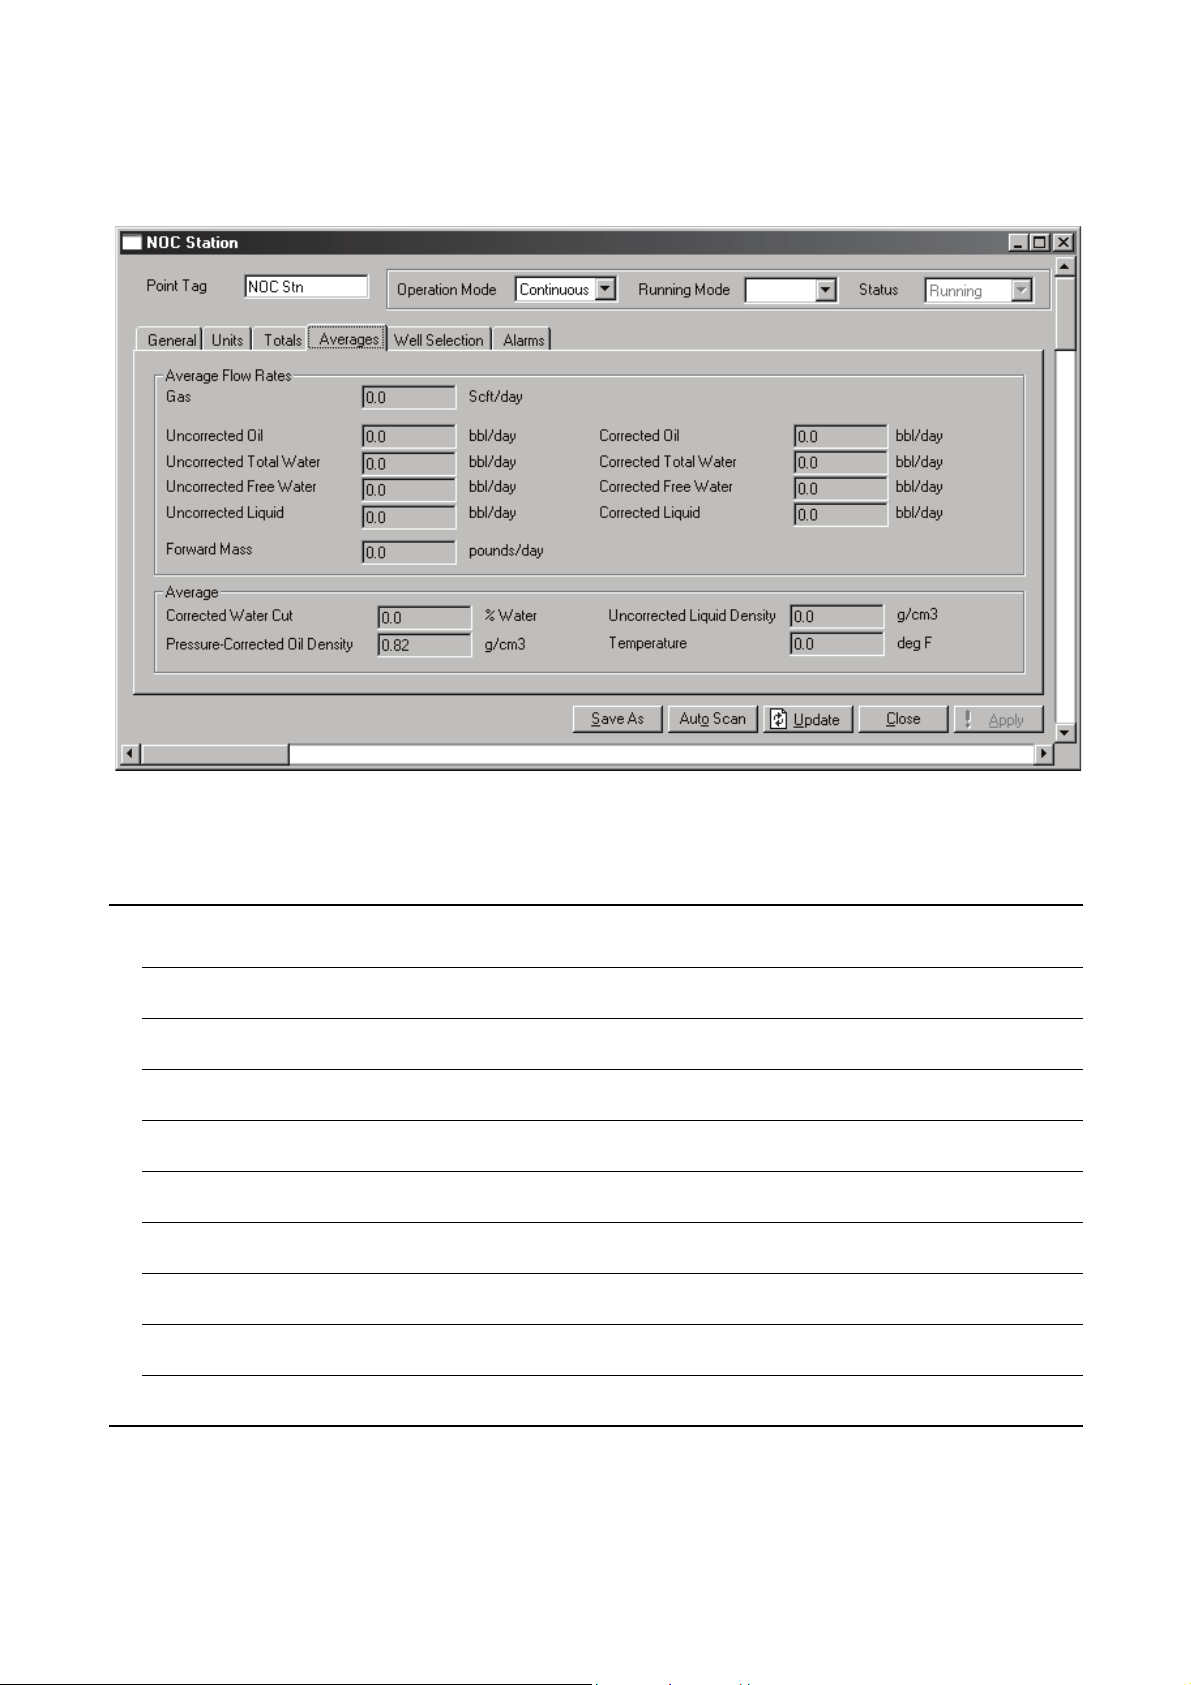
4.2.4 NOC Station display – Averages panel
The NOC Station Averages panel displays current NOC averages, rolled up from the NOC Meters.
See Figure 4-5 and Table 4-4. In this panel, values are averaged for the current period:
• In Continuous mode, the current period runs from the most recent contract hour to the present
moment.
• In Well Test mode, the current period runs from the beginning of the well test to the present
moment.
Configuration and Use Manual 29
Page 36
Net Oil Computer Software Displays
Figure 4-5 NOC Station display – Averages panel
Tabl e 4-4 NOC Station parameters – Averages panel
Parameter Description Comments
Average Flow Rates All average values in this section are rolled up from the NOC Meters and flow-weighted.
Gas Average gas volume flow rate for the current period
Uncorrected Oil The average flow rate of oil for the current period,
uncorrected for temperature or pressure
Uncorrected Total
Water
Uncorrected Free
Water
Uncorrected
Liquid
Forward Mass The average mass flow rate, forward flow only, for the
Corrected Oil The average flow rate of oil for the current period, corrected
Corrected Total
Water
Corrected Free
Water
Corrected Liquid The average flow rate of the liquid for the current period,
The average flow rate of total water for the current period,
uncorrected for temperature or pressure
The average flow rate of free water for the current period,
uncorrected for temperature or pressure
The average flow rate of the liquid for the current period,
uncorrected for temperature or pressure
current period
for temperature and pressure
The average flow rate of total water for the current period,
corrected for temperature and pressure
The average flow rate of free water for the current period,
corrected for temperature and pressure
corrected for temperature and pressure
30 Micro Motion® Net Oil Computer Software and NOC System
Page 37

Net Oil Computer Software Displays
Tabl e 4-4 NOC Station parameters – Averages panel continued
Parameter Description Comments
Average All average values in this section are rolled up from the NOC Meters and flow-weighted.
Corrected Water
Cut
PressureCorrected Oil
Density
Uncorrected
Liquid Density
Temperature The average temperature of the liquid for the current period
The average water cut applied during the current period,
corrected for temperature and pressure
The average oil density for the current period, corrected for
temperature and pressure
The average density of the liquid for the current period
4.2.5 NOC Station display – Well Selection panel
The Well Selection panel (see Figure 4-6) is used only in Well Test mode. It displays the well number
and well tag for all fifty wells that can be part of the NOC system. To select a well for testing:
1. Click its radio button.
2. Click
Apply.
Figure 4-6 NOC Station display – Well Selection panel, Well Test mode
NOC System Overview NOC DisplaysROC809 SetupBefore You Begin NOC System Overview NOC DisplaysROC809 SetupBefore You Begin NOC System Overview NOC DisplaysROC809 SetupBefore You Begin NOC System Overview NOC DisplaysROC809 SetupBefore You Begin
Configuration and Use Manual 31
Page 38

Net Oil Computer Software Displays
4.2.6 NOC Station display – Alarms panel
The NOC Station Alarms panel (see Figure 4-7) displays active alarms for the NOC Meters, in the
following alarm categories:
• No Flow alarms, as defined by the Low Flow Cutoff value configured on the NOC Meter
Inputs panel (see Section 4.4.2)
• Low Flow and High Flow alarms, as defined in the Alarms fields on the NOC Meter Alarms
panel (see Section 4.4.7)
• Coriolis alarms – alarms posted by the Micro Motion sensor associated with the NOC Meter
• No Comm alarms – the NOC Meter is not communicating with the sensor
Note: Alarm conditions are indicated for all operational states: Continuous mode and Well Test mode
with a well test running, paused, or inactive.
Note: The indicators on this panel do not distinguish between a continuous alarm condition and
several short alarm conditions.
Figure 4-7 NOC Station display – Alarms panel
4.3 MMI Interface display
The MMI Interface display includes four panels:
• Comm Setup – see Section 4.3.1
• Registers – see Section 4.3.2
• Alarms – see Section 4.3.3
• Configuration – see Section 4.3.4
32 Micro Motion® Net Oil Computer Software and NOC System
Page 39

Net Oil Computer Software Displays
4.3.1 MMI Interface display – Comm Setup panel
The MMI Interface Comm Setup panel is used to specify the core processor from which the
MMI Interface will receive data. See Figure 4-8 and Table 4-5.
Figure 4-8 MMI Interface display – Comm Setup panel
NOC System Overview NOC DisplaysROC809 SetupBefore You Begin NOC System Overview NOC DisplaysROC809 SetupBefore You Begin NOC System Overview NOC DisplaysROC809 SetupBefore You Begin NOC System Overview NOC DisplaysROC809 SetupBefore You Begin
Tabl e 4-5 MMI Interface parameters – Comm Setup panel
Parameter Description Comments
Point Number The number of the currently selected Micro Motion sensor.
Use the dropdown list to select a different sensor.
Point Tag The name of the currently selected Micro Motion sensor
Scanning • Enabled: The Net Oil Computer Software is polling the
Micro Motion sensor for current data.
• Disabled: The Net Oil Computer Software is not polling
the Micro Motion sensor for current data.
Status • Communicating: The connection between the ROC809
Comm Setup
Comm Port for
Device Address
Modbus Address The Modbus address of the core processor on this
and the Micro Motion sensor is active.
• Not Communicating: The connection between the
ROC809 and the Micro Motion sensor is not active.
The ID of the ROC809 comm port that is used to connect to
Micro Motion sensors. This must be the port of the RS-485
module used for sensor communications.
Micro Motion sensor
Read-only
In standard installations, this
module is installed in Slot 1
(COMM 3, or DNOC), so the
following TLP is used:
(DNOC 4, TAG) (95, 3, 0)
Defaults: 1–4
COM 4, TAG
Configuration and Use Manual 33
Page 40

Net Oil Computer Software Displays
Tabl e 4-5 MMI Interface parameters – Comm Setup panel continued
Parameter Description Comments
Communication Statistics
Good Responses Displays the number of good responses from this
Micro Motion sensor during the current period
Bad Responses Displays the number of bad responses from this
Micro Motion sensor during the current period
Last Poll Duration Displays the duration of the last polling interval (the number
of seconds between polls)
4.3.2 MMI Interface display – Registers panel
The MMI Interface Registers panel displays current data from the core processor. See Figure 4-9 and
Table 4-6. All values displayed on this panel are read-only.
Figure 4-9 MMI Interface display – Registers panel
Tabl e 4-6 MMI Interface parameters – Registers panel
Parameter Description Comments
Mass Flow Mass flow rate as retrieved from sensor
Density Process density value as retrieved from sensor
Temperature Process temperature as retrieved from sensor
Vol Flow Rate Volume flow rate as retrieved from sensor
Mass Total Mass total as measured by core processor Total since last reset of totalizer in
core processor
Volume Total Volume total as measured by core processor Total since last reset of totalizer in
core processor
34 Micro Motion® Net Oil Computer Software and NOC System
Page 41

Net Oil Computer Software Displays
Tabl e 4-6 MMI Interface parameters – Registers panel continued
Parameter Description Comments
Mass Inventory Mass inventory as measured by core processor Total since last reset of inventory
Volume Inventory Volume inventory as measured by core processor Total since last reset of inventory
Left Pickoff Voltage at sensor’s left pickoff
Right Pickoff Voltage at sensor’s right pickoff
Coriolis Drive Gain A measure of the sensor’s ability to vibrate freely Used in troubleshooting and
Pressure Compensated Values
Mass Flow Rate Mass flow rate from the sensor, compensated for pressure Pressure compensation must be
Density Process density from the sensor, compensated for pressure Pressure compensation must be
in core processor
in core processor
transient bubble remediation
enabled. See Section 5.5
enabled. See Section 5.5
.
.
4.3.3 MMI Interface display – Alarms panel
The MMI Interface Alarms panel (see Figure 4-10) displays all currently active alarms reported by the
Micro Motion sensor associated with this MMI Interface.
NOC System Overview NOC DisplaysROC809 SetupBefore You Begin NOC System Overview NOC DisplaysROC809 SetupBefore You Begin NOC System Overview NOC DisplaysROC809 SetupBefore You Begin NOC System Overview NOC DisplaysROC809 SetupBefore You Begin
Note: This is not a list of all active alarms. For more information on alarms, see the manual entitled
ROCLINK 800 Configuration Software: User Manual.
Figure 4-10 MMI Interface display – Alarms panel
Configuration and Use Manual 35
Page 42

Net Oil Computer Software Displays
4.3.4 MMI Interface display – Pressure Compensation panel
The MMI Interface Pressure Compensation panel is used to configure pressure compensation for mass
or density values from the associated sensor. See Figure 4-11 and Table 4-7.
Figure 4-11 MMI Interface display – Pressure Compensation panel
Tabl e 4-7 MMI Interface parameters – Pressure Compensation panel
Parameter Description Comments
Density
Compensate
Density for
Pressure
Compensation
Coefficient
Mass
Compensate
Mass for
Pressure
Compensation
Coefficient
• Enabled: Pressure compensation will be applied to
density values before NOC calculations are performed
• Disabled: Pressure compensation will not be applied to
density values before NOC calculations are performed
Specifies the factor to be used for pressure compensation
of density data
• Enabled: Pressure compensation will be applied to mass
values before NOC calculations are performed
• Disabled: Pressure compensation will not be applied to
mass values before NOC calculations are performed
Specifies the factor to be used for pressure compensation
of mass data
See Sections 2.10
See Section 2.10
See Sections 2.10
See Section 2.10
and 5.5
and 5.5
36 Micro Motion® Net Oil Computer Software and NOC System
Page 43

Net Oil Computer Software Displays
4.4 NOC Meter display
The NOC Meter display includes eight panels:
• General – see Section 4.4.1
• Inputs – see Section 4.4.2
• TBR – see Section 4.4.3
• Instant Values – see Section 4.4.4
• Totals – see Section 4.4.5
• Averages – see Section 4.4.6
• Alarms – see Section 4.4.7
• Density Determination – see Section 4.4.8
4.4.1 NOC Meter display – General panel
The NOC Meter General panel is used to configure the water cut setpoint and enable or disable alarms
for the selected NOC Meter. See Figure 4-12 and Table 4-8.
Figure 4-12 NOC Meter display – General panel
NOC System Overview NOC DisplaysROC809 SetupBefore You Begin NOC System Overview NOC DisplaysROC809 SetupBefore You Begin NOC System Overview NOC DisplaysROC809 SetupBefore You Begin NOC System Overview NOC DisplaysROC809 SetupBefore You Begin
Tabl e 4-8 NOC Meter parameters – General panel
Parameter Description Comments
Point Number The number of the currently selected NOC Meter. Use the
dropdown list to select the NOC Meter you want to use.
Point Tag The name of the currently selected NOC Meter.
Configuration and Use Manual 37
Page 44

Net Oil Computer Software Displays
Tabl e 4-8 NOC Meter parameters – General panel continued
Parameter Description Comments
MMI Device Displays information about the Micro Motion sensor associated with this NOC Meter
Modbus Address The Modbus address of the core processor on the
associated sensor
Comm Port for
Device Access
Alarming • Enabled: Flow alarms and sensor alarms are displayed on
Water Cut Setpoint for
Free Water
The ID of the ROC809 comm port that is used to connect to
Micro Motion sensors.
the Alarms panel, and SRBX alarming is available for
configuration.
• Disabled: Flow alarms and sensor alarms are not
displayed on the Alarms panel, and SRBX alarming
cannot be configured or used for flow alarms.
The water cut value used to define free water. If the applied
water cut is equal to or greater than this value, the process
fluid is considered to be free water.
• If the Micro Motion sensor associated with this
NOC Meter is installed on the water leg, enter 0.
• If the Micro Motion sensor associated with this
NOC Meter is installed on the liquid leg, enter a non-zero
value.
Read-only. The Modbus Address
is configured on the MMI Interface
display, Comm Setup panel (see
Section 4.3.1).
Read-only. The Comm Port for
Device Access is configured on
the MMI Interface display, Comm
Setup panel (see Section 4.3.1).
See Section 2.7
4.4.2 NOC Meter display – Inputs panel
The NOC Meter Inputs panel is used to identify the source of process data used in NOC
measurement, and to configure how water cut will be determined. See Figure 4-13 and Table 4-9.
Figure 4-13 NOC Meter display – Inputs panel
38 Micro Motion® Net Oil Computer Software and NOC System
Page 45

Net Oil Computer Software Displays
Tabl e 4-9 NOC Meter parameters – Inputs panel
Parameter Description Comments
Auto Configure Inputs • Checked: The following TLP assignments are
automatically made:
- Coriolis Drive Gain = UDP71 [1/2/3], R291
- Coriolis Mass = UDP71 [1/2/3], R259CU
-Density = UDP71 [1/2/3], R249CU
- Temperature = UDP71 [1/2/3], R251CU
• Unchecked: No inputs are configured automatically
Coriolis Drive Gain The point from which to read the sensor drive gain. This
must be a Micro Motion sensor value (TLP:
R291
).
Coriolis Mass The point from which to read the mass total value. Typically, the mass total value from
Density The point from which to read the density value. Typically, the density value from a
Pressure The point from which to read the static pressure value. Static pressure is typically read
Temperature The point from which to read the temperature value.
Low WC Probe The point from which to read the value from the water cut
High WC Probe The point from which to read the value from the water cut
Low Flow Cutoff The flow rate below which the flow rate will be reported as
Water Cut Probe Limits
Low A water cut value, in % of water. If the calculated water cut
High A water cut value, in % of water. If the calculated water cut
Difference Limit Defines the discrepancy between the density-based water
Water Cut Probe
Mode
Specify either:
• The temperature value from a Micro Motion sensor
• The EU value from an RTD input
probe used to monitor low water cut
probe used to monitor high water cut
0. If the flow rate goes below this value:
• 0 will be used in NOC calculations.
• A No Flow alarm will be posted for this NOC Meter.
value is below the Low Water Monitor Limit, the value
reported by the low water cut probe is considered for use in
NOC measurement and reporting.
value is above the High Water Monitor Limit, the value
reported by the high water cut probe is considered for use in
NOC measurement and reporting.
cut value and the water cut value measured by probes at
which the Net Oil Computer Software will consider using the
water cut source
• Ignore: Water cut probes are ignored and the
density-based water cut is always used.
• Auto: The Net Oil Computer Software selects the water
cut source to use based on the configured water cut probe
limits, the configured difference limit, and the current
water cut values from both sources
UDP71 [1/2/3],
If auto-configuration is used,
inputs will reference the
Micro Motion sensor associated
with this NOC Meter.
The checkbox is automatically
cleared after auto-configuration
has been performed.
See Section 2.11
a Micro Motion sensor is used.
Micro Motion sensor is used.
from an analog input connected to
a pressure sensor (TLP example:
AIN 4-1, EU). However, an FST may
be used to write a pressure value
to an FST register or a soft point.
No Flow alarms are displayed on
the NOC Station Alarms panel
(see Section 4.2.6) and on the
appropriate NOC Meter Alarms
panel (see Section 4.4.7).
See Section 2.7
See Section 2.7
See Section 2.7
See Section 2.7
NOC System Overview NOC DisplaysROC809 SetupBefore You Begin NOC System Overview NOC DisplaysROC809 SetupBefore You Begin NOC System Overview NOC DisplaysROC809 SetupBefore You Begin NOC System Overview NOC DisplaysROC809 SetupBefore You Begin
Configuration and Use Manual 39
Page 46

Net Oil Computer Software Displays
4.4.3 NOC Meter display – TBR panel
The NOC Meter TBR panel is used to configure transient bubble remediation. See Figure 4-14 and
Table 4-10.
Figure 4-14 NOC Meter display – TBR panel
Tabl e 4-10 NOC Meter parameters – TBR panel
Parameter Description Comments
Settings
Drive Gain
Setpoint
Lookback Period The number of seconds to go back in time to retrieve the
Action The action(s) that this NOC Meter will perform if a transient
DO to Energize Use the Select TLP dialog box to specify the discrete output
The drive gain threshold (in %) above which TBR will be
applied.
density value to be used in NOC calculations if the Correct
Density action is specified.
bubble condition is detected:
• No Action: This NOC Meter will not take any action.
Measurement will continue normally.
• Correct Density: This NOC Meter will use the density
value as measured at a previous point. This point is
determined by the Time parameter.
• Log Alarm: The Net Oil Computer Software will write an
alarm to the alarm log.
• Energize DO: The Net Oil Computer Software will activate
the discrete output specified below.
• All: The system will simultaneously correct the density
reading, log an alarm, and energize the configured
discrete output.
that will be activated if a transient bubble condition is
detected (TLP example:
DOU 3-1, TAG).
The drive gain must exceed this
value for three seconds before
TBR is applied.
Default: 15 seconds
Range: 5–30 seconds
Used only if the selected Action is
Energize DO or All.
40 Micro Motion® Net Oil Computer Software and NOC System
Page 47

Net Oil Computer Software Displays
Tabl e 4-10 NOC Meter parameters – TBR panel continued
Parameter Description Comments
TBR Mode • Off: TBR is not enabled. This NOC Meter will not attempt
TBR Mode Totals All values represent only data from intervals when a transient bubble condition was determined to
Time The total hours, minutes, and seconds that transient bubble
Water Volume The total quantity of water that has been measured by this
Oil Volume The total quantity of oil that has been measured by this
TBR Mode Averages All values represent only data from intervals when a transient bubble condition was determined to
Water Cut The average water cut applied by this NOC Meter during
to detect transient bubble conditions.
• On: TBR is enabled. This NOC Meter will detect transient
bubble conditions and take the actions specified above.
exist. Data is summed across all transient bubble intervals in the current period:
• In Continuous mode, the current period runs from the most recent contract hour to the present
moment.
• In Well Test mode, the current period runs from the beginning of the well test to the present
moment.
conditions have been detected by this NOC Meter.
NOC Meter during transient bubble intervals in the current
period.
NOC Meter during transient bubble intervals in the current
period.
exist. Data is averaged across all transient bubble intervals in the current period:
• In Continuous mode, the current period runs from the most recent contract hour to the present
moment.
• In Well Test mode, the current period runs from the beginning of the well test to the present
moment.
See Section 2.7
transient bubble intervals in the current period
NOC System Overview NOC DisplaysROC809 SetupBefore You Begin NOC System Overview NOC DisplaysROC809 SetupBefore You Begin NOC System Overview NOC DisplaysROC809 SetupBefore You Begin NOC System Overview NOC DisplaysROC809 SetupBefore You Begin
Configuration and Use Manual 41
Page 48

Net Oil Computer Software Displays
4.4.4 NOC Meter display – Instant Values panel
The NOC Meter Instant Values panel displays current NOC data from this NOC Meter. See
Figure 4-15 and Table 4-11.
Figure 4-15 NOC Meter display – Instant Values panel
Tabl e 4-11 NOC Meter parameters – Instant Values panel
Parameter Description Comments
Volume Flow Rate
Uncorrected Oil The current volume flow rate of oil through the associated
Micro Motion sensor, not corrected for temperature or
pressure
Uncorrected Total
Water
Uncorrected Free
Water
Uncorrected
Liquid
Uncorrected
Reverse Liquid
Corrected Oil The current volume flow rate of oil through the associated
Corrected Total
Water
The current volume flow rate of total water through the
associated Micro Motion sensor, not corrected for
temperature or pressure
The current volume flow rate of free water through the
associated Micro Motion sensor, not corrected for
temperature or pressure
The current volume flow rate, forward flow only, of liquid
through the associated Micro Motion sensor, not corrected
for temperature or pressure
The current volume flow rate, reverse flow only, of liquid
through the associated Micro Motion sensor, not corrected
for temperature or pressure
Micro Motion sensor, corrected for temperature and
pressure
The current volume flow rate of total water through the
associated Micro Motion sensor, corrected for temperature
and pressure
42 Micro Motion® Net Oil Computer Software and NOC System
Page 49

Net Oil Computer Software Displays
Tabl e 4-11 NOC Meter parameters – Instant Values panel continued
Parameter Description Comments
Corrected Free
Water
Corrected Liquid The current volume flow rate of liquid through the
Water Cut
Density-Based The current water cut value for the process stream through
From WC Probe The current water cut value for the process stream through
Applied The water cut currently used in NOC measurement See Section 2.7
Mass Flow Rate
Forward Mass flow rate, forward flow only, of liquid through the
Reverse Mass flow rate, reverse flow only, of liquid through the
The current volume flow rate of free water through the
associated Micro Motion sensor, corrected for temperature
and pressure
associated Micro Motion sensor, corrected for temperature
and pressure
See Section 2.7
the associated Micro Motion sensor, as derived from
density data using NOC equations
See Section 2.7
the associated Micro Motion sensor, as measured by the
water cut probe
associated Micro Motion sensor
associated Micro Motion sensor
NOC System Overview NOC DisplaysROC809 SetupBefore You Begin NOC System Overview NOC DisplaysROC809 SetupBefore You Begin NOC System Overview NOC DisplaysROC809 SetupBefore You Begin NOC System Overview NOC DisplaysROC809 SetupBefore You Begin
4.4.5 NOC Meter display – Totals panel
The NOC Meter Totals panel (see Figure 4-16 and Table 4-12) displays current NOC totals for this
NOC Meter. Data is totaled for the current period:
• In Continuous mode, the current period runs from the most recent contract hour to the present
moment.
• In Well Test mode, the current period runs from the beginning of the well test to the present
moment.
Configuration and Use Manual 43
Page 50

Net Oil Computer Software Displays
Figure 4-16 NOC Meter display – Totals panel
Tabl e 4-12 NOC Meter parameters – Totals panel
Parameter Description Comments
Uncorrected Oil The amount of oil through the associated Micro Motion sensor
for the current period, not corrected for temperature or pressure
Total Water The amount of total water through the associated Micro Motion
sensor for the current period, not corrected for temperature or
pressure
Free Water The amount of free water through the associated Micro Motion
sensor for the current period, not corrected for temperature or
pressure
Uncorrected
Liquid
Time Time elapsed since totalizers were last reset Refers to totalizers in the Net Oil
Corrected Oil The amount of oil through the associated Micro Motion sensor
Corrected Total
Water
Corrected Free
Water
The amount of liquid through the associated Micro Motion
sensor for the current period, not corrected for temperature or
pressure
Computer Software, not totalizers
in the core processor.
for the current period, corrected for temperature and pressure
The amount of total water through the associated Micro Motion
sensor for the current period, corrected for temperature and
pressure
The amount of free water through the associated Micro Motion
sensor for the current period, corrected for temperature and
pressure
44 Micro Motion® Net Oil Computer Software and NOC System
Page 51

Net Oil Computer Software Displays
Tabl e 4-12 NOC Meter parameters – Totals panel continued
Parameter Description Comments
Corrected Liquid The amount of liquid through the associated Micro Motion
sensor for the current period, corrected for temperature and
pressure
Forward Mass The amount of mass, forward flow only, through the associated
Micro Motion sensor for the current period
Reverse Mass The amount of mass, reverse flow only, through the associated
Micro Motion sensor for the current period
4.4.6 NOC Meter display – Averages panel
The NOC Meter Averages panel (see Figure 4-17 and Table 4-13) displays current NOC totals for this
NOC Meter. Data is averaged for the current period:
• In Continuous mode, the current period runs from the most recent contract hour to the present
moment.
• In Well Test mode, the current period runs from the beginning of the well test to the present
moment.
NOC System Overview NOC DisplaysROC809 SetupBefore You Begin NOC System Overview NOC DisplaysROC809 SetupBefore You Begin NOC System Overview NOC DisplaysROC809 SetupBefore You Begin NOC System Overview NOC DisplaysROC809 SetupBefore You Begin
Figure 4-17 NOC Meter display – Averages panel
Configuration and Use Manual 45
Page 52

Net Oil Computer Software Displays
Tabl e 4-13 NOC Meter parameters – Averages panel
Parameter Description Comments
Average Flow Rates All average values in this section are flow-weighted.
Uncorrected Oil Average volume flow rate of oil for the current period, not
corrected for temperature or pressure
Uncorrected Total
Water
Uncorrected Free
Water
Uncorrected
Liquid
Mass Average mass flow rate of all process fluid for the current
Corrected Oil Average volume flow rate of oil for the current period,
Corrected Total
Water
Corrected Free
Water
Corrected Liquid Average volume flow rate of all process fluid for the current
Average All average values in this section are flow-weighted.
Uncorrected
Liquid Density
Temperature Average temperature of all process fluid
Water Cut
Applied
Average volume flow rate of all water for the current period,
not corrected for temperature or pressure
Average volume flow rate of free water for the current
period, not corrected for temperature or pressure
Total volume flow rate of all process fluid for the current
period, not corrected for temperature or pressure
period
corrected for temperature and pressure
Average volume flow rate of all water for the current period,
corrected for temperature and pressure
Average volume flow rate of free water for the current
period, corrected for temperature and pressure
period, corrected for temperature and pressure
Average density of liquid for the current period, uncorrected
for temperature or pressure
The average water cut used in NOC calculations during the
current period
See Section 2.7
4.4.7 NOC Meter display – Alarms panel
The NOC Meter Alarms panel (see Figure 4-18 and Table 4-14) displays active alarms for this
NOC Meter, in the following alarm categories:
• No Flow alarms, as defined by the Low Flow Cutoff value configured on the NOC Meter
Inputs panel (see Section 4.4.2)
• Low Flow and High Flow alarms, as defined in the Alarms fields on this panel
• Coriolis alarms – alarms posted by the Micro Motion sensor associated with the NOC Meter
• No Communications alarms, indicating that this NOC Meter is not receiving data from the
associated Micro Motion sensor
This panel is also used to configure settings for Low Flow and High Flow alarms, and to configure
alarm reporting for flow alarms.
46 Micro Motion® Net Oil Computer Software and NOC System
Page 53

Net Oil Computer Software Displays
Figure 4-18 NOC Meter display – Alarms panel
NOC System Overview NOC DisplaysROC809 SetupBefore You Begin NOC System Overview NOC DisplaysROC809 SetupBefore You Begin NOC System Overview NOC DisplaysROC809 SetupBefore You Begin NOC System Overview NOC DisplaysROC809 SetupBefore You Begin
Tabl e 4-14 NOC Meter parameters – Alarms panel
Parameter Description Comments
Alarm Status These fields appear only if alarming is enabled on the General panel (see Figure 4-12).
No Flow Indicates No Flow alarm status:
• A blank field represents an inactive alarm state.
• A red bar represents an active alarm state.
Low Flow Indicates Low Flow alarm status:
• A blank field represents an inactive alarm state.
• A red bar represents an active alarm state.
High Flow Indicates High Flow alarm status:
• A blank field represents an inactive alarm state.
• A red bar represents an active alarm state.
Coriolis Indicates that the associated Micro Motion sensor is
No Comm Indicates that this NOC Meter is unable to communicate
Core Registers
245 and 256
No
Communication
reporting an alarm condition
with the associated Micro Motion sensor
Displays the internal value of the core processor status
registers 245 and 246
Displays the internal value of the active Micro Motion
communications alarm
As defined by the Low Flow Cutoff
value configured on the
NOC Meter Inputs panel (see
Section 4.4.2)
As defined by the Low Flow Rate
Alarm parameter on this panel
As defined by the High Flow Rate
Alarm parameter on this panel
Micro Motion sensor alarms are
displayed on the MMI Interface
Alarms panel (see Section 4.3.3).
Read-only
Read-only
Configuration and Use Manual 47
Page 54

Net Oil Computer Software Displays
Tabl e 4-14 NOC Meter parameters – Alarms panel continued
Parameter Description Comments
Alarm Setpoints
Low Flow Rate
Alarm
High Flow Rate
Alarm
Alarm Deadband Specify the size of two inactive zones: one below the low
Report by Exception These fields appear only if alarming is enabled on the General panel (see Figure 4-12).
On Alarm Set • Enabled – An RBX alarm will be generated when flow
On Alarm Clear • Enabled – An RBX alarm will be generated when the flow
Specify the value at which a low flow rate alarm will be
posted. The alarm will be posted if the instantaneous flow
rate meets or drops below this value.
Specify the value at which a high flow rate alarm will be
posted. The alarm will be posted if the instantaneous flow
rate meets or exceeds this value.
flow rate alarm limit and one above the high flow rate alarm
limit.
enters an alarm condition
• Disabled – An RBX alarm will not generated when flow
enters an alarm condition
alarm condition clears
• Disabled – An RBX alarm will not generated when the flow
alarm condition clears
If pressure compensation is
enabled, the alarm is based on the
compensated flow rate.
If pressure compensation is
enabled, the alarm is based on the
compensated flow rate.
Prevents recurrent setting and
clearing of alarm when the input
value is oscillating around the
alarm limit. Also prevents filling the
alarm log with repetitive data.
If either of these options is
enabled, a communications port
must be configured for SRBX
alarming. See the manual entitled
ROCLINK 800 Configuration
Software: User Manual.
4.4.8 NOC Meter display – Density Determination panel
The NOC Meter Density Determination panel (see Figure 4-19 and Table 4-15) is used to perform
density determination routines for oil or water.
Figure 4-19 NOC Meter display – Density Determination panel
48 Micro Motion® Net Oil Computer Software and NOC System
Page 55

Net Oil Computer Software Displays
Tabl e 4-15 NOC Meter parameters – Density Determination panel
Parameter Description Comments
Current Well
Oil Density at Ref Displays the value currently configured for the selected well Read-only; see Section 4.5.1
Water Density at
Ref
DDR Oil Density
at Ref
DDR Water
Density at Ref
Density Determination
Water Cut In
Sample
Sample
Temperature
DDR Command Select density determination command to be executed, then
DDR Previous
Command
Current DDR Values
Total Sample
Time
Sample Time
Remaining
Instant Density Current density of the process fluid
Instant
Temperature
Instant
Uncorrected
Volu me F low
Average
Uncorrected
Liquid Density
Average
Temperature
Total Uncorrected
Volu me
Displays the value currently configured for the selected well Read-only; see Section 4.5.1
Displays the value generated by the density determination
routine
Displays the value generated by the density determination
routine
Amount of water in oil sample, as determined by external
procedure. Enter as percent.
Temperature of the oil sample when the water cut was
determined. Enter in configured temperature units.
click Apply.
Displays previous density determination command Read-only
Number of minutes over which values will be averaged for
density determination
Number of minutes remaining in the test period Read-only
Current temperature of the process fluid
Current volume flow rate of the process fluid, uncorrected
for temperature or pressure
Average density of the process fluid, uncorrected for
temperature or pressure
Average temperature of the process fluid
Total volume of either oil or water (depending on the density
determination routine being performed), uncorrected for
temperature or pressure
Read only; will be 0.0 until a
density determination procedure
for oil has been performed
Read only; will be 0.0 until a
density determination procedure
for oil has been performed
Used only during oil density
determination
Used only during oil density
determination
Default: 1.0 minute
In general, longer values yield
better results.
Averaged from the time the density
determination routine was started
to the present moment
Totaled from the time the density
determination routine was started
to the present moment
NOC System Overview NOC DisplaysROC809 SetupBefore You Begin NOC System Overview NOC DisplaysROC809 SetupBefore You Begin NOC System Overview NOC DisplaysROC809 SetupBefore You Begin NOC System Overview NOC DisplaysROC809 SetupBefore You Begin
Configuration and Use Manual 49
Page 56

Net Oil Computer Software Displays
4.5 Well Data display
The Well Data display includes two panels:
• Configuration – see Section 4.5.1
• History – see Section 4.5.2
Both panels vary slightly depending on the configured Operation Mode.
4.5.1 Well Data display – Configuration panel
The Well Data Configuration panel (see Figure 4-20 and Table 4-16) is used to specify reference and
other values for the selected well.
Figure 4-20 Well Data display – Configuration panel
Tabl e 4-16 Well Data parameters – Configuration panel
Parameter Description Comments
Point Number (Operation Mode = Well Test) The number of the currently
selected well. Use the dropdown list to select a different well.
(Operation Mode = Continuous) The name of the currently
selected contract period. Use the dropdown list to select a
different contract period.
Well Tag (Operation Mode = Well Test) The name assigned to this well
History Record to
Retrieve
50 Micro Motion® Net Oil Computer Software and NOC System
(Operation Mode = Well Test) The six most recent well tests can
be retrieved for viewing. Use the dropdown list to select the
desired well test.
Page 57

Net Oil Computer Software Displays
2 LiquidVolumeOfSeparator×
AverageFlowRateOfWell
------------------------------------------------------------------------------
Tabl e 4-16 Well Data parameters – Configuration panel continued
Parameter Description Comments
Station Record to
Retrieve
Oil Density at
Reference
Temperature
Water Density at
Reference
Temperature
Purge Time (Operation Mode = Well Test) The number of minutes required
(Operation Mode = Continuous) Use the dropdown list to view
data from the NOC Station (summed across NOC Meters) or
data from a specific meter.
The density of live oil from this well at the configured Reference
Temperature (see Table 4-1).
The density of the water from this well at the configured
Reference Temperature (see Table 4-1).
to clear well test fluids from the separator.
When a well test is initiated, the
Net Oil Computer Software waits
for the period specified here before
recording test data. Totals remain
constant throughout the purge,
and increase as the well test
begins. Micro Motion recommends
that purge time be calculated as
follows:
NOC System Overview NOC DisplaysROC809 SetupBefore You Begin NOC System Overview NOC DisplaysROC809 SetupBefore You Begin NOC System Overview NOC DisplaysROC809 SetupBefore You Begin NOC System Overview NOC DisplaysROC809 SetupBefore You Begin
4.5.2 Well Data display – History panel
The Well Data History panel (see Figure 4-21 and Table 4-17) displays Initial and Recalculated values
for many fields:
• Initial values are the values measured or calculated during the selected well test or during the
selected measurement period.
• Recalculated values are the values generated by a recalculation procedure (see Section 2.13
Section 8.7). If no recalculation has been performed on the selected data set, the
and
Recalculated fields display zeros.
For Total and Average values:
• In Well Test mode, the values represent data from the selected well test.
• In Continuous mode, the values represent data from the selected contract period and either the
NOC Station or the selected NOC Meter.
Configuration and Use Manual 51
Page 58

Net Oil Computer Software Displays
Figure 4-21 Well Data display – History panel
Tabl e 4-17 Well Data parameters – History panel
Parameter Description Comments
Point Number (Operation Mode = Well Test) The number of the currently
History Record to
Retrieve
Station Record to
Retrieve
Test Duration (Operation Mode = Well Test) The hours and minutes that
Test Purge Time (Operation Mode = Well Test only) The hours and minutes
Start Date (Operation Mode = Well Test) The date and time that the
selected well. Use the dropdown list to select a different
well.
(Operation Mode = Continuous) The name of the currently
selected contract period. Use the dropdown list to select a
different contract period.
(Operation Mode = Well Test) The six most recent well tests
can be retrieved for viewing. Use the dropdown list to select
the desired well test.
(Operation Mode = Continuous) Use the dropdown list to
view data from the NOC Station (summed across
NOC Meters) or data from a specific meter.
the selected well test was active, including paused time and
transient bubble intervals
(Operation Mode = Continuous) The hours and minutes that
Continuous Mode has been active, including transient
bubble intervals
spent in purge time during the selected well test
selected well test was initiated
(Operation Mode = Continuous) The beginning timestamp
for this contract period.
52 Micro Motion® Net Oil Computer Software and NOC System
Page 59

Net Oil Computer Software Displays
Tabl e 4-17 Well Data parameters – History panel continued
Parameter Description Comments
End Date (Operation Mode = Well Test) The date and time that the
Recalc Date The date and time that the displayed recalculation was
Pause Time (Operation Mode = Well Test) The total duration, in hours
Reference
Temperature
Gas to Oil Ratio The Gas to Oil Ratio of the process fluid
To tals
Gas The total gas measured by the gas sensor
Uncorrected Oil The amount of oil measured by the NOC system,
Uncorrected Total
Water
Uncorrected Free
Water
Corrected Oil The amount of oil measured by the NOC system, corrected
Corrected Total
Water
Corrected Free
Water
Forward Mass The amount of mass measured by the NOC system,
Reverse Mass The amount of mass measured by the NOC system,
Averages All average values in this section are flow-weighted.
Corrected Water
Cut
Gas Flow The average flow rate of gas
Liquid density The average density of liquid
Temperature The average temperature
Uncorrected Oil The average flow rate of oil, uncorrected for temperature or
Uncorrected Total
Water
Uncorrected Free
Water
Corrected Oil The average flow rate of oil, corrected for temperature and
Corrected Total
Water
Corrected Free
Water
selected well test was stopped.
(Operation Mode = Continuous) The ending timestamp for
this contract period
performed
and minutes, of all pause time during the selected well test
The temperature to which density and volume
measurements are corrected during NOC calculation
uncorrected for temperature or pressure
The amount of total water measured by the NOC system,
uncorrected for temperature or pressure
The amount of free water measured by the NOC system,
uncorrected for temperature or pressure
for temperature and pressure
The amount of total water measured by the NOC system,
corrected for temperature and pressure
The amount of free water measured by the NOC system,
corrected for temperature and pressure
forward flow only
reverse flow only
The average water cut during the well test or measurement
period
pressure
The average flow rate of total water, uncorrected for
temperature or pressure
The average flow rate of free water, uncorrected for
temperature or pressure
pressure
The average flow rate of total water, corrected for
temperature and pressure
The average flow rate of free water, corrected for
temperature and pressure
NOC System Overview NOC DisplaysROC809 SetupBefore You Begin NOC System Overview NOC DisplaysROC809 SetupBefore You Begin NOC System Overview NOC DisplaysROC809 SetupBefore You Begin NOC System Overview NOC DisplaysROC809 SetupBefore You Begin
Configuration and Use Manual 53
Page 60

Net Oil Computer Software Displays
4.6 NOC Recalc display
The NOC Recalc display includes four panels:
• General – see Section 4.6.1
• Totals – see Section 4.6.2
• Averages – see Section 4.6.3
• Recalculable Tests – see Section 4.6.4
4.6.1 NOC Recalc display – General panel
The NOC Recalc General panel (see Figure 4-22 and Table 4-18) is used to specify the measurement
units, reference temperature, and time base to be used during recalculation.
Figure 4-22 NOC Recalc display – General panel, Well Test mode
Tabl e 4-18 NOC Recalc parameters – General panel
Parameter Description Comments
Point Number
Point Tag
Well Selected (Tag) The name of the well whose test is selected for
Well Selected (Index) The number of the well whose test is selected for
Test Start Time The start time of the test selected for recalculation
54 Micro Motion® Net Oil Computer Software and NOC System
The current function Read-only
Well tests are selected on the
recalculation
recalculation
Recalculable Tests panel
Page 61

Net Oil Computer Software Displays
Tabl e 4-18 NOC Recalc parameters – General panel continued
Parameter Description Comments
Units
Mass The mass unit to be used in the recalculation Default: Unit used in original
Gas Volume The gas volume unit to be used in the recalculation
Liquid Volume The liquid volume unit to be used in the recalculation
Density The density unit to be used in the recalculation
Temperature The temperature unit to be used in the recalculation
Pressure The pressure unit to be used in the recalculation
Reference
Temperature
Time Base The time unit to be used in the recalculation
The reference temperature to which oil density and water
density will be corrected in the recalculation
measurement and calculation
4.6.2 NOC Recalc display – Totals panel
The NOC Recalc Totals panel (see Figure 4-23 and Table 4-19) displays NOC totals, either before or
after recalculation.
NOC System Overview NOC DisplaysROC809 SetupBefore You Begin NOC System Overview NOC DisplaysROC809 SetupBefore You Begin NOC System Overview NOC DisplaysROC809 SetupBefore You Begin NOC System Overview NOC DisplaysROC809 SetupBefore You Begin
Figure 4-23 NOC Recalc display – Totals panel
Configuration and Use Manual 55
Page 62

Net Oil Computer Software Displays
Tabl e 4-19 NOC Recalc parameters – Totals panel
Parameter Description Comments
Time
Current Test Duration of the selected well test or contract period, in
minutes
Pause Time Total pause time recorded for the selected well test or
contract period, in minutes
TBR Time Total of all transient bubble intervals recorded for the
selected well test or contract period, in minutes
TMR Time Not supported in the current release
Volume Totals
Gas The amount of gas measured during the selected test or
period
Uncorrected Oil The amount of oil measured during the selected test or
period, uncorrected for temperature or pressure
Uncorrected Total
Water
Uncorrected Free
Water
Uncorrected
Liquid
Corrected Oil The amount of oil measured during the selected test or
Corrected Total
Water
Corrected Free
Water
Corrected Liquid The amount of process fluid measured during the selected
The amount of all water measured during the selected test
or period, uncorrected for temperature or pressure
The amount of free water measured during the selected test
or period, uncorrected for temperature or pressure
The amount of process fluid measured during the selected
test or period, uncorrected for temperature or pressure
period, corrected for temperature and pressure
The amount of all water measured during the selected test
or period, corrected for temperature and pressure
The amount of free water measured during the selected test
or period, corrected for temperature and pressure
test or period, corrected for temperature and pressure
56 Micro Motion® Net Oil Computer Software and NOC System
Page 63

Net Oil Computer Software Displays
4.6.3 NOC Recalc display – Averages panel
The NOC Recalc Averages panel (see Figure 4-24 and Table 4-20) displays NOC totals, either before
or after recalculation.
Figure 4-24 NOC Recalc display – Averages panel
NOC System Overview NOC DisplaysROC809 SetupBefore You Begin NOC System Overview NOC DisplaysROC809 SetupBefore You Begin NOC System Overview NOC DisplaysROC809 SetupBefore You Begin NOC System Overview NOC DisplaysROC809 SetupBefore You Begin
Tabl e 4-20 NOC Recalc parameters – Averages panel
Parameter Description Comments
Average Flow Rates All average values in this section are flow-weighted.
Gas Average flow rate of gas for the selected test or period
Uncorrected Oil Average volume flow rate of oil for the selected test or
Uncorrected Total
Water
Uncorrected Free
Water
Uncorrected
Liquid
Corrected Oil Average volume flow rate of oil for the selected test or
Corrected Total
Water
Corrected Free
Water
period, not corrected for temperature or pressure
Average volume flow rate of all water for the selected test or
period, not corrected for temperature or pressure
Average volume flow rate of free water for the selected test
or period, not corrected for temperature or pressure
Total volume flow rate of all process fluid for the selected
test or period, not corrected for temperature or pressure
period, corrected for temperature and pressure
Average volume flow rate of all water for the selected test or
period, corrected for temperature and pressure
Average volume flow rate of free water for the current
period, corrected for temperature and pressure
Configuration and Use Manual 57
Page 64

Net Oil Computer Software Displays
Tabl e 4-20 NOC Recalc parameters – Averages panel continued
Parameter Description Comments
Average All average values in this section are flow-weighted.
Water Cut Average water cut used during the selected test or period
PressureCorrected Oil
Density
The average oil density for the selected test or period,
corrected for temperature and pressure
4.6.4 NOC Recalc display – Recalculable Tests panel
The NOC Recalc Recalculable Tests panel is used to select the well test or contract period to be
recalculated. There are two versions of this panel: the version displayed depends on the configured
Operation Mode. See Figures 4-25 and 4-26 and Table 4-21.
Figure 4-25 NOC Recalc display – Recalculable Tests panel, Well Test mode
58 Micro Motion® Net Oil Computer Software and NOC System
Page 65

Net Oil Computer Software Displays
Figure 4-26 NOC Recalc display – Recalculable Tests panel, Continuous mode
NOC System Overview NOC DisplaysROC809 SetupBefore You Begin NOC System Overview NOC DisplaysROC809 SetupBefore You Begin NOC System Overview NOC DisplaysROC809 SetupBefore You Begin NOC System Overview NOC DisplaysROC809 SetupBefore You Begin
Tabl e 4-21 NOC Recalc parameters – Recalculable Tests panel
Parameter Description Comments
Selection List The NOC measurements available for recalculation.
• In Well Test mode, data for individual well tests can be
recalculated. Available well tests are displayed by well
name, test start time, and test end time
• In Continuous mode, data for individual contract periods
can be recalculated. The available contract days are
displayed by date, and the start and end time of the
contract period.
Original Reference
Densities
Oil The configured oil density at reference temperature for the
selected well.
Water The configured water density at reference temperature for
the selected well.
Recalculation
Densities
Oil The value for oil density at reference temperature to be
used in the recalculation procedure
Water The value for water density at reference temperature to be
used in the recalculation procedure
Configured on the Well Data
Configuration panel (see
Section 4.5.1)
Configured on the Well Data
Configuration panel (see
Section 4.5.1)
Configuration and Use Manual 59
Page 66

60 Micro Motion® Net Oil Computer Software and NOC System
Page 67

Chapter 5
Configuring the NOC System
5.1 About this chapter
This chapter explains how to configure the NOC system and the Net Oil Computer Software. This
includes:
• General procedure – see Section 5.2
• Configuring the NOC Station – see Section 5.3
• Configuring the well – see Section 5.4
• Configuring the MMI Interface – see Section 5.5
• Configuring pressure compensation (optional) – see Section 5.5
• Configuring NOC Meters – see Section 5.6
• Configuring transient bubble remediation (optional) – see Section 5.6
In general, perform configuration tasks in the order listed here.
NOC Special Configuration Using the NOC SystemDensity Determination RoutinesNOC Configuration
For a detailed listing of the user-defined points in the Net Oil Computer Software, see Appendix A.
5.2 General procedure
To begin configuration:
1. Start ROCLINK 800 and connect to the ROC809 platform.
2. In ROCLINK 800, select the Configuration Tree window.
3. Expand the User Program nodes as shown in Figure 5-1.
As you work through the configuration tasks in this chapter, use the Configuration Tree window to
select the display you want to configure.
Micro Motion recommends the following good practices:
• During configuration, save your work to flash memory at frequent intervals.
• After configuration is complete, save the configuration to flash memory and to a file.
Configuration and Use Manual 61
Page 68

Configuring the NOC System
Figure 5-1 Net Oil Computer Software in Configuration Tree window
5.3 Configuring the NOC Station
To configure the NOC Station:
1. In the Configuration Tree window, double-click the NOC Station node.
2. Configure the following parameters:
a. General panel (see Section 4.2.1
• Point Tag
• Operation Mode
• Contract Hour (Continuous mode only)
b. Units panel (see Section 4.2.2):
• Measurement units
•
Reference Temperature
•Time Base
3. Click Apply.
4. If your NOC system includes gas measurement, see Section 6.2 for configuration instructions
for the Associated Gas Station.
):
62 Micro Motion® Net Oil Computer Software and NOC System
Page 69

Configuring the NOC System
Note the following:
• The station name specified here refers to the Net Oil Computer Software running on this
ROC809 platform. It is not the same station name that is configured for the device. However, it
may be convenient to assign the same tag to both stations.
• The Net Oil Computer Software does not allow you to change measurement units, time base,
or reference temperature during a well test. If you change measurement units, time base, or
reference temperature during Continuous mode measurement, you will introduce a
discontinuity into the data.
If you need to change this information, Micro Motion recommends:
- In Well Test mode, complete the well test, make the required changes, and use the new
measurement units for subsequent tests. Use the recalculation feature (see Section 8.7) to
convert existing well test data to different measurement units.
- In Continuous mode, wait until the contract period has expired, or manually force an end
of day (see Section 8.3.2). Make the required changes, then force another end of day and
resume data collection. Use the recalculation feature (see Section 8.7) to convert existing
data to different measurement units.
Note that if you choose to store the recalculated data on the ROC platform, it will be returned
to the original units for ease of comparison. You must manually record the recalculated data if
you want to preserve the converted units.
NOC Special Configuration Using the NOC SystemDensity Determination RoutinesNOC Configuration
5.4 Configuring the wells
For each well that will be measured:
1. In the Configuration Tree window, expand the Well Data node and click the number of the well
you want to configure.
• For Continuous mode measurement, configure Well #01.
• For Well Test mode, configure all wells to be tested through this system.
2. On the Configuration panel (see Section 4.5.1
•
Well Tag (Well Test mode only)
•
Oil Density at Reference Temperature
• Water Density at Reference Temperature
• Purge Time (Well Test mode only)
If you do not know the density values at reference temperature for this well:
• You can perform a density determination for oil and/or a density determination for water.
See Chapter 7.
• You can configure the well with approximate values now, and recalculate NOC
measurement data when accurate density values are available. See Section 8.7.
3. Click
Apply.
5.5 Configuring the MMI Interface(s)
), configure the following parameters:
The MMI Interface specifies how the Net Oil Computer Software will communicate with the
Micro Motion sensor. There is one MMI Interface for every Micro Motion sensor in the NOC system.
Before configuring an MMI Interface, you must understand how Micro Motion sensors are mapped to
NOC Meters. See Section 2.4.1.
Configuration and Use Manual 63
Page 70

Configuring the NOC System
To configure an MMI Interface:
1. In the Configuration Tree window, expand the MMI Interface node and click the number of the
MMI Interface you want to configure.
2. On the Comm Setup panel (see Section 4.3.1
•
Point Tag
• Comm Port for Device Access – COM 4, TAG (95, 3, 0)
•
Modbus Address – Modbus address of the core processor associated with this sensor. The
default value is
•
Communications Scanning – Enabled
3. If you want to implement pressure compensation (see Section 2.10):
a. Open the Pressure Compensation panel (see Section 4.3.4).
b. Enter the compensation coefficient for density and/or mass.
c. Click the appropriate checkbox(es).
d. Ensure that the required pressure data will be available via the NOC Meter (see
Section 5.6, Step 3c).
4. Click
Apply.
), configure the following parameters:
1.
5. To test the connection, open the Registers panel (see Section 4.3.2), and click
should see process data from the sensor. If you do not, check all wiring, ensure that the core
processor is powered up, and that you are using the correct Modbus address.
5.6 Configuring an NOC Meter
Before configuring an NOC Meter, you must understand how Micro Motion sensors are mapped to
NOC Meters. There is one NOC Meter for every Micro Motion sensor used for NOC measurement.
The NOC Meter receives sensor data through the MMI Interface. See Section 2.4.1.
To configure an NOC Meter:
1. In the Configuration Tree window, expand the NOC Meter node and click the number of the
NOC Meter that you want to configure.
2. On the General panel (see Section 4.4.1), configure the following parameters:
•
Point Tag
• Alarming – If you enable alarming, be sure to configure the alarm setpoints on the Alarms
panel as desired (see Step 4).
•
Water Cut Setpoint for Free Water – If this NOC Meter is on an oil or liquid leg, set the
setpoint to the appropriate water cut. If this NOC Meter is on a water leg, set the setpoint
to
0. See Section 2.4.2.
3. On the Inputs panel (see Section 4.4.2
Update. You
):
a. Click the Auto Configure Inputs checkbox and click Apply.
b. Click
Update and verify that inputs for the following process variables have been defined:
• Coriolis Drive Gain –
UDP71 x, R291 (71, y, 32)
• Coriolis Mass – UDP71 x, R259CU (71, y, 44)
• Density – UDP71 x, PCDENS (71, y, 39)
• Temperature – UDP71 x, R251CU (71, y, 42)
64 Micro Motion® Net Oil Computer Software and NOC System
Page 71

Configuring the NOC System
If they are not defined, use the TLP dialog box to define them. Be sure to specify the
appropriate MMI Interface (NOC Meter 1 uses MMI Interface 1, NOC Meter 2 uses
MMI Interface 2, etc.).
c. Use the TLP dialog box to define the pressure input (if required). A typical pressure input
would be
d. If you are not using water cut probes, set
using water cut probes, see Section 6.3 for configuration instructions.
4. On the Alarms panel (see Section 4.4.7) configure the following parameters:
Low Flow Rate Alarm
•
• High Flow Rate Alarm
• Alarm Deadband
• Report by Exception options
Note: Flow alarms will be reported only if alarming is enabled for this NOC Meter (see Step 2).
AIN 4-2, 21 (103, 65, 21).
Water Cut Probe Mode to Ignore. If you are
NOC Special Configuration Using the NOC SystemDensity Determination RoutinesNOC Configuration
5. Click
Apply.
6. If you want to implement transient bubble remediation (see Section 2.11):
a. Open the TBR panel (see Section 4.4.3
).
b. Specify Drive Gain Setpoint, Lookback Period, and Action as desired.
c. If the TBR action includes energizing a discrete output, set
DO to Energize to the discrete
output that will be used to indicate that TBR is active.
d. Enable
e. Click
TBR Mode.
Apply.
7. To test the configuration:
a. Open the Inputs panel and click
Update. You should see process data from the sensor. If
you do not, verify the MMI Interface that this NOC Meter uses for sensor data.
b. Open the Instant Values panel (see Section 4.4.4), and click
Update. You should see NOC
measurement data.
Configuration and Use Manual 65
Page 72

66 Micro Motion® Net Oil Computer Software and NOC System
Page 73

Chapter 6
Special Topics in Configuration
6.1 About this chapter
This chapter provides information on the following configuration topics:
• Setting up gas measurement
• Configuring water cut measurement using water cut probes
6.2 Setting up gas measurement
You can measure gas using either an MMI sensor or a conventional (turbine or orifice plate) meter. In
both cases, there are three tasks involved in setting up gas measurement:
• Setting up the gas station on the ROC809 platform
• Setting up the gas meter
• Configuring the NOC Gas Station to access the ROC809 gas station
NOC Special Configuration Using the NOC SystemDensity Determination RoutinesNOC Configuration
Note: To use the gas measurement functionality of the ROC809, an AGA license must be installed on
the ROC809 platform. The AGA license is available from Remote Automation Solutions.
Task 1 Setting up the ROC809 gas station
1. Start ROCLINK 800 and connect to the ROC809 platform.
2. Click
3. In the Points panel, ensure that at least one station and one turbine meter or one orifice meter is
4. Click
5. For the station to be configured, select
Note: This station is named “Coriolis” by the factory-supplied configuration file. You may name this
station as desired.
6. On the General panel:
Note: The contract hour is controlled by the Net Oil Computer Software.
7. Configure options on the Gas Quality panel, the Advanced panel, and the Alarms panel
Device > Information.
active.
Meter > Setup > Station.
1 - Coriolis.
• Ensure that
• Select the calculation standard you want to use. In most cases, this will be
(the first option).
according to the information provided in the manual entitled ROCLINK 800 Configuration
Software: User Manual.
History Segment is set to General 00.
Gas, AGA11
8. Click
Configuration and Use Manual 67
Apply and close the Station Setup window.
Page 74

Special Topics in Configuration
Task 2 Setting up the gas meter
1. In ROCLINK 800, click
• If you are using an MMI sensor or a turbine meter, click
Meter > Setup, and select the meter type you are using:
Turbine Meter.
• If you are using an orifice plate meter, click
Orifice Meter.
2. In the General panel:
a. Specify a name or description for the meter.
b. Select the external gas station that you defined in the previous task (e.g., Coriolis).
c. For MMI sensors or turbine meters, set
- MMI sensor: Meter Type =
Mass
Meter Type as required:
- Turbine meter: Meter Type = Vo lume
d. Click Apply.
3. On the Inputs panel:
a. If you are using an MMI sensor, set
flow rate from MMI #4 (
UDP71 4, PCMASS) (71, 3, 38).
Mass I/O Definition to the pressure-corrected mass
Note: To access the MMI points, you may need to enable Show All Point Types and Parameters.
b. If you are using a turbine meter, set
input from the turbine meter (e.g.,
c. If you are using an orifice plate meter: set
analog input from the orifice plate meter (e.g.,
d. For all meter types, set
AIN 4-2, EU or 103, 65, 21).
e. For all meter types, set
106, 144, 0).
or
f. Click
Apply.
Static Pressure to the analog input from the pressure sensor (e.g.,
Temper ature to the analog input from the RTD (e.g., RTD 9-1, EU
Uncorrected Volume I/O Definition to the analog
AIN 4-1, EU or 103, 64, 21).
Differential Pressure I/O Definition to the
AIN 4-1, EU or 103, 64, 21).
4. Complete meter setup according to the configuration instructions in the manual entitled
ROCLINK 800 Configuration Software: User Manual. Be sure to review all parameters on all
panels.
5. Click
Apply and close the Meter Setup window.
Task 3 Configuring the NOC Gas Station
1. Open the NOC Station display.
2. For
Associated Gas Station, specify STN 1, TAG (112, 0, 0).
3. Click
Apply.
Data should appear in the Current Gas Flow field when NOC measurement begins:
• For Continuous mode, data should appear immediately.
• For Well Test mode, data should appear when a well test is started.
68 Micro Motion® Net Oil Computer Software and NOC System
Page 75

Special Topics in Configuration
6.3 Configuring water cut measurement using water cut probes (WCPs)
Be sure to configure water cut measurement on all NOC Meters where water cut probes are installed.
To configure water cut measurement using one or two water cut probes:
1. Open the Inputs panel of the NOC Meter display (see Section 4.4.2).
2. For
Low WC Probe and/or High WC Probe, specify the analog input used to retrieve data
from the low-end and/or high-end WCP.
3. Using the Water Monitors Limits parameters, specify the range for the WCP(s). For example:
• If
Low is set to 20, the range defined for the low-end WCP is 0 to 20%.
• If
High is set to 80, the range defined for the high-end WCP is 80 to 100%.
If you want to use data from the WCPs for all water cut values, see Examples 1 and 2 in this
section and set range values as described in the applicable example.
4. Set
Water Cut Probe Mode to Auto.
5. Set the
Difference Limit value as desired. When Water Cut Probe Mode is Auto, the Net Oil
Computer Software continually compares the density-based water cut value to the WCP value.
When the difference is greater than the specified Difference Limit, the software switches from
using the density-based value to using the WCP value, or vice versa. See Example 3.
NOC Special Configuration Using the NOC SystemDensity Determination RoutinesNOC Configuration
Example 1
Example 2
Two water cut probes are installed. You want to use the measured
water cut values for all water cut ranges.
1. Set Water Cut Probe Mode to Auto.
2. Configure the Water Monitors Limits parameters to cover the entire
span, e.g.:
• Low = 20 and High = 21
• Low = 50 and High = 51
• Low = 20 and High = 81
One water cut probe is installed. You want to use the measured water
cut values for all water cut ranges.
1. Set Water Cut Probe Mode to Auto.
2. Define the analog input for either the Low Water Monitor or the
High Water Monitor (as you prefer).
3. Set the applicable limit to cover the entire span, e.g.:
• If you are using a Low Water Monitor input, set Low to 100 (the
high limit is not applicable). Any value below 100% is now in
range.
• If you are using a High Water Monitor input, set High to 0 (the
low limit is not applicable). Any value above 0% is now in range.
Configuration and Use Manual 69
Page 76

Special Topics in Configuration
Example 3
Two water cut probes are installed. You want to use the low-end probe
for all water cut values below 20%, and the high-end probe for all water
cut values above 80%.
Configure the water cut parameters as follows:
• Water Monitors Limits: Low: 20
• Water Monitors Limits: High: 80
• Difference Limit: 5
• Water Cut Probe Mode: Auto
At the high end:
• When the density-based water cut value is less than or equal to
80%, NOC measurements are based on the density-based water
cut.
• When the density-based value is greater than 80%, the
density-based value is compared to the high-end probe value. If
the difference is greater than 5, the system will switch to using the
water cut value from the probe. The system will continue to use the
water cut value from the probe until the density-based value is
lower than 80% and the difference is less than 5.
At the low end:
• When the density-based water cut value is greater than or equal to
20%, NOC measurements are based on the density-based water
cut.
• When the density-based value is less than 20%, the density-based
value is compared to the low-end probe value. If the difference is
greater than 5, the system will switch to using the water cut value
from the probe. The system will continue to use the water cut value
from the probe until the density-based value is greater than 20%
and the difference is less than 5.
70 Micro Motion® Net Oil Computer Software and NOC System
Page 77

Chapter 7
Density Determination Routines
7.1 About this chapter
This chapter describes the procedures for performing density determination for oil and water.
7.2 About the density determination routines
To derive water cut from measured density values, the Net Oil Computer Software needs two
reference values for the well being tested:
• Live oil density at reference temperature
• Water density at reference temperature
Note: These values are not needed if water cut probes will be used for all water cut data.
The density determination routines provided with the Net Oil Computer Software allow you to obtain
these values directly from the NOC system in operation.
NOC Special Configuration Using the NOC SystemDensity Determination RoutinesNOC Configuration
The Density Determination panel in the NOC Meter window (see Figure 4-19) is used for density
determination. Fields in this panel are listed and defined in Table 4-15.
You cannot perform a density determination while a well test is running, or while the Net Oil
Computer Software is in Continuous mode.
7.3 Preparing for density determination
During the density determination for oil, you will need to:
• Pump live oil through a Micro Motion sensor paired with an NOC Meter (see Section 2.4.1),
ensuring that the oil contains as little water as possible
• Obtain a sample of the live oil
• Obtain laboratory values for the water cut and the water temperature of the sample
During the density determination for water, you will need to pump free water through a Micro Motion
sensor paired with an NOC Meter. If you do not have a sensor installed on a water leg, you can use the
instant density value of the process fluid to help determine what fluid is flowing through the sensor.
The first fluid flowing through the sensor is typically water from the water layer in the separator, and
you should see a stable density value. This process fluid can be used for the density determination of
water. As the fluid transitions from water to oil, the density value will fluctuate. When the density
value stabilizes again, the fluid flowing through the sensor is oil from the oil layer.
Configuration and Use Manual 71
Page 78

Density Determination Routines
7.4 Density determination for oil
To perform density determination for oil:
1. Open the NOC Station display and select the well whose oil density you are measuring. Click
Apply.
2. If Operation Mode is set to Continuous, change to Well Test (see Section and Section 4.2.1).
If a well test is in progress, stop the test (see Section 8.4.1).
3. Open the NOC Meter display and select the NOC Meter installed on the oil or liquid leg that
you want to use.
4. Select the Density Determination panel (see Section 4.4.8).
5. Set
Total Sample Time to the desired value and click Apply.
6. Set
DDR Command to Start Oil and click Apply.
7. While the test is running (
Sample Time Remaining > 0), collect a sample of the process fluid.
Use standard methods (centrifuge, distillation, Karl-Fischer, etc.) to determine:
• Water cut (percentage of water in the sample)
• Water cut temperature (temperature of the water in the sample)
8. When the test has finished (
Sample Time Remaining = 0), enter the Water Cut In Sample
and Sample Temperature values from the sample and click Apply.
DDR Command to Apply Water Cut and click Apply.
9. Set
10. The calculated oil density at reference temperature is displayed in the DDR Oil Density at Ref
field. You may need to click
11. If you want to save the calculated oil density, set
click
Apply. The Oil Density at Ref field will be updated with the calculated value. You can
Update to see it.
DDR Command to Save Oil Density and
verify this by checking the Configuration panel in the Well Data window.
At any time during the density determination procedure:
• You can set
DDR Command to Reset and click Apply. This will reset only the Total
Uncorrected Volume value shown on the Density Determination panel. This function is used to
allow you to refill the separator, if required, before performing the density determination.
• You can set
measurements, but does not reset any values. If desired, you can still enter the
Sample
DDR Command to End and click Apply. This will stop the density determination
Water Cut In
and Sample Temperature values from the sample, apply the water cut, and save the
calculated value to the NOC system.
7.5 Density determination for water
To perform density determination for water:
1. Open the NOC Station display and select the well whose water density you are measuring.
Click
Apply.
2. If Operation Mode is set to Continuous, change to Well Test (see Section and Section 4.2.1).
If a well test is in progress, stop the test (see Section 8.4.1).
3. Open the NOC Meter display and select the NOC Meter installed on the water leg, or on the
leg that you will pump water through.
4. Select the Density Determination panel (see Section 4.4.8).
5. Set
Test Time to the desired value and click Apply.
6. Set
Measurement Mode to Start Water and click Apply.
72 Micro Motion® Net Oil Computer Software and NOC System
Page 79

Density Determination Routines
7. When the test has finished (Sample Time Remaining = 0), the calculated water density at
reference temperature is displayed in the DDR Water Density at Ref field. You may need to
click
Update to see it.
8. If you want to save the calculated water density, set
and click
Apply. The Water Density at Ref field will be updated with the calculated value. You
can verify this by checking the Configuration panel in the Well Data window.
At any time during the density determination procedure:
• You can set
Uncorrected Volume value shown on the Density Determination panel. This function is used to
allow you to refill the separator, if required, before performing the density determination.
• You can set
measurements, but does not reset any values. If desired, you can still save the calculated value
to the NOC system.
DDR Command to Save Water Density
DDR Command to Reset and click Apply. This will reset only the Total
DDR Command to End and click Apply. This will stop the density determination
NOC Special Configuration Using the NOC SystemDensity Determination RoutinesNOC Configuration
Configuration and Use Manual 73
Page 80

74 Micro Motion® Net Oil Computer Software and NOC System
Page 81

Chapter 8
Using the NOC System
8.1 About this chapter
This chapter explains how to use the NOC system via the ROCLINK 800 user interface. The
following topics are discussed:
• Operation mode – see Section 8.2
• Using Continuous mode and viewing data – see Section 8.3
• Performing a well test and viewing well test data – see Section 8.4
• Viewing flow and status alarms – see Section 8.5
• Viewing gas data – see Section 8.6
• Using the Recalculation feature – see Section 8.7
NOC Special Configuration Using the NOC SystemDensity Determination RoutinesNOC Configuration
8.2 Operation mode
The NOC system can run in either Continuous mode or Well Test mode:
• In Continuous mode, the NOC system continuously monitors a well, separator, or pipeline. By
default, NOC measurement data is written to the history database:
-Every minute
- Every 15 minutes (for some values), or every 60 minutes (for other values)
- At the end of each contract period, as defined by the contract hour or a manual end of day
• In Well Test mode, the NOC system performs NOC measurement on a single well. It is the
user’s responsibility to ensure that output from the correct well is routed through the system
and that the appropriate purge time is configured. The well test is started and ended manually.
During the well test, measurement may be paused and restarted. When the test is ended, well
test data is automatically written to the history database.
8.2.1 Changing operation mode
Micro Motion recommends that you perform the initial configuration of the Net Oil Computer
Software for the operation mode that will be used, and thereafter change modes as little as possible.
However, you can safely change modes at certain points during operation, as described below.
From Continuous to Well Test
To change from Continuous mode to Well Test mode, Micro Motion recommends that you either wait
until the end of the current contract period or force an end of day (see Section 8.3.2).
History data for Continuous mode will be overwritten as well tests are performed. Before changing
modes, ensure that you have performed all desired recalculations and viewed or retrieved all desired
data.
Configuration and Use Manual 75
Page 82

Using the NOC System
From Well Test to Continuous
If you change from Well Test mode to Continuous mode:
• While a well test is in progress (either running or paused), the current well test is stopped and
current well test data is lost.
• When no well test is active, no well test data is lost.
Well test data will be overwritten as Continuous mode records are written. Before changing modes,
stop the well test if you need its data, then ensure that you have performed all desired recalculations
and viewed or retrieved all desired data.
8.2.2 Managing tags when changing modes
The Net Oil Computer Software uses one set of tags for both well names and contract periods. As a
result, you may see contract period dates when you expect to see well names, or vice versa. This
effect will appear:
• In the NOC Station General panel
• In the Recalculable Tests Recalc panel
• In all Well Data panels
If you want to reset the tags:
• From well names to contract periods, download the Well Data points from the startup
configuration file named NOCStartup_CONTINUOUS.800.
• From contract periods to well names, download the Well Data points from the startup
configuration file named NOCStartup_WELLTEST.800.
Note: Downloading other point types will overwrite existing configuration data.
8.3 Using Continuous mode
Continuous mode can measure only Well #01. Before using Continuous mode, ensure that Well #01 is
correctly configured for the well that will be measured (see Section 5.4).
8.3.1 Starting Continuous mode measurement
To start Continuous mode measurement:
1. Ensure that the desired stream is flowing through the system.
2. Start ROCLINK 800 and connect to the ROC809.
3. Open the NOC Station display.
4. In the General panel (see Figure 4-2):
a. Set
Operation Mode to Continuous and click Apply.
b. Reconfigure
Contract Hour if desired.
76 Micro Motion® Net Oil Computer Software and NOC System
Page 83

Using the NOC System
Continuous mode measurement will continue until Operation Mode is switched to Well Test. During
Continuous mode measurement:
• The Status field displays the current state of the process.
• Current data is shown in the NOC Station display, the NOC Meter display, and the
MMI Interface display (see Section 8.3.4).
• History data is recorded at the configured intervals.
• At the configured contract hour, values are totaled for a single day’s production, totals are
reset, and data is logged to the Daily History database.
If Continuous mode measurement is interrupted due to a power failure or power shutoff, the
NOC system resumes measurement as soon as power is restored. Visually inspect data for the affected
contract period. If appropriate, use Force End of Day (see Section 8.3.2) to start a new contract
period, and discard the data from the affected contract period.
8.3.2 Using Force End of Day
The Force End of Day checkbox located on the NOC Station General panel (see Figure 4-2) can be
used to perform contract hour actions manually. To do this:
NOC Special Configuration Using the NOC SystemDensity Determination RoutinesNOC Configuration NOC Special Configuration Using the NOC SystemDensity Determination RoutinesNOC Configuration NOC Special Configuration Using the NOC SystemDensity Determination RoutinesNOC Configuration NOC Special Configuration Using the NOC SystemDensity Determination RoutinesNOC Configuration
1. Check the
2. Click
Force End of Day checkbox.
Apply.
As a result:
• Current daily, hourly, and min/max values will be logged to the history database.
• All totals will be reset.
Note: Do not use the Force End of Day button on the History Segment Configuration window. This
button does not write NOC measurement data to history.
8.3.3 Changing parameters during Continuous mode measurement
If you change the well configuration values, measurement units, reference temperature, or time base
during a contract period, the changes are not applied to existing data. As a result, you will introduce
discontinuities into the data for that contract period. If you need to change any of these values:
1. Force an end of day (see Section 8.3.2).
2. Reconfigure as required.
3. Force a second end of day.
4. Discard measurement data for the contract period used for reconfiguration.
If you need to apply different reference values or measurement units to existing data, use the
Recalculation feature (see Section 8.7).
Configuration and Use Manual 77
Page 84

Using the NOC System
8.3.4 Viewing Continuous mode current data
While Operation Mode is set to Continuous, current data is available in several locations:
• The NOC Station display shows NOC measurement data summed or averaged across
NOC Meters:
- The Instant Values fields on the General panel (Figure 4-2)
- The Totalizers panel (Figure 4-4)
- The Averages panel (Figure 4-5)
• The NOC Meter display shows NOC measurement data for a single NOC Meter. See:
- The Instant Values panel (Figure 4-15)
- The Totalizers panel (Figure 4-16)
- The Averages panel (Figure 4-17)
• The Registers panel in the MMI Interface display shows data from a single Micro Motion
sensor, before NOC calculations have been performed. See Figure 4-9.
8.3.5 Viewing Continuous mode contract period data
While Operation Mode is set to Continuous, data is available for the following data collection periods:
• The 10 most recent contract periods, including the current period
• The current month (assuming that each contract period is a day)
• The previous month
• All history data since Continuous mode measurement was started, including any pauses, stops,
and starts.
Note: If you set Operation Mode to Well Test, all history data accumulated for Continuous mode is
overwritten.
For each data collection period, you can view:
• History for the NOC Station or history for a single NOC Meter
• The original data and recalculated data
To view history data:
1. Open the Well Data display and select the History panel.
2. Use the
• To view current data, select
Point Number dropdown list to specify the data collection period you want to view:
1 (today’s date).
• To view data for a previous day, select the point for that day. For example, for yesterday,
select
2 (yesterday’s date); for the day before yesterday, select 3, and so on.
• To view summary data for the current month, select
• To view summary data for the previous month, select
• To view summary data since Continuous mode measurement was started, select
37 (This Month).
38 (Previous Month).
39
(Forever).
3. Use the
4. Click
78 Micro Motion® Net Oil Computer Software and NOC System
Station Record to Retrieve dropdown list to specify the stream you want to view.
Apply.
Page 85

Using the NOC System
CumulativeTotalForTest
TestTime
------------------------ ----------------------------- -----------
24×
8.4 Performing a well test
To perform a well test:
1. Ensure that the desired stream is flowing through the NOC Station.
2. Start ROCLINK 800.
3. Connect to the ROC809.
4. Open the NOC Station display.
5. Ensure that
6. In the Well Selection panel (see Figure 4-6), select the well to be tested and click
7. In the General panel (see Figure 4-1), set
Operation Mode is set to Well Test.
Apply.
Running Mode to Start and click Apply.
The well test will continue until it is manually paused or ended, or Operation Mode is switched to
Continuous. During a well test:
• The Status field displays the current state of the well test.
• Current data is shown in the NOC Station display, the NOC Meter display, and the
MMI Interface display (see Section 8.4.3).
If a well test is interrupted due to a power failure or accidental power shutoff, the well test will
continue from the point of interruption when power is restored.
8.4.1 Pausing or stopping a well test
To pause a well test:
1. Open the NOC Station display.
2. On the General panel, set
Running Mode to Pause and click Apply.
The status is changed to Stopped, and totalizing stops for all streams (oil and water). Time
spent in this state is reported as Pause Time in the Totalizers panel.
3. To restart a well test, set
Running Mode to Start and click Apply.
Totalizing is resumed. If a well test is paused, the average daily flow rate over the test period is
calculated as follows:
NOC Special Configuration Using the NOC SystemDensity Determination RoutinesNOC Configuration NOC Special Configuration Using the NOC SystemDensity Determination RoutinesNOC Configuration NOC Special Configuration Using the NOC SystemDensity Determination RoutinesNOC Configuration NOC Special Configuration Using the NOC SystemDensity Determination RoutinesNOC Configuration
To stop a well test, with no restart possible:
1. Open the NOC Station display.
2. On the General panel, set
Running Mode to End Test, and click Apply.
Status is changed to Inactive. The completed well test is saved in history. To view well test
data, see Section 8.4.4.
Configuration and Use Manual 79
Page 86

Using the NOC System
8.4.2 Changing parameters during a well test
The Net Oil Computer Software does not allow you to change the measurement units, reference
temperature, or time base during a well test.
The Net Oil Computer Software does allow you to change the values configured for oil density at
reference temperature and water density at reference temperature. However, if you do so, you will
introduce discontinuities into the data. If you need to change any of these values:
1. Stop the well test.
2. Reconfigure as required.
3. Start a new well test.
4. Use the Recalculation feature (see Section 8.7) to convert the existing well test data to the new
reference values.
8.4.3 Viewing current well test data
During the well test, current data is available in several locations:
• The NOC Station display shows NOC measurement data summed or averaged across
NOC Meters:
- The Instant Values fields on the General panel (Figure 4-1)
- The Totalizers panel (Figure 4-4)
- The Averages panel (Figure 4-5)
• The NOC Meter display shows NOC measurement data for a single NOC Meter. See:
- The Instant Values panel (Figure 4-15)
- The Totalizers panel (Figure 4-16)
- The Averages panel (Figure 4-17)
• The Registers panel in the MMI Interface display shows data from a single Micro Motion
sensor, before NOC calculations have been performed. See Figure 4-9.
8.4.4 Viewing stored well tests
For each well, NOC system history stores data for the current well test and for the five previous well
tests. To view well test data from history:
1. Open the Well Data display and select the History panel.
2. Use the
3. Use the
and click
Point Number dropdown list to select the well you want to view.
History Record to Retrieve dropdown list to specify the well test you want to view
Apply.
For information on the displayed data, see Figure 4-21 and Table 4-17.
8.5 Viewing flow and status alarms
Flow alarms are detected by the NOC Meters. Flow alarms can be viewed on the Alarms panel of the
specific NOC Meter (see Figure 4-18), or on the NOC Station Alarms panel (see Figure 4-7), which
shows information for all NOC Meters.
Status alarms from the Micro Motion sensor are displayed on the MMI Interface Alarms panel (see
Figure 4-10).
80 Micro Motion® Net Oil Computer Software and NOC System
Page 87

Using the NOC System
8.6 Viewing gas data
If the NOC system includes a gas meter, gas data is available:
• On the NOC Station display:
- The current gas flow rate is displayed on the General panel (see Figure 4-1 or Figure 4-2).
- The total gas volume for the current period or well test is displayed on the Totalizers panel
(see Figure 4-4).
- The average gas flow rate is displayed on the Averages panel (see Figure 4-5).
• On the Well History panel (see Figure 4-21)
8.7 Using the Recalculation feature
The Recalculation feature allows you to recalculate NOC data for a well test or for a contract period.
For a discussion of the Recalculation feature, see Section 2.13.
8.7.1 For well tests
Recalculation of well test data is limited to the ten most recent well tests for which periodic records
are available.
Note the following:
• The recalculation is based on all periodic records written during the well test. If the well test
was paused for a significant amount of time, the results of the recalculation may not be valid.
• If the well test was run for more than 10 days, the recalculation may not be valid because
periodic records more than 10 days old will have been deleted.
To recalculate a well test:
1. Ensure that the NOC system is running in Well Test mode.
2. Open the NOC Recalc display.
3. Open the Recalculable Tests panel (see Figure 4-25). The tests available for recalculation are
displayed.
a. Click the radio button for the test you want to recalculate.
b. Click
4. The
Apply.
Original Reference Densities fields display the values used for oil density at reference
temperature and water density at reference temperature during the selected test. If you want to
change either of these values:
a. Enter the new value(s) in the
b. Click
Apply.
Recalculation Densities field(s).
NOC Special Configuration Using the NOC SystemDensity Determination RoutinesNOC Configuration NOC Special Configuration Using the NOC SystemDensity Determination RoutinesNOC Configuration NOC Special Configuration Using the NOC SystemDensity Determination RoutinesNOC Configuration NOC Special Configuration Using the NOC SystemDensity Determination RoutinesNOC Configuration
5. If you want to change any of the measurement units, the reference temperature, or the time
base:
a. Open the General panel (see Figure 4-22) and configure the parameter(s) as desired.
b. Click
Apply.
Note: The configured Reference Temperature must be appropriate to the Recalculation Densities
values on the Recalculable Tests panel.
Configuration and Use Manual 81
Page 88

Using the NOC System
6. When all desired changes have been made:
a. Select
b. Click
You might find it useful to run the recalculation from the Totalizers or Averages panel so that
you can click
recalculation to complete.
7. If you want to save the results of the recalculation:
Start from the Mode dropdown list at the bottom of the window.
Apply.
Update and watch the values change. You will need to wait a few seconds for the
a. Click the
b. Click
Save checkbox at the bottom of the window.
Apply.
The recalculated data will be written to history. To view the recalculated data side by side with
the original data, see Section 8.4.4.
8.7.2 For contract periods
Recalculation of contract period data is limited to the ten most recent contract periods for which
periodic records are available.
To recalculate a contract period:
1. Ensure that the NOC system is running in Continuous mode.
2. Open the NOC Recalc display.
3. Open the Recalculable Tests panel (see Figure 4-26). The contract periods available for
recalculation are displayed.
a. Click the radio button for the contract period you want to recalculate.
b. Click
4. The
Apply.
Original Reference Densities fields display the values used for oil density at reference
temperature and water density at reference temperature during the selected contract period. If
you want to change either of these values:
a. Enter the new value(s) in the
b. Click
Apply.
Recalculation Densities field(s).
5. If you want to change any of the measurement units, the reference temperature, or the time
base:
a. Open the General panel (see Figure 4-22) and configure the parameter(s) as desired.
b. Click
Apply.
Note: The configured Reference Temperature must be appropriate to the Recalculation Densities
values on the Recalculable Tests panel.
6. When all desired changes have been made:
a. Select
b. Click
Start from the Mode dropdown list at the bottom of the window.
Apply.
You might find it useful to run the recalculation from the Totalizers or Averages panel so that
you can click
Update and watch the values change. You will need to wait a few seconds for the
recalculation to complete.
82 Micro Motion® Net Oil Computer Software and NOC System
Page 89

Using the NOC System
7. If you want to save the results of the recalculation:
a. Click the
b. Click
The recalculated data will be written to history. To view the recalculated data side by side with
the original data, see Section 8.3.5.
Save checkbox at the bottom of the window.
Apply.
NOC Special Configuration Using the NOC SystemDensity Determination RoutinesNOC Configuration NOC Special Configuration Using the NOC SystemDensity Determination RoutinesNOC Configuration NOC Special Configuration Using the NOC SystemDensity Determination RoutinesNOC Configuration NOC Special Configuration Using the NOC SystemDensity Determination RoutinesNOC Configuration
Configuration and Use Manual 83
Page 90

84 Micro Motion® Net Oil Computer Software and NOC System
Page 91

Chapter 9
History and Modbus Interface
9.1 About this chapter
This chapter discusses:
• History on the ROC809 platform – see Section 9.2
• The Modbus interface on the ROC809 platform – see Section 9.3
9.2 History on the ROC809 platform
Although you can view NOC data through the history function, Micro Motion recommends using the
Net Oil Computer Software to view NOC data. The Net Oil Computer Software compiles and
presents NOC data in a more usable form (see Sections 8.3.4, 8.3.5, 8.4.3, and 8.4.4).
However, you may want to add history points to the default history configuration. Note the following:
• Three history segments have been predefined by the Net Oil Computer Software: General 00,
Segment 01, and Segment 02. Most of the General 00 segment and all of Segment 01 are used
for internal processing. Part of the General 00 segment and all of Segment 02 are available for
site use. See Table 9-1. Do not change any history that is reserved by the Net Oil Computer
Software. If you do, the NOC system will not function correctly.
Maintenance and Troubleshooting IndexUser-Defined PointsHistory and Modbus Interface
Tabl e 9-1 Predefined segments
Segment Point # Description
General 00 1–10 Available for site use
11–61 Reserved for use by Net Oil Computer Software
Segment 01 1–42 Reserved for use by Net Oil Computer Software
Segment 02 1–70 Available for site use
• If you add history points, you must use the history function to view these records. For
information on configuring and accessing history, see the manual entitled ROCLINK 800
Configuration Software: User Manual.
• Before configuring history, review the data provided by the Net Oil Computer Software to
determine whether or not you need additional history (see Sections 8.3.4, 8.3.5, 8.4.3, and
8.4.4).
Configuration and Use Manual 85
Page 92

History and Modbus Interface
9.3 Modbus interface on the ROC809 platform
For general information on the Modbus interface provided by the ROC809 platform, see the manual
entitled ROCLINK 800 Configuration Software: User Manual.
If you want to use the Modbus interface, note the following:
• Because NOC data is not stored in standard history, the Modbus History window is not used
for access to NOC data. The Modbus History window is used only to define the date, time, and
event/alarm log indexes. In most cases, the default values should be used.
• The NOCStartup.800 configuration file includes predefined Modbus register ranges that
provide access to most of the Net Oil Computer Software data, including process data, unit
data, and some configuration data. All of the predefined register ranges have been defined for
use by any comm port. You can modify the predefined register ranges if you wish:
NOC system operation will not be affected.
9.3.1 Predefined Modbus register ranges
The predefined Modbus register ranges are organized into Modbus register tables 1–15 as shown in
Table 9 -2 .
Tabl e 9-2 Predefined Modbus register ranges
NOC data Modbus register table See
NOC Station 1 Table 9-3
NOC Meter data
• NOC Meter 1 2 Table 9-4, Column 2
• NOC Meter 2 3 Table 9-4, Column 3
• NOC Meter 3 4 Table 9-4, Column 4
Recalculation data 5 Table 9-5
6Table9-6
MMI Interface data
• MMI Interface #1 7 Table 9-7, Column 2
• MMI Interface #2 8 Table 9-7, Column 3
• MMI Interface #3 9 Table 9-7, Column 4
• MMI Interface #4 10 Table 9-7, Column 5
Well configuration data 11 Table 9-8
Well test data
• Wells 1–15 12 Table 9-9, Column 2
• Wells 16–30 13 Table 9-9, Column 3
• Wells 31–45 14 Table 9-9, Column 4
• Wells 46–50 15 Table 9-9, Column 5
86 Micro Motion® Net Oil Computer Software and NOC System
Page 93

History and Modbus Interface
In these tables, the TLP values are provided in both text and numeric format, for convenience. Note
the following:
• In text format, numbering for the logicals (e.g., the NOC Meters) begins at 1; in numeric
format, numbering for the logicals begins at 0.
• One Modbus register can store:
- Any 16 bits (= 2 bytes = 1 word)
- One ASCII character
Therefore:
- One Modbus register is required for short integers and binary values.
- Two Modbus registers are required for floating-point values, long integers, and
doublewords.
Tabl e 9-3 Predefined Modbus register ranges – Modbus Register Table 1
Index Modbus addresses NOC TLPs and data Conversion
1 100–110
• 100
• 101
• 102
• 103
• 104
• 105
• 106
• 107
• 108
• 109
• 110
UDP67 1, MUNITS–RUNMD (67, 0, 1–11)
• Mass Units
• Gas Volume Units
• Liquid Volume Units
• Density Units
• Temperature Units
• Pressure Units
• Base Temperature
•Time Base
• Operation Mode
• Test Status
• Running Mode
2 111–111 UDP67 1, WELLIDX (67, 0, 14)
• Well Selected (Index)
3 1000–1009 UDP67 1, TAG–OPMODE (67, 0, 0)
• Point Tag ID (10-character string)
4 1010–1023
• 1010–1011
• 1012–1013
• 1014–1015
• 1016–1017
• 1018–1019
• 1020–1021
• 1022–1023
5 1024–1045
• 1024–1025
• 1026–1027
• 1028–1029
• 1030–1031
• 1032–1033
• 1034–1035
• 1036–1037
• 1038–1039
• 1040–1041
• 1042–1043
• 1044–1045
UDP67 1, TSTTIME– IWCUTA (67, 0, 15–21)
• Current Test Start Date/Time
• Station Instant Liquid Mass Flow Rate
• Station Instant Liquid Volume Flow Rate, Gross
• Station Instant Liquid Volume Flow Rate, Net
• Station Instant Water Cut Calculated
• Station Instant Water Cut Measured
• Station Instant Water Cut Applied
UDP67 1, PCOD–IRLGFLW (67, 0, 45–55)
• API Average Pressure Compensated Oil Density
• Total Purge Time
• Well Oil Density
• Well Water Density
• Instant Gas Flow Rate
• Instant Oil Density
• Instant Water Density
• Instant Emulsion Density
• Instant Temperature
• Instant Reverse Mass Flow
• Instant Reverse Liquid Gross Volume Flow
28 (to integer)
28 (to integer)
0 (none)
70 (to float)
70 (to float)
Maintenance and Troubleshooting IndexUser-Defined PointsHistory and Modbus Interface
Configuration and Use Manual 87
Page 94

History and Modbus Interface
Tabl e 9-3 Predefined Modbus register ranges – Modbus Register Table 1 continued
Index Modbus addresses NOC TLPs and data Conversion
6 1050–1075
• 1050–1052
• 1052–1053
• 1054–1055
• 1056–1057
• 1058–1059
• 1060–1061
• 1062–1063
• 1064–1065
• 1066–1067
• 1068–1069
• 1070–1071
• 1072–1073
• 1074–1075
7 1076–1083
• 1076–1077
• 1078–1079
• 1080–1081
• 1082–1083
8 1100–1119
• 1100–1101
• 1102–1103
• 1104–1105
• 1106–1107
• 1108–1109
• 1110–1111
• 1112–1113
• 1114–1115
• 1116–1117
• 1118–1119
9 1120–1125
• 1120–1121
• 1122–1123
• 1124–1125
UDP67 1, TOTTIME–TOTNL (67, 0, 22–34)
• Total Time
• Total Pause Time
• Total TBR Time
• Total TMR Time
• Total Gas
• Total Gross Oil Volume
• Total Gross Water Volume
• Total Gross Free Water Volume
• Total Gross Liquid Volume
• Total Net Oil Volume
• Total Net Water Volume
• Total Net Free Water Volume
• Total Net Liquid Volume
UDP67 1, TOTM–TOTRTM (67, 0, 56–59)
• Total Mass
• Total Reverse Mass
• Total Reverse Liquid Gross Volume
• Total Reverse Flow Time
UDP67 1, AVGAS–AVCUT (67, 0, 35–44)
•Average Gas
• Average Gross Oil Flow Rate
• Average Gross Water Flow Rate
• Average Gross Free Water Flow Rate
• Average Gross Liquid Flow Rate
• Average Net Oil Flow Rate
• Average Net Water Flow Rate
• Average Net Free Water Flow Rate
• Average Net Liquid Flow Rate
• Average Water Cut Applied
UDP67 1, ADVEN–AVMFLW (67, 0, 60–62)
• Average Density
• Average Temperature
• Average Mass Flow Rate
10 1130–1149 UDP67 1, WELLTAG (67, 0, 13)
• Well Selected (Tag) (20-character string)
70 (to float)
70 (to float)
70 (to float)
70 (to float)
0 (none)
Tabl e 9-4 Predefined Modbus register ranges – Modbus Register Tables 2–4
Modbus addresses
NOC Meter 1
Index
1 2000–2009 2200–2209 2400–2409 UDP68 x, TAG (68, y,0)
2 2011–2011 2211–2211 2411–2411 UDP68 x, MBDN (68, y,2)
3 2012–2021 2212–2221 2412–2421 UDP68 x, MBPORT (68, y,3)
4 2023–2023 2223–2223 2423–2423 UDP68 x, TBRACO (68, y,7)
5 2024–2025
88 Micro Motion® Net Oil Computer Software and NOC System
(Table 2)
• 2024
• 2025
NOC Meter 2
(Table 3)
2224–2225
• 2224
• 2225
NOC Meter 3
(Table 4)
2424–2425
• 2424
• 2425
NOC TLPs and data
(1)
• Point Tag ID (10-character string)
• Modbus Device Number
• COM Port Tag (10-character string)
• TBR Action Option
UDP68 x, WMMODE–ACFGC
(68, y, 31–32)
• Water Monitors Mode
• Auto Configure Command
Conversion
0 (none)
28 (to integer)
0 (none)
28 (to integer)
28 (to integer)
Page 95

History and Modbus Interface
Tabl e 9-4 Predefined Modbus register ranges – Modbus Register Tables 2–4 continued
Modbus addresses
NOC Meter 1
Index
6 2026–2028
(Table 2)
NOC Meter 2
(Table 3)
2226–2228
NOC Meter 3
(Table 4)
2426–2428
NOC TLPs and data
(1)
UDP68 x, ALMOPT–RBXCO
(68, y, 63–65)
• 2026
• 2027
• 2028
7 2029–2030
• 2226
• 2227
• 2228
2229–2230
• 2426
• 2427
• 2428
2429–2430
• Flow Rate Alarm Option
• SRBX on Set
• SRBX on Clear
UDP68 x, CALNC–ALMCODE
(68, y, 70–71)
• 2029
• 2030
• 2229
• 2230
• 2429
• 2430
• Coriolis No Communication Alarm
• Alarm Code
8 2031–2031 2231–2231 2431–2431 UDP68 x, DMSMD (68, y,74)
• Density Measurement Mode
9 2032–2033
2232–2233
2432–2433
UDP68 x, PVMODE–WMSEL
(68, y, 92–93)
• 2032
• 2033
10 2040–2061
• 2232
• 2233
2240–2261
• 2432
• 2433
2440–2461
• DDR Previous Mode
• Water Monitor Select
UDP68 x, CDGVAL–WMLDB
(68, y, 20–30)
• 2040–2041
• 2042–2043
• 2044–2045
• 2046–2047
• 2048–2049
• 2050–2051
• 2052–2053
• 2054–2055
• 2056–2057
• 2058–2059
• 2060–2061
• 2240–2241
• 2242–2243
• 2244–2245
• 2246–2247
• 2248–2249
• 2250–2251
• 2252–2253
• 2254–2255
• 2256–2257
• 2258–2259
• 2260–2261
• 2440–2441
• 2442–2443
• 2444–2445
• 2446–2447
• 2448–2449
• 2450–2451
• 2452–2453
• 2454–2455
• 2456–2457
• 2458–2459
• 2460–2461
• Coriolis Drive Gain Value
• Coriolis Mass Value
•Density Value
• Static Pressure Value
• Temperature Value
• Low Water Monitor Value
• High Water Monitor Value
• Low Mass Flow Cutoff
• Low Water Monitor Limit
• High Water Monitor Limit
• Water Monitors Limit Tolerance
Conversion
28 (to integer)
28 (to integer)
Maintenance and Troubleshooting IndexUser-Defined PointsHistory and Modbus Interface
28 (to integer)
28 (to integer)
70 (to float)
Configuration and Use Manual 89
Page 96

History and Modbus Interface
Tabl e 9-4 Predefined Modbus register ranges – Modbus Register Tables 2–4 continued
Modbus addresses
NOC Meter 1
Index
11 2062–2121
(Table 2)
• 2062–2063
• 2064–2065
• 2066–2067
• 2068–2069
• 2070–2071
• 2072–2073
• 2074–2075
• 2076–2077
• 2078–2079
• 2080–2081
• 2082–2083
• 2084–2085
• 2086–2087
• 2088–2089
• 2090–2091
• 2092–2093
• 2094–2095
• 2096–2097
• 2098–2099
• 2100–2101
• 2102–2103
• 2104–2105
• 2106–2107
• 2108–2109
• 2110–2111
• 2112–2113
• 2114–2115
• 2116–2117
• 2118–2119
• 2120–2121
NOC Meter 2
(Table 3)
2262–2321
• 2262–2263
• 2264–2265
• 2266–2267
• 2268–2269
• 2270–2271
• 2272–2273
• 2274–2275
• 2276–2277
• 2278–2279
• 2280–2281
• 2282–2283
• 2284–2285
• 2286–2287
• 2288–2289
• 2290–2291
• 2292–2293
• 2294–2295
• 2296–2297
• 2298–2299
• 2300–2301
• 2302–2303
• 2304–2305
• 2306–2307
• 2308–2309
• 2310–2311
• 2312–2313
• 2314–2315
• 2316–2317
• 2318–2319
• 2320–2321
NOC Meter 3
(Table 4)
2462–2521
• 2462–2463
• 2464–2465
• 2466–2467
• 2468–2469
• 2470–2471
• 2472–2473
• 2474–2475
• 2476–2477
• 2478–2479
• 2480–2481
• 2482–2483
• 2484–2485
• 2486–2487
• 2488–2489
• 2490–2491
• 2492–2493
• 2494–2495
• 2496–2497
• 2498–2499
• 2500–2501
• 2502–2503
• 2504–2505
• 2506–2507
• 2508–2509
• 2510–2511
• 2512–2513
• 2514–2515
• 2516–2517
• 2518–2519
• 2520–2521
NOC TLPs and data
(1)
UDP68 x, IMFW–AVWCA
(68, y, 33–62)
• Instant Mass Flow
• Instant Gross Oil Volume Flow
• Instant Gross Water Volume Flow
• Instant Gross Free Water Volume
Flow
• Instant Gross Liquid Volume Flow
• Instant Net Oil Vol Flow
• Instant Net Water Volume Flow
• Instant Net Free Water Volume
Flow
• Instant Net Liquid Volume Flow
• Instant Water Cut Calculated
• Instant Water Cut Measured
• Instant Water Cut Applied
• Total Time
• Total Gross Oil
• Total Gross Water
• Total Gross Free Water
• Total Gross Liquid
• Total Net Oil
• Total Net Water
• Total Net Free Water
• Total Net Liquid
• Average Gross Oil Volume Flow
• Average Gross Water Volume Flow
• Average Gross Free Water Volume
Flow
• Average Gross Liquid Volume Flow
• Average Net Oil Vol Flow
• Average Net Water Volume Flow
• Average Net Free Water Volume
Flow
• Average Net Liquid Volume Flow
• Average Water Cut Applied
Conversion
70 (to float)
90 Micro Motion® Net Oil Computer Software and NOC System
Page 97

History and Modbus Interface
Tabl e 9-4 Predefined Modbus register ranges – Modbus Register Tables 2–4 continued
Modbus addresses
NOC Meter 1
Index
12 2122–2129
(Table 2)
NOC Meter 2
(Table 3)
2322–2329
NOC Meter 3
(Table 4)
2522–2529
NOC TLPs and data
(1)
UDP68 x, LFWALM–CALVAL
(68, y, 66–69)
• 2122–2123
• 2124–2125
• 2126–2127
• 2128–2129
• 2322–2323
• 2324–2325
• 2326–2327
• 2328–2329
• 2522–2523
• 2524–2525
• 2526–2527
• 2528–2529
• Low Flow Rate Alarm Value
• High Flow Rate Alarm Value
• Flow Rate Alarm Deadband
• Coriolis Alarm Dword (two
registers)
13 2130–2163
2330–2363
2530–2563
UDP68 x, APCOD–WCTMP
(68, y, 75–91)
• 2130–2131
• 2330–2331
• 2530–2531
• API Pressure Compensated Oil
Density
• 2132–2133
• 2134–2135
• 2136–2137
• 2138–2139
• 2140–2141
• 2142–2143
• 2144–2145
• 2146–2147
• 2148–2149
• 2332–2333
• 2334–2335
• 2336–2337
• 2338–2339
• 2340–2341
• 2342–2343
• 2344–2345
• 2346–2347
• 2348–2349
• 2532–2533
• 2534–2535
• 2536–2537
• 2538–2539
• 2540–2541
• 2542–2543
• 2544–2545
• 2546–2547
• 2548–2549
• Instant Reverse Mass Flow
• Instant Reverse Gross Liquid Flow
• Total Reverse Time
• Total Mass
• Total Reverse Mass
• Total Reverse Gross Liquid
• Average Mass Flow
• Average Reverse Mass Flow
• Average Reverse Gross Liquid
Flow
• 2150–2151
• 2152–2153
• 2154–2155
• 2156–2157
• 2158–2159
• 2160–2161
• 2162–2163
• 2350–2351
• 2352–2353
• 2354–2355
• 2356–2357
• 2358–2359
• 2360–2361
• 2362–2363
• 2550–2551
• 2552–2553
• 2554–2555
• 2556–2557
• 2558–2559
• 2560–2561
• 2562–2563
• Average Density
• Average Temperature
• Net Oil Density DDR
• Net Water Density DDR
• DDR Test Time
• DDR Test Time Remaining
• DDR Water Cut Temperature
14 2164–2165 2364–2365 2564–2565 UDP68 x, DRVGL (68, y,5)
• TBR Drive Gain Setpoint
Conversion
70 (to float)
70 (to float)
Maintenance and Troubleshooting IndexUser-Defined PointsHistory and Modbus Interface
70 (to float)
(1) x represents the point number of the NOC Meter in TLP text format (1–3); y represents the point number of the NOC Meter in TLP
numeric format (0–2).
Tabl e 9-5 Predefined Modbus register ranges – Modbus Register Table 5
Index Modbus addresses NOC TLPs and data Conversion
1 1500–1509 UDP70 1, TAG (70, 0, 0)
• Point Tag ID (10-character string)
2 500–509
• 500
• 501
• 502
• 503
• 504
• 505
• 506
• 507
• 508
• 509
UDP70 1, MUNITS–TSTSTAT (70, 0, 1–10)
• Mass Units
• Gas Volume Units
• Liquid Volume Units
• Density Units
• Temperature Units
• Pressure Units
• Base Temperature Option
•Time Base
• Operation Mode
• Test Status
3 510–510 UDP70 1, WELLLIDX (70, 0, 12)
• Well Selected (Index)
0 (none)
28 (to integer)
28 (to integer)
Configuration and Use Manual 91
Page 98

History and Modbus Interface
Tabl e 9-5 Predefined Modbus register ranges – Modbus Register Table 5 continued
Index Modbus addresses NOC TLPs and data Conversion
4 511–514
• 511
• 512
• 513
• 514
5 515–515 UDP70 1, RCIDX (70, 0, 41)
6 516–525
• 516
• 517
• 518
• 519
• 520
• 521
• 522
• 523
• 524
• 525
7 1510–1555
• 1510–1511
• 1512–1513
• 1514–1515
• 1516–1517
• 1518–1519
• 1520–1521
• 1522–1523
• 1524–1525
• 1526–1527
• 1528–1529
• 1530–1531
• 1532–1533
• 1534–1535
• 1536–1537
• 1538–1539
• 1540–1541
• 1542–1543
• 1544–1545
• 1546–1547
• 1548–1549
• 1550–1551
• 1552–1553
• 1554–1555
8 1556–1563
• 1556–1557
• 1558–1559
• 1560–1561
• 1562–1563
10 1570–1579 UDP70 1, R1WTAG (70, 0, 46)
11 1580–1583
• 1580–1581
• 1582–1583
12 1590–1599 UDP70 1, R2WTAG (70, 0, 49)
UDP70 1, RECMD–RECSTAT (70, 0, 14–17)
• Recalc Mode
• Current Record (two registers)
• Recalc Save Mode
• Recalc Status
• Recalculated Test Index
UDP70 1, R01IDX–R10IDX (70, 0, 76–85)
• Index for Recalculable Test 1
• Index for Recalculable Test 2
• Index for Recalculable Test 3
• Index for Recalculable Test 4
• Index for Recalculable Test 5
• Index for Recalculable Test 6
• Index for Recalculable Test 7
• Index for Recalculable Test 8
• Index for Recalculable Test 9
• Index for Recalculable Test 10
UDP70 1, TOTIME–PCOD (70, 0, 18–40)
• Current Recalc Total Time
• Current Recalc TBR Time
• Current Recalc Pause Time
• Current Recalc Total Gas
• Current Recalc Total Gross Oil
• Current Recalc Total Gross Water
• Current Recalc Total Gross Free Water
• Current Recalc Total Gross Liquid
• Current Recalc Total Net Oil
• Current Recalc Total Net Water
• Current Recalc Total Net Free Water
• Current Recalc Total Net Liquid
• Current Recalc Average Gas Flow Rate
• Current Recalc Average Water Cut Applied
• Current Recalc Average Gross Oil
• Current Recalc Average Gross Water
• Current Recalc Average Gross Free Water
• Current Recalc Average Gross Liquid
• Current Recalc Average Net Oil
• Current Recalc Average Net Water
• Current Recalc Average Net Free Water
• Current Recalc Average Net Liquid
• API Pressure Compensated Oil Density
UDP70 1, DBODEN–RCWDEN (70, 0, 42–45)
• Database Oil Density
• Database Water Density
• Recalc Oil Density
• Recalc Water Density
• Recalculable Test 1 Well Tag (10-character string)
UDP70 1, R1STM–R2ETM (70, 0, 47–48)
• Recalculable Test 1 Start Time
• Recalculable Test 1 End Time
• Recalculable Test 2 Well Tag (10-character string)
28 (to integer)
28 (to integer)
28 (to integer)
70 (to float)
70 (to float)
0 (none)
70 (to float)
0 (none)
92 Micro Motion® Net Oil Computer Software and NOC System
Page 99

History and Modbus Interface
Tabl e 9-5 Predefined Modbus register ranges – Modbus Register Table 5 continued
Index Modbus addresses NOC TLPs and data Conversion
13 1600–1603
• 1600–1601
• 1602–1603
14 1610–1619 UDP70 1, R3WTAG (70, 0, 52)
15 1620–1623
• 1620–1621
• 1622–1623
UDP70 1, R2STM–R2ETM (70, 0, 50–51)
• Recalculable Test 2 Start Time
• Recalculable Test 2 End Time
• Recalculable Test 3 Well Tag (10-character string)
UDP70 1, R3STM–R3ETM (70, 0, 53–54)
• Recalculable Test 3 Start Time
• Recalculable Test 3 End Time
70 (to float)
0 (none)
70 (to float)
Tabl e 9-6 Predefined Modbus register ranges – Modbus Register Table 6
Index Modbus addresses NOC TLPs and data Conversion
1 1630–1639 UDP70 1, R4WTAG (70, 0, 55)
• Recalculable Test 4 Well Tag (10-character string)
2 1640–1643
• 1640–1641
• 1642–1643
UDP70 1, R4STM–R4ETM (70, 0, 56–57)
• Recalculable Test 4 Start Time
• Recalculable Test 4 End Time
3 1650–1659 UDP70 1, R5WTAG (70, 0, 58)
• Recalculable Test 5 Well Tag (10-character string)
4 1660–1663
• 1660–1661
• 1662–1663
UDP70 1, R5STM–R5ETM (70, 0, 59–60)
• Recalculable Test 5 Start Time
• Recalculable Test 5 End Time
5 1670–1679 UDP70 1, R6WTAG (70, 0, 61)
• Recalculable Test 6 Well Tag (10-character string)
6 1680–1683
• 1680–1681
• 1682–1683
UDP70 1, R6STM–R6ETM (70, 0, 62–63)
• Recalculable Test 6 Start Time
• Recalculable Test 6 End Time
7 1690–1699 UDP70 1, R7WTAG (70, 0, 64)
• Recalculable Test 7 Well Tag (10-character string)
8 1700–1703
• 1700–1701
• 1702–1703
UDP70 1, R7STM–R7ETM (70, 0, 65–66)
• Recalculable Test 7 Start Time
• Recalculable Test 7 End Time
9 1710–1719 UDP70 1, R8WTAG (70, 0, 67)
• Recalculable Test 8 Well Tag (10-character string)
10 1720–1723
• 1720–1721
• 1722–1723
UDP70 1, R8STM–R8ETM (70, 0, 68–69)
• Recalculable Test 8 Start Time
• Recalculable Test 8 End Time
11 1730–1739 UDP70 1, R9WTAG (70, 0, 70)
• Recalculable Test 9 Well Tag (10-character string)
12 1740–1743
• 1740–1741
• 1742–1743
UDP70 1, R9STM–R9ETM (70, 0, 71–72)
• Recalculable Test 9 Start Time
• Recalculable Test 9 End Time
13 1750–1759 UDP70 1, R10WTAG (70, 0, 73)
• Recalculable Test 10 Well Tag (10-character string)
14 1760–1763
• 1760–1761
• 1762–1763
UDP70 1, R10STM–R10ETM (70, 0, 74–75)
• Recalculable Test 10 Start Time
• Recalculable Test 10 End Time
0 (none)
70 (to float)
0 (none)
70 (to float)
0 (none)
70 (to float)
0 (none)
70 (to float)
0 (none)
70 (to float)
0 (none)
70 (to float)
0 (none)
70 (to float)
Maintenance and Troubleshooting IndexUser-Defined PointsHistory and Modbus Interface
Configuration and Use Manual 93
Page 100

History and Modbus Interface
Tabl e 9-7 Predefined Modbus register ranges – Modbus Register Tables 7–10
Modbus addresses
Index
NOC TLPs and data
1 3000–3009 3200–3209 3400–3409 3600–3609 UDP71 x, TAG–R245 (71, y, 0)
• Point Tag ID (10-character string)
2 3010–3011
3210–3211
3410–3411
3610–3611
UDP71 x, DPRSCO–MPRSCO
(71, y, 1–2)
• 3010
• 3210
• 3310
• 3410
• Density Press Compensation
Option
• 3011
3 3012–3014
• 3211
3212–3214
• 3311
3412–3414
• 3411
3612–3614
• Mass Press Compensation Option
UDP71 x, MADDR–COMST
(71, y, 6–8)
• 3012
• 3013
• 3014
4 3015–3016
• 3212
• 3213
• 3214
3215–3216
• 3412
• 3413
• 3414
3415–3416
• 3612
• 3613
• 3614
3615–3616
• Device Modbus Address
• Scanning Mode
• Communications Status
UDP71 x, ALSH1–ALSH2
(71, y, 33–34)
• 3015
• 3016
5 3020–3023
• 3215
• 3216
3220–3223
• 3415
• 3416
3420–3423
• 3615
• 3616
3620–3623
• Coriolis Alarm MS Word
• Coriolis Alarm LS Word
UDP71 x, DPRSCC–MPRSCC
(71, y, 3–4)
• 3020–3021
• 3022–3023
6 3024–3071
• 3024–3025
• 3026–3027
• 3028–3029
• 3030–3031
• 3032–3033
• 3034–3035
• 3036–3037
• 3038–3039
• 3040–3041
• 3042–3043
• 3044–3045
• 3046–3047
• 3220–3221
• 3222–3223
3224–3271
• 3224–3225
• 3226–3227
• 3228–3229
• 3230–3231
• 3232–3233
• 3234–3235
• 3236–3237
• 3238–3239
• 3240–3241
• 3242–3243
• 3244–3245
• 3246–3247
• 3420–3421
• 3422–3423
3424–3471
• 3424–3425
• 3426–3427
• 3428–3429
• 3430–3431
• 3432–3433
• 3434–3435
• 3436–3437
• 3438–3439
• 3440–3441
• 3442–3443
• 3444–3445
• 3446–3447
• 3620–3621
• 3622–3623
3624–3671
• 3624–3625
• 3626–3627
• 3628–3629
• 3630–3631
• 3632–3633
• 3634–3635
• 3636–3637
• 3638–3639
• 3640–3641
• 3642–3643
• 3644–3645
• 3646–3647
• Density Press Compensation Coeff
• Mass Press Compensation Coeff
UDP71 x, R245–R291 (71, y, 9–32)
• Alarms Reg 245
• Mass Flowrate Reg 247
• Density Reg 249
• Temperature Reg 251
• Vol Flowrate Reg 253
• Viscosity Unused Reg 255
• Internal Derived Pressure Reg 257
• Mass Total Reg 259
• Vol Total Reg 261
• Mass Inventory Reg 263
• Vol Inventory Reg 265
• Press Correction Factor Flow Reg
267
• 3048–3049
• 3248–3249
• 3448–3449
• 3648–3649
• Press Correction Factor Density
Reg 269
• 3050–3051
• 3052–3053
• 3054–3055
• 3056–3057
• 3250–3251
• 3252–3253
• 3254–3255
• 3256–3257
• 3450–3451
• 3452–3453
• 3454–3455
• 3456–3457
• 3650–3651
• 3652–3653
• 3654–3655
• 3656–3657
• Flow Calibration Press Reg 271
• Press Input at 4 mA Reg 273
• Press Input at 20 mA Reg 275
• Density Value for FD Calibration
Reg 277
• 3058–3059
• 3060–3061
• 3062–3063
• 3064–3065
• 3066–3067
• 3068–3069
• 3070–3071
• 3258–3259
• 3260–3261
• 3262–3263
• 3264–3265
• 3266–3267
• 3268–3269
• 3270–3271
• 3458–3459
• 3460–3461
• 3462–3463
• 3464–3465
• 3466–3467
• 3468–3469
• 3470–3471
• 3658–3659
• 3660–3661
• 3662–3663
• 3664–3665
• 3666–3667
• 3668–3669
• 3670–3671
• Mass Rate Factor Reg 279
• Volume Rate Factor Reg 281
• Density Factor Reg 283
• Raw Tube Frequency Reg 285
• Left PickOff Voltage Reg 287
• Right PickOff Voltage Reg 289
• Coriolis Drive Gain Reg 291
(1)
ConversionMMI #1 MMI #2 MMI #3 MMI #4
0 (none)
28 (to integer)
28 (to integer)
0 (none)
70 (to float)
70 (to float)
94 Micro Motion® Net Oil Computer Software and NOC System
 Loading...