

Page 1
Installation Manual
MMI-20031632, Rev AA
August 2016
Micro Motion® 2-Wire Time Period Signal (TPS)
Compact Density Meter (CDM)
2-Wire TPS CDM Installation Supplement
Page 2

Safety and approval information
This Micro Motion product complies with all applicable European directives when properly installed in accordance with the
instructions in this manual. Refer to the EC declaration of conformity for directives that apply to this product. The EC declaration of
conformity, with all applicable European directives, and the complete ATEX Installation Drawings and Instructions are available on
the internet at www.micromotion.com or through your local Micro Motion support center.
For information about the Pressure Equipment Directive, go to www.micromotion.com/documentation.
For hazardous installations in Europe, refer to standard EN 60079-14 if national standards do not apply.
Other information
Full product specifications can be found in the product data sheet. Troubleshooting information can be found in the transmitter
configuration manual. Product data sheets and manuals are available from the Micro Motion web site at
www.micromotion.com/documentation.
Return policy
Follow Micro Motion procedures when returning equipment. These procedures ensure legal compliance with government
transportation agencies and help provide a safe working environment for Micro Motion employees. Micro Motion will not accept
your returned equipment if you fail to follow Micro Motion procedures.
Return procedures and forms are available on our web support site at www.micromotion.com, or by phoning the Micro Motion
Customer Service department.
Emerson Flow customer service
Email:
• Worldwide: flow.support@emerson.com
• Asia-Pacific: APflow.support@emerson.com
Telephone:
North and South America Europe and Middle East Asia Pacific
United States 800-522-6277 U.K. 0870 240 1978 Australia 800 158 727
Canada +1 303-527-5200 The Netherlands +31 (0) 704 136 666 New Zealand 099 128 804
Mexico +41 (0) 41 7686 111 France 0800 917 901 India 800 440 1468
Argentina +54 11 4837 7000 Germany 0800 182 5347 Pakistan 888 550 2682
Brazil +55 15 3413 8000 Italy 8008 77334 China +86 21 2892 9000
Venezuela +58 26 1731 3446 Central & Eastern +41 (0) 41 7686 111 Japan +81 3 5769 6803
Russia/CIS +7 495 981 9811 South Korea +82 2 3438 4600
Egypt 0800 000 0015 Singapore +65 6 777 8211
Oman 800 70101 Thailand 001 800 441 6426
Qatar 431 0044 Malaysia 800 814 008
Kuwait 663 299 01
South Africa 800 991 390
Saudi Arabia 800 844 9564
UAE 800 0444 0684
Page 3

Contents
Contents
Chapter 1 Planning ........................................................................................................................ 1
1.1 2-wire installations .......................................................................................................................1
1.2 Installation checklist .................................................................................................................... 1
1.3 Best practices .............................................................................................................................. 2
1.4 Pressure drop in the meter ...........................................................................................................3
1.5 Recommended flow rates ............................................................................................................4
1.6 Power requirements .................................................................................................................... 5
1.7 Perform a pre-installation meter check ........................................................................................ 7
Chapter 2 Mounting .......................................................................................................................9
2.1 Mount the meter ......................................................................................................................... 9
2.2 Rotate the electronics on the meter (optional) .......................................................................... 10
Chapter 3 Wiring ......................................................................................................................... 12
3.1 Terminals and wiring requirements ............................................................................................12
3.2 Hazardous area output wiring ....................................................................................................13
3.3 Wire to galvanic isolators ...........................................................................................................19
Chapter 4 Grounding ....................................................................................................................21
Chapter 5 Verifying ...................................................................................................................... 22
Appendices and reference
Appendix A Sample calibration certificate .......................................................................................23
Installation Manual i
Page 4

Contents
ii Micro Motion Compact Density Meter
Page 5

1 Planning
Topics covered in this chapter:
2-wire installations
•
Installation checklist
•
Best practices
•
Pressure drop in the meter
•
Recommended flow rates
•
Power requirements
•
Perform a pre-installation meter check
•
1.1 2-wire installations
The 2-wire Time Period Signal (TPS) is a configuration option available on the Compact
Density Meter (CDM).
Planning
1.2
This option provides:
• A TPS output superimposed on the same pair of wires used to power the meter
• An optional 4-wire connection to the internal RTD
Restriction
The 2-wire TPS device does not support:
• Internal calculations of density
• Internal calculations of process variables, such as velocity indication, case temperature
measurement, or integral health diagnostics
• The display option available on the CDM
For more information on the availability of these features and functionality, refer to the full CDM
installation and configuration manuals.
Installation checklist
□
Make sure that the hazardous area specified on the approval tag is suitable for the
environment in which the meter will be installed.
□
Verify that the local ambient and process temperatures are within meter limits.
□
For optimal performance, install the meter in the preferred orientation.
The meter will work in any orientation as long as the vibrating tubes remain full of
the process fluid. However, you should validate the meter performance prior to
operation if you have installed it in a non-preferred orientation.
Installation Manual 1
Page 6

Planning
Preferred meter orientation — vertical, flowing upTable 1-1:
Liquids and slurries
□
Confirm the CDM output wiring requirements.
Tip
Micro Motion provides safety barriers for wiring the CDM in a hazardous environment. For the 2-wire
TPS CDM electronics, the spare part model codes BARRIER7787+ and BARRIER7764+ provide the
barriers needed for an intrinsically-safe installation. For ordering information, contact
flow.support@emerson.com.
1.3 Best practices
The following information can help you get the most from your meter.
• Handle the meter with care. Follow local practices for lifting or moving the meter.
• Install the meter in the preferred orientation in a vertical pipeline with liquids and
slurries flowing upward.
Important
If you do not install the meter in the preferred orientation, you may need to apply a field
offset to ensure optimal performance. Refer to your organizational standards for sampling
and reference measurement to determine what the offset may be.
• Do not apply a compression force greater than 200 lbs (90.7 kg) when installing the
meter.
• Thermally insulate the meter and the inlet and bypass-loop pipeline to maintain
stable temperatures.
• There are no pipe run requirements for Micro Motion meters. Straight runs of pipe
upstream or downstream are unnecessary.
• Keep the meter tubes full of process fluid.
• For halting flow through the meter with a single valve, install the valve downstream
from the meter.
• Minimize bending and torsional stress on the meter.
Important
Do not use the meter to align misaligned piping as this can invalidate the meter calibration.
2 Micro Motion Compact Density Meter
Page 7
• The meter does not require external supports. The flanges will support the meter in
any orientation.
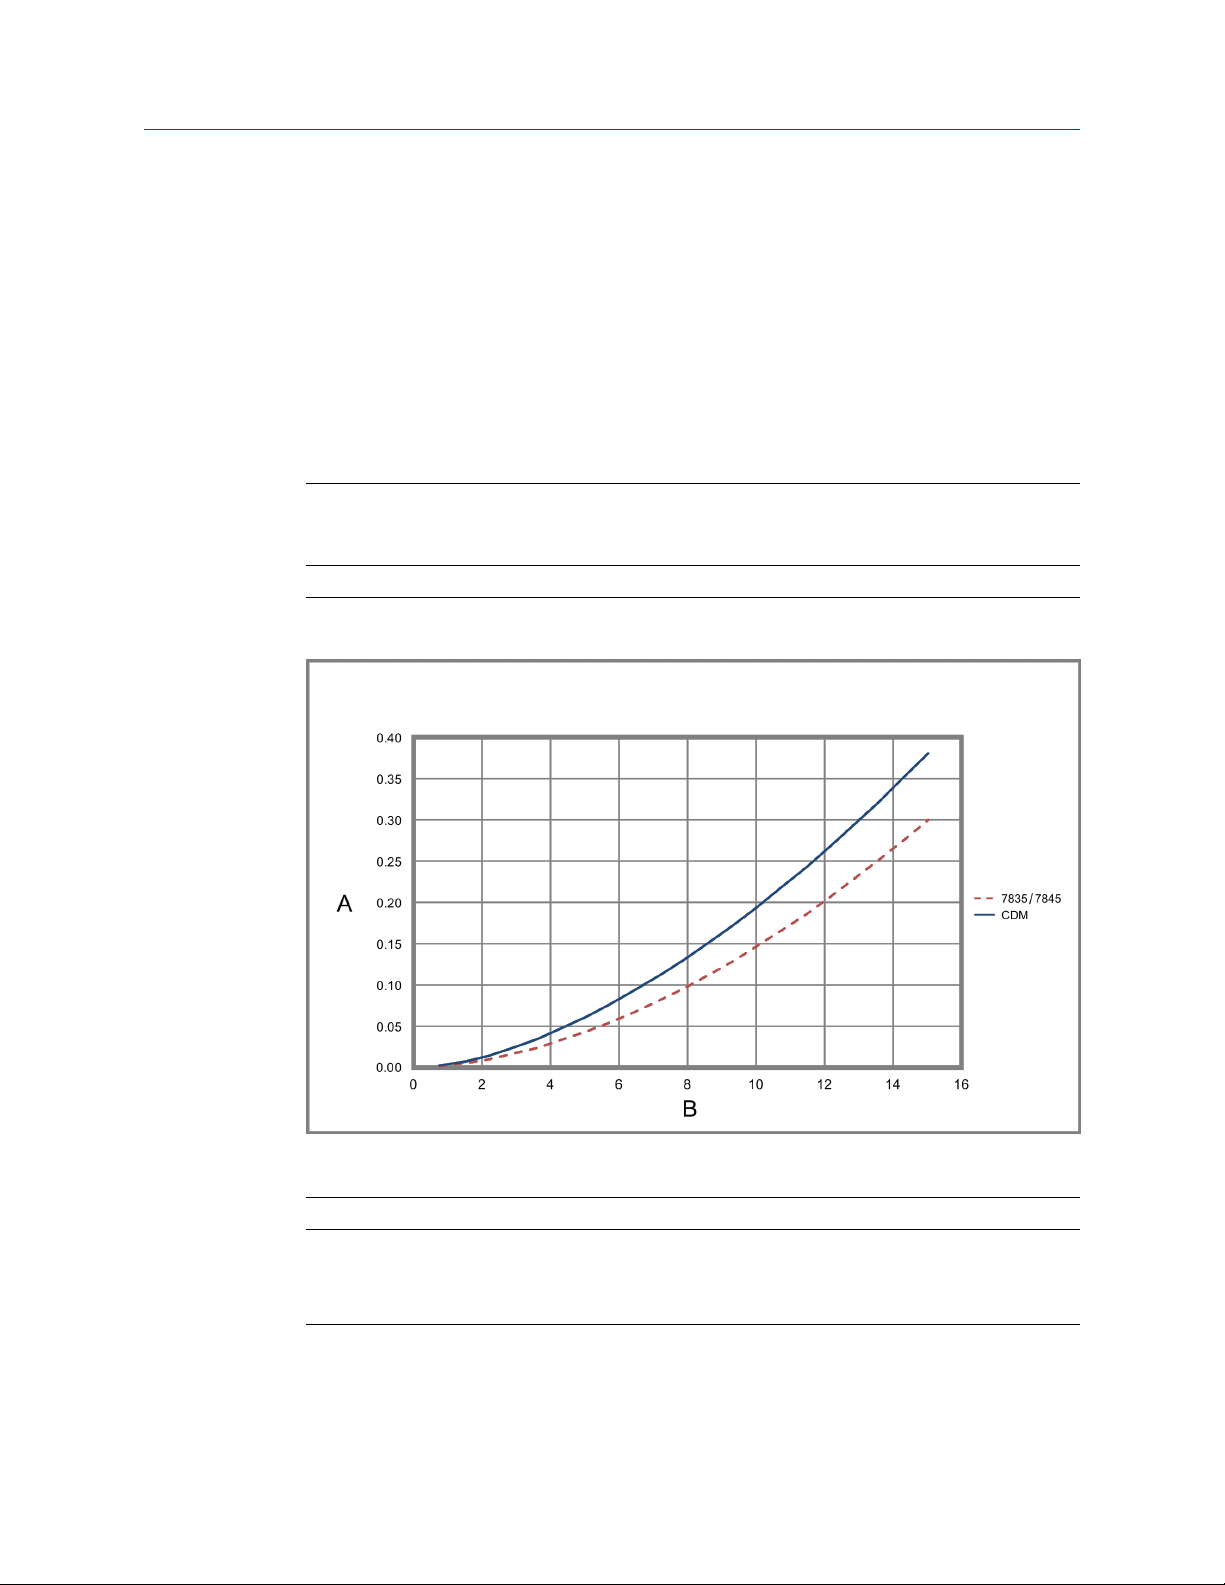
1.4 Pressure drop in the meter
The pressure drop in the meter depends on the process conditions. The following figures
illustrate the pressure drop for the meter at varying fluid density and viscosity. In addition,
these charts show how the meter compares to the Micro Motion 7835/7845 liquid density
meters.
Important
For the most accurate pressure drop calculations using your process variables, use the Micro Motion
product selector available at www.micromotion.com.
Sample pressure drop calculations (fluid viscosity equals 2 cP)Figure 1-1:
Planning
A. Pressure drop (bar)
B. Flow rate (m3/hr)
Note
• Density = 800 kg/m
• Viscosity = 2 cP
3
Installation Manual 3
Page 8
Planning
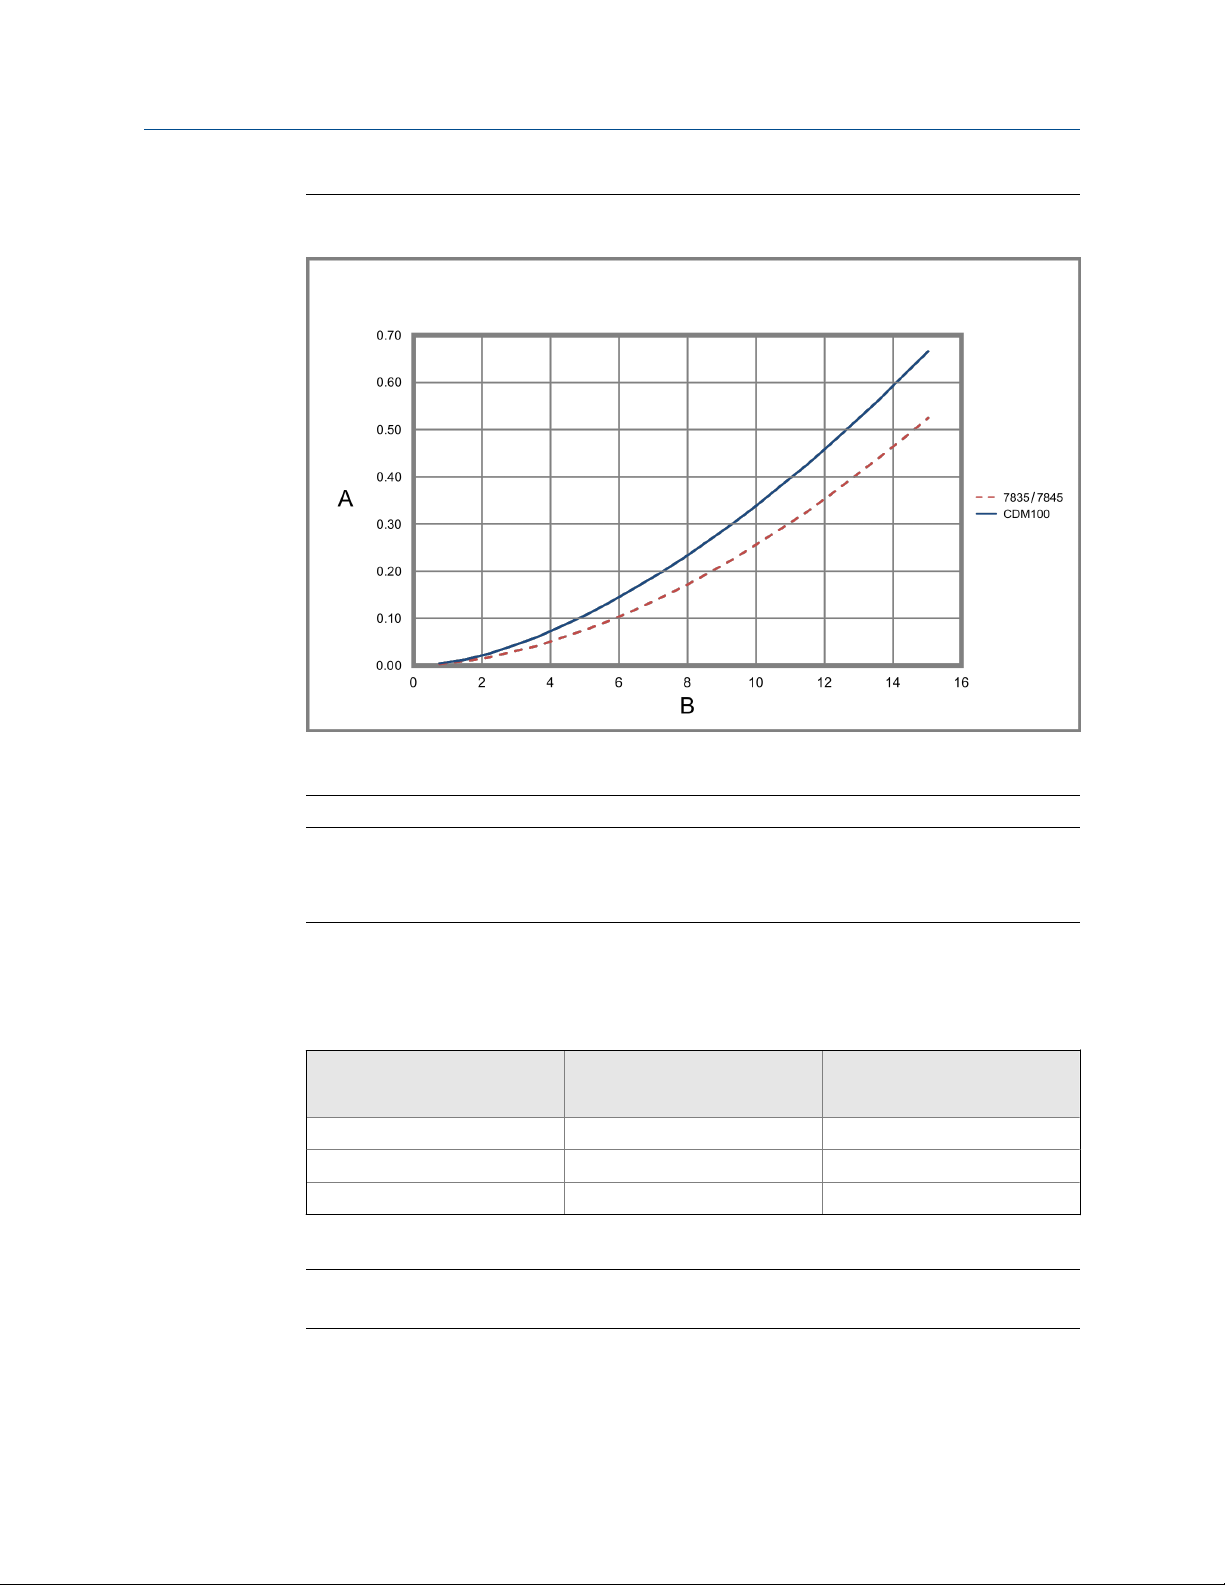
Sample pressure drop calculations (fluid viscosity equals 10 cP)Figure 1-2:
1.5
A. Pressure drop (bar)
B. Flow rate (m3/hr)
Note
• Density = 800 kg/m
• Viscosity = 10 cP
3
Recommended flow rates
Typical flow
recommendations Flow rate Velocity
Minimum 3 gpm (700 L/hr) 1.5 ft/sec (0.5 m/sec)
Normal 11 gpm (2,500 L/hr) 5 ft/sec (1.5 m/sec)
Maximum 75 gpm (17,000 L/hr) 30 ft/sec (9 m/sec)
Note
For fluids that contain abrasive particles, velocity should be below 10 ft/s (3 m/s).
4 Micro Motion Compact Density Meter
Page 9
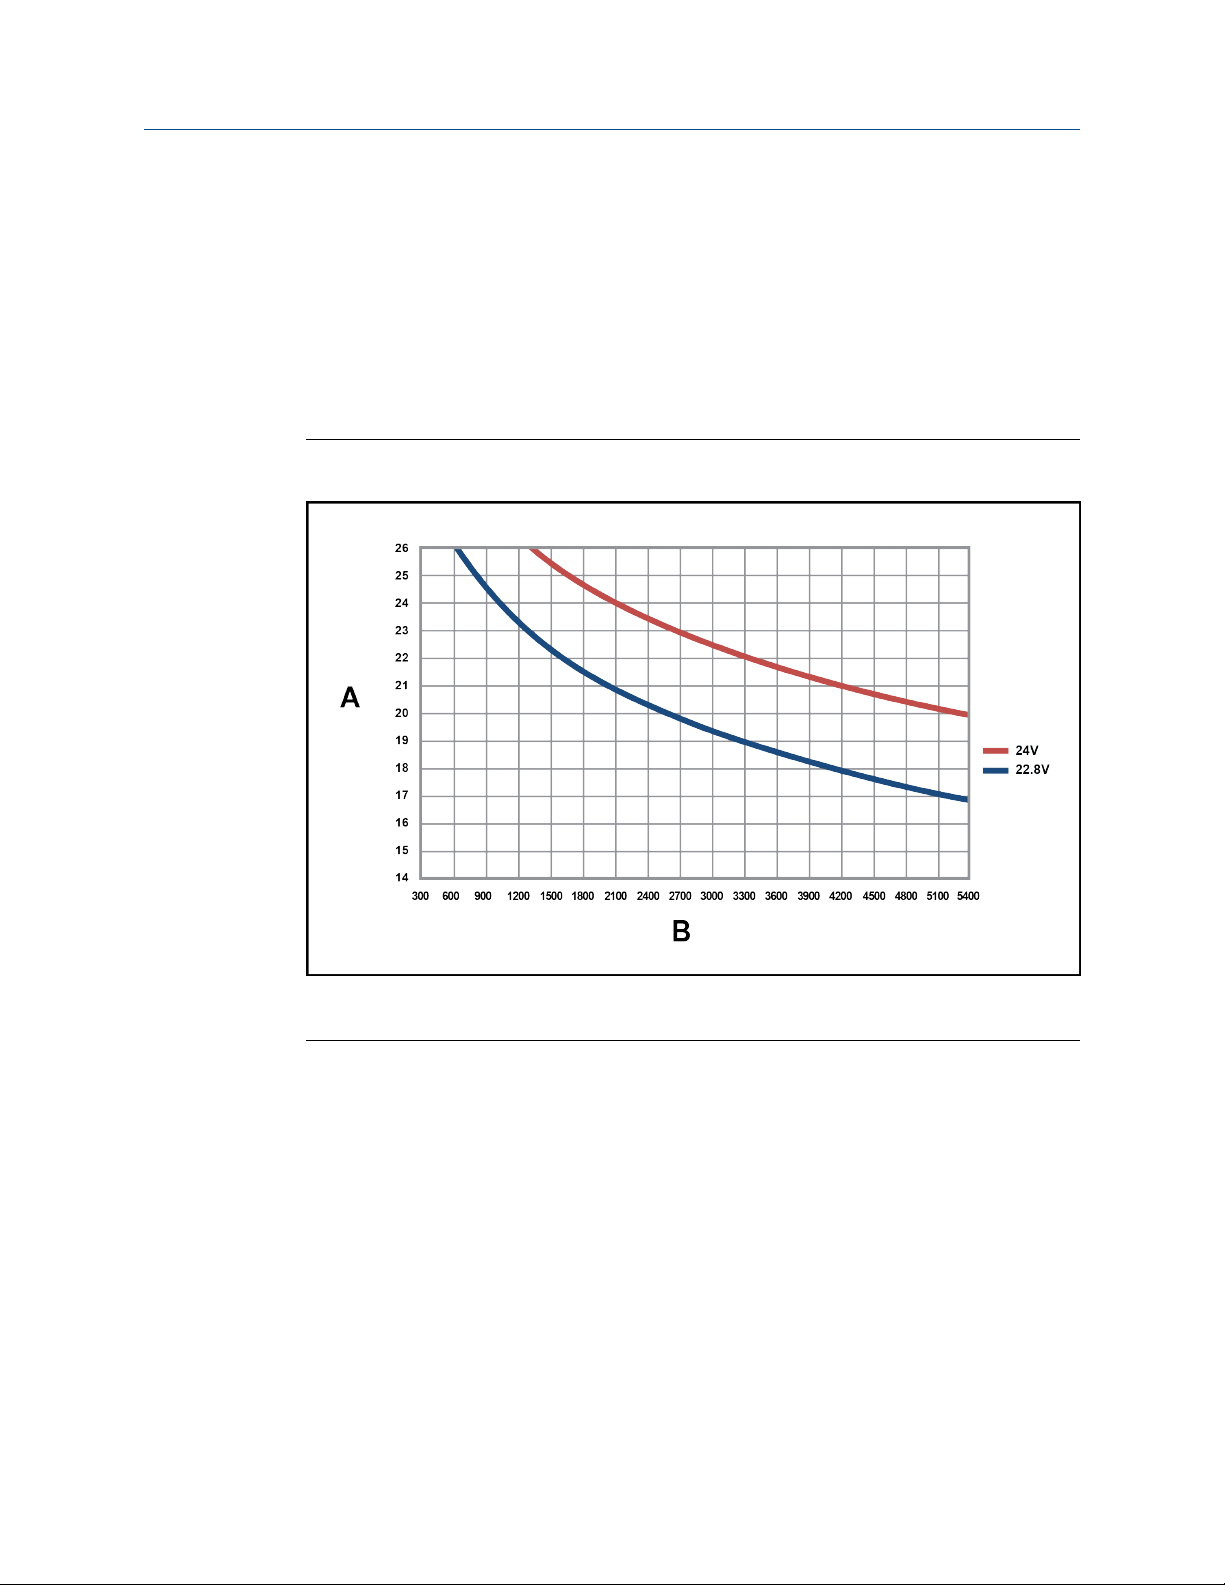
1.6 Power requirements
The following DC power requirements are needed to operate the meter:
• 24 VDC, 0.25 W typical with 300 Ω barrier, 0.3 W maximum with 300 Ω barrier
• Minimum recommended voltage: 22.8 VDC with 1000 ft of 22 AWG (300 m of 0.25
mm2) power-supply cable with 300 Ω barrier
Power cable recommendations for intrinsically-safe meters
Minimum wire gauge with 300 Ω barrierFigure 1-3:
Planning
A. AWG
B. Distance of installation in feet
Installation Manual 5
Page 10

Planning
Minimum wire area with 300 Ω barrierFigure 1-4:
A. Minimum wire area (mm2)
B. Distance of installation in meters
6 Micro Motion Compact Density Meter
Page 11

Planning
Limits of series resistance versus supply voltageFigure 1-5:
1.7
A. Series resistance (Ω)
B. Supply voltage (V)
C. 300 Ω barrier resistance
D. Normal operating point
E. Maximum resistance for correct operation
F. Minimum resistance for 5 volt TPS
G. The 2-wire CDM fully operates anywhere in the shaded area
Perform a pre-installation meter check
Micro Motion recommends that you check the meter prior to installation. This check
confirms that the meter was not damaged during shipment.
1. Remove the meter from the box.
CAUTION!
Handle the meter with care. Follow all corporate, local, and national safety regulations
for lifting and moving the meter.
2. Visually inspect the meter for any physical damage.
If you notice any physical damage to the meter, immediately contact Micro Motion
Customer Support at flow.support@emerson.com.
3. Connect and power up the meter.
To access the PWR terminals, remove the back transmitter housing cover.
4. Verify that the meter is empty, clean, and dry.
Installation Manual 7
Page 12

Planning
5. Allow the Time Period Signal (TPS) to stabilize to +/- 100ns before recording the
value.
6. Once stabilized, measure the TPS output and temperature of the meter from the
internal RTD.
7. Verify that the measured TPS value matches the Verification Time Period (on Air) @
20C (68F) value shown on the calibration certificate to within the limits in the
following table.
Air check limit at 68 °F
Meter type
CDM100M +/- 2 µs -570 (ns/°C) * (T-20 °C)
CDM100P +/- 2 µs -445 (ns/°C) * (T- 20 °C)
(20 °C) Added temperature effect
8 Micro Motion Compact Density Meter
Page 13

2 Mounting
Topics covered in this chapter:
Mount the meter
•
Rotate the electronics on the meter (optional)
•
2.1 Mount the meter
Use your common practices to minimize torque and bending load on process connections.
Tip
To reduce the risk of condensation or excessive moisture, the transmitter conduit opening should
not point upward (if possible). The conduit opening of the transmitter can be rotated freely to
facilitate wiring.
Mounting
CAUTION!
Do not lift the meter by the electronics. Lifting the meter by the electronics can damage the
device.
Installation Manual 9
Page 14

Mounting
Mounting the sensorFigure 2-1:
Notes
• Do not use the meter to support the piping.
• The meter does not require external supports. The flanges will support the meter in any orientation.
• All pipework joints and couplings must be airtight to minimize the presence of gas bubbles in the
fluid.
2.2
10 Micro Motion Compact Density Meter
Rotate the electronics on the meter (optional)
You can rotate the transmitter on the meter up to 90°.
1. Using a 4 mm hex key, loosen the cap screw that holds the transmitter in place.
Page 15

Component to secure transmitter in placeFigure 2-2:
A
A. M5 socket-head cap screw
2. Rotate the transmitter clockwise to the desired orientation up to 90°.
3. Secure the cap screw in place and tighten to 60 lb·in (6.8 N·m).
Mounting
Installation Manual 11
Page 16

Wiring
3 Wiring
Topics covered in this chapter:
Terminals and wiring requirements
•
Hazardous area output wiring
•
Wire to galvanic isolators
•
3.1 Terminals and wiring requirements
Three pairs of wiring terminals are available for transmitter outputs. One terminal is
designated for the 24 VDC Power and Time Period Signal (TPS). The other two terminals
are for the internal RTD connection.
The screw connectors for each output terminal accept a maximum wire size of 14 AWG
(2.5 mm2).
Important
Output wiring requirements depend on whether the meter will be installed in a safe area or a
hazardous area. It is your responsibility to verify that this installation meets all corporate, local, and
national safety requirements and electrical codes.
12 Micro Motion Compact Density Meter
Page 17

Wiring
Output wiring terminalsFigure 3-1:
3.2
A. RTD connector block
B. Chassis ground (external)
C. Chassis ground (internal)
D. Power/TPS connector block
Hazardous area output wiring
Micro Motion provides safety barrier installation kits for wiring the meter in a hazardous
environment. These kits provide the appropriate barriers depending on the outputs
available and approvals required.
Information provided about wiring the safety barriers is intended as an overview. You
should wire the meter according to the standards that are applicable at your site.
Installation Manual 13
Page 18

Wiring
CAUTION!
• Meter installation and wiring should be performed by suitably trained personnel only in
accordance with the applicable code of practice.
• Refer to the hazardous area approvals documentation shipped with your meter. Safety
instructions are available on the Micro Motion Product Documentation DVD and
accessible on the Micro Motion website at www.micromotion.com.
3.2.1 Hazardous area entity parameters
DANGER!
• Hazardous voltage can cause severe injury or death. To reduce the risk of hazardous
voltage, shut off power before wiring the meter.
• Improper wiring in a hazardous environment can cause an explosion. Install the meter
only in an area that complies with the hazardous classification tag on the meter.
Input entity parameters
Power in/signal output terminals 1, 2Table 3-1:
Parameter
Maximum input voltage Ui 28 V
Maximum input current li 93 mA
Maximum input power Pi 0.65 W
Maximum internal capacitance Ci 0 nF
Maximum internal inductance Li 0 mH
RTD terminals 5, 6, 7 and 8Table 3-2:
Parameter
Maximum input voltage Ui 12 V
Maximum input current li 36 mA
Maximum input power Pi 0.432 W
Maximum internal capacitance Ci 0 nF
Maximum internal inductance Li 0 mH
The voltage, current, and power values are the total available to all four RTD connections.
The total inductance (La) and capacitance (Ca) allowable for the electronics plus the cable
connecting it to the Zener barriers must be equal or less than the specified values for the
hazardous are classification. Refer to the hazardous area approvals documentation
shipped with the meter.
14 Micro Motion Compact Density Meter
Page 19

Wiring
Hazardous area
capacitance
The capacitance (Ci) of the meter is 0.0 µF. There is no extra
capacitance when calculating the maximum capacitance allowable for
the connecting cable. Therefore, the cable capacitance may be less or
equal to the maximum permitted capacitance (Ca) specified by the
safety barrier: (Ccable ≤ Ca)
Hazardous
area
inductance
The inductance (Li) of the meter is 0.0 µH. There is no extra inductance
when calculating the maximum inductance allowable for the
connecting cable. Therefore, the cable inductance may be less or equal
to the maximum permitted inductance (La) specified by the safety
barrier: (Lcable ≤ La)
3.2.2 Wire all intrinsically-safe installations using Zener safety barriers
Micro Motion provides safety barriers for wiring the meter in a hazardous area. Contact
your local sales representative or Micro Motion Customer Support at
flow.support@emerson.com for more information on ordering the appropriate barriers.
CAUTION!
• Install the meter installation and wiring only if you are suitably trained in accordance
with the applicable code of practice.
• Refer to the hazardous area approvals documentation shipped with your meter. Safety
instructions are available on the Micro Motion Product Documentation DVD and
accessible on the Micro Motion website at www.micromotion.com.
• Wire the i.s. barrier earth directly to its own earth bar as described in the safety
instructions. If you do not have a good i.s. earth — for example, if you are installing the
meter in a dry area, then use galvanic isolators instead of Zener safety barriers. Order
galvanic isolators from an external supplier since Micro Motion does not sell them.
The barriers are used for connecting all of the available meter outputs. Use the following
barriers with the designated output.
Output(s)
Power and TPS MTL 7787+ BARRIER7787
RTD MTL 7764+ (two) BARRIER7764
Barrier Model code for ordering
Procedure
Using the 2-wire wiring diagrams, wire the barriers to the appropriate output terminal and
pins.
Installation Manual 15
Page 20

Wiring
2-wire wiring diagrams
CAUTION!
• To meet the EC Directive for Electromagnetic Compatibility (EMC), use a suitable
instrumentation cable to connect the meter. The instrumentation cable should have
individual screens, foil or braid over each twisted pair, and an overall screen to cover all
cores. Where permissible, connect the overall screen to earth at both ends (360° bonded
at both ends). Connect the inner individual screens at only the controller end.
• Use metal cable glands where the cables enter the meter amplifier box. Fit unused cable
ports with metal blanking plugs.
Minimum 2-wire barrier connectionFigure 3-2:
A. Power / TPS out
B. IS barrier earth bar
C. IS ground
D. TPS signal +
E. TPS signal –
16 Micro Motion Compact Density Meter
Page 21

2-wire barrier connection with flow computer / signal converterFigure 3-3:
The following figure describes a 2-wire barrier connection that is powered through a flow computer /
signal converter.
A. Power / TPS out
B. IS barrier earth bar
C. IS ground
D. Flow computer / signal converter
E. Power +
F. TPS signal +
G. Power –
H. TPS signal –
Wiring
Installation Manual 17
Page 22

Wiring
2-wire barrier connection plus RTD barrier connectionFigure 3-4:
A. Power / TPS out
B. IS barrier earth bar
C. RTD
D. Flow computer / signal converter
E. Power +
F. TPS signal +
G. Power –
H. TPS signal –
I. RTD supply +
J. RTD signal +
K. RTD signal –
L. RTD supply –
18 Micro Motion Compact Density Meter
Page 23

M. IS ground
Note
If required, use two separate screened cables via two separate cable glands, one for the power and
one for the RTD. However, Micro Motion recommends that you use a single cable to facilitate a good
seal through a single cable entry gland.
3.3 Wire to galvanic isolators
In hazardous area installations where there is no proper I.S. ground available, such as dry
locations, Micro Motion recommends that you use galvanic isolators instead of Zener
barriers. Galvanic isolators convert the signal differently from Zenier barriers when passing
the signal across an isolation gap.
Prerequisites
• Galvanic isolators (MTL5532 and MTL5575)
Wiring
Note
Micro Motion does not sell galvanic isolators. Obtain the isolators from an external supplier.
• A Zener diode
The MTL5532 pulse isolator has a trigger level connected to the power + pin that is
not connected to the power – pin. Therefore, a Zener diode ensures a reliable
switching point.
• A pull-up resistor
The resistor is required because the output is passive.
• A 20 V to 35 V supply on the safe area side.
The MTL5575 is used specifically for the 4-wire RTD, and converts the RTD voltage and
current into a 4-20mA loop signal on the safe area side. The isolator requires 20 V to 35 V
DC energization from the safe area side that also supplies the active output of the 4-20 mA
loop.
Procedure
Using the 2-wire galvanic isolator wiring diagram, wire the isolators to the appropriate
output terminal and pins.
Installation Manual 19
Page 24

Wiring
2-wire galvanic isolator connectionsFigure 3-5:
A. Hazardous area
B. Safe area
C. Flow computer / signal converter
D. Power +
E. Power –
F. TPS signal +
G. TPS signal –
H. Analog i/p +
I. Analog i/p –
J. Analog pwr +
K. Analog pwr –
Note
Connect the screens to the chassis if no better earth is available.
Isolator trip level switch setting
12 V 6.2 V
6 V 13 V
3 V 16 V
Zener voltage
20 Micro Motion Compact Density Meter
Page 25

4 Grounding
The meter must be grounded according to the standards that are applicable at the site.
The customer is responsible for knowing and complying with all applicable standards.
Prerequisites
Micro Motion suggests the following guides for grounding practices:
• In Europe, EN 60079-14 is applicable to most installations, in particular Sections
12.2.2.3 and 12.2.2.4.
• In the U.S.A. and Canada, ISA 12.06.01 Part 1 provides examples with associated
applications and requirements.
• For IECEx installations, IEC 60079-14 is applicable.
If no external standards are applicable, follow these guidelines to ground the meter:
• Use copper wire, 18 AWG (0.75 mm2) or larger wire size.
• Keep all ground leads as short as possible, less than 1 Ω impedance.
• Connect ground leads directly to earth, or follow plant standards.
Grounding
CAUTION!
Ground the meter to earth, or follow ground network requirements for the facility. Improper
grounding can cause measurement error.
Procedure
Check the joints in the pipeline.
- If the joints in the pipeline are ground-bonded, the sensor is automatically grounded
and no further action is necessary (unless required by local code).
- If the joints in the pipeline are not grounded, connect a ground wire to the grounding
screw located on the sensor electronics.
Installation Manual 21
Page 26

Verifying
5 Verifying
Use the following procedure after installation to verify that your meter is working
correctly.
1. Check for a series resistance of approximately 300 Ω either as a load resistor or the
Zener barrier.
2. Measure the current consumption and the supply voltage at the meter terminals.
3. Verify that the measured values match the values in the following table.
Power supply voltage (safe
area)
22.8 VDC 18.4 ± 0.5 VDC 13.6 mA ± 0.7 mA
24.0 VDC 20.0 ± 0.5 VDC 12.4 mA ± 0.7 mA
28.0 VDC 24.9 ± 0.5 VDC 9.8 mA ± 0.7 mA
CDM terminal voltage (hazardous area) Supply current
22 Micro Motion Compact Density Meter
Page 27

Appendix A
Sample calibration certificate
Your meter was shipped with a calibration certificate. The calibration certificate describes
the calibrations and configurations that were performed or applied at the factory.
Sample calibration certificate: 2-wire TPS CDMFigure A-1:
Sample calibration certificate
Installation Manual 23
Page 28

Micro Motion Inc. USA
Worldwide Headquarters
7070 Winchester Circle
Boulder, Colorado 80301
T +1 303-527-5200
T +1 800-522-6277
F +1 303-530-8459
www.micromotion.com
Micro Motion Europe
Emerson Process Management
Neonstraat 1
6718 WX Ede
The Netherlands
T +31 (0) 70 413 6666
F +31 (0) 318 495 556
www.micromotion.nl
*MMI-20031632*
MMI-20031632
Rev AA
2016
Micro Motion Asia
Emerson Process Management
1 Pandan Crescent
Singapore 128461
Republic of Singapore
T +65 6777-8211
F +65 6770-8003
Micro Motion United Kingdom
Emerson Process Management Limited
Horsfield Way
Bredbury Industrial Estate
Stockport SK6 2SU U.K.
T +44 0870 240 1978
F +44 0800 966 181
Micro Motion Japan
Emerson Process Management
1-2-5, Higashi Shinagawa
Shinagawa-ku
Tokyo 140-0002 Japan
T +81 3 5769-6803
F +81 3 5769-6844
©
2016 Micro Motion, Inc. All rights reserved.
The Emerson logo is a trademark and service mark of Emerson
Electric Co. Micro Motion, ELITE, ProLink, MVD and MVD Direct
Connect marks are marks of one of the Emerson Process
Management family of companies. All other marks are property of
their respective owners.
 Loading...