

Page 1

1
X118
User Guide
Page 2

2
1. Legal Information ......................................................................................... 4
2. Important Notice ......................................................................................... 5
3. Getting Started ............................................................................................ 6
3.1. Packing Contents ......................................................................................... 6
Memory Card Installation .................................................................................... 7
Left Soft Key ........................................................................................................ 9
Right Soft Key ...................................................................................................... 9
Call Key ............................................................................................................... 9
End Key ............................................................................................................... 9
Up and Down Direction Keys ............................................................................... 9
Left and Right Direction Keys ............................................................................. 10
0-9 Keys ............................................................................................................ 10
* & # Key ........................................................................................................... 10
3.2. Important Phone Icons ............................................................................... 10
Signal Strength Icon ........................................................................................... 10
Battery Meter Icon ............................................................................................ 10
Keypad Lock Icon ............................................................................................... 10
3.3. Basic Functions .......................................................................................... 11
Making a Call Using Call Logs ............................................................................. 11
Answering a Call ................................................................................................ 11
Call Option ........................................................................................................ 11
3.4. Menu Layout .............................................................................................. 12
4. Function Menu ........................................................................................... 14
4.1. Multimedia ................................................................................................ 14
Video Player: ..................................................................................................... 14
Audio Player ...................................................................................................... 14
Sound Recorder ................................................................................................. 15
FM Radio ........................................................................................................... 15
FM Radio Receiver ............................................................................................. 15
Schedule FM Recorder ....................................................................................... 15
4.2. Phonebook ................................................................................................ 16
Phonebook List: ................................................................................................. 16
Page 3

3
Search Contact: ................................................................................................. 16
Add New Contact: ............................................................................................. 16
Caller Group: ..................................................................................................... 16
Phonebook Settings: .......................................................................................... 16
4.3. Call Logs ..................................................................................................... 17
4.4. User Profiles .............................................................................................. 17
4.5. Messages ................................................................................................... 18
Text Message: ................................................................................................... 18
Chat: ................................................................................................................. 19
Voice Mail Server: ............................................................................................. 19
Broadcast Message: ........................................................................................... 19
4.6. File Manager .............................................................................................. 19
Memory Card .................................................................................................... 19
4.7. Applications ............................................................................................... 19
Games ............................................................................................................... 19
STK: ................................................................................................................... 20
Calculator: ......................................................................................................... 20
Converter: ......................................................................................................... 20
Stopwatch: ........................................................................................................ 20
Flash Light: ........................................................................................................ 20
Missed Call Alert ............................................................................................... 20
SMS Received Alert ........................................................................................... 20
4.8. Organizer ................................................................................................... 20
Calendar ............................................................................................................ 20
Alarm ................................................................................................................ 21
To Do List .......................................................................................................... 21
World Clock ....................................................................................................... 21
4.9. Settings ...................................................................................................... 21
Dual SIM Settings .............................................................................................. 21
Phone Setup ...................................................................................................... 22
Network Setup .................................................................................................. 23
Security Setup ................................................................................................... 23
Call Setup .......................................................................................................... 23
Page 4
4
Restore Factory Settings .................................................................................... 24
4.10. Applications ............................................................................................... 24
Games ............................................................................................................... 24
STK: ................................................................................................................... 24
Calculator: ......................................................................................................... 24
Converter: ......................................................................................................... 24
Stopwatch: ........................................................................................................ 24
Flash Light: ........................................................................................................ 24
Missed Call Alert ............................................................................................... 24
SMS Received Alert ........................................................................................... 24
1. Legal Information
All rights reserved. Reproduction, transfer, distribution or storage of part or all of
the contents in this document in any form without the prior written permission of
Micromax is prohibited.
Micromax operates on a policy of continuous development. Micromax reserves the
right to make changes and improvements to any of the products described in this
document without prior notice.
Under no circumstances shall Micromax be responsible for any loss of data or
income or any special, incidental, consequential or indirect damages howsoever
caused.
The contents of this document are provided "as is". Except as required by applicable
law, no warranties of any kind, either express or implied, including, but not limited
to, the implied warranties of merchantability and fitness for a particular purpose,
are made in relation to the accuracy, reliability or contents of this document.
Micromax reserves the right to revise this document or withdraw it at any time
without prior notice.
The availability of particular products may vary by region. Please check with the
Micromax Executive or by email at info@micromaxinfo.com
Disclaimer: Micromax will not bear any responsibility for any incompliance with the
guidelines mentioned below; or improper use of the mobile phone. Our company
keeps the right to make modifications to any of the content here in this user guide
without public announcement in advance. The content of this manual may vary from
the actual content displayed in the mobile phone. In such case, the latter shall
govern.
Page 5
5
2. Important Notice
Important Safety Precautions
Do not use the device while driving. Please see that in some countries, it is illegal
to use such devices while driving.
Switch off when refueling. Do not use the device at a refueling point (service
station) or near fuels or chemicals.
Switch off in aircraft. Mobile phones and GSM devices can cause interference.
Using them on aircraft is both illegal and dangerous.
Follow Special Regulations
Special Regulation. Follow any special regulations in force in any area and always
switch off your device whenever it is forbidden to use it, or when it may cause
interference to the surrounding.
Radio Interference. All mobile phones cause radio interference within the
specified Limits of GSM standards.
Qualified Service. Only qualified service personnel must repair the equipment.
Use only approved accessories and batteries.
Emergency calls. Ensure that the phone is switched on and in service. Enter the
emergency number (112 or another official emergency number) and press the
"Dial" key.
Use only approved accessories. The use of any other power accessory will
violate warranty conditions that apply to the phone.
Safe Operation Instructions
Before Installing or operating this product, read this manual carefully.
Do not expose unit to rain or moisture.
Do not place unit on or close to any heat source.
Page 6
6
3. Getting Started
3.1. Packing Contents
Before using Micromax X118 mobile phone, carefully remove the contents from the
shipping carton and check for any damages or missing contents. Incase you found any,
contact your Authorized Distributor or Shipping agent immediately. The standard
packing contents are as follows:
Base Transceiver
Standard Battery(850mAh)
User Guide
Service Guide
Charging Adaptor
Hands-Free Unit
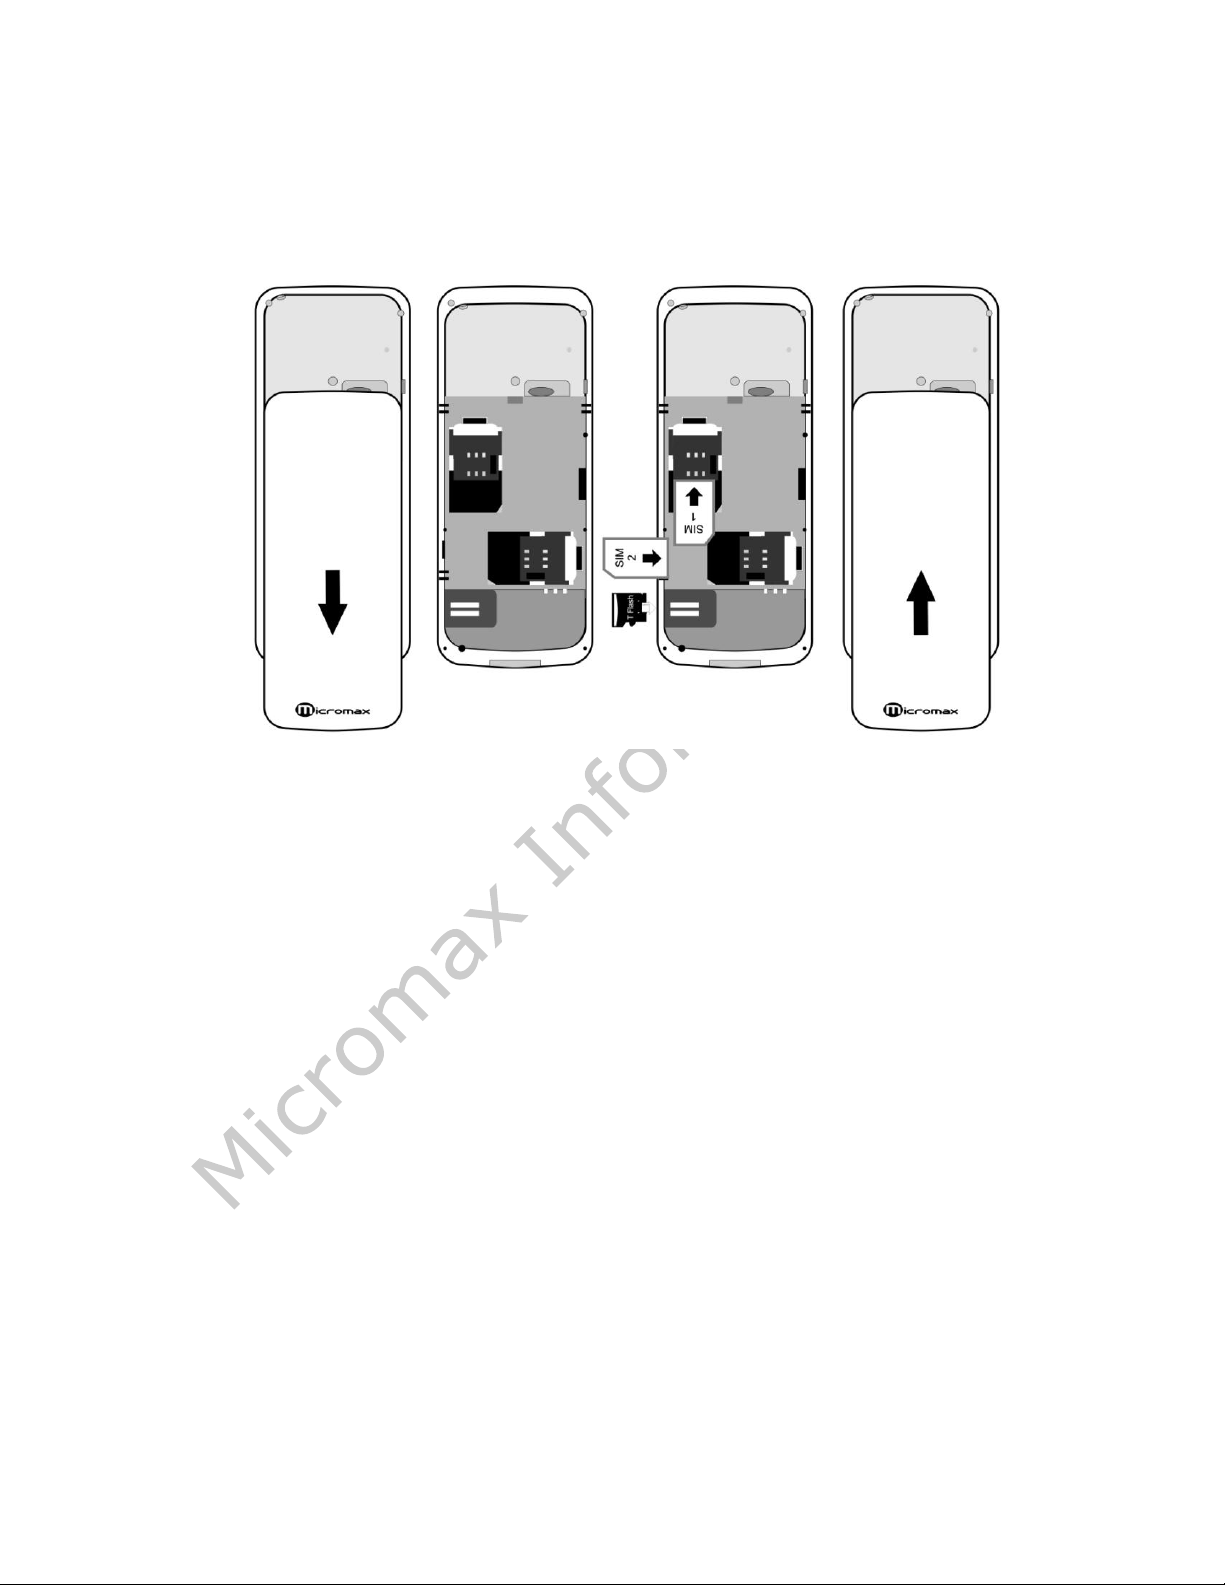
INSTALLING SIM, BATTERY AND ATTACHING OTHER ACCESSORIES SIM CARD &
BATTERY INSTALLATION (FIGURE 2)
Always turn off the phone and detach the charger when you insert or remove a SIM
card or Battery from the phone.
1. Remove the battery cover by pulling it as shown in Figure 2.
2. Slide the SIM Cards into their holder. Make sure that the gold contacts of the
SIM Cards are facing down, and the cut off corner is correctly aligned as shown in
the embedded picture.
Page 7
7
3. Place the battery in the back of the phone with the label side up and the
connectors facing each other.
4. Place the battery cover as shown in the picture and press it into place.
Figure 2
Memory Card Installation
The Memory Card gives you extra storage capacity for content such as pictures,
music and video clips. To install:
1. Remove the battery cover by gently pulling and remove the battery as shown.
2. Slide open the memory card cover as shown and place the card inside the slot.
NOTE: Do not remove the memory card while reading or writing to the card. Doing
so may cause data corruption on the card or on the phone.
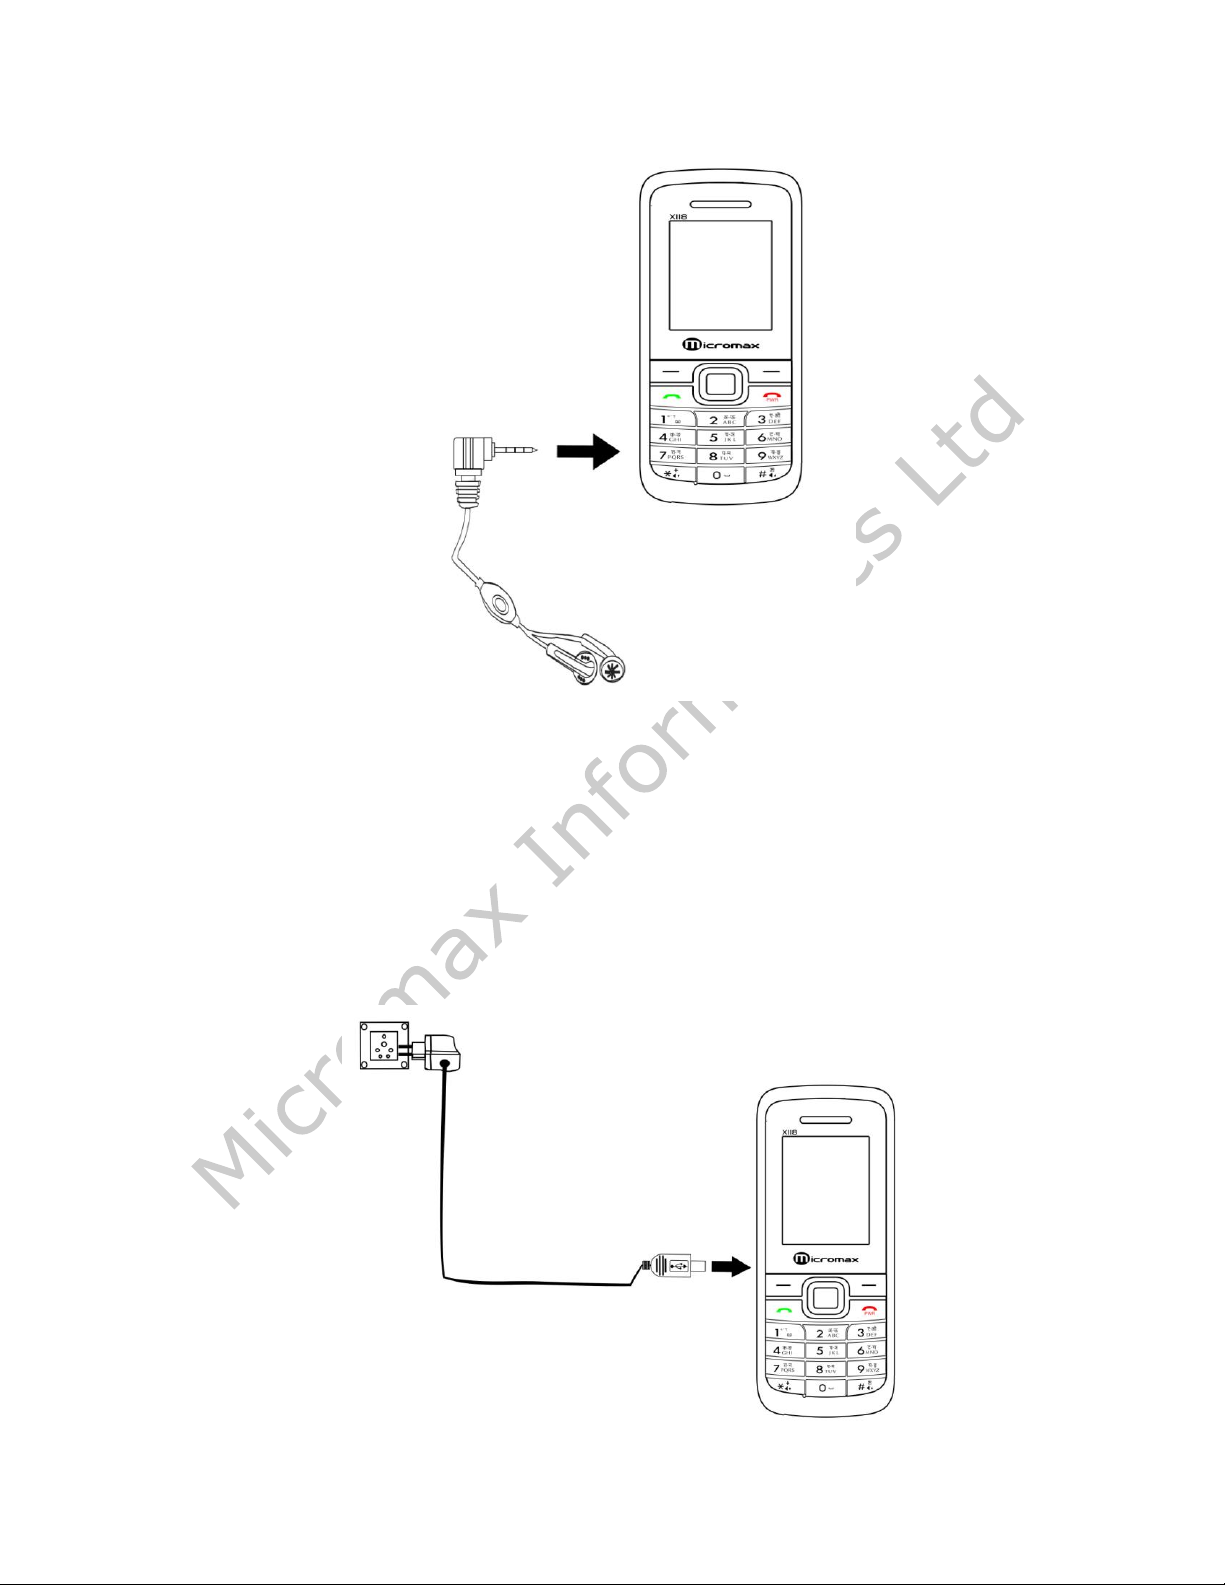
CONNECTING HANDS-FREE KIT (REF FIGURE 3)
You are provided with a hands-free earpiece set with your phone. The same can be
used to listen to your mp3 songs and listen and speak while on a call. To connect the
hands-free earpiece, simply connect the connector into the connecting socket as
shown in figure. When properly connected, the phone will display a message
‘Earphone Plugged In!’ with an icon displayed on top of the screen.
NOTE: Only use Micromax specified accessories.
Page 8
8
Figure-3
CONNECTING THE CHARGER/CHARGING THE BATTERY (REF FIGURE 4)
1. Plug the charger’s transformer into a standard AC outlet.
2. Insert the charger’s output plug into the phone’s connecting socket as shown in
figure.
NOTE: It may take up-to 30 minutes before the battery icon/charging icon appears
on the screen when charging.
Page 9

9
Figure-4
POWERING ON AND OFF THE PHONE
To Power your phone ON or OFF, press and hold the End (RED) key for at least 3
seconds or until the display lights goes up or goes off. Enter the lock code if
necessary and select OK to Power ON.
Figure-5
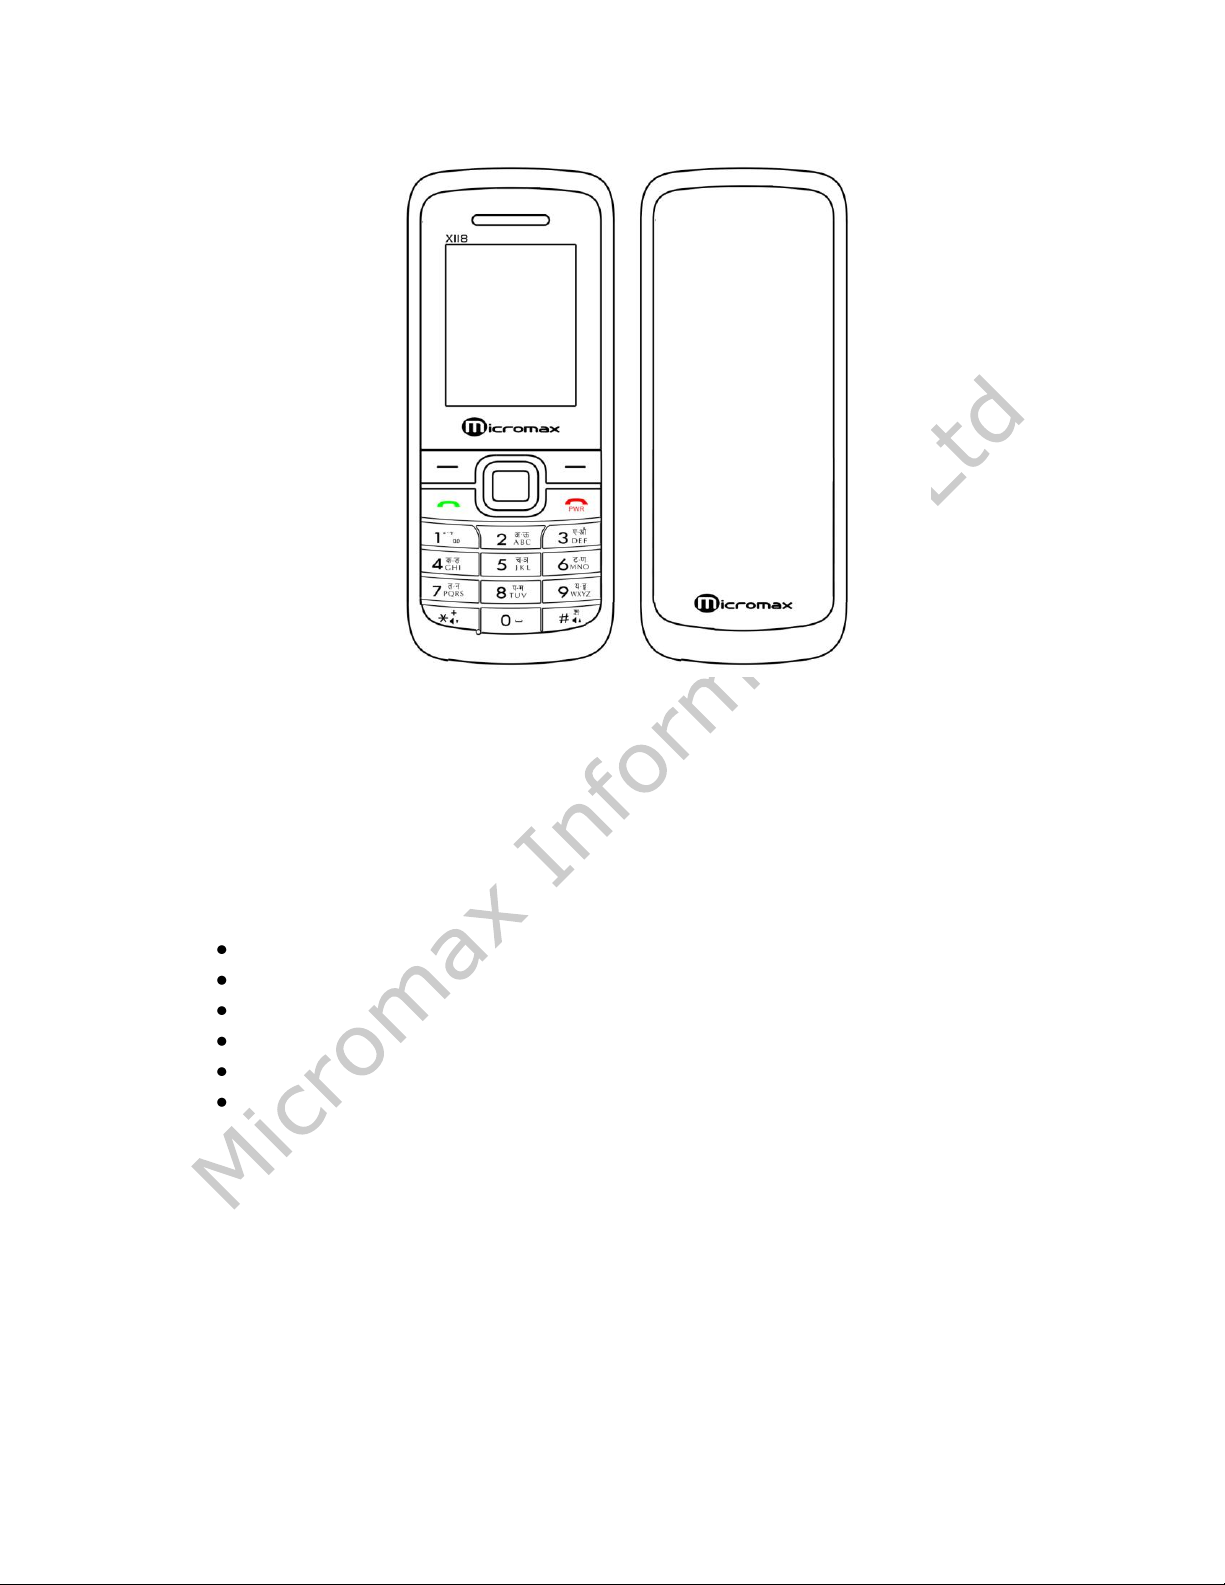
PHONE KEYPAD LAYOUT (FIGURE 5)
Left Soft Key
Performs functions in lower left display. In standby mode, press OK key to open
shortcut functions
Right Soft Key
Performs functions in lower right display.
Call Key
Make calls
Answer calls
Press when idle to see the list of calls.
End Key
End or reject calls; Press and hold this key to turn phone ON/OFF.
Up and Down Direction Keys
Scroll to select options
In standby mode press to open corresponding applications.
Page 10

10
In edit message status, press to select the required word.
In function menu, scroll to open corresponding function.
Left and Right Direction Keys
Scroll to select options
In standby mode press to open corresponding applications
In edit message status, press to select the required word.
0-9 Keys
In standby mode, press number keys to input dialing number. In standby mode,
press and hold 1-8 key to directly call the number set before, in the speed dial list. In
edit status, press to input numbers, characters and phonetic notation. In edit mode,
except input number, press 0 key to input space. In functional menu, press numbers
to speed select submenu items.
* & # Key
Functions vary in different situations or function menus: On Input Screen, press "*"
for symbols. On Input Screen, press "#" to switch between different inputting
methods. In standby and dial mode, press and hold "*" to input +. In standby mode,
input "+" for an international call.
3.2. Important Phone Icons
Signal Strength Icon
The Signal Strength Icon is seen on the top leftmost corner of the screen. The icon
helps you to identify the strength of the network; the phone has latched on to, at
that particular instance. It has a maximum of 4 bars and with a minimum as no bar. 4
bars signify strongest network strength and subsequently minimizes with each
diminishing bar. No bar signifies least or no network strength.
Battery Meter Icon
The Battery Meter Icon is seen on the top rightmost corner of the screen. The icon
signifies the battery strength available at that instance. The icon will signify the
maximum battery strength by 3 bars and no bar will signify least battery strength.
NOTE: At very low battery levels, the phone will prompt ‘Low Battery’ message on
the screen.
Keypad Lock Icon
The Keypad Lock Icon is seen on top of the screen at various positions depending on
the number of icons displayed. An Open Lock signifies that the phone’s keypad is
unlocked and a closed lock signifies that the keypad is locked.
Page 11

11
You can unlock the keypad by pressing Lock/ Unlock by pressing the RSK on the
phone, followed by the * key. Similarly for locking the keypad, press the End (RED)
key, to be followed by the Send key.
3.3. Basic Functions
Making a Call Using Call Logs
All dialed and incoming numbers are saved in call logs and categorized into Missed
Calls, Received Calls and Dialed Calls. To check the logs, please follow these steps:
In standby mode, press the Send (GREEN) key to view Call Logs. Use the scroll keys
to scroll between Missed Calls, Received Calls and Dialed Calls.
Or else, you can go to Call Logs>Call History>Select the appropriate SIM to view the
missed, received and dialed calls.
Answering a Call
To receive an incoming call, press the Option key and select ‘Answer’ or receive
it directly by pressing the Send (GREEN) key.
If headset is available, user can choose headset keys to answer the call or turn on
auto answer.
Call Option
The Micromax X118 phone offers multiple functions during a call. During a call,
following functions can be actualized if you operate according to the instructions on
the screen. Press up and down direction keys to choose the wanted function and
press select key to enter.
Hold a Call: To hold an Active call.
Swap between Held/Waiting and Active: Swap among the calls. This option is
network dependent.
End: End the present active call only.
New call: To make a new call.
Phone Book: To explore the Phonebook for phone numbers.
Message: To explore the SMS menu (Inbox, outbox, etc)
Sound Recorder: To record the present active call for later listening/review.
Mute: Turn off the Microphone during an active call.
DTMF (Dual-tone Multi-frequency): You can choose on/off; which is to send
dual-tone multi-frequency sound. This can offer dialing to the telephone
numbers with extensions or IVR systems installed for menu driven options.
Conference: By multi-way conferencing, you can answer an incoming call and
add new participants according to the prompt. Keep the ongoing multi-way
Page 12

12
conference, have a private conversation while keeping all the others on hold, get
through one participant with another one, quit yourself from the conference.
NOTE: This feature is network dependent.
3.4. Menu Layout
3.4.1 Multimedia
Video Player
Audio Player
Sound Recorder
FM Radio
3.4.2 Phonebook
Phonebook List
Add New Contact
Group
Send Vcard
Phonebook Settings
3.4.3 Call Logs
SIM1 call logs
3.4.4 User Profile
General
Meeting
Outdoor
Indoor
Headset
3.4.5 Messages
SMS
Page 13

13
Chat
Voice Mail Server
Broadcast Message
3.4.6 File Manager
Memory Card
3.4.7 Organizer
Calendar
Alarm
To Do List
World Clock
3.4.8 Settings
Reception Mode
Phone Setup
Network Setup
Security Setup
Call Settings
Restore Factory Settings
3.4.9 Applications
Fun & Games
STK
Calculator
Converter
Stopwatch
Flash Light
Page 14

14
Missed Call Alert
SMS Received Alert
4. Function Menu
4.1. Multimedia
The Micromax X118 comes with a host of multimedia applications to provide you
with unlimited entertainment.
Video Player:
The Video Player plays all your video files stored in the phone (Phone Memory or on
the Memory Card). The video player gives you the following options:
Play – To start playing the video file.
Rename - To rename an already saved file.
Delete – To delete an existing file.
Delete All Files – To delete all files at once.
Sort – To sort the already saved files by Name, Type, Time and Size.
Audio Player
The Micromax X118 comes with an inbuilt audio player that plays all your favorite
songs stored in the micro SD memory card. It gives you a host of setting options to
make your listening experience interesting.
The player gives you an option to select from a list of songs already stored in the
memory card, to be played, added to your ring tones or deleted.
The player has the following setting options:
o Repeat: You can also select to repeat the song or complete play list
(Off/One/All).
o Shuffle: You can shuffle the order of your songs to be played. If you put
this mode ON, then the songs will be played in a random fashion
otherwise, a sequential pattern will be followed.
o Back Ground Play: Back Ground play option allows you to enjoy your
music even if the player is minimized to use other functions of the phone.
o Lyrics Display: Micromax X118 offers you an exciting feature of displaying
you sing with the song while the lyrics are displayed on the phone screen
when the song plays. Once the Lyrics Display is put ON and the lyrics file
of the song is stored in the same folder as the song is, you can play the
song and sing with it, reading from the display.
Page 15

15
Sound Recorder
You can record sound/voice on your Micromax X118 phone. Just select sound
recorder, go to options and press record. Select Stop to rename the file and save it.
Select pause to ‘pause’ the recording and ‘continue’ to resume the recording.
FM Radio
The Micromax X118 comes with an in-built FM Radio Receiver/Schedule FM
Recorder. The X118 comes with a built-in FM Receiver antenna. Hence, you don’t
need to plug the hands-free to listen to radio anymore. Press Options to find:
The FM Radio also gives you an option to change the settings through short-cut keys
available on the main window. Such as ‘To Power ON’, to ‘Skip to next channel’, to
‘skip to previous channel’ etc.
FM Radio Receiver
You can schedule the FM Receiver to automatically start playing according to the
schedule fed in the player. You can save as many as 5 preset settings in the player.
Channel List: Store all the channels that the FM Radio can receive. You get
options to play or edit them.
Manual Input: You can store and register your channel frequency and play it by
pressing OK.
Preset Auto Search: On selecting this, the FM tries to scan all the available
channels provided by the network. To start the search, make sure that the radio
is powered ON.
Settings: Under settings, you have options for Back Ground Play (ON/OFF), Loud
Speaker (ON/OFF), Recording Format (AMR/WAV) and Record Storage (Phone or
Memory card).
Record: You can record your favorite music or program. To record, make sure
that the radio is powered ON.
File List: Select File List to check your previously stored files.
Append: The append option enables you to continue recording further to a pre
recorded sound file.
Schedule FM Recorder
Micromax X118 comes with a unique feature of FM Scheduling. This feature enables
you to schedule the radio to power ON itself and record your favorite program. You
can set the time, date, and channel and record functions to record the desired
program. It can record 4 programs for you to enjoy them anytime later at your own
wish. On pressing Edit, you will have following functions to set:
Power ON/OFF
Date and Time
Page 16

16
Repetition Cycle
Channel setting
Record Setting
4.2. Phonebook
Phonebook List:
Allows you to call a number stored in your phonebook list.
Search Contact:
Unlike Quick search, Search option enables the user to search an entry by its
complete name.
Add New Contact:
Select this option in order to add a new entry into the SIM memory or to the phone
memory.
Caller Group:
Caller Group contains five default groups:
Friends
Family
VIP
Business
Others
Selecting any group allows you to edit the options available with it. For example:
o Setting the ring tone associated with the group.
o Picture associated with the group.
Send VCard: The phone gives you 2 vCard Versions.
My vCard: My vCard gives you an option to edit and send your business card to
the selected recipients.
Phonebook Settings:
The following fields are listed under settings:
Extra Number: It has the following options to edit
Owner Number
Owner Number lets you input your own phone number and name. If set to
ON, the phone’s main screen displays the name or your number on the
screen.
NOTE: This is a SIM Card dependant service.
Page 17

17
Memory Status: This option enables you to check the memory status of the
phone and the SIM card.
Fields: Gives you an option to select the fields to be edited at the time of a
adding a new entry in the Phone book. The fields include:
Home Number
Company Name
Email Address
Company Number
Fax Number
Birthday
Caller Picture
Caller Ringtone
Caller Group
Send VCard: The phone gives you 2 vCard Versions.
4.3. Call Logs
Calls Logs gives you the option to check missed calls, received calls, dialed calls etc in
SIM1 and SIM2
4.4. User Profiles
All the different profiles are listed under this option:
General: The Profile gives you an option to activate and customize the settings.
You can customize the following features:
o Tone Setup: Tone Setup enables you to set up different music tones to
different functionalities of the phone like, Incoming Call, Power ON,
Power OFF, Message Tone and Keypad tone.
o Volume: You can vary the volume levels for Ring Tone and Key Tone.
o Alert Type: Alert Type lets you choose the way you want to be alerted. You
can choose from, Ring, Vibration only, Vibration and Ring, Vibration then
Ring and Light only.
o Ring Type: Ring Type lets you select the type of ring to alert you. You can
choose from Single, Repeat and Ascending.
o Extra Tone: Extra Tone is added to a number of incidences such as
Warning, Error, Camp On and Connect.
o Answer Mode: Answer Mode gives you the choice to select ‘Any’ key
answer mode. Any key enables you to receive a call using any key of the
phone except the End (RED) key.
Meeting: These modes are similar to General Mode and can be customized
according to your own preference.
Page 18

18
Outdoor: These modes are similar to General Mode and can be customized
according to your own preference.
Indoor: These modes are similar to General Mode and can be customized
according to your own preference.
Headset: These modes are similar to General Mode and can be customized
according to your own preference.
4.5. Messages
Your phone supports various messaging services. You can create, send, receive, edit
and organize text messages.
Messages contain the following folders:
SMS
Chat
Voice Mail Box
Cell Broadcast
Text Message:
Under SMS, the phone has the following folders listed.
Write Message: On selecting Write Message, the screen will pop up to ask you to
input the contents of the message using different input methods (Templates,
Insert Number, Insert Object etc).
Inbox: This folder stores all the received messages.
Outbox: This folder contains all the messages sent from your phone as well as
the unsent messages.
Drafts: This folder stores the unsent messages.
Templates: Templates stores 10 preloaded/pre-written text messages for ready
usage. You can edit the templates according to your wish and also store the
messages that you send more often.
Message Settings: Message settings stores all the different settings responsible
for sending and receiving messages.
o Profile Setting: It contains 4 default profiles which includes Profile name,
Service Centre Address, Validity Period and Message type.
o Common setting: These settings include the following - Delivery Report and
Reply Path
o Memory Status: Memory status gives you the information about the storage
status of the phone memory as well as the SIM memory.
o Preferred Storage: Lets you select the default storage location of the
messages between Phone and SIM.
Page 19

19
Save Sent Message: Selecting this will enable you to save the message in the
Outbox
Chat:
Chat enables you to enter 2 different user’s default settings (Chat Room 1 and Chat
Room 2) to enable sending and receiving the messages. Chat option enables you to
see the complete conversation on a single window as in a messenger window.
Voice Mail Server:
The Voice Mail is an interactive system for storing, processing and reproducing
verbal messages through a voicemail server. The service is operator dependant and
the settings are provided by the operator upon activating the service on the SIM
card.
Broadcast Message:
Your phone is capable to receive and store broadcast messages. You can set the
receive status to ON/OFF. Read Message folder stores the received messages.
4.6. File Manager
Memory Card
As the name suggests, File manager allows you to manage all the files stored in the
external memory card.
You can view the remaining memory and available memory in phone and micro-SD
card.
You can open and navigate the directories and files in the storage.
You can View, Play and Setup files in the storage disks.
4.7. Applications
Games
To win the game the player has to move the designed boxes to the appointed
locations. The player controls the man who stands by the box via navigation keys
(Up, Down, Right or Left) or the number keys (2, 8, 4 and 6). To cancel the previous
move, press number key 5, OK key or left function key.
Game Settings:
These settings enable you to vary the settings in Audio to ON/OFF, allow you to put
the vibration mode to ON/OFF and to increase/decrease the volume levels.
Page 20

20
STK:
STK stands for SIM Tool Kit. Please contact your service provider for more details.
Calculator:
Keep your calculations on your finger tips with the easy to use calculator.
Converter:
Make your calculations/conversions simpler and accurate.
Stopwatch:
Calculate any time duration with Typical stopwatch and Nway stopwatch.
Flash Light:
Select this to enable/disable the Dual LED Torch Light.
Missed Call Alert
Choose this option to set as a ‘reminder’. If you have missed a call the phone will
ring according to a time chosen by you to remind you to check the pending call.
SMS Received Alert
Choose this option to set as a ‘reminder’. If you have received a message the phone
will ring according to a time chosen by you to remind you to check the pending
message.
4.8. Organizer
Calendar
You can use the calendar to keep track of important meetings. After entering the
calendar function menu you can select year, month and date using direction keys.
On a selected date you can select to view:
View Today/View All: If there is a special background color on a date which
means there is some task on that day. You can also view any Note / Remark
mentioned by you for a task stored by you previously.
Add Task: When you add a new task, you can do the following:
o Input task duration time.
o Add a Note for that task.
o Set alarms on/off.
Jump to date: Input a date, and then press OK to go to a specific date for
entry/edit/viewing of task for that date.
Go to Weekly View: Select this option to view tasks in weekly format.
Page 21

21
Alarm
The Alarm can be set to ring at a specific time on several days. There are five
different default alarms. You can set these alarms to alarm you at different time in
specific day(s) of a week. The alarm can use radio as an alarm tone also.
To set an alarm:
Press edit to enter alarm settings menu.
Select edit option using up and down direction keys
o ON/OFF: Select alarm on or off using left and right direction key
o Alarm time: Input alarm time
o Repeat Setting: Press left and right direction keys to select alarm types
which consists of one time, everyday and weekdays.
o Alarm Tone: Select the alarm that you wish to listen.
o Snooze: To set Snooze duration in minutes.
o Alert Type: To select between Ring/Vibrate combinations.
To Do List
All tasks saved in calendar, can be viewed in To-Do list.
World Clock
World clock can be used to know the time in various cities across the world. You can
see a world map and instantaneous time in those cities using world clock. Enter
world clock to view world cities time using the direction keys.
4.9. Settings
Under settings, the phone gives you the option to change the settings for various
features of the phone.
The following list is available in Settings:
Dual SIM Settings
Dual SIM settings allows you to select the mode in which you want the phone to be.
The Modes of the Phone are:
Dual SIM Active
This mode allows you to access the services of both the SIM’S i.e. Dual SIM Dual
Standby.
Only SIM1 Active
Only the SIM1 is functional whereas the SIM2 is not accessed.
Only SIM2 Active
Page 22

22
This mode is used to enable the situation where you want only the SIM2 to be
functional.
Flight Mode
This mode is used to set the phone in Flight Mode. In this mode the phone will be
out of signal reception but you will be able to use other functions of the phone in
standby mode.
Phone Setup
You have following options listed under phone settings:
Language: The Micromax X118 currently supports English/Hindi languages.
Time and Date: Lets you set the Time and Date on the phone including the Home
City.
Auto Update of Date & Time: This feature automatically updates the date and
time on the phone, receiving it from the network.
Set Time and Date: Enables you to set the time and date in the handset.
Set Format: You can select between 24 hour and 12 hour format.
Set Home City: You can select the Home City timings according to the GMT.
Display Characteristic: Under Display characteristics, you can set a host of
different characteristics of the phone. Like
o Wallpaper – Set your favorite wallpaper on the phone
o Screen Saver – Lets you set an image as a screen saver.
o Show Date and Time – Enables you to see the date and time on the idle
screen.
o Show Owner Number – It helps you set your own number on the display
for your ready reference.
o Show Operator Name – You can put this to ON/OFF state. It lets you see
the Operator name on the idle screen
o Greeting text - Lets you set your own greeting message when you power
ON the phone.
o LCD Backlight – Allows you to set the parameters for the LCD Brightness
etc.
Preferred Input Method: This enables you to select the text input method from
5 options. They are – Multitap ABC, Multitap Hindi, Multitap abc, Numeric, Smart
ABC, Smart abc.
Shortcuts: Shortcuts help you use certain key features of the phone instantly.
You can choose the features at your own wish and set them in the menu. You
can add new features to the list, delete, edit, disable and change the order.
Page 23

23
Dedicated Key: This option helps you dedicate/map certain key features of the
phone with the Directional keys (UP/DOWN/LEFT/RIGHT) of the phone. At
anytime you can change the mapping and select a new feature from the list of
features available.
Network Setup
Network setup gives the user the ability to select a desired network and addition of
a new network to the network list. The network setup gives you the follow options:
Network Selection (Automatic/Manual)
Preferred Networks – Will list down all the network IDs (depending on the SIM
card used)
Security Setup
Under Security Setup, you can change the security settings of SIM1 or SIM2.
SIM Lock: SIM Lock protects illegal usage of the SIM card. SIM is protected by a
password.
o Fixed Dial: Outgoing calls from your phone can be restricted by making a
fixed dialing list that allows only numbers on that list to be dialed from
the phone.
o Barred Dial: Barred Dialing is a SIM card/Network dependant feature If
your operator supports it, then you can use the facility in the phone.
o SIM PIN: You can use this to change the SIM PIN Lock for both SIM1 and
SIM2.
Change Password: Change Password option gives you the options to change PIN,
PIN2 and Phone Lock password
Phone Lock: You can set the “Auto Keypad Lock”, “Phone Lock Encryption” and
can also change the Phone Lock Password. Press the ‘right soft key and *’ to lock
and unlock the phone.
Call Setup
Call Settings: You can choose from the following options
SIM1 Call Settings
Caller ID
Call Waiting
Call Divert
Call Barring
Line Switching
Auto Redial
Call Time Display
Call Time Reminder
Page 24

24
Auto Quick End
Speed Dial: Set the desired entries corresponding to the digits from 1 to 9. once
set, you can long press the corresponding key to call the desired number.
Restore Factory Settings
Selecting this option will ask you to enter the password to restore the phone to
factory settings. The default password is ‘0000’
4.10. Applications
Games
To win the game the player has to move the designed boxes to the appointed
locations. The player controls the man who stands by the box via navigation keys
(Up, Down, Right or Left) or the number keys (2, 8, 4 and 6). To cancel the previous
move, press number key 5, OK key or left function key.
Game Settings:
These settings enable you to vary the settings in Audio to ON/OFF, allow you to put
the vibration mode to ON/OFF and to increase/decrease the volume levels.
STK:
STK stands for SIM Tool Kit. Please contact your service provider for more details.
Calculator:
Keep your calculations on your finger tips with the easy to use calculator.
Converter:
Make your calculations/conversions simpler and accurate.
Stopwatch:
Calculate any time duration with Typical stopwatch and Nway stopwatch.
Flash Light:
Select this to enable/disable the Dual LED Torch Light.
Missed Call Alert
Choose this option to set as a ‘reminder’. If you have missed a call the phone will
ring according to a time chosen by you to remind you to check the pending call.
SMS Received Alert
Choose this option to set as a ‘reminder’. If you have received a message the phone
will ring according to a time chosen by you to remind you to check the pending
message.
Page 25

25
The contents of the manual may differ/vary from the actual product. The contents in
this manual may be updated without any prior notices. For latest updates please
refer to Micromax website at www.micromaxinfo.com
 Loading...