

Page 1

Mi Smart Standing Fan 1C User Manual
Manual de usuario de Mi Smart Standing Fan 1C
1
11
Руководство пользователя напольного смарт-вентилятора Mi 1C 21
Manuel d'utilisation de Mi Smart Standing Fan 1C
Mi Intelligenter Standventilator 1C Benutzerhandbuch
29
39
Manuale utente Mi Smart Standing Fan 1C 49
WARRANTY NOTICE 59
AVISO DE GARANTÍA 61
ГАРАНТИЙНОЕ УВЕДОМЛЕНИЕ 63
GARANTIE 65
GARANTIEERKLÄRUNG 67
AVVISO SULLA GARANZIA 70
Page 2

Safety Instructions
Read this manual carefully before use, and retain it for future reference.
Precautions Warnings
Installation
Improper use may lead to electric shocks, fire, personal injury, or other damage.
Make sure the fan is properly installed according to the instructions,
so as to avoid electric shocks, fire, personal injury, or other damage.
Do not connect the fan to a power outlet as long as it is not assembled.
Handling the Fan
Turn off and unplug the fan before moving it.
Firmly hold the fan stand to avoid it from falling down and causing
personal injury.
Using the Fan
Immediately stop using the fan if it makes unusual sounds, gives off
bad odors, overheats, or rotates irregularly.
Do not lean on or tilt the fan while it is running.
Do not push the fan's head repeatedly so as to avoid damage to the
internal mechanism.
Power Cord
Unplug the power cord before repairing or moving the fan.
Always unplug the fan by pulling the power plug rather than the cord.
When the power cord is damaged, it must be replaced with a genuine
power cord purchased from the manufacturer or aer-sales service
department.
This appliance can be used by children aged from 8 years and above
and persons with reduced physical, sensory or mental capabilities or
lack of experience and knowledge if they have been given supervision
or instruction concerning use of the appliance in a safe way and
understand the hazards involved. Children shall not play with the
appliance. Cleaning and user maintenance shall not be made by
children without supervision. (For European countries or regions)
This appliance is not intended for use by persons (including children)
with reduced physical, sensory or mental capabilities, or lack of
experience and knowledge, unless they have been given supervision
or instruction concerning use of the appliance by a person responsible
for their safety.
Children should be supervised to ensure that they do not play with the
appliance. (For no European countries or regions)
Once assembly completed, it’s strictly forbidden to remove the guards
for any purpose.
Children should be supervised to ensure that they do not play with the
appliance.
If the supply cord is damaged, it must be replaced by the manufacturer,
its service agent or similarly qualified persons in order to avoid a hazard.
1
Page 3
Safety Instructions
Read this manual carefully before use, and retain it for future reference.
Warnings
Improper use may lead to electric shocks, fire, personal injury, or other damage.
Do not use this fan in place where it is easy to fall over or where there
are other unstable objects nearby.
Do not use this fan in hot and humid environments such as a bathroom.
Do not use this fan if its power cord is damaged or its power plug is
loose.
Do not use this fan if its front grille is not installed, or its rear grille is
loose or fell off.
Do not allow adults who are incapable of operating this fan or children
to use it.
Do not disassemble or repair this fan.
Do not pinch, bend, or twist the power cord too much, so as to prevent
from exposing or breaking its core.
Do not insert your fingers or any object into the front grille, rear grille,
or the fan blades when the fan is in use.
Keep hair and fabrics away from the fan to avoid geing them caught in
the fan.
Do not use any improper power outlet.
Do not use the supplied power cord with any other device.
Under normal use of condition, this equipment should be kept a
separation distance of at least 20cm between the antenna and
the body of the user.
2
Page 4
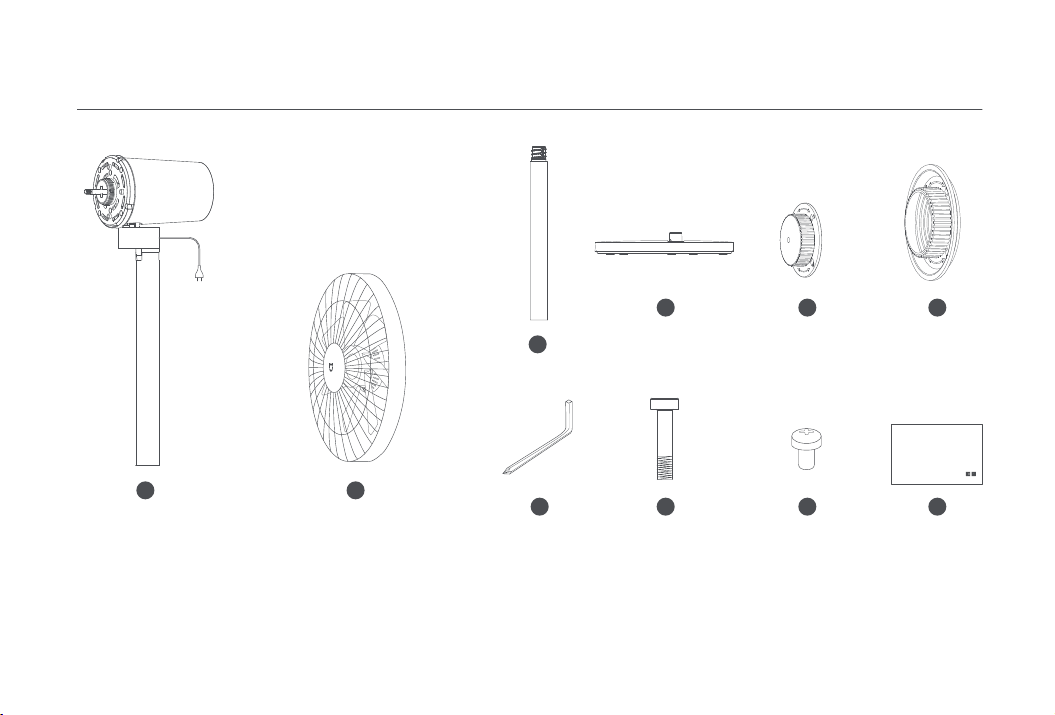
Package Contents
4
3
Lower Stand
1
Motor & Upper Stand &
Power Cord
Note: Illustrations of the product, accessories, and user interface in the user manual are for reference purposes only. The actual product and functions may
vary due to product enhancements.
(front grille, fan blade assembly, rear grille)
2
Fan Assembly
7
Allen Key Base Bolt×1
3
Base
8
Fan Blade Assembly Knob Rear Grille Knob
5 6
9
Fan Grille Screw×1 User Manual
10
Page 5
Overview
Installation Instructions
Base
Top View
Motor &
Upper Stand
Lower Stand
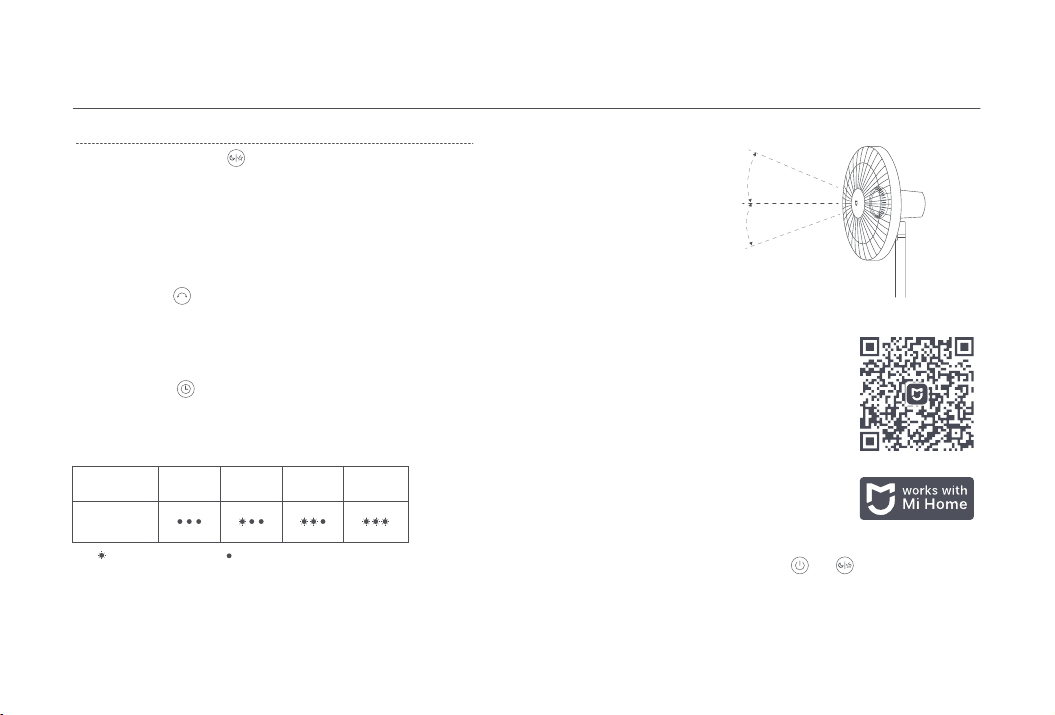
Wi-Fi Indicator
Speed/Delayed Turn-off Indicator
Sleep Mode Indicator
On/Off Buon
Speed Adjustment/Mode Switch Buon
Oscillation Buon
Scheduled Turn-off Buon
Center Point Indicator (no light effect):
Center point for the fan's head angle
range.
Power Cord
Base Bolt
Step 1: Base installation
1
3
4
1(1). Standing fan mode: Connect
lower stand to upper stand, then
install it onto base as shown
in the figure.
4
1
3
4
1(2). Table fan mode: Install upper
stand directly onto base.
8
2. Insert base bolt into the hole
on the boom of the base.
3
3. Use the included Allen key to
8
turn base bolt clockwise to fix
the stand to the base.
1
4
8
7
7
Page 6

Installation Instructions
Step 2: Open the fan assembly
Disassemble fan assembly as shown in the figures below: ①Turn the
front grille counterclockwise until the grilles are properly loosened. ②Then
remove front grille from rear grille and take out fan blade assemby.
2
11
11
Front Grille
①
2
Fan Assembly
②
12 13
Fan Blade Assembly
1213
Rear Grille
Step 3: Install the rear grille
Make sure “ ” points up when installing rear grille onto the motor,
and turn rear grille knob clockwise to tighten the rear grille to the motor.
6
13
13
6
Step 4: Install the fan blade assembly
Align the center hole of fan blade assembly with the motor's sha and
install it onto the sha, then install fan blade assembly knob onto the
motor's sha. Turn the knob counterclockwise in order to fix the fan blade
assembly to the motor's sha.
12
5
12
5
5
Page 7
Installation Instructions
How to Use
Step 5: Install the front grille
1. Align Front Grille Alignment Mark with Rear Grille Le Alignment
11
Mark, and make sure the front grille is properly embedded into the rear
grille.
2. Turn the front grille clockwise until the Front Grille Alignment Mark aligns
the Rear Grille Right Alignment Mark. Make sure the grilles are securely
fastened.
Rear Grille Le
Alignment Mark
Front Grille
Alignment Mark
Top View before
Fastening
the Front & Rear Grille
11
13
13
Rear Grille Right
Alignment Mark
Front Grille
Alignment Mark
Top View aer Fastening
the Front & Rear Grille
Step 6: Fasten the front grille
9
Insert fan grille screw into the hole at the boom of the
fan grille. Turn the screw clockwise by using the included
Allen key to tighten it.
7
9
7
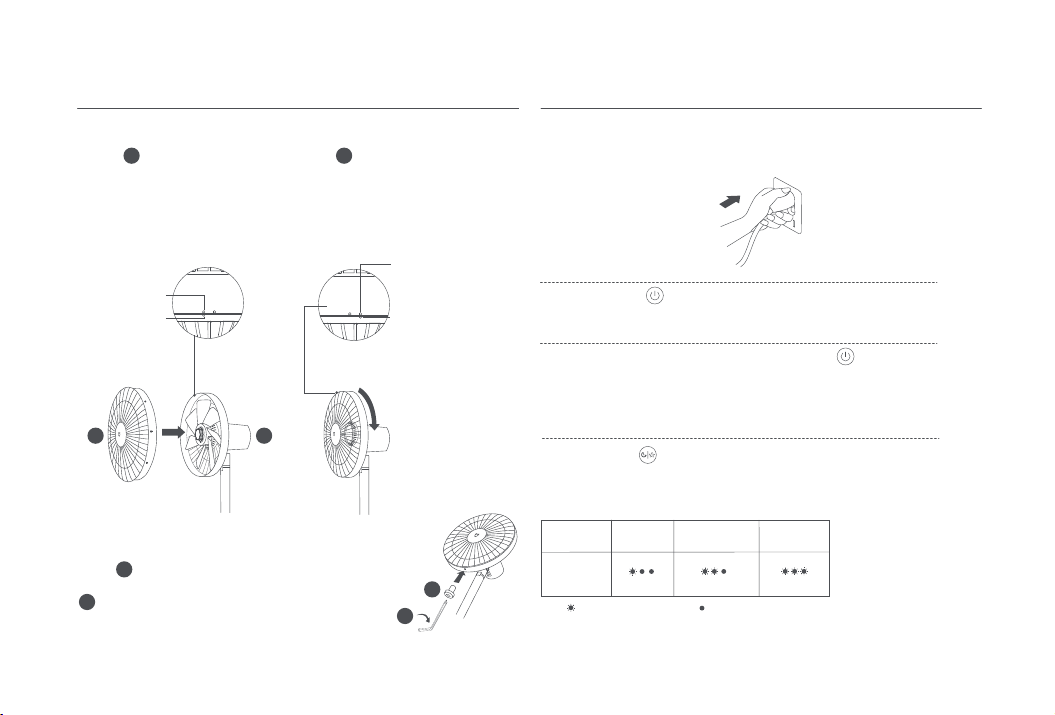
Connect to a power outlet
Plug the power cord into a power outlet. Once you hear a beep, the fan is
connected successfully.
Turn on/off
Turn on
Press the buon to start the fan. When turned on for the
first time, the default speed is slow (1).
Turn off
When the fan is working, press and hold the buon to stop it.
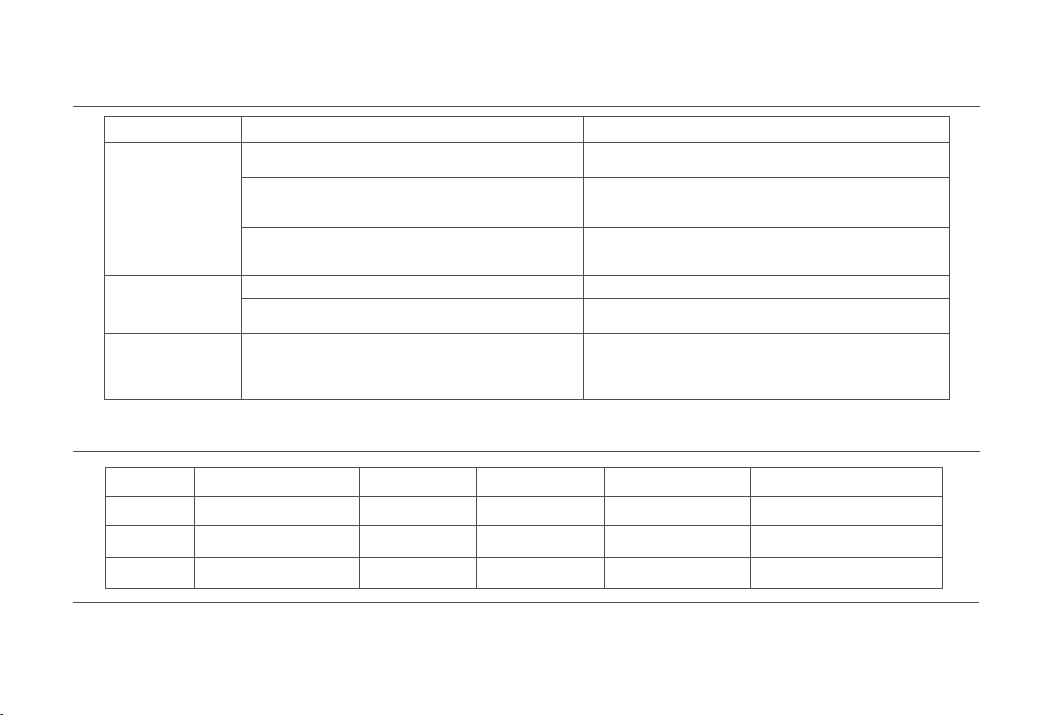
Switching Speed/Mode
Switching speed
Press the buon to adjust the speed. With each press, the corresponding
status indicator will be on (see the table below). The fan will remember and
apply the last used speed mode when turned on again.
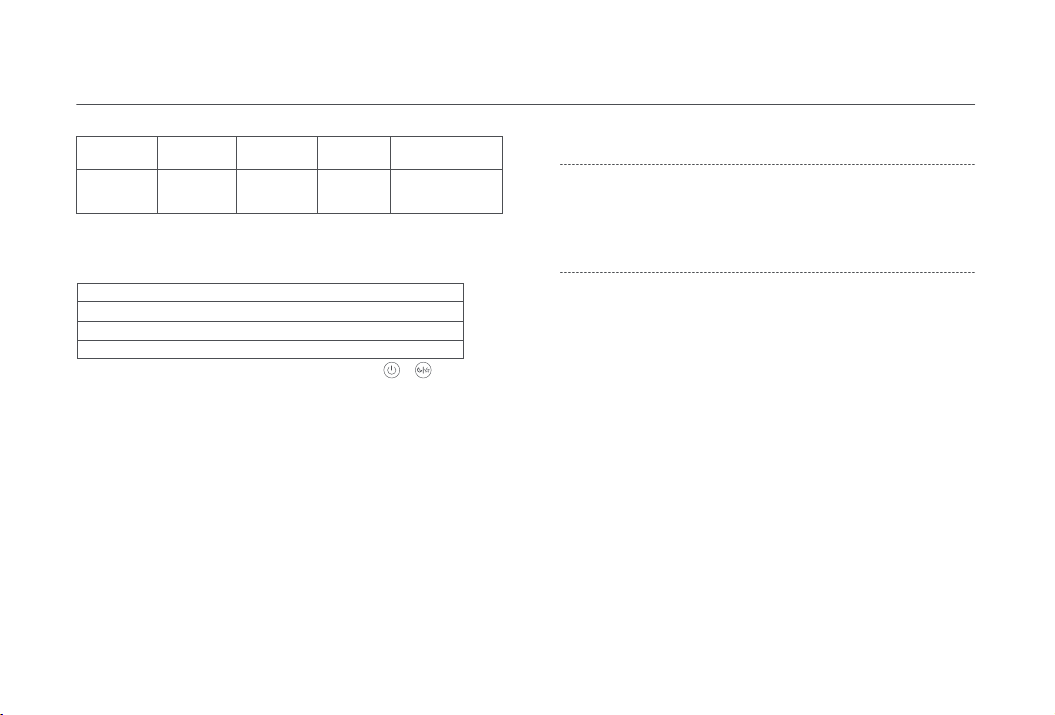
Fan Speed
Indicator
Status
Note: means the indicator is on; means the indicator is off.
6
Slow (1) Medium (2)
Fast (3)
Page 8
How to Use
Switching mode
Press and hold the buon to switch between direct breeze and
sleep mode. The sleep mode indicator is on while in sleep mode, and
off while in direct breeze mode.
Note: The fan is set to direct breeze by default. The fan will remember and apply the last used
mode when turned on again.
Enable/Disable Oscillation
Press the buon to enable or disable 90° oscillation. The fan will
remember and apply the last used oscillation seing when turned on
again.
Delayed Turn-off
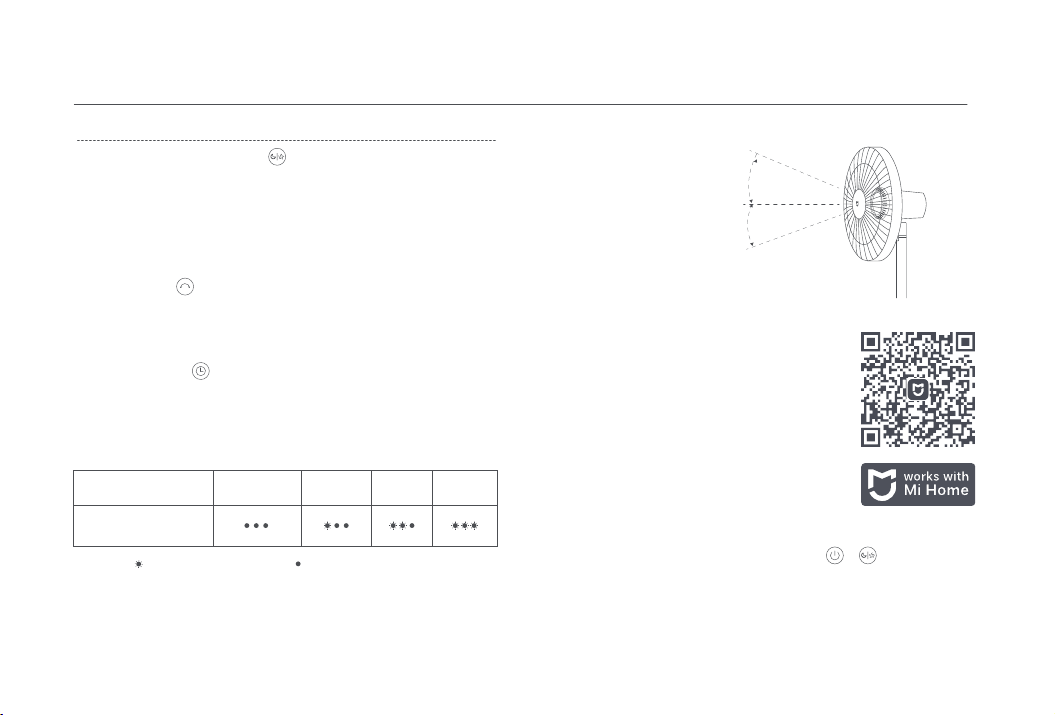
Press the buon to cycle through the delayed turn-off times: 1
hour, 2 hours, 3 hours, and disabled, and the corresponding status
indicator(s) will be on (see the table below). Five seconds aer
using the delayed turn-off function, the status indicator(s) will
display the corresponding status of the currently selected speed.
Scheduled
Status
Indicator
Status
Note: means the indicator is on; means the indicator is off.
For more delayed turn-off options (up to 8 hours), please go to the
Mi Home/Xiaomi Home app.
Disabled 1 hour 2 hours 3 hours
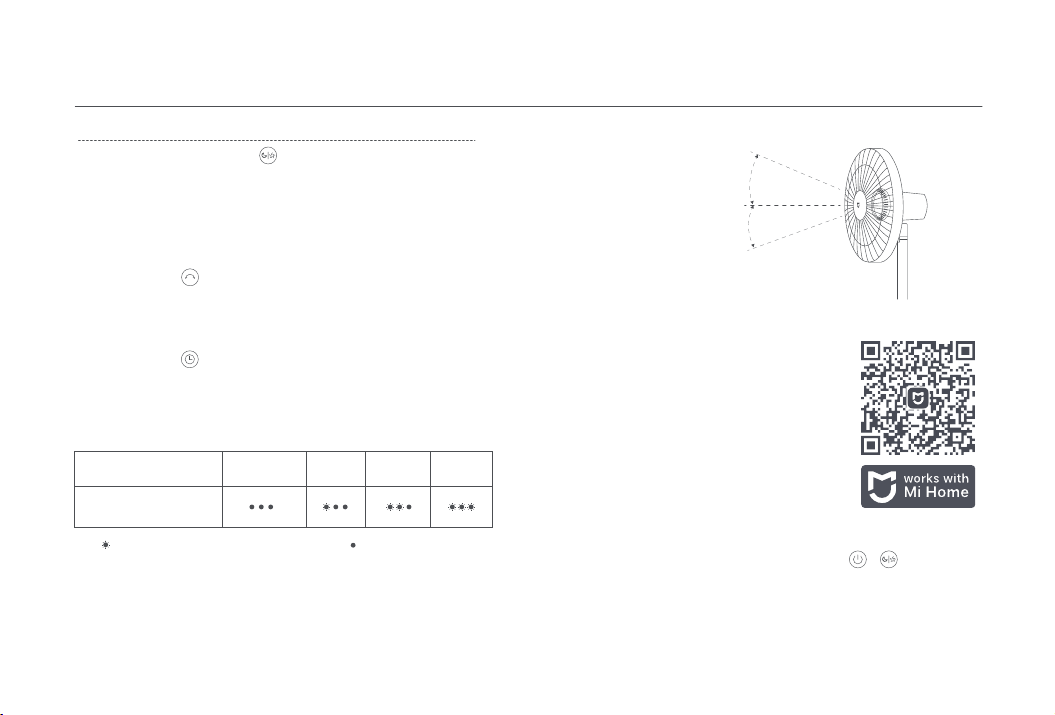
Adjust the Airflow Direction
Gently li or push down the
fan's head or fan grille to adjust
the airflow upwards or
downwards.
20° upwards
16° downwards
Connect with Mi Home/Xiaomi Home App
Scan the QR code to download and install the app.
You will be directed to the connection setup page if
the app is installed already. Or search "Mi Home/Xiaomi Home" in the app store to download and install
it.Open Mi Home/Xiaomi Home app, tap "+" on the
upper right, and then follow prompts to add your
device.
* The app is referred to as Xiaomi Home app in Europe
(except for Russia). The name of the app displayed on
your device should be taken as the default.
Note: The version of the app might have been updated, please follow the
instructions based on the current app version.
Connecting to Wi-Fi
Simultaneously press and hold the buons and . Once you hear a
beep, the fan is awaiting a connection, then you can pair it with a device
via the app.
7
Page 9
How to Use
Wi-Fi Indicator Status:
Wi-Fi Status
Indicator
Status
Awaiting
connection
Blinking orange Blinking blue Blue Orange
Connecting Connected Couldn't connect
Reseting the Wi-Fi
The Wi-Fi connection needs to be reset on the circumstances listed in the
table below.
The Mi account that the fan is paired with has been changed.
The router that the fan is connected to has been changed.
The account or password of the router that the fan is connected to has been changed.
The Mi Home/Xiaomi Home app cannot control the fan.
Simultaneously press and hold the buons and . Once you hear a
long beep, the Wi-Fi connection has been reset successfully and then the
Wi-Fi is awaiting a connection.
Child Safety Lock
Enabling
You can enable the function of child lock in the Mi Home/Xiaomi Home
app. Once it is enabled, the fan will not respond to buon operations but
instead of all indicators blinking twice with two beeping sounds.
Disabling
You can disable the function of child lock in the Mi Home/Xiaomi Home
app. Reseing the Wi-Fi connection or unplugging and plugging in the fan
again can also disable this function.
8
Page 10
Trobleshooting
Fault
The fan doesn't work
Wi-Fi is unable
to connect
Fan blades are stuck
Possible Cause Solution
No electricity from the power outlet or the fan does not
The fan blade assembly or the grilles are not installed
The fan is offline for more than half an hour.
connect to the power.
properly.
Child lock is enabled.
The Wi-Fi connection is 5 GHz.
Fan blades are stuck by a foreign object.
9
Connect to a power outlet that meets the fan's requirements.
Follow the steps in the user manual to check and make sure
Disable the child lock in the Mi Home/Xiaomi Home app, or
disconnect the fan from power then connect again.
they are securely installed.
Connect to a 2.4 GHz Wi-Fi connection.
Reset the Wi-Fi connection.
Unplug the fan and remove the foreign object.
Page 11

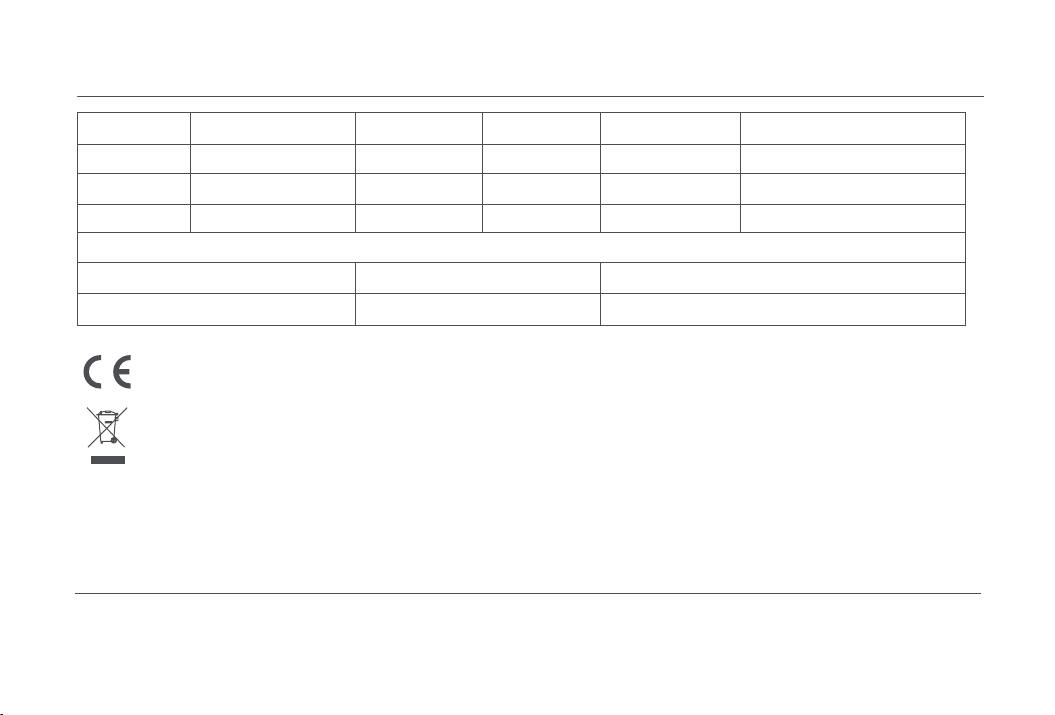
Specifications
Name
Model
Type
Gross Weight
Mi Smart Standing Fan 1C
JLLDS01XY
AC Standing Fan
4.5 kg
Rated Voltage Power Cord Length
Rated Power Item Dimensions
Net Weight
220-230 V~
50/60 Hz
38 W
3.5 kg
Wireless ConnectivityRated Frequency
Noise Emission
Wi-Fi IEEE 802.11b/g/n 2.4G Hz
343 × 330 × 1000 mm
*Radio frequency and radio transmission power
RF Specification Working Frequency Maximum Output Power
2.4G Wi-Fi
Hereby, Zhejiang Xingyue Electric Equipment Co., Ltd. declares that the radio equipment type JLLDS01XY is in compliance with
Directive 2014/53/EU. The full text of the EU declaration of conformity is available at the following internet
address: hp://www.mi.com/global/service/support/declaration.html
All products bearing this symbol are waste electrical and electronic equipment (WEEE as in directive 2012/19/EU) which should not
be mixed with unsorted household waste. Instead, you should protect human health and the environment by handing over your
waste equipment to a designated collection point for the recycling of waste electrical and electronic equipment, appointed by the
government or local authorities. Correct disposal and recycling will help prevent potential negative consequences to the environment and human health. Please contact the installer or local authorities for more information about the location as well as terms
and conditions of such collection points.
Manufactured for: Xiaomi Communications Co., Ltd.
Manufactured by: Zhejiang Xingyue Electric Equipment Co., Ltd.
(a Mi Ecosystem company)
2412-2472 MHz 19.67 dBm
Address: South Side, 24th Floor, Jinpin Building, Headquarters
Center, Yongkang City, Zhejiang Province, China
For further information, please go to www.mi.com
10
1.6 m
≤63 dB(A)
V1.0
Page 12
Instrucciones de Seguridad
Lea detenidamente este manual antes de usar el producto y consérvelo para futuras consultas.
Precauciones Advertencias
Instalación
Asegúrese de que el ventilador sea instalado adecuadamente siguiendo
las instrucciones, para evitar así descargas eléctricas, incendios, lesiones
personales u otros daños.
No conecte el ventilador a una toma de corriente en tanto no esté
montado.
Manejo del ventilador
Apague y desenchufe el ventilador antes de moverlo.
Sujete firmemente el soporte del ventilador para evitar que caiga
causando lesiones personales.
Uso del ventilador
Deje de usar el ventilador inmediatamente si emite sonidos extraños,
malos olores, se sobrecalienta o gira de forma irregular.
No se apoye o incline el ventilador mientras esté funcionando.
No empuje la cabeza del ventilador repetidamente para evitar daños
a los mecanismos internos.
Cable de alimentación
Desenchufe el cable de alimentación antes de reparar o mover el
ventilador.
Desenchufe siempre el ventilador tirando del enchufe en lugar del cable.
Si se ha dañado el cable de alimentación, deberá reemplazarlo por un
recambio original del fabricante o su departamento de servicio técnico
posventa, para evitar riesgos de seguridad.
El uso inadecuado puede conllevar riesgo de descarga eléctrica, incendio,
lesiones personales u otros daños.
Este aparato puede ser utilizado por niños de 8 años en adelante y por
personas con capacidades sensoriales, mentales o sicas reducidas,
siempre y cuando estén bajo la supervisión de un adulto, se les hayan
proporcionado instrucciones sobre el uso del producto y se les haya
advertido de los riesgos que implica. Los niños no deben jugar con el
aparato. La limpieza y el mantenimiento por parte del usuario no deben
realizarse por niños sin supervisión de un adulto. (Para países o regiones
europeos)
Este dispositivo no está diseñado para personas (incluidos niños) con
capacidades sicas, sensoriales o mentales reducidas, o con falta de
experiencia y conocimientos, a menos que estén bajo supervisión o que la
persona responsable de su seguridad les haya proporcionado
instrucciones sobre el uso del producto.
Los niños deberán estar bajo supervisión para asegurarse de que no
jueguen con el aparato. (Para países o regiones no europeas)
Una vez completado el montaje, está estrictamente prohibido retirar las
salvaguardas bajo ninguna circunstancia.
Los niños deberán estar bajo supervisión para asegurarse de que no
jueguen con el aparato.
Si el cable de alimentación está dañado, debe ser reemplazado por el
fabricante, su servicio técnico o personas con una cualificación similar
para evitar peligros.
11
Page 13
Instrucciones de Seguridad
Lea detenidamente este manual antes de usar el producto y consérvelo para futuras consultas.
Advertencias
El uso inadecuado puede conllevar riesgo de descarga eléctrica, incendio, lesiones personales u otros daños.
No utilice este ventilador en lugares donde pueda caerse fácilmente, o
donde pueda haber objetos inestables cerca.
No utilice este ventilador en entornos cálidos y húmedos como un baño.
No utilice este ventilador si su cable de alimentación está dañado o el
enchufe está suelto.
No utilice este ventilador si la parrilla frontal o trasera está suelta o se
ha caído.
No permita que adultos incapaces o niños utilicen este ventilador.
No desmonte o arregle este ventilador.
No apriete, doble o gire demasiado el cable de alimentación, para evitar
la exposición o rotura del núcleo.
No introduzca los dedos o cualesquiera objetos en la parrilla frontal,
trasera, u hojas del ventilador cuando esté en uso.
Mantenga alejada cualquier tela del ventilador para evitar que queden
atrapadas en este.
No utilice tomas de alimentación inadecuadas.
En condiciones normales de uso, este equipo debe mantenerse a una
distancia de, al menos, 20 cm entre la antena y el cuerpo del usuario.
12
Page 14
Contenido del paquete
4
3
Soporte inferior
1
Motor, soporte superior y
cable de alimentación.
Nota: Las ilustraciones del producto, los accesorios y la interfaz de usuario del manual de usuario son solo para fines de referencia. El producto y las
funciones actuales pueden variar debido a mejoras del producto.
Montaje del Ventilador (parrilla frontal,
ensamblaje de las hojas y parrilla trasera)
2
7
Llave Allen Perno de la base×1
13
Base
8
Pomo del ensamblaje
5 6
de las hojas del
ventilador
9
Tornillo de la parrilla
del ventilador×1
Pomo de la
parrilla trasera
Manual de usuario
10
Page 15
Descripción general
Instrucciones de instalación
Base
Planta
Indicador del Wi-Fi
Indicador de Velocidad/Apagado Diferido
Indicador del Modo Reposo
Botón de encendido/apagado
Botón de Ajuste de Velocidad/Selector de Modo
Botón de oscilación
Botón de Apagado Programado
Indicador del Punto Central (sin indicador
luminoso): Punto Central del rango angular
de la cabeza del ventilador.
Motor & Soporte
Superior
Soporte inferior
Cable de
alimentación
Perno de
la base
Paso 1: Instalación de la base
1
3
4
1(1). Modo Erguido: Conecte el
soporte inferior al soporte superior,
después instálelo sobre la base
tal y como muestra la imagen.
14
1
3
3
4
1(2). Modo ventilador de mesa:
Instale el soporte superior
directamente sobre la base.
2. Introduzca el perno de la
base en el agujero en la parte
inferior de la base.
3. Utilice la llave Allen incluida
para girar el perno de la base en
dirección horaria para sujetar el
soporte a la base.
1
7
4
8
8
7
8
Page 16

Instrucciones de instalación
Paso 2: Apertura del ensamblaje del ventilador
Desmonte el ensamblaje del ventilador tal y como muestran las
imágenes siguientes: ①Gire la parrilla frontal en sentido antihorario
hasta que las parrillas se aflojen de forma efectiva. ②Después retire la
parrilla trasera y extraiga el ensamblaje del ventilador.
2
11
parrilla frontal
11
12
①
2
Montaje del Ventilador
②
12
ensamblaje de las
hojas y
13
parrilla trasera
Paso 3: Instalación de la parrilla trasera
Asegúrese de que “ ” mire hacia arriba cuando coloque la parrilla
trasera en el motor, y gire el pomo de la parrilla trasera en sentido
horario para apretar ésta al motor.
13
13
6
6
Paso 4: Instalación del ensamblaje de las hojas
Alinee el agujero central del ensamblaje de las hojas con la cubierta del
motor e instálelo en ésta, después coloque el pomo del ensamblaje de las
hojas del ventilador en la cubierta del motor. Gire el pomo en sentido
antihorario para sujetar el ensamblaje de las hojas a la cubierta del motor.
12
15
12
5
5
13
Page 17

Instrucciones de instalación
Modo de uso
Paso 5: Instalación de la parrilla frontal
1. Alinee la marca de alineamiento de la Parrilla Central con la marca de
alineamiento izquierda de la parrilla trasera, y asegúrese de que la
parrilla frontal queda correctamente encajada con la parrilla trasera.
2. Gire la parrilla frontal en sentido horario hasta que la marca de alineación
de la parrilla frontal se alinee con la marca de alineación derecha de la
parrilla trasera. Asegúrese de que las parrillas están firmemente sujetas.
Marca de alineación
izquierda de la
parrilla trasera
Marca de alineación
de la parrilla frontal
13
Planta previa
sujeción de las
parrillas frontal y
trasera
1311
11
Marca de alineación
derecha de la parrilla
Marca de alineación
de la parrilla frontal
Planta tras la unión de las
parrillas frontal y trasera
trasera
Paso 6: Apriete la parrilla frontal
Introduzca el tornillo de la parrilla del ventilador en el
agujero en la parte inferior de la parrilla del ventilador. Gire
el tornillo en sentido horario usando la llave Allen
incluida para apretarlo.
9
7
9
7
Conectar a la toma de alimentación
Inserte el cable de alimentación a una toma de corriente. Una vez escuche
un pitido, el ventilador se habrá conectado con éxito.
Encender/apagar
Encender
Presione el botón para encender el ventilador. Cuando lo encienda por
primera vez, la velocidad por defecto es lenta (1).
Apagar
Cuando el ventilador esté funcionando, mantenga presionado el botón ●
para detenerlo.
Cambiar de velocidad/modo
Cambiar la velocidad
Presione el botón para ajustar la velocidad. Con cada pulsación, el
correspondiente indicador de estado se encenderá (vea la siguiente tabla).
El ventilador registrará y utilizará la última velocidad utilizada cuando vuelva
a encenderse.
Velocidad del ventilador
Lenta (1)
Media (2)
Estado del indicador
Nota: significa que el indicador está encendido; mientras que significa que el indicador está
apagado.
16
Rápida (3)
Page 18
Modo de uso
Cambio de modo
Mantenga presionado el botón para alternar entre brisa directa y
modo reposo. El indicador de modo reposo se encenderá en modo
reposo, y estará apagado cuando esté en modo de brisa directa.
Nota: El ventilador está configurado en modo brisa directa por defecto. El ventilador registrará y
utilizará el último modo utilizado cuando vuelva a encenderse.
Habilitar/Deshabilitar la oscilación
Presione el botón para habilitar o deshabilitar una oscilación de 90º.
El ventilador registrará la última configuración de oscilación utilizada
cuando vuelva a encenderse.
Apagado Programado.
Presione el botón para alternar entre los tiempos de apagado
programado: 1 hora, 2 horas, 3 horas, y deshabilitado. El correspondiente
indicador de estado se encenderá (vea la siguiente tabla). Cinco
segundos antes de la función de apagado programado, el(los)
indicador(es) de estado mostrarán el estado de la velocidad actualmente
seleccionada.
Estado de Programación
Estado del indicador
Nota: significa que el indicador está encendido; mientras que significa que el indicador
está apagado.
Para ulteriores opciones de apagado programado (hasta 8 horas), por favor, utilice
Mi Home/Xiaomi Home.
Desactivado 1 hora 2 horas 3 horas
Ajustar la dirección del aire
Levante o baje suavemente la
cabeza o parrilla del ventilador
para ajustar la dirección de aire
hacia arriba o hacia abajo.
20º hacia arriba
16º hacia abajo
Conectar con la aplicación Mi Home/Xiaomi Home
Escanee el código QR para descargar e instalar la
aplicación. Se le dirigirá a la página de configuración
de conexión si la aplicación ya está instalada. O
busque "Mi Home/Xiaomi Home" en la App Store para
descargarla e instalarla.
* La aplicación se conoce como Xiaomi Home en
Europa (excepto en Rusia). El nombre de la aplicación
que aparece en su dispositivo debe ser tomado como
el predeterminado.
Nota: La versión de la aplicación puede haber sido actualizada, siga las
instrucciones basadas en la versión actual de la aplicación.
Conectarse al Wi-Fi
Mantenga presionados al mismo tiempo los botones y . Una vez
escuche un pitido, el ventilador estará esperando para conectarse,
después podrá emparejarlo con un dispositivo a través de la aplicación.
17
Page 19
Modo de uso
Estado del indicador del Wi-Fi
Estado del Wi-Fi
Estado del
indicador
Esperando
conexión
Parpadeo naranja
Conectando Conectado No se pudo conectar
Rápido
parpadeo azul
Azul Naranja
Restablecer la red Wi-Fi
La conexión Wi-Fi necesita ser restablecida en las circunstancias dispuestas
en la tabla a continuación.
Se ha cambiado la Cuenta Mi vinculada con el ventilador.
Se ha cambiado el rúter al que se ha conectado el ventilador.
Se ha cambiado la cuenta o contraseña del rúter al que está conectado el ventilador.
Mi Home/Xiaomi Home no puede controlar el ventilador.
Mantenga presionados al mismo tiempo los botones y . Una vez
escuche un pitido largo, la conexión Wi-Fi se habrá restablecido con éxito y
estará aguardando una nueva conexión.
Seguro Infantil
Activación
Puede activar la función de seguro infantil en Mi Home/Xiaomi Home.
Una vez habilitado, el ventilador no responderá a las funciones de
botón, si no que todos los indicadores parpadearán dos veces con dos
pitidos.
Desactivación
Puede desactivar la función de seguro infantil en Mi Home/Xiaomi
Home. Restablecer la conexión Wi-Fi o desconectar y volver a conectar
el ventilador a la corriente también deshabilita esta opción.
18
Page 20
Solución de problemas
Error
El ventilador no
funciona
No es posible
conectar el Wi-Fi
Las hojas están
atascadas
Posible causa Solución
No hay electricidad en la toma de corriente o el
ventilador no está conectado a la corriente.
El ensamblaje de las hojas o las parrillas no han sido
El ventilador está desconectado durante más de media
Las hojas del ventilador están atascadas con un
adecuadamente instalados.
Seguro infantil habilitado.
La conexión Wi-Fi es de 5 GHz.
hora.
elemento extraño.
19
Conéctelo a una toma de corriente que cumpla con los
Siga los pasos del manual de usuario para comprobar y
asegurarse de que estén correctamente instaladas.
Desactive el Seguro infantil en Mi Home/Xiaomi Home, o
desconecte el ventilador de la corriente y vuélvalo a conectar.
Desenchufe el ventilador y retire el objeto extraño.
requisitos del ventilador.
Conéctese a una red Wi-Fi de 2,4 GHz.
Restablecer la red Wi-Fi.
Page 21

Especificaciones
Nombre
Model
Tipo
Peso bruto
Ventilador inteligente
inalámbrico Mi 1C
JLLDS01XY
Ventilador de pie con
corriente alterna
4.5 kg
Tensión nominal
Potencia nominal
Peso neto
*Radiofrecuencia y potencia de transmisión por radio
Especificación RF Frecuencia de Trabajo Potencia Máxima de Salida
2.4G Wi-Fi
Por la presente, Zhejiang Xingyue Electric Equipment Co., Ltd. declara que el tipo de equipo radioeléctrico JLLDS01XY cumple con
la Directiva 2014/53/UE. Encontrará el texto completo de la declaración de conformidad de la UE en esta dirección de Internet:
hp://www.mi.com/global/service/support/declaration.html
Todos los productos que llevan este símbolo son residuos de aparatos eléctricos y electrónicos (RAEE según la directiva 2012/19/UE)
que no deben mezclarse con residuos domésticos sin clasificar. En su lugar, debe proteger la salud humana y el medio ambiente
entregando sus equipos de desecho a un punto de recogida para el reciclaje de residuos de equipos eléctricos y electrónicos,
designado por el gobierno o las autoridades locales. La eliminación y el reciclado correctos ayudarán a evitar posibles consecuencias negativas para el medio ambiente y la salud humana. Póngase en contacto con el instalador o con las autoridades locales para
obtener más información sobre la ubicación y las condiciones de dichos puntos de recogida.
Fabricado para: Xiaomi Communications Co., Ltd.
Fabricado por: Zhejiang Xingyue Electric Equipment Co., Ltd.
(una empresa Mi Ecosystem)
220-230 V~
50/60 Hz
38 W
3.5 kg
Longitud del cable de
alimentación
Conexión inalámbricaFrecuencia nominal
Dimensiones del
artículo
Emisión acústica
2412-2472 MHz 19.67 dBm
Dirección: South Side, 24th Floor, Jinpin Building, Headquarters
Center, Yongkang City, Zhejiang Province, China
20
1.6 m
Wi-Fi IEEE 802.11b/g/n 2.4G Hz
343 × 330 × 1000 mm
≤63 dB(A)
Para obtener más información, visite www.mi.com
V1.0
Page 22
Инструкция по технике безопасности
Перед использованием внимательно прочтите это руководство. Сохраните его — оно может понадобиться вам в дальнейшем.
Меры предосторожности Предупреждения
Установка
Убедитесь в надлежащей установке вентилятора в соответствии с
инструкцией, чтобы избежать ударов электрическим током, пожара,
телесных повреждений или возникновения иного ущерба.
Не подключайте вентилятор к электрической розетке, если он не
собран.
Обращение с вентилятором
Перед перемещением вентилятора выключите его и выньте вилку из
электрической розетки.
Крепко держите стойку вентилятора, чтобы она не упала и не
причинила телесные повреждения.
Использование вентилятора
Немедленно перестаньте использовать вентилятор, если он издает
необычные звуки, неприятный запах или вращается неравномерно.
Не опирайтесь на вентилятор и не наклоняйте его, когда он работает.
Не толкайте головку вентилятора несколько раз подряд, чтобы
избежать повреждения внутреннего механизма.
Шнур питания
Выньте шнур питания из розетки до выполнения ремонта или
перемещения вентилятора.
При отключении вентилятора от электрической розетки всегда
держитесь за штепсель, а не за шнур.
Если шнур питания поврежден или разорван, его необходимо
заменить оригинальным шнуром питания, приобретенным у
изготовителя или в отделе послепродажного обслуживания, чтобы
избежать опасности травмирования.
Ненадлежащее использование может привести к поражению электрическим
током, пожару, телесным повреждениям или возникновению иного ущерба.
Не используйте вентилятор в местах, где он может опрокинуться,
или поблизости от других неустойчивых предметов.
Не используйте вентилятор в жаркой или влажной среде, например,
в ванной.
Не используйте вентилятор, если шнур питания поврежден или
электрическая вилка вставлена неплотно.
Не используйте вентилятор, если не установлена передняя защитная
решетка или задняя решетка не закреплена либо отпала.
Не позволяйте использовать вентилятор взрослым людям,
неспособным эксплуатировать вентилятор, или детям.
Не разбирайте и не ремонтируйте этот вентилятор.
Не защемляйте, изгибайте или скручивайте шнур питания
чрезмерно, чтобы избежать оголения или поломки жилы.
Не вставляйте пальцы или какие-либо предметы в переднюю
защитную решетку, заднюю решетку или лопасти вентилятора, когда
он используется.
Не допускайте попадания в вентилятор волос или ткани, чтобы они
не запутались в вентиляторе.
Не используйте неподходящие электрические розетки.
При обычных условиях использования между антенной этого
оборудования и телом пользователя должно сохраняться расстояние
не менее 20см.
21
Page 23

Комплект поставки
4
3
Низ стойки
1
Двигатель, верх стойки и
шнур питания
Примечание. Иллюстрации изделия, аксессуаров и пользовательского интерфейса в настоящем руководстве пользователя представлены
исключительно в ознакомительных целях. Фактические характеристики прибора и его функции могут отличаться в связи с улучшениями продукта.
Вентилятор в сборке (передняя
защитная решетка, лопасти
вентилятора в сборке, задняя решетка)
2
7
Торцевой ключ
22
Подставка
электропитания
8
Болт подставки
электропитания×1
5 6
Ручка узла лопастей
вентилятора
9
Винт решетки
вентилятора×1
Ручка задней
решетки
10
Руководство
пользователя
Page 24

Обзор
Инструкция по установке
Вид сверху
Двигатель и
верх стойки
Низ стойки
Подставка
электропит
ания
Индикатор Wi-Fi
Индикатор скорости/задержки выключения
Индикатор режима сна
Кнопка Вкл./Выкл.
Кнопка регулировки
скорости/переключения режимов
Кнопка поворота
Кнопка запланированного выключения
Индикатор центральной точки (без
светового эффекта): Центральная точка
диапазона углов головки вентилятора.
Шнур питания
Болт подставки
электропитани
я
Этап 1: Установка подставки электропитания
1(2). Режим настольного
вентилятора: установите верх
стойки непосредственно на
подставку электропитания.
1
3
4
1(1). Режим напольного вентилятора:
соедините низ стойки с верхом
стойки, затем установите его на
подставку электропитания, как
показано на рисунке.
23
3
1
2. Вставьте болт подставки в
отверстие в нижней части
подставки электропитания.
3. При помощи торцевого
ключа, входящего в комплект
поставки, поворачивайте болт
3
4
подставки по часовой стрелке,
чтобы закрепить стойку на
подставке электропитания.
8
7
1
4
8
7
8
Page 25

Инструкция по установке
Этап 2: Откройте вентилятор в сборке
Выполните разборку вентилятора, как показано на рисунках ниже:
①Поворачивайте переднюю защитную решетку против часовой
стрелки до достаточного ослабления решеток. ②Затем удалите
переднюю защитную решетку из задней решетки и выньте узел
лопастей вентилятора.
передняя защитная
решетка
2
11
13
①
2
Вентилятор в сборке
②
11
12
лопасти вентилятора
в сборке
13
задняя решетка
12
Этап 3: Установите заднюю решетку
При установке задней решетки на двигатель символ « »
обязательно должен быть направлен вверх, также следует повернуть
ручку задней решетки по часовой стрелке в сторону двигателя.
13
13
6
Этап 4: Установка узла лопастей вентилятора
Выровняйте центральное отверстие узла лопастей вентилятора
относительно вала двигателя и установите вентилятор на вал, затем на
вал двигателя установите ручку узла лопастей вентилятора.
Поворачивайте ручку против часовой стрелки, чтобы закрепить узел
лопастей вентилятора на валу.
12
24
5
12
5
6
Page 26

Инструкция по установке
Инструкция
Этап 5: Установите переднюю решетку
1. Выровняйте метку совмещения передней защитной решетки с
левой меткой совмещения задней решетки. Убедитесь в том, что
передняя решетка надлежащим образом вставлена в заднюю решетку.
2. Поворачивайте переднюю защитную решетку по часовой стрелке до
совмещения метки передней решетки с правой меткой совмещения
задней решетки. Обязательно прочно закрепите решетки.
Левая метка
совмещения задней
решетки
Метка совмещения
передней защитной
решетки
Вид сверху до
закрепления
передней и
задней решетки
1311
13
Правая метка
совмещения задней
решетки
Метка совмещения
передней защитной
решетки
Вид сверху после закрепления
передней и задней решетки
11
Этап 6: Закрепите переднюю решетку
9
Вставьте винт решетки вентилятора в отверстие в
нижней части решетки вентилятора. Поворачивайте винт
по часовой стрелке при помощи торцевого ключа,
входящего в комплект поставки, чтобы его затянуть.
7
9
7
Подключите к электрической розетке
Подключите шнур питания к сетевой розетке. Звуковой сигнал будет
означать, что подключение вентилятора выполнено успешно.
Включение/выключение
Включить
Нажмите кнопку для запуска вентилятора. При первом включении
по умолчанию установлена медленная скорость (1).
Выключить
Когда вентилятор работает, нажмите и удерживайте кнопку для его
остановки.
Переключение скорости/режима
Переключение скорости
Нажмите кнопку для регулировки скорости. При каждом нажатии
загорается соответствующий индикатор состояния (см. таблицу ниже).
Вентилятор запоминает и применяет при следующем включении
последний использовавшийся скоростной режим.
Скорость вентилятора
Медленно (1)
Средне (2)
Состояние индикатора
Примечание: означает, что индикатор включен; означает, что индикатор выключен.
25
Быстро (3)
Page 27
Инструкция
Переключение режимов
Нажмите и удерживайте кнопку для переключения между режимом
прямого обдува и сна. Индикатор режима сна включен, когда
вентилятор находится в режиме сна, и выключен, когда вентилятор
находится в режиме прямого обдува.
Примечание. По умолчанию в вентиляторе установлен режим прямого обдува. Вентилятор
запоминает и применяет при следующем включении последний использовавшийся режим.
Включить/отключить поворот
Нажмите кнопку для включения или выключения поворота на 90°.
Вентилятор запоминает и применяет при следующем включении
последний использовавшийся поворот.
Задержка выключения
Нажимайте кнопку для переключения последовательности
времен задержки: 1 час, 2 часа, 3 часа и выключено, при этом будет
загораться соответствующий индикатор состояния (см. таблицу
ниже). В течение пяти секунд с момента использования функции
задержки выключения индикатор(-ы) состояния будет(-ут) показывать
соответствующее состояние выбранной в данный момент скорости.
Запланированное
состояние
Состояние
индикатора
Примечание. означает, что индикатор включен; означает, что индикатор выключен.
Больше параметров задержки выключения (до 8 часов) можно использовать в
Mi Home/Xiaomi Home.
Отключено
1 час 2 часа 3 часа
Регулировка направления потока воздуха
Осторожно приподнимите
головку или решетку
вентилятора либо придавите ее
вниз, чтобы отрегулировать
поток воздуха в направлении
вверх или вниз.
20° вверх
16° вниз
Подключитесь к приложению Mi Home/Xiaomi Home
Отсканируйте QR-код, чтобы скачать и установить
приложение. Вы будете перенаправлены на
страницу настройки подключения, если
приложение уже установлено. Или выполните
поиск по запросу "Mi Home/Xiaomi Home" в App
Store, чтобы скачать и установить приложение.
* В Европе приложение называется "Xiaomi Home"
(кроме России). Название приложения, которое
отображается на вашем устройстве, должно быть
принято по умолчанию.
Примечание. Версия приложения могла обновиться. Следуйте
инструкциям для текущей версии приложения.
Подключение к Wi-Fi
Одновременно нажмите и удерживайте кнопки и . Если вы
слышите звуковой сигнал, это означает, что вентилятор ожидает
подключения, после которого можно установить соединение между
ним и устройством посредством приложения.
26
Page 28

Инструкция
Состояние индикатора беспроводной сети Wi-Fi
Состояние
беспроводной сети Wi-Fi
Состояние индикатора
Ожидание
подключения
Мигает оранжевым
цветом
Подключение
Мигает синим
цветом
Подключение
установлено
Синий Оранжевый
Невозможно
установить
подключение
Сброс Wi-Fi
При возникновении обстоятельств, перечисленных в приведенной ниже
таблице, соединение Wi-Fi необходимо сбросить.
Изменена учетная Mi аккаунт, с которой установлено соединение вентилятора.
Изменен маршрутизатор, с которым установлено соединение вентилятора.
Изменена учетная запись или пароль маршрутизатора, с которым установлено соединение
вентилятора.Изменена учетная запись или пароль маршрутизатора, с которым установлено
соединение вентилятора.
Mi Home/Xiaomi Home не может управлять вентилятором.
Одновременно нажмите и удерживайте кнопки и . Когда
послышится долгий звуковой сигнал, это означает, что соединение Wi-Fi
успешно сброшено и Wi-Fi ожидает соединения.
Детское предохранительное устройство
Включение
Функцию детской блокировки можно включить в Mi Home/Xiaomi
Home. После ее включения вентилятор не будет реагировать на
нажатия кнопки. Вместо этого все индикаторы будут мигать дважды и
издавать два звуковых сигнала.
Отключение
Функцию детской блокировки можно отключить в Mi Home/Xiaomi
Home. Эту функцию также может отключить сброс соединения Wi-Fi
или отключение вентилятора от электрической розетки и повторное
его включение.
27
Page 29
Устранение неполадок
Неисправность
Вентилятор не
работает
Wi-Fi не может
установить
соединение
Произошло
застревание
лопастей
вентилятора
В электрической розетке отсутствует электричество,
или вентилятор не подключен к источнику питания.
Узел лопастей вентилятора или решетки не
Вентилятор находится в автономном режиме на
Произошло застревание в лопастях вентилятора
Возможная причина Решение
установлены надлежащим образом.
Включена детская блокировка.
Wi-Fi работает на частоте 5 ГГц.
протяжении более получаса.
инородного предмета.
Технические характеристики
Название
Модель
Тип
Вес брутто
Изготовлено для: Xiaomi Communications Co., Ltd.
Изготовитель: Zhejiang Xingyue Electric Equipment Co., Ltd.
(компания экосистемы Mi)
Напольный
смарт-вентилятор Mi 1C
JLLDS01XY
Напольный вентилятор
переменного тока
4,5 кг
Номинальное
напряжение
Номинальная
Номинальная
Подключитесь к электрической розетке, соответствующей
Следуйте этапам в руководстве пользователя для
выполнения проверки и убедитесь в том, что узел
лопастей вентилятора надежно установлен.
Отключите детскую блокировку в Mi Home/Xiaomi Home
или отключите вентилятор от источника питания и затем
Подключитесь к соединению Wi-Fi 2,4 ГГц.
Выньте вилку из розетки и удалите инородный
220-230 В~
частота
мощность
Вес нетто
Адрес: South Side, 24th Floor, Jinpin Building, Headquarters Center,
Yongkang City, Zhejiang Province, Китай
50/60 Гц
38 Вт
3,5 кг
28
Длина шнура питания
Беспроводное
подключение
Размеры изделия
Шумовое
воздействие
требованиям вентилятора.
подключите снова.
Сброс Wi-Fi.
предмет.
1,6 м
Wi-Fi IEEE 802.11 b/g/n 2,4 ГГц
343 × 330 × 1000 мм
≤63 дБ(A)
Чтобы получить дополнительную информацию,
посетите сайт www.mi.com
V1.0
Page 30

Consignes relatives à la Sécurité
Lisez aentivement ce manuel avant toute utilisation et conservez-le pour pouvoir le consulter ultérieurement.
Précautions
Installation
Se rassurer que le ventilateur est correctement installé conformément
aux instructions afin d'éviter des décharges électriques, des incendies,
des blessures corporelles ou d'autres dommages.
Ne pas connecter le ventilateur sur une prise de courant tant qu´il
n'est pas assemblé.
Manipulation du ventilateur
Éteindre et débrancher le ventilateur avant de le déplacer.
Tenir fermement le support du ventilateur pour éviter qu'il ne tombe et
n'entraîne de blessures corporelles.
Utilisation du ventilateur
Cesser immédiatement d'utiliser le ventilateur lorsqu'il émet des bruits
inhabituels, dégage de mauvaises odeurs, surchauffe ou lorsqu'il tourne
de façon irrégulière.
Ne pas pencher ou incliner le ventilateur lorsqu'il est en cours de
fonctionnement.
Ne pas pousser la tête du ventilateur de manière répétitive afin d'éviter
d'endommager son mécanisme interne.
Cordon d'alimentation
Débrancher le cordon d'alimentation avant de réparer ou de déplacer
le ventilateur.
Toujours débrancher le ventilateur en tirant la fiche d'alimentation
plutôt que le cordon d'alimentation.
Si le cordon d'alimentation est endommagé ou cassé, vous devez le
remplacer par un cordon de remplacement dédié que vous aurez
acheté auprès du fabriquant ou de son département d'assistance afin
d'éviter des accidents de liés à la sécurité.
Avertissements
L'utilisation incorrecte peut entraîner des décharges électriques, un
incendie, des blessures personnelles ou d'autres dégâts.
Cet appareil peut être utilisé par des enfants d'au moins 8ans, des
personnes aux aptitudes physiques, sensorielles et/ou mentales
réduites ou encore manquant d'expérience et de connaissances à
condition qu'ils soient surveillés et/ou sensibilisés à l'utilisation de
manière sécurisée de l'appareil et d'avoir compris les risques impliqués.
Il est déconseillé de laisser les enfants jouer avec l'appareil. Le
neoyage et l'entretien ne doivent pas être effectués par un enfant
sans surveillance. (Pour les pays ou régions européens)
Cet appareil n'a pas été conçu pour être utilisé par des personnes (y
compris des enfants) ayant des capacités physiques, sensorielles ou
mentales réduites, ou ne disposant pas de l'expérience ou des
connaissances nécessaires, sauf sous la supervision d'une personne
responsable de leur sécurité, qui doit leur donner des instructions sur
l'utilisation de l'appareil.
Les enfants doivent être placés sous surveillance pour qu'ils ne jouent
pas avec l'appareil. (Pour les pays ou régions non européens)
Une fois l'assemblage terminé, il est strictement interdit de retirer les
protections pour quell but que ce soit.
Les enfants doivent être placés sous surveillance pour qu'ils ne jouent
pas avec l'appareil.
Si le cordon d'alimentation est endommagé, ce dernier doit être
remplacé par le fabricant, son agent de maintenance ou des personnes
qualifiées afin d'éviter tout danger.
29
Page 31
Consignes relatives à la Sécurité
Lisez aentivement ce manuel avant toute utilisation et conservez-le pour pouvoir le consulter ultérieurement.
Avertissements
L'utilisation incorrecte peut entraîner des décharges électriques, un incendie, des blessures personnelles ou d'autres dégâts.
Ne pas utiliser ce ventilateur à des endroits où il peut tomber
facilement ou près d'autres objets instables.
Ne pas utiliser ce ventilateur dans des environnements chauds et
humides tels que les salles de bain.
Ne pas utiliser ce ventilateur si son cordon d'alimentation est
endommagé ou si sa prise d'alimentation est flasque.
Ne pas utiliser ce ventilateur si la grille avant n'est pas installée ou si sa
grille arrière est flasque ou détachée.
Ne pas autoriser des adultes qui sont incapables de manipuler ce
ventilateur ou des enfants de l'utiliser.
Ne pas assembler ou réparer ce ventilateur.
Ne pas trop pincer, courber ou tordre le cordon d'alimentation, afin
d'éviter d'exposer ou casser son noyau.
Ne pas insérer vos doigts ou tout autre objet dans la grille avant, la grille
arrière, ou les pales du ventilateur lorsque celui-ci est en cours de
fonctionnement.
Tenir les cheveux et les tissus loin du ventilateur afin d'éviter qu'ils ne
soient pris à l'intérieur.
Ne pas utiliser des prises d'alimentation inadaptées.
Dans des conditions normales d’utilisation, cet équipement doit être
maintenu à une distance d’au moins 20cm entre l’antenne et le corps
de l’utilisateur.
30
Page 32

Contenu du paquet
4
3
Partie inférieure du
support
1
Moteur et support
supérieur et cordon
d'alimentation
Remarque: les illustrations du produit, accessoires et interface utilisateur présents dans le manuel d'utilisation ne sont présentés qu'à titre de référence. Le
produit et les fonctions réels peuvent varier suite à des améliorations diverses.
Assemblage du ventilateur (la grille
avant, assemblage des pales du
2
7
Clé Allen Boulon du socle×1
ventilateur, grille arrière)
31
Socle
8
Poignée de l'assemblage
des pales du ventilateur
Vis de la grille avant×1 Manuel d'utilisation
5 6
Poignée de la
grille arrière
9
10
Page 33

Présentation
Instructions d'installation
Vue supérieure
Socle
Moteur et partie
supérieure du
support
Partie inférieure
du support
Indicateur de Wi-Fi
Vitesse/indicateur d'arrêt différé
Indicateur du mode veille
Bouton Marche/Arrêt
Réglage de la vitesse/Bouton du mode
basculement
Bouton d'oscillation
Bouton d'arrêt programmé
Indicateur du point central (pas d'effet
de lumière): point central pour la portée
de tête de l'angle du ventilateur.
Cordon
d'alimentation
Boulon du socle
Étape 1: Installation du socle
1
3
4
1(1). Mode de ventilation élevée:
brancher la partie inférieure du
support à la partie supérieure,
puis l'installer dans le socle
comme le montre la figure.
32
3
1
4
3
1(2). Mode de ventilation sur table:
installer la partie supérieure du
support directement dans le socle.
2. Insérer le boulon du socle
dans le trou sur la base du socle.
3. Utiliser la clé Allen incluse
pour tourner le boulon du socle
dans le sens des aiguilles d'une
montre pour fixer le support sur le
socle.
1
4
4
8
8
7
7
8
Page 34

Instructions d'installation
Étape 2: ouvrir l'assemblage du ventilateur
Démonter l' assemblage du ventilateur comme l'indiquent les figures
ci-dessous: ①Tourner la grille avant dans le sens contraire des aiguilles
d'une montre jusqu'à ce que les grilles soient correctement desserrées. ②
Puis retirer la grille avant de la grille arrière et sortir l' assemblage de
la pale du ventilateur.
2
13
11
la grille avant
11
①
2
Assemblage du ventilateur
②
12
assemblage des
pales du ventilateur
12
13
grille arrière
Étape 3: Installer la grille arrière
Se rassurer que « » est orienté vers le haut lors de l'installation de la
grille arrière dans le moteur, puis tourner la poignée de la grille arrière
dans le sens des aiguilles d'une montre pour serrer la grille arrière au
moteur.
13
6
6
Étape 4: Installer l'assemblage de la pale du
ventilateur
Aligner le centre du trou de l' assemblage de la pale du ventilateur avec
l'arbre du moteur et l'installer sur l'arbre, puis installer la poignée de
l'assemblage des pales du ventilateur dans l'arbre du moteur. Tourner la
poignée dans le sens contraire des aiguilles d'une montre pour fixer
l'assemblage de la pale du ventilateur sur l'arbre du moteur.
12
33
12
5
5
13
Page 35

Instructions d'installation
Utilisation
Étape 5: Installation de la grille avant
1. Aligner la marque d'alignement de la grille avant avec la marque
d'alignement gauche de la grille arrière, et se rassurer que la grille
avant est correctement encastrée dans la grille arrière.
2. Tourner la grille avant dans le sens des aiguilles d'une montre jusqu'à ce
que la marque d'alignement de la grille avant s'aligne avec la marque
d'alignement de la grille arrière droite. Se rassurer que les grilles sont
serrées de manière sécurisée.
Marque
d'alignement de la
grille arrière gauche
Marque
d'alignement de la
grille avant
13 11
Vue supérieure
avant le serrage de
la grille arrière et
avant
1311
Vue supérieure après serrage
de la grille arrière et avant
Marque d'alignement de la
grille arrière droite
Marque d'alignement de la
grille avant
Étape 6: Serrage de la grille avant
Insérer la vis de la grille du ventilateur dans le trou à la
base de la grille du ventilateur. Tourner la vis dans le sens
des aiguilles d'une montre en utilisant la clé Allen incluse
pour la serrer.
9
7
9
7
Connecter l'appareil à la prise de courant.
Brancher le cordon d'alimentation à la prise de courant. Dès l'émission d'un
bip indique la connexion réussie du ventilateur.
Allumer/Éteindre
Allumer
Appuyer le bouton pour démarrer le ventilateur. Lorsque celui-ci
est allumé pour la première fois, la vitesse par défaut est fixée à
faible (1).
Éteindre
Lorsque le ventilateur est en fonctionnement appuyer et maintenir le
bouton pour l'arrêter.
Changement de vitesse/mode
Changement de vitesse
Appuyer et maintenir le bouton pour régler la vitesse. À chaque fois que
vous appuyez, la voyant de statut correspondant sera allumé (voir le tableau
ci-dessous). Le ventilateur s'en rappellera et appliquera le dernier mode de
vitesse utilisé à la prochaine activation.
Vitesse du ventilateur
État du voyant
Remarque: signifie que le voyant est allumé; signifie que le voyant est éteint.
34
Faible (1)
Moyen (2)
Rapide (3)
Page 36

Utilisation
Changement de mode
Appuyer et maintenir le bouton pour changer entre la ventilation
directe et le mode veille. Le voyant du mode veille est allumé lorsque le
ventilateur est en mode veille et s'éteint lorsque le mode de ventilation
directe est allumé.
Remarque: Le ventilateur est configure par défaut à la ventilation directe. Le ventilateur s'en
rappellera et l'appliquera le dernier mode utilisé à la prochaine activation.
Activation/désactivation de l'oscillation
Appuyer le bouton pour active ou désactiver l'oscillation à 90°. Le
ventilateur s'en rappellera et l'appliquera le dernier paramétrage
d'oscillation utilisé lors de la prochaine activation.
Extinction en différée
Appuyer le bouton pour basculer à travers les durées d'extinction
différées: 1heure, 2heures, 3heures, et désactivé et le (s) de statut
correspondant(s) sera/seront activé(s) (voir le tableau ci-dessous).
Cinq secondes après l'utilisation de la fonction d'extinction différée, le
(s) voyant(s) de statut affichera/afficheront l'état correspondant de la
vitesse actuellement sélectionnée.
Statut programmé
État du voyant
Remarque: signifie que le voyant est allumé; signifie que le voyant est éteint.
pour des options d'extinction différée (jusqu'à 8heures), veuillez passer au
Mi Home/Xiaomi Home.
Désactivé 1heure 2heures 3 heures
Réglage du flux d'air
Soulever légèrement ou
appuyer la tête du ventilateur
ou la grille du ventilateur vers le
bas pour régler le flux d'air vers
le haut ou vers le bas.
20° vers le haut
16° vers le bas
Connexion avec l’application MiHome/XiaomiHome
Scannez le code QR pour télécharger et installer
l’ application. Vous serez redirigé vers la page de
configuration si l’application est déjà installée. Sinon,
recherchez «MiHome/XiaomiHome» dans l’ App
Store pour la télécharger et l’installer.
*Cee application est appelée l’application Xiaomi
Home en Europe (sauf en Russie). Le nom de
l’application qui s’affiche sur votre appareil devrait
être utilisé comme nom par défaut.
Remarque: la version de l’application a été mise à jour. Suivez les
instructions basées sur la version actuelle de l’application.
Connexion au Wi-Fi
Appuyer et maintenir les boutons et . l'émission du bip indique le
ventilateur est en aente d'une connexion, puis vous pouvez l'apparier
avec un appareil à travers l'application.
35
Page 37

Utilisation
Voyant d'état du Wi-Fi
Statut Wi-Fi
État du
voyant
En aente de
connexion
Orange
clignotant
Connexion en
cours
Clignote-
ment bleu
Connecté
Bleu Orange
Échec de la
connexion
Réinitialisation du Wi-Fi
La connexion Wi-Fi doit être réinitialisée dans les circonstances énumérées
ci-dessous.
Le compte Mi auquel le ventilateur est apparié a été changé.
Le routeur auquel le ventilateur est connecté a été changé.
Le compte ou le mot de passe du routeur auquel le ventilateur est connecté a été changé.
Le Mi Home/Xiaomi Home ne peut pas contrôler le ventilateur.
Appuyer et maintenir simultanément les boutons et . L'émission
d'un long bip traduit la réinitialisation réussie de la connexion Wi-Fi, et que
le Wi-Fi est en aente de connexion.
Verrouillage de protection anti enfant
Activé
Vous pouvez active la fonction de verrouillage anti enfant dans le Mi
Home/Xiaomi Home. Une fois activé, le ventilateur ne réagira pas aux
fonctionnements du bouton, au contraire, tous les voyants vont
clignoter deux fois émeant deux bips.
Désactiver
Vous pouvez désactiver la fonction de verrouillage anti enfant dans le
Mi Home/Xiaomi Home. La réinitialisation de la connexion Wi-Fi ou le
fait de débrancher et de rebrancher le ventilateur peut également
désactiver cee fonction.
36
Page 38

Dépannage
Panne
Le ventilateur ne
fonctionne pas
Impossible de
connecter le Wi-Fi
Les pales du
ventilateur sont
bloquées
Cause possible Solution
Pas d'électricité en provenance de la prise de courant ou le
Le ventilateur est hors ligne pendant plus d'une demi-heure.
ventilateur ne prend pas de courant.
L'assemblage des pales du ventilateur ou les grilles du
ventilateur ne sont pas correctement installés.
Verrouillage de protection anti enfant activé.
La connexion Wi-Fi est de 5 GHz.
Les pales du ventilateur sont bloquées par un corps
étranger.
37
Connecter la prise de courant qui correspond aux exigences du
Suivre les étapes indiquées dans le présent manuel d'utilisation
pour vérifier et se rassurer que ces parties sont bien installées.
Désactiver le verrouillage anti enfant dans le Mi Home/Xiaomi
Home, ou débrancher le ventilateur de la source d'alimentation
Connecter à une connexion Wi-Fi de 2.4 GHz.
Débrancher le ventilateur puis retirer le corps étranger.
ventilateur.
puis le reconnecter à nouveau.
Réinitialisation du Wi-Fi.
Page 39
Caractéristiques
Nom
Modèle
Type
Poids brut Poids net
Ventilateur sur pied
connecté 1C Mi
JLLDS01XY
ventilateur sur pied AC
4.5 kg
Tension nominale
Puissance nominale
220-230 V~
50/60 Hz
38 W
3.5 kg
Longueur du cordon
d'alimentation
Connectivité sans filFréquence nominale
Dimensions du
produit
Émission de bruit
Wi-Fi IEEE802.11b/g/n, 2,4GHz
*Fréquence radio et puissance de transmission radio
Spécifications RF Fréquence de Fonctionnement Puissance maximale en sortie
2.4G Wi-Fi
Par la présente, Zhejiang Xingyue Electric Equipment Co., Ltd. déclare que cet équipement radio de type JLLDS01XY est conforme
à la Directive européenne2014/53/UE. L’intégralité de la déclaration de conformité pour l’UE est disponible à l’adresse suivante:
hp://www.mi.com/global/service/support/declaration.html
Tous les produits portant ce symbole deviennent des déchets d’équipements électriques et électroniques (DEEE dans la Directive
européenne2012/19/UE) qui ne doivent pas être mélangés aux déchets ménagers non triés. Vous devez contribuer à la protection
de l’environnement et de la santé humaine en apportant l’équipement usagé à un point de collecte dédié au recyclage des
équipements électriques et électroniques, agréé par le gouvernement ou les autorités locales. Le recyclage et la destruction
appropriés permeront d’éviter tout impact potentiellement négatif sur l’environnement et la santé humaine. Contactez l’installateur ou les autorités locales pour obtenir plus d’informations concernant l’emplacement ainsi que les conditions d’utilisation de ce
type de point de collecte.
Fabriqué pour: XiaomiCommunicationsCo.,Ltd.
Fabricant: Zhejiang Xingyue Electric Equipment Co., Ltd.
(une société MiEcosystem)
2412-2472 MHz 19.67 dBm
Adresse : South Side, 24th Floor, Jinpin Building, Headquarters Center,
Yongkang City, Zhejiang Province, Chine
Pour plus d'informations, rendez-vous sur www.mi.com
38
1.6 m
343 × 330 × 1000 mm
≤63 dB(A)
V1.0
Page 40

Sicherheitshinweise
Lesen Sie diese Handbuch vor der Verwendung sorgfältig und bewahren Sie es auf, um zukünig die Informationen nachlesen zu können.
Vorsichtsmaßnahmen Warnungen
Installation
Vergewissern Sie sich, dass der Ventilator ordnungsgemäß und gemäß
den Anweisungen installiert ist, um elektrische Schläge, Feuer,
Verletzungen oder andere Schäden zu vermeiden.
Schließen Sie den Ventilator nicht an eine Steckdose an, solange er
nicht montiert ist.
Handhabung des Ventilators
Schalten Sie den Ventilator aus und ziehen Sie den Stecker, bevor Sie
ihn bewegen.
Halten Sie den Ventilatorständer fest, um ein Herabfallen und
Verletzungen zu vermeiden.
Verwendung des Ventilators
Stellen Sie die Verwendung des Ventilator sofort ein, wenn er
ungewöhnliche Geräusche macht, schlechte Gerüche abgibt, sich
überhitzt oder sich unregelmäßig dreht.
Lehnen Sie sich nicht an den laufenden Ventilator und kippen Sie ihn nicht.
Drücken Sie nicht wiederholt auf den Kopf des Ventilators, um Schäden
am internen Mechanismus zu vermeiden.
Stromkabel
Ziehen Sie das Stromkabel, bevor Sie den Ventilator reparieren oder
transportieren.
Trennen Sie den Ventilator immer durch Abziehen des Steckers und
ziehen Sie nicht am Kabel.
Wenn das Strom beschädigt ist, muss es durch ein Original-Stromkabel
ersetzt werden, das vom Hersteller oder der Kundendienstabteilung
erworben wurde, um Sicherheitsgefährdungen zu vermeiden.
Unsachgemäßer Gebrauch kann zu Stromschlägen, Feuer, Verletzungen oder
anderen Schäden führen.
Dieses Gerät ist für Kindern ab einem Alter von 8 und Personen
geeignet, die körperlich, sensorisch oder geistig behindert sind oder
nicht über ausreichend Erfahrung oder Kenntnisse verfügen, wenn sie
eine Beaufsichtigung oder Anweisung zur sicheren Nutzung des Geräts
erhalten haben und wissen, welche Gefahren aureten können. Kinder
dürfen nicht mit dem Gerät spielen. Die Reinigung und Wartung darf von
Kindern nur unter Aufsicht vorgenommen werden. (Für europäische
Länder oder Regionen)
Dieses Gerät ist nicht für die Nutzung durch Personen (inklusive Kinder)
mit eingeschränkten körperlichen, sensorischen oder mentalen
Fähigkeiten, oder für Personen mit einem Mangel an Erfahrung und
Wissen geeignet, es sei denn, diese wurden beaufsichtigt oder erhielten
von einer Person, die für ihre Sicherheit verantwortlich ist, eine
Anleitung bezüglich der Bedienung des Gerätes.
Kinder sollten beaufsichtigt werden, um sicherzustellen, dass sie nicht
mit dem Gerät spielen. (Für nicht europäische Länder oder Regionen)
Nach Abschluss der Montage ist es strengstens verboten, die
Schutzvorrichtungen zu irgendeinem Zweck zu entfernen.
Kinder sollten beaufsichtigt werden, um sicherzustellen, dass sie nicht
mit dem Gerät spielen.
Wenn das Netzkabel beschädigt ist, muss dieses vom Hersteller selbst
oder von einer herstellereigenen Reparatur-Werksta oder von ähnlich
qualifizierten Personen ersetzt werden, um Gefahren zu vermeiden.
39
Page 41
Sicherheitshinweise
Lesen Sie diese Handbuch vor der Verwendung sorgfältig und bewahren Sie es auf, um zukünig die Informationen nachlesen zu können.
Warnungen
Unsachgemäßer Gebrauch kann zu Stromschlägen, Feuer, Verletzungen oder anderen Schäden führen.
Verwenden Sie diesen Ventilator nicht an Orten, an denen er leicht
umstürzen kann oder an denen sich andere instabile Gegenstände in der
Nähe befinden.
Verwenden Sie diesen Ventilator nicht in heißen und feuchten
Umgebungen wie z.B. im Badezimmer.
Verwenden Sie diesen Ventilator nicht, wenn sein Stromkabel
beschädigt oder sein Netzstecker lose ist.
Verwenden Sie diesen Ventilator nicht, wenn das Frontgier nicht
installiert ist oder das hintere Gier lose ist oder abgefallen ist.
Erlauben Sie Erwachsenen, die diesen Ventilator nicht bedienen
können, oder Kindern nicht, ihn zu benutzen.
Demontieren oder reparieren Sie diesen Lüer nicht.
Das Stromkabel darf nicht zu stark gequetscht, geknickt oder verdreht
werden, um zu verhindern, dass der Kern des Kabels freigelegt wird oder
bricht.
Stecken Sie Ihre Finger oder andere Gegenstände nicht in das
Frontgier, das hintere Gier oder die Ventilatorflügel, wenn der
Ventilator in Betrieb ist.
Halten Sie Haare und Stoffe vom Ventilator fern, um zu vermeiden, dass
sie sich im Ventilator verfangen.
Verwenden Sie keine ungeeigneten Steckdosen.
Unter normalen Einsatzbedingungen muss dieses Gerät einen
Abstand von mindestens 20cm zwischen der Antenne und dem
Körper des Benutzers einhalten.
40
Page 42

Verpackungsinhalt
4
3
Unterer Ständer
1
Motor und oberer
Ständer und Stromkabel
Hinweis: Abbildungen des Produkts, des Zubehörs und der Benutzeroberfläche in dem Benutzerhandbuch dienen nur als Referenz. Die tatsächlichen
Produkte und Funktionen können aufgrund von Produktverbesserungen variieren.
Ventilatorbaugruppe (Frontgier,
Ventilatorflügel-Baugruppe, hinteres
2
Gier)
7
Innensechs-
kantschlüssel
41
Sockel
8
Sockelbolzen×1
Knopf für die Ventilator-
5 6
flügelmontage
9
Ventilatorgier
Schraube×1
Knopf für
hinteres Gier
Benutzerhandbuch
10
Page 43

Übersicht
Installationsanleitung
Ansicht von oben
Sockel
Motor und
Obergestell
Unterer Ständer
WLAN-Anzeige
Geschwindigkeits-/Abschaltver-
zögerungs-Anzeige
Schlafmodus-Anzeige
Ein-/Aus-Schalter
Taste für Geschwindigkeitseinstellun-
gen/Modusschalter
Oszillation Taste
Taste zum zeitgesteuerten Ausschalten
Mielpunktsanzeige (kein Lichteffekt):
Mielpunkt für den Kopfwinkelbereich
des Ventilators.
Stromkabel Sockelbolzen
Schri 1: Installation des Sockels
1
3
4
1(1). Standventilator-Modus:
Verbinden Sie den unteren
Ständer mit dem oberen Ständer
und montieren Sie ihn dann wie
in der Abbildung gezeigt auf dem
Sockel.
42
3
1
3
4
1(2). Tischventilator-Modus:
Installieren Sie den oberen
Ständer direkt auf dem Sockel.
2. Stecken Sie den Bolzen des
Sockels in das Loch an der
Unterseite des Sockels.
3. Verwenden Sie den mitgelieferten Innensechskantschlüssel,
um den Sockelbolzen im
Uhrzeigersinn zu drehen, um den
Ständer am Sockel zu befestigen.
1
7
8
4
8
8
7
Page 44

Installationsanleitung
Schri 2: Öffnen Sie die Ventialtorbaugruppe
Demontieren Sie die Ventilatorbaugruppe wie in den Abbildungen
unten dargestellt: Drehen Sie das Frontgier gegen den Uhrzeigersinn,
bis die Gier richtig gelöst sind. Nehmen Sie dann das Frontgier
vom hinteren Gier ab und nehmen Sie die Ventilatorflügelbau-
13
gruppe heraus.
Frontgier
2
①
11
②
①
2
Ventilatorbaugruppe
②
12
Ventilatorflügel-Ba-
ugruppe
12
hinteres Gier
11
13
Schri 3: Installieren des hinteren Giers
Achten Sie darauf, dass „ “ nachoben zeigt, wenn Sie das hintere
Gier auf den Motor montieren, und drehen Sie den Knopf des hinteren
Giers im Uhrzeigersinn, um das hintere Gier am Motor zu befestigen.
13
6
13
6
Schri 4: Installieren der Ventilatorflügelbaugruppe
Richten Sie das Mielloch der Ventilatorflügelbaugruppe auf die
Motorwelle aus und installieren Sie sie auf der Welle, dann montieren Sie
den Knopf der Ventilatorflügelbaugruppe auf der Motorwelle. Den Knopf
5
gegen den Uhrzeigersinn drehen, um die Ventilatorflügelbaugruppe an der
Motorwelle zu befestigen.
12
43
12
5
Page 45

Installationsanleitung
Verwendung
Schri 5: Installieren Sie das Frontgier
1. Richten Sie die Ausrichtungsmarkierung des vorderen Giers an der
linken Ausrichtungsmarkierung des hinteren Giers aus und stellen Sie
sicher, dass das vordere Gier richtig in das hintere Gier eingebeet ist.
2. Drehen Sie das Frontgier im Uhrzeigersinn, bis die Ausrichtungsmarkierung für das Frontgier mit der Ausrichtungsmarkierung für das hintere
Gier übereinstimmt. Vergewissern Sie sich, dass die Gier sicher befestigt
sind.
Ausrichtungsmark-
ierung für das hintere
Kühlergrill links
Ausrichtungsmark-
ierung für das
Frontgier
11
Draufsicht vor der
Befestigung des
Front- und
Rückgiers
1311
13
Rechte Ausrichtungsmarkierung des hinteren Giers
Ausrichtungsmarkierung für
Draufsicht nach Befestigung des Front-
und Rückgiers
das Frontgier
Schri 6: Befestigen Sie das Frontgier
Stecken Sie die Schraube des Ventilatorgiers in die
Bohrung am Boden des Ventilatorgiers. Drehen Sie die
Schraube im Uhrzeigersinn, indem Sie sie mit dem
mitgelieferten Inbusschlüssel anziehen.
7
9
9
7
Schließen Sie ihn an die Steckdose an
Stecken Sie das Stromkabel in eine Steckdose. Sobald Sie einen Piepton
hören, ist der Ventilator erfolgreich angeschlossen.
Ein-/Ausschalten
Einschalten
Drücken Sie die Taste , um den Ventilator zu starten. Wenn er zum
ersten Mal eingeschaltet wird, ist die Standardgeschwindigkeit langsam (1).
Ausschalten
Wenn der Ventilator funktioniert, drücken und halten Sie die Taste , um
ihn zu stoppen.
Wechsel von Geschwindigkeit/Modus
Wechsel der Geschwindigkeit
Drücken Sie die Taste , um die Geschwindigkeit einzustellen. Bei jedem
Drücken leuchtet die entsprechende Statusanzeige auf (siehe Tabelle
unten). Der Ventilator merkt sich den zuletzt verwendeten Geschwindigkeitsmodus und wendet diesen an, wenn er wieder eingeschaltet wird.
Ventilatorgeschwindigkeit
Langsam (1)
Miel (2)
Anzeigestatus
Hinweis: bedeutet, dass die Anzeige eingeschaltet ist; bedeutet, dass die Anzeige
ausgeschaltet ist.
44
Schnell (3)
Page 46

Verwendung
Wechseln des Modus
Halten Sie die Taste gedrückt, um zwischen Direkt-Brise- und
Schlafmodus zu wechseln. Die Anzeige für den Schlafmodus ist im
Schlafmodus an und im Direkt-Brise-Modus aus.
Hinweis: Der Ventilator ist standardmäßig auf Direkt-Brise eingestellt. Der Ventilator merkt sich
den zuletzt verwendeten Modus und wendet ihn an, wenn er wieder eingeschaltet wird.
Oszillation aktivieren/deaktivieren
Drücken Sie die Taste , um die 90°-Oszillation zu aktivieren oder zu
deaktivieren. Der Ventilator merkt sich die zuletzt benutzte Oszillationseinstellung und wendet sie an, wenn er wieder eingeschaltet wird.
Verzögerte Abschaltung
Drücken Sie die Taste , um die Verzögerung der Ausschaltzeiten zu
durchlaufen: 1 Stunde, 2 Stunden, 3 Stunden und deaktiviert, und die
entsprechende(n) Statusanzeige(n) leuchtet/leuchten auf (siehe Tabelle
unten). Fünf Sekunden nach Verwendung der verzögerten Ausschaltfunktion zeigen die Statusanzeige(n) den entsprechenden Status der aktuell
gewählten Geschwindigkeit an.
Geplanter Status
Anzeigestatus
Hinweis: bedeutet, dass die Anzeige eingeschaltet ist; bedeutet, dass die Anzeige
ausgeschaltet ist.
Für weitere Optionen zum verzögerten Ausschalten (bis zu 8 Stunden), gehen Sie bie zur
Mi Home/Xiaomi Home.
Deaktiviert
1 Stunde 2 Stunden 3 Stunden
Einstellen der Lustromrichtung
Heben oder drücken Sie den
Ventilatorkopf oder das
Ventilatorgier vorsichtig nach
unten, um den Lustrom nach
oben oder unten zu regulieren.
20° nach oben
16° nach unten
Mit der Mi Home-/Xiaomi Home-App verbinden
Scannen Sie den QR-Code, um die App herunterzuladen und zu installieren. Ist die App bereits installiert, werden Sie zur Verbindungseinrichtungs-Seite
weitergeleitet. Sie können aber auch im App Store
nach „Mi Home/Xiaomi Home “ suchen, um die App
herunterzuladen und zu installieren.
* In Europa (außer in Russland) wird die App unter
dem Namen Xiaomi Home-App geführt. Der auf
Ihrem Gerät angezeigte Name der App sollte
standardmäßig verwendet werden.
Hinweis: Die Version der App wurde möglicherweise aktualisiert.
Befolgen Sie bie die Anweisungen zur aktuellen App-Version.
Mit WLAN verbinden
Halten Sie die Tasten und gleichzeitig gedrückt. Sobald Sie einen
Piepton hören, wartet der Ventilator auf eine Verbindung, dann können
Sie ihn mit einem Gerät über die App koppeln.
45
Page 47

Verwendung
Status der WLAN-Betriebsanzeige
WLAN-Status
Anzeigestatus
Warten auf
Verbindung
Orangefarbenes
Blinken
Verbindung wird
hergestellt
Blaues Blinken Blau Orange
Verbunden
Keine Verbindung
möglich
WLAN zurücksetzen
Die WLAN-Verbindung muss unter den in der folgenden Tabelle
aufgeführten Umständen zurückgesetzt werden.
Das Mi-Konto, mit dem der Ventilator gekoppelt ist, wurde geändert.
Der Router, mit dem der Ventilator verbunden ist, wurde geändert.
Das Konto oder Kennwort des Routers, mit dem der Ventilator verbunden ist, wurde geändert.
Die Mi Home/Xiaomi Home kann den Ventilator nicht steuern.
Halten Sie die Tasten und gleichzeitig gedrückt. Wenn Sie einen
langen Piepton hören, wurde die WLAN-Verbindung erfolgreich zurückgesetzt, und dann wartet das WLAN auf eine Verbindung.
Kindersicherung
Aktivierend
Sie können die Funktion der Kindersicherung in der Mi Home/Xiaomi
Home aktivieren. Sobald sie aktiviert ist, reagiert der Ventilator nicht mehr
auf Tastenbetätigungen, stadessen blinken alle Anzeigen zweimal mit
zwei Pieptönen.
Deaktivierend
Sie können die Funktion der Kindersicherung in der Mi Home/Xiaomi
Home deaktivieren. Das Zurücksetzen der WLAN-Verbindung oder das
Trennen und erneute Anschließen des Ventilators kann diese Funktion
ebenfalls deaktivieren.
46
Page 48
Trobleshooting
Fehler
Der Ventilator
funktioniert nicht
WLAN kann keine
Verbindung herstellen
Ventilatorflügel
stecken fest
Mögliche Ursache Lösung
Kein Strom aus der Steckdose oder der Ventilator ist
nicht an das Stromnetz angeschlossen.
Die Ventilatorflügelbaugruppe oder die Gier sind
Die WLAN-Verbindung hat eine Frequenz von 5 GHz.
Der Ventilator ist mehr als eine halbe Stunde lang ohne
Die Ventilatorflügel sind durch einen Fremdkörper
nicht richtig installiert.
Kindersicherung aktiviert.
Verbindung.
blockiert.
47
Schließen Sie das Gerät an eine Steckdose an, die den
Anforderungen des Ventilators entspricht.
Befolgen Sie die Schrie im Benutzerhandbuch, um zu prüfen
und sicherzustellen, dass sie sicher installiert sind.
Deaktivieren Sie die Kindersicherung in der Mi Home/Xiaomi
Home, oder trennen Sie den Ventilator vom Netz und
Stellen Sie eine Verbindung zu einer 2,4 GHz WLAN-Verbind-
Ziehen Sie den Stecker des Ventilators ab und entfernen Sie
schließen Sie ihn wieder an.
ung her.
WLAN zurücksetzen.
den Fremdkörper.
Page 49

Spezifikationen
Bezeichnung
Modell
Typ
Bruogewicht
Mi Intelligenter
Standventilator 1C
JLLDS01XY
AC Standventilator
4.5 kg
*Radiofrequenz und Funkübertragungsleistung
RF Spezifikation Arbeitsfrequenz Maximale Ausgangsleistung
2.4G Wi-Fi
Hiermit bestätigt Zhejiang Xingyue Electric Equipment Co., Ltd., dass das Funkgerät des Typs JLLDS01XY mit der Verordnung
2014/53/EU in Einklang steht. Der vollständige Wortlaut der EU-Konformitätserklärung ist unter der folgenden Internetadresse
abruar: hp://www.mi.com/global/service/support/declaration.html
Alle mit diesem Symbol gekennzeichneten Produkte sind Elektroschro und Elektrogeräte (WEEE entsprechend EU-Richtlinie
2012/19/EU) und dürfen nicht mit unsortiertem Haushaltsmüll vermischt werden. Schützen Sie stadessen Ihre Mitmenschen und
die Umwelt, indem Sie Ihre zu entsorgenden Geräte an eine dafür vorgesehene, von der Regierung oder einer lokalen Behörde
eingerichtete Sammelstelle zum Recycling von Elektroschro und Elektrogeräten bringen. Eine ordnungsgemäße Entsorgung und
Recycling helfen, negative Auswirkungen auf die Gesundheit von Umwelt und Menschen zu vermeiden. Wenden Sie sich bie an
den Installateur oder lokale Behörden, um Informationen zum Standort und den allgemeinen Geschäsbedingungen solcher
Sammelstellen zu erhalten.
Hergestellt für: Xiaomi Communications Co., Ltd.
Hersteller: Zhejiang Xingyue Electric Equipment Co., Ltd.
(ein Unternehmen von Mi Ecosystem)
Nennspannung Stromkabellänge
Nennfrequenz
Nennleistung
Neogewicht
220-230 V~
50/60 Hz
38 W
3.5 kg
WLAN-Verbindung
Artikelmaße
Geräuschauss-
trahlung
2412-2472 MHz 19.67 dBm
Adresse: South Side, 24th Floor, Jinpin Building, Headquarters Center, Yongkang
City, Zhejiang Province, China
48
1.6 m
Wi-Fi IEEE 802.11b/g/n 2.4G Hz
343 × 330 × 1000 mm
63 dB(A)
≤
Weitere Informationen finden Sie auf www.mi.com.
V1.0
Page 50

Norme di sicurezza
Leggere aentamente il presente manuale prima dell'uso del dispositivo e conservarlo per ogni riferimento futuro.
Precauzioni Avvertenze
Installazione
Assicurarsi che il ventilatore sia installato correamente secondo le
istruzioni, in modo da evitare scosse eleriche, incendi, lesioni
personali o altri danni.
Non collegare il ventilatore alla presa di corrente finché non è
assemblato.
Maneggiare il ventilatore
Spegnere e scollegare il pventilatore prima di spostarlo.
Tenere saldamente il supporto del ventilatore per evitare che cada e
causi lesioni personali.
Utilizzare il ventilatore
Interrompere immediatamente l'uso del ventilatore quando emee
suoni insoliti, emee caivi odori, si surriscalda o ruota irregolarmente.
Non appoggiarsi o inclinare il ventilatore mentre è in funzione.
Non spingere ripetutamente la testa del ventilatore per evitare danni al
meccanismo interno.
Cavo di alimentazione
Scollegare il cavo di alimentazione prima di riparare o spostare il
ventilatore.
Scollegare sempre il ventilatore tirando la spina di alimentazione
anziché il cavo.
Se il cavo di alimentazione è danneggiato o roo, è necessario
sostituirlo acquistando un cavo di alimentazione originale dal
produore o dal reparto di assistenza post-vendita per evitare rischi di
sicurezza.
L'uso improprio può provocare scosse eleriche, incendi, lesioni personali o
altri danni.
L'apparecchio può essere utilizzato da bambini di che abbiano un'età
dagli 8 anni in poi e da persone con capacità mentali, fisiche o sensoriali
ridoe oppure da persone prive di esperienza o conoscenza
dell'apparecchio, purché siano sorvegliate o siano stati istruiti sull'uso
sicuro dell'apparecchio e comprendano i rischi che ne possono
derivare. Non consentire ai bambini di giocare con l'apparecchio. Le
operazioni di pulizia e manutenzione non devono essere effeuate da
bambini, a meno che non siano sorvegliati. (Per le nazioni o le regioni
europee)
Il presente apparecchio non è destinato all'utilizzo da parte di persone
(inclusi bambini) con capacità fisiche, sensoriali o mentali ridoe,
oppure carenti di esperienza e conoscenza, a meno che non vi siano il
controllo e le indicazioni riguardo l'utilizzo dell'apparecchio da parte di
una persona responsabile della loro incolumità.
Per assicurarsi che bambini non giochino con l'apparecchio è
necessario vigilarli. (Per nessuna nazione o regione europea)
Una volta completato l'assemblaggio, è assolutamente vietato
rimuovere il dispositivo di protezione per qualsiasi motivo.
Per assicurarsi che bambini non giochino con l'apparecchio è
necessario vigilarli.
Se il cavo di alimentazione è danneggiato, deve essere sostituito dal
costruore, da un suo agente per assistenza clienti o da una persona
analogamente qualificata al fine di evitare pericoli.
49
Page 51

Norme di sicurezza
Leggere aentamente il presente manuale prima dell'uso del dispositivo e conservarlo per ogni riferimento futuro.
Avvertenze
L'uso improprio può provocare scosse eleriche, incendi, lesioni personali o altri danni.
Non utilizzare questo ventilatore in luoghi in cui è facile cadere o dove
ci sono altri oggei instabili nelle vicinanze.
Non utilizzare questo ventilatore in ambienti caldi e umidi come un bagno.
Non utilizzare questo ventilatore se il suo cavo di alimentazione è
danneggiato o la sua spina è allentata.
Non utilizzare questo ventilatore se la griglia anteriore non è installata o
se la griglia posteriore è allentata o caduta.
Non consentire agli adulti incapaci di utilizzare questo ventilatore o ai
bambini di usarlo.
Non smontare o riparare questo ventilatore.
Non pizzicare, piegare o aorcigliare troppo il cavo di alimentazione, per
evitare di esporre o rompere il suo nucleo.
Non inserire le dita o alcun oggeo nella griglia anteriore, nella griglia
posteriore o nelle pale del ventilatore quando il ventilatore è in uso.
Tenere i capelli e i tessuti lontani dal ventilatore per evitare che si
impiglino nel ventilatore.
Non utilizzare prese di corrente non idonee.
In condizioni d'uso normali, questa apparecchiatura deve essere
tenuta a una distanza minima di 20 cm tra l’antenna e il corpo
dell’utente.
50
Page 52

Contenuto della confezione
4
3
Supporto inferiore
1
Motore e supporto
superiore e cavo di
alimentazione
Nota: le illustrazioni del prodoo, degli accessori e dell'interfaccia utente nel manuale utente sono esclusivamente a scopo di riferimento. Il prodoo
effeivo e le relative funzioni possono variare a causa dei miglioramenti apportati al prodoo stesso.
Gruppo ventilatore (griglia
anteriore, gruppo pale ventilatore,
2
7
Chiave a brugola Bullone di base×1
griglia posteriore)
51
Base
8
Manopola di montaggio
5 6
della pala del
ventilatore
9
Vite della griglia del
ventilatore×1
Manopola griglia
posteriore
Manuale utente
10
Page 53
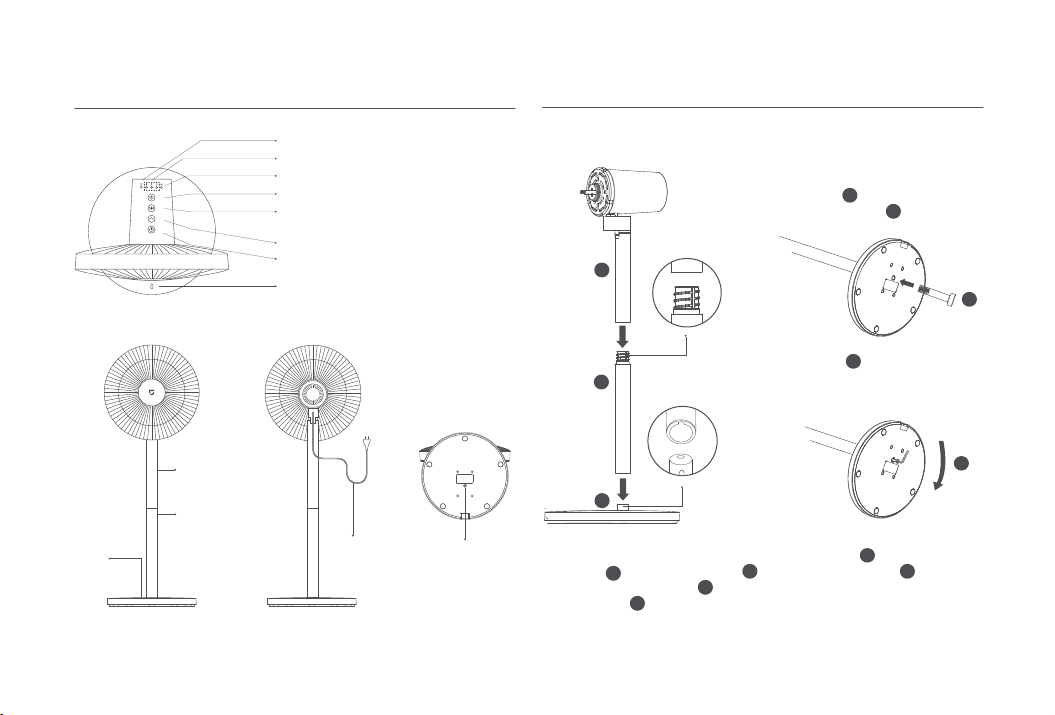
Panoramica
Istruzioni di installazione
Base
Vista dall'alto
Motore e supporto
superiore
Supporto inferiore
Indicatore Wi-Fi
Indicatore di velocità/spegnimento ritardato
Spia modalità Risparmio energia
Pulsante di accensione/spegnimento
Pulsante di regolazione velocità/interruore modalità
Pulsante di oscillazione
Pulsante di spegnimento programmato
Indicatore del punto centrale (nessun
effeo luce): punto centrale per l'intervallo
dell'angolo della testa del ventilatore.
Cavo di
alimentazione
Bullone di base
52
Passaggio 1: installazione della base
1(2). Modalità ventilatore da tavolo:
installare il supporto superiore
direamente sulla base.
1
2. Inserire il bullone della base
3
4
1(1). Modalità ventilatore in piedi:
collegare il supporto inferiore al
supporto superiore, quindi
installarlo sulla base come
mostrato in figura.
3
4
3
nel foro nella parte inferiore della
base.
3. Utilizzare la chiave a brugola
1
inclusa per ruotare il bullone
della base in senso orario per
fissare il supporto alla base.
1
4
8
8
7
7
8
Page 54

Istruzioni di installazione
Passaggio 2: aprire il gruppo ventilatore
Smontare il gruppo ventilatore come mostrato nelle figure seguenti:
Ruotare la griglia anteriore in senso antiorario fino a quando le griglie
non sono allentate correamente. Quindi rimuovere la griglia anteriore
dalla griglia posteriore ed estrarre il gruppo del ventilatore.
2
11
13
11
griglia anteriore
②
12
①
2
Gruppo ventilatore
②
12
gruppo pale ventilatore
①
13
griglia posteriore
Passaggio 3: installare la griglia posteriore
Accertarsi che “ ” sia rivolto verso l'alto durante l'installazione della
griglia posteriore sul motore e ruotare la manopola della griglia
posteriore in senso orario per serrare la griglia posteriore al motore.
13
6
6
Passaggio 4: installare il gruppo pala del ventilatore
Allineare il foro centrale del gruppo della pala del ventilatore con l'albero
del motore e installarlo sull'albero, quindi installare la manopola di
montaggio di montaggio della pala del ventilatore sull'albero del motore.
Ruotare la manopola in senso antiorario per fissare il gruppo della pala del
ventilatore all'albero del motore.
12
53
12
5
5
13
Page 55
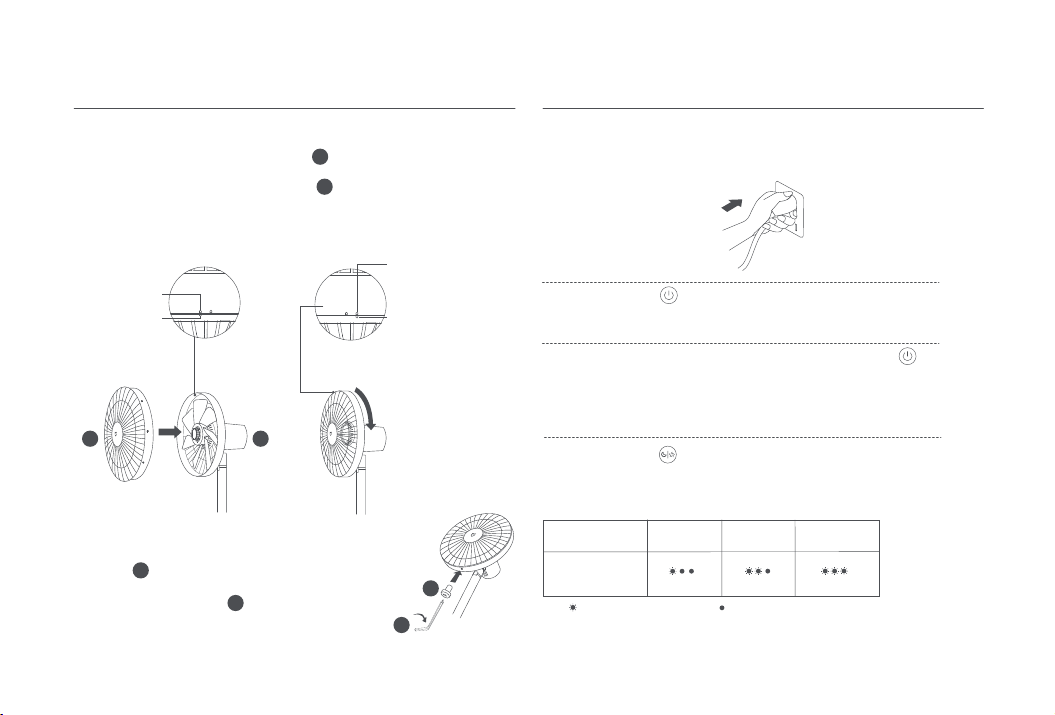
Istruzioni di installazione
Modalità d'utilizzo
Passaggio 5: installare la griglia anteriore
1. Allineare il segno di allineamento della griglia anteriore con il segno di
allineamento sinistro della griglia posteriore e assicurarsi che la griglia
anteriore sia correamente inserita nella griglia posteriore.
2. Ruotare la griglia anteriore in senso orario fino a quando il segno di
allineamento griglia anteriore si allinea con il segno di allineamento destro
griglia posteriore. Assicurarsi che le griglie siano fissate saldamente.
Griglia posteriore
Segno di
allineamento a
sinistra
Segno di
allineamento della
griglia anteriore
Vista dall'alto
prima di fissare la
griglia anteriore e
posteriore
1311
11
13
Griglia posteriore Segno di
allineamento a destra
Segno di allineamento della
griglia anteriore
Vista dall'alto dopo aver fissato la
griglia anteriore e posteriore
Passaggio 6: fissare la griglia anteriore
Inserire la vite della griglia del ventilatore nel foro nella
parte inferiore della griglia del ventilatore. Ruotare la vite in
senso orario utilizzando la chiave a brugola inclusa per
serrarla.
9
7
9
7
Collegare a una presa di corrente
Inserire il cavo di alimentazione in una presa di corrente. Quando viene
emesso un segnale acustico, il ventilatore viene collegato correamente.
Accendi/Spegni
Accendi
Premere il pulsante per avviare il ventilatore. Alla prima accensione, la velocità predefinita è bassa (1).
Spegni
Quando il ventilatore è in funzione, tenere premuto il pulsante per
fermarlo.
Cambio velocità/modalità
Velocità di commutazione
Premere il pulsante per regolare la velocità. Ad ogni pressione,
l'indicatore di stato corrispondente si accende (vedere la tabella seguente).
Il ventilatore ricorderà e applicherà l'ultima modalità di velocità utilizzata
quando riacceso.
Velocità ventola
Lento (1)
Medio (2)
Stato della spia
Nota: indica che l'indicatore è acceso; indica che l'indicatore è spento.
54
Veloce (3)
Page 56

Modalità d'utilizzo
Modalità di commutazione
Premere e tenere premuto il pulsante per alternare la modalità
brezza direa e la modalità di sospensione. L'indicatore della modalità
di sospensione è acceso mentre è in modalità di sospensione e spento
mentre è in modalità brezza direa.
Nota: il ventilatore è impostato sulla brezza direa per impostazione predefinita. Il ventilatore
ricorderà e applicherà l'ultima modalità utilizzata quando riacceso.
Abilita/Disabilita Oscillazione
Premere il pulsante per abilitare o disabilitare l'oscillazione di 90°. Il
ventilatore ricorderà e applicherà l'ultima impostazione di oscillazione
utilizzata quando riacceso.
Ritardo spegnimento
Premere il pulsante per scorrere i tempi di spegnimento ritardati: 1
ora, 2 ore, 3 ore e disabilitati e gli indicatori di stato corrispondenti
saranno accesi (vedere la tabella seguente). Cinque secondi dopo aver
usato la funzione di spegnimento ritardato, l'indicatore (i) di stato
mostrerà lo stato corrispondente della velocità aualmente selezionata.
Stato pianificato
Stato della spia
Nota: indica che l'indicatore è acceso; indica che l'indicatore è spento.
per ulteriori opzioni di spegnimento ritardato (fino a 8 ore), vai su Mi Home/Xiaomi Home.
Disabilitato 1 ora 2 ore 3 ore
Regolare la direzione del flusso d'aria
Sollevare o spingere delicatamente verso il basso la testa del
ventilatore o la griglia del
ventilatore per regolare il flusso
d'aria verso l'alto o verso il basso.
20° verso l'alto
16° verso il basso
Connessione con l’app Mi Home/Xiaomi Home
Eseguire la scansione del codice QR per scaricare e
installare l’app. Se l’app è già installata, si verrà
indirizzati alla pagina di configurazione della
connessione. In alternativa, cercare l’app "Mi
Home/Xiaomi Home" nell’App Store per scaricarla e
installarla.
* In Europa, ecceo che in Russia, l’app si chiama
Xiaomi Home. Si consiglia di tenere per impostazione
predefinita il nome dell’app visualizzato sul
dispositivo.
Nota: poiché la versione dell’app potrebbe essere stata aggiornata,
seguire le istruzioni della versione dell’app corrente.
Conneiti a una rete Wi-Fi
Premere e tenere premuti contemporaneamente i pulsanti e . Una
volta emesso un segnale acustico, il ventilatore è in aesa di una
connessione, quindi è possibile associarlo a un dispositivo tramite l'app.
55
Page 57

Modalità d'utilizzo
Stato spia Wi-Fi
Stato Wi-Fi
Stato della
spia
In aesa di
connessione
Arancione
lampeggiante
Connessione
in corso
Blu
lampeggiante
Connesso
Blu
Impossibile
conneere
arancione
Researe il Wi-Fi
La connessione Wi-Fi deve essere ripristinata nelle circostanze elencate
nella tabella seguente.
Il Mi Account a cui è associato il ventilatore è stato modificato.
Il router a cui è collegato ventilatore è stato modificato.
L'account o la password del router a cui è collegato ventilatore è stato modificato.
Mi Home/Xiaomi Home non può controllare il ventilatore.
Premere e tenere premuti contemporaneamente i pulsanti e .
Quando viene emesso un segnale acustico prolungato, la connessione
Wi-Fi è stata ripristinata correamente e quindi il Wi-Fi è in aesa di una
connessione.
Blocco di sicurezza per bambini
Abilitare
È possibile abilitare la funzione di blocco bambini in Mi Home/Xiaomi
Home. Una volta abilitato, il ventilatore non risponderà alle operazioni del
pulsante ma invece a tui gli indicatori che lampeggiano due volte con due
segnali acustici.
Disabilitare
È possibile disabilitare la funzione di blocco bambini in Mi Home/Xiaomi
Home. Anche il ripristino della connessione Wi-Fi o lo scollegamento e il
ricollegamento del ventilatore possono disabilitare questa funzione.
56
Page 58

Risoluzione dei problemi
Guasto
Il ventilatore non
funziona
Il Wi-Fi non è in
grado di
conneersi
Le pale del
ventilatore sono
bloccate
Possibile causa Soluzione
Nessuna elericità dalla presa di corrente o il ventilatore
non si collega all'alimentazione.
Il gruppo pala del ventilatore o le griglie non sono
installati correamente.
Blocco bambini abilitato.
La connessione Wi-Fi è di 5 GHz.
Il ventilatore è offline per più di mezz'ora.
Le pale del ventilatore sono bloccate da un
oggeo estraneo.
57
Collegare a una presa di corrente che soddisfi i requisiti del
Seguire i passaggi nel manuale utente per verificare e
assicurarsi che siano installati in modo sicuro.
Disabilitare il blocco bambini in Mi Home/Xiaomi Home o
scollega il ventilatore dall'alimentazione, quindi ricollegarlo.
Collegare a una connessione Wi-Fi a 2,4 GHz.
Scollegare il ventilatore e rimuovere l'oggeo
ventilatore.
Researe il Wi-Fi.
estraneo.
Page 59
Specifiche tecniche
Nome
Modello
Tipo
Peso lordo
Ventilatore a piantana
Smart Mi 1C
JLLDS01XY
ventilatore a piantana CA
4.5 kg
Tensione nominale
Potenza nominale
Peso neo
220-230 V~
50/60 Hz
38 W
3.5 kg
Lunghezza del cavo di
alimentazione
Conneività wirelessFrequenza nominale
Dimensioni articolo
Noise Emission
Wi-Fi IEEE 802.11b/g/n 2.4G Hz
343 × 330 × 1000 mm
*Frequenza radio e potenza di trasmissione radio
Specifiche Tecniche RF Frequenza di Funzionamento Massima Potenza in Uscita
2.4G Wi-Fi
Con la presente, Zhejiang Xingyue Electric Equipment Co., Ltd. dichiara che l'apparecchiatura radio di tipo JLLDS01XY è conforme
alla Direiva 2014/53/UE. Il testo completo della dichiarazione di conformità UE è disponibile al seguente indirizzo Internet: hp://www.mi.com/global/service/support/declaration.html
Tui i prodoi contrassegnati da questo simbolo sono rifiuti di apparecchiature eleriche ed eleroniche (RAEE in base alla direiva
2012/19/UE) che non devono essere smaltiti assieme a rifiuti domestici non differenziati. Al contrario, è necessario proteggere
l’ambiente e la salute umana consegnando i rifiuti a un punto di raccolta autorizzato al riciclaggio di rifiuti di apparecchiature
eleriche ed eleroniche, predisposto dalla pubblica amministrazione o dalle autorità locali. Lo smaltimento e il riciclaggio correi
aiutano a prevenire conseguenze potenzialmente negative all’ambiente e alla salute umana. Contaare l’installatore o le autorità
locali per ulteriori informazioni sulla sede e per i termini e le condizioni di tali punti di raccolta.
Fabbricato per: Xiaomi Communications Co., Ltd.
Fabbricato da: Zhejiang Xingyue Electric Equipment Co., Ltd.
(un'azienda del Mi Ecosystem)
2412-2472 MHz 19.67 dBm
Indirizzo: South Side, 24th Floor, Jinpin Building, Headquarters Center,
Yongkang City, Zhejiang Province, Cina
58
Per ulteriori informazioni, visitare il sito www.mi.com
1.6 m
≤63 dB(A)
V1.0
Page 60

WARRANTY NOTICE
THIS WARRANTY GIVES YOU SPECIFIC RIGHTS, AND YOU MAY HAVE OTHER RIGHTS CONVEYED BY LAWS OF YOUR COUNTRY, PROVINCE OR STATE.
INDEED, IN SOME COUNTRIES, PROVINCES OR STATES, CONSUMER LAW MAY IMPOSE A MINIMUM WARRANTY PERIOD. OTHER THAN AS PERMITTED
BY LAW, XIAOMI DOES NOT EXCLUDE, LIMIT OR SUSPEND OTHER RIGHTS YOU MAY HAVE. FOR A FULL UNDERSTANDING OF YOUR RIGHTS WE INVITE
YOU TO CONSULT THE LAWS OF YOUR COUNTRY, PROVINCE OR STATE.
1. LIMITED PRODUCT WARRANTY
XIAOMI warrants that the Products are free from defects in materials and workmanship under normal use and use in accordance with the respective
Product user manual, during the Warranty Period.
The duration and conditions related to the legal warranties are provided by respective local laws. For more information about the consumer warranty
benefits, please refer to Xiaomi's official website hps://www.mi.com/en/service/warranty/.
Xiaomi warrants to the original purchaser that its Xiaomi Product will be free from defects in materials and workmanship under normal use in the period
mentioned above.
Xiaomi does not guarantee that the operation of the Product will be uninterrupted or error free.
Xiaomi is not liable for damages arising from non-compliance with the instructions related to the use of the Product.
2. REMEDIES
If a hardware defect is found and a valid claim is received by Xiaomi within the Warranty Period, Xiaomi will either (1) repair the product at no charge, (2)
replace the product, or (3) refund the Product, excluding potential shipping costs.
3. HOW TO OBTAIN WARRANTY SERVICE
To obtain warranty service, you must deliver the Product, in its original packaging or similar packaging providing an equal degree of Product protection, to
the address specified by Xiaomi. Except to the extent prohibited by applicable law, Xiaomi may require you to present proofs or proof of purchase and / or
comply with registration requirements before receiving warranty service.
4. EXCLUSIONS AND LIMITATIONS
Unless otherwise stipulated by Xiaomi, this Limited Warranty applies only to the Product manufactured by or for Xiaomi and identifiable by the trademarks,
trade name or "Xiaomi" or "Mi" logo.
The Limited Warranty does not apply to any (a) Damage due to acts of nature or God, for example, lightning strikes, tornadoes, flood, fire, earthquake or other
external causes; (b) Negligence; (c) Commercial use; (d) Alterations or modifications to any part of the Product; (e) Damage caused by use with non-Xiaomi
products; (f) Damage caused by accident, abuse or misuse; (g) Damage caused by operating the Product outside the permied or intended uses described
by Xiaomi or with improper voltage or power supply; or (h) Damage caused by service (including upgrades and expansions) performed by anyone who is not a
representative of Xiaomi.
59
Page 61

It is your responsibility to backup any data, soware, or other materials you may have stored or preserved on the product. It is likely that the data, soware
or other materials in the equipment will be lost or reformaed during the service process, Xiaomi is not responsible for such damage or loss.
No Xiaomi reseller, agent, or employee is authorized to make any modification, extension, or addition to this Limited Warranty. If any term is held to be
illegal or unenforceable, the legality or enforceability of the remaining terms shall not be affected or impaired.
Except as prohibited by laws or otherwise promised by Xiaomi, the aer-sales services shall be limited to the country or region of the original purchase.
Products which were not duly imported and/or were not duly manufactured by Xiaomi and/or were not duly acquired from Xiaomi or a Xiaomi’s official seller
are not covered by the present warranties. As per applicable law you may benefit from warranties from the non-official retailer who sold the product.
Therefore, Xiaomi invites you to contact the retailer from whom you purchased the product.
The present warranties do not apply in Hong Kong and Taiwan.
5. IMPLIED WARRANTIES
Except to the extent prohibited by applicable law, all implied warranties (including warranties of merchantability and fitness for a particular purpose) will
have a limited duration up to a maximum duration of this limited warranty. Some jurisdictions do not allow limitations on the duration of an implied
warranty, so the above limitation will not be applied in these cases.
6. DAMAGE LIMITATION
Except to the extent prohibited by applicable law, Xiaomi shall not be liable for any damages caused by accidents, indirect, special or consequential
damages, including but not limited to loss of profits, revenue or data, damages resulting from any breach of express or implied warranty or condition, or
under any other legal theory, even if Xiaomi has been informed of the possibility of such damages. Some jurisdictions do not allow the exclusion or
limitation of special, indirect, or consequential damages, so the above limitation or exclusion may not apply to you.
7. XIAOMI CONTACTS
For customers, please visit the website: hps://www.mi.com/en/service/warranty/
The contact person for the aer-sale service may be any person in Xiaomi's authorized service network, Xiaomi's authorized distributors or the final vendor
who sold the products to you. If in doubt please contact the relevant person as Xiaomi may identify.
60
Page 62

AVISO DE GARANTÍA
ESTA GARANTÍA LE OTORGA DERECHOS ESPECÍFICOS Y PUEDE QUE YA TENGA OTROS DERECHOS QUE VENGAN REFLEJADOS EN LAS LEYES DE SU
PAÍS, PROVINCIA O ESTADO. DE HECHO, EN ALGUNOS PAÍSES, PROVINCIAS O ESTADOS, LAS LEYES DEL CONSUMIDOR PUEDEN IMPONER UN
PERIODO MÍNIMO DE GARANTÍA. EXCEPTO LO PERMITIDO POR LA LEY, XIAOMI NO EXCLUYE, LIMITA NI SUSPENDE OTROS DERECHOS QUE USTED
PUEDA TENER. PARA COMPRENDER DEL TODO SUS DERECHOS, LE RECOMENDAMOS QUE CONSULTE LAS LEYES DE SU PAÍS, PROVINCIA O ESTADO.
1. GARANTÍA LIMITADA DEL PRODUCTO
XIAOMI garantiza que los productos no tienen ningún defecto material ni de mano de obra cuando lo use de forma normal de acuerdo al manual de usuario
del producto correspondiente durante el periodo de garantía.
La duración y las condiciones relativas a las garantías legales se contemplan en la legislación local respectiva. Para más información acerca de los
beneficios de las garantías para el consumidor, diríjase a la página web oficial de Xiaomi hps://www.mi.com/en/service/warranty/.
Xiaomi garantiza al comprador original que su Producto Xiaomi no tendrá ningún defecto material ni de mano de obra cuando lo use de forma normal
durante el periodo de tiempo antes mencionado.
Xiaomi no garantiza que el uso del Producto sea ininterrumpido ni esté libre de errores.
Xiaomi no se hace responsable de los daños que surjan del incumplimiento de las instrucciones relacionadas con el uso del producto.
2. MEDIDAS COMPENSATORIAS
Si se encuentra un defecto de hardware y Xiaomi recibe una reclamación válida dentro del Periodo de garantía, Xiaomi (1) reparará el producto sin cargos, (2)
reemplazará el producto o (3) lo restituirá, excluyendo los posibles gastos de envío.
3. CÓMO OBTENER EL SERVICIO DE GARANTÍA
Para obtener el servicio de garantía, usted debe enviar el producto, o bien en su paquete original o bien con un paquete similar que ofrezca el mismo nivel de
protección, a la dirección que especifique Xiaomi. Excepto en la medida que lo prohíba la ley aplicable, Xiaomi podría pedirle que presente pruebas o un
comprobante de compra y/o que cumpla con los requisitos de inscripción antes de que usted reciba el servicio de garantía.
4. EXCEPCIONES Y LIMITACIONES
A menos que Xiaomi estipule lo contrario, esta Garantía limitada se aplica solo al Producto fabricado por o para Xiaomi e identificable por la marca
registrada, el nombre comercial o el logotipo "Xiaomi" o "Mi".
La Garantía limitada no es aplicable a ningún (a) daño provocado por desastres naturales, por ejemplo, rayos, tornados, inundaciones, incendios, terremotos
u otras causes externas; (b) negligencia; (c) uso comercial; (d) alteraciones o modificaciones a cualquier parte del Producto; (e) daños provocados por el uso
con productos que no son de Xiaomi; (f) daños provocados por accidentes, abusos o malos usos; (g) daños provocados por utilizar el Producto fuera de los
usos permitidos o previstos descritos por Xiaomi, o con una tensión o fuente de alimentación incorrecta; o (h) daños provocados por el servicio (incluidas las
actualizaciones y expansiones) realizado por cualquiera que no sea representante de Xiaomi.
61
Page 63

Es responsabilidad suya hacer una copia de seguridad de cualquier información, soware u otros materiales que haya almacenado o conservado sobre el
producto. Es probable que los datos, soware u otros materiales del equipo se pierdan o se reformateen durante el proceso del servicio. Xiaomi no se hace
responsable de dichos daños o pérdidas.
Ningún revendedor, representante ni empleado de Xiaomi está autorizado a realizar modificaciones, extensiones ni adiciones a esta Garantía limitada. Si
cualquier término se considera ilegal o inaplicable, la legalidad o la aplicabilidad de los términos restantes no se verán afectados ni perjudicados.
Excepto cuando la ley lo prohíba o cuando Xiaomi prometa lo contrario, el servicio posventa quedará limitado al país o región de compra original.
Los productos que no se importaron debidamente y/o que Xiaomi no fabricó debidamente y/o no fueron adquiridos a Xiaomi o a un vendedor oficial de
Xiaomi no están cubiertos por las presentes garantías. De acuerdo con la ley aplicable, usted puede beneficiarse de las garantías del minorista no oficial
que vendió el producto. Por lo tanto, Xiaomi le invita a que se ponga en contacto con el minorista al que compró el producto.
Las presentes garantías no se aplican en Hong Kong y Taiwan.
5. GARANTÍAS IMPLÍCITAS
Excepto en la medida que lo prohíba la ley aplicable, todas las garantías implícitas (incluidas las garantías de comercialización y adecuación para un fin
determinado) estarán limitadas a una duración máxima de hasta la duración límite de esta garantía limitada. Algunas jurisdicciones no permiten las
limitaciones en la duración de una garantía implícita, por lo que no se aplicará la limitación anterior en estos casos.
6. LIMITACIÓN DE DAÑOS
Excepto en la medida que lo prohíba la ley aplicable, Xiaomi no será responsable de ningún daño accidental, indirecto, especial o consecuente, incluyendo,
entre otros, la pérdida de beneficios, ingresos o datos provocada por cualquier incumplimiento de la garantía expresa o implícita, o condición; o bajo
cualquier otra teoría legal, incluso cuando se ha informado a Xiaomi de la posibilidad de dichos daños. Algunas jurisdicciones no permiten las excepciones
ni las limitaciones de daños especiales, indirectos ni consecuentes, por lo que la limitación o exclusión anterior no se aplicará.
7. CONTACTOS DE XIAOMI
Para clientes, visiten la página web hps://www.mi.com/en/service/warranty/
La persona de contacto del servicio posventa puede ser cualquier persona de la red de servicio autorizado de Xiaomi, los distribuidores autorizados de
Xiaomi o el vendedor final que vendió los productos. Si tiene alguna duda, póngase en contacto con la persona correspondiente que pueda identificar
Xiaomi.
62
Page 64

ГАРАНТИЙНОЕ УВЕДОМЛЕНИЕ
НАСТОЯЩАЯ ГАРАНТИЯ ДАЕТ ВАМ ОПРЕДЕЛЕННЫЕ ПРАВА, А В ЗАВИСИМОСТИ ОТ ЗАКОНОДАТЕЛЬСТВА ВАШЕЙ СТРАНЫ, ПРОВИНЦИИ ИЛИ
ШТАТА ОНИ МОГУТ БЫТЬ БОЛЕЕ ШИРОКИМИ. В НЕКОТОРЫХ СТРАНАХ, ПРОВИНЦИЯХ И ШТАТАХ ЗАКОНОМ О ЗАЩИТЕ ПРАВ ПОТРЕБИТЕЛЕЙ
ПРЕДУСМОТРЕН МИНИМАЛЬНЫЙ ГАРАНТИЙНЫЙ СРОК. КОМПАНИЯ XIAOMI НЕ ИСКЛЮЧАЕТ, НЕ ОГРАНИЧИВАЕТ И НЕ ПРИОСТАНАВЛИВАЕТ
ОСУЩЕСТВЛЕНИЕ ДРУГИХ ВАШИХ ЗАКОННЫХ ПРАВ. РЕКОМЕНДУЕМ ОЗНАКОМИТЬСЯ С ЗАКОНАМИ ВАШЕЙ СТРАНЫ, ПРОВИНЦИИ ИЛИ ШТАТА
ДЛЯ ПОЛНОГО ПОНИМАНИЯ СВОИХ ПРАВ.
1. ОГРАНИЧЕННАЯ ГАРАНТИЯ НА ПРОДУКТ
Компания Xiaomi гарантирует, что материалы и качество продуктов исключают возникновение дефектов при условии их нормального использования
в соответствии с руководством по эксплуатации в течение гарантийного срока.
Продолжительность и условия правовых гарантий представлены в соответствующих местных законах. Дополнительные сведения о преимуществах
гарантий для потребителей см. на официальном веб-сайте Xiaomi hps://www.mi.com/en/service/warranty/.
Компания Xiaomi гарантирует первоначальному покупателю, что материалы и качество ее продуктов исключают возникновение дефектов при
условии их нормального использования в течение вышеуказанного периода.
Xiaomi не гарантирует, что работа продукта будет бесперебойной или безошибочной.
Xiaomi не несет ответственности за убытки, понесенные в результате несоблюдения инструкций по использованию продукта.
2. СРЕДСТВА ПРАВОВОЙ ЗАЩИТЫ
Если обнаружен дефект оборудования и компания Xiaomi получила обоснованную претензию в течение гарантийного периода, Xiaomi обязуется (1)
выполнить ремонт продукта бесплатно, (2) заменить изделие или (3) возместить стоимость продукта, исключая возможные расходы по доставке.
3. КАК ПОЛУЧИТЬ ГАРАНТИЙНОЕ ОБСЛУЖИВАНИЕ
Чтобы получить гарантийное обслуживание, вы должны доставить продукт в оригинальной или аналогичной упаковке, обеспечив равноценную
степень защиты продукта, по адресу, указанному Xiaomi. Компания Xiaomi вправе потребовать предоставить доказательства или доказательство
покупки и/или выполнить требования регистрации перед получением гарантийного обслуживания, если иное не предусмотрено законодательством.
4. ИСКЛЮЧЕНИЯ И ОГРАНИЧЕНИЯ
Эта ограниченная гарантия распространяется только на продукт, изготовленный компанией Xiaomi или для нее и содержащий ее товарные знаки,
торговое наименование или логотип «Xiaomi» либо «Mi», если иное не предусмотрено компанией Xiaomi.
Ограниченная гарантия не распространяется на (а) повреждения в результате стихийных бедствий, например удара молнии, смерча, наводнения,
пожара, землетрясения или других экзогенных факторов; (б) следствия халатности; (в) коммерческое использование; (г) внесенные изменения или
модификации любой части продукта; (д) повреждения, вызванные использованием продуктов других производителей; (е) повреждения в результате
несчастного случая, злоупотребления или неправильного использования; (ж) повреждения, вызванные применением продукта за пределами
разрешенного или допускаемого использования, описанного Xiaomi, а также в результате несоответствующего напряжения или питания; (з)
повреждения из-за обслуживания (включая обновления и расширения) лицом, не являющимся представителем компании Xiaomi.
63
Page 65

Создание резервной копии данных, программного обеспечения и других материалов, которые вы можете хранить на продукте, является вашей
ответственностью. Компания Xiaomi не несет ответственности за потерю или переформатирование данных, программного обеспечения и других
материалов, содержащихся в оборудовании, в процессе эксплуатации.
Ни один реселлер, агент или сотрудник компании Xiaomi не уполномочен вносить изменения или дополнения в настоящую гарантию. Если
какое-либо условие окажется незаконным или юридически недействительным, законность или исполнимость остальных положений не должна быть
затронута или нарушена.
Послепродажное обслуживание осуществляется в стране или регионе покупки, за исключением случаев, запрещенных законом, или если иное
предусмотрено компанией Xiaomi.
Настоящая гарантия не покрывает продукты, которые не были должным образом импортированы, были изготовлены не компанией Xiaomi и/или
приобретены не у Xiaomi либо ее официального представителя. Согласно действующему законодательству, вы можете рассчитывать на гарантии от
официального дистрибьютора, который продал продукт. Поэтому компания Xiaomi предлагает обращаться к продавцу, у которого вы приобрели
продукт.
Настоящая гарантия не распространяется на Гонконг и Тайвань.
5. ПОДРАЗУМЕВАЕМЫЕ ГАРАНТИИ
За исключением случаев, запрещенных законодательством, подразумеваемые гарантии (включая гарантии товарного состояния и пригодности для
конкретной цели) имеют ограниченный срок действия, который не может превышать срок действия настоящей ограниченной гарантии. В некоторых
юрисдикциях не допускается ограничение срока действия подразумеваемой гарантии. В таких случаях указанное ограничение не применяется.
6. ОГРАНИЧЕНИЕ ПОВРЕЖДЕНИЯ
За исключением случаев, запрещенных законодательством, компания Xiaomi не несет ответственности за повреждения в результате ДТП,
косвенных, специальных или последующих повреждений, включая потерю прибыли, доходов или данных, убытки, возникшие в результате нарушения
явных или подразумеваемых гарантий или условий, или по любой другой законной теории, даже если компания Xiaomi была предупреждена о
возможности таких повреждений. В некоторых юрисдикциях не допускается исключение или ограничение ответственности за специальные,
косвенные или последующие убытки. В таких случаях указанные выше ограничения не применяются.
7. КОНТАКТЫ КОМПАНИИ XIAOMI
Подробную информацию для клиентов см. на сайте hps://www.mi.com/en/service/warranty/
Контактным лицом для послепродажного обслуживания может быть любое лицо из авторизованной сервисной сети Xiaomi, авторизованный
дистрибьютор Xiaomi или продавец, у которого вы приобрели продукт. Если у вас возникли какие-либо вопросы, обратитесь к соответствующему
лицу в компании Xiaomi.
64
Page 66

GARANTIE
CETTE GARANTIE VOUS DONNE DES DROITS SPÉCIFIQUES ET IL EST POSSIBLE DE PROFITER D’AUTRES DROITS OCTROYÉS PAR LES LOIS APPLICABLES
DANS VOTRE PAYS, VOTRE RÉGION OU VOTRE DÉPARTEMENT. EN EFFET, DANS CERTAINS PAYS, PROVINCES OU DÉPARTEMENTS, LES DROITS DU
CONSOMMATEUR PEUVENT IMPOSER UNE PÉRIODE DE GARANTIE MINIMALE. AUTRES QUE LES LIMITES PERMISES PAR LA LOI, XIAOMI N’EXCLUT PAS,
LIMITE NI SUSPEND D’AUTRES DROITS QUE VOUS POUVEZ DÉTENIR. POUR COMPRENDRE PLEINEMENT VOS DROITS, CONSULTEZ LES LOIS
APPLICABLES DANS VOTRE PAYS, PROVINCE OU DÉPARTEMENT.
1. GARANTIE LIMITÉE DE PRODUIT
XIAOMI garantit que les Produits sont exempts de tout défaut matériel ou de conception dans le cadre d’une utilisation normale en accord avec le mode
d’emploi dudit Produit et dans la Durée de garantie.
La durée et les conditions relatives aux garanties légales sont prévues par les lois locales afférentes. Pour plus d’informations sur les avantages de la
garantie du consommateur, veuillez consulter le site web officiel de Xiaomi hps://www.mi.com/en/service/warranty/.
Xiaomi garantit à l’acheteur d’origine que le produit Xiaomi est exempt de tout défaut matériel ou de conception dans le cadre d’une utilisation normale
dans la période mentionnée ci-dessus.
Xiaomi ne garantit pas que le fonctionnement du Produit restera ininterrompu et exempt d’erreur.
Xiaomi n’est pas responsable des dommages découlant d’une non-conformité aux instructions liées à l’utilisation du produit.
2. SOLUTIONS
Si un défaut matériel est rencontré et une réclamation fondée est reçue par Xiaomi pendant la période de garantie, Xiaomi va soit (1) réparer le produit
gratuitement, (2) échanger le produit, ou (3) rembourser le produit, frais d’expédition exclus.
3. COMMENT PROFITER D’UN SERVICE DE GARANTIE
Pour bénéficier du service de garantie, vous devez fournir le Produit à l’adresse spécifiée par Xiaomi, dans son emballage d’origine ou dans un emballage
similaire garantissant le même degré de protection. Sauf mesures prohibées par la loi applicable, Xiaomi peut vous demander de présenter des preuves
d’achat et/ou de vous conformer aux exigences d’inscription avant de profiter du service de garantie.
4. EXCLUSIONS ET LIMITATIONS
Sauf stipulation contraire mentionnée par Xiaomi, la présente Garantie limitée s’applique uniquement au Produit fabriqué par ou pour Xiaomi et identifiable
par les marques commerciales, le nom commercial ou le logo « Xiaomi » ou « Mi ».
65
Page 67

La Garantie limitée ne s’applique pas (a) aux dégâts dus aux catastrophes naturelles, comme la foudre, les tornades, les inondations, les incendies, les
tremblements de terre ou autres causes externes (b) aux négligences, (c) à l’utilisation commerciale, (d) aux modifications de tout ou partie du Produit, (e)
aux dommages provoqués par une utilisation avec des Produits non-Xiaomi, (f) aux dommages provoqués par un accident, un abus, une mauvaise utilisation
(g) aux dommages provoqués par l’utilisation du Produit hors des utilisations autorisées ou prévues décrites par Xiaomi ou avec une tension ou une
alimentation électrique inappropriée, ou (h) aux dommages provoqués par une maintenance (mises à niveau ou extensions comprises) réalisée par une
personne non représentative de Xiaomi.
Il en va de votre responsabilité de sauvegarder les données, le logiciel ou tout autre matériel que vous pourriez avoir stocké ou préservé sur le Produit. Il est
probable que les données, le logiciel ou d’autres matériels de l’équipement soient perdus ou formatés lors d’une maintenance. Xiaomi n’est pas responsable
de ce type de dommages ou de pertes.
Aucun revendeur, agent ou employé de Xiaomi n’est autorisé à apporter des modifications, des extensions ou des ajouts à la présente Garantie limitée. Si
une disposition est jugée illégale ou inapplicable, la légitimité et l’applicabilité des dispositions restantes ne sauraient être affectées ou impactées.
Sauf mesures prohibées par la loi ou promesse contraire par Xiaomi, les services après-ventes sont limités au pays ou à la région de l’achat initial.
Les produits qui n’ont pas été dûment importés et/ou n’ont pas été dûment fabriqués par Xiaomi et/ou n’ont pas été dûment obtenus chez Xiaomi ou un
vendeur officiel de Xiaomi ne sont pas couverts par les présentes garanties. Conformément à la loi applicable, vous pouvez bénéficier des garanties depuis
le détaillant non officiel qui vous a vendu le produit. Pour cela, Xiaomi vous invite à contacter le détaillant auprès duquel vous avez acheté le produit.
Les présentes garanties ne s’appliquent pas à Hong Kong et à Taiwan.
5. GARANTIES IMPLICITES
Sauf mesures prohibées par la loi applicable, toutes les garanties implicites (notamment les garanties de commercialisation et de conformité pour un but
spécifique) disposeront d’une durée de garantie limitée allant jusqu’à la durée maximale de la présente garantie limitée. Certaines juridictions n’autorisent
pas les limitations de durée d’une garantie implicite. La limitation ci-dessus ne s’applique donc pas à de tels cas.
6. LIMITATION DES DOMMAGES
Sauf mesures prohibées par la loi applicable, Xiaomi ne devrait être tenue pour responsable pour tous dommages provoqués par des accidents, indirects,
spécifiques ou conséquents, notamment les pertes de bénéfices, de chiffre d’affaires ou de données, résultant de toute brèche dans une garantie ou
condition expresse ou implicite, ou sous toute théorie légale, même si Xiaomi a été informée de la possibilité de tels dommages. Certaines juridictions
n’autorisent pas l’exclusion ou la limitation des dommages indirects, spécifiques ou conséquents. La limitation ci-dessus ne s’applique donc pas à vous.
7. CONTACTS XIAOMI
Pour les clients, consultez le site Web : hps://www.mi.com/en/service/warranty/
La personne à contacter pour le service après-vente peut être n’importe quelle personne de service agréé Xiaomi, les distributeurs agréés Xiaomi ou le
vendeur final qui vous a vendu le produit. En cas de doute, veuillez contacter la personne concernée que Xiaomi peut identifier.
66
Page 68

GARANTIEERKLÄRUNG
DIESE GARANTIE GIBT IHNEN BESTIMMTE RECHTE UND MÖGLICHERWEISE VERFÜGEN SIE AUFGRUND DER GESETZE IHRES LANDES, IHRER PROVINZ
ODER IHRES BUNDESLANDES ÜBER WEITERE RECHTE. IN EINIGEN LÄNDERN, PROVINZEN ODER BUNDESLÄNDERN SCHREIBT DAS
VERBRAUCHERRECHT EINE MINDESTGARANTIEZEIT VOR. XIAOMI SCHLIESST IHRE WEITEREN RECHTE NICHT AUS, SCHRÄNKT SIE NICHT EIN UND
SETZT SIE NICHT AUS, SOFERN DIES NICHT GESETZLICH ZULÄSSIG IST. UMFASSENDE INFORMATIONEN ZU IHREN RECHTEN FINDEN SIE IN DEN
GESETZEN IHRES LANDES, IHRER PROVINZ ODER IHRES BUNDESLANDES.
1. EINGESCHRÄNKTE PRODUKTGARANTIE
Xiaomi garantiert Ihnen, dass Ihr Xiaomi-Produkt während der Garantiezeit bei normalem Gebrauch frei und bei Gebrauch in Übereinstimmung mit den
Anweisungen des betreffenden Benutzerhandbuchs frei von Material- und Verarbeitungsfehlern ist.
Die gesetzlichen Gewährleistungsfristen und -bestimmungen ergeben sich aus den jeweiligen lokalen Gesetzen. Weitere Informationen zu den Garantieleistungen für Verbraucher finden Sie auf der Website von Xiaomi unter hps://www.mi.com/en/service/warranty/.
Xiaomi garantiert Ihnen als Erstkäufer, dass das Xiaomi-Produkt während des oben genannten Zeitraums bei normalem Gebrauch frei von Material- und
Verarbeitungsfehlern ist.
Xiaomi garantiert nicht, dass das Produkt unterbrechungsfrei oder fehlerfrei funktioniert.
Xiaomi haet nicht für Schäden, die aus der Nichteinhaltung der Anweisungen zur Verwendung des Produkts resultieren.
2. RECHTSMITTEL
Wenn ein Hardwarefehler festgestellt wird und Xiaomi eine gültige Reklamation innerhalb der Garantiezeit erhält, wird Xiaomi entweder (1) das Produkt unter
Verwendung neuer oder überholter Ersatzteile kostenlos reparieren, (2) das Produkt ersetzen oder (3) den Kaufpreis des Produkts zurückerstaen, wobei
mögliche Versandkosten ausgeschlossen werden.
3. NUTZUNG DES GARANTIESERVICES
Um Garantieleistungen in Anspruch nehmen zu können, müssen Sie das Produkt in der Originalverpackung oder einer ähnlichen Verpackung, die das
Produkt im gleichen Maße schützt, an die von Xiaomi angegebene Adresse senden. Wenn dies nicht durch anwendbares Recht untersagt ist, kann Xiaomi
vor der Erbringung von Garantieleistungen die Vorlage von Kaufnachweise(n) und / oder eine Registrierung von Ihnen verlangen.
4. AUSSCHLÜSSE UND EINSCHRÄNKUNGEN
Soweit nicht anders durch Xiaomi bestimmt, gilt diese eingeschränkte Garantie ausschließlich für das von oder für Xiaomi hergestellte Produkt, das durch
das die Marken oder Handelsnamen oder das „Xiaomi“- bzw. „Mi“-Logo identifiziert werden kann.
67
Page 69

Die Garantie beinhaltet keine (a) Schäden durch Naturereignisse oder höhere Gewalt, z. B. Blitzeinschläge, Tornados, Überschwemmungen, Feuer,
Erdbeben oder andere äußere Ursachen; (b) Schäden durch Fahrlässigkeit; (c) Schäden durch kommerzielle Nutzung; (d) Schäden durch Änderungen oder
Modifikationen an einem Teil des Produkts; (e) Schäden, die durch die gemeinsame Verwendung mit Produkten anderer Hersteller verursacht werden; (f)
Schäden, die durch Unfall, Missbrauch oder Zweckentfremdung verursacht werden; (g) Schäden, die durch den Betrieb des Produkts im Widerspruch zur
von Xiaomi beschriebenen zulässigen oder beabsichtigten Verwendung oder durch unzulässige Spannungs- oder Stromversorgung verursacht werden; (h)
Schäden, die durch Serviceleistungen (einschließlich Upgrades und Erweiterungen) von Personen verursacht werden, die dafür nicht von Xiaomi autorisiert
wurden.
Es liegt in Ihrer Verantwortung, Daten, Soware oder andere Materialien, die Sie auf dem Produkt gespeichert haben, zu sichern. Es ist wahrscheinlich, dass
Daten, Soware oder andere Materialien bei Inanspruchnahme des Garantieservices verloren gehen oder Geräte neu formatiert werden und Xiaomi
übernimmt keine Haung für solche Schäden oder Verluste.
Wiederverkäufer, Agenten oder Mitarbeiter von Xiaomi sind nicht berechtigt, Änderungen, Erweiterungen oder Ergänzungen hinsichtlich dieser
eingeschränkten Garantie vorzunehmen. Sollte eine Bestimmung rechtswidrig oder nicht durchsetzbar sein, wird die Rechtmäßigkeit oder Durchsetzbarkeit der übrigen Bestimmungen davon nicht berührt oder beeinträchtigt.
Sofern dies nicht gesetzlich verboten oder anderweitig von Xiaomi versprochen wurde, ist der Kundendienst auf das Land oder die Region des ursprünglichen Kaufs beschränkt.
Produkte, die nicht ordnungsgemäß eingeführt wurden und/oder nicht ordnungsgemäß von Xiaomi hergestellt wurden und/oder nicht ordnungsgemäß
von Xiaomi oder einem offiziellen Händler von Xiaomi erworben wurden, fallen nicht unter diese Garantie. Gemäß geltendem Recht können Garantieforderungen gegen Einzelhändler geltend gemacht werden, die das Produkt trotz Ermangelung gegenseitiger Vertriebsvereinbarungen in Umlauf gebracht
haben. In solchen Fällen ermutigt Sie Xiaomi, den Händler zu kontaktieren, bei dem Sie das Produkt gekau haben.
Diese Garantieerklärung ist nicht auf Hong Kong und Taiwan anwendbar.
5. STILLSCHWEIGENDE GARANTIEN
Soweit durch geltendes Recht zulässig, sind alle stillschweigend begründeten Garantien (einschließlich der Garantie der Gebrauchstauglichkeit oder der
Eignung für einen bestimmten Zweck) zeitlich beschränkt und gelten maximal für die Dauer dieser eingeschränkten Garantie. In einigen Ländern ist die
Beschränkung der Dauer stillschweigender Garantien nicht zulässig, sodass die o. g. Beschränkung auf Sie nicht zutri, wenn Sie Verbraucher in einem
dieser Länder sind.
68
Page 70

6. SCHADENSBESCHRÄNKUNG
Soweit durch geltendes Recht zulässig, haet Xiaomi nicht für zufällige oder indirekte Schäden, Neben- oder Folgeschäden oder besondere Schadensfolgen einschließlich, aber nicht beschränkt auf, entgangenen Gewinnen oder Einnahmen sowie Datenverluste und Schäden, die aus einer Verletzung einer
ausdrücklichen oder stillschweigenden Garantie- oder anderweitigen Bedingung oder aus einer anderen rechtlichen Grundlage resultieren, selbst wenn
Xiaomi auf die Möglichkeit solcher Schäden hingewiesen wurde. In einigen Ländern sind Ausschluss oder Beschränkung der Haung für indirekte oder
Folgeschäden sowie besondere Schadensfolgen nicht zulässig, sodass die o. g. Beschränkung auf Sie evtl. nicht zutri.
7. KONTAKT XIAOMI
Kontaktinformationen finden Sie auf unserer Website: hps://www.mi.com/en/service/warranty/
Der Kundendienst kann durch jede Person im autorisierten Servicenetz von Xiaomi erbracht werden, durch die autorisierten Händler von Xiaomi oder durch
den Endverkäufer, der die Produkte an Sie verkau hat. Bei Fragen Sie sich bie an die entsprechende von Xiaomi angegebene Person.
69
Page 71

AVVISO SULLA GARANZIA
LA PRESENTE GARANZIA RICONOSCE AL CLIENTE DIRITTI LEGALI SPECIFICI E IL CLIENTE POTREBBE AVERE ALTRI DIRITTI PREVISTI DA LEGGI DEL
PROPRIO PAESE, PROVINCIA O STATO. IN ALCUNI PAESI, PROVINCE O STATI, LA LEGGE PER LA TUTELA DEI CONSUMATORI PUÒ IMPORRE UN PERIODO
MINIMO DI GARANZIA. ECCETTO NEI CASI CONSENTITI DALLA LEGGE, XIAOMI NON ESCLUDE, LIMITA O REVOCA ALTRI DIRITTI CHE L’UTENTE PUÒ
AVERE. PER UNA COMPRENSIONE COMPLETA DEI PROPRI DIRITTI, INVITIAMO GLI UTENTI A CONSULTARE LE LEGGI DEL PROPRIO PAESE, PROVINCIA O
STATO.
1. GARANZIA LIMITATA DI PRODOTTO
XIAOMI garantisce che i Prodoi siano privi di difei in fao di materiali e manodopera in circostanze di utilizzo normali e in caso di utilizzo in conformità con
il manuale utente del rispeivo Prodoo, durante il Periodo di Garanzia.
La durata e le condizioni relative alle garanzie legali sono stabilite dalle relative norme locali. Per ulteriori informazioni sui vantaggi della garanzia per i
consumatori, fare riferimento al sito Web ufficiale di Xiaomi hps://www.mi.com/en/service/warranty/.
Xiaomi garantisce all’acquirente originale che il suo Prodoo Xiaomi sarà privo di difei in fao di materiali e manodopera in circostanze di utilizzo normali
nel periodo sopra indicato.
Xiaomi non garantisce che il funzionamento del Prodoo sia ininterroo o privo di errori.
Xiaomi non è responsabile per danni dovuti al mancato rispeo delle istruzioni relative all’utilizzo del Prodoo.
2. RIPARAZIONI
Nel caso in cui venga rilevato un difeo hardware e Xiaomi riceva un valido reclamo entro il Periodo di garanzia, Xiaomi (1) riparerà il Prodoo gratuitamente
o (2) sostituirà il prodoo o (3) rimborserà il Prodoo, con l’esclusione di eventuali costi di spedizione.
3. COME OTTENERE IL SERVIZIO DI GARANZIA
Per oenere l'assistenza in garanzia, è necessario consegnare il Prodoo, nella sua confezione originale o in una confezione simile che assicuri un grado
equivalente di protezione del Prodoo, all'indirizzo indicato da Xiaomi. Ad eccezione della misura proibita dalla legge applicabile, Xiaomi può richiedere che
l’utente presenti prove o prova di acquisto e / o soddisfi i requisiti di registrazione prima di ricevere il servizio di garanzia.
4. ESCLUSIONI E LIMITAZIONI
Se non precedentemente stipulato da Xiaomi, la presente Garanzia limitata si applica solo al Prodoo fabbricato da o per Xiaomi, che può essere identificato
dai marchi, dal nome commerciale o dal logo “Xiaomi” o “Mi”.
70
Page 72

La Garanzia Limitata non si applica in caso di (a) Danni dovuti a cause naturali o di forza maggiore, ad esempio fulmini, tornado, allagamenti, incendi,
terremoti o altre cause esterne; (b) negligenza; (c) uso commerciale; (d) alterazioni o modifiche a qualsiasi parte del Prodoo; (e) Danni causati dall’utilizzo
con prodoi non Xiaomi; (f) Danni causati da incidenti, abuso o uso errato; (g) Danni causati dall’aver utilizzato il Prodoo per utilizzi diversi da quelli
permessi o previsti come descrio da Xiaomi o con tensione o alimentazione inappropriati; oppure (h) Danni causati dal servizio (inclusi aggiornamenti ed
espansioni) fornito da chiunque non sia un rappresentante di Xiaomi.
È responsabilità dell’utente effeuare il backup di qualsiasi tipo di dati, soware o altri materiali che l’utente può aver archiviato o conservato nel prodoo. È
possibile che i dati, il soware o gli altri materiali nell’apparecchio vengano persi o riformaati durante il processo di servizio, Xiaomi non è responsabile per
tali danni o perdite.
Nessun rivenditore, agente o dipendente Xiaomi è autorizzato a effeuare qualsiasi modifica, estensione o aggiunta a questa Garanzia Limitata. Se una
disposizione è ritenuta illegale o non applicabile, la legalità o l’applicabilità delle disposizioni restanti non viene interessata o compromessa.
Salvo quanto vietato dalle leggi o altrimenti promesso da Xiaomi, i servizi post-vendita saranno limitati al paese o alla regione dell’acquisto originale.
I Prodoi che non sono stati debitamente importati e/o debitamente prodoi da Xiaomi e/o debitamente acquisiti da Xiaomi o da un rivenditore ufficiale di
Xiaomi non sono coperti dalle presenti garanzie. Come da legislazione applicabile, l’utente può usufruire delle garanzie dal rivenditore non ufficiale che ha
venduto il prodoo. Perciò Xiaomi invita l’utente a contaare il rivenditore da cui ha acquistato il prodoo.
Le presenti garanzie non si applicano a Hong Kong e Taiwan.
5. GARANZIE IMPLICITE
Ad eccezione della misura proibita dalla legge applicabile, tue le garanzie implicite (incluse le garanzie di commerciabilità e idoneità per finalità particolari)
avranno una durata limitata fino alla durata massima di questa garanzia limitata. Alcune giurisdizioni non consentono limitazioni sulla durata di una garanzia
implicita, perciò la limitazione di cui sopra non verrà applicata in tali casi.
6. LIMITAZIONE DEL DANNO
Ad eccezione della misura proibita dalla legge applicabile, Xiaomi non sarà responsabile per qualsiasi danno causato da incidenti, indireo, speciale o
consequenziale, inclusi, a titolo esemplificativo ma non esaustivo, la perdita di profii, reddito o dati o danni risultanti da qualsiasi violazione di una garanzia
o una condizione espressa o implicita, o in virtù di qualsiasi altra teoria legale, anche se Xiaomi è stata informata della possibilità di tali danni. Alcune
giurisdizioni non consentono l’esclusione o la limitazione di danni speciali, indirei o consequenziali, perciò la limitazione o esclusione di cui sopra potrebbe
non applicarsi per l’utente.
7. CONTATTI XIAOMI
I clienti possono visitare il sito Web: hps://www.mi.com/en/service/warranty/
La persona di contao per il servizio post-vendita può essere qualsiasi addeo della rete di assistenza autorizzata Xiaomi, un addeo dei distributori
autorizzati Xiaomi o il venditore finale che ha venduto i prodoi al cliente. In caso di dubbi, contaare la persona indicata da Xiaomi.
71
 Loading...