

Page 1
Mi Smart LED Ceiling Light
User Manual
Page 2
EN
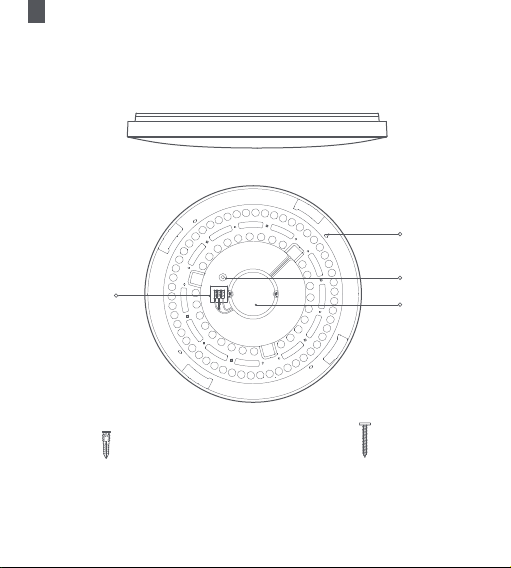
Product Overview
Read this manual carefully before use, and retain it for future reference.
Lampshade
Mounting Hole
Terminal Block
Connector
Base
× 4
Wall Plug
Note: Illustrations of product, accessories, and user interface in the user manual are for reference
purposes only. Actual product and functions may vary due to product enhancements.
10
Wiring Hole
Junction Box
× 4
Self-tapping Screw
Page 3
EN
Installation
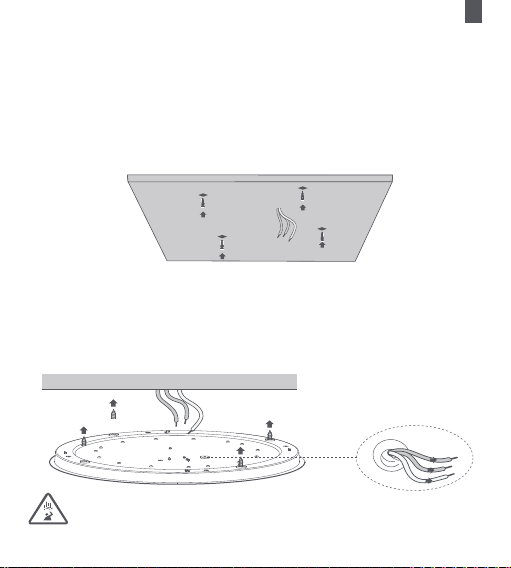
1. Drill holes
Place the base in the position the ceiling light will be installed, and mark the positions
of the mounting holes, then remove the base. Use a φ6 mm drill to drill holes with a
depth of at least 40 mm, then insert the included four wall plugs into the holes.
2. Fix the base
Lead the stripped wires through the wiring hole in the base, and then align the
mounting holes with the wall plugs. Screw the included four self-tapping screws into
the wall plugs to fix the base onto the ceiling. Make sure the base is securely installed.
Note: Try to wiggle the base around to make sure it is properly and firmly installed.
Otherwise, it may fall down.
11
Page 4
EN
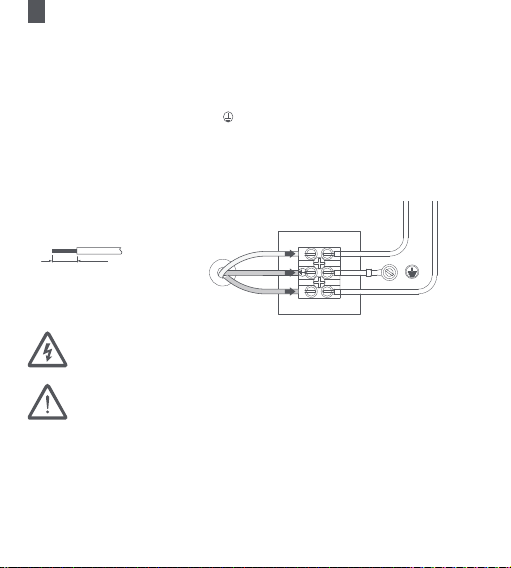
3. Connect the stripped wires
The terminal block connector is suitable for wires with a cross-sectional area of
0.75–1.5 mm². Strip about 6–8 mm of the wires, then connect the neutral, ground, and
live wires according to the marks (N, , and L) to the terminal block connector on the
ceiling light. Use a screwdriver to clamp down each line by tightening the screws.
Gently pull each wire to ensure it has been firmly connected.
Note: The wires should run closely along the base in order to avoid shadows on the lampshade. If the
wires are too long, please cut off the excess part.
Stripped Wire
6-8mm
Warning: Risk of an electric shock. This ceiling light must be grounded.
Warning: Before installing, replacing or inspecting the ceiling light, cut off
the electricity to prevent an electric shock.
N
L
4. Install the lampshade
Hold both sides of the lampshade and align it with the base, then gently place it onto
the base. Rotate the lampshade clockwise and lock it into the place until the internal
metal part makes a clicking sound.
12
Page 5

Note: Try to wiggle the lampshade around to make sure it is properly and firmly installed.
Otherwise, it may fall down.
Connect with Mi Home/Xiaomi Home App
This product works with Mi Home/Xiaomi Home app *. Control your device, and
interact it and other smart home devices with Mi Home/Xiaomi Home app.
Scan the QR code to download and install the app. You will be directed to the
connection setup page if the app is installed already. Or search "Mi Home/Xiaomi
Home" in the app store to download and install it.
Open Mi Home/Xiaomi Home app, tap "+" on the upper right, and then follow prompts
to add your device.
EN
13
Page 6

EN
* The app is referred to as Xiaomi Home app in Europe (except for Russia). The name of the app
displayed on your device should be taken as the default.
Note: The version of the app might have been updated, please follow the instructions based on the
current app version.
Apple HomeKit Smart Control
1. Open the Home app on your iPhone or iPad.
2. Tap "Add Accessories" and follow the instructions to scan the QR code either on
the back cover of the user manual or on the junction box, or enter the 8-digit setup
code above the QR code to grant the Apple Home app access.
* Make sure a Wi-Fi network with Internet access is available (this product does not support 5 GHz
networks).
To control this HomeKit-compatible accessory, it is recommended that you use iOS 9.0 or above.
The HomeKit setup code is in the user manual and on the junction box, do not lose it.
When adding the product to the Home app after the factory settings are restored, you will need the
HomeKit setup code again.
In case the user manual is lost, remove the lampshade and scan the QR code or enter the setup code
on the junction box.
iPad and iPhone are the trademarks of Apple Inc., and they are registered in the United States and
other countries.
14
Page 7

EN
Wall Switch Control
Use the wall switch to turn on and off the ceiling light within 5 seconds, you can change
the color temperature from warm yellow light, white light to night light by default. You
can set the favorite light via the app.
Note: Cycling the three light modes twice and pressing the wall switch again will restore the factory
settings of the ceiling light.
Restoring Factory Settings
Use the wall switch to turn the ceiling light on and off seven times consecutively (turn
off the ceiling light and wait for two seconds, then turn it on and wait for two seconds,
this counts as one time). The ceiling light then starts breathing and automatically restarts
after five seconds, and the factory settings of the ceiling light have been restored.
Note: When using the ceiling light in a new network environment, you need to restore the factory
settings and connect to the network again.
Replacing the Light Source
1. Remove the light source
The ceiling light contains three light boards and three protective covers. Each light
board is fixed to the base with two rivets and each protective cover is fixed to the light
board and base with three rivets.
When removing the light source, first uninstall the three rivets from the protective
15
Page 8

EN
cover of the light board, then remove the protective cover of the light board and
unplug the wiring connected to the light board. Finally, uninstall the two rivets from
the light board, and then remove the light board.
2. Install the light source
Place the light board on the base, and use two new rivets to fix the light board onto
the base. Connect the wiring, then install the protective cover on the light board with
three new rivets to fix the cover onto the base.
Warning: Before replacing the LED light board, cut off the electricity to prevent an electric shock.
This replacement should only be carried out by a qualified electrician.
Light Board
Light B oard Rivet
Press do wn the plastic ti p of the rivet
cap abo ut 3 mm, then rem ove the rivet
bracke t to completel y remove the rive t.
Protective Cover
Protective Cover Rivet
Press do wn the plastic ti p of the rivet
cap abo ut 3 mm, then rem ove the rivet
bracke t to completel y remove the rive t.
16
Page 9

Specifications
Model: MJXDD01SYL
Power Factor: >0.9
Operating Temperature: -10°C to 40°C
Operating Humidity: 0–85% RH
Color Temperature: 2700–6000 K
Rated Input: 100–240V~ 50/60Hz Max. 0.5A
Rated Power: 45 W (81 × 1 W/LED module)
Compatible with: Android 4.4 & iOS 9.0 or above
Wireless Connectivity: Wi-Fi IEEE 802.11 b/g/n 2.4 GHz, Bluetooth 4.2 BLE
Operating Frequency:2412-2472 MHz (Wi-Fi) 2402-2480 MHz (BT)
Maximum Output Power: 18.95 dBm (Wi-Fi) 4.81 dBm (BT)
Product Features
EN
Adjustable Color
Temperature
App Remote Control Smart ConnectionVoice Control
Adjustable Brightness
High Color
Rendering Index
Smart Scene
Firmware Update
17
Page 10

EN
Precautions
Make sure the voltage is consistent with the ceiling light's operating voltage before
use. Using the mismatched voltage may damage the ceiling light and cause safety
hazards.
Do not replace the light source of the ceiling light by yourself. The light source
should only be replaced by the manufacturer, after-sales service, or a qualified
electrician.
The ceiling light generates heat during working. Please keep it is well ventilated for
heat dissipation.
This ceiling light can be controlled by an app or remote control (not included, sold
separately). Turning off the ceiling light by remote control or app does not cut it off
from the electricity, hence, do not touch, replace, or disassemble this ceiling light.
Otherwise, it may cause an electric shock, injury, or even death.
The light installation requires a qualified electrician, and the wiring must comply
with IEEE electrical standards or national standards.
The ceiling light should be installed in a stable location to prevent it from dropping
down or falling off.
Under normal use of condition, this equipment should be kept a separation
distance of at least 20cm between the antenna and the body of the user.
For indoor use only.
18
Page 11

EN
EU Declaration of Conformity
Hereby, Qingdao Yeelink Information Technology Co., Ltd. declares that the radio
equipment type MJXDD01SYL is in compliance with Directive 2014/53/EU. The full
text of the EU declaration of conformity is available at the following internet address:
https://www.mi.com/en/service/support/declaration.html.
WEEE Disposal and Recycling
All products bearing this symbol are waste electrical and electronic equipment
(WEEE as in directive 2012/19/EU) which should not be mixed with unsorted
household waste. Instead, you should protect human health and the
environment by handing over your waste equipment to a designated collection
point for the recycling of waste electrical and electronic equipment, appointed
by the government or local authorities. Correct disposal and recycling will help
prevent potential negative consequences to the environment and human
health. Please contact the installer or local authorities for more information
about the location as well as terms and conditions of such collection points.
19
Page 12

Manufactured for: Xiaomi Communications Co., Ltd.
Manufactured by: Qingdao Yeelink Information Technology Co., Ltd.
(a Mi Ecosystem company)
Address: F10-B4, Bldg. B, International Innovation Park, 1# Keyuanweiyi Rd.,
Laoshan District, Qingdao, 266101, Shandong, China
For further information, please go to www.mi.com
Importer:
Beryko s.r.o.
Na Roudné 1162/76, 301 00 Plzeň
www.beryko.cz
 Loading...