

Page 1

This version is for private use only and should not be distributed.
Mi Home Security Camera 360°
1080P
Page 2
This version is for private use only and should not be distributed.
Read this manual carefully before use, and retain it for future
reference
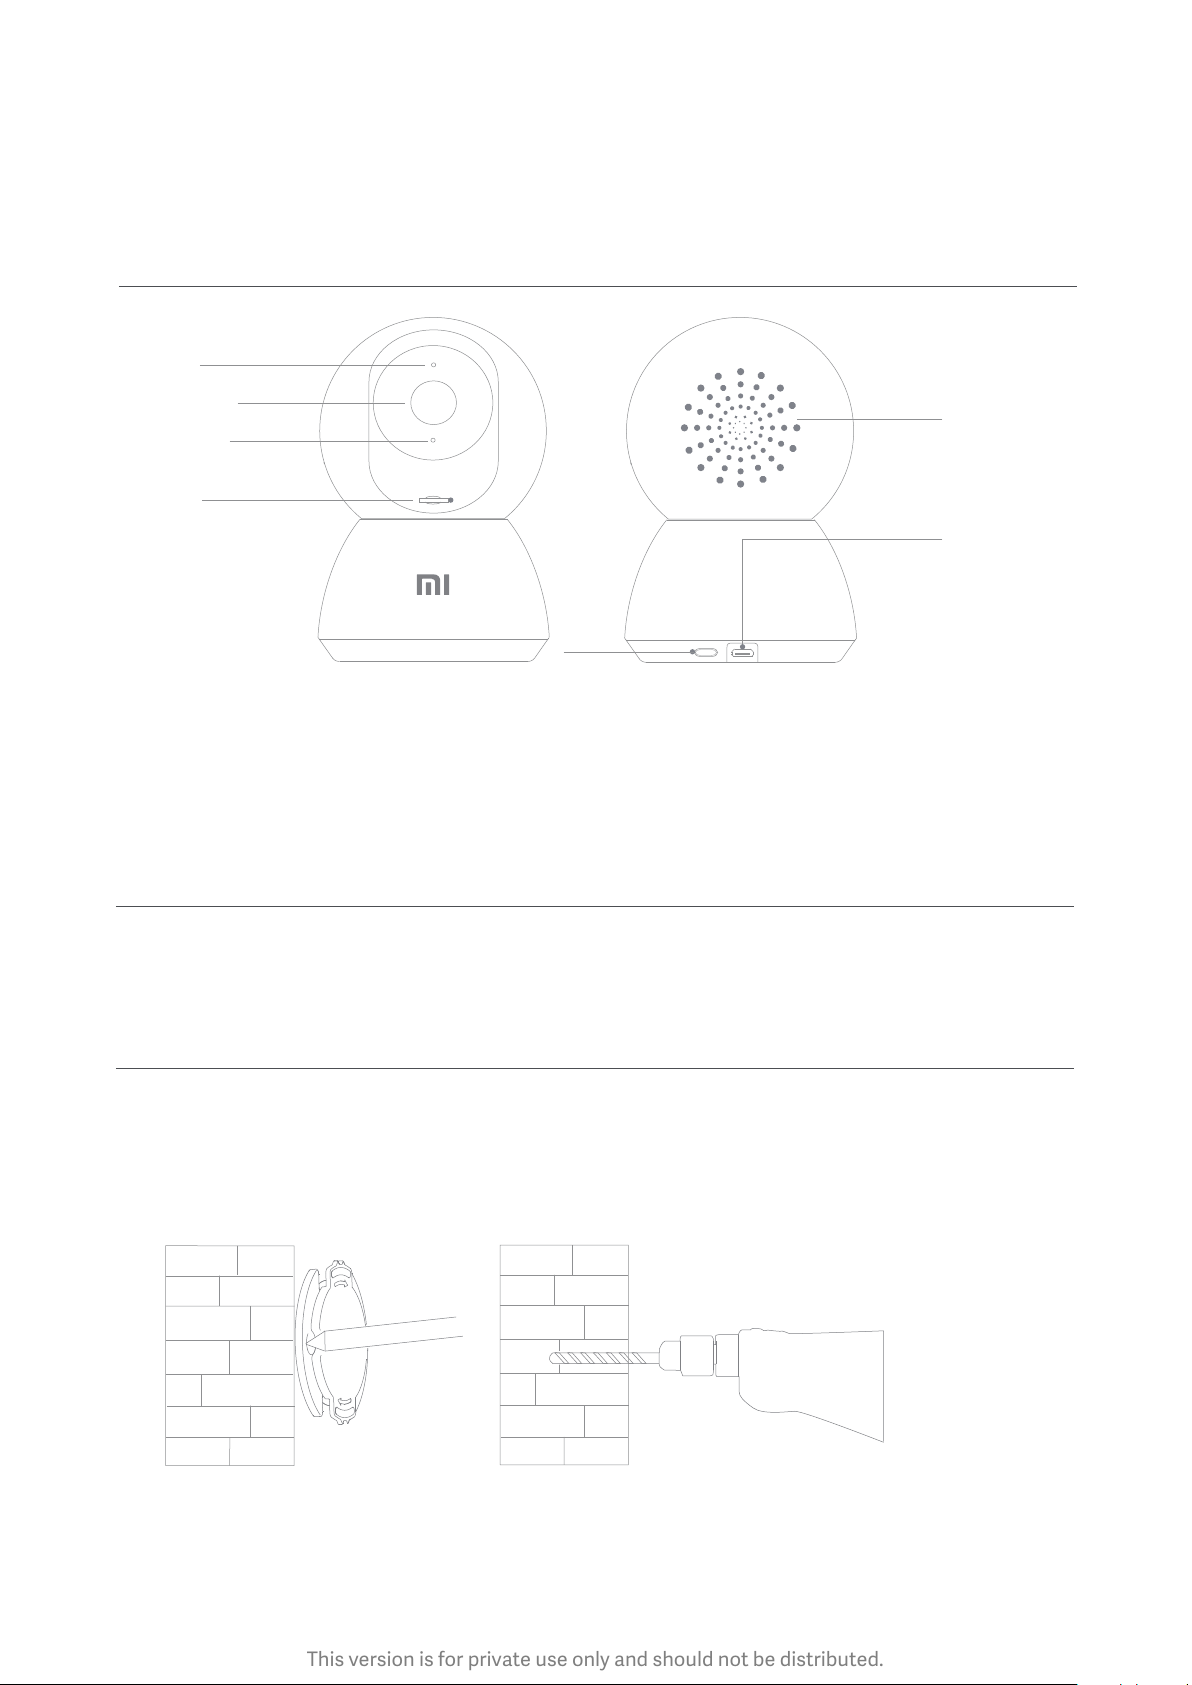
Product Overview
Status Indicator
Lens
MIC
MicroSD Slot
(Can be
revealed by
pushing the
lens upward)
Front View
Package Contents: Mi Home Security Camera 360° 1080P, power adapter, user manual,
wall mounting accessories pack, warranty card
Reset
Buon
reset
Rear View
Loudspeaker
Micro-USB
Charging Port
Product Installation
The Mi Home Security Camera 360° 1080P can be placed on a number of horizontal surfaces,
such as a writing desk, dining table, and coffee table. It can also be mounted on the wall.
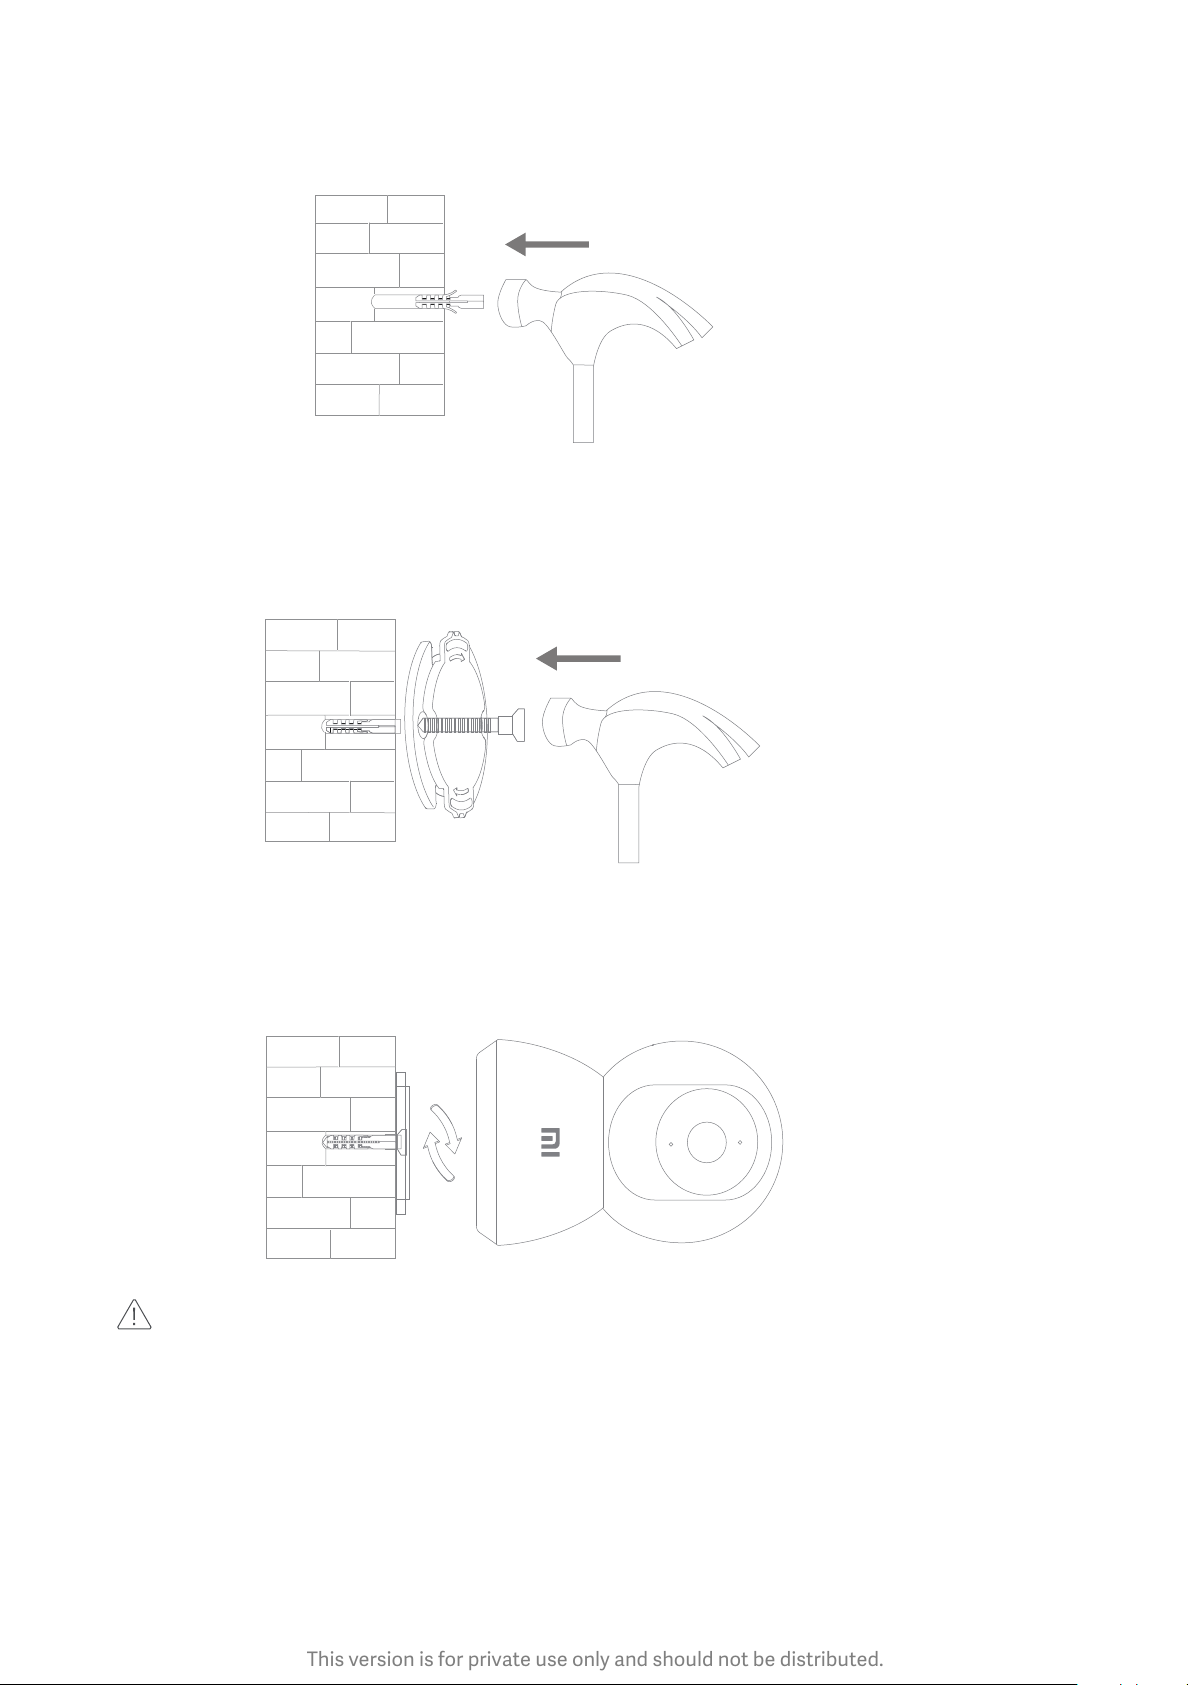
Mounting the Security Camera on a Wall
1. Drill two holes on the wall by using the base of the security camera as a template. It is
recommended that you mark the locations of the holes with a pencil before drilling.
The diameter of each hole is approximately 0.24 inches, and the depth is approximately
0.98 inches.
01
Page 3
This version is for private use only and should not be distributed.
2. Insert the two plastic anchors into the holes on the wall.
3. Make sure to position the base unit so that the arrow is pointing up. Secure the base unit
in place by tightening the screws into the plastic anchors.
4. Match the grooves on the boom of the camera unit with the raised area on the base
unit. Press down until the two surfaces are flush, then turn the camera unit in either
direction to lock it in position.
When mounting the security camera on a wall:
please note that the wall must be able to support at least triple the product's total
weight.
02
Page 4

This version is for private use only and should not be distributed.
Product Instructions
Turning the Device On
The Mi Home Security Camera will automatically activate once the power cable is
inserted into the Micro-USB charging port.
reset
If the indicator light is flashing orange, that means the device is activated successfully.
If you do not see a flashing orange light, please press and hold the Reset buon to
restart the device to enter pairing mode. Once the Mi Home Security Camera is turned
on, please do not aempt to rotate its head by force. If the camera position is incorrect,
adjustments can be made through the app.
Indicator Light
Steady blue on: connected/device status is normal
Flashing blue: network error
Flashing orange rapidly: waiting for connection
Flashing orange slowly: system upgrade in progress
03
Page 5
This version is for private use only and should not be distributed.
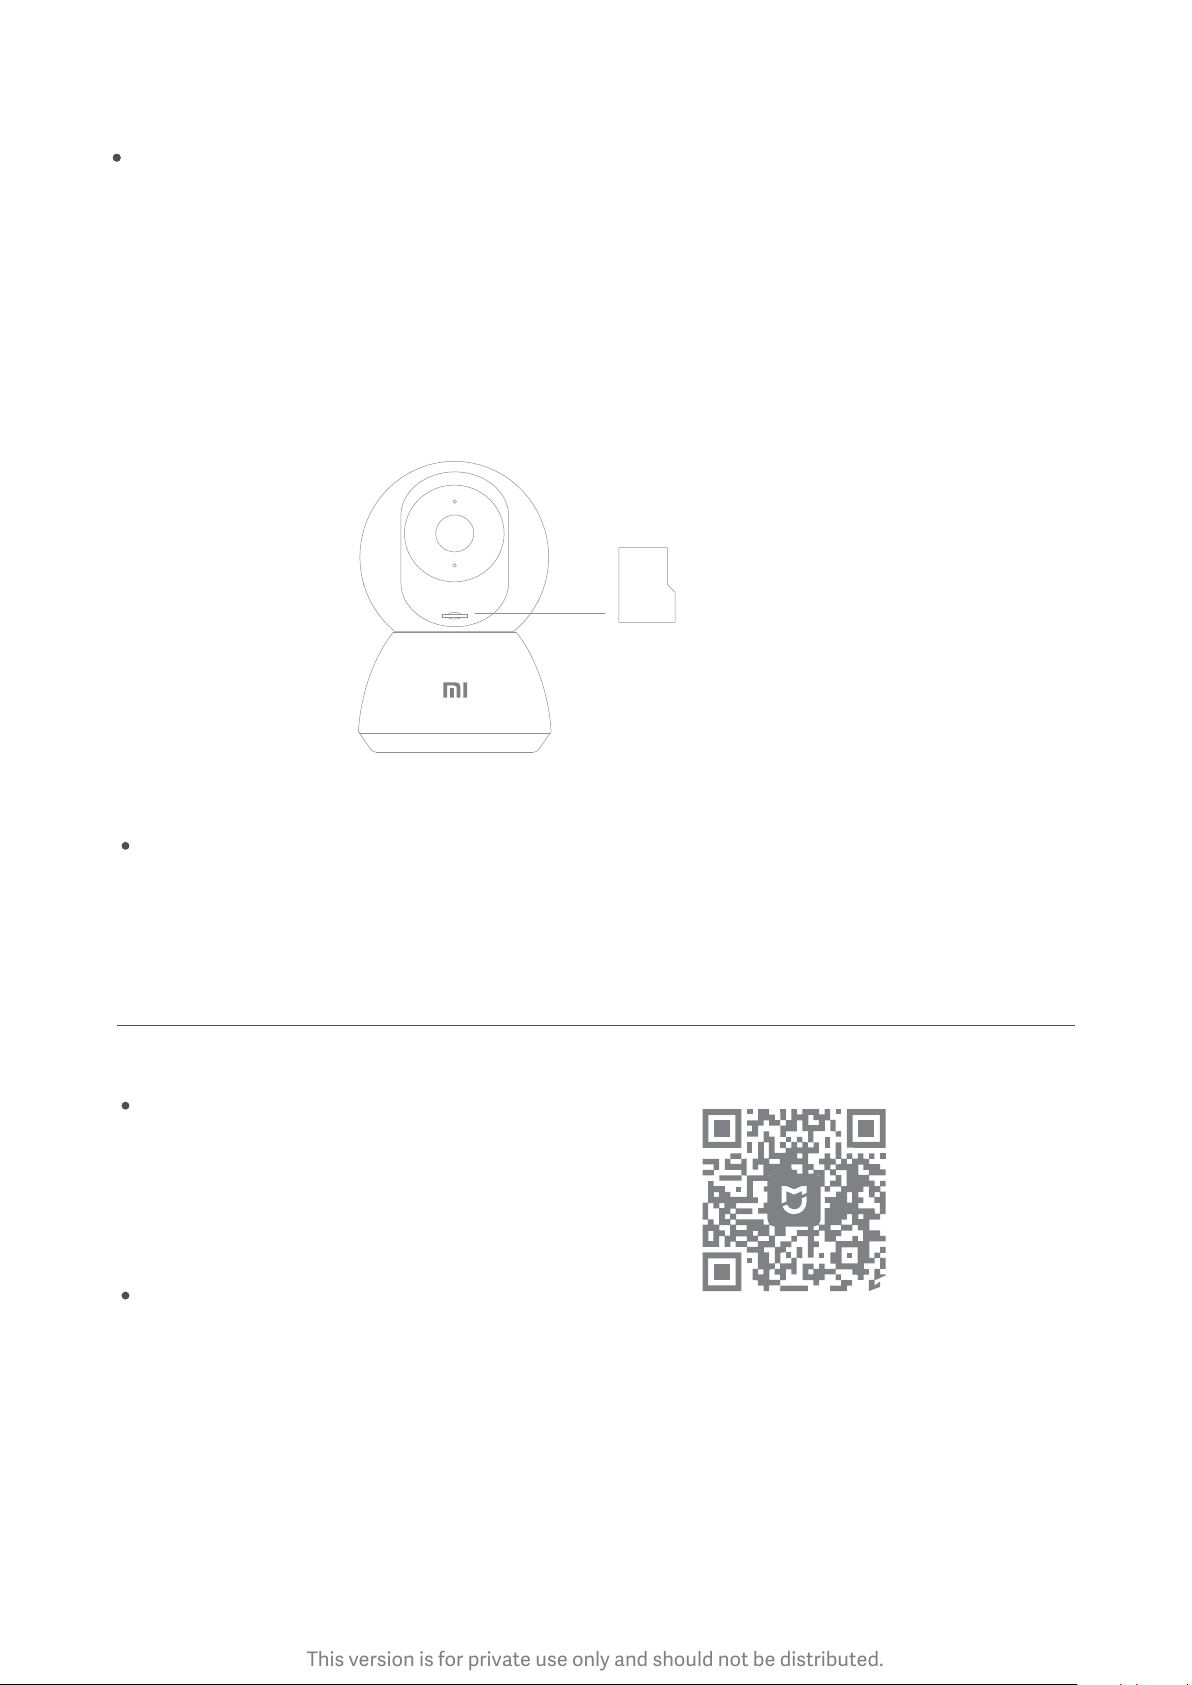
Installing a MicroSD Card
Make sure that the power to the security camera is already disconnected. Adjust the
camera lens upward until the MicroSD slot is revealed, then insert the MicroSD card
into the slot (the side with contact points must be facing down).
Note: Please turn off the security camera's power supply before inserting or removing
the MicroSD card. Please use a genuine MicroSD card manufactured by a qualified
supplier and make sure that thestorage capacity is 64 GB or less, with a reading/
writing speed of no less than U1/Class 10.
MicroSD
Restore Factory Seings
Press and hold the Reset buon to restore your device to factory seings.
Data stored on the MicroSD card is not erased.
Quick Setup
Control your device and interact it with other smart home devices in Mi Home app.
Install Mi Home app
Scan the QR code or go to app store to
download and install Mi Home app.
Add a device
Open Mi Home app, tap "+" on the upper right, and then follow prompts to add your
device.
Note: The version of Mi Home app might have been updated, please follow the
instructions based on the current app version.
04
Page 6

This version is for private use only and should not be distributed.
Precautions
The suitable operating temperature range for this product is between -14 °F and 122 °F.
Please do not use the product in an environment with temperatures above or below
the specified range.
The security camera is a precision electronic product. In order to ensure its normal
operation, please do not install the device in an environment with high humidity levels
or allow water to enter the product.
To improve the product's performance, please do not place the camera lens facing or
next to a reflective surface, such as glass windows/doors and white walls, which will
cause the image to appear overly bright in areas close to the camera and darker in areas
further away, or cause the camera to produce white images.
Please install the product in areas with Wi-Fi reception, and try to place the device where
the Wi-Fi signal is strong. In addition, please keep the security camera away from metal
structures, microwave ovens, or other locations where signal strength may be impacted.
Shared Remote Viewing
Through the Mi Home Security Camera 360° 1080P control interface in the Mi Home app,
you can set your security camera as a shared device under the General Seings menu,
and invite your friends to view the camera remotely. Your friends will be required to
download the Mi Home app and log in with his/her Xiaomi account.
General Seings Sharing with Mi Home ……
Rename
Security Seings
Device Sharing
Location Management
Check for Firmware Updates
Delete Device
Add Desktop Shortcut
Network Information
Feedback
Mi Home Security Camera 360° 1080P
Manage Sharing
Share with Mi Account
Note:
The diagram is for reference only. Actual displays will vary based on different versions of
the Mi Home platform and your smartphone model.
05
Page 7

This version is for private use only and should not be distributed.
Automatic Monitoring
Automatic monitoring can be configured through the Mi Home Security Camera 360°
1080P control interface in the Mi Home app.
Available options include 24-hour, daytime, and nighime monitoring. You can also
create your own schedule and set the desired camera angle.
This product is able to detect movements within its field of view. Once movements are
detected, a video is recorded and you will receive a notification.
Playback
Mi Home Security Camera's playback feature is only available aer installing a compatible
MicroSD card. Once a MicroSD card has been installed and the security camera is turned
on, videos will be recorded automatically. Aer entering the user interface of the Playback
feature, simply slide the bar on the timeline to select the time period you wish to view.
Mi Home Security Camera 360° 1080P
108KB S
HD
Mi Home Security Camera 360° 1080P
108KB S
Monitoring Review Call Photo Album Shortcut
Note:
The diagram is for reference only. Actual displays will vary based on different versions of
the Mi Home platform and your smartphone model.
Monitoring Review Call Photo Album Shortcut
06
Page 8

This version is for private use only and should not be distributed.
Supporting Infrared and Image-intensified Night Vision
With the incorporation of eight infrared illuminators, the security camera is able to view
up to a distance of 29.5 feet and capture crystal clear images in the dark.
2018 3 2 20:51:05
Infrared night vision mode sample
Note:
The diagram is for reference only. Actual displays will vary based on different versions of
the Mi Home platform and your smartphone model.
Real-Time Monitoring
Launch the Mi Home app and select a Mi Home Security Camera 360° 1080P that is already
connected to monitor the surroundings in real-time. The camera's control interface allows
you to adjust the sharpness of the image, as well as to change the device's vertical and
horizontal viewing angles. Additional features such as screen capture or record and remote
communications can also be performed.
Mi Home Security Camera 360° 1080P
105KB S
HD
Monitoring Review Call Photo Album Shortcut
Note:
The diagram is for reference only. Actual displays will vary based on different versions of
the Mi Home platform and your smartphone model.
07
Page 9
This version is for private use only and should not be distributed.
Specifications
Name: Mi Home Security Camera 360° 1080P
Model: MJSXJ02CM
Focal Length: 0.11 inches
Power Input: 5 V 2 A
Adapter Input: 100 - 240 V ~ 50/60 Hz 0.35 A
Item Dimensions: 4.64 x 3.07 x 3.07 inches
Lens Angle: 110°
Resolution: 1080P
Net Weight: 8.43 oz
Output: 5 V 2 A
Video Encoding: H.265
Expandable Memory: MicroSD card (up to 64 GB)
Operating Temperature: -14 °F ~ 122 °F
Compatible With: Android 4.4, iOS 9.0 or later
Wireless Connectivity: Wi-Fi IEEE 802.11 b/g/n 2.4 GHz
We hereby declare that all essential radio test suites have been carried
out and that the above named product is in conformity to all the
essential requirement of Directive 2014/53/EU.
Conclusion: When tested as specified, the results shown on the report meet
the requirements of the Reuse / Recycling / Rccovery Rate of Directive
2012/19/EU released on EU Oddicial Joumal (OJ).
Manufactured for: Xiaomi Communications Co., Ltd.
Manufactured by: Shanghai Imilab Technology Co., Ltd.
(a Mi Ecosystem company)
Address: Room 908, No. 1, Lane 399, Shengxia Rd., China Pilot Free Trade
Zone, Shanghai, China 201210
For further information, please go to www.mi.com
08
Page 10

This version is for private use only and should not be distributed.
FCC Statement
Changes or modifications not expressly approved by the party responsible for compliance
could void the user’s authority to operate the equipment.
This device complies with Part 15 of the FCC Rules.
Operation is subject to the following two conditions:
(1) this device may not cause harmful interference, and
(2) this device must accept any interference received, including interference that may
cause undesired operation.
Note: This equipment has been tested and found to comply with the limits for a Class B
digital device, pursuant to Part 15 of the FCC Rules. These limits are designed to provide
reasonable protection against harmful interference in a residential installation. This
equipment generates, uses, and canradiate radio frequency energy, and if not installed
and used in accordance with the instructions, may cause harmful interferenceto radio
communications. However, there is no guarantee that interference will not occur in a
particular installation. If this equipment does cause harmful interference to radio or
television reception, which can be determined by turning the equipment off and on,
the user is encouraged to try to correct the interference by one or more of the
following measures:
– Reorient or relocate the receiving antenna.
– Increase the separation between the equipment and receiver.
– Connect the equipment into an outlet on a circuit different from that to which the
receiver is connected.
– Consult the dealer or an experienced radio/TV technician for help.
FCC 20cm Statement: This equipment complies with FCC radiation exposure limits set
forth for an uncontrolled environment. This equipment should be installed and operated
with a minimum distance of 20cm between the radiator & your body. This transmier
must not be co-located or operating in conjunction with any other antenna or transmier.
FCC ID: 2APA9-IPC009A
Adaptor Statements
For pluggable equipment, the socket-outlet (power adaptor) shall be installed near the
equipment and shall be easily accessible.
09
 Loading...