

Page 1

This version is for private use only and should not be distributed.
Mi Electric Scooter User Manual
Page 2

This version is for private use only and should not be distributed.
Thank you for purchasing
Thank you for purchasing Mi Electric Scooter. It is a sports and recreational vehicle with
style.
Contents
1. Package Contents .........................................................................................................................................02
2. Product Overview..........................................................................................................................................03
3. Assembly and Set-Up ..................................................................................................................................04
4. Charge Your Scooter....................................................................................................................................05
5. How To Ride.....................................................................................................................................................05
6. Safety Instructions........................................................................................................................................07
8. Daily Care and Maintenance ....................................................................................................................12
10. Trademark and Legal statement...........................................................................................................13
9. Specifications .................................................................................................................................................16
7. Folding and Carrying ....................................................................................................................................17
11. Certifications..................................................................................................................................................18
12. Quick Setup ...................................................................................................................................................20
01
Page 3
This version is for private use only and should not be distributed.
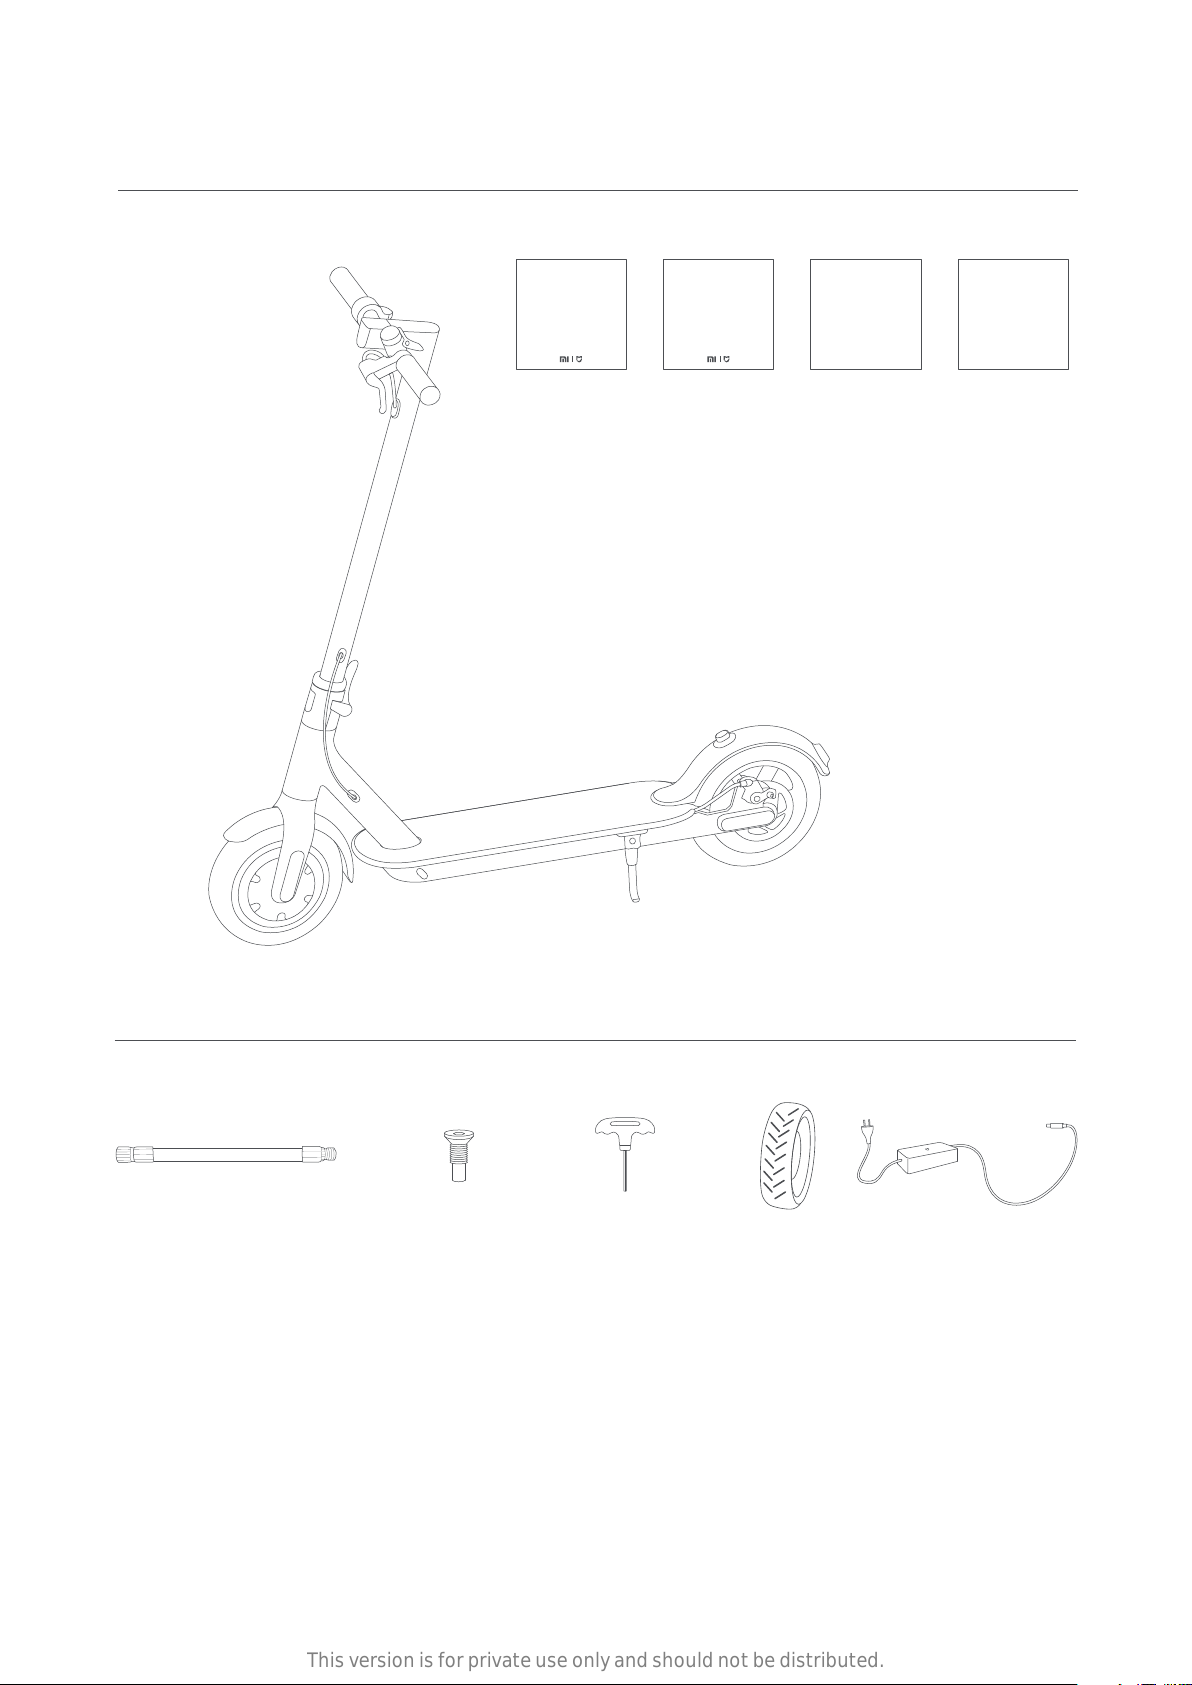
1 Package Contents
Assembled Electric Scooter
User Manual
Mi Electric Scooter User Manual
Legal Statement
Legal Statement
Quick Start Guide
Tips
Warranty Card
Warranty Card
Accessories
Extended Nozzle Adapter Screw × 4 Hexagon Wrench tire × 2 Charging Adapter
Carefully check package contents, if anything is missing or damaged, please
contact local customer service for support.
02
Page 4
This version is for private use only and should not be distributed.
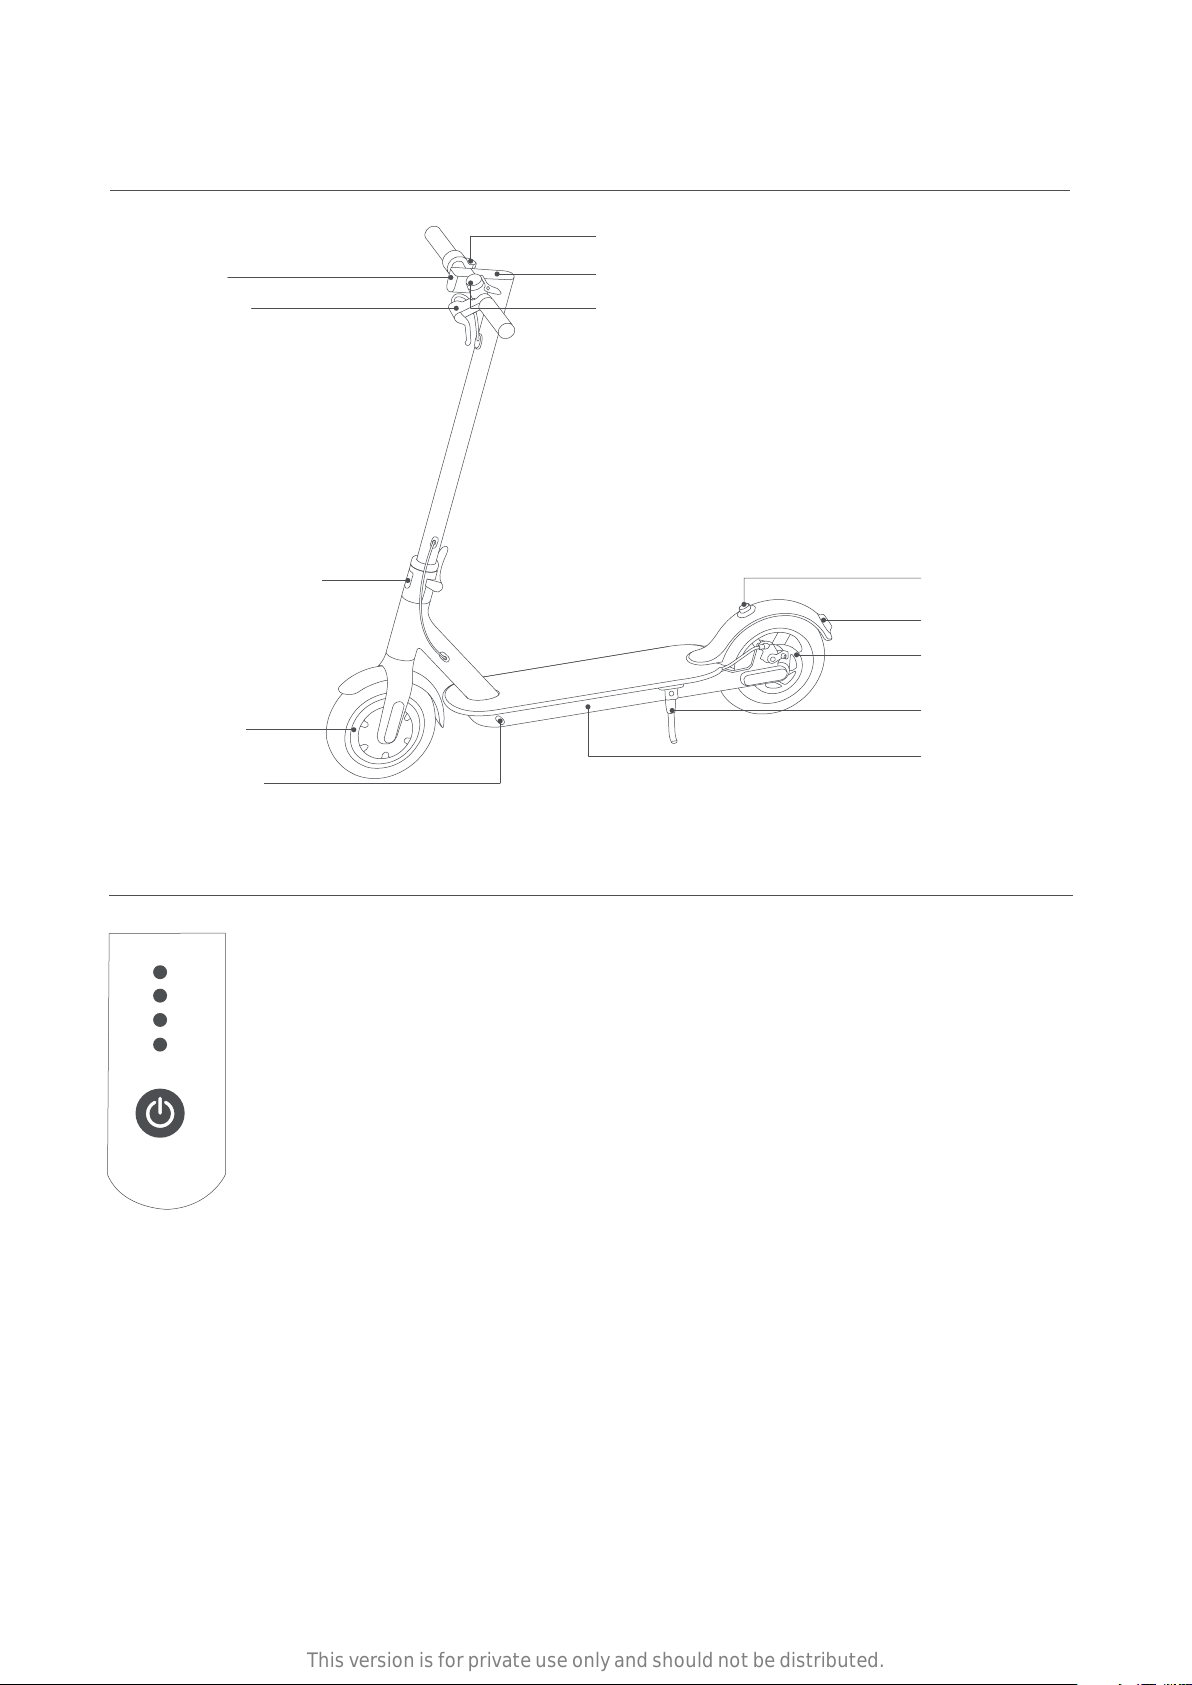
2 Product Overview
Accelerator
Headlight
Brake Lever
Folding Mechanism
Wheel Motor
Charging Port
Control Panel
Scooter Bell
Buckle
Brake Light
Disc Brake
Kickstand
Baery
Compartment
Control Panel
Baery level
display
Mode display
Power buon
The power level is indicated by four power lights on the control
panel. As power is consumed, the lights will change from solid
to flashing, and finally turn off from up to down. When all four
power lights are on, the baery level is between 100% - 86%;
When three lights are solid and one is flashing, the baery level
is between 85% - 71%, and so on. When the boom power light
flashes, it indicates low power. Please recharge soon for further
use. Aer running out of power, all lights will turn off, and the
scooter will coast until it comes to a complete stop.
The boom light either flashes white or green. The white light
indicates regular mode, and green light indicates power-saving
mode. (power-saving mode: max speed of 18km/h with
smoother acceleration for beginners)
When the scooter is off, press the buon to turn on the scooter;
When the scooter is on, press and hold for 2 seconds to turn off
the scooter. Aer turning on, press the buon to turn on or off
the headlight; And press twice to switch between modes.
03
Page 5
This version is for private use only and should not be distributed.
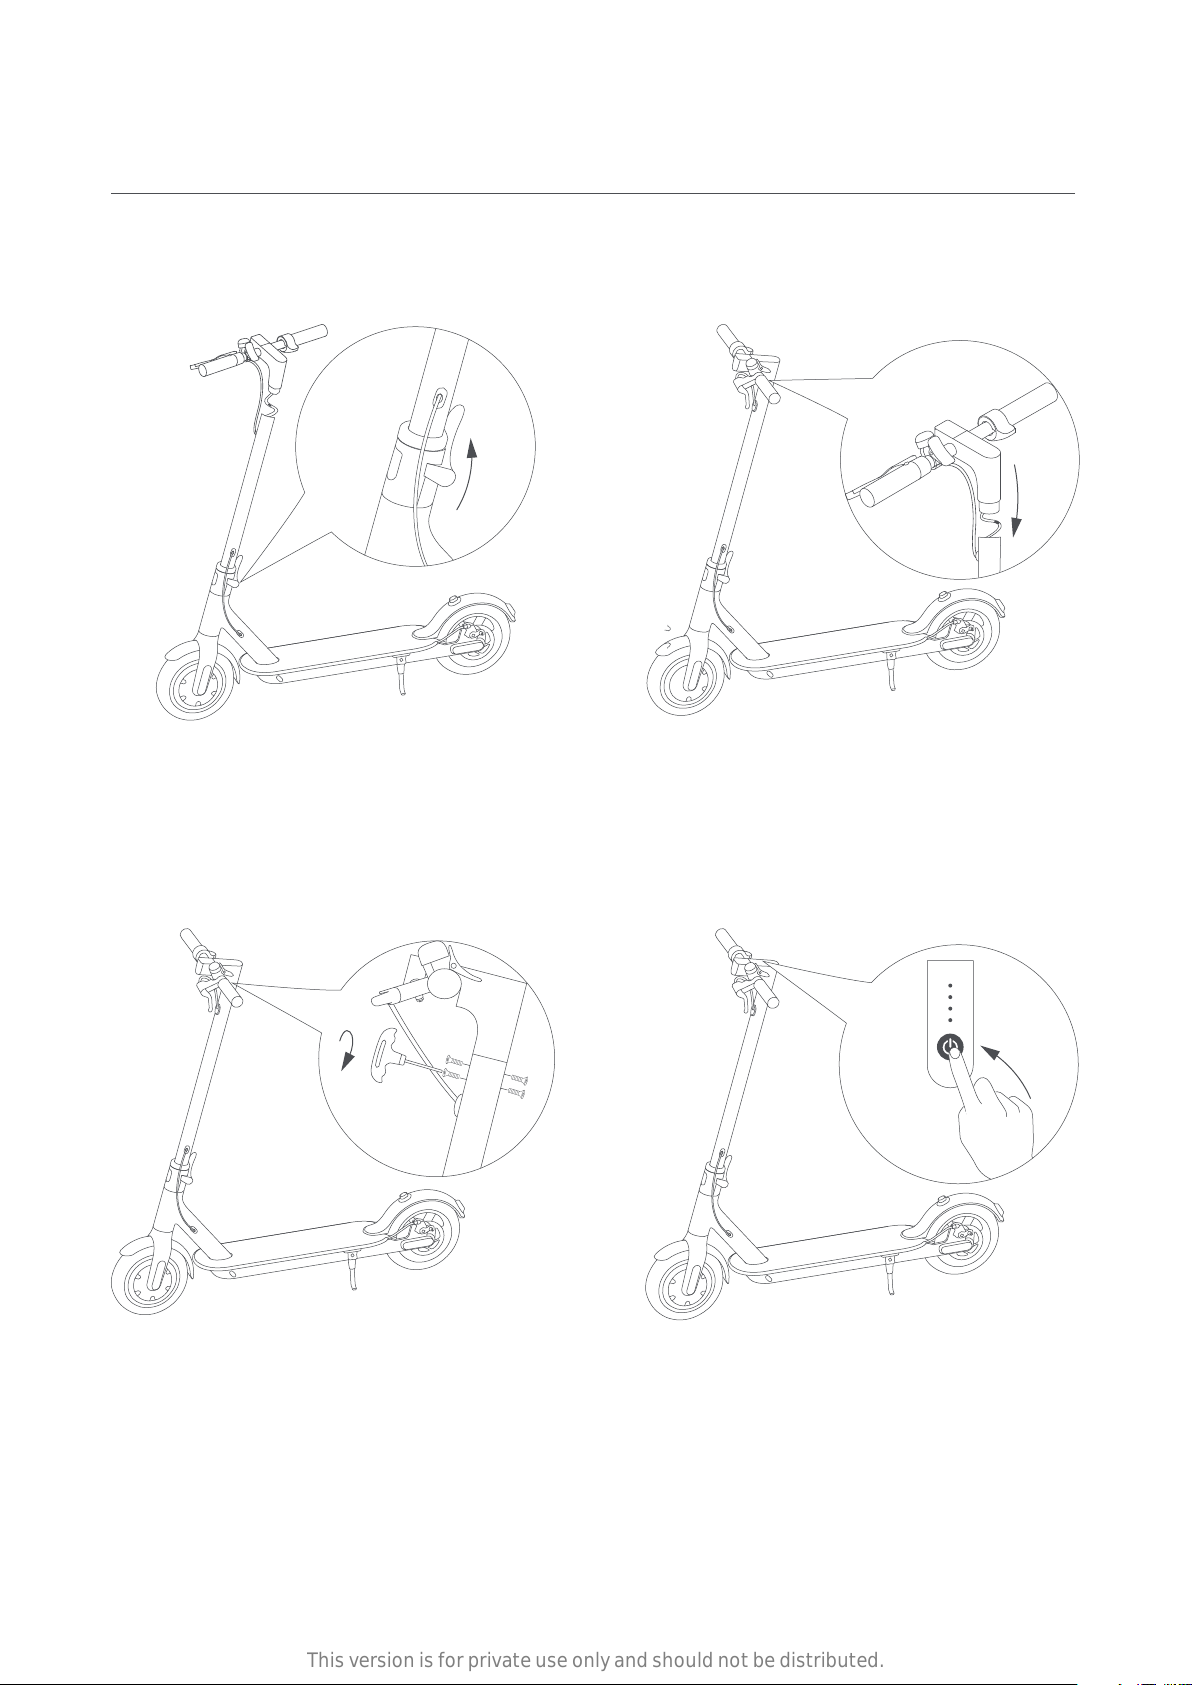
3 Assembly and Set-Up
1. Fasten the handlebar stem on the headset,
and put the kickstand down
2. Aach the handlebar to the stem
3. Tighten the screws onto both sides of
the stem with the hexagon wrench
4. Aer the assembly, press the power
buon to check if it's working properly
04
Page 6
This version is for private use only and should not be distributed.
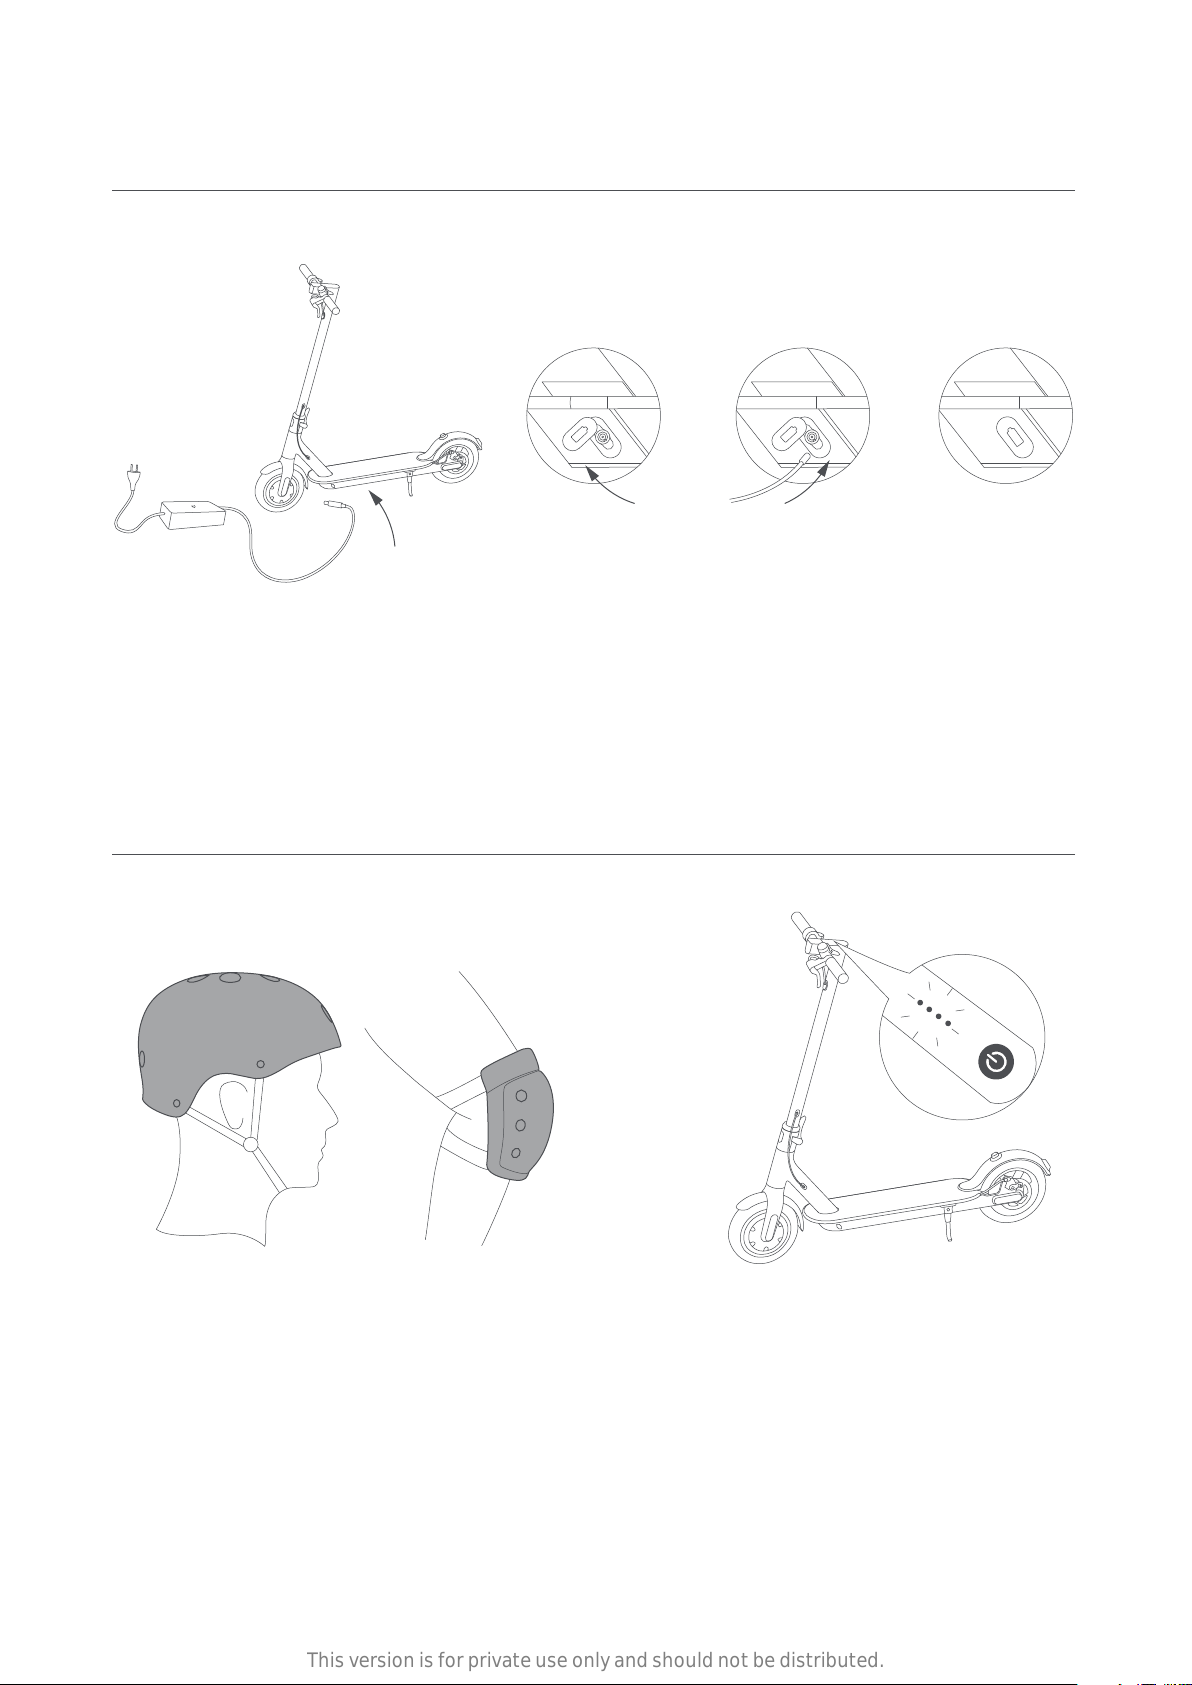
4 Charge Your Scooter
5 How To Ride
Li up the
rubber flap
Plug the power
adapter into the
charging port
When charging
is completed,
put back
the rubber flap
Wear helmets and knee pads in case
of falls and injuries when you learn
to ride the scooter
1. Turn on the scooter, and
check the power indicator
05
Page 7
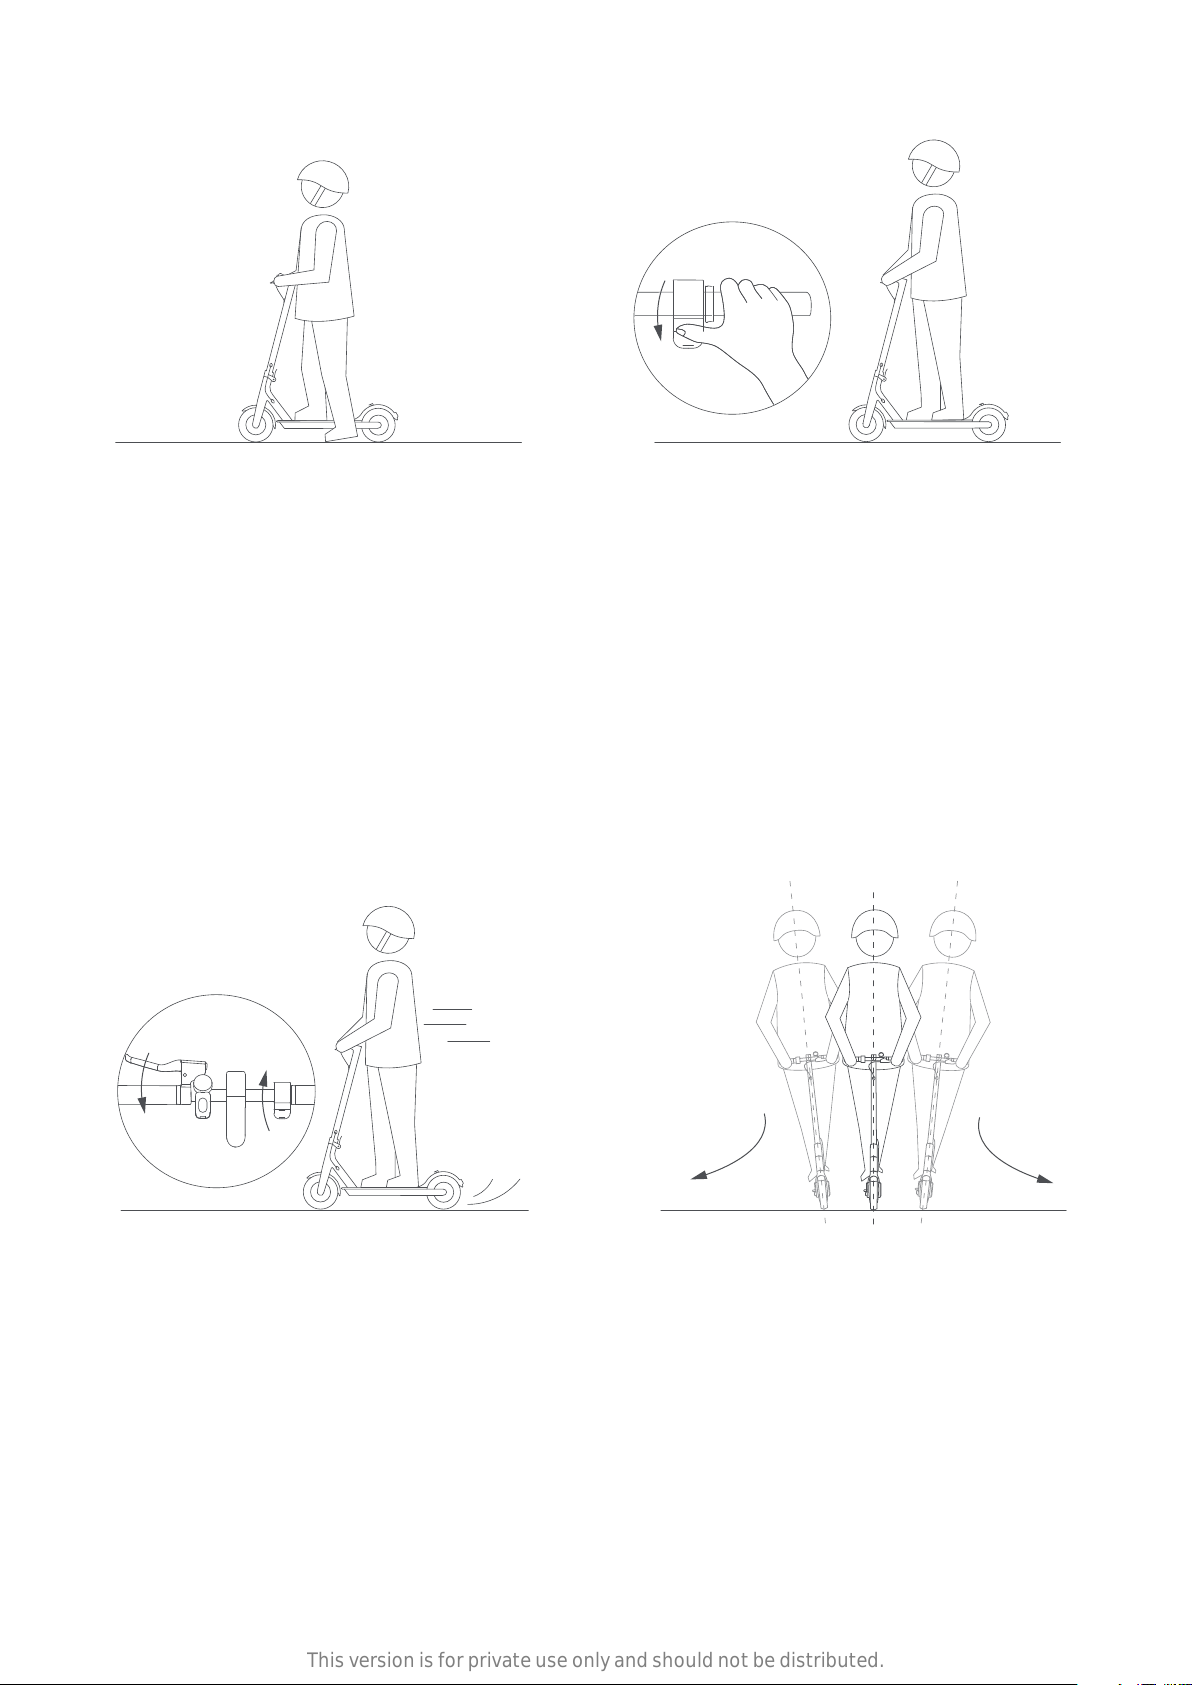
This version is for private use only and should not be distributed.
2. Step on the deck with one foot,
3. When the scooter starts to coast,
and slowly kicks off the other on
the ground
put both feet on the deck and press
the accelerator (the accelerator
initiates once the coasting speed
exceeds 5km/h)
4. Release the accelerator and the
kinetic energy recovery system
(KERS) initiates automatically to
brake slowly; And
squeeze the brake lever for a
sudden brake
5. Tilt your body to the steering
direction as you turn, and slowly
turn the handlebar
06
Page 8

This version is for private use only and should not be distributed.
6 Safety Instructions
Watch out for safety risks
Do not ride in the rain Keep your speed between 5-10km/h when you ride
through speed bumps, elevator door sills, bumpy
roads or other uneven surfaces. Slightly bend your
Look out for doors, elevators
and other overhead obstacles
knee to beer adjust mentioned surfaces
Do not accelerate when you go downhill
07
Page 9

This version is for private use only and should not be distributed.
Do not press the accelerator when
you're walking alongside the scooter
Always steer clear of obstacles
Do not hang bags or other heavy
stuff on the handlebar
Keep both feet on the deck all time.
08
Page 10

This version is for private use only and should not be distributed.
Do not try following dangerous actions
Do not ride in traffic lanes
or residential areas where
vehicles and pedestrians
are both allowed
Do not ride in a ponding that
Do not turn the handlebar
violently during high-speed riding
Do not ride with anyone else,
is higher than 2cm
including children
09
Page 11

This version is for private use only and should not be distributed.
Keep your feet off the rear
mudguard
Do not touch the disc brake
Always keep your hands on
the handlebar
Do not try riding up or down stairs,
and jumping over obstacles
10
Page 12

This version is for private use only and should not be distributed.
Safety Reminder
This electric scooter is a leisure device. But once they're in a public area, they'll be seen as
vehicles, subjecting to any risks faced by vehicles. For your safety, please follow
instructions in the manual and traffic laws and regulations set forth by government and
regulatory agencies. (Pour votre sécurité, veuillez suivre les instructions contenues dans le
manuel et les lois sur la circulation et les règlements énoncés par les organismes
gouvernementaux et réglementaires.)
At the same time, you should understand that risks cannot be entirely avoided as others
may violate traffic regulations and drive incautiously, and you're exposed to road accidents
just as when you're walking or biking. The faster the scooter is, the longer it takes to stop.
On a smooth surface, the scooter may slip, lose balance, and even result in a fall. Thus it is
crucial that you use caution, keep proper speed and distance, especially so when you're
unfamiliar with the place.
Respect pedestrians' Right of Way. Try not to startle them while driving, especially children.
When you ride from behind pedestrians, ring your bell to give them a heads-up and slow
your scooter to pass from their le (applicable to countries where vehicles drive on the
right). When you ride from across pedestrians, Keep to the right at a low speed.
Closely follow the safety instructions in the manual especially in China and countries that
lack relevant laws and regulations regarding electric scooters. Xiaomi Communication Co.,
Ltd. shall not be liable for any financial losses, physical injuries, accidents, legal disputes
and other interest conflicts resulted from actions that violate user instructions.
Do not lend your scooter to whoever knows not the operations. And when you do lend it to
your friends, please take the responsibility to ensure he/she knows the operation and
wears the safety gear.
Check the scooter before every use. When you note loosen parts, low baery alerts, flat
tires, excessive wear, strange sounds, malfunctions and other abnormal conditions, stop
riding immediately and call for professional support.
WARNING – Risk of Fire – No User Serviceable Parts.
AVERTISSEMENT - Risque d’ incendie -Aucune des pièces ne peut être réparée par l’
utilisateur.
11
Page 13

This version is for private use only and should not be distributed.
7 Folding and Carrying
Fold OpenOpen
Make sure that the scooter's turned off. To fold, unlock the folding mechanism, and bend
the handlebar stem to hook the buckle on the rear mudguard. To open, press the bell
trigger to remove from the buckle, erect the handlebar and lock the folding structure.
Carry
Hold the handlebar stem with either one hand or both hands to carry.
12
Page 14

This version is for private use only and should not be distributed.
8 Daily Care and Maintenance
Cleaning and storage
If you see stains on the scooter's body, wipe them off with a damp cloth. If the stains won't
scrub off, put on some toothpaste, and brush them with a toothbrush, then wipe them off
with a damp cloth. If you see scratches on plastic parts, use sandpaper or other abrasive
materials to polish them.
Notes: do not clean the scooter with alcohol, gasoline, kerosene or other corrosive and
volatile chemical solvents to prevent dire damage. Do not wash the scooter with a
high-pressure water spray. During cleaning, make sure that the scooter's turned off, the
charging cable is unplugged, and the rubber flap is closed as water leakage may result in
electric shock or other major problems.
When the scooter's not in use, keep it indoors where it is dry and cool. Do not put it
outdoors for long time. Excessive sunlight, overheating and overcooling accelerate tire
aging and compromise the scooter and the baery pack's lifespan. (Lorsque le scooter
n'est pas utilisé, gardez-le à l'intérieur dans un endroit sec et frais. Ne le meez pas en
plein air pendant longtemps. La lumière du soleil excessive, la surchauffe et le
sur-refroidissement accélèrent le vieillissement des pneus et compromeent le scooter et
la durée de vie de la baerie.)
Baery maintenance
1. Use original baery packs, use of other models or brands may bring about safety issues;
2. Do not touch the contacts. Do not dismantle or puncture the casing. Keep the contacts
away from metal objects to prevent short circuit which may result in baery damage or
even injuries and deaths;
3. Use original power adapter to avoid potential damage or fire;
4. Mishandling of used baeries may do tremendous harm to the environment. To protect
natural environment, please follow local regulations to properly dispose used baeries.
5. Aer every use, fully charge the baery to prolong its lifespan.
Do not place the baery in an environment where the ambient temperature is higher than
50°C or lower than -20°C (e.g., do not leave the scooter or the baery pack in a car under
direct sunlight for an extended time). Do not throw the baery pack into fire as it may lead
to baery failure, baery overheating, and even another fire. If the scooter is expected to
be le idle for more than 30 days, please fully charge the baery and place it in a dry and
cool place. Keep in mind to recharge it every 60 days to protect the baery from potential
damage which is beyond limited warranty.
13
Page 15

This version is for private use only and should not be distributed.
Always charge before exhausting the baery to prolong the baery's lifespan. The baery
pack performs beer at normal temperature, and poor when it is below 0°C. For instance,
when it is below -20°C, the riding range is only half or less at normal state. When the
temperature rises, the riding range restores. For detailed information, please refer to Mi
Home App.
Note: fully charged Mi Electric Scooter will last for 120-180 days. The built-in intelligent chip
will keep a log of its charging and discharging records. The damage caused by prolonged
no charge is irreversible and is beyond limited warranty. Once the damage is done, the
baery can not be recharged (non-professionals are forbidden to dismantle the baery
pack, as it may cause electric shock, short circuit or even major safety accidents).
Adjusting the disc brake
Brake Cable
If the brake is too tight, use the M4 hexagon wrench to loosen the screws on the caliper,
and slightly send back the brake cable to shorten the exposed length, then tighten the
screws. If the brake is too loose, loosen the screws, and slightly pull out the brake cable to
lengthen the exposed length, then tighten the screws.
Adjust the handlebar
If the handlebar and its stem sway during riding, use the M5 hexagon wrench to tighten
the screws on the folding mechanism.
14
Page 16

This version is for private use only and should not be distributed.
How to use the extended nozzle adapter
If your tires are flat, remove the screw-on cap from the valve, and connect the extended
nozzle adapter to the valve for pumping up.
Remove the outer and inner tires
Note: Crowbars not included, and should be purchased separately.
1 2 3
1. Deflate the inner tire first. Use a tool to press the core rod in the air valve so that air is
discharged from the inner tire, and buse another hand to forcibly pinch the tire at
different places to discharge more air.
2. Select a position far from the air valve on the outer tire, use two crowbars to prize up the
outer tire by about 1/6 of the circumference, and forcibly separate one side of the outer
tire from the hub.
3. Find the air valve, and pull the air valve out of the air valve hole of hub. To pull out the air
valve more conveniently, hold the air valve of the inner tire, and pull the outer tire
outwards slowly, lest the inner tire would be damaged. Remove the inner tire from the
position of air valve in sequence, and separate the inner tire finally.
Note: Wrap the pointed end of the crowbar with fiber cloth so that it will not damage the
inner tire and coating of the hub.
15
Page 17

This version is for private use only and should not be distributed.
Install the inner and outer tires
40
20
60
P S I
80
100
120
40
20
60
P S I
80
100
120
1
2
3 4
1. Fill a small amount of air into the deflated inner tire till the inner tire is just bulged to
look round.
2. Put the hub on the top of a desk. Pay aention to the direction when installing the outer
tire. There is an arrow on the outer tire, and it must be consistent with the forward
direction of the wheel. Use one hand to hold the hub, and use the other hand to insert
one side of the outer tire in the hub groove.
3. Insert the air valve of the inner tire into the air valve hole. Insert the inner tire in the
outer tire clockwise and in sequence.
Make sure that the air valve does not tilt. Then, insert the other side of the outer tire in
the hub groove. Finally use a crowbar to install the remaining tire lips in the hub groove.
Aer installation, pinch the outer tire to check if the inner tire is pressed bythe tire lips
of outer tire.
4. Inflate the inner tire to 15-20 PSI, and check the safety lines at two sides of the outer tire.
Make sure that the distances from the safety lines to the hub edge are consistent.
5. Finally inflate the inner tire to 45-50 PSI. Tighten the air valve cap. Then, the tire assembly is completed.
Note: Wrap the pointed end of the crowbar with fiber cloth so that it will not damage the
inner tire and coating of the hub.
16
Page 18

This version is for private use only and should not be distributed.
9 Specifications
Performance index Items
Dimensions
Weight
Riding
requirements
Main
parameters
Baery pack
L × W × H [1] (cm)
Aer folding: L × W × H (cm)
Item weight (kg)
Load range (kg)
Age
Body length (cm)
Max. speed (km/h)
General range[2] (km)
Max. climbing angle (%)
Suitable surfaces
Operating temperature (°C)
Storage temperature (°C)
IP rating
Rated voltage (VDC)
Max. input voltage (VDC)
Specifications
108×43×114
108×43×49
Approx. 12.2
25–100
16–50
120–200
Approx. 25
Approx. 30
Approx. 14
Cement, asphalt and mud roads;
bench lower than 1cm; crevice
narrower than 3cm
-10–40
-20–45
IP54
36
42
Rated capacity (Wh)
Intelligent baery
management system
Rated power (W)
Wheel Motor
Max. power (W)
Output power (W)
Charging
adapter
[1] Item height: from the ground to the top of the scooter;
[2] General range: measured when it is no wind and at 25°C, the scooter's fully charged to
ride at a even speed of 15 km/h on a flat surface with a load of 75 kg.
Input voltage (VAC)
Output voltage (VDC)
Output current (A)
Charging time (h)
280
Unusual temperature/short circuit/
under voltage/over current/dual
overcharge/dual over-discharge
protections
250
500
71
100–240
42
1.7
Approx. 5
Note: data and specifications may vary due to different models, and are subject to change
without notice.
17
Page 19

This version is for private use only and should not be distributed.
10 Trademark and Legal statement
is a registered trademark owned by Xiaomi Inc (hereinaer referred to as Xiaomi).
Xiaomi reserves all rights to the trademark . Ninebot is a registered trademark of
Ninebot(Tianjin) Technology Co., Ltd., all other trademarks and trade names are those of
their respective owners.
© 2017 Ninebot (Beijing) Technology Co., Ltd all rights reserved.
This manual included all functions and instructions when it is printed. But actual product
may vary due to improved functions and design. Please scan the QR code in the back
cover for latest user manual.
Principal: Xiaomi Communications Co., Ltd.
Manufacturer: Ninebot (Changzhou) Tech Co., Ltd.
Address: 16F-17F, Block A, Building 3, No.18, Changwu Mid Rd, Wujin Dist., Changzhou,
Jiangsu, China.
18
Page 20

This version is for private use only and should not be distributed.
11 Certifications
Federal Communications Commission (FCC) Compliance Statement for USA
This device complies with part 15 of the FCC rules. Operation is subject to the following two
conditions: (1) This device may not cause harmful interference, and (2) this device must
accept any interference received, including interference that may cause undesired operation.
Note: This equipment has been tested and found to comply with the limits for a Class B
digital device, pursuant to part 15 of the FCC Rules. These limits are designed to provide
reasonable protection against harmful interference in a residential installation. This
equipment generates, uses and can radiate radio frequency energy and, if not installed and
used in accordance with the instructions, may cause harmful interference to radio
communications. However, there is no guarantee that interference will not occur in a
particular installation. If this equipment does cause harmful interference to radio or
television reception, which can be determined by turning the equipment off and on, the user
is encouraged to try to correct the interference by one or more of the following measures:
- Reorient or relocate the receiving antenna.
- Increase the separation between the equipment and receiver.
- Connect the equipment into an outlet on a circuit different from that to which the
receiver is connected.
- Consult the dealer or an experienced radio/TV technician for help.
This equipment complies with FCC r adiation exposure limits set forth for an uncontrolled
environment.
Industry Canada (IC) Compliance Statement for Canada
This device complies with Industry Canada license-exempt RSS standard(s). Operation is
subject to the following two conditions: (1) this device may not cause interference, and (2)
this device must accept any interference, including interference that may cause undesired
operation of the device.
Le présent appareil est conforme aux CNR d'Industrie Canada applicables aux appareils
radio exempts de licence. L'exploitation est autorisée aux deux conditions suivantes : (1)
l'appareil ne doit pas produire de brouillage, et (2) l'utilisateur de l'appareil doit accepter
tout brouillage radioélectrique subi, même si le brouillage est susceptible d'en
compromere le fonctionnement.
CAN ICES-3 (B)/NMB-3(B)
Ninebot is not responsible for any changes or modifications not expressly approved by
Ninebot. Such modifications could void the user's authority to operate the equipment.
For model: M365
FCC ID: 2ALS8-NS9633
IC : 22636-NS9633
19
Page 21

This version is for private use only and should not be distributed.
European Union Compliance Statement
Baery recycling information for the European Union
Baeries or packaging for baeries are labeled in accordance with European Directive
2006/66/EC concerning baeries and accumulators and waste baeries and
accumulators. The Directive determines the framework for the return and recycling of
used baeries and accumulators as applicable throughout the European Union. This label
is applied to various baeries to indicate that the baery is not to be thrown away, but
rather reclaimed upon end of life per this Directive.
In accordance with the European Directive 2006/66/EC, baeries and accumulators are
labeled to indicate that they are to be collected separately and recycled at end of life. The
label on the baery may also include a chemical symbol for the metal concerned in the
baery (Pb for lead, Hg for mercury, and Cd for cadmium). Users of baeries and
accumulators must not dispose of baeries and accumulators as unsorted municipal
waste, but use the collection framework available to customers for the return, recycling,
and treatment of baeries and accumulators. Customer participation is important to
minimize any potential effects of baeries and accumulators on the environment and
human health due to the potential presence of hazardous substances.
Restriction of Hazardous Substances Directive (RoHS)
Ninebot (Changzhou) Tech Co., Ltd. products sold in the European Union, on or aer 3
January 2013 meet the requirements of Directive 2011/65/EU on the restriction of the use
of certain hazardous substances in electrical and electronic equipment ( “RoHS recast” or
“RoHS 2” ).
Radio and Telecommunications Terminal Equipment Directive
Hereby, Ninebot (Changzhou) Tech Co., Ltd. declares that the wireless equipment listed in
this section are in compliance with the essential requirements and other relevant
provisions of Directive 2014/53/EU.
20
Page 22

This version is for private use only and should not be distributed.
12 Quick Setup
Control your Mi Electric Scooter and interacts it with other smart home devices in Mi
Home App.
1. Download Mi Home App
Scan the QR code below or go to App Store to download Mi Home App
2. Add a device
Open "My devices", select "+" on the upper right to add a device
21
Page 23

This version is for private use only and should not be distributed.
Actual functions may vary due to technical upgrades and firmware updates.
For latest functions and safety instructions, please go to Mi Community
to exchange with other users.
Online support: www.mi.com/service
www. mi. com
V1.0
 Loading...