


MFJ-834 RF Ammeter Instruction Manual
g
MFJ-834 RF Ammeter
Introduction
Congratulations on purchasing the MFJ-834 RF Ammeter. The MFJ-834 is designed for
measuring in-line RF feedline current on 1.8-30 MHz while having low interaction on the
primary line. Connect the Coax In-Line RF Ammeter between your antenna and tuner/
transmitter/amplifier and measure antenna feedline current in 3 calibrated ranges: .3
Amperes, 1 Ampere, and 3 Amperes.
Uses
• Use it for tuning your antenna tuner/transmitter/amplifier for maximum radiated
power, for determining antenna feedpoint impedance, for comparing antennas and
tuners, for troubleshooting and for checking for changes.
• Tuning for maximum feedline current for any given antenna always gives
maximum radiated power. Any adjustment that increases feedline current
improves power transfer and gives you a stronger radiated signal. Radiated power
increases rapidly because power increases as the square of the current.
• Minimum SWR does not always mean maximum radiated power. Your tuner or
lossy coax may be dissipating power and you may not get peak output power even
if your tuner or amplifier is properly tuned.
• Use the MFJ-834 RF Ammeter to determine best antenna tuner settings and to
compare various tuners. Calculate your antenna feedpoint impedance by dividing
your applied power by the square of the feedpoint current.
• Your antenna can change when you apply power. Insulators break down, traps
heat up, capacitors leak and your feedpoint impedance may be drastically
different from your SWR Analyzer measurements.
IMPORTANT:
Please read entire manual before attempting to operate this equipment. This
unit does not provide a dc or low frequency earth ground. A separate wire
should be connected from the station ground bus to an electric
not place any non-coaxial feed wires near metallic or RF sensitive devices.
1
round. Do
MFJ-834 RF Ammeter Instruction Manual
Installation
1. Connect your transmitter to the connector on the back of the unit labeled
TRANSMITTER and your antenna to the connector labeled ANTENNA. It is
important that you use good quality coax and properly installed connectors.
2. An internal lamp backlights the RF Ammeter scale. The lamp circuit requires 12
VDC. The rear panel accepts a 2.1 mm coaxial plug with the center conductor
positive (+) and the sleeve negative (-). The negative lead is grounded inside the
meter.
3. To measure the power output capability of a transmitter/amplifier you should
connect a quality 50-ohm dummy load to the ANTENNA connector of the MFJ-
834.
Operation
1. The RF Ammeter measures RF current in three calibrated ranges: 0.3 Amperes,
1 Ampere, and 3 Amperes. Simply turn the Current Range knob to the desired
range.
2. The meter is scaled from 0 to 100. On the 100-mA range, readout is direct (100 =
100 mA). On the 1-A range, move the decimal point 2 places to the left (100 =
1.00 A). To convert meter readings made on the 30 mA, 300 mA, and 3-A
ranges, multiply accordingly. For example, a reading of 85 on the 300-mA range
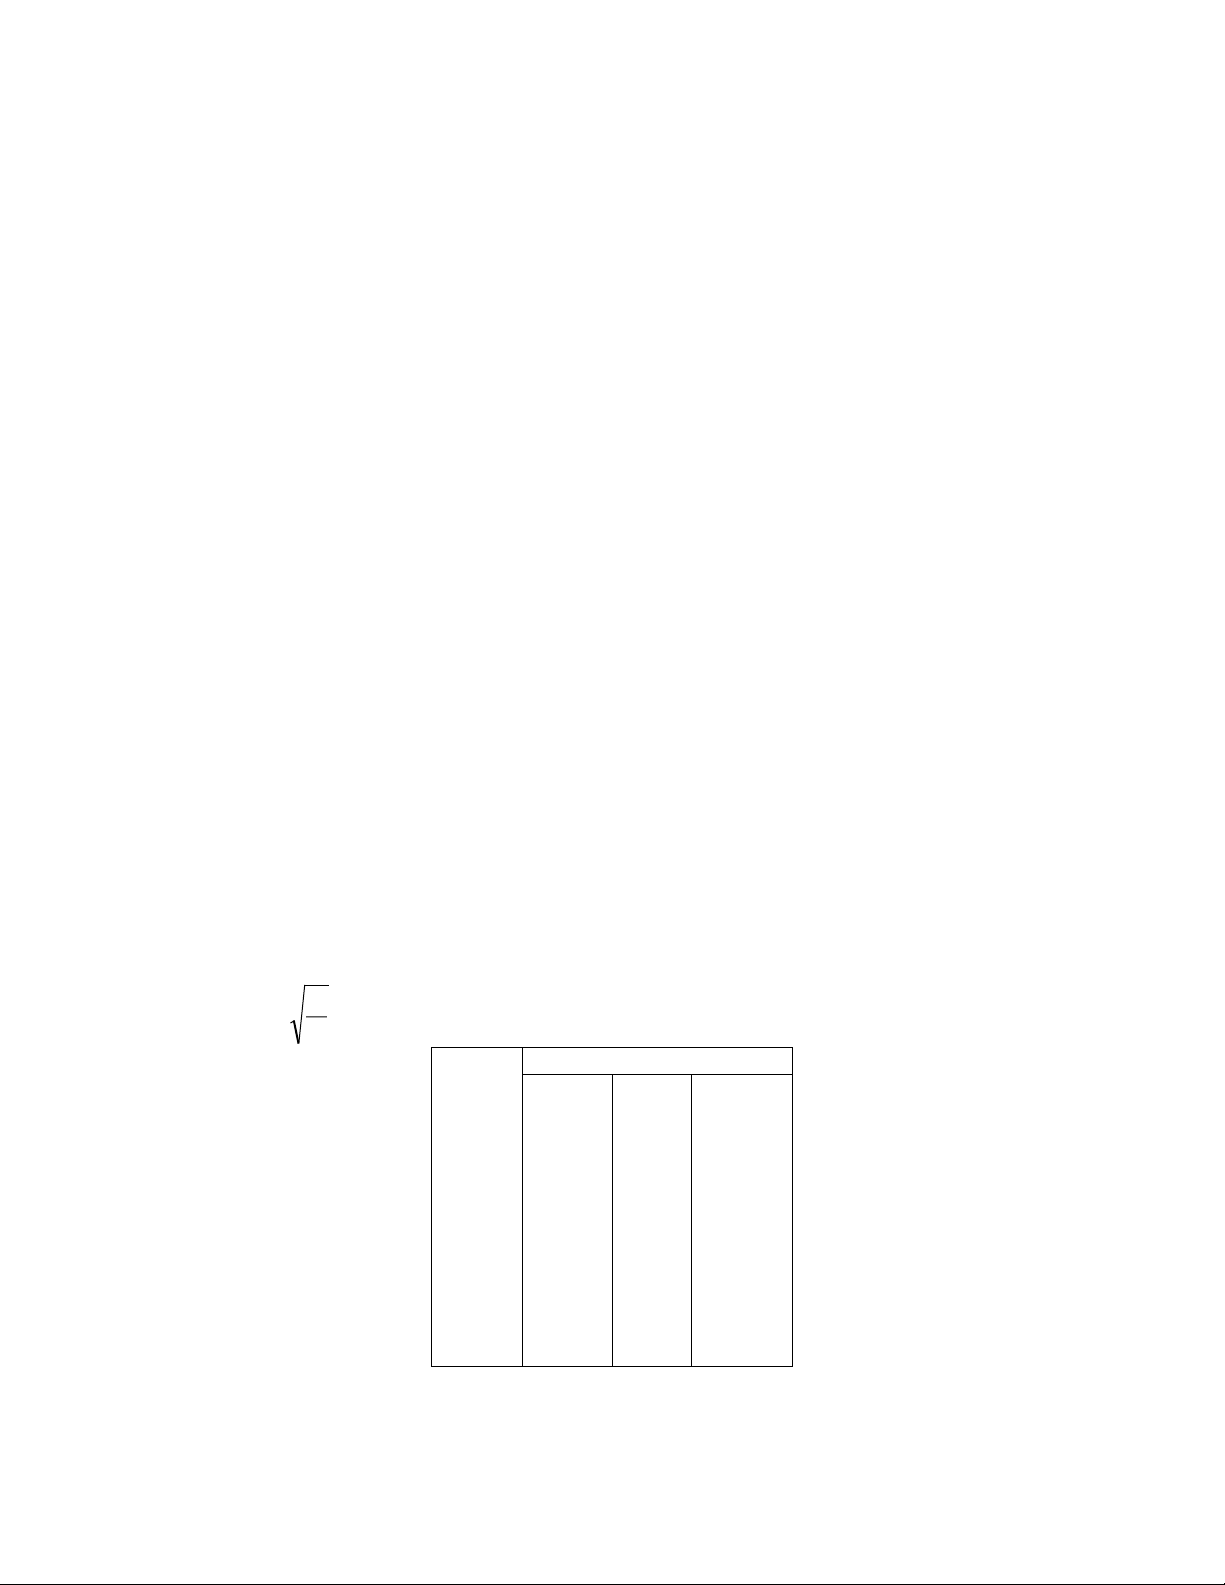
equals 300 x .85, or 255 mA. See Table 1 below to estimate readings quickly.
3. To prevent meter pegging, begin checks on a high range and work down. To
estimate unknown current levels, use the formula below (I = Unknown Current in
Amps, P = Applied Power in Watts, and R = Load Resistance in Ohms).
P
I
=
R
Range
Meter 300 mA 1 A 3 A
10 30 0.1 0.3
20 60 0.2 0.6
30 90 0.3 0.9
40 120 0.4 1.2
50 150 0.5 1.5
60 180 0.6 1.8
70 210 0.7 2.1
80 240 0.8 2.4
90 270 0.9 2.7
100 300 1.0 3.0
Table 1: Actual Current Value
2
 Loading...