

Page 1

OPERATING INSTRUCTIONS
LEO-M™ Linear Line Array Loudspeaker
LINE ARRAY
Keep these important operating instructions.
Check www.meyersound.com for updates.
Page 2

© 2014, 2016
Meyer Sound. All rights reserved.
LEO-M Operating Instructions, PN 05.215.020.01 B
The contents of this manual are furnished for informational purposes only, are subject to change without notice, and should not be construed as a commitment by Meyer Sound Laboratories Inc. Meyer Sound assumes no responsibility or liability for any errors or inaccuracies that may appear in this manual. Except as permitted by applicable copyright law, no part of this publication may be reproduced,
stored in a retrieval system, or transmitted, in any form or by any means, electronic, mechanical, recording or otherwise, without prior written permission from Meyer Sound.
Compass RMS, GuideALink, Intelligent AC, LEO-M, LYON, MAPP, QuietCool, RMS, RMServer, and all alpha-numeric designations for
Meyer Sound products and accessories are trademarks of Meyer Sound. Callisto, Galileo, LEO, Meyer Sound, the Meyer Sound wave
logo, MICA, QuickFly, REM, SIM, and TruPower are registered trademarks of Meyer Sound Laboratories Inc. (Reg. U.S. Pat. & Tm. Off.). All
third-party trademarks mentioned herein are the property of their respective trademark holders.
ii
Page 3

CONTENTS
Chapter 1: Introduction 5
How to Use This Manual 5
LEO-M Linear Line Array Loudspeaker 5
Chapter 2: Power Requirements 7
AC Power Distribution 7
AC Input 8
Wiring AC Power Cables 8
LEO-M Voltage Requirements 9
LEO-M Current Requirements 9
Do Not Reset Circuit Breakers! 10
Intelligent AC Power Supply 10
Electrical Safety Guidelines 10
Chapter 3: Amplification and Audio 11
Audio Connectors 11
Cable Rings 12
TruPower Limiting 12
Amplifier Cooling System 13
Chapter 4: QuickFly Rigging 15
Important Safety Considerations! 15
LEO-M Rigging Options 15
LEO-M GuideALinks 17
When to Move the Locking Pins to the “Stow Pin” Position 18
Chapter 5: RMS Remote Monitoring System 19
Compass RMS Software 19
RMS Module 20
Neuron ID for RMS Module 20
Resetting the RMS Module 20
Chapter 6: System Design and Integration Tools 21
MAPP System Design Tool 21
SIM 3 Measurement System 22
Appendix A: Rain Hoods 23
Appendix B: Specifications 25
iii
Page 4

iv
Page 5
CHAPTER 1: INTRODUCTION
!
HOW TO USE THIS MANUAL
Make sure to read these instructions in their entirety before
configuring a Meyer Sound loudspeaker system. In particular, pay close attention to material related to safety issues.
As you read these instructions, you will encounter the following icons for notes, tips, and cautions:
NOTE: A note identifies an important or useful
piece of information relating to the topic under
discussion.
TIP: A tip offers a helpful tip relevant to the topic
at hand.
CAUTION: A caution gives notice that an
action may have serious consequences and
could cause harm to equipment or personnel, or
could cause delays or other problems.
Information and specifications are subject to change.
Updates and supplementary information are available at
www.meyersound.com
.
Meyer Sound Technical Support is available at:
■ Te l: +1 510 486.1166
■ Te l: +1 510 486.0657 (after hours support)
■ Web: www.meyersound.com/support
■ Email: techsupport@meyersound.com
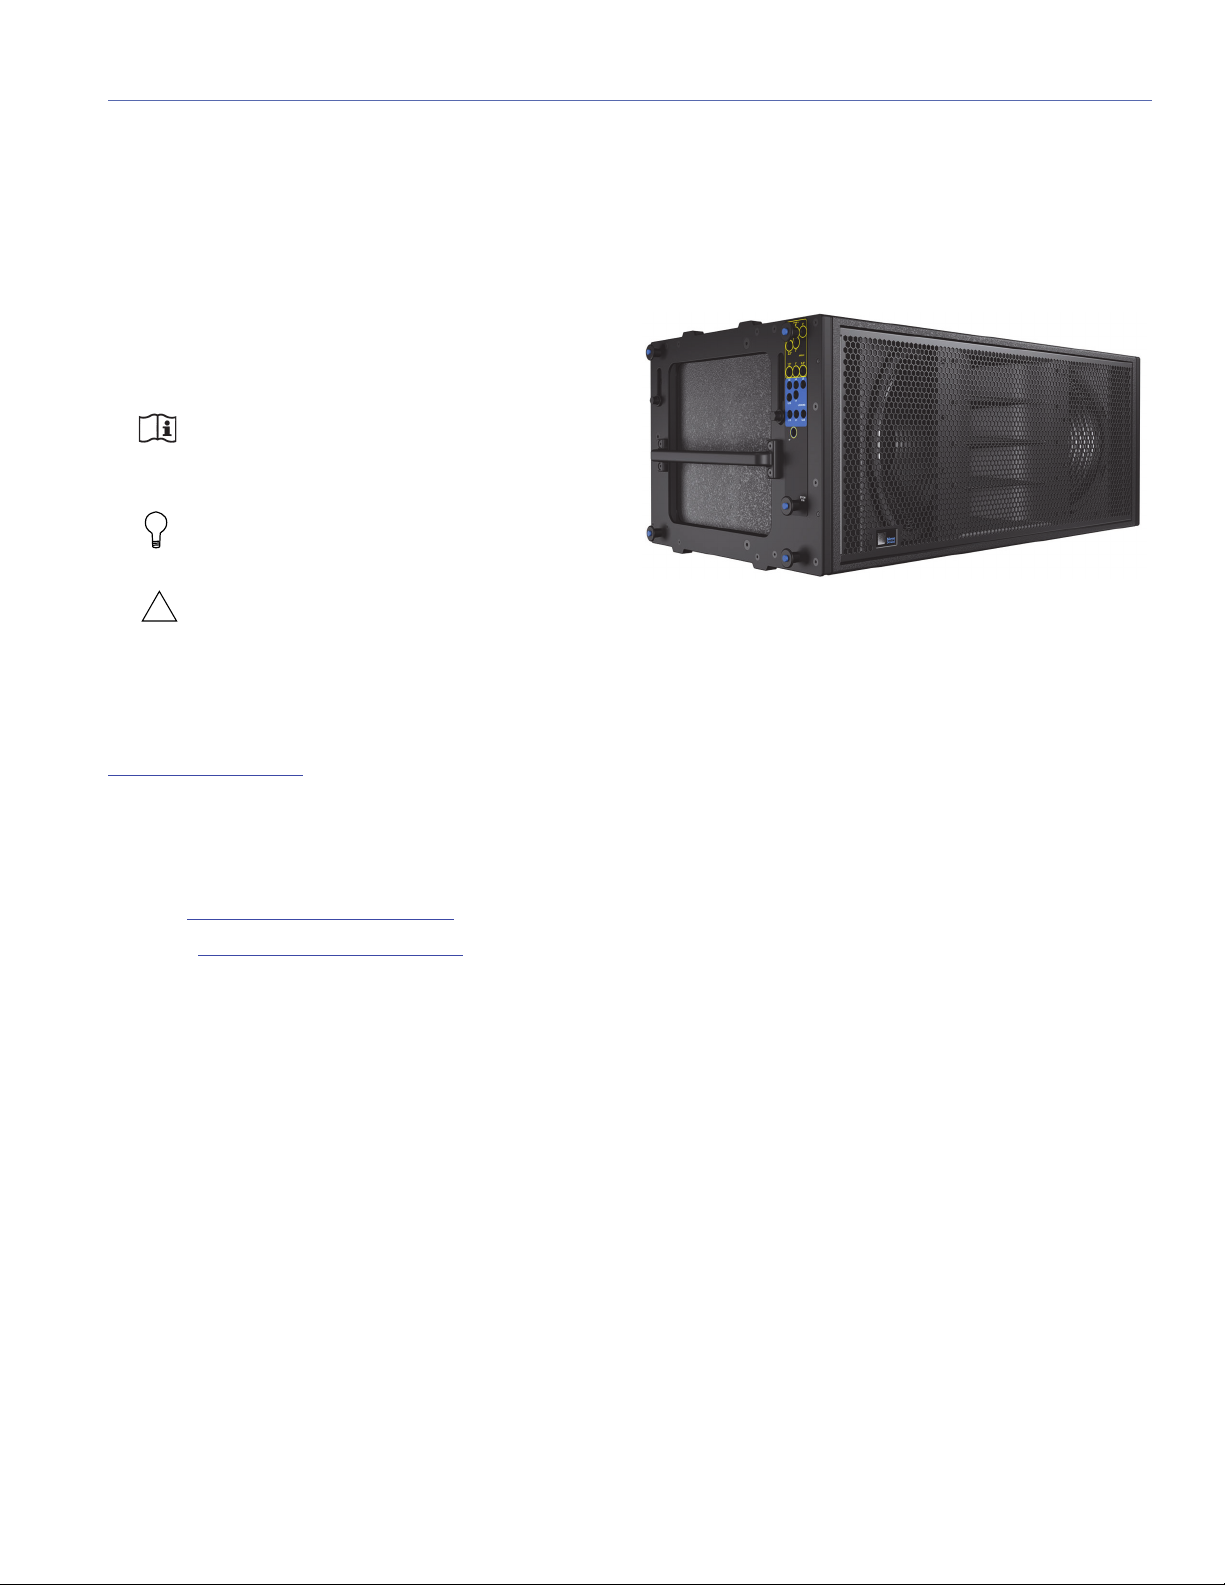
LEO-M LINEAR LINE ARRAY LOUDSPEAKER
The LEO-M™ linear array loudspeaker is defined by its sonic
linearity at any output level. With exceptional headroom,
extremely low distortion, and optimized rigging options,
LEO-M forms the nucleus of Meyer Sound’s next-generation
®
LEO
array systems, conceived for long-throw applications.
LEO arrays are ideally paired with Meyer Sound’s 1100-LFC
low-frequency control element for bass reproduction, and
the LYON
MICA
also well suited for downfill. Entire systems are driven by
™
linear line array loudspeaker for downfill. The
®
compact high-power curvilinear array loudspeaker is
Meyer Sound’s Galileo Callisto
™
616 array processor, which
provides matrix routing, alignment, and processing for array
components.
LEO-M Loudspeaker
To guarantee optimum performance, LEO array systems
should be designed with Meyer Sound’s MAPP
™
prediction
software. The intuitive, cross-platform application accurately
predicts coverage patterns, frequency and impulse
responses, and maximum peak SPL for LEO array systems,
ensuring that systems deliver the required SPL and ideal
coverage for the intended audience areas.
LEO-M’s high-frequency section is comprised of two proprietary compression drivers coupled to a constant-directivity
horn through a patented REM
®
manifold. The manifold’s
smooth radiating characteristics afford tight vertical coverage. The low-frequency section includes two long-excursion
cone drivers, also proprietary, capable of withstanding high,
continuous output levels. Precise phase and magnitude
alignment between low- and high-frequency drivers yields
consistent and well-behaved system responses.
The unit’s onboard power amplifier operates at nominal voltages from 165–264 V AC at 50–60 Hz. TruPower
®
limiting
ensures maximum driver protection, minimizing power compression while yielding high constant output under high continuous and peak power conditions. The amplifier, control
electronics, and power supply are contained in a single fieldreplaceable module located on the rear of the cabinet.
Meyer Sound’s RMS
™
remote monitoring system comes
standard with all LEO-M loudspeakers and provides comprehensive monitoring of system parameters on a Mac
Windows
®
-based computer. Convenient XLR 5-pin connec-
®
or
tors allow the use of composite cables carrying both RMS
and balanced audio signals.
5
Page 6

CHAPTER 1: INTRODUCTION
LEO-M offers intuitive rigging with captive GuideALinks™
that can be set to the desired splay angles while cabinets
rest in caster frames. The MTG-LEO-M top grid flies arrays
of up to 18 LEO-Ms at a 7:1 safety factor (with some restrictions). Optional transition frames are available for flying
LYONs or MICAs below LEO-M arrays for downfill. Stacks of
up to four LEO-Ms can be securely transported with the
optional MCF-LEO-M caster frame; durable nylon covers,
accommodating stacks of two, three, or four units, are available to protect the cabinets during transport.
The vented LEO-M cabinet is constructed of multi-ply hardwood and coated with a black-textured finish. A hexstamped, steel grille with acoustical black mesh protects the
unit’s drivers. The cabinet is weather protected and includes
a collapsible rain hood that shields user panel connectors
from water intrusion.
MTG-LEO-M Top Grid with LEO-M Array
6
MCF-LEO-M Caster Frame with Stack of Four LEO-Ms
Page 7

CHAPTER 2: POWER REQUIREMENTS
!
!
Neutral
Earth/Ground
Loudspeaker
(208 V AC)
Loudspeaker
(208 V AC)
Loudspeaker
(208 V AC)
Line 1 (120 V AC)
Line 3 (120 V AC)
Line 2 (120 V AC)
Neutral
Earth/Ground
Line 1 (220 V AC)
Line 3 (220 V AC)
Line 2 (220 V AC)
Loudspeaker
(220 V AC)
Loudspeaker
(220 V AC)
Loudspeaker
(220 V AC)
!
LEO-M combines advanced loudspeaker technology with
equally advanced power capabilities. Understanding power
distribution, voltage and current requirements, and electrical
safety guidelines is critical to the safe operation of LEO-M.
AC POWER DISTRIBUTION
All components in an audio system (self-powered loudspeakers, mixing consoles, and processors) must be properly connected to an AC power distribution system, ensuring
that AC line polarity is preserved and that all grounding
points are connected to a single node or common point
using the same cable gauge (or larger) as the neutral and
line cables.
CAUTION: Make sure the voltage received by
LEO-M remains within its 165–264 V AC operating range. In addition, the ground line must always
be used for safety reasons and the line-to-ground
voltage should never exceed 250 V AC (typically
120 V AC from line to ground).
CAUTION: Before applying AC power to any
Meyer Sound self-powered loudspeaker, make
sure that the voltage potential difference between the
neutral and earth-ground lines is less than 5 V AC
when using single-phase AC wiring.
NOTE: Improper grounding of connections
between loudspeakers and the rest of the
audio system may produce noise or hum, or cause
serious damage to the input and output stages of the
system’s electronic components.
120 V AC, 3-Phase Wye System (Two Lines)
Line-Line-Earth/Ground
Figure 1 illustrates a 120 V AC, 3-phase Wye distribution
system with each loudspeaker connected to two lines and a
common earth/ground line. This configuration is possible
because LEO-M tolerates elevated voltages from the ground
line and does not require a neutral line. This system delivers
208 V AC to each loudspeaker.
Figure 1: 120 V AC, 3-Phase Wye System (Two Lines to Loudspeakers)
TIP: The 120 V AC, 3-phase Wye system with
two lines is recommended because it allows
loudspeakers to draw less current than with singleline systems, thereby reducing voltage drop due to
cable resistance.
220 V AC, 3-Phase Wye System (Single Line)
Line-Neutral-Earth/Ground
Figure 2 illustrates a basic 220 V AC, 3-phase Wye distribution system with the loudspeaker load distributed across all
three phases, with each loudspeaker connected to a single
line and common neutral and earth/ground lines. This system delivers 220 V AC to each loudspeaker.
Figure 2: 220 V AC, 3-Phase Wye System (Single Line to Loudspeakers)
CAUTION: For 220 V AC, 3-phase Wye sys-
tems, never connect two lines to the AC input
of LEO-M, as the resulting voltage would be higher
than the allowable upper voltage range (275 V AC)
and would damage the loudspeaker.
7
Page 8
CHAPTER 2: POWER REQUIREMENTS
L
N
PE
SIDE FRONT REAR
U.S./Canada, 60 Hz
Black (L)
Europe, 50 Hz
Green (E)
White (N)
Brown (L)
Blue (N)
Green/
yellow (E)
!
AC INPUT
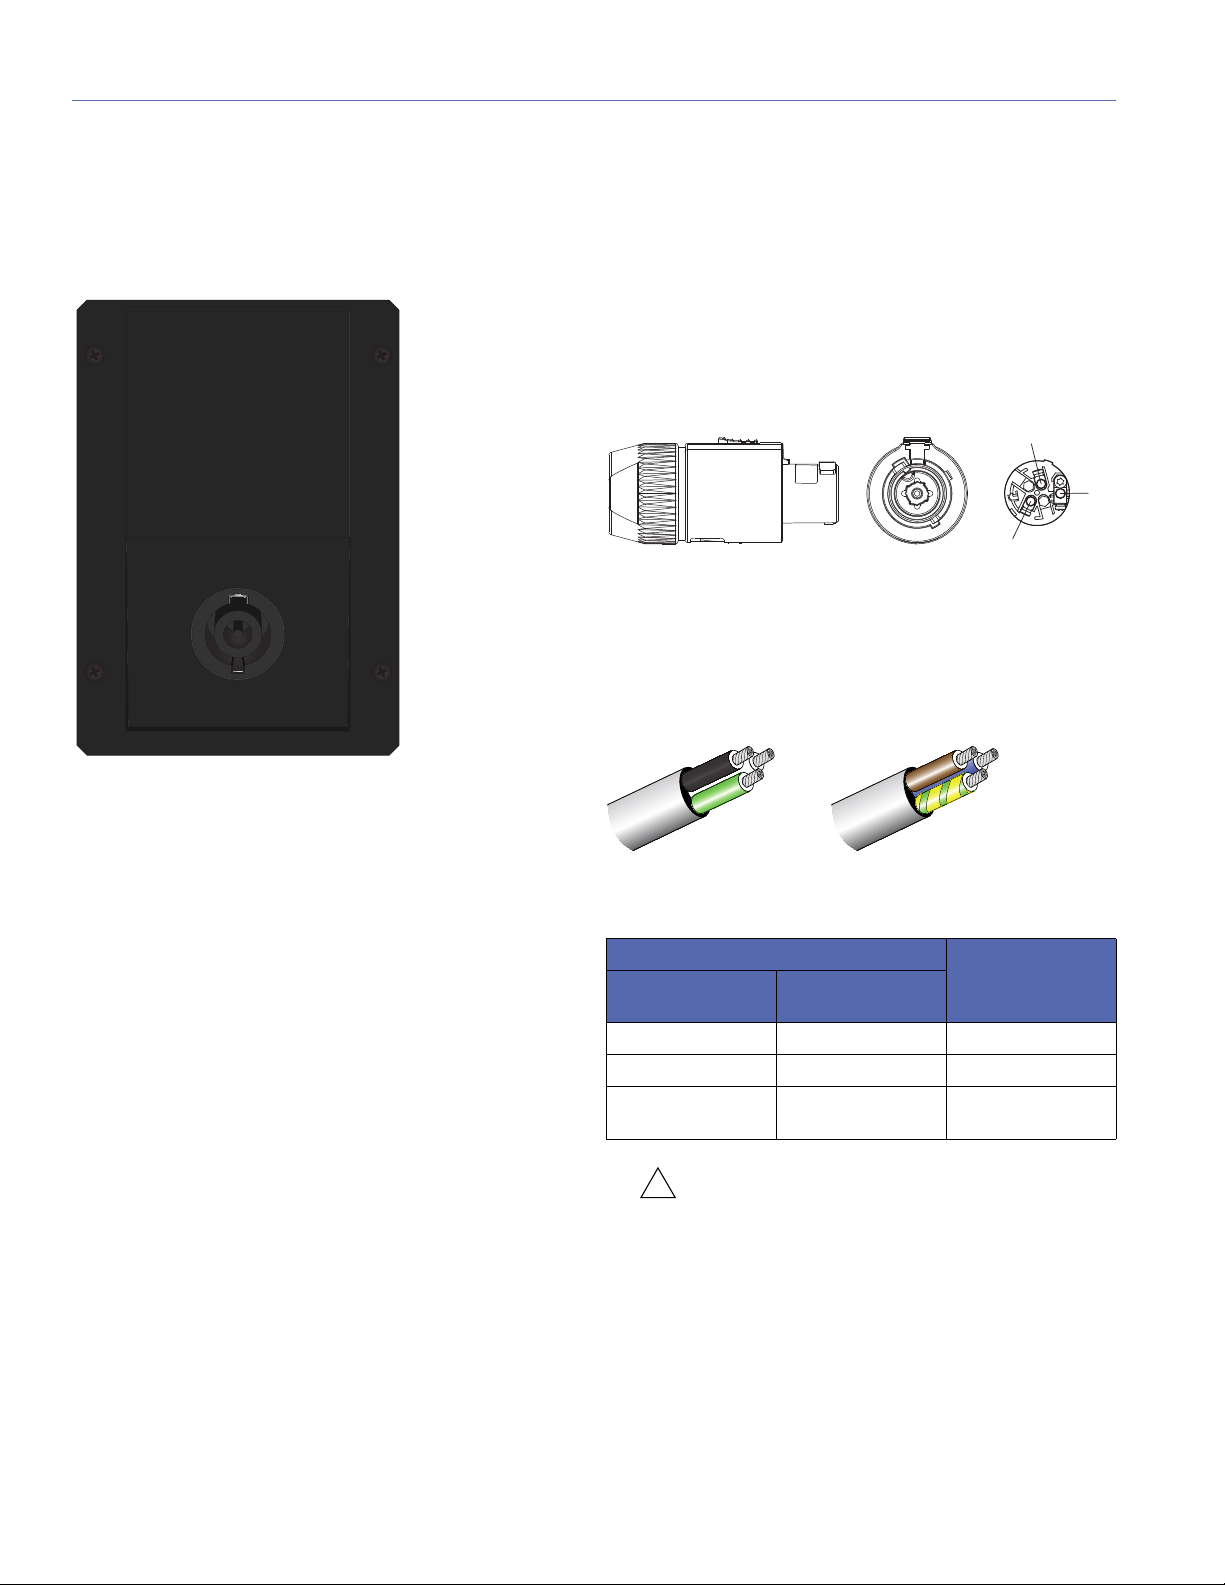
The LEO-M user panel includes an AC Input connector that
supplies power to the loudspeaker. The 3-conductor
powerCON 32 is rated at 32 A and uses a locking connector
that prevents accidental disconnections.
WIRING AC POWER CABLES
LEO-M ships with a black powerCON 32 cable mount connector, rated at 32 A, for assembling AC power cables. The
pins on the powerCON 32 cable mount connector are
labeled as follows:
■ L (Line)
■ N (Neutral)
■ PE (Protective Earth or Ground)
powerCON 32 Cable Mount Connector
How AC power cables are wired is determined by the type of
AC power distribution system used (see “AC Power Distribution” on page 7). When wiring AC power cables for singleline systems, use one of the following wiring schemes:
powerCON 32 AC Input Connector
LEO-M ships with a black powerCON 32 cable mount connector, rated at 32 A, for assembling AC power cables.
Make sure to use an AC power cable that is wired correctly
(see “Wiring AC Power Cables” on page 8) and equipped
with the appropriate power plug (on the other end) for the
area in which you will operate the unit.
LEO-M requires a grounded outlet. To operate safely and
effectively, it is extremely important that the entire system be
properly grounded.
AC Wiring Scheme
Wire Color Attach to the
U.S. / Canada
60 Hz
Black Brown Hot or live (L)
White Blue Neutral (N)
Green Green and Yellow Protective earth /
European
50 Hz
Following
Te rm i n al
ground (E or PE)
CAUTION: When wiring AC power cables and
distribution systems, it is important to preserve
AC line polarity and connect the earth ground on both
ends of the cable. LEO-M requires a grounded connection. Always use a grounded outlet and plug. It is
extremely important that the system be properly
grounded to operate safely and properly. Do not
ground-lift the AC cable.
8
Page 9

LEO-M OPERATING INSTRUCTIONS
!
!
Supported Cable Gauges for the powerCON 32
While the powerCON 32 connector supports cable gauges
of 14–10 AWG (2.5–6.0 mm
10 AWG (6.0 mm
2
) should be used whenever possible.
2
), due to LEO-M’s current draw,
LEO-M VOLTAGE REQUIREMENTS
CAUTION: Due to its expanded power capabil-
ities, LEO-M was engineered to operate only at
220 V AC (208–235 V AC) to reduce current draw.
Make sure to use AC power cables with sufficient
gauge to operate with stable voltages during peaks
and that the AC power source is capable of providing
enough power.
LEO-M operates as intended when receiving AC voltage
within the following range:
■ 165–264 V AC, 50–60 Hz
If the voltage drops below 165 V, the loudspeaker uses
stored power to continue operating temporarily; the loudspeaker powers off if the voltage does not return to its operating range.
If the voltage rises above 275 V, the power supply could
become damaged.
CAUTION: To ensure that LEO-M performs as
specified, without interruption, and without
damage to its power supply:
1. Its power source must operate within the required
voltage window (208–235 V AC).
2. Its AC cable length and gauge must be such that
peak voltage drops do not exceed 5 percent of its
voltage.
NOTE: When voltage fluctuates within the
loudspeaker’s operating ranges, automatic tap
selection stabilizes the voltage. Tap selection is
instantaneous with no audible artifacts, allowing continuous operation.
LEO-M CURRENT REQUIREMENTS
Current draw for loudspeakers is dynamic and fluctuates as
operating levels change. Since different cables and circuit
breakers heat up at varying rates, it is important to understand the following types of current ratings and how they
affect circuit breaker and cable specifications.
■ Idle Current — The maximum rms current during idle
periods.
■ Maximum Long-Term Continuous Current — The
maximum rms current during a period of at least
10 seconds. The maximum long-term continuous current
is used to calculate temperature increases for cables, to
ensure that cable sizes and gauges conform to electrical
code standards. The current rating is also used as a rating for slow-reacting thermal breakers, which are recommended for loudspeaker power distribution.
■ Burst Current — The maximum rms current during a
period of around 1 second. The burst current is used as
a rating for magnetic breakers. It is also used for calculating the peak voltage drop in long AC cable runs
according to the following formula:
V pk (drop) = I pk x R (cable total)
■ Maximum Instantaneous Peak Current — A rating for
fast-reacting magnetic breakers.
■ Inrush Current — The spike of initial current encoun-
tered when powering on.
You can the following table as a guide for selecting cable
gauges and circuit breaker ratings for the system’s operating voltage.
LEO-M Current Draw
Current Draw 230 V AC
Idle 0.6 A rms
Maximum LongTerm Continuous
Burst 8.0 A rms
Maximum Instantaneous Peak
Inrush <15 A peak
6.0 A rms
24 A peak
The minimum electrical service amperage required by a
loudspeaker system is the sum of the maximum long-term
continuous current for all loudspeakers. An additional
30 percent above the minimum amperage is recommended
to prevent peak voltage drops at the service entry.
9
Page 10

CHAPTER 2: POWER REQUIREMENTS
!
!
NOTE: For best performance, the AC cable volt-
age drop should not exceed 10 V (5 percent at
230 V). Make sure that even with AC voltage drops that
the voltage always remains within the loudspeaker’s
operating range.
DO NOT RESET CIRCUIT BREAKERS!
CAUTION: In the unlikely event that one of
LEO-M’s circuit breakers trips (the center button disengages), disconnect the AC power cable and
contact Meyer Sound for repair information. DO NOT
attempt to reset the breaker or reconnect the AC
power cable.
INTELLIGENT AC POWER SUPPLY
LEO-M’s Intelligent AC™ power supply eliminates high
inrush currents with soft-start power up; suppresses highvoltage transients up to several kilovolts; filters common
mode and differential mode radio frequencies (EMI); and
sustains operation temporarily during low-voltage periods.
ELECTRICAL SAFETY GUIDELINES
Make sure to observe the following important electrical and
safety guidelines.
■ The powerCON 32 connector should not be engaged or
disengaged when under load or live.
■ LEO-M requires a grounded outlet. Always use a
grounded outlet and plug.
■ Do not use a ground-lifting adapter or cut the AC cable
ground pin.
■ Make sure the AC power cable for the loudspeaker has the
appropriate power plug (on the other end) for the area in
which you will operate the loudspeaker.
■ Do not operate the unit if the power cable is frayed or
broken.
■ Keep all liquids away from LEO-M loudspeakers to avoid
hazards from electrical shock.
■ Use the cable rings (see “Cable Rings” on page 12) on
the rear of the LEO-M cabinet to reduce strain on the AC
power cable (and audio cables). Do not use the cable
rings for any other purpose.
Powering on LEO-M
When powering on LEO-M, the following startup events take
place over several seconds.
1. Audio output is muted.
2. The primary fan turns on.
3. The power supply ramps up.
4. On the user panel, the Active LED turns solid green, indicating the loudspeaker is ready to output audio.
CAUTION: If the Active LED does not turn solid
green, or LEO-M does not output audio after
10 seconds, remove AC power immediately and verify that the voltage is within the required range. If the
problem persists, contact Meyer Sound Technical
Support.
10
Page 11

CHAPTER 3: AMPLIFICATION AND AUDIO
LEO-M’s drivers are powered by a proprietary 3-channel
amplifier with bridged MOSFET output stages. The audio signal is processed with an electronic crossover, correction filters
for flat phase and frequency responses, and driver protection
circuitry. Each channel has peak and rms limiters that prevent
driver over-excursion and regulate voice coil temperatures.
LEO-M User Panel
The LEO-M user panel includes Input and Loop output connectors for audio, Limit and Active LEDs, and RMS connectors and controls (see Chapter 5, “RMS Remote Monitoring
System”).
AUDIO CONNECTORS
LEO-M includes XLR 5-pin connectors for audio Input and
audio Loop output. XLR 5-pin connectors accommodate
both balanced audio and RMS signals.
XLR 5-Pin Audio Connectors, Input and Loop Output
Audio Input (XLR 5-Pin Female)
The XLR 5-pin female Input connector accepts balanced
audio signals with an input impedance of 10 kOhm. The
connector uses the following wiring scheme:
■ Pin 1 — 1 kOhm to chassis and earth ground (ESD
clamped)
■ Pin 2 — Signal (+)
■ Pin 3 — Signal (–)
■ Pin 4 — RMS (polarity insensitive)
■ Pin 5 — RMS (polarity insensitive)
■ Case — Earth (AC) ground and chassis
Pins 2 and 3 carry the input as a differential signal. Pin 1 is
connected to earth through a 1 kOhm, 1000 pF, 15 V
clamped network. This circuitry provides virtual ground lift
for audio frequencies while allowing unwanted signals to
bleed to ground. Make sure to use balanced XLR audio
cables with pins 1–3 connected on both ends. Telescopic
grounding is not recommended and shorting an input connector pin to the case may cause a ground loop, resulting in
hum.
TIP: If unwanted noise or hiss is produced by the
loudspeaker, disconnect its input cable. If the
noise stops, there is most likely nothing wrong with the
loudspeaker. To locate the source of the noise, check
the audio cable, source audio, and AC power.
11
Page 12

CHAPTER 3: AMPLIFICATION AND AUDIO
!
!
Audio Loop Output (XLR 5-Pin Male)
The XLR 5-pin male Loop output connector allows multiple
loudspeakers to be looped from a single audio source. The
Loop output connector uses the same wiring scheme as the
Input connector (see “Audio Input (XLR 5-Pin Female)” on
page 11). For applications that require multiple LEO-Ms,
connect the Loop output of the first loudspeaker to the Input
of the second loudspeaker, and so forth.
NOTE: The Loop output connector is wired in
parallel to the Input connector and transmits
the unbuffered source signal even when the loudspeaker is powered off.
Calculating Load Impedance for Looped Audio Signals
To avoid distortion when looping multiple loudspeakers,
make sure the source device can drive the total load impedance of the looped loudspeakers. In addition, the source
device must be capable of delivering approximately 20 dBV
(10 V rms into 600 ohms) to yield the maximum SPL over the
operating bandwidth of the loudspeakers.
To calculate the load impedance for the looped loudspeakers, divide 10 kOhms (the input impedance for a single loudspeaker) by the number of looped loudspeakers. For
example, the load impedance for 10 LEO-Ms is 1000 ohms
(10 kOhms / 10). To drive this number of looped loudspeakers, the source device should have an output impedance of
100 ohms or less. This same rule applies when looping
LEO-Ms with other Meyer Sound self-powered loudspeakers.
NOTE: Most source devices are capable of
driving loads no smaller than 10 times their
output impedance.
TIP: Audio outputs from Meyer Sound’s
Galileo 616 and Galileo Callisto 616 are rated at
50 ohms, which means that their outputs can singly
drive up to 20 Meyer Sound (10 kOhm) loudspeakers
without distortion.
CAUTION: Make sure that all cabling for
looped loudspeakers is wired correctly (Pin 1
to Pin 1, Pin 2 to Pin 2, and so forth) to prevent the
polarity from being reversed. If one or more loudspeakers in a system have reversed polarity, frequency response and coverage will be significantly
degraded.
CABLE RINGS
Two cable rings are provided on the rear of the LEO-M cabinet. Power and audio cables should be tied off to the rings
to reduce strain on the cables and prevent damage to them
during installation. The cable rings should not be used for
any other purpose.
Cables Tied Off to Cable Ring
CAUTION: LEO-M cable rings should only be
used to reduce strain on cables. The cable
rings should not be used for any other purpose.
TRUPOWER LIMITING
LEO-M employs Meyer Sound’s advanced TruPower® limiting. Conventional limiters assume a constant loudspeaker
impedance and set the limiting threshold by measuring voltage alone. This method is inaccurate because loudspeaker
impedances change as frequency content in the source
material changes, and as thermal values for the loudspeaker’s voice coil and magnet vary. Consequently, conventional limiters often begin limiting prematurely, which
reduces system headroom and dynamic range.
In contrast, TruPower limiting anticipates varying loudspeaker impedances by measuring both current and voltage
to compute the actual power dissipation in the voice coil.
This improves performance, both before and during limiting,
by allowing the driver to produce the maximum SPL across
its entire frequency range, while also retaining signal peaks.
TruPower limiting also eliminates power compression at high
levels over lengthy periods, which helps regulate voice coil
temperatures, thereby extending the life of the driver.
12
Page 13

LEO-M OPERATING INSTRUCTIONS
!
!
!
HF and LF Limit LEDs
The low- and high-frequency drivers for LEO-M are powered
by separate amplifier channels, each with their own limiter.
Limiting activity is indicated with two Limit LEDs on the user
panel. The HF Limit LED indicates limiting for the high-frequency channel and the LF Limit LED indicates limiting for
the low-frequency channel.
LEO-M Limit LEDs
When engaged, the limiters not only protect the drivers but
also prevent signal peaks from causing excessive distortion
in the amplifier channels, thereby preserving headroom and
maintaining smooth frequency response at high levels.
When levels return to normal, below the limiter thresholds,
limiting ceases.
LEO-M performs within its acoustical specifications at normal temperatures when the Limit LEDs are unlit, or when the
LEDs are lit for 2 seconds or less and then turn off for at
least 1 second. If the LEDs remain lit for longer than
3 seconds, the loudspeaker enters hard limiting where:
■ Increases to the input level have no effect
■ Distortion increases due to clipping
■ Drivers are subjected to excessive heat and excursion,
thereby compromising their lifespan
CAUTION: The Limit LEDs indicate when a
safe, optimum level is exceeded. If a LEO-M
loudspeaker system begins to limit before reaching
the desired SPL, consider adding more units to the
system.
NOTE: LEO-M uses optical limiters that add no
noise and have no effect on the signal when
limiting is not engaged.
AMPLIFIER COOLING SYSTEM
LEO-M employs forced-air cooling with four ultrahigh-speed
fans (two primary, and two reserve) to prevent the amplifier
from overheating. The fans draw air in through ducts on the
rear of the cabinet, over the heat sinks, and out the rear of
the cabinet. Because dust does not accumulate in the
amplifier and power circuitry, their lifespans are increased
significantly.
CAUTION: To keep LEO-M from overheating,
allow at least 6 inches behind the loudspeaker
for proper ventilation.
LEO-M Fans
Primary Fans Reserve Fans
Type Ultrahigh-speed Ultrahigh-speed
Number 2 2
Location 1 for each heat sink (2) 1 for each heat sink (2)
Fan speeds
and heat
sink temp.
desired SPL, consider adding more units to the system.
tional feedback on the loudspeaker’s hardware status
and operating temperature. For more information, see
Chapter 5, “RMS Remote Monitoring System.”
<34° C Half speed <52° C Off
34° – 50° C Ramps up >52° C Full speed
50° – 84° C Full speed <44° C Off
>95° C Audio
muted, fans
continue at
full speed
<86° C Audio
unmuted,
fans con-
tinue at full
speed
>95° C Audio
muted, fans
continue at
full speed
<86° C Audio
unmuted,
fans con-
tinue at full
speed
CAUTION: If a LEO-M loudspeaker system
consistently overheats before reaching the
TIP: When LEO-M is connected to an RMS net-
work, the Compass RMS software provides addi-
13
Page 14

CHAPTER 3: AMPLIFICATION AND AUDIO
14
Page 15

CHAPTER 4: QUICKFLY RIGGING
IMPORTANT SAFETY CONSIDERATIONS!
When installing Meyer Sound loudspeakers and subwoofers, the following precautions should always be observed:
■ All Meyer Sound products must be used in accordance
with local, state, federal, and industry regulations. It is
the owner’s and user’s responsibility to evaluate the reliability of any rigging method for their application. Rigging
should only be carried out by experienced professionals.
■ Use mounting and rigging hardware that has been rated
to meet or exceed the weight being hung.
■ Make sure to attach mounting hardware to the building’s
structural components (roof truss), and not just to the
wall surface.
■ Make sure bolts and eyebolts are tightened securely.
®
Meyer Sound recommends using Loctite
on all
threaded fasteners.
■ Inspect mounting and rigging hardware regularly. Imme-
diately replace any worn or damaged components.
LEO-M RIGGING OPTIONS
Table 1 summarizes the available rigging options for LEO-M. For complete information on rigging hardware, including
dimensions, weight, configuration, and load ratings, refer to the MTG-LEO-M Assembly Guide (PN 05.215.049.01) available
at www.meyersound.com
Table 1: LEO-M Rigging Options
Model Weight Features Required Quick-
MTG-LEO-M top grid
(PN 40.215.114.01)
MVP motor Vee plate
(PN 40.215.184.01)
MTF-LEO-M/LYON
transition frame
(PN 40.215.250.01)
MTF-LEO-M/MICA
transition frame
(PN 40.215.131.01)
PBF-LEO-M
pull-back frame
(PN 40.215.136.01)
RPP-LEO-M
rear pull-up plate
(PN 40.215.181.01)
MCF-LEO-M
caster frame
(PN 40.215.130.01)
.
205 lbs
(93.0 kg)
20 lbs
(9.1 kg)
85 lbs
(38.6 kg)
9 lbs
(4.1 kg)
16 lbs
(7.3 kg)
6 lbs
(2.7 kg)
110 lbs
(49.9 kg)
With some restrictions, flies up to 22 LEO-Ms at a 5:1
safety factor, or up to 18 LEO-Ms at a 7:1 safety factor;
accommodates a variety of pickup configurations with six
pickup points; includes attachment points to accommodate brackets and adapters for lasers and inclinometers
Fine tunes the horizontal aim of arrays; compatible with
MTG-LEO-M, MTG-LYON, MTG-1100, and MGLEOPARD/900 grids
With some restrictions, flies up to seven LYONs at a 7:1
safety factor below LEO-M arrays for downfill; includes
rear attachment points for pull-back
With some restrictions, flies up to eight MICAs at a 7:1
safety factor below LEO-M arrays for downfill
Attaches to bottom of LEO-M arrays (to the MTFLEO-M/MICA transition frame) and provides pull-back
for extreme array downtilt; can also be used for pull-up
to expand the array’s splay angles during installation so
the blue locking pins can be more easily inserted
Helps assemble large arrays with wide splay angles by
providing pull-up (with a motor) to expand the array’s
splay angles during installation so the blue locking pins
can be more easily inserted
Safely transports up to four LEO-M cabinets, making it
easy to assemble and disassemble arrays in blocks of
four cabinets
Release Pins
1/2 x 1.50-inch (red button),
PN 134.045, qty 4 included
— 3/4-inch or
7/16 x 1.50-inch (red button),
PN 134.051, qty 4 included
5/16 x 0.875-inch (red button),
PN 134.025, qty 4 included
7/16 x 1.50-inch (red button),
PN 134.051, qty 0 included
3/8 x 1.125-inch (blue button),
PN 134.021, qty 0 included
1/2 x 1.50-inch (red button),
PN 134.045, qty 2 included
1/2 x 2.50-inch (blue button),
PN 134.007, qty 2 included
1/2 x 1.25-inch (blue button),
PN 134.044, qty 0 included
Required
Shackles
7/8-inch
7/8-inch
5/8-inch
—
5/8-inch
5/8-inch
5/8-inch
NOTE: The MCF-LEO-M caster frame and MTF-LEO-M/MICA transition frame do not include quick-release
pins because they are secured with the quick-release pins included with the loudspeakers.
15
Page 16

CHAPTER 4: QUICKFLY RIGGING
MTG-LEO-M Top Grid
Oriented for maximum
array downtilt with three
pick-up points and four
motors
(12) LEO-Ms
Primary array
coverage
MTF-LEO/MICA
Transition Frame
Transitions from last LEO-M
to first MICA (for downfill); is
also required when using the
PBF-LEO-M pull-back frame
(with or without MICAs)
The MTF-LEO/LYON transi-
tion frame is also available
for flying LYONs below
LEO-Ms
RPP-LEO-M
Rear Pull-Up Plate
Helps assemble large
arrays with wide splay
angles by providing pullup (with a motor) to
expand the array’s splay
angles during installation
so the blue locking pins
can be more easily
inserted
MVP Motor Vee Plate
Attached to rear center
of grid with two motors
to adjust the horizontal
aim of the array
(3) MICAs
Downfill coverage
PBF-LEO-M
Pull-Back Frame
Attached to transition
frame to provide pullback for extreme array
downtilt; can also be used
for pull-up to expand the
array’s splay angles
during installation so the
blue locking pins can be
more easily inserted
Rigging Example, LEO-M Array with MICA Downfill and Pull-Up
16
Page 17

LEO-M OPERATING INSTRUCTIONS
!
!
LEO-M GUIDEALINKS
LEO-M is equipped with four captive GuideALinks and four
mating link slots that link to adjacent units in flown arrays.
Located at the top corners of the cabinet, GuideALinks
extend up and into the link slots of the cabinet above it, or
into the link slots of the MTG-LEO-M grid, making it easy to
link cabinets once they are stacked. GuideALinks extend
and retract with knobs and are secured with two quickrelease pins: one each in the top and bottom cabinets. Each
LEO-M loudspeaker ships with 10 1/2 x 1.25-inch quickrelease pins (blue button) (PN 134.044).
LEO-M Splay Angles
Rear GuideALinks attach at a fixed splay angle of 0 degrees
and act as a pivot point between linked LEO-Ms, with the
splay angle between the units determined by the front
GuideALink positions. Rear GuideALinks can be pinned in
either of two positions: extended or stowed.
LEO-M GuideALinks with Quick-Release Pins, Exploded View
CAUTION: GuideALinks must be secured with
the included quick-release pins. At no time
should the weight of the loudspeaker rest on the
GuideALink knobs when the links are fully extended
(without the pins inserted). GuideALink knobs are for
extending and retracting the links only.
LEO-M GuideALinks (Exposed) Attached at 0 Degrees
Front GuideALinks determine the loudspeaker splay angles
and are configured with the yellow ANGLE positions when
the cabinets are resting in the caster frame. After the stack is
lifted with the motors, the loudspeakers rotate on the axis of
the rear GuideALinks and the front GuideALinks slide into
position as the weight of the loudspeakers causes the cabinets to shift, at which point, quick-release pins are inserted
in the corresponding blue LOCKING positions to lock the
splay angles.
Available splay angles for linked LEO-Ms include 0.0, 0.5,
1.0, 1.5, 2.0, 2.5, 3.0, 4.0, and 5.0 degrees and are indicated
by the blue and yellow GuideALink labels.
CAUTION: Splay angles of 0 degrees should
only be used for the top cabinet attached to
the grid. Splay angles of at least 0.5 degrees are recommended for cabinets near the top of the array. If
multiple cabinets are set to 0 degrees and the array is
17
Page 18

CHAPTER 4: QUICKFLY RIGGING
STOW
PIN
0°
L5 L4 L3
L2.5
L2
L1.5
L1 L0.5
LOCKING
5° 4° 3°
2.5°
1.5° 0.5°
2°
1°
STOW &
ANGLE
Angle (Yellow)
Sets splay angles for
cabinets when stack is
on ground.
Stow Pin
Move locking pins here for safekeeping before lifting or lowering the stack. This allows splay
angles to expand and contract.
Never put the blue locking pins
in your pocket.
Locking (Blue)
Locks splay angles for
cabinets after stack is
lifted.
0° / TRANSPORT
Locks cabinets for safe transport in caster frame. Can also
be used when attaching top
cabinet to grid.
flown with downtilt, the resulting splay angles could
be negative because of the gaps in the links and pins
that facilitate easy pinning.
NOTE: The splay angles listed on the GuideA-
Link labels are for relative angles between the
center axes of the linked units. For example, setting
the GuideALinks to 5 degrees yields a 5-degree downtilt of the lower unit to the upper unit. How the loudspeakers relate to the floor, stage, and seating angles
in the venue depends on the orientation of the grid, the
angles of the loudspeakers in the array above them,
and other factors. MAPP prediction software should
be used to calculate optimum splay angles for loudspeakers and to predict coverage patterns for arrays.
NOTE: For more information on GuideALink
configurations, refer to the MTG-LEO-M
Assembly Guide (PN 05.215.049.01) available at
www.meyersound.com
.
WHEN TO MOVE THE LOCKING PINS TO THE “STOW PIN” POSITION
The quick-release pins in the blue LOCKING positions must
be moved to the STOW PIN position before either lifting or
lowering an array. The removal of the quick-release pins
from the LOCKING positions allows the splay angles to
expand and contract when assembling and disassembling
the array. Moving the pins to the STOW PIN position also
keeps them handy so they won’t be dropped or misplaced.
TIP: Resist the urge to put the blue locking pins
in your pocket. Instead place them in the STOW
PIN position before lifting or lowering the array.
Figure 3: LEO-M Front GuideALinks Label
18
Page 19

CHAPTER 5: RMS REMOTE MONITORING SYSTEM
LEO-M includes an RMS remote monitoring system module,
allowing the loudspeaker to be connected to an RMS network. RMS reports, in real time, the status and power usage
of multiple Meyer Sound loudspeakers from a Mac or Windows-based computer. The RMS host computer communicates with Meyer Sound loudspeakers (equipped with RMS
modules) via RMServer
™
, a compact, Ethernet-based hardware unit with two FT-10 ports. RMServer stores system
configurations internally, eliminating most manual data entry.
Systems can be monitored from a computer at front-ofhouse or backstage, or from a laptop anywhere within the
venue over WiFi.
NOTE: For the latest RMS system require-
ments, visit the Meyer Sound website
(http://www.meyersound.com
).
NOTE: LEO-M includes an internal Mute
Jumper that enables RMS mute and solo capability. The loudspeaker currently ships with the Mute
Jumper installed. Compass RMS also allows you to
disable Mute and Solo functions to eliminate any
possibility of accidentally muting loudspeakers.
COMPASS RMS SOFTWARE
Compass RMS™ software provides extensive system status
and performance data for each loudspeaker, including
amplifier voltage, limiting activity, power output, fan and
driver status, as well as mute and solo capability. Loudspeakers are added to the RMS network and assigned a
node name during a one-time discovery procedure. Once
loudspeakers are identified on the RMS network, they
appear in Compass RMS as icons that can be customized
to suit your needs.
NOTE: RMS does not control AC power.
Compass RMS Window
Individual loudspeakers can be physically identified with the
Wink option in RMS, which lights the Wink LED on the RMS
module for that particular loudspeaker. Conversely, a loudspeaker can be identified in Compass RMS by pressing the
Identify button on the loudspeaker’s RMS module.
Loudspeaker icons can be arranged in Compass RMS and
saved as pages to represent how the loudspeakers have
been deployed in the system. Multiple pages can be saved
and recalled for specific performances and venues.
19
Page 20

CHAPTER 5: RMS REMOTE MONITORING SYSTEM
RMS MODULE
The LEO-M RMS user panel includes an Identify button,
Wink/Activity LED, and two Network connectors.
LEO-M RMS Module
NOTE: The Identify button and Wink/Activity
LED on the RMS user panel are used exclusively by RMS and have no effect on the acoustical or
electrical activity of the loudspeaker.
Identify Button
The Identify button serves the following functions:
■ If the loudspeaker has not yet been discovered on the
RMS network (Wink/Activity LED not lit), press the Identify button to discover it.
■ If the loudspeaker has been successfully discovered on
the RMS network, the LED flashes green continuously
and flashes more rapidly with increased data activity.
■ When the loudspeaker is winked, either by clicking the
Wink button in Compass RMS or by pressing the Identify
button on the RMS user panel, the LED is solid green.
The LED remains solid green until the loudspeaker is
unwinked.
TIP: The Wink function is useful for identifying
the physical loudspeaker corresponding to a
loudspeaker icon in Compass RMS.
RMS Network Connectors
The Weidmuller 2-conductor, locking connectors transfer
data to and from the RMS network. Two connectors are provided to allow for easy connection of multiple (daisychained) loudspeakers on the network. Included with each
RMS-equipped loudspeaker are RMS cable connectors and
mounting blocks for constructing RMS cables. The RMS
blocks allow cables to be securely attached to the RMS
module with screws.
■ To remove the loudspeaker from the RMS network, press
and hold the Identify button during startup (see “Resetting the RMS Module” on page 20).
■ To wink a discovered loudspeaker, press the Identify but-
ton. The Wink LED on the loudspeaker icon in Compass
RMS lights up and the Wink/Activity LED on the loudspeaker’s RMS user panel turns solid green. Press the
Identify button again to unwink the loudspeaker.
TIP: The Wink function is useful for identifying
the physical loudspeaker corresponding to a
loudspeaker icon in Compass RMS.
TIP: The loudspeaker can also be winked by
clicking the Wink button on the loudspeaker
icon in Compass RMS.
Wink/Activity LED (Green)
The green Wink/Activity LED indicates the status of the
loudspeaker:
■ During startup, the LED flashes green 10 times.
■ If the loudspeaker has not yet been discovered on the
RMS network, the LED is not lit after startup.
NEURON ID FOR RMS MODULE
Each RMS module has a unique 12-character Neuron ID
(NID) that identifies the loudspeaker on the network. The
NID is automatically detected by RMServer but can also be
entered manually, if necessary, when configuring RMS systems in Compass RMS without loudspeakers present. The
NID label is located on the RMS user panel near the orange
Network connectors.
RESETTING THE RMS MODULE
You can use the Identify button to reset the LEO-M RMS
module when powering on the loudspeaker. This will cause
the module to be removed from the RMS network.
To reset the RMS module:
1. Power down the loudspeaker.
2. Press and hold the Identify button.
3. While continuing to hold down the Identify button, power
on the loudspeaker.
4. After the Wink/Status LED flashes on and off, release the
Identify button. The RMS module is reset and the loudspeaker is removed from the RMS network.
20
Page 21

CHAPTER 6: SYSTEM DESIGN AND INTEGRATION TOOLS
This chapter introduces MAPP, Meyer Sound’s patented system design tool, and SIM 3, a comprehensive system for
measurement and analysis.
MAPP SYSTEM DESIGN TOOL
MAPP is a powerful, cross-platform application for accurately predicting the coverage pattern, frequency response,
phase response, impulse response, and SPL capability of
single or arrayed Meyer Sound loudspeakers.
MAPP System Design Tool
Whether planning for fixed installations or for tours with multiple venues, you can use MAPP to accurately predict the
appropriate loudspeaker deployment for each job, complete
with coverage data, system delay and equalization settings,
rigging information, and detailed design illustrations. MAPP’s
accurate, high-resolution predictions ensure that systems will
perform as expected, thereby eliminating unexpected coverage problems and minimizing onsite adjustments.
The key to the accuracy of MAPP’s predictions is Meyer
Sound’s exhaustive database of loudspeaker measurements.
Performance predictions for each loudspeaker are based on
720 1/48th-octave-band measurements taken with a SIM
audio analyzer in the Meyer Sound anechoic chamber. The
extraordinary consistency between Meyer Sound loudspeakers guarantees that predictions from MAPP will closely match
their actual performance.
MAPP client software lets you configure Meyer Sound loudspeaker systems and define the environment in which they
operate, including air temperature, pressure, humidity, and
even the location and composition of surfaces. You can also
import CAD (.DXF) files containing detailed venue information
to act as a visual aid.
MAPP prediction requests are sent by the client software to
Meyer Sound servers, where complex, high-resolution (magnitude and phase) polar data is processed with sophisticated
acoustical prediction algorithms. The resulting predictions
are then displayed in the MAPP client software.
TIP: Meyer Sound offers seminars and webinars
on using MAPP. For more information, visit
www.meyersound.com
.
MAPP Capabilities
With MAPP, you can:
■ Simulate different loudspeaker configurations to refine
system design and determine the best coverage for
intended audience areas
■ Monitor loudspeaker interactions to locate constructive
and destructive interferences so that loudspeakers can
be re-aimed and repositioned as necessary
■ Place microphones anywhere in the sound field and pre-
dict loudspeaker frequency response, phase response,
and sound pressure levels as measured at each microphone position
■ Determine delay settings for fill loudspeakers using the
Inverse Fast Fourier Transform feature
■ Preview the results of Galileo or Galileo Callisto process-
ing to determine optimum settings for the best system
response
■ Automatically calculate load information for arrays to
determine rigging capacity, front-to-back weight distribution, and center of gravity location
■ Generate and export system images and full-system PDF
reports for client presentations
21
Page 22

CHAPTER 6: SYSTEM DESIGN AND INTEGRATION TOOLS
SIM 3 MEASUREMENT SYSTEM
The SIM 3 audio analyzer is a high-resolution audio measurement system comprised of software, hardware, microphones,
and accessory cables. SIM 3 is optimized for measuring
audio frequencies with resolutions down to 1/48th of an
octave, allowing you to apply precise corrections to balance
system response using frequency and phase domain information.
Source Independent Measurement Technique
The SIM 3 audio analyzer implements Meyer Sound’s source
independent measurement technique, a dual-channel
method that accommodates statistically unpredictable excitation signals. Any excitation signal within a desired frequency
range can be used to obtain highly accurate measurements
for acoustical or electronic systems.
For example, during a performance, both the input signal and
the measured output of the loudspeaker system can be captured and used as a SIM 3 test signal, so you can:
■ View measurement data as amplitude versus time
(impulse response) or amplitude and phase versus frequency (frequency response)
SIM 3 Applications
SIM 3’s main applications are testing and aligning loudspeaker systems, which entails:
■ Measuring propagation delays between subsystems to
determine appropriate polarities and delay times
■ Measuring variations in frequency response caused by the
acoustical environment and the placement and interaction
of loudspeakers to determine corrective equalization
■ Optimizing subwoofer integrations
■ Optimizing loudspeaker arrays
SIM 3 can also be used in the following applications:
■ Microphone calibration and equalization
■ Transducer evaluation and correction
■ Echo detection and analysis
■ Vibration analysis
■ Architectural acoustics
■ Utilize a single-channel spectrum mode
■ View frequency domain data with a logarithmic frequency
axis
■ Determine and internally compensate for propagation
delays using the SIM 3 Delay Finder
22
Page 23

APPENDIX A: RAIN HOODS
OPEN TO FULLY OPERATE
OPEN TO FULLY OPERATE
6.25
[159 mm]
8.50
[216 mm]
9.27
[235 mm]
Rear view
(collapsed)
Top v i ew
(expanded)
Side view
(expanded)
LEO-M comes standard with weather protection that includes a collapsible rain hood that protects the loudspeaker’s connectors from water intrusion.
EXPANDING THE LEO-M COLLAPSIBLE RAIN HOOD
To expand the LEO-M collapsible rain hood:
1. Remove the rain hood’s Velcro straps.
2. Expand the rain hood’s fabric fully upward and outward.
3. Reach inside the rain hood and free the two struts from the top corner pockets nearest the loudspeaker.
4. Fold the two struts downward and outward and insert them into the two side pockets.
LEO-M with Rain Hood Expanded
NOTE: For LEO-M dimensions with the rain hood expanded, see “LEO-M Dimensions with Rain Hood” on
page 28.
23
Page 24

APPENDIX A: RAIN HOODS
24
Page 25

APPENDIX B: SPECIFICATIONS
NOTE: Loudspeaker system predictions for coverage and SPL are available in Meyer Sound’s MAPP predic-
tion software.
LEO-M Specifications
ACOUSTICAL
Operating Frequency Range 55 Hz – 16.5 kHz
Note: Recommended maximum operating frequency range. Response depends on loading conditions and room acoustics.
Phase Response 375 Hz to 14 kHz ±30 degrees
TRANSDUCERS
Low Frequency Two 15-inch long-excursion cone drivers
High Frequency Two 4-inch compression drivers coupled to a constant-directivity horn through a patented
AUDIO INPUT
Type Differential, electronically balanced
Maximum Common Mode Range ±15 V DC, clamped to earth for voltage transient protection
Connectors XLR 5-pin female input
Input Impedance 10 kOhm differential between pins 2 and 3
Wiring Pin 1: Chassis/earth through 1 kOhm, 1000 pF, 15 V clamped network to provide virtual
®
manifold
REM
XLR 5-pin male loop output
ground lift at audio frequencies
Pin 2: Signal (+)
Pin 3: Signal (–)
Pin 4: RMS (polarity insensitive)
Pin 5: RMS (polarity insensitive)
Case: Earth ground and chassis
DC Blocking Differential DC blocking up to the maximum common mode voltage
CMRR >50 dB, typically 80 dB (50 Hz – 500 Hz)
RF Filter Common mode: 425 kHz
Differential mode: 142 kHz
TIM Filter Integral to signal processing (<80 kHz)
Nominal Input Sensitivity 0.0 dBV (1.0 V rms) continuous is typically the onset of limiting for noise and music
Input Level Audio source must be capable of producing +20 dBV (10 V rms, 14 V peak) into
600 ohms to produce the maximum peak SPL over the operating bandwidth of the loudspeaker
AMPLIFIER
Type 3-channel, complementary MOSFET output stages (class AB/H bridged)
Cooling Two ultrahigh-speed primary fans, two ultrahigh-speed reserve fans
AC POWER
Connector powerCON 32 input
Safety Rated Voltage Range 208–235 V AC, 50–60 Hz
Turn-on/off Points Turn-on: 165 V AC; Turn-off: 264 V AC
25
Page 26

APPENDIX B: SPECIFICATIONS
LEO-M Specifications
Current Draw
Idle 0.6 A rms (230 V AC)
Maximum Long-Term Continuous 6.0 A rms (230 V AC)
Burst 8.0 A rms (230 V AC)
Maximum Instantaneous Peak 24 A peak (230 V AC)
Inrush <15 A peak (230 V AC)
PHYSICAL
Enclosure Multi-ply hardwood
Finish Black textured
Protective Grille Hex-stamped steel with acoustical black mesh
Rigging Endframes with captive GuideALinks (0.0 to 5.0-degree splay angles), quick-release pins,
and detachable side handles
Dimensions 44.42 inches (1128 mm) W 17.85 inches (453 mm) H 23.00 inches (584 mm) D
Weight 265 lbs (120.2 kg)
ENVIRONMENTAL
Operating Temperature 0° C to +45° C
Non Operating Temperature –40° C to +75° C
Humidity To 95% at 45° C (non-condensing)
Operating Altitude To 5,000 m (16,404 ft)
Non Operating Altitude To 12,000 m (39,000 ft)
Shock 30 g 11 msec half-sine on each of 6 sides
Vibration 10 Hz – 55 Hz (0.010 m peak-to-peak excursion)
26
Page 27

LEO-M DIMENSIONS
41.42
[1052 mm]
23.00
[584 mm]
17.85
[453 mm]
44.42
[1128 mm]
11.50
[292 mm]
9.00
[229 mm]
LEO-M OPERATING INSTRUCTIONS
LEO-M Dimensions
NOTE: For the dimensions and weight for the MTG-LEO-M top grid and MCF-LEO-M caster frame, refer to the
MTG-LEO-M Assembly Guide (PN 05.215.049.01) available at www.meyersound.com
.
27
Page 28

APPENDIX B: SPECIFICATIONS
41.42
[1052 mm]
23.00
[584 mm]
17.85
[453 mm]
44.42
[1128 mm]
11.50
[292 mm]
9.00
[229 mm]
8.50
[216 mm]
6.25
[159 mm]
31.27
[794 mm]
LEO-M Dimensions with Rain Hood
LEO-M Dimensions with Rain Hood
28
Page 29

LEO-M OPERATING INSTRUCTIONS
FEDERAL COMMUNICATIONS COMMISSION (FCC) STATEMENT
This equipment has been tested and found to comply with the limits for a Class A digital device, pursuant to part 15 of the
FCC Rules. These limits are designed to provide reasonable protection against harmful interference when the equipment is
operated in a commercial environment. This equipment generates, uses, and can radiate radio frequency energy and, if not
installed and used in accordance with the instruction manual, may cause harmful interference to radio communications.
Operation of this equipment in a residential area is likely to cause harmful interference in which case the user will be required
to correct the interference at their own expense.
This device complies with Part 15 of the FCC rules. Operation is subject to the following two conditions: (1) this device may
not cause harmful interference, and (2) this device must accept any interference received, including interference that may
cause undesired operation.
INDUSTRY CANADA COMPLIANCE STATEMENT
This Class A digital apparatus complies with Canadian ICES-003.
AVIS DE CONFORMITÉ À LA RÉGLEMENTATION D'INDUSTRIE CANADA
Cet appareil numérique de la classe A est conforme à la norme NMB-003 du Canada.
EN 55032 (CISPR 32) STATEMENT
Warning: This equipment is compliant with Class A of CISPR 32. In a residential environment this equipment may cause
radio interference.
29
Page 30

APPENDIX B: SPECIFICATIONS
30
Page 31

Page 32

Meyer Sound Laboratories Inc.
2832 San Pablo Avenue
Berkeley, CA 94702
+1 510 486.1166
www.meyersound.com
© 2014, 2016
Meyer Sound. All rights reserved.
LEO-M Operating Instructions
PN 05.215.020.01 B
 Loading...