

Mettler Toledo XSR10001L, XSR10001L/A, XSR10001S, XSR1202S, XSR1203S/A Instruction Manual
...Page 1
Precision Balances
XSR models
Operating Instructions
Page 2

Page 3

Table of Contents
1 Introduction 5
1.1 Conventions and symbols used in these operating instructions ......................................... 6
2 Safety Information 7
2.1 Definition of signal warnings and symbols...................................................................... 7
2.2 Product safety information ............................................................................................ 7
3 Design and Function 9
3.1 Overview S weighing platform ....................................................................................... 9
3.2 Overview L weighing platform........................................................................................ 11
3.3 Terminal ..................................................................................................................... 12
3.4 User interface .............................................................................................................. 13
4 Basic Navigation 16
4.1 Main sections at a glance............................................................................................. 16
4.2 Opening a section/function............................................................................................ 17
4.3 Scrolling ..................................................................................................................... 17
3.1.1 Balances 1 mg............................................................................................. 9
3.1.2 Balances 10 mg and 0.1 g............................................................................ 10
3.1.3 Interface board.............................................................................................. 10
3.2.1 Balances with readability of 0.1 g / 1 g ........................................................... 11
3.2.2 Interface board.............................................................................................. 11
3.4.1 Method work screen ...................................................................................... 13
3.4.2 Input dialogs ................................................................................................ 14
3.4.2.1 Entering characters and numbers.............................................................. 14
3.4.2.2 Changing the date and time...................................................................... 15
5 Installation and Putting into Operation 18
5.1 Unpacking the balance................................................................................................. 18
5.2 Scope of delivery ......................................................................................................... 18
5.2.1 S weighing platform ...................................................................................... 18
5.2.2 L weighing platform....................................................................................... 19
5.3 Selecting the location ................................................................................................... 19
5.4 Assembling the balance................................................................................................ 19
5.4.1 Models with S weighing platform .................................................................... 19
5.4.1.1 Attaching the terminal to the weighing platform........................................... 19
5.4.1.2 Installing the MagicCube Draft Shield......................................................... 20
5.4.2 Models with L weighing platform..................................................................... 23
5.4.2.1 Attaching the terminal to the weighing platform........................................... 23
5.4.2.2 Balances 0.1 g and 1 g........................................................................... 24
5.5 Connecting the balance to the mains.............................................................................. 24
5.6 Setting up the balance.................................................................................................. 25
5.6.1 Switching on the balance ............................................................................... 25
5.6.2 Leveling the balance...................................................................................... 25
5.6.3 Performing a simple weighing ........................................................................ 26
5.6.3.1 Zeroing .................................................................................................. 26
5.6.3.2 Taring.................................................................................................... 26
5.6.3.3 Performing General Weighing ................................................................... 26
5.6.4 Setting the balance to standby mode ............................................................... 26
5.6.5 Switching off the balance ............................................................................... 26
5.7 Below-the-balance weighing ......................................................................................... 26
5.7.1 S weighing platform ...................................................................................... 27
5.7.2 L weighing platform....................................................................................... 27
5.8 Transporting the balance .............................................................................................. 27
5.8.1 Carrying the balance over short distances ........................................................ 27
Table of Contents 1Precision Balances
Page 4

5.8.2 Transporting the balance over long distances ................................................... 28
6 Methods 29
6.1 Methods list ................................................................................................................ 29
6.1.1 Creating new method..................................................................................... 29
6.1.2 Editing method ............................................................................................. 29
6.1.3 Cloning method ............................................................................................ 29
6.1.4 Deleting method............................................................................................ 30
6.1.5 General Weighing ......................................................................................... 31
6.1.5.1 Creating new method type General Weighing.............................................. 31
6.1.5.2 Performing General Weighing ................................................................... 31
6.1.5.3 Method settings....................................................................................... 32
6.1.6 Simple Formulation ....................................................................................... 40
6.1.6.1 Creating new method type Simple Formulation............................................ 40
6.1.6.2 Performing Simple Formulation................................................................. 40
6.1.6.3 Method settings....................................................................................... 41
6.1.7 Piece Counting ............................................................................................. 49
6.1.7.1 Creating new method type Piece Counting.................................................. 49
6.1.7.2 Performing Piece Counting ....................................................................... 49
6.1.7.3 Method settings....................................................................................... 49
6.1.8 Using templates ............................................................................................ 56
6.1.8.1 Defining templates................................................................................... 56
6.1.8.2 Working with templates............................................................................ 57
6.2 Tests .......................................................................................................................... 57
6.2.1 Sensitivity test............................................................................................... 57
6.2.2 Repeatability test........................................................................................... 57
6.2.3 Eccentricity test ............................................................................................. 58
6.2.4 Creating a test .............................................................................................. 58
6.2.5 Performing a test........................................................................................... 58
6.2.6 Test settings ................................................................................................. 58
6.2.6.1 Sensitivity test settings ............................................................................. 58
6.2.6.2 Repeatability test settings ......................................................................... 62
6.2.6.3 Eccentricity test settings ........................................................................... 65
6.3 Adjustments ................................................................................................................ 67
6.3.1 Internal adjustment........................................................................................ 67
6.3.1.1 Editing internal adjustment ....................................................................... 67
6.3.1.2 Performing internal adjustment ................................................................. 68
6.3.1.3 Parameters............................................................................................. 68
6.3.2 External adjustment....................................................................................... 69
6.3.2.1 Editing external adjustment....................................................................... 69
6.3.2.2 Defining external test weights.................................................................... 69
6.3.2.3 Parameters............................................................................................. 70
6.3.2.4 Performing external adjustment................................................................. 70
7 Balance Menu 71
7.1 Leveling aid ................................................................................................................ 71
7.2 History ....................................................................................................................... 71
7.2.1 Adjustments ................................................................................................. 71
7.2.2 Tests ........................................................................................................... 71
7.2.3 Service......................................................................................................... 72
7.3 Balance info................................................................................................................ 72
7.4 Settings ...................................................................................................................... 72
7.4.1 Balance ....................................................................................................... 72
7.4.1.1 Weighing instrument................................................................................ 72
7.4.1.2 Weighing / Quality................................................................................... 72
7.4.1.3 Date / Time / Language / Format............................................................... 75
7.4.1.4 Screen / StatusLight / Sound..................................................................... 76
7.4.1.5 General.................................................................................................. 76
Table of Contents2 Precision Balances
Page 5

7.4.2 Interfaces ..................................................................................................... 77
7.4.2.1 Ethernet ................................................................................................. 77
7.4.3 Devices / Printers .......................................................................................... 78
7.4.4 LabX / Services ............................................................................................. 78
7.5 Maintenance ............................................................................................................... 78
7.5.1 Import / Export.............................................................................................. 79
7.5.1.1 Exporting data and settings ...................................................................... 79
7.5.1.2 Importing data and settings...................................................................... 79
7.5.2 Firmware update........................................................................................... 79
7.5.2.1 Updating the firmware.............................................................................. 80
7.5.2.2 Restoring the firmware to the previous version ............................................ 80
7.5.3 Reset........................................................................................................... 80
7.5.3.1 Resetting the balance............................................................................... 80
7.5.4 Service......................................................................................................... 80
7.5.4.1 View adjustment state.............................................................................. 80
7.5.4.2 Save support file ..................................................................................... 80
7.5.4.3 Import log configuration........................................................................... 80
8 Maintenance 81
8.1 Cleaning..................................................................................................................... 81
8.2 Disposal..................................................................................................................... 81
9 Troubleshooting 82
9.1 System messages icons ............................................................................................... 82
9.2 Weight status icons...................................................................................................... 82
9.3 What to do if...?........................................................................................................... 83
10 Technical Data 84
10.1 General technical data.................................................................................................. 85
10.1.1 S Platform .................................................................................................... 85
10.1.2 L Platform .................................................................................................... 86
10.2 Model-specific data...................................................................................................... 87
10.2.1 S platform .................................................................................................... 87
10.2.1.1 Readability 1 mg, with MagicCube Draft Shield and SmartPan...................... 87
10.2.1.2 Readability 1 mg, with SmartPan .............................................................. 88
10.2.1.3 Readability 10 mg, with SmartPan ............................................................ 89
10.2.1.4 Readability 0.1 g .................................................................................... 91
10.2.2 L platform .................................................................................................... 93
10.2.2.1 Readability 0.1 g .................................................................................... 93
10.2.2.2 Readability 1 g ....................................................................................... 95
10.3 Dimensions................................................................................................................. 96
10.3.1 S platform, readability 1 mg, with MagicCube Draft Shield and SmartPan ............ 96
10.3.2 S platform, readability 1 mg, with SmartPan .................................................... 97
10.3.3 S platform, readability 10 mg, with SmartPan .................................................. 98
10.3.4 S platform, readability 0.1 g........................................................................... 99
10.3.5 L platform, readability 0.1 g / 1 g ................................................................... 100
11 Accessories and Spare Parts 101
11.1 Accessories................................................................................................................. 101
11.2 Spare parts ................................................................................................................. 106
11.2.1 Balances with S weighing platform.................................................................. 106
11.2.2 S platform miscellaneous............................................................................... 107
11.2.3 Balances with L weighing platform.................................................................. 107
11.2.4 L platform miscellaneous ............................................................................... 108
11.2.5 MagicCube Draft shield.................................................................................. 109
11.2.6 Packaging.................................................................................................... 109
Index 111
Table of Contents 3Precision Balances
Page 6

Table of Contents4 Precision Balances
Page 7

1 Introduction
Thank you for choosing a METTLER TOLEDO balance.
The balances of the XSR line combine a large number of weighing and adjustment possibilities with excep-
tionally convenient operation.
The XSR line comprises a range of balances which differ from each other in relation to their weighing range
and resolution.
The following features are common to all models of the XSR line:
• Fully automatic adjustment using internal weights.
• Built-in level sensor and leveling aid for fast and easy leveling.
• 4.3 inch capacitive color TFT touchscreen.
• Different methods that can be defined individually.
• Different routine tests that can be defined individually.
Software version
These operating instructions refer to the originally installed firmware (software) version V 2.01.
Finding more information
u www.mt.com/balances
For further questions, please contact your authorized METTLER TOLEDO dealer or service representative.
u www.mt.com/contact
Introduction 5Precision Balances
Page 8

1.1 Conventions and symbols used in these operating instructions
Refers to an external document.
Key and/or button designations and display texts are shown in graphic or bold text (e.g.
menu).
Note
These symbols indicate an instruction:
prerequisites
§
1 steps
2 ...
ð results
(no symbol)
for useful information about the product.
, Balance
Introduction6 Precision Balances
Page 9
2 Safety Information
• Read and understand the information in these Operating Instructions before you use the instrument.
• Keep these Operating Instructions for future reference.
• Include these Operating Instructions if you pass on the instrument to other parties.
If the instrument is not used according to the information in these Operating Instructions or if it is modified,
the safety of the instrument may be impaired and Mettler-Toledo GmbH assumes no liability.
2.1 Definition of signal warnings and symbols
Safety notes are marked with signal words and warning symbols. These show safety issues and warnings.
Ignoring the safety notes may lead to personal injury, damage to the instrument, malfunctions and false
results.
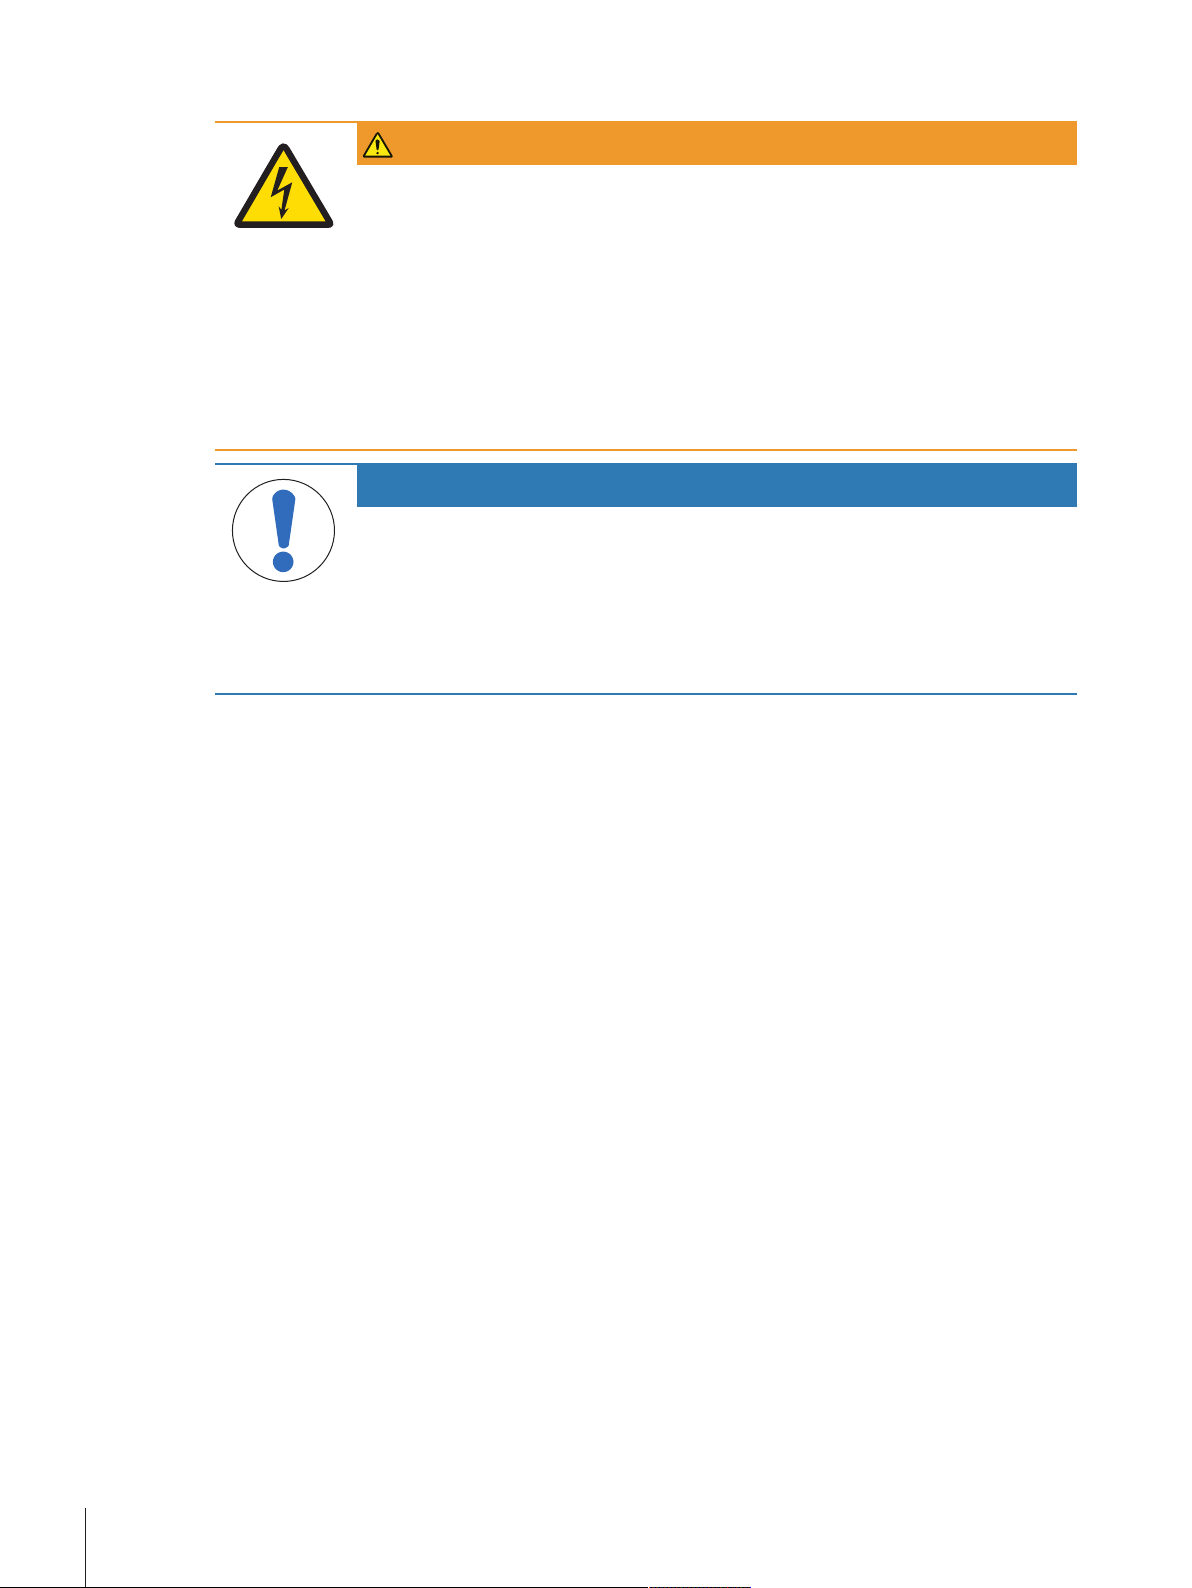
WARNING
for a hazardous situation with medium risk, possibly resulting in death or severe
injury if not avoided.
CAUTION
NOTICE
for a hazardous situation with low risk, resulting in minor or moderate injury if not
avoided.
for a hazardous situation with low risk, resulting in damage to the instrument, other
material damage, malfunctions and erroneous results, or loss of data.
General hazard Electrical shock
2.2 Product safety information
Intended use
This balance is designed to be used in laboratories by trained staff. The balance is intended for weighing
purposes.
Any other type of use and operation beyond the limits of technical specifications without written consent
from Mettler-Toledo GmbH is considered as not intended.
General safety information
This balance complies with current industry standards and the recognized safety regulations; however, it
can constitute a hazard in use. Do not open the balance housing: The balance contains no user-serviceable
parts. In the event of problems, please contact a METTLER TOLEDO representative.
Always operate and use your instrument only in accordance with the instructions contained in this
document. The instructions for setting up your new instrument must be strictly observed.
If the instrument is not used according to the Operating Instructions, protection of the instrument may
be impaired and METTLER TOLEDO assumes no liability.
Staff safety
This printed document must be read and understood before using the balance. This printed document must
be retained for future reference.
The balance must not be altered or modified in any way. Only use METTLER TOLEDO original spare parts
and accessories.
Safety Information 7Precision Balances
Page 10
Safety notes
WARNING
Danger of death or serious injury due to electric shock!
Contact with parts that contain a live current can lead to injury and death. If the balance
cannot be shut down in an emergency situation, people can be injured or the balance can
be damaged.
1 Only use the original universal AC/DC adapter delivered with your balance.
2 Check that the voltage printed on the balance is the same as your local power supply
voltage.
ð If this is not the case, under no circumstances connect the AC/DC adapter to the
power supply, but contact a METTLER TOLEDO representative.
3 Only plug the adapter into a socket which is grounded.
NOTICE
Damage to the balance due to wrong usage.
1 Only use indoors in dry locations.
2 Do not use pointed objects to operate the touchscreen.
3 Only use original METTLER TOLEDO accessories and peripheral devices.
4 Do not open the balance housing. It contains no user-serviceable parts. Contact a
METTLER TOLEDO representative in case of any issue.
Safety Information8 Precision Balances
Page 11
3 Design and Function
3
4
1
2
2
5
6
8
3
9
10
8
10 9
7
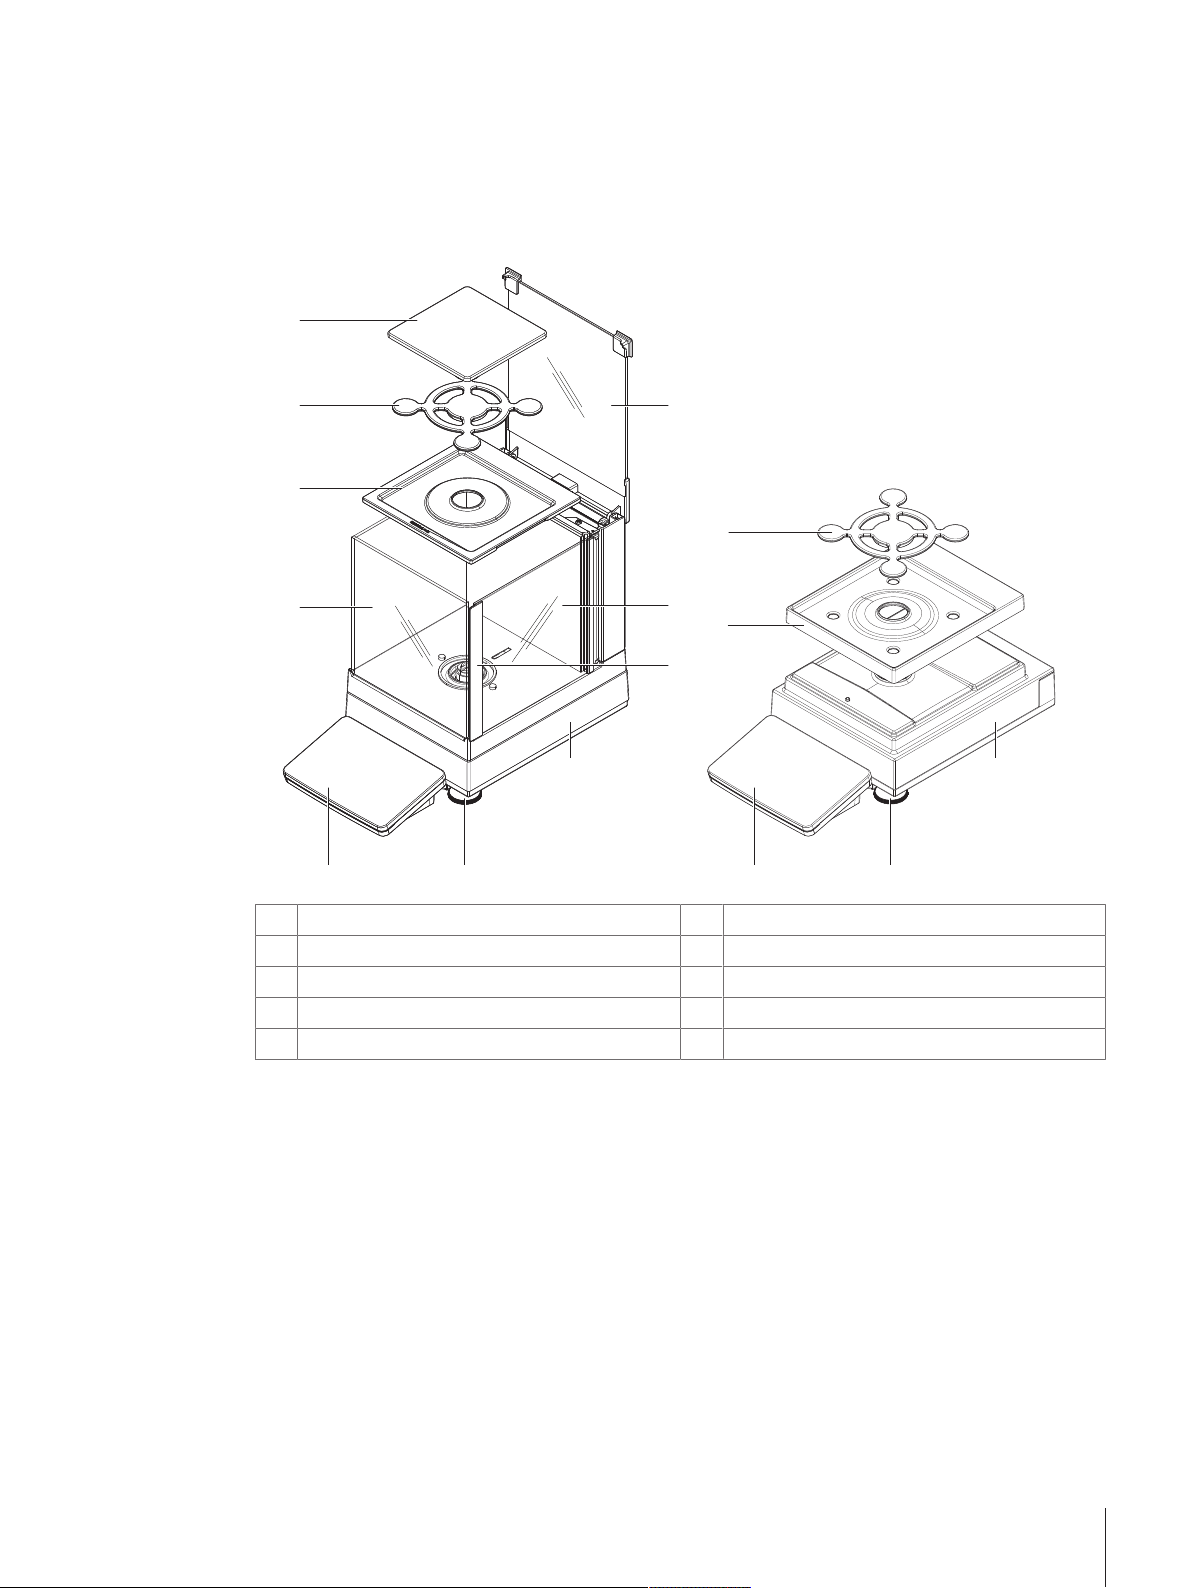
3.1 Overview S weighing platform
3.1.1 Balances 1 mg
MagicCube Draft Shield
1
DripTray
2
SmartPan weighing pan
3
Weighing pan
4
MagicCube Draft Shield top door
5
MagicCube Draft Shield side door
6
MagicCube Draft Shield side door handler
7
Weighing platform with protective cover
8
Leveling foot
9
Terminal with protective cover
10
Design and Function 9Precision Balances
Page 12
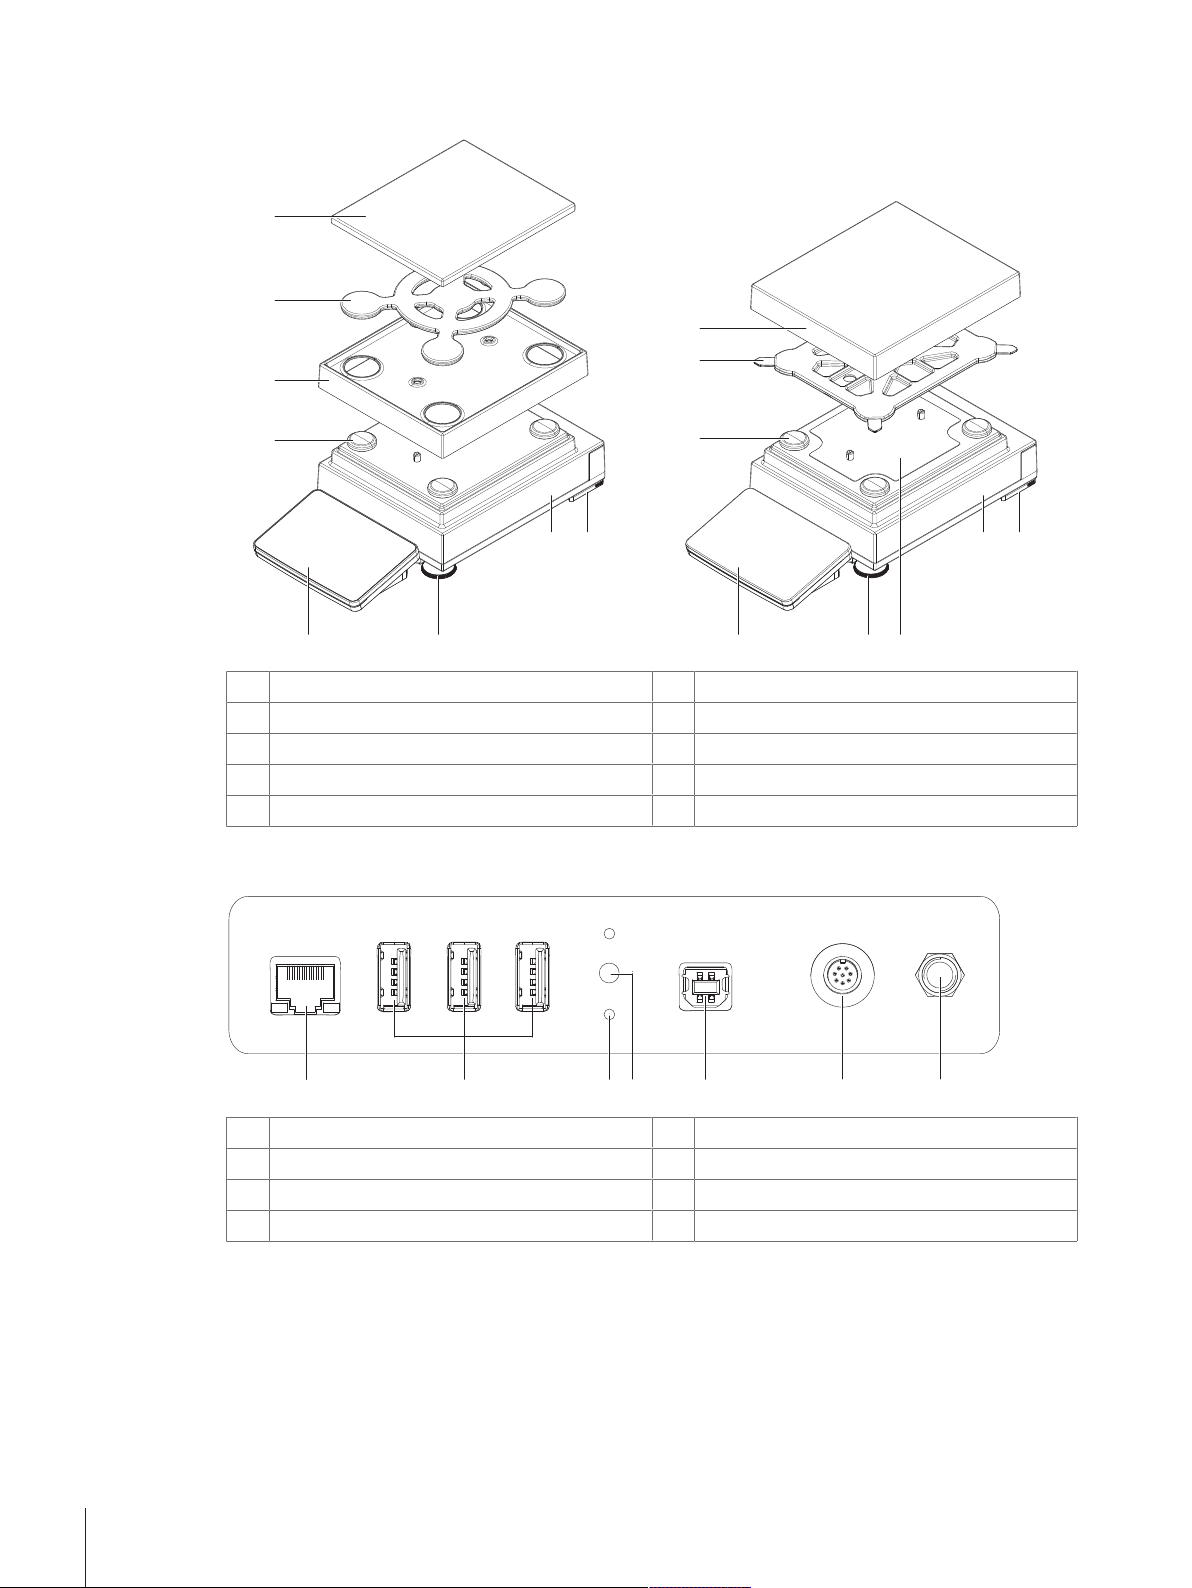
3.1.2 Balances 10 mg and 0.1 g
7
910
10 mg
0.1 g
11
6
11
22
33
44
55
55
7 6
910 8
11
2
3
6 7
5
4
Weighing pan support cap
1
DripTray
2
SmartPan weighing pan
3
Weighing pan support
4
Weighing pan with protective cover
5
3.1.3 Interface board
Ethernet port
1
USB device ports
2
Fixations for optional terminal stand
3
Service seal
4
Safety foot
6
Weighing platform with protective cover
7
Fastening plate with positioning screws
8
Leveling foot
9
Terminal with protective cover
10
USB host port
5
Socket for terminal connection cable
6
Socket for AC/DC adapter
7
Design and Function10 Precision Balances
Page 13
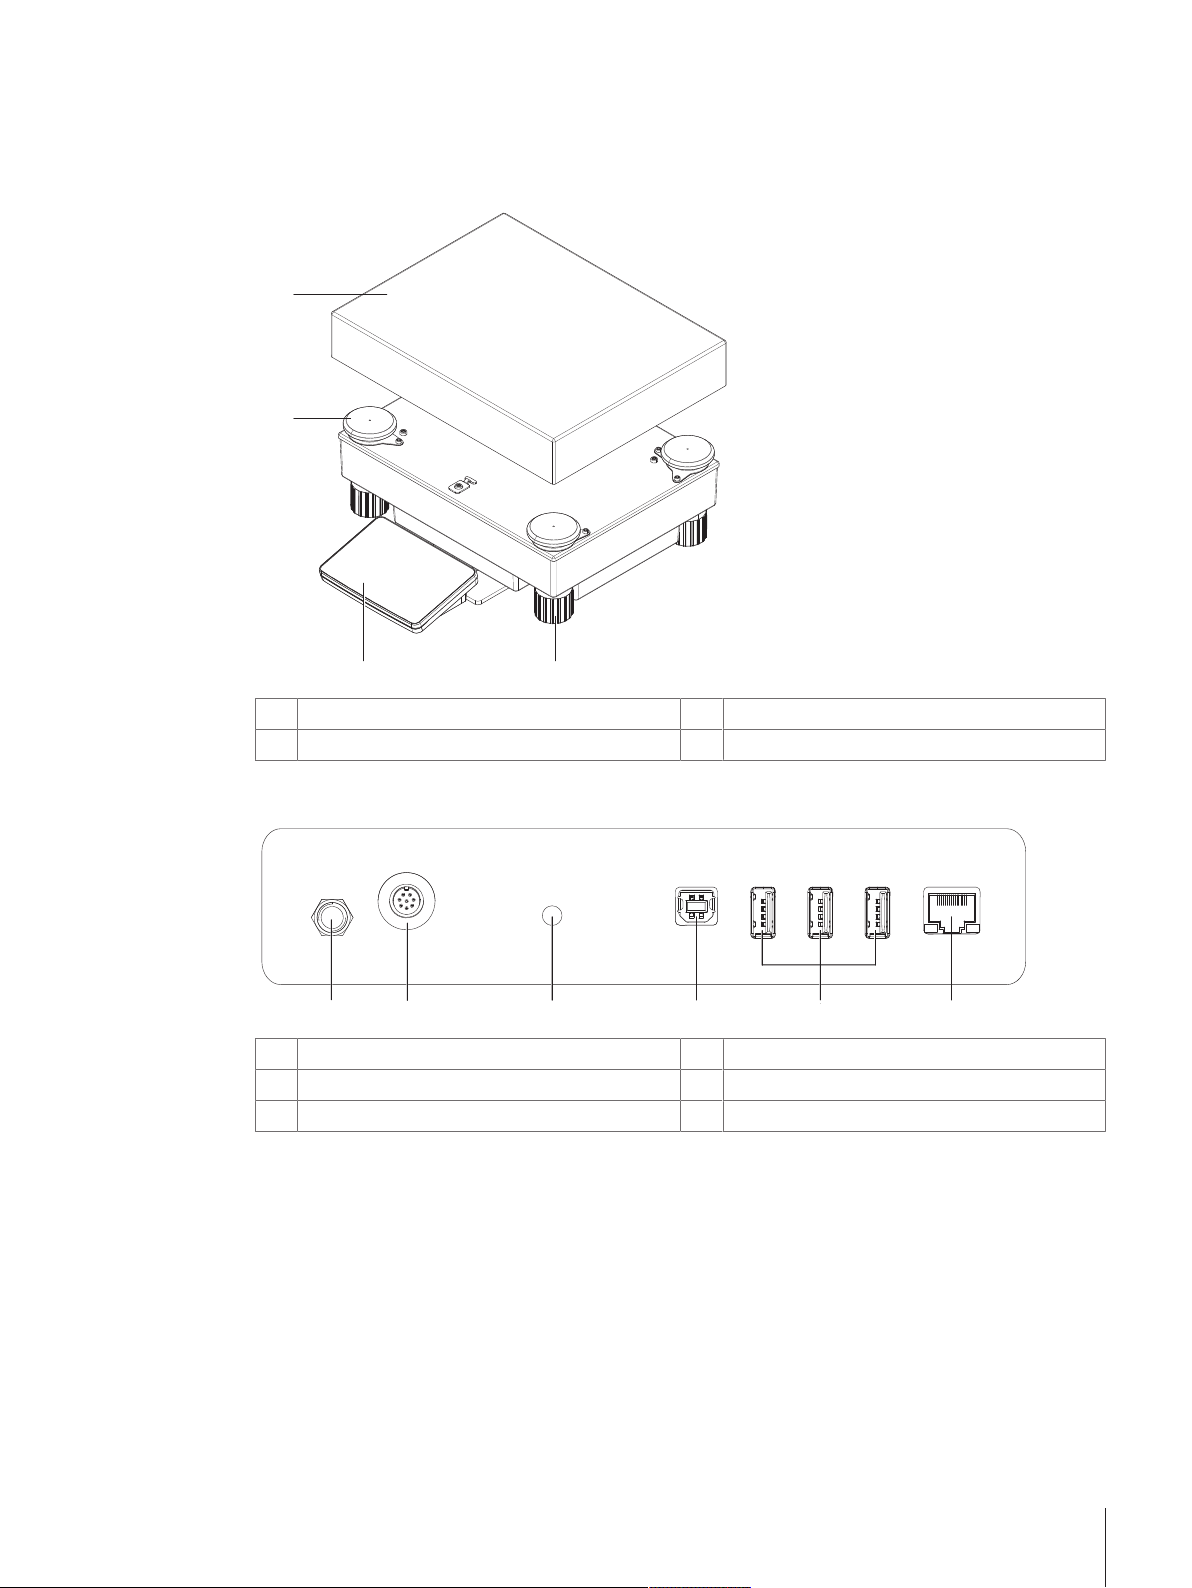
3.2 Overview L weighing platform
11
22
3344
11 22 4
5
6
3
3.2.1 Balances with readability of 0.1 g / 1 g
Weighing pan support cap
1
Weighing pan
2
Leveling foot
3
Terminal with protective cover
4
3.2.2 Interface board
Socket for AC/DC adapter
1
Socket for terminal connection cable
2
Service seal
3
USB host port
4
USB device ports
5
Ethernet port
6
Design and Function 11Precision Balances
Page 14
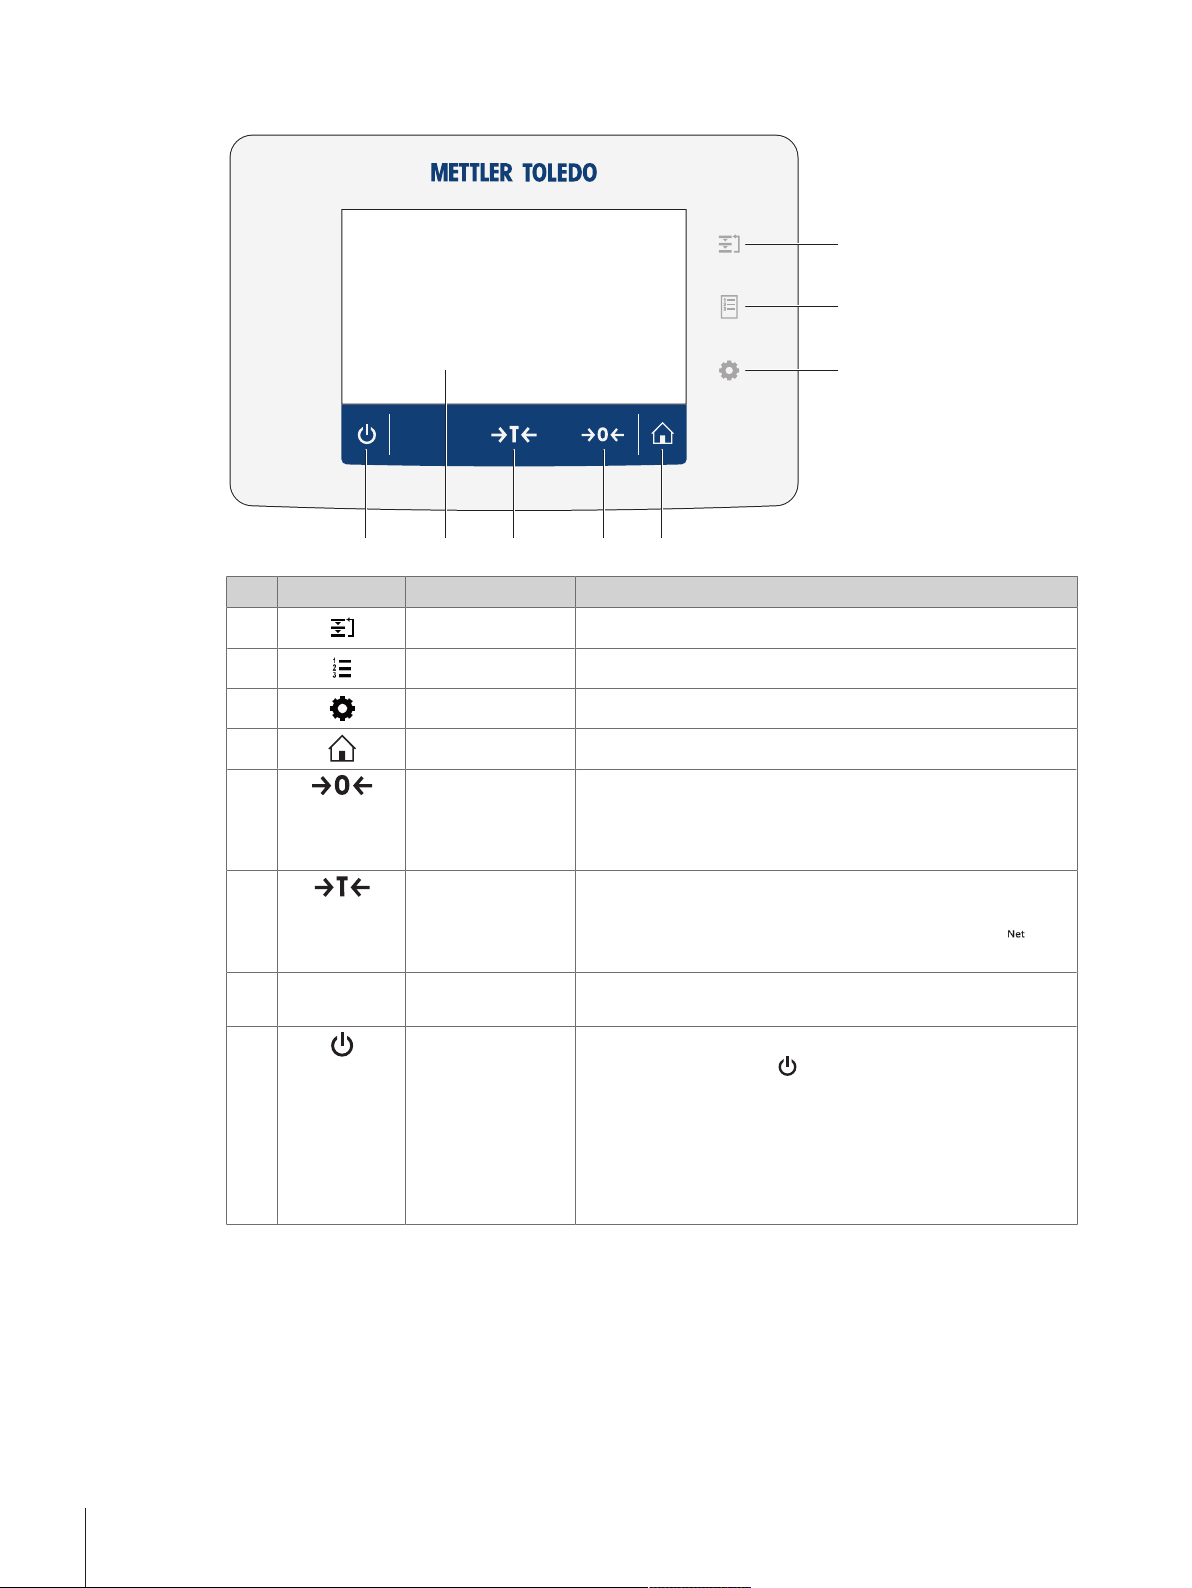
3.3 Terminal
11
22
33
4455
66
77
88
No. Key Name Explanation
1 Methods Opens the section Methods.
2 Protocol Opens the section Protocol.
3 Balance menu Opens the section Balance menu.
4
5
Home To return from any menu level to the method work screen.
Zero Zeroes the balance.
The balance must always be zeroed before starting the
weighing process. After zeroing, the balance sets a new zero
point.
6
Tare Tares the balance.
This function is used when the weighing process involves
containers. After taring the balance, the screen shows
which indicates that all displayed weights are net.
7
- 4.3 inch capacitive
TFT touchscreen
8
ON/OFF Switches the balance on/off.
The touchscreen shows information about the current weighing
process.
By tapping on the button
, the balance is not completely
switched off but goes into standby mode. To switch the
balance completely off, it must be unplugged from the power
supply.
Note
Do not disconnect the balance from the power supply unless
the balance is not used for an extended period of time.
Design and Function12 Precision Balances
Page 15
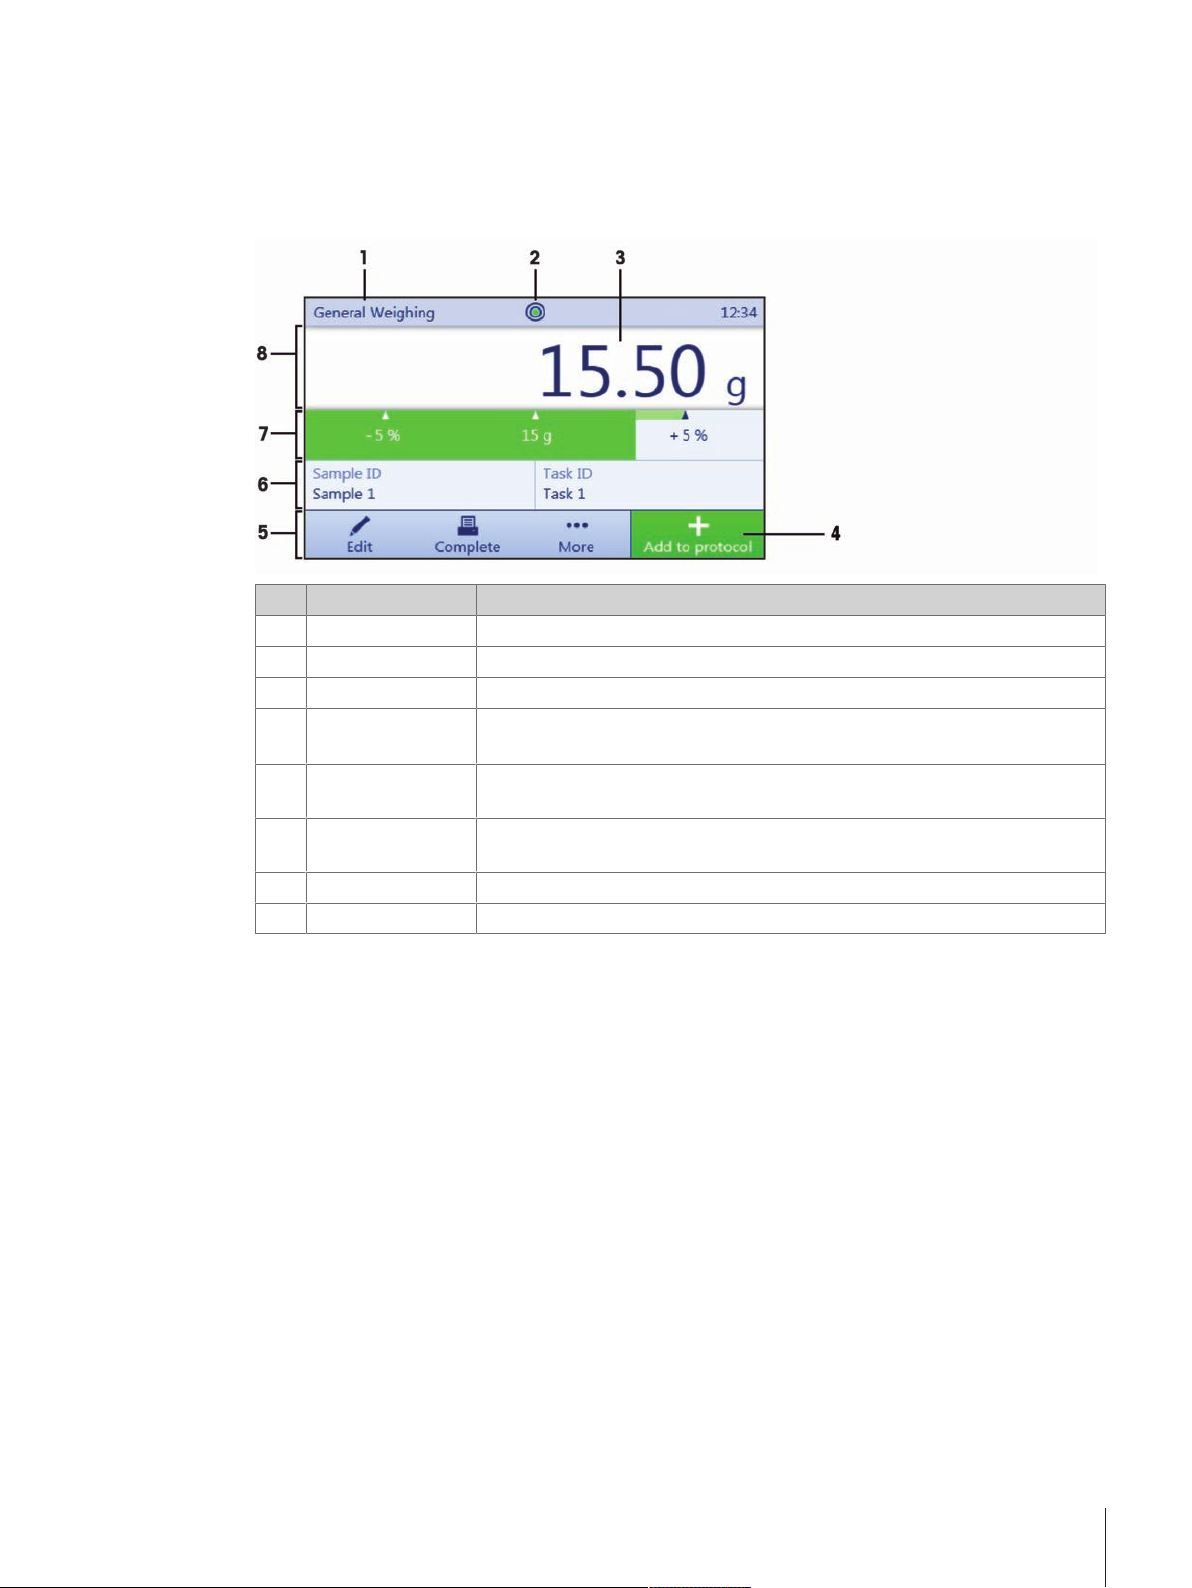
3.4 User interface
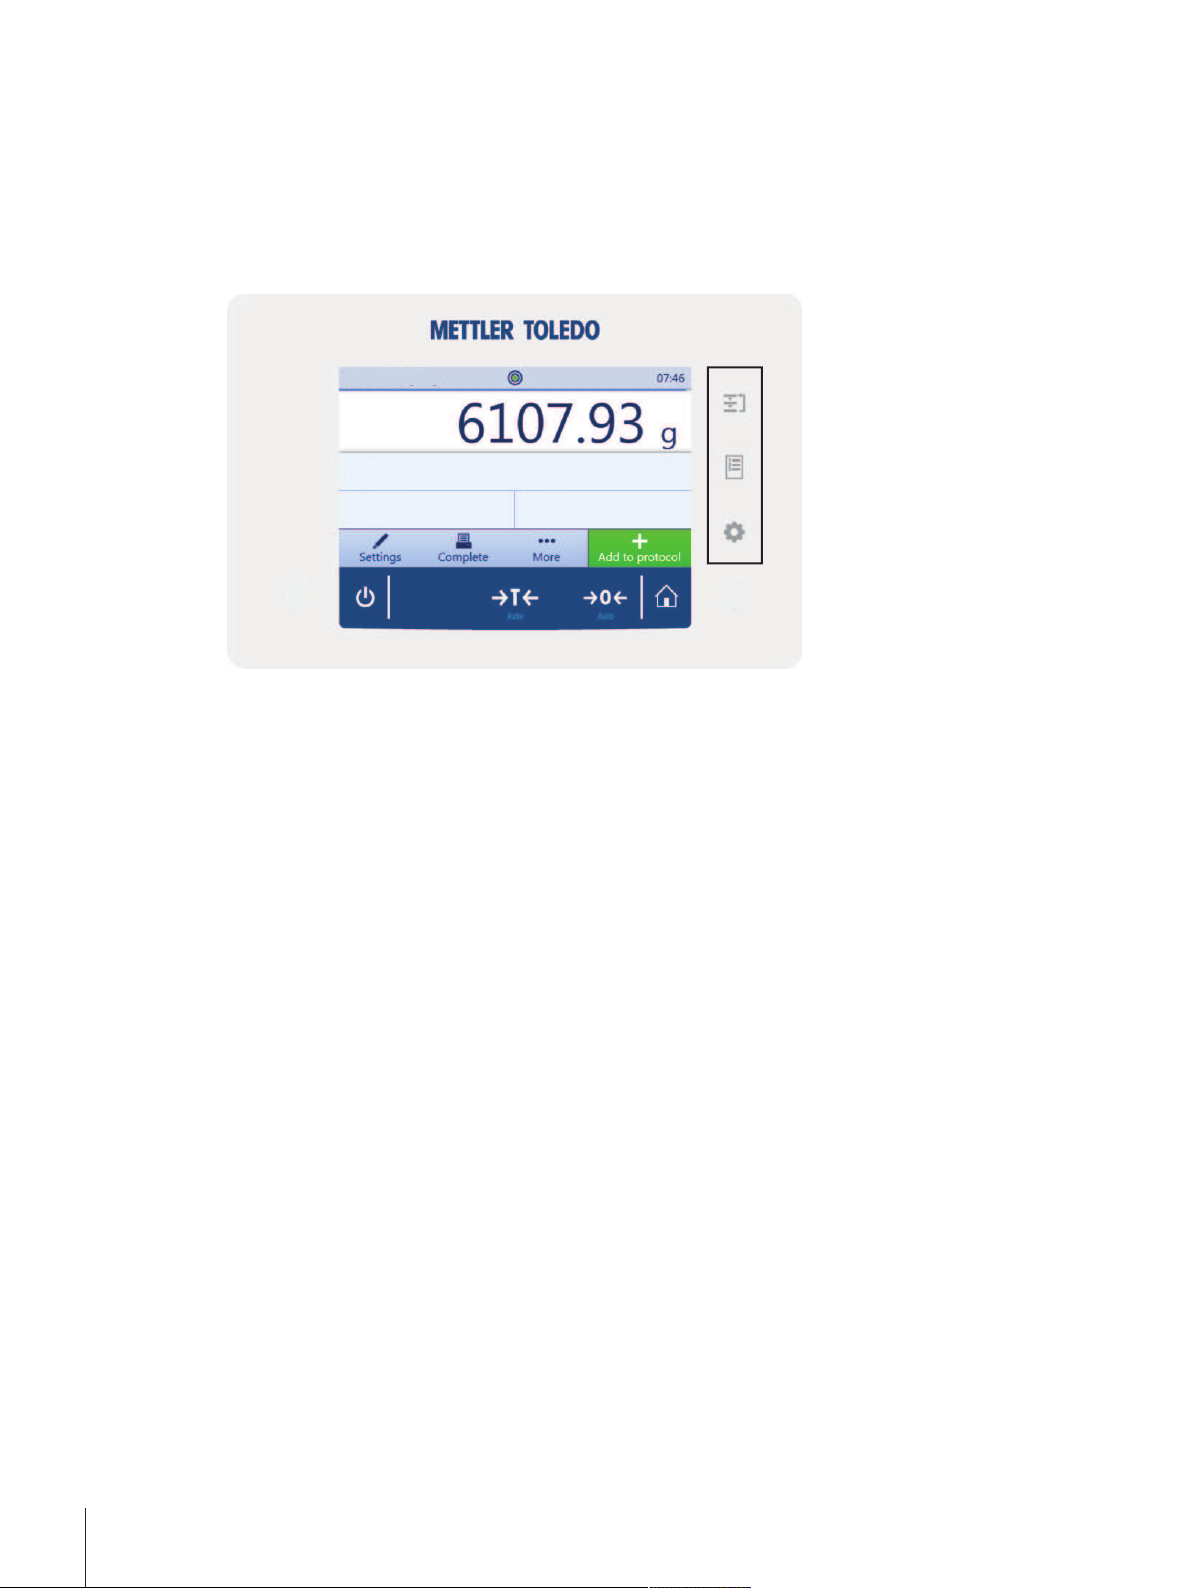
3.4.1 Method work screen
The method work screen is the basic screen that appears when working with the balance. Depending on the
method, the method work screen can slightly differ, but the basic elements appear for all methods.
No. Name Explanation
1 Method name
Level indicator Indicates if the balance is leveled.
2
Weighing value field Shows the current weighing value.
3
4 Button Add to
protocol
Weighing action
5
field
Method information
6
area
Weighing-in aid Defines a target weight with upper und lower tolerances.
7
Weighing value area In this area the value of the current weighing process is shown.
8
Shows the name of the current method.
Adds the result to the protocol.
Depending on the selected method the button can have a different functions.
This field contains actions referring to the current task.
Contains information about sample IDs, method IDs or task IDs.
Design and Function 13Precision Balances
Page 16
3.4.2 Input dialogs
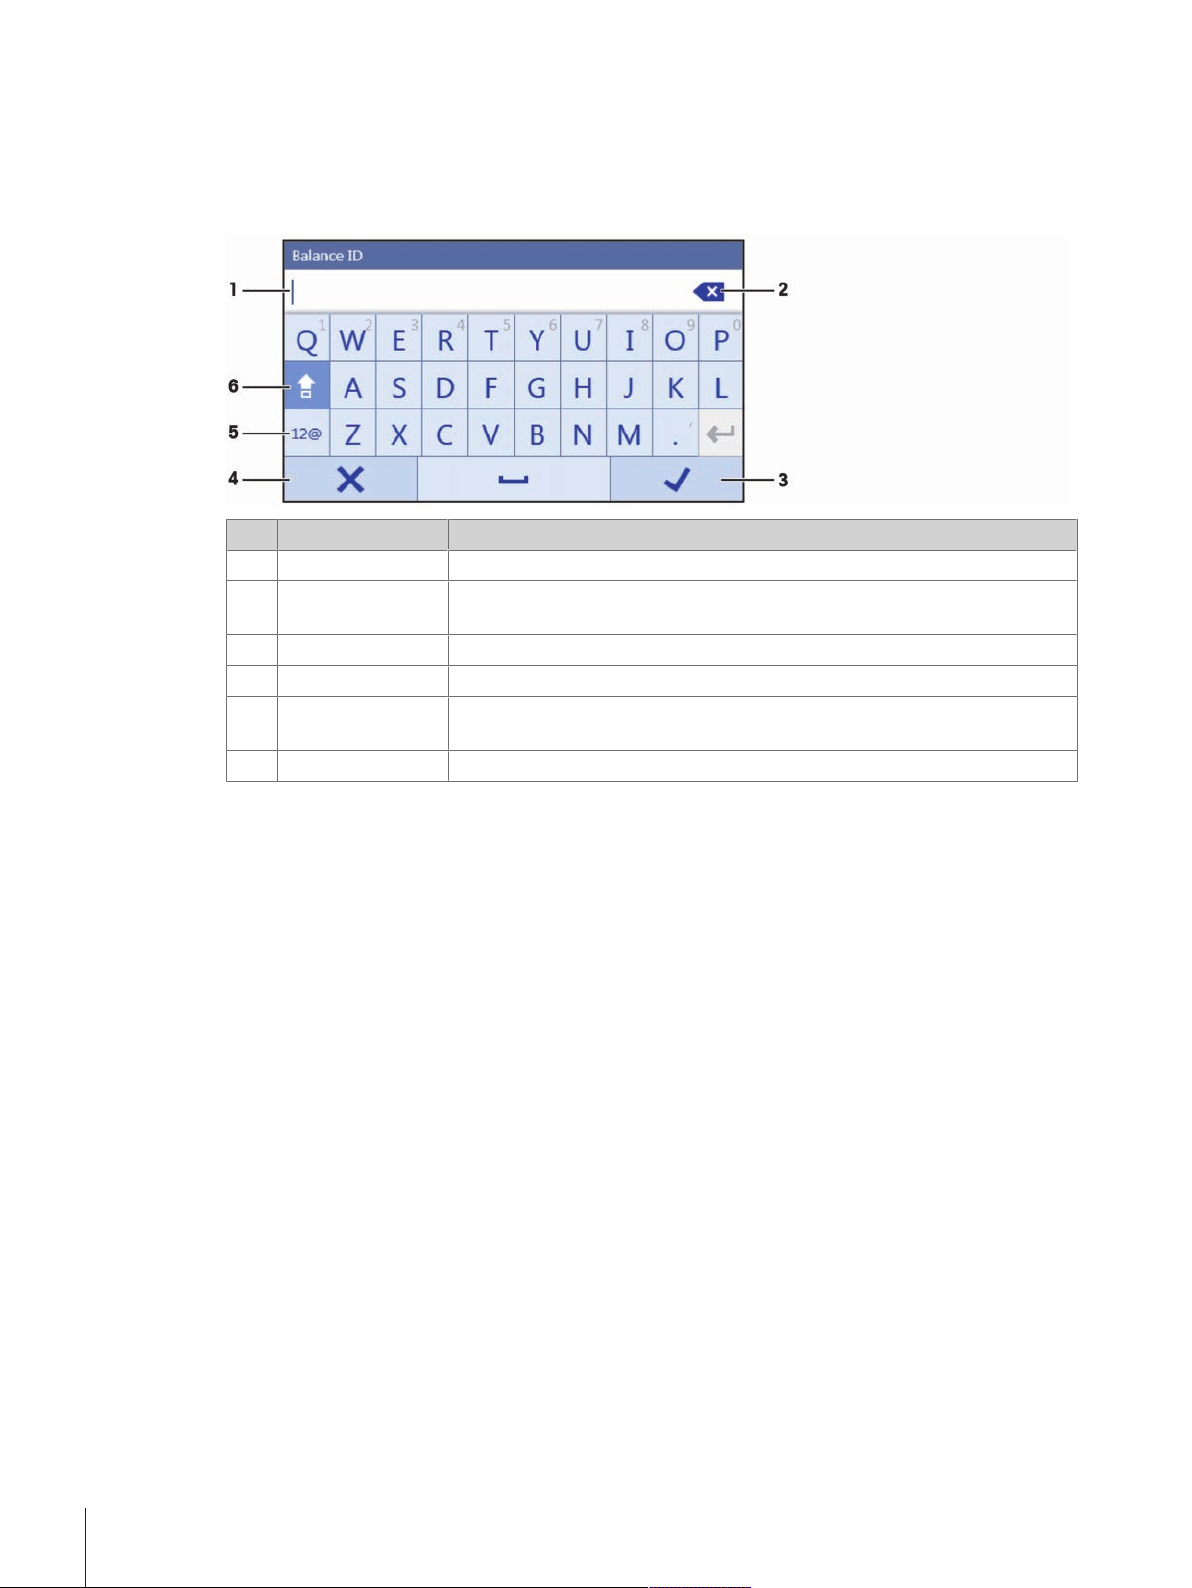
3.4.2.1 Entering characters and numbers
In this keyboard dialog characters including letters, numbers and a variety of special characters can be
entered.
No. Name Explanation
Input field Shows the characters or numbers that have been entered.
1
Delete Deletes the character next to the current curser position. The curser can be
2
positioned by using the touchscreen.
Confirm Confirms the entered data.
3
Discard Closes the keyboard dialog.
4
Numbers and
5
special characters
Shift To switch between lower or upper case letters.
6
To switch into the special characters mode.
Design and Function14 Precision Balances
Page 17
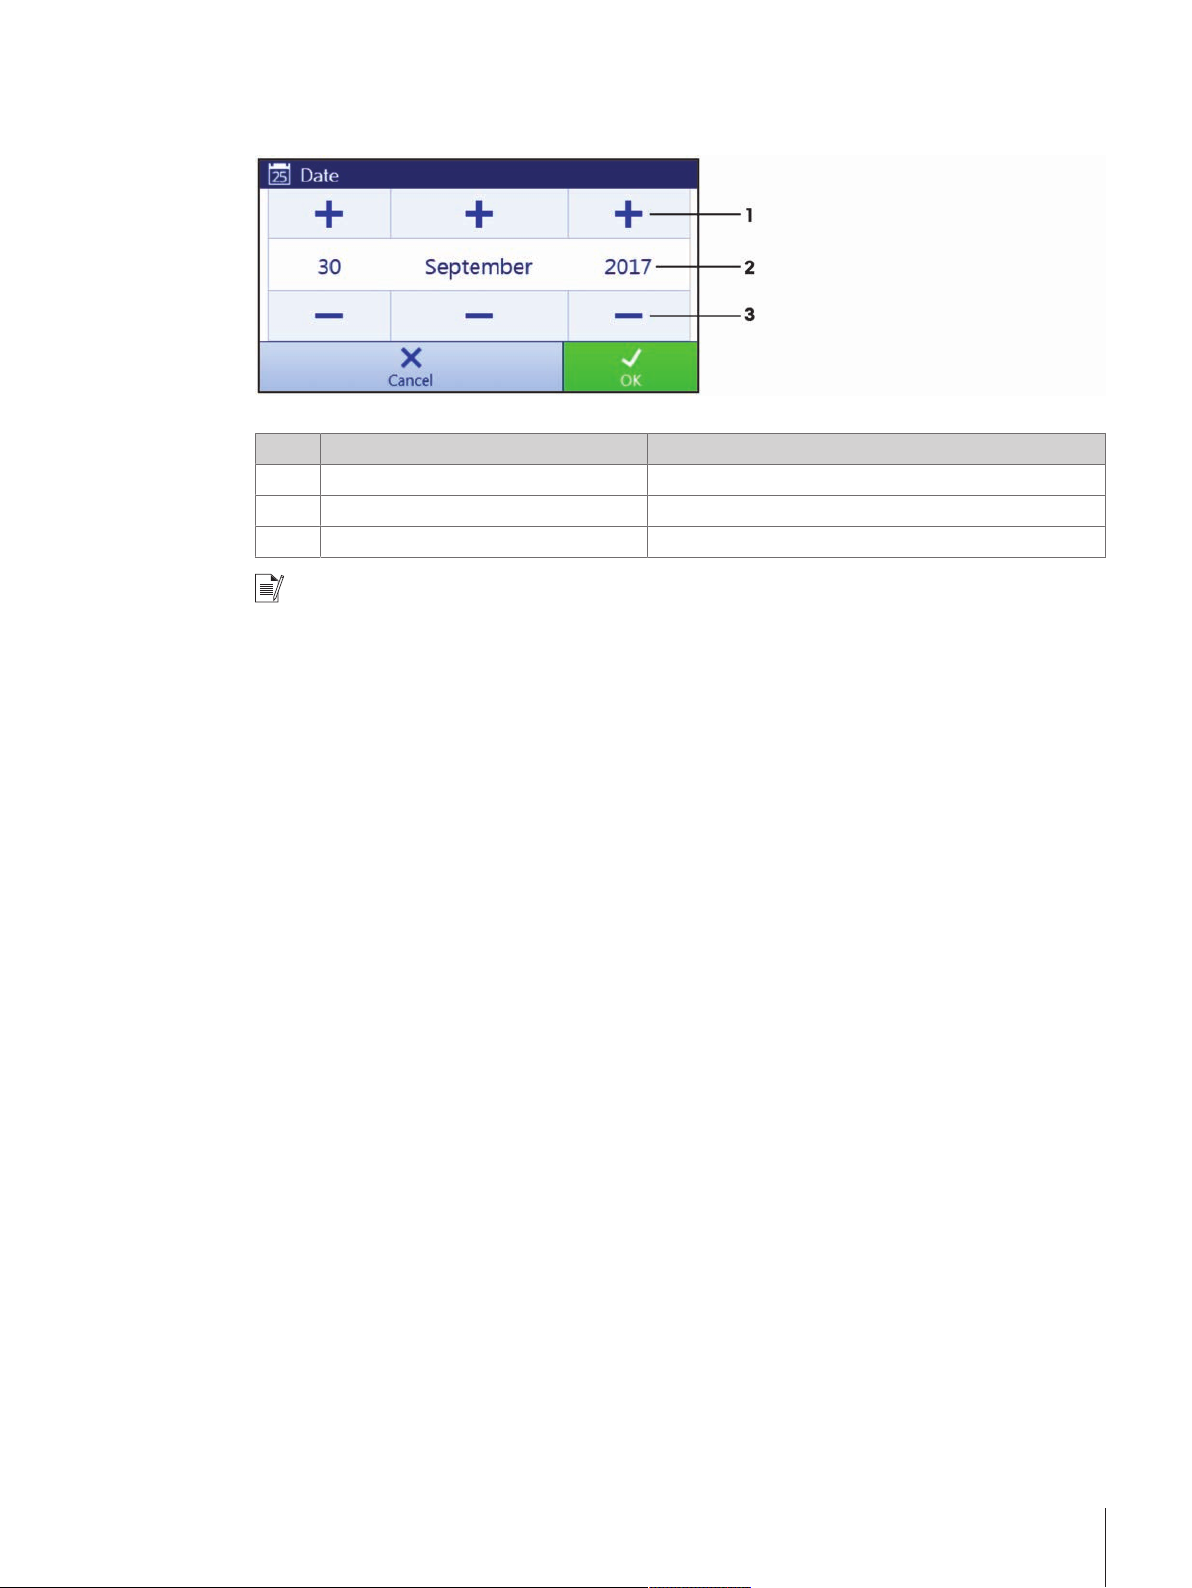
3.4.2.2 Changing the date and time
In this dialog (picker view) the user can set the date and the time.
No. Name Explanation
Pick button Increment
1
Picker field Shows the defined time or date.
2
Pick button Decrement
3
Note
The format of date and time can also be defined in the settings via the options Date format and Time
format.
Design and Function 15Precision Balances
Page 18
4 Basic Navigation
4.1 Main sections at a glance
The method work screen shows information about the current weighing process and the selected method
(the picture shows the method work screen of the method General Weighing). The sections Methods,
Protocol and Balance menu can be opened by tapping on the corresponding button on the right hand side
of the touch screen.
Basic Navigation16 Precision Balances
Page 19
4.2 Opening a section/function
A menu item or a function can be selected or activated by tapping it.
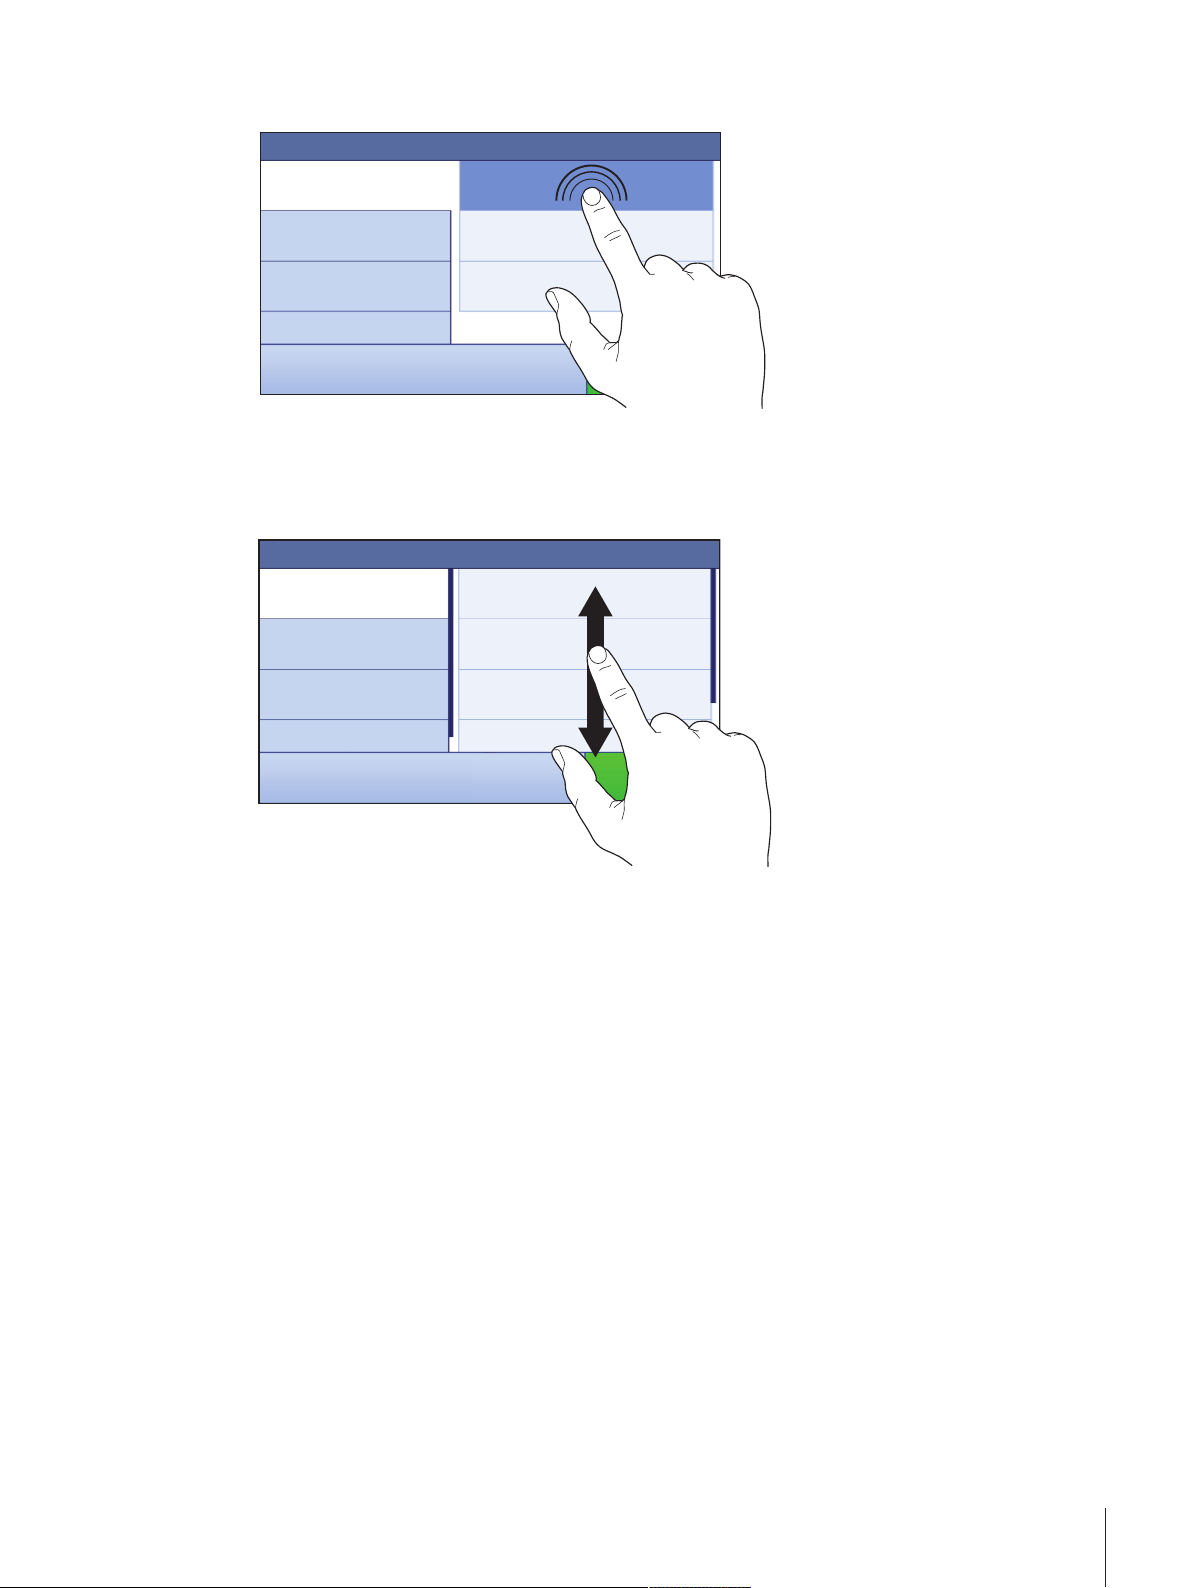
4.3 Scrolling
If a list of available options or results is longer than the size of the screen, a scroll bar appears on the right
side of the list. Place the finger on the list and move the finger up and down to scroll through the list.
Basic Navigation 17Precision Balances
Page 20
5 Installation and Putting into Operation
5.1 Unpacking the balance
Open the balance packaging and check for transportation damage or missing parts. Please inform a
METTLER TOLEDO representative in the event of missing or defective parts.
We recommend retaining the original box with its packaging elements. The packaging elements are
designed to protect the balance. Use the packaging elements and the original box to store and transport the
balance.
5.2 Scope of delivery
NOTICE
Risk of damage to the instrument due to the use of unsuitable parts!
Using unsuitable parts with the instrument can damage the Instrument or cause it to
malfunction.
− Only use parts from METTLER TOLEDO that are intended to be used with your
instrument.
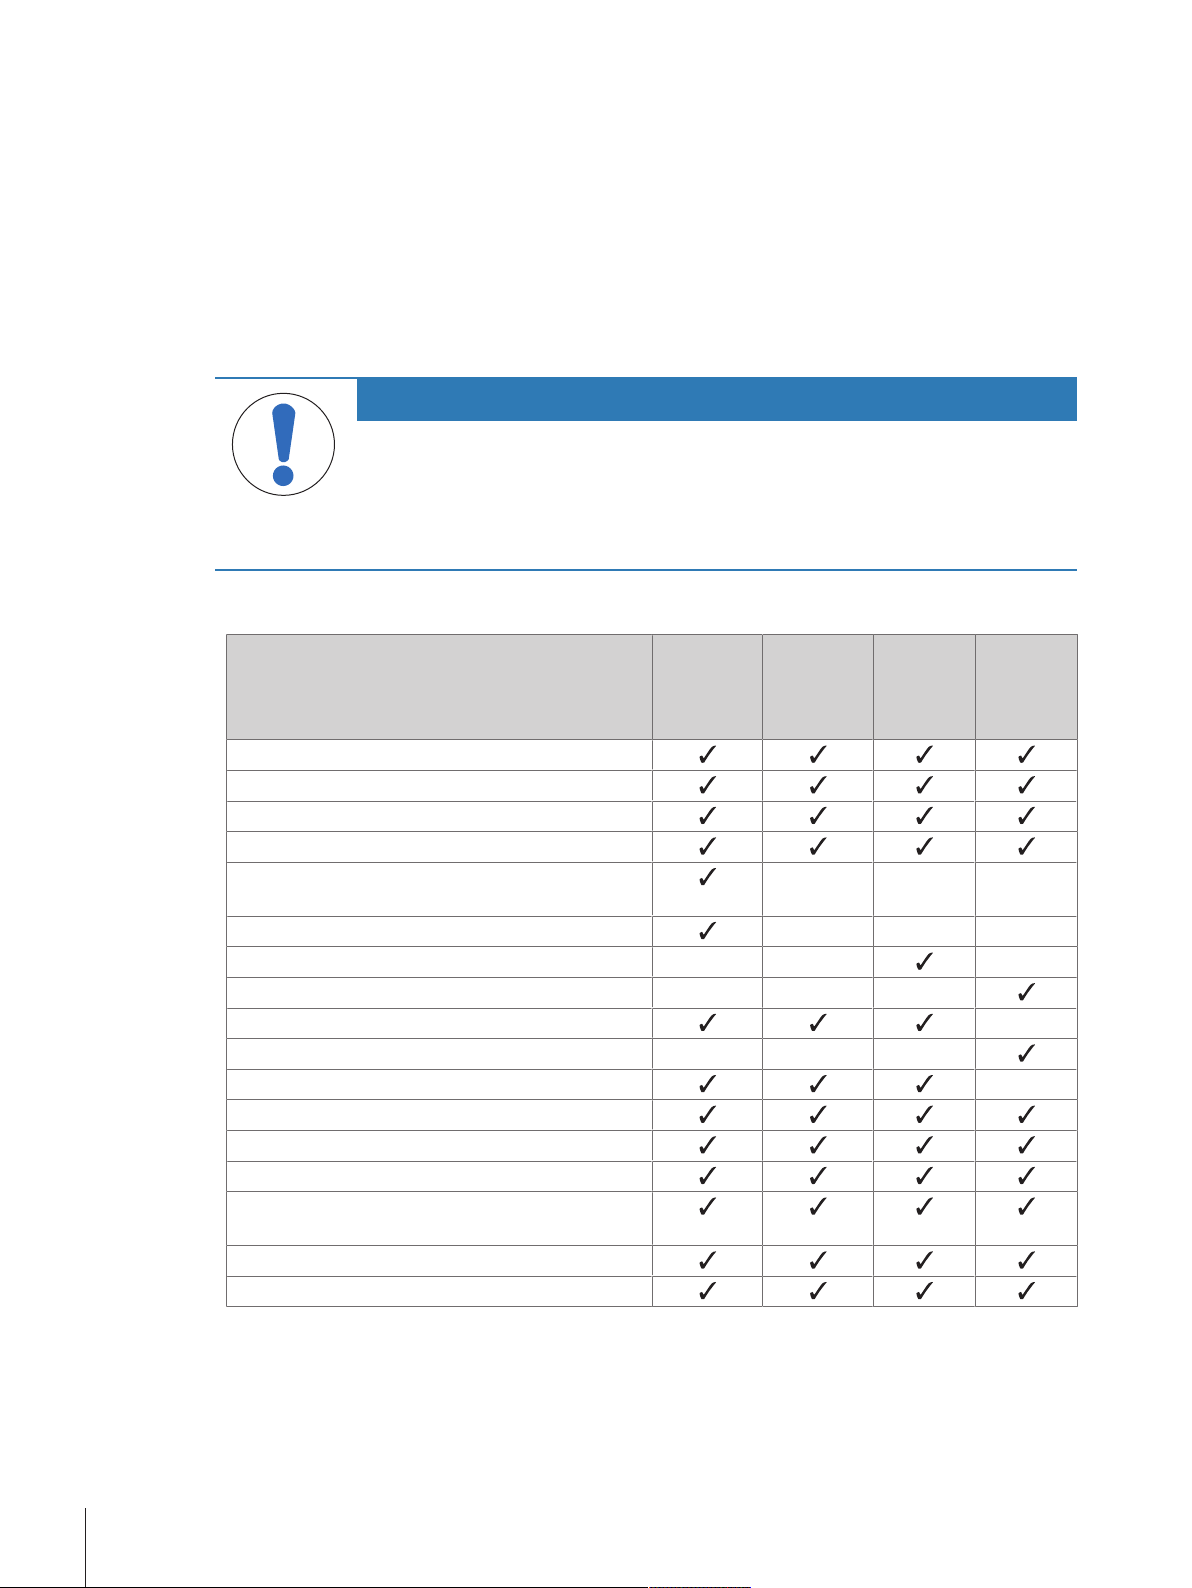
5.2.1 S weighing platform
Components 1 mg with
MagicCube
Draft Shield
Weighing platform with protective cover
Terminal with protective cover
Terminal support
Terminal connection cable (pre-assembled)
MagicCube Draft Shield with additional draft shield
door and DripTray
Weighing pan 127×127mm – – –
Weighing pan 172×205mm – – –
Weighing pan 190×223mm – – –
SmartPan weighing pan –
Weighing pan support – – –
DripTray –
Weighing hook for below-the-balance weighing
AC/DC adapter
Power cable (country-specific)
Operating instructions or user manual; printed or on
CD-ROM (country-specific)
Production certificate
CE declaration of conformity
1 mg
without
MagicCube
Draft Shield
– – –
10 mg 0.1 g
Installation and Putting into Operation18 Precision Balances
Page 21

5.2.2 L weighing platform
Components 0.1 g 1 g
Weighing platform
Terminal with protective cover
Terminal support (pre-assembled)
Terminal connection cable
Weighing pan
Power cable (country-specific)
Operating instructions and user manuals printed or
on CD-ROM (country-specific)
Production certificate
CE declaration of conformity
5.3 Selecting the location
A balance is a sensitive precision instrument. The location where it is placed will have a profound effect on
the accuracy of the weighing results.
• Choose a solid table that is as horizontal as possible.
Choose the table according to the maximum capacity of the
balance.
The balance must only be used indoors and up to a
maximum altitude of 4,000m above sea level.
• Before switching on the balance, wait until all parts are at
room temperature (+10 °C to +30°C).
The humidity must be between 10% and 80% noncondensing.
• The power plug must be accessible.
• Vibration-free location
• No direct sunlight
• No excessive temperature fluctuations
• No strong drafts
5.4 Assembling the balance
5.4.1 Models with S weighing platform
5.4.1.1 Attaching the terminal to the weighing platform
The terminal is usually placed in front of the weighing platform on the terminal support. The terminal can
also be placed individually, e.g. beside the weighing platform or it can be fixed on an additional terminal
stand.
NOTICE
Damage to the balance
The weighing platform and the terminal are not safely fixed by the terminal support and
may fall off when carrying.
− Remove the terminal from the weighing platform and place it on the weighing pan
when carrying the balance.
Installation and Putting into Operation 19Precision Balances
Page 22

11
2
1 Place the weighing platform on a flat surface.
3 4
2 Position the terminal support (1) in front of the
weighing platform. The plug of the pre-mounted
terminal connection cable (2) must lie between the
terminal support (1) and the weighing platform.
3 Push the terminal support (3) towards the weighing
platform. The far end of the terminal support (3)
must be pushed into the lock element (4) at the
bottom of the weighing platform.
4 Use the terminal connection cable to connect the
terminal to the weighing platform.
5 Place the terminal on top of the terminal support.
6 Push the terminal towards the weighing platform
until the terminal locks into the terminal support.
ð The terminal is mounted and connected to the
weighing platform.
5.4.1.2 Installing the MagicCube Draft Shield
Balances with readability of 1mg with MagicCube Draft Shield and SmartPan weighing pan
NOTICE
Damage to weighing platform and the MagicCube Draft Shield when carrying
The U-shaped MagicCube Draft Shield glass is not fixed to the MagicCube Draft Shield
housing.
1 Always close the cover before carrying the MagicCube Draft Shield.
2 Always hold the MagicCube Draft Shield on the housing underneath the glass. Always
hold the MagicCube Draft Shield with both hands and on both sides and keep it in a
horizontal position.
Installation and Putting into Operation20 Precision Balances
Page 23
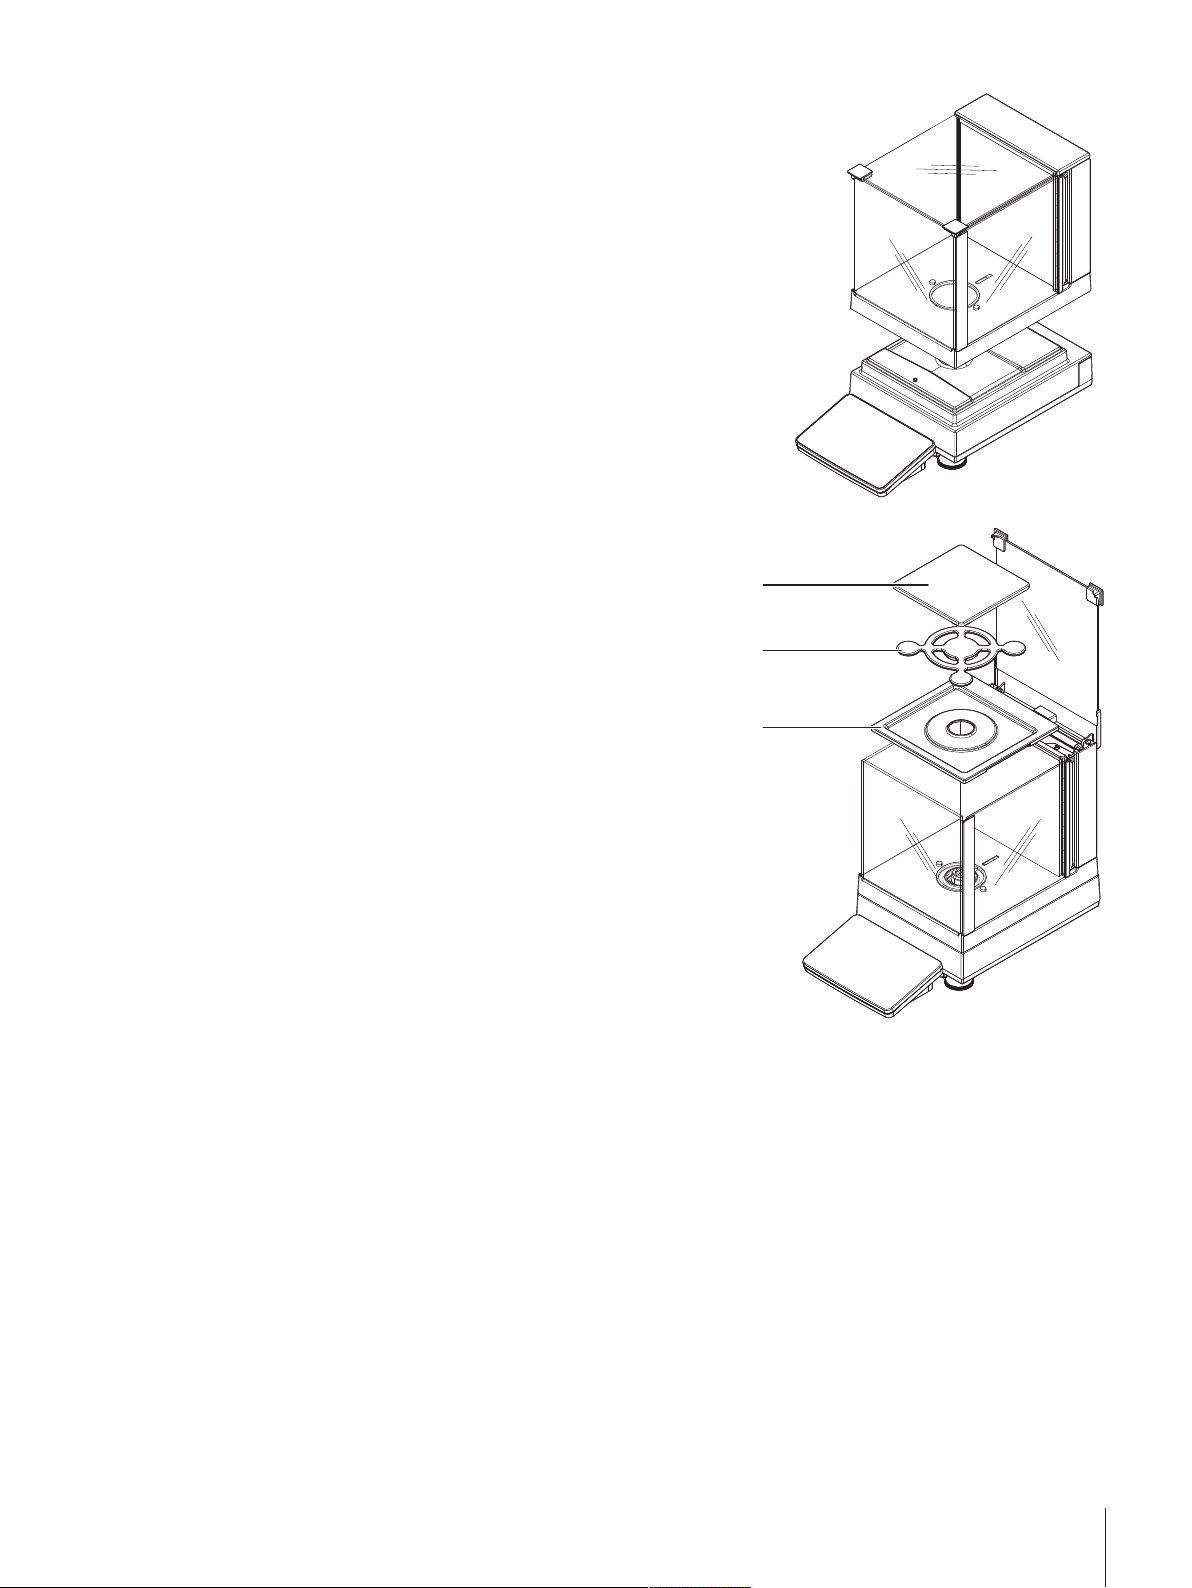
1 Place the MagicCube Draft Shield on top of the
3
2
1
weighing platform.
2 Open the MagicCube Draft Shield top door.
3 Place the DripTray (1) into the MagicCube Draft
Shield.
4 Place the SmartPan weighing pan (2) into the
MagicCube Draft Shield on top of the DripTray (1).
5 The weighing pan (3) is optional and can be
placed into the MagicCube Draft Shield on top of
the SmartPan weighing pan (2).
Install the additional MagicCube Draft Shield door
1 Open the MagicCube Draft Shield top door.
2 Take the additional MagicCube Draft Shield door (1) out of the rear panel.
3 Insert the additional MagicCube Draft Shield door into the housing from the left or the right side.
4 Insert the additional MagicCube Draft Shield door into the fixation holes at the bottom of the housing and
then at the top of the housing.
Installation and Putting into Operation 21Precision Balances
Page 24
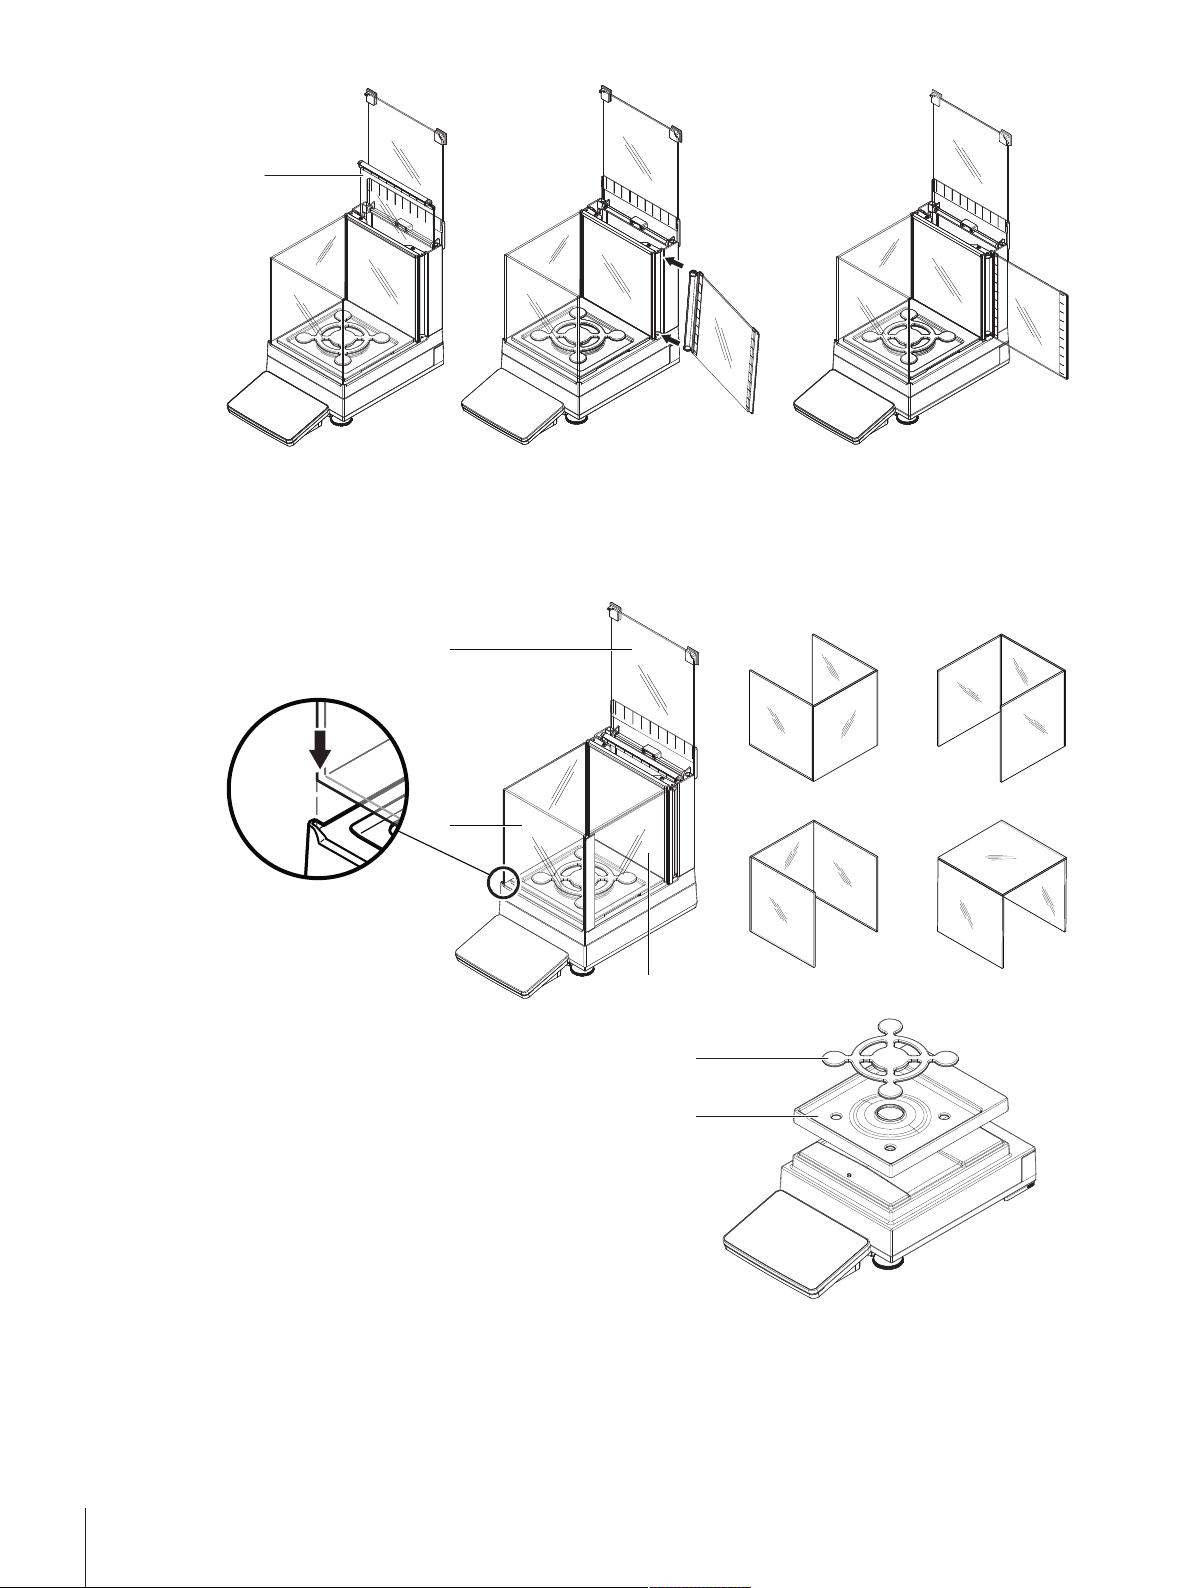
1
The MagicCube Draft Shield for XSR models consists of a fixed draft shield housing with top door (1), side
3
1
2
11
2
2
door (2) and a flexible U-shaped draft shield glass (3). The U-shaped draft shield glass (3) can be placed
individually on top of the draft shield housing. The side door can be found in the draft shield housing.
1 Place the DripTray (1) on top of the weighing
platform.
2 Place the SmartPan weighing pan (2) on top of the
DripTray (1).
Installation and Putting into Operation22 Precision Balances
Page 25
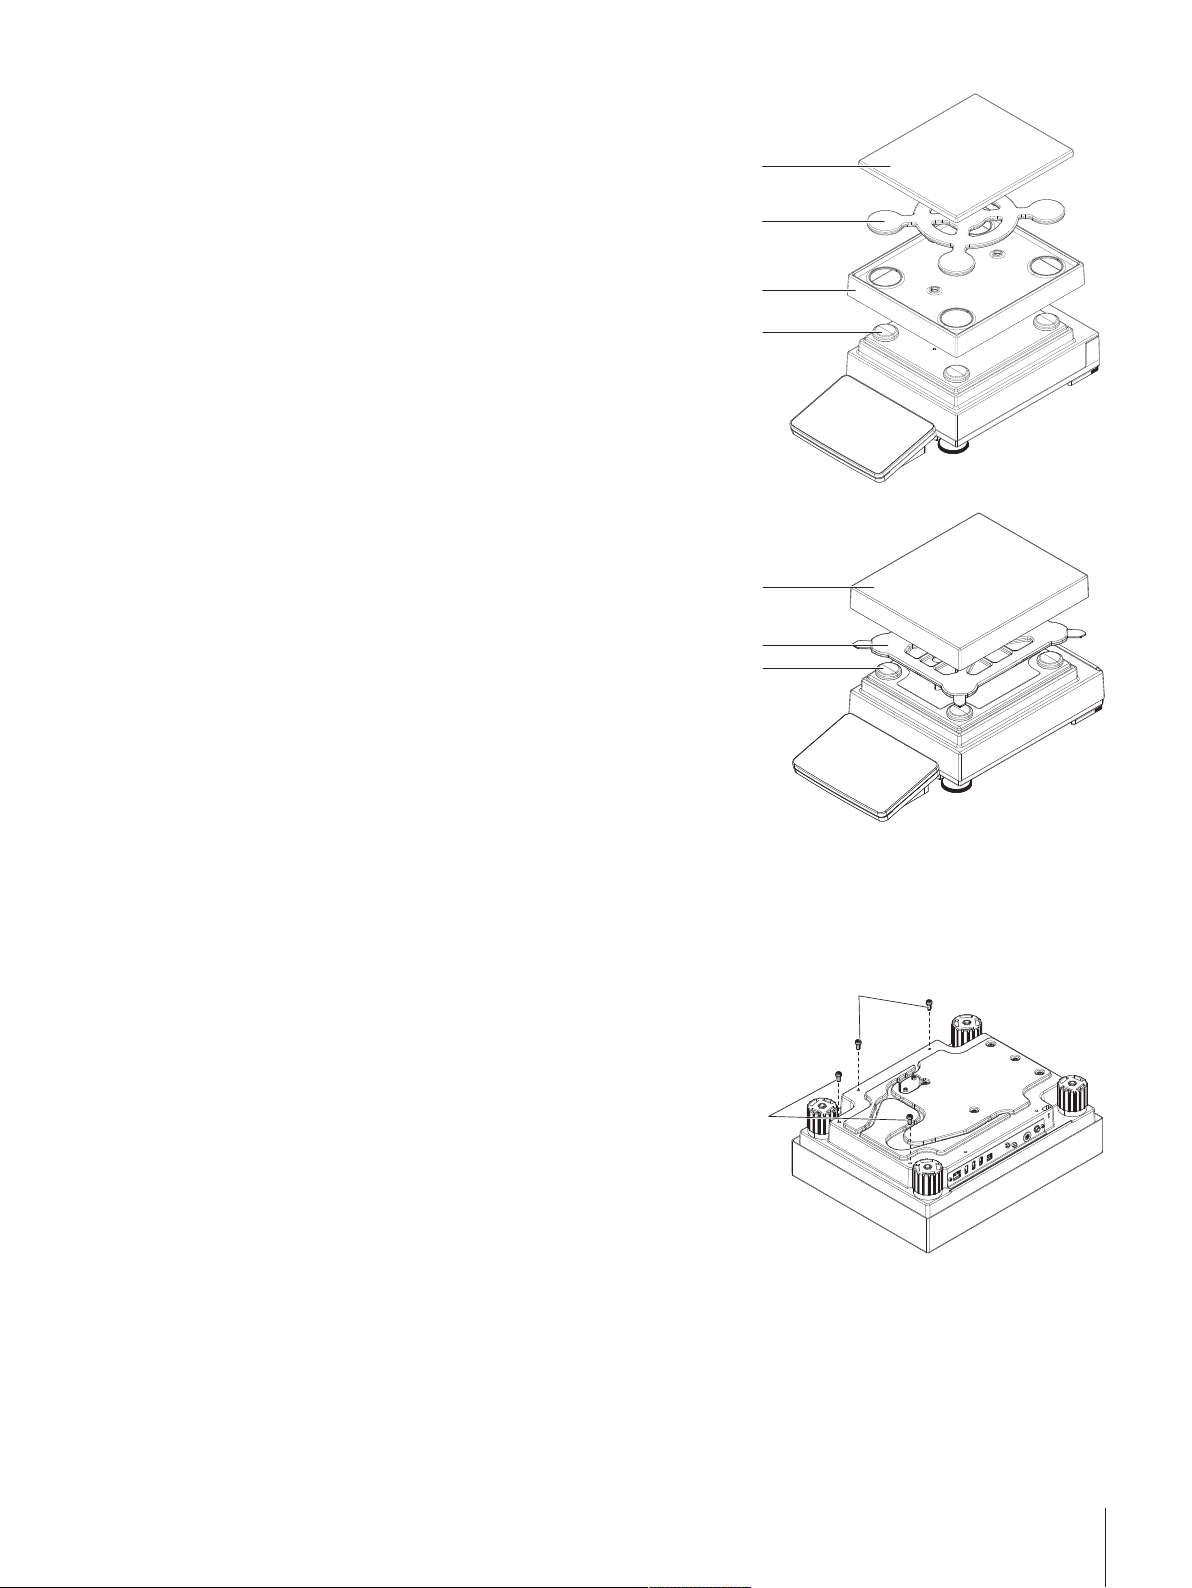
11
22
33
44
1 Place the 4 weighing pan support caps (1) on top
11
22
3
1
2
of the weighing platform.
2 Place the DripTray (2) on top of the weighing
platform.
3 Place the SmartPan weighing pan (3) on top of the
4 weighing pan support caps (1).
4 The weighing pan (4) is optional and can be
placed on top of the SmartPan weighing pan (3).
1 Place the 4 weighing pan support caps (1) on top
of the weighing platform.
2 Place the weighing pan support (2) on top of the 4
weighing pan support caps (1).
3 Place the weighing pan with the protective cover
(3) on top of the weighing pan support (2).
5.4.2 Models with L weighing platform
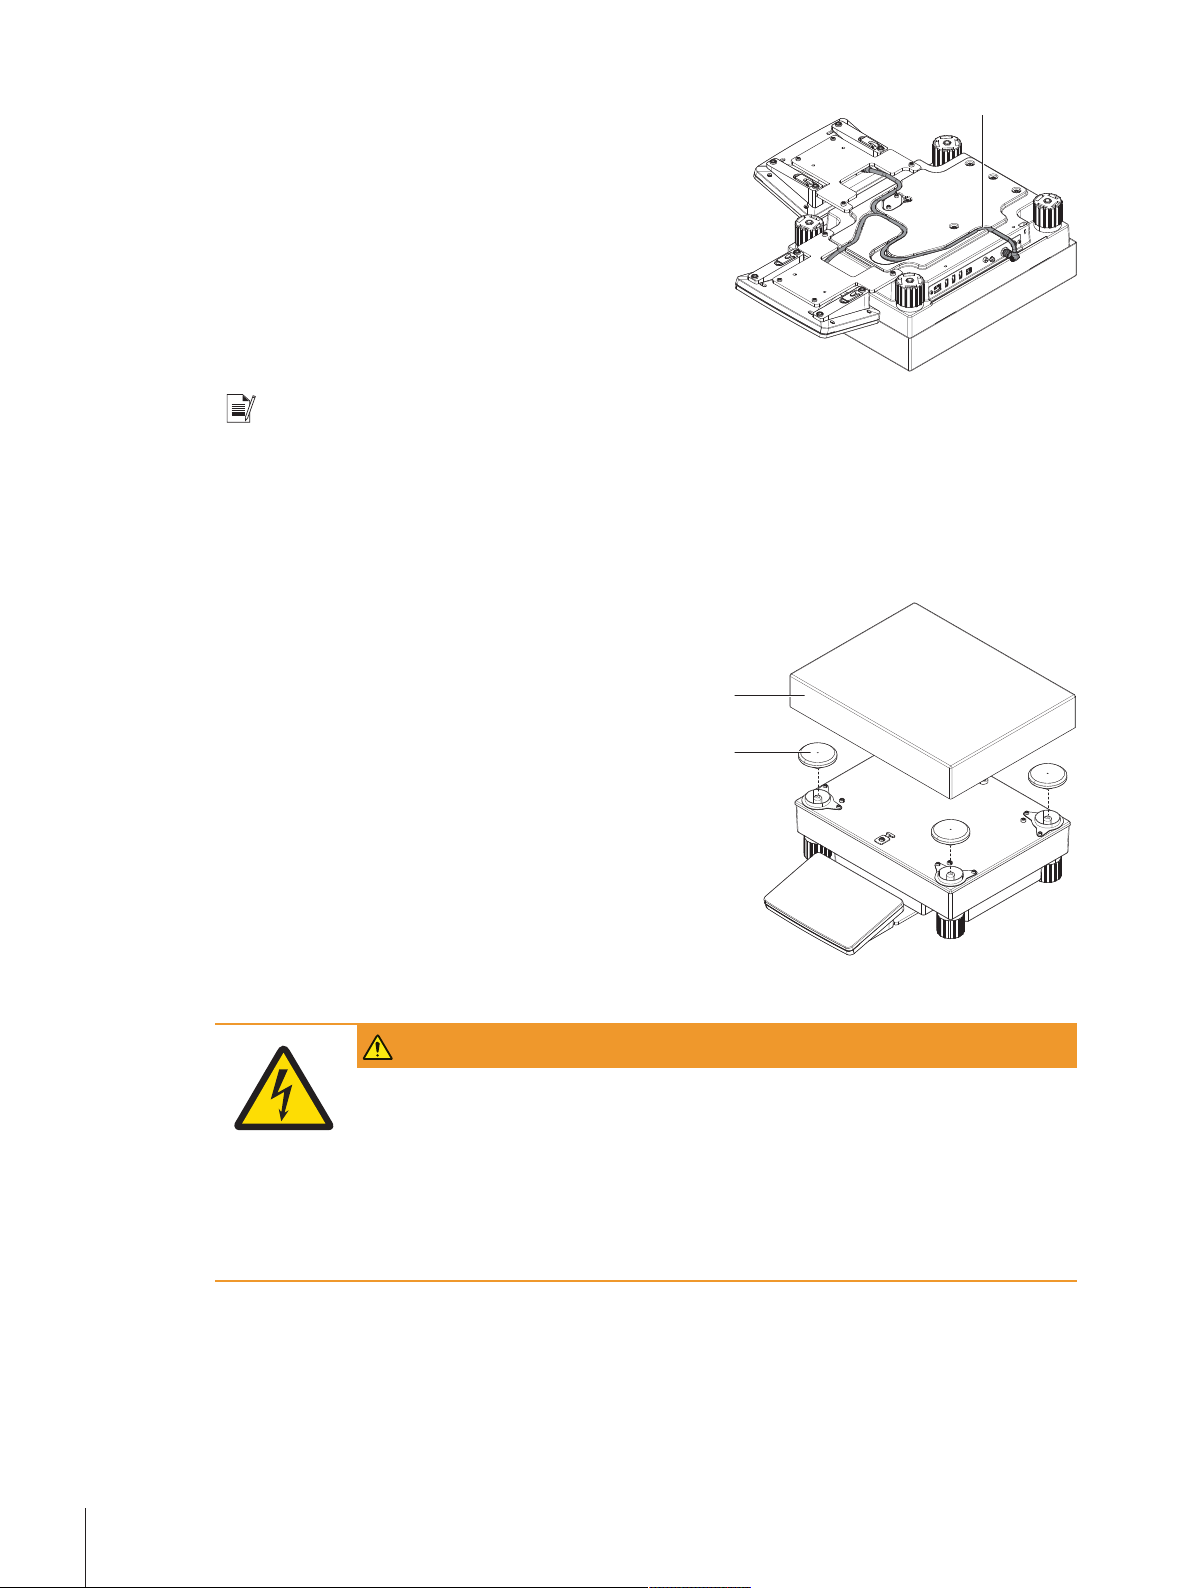
5.4.2.1 Attaching the terminal to the weighing platform
The terminal can be attached to the long side or to the short side of the L weighing platform.
1 Turn the weighing platform upside down.
2 Dismantle the screws (1) on the long side or the
screws (2) on the short side of the weighing
platform.
3 Connect the terminal to the weighing platform with
the terminal connection cable.
4 Attach the terminal support to the long side or to the
short side of the weighing platform. Fix the terminal
support with the screws from the weighing platform.
Installation and Putting into Operation 23Precision Balances
Page 26
3
5 Insert the terminal connection cable (3) into the
2
11
cable channel.
Note
When inserting the terminal connection cable into the cable channel, the terminal connection cable must be
inserted simultaneously from both directions. The terminal connection cable must not have any play
between the plug and the cable channel (see picture).
6 Turn the weighing platform.
5.4.2.2 Balances 0.1 g and 1 g
1 Place the weighing pan support caps (1) on top of
the weighing platform.
2 Place the weighing pan (2) on top of the weighing
pan support caps (1).
5.5 Connecting the balance to the mains
WARNING
Danger of death or serious injury due to electric shock.
Contact with parts that contain a live current can lead to injury and death.
1 To connect the balance, only use the supplied three-core power cable with equipment
grounding conductor.
2 Only use a three-pin power socket with earthing contact.
3 Only use standardized extension cable with equipment grounding conductor.
4 Do not disconnect the equipment grounding conductor.
Installation and Putting into Operation24 Precision Balances
Page 27
NOTICE
11
22
Damage to the balance due to short circuit!
Damage to the insulation on the AC/DC adapter can result in a short circuit and damage
the balance.
1 Only use the original AC/DC adapter supplied with your balance.
2 Route the cable so that it cannot be damaged by external influences.
3 Make sure that the power plug is always accessible.
Note
The balance is supplied with an AC/DC adapter and a country-specific power cable. The AC/DC adapter is
suitable for use with the following voltage range:
100 – 240 VAC, 50/60Hz.
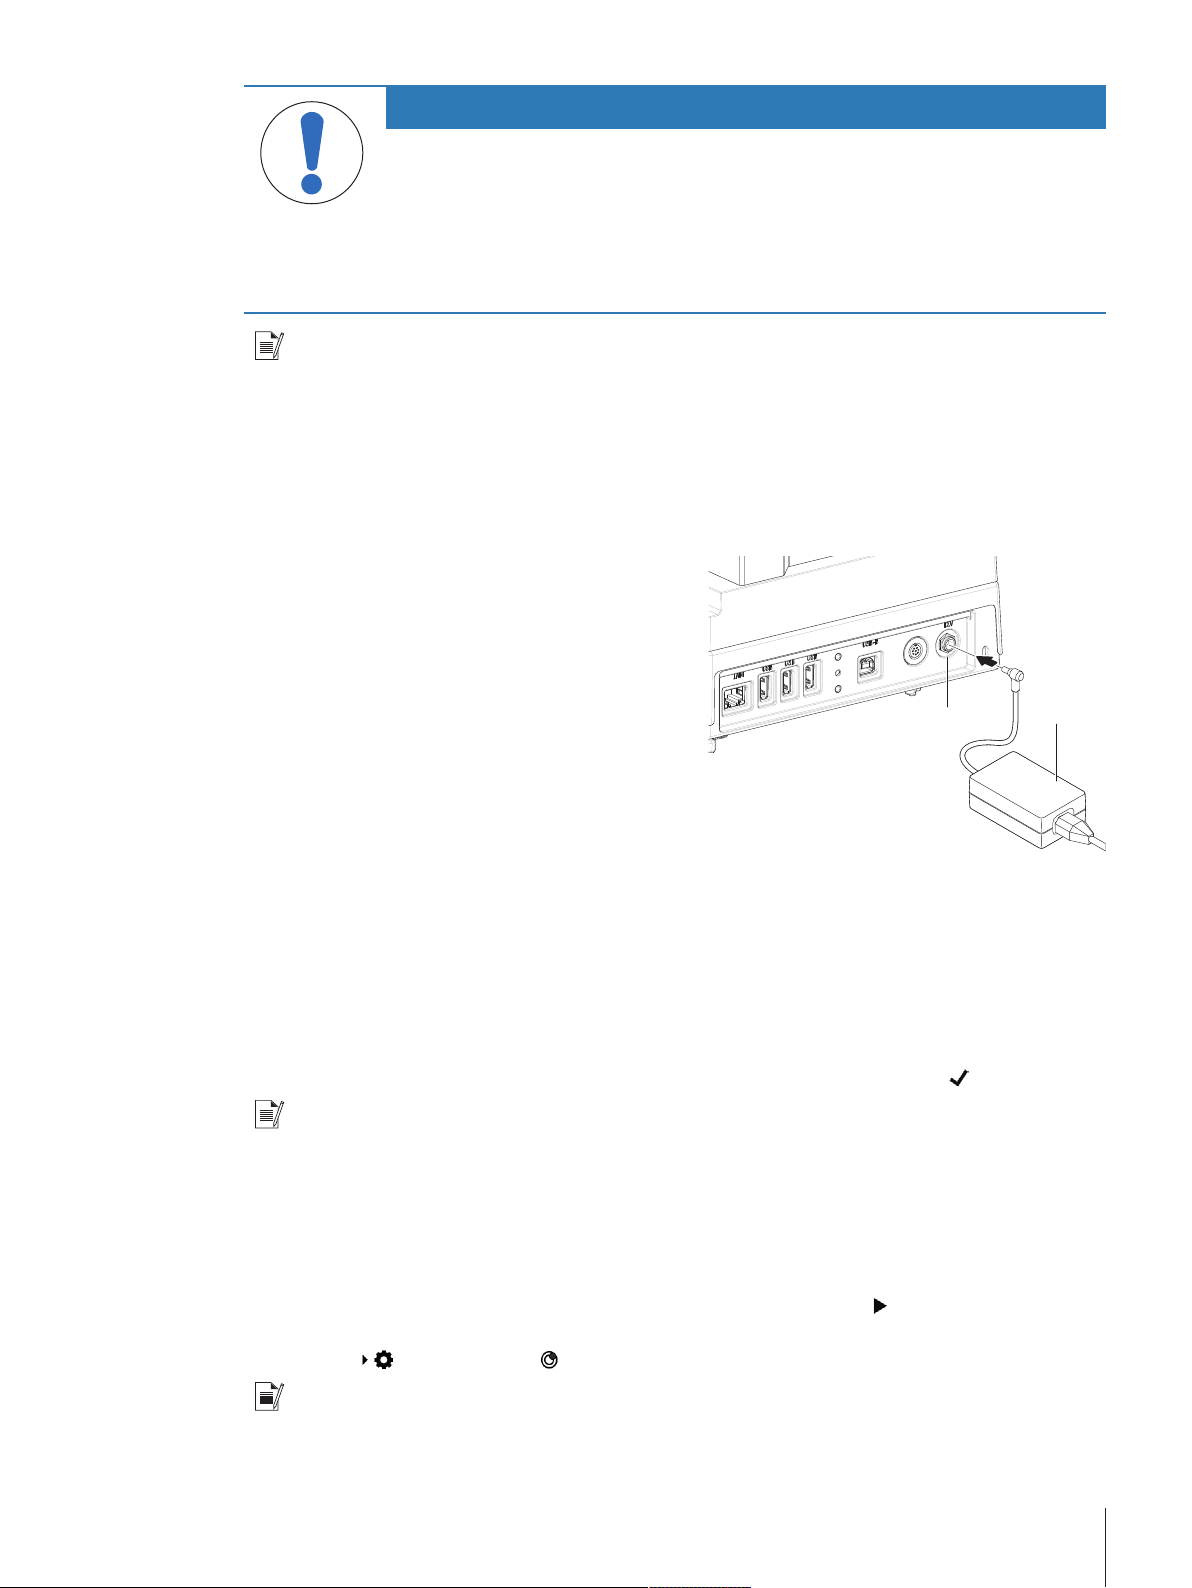
Connect the balance to the mains as follows:
1 Check whether your local power supply falls within the range of the delivered AC/DC adapter. If this is
not the case, under no circumstances connect the AC/DC adapter to the power supply, but contact a
METTLER TOLEDO representative.
2 Connect the AC/DC adapter (2) to the AC/DC socket
(1).
3 Use the power cable to connect the AC/DC adapter
to the mains.
ð The balance performs a self-test after connection to
the power supply and is then ready to use.
5.6 Setting up the balance
5.6.1 Switching on the balance
When the balance is connected to the mains it starts automatically.
EULA (End User License Agreement)
When the balance is switched on for the first time, the EULA (End User License Agreement) appears on the
screen. Read the conditions, tap I accept the terms in the license agreement. and tap
Note
Before the balance can be used, it must warm up first. The warm-up time is at least 30 minutes after
connecting the balance to the power supply. When the balance was switched on from standby-mode, the
balance is ready for operation immediately.
5.6.2 Leveling the balance
When the balance is switched on for the first time or when it is switched on after the location of the balance
has been changed, the message Balance is out of level appears. By tapping
opens. Follow the instructions on the screen to level the balance.
Navigation:
Note
A leveled balance and a stable installation are prerequisites for accurate weighing results.
Balance menu > Leveling aid
OK.
the function Leveling aid
Installation and Putting into Operation 25Precision Balances
Page 28
5.6.3 Performing a simple weighing
When the balance is switched on for the first time, the method work screen of the method General
Weighing opens (the method work screen is described in more detail in the section Method work screen).
5.6.3.1 Zeroing
1 Clear the weighing pan.
2 Close the weighing chamber if the balance has a draft shield.
3 Tap
ð The balance is zeroed.
5.6.3.2 Taring
If a weighing container is used, the balance must be tared.
1 Clear the weighing pan.
2 Close the weighing chamber if a draft shield is being used.
3 Tap
4 Open the weighing chamber if a draft shield is being used.
5 Place the container on the weighing pan.
6 Close the weighing chamber if a draft shield is being used.
7 Tap
ð The balance is tared.
to zero the balance.
to zero the balance.
to tare the balance.
5.6.3.3 Performing General Weighing
1 Place the weight on top of the weighing pan and wait until the weight value is stable.
2 Tap
ð The weighing process was successfull. The weight value has been transferred to the section Protocol.
Add to protocol.
5.6.4 Setting the balance to standby mode
The balance can be set to standby mode by holding
again.
5.6.5 Switching off the balance
To completely switch off the balance it must be disconnected from the mains. By holding
goes only into standby mode.
Note
When the balance was completely switched off for some time, it must be warmed up for at least 30 minutes
before it can be used.
5.7 Below-the-balance weighing
All models with S weighing platform are equipped with a weighing hook for below-the-balance weighing.
Models with L weighing platform are not equipped with a weighing hook. The weighing hook for L weighing
platforms can be ordered as an accessory.
. The standby mode can be finished by holding
the balance
Note
Before preparing the balance for below-the-balance weighing, the balance must be switched off, disconnected from the mains and all components (e.g. draft shield, terminal or weighing pan) must be removed
from the weighing platform.
Installation and Putting into Operation26 Precision Balances
Page 29

5.7.1 S weighing platform
22
11
2
11
1 Turn the weighing platform upside down.
2 Dismantle the screws (1) and remove the cover
plate (2).
3 Turn the weighing platform to its normal position
and reinstall all components.
ð The weighing hook is accessible and can be used
for below-the-balance weighing.
5.7.2 L weighing platform
1 Turn the weighing platform upside down.
2 Dismantle the screws (1) and remove the cover
plate (2).
3 Install the weighing hook.
4 Turn the weighing platform to its normal position.
ð The balance is prepared for below-the-balance
weighing.
5.8 Transporting the balance
NOTICE
Damage to the draft shield, terminal or additional terminal stand
Do not hold the balance only by the glass draft shield, by the terminal or by the terminal
stand when carrying the balance.
− Remove the terminal of the S weighing platform from the terminal support and place
the terminal on top of the weighing pan. Always hold the weighing platform with both
hands when carrying the balance.
5.8.1 Carrying the balance over short distances
1 Switch off the balance and disconnect the balance from the mains.
2 Unplug all interface cables if necessary.
3 Hold the weighing platform with both hands.
4 Remove the terminal from the terminal support element and place the terminal on top of the weighing
platform (only for S weighing platform).
5 Carry the balance in horizontal position to the new location.
Installation and Putting into Operation 27Precision Balances
Page 30

5.8.2 Transporting the balance over long distances
We recommend using the original packaging for transportation or shipment of the balance or balance
components over long distances. The elements of the original packaging are developed specifically for the
balance and its components and ensure maximum protection during transportation.
Installation and Putting into Operation28 Precision Balances
Page 31

6 Methods
The section Methods includes the weighing methods as well as test and adjustment procedures to check
the accuracy of the balance.
A weighing method is an application for carrying out specific weighing tasks. The balance offers various
predefined methods with default parameters. You can use this methods for your weighing task or editing
them according to your requirements. Predefined methods can also be deleted or cloned.
To support you while configuring new methods, a configuration wizard leads you through the whole
process. The changes performed to a method are recorded in the change history. To ensure that only
privileged user can edit the method settings, methods can get locked.
Navigation:
The section Methods is divided into the following sub-sections:
Methods list (see section [Methods list}Page29])
•
Tests (see section [Tests}Page57])
•
Adjustments (see section [Adjustments}Page67])
•
6.1 Methods list
In the section Methods list new methods can be defined, existing methods can be edited, cloned or
cancelled. It is also the starting point of using any method in a weighing procedure.
Navigation:
The following methods are available:
•
General Weighing (see section [General Weighing}Page31])
Simple formulation (see section [Simple Formulation}Page40])
•
Piece Counting (see section [Piece Counting}Page49])
•
Methods
Methods > Methods list
6.1.1 Creating new method
To create a new method tap
definition.
6.1.2 Editing method
1 Open the Methods section.
2 Tap the method that you want to edit.
3 Tap
4 Define the settings of the method.
An overview of the method settings can be found at the end of every method section.
Edit.
ð The dialogue screen Edit method - {0} opens.
Note
6.1.3 Cloning method
To simplify the process to create a method, an existing method can be cloned one or several times. The
cloned method will have the same parameter values as the original one. If weighing item templates exist,
those will be cloned as well.
The name of the cloned method is always similar to its original name. Additionally there is always a
number at the end of the method name.
To clone an existing method proceed as follows:
1 Open the Methods section.
2 Tap the method that you want to clone.
ð The line color of the selected method becomes blue.
New in the action bar. A stepwise wizard will lead you through the method
Methods 29Precision Balances
Page 32

3 Tap
4 Tap
A method can be cloned several times. The name of the cloned method is always similar to its original
name. Additionally there is always a number at the end of the method name.
More.
Clone.
ð A copy of the selected method appears in the list. The cloned method has the same settings like the
original method.
Note
6.1.4 Deleting method
Both factory defined methods and user defined methods can be deleted if they are not needed. For this
purpose proceed as follows:
1 Open the Methods section.
2 Tap the method that you want to delete.
ð The line color of the selected method becomes blue.
3 Tap
4 Tap
5 Tap
ð The system returns to the method list. The method has been deleted and does not appear on the list
More.
Delete.
ð The message Delete method and cancel tasks? appears on the screen.
Yes to delete the selected method.
anymore.
Note
There is always a method activated in the background. This method can not be directly deleted. To delete
the method, another method must be started instead. Now the method is not activated anymore and can be
deleted.
Methods30 Precision Balances
Page 33

6.1.5 General Weighing
This section describes the method General Weighing. The method General Weighing offers the basic
weighing functions (zeroing, taring, weighing) with no process support. The method is used for simple
weighing tasks or to perform a series of check weighing or dosing.
This section describes how to create a new method with the method wizard, how to work with the method
and the method settings. The parameter of the weighing item (e.g. sample ID and target weight) can either
be entered manually or by using a template. Therefore two different methods exist:
• General Weighing: Select this method if you want to define the parameters for the weighing item ad-hoc
while weighing or pre-defined on a method level for all weighing items.
• General Weighing with templates: Select this method if you want to use a template to define the
parameters for the weighing item. Templates are helpful to safe time while weighing items with the same
parameters and to ensure the consistent use of the parameters. For further information see [Using
templates}Page56].
In the section [Method settings}Page41] the settings for both methods General Weighing and General
Weighing with templates can be found.
6.1.5.1 Creating new method type General Weighing
1 Open the Methods section.
2 Tap
3 Tap Method type and select the method type General Weighing or General Weighing with templates.
4 Follow the stepwise wizard through the creating process.
5 Tap
ð The method has been created and appears in the list.
New in the action bar.
ð The method wizard opens, starting at 1. Method type.
Save method at the end of the wizard.
6.1.5.2 Performing General Weighing
This section describes how the method General Weighing is being used in a task. In this example we are
weighing one single weight without any tare weight.
1 Open the Methods section.
2 Select a method from the list or define a new method.
3 Tap
4 Press
5 Place the weight on the weighing pan.
6 Wait until the weight is stable.
7 Tap
8 When the weighing process is finished, tap
9 Tap
When you tap Delete protocol the current weighing process will close without saving any data. The
window Complete task always appears after completing the task, even if the results will be saved automat-
ically.
Start method.
ð The method work screen of the selected method opens.
to zero the balance.
Add to protocol.
ð The weighing result has been added to the protocol.
Complete in the action bar.
ð The window Complete task appears. The result of the task can be printed on a label printer, the
protocol can be printed manually or the result can be exported on an external storage device.
ð The task General Weighing was successfully completed.
Note
Protocol.
Methods 31Precision Balances
Page 34

6.1.5.3 Method settings
In this section, the settings of the methods General Weighing and General Weighing with templates are
being described.
The section Edit method - {0} is divided into the following sub-sections:
General
•
ID format
•
Templates (Only available for the method General Weighing with templates)
•
Weighing item (Only available for the method General Weighing)
•
Weighing
•
Automation
•
Print / Export
•
6.1.5.3.1 General
The following parameters can be defined:
Parameter Explanation Values
Method name Defines the name of the method. The system copies the method
Comment The method can be described with a comment. Text (0...128
Lock method Locks the method for other users and from further editing while
* Factory setting
name that has been defined with the function Method wizard.
running.
Text (1...22
characters)
characters)
Active | Inactive*
Note
The option Method type has been defined in the wizard and cannot be changed.
6.1.5.3.2 ID format
The following parameters can be defined:
Task IDs
Parameter Explanation Values
Number of task
IDs
Task ID 1 Defines the value of the task ID.
Description
Prefix Defines a prefix for the task ID.
For a method up to three task identifiers (task IDs), such as
SOP Id, Lot Id etc. can be defined.
If the value of the option Number of task IDs is set to 1, the
options Task ID 1, Description and Prefix/Default value
appear.
Manual with default: The value of the task ID can be entered
manually at method execution time.
Automatic timestamp: The system provides a value created
from a prefix with the current date and time appended.
Describes the option Task ID 1.
This option only appears when the option Automatic
timestamp is activated.
0 | 1*
Manual with default* |
Automatic timestamp
Text (0...32
characters)
Text (0...32
characters)
Methods32 Precision Balances
Page 35

Default value Defines a default value for the task ID. The value of the task ID
can be changed manually while executing the method.
This option only appears when the option Manual with default
is activated.
* Factory setting
Result IDs
Parameter Explanation Values
Number of result
IDs
Result ID 1 Defines the value of the result ID.
Description
Prefix Defines a prefix for the result ID.
Default value Defines a default value for the result ID. The value of the result
* Factory setting
Defines the number of result IDs.
If the value of the option Number of result IDs is set to 1, the
options Result ID 1, Description and Prefix/Default value
appear.
Manual with default: The value of the result ID can be entered
manually at method execution time.
Automatic counter: The system provides a value created from
a prefix with an unique number (counter) appended.
Describes the option Result ID 1.
This option only appears when the option Automatic counter is
activated.
ID can be changed manually while executing the method.
This option only appears when the option Manual with default
is activated.
Text (0...32
characters)
0 | 1*
Manual with default |
Automatic counter*
Text (0...32
characters)
Text (0...32
characters)
Text (0...32
characters)
6.1.5.3.3 Weighing item
In this section a target weight with tolerance limits can be defined. Depending on the selected method, the
parameters for the weighing item are defined directly in the method (General Weighing) or in one or more
templates (General Weighing with templates).
The following parameters can be defined:
Note
This option is only available for the method General Weighing.
Initial values for weighing
Parameter Explanation Values
Unit Defines the unit of the primary weighing result. The available units
Target weight Defines the target weight. The target weight will be shown in the
Tolerance (min.) Defines the under tolerance limit.
depend on the balance
model.
Numeric
weighing-in aid of the balance (SmartTrac). When a target
weight including tolerances is defined, the SmartTrac indicates
if the current display weight is in tolerance or not.
Numeric
This option only appears when the option Target weight is
activated.
Methods 33Precision Balances
Page 36

Tolerance (max.) Defines the upper tolerance limit.
6.1.5.3.4 Templates
In this section a target weight with tolerance limits can be defined. Depending on the selected method, the
parameters for the weighing item are defined directly in the method (General Weighing) or in one or more
templates (General Weighing with templates).
Note
This Option is only available for the method General Weighing with templates.
The following parameters can be defined:
Parameter Explanation Values
Unit Defines the unit of the primary weighing result. The available units
Target weight Defines the target weight. The target weight will be shown in the
Tolerance (min.) Defines the under tolerance limit.
Tolerance (max.) Defines the upper tolerance limit.
Numeric
This option only appears when the option Target weight is
activated.
depend on the balance
model.
Numeric
weighing-in aid of the balance (SmartTrac). When a target
weight including tolerances is defined, the SmartTrac indicates
if the current display weight is in tolerance or not.
Numeric
This option only appears when the option Target weight is
activated.
Numeric
This option only appears when the option Target weight is
activated.
6.1.5.3.5 Weighing
The following parameters can be defined:
Parameter Explanation Values
Show info weight With this option activated a secondary info weight appears on
Info unit Defines the unit of the info weight.
* Factory setting
Custom unit
Parameter Explanation Values
Define custom
unit
Name Defines the name of the custom unit. Text (0...6 characters)
the weighing screen on top of the weighing result.
This option only appears when the option Show info weight is
activated.
With this option activated a specific weighing unit can be
defined. This allows calculations (e.g. surfaces or volumes) to
be carried out directly during determination of the weighing
result.
The custom units are available in all menus and input fields in
which weighing units can be selected.
Active | Inactive*
The available units
depend on the balance
model.
Active | Inactive*
Methods34 Precision Balances
Page 37

Formula
Factor Defines the factor with which the effective weighing result (net
Display
readability
* Factory setting
Weighing settings
Parameter Explanation Values
Tolerance profile To select a tolerance profile to use in a method.
Weight capture
mode
Weight capture
delay
* Factory setting
Defines how subsequently defined value for Factor is
calculated. There are 2 formulae available:
Multiplicative: Multiplies the net weight by the factor.
Divisive: The factor is divided by the net weight.
The formula can be used, for example, to simultaneously take
into account a known error factor while weighing.
weight) is calculated via the previously selected Formula.
Defines the formatting for the weighing result.
Example: A setting of “0.05” defines 2 places after the decimal
point with rounding to 5. A determined result of 123.4777 is
consequently displayed as 123.50.
This function can only be used to reduce the resolution of the
weighing result. No value must therefore be entered that
exceeds the maximum balance resolution. Values that are too
small are automatically rounded off.
By setting up tolerance profiles you can ensure weighing tasks
meet defined quality requirements and regulations. In addition,
as the same profile is used each time a specific task is carried
out, you can be sure of consistent settings to guarantee
traceable results.
Defines the behavior when the button to add the result was
tapped or the add result was triggered by the automatic
weighing result creation.
Stable: The system waits for a stable weight.
Immediate: The system doesn’t wait for a stable weight. The
system waits for the defined amount of seconds (Weight
capture delay). After the weight capture delay, the weight value
from the weight stream is captured.
Defines the time in seconds the balance waits for capturing the
weight after the button to add the result was tapped or the add
result was triggered by the automatic weighing result creation.
This option only appears when the Weight capture mode
Immediate or Dynamic is selected.
Multiplicative* | Divisive
Numeric
Numeric
Available tolerance
profiles are modelspecific.
Stable* | Immediate
Numeric (5 seconds* |
0...60 seconds)
Methods 35Precision Balances
Page 38

Statistics
Activate statistics
* Factory setting
6.1.5.3.6 Automation
The following parameters can be defined:
Parameter Explanation Values
Barcode data
target
* Factory setting
If Activate statistics is set to Active, the following statistics will
be calculated:
• Count: Number of items used for the statistics.
• Sum: The displayed values are summed up.
• Minimum: The minimal displayed value.
• Maximum: The maximum displayed value.
• Average: The displayed values are summed up and divided
by the count of values summed up. The result is rounded to
the balance resolution.
• Standard deviation
• Relative standard deviation
The statistical values are calculated and visualized as soon as
a result is added or updated.
If a barcode reader is connected to the balance, this option
defines how the data is to be processed.
Keyboard Input: The data is written in the currently open input
window. If no input window is open, the data is ignored.
Target weight value: The barcode data is interpreted as a value
for the target weight.
Task ID 1: The received barcode data is treated as identification
text for the Task ID.
Result ID 1: The received barcode data is treated as identification text for the Result ID.
Active | Inactive*
Keyboard Input* |
Target weight value |
Task ID 1 | Result ID 1
Weighing automation
Parameter Explanation Values
Automatic result Automatically generates a weighing result after a threshold is
reached.
None: No automatic result will be generated.
None* | With sample
tare | Without sample
tare
With sample tare: After a weight value that reached the
threshold is being removed from the weighing pan, the balance
is being tared.
Without sample tare: After a weight value that reached the
threshold is being removed from the weighing pan, the balance
is not being tared.
Automatic result
threshold
Defines the threshold of the option Automatic result.
This option only appears when the option Automatic result is
Numeric
activated.
Methods36 Precision Balances
Page 39

Weight trigger
Defines the behaviour of the option Automatic result threshold.
Exceeding: The weighing result is generated when the weight
exceeds the defined threshold.
Falling below: The weighing result is generated when the
weight falls below the defined threshold.
This option only appears when the option Automatic result is
set to Without sample tare.
Automatic zero
If Automatic zero is set to Active, the balance automatically
zeros the balance when the weight falls below a predefined
threshold.
Automatic zero
threshold
Defines the threshold of the option Automatic zero.
This option only appears when the option Automatic zero is
activated.
Tare Mode Defines the tare mode.
None: No automatic tare.
Automatic tare: The balance stores automatically the first
stable weight as the tare weight.
Pretare: Allows you to enter manually a numerical entry of a
fixed tare weight.
Automatic tare
threshold
Defines the threshold of the option Tare Mode.
This value defines the minimum weight that must be applied to
the weighing pan so that it is automatically stored as the tare
weight. If the weight is below the limits, it is not automatically
transferred to the tare memory.
Instead of entering the weight, the lightest tare container can be
placed on the weighing pan and the button
pressed. The applied weight is directly taken over as a limit.
This option only appears when the option Tare Mode is set to
Automatic tare.
Pretare value Defines a weight value for the pretare function.
Instead of entering the value, the respective tare container can
be placed on the weighing pan and the button
pressed. The weight is directly taken over as pretare value.
This option only appears when the option Tare Mode is set to
Pretare.
* Factory setting
Exceeding* | Falling
below
Active | Inactive*
Numeric
None* | Automatic tare |
Pretare
Numeric
subsequently
Numeric
subsequently
6.1.5.3.7 Print / Export
In this section the options for printing and exporting can be defined.
This section is divided into the following sub-sections:
• Protocol printout and data export
• Label printout for task
• Label printout for weighing item
Protocol printout and data export
The following parameters can be defined:
Methods 37Precision Balances
Page 40

Automatic data output
Parameter Explanation Values
Strip printer Activates/Deactivates the strip printer. The data to be transmitted
Active | Inactive*
to the printer can be defined in the section Template settings.
Weight value Activates/Deactivates the weighing value character output over
Active | Inactive*
USB.
* Factory setting
Protocol template for printout
Template settings
This menu item can be used to define information to appear in the protocols. The extensive menu is divided
into six submenus in which options for the printout/export can be defined. Information can be enabled or
disabled by activating or deactivating the corresponding checkbox.
Parameter Explanation
Header and
Footer
Balance information
Quality information
Defines if a header (with title, date and time) and/or footer (with signature and end line)
should be printed/exported.
Defines if the following information about the balance is being printed/exported:
• Balance type
• Balance ID
• Balance serial number
• Firmware version
Defines if quality information such as the used tolerance profile or test information is
being printed/exported.
Task information Defines if information about the task is being printed/exported.
Weighing item
Defines if information about the weighing item is being printed/exported.
information
Result detail
Defines if information relating to the result of the measurement is being printed/exported.
information
Label printout for task
The following parameters can be defined:
Parameter Explanation Values
Automatic label
printout for task
Activates/Deactivates the option Automatic label printout for
task.
Active | Inactive*
Used template To choose the label template. Available labels
Field settings Defines which information appears in the label fields. The
number of the label fields differ depending on the selected
template.
Barcode settings Defines which information appears in the barcode. The number
of the barcode fields differ depending on the selected template.
The option 2D barcode delimiter appears only when the
Available options
depending on the
selected template.
Available options
depending on the
selected template.
selected template in the option Used template has a 2D code.
* Factory setting
Label printout for weighing item
In this section the label printout options for weighing items can be defined. This section is similar to the
section [Label printout for task}Page38], but it does not refer to a task but to a weighing object.
Methods38 Precision Balances
Page 41

Note
Supported printers for labels are P-56RUE, P-58RUE and Citizen CLS631 (for more information see section
[Accessories}Page101]).
Available labels
The following label printouts can be selected:
5 large fields 5 small fields
10 small fields 1D barcode with 3 large fields
1D barcode with 3 small fields 1D barcode with 6 small fields
2D barcode with 5 large fields 2D barcode with 5 small fields
2D barcode with 2 large fields and 6 small fields 2D barcode with 8 small fields
Methods 39Precision Balances
Page 42

6.1.6 Simple Formulation
This section describes the method Simple formulation. With the method Simple formulation the concentration of a substance can automatically be calculated.
This section describes how to create a new method with the method wizard, how to work with the method
and the method settings. The parameter of the weighing item (e.g. sample ID and target weight) can either
be entered manually or by using a template. Therefore two different methods exist:
• Simple formulation: Select this method if you want to define the parameters for the weighing item ad-
hoc while weighing or pre-defined on a method level for all weighing items.
• Simple formulation with templates: Select this method if you want to use a template to define the
parameters for the weighing item. Templates are helpful to safe time while weighing items with the same
parameters and to ensure the consistent use of the parameters. For further information see [Using
templates}Page56].
In the section [Method settings}Page41] the settings for both methods Simple formulation and Simple
formulation with templates can be found.
6.1.6.1 Creating new method type Simple Formulation
1 Open the Methods section.
ð The section Methods list opens.
2 Tap
3 Tap Method type and select the method type Simple formulation or Simple formulation with
4 Follow the step-wise wizard.
5 Tap
ð The method has been created and appears in the list.
New method in the action bar.
ð The method wizard opens, starting at step 1. Method type.
templates.
Save method at the end of the wizard.
6.1.6.2 Performing Simple Formulation
This example describes how to perform a simple formulation with two different components. It explains the
basic functions of the method without the use of any templates. Advanced functions such as the calculation
of the concentration of a component can be defined in the method settings.
1 Open the Methods section.
2 Select a method of the type Simple formulation or define a new method.
3 Tap
4 Define the target weight and the tolerance limits for the first component.
5 Select Component ID to define the first component.
6 Select Task ID to define the whole task.
7 Place the weight on the weighing pan.
8 Tap
9 Define the target weight and the tolerance limits for the second component.
10 Select Component ID to define the second component.
11 Place the weight on the weighing pan.
12 Tap
13 Tap
ð The weight task is finished and the balance returns to the method work screen.
Start method.
ð The method work screen opens.
Add to protocol.
ð The weight value is being transferred to the section Protocol.
Add to protocol.
ð The weight value is being transferred to the section Protocol.
Complete and select if you want to print or to export the task protocol.
Methods40 Precision Balances
Page 43

6.1.6.3 Method settings
In this section, the settings of the methods Simple formulation and Simple formulation with templates are
being described.
The section Edit method - {0} consists of the following sub-sections:
General
•
Formulation
•
ID format
•
Templates (Only available for the method Simple formulation with templates)
•
Weighing item (Only available for the method Simple formulation)
•
Weighing
•
Automation
•
Print / Export
•
6.1.6.3.1 General
In this section general settings like the name of the method and a comment can be defined.
The following parameters can be defined:
Parameter Explanation Values
Method name Defines the name of the method. The system copies the method
Comment The method can be described with a comment. Text (0...128
Lock method Locks the method for other users and from further editing while
* Factory setting
name that has been defined with the function Method wizard.
running.
Text (1...22
characters)
characters)
Active | Inactive*
Note
The option Method type has been defined in the wizard and cannot be changed.
6.1.6.3.2 Formulation
The following parameters can be defined:
Parameter Explanation Values
Calculate target In this section the flask volume and the concentration of the
Calculate
concentration per
component
Calculate
amount of
component
target can be defined.
Flask volume: Calculates the target weight according to the
reference flask volume and the actual flask volume.
Target concentration: Calculates the target weight according to
the desired target concentration.
This option only appears for the method Simple formulation
with templates.
Calculates the concentration of the substance based on the
molecular weight, purity volume and dosed amount of
substance, e.g. mmol/l.
If this option is activated, the sub-options Reference weight
(100%) and Concentration unit appear in the list.
Calculates the effective amount of a component based on the
current weighing value.
None* | Flask volume |
Target concentration
Active | Inactive*
Active | Inactive*
Methods 41Precision Balances
Page 44

Concentration
unit
Calculate target In this section the flask volume and the concentration of the
Reference flask
volume
Reference weight
(100%)
* Factory setting
Production and expiry date
Parameter Explanation Values
Production date Defines the production date.
Expiry date Defines the expiry date of the substance.
Period Defines the period of the expiry date.
* Factory setting
Defines the concentration unit. mol/l* l mmol/l l mg/ml
l mg/l l ug/ml l g/ml l
g/l l %
None* | Flask volume |
target can be defined.
Flask volume: Calculates the target weight according to the
reference flask volume and the actual flask volume.
Target concentration: Calculates the target weight according to
the desired target concentration.
This option only appears for the method Simple formulation
with templates.
Defines the volume of the reference flask. Numeric (1 ml* |
Defines the reference weight.
Instead of entering the reference weight manually, press subse-
quently the button
as a reference weight.
Current date: The production date is set automatically to the
date when starting the weighing task.
Manual input: The production date can be entered manually
when starting the weighing task.
Period: The expiry date is set automatically when starting the
weighing task (expiry date = date when starting the weighing
task + number of days defined in the field Period.
Manual input: The expiry date can be entered manually when
starting the weighing task.
This option only appears when the option Expiry date is set to
Period.
. The applied weight is directly taken over
Target concentration
1...999999 ml)
Depending on the
capacity of the balance.
None | Current date* |
Manual input
None* | Period |
Manual input
Numeric (1 day* |
1...9999 days)
6.1.6.3.3 ID format
The following parameters can be defined:
Task IDs
Parameter Explanation Values
Number of task
IDs
Methods42 Precision Balances
For a method up to three task identifiers (task IDs), such as
SOP Id, Lot Id etc. can be defined.
If the value of the option Number of task IDs is set to 1, the
options Task ID 1, Description and Prefix/Default value
appear.
0 | 1*
Page 45

Task ID 1 Defines the value of the task ID.
Manual with default: The value of the task ID can be entered
manually at method execution time.
Automatic timestamp: The system provides a value created
from a prefix with the current date and time appended.
Description
Prefix Defines a prefix for the task ID.
Default value Defines a default value for the task ID. The value of the task ID
* Factory setting
Result IDs
Parameter Explanation Values
Number of result
IDs
Result ID 1 Defines the value of the result ID.
Description
Prefix Defines a prefix for the result ID.
Default value Defines a default value for the result ID. The value of the result
* Factory setting
Describes the option Task ID 1.
This option only appears when the option Automatic
timestamp is activated.
can be changed manually while executing the method.
This option only appears when the option Manual with default
is activated.
Defines the number of result IDs.
If the value of the option Number of result IDs is set to 1, the
options Result ID 1, Description and Prefix/Default value
appear.
Manual with default: The value of the result ID can be entered
manually at method execution time.
Automatic counter: The system provides a value created from
a prefix with an unique number (counter) appended.
Describes the option Result ID 1.
This option only appears when the option Automatic counter is
activated.
ID can be changed manually while executing the method.
This option only appears when the option Manual with default
is activated.
Manual with default* |
Automatic timestamp
Text (0...32
characters)
Text (0...32
characters)
Text (0...32
characters)
0 | 1*
Manual with default |
Automatic counter*
Text (0...32
characters)
Text (0...32
characters)
Text (0...32
characters)
6.1.6.3.4 Weighing item
In this section a target weight with tolerance limits can be defined. Depending on the selected method, the
parameters for the weighing item are defined directly in the method (Simple formulation) or in one or more
templates (Simple formulation with templates).
The following parameters can be defined:
Initial values for weighing
Parameter Explanation Values
Molar mass Molar mass of an ion is calculated by adding the atomic weight
Purity To define the purity of the component. Numeric
Numeric (1...10000 )
of the individual atoms the ion is composed of. This parameter
is needed for calculations of the units mol/L and mmol/L.
(0.001...100%)
Methods 43Precision Balances
Page 46

Unit Defines the unit of the primary weighing result. The available units
Target weight Defines the target weight. The target weight will be shown in the
Tolerance (min.) Defines the under tolerance limit.
Tolerance (max.) Defines the upper tolerance limit.
6.1.6.3.5 Templates
The following parameters can be defined:
Parameter Explanation Values
Component ID Assigns a name to the component ID Text (0...32
Molar mass Molar mass of an ion is calculated by adding the atomic weight
Purity To define the purity of the component. Numeric
Unit Defines the unit of the primary weighing result. The available units
Target weight Defines the target weight. The target weight will be shown in the
Target concentration
Tolerance (min.) Defines the under tolerance limit.
Tolerance (max.) Defines the upper tolerance limit.
depend on the balance
model.
Numeric
weighing-in aid of the balance (SmartTrac). When a target
weight including tolerances is defined, the SmartTrac indicates
if the current display weight is in tolerance or not.
Numeric
This option only appears when the option Target weight is
activated.
Numeric
This option only appears when the option Target weight is
activated.
characters)
Numeric (1...10000 )
of the individual atoms the ion is composed of. This parameter
is needed for calculations of the units mol/L and mmol/L.
(0.001...100%)
depend on the balance
model.
Numeric
weighing-in aid of the balance (SmartTrac). When a target
weight including tolerances is defined, the SmartTrac indicates
if the current display weight is in tolerance or not.
To define the concentration of the component. Numeric
(0.001...100%)
Numeric
This option only appears when the option Target weight is
activated.
Numeric
This option only appears when the option Target weight is
activated.
Note
Detailed information about how to create templates and the use of templates can be found in the section
[Using templates}Page56].
6.1.6.3.6 Weighing
The following parameters can be defined:
Methods44 Precision Balances
Page 47

Weighing settings
Parameter Explanation Values
Tolerance profile To select a tolerance profile to use in a method.
6.1.6.3.7 Automation
The following parameters can be defined:
Parameter Explanation Values
Barcode data
target
* Factory setting
By setting up tolerance profiles you can ensure weighing tasks
meet defined quality requirements and regulations. In addition,
as the same profile is used each time a specific task is carried
out, you can be sure of consistent settings to guarantee
traceable results.
If a barcode reader is connected to the balance, this option
defines how the data is to be processed.
Keyboard Input: The data is written in the currently open input
window. If no input window is open, the data is ignored.
Target weight value: The barcode data is interpreted as a value
for the target weight.
Task ID 1: The received barcode data is treated as identification
text for the Task ID.
Result ID 1: The received barcode data is treated as identification text for the Result ID.
Available tolerance
profiles are modelspecific.
Keyboard Input* |
Target weight value |
Task ID 1 | Result ID 1
Weighing automation
Parameter Explanation Values
Automatic zero
Automatic zero
threshold
Tare Mode Defines the tare mode.
Automatic tare
threshold
If Automatic zero is set to Active, the balance automatically
zeros the balance when the weight falls below a predefined
threshold.
Defines the threshold of the option Automatic zero.
This option only appears when the option Automatic zero is
activated.
None: No automatic tare.
Automatic tare: The balance stores automatically the first
stable weight as the tare weight.
Pretare: Allows you to enter manually a numerical entry of a
fixed tare weight.
Defines the threshold of the option Tare Mode.
This value defines the minimum weight that must be applied to
the weighing pan so that it is automatically stored as the tare
weight. If the weight is below the limits, it is not automatically
transferred to the tare memory.
Instead of entering the weight, the lightest tare container can be
placed on the weighing pan and the button
pressed. The applied weight is directly taken over as a limit.
This option only appears when the option Tare Mode is set to
Automatic tare.
subsequently
Active | Inactive*
Numeric
None* | Automatic tare |
Pretare
Numeric
Methods 45Precision Balances
Page 48

Pretare value Defines a weight value for the pretare function.
* Factory setting
6.1.6.3.8 Print / Export
In this section the label printout options for weighing items can be defined.
This section is divided into the following sub-sections:
• Protocol printout and data export
• Label printout for task
• Label printout for weighing item
Protocol printout and data export
The following parameters can be defined:
Automatic data output
Parameter Explanation Values
Strip printer Activates/Deactivates the strip printer. The data to be transmitted
Weight value Activates/Deactivates the weighing value character output over
* Factory setting
Instead of entering the value, the respective tare container can
be placed on the weighing pan and the button
subsequently
pressed. The weight is directly taken over as pretare value.
This option only appears when the option Tare Mode is set to
Pretare.
to the printer can be defined in the section Template settings.
USB.
Numeric
Active | Inactive*
Active | Inactive*
Protocol template for printout
Template settings
This menu item can be used to define information to appear in the protocols. The extensive menu is divided
into six submenus in which options for the printout/export can be defined. Information can be enabled or
disabled by activating or deactivating the corresponding checkbox.
Parameter Explanation
Header and
Footer
Balance information
Quality information
Defines if a header (with title, date and time) and/or footer (with signature and end line)
should be printed/exported.
Defines if the following information about the balance is being printed/exported:
• Balance type
• Balance ID
• Balance serial number
• Firmware version
Defines if quality information such as the used tolerance profile or test information is
being printed/exported.
Task information Defines if information about the task is being printed/exported.
Weighing item
Defines if information about the weighing item is being printed/exported.
information
Result detail
Defines if information relating to the result of the measurement is being printed/exported.
information
Label printout for task
In this section the settings for the label printout can be defined.
Methods46 Precision Balances
Page 49

The following parameters can be defined:
Parameter Explanation Values
Automatic label
printout for task
Activates/Deactivates the option Automatic label printout for
task.
Active | Inactive*
Used template To choose the label template. Available labels
Field settings Defines which information appears in the label fields. The
number of the label fields differ depending on the selected
template.
Barcode settings Defines which information appears in the barcode. The number
of the barcode fields differ depending on the selected template.
The option 2D barcode delimiter appears only when the
Available options
depending on the
selected template.
Available options
depending on the
selected template.
selected template in the option Used template has a 2D code.
* Factory setting
Label printout for weighing item
In this section the label printout options for weighing items can be defined. This section is similar to the
section [Label printout for task}Page38], but it does not refer to a task but to a weighing object.
Note
Supported printers for labels are P-56RUE, P-58RUE and Citizen CLS631 (for more information see section
[Accessories}Page101]).
Available labels
The following label printouts can be selected:
5 large fields 5 small fields
10 small fields 1D barcode with 3 large fields
1D barcode with 3 small fields 1D barcode with 6 small fields
2D barcode with 5 large fields 2D barcode with 5 small fields
Methods 47Precision Balances
Page 50

2D barcode with 2 large fields and 6 small fields 2D barcode with 8 small fields
Methods48 Precision Balances
Page 51

6.1.7 Piece Counting
This section describes the method Piece Counting. The method Piece Counting allows you to determine
the number of pieces put on the weighing pan. It is advantageous if all pieces are of approximately equal
weight, since the unit quantity is determined on the basis of average weight. Various methods can be used
to determine the reference unit weight.
6.1.7.1 Creating new method type Piece Counting
A stepwise wizard leads you through the creating process.
1 Open the Methods section.
2 Tap
3 Tap Method type and select the method type Piece Counting.
4 Tap
5 Follow the stepwise wizard through the creating process.
6 Tap
ð The method has been created and appears in the list.
6.1.7.2 Performing Piece Counting
1 Open the Methods section.
2 Select a defined method from the list or define a new method.
3 Tap
4 Press
5 If not yet done, enter the average weight for one piece. This serves as reference for the piece counting.
6 Place all the pieces on the weighing pan.
7 Wait until the weight is stable.
8 Tap
9 When the weighing process is finished, tap
10 When the weighing process is finished, tap
New method in the action bar.
ð The method wizard opens, starting at 1. Method type.
Next.
Save method to save the method.
Start method.
ð The method work screen of the selected method opens. The balance displays the defined target
value, the tolerance and the current average weight of one piece.
to zero the balance.
Add to protocol.
ð The weighing result is being copied to the protocol area.
ð The protocol section opens.
ð The window Complete task appears. The result of the task can be printed on a label printer, the
protocol can be printed manually or the result can be exported on an external storage device.
ð The task Piece Counting was successfully completed.
on the right hand side of the screen.
Complete.
Note
When you tap Delete protocol the current weighing process will close without saving any data. The
window Complete task always appears after completing the task, even if the results will be saved automatically.
6.1.7.3 Method settings
In this section, the settings of the method Piece Counting are being described.
The section Edit method - {0} consists of the following sub-sections:
•
General
ID format
•
Weighing item
•
Weighing
•
Methods 49Precision Balances
Page 52

Automation
•
Print / Export
•
6.1.7.3.1 General
The following parameters can be defined:
Parameter Explanation Values
Method name Defines the name of the method. The system copies the method
Comment The method can be described with a comment. Text (0...128
Lock method Locks the method for other users and from further editing while
* Factory setting
Note
The option Method type has been defined in the wizard and cannot be changed.
6.1.7.3.2 ID format
The following parameters can be defined:
Task IDs
Parameter Explanation Values
Number of task
IDs
Task ID 1 Defines the value of the task ID.
Description
Default value Defines a default value for the task ID. The value of the task ID
Prefix Defines a prefix for the task ID.
* Factory setting
name that has been defined with the function Method wizard.
running.
For a method up to three task identifiers (task IDs), such as
SOP Id, Lot Id etc. can be defined.
If the value of the option Number of task IDs is set to 1, the
options Task ID 1, Description and Prefix/Default value
appear.
Manual with default: The value of the task ID can be entered
manually at method execution time.
Automatic timestamp: The system provides a value created
from a prefix with the current date and time appended.
Describes the option Task ID 1.
can be changed manually while executing the method.
This option only appears when the option Manual with default
is activated.
This option only appears when the option Automatic
timestamp is activated.
Text (1...22
characters)
characters)
Active | Inactive*
0 | 1*
Manual with default* |
Automatic timestamp
Text (0...32
characters)
Text (0...32
characters)
Text (0...32
characters)
Result IDs
Parameter Explanation Values
Number of result
IDs
Defines the number of result IDs.
If the value of the option Number of result IDs is set to 1, the
0 | 1*
options Result ID 1, Description and Prefix/Default value
appear.
Methods50 Precision Balances
Page 53

Result ID 1 Defines the value of the result ID.
Description
Default value Defines a default value for the result ID. The value of the result
Prefix Defines a prefix for the result ID.
* Factory setting
6.1.7.3.3 Weighing item
The following parameters can be defined:
Initial values for weighing
Parameter Explanation Values
Reference PCS Defines a reference unit quantity. This allows you to determine
Reference
average weight
Target weight Defines the target weight. The target weight will be shown in the
Tolerance (min.) Defines the under tolerance limit.
Tolerance (max.) Defines the upper tolerance limit.
* Factory setting
Manual with default: The value of the result ID can be entered
manually at method execution time.
Automatic counter: The system provides a value created from
a prefix with an unique number (counter) appended.
Describes the option Result ID 1.
ID can be changed manually while executing the method.
This option only appears when the option Manual with default
is activated.
This option only appears when the option Automatic counter is
activated.
the reference unit weight with a defined, fixed number of pieces.
Defines the average weight for one piece. The average weight of
one piece serves as basis for the piece counting. During task
execution, the balance calculates the actual number of pieces
on the weighing pan based on the measured weight and the
average weight of one piece.
weighing-in aid of the balance (SmartTrac). When a target
weight including tolerances is defined, the SmartTrac indicates
if the current display weight is in tolerance or not.
This option only appears when the option Target weight is
activated.
This option only appears when the option Target weight is
activated.
Manual with default |
Automatic counter*
Text (0...32
characters)
Text (0...32
characters)
Text (0...32
characters)
Numeric (10* |
1...10000)
Numeric
Numeric
Numeric
Numeric
6.1.7.3.4 Weighing
The following parameters can be defined:
Weighing settings
Parameter Explanation Values
Tolerance profile To select a tolerance profile to use in a method.
By setting up tolerance profiles you can ensure weighing tasks
meet defined quality requirements and regulations. In addition,
as the same profile is used each time a specific task is carried
out, you can be sure of consistent settings to guarantee
traceable results.
Available tolerance
profiles are modelspecific.
Methods 51Precision Balances
Page 54

Weight capture
mode
Weight capture
delay
* Factory setting
Statistics
Activate statistics
* Factory setting
Defines the behavior when the button to add the result was
tapped or the add result was triggered by the automatic
weighing result creation.
Stable: The system waits for a stable weight.
Immediate: The system doesn’t wait for a stable weight. The
system waits for the defined amount of seconds (Weight
capture delay). After the weight capture delay, the weight value
from the weight stream is captured.
Defines the time in seconds the balance waits for capturing the
weight after the button to add the result was tapped or the add
result was triggered by the automatic weighing result creation.
This option only appears when the Weight capture mode
Immediate is selected.
If Activate statistics is set to Active, the following statistics will
be calculated:
• Count: Number of items used for the statistics.
• Sum: The displayed values are summed up.
• Minimum: The minimal displayed value.
• Maximum: The maximum displayed value.
• Average: The displayed values are summed up and divided
by the count of values summed up. The result is rounded to
the balance resolution.
• Standard deviation
• Relative standard deviation
The statistical values are calculated and visualized as soon as
a result is added or updated.
Stable* | Immediate
Numeric (5 seconds* |
0...60 seconds)
Active | Inactive*
6.1.7.3.5 Automation
The following parameters can be defined:
Parameter Explanation Values
Barcode data
target
* Factory setting
If a barcode reader is connected to the balance, this option
defines how the data is to be processed.
Keyboard Input: The data is written in the currently open input
window. If no input window is open, the data is ignored.
Target weight value: The barcode data is interpreted as a value
for the target weight.
Task ID 1: The received barcode data is treated as identification
text for the Task ID.
Result ID 1: The received barcode data is treated as identification text for the Result ID.
Keyboard Input* |
Target weight value |
Task ID 1 | Result ID 1
Methods52 Precision Balances
Page 55

Weighing automation
Parameter Explanation Values
Automatic result Automatically generates a weighing result after a threshold is
reached.
None: No automatic result will be generated.
Without sample tare: After a weight value that reached the
threshold is being removed from the weighing pan, the balance
is not being tared.
Automatic result
threshold
Weight trigger
Automatic zero
Automatic zero
threshold
Tare Mode Defines the tare mode.
Automatic tare
threshold
Pretare value Defines a weight value for the pretare function.
* Factory setting
Defines the threshold of the option Automatic result.
This option only appears when the option Automatic result is
activated.
Defines the behaviour of the option Automatic result threshold.
Exceeding: The weighing result is generated when the weight
exceeds the defined threshold.
Falling below: The weighing result is generated when the
weight falls below the defined threshold.
This option only appears when the option Automatic result is
set to Without sample tare.
If Automatic zero is set to Active, the balance automatically
zeros the balance when the weight falls below a predefined
threshold.
Defines the threshold of the option Automatic zero.
This option only appears when the option Automatic zero is
activated.
None: No automatic tare.
Automatic tare: The balance stores automatically the first
stable weight as the tare weight.
Pretare: Allows you to enter manually a numerical entry of a
fixed tare weight.
Defines the threshold of the option Tare Mode.
This value defines the minimum weight that must be applied to
the weighing pan so that it is automatically stored as the tare
weight. If the weight is below the limits, it is not automatically
transferred to the tare memory.
Instead of entering the weight, the lightest tare container can be
placed on the weighing pan and the button
pressed. The applied weight is directly taken over as a limit.
This option only appears when the option Tare Mode is set to
Automatic tare.
Instead of entering the value, the respective tare container can
be placed on the weighing pan and the button
pressed. The weight is directly taken over as pretare value.
This option only appears when the option Tare Mode is set to
Pretare.
subsequently
subsequently
None* | Without
sample tare
Numeric
Exceeding* | Falling
below
Active | Inactive*
Numeric
None* | Automatic tare |
Pretare
Numeric
Numeric
6.1.7.3.6 Print / Export
In this section the options for printing and exporting can be defined.
Methods 53Precision Balances
Page 56

This section is divided into the following sub-sections:
• Protocol printout and data export
• Label printout for task
• Label printout for weighing item
Protocol printout and data export
In this section the settings for printout protocol and export can be defined.
The following parameters can be defined:
Automatic data output
Parameter Explanation Values
Strip printer Activates/Deactivates the strip printer. The data to be transmitted
Active | Inactive*
to the printer can be defined in the section Template settings.
Weight value Activates/Deactivates the weighing value character output over
Active | Inactive*
USB.
* Factory setting
Protocol template for printout
Template settings
This menu item can be used to define information to appear in the protocols. The extensive menu is divided
into six submenus in which options for the printout/export can be defined. Information can be enabled or
disabled by activating or deactivating the corresponding checkbox.
Parameter Explanation
Header and
Footer
Balance information
Quality information
Defines if a header (with title, date and time) and/or footer (with signature and end line)
should be printed/exported.
Defines if the following information about the balance is being printed/exported:
• Balance type
• Balance ID
• Balance serial number
• Firmware version
Defines if quality information such as the used tolerance profile or test information is
being printed/exported.
Task information Defines if information about the task is being printed/exported.
Weighing item
Defines if information about the weighing item is being printed/exported.
information
Result detail
Defines if information relating to the result of the measurement is being printed/exported.
information
Label printout for task
In this section the settings for the label printout can be defined.
The following parameters can be defined:
Parameter Explanation Values
Automatic label
printout for task
Activates/Deactivates the option Automatic label printout for
task.
Active | Inactive*
Used template To choose the label template. Available labels
Field settings Defines which information appears in the label fields. The
number of the label fields differ depending on the selected
template.
Available options
depending on the
selected template.
Methods54 Precision Balances
Page 57

Barcode settings Defines which information appears in the barcode. The number
of the barcode fields differ depending on the selected template.
The option 2D barcode delimiter appears only when the
Available options
depending on the
selected template.
selected template in the option Used template has a 2D code.
* Factory setting
Label printout for weighing item
In this section the label printout options for weighing items can be defined. This section is similar to the
section Label printout for task, but it does not refer to a task but to a weighing object.
Available labels
The following label printouts can be selected:
5 large fields 5 small fields
10 small fields 1D barcode with 3 large fields
1D barcode with 3 small fields 1D barcode with 6 small fields
2D barcode with 5 large fields 2D barcode with 5 small fields
2D barcode with 2 large fields and 6 small fields 2D barcode with 8 small fields
Methods 55Precision Balances
Page 58

6.1.8 Using templates
This section describes how to work with templates.
Working with templates simplifies the task and improves the quality of the whole working process. Charac-
teristic information such as a certain target weight can be defined in a template and must not be defined for
every single weighing task. This may safe time especially when the weighing process consists of multiple
steps.
The methods General Weighing with templates and Simple formulation with templates are methods in
which templates are being used.
6.1.8.1 Defining templates
Before a template can be used in the weighing process, it must be defined. There are two ways to define
templates:
• The templates can be defined directly in the method creating process.
• The templates can be defined ad-hoc during a task.
Note
Defining templates is a single step in the method creating process. In this section we only describe how to
create templates. For more information about how defining a method see in the sections of the different
methods.
6.1.8.1.1 Defining templates in the method defining process
This example describes how to define a template for the method General Weighing with templates.
1 Open the Methods section.
2 Tap
3 Select Method type General Weighing with templates.
4 Step through the method wizard until step 4. Templates.
5 Tap Unit to select the template unit.
6 Tap Target weight to define the target weight.
7 Tap Tolerance (min.) to define the lower tolerance.
8 Tap Tolerance (max.) to define the upper tolerance.
9 Tap
10 Tap
ð The method has been created and appears in the method list.
New method.
ð The dialog screen 4. Templates appears, the sample 1 can be defined.
ð The options Tolerance (min.) and Tolerance (max.) appear.
Next.
Save method.
Note
This example only describes how to create templates for the method General Weighing with templates. For
the other methods there might be several other options that can be defined.
6.1.8.1.2 Defining templates in a current task
It is also possible to create templates ad-hoc in a current task. This example describes how to create
templates for the method General Weighing, respectively for the method General Weighing with
templates.
1 Start the method General Weighing.
2 Perform 3 weighings and add the results to the protocol by tapping
ð The results are being transferred to the Protocol section.
ð Tap
3 Tap
Methods56 Precision Balances
on the right side of the screen to open the Protocol section.
More.
Add to protocol.
Page 59

4 Tap
5 Define Method name.
6 Tap
ð The method General Weighing has changed to the method General Weighing with templates. Tap the
Save as method with templates.
OK.
results in the section Protocol and define the options for the template.
6.1.8.2 Working with templates
After the template has been created within a method, it can be used in a task.
1 Open the Methods section.
2 Select a method from the list or define a new method.
3 Tap
Start method.
ð The method work screen opens. The target weight and the tolerance limits that have been defined in
the template appear.
6.2 Tests
In this section routine tests such as sensitivity tests, repeatability tests or eccentricity tests can be defined,
edited and performed. Routine tests can be performed to ensure accurate weighing results according to
GWP® or other QM systems. Therefore the tests should be performed in fixed, regular intervals depending
on your QM system and the results should be documented in a traceable way.
Navigation:
Methods > Tests
6.2.1 Sensitivity test
The sensitivity of the balance defines the degree of responsiveness to a change of load. In other words the
sensitivity defines the minimal variation in mass the balance can detect. Therefore, a mass smaller than the
sensitivity of a balance will not be detectable. The sensitivity test allows you to measure the sensitivity using
one or two test points.
The following test types are available:
• Sensitivity - 1test point: To test sensitivity of the balance with one test weight.
• Sensitivity - 2test points: To test sensitivity of the balance with two test weights.
• Sensitivity - Tare - 1test point: To test sensitivity of the balance with two test weights. The first test
weight (tare weight) is used to simulate a tare container.
• Sensitivity - Tare - 2test points: To test sensitivity of the balance with three test weights. The first test
weight (tare weight) is used to simulate a tare container.
6.2.2 Repeatability test
The repeatability test calculates the mean and standard deviation of a series of measurements with a single
test weight in order to determine the repeatability of the balance.
Repeatability is a measure of the ability of a balance to supply the same result in repetitive weighings with
one and the same load under the same measurement conditions. During the test, the same load is placed
and measured in different parts of the weighing pan. Afterwards, the difference between the measured
weight values is calculated. The spread of the measured results implies the repeatability.
Note
Repeatability is highly affected by the ambient conditions (drafts, temperature fluctuations and vibrations)
and also by the skill of the person performing the weighing. Therefore, the series of measurements must be
carried out by the same operator, in the same location, under constant ambient conditions and without
interruption.
The following test types are available:
• Repeatability - 1test point: To test repeatability of the balance without tare weight.
Methods 57Precision Balances
Page 60

• Repeatability - Tare - 1test point: To test repeatability of the balance with tare weight. The first test
11
22
33 44
55
weight (tare weight) is used to simulate a tare container.
6.2.3 Eccentricity test
The purpose of the eccentricity test is to ensure that every eccentric load deviation (corner-load deviation) is
within the necessary user SOP tolerances. The corner-load is the deviation of the measurement value
through off-center (eccentric) loading. The corner-load increases with the weight of the load and its distance
from the center of the pan support. If the display remains consistent, even when the same load is placed on
different parts of the weighing pan, the balance does not have corner-load deviation.
6.2.4 Creating a test
Before a test can be performed, the test has to be created and the test settings have to be defined. A test
wizard is leading you step-by-step through the creation process.
To create a test proceed as follows:
1 Open the Methods section.
2 Tap
3 Tap
4 Select the test type.
5 Work through the process by using the button
For information concerning the settings for the different test types see the following chapters:
• [Sensitivity test settings}Page58]
• [Repeatability test settings}Page62]
• [Eccentricity test settings}Page65]
Tests.
New.
ð The wizard Create new test starts.
back to the step before.
The result corresponds to the highest of the four determined eccentric load
deviations (2–5).
Next to go to the next step or the button Back to go
6.2.5 Performing a test
To perform a test proceed as follows:
1 Open the Methods section.
2 Tap
Tests.
ð The test(s) previously defined appear on the list.
3 Select the test you wish to perform and tap
Start
ð The test sequence starts. Follow the instructions.
ð When the test was successfully finished, the test results can be exported or printed.
6.2.6 Test settings
6.2.6.1 Sensitivity test settings
The following parameters can be defined:
Methods58 Precision Balances
Page 61

1. Name and type
Parameter Explanation Values
Test type The test type has been pre-defined and cannot be changed in
this menu.
Name Defines the name of the test. Text (1...22
Test activated Enables/disables the test. Active*| Inactive
Show prepa-
ration
instructions
Automatic print When activated test results are immediately printed after the test
* Factory setting
2. Test specification
Parameter Explanation Values
Result calculation
* Factory setting
If activated, a predefined preparatory instruction is displayed in
the test sequence.
result has been calculated on the enabled printer.
Select whether the nominal weight or the conventional mass
value (CMV) is used for the result calculation.
On nominal weight: Nominal value of a weight with a specific
weight class.
On actual weight (CMV): Conventional mass value (CMV) of a
weight from the weight calibration certificate.
Available test types
characters)
Active*| Inactive
Active | Inactive*
On nominal weight* |
On actual weight
(CMV)
Tare
Note
This section only appears when the option Test type is set to Sensitivity - Tare - 1test point or Sensitivity
- Tare - 2test points.
Parameter Explanation Values
Tare name Defines a name for the tare weight. Text (1...22
characters)
Minimum tare
weight
Test point
Depending on the selected test, the following options can be defined for one or two test points:
Parameter Explanation Values
Nominal weight Defines the value for the nominal weight. The nominal weight is
Weight class Defines the weight class according to OIML or ASTM. E1 | E2 | F1 | F2 | M1 |
Defines the minimum weight for the tare container. The test is
only continued if a tare container with at least this weight is
placed on the balance.
defined as the expected weight of the measured object.
Numeric
Numeric
M2 | M3 | ASTM000 |
ASTM00 | ASTM0 |
ASTM0 | ASTM1 |
ASTM2 | ASTM3 |
ASTM4 | ASTM5 |
ASTM6 | ASTM7 | Own*
Methods 59Precision Balances
Page 62

Control limit Defines the control limit.
The control limit is the error tolerance of a process with respect
to its set value. Exceeding the control limit is a violation of
quality requirements and therefore requires a correction of the
process.
Result if the control limit is exceeded: The test failed, the
balance is out of specification.
Warning limit Defines the warning limit.
The warning limit is an upper or lower limit, which if exceeded
or not reached, makes more stringent process monitoring
necessary. The warning limit has to be smaller than the control
limit.
Result if the warning limit is exceeded: The test is passed, but
the difference is higher than expected.
* Factory setting
3. Test weights
In this section a test weight must be defined. For information concerning the test weight settings see
[Defining external test weights}Page69].
4. Error management
Parameter Explanation Values
Block balance Defines the behavior of the balance if a test has failed.
Active: The balance will be blocked after a specified amount of
failed tests. In this case, the balance cannot be used anymore
until a user with the appropriate right unblocks the balance.
Inactive: Blocking is not activated.
Allowed number
of retries
* Factory setting
Defines the maximum allowed retries until the balance will be
blocked.
Numeric | 0.2 %*
(0.001 ... 100%)
Numeric | (0.001 ...
100%)
Active| Inactive*
Numeric (3* | 0...9)
5. Test planning
Parameter Explanation Values
Planning type Specifies the schedule for the test to be performed.
Manually: The test must be performed manually.
Daily: The test will be performed automatically every day at the
specified time.
Weekly: The test is performed automatically at least once a
week. Additional days can be selected if required.
Monthly: The test will be performed automatically every month
at the specified day and time.
Quarterly: The test will be performed automatically every three
months at the specified time.
Annually: The test will be performed automatically once a year
at the specified time.
Start time Defines the start time for executing the task. Time
* Factory setting
Notification
Note
This section does not appear when the option Planning type is set to Manually.
Manually* | Daily |
Weekly | Monthly |
Quarterly | Annually
Methods60 Precision Balances
Page 63

Parameter Explanation Values
(x) hours before
test
Defines the time period before the notification informs about the
upcoming expiry date.
Different values
depending on the
selected frequency
(Planning type).
Notification every
(x) hours
Defines the time interval before the next notification is issued. Different values
depending on the
selected frequency
(Planning type).
Preferred days
Note
This option only appears when the option Planning type is set to Weekly.
Parameter Explanation Values
Preferred days Defines the preferred weekday for the execution of the test. Monday | Tuesday |
Wednesday | Thursday
| Friday | Saturday |
Sunday
Preferred day for execution
Note
This section only appears when the option Planning type is set to Monthly.
Day Defines the preferred day for execution of the test. None*| Monday|
Tuesday| Wednesday|
Thursday| Friday|
Saturday| Sunday
Occurrence of
day
Defines the occurrence of a given day of week within a month. First* | Second | Third |
Fourth
* Factory setting
Methods 61Precision Balances
Page 64

6.2.6.2 Repeatability test settings
The following parameters can be defined:
1. Name and type
Parameter Explanation Values
Test type The test type has been pre-defined and cannot be changed in
this menu.
Name Defines the name of the test. Text (1...22
Test activated Enables/disables the test. Active*| Inactive
Show prepa-
ration
instructions
Automatic print When activated test results are immediately printed after the test
* Factory setting
2. Test specification
Parameter Explanation Values
Result calculation
Number of
repetitions
* Factory setting
If activated, a predefined preparatory instruction is displayed in
the test sequence.
result has been calculated on the enabled printer.
Select whether the nominal weight or the conventional mass
value (CMV) is used for the result calculation.
On nominal weight: Nominal value of a weight with a specific
weight class.
On actual weight (CMV): Conventional mass value (CMV) of a
weight from the weight calibration certificate.
Defines the number of weight measurements of a series. Numeric 10* | (2...15)
Available test types
characters)
Active*| Inactive
Active | Inactive*
On nominal weight* |
On actual weight
(CMV)
Tare
Note
This section only appears when the option Test type is set to Repeatability - Tare - 1test point.
Parameter Explanation Values
Tare name Defines a name for the tare weight. Text (1...22
characters)
Minimum tare
weight
* Factory setting
Test point
Parameter Explanation Values
Nominal weight Defines the value for the nominal weight. The nominal weight is
Weight class Defines the weight class according to OIML or ASTM. E1 | E2 | F1 | F2 | M1 |
* Factory setting
Defines the minimum weight for the tare container. The test is
only continued if a tare container with at least this weight is
placed on the balance.
defined as the expected weight of the measured object.
Numeric
Numeric
M2 | M3 | ASTM000 |
ASTM00 | ASTM0 |
ASTM0 | ASTM1 |
ASTM2 | ASTM3 |
ASTM4 | ASTM5 |
ASTM6 | ASTM7 | Own*
Methods62 Precision Balances
Page 65

Test limits
Parameter Explanation Values
Control limit Defines the control limit.
The control limit is the error tolerance of a process with respect
to its set value. Exceeding the control limit is a violation of
quality requirements and therefore requires a correction of the
process.
Result if the control limit is exceeded: The test failed, the
balance is out of specification.
Warning limit Defines the warning limit.
The warning limit is an upper or lower limit, which if exceeded
or not reached, makes more stringent process monitoring
necessary. The warning limit has to be smaller than the control
limit.
Result if the warning limit is exceeded: The test is passed, but
the difference is higher than expected.
* Factory setting
3. Test weights
In this section a test weight must be defined. For information concerning the test weight settings see
[Defining external test weights}Page69].
4. Error management
Parameter Explanation Values
Block balance Defines the behavior of the balance if a test has failed.
Active: The balance will be blocked after a specified amount of
failed tests. In this case, the balance cannot be used anymore
until a user with the appropriate right unblocks the balance.
Inactive: Blocking is not activated.
Allowed number
of retries
* Factory setting
Defines the maximum allowed retries until the balance will be
blocked.
Numeric | 0.2 %*
(0.001 ... 100%)
Numeric | (0.001 ...
100%)
Active| Inactive*
Numeric (3* | 0...9)
5. Test planning
Parameter Explanation Values
Planning type Specifies the schedule for the test to be performed.
Manually: The test must be performed manually.
Daily: The test will be performed automatically every day at the
specified time.
Weekly: The test is performed automatically at least once a
week. Additional days can be selected if required.
Monthly: The test will be performed automatically every month
at the specified day and time.
Quarterly: The test will be performed automatically every three
months at the specified time.
Annually: The test will be performed automatically once a year
at the specified time.
Start time Defines the start time for executing the task. Time
* Factory setting
Manually* | Daily |
Weekly | Monthly |
Quarterly | Annually
Methods 63Precision Balances
Page 66

Notification
Note
This section does not appear when the option Planning type is set to Manually.
Parameter Explanation Values
(x) hours before
test
Defines the time period before the notification informs about the
upcoming expiry date.
Different values
depending on the
selected frequency
(Planning type).
Notification every
(x) hours
Defines the time interval before the next notification is issued. Different values
depending on the
selected frequency
(Planning type).
Preferred days
Note
This option only appears when the option Planning type is set to Weekly.
Parameter Explanation Values
Preferred days Defines the preferred weekday for the execution of the test. Monday | Tuesday |
Wednesday | Thursday
| Friday | Saturday |
Sunday
Preferred day for execution
Note
This section only appears when the option Planning type is set to Monthly.
Parameter Explanation Values
Day Defines the preferred day for execution of the test. None*| Monday|
Tuesday| Wednesday|
Thursday| Friday|
Saturday| Sunday
* Factory setting
Methods64 Precision Balances
Page 67

6.2.6.3 Eccentricity test settings
1. Name and type
The following parameters can be defined:
Parameter Explanation Values
Test type The test type has been pre-defined and cannot be changed in
this menu.
Name Defines the name of the test. Text (1...22
Test activated Enables/disables the test. Active*| Inactive
Show prepa-
ration
instructions
Automatic print When activated test results are immediately printed after the test
* Factory setting
2. Test specification
The following parameters can be defined:
Parameter Explanation Values
Result calculation
* Factory setting
If activated, a predefined preparatory instruction is displayed in
the test sequence.
result has been calculated on the enabled printer.
Select whether the nominal weight or the conventional mass
value (CMV) is used for the result calculation.
On nominal weight: Nominal value of a weight with a specific
weight class.
On actual weight (CMV): Conventional mass value (CMV) of a
weight from the weight calibration certificate.
Available test types
characters)
Active*| Inactive
Active | Inactive*
On nominal weight* |
On actual weight
(CMV)
Test point
The following parameters can be defined:
Parameter Explanation Values
Nominal weight Defines the value for the nominal weight. The nominal weight is
defined as the expected weight of the measured object.
Weight class Defines the weight class according to OIML or ASTM. E1 | E2 | F1 | F2 | M1 |
* Factory setting
Eccentricity limits
Parameter Explanation Values
Control limit Defines the control limit.
The control limit is the error tolerance of a process with respect
to its set value. Exceeding the control limit is a violation of
quality requirements and therefore requires a correction of the
process.
Result if the control limit is exceeded: The test failed, the
balance is out of specification.
Numeric
M2 | M3 | ASTM000 |
ASTM00 | ASTM0 |
ASTM0 | ASTM1 |
ASTM2 | ASTM3 |
ASTM4 | ASTM5 |
ASTM6 | ASTM7 | Own*
Numeric | 0.2 %*
(0.001 ... 100%)
Methods 65Precision Balances
Page 68

Warning limit Defines the warning limit.
The warning limit is an upper or lower limit, which if exceeded
or not reached, makes more stringent process monitoring
necessary. The warning limit has to be smaller than the control
limit.
Result if the warning limit is exceeded: The test is passed, but
the difference is higher than expected.
* Factory setting
3. Test weights
In this section a test weight must be defined. For information concerning the test weight settings see
[Defining external test weights}Page69].
4. Error management
The following parameters can be defined:
Parameter Explanation Values
Block balance Defines the behavior of the balance if a test has failed.
Active: The balance will be blocked after a specified amount of
failed tests. In this case, the balance cannot be used anymore
until a user with the appropriate right unblocks the balance.
Inactive: Blocking is not activated.
Allowed number
of retries
* Factory setting
Defines the maximum allowed retries until the balance will be
blocked.
Numeric | (0.001 ...
100%)
Active| Inactive*
Numeric (3* | 0...9)
5. Test planning
The following parameters can be defined:
Parameter Explanation Values
Planning type Specifies the schedule for the test to be performed.
Manually: The test must be performed manually.
Daily: The test will be performed automatically every day at the
specified time.
Weekly: The test is performed automatically at least once a
week. Additional days can be selected if required.
Monthly: The test will be performed automatically every month
at the specified day and time.
Quarterly: The test will be performed automatically every three
months at the specified time.
Annually: The test will be performed automatically once a year
at the specified time.
Start time Defines the start time for executing the task. Time
* Factory setting
Notification
Note
This section does not appear when the option Planning type is set to Manually.
The following parameters can be defined:
Manually* | Daily |
Weekly | Monthly |
Quarterly | Annually
Methods66 Precision Balances
Page 69

Parameter Explanation Values
(x) hours before
test
Notification every
(x) hours
Preferred days
Note
This option only appears when the option Planning type is set to Weekly.
The following parameters can be defined:
Parameter Explanation Values
Preferred days Defines the preferred weekday for the execution of the test. Monday | Tuesday |
Preferred day for execution
Note
This section only appears when the option Planning type is set to Monthly.
The following parameters can be defined:
Parameter Explanation Values
Day Defines the preferred day for execution of the test. None*| Monday|
* Factory setting
Defines the time period before the notification informs about the
upcoming expiry date.
Defines the time interval before the next notification is issued. Different values
Different values
depending on the
selected frequency
(Planning type).
depending on the
selected frequency
(Planning type).
Wednesday | Thursday
| Friday | Saturday |
Sunday
Tuesday| Wednesday|
Thursday| Friday|
Saturday| Sunday
6.3 Adjustments
This section describes how internal and external adjustments can be defined and performed.
Navigation:
6.3.1 Internal adjustment
6.3.1.1 Editing internal adjustment
This section describes how to edit the function Internal adjustment. There is no wizard function, the subsections must be defined manually.
1 Open the Methods section.
2 Tap
3 Select the defined adjustment.
4 Tap
5 Select Internal adjustment.
6 Define the adjustment parameters.
ð Tap
Methods > Adjustments
Adjustments.
Edit.
OK when all the parameters have been defined.
Methods 67Precision Balances
Page 70

6.3.1.2 Performing internal adjustment
After the internal adjustment has been defined, it can be performed.
1 Open the Methods section.
2 Tap
3 Tap the internal adjustment.
4 Tap
5 Tap
6 Tap
Adjustments.
Start.
ð The function Internal adjustment is being executed.
ð When the adjustment has been completed, an overview of the adjustment results appears.
Print to print the results.
Finish adjustment.
6.3.1.3 Parameters
1. Strategy
The following parameters can be defined:
Parameter Explanation Values
Strategy Defines the adjustment method.
When the options No adjustment or External adjustment are
activated other options are not available.
Automatic print When activated adjustment results are immediately printed after
the result has been calculated on the enabled strip printer.
* Factory setting
Internal adjustment* |
External adjustment |
No adjustment
Active| Inactive*
2. Specification
Parameter Explanation Values
'As found' test At the start of the adjustment sequence, an internal test (sensi-
tivity) is performed to ascertain the actual status. The input test
has automatically started when the adjustment sequence is
activated and the result is displayed and recorded.
'As left' test When the adjustment is complete, an internal test (sensitivity)
is performed.
* Factory setting
Limits
Note
This settings only appear when one of the options 'As found' test or 'As left' test is activated.
Parameter Explanation Values
Control limit Defines the control limit.
The control limit is the error tolerance of a process with respect
to its set value. Exceeding the control limit is a violation of
quality requirements and therefore requires a correction of the
process.
Result if the control limit is exceeded: The adjustment failed, the
balance is out of specification.
Active| Inactive*
Active| Inactive*
Numeric | 0.1 %*
(0.001 ... 100%)
Methods68 Precision Balances
Page 71

Warning limit Defines the warning limit.
The warning limit is an upper or lower limit, which if exceeded
or not reached, makes more stringent process monitoring
necessary. The warning limit has to be smaller than the control
limit.
Result if the warning limit is exceeded: The adjustment is
passed, but the difference is higher than expected.
* Factory setting
3. Error management
Parameter Explanation Values
Block balance Defines the behavior of the balance if the adjustment has failed.
Active: The balance will be blocked after the adjustment has
failed. In this case, the balance can not be used anymore until
a user with the appropriate right unblocks the balance.
Inactive: The balance will not be blocked.
* Factory setting
4. Planning
Parameter Explanation Values
Start after
leveling
Start after
temperature
change
Schedule Defines when the adjustment is being performed. It is possible
Start time Defines the start time for executing the task. Time
Preferred days Defines the days for the scheduled adjustments.
* Factory setting
Defines if the internal adjustment starts after leveling. Active| Inactive*
Defines if the internal adjustment starts after a temperature
change.
to define several start times (1-3) per day. It can also be
defined on what day/s the adjustment is being performed.
This section only appears with a defined start time.
Numeric
(0.001...100%)
Active| Inactive*
Active| Inactive*
Inactive*| 1 start time|
2 start times| 3 start
times
Monday| Tuesday|
Wednesday|
Thursday| Friday|
Saturday| Sunday
6.3.2 External adjustment
Note
Because of certification legislation, approved balances cannot be adjusted with an external weight
(depending on the certification legislation of the selected country).
6.3.2.1 Editing external adjustment
Compared to the function Internal adjustment there are no options for the function External adjustment
that can be defined. The weighing process cannot be planned as in the function Internal adjustment
because there are external weights being used. However, the test weights for the function External
adjustment need to be defined.
6.3.2.2 Defining external test weights
1 Open the Methods section.
2 Tap
3 Select the option External adjustment.
Adjustments.
Methods 69Precision Balances
Page 72

4 Tap
5 Tap
6 Define the test weight settings and confirm with
Edit test weights.
ð The dialogue Edit test weights appears.
New test weight.
6.3.2.3 Parameters
The following parameters can be defined:
Parameter Explanation Values
Test weight
name
Test weight ID Defines the test weight ID. Text (1...22
Nominal weight Defines the value for the nominal weight. The nominal weight is
Weight class Defines the weight class according to OIML or ASTM. E1 | E2 | F1 | F2 | M1 |
Actual weight Defines the actual weight. The actual weight is a specific weight
Next calibration
date
Certificate Defines if the certificate is activated or deactivated. Active | Inactive*
Certificate ID Defines the certificate ID.
Certificate date Defines the certificate date.
Weight set ID Defines the weight set ID. Text (1...22
* Factory setting
OK.
Defines the name of the test weight. Text (1...22
characters)
characters)
Numeric
defined as the expected weight value of the weight.
M2 | M3 | ASTM000 |
ASTM00 | ASTM0 |
ASTM0 | ASTM1 |
ASTM2 | ASTM3 |
ASTM4 | ASTM5 |
ASTM6 | ASTM7 | Own*
Numeric
with a specific Conventional Mass Value (CMV) from the weight
calibration certificate.
Defines the date of the next calibration date. Date
Text (1...22
This option only appears when the option Certificate ID is set
to Active.
This option only appears when the option Certificate ID is set
to Active.
characters)
Date
characters)
6.3.2.4 Performing external adjustment
After the external weights have been defined, the function External adjustment can be performed.
1 Open the Methods section..
2 Tap
3 Tap the external adjustment.
4 Tap
5 The results of the adjustment process can be printed.
Methods70 Precision Balances
Adjustments.
Start.
ð The adjustment process starts. Follow the instructions on the screen.
Page 73

7 Balance Menu
In the section Balance menu the basic settings of the balance can be defined. These settings are of a
general character and are not directly related to any specific method. To open the section Balance menu tap
the button
The section Balance menu is devided into the following sub-sections:
• Leveling aid (see section [Leveling aid}Page71])
• History (see section [History}Page71])
• Balance info (see section [Balance info}Page72])
• Settings (see section [Settings}Page72])
• Maintenance (see section [Maintenance}Page78])
7.1 Leveling aid
Exact horizontal positioning and stable installation are prerequisites for repeatable and accurate weighing
results. With the option Leveling aid the balance can be leveled.
For detailed information see section Leveling the balance.
Navigation:
Note
When using an L weighing platform tap Change orientation depending if the terminal is installed on the
long side or on the short side of the weighing platform.
Note
To guarantee correct weighing results the balance must always be leveled. After leveling the balance an
internal adjustment must be performed.
on the right hand side of the touch screen.
Balance menu > Leveling aid
7.2 History
The balance permanently records the tests and adjustments that are performed. In the section History
detailed information about performed adjustments, tests and service modifications can be displayed.
Navigation:
The section History is divided into the following sub-sections:
• Adjustments (see section [Adjustments}Page71])
• Tests (see section [Tests}Page71])
• Service (see section [Service}Page72])
7.2.1 Adjustments
In the section Adjustments a list of the performed adjustments is displayed. Tap into the list to display
detailed information about a specific adjustment. Tap
defined date range or by a user ID. Tap
History.
Navigation:
7.2.2 Tests
In the section Tests a list of the performed tests is displayed. Tap into the list to display detailed information
about a specific test. Tap
Print to print the list or tap Close to return to the section History.
Navigation:
Balance menu > History
Filter to filter the performed adjustments by a
Print to print the list or tap Close to return to the section
Balance menu > History > Adjustments
Filter to filter the performed tests by a defined date range or by a user ID. Tap
Balance menu > History > Tests
Balance Menu 71Precision Balances
Page 74

7.2.3 Service
In the section Service a list of executed services is displayed. Tap into the list to display detailed information about the service action. Tap
or by technician. Tap
History.
Navigation:
7.3 Balance info
The section Balance info shows numerous information about the balance such as version numbers,
maintenance information and used licenses.
Navigation:
7.4 Settings
Filter to filter the performed service actions by a defined date range
Print to print the list of service actions. Tap Close to return to the section
Balance menu > History > Service
Balance menu > Balance info
Navigation:
The section Settings is divided into the following sub-sections:
Balance (see section [Balance}Page72])
•
Interfaces (see section [Interfaces}Page77])
•
Devices / Printers (see section [Devices / Printers}Page78])
•
LabX / Services (see section [LabX / Services}Page78])
•
Note
The system settings can be printed by tapping
screen.
Balance menu > Settings
7.4.1 Balance
Navigation:
The section Balance consists of the following sub-sections:
Weighing instrument (see section [Weighing instrument}Page72])
•
Weighing / Quality (see section [Weighing / Quality}Page72])
•
Date / Time / Language / Format (see section [Date / Time / Language / Format}Page75])
•
Screen / StatusLight / Sound (see section [Screen / StatusLight / Sound}Page76])
•
General (see section [General}Page76])
•
7.4.1.1 Weighing instrument
Balance menu > Settings > Balance
Print the settings in the action bar at the bottom of the
The following parameters can be defined:
Parameter Explanation Values
Leveling warning
* Factory setting
Defines the behaviour of the option Leveling warning.
When the option Forced leveling is selected and the balance is
out of level, a weighing value cannot be added to the protocol
(green button disabled).
Inactive | Optional
leveling* | Forced
leveling
7.4.1.2 Weighing / Quality
In this section the quality settings for the weighing process can be defined.
The following parameters can be defined:
Balance Menu72 Precision Balances
Page 75

Parameter Explanation Values
Tolerance
profiles
By setting up tolerance profiles you can ensure weighing tasks
meet defined quality requirements and regulations. In addition,
as the same profile is used each time a specific task is carried
out, you can be sure of consistent settings to guarantee
traceable results.
This option has several sub-sections and is described later in
this chapter.
Automatic weight
value output
Defines if and in which manner (MT-SICS or HID) the weighing
values should be exported.
This option has several sub-sections and is described later in
this chapter.
GWP Approved
mode
Good Weighing Practice (GWP®) is a program started by
METTLER TOLEDO to help customers operate their weighing
Active | Inactive*
equipment in a safe and efficient way. It covers every relevant
step in the life cycle of the instrument and provides clear
guidance on how to specify, calibrate and operate weighing
instruments.
The GWP Approved mode observes if the following conditions
are given:
• Use of an appropriate tolerance profile.
• FACT was successful.
• Required tests were successful.
• Setting up of enforced leveling.
• No MinWeigh violation.
If all conditions are given, the balance adds the GWP Approved
sign behind every weighing result.
The GWP Approved mode can only be enabled by a METTLER
TOLEDO service technician.
Balance recalibration reminder
Days in advance Defines the number of days before the reminder informs about
Action when
calibration
expired
Defines whether the user is reminded about the upcoming
exipry date of the calibration.
the upcoming expiry date.
Defines the action when the calibration has expired.
Block: The balance will be blocked. In this case, the balance
can not be used anymore until a user with the appropriate right
Active* | Inactive
Days (30 days* |
0...400 days)
None* | Block
unblocks the balance.
Days before
blocking
Test weight
recalibration
Defines the number of days before the reminder informs about
the upcoming blocking of the balance.
Defines whether the user is reminded about the upcoming
expiry date of the test weight calibration.
Days (0 days* |
0...400 days)
Active | Inactive*
reminder
Days in advance Defines the number of days before the reminder informs about
the upcoming expiry date.
Service reminder Defines whether the user is reminded about the upcoming due
Days (30 days* |
0...400 days)
Active | Inactive*
date of the service.
Days in advance Defines the number of days before the reminder informs about
the upcoming due date.
Days (30 days* |
0...400 days)
* Factory setting
Tolerance profiles
In this section profiles for weighing settings and tolerances can be defined.
Balance Menu 73Precision Balances
Page 76

Creating Tolerance profile
1 Tap
2 Define the profile settings.
3 When all the settings have been defined, tap
By tapping an existing profile, its settings can be changed, the profile can be deleted or be set as default
value. Several profiles can be created. A default profile must be selected.
The following parameters can be defined:
Parameter Explanation Values
Name Defines the name of the profile. Text (0...22
Calibration
certificate
Environment Defines the environmental conditions of the balance.
Weighing mode Defines the filter settings of the balance.
Value release Defines how fast a measured value is recognized by the
Display
readability
Zero drift
compensation
New to create a new profile.
OK.
ð The system returns to the profile list and the new profile appears on the list.
Note
To select a calibration certificate. Calibration certificate |
Stable: For an environment which is practically free from drafts
and vibrations.
Standard: For an average working environment subject to
moderate variations in the ambient conditions.
Unstable: For an environment where the conditions are continuously changing.
Universal: For all standard weighing applications.
Sensor mode: Depending on the setting of the ambient
conditions, this setting delivers a filtered weighing signal of
varying strength. The filter has a linear characteristic in relation
to time (not adaptive) and is suitable for continuous measured
value processing.
Dynamic: The dynamic weighing function determines the
average weight of a moving sample.
balance as stable and released.
Very fast: For fast value release with increased repeatability.
Very reliable: For extended settling time with low repeatability.
Determines the readability [d] of the balance display.
1d: Shows the maximum resolution
2d: Shows the final digit in increments of 2
5d: Shows the final digit in increments of 5
10d: 10x smaller resolution
100d: 100x smaller resolution
1000d: 1000x smaller resolution
The function Zero drift compensation performs ongoing
corrections of deviations from zero which may occur, for
example, as a result of small amounts of dirt on the weighing
pan.
This menu option is not available for "Approved balances", as
the settings are predefined.
characters)
None*
Stable| Standard|
Unstable
Universal* | Sensor
mode | Dynamic
Very fast* | Fast | Fast
and reliable | Reliable |
Very reliable
1d* | 2d | 5d | 10d |
100d | 1000d
Active*| Inactive
Balance Menu74 Precision Balances
Page 77

Allowed units Defines the units that are allowed in this tolerance profile. The available values
are model-specific.
* Factory setting
Automatic weight value output
The balance can be connected to a PC with a USB cable. That way, the weighing data can be transferred to
the PC and weighing results can be directly transferred into an application (e.g. Microsoft Excel).
The following parameters can be defined:
Parameter Explanation Values
Target Defines the way the weighing values are transferred.
HID: Transfers simple character streams (e.g. weight values) to
a desktop computer without installing additional drivers
(comparable to a keyboard). The format of a transferred
weighing value can be configured.
MT-SICS: The data is transferred in MT-SICS format (METTLER
TOLEDO Standard Interface Command Set). MT-SICS operates
bidirectional, i.e. the balance can also receive confirmations or
commands from the host. A separate reference manual is
available for MT-SICS.
Weight field
length
Sign Defines if the weighing result is displayed with an algebraic
Sign position Defines if the algebraic sign is positioned at the first place of the
Decimal delimiter Defines the character used to separate the whole and fractional
Net indicator In the standard output format, net weights are not specially
Net indicator field
length
Unit Defines if a weighing unit is being shown in the weighing field. Active* | Inactive
Unit field length Defines the field length of the weighing unit.
Field delimiter Defines a character or sequence of characters to separate data
End of line
character
* Factory setting
Defines the number of digits that will be transferred into the
application on the PC, e.g. into an Excel field
sign.
For all values: Each weighing result is preceded by a plus or
minus sign.
For negative values: Only negative values are preceded by a
minus sign. Positive values are transferred without algebraic
sign.
weight field or directly in front of the weight digits.
part of a numeric value.
marked. To place an N in front of net weights, this function can
be activated. The net symbol is left-justified in the field.
Defines the field length of the Net indicator.
This option only appears when the option Net indicator is set
to Active.
This option only appears when the option Unit is set to Active.
fields.
Defines a character or sequence of characters signifying the
end of a line.
HID* | MT-SICS | Both
Numeric (1* | 0...20)
For all values | For
negative values*
Left of weight field | Left
of weight digits*
, | .*
Active | Inactive*
Numeric (2*| 1 ... 2)
Numeric (1*| 1...6)
No* | TAB | , | ;
CRLF* | CR | LF | TAB |
No | Enter
7.4.1.3 Date / Time / Language / Format
The following parameters can be defined:
Balance Menu 75Precision Balances
Page 78

Parameter Explanation Values
Date Defines the current date. Use the pick buttons Increment/
Decrement to define the date.
Time Defines the current time.
Use the pick buttons Increment/Decrement to define the time.
Language Defines the language of the interface navigation. English| Deutsch|
Time zone To select a time zone. see list on the screen
Date format To select the date format. D.MMM.YYYY* | MMM
Time format To select the time format. 24:MM* | 12:MM |
Keyboard layout Defines the language of the keyboard layout. English| German|
* Factory setting
Date
Time
Français| 日本語| 中
文| Español| Italiano|
Русский| Português|
Polski| Magyar|
Čeština
D YYYY | DD.MM.YYYY |
MM/DD/YYYY | YYYY-
MM-DD | YYYY/MM/DD
24.MM | 12.MM
French| Spanish|
Japanese| Simplified
Chinese| Russian|
Czech| Polish|
Hungarian
7.4.1.4 Screen / StatusLight / Sound
The following parameters can be defined:
Parameter Explanation Values
Screen
brightness
Sound volume Defines the volume of the terminal sound. Inactive | 20% | 40%
Sound on key
press
Sound on info Defines if there is a sound when an information appears on the
Sound on
warning
Sound on error Defines is there is a sound in case of an error. Active* | Inactive
StatusLight Activates/deactivates the status light. Active* | Active (without
StatusLight
brightness
* Factory setting
Defines the brightness of the display. 20 % | 40 % | 60 % |
Defines if there is a sound when a key is pressed. Active* | Inactive
screen.
Defines is there is a sound when a warning appears on the
screen.
Defines the brightness of the activated status light.
This option appears only when the option StatusLight is set to
Active or Active (without green light).
80 %* | 100 %
| 60%* | 80% |
100%
Active* | Inactive
Active* | Inactive
green light) | Inactive
20 % | 40 % | 60 %* |
80 % | 100 %
7.4.1.5 General
The following parameters can be defined:
Balance Menu76 Precision Balances
Page 79

Parameter Explanation Values
Balance ID Defines the ID of the balance. Text (0...22
Standby Activates/deactivates the automatic standby mode.
Wait time Defines after how many minutes the balance switches automat-
Firmware update
on system startup
Automatic export
directory
* Factory setting
7.4.2 Interfaces
In this section the settings for the interfaces can be defined.
Navigation:
The section Interfaces is divided into the following sub-section(s):
Ethernet
•
characters)
Active* | Inactive
Active: The standby mode becomes active after a configurable
time period the balance was not used.
Inactive: The standby mode has to be activated manually by
tapping the ON/OFF button.
Numeric (15 minutes* |
ically in standby mode when not used.
This option is only activated when the option Standby is set to
Active.
With this option activated the update of the firmware can be
performed from a USB storage device.
Defines the target directory for the automatic export. USB storage device*
Balance menu > Settings > Interfaces
0...60 minutes)
Active* | Inactive
7.4.2.1 Ethernet
In this section the settings for the option Ethernet can be defined.
With the option DHCP activated, the parameters for the ethernet connection will be automatically set. With
the option Manual activated, the options for the ethernet connection must be set manually by the user.
Navigation:
The following parameters can be defined:
Parameter Explanation Values
Host name Shows the balance host name. The host name can be defined
MAC address Information on the MAC address (Media Access Control) that is
Network configuration
IP address If the IP is not to be automatically obtained, you can enter it
Subnet mask Defines the subnet mask which is used by the TCP/IP protocol
DNS server
(primary)
DNS server
(secondary)
Balance menu > Settings > Interfaces > Ethernet
Numeric (22* | 0 ...
via Settings > General > Balance ID.
used to uniquely identify the balance in the network.
DHCP: The parameters for the ethernet connection will be
automatically set.
Manual: The options for the ethernet connection must be set
manually by the user.
here.
to determine whether a host is on the local subnet or on a
remote network.
Defines the domain name server address of the primary server. 000.000.000.000 …
Defines the domain name server address of the secondary DNS
server.
22)
-
DHCP*| Manual
000.000.000.000 …
255.255.255.255
000.000.000.000 …
255.255.255.255
255.255.255.255
000.000.000.000 …
255.255.255.255
Balance Menu 77Precision Balances
Page 80

Default gateway Defines the address of the default gateway which links the
host's subnet to other networks.
7.4.3 Devices / Printers
In this section external devices such as printers, barcode scanners, ErgoSens, foot switches, anti-static kits
as well as PCs or MT-SICS hosts can be added and configured.
Navigation:
Balance menu > Settings > Devices / Printers
7.4.4 LabX / Services
In this section, the options for LabX and services can be defined.
To enable communication between LabX and instruments, the appropriate settings in the instruments must
correspond with the settings in LabX.
LabX synchronizes the date and time on the instruments with the LabX Server each time a connection is
made and each time a task is started. When an instrument is connected, the user interface language on the
connected instrument is changed to the language currently installed on the LabX installation.
Navigation:
The following parameters can be defined:
Parameter Explanation Values
LabX service
Keyboard layout Defines the language of the keyboard layout. English| German|
Port Defines the port for a network connection of the balance to
MT-SICS service
Port Defines the port for a network connection of the balance to MT-
Balance menu > Settings > LabX / Services
Network: A network connection to LabX will be established on
startup.
Inactive: No connection to LabX will be established.
USB: A USB connection to LabX will be established on startup.
LabX. Port 8014 is proposed by default. The port number must
be entered when adding an instruments in LabX.
Network: A network connection to MT-SICS will be established
on startup.
Inactive: No connection to MT-SICS will be established.
USB client: A USB connection to MT-SICS will be established
on startup.
SICS. Port 8014 is proposed by default. The port number must
be entered when adding an instruments in MT-SICS.
000.000.000.000 …
255.255.255.255
Network| Inactive*|
USB
French| Spanish|
Japanese| Simplified
Chinese| Russian|
Czech| Polish|
Hungarian
1024…65535
Network| Inactive*|
USB client
(8001*| 1024…
65535
7.5 Maintenance
In this section maintenance-specific settings can be defined.
Navigation:
The section Maintenance is divided into the following sub-sections:
• Import / Export (see section [Import / Export}Page79])
• Firmware update (see section [Firmware update}Page79])
• Reset (see section [Reset}Page80])
• Service (see section [Service}Page80])
Balance Menu78 Precision Balances
Balance menu > Maintenance
Page 81

7.5.1 Import / Export
In the section Import / Export data such as balance settings or defined methods can be imported or
exported to other balances. The data can be imported/exported via an external USB storage device or within
a network.
Navigation:
7.5.1.1 Exporting data and settings
Balance menu > Maintenance > Import / Export
1 Select
2 Tap
ð The window Export data and settings appears.
3 Select the data type(s) you want to export.
4 Plug in the USB storage device.
5 Tap
ð A list of available USB storage devices opens.
6 Select the target USB storage device to store the data.
7 Tap
ð The system exports the data to the USB storage device. If the export process was successful, the
8 Tap
Export data and settings.
Next.
Export.
Next.
screen shows
Close to finish the process.
with the file name and its target folder.
7.5.1.2 Importing data and settings
With the function Import data and settings settings from other balances can be transferred to this balance.
It is also possible to re-import settings that have been exported.
1 Select
2 Plug in the USB storage device with the data to import.
3 Tap
ð A list of available USB storage devices opens.
4 Select the USB storage device with the data to import.
5 Tap
6 Select the data file you want to import.
7 Tap
8 Select the data type/s you want to import.
Import data and settings.
Next.
Next.
Next.
Note
When importing methos it can be selected if the imported methods will replace all existing methods or if the
imported methods can be selected individually.
Note
The imported data categories will replace the current data categories on the balance. Make sure that the
existing data categories can be replaced.
9 Tap
10 Tap
ð The message Import of data and settings has been executed. appears. The import was successful.
Import.
Next.
Close to return to the method work screen.
Tap
7.5.2 Firmware update
This section shows information about the current firmware version that is currently installed on the balance.
The firmware can be updated or it can be rolled back to a previous version.
Navigation:
Balance menu > Maintenance > Firmware update
Balance Menu 79Precision Balances
Page 82

NOTICE
Firmware update causes data loss.
After a firmware update all saved data and user settings will be deleted. Save all relevant
data before the update.
7.5.2.1 Updating the firmware
In this section the balance firmware can be updated. Select Update firmware and tap
wizard will lead you stepwise through the whole updating process.
7.5.2.2 Restoring the firmware to the previous version
In this section the current firmware version can be rolled back to the previous software version. Select
Restore the firmware to the previous version. and tap
wizard.
7.5.3 Reset
In this section the balance firmware can be reset to the factory state.
Navigation:
Balance menu > Maintenance > Reset
NOTICE
Reset causes data loss
Resetting the balance will delete all user application data and set the user configuration
back to factory state.
Note
The history data for Changes, Tests and Adjustments will not be affected by resetting the balance. If you
want to delete these data, activate the option Also delete change history, test and adjustment history.
7.5.3.1 Resetting the balance
Next. An update
Next. This process is guided by a stepwise
1 To delete the change history data and the data for test history and adjustment history, activate the option
Also delete change history, test and adjustment history.
2 Tap
3 Tap
Next.
ð The window Reset balance opens and warns that some data will be lost by resetting the balance.
Reset balance.
ð The balance firmware restarts in factory state.
7.5.4 Service
In this section the settings for the service menu can be defined.
Navigation:
7.5.4.1 View adjustment state
In this section a list of adjustment states appears.
7.5.4.2 Save support file
In this section support files can be saved on external USB storage devices.
7.5.4.3 Import log configuration
To import log configuration data from an external USB storage device.
Balance menu > Maintenance > Service
Balance Menu80 Precision Balances
Page 83

8 Maintenance
8.1 Cleaning
We recommend periodically cleaning the draft shield, the weighing platform, and the terminal. For cleaning
the weighing chamber use the brush supplied with it. The maintenance interval depends on your standard
operating procedure (SOP). The balance is made of high-quality, resistant materials and can therefore be
cleaned with a commercially available, mild cleaning agent.
WARNING
Danger of death or serious injury due to electric shock!
Contact with parts that contain a live current can lead to injury and death. If the device
cannot be shut down in an emergency situation, people can be injured or the device can
be damaged.
1 Disconnect the device from the power supply prior to cleaning and maintenance.
2 Only use METTLER TOLEDO power cables, if these need to be replaced.
3 Make sure that no liquid enters the device or AC/DC adapter.
4 Do not open the device or AC/DC adapter. These do not contain any user-serviceable
parts.
NOTICE
Damage of the balance due to the use of inappropriate cleaning agents!
− On no account use cleaning agents which contain solvents or abrasive ingredients, as
this can result in damage to the terminal overlay.
Note
Please contact your METTLER TOLEDO dealer for details of the available service options. Regular servicing
by an authorized service engineer ensures constant accuracy for years to come and prolongs the life of your
balance.
8.2 Disposal
In conformance with the European Directive 2012/19/EU on Waste Electrical and
Electronic Equipment (WEEE) this device may not be disposed of in domestic waste. This
also applies to countries outside the EU, per their specific requirements.
Please dispose of this product in accordance with local regulations at the collecting point
specified for electrical and electronic equipment. If you have any questions, please contact
the responsible authority or the distributor from which you purchased this device. Should
this device be passed on to other parties (for private or professional use), the content of
this regulation must also be related.
Thank you for your contribution to environmental protection.
Maintenance 81Precision Balances
Page 84

9 Troubleshooting
GWP
GWP
GWP
9.1 System messages icons
Balance system messages can appear due to a user action, user input or a system process. Some
messages leave it up to the user to choose upon acting, they will disappear after acknowledging. Other
messages remain persistent, such that the user can sometimes defer them but eventually has to handle
them. These messages can be looked up in the Main Status Bar on the upper righthand side.
The balance is out of level. The balance must be leveled. Information about leveling the
balance can be found in the section Leveling the balance.
When the balance is leveled the symbol
Information Information messages appear due to user actions or system
processes and offer opportunities that are related to the action
or process.
Warning Warning messages appear due to user actions or system
processes that could lead to a problem and can be prevented.
Error Error messages appear due to user actions or system
processes that have failed. It is mostly still possible to handle
such a problem.
9.2 Weight status icons
Weight status icons appear due to the weight value matching certain quality criteria. The information on the
status can be looked up by tapping on any of the visible weight status icons.
Stability indicator When the stability indicator appears, the balance is not stable.
Make sure that the balance is placed in an adequate location.
Information about the adequate location can be found in the
section Selecting the location.
Net indicator Appears when the tare key has been pressed and the tare
weight has been subtracted.
appears.
Minimum weight violation The current weight value violates the defined minimum weight
definition. Make sure that the weight is not below the minimum
weight.
Calculated value The current weight value is calculated. The symbol only
appears when a container has been used with the function
Pretare.
Balance invalid The current balance configuration is invalid or quality criteria
have not been fulfilled according to the GWP approved
definition.
Weight not ready The current weight measurement is not ready according to the
GWP approved definition. This can be caused by a violation of
the minimum weight, an overload or an underload.
Weight ready The current weight measurement is ready according to the GWP
approved definition. It can be added to the protocol.
Troubleshooting82 Precision Balances
Page 85

9.3 What to do if...?
Symptom Countermeasure
The following symbol appears
on the screen:
Underload
• Check if the weighing pan is positioned correctly.
The following symbol appears
on the screen:
The screen remains dark after
switching on the balance.
The balance cannot be
levelled.
The weighing pan does slightly
move.
An external device doesn't
work.
Overload
• Reduce the sample weight.
• Ensure that the terminal is correctly connected to the weighing
platform.
• Ensure that the balance in correctly connected to the power supply.
• If the problem persists, contact a METTLER TOLEDO representative.
• Ensure that the terminal connection cable is not squeezed between the
levelling foot and the bottom of the weighing platform.
• If the problem persists, contact a METTLER TOLEDO representative.
• Ensure that the weighing pan is correctly placed on the weighing
platform.
• When using a SmartPan weighing pan make sure that the SmartPan
weighing pan is locked.
• Ensure that the device is correctly connected.
• Ensure that the device is correctly configured in the system settings of
the balance.
• Ensure that the settings of the device are correctly configured.
• If the problem persists, contact a METTLER TOLEDO representative.
Troubleshooting 83Precision Balances
Page 86

10 Technical Data
FCC Rules
This device complies with Industry Canada licence-exempt RSS standard(s) and part 15 of the FCC Rules.
Operation is subject to the following two conditions: (1) this device may not cause interference, and (2)
this device must accept any interference, including interference that may cause undesired operation of the
device.
Changes or modifications not expressly approved by the party responsible for compliance could void the
user's authority to operate the equipment.
This equipment has been tested and found to comply with the limits for a Class A digital device, pursuant to
part 15 of the FCC Rules. These limits are designed to provide reasonable protection against harmful interference when the equipment is operated in a commercial environment. This equipment generates, uses, and
can radiate radio frequency energy and, if not installed and used in accordance with the instruction manual,
may cause harmful interference to radio communications. Operation of this equipment in a residential area
is likely to cause harmful interference in which case the user will be required to correct the interference at his
own expense.
Technical Data84 Precision Balances
Page 87

10.1 General technical data
10.1.1 S Platform
Power supply
AC adapter: Primary: 100 – 240VAC, 50/60 Hz
Cable for AC adapter: 3-core, with country-specific plug
Balance power supply: 12 VDC ±3%, 2.25 A, maximum ripple: 80 mVpp
Protection and standards
Overvoltage category: II
Degree of pollution: 2
Protection: Only use indoors in dry locations
Standards for safety and EMC: See Declaration of Conformity
Range of application: For use only in closed interior rooms
Environmental conditions
Height above mean sea level: Up to 5000m
Ambient temperature: 5–40°C
Relative air humidity: Max. 80% up to 31°C, linearly decreasing to 50% at 40°C,
Warm-up time:
Secondary: 12VDC ±3%, min. 2.5A, max. 6.0 A (with
electronic overload protection)
noncondensing
At least 30 minutes after connecting the balance to the power
supply; when switched on from standby-mode, the balance is
ready for operation immediately
Materials
Housing: Die-cast aluminum, lacquered, plastic and chrome steel
Terminal: Die-cast zinc, chromed and plastics
Weighing pan: Chrome-nickel steel X2CrNiMo-17-12-2
SmartPan with drip tray Die-cast zinc, chromed (5 mg and 10 mg models)
Draft shield: Aluminum, plastic, chrome steel and glass
Draft shield element: Chrome steel X2CrNiMo-17-13-2 (0.1 mg models)
Technical Data 85Precision Balances
Page 88

10.1.2 L Platform
Power supply
AC adapter: Primary: 100 – 240VAC, 50/60 Hz
Cable for AC adapter: 3-core, with country-specific plug
Balance power supply: 12 VDC ±3%, 2.25 A, maximum ripple: 80 mVpp
Protection and standards
Overvoltage category: II
Degree of pollution: 2
Protection: Only use indoors in dry locations
Standards for safety and EMC: See Declaration of Conformity
Range of application: For use only in closed interior rooms
Environmental conditions
Height above mean sea level: Up to 5000m
Ambient temperature: 5–40°C
Relative air humidity: Max. 80% up to 31°C, linearly decreasing to 50% at 40°C,
Warm-up time:
Secondary: 12VDC ±3%, min. 2.5A, max. 6.0 A (with
electronic overload protection)
noncondensing
At least 30 minutes after connecting the balance to the power
supply; when switched on from standby-mode, the balance is
ready for operation immediately
Materials
Housing: Sheet aluminum, die cast, lacquered, plastic and chrome steel
Terminal: Die-cast zinc, chromed and plastics
Weighing pan: Chrome-nickel steel X2CrNiMo-17-12-2
SmartPan with drip tray Die-cast zinc, chromed (10 mg models)
Technical Data86 Precision Balances
Page 89

10.2 Model-specific data
10.2.1 S platform
10.2.1.1 Readability 1 mg, with MagicCube Draft Shield and SmartPan
XSR303S XSR603S XSR1203S
Limit Values
Maximum capacity 310 g 610 g 1210 g
Readability 1 mg 1 mg 1 mg
Maximum capacity in fine range - - Readability in fine range - - Tare range (from…to) 0 … 310 g 0 … 610 g 0 … 1210 g
Repeatability (sd) 0.9 mg (100 g) 0.9 mg (200 g) 0.8 mg (500 g)
Repeatability in fine range (sd) - - Linearity deviation 2 mg (50 g) 2 mg (200 g) 2 mg (200 g)
Eccentricity deviation (test load)
Sensitivity offset (at nominal load)
Sensitivity temperature drift
Sensitivity stability
3)
Typical values
Repeatability (sd) 0.5 mg 0.5 mg 0.4 mg
Repeatability in fine range (sd) - - Linearity deviation 0.6 mg 0.6 mg 0.6 mg
Eccentricity deviation (test load)
Sensitivity offset (at nominal load)
USP minimum sample weight (k=2, U=0.10%) 1g 1g 820mg
USP minimum sample weight in fine range (k=2,
U=0.10%)
Minimum sample weight (k=2, U=1%) 100mg 100mg 82mg
Minimum sample weight in fine range (k=2, U=1%) - - Settling time 1.5 s 1.5 s 1.5 s
Settling time in fine range - - -
Dimensions & other specifications
Balance dimensions (W × D × H) 197 × 391 × 281 mm 197 × 391 × 281 mm 197 × 391 × 281 mm
Weighing pan dimensions (W × D) 127 × 127 mm 127 × 127 mm 127 × 127 mm
Usable height of draft shield 175 mm 175 mm 175 mm
Weight of the balance 7 kg 7 kg 7 kg
Weights for routine testing
OIML CarePac #11123001 #11123007 #11123008
Weights 200 g F2, 10 g F1 500 g F2, 20 g F1 1000 g F2, 50 g F1
ASTM CarePac #11123101 #11123107 #11123108
Weights 200 g 1, 10 g 1 500 g 1, 20 g 1 1000 g 1, 50 g 1
2)
1)
3)
3 mg (100 g) 3 mg (200 g) 3 mg (500 g)
6 mg (300 g) 4.5 mg (600 g) 6 mg (1.2 kg)
0.0005 %/°C 0.0002 %/°C 0.0002 %/°C
0.0025 %/a 0.001 %/a 0.001 %/a
2)
1)
1 mg (100 g) 1 mg (200 g) 1 mg (500 g)
1.2 mg (300 g) 1.2 mg (600 g) 1.5 mg (1.2 kg)
- - -
sd = Standard deviation
1)
After adjustment with internal reference weight
3)
In the temperature range 10 ... 30 °C
2)
According to OIML R76
Technical Data 87Precision Balances
Page 90

10.2.1.2 Readability 1 mg, with SmartPan
Limit Values
Maximum capacity 310 g 610 g
Readability 1 mg 1 mg
Maximum capacity in fine range - Readability in fine range - Tare range (from…to) 0 … 310 g 0 … 610 g
Repeatability (sd) 0.9 mg (100 g) 0.9 mg (200 g)
Repeatability in fine range (sd) - Linearity deviation 2 mg (50 g) 2 mg (200 g)
Eccentricity deviation (test load)
Sensitivity offset (at nominal load)
Sensitivity temperature drift
Sensitivity stability
3)
Typical values
Repeatability (sd) 0.5 mg 0.5 mg
Repeatability in fine range (sd) - Linearity deviation 0.6 mg 0.6 mg
Eccentricity deviation (test load)
Sensitivity offset (at nominal load)
USP minimum sample weight (k=2, U=0.10%) 1 g 1 g
USP minimum sample weight in fine range (k=2, U=0.10%) - Minimum sample weight (k=2, U=1%) 100 mg 100 mg
Minimum sample weight in fine range (k=2, U=1%) - Settling time 1.5 s 1.5 s
Settling time in fine range - -
Dimensions & other specifications
Balance dimensions (W × D × H) 194 × 391 × 102 mm 194 × 391 × 102 mm
Weighing pan dimensions (W × D) 127 × 127 mm 127 × 127 mm
Weight of the balance 5.4 kg 5.4 kg
Weights for routine testing
OIML CarePac #11123001 #11123007
Weights 200 g F2, 10 g F1 500 g F2, 20 g F1
ASTM CarePac #11123101 #11123107
Weights 200 g 1, 10 g 1 500 g 1, 20 g 1
2)
1)
3)
2)
1)
XSR303SN XSR603SN
3 mg (100 g) 3 mg (200 g)
6 mg (300 g) 4.5 mg (600 g)
0.0005 %/°C 0.0002 %/°C
0.0025 %/a 0.001 %/a
1 mg (100 g) 1 mg (200 g)
1.2 mg (300 g) 1.2 mg (600 g)
sd = Standard deviation
1)
After adjustment with internal reference weight
3)
In the temperature range 10 ... 30 °C
2)
According to OIML R76
Technical Data88 Precision Balances
Page 91

10.2.1.3 Readability 10 mg, with SmartPan
Limit Values
Maximum capacity 1210 g 2.1 kg 4.1 kg
Readability 0.01 g 0.01 g 0.01 g
Maximum capacity in fine range - - Readability in fine range - - Tare range (from…to) 0 … 1210 g 0 … 2.1 kg 0 … 4.1 kg
Repeatability (sd) 8 mg (500 g) 8 mg (1kg) 8 mg (2 kg)
Repeatability in fine range (sd) - - Linearity deviation 20 mg (200 g) 20 mg (500 g) 20 mg (1kg)
Eccentricity deviation (test load)
Sensitivity offset (at nominal load)
Sensitivity temperature drift
Sensitivity stability
3)
Typical values
Repeatability (sd) 4 mg 4 mg 4 mg
Repeatability in fine range (sd) - - Linearity deviation 6 mg 6 mg 6 mg
Eccentricity deviation (test load)
Sensitivity offset (at nominal load)
USP minimum sample weight (k=2, U=0.10%) 8.2 g 8.2 g 8.2 g
USP minimum sample weight in fine range (k=2,
U=0.10%)
Minimum sample weight (k=2, U=1%) 820 mg 820 mg 820 mg
Minimum sample weight in fine range (k=2, U=1%) - - Settling time 1.2 s 1.2 s 1.2 s
Settling time in fine range - - -
Dimensions & other specifications
Balance dimensions (W × D × H) 194 × 391 × 102 mm 194 × 391 × 102 mm 194 × 391 × 102 mm
Weighing pan dimensions (W × D) 172 × 205mm 172 × 205mm 172 × 205mm
Weight of the balance 7.9 kg 7.9 kg 7.9 kg
Weights for routine testing
OIML CarePac #11123008 #11123009 #11123010
Weights 1000 g F2, 50 g F2 2 kg F2, 100 g F2 2 kg F2, 200 g F2
ASTM CarePac #11123108 #11123109 #11123110
Weights 1000 g 1, 50 g 1 2 kg 1, 100 g 1 2 kg 4, 200 g 4
2)
1)
3)
2)
1)
XSR1202S XSR2002S XSR4002S
20 mg (500 g) 30 mg (1kg) 30 mg (2 kg)
60 mg (1200 g) 60 mg (2 kg) 60 mg (4 kg)
0.0003 %/°C 0.0003 %/°C 0.0003 %/°C
0.0025 %/a 0.0025 %/a 0.0015 %/a
6 mg (500 g) 10 mg (1kg) 10 mg (2 kg)
15 mg (1200 g) 25 mg (2 kg) 25 mg (4 kg)
- - -
sd = Standard deviation
1)
After adjustment with internal reference weight
3)
In the temperature range 10 ... 30 °C
2)
According to OIML R76
Technical Data 89Precision Balances
Page 92

XSR6002S XSR6002SDR XSR10002S
Limit Values
Maximum capacity 6.1 kg 6.1 kg 10.1 kg
Readability 0.01 g 0.1 g 0.01 g
Maximum capacity in fine range - 1200 g Readability in fine range - 0.01 g Tare range (from…to) 0 … 6.1 kg 0 … 6.1 kg 0 … 10.1 kg
Repeatability (sd) 8 mg (2 kg) 60 mg (2 kg) 8 mg (5 kg)
Repeatability in fine range (sd) - 8 mg (500 g) Linearity deviation 20 mg (1 kg) 60 mg (1 kg) 20 mg (2 kg)
Eccentricity deviation (test load)
Sensitivity offset (at nominal load)
Sensitivity temperature drift
Sensitivity stability
3)
2)
1)
3)
30 mg (2 kg) 100 mg (2 kg) 40 mg (5 kg)
60 mg (6 kg) 150 mg (6 kg) 50 mg (10 kg)
0.0003 %/°C 0.0003 %/°C 0.00025 %/°C
0.0015 %/a 0.0015 %/a 0.0015 %/a
Typical values
Repeatability (sd) 4 mg 40 mg 4 mg
Repeatability in fine range (sd) - 5 mg Linearity deviation 6 mg 20 mg 6 mg
Eccentricity deviation (test load)
Sensitivity offset (at nominal load)
2)
1)
10 mg (2 kg) 30 mg (2 kg) 12 mg (5 kg)
12 mg (6 kg) 30 mg (6 kg) 12 mg (10 kg)
USP minimum sample weight (k=2, U=0.10%) 8.2 g 82 g 8.2 g
USP minimum sample weight in fine range (k=2,
- 8.2 g -
U=0.10%)
Minimum sample weight (k=2, U=1%) 0.82 g 10 g 0.82 g
Minimum sample weight in fine range (k=2, U=1%) - 1 g Settling time 1.2 s 1.2 s 1.5 s
Settling time in fine range - 1.2 s -
Dimensions & other specifications
Balance dimensions (W × D × H) 194 × 391 × 102 mm 194 × 391 × 102 mm 194 × 391 × 102 mm
Weighing pan dimensions (W × D) 170 × 203 mm 170 × 203 mm 170 × 203 mm
Weight of the balance 7.9 kg 7.9 kg 7.5 kg
Weights for routine testing
OIML CarePac #11123011 #11123011 Weights 5 kg F2, 200 g F2 5 kg F2, 200 g F2 10 kg F2, 500 g F2
ASTM CarePac #11123111 #11123111 Weights 5 kg 4, 200 g 4 5 kg 4, 200 g 4 10 kg 4, 500 g 4
sd = Standard deviation
1)
After adjustment with internal reference weight
3)
In the temperature range 10 ... 30 °C
2)
According to OIML R76
Technical Data90 Precision Balances
Page 93

10.2.1.4 Readability 0.1 g
Limit Values
Maximum capacity 4.1 kg 6.1 kg
Readability 0.1 g 0.1 g
Maximum capacity in fine range - Readability in fine range - Tare range (from…to) 0 … 4.1 kg 0 … 6.1 kg
Repeatability (sd) 80 mg (2 kg) 80 mg (2 kg)
Repeatability in fine range (sd) - Linearity deviation 60 mg (1 kg) 60 mg (2 kg)
Eccentricity deviation (test load)
Sensitivity offset (at nominal load)
Sensitivity temperature drift
Sensitivity stability
Typical values
Repeatability (sd) 40 mg 40 mg
Repeatability in fine range (sd) - Linearity deviation 20 mg 20 mg
Eccentricity deviation (test load)
Sensitivity offset (at nominal load)
USP minimum sample weight (k=2, U=0.10%) 82 g 82 g
USP minimum sample weight in fine range (k=2, U=0.10%) - Minimum sample weight (k=2, U=1%) 8.2 g 8.2 g
Minimum sample weight in fine range (k=2, U=1%) - Settling time 0.8 s 0.8 s
Settling time in fine range - -
Dimensions & other specifications
Balance dimensions (W × D × H) 194 × 391 × 99 mm 194 × 391 × 99 mm
Weighing pan dimensions (W × D) 190 × 223 mm 190 × 223 mm
Weight of the balance 6.3 kg 6.3 kg
Weights for routine testing
OIML CarePac #11123010 #11123011
Weights 2 kg F2, 200 g F2 5 kg F2, 200 g F2
ASTM CarePac #11123110 #11123111
Weights 2 kg 4, 200 g 4 5 kg 4, 200 g 4
3)
XSR4001S XSR6001S
2)
1)
3)
200 mg (2 kg) 200 mg (2 kg)
240 mg (4 kg) 240 mg (6 kg)
0.0015 %/°C 0.0015 %/°C
0.005 %/a 0.005 %/a
2)
1)
60 mg (2 kg) 60 mg (2 kg)
50 mg (4 kg) 50 mg (6 kg)
sd = Standard deviation
1)
After adjustment with internal reference weight
3)
In the temperature range 10 ... 30 °C
2)
According to OIML R76
Technical Data 91Precision Balances
Page 94

XSR8001S XSR10001S
Limit Values
Maximum capacity 8.1 kg 10.1 kg
Readability 0.1 g 0.1 g
Maximum capacity in fine range - Readability in fine range - Tare range (from…to) 0 ... 8.1 kg 0 … 10.1 kg
Repeatability (sd) 80 mg (5 kg) 80 mg (5 kg)
Repeatability in fine range (sd)
1)
- Linearity deviation 100 mg (2 kg) 100 mg (2 kg)
Eccentricity deviation (test load)
Sensitivity offset (at nominal load)
Sensitivity temperature drift
Sensitivity stability
3)
2)
1)
3)
200 mg (5 kg) 200 mg (5 kg)
600 mg (8 kg) 500 mg (10 kg)
0.0015 %/°C 0.0015 %/°C
0.005 %/a 0.005 %/a
Typical values
Repeatability (sd) 40 mg 40 mg
Repeatability in fine range (sd) - Linearity deviation 30 mg 30 mg
Eccentricity deviation (test load)
Sensitivity offset (at nominal load)
2)
1)
60 mg (5 kg) 60 mg (5 kg)
120 mg (8 kg) 120 mg (10 kg)
USP minimum sample weight (k=2, U=0.10%) 82 g 82 g
USP minimum sample weight in fine range (k=2, U=0.10%) - Minimum sample weight (k=2, U=1%) 8.2 g 8.2 g
Minimum sample weight in fine range (k=2, U=1%) - Settling time 1 s 1 s
Settling time in fine range - -
Dimensions & other specifications
Balance dimensions (W × D × H) 194 × 391 × 99 mm 194 × 391 × 99 mm
Weighing pan dimensions (W × D) 190 × 223 mm 190 × 223 mm
Weight of the balance 6.3 kg 6.3 kg
Weights for routine testing
OIML CarePac #11123011 Weights 5 kg F2, 200 g F2 10 kg F2, 500 g F2
ASTM CarePac #11123111 Weights 5 kg 4, 200 g 4 10 kg 4, 500 g 4
sd = Standard deviation
1)
After adjustment with internal reference weight
3)
In the temperature range 10 ... 30 °C
2)
According to OIML R76
Technical Data92 Precision Balances
Page 95

10.2.2 L platform
10.2.2.1 Readability 0.1 g
Limit Values
Maximum capacity 10.1 kg 16.1 kg
Readability 0.1 g 0.1 g
Maximum capacity in fine range - Readability in fine range - Tare range (from…to) 0 … 10.1 kg 0 ... 16.1 kg
Repeatability (sd) 80 mg (5 kg) 80 mg (5 kg)
Repeatability in fine range (sd) - Linearity deviation 200 mg (2 kg) 200 mg (4 kg)
Eccentricity deviation (test load)
Sensitivity offset (at nominal load)
Sensitivity temperature drift
Sensitivity stability
Typical values
Repeatability (sd) 40 mg 40 mg
Repeatability in fine range (sd) - Linearity deviation 60 mg 60 mg
Eccentricity deviation (test load)
Sensitivity offset (at nominal load)
USP minimum sample weight (k=2, U=0.10%) 82 g 82 g
USP minimum sample weight in fine range (k=2, U=0.10%) - Minimum sample weight (k=2, U=1%) 8.2 g 8.2 g
Minimum sample weight in fine range (k=2, U=1%) - Settling time 1.5 s 1.5 s
Settling time in fine range - -
Dimensions & other specifications
Balance dimensions (W × D × H) 360 × 412 × 122 mm 360 × 412 × 122 mm
Weighing pan dimensions (W × D) 360 × 280 mm 360 × 280 mm
Weight of the balance 10.1 kg 10.1 kg
Weights for routine testing
OIML CarePac - Weights 10 kg F2, 500 g F2 10 kg F2, 500 g F2
ASTM CarePac - Weights 10 kg 4, 500 g 4 10 kg 4, 500 g 4
3)
XSR10001L XSR16001L
2)
1)
3)
300 mg (5 kg) 300 mg (5 kg)
500 mg (10 kg) 800 mg (16 kg)
0.0015 %/°C 0.0015 %/°C
0.005 %/a 0.005 %/a
2)
1)
100 mg (5 kg) 100 mg (5 kg)
120 mg (10 kg) 120 mg (16 kg)
sd = Standard deviation
1)
After adjustment with internal reference weight
3)
In the temperature range 10 ... 30 °C
2)
According to OIML R76
Technical Data 93Precision Balances
Page 96

XSR32001L XSR32001LDR
Limit Values
Maximum capacity 32.1 kg 32.1 kg
Readability 0.1 g 1 g
Maximum capacity in fine range - 6.4 kg
Readability in fine range - 0.1 g
Tare range (from…to) 0 … 32.1 kg 0 … 32.1 kg
Repeatability (sd) 80 mg (10 kg) 600 mg (10 kg)
Repeatability in fine range (sd) - 100 mg (5 kg)
Linearity deviation 300 mg (5 kg) 300 mg (5 kg)
Eccentricity deviation (test load)
Sensitivity offset (at nominal load)
Sensitivity temperature drift
Sensitivity stability
3)
2)
1)
3)
300 mg (10 kg) 1 g (10 kg)
960 mg (32 kg) 960 mg (32 kg)
0.001 %/°C 0.001 %/°C
0.003 %/a 0.003 %/a
Typical values
Repeatability (sd) 40 mg 400 mg
Repeatability in fine range (sd) - 40 mg
Linearity deviation 100 mg 200 mg
Eccentricity deviation (test load)
Sensitivity offset (at nominal load)
2)
1)
100 mg (10 kg) 300 mg (10 kg)
160 mg (32 kg) 320 mg (32 kg)
USP minimum sample weight (k=2, U=0.10%) 82 g 1 kg
USP minimum sample weight in fine range (k=2, U=0.10%) - 82 g
Minimum sample weight (k=2, U=1%) 8.2 g 100 g
Minimum sample weight in fine range (k=2, U=1%) - 8.2 g
Settling time 1.5 s 1.5 s
Settling time in fine range - 1.5 s
Dimensions & other specifications
Balance dimensions (W × D × H) 360 × 412 × 122 mm 360 × 412 × 122 mm
Weighing pan dimensions (W × D) 360 × 280 mm 360 × 280 mm
Weight of the balance 10.1 kg 10.1 kg
Weights for routine testing
OIML CarePac - Weights 20 kg F2, 1000 g F2 20 kg F2, 1000 g F2
ASTM CarePac - Weights 20 kg 4, 1000 g 4 20 kg 4, 1000 g 4
sd = Standard deviation
1)
After adjustment with internal reference weight
3)
In the temperature range 10 ... 30 °C
2)
According to OIML R76
Technical Data94 Precision Balances
Page 97

10.2.2.2 Readability 1 g
Limit Values
Maximum capacity 16.1 kg 32.1 kg
Readability 1 g 1 g
Maximum capacity in fine range - Readability in fine range - Tare range (from…to) 0 … 16.1 kg 0 … 32.1 kg
Repeatability (sd) 0.6 g (5 kg) 600 mg (10 kg)
Repeatability in fine range (sd)
Linearity deviation 0.6 g (4 kg) 600 mg (5 kg)
Eccentricity deviation (test load)
Sensitivity offset (at nominal load)
Sensitivity temperature drift
Sensitivity stability
Typical values
Repeatability (sd) 400 mg 400 mg
Repeatability in fine range (sd) - Linearity deviation 0.4 g 0.4g
Eccentricity deviation (test load)
Sensitivity offset (at nominal load)
USP minimum sample weight (k=2, U=0.10%) 820 g 820 g
USP minimum sample weight in fine range (k=2, U=0.10%) - Minimum sample weight (k=2, U=1%) 82 g 82 g
Minimum sample weight in fine range (k=2, U=1%) - Settling time 1.2 s 1.2 s
Settling time in fine range - -
Dimensions & other specifications
Balance dimensions (W × D × H) 360 × 412 × 122 mm 360 × 434 × 122 mm
Weighing pan dimensions (W × D) 360 × 280 mm 360 × 280 mm
Weight of the balance 10.1 kg 10.3 kg
Weights for routine testing
OIML CarePac - Weights 10 kg F2, 500 g F2 20 kg F2, 1000 g F2
ASTM CarePac - Weights 10 kg 4, 500 g 4 20 kg 4, 1000 g 4
XSR16000L XSR32000L
1)
2)
1)
3)
3)
2)
1)
- -
1 g (5 kg) 1 g (10 kg)
1.1 g (16 kg) 1.6 g (32 kg)
0.0015 %/°C 0.0015 %/°C
0.005 %/a 0.005 %/a
0.3 g (5 kg) 0.3 g (10 kg)
0.35 g (16 kg) 0.65 g (32 kg)
sd = Standard deviation
1)
After adjustment with internal reference weight
3)
In the temperature range 10 ... 30 °C
2)
According to OIML R76
Technical Data 95Precision Balances
Page 98

10.3 Dimensions
251
107
47
281
390
194
127
263
160
127
127
194
205
10.3.1 S platform, readability 1 mg, with MagicCube Draft Shield and SmartPan
Models: XSR303S, XSR603S, XSR1203S
All dimensions in mm
Technical Data96 Precision Balances
Page 99

10.3.2 S platform, readability 1 mg, with SmartPan
205
107
47
205
102
390
194
127
263
194
127
170
127
Models: XSR303SN, XSR603SN
All dimensions in mm
Technical Data 97Precision Balances
Page 100

10.3.3 S platform, readability 10 mg, with SmartPan
227
107
47
205
102
390
194
127
263
160
205
194
172
Models: XSR1202S, XSR2002S, XSR4002S, XSR6002S, XSR6002SDR, XSR10002S
All dimensions in mm
Technical Data98 Precision Balances
 Loading...