

Mettler Toledo XRW, Xpress XRW Service Manual
STANDARD COMPACT SCALE OPERATION & SERVICE MANUAL
Model XRW
STANDARD COMPACT SCALE www.mt.com/xpress

2
STANDARD COMPACT SCALE
ABOUT THIS MANUAL AND MT EXPRESS
Thank you for purchasing a METTLER TOLEDO Xpress product.
All of our equipment is assembled and packed with great care. If you should find any incorrect item, please
contact your METTLER TOLEDO Xpress Dealer immediately.
This METTLER TOLEDO Xpress product was developed, produced, and tested in a METTLER TOLEDO facility
that has been audited and registered according to international ISO 9001 quality standards and ISO 14000
environment control program. Properly used and maintained, this product will provide years of accurate
weighing. Handle it as you would any piece of fine electronic equipment.
Please READ this manual BEFORE operating or servicing this equipment. Follow the instructions carefully
and save this manual for future reference.
We at METTLER TOLEDO Xpress want to make sure you received the product you expected. It is important to
us that you are satisfied with your purchase. If there is anything we can help you with, or if you are not
satisfied with either your product or the services received from the METTLER TOLEDO Xpress representative,
let us know.
How can you reach us?
XPRESS CUSTOMER CARE CENTER, USA
24/7 Information and Support: www.mt.com/xpress
xpress@mt.com
AM to 8 PM EST Toll Free: 1-866-MTXPRESS
8
Xpress
Mettler-Toledo, Inc.
60 Collegeview
Westerville, OH 43081

STANDARD COMPACT SCALE
FCC Approval
This device complies with part 15 of the FCC Rules. Operation is subject to the following two
conditions: (1) this device may not cause harmful interference, and (2) this device must accept
any interference received, including interference that may cause undesired operation.
3

4
STANDARD COMPACT SCALE
CONTENTS
SAFETY NOTICE ............................................................................................................................ 5
PREPARING THE SCALE FOR USE .................................................................................................... 6
ENVIRONMENT .....................................................................................................................6
UNPACKING AND ASSEMBLY.................................................................................................. 6
POWER UP/DOWN SEQUENCE ............................................................................................... 7
YOUR XPRESS SCALE AT A GLANCE ................................................................................................. 8
DISPLAY .............................................................................................................................. 8
KEYPAD............................................................................................................................... 8
CURSORS (LED) ...................................................................................................................8
OPERATING YOUR SCALE ............................................................................................................... 9
STRAIGHT WEIGHING ............................................................................................................ 9
RE-ZERO FUNCTION .............................................................................................................. 9
TARE FUNCTION ...................................................................................................................9
POWER SAVE ....................................................................................................................... 9
SPECIAL MODES - OVER/UNDER ................................................................................................... 10
OVER/UNDER SETUP MODE ................................................................................................. 10
FUNCTION OF THE KEYS...................................................................................................... 10
SET OVER AND UNDER VALUES ............................................................................................ 10
OVER AND UNDER CURSORS ............................................................................................... 11
OPERATION........................................................................................................................ 11
SCALE SOFTWARE SETUP............................................................................................................. 12
ACCESS TO SETUP MODE .................................................................................................... 12
FUNCTION OF THE KEYS...................................................................................................... 12
PARAMETER LIST ................................................................................................................ 12
EXIT SETUP MODE .............................................................................................................. 12
CLEANING AND MAINTAINING YOUR SCALE..................................................................................... 13
CLEANING AND MAINTENANCE............................................................................................. 13
SERVICING YOUR SCALE .............................................................................................................. 14
ACCESSING THE SERVICE MODE........................................................................................... 14
FUNCTION OF THE KEYS...................................................................................................... 15
PARAMETER LIST ................................................................................................................ 15
CALIBRATION .....................................................................................................................16
GRAVITY ADJUSTMENT ........................................................................................................ 16
BATTERY REPLACEMENT...................................................................................................... 17
CHARGING THE RECHARGEABLE LEAD-ACID BATTERY............................................................. 17
BATTERY NOTICE ................................................................................................................ 18
APPENDIX.................................................................................................................................. 19
ERROR MESSAGES.............................................................................................................. 19
SPECIFICATIONS ................................................................................................................. 20
GEO VALUE TABLE .............................................................................................................. 21
PHYSICAL DIMENSIONS ....................................................................................................... 22

STANDARD COMPACT SCALE
SAFETY NOTICE
Product safety is a fundamental concern at MT Xpress. Use common sense and follow the simple
precautions listed below to ensure your safety and to optimize the use and performance of this product.
− Read this manual before operating or servicing this product. Save this manual for future reference.
− Observe safety warnings located throughout this manual.
− Use caution when lifting or moving heavy equipment.
− This product should only be serviced by qualified personnel. Exercise care when moving, testing, or
adjusting this product.
− Disconnect all power to this product before installing, servicing, or cleaning.
5
− Use only METTLER TOLEDO Xpress parts for repair.
− Observe electrostatic handling precautions for electronic components. Allow at least thirty (30)
seconds after power is disconnected to allow charges to dissipate before servicing any electronic
components.
− Allow the product to adjust to room temperature before connecting the power.
FAILURE TO FOLLOW THESE PRECAUTIONS COULD RESULT IN DAMAGE TO OR DESTRUCTION OF THE
EQUIPMENT, OR BODILY HARM.
6
STANDARD COMPACT SCALE
PREPARING THE SCALE FOR USE
This chapter gives detailed instructions and important information regarding the successful installation of the
METTLER TOLEDO Xpress XRW scale.
ENVIRONMENT
Before you install the scale, identify the best location for the equipment. The proper environment enhances
its operation and longevity. Keep in mind the following factors, which might have a negative influence on
the scale's operation:
Vibration: Vibration diminishes the scale’s ability to measure accurately. Electrical machinery such as
conveyors and drill presses can cause inaccurate and non-repeatable readings. The scale may also read
inaccurately if it is not leveled properly.
Air currents: Moving air can cause the scale to read wind movement as an additional force and cause
inconsistency in the weighing results.
Friction: A scale cannot measure accurately if an object is rubbing or pressing against the scale platform.
UNPACKING AND ASSEMBLY
Please inspect the package immediately upon receipt. If the box is damaged, check for internal damage and
file a freight claim with the carrier if necessary. If the container is undamaged, open the box, remove the
scale and place it on a solid, flat surface. Please keep the packing material and shipping insert in case you
need to return the scale to an Xpress representative.
Package contents for all Xpress XRW units include:
Product
− Xpress XRW scale
− Weighing platter
− AC-DC power adapter
Documents
− Quickstart Guide
− Installation Instructions
CD-ROM
− Operation & Service Manual
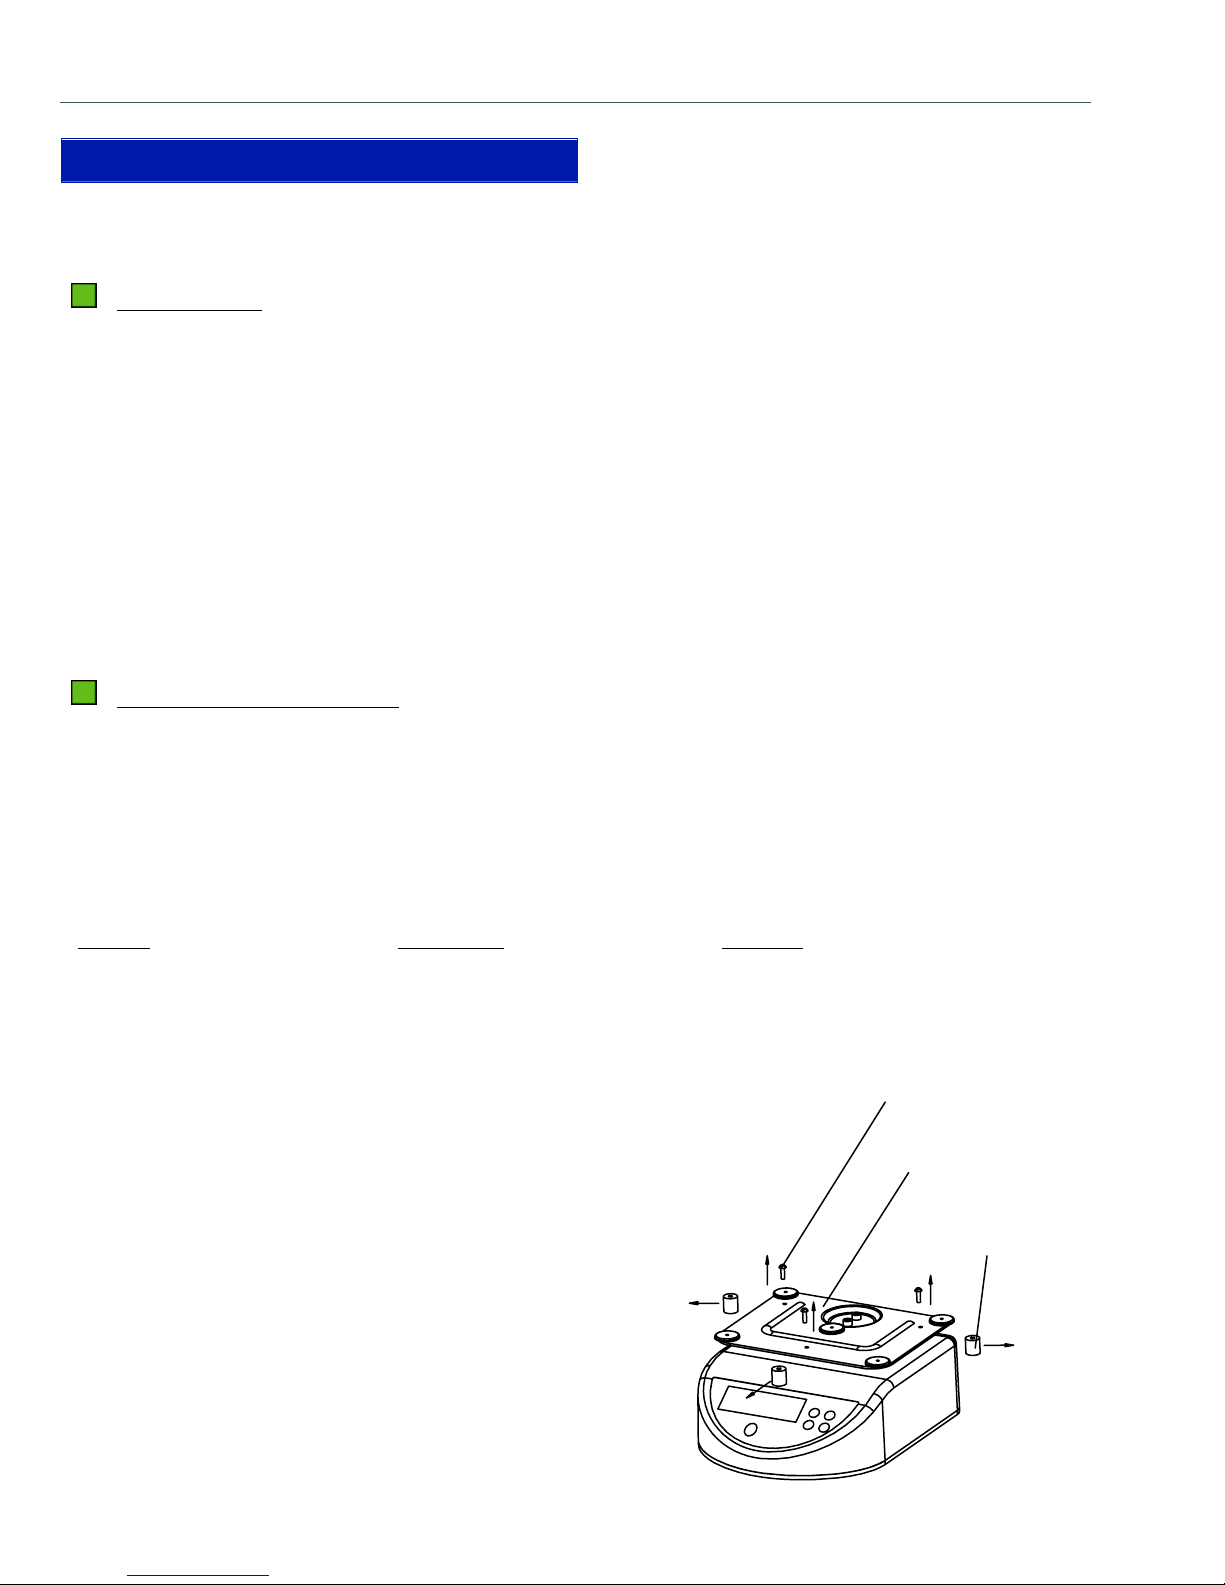
z Open the box and remove the scale by gently pulling the
Screw for shipping protection
(3 total)
scale upward away from the platform.
z Remove the packing material from each side of the scale.
z Set the unit on a sturdy workplace and remove the three
shipping protection screws on the spider, then remove the
Spider
Insert for shipping protection
(3 total)
three plastic inserts under the spider (stainless steel plate).
z Turn the scale feet until they are just against the body of
the scale.
z Then adjust the feet to insure that all four feet must touch
the working surface to make sure that METTLER TOLEDO
Xpress XRW does not rock.
STANDARD COMPACT SCALE
r
Note: The rear feet should be against the body of the scale
tightly when cleaning the scale. After the scale has been
cleaned, loosen the rear feet, this allows the internal and
external pressure to equalize.
7
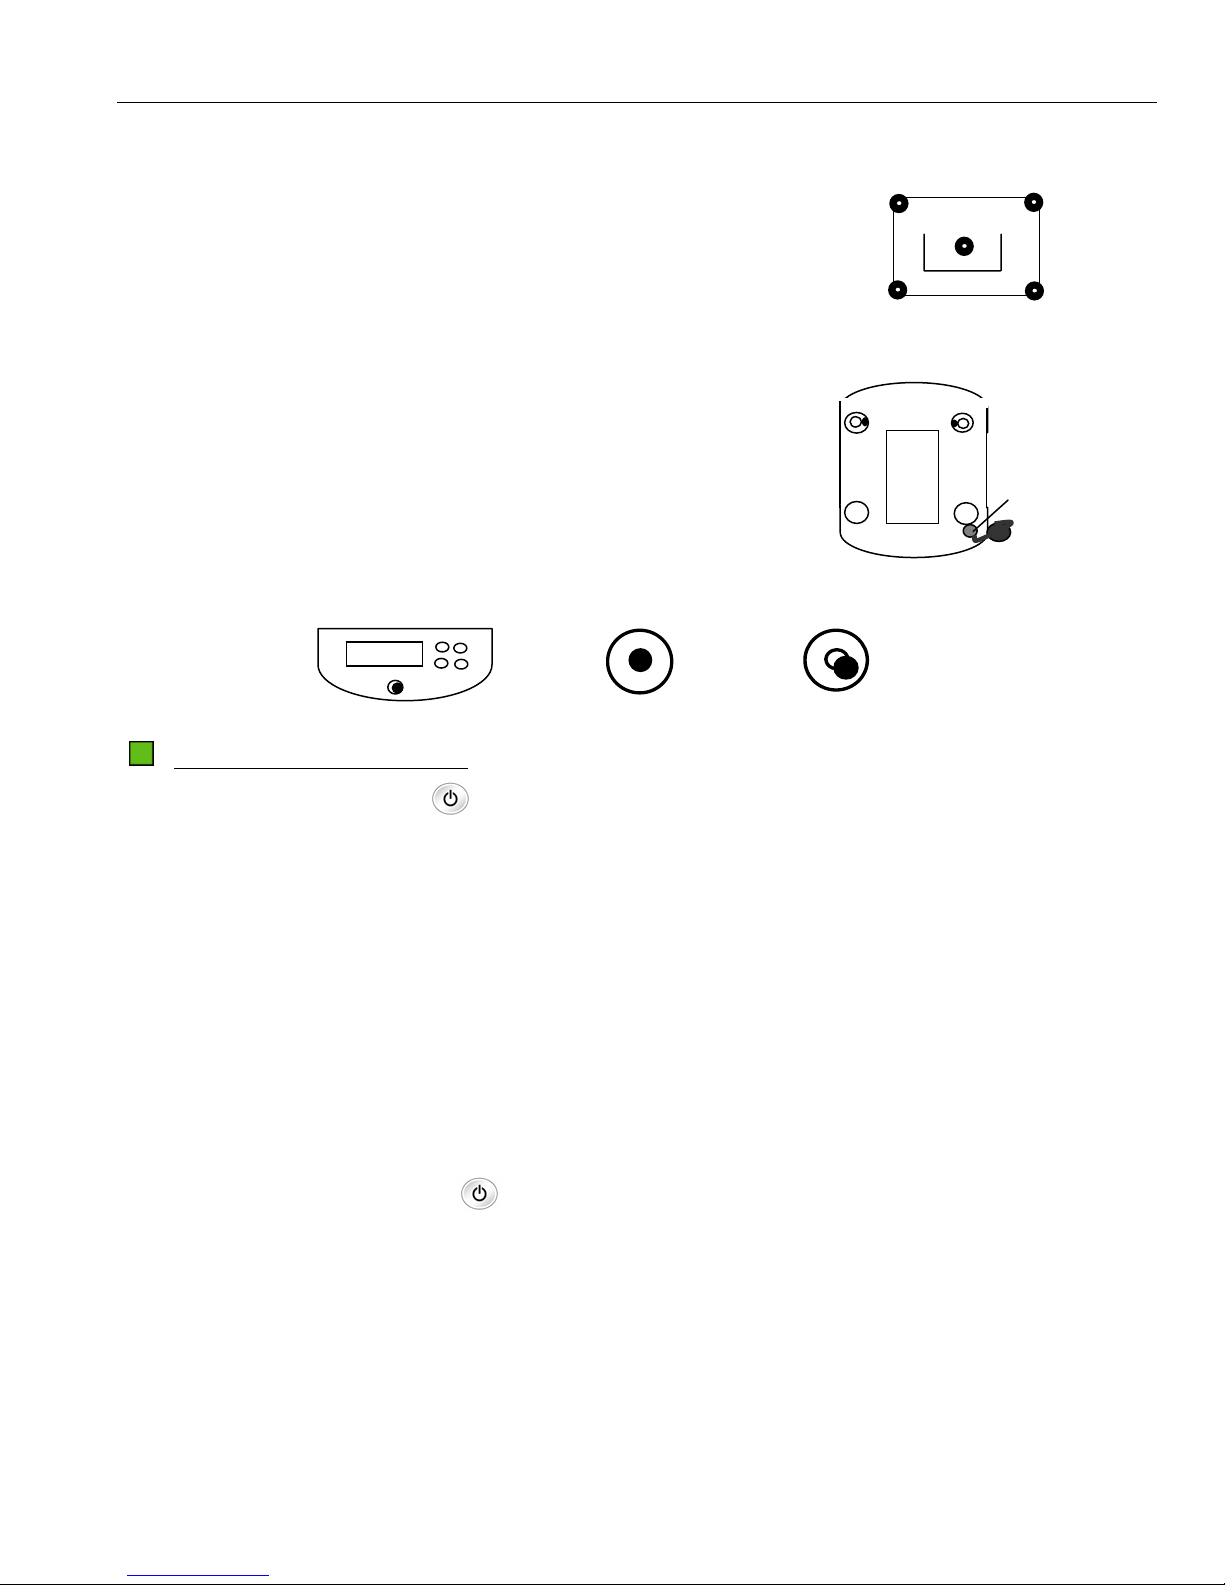
Top view without platter
z Insure that all of the five black plastic bushings are in place
on the spider, and then place the stainless steel platter on top
of METTLER TOLEDO Xpress XRW.
z Level the scale by turning the adjustable feet. It is leveled
Bottom view front
correctly when the bubble indicator is in the center of the
circle.
z Plug the connector of the adapter to the power connector of
Power connecto
the scale, and plug the adapter to local AC outlet.
Bubble indicator Proper alignment Improper alignment
POWER UP/DOWN SEQUENCE
Power Up: Press the power key
to turn on the METTLER TOLEDO Xpress XRW. It goes through a series
of self-tests when it is turned on. The scale performs diagnostics on its internal memory, and precedes to
normal the operating mode. The power up sequence is as follows:
z All segments of the display segments and cursors light to verify operation.
z Next the unit displays the software part number; revision number, GEO value and country one by one.
z The unit captures zero and is ready for normal operation.
Note: Before switching on the METTLER TOLEDO Xpress XRW scale, always make sure there is nothing on
the platter. If you have powered up the unit with something on the scale, the scale may not find the zero
value, and shows
“------“. To clear this condition remove the item, press the power key until the unit displays “off”. Then press
the power key again and the scale will then capture the correct zero value.
Power Down: Press the power key
until “off” is shown on the display to turn off the scale.

8
YOUR XPRESS SCALE AT A GLANCE
DISPLAY
KEYPAD
STANDARD COMPACT SCALE
Key Name Function Over/Under Setting
Zero Key To return the scale to gross zero
Tare Key
Function Key To enter Over/Under mode
Power key To turn the scale on or off Confirm choice
CURSORS (LED)
To tare the scale. Pressing this key at
zero clears the tare value from memory
Setting complete exit
Increment digit 1, 2, 3…..
Move to the next digit on the right
Cursor Description
>0< Illuminates when weight is gross zero (0)
Illuminates when the power supply is operating or the battery is fully charged
Blinks to indicate the battery is fully charged.
UNDER Illuminates when the weight is less than the programmed “Under”’ value
OVER Illuminates when the weight is more than the programmed “Over” value
(-)
Blinks to indicate the battery voltage is lower than the required for proper operation
Net Illuminates to indicate the displayed value is net weight (gross minus tare)
lb, oz, g Weight unit indicates current unit of measure associated with the displayed value
 Loading...