

Mettler Toledo XPE26C, XPE205CDR, XPE56C, XPE505C, XPE56 Quick Manual
...
www.mt.com
XP56
www.mt.com
XPE56C
ME
TTLER TOLEDO
XPE56/26/205CDR/505 models
Quick Guide
Comparator Balances


Table of Contents
1 Introduction 5
2 Safety Information 6
3 Design and Function 8
4 Installation and Putting into Operation 17
5 Maintenance 28
6 Technical Data 29
1.1 Conventions and symbols used in these operating instructions 5
2.1 Explanation of warnings and symbols 6
2.2 Product safety information 6
3.1 Overview 8
3.1.1 XPE56C/XPE26C balances 8
3.1.2 XPE205CDR/XPE505C balances 9
3.1.3 Terminal 10
3.2 User interface 12
3.2.1 Display 12
3.2.2 Input dialog boxes 13
3.2.3 Firmware 13
3.2.3.1 System settings 14
3.2.3.2 User profiles 14
3.2.3.3 User-specific settings 15
3.2.4 Security system 16
4.1 Unpacking 17
4.2 Location 18
4.3 Assembling the balance 19
4.3.1 Inner draft shield for XPE56C and XPE26C comparator balances 19
4.3.2 Outer draft shield 22
4.4 Connecting the balance 24
4.5 Setting up the balance 25
4.5.1 Weighing for the first time 25
4.5.1.1 Switching on the balance 25
4.5.1.2 Leveling the balance 25
4.5.1.3 Performing a simple weighing 26
4.5.2 Operating of the outer draft shield and the inner draft shield 26
5.1 Cleaning 28
5.2 Disposal 28
6.1 General data 29
6.2 Explanatory notes for the METTLER TOLEDO AC adapter 29
6.3 Model-specific data 30
Table of Contents 3Comparator Balances

1 Introduction
Thank you for choosing a METTLER TOLEDO balance.
The balances offers numerous weighing and adjustment options with exceptional operating convenience.
The different models have different characteristics regarding equipment and performance. Special notes in the text
indicate where this makes a difference to operation.
METTLER TOLEDO is a leading manufacturer of balances for laboratory and production use as well as analytical
measuring instruments. A globally present customer service network with highly trained personnel is always
available to assist with the selection of accessories or provide advice on the optimal use of the balance.
The balance conforms to current standards and directives. It supports requirements, work techniques and protocols
as specified by all international quality assurance systems, e.g. GLP (Good Laboratory Practice), GMP (Good
Manufacturing Practice). The balance has a CE Declaration of Conformity and METTLER TOLEDO, as the
manufacturer, is certified to ISO 9001 and ISO 14001. This provides the assurance that your capital investment is
protected in the long term by high product quality and a comprehensive service package (repairs, maintenance,
servicing, adjustment service).
Finding more information
u www.mt.com/comparators
More detailed information is in the Operating Instructions on the CD-ROM.
Software version
The operating instructions are based on the initially installed terminal firmware (software) version V 2.00.
1.1 Conventions and symbols used in these operating instructions
Key and button designations are shown in graphic or text form in square brackets (e.g. [
[Define].
These symbols indicate an instruction:
§ prerequisites
1 steps
2 ...
ð results
This symbol indicates press key briefly (less than 1.5 s).
] or
This symbol indicates press and hold key down (longer than 1.5 s).
Introduction 5Comparator Balances
2 Safety Information
2.1 Explanation of warnings and symbols
Safety notes are indicated by signal words and warning symbols and contain warnings and information about
safety issues. Ignoring safety notes can lead to personal injury, damage to the instrument, malfunctions and
erroneous results.
Signal words
WARNING
CAUTION
Attention
Note
Warning symbols
Mandatory signs
for a hazardous situation with medium risk, possibly resulting in severe injuries
or death if not avoided.
for a hazardous situation with low risk, resulting in damage to the device or the
property or in loss of data or minor or medium injuries if not avoided.
(no symbol)
for important information about the product.
(no symbol)
for useful information about the product.
General hazard Electrical shock
Gloves must be worn
2.2 Product safety information
Intended use
Your balance is used for weighing. Use the balance exclusively for this purpose. Any other type of use and operation
beyond the limits of technical specifications without written consent from Mettler-Toledo AG, is considered as not
intended.
It is not permitted to use the instrument in explosive atmosphere of gases, steam, fog, dust and
flammable dust (hazardous environments).
General safety information
This balance complies with current industry standards and the recognized safety regulations; however, it can
constitute a hazard in use. Do not open the balance housing: The balance contains no user-serviceable parts. In the
event of problems, please contact a METTLER TOLEDO representative.
Always operate and use your instrument only in accordance with the instructions contained in this manual. The
instructions for setting up your new instrument must be strictly observed.
If the instrument is not used according to these Operating Instructions, protection of the instrument may be
impaired and METTLER TOLEDO assumes no liability.
Staff safety
These operating instructions must be read and understood before using the balance. These operating instructions
must be retained for future reference.
The balance must not be altered or modified in any way. Only use METTLER TOLEDO original spare parts and
accessories.
Safety Information6 Comparator Balances
Safety notes
WARNING
Risk of electric shock
Use only the original universal AC adapter delivered with your balance, and check that the voltage
printed on it is the same as your local power supply voltage. Only plug the adapter into a socket
which is grounded.
CAUTION
Damage to the balance
a) Only use indoors in dry locations.
b) Do not use pointed objects to operate the touch screen!
The balance is of a very sturdy design, but is still a precision instrument. It must be handled
with care.
c) Do not open the balance:
The balance contains no user-serviceable parts. In the event of problems, please contact a
METTLER TOLEDO representative.
d) Only use METTLER TOLEDO original accessories and peripheral devices for the balance.
These are specifically designed for the balance.
Safety Information 7Comparator Balances
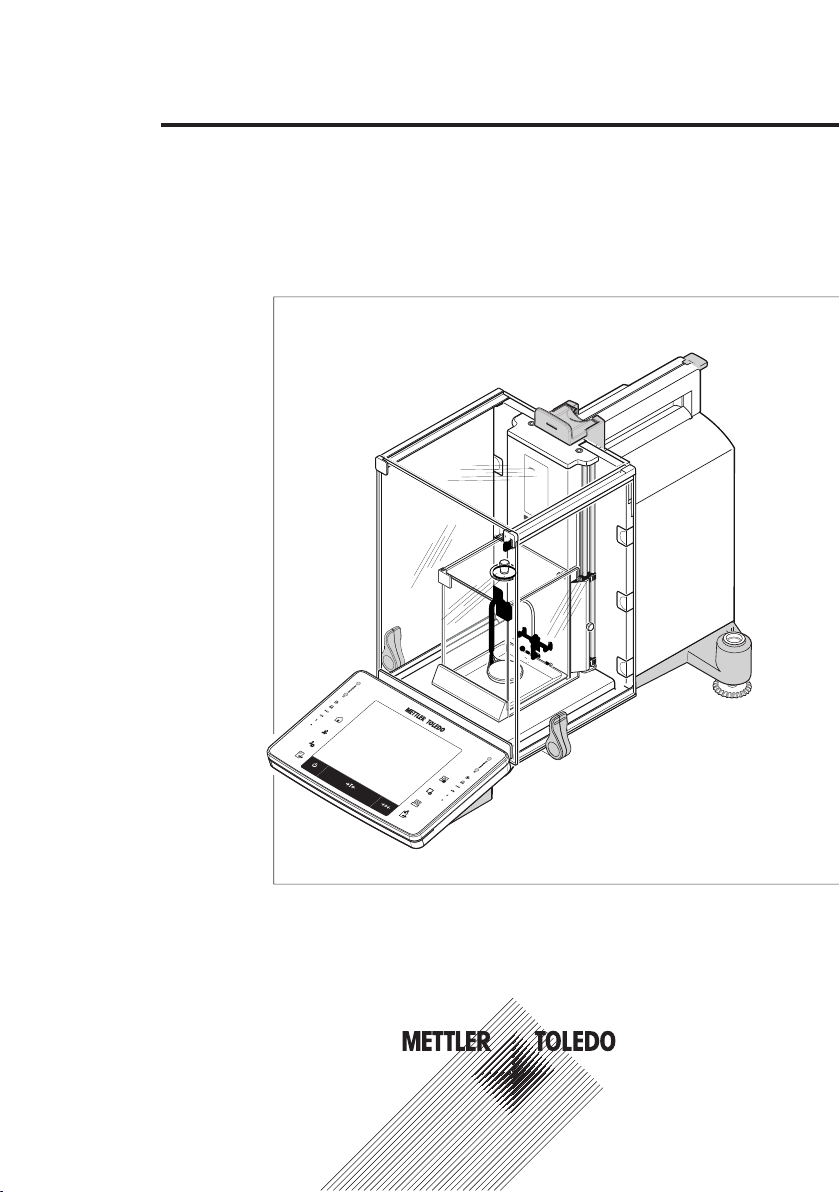
3 Design and Function
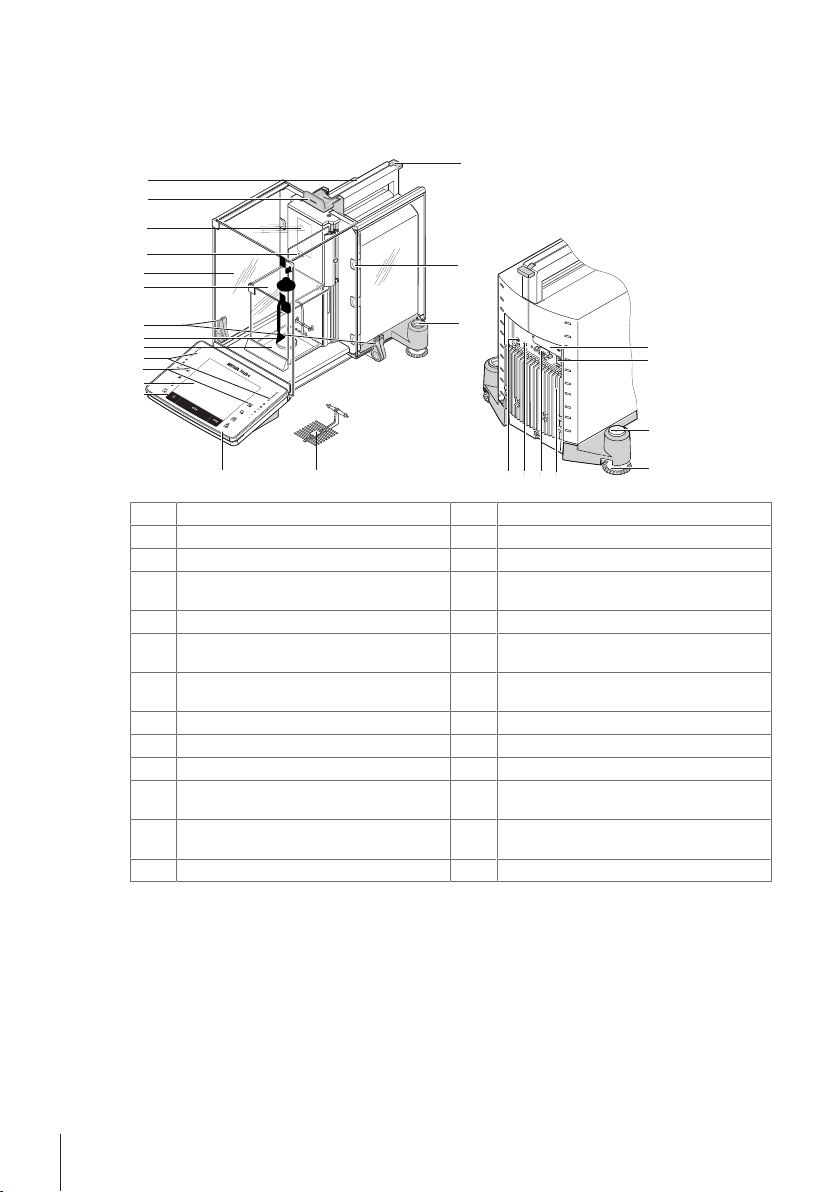
1
5
6
7
2
3
8
9
12
13
11
10
15
7
14
17
18
19
16
www.mt.com
XP56
www.mt.com
XPE56C
XPE56C
ME
T
TLER
TOL
E
DO
4
2425
21 2022
23
3.1 Overview
3.1.1 XPE56C/XPE26C balances
Terminal
1
Operating keys
3
Drip tray
5
Handle/Coupling element for the operation of
7
Display "Touch screen"
2
SmartSens sensors
4
Hanging weighing pan
6
Inner glass draft shield
8
the outer draft-shield doors
Outer glass draft shield
9
Type designation
11
StaticDetect light
10
Handle for operation of the outer draft-shield
12
top door
Guide for top door of draft shield and handle for
13
Removable clips for feeding cables or tubes
14
transport
Level indicator/Level sensor
15
Socket for AC adapter
17
Foot screw
19
RS232C serial interface
21
Slot for second interface (optional)
16
Fastening point for anti-theft device
18
Cooling element (based on model)
20
Aux 2 (connection for "ErgoSens", hand- or
22
foot-switch)
Aux 1 (connection for "ErgoSens", hand- or
23
SmartGrid weighing pan
24
foot-switch)
StatusLight
25
Design and Function8 Comparator Balances
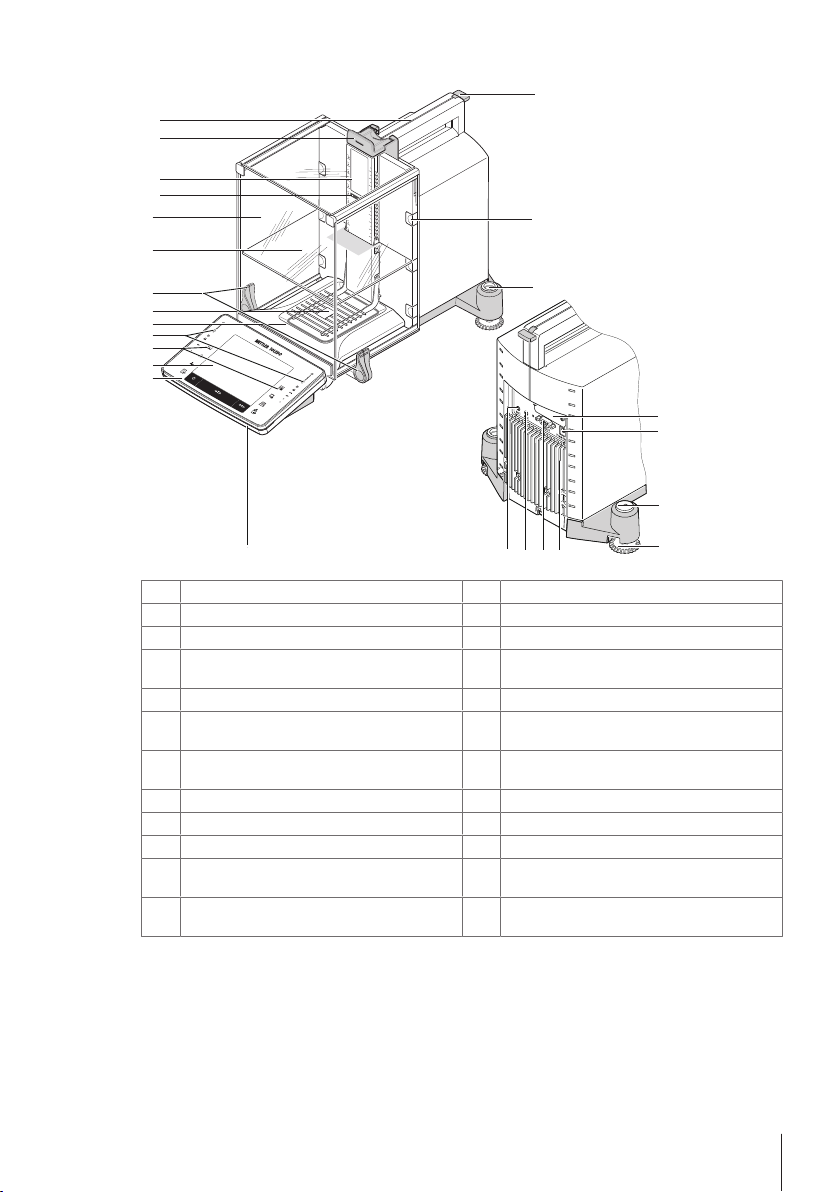
3.1.2 XPE205CDR/XPE505C balances
1
5
6
7
2
3
8
9
12
13
11
10
15
7
14
17
18
19
16
www.mt.
c
om
XP
E505C
F
F
METTLER TOLEDO
4
21 2022
23
24
Terminal
1
Operating keys
3
Drip tray
5
Handle/Coupling element for the operation of the
7
Display "Touch screen"
2
SmartSens sensors
4
SmartGrid weighing pan
6
Intermediate shelf
8
outer draft-shield doors
Glass draft shield
9
Type designation
11
Guide for top door of draft shield and handle for
13
15
17
19
21
23
transport
Level indicator / Level sensor
Socket for AC adapter
Foot screw
RS232C serial interface
Aux 1 (connection for "ErgoSens", hand- or footswitch)
StaticDetect light
10
Handle for operation of the outer draft-shield top
12
door
Removable clips for feeding cables or hoses
14
Slot for second interface (optional)
16
Fastening point for anti-theft device
18
Cooling element (based on model)
20
Aux 2 (connection for "ErgoSens", hand- or foot-
22
switch)
StatusLight
24
Design and Function 9Comparator Balances
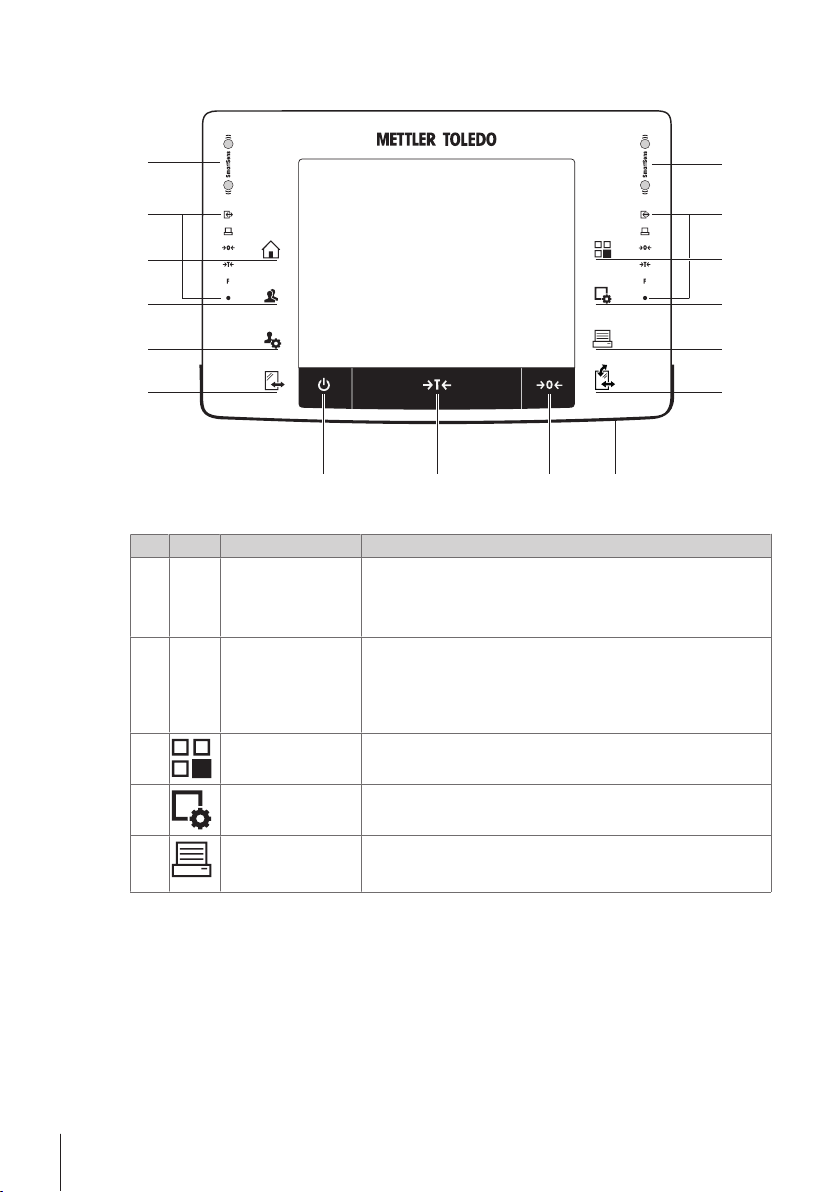
3.1.3 Terminal
7
8
10
9
1
2
14
13
12
11
1
2
3
4
5
6
Key assignments and terminal connection.
1: Front view
Designation Explanation
1
2
3
SmartSens Two hands-free sensors.
Status bar The green icons in the status bar indicate the functions assigned to the
Select application This key is used to select a required application.
Both of these hands-free sensors can be assigned a specific function
(e.g. zeroing, printing or display resolution adjustment).
See settings for SmartSens and ErgoSens in the respective applications.
SmartSens left or SmartSens right. The F symbol represents a function
key. SmartSens is deactivated when no green symbol is illuminated.
The yellow LED at the bottom of the status bar lights up briefly when a
key is selected or a menu function is initiated.
4
5
Configuration For displaying menus for the configuration of a current application. The
Print This key is used to transfer data via the interface, e.g. to a printer. Other
application can be adjusted to a specific task via numerous settings.
devices, e.g. a PC can also be connected. The data to be transferred
can be freely defined.
Design and Function10 Comparator Balances
6
1 22
Open/Close For opening and closing the glass draft shield doors. For convenient
right and left-handed operation, one of these keys is provided on both
sides of the terminal.
Note
The key can have different functions if a powder module or autosampler
is installed.
• If powder module and front door are defined as mounted, the key
operates the front door.
• If powder module is defined as mounted and front door is defined as
unmounted, the key operates the side doors.
• If autosampler and front door are defined as mounted, the key
operates the front door.
• If autosampler is defined as mounted and front door is defined as
unmounted, the key turns the autosampler clockwise by 1magazine
= 5positions.
Refer to your Autosampler Operating Instructions for further information.
7
StatusLight Indicates the current balance status. The status light shows that the
balance is ready to use.
8
Zeroing This key is used for setting a new zero point manually (only required if
the balance is used for normal weighings).
9
Tare This key is used to tare the balance manually (only necessary for
normal weighings). When the balance has been tared, the Net symbol
is displayed to indicate that all displayed weights are net.
10
On/Off For switching the balance on and off (standby mode).
Note
It is recommended not to disconnect the balance from the power supply
unless it is not going to be used for an extended period.
11
Open/Close For opening and closing the glass draft shield doors. For convenient
right and left-handed operation, one of these keys is provided on both
sides of the terminal.
Note
The key can have different functions if an autosampler is installed.
• If the autosampler is defined as mounted, the key turns the
autosampler on counterclockwise by 1 magazine = 5 positions.
12
Settings for user
profiles
For defining basic settings for each user profile. These settings apply to
all user applications.
13
User profile This key is used to display a specific user profile. Different settings can
be saved in a user profile. This allows the balance to be adjusted to a
specific user or weighing task.
14
Home
This key is used to return to the user profile Home from any menu level
in any application.
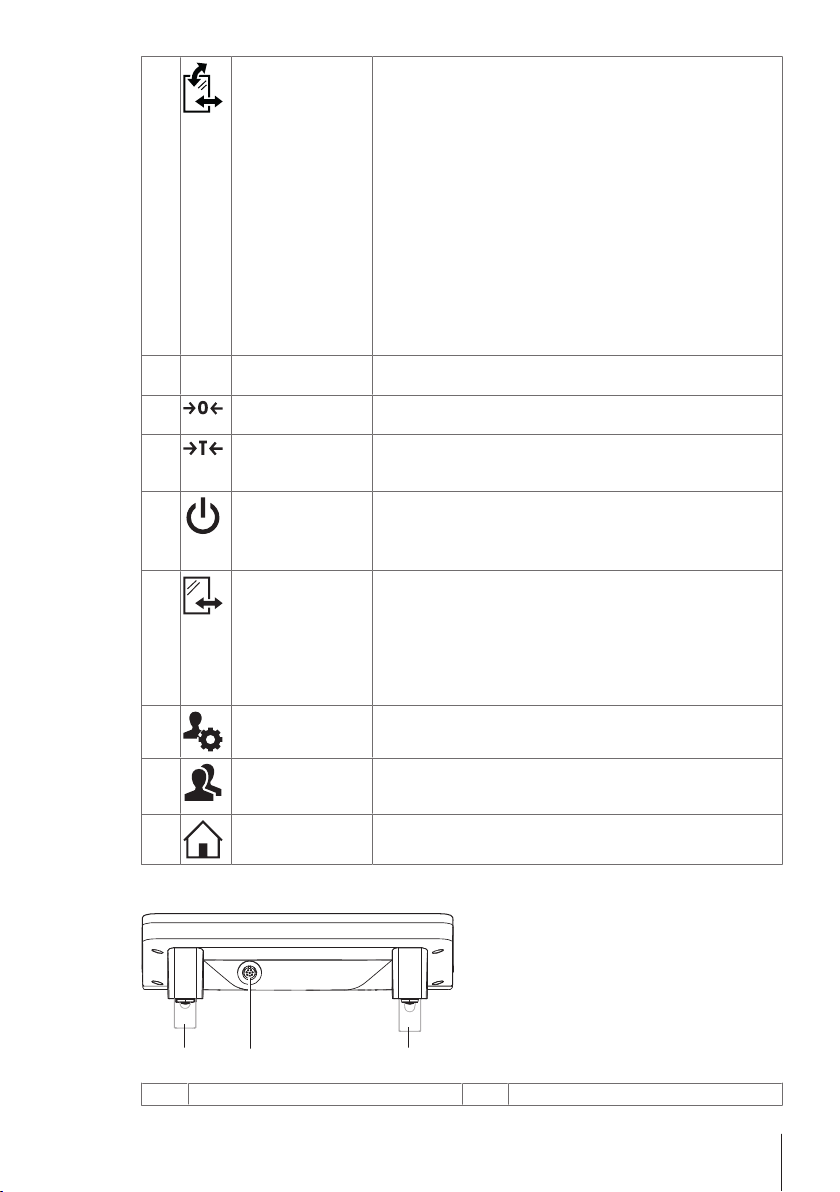
System connection (terminal cable)
1
Height adjustable feet
2
Design and Function 11Comparator Balances
 Loading...