

Page 1
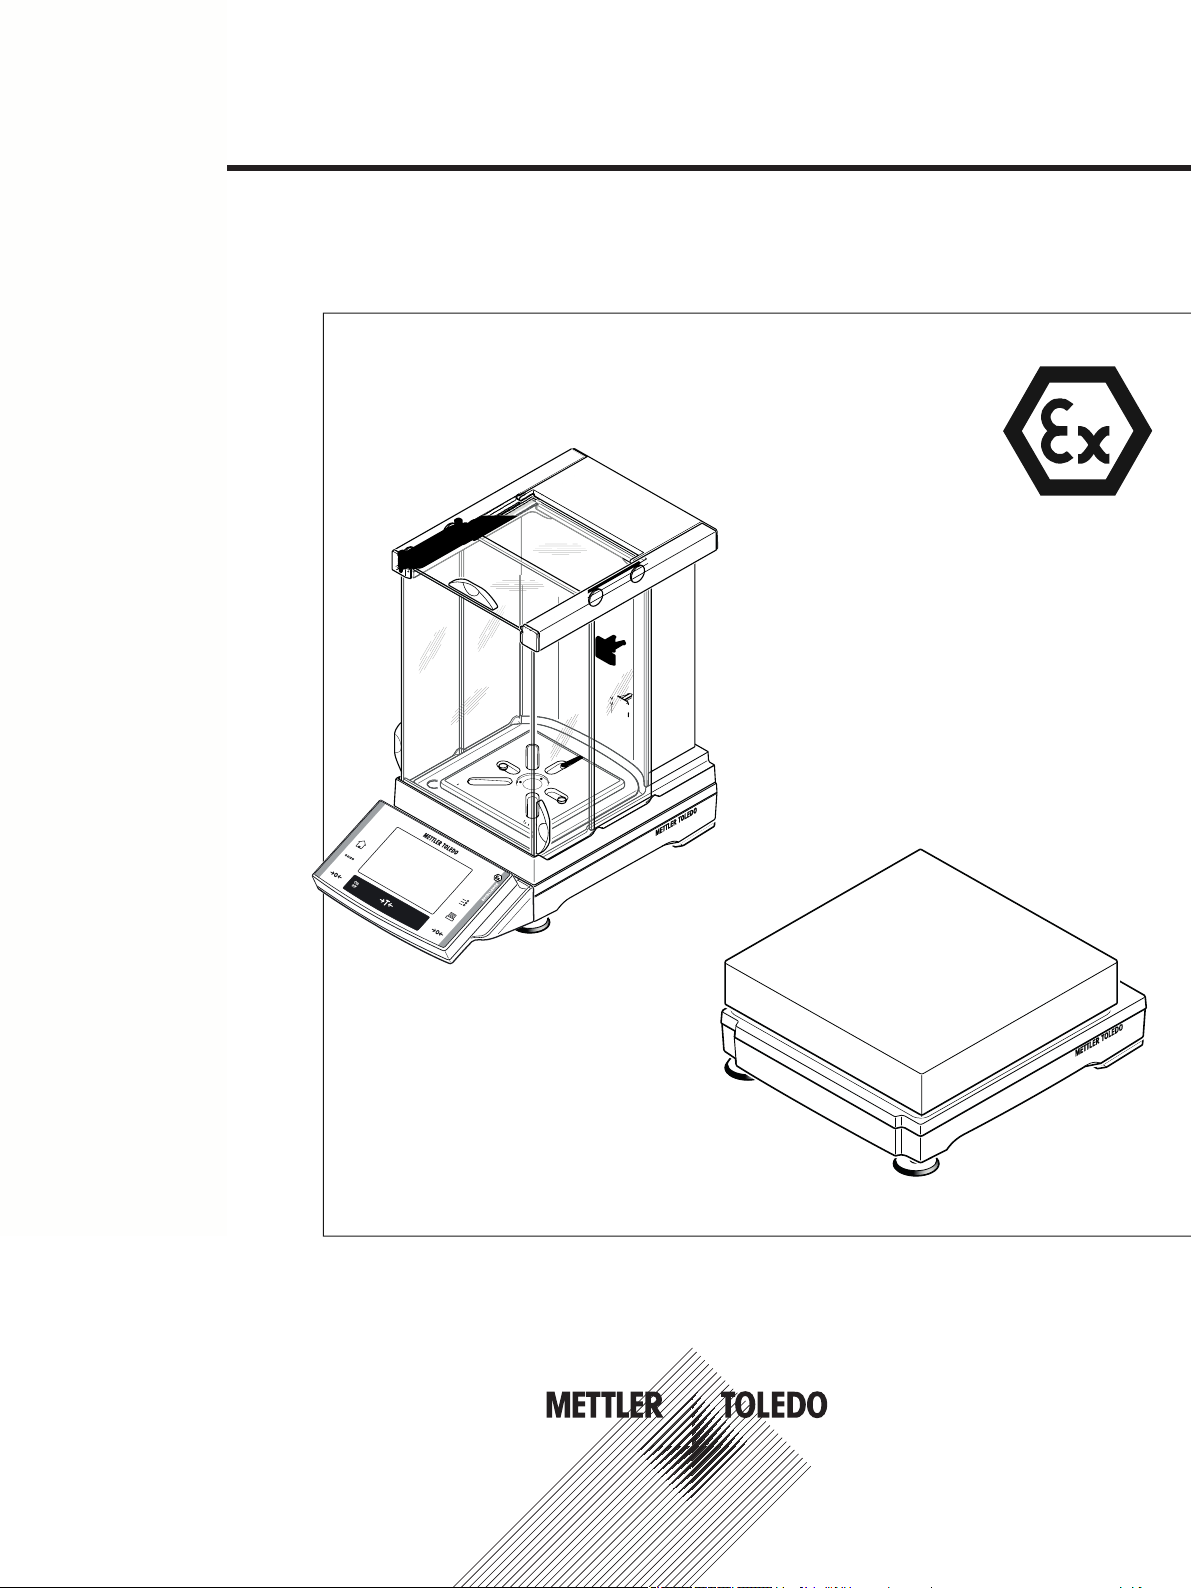
Excellence Precision Balances
XS-Ex2 and X-Ex2 Models – Part 1
Operating Instructions
Page 2

Page 3

Table of Contents
Introduction1 5
Safety Information2 7
Overview Balances and Weighing Platforms for Ex-Zone 23 11
Setting up the Balance4 15
Connection of Peripheral Devices and System Integration5 26
5.1.2 27
5.2.2 28
Maintenance6 29
Technical Data7 32
Symbols and presentations used1.1 6
Definition of signal warnings and symbols2.1 7
Product specific safety notes2.2 7
Overview XS-Ex2 "S" and "M" weighing platform3.1 11
Overview XS-Ex2 "L" weighing platform3.2 12
Overview X-Ex2 "S" and "M" weighing platform3.3 13
Overview X-Ex2 "L" weighing platform3.4 14
Unpacking and checking the delivered items4.1 15
Scope of delivery4.1.1 15
Unpacking the Draft Shield "S" Weighing Platform (Model-dependent)4.1.2 17
Assembling the balance4.2 17
Installing the draft shield and weighing pan4.2.1 17
Placing the terminal on the "L" weighing platform4.2.2 20
Selecting the location and level of the balance4.3 21
Selecting the location4.3.1 21
Leveling the balance4.3.2 21
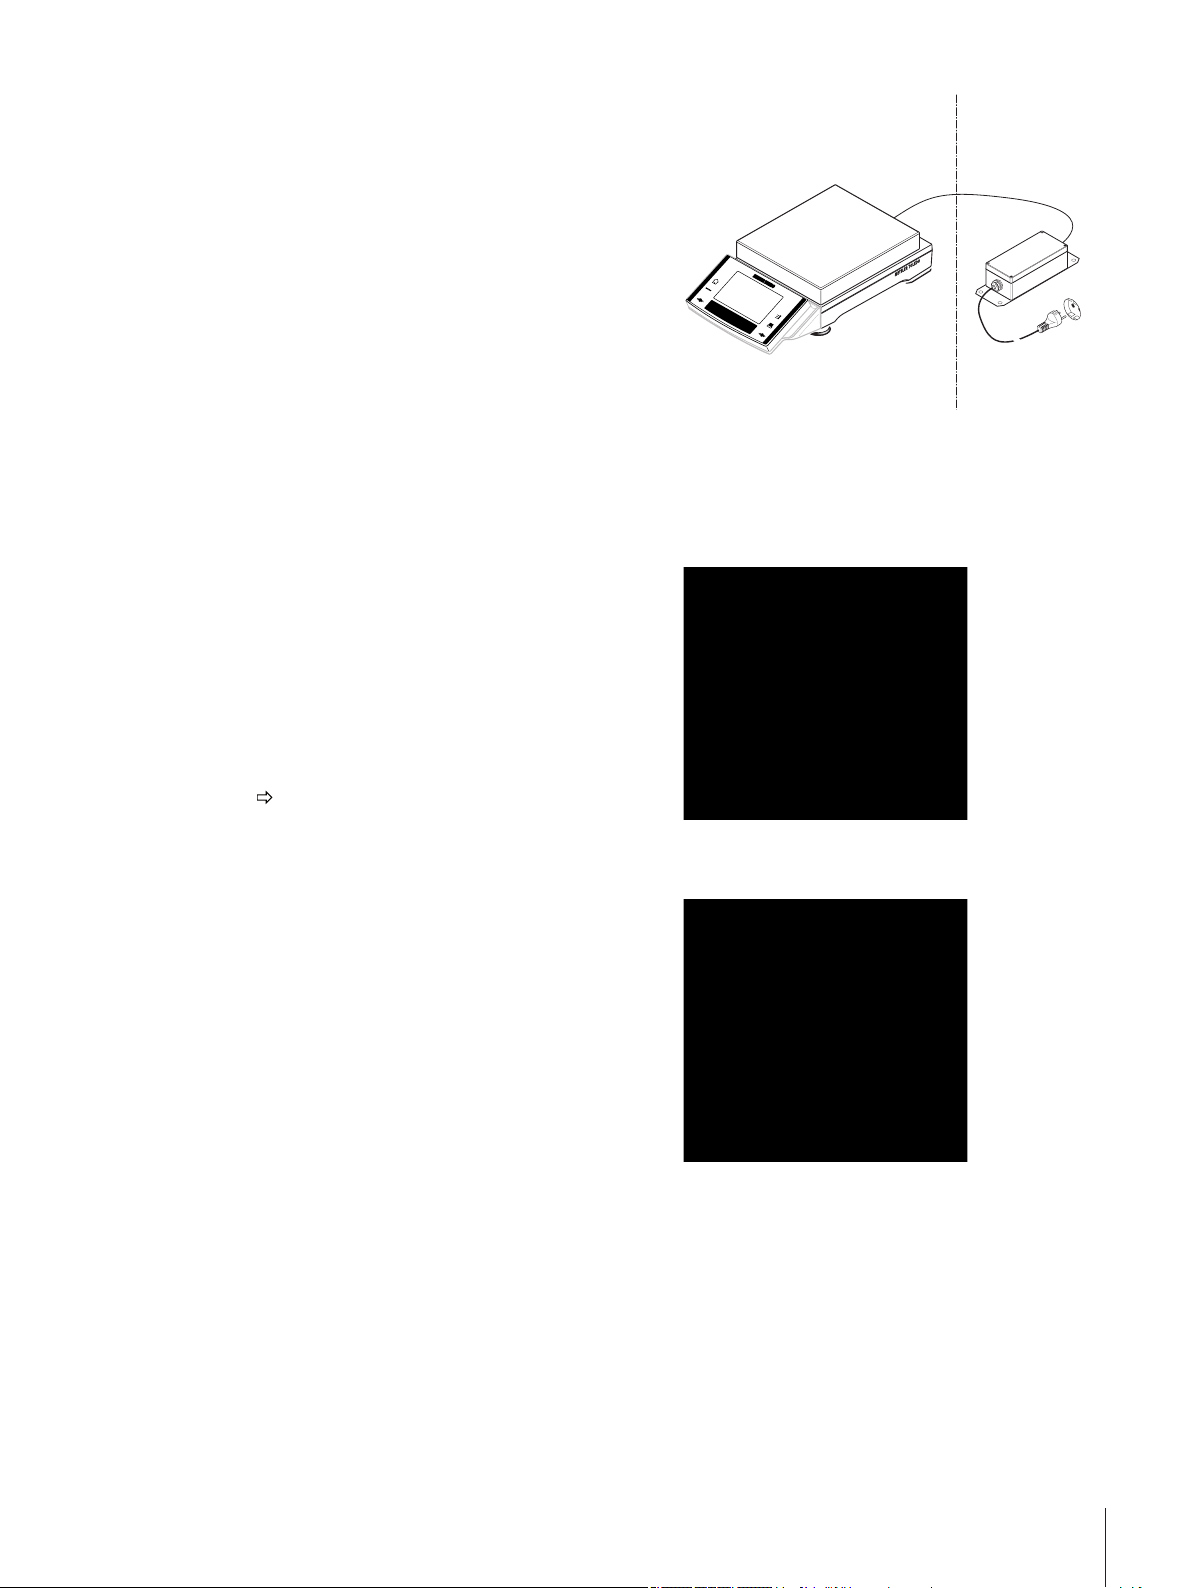
Installation of the AC adapter PSX24.4 22
Installation in the Ex hazardous area (zone 2)4.4.1 22
Installation outside the Ex hazardous area4.4.2 22
Connection to the balance/weighing platform4.4.3 23
Dismantling4.4.4 24
Marking the balance/weighing platform and the AC adapter4.5 24
Usage of data interface "RS232" in the Ex hazardous area (zone 2)5.1 26
The peripheral device «P» is located inside the Ex hazardous area5.1.1 26
The peripheral device «P» (e.g. PC or printer) is located outside the Ex
hazardous area
Usage of the optional data interface "Bluetooth" in the Ex hazardous area5.2 27
The peripheral device «P» is located inside the Ex hazardous area5.2.1 27
The peripheral device «P» (e.g. printer) is located outside the Ex haz
ardous area
Cleaning6.1 29
Cleaning the draft shield (0.1mg and 1mg models)6.2 30
Disposal6.3 31
General data7.1 32
Table of Contents 3
Page 4

Model-specif data of the Excellence XS-Ex2 precision balances7.2 33
7.2.1 33
7.3.1 40
7.4.3 47
7.5.1 53
7.5.2 54
7.5.3 55
Accessories and Spare Parts8 61
Certificate of the Issuing Institution9 68
Appendix10 73
Index11 74
XS-Ex2 balances with readability of 0.1 mg / 1 mg, "S" platform with draft
shield
XS-Ex2 balances with readability of 0.1 mg, "S" platform7.2.2 35
XS-Ex2 balances with readability of 10 mg / 0.1 g, "S" platform7.2.3 36
XS-Ex2 balances with readability of 10 mg / 0.1 g, "M" platform7.2.4 37
XS-Ex2 balances with readability of 1 mg / 5 mg, "L" platform7.2.5 38
XS-Ex2 balances with readability of 0.1 g / 1 g, "L" platform7.2.6 39
Model-specif data of the Excellence X-Ex2 precision balances7.3 40
X-Ex2 balances with readability of 0.1 mg / 1 mg, "S" platform with draft
shield
X-Ex2 balances with readability of 10 mg / 0.1 g, "S" platform7.3.2 42
X-Ex2 balances with readability of 10 mg / 0.1 g, "M" platform7.3.3 43
X-Ex2 balances with readability of 0.1 g / 1 g, "L" platform7.3.4 43
Dimensions of the Excellence XS-Ex2 balances7.4 45
XS-Ex2 balances with readability of 0.1 mg, "S" platform with draft shield7.4.1 45
XS-Ex2 balances with readability of 1 mg, "S" platform with draft shield7.4.2 46
XS-Ex2 balances with readability of 10 mg, "S" platform with draft shield
element
XS-Ex2 balances with readability of 0.1 mg, "S" platform7.4.4 48
XS-Ex2 balances with readability of 0.1 g, "S" platform7.4.5 49
XS-Ex2 balances with readability of 10 mg / 0.1 g, "M" platform7.4.6 50
XS-Ex2 balances with readability of 1 mg / 5 mg, "L" platform7.4.7 51
XS-Ex2 balances with readability of 0.1 g / 1 g, "L" platform7.4.8 52
Dimensions of the Excellence X-Ex2 weighing platforms7.5 53
X-Ex2 weighing platforms with readability of 0.1 mg, "S" platform with
draft shield
X-Ex2 weighing platforms with readability of 1 mg, "S" platform with draft
shield
X-Ex2 weighing platforms with readability of 10 mg, "S" platform with draft
shield element
X-Ex2 weighing platforms with readability of 0.1 g, "S" platform7.5.4 56
X-Ex2 weighing platforms with readability of 0.1 g, "M" platform7.5.5 57
X-Ex2 weighing platforms with readability of 0.1 g, "L" platform7.5.6 58
Dimensions of the AC adapter PSX27.6 59
Interfaces7.7 60
Specifications of RS232C7.7.1 60
Accessories8.1 61
Spare parts8.2 66
Power supply PSX29.1 68
Balances XS-Ex2 and platforms X-Ex29.2 70
MT-SICS interface commands and functions10.1 73
Table of Contents4
Page 5

1Introduction
Thank you for choosing a METTLER TOLEDO balance.
Balances and platforms for use in zone 2 hazardous areas combine a host of weighing and setting possibilities
with uncommon operating comfort.
In this chapter you will be given basic information about your balance. Please read right through this chapter
carefully even if you already have experience with METTLER TOLEDO balances. Please pay special attention to
the safety warnings!
The different models have different characteristics regarding equipment and performance. Special notes in the
text indicate where this makes a difference to operation.
The XS-Ex2/X-Ex2 family comprises a range of balances which differ from each other in relation to their weigh
ing range and resolution.
The following features are common to all models of the XS lines:
●
Type of protection: Ex nL for use in zone 2 hazardous areas.
●
Fully automatic adjustment "FACT" using internal weight.
●
Built-in applications for normal weighing, statistics, formulation, density, percent weighing, piece counting,
dynamic weighing and LabX Client (only XS-Ex2 models).
●
Integral RS232C interface.
●
Slot for second interface (optional).
●
Touch-sensitive graphics terminal ("Touch screen") for easy, convenient operation (only XS-Ex2 models).
A brief word about standards, guidelines, and methods of quality assurance: The balances comply with usual
standards and guidelines. They support standard procedures, specifications, working methods, and reports
according to GLP (Good Laboratory Practice). In this connection, records of working procedures and adjust
ments become very important; for this purpose we recommend you to use a printer from the METTLER TOLEDO
range, since these are optimally adapted to your balance. The balances conform to the applicable standards
and guidelines and possess a EC declaration of conformity. METTLER TOLEDO is certified as manufacturer
according to ISO9001 and ISO14001.
The operating instructions for the XS-Ex2/X-Ex2 balances consist of 3 separate documents, whose con
tents are listed below.
Part 1, this document
Contents
●
Introduction
●
Safety notes
●
Setting up the balance/weighing platform
●
Leveling the balance/weighing platform
●
Installation of the AC adapter PSX2
●
Connection of peripheral devices and system integration
●
Cleaning and service
●
Technical data
●
Accessories
●
Spare parts
●
Certificate of the issuing institution
●
Interface commands and MT-SICS functions
5Introduction
Page 6
Part 2, separate document (only XS-Ex2 balances)
1
2
…
Contents: Terminal, System, and Applications
●
Basic principles for using the terminal and the firmware
●
System settings
●
Applications
●
Firmware (Software) updates
●
Error and status messages
●
Conversion table for weight units
●
Recommended printer settings
Part 3, separate document (only XS-Ex2 balances)
Contents: Adjustments, and Tests
●
Adjustments
●
Tests
Finding more information
Internet http://www.mt.com/excellence
1.1Symbols and presentations used
The following conventions apply to the operating instructions: part 1, part 2 and part 3.
Key designations are indicated by a picture or text in double angular parentheses (e.g. [ ] or [On/Off]).
This symbol indicates press key briefly (less than 1.5 s).
This symbol indicates press and hold key down (longer than 1.5 s).
These symbols indicate an instruction:
prerequisites
steps
results
6 Introduction
Page 7
2Safety Information
2.1Definition of signal warnings and symbols
Safety notes are indicated by signal words and warning symbols and contain warnings and information about
safety issues. Ignoring safety notes can lead to personal injury, damage to the instrument, malfunctions and
erroneous results.
Signal words
WARNING for a hazardous situation with medium risk, possibly resulting in severe
injuries or death if not avoided.
CAUTION for a hazardous situation with low risk, resulting in damage to the device or
the property or in loss of data or minor or medium injuries if not avoided.
Attention (no symbol)
for important information about the product.
Note (no symbol)
for useful information about the product.
Warning symbols
General hazard Electrical shock
2.2Product specific safety notes
Approved for use in zone 2 hazardous areas
The AC adapter PSX2 supplies the power to the XS-Ex2 precision balances and X-Ex2 preci
sion weighing platforms for their intended use in the Ex hazardous area classified as zone 2.
In this zone, ignitable concentrations of flammable gases, vapors or liquids are not likely to
occur in normal operation, and if they do occur, will exist for only a short period. The AC
adapter can be installed inside or outside the Ex hazardous area.
Use in zone 1 and 0 is not permitted.
General safety information
Your instrument meets the state of the art technology and complies with all recognized safety rules, however,
certain hazards may arise in extraneous cirmumstances. Do not open the housing of the instrument: It does not
contain any parts which can be maintained, repaired or replaced by the user. If you ever have problems with
your instrument, contact your authorized METTLER TOLEDO dealer or service representative.
Always operate and use your balance only in accordance with the operating instructions part1, part2 and
part3.
The instructions for setting up your new balance/weighing platform must be strictly observed.
If the instrument is not used according to the manufacturer’s operating instructions (part1, part2 and
part3), protection of the instrument may be impaired.
Heavy object
7Safety Information
Page 8

Staff safety
In order to use the instrument, you must have read and understood the operating instructions. Keep the operat
ing instructions for further reference.
Never make any modifications or constructional alterations to the instrument and use only original spare parts
and optional equipment from METTLER TOLEDO.
Safety notes
CAUTION
Damage of device
– For use only in dry interior rooms.
– Do not use sharply pointed objects to operate the keyboard! Although your balance is very
ruggedly constructed, it is nevertheless a precision instrument. Treat it with corresponding
care.
CAUTION
Risk of electric shock
Use only the AC adapter PSX2 delivered with your balance/weighing platform, and check that
the voltage printed on its the same as your local power supply voltage.
WARNING
Heavy object
– Single person lift could cause injury.
– Do not move or lift this equipment without assistance.
8 Safety Information
Page 9
Safety instructions regarding installation and operation in the Ex hazardous area, zone 2
CAUTION
Safety instructions
– The installation may be performed only by a qualified electrician as described in this
installation information.
– Check whether special clothing or special tools are needed for work in the hazardous area
of the end-user and then wear or use these if required.
– Find out whether the use of certain electronic devices (cell phones, computers, etc.) is pro
hibited in the hazardous area of the end-user, and then follow these regulations.
– Establishing and separating the connections to the power supply are exclusively the task of
the electrician(s) of the end user.
– Any modifications to the balance/weighing platform and AC adapter, as well as repairs to
the assemblies, are prohibited. These actions endanger the safety of the system, result in
loss of the Ex Approval, and nullify any warranty and product liability claims.
– Service work and repairs may be performed only by personnel authorized by METTLER
TOLEDO.
– The classification as zone 2 must be confirmed by the regulatory body of your profession.
– Check that the balance and AC adapter are in perfect condition before putting into operation
for the first time and at least every 3 years.
– It is important to observe the European Directive on Equipment Intended for Use in Poten
tially Explosive Atmospheres (94/9/CE)!
– Only accessories which are explicitly mentioned in this document may be used, and they
must be installed and operated as described here.
– Installation work on the balance/weighing platform must be carried out outside the haz
ardous area.
Safety measures during operation in the Ex hazardous area, zone 2
CAUTION
Damage of device
– AC adapter and balance may be operated only when the housing is closed.
– The instrument must only be cleaned with a damp cloth.
Note
– According to Directive 94/9/EU (ATEX 95), XS-Ex2 precision balances, X-Ex2 precision
weighing platforms, and the AC adapter PSX2 are Group II, Category 3G devices that,
according to Directive 99/92/EU (ATEX 137), can be used in zone 2, as well as in Gas
Groups IIA, IIB and IIC, which are potentially ignitable by combustible substances in the
range of Temperature Classes T1 to T5.
– For use/installation, the requirements of EN 60079-14 must be observed.
9Safety Information
Page 10
Special conditions X for the AC adapter PSX2
CAUTION
Damage of device
– The power supply cable of the METTLER TOLEDO Type AC adapter PSX2 must be installed
with protection against mechanical damage.
– Only the special plug-connector of the output circuit may be plugged into, or unplugged
from, a power-consuming device such as a balance while it is under voltage.
– The internal inductance (including the connecting cable) of any power-consuming device
connected to the AC adapter must not exceed ≤ 30 µH, and its internal capacity must not
exceed ≤ 4.9 µF.
Special condition X for the balance/weighing platform
CAUTION
Damage of device
– XS-Ex2 precision balances and X-Ex2 precision weighing platforms can only be used in
closed and clean interior spaces.
– The instrument must only be cleaned using a damp cloth.
Technical data of the precision balances in the XS/X-Ex2 line and the AC adapter PSX2.
See Technical Data (page32).
10 Safety Information
Page 11
3Overview Balances and Weighing Platforms for Ex-Zone 2
1mg
Power Supply Aux 1 Aux 2 RS 232 C
1
2
3
4
5
6
7
7
9
8
8
10
7
7
7
10
10
1111
6
11
12
10
11
13
14
15161718
7
11
10
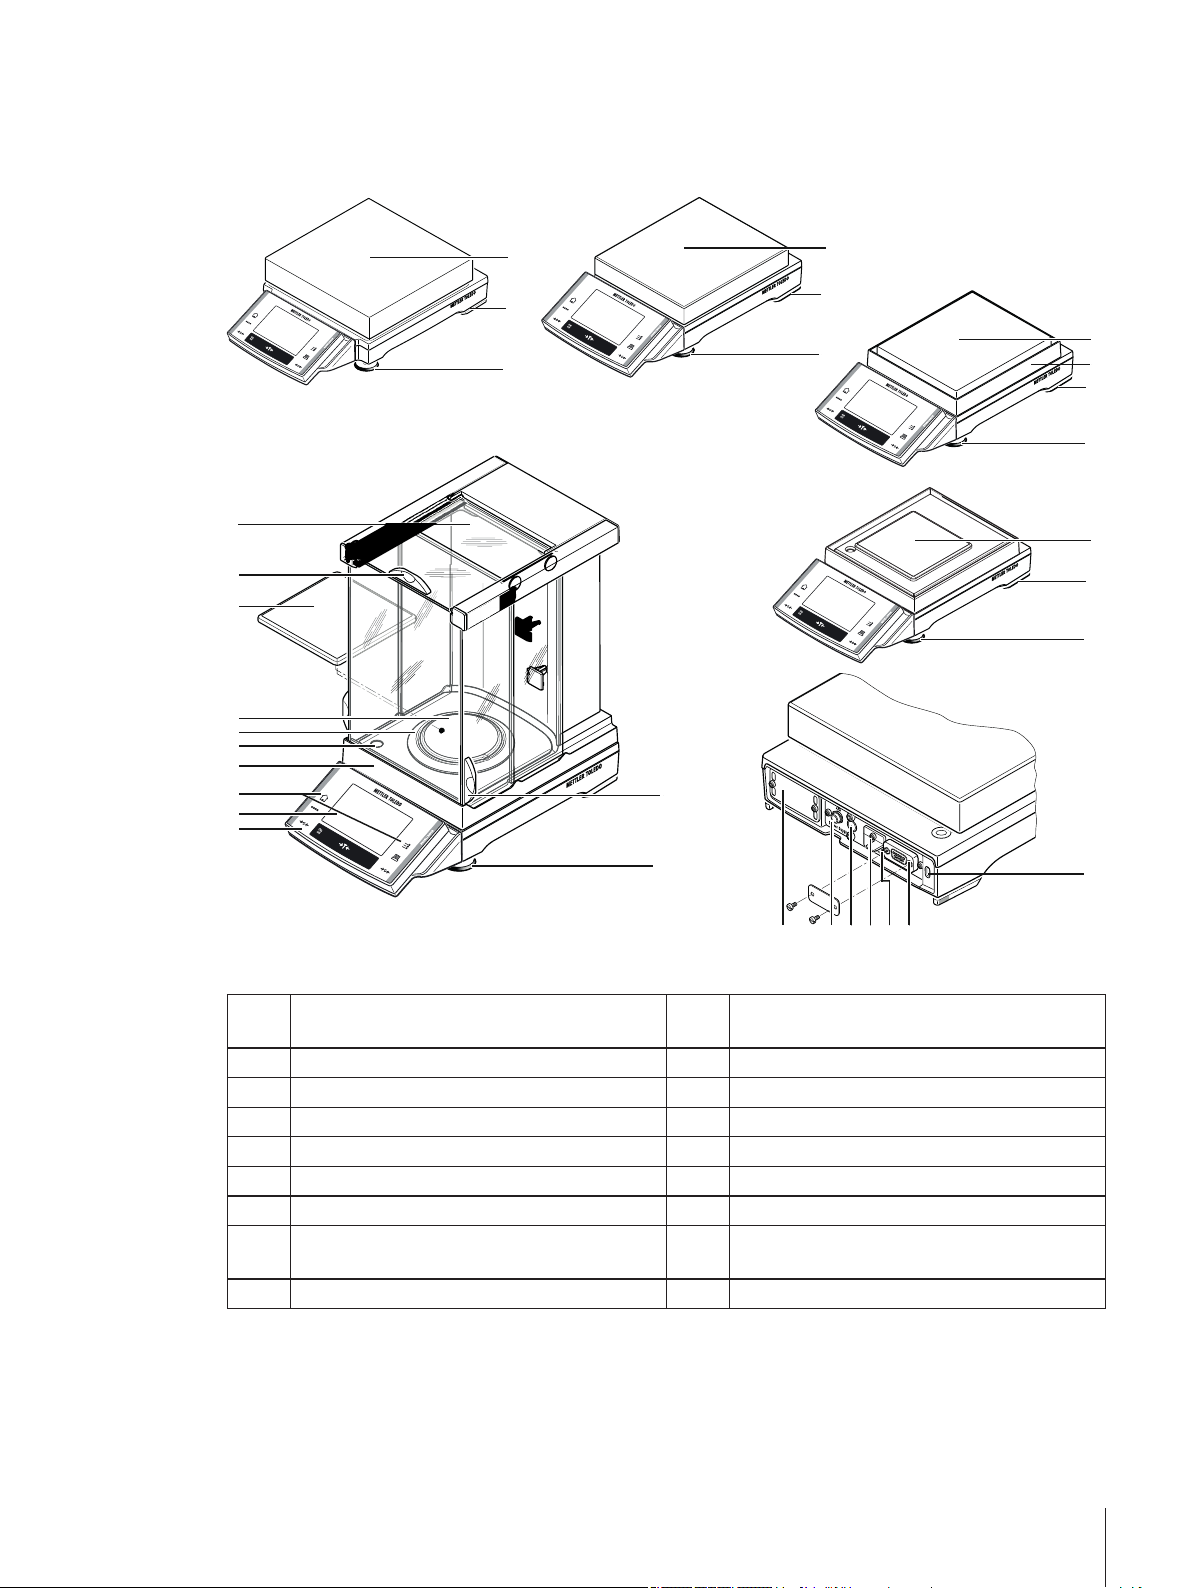
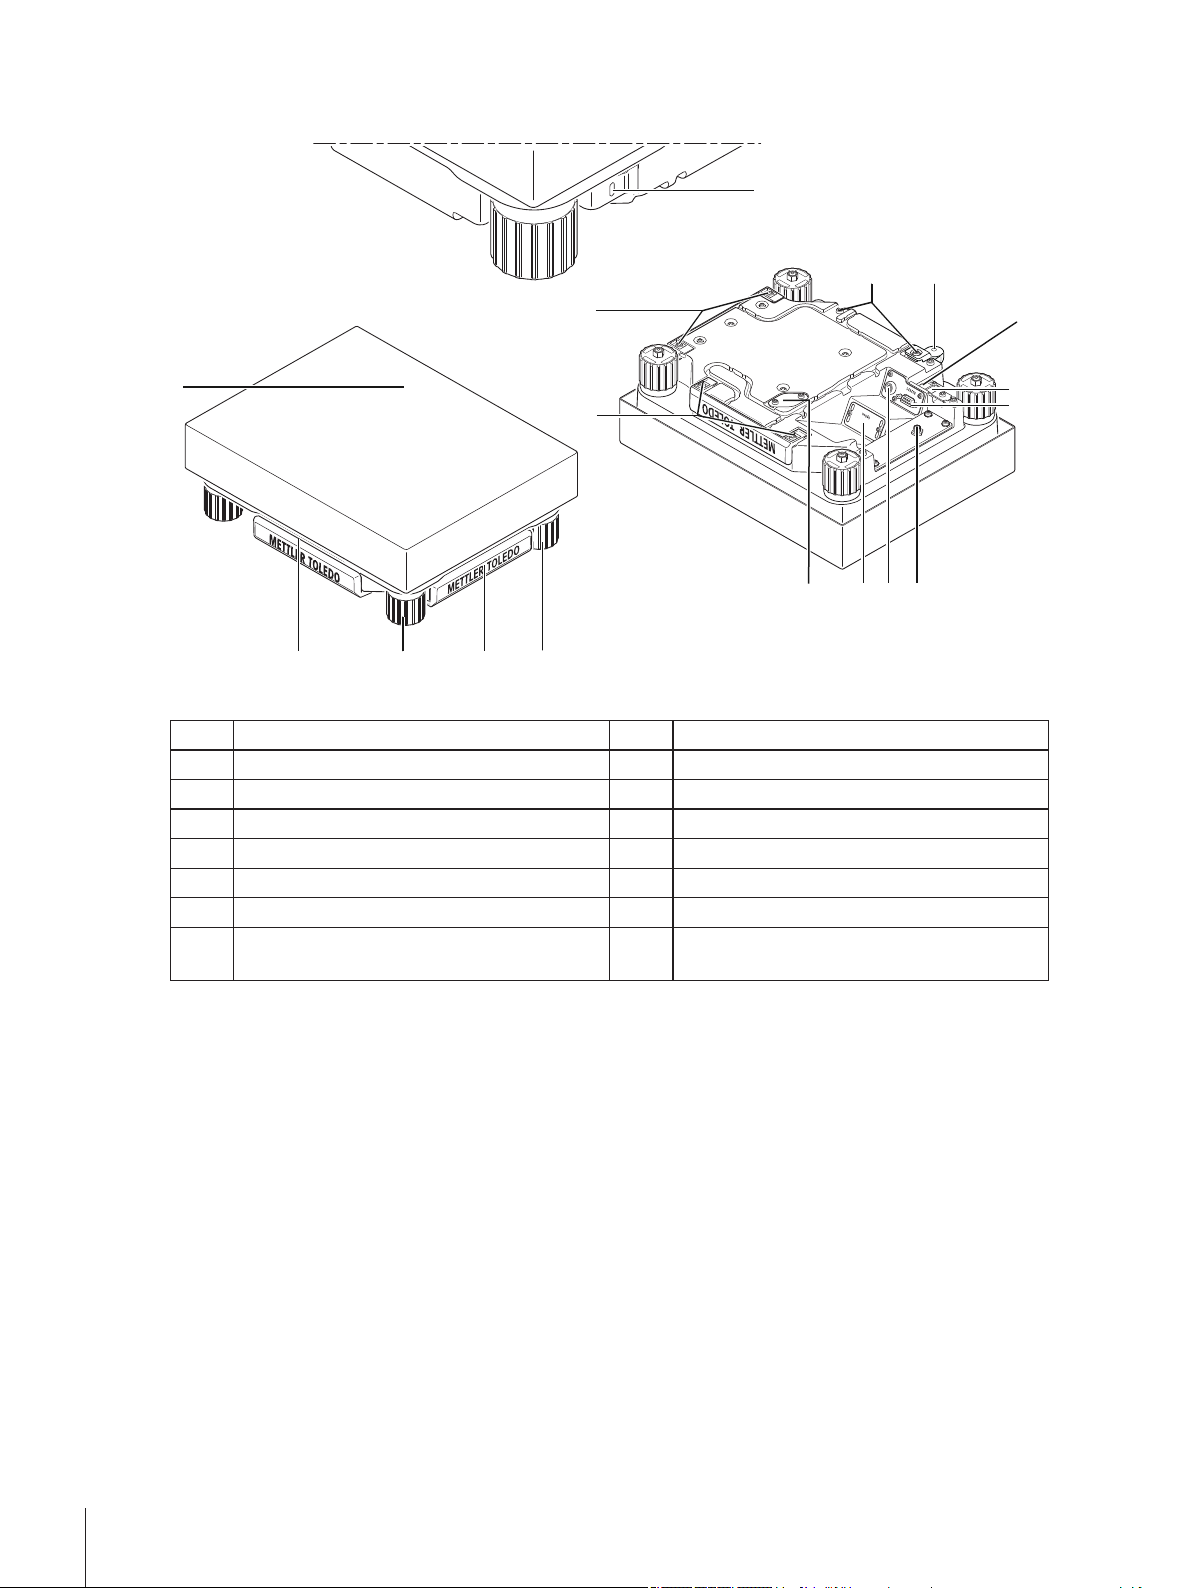
3.1Overview XS-Ex2 "S" and "M" weighing platform
2 Display (Touch-sensitive "Touch screen")
XS-Ex2 View S and M Platform
1 Terminal (details see Operating Instruction –
Part 2)
3 Operating keys 4 Type name
5 Level indicator 6 Draft shield element
7 Weighing pan 8 Handle for operation of the draft-shield door
9 Glass draft shield 10 Foot screws
11 Safety feet (10 mg, 0.1 g + 1 g models) 12 Fastening point for anti-theft device
13 RS232C serial interface 14 Aux 1 (connection for "ErgoSens")
15 Aux 2 (connection for "ErgoSens") 16 Fastening for auxiliary display stand or termi
nal stand (optional)
17 Socket for AC adapter 18 Slot for second interface (optional)
11Overview Balances and Weighing Platforms for Ex-Zone 2
Page 12
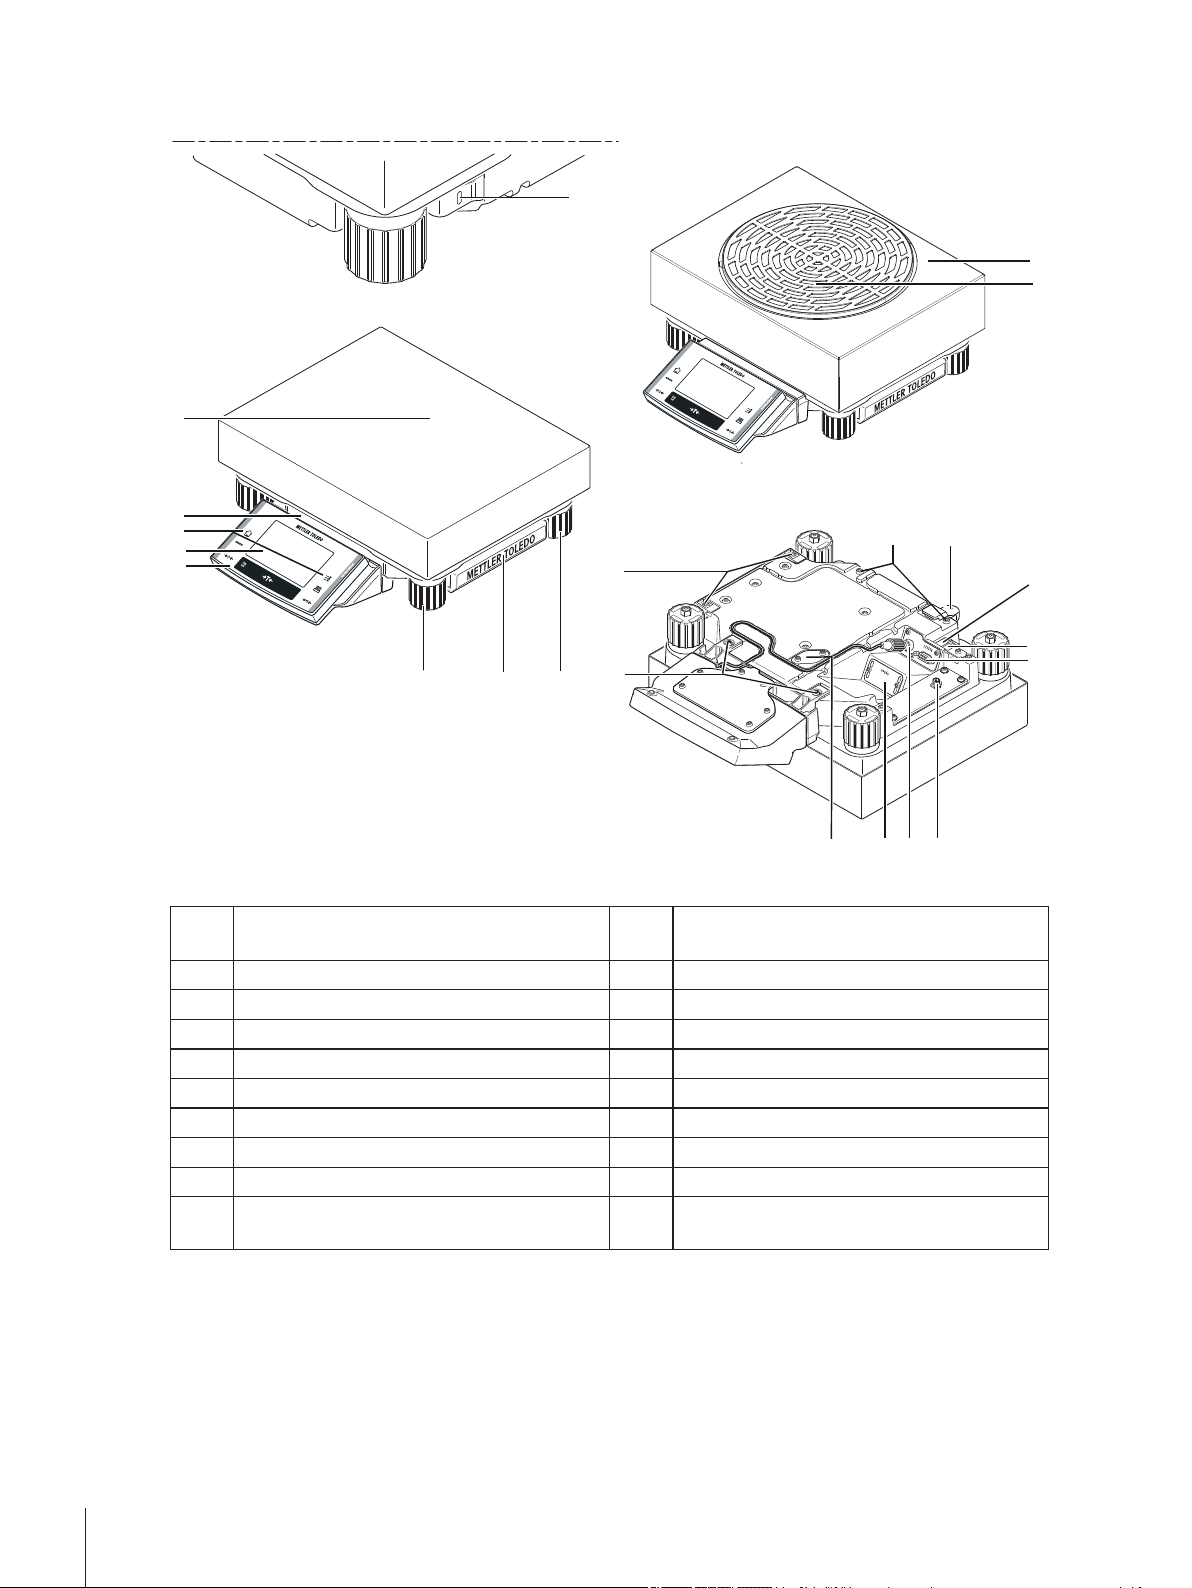
3.2Overview XS-Ex2 "L" weighing platform
8
1
2
4
5
5
9
67
6
3
10
10
11
12
13
15
14
17
1618
19
XS-Ex2 View L Platform
1 Terminal (details see Operating Instruction –
2 Display (Touch-sensitive "Touch screen")
Part 2)
3 Operating keys 4 Type name
5 Weighing pan 6 Foot screws
7 Cover 8 Fastening point for anti-theft device
9 Draft shield 10 Points of attachment for terminal or cover
11 Fastening for terminal stand (optional) 12 Level indicator
13 Aux 1 (connection for "ErgoSens") 14 Aux 2 (connection for "ErgoSens")
15 RS232C serial interface 16 Socket for AC adapter
17 Connector for terminal cable 18 Slot for second interface (optional)
19 Cover plate for below-the balance weighing
(hook optional)
12 Overview Balances and Weighing Platforms for Ex-Zone 2
Page 13
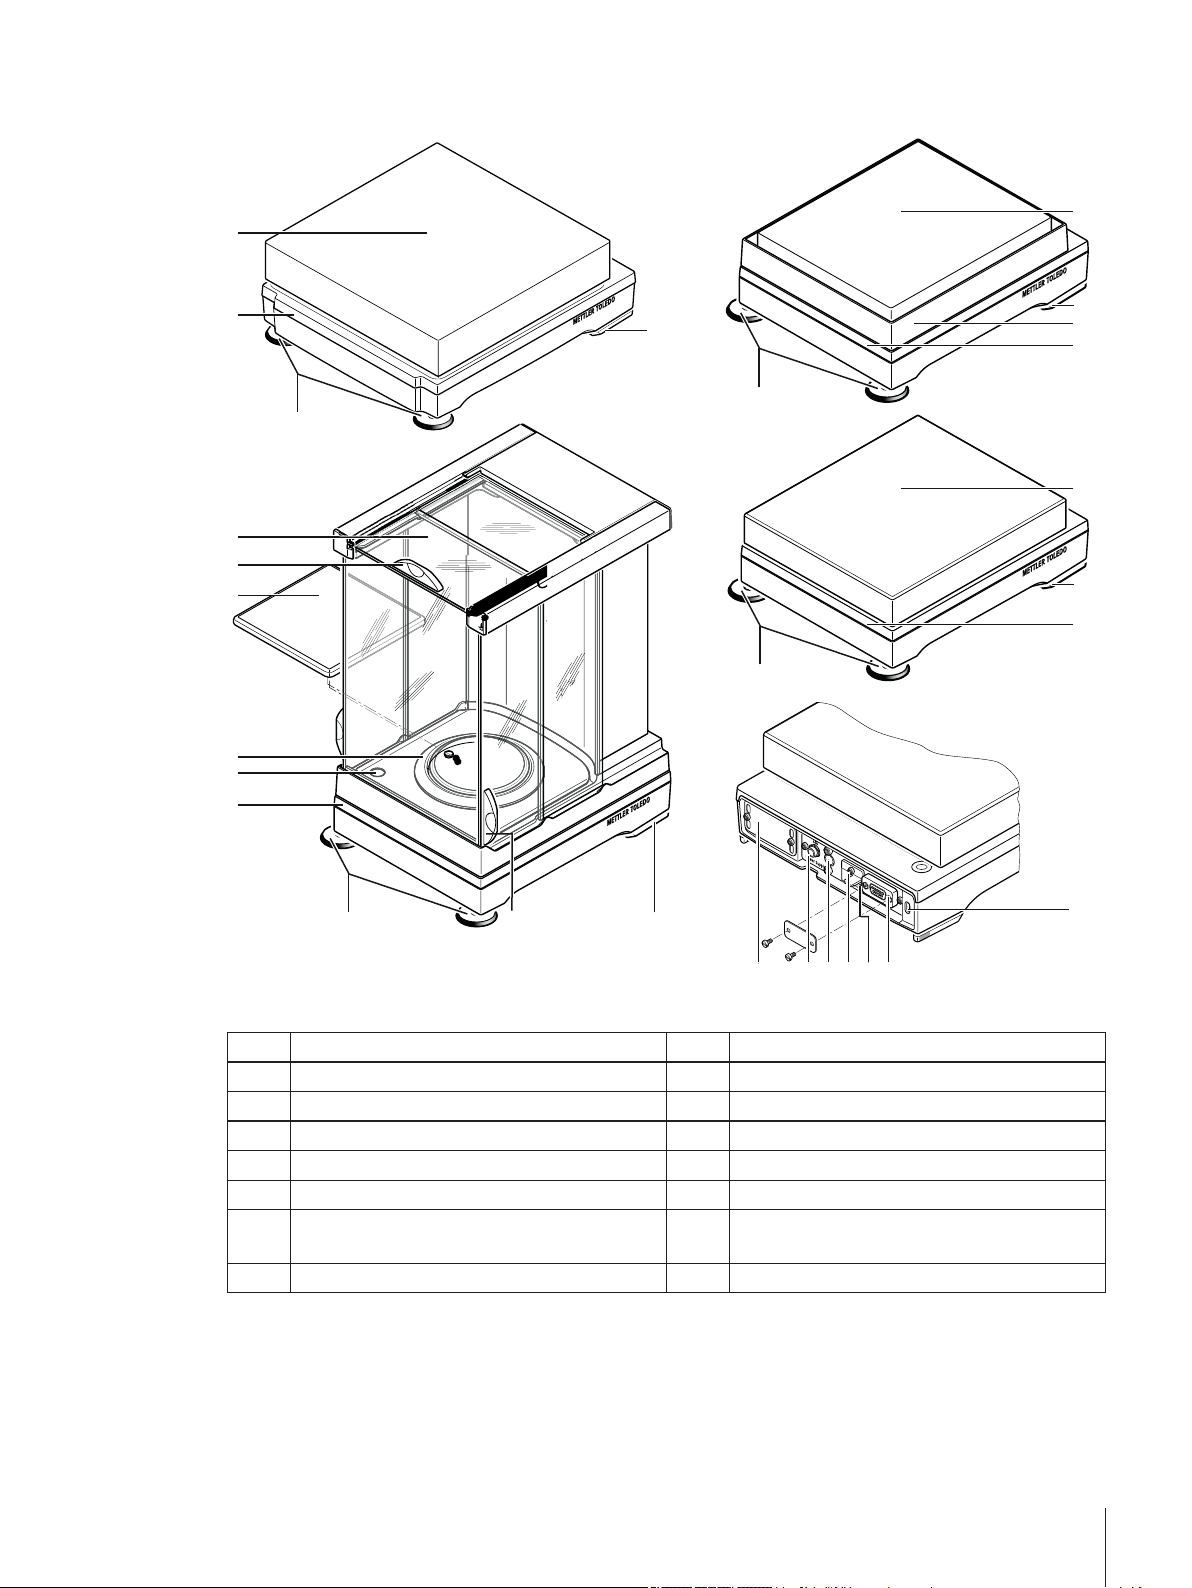
3.3Overview X-Ex2 "S" and "M" weighing platform
1mg
7
1
1
4
2
3
4
5
6
58
8
8
8
1
1
4
4
3
7
7
7
Power Supply Aux 1 Aux 2 RS 232 C
9
10
11
12131415
X-Ex2 View S and M Platform
1 Type name 2 Level indicator
3 Draft shield element 4 Weighing pan
5 Handle for operation of the draft-shield door 6 Glass draft shield
7 Safety feet (10 mg, 0.1 g + 1 g models) 8 Foot screws
9 Fastening point for anti-theft device 10 RS232C serial interface
11 Aux 1 (connection for "ErgoSens") 12 Aux 2 (connection for "ErgoSens")
13 Fastening for auxiliary display stand or termi
14 Socket for AC adapter
nal stand (optional)
15 Slot for second interface (optional)
13Overview Balances and Weighing Platforms for Ex-Zone 2
Page 14
3.4Overview X-Ex2 "L" weighing platform
2
1
5
34
3
6
6
7
8
9
11
10
13
1214
15
X-Ex2 View L Platform
1 Type name 2 Weighing pan
3 Foot screws 4 Cover
5 Fastening point for anti-theft device 6 Points of attachment for terminal or cover
7 Fastening for terminal stand (optional) 8 Level indicator
9 Aux 1 10 Aux 2
11 RS232C serial interface 12 Socket for AC adapter
13 Connector for terminal cable 14 Slot for second interface (optional)
15 Cover plate for below-the balance weighing
(hook optional)
14 Overview Balances and Weighing Platforms for Ex-Zone 2
Page 15
4Setting up the Balance
This chapter describes how to unpack your new balance, set it up and prepare it for operation. On completion
of the steps described in this chapter, your balance is ready for operation.
CAUTION
Risk of electric shock
– The balance/weighing platform must be disconnected from the power supply before any
set-up or installation work.
– All unpacking, set-up, installation or disassembly work must be performed outside the
hazardous area.
4.1Unpacking and checking the delivered items
Open the packaging and carefully remove all components.
4.1.1Scope of delivery
Note
The AC adapter PSX2 is not included in the scope of delivery for the balance/weighing platform and must be
ordered separately (11132730).
Components S platform
0.1 mg XS2004SX
XS-Ex2 balance or X-Ex2 weighing plat
form
Draft shield "Pro" with bottom plate – – –
Draft shield – – – – –
Draft shield element – –
Ring seal – – – –
Pan support –
Weighing pan
Operating Instructions Part 1 (this docu
ment)
Operating Instructions Part 2 and Part 3
(only XS-Ex2 balances)
Production certificate
CE declaration of conformity
ø 90 mm – – – –
ø 258 mm – – – – –
127 x 127mm – – –
170 x 205mm – – – –
190 x 223mm – – – –
237 x 237mm – – – – –
280 x 360mm – – – – –
1 mg 10 mg 0.1 g
0.1mg
Components M platform * L platform
10 mg 0.1 g 1 g 0.1 g 1 g
15Setting up the Balance
Page 16
Components M platform * L platform
XS-Ex2 balance or X-Ex2 weighing plat
form
Draft shield "Pro" with bottom plate – – – – –
Draft shield – – – – –
Draft shield element – –
Ring seal – – – – –
Pan support – –
Weighing pan
Operating Instructions Part 1 (this docu
ment)
Operating Instructions Part 2 and Part 3
(only XS-Ex2 balances)
Production certificate
CE declaration of conformity
ø 90 mm – – – – –
ø 258 mm – – – – –
127 x 127mm – – – – –
170 x 205mm – – – – –
190 x 223mm – – – – –
237 x 237mm – –
280 x 360mm – – –
* The precision balances with M platform are no longer available.
Components L platform
1 mg 5mg
XS-Ex2 balance or X-Ex2 weighing plat
form
Draft shield "Pro" with bottom plate – –
Draft shield
Draft shield element – –
Ring seal – –
Weighing pan
Operating Instructions Part 1 (this docu
ment)
Operating Instructions Part 2 and Part 3
(only XS-Ex2 balances)
Production certificate
CE declaration of conformity
ø 90 mm – –
ø 258 mm
127 x 127mm – –
170 x 205mm – –
190 x 223mm – –
237 x 237mm – –
280 x 360mm – –
16 Setting up the Balance
Page 17
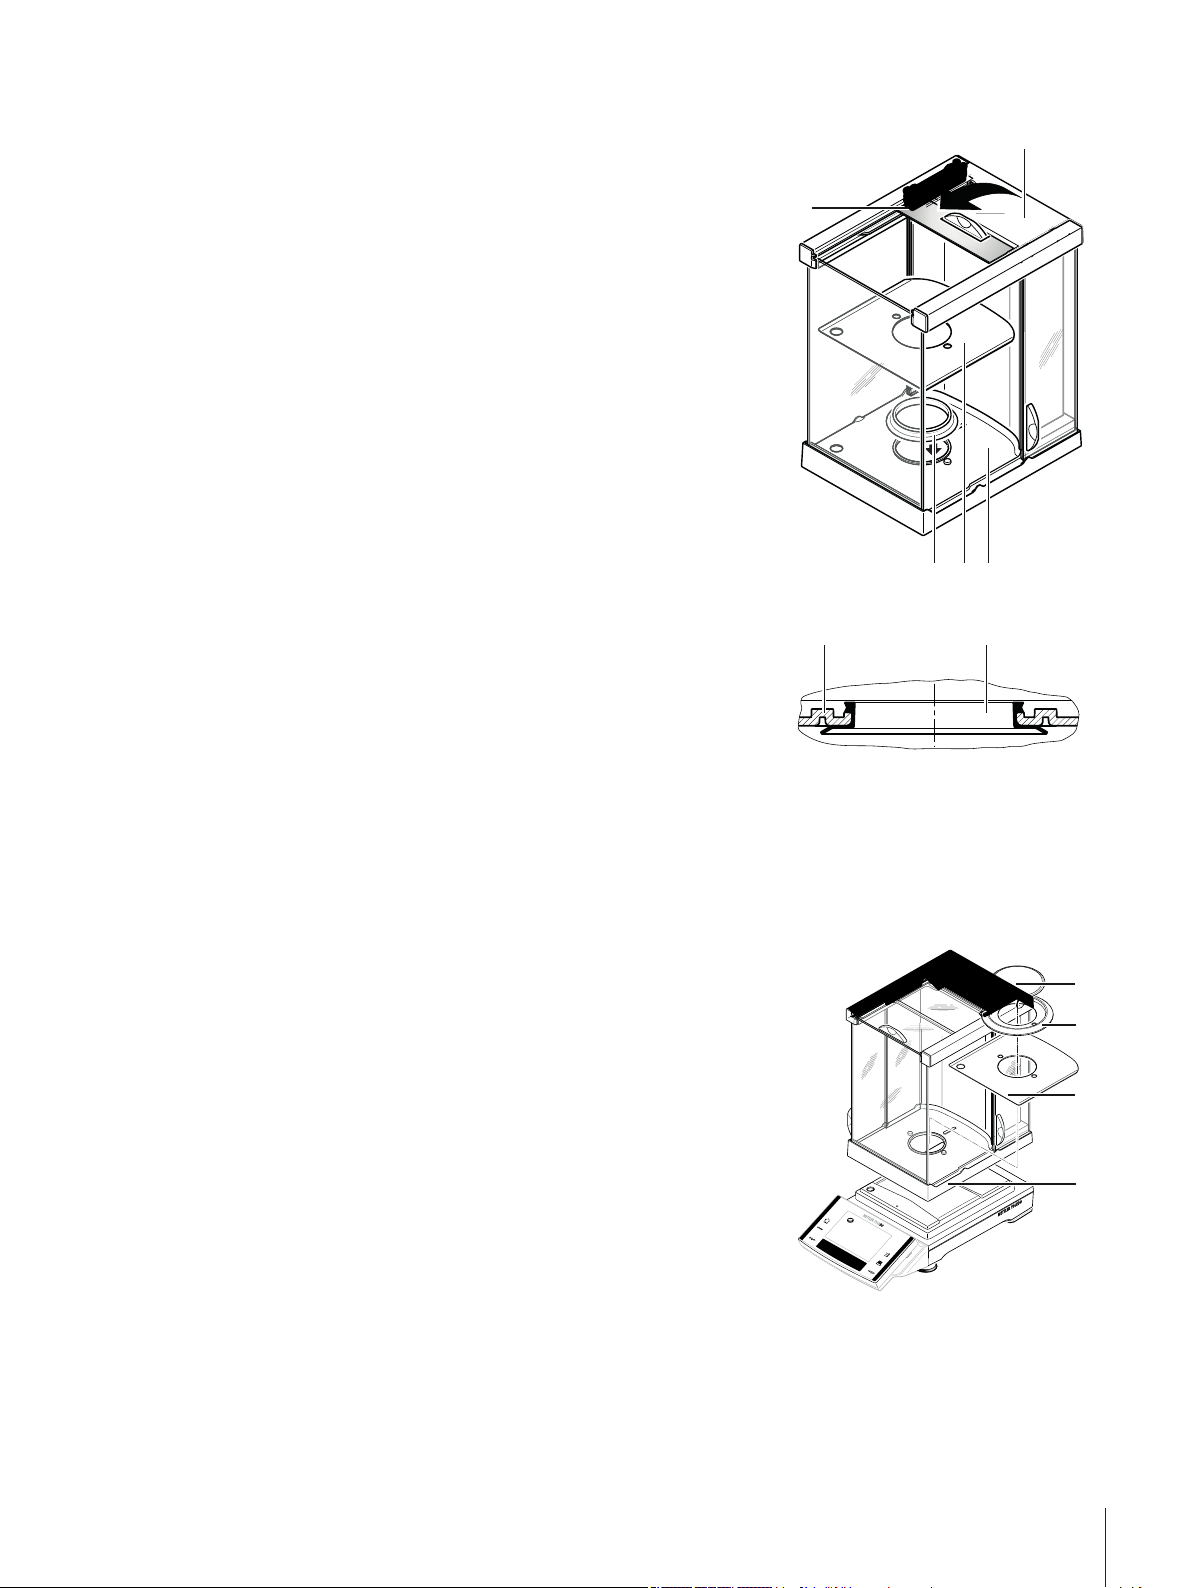
4.1.2Unpacking the Draft Shield "S" Weighing Platform (Model-dependent)
1
2
3 5 4
4 3
1
2
4
3
1 Place the draft shield on a clean surface.
2 Turn so the cover (1) is vertically on top.
3 Lift the carton (2) off over the handle and the pull the carton off
toward the back.
4 Hold the glass panels firmly so they do not get pulled off and fall to
the floor.
5 Close the cover (1) again.
6 Push all the glass panels as far as they will go to the back.
Balance with 0.1 mg readability
1 Place the ring seal (3) into the draft shield base (4) from above.
2 Push the complete ring seal (3) through the opening in the draft
shield base.
3 Pull the top edge upward through the opening until the edge lies
flat and tight all the way round.
4 Check by running a finger all the way round that the seal ring (3)
is fitted tightly into the opening in the draft shield base (4).
5 Insert the bottom plate (5).
Balance with 1 mg readability
– Insert the bottom plate (5).
4.2Assembling the balance
The size of the weighing pan depends on the readability and maximum capacity of the balance.
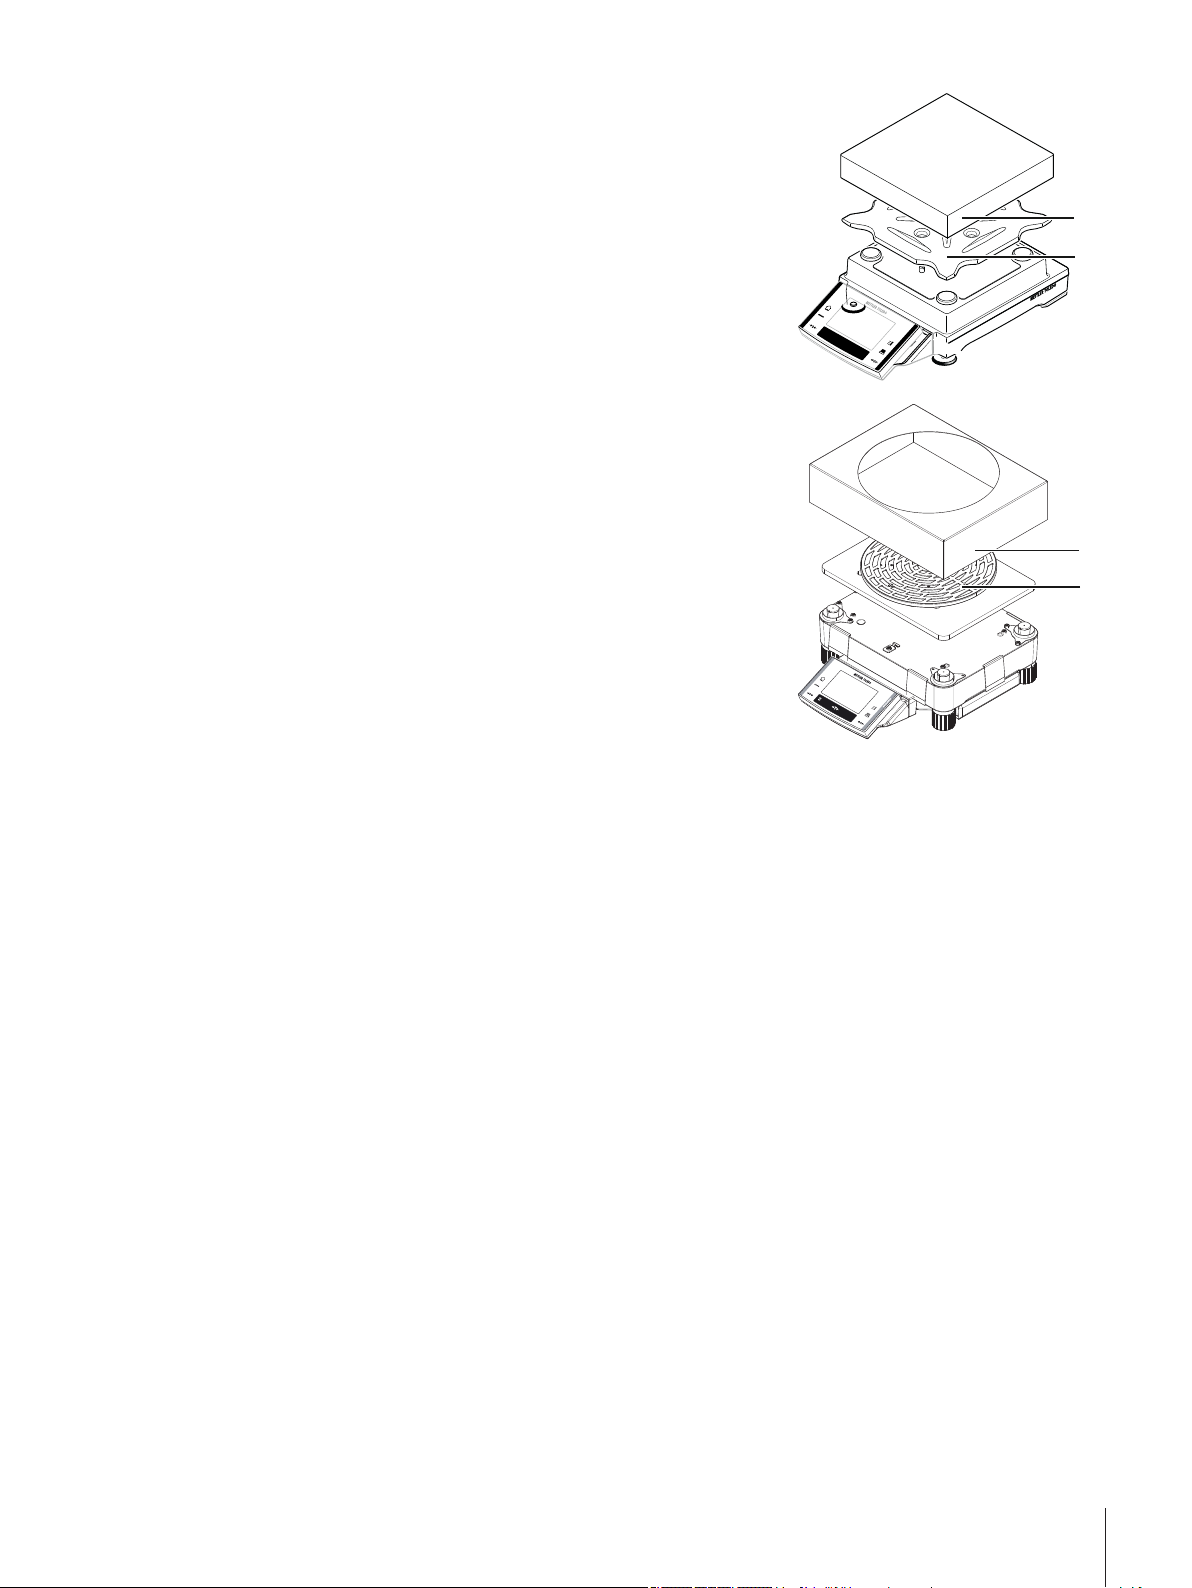
4.2.1Installing the draft shield and weighing pan
Balances with readability of 0.1 mg, "S" platform with draft shield
– Place the following components on the balance in the specified
order:
Attention
Push the side glass back as far as it will go. Grasp the draft shield
with both hands on the bars at the top.
●
Draft shield (1) with ring seal inserted, see Unpacking the Draft
Shield "S" Weighing Platform (Model-dependent) (page17).
●
Bottom plate (2), if not already inserted, see Unpacking the Draft
Shield "S" Weighing Platform (Model-dependent) (page17)!
●
Draft shield element (3).
●
Weighing pan (4).
Note
Cleaning the draft shield, see Cleaning the Draft Shield (0.1mg and
1mg Models) (page30).
17Setting up the Balance
Page 18

Balances with readability of 1 mg, "S" platform with draft shield
1
2
4
3
1
2
3
1
2
3
– Place the following components on the balance in the specified
order:
Attention
Push the side glass back as far as it will go. Grasp the draft shield
with both hands on the bars at the top.
●
Draft shield (1) with ring seal inserted.
●
Bottom plate (2), if not already inserted, see Unpacking the Draft
Shield "S" Weighing Platform (Model-dependent) (page17)!
●
Pan support (3).
●
Weighing pan (4).
Note
Cleaning the draft shield, see Cleaning the Draft Shield (0.1mg and
1mg Models) (page30).
Balances with readability of 0.1 mg, "S" platform
– Place the following components on the balance in the specified
order:
●
Draft shield element (1).
●
Pan support (2).
●
Weighing pan (3).
Balances with readability of 10 mg, "S" platform with draft shield
element
– Place the following components on the balance in the specified
order:
●
Pan support (1).
●
Weighing pan (2).
●
Draft shield element (3).
Note
It is also possible to work without the draft shield element (3). Howev
er, depending on the ambient conditions, the display of the results
may be slightly more unstable.
18 Setting up the Balance
Page 19
Balances with readability of 10 mg ("M" platform), 0.1 g ("S" and
1
2
1
2
"M" platform) and 1 g ("M" platform)
– Place the following components on the balance in the specified
order:
●
Pan support (1).
●
Weighing pan (2).
Balances with readability of 1 mg and 5 mg ("L" platform)
Attention
Remove the cells of the transport lock screws!
– Place the following components on the balance in the specified
order:
●
Weighing pan (1).
●
Draft shield (2).
19Setting up the Balance
Page 20
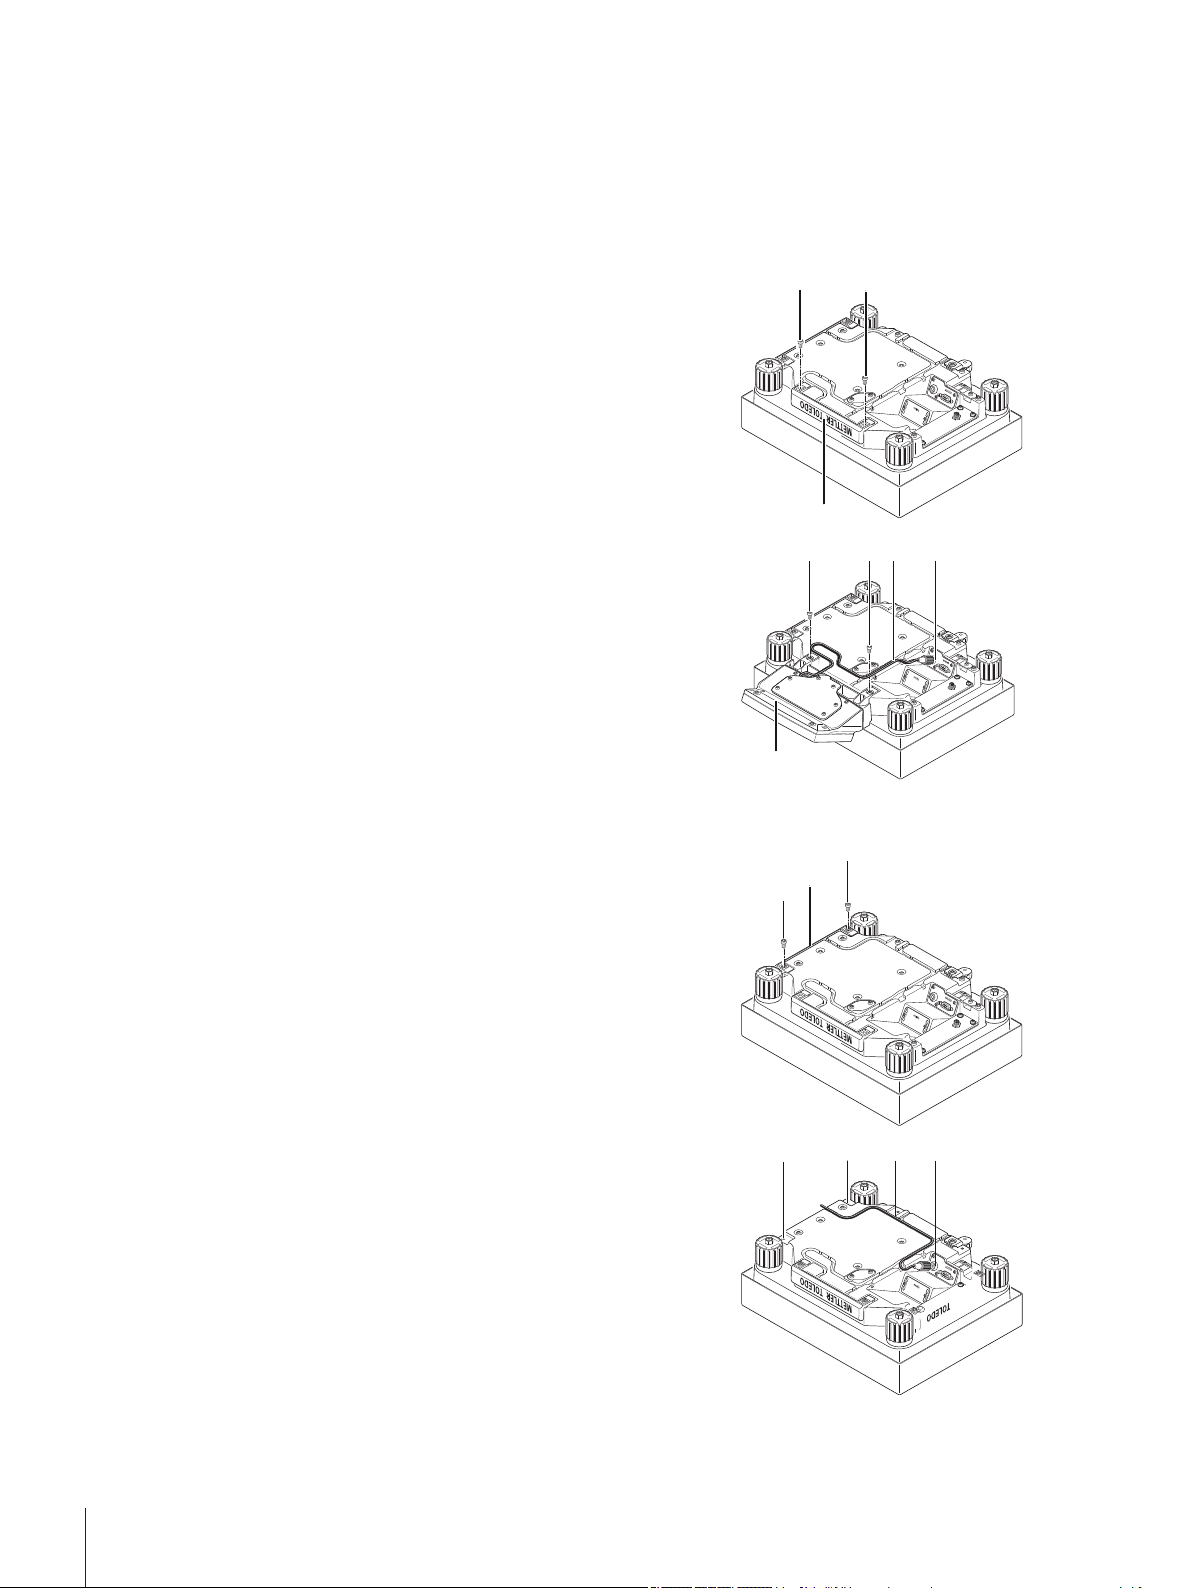
4.2.2Placing the terminal on the "L" weighing platform
1
2
2
22
5
3
4
2
2
1
3
46
6
The terminal can be attached to the long or short side of the balance.
1 Mount the weighing pan.
2 Carefully turn the weighing platform over onto the weighing pan.
Attaching the terminal to the long side
1 Dismantle the cover (1) by removing the 2 screws (2).
2 Attach the terminal to the terminal support (5) as shown, using the
screws (2) from the cover that was removed.
3 Insert the terminal cable (3) into the cable channel, as shown.
4 Screw the connector of the terminal cable into the socket (4).
5 Turn the balance back over into position.
Attaching the terminal to the short side
1 Dismantle the cover (1) by removing the 2 screws (2).
2 Attach the terminal with terminal support to the points of attachment
(6) with the screws (2).
3 Insert the terminal cable (3) into the cable channel, as shown.
4 Screw the connector of the terminal cable into the socket (4).
5 Turn the balance back over into position.
20 Setting up the Balance
Page 21
4.3Selecting the location and level of the balance
11
22
Your balance is a precision instrument and will thank you for an optimum location with high accuracy and
dependability.
4.3.1Selecting the location
Choose a position which is stable, free from vibration, and as nearly
horizontal as possible. The supporting surface must be able to bear
the weight of the fully loaded balance safely.
Avoid the following:
●
Direct sunlight
●
Draft (e.g. from fans or air conditioning)
●
Excessive fluctuations in temperature.
Further information can be found in Weighing the Right Way.
Observe ambient conditions, see General data (page32).
4.3.2Leveling the balance
Balances with readability of 1mg "S" platform and balances with "L" platform
1 Align the balance horizontally.
2 Turning the leveling screws of the housing until the air bubble is in
the inner circle of the level indicator.
The position of the air bubble illustrates which leveling screw
you need to turn (L = left leveling screw, R = right leveling
screw) and in which direction so that the air bubble moves to
the center.
Example
In this example, turn the left leveling screw counterclockwise.
Balances with readability of 10mg, 0.1g and 1g ("S" and "M" platforms)
1 Remove the clamps (1) for the safety feet by turning them out
wards.
Attention
Turn the clamps (1) outwards as far as they will go (~ 90°), so
that the safety feet can move freely.
2 Now level the balance by turning both leveling screws (2) until the
air bubble is in the inner circle of the level indicator.
3 Secure the safety feet by turning the clamps (1) inwards as far as
they will go.
Note
The balance must be leveled and adjusted each time it is moved to a
new location.
21Setting up the Balance
Page 22
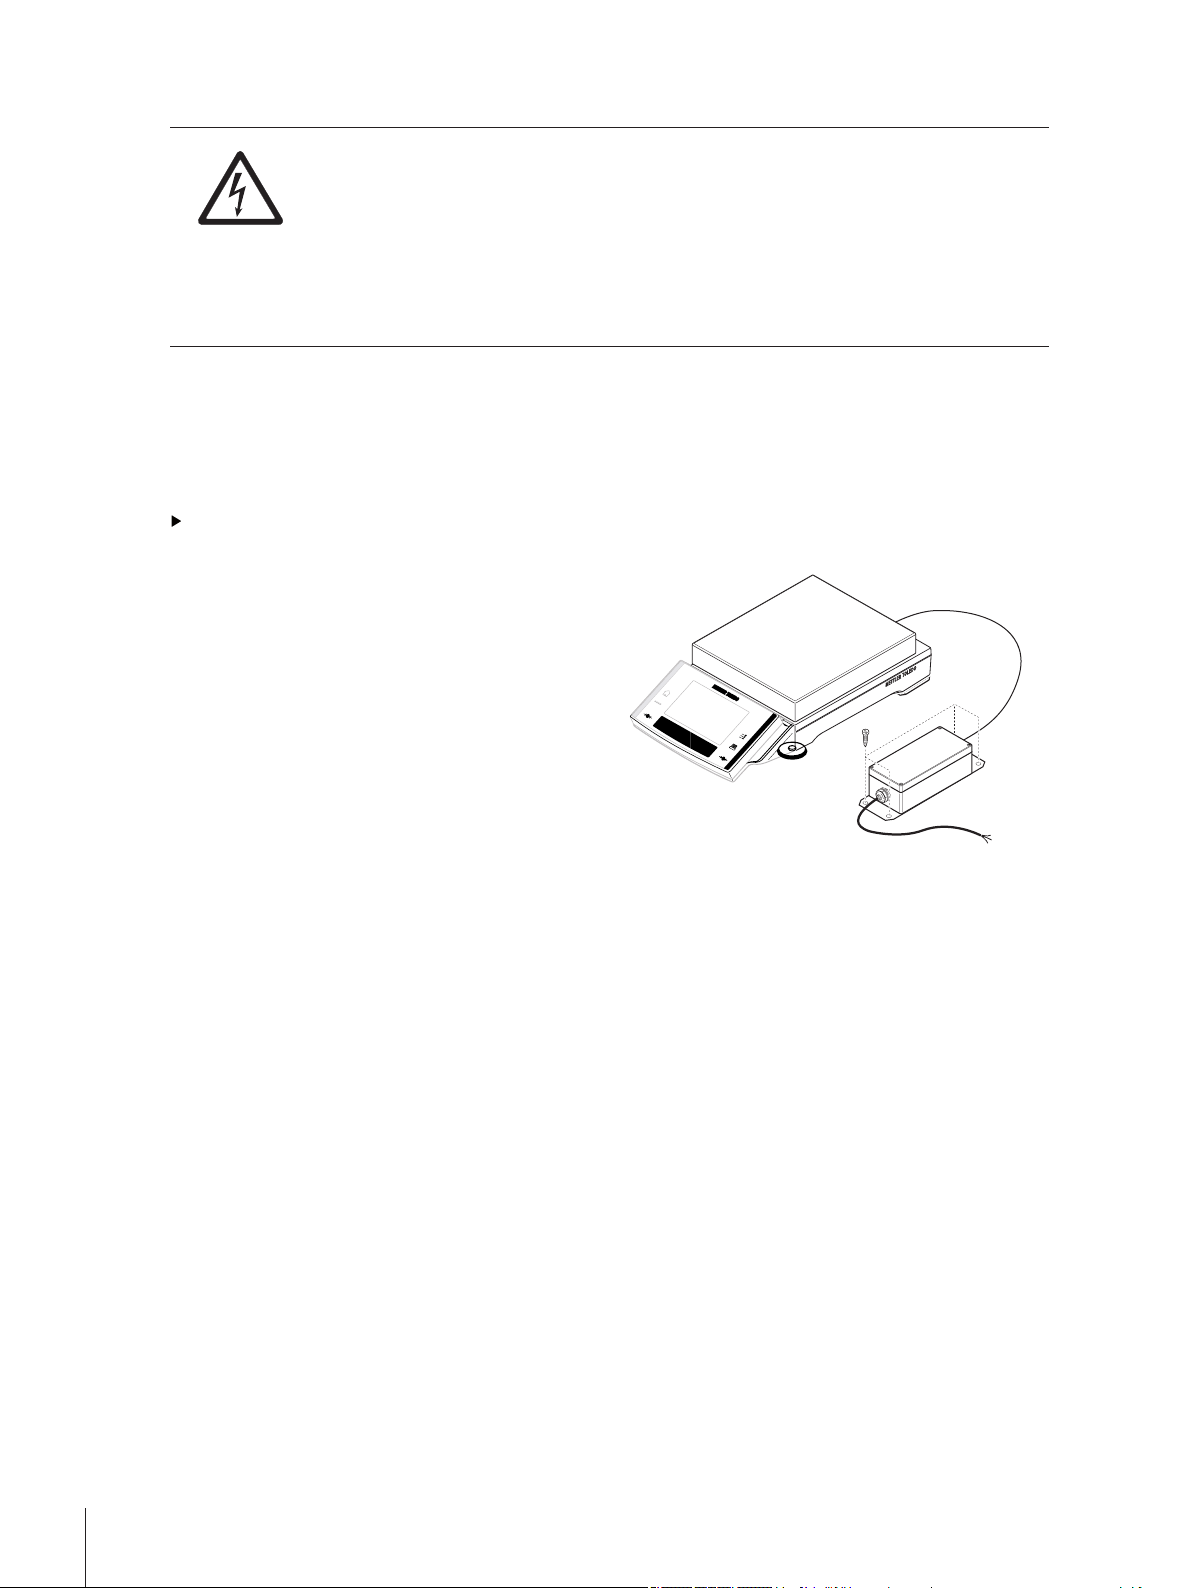
4.4Installation of the AC adapter PSX2
Zone 2
Country-specific 115/230 V power supply
connection
WARNING
Risk of electric shock
– Your weighing platform has been delivered with a country-specific AC adapter. Check
whether the local power supply voltage is compatible with the AC adapter. If this is not the
case, on no account connect the AC adapter to the power supply but contact your responsi
ble METTLER TOLEDO dealer.
– The installation may be performed only by a qualified electrician.
4.4.1Installation in the Ex hazardous area (zone 2)
If the AC adapter is installed in zone 2, the power supply cable must either be connected to the screw terminals
or a connection box outside the hazardous area, or to a connection box of suitable protection type within the
hazardous area of the building.
An all-pole supply isolation device must be
connected on the line side of the screw termi
nals of the building installation.
1 Install AC adapter in a permanent position so
that it is protected against mechanical dam
age.
2 Attach power cable to the screw terminals of
the building installation as follows:
Core end yellow/green = ground
Core end black No. 1 = phase
Core end black No. 2 = neutral conductor
3 Route power cable so that it is protected
against mechanical damage.
4.4.2Installation outside the Ex hazardous area
If the AC adapter is installed outside the hazardous area and only the balance/platform is in the hazardous
area, the AC adapter can also be connected to the building installation using a commercial plug connection. In
such a case the power plug is used as a supply isolation device.
Note
The power plug is not included in the standard equipment.
22 Setting up the Balance
Page 23
1 Install AC adapter in a permanent position so
Zone 2 Outside
hazardous
area
Country-specific 115/230 V power supply
connection
that it is protected against mechanical dam
age.
2 Connect 3-pin power plug to power cable:
Core end yellow/green = ground
Core end black No. 1 = phase
Core end black No. 2 = neutral conductor
3 Plug power plug into receptacle outlet of the
building installation.
4 Route power cable so that it is protected
against mechanical damage.
4.4.3Connection to the balance/weighing platform
1 Connect the AC adapter to the connector socket
on the backside/underside of your bal
ance/weighing platform.
2 Secure the connection to the balance by screw
ing the plug tightly.
3 Install the cable in such a way that it will not
be damaged and will not hinder day-to-day
work.
After the balance/weighing platform has
been connected to the power supply, it car
ries out a self-test and is then ready for
operation.
"S" and "M" platform
"L" platform
23Setting up the Balance
Page 24

4.4.4Dismantling
2
3
2
3
WARNING
Risk of electric shock
Disconnect AC adapter from power supply
1 Disconnect the power supply cable from the screw terminals of the in-house power supply in the following
sequence:
Core end black No. 2 = neutral conductor
Core end black No. 1 = phase
Core end yellow/green = ground
2 Unscrew the power supply unit.
3 Remove the balance and power supply cable.
4.5Marking the balance/weighing platform and the AC adapter
Instruments for use in hazardous areas must be marked with their type of protection and with warnings. The
appropriate stickers are affixed to the balance.
– Check to make sure model plate with the Ex symbol (1) and the "Electrostatic" warning label (2) has been
applied to the balance/weighing platform.
Model plate balance/weighing platform
24 Setting up the Balance
Page 25

– Check to make sure that the model plate with the Ex symbol (1) has been applied to the AC adapter.
2
Model plate AC adapter
25Setting up the Balance
Page 26

5Connection of Peripheral Devices and System Integration
Ex hazardous area, zone 2
P
B
P ≠ Ex ic
Many of the balances in current use, and especially weighing platforms, are normally integrated into complex
computer or weighing systems. The integrated RS232 or an optional data interface can be used to capture
weighing results and to control or adjust the weighing platform. Standard commands are available for this pur
pose.
System integration
5.1Usage of data interface "RS232" in the Ex hazardous area (zone 2)
Attention
The installation must be performed by a professional in accordance with the applicable regulations.
If peripheral devices are connected to the RS232 data interface of the balance in the Ex hazardous area, there
are two possible cases.
5.1.1The peripheral device «P» is located inside the Ex hazardous area
The peripheral device «P» which is used must be approved for zone 2.
The peripheral device «P» does not conform to protection type Ex ic.
– In order for the energy flow via the data cable to be limited between the balance and the peripheral device
«P», an energy limiter with corresponding Ex certification «B» must be used.
The peripheral device «P» does conform to protection type Ex ic.
– The data cable does not need a special energy limiter.
«B» = Standard energy limiter in housing with pro
tection type (Ex ic IIC T5).
(If «P» ≠ Ex ic).
26 Setting up the Balance
Page 27

If the peripheral device «P» conforms to protection
Ex hazardous area, zone 2
P
RS
P = Ex ic
Ex hazardous area, zone 2
P
B
Out
side hazardous
area
Ex hazardous area, zone 2
P
type Ex ic, no special energy limiter is necessary
RS = standard RS cable, use for circuit [Ex ic] IIC.
5.1.2The peripheral device «P» (e.g. PC or printer) is located outside the Ex hazardous area
The peripheral device «P» does not need special approval with regard to Ex zone 2.
– In order for the energy flow via the data cable to be limited between the balance and the peripheral device
«P», an energy limiter with corresponding Ex certification «B» must be used.
«B» = Standard energy limiter in housing with pro
tection type (Ex ic IIC T5).
(If «P» ≠ Ex ic).
5.2Usage of the optional data interface "Bluetooth" in the Ex hazardous area
5.2.1The peripheral device «P» is located inside the Ex hazardous area
If peripheral devices are connected to the Bluetooth data interface of the balance in the Ex hazardous area, there
are two possible cases.
The peripheral device «P» must be approved for
use in zone 2.
27Connection of Peripheral Devices and System Integration
Page 28

5.2.2The peripheral device «P» (e.g. printer) is located outside the Ex hazardous area
Ex hazardous area, zone 2
P
Outside hazardous
area
The peripheral device «P» does not need special
approval for use inzone 2.
28 Connection of Peripheral Devices and System Integration
Page 29

6Maintenance
6.1Cleaning
Periodically clean the weighing pan, draft shield element, draft shield (depending on the model), housing and
terminal of your balance using a damp cloth. The maintenance interval depends on your standard operating
procedure (SOP).
Please observe the following notes
WARNING
Risk of electric shock
- The balance must be disconnected from the power supply.
- Balances located in the hazardous area must be damp-cleaned to prevent the risk of spark
formation through dry rubbing on plastic parts.
- Make sure that no liquid penetrates the balance/weighing platform.
- Never open the balance/weighing platform or AC adapter. They do not contain any parts
that can be cleaned, repaired or replaced by the user.
CAUTION
Damage of balance
On no account use cleaning agents which contain solvents or abrasive ingredients, as this
can result in damage to the terminal overlay.
Cleaning
Your balance is made from high quality, resistant materials and can therefore be cleaned with a commercially
available, mild cleaning agent.
1 Remove the draft shield for thoroughly cleaning the draft shield glasses.
2 When you replace these parts, make sure they are in the correct position.
Note
Please contact your METTLER TOLEDO dealer for details of the available service options. Regular servicing by
an authorized service engineer ensures constant accuracy for years to come and prolongs the service life of
your balance.
29Maintenance
Page 30

6.2Cleaning the draft shield (0.1mg and 1mg models)
1
2
2
1 Remove the weighing pan, draft-shield element
(0.1mg models), pan support (1mg models).
2 Lift the draft shield off the balance and place it on
a clean surface.
3 Remove the bottom plate.
4 Push all the glasses back as far as they will go.
5 Turn the cover (1) to the front.
6 Pull the top glass toward the back and off.
7 Pull the side glasses toward the back and off.
Attention
Always hold the 2 parallel guided glasses (side
glasses and top glasses) together with one hand.
8 Clean all parts then reassemble the draft shield in
the reverse order.
Insert glasses
Attention
Always hold the 2 parallel guided glasses (side
glasses and top glasses) together and parallel with
one hand. The side glasses must not be placed oust
side the projections (2).
30 Maintenance
Page 31

6.3Disposal
In conformance with the European Directive 2002/96/EC on Waste Electrical and Electronic
Equipment (WEEE) this device may not be disposed of in domestic waste. This also applies
to countries outside the EU, per their specific requirements.
Please dispose of this product in accordance with local regulations at the collecting point
specified for electrical and electronic equipment. If you have any questions, please contact
the responsible authority or the distributor from which you purchased this device. Should this
device be passed on to other parties (for private or professional use), the content of this regu
lation must also be related.
Thank you for your contribution to environmental protection.
31Maintenance
Page 32

7Technical Data
7.1General data
Technical data AC adapter PSX2, 11132730 (external)
Dimensions: 233 x 80 x 60mm
Hole distance: 215 x 62mm (center mounting holes)
Weight: 1.42kg
Line voltage: 230V ±10%, 0.1A, 50/60Hz / 115V (±10%), 0.2A,
Fuses: Primary: T125L250V (230V Version) / T250L250V (115V Ver
Electrical data: U0 ≤ 13.5V, I0 ≤ 1.2A, P0 ≤ 6W
Applied standards: IEC EN 61010-1, IEC EN 60950-1, CAN/CSA-C22.2 No.
Classification: II 3G Ex [ic] nA IIC T5
Application range: • For use only in closed interior rooms
Overvoltage category: Class II
Degree of pollution: 2
Degree of protection housing: IP66
High above mean sea level: Up to 4000 m
Ambient temperature: -10 to +40 °C
Relative air humidity: Max. 80% at 31°C, linearly decreasing to 50% at 40C, non
Housing materials: Die-cast aluminium, laquered
50/60Hz (country-specific)
sion)
Secondary: T500L250V
C0 ≤ 4.9µF, L0 ≤ 30µH, rectangular characteristics
61010-1, UL Std No. 61010A-1,
EN 61326+A1+A2+A3 (Class B + Industrial environments),
FCC Part 15 (Class A),
AS/NZS CISPR 22, AS/NZS 61000.4.3
ATEX: EN 60079-0 (IEC 60079-0),
EN 60079-15 (IEC 60079-15), EN 60079-11 (IEC 60079-11)
• Ex hazardous area, Zone 2
condensing
Technical data balance / weighing platform
Protection and standards
Overvoltage categoriy: Class II
Degree of pollution: 2
Electrical data: Ui ≤ 13.5V, Ii ≤ 1.2A, Pi ≤ 6W, Ci = 0nF, Li = 0µH
Applied standards: IEC EN 61010-1, CAN/CSA-C22.2 No. 61010-1,
Classification: II 3G Ex ic IIC T5
Degree of protection: IP44
Application range: • For use only in closed and clean interior rooms
32 Maintenance
UL Std No. 61010A-1,
EN 61326+A1+A2+A3 (Class B + Industrial environments),
FCC Part 15 (Class A),
AS/NZS 4251.1, AS/NZS 61000 4252.1
ATEX: EN 60079-0 (IEC 60079-0),
EN 60079-11 (IEC 60079-11)
• Ex hazardous area, Zone 2
Page 33

Environmental conditions
Height above mean sea level: Up to 4000m
Ambient temperature: 5-40°C
Relative air humidity: Max. 80% at 31°C, linearly decreasing to 50% at 40°C, non
condensing
Environmental conditions XS2004SX, XS26003LX, XS64003LX
High above mean sea level: Up to 4000 m
Ambient temperature: 10 - 30°C ±0.3°C / 1h, resp. ±0.5°C / 12h
Relative air humidity: 40 to 60% ±5% / 4h
Warm-up time: At least 12 hours after connecting the balance to the power sup
ply.
The balance should not be switched into standby mode.
Materials
Housing: Die-cast aluminium, laquered, plastic and chrome steel
Terminal: Die-cast zinc, chromed and plastics
Weighing pan: Chrome-nickel steel ("S" and "M" platform: X2CrNiMo-17-12-2,
"L" platform: X5CrNi18-10)
Draft shield: Aluminium, plastic, chrome steel and glass
Draft shield element: Die-cast zinc, chromed (10mg models, "S" platform and
XS2004SX 0.1mg, "S" platform), Chrome steel X2 Cr Ni Mo
17132 (0.1mg models)
7.2Model-specif data of the Excellence XS-Ex2 precision balances
7.2.1XS-Ex2 balances with readability of 0.1 mg / 1 mg, "S" platform with draft shield
XS204SX XS603SX
Limit values
Maximum capacity 220 g 610 g
Readability 0.1 mg 1 mg
Tare range (from…to) 0…220 g 0…610 g
Repeatability (at nominal load) sd 0.1 mg (200 g) 0.9 mg
Linearity deviation 0.2 mg 2 mg
Eccentricity deviation (test load) 0.3 mg (100 g) 3 mg (200 g)
Sensitivity offset (test weight) 1 mg (200 g) 4.5 mg (600 g)
Sensitivity temperature drift
Sensitivity stability 0.0002%/a 0.001%/a
Typical values
Repeatability sd 0.04 mg 0.5 mg
Linearity deviation 0.13 mg 0.7 mg
Eccentric deviation (test load) 0.16 mg (100 g) 0.6 mg (200 g)
Sensitivity offset (test load) 0.8 mg (200 g) 3 mg (600 g)
Minimum sample weight (according to USP) 120 mg 1500 mg
Minimum sample weight
(U=1%, k=2)
Settling time 1.5 s 1.5 s
Dimensions
Balance dimensions (WxDxH) 263x453x322 mm 198x366x276 mm
Weighing pan dimensions 78x73 mm (WxD) 127x127 mm (WxD)
Typical uncertainties and supplementary data
Repeatability sd 0.04mg
Differential linearity deviation sd √(20pg·Rnt) √(200pg·Rnt)
1)
0.00015%/°C 0.0002%/°C
8 mg 100 mg
0.5mg+0.00005%·Rgr
+0.000015%·Rgr
33Technical Data
Page 34

XS204SX XS603SX
Differential eccentric load deviation sd 0.00008%·Rnt 0.00015%·Rnt
Sensitivity offset sd 0.0002%·Rnt 0.00025%·Rnt
Minimum sample weight (according to USP) 120mg+0.045%·Rgr 1500mg+0.15%·Rgr
Minimum sample weight
8mg+0.003%·Rgr 100mg+0.01%·Rgr
(U=1%, k=2)
Interface update rate 23 /s 23 /s
Usable height of draft shield 235 mm 175 mm
Weight of balance 9.1 kg 7.6 kg
Number of built-in reference weights 2 1
Weights for routine testing
OIML Single Weights
OIML Single Weights
Small
Large
10 g F1
#11119528
200 g F2
#11118202
20 g F1
#11119529
500 g F2
#11118203
sd = Standard deviation Rnt = Net weight (sample weight)
Rgr = Gross weight a = Year (annum)
1)
In the temperature range 10…30 °C
XS1003SX XS5003SXDR
Limit values
Maximum capacity 1010 g 5.1 kg
Readability 1 mg 10 mg
Maximum capacity, fine range – 1 kg
Readability, fine range – 1 mg
Tare range (from…to) 0…1010 g 0…5.1 kg
Repeatability (at nominal load) sd 0.8 mg 6 mg
Repeatability, fine range (at nominal load) sd – 1 mg
Linearity deviation 2 mg 6 mg
Eccentricity deviation (test load) 3 mg (500 g) 10 mg (2 kg)
Sensitivity offset (test weight) 5 mg (1000 g) 20 mg (5 kg)
Sensitivity temperature drift
1)
0.0002%/°C 0.0003%/°C
Sensitivity stability 0.001%/a 0.0015%/a
Typical values
Repeatability sd 0.4 mg 4 mg
Repeatability, fine range sd – 0.6 mg
Linearity deviation 0.7 mg 1 mg
Eccentric deviation (test load) 0.6 mg (500 g) 0.6 mg (2 kg)
Sensitivity offset (test load) 3 mg (1000 g) 10 mg (5 kg)
Minimum sample weight (according to USP) 1200 mg 12 g
Minimum sample weight
80 mg 800 mg
(U=1%, k=2)
Minimum sample weight (according to USP),
– 1.8 g
fine range
Minimum sample weight
– 120 mg
(U=1%, k=2), fine range
Settling time 1.5 s 2 s
Dimensions
Balance dimensions (WxDxH) 198x366x276 mm 214x366x363 mm
Weighing pan dimensions 127x127 mm (WxD) 127x127 mm (WxD)
Typical uncertainties and supplementary data
Repeatability sd 0.4mg+0.00002%·Rgr 4mg+0.00002%·Rgr
Repeatability, fine range sd – 0.6mg+0.00002%·Rgr
Differential linearity deviation sd √(120pg·Rnt) √(50pg·Rnt)
Differential eccentric load deviation sd 0.00006%·Rnt 0.000015%·Rnt
Sensitivity offset sd 0.00015%·Rnt 0.0001%·Rnt
Minimum sample weight (according to USP) 1200mg+0.06%·Rgr 12g+0.06%·Rgr
34 Technical Data
Page 35

XS1003SX XS5003SXDR
Minimum sample weight (according to USP),
– 1.8g+0.06%·Rgr
fine range
Minimum sample weight
80mg+0.004%·Rgr 800mg+0.004%·Rgr
(U=1%, k=2)
Minimum sample weight
– 120mg+0.004%·Rgr
(U=1%, k=2), fine range
Interface update rate 23 /s 23 /s
Usable height of draft shield 175 mm –
Weight of balance 7.6 kg 8.1 kg
Number of built-in reference weights 1 1
Weights for routine testing
OIML Single Weights
OIML Single Weights
Small
Large
50 g F2
#11118196
1000 g F2
#11118204
200 g F2
#11118202
5000 g F2
#11118206
sd = Standard deviation Rnt = Net weight (sample weight)
Rgr = Gross weight a = Year (annum)
1)
In the temperature range 10…30 °C
7.2.2XS-Ex2 balances with readability of 0.1 mg, "S" platform
XS2004SX
Limit values
Maximum capacity 2.3 kg
Readability 0.1 mg
Tare range (from…to) 0…2.3 kg
Repeatability at nominal load (ABA, measured
at) 2)
Repeatability at low load (ABA, measurered at)
2)
Repeatability (at nominal load) sd 0.35 mg
Linearity deviation 1 mg
Eccentricity deviation (test load) 1.5 mg (1 kg)
Sensitivity offset (test weight) 10 mg (2 kg)
Sensitivity temperature drift
1)
Sensitivity stability 0.0025%/a
Typical values
Repeatability sd 0.2 mg
Repeatability ABA typical
2)
Linearity deviation 0.7 mg
Eccentric deviation (test load) 0.3 mg (1 kg)
Sensitivity offset (test load) 1.6 mg (2 kg)
Minimum sample weight (according to USP) 0.6 g
Minimum sample weight
(U=1%, k=2)
Settling time 10 s
Dimensions
Balance dimensions (WxDxH) 214x366x96 mm
Weighing pan dimensions 127x127 mm (WxD)
Typical uncertainties and supplementary data
Repeatability sd 0.2mg
Repeatability ABA typical
2)
Differential linearity deviation sd √(60pg·Rnt)
Differential eccentric load deviation sd 0.00003%·Rnt
Sensitivity offset sd 0.00008%·Rnt
0.1 mg (2 kg)
0.08 mg (100 g)
0.0005%/°C
sd 0.06 mg
0.04 g
+0.0000045%·Rgr
sd 0.06mg
+0.0000009%·Rgr
35Technical Data
Page 36

XS2004SX
Minimum sample weight (according to USP) 600mg+0.0135%·Rgr
Minimum sample weight
40mg+0.0009%·Rgr
(U=1%, k=2)
Interface update rate 23 /s
Weight of balance 6.9 kg
Number of built-in reference weights 1
Weights for routine testing
OIML CarePac
Weights
100 g F2
#11118201
2 kg M1
#11117722
ASTM CarePac
Weights
100 g ASTM 3
#11123576
2 kg ASTM 3
#11123580
sd = Standard deviation Rnt = Net weight (sample weight)
Rgr = Gross weight a = Year (annum)
1)
In the temperature range 10…30 °C
2)
Value out of 5 ABA measurements according to OIML R111
7.2.3XS-Ex2 balances with readability of 10 mg / 0.1 g, "S" platform
XS4002SX XS6002SX XS4001SX
Limit values
Maximum capacity 4.1 kg 6.1 kg 4.1 kg
Readability 10 mg 10 mg 100 mg
Tare range (from…to) 0…4.1 kg 0…6.1 kg 0…4.1 kg
Repeatability (at nominal load) sd 8 mg 8 mg 80 mg
Linearity deviation 20 mg 20 mg 60 mg
Eccentricity deviation (test load) 30 mg (2 kg) 30 mg (2 kg) 200 mg (2 kg)
Sensitivity offset (test weight) 60 mg (4 kg) 60 mg (6 kg) 240 mg (4 kg)
Sensitivity temperature drift
Sensitivity stability 0.0015%/a 0.0015%/a 0.005%/a
Typical values
Repeatability sd 4 mg 4 mg 40 mg
Linearity deviation 7 mg 7 mg 20 mg
Eccentric deviation (test load) 6 mg (2 kg) 6 mg (2 kg) 32 mg (2 kg)
Sensitivity offset (test load) 32 mg (4 kg) 30 mg (6 kg) 160 mg (4 kg)
Minimum sample weight (according to USP) 12 g 12 g 120 g
Minimum sample weight
(U=1%, k=2)
Settling time 1.2 s 1.2 s 0.8 s
Dimensions
Balance dimensions (WxDxH) 194x366x96 mm 194x366x96 mm 194x366x96 mm
Weighing pan dimensions 170x205 mm (WxD) 170x205 mm (WxD) 190x223 mm (WxD)
Typical uncertainties and supplementary data
Repeatability sd 4mg+0.00005%·Rgr 4mg+0.00003%·Rgr 40mg+0.0005%·Rgr
Differential linearity deviation sd √(3ng·Rnt) √(2ng·Rnt) √(25ng·Rnt)
Differential eccentric load deviation sd 0.00015%·Rnt 0.00015%·Rnt 0.0008%·Rnt
Sensitivity offset sd 0.0004%·Rnt 0.00025%·Rnt 0.002%·Rnt
Minimum sample weight (according to USP) 12g+0.15%·Rgr 12g+0.09%·Rgr 120g+1.5%·Rgr
Minimum sample weight
(U=1%, k=2)
Interface update rate 23 /s 23 /s 23 /s
Weight of balance 6.9 kg 6.9 kg 6.4 kg
Number of built-in reference weights 1 1 1
1)
0.0003%/°C 0.0003%/°C 0.0015%/°C
800 mg 800 mg 8 g
800mg+0.01%·Rgr 800mg+0.006%·Rgr 8g+0.1%·Rgr
36 Technical Data
Page 37

XS4002SX XS6002SX XS4001SX
Weights for routine testing
OIML Single Weights
OIML Single Weights
sd = Standard deviation Rnt = Net weight (sample weight)
Rgr = Gross weight a = Year (annum)
1)
In the temperature range 10…30 °C
Small
Large
200 g F2
#11118202
2000 g F2
#11118205
200 g F2
#11118202
5000 g F2
#11118206
7.2.4XS-Ex2 balances with readability of 10 mg / 0.1 g, "M" platform
XS6002MXDR XS6001MX XS12001MX
Limit values
Maximum capacity 6.1 kg 6.1 kg 12.1 kg
Readability 100 mg 100 mg 1000 mg
Maximum capacity, fine range 1.2 kg – 2.4 kg
Readability, fine range 10 mg – 100 mg
Tare range (from…to) 0…6.1 kg 0…6.1 kg 0…12.1 kg
Repeatability (at nominal load) sd 60 mg 80 mg 600 mg
Repeatability, fine range (at nominal load) sd 10 mg – 80 mg
Linearity deviation 60 mg 60 mg 600 mg
Eccentricity deviation (test load) 100 mg (2 kg) 200 mg (2 kg) 1000 mg (5 kg)
Sensitivity offset (test weight) 150 mg (6 kg) 240 mg (6 kg) 600 mg (12 kg)
Sensitivity temperature drift
Sensitivity stability 0.0015%/a 0.005%/a 0.005%/a
Typical values
Repeatability sd 40 mg 40 mg 400 mg
Repeatability, fine range sd 6 mg – 40 mg
Linearity deviation 7 mg 19 mg 34 mg
Eccentric deviation (test load) 10 mg (2 kg) 32 mg (2 kg) 30 mg (5 kg)
Sensitivity offset (test load) 60 mg (6 kg) 180 mg (6 kg) 290 mg (12 kg)
Minimum sample weight (according to USP) 120 g 120 g 1200 g
Minimum sample weight
(U=1%, k=2)
Minimum sample weight (according to USP),
fine range
Minimum sample weight
(U=1%, k=2), fine range
Settling time 1.5 s 1 s 1 s
Dimensions
Balance dimensions (WxDxH) 240x393x110 mm 240x393x110 mm 240x393x110 mm
Weighing pan dimensions 237x237 mm (WxD) 237x237 mm (WxD) 237x237 mm (WxD)
Typical uncertainties and supplementary data
Repeatability sd 40mg+0.00015%·Rgr 40mg+0.0003%·Rgr 400mg+0.0008%·Rgr
Repeatability, fine range sd 6mg+0.00015%·Rgr – 40mg+0.0008%·Rgr
Differential linearity deviation sd √(2ng·Rnt) √(15ng·Rnt) √(25ng·Rnt)
Differential eccentric load deviation sd 0.00025%·Rnt 0.0008%·Rnt 0.0003%·Rnt
Sensitivity offset sd 0.0005%·Rnt 0.0015%·Rnt 0.0012%·Rnt
Minimum sample weight (according to USP) 120g+0.45%·Rgr 120g+0.9%·Rgr 1200g+2.4%·Rgr
Minimum sample weight (according to USP),
fine range
Minimum sample weight
(U=1%, k=2)
Minimum sample weight
(U=1%, k=2), fine range
Interface update rate 23 /s 23 /s 23 /s
Weight of balance 8 kg 8 kg 8 kg
1)
0.0003%/°C 0.0015%/°C 0.0015%/°C
8 g 8 g 80 g
18 g – 120 g
1.2 g – 8 g
18g+0.45%·Rgr – 120g+2.4%·Rgr
8g+0.03%·Rgr 8g+0.06%·Rgr 80g+0.16%·Rgr
1.2g+0.03%·Rgr – 8g+0.16%·Rgr
200 g F2
#11118202
2000 g F2
#11118205
37Technical Data
Page 38

XS6002MXDR XS6001MX XS12001MX
Number of built-in reference weights 1 1 1
Weights for routine testing
OIML Single Weights
OIML Single Weights
Small
Large
200 g F2
#11118202
5000 g F2
#11118206
200 g F2
#11118202
5000 g F2
#11118206
sd = Standard deviation Rnt = Net weight (sample weight)
Rgr = Gross weight a = Year (annum)
1)
In the temperature range 10…30 °C
The precision balances with "M" platform are no longer available.
7.2.5XS-Ex2 balances with readability of 1 mg / 5 mg, "L" platform
XS26003LX XS64003LX
Limit values
Maximum capacity 26.1 kg 64.1 kg
Readability 1 mg 5 mg
Tare range (from…to) 0…26.1 kg 0…64.4 kg
Repeatability at nominal load (ABA, measured
at) 2)
Repeatability at low load (ABA, measurered at)
2)
Repeatability (at nominal load) sd 5 mg 40 mg
Linearity deviation 25 mg 50 mg
Eccentricity deviation (test load) 0.2 g (8 kg) 0.35 g (24 kg)
Sensitivity offset (test weight) 240 mg (24 kg) 960 mg (64 kg)
Sensitivity temperature drift
1)
Sensitivity stability 0.0015%/a 0.0015%/a
Typical values
Repeatability sd 2 mg 4 mg
Linearity deviation 17.5 mg 35 mg
Eccentric deviation (test load) 40 mg (8 kg) 70 mg (24 kg)
Sensitivity offset (test load) 48 mg (24 kg) 260 mg (64 kg)
Minimum sample weight (according to USP) 6 g 12 g
Minimum sample weight
(U=1%, k=2)
Settling time 10 s 10 s
Dimensions
Balance dimensions (WxDxH) 360x410x147 mm 360x410x147 mm
Weighing pan dimensions 258 mm (Ø) 258 mm (Ø)
Typical uncertainties and supplementary data
Repeatability sd 2mg+0.000006%·Rgr 4mg+0.000023%·Rgr
Repeatability ABA typical
2)
Differential linearity deviation sd √(5pg·Rnt) √(4pg·Rnt)
Differential eccentric load deviation sd 0.0001%·Rnt 0.00015%·Rnt
Sensitivity offset sd 0.0001%·Rnt 0.0002%·Rnt
Minimum sample weight (according to USP) 6g+0.018%·Rgr 12g+0.069%·Rgr
Minimum sample weight
(U=1%, k=2)
Interface update rate 23 /s 23 /s
Weight of balance 15.7 kg 15.7 kg
Number of built-in reference weights 2 2
Weights for routine testing
3 mg (26 kg) 10 mg (60 kg)
2.5 mg (1 kg) 6 mg (5 kg)
0.0003%/°C 0.0003%/°C
400 mg 800 mg
sd 1.5mg+0.000002%·Rgr 3.5mg
+0.0000094%·Rgr
400mg+0.0012%·Rgr 800mg+0.0046%·Rgr
500 g F2
#11118203
10000 g F2
#11118211
38 Technical Data
Page 39

XS26003LX XS64003LX
OIML CarePac
Weights
ASTM CarePac
Weights
1 kg F2
#11118204
20 kg M1
#30024249
1 kg ASTM 3
#11123579
20 kg ASTM 3
#11123583
2 kg F2
#11118205
50 kg M1
#11125499
2 kg ASTM 3
#11123580
50 kg ASTM 3
#00158741
sd = Standard deviation Rnt = Net weight (sample weight)
Rgr = Gross weight a = Year (annum)
1)
In the temperature range 10…30 °C
2)
Value out of 5 ABA measurements according to OIML R111
7.2.6XS-Ex2 balances with readability of 0.1 g / 1 g, "L" platform
XS32001LX XS32000LX
Limit values
Maximum capacity 32.1 kg 32.1 kg
Readability 100 mg 1000 mg
Tare range (from…to) 0…32.1 kg 0…32.1 kg
Repeatability (at nominal load) sd 80 mg 600 mg
Linearity deviation 300 mg 600 mg
Eccentricity deviation (test load) 300 mg (10 kg) 1000 mg (10 kg)
Sensitivity offset (test weight) 960 mg (32 kg) 1920 mg (32 kg)
Sensitivity temperature drift
Sensitivity stability 0.003%/a 0.005%/a
Typical values
Repeatability sd 40 mg 400 mg
Linearity deviation 200 mg 400 mg
Eccentric deviation (test load) 200 mg (10 kg) 600 mg (10 kg)
Sensitivity offset (test load) 320 mg (32 kg) 650 mg (32 kg)
Minimum sample weight (according to USP) 120 g 1200 g
Minimum sample weight
(U=1%, k=2)
Settling time 1.5 s 1.2 s
Dimensions
Balance dimensions (WxDxH) 360x404x130 mm 360x404x130 mm
Weighing pan dimensions 360x280 mm (WxD) 360x280 mm (WxD)
Typical uncertainties and supplementary data
Repeatability sd 40mg+0.00006%·Rgr 400mg+0.0003%·Rgr
Differential linearity deviation sd √(300ng·Rnt) √(1.2ug·Rnt)
Differential eccentric load deviation sd 0.001%·Rnt 0.003%·Rnt
Sensitivity offset sd 0.0005%·Rnt 0.001%·Rnt
Minimum sample weight (according to USP) 120g+0.18%·Rgr 1200g+0.9%·Rgr
Minimum sample weight
(U=1%, k=2)
Interface update rate 23 /s 23 /s
Weight of balance 12.4 kg 12.4 kg
Number of built-in reference weights 2 2
Weights for routine testing
OIML Single Weights
OIML Single Weights
1)
0.001%/°C 0.0015%/°C
8 g 80 g
8g+0.012%·Rgr 80g+0.06%·Rgr
Small
Large
1000 g F2
#11118204
20000 g F2
#11118212
1000 g F2
#11118204
20000 g F2
#11118212
sd = Standard deviation Rnt = Net weight (sample weight)
39Technical Data
Page 40

Rgr = Gross weight a = Year (annum)
1)
In the temperature range 10…30 °C
XS64001LX XS64000LX
Limit values
Maximum capacity 64.1 kg 64.1 kg
Readability 100 mg 1000 mg
Tare range (from…to) 0…64.1 kg 0…64.1 kg
Repeatability (at nominal load) sd 100 mg 600 mg
Linearity deviation 500 mg 600 mg
Eccentricity deviation (test load) 500 mg (20 kg) 1000 mg (20 kg)
Sensitivity offset (test weight) 1280 mg (64 kg) 1920 mg (64 kg)
Sensitivity temperature drift
Sensitivity stability 0.005%/a 0.003%/a
Typical values
Repeatability sd 40 mg 400 mg
Linearity deviation 320 mg 400 mg
Eccentric deviation (test load) 320 mg (20 kg) 600 mg (20 kg)
Sensitivity offset (test load) 380 mg (64 kg) 650 mg (64 kg)
Minimum sample weight (according to USP) 120 g 1200 g
Minimum sample weight
(U=1%, k=2)
Settling time 1.8 s 1.5 s
Dimensions
Balance dimensions (WxDxH) 362x404x131 mm 362x404x131 mm
Weighing pan dimensions 362x282 mm (WxD) 362x282 mm (WxD)
Typical uncertainties and supplementary data
Repeatability sd 40mg+0.00006%·Rgr 400mg+0.0003%·Rgr
Differential linearity deviation sd √(400ng·Rnt) √(600ng·Rnt)
Differential eccentric load deviation sd 0.0008%·Rnt 0.0015%·Rnt
Sensitivity offset sd 0.0003%·Rnt 0.0005%·Rnt
Minimum sample weight (according to USP) 120g+0.18%·Rgr 1200g+0.9%·Rgr
Minimum sample weight
(U=1%, k=2)
Interface update rate 23 /s 23 /s
Weight of balance 14.1 kg 14.1 kg
Number of built-in reference weights 2 2
Weights for routine testing
OIML Single Weights
OIML Single Weights
1)
0.001%/°C 0.0015%/°C
8 g 80 g
8g+0.012%·Rgr 80g+0.06%·Rgr
Small
Large
2000 g F2
#11118205
50000 g F2
#11116659
2000 g F2
#11118205
50000 g F2
#11116659
sd = Standard deviation Rnt = Net weight (sample weight)
Rgr = Gross weight a = Year (annum)
1)
In the temperature range 10…30 °C
7.3Model-specif data of the Excellence X-Ex2 precision balances
7.3.1X-Ex2 balances with readability of 0.1 mg / 1 mg, "S" platform with draft shield
X204SX X603SX
Limit values
Maximum capacity 210 g 610 g
Readability 0.1 mg 1 mg
Tare range (from…to) 0…210 g 0…610 g
Repeatability (at nominal load) sd 0.2 mg 0.9 mg
Linearity deviation 0.2 mg 2 mg
40 Technical Data
Page 41

X204SX X603SX
Eccentricity deviation (test load) 0.3 mg (100 g) 3 mg (200 g)
Sensitivity offset (test weight) 1 mg (200 g) 4.5 mg (600 g)
Sensitivity temperature drift
1)
0.00015%/°C 0.0002%/°C
Sensitivity stability 0.00025%/a 0.001%/a
Typical values
Repeatability sd 0.12 mg 0.5 mg
Linearity deviation 0.07 mg 0.7 mg
Eccentric deviation (test load) 0.08 mg (100 g) 0.8 mg (200 g)
Sensitivity offset (test load) 0.4 mg (200 g) 2.4 mg (600 g)
Minimum sample weight (according to USP) 360 mg 1500 mg
Minimum sample weight
24 mg 100 mg
(U=1%, k=2)
Settling time 2 s 1.5 s
Dimensions
Balance dimensions (WxDxH) 214x260x363 mm 198x366x276 mm
Weighing pan dimensions 90 mm (Ø) 127x127 mm (WxD)
Typical uncertainties and supplementary data
Repeatability sd 0.12mg
0.5mg+0.000025%·Rgr
+0.000015%·Rgr
Differential linearity deviation sd √(6pg·Rnt) √(200pg·Rnt)
Differential eccentric load deviation sd 0.00004%·Rnt 0.0002%·Rnt
Sensitivity offset sd 0.0001%·Rnt 0.0002%·Rnt
Minimum sample weight (according to USP) 360mg+0.045%·Rgr 1500mg+0.075%·Rgr
Minimum sample weight
24mg+0.003%·Rgr 100mg+0.005%·Rgr
(U=1%, k=2)
Interface update rate 23 /s 23 /s
Usable height of draft shield 248 mm 175 mm
Weight of balance 7 kg 6.5 kg
Number of built-in reference weights 1 1
sd = Standard deviation Rnt = Net weight (sample weight)
Rgr = Gross weight a = Year (annum)
1)
In the temperature range 10…30 °C
X1003SX X5003SXDR
Limit values
Maximum capacity 1010 g 5.1 kg
Readability 1 mg 10 mg
Maximum capacity, fine range – 1 kg
Readability, fine range – 1 mg
Tare range (from…to) 0…1010 g 0…5.1 kg
Repeatability (at nominal load) sd 0.8 mg 6 mg
Repeatability, fine range (at nominal load) sd – 1 mg
Linearity deviation 2 mg 6 mg
Eccentricity deviation (test load) 3 mg (500 g) 10 mg (2 kg)
Sensitivity offset (test weight) 5 mg (1000 g) 20 mg (5 kg)
Sensitivity temperature drift
1)
0.0002%/°C 0.0003%/°C
Sensitivity stability 0.001%/a 0.0015%/a
Typical values
Repeatability sd 0.4 mg 4 mg
Repeatability, fine range sd – 0.6 mg
Linearity deviation 0.7 mg 1 mg
Eccentric deviation (test load) 0.6 mg (500 g) 0.6 mg (2 kg)
Sensitivity offset (test load) 3 mg (1000 g) 10 mg (5 kg)
Minimum sample weight (according to USP) 1200 mg 12 g
Minimum sample weight
80 mg 800 mg
(U=1%, k=2)
Minimum sample weight (according to USP),
– 1.8 g
fine range
41Technical Data
Page 42

X1003SX X5003SXDR
Minimum sample weight
(U=1%, k=2), fine range
Settling time 1.5 s 2 s
Dimensions
Balance dimensions (WxDxH) 214x260x363 mm 198257x276 mm
Weighing pan dimensions 127x127 mm (WxD) 127x127 mm (WxD)
Typical uncertainties and supplementary data
Repeatability sd 0.4mg+0.00002%·Rgr 4mg+0.00002%·Rgr
Repeatability, fine range sd – 0.6mg+0.00002%·Rgr
Differential linearity deviation sd √(120pg·Rnt) √(50pg·Rnt)
Differential eccentric load deviation sd 0.00006%·Rnt 0.000015%·Rnt
Sensitivity offset sd 0.00015%·Rnt 0.0001%·Rnt
Minimum sample weight (according to USP) 1200mg+0.06%·Rgr 12g+0.06%·Rgr
Minimum sample weight (according to USP),
fine range
Minimum sample weight
(U=1%, k=2)
Minimum sample weight
(U=1%, k=2), fine range
Interface update rate 23 /s 23 /s
Usable height of draft shield 248 mm 175 mm
Weight of balance 7 kg 6.8 kg
Number of built-in reference weights 1 1
sd = Standard deviation Rnt = Net weight (sample weight)
Rgr = Gross weight a = Year (annum)
1)
In the temperature range 10…30 °C
– 120 mg
– 1.8g+0.06%·Rgr
80mg+0.004%·Rgr 800mg+0.004%·Rgr
– 120mg+0.004%·Rgr
7.3.2X-Ex2 balances with readability of 10 mg / 0.1 g, "S" platform
X4002SX X6002SX X4001SX
Limit values
Maximum capacity 4.1 kg 6.1 kg 4.1 kg
Readability 10 mg 10 mg 100 mg
Tare range (from…to) 0…4.1 kg 0…6.1 kg 0…4.1 kg
Repeatability (at nominal load) sd 8 mg 8 mg 80 mg
Linearity deviation 20 mg 20 mg 60 mg
Eccentricity deviation (test load) 30 mg (2 kg) 30 mg (2 kg) 200 mg (2 kg)
Sensitivity offset (test weight) 60 mg (4 kg) 60 mg (6 kg) 240 mg (4 kg)
Sensitivity temperature drift
Sensitivity stability 0.0015%/a 0.0015%/a 0.005%/a
Typical values
Repeatability sd 4 mg 4 mg 40 mg
Linearity deviation 7 mg 7 mg 20 mg
Eccentric deviation (test load) 8 mg (2 kg) 8 mg (2 kg) 32 mg (2 kg)
Sensitivity offset (test load) 32 mg (4 kg) 30 mg (6 kg) 160 mg (4 kg)
Minimum sample weight (according to USP) 12 g 12 g 120 g
Minimum sample weight
(U=1%, k=2)
Settling time 1.2 s 1.2 s 0.8 s
Dimensions
Balance dimensions (WxDxH) 194x257x96 mm 194x257x96 mm 194x257x96 mm
Weighing pan dimensions 170x205 mm (WxD) 170x205 mm (WxD) 190x223 mm (WxD)
Typical uncertainties and supplementary data
Repeatability sd 4mg+0.00005%·Rgr 4mg+0.00003%·Rgr 40mg+0.0005%·Rgr
Differential linearity deviation sd √(3ng·Rnt) √(2ng·Rnt) √(25ng·Rnt)
Differential eccentric load deviation sd 0.0002%·Rnt 0.0002%·Rnt 0.0008%·Rnt
Sensitivity offset sd 0.0004%·Rnt 0.00025%·Rnt 0.002%·Rnt
Minimum sample weight (according to USP) 12g+0.15%·Rgr 12g+0.09%·Rgr 120g+1.5%·Rgr
1)
0.0003%/°C 0.0003%/°C 0.0015%/°C
800 mg 800 mg 8 g
42 Technical Data
Page 43

X4002SX X6002SX X4001SX
Minimum sample weight
(U=1%, k=2)
Interface update rate 23 /s 23 /s 23 /s
Weight of balance 5.4 kg 5.4 kg 5.4 kg
Number of built-in reference weights 1 1 1
sd = Standard deviation Rnt = Net weight (sample weight)
Rgr = Gross weight a = Year (annum)
1)
In the temperature range 10…30 °C
800mg+0.01%·Rgr 800mg+0.006%·Rgr 8g+0.1%·Rgr
7.3.3X-Ex2 balances with readability of 10 mg / 0.1 g, "M" platform
X6001MX X12001MX
Limit values
Maximum capacity 6.1 kg 12.1 kg
Readability 100 mg 100 mg
Tare range (from…to) 0…6.1 kg 0…12.1 kg
Repeatability (at nominal load) sd 80 mg 80 mg
Linearity deviation 60 mg 100 mg
Eccentricity deviation (test load) 200 mg (2 kg) 200 mg (5 kg)
Sensitivity offset (test weight) 240 mg (6 kg) 600 mg (12 kg)
Sensitivity temperature drift
Sensitivity stability 0.005%/a 0.005%/a
Typical values
Repeatability sd 40 mg 40 mg
Linearity deviation 19 mg 34 mg
Eccentric deviation (test load) 32 mg (2 kg) 30 mg (5 kg)
Sensitivity offset (test load) 180 mg (6 kg) 290 mg (12 kg)
Minimum sample weight (according to USP) 120 g 120 g
Minimum sample weight
(U=1%, k=2)
Settling time 1 s 1.2 s
Dimensions
Balance dimensions (WxDxH) 240x278x110 mm 240x278x110 mm
Weighing pan dimensions 237x237 mm (WxD) 237x237 mm (WxD)
Typical uncertainties and supplementary data
Repeatability sd 40mg+0.0003%·Rgr 40mg+0.00015%·Rgr
Differential linearity deviation sd √(15ng·Rnt) √(25ng·Rnt)
Differential eccentric load deviation sd 0.0008%·Rnt 0.0003%·Rnt
Sensitivity offset sd 0.0015%·Rnt 0.0012%·Rnt
Minimum sample weight (according to USP) 120g+0.9%·Rgr 120g+0.45%·Rgr
Minimum sample weight
(U=1%, k=2)
Interface update rate 23 /s 23 /s
Weight of balance 6.9 kg 6.9 kg
Number of built-in reference weights 1 1
sd = Standard deviation Rnt = Net weight (sample weight)
Rgr = Gross weight a = Year (annum)
1)
In the temperature range 10…30 °C
1)
0.0015%/°C 0.0015%/°C
8 g 8 g
8g+0.06%·Rgr 8g+0.03%·Rgr
The precision balances with "M" platform are no longer available.
7.3.4X-Ex2 balances with readability of 0.1 g / 1 g, "L" platform
X32001LX X64001LX
Limit values
Maximum capacity 32.1 kg 64.1 kg
Readability 100 mg 100 mg
43Technical Data
Page 44

X32001LX X64001LX
Tare range (from…to) 0…32.1 kg 0…64.1 kg
Repeatability (at nominal load) sd 80 mg 100 mg
Linearity deviation 300 mg 500 mg
Eccentricity deviation (test load) 300 mg (10 kg) 500 mg (20 kg)
Sensitivity offset (test weight) 960 mg (32 kg) 1280 mg (64 kg)
Sensitivity temperature drift
1)
0.001%/°C 0.001%/°C
Sensitivity stability 0.003%/a 0.005%/a
Typical values
Repeatability sd 40 mg 40 mg
Linearity deviation 200 mg 320 mg
Eccentric deviation (test load) 200 mg (10 kg) 320 mg (20 kg)
Sensitivity offset (test load) 320 mg (32 kg) 380 mg (64 kg)
Minimum sample weight (according to USP) 120 g 120 g
Minimum sample weight
8 g 8 g
(U=1%, k=2)
Settling time 1.5 s 1.8 s
Dimensions
Balance dimensions (WxDxH) 360x280x130 mm 360x280x130 mm
Weighing pan dimensions 360x280 mm (WxD) 360x282 mm (WxD)
Typical uncertainties and supplementary data
Repeatability sd 40mg+0.00006%·Rgr 40mg+0.00006%·Rgr
Differential linearity deviation sd √(300ng·Rnt) √(400ng·Rnt)
Differential eccentric load deviation sd 0.001%·Rnt 0.0008%·Rnt
Sensitivity offset sd 0.0005%·Rnt 0.0003%·Rnt
Minimum sample weight (according to USP) 120g+0.18%·Rgr 120g+0.18%·Rgr
Minimum sample weight
8g+0.012%·Rgr 8g+0.012%·Rgr
(U=1%, k=2)
Interface update rate 23 /s 23 /s
Weight of balance 12.4 kg 14.1 kg
Number of built-in reference weights 2 2
sd = Standard deviation Rnt = Net weight (sample weight)
Rgr = Gross weight a = Year (annum)
1)
In the temperature range 10…30 °C
44 Technical Data
Page 45

7.4Dimensions of the Excellence XS-Ex2 balances
178
156
199
214
172.5
257
95
251
177
156
72
197
128
366
58
77
95
248
356
363
3
115
Ø 90
7.4.1XS-Ex2 balances with readability of 0.1 mg, "S" platform with draft shield
Models: XS204SX
45Technical Data
Page 46

7.4.2XS-Ex2 balances with readability of 1 mg, "S" platform with draft shield
178
127
127
156
199
214
172.5
257
95
251
177
156
72
197
128
366
58
77
95
248
356
363
3
115
46 Technical Data
Models: XS603SX, XS1003SX, XS5003SXDR
Page 47

7.4.3XS-Ex2 balances with readability of 10 mg, "S" platform with draft shield element
170
156
194
257
226
72
22197128
115
366
178
263
168 58
77
88
96
205
251
25
Models: XS4002SX, XS6002SX
47Technical Data
Page 48

7.4.4XS-Ex2 balances with readability of 0.1 mg, "S" platform
127
156
194
257
226
72
22197128
115
366
178
263
168 58
77
88
96
127
251
25
Models: XS2004SX
48 Technical Data
Page 49

7.4.5XS-Ex2 balances with readability of 0.1 g, "S" platform
190
156
194
226
72
22197128
115
366
178
263
168 58
77
96
223
257
251
25
Models: XS4001SX
49Technical Data
Page 50

7.4.6XS-Ex2 balances with readability of 10 mg / 0.1 g, "M" platform
214
77.8
178
58
77
110
202
240
278
393
237
206.5135 34
237
115
309
32
Models: XS6001MX, XS6002MXDE, XS12001MX
50 Technical Data
Page 51

7.4.7XS-Ex2 balances with readability of 1 mg / 5 mg, "L" platform
280124
410
296
194
15
360
45
142
46
216156
124
77
174
147
258
Models: XS26003LX, XS64003LX
51Technical Data
Page 52

7.4.8XS-Ex2 balances with readability of 0.1 g / 1 g, "L" platform
280124
404
296
194
15
360
68
130
46
216156
124
77
174
Models: XS32001LX, XS64001LX, XS32000LX, XS64000LX
52 Technical Data
Page 53

7.5Dimensions of the Excellence X-Ex2 weighing platforms
156
199
214
172.5
257 3
95
251
177
156
Ø 90
72
197
58
95
248
356
363
7.5.1X-Ex2 weighing platforms with readability of 0.1 mg, "S" platform with draft shield
Models: X204SX
53Technical Data
Page 54

127
127
156
199
214
172.5
257 3
95
251
177
156
72
197
58
95
248
356
363
7.5.2X-Ex2 weighing platforms with readability of 1 mg, "S" platform with draft shield
Models: X603SX, X1003SX, X5003SXDR
54 Technical Data
Page 55

7.5.3X-Ex2 weighing platforms with readability of 10 mg, "S" platform with draft shield ele
170
156
194
257
226
72
22197
263
168 58
88
96
205
25
ment
Models: X4002SX, X6002SX
55Technical Data
Page 56

7.5.4X-Ex2 weighing platforms with readability of 0.1 g, "S" platform
190
156
194
257
226
72
22197
263
168 58
96
223
25
Models: X4001SX
56 Technical Data
Page 57

7.5.5X-Ex2 weighing platforms with readability of 0.1 g, "M" platform
214
77.8
58
110
202
240
309
278
237 x 237
206.5 34
32
Models: X6001MX, X12001MX
57Technical Data
Page 58

7.5.6X-Ex2 weighing platforms with readability of 0.1 g, "L" platform
280
29615360
68
130
46
216
Models: X32001LX, X64001LX
58 Technical Data
Page 59

7.6Dimensions of the AC adapter PSX2
2.5
25
60
62
215
233
ø 5.8
9
80
Dimensions in mm
AC Adapter PSX2
59Technical Data
Page 60

7.7Interfaces
6
15
9
Data
GND
Handshake
7.7.1Specifications of RS232C
Interface type: Voltage interface according to EIA RS-232C/DIN 66020 (CCITT V24/V.28)
Max. cable length: 15 m
Signal level: Outputs:
Connector: Sub-D, 9-pole, female
Operating mode: Full duplex
Transmission mode: Bit-serial, asynchronous
Transmission code: ASCII
Baud rates: 600, 1200, 2400, 4800, 9600, 19200, 384001) (firmware selectable)
Bits/parity: 7-bit/even, 7-bit/odd, 7-bit/none, 8-bit/none (firmware selectable)
Stop bits: 1 stop bit
Handshake: None, XON/XOFF, RTS/CTS (firmware selectable)
End-of-line: <CR><LF>, <CR>, <LF> (firmware selectable)
Inputs:
+5 V ... +15 V (RL = 3 – 7 kΩ)
–5 V ... –15 V (RL = 3 – 7 kΩ)
+3 V ... 25 V
–3 V ... 25 V
Pin 2: Balance transmit line (TxD)
Pin 3: Balance receive line (RxD)
Pin 5: Ground signal (GND)
Pin 7: Clear to send (hardware handshake) (CTS)
Pin 8: Request to send (hardware handshake) (RTS)
1)
38400 baud is only possible in special cases, such as:
• Weighing platform without terminal, or
• Weighing platform with terminal, only via the optional RS232C interface.
60 Technical Data
Page 61

8Accessories and Spare Parts
Printer
17.375 g
19.3
19 g
8
.00
3
g
7
.
773
g
6
.554 g
10.50
6 g
8
.097
g
5.
8
7
6 g
3
.2
0
5 g
1.0
98 g
METTLER TOLEDO
Printer
17.375 g
19.3
19 g
8
.00
3
g
7
.
773
g
6
.554 g
10.50
6 g
8
.097
g
5.
8
7
6 g
3
.2
0
5 g
1.0
98 g
METTLER TOLEDO
8.1Accessories
You can increase the functionality of your balance with accessories from the METTLER TOLEDO range. The fol
lowing options are available:
Description Part No.
Printers
It is not permitted to use these units in Ex hazadous areas!
BT-P42 printer with Bluetooth connection to instrument 11132540
RS-P42 printer with RS232C connection to instrument 00229265
Paper roll, set of 5pcs 00072456
Paper roll, self-adhesive, set of 3pcs 11600388
Ribbon cartridge, black, set of 2pcs 00065975
Paper roll, set of 5pcs 00072456
Paper roll, self-adhesive, set of 3pcs 11600388
Ribbon cartridge, black, set of 2pcs 00065975
Optional interfaces
Second RS232C Interface 11132500
Ethernet Interface for connection to an Ethernet network 11132515
BT option: Bluetooth Interface for multipoint connection for up
11132530
to 6 Bluetooth devices (XS-Ex2 models only)
BTS option: Bluetooth Interface, single-point connection 11132535
61Accessories and Spare Parts
Page 62

Auxiliary displays
It is not permitted to use these units in Ex hazadous areas!
Displays only the weight value and unit, if defined.
Sensors
BT-BLD Bluetooth auxiliary display for table mounting,
168mm, LCD display with backlighting
LC/RS-BLD auxiliary display on bench stand, backlit (incl. RS
cable and separate AC adapter)
RS/LC-BLDS auxiliary display for table or balance mounting,
480 mm, LCD display with backlighting
ErgoSens, optical sensor for hands-free operation 11132601
11132555
00224200
11132630
Density determination
Kit for density determination of solids and liquids (for 1mg
and 0.1mg models)
Sinker for density of liquids in conjunction with Density Kit 00210260
Calibrated (sinker + certificate) 00210672
Recalibrated (new certificate) 00210674
Calibrated thermometer with certificate 11132685
11132680
62 Accessories and Spare Parts
Page 63

Anti-theft devices
AC adapter PSX2
Transport cases
Software
Steel cable 11600361
AC adapter PSX2 (not included in the scope of delivery for the
balance/weighing platform)
Transport case for precision balances for 10 mg and 0.1 g
models, "S" platform
LabX software for one click™ weighing solutions
Enables you to perform One Click™ Standard Preparation, One
Click™ Loss on Drying, One Click™ Sieve Analysis and many
other applications.
Simply start the method with the One Click™ shortcut on the
balance touchscreen. LabX guides you step-by-step through
the SOP on the balance, performs your calculations automati
cally, and takes care of saving all your data. The complete
solution can be tailored to match your process requirements.
Visit www.mt.com/one-click-weighing for more information
11132730
11132595
on request
Production certificate
Weighing pans
Production Certificate "PRO" 11106895
MPS (Magnetic Protection Shield) weighing pan for 0.1g
models 190 x223mm, "S" platform
11132625
63Accessories and Spare Parts
Page 64

MPS (Magnetic Protection Shield) weighing pan for 10mg
models 170 x205mm, "S" platform
Weighing pan 190 x223mm, incl. pan support, "S" platform 11132655
11132626
Draft shields
Weighing pan 170 x205mm, incl. pan support and and draft
shield element, "S" platform
"MagicCube" Draft shield glass free for 0.1mg and 1mg mod
els, usable height 175mm, "S" platform
Simple Draft shield glass free for 0.1g and 10mg models,
usable height 175mm, "S" platform
For 0.1g model the weighing pan set must be ordered addi
tionally
Draft shield to cover the entire balance "XP-W12"
300x450x450mm (WxDxH), "S" and "M" platform
11132660
11131650
11131653
11132660
11134430
Weighing below the balance
64 Accessories and Spare Parts
Draft shield to cover the entire balance "XP-W64"
550x470x580mm (WxDxH), "M" and "L" platform
Hook for the hanger (depending on the model), "M" and "L"
platform
11134470
11132565
Page 65

Various
Terminal stand for placement of the terminal 30cm above the
weighing pan, "S" and "M" platform
11132636
Terminal stand for placement of the terminal 30cm above the
weighing pan, "L" platform
11132653
65Accessories and Spare Parts
Page 66

8.2Spare parts
1
2
3
4
5
6
7
8
1
2
3
4
5
6
Draft shield, "S" platform (0.1mg + 1mg)
Pos Description Part No.
1 Door front left 11133080
2 Door back left 11133079
3 Door top front 11133082
4 Door top back 11133081
5 Door back right 11133077
6 Door front right 11133078
7 Draft shield element, 0.1mg 11131531
8 Ring seal, 0.1mg 11131551
Various
Pos Description Part No.
Weighing pans, "S" platform
1 0.1mg Weighing pan 90mm 11133064
2 1mg Weighing pan
11131022
127x127mm
3 10mg Weighing pan
11131030
170x205mm
3 0.1g Weighing pan
11131031
190x223mm
4 10mg Draft shield element 11131040
Weighing pans, "M" platform
3 all Weighing pan
11131173
237x237mm
Weighing pans, "L" platform
3 ≤32kg Weighing pan
00239105
280x360mm
3 64kg Weighing pan
280x360mm
Various
5 ≥ 10mg Pan support, "S" and "M"
platform
11102124
11131029
5 Pan support, "L" platform 00239104
6 Foot screw, "S" and "M"
11106323
platform
66 Accessories and Spare Parts
Page 67

Packaging
Pos Description Part No.
"S" Weighing platform, Type X/XSxx4SX (0.1mg)
Packaging 11133052
Export box 11132834
Packaging Draft shield 11133054
Export carton Draft shield 11132867
"S" Weighing platform, Type X/XSxx3SX (1mg)
Packaging 11133053
Export box 11132834
Packaging Draft shield 11133054
Export carton Draft shield 11132867
"S" Weighing platform, Type X/XSxx2SX (10mg)
Packaging 11133050
Export box 11132839
"S" Weighing platform, Type X/XSxx1SX (0.1g)
Packaging 11133051
Export box 11132839
"M" Weighing platform, Type X/XSxxxMX
Packaging 11133056
Export box 11132879
"L" Weighing platform, Type X/XSxxxxLX
Packaging 11133057
Export box 11132912
67Accessories and Spare Parts
Page 68

9Certificate of the Issuing Institution
9.1Power supply PSX2
68 Accessories and Spare Parts
Page 69

69Certificate of the Issuing Institution
Page 70

9.2Balances XS-Ex2 and platforms X-Ex2
70 Certificate of the Issuing Institution
Page 71

71Certificate of the Issuing Institution
Page 72

72 Certificate of the Issuing Institution
Page 73

10Appendix
10.1MT-SICS interface commands and functions
Many of the instruments and balances used have to be capable of integration in a complex computer or data
acquisition system.
To enable you to integrate balances in your system in a simple manner and utilize their capabilities to the full,
most balance functions are also available as appropriate commands via the data interface.
All new METTLER TOLEDO balances launched on the market support the standardized command set "METTLER
TOLEDO Standard Interface Command Set" (MT-SICS). The commands available depending on the functionality
of the balance.
For further information please refer to the Reference Manual MT-SICS downloadable from the Internet under
u www.mt.com/xs-ex
73Appendix
Page 74

11Index
A
B
C
D
E
G
H
I
AC adapter PSX2 7, 32
Accessories 61
Bluetooth 27
Certificate 68, 70
Cleaning 29
Cleaning the draft shield 30
Connection of peripheral devices 26
Conventions 6
Country-specific AC adapter 22
Dimensions 45, 53, 59
Dismantling 24
Disposal 31
Environmental conditions 33
General data 32
General safety information 7
GLP 5
Good Laboratory Practice 5
Hazardous areas 7
Installation of the AC Adapter
PSX2
Installing the draft shield and
weighing pan
Interface
MT-SICS 73
ISO14001 5
ISO9001 5
22
17
Power supply PSX2 68
Power supply voltage 8, 22
Protection and standards 32
R
RS232C interface 60
S
Safety information
General 7
Staff safety 8
safety information 7
Safety instructions regarding
installation
Safety measures during opera
tion
Scope of delivery 15
Setting up 15
Spare parts 67
Special conditions 10
Staff safety 8
System integration 26
T
Technical data 32
U
Unpacking 17
Unpacking the draft shield 17
Usage of data interface "RS232" 26
Usage of the optional data inter
face "Bluetooth"
W
Weighing platform 17
9
9
27
L
Level indicator 21
Leveling 21
Location 21
M
Marking the balance/weighing
platform
Materials 33
Model-specif data 33
MT-SICS 73
P
Peripheral devices 26
Placing the terminal 20
Index74
24
Page 75

Page 76

Mettler-Toledo AG, Laboratory & Weighing Technologies
CH-8606 Greifensee, Switzerland
Tel. +41 (0)44 944 22 11
Fax +41 (0)44 944 30 60
www.mt.com
www.mt.com/excellence
For more information
Subject to technical changes.
© Mettler-Toledo AG 05/2013
11781111D en
*11781111*
 Loading...