

Page 1
Micro-Weighing Guide
Maximize Efficiency
in Micro-Weighing
Improve Quality
of Results
Ensure Safer
Operations
10 Steps
to Successful Micro-Weighing
Page 2

2
Page 3

10 Steps to Successful Micro-Weighing
Practical Weighing Guide
1. Which microbalance is right for me? 4
2. Where should I place the microbalance? 6
3. Why is calibration of the microbalance important? 7
4. How can I ensure accurate results every day? 8
5. How can I deal with drifting weight results? 9
6. How can I optimize working with small samples? 10
7. How can I clean my microbalance more easily? 11
8. How can I make the weighing process more efficient? 13
9. What data capture / data transfer options do I have? 14
10. Other helpful tips to optimize micro-weighing 15
3
Page 4
Micro-Weighing Guide
e
le
D
1. Which Microbalance is Right for Me?
Consider which criteria are relevant in choosing the right balance for your needs.
Every measurement on ANY balance is subject to uncertainty. Understanding this uncertainty is the key to
ensuring accurate weighing results and avoiding errors in downstream processing. For a microbalance, the
uncertainty is almost entirely due to repeatability (precision) when weighing small samples (i.e. at the low end
of the weighing range of a specific balance).
It is not the readability that determines the accuracy of a weighing instrument, but rather its repeatability,
ordepending on it, its minimum weight capability.
To find the appropriate microbalance for your needs you should define the smallest amount you want to weigh
and how accurately you need to weigh it (i.e. at what tolerance). From this basic information, the accuracy of the
required microbalance can be determined. Your weighing consultant can calculate this for you and verify that it
meets your daily needs:
Lab Technician
Sulfamidin Prep
Measurement uncertainty [%]
Accuracy limit:
Minimum weight
Methods
03:07
pm
Sulfamidin
B2
Protocol
g
Methods
0.0009999
Sampl
I
Delete protocol Edit method Complete task Add result
Process tolerance
of customer [%]
Smallest
net weight
Lab Technician
Sulfamidin Prep
Samp
I
Delete protocol Edit method Complete task Add result
Methods
Methods
0.005000
Sulfamidin
B2
03:07
pm
Protocol
g
Weight [g] Max.
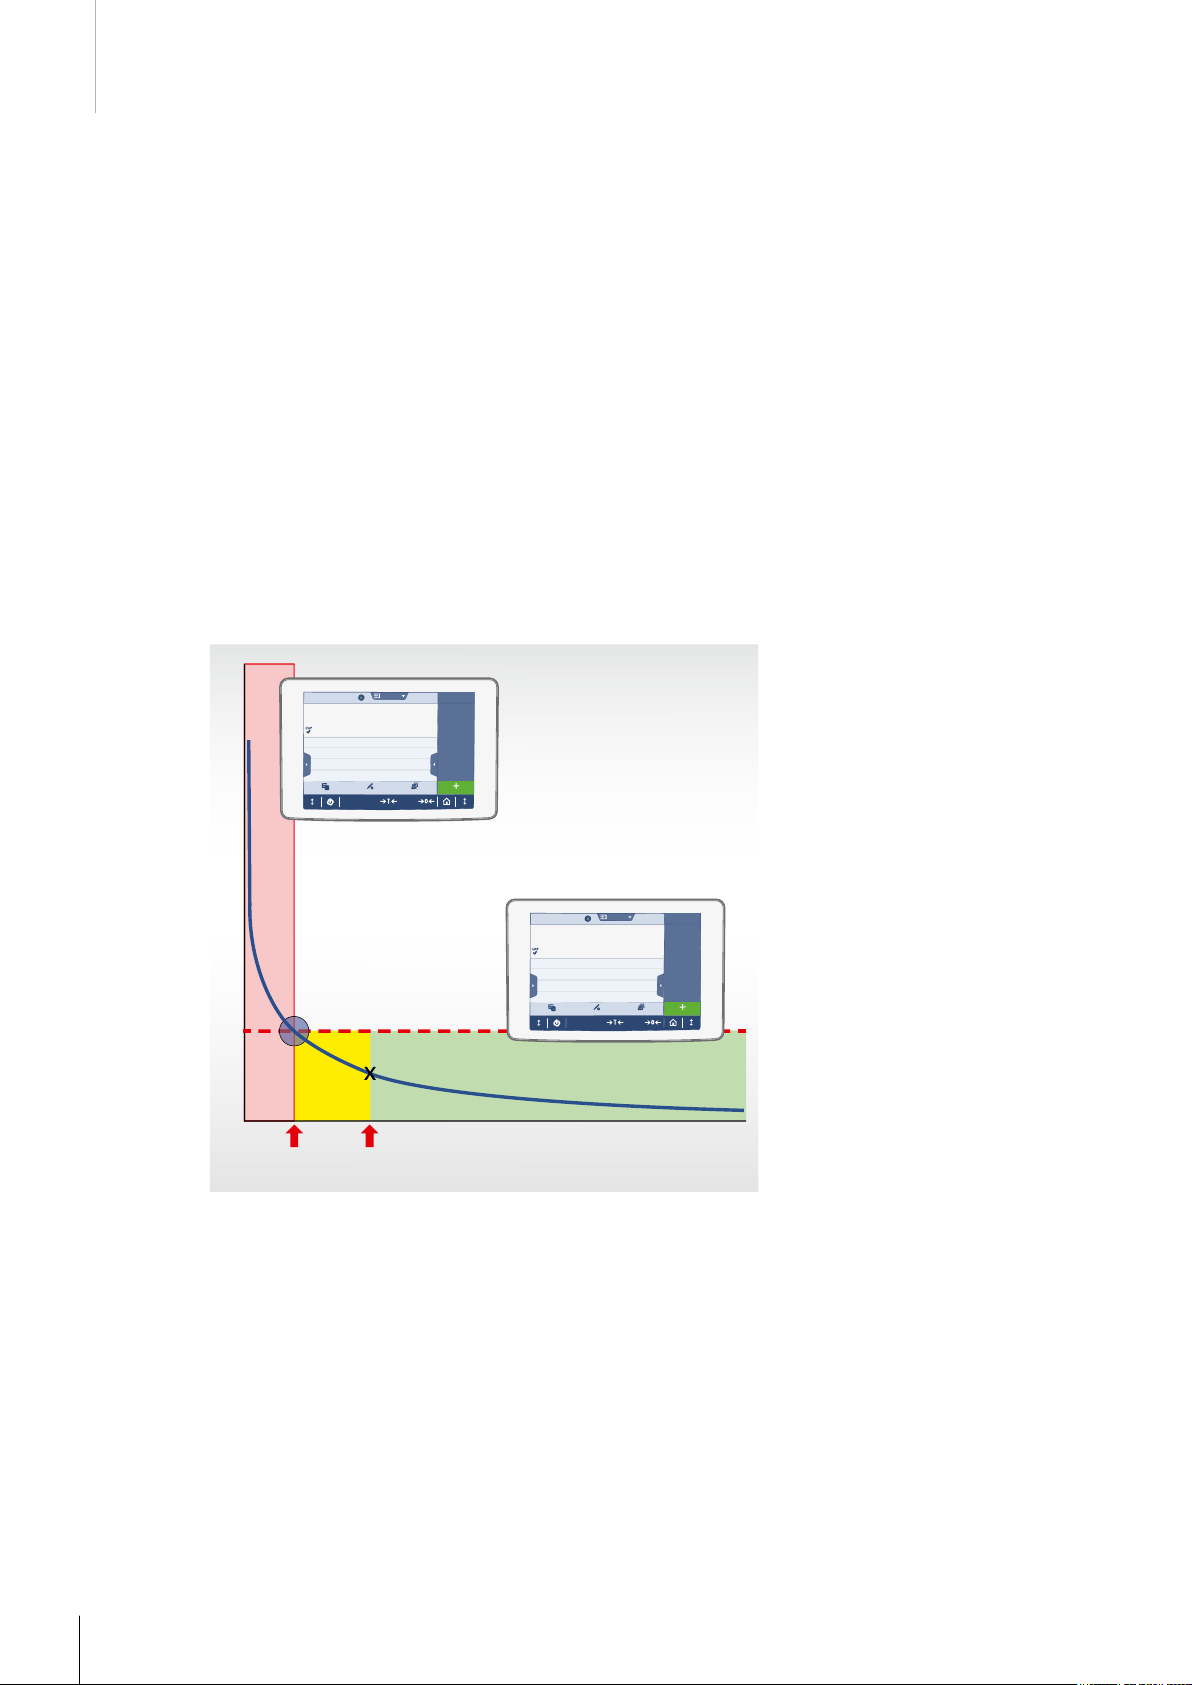
Fig. 1: Typical measurement uncertainty curve of
atypical ultra-microbalance. At the accuracy limit
the relative measurement uncertainty increases with
decreasing sample weights above the user defined
tolerances. The yellow area represents a safety margin between user formulated smallest net weight
and accuracy limit.
4
Page 5

Example
• Smallest sample typically weighed in (defined by user).
(smallest net weight = 2 mg)
• Tolerance required = 2 mg ± 10 μg [= 0.5%]
Formula applied to fulfill user requirement
Smallest net weight ≥ minimum weight * safety factor
Minimum weight = Repeatability of the balance * k / Required tolerance [%]
• For a safety factor of 2, select a balance with a repeatability ≤ 2.5 μg
Explanation of terms:
Safety factor: A safety margin to protect against variations in the weighing process, environmental conditions or
user influence. A safety factor of 2 is recommended for typical processes. For higher risk processes, a higher
safety factor is recommended.
Expansion factor (k): Typically an expansion factor k = 2 is used.
(For a Gaussian distribution, 95% of the results statistically fall within the k = 2 range;
99.7% of the results fall within k = 3).
Recommendation
A microbalance is advised for use in this application. An analytical balance has a repeatability of 7 µg and
is not accurate enough for this task, and an ultra-microbalance with a repeatability of 0.15 µg would allow
weighing much smaller amounts of sample as required and might not be needed. The XPR2 microbalance with
arepeatability of 0.5 μg fulfills the requirements perfectly.
Special Tip
• Ask your METTLER TOLEDO consultant about GWP® Recommendation which helps you select the right
weighing instrument based on your weighing requirements: www.mt.com/gwp-recommendation.
5
Page 6

Micro-Weighing Guide
2. Where Should I Place the Microbalance?
Several factors should be considered when choosing a suitable location for accurate weighing.
When choosing a location for your microbalance, take into consideration the three main external influences that
have an impact on the accuracy of microweighing: vibrations, air drafts and temperature variations. The impact
of these external influences can be prevented or minimized by taking simple precautions:
0.0000000 g
Administ
rator
Genera
l
W
eighing
Methods
0.0000000
03:07
pm
Press her
Sample
Delet
e protocol
Protocol
e
to e
nter target weight
g
Enter
her
e
E
di
t meth
od
C
om
plet
e
task
Add result
Fig.2: Microbalances are sensitive against environmental influences
and the installation place should be selected carefully.
• Vibrations
Use a solid, stable weighing table to reduce vibrations. Damper plates can be helpful in some cases.
Avoidpositioning the balance near mechanical equipment, such as pumps, etc.
• Air Drafts
Avoid locating the balance near an opening door or in a position where many people walk past.
Avoidpositioning near or under an air conditioning unit. Always close the draft shield during weighing
(andtare weighing) operations.
• Temperature Variations
Avoid locating the balance near any direct heat sources, such as radiators, or near to windows.
Special Tips
• Avoid vibrations and use an appropriate weighing table.
• Strong air drafts can be avoided by using an external draft shield.
• Find more useful accessories for controlling external influences at: www.mt.com/accessories.
6
Page 7

3. Why is Calibration of the Microbalance Important?
Ensure the accuracy of your microbalance in your laboratory.
The accuracy of the weighing device is determined by calibration. The calibration certificate is the basis
to prove that your microbalance is working correctly in accordance to your weighing requirements.
Manufacturer's specifications (or tolerances) are measured under standardized and stable conditions.
Asmicrobalances can be influenced by several external factors, it is important to understand how a specific
balance performs in its actual working environment.
± 0.005
± 0.001
± 0.002
5.000000 g
Fig. 3: At different locations the balance measurement uncertainty
may be different as well. With a calibration certificate you make
sure your microbalance is working correctly in accordance to your
weighing requirements.
• Balance calibration by a qualified service provider determines the measurement uncertainty over the whole
weighing range at the actual weighing location.
• The calibration certificate includes the reported measurement uncertainty:
U = U0 + C * I
(U0 is the measurement uncertainty at zero load, C is the parameter that describes the increase of the
measurement uncertainty with the load and I is the net load indication).
Since the external conditions and the balance performance can change over time, the calibration should be
carried out periodically.
Special Tips
• The XPR microbalance stores the parameters of the measurement uncertainty for full traceability:
www.mt.com/xpr-microbalances.
• GWP® Verification gives you clear advice how often you should calibrate your equipment. This advice is
based on your specific risk and process requirements: www.mt.com/gwp-verification.
• A qualified calibration certificate is provided by METTLER TOLEDO (e.g. Accuracy Calibration Certificate).
For more information go to www.mt.com/service or contact your local METTLER TOLEDO service office.
7
Page 8

Micro-Weighing Guide
4. How Can I Ensure Accurate Results Every Day?
It is important to perform routine testing on your balance even though it has been calibrated.
In addition to regular calibration, weighing instruments also require periodic routine testing between calibrations
and should be tested regularly with an external weight for two reasons:
• Within the calibration period, changes of the balance performance may occur. A routine test is a quick and
traceable check that the balance still performs according to the required user defined process tolerance.
• By following a routine test procedure you might elongate the time between calibration cycles (based on
therisk of the weighing application), i.e. annually rather than every 6 months.
12
93
D
e
l
ete pr
o
t
oco
Press here to enter target weight
Sample
l
E
dit meth
Administrator
General Weighing
5.000000
Enter here
o
d
Complet
e
task
6
Methods
03:07
p
m
Protocol
g
A
d
d result
5.000000 g
Fig. 4: Conditions can change within the long calibration intervals.
Aroutine test detects changes in the conditions which would have an
impact on your results.
The overall measurement uncertainty (short: MU) consists of four main contributing factors − repeatability,
sensitivity, eccentricity, and non-linearity. All of these factors are measured during calibration, but typically
repeatability and sensitivity should be checked routinely by the user, as defined by Good Weighing Practice™,
the science-based global weighing standard.
Repeatability Testing (RP)
With test weights up to 5% of the balance capacity, repeatability (also called "precision") is the dominant
contributor to measurement uncertainty and is constant. Repeatability is measured by performing 10 replicate
weighings under the same conditions using a test weight at 5% of the balance capacity.
Sensitivity Testing (SE)
With test weights close 100% of the balance capacity, sensitivity (also called "error of indication") is thedominant contributor to measurement uncertainty. Sensitivity is measured by placing a test weight close to thecapac-
ity on the balance and comparing it with the mass value of the weight.
8
Page 9

10
RP SE
1
Adm
i
nistrator
G
en
er
al Weig
h
i
n
g
M
etho
ds
0.0000000
Pr
e
ss
h
e
re
S
am
p
l
0.1
e
Delet
e pr
o
tocol
E
03:07
p
m
Prot
o
c
o
t
o e
nte
r
tar
g
e
t
we
di
t
m
et
h
od
l
g
i
g
h
t
Ente
r
here
C
o
m
plet
e
tas
k
Add
res
ult
0.0000000 g
0.01
0.001
Measurement uncertainty in [%]
0.0001
Fig. 5: A typical measurement uncertainty curve of a typical
0.00001
0.00001
0.0001
0.001 0.01 0.1 1 10
Sample weight [g]
microbalances. With sample weights below 5% of the capacity
therepeatability is the biggest error where as around maximum
capacity the sensitivity is dominant.
Special Tips
• METTLER-TOLEDO's GWP® Verification is a risk-based assessment. It provides you with a personalized
recommendation on how to test your balance and how often to perform each routine test:
www.mt.com/gwp-verification.
• CarePacs® include the two correct test weights needed for the user to perform routine repeatability
andsensitivity balance tests for any balance model: www.mt.com/carepacs.
5. How Can I Deal With Drifting Weight Results?
What to do if the balance settings are correct, all tests are passed, but your weighing results
are still drifting.
The influence of the sample or weighing vessel on the measurement result is often overlooked, and can
frequently be a cause of drifting results. Most of these external influences can be prevented or reduced by
thefollowing simple measures:
Observed Problem Possible Reason Recommended Actions
Weight reading shows steady
(linear) increase
Weight reading shows steady
(linear) decrease
Weight reading shows small,
sometimes stepwise, increase
or decrease
Weight reading shows unpredictable
drift (jumping up and down)
Sample is hygroscopic and
absorbing moisture, causing steady
increase in mass
Sample is evaporating and losing
moisture, causing steady decrease
in mass
Temperature differences between
sample and environment cause
heating or cooling effects in the
weighing chamber, and therefore
change in mass
Electrostatic effects typically produce
chaotic drift patterns
• Close the vessel
• Keep air humidity constant and store sample
under these conditions before weighing
• Close the vessel
• Keep air humidity constant and store sample
under these conditions before weighing
• Use tweezers to handle the weighing vessel
• Allow suf ficient acclimatization time of
the samples and vessels in the weighing
environment (at least 30 minutes)
• Avoid the use of plastic or PTFE weighing vessels
wherever possible Use a good ionizer to dissipate
static charges in the sample and vessel.
Discharge the samples for several seconds
9
Page 10

Displayed Weight
to
G
2.433601 g
Ad
mi
nis
trator
Genera
l Weighing
Methods
03:07
2.433601
pm
Pr
P
r
ess
h
ere
to
enter ta
Sam
pl
e
D
e
lete
pro
t
oc
o
l
E
dit
met
h
o
d
otocol
g
rge
t
wei
gh
t
E
nter
h
e
re
C
o
m
p
lete task
Add
result
Micro-Weighing Guide
Fig. 6: Typical weight changes over the time due to different influences
time
by the sample itself.
Special Tips
• The XPR6UD5 or XPR10 balances have sufficient capacity to allow a flask to be weighed with a cap or lid on.
• Use an ionizer to remove charges from samples and weighing vessels. METTLER TOLEDO offers various
ionizer options: www.mt.com/accessories.
6. How Can I Optimize Working With Small Samples?
Weighing very small samples can be tricky, but there are tools available to make this task easier.
Weighing out small amou
small objects, such as crucibles can also be difficult. Accessories that are specifically designed for the app
can make these tricky tasks easier:
nts on a microbalance can be challenging, especially when wearing gloves. Handling
lication
0.0000 000 g
A
dministrator
eneral Weighing
enter target weight
method
000
Enter here
Co
mpl
ete
task
Methods
03:07
p
m
g
Protocol
Add result
Fig. 7: Sample sizes, flasks or crucibles are tiny. Using the appropriate tools will have an positive influence on your weighing in terms of
speed, accuracy and convenience.
10
Page 11

• A micro spatula with a thick handle supports precise sample transfer.
• Specially shaped tweezers can be a big help in transferring the sample into the balance smoothly.
• Flat-bottomed weighing dishes can be positioned safely on the weighing pan.
• Using a foot switch for opening and closing the balance door frees up yours hands and aids concentration.
• A tubular weighing pan kit makes the weighing of tubular samples, such as stents, springs and wires, much
easier (available for the XPR microbalance).
Special Tip
• Specialized tweezers, weighing pans and all the latest accessories for micro-weighing can be found at:
www.mt.com/accessories
7. How Can I Clean My Microbalance More Easily?
Use recommended procedures for cleaning toxic or sticky substances.
• Switch off the balance.
• Coarse cleaning can be done with brush and tissues (only for non-toxic samples). Fine cleaning should be
done with detergents or suitable solvents.
• The inner parts of the draft shield can be brushed out. To clean more thoroughly, dismantle the drip tray
and the weighing pan. These parts may also be cleaned in sonic water baths if required.
• Usually use common cleaning agents such as 70% alcohol or isopropanol, or common detergents.
Theinner draft shield parts are made from stainless steel and are chemically resistant and robust.
Note: stainless steel is not compatible with strong acids.
• Acetone should NOT be used, even for highly sticky substances. This solvent can dissolve plastics and
attack the glued surfaces of the draft shield. Keep acetone away from the plastic handles and balance
terminal screen.
• Balance manufacturers will usually provide a chemical compatibility list.
• Always check the instructions given in the operating manual.
11
Page 12

0.0000000 g
Micro-Weighing Guide
Fig. 8: Keeping your microbalance clean helps to protect your balance
for many years to come.
H2O
Wind ring • • • • – – • •
Draft shield
glass uncoated
Draft shield
glass coated
Draft shield
frame
Draft shield
bottom
Paint housing • • • – • • • •
Display
SmartView
Display
terminal
Protective cover • • • – • • • •
Feet • • • – • • – –
Iso–
propanol Ethanol 70% Acetone
• • • • • • • •
• • • – – – – –
• • • • – – • •
• • • • – – • •
• • • – – – • •
• • • – – – • •
Hydro–chloric
acid (half
concentrated)
Sodium–
hydroxide
(half
concentrated)
Peracetic
acid (2%)
Sodium
hypo–chlori t e (0.5 %)
12
Top housing • • • • • • • •
Cooling fins • • • • – – – –
The data indicated in the table exclusively apply to the XPR Microbalance.
• Can be applied
– Can not be applied
These data are subject to technical changes.
Special Tip
• Find more details in our e-learning: "Lab Balances: External influences and Cleaning", which can be found at:
www.mt.com/lab-elearning-influences.
Page 13

8. How Can I Make the Weighing Process More Efficient?
Adm
i
nis
tr
a
t
or
Press
h
ere to enter
target we
ight
Sa
mple
Enter here
D
elete pro
tocol
Edit
method
C
omp
le
te ta
s
k
General
Weighing
Met
hods
0
3:
0
7
p
m
Protocol
A
dd re
su
lt
0.00000
0.000000
g
Some simple balance functions can make life easier.
Most microbalances contain built-in software which provides useful features to accelerate and simplify
weighing, but sometimes configuring them may be difficult or time-consuming. Check out the user manual
ofyour specific balance for more information.
The weighing time can be decreased by optimizing the Weighing Mode, Environment, Value Release settings.
Asthese changes will also have an influence on the measurement uncertainty, a calibration should be made
toensure weighings are within the required tolerances.
• Separate User Profiles
For XP microbalances, individual user accounts can be used to preconfigure certain parameters. Use
theright account for your weighing tasks. For XPR microbalances, tolerance profiles can be programmed.
These profiles are linked to all necessary quality and weighing settings including the correct preventive
maintenance procedures.
User Management
User 1
User 2
User 3
User 4
User 5
User 6
Calculator
+
Add user
Confirm Start method
Protocol
Test 1-1
1.551 mg
Test 1-2
1.531 mg
Test 1-3
1.509 mg
Methods
Sulfadimidin Prep
Methionin Prep
Benzylcystein Prep
CHNS Prep
CHNS Reference
Calibration Standard A
Add result
Feb 2 2016 - 06:47 PM
Feb 3 2016 - 02:45 PM
Feb 3 2016 - 02:47 PM
Feb 3 2016 - 02:52 PM
Feb 3 2016 - 02:54 PM
Feb 3 2016 - 02:54 PM
+
Fig. 9: Modern microbalances provide many helpful features and
functions to support the efficiency of your daily weighing tasks.
• Method Storage
The XPR user interface (short UI) offers the possibility to store general sample parameters in "methods" which
can be selected by a single click. Click directly on important parameter fields and directly type in required
values and start directly your weighing tasks. This is especially helpful for repetitive weighing tasks.
• Select Parameters with One Click
On the XPR, you can click directly on important parameter fields (e.g. target weights, sample ID's, ± tolerances)
and type the required values. Efficient data input is supported by state-of-the-art touch screen user interfaces
which simplify typing and method enable swiping.
Special Tips
• With the XPR microbalances you can do simple calculations such as concentration to sample weight
conversions.
• Many functions can be accessed directly from the touchscreen. Take a closer look at all the options
onthedisplay and explore the possibilities.
13
Page 14

Micro-Weighing Guide
9. What Data Capture / Data Transfer Options Do I Have?
Time consuming and error prone manual data capture and transfer processes can be improved.
Usually the weight data are recorded and used in subsequent calculations or steps downstream in the process.
The weight is often noted down by hand, or typed into a spreadsheet or other instrument software. Manual data
transcription is time-consuming and a major source of errors. Especially transcription errors can quickly lead
toextended rework.
Most balances offer useful functions to simplify and automate data transfer from the balance to another system:
• How to Identify the Sample?
Sample IDs can be scanned with a barcode reader (1D or 2D) to avoid manually recording the sample.
• How to Transfer the Data to Microsoft Excel (or other MS Program)?
Simple software (e.g. LabX direct) allows transfer of results easily into MS programs, such as MS Excel
(forXP/XS microbalances). For latest XPR balances, the data can be transferred easily without need for
special software or drivers.
• How to Transfer the Data to an External Software Package?
XP balances can export data such as weights fast and error free to an external software (e.g. analytical
instrument) over the so-called transfer key using a standardized output protocol. A helpful function especially
when weighing numerous samples.
0.0000000 g
Administ
rator
Gener
a
l
W
eighing
Methods
0.0000000
03:07
pm
Protoco
Press her
e
to e
Sample
Delete protocol
E
dit meth
l
nter
target weight
g
Enter
her
e
od
C
om
plete
task
Add result
Fig. 10: Data transfer is cumbersome and prone to errors. Use
thedata transfer opportunities provided by your microbalance to
remove this time consuming task.
14
Page 15

• For Remote Control of the Balance?
For complex integration into customer's data systems (e.g. LIMS) the user can use the METTLERTOLEDO
Standard Interface Command Set (MT-SICS). The balance can be completely controlled remotely. Please
download the MT-SICS command set or contact your local weighing consultant for more information.
• What is the Most Secure Data Transfer Option?
For data centralization and to ensure 21 CFR part 11 compliance LabX software is recommended. LabX
can be used not only to record all results but also to control the weighing process, balance data and
record the audit trail for all balances in the laboratory. LabX ensures that raw data cannot be manipulated.
LabX is currently available for XP/XS microbalances.
Special Tips
• For maximum data transfer security, use LabX software: www.mt.com/labx.
• For complex integration to LIMS ask the MT-SICS.
10. Other Helpful Tips to Optimize Micro-Weighing
Only unplug a balance if absolutely necessary. For best weighing results a microbalance needs 24 hours to
warm up and stabilize after being plugged in.
Ensure the balance is leveled. XPR LevelControl should always be active.
Work faster and more conveniently with touch-free weighing. IR sensor allows automatic opening/closing of the
door by waving hand in front of sensor alternatively use a footswitch to leave hands completely free.
Use an appropriate weighing pan for your sample e.g. use a filter weighing pan or a filter weighing kit for determining particulate matter, and a dedicated weighing pan for tubular samples such as wires, stents, springs etc.
Always close the balance door whilst weighing to avoid drafts causing instability in the weighing result.
15
Page 16

Benefit From Our Weighing Expertise
With decades of experience in laboratory weighing, METTLER TOLEDO can offer
you a wide range of online learning resources. Take advantage of our expertise to
enhance your weighing know-how and make the most of your balance. Check out
the documentation on our internet page for a range ofrelevant materials.
Laboratory Expertise
Valuable know-how is at your fingertips on our
competence pages. Learn about:
• USP Revisions
• Electrostatic Influences
• Calibrating Your Weighing Device
www.mt.com/lab-exper tise
eLearning
Online training is a cost effective way to train new
employees and fulfill GLP/GMP/ISO re-training
requirements. Get going with:
• USP Compliance
• Lab Balances – External Influences and Cleaning
Mettler-Toledo GmbH
Laboratory Weighing
8606 Greifensee, Switzerland
Tel. +41 44 944 22 11
Fax. +41 44 944 30 60
Subject to technical changes
© 04/2016 Mettler-Toledo GmbH
30323853A
Global MarCom 1874 PH/MD
www.mt.com/lab-elearning
On-demand Webinars
Learn directly from our weighing experts and guest
speakers. It’s easy to register.
For starters, we recommend:
• Minimizing Out-of-Specification Errors
• Good Weighing Practice
• Calibration of Laboratory Instruments
www.mt.com/webinars
www.mt.com/xpr-microbalances
GWP
Good Weighing Practice™
The global weighing guideline GWP® reduces risks
associated with your weighing processes and helps to
• choose the appropriate balance
• reduce costs by optimizing testing procedures
• comply with the most common regulatory requirements
*30323853*
For more information
®
www.mt.com/gwp
 Loading...