

Page 1

Operator manual
METTLER TOLEDO
Viper Smart Count
Page 2
On
Off
APW
C
1
-,/&
2
abc
3
def
4
ghi
5
jkl
6
mno
7
pqrs
8
tuv
9
w
x
yz
.
+
0
_
SMART COUNT
i
1
2
3
4
5
6
7
8
9
10
10a
10b
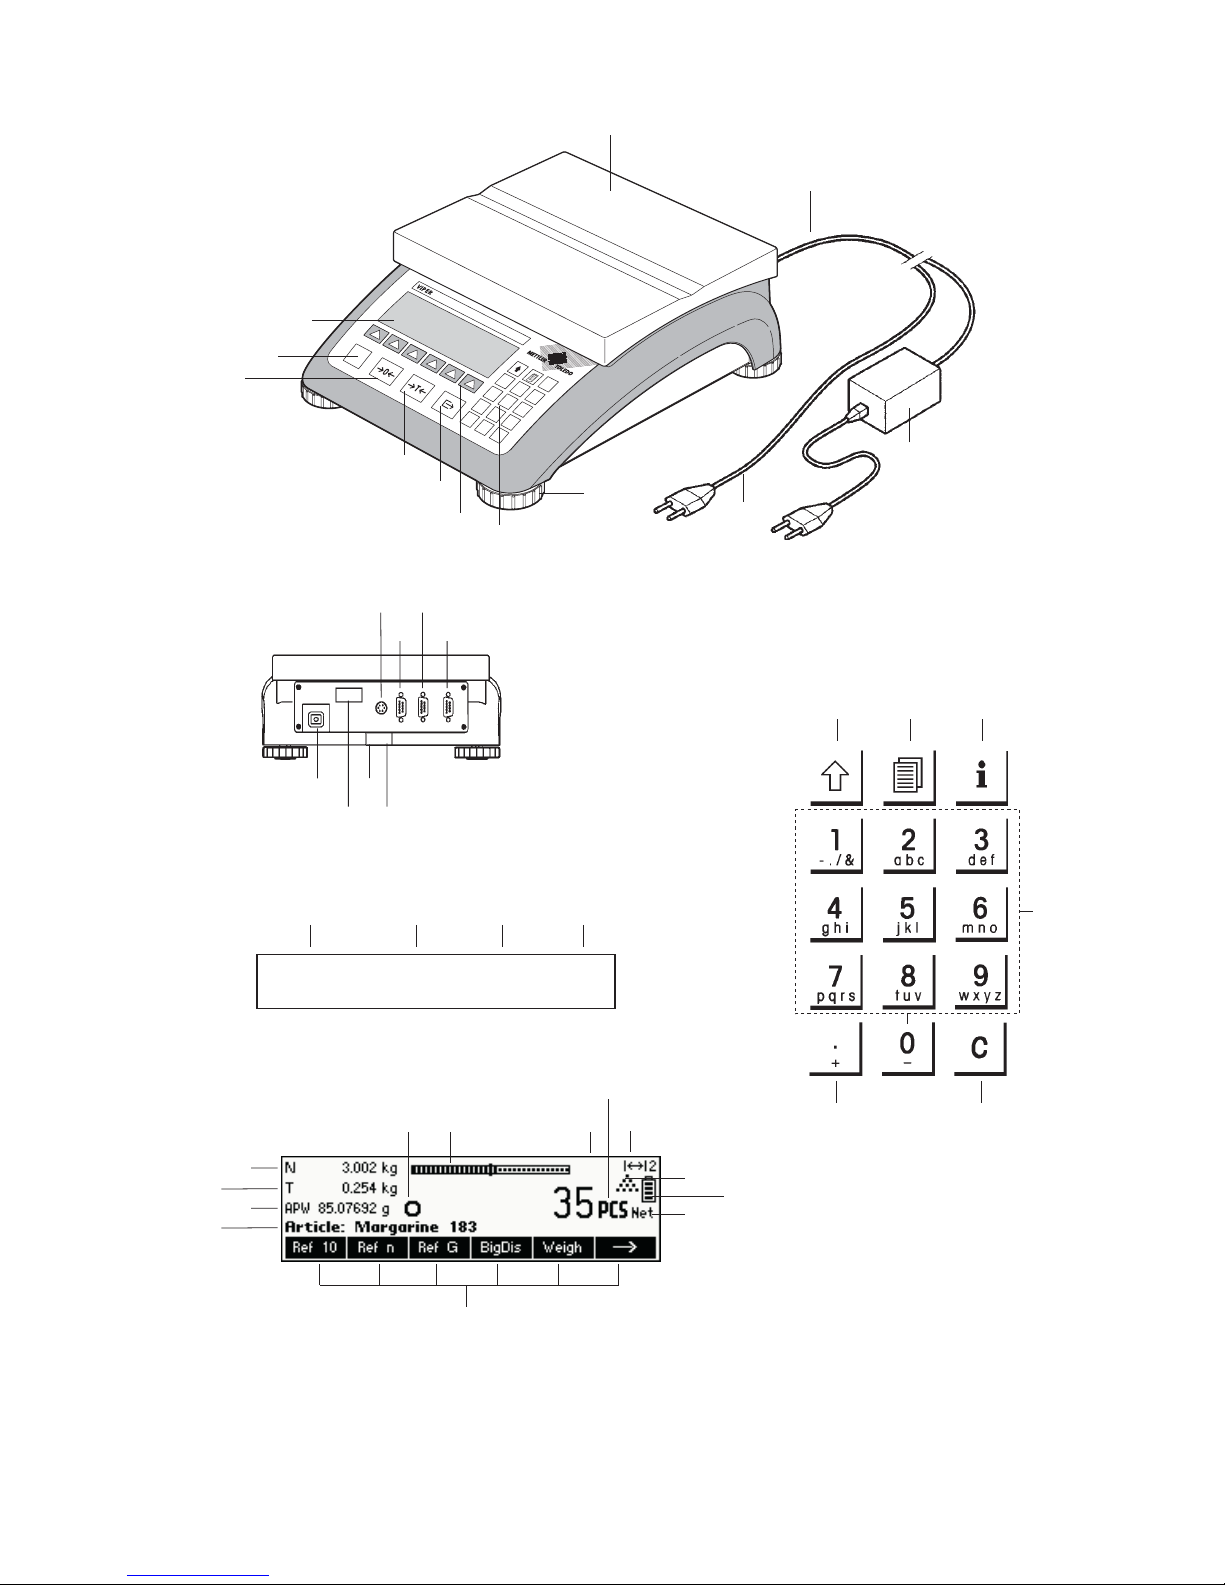
Overview
Rear of Scale
Scale specifications (example)
Keypad
23 24 25
26 27
28
111213
14
15
16
16
17
18
Max1: 3kg Min1: 20g e1: 1g d1: 1g
Max2 6kg Min2: 40g e2 2g d2: 2g
19 20 21 22
Display
36
41
29
30
31
32
33 34 35 37
38
39
40
Page 3

Overview
1 Display
2 On/Off key
3 Tare key
4 Zero key
5 Enter key
6 Command softkeys
7 Keypad
8 Adjustable feet
9 Weighing pan
10 Power supply:
10a: power cord (scale w/o battery)
10b: AC adapter (scale with battery)
Rear of scale
11 Power cord or jack for AC adapter
12 Model plate
13 Hole for anti-theft device
14 Spirit level (only on certified scales and those with
MonoBloc weighing cells)
For Standard:
15 PS2 connector for keyboard and/or BCR (Barcode
reader)
16 COM3 (RS232C interface)
17 COM2 (RS232C interface)
18 COM1 (RS232C interface)
For Optional Analogue Base:
15 PS/2 connector for keyboard and/or BCR (Barcode
reader)
16 Analog Base
17 COM3 (RS232C interface)
18 COM1/2 (RS232C interface), to access COM2
(Printer only) use included Y-cable
Scale specifications
19 Maximum loads (ranges 1/2)
20 Minimum loads (ranges 1/2)
21 Verification scale interval (certified scale) (ranges
1/2)
22 Max. resolution (ranges 1/2)
Keypad
23 Shift key
24 Database key
25 Info key
26 Special characters key
27 Clear key
28 Numeric/alphanumeric keys
Display
29 Info line 1
30 Info line 2
31 Info line 3
32 Info line 4
33 Stability detector
34 Weighing range bar graph
35 Active scale (in 2-scale systems)
36 Unit
37 Weighing range display
38 Piece counting symbol
39 Battery discharge status
40 Net weight indicator
41 Softkeys 1…6
Page 4

Contents METTLER TOLEDO Viper Smart Count
4
Contents
Page
1 Setting up the scale .........................................................................................................8
1.1 Unpacking and checking contents ..........................................................................................................8
1.2 Safety and environment .........................................................................................................................8
1.3 Positioning and leveling the scale ..........................................................................................................9
1.4 Connecting to power supply.................................................................................................................10
1.5 Battery operation ................................................................................................................................10
2 Basic functions ..............................................................................................................11
2.1 Switching on and off and zeroing .........................................................................................................11
2.2 Setting date and time ..........................................................................................................................11
2.3 Language settings ..............................................................................................................................12
2.4 Simple weighing.................................................................................................................................13
2.5 Weighing with tare..............................................................................................................................14
2.5.1 Taring by placing the weighing container on the scale...............................................................14
2.5.2 Entering the tare weight numerically (pre-tare)..........................................................................15
2.5.3 Determining the gross and net weights ....................................................................................16
2.6 Recording weighing results ..................................................................................................................16
3 Enhanced functions........................................................................................................ 17
3.1 General Info .......................................................................................................................................17
3.2 Database ...........................................................................................................................................18
3.2.1 Database editing functions .....................................................................................................18
3.2.2 Defining an article .................................................................................................................19
3.2.3 Save As Article ......................................................................................................................21
3.3 Backup/Restore ..................................................................................................................................22
3.4 FlashLoader .......................................................................................................................................22
4 Application....................................................................................................................23
4.1 Counting pieces into a container ..........................................................................................................23
4.1.1 Determining the reference by placing pieces on the scale...........................................................23
4.1.2 Entering the reference when the piece weight is known ..............................................................24
4.2 Counting out pieces out of a container ..................................................................................................25
4.2.1 Determine reference by removing pieces ..................................................................................25
Page 5

METTLER TOLEDO Viper Smart Count Contents
5
Contents
Page
4.3
Reference optimization ........................................................................................................................26
4.4 Minimum reference weight ...................................................................................................................26
4.5 Using the info key ...............................................................................................................................27
4.6 Piece counting with 2-scale systems ....................................................................................................28
4.7 Totalisation ........................................................................................................................................29
4.8 Filling ................................................................................................................................................30
4.9 Checkweighing (+/-)...........................................................................................................................31
4.10 Factor/Unit .........................................................................................................................................31
4.11 Average weighing ...............................................................................................................................33
5 Vision setup .................................................................................................................. 34
5.1 Overview and operation .......................................................................................................................34
5.2 Calling up the menu and entering the password.....................................................................................35
5.3 Menu overview ...................................................................................................................................36
5.3.1 Scale ...................................................................................................................................36
5.3.2 Application ...........................................................................................................................37
5.3.3 Terminal...............................................................................................................................39
5.3.4 Communications ...................................................................................................................40
5.3.5 Diagnostics ..........................................................................................................................43
5.4 Scale settings (SCALE) ........................................................................................................................43
5.4.1 Adjust/calibrate (SCALE Æ Calibration) ...................................................................................44
5.4.2 Display resolution and weighing unit (SCALE Æ Display)..........................................................44
5.4.3 Tare settings (SCALE Æ Tare).................................................................................................45
5.4.4 Automatic zero point correction (SCALE Æ Zero) ......................................................................45
5.4.5 Automatic save of tare and zero values (SCALE Æ Restart) .......................................................46
5.4.6 Adaptation to environmental conditions and weighing mode (SCALE Æ Filter).............................46
5.4.7 Resetting scale to factory default settings (SCALE Æ Reset) .......................................................47
5.5 Application settings (APPLICATION) ......................................................................................................47
5.5.1 Settings for piece counting (APPLICATION Æ Counting) ............................................................47
5.5.2 Settings for database (APPLICATION Æ Database) ...................................................................49
5.5.3 Settings for totalisation (APPLICATION Æ Totalisation) ..............................................................50
5.5.4 Settings for filling/checkweighing (APPLICATION Æ Filling/Checkweighing) .................................50
5.5.5 Settings for softkey configuration (APPLICATION Æ Softkey Configuration) ..................................51
5.5.6 Settings for Info/Help (APPLICATION Æ Info/Help).....................................................................52
5.5.7 Settings for reset (APPLICATION Æ Reset)................................................................................53
Page 6

Contents METTLER TOLEDO Viper Smart Count
6
Contents
Page
5.6
Terminal settings for device (TERMINAL Æ Device) ................................................................................53
5.6.1 Language settings (TERMINAL Æ Device Æ Language) ............................................................54
5.6.2 Sleep function (TERMINAL Æ Device Æ Sleep).........................................................................54
5.6.3 Turning off the backlight (TERMINAL Æ Device Æ Backlight).....................................................55
5.6.4 Adjusting the contrast of the display (TERMINAL Æ Device Æ Contrast)......................................55
5.6.5 Invert (TERMINAL Æ Device Æ Invert).....................................................................................55
5.6.6 Changing the size of weight display (TERMINAL Æ Device Æ Weight display) ............................56
5.6.7 Adjusting the date and time (TERMINAL Æ Device Æ Date Time) ...............................................56
5.6.8 Activating the beep (TERMINAL Æ Device Æ Beep) ..................................................................56
5.7 Define supervisor password (TERMINAL Æ Access) ...............................................................................57
5.8 Reset terminal settings to factory settings (TERMINAL Æ Reset) ...............................................................57
5.9 Communication settings (COMMUNICATIONS) .......................................................................................57
5.9.1 Mode (COMMUNICATIONS Æ Mode) .......................................................................................58
5.9.2 Parameters (COMMUNICATIONS Æ Parameters) ......................................................................58
5.9.3 Define string (COMMUNICATIONS Æ Def. String – only if Mode is Printer or Auto Print) .................59
5.9.4 Add LineFeed (COMMUNICATIONS Æ Add LineFeed).................................................................60
5.9.5 Define I/O (COMMUNICATIONS Æ Def. I/O – only if Mode is Digital I/0) ......................................60
5.9.6 Reset communications (COMMUNICATIONS Æ Comx Æ Reset Com) .........................................61
5.9.7 Option Settings (COMMUNICATIONS Æ Option) ........................................................................61
5.9.8 PS2 Settings (COMMUNICATIONS Æ PS2)...............................................................................61
5.10 Diagnostic settings (DIAGNOSTICS) ......................................................................................................62
5.10.1 Keyboard (DIAGNOSTICSÆ Keyboard Test) .............................................................................63
5.10.2 Display (DIAGNOSTICSÆ Display Test) ...................................................................................63
5.10.3 Serial Number 1 (DIAGNOSTICSÆ SNR1) ................................................................................64
5.10.4 Serial Number 2 (DIAGNOSTICSÆ SNR2) ................................................................................64
5.10.5 List 1 (DIAGNOSTICSÆ List 1) ...............................................................................................64
5.10.6 List 2 (DIAGNOSTICSÆ List 2) ...............................................................................................64
5.10.7 List memory (DIAGNOSTICSÆ List Memory) ............................................................................65
5.10.8 Reset All (DIAGNOSTICSÆ Reset All) .......................................................................................65
6 Other important information ...........................................................................................66
6.1 Error messages ..................................................................................................................................66
6.2 Sample reports ...................................................................................................................................68
6.3 Cleaning instructions...........................................................................................................................68
Page 7

METTLER TOLEDO Viper Smart Count Contents
7
Contents
Page
7 Technical data, interfaces and accessories......................................................................69
7.1 General data and delivered items..........................................................................................................69
7.2 Dimensions........................................................................................................................................70
7.3 Interface technical data........................................................................................................................71
7.4 Accessories ........................................................................................................................................71
7.5 Interface commands ...........................................................................................................................72
7.5.1 Preconditions........................................................................................................................72
7.5.2 SICS Command set................................................................................................................72
7.6 Declaration of conformity.....................................................................................................................76
Page 8
Chapter 1: Setting up the scale METTLER TOLEDO Viper Smart Count
8
1
Setting up the scale
Please read through these operating instructions carefully and adhere to them at all times. If you discover that materials
are missing or that the wrong ones have been supplied, or if you have any other problems with your scale, please refer to
the dealer and salesperson concerned, or if necessary to the METTLER TOLEDO representative responsible.
1.1 Unpacking and checking contents
Remove the scale and accessories from the packaging and check the delivered items:
• Terminal and weighing platform with installed weighing plan and level indicator (certified scales only)
• Open-end wrench for leveling the weighing platform
• Operating instructions (this document)
• Special accessories (if any) as per packing list
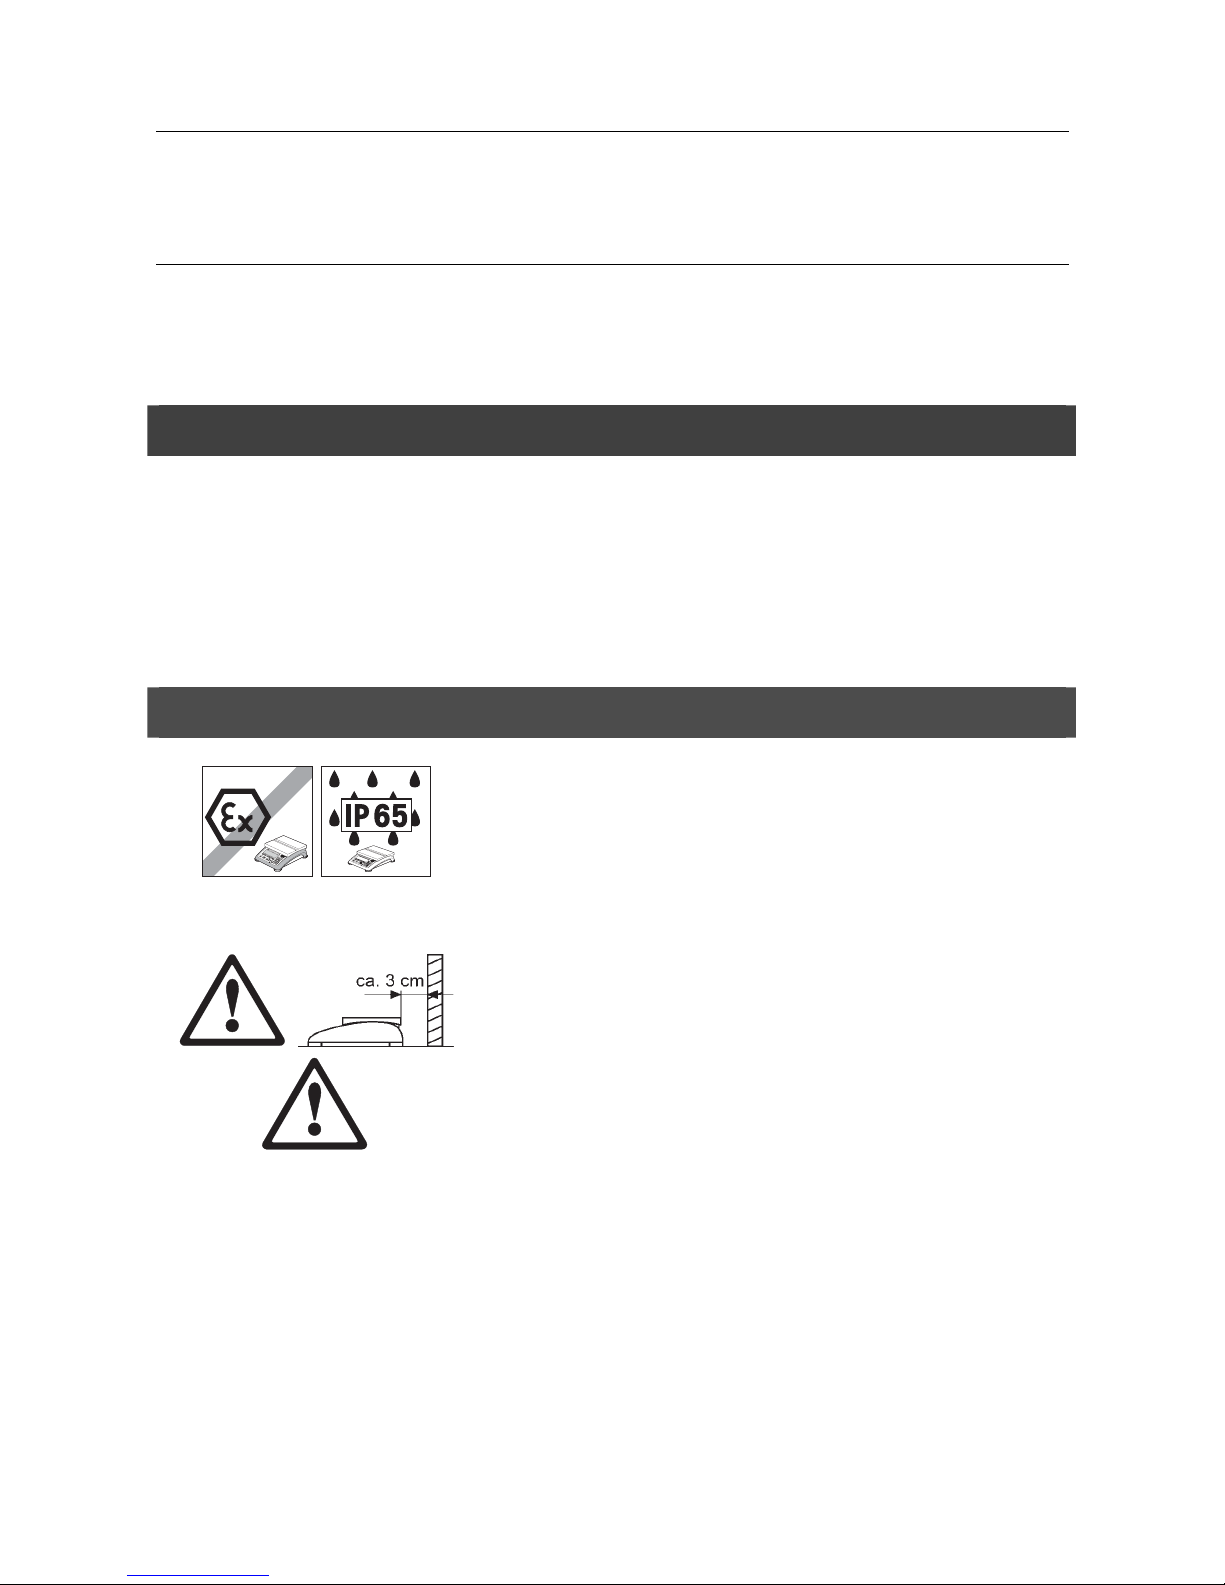
1.2 Safety and environment
Do not use the scale in hazardous areas (unless it is clearly identified as
being approved for these areas).
For service in wet areas or dusty environments, or if wet cleaning is
necessary, scales with IP 65 ingress protection must be used. But even
these scales must not be used in environments where there is a risk of
corrosion. The scales must never be drenched or immersed in liquid.
If the power cord is damaged, the scale must no longer be operated.
Therefore check the cable regularly and ensure that a free space of about 3
cm is left at the rear of the scale, so that the cable is not kinked too severely.
Never tamper with the retaining screws for the load plate support
underneath the weighing pan.
When the weighing pan is removed, never insert a solid object underneath
the load plate support.
Never open the scale by removing the screws in its base.
Use only approved accessories and peripherals.
Handle the scale with utmost care; it is a precision instrument. Blows on the
weighing pan must be avoided, and heavy overloads must not be placed on
it.
Page 9

METTLER TOLEDO Viper Smart Count Setting up the scale
9
Important instructions when using Viper scales in the food sector: those
parts of the scale can come into contact with food products have smooth
surfaces and are easy to clean. The materials used do not splinter and are
free from contaminants. In food processing areas, it is recommended that a
protective cover (accessory) is used. This must be cleaned regularly, just
like the scale itself. Damaged or heavily contaminated protective covers must
be replaced immediately.
When the scale is finally taken out of service, observe the current
environmental regulations. If the scale is equipped with a battery, this
contains heavy metals and therefore must not be treated as normal refuse!
Local regulations for disposing of environmentally hazardous substances
must be complied with.
1.3 Positioning and leveling the scale
The correct location is a decisive factor in ensuring accurate weighing results.
- Choose a stable and vibration-free location (particularly important for
high-resolution scales using Mettler Toledo MonoBloc technology). Place
the scale on a surface that is as horizontal as possible and strong
enough to bear its weight when fully loaded.
- Check the ambient conditions.
- Avoid:
- direct sunlight
- strong drafts (e.g. from fans or air conditioning systems)
- excessive temperature fluctuations.
Turn the adjustable feet so that the scale is horizontal. If a spirit level is filled,
the bubble must be located within the inner circle.
Note: The Viper Smart Count has a special filter that accelerates certain
procedures (zeroing, taring, determining the reference weight for piece
counting) in a non-tranquil environment. This inevitably means that there is a
slight loss of accuracy with the results. For high-precision results, care must
be taken to ensure as tranquil and stable an environment as possible, so that
the filter is not activated.
Major changes in geographical location:
Every scale is set by the manufacturer to suit the local gravitational
conditions (geographical adjustment value) in the geographical zone to
which the instrument is supplied. If a major change of geographical location
takes place, this setting must be adjusted by a service technician or a new
setting made. Certified scales must, in addition, be recalibrated in
accordance with national certification regulations.
Page 10
Chapter 1: Setting up the scale METTLER TOLEDO Viper Smart Count
10
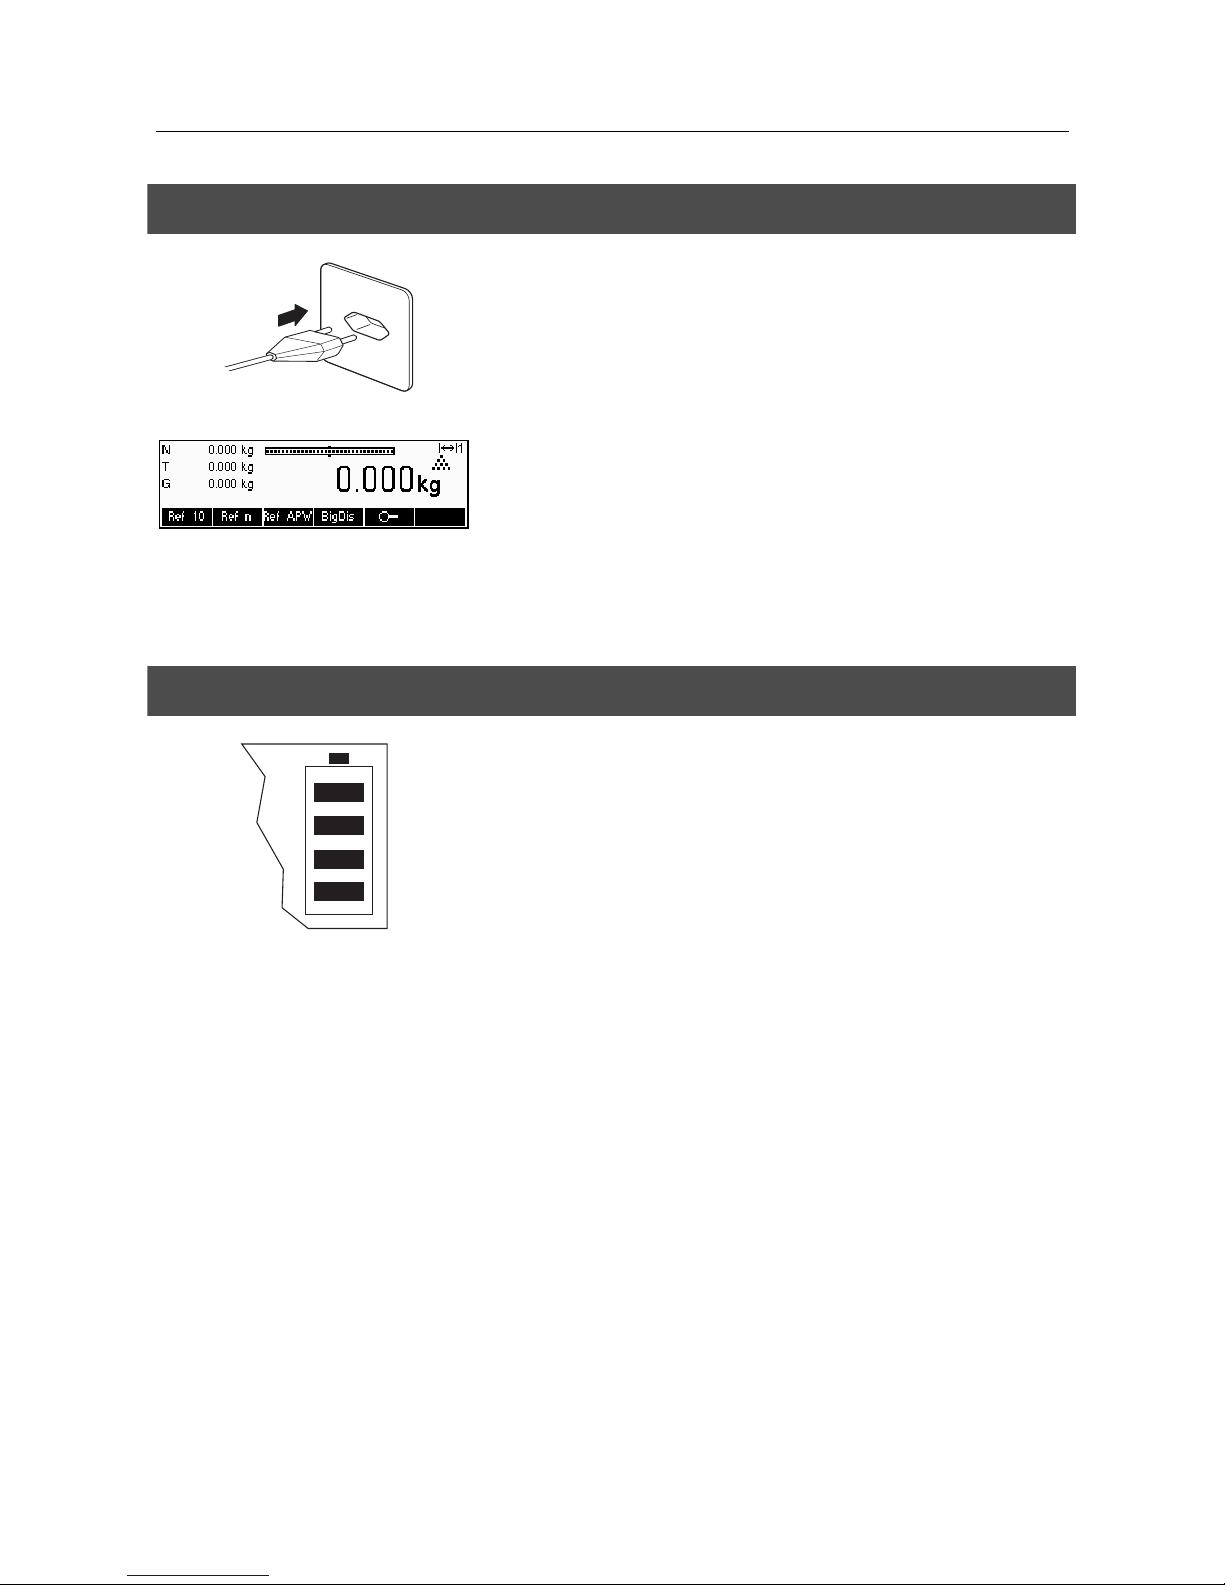
1.4 Connecting to power supply
Before connecting the power supply plug or AC adapter (AccuPac version),
verify that the voltage stated on the model plate is the same as the local
power line voltage.
Connect the power cord plug or the AC adapter plug to the supply, then
connect the AC adapter (AccuPac version) via the jack at the rear of the
scale.
Powering up the scale initiates a display test in which all the segments and
then the software version are briefly displayed. Once the decimal zero
appears in the display, the scale is ready to operate.
For maximum possible precision, adjust/calibrate the scale after installing it
(Chapter 5.4.1). Note: Certified scales must be adjusted by an authorized
organization. Please consult your dealer.
1.5 Battery operation
Scales with a built-in battery (AccuPac) can, under normal operation
conditions, work independently of the AC power line for about 8 hours.
Immediately the AC power supply is interrupted (by withdrawing the power
cord plug or if there is a power failure), the scale switches automatically to
battery operation. Once the AC power supply is restored, the scale reverts
automatically to AC operation.
The battery symbol indicates the current discharge status of the battery (1
segment corresponding to about 25% capacity). If the symbol flashes, the
battery must be recharged.
A discharged battery requires at least 8 hours until it is recharged. During the
charging process, work with the scale can continue, but under these
conditions, a longer charging time is needed.
The battery is protected against overcharging, and the scale can therefore
remain permanently connected with the AC power line without any problems.
Page 11
METTLER TOLEDO Viper Smart Count Chapter 2: Basic functions
11
2
Basic functions
This Chapter describes how to switch the scale on and off, zero and tare it, weigh materials and record the results.
All displays are based on default settings “English”.
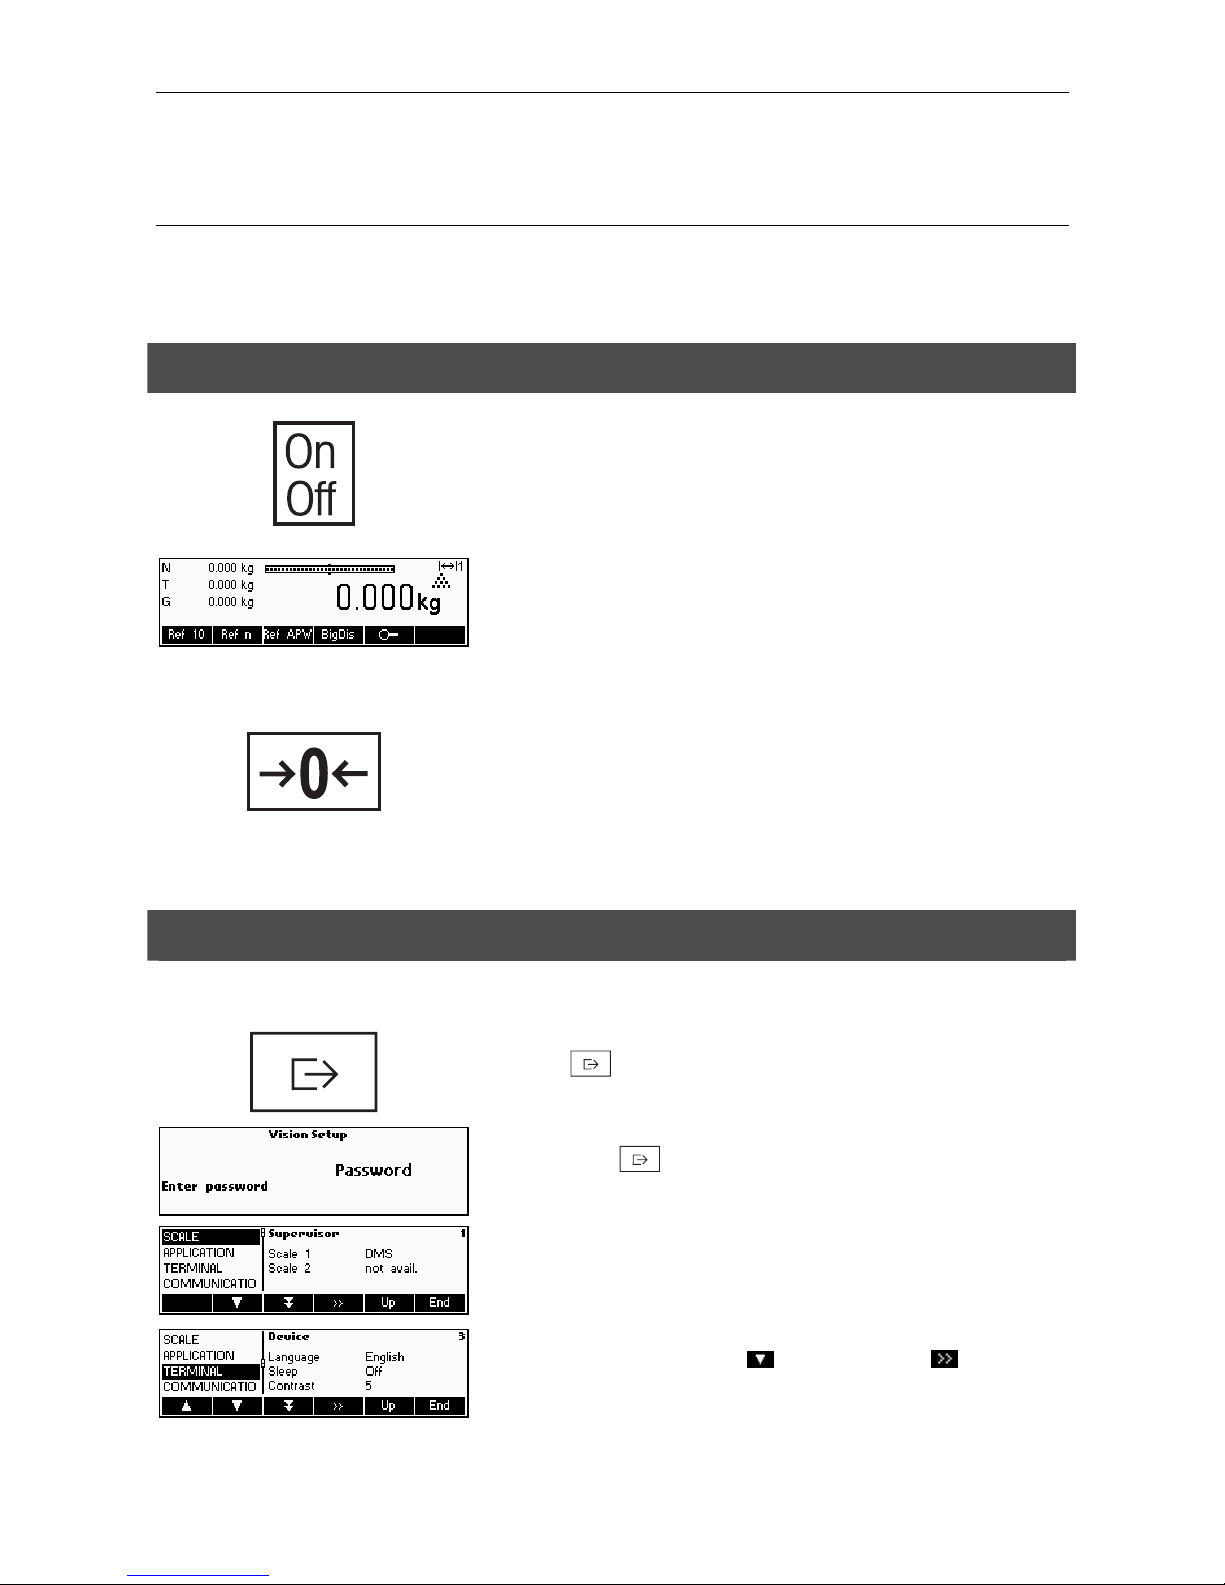
2.1 Switching on and off and zeroing
Briefly pressing «On/Off»
key switches the scale on or off.
The scale carries out a display test (Chapter 1.4). Once the weight display
appears, the scale is ready to operate and automatically zeroed.
Note: The screen display shown here may not necessarily be the same as
the display appearing on your scale. Please refer to Chapter 5 on how to
navigate within the 'Vision Setup'-menu and how to define softkeys for each
function.
Note: If necessary, the scale can be zeroed at any time with the line «Æ0Å»
key.
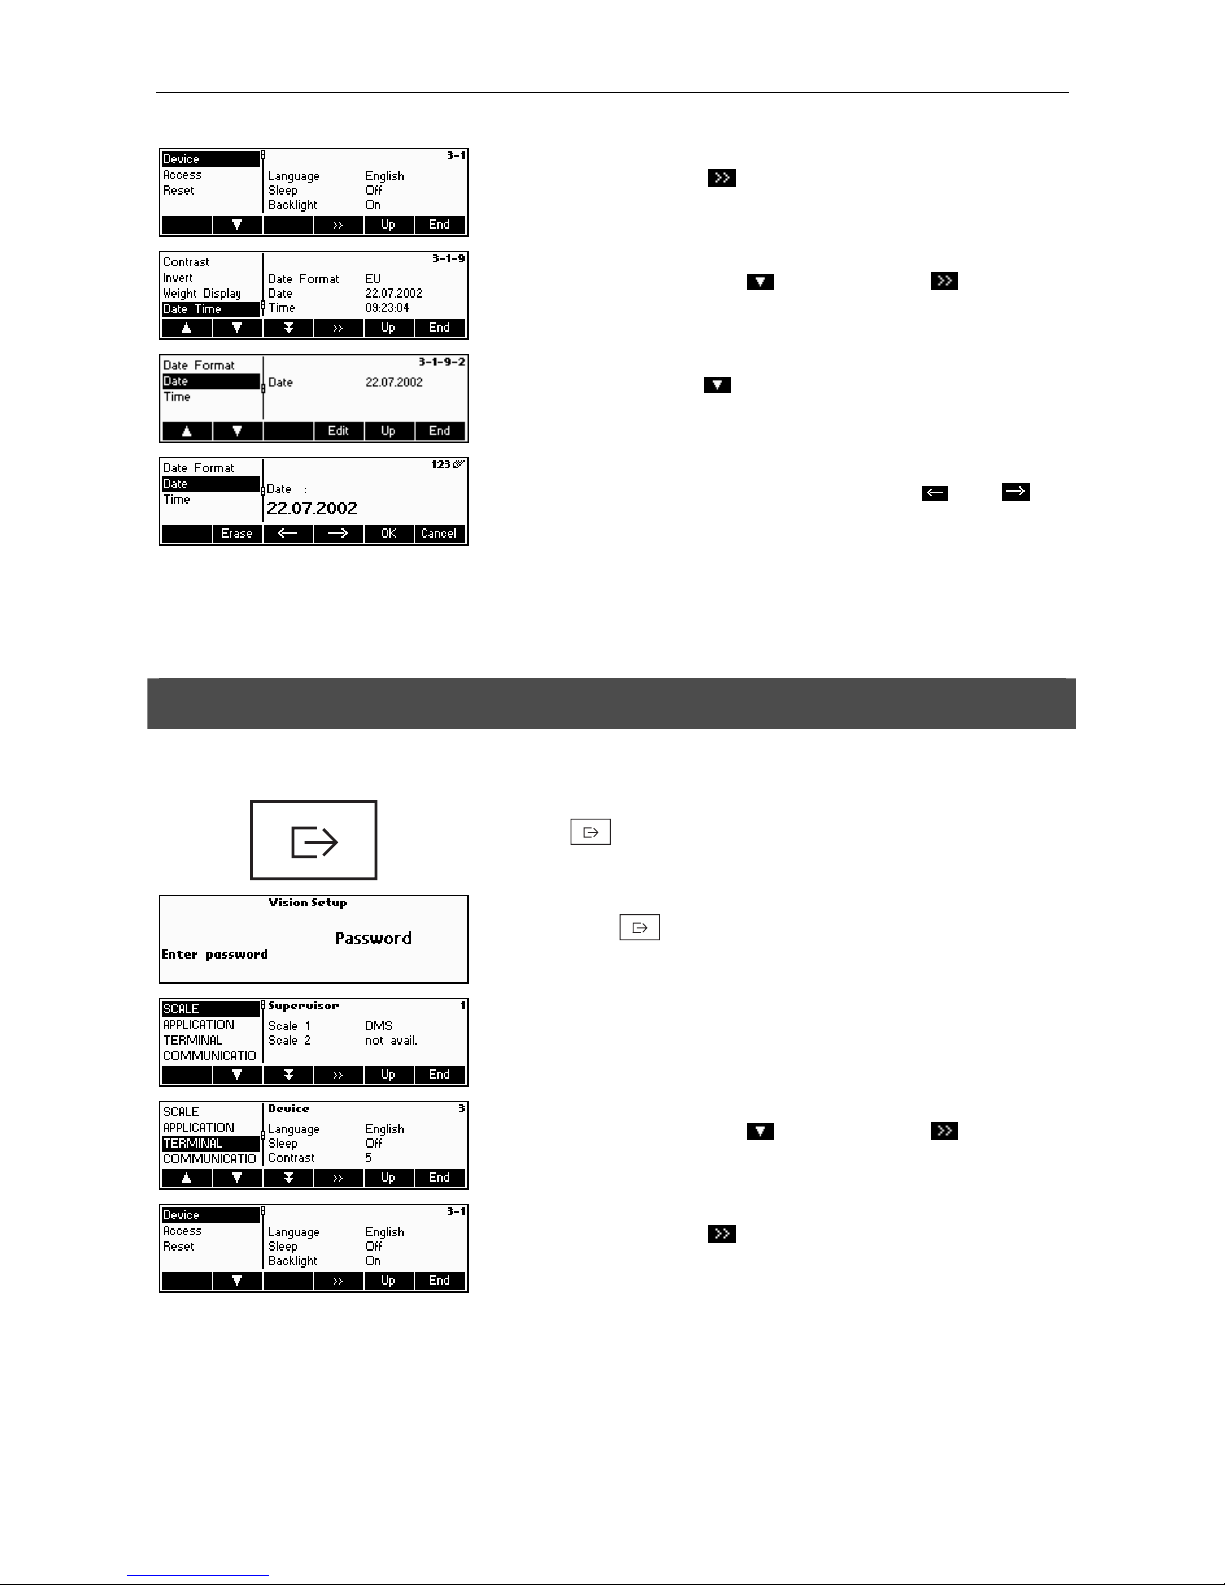
2.2 Setting date and time
Time can be set in 24 hours or 12 hours format, and the date in European or US format.
Press the « » key continuously for about 2 seconds.
Briefly press the «
» key again.
Select TERMINAL by pressing the «
» key and press the « » key.
Page 12
Chapter 2: Basic functions METTLER TOLEDO Viper Smart Count
12
Select Device and press the «
» key.
Select Date Time by pressing the «
» key and press the « » key.
Select Date by pressing the «
» key and press the «Edit» key.
Use the numeric keypad to enter the date and confirm with the «OK» key.
Incorrect inputs can be deleted with the «Erase»
key. The « » and « »
keys can be used to scroll the characters that are entered.
To set the correct time, do the same procedure but select Time instead of
Date.
2.3 Language settings
Language can be set into US English, English, German, French, Spanish or Italian.
Press the «
» key continuously for about 2 seconds.
Briefly press the «
» key again.
…appears on the screen.
Select TERMINAL by pressing the «
» key and press the « » key.
Select Device and press the «
» key.
Page 13

METTLER TOLEDO Viper Smart Count Chapter 2: Basic functions
13
Select Language by pressing the «
» key and then press the «Edit» key.
Choose the desired language and then press the «OK» key.
2.4 Simple weighing
Place the object to be weighed on the scale.
The bar graph at the top of the display shows how much of the weighing
range is being used and how much is still available (as % of total scale
capacity). The range symbol at the upper right corner of the display shows
the first or second half of the range of the maximum load. Note: The number
changes from 1 to 2 when set for 2 weighing ranges:
Example: 6 kg scale:
1. Range 0 – 3 kg Resolution 1 g
2. Range 0 – 6 kg Resolution 2 g
In order to switch from the 2
nd
range back to the 1st range, the load must first
be removed from the scale or it must be zeroed.
Wait until the stability detector (a small ring at the left edge of the display)
disappears, then…
Note: Please refer to Chapter 5.5.5 'Vision Setup Æ APPLICATION Æ Softkey
Configuration' on how to define softkeys. In this example, a new softkey was
added, i.e. «
» softkey (high resolution).
… read the indicated net weight and press the «
» key.
Page 14
Chapter 2: Basic functions METTLER TOLEDO Viper Smart Count
14
The « » key enables the weighing result to be displayed in control mode,
i.e. with a higher resolution. Press «Cancel» key to go back to the normal
weighing mode. Press «Average» key to perform average weighing. See also
Chapter 4.11
Control mode is not available if the maximum resolution has already been
selected in Vision setup (Chapter 5).
2.5 Weighing with tare
The tare can be specified by placing the weighing container on the scale or by entering the tare weight numerically. The
two possibilities are described below. Moreover, the gross and net weights can be determined separately.
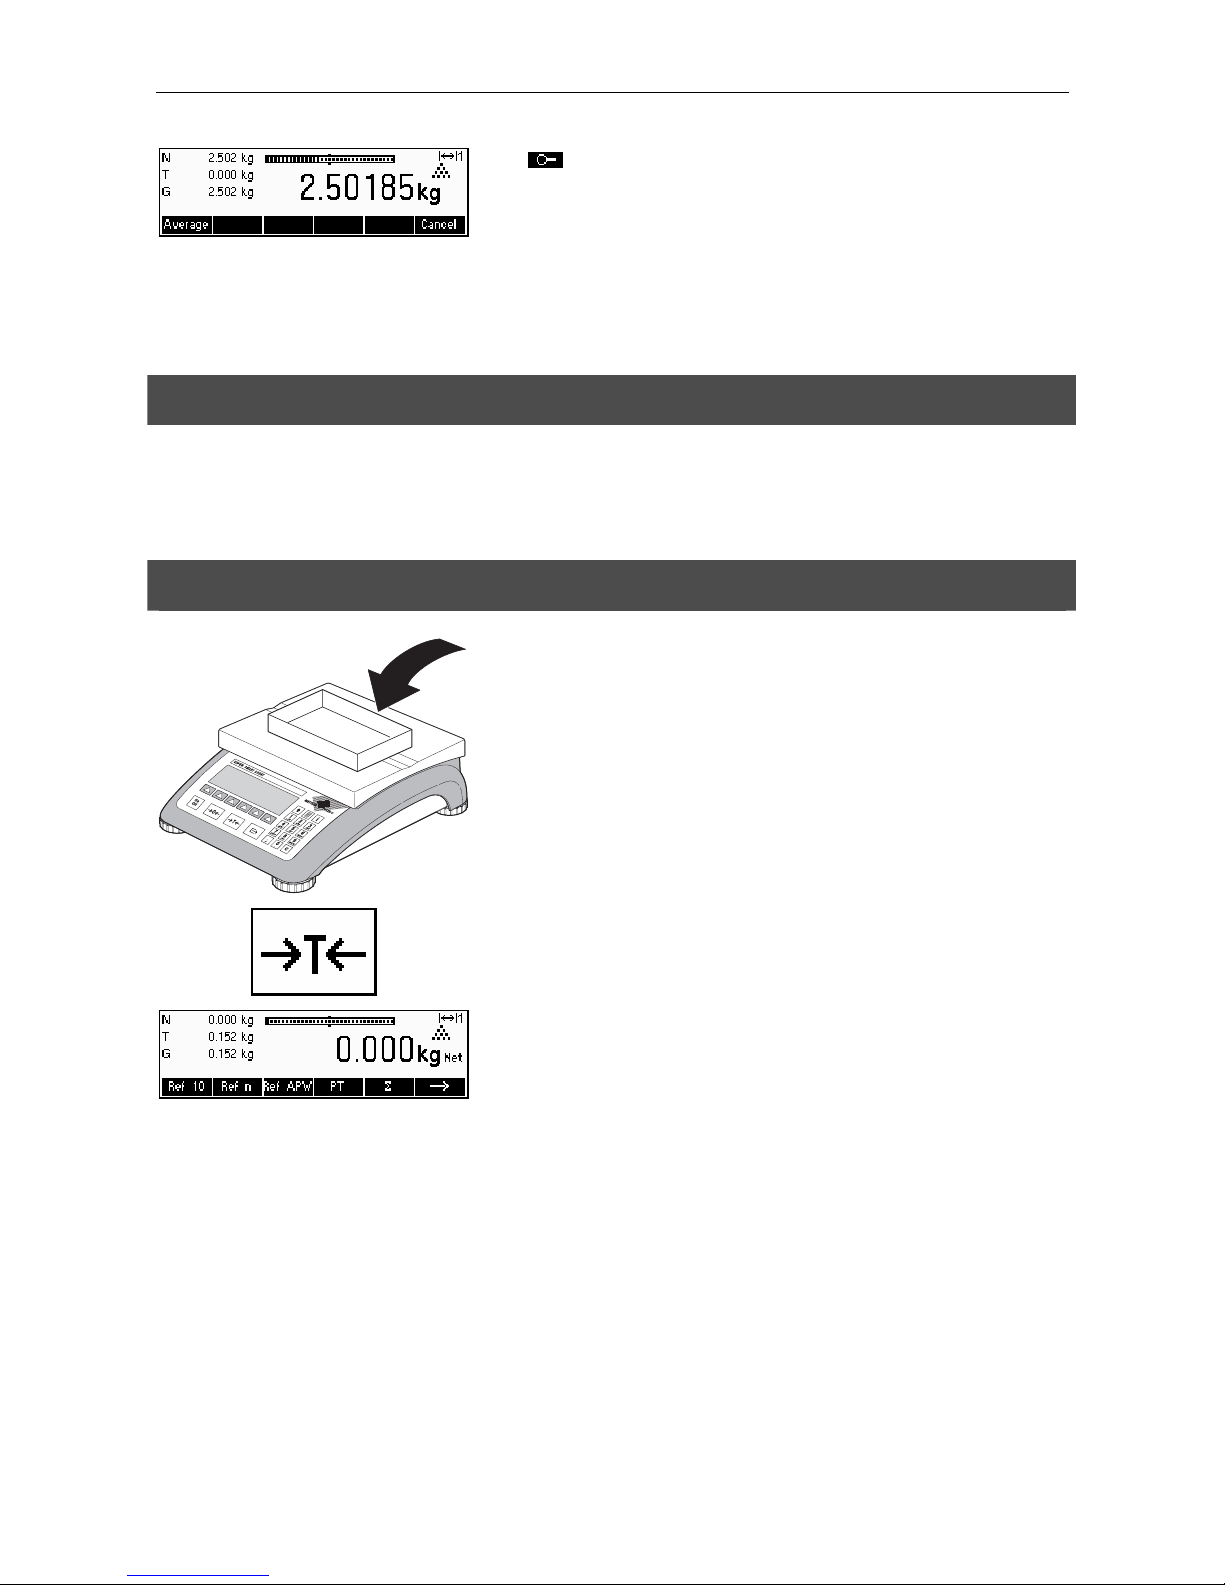
2.5.1 Taring by placing the weighing container on the scale
Place the empty weighing container or packaging on the scale.
Press the «ÆTÅ»
key briefly to tare the scale.
The zero display and the “Net” (net weight) symbol appear. Note: If the
automatic tare function has been activated in Vision Setup (Chapter 5),
there is no need to press the «ÆTÅ»
key.
Page 15
METTLER TOLEDO Viper Smart Count Chapter 2: Basic functions
15
Place the material to be weighed in the container, then…
… read the result (net weight of the weighing sample).
Note: The tare weight is retained until either a new tare is determined, or the
scale is set to zero or switched off. If the automatic taring function is active,
the tare is automatically cleared when weighing is completed and the
weighing pan emptied; the scale is then ready for the next taring and
weighing.
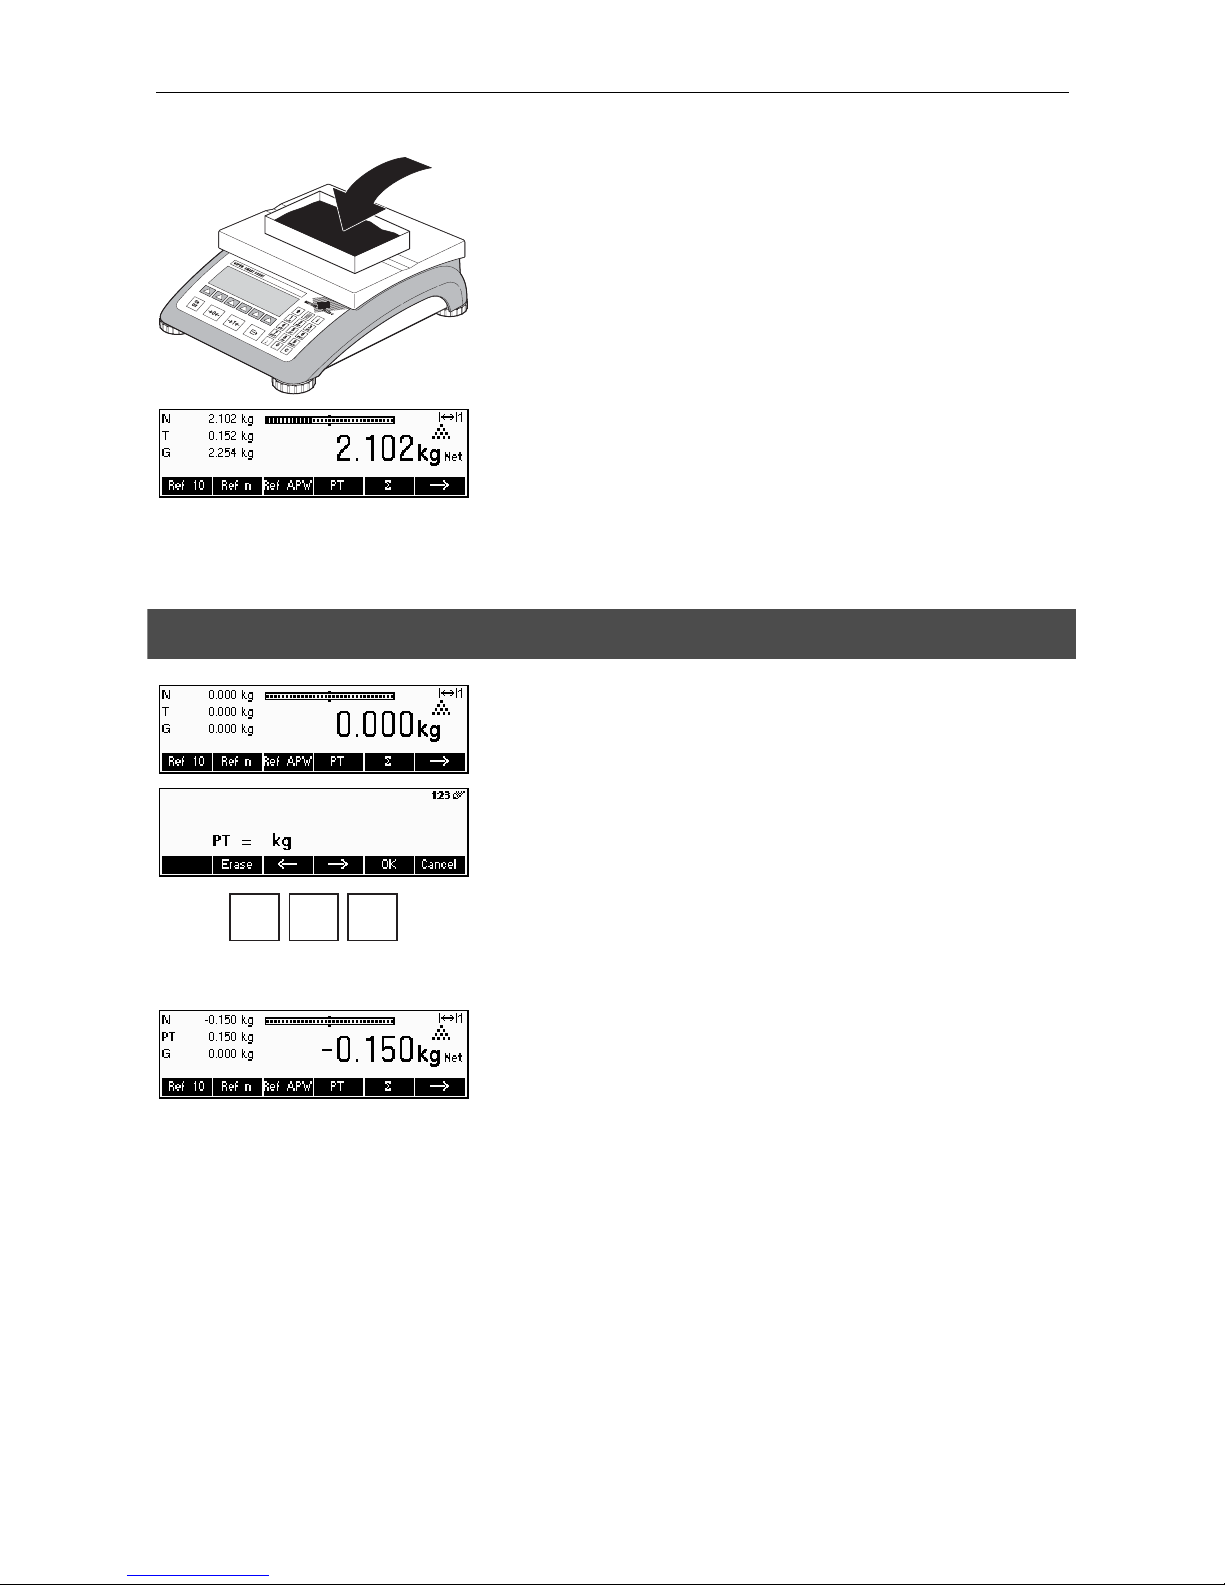
2.5.2 Entering the tare weight numerically (pre-tare)
Press the «PT»
key.
… appears on the screen.
.
1 5
Use the numeric keypad to enter the known tare weight in the current
weighing unit and confirm with the «OK»
key. Incorrect inputs can be deleted
with the «Erase»
key. The arrow keys can be used to scroll the characters that
are entered.
The tare values entered appear in the display with a negative sign and the
symbol “Net” (net weight). As soon as the weighing container with the
corresponding weight is placed on the scale, the zero display appears.
Page 16
Chapter 2: Basic functions METTLER TOLEDO Viper Smart Count
16
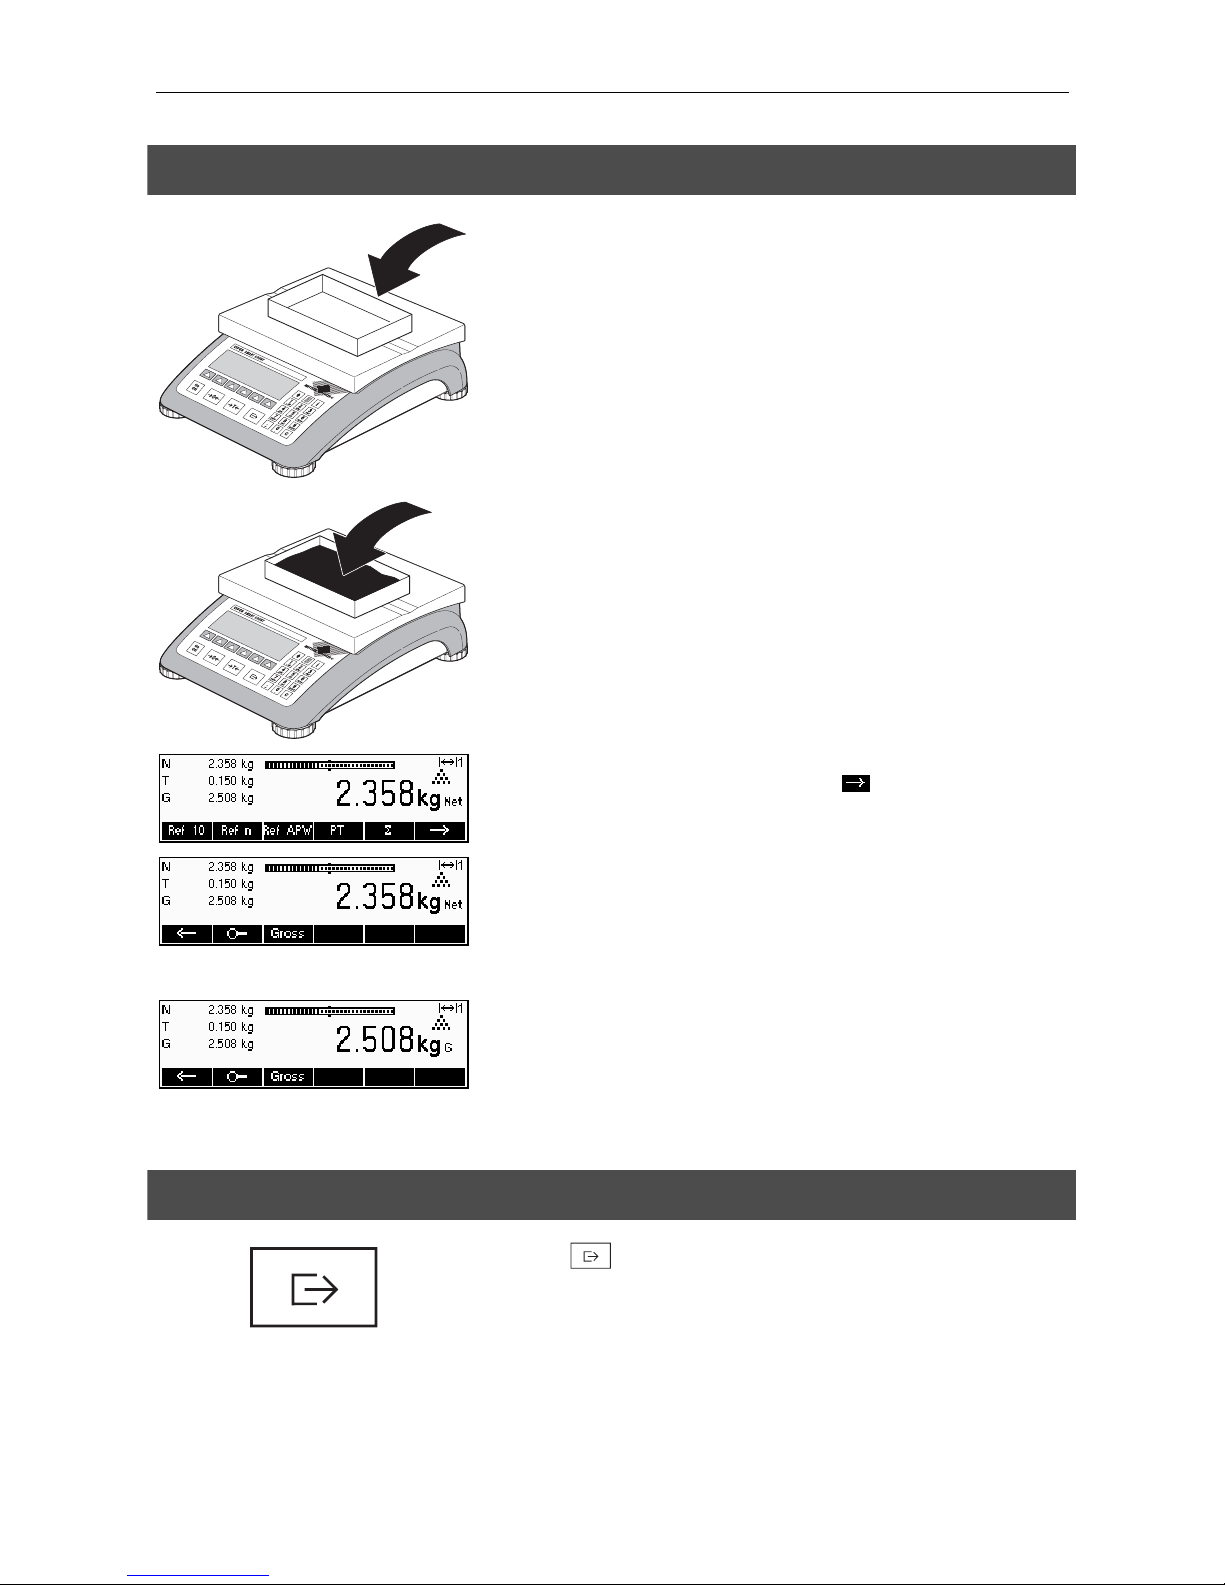
2.5.3 Determining the gross and net weights
Place the empty weighing container or packaging on the scale and then
press the «ÆTÅ»
key briefly, or press the «PT» softkey if a known tare
weight has already been established.
Place the material to be weighed in the container, then…
… read the indicated net weight. Scroll on the «
» key.
•
•
Press the «Gross»
key. This function causes the gross weight to be displayed
(the “G” symbol appears and replaces the “Net” symbol).
After a few seconds the scale automatically reverts to displaying the net
weight.
2.6 Recording weighing results
Press the «
» key to send the current weighing result to the peripheral
device (printer, computer) via the interface. Factory default configures
interface 1 for connection to a printer.
Please refer to Chapter 5 Vision setup for instructions on configuring the
interface(s).
Page 17

METTLER TOLEDO Viper Smart Count Chapter 3: Enhanced functions
17
3
Enhanced functions
This Chapter describes the Smart Count features that simplify working with the application.
3.1 General Info
Smart Count provides several features which make working with the application easier.
Short Input Mode
For some Smart Count functions, it is possible to use a short-cut method of
user input.
As in the example for entering the pre-tare weight in Chapter 2.5.2, the
normal procedure for initiating user input is to press the function softkey first
before entering the data. However, it is also possible to key in the data first
prior to selecting the function the data is intended for.
.
1 5
This example shows how to enter the pre-tare weight using short-input mode.
While in standby mode, use the numeric keypad to enter the known tare
weight in the current weighing unit.
Then press the «PT» softkey or the «ÆTÅ» key to set this value as the pretare weight.
The result is the same as in Chapter 2.5.2.
Short-input mode works with the following function softkeys:
«Ref X» The value keyed in replaces the value of X (Chapter 5.5.1) and
perform a reference weight determination using the value as
reference number of pieces (Chapter 4.1.1).
«Ref n» The value keyed in will be used as the reference number of
pieces for the reference weight determination.
«Ref APW» The value keyed in will be used as the average piece weight.
«PT» The value keyed in will be used as the pre-tare weight.
Smart Count recognizes if the function softkey pressed is not compatible with
short-input mode and will display a warning indicating so.
Page 18
Chapter 3: Enhanced functions METTLER TOLEDO Viper Smart Count
18
3.2 Database
The following describes the operations for working with the article database.
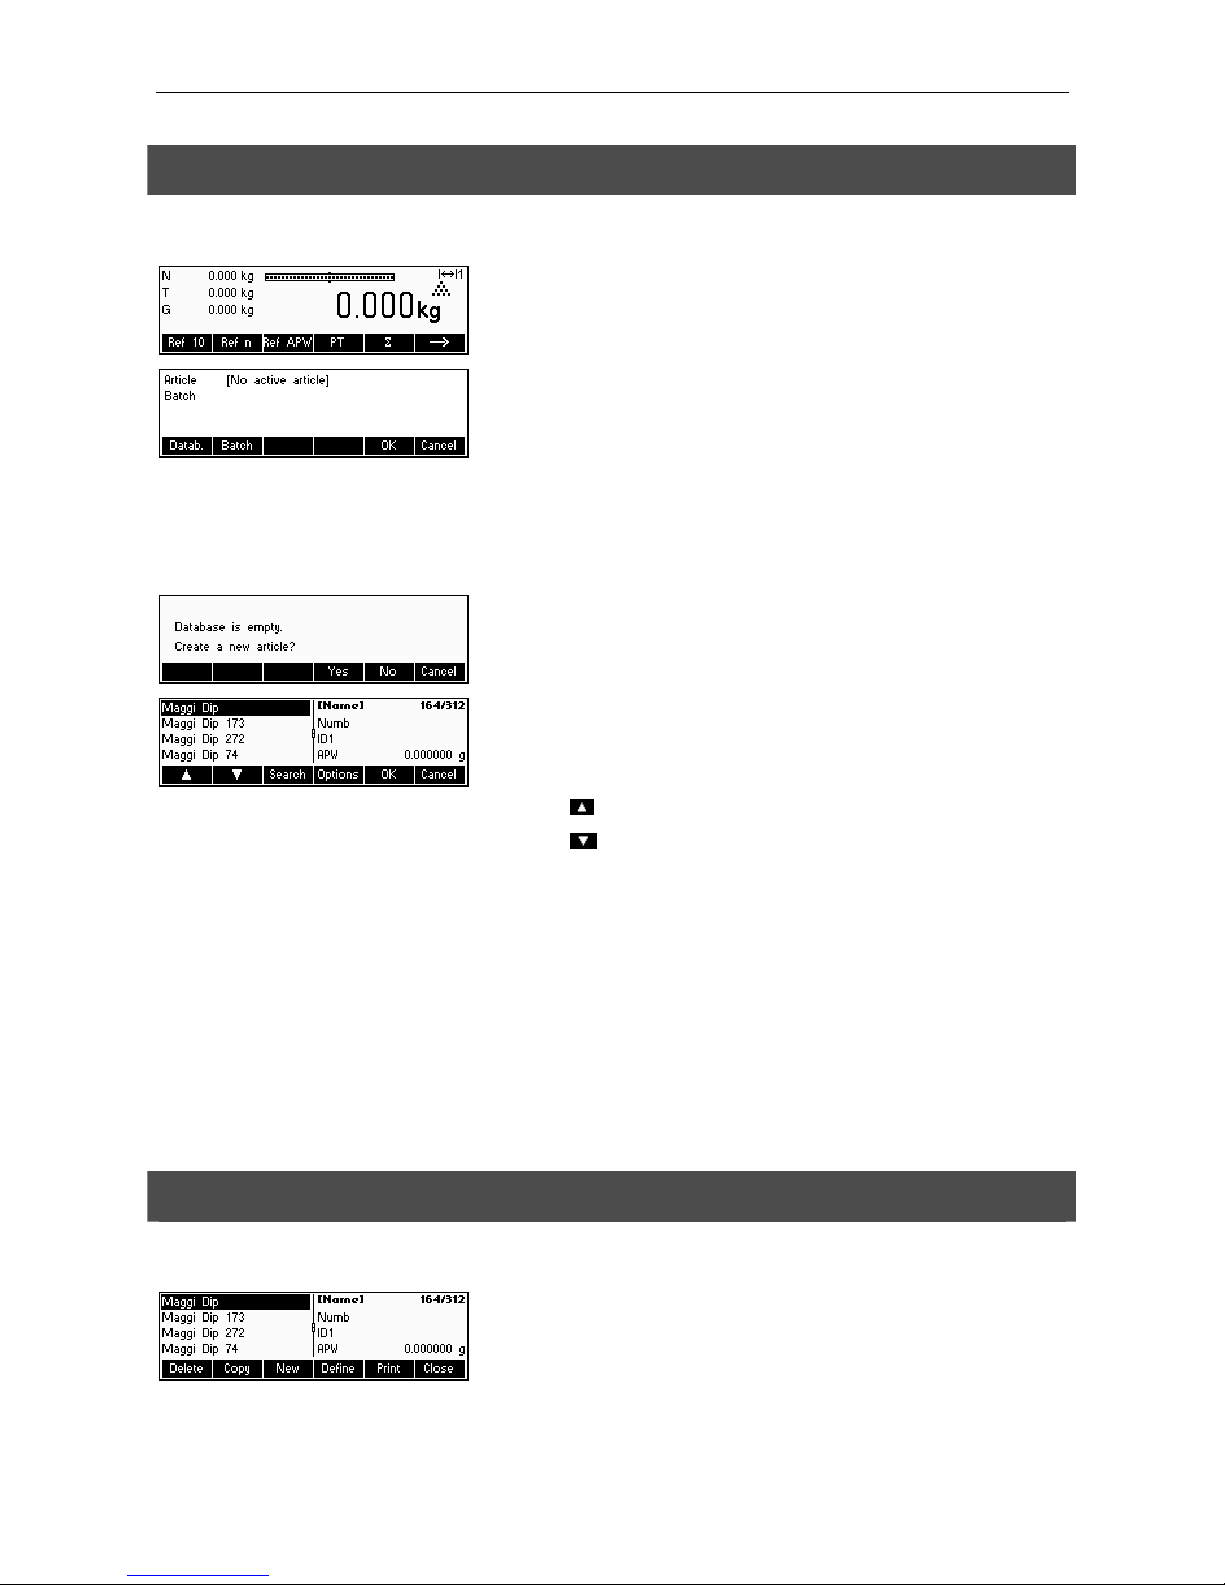
Briefly press the «
» key.
If any of the ID’s in 'Vision Setup Æ APPLICATION Æ Database Æ ID1- ID3'
are active (Please refer to Chapter 5.5.2 on how to use the ID’s), you need to
make a selection of which item to edit. In this example, ID1 “Softkey” and
“Printout” were set to “Batch”.
To enter the article database menu, press the «Datab.» softkey.
Note: If no ID is active, this screen will be skipped and you will be brought
directly to the article database menu.
The first time the article database is accessed, the database will be empty
and Smart Count will prompt you to create a new article.
If articles have been previously defined, you will be presented with several
options for working with the article database:
Press the «
» key to select the previous article in the list.
Press the «
» key to select the next article in the list.
Press the «Search» key to find an article in the list.
Press the «Options» key to perform other operations on the currently selected
article (Chapter 3.2.1).
Press the «OK» key to make the currently selected article the active one for
use with the various Smart Count applications and leave the article database
menu.
Press the «Cancel» key to leave the article database menu. The article that
was active before entering the article database menu will be retained except if
that article was deleted. Other changes made to the database with the
«Options» key will not be undone.
3.2.1 Database editing functions
The following describes various operations that could be performed on articles.
With the desired article selected in the article list, press the «Options» key.
You can then choose an operation to be done on the article.
Note: If a password was defined in 'Vision Setup Æ APPLICATION Æ
Database Æ Article Æ Password' (Chapter 5.5.2) then you will be asked to
enter the password before you can modify the selected article.
Page 19

METTLER TOLEDO Viper Smart Count Chapter 3: Enhanced functions
19
Press «Delete» to remove the current article from the database. You will be
asked to confirm deletion of an article.
Press «Copy» to create a duplicate of the selected article. All the parameters
of the current article, except the name, will be copied into the newly created
article.
Press «New» to create a blank article.
Press «Define» to modify the selected article. Select the desired parameter by
using the «
», « », or « » softkeys, then press «Edit» to modify the
selected parameter.
A «
» softkey in place of the «Edit» softkey indicates that there is a
submenu for the selected item.
Press «Print» to print out the parameters of the selected article.
Press «Close» to leave the article editing menu and return to the article
selection menu.
3.2.2 Defining an article
The following describes the parameters of a Smart Count article.
Name
The name of the article. If 'Vision Setup Æ APPLICATION Æ Database Æ
Article Æ Search criterion' is set to “By name”, this parameter is used for
searching in the article database.
Number
The number of the article. If 'Vision Setup Æ APPLICATION Æ Database Æ
Article Æ Search criterion' is set to “By number”, this parameter is used for
searching in the article database.
Identification / ID1 and ID2
Additional identification parameters for the article. These parameters could be
used to provide additional information about the article in the report printouts.
Page 20

Chapter 3: Enhanced functions METTLER TOLEDO Viper Smart Count
20
APW
Define the average piece weight of the article. It is possible to set the average
piece weight for the article by performing a reference weight determination
(Chapter 4.1.1) or by manually entering a known piece weight (Chapter
4.1.2).
Tare
Pre-defined tare weight for the article.
Sample size
Define the reference number of pieces. This value will override the one set in
'Vision Setup Æ APPLICATION Æ Counting Æ Ref X' (Chapter 5.5.1) while
the article is active.
PW optimization
The correction factor for optimizing the piece weight. The previous value of
the APW will be adjusted by this factor in relation to the new APW. Note: This
works only if PW Tol+ and PW Tol- are set and the APW is within the
tolerances.
PW Tol+
The upper limit for a new average piece weight. If the new piece weight is
above this value, a warning will be displayed prompting the operator whether
or not he wants to accept the new piece weight. Note: APW must already be
defined before setting the PW Tol+, otherwise the PW Tol+ entry will be
cleared.
PW Tol-
The lower limit for a new average piece weight. If the new piece weight is
below this value, a warning will be displayed prompting the operator whether
or not he wants to accept the new piece weight. Note: APW must already be
defined before setting the PW Tol+, otherwise the PW Tol+ entry will be
cleared.
Filling/checkweighing nominal
The nominal value used for the filling (Chapter 4.8) and checkweighing
(Chapter 4.9) applications. It is possible to define the nominal value in
pieces or as weight value. This parameter must be filled in first before
defining Tol+ and Tol-.
Filling/checkweighing Tol+
The upper limit for filling (Chapter 4.8) and checkweighing (Chapter 4.9)
applications. It is possible to define this parameter as an absolute value,
relative to the Nominal, or as a percentage of Filling / Nominal.
Page 21

METTLER TOLEDO Viper Smart Count Chapter 3: Enhanced functions
21
Filling/checkweighing Tol-
The lower limit for the filling (Chapter 4.8) and checkweighing (Chapter 4.9)
applications. It is possible to define this parameter as an absolute value,
relative to the nominal, or as a percentage of nominal.
Accumulation total net
The total net weight for the Totalisation application (0)
Accumulation total gross
The total gross weight for the Totalisation application (Chapter 4.7)
Accumulation total pcs.
The total number of pieces for the Totalisation application (Chapter 4.7)
Accumulation total lot
The total number of lots for the Totalisation application (Chapter 4.7)
3.2.3 Save As Article
In the course of working with Smart Count, you may wish to save the current state into an article. The Save As Article
function makes this possible.
Define a softkey for “Save As Article” in the softkey configuration (See Chapter 5.5.5).
In this example, a reference weight determination has already been performed
(Chapters 4.1.1 and 4.1.2).
Press the «
» softkey once to scroll to the next set of softkeys.
Press the «SaveAs» softkey…
…Smart Count asks for the Name you wish to use for this article. From this
point on, the procedure is the same as defining a normal article (Chapter
3.2.2).
Note, however, that the parameter APW is already defined and its value is set
to the APW that was active before «SaveAs» was pressed.
Aside from the APW, the article parameters that will also be saved are Tare,
Sample Size, the Filling/Checkweighing parameters, and the Totalisation
parameters.
Page 22

Chapter 3: Enhanced functions METTLER TOLEDO Viper Smart Count
22
3.3 Backup/Restore
To make working with the article database even easier, a backup/restore program is included as a standard equipment of
Viper Smart Count. This program eases data entry as articles can be defined on a standard PC which are then later
restored to the scale. This program also provides a means to backup the data stored on the scale for archive or security
reasons.
• Install the Backup-Restore program. (Requires MS Windows 95 or higher)
• Ensure that Viper Smart Count balance is connected to the PC via a serial interface cable. It is possible to use any of
the 3 COM ports of the balance but it is necessary to set the correct mode and parameters for the COM port. Set the
respective COM settings as follows: Mode – Dialog / Baud – 38400 / Parity – 8-none / Handshake – XonXoff.
• Start up the Backup-Restore program by double-clicking the icon.
• The Backup-Restore program attempts to reserve the COM2 port of the PC. If it is not successful, e.g. COM2 is not
installed or is used by another program, an appropriate message is shown. Should this be the case, select the
appropriate port in the “Interface Configuration” under the Options menu.
• To check if the PC and scale are successfully connected, select “Help / About”. An animation will indicate whether the
Backup-Restore program was able to successfully communicate with the scale.
• If you have determined that the Backup-Restore program can successfully communicate with the scale, you may start
the desired operation. Select either “Backup” or “Restore” from the “Transfer menu.
3.4 FlashLoader
The Viper Smart Count software is stored in flash memory and the FlashLoader program enables you to upgrade the
software of your balance when updates are available.
To be able to update your software using the FlashLoader, you will need the following:
• PC with Microsoft Windows ® operating system (version 95, 98, NT 4.0, 2000, or XP)
• Computer-to-balance connection cable (RS232 cable, 9-pin sub-D plug m/f, order number 11101051)
• FlashLoader program
The FlashLoader program will guide you through the updating process.
Page 23

METTLER TOLEDO Viper Smart Count Chapter 4: Application
23
4
Application
Your scale has a number of powerful application functions that can be activated in the menu (see Chapter 5.5.1). This
chapter describes the some of the functions that have been activated at the factory.
4.1 Counting pieces into a container
Place empty container on the scale and tare with the «ÆTÅ»
key.
Note: If the automatic taring function is active (Chapter 5.4.3), you need not
press the «ÆTÅ»
key, because the scale registers the tare weight
automatically as soon as the container is placed on the weighing pan.
Before your scale can be used for counting parts, it must know the average
piece weight (the so-called reference). The reference is then used to do the
counting. The reference can be determined by placing a number of pieces on
the scale. If the piece weight is known, it can be manually entered and used
as the reference.
4.1.1 Determining the reference by placing pieces on the scale
Define a softkey for “Ref 10” and “Ref n” in the softkey configuration (See Chapter 5.5.5). After the softkeys have been
defined, do the following steps:
…appears on the screen.
…place 10 pieces of materials to be weighed to determine the reference
weight.
Press the «Ref 10»
key.
Page 24

Chapter 4: Application METTLER TOLEDO Viper Smart Count
24
A reference weight has been established.
If a different number of pieces has been placed on the scale, press the
«Ref n»
key and choose from among the choices of 5, 20, 30, 40 or 50
pieces. If the number of pieces is different, choose the «Var» key and enter
the desired number of pieces.
Once a reference has been determined, you can use the «Weigh» key to
switch back to the weight display at any time.
Press «Count» key to switch back again to counting mode.
You can use the « » key to transmit the piece counting result via the
interface to a peripheral device (printer, computer) (for sample report see
Chapter 6.2).
4.1.2 Entering the reference when the piece weight is known
Define a softkey for “Ref APW” in the softkey configuration (See Chapter 5.5.5). After the Ref APW softkey has been
defined, do the following steps:
In standby mode, press the «Ref APW»
key.
Enter piece weight, example: 0.02931 kg
Press the «OK» key.
The balance has established a known reference weight and is now ready for
piece counting.
Page 25

METTLER TOLEDO Viper Smart Count Chapter 4: Application
25
4.2 Counting out pieces out of a container
Counting out pieces from a weighing container differs in a few essentials from counting them in (Chapter 4.1).
4.2.1 Determine reference by removing pieces
…initially appears on the screen.
Place the full weighing container on the pan and tare the scale with the
«ÆTÅ»
key.
… appears on the screen again.
Remove the reference number of pieces from the weighing container.
Remove further pieces until the desired number has been reached.
… a negative weight value appears on the screen.
Press the «Ref 10» or «Ref n» keys to determine the reference, as described
in the previous chapter.
The balance is now ready for piece counting.
Page 26

Chapter 4: Application METTLER TOLEDO Viper Smart Count
26
4.3 Reference optimization
Reference optimization serves to enhance the accuracy of the average piece weight by re-calculating it using a greater
number of reference pieces. Reference optimization can be performed either manually or automatically.
Manual Reference Optimization
Define a softkey for Reference Optimization in the softkey configuration (See
Chapter 5.5.5). The Reference Optimization softkey is displayed as «RefOpt»
and it will only be active while in piece counting mode. If the scale is in
weighing mode, this softkey will not appear even if it is part of the softkey
configuration.
To perform a reference optimization at any time, press the «RefOpt» softkey.
The average piece weight will be re-calculated using the current weight and
the current number of pieces on the scale. At each optimization, the message
“PW Opt” appears briefly and the new total number of pieces is then
displayed.
Automatic Reference Optimization
No action is required during operation for automatic reference optimization
and it functions both in “Counting in” (Chapter 4.1) and “Counting out”
(Chapter 4.2). The “Auto OPT” symbol (located near the lower right corner of
the screen) appears in the display indicates that automatic reference
optimization is switched on.
Each time you place additional parts on the scale, it optimizes automatically.
You do not have to press a key to perform optimization. At each optimization,
the message “PW Opt” appears briefly and the new total number of pieces is
then displayed.
Note: Automatic optimization only functions if the number of additional
pieces placed on the scale is not greater than the number already on the
weighing pan.
4.4 Minimum reference weight
To ensure that a more accurate average piece weight is attained during reference weight determination, it is possible to set
a desired minimum percentage accuracy as determined by the reference weight placed on the scale. To enable minimum
reference weight checking, set 'Vision Setup Æ APPLICATION Æ Counting Æ Min. Ref. WT' (See Chapter 5.5.1) to the
desired percentage accuracy.
To be able to view the percentage accuracy for a reference weight determination, set 'Vision Setup Æ APPLICATION Æ
Counting Æ Accuracy Disp.' (See Chapter 5.5.1) to 'On'.
In this example, the minimum reference weight was set to 99.5% and
accuracy display is active.
Page 27

METTLER TOLEDO Viper Smart Count Chapter 4: Application
27
10 samples were placed on the scale and «Ref 10» was pressed.
Smart Count calculates the average piece weight as in Chapter 4.1.1 but it
has determined that the percentage accuracy for the reference weight is below
the value set as Minimum Reference Weight.
It will calculate the number of pieces that you have to place on the pan to
reach the desired percentage accuracy.
After placing the specified number of pieces on the scale, the average piece
weight will be optimized (Chapter 4.3) and, since accuracy display is active,
the percentage accuracy will be displayed for approximately 4 seconds.
Note that in this example, the percentage accuracy is at 99.54% which is
above the desired minimum reference weight of 99.5%.
Smart Count is now ready to perform piece counting using the optimized
average piece weight.
It is possible to override the minimum reference weight checking by pressing
the «C» key when you are prompted to add pieces on the scale. This will
enable you to use the calculated piece weight, but note that a “*” appears on
the display to indicate that the reference weight is below the desired
percentage accuracy.
Adding mode works both with “Counting in” (Chapter 4.1) and with
“Counting out” (Chapter 4.2).
4.5 Using the info key
Use the «
i» key to call up additional information as defined in the Info/Help menu under Application (Chapter 5.5.6).
i
In this example, Info lines 1 to 4 were configured to show the gross weight,
date, time, and percentage accuracy respectively.
Pressing the «
i» key will toggle between a screen that shows the default
content of the Info lines and another window that shows the additional
information configured such as the Gross Weight, Date, Time and Percentage
Accuracy.
For a list of the additional information that can be displayed on the Info lines,
please refer to Chapter 5.5.6.
Page 28

Chapter 4: Application METTLER TOLEDO Viper Smart Count
28
4.6 Piece counting with 2-scale systems
You can hook up your Viper scale to a second scale, e.g. a floor scale for counting a large number of pieces that would
exceed the capacity of Viper.
In the Vision Menu select the Smart Count operating mode for connecting a
second scale. See Chapter 5: Vision setup under “Communications” Æ
“Com1/Com2/Com3” Æ “Mode”.
The interface of the second scale must be set as follows:
- For Viper and Spider scales:
“Mode”: “Dialog” (9600 bd, 8b no parity, Xon/Xoff)
- For PB-S scales:
“Mode”: “Host” (9600 bd, 8b no parity, Xon/Xoff)
- For other METTLER TOLEDO products:
MT-SICS-compatible interface (9600 bd, 8b no parity, Xon/Xoff)
There are three modes that can be assigned to the second scale:
Reference The second scale is to be used for reference weight determination
only. The APW will be calculated using the weight placed on the
second scale regardless of the active scale. This is used if the
second scale has a finer resolution than the Smart Count scale to
achieve a more precise piece weight.
Bulk The second scale is to be used as bulk weight only. The APW will
be calculated using the weight placed on the first scale (Smart
Count scale), regardless of the active scale, then the weight on
the second scale will be used for counting. This is used if the
sample to be weighed is heavier than the maximum load of the
Smart Count scale.
Auxiliary The second scale can be used as either reference or bulk scale
and the active scale will not be automatically switched after the
reference weight determination.
When an interface is set to one of the three modes above, the scale switch
key will be added to the softkeys. You can toggle between the two scales with
the «
» key.
While in Reference or Bulk modes, you can override the source used for
reference weight determination by keeping the «
» key pressed for 1
second. Info line 4 will indicate which scale will be used for reference weight
determination.
The scale symbol on the top right in the display indicates the active scale:
“
1” = viper scale, “ 2” = second scale.
When the second scale is active, you can zero and tare it with the Viper
«Æ0Å»
and «ÆTÅ» keys, respectively.
Page 29

METTLER TOLEDO Viper Smart Count Chapter 4: Application
29
4.7 Totalisation
If the scale is in piece counting mode, you can do several piece counts and then determine the total number of pieces
weighed and their total weight. If the scale is in weighing mode, several weighings can also be accumulated to determine
their total.
To print reports of the totalisation transactions, a printer should be connected to one of the COM Interfaces and the mode
should be set to “Printer”.
Define a softkey for Totalisation in the softkey configuration (See Chapter 5.5.5). After a Totalisation softkey has been
defined, do the following steps:
If a weighing container is used, it must be tared.
Determine the reference (see Chapter 4.1)
Press the «
» key to go to the next menu.
Press the «
» key to start the totalisation function.
Press the «+» key to add the current number of pieces to the total.
The quantity of the first lot has been saved in the memory. If Lot printing is
active (Chapter 5.5.3) the lot number, net weight and number of pieces will
be printed out automatically.
Place the desired quantity of the second lot and press the «+» key to add
again.
Press the «n» key to limit the number of lots to accumulate.
If Max n is defined, it will only be possible to accumulate as many lots as the
value set. Once the number of lots accumulated reaches the value of Max n,
a warning will be displayed indicating that maximum items have been
reached.
Page 30

Chapter 4: Application METTLER TOLEDO Viper Smart Count
30
Press the «Delete» key to clear all the lots from the memory. A summary
report with the total number of lots, total weight, and total number of pieces
will be printed out.
Press the «Undo» key to discard the last lot added.
To close the Totalisation application at any time, press the «Cancel» key.
This will return the scale to standby mode but the lots accumulated will be
retained in memory.
To close the Totalisation application and clear all the lots from memory,
press the «C» key. This will also generate a summary report.
Note: If an article was active when the Totalisation application was started,
the Totalisation parameters (Chapter 3.2.2) of the article will be updated by
the transactions done with the application. That means the total net or gross
weight, the total pieces, and the number of lots will be added to the values
already stored in the database for the active article
4.8 Filling
The filling application simplifies weighing of small parts (e.g. liquid or powder) until a target amount or weight is reached.
It provides the user a visual indication of the amount currently on the scale in relation to the target amount. If activated in
the Vision Setup, the scale will also beep if the amount is already within the tolerance limits defined.
Define a softkey for Filling in the softkey configuration (See Chapter 5.5.5). After a Filling softkey has been defined, do the
following steps:
In standby mode, press the «
» key to scroll to the next menu.
Press the «Filling» key.
In this example, Target (target weight), + Tol (positive tolerance) and – Tol
(negative tolerance) have been defined. The first bar graph that appears is
the coarse range indicator. The fine range, as shown by the gray area in the
bar graph, depends on the tolerance limits set. As the tolerance limits are
increased or decreased, the size of the fine range will also be adjusted
accordingly.
Place sample to be weighed on the scale.
As soon as the weighed amount reaches the start of the fine range, a second
bar graph appears that shows the fine range.
For very small tolerance limits, there will be a third-stage indicator that will
appear to show the fine range.
Please refer to the Notes in Chapter 4.9 for additional information.
Page 31

METTLER TOLEDO Viper Smart Count Chapter 4: Application
31
4.9 Checkweighing (+/-)
The checkweighing application simplifies verification of sample weights or amounts. It provides the user with visual
indicators to show whether or not weight of the sample is within tolerance limits of a specified target weight or amount.
Define a softkey for Checkweighing in the softkey configuration (See Chapter 5.5.5). After a checkweighing (+/-) softkey
has been defined, do the following steps:
In standby mode, press the «
» key to scroll to the next menu.
Press the «+/-» key.
In this example, Target (target weight), + Tol (positive tolerance) and – Tol
(negative tolerance) have been defined.
Place sample to be weighed on the scale.
The indicators help the user easily verify the weight if the sample is within the
targets defined.
Notes:
The Filling and CheckWeighing applications use the filling parameters stored in the article database (Chapter 3.2.2) if
they are defined and if they are in the same mode (weighing or piece counting). For example, if Filling/Checkweighing
Nominal is defined as weight and the scale is currently in weighing mode, it will not be possible to define Target, Tol+,
and Tol- while the Filling or Checkweighing applications are active. The values for these parameters will be taken from
those defined in the current article. If however, Filling/Nominal is defined as weight and the scale is in counting mode, the
Filling parameters of the article will not be used and the Target, Tol+ and Tol- parameters of the Filling or Checkweighing
applications will have to be defined inside the application.
Clearing the currently selected article by pressing the «C» key while in standby mode will not clear the values defined for
Target, Tol+, and Tol-. To clear these parameters, the «C» has to be pressed while inside the Filling or Checkweighing
applications.
4.10 Factor/Unit
The Factor/Unit weighing function allows weighing using a unit that can be defined freely.
Define a softkey for Factor/Unit in the softkey configuration (See Chapter 5.5.5). After a Factor/Unit softkey has been
defined, do the following steps:
In standby mode, press the «
» key to scroll to the next menu.
Page 32

Chapter 4: Application METTLER TOLEDO Viper Smart Count
32
Press the «F/U» key.
From the main Factor/Unit screen you can define the text for the custom unit,
set the factor to use for weighing, recall previous definitions, or save the
current definition.
Define the text for the custom unit.
The factor can either be entered manually or can be calculated from the
weight of samples placed on the balance.
To define the factor manually, press the «SetFact» softkey.
To use the automatically calculated factor, place the sample on the scale,
press the «Build» softkey and enter the reference mass.
To change the resolution of the display, press the «Format» softkey and
select the desired format.
You can save the factor and unit you have just defined by pressing the
«Save» softkey. While in this screen, you can delete other Factor/Unit
definitions you have already saved or save your current definition.
To save the current definition, press «Save» and enter the name you wish to
give this definition.
You can save up to 25 Factor/Unit definitions.
To recall previous Factor/Unit definitions, press the «Recall» softkey and
select the name of the Factor/Unit definition you wish to use.
Page 33

METTLER TOLEDO Viper Smart Count Chapter 4: Application
33
4.11 Average weighing
The Average weighing function allows weighing of unstable goods (e.g. animals). It takes around 10 seconds to
calculate the average weight of the load. This function also works in piece counting mode.
Define a softkey for Average weighing in the softkey configuration (See Chapter 5.5.5). After an Average weighing softkey
has been defined, do the following steps:
In standby mode, press the «
» key to scroll to the next menu.
Place the load on the scale and press the «Average» key. Smart Count will
then take weight readings for 10 seconds and average these weight values.
After 10 seconds, Smart Count will display the average weight of the load.
Note that the ‘AVERAGE’ indicator on the upper right side of the display is
visible while in Average weighing mode.
While in this mode, the weight displayed is frozen and small variations in the
actual weight due to the unstable load will not be reflected on the display.
If the load changes more than 10% then the weight display will be released
and Average weighing is no longer active.
Page 34

Chapter 5: Vision setup METTLER TOLEDO Viper Smart Count
34
5
Vision setup
Vision Setup can be used to change the settings of the scale and to activate functions, thereby allowing the scale to be
adapted to individual weighing needs.
Important: To avoid incorrect operation of the scale in normal use, Vision Setup can be protected with a password. The
scale differentiates between a user and a supervisor. When the scale leaves the factory, the entire menu can be accessed
by both user and supervisor. We therefore recommend you to define your own supervisor password as soon as you
set up the scale (Chapter 5.7). This limits access by the user to a smaller number of menu items (calibration, and
settings for energy-saving mode and backlighting).
5.1 Overview and operation
Standby / weighing mode
After switching on...
Long press on
Password
Type password
End with short press on
Scale
Chapter 5.3.1
Application
Chapter 5.3.2
Terminal
Chapter 5.3.3
Communications
Chapter 5.3.4
Diagnostics
Chapter 5.3.5
Navigating through the Vision Menu is done through the six softkeys found at the bottom of the display.
The softkeys change depending on the currently selected menu item to allow the user to perform the
appropriate action for the selected item.
This key selects the previous item listed on the current menu.
This key selects the next item listed on the current menu.
This key selects the first item on the next “page” of the menu. If all the items for the current menu are
visible (i.e. there are four or less items for the current menu), this key is not visible.
Page 35

METTLER TOLEDO Viper Smart Count Chapter 5: Vision setup
35
This key enters the submenu of the currently selected item. If the currently selected item does not have a
submenu, this key is not visible.
This key leaves the current submenu and goes one level up. If the Vision Menu is already at the top
level, pressing this key is similar to pressing «End» (see below).
This key allows the user to edit the value or setting of the currently selected item. If the currently
selected item contains a submenu, this key is not visible.
Some menu items perform specific actions rather than editing. Pressing this key directs the Vision
Menu to perform the action specified by the currently selected menu item.
This key can be pressed at any time to leave the Vision Menu. The Vision Menu will then prompt the
user to save or discard the changes the user has made. The user may also press «Cancel» at this time
to go back to the Vision Menu.
i
This key allows the user to get an overview of the current location within the Vision Menu structure.
5.2 Calling up the menu and entering the password
Press the «
» key and hold it down until the prompt to enter the password
appears.
User: No password required, just press the « » key.
Supervisor: Enter password (sequence of keystrokes, Chapter 5.7)
immediately and confirm with the «
» key. Otherwise after a few seconds
the scale returns to weighing mode. If an incorrect password is entered, the
menu cannot be called up. Note: When the scale leaves the factory, no
supervisor password is defined, so when the password is requested, just
press the «
» key.
Page 36

Chapter 5: Vision setup METTLER TOLEDO Viper Smart Count
36
5.3 Menu overview
5.3.1 Scale
Scale
Scale 1
Scale 2
Calibration
Start?
- 0 -
6000 g
1800 g
- done -
Display
Unit 1
g
kg
t
lb
oz
Resolution
0.0005
0.01
Zero
Auto Zero
Off
On
Restart
Off
On
Filter
Vibration
Low
Mid
High
Process
Universal
Filling
Reset
SURE?
Start?
Page 37

METTLER TOLEDO Viper Smart Count Chapter 5: Vision setup
37
5.3.2 Application
Application
Counting Database
Ref X
10
User Prompting
APW Enhanc.
Off
On
Tare/Sample
Off
Sample Tare
Handsfree
Min. Ref. WT
97.5%
Off
99.0%
99.5%
Ref. Opt
Off
On
Auto Clear APW
Off
On
Accuracy Disp.
Off
On
Article
Display
Softkey
Edit prinout text
Edit softkey text
ID1
Printout
Softkey
Edit prinout text
Edit softkey text
ID2
Printout
Softkey
Edit prinout text
Edit softkey text
ID3
Printout
Softkey
Edit prinout text
Edit softkey text
A
B
Article
Totalisation
Lot printing
Autoprint off
Autoprint on
Final printing
Autoprint off
Autoprint on
Search Criterion
Password
By name
By number
Edit password
Page 38

Chapter 5: Vision setup METTLER TOLEDO Viper Smart Count
38
Applications continued….
Filling/Checkweighing
Beeper
Off
On
Setpoint Tol-
Send mode
Continuous
Stable
Edit Setpoint Tol-
A
B
Start?
SURE?
Softkey Config Info Help Reset
Softkey 1
Softkey 30
Info 1
Info 4
Not Used
Ref X
Ref. n
Ref. APW
Ref. Opt
Totalisation
Checkweighing
Filling
Factor/Unit
Weigh Count
Averageweighing
Additive Tare
Multi Tare
Preset Tare
Gross
Scale
High Res.
Unit
Big Display
Save As Article
Consecutive No.
Not Used
Gross Wt.
Date
Time
Accuracy
Zoom
Timeout
Consecutive No.
Invert
Blank
Page 39

METTLER TOLEDO Viper Smart Count Chapter 5: Vision setup
39
5.3.3 Terminal
Terminal
Language
Device
Weight Display
Sleep Backlight
Contrast Invert Date Time Beep
English
US English
German
French
Italian
Spanish
Access
Supervisor Pwd
Enter Pwd
Retype Pwd
Reset
Start?
SURE?
Off
1 minute
3 minutes
5 minutes
Off
On
0
10
No
Yes
small
big
EU
Date Format
US
Date
13.12.02
Time
08.45.33
Off
On
Page 40

Chapter 5: Vision setup METTLER TOLEDO Viper Smart Count
40
5.3.4 Communications
Reset Com
Communications
COM1
COM2
Mode
COM3
Parameters
Start?
SURE?
Option
Mode
Reference Scale
Bulk Scale
Auxiliary Scale
Bypass
*
only if an analog option is installed
Keyboard
US International
UK
French
Swiss French
Belgian French
German
German Swiss
Italian
Spanish
Latin America
BCR
Not Used
Article Search
Tare Wt.
APW
ID1
ID2
ID3n
PS2
Printer
Auto Print
Continuous Wt
Dialog
2nd Display
Reference Scale
Bulk Scale
Baud
300
600
1200
2400
4800
9600
19200
Parity
7-none
7-odd
7-even
8-none
Handshake
No
XonXoff
Net 422
Net 485
Net addr *
0
31
Auxiliary Scale
Toledo Weight
Toledo Count
Digital I/0
38400
8-odd
8-even
Checksum *
Off
On
Define String Add Line Feed
See continuation on
next page
See continuation on
next page
*
only if Mode is Printer or Auto Print
Define I/0
See continuation on
next page
*
only if Mode is Digital I/0
*
can only be selected
if Mode is Toledo Weight
or Toledo Count
*
can only be selected
if Net422/Net485
Handshaking
Page 41

METTLER TOLEDO Viper Smart Count Chapter 5: Vision setup
41
Communications continued… (only if Mode is Printer or Auto Print)
Communications
COM1
COM2
Mode
COM3
Line Format
Parameters
Define String Add Line Feed
Reset Com
Start?
SURE?
PS2
Single
Multiple
Printer Type
Strip Printer
TLP 2824
TLP 2844
Format
Standard
Customer
Line 1 Line 23
Font
Standard
Bold
Big
Big & Bold
BC Code39
BC EAN13
BC 2 of 5
BC Code128
Data
Not Used
Header
Scale No.
Gross Wt.
Tare Wt.
Net Wt.
APW
Ref. Count
PCS
Article Name
Article Number
Article ID1/2
ID1
ID2
ID3
Date
Time
Target Wt.
Target PCS
Starline
Empty Line
Form Feed
End of String
Consecutive No.
0
9
Define header
Header Line1
Header Line5
Edit Header line
*
Available only if Format is Customer
Total Lots
Left Border
5 mm
10 mm
15 mm
20 mm
25 mm
30 mm
35 mm
40 mm
*
Active only if Printer Type
is TLP284
45 mm
50 mm
*
only if Mode is Printer or Auto Print
Factor Wt.
Total Net
Total Gross
Total PCS
Page 42

Chapter 5: Vision setup METTLER TOLEDO Viper Smart Count
42
Communications continued… (only if Mode is Digital I/0)
Communications
COM1
COM2
Mode
COM3
Parameters
Define I/0 Reset Com
PS2
< Range-
*
only if Mode is Digital I/0
Edit <Range -
< Tol- Edit < Tol-
Good Edit Good
> Tol+ Edit > Tol+
> Range+ Edit > Range+
Output off Edit Output off
Reset I/0 Sure?
Page 43

METTLER TOLEDO Viper Smart Count Chapter 5: Vision setup
43
5.3.5 Diagnostics
Diagnostics
Keyboard Test Display Test
SNR1
SNR2 List1 List2 Reset All
Start?
PUSH 1
PUSH 25
Start?
Beam Test
01234657
Start?
Printout
Start?
SURE?
List Memory
Start?
Printout
5.4 Scale settings (SCALE)
This function block allows the user to change general scale functionality.
Please refer to Chapter 5.2. on how to reach the menu position 'Vision Setup Æ SCALE' and how to navigate within the
'Vision Setup'-menu.
The screen shows the most important
scale settings as a preview.
The screen shows a preview of the most
important settings of the active item, e.g.
those of scale 1 if 'Scale 1' is active (i.e.
highlighted).
Enter the SCALE menu (« »), select the appropriate scale (Scale 1 or 2;
note that this submenu appears only if a second scale is installed with the
analog option) and choose one of the functions listed below.
Available functions and settings:
Adjust/calibrate the scale Æ Chapter 5.4.1
Display accuracy and weighing unit Æ Chapter 5.4.2
Tare settings Æ Chapter 5.4.3
Automatic zero point correction Æ Chapter 5.4.4
Automatic storage of tare and zero values Æ Chapter 5.4.5
Adaptation to environmental conditions and weighing
mode Æ Chapter 5.4.6
Reset 'SCALE' settings to factory settings Æ Chapter 5.4.7
Page 44

Chapter 5: Vision setup METTLER TOLEDO Viper Smart Count
44
5.4.1 Adjust/calibrate (SCALE Æ Calibration)
This function enables the scale to be adjusted/calibrated (weighing pan must be empty). Not available on certified
scales!
Please refer to Chapter 5.2 on how to reach the menu position 'Vision Setup Æ SCALE Æ Calibration' and how to
navigate within the 'Vision Setup'-menu.
Press «Yes» and follow the instructions given on the screen.
O
n
O
ff
A
P
W
C
1
-,/&
2
abc
3
def
4
g
h
i
5
jkl
6
mno
7
p
qrs
8
tuv
9
w
xy
z
.
+
0
_
SMART COUNT
i
After choosing the calibration weight, place the weight on the weighing pan
and then press the «OK» key.
It is recommended to use the maximum calibration weight from the list. If it is
not possible to use the maximum weight, at least do not use less than onethird of the maximum load to ensure reliable weighing values.
Calibration is done. Continue with other functions or press «End» and confirm
with the «Yes» key to save the changes.
Note: Abort calibration at any given time by pressing the «Cancel» key.
5.4.2 Display resolution and weighing unit (SCALE Æ Display)
This function allows the user to change the weighing unit, to add a second unit (to switch between Unit 1 and Unit 2, a
softkey 'Unit' has to be configured in 'Vision Setup Æ APPLICATION Æ Softkey Config. ') and to set the resolution of the
weight (always Unit 1).
Please refer to Chapter 5.2 on how to reach the menu position 'Vision Setup Æ SCALE Æ Display' and how to navigate
within the 'Vision Setup'-menu.
Press «
» and select e.g. “Unit 1”, then «Edit» to change the unit.
In order to change the settings of the resolution of the balance, select
“Resolution” (this function is not available on all models).
Page 45

METTLER TOLEDO Viper Smart Count Chapter 5: Vision setup
45
Use the « » key and the « » key to select the desired resolution and press
the «OK» key. For multi range scales, the 'd1' resolution may be available
twice (depending on the scale model), as single range and as multi range
(with symbol in top right corner).
Note: For Multi Range scales, changing the resolution will disable the range
icon. To re-enable it, select a resolution which is indicated as Multi Range.
5.4.3 Tare settings (SCALE Æ Tare)
This function allows the user to configure all the available tare function of the balance.
Please refer to Chapter 5.2 on how to reach the menu position 'Vision Setup Æ SCALE Æ Tare' and how to navigate
within the 'Vision Setup'-menu.
Switch the available functions Auto Tare, Chain Tare, AutoClr Tare or Pusb.
Tare either On or Off.
Automatic tare automatically tares the scale once a load is placed on the weighing pan. If this is active, the icon AT
flashes on the lower right side of the display.
Chain tare allows several tare actions without clearing the tare memory. If this is not active, the tare memory has to be
cleared by pressing the «C» key. The tare memory has to be cleared before a new tare can be performed.
Automatic clear tare automatically clears the tare memory once the load is removed from the weighing pan.
Push button tare enables/disables the use of the «ÆTÅ»
key to perform manual taring.
5.4.4 Automatic zero point correction (SCALE Æ Zero)
With Auto Zero, small deviations in the weight (in the range of 50% of 1d) are automatically zeroed. Always active for
certified scales!
Please refer to Chapter 5.2 on how to reach the menu position 'Vision Setup Æ SCALE Æ Zero' and how to navigate
within the 'Vision Setup'-menu.
Press «Edit» to switch the Auto Zero function on or off.
Page 46

Chapter 5: Vision setup METTLER TOLEDO Viper Smart Count
46
5.4.5 Automatic save of tare and zero values (SCALE Æ Restart)
This function allows the user to set the scale so that it is able to automatically save the tare and zero values after
switching off or when a power outage occurs. Not available on certified scales. Automatic save switched off is the
factory setting.
Block can only be accessed by a supervisor.
Please refer to Chapter 5.2 on how to reach the menu position 'Vision Setup Æ SCALE Æ Restart' and how to navigate
within the 'Vision Setup'-menu.
Press «Edit» to switch the automatic save switch function on or off.
5.4.6 Adaptation to environmental conditions and weighing mode (SCALE Æ Filter)
Vibration function allows the user to set the scale so that it is able to adapt itself to the existing environmental conditions.
Process function allows the user to set the weighing mode of the scale (weighing process adapter).
Block can only be accessed by a supervisor.
Please refer to Chapter 5.2 on how to reach the menu position 'Vision Setup Æ SCALE Æ Filter' and how to navigate
within the 'Vision Setup'-menu.
Press «
» to go to the vibration and process settings menu.
Vibration:
Low: For very stable and stable environment. Scale operates very quickly but
is more sensitive to external influences.
Mild: For normal environment conditions. Scale operates at medium speed
(factory setting).
High: For unstable environment. Scale operates more slowly but is less
sensitive to external influences.
Process:
Universal: Setting for all weighing types and normal weighing goods (factory
setting)
Filling: Setting for dispensing liquids or powdery substances.
Page 47

METTLER TOLEDO Viper Smart Count Chapter 5: Vision setup
47
5.4.7 Resetting scale to factory default settings (SCALE Æ Reset)
This function resets the 'SCALE' block to its original factory settings. Can only be accessed by a supervisor.
Please refer to Chapter 5.2 on how to reach the menu position 'Vision Setup Æ SCALE Æ Reset' and how to navigate
within the 'Vision Setup'-menu.
Press «Yes» to reset the scale settings. 'SURE?' will appear, press «Yes» to
confirm. The scale settings are now reset to its original factory settings.
5.5 Application settings (APPLICATION)
This function block allows the user to change the count application specific settings of the scale. Can only be accessed by
a supervisor.
Please refer to Chapter 5.2 on how to reach the menu position 'Vision Setup Æ APPLICATION' and how to navigate within
the 'Vision Setup'-menu.
The screen shows the most important
application settings as a preview.
The screen shows a preview of the most
important settings of the active item, e.g.
those of counting if 'Counting' is active
(i.e. highlighted).
Enter the APPLICATION menu (« ») and choose one of the functions listed
below.
Available functions and settings:
Settings for piece counting Æ Chapter 5.5.1
Database Æ Chapter 5.5.2
Settings for totalisation Æ Chapter 5.5.3
Settings for filling/checkweighing Æ Chapter 5.5.4
Settings for softkey configuration Æ Chapter 5.5.5
Info/Help Æ Chapter 5.5.6
Reset 'APPLICATION' settings to factory settings Æ Chapter 5.5.7
5.5.1 Settings for piece counting (APPLICATION Æ Counting)
The Ref X parameter determines the amount of pieces used to get the average piece weight.
Please refer to Chapter 5.2 on how to reach the menu position 'Vision Setup Æ APPLICATION Æ Counting' and how to
navigate within the 'Vision Setup'-menu.
Press «Edit» to change the settings into the desired number of pieces. After
the Ref X has been changed, the number of references in the main menu
changes accordingly (e.g. 'Ref 10').
Page 48

Chapter 5: Vision setup METTLER TOLEDO Viper Smart Count
48
User Prompting
This setting allows the user to be in either dependent or independent mode of
operation. The dependent mode provides a prompting display for a preselected sequence of operation. The display will prompt the operator through
a complete counting sequence. The prompt will be shown in the display
instead of article data. The independent mode allows the operator to choose
the data to be entered and in which order. It is the default mode of the scale.
User prompting can be either one of the following modes:
Tare/Sample - With this setting, Smart Count will guide the user through
the counting procedure using the Tare -> Sample method.
Sample/Tare - With this setting, Smart Count will guide the user through
the counting procedure using the Sample -> Tare method.
Handsfree - With this setting, Smart Count will guide the user through
the counting procedure and will automatically tare the
scale so that the user does not have to press the «ÆTÅ»
key.
Note: User prompting should not be used in 2-scale counting.
Minimum Reference Weight
This setting controls the limits for reference weight determination. If this
function is active, the relative accuracy of the APW (see accuracy display)
must be greater than the value selected. Otherwise, the user will be prompted
to add more pieces to increase the value of the accuracy of the APW.
Reference Optimization. See also Chapter 4.3 “Reference Optimization”.
Activate Reference Optimization by choosing “On” or deactivate by choosing
“Off”.
Auto Reference Determination
With this set to on, reference determination is automatically performed once
load is placed on the scale without the user having to press the Ref_X
softkey.
Activate auto sampling by choosing “On” or deactivate by choosing “Off”.
Page 49

METTLER TOLEDO Viper Smart Count Chapter 5: Vision setup
49
Automatic Clear Average Piece Weight
With this set to on, the average piece weight is automatically cleared once
the load is removed from the scale without the user having to press the «C»
key.
Activate automatic clear average piece weight by choosing “On” or deactivate
by choosing “Off”.
Accuracy Display
This function enables the display of the percentage accuracy. With this
function set to ON, the percentage accuracy will be displayed for
approximately 4 seconds on the 4
th
Info line after a reference weight
determination.
Activate accuracy display by choosing “On” or deactivate by choosing “Off”.
5.5.2 Settings for database (APPLICATION Æ Database)
The database settings allow the user to configure the operation of Smart Count while working with the article database and
the Identification storage.
Please refer to Chapter 5.2 on how to reach the menu position 'Vision Setup Æ APPLICATION Æ Database' and how to
navigate within the 'Vision Setup'-menu.
Press « » to go to database settings menu. Select the item that you wish to
modify by using the «
» and the « » keys. When the desired item is
highlighted, press «
» to modify the item.
Article - Used for entering the article database.
ID1 – ID3 - Used for identification purposes. If text is entered for the
ID’s they will be included in the printouts.
The following settings can be configured:
Printout - Set the text that will serve as title for printouts.
Softkey - Set the text that will appear on the softkey that is used
to enter the articles database or to edit the selected ID.
Page 50

Chapter 5: Vision setup METTLER TOLEDO Viper Smart Count
50
The next settings are only for “Article”:
Search criterion - Set the field that will be used for searching, scrolling,
and sorting of the list of articles in the database. It
could either be by name or by number.
Password - Password-protect the article database from being
modified.
Note: Press the «Erase»
key to clear the existing text and type the desired text
using the keypad. Press the «
» and « » keys to move cursor from left to
right and vice-versa. Press the «OK»
key when input is done. To deactivate
the ID’s, make their “Softkey” text blank (i.e. Press «Erase» then accept the
empty text by pressing «OK»).
5.5.3 Settings for totalisation (APPLICATION Æ Totalisation)
These settings control the printout during the Totalisation function.
Please refer to Chapter 5.2 on how to reach the menu position 'Vision Setup Æ APPLICATION Æ Totalisation' and how to
navigate within the 'Vision Setup'-menu.
Press « » to go to Totalisation settings menu.
Lot Printing - With this set to “Autoprint On”, each lot is printed after it
has been added to the total.
Final Printing - With this set to “Autoprint On”, there will be a printout of
the total amount when the number of lots specified has
been reached.
5.5.4 Settings for filling/checkweighing (APPLICATION Æ Filling/Checkweighing)
This setting controls the use of the built-in beeper during the Checkweighing (+/-) and Filling functions.
Please refer to Chapter 5.2 on how to reach the menu position 'Vision Setup Æ APPLICATION Æ Filling/Checkweighing'
and how to navigate within the 'Vision Setup'-menu.
Press «Edit» to go to Filling/Checkweighing settings menu.
Press «Edit» to change settings of the Beeper. If the Beeper is set to on, there
will be a short beep when the current load is within the target range.
Press «Edit» to change settings of the setpoint negative tolerance. Tolerance
is shown in percent.
Page 51

METTLER TOLEDO Viper Smart Count Chapter 5: Vision setup
51
Press «Edit» to change settings of the mode of sending. Choices are either
“Continuous” or “Stable”.
5.5.5 Settings for softkey configuration (APPLICATION Æ Softkey Configuration)
This function configures the task of each softkey in the main display. There are a maximum of 30 definable softkeys, each
of which can be configured to perform various applications and shortcuts to some scale operations.
Please refer to Chapter 5.2 on how to reach the menu position 'Vision Setup Æ APPLICATION Æ Softkey Configuration'
and how to navigate within the 'Vision Setup'-menu.
Press «Edit» to go to Softkey Configuration settings menu.
Select the desired softkey that is to be defined and press «Edit» to designate
its function. It is possible to define up to 30 softkeys.
Use the «
» key and the « » key to select the desired function of the
softkey then press the «OK» key.
Each softkey can be configured to any of the following functions:
Not Used Select “Not Used” to indicate the last visible softkey. Softkeys with designated functions but are past
the softkey set to “Not Used” will not be visible in the main display.
Ref X Show the «Ref X» softkey where X is the reference number of pieces to use for average piece weight
determination. The value for X can be defined in 'Vision Setup Æ APPLICATION Æ Counting Æ Ref X'
(Chapter 5.5.1).
Ref. n Show the «Ref n» softkey. With this softkey it is possible to select the reference number of pieces to
use for average piece weight determination.
Ref. APW Show the «Ref APW» softkey which is used to enter a pre-defined Average Piece Weight.
Ref. Opt Show the «RefOpt» softkey which is used to perform a manual reference optimization (Chapter 4.3).
Totalisation Show the «
» softkey which is be used to start the Totalisation application (Chapter 4.7).
Checkweighing Show the «+/-» softkey which is used to start the Checkweighing application (Chapter 4.9).
Filling Show the «Filling» softkey which is used to start the Filling application (Chapter 4.8).
Factor/Unit Show the «F/U» softkey which is used to start the Factor/Unit application (Chapter 4.10).
Weigh Count Show the «Weigh» (if scale is in piece counting mode) or «Count» (if scale is in weighing mode)
softkey which is used to toggle the scale to weighing mode and piece counting mode respectively.
Note: If there is no average piece weight active, it will not be possible to switch modes so this softkey
will not be visible even if it is configured.
Page 52

Chapter 5: Vision setup METTLER TOLEDO Viper Smart Count
52
Averageweighing Show the «Average» softkey which is used to start the Average Weighing application (Chapter 4.11).
Additive Tare Show the «AddTare» softkey which is used to add the current weight on the scale to the tare weight
memory.
Multi Tare Show the «MulTare» softkey. With this softkey, it is possible to enter the number of containers and
the pre-determined tare weight of 1 container. Smart Count will automatically calculate the cumulative
tare weight of the multiple containers.
Preset Tare Show the «PT» softkey which is used to enter a pre-defined tare weight.
Gross Show the «Gross» softkey which is used to show the gross weight on the main weight display.
Scale Show the «
» softkey which is used to toggle the weight source during 2-scale operations (Chapter
4.6). Note: This softkey will only be visible if 2-scale operations are possible. That means one of the
interfaces must be set to a mode of “Reference Scale”, “Bulk Scale”, or “Auxiliary Scale” (Chapter
5.9.1).
High Res. Show the «
» softkey which is used to display the net weight at a higher resolution.
Unit Show the «Unit» softkey which is used to toggle the weight display between Unit1 and Unit2. Note:
This softkey will only be visible if Unit1 and Unit2 (Chapter 5.4.2) are not the same.
Big Display Show the «BigDis» softkey which is used to toggle the display between a large-font weight display
and the normal weight display.
Save As Article Show the «SaveAs» softkey. With this softkey, it is possible to save the current state of the
applications into a new article.
Consecutive No Show the «CNo» softkey. With this softkey, it is possible to edit the Consecutive Number which is
incremented after every printout.
Invert Show the «Invert» softkey which is used to invert the LCD display (Chapter 5.6.5).
Blank Show a blank softkey.
5.5.6 Settings for Info/Help (APPLICATION Æ Info/Help)
This function configures the contents of the four Info lines located at the left side of the main display. The info lines can be
accessed by pressing the «
i» key while in the main display.
Please refer to Chapter 5.2 on how to reach the menu position 'Vision Setup Æ APPLICATION Æ Info/Help' and how to
navigate within the 'Vision Setup'-menu.
Press the «Edit»
key to enter the list of available Info that can be designated
for each Info line.
Page 53

METTLER TOLEDO Viper Smart Count Chapter 5: Vision setup
53
Each Info line can be configured to display any of the following information:
Not Used Display a blank Info line.
Gross Wt. Display the gross weight.
Date Display the date.
Time Display the time.
Accuracy Display the percentage accuracy. This line will only be
displayed if a reference weight determination has been
performed.
Zoom Display the net weight at a higher resolution.
Timeout Display the timeout status.
Consecutive No. Display the current value of the Consecutive Number.
ID1 … ID3 Display the entry for the IDs. You can only select this if
the IDs have been set up in 'Vision Setup Æ
APPLICATION Æ Database Æ ID1-ID3' (Chapter
5.5.2).
5.5.7 Settings for reset (APPLICATION Æ Reset)
This function resets the 'APPLICATION' block to its original factory settings.
Please refer to Chapter 5.2 on how to reach the menu position 'Vision Setup Æ APPLICATION Æ Reset' and how to
navigate within the 'Vision Setup'-menu.
Press «Yes» to reset the application settings. 'SURE?' will appear, press
«Yes» to confirm. The application settings are now reset to its original factory
settings.
5.6 Terminal settings for device (TERMINAL Æ Device)
This function block allows the user to change display and peripheral oriented settings of the scale. Only the “Device”
block is available to the user.
Please refer to Chapter 4.2 on how to reach the menu position 'Vision Setup Æ TERMINAL Æ Device' and how to navigate
within the 'Vision Setup'-menu.
Page 54

Chapter 5: Vision setup METTLER TOLEDO Viper Smart Count
54
The screen shows the most important
terminal settings as a preview.
The screen shows a preview of the most
important settings of the active item, e.g.
those of device if 'Device' is active (i.e.
highlighted).
Enter the TERMINAL menu (« ») and choose one of the functions listed
below.
Available functions and settings:
Language settings Æ Chapter 5.6.1
Sleep function Æ Chapter 5.6.2
Backlight Æ Chapter 5.6.3
Contrast Æ Chapter 5.6.4
Invert Æ Chapter 5.6.5
Weight display Æ Chapter 5.6.6
Date and time Æ Chapter 5.6.7
Beep Æ Chapter 5.6.8
5.6.1 Language settings (TERMINAL Æ Device Æ Language)
This function allows the user to change the language settings of the scale.
Please refer to Chapter 5.2 on how to reach the menu position 'Vision Setup Æ TERMINAL Æ Device Æ Language' and
how to navigate within the 'Vision Setup'-menu.
Press the «Edit»
key to go to the Language settings menu.
Use the «
» key and the « » key to select the desired language setting
and press the «OK» key.
5.6.2 Sleep function (TERMINAL Æ Device Æ Sleep)
When the balance is deriving its power only from a battery and is not plugged in an electrical outlet, this function is
especially useful in order to conserve power.
Please refer to Chapter 5.2 on how to reach the menu position 'Vision Setup Æ TERMINAL Æ Device Æ Sleep' and how
to navigate within the 'Vision Setup'-menu.
Press the «Edit»
key to go to the Sleep settings menu.
The balance will turn itself off automatically when the selected time elapses.
Page 55

METTLER TOLEDO Viper Smart Count Chapter 5: Vision setup
55
5.6.3 Turning off the backlight (TERMINAL Æ Device Æ Backlight)
Switch the backlight on or off. This function is again useful when conserving power, if the balance is deriving its power
from a battery. Please note however that without the backlight, it is difficult to see the display. If the display becomes too
dark to see when you select “Off”, immediately press on the 2
nd
softkey to switch the backlight on again.
Please refer to Chapter 5.2 on how to reach the menu position 'Vision Setup Æ TERMINAL Æ Device Æ Backlight' and
how to navigate within the 'Vision Setup'-menu.
Press the «Edit»
key to go to the Backlight settings menu.
Switch on or off and then press the «OK» key.
5.6.4 Adjusting the contrast of the display (TERMINAL Æ Device Æ Contrast)
This function allows the user to adjust the contrast of the screen display.
Please refer to Chapter 5.2 on how to reach the menu position 'Vision Setup Æ TERMINAL Æ Device Æ Contrast' and
how to navigate within the 'Vision Setup'-menu.
Press the «Edit»
key to go to the Contrast settings menu.
Select the degree of contrast by scrolling the «
» key or the « » key.
Press the «OK»
key to confirm selection.
5.6.5 Invert (TERMINAL Æ Device Æ Invert)
This function allows the user to select either a white or a black background of the screen display.
Please refer to Chapter 5.2 on how to reach the menu position 'Vision Setup Æ TERMINAL Æ Device Æ Invert' and how
to navigate within the 'Vision Setup'-menu.
Press the «Edit» key to go to the Invert settings menu.
Choose the desired setting (Yes or No) and then press the «OK»
key to
confirm selection.
Page 56

Chapter 5: Vision setup METTLER TOLEDO Viper Smart Count
56
5.6.6 Changing the size of weight display (TERMINAL Æ Device Æ Weight display)
This function allows the user to select either a small or a big weight display on the screen.
Please refer to Chapter 5.2 on how to reach the menu position 'Vision Setup Æ TERMINAL Æ Device Æ Weight display'
and how to navigate within the 'Vision Setup'-menu.
Press the «Edit»
key to go to the Weight Display settings menu. Default
setting is big.
Choose the desired size and then press the «OK»
key to confirm selection.
Note: Changing the mode of the weight display with the «BigDis» softkey
(Chapter 5.5.5) will not affect this setting. If the mode was changed with the
«BigDis» softkey, the display will revert to this setting after switching the
balance on or after leaving the Vision Setup.
5.6.7 Adjusting the date and time (TERMINAL Æ Device Æ Date Time)
This function allows the user to set date and time of the balance.
Please refer to Chapter 5.2 on how to reach the menu position 'Vision Setup Æ TERMINAL Æ Device Æ Date Time' and
how to navigate within the 'Vision Setup'-menu.
Press the «Edit»
key to go to the Date and Time settings menu.
Press the «Edit» key to change format either from US or EU format. Select
Date to change the date and Time to change the clock of the balance. Press
«OK»
key to confirm selection.
5.6.8 Activating the beep (TERMINAL Æ Device Æ Beep)
This function allows the user to switch the beep on or off, that is appearing on each key press.
Please refer to Chapter 5.2 on how to reach the menu position 'Vision Setup Æ TERMINAL Æ Device Æ Beep' and how to
navigate within the 'Vision Setup'-menu.
Press the «Edit» key to go to the Beep settings menu.
Choose the desired setting (On or Off) and then press the «OK»
key to confirm
selection.
Page 57

METTLER TOLEDO Viper Smart Count Chapter 5: Vision setup
57
5.7 Define supervisor password (TERMINAL Æ Access)
This function allows the user to change the supervisor password of the scale. Can only be accessed by a supervisor.
Please refer to Chapter 5.2 on how to reach the menu position 'Vision Setup Æ TERMINAL Æ Access' and how to
navigate within the 'Vision Setup'-menu.
Press the «
» key …
… and then press the «Edit»
key to enter a new password.
Enter the password using the keypad, press «Ok» to confirm. 'Retype Pwd'
appears. Retype the new password and press «Ok» again.
If the password was forgotten, you may press «Æ0Å», «Æ0Å», «Æ0Å»,
«
» keys in sequence to access the Vision Setup.
5.8 Reset terminal settings to factory settings (TERMINAL Æ Reset)
This function resets the 'TERMINAL' block to its original factory settings. The supervisor password ('TERMINAL Æ Access')
will not be reset, only “Device” block.
Please refer to Chapter 5.2 on how to reach the menu position 'Vision Setup Æ TERMINAL Æ Reset' and how to navigate
within the 'Vision Setup'-menu.
Press «Yes» to reset the terminal settings. 'SURE?' will appear, press «Yes» to
confirm. The terminal settings are now reset to its original factory settings.
5.9 Communication settings (COMMUNICATIONS)
This function block allows the user to change the peripheral settings of the scale. Differences will appear depending on the
option pack installed. Can only be accessed by a supervisor.
Please refer to Chapter 4.2 on how to reach the menu position 'Vision Setup Æ COMMUNICATIONS' and how to navigate
within the 'Vision Setup'-menu.
Page 58

Chapter 5: Vision setup METTLER TOLEDO Viper Smart Count
58
The screen shows the most important
communication settings as a preview.
The screen shows a preview of the most
important settings of the active item, e.g.
those of COM1 if 'Com1' is active (i.e.
highlighted).
Enter the COMMUNICATION menu («
»), select a COM port and choose one
of the functions listed below.
Available functions and settings:
Mode Æ Chapter 5.9.1
Parameters Æ Chapter 5.9.2
Define string – if mode is Printer or Auto print Æ Chapter 5.9.3
Add Line Feed Æ Chapter 5.9.4
Define I/O – if mode is Digital I/0 Æ Chapter 5.9.5
Reset 'COMMUNICATION' settings to factory settings Æ Chapter 5.9.6
Option Settings Æ Chapter 5.9.7
PS2 settings Æ Chapter 5.9.8
5.9.1 Mode (COMMUNICATIONS Æ Mode)
This function enables the user to set the input/output mode of a COM port.
Please refer to Chapter 5.2 on how to reach the menu position 'Vision Setup Æ COMMUNICATIONS Æ Mode' and how to
navigate within the 'Vision Setup'-menu.
Press the «Edit» key to go to the Mode settings menu.
The mode setting can be changed to either Printer, Auto Print, Continuous
Weight, Dialog, 2
nd
Display, Reference Scale, Bulk Scale, Auxiliary Scale,
Toledo Weight, Toledo Count or Digital I/0. In this example, Com1 was set
to Dialog (also known as host mode for SICS commands).
Press the «End» key and confirm with the «Yes» key to save the changes.
5.9.2 Parameters (COMMUNICATIONS Æ Parameters)
Please refer to Chapter 5.2 on how to reach the menu position 'Vision Setup Æ COMMUNICATIONS Æ Parameters' and
how to navigate within the 'Vision Setup'-menu.
The current Baud Rate, Parity and Handshake settings are displayed on the
screen. Press «
» and …
Page 59

METTLER TOLEDO Viper Smart Count Chapter 5: Vision setup
59
… «Edit» to change settings of Baud, Parity or Handshake.
Baud: Parity: Handshake:
300 7-none No
600 7-odd XonXoff
1200 7-even Net 422
2400 8-none Net 485
4800 8-odd
9600 8-even
19200
38400
115200 (Only for COM3)
Note: If Handshake “Net 422” or “Net 485”, a Net Address menu will appear
from which you can select from 0…31.
If Mode is “Toledo Weight” or “Toledo Count”, a Checksum menu will appear
which you can turn either “Off” or “On”. If checksum is turned “On”, the
values transmitted through the interface can be verified by means of a
checksum.
5.9.3 Define string (COMMUNICATIONS Æ Def. String – only if Mode is Printer or Auto Print)
This function allows customizing the printer output. Note that this function is only available if Mode is Printer or Auto Print.
Please refer to Chapter 5.2 on how to reach the menu position 'Vision Setup Æ COMMUNICATIONS Æ Def. String' and
how to navigate within the 'Vision Setup'-menu.
The current settings are displayed on the screen. Press «
» and …
Line Format menu: Choose Single or Multiple. For normal print-outs, 'Single'
is recommended.
'Single' = 1 result per line. 'Multiple' = all results on one line.
Printer type menu: Choose 'Strip Printer' (e.g. 24 char/line strip printer
Sprinter 1) or 'A4 Printer' (Epson LX-300).
Define Header menu: Press «
» to specify the header of the printout.
Select the header line and press «Edit» key and type in the header using the
keypad or attached keyboard.
Format menu: The appearance of the printout may be altered according to the
specifications of the user. To do so, choose 'Customer' rather than 'Standard'.
If Customer is selected, press the «
» key to go to the 'Line Available' menu
to customize the lines to be printed out.
Page 60

Chapter 5: Vision setup METTLER TOLEDO Viper Smart Count
60
Browse the line numbers 1-23 and edit the lines according to your needs.
5.9.4 Add LineFeed (COMMUNICATIONS Æ Add LineFeed)
This feature is used to add an empty Line Feed on the printout right after each report. The default settings is 4 lines,
meaning 4 empty lines are generated right after each report, to make it more convenient for the user to detach the printed
output from the printer.
Please refer to Chapter 5.2 on how to reach the menu position 'Vision Setup Æ COMMUNICATIONS Æ Add LineFeed' and
how to navigate within the 'Vision Setup'-menu.
… when this screen appears, press the «Edit» key to change the Add
LineFeed settings menu.
Press the «
» and « » keys to choose the desired number of lines and
then press the «Ok» key to confirm changes.
5.9.5 Define I/O (COMMUNICATIONS Æ Def. I/O – only if Mode is Digital I/0)
This function defines commands sent by Smart Count to the LC-IO during Checkweighing and Filling functions. Note that
this function may only be activated if Mode is Digital I/0.
Please refer to Chapter 5.2 on how to reach the menu position 'Vision Setup Æ COMMUNICATIONS Æ Def. I/O' and how
to navigate within the 'Vision Setup'-menu.
Choose < Range-, < Tol-, Good, > Tol+, >Range+, Output off or Reset I/0
and the press the «Edit» key to define the commands.
< Range- The command to send if the weight is below plausible
limits.
< Tol- The command to send if the weight is below the Tol-
defined.
Good The command to send if the weight is within the tolerances
defined.
> Tol+ The command to send if the weight is above the Tol+
defined.
> Range+ The command to send if the weight is above plausible
limits.
Page 61

METTLER TOLEDO Viper Smart Count Chapter 5: Vision setup
61
5.9.6 Reset communications (COMMUNICATIONS Æ Comx Æ Reset Com)
This function resets the 'COMMUNICATIONS' block to its original factory settings.
Please refer to Chapter 5.2 on how to reach the menu position 'Vision Setup Æ COMMUNICATIONS Æ Comx Æ Reset
Com' and how to navigate within the 'Vision Setup'-menu.
Press «Yes» to reset the settings of the current Com port. 'SURE?' will appear,
press «Yes» to confirm. The chosen Com port is now reset to its original
factory settings.
5.9.7 Option Settings (COMMUNICATIONS Æ Option)
This function allows setting up the attached analog option. Available only if analog option is installed.
Please refer to Chapter 5.2 on how to reach the menu position 'Vision Setup Æ COMMUNICATIONS Æ Def. String' and
how to navigate within the 'Vision Setup'-menu.
The current settings are displayed on the screen. Press «
» and …
Press the «Edit» key to change the mode of the analog option input.
Choose Reference Scale, Bulk Scale, Auxiliary Scale or Bypass and then
press the «OK» key to select the desired mode.
Reference Scale- The weight coming from the analog option is to be
used for reference weight determination only.
Bulk Scale The weight coming from the analog option is to be
used as bulk weight only.
Auxiliary Scale The weight coming from the analog option can be
used as either reference or bulk.
Bypass The weight coming from the analog option will be
ignored.
5.9.8 PS2 Settings (COMMUNICATIONS Æ PS2)
This function allows setting up of the peripherals that are attached via the PS2 Interface.
Select the item you wish to configure.
Page 62

Chapter 5: Vision setup METTLER TOLEDO Viper Smart Count
62
Keyboard
It is possible to attach a PS2 keyboard to the balance via the PS2 Interface.
This function enables you to specify the layout of the keyboard that you are
using.
Note: When a PS2 keyboard is attached, it is possible to work with Smart
Count using only this keyboard. The keys F1-F6 simulate the softkeys, F9F11 simulate the top 3 function keys of the Viper scale. You can press the
«Enter» and «Esc» keys to simulate the «OK» and «Cancel» softkeys
respectively. The «Backspace» key simulates the «C» key.
BCR
Aside from a keyboard, it is also possible to attach a barcode reader via the
PS2 Interface. This function enables you to specify the designation of the data
coming from the barcode reader used for Direct Input (i.e. when the scale is
in weighing or piece counting mode).
Not Used Ignore data coming from the barcode reader.
Article Search Use the data for searching through the article database.
Tare Wt. Assign the data read to Tare weight.
APW Assign the data read to Average Piece Weight.
ID1 Assign the data read to ID1.
ID2 Assign the data read to ID2.
ID3 Assign the data read to ID3.
Note: The BCR setting is only used for Direct Input. Whenever the scale is
asking for user input, the barcode reader can also be used to scan in data
and the data will be used in the context of the user input.
5.10 Diagnostic settings (DIAGNOSTICS)
This function block allows the user to verify if all keys are functioning properly. Can only be accessed by a supervisor.
Please refer to Chapter 5.2 on how to reach the menu position 'Vision Setup Æ DIAGNOSTICS' and how to navigate within
the 'Vision Setup'-menu.
Page 63

METTLER TOLEDO Viper Smart Count Chapter 5: Vision setup
63
Enter the DIAGNOSTICS menu (« ») and choose one of the functions listed
below.
Available functions and settings:
Keyboard Test Æ Chapter 5.10.1
Display Test Æ Chapter 5.10.2
Serial Number 1 Æ Chapter 5.10.3
Serial Number 2 Æ Chapter 5.10.4
List1 Æ Chapter 5.10.5
List2 Æ Chapter 5.10.6
List Memory Æ Chapter 5.10.7
Reset All Æ Chapter 5.10.8
5.10.1 Keyboard (DIAGNOSTICSÆ Keyboard Test)
Please refer to Chapter 5.2 on how to reach the menu position 'Vision Setup Æ DIAGNOSTICS Æ Keyboard Test' and how
to navigate within the 'Vision Setup'-menu.
In order to check if all the keys are functioning properly, press «Yes» to start
the keyboard test.
Press all 25 keys in sequence. If a key is functioning, the scale jumps to the
next key. The keys are numbered as follows:
5 6 7 8 9 10
432
1
23
20
17
14
11
24
21
18
15
12
25
22
19
16
13
5.10.2 Display (DIAGNOSTICSÆ Display Test)
Please refer to Chapter 5.2 on how to reach the menu position 'Vision Setup Æ DIAGNOSTICS Æ Display Test' and how to
navigate within the 'Vision Setup'-menu.
In order to check if the screen is functioning properly, press «Yes» and…
… appears on the screen.
Page 64

Chapter 5: Vision setup METTLER TOLEDO Viper Smart Count
64
5.10.3 Serial Number 1 (DIAGNOSTICSÆ SNR1)
Please refer to Chapter 5.2 on how to reach the menu position 'Vision Setup Æ DIAGNOSTICS Æ SNR1' and how to
navigate within the 'Vision Setup'-menu.
The serial number of the scale is displayed
5.10.4 Serial Number 2 (DIAGNOSTICSÆ SNR2)
Please refer to Chapter 5.2 on how to reach the menu position 'Vision Setup Æ DIAGNOSTICS Æ SNR2' and how to
navigate within the 'Vision Setup'-menu.
The serial number of the analog option, if it is installed, is displayed.
5.10.5 List 1 (DIAGNOSTICSÆ List 1)
Please refer to Chapter 5.2 on how to reach the menu position 'Vision Setup Æ DIAGNOSTICS Æ List 1' and how to
navigate within the 'Vision Setup'-menu.
Press «Yes»
to print out the current settings of the whole Vision Setup menu.
5.10.6 List 2 (DIAGNOSTICSÆ List 2)
Please refer to Chapter 5.2 on how to reach the menu position 'Vision Setup Æ DIAGNOSTICS Æ List 2' and how to
navigate within the 'Vision Setup'-menu.
Press «Yes»
to print out the current settings of analog option, if it is installed.
Page 65

METTLER TOLEDO Viper Smart Count Chapter 5: Vision setup
65
5.10.7 List memory (DIAGNOSTICSÆ List Memory)
This function prints outa listing of all the articles stored in the database including a summary of the important parameters
for each article.
Please refer to Chapter 5.2 on how to reach the menu position 'Vision Setup Æ DIAGNOSTICS Æ List Memory' and how to
navigate within the 'Vision Setup'-menu.
Press the «
»key to go to the List Memory settings menu and press the
«Yes» key to start.
5.10.8 Reset All (DIAGNOSTICSÆ Reset All)
This function resets the all blocks of the whole Vision Setup Menu to its original factory settings. The supervisor password
('TERMINAL Æ Access') will not be reset.
Please refer to Chapter 5.2 on how to reach the menu position 'Vision Setup Æ DIAGNOSTICS Æ Reset All' and how to
navigate within the 'Vision Setup'-menu.
Press the «
»key to go to the List Memory settings menu and press the
«Yes» key to reset all.
Page 66

Chapter 6: Other important information METTLER TOLEDO Viper Smart Count
66
6
Other important information
This Chapter gives information on error messages and instructions for cleaning your scale. It also includes the declaration
of conformity and technical data.
6.1 Error messages
Overload
Reduce the load on the scale or the preload.
Underload
Place weighing pan on the scale and ensure that it can move freely.
Weight reading does not stabilize
• Ensure a tranquil environment.
• Ensure that the weighing pan is free to move.
• Change the setting of the vibration adapter (Chapter 5.4.6)
Not possible to zero scale
Ensure that the zeroing is only carried out in the permissible range and not
under overload or underload conditions.
Reference weight too low
The weight placed on the pan is too small to define a valid reference weight
for piece counting. Place a larger number of reference pieces on the scale.
No valid value from reference scale
This message is only given when piece counting with a 2-scale system.
Check the connecting cable between the scales and the interface settings.
No calibration/adjustment
Disconnect the power cord plug and then plug it in again. (If operating on the
battery, switch the scale off and then on again.) If the error message
reappears, calibrate/adjust the scale (Chapter 5.4.1). If this does not help,
contact your dealer or local representative.
Page 67

METTLER TOLEDO Viper Smart Count Chapter 6: Other important information
67
Reference piece weight too small
When defining the reference weight, the scale has found that the resultant
weight of one single piece is below the permissible limit. Piece counting is
not possible for articles as small as this.
Unstable weight when determining the reference weight
When determining the reference weight, the reading did not stabilize, and the
scale therefore cannot determine the reference weight of a single piece.
1. Ensure a tranquil environment.
2. Ensure that the weighing pan is free to move.
3. Change the setting of the vibration adapter (Chapter 5.4.6).
EAROM checksum error
Disconnect the power cord plug and then plug it in again. (If operating on the
battery, switch the scale off and then on again.) If the error message
reappears, contact your dealer or local representative.
Chain Tare not allowed
Chain Tare is deactivated in the Vision Menu ('Vision Setup Æ SCALE Æ Tare
Æ Chain Tare'). This means it is not possible to tare the balance once there
is already a value in the tare memory.
Pushbutton Tare not allowed
The scale cannot be tared using the «ÆTÅ» key because this feature was
deactivated in the Vision Setup ('Vision Setup Æ SCALE Æ Tare Æ Pushb.
Tare').
Key not allowed in short input mode
The function softkey that was pressed while in Short Input Mode (Chapter
3.1) is not compatible with Short Input Mode.
Factor/Unit weighing not possible
The application Factor/Unit weighing (Chapter 4.10) cannot be started while
the balance is in piece counting mode. Either press the «Weigh» key to
switch to weighing mode or press «C» to clear the APW which should
automatically switch the balance to weighing mode.
No valid input of reference pieces
The reference number of pieces that was entered via «Ref n» Æ «Var» or
Short Input Mode Æ «Ref n» was invalid. The reference weight determination
will not be performed.
Search string not found
This warning appears if the bar code reader was configured for article
searching ('Vision Setup Æ COMMUNICATIONS Æ PS2 Æ BCR') and the text
read in by the bar code reader was not found in the article database.
Page 68

Chapter 6: Other important information METTLER TOLEDO Viper Smart Count
68
6.2 Sample reports
Weigh mode
(c) Mettler-Toledo GmbH
http://www.mt.com
------------------------
Date 17.07.2002
Time 15:28:12
G 0.0370 kg
T 0.2843 kg
N 0.3213 kg
************************
Weigh mode with article
(c) Mettler-Toledo GmbH
http://www.mt.com
------------------------
Caramel 1365
Toffee Factory
000124245672
Date 17.07.2002
Time 15:32:32
G 0.6549 kg
PT 0.0630 kg
N 0.5919 kg
************************
Count mode
(c) Mettler-Toledo GmbH
http://www.mt.com
------------------------
Date 17.07.2002
Time 15:13:51
G 0.4122 kg
T 0.0630 kg
N 0.3492 kg
Piece Wt 14.11524 g
Out of 10 PCS
QUANTITY 25 PCS
************************
Count mode with article
(c) Mettler-Toledo GmbH
http://www.mt.com
------------------------
English Toffees 1060
Toffee Factory
000124254467
Date 17.07.2002
Time 13:46:50
G 0.3980 kg
PT 0.0630 kg
N 0.3350 kg
Piece Wt 3.450000 g
QUANTITY 97 PCS
************************
6.3 Cleaning instructions
Disconnect the scale from the power supply before cleaning it!
Use a damp cloth (do not use acids, alkalis or strong solvents).
Wet cleaning is only allowable on scales with IP65 ingress protection.
If heavily contaminated, the weighing pan, protective cover (if fitted) and
adjustable feet must be removed and cleaned separately.
With the weighing pan removed, never use a solid object to clean underneath
the load plate support!
Observe your organization’s internal rules and industry-specific regulations
for cleaning intervals and permissible cleaning agents.
Page 69

METTLER TOLEDO Viper Smart Count Chapter 7: Technical data, interfaces and accessories
69
7
Technical data, interfaces and accessories
In this chapter you will find technical specifications for your scale, information about standards and directives, and a list
of currently available accessories.
7.1 General data and delivered items
Applications
Weighing
Piece counting / Piece counting with second scale
Totaling weighings and piece countings
Weighing to a target value (for weighing and piece counting)
Checkweighing
Free Unit
Average Weighing
Settings
5 units of weight
Adding mode for reference definition (piece counting)
Automatic reference optimization (piece counting)
Vibration adapter
Weighing process adapter
Automatic tare function
Automatic zero correction
Power-saving shutoff
Display backlighting
Automatic saving of tare and zero
Display
Graphical liquid crystal display (LCD), 35 mm high, with CFL backlit
Interface
3 RS232C interface built in (for data s. Chapter 7.3)
PS2 interface for keyboard and barcode reader
Optional interfaces available
Environmental conditions Accuracy is guaranteed in the following ranges:
Temperature range: -10 … +40°C/14 … 104°F
Relative air humidity: 15 … 85% (non-condensing)
Overvoltage capacity: II
Pollution degree: 2
Power supply
Direct connection to AC power line or via AC adapter
240V, 50 Hz, 70mA 120V, 60Hz, 90 mA
230V, 50 Hz, 70mA 100V, 50/60 Hz, 90mA
With extra AC adapter for battery operation: feed for the scale 13.5 VAC, 450 mA
Page 70

Chapter 7: Technical data, interfaces and accessories METTLER TOLEDO Viper Smart Count
70
Total weight
Stain gauge MonoBloc
Small platform: line-voltage scale: 4.6 kg 4.7 kg
AccuPac scale: 5.2 kg 5.3 kg
Large platform: line-voltage scale: 8.2 kg 10.5 kg
AccuPac scale: 8.8 kg 11.1 kg
Ingress protection
IP43 (optional IP65 (EN 60529) for scales with strain gauge cells. These scales are
identified with an IP65 adhesive label.)
Standard delivery
package
Complete scale (terminal and weighing platform assembled)
Operating instructions
Open-end wrench (for leveling)
7.2 Dimensions
B
D
C
E
A
A B C* D E
Small platform 335 265 110 240 200
Large platform 370 360 115 350 240
All dimensions in millimeters
* with adjustable feet fully screwed in
Page 71

METTLER TOLEDO Viper Smart Count Chapter 7: Technical data, interfaces and accessories
71
7.3 Interface technical data
The scale is provided with an EIA RS-232C (CCITT V24/V.28) voltage-controlled interface as standard. Maximum cable
length is 15 m. All interfaces are in the form of a 9-pin D-sub female connector. Instructions for configuring the interfaces
are given in Chapter 5.9.2.
Interface
1 (standard) 2 (standard) 3 (standard) optional
Type
RS232C RS232C RS232C Analog
Pin 1 --- --- --- + Excitation
(+8.2V)
Pin 2 TxD TxD TxD + Sense
Pin 3 RxD RxD RxD Shield
Pin 4 --- --- --- - Sense
Pin 5 GND GND GND - Excitation
(GND)
Pin 6 --- --- --- ---
Pin 7 --- --- CTS + Signal
Pin 8 --- --- RTS - Signal
Pin assignment
Pin 9 VCC VCC VCC ---
TxD: Transmit data RxD: Receive data
GND: Signal ground VCC: Power supply +5V
Technical data for 'Analog' option:
A/D-Converter ('analog' option) Load cell (weighing bridge to be connected to analog option)
Resolution (approved): 7'000 e Power supply: 8.2 V
Resolution (not approved): 300'000 d Impedance: 80 -1'000 R
Input signal (approved): 1.3 µV/e Output signal: 2 mV/V
7.4 Accessories
Article No.
Auxiliary display RS-PD/PASM 21302875
RS232 cable for auxiliary display 1.8m (9-pin D-Sub, m/m parallel) 21250066
Protective cover for small platform scale 21203207
Protective cover for large platform scale 21203206
Antitheft device 00229175
“Sprinter 1” printer, EURO version 21253399
Page 72

Chapter 7: Technical data, interfaces and accessories METTLER TOLEDO Viper Smart Count
72
“Sprinter 1” printer, UK version 21253745
RS232 cable for printer 1.8m (25/9-pin D-Sub, m/m crossover) 21253677
RS232 cable for 2nd scale 1.8m (9-pin D-Sub, m/m, crossover) 21252588
RS232 cable for PC 1.8m (9-pin D-Sub, m/f, parallel) 00410024
7.5 Interface commands
Your scale can be configured and operated, and can communicate from a PC via RS232C interface.
7.5.1 Preconditions
The following preconditions must be fulfilled to achieve communication between the scale and a PC:
• The scale must be connected to the RS232C interface of the PC using the necessary cable.
• The scale interface must be set in “Dialog” mode (see Chapter 5.9.1).
• A terminal program must be available on the PC (e.g. “Hyper Terminal”).
• The communications parameters (protocol, bits and parity, data transfer rate) must be set using the same values in
the terminal program and in the scale (see Chapter 5.9.2).
7.5.2 SICS Command set
Your scale basically supports the Mettler Toledo Standard Interface Command Set (MT-SICS). The SICS command set
used are “Level 0”, “Level 1”, and some “Level 2” commands. Detailed information on the interface commands is given
in the “MT SICS Reference Manual” (No. 705184, only available in English).
Notes:
• Every command line must be terminated with <CR><LF> (corresponding to the “Enter” or “Return” key on the PC
keyboard). The command is then executed immediately. To correct a line, this needs to be entered again completely.
• For commands with parameters, the “_” symbol signifies an empty space, and in the examples given, serves solely
to clarify the syntax.
• For commands that require text parameters, the quotation marks must be entered, as they indicate to the scale that
they enclose a text string and not another parameter.
The following lists the supported MT-SICS commands:
I0 Inquiry of all implemented MT-SICS commands.
I1 Inquiry of MT-SICS level and MT-SISCS versions.
I2 Inquiry of balance data.
I3 Inquiry of balance software version.
I4 Inquiry of serial number.
S Send stable weight value.
SI Send weight value immediately irrespective of balance stability.
SIR Send weight values repeatedly irrespective of balance stability.
Page 73

METTLER TOLEDO Viper Smart Count Chapter 7: Technical data, interfaces and accessories
73
Z Zero the balance.
ZI Zero the balance immediately irrespective of balance stability.
@ Reset the balance to condition after switching on but without a zero setting being performed.
D Write text into balance display. (E.g. D_“text”).
DW Switch back to weight display after D command.
K Configure key control.
SR
Send current stable weight value and then continuously on weight change equal to or greater than the preset
value. (E.g. SR_10.00_g).
T
Tare the balance.
TA
Inquire or preset the tare weight value.
TAC
Clear the tare value.
TI Tare immediately regardless of whether the current value is stable or not.
C2 Initiate calibration.
I10 Inquire or set the balance ID.
I11 Inquiry of balance type.
DAT Inquire of set the date on the balance.
P100 Print out text on the printer. (E.g. P100_“text”).
P101 Print out current stable weight value.
P102 Print out current weight value irrespective of balance stability.
PWR Switch the balance on or off.
ST
Send stable weight after pressing the «
» key.
TIM Inquire or set the time on the balance.
SU Send stable weight value with currently displayed unit.
SIU Send weight value with currently displayed unit immediately irrespective of balance stability.
SIRU Send weight value with currently displayed unit immediately and repeat.
SRU Send stable weight value with currently displayed unit and repeat on weight change greater than or equal to
preset value.
Aside from the standard MT-SICS commands, Smart Count also provides the following commands for working with the
balance:
M01 Inquire or set the weighing mode ('Vision Setup Æ SCALE Æ Filter Æ Process': Chapter 5.4.6).
M01 Inquiry of weighing mode.
M01_0 Set weighing mode to “Universal”.
M01_1 Set weighing mode to “Filling”.
M03 Inquiry or setting of AutoZero ('Vision Setup Æ SCALE Æ Zero Æ Auto Zero': Chapter 5.4.4).
M03 Inquiry of AutoZero mode.
M03_0 Set “AutoZero” to off.
M03_1 Set “AutoZero” to on.
M09 Inquiry or setting of display contrast ('Vision Setup Æ TERMINAL Æ Device Æ Contrast': Chapter 5.6.4)
M09 Inquiry of display contrast.
M09_x Set the display contrast to x% where x can have a value of 0-100.
Page 74

Chapter 7: Technical data, interfaces and accessories METTLER TOLEDO Viper Smart Count
74
M10 Inquiry or setting of weight display size ('Vision Setup Æ TERMINAL Æ Device Æ Weight display': Chapter
5.6.6).
M10 Inquiry of weight display size.
M10_0 Select small weight display.
M10_1 Select big weight display.
M11 Inquiry or setting of the beeper status ('Vision Setup Æ TERMINAL Æ Device Æ Beep': Chapter 5.6.8).
M11 Inquiry of beeper status.
M11_0 Switch beeper off
M11_1 Switch beeper on.
M14 Inquiry or setting of language ('Vision Setup Æ TERMINAL Æ Device Æ Language': Chapter 5.6.1).
M14 Inquiry of language setting.
M14_x Set the language to the value of x where x can be:
0 = English
1 = German
2 = French
3 = Spanish
4 = Italian
7 = US English
M16 Inquiry or setting of the sleep status ('Vision Setup Æ TERMINAL Æ Device Æ Sleep': Chapter 5.6.2)
M16 Inquiry of “Sleep” status.
M16_x Set the “Sleep” status to the value of x where x can be:
0 = Off
1 = 1 minute
2 = 3 minutes
3 = 5 minutes
M19 Inquiry of adjustment weight.
M21 Inquiry or setting of “Unit1” ('Vision Setup Æ SCALE Æ Display': Chapter 5.4.2) and display unit.
M21 Inquiry of “Unit1” and display unit.
M21_Des_x Set the “Des” unit to the value of x where
Des: x:
0 = Unit 1 0 = g
1 = Display unit 1 = kg
2 = t
7 = lb
8 = oz
PW Inquire or set the value of Average Piece Weight.
PW Inquire the value of Average Piece Weight.
PW_val_unit Set the value of the Average Piece Weight.
Example: PW 100.0 g
Page 75

METTLER TOLEDO Viper Smart Count Chapter 7: Technical data, interfaces and accessories
75
I31 Inquire or define the record header for printouts.
I31_x Inquiry the definition for the x header line.
I31_x_”text” Define the text for a specific header line where:
x 1..5
text String of characters with a maximum of 24 characters.
Example: I31_1_“Mettler Toledo GmbH”
I31_2_“Heuwinkelstrasse”
I31_3_“CH-8606 Naenikon”
I31_4_“Telefon 01/944 22 11”
I31_5_“Internet www.mt.com”
SWU Switch the displayed unit from “Unit1” to “Unit2” and vice versa.
PRN Initiate a printout of the current stable weight or number of pieces.
ICP Configure customer-defined printout ('Vision Setup Æ COMMUNICATIONS Æ Def. String': Chapter 5.9.3).
ICP_? Send this command to get a response from the balance with details about how to use
the ICP MT-SICS command.
SIH Send the current weight value displayed in control mode, i.e. with a higher resolution, immediately irrespective
of balance stability.
Page 76

Chapter 7: Technical data, interfaces and accessories METTLER TOLEDO Viper Smart Count
76
7.6 Declaration of conformity
We, Mettler-Toledo (Albstadt) GmbH, Unter dem Malesfelsen 34, D-72458 Albstadt declare under our sole
responsibility that the product
Viper Smart from serial no. 2511380,
to which this declaration relates, is in conformity with the following directives and standards:
Directive Applicable standard
Relating to electrical equipment designed for use within
certain voltage limits
(73/23/EEC; amended by directive 93/68/EEC)
EN61010-1 (Safety Regulations)
Relating to electromagnetic compatibility
(89/336/EEC; amended by directive 93/68/EEC;
92/31/EEC)
EN61326-1
Relating to non-automatic weighing instruments
EN45501
1)
(Metrological Aspects)
(90/384/EEC; amended by directive 93/68/EEC)
1)
[year]
1)
[code]
1)
Applies only to certified scales (approved/tested certificate no. T5508 for scales with strain gauge cells, T5627 for
scales with “MonoBloc” cells).
Albstadt, July 2002 Mettler-Toledo GmbH
Roland Schmider, General Manager Heiko Carls, Quality Manager
Page 77

METTLER TOLEDO Viper Smart Count Chapter 7: Technical data, interfaces and accessories
77
Important notice for verified weighing instruments in EC countries
M
Weighing instruments verified at the place of manufacture bear the preceding mark on the packing label and a
green “M” sticker on the descriptive plate. They may be set to work immediately.
M
Weighing instruments which are verified in two steps have no green “M” on the descriptive plate and bear the
preceding identification mark on the packing label. The second step of the verification must be carried out by
the approved Mettler-Toledo service or by the W&M authorities. Please contact your Mettler-Toledo
organization.
The first step of the verification has been carried out at the manufacturing plant. It comprises all tests according to
EN45501-8.2.2.
If national regulations in individual countries limit the period of validity of the certification, the operator of such a scale is
himself responsible for its timely re-certification.
USA/Canada
This equipment has been tested and found to comply with the limits for a Class A digital device, pursuant to both Part 15
of the FCC Rules and the radio interference regulations of the Canadian Department of Communications. These limits are
designed to provide reasonable protection against harmful interference when the equipment is operated in a commercial
environment. This equipment generates, uses and can radiate radio frequency energy and, if not installed and used in
accordance with the instruction manual, may cause harmful interference to radio communications. Operation of this
equipment in a residential area is likely to cause harmful interference, in which case the user will be required to correct the
interference at his own expense.
Cet appareil a été testé et s’est avéré conforme aux limites prévues pour les appareils numériques de classe A et à la
partie 15 des règlements FCC et à la réglementation des radio-Interférences du Canadian Department of Communications.
Ces limites sont destinées à fournir une protection adéquate contre les interférences néfastes lorsque l’appareil est utilisé
dans un environnement commercial. Cet appareil génère, utilise et peut radier une énergie à fréquence radioélectrique ; il
est en outre susceptible d’engendrer des interférences avec les communications radio, s’il n’est pas installé et utilisé
conformément aux instructions du mode d’emploi. L’utilisation de cet appareil dans les zones résidentielles peut causer
des interférences néfastes, auquel cas l’exploitant sera amené à prendre les dispositions utiles pour palier aux
interférences à ses propres frais.
Page 78

Index METTLER TOLEDO Viper Smart Count
78
Index
2
2nd display ...........................................................58
2-scale ...........................................................28, 43
A
accumulation total gross weight ..............................21
accumulation total net weight ..................................21
accumulation total number of lots ............................21
accumulation total number of pieces........................21
accuracy display....................................................49
additive tare...........................................................52
analog option ........................................................61
article database ...............................................18, 49
article identification...........................................19, 49
article name ..........................................................19
article number........................................................19
article sample size .................................................20
article tare weight ...................................................20
auto print ..............................................................58
auto sampling .......................................................48
auto zero...............................................................45
automatic clear average piece weight.......................49
automatic clear tare................................................45
automatic reference optimization..............................26
automatic tare........................................................45
automatic taring.....................................................23
autoprint ...............................................................50
auxiliary scale .................................... 28, 52, 58, 61
average piece weight......... 17, 20, 23, 26, 27, 49, 51
average weighing.............................................33, 52
average weight ......................................................33
B
backlight ...............................................................55
bar graph ..............................................................30
barcode reader connection ......................................62
battery ..................................................................10
baud rate ..............................................................59
beep .....................................................................56
beeper ..................................................................50
big display ............................................................52
blank info line........................................................53
blank softkey .........................................................52
bulk scale .......................................... 28, 52, 58, 61
bypass..................................................................61
C
calibration .............................................................44
chain tare..............................................................45
checksum .............................................................59
checkweighing...........................................31, 50, 51
communication................................... 28, 57, 58, 61
consecutive number ...............................................52
consecutive number info line ...................................53
continuous weight..................................................58
contrast................................................................ 55
Count key ............................................................. 24
D
database ........................................................ 49, 50
date ..................................................................... 27
date and time.................................................. 11, 56
date info line......................................................... 53
dependent mode ................................................... 48
dialog .................................................................. 58
digital I/O ............................................................. 58
display..................................................... 11, 28, 32
display test ........................................................... 63
ditigal I/O ............................................................. 60
E
empty line feed...................................................... 60
F
factor ................................................................... 32
factor/unit weighing ......................................... 31, 51
filling ............................................................. 30, 51
filling/checkweighing lower limit.............................. 21
filling/checkweighing nominal value........................ 20
filling/checkweighing upper limit ............................. 20
final printing ......................................................... 50
fine range ............................................................. 30
G
gross weight ............................................. 16, 27, 52
gross weight info line............................................. 53
H
Handsfree............................................................. 48
handshake ........................................................... 59
header ................................................................. 59
high resolution info line.......................................... 53
HighRes - softkey .................................................. 52
I
independent mode................................................. 48
Info line.............................................. 52, 54, 55, 56
Info/Help key................................................... 27, 52
interface ................................................... 16, 24, 28
invert ............................................................. 52, 55
K
keyboard connection ............................................. 62
keyboard test ........................................................ 63
L
language........................................................ 12, 54
line format ............................................................ 59
lot printing ............................................................ 50
Page 79

METTLER TOLEDO Viper Smart Count Index
79
Index
M
manual reference optimization...........................26, 51
minimum reference weight ................................26, 48
mode settings ........................................................58
multi range scale ...................................................45
multi tare...............................................................52
N
negative tolerance ............................................30, 31
net weight .............................................................16
P
parity ....................................................................59
password ........................................... 34, 35, 50, 57
percentage accuracy.........................................26, 27
percentage accuracy info line ..................................53
piece counting mode ..............................................51
piece weight lower limit...........................................20
piece weight optimization........................................20
piece weight upper limit ..........................................20
positive tolerance .............................................30, 31
power cord plug.....................................................10
preset tare .............................................................52
pre-tare .................................................................15
pre-tare weight.......................................................17
printer ................................................ 16, 24, 29, 58
printout .............................................. 49, 59, 64, 65
push button tare.....................................................45
R
range symbol ........................................................13
reference ...............................................................23
reference number ...................................................51
reference optimization.............................................26
reference scale.................................... 28, 52, 58, 61
reference weight .....................................................23
reference weight determination...........................17, 26
reset ............................................ 47, 53, 57, 61, 65
resolution ..................................................32, 44, 45
S
Sample/Tare ..........................................................48
save as article .......................................................52
Save As Article function ...........................................21
search criterion ......................................................50
serial number ........................................................64
short-input mode....................................................17
sleep function ..................................................54, 74
softkey ............................................................49, 51
softkey configuration ..............................................51
stability detector .....................................................13
summary report .....................................................30
T
tare.......................................................................14
tare memory ..........................................................45
tare weight ............................................................15
tare weight memory ............................................... 52
Tare/Sample- ........................................................ 48
target weight ................................................... 30, 31
time ..................................................................... 27
time info line......................................................... 53
timeout status ....................................................... 53
Toledo Count ........................................................ 58
Toledo Weight....................................................... 58
tolerance limits................................................ 30, 31
totalisation............................................................ 29
U
unit...................................................................... 32
unit - toggle Unit1 / Unit2 ....................................... 52
user prompting...................................................... 48
V
vibration settings ................................. 46, 49, 50, 51
W
Weigh key ............................................................ 24
weighing mode ..................................................... 51
weighing range ..................................................... 13
weight display size ................................................ 56
Z
zeroing................................................................. 11
Page 80

For the future benefit of your METTLER TOLEDO product, and
to preserve its value, METTLER TOLEDO service assures you
of its quality and measuring accuracy for years to come.
Please request full details of our attractive terms of service.
Thank you.
P22009310
Subject to technical changes.
Printed on 100% chlorine-free paper.
For the sake of our environment.
© Mettler-Toledo GmbH 2002 22009310A Printed in Germany 1202/2.12
Mettler-Toledo (Albstadt) GmbH, U. d. Malesfelsen 34, D-72458 Albstadt
Tel. +49-7431 14-0, Fax +49-7431 14-371, Internet: http://www.mt.com
 Loading...