

Page 1
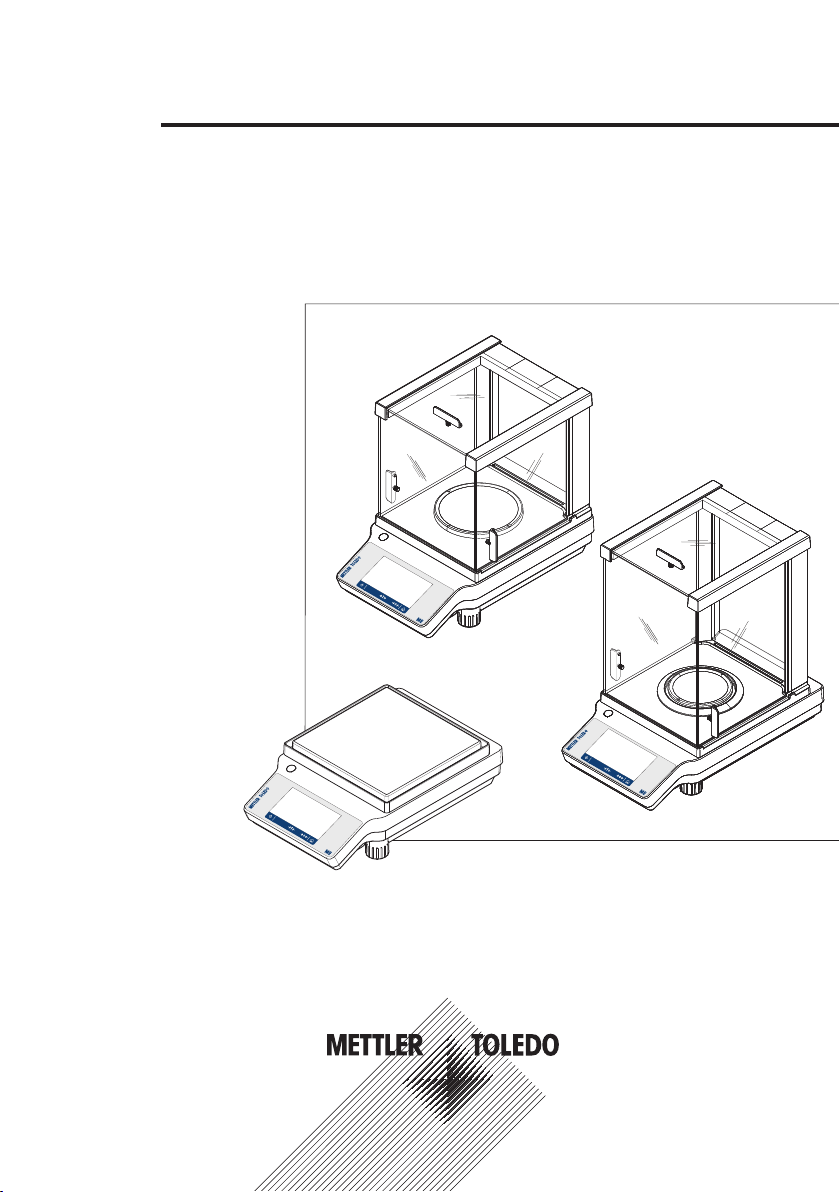
Precision and Analytical Balances
User Manual
ME-T
Page 2

Page 3
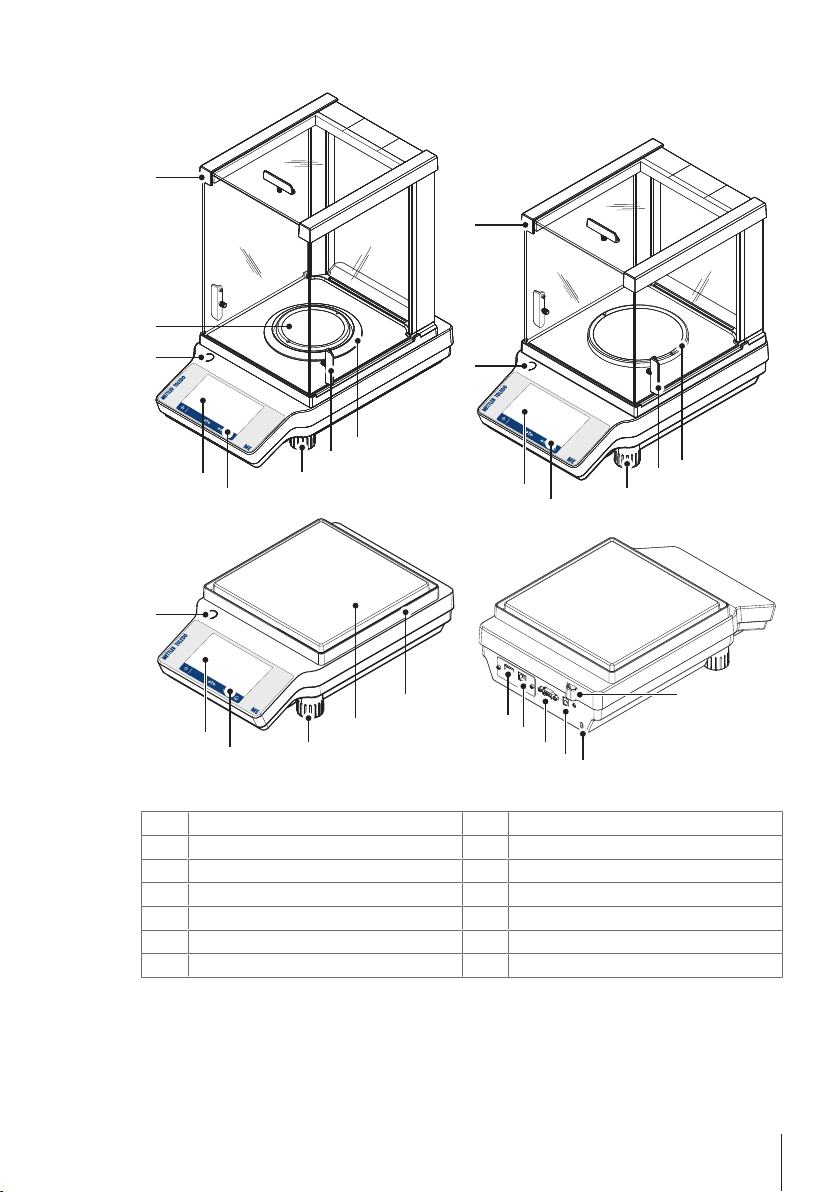
Overview balance
8
10
1
2
3
3
3
1
2
1
2
7
7
7
9
9
5
6
5
4
4
5
6
11
13
14
12
0.1 mg
1 mg
10 mg~0.1 g
Balance overview legend
Capacitive color TFT touch screen
1
Level indicator
3
Weighing pan
5
Glass draft shield
7
Legal for trade (LFT) sealing
9
Socket for AC/DC adapter
11
USB device
13
Operating keys
2
Draft shield element
4
Handle for operation of the draft shield door
6
Leveling foot
8
Kensington slot for anti-theft purposes
10
RS232 serial interface
12
USB host
14
3Precision and Analytical Balances
Page 4
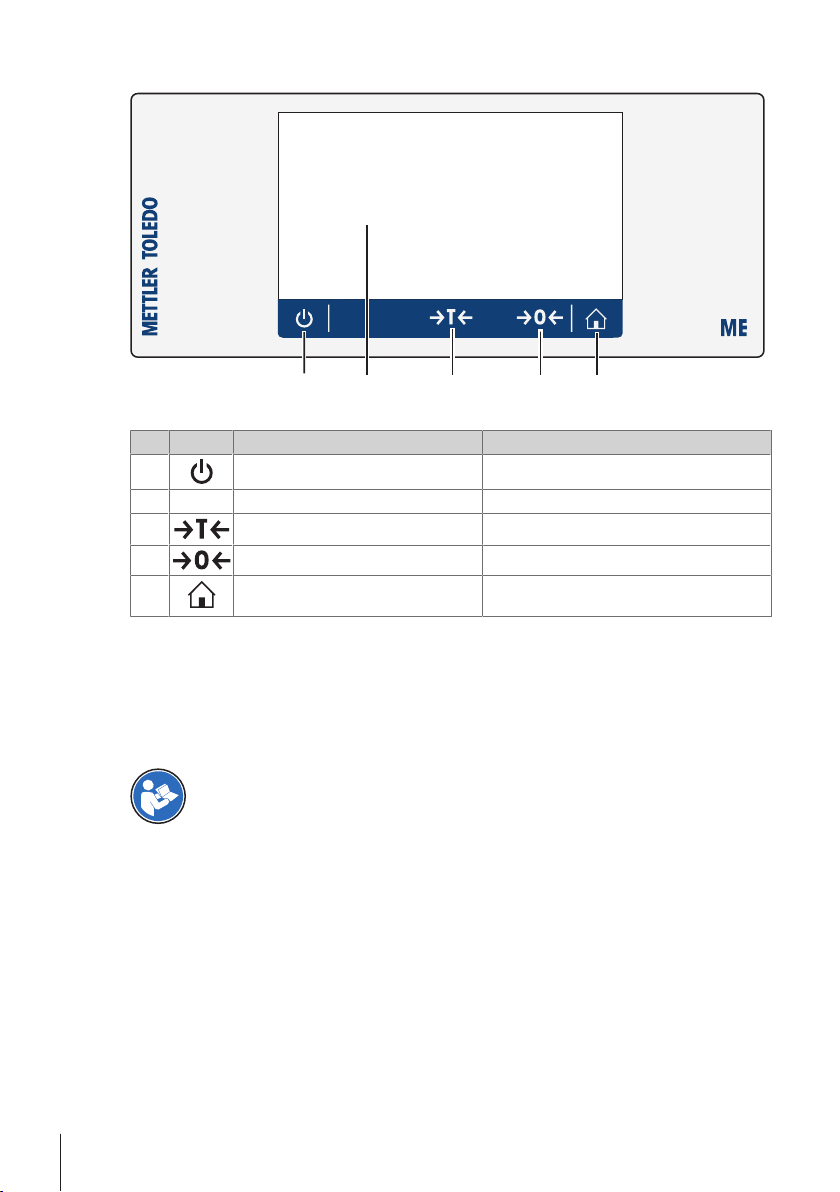
Overview operation keys
5
3 4
1 2
Terminal keys legend
No. Key Name Explanation
1
ON/OFF Switches the balance on or off.
2
3
4
5
Capacitive color TFT touch screen General navigation
Tare Tares the balance.
Zero Zeros the balance.
Home Returns from any menu level, or other window
to the application home screen.
1 Safety Information
• Read and understand the instructions in this User Manual before using the instrument.
• Keep this User Manual for future reference.
• Include this User Manual if you pass on the instrument to other parties.
If the instrument is not used according to the information in the Operating Instructions or if it is modified, the
safety of the instrument may be impaired and Mettler-Toledo GmbH assumes no liability.
Additional information about this balance can be found in the Operating Instructions on the CDROM or online.
u www.mt.com/library
1.1 Definition of signal warnings and symbols
Safety notes are marked with signal words and warning symbols. These show safety issues and warnings.
Ignoring the safety notes may lead to personal injury, damage to the instrument, malfunctions and false
results.
WARNING
CAUTION
NOTICE
for a hazardous situation with medium risk, possibly resulting in death or severe
injury if not avoided.
for a hazardous situation with low risk, resulting in minor or moderate injury if not
avoided.
for a hazardous situation with low risk, resulting in damage to the balance, other
material damage, malfunctions and erroneous results, or loss of data.
4 Precision and Analytical Balances
Page 5
Electrical shock
General hazard: read the Operating Instructions for information about the hazards and the
resulting measures.
1.2 Product safety information
The balance has been tested for the experiments and intended purposes documented in the appropriate
manual. However, this does not absolve you from the responsibility of performing your own tests of the
products supplied by us regarding their suitability for the methods and purposes you intend to use them for.
Intended use
This balance is designed to be used in laboratories by trained staff. The balance is intended for weighing
purposes.
Any other type of use and operation beyond the limits of technical specifications without written consent from
Mettler-Toledo GmbH is considered as not intended.
Responsibilities of the balance owner
The balance owner is the person that uses the balance for commercial use or places the balance at the
disposal of his staff. The balance owner is responsible for product safety and the safety of staff, users and
third parties.
METTLER TOLEDO assumes that the balance owner provides the necessary protective gear, appropriate
training for the daily work and for dealing with potential hazards in their laboratory.
Safety notes
WARNING
Risk of electric shock
Contact with parts that contain a live current can lead to injury and death.
1 Only use the METTLER TOLEDO power supply cable and AC/DC adapter designed for your
balance.
2 Connect the power cable to a grounded power outlet.
3 Keep all electrical cables and connections away from liquids and moisture.
4 Check the cables and power plug for damage and replace damaged cables and power
plugs.
NOTICE
Risk of damage to balance due to incorrect parts
Using incorrect parts with the balance can damage the balance or cause the balance to
malfunction.
− Only use parts supplied with the balance, listed accessories and spare parts from Mettler-
Toledo GmbH.
5Precision and Analytical Balances
Page 6
2 Design and Function
Prepare weight and start
2.1 User Interface
NOTICE
Risk of damaging the touch screen with pointed or sharp objects
Do not use pointed or sharp objects to navigate the touch screen. This may damage the
surface of the touch screen.
− Operate the touch screen with your fingers.
The screen is a capacitive color TFT touch screen. The screen displays information and allows the user to
enter commands by tapping certain areas on its surface. You can choose the information displayed on the
screen, change the balance settings and perform certain operations on the balance.
Only those elements which are available for the current dialog appear on the display.
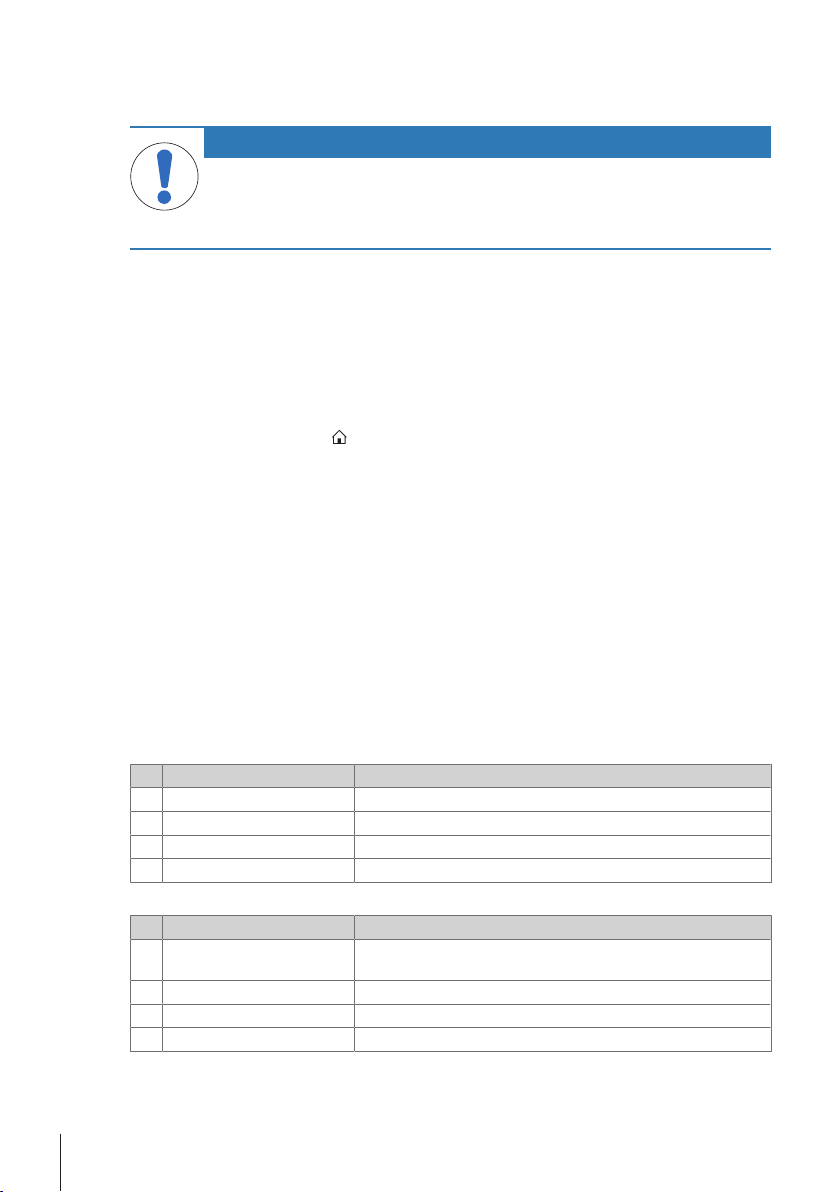
2.1.1 Application home screen
The application home screen appears after switching the balance on. It always displays the last application
that was in use before the balance was switched off. The application home screen is the main screen of the
balance. Every function can be accessed from here. You can return to the application home screen at any
time by pressing the home button
in the lower right corner of the screen.
Information and work bars
Name Explanation
Weighing information bar Displays the weighing-in aid and general balance information.
1
Work title bar Displays information about the current activity.
2
Value bar Displays information about the current weighing process.
3
Main navigation Work-related functions.
4
Information fields
Name Explanation
Weighing-in aid A dynamic graphic indicator displays how much of the total weighing
5
Short balance information Readability and capacity of the balance.*
6
Weighing value field Displays the value of the current weighing process (model-specific).
7
Coach text field Displays instructions for the current weighing process.
8
* For approved balances: Min (minimum capacity) and e (verification of scale interval) are shown in the
upper left corner.
6 Precision and Analytical Balances
range is in use.
Page 7
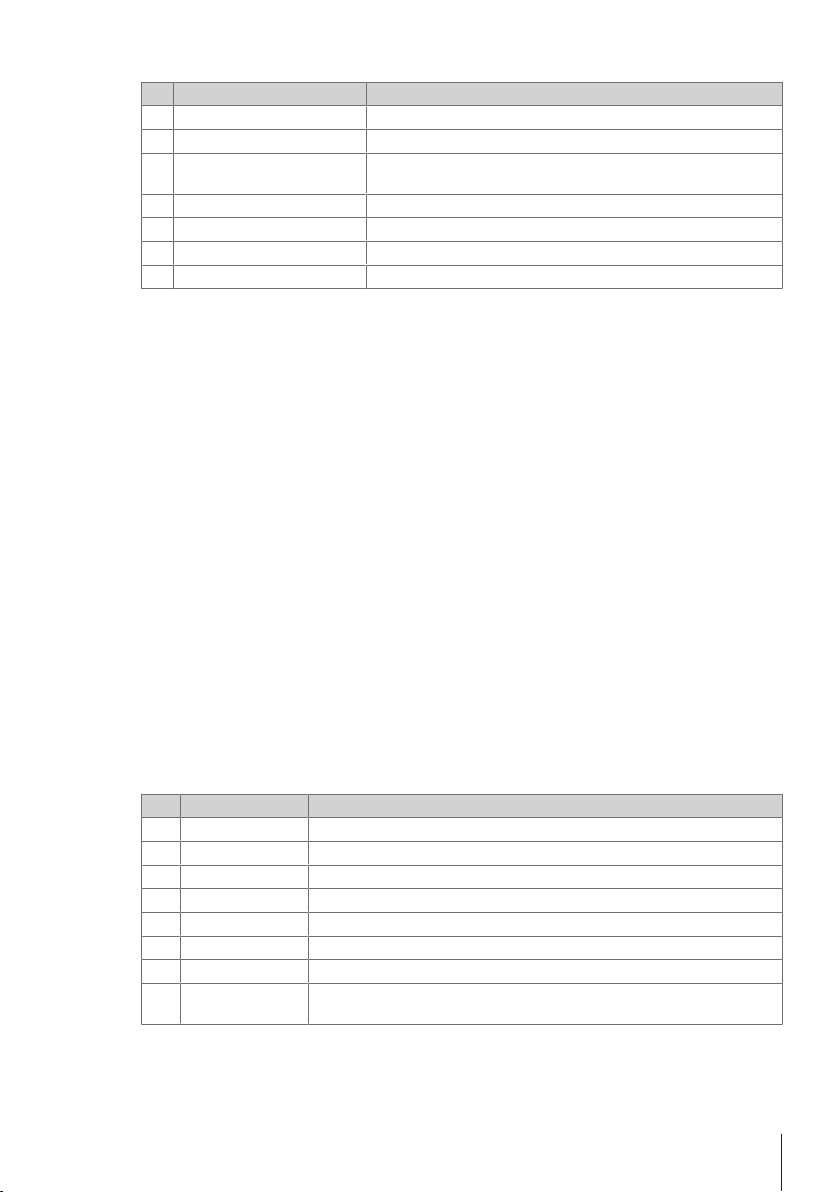
Action buttons
ID 1 - Label
Name Explanation
Main activity configuration
9
Detailed balance information Displays detailed technical data about the balance.
10
Weighing unit Displays the unit of the current weighing process (model- and
11
Activities Opens the activities selection.
12
Print Prints out results and/or settings (printer required).
13
Settings/preferences Configures settings/preferences.
14
Status information field Displays information about the system status.
15
2.1.2 Input dialogs
2.1.2.1 Entering characters and numbers
The keyboard allows the user to enter characters, including letters, numbers and a range of special
characters.
If a barcode reader is connected to your balance and your sample provides a barcode, scan the product
barcode instead of entering the designation manually. The name of the sample appears in the respective
information field and can be printed on the reports. The ID is frequently scanned via barcode reader to
ensure that the sample is clearly assigned to the corresponding product.
To configure the current application (e.g. Weighing).
country-specific).
Name Explanation
Input field Displays all characters that have been entered.
1
Delete all Deletes all entered characters.
2
Discard Discards the entered data and exits the dialog.
3
Delete Deletes the last character.
4
Confirm Confirms the data entered.
5
Shift Switches between lower and upper case letters.
6
Specialized tabs Switches keyboard mode for entering letters, numbers or special characters.
7
Explanation field Extra information about the value to be entered (e.g. maximum number of
8
characters available).
7Precision and Analytical Balances
Page 8
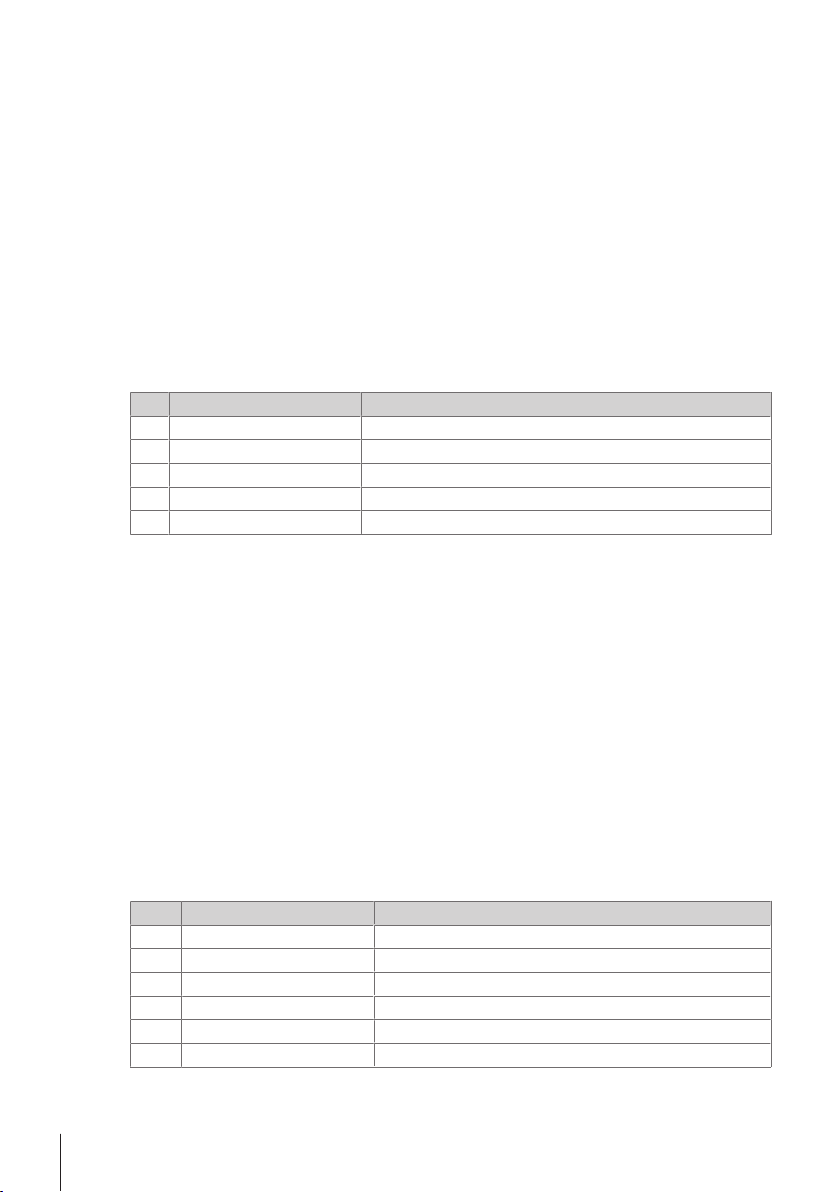
2.1.2.2 Changing the date and time
Time
General configuration
Weighing options
Publishing
Devices/connectivity
System settings
The dialog (Picker view) allows the user to set the date and time.
Name Explanation
Change date/time format Various date/time formats can be selected.
1
Pick button Increment.
2
Picker field Displays the defined time/date.
3
Pick button Decrement.
4
Selection tabs Tabs of the selectable sub-categories.
5
2.1.3 Lists and tables
The basic elements in a simple list include a content title and a list of sub-elements. Tapping an element
opens a list of sub-elements or an input dialog.
Name Explanation
List title Title of the current list.
1
Contextual help Additional information about the current process
2
Back button Moves go one step back.
3
List element title Title of the list element.
4
5
6
Scroll position Scrolls through the list.
Selection tabs Tabs of the selectable sub-categories.
8 Precision and Analytical Balances
Page 9

2.2 Main settings and activities at a glance
Application main configuration
Balance information
General settings
Activities
The diagram below provides an overview of the main settings of an application (in this case, Weighing).
Depending on the application, the options available to be selected and their content may differ. All applications is based on this concept.
9Precision and Analytical Balances
Page 10

2.2.1 Touch screen navigation
Activities
Formula-
tion
Weighing applications
Counting
Percent weighing
Back-
weighing
Check
weighing
Quick settings
Date and Time
Brightness
Sound
ON (3 of 3 beeps)
Language
To interact with the balance, use the screen and the operating keys at the bottom of the screen. Using the
screen to navigate is similar to using a smartphone or tablet PC.
Opening an application
Navigation:
To open settings or applications, tap with your finger on the application symbol (e.g.
> Activities - Weighing applications
Weighing).
There is not enough space to show all the weighing applications on one screen. Scroll horizontally to reach
the applications on the second page.
Scrolling
Navigation:
> Quick settings
When the options are too numerous to be displayed on one screen, a blue bar on the right side appears.
This means that the user can scroll up and down. To scroll simply place your finger anywhere on the list
and drag it up or down.
10 Precision and Analytical Balances
Page 11

Using shortcuts
To simplify navigation on the capacitive color TFT touch screen, there are a few shortcuts that provide quick
access to key areas of the balance. For example, the weighing value field on the application home screen
works as a shortcut (see screen below), as does the weighing unit next to the weighing value field. Other
shortcuts may be available to use depending on the application.
Every setting that can be changed directly via shortcut, can also be changed in the main configuration
settings for that application.
3 Installation and Putting into Operation
Finding more information
Additional information about this balance can be found in the Operating Instructions on the CDROM or online.
u www.mt.com/library
WARNING
Risk of electric shock
The balance must be disconnected from the power supply before performing all setup and
assembly work.
11Precision and Analytical Balances
Page 12

3.1 Scope of delivery
NOTICE
Risk of damage to balance due to incorrect parts
Using incorrect parts with the balance can damage the balance or cause the balance to
malfunction.
− Only use parts supplied with the balance, listed accessories and spare parts from MettlerToledo GmbH.
Components Model
0.1 mg 1 mg 10 mg / 100mg
Draft shield high, 235 mm – –
low, 170 mm – –
Weighing pan with pan support ø 90 mm – –
ø 120 mm – –
180 × 180 mm – –
Draft shield element –
Pan support – –
Protective cover
Universal AC/DC adapter -
AC/DC adapter with country-specific power cable - -
Operating Instructions or User Manual; printed or on CD-ROM
depending on country of use
Declaration of conformity
3.2 Selecting the location
A good location will enable the balance to work accurately and reliably. The surface must be able to safely
take the weight of the balance when fully loaded. The following local conditions must be observed:
If the balance is not horizontal at the outset, it must be leveled during commissioning.
• Operate the balance in indoor environments only and at an altitude of less than 4000 m above sea
level.
• Before switching on the balance, leave the parts to reach room temperature (+5 to 40°C).
Ensure that the relative humidity is between 10% and 80% and non-condensing conditions are met.
• The power plug must be easily accessible.
• Find a firm horizontal location which is as free from
vibrations as possible.
• Avoid direct sunlight.
• Avoid excessive temperature fluctuations.
• Avoid powerful drafts.
• Ensure that the surroundings as free from dust as
possible.
12 Precision and Analytical Balances
Page 13

3.3 Installing components
1
2
1
1
2
3
Balances with readability of 0.1 mg
Place the following components on the balance in the specified order:
1 Push the side glass doors back as far as they will go.
2 Insert the draft shield element (1).
3 Insert the weighing pan (2).
Balances with readability of 1 mg
Place the following components on the balance in the specified order:
1 Push the side glass doors back as far as they will go.
2 Insert the weighing pan (1).
Balances with readability of 10 mg / 100mg
Place the following components on the balance in the specified order:
1 Place the draft shield element (1).
2 Carefully pull apart the draft shield element to fix it
under the retaining plate.
3 Place the pan support (2).
4 Place the weighing pan (3).
13Precision and Analytical Balances
Page 14

3.4 Connecting the balance
WARNING
Risk of electric shock
Contact with parts that contain a live current can lead to injury and death.
1 Only use the METTLER TOLEDO power supply cable and AC/DC adapter designed for your
balance.
2 Connect the power cable to a grounded power outlet.
3 Keep all electrical cables and connections away from liquids and moisture.
4 Check the cables and power plug for damage and replace damaged cables and power
plugs.
NOTICE
Risk to the AC/DC adapter due to overheating
If the AC/DC adapter is covered or in a container, it is not sufficiently cooled and will overheat.
1 Do not cover the AC/DC adapter.
2 Do not put the AC/DC adapter in a container.
The balance is supplied with a universal AC/DC adapter or an AC/DC adapter with a country-specific power
cable.
• Install the cables so that they cannot be damaged or interfere with operation.
• Insert the power cable in a grounded power outlet that is easily accessible.
1 Connect the AC/DC adapter to the connection socket
on the back of your balance (see figure) and to the
power line.
2 Screw the plug tight to the balance.
ð The balance is ready for use.
3.5 Setting up the balance
3.5.1 Switching on the balance
Before using the balance, it must be warmed up in order to obtain accurate weighing results. To reach
operating temperature, the balance must be connected to the power supply for at least 30 minutes (60
minutes for 0.1mg models).
The balance is connected to the power supply.
§
− Press
ð The balance is ready to use.
When the balance is switched on for the first time, the Weighing application home screen will open. If the
balance is switched on again, it will always go to the home screen of the application last used before
switching it off.
3.5.2 Leveling the balance
Exact horizontal and stable positioning are essential for repeatable and accurate weighing results.
14 Precision and Analytical Balances
.
ð After the start screen has disappeared, the application home screen will open.
Page 15

There are two adjustable leveling feet to compensate for slight irregularities in the surface of the weighing
bench.
The balance must be leveled and adjusted each time it is moved to a new location.
1 Position the balance at the selected location.
2 Align the balance horizontally.
3 Turning the two front leveling feet of the housing until
the air bubble is in the middle of the glass.
Example
Air bubble at 12 o'clock: turn both feet clockwise.
Air bubble at 3 o'clock: turn left foot clockwise, right foot counterclockwise.
Air bubble at 6 o'clock: turn both feet counterclockwise.
Air bubble at 9 o'clock: turn left foot counterclockwise, right foot clockwise.
3.5.3 Adjusting the balance
To obtain accurate weighing results, the balance must be adjusted to match the gravitational acceleration at
its location. This is also dependent on the ambient conditions. After reaching the operating temperature, it is
important to adjust the balance in the following cases:
• Before the balance is used for the first time.
• After reaching the operating temperature.
• If the balance has been disconnected from the power supply or in the event of power failure.
• After significant environmental changes (e. g. temperature, humidity, air draft or vibrations)
• At regular intervals during weighing service.
3.6 Performing a simple weighing
Navigation:
This section describes how to perform a simple weighing operation. The basic navigation concept and the
basic functions of the balance are also explained.
When you switch on the balance for the first time, the Weighing application home screen opens automatically. If the balance has already been used, the application that was last used before the balance was
switched off will open. If another application is running, switch to Weighing.
1 Press
ð The application home screen appears.
2 Place the sample on the weighing pan.
ð The instability symbol
3 Wait until the instability symbol
blue again.
ð The weighing process is complete.
ð The results are now displayed.
Zeroing
Use the
1 Unload the balance.
2 Press
ð All weight values are measured in relation to this zero point.
> Activities - Weighing applications > Weighing
to zero the balance.
appears and the value in the weighing value field becomes light blue.
disappears and the value in the weighing value field becomes dark
zeroing key before starting to weigh anything.
to zero the balance.
15Precision and Analytical Balances
Page 16

Taring
If you are working with a weighing container, tare the balance.
1 Place a container on the weighing pan.
ð The weight is displayed.
2 Press
ð 0.000 g and Net appears in the display. Net indicates that all weight values displayed are net
3 Place the sample in the container.
ð The results are now displayed.
• If the container is removed from the balance, the tare weight will be shown as a negative value.
• The tare weight remains stored until the
to tare the balance.
values.
key is pressed again or the balance is switched off.
Switching off
1 Press and hold
2 Tap
• After switching on from standby mode, the balance does not need to warm up. It is immediately ready to
• If the balance has been switched off manually, the display will also be off.
to confirm.
ð The balance switches off and enters standby mode.
start weighing.
To switch off the balance fully, it must be disconnected from the power supply.
until the dialog Switch-off appears.
4 Maintenance
4.1 Cleaning and servicing
Clean the weighing pan, draft shield element, bottom plate, draft shield (depending on the model) and
housing of your balance at regular intervals. The balance is made from high-quality, durable materials and
can therefore be cleaned using a damp cloth or a standard cleaning agent.
To thoroughly clean the draft shield glass panels, remove the draft shield from the balance. When
reinstalling the draft shield, make sure it is in the correct position.
Please observe the following notes
WARNING
Risk of electric shock
Contact with parts carrying a live current can lead to injury and death.
1 Disconnect the balance from the power supply prior to cleaning and maintenance.
2 Only use METTLER TOLEDO power cables if they need to be replaced.
3 Prevent liquid from entering the balance, terminal or AC/DC adapter.
4 Do not open the balance, terminal or AC/DC adapter.
They do not contain any parts that can be serviced by the user.
NOTICE
Risk of damage to balance due to inappropriate cleaning methods
The balance is made from high quality, resistant materials and can be damaged by certain
cleaning agents, solvents or abrasives. Any liquid that enters the housing may damage the
balance.
1 Use water and a mild detergent to clean the balance or terminal.
2 Wipe off any spills immediately.
3 Prevent liquid from entering the interior of the balance.
16 Precision and Analytical Balances
Page 17

Contact a METTLER TOLEDO representative to find about the service options available – regular maintenance
by an authorized service engineer will ensure consistent weighing accuracy over the long term and extend
the service life of the balance.
4.2 Cleaning the draft shield (0.1mg and 1mg models)
Removing or inserting sliding glass doors
It is possible to remove the sliding glass doors for cleaning or for replacing.
Note
Front and rear glass panels cannot be removed.
1 Remove the handle.
2 Pull the side glass out to the rear.
After cleaning, reinstall all components in the reverse
order. Installing the handle after insertion of the glass
door.
17Precision and Analytical Balances
Page 18

5 Technical Data
5.1 General data
WARNING
Risk of electric shock
Contact with parts that contain a live current can lead to injury and death.
1 Only use an approved AC/DC adapter with a current-limited SELV output.
2 Ensure correct polarity
Standard power supply
AC/DC adapter: Primary: 100 – 240 V, ±10%, 50/60Hz, 0.3 A
Balance power supply: 12 V DC, 0.84 A
NOTICE
If the balance is used above 2000 m mean sea level, the optional power supply must be
used.
Optional power supply
AC/DC adapter: Primary: 100 – 240 V, ±10%, 50/60Hz
Cable for AC/DC adapter: 3-core, with country-specific plug
Balance power supply: 12 V DC ±3%, 2.25 A, maximum ripple: 80 mVpp
Protection and standards
Overvoltage category: II
Degree of pollution: 2
Protection: Protected against dust and water
Standards for safety and EMC: See Declaration of Conformity
Range of application: For use in closed interior rooms only
Environmental conditions
Height above mean sea level: Depending on the power adapter (2000 - 4000 m)
Ambient temperature: Operating conditions for ordinary lab application: +10 to 30°C
Relative air humidity: 10% up to 80% at 31°C with a linear decrease to 50% at
Warm-up time: At least 30 minutes (60 minutes for 0.1 mg models) after
Secondary: 12 V DC, 0.84 A (with electronic overload
protection)
Can be used up to 2000 m above mean sea level.
Secondary: 12 V DC ±3%, 2.5 A (with electronic overload
protection)
Can be used up to 4000 m above mean sea level.
Except for China: max. 2000 m
(operability guaranteed between +5 and 40°C)
40°C, non-condensing
connecting the balance to the power supply. When switched on
from standby, the instrument is ready for operation
immediately.
18 Precision and Analytical Balances
Page 19

Materials
Housing: Top housing: Plastic (ABS)
Bottom housing: Die-cast aluminum
Weighing pan: Pan ø 90 mm: Stainless steel X2CrNiMo 17-12-2 (1.4404)
All others: Stainless steel X5CrNi 18-10 (1.4301)
Draft shield element: 0.1 mg models: Stainless steel X5CrNi 18-10 (1.4301)
Draft shield: Plastic (ABS), glass
Protective cover: Plastic (PET)
TFT touch screen surface: Glass
19Precision and Analytical Balances
Page 20

20 Precision and Analytical Balances
Page 21

Page 22

Page 23

Page 24

Mettler-Toledo GmbH
30203401
Im Langacher 44
8606 Greifensee, Switzerland
www.mt.com/contact
Subject to technical changes.
© Mettler-Toledo GmbH 08/2017
30203401Cen
www.mt.com/balances
For more information
 Loading...