

Page 1

METTLER TOLEDO
METTLER TOLEDO
METTLER T
O
L
EDO
Precision and Analytical Balances
User Manual
ME
Page 2

Page 3

EULA
The software in this product is licensed under the METTLER TOLEDO End User
License Agreement (EULA) for Software.
When using this product you agree to the terms of the EULA.
This User Manual is a brief instruction that provides information to handle with the first steps of the
instrument in a safe and efficient manner. Personnel must have carefully read and understood this
manual before performing any tasks.
For full information, always consult the Reference Manual (RM).
u www.mt.com/EULA
u www.mt.com/me-RM
3Precision and Analytical Balances
Page 4
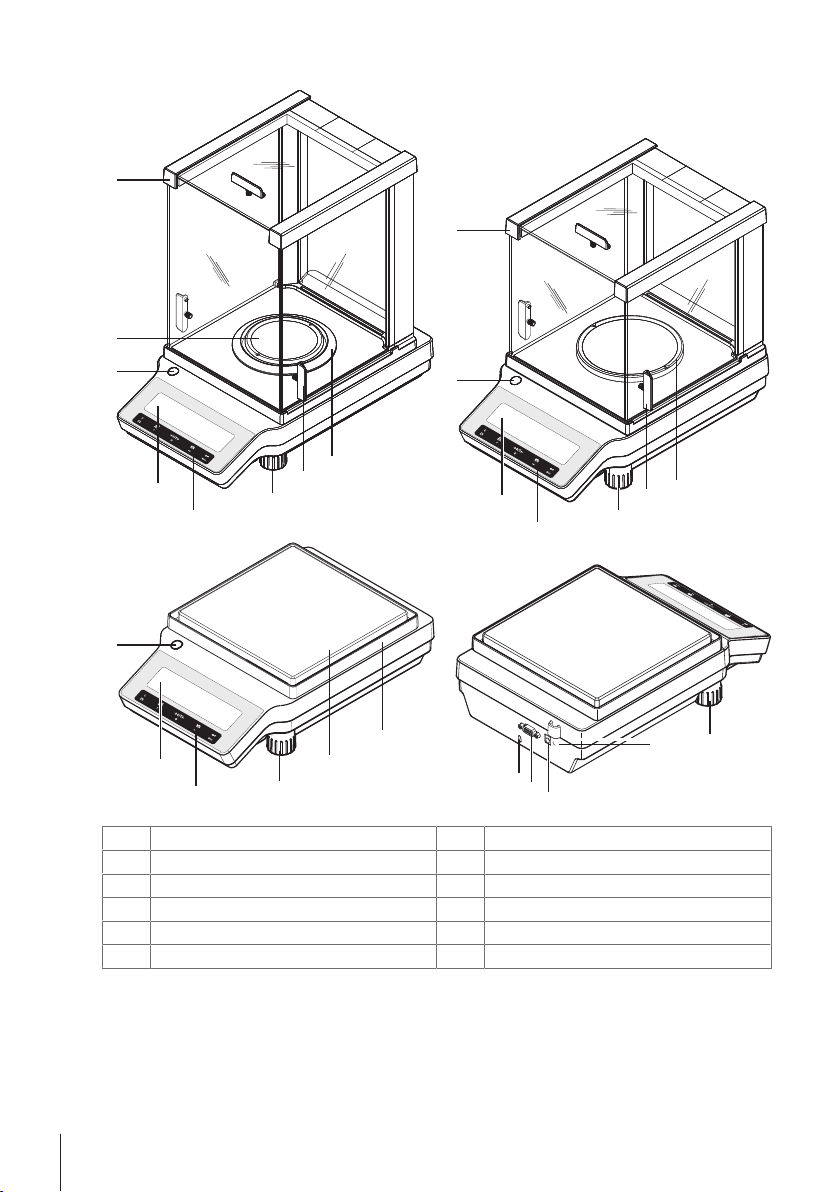
Overview balance
METT
LER TOLEDO
METT
LER TOLEDO
M
ETTLER TOLEDO
METTLER TOLEDO
11
8
10
1
2
3
3
3
3
1
2
1
2
7
7
7
9
9
5
6
5
4
4
5
6
0.1 mg
1 mg
10 mg~100 mg
12
Display
1
Leveling foot
3
Weighing pan
5
Level indicator
7
Glass draft shield
9
Socket for AC adapter
11
Operation keys
2
Handle for operation of the draft shield door
4
Draft shield element
6
Kensington slot for anti-theft purposes
8
RS232C serial interface
10
Legal for Trade (LFT) sealing
12
Overview balance4 Precision and Analytical Balances
Page 5
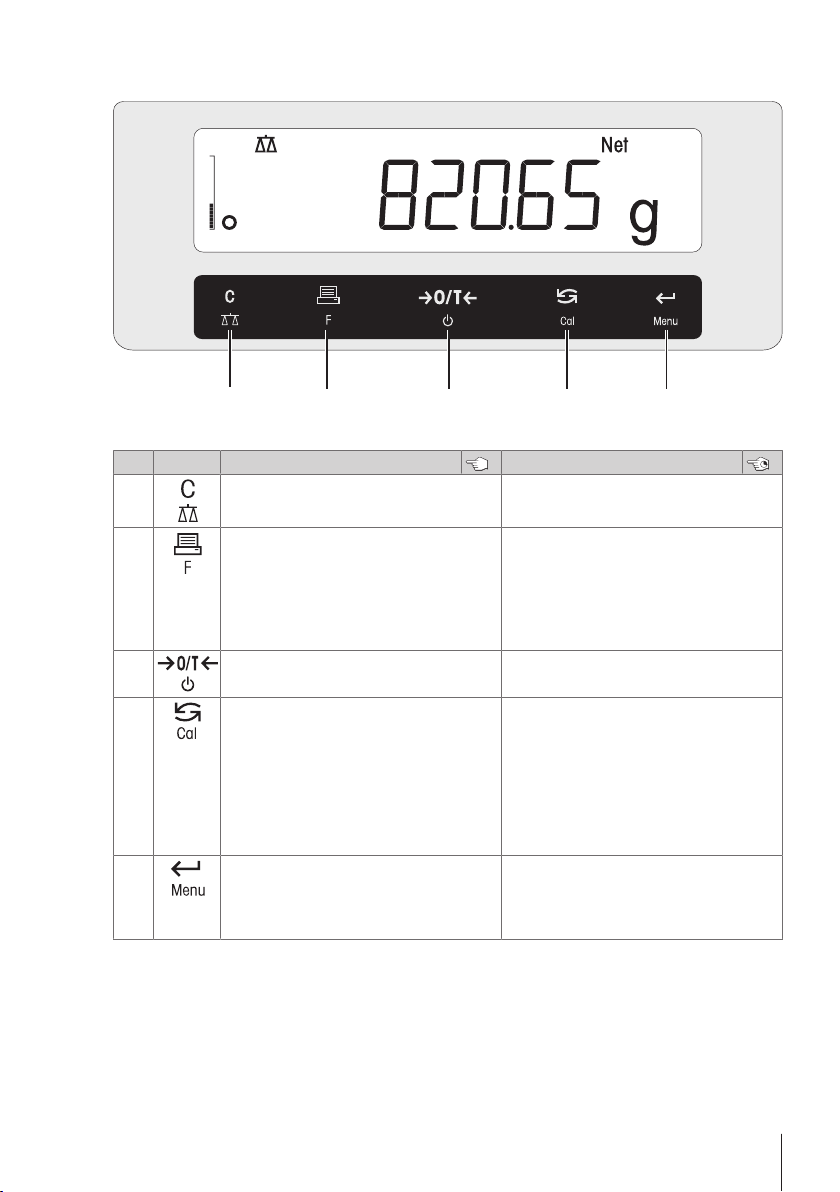
Overview operation keys
1 2 3 4 5
Legend key functions
No. Key Press briefly (less than 1.5 s) Press and hold (longer than 1.5 s)
1
2
• Cancel or leave menu without saving
• One step back in the menu
• Print display value
• Transmit data
• To navigate backwards in the menu or
menu selection
• Decrease parameters in menu or appli-
cations
3
4
• Zero/Tare
• Switch on
• With entries, scroll down
• To navigate forward menu topics or menu
selections
• To toggle between unit 1, recall value (if
selected), unit 2 (if different from unit 1)
and the application unit (if any)
• Increase parameters in menu or appli-
cations.
5
• Enter or leave menu selection
• To enter application parameter digit and
switch to next parameter digit
• To accept parameter in menu selection.
• Select the simple weighing application
• Exit application
• Open the application list for selecting an
application
• Switch off into standby mode
• Select adjustment (calibration)
– with internal weight *
– with external weight
– Customer fine adjustment *
* On models with internal weight only
• Enter or leave menu (parameter settings)
• To store parameter
• To accept numeric inputs in applications.
Overview operation keys 5Precision and Analytical Balances
Page 6

1 Safety Information
Two documents named "User Manual" and "Reference Manual" are available for this instrument.
• The User Manual is printed and delivered with the instrument.
• The electronic Reference Manual contains a full description of the instrument and its use.
• Keep both documents for future reference.
• Include both documents if you transfer the instrument to other parties.
Only use the instrument according to the User Manual and the Reference Manual. If you do not use the
instrument according to these documents or if the instrument is modified, the safety of the instrument may be
impaired and Mettler-Toledo GmbH assumes no liability.
1.1 Further applicable documents
This User Manual is a brief instruction that provides information to handle with the first steps of the
instrument in a safe and efficient manner. Personnel must have carefully read and understood this
manual before performing any tasks.
For full information, always consult the Reference Manual (RM).
u www.mt.com/me-RM
Search for software downloads u www.mt.com/labweighing-software-download
1.2 Definitions of signal warnings and warning symbols
Safety notes contain important information on safety issues. Ignoring the safety notes may lead to personal
injury, damage to the instrument, malfunctions and false results. Safety notes are marked with the following
signal words and warning symbols:
Signal words
WARNING
CAUTION
NOTICE
Warning symbols
Electrical shock
A hazardous situation with medium risk, possibly resulting in death or severe injury if not
avoided.
A hazardous situation with low risk, resulting in minor or moderate injury if not avoided.
A hazardous situation with low risk, resulting in damage to the instrument, other material
damage, malfunctions and erroneous results, or loss of data.
General hazard: read the documentation for information about the hazards and the resulting
measures.
Notice
1.3 Product specific safety notes
Intended use
This instrument is designed to be used in laboratories by trained staff. The instrument is intended for weighing
purposes.
Any other type of use and operation beyond the limits of technical specifications without written consent from
Mettler-Toledo GmbH is considered as not intended.
Safety Information6 Precision and Analytical Balances
Page 7
Responsibilities of the instrument owner
The instrument owner is the person holding the legal title to the instrument and who uses the instrument or
authorizes any person to use it, or the person who is deemed by law to be the operator of the instrument. The
instrument owner is responsible for the safety of all users of the instrument and third parties.
METTLER TOLEDO assumes that the instrument owner trains users to safely use the instrument in their workplace
and deal with potential hazards. METTLER TOLEDO assumes that the instrument owner provides the necessary
protective gear.
Personal protective equipment
Chemical resistant safety gloves are intended to protect hands against aggressive chemicals.
The protective goggles protect the eyes from flying parts and liquid splashes.
Safety notes
WARNING
Death or serious injury due to electric shock
Contact with parts that carry a live current can lead to death or injury.
1 Only use the approved METTLER TOLEDO power supply cable and AC/DC adapter with a
current-limited SELV output.
2 Connect the power cable to a grounded power outlet, ensure correct polarity.
3 Keep all electrical cables and connections away from liquids and moisture.
4 Check the cables and power plug for damage and replace damaged cables and power plugs.
NOTICE
Damage to the instrument due to the use of unsuitable parts
Using unsuitable parts with the instrument can damage the instrument or cause it to malfunction.
− Only use parts from METTLER TOLEDO that are intended to be used with your instrument.
NOTICE
Damage to the instrument or software
In some countries, excessive mains voltage fluctuations and strong glitches may occur. This may
affect the instrument functions or damage the software.
− Use a voltage regulator for stabilizing.
Safety Information 7Precision and Analytical Balances
Page 8

2 Design and Function
Application Icons
Status Icons
Weighing-in aid
Weight Value Field
Unit Field
2.1 Display
Application Icons
Application "Weighing" Application “Totaling”
Application "Piece counting" Application “Dynamic weighing”
Application "Percent weighing" Application “Multiplication factor”
Application "Check weighing" Application “Division factor”
Application "Statistics" Application “Density”
Application “Formulation / Net-Total” Menu locked
While an application is running, the corresponding application icon appears at the top of the display.
Status Icons
Indicates stored value (Memory) Feedback for pressed keys
Indicates Net weight values Weighing range 1 (Dual Range models only)
Adjustments (calibration) started Weighing range 2 (Dual Range models only)
Service reminder
Weight Value Field and Weighing-in aid
Indicates negative values Brackets to indicate uncertified digits
Indicates unstable values Marking of nominal or target weight
Indicates calculated values Marking of tolerance limit T+
(approved models only)
Marking of tolerance limit T-
Design and Function8 Precision and Analytical Balances
Page 9
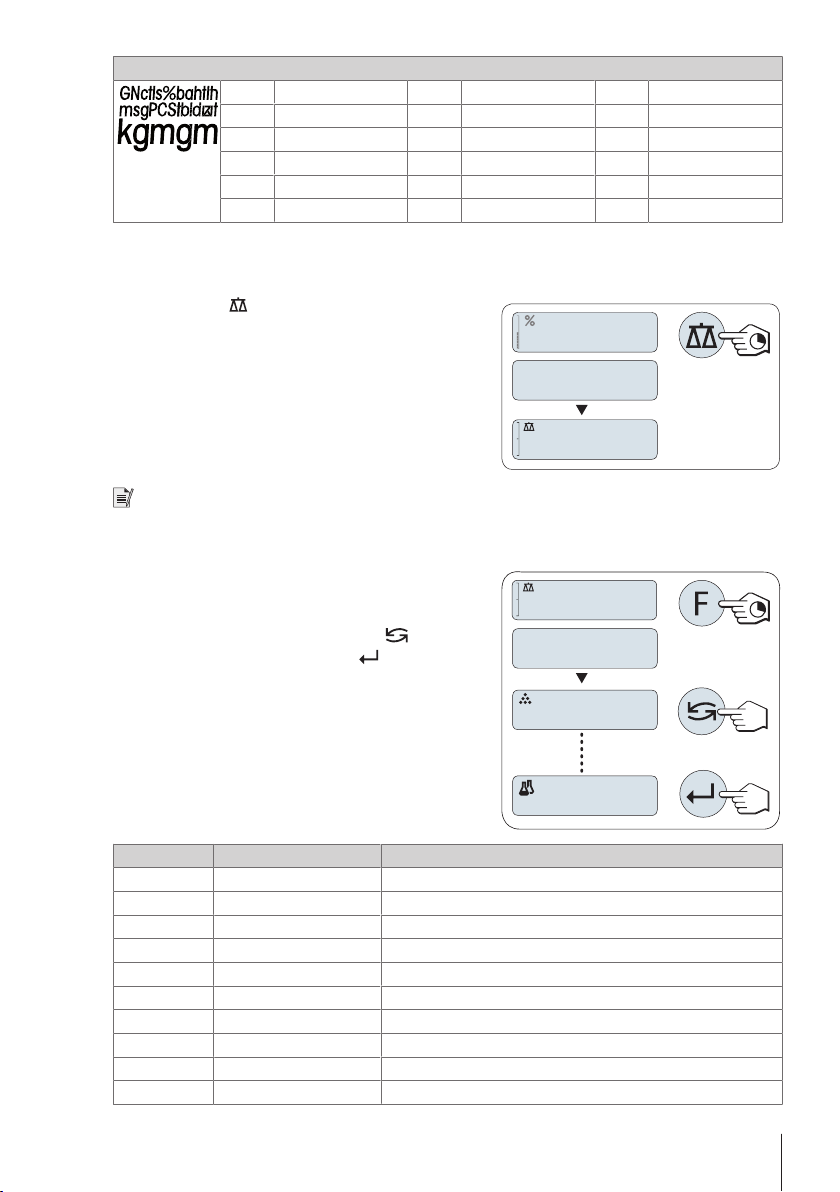
Unit Field
WEIGH
0.00
g
I00.0%
APP.LIST
0.00
g
COUNT
FORMULA
gram
g
kilogram
kg
milligram
mg
lb
oz
carat
ct
pound
ounce
dwt
mom
msg
2.2 Basic principles for operation
Selecting simple weighing or terminate application
− Press and hold until WEIGH appears on the display.
ð The balance returns to the simple weighing mode.
Note
How to perform simple weighing see Performing a simple weighing.
Selecting an application
1 Press and hold F until APP.LIST (application list).
ð Last active application, e.g., COUNT appears on the
display.
2 Select an application by multiple pressing
3 To execute selected application press
Available applications
.
.
troy ounce
ozt
grain
GN
pennyweight
momme
mesghal
Hong Kong taels
tlh
tls
tlt
tola
baht
Singapore taels
Taiwan taels
tola
baht
Display Remark Description
COUNT
PERCENT
CHECK
STAT
FORMULA
TOTAL
DYNAMIC
FACTOR.M
FACTOR.D
DENSITY
Piece counting
Percent weighing
Checkweighing
Statistics
Formulation / Net-Total
Totaling
Dynamic weighing
Multiplication factor
Division factor
Density
see Application "Piece Counting"
see Application "Percent Weighing"
see Application "Check Weighing"
see Application "Statistics"
see Application "Formulation" (Net Total Formulation)
see Application "Totaling"
see Application "Dynamic Weighing"
see Application "Multiplication Factor Weighing"
see Application "Division Factor Weighing"
see Application "Density"
Design and Function 9Precision and Analytical Balances
Page 10
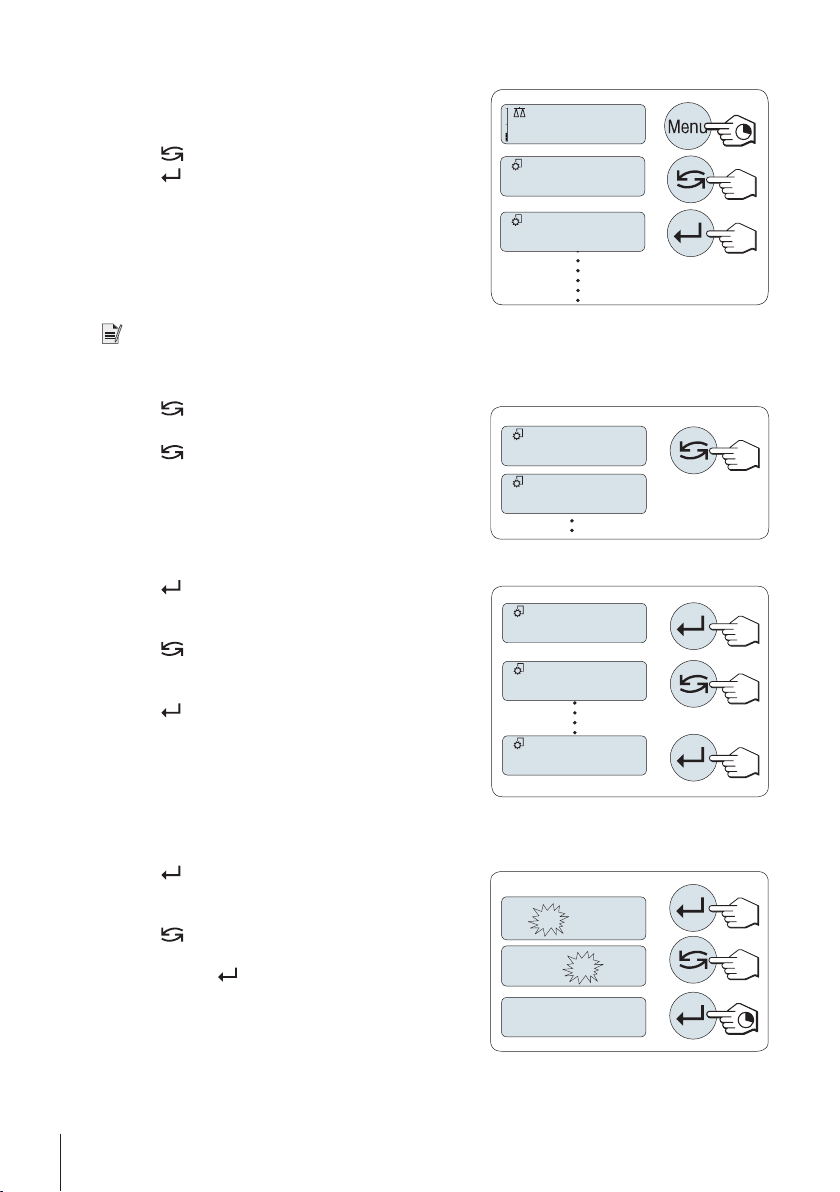
Entering the menu
406.2
g
ADVANCE
BASIC
TIME
DATE
ENVIRON.
STABLE
ENVIRON.
01. 2500
01. 6500
01.6500
1 Press and hold Menu to enter main menu.
ð The first menu BASIC is displayed (except menu
protection is active).
2 Press
3 Press
Detailed description of the menu see The Menu.
Selecting menu topics
1 Press .
2 Press
Changing settings in selected menu topic
1 Press .
2 Press
3 Press
For store the setting see section Saving settings and closing
the menu.
repeatedly to change menu.
to confirm the selection.
Note
ð The next menu topic appears in the display.
repeatedly, the balance switches to the next
menu topic.
ð The display shows the current setting in the selected
menu topic.
repeatedly, the balance switches to the next
selection.
ð After the last selection, the first is shown again.
to confirm the setting.
Changing settings in a submenu selection
The same procedure as for menu topics.
Input principle of numerical values
1 Press to select a digit (cyclically from left to right) or a
value (depending on the application).
ð The selected digit or the selected value is blinking.
2 Press
3 Press and hold
Design and Function10 Precision and Analytical Balances
to increase or F to decrease for changing
blinking digits or values.
to confirm the value.
Page 11
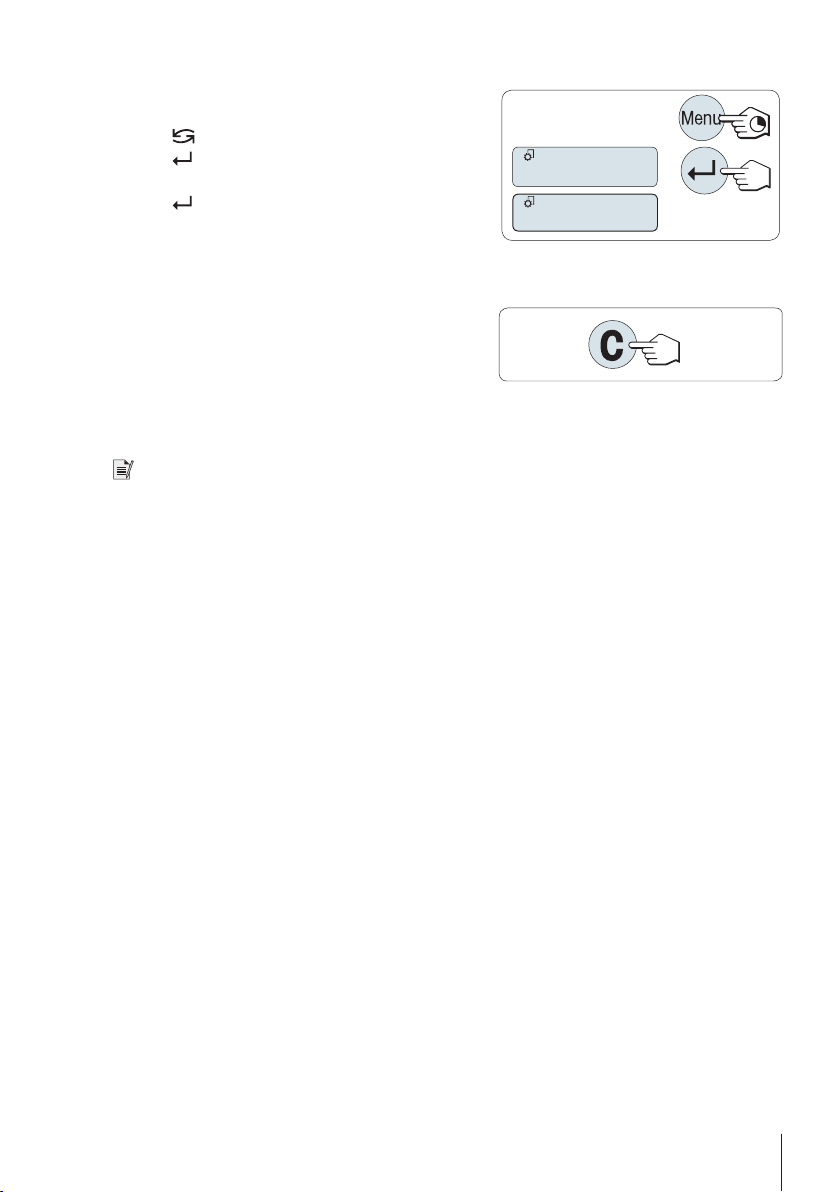
Saving settings and closing the menu
SAVE:YES
SAVE:NO
1 Press and hold Menu to leave menu topic.
ð SAVE:YES appears on the display.
2 Press
3 Press
4 Press
to toggle between SAVE:YES and SAVE:NO.
to execute SAVE:YES.
ð Changes are saved.
to execute SAVE:NO.
ð Changes are not saved.
Cancel
During menu operation
§
1 Press C for leaving menu topic or menu selection without
saving (one step back in the menu).
2 To leave menu topic or menu selection without saving
press C (one step back in the menu).
During application operation
§
− Press C to cancel settings.
ð The balance returns to the previous active application.
Note
If no entry is made within 30 seconds, the balance reverts to last active application mode. Changes are not
saved. If changes are made, the balance asks SAVE:NO.
Design and Function 11Precision and Analytical Balances
Page 12

3 Installation and Putting into Operation
3.1 Selecting the location
A balance is a sensitive precision instrument. The location where it is placed will have a profound effect on the
accuracy of the weighing results.
Requirements of the location
According to the environmental condition, see chapter "General data".
Ensure that the instrument is:
• indoor on
stable table
Avoid:
• direct sunlight • vibrations • strong drafts • temperature
3.2 Scope of delivery
Components 0.1 mg 1 mg 10 mg / 100 mg
Draft shield high, 235 mm – –
Weighing pan with pan support ø 90 mm – –
Draft shield element –
Pan support – –
Protective cover
Universal AC/DC adapter
User Manual
Declaration of conformity
• with sufficient
distance
(>15cm)
low, 170 mm – –
ø 120 mm – –
180 × 180 mm – –
• in level • adequately lit
fluctuations
3.3 Unpacking
Open the balance packaging. Check the balance for transport damage. Immediately inform a METTLER TOLEDO
representative in the event of complaints or missing accessories.
Retain all parts of the packaging. This packaging offers the best possible protection for transporting the balance.
Installation and Putting into Operation12 Precision and Analytical Balances
Page 13

3.4 Installing components
METTLER
TOLE
DO
1
2
M
ET
T
LER TOLE
DO
1
CAUTION
Injury due to breaking glass
Careless handling with the glass components can lead to breakage off glass and damage
cuttings.
− Always proceed focused and with care.
Balances with a readability of 0.1 mg with draft shield (235mm)
Place the following components on the balance in the specified order:
Push the side glass doors back as far as they will go.
§
1 Place draft shield element (1).
2 Place weighing pan (2).
Balances with a readability of 1 mg with draft shield (170mm)
Place the following components on the balance in the specified order:
Push the side glass doors back as far as they will go.
§
1 Push the side glass doors back as far as will go.
2 Place weighing pan (1).
Installation and Putting into Operation 13Precision and Analytical Balances
Page 14

Balances with a readability of 10 mg / 100 mg
METTLER TOLEDO
1
2
3
Place the following components on the balance in the specified order:
1 Place draft shield element (1): carefully pull apart the draft
shield element to fix it under the retaining plate.
2 Insert pan support (2).
3 Place weighing pan (3).
See also
2 Cleaning the glass draft shield}Page22
Installation and Putting into Operation14 Precision and Analytical Balances
Page 15

3.5 Installing protective cover
METTLER TOLEDO
METTLER TOLEDO
NOTICE
Damage to the instrument due to the use of unsuitable parts
Using unsuitable parts with the instrument can damage the instrument or cause it to malfunction.
− Only use parts from METTLER TOLEDO that are intended to be used with your instrument.
Balances with readability of 0.1mg / 1mg Balances with readability of 10 mg / 100 mg
Install the protective cover according to the illustrations
below, using a screwdriver Philips No. 2.
Install the protective cover according to the illustrations
below, using a screwdriver Torx TX20.
Installation and Putting into Operation 15Precision and Analytical Balances
Page 16

3.6 Connecting the balance
WARNING
Death or serious injury due to electric shock
Contact with parts that carry a live current can lead to death or injury.
1 Only use the approved METTLER TOLEDO power supply cable and AC/DC adapter with a
current-limited SELV output.
2 Connect the power cable to a grounded power outlet, ensure correct polarity.
3 Keep all electrical cables and connections away from liquids and moisture.
4 Check the cables and power plug for damage and replace damaged cables and power plugs.
NOTICE
Damage to the AC/DC adapter due to overheating
If the AC/DC adapter is covered or in a container, it is not sufficiently cooled and will overheat.
1 Do not cover the AC/DC adapter.
2 Do not put the AC/DC adapter in a container.
The balance is supplied with an universal AC/DC adapter and a country-specific plug. The AC/DC adapter is
suitable for use with the following voltage range: 100 – 240 V AC, 50/60 Hz.
• Install the cables so that they cannot be damaged or interfere with operation.
• Insert the power cable in power outlet that is easily accessible.
− Connect the AC/DC adapter to the connection socket on the
back of your balance (see figure) and to the power line.
ð The balance performs a display test (all segments in
the display light up briefly), WELCOME, Software
version, Maximum load and Readability appears
briefly.
ð The balance is ready for use.
Installation and Putting into Operation16 Precision and Analytical Balances
Page 17

3.7 Setting up the balance
0.00
g
MT.GREEN
3.7.1 Switching on the balance
Before using the balance, it must be warmed up in order to obtain accurate weighing results. To reach operating
temperature, the balance must be connected to the power supply for at least 30 minutes (60 minutes for 0.1mg
models).
The balance is connected to the power supply.
§
The balance is in STANDBY mode. MT.GREEN appears on
§
the display.
− Press
ð The balance is ready for weighing or for operation with the
Legal-for-trade
Approved balances can only be switched on by pressing
3.7.2 Leveling the balance
Exact horizontal and stable positioning are essential for repeatable and accurate weighing results.
There are two adjustable leveling feet to compensate for slight irregularities in the surface of the weighing bench.
The balance must be leveled and adjusted each time it is moved to a new location.
1 Position the balance at the selected location.
2 Align the balance horizontally.
3 Turning the two front leveling feet of the housing until the
.
last active application.
in selected countries.
air bubble is in the middle of the glass.
Example
Air bubble at 12 o'clock: turn both feet clockwise.
Air bubble at 3 o'clock: turn left foot clockwise, right foot
Air bubble at 6 o'clock: turn both feet counterclockwise.
Air bubble at 9 o'clock: turn left foot counterclockwise,
counterclockwise.
right foot clockwise.
3.7.3 Setting date and time
When you put your new instrument into operation for the first time, you should enter the current date and time.
Installation and Putting into Operation 17Precision and Analytical Balances
Page 18

Note
BASIC
SET.TIME
DATE
TIME
06.05.12
13.30
SAVE:YES
DATE
TIME
+1H
• These settings are retained even if you disconnect your instrument from the power supply.
• A reset of the instrument will not change these settings.
• Set the current date according to the date format DATE.FRM in the menu ADVANCE..
• Set the current time according to the time format TIME.FRM in the menu ADVANCE..
1 Press and hold Menu until menu BASIC appears on the
display.
2 Press
3 Press
4 Set current date. Press
5 Press and hold
6 Set current time. Press
7 Press
8 Select SET.TIME by pressing
9 Press
10 Press
11 Press and hold
12 Press and hold
13 Press
to open menu BASIC.
ð DATE appears.
to confirm.
press
to set current day, month or year.
ð DATE appears..
to confirm.
ð +1H appears.
to confirm.
to select hours or minutes; press to set
current hours or minutes.
ð TIME appears.
ð SAVE:YES appears.
to confirm.
to select day, month or year;
to confirm the settings.
to select TIME.
to confirm the settings.
to store the settings.
.
Installation and Putting into Operation18 Precision and Analytical Balances
Page 19

3.7.4 Adjusting the balance
1250.38
0.00
1182.03
C
¢¢¢¢¢¢¢¢
¢¢¢¢¢¢
#
0.00
121.01
g
¢¢¢¢
#
0.01
g
0.00
g
C
To obtain accurate weighing results, the balance must be adjusted to match the gravitational acceleration at its
location. This is also dependent on the ambient conditions. After reaching the operating temperature, it is
important to adjust the balance in the following cases:
• Before the balance is used for the first time.
• If the balance has been disconnected from the power supply or in the event of power failure.
• After significant environmental changes, e.g., temperature, humidity, air draft or vibrations.
• At regular intervals during weighing service.
For full information, always consult and download the Reference Manual (RM).
u www.mt.com/me-RM
3.8 Performing a simple weighing
The weighing application allows you to perform simple weighings and how you can accelerate
the weighing process.
If your balance is not in the weighing mode, press and hold the
display. Release the key. Your balance is in the weighing mode and set to zero.
1 Press to zero the balance.
2 Place weighing sample on the weighing pan.
3 Wait until the instability detector
stability beep sounds.
4 Read the result.
disappears and the
key down until WEIGHING appears in the
Zeroing
Use the
1 Unload the balance.
2 Press
All weight values are measured in relation to this zero
point.
Taring
If you are working with a weighing container, first set the balance to zero.
zeroing key before you start with a weighing.
to set the balance to zero.
Installation and Putting into Operation 19Precision and Analytical Balances
Page 20

C
121.01
g
¢¢¢¢
0.00
g
0.00
g
¢¢¢¢
95.97
g
¢¢¢¢¢¢¢
121.01
g
¢¢¢¢
-
N
et
Net
Net
#
C
C
1 Place empty container on the weighing pan.
0.00
g
MT.GREEN
ð The weight is displayed.
2 Press
ð 0.00 g and Net appears in the display. Net indicates
that all weight values displayed are net values.
3 Place weighing sample into the weighing container.
ð The result appears in the display.
• If the container is removed from the balance, the tare
weight will be shown as a negative value.
• The tare weight remains stored until the
pressed again or the balance is switched off.
to set the balance to zero.
key is
Switching off
− Press and hold the key until STANDBY appears on the
display. Release the key.
ð MT.GREEN appears on the display.
• After switching on from standby mode, your balance needs
no warm-up time and is immediately ready for weighing.
• To completely switch off the balance, disconnect it from the
power supply.
Legal-for-trade
Standby mode is not possible with approved balances (only available in selected countries).
For full information, always consult and download the Reference Manual (RM).
3.9 Transporting the balance
1 Press and hold the key.
2 Disconnect the balance from the power supply.
3 Disconnect all interface cables.
Installation and Putting into Operation20 Precision and Analytical Balances
Injury due to breaking glass
Careless handling with the glass components can lead to breakage off glass and damage
cuttings.
1 Do not lift the instrument by the glass draft shield.
2 Always proceed focused and with care.
CAUTION
u www.mt.com/me-RM
Page 21

3.9.1 Transporting over short distances
M
ETTLER TOLEDO
To move the balance over a short distance to a new location, follow the instructions below.
1 Hold the balance with both hands as shown.
2 Carefully lift the balance and carry it to its new location.
If you want the balance put into operation, proceed as follows:
1 Connect in reverse order.
2 Level the balance.
3 Perform an internal adjustment.
3.9.2 Transporting over long distances
For transporting the balance over long distances, always using the original packaging.
3.9.3 Packaging and storage
Packaging
Store all parts of packaging in a save place. The elements of the original packaging are developed specifically for
the balance and its components to ensure maximum protection during transportation or storing.
Storage
Store the balance under following conditions:
• Indoor and in the original packaging.
• According to the environmental condition, see chapter "General data".
• When storing for longer than six months, the rechargeable battery maybe down (date and time get lost).
Installation and Putting into Operation 21Precision and Analytical Balances
Page 22

4 Maintenance
To guarantee the functionality of the balance and the accuracy of the weighing results, a number of maintenance
actions must be performed by the user.
4.1 Maintenance table
Maintenance action Recommended interval Remarks
Performing an internal
adjustment
Performing routine tests
(sensitivity test, repeatability test).
METTLER TOLEDO
recommends to perform at
least a sensitivity test.
Cleaning Depending on the degree of pollution or your
4.2 Performing routine tests
There are several routine tests. Depending on your internal regulations, specific routine test must be performed by
the user.
METTLER TOLEDO recommend to perform an sensitivity test after cleaning and reassembling the balance.
For full information, always consult and download the Reference Manual (RM).
• Daily
• After cleaning
• After leveling
• After changing the location
• After cleaning
internal regulations (SOP), clean the instrument:
• After every use
• After change of sample
see chapter "Adjustment with
internal weight"
see below
see chapter "Cleaning the
balance"
u www.mt.com/me-RM
4.3 Cleaning
WARNING
Death or serious injury due to electric shock
Contact with parts carrying a live current can lead to injury and death.
1 Disconnect the instrument from the power supply prior to cleaning and maintenance.
2 Prevent liquid from entering the instrument, terminal or AC/DC adapter.
4.3.1 Cleaning the glass draft shield
CAUTION
Injury due to breaking glass
Careless handling with the glass components can lead to breakage off glass and damage
cuttings.
− Always proceed focused and with care.
Removing or inserting sliding glass doors
It is possible to remove the sliding glass doors for cleaning or for replacing.
Maintenance22 Precision and Analytical Balances
Page 23

Note
Front and rear glass panels cannot be removed.
1 Remove the handle first.
2 Remove the sliding glass doors.
3 Install the handle after insertion of the glass door.
4.3.2 Cleaning the balance
NOTICE
Damage due to improper cleaning
Improper cleaning can damage the weighing cell or other essential parts.
1 Do not use any cleaning agents other than the ones specified in the Reference Manual or
Cleaning Guide.
2 Do not spray or pour liquids on the instrument. Always use a moistened lint-free cloth or a
tissue.
3 Always wipe out from inside to outside of the instrument.
Protective equipment:
• Gloves
• Goggles
The following procedures describe the cleaning of the weighing pan and all components.
Around the balance
− Remove any dirt or dust around the balance and avoid further contaminations.
Cleaning the balance
1 Use a lint-free cloth moistened with a mild cleaning agent to clean the surface of the balance.
2 Remove powder or dust at first with a disposable tissue.
3 Remove sticky substances with a damp lint-free cloth and a mild solvent, e.g., isopropanol or ethanol 70%.
Cleaning all removable parts
− Clean all removed part with a damp cloth or a tissue and a mild cleaning agent or clean them in a
dishwasher up to 80 °C.
Note
Useful details to avoid soiling are described in the METTLER TOLEDO "SOP for Cleaning a Balance".
4.3.3 Putting into operation after cleaning
1 Reassemble the balance.
2 Check the functionality of the draft shield.
3 Press
4 Warm up the balance. Wait 1h for the acclimatization, before starting the tests.
5 Check the level status, level the balance if necessary.
6 Perform an internal adjustment.
to switch on the balance.
Maintenance 23Precision and Analytical Balances
Page 24

7 Perform a routine test due to the internal regulations of your company. METTLER TOLEDO recommends to
perform an repeatability test after cleaning the balance.
8 Press
ð The balance has been putting into operation and is ready to use.
See also
2 Leveling the balance}Page17
to zero the balance.
Maintenance24 Precision and Analytical Balances
Page 25

5 Troubleshooting
Possible causes for faults and fault correction tasks are described in the following chapters. If there are faults that
cannot be corrected through the instructions below, contact the METTLER TOLEDO.
5.1 Error messages
Error message Possible cause Diagnostic Remedy
NO STABILTY
WRONG ADJUSTMENT
WEIGHT
REFERENCE TOO SMALL
EEPROM ERROR - PLEASE
CONTACT CUSTOMER
SERVICE
WRONG CELL DATA PLEASE CONTACT
CUSTOMER SERVICE
NO STANDARD
ADJUSTMENT - PLEASE
CONTACT CUSTOMER
SERVICE
PROGRAM MEMORY
DEFECT - PLEASE
CONTACT CUSTOMER
SERVICE
Vibrations at the
workplace.
Draft due to untight draft
shield and /or open
window.
The location is not suitable
for weighing.
Something is touching the
weighing pan.
Wrong adjustment weight. Check weight. Place correct weight on the
Reference for piece
counting too small.
Data in EEPROM
damaged.
Defect load cell data. – Please contact your
– – Please contact your
– – Please contact your
Place beaker with tap
water on the weighing
table. Vibrations cause
ripples on the water
surface.
• Protect weighing
location against
vibrations (vibration
absorber, etc.).
• Set weighing
parameters coarser
(change ENVIRON.
from STABLE to
STANDARD or even
UNSTABLE.
• Find a different
weighing location (by
agreement with
customer).
Make sure draft shield or
window is closed.
• Close draft shield or
window.
• Set weighing
parameters coarser
(change ENVIRON.
from STABLE to
STANDARD or even
UNSTABLE.
– Check and observe the
requirements for the
location, refer to the
"Selecting the location"
chapter.
Check for touching parts or
dirts.
Remove touching parts or
clean the balance.
weighing pan.
– Increase reference weight.
– Please contact your
METTLER TOLEDO-Support
representative.
METTLER TOLEDO-Support
representative.
METTLER TOLEDO-Support
representative.
METTLER TOLEDO-Support
representative.
Troubleshooting 25Precision and Analytical Balances
Page 26

Error message Possible cause Diagnostic Remedy
TEMP SENSOR DEFECT PLEASE CONTACT
CUSTOMER SERVICE
WRONG LOAD CELL
BRAND - PLEASE
CONTACT CUSTOMER
SERVICE
WRONG TYPE DATA SET PLEASE CONTACT
CUSTOMER SERVICE
Battery backup lost
ABOVE INITIAL ZERO
RANGE
BELOW INITIAL ZERO
RANGE
MEM FULL
FACTOR OUT OF RANGE
STEP OUT OF RANGE
OUT OF RANGE
Temperature sensor of
load cell defect.
Wrong load cell installed. – Please contact your
Wrong type data set. – Please contact your
Backup battery is empty.
This battery ensures that
the date and time are not
lost when the balance is
disconnected from power.
Wrong weighing pan.
Pan is not empty.
Wrong weighing pan.
Pan is missing.
Memory full. – Clear the memory by
Factor is outside the allow
range.
Step is outside the allow
range.
Sample weight is outside
the allow range.
– Please contact your
Connect the balance to the
power supply for charging
the battery (full capacity
after 2 days of charging).
Check weighing pan. Mount correct weighing
Check weighing pan. Mount correct weighing
– Select a new factor.
– Select a new step.
– Unload the pan and load a
METTLER TOLEDO-Support
representative.
METTLER TOLEDO-Support
representative.
METTLER TOLEDO-Support
representative.
Battery must be recharged.
Please contact METTLER
TOLEDO-Support representative.
pan or unload weighing
pan.
pan.
finishing all applications
where a measurement is
ongoing.
new sample weight.
5.2 Error symptoms
Error symptoms Possible cause Diagnostic Remedy
Display is dark Instrument is switched off. – Switch on the instrument.
Power plug not connected. Check Connect power cable to
Power supply not
connected to balance.
Power supply is faulty. Check/test Replace power supply.
Wrong power supply. Check that input data on
Connector socket on
balance is corroded or
faulty.
Display is faulty. Replace display. Please contact your
Operation Keys do not
work
Troubleshooting26 Precision and Analytical Balances
Keypad is defect. Replace the keypad. Please contact your
Check Connect power supply.
type plate match the power
supply values.
Check Please contact your
power supply.
Use proper power supply.
METTLER TOLEDO-Support
representative.
METTLER TOLEDO-Support
representative.
METTLER TOLEDO-Support
representative.
Page 27

Error symptoms Possible cause Diagnostic Remedy
The value drifts into plus or
minus
Room, environment not
suitable.
–
Environmental recommendations
• Windowless, non air-
conditioned room,
e.g., basement.
• Only one person in the
weighing room.
• Sliding doors.
Standard doors cause
pressure changes.
• No draft in weighing
room (check with
suspended threads).
• No air conditioning
(temperature
oscillates, draft).
• Acclimatize balance,
take dummy
measurements.
• Instrument uninter-
ruptedly connected to
the power supply (24h
per day).
Direct sunlight or other
heat source.
Is any sun shade (blinds,
curtains, etc.) available?
Select location according
to chapter "Selecting the
location" (customer
responsibility).
Weighing sample absorbs
moisture or evaporates
moisture.
• Is the weighing result
with a test weight
stable?
• Sensitive weighing
• Use aids.
• Cover weighing
sample.
samples e.g. paper,
cardboard, wood,
plastic, rubber, liquids.
Weighing sample is
electrostatically charged.
• Is the weighing result
with a test weight
stable?
• Sensitive weighing
• Increase air humidity
in weighing chamber
(45% - 50%).
• Use ionizer.
samples e.g. plastic,
powder, insulating
materials.
The value drifts into plus or
minus
(Continuation)
Weighing sample is hotter
or colder than the air in the
weighing chamber.
Instrument has not yet
reached thermal
equilibrium.
Weighing operation with
test weight does not show
this effect.
• Was there a power
outage?
• Was power supply
disconnected?
Bring weighing sample to
room temperature before
weighing.
• Acclimatize instrument
for at least 1 hour.
Depending on climatic
conditions, extend this
period accordingly.
• Instrument switched on
for at least 1 hour,
refer to the "General
data" chapter.
Troubleshooting 27Precision and Analytical Balances
Page 28

Error symptoms Possible cause Diagnostic Remedy
Display shows overload or
underload
The weight on the
weighing pan exceeds the
Check weight. Reduce the weight on the
weighing pan.
weighing capacity of the
instrument.
Wrong weighing pan. Slightly lift or press
Use proper weighing pan.
weighing pan. The weight
display appears.
No weighing pan. – Install weighing pan.
Incorrect zero point at
switch-on.
– • Switch off balance.
• Disconnect and
reconnect power cable.
Display flashes 0.0000 Loose cables. Check all cable
connections.
Connect all cables.
Please contact your
METTLER TOLEDO-Support
representative if the
problem persists.
Taring not possible Vibrations at the
workplace.
Display unstable. Press Tare again.
Place beaker with tap
water on the weighing
table. Vibrations cause
ripples on the water
surface.
• Protect weighing
location against
vibrations (vibration
absorber, etc.).
• Set weighing
parameters coarser
(change ENVIRON.
from STABLE to
STANDARD or even
UNSTABLE.
• Find a different
weighing location (by
agreement with
customer).
5.3 Status messages/Status icons
Status messages are displayed by means of small icons. The status icons indicate the following:
Icon Status description Diagnostic Remedy
Service due.
See menu topic SERV.ICON in
chapter "Description of menu
Please contact your METTLER
TOLEDO-Support representative.
topic" -> "Advanced menu".
5.4 Putting into operation after correction of fault
After correcting the fault, perform the following steps to put the balance into operation:
• Ensure that the balance is completely reassemble and cleaned.
• Reconnect the balance to the power supply.
Troubleshooting28 Precision and Analytical Balances
Page 29

6 Technical Data
6.1 General data
Standard power supply
AC/DC adapter: Primary: 100 - 240 V~ 0.5 A, 50 – 60 Hz
Balance power consumption: 12 V DC, 0.3 A
Optional power supply
AC/DC adapter: Primary: 100 - 240 V~ 0.8 A, 50 – 60 Hz 60 - 80 VA
Cable for AC/DC adapter: 3-core, with country-specific plug
Polarity:
Protection and standards
Overvoltage category: II
Degree of pollution: 2
Protection: Protected against dust and water
Standards for safety and EMC: See Declaration of Conformity
Range of application: For use in closed interior rooms only
Environmental conditions
Height above mean sea level: Up to 2000 m (Standard power supply)
Height above mean sea level: Up to 4000 m (Optional power supply)
Ambient temperature: 5 - 40 °C
Storage condition: -25 to 70 °C
Relative air humidity: Max. 80% up to 31°C, linearly decreasing to 50% at 40°C,
Warm-up time:
Secondary: 12 V 1 A MAX 23 - 34 VA LPS
If the balance is used above 2000 m mean sea level, the optional
power supply must be used
Secondary: 12 V DC, 2.5 A LPS (with electronic overload
protection)
with a current limited SELV (Safety Extra Low Voltage)
output
noncondensing
At least 30 minutes (0.1 mg models 60 minutes) after connecting
the balance to the power supply
Technical Data 29Precision and Analytical Balances
Page 30

Materials
Housing: Top housing: Plastic (ABS)
Weighing pan: Pan ø 90 mm: Stainless steel X2CrNiMo 17-12-2 (1.4404)
Draft shield element: 0.1 mg models: Stainless steel X5CrNi 18-10 (1.4301)
Draft shield: Plastic (ABS), glass
Protective cover: Plastic (PET)
Bottom housing: Die-cast aluminum, lacquered
All others: Stainless steel X5CrNi 18-10 (1.4301)
Technical Data30 Precision and Analytical Balances
Page 31

7 Disposal
In conformance with the European Directive 2012/19/EU on Waste Electrical and Electronic
Equipment (WEEE) this device may not be disposed of in domestic waste. This also applies to
countries outside the EU, per their specific requirements.
Please dispose of this product in accordance with local regulations at the collecting point specified for electrical
and electronic equipment. If you have any questions, please contact the responsible authority or the distributor
from which you purchased this device. Should this device be passed on to other parties, the content of this
regulation must also be related.
Disposal 31Precision and Analytical Balances
Page 32

Disposal32 Precision and Analytical Balances
Page 33

Page 34

Page 35

Page 36

Mettler-Toledo GmbH
30348473
Im Langacher 44
8606 Greifensee, Switzerland
www.mt.com/contact
Subject to technical changes.
© Mettler-Toledo GmbH 11/2018
30348473Een
www.mt.com/balances
For more information
 Loading...