

Page 1
Installation and
ATRO
0...
-999 %
S
T
A
R
T
S
T
O
P
100...
0 %
0...
-100 %
ATRO
100...
999 %
%
°C
M
O
D
E
E
N
T
E
R
Operating Instructions
METTLER TOLEDO
Infrared Dryers
LJ16
LP16
Page 2

Leerseite
Page 3

Contents
1. Cautionary notes
Page
2
2. General
3. Mounting
4. Key pad assignment
5. Operation
6. What if ...?
7. Maintenance
8. Appendix
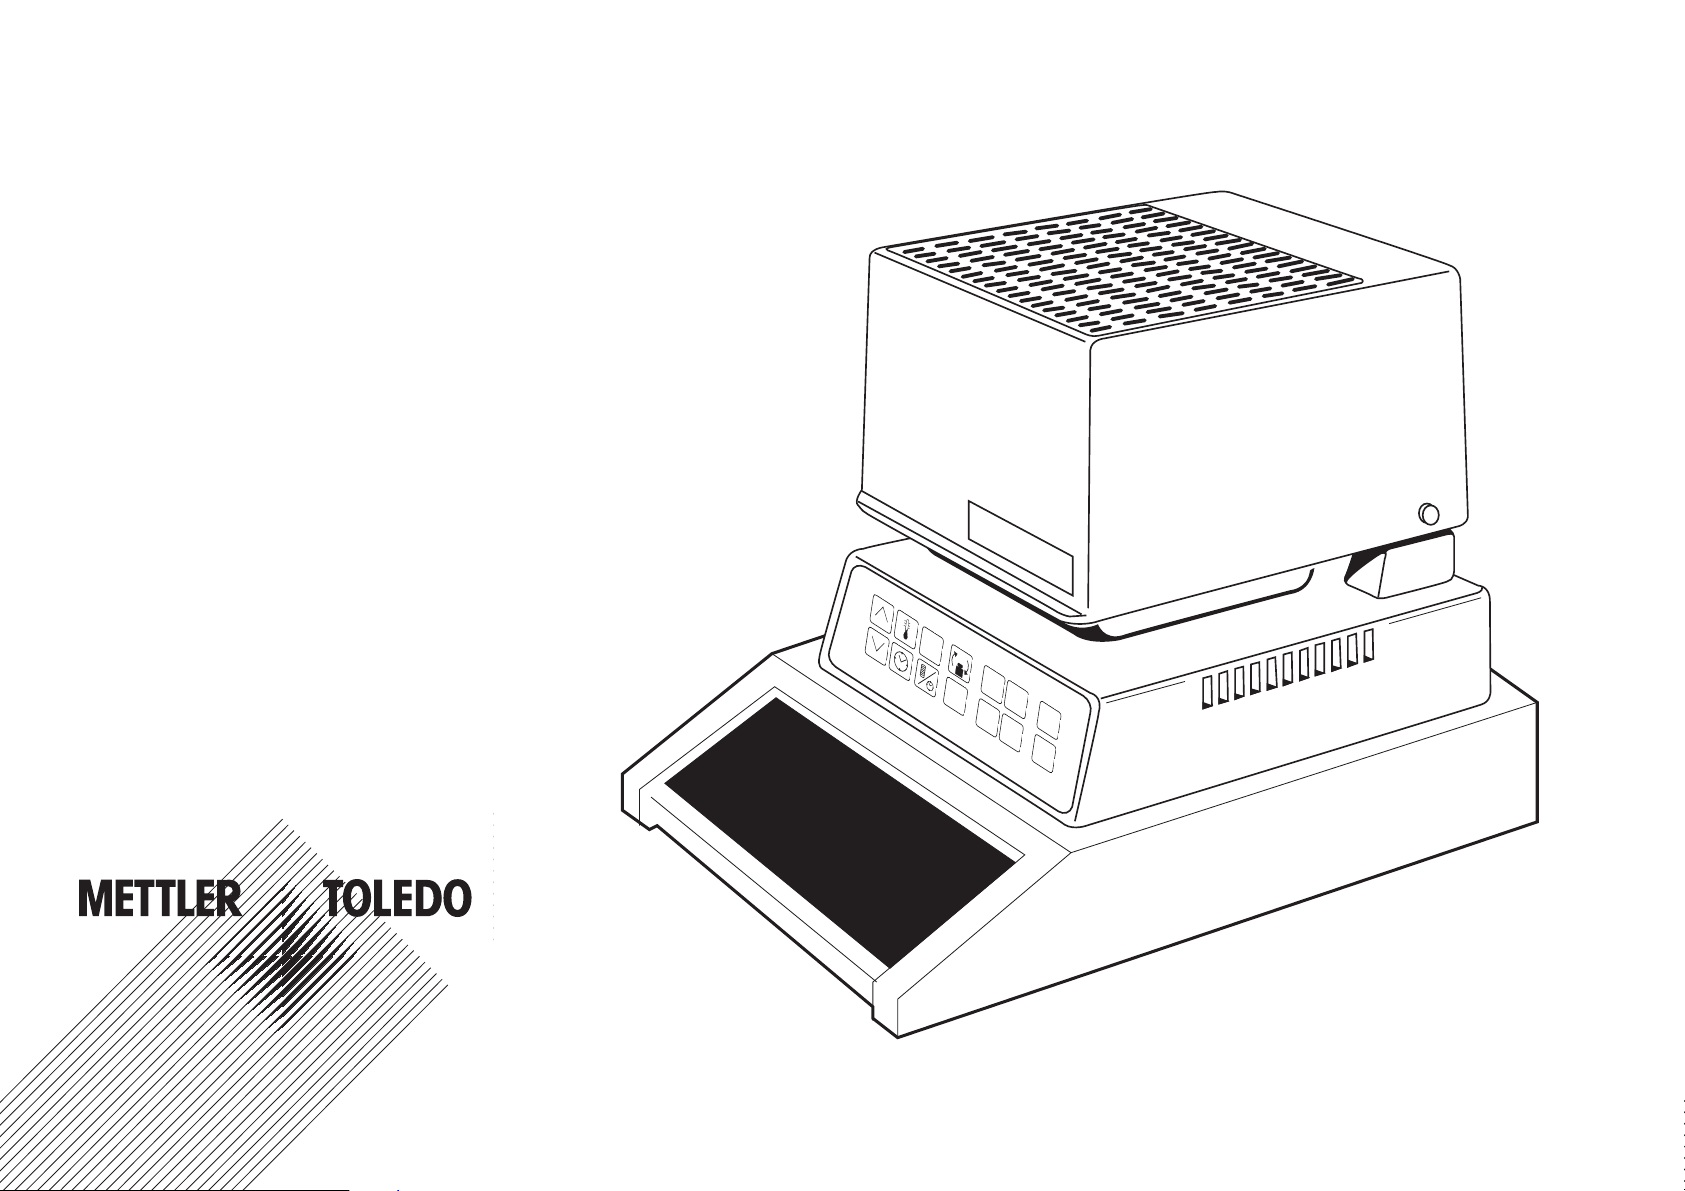
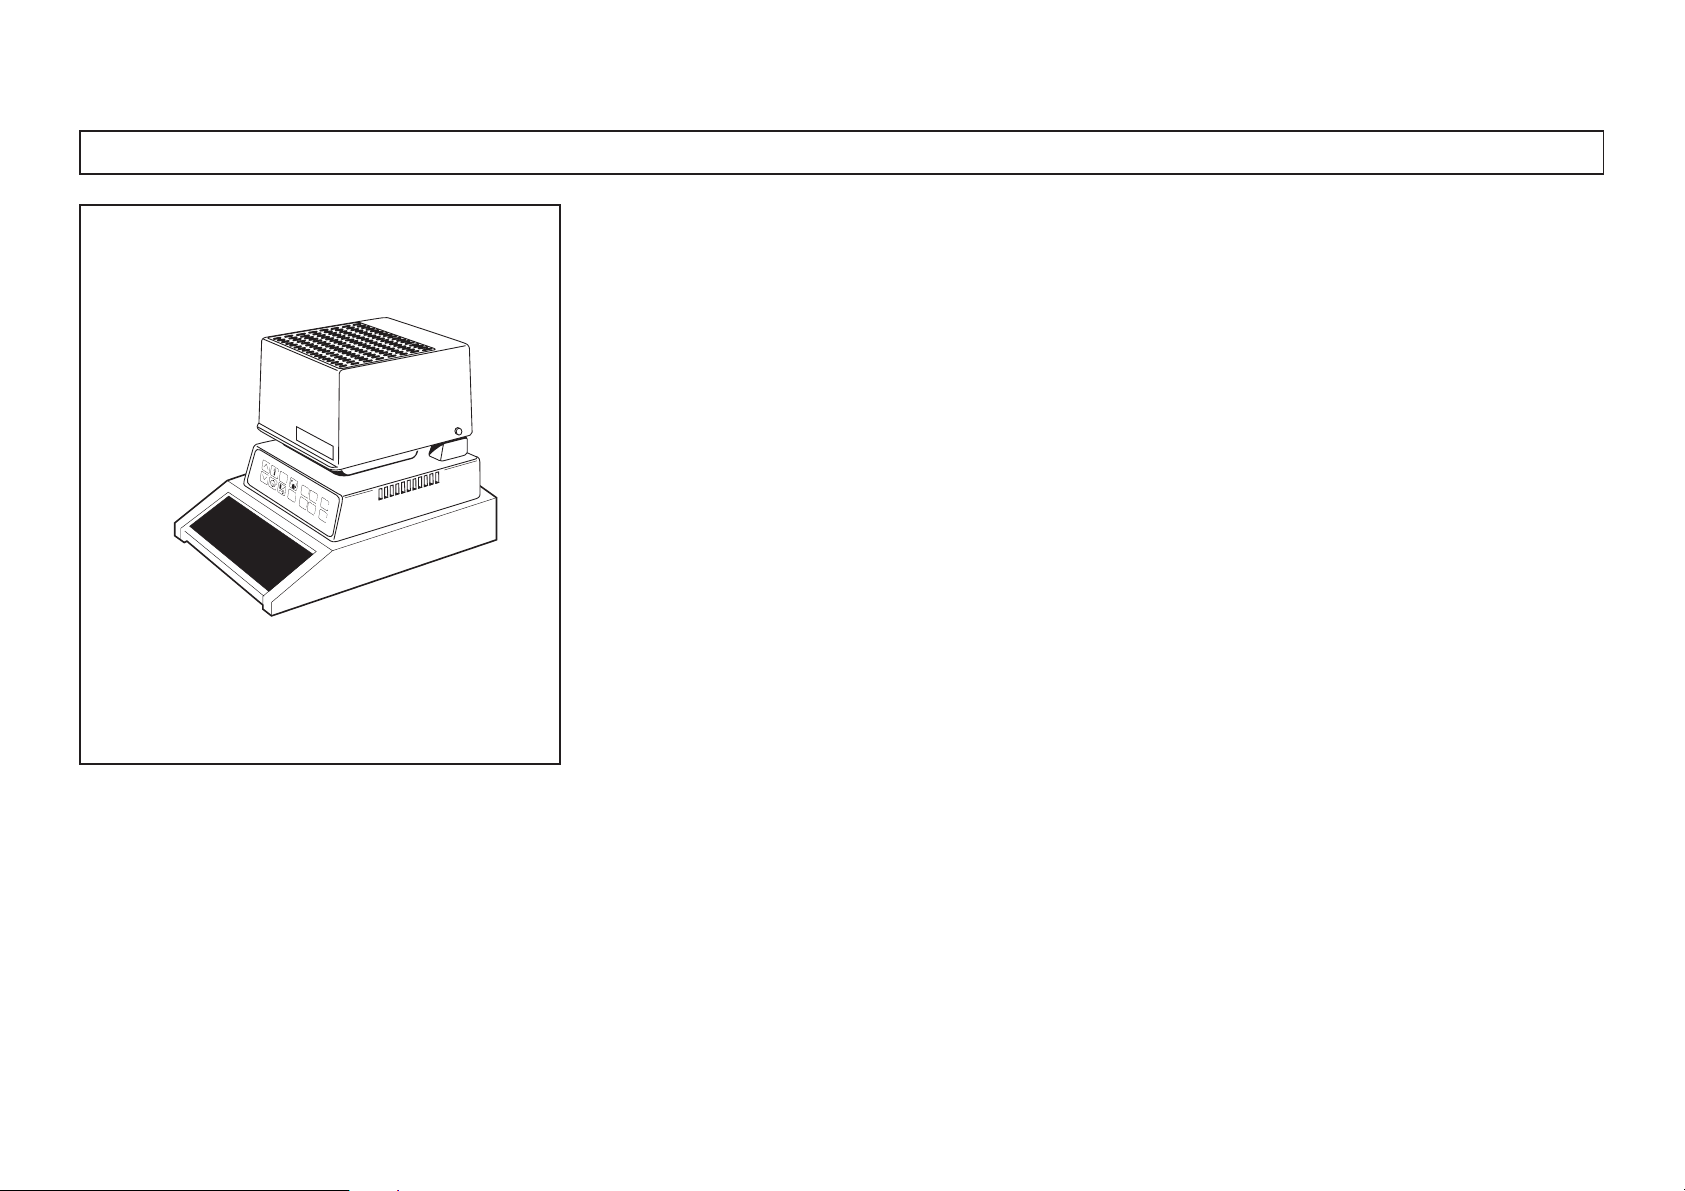
2.1 The infrared dryer
3.1 Preparing for mounting the LJ16
3.2 Preparing for mounting the LP16
3.3 Mounting the LJ16 and LP16
4.1 Keys with direct function
4.2 Keys with subsequent entry
5.1 Operation of the LJ16
5.2 Operation of the LP16
5.3 Performing a drying operation with the LJ16 or LP16
5.4 Attachment of accessories
7.1 Changing the fuses
7.2 Cleaning
8.1 Accessories
8.2 Technical data
8.3 Admissible ambient conditions
4
5
6
7
10
11
13
15
18
20
21
25
26
27
28
29
1
Page 4
2
1. Cautionary notes
Your infrared dryer corresponds to state of the art technology and meets the requirements regarding instrument safety. This notwithstanding,
improper handling can lead to hazards for personnel and tangibles. Please note the following instructions for safe and dependable operation:
• The infrared dryer is used to determine moisture in samples. Please use the instrument solely for this purpose. Any other
application can endanger personnel and lead to damage to the instrument or other tangibles.
• The infrared dryer may be operated only by qualified personnel who are familiar with the properties of the samples used and
the handling of the instrument.
• Use only indoors in closed rooms.
• The infrared dryer may not be used in a hazardous environment and must be operated only under the ambient conditions
specified in these instructions.
Warning:
hot surface
• The infrared dryer operates with heat!
• Ensure sufficient free space around the instrument to avoid heat accumulation and overheating (approx. 1 m free
space above the instrument).
• Do not place any material on top, underneath or in the immediate vicinity of the instrument while the latter is
connected to the mains, as the area surrounding the drying unit will heat up.
• Exercise caution when removing the sample: The sample itself, the draft shield and any sample pan used can still be
very hot. The cooling time for the sample pan is approx.
1 minute.
• Your infrared dryer is supplied with a 3-core power cable with an equipment grounding conductor. Only extension cables
which comply with the standards and also have an equipment grounding conductor may be used. Deliberate disconnection
of the equipment grounding conductor is strictly forbidden!
Page 5

Certain samples require special care!
Certain types of samples may possibly represent a hazard to personnel or tangibles through:
Fire or explosion
• Flammable or explosive substances
• Substances containing solvent
• Substances which evolve flammable or explosive gases or vapors when dried.
When working with such samples, ensure a drying temperature which is low enough to prevent ignition or explosion and wear protective
goggles. If uncertainty exists regarding the flammability of a sample, always work with small amounts of sample (max. 1 gram).
In cases of doubt, conduct a careful risk analysis.
Poisoning, burning
• Substances which contain highly volatile toxic or corrosive components. Such substances may be dried only in a fume cupboard.
Corrosion
Substances which evolve corrosive vapors on warming (e.g. acids). For such substances we advise working with small amounts of sample as
the vapors can condense on colder housing parts and cause corrosion.
Please note that the user is always responsible and liable for damage caused by the use of the above-mentioned types of samples!
• Make no modifications or alterations to your instrument and use only original spare parts and accessories supplied by METTLER TOLEDO.
• Your infrared dryer is a rugged precision instrument - nevertheless, you should handle it carefully and it will thank you with many years of
trouble-free operation.
• Please heed all instructions and information in these operating instructions. Keep the instructions in a safe place where they are always
available should uncertainties arise. If you lose the instructions, please contact your METTLER TOLEDO dealer to obtain a replacement copy.
3
Page 6
2. General
1
0
0
.
..
0
%
0
.
.
.
1
0
0
%
AT
R
O
1
0
0
.
..
9
9
9
%
AT
R
O
0
.
..
9
9
9
%
%
S
T
A
R
T
S
T
O
P
°C
M
O
D
E
E
N
T
E
R
4
2.1 The infrared dryer
The infrared dryer is used to determine water or moisture content. This type of analysis is
employed primarily in the following fields:
• Determination of storage life and quality
• Quality monitoring and control of intermediate products
•Monitoring of and compliance with statutory regulations
The principal application area of the infrared dryer is the food and chemical industries.
LJ16
The LJ16 Infrared Dryer is a simple-to-operate, compact instrument with integrated balance for
routine work in the lab and production.
LP16
The LP16 is a high-quality instrument for the lab. The LP16 can be operated with the following
METTLER TOLEDO balances:
• PM100, PM200, PM300, PM400, PM480, PM600
Page 7
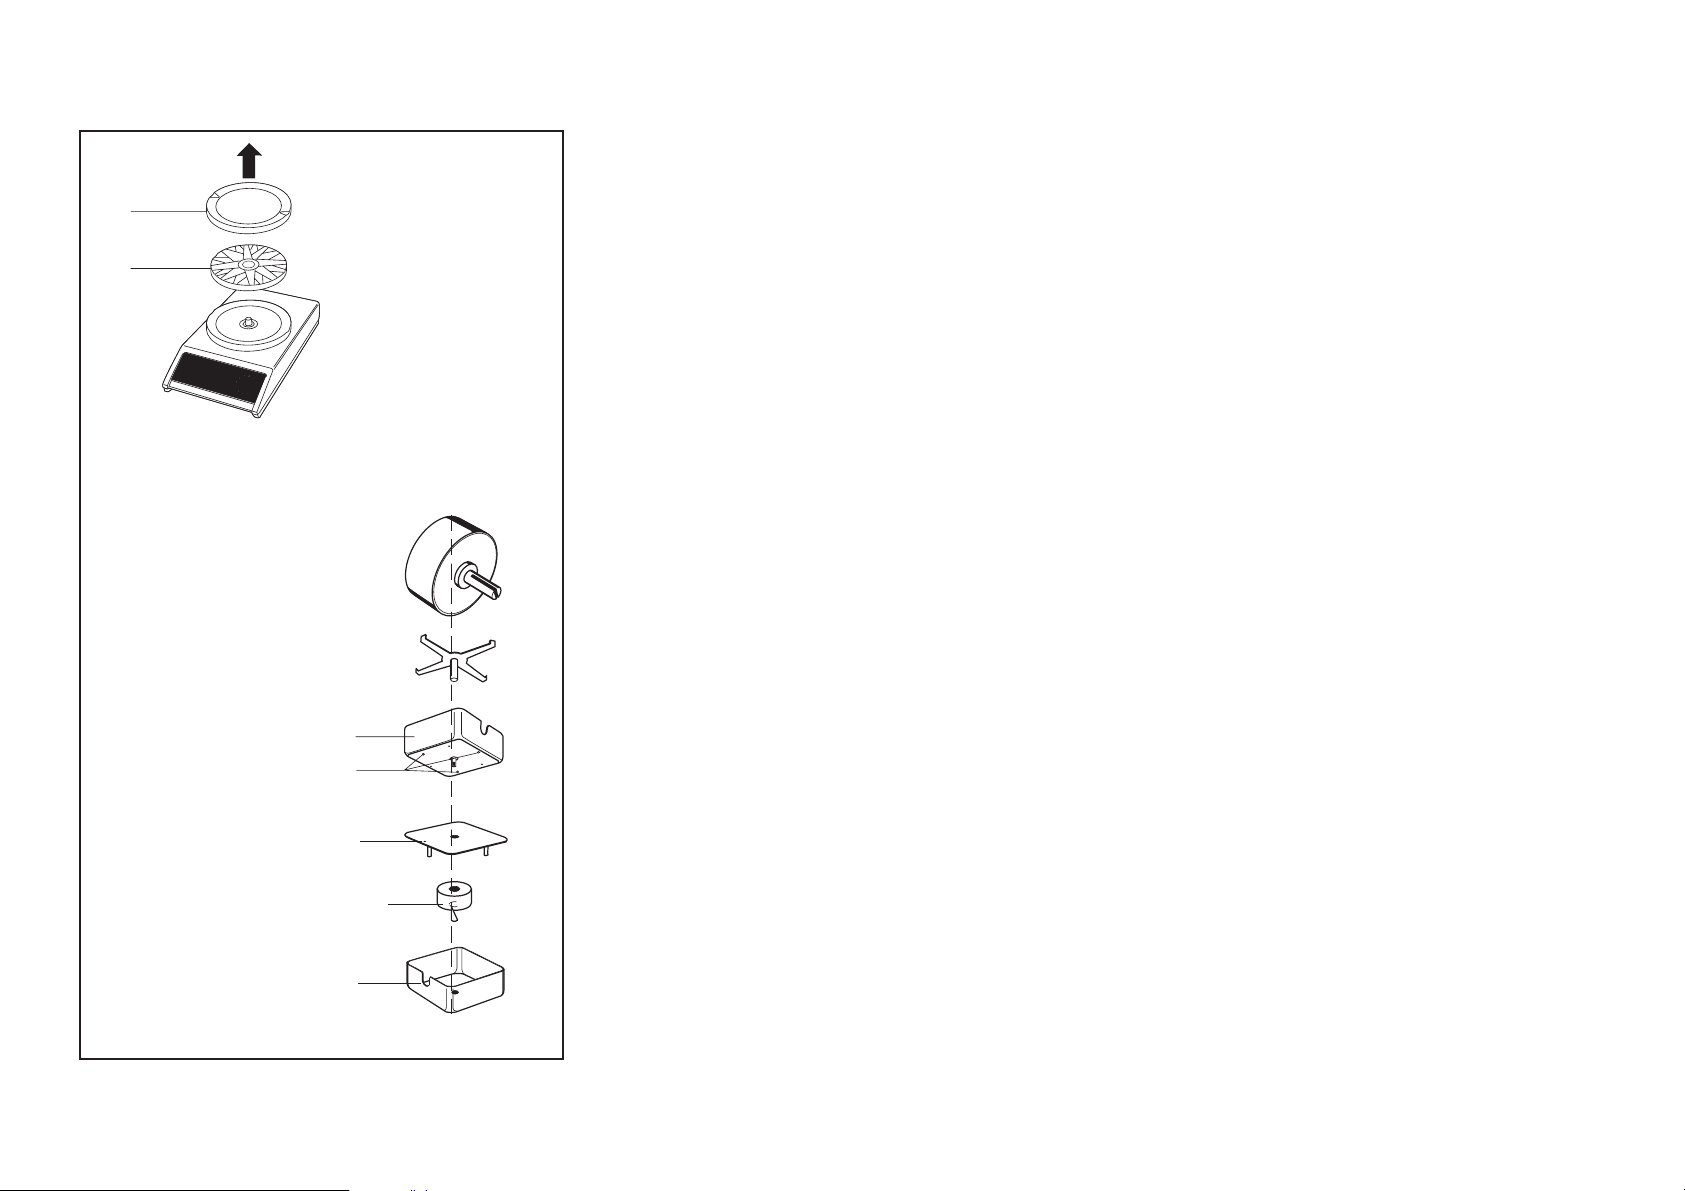
3. Mounting
4
3.1 Preparing the balance for mounting the LJ16
1
Checking the set voltage
Before first-time operation of the dryer, the associated balance must be checked for correct
3
2
setting of the operating voltage.
A label showing the set voltage is affixed above the power socket in the factory. If this
specification does not match the power supply voltage or if the label is missing, the setting of the
voltage selector inside the balance must be checked and altered if necessary.
Resetting the operating voltage
Warning
• First ensure that the instrument is disconnected from the power supply. If the power cable (1)
is attached, the interior of the balance is live even if the display is blank!
•When the operating voltage is reset, the microfuse must be changed.
(Section 7.1)
Resetting
• Remove weighing pan, unscrew screw (2) and carefully lift off top housing (3). Reset voltage
selector (4) with a screwdriver.
• Carefully remount top housing and insert and tighten screw (2).
Selecting the location
The correct location should be selected according to the following criteria:
• Stable, vibration-free position as horizontal as possible
• No drafts
5
Page 8
6
3.2 Preparing the balance for mounting the LP16
1
Removing the weighing pan
• Take off weighing pan (1) and pan support (2).
2
Installing the compensation weight on the LP16
If the LP16 is mounted on a PM600, PM2000, PM4000 or PM4800, the compensation weight in
0
.0
0
9
the draft shield must be changed.
• Unscrew 3 screws (5); disassemble draft shield.
• Take out compensation weight (7) built in as standard.
• Install compensation weight.
• Reassemble draft shield. Marking (6) and cutout (8) must be aligned.
Resetting the operating voltage
Warning
• First ensure that the instrument is disconnected from the power supply. If the power cable (1)
is attached, the interior of the balance is live even if the display is blank!
•When the operating voltage is reset, the microfuse must be changed.
4
5
(Section 7.1)
Resetting
• Remove weighing pan, unscrew screw (2) and carefully lift off top housing (3). Reset voltage
6
selector (4) with a screwdriver.
• Carefully remount top housing and insert and tighten screw (2).
7
Selecting the location
8
The correct location should be selected according to the following criteria:
• Stable, vibration-free position as horizontal as possible
• No drafts
Page 9
3.3 Mounting the LJ16 and LP16 drying unit
Note
1
Before mounting, the preparatory measures must have been carried out.
LJ16, see section 3.1.
LP16, see section 3.2.
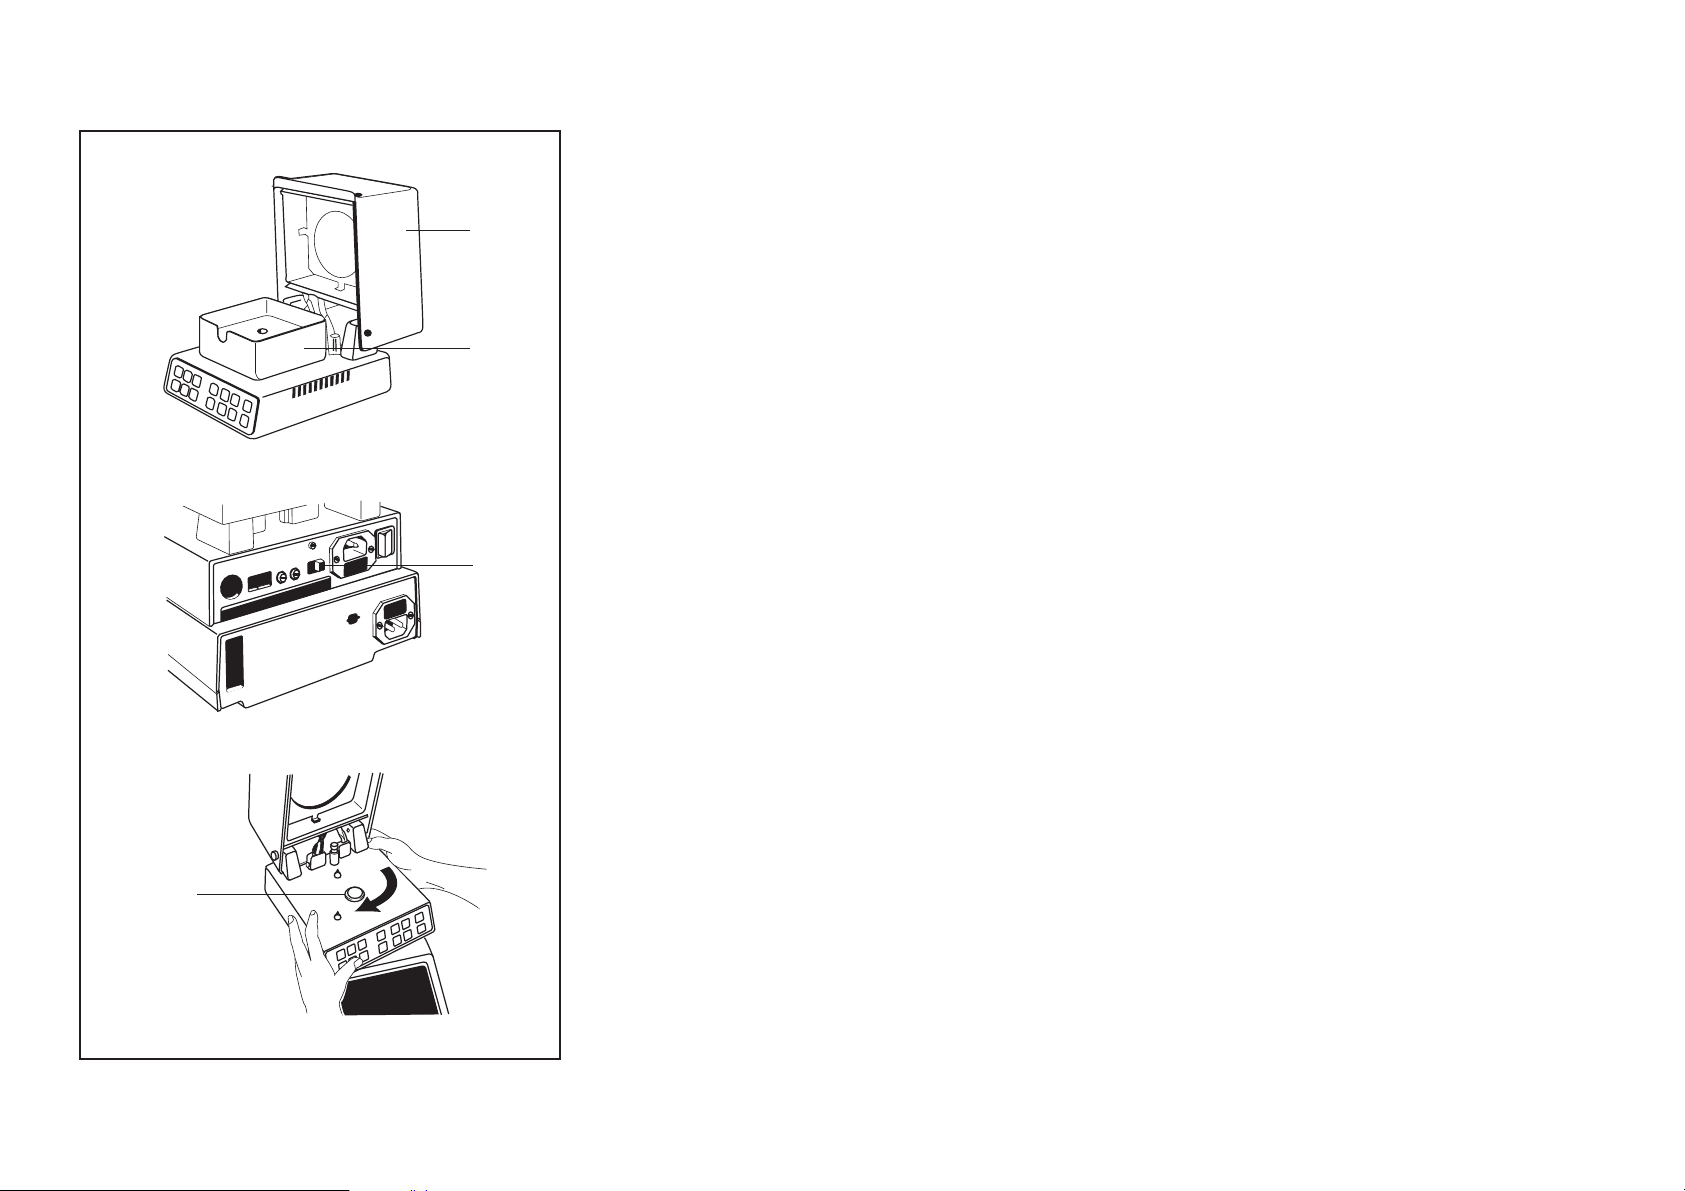
2
• Lift up drying cover (1).
• Take foam cushioning and plastic sheet out of draft shield (2). Remove draft shield with
packaging.
• Affix label with warning regarding heat development so that it is clearly visible.
Setting the operating voltage
• Set voltage selector (3) at rear of dryer so that the voltage matches the local power supply
3
voltage:
115 V (range 93 V ... 132 V)
230 V (range 187 V ... 264 V)
Mounting the dryer
•Mount dryer carefully on the balance as shown in the illustration opposite. Center hole (6) on
conical spigot of balance.
• Turn dryer clockwise until the stop.
The dryer is now mounted on the balance by means of the bayonet fixing.
6
7
Page 10
8
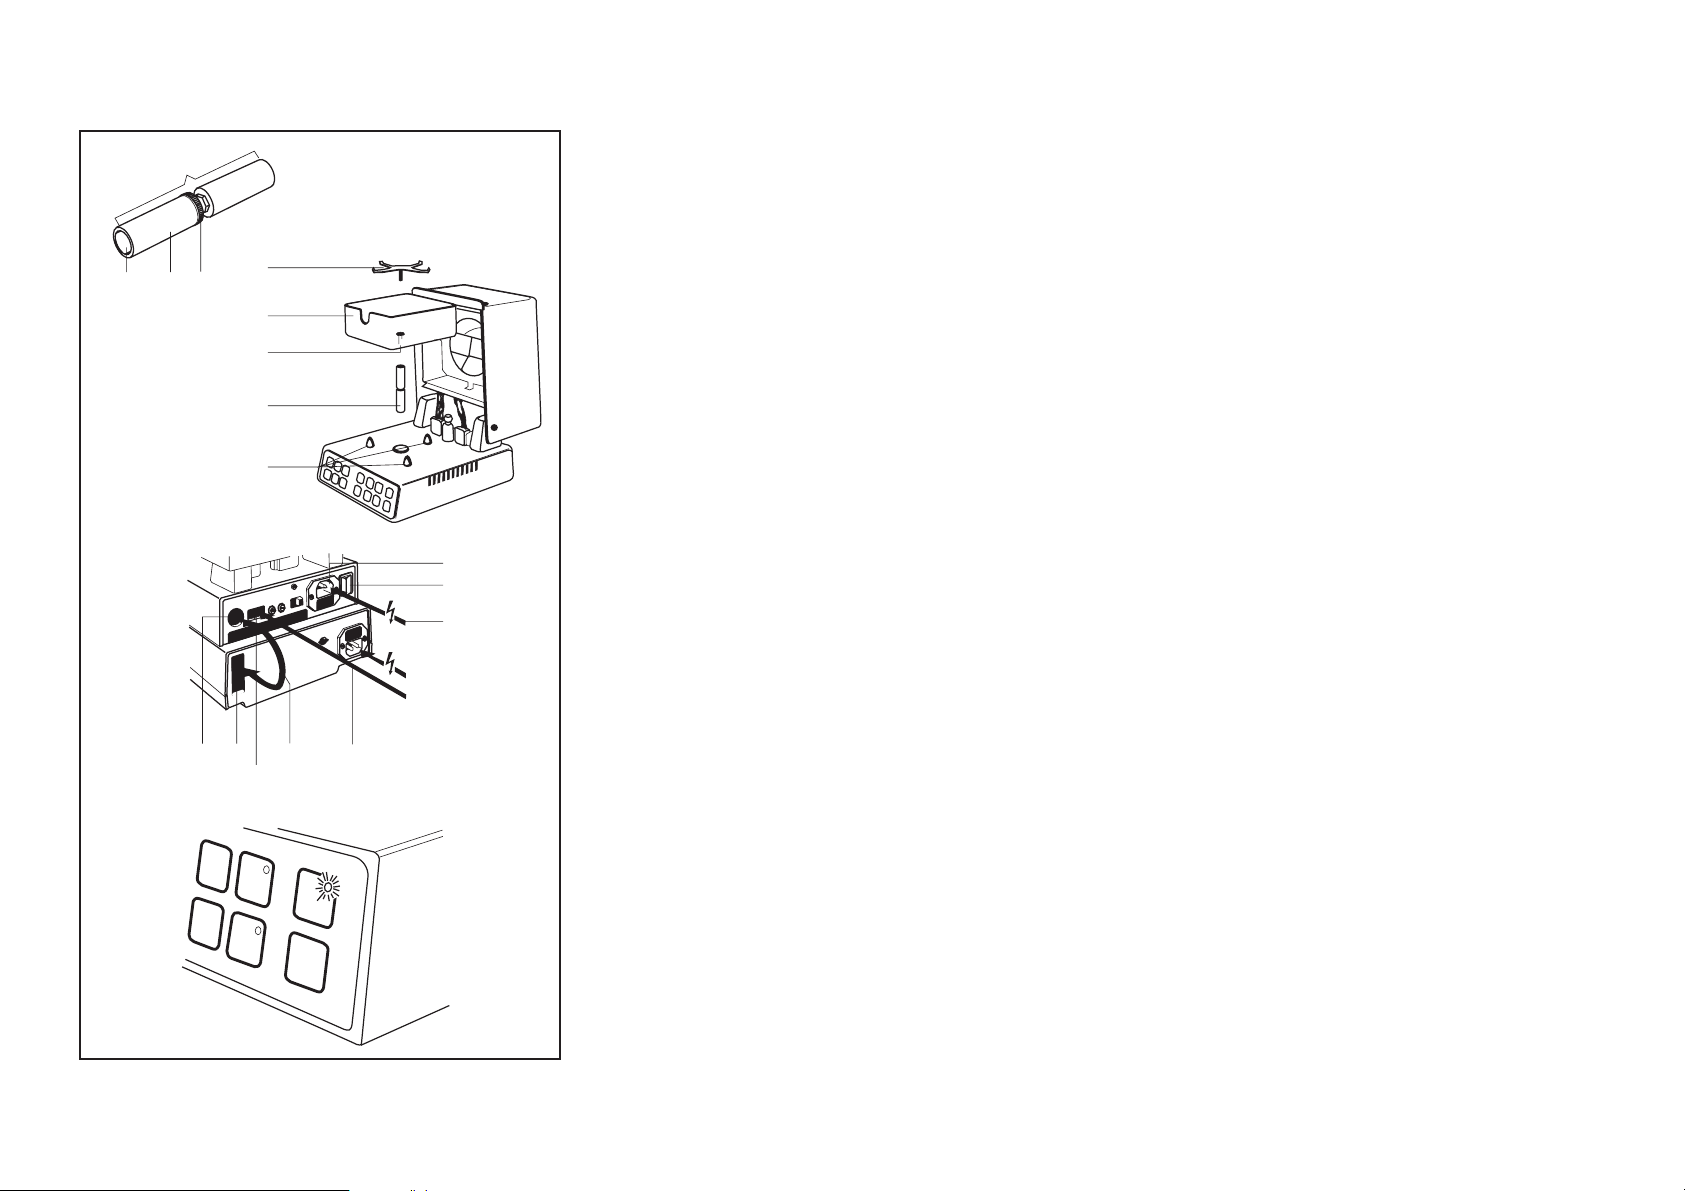
4
1
32
Inserting the spacer bolt
Prepare spacer bolt (1):
The spacer bolt must have a length of approx. 66 mm. If the bolt is shorter:
• Hold knurled nut (2) and loosen the lower half (3) by turning counterclockwise.
8
•When the bolt is the required length, screw knurled nut (2) to lower half (3).
5
7
•Mount spacer bolt (1) with taper leading on conical spigot of the balance.
•Mount draft shield (5) on the three centering pegs (6). Ensure that spacer bolt (1) slides onto
centering peg (7).
1
6
• Insert pan support (8) in draft shield (5) and press downward gently.
Attaching the cables
• Attach the short connection cable (9) enclosed with the accessories to socket (10) of the
balance and to socket (11) of the dryer.
13
16
12
• Connect drying unit and balance to the power supply.
If a LC-P45 Printer or a GA37 Digital/Analog Converter is attached:
• Attach connection cable (14) from the accessories of the printer or digital/analog converter to
socket (15) of the dryer and to the appropriate socket of the LC-P45 or GA37.
11
1015914
ATRO
0.....
999%
ATRO
100......
999%
START
STOP
• Turn on power switch (16).
• Switch on balance using the tare bar.
The flashing lamp of the START key at the front of the dryer signals operational readiness.
Page 11

Function check
• Tap pan support (7) with your hand and check whether the balance display reacts.
• Check whether the display shows a constant value when the pan support is at rest.
If this is not the case, the length of spacer bolt (12) must be corrected and the seating of draft
7
shield (5) checked, see also section 6, “What if...?”
5
12
Optimum configuration (the balance)
For optimum functioning of the infrared dryer, the balance must be configured as followed:
LJ16: Stability detector ASd-2-
Integration time Int-2-
Setting the configuration, see section 5.1.
LP16: Stability detector ASd-2-
Pause 0
Vibration adapter
Weighing process adapter
Setting the configuration, see operating instructions of the PM balance used.
Leveling the balance
2
• Turn screw feet (1) so that the air bubble is in the middle of level (2).
Note
After every location change, the balance should be releveled.
1
1
9
Page 12

4. Keypad assignment
10
4.1 Keys with direct function
Calculation mode keys
100...
0 %
0...
-100 %
ATRO
100...
999 %
ATRO
0...
-999 %
Calculation of the dry weight
In this calculation mode, the dry weight of the sample is calculated in percent (referred to the wet
weight = 100 %).
At the end of the drying time, the dry weight (100 % ... 0 %) is available. The drying progress can
be followed on the display.
Calculation of the moisture content
In this calculation mode, the moisture content of the sample is calculated in percent (referred to
the wet weight = 100 %).
At the end of the drying time, the moisture content (0 % ... -100 %) is available. During drying, the
progress of the operation is displayed continuously.
Calculation of the wet weight
In this calculation mode, the wet weight of the sample is calculated in percent (referred to the dry
weight = 100 %).
At the end of drying, the wet weight (ATRO value) is available in percent referred to the dry
weight of 100 % (100 % ... 999 %). No percentage display is possible during the drying
operation.
Calculation of the moisture content ATRO
In this calculation mode, the moisture content of the sample is calculated in percent (referred to
the dry weight = 100 %).
At the end of the drying time, the moisture content (ATRO value) is available in percent referred
to the dry weight of 100 % (0 % ... -999 %).
No percentage display is possible during the drying operation.
Page 13

Switch key
%
START
STOP
This key allows selection between weight and percentage display during the drying operation.
Note regarding calculation mode ATRO value: If the dry weight (key ATRO 0 ... -999 % or ATRO
100 ... 999 %) is used as a basis for the calculation, a percentage display is not possible until the
drying operation has ended.
START key
This key is used to start the drying operation:
• Lamp flashes 1 instrument in operational readiness.
• Lamp lit up 1 drying operation in progress.
STOP key
With this key, each initiated drying operation can be ended (aborted). The final value in the
display is marked with (*) and kept until the drying cover is opened or taring performed.
If a printer is attached, the final result is printed out at the same time.
4.2 Keys with subsequent entry of a value
Drying temperature key
°C
This key is used – before the start of a drying operation – to call up the stored drying temperature
(50 °C ... 160 °C) to the display and release it for change.
Drying time key
This key is used – before the start of a drying operation – to call up the stored drying time
(0 ... 240 minutes) to the display and release it for change.
Note for operation of the LJ16
When the time key is pressed, the value range 0, Auto ... 240 is available for selection.
If -Auto- is selected, the automatic switch-off criterion of 2 mg/30 s is active.
11
Page 14

MODE
12
Print interval key
This key is used – before the start of a drying operation – to call up the stored print interval time
of 0 ... 9.9 minutes to the display and release it for change.
MODE key (LP16 only)
This key is used – before the start of a drying operation – to select the desired MODE (operating
mode).
MODE manual switching off or switching off with time switch
MODE d/10 s
MODE d/30 s switching off with switch-off criterion, weight loss d adjustable
MODE d/120 s
LJ16: see
Adjustment keys to change the recalled values
This key can be used to increment the displayed value. Single steps are possible by pressing
briefly.
ENTER
This key can be used to decrease the displayed value. Single steps are possible by tapping.
ENTER key
This key accepts and stores an entry (temperature, drying time, print interval time, MODE).
Note
All set values and operating parameters are stored in a fail-safe manner.
Page 15

5. Operation
1
0
0
.
.
.
0
%
0
.
.
.
1
0
0
%
AT
R
O
1
0
0
.
.
.
9
9
9
%
AT
R
O
0
.
.
.
9
9
9
%
%
S
T
A
R
T
S
T
O
P
°C
M
O
D
E
E
N
T
E
R
5.1 Operation of the LJ16
Controls
(1) Control bar of the balance (tare bar)
(2) Keypad of the dryer
Switching display on/off
• Press control bar (1) briefly ; all display segments light up for a few seconds.
• The display then shows 0.000 g.
• Raise control bar briefly; the display blanks out.
1
Taring
2
0.000
9
• Place aluminum sample pan on pan support.
• Press control bar (1) briefly; the display changes to 0.000 g.
Calibrating
Before work is performed for the first time with the LJ16 dryer, the balance should be calibrated.
To achieve a correct calibration, it is advisable to attach the instrument to the power supply 30
minutes before calibrating. Calibration is necessary only if the absolute sample weight is of
importance.
• Press control bar (1) until -CAL- appears, then release; display changes to - - - - - - and then to
calibration weight (flashes).
• Load requested calibration weight (e.g. 100 g); display changes to - - - - - -, then 0.000 g
flashes.
• Remove calibration weight; display shows - - - - - - and then changes to 0.000 g.
The instrument is now calibrated.
13
Page 16

14
Changing weighing speed or reproducibility
Setting stability detector
ASd -1ASd -2ASd -3ASd -4-
Weighing speed
very fast
relatively slow
Reproducibility
good
very good
The LJ16 can be adapted to the ambient conditions. For this, the appropriate setting should be
selected for the integration time and the stability detector.
Stability detector
• Press control bar until -ASd- appears, then release.
• Press control bar briefly; the display changes to the next setting.
• At the desired setting, wait until the display returns to the operating mode.
Integration time
Possible settings
Int-1- With very stable, vibration-free surroundings
Int-2- Normal setting
Int-3- With unfavorable ambient conditions
Performing the settings
• Press control bar until -Int- appears in the display, then release.
• Press control bar briefly; the display changes to the next setting.
• At the desired setting, wait until the balance returns to the operating mode.
Optimum settings, see section 3.3.
Page 17

5.2 Operation of the LP16
1
0
0
.
.
.
0
%
0
.
..
1
0
0
%
AT
R
O
1
0
0
.
.
.
9
9
9
%
AT
R
O
0
.
.
.
9
9
9
%
%
S
T
A
R
T
S
T
O
P
°C
M
O
D
E
E
N
T
E
R
Controls
(1) Control bar of the balance (tare bar)
(2) Keypad of the dryer
Switching display on/off
• Press control bar briefly; all display segments light up for a few seconds.
• The display then shows 0.000 g.
• Raise control bar briefly; the display blanks out.
1
2
0.000
9
Taring
•Mount aluminum sample pan on the weighing pan.
• Press control bar briefly; the display changes to 0.000 g.
Calibrating
Before work is performed for the first time with the LP16 dryer, the balance should be calibrated.
To achieve a correct calibration, it is advisable to attach the instrument to the power supply
30 minutes before calibrating. Calibration is necessary only if the absolute sample weight is of
importance.
The calibration procedure is described in the operating instructions of the PM balance used.
15
Page 18

16
Changing weighing speed or reproducibility
Setting stability detector
ASd -1ASd -2ASd -3ASd -4-
Weighing speed
very fast
relatively slow
Reproducibility
good
very good
The LP16 can be adapted to the ambient conditions. For this, the appropriate setting should be
selected for the stability detector, the weighing process adapter and the vibration adapter.
Stability detector
Performing the settings
• Press control bar until -ASd- appears in the display, then release.
• Press control bar briefly; the display changes to the next setting.
• At the desired setting, wait until the display returns to the operating mode.
Setting the weighing process adapter
Performing the settings
Fine dispensing
Normal setting, setting for the LP16
Absolute weighing
Setting options
• Press control bar briefly until appears, then release.
• Press control bar briefly; the display changes to the next setting.
• At , wait until the display returns to the operating mode.
Setting the vibration adapter
Performing the settings
With very stable, vibration-free surroundings
Normal setting
With unfavorable ambient conditions
Setting options
• Press control bar until appears, then release.
• Press control bar briefly; the display changes to the next setting.
• At the desired setting, wait until the display returns to the operating mode.
Optimum settings, see section 3.3.
Page 19

5.2.1 Automatic switch-off criterion
Sample
weight
Wet
Dry
Time
The LP16 and LJ16 have an automatic switch-off criterion.
The adjacent curve shows the typical weight profile of a sample during a drying operation.
The automatic switch-off criterion offers the user the possibility of terminating drying
automatically when the weight loss per time interval is less than a preset value.
Example: Weight loss < 2 mg/30 sec.
LP16: Variable, freely selectable, automatic switch-off criterion
(1 ... 99 mg/10 sec, 1 ... 99 mg/30 sec, 1 ... 99 mg/120 sec).
LJ16: fixed, automatic switch-off criterion (2 mg/30 sec).
17
Page 20

5.3 Performing a drying operation with the LJ16 or LP16
0...
-100 %
18
Switching off with manual stop
0...
100...
Select calculation mode
0 %
-100 %
ATRO
ATRO
Press key of the desired calculation
100...
0...
999 %
-999 %
mode.
Set drying time 0
Press the drying time key.
Set time 0 (infinitely long drying).
Press ENTER key.
ENTER
Set drying temperature
°C
Press drying temperature key.
Set drying temperature.
Press ENTER key.
ENTER
Set print interval (if printer attached)
Switching off with the time switch Switching off as soon as the preset
weight loss per time interval is reached
0...
100...
Select calculation mode
0 %
ATRO
ATRO
Press key of the desired calculation
100...
0...
999 %
-999 %
mode.
Set drying time
Press the drying time key.
Set time.
Press ENTER key.
ENTER ENTER
-100 %
ATRO
0...
-999 %
100...
Select calculation mode
0 %
ATRO
Press key of the desired calculation
100...
999 %
mode.
Set switch-off criterion
LP16:
Press MODE key until the desired
abort criterion is displayed (LED
flashes).
Press ENTER key.
Set drying temperature
°C
Press drying temperature key.
Set drying temperature.
Press ENTER key.
ENTER
Set print interval (if printer at-
LJ16: see section 4.2
Set drying temperature
°C
Press drying temperature key.
Set drying temperature.
ENTER
Press ENTER key.
tached)
Press print interval key.
Set interval time.
Press ENTER key.
ENTER
Press print interval key.
Set interval time.
Press ENTER key.
ENTER
Set print interval (if printer attached)
Press print interval key.
Set interval time.
ENTER
Press ENTER key.
Page 21

Switching off with manual stop
Switching off with the time switch
Switching off as soon as a preset weight
loss per time interval is reached
START
STOP
Load sample
• Open drying cover.
• Mount aluminum pan on the pan
support.
• Tare.
• Distribute sample evenly.
• Close dryer.
Start
Press START key
Switching between % and g
Press switch key.
Not possible during operating mode
ATRO value.
Stop
Press STOP key.
START
STOP
Load sample
• Open drying cover.
• Mount aluminum pan on the pan
support.
• Tare.
• Distribute sample evenly.
• Close dryer.
Start
Press START key
START
Switching between % and g
%%
Press switch key.
%
Not possible during calculation mode
ATRO value.
Stop
After elapse of the set drying time,
STOP
the dryer switches off automatically.
Load sample
• Open drying cover.
•Mount aluminum pan on the pan
support.
• Tare.
• Distribute sample evenly.
• Close dryer.
Start
Press START key
Switching between % and g
Press switch key.
Not possible during calculation mode
ATRO value.
Stop
When the set weight loss per time
interval is reached, the dryer
switches off automatically.
Warning
Aluminum pan with sample is very
hot.
Warning
Aluminum pan with sample is very
hot.
19
Warning
Aluminum pan with sample is very
hot.
Page 22

20
Attachment to LJ16, LP16
Top unit
Balance
Top unit
Balance
LC-P45 Printer
GA37
Line
recorder
Attachment to LP16
Top unit
Balance
DataPac
D/A Converter
LC-P45
Keypad
Printer
5.4 Attachment of accessories
Attachment of the LC-P45 Printer for recording results numerically
Printout with time,date and sample number
Attachment of the GA37 Digital/Analog Converter for graphical representation of the drying
profile
Set print interval to 0.1 minutes for this.
Attachment of the DataPac-M for sample identification with keypad entry
Attachment of the GM54 Output Module for signalization of the end of drying
On completion of drying, the contact of the GM54 closes and remains closed for 1 second.
GM54
Attachment to PC
Top unit
Balance
Printer cable
Software: Windows (Microsoft)
BalanceLink (METTLER TOLEDO)
Excel (Microsoft)
Output
Module
Drying data can be automatically read into the Excel spreadsheet program via the unidirectional
RS232 data interface using the BalanceLink software.
Note: Set print interval to 0.1 minutes.
Page 23

6. What if ...?
Error/Display
After switching on, only the bottom segments
of the display light up
Unstable value in the display
After addition of the sample, only the top
segments of the display light up
Display “OFF”
No LED light up on the dryer
Possible cause
• Spacer bolt too short
• Draft shield not mounted correctly
• Compensation weight not installed in draft
shield
• Spacer bolt too long
• Draft shield not mounted properly
•Weighing range exceeded
• Spacer bolt too long
• Power outage
• Instrument not switched on
• No power supply voltage
• Power cable not plugged in
• Voltage selector not set properly
• Microfuse blown
Rectification
• Lengthen spacer bolt
•Mount draft shield correctly
• Install compensation weight
• Shorten spacer bolt
•Mount draft shield correctly
• Remove sample
• shorten
• Repeat drying operation. The parameter
entries are not lost through a power outage.
• Switch on dryer
• Check power supply
• Plug in power cable
• Set voltage selector correctly
• Check functioning of the microfuses and
replace fuses if need be
Only the LED START flashes
After switching on, the configuration is wrong
• Balance switched off
• Connection cable from balance to dryer
loose or not plugged in
• The configuration has been changed
21
• Switch on balance
• Plug in connection cable properly
• Reenter operating parameters
Page 24

22
Error/Display
Lamp of the MODE key flashes (LP16 only)
Drying unit does not heat
The parameters to be changed can not be
called up
No entry possible
When the START key is pressed, “Err 0”
lights up (no start possible)
When the START key is pressed, “Err 1”
lights up (no start possible)
Possible cause
• Entry not closed with ENTER
• Flat connector from top part to balance not
plugged in
• Infrared radiators faulty
• Previous entry not closed with ENTER
•A drying operation has been performed
beforehand
• Connection cable balance - dryer missing
• Previous entry not closed with ENTER
• Sample has been tared
•Weight of sample too low (less than 100
digits)
Rectification
• Close entry with ENTER
• Plug in connector properly
• Inform METTLER TOLEDO customer
service
• Close entry with ENTER
• Tare or open drying cover
• Close entry with ENTER
• Remove sample, tare and add sample
again
• Select larger sample
When the START key is pressed, “Err 2”
lights up (no start possible)
“Err 3”
• Drying cover opened
• Percent value larger than display capacity
• In the calculation of an ATRO value, the
weight value is 0
• Close cover
• Perform new drying
• Perform new drying
Page 25

Error/Display
Possible cause
Rectification
Drying operation does not start and no error
message in the display
No switching between weight and percentage display possible
Termination of the drying operation
When the START key is pressed, the dashed
wait line - - - - - - appears.
• Connection dryer - balance interrupted
•A drying operation has been performed
beforehand
• Drying operation has not been started
• The calculation mode ATRO value has
been selected for the drying operation
• Control bar of the balance or the STOP
key on the dryer has been pressed
•Weight value has become negative
• The set abort criterion is too large, drying
is aborted since the effective weight loss
of the sample per time interval is less than
the abort criterion
• Balance not yet stable
• Sample evaporates even before the start
of drying
• Stability not reached up to timeout since
unstable ambient conditions
• Set up correct connection
• Open drying cover
• Start drying
• Percentage display does not appear until
after end of drying operation
• Perform drying again
• Perform drying again
• Enter lower value and repeat drying
• On stability, the drying operation starts
automatically
• Set vibration adapter to unstable surroundings (LP16)
• Increase integration time (LJ16)
23
Page 26

24
Error/Display
Drying operation is not aborted until after
3'10", 3'30" or 5' although the sample no
longer loses weight
The message ERROR appears in the display
The reproducibility of the results is unsatisfactory
Possible cause
•Minimum drying time 3'10"/3'30"/5', depending on the setting of the abort criterion
• Admissible temperature range exceeded
• The sample material is inhomogeneous in
regard to moisture
• The sample material is hygroscopic or
contains highly volatile substances that
evaporate even before the start of the
infrared drying
• Film formation at sample surface
• Drying is incomplete since it has been
prematurely terminated
• Small amount of sample
• Low moisture content
Rectification
• Perform new setting or use time-controlled
switching off
• Disconnect power connector and plug in
again
• If error message remains, inform
METTLER TOLEDO service
• Increase amount of sample
• Calculate mean values
• Change sample preparation
• Use blotting paper to increase surface area
• Increase amount
• Prolong time
Page 27

7. Maintenance
7.1 Changing the fuses
Changing “3.15 A slow-blow” fuse
• Disconnect power cable of the dryer!
• Lever out holder (1) of the microfuse using a screwdriver.
• Change 3.15 A slow-blow microfuse (spare in holder).
• Plug in connector cable.
1
Changing “200 mA slow-blow” or “100 mA slow-blow” fuse
• Disconnect power cable of the dryer!
• Take out holder (2) particular microfuse with a screwdriver turning it to the left.
• Replace “200 mA slow-blow” or “100 mA slow-blow” microfuse (spare in the accessories).
• Push in holder (2) using a screwdriver and then secure by turning to right (up to stop).
• Plug in power cable.
2
Replacing microfuses of the balance
3
4
The spare fuse is in the fuse holder (4).
Fuse ratings: 115 V = 125 mA slow-blow
230 V = 63 mA slow-blow
• Disconnect power cable (3).
• Take out fuse holder (4) using a screwdriver.
• Remove blown fuse and insert new one.
• Replace fuse holder. Plug in power cable.
25
Page 28

26
7.2 Cleaning
The draft shield should occasionally be freed from dust and dirt.
The reflector must be kept clean.
N
I
T
O
R
A cloth and some soapy water suffice for external cleaning.
Never use powerful solvents. The above are the only cleaning operations needed for the dryer.
Page 29

8. Appendix
8.1 Accessories
Description Order No.
Aluminum pan, set of 80 13865
Pan support 600210
Spacer bolt 13942
Compensation weight No. 2 13794
Draft shield 600203
Power cable depending on country
Connection cable 13969
Microfuse 3.15 mA slow-blow (in holder) 54286
Microfuse 200 mA slow-blow (set of 3) 20181
Microfuse 100 mA slow-blow (set of 3) 16511
Warning sticker 13909
Supplied on request:
Chrome steel pan (set of 3) 13954
Hand switch 42500
associated adapter 33872
LP16 thermometer set 13701
Temperature calibration kit 214240
Data Pac-M Keypad
GA37 Digital/Analog Converter
GA44 Printer
GM54 Output Module
Software BalanceLink V 2.0 or higher
27
Page 30

28
8.2 Technical data
LP16 (e.g. with PM480) LJ16
Power supply 115 V/230 V (selectable) 115 V/230 V (selectable)
admissible range 115 V 93 V ... 132 V 93 V ... 132 V
admissible range 230 V 187 V ... 264 V 187 V ... 264 V
Frequency 50 Hz ... 60 Hz 50 Hz ... 60 Hz
Power consumption max. 470 VA max. 470 VA
Temperature (range) 50 °C ... 160 °C 50 °C ... 160 °C
Graduation 5 °C 5 °C
Time switch (range) 0 ... 240 min 0 ... 240 min
Calculation modes 4 methods 4 methods
Percent calculation (range for ATRO) 0 ... 999 % 0 ... 999 %
Resolution (sample >10 g) 0.01 % 0.01 %
Resolution (sample <10 g) 0.1 % 0.1 %
Repeatability (sample = 1 g) 1) 0.2 % 0.3 %
Repeatability (sample = 10 g) 1) 0.02 % 0.03 %
Minimum sample weight 0.1 g 0.1 g
Maximum sample weight 400 g 300 g
Resolution of balance 1 mg 1 mg
1) To achieve this repeatability, the instrument must have been switched on for at least 2 hours.
(applies to a typical drying time of approx. 10 min.).
Page 31

LP16 (e.g. with PM480) LJ16
Dimensions (W x D x H) 195 x 330 x 260 mm 195 x 330 x 260 mm
Weight incl. balance approx. 7 kg approx. 7 kg
Interface (for LC-P45 Printer or computer
connection; BalanceLink) RS232 and CL RS232 and CL
Drying method Infrared drying Infrared drying
Automatic abort criterion ≥ 1mg / 120 sec ... 99mg / 10 sec 2mg / 30 sec
Application brochure x x
Active display x x
Identification of the sample with DataPac-M x –
Graphical representation (GA37) x –
DeltaTrac® x –
Balance usable separately x –
8.3 Admissible ambient conditions
Temperature + 10 °C ... + 40 °C
Storage temperature - 25 °C ... + 70 °C
max. relative humidity 80 %
Height max. 2000 m NN
Overvoltage category II
Pollution degree 2
29
Page 32

To protect your METTLER TOLEDO product’s future:
METTLER TOLEDO Service assures the quality, measuring accuracy and preservation of value of all
METTLER TOLEDO products for years to come.
Please send for full details about our attractive terms of service.
Thank you.
*P704719*
© Mettler-Toledo GmbH 1999 704719D Printed in Switzerland 9902/2.12
Mettler-Toledo GmbH, Laboratory & Weighing Technologies, CH-8606 Greifensee, Switzerland
Phone +41-1-944 22 11, Fax +41-1-944 30 60, Internet: http://www.mt.com
Subject to technical changes and to the availability
of the accessories supplied with the instruments.
 Loading...