

Page 1

daeg SPO2 Simulator
User Manual
Version 1.15_2
Updated 22/01/2007
Page 2

Warranty and Product Support
Fluke Biomedical warrants this instrument against defects in materials and
workmanship for one full year from the date of original purchase. During the
warranty period, we will repair or, at our option, replace at no charge a product
that proves to be defective, provided you return the product, shipping prepaid, to
Fluke Biomedical. This warranty does not apply if the product has been damaged
by accident or misuse or as the result of service or modification by other than
Fluke Biomedical. IN NO EVENT SHALL FLUKE BIOMEDICAL BE
LIABLE FOR CONSEQUENTIAL DAMAGES.
Only serialized products and their accessory items (those products and items
bearing a distinct serial number tag) are covered under this one–year warranty.
PHYSICAL DAMAGE CAUSED BY MISUSE OR PHYSICAL ABUSE IS
NOT COVERED UNDER THE WARRANTY. Items such as cables and
nonserialized modules are not covered under this warranty.
Recalibration of instruments is not covered under the warranty.
This warranty gives you specific legal rights, and you may also have other rights
which vary from state to state, province to province, or country to country. This
warranty is limited to repairing the instrument to Fluke Biomedical’s
specifications.
Warranty Disclaimer
Should you elect to have your instrument serviced and/or calibrated by someone
other than Fluke Biomedical, please be advised that the original warranty
covering your product becomes void when the tamper-resistant Quality Seal is
removed or broken without proper factory authorization. We strongly
recommend, therefore, that you send your instrument to Fluke Biomedical for
factory service and calibration, especially during the original warranty period.
Page 3

Notices
All Rights Reserved
Copyright 2006, Fluke Biomedical. No part of this publication may be reproduced, transmitted, transcribed, stored in a retrieval
system, or translated into any language without the written permission of Fluke Biomedical.
Copyright Release
Fluke Biomedical agrees to a limited copyright release that allows you to reproduce manuals and other printed materials for use in
service training programs and other technical publications. If you would like other reproductions or distributions, submit a written
request to Fluke Biomedical.
Unpacking and Inspection
Follow standard receiving practices upon receipt of the instrument. Check the shipping carton for damage. If damage is found, stop
unpacking the instrument. Notify the carrier and ask for an agent to be present while the instrument is unpacked. There are no
special unpacking instructions, but be careful not to damage the instrument when unpacking it. Inspect the instrument for physical
damage such as bent or broken parts, dents, or scratches.
Technical Support
For application support or answers to technical questions, either email techservices@flukebiomedical.com or call 1-800- 648-7942
or 1-425-446-6945.
Claims
Our routine method of shipment is via common carrier, FOB origin. Upon delivery, if physical damage is found, retain all packing
materials in their original condition and contact the carrier immediately to file a claim. If the instrument is delivered in good
physical condition but does not operate within specifications, or if there are any other problems not caused by shipping damage,
please contact Fluke Biomedical or your local sales representative.
Standard Terms and Conditions
Refunds and Credits
Please note that only serialized products and their accessory items (i.e., products and items bearing a distinct serial
number tag) are eligible for partial refund and/or credit. Nonserialized parts and accessory items (e.g., cables, carrying
cases, auxiliary modules, etc.) are not eligible for return or refund. Only products returned within 90 days from the date of
original purchase are eligible for refund/credit. In order to receive a partial refund/credit of a product purchase price on a serialized
product, the product must not have been damaged by the customer or by the carrier chosen by the customer to return the goods, and
the product must be returned complete (meaning with all manuals, cables, accessories, etc.) and in “as new” and resalable
condition. Products not returned within 90 days of purchase, or products which are not in “as new” and resalable condition, are not
eligible for credit return and will be returned to the customer. The Return Procedure (see below) must be followed to assure prompt
refund/credit.
Restocking Charges
Products returned within 30 days of original purchase are subject to a minimum restocking fee of 15 %. Products
returned in excess of 30 days after purchase, but prior to 90 days, are subject to a minimum restocking fee of 20 %.
Additional charges for damage and/or missing parts and accessories will be applied to all returns.
Return Procedure
All items being returned (including all warranty-claim shipments) must be sent freight-prepaid to our factory location. When you
return an instrument to Fluke Biomedical, we recommend using United Parcel Service, Federal Express, or Air Parcel Post. We
also recommend that you insure your shipment for its actual replacement cost. Fluke Biomedical will not be responsible for lost
shipments or instruments that are received in damaged condition due to improper packaging or handling.
Use the original carton and packaging material for shipment. If they are not available, we recommend the following guide for
repackaging:
Use a double–walled carton of sufficient strength for the weight being shipped.
Use heavy paper or cardboard to protect all instrument surfaces. Use nonabrasive material around all projecting parts.
Use at least four inches of tightly packed industry-approved, shock-absorbent material around the instrument.
Returns for partial refund/credit:
Page 4

Every product returned for refund/credit must be accompanied by a Return Material Authorization (RMA) number, obtained from
our Order Entry Group at 1-800-648-7952 or 1-425-446-6945.
Repair and calibration:
To find the nearest service center, go to www.flukebiomedical.com/service or
In the U.S.A.:
Cleveland Calibration Lab
Tel: 1-800-850-4606
Email: globalcal@flukebiomedical.com
Everett Calibration Lab
Tel: 1-800-850-4606
Email: service.status@fluke.com
In Europe, Middle East, and Africa:
Eindhoven Calibration Lab
Tel: +31-402-675300
Email: ServiceDesk@fluke.com
In Asia:
Everett Calibration Lab
Tel: +425-446-6945
Email: service.international@fluke.com
Certification
This instrument was thoroughly tested and inspected. It was found to meet Fluke Biomedical’s manufacturing specifications when
it was shipped from the factory. Calibration measurements are traceable to the National Institute of Standards and Technology
(NIST). Devices for which there are no NIST calibration standards are measured against in-house performance standards using
accepted test procedures.
WARNING
Unauthorized user modifications or application beyond the published specifications may result in electrical shock hazards or
improper operation. Fluke Biomedical will not be responsible for any injuries sustained due to unauthorized equipment
modifications.
Restrictions and Liabilities
Information in this document is subject to change and does not represent a commitment by Fluke Biomedical. Changes
made to the information in this document will be incorporated in new editions of the publication. No responsibility is
assumed by Fluke Biomedical for the use or reliability of software or equipment that is not supplied by Fluke
Biomedical, or by its affiliated dealers.
Manufacturing Location
The daeg is manufactured in Norway for Fluke Biomedical, Everett, WA, U.S.A.
Page 5

Table of Contents
daeg Specifications ......................................................................................................................... 7
daeg Quick Start .............................................................................................................................. 9
Unit Setup ..................................................................................................................................... 11
Operation....................................................................................................................................... 13
Troubleshooting ............................................................................................................................ 19
Page 6

6
This page was intentionally left blank.
www.metron-biomed.com
Page 7

7
daeg Specifications
SPO2 SIMULATION
GENERAL
Factory installed, downloadable and user
programmable R-curves, patient conditions
and templates.
Probe signal and LED test
ACTIVE PROBE SPO2 SIMULATION
O2 saturation range: 35 – 100 %
Simulation resolution: 1% SpO2%
Simulation accuracy:
± 0.5 SpO2% 65-100% SpO2%
± 1 SpO2% 30-64% SpO2%
Simulation repeatability: ± 0.2 SpO2%
Simulation rate: 30 – 300 bpm
Rate resolution: 5 bpm (sync. to ECG
for
“C-lock” testing)
Rate accuracy: ± 0.1%
Pulse amplitude 0 – 100% of nominal
pleth amplitude.
Amplitude resolution: 0-10 range, 1%
10-100 range, 5%
Amplitude accuracy: ≥30% amplitude ±1%.
1-29% amplitude ±5%.
Pigmentation: Low, medium and high
Light repeater bandwidth:
DC – 1MHz
Optical slew rate: 50 mcd/ s
Light repeater dynamic range:
1mcd + 13 dB – 60 dB
Receiver optical 3 dB bandwidth:
600 – 1050 nm.
INSTALLED R-CURVES
BCI Oxipuls
Criticare
Nellcor
HP
Ohmeda
ADDITIONAL R-CURVES
These are R-Curves that are available and
can be uploaded using the PRO-Soft daeg
software.
BCI Oxipulse 3301
Criticare 504
Dolphin 2100
HP/Philips
Massimo
Nellcor N-20, N-180, N-200, NBP-40,
Symphony
Nonin 8500 & Marquette Apex
Novametrix Oxypleth
Ohmeda 3700, 3740
Welch Allen Propaq
INSTALLED PATIENT CONDITIONS
Normal patient
Geriatric patient
Obese patient
Patient with weak pulse
Bradycardia
Tachycardia
ARTIFACTS (ACTIVE PROBE ONLY)
Motion: 0 - 4Hz
Ambient sunlight: Ambient, Sun
Interfering light: 50Hz, 60Hz
PROBE LED OPTICAL FREQUENCY
Frequency range: 550 – 1050 nm
Resolution: 1nm
Accuracy: ±2% of range
PROBE TEST
Available with PTA-1 Probe Test Adapter Box Tests cable, photo sensors, Red LED and IR
LED.
Interface for Nellcor and Ohmeda type sensors
as standard.
Adapters for most major manufacturers
available.
LED current continuity tests.
Photodiode response test with numerical
display of light transfer function, 0-100%
Advance cable test by detecting response
glitches when flexing the cable.
ECG SIMULATION -
GENERAL
The data below is related both to factory installed
and downloadable waveforms.
Lead configuration:
5 lead RL, RA, LA, LL, V1-6
Low level output amplitude:
0.2-2mV, resolution 100 V
Low level output impedance:
1000 ohm to RL
High level output amplitude:
0.5V/mV of low level.
High level output impedance: 50 ohm
System amplitude accuracy: ±2% @1mV
System rate accuracy: ± 0.1%
System time resolution: 10 s
(100 kHz maximum update rate)
ECG OUTPUT
The data below is related to factory installed
waveform types.
NORMAL ECG SINUS
30 – 300 BPM, resolution 5 BPM
(synchronized with pleth wave)
ACCESSORIES
Battery Eliminator 240V or 115V
Batteries
User/Service Manual
OPTIONS
PTA-1 Probe Test Adapter Box
SpO2 Probe Adapters (check availability)
Carrying case
Universal Snap-to-Banana Adapters
GENERAL INFORMATION
POWER SUPPLY
Power sources: 4 standard AA/LR6/MN-1500
cells.
230VAC/115VAC to 9vDC battery
eliminator.
Power consumption:
200 mA w/o display backlight.
400 mA w/full backlight.
Battery lifetime:
12 h for alkaline cells without
backlight.
HOUSING
High impact plastic case.
DIMENSIONS
Height: 237 mm/9.2”
Width: 122 mm/4.8”
Depth: 42 mm/1.6”
www.metron-biomed.com
WEIGHT
With battery: 0.6 kg/1.3 lb
TEMPERATURE
Storage temperature:
0/32 to +50/122 C/F
Operating temperature:
+ 15/59 to +35/95 C/F
HUMIDITY
Operating humidity:
10% - 80% (non-condensing)
DISPLAY
Graphical LCD, with backlighting.
CONNECTORS
9V DC power inlet (standard 2.1 mm power
jack.
RS-232/C for PC or printer communication (9-
pin D-sub male)
1 probe connector (Redel 8-pin).
5 low level ECG outputs RA, RL, LA, LL and
V1 (AHA color coded safety connector)
1 high level ECG output (standard phono jack).
RECOMMENDED PRINTERS
HP DeskJet, Canon Bubble Jet or compatible.
daeg SpO2 Analyzer
Ordering Information
Order no:
12700: daeg SpO2 Analyzer
Accessories:
12715: Finger Probe AFP-1
17030: Battery Eliminator daeg, 240V
or
17027R: Regulated Battery Eliminator 115V
17031: Battery package, 4-cells
12710: User and Service Manual (CD)
Options:
11150: Carrying case
12711: Probe Test Adapter Box
12712: PRO-Soft daeg
12713: PRO-Soft daeg, demo
12714: User Manual PRO-Soft daeg
17024: Universal Banana Adapter
SpO2 Probe Adapters
12761: BCI Compatible Direct SpO2
12761N: BCI Compatible 9-Pin SpO2
12762: Criticare Compatible Direct SpO2
12762N: Criticare Compatible 9-Pin SpO2
12764: Datascope Compatible Direct SpO2
12764N: Datascope Compatible 9-Pin SpO2
12765: Datex Compatible Direct SpO2
12765N: Datex Compatible 9-Pin SpO2
12766: Philips Compatible Direct SpO2
12767: Invivo Compatible Direct SpO2
12768: Nihon Kohden Compatible Direct SpO2
12769: Nonin Compatible Direct SpO2
12770: Novametrix Compatible Direct SpO2
12773: Simed Compatible Direct SpO2
12774: Spacelabs Compatible Direct SpO2
12775: Sensormedics Compatible Direct SpO2
12776: Masimo Compatible Direct SpO2
Page 8

8
This page was intentionally left blank.
www.metron-biomed.com
Page 9

9
daeg Quick Start
daeg Startup
Release
------------------STATUS --------
--------Preset : Manual
SpO2 : 96 %
Rate : 60 BPM
P.ampl : 100 %
F1
F3
----------------- STATUS ---------------Preset : Manual
SpO2 : 96 %
Rate : 60 BPM
P.ampl : 100 %
FUNC. displ-1
METR N
SpO2 Analyzer
LED-test
Red
IR
F1
F2
F3
daeg
no
clear
yes
enter
1
. , # $
7
template
esc
2
3
4
9
8
0 _-
6
5
on
off
Battery Compartment
daeg finger probe
Label side to bottom.
SpO2 sensor
Red, IR light source
introduced on unlabeled
side of daeg finger.
Daeg Operation / Simulation
1. Connect daeg’s Finger Probe to the main daeg unit,
and switch the daeg unit on.
The daeg must be powered by the 9VDC 400mA
power supply or by 4 AA alkaline batteries loaded
into the unit’s battery compartment.
2. The version number of the firmware will be briefly
displayed, followed by the first display screen
(below). The unit is immediately outputting the
simulation as displayed.
3. Apply the oximeter’s sensor to the daeg finger
probe. The sensor’s transmitter must be on the
bottom (unlabeled) side of the daeg finger.
1. To adjust the simulation settings, use the F2
function key to select the “active” parameter. The
active parameter is marked with an asterisk (*).
Note: Menu items at the bottom of the display are
activated/accessed using the F1, F2, and F3 function
keys.
2. Adjust the active parameter using the yellow Up
and Down arrow keys on the keypad, then press
enter to confirm the change.
3. To change the simulation setting for oximeter
model (Make), Ambient Light, Pigmentation, or to
select an automated simulation sequence, select the
F3 function key to go to the second display screen.
4. To access additional test and auxiliary functions,
press the F1 function key while in the first or
second screen display.
Additional / Auxiliary functions include:
Alarm Tests, Print functions, Remote Control Operation,
Probe Tests, and Simulation Setup.
www.metron-biomed.com
Page 10

10
This page was intentionally left blank.
www.metron-biomed.com
Page 11
11
Unit Setup
Bottom
Tabs
Right
Left
Unpacking
Unpack the unit and confirm the presence of the following components:
1 - daeg main unit
1 - daeg artificial finger
4 - AA batteries
1 – battery eliminator
If any of these items are missing or damaged, please contact your local Metron office.
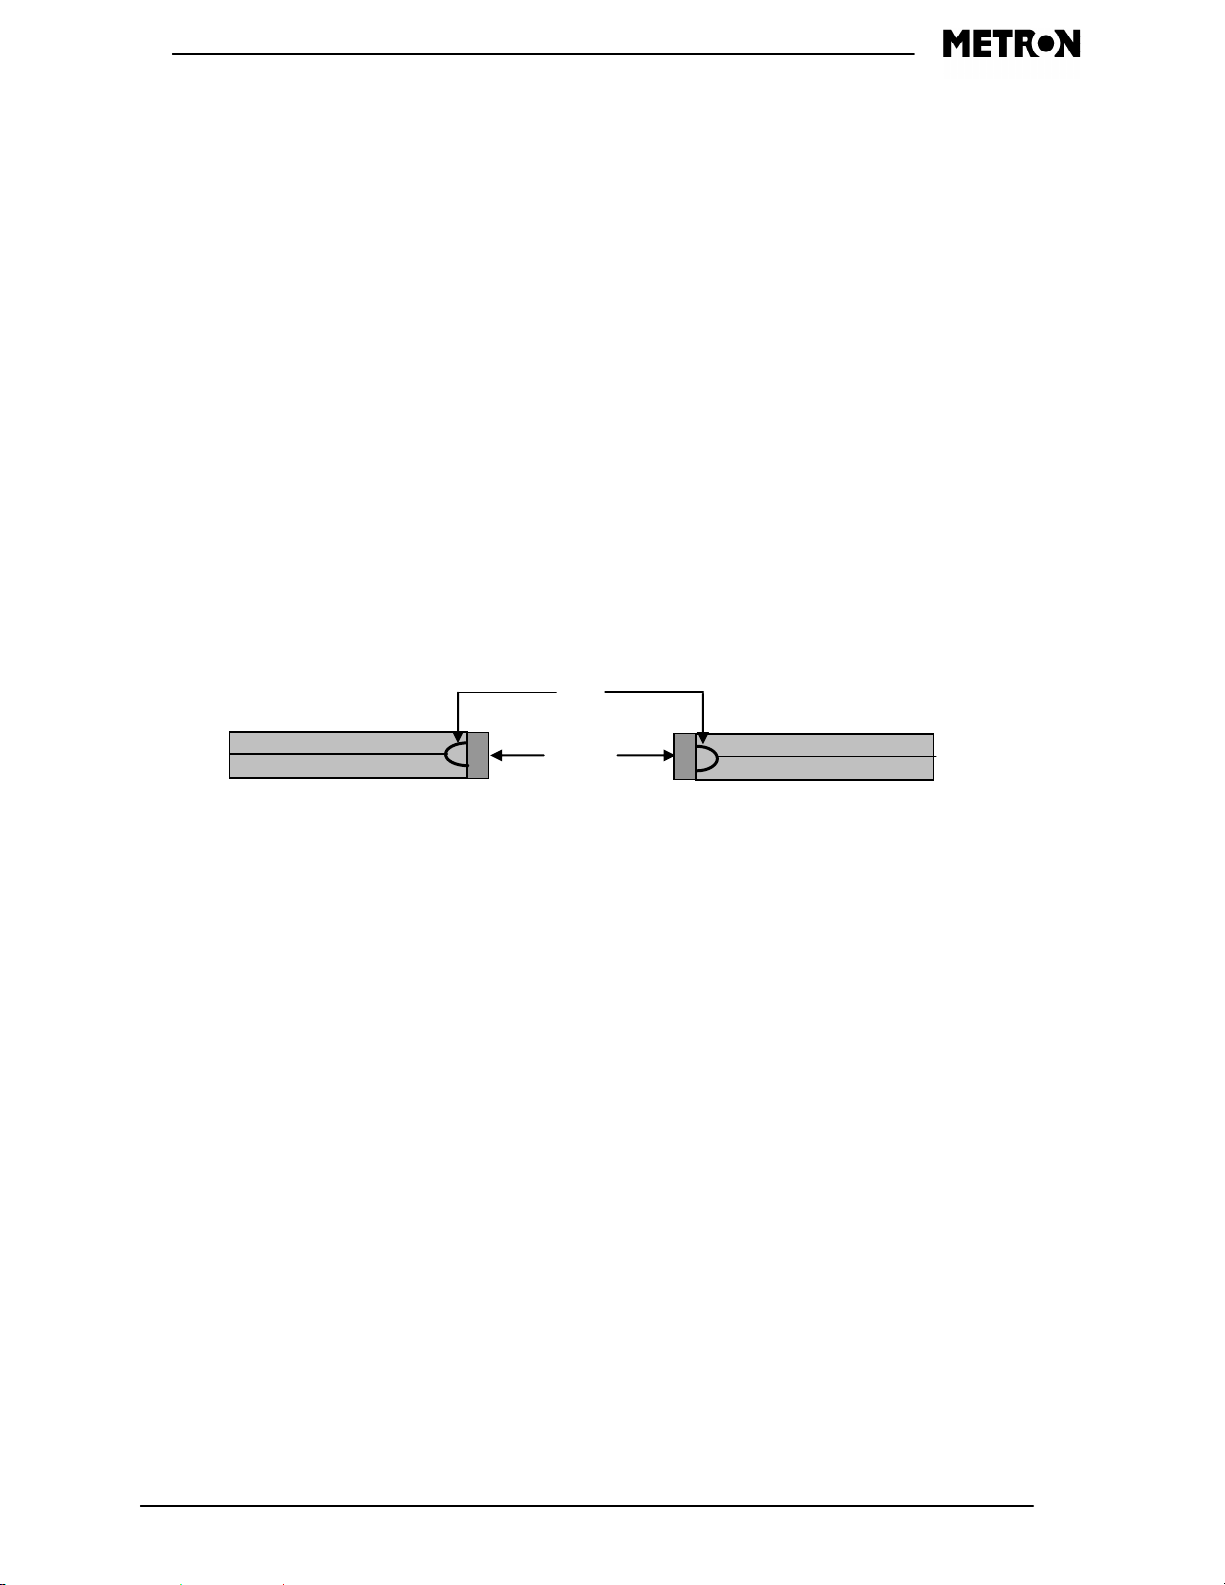
Battery Installation
Refer to the diagram below when installing the batteries. You will need to depress the tabs
shown in the diagram below and remove the bottom dark gray piece of the chassis. This will
then expose the battery connector and battery tray. Disconnect the battery clip and remove the
battery tray. When inserting the batteries into the tray, be sure to observe the polarity of the
batteries. When the tray is loaded back into the unit, reconnect the clip, and then replace the
chassis piece.
www.metron-biomed.com
Page 12

12
This page was intentionally left blank.
www.metron-biomed.com
Page 13

13
Operation
---- METRON daeg ---
SpO2 Meter Analyzer
Revision X.XX
loading sim data...
------ STATUS -----Preset:*Manual
SpO2 : 96 %
Rate : 60 BPM
P.ampl: 100 %
FUNC. * displ-1
------ SETUP ------Make :*Nellcor
Oper. : Manual
Amb.L.: Manual
Pigm. : Manual
FUNC. * displ-2
Power up Screen
Main Simulation Screens
This screen is the first one that is visible when the unit is
turned on. It indicates which version of the firmware is
installed.
These are the two screens that are used when performing
SPO2 simulations. You can change between the screens by
pressing the (F3) button. The (F2) button will move the
cursor, (*), to the next parameter. Using the Up and Down
arrows will let you change the value of the selected
parameter. You will then need to press the (yes/enter)
button to accept the change. Pressing the (F1) button will
take you the Function Selection Menu.
www.metron-biomed.com
Page 14
14
-----FUNCTIONS----- Alarm limits
Print header
Print Status
Remote Contr
ENTER EXIT
-----FUNCTIONS----- Print Status
Remote Contr
Probe Analyz
Sim. Setup
ENTER EXIT
AL_LIMIT t= 0.0 sec
Pulse :*On
SpO2 : 96 %
Rate : 60 BPM
P.ampl: 100 %
STOPt * PRINT
Function Selection Menu
This screen will let you select which testing function of
the daeg that you wish to perform. Using the Up and
Down arrows will let you move the cursor (->) next to the
function that you wish to use. Once the cursor is placed
press the (F2) button or the (yes/enter) button to enter
that function. Pressing the (F3) or (esc) buttons will take
you back to the Main Simulation Screen.
Alarm Limits
This test is designed to test your alarm system on your
monitor. The (F2) button will move the cursor, (*), to the
next parameter. Using the Up and Down arrows will let
you change the value of the selected parameter. You will
then need to press the (yes/enter) button to accept the
change and start the timer. Press the (F1) button to stop
the clock when you hear the alarm from your monitor.
The (F3) button will generate a line of printout via the
parallel port. Pressing the (esc) button will take you back
to the Main Simulation Screen.
www.metron-biomed.com
Page 15

15
------ STATUS -----Preset:*Manual
SpO2 : 96 %
Rate : 60 BPM
P.ampl: 100 %
LOCAL
CONTR. *
-- PROBE ANALYZER –-
Choose a test to
perform on the
SpO2 probe.
DIODE CONTI SENSI
-- PROBE ANALYZER –-
Probe OK!
DIODE CONTI SENSI
Remote Control
Probe Analyzer
This is the screen that is shown when the daeg is in
remote control mode. All currently active parameters are
displayed on the screen. Pressing (F1) will cancel the
remote control mode and take you back to the local Main
Simulation Screen.
This screen will let you select which test you wish to
perform on the finger probe when you have the probe
tester adaptor box attached.
Diode Test
Pressing (DIODE) runs the test.
This test gives a descriptive message as to the condition
of the probe’s LEDs and sensing elements. It tests the
probe for electrical shorts and open circuits.
www.metron-biomed.com
Page 16

16
Continuity Test
-- PROBE ANALYZER --
- ---Dio:----------- = ---Phd:----- ----
- --DIODE CONTI SENSI
-- PROBE ANALYZER –-
IR : XX %
Red: XX %
DIODE CONTI SENSI
IR :--------------- =
Red:--------------- =
Phd:----------------
DIODE CONTI SENSI
Pressing (CONTI) starts the continuity test. This test
constantly monitors the LED’s and the photocell.
Depending on the nature of the probe you will either
have “Dio” and “Phd” or “IR”, “RED”, and “Phd”
status lines. This is a continuous test and will display
changes in the status in real time. If the status changes
this will be reflected on the graph. A “High” line
indicates a short in that element. A “Middle” line is
normal operation. A “Low” indicates an open circuit.
Since this is a continuously running test it lets you flex
you cable to check for intermittent failures.
Sensitivity Test
Press (SENSI) to start the sensitivity test. This test gives
a value for the Red and IR light being seen by the sensor.
The scale is from 0 – 100. For repeatability purposes, do
not hold your probe open or squeeze it shut. Just let it
rest in its normal position.
www.metron-biomed.com
Page 17

17
Simulation Setup
SIM SETUP:
To change values,
use 'Yes' –button
for up, and
'No' –button for
down!
Make :Nellcor
RedDC:2048
IRDC :1024
Lcode: 101
Rval :0.48@SpO2:100
SAVE &
SpO2- SpO2+ QUIT
This function lets you manually alter the R-Curves within
the daeg unit.
Be cautious when using this mode as you are altering the
simulator output. If you make any changes that you do
not wish to keep you must turn off the daeg for 5 seconds
then turn it back on.
When in this mode the controls will be as follows:
Up and Down arrows control the cursor position.
(yes/enter) increases the indicated value.
(no/clear) decreases the selected value.
(F1) decreases the selected SPO2 value.
(F2) increases the selected SPO2 value.
(F3) Saves the changes and takes you back to the Main
Simulation Screen.
The saving procedure may take up to 5 minutes. Do not
turn off the power during this time.
www.metron-biomed.com
Page 18

18
This page was intentionally left blank.
www.metron-biomed.com
Page 19

19
Troubleshooting
Q: SPO2 values do not match.
A: Confirm that the “Make” is properly selected. Confirm your selection by pressing the
(ENTER) key after changing the value.
Q: The monitor is not reading any values.
A: Check all connections and verify if the “Red” and “IR” lights on the daeg are illuminated.
www.metron-biomed.com
Page 20

20
This page was intentionally left blank
www.metron-biomed.com
 Loading...