

Page 1
Made in Germany
SBE 1010 Diagnostic
Gebrauchsanleitung ..............Seite
Operating Instructions........... page
Mode d’emploi ...................... page
Gebruiksaanwijzing .........bladzijde
Istruzioni d’uso ................... pagina
Instrucciones de manejo .... página
170 24 7950 - 0106
5
10
15
20
25
30
Page 2
15
SBE 1010 Diagnostic
P
1
P
2
n
1
n
2
ø max.
S max.
ø max.
ø max.
b
G
H
m
W 1010
W 610
/min
/min
mm
(in)
/min.
bpm
mm
(in)
mm
(in)
mm
(in)
UNF
(in)
mm
(in)
kg
(lbs)
0-2600
0-900
2600
900
20 (3/4“)
50000
25 (1“)
40 (1 9/16“)
8 (5/16“)
16 (5/8“)
1-13 (1/32“-1/2“)
1/2“-20
6,35 (1/4“)
2,4 (5,3)
D
a
hw
L
pA/KpA
L
WA/KWA
mm
(in)
m/s
2
43 (1 11/16“)
14
dB(A) 99 / 3
dB(A) 110 / 3
EN 60745
98/37EG, 89/336/EWG
Dr. Johannes Haupt, Geschäftsführung
© 2006 Metabowerke GmbH, Postfach 1229, 72602 Nürtingen, Germany
2
Page 3
3
Page 4
4
Page 5

DEUTSCH
D
Gebrauchsanleitung
Sehr geehrter Kunde,
vielen Dank für das Vertrauen, das Sie uns beim Kauf Ihres neuen Metabo Elektrowerkzeugs
entgegengebracht haben. Jedes Metabo Elektrowerkzeug wird sorgfältig getestet und unterliegt den
strengen Qualitätskontrollen der Metabo Qualitätssicherung. Die Lebensdauer eines Elektrowerkzeugs
hängt aber in starkem Maße von Ihnen ab. Beachten Sie bitte die Informationen dieser
Gebrauchsanleitung und der beiliegenden Dokumente. Je sorgsamer Sie Ihr Metabo Elektrowerkzeug
behandeln, um so länger wird es zuverlässig seinen Dienst erfüllen.
Inhalt
1 Konformitätserklärung
2 Bestimmungsgemäße Verwendung
3 Allgemeine Sicherheitshinweise
4 Spezielle Sicherheitshinweise
5 Überblick
6 Besondere Produkteigenschaften
7 Inbetriebnahme
7.1 Montage des Zusatzhandgriffes
8 Benutzung
8.1 Verstellen des Bohrtiefenanschlags
8.2 Ein-/Ausschalten
8.3 Drehzahl vorwählen
8.4 Gang wählen
8.5 Umschalten Bohren/Schlagbohren
8.6 Drehrichtung wählen
8.7 Werkzeugwechsel SchnellspannBohrfutter Futuro Top
8.8 Bohrfutter abnehmen
9 Metabo Diagnostic System (MDS)
9.1 Elektronik-Signalanzeige leuchtet
nicht
9.2 Dauerleuchten - Überlast
9.3 Einfaches Blinken - Service-Aufruf 1
9.4 Doppelblinken - Service-Aufruf 2
9.5 Schnelles Blinken -
10 Tipps und Tricks
11 Störungsbeseitigung
12 Zubehör
13 Reparatur
14 Umweltschutz
15 Technische Daten
Wiederanlaufschutz
1 Konformitätserklärung
Wir erklären in alleiniger Verantwortlichkeit, daß
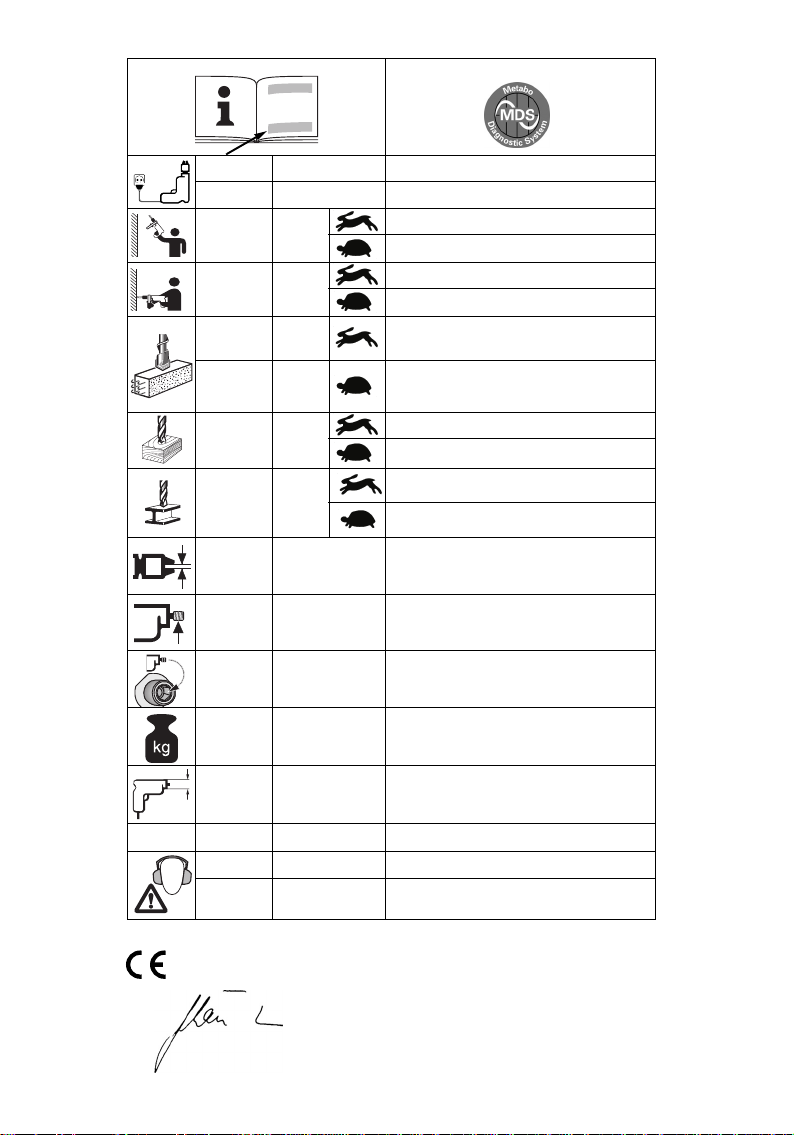
dieses Produkt mit den auf Seite 2 angegebenen
Normen oder normativen Dokumenten
übereinstimmt.
2 Bestimmungsgemäße
Verwendung
Die Maschine ist geeignet zum Bohren ohne
Schlag in Metall, Holz, Kunststoff und ähnlichen
Materialien und zum Schlagbohren in Beton, Stein
und ähnlichen Materialien. Darüber hinaus ist die
Maschine zum Gewindeschneiden und zum
Schrauben geeignet.
Für Schäden durch nicht bestimmungsgemäßen
Gebrauch haftet allein der Benutzer.
Allgemein anerkannte
Unfallverhütungsvorschriften und beigelegte
Sicherheitshinweise müssen beachtet werden.
3Allgemeine
Sicherheitshinweise
Lesen Sie vor der Benutzung des
Elektrowerkzeugs die beiliegenden
Sicherheitshinweise (rotes Heft) und die
Gebrauchsanleitung aufmerksam und vollständig
durch. Bewahren Sie alle beiliegenden Dokumente
auf und geben Sie Ihr Elektrowerkzeug nur
zusammen mit diesen Dokumenten weiter.
4Spezielle
Sicherheitshinweise
Tragen Sie Gehörschutz bei der Benutzung von
Schlagbohrmaschinen.
kann Gehörverlust bewirken.
Benutzen Sie den mit dem Gerät gelieferten
Zusatzhandgriff.
die Maschine kann zu Verletzungen führen.
Beachten Sie die mit diesem
Symbol gekennzeichneten
Textstellen zu Ihrem eigenen
Schutz und um Schutz Ihres
Elektrowerkzeugs!
Stecker aus der Steckdose ziehen, bevor
irgendeine Einstellung oder Wartung
vorgenommen wird.
Beachten Sie Gas-, Strom-, und Wasserleitungen!
Die Einwirkung von Lärm
Der Verluste der Kontrolle über
5
Page 6
D
DEUTSCH
Metabo S-automatic Sicherheitskupplung.
Bei Ansprechen der Sicherheitskupplung sofort
die Maschine ausschalten!
Nicht an das sich drehende Werkzeug fassen!
Späne und Ähnliches nur bei Stillstand der
Maschine entfernen.
Das Elektrowerkzeug nur an isolierten
Gehäuseteilen anfassen, wenn die Möglichkeit
besteht, bei der Arbeit verdeckte Leitungen
oder die Netzleitung zu berühren.
mit stromführenden Leitungen setzt die
metallischen Gehäuseteile unter Spannung und
kann dem Bedienenden einen elektrischen Schlag
versetzen.
Achtung beim harten Schraubfall (Einschrauben
von Schrauben mit metrischem oder Zoll-Gewinde
in Stahl)! Der Schraubenkopf kann abgerissen
werden, bzw. es können hohe Rückdrehmomente
am Handgriff auftreten.
Der Kontakt
5Überblick
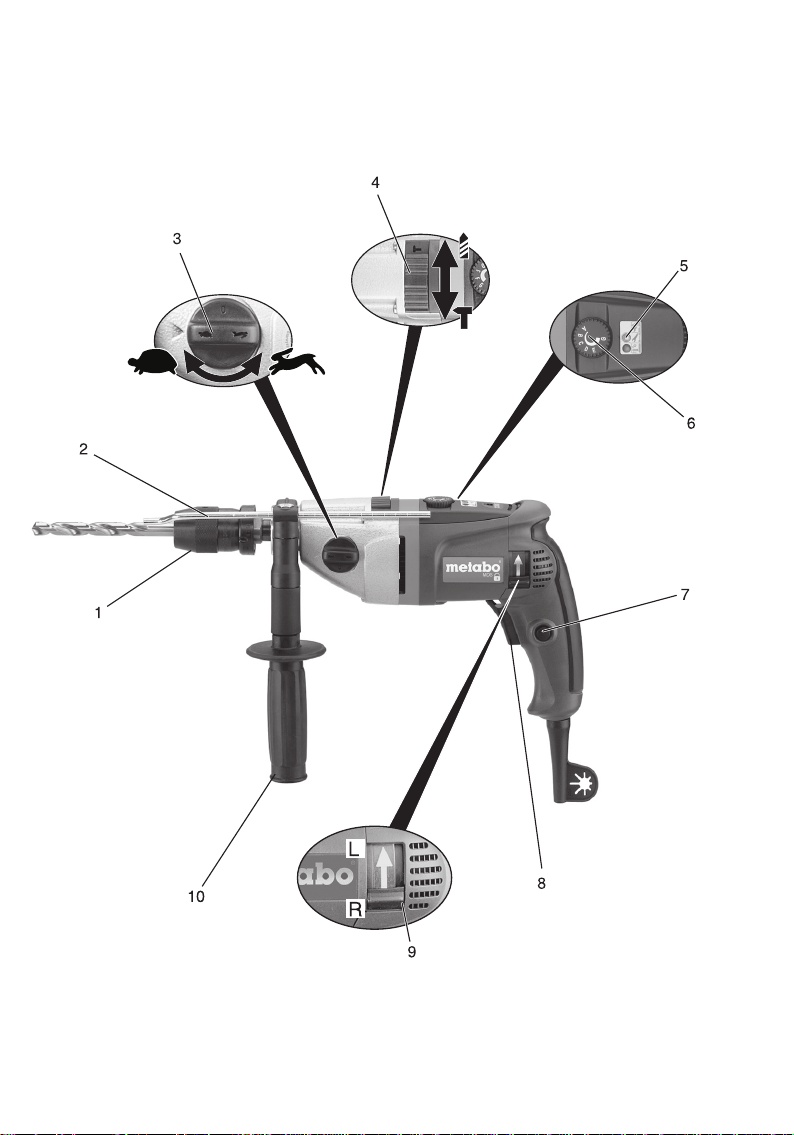
Siehe Seite 3 (bitte ausklappen).
1 Schnellspann-Bohrfutter Futuro Top
2 Bohrtiefenanschlag
3 Schaltknopf für Gangwahl
4 Schaltschieber Bohren/Schlagbohren
5 Elektronik-Signal-Anzeige
6 Stellrad zur Drehzahlvorwahl
7 Feststellknopf
8 Schalterdrücker
9 Drehrichtungsumschalter
10 Zusatzhandgriff
6 Besondere
Produkteigenschaften
Metabo Diagnostic System
Ein eingebauter Microcontroller steuert eine
nutzungsabhängige Serviceanzeige, die sich
Ihrem Arbeitsverhalten anpasst. Der Chip
signalisiert, in welchem Zustand sich Ihre
Maschine befindet und verhindert so durch
frühzeitige Warnung unerwarteten Totalausfall.
Metabo S-automatic Sicherheitskupplung:
Klemmt oder hakt das Einsatzwerkzeug, wird der
Kraftfluss zum Motor begrenzt. Wegen der dabei
auftretenden hohen Kräfte die Maschine immer mit
beiden Händen an den vorgesehenen Handgriffen
festhalten, einen sichereren Stand einnehmen und
konzentriert arbeiten.
Abschaltkohlebürsten
Eine Leuchtdiode warnt, bevor die Kohlebürsten
vollständig abgenutzt sind. Bei abgenutzten
6
Kohlebürsten schaltet die Maschine automatisch
ab.
Wiederanlaufschutz und
Überlastschutzanzeige
Der Wiederanlaufschutz verhindert ein
unbeabsichtigtes Anlaufen der Maschine nach
erneutem Netzanschluss bzw. bei
Spannungswiederkehr nach Netzausfall.
Die Überlastschutzanzeige warnt vor Überlastung
der Maschine.
7 Inbetriebnahme
Vergleichen Sie vor Inbetriebnahme, ob
die auf dem Typenschild angegebene
Netzspannung und Netzfrequenz mit den
Daten Ihres Stromnetzes übereinstimmen.
7.1 Montage des Zusatzhandgriffes
Aus Sicherheitsgründen stets den
mitgelieferten Zusatzhandgriff
verwenden.
Klemmring durch Linksdrehen des Zusatzhandgriff
(10) öffnen. Zusatzhandgriff auf Spannhals der
Maschine aufschieben. Bohrtiefenanschlag (2)
einschieben. Zusatzhandgriff je nach Anwendung
im gewünschten Winkel festziehen.
8Benutzung
8.1 Verstellen des Bohrtiefenanschlags
Zusatzhandgriff (10) lösen. Bohrtiefenanschlag (2)
auf die gewünschte Bohrtiefe einstellen und
Zusatzhandgriff wieder festziehen.
8.2 Ein-/Ausschalten
Zum Einschalten der Maschine Schalterdrücker (8)
drücken.
Die Drehzahl kann am Schalterdrücker verändert
werden.
Durch den elektronischen Sanftanlauf
beschleunigt die Maschine kontinuierlich bis zur
vorgewählten Drehzahl.
Für Dauereinschaltung kann der Schalterdrücker
mit dem Feststellknopf (7) arretiert werden. Zum
Ausschalten Schalterdrücker erneut drücken.
Bei Dauereinschaltung läuft die
Maschine weiter, wenn sie aus der Hand
gerissen wird. Daher die Maschine
immer mit beiden Händen an den
vorgesehenen Handgriffen festhalten, einen
sicheren Stand einnehmen und konzentriert
arbeiten.
Page 7
DEUTSCH
D
8.3 Drehzahl vorwählen
Am Stellrad (6) die maximale Drehzahl vorwählen.
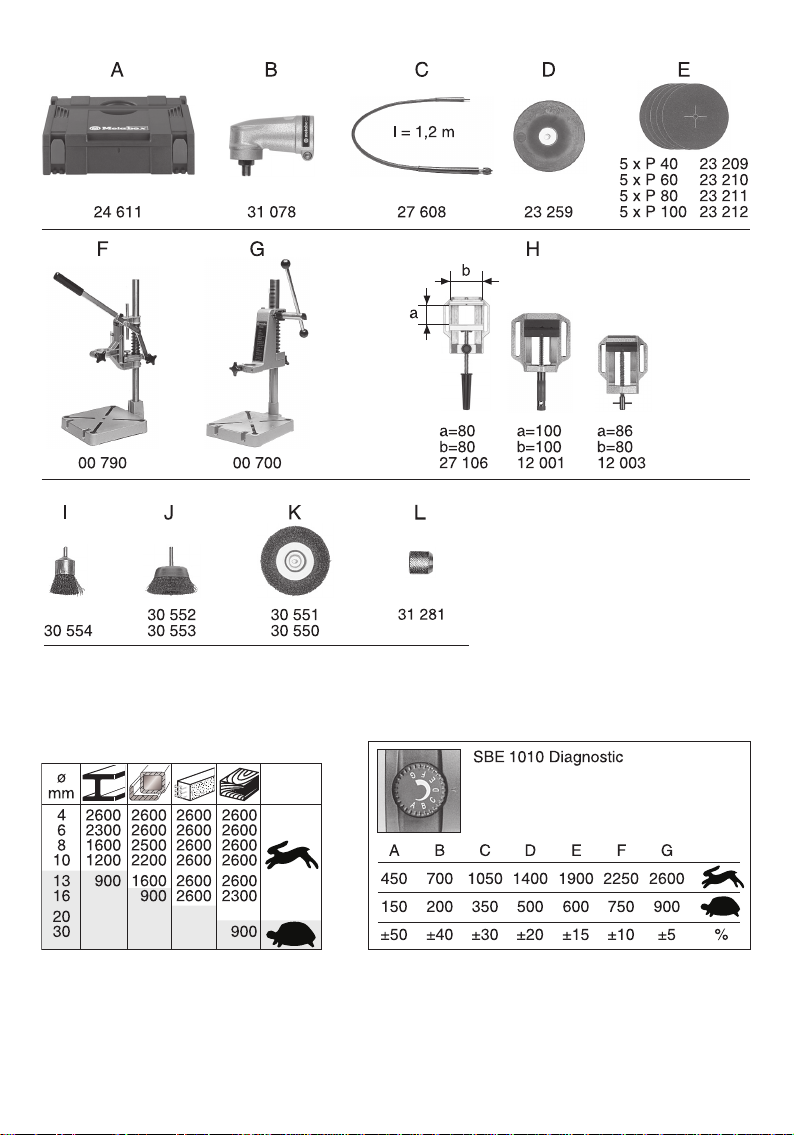
Empfohlene Drehzahlen zum Bohren siehe Seite 4.
8.4 Gang wählen
Den gewünschten Gang durch Verdrehen des
Schaltknopfes (3) wählen.
Umschalten nur bei auslaufender Maschine (kurz
Ein-/Ausschalten).
1. Gang
(niedrige Drehzahl, hohes
Drehmoment) z.B. zum Schrauben,
Bohren
2. Gang
(hohe Drehzahl) z.B. zum Bohren,
Schlagbohren
8.5 Umschalten Bohren/Schlagbohren
Die gewünschte Betriebsart durch Verschieben
des Schaltschiebers (4) wählen.
Bohren
Schlagbohren
Im Schlagbohrbetrieb mit hoher Drehzahl arbeiten.
Schaltknopf (3) auf stellen.
Schlagbohren und Bohren nur bei Rechtslauf.
8.6 Drehrichtung wählen
Drehrichtungsumschalter (9) nur bei
Stillstand des Motors betätigen.
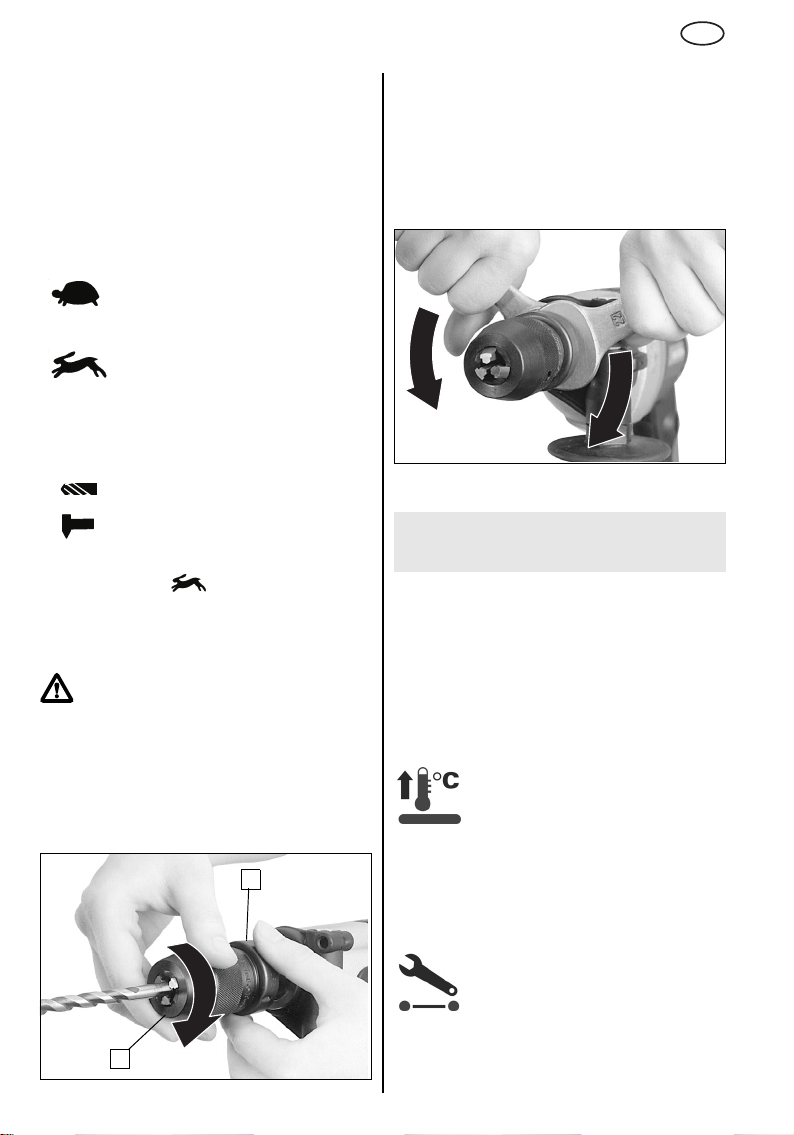
Werkzeug einsetzen. Haltering (a) festhalten und
mit der anderen Hand die Hülse (b) kräftig bis zum
Anschlag drehen. Zum Öffnen des Bohrfutters,
den Haltering (a) festhalten und die Hülse (b) in die
entgegengesetzte Richtung drehen.
8.8 Bohrfutter abnehmen
Schnellspann-Bohrfutter Futuro Top (1)
Bohrfutter mit zwei Gabelschlüsseln abschrauben.
9 Metabo Diagnostic System
(MDS)
Elektronik-Signalanzeige (5) - Bedeutung der
Leuchtsignale:
9.1 Elektronik-Signalanzeige (5) leuchtet
nicht
Die Maschine ist voll einsatzfähig.
Drehrichtung wählen:
R = Rechtslauf
L = Linkslauf
8.7 Werkzeugwechsel SchnellspannBohrfutter Futuro Top (1)
a
b
9.2 Dauerleuchten - Überlast
Bei einer länger andauernden
Überlastung der Maschine wird die
Leistungsaufnahme der Maschine
begrenzt und dadurch eine weitere
vermieden. Bei weiterer Überlastung bleibt die
Maschine stehen. Maschine aus- und wieder
einschalten und im Leerlauf abkühlen lassen.
9.3 Einfaches Blinken -
Tritt das Signal nur bei betätigtem Schalterdrücker
auf, sind die Kohlebürsten fast vollständig
abgenutzt.
unzulässige Erwärmung des Motors
Service-Aufruf 1
Leuchten - längere Pause Leuchten ...: Die Maschine ist bis zur
Wartung noch weitere 5 - 10% der
bisherigen Nutzungszeit bei voller
Beanspruchung einsetzbar.
7
Page 8

D
DEUTSCH
9.4 Doppelblinken - Service-Aufruf 2
2 x Leuchten - längere Pause 2 x Leuchten ...: Geben Sie das Gerät
sofort zum Fachhändler/Service, um
einen Maschinenausfall mit hohen
Folgekosten zu vermeiden.
Tritt das Signal nur bei betätigtem Schalterdrücker
auf, sind die Kohlebürsten vollständig abgenutzt.
Die Maschine hat automatisch abgeschaltet.
Kohlebürsten beim Kundendienst wechseln
lassen.
9.5 Schnelles Blinken - Wiederanlaufschutz
Bei Spannungswiederkehr nach Netzausfall läuft
die noch eingeschaltete Maschine aus
Sicherheitsgründen nicht wieder von alleine an.
Die Maschine am Schalter aus- und wieder
einschalten.
10 Tipps und Tricks
Bei tiefen Bohrungen den Bohrer von Zeit zu Zeit
aus der Bohrung ziehen, um das Gesteinsmehl
oder Späne zu entfernen.
Fliesen und andere spröde Materialien ohne
Schlag bohren.
Zum Schrauben kann das Bohrfutter
abgeschraubt werden. Schrauber-Bit direkt in den
Innensechskant der Spindel einsetzen.
Bei angebrachter Bit-Spannbuchse wird der
Schrauber-Bit gehalten.
Zum Gewindeschneiden, Gewindebohrer etwas
ölen. Geringe Drehzahl und wählen. Im
Rechtslauf einschneiden, anhalten, im Linkslauf
herausdrehen.
11 Störungsbeseitigung
Sollte sich der Schalterdrücker (8) nicht
eindrücken lassen, überprüfen, ob der
Drehrichtungsumschalter (9) vollständig auf
Position R oder L steht.
Elektronik-Signalanzeige (5)
Siehe Kapitel 9 Metabo Diagnostic System.
f
12 Zubehör
Verwenden Sie nur original Metabo Zubehör.
Wenn Sie Zubehör benötigen, wenden Sie sich
bitte an Ihren Händler.
Zur Auswahl des richtigen Zubehörs teilen Sie dem
Händler bitte den genauen Typ Ihres
Elektrowerkzeugs mit.
Siehe Seite 4.
AMetabox
B Winkel-Bohr- und Schraubvorsatz
C Biegewelle
D Gummi-Stützteller
E Leinen-Schleifblätter
F Bohrständer (Maschinenhalter kann um 360°
gedreht werden.)
G Fräs-Bohrständer (Säule mit Zahnstange und
Führungsnut)
H Maschinenschraubstock
I Stahldraht-Pinselbürste
J Stahldraht-Topfbürste
K Stahldraht-Rundbürste
L Bit-Spannbuchse
Zubehör-Komplettprogramm siehe
www.metabo.com oder Hauptkatalog.
13 Reparatur
Reparaturen an Elektrowerkzeugen dürfen nur
durch eine Elektrofachkraft ausgeführt werden!
Reparaturbedürftige Metabo Elektrowerkzeuge
können an die auf der Ersatzteilliste angegebenen
Adressen eingesandt werden.
Bitte beschreiben Sie bei der Einsendung zur
Reparatur den festgestellten Fehler.
14 Umweltschutz
Metaboverpackungen sind 100% recyclingfähig.
Ausgediente Elektrowerkzeuge und Zubehör
enthalten große Mengen wertvoller Roh- und
Kunststoffe, die ebenfalls einem Recyclingprozeß
zugeführt werden können.
Diese Gebrauchsanleitung ist auf chlorfrei
gebleichtem Papier gedruckt.
Nur für EU-Länder: Werfen Sie
Elektrowerkzeuge nicht in den Hausmüll!
Gemäß Europäisch er Richtlinie 2002/96/EG
über Elektro- und Elektronik-Altgeräte und
Umsetzung in nationales Recht müssen
verbrauchte Elektrowerkzeuge getrennt
8
Page 9

gesammelt und einer umweltgerechten
Wiederverwertung zugeführt werden.
15 Technische Daten
Erläuterungen zu den Angaben auf Seite 2.
Änderungen im Sinne des technischen Fortschritts
vorbehalten.
= Nennaufnahme
P
1
= Abgabeleistung
P
2
= Leerlaufdrehzahl
n
1
=Lastdrehzahl
n
2
ø max = maximaler Bohrdurchmesser
s max = maximale Schlagzahl
b = Bohrfutter-Spannweite
G = Bohrspindelgewinde
H = Bohrspindel mit Innensechskant
m=Gewicht
D = Spannhalsdurchmesser
Typische A-bewertete Schallpegel:
= Schalldruckpegel
L
pA
= Schalleistungspegel
L
WA
, KWA= Unsicherheit
K
pA
Beim Arbeiten kann der Geräuschpegel 85 dB(A)
überschreiten.
Gehörschutz tragen!
DEUTSCH
D
ahw = typisch bewe rtete Beschleunigung im
Hand-Arm-Bereich
Meßwerte ermittelt gemäß EN 60745.
Die angegebenen technischen Daten sind
toleranzbehaftet (entsprechend den jeweils
gültigen Standards).
9
Page 10

ENG
ENGLISH
Operating Instructions
Dear Customer,
Thank you for the trust you have placed in us by buying a Metabo power tool. Each Metabo power tool
is carefully tested and subject to strict quality controls by Metabo's quality assurance. Nevertheless, the
service life of a power tool depends to a great extent on you. Please observe the information contained
in these instructions and the enclosed documentation. The more carefully you treat your Metabo power
tool, the longer it will provide dependable service.
Contents
1 Declaration of Conformity
2 Specified Conditions of Use
3 General Safety Information
4 Special Safety Information
5 Overview
6 Special Product Features
7 Start of Operation
7.1 Side handle installation
8Use
8.1 Depth stop setting
8.2 Switching on/off
8.3 Speed preselection
8.4 Gear selection
8.5 Changing between twist drilling/
impact drilling
8.6 Selection of direction of rotation
8.7 Tool change with Futuro Top keyless
chuck
8.8 Removing the drill chuck
9 Metabo Diagnostic System (MDS)
9.1 Electronic signal display does not
illuminate
9.2 Illuminated continuously - overload
9.3 Single flashing - Service call 1
9.4 Double flashing - Service call 2
9.5 Rapid flashing - restart protection
10 Tips and Tricks
11 Trouble Shooting
12 Accessories
13 Repairs
14 Protection of the Environment
15 Technical Specifications
2 Specified Conditions of Use
The machine is suitable for non-impact drilling into
metal, wood, plastic and similar materials and for
impact drilling into concrete, stone and other such
materials. Furthermore the machine is suitable for
tapping and screw driving.
The user bears sole responsibility for any damage
caused by inappropriate use.
Generally accepted accident prevention
regulations and the enclosed safety information
must be observed.
3 General Safety Information
Before using this power tool, completely read and
understand the enclosed safety information (red
booklet) and the instructions. Keep all enclosed
documentation for future reference, and pass on
your power tool only together with this
documentation.
4 Special Safety Information
Always wear hearing protection when using
hammer drills.
of hearing.
Use the additional handles supplied with the
Loss of control over the tool can lead to
tool.
injuries.
Exposure to noise can cause loss
For your own protection and the
protection of your power tool,
observe the passages marked by
this symbol!
1 Declaration of Conformity
We hereby declare at our sole responsibility that
this product conforms to the standards and
normative documents mentioned on page 2.
10
Pull the plug out of the plug socket before any
adjustments or servicing are performed.
Take care to avoid gas, electricity, and water
supplies!
Metabo S-automatic safety clutch.
When the safety clutch responds, switch off the
machine immediately!
Page 11
ENGLISH
ENG
Do not grasp the rotating tool!
Remove chips and similar matter only with the
machine at standstill.
Hold the power tool only at insulated housing
parts, if there is a possible hazard of making
contact with concealed electric cables or the
supply cable.
the metal parts of the housing and can cause
electric shock to the operator.
Caution with hard screwdriving (driving of screws
with either a metric or an imperial thread into steel).
The head of the screw may rip off or high restoring
torques may be incurred at the handle.
Contact with live wires energizes
5 Overview
See page 3 (please unfold).
1 Keyless chuck Futuro Top
2Depth stop
3 Control knob for gear selection
4 Slide switch for drilling/impact drilling
5 Electronic signal indicator
6 Speed preselection wheel
7 Lock button
8 Trigger
9 Selector switch for direction of rotation
10 Side handle
6 Special Product Features
M
etabo Diagnostic System (MDS)
An integral microcontroller controls a usedependent service display that adjusts itself to
your working methods. The chip signalizes the
status of your machine, the early warning thus
preventing unexpected total failure.
Metabo S-automatic safety clutch:
If the insertion tool jams or hooks, the power flow
to the engine will be restricted. Because of the high
power which then arises, always hold the machine
with both hands on the handles, stand safely, and
concentrate on your work.
Cut-out brushes, with wearing indication
A LED warns before the carbon brushes are
completely worn. If the brushes are worn
completely the machine switches off
automatically.
Restart protection and overload protection
indicator
The restart protection prevents the machine from
being unintentionally started when it is plugged in
again or when power is restored after a power
failure.
The overload protection indicator warns of an
impending overload.
7Start of Operation
Before plugging in check to see that the
rated mains voltage and power
frequency, as stated on the name plate,
match with your power supply.
7.1 Side handle installation
For safety reasons, always use the side
handle supplied.
Open the clamping ring by turning the side handle
(10) counter-clockwise. Slide the side handle onto
the spindle collar of the machine. Insert the (2)
depth stop. Tighten the side handle at an angle as
required for the application.
8Use
8.1 Depth stop setting
Loosen the side handle (10). Set depth stop (2) to
the desired drilling depth and retighten the side
handle.
8.2 Switching on/off
To start the machine, press the trigger (8).
The speed can be changed at the trigger.
Due to the electronic soft start the machine
accelerates continuously up to the pre-selected
speed.
For continuous operation the trigger can be locked
with the lock button (7). To stop the machine,
press the trigger again.
8.3 Speed preselection
Pre-select the max. speed with the preselection
wheel (6). See page 4 for recommended drilling
speeds.
If switched on continuously, the machine
continues running if it is jerked out of
your hands. Therefore, always hold the
machine with both hands on the handles, stand
safely, and concentrate on your work.
8.4 Gear selection
Select the desired gear by turning the control knob
(3).
11
Page 12
ENG
ENGLISH
Change gears only with the machine coming to a
complete standstill (start and switch right off
again).
1. gear
(low speed, high torque)
e.g. for screwing twist drilling
2. gear
(high speed) e.g. for twist drilling,
impact drilling
8.5 Changing between twist drilling/impact
drilling
Select desired operating mode by shifting the slide
switch (4) as required.
Twist drilling
Impact drilling
Use high speed for impact drilling. Set control
knob (3) to .
Impact and twist drilling can be done only with a
clockwise direction of rotation.
8.6 Selection of direction of rotation
Do not actuate the rotation selector
switch (9) unless the motor has
completely stopped.
Select direction of rotation:
R = clockwise
L = counter-clockwise
8.7 Tool change with Futuro Top keyless
chuck (1)
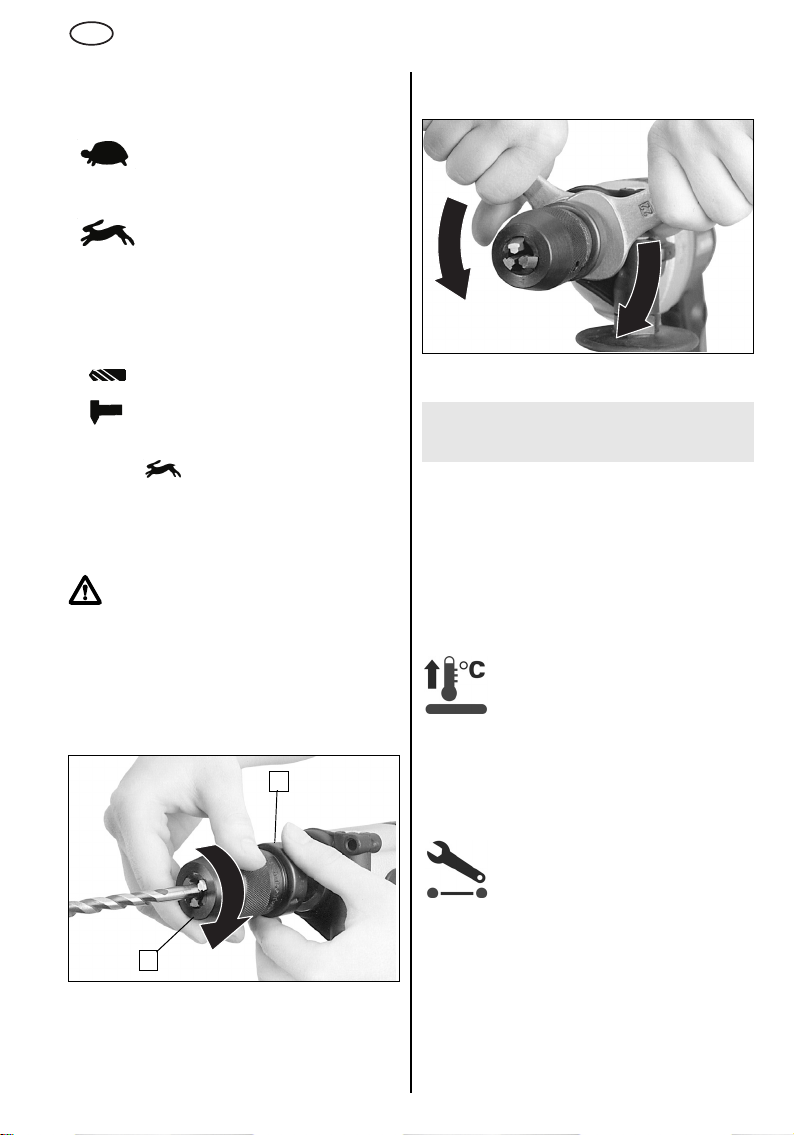
a
8.8 Removing the drill chuck
Keyless chuck Futuro Top (1)
Remove the chuck with two open end spanners.
9 Metabo Diagnostic System
(MDS)
Electronic signal display(5) - Meaning of light
signals:
9.1 Electronic signal display (5) does not
illuminate
The machine is ready for operation.
9.2 Illuminated continuously - overload
If the machine is subject to long
periods of continuous overloading,
the power input of the machine is
limited, thus preventing the further
Further overloading stops the machine. Switch the
machine off and on again and leave to cool down
in the idle position.
unauthorized heating of the motor.
b
Insert tool. Grip the retaining ring (a) firmly and,
with the other hand, turn the sleeve (b) against the
stop. To open the drill chuck grip the retaining ring
(a) firmly and turn sleeve (b) in the opposite
direction.
12
9.3 Single flashing -
Illumination - longer pause illumination ...: The machine can be
operated at full load for another 5 10% of the current active period until
servicing.
If the signal only appears when the pushbutton is
pressed, this means the carbon brushes are
almost completely worn.
Service call 1
Page 13
ENGLISH
ENG
9.4 Double flashing - Service call 2
2 x illuminations - longer pause 2 x illuminations ...: Refer the machine
to a specialized dealer/service
immediately in order to avoid machine
failure and subsequent high costs.
If the signal only appears when the pushbutton is
pressed, this means the carbon brushes are
completely worn. The machine has switched off
automatically. Have the brushes replaced by an
authorized service center.
9.5 Rapid flashing - restart protection
When power is restored after a power supply
failure, for reasons of safety the still switched-on
machine will not start. Switch the machine off and
on at the switch.
10 Tips and Tricks
When drillling deep holes, pull the drill bit out of the
hole from time to time to clear the stone dust or
chips.
Drill tiles and other brittle materials without impact.
For screw driving the drill chuck can be removed.
Insert screwdriver bit directly into the spindle's
hexagon socket.
Attach the screwdriver-bit retaining bush to hold
the screwdriver bit.
For tapping, apply a little cutting oil to the tap.
Select a low speed and .Set for clockwise
rotation and tap hole, stop machine and switch to
counter-clockwise rotation to remove tap.
11 Trouble Shooting
If the trigger (8) can not be depressed, check to
see that the rotation selector switch (9) is fully set
to position R or L.
Electronic signal display (5)
See Chapter 9, Metabo Diagnostic System (MDS).
f
12 Accessories
See page 4.
AMetabox
B Angle Drilling and Screwdriving Attachment
C Flexible Shaft
DRubber Backing Pad
E Linen-backed Sanding Discs
FDrill Stand
(drill clamp can be rotated by 360°.)
G Moulding & Drill Stand
(Column with toothed rack and guide groove)
H Machine Vice
I Steel-wire End Brush
J Steel-wire Cup Brush
K Steel-wire Wheel Brush
Fitting bit spring
L
For complete range of accessories, see
www.metabo.com or the main catalogue.
13 Repairs
Repairs to power tools must be carried out by
qualified electricians ONLY!
Any Metabo power tool in need of repair can be
sent to one of the addresses listed on the page
before the last page.
Please attach a description of the fault to the
machine.
14 Protection of the
Environment
Metabo's packaging can be 100% recycled.
Worn out power tools and accessories contain
considerable amounts of valuable raw and plastic
materials, which can be recycled.
These instructions are printed on chlorine-free
bleached paper.
Only for EU countries: Never dispose of
power tools in your household waste! In
accordance with European Guideline
2002/96/EC on used electronic and electric
equipment and its implementation in national legal
systems, used power tools must be collected
separately and handed in for environmentally
compatible recycling.
Use only genuine Metabo accessories.
If you need accessories, check with your dealer.
For the dealer to select the correct accessory, he
needs to know the exact model designation of
your power tool.
13
Page 14

ENG
ENGLISH
15 Technical Specifications
Explanatory notes on the information on page 2.
Changes due to technological progress reserved.
= rated input
P
1
= rated output
P
2
= no-load speed
n
1
= load speed
n
2
ø max = max. solid drill diameter
S max = max. impact rate
b = drill chuck clamping capacity
G = spindle thread
H = spindle with hexagon socket
m = weight
D = spindle collar diameter
= typical weighted acceleration
a
hw
typical A-weighted sound levels:
L
pA
L
WA
, KWA= unsafe
K
pA
During operation the noise level can exceed
85 dB(A).
Measured values established according to
EN 60745.
The technical specifications quoted are subject to
tolerances (in compliance with the relevant valid
standards).
for the hand-arm area
= sound pressure level
= sound power level
Wear hearing protection!
14
Page 15
FRANÇAIS
F
Mode d'emploi
Cher client,
merci de la confiance que vous nous avez témoignée en achetant un outil électrique Metabo. Tous les
outils électriques Metabo sont testés avec soin et font l'objet de contrôles qualité très stricts effectués
par le Service Qualité Metabo. Mais c'est vous qui avez la plus grande influence sur la durée de vie de
votre outil électrique. Veuillez respecter les informations contenues dans ces instructions d'utilisation et
dans les documents ci-joints. En prenant grand soin de votre outil électrique Metabo, vous en
augmenterez la durée de vie et en garantirez le bon fonctionnement.
Sommaire
1 Déclaration de conformité
2 Utilisation conforme
3 Consignes générales de sécurité
4 Consignes spéciales de sécurit
5Aperçu
6 Propriétés particulières du produit
7 Mise en service
7.1 Montage de la poignée collier
8 Utilisation
8.1 Réglage de la butée de profondeur
8.2 Mise sous/hors tension
8.3 Présélection de la vitesse
8.4 Sélection de la vitesse
8.5 Commutation perçage simple / à
percussion
8.6 Sélection du sens de rotation
8.7 Changement d'outil - Mandrin
autoserrant Futuro Top
8.8 Dépose de mandrin
9 Metabo Diagnostic System (MDS)
9.1 Voyant éteint
9.2 Voyant allumé en continu - surcharge
9.3 Simple clignotement - avertissement
de maintenance 1
9.4 Double clignotement - avertissement
de maintenance 2
9.5 Clignotement rapide - protection de
antidémarrage
10 Conseils et astuces
11 Dépannage
12 Accessoires
13 Réparation
14 Protection de l'environnement
15 Caractéristiques techniques
1 Déclaration de conformité
2 Utilisation conforme
La machine convient aux travaux de perçage sans
percussion dans le métal, le bois, le plastique et
les matériaux similaires, et aux travaux de perçage
à percussion dans le béton, la pierre et les
matériaux similaires. La machine est d'autre part
adaptée au taraudage et au vissage.
Les dommages résultant d'une utilisation non
conforme incombent entièrement à l'utilisateur.
Les prescriptions générales en vigueur en matière
de prévention des accidents, ainsi que les
consignes de sécurité jointes, doivent être
respectées.
3 Consignes générales de
sécurité
Avant d'utiliser votre outillage électrique, veuillez
lire attentivement et entièrement les consignes de
sécurité jointes (cahier rouge) et la notice
d'utilisation. Conservez tous les documents joints
et ne transmettez votre outillage électrique à des
tiers qu'accompagné de ces documents.
4 Consignes spéciales de
sécurit
Portez une protection auditive lorsque vous
utilisez une perceuse à percussion.
susceptible de provoquer une perte de capacité
auditive.
Utiliser les poignées complémentaires fournies
avec l'outil.
susceptible de provoquer des blessures.
La perte de contrôle de la machine est
Pour votre sécurité et celle de votre
outillage électrique, observez les
endroits du texte marqués par ce
symbole!
Le bruit est
Nous déclarons, sous notre seule responsabilité,
que ce produit est en conformité avec les normes
ou documents servant de normes, mentionnés à la
page 2.
Débrancher le cordon d'alimentation de la prise de
courant avant toute opération de réglage ou de
maintenance.
15
Page 16
F
FRANÇAIS
Notez la position des conduites de gaz et d'eau,
ainsi que des câbles électriques!
Débrayage de sécurité Metabo S-automatic.
En cas de déclenchement du débrayage de
sécurité, arrêtez immédiatement la machine!
Ne pas toucher à l'outil en rotation!
N'enlever les copeaux ou autres déchets que
lorsque la machine est arrêtée.
Ne saisir l'outillage électrique que sur les
parties du boîtier isolées quand il existe un
risque de toucher des conduites ou le câble
secteur pendant les travaux.
câbles conducteurs d'électricité peut mettre les
pièces de boîtier métalliques sous tension et
représenter un risque de choc électrique pour
l'utilisateur.
Attention en cas de vissage dur (vissage dans des
filets métriques ou des filets au pouce dans
l'acier). La tête de vis peut être cassée ou des
moments de réaction élevés peuvent intervenir au
niveau de la poignée.
Le contact avec les
5Aperçu
Voir page 3 (déplier).
1 Mandrin autoserrant Futuro Top
2 Butée de profondeur
3 Sélecteur de vitesse
4 Commutateur à coulisse perçage simple /
à percussion
5 Affichage signal électronique
6 Molette de présélection de la vitesse
7 Bouton de blocage
8 Gâchette
9 Inverseur de sens de rotation
10 Poignée collier
6 Propriétés particulières du
produit
Metabo Diagnostic System (MDS)
Un microcontrolleur intégré commande un
affichage de maintenance en fonction de
l'utilisation et de votre façon de travailler. La puce
électronique signale à l'opérateur l'état dans
lequel se trouve la machine et empêche ainsi une
défaillance intempestive de celle-ci.
Débrayage de sécurité Metabo S-automatic :
Si l'outil interchangeable reste coincé ou
accroché, la transmission de la force vers le
moteur est limitée. Comme dans ce cas, on
rencontre des forces élevées, il faut
systématiquement saisir la machine des deux
mains aux poignées prévues à cet effet, veiller à
bien se camper sur ses jambes et à se concentrer
sur son travail
16
Balais autorupteurs avec affichage de l'usure
une diode lumineuse est activée avant que les
charbons ne soient complètement usés. Lorsqu'ils
sont usés, la machine s'arrête automatiquement.
Protection anti-démarrage et affichage de
surcharge
Le système anti-démarrage empêche que la
machine ne se remette involontairement en
marche après une remise en route ou lorsque la
tension revient après une panne de secteur.
L'affichage de surcharge se déclenche lorsqu'il y a
risque de surcharge de la machine.
7 Mise en service
Avant la mise en service, s'assurer que la
tension et la fréquence secteur
mentionnées sur la plaque signalétique
correspondent bien aux caractéristiques de
votre réseau électrique.
7.1 Montage de la poignée collier
Pour des raisons de sécurité, utiliser
systématiquement la poignée collier
livrée.
Ouvrir la bague de serrage en tournant la poignée
collier vers la gauche (10). Engager la poignée sur
le col de serrage de la machine. Mettre en place la
butée de profondeur (2). Serrer la poignée collier
dans la position souhaitée selon l'application.
8 Utilisation
8.1 Réglage de la butée de profondeur
Desserrer la poignée collier (10). Mettre en place la
butée de profondeur (2) sur la profondeur de
perçage souhaitée et resserrer la poignée.
8.2 Mise sous/hors tension
Pour mettre la machine en marche, actionner la
gâchette (8).
La vitesse peut être modifiée via la gâchette.
Grâce au démarrage électronique en douceur, la
machine accélère en continu jusqu'à la vitesse
présélectionnée.
Pour un fonctionnement continu, la gâchette peut
être verrouillée avec le bouton de blocage (7). Pour
la déverrouiller, actionner de nouveau la gâchette.
Si elle est réglée sur marche continue,
la machine continue à tourner si elle
s'arrache de la main. Pour cette raison,
il faut systématiquement saisir la machine des
deux mains aux poignées prévues à cet effet,
veiller à bien se camper sur ses jambes et à se
concentrer sur son travail.
Page 17
FRANÇAIS
F
8.3 Présélection de la vitesse
Avec la molette de réglage (6), présélectionner la
vitesse maximale. Voir les vitesses conseillées
pour le perçage à la page 4.
8.4 Sélection de la vitesse
Sélectionner la vitesse souhaitée en tournant le
commutateur (3).
Ne commuter que lorsque la machine est en
décélération (brève mise en marche/arrêt).
1ère vitesse
(vitesse réduite, couple élevé) p. ex.
pour le vissage, perçage
2ème vitesse
(grande vitesse) p. ex. pour le
perçage, perçage avec percussion
8.5 Commutation perçage simple / à
percussion
Sélectionner le mode de fonctionnement souhaité
en déplaçant le commutateur à coulisse (4).
Perçage simple
Perçage avec percussion
En mode Perçage avec percussion, travailler à
grande vitesse. Régler le commutateur (3) sur
.
Perçage avec percussion et perçage simple
uniquement en rotation à droite.
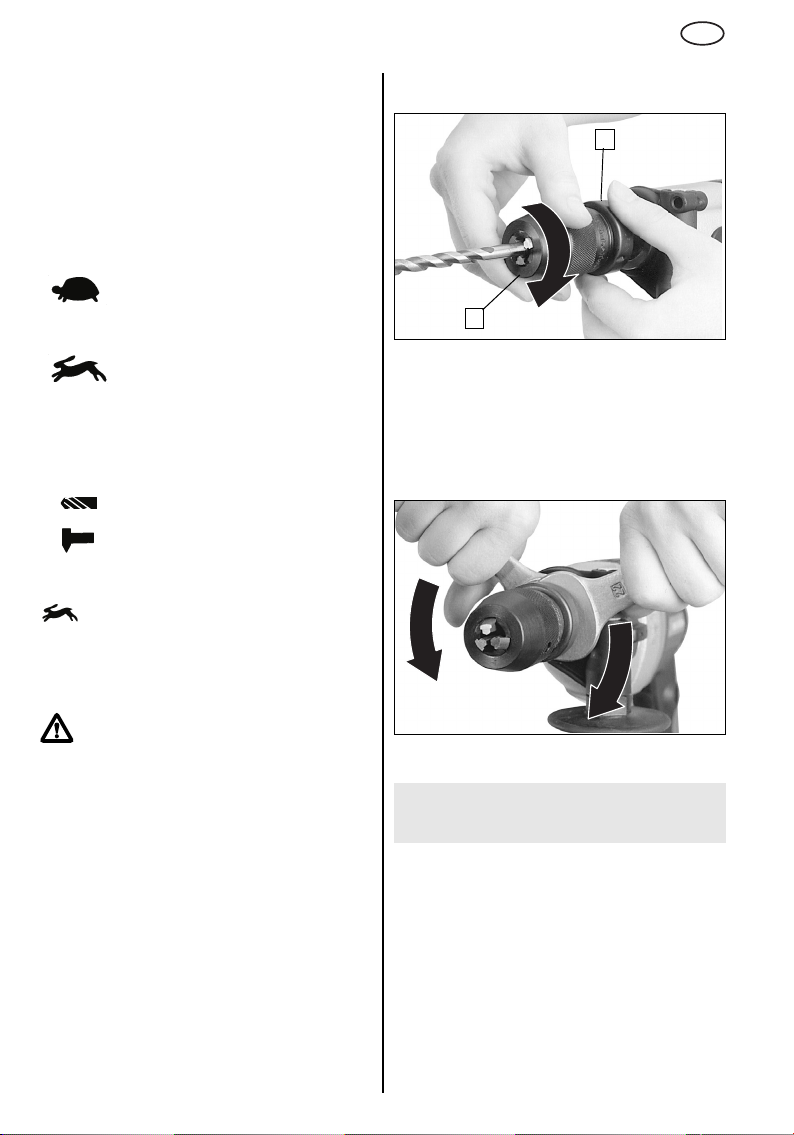
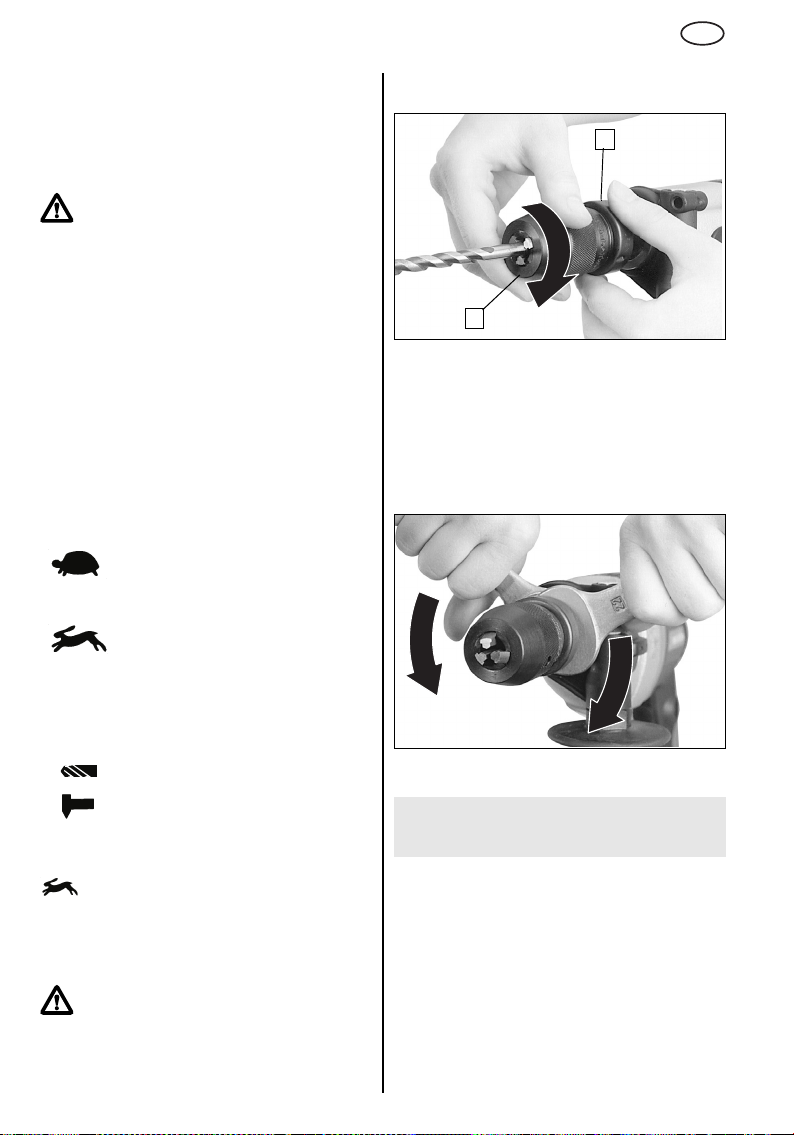
8.7 Changement d'outil - Mandrin
autoserrant Futuro Top (1)
a
b
Mettre l'outil en place. Maintenir la bague de
serrage (a) et tourner vigoureusement la douille (b)
avec l'autre jusqu'à la butée. Pour libérer l'outil,
tenir la bague de serrage (a) et tourner la douille (b)
dans le sens inverse.
8.8 Dépose de mandrin
Mandrin autoserrant Futuro Top (1)
8.6 Sélection du sens de rotation
N'actionner l'inverseur du sens de
rotation (9) que lorsque le moteur est
arrêté.
Sélectionner le sens de rotation:
R = vers la droite
L = vers la gauche
Dévisser le mandrin avec deux clés à fourche.
9 Metabo Diagnostic System
(MDS)
Affichage électronique (5)- Interprétation des
signaux lumineux :
9.1 Voyant (5) éteint
La machine fonctionne parfaitement bien.
17
Page 18

F
FRANÇAIS
9.2 Voyant allumé en continu - surcharge
Une surcharge prolongée de la
machine entraîne une limitation de la
puissance absorbée et empêche ainsi
un échauffement excessif du moteur.
s'arrête. Mettez la machine hors tension / sous
tension et laissez-la refroidir à vide.
9.3 Simple clignotement -
d'utilisation écoulé.
Si le signal n'est émis qu'à l'action du bouton-
pression, les charbons sont presque entièrement
usés.
9.4 Double clignotement - avertissement
Si le signal n'est émis qu'à l'action du boutonpression, les charbons sont presque entièrement
usés. La machine s'est arrêtée automatiquement.
Faites remplacer les charbons par votre service
après-vente.
9.5 Clignotement rapide - protection de
Lorsque la tension est rétablie après une coupure
de courant, la machine, pour des raisons de
sécurité, ne se remet pas en marche toute seule.
Mettez la machine hors tension / sous tension.
Si la surcharge persiste, la machine
maintenance 1
Clignotement - pause prolongée clignotement ... : Avant intervention
pour maintenance, la machine peut
continuer de fonctionner à pleine
charge pendant 5 à 10 % du temps
de maintenance 2
Double clignotement - pause
prolongée - double clignotement ... :
Faites immédiatement vérifier
l'appareil par votre distributeur/SAV
pour éviter les frais consécutifs à une
défaillance.
antidémarrage
avertissement de
Pour le taraudage, huiler légèrement le taraud.
Sélectionner une vitesse réduite et .
Tarauder vers la droite, stopper, sortir en tournant
vers la gauche.
11 Dépannage
Si la gâchette (8) ne peut pas être actionnée,
vérifier si l'inverseur de sens de rotation (9) est
complètement en position R ou L.
Affichage électronique (5)
Voir chapitre 9 Metabo Diagnostic System (MDS).
f
12 Accessoires
N'utiliser que des accessoires originaux Metabo.
Si vous avez beson d'accessoires, veuillez vous
adresser à votre concessionnaire.
Pour choisir l'accessoire approprié, veuillez
indiquer le type exact de votre outillage électrique
à votre revendeur.
Voir page 4.
AMetabox
B Adaptation renvoi d'angle
CFlexible
D Plateau à poncer en caoutchouc
E Disques abrasifs sur toile
F Support de perçage
(possibilité de faire tourner le berceau du
support sur 360° autour de la colonne.)
G Support de moulurage / perçage
(Colonne à crémaillère et rainure de guidage)
H Etau machine
I Brosse métallique, forme pinceau
J Brosse métallique boisseau
K Brosse métallique ronde
Douille de serrage pour embouts
L
Voir programme complet des accessoires sur
www.metabo.com ou dans le catalogue principal.
13 Réparation
10 Conseils et astuces
En cas de perçages profonds, retirer de temps à
autre l'outil du trou de perçage pour éliminer la
poussière ou les copeaux.
Percer les carrelages et autres matériaux cassants
sans percussion.
Pour le vissage, le mandrin peut être démonté.
Placer l'embout de vissage directement dans
l'alésage à six pans.
Quand la douille de serrage d'embout est montée,
l'embout de vissage est maintenu.
18
Les réparations sur les outillages électriques ne
doivent être effectuées que par un électricien
spécialisé!
Les outillages électriques Metabo devant être
réparés peuvent être envoyés aux adresses
mentionnées à l'avant-dernière page.
Lors de l'expédition pour réparation, veuillez
décrire le défaut constaté.
Page 19

14 Protection de
l'environnement
Les emballages Metabo sont à 100% recyclables.
Les outillages électriques et les accessoires hors
d'usage comportent de grandes quantités de
matières premières et plastiques précieuses qui
peuvent être également envoyées au recyclage.
Cette notice d'utilisation est imprimée sur du
papier blanchi sans chlore.
Pour les pays européens uniquement :
Ne pas jeter les appareils électriques dans
les ordures ménagères ! Conformément à
la directive européenne 2002/96/CE relative aux
déchets d'équipements électriques ou électroniques (DEEE), et à sa transposition dans la
législation nationale, les appareils électriques
doivent être collectés à part et être soumis à un
recyclage respectueux de l’environnement.
15 Caractéristiques
techniques
Explications relatives aux indications de la page 2.
Sous réserve de modifications inhérentes au
progrès de la technique.
P
= Puissance nominale absorbée
1
= Puissance utile
P
2
= Vitesse à vide
n
1
= Vitesse en charge
n
2
ø max = Diamètre de perçage maximal
S max = Cadence de frappe maximale
b = Capacité du mandrin
G = Filetage de broche
H = Broche à six pans creux
m=Poids
D = Diamètre du collet
Niveau de bruit, évaluation type, A:
= Niveau de pression acoustique
L
pA
= Niveau de puissance acoustique
L
WA
, KWA= Incertitude
K
pA
Pendant le fonctionnement, il se peut que le niveau
sonore dépasse les 85 db(A).
Porter un protège-oreilles!
FRANÇAIS
F
a
= Evaluation d'accélération type dans
hw
Valeurs de mesure déterminées conformément à
la norme EN 60745.
Les caractéristiques indiquées sont soumises à
tolérance (selon les normes en vigueur
correspondantes).
la zone main-bras
19
Page 20

NL
NEDERLANDS
Gebruiksaanwijzing
Geachte klant,
Hartelijk dank voor het vertrouwen dat u ons heeft geschonken bij de aankoop van uw nieuw
elektrischgereedschap van Metabo. Elektrisch gereedschap van Metabo wordt zorgvuldig getest en moet
beantwoorden aan de strenge kwaliteitsnormen en controles van Metabo. De levensduur van elektrisch
gereedschap hangt echter ook in hoge mate van u af. Wij verzoeken u aandacht te schenken aan de
informatie in deze gebruiksaanwijzing en de bijgevoegde documenten. Hoe zorgvuldiger u omgaat met
uw Metabo elektrisch gereedschap, des te langer zult u er plezier van hebben.
Inhoud
1 Conformiteitsverklaring
2 Reglementair gebruik
3 Algemene veiligheidsinstructies
4 Bijzondere veiligheidsinstructies
5Overzicht
6 Bijzondere productkenmerken
7 Ingebruikname
7.1 De extra handgreep monteren
8Gebruik
8.1 De boordiepteaanslag instellen
8.2 In- en uitschakelen
8.3 Het toerental instellen
8.4 Mechanische toerentalkeuze
8.5 Schakelaar boren/klopboren
8.6 De draairichting selecteren
8.7 Gereedschap verwisselen bij de
snelspanboorhouder Futuro Top
8.8 De boorhouder verwijderen
9 Metabo Diagnostic System (MDS)
9.1 Elektronische signaalindicatie brandt
niet
9.2 Permanent branden - overbelasting
9.3 Enkelvoudig knipperen - serviceoproep 1
9.4 Dubbel knipperen - service-oproep 2
9.5 Snel knipperen - herstartbeveiliging
10 Tips en trucs
11 Storing verhelpen
12 Toebehoren
13 Reparatie
14 Milieubescherming
15 Technische gegevens
1 Conformiteitsverklaring
Wij verklaren en stellen er ons alleen aansprakelijk
voor dat dit product voldoet aan de normen
vermeld op pagina 2 of aan de normatieve
documenten.
2 Reglementair gebruik
De machine is geschikt voor boren zonder kloppen
in metaal, hout, kunststof en gelijkaardige
materialen en voor klopboren in beton, steen en
soortgelijke materialen. Bovendien is de machine
geschikt voor schroefdraad tappen en het
schroeven.
Voor schade als gevolg van onoordeelkundig
gebruik is enkel de gebruiker aansprakelijk.
Algemeen erkende veiligheidsvoorschriften en
bijgevoegde veiligheidsinstructies moeten worden
nageleefd.
3 Algemene
veiligheidsinstructies
Lees de veiligheidsinstructies (rood boekje) en de
gebruiksaanwijzing aandachtig en volledig door
alvorens de machine in gebruik te nemen. Bewaar
alle bijgevoegde documenten en leen uw
elektrische machine enkel samen met deze
documenten uit.
4 Bijzondere
veiligheidsinstructies
Draag oorbeschermers bij het gebruik van
slagboormachines.
gehoorverlies.
Gebruik de extra handgreep die bij de levering
van het apparaat inbegrepen is.
controle over de machine kan tot lichamelijk letsel
leiden.
Stekker uit het stopcontact trekken, voordat enige
instelling of onderhoudswerkzaamheden
uitgevoerd worden.
Let op gas-, stroom- en waterleidingen!
Lawaai kan leiden tot
Verlies van
Let voor uw eigen veiligheid en voor
die van uw machine op de
passages in de tekst die met dit
symbool gemarkeerd zijn!
20
Page 21
NEDERLANDS
NL
De Metabo S-automatic veiligheidskoppeling.
Schakel de machine onmiddellijk uit als de
veiligheidskoppeling in werking treedt!
Neem de draaiende onderdelen van de machine
niet vast!
Verwijder spaanders en dergelijke uitsluitend bij
uitgeschakelde en stilstaande machine.
Neem de machine enkel aan de geïsoleerde
delen van de behuizing vast, als de kans
bestaat dat er tijdens de werkzaamheden een
verborgen leiding of de elektriciteitsleiding kan
worden geraakt.
leidingen worden de metalen delen van de
behuizing onder spanning gezet, en loopt de
gebruiker het risico van een schok.
Pas op bij moeilijke schroefsituaties (schroeven
met metrisch of inch-schroefdraad in staal
schroeven). De schroefkop kan afscheuren, resp.
er kunnen hoge terugdraaimomenten optreden bij
de handgreep.
Bij contact met stroomvoerende
5 Overzicht
Zie pagina 3 (uitklappen a.u.b.).
1 Snelspanboorhouder Futuro Top
2 Boordiepteaanslag
3 Draaiknop voor mechanische
toerentalkeuze
4 Schakelschuif boren/klopboren
5 Indicatie elektronisch signaal
6 Instelwiel voor toerentalinstelling
7 Vastzetknop
8 Schakelaardrukker
9 Draairichtingschakelaar
10 Extra handgreep
6 Bijzondere
productkenmerken
Metabo Diagnostic System (MDS)
Een ingebouwde microcontroller bestuurt een
gebruiksafhankelijke service-indicatie die zich
aanpast aan uw werkgedrag. De chip signaleert in
welke staat uw machine zich bevindt en voorkomt
zo door vroegtijdige waarschuwing een
onverwachte totale uitval.
Metabo S-automatic veiligheidskoppeling:
Blijft het ingezette gereedschap klemmen of
haken, dan wordt de krachtstroom naar de motor
begrensd. Vanwege de daarbij optredende hoge
krachten de machine altijd met beide handen aan
de hiervoor bestemde handgrepen vasthouden,
een stabiele stand innemen en geconcentreerd
werken.
Afschakelkoolborstels met aangave van
verbruikte koolborstels
Een lichtdiode geeft aan als de koolborstels bijna
versleten zijn. Als de koolborsteIs totaal versleten
zijn schakelt de machine automatisch uit.
Herstartbeveiliging en
overbelastingsbeveiliging met signaal
De herstartbeveiliging voorkomt dat de nog
ingeschakelde machine gaat draaien als de
spanning, nadat deze is weggevallen, weer terug
keert.
Het overbelastingsignaal waarschuwt bij een
beginnende overbelasting van de machine.
7 Ingebruikname
Vergelijk of de netspanning en de
netfrequentie op het typeplaatje
overeenstemmen met de waarden van
uw elektriciteitsnet, alvorens de machine in
gebruik te nemen.
7.1 De extra handgreep monteren
Gebruik om veiligheidsredenen steeds
de meegeleverde handgreep.
Open de klemring door de handgreep (10) linksom
te draaien. Schuif de handgreep op de spanhals
van de machine. Breng de boordiepteaanslag (2)
aan. Zet de handgreep naargelang van het gebruik
in de gewenste stand vast.
8Gebruik
8.1 De boordiepteaanslag instellen
Draai de handgreep (10) los. Stel de aanslag (2) op
de gewenste boordiepte in en zet de handgreep
weer vast.
8.2 In- en uitschakelen
Druk op de schakelaardrukker (8) om de machine
in te schakelen.
Via de schakelaardrukker kunt u het toerental
wijzigen.
De elektronische zachtaanloop zorgt voor een
continue versnelling tot de machine het ingestelde
toerental bereikt.
Om de machine continue in te schakelen kan de
schakelaardrukker met de vastzetknop (7)
vergrendeld worden. Druk opnieuw op de
schakelaardrukker om deze functie uit te
schakelen.
21
Page 22
NL
NEDERLANDS
In de stand continu inschakeling loopt de
machine verder, wanneer deze uit de
hand getrokken wordt. Daarom de
machine altijd met beide handen aan de hiervoor bestemde handgrepen vasthouden, een
stabiele stand innemen en geconcentreerd
werken.
8.3 Het toerental instellen
Stel met het stelwiel (6) het maximale toerental in.
Op pagina 4 vindt u de aanbevolen
toerentalinstellingen bij boorwerkzaamheden.
8.4 Mechanische toerentalkeuze
Kies de gewenste stand door instelling van de
draaiknop (3).
Schakel uitsluitend om, wanneer de machine
uitloopt (kort in- en uitschakelen).
Stand 1
(laag toerental, hoog koppel)
bijvoorbeeld voor
schroefwerkzaamheden
Stand 2
(hoog toerental) bijvoorbeeld voor
boor-, klopboorwerkzaamheden
8.5 Schakelaar boren/klopboren
Kies de gewenste stand door de schakelschuif (4)
te verplaatsen.
Boren
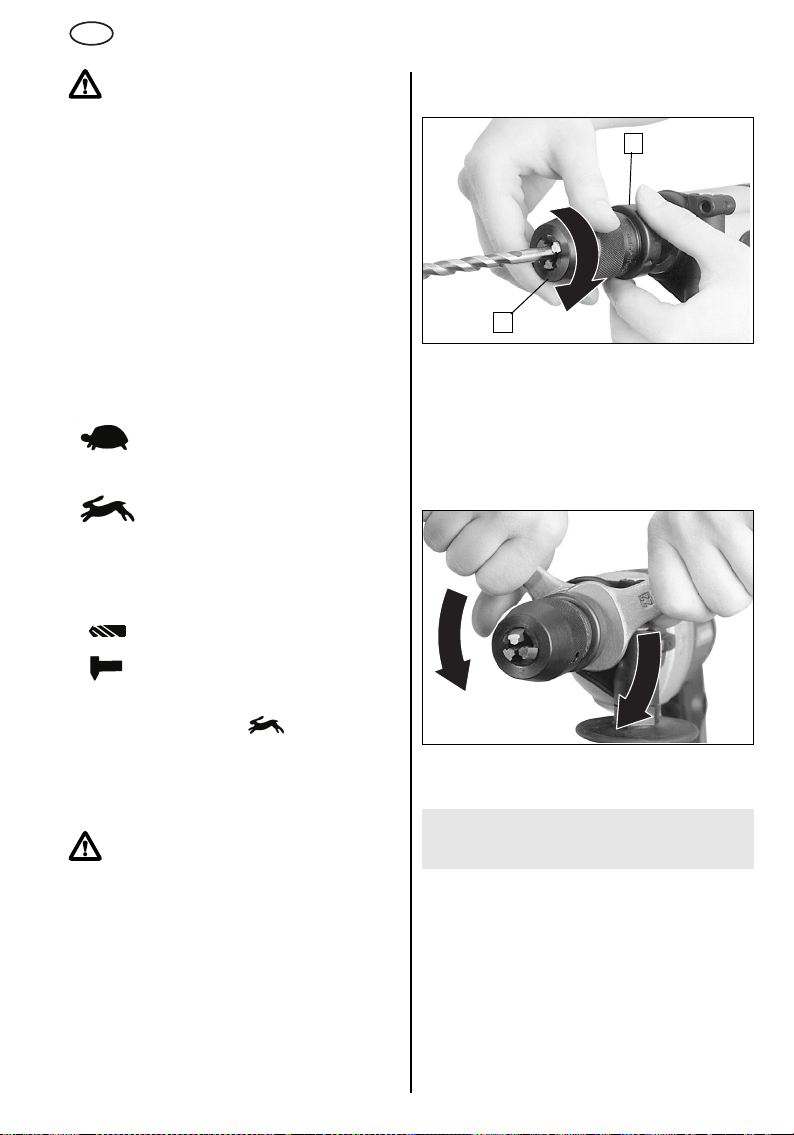
8.7 Gereedschap verwisselen bij de
snelspanboorhouder Futuro Top (1)
a
b
Breng het gereedschap aan. Houd de borgring (a)
vast en draai met de andere hand de huls (b)
krachtig tot tegen de aanslag. Om de boorhouder
te openen, houdt u de borgring (a) vast en draait u
de huls (b) in tegengestelde richting.
8.8 De boorhouder verwijderen
De snelspanboorhouder Futuro Top (1)
Klopboren
Stel bij klopboorwerking een hoog toerental in.
Plaats de draaiknop (3) op
Klopboren en boren mag uitsluitend bij rechtse
draairichting gebeuren.
8.6 De draairichting selecteren
Stel de draairichtingschakelaar (9)
uitsluitend in bij stilstaande motor.
De draairichting selecteren:
R = rechtse draairichting
L = linkse draairichting
22
Schroef de boorhouder los met behulp van twee
steeksleutels.
9 Metabo Diagnostic System
(MDS)
Elektronische signaalindicatie (5)- Betekenis van
de lichtsignalen:
9.1 Elektronische signaalindicatie (5)
brandt niet
De machine is volledig inzetbaar.
Page 23
NEDERLANDS
NL
9.2 Permanent branden - overbelasting
Bij een langer aanhoudende
overbelasting van de machine wordt
het opgenomen vermogen van de
machine begrensd en daardoor een
van de motor vermeden. Bij verdere overbelasting
blijft de machine stilstaan. Machine uit- en weer
inschakelen en in nullast laten afkoelen.
9.3 Enkelvoudig knipperen -
Treedt het signaal alleen bij bediende
drukschakelaar op, dan zijn de koolborstels bijna
helemaal versleten.
9.4 Dubbel knipperen - service-oproep 2
Treedt het signaal alleen bij bediende
drukschakelaar op, dan zijn de koolborstels
helemaal versleten. De machine is automatisch
uitgeschakeld. De koolborstels kunt u laten
vervangen door een erkende vakman of de
Metabo service dienst.
9.5 Snel knipperen - herstartbeveiliging
Bij terugkeren van de spanning, nadat deze is
uitgevallen, start de nog ingeschakelde machine
uit veiligheidsoverwegingen niet uit zichzelf. De
machine met de schakelaar uit- en weer
inschakelen.
verdere ontoelaatbare verwarming
service-oproep 1
Branden - langere pauze - branden ...:
de machine is tot het onderhoud nog
5 - 10% van de gebruikstijd tot nu toe
bij volledige belasting inzetbaar.
2 x branden - langere pauze 2 x branden ...: breng het apparaat
onmiddellijk naar de erkende vakman/
Metabo service dienst, om een uitval
van de machine met hoge
vervolgkosten te vermijden.
10 Tips en trucs
Voor schroefdraadtappen doet u wat olie op de
schroefdraadtap. Stel een laag toerental in en
selecteer . Tap de schroefdraad in rechtse
draairichting, stop, en draai in linkse draairichting
uit.
11 Storing verhelpen
Indien u de schakelaardrukker (8) niet volledig kunt
indrukken, controleer dan of de
draairichtingsschakelaar (9) volledig in de stand R
of L staat.
Elektronische signaalindicatie (5)
Zie hoofdstuk 9 Metabo Diagnostic System (MDS).
f
12 Toebehoren
Gebruik uitsluitend originele Metabo toebehoren.
Neem contact op met uw handelaar, wanneer u
toebehoren nodig heeft.
Om de juiste toebehoren te selecteren, dient u het
precieze type van de machine aan uw handelaar
op te geven.
Zie pagina 4.
AMetabox
B Voorzetappara at vo or haaks boren en
schroeven
C Flexibele as
D Rubberen steunschijf
E Linnen schuurschijven
F Boorstandaard
(machinehouder kan 360° gedraaid worden.)
G Frees-boorstandaard
(kolom met tandbaan en geleidesleuf)
H Machinebankschroef
I Kwastvormige staalborstel
J Komstaalborstel
K Vlakke staalborstel
Bit-spanbus
L
Compleet toebehorenprogramma zie
www.metabo.com of hoofdcatalogus.
Trek de boor bij diepe boringen regelmatig uit het
geboorde gat om het steenstof of de spaanders te
verwijderen.
In tegels en andere broze materialen mag u niet
klopboren.
De boorhouder kan voor schroefwerkzaamheden
losgeschroefd worden. Plaats de schroefbit in de
binnenzeskant van de booras.
Bij gemonteerde bitspanbus wordt de schroefbit
vastgehouden.
13 Reparatie
Reparaties aan elektrische machines mogen
uitsluitend door een erkend vakman worden
uitgevoerd!
De machines van Metabo kunnen voor reparatie
worden verzonden naar het adres dat op de
voorlaatste pagina vermeld staat.
Geef bij inzending voor reparatie in elk geval een
omschrijving van het vastgestelde defect.
23
Page 24

NL
NEDERLANDS
14 Milieubescherming
De verpakkingen van Metabo zijn 100%
recycleerbaar.
Afgedankte machines en toebehoren bevatten
grote hoeveelheden waardevolle grond- en
kunststoffen die eveneens gerecycleerd kunnen
worden.
Deze gebruiksaanwijzing is op chloorvrij gebleekt
papier gedrukt.
Alleen voor EU-landen: Geef uw elektrogereedschap nooit met het huisvuil mee!
Volgens de Europese richtlijn 2002/96/EG
inzake gebruikte elektrische en elektronische
apparaten en de vertaling hiervan in de nationale
wetgeving dienen oude elektroapparaten
gescheiden te worden ingezameld en op milieuvriendelijke wijze te worden afgevoerd.
15 Technische gegevens
Verklaringen bij de gegevens vindt u op pagina 2.
Met voorbehoud van wijzigingen die een
technische verbetering inhouden.
= nominaal opgenomen vermogen
P
1
= afgegeven vermogen
P
2
=toerental onbelast
n
1
=toerental belast
n
2
ø max = maximale boordiameter
S max = maximaal aantal slagen
b = spanwijdte boorhouder
G = boorasschroefdraad
H = booras met binnenzeskant
m = gewicht
D = spanhalsdiameter
Karakteristiek geluidsniveau (A):
= geluidsdrukniveau
L
pA
= geluidsvermogenniveau
L
WA
, KWA= onzekerheid
K
pA
Tijdens het werken kan het geluidsniveau de
85 dB(A) overschrijden.
Draag gehoorbescherming!
a
= karakteristiek gemeten versnelling
hw
in het hand-armbereik
De registratie van de meetwaarden gebeurde
conform EN 60745.
De vermelde technische gegevens zijn
tolerantiewaarden (overeenkomstig de telkens
geldige norm).
24
Page 25

ITALIANO
IT
Istruzioni per l'uso
Caro Cliente,
Innanzitutto desideriamo esprimere la nostra gratitudine per aver scelto ed acquistato uno degli utensili
elettrici della Metabo. Ogni utensile elettrico della Metabo viene accuratamente collaudato in conformità
ai più severi requisiti del programma di assicurazione della qualità nell'ambito della Metabo stessa. Si
deve, comunque, tenere presente che la durata dell'utensile elettrico dipende largamente dal
comportamento dell'utilizzatore. Pertanto raccomandiamo di prestare molta attenzione a quanto
contenuto nel presente manuale, nonché nei documenti ad esso allegati. Quanto più si curerà l'utensile
elettrico Metabo, tanto più questo durerà nel tempo soddisfacendo ogni vostra esigenza.
Indice 1 Dichiarazione di conformità
1 Dichiarazione di conformità
2 Utilizzo conforme
3 Prescrizioni di sicurezza generali
4 Prescrizioni di sicurezza speciali
5Panoramica
6 Caratteristiche particolari del prodotto
7 Messa in funzione
7.1 Montaggio dell'impugnatura
8 Utilizzo
8.1 Regolazione dell'arresto di profondità
8.2 Avviamento/spegnimento
8.3 Preselezionare il numero di giri
8.4 Utilizzo del cambio
8.5 Commutazione foratura/foratura a
percussione
8.6 Preselezionare il senso di rotazione
8.7 Sostituzione dell'utensile con
mandrino autoserrante Futuro Top
8.8 Rimuovere il mandrino
9 Metabo Diagnostic System (MDS)
9.1 L'indicatore elettronico di segnale non
si accende
9.2 Luce accesa permanentemente -
sovraccarico
9.3 Normale lampeggio -
richiamo-Service 1
9.4 Lampeggio doppio -
richiamo-Service 2
9.5 Lampeggio veloce - protezione contro
il riavviamento involontario
10 Suggerimenti ed accorgimenti
11 In caso di anomalie
12 Accessori
13 Riparazione
14 Tutela dell'ambiente
15 Caratteristiche tecniche
Noi dichiariamo sotto la nostra esclusiva
responsabilità che questo prodotto è conforme
alle norme o alla documentazione normativa
riportate a pagina 2.
2 Utilizzo conforme
Il trapano è adatto alla foratura senza percussione
in metallo, legno, materiale plastico e materiali
simili e alla foratura a percussione in cemento,
pietra e materiali simili. Inoltre il trapano è adatto
alla filettatura e all'avvitamento.
Per i danni causati da un utilizzo non conforme
risponde esclusivamente l'utente.
Le norme antinfortunistiche generalmente
riconosciute e le prescrizioni di sicurezza allegate
devono essere rispettate.
3 Prescrizioni di sicurezza
generali
Prima di utilizzare l'utensile elettrico leggete
attentamente e completamente le prescrizioni di
sicurezza allegate (quaderno rosso) e le istruzioni
d'uso. Conservate tutta la documentazione
allegata e consegnate il vostro utensile elettrico
soltanto assieme a questa documentazione.
4 Prescrizioni di sicurezza
speciali
Indossare protezioni acustiche durante l'uso
dei trapani battenti.
perdita dell'udito.
Utilizzare le impugnature supplementari fornite
con l'apparecchio.
macchina può causare lesioni all'operatore.
Il rumore può provocare la
La perdita di controllo della
25
Page 26
IT
ITALIANO
!Osservate le parti del testo
contrassegnate con questo
simbolo, esse servono per la vostra
tutela e per la protezione del vostro
utensile elettrico!
Prima di eseguire qualsiasi lavoro di regolazione o
manutenzione estrarre la spina elettrica dalla
presa.
Fate attenzione alle condutture del gas, della
corrente elettrica e dell'acqua!
Frizione di sicurezza Metabo S-automatic.
Quando interviene la frizione di sicurezza bisogna
immediatamente disattivare la macchina!
Non toccate la punta in rotazione!
I trucioli e simili vanno asportati solo quando il
trapano è fermo.
Afferrate l'utensile elettrico solo sulle parti
isolate dell'alloggiamento, quando vi è la
possibilità di toccare condutture coperte o la
linea della rete durante il lavoro.
linee sotto corrente mette sotto tensione le parti
metalliche dell'alloggiamento e può provocare
all'operatore una scossa elettrica.
Attenzione nei casi di avvitamento forte
(avvitamento di viti di acciaio con filettatura
metrica o in pollici), la testa della vite si può
rompere oppure possono insorgere delle elevate
coppie di contraccolpo nell'impugnatura.
Il contatto con
5 Panoramica
Si veda a pagina 3 (aprire l'opuscolo).
1 Mandrino autoserrante Futuro Top
2 Arresto di profondità
3 Pulsante di commutazione per l'utilizzo del
cambio
4 Cursore di commutazione foratura/foratura
a percussione
5 Indicatore elettronico Signal
6 Rotella per la preselezione del numero di giri
7 Pulsante di arresto
8 Interruttore
9 Commutatore del senso di rotazione
10 Impugnatura
6 Caratteristiche particolari
del prodotto
Metabo Diagnostic System (MDS)
Un microcontroller incorporato comanda una
indicazione-Service in funzione della durata di
esercizio, che si adatta al proprio comportamento
di lavoro. Il chip segnala lo stato nel quale si trova
la macchina ed evita in questo modo, mediante
un'avvertenza precoce, un guasto totale e
inaspettato della macchina.
Frizione di sicurezza Metabo S-automatic:
In caso di blocco o aggancio dell'utensile di
innesto, il flusso di potenza del motore sarà limitato. Data l'elevata potenza, impugnare sempre il
trapano con entrambe le mani mediante le apposite impugnature, assumere una posizione stabile
e lavorare con concentrazione.
S
Spazzole di carbone di disinserimento con
indicazione del grado di usura
Un LED si accende prima che le spazzole di
carbone siano completamente consumate. In caso
di spazzole di carbone completamente
consumate, il trapano si spegne automaticamente.
Protezione contro l'accensione accidentale e
indicazione di sovraccarico
Questa protezione impedisce l'accensione
accidentale del trapano dopo l'interruzione
dell'alimentazione elettrica (spina staccata,
mancanza di corrente, ecc.).
L'indicatore di sovraccarico fornisce un segnale
d'avviso prima che il trapano si trovi in
sovraccarico.
7 Messa in funzione
Verificate prima della messa in funzione
se la tensione di rete e la frequenza di
rete indicate sulla targhetta di
fabbricazione coincidono con i dati della vostra
rete elettrica.
7.1 Montaggio dell'impugnatura
Per motivi di sicurezza bisogna sempre
utilizzare l'impugnatura fornita.
Aprire l'anello di bloccaggio ruotando la maniglia
verso sinistra (10). Spingere l'impugnatura sul
collare del trapano. Inserire l'arresto di profondità
(2). Serrare l'impugnatura a seconda dell'utilizzo
nell'angolatura desiderata.
8 Utilizzo
8.1 Regolazione dell'arresto di profondità
Sbloccare l'impugnatura (10). Regolare l'arresto di
profondità (2) sulla profondità di foratura
desiderata e serrare nuovamente l'impugnatura.
8.2 Avviamento/spegnimento
Per avviare il trapano premere l'interruttore (8).
Il numero di giri può essere regolato con il pulsante
interruttore.
26
Page 27
ITALIANO
IT
Grazie all'avviamento morbido elettronico il
trapano accelera costantemente fino al numero di
giri preselezionato.
Per l'inserimento permanente il pulsante
interruttore può essere bloccato mediante il
pulsante di arresto (7). Per lo spegnimento basta
premere nuovamente il pulsante.
Con l'avviamento continuo, il trapano
funziona anche se sfugge di mano.
Quindi è necessario maneggiare il
trapano sempre con entrambe le mani mediante le apposite impugnature, assumere una
posizione stabile e lavorare con concentrazione.
8.3 Preselezionare il numero di giri
Preselezionare sulla rotella (6) il numero di giri
massimo. Per i numeri di giri consigliati per la
foratura si veda a pagina 4.
8.4 Utilizzo del cambio
Scegliere la velocità meccanica desiderata
ruotando il pulsante di commutazione (3).
La commutazione può avvenire solo mentre il
trapano è in fase di arresto (avviare e spegnere
brevemente).
1. velocità
(basso numero di giri, coppia elevata)
ad esempio per avvitare, forare
2. velocità
( e l e v a t o n u m e r o d i g i r i ) a d e s e m p i o
per forare, forare a percussione
8.7 Sostituzione dell'utensile con mandrino
autoserrante Futuro Top (1)
a
b
Inserire la punta. Tenere l'anello di fissaggio (a) e
ruotare con l'altra mano la bussola (b) con forza
fino all'arresto. Per aprire il mandrino trattenere
l'anello di fissaggio (a) e ruotare la bussola (b) nella
direzione opposta.
8.8 Rimuovere il mandrino
Mandrino autoserrante Futuro Top (1)
8.5 Commutazione foratura/foratura a
percussione
Scegliere la modalità di funzionamento desiderata
spostando il cursore di commutazione (4).
Forare
Forare a percussione
Lavorare con elevati numeri di giri nel
funzionamento con foratura a percussione.
Posizionare il pulsante di commutazione (3) su
.
Foratura e foratura a percussione solo con
rotazione verso destra.
8.6 Preselezionare il senso di rotazione
Azionare il commutatore del senso di
rotazione (9) soltanto quando il motore è
fermo.
Selezionare il senso di rotazione:
R = rotazione verso destra
L = rotazione verso sinistra
Svitare il mandrino con due chiavi a forcella.
9 Metabo Diagnostic System
(MDS)
Indicatore elettronico di segnale (5)- Significato del
segnale luminoso:
9.1 L'indicatore elettronico di segnale (5)
non si accende
La macchina è completamente pronta per
l'impiego.
27
Page 28
IT
ITALIANO
9.2 Luce accesa permanentemente sovraccarico
Con un sovraccarico della macchina
di lunga durata, l'assorbimento di
potenza della macchina viene limitato
evitando in questo modo un ulteriore
ammesso. In caso di ulteriori sovraccarichi la
macchina rimane ferma. Spegnere e accendere
nuovamente la macchina e lasciarla raffreddare n el
funzionamento a vuoto.
9.3 Normale lampeggio -
della sua rispettiva durata di esercizio.
Se il segnale insorge solo quando è azionato
l'interruttore a pulsante, in questo caso significa
che le spazzole di carbone sono quasi
completamente consumate.
9.4 Lampeggio doppio - richiamo-Service 2
Se il segnale insorge solo quando è azionato
l'interruttore a pulsante, in questo caso significa
che le spazzole di carbone sono completamente
consumate. La macchina si è disinserita
automaticamente. Fare sostituire le spazzole di
carbone dal personale del centro assistenza
autorizzato.
9.5 Lampeggio veloce - protezione contro il
Con il ricollegamento della tensione dopo una
interruzione della rete la macchina, ancora inserita,
non entra in funzione da sola per motivi di
sicurezza. Disinserire e inserire nuovamente
l'interruttore della macchina.
riscaldamento del motore non
richiamo-Service 1
Accensione - lunghe pause accensione ...: fino alla prossima
manutenzione, la macchina può
essere usata con la massima
sollecitazione ancora per il 5 - 10 %
2 x accensione - lunghe pause 2 x accensione ...: consegnare subito
l'apparecchio ad un commerciante
specializzato/Service onde evitare un
guasto della macchina con
conseguenti costi elevati.
riavviamento involontario
10 Suggerimenti ed
accorgimenti
In caso di fori profondi estrarre la punta di tanto in
tanto per asportare la polvere prodotta o i trucioli.
Non forate le piastrelle e altri materiali fragili con
percussione.
Per l'avvitamento il mandrino può anche essere
svitato. Inserire l'inserto direttamente nell'esagono
cavo del mandrino.
Se è montata la bussola di serraggio l'inserto viene
trattenuto saldamente.
Per effettuare la filettatura oleare leggermente il
maschio per filettare. Selezionare un basso
numero dei giri e . Intagliare con rotazione
verso destra, fermarsi, svitare con rotazione verso
sinistra.
11 In caso di anomalie
Se non si riuscisse a premere il pulsante
interruttore(8), controllare se il commutatore del
senso di rotazione (9) è completamente sulla
posizione R o L.
Indicatore elettronico di segnale (5)
Vedere il capitolo 9 Metabo Diagnostic System
(MDS).
f
12 Accessori
Utilizzate esclusivamente accessori originali
Metabo.
Se vi servono degli accessori rivolgetevi al vostro
rivenditore.
Per la scelta degli accessori adatti comunicate al
rivenditore il tipo esatto di utensile elettrico.
Vedi pagina 4.
AMetabox
B Attrezzo per forare ed avvitare ad angolo
C Albero flessibile
D Platorello in gomma
E Dischi abrasivi in tela
F Supporto di foratura
(Il supporto del trapano può essere
ruotato di 360°)
G Supporto di fresatura
(Colonna con asta a cremagliera)
H Morse portapezzo
I Spazzola metallica a pennello
J Spazzola metallica a tazza
K Spazzola metallica circolare
Boccola di serraggio punta
L
Il programma completo degli accessori si trova su
www.metabo.com oppure nel catalogo principale.
28
Page 29
ITALIANO
IT
13 Riparazione
Le riparazioni degli utensili elettrici devono essere
effettuate soltanto da operatori specializzati!
Gli utensili elettrici Metabo che necessitano di
riparazione possono essere spediti agli indirizzi
riportati sulla penultima pagina o ad un altro
Centro di assistenza autorizzato.
Quando spedite un utensile per la riparazione
descrivete il guasto constatato.
14 Tutela dell'ambiente
Gli imballaggi Metabo sono riciclabili al 100%.
Utensili elettrici e accessori diventati inservibili
contengono grandi quantità di materie prime e
materie plastiche preziose che possono essere
anch'esse addotte ad un processo di riciclaggio.
Queste istruzioni d'uso sono stampate su carta
sbiancata senza cloro.
Solo per i Paesi UE: non smaltire gli utensili
elettrici con i rifiuti domestici! Secondo la
Direttiva europea 2002/96/CE sugli utensili
elettrici ed elettronici usati e l'applicazione nel
diritto nazionale, gli utensili elettrici usati devono
essere smaltiti separatamente e sottoposti ad un
sistema di riciclo ecologico.
15 Caratteristiche tecniche
Spiegazioni relative alle indicazioni riportate a
pagina 2.
Ci riserviamo modifiche finalizzate allo sviluppo
tecnico.
= Assorbimento nominale
P
1
=Potenza resa
P
2
= Velocità a vuoto
n
1
= Velocità sotto carico
n
2
ø max = Massimo diametro di foratura
S max = Massimo numero di percussioni
b=Apertura mandrino
G = Filettatura albero portamandrino
H = M a n d r i n o p o r t a m a n d r i n o c o n e s a
m=Peso
D = Diametro collare
Livelli di pressione acustica tipici con
valutazione A:
L
pA
L
WA
, KWA= incertezza
K
pA
Durante il lavoro è possibile che venga superato il
livello di rumorosità di 85 dB(A).
a
hw
I valori di misura sono stati rilevati ai sensi della
norma EN 60745.
I suddetti dati tecnici sono condizionati dalle
tolleranze (corrispondono ai rispettivi standard
validi).
gono cavo
= livello di pressione sonora
= livello di potenza sonora
Indossare cuffie antirumore!
= Accelerazione con valutazione tipica
nella zona mano-braccio
29
Page 30
ES
ESPAÑOL
Instrucciones de manejo
Estimado cliente,
le agradecemos la confianza mostrada al comprar una máquina Metabo. Cada máquina Metabo ha sido
probada cuidadosamente y ha pasado los estrictos controles de calidad de la garantía de calidad de Metabo.
Sin embargo, la vida útil de una máquina depende en gran medida de usted. Le rogamos tenga en cuenta la
información contenida en estas instrucciones y en los documentos adjuntos. Cuanto mejor cuide su máquina
Metabo, mayor será el tiempo durante el que le proporcionará un servicio fiable.
Contenido
1 Declaración de conformidad
2 Aplicación de acuerdo a la finalidad
3 Instrucciones generales de seguridad
4 Instrucciones especiales de seguridad
5Vista general
6 Propiedades especiales del producto
7 Puesta en marcha
7.1 Montaje de la empuñadura de
sujeción
8 Utilización
8.1 Ajuste del tope de profundidad de
taladro
8.2 Conexión/Desconexión
8.3 Preseleccionar la velocidad
8.4 Seleccionar la marcha
8.5 Conmutación taladrar sin percusión/
con percusión
8.6 Seleccionar el sentido de rotación
8.7 Cambio de herramienta portabrocas
de cierre rápido Futuro Top
8.8 Desmontar el portabrocas
9 Metabo Diagnostic System (MDS)
9.1 El indicador electrónico no se ilumina
9.2 Iluminación permanente: sobrecarga
9.3 Parpadeo simple: demanda de
servicio 1
9.4 Parpadeo doble: demanda de
servicio 2
9.5 Parpadeo rápido: protección contra
10 Consejos y artificios
11 Eliminación de averías
12 Accesorios
13 Reparación
14 Protección ecológica
15 Especificaciones técnicas
rearranque
1 Declaración de
conformidad
Declaramos bajo nuestra exclusiva responsabilidad,
que este producto cumple con las normas o
documentos normativos especificados en la
página 2.
30
2 Aplicación de acuerdo a la
finalidad
La máquina es apta para taladrar sin percusión en
metales, madera, plásticos y materiales similares y
para taladrar con percusión en hormigón, ladrillo y
materiales similares. Además, la máquina es
adecuada para filetear roscas y para el atornillado.
El usuario será responsable exclusivo de daños
causados por una utilización en desacuerdo con la
finalidad descrita del presente aparato.
Se debe prestar estricta observancia a las
prescripciones de reconocimiento general para la
prevención de accidentes laborales y a las
instrucciones de seguridad adjuntas.
3 Instrucciones generales de
seguridad
Antes de utilizar la herramienta eléctrica, léase
completa y detenidamente las instrucciones de
seguridad (cuadernillo rojo) y el manual de
instrucciones para el manejo adjuntos. Guardar
todos los documentos entregados junto con la
herramienta eléctrica. Entregar la herramienta
eléctrica siempre incluyendo estos documentos.
4 Instrucciones especiales
de seguridad
Póngase cascos protectores cuando maneje
taladradoras con percutor.
puede provocar pérdida auditiva.
Utilice las empuñaduras complementarias
suministradas con la herramienta.
pueden resultar heridos por la pérdida del control
de la máquina.
Sírvase prestar especial
!
observancia a las partes del texto
marcadas mediante este símbolo,
con el fin de garantizar su propia
protección personal y la protección
de su herramienta eléctrica!
Desenchufe el equipo antes de llevar a cabo
cualquier ajuste o mantenimiento.
¡Tomar cuidado con las tuberías de gas y agua y con
los cables eléctricos!
El efecto del ruido
Los usuarios
Page 31
ESPAÑOL
ES
Embrague de seguridad Metabo S-automatic.
¡Apagar la máquina inmediatamente después de
activarse el embrague de seguridad!
¡No tocar la herramienta en rotación!
Eliminar las virutas y similares solamente estando la
máquina en reposo.
Coger la herramienta eléctrica únicamente de las
partes de la carcasa que estén aisladas, si existe
la posibilidad de que la máquina toque durante el
trabajo cables ocultos o cables de la red.
máquina tuviera contacto con cables conductores
de corriente es posible que las partes metálicas de
la carcasa estén bajo tensión y el operario puede
recibir un golpe de corriente.
Vaya con cuidado con los atornillados duros
(enroscados de tornillos con una rosca métrica o
inglesa en acero). Puede arrancarse la cabeza del
tornillo o pueden producirse altos pares de
retroceso en la empuñadura.
Si la
5Vista general
Véase página 3 (debe ser desplegada).
1 Portabrocas de cierre rápido Futuro Top
2 Tope de profundidad de taladro
3 Botón de conmutación para seleccionar la
marcha
4 Conmutador corredizo taladrar sin percusión/
con percusión
5 Indicación de señal electrónica
6 Ruedecilla de ajuste de preselección de
velocidad
7 Botón de retención
8 Interruptor
9 Inversor del sentido de rotación
10 Empuñadura de sujeción
6 Propiedades especiales del
producto
Metabo Diagnostic System (MDS)
Un microcontrolador incorporado controla un
indicador de servicio en función del uso que se
adapta a sus condiciones de trabajo. El chip
muestra en qué estado se encuentra su máquina y
evita que se produzcan averías graves inesperadas
advirtiendo con antelación.
Embrague de seguridad Metabo S-automatic:
Si la herramienta de aplicación se enclava o
engancha, se limita el flujo de potencia hacia el
motor. Debido a las grandes fuerzas que
intervienen, sujetar siempre la máquina con ambas
manos en las empuñaduras previstas para ello,
adoptar una postura segura y trabajar con
concentración.
Escobillas de carbón de desconexión
Al desgastarse completamente las escobillas de
carbón, la máquina se desconecta
automáticamente.
P
Escobillas de desconexión, con indicador de
desgaste
Un piloto LED avisa antes de que las escobillas
estén completamente gastadas. Si las escobillas
están completamente gastadas, la máquina se
desconecta automáticamente.
Protección de arranque e indicador de
protección contra sobrecarga
La protección de arranque impide el arranque no
intencionado al volver a enchufar la herramienta o
cuando la energía vuelve después de una
interrupción de la misma.
El indicador de protección contra sobrecarga
avisa en el caso de que se produzca.
7 Puesta en marcha
Antes de poner en marcha la
herramienta eléctrica, se debe controlar
si la tensión y frecuencia de la red
especificadas en la placa de tipo coinciden con
los datos de la red de alimentación de corriente
eléctrica a que se desea conectar el aparato.
7.1 Montaje de la empuñadura de sujeción
Por razones de seguridad se debe
utilizar siempre la empuñadura de
sujeción entregada junto con la
máquina.
Abrir el anillo de sujeción girando la empuñadura de
sujeción (10) hacia la izquierda. Colocar la
empuñadura de sujeción en el cuello de sujeción de
la máquina. Introducir el tope de profundidad de
taladro (2). Fijar la empuñadura de sujeción en el
ángulo deseado, de acuerdo a la aplicación de la
máquina.
8Utilización
8.1 Ajuste del tope de profundidad de
taladro
Aflojar la empuñadura de sujeción (10). Ajustar el
tope de profundidad de taladro (2) a la profundidad
de taladro deseada y fijar nuevamente la
empuñadura de sujeción.
8.2 Conexión/Desconexión
Para conectar la máquina, pulsar el interruptor (8).
La velocidad de la máquina puede variarse con el
interruptor.
Gracias al arranque electrónico suave, la máquina
acelera de forma continua hasta alcanzar la
velocidad preseleccionada.
31
Page 32
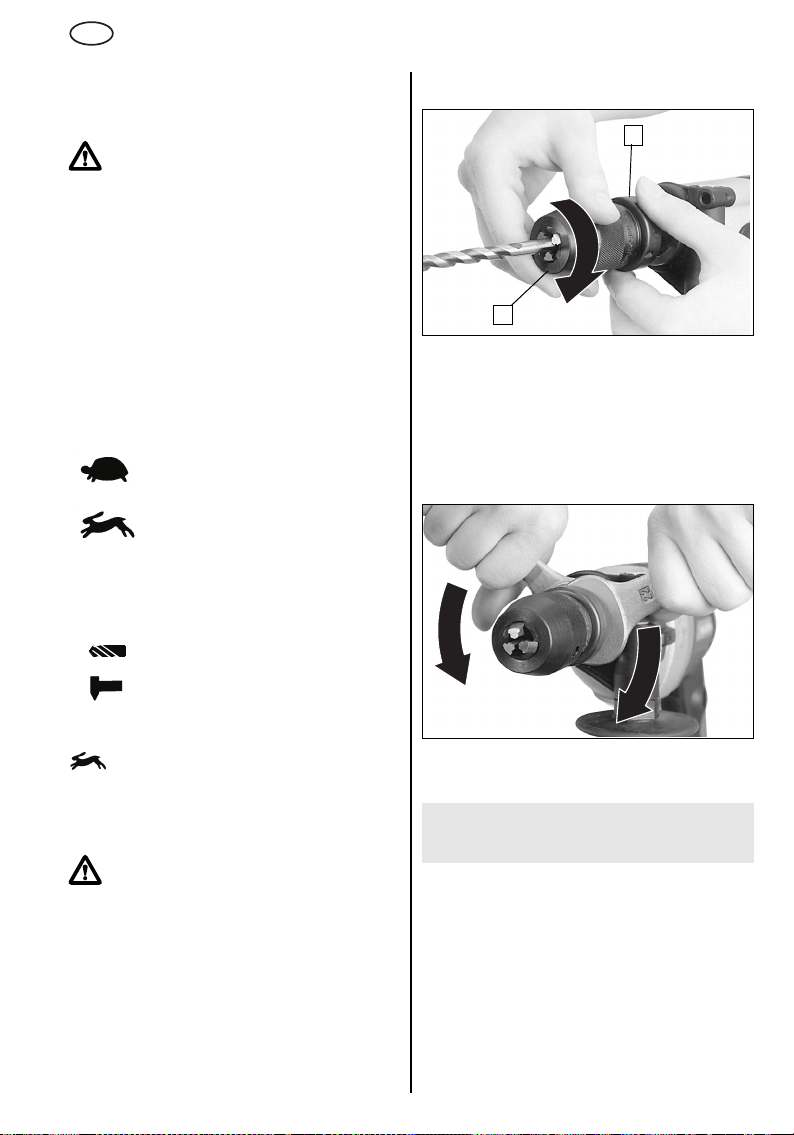
ES
ESPAÑOL
Para una conexión permanente de la máquina es
posible enclavar el interruptor con el botón de
retención (7). Para desconectar la máquina, pulsar
nuevamente el interruptor.
En marcha continua, la máquina sigue
funcionando cuando es arrancada de las
manos. Por este motivo, sujetarla
siempre con ambas manos en las empuñaduras previstas para ello, adoptar una postura
segura y trabajar con concentración.
8.3 Preseleccionar la velocidad
Preseleccionar la velocidad máxima en la ruedecilla
de ajuste (6). Consultar las velocidades de taladrado
recomendadas en la página 4.
8.4 Seleccionar la marcha
Seleccionar la marcha deseada girando el
interruptor (3).
Conmutar la máquina solamente en marcha de
inercia (conectar/desconectar brevemente).
1. marcha
(baja velocidad, alto par de giro) por
ejemplo para atornillar, taladrar
2. marcha
(alta velocidad) por ejemplo para
taladrar, taladrar con percusión
8.5 Conmutación taladrar sin percusión/
con percusión
Seleccionar el modo de operación deseado
desplazando el conmutador corredizo (4).
taladrar sin percusión
8.7 Cambio de herramienta portabrocas de
cierre rápido Futuro Top (1)
a
b
Colocar la herramienta. Sujetar el anillo de sujeción
(a) y con la otra mano girar el manguito (b)
fuertemente hasta el tope. Para abrir el portabrocas
sujetar el anillo de sujeción (a) y girar el manguito (b)
en la dirección opuesta.
8.8 Desmontar el portabrocas
Cambio de herramienta portabrocas de cierre
rápido Futuro Top (1)
taladrar con percusión
Trabajar a alta velocidad para taladrar con
percusión. Colocar el interruptor (3) en la posición
.
Taladrar con percusión y taladrar sin percusión
solamente con rotación hacia la derecha.
8.6 Seleccionar el sentido de rotación
Accionar el inversor del sentido de
rotación (9) solamente cuando el motor
esté detenido.
Seleccionar el sentido de rotación:
R = rotación hacia la derecha
L = rotación hacia la izquierda
32
Desatornillar el portabrocas mediante dos llaves de
boca.
9 Metabo Diagnostic System
(MDS)
Indicador electrónico (5): Significado de las
señales luminosas:
9.1 El indicador electrónico (5) no se
ilumina
La máquina está totalmente apta para el uso.
Page 33
ESPAÑOL
ES
9.2 Iluminación permanente: sobrecarga
En caso de una sobrecarga
ininterrumpida de la máquina, se
limita el consumo de energía y con
ello se evita un calentamiento
sobrecarga aumente, se detiene la máquina.
Apagar y encender la máquina y dejar que se
enfríe al ralentí.
9.3 Parpadeo simple:
Si la señal se produce con el interruptor
accionado, las escobillas de carbón están
prácticamente desgastadas.
9.4 Parpadeo doble: demanda de servicio 2
que conlleve mayores costes de reparación.
Si la señal se produce con el interruptor
accionado, las escobillas de carbón están
completamente desgastadas. La máquina se ha
desconectado automáticamente. Encargue que
cambien las escobillas en un centro de servicio
autorizado.
9.5 Parpadeo rápido: protección contra
Cuando se restaura la energía eléctrica después
de un corte de la misma, por razones de
seguridad, la máquina que sigue conectada no se
pondrá en marcha. Apagar y volver a encender la
máquina mediante el interruptor.
excesivo del motor. En caso de que la
servicio 1
El piloto se ilumina, realiza una pausa,
se ilumina ...: La máquina dispone
todavía, a pleno rendimiento, de un 5
a 10% del tiempo que ya ha sido
utilizada.
El piloto parpadea dos veces, realiza
una pausa, parpadea ...: Entregue
inmediatamente la máquina al
servicio técnico o distribuidor
especializado para evitar una avería
rearranque
demanda de
Para filetear roscas se debe aceitar ligeramente el
macho de roscar. Seleccionar una velocidad baja y
. Comenzar a filetear con el giro a la derecha,
detener la máquina y desatornillar el macho en giro
a la izquierda.
11 Eliminación de averías
Si no fuera posible pulsar el interruptor (8), debe
controlarse si el Inversor del sentido de rotación (9)
no se encuentra posicionado correctamente en R o
en L.
Indicador electrónico (5)
Véase el capítulo 9 Metabo Diagnostic System
(MDS).
f
12 Accesorios
Utilizar exclusivamente accesorios originales de
Metabo.
Si Vd. necesitara accesorios, sírvase dirigirse a su
proveedor.
Para seleccionar las piezas correctas de accesorios
indique Vd, al proveedor el tipo exacto de su
herramienta eléctrica.
Posibles accesorios véase página 4.
AMetabox
B Adaptable para taladrar y atornillar en ángulo
CArbol flexible
D Plato de apoyo de goma
E Discos de lijar de tela
F Soporte para taladradora (Soporte de la máquina
puede ser girado en 360°.)
G Soporte para fresar y taladrar (columna con
cremallera y ranura guía)
H Mordazas para máquinas
I Cepillo en forma de brocha de alambre de acero
J Cepillo en forma de cazoleta de alambre de
acero
K
Cepillo circular de alambre
L
Montaje del manguito de sujeción
Programa completo de accesorios disponible en
www.metabo.com o en el catálogo principal.
10 Consejos y artificios
Si se trata de taladros profundos, sacar de tiempo
en tiempo la broca del taladro, para eliminar el polvo
de ladrillo o las virutas.
Taladrar azulejos y otros materiales frágiles sin
percusión.
Para el atornillado es posible desmontar el
portabrocas. Colocar la punta de atornillar
directamente en el hexágono interior del husillo.
La punta de atornillar queda fija si se encuentra
apretado el casquillo de apriete.
13 Reparación
¡Los trabajos de reparación en herramientas
eléctricas deben ser llevados a cabo
exclusivamente por técnicos especializados!
Las herramientas eléctricas de Metabo que
necesitaran reparación pueden ser enviadas a la
dirección indicada en la penúltima página.
Sírvase incluir a la herramienta eléctrica enviada
para su reparación una descripción de la anomalía
determinada.
33
Page 34

ES
ESPAÑOL
14 Protección ecológica
El material de embalaje utilizado por Metabo es
reciclable en un 100%.
Las herramientas eléctricas y sus accesorios fuera
de uso contienen grandes cantidades de materia
prima y plásticos que también pueden ser
reciclados.
Este manual de instrucciones para el manejo está
impreso en papel blanqueado exento de cloro.
Sólo para países de la UE. No tire las
herramientas eléctricas a la basura. Según
la directiva europea 2002/96/CE sobre
residuos de aparatos eléctricos y electrónicos y
aplicable por ley en cada país, las herramientas
eléctricas usadas se deben recoger por separado
y posteriormente llevar a cabo un reciclaje acorde
con el medio ambiente.
15 Especificaciones técnicas
Explicaciones sobre las especificaciones indicadas
en la página 2.
Reservados los derechos a modificaciones
relacionadas con el avance técnico.
P
= Potencia nominal absorbida
1
= Potencia entregada
P
2
= Nº de revoluciones de marcha en
n
1
= Nº de revoluciones de marcha bajo
n
2
ø máx = diámetro máximo de taladrado
S máx = número máximo de percusiones
b = Capacidad del portabrocas
G = Rosca del husillo portabrocas
H = Husillo portabroca con hexágono
m=Peso
D = Diámetro del cuello de sujeción
Nivel acústico típico evaluado en A:
L
pA
L
WA
, KWA= inseguridad
K
pA
Al trabajar, el nivel de ruido puede superar los
85 dB(A).
vacío
carga
interior
= nivel de intensidad acústica
= nivel de potencia acústica
¡Llevar protectores del oído!
a
= aceleración típica evaluada en la
hw
zona del brazo y mano
Valores de medición determinados conforme a la
norma EN 60745.
Las especificaciones técnicas aquí indicadas se
entienden dentro de determinadas tolerancias
(conformes a las normas que rigen actualmente).
34
Page 35

Page 36

Metabowerke GmbH,
72622 Nürtingen, Germany
www.metabo.com
 Loading...