

Page 1
KH 18 LTX 24
de Originalbetriebsanleitung 4
CHI 使用說明 4
en Original instructions 8
fr Notice originale 12
nl Oorspronkelijke gebruiksaanwijzing 16
it Istruzioni originali 20
es Manual original 24
pt Manual original 28
sv Bruksanvisning i original 32
fi Alkuperäiset ohjeet 36
en Original instructions 8
no Original bruksanvisning 40
da Original brugsanvisning 44
pl Instrukcja oryginalna 48
el Πρωτότυπο οδηγιώνχρήσης 52
hu Eredeti használati utasítás 56
ru Оригинальное руководство по
эксплуатации 60
www.metabo.com Made in Germany
Page 2
a
b
1
3
4
A
56
R
0
7
L
8
9
2
1
10
131412 11
2
2
Page 3
KH 18 LTX 24
*1) Serial Number: 01712..
12.
U
n
1
n
2
s
max
(EPTA 05/2009) J 2,1
W
D
1
D
2
D
3
D
4
D
5
V 18
/min 0 - 1400
/min 1100
/min
bpm
mm (in) 24 (1)
mm (in)
mm (in)
68 (2
68 (2
mm (in)
mm (in)
m kg (lbs) 2,6 (5,73)
D mm (in)
a
h,HD/Kh,HD
a
h,Cheq/Kh,Cheq
L
pA/KpA
L
WA/KWA
2
m/s
2
m/s
dB (A) 87 / 3
dB (A) 98 / 3
43 (1
SDS-plus
5200
11
/16)
11
/16)
1
/2)
13 (
3
30 (1
/16)
11
/16)
10,2 / 1,5
8,3 / 1,5
*2) 2014/30/EU, 2006/42/EC, 2011/65/EU
*3) EN 60745-1:2009+A11:2010, EN 60745-2-6:2010, EN IEC 63000:2018
2021-05-03, Bernd Fleischmann
Direktor Produktentstehung & Qualität (Vice President Product Engineering & Quality)
*4) Metabowerke GmbH - Metabo-Allee 1 - 72622 Nuertingen, Germany
3
3
Page 4
CHI 繁體中文
使用說明
1. 符合性聲明
做為唯一責任人,我們特此聲明:按類型和型號
*1) 識別的這些無線電鑽符合指令 *2) 和標準 *3) 的
所有相關要求。*4) 的技術文件 - 見第 3 頁。
僅針對英國:
作為製造商和編撰技術檔案的獲授權人 (參閱
第 3 頁的 *4)),我們特此聲明,依第 3 頁的型
號和序號 *1) 識別的這些鑽孔和鑿錘符合下列英國
法規 *2) S.I. 2016/1091、S.I. 2008/1597、S.I.
2012/3032 和指定標準 EN 60745- 1:2009+A11:2010、
EN 60745-2-6:2010、EN IEC 63000:2018 的所有相
關規定。
2. 規定的使用條件
搭配適當的配件,無線電鑽適合搭配錘鉆鑽頭和鑿
子鑿入混凝土、石材和類似材質,並適合搭配巖心
鑽頭鑿入瓷磚和類似材質,也適用於在金屬、木材
等材質上非擊式鑽孔,以及旋入螺絲。
使用者必須承擔不當使用造成任何損壞的完全責任。
請瞭解並遵守一般事故防範條例,以及隨附的安全
資訊。
3. 一般安全資訊
為了您的安全與保護您的電動工具,請
特別注意有此警示標誌的地方!
警告 – 閱讀使用說明將能降低受傷的風險。
「帶電」的電線時,可能導致電動工具的金屬部位
也「帶電」,造成操作者因此觸電。
務必正確安裝附加手柄後進行作業。
一定要用雙手握住預定的手柄,站穩腳步,並專注
於工作。
在使用工具作業時,一定要使用護目鏡、手套與堅
固的鞋子。
請先確認:施工的位置沒有埋設電線、瓦斯管線或
水管 (可使用如金屬探測器的設備偵測)。
請勿接觸轉動的工具!
固定工件,以免滑動或轉動 (例如,使用螺絲鉗固定)。
除非工具已經靜止不動,否則不宜移除碎屑和類似
廢棄物。
在將螺絲鎖入堅硬材料時 (例如將公制或英制螺絲
鎖入鋼鐵) 必須小心!螺絲頭可能會斷裂或高反向
扭力可能累積於手柄上。
S-自動安全離合器:如果工具夾住或卡住,進入馬
達的電源供應受到限制。由於可能產生強大的力
量,一定要用所提供的手柄雙手握住機器、站穩腳
步並專心。
必須要更換受損或龜裂的附加手柄。絕對不可以用
損壞的附加手柄操作。
LED 燈 (11):不可通過光學儀器直視 LED 光線。
進行任何調整、更換工具、維護或清潔之前,請取
出工具的電池組。
電池組不可沾水與受潮!
警告–請閱讀所有安全警告與說明。
所有安全警告與說明,可能導致觸電、起火和/
或嚴重受傷。
請妥善保存所有安全說明與資訊,以供將來參考。
轉交電動工具時,務必一併轉交這些文件。
4. 特殊安全說明
請佩戴防護耳罩。暴露於噪音之下可能造成聽力
喪失。
使用工具所附的輔助手柄。失去控制可能造成人員
受傷。
如果工作時使用的切割配件有可能接觸隱藏電線,
一定要握著絕緣手柄操作工具。切割配件若接觸到
4
如未遵守
不要使電池組接近火源!
不要使用有故障或變形的電池組!
不要拆開電池組!
不可觸碰觸點或使電池組短路!
損壞的鋰電池組可能會洩漏弱酸性可燃
液
體!
如果電池洩漏出的液體接觸到皮膚,請立即
用大量清水沖洗。如果電池滲漏出的液體接
觸到眼睛,請用清水沖洗並立即就醫!
如果電動工具損壞,請取出其中的電池組。
Page 5

鋰電池組的運輸:
鋰電池組的運輸必須遵守危險品運輸的相關法律
(UN 3480 與 UN 3481)。運輸鋰電池組時,請瞭解
現行的有效規範。必要時,請洽詢貨運商。麥太保
提供通過認證的包材。
送交運送的電池組必須外表無損,而且無漏液。送
交運送工具時,請取出電池組。避免觸點短路 (例
如,用膠帶保護)。
減少灰塵暴露:
警告 - 強力打磨、鋸切、研磨、鑽孔與其他作
業活動產生的一些粉塵含有已知會導致癌症、
先天缺陷或其他生殖損害的化學物質。這些化學物
質的其中一些範例如下:
- 含鉛油漆中的鉛、
- 磚、水泥與其他磚石產品中的結晶二氧化矽;
以及
- 經過化學處理的木材中的砷與鉻。
這些暴露的風險依您進行此類作業的頻率而定。為
降低對這些化學物質的曝露程度:在通風良好的區
域作業,並穿戴經認證的防護裝備,例如專為過濾
微小顆粒所設計的防塵面罩等。
這同樣適用於來自其他材料的粉塵,例如某些木材
(例如橡木或山毛櫸粉塵)、金屬、石棉。其他已知
疾病包括過敏反應、呼吸系統疾病等等。不要讓粉
塵進入人體。
遵守材料、人員、應用和應用地點的相關準則和國
家法規 (例如,職業健康和安全規定、處置)。
收集從源頭產生的粒子,並避免在周圍區域堆積。
使用特殊工作適用的配件。如此可減少粒子恣意進
入環境。
使用適當的除塵裝置。
利用下列措施減少灰塵暴露:
- 不可將四散的粒子與排氣氣流導向您自己或附近
的人,也不可導向堆積的灰塵。
- 使用除塵裝置和/或空氣凈化器。
- 確保工作場所通風良好,並使用吸塵器保持清潔。
掃除或吹揚灰塵。
-
以吸塵器抽吸或清洗防護衣。不可對保護齒輪吹氣、
拍打或刷除。
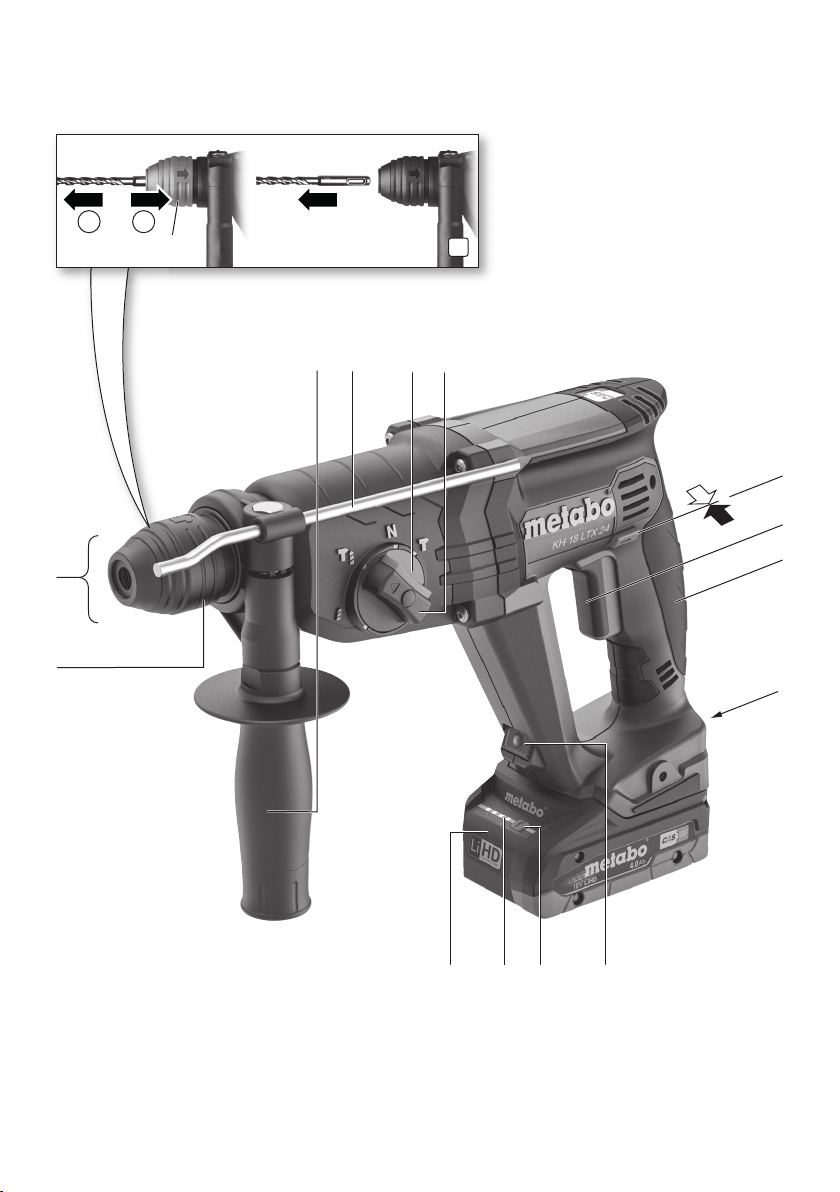
5. 概觀
見第 2 頁。
1 工具鎖
2 SDS 鑽頭
3 附加手柄
4 深度擋片
繁體中文 CHI
5 鎖
6 開關按鈕 (用於更換操作模式)
7 旋轉選擇器開關
8 觸發開關
9 手柄
10 電池組釋放按鈕
11 工作場所照明的 LED 燈
12 電量指示燈按鈕 *
13 電量和訊號指示燈 *
14 電池組 *
* 端視設備/機型而定/不在交貨範圍內
6. 初始操作
6.1 附加手柄的組裝
基於安全理由,一定要使用所附的附加手柄。
以逆時鐘方向轉動側向手柄 (3) 打開鉗定環。將附
加手柄推向工具的軸環。插入深度擋片 (4)。以應
用所需的角度旋緊附加手柄。
6.2 電池組
使用前將電池組 (14) 充電。
如果性能降低,請將電池組重新充電。
理想的存放溫度介於 10°C 與 30°C 之間。
對於帶有電量和訊號指示燈 (13) (設備特定) 的鋰電
池組:
- 按下按鈕 (12);LED 指示電量 (13)。
-
如果一個 LED 閃爍,則表示電池組電量幾乎耗盡,
必須重新充電。
6.3 取出和裝入電池組
取出:
按下電池組釋放 (10) 按鈕,並取出電池 (14)。
裝入:
滑入電池組 (14),直到卡入為止。
7. 使用方式
7.1 深度擋片設定
鬆開附加手柄 (3)。將深度擋片 (4) 設定到預定的鑽
孔深度並重新旋緊附加手柄 (3)。
7.2 開機與關機
按下觸發開關 (8) 啟動工具。
按壓觸發開關可變換速度。若要關閉,請放開觸發
開關 (8)。
5
Page 6
CHI 繁體中文
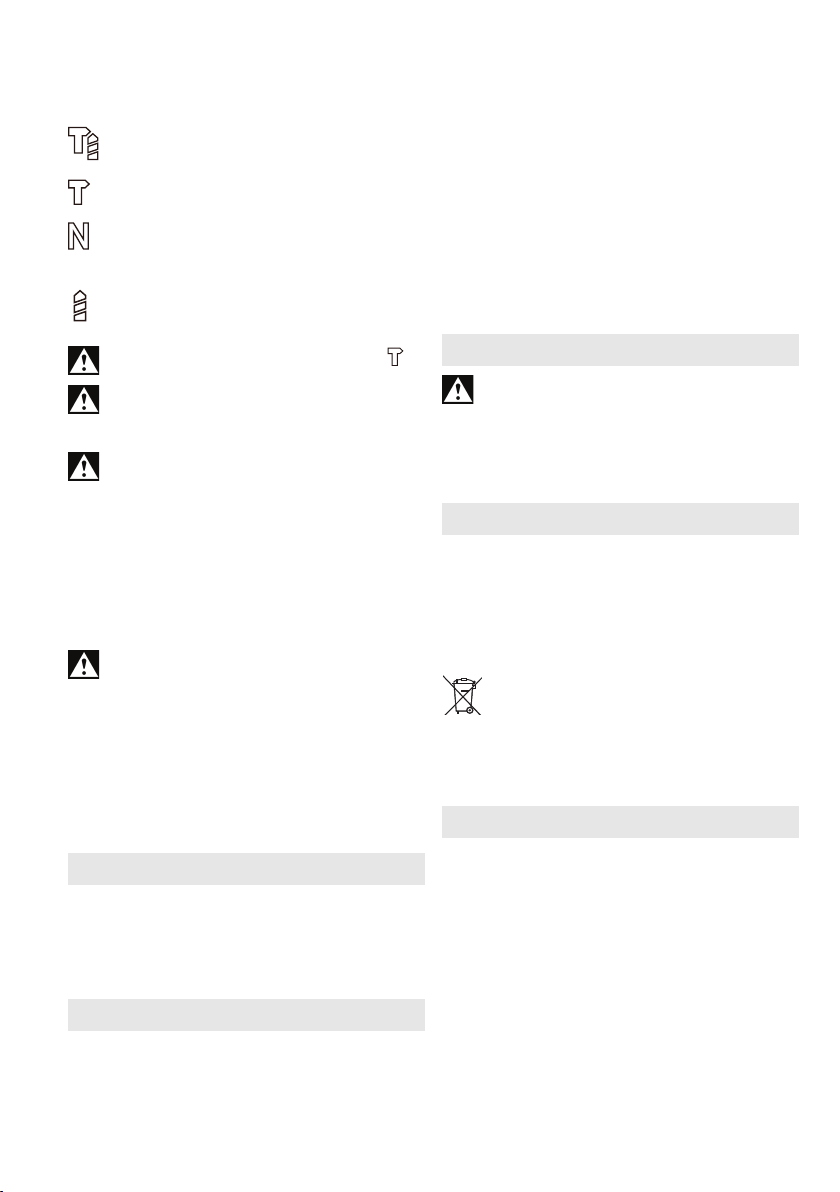
7.3 操作模式選擇
壓下鎖 (5) 並轉動指輪 (6)。
錘鉆鑽孔
雕鑿
設定鑿子位置
將鑿子轉到預定位置。然後,選擇「雕鑿」
固定鑿子,防止扭轉。
鑽孔
牢穩地固定配件。如果工具裝在固定座上運轉:確
實固定工具。失去控制可能造成人員受傷。
充電器:ASC 145 等
不同容量的電池組。務必購買電壓與電動工具相符
的電池組。
5.5 Ah (LiHD),訂單編號:625368000
等
5.2 Ah (鋰離子),訂單編號:625028000
等等
關於完整的配件清單,請參閱 www.metabo.com 或
產品目錄。
安裝鑿子時,只能在雕鑿作業模式操作工具 。
安裝鑿子時,避免以工具撬開。
7.4 選擇旋轉方向
只有在馬達完全停止時才能啟動旋轉選擇開
關 (7)。
選擇旋轉方向:
R = 順時鐘旋轉(適用於鑽孔、錘鉆鑽孔、雕鑿、
旋入螺絲)
L = 逆時鐘旋轉(適用於移除螺絲)
0 = 中央位置:啟動搬運安全裝置 (開啟鎖)
7.5 以 SDS 鑽頭更換工具
在安裝之前,清潔工具輪軸並塗抹專用油脂
(配件訂單號碼 6.31800)!僅使用 SDS-Plus
工具。
插入工具:
- 轉動工具並插入,直到卡住為止。工具自動鎖定。
移除工具:
見第 2 頁圖 A。
- 依箭頭 (a) 方向將工具鎖 (1) 往後拉,並移除工具 (b)。
8. 維護和清潔
通風孔:
工具通風孔應該定期清潔。
定期取出電池組,並以乾布擦拭電池組與工具的接
觸表面,去除鑽孔塵。
9. 配件
務必使用原廠麥太保電池組和麥太保配件。
務必僅使用符合這些使用說明中所列需求和參數的
配件。
6
10. 維修
只有合格的電工可以修理電動工具!
如果您的麥太保電動工具需要維修,請聯絡附
近的麥太保業務代表。如需地址,請參閱
www.metabo.com。
您可以從 www.metabo.com 下載備品清單。
11. 環保
請依照所在國家的法規,以符合環保的方式處置及
回收廢棄的工具、包材及配件。
不可將電池組視為一般廢棄物進行處理。故障或用
過的電池交由麥太保經銷商處理!
不可使電池組沾水!
針對歐盟國家:請勿將電動工具當做家庭廢
棄物處置!根據電氣與電子設備廢棄物的歐
盟指令 2012/19/EU 以及施行的國家法律,廢
棄的電動工具必須個別收集並以環保的方式回收。
在丟棄前,將電動工具的電池組放電。避免觸點短
路 (例如,用膠帶保護)。
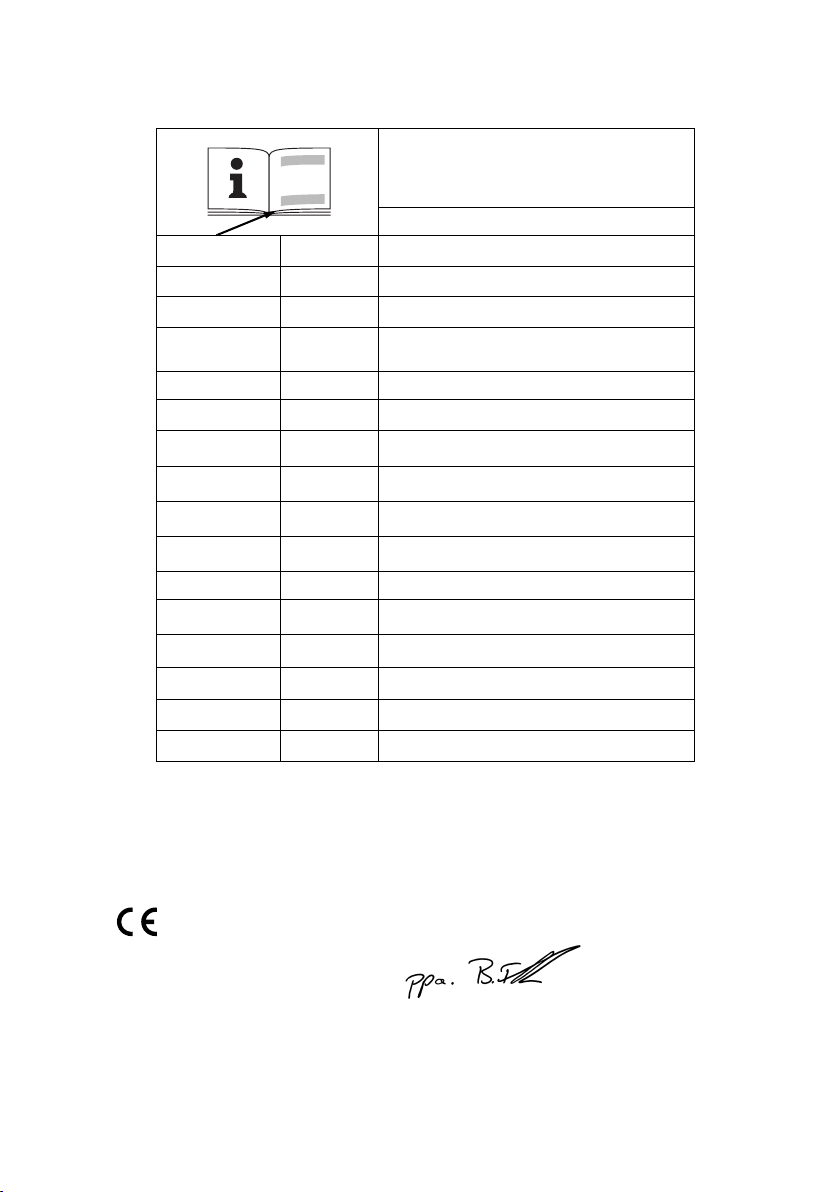
12. 技術資料
有關規格的解釋說明,請見第 3 頁。可能由於技術進
展而隨時變更。
U = 電池組電壓
n1 = 無負載速度
n2 = 帶負載速度
s
= 最大撞擊率
max
W = 最大單次撞擊力
D1 = 用錘鉆鑽頭在混凝土上鑽孔的 Ø
D2 = 用巖心鑽頭在磚石上鑽孔的 Ø
D3 = 用巖心鑽頭在混凝土上鑽孔的 Ø
D4 = 在鋼鐵上鑽孔的 Ø
D5 = 在軟質木材上鑽孔的 Ø
m = 含最小電池組的重量
D = 軸環直徑
Page 7

測量依據 EN 60745 標準確認。
直流電
上述技術規格皆含有公差在內 (符合相關的有效
標準)。
排放值
這些值可用來評估電動工具的排放量,以及比
較不同的電動工具。實際負載可能更高或更低,端
視操作條件、電動工具或所用配件的情況而定。當
負載較低無法評估時,請允許休息並停止一下。根
據調整後的估計值,為使用者安排保護措施,例如
組織措施。
總振動值 (三個方向的矢量和) 依據 EN 60745 確定:
a
= 震動散發值 (在混凝土錘鉆鑽孔)
h, HD
a
= 震動散發值 (雕鑿)
h, Cheq
K
= 不確定性 (震動)
h,HD/Cheq
一般的 A 實際感知音量:
LpA = 聲音壓力等級
LWA = 聲音功率等級
K
= 不確定性
pA, KWA
操作時噪音等級可能超過 80 dB(A)。
請佩戴防護耳罩!
繁體中文 CHI
台灣華嶠貿易股份有限公司
聯絡電話:02-28124901
聯絡地址:台北市士林區重慶北路四段 103 號
7
Page 8
en ENGLISH
Original instructions
1. Declaration of Conformity
We, being solely responsible: Hereby declare that
these cordless hammers, identied by type and
serial number *1), meet all relevant requirements of
directives *2) and standards *3). Technical
documents for *4) - see page 3.
For UK only:
We as manufacturer and authorized person to
compile the technical le, see *4) on page 3,
hereby declare under sole responsibility that these
drilling and chisel hammer, identied by type and
serial number *1) on page 3, fulll all relevant
provisions of following UK Regulations *2) S.I.
2016/1091, S.I. 2008/1597, S.I. 2012/3032 and
Designated Standards EN 607451:2009+A11:2010, EN 60745-2-6:2010, EN IEC
63000:2018.
2. SpeciedConditionsofUse
The cordless hammers are suited, with appropriate
accessories, for working with hammer drill bits and
chisels in concrete, stone and similar materials and
with core bits in tiles and similar, as well as drilling
without impact in metal, wood, etc and for
nscrewdriving.
The user bears sole responsibility for any damage
caused by inappropriate use.
Generally accepted accident prevention
regulations and the enclosed safety information
must be observed.
3. General Safety Information
For your own protection and for the
protection of your power tool, pay
attention to all parts of the text that are
marked with this symbol!
WARNING – Read the operating
instructions to reduce the risk of injury.
WARNINGReadallsafetywarningsand
instructions. Failure to follow all safety
warnings and instructions may result in electric
shock, re and/or serious injury.
Keepallsafetyinstructionsandinformation
for future reference.
Always include these documents when passing on
your power tool.
4. Special Safety Instructions
Wear ear protectors. Exposure to noise can cause
hearing loss.
Useauxiliaryhandlesuppliedwiththetool.
Loss of control can cause personal injury.
Holdpowertoolbyinsulatedgrippingsurfaces,
whenperforminganoperationwherethecutting
8
accessorymaycontacthiddenwiring. Cutting
accessory contacting a "live" wire may make
exposed metal parts of the power tool "live" and
could give the operator an electric shock.
Always work with the additional handle correctly
installed.
Always hold the machine with both hands at the
intended handles, take a secure stance and
concentrate on the work.
Always wear protective goggles, gloves, and sturdy
shoes when working with this tool.
Ensure that the spot where you wish to work is free of
powercables,gaslinesorwaterpipes (e.g. using
a metal detector).
Do not touch the rotating tool!
Secure the workpiece to prevent slipping or rotation
(e.g. by securing with screw clamps).
Remove chips and similar material only with the
machine at a standstill.
Caution must be exercised when driving screws into
hard materials (driving screws with metric or imperial
threads into steel)! The screw head may break or a
high reverse torque may build up on the handle.
S-automatic safety clutch: If the tool jams or catches,
the power supply to the motor is restricted. Due to the
strong force which can arise, always hold the
machine with both hands using the handles provided,
stand securely and concentrate.
A damaged or cracked additional handle must be
replaced. Never operate a machine with a defective
additional handle.
LED light (11): do not observe the LED radiation
directly with optical instruments.
Remove the battery pack from the machine before
making any adjustments, changing tools, maintaining
or cleaning.
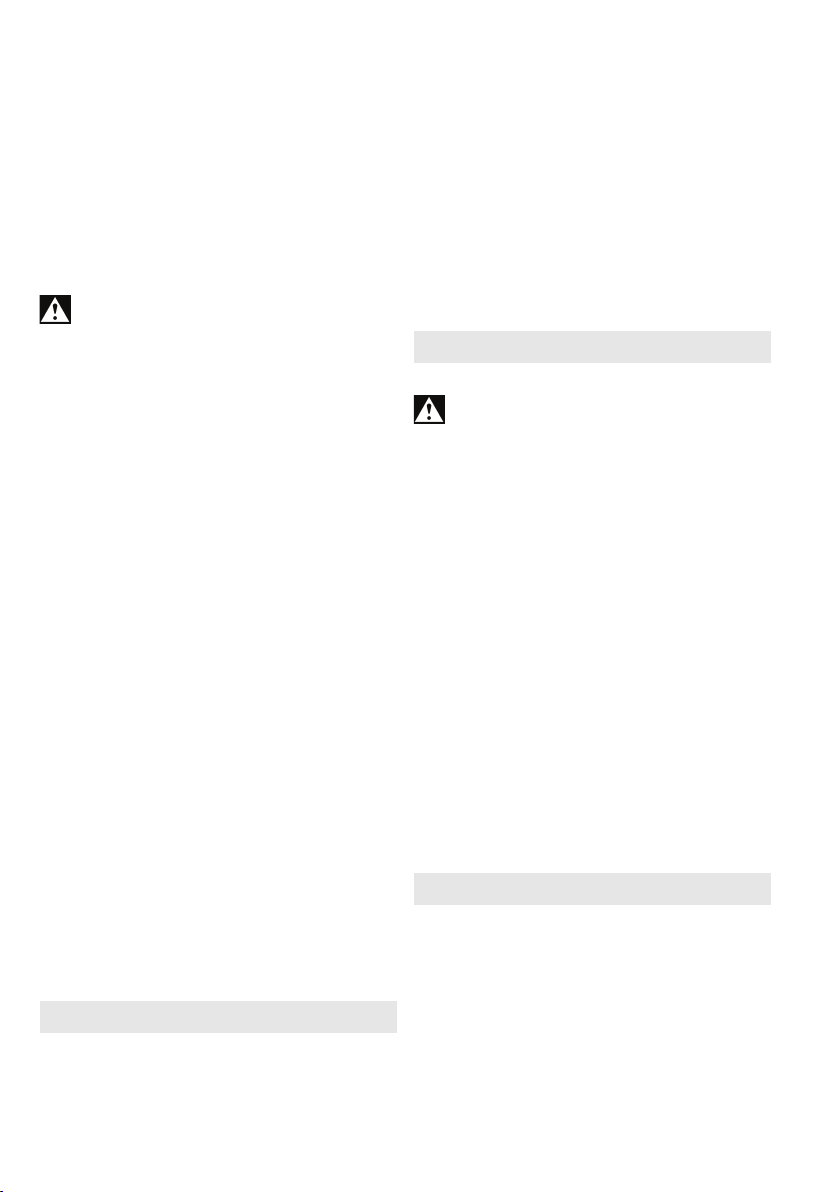
Protect battery packs from water and
moisture!
Do not expose battery packs to re!
Do not use faulty or deformed battery packs!
Do not open battery packs!
Do not touch or short circuit battery pack contacts!
A slightly acidic, ammable uid may leak
from defective Li-Ion battery packs!
If battery uid leaks out and comes into
contact with your skin, rinse immediately with
plenty of water. If battery uid leaks out and
comes into contact with your eyes, wash them with
clean water and seek medical attention immediately!
If the machine is defective, remove the battery pack
from the machine.
Page 9
TransportofLi-Ionbatterypacks:
The shipping of Li-Ion battery packs is subject to laws
related to the carriage of hazardous goods (UN 3480
and UN 3481). Inform yourself of the currently valid
specications when shipping Li-Ion battery packs. If
necessary, consult your freight forwarder. Certied
packaging is available from Metabo.
Only send the battery pack if the housing is intact and
no uid is leaking. Remove the battery pack from the
machine for sending. Prevent the contacts from
short-circuiting (e.g. by protecting them with adhesive
tape).
Reducingdustexposure:
WARNING - Some dust created by power
sanding, sawing, grinding, drilling, and other
construction activities contains chemicals known to
cause cancer, birth defects or other reproductive
harm. Some examples of these chemicals are:
- Lead from lead-based paints,
- crystalline silica from bricks and cement and other
masonry products, and
- arsenic and chromium from chemically treated
lumber.
Your risk from these exposures varies, depending on
how often you do this type of work. To reduce your
exposure to these chemicals: work in a wellventilated
area, and work with approved safety equipment, such
as those dust masks that are specially designed to
lter out microscopic particles.
This also applies to dust from other materials, such
as some timber types (like oak or beech dust),
metals, asbestos. Other known diseases are e.g.
allergic reactions, respiratory diseases. Do not let
dust enter the body.
Observe the relevant guidelines and national
regulations for your material, sta, application and
place of application (e.g. occupational health and
safety regulations, disposal).
Collect the particles generated at the source, avoid
deposits in the surrounding area.
Use suitable accessories for special work. In this way,
fewer particles enter the environment in an
uncontrolled manner.
Use a suitable extraction unit.
Reduce dust exposure with the following measures:
- do not direct the escaping particles and the exhaust
air stream towards yourself or nearby persons or
towards dust deposits, - use an extraction unit and/
or an air purier,
- ensure good ventilation of the workplace and keep
it clean using a vacuum cleaner. Sweeping or
blowing stirs up dust.
- Vacuum or wash protective clothing. Do not blow,
beat or brush protective gear.
5. Overview
See page 2.
1 Tool lock
2 SDS chuck
3 Additional handle
4 Depth stop
ENGLISH en
5 Lock
6 Switch button (for changing the operating
mode)
7 Rotation selector switch
8 Trigger switch
9 Handle
10 Battery pack release button
11 LED light to illuminate the workplace
12 Capacity indicator button *
13 Capacity and signal indicator *
14 Battery pack *
* depending on equipment/model/not included in
scope of delivery
6. Initial Operation
6.1 Assemblyoftheadditionalhandle
For safety reasons, always use the additional
handle supplied.
Open the clamping ring by turning the side handle
(4) anti-clockwise. Push the additional handle onto
the collar of the machine. Insert the depth stop (4).
Securely tighten the additional handle at the angle
required for the application.
6.2 Batterypack
Charge the battery pack (14) before use.
Recharge the battery pack if performance
diminishes.
The ideal storage temperature is between 10°C
and 30°C.
In case of Li-Ion battery packs with capacity and
signal display (13) (equipment-specic):
- Press the button (12); the LEDs indicate the charge
(13) level.
- The battery pack is almost empty and must be
recharged if one LED is ashing.
6.3 Removingandinsertingthebatterypack
Removing:
Press the battery pack release (10) button and
remove the battery pack (14).
Inserting:
Slide in the battery pack (14) until it engages.
7. Use
7.1 Depth Stop Setting
Loosen the additional handle (3). Set the depth
stop (4) to the desired drilling depth and retighten
additional handle (3).
7.2 SwitchingOnandO
Press the trigger switch (8) to switch on the
machine.
The speed can be changed using the trigger
switch. To switch o release the trigger switch (8).
9
Page 10
en ENGLISH
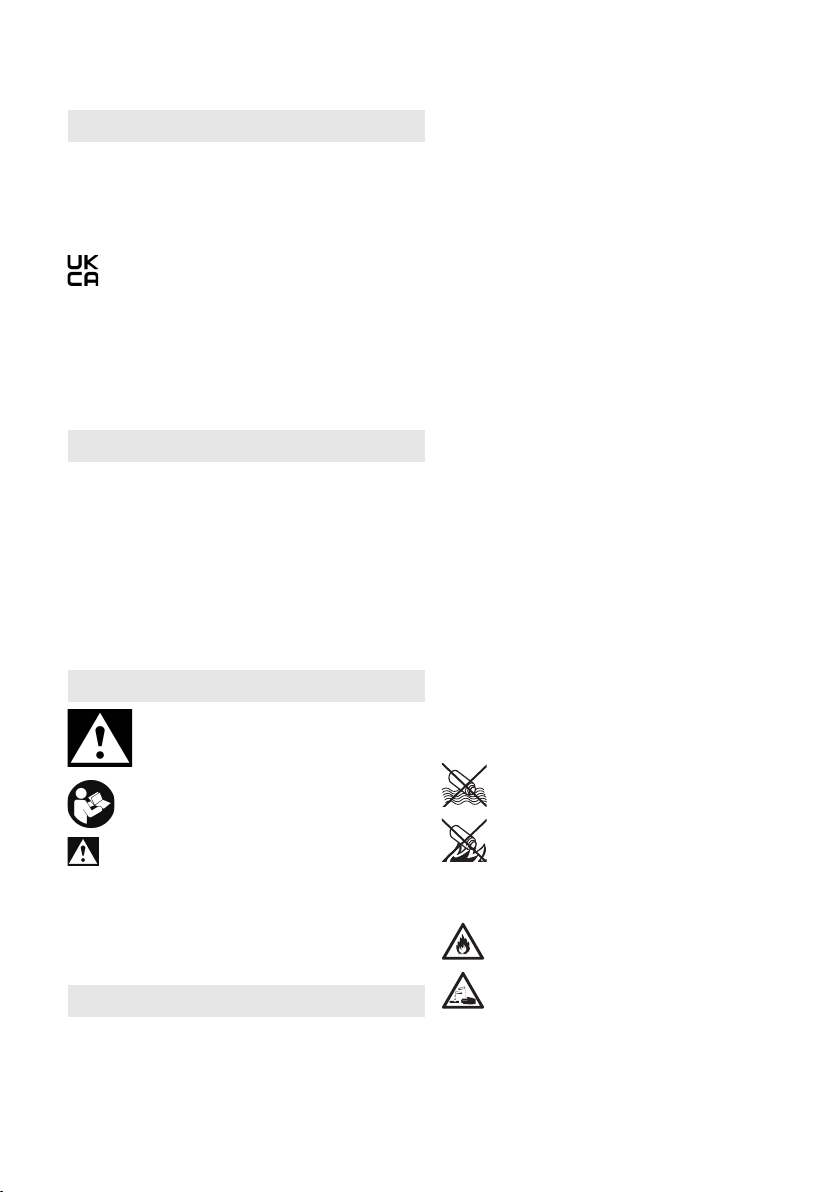
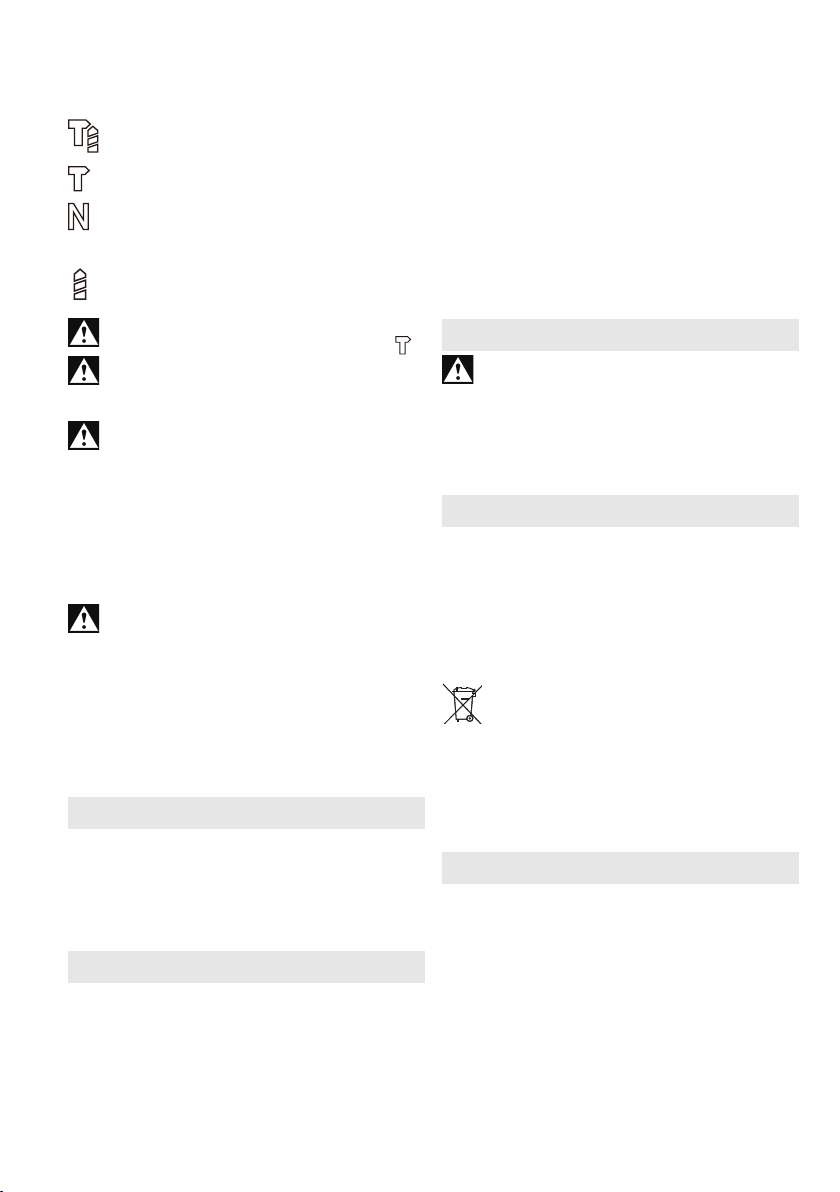
7.3 Operatingmodeselection
Press the lock (5) and turn the thumbwheel (6).
Hammer drilling
Chiselling
Setting chisel position
Turn the chisel in the desired position. Then
select "Chiselling" to secure the chisel and
prevent it from twisting.
Drilling
When a chisel is tted, only operate the
machine in the chiselling operating mode .
Avoid levering with the machine when a chisel
is tted.
7.4 Selectionofdirectionofrotation
Only activate the rotation selector switch (7)
when the motor has completely stopped.
Select direction of rotation:
R = clockwise rotation (for drilling, hammer
drilling, chiselling, drive in screws)
L = anti-clockwise rotation (for the removal of
screws)
0 = Centre position: with the transporting safety
device engaged (switch-on lock)
7.5 ToolchangewithSDSchuck
Before tting, clean tool shank and apply
special grease (accessories order no.
6.31800)! Use only SDS-Plus tools.
Inserting tools:
- Turn tool and insert until it engages. The tool is
automatically locked.
Remove the tool:
See page 2, g. A.
- Pull tool lock (1) backwards in direction indicated by
arrow (a) and remove tool (b).
8. MaintenanceandCleaning
Vent slots:
The vent slots of the machine should be cleaned
periodically.
Remove the batterypack periodically and wipe
the contact area of the battery pack and machine
with a dry cloth and remove drilling dust.
9. Accessories
Only use original Metabo battery packs and
Metabo accessories.
Use only accessories that full the requirements
and specications listed in these operating
instructions.
10
Fit accessories securely. If the machine is operated
in a holder: secure the machine well. Loss of
control can cause personal injury.
Chargers: ASC 145, etc.
Batterypackswithdierentcapacities. Buy
battery packs only with voltage suitable for your
power tool.
5.5 Ah (LiHD), order no.: 625368000
etc.
5.2 Ah (Li-Ion), order no.: 625028000
etc.
For a complete range of accessories, see
www.metabo.com or the catalogue.
10. Repairs
Repairs to electrical tools must ONLY be
carried out by qualied electricians!
Contact your local Metabo representative if you
have Metabo power tools requiring repairs. For
addresses see www.metabo.com.
You can download a list of spare parts from
www.metabo.com.
11. Environmental Protection
Observe national regulations on environmentally
compatible disposal and on the recycling of disused
machines, packaging and accessories.
Battery packs may not be disposed of with regular
waste. Return faulty or used battery packs to your
Metabo dealer!
Do not allow battery packs to come into contact with
water!
Only for EU countries: never dispose of power
tools in your household waste! According to
European Directive 2012/19/EU on Waste
from Electric and Electronic Equipment and
implementation in national law, used power tools
must be collected separately and recycled in an
environmentally-friendly manner.
Discharge the battery pack in the power tool before
disposal. Prevent the contacts from short-circuiting
(e.g. by protecting them with adhesive tape).
12. Technical Data
Explanatory notes on the specications on page 3.
Subject to change in accordance with technical progress.
U = Voltage of battery pack
n1 = no-load speed
n2 = on-load speed
s
= max. impact rate
max
W = max. single impact force
D1 = drill-Ø concrete with hammer drill bits
D2 = drill-Ø masonry with core bits
D3 = drill-Ø concrete with core bits
D4 = drill-Ø steel
D5 = drill-Ø soft wood
m = Weight with smallest battery pack
D = Collar diameter
Page 11

Measured values determined in conformity with EN
60745.
direct current
The technical specications quoted are subject to
tolerances (in compliance with relevant valid
standards).
Emission values
These values make it possible to assess the
emissions from the power tool and to compare
dierent power tools. The actual load may be higher
or lower depending on operating conditions, the
condition of the power tool or the accessories used.
Please allow for breaks and periods when the load
is lower for assessment purposes. Arrange
protective measures for the user, such as
organisational measures based on the adjusted
estimates.
Total vibration value (vector sum of three directions)
determined in accordance with EN 60745:
a
= Vibration emission value (hammer drilling
h, HD
a
h, Cheq
K
h,HD/Cheq
into concrete)
= Vibration emission value (chiselling)
= Uncertainty (vibration)
Typical A-eective perceived sound levels:
LpA = sound-pressure level
LWA = Acoustic power level
K
= Uncertainty
pA, KWA
During operation the noise level can exceed 80
dB(A).
Wear ear protectors!
ENGLISH en
11
Page 12

170 27 8090 - 0521
170 27 8100 -0921
Metabowerke GmbH
Metabo-Allee 1
72622 Nuertingen
Germany
www.metabo.com
 Loading...