

Page 1
DFP 400
de Originalbetriebsanleitung 4
en Original instructions 9
fr Notice d'utilisation originale 14
nl Oorspronkelijke gebruiksaanwijzing 19
es Manual original 24
no Originalbruksanvisning 29
pl Oryginalna instrukcja obsługi 34
hu Eredeti üzemeltetési útmutató 39
ru Оригинальное руководство по
эксплуатации 44
cs Originální návod k použití 50
www.metabo.com
Page 2

richtiges Bild aus ComDB einsetzen wenn vorganden
12345678
13
12 11 10 9
richtiges Bild aus ComDB einsetzen wenn vorganden
2
Page 3

DFP 400
11.
*1) Serial Number 01572..
V
1
p
max.
A mm (in)
mkg (lbs) 1,55 (3.4)
LpA/K
pA
LWA/K
WA
*2) 2006/42/EC
*3) EN ISO 12100
2013-11-26, Volker Siegle
Direktor Innovation, Forschung und Entwicklung
(Director Innovation, Research and Development)
*4) Metabowerke GmbH - Metabo-Allee 1 - 72622 Nuertingen, Germany
l 0,4
bar 10
385 x 190x 70
1
(15
/
x 7
8
dB(A)
dB(A)
1
79 / 3
88 / 3
3
/
x 2
/
)
2
4
3
Page 4

DEUTSCHde
Originalbetriebsanleitung
1. Konformitätserklärung
Wir erklären in alleiniger Verantwortlichkeit: Diese
Druckluft-Fettpressen, identifiziert durch Type und
Seriennummer *1), entsprechen allen
einschlägigen Bestimmungen der Richtlinien *2)
und Normen *3). Technische Unterlagen bei *4) siehe Seite 3.
2. Bestimmungsgemäße
Verwendung
Die Fettpresse ist ein druckluftbetriebenes
Werkzeug für den handwerklichen Einsatz. Sie
kann zum Abschmieren von Maschinen,
Kraftfahrzeugen, Landmaschinen,
Industrieanlagen, Transport und
Beförderungsanlagen eingesetzt werden.
Dieses Werkzeug darf nur mit einer Druckluftversorgung angetrieben werden. Der auf dem
Druckluftwerkzeug angegebene maximal zulässige
Arbeitsdruck darf nicht überschritten werden.
Dieses Druckluftwerkzeug darf nicht mit
explosiven, brennbaren oder
gesundheitsgefährdenden Gasen betrieben
werden.
Jede andere Verwendung ist bestimmungswidrig.
Durch bestimmungswidrige Verwendung,
Veränderungen am Druckluftwerkzeug oder durch
den Gebrauch von Teilen, die nicht vom Hersteller
geprüft und freigegeben sind, können
unvorhersehbare Schäden entstehen!
Für Schäden durch nicht bestimmungsgemäßen
Gebrauch haftet allein der Benutzer.
Allgemein anerkannte Unfallverhütungsvorschriften
und beigelegte Sicherheitshinweise müssen
beachtet werden.
3. Allgemeine
Sicherheitshinweise
Beachten Sie die mit diesem Symbol
gekennzeichneten Textstellen zu Ihrem
eigenen Schutz und zum Schutz Ihres
Druckluftwerkzeugs!
WARNUNG – Zur Verringerung eines
Verletzungsrisikos Betriebsanleitung lesen.
WARNUNG Lesen Sie alle Sicherheitshinweise und Anweisungen. Versäumnisse
bei der Einhaltung der Sicherheitshinweise und
Anweisungen können elektrischen Schlag, Brand
und/oder schwere Verletzungen verursachen.
Bewahren Sie alle Sicherheitshinweise und
Anweisungen für die Zukunft auf.
Geben Sie Ihr Druckluftwerkzeug nur zusammen
mit diesen Dokumenten weiter.
- Der Benutzer oder der Arbeitgeber des Benutzers
muss die spezifischen Risiken bewerten, die
4
aufgrund jeder Verwendung auftreten können.
- Die Sicherheitshinweise sind vor dem Einrichten,
dem Betrieb, der Reparatur, der Wartung und
dem Austausch von Zubehörteilen sowie vor der
Arbeit in der Nähe des Druckluftwerkzeugs zu
lesen und müssen verstanden werden. Ist dies
nicht der Fall, so kann dies zu schweren
körperlichen Verletzungen führen.
- Das Druckluftwerkzeug sollte ausschließlich von
qualifizierten und geschulten Bedienern
eingerichtet, eingestellt oder verwendet werden.
- Das Druckluftwerkzeug darf nicht verändert
werden. Veränderungen können die Wirksamkeit
der Sicherheitsmaßnahmen verringern und die
Risiken für den Bediener erhöhen.
- Benutzen Sie niemals beschädigte
Druckluftwerkzeuge. Pflegen Sie
Druckluftwerkzeuge mit Sorgfalt. Kontrollieren Sie
regelmäßig, ob bewegliche Teile einwandfrei
funktionieren und nicht klemmen, ob Teile
gebrochen oder so beschädigt sind, dass die
Funktion des Druckluftwerkzeugs beeinträchtigt
ist. Prüfen sie Schilder und Aufschriften auf
Vollständigkeit und Lesbarkeit. Lassen Sie
beschädigte Teile vor dem Einsatz des Gerätes
reparieren oder erneuern. Viele Unfälle haben ihre
Ursache in schlecht gewarteten
Druckluftwerkzeugen.
4. Spezielle Sicherheitshinweise
4.1 Gefährdungen durch
herausgeschleuderte Teile
- Trennen Sie das Druckluftwerkzeug von der
Druckluftversorgung, bevor Sie das
Einsatzwerkzeug oder Zubehörteile austauschen
oder eine Einstellung oder Wartung
vorgenommen wird.
- Bei einem Bruch des Werkstücks, von
Zubehörteilen oder des Druckluftwerkzeugs,
können Teile mit hoher Geschwindigkeit
herausgeschleudert werden.
- Beim Betrieb, beim Austausch von Zubehörteilen
sowie bei Reparatur- oder Wartungsarbeiten am
Druckluftwerkzeug ist immer ein schlagfester
Augenschutz zu tragen. Der Grad des
erforderlichen Schutzes sollte für jeden einzelnen
Einsatz gesondert bewertet werden.
- Stellen sie sicher, dass auch für andere Personen
keine Gefahren entstehen
4.2 Gefährdungen im Betrieb
- Der Bediener und das Wartungspersonal müssen
physisch in der Lage sein, die Größe, das Gewicht
und die Leistung des Druckluftwerkzeugs zu
beherrschen.
- Halten Sie das Druckluftwerkzeug richtig: Seien
Sie bereit, den üblichen oder plötzlichen
Bewegungen entgegenzuwirken – halten Sie
beide Hände bereit.
- Sorgen Sie für einen sicheren Stand und halten
Sie jederzeit das Gleichgewicht.
- Vermeiden Sie eine unbeabsichtigte
Inbetriebnahme. Bei einer Unterbrechung der
Page 5

Luftversorgung, das Druckluftwerkzeug am Ein-/
Ausschalter ausschalten.
- Verwenden Sie nur die vom Hersteller
empfohlenen Schmiermittel.
- Tragen Sie persönliche Schutzausrüstung und
immer eine Schutzbrille. Das Tragen persönlicher
Schutzausrüstung, wie Schutzhandschuhe,
Schutzkleidung, Staubmaske, rutschfeste
Sicherheitsschuhe, Schutzhelm oder
Gehörschutz, je nach Art und Einsatz des
Gerätes, verringert das Risiko von Verletzungen
und wird empfohlen.
4.3 Gefährdungen durch wiederholte
Bewegungen
- Beim Arbeiten mit dem Druckluftwerkzeug
können unangenehme Empfindungen in den
Händen, Armen, Schultern, im Halsbereich oder
an anderen Körperteilen auftreten.
- Nehmen Sie für die Arbeit mit dem
Druckluftwerkzeug eine bequeme Stellung ein,
achten Sie auf sicheren Halt und vermeiden Sie
ungünstige Positionen oder solche, bei denen es
schwierig ist, das Gleichgewicht zu halten. Der
Bediener sollte während lang dauernder Arbeiten
die Körperhaltung verändern, was helfen kann,
Unannehmlichkeiten und Ermüdung zu
vermeiden.
- Falls beim Bediener Symptome wie z. B.
andauerndes Unwohlsein, Beschwerden,
Pochen, Schmerz, Kribbeln, Taubheit, Brennen
oder Steifheit auftreten, sollten diese warnenden
Anzeichen nicht ignoriert werden. Der Bediener
sollte diese seinem Arbeitgeber mitteilen und
einen qualifizierten Arzt konsultieren.
4.4 Gefährdungen durch Zubehörteile
- Trennen Sie das Druckluftwerkzeug von der
Luftversorgung, bevor das Einsatzwerkzeug oder
Zubehörteil befestigt oder gewechselt wird.
- Verwenden Sie nur Zubehör, das für dieses Gerät
bestimmt ist und die in dieser Betriebsanleitung
angegebenen Anforderungen und Kenndaten
erfüllt.
4.5 Gefährdungen am Arbeitsplatz
- Ausrutschen, Stolpern und Stürzen sind
Hauptgründe für Verletzungen am Arbeitsplatz.
Achten Sie auf Oberflächen, die durch den
Gebrauch des Druckluftwerkzeugs rutschig
geworden sein können, und auf durch den
Luftschlauch bedingte Gefährdungen durch
Stolpern.
- Gehen Sie in unbekannten Umgebungen mit
Vorsicht vor. Es können versteckte Gefährdungen
durch Stromkabel oder sonstige
Versorgungsleitungen gegeben sein.
- Das Druckluftwerkzeug ist nicht zum Einsatz in
explosionsgefährdeten Atmosphären bestimmt
und nicht gegen den Kontakt mit elektrischen
Stromquellen isoliert.
4.6 Gefährdungen durch Staub und Dämpfe
- Die beim Einsatz des Druckluftwerkzeugs
entstehenden Stäube und Dämpfe können
gesundheitliche Schäden (wie z. B. Krebs,
DEUTSCH de
Geburtsfehler, Asthma und/oder Dermatitis)
verursachen; es ist unerlässlich, eine
Risikobewertung in Bezug auf diese
Gefährdungen durchzuführen und geeignete
Regelungsmechanismen umzusetzen.
- In die Risikobewertung sollten der bei der
Verwendung des Druckluftwerkzeugs
entstehende Staub und der dabei möglicherweise
aufwirbelnde vorhandene Staub einbezogen
werden.
- Das Druckluftwerkzeug ist nach den in dieser
Anleitung enthaltenen Empfehlungen zu
betreiben und zu warten, um die Freisetzung von
Staub und Dämpfen auf ein Mindestmaß zu
reduzieren.
- Die Abluft ist so abzuführen, dass die
Aufwirbelung von Staub in einer staubgefüllten
Umgebung auf ein Mindestmaß reduziert wird.
- Falls Staub oder Dämpfe entstehen, muss die
Hauptaufgabe sein, diese am Ort ihrer
Freisetzung zu kontrollieren.
- Alle zum Auffangen, Absaugen oder zur
Unterdrückung von Flugstaub oder Dämpfen
vorgesehenen Einbau- oder Zubehörteile des
Druckluftwerkzeugs sollten den Anweisungen des
Herstellers entsprechend ordnungsgemäß
eingesetzt und gewartet werden.
- Die Verbrauchsmaterialien und das
Einsatzwerkzeug sind den Empfehlungen dieser
Anleitung entsprechend auszuwählen, zu warten
und zu ersetzen, um eine unnötige Intensivierung
der Staub- oder Dampfentwicklung zu vermeiden.
- Verwenden Sie Atemschutzausrüstungen nach
den Anweisungen Ihres Arbeitgebers oder wie
nach den Arbeits- und
Gesundheitsschutzvorschriften gefordert.
4.7 Gefährdungen durch Lärm
- Die Einwirkung hoher Lärmpegel kann bei
ungenügendem Gehörschutz zu dauerhaften
Gehörschäden, Gehörverlust und anderen
Problemen, wie z. B. Tinnitus (Klingeln, Sausen,
Pfeifen oder Summen im Ohr), führen.
- Es ist unerlässlich, eine Risikobewertung in Bezug
auf diese Gefährdungen durchzuführen und
geeignete Regelungsmechanismen umzusetzen.
- Zu den für die Risikominderung geeigneten
Regelungsmechanismen gehören Maßnahmen
wie die Verwendung von Dämmstoffen, um an
den Werkstücken auftretende Klingelgeräusche
zu vermeiden.
- Verwenden Sie Gehörschutzausrüstungen nach
den Anweisungen Ihres Arbeitgebers und wie
nach den Arbeits- und
Gesundheitsschutzvorschriften gefordert.
- Das Druckluftwerkzeug ist nach den in dieser
Anleitung enthaltenen Empfehlungen zu
betreiben und zu warten, um eine unnötige
Erhöhung der Lärmpegel zu vermeiden.
- Die Verbrauchsmaterialien und das
Einsatzwerkzeug sind den Empfehlungen dieser
Anleitung entsprechend auszuwählen, zu warten
und zu ersetzen, um eine unnötige Erhöhung des
Lärmpegels zu vermeiden.
- Der integrierte Schalldämpfer darf nicht entfernt
werden und muss sich in einem guten
Arbeitszustand befinden.
5
Page 6

DEUTSCHde
4.8 Gefährdungen durch Schwingungen
- Die Einwirkung von Schwingungen kann
Schädigungen an den Nerven und Störungen der
Blutzirkulation in Händen und Armen
verursachen.
- Tragen Sie bei Arbeiten in kalter Umgebung
warme Kleidung und halten Sie Ihre Hände warm
und trocken.
- Falls Sie feststellen, dass die Haut an Ihren
Fingern oder Händen taub wird, kribbelt, schmerzt
oder sich weiß verfärbt, stellen Sie die Arbeit mit
dem Druckluftwerkzeug ein, benachrichtigen Sie
Ihren Arbeitgeber und konsultieren Sie einen Arzt.
- Das Druckluftwerkzeug ist nach den in dieser
Anleitung enthaltenen Empfehlungen zu
betreiben und zu warten, um eine unnötige
Verstärkung der Schwingungen zu vermeiden.
- Die Verbrauchsmaterialien und das
Einsatzwerkzeug sind den Empfehlungen dieser
Anleitung entsprechend auszuwählen, zu warten
und zu ersetzen, um eine unnötige Verstärkung
der Schwingungen zu vermeiden.
4.9 Zusätzliche Sicherheitsanweisungen
- Druckluft kann ernsthafte Verletzungen
verursachen.
- Wenn das Druckluftwerkzeug nicht in Gebrauch
ist, vor dem Austausch von Zubehörteilen oder bei
der Ausführung von Reparaturarbeiten ist stets
die Luftzufuhr abzusperren, der Luftschlauch
drucklos zu machen und das Druckluftwerkzeug
von der Druckluftzufuhr zu trennen.
- Richten Sie den Luftstrom niemals auf sich selbst
oder gegen andere Personen.
- Umherschlagende Schläuche können ernsthafte
Verletzungen verursachen. Überprüfen Sie daher
immer, ob die Schläuche und ihre
Befestigungsmittel unbeschädigt sind und sich
nicht gelöst haben.
- Kalte Luft ist von den Händen fortzuleiten.
-Falls Universal-Drehkupplungen
(Klauenkupplungen) verwendet werden, müssen
Arretierstifte eingesetzt werden und verwenden
Sie Whipcheck-Schlauchsicherungen, um Schutz
für den Fall eines Versagens der Verbindung des
Schlauchs mit dem Druckluftwerkzeug oder von
Schläuchen untereinander zu bieten.
- Sorgen Sie dafür, dass der auf dem
Druckluftwerkzeug angegebene Höchstdruck
nicht überschritten wird.
- Tragen Sie Druckluftwerkzeuge niemals am
Schlauch.
4.10 Weitere Sicherheitshinweise
- Beachten Sie gegebenenfalls spezielle
Arbeitsschutz- oder UnfallverhütungsVorschriften für den Umgang mit Kompressoren
und Druckluftwerkzeugen.
- Stellen Sie sicher, dass der in den Technischen
Daten angegebene maximal zulässige
Arbeitsdruck nicht überschritten wird.
- Überlasten Sie dieses Werkzeug nicht – benutzen
Sie dieses Werkzeug nur im Leistungsbereich,
der in den Technischen Daten angegeben ist.
- Verwenden Sie unbedenkliche Schmierstoffe.
Sorgen sie für ausreichende Belüftung des
6
Arbeitsplatzes. Bei erhöhtem Austrag:
Druckluftwerkzeug prüfen und ggf. reparieren
lassen.
- Benutzen Sie dieses Werkzeug nicht, wenn Sie
unkonzentriert sind. Seien Sie aufmerksam,
achten Sie darauf, was Sie tun, und gehen Sie mit
Vernunft an die Arbeit mit einem
Druckluftwerkzeug. Benutzen Sie kein Werkzeug,
wenn Sie müde sind oder unter dem Einfluss von
Drogen, Alkohol oder Medikamenten stehen. Ein
Moment der Unachtsamkeit beim Gebrauch des
Werkzeuges kann zu ernsthaften Verletzungen
führen.
- Halten Sie Ihren Arbeitsbereich sauber und gut
beleuchtet. Unordnung oder unbeleuchtete
Arbeitsbereiche können zu Unfällen führen.
- Druckluftwerkzeuge vor Kindern sichern.
- Werkzeug nicht ungeschützt im Freien oder in
feuchter Umgebung aufbewahren.
- Schützen Sie das Druckluftwerkzeug,
insbesondere den Druckluftanschluss und die
Bedienelemente vor Staub und Schmutz.
- Halten Sie die Schubstange (9) eines
abgeschraubten Fettbehälters beim Lösen der
Schubstangensicherung (10) fest. Lassen Sie die
Schubstange (9) nicht ruckartig zurückschnellen.
- Beim Auslösen der Fettpresse tritt Fett unter
hohem Druck aus.
- Halten Sie das Abschmierrohr (1) und den
Abschmierschlauch (12) nicht mit der Hand zu.
- Richten Sie die Fettpresse nicht auf Menschen
oder Tiere.
- Betätigen Sie die Fettpresse nur, wenn sie auf
einen Schmiernippel aufgesetzt ist.
- Halten Sie den Abschmierschlauch (12)
während des gesamten Abschmiervorganges
fest, um ein Wegschlagen zu verhindern.
Die Informationen in dieser Betriebsanleitung sind
wie folgt gekennzeichnet:
Gefahr! Warnung vor Personenschäden
oder Umweltschäden.
Achtung. Warnung vor Sachschäden.
4.11 Symbole auf dem Druckluftwerkzeug
Vor der Inbetriebnahme die
Bedienungsanleitung lesen.
Augenschutz tragen
Gehörschutz tragen
5. Überblick
Siehe Seite 2.
1Abschmierrohr
2 Befüllstutzen
3Entlüftungsventil
4Druckkopf
5Abzugbügel
6 Flügelmutter (zum Verstellen des Griffes)
7Griff
Page 7
8 Stecknippel 1/4“ (Druckluft-Anschluss)
9Schubstange
10 Schubstangensicherung
11 Fettbehälter
12 Abschmierschlauch
13 Schallgedämpfter Lauftaustritt
6. Betrieb
6.1 Vor dem ersten Betrieb
Stecknippel (8) einschrauben.
6.2 Fettbehälter befüllen
Achtung. Befüllen Sie den Fettbehälter (11)
ausschließlich mit nicht korrosiven
Schmierstoffen, die für die Verwendung in
Fettpressen zugelassen sind. Beachten Sie die
Angaben des Schmierstoff-Herstellers.
Der Druckkolben kann sich durch dauerhafte
Verwendung von Kartuschen verformen. Wenn Sie
anschließend die Füllmethode wechseln, kann es
zu Undichtigkeit und Fettaustritt kommen. Legen
Sie möglichst eine durchgängige Füllmethode fest.
Hinweis:
Beim Wechsel der Fettsorte kann eine sortenreine
Anwendung nur durch eine gründliche Reinigung
sichergestellt werden.
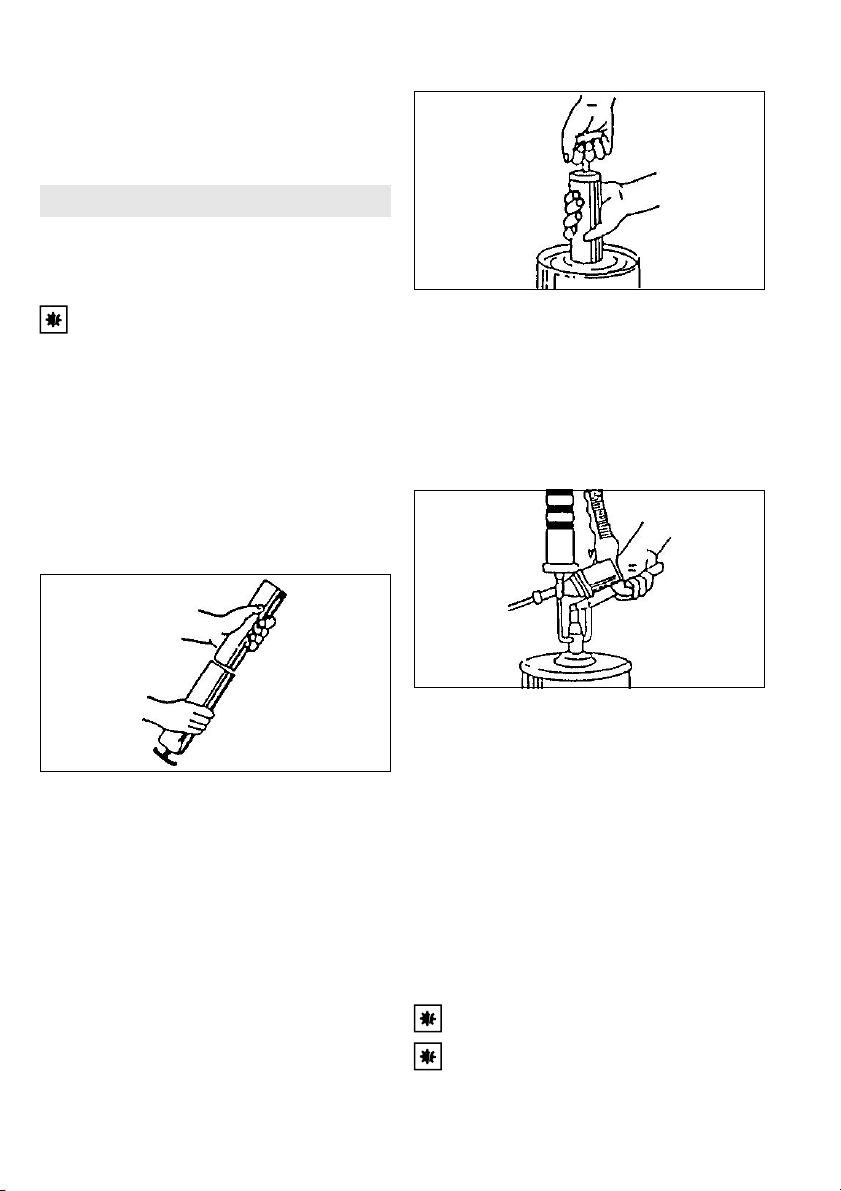
Füllen mit Kartusche
DEUTSCH de
Füllen aus Gebinden
1. Fettbehälter (11) zum Lösen gegen den
Uhrzeigersinn abschrauben.
2. Fettbehälter (11) etwa 5 cm in das Fett
eintauchen und Schubstange (9) langsam bis
zum Anschlag herausziehen.
3. Fettbehälter (11) im Uhrzeigersinn
einschrauben.
4. Schubstangensicherung (10) gedrückt halten
und Schubstange (9) einschieben.
Füllen durch Füllpumpe
1. Fettbehälter (11) zum Lösen gegen den
Uhrzeigersinn abschrauben.
2. Kartusche mit offenem Ende nach oben in
Fettbehälter (11) einführen und nach unten
drücken.
3. Fettbehälter (11) im Uhrzeigersinn
einschrauben. Nicht zu fest anziehen.
4. Schubstangensicherung (10) gedrückt halten
und Schubstange (9) einschieben.
1. Schubstange (9) bis zum Anschlag
herausziehen.
2. Befüllstutzen (2) mit Füllpumpe verbinden.
3. Füllpumpe betätigen und Fettbehälter (11)
vollständig füllen.
4. Verbindung zwischen Befüllstutzen (2) und
Füllpumpe trennen.
5. Schubstangensicherung (10) gedrückt halten
und Schubstange (9) einschieben.
6.3 Druckluftwerkzeug benutzen
Um die volle Leistung Ihres Druckluftwerkzeuges zu
erzielen, verwenden Sie bitte stets
Druckluftschläuche mit einem Innendurchmesser
von mindestens 9 mm. Ein zu geringer
Innendurchmesser kann die Leistung deutlich
mindern.
Achtung. Die Druckluftleitung darf kein
Kondenswasser enthalten.
Achtung. Damit dieses Werkzeug lange
einsatzbereit bleibt, muss es ausreichend mit
Pneumatiköl versorgt werden. Dies kann wie folgt
geschehen:
– Geölte Druckluft verwenden durch Anbau eines
Nebelölers.
7
Page 8

DEUTSCHde
– Ohne Nebelöler: Täglich von Hand über den
Druckluftanschluss ölen. Ca. 3-5 Tropfen
Pneumatiköl je 15 Betriebsminuten bei
Dauereinsatz.
War das Werkzeug mehrere Tage außer Betrieb,
etwa 5 Tropfen Pneumatiköl von Hand in den
Druckluftanschluss geben.
1. Wahlweise Abschmierrohr (1) oder
Abschmierschlauch (12) im Uhrzeigersinn am
Druckkopf (4) festdrehen.
2. Arbeitsdruck am Kompressor einstellen
(maximal zulässiger Arbeitsdruck siehe
Technische Daten).
3. Werkzeug über Schnellkupplung an die
Druckluftversorgung anschließen.
4. Fettpresse an Schmiernippel ansetzen.
5. Zur Fettabgabe Abzugbügel (5) drücken.
6. Abzugbügel (5) loslassen, sobald eine
ausreichende Fettmenge an den Schmiernippel
abgegeben wurde.
Hinweis:
Beachten Sie die Herstellerangaben des zu
schmierenden Gerätes bezüglich Druck,
Schmierintervall sowie Schmiermittelart und menge.
.
7. Wartung und Pflege
Gefahr! Vor allen Arbeiten am Werkzeug
Druckluftanschluss trennen.
Gefahr! Weitergehende Wartungs- oder
Reparaturarbeiten, als die in diesem Kapitel
beschriebenen, dürfen nur Fachkräfte
durchführen.
- Stellen Sie durch regelmäßige Wartung die
Sicherheit des Druckluftwerkzeugs sicher.
- Verschraubungen auf festen Sitz prüfen, ggf.
festziehen.
- Filter im Druckluftanschluss mindestens
wöchentlich reinigen.
-Es wird empfohlen, dem Druckluftwerkzeug einen
Druckminderer mit Wasserabscheider und einen
Öler vorzuschalten.
- Bei erhöhtem Öl- oder Luftaustritt das
Druckluftwerkzeug prüfen und ggf. instand setzen
lassen. (Siehe Kapitel 9.)
- Vermeiden sie den Kontakt mit gefährlichen
Substanzen, die sich auf dem Werkzeug
abgelagert haben. Tragen sie geeignete
persönliche Schutzausrüstung und beseitigen Sie
gefährlichen Substanzen mit geeigneten
Maßnahmen vor der Wartung.
f
8. Zubehör
Verwenden Sie nur original Metabo Zubehör.
Verwenden Sie nur Zubehör, das für dieses
Druckluftwerkzeug bestimmt ist und die in dieser
Betriebsanleitung angegebenen Anforderungen
und Kenndaten erfüllt.
Zubehör-Komplettprogramm siehe
www.metabo.com oder Katalog.
8
9. Reparatur
Gefahr! Reparaturen an Druckluft-
werkzeugen dürfen nur Fachkräfte mit original
Metabo-Ersatzteilen ausführen!
Mit reparaturbedürftigen Metabo
Druckluftwerkzeugen wenden Sie sich bitte an Ihre
Metabo-Vertretung. Adressen siehe
www.metabo.com.
Ersatzteillisten können Sie unter www.metabo.com
herunterladen.
10. Umweltschutz
Befolgen Sie nationale Vorschriften zu umweltgerechter Entsorgung und zum Recycling
ausgedienter Druckluftwerkzeuge, Verpackungen
und Zubehör. Es dürfen keine Gefährdungen für
Personen und Umwelt entstehen.
Verwenden Sie umweltverträgliche Fette.
Verhindern Sie unkontrolliertes Abtropfen, damit
kein Fett in die Umwelt gelangt.
11. Technische Daten
Erläuterungen zu den Angaben auf Seite 3.
Änderungen im Sinne des technischen Fortschritts
vorbehalten.
V
p
A = Abmessungen: Länge x Breite x Höhe
m=Gewicht
Die angegebenen technischen Daten sind
toleranzbehaftet (entsprechend den jeweils
gültigen Standards).
der Emissionen des Werkzeugs und den Vergleich
verschiedener Werkzeuge. Je nach
Einsatzbedingung, Zustand des Werkzeuges oder
der Einsatzwerkzeuge kann die tatsächliche
Belastung höher oder geringer ausfallen.
Berücksichtigen Sie zur Abschätzung
Arbeitspausen und Phasen geringerer Belastung.
Legen Sie aufgrund entsprechend angepasster
Schätzwerte Schutzmaßnahmen für den Anwender
fest, z.B. organisatorische Maßnahmen.
Schallpegel (EN ISO 15744)
L
L
KpA, KWA= Messunsicherheit
= Luftbedarf pro Hub
1
= maximal zulässiger Arbeitsdruck
max.
Emissionswerte
Diese Werte ermöglichen die Abschätzung
:
=Schalldruckpegel
pA
=Schallleistungspegel
WA
Gehörschutz tragen!
Page 9
Original instructions
1. Declaration of Conformity
Under our sole responsibility, we hereby declare
that these compressed air grease guns, identified
by type and serial number *1), meet all relevant
requirements of directives *2) and standards *3).
Technical documents for *4) - see Page 3.
2. Specified Use
The grease gun is an air-powered tool designed for
use in the area of skilled trades. It can be used to
lubricate machines, motor vehicles, agricultural
machines, industrial systems, transport and conveying equipment.
The tool must only ever be operated with a compressed air supply. The maximum supply pressure
specified on the air tool must never be exceeded.
The air tool must not be operated using explosive,
inflammable or hazardous gases.
Any other use does not comply with the intended
purpose. Unspecified use, modification of the air
tool or use of parts that have not been tested and
approved by the manufacturer can cause unforeseeable damage.
The user bears sole responsibility for any damage
caused by improper use.
Generally accepted accident prevention regulations and the enclosed safety information must be
observed.
3. General Safety Instructions
For your own protection and for the
protection of your air tool, pay attention to
all parts of the text that are marked with
this symbol!
WARNING – Reading the operating instructions will reduce the risk of injury.
WARNING Read all safety warnings and
instructions. Failure to follow all safety warn-
ings and instructions may result in electric shock,
fire and/or serious injury.
Keep all safety instructions and information for
future reference.
Pass on your air tool only together with these documents.
- The user or user's employer must evaluate the
specific risks associated with each application of
the tool.
- The safety instructions must be read and understood before installing, operating, repairing or
maintaining the tool, and also before replacing any
accessory parts or carrying out any work in the
vicinity of the air tool. Failure to read and follow the
instructions may lead to serious injury.
- Only qualified, trained operators are authorised to
install, adjust or use the air tool.
ENGLISH en
- The air tool must not be modified. Any modifications may reduce the efficiency of the safety
measures and increase risks for the operator.
- Never use air tools th at have been damaged. Look
after your air tools carefully. Regularly check that
all moving parts are functioning correctly and do
not jam. Also ensure that no parts are broken or
damaged to an extent that they affect the operation of the air tool. Check that all signs and labels
are legible and intelligible. Have damaged parts
repaired or replaced before using the device.
Many accidents are caused by poorly maintained
air tools.
4. Special Safety Instructions
4.1 Risks associated with ejected parts
- Disconnect the air tool from the compressed air
supply before replacing the mounted tool or
accessory parts, and also before carrying out
repairs or settings.
- If either the workpiece, accessory parts or the air
tool breaks, parts may be ejected at high speed.
- While operating, maintaining or repairing the air
tool, or replacing accessory parts, you must
always wear impact-resistant safety goggles. The
degree of protection required for each individual
task must be evaluated separately in each case.
- Also ensure that no other people are placed at
risk.
4.2 Risks during operation
- The operator and maintenance staff must be
physically capable of handling the size, weight
and power output of the air tool.
-Make sure you hold the air tool correctly: since
you must be prepared to counter any standard or
unexpected movements, keep both hands ready.
- Ensure you stand in a safe position and keep your
balance at all times.
- Avoid accidental operation. If the air supply is
interrupted, switch off the air tool using the On/Off
switch.
- Only use lubricants that have been recommended
by the manufacturer.
- Wear personal protective equipment and always
wear safety glasses. By wearing personal protective equipment such as gloves, protective
clothing, a dust mask, non-skid safety shoes, a
safety helmet or ear protectors, to suit the type of
device and its use, you reduce the risk of injury.
Wearing this equipment is recommended.
4.3 Risks associated with recurring move-
ments
- When working with the air tool, you may experience an uncomfortable sensation in your hands,
arms, shoulders, neck or other body parts.
- Make sure you are in a comfortable position to
carry out work with the air tool, check that the tool
is held securely, and avoid any awkward positions
that make it difficult, for example, to keep your
balance. If carrying out work over an extended
9
Page 10

ENGLISHen
period, the operator should change position occasionally. This should help to avoid fatigue and any
unpleasant sensation.
- If the operator experiences persistent symptoms
such as feeling unwell, aches, pains or throbbing,
a prickling or burning sensation, loss of hearing, or
joint stiffening, these warning signs must not be
ignored. The operator should advise the employer
of these symptoms and consult a qualified doctor.
4.4 Risks associated with accessory parts
- Disconnect the air tool from the air supply before
the mounted tool or accessory part is secured or
replaced.
- Only use accessories that are designed for this
device and that fulfil the requirements and the
specifications listed in these operating instructions.
4.5 Risks in the workplace
- Slipping, tripping and falling are the main reasons
for accidents in the workplace. Pay attention to
surfaces that may have become slippery as a
result of using the air tool, and also watch that the
air hose does not cause someone to trip.
- Proceed carefully when working in unfamiliar environments. Power cables and other supply lines
may represent a hidden risk.
- The air tool is not designed for use in explosive
environments and is not insulated against contact
with sources of electric power.
4.6 Risks associated with dust and vapours
- The dust and vapours generated when the air tool
is used may carry health risks (e.g. cancer, birth
defects, asthma and/or dermatitis); it is therefore
imperative that a risk assessment is carried out in
relation to these risks and that suitable controls
are then implemented.
- The risk assessment should take into account
both the dust generated while the air tool is used
and any existing dust that may be raised during
operation.
- The air tool must be operated in accordance with
the recommendations set forth in these instructions and must be maintained in order to minimise
the release of dust and vapours.
- The extracted air must be discharged in such a
way that, in a dust-filled environment, the
minimum of dust is raised.
- If dust or vapours are generated, the main priority
is to control these at the location where they are
released.
- All integral or accessory parts on the air tool that
are designed to collect, extract or prevent airborne
dust or vapours must be used and maintained in
accordance with the manufacturer's instructions.
- To avoid increasing the amount of dust or vapours
generated unnecessarily, consumables and the
mounted tool must be selected, maintained and
replaced in accordance with these instructions.
- Use protective breathing apparatus in accordance
with your employer instructions or in accordance
with health and safety regulations.
10
4.7 Risks associated with noise
- Failure to use adequate ear protectors when the
noise level is high can result in lasting damage to
hearing, hearing loss and other problems, such as
tinnitus (ringing, whistling or buzzing in the ear).
- It is vital to carry out a risk assessment in relation
to these risks and to implement appropriate
control measures that take the risks into account.
- Appropriate risk control measures may include,
for example, the use of sound-insulating materials
to prevent the knocking sounds that occur on the
workpieces.
- Use ear protection in accordance with your
em pl oy er in st ru ct io ns or in acc or da nc e w it h h ea lt h
and safety regulations.
- The air tool must be operated in accordance with
the recommendations provided in these instructions and must be maintained in order to avoid
unnecessarily raising the noise level.
- To avoid increasing the noise level unnecessarily,
consumables and the mounted tool must be
selected, maintained and replaced in accordance
with these instructions.
- The integrated sound absorber must not be
removed. You must ensure the sound absorber is
in good working order.
4.8 Risks associated with vibration
- The effects of vibrations can damage nerves and
impair blood circulation in the hands and arms.
- When working in cold environments, you must
wear warm clothing and keep your hands warm
and dry.
- If you notice that the skin on your fingers or hands
is numb, prickling or turning white, stop working
with the air tool immediately, notify your employer
and consult a doctor.
- The air tool must be operated in accordance with
the recommendations provided in these instructions and must be maintained in order to avoid
unnecessarily raising the level of vibration.
- To avoid increasing the level of vibration unnecessarily, consumables and the mounted tool must be
selected, maintained and replaced in accordance
with these instructions.
4.9 Additional safety instructions
- Compressed air can cause serious injury.
- When the air tool is not in use, and before
replacing accessory parts or when carrying out
repairs, you must ensure that air supply is shut off,
that the air hose is depressurised and that the air
tool is disconnected from the compressed air
supply.
- Never direct the air jet at yourself or other people.
- Whiplashing hoses can cause serious injury.
Therefore always check that the hoses and their
fixtures are in good condition and that they have
not become loose.
- Cold wind should be directed away from the
hands.
- If universal swivel couplings (claw couplings) are
being used, locking pins must also be used. You
should also use whip check hose restraints in
case there is a problem with the connection
between the hose and air tool or between the
hoses themselves.
Page 11

- Ensure that the maximum pressure specified on
the air tool is not exceeded.
- Never carry air tools by the hose.
ENGLISH en
Wear ear protectors.
4.10 Additional safety instructions
- If applicable, observe any particular health and
safety or accident prevention regulations
governing the use of compressors and
compressed air tools.
- Ensure that the maximum supply pressure specified in the Technical Specifications is not
exceeded.
- Do not overload the tool – use it only within the
performance range for which it was designed (see
“Technical Specifications”).
- Use non-hazardous lubricants. Ensure the workplace is adequately ventilated. If there is a large
amount of discharge: check the air tool and have
it repaired if necessary.
- Do not operate the tool unless you are completely
focused. You must be alert, pay attention to what
you are doing and proceed cautiously when
working with an air tool. Never use a tool when you
are tired or under the influence of drugs, alcohol or
medication. Just one moment's carelessness
when using the tool can cause serious injury.
- Make sure your workplace is clean and well lit.
Untidy or poorly lit workplaces can cause accidents.
- Keep air tools away from children.
- Do not store the tool outdoors or in damp conditions without protection.
- Protect the air tool, especially the compressed air
connection and the control elements from dust
and dirt.
- Hold the plunger rod (9) of an unscrewed grease
reservoir while releasing the plunger rod catch
(10). Do not allow the plunger rod (9) to bounce
backwards.
- When you activate the grease gun, pressurised
grease is ejected.
- Do not hold the lubrication tube (1) or the lubri-
cation hose (12) with your hand.
- Do not point the grease gun at people or ani-
mals.
- Only activate the grease gun when it is en-
gaged with a lubrication nipple.
- Hold the lubrication hose (12) firmly during the
entire lubrication process to prevent it from
thrashing about.
Information in these operating instructions is categorised as shown below:
Danger! Risk of personal injury or environmental damage.
Caution. Risk of material damage
5. Overview
See page 2.
1Lubricant tube
2 Filler neck
3Air valve
4Head
5Trigger
6 Wing nut (for adjusting the handle)
7Handle
8 Plug-in nipple 1/4" (compressed air connection)
9Plunger rod
10 Plunger rod catch
11 Grease reservoir
12 Lubrication hose
13 Noise-reduced air outlet
6. Operation
6.1 Before using the tool for the first time
Insert plug-in nipple (8).
6.2 Filling the grease reservoir
Caution. Fill the grease reservoir (11) using
only non-corrosive lubricants that are
approved for use in grease guns. Read the instructions provided by the lubricant manufacturer.
The pressure piston may become deformed
through prolonged use of cartridges. In this case,
grease leakage may occur when you switch to
another filling method. For this reason, you should
aim to use a single, consistent filling method, if
possible.
Note:
If you change the type of grease used, you must
clean the device thoroughly before use to ensure
that the grease types are not mixed.
Filling the gun with a cartridge
4.11 Symbols on the air tool
Read the operating instructions before
starting to use the machine.
Wear safety goggles.
1. Unscrew the grease reservoir (11), turning it
counter-clockwise to release.
2. With the open end facing upwards, insert the
cartridge into the grease reservoir (11) and
push it down.
11
Page 12
ENGLISHen
3. Screw the grease reservoir (11) back in place
in a clockwise direction. Do not secure too
tightly.
4. Holding the plunger rod catch (10) down, insert
the plunger rod (9).
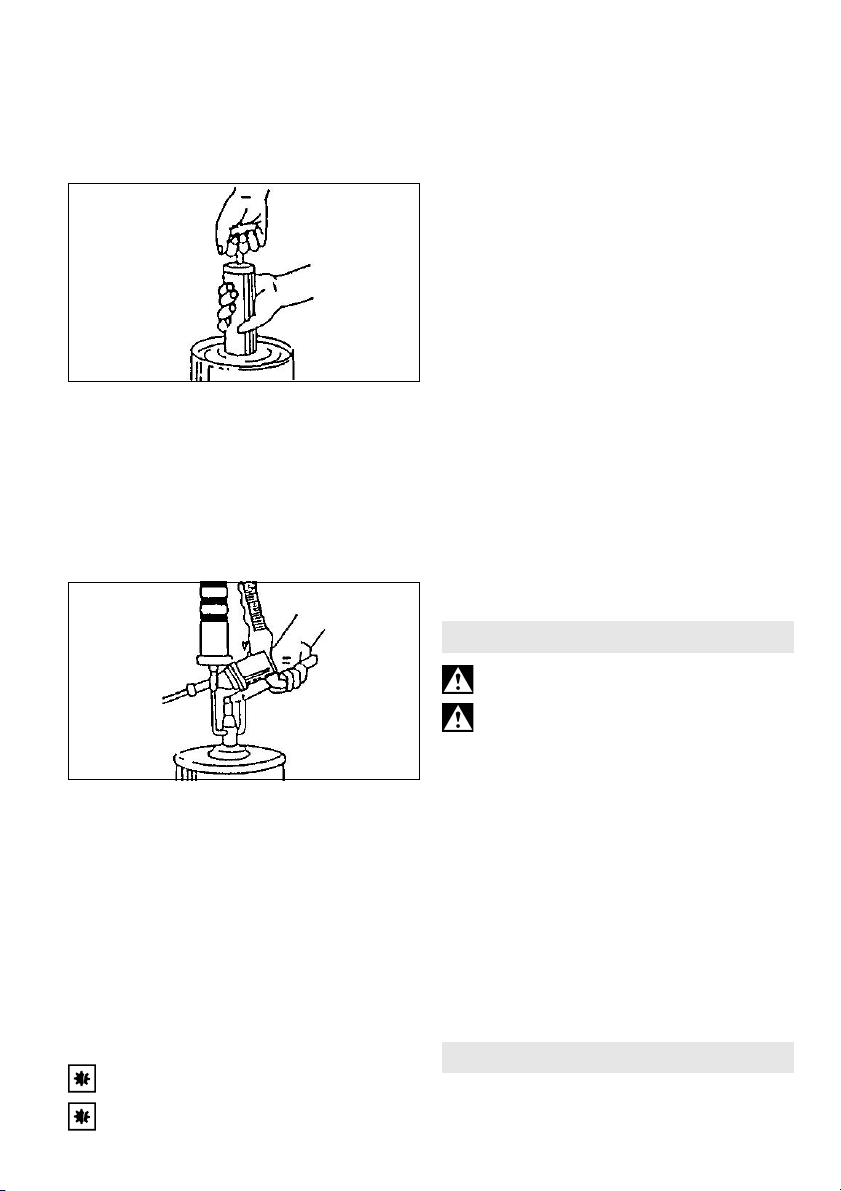
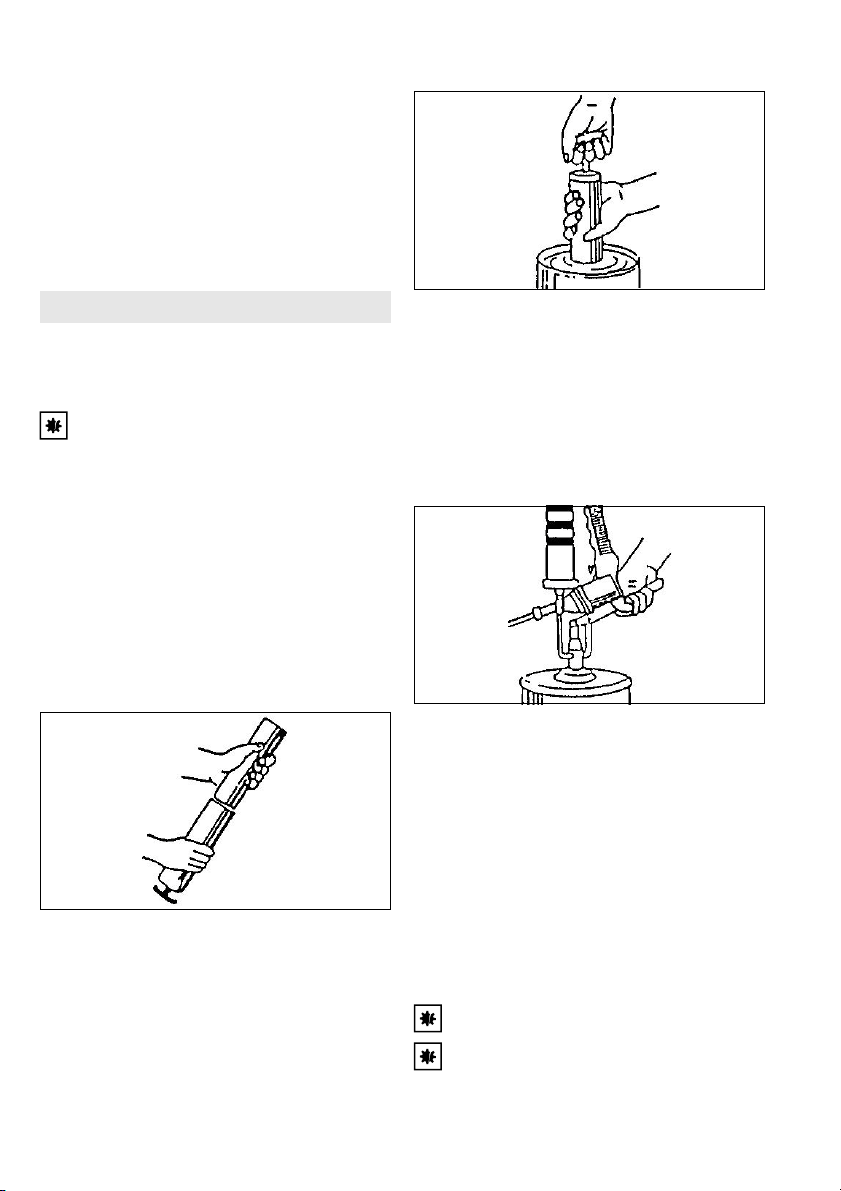
Filling the gun from bulk containers
1. Unscrew the grease reservoir (11), turning it
counter-clockwise to release.
2. Immerse the grease reservoir (11) approximately 5 cm in the grease and slowly pull back
the plunger rod (9) as far as it will go.
3. Screw the grease reservoir (11) back in place
in a clockwise direction.
4. Holding the plunger rod catch (10) down, insert
the plunger rod (9).
Filling the grease gun with a filler pump
1. Withdraw the plunger rod (9) as far as it will go.
2. Connect the filler neck (2) to the filler pump.
3. Switch on the filler pump and fill the grease reservoir (11) completely.
4. Disconnect the filler neck (2) from the filler
pump.
5. Holding the plunger rod catch (10) down, insert
the plunger rod (9).
6.3 Using the air tool
To benefit from the air tool's full performance,
always use compressed air hoses with an inner
diameter of at least 9 mm. Tool performance can be
significantly impaired if the inner diameter is too
small.
Caution. The compressed air line must not
contain any water condensation.
Caution. To preserve and extend the service
12
life of this tool, you must ensure that it is regu-
larly maintained with pneumatic oil lubricator. You
can do this as follows:
– Use oiled compressed air by fitting an oil-fog lu-
bricator.
– Without an oil-fog lubricator: manually apply oil
every day via the compressed air connection.
Use approx. 3-5 drops of pneumatic oil lubricator
for each 15 minutes of continuous operation.
If the tool has not been in use for several days, you
should manually apply about 5 drops of pneumatic
oil lubricator into the compressed air connection.
1. Tighten either the lubrication tube (1) or lubrication hose (12) in a clockwise direction on the
head (4).
2. Adjust the supply pressure on the compressor
(for the maximum permissible supply pressure,
see Technical Specifications).
3. Connect the tool by means of a quick coupling
to the compressed air supply.
4. Engage the grease gun with the lubrication nipple.
5. To deliver the grease, press the trigger (5).
6. Release the trigger (5) as soon as sufficient
grease has been delivered to the lubrication
nipple.
Note:
For the device to be lubricated, refer to the manufacturer's instructions for information about the
required pressure, lubrication interval, lubricant
type and quantity.
.
7. Care and Maintenance
Danger! Disconnect the compressed air con-
nection before carrying out any work.
Danger! Repair and maintenance work other
than described in this section should only be
carried out by qualified specialists.
- Carry out regular maintenance to ensure the
safety of the air tool.
- Check that all screw fittings are seated securely,
and tighten if necessary.
- Clean the filter in the compressed air connection
at least once a week.
- It is recommended that you install a pressure
reducer with an air-water separator and lubricator
upstream of the air tool.
- If a large amount of air or oil is escaping, check the
air tool and have it maintained if necessary. (see
Section 9.)
- Avoid contact with dangerous substances that
have collected on the tool. Wear suitable personal
protective equipment and take appropriate measures to remove any dangerous substances before
maintenance.
f
8. Accessories
Use only genuine Metabo accessories.
Only use accessories that are designed for this air
tool and that fulfil the requirements and the specifications listed in these operating instructions.
Page 13

For a complete range of accessories, see
www.metabo.com or the catalogue.
9. Repairs
Danger! Repairs to air tools must only be
carried out by qualified specialists, using orig-
inal Metabo spare parts!
If you have Metabo air tools that require repairs,
please contact your Metabo service centre. For
addresses see www.metabo.com.
You can download spare parts lists from
www.metabo.com.
10. Environmental Protection
Observe national regulations on environmentally
compatible disposal and on the recycling of disused
air tools, packaging and accessories. You must not
cause risks to people or the environment.
Use non-polluting lubricating greases.
To prevent any grease from entering the environ-
ment, do not allow it to drip uncontrollably.
11. Technical specifications
Explanatory notes on the specifications on page 3.
Subject to change in line with technological
advances.
V
p
A = Dimension: Length x Width x Height
m=Weight
The technical specifications quoted are subject to
tolerances (in compliance with the relevant valid
standards).
emissions from this tool and compare these with the
values emitted by other tools. The actual values
may be higher or lower, depending on the particular
application and the condition of the tool or mounted
tools. In estimating the values, you should also
include work breaks and periods of low use. Based
on the estimated emission values, specify protective measures for the user - for example, any organisational steps that must be put in place.
Sound level (EN ISO 15744)
L
L
KpA, KWA= Measurement uncertainty
= Air requirement per stroke
1
= Maximum permissible supply pressure
max.
Emission values
Using these values, you can estimate the
=Sound pressure level
pA
=Acoustic power level
WA
Wear ear protectors!
:
ENGLISH en
13
Page 14

FRANÇAISfr
Notice d'utilisation originale
1. Déclaration de conformité
Nous déclarons sous notre seule responsabilité :
ces pompes à graisse pneumatiques, identifiées
par le type et le numéro de série *1), sont conformes
à toutes les prescriptions applicables des directives
*2) et normes *3). Documents techniques pour *4) voir page 3.
2. Utilisation conforme aux
prescriptions
La pompe à graisse est un outil à commande
pneumatique pour une utilisation dans le domaine
artisanal. Elle peut être utilisée pour le graissage
de machines, de véhicules automobiles, de machines agricoles, d'installations industrielles, ainsi
que d'installations de transport et de convoyage.
Cet outil ne peut fonctionner que s’il est raccordé à
une alimentation en air comprimé. La pression de
service maximale admissible indiquée pour cet outil pneumatique ne doit pas être dépassée. Cet outil pneumatique ne doit pas être exploité avec des
gaz explosibles, inflammables ou nocifs.
Toute autre utilisation est considérée comme étant
contraire aux prescriptions. Une utilisation
contraire aux prescriptions, des modifications apportées à l’outil pneumatique ou l’emploi de pièces
qui n’ont été ni testées, ni homologuées par le fabricant peuvent entraîner des dommages
imprévisibles !
L'utilisateur est entièrement responsable de tous
dommages résultant d'une utilisation non conforme
aux prescriptions.
Il est impératif de respecter les directives de
prévention des accidents reconnues et les
consignes de sécurité ci-jointes.
3. Consignes de sécurité
générales
Pour votre propre sécurité et afin de
protéger l'outil pneumatique, observez
les passages de texte repérés par ce
symbole !
AVERTISSEMENT – Lire la notice d'utilisation afin d'éviter tout risque de blessures.
AVERTISSEMENT Lire toutes les
consignes de sécurité et instructions. Le
non-respect des consignes de sécurité et des
instructions peut être à l'origine d'un choc électrique, d'un incendie et/ou de blessures graves.
Conserver toutes les consignes de sécurité et
instructions.
En cas de transmission de l’outil pneumatique,
remettre également tous les documents qui
l’accompagnent.
- L’utilisateur ou son employeur est dans l’obliga-
14
tion d’évaluer les risques spécifiques qui sont
susceptibles de se produire en fonction de
chaque application.
- Il est indispensable de lire et de bien comprendre
les consignes de sécurité avant de régler,
d'exploiter, de réparer, d’effectuer la maintenance
de l’outil, de remplacer des accessoires, ou même
de travailler à proximité de l’outil pneumatique.
Dans le cas contraire, il y a risque de blessures
corporelles graves.
- Cet outil pneumatique doit être exclusivement
préparé, réglé ou utilisé par des personnes qualifiées et formées.
- Il est interdit d’apporter des modifications à cet
outil pneumatique. Toute modification risque
d’altérer l’efficacité des dispositifs de sécurité et,
par conséquent, d’aggraver les risques encourus
par l’utilisateur.
- Ne jamais utiliser des outils pneumatiques
endommagés. Manipuler les outils pneumatiques
avec soin. Contrôler régulièrement si les pièces
mobiles fonctionnent sans problèmes et si elles
ne coincent pas, si des pièces sont brisées ou
endommagées de sorte à affecter le fonctionnement de l’outil pneumatique. Vérifier que les
plaques et les inscriptions sont complètes et bien
lisibles. Faire réparer ou remplacer les pièces
endommagées avant d’utiliser l’appareil. De
nombreux accidents proviennent d’un mauvais
entretien des outils pneumatiques.
4. Consignes de sécurité
spéciales
4.1 Risques inhérents à la projection de
pièces
- Débrancher l’outil pneumatique de l’alimentation
en air comprimé avant de changer l’outil rapporté
ou les accessoires, d’effectuer un réglage ou la
maintenance de l’outil.
- En cas de rupture du matériau, d’accessoires ou
de l’outil pneumatique lui-même, des pièces
risquent d’être projetées à une grande vitesse.
- Porter systématiquement des lunettes de protection anti-chocs lors de l'exploitation de l’outil pneumatique, pour changer les accessoires ou encore
effectuer des opérations de réparation ou de
maintenance sur l’outil. Le degré de protection
nécessaire doit être déterminé au cas par cas.
- Veiller à ce que d'autres personnes éventuellement présentes ne soient pas exposées à des
risques
4.2 Risques en cours de fonctionnement
- L’utilisateur et le personnel de maintenance
doivent être physiquement en mesure de
maîtriser la taille, le poids et la puissance de l’outil
pneumatique.
- Tenir l’outil pneumatique correctement : l’utilisateur doit être en mesure de contenir tout mouvement brusque ou usuel de l’appareil. Il doit donc
pouvoir utiliser ses deux mains.
- Veiller à une bonne stabilité et toujours se tenir en
équilibre.
Page 15

- Eviter toute mise en route involontaire. En cas
d'interruption de l’alimentation en air comprimé,
arrêter l’outil pneumatique par le biais de l’interrupteur de marche/arrêt.
- Utiliser exclusivement le lubrifiant recommandé
par le fabricant.
- Porter un équipement de protection individuelle et
systématiquement des lunettes de protection. Le
port d’un équipement de protection individuelle,
tels que gants de protection, vêtements de protection, masque antipoussières, chaussures de
sécurité antidérapantes, casque de protection ou
protection auditive, réduit les risques de blessures
et est par conséquent recommandé, suivant la
nature et l'utilisation de l’appareisl.
4.3 Risques inhérents à des mouvements
répétitifs
- L’utilisation d’un outil pneumatique peut s’accompagner de sensations désagréables au niveau
des mains, des bras, des épaules, du cou ou
d’autres parties du corps.
- Faire en sorte d’adopter une position confortable
et d’avoir de bons appuis pour utiliser l’outil pneumatique. Eviter les positions inconfortables ou les
postures qui permettent difficilement de garder
l’équilibre. Il est conseillé de changer de posture
lors des travaux prolongés, puisque ceci
contribue à éviter les sensations désagréables et
la fatigue.
- Si l’utilisateur ressent des symptômes comme un
malaise persistant, des troubles, des palpitations,
des douleurs, des fourmillements, des engourdissements, des sensations de brûlure ou des ankyloses, il ne doit surtout pas ignorer les signaux
d’alerte que cela représente. L’utilisateur doit
alors en faire part à son employeur et consulter un
médecin qualifié.
4.4 Risques inhérents aux accessoires
- Séparer l’outil pneumatique de l’alimentation en
air comprimé avant de fixer ou de changer d’outil
rapporté ou d’accessoire.
- Utiliser uniquement des accessoires spécialement conçus pour cet appareil et qui sont
conformes aux exigences et aux données caractéristiques indiquées dans la présente notice
d’utilisation.
4.5 Risques inhérents au poste de travail
- Les glissades, pertes d’équilibre et les chutes
constituent les principales causes de blessures
sur le lieu de travail. Faire très attention en cas
d’évolution sur des surfaces rendues glissantes
par l’utilisation de l’outil pneumatique et veiller à
ne pas trébucher en se prenant les pieds dans le
flexible pneumatique.
- Agir avec prudence dans les environnements qui
ne sont pas familiers. Les câbles électriques et
autres câbles d’alimentation sont autant de
sources de danger qui peuvent passer inaperçues.
- L’outil pneumatique n’a pas été conçu pour être
utilisé dans des atmosphères explosibles et il ne
bénéficie pas d’une isolation spécifique en cas de
contact avec des sources électriques.
FRANÇAIS fr
4.6 Risques inhérents aux poussières et aux
vapeurs
- Les poussières et les vapeurs produites par le
fonctionnement de l’outil pneumatique peuvent
être néfastes pour la santé (et provoquer notamment des cancers, des fausses couches, de
l’asthme et/ou des dermatites). Il est donc indispensable de procéder à une analyse des risques
liés à ces facteurs et de mettre en place des
mécanismes de régulation adaptés.
- L’analyse des risques doit notamment tenir
compte des poussières produites lors de l’utilisation de l’outil pneumatique et des risques de tourbillonnement des poussières en résultant.
-L’outil pneumatique doit être utilisé et entretenu
conformément aux recommandations de la
présente notice d’utilisation, afin de réduire au
minimum la production de poussières et de
vapeurs.
- L’air vicié doit être évacué de façon à réduire au
minimum les risques de tourbillonnement de particules dans les environnements poussiéreux.
- Si la formation de poussières ou de vapeurs est
inévitable, la tâche principale consiste à les
contrôler sur le lieu de génération.
- Tous les éléments rapportés ou accessoires de
l’outil pneumatique conçus pour collecter, aspirer
ou éliminer les poussières et les vapeurs volatiles
doivent être utilisés et entretenus correctement,
dans le respect des consignes du fabricant.
- Les consommables et l'outil rapporté doivent être
sélectionnés, entretenus et remplacés conformément aux recommandations de la présente notice
d'utilisation, afin d’éviter d’augmenter inutilement
la quantité de poussières ou de vapeurs produite.
- Utiliser des équipements de protection des voies
respiratoires conformes aux consignes de
l’employeur ou aux directives en matière de santé
et de sécurité au travail.
4.7 Risques inhérents au bruit
- En cas de protection auditive insuffisante, l’expo-
sition à un niveau de bruit élevé risque d’endommager durablement l’audition, d’entraîner une
perte d’audition et d’autres problèmes, comme les
acouphènes (tintement, chuintement, sifflement
ou bourdonnement dans les oreilles).
- Il est indispensable de procéder à une analyse
des risques eu égard à ces facteurs et de mettre
en œuvre des mécanismes de régulation appropriés.
- Les mécanismes de régulation susceptibles
d’être mis en œuvre pour réduire les risques
incluent notamment l’utilisation de matériaux
isolants pour éviter les bruits de tintement qui se
produisent au niveau des pièces à usiner.
- Utiliser des équipements de protection acous-
tique conformes aux consignes de l’employeur et
aux directives en matière de santé et de sécurité
au travail.
-L’outil pneumatique doit être utilisé et entretenu
conformément aux recommandations de la
présente notice d'utilisation pour éviter toute
augmentation inutile du niveau sonore.
- Les consommables et l'outil rapporté doivent être
sélectionnés, entretenus et remplacés conformément aux recommandations de la présente notice
15
Page 16

FRANÇAISfr
d'utilisation, afin d’éviter toute augmentation
inutile du niveau sonore.
- Il est interdit de retirer le silencieux intégré. Par
ailleurs, ce silencieux doit être en bon état de
fonctionnement.
4.8 Risques inhérents aux vibrations
- Les vibrations peuvent provoquer des troubles
nerveux, mais aussi perturber la circulation
sanguine au niveau des mains et des bras.
- Si la température est basse, porter des vêtements
chauds et faire en sorte de garder les mains au
chaud et au sec.
- Si la peau des doigts ou des mains s’engourdit,
qu’elle picote, qu’elle fait mal ou qu’elle devient
blanche, cesser d’utiliser l’outil pneumatique,
avertir l’employeur et consulter un médecin.
- L’outil pneumatique doit être utilisé et entretenu
conformément aux recommandations de la
présente notice d'utilisation pour éviter tout renforcement inutile des vibrations.
- Les consommables et l'outil rapporté doivent être
sélectionnés, entretenus et remplacés conformément aux recommandations de la présente notice
d'utilisation, afin d’éviter tout renforcement inutile
des vibrations.
4.9 Consignes de sécurité supplémentaires
- L’air comprimé risque de provoquer de graves
blessures.
- Lorsque l’outil pneumatique n’est pas utilisé,
avant de changer des accessoires ou d’effectuer
des réparations, il convient systématiquement de
couper l’alimentation pneumatique, de mettre le
flexible pneumatique hors pression et de débrancher l’outil pneumatique de l’alimentation en air
comprimé.
- Ne jamais orienter le flux d’air vers soi ou vers
d’autres personnes.
- Les flexibles qui sont projetés peuvent provoquer
de graves blessures. Pour cette raison, s’assurer
systématiquement que les flexibles et les dispositifs de fixation ne sont pas endommagés ou
desserrés.
- Il ne faut pas exposer ses mains au flux d’air froid.
- En cas d’utilisation de raccords tournants universels (accouplement à griffes), il est indispensable
de mettre en place des goupilles d’arrêt et
d’utiliser des câbles de sécurité pour les flexibles,
afin de se protéger en cas de défaillance de la
liaison entre le flexible et l’outil pneumatique ou
entre deux flexibles.
- Faire en sorte que la pression maximale indiquée
pour l’outil pneumatique ne soit pas dépassée.
- Ne jamais utiliser le flexible pour transporter l’outil
pneumatique.
4.10 Autres consignes de sécurité
- Respecter, le cas échéant, les prescriptions
spécifiques en matière de prévention des accidents et de sécurité au travail relatives à la manipulation de compresseurs et d’outils
pneumatiques.
- Veiller à ce que la pression de service maximale
admissible qui figure dans les caractéristiques
techniques soit bien respectée.
16
- Ne pas surcharger l’outil ; n’utiliser cet outil que
dans la plage de puissance indiquée dans les
caractéristiques techniques.
- Utiliser des lubrifiants non nocifs. Veiller à une
ventilation suffisante au poste de travail. En cas
d’usure prononcée, faire contrôler et réparer le
cas échéant l’outil pneumatique.
- Ne pas utiliser cet outil si l’on n’est pas concentré.
Soyez vigilant, faites attention à ce que vous faites
et prenez toutes les précautions qui s’imposent en
travaillant avec un outil pneumatique. Ne pas
utiliser d’outil sous l’influence de la fatigue, de
drogues, d’alcool ou de médicaments. Il suffit d’un
moment d’inattention lors de l’utilisation de cet
outil pour encourir de graves blessures.
- Veiller à ce que la zone de travail soit propre et
bien éclairée. Les zones de travail encombrées et
mal éclairées peuvent provoquer des accidents.
- Conserver les outils pneumatiques hors de portée
des enfants.
- Ne pas conserver l’outil à l’extérieur sans protection, ni dans un environnement humide.
- Protéger l’outil pneumatique des poussières et
des salissures, et tout spécialement le raccord
pneumatique et les éléments de commande.
- Retenir la tige de poussée (9) d'un réservoir de
graisse dévissé en desserrant la sécurité de la
tige de poussée (10). Ne pas laisser bondir brusquement en arrière la tige de poussée (9).
- Lors de l'actionnement de la pompe à graisse, de
la graisse s'écoule à haute pression.
- Ne pas obturer le tube de graissage (1) et le
flexible de graissage (12) avec la main.
- Ne pas orienter la pompe à graisse vers des
personnes ou des animaux.
- Actionner seulement la pompe à graisse lors-
qu'elle est appliquée sur un graisseur.
- Tenir fermement le flexible de graissage (12)
pendant l'ensemble du processus de graissage, afin d'empêcher que celui-ci ne soit projeté sous l'effet de la pression.
Les informations qui figurent dans la présente notice d'utilisation sont signalées comme suit :
Danger ! Risques de dommages corporels
ou de dégâts causés à l'environnement.
Attention. Risque de dommages matériels.
4.11 Symboles sur l’outil pneumatique
Lire la notice d’utilisation avant la mise en
service.
Porter des lunettes de protection
Porter un casque antibruit
5. Aperçu
Voir page 2.
1 Tube de graissage
2 Tubulure de remplissage
Page 17
3 Soupape de purge
4 Tête de pression
5Déclencheur
6 Ecrou à oreilles (pour le réglage de la poignée)
7 Poignée
8 Raccord enfichable 1/4“ (raccord d'air
comprimé)
9Tige de poussée
10 Sécurité de la tige de poussée
11 Réservoir de graisse
12 Flexible de graissage
13 Sortie d'air insonorisée
FRANÇAIS fr
Remplissage à partir de récipients
6. Fonctionnement
6.1 Avant la première mise en service
Visser le raccord enfichable (8).
6.2 Remplissage du réservoir de graisse
Attention. Remplir exclusivement le réservoir
de graisse (11) avec des graisses non corrosives qui sont homologuées pour une utilisation
avec des pompes à graisse. Observer les indications du fabricant de graisse.
Le piston peut se déformer du fait de l'utilisation
permanente de cartouches. Si vous changez
ensuite de méthode de remplissage, il peut en
résulter des défauts d'étanchéité et un écoulement
de graisse. Définissez une méthode de remplissage autant que possible homogène.
Remarque :
Lors d'un changement du type de graisse, une
application pure du nouveau type de graisse peut
uniquement être garantie par un nettoyage rigoureux.
Remplissage avec cartouche
1. Dévisser le réservoir de graisse (11) dans le
sens inverse des aiguilles d'une montre.
2. Plonger le réservoir de graisse (11) d'environ 5
cm dans la graisse et sortir lentement la tige de
poussée (9) jusqu'en butée.
3. Visser le réservoir de graisse (11) dans le sens
des aiguilles d'une montre.
4. Maintenir la sécurité de la tige de poussée (10)
pressée et insérer la tige de poussée (9).
Remplissage par le biais d'une pompe de
remplissage
1. Sortir la tige de poussée (9) jusqu'en butée.
2. Relier la tubulure de remplissage (2) à la
pompe de remplissage.
3. Actionner la pompe de remplissage et remplir
entièrement le réservoir de graisse (11).
4. Séparer la liaison entre la tubulure de remplissage (2) et la pompe de remplissage.
5. Maintenir la sécurité de la tige de poussée (10)
pressée et insérer la tige de poussée (9).
1. Dévisser le réservoir de graisse (11) dans le
sens inverse des aiguilles d'une montre.
2. Insérer la cartouche dans le réservoir de
graisse (11) avec l'extrémité ouverte orientée
vers le haut, et la presser vers le bas.
3. Visser le réservoir de graisse (11) dans le sens
des aiguilles d'une montre. Ne pas serrer trop
fort.
4. Maintenir la sécurité de la tige de poussée (10)
pressée et insérer la tige de poussée (9).
6.3 Utilisation de l’outil pneumatique
Afin d'obtenir la pleine puissance de votre outil
pneumatique, utiliser systématiquement des
flexibles pneumatiques avec un diamètre intérieur
d’au moins 9 mm. Un diamètre intérieur insuffisant
peut nettement réduire la puissance.
Attention. Le tuyau d’air comprimé ne doit
pas contenir d'eau de condensation.
Attention. Pour que cet outil reste opération-
nel longtemps, il doit être suffisamment lubrifié en utilisant de l’huile pneumatique. La marche à
suivre est la suivante :
– Utiliser de l’air comprimé lubrifié en montant un
système de lubrification par brouillard d’huile.
17
Page 18

FRANÇAISfr
– Sans lubrificateur par brouillard d’huile : lubrifier
quotidiennement l’outil par le biais du raccord
pneumatique. Verser 3 à 5 gouttes d’huile pneumatique pour 15 minutes de fonctionnement en
continu.
Si l’outil n’a pas été utilisé pendant plusieurs jours,
verser manuellement environ 5 gouttes d’huile
pneumatique dans le raccord d’air comprimé.
1. Visser au choix le tube de graissage (1) ou le
flexible de graissage (12) dans le sens des aiguilles d'une montre sur la tête de pression (4).
2. Régler la pression de service sur le compresseur (pression de service maximale admissible,
voir caractéristiques techniques).
3. Raccorder l'outil à l'alimentation en air comprimé via l'accouplement rapide.
4. Appliquer la pompe à graisse contre le graisseur.
5. Pour appliquer de la graisse, presser le déclencheur (5).
6. Relâcher le déclencheur (5) dès qu'une quantité de graisse suffisante est appliquée au niveau
du graisseur.
Remarque :
Observer les indications du fabricant de l'appareil à
graisser concernant la pression, l'intervalle de
graissage ainsi que le type et la quantité de graisse.
.
7. Maintenance et entretien
Danger ! Avant toute intervention sur l’outil
pneumatique, séparer le raccordement pneu-
matique.
Danger ! Les travaux de maintenance et de
réparation autres que ceux décrits dans ce
chapitre ne doivent être exécutés que par une per-
sonne qualifiée et compétente.
- Entretenir régulièrement l’outil pneumatique pour
garantir sa sécurité de fonctionnement.
- Vérifier que les raccords sont bien fixés et les
resserrer si nécessaire.
- Nettoyer le filtre du raccord pneumatique au
moins une fois par semaine.
- Il est préconisé de placer un réducteur de pres-
sion avec séparateur d’eau et dispositif de lubrification en amont de l’outil pneumatique.
- En cas de fuite d’huile ou d’air importante, vérifier
l’outil pneumatique et le faire réparer si nécessaire
(voir chapitre 9.).
- Eviter tout contact avec les substances nocives
qui se sont déposées sur l’outil. Porter des équipements de protection adaptés et retirer les substances nocives avec des moyens appropriés
avant de procéder à la maintenance.
f
8. Accessoires
Utiliser uniquement des accessoires d'origine
Metabo.
Utiliser uniquement des accessoires spécialement
conçus pour cet outil pneumatique et qui sont
18
conformes aux exigences et aux données caractéristiques de la présente notice d’utilisation.
Gamme d'accessoires complète, voir
www.metabo.com ou catalogue.
9. Réparation
Danger ! Seuls des techniciens compétents
sont habilités à réparer les outils pneumatiques, à condition d’utiliser des pièces de rechange
Metabo d’origine !
Pour toute réparation d’un outil pneumatique
Metabo, contacter l’agence Metabo. Voir les
adresses sur www.metabo.com.
Les listes des pièces de rechange peuvent être
téléchargées sur le site Internet www.metabo.com.
10. Protection de l'environnement
Observez les réglementations nationales concernant la mise au rebut dans le respect de l'environnement et le recyclage des outils pneumatiques, des
emballages et des accessoires. Il est interdit de
mettre en danger des personnes ou de nuire à
l’environnement.
Utiliser des graisses compatibles avec l'environnement.
Eviter un égouttage incontrôlé, afin que la graisse
ne parvienne pas dans l'environnement.
11. Caractéristiques techniques
Explications concernant les indications de la page
3.
Sous réserve de modifications allant dans le sens
du progrès technique.
V
p
A = dimensions : longueur x largeur x
m=poids
Les caractéristiques techniques indiquées sont
soumises à tolérance (selon les normes en vigueur
correspondantes).
sions de l’outil et la comparaison entre différents
outils. Selon les conditions d’utilisation, de l’état de
l’outil ou des outils rapportés utilisés, la charge
effective peut plus ou moins varier. Pour l'estimation, tenir compte des pauses de travail et des
phases de sollicitation moindre. Définir des
mesures de protection pour l'utilisateur sur la base
des valeurs estimatives adaptées en conséquence,
par ex. mesures organisationnelles.
Niveau sonore (NE ISO 15744)
L
L
K
= consommation d'air par course
1
= pression de service maximale admissible
max.
hauteur
Valeurs d'émission
Ces valeurs permettent l’estimation des émis-
=niveau de pression acoustique
pA
=niveau de puissance acoustique
WA
, KWA= incertitude de mesure
pA
Porter un casque antibruit !
:
Page 19

Oorspronkelijke gebruiksaanwijzing
1. Conformiteitsverklaring
Wij verklaren op eigen en uitsluitende verantwoording: Deze perslucht-vetspuiten, geïdentificeerd
door type en serienummer *1), voldoen aan alle
relevante bepalingen van de richtlijnen *2) en
normen *3). Technische documentatie bij *4) - zie
pagina 3.
2. Gebruik volgens de
voorschriften
De vetspuit is een met perslucht aangedreven gereedschap voor beroepsmatig gebruik. Hij kan
worden gebruikt voor het doorsmeren van machines, motorvoertuigen, landbouwmachines en bedrijfs- en transportinstallaties.
Dit gereedschap mag uitsluitend met persluchtaanvoer worden aangedreven. De op het persluchtgereedschap aangegeven maximaal toelaatbare werkdruk mag niet worden overschreden. Dit
persluchtgereedschap mag niet worden aangedreven met explosieve, brandbare of gezondheidsbedreigende gassen.
Iedere andere toepassing is niet volgens de voorschriften. Door onreglementair gebruik, veranderingen aan het persluchtgereedschap of door gebruik van onderdelen die niet door de fabrikant
gekeurd en vrijgegeven zijn, kunnen niet te voorziene beschadigingen ontstaan!
Voor schade door oneigenlijk gebruik is alleen de
gebruiker aansprakelijk.
De algemeen erkende veiligheidsvoorschriften en
de bijgevoegde veiligheidsvoorschriften dienen te
worden nageleefd.
3. Algemene
veiligheidsvoorschriften
Let ter bescherming van uzelf en het
persluchtgereedschap op de met dit
symbool aangegeven passages!
WAARSCHUWING – Lees de gebruiks-
aanwijzing om het risico van letsel te verminderen.
WAARSCHUWING Lees alle veiligheidsvoorschriften en aanwijzingen. Worden de
veiligheidsinstructies en aanwijzingen niet in acht
genomen, dan kan dit een elektrische schok, brand
en/of ernstig letsel tot gevolg hebben.
Bewaar alle veiligheidsvoorschriften en
aanwijzingen goed met het oog op toekomstig
gebruik.
Geef het persluchtgereedschap alleen samen met
deze documenten aan anderen door.
- De gebruiker of werkgever van de gebruiker moet
de specifieke risico's inschatten die door het
gebruik kunnen optreden.
- Vóór installatie, bediening, reparatie, onderhoud
en vervanging van toebehoren en voordat in de
buurt van het persluchtgereedschap wordt
gewerkt, dienen de veiligheidsvoorschriften te
worden gelezen en begrepen. Gebeurt dit niet,
dan kan dit leiden tot ernstig lichamelijk letsel.
- Het persluchtgereedschap mag uitsluitend door
gekwalificeerd en geschoold personeel worden
geïnstalleerd of gebruikt.
- Aan het persluchtgereedschap mogen geen wijzigingen worden aangebracht. Wijzigingen kunnen
de effectiviteit van de veiligheidsmaatregelen
verminderen en de risico's voor de bediener
verhogen.
- Gebruik nooit beschadigd persluchtgereedschap.
Onderhoud het persluchtgereedschap zorgvuldig.
Controleer regelmatig of beweeglijke onderdelen
correct functioneren en niet klemmen, of er onderdelen gebroken of dermate beschadigd zijn dat de
werking van het persluchtgereedschap hieronder
lijdt. Controleer borden en opschriften op volledigheid en leesbaarheid. Laat beschadigde delen
repareren of vernieuwen voordat u het apparaat
gebruikt. Veel ongevallen hebben hun oorzaak in
slecht onderhouden persluchtgereedschap.
4. Speciale
veiligheidsvoorschriften
4.1 Gevaar door wegslingerende onderdelen
- Maak het persluchtgereedschap los van de persluchtvoorziening, voordat u het inzetgereedschap
of toebehoren vervangt of instel- of onderhoudswerkzaamheden uitvoert.
- Wanneer een werkstuk, toebehoren of persluchtgereedschap breekt, kunnen onderdelen met
hoge snelheid worden weggeslingerd.
- Bij de bediening, het vervangen van toebehoren
en bij reparatie- en onderhoudswerkzaamheden
aan het persluchtgereedschap moet altijd een
slagvaste oogbescherming worden gedragen.
Het niveau van de vereiste bescherming dient
voor elk geval apart te worden beoordeeld.
- Zorg ervoor dat er voor andere personen geen
gevaar ontstaat.
4.2 Gevaren tijdens bedrijf
- Het bedienings- en onderhoudspersoneel dient
fy siek i n st aat te zijn d e grootte, het gewicht en het
vermogen van de machine te hanteren.
- Houd het persluchtgereedschap correct vast:
Wees erop voorbereid de normale of plotselinge
bewegingen op te vangen – houd beide handen
gereed.
- Zorg ervoor dat u stevig staat en steeds in evenwicht blijft.
- Voorkom dat het apparaat onbedoeld wordt ingeschakeld. Wordt de luchtvoorziening onderbroken, het persluchtgereedschap bij de in-/
uitschakelaar uitzetten.
- Gebruik uitsluitend de door de fabrikant aanbevolen smeermiddelen.
NEDERLANDS nl
19
Page 20

NEDERLANDSnl
- Draag persoonlijke beschermende uitrusting en
altijd een veiligheidsbril. Het dragen van een
persoonlijke beschermende uitrusting, zoals
veiligheidshandschoenen, beschermende
kleding, stofmasker, slipvrije werkschoenen,
veiligheidshelm of gehoorbescherming, afhankelijk van soort en gebruik van het apparaat, vermindert het risico op letsel en wordt aanbevolen.
4.3 Gevaar door herhalende bewegingen
- Bij het werken met het persluchtgereedschap
kunnen onaangename gevoelens in handen,
armen, schouders, de halsstreek of andere
lichaamsdelen optreden.
- Neem bij het werk met het persluchtgereedschap
een gemakkelijke positie in, let op een goede
steun en voorkom een stand die ongunstig is of
waarbij het moeilijk is het evenwicht te behouden.
Bij langdurige werkzaamheden moet de bediener
zijn lichaamshouding af en toe veranderen, om
onaangenaamheden en vermoeidheid te voorkomen.
- Indien bij een bediener symptomen zoals aanhoudende onpasselijkheid, klachten, kloppen, pijn,
kriebels, doofheid, branden of stijfheid optreden,
mogen deze waarschuwingsindicatoren niet
worden genegeerd. De bediener dient zijn werkgever te informeren en een gekwalificeerde arts te
raadplegen.
4.4 Gevaar door toebehoren
- Maak het persluchtgereedschap los van de persluchtvoorziening, voordat inzetgereedschap of
toebehoren worden bevestigd of vervangen.
- Gebruik alleen toebehoren die voor dit apparaat
bestemd zijn en voldoen aan de in deze gebruiksaanwijzing genoemde eisen en kenmerken.
4.5 Gevaar op de werkplek
- Het meeste letsel op de werkplek wordt veroorzaakt door uitglijden, struikelen of vallen. Let op
oppervlakken die door het gebruik van het persluchtgereedschap wellicht glad zijn geworden en
op het mogelijke gevaar van struikelen door de
luchtslang.
- Ga in een onbekende omgeving voorzichtig te
werk. Er kan sprake zijn van verborgen gevaar
door stroomkabels of andere voedingsleidingen.
- Het persluchtgereedschap is niet bestemd voor
gebruik in een explosieve omgeving en niet geïsoleerd tegen contact met elektrische stroombronnen.
4.6 Gevaar door stof en dampen
- De stoffen en dampen die bij het gebruik van het
persluchtgereedschap ontstaan kunnen schadelijke gevolgen hebben voor de gezondheid (bijv.
kanker, geboorteafwijkingen, astma en/of dermatitis); het is beslist noodzakelijk een risicoanalyse
van deze gevaren te maken en deze om te zetten
in passende regelgeving.
- In de risicoanalyse moet rekening worden
gehouden met het stof dat bij het gebruik van het
persluchtgereedschap ontstaat en het reeds
aanwezige stof dat hierbij mogelijk opstuift.
20
- Het persluchtgereedschap dient te worden
bediend en onderhouden volgens de aanbevelingen in deze gebruiksaanwijzing, om het vrijkomen van stof en dampen tot een minimum te
beperken.
- De afzuiglucht moet zo worden afgevoerd, dat in
een stoffige omgeving zo min mogelijk stof
opstuift.
- Indien stof en dampen ontstaan, moeten alle
inspanningen erop zijn gericht deze te controleren
op de plaats waar ze vrijkomen.
- Alle inbouwelementen- en toebehoren van het
persluchtgereedschap, die voor het opvangen,
afzuigen of onderdrukken van zwevend stof of
dampen zijn aangebracht, dienen volgens de
aanwijzingen van de fabricant volgens voorschrift
te worden geplaatst en onderhouden.
- Het verbruiksmateriaal en het inzetgereedschap
moet volgens de aanbevelingen van deze
gebruikshandleiding worden gekozen, onderhouden en vervangen om onnodige intensivering
van de stof- en dampontwikkeling te voorkomen.
- Gebruik beschermende ademhalingsvoorzieningen volgens de aanwijzingen van uw werkgever of zoals vereist in de voorschriften voor de
veiligheid op het werk en ter bescherming van uw
gezondheid.
4.7 Gevaar door geluid
- De invloed van hoge geluidsniveaus kan bij onvoldoende gehoorbescherming leiden tot permanente gehoorschade, gehoorverlies en andere
problemen, zoals tinnitus (bellen, suizen, fluiten of
zoemen in het oor).
- Het is beslist noodzakelijk een risicoanalyse van
deze gevaren te maken en deze om te zetten in
passende regelgeving.
- Tot de passende regelgeving ter vermindering
van het risico behoren maatregelen zoals het
gebruik van isolatiemateriaal ter voorkoming van
het geluid dat bij de werkstukken optreedt.
- Gebruik gehoorbeschermende voorzieningen
volgens de aanwijzingen van uw werkgever of
zoals vereist in de voorschriften voor de veiligheid
op het werk en ter bescherming van de gezondheid.
- Het persluchtgereedschap dient te worden
bediend en onderhouden volgens de aanbevelingen in deze gebruiksaanwijzing, om een onnodige verhoging van het geluidsniveau te voorkomen.
- Het verbruiksmateriaal en het inzetgereedschap
moet volgens de aanbevelingen van deze
gebruikshandleiding worden gekozen, onderhouden en vervangen om een onnodige verhoging van het geluidsniveau te voorkomen.
- De geïntegreerde geluidsdemper mag niet
worden verwijderd en moet zich in een goede
werktoestand bevinden.
4.8 Gevaar door trillingen
- De invloed van trillingen kan beschadiging van de
zenuwen en storingen in de bloedcirculatie in
handen en armen veroorzaken.
- Draag bij het werken in een koude omgeving
warme kleding en houd de handen warm en
droog.
Page 21

- Indien u merkt dat de huid van uw vingers of
handen gevoelloos wordt, jeukt, pijn doet of wit
verkleurt, moet u stoppen met het persluchtgereedschap, uw werkgever informeren en een arts
raadplegen.
- Het persluchtgereedschap dient te worden
bediend en onderhouden volgens de aanbevelingen in deze gebruiksaanwijzing om een onnodige versterking van de trillingen te voorkomen.
- Het verbruiksmateriaal en het inzetgereedschap
moet volgens de aanbevelingen van deze
gebruikshandleiding worden gekozen, onderhouden en vervangen om een onnodige versterking van de trillingen te voorkomen.
4.9 Extra veiligheidsvoorschriften
- Perslucht kan tot ernstig letsel leiden.
- Wanneer het persluchtgereedschap niet in
gebruik is, is het altijd vereist om de luchttoevoer
af te sluiten, de luchtslang drukloos te maken en
het persluchtgereedschap van de persluchttoevoer te scheiden, voordat toebehoren worden
vervangen of reparaties worden uitgevoerd.
- Richt de luchtstroom nooit op uzelf of andere
personen.
- Rondslaande slangen kunnen tot ernstig letsel
leiden. Controleer daarom altijd of de slangen en
het bevestigingsmateriaal beschadigd of losgeraakt zijn.
- Koude lucht moet van de handen worden weggeleid.
- Bij universele draaikoppelingen (klauwkoppelingen) dient u gebruik te maken van arrêteerpennen en Whipcheck-slangbeveiligingen om
bescherming te bieden voor het geval dat een
verbinding van de slang met het persluchtgereedschap of tussen slangen defect raakt.
- Zorg ervoor dat de op het persluchtgereedschap
aangegeven maximale druk niet wordt overschreden.
- Draag persluchtgereedschap nooit bij de slang.
4.10 Overige veiligheidsvoorschriften
- Neem de eventueel speciale werkbeschermingsof ongevalpreventievoorschriften voor de omgang
met compressoren en persluchtgereedschap in
acht.
- Zorg ervoor dat de in de Technische gegevens
aangegeven maximaal toelaatbare werkdruk niet
wordt overschreden.
- Zorg dat u het gereedschap niet overbelast –
gebruik dit gereedschap alleen binnen het vermogensbereik dat in de Technische gegevens
vermeld wordt.
- Gebruik geen twijfelachtige smeermiddelen. Zorg
voor een voldoende ventilatie van de werkplek. Bij
verhoogde uittreding: persluchtgereedschap
controleren en eventueel laten repareren.
- Gebruik dit gereedschap niet wanneer u niet
geconcentreerd bent. Wees alert, let goed op wat
u doet en ga bij het gebruik van het persluchtgereedschap met verstand te werk. Gebruik geen
gereedschap wanneer u moe bent of onder
invloed staat van drugs, alcohol of medicijnen.
Een moment van onoplettendheid bij het gebruik
van gereedschap kan tot ernstig letsel leiden.
NEDERLANDS nl
- Houd uw werkomgeving schoon en goed verlicht.
Een rommelige of onverlichte werkomgeving kan
tot ongevallen leiden.
- Persluchtgereedschap voor kinderen beveiligen.
- Het gereedschap mag niet in de open lucht of in
een vochtige omgeving worden opgeborgen.
- Bescherm het persluchtgereedschap, met name
de persluchtaansluiting en bedieningselementen,
tegen stof en vuil.
- Houdt de schuifstang (9) van een afgeschroefd
vetreservoir vast wanneer u de borging van de
schuifstang (10) losdraait. Laat de schuifstang (9)
schoksgewijs terugspringen.
- Met het in werking stellen van de vetspuit komt
onder hoge druk vet vrij.
- Bedek de smeerleiding (1) en de smeerslang
(12) niet met de hand.
- Richt de vetspuit niet op mensen of dieren.
- Bedien de vetspuit alleen, wanneer deze op
een smeernippel is geplaatst.
- Houdt de smeerslang (12) tijdens het smeren
steeds goed vast om te voorkomen dat deze
wegslaat.
De informatie in deze handleiding is als volgt gekenmerkt:
Gevaar! Waarschuwing voor lichamelijk letsel of milieuschade.
Let op Waarschuwing voor materiële schade.
4.11 Symbolen op het persluchtgereedschap
Voor inbedrijfstelling de gebruiksaanwijzing
lezen.
Draag oogbescherming
Draag gehoorbescherming
5. Overzicht
Zie bladzijde 2.
1 Smeerleiding
2Vultuit
3 Ontluchtingsventiel
4 Drukkop
5Trekker
6 Vleugelmoer (voor het afstellen van de
handgreep)
7 Handgreep
8 Steeknippel 1/4“ (perslucht-aansluiting)
9 Schuifstang
10 Schuifstangborging
11 Vetreservoir
12 Smeerslang
13 Geluidgedempte luchtafvoer
21
Page 22

NEDERLANDSnl
6. Bediening
6.1 Voor het eerste bedrijf
Steeknippel (8) inschroeven.
6.2 Vetreservoir vullen
Let op Vul het vetreservoir (11) uitsluitend met
niet-corrosieve smeermiddelen die voor
gebruik in vetspuiten zijn toegelaten. Neem de
opgaven van de fabrikant van het smeermiddel in
acht.
De drukzuiger kan door langdurig gebruik van
patronen vervormen. Wanneer u vervolgens van
vulmethode wisselt, kan dit leiden tot lekkage en het
vrijkomen van vet. Bepaal zo mogelijk een algemene vulmethode.
Aanwijzing:
Bij verandering van vetsoort kan een soortzuiver
gebruik alleen door een grondige reiniging worden
gegarandeerd.
Vullen met patronen
1. Vetreservoir (11) tegen de klok in afschroeven.
2. Patroon met open uiteinde naar boven in het
vetreservoir (11) inbrengen en naar beneden
drukken.
3. Vetreservoir (11) met de klok mee inschroeven.
Niet te vast aandraaien.
4. Schuifstangborging (10) ingedrukt houden en
schuifstang (9) inschuiven.
Vullen uit blik
1. Vetreservoir (11) tegen de klok in afschroeven.
2. Vetreservoir (11) ca. 5 cm in het vet dompelen
en de schuifstang (9) langzaam tot aan de aanslag uittrekken.
3. Vetreservoir (11) met de klok mee inschroeven.
22
4. Schuifstangborging (10) ingedrukt houden en
schuifstang (9) inschuiven.
Vullen met vulpomp
1. Schuifstang (9) tot aan de aanslag uittrekken.
2. Vultuit (2) met vulpomp verbinden.
3. Vulpomp in werking stellen en vetreservoir (11)
geheel vullen.
4. Verbinding tussen vultuit (2) en vulpomp verbreken.
5. Schuifstangborging (10) ingedrukt houden en
schuifstang (9) inschuiven.
6.3 Persluchtgereedschap gebruiken
Gebruik altijd persluchtslangen met een binnendiameter van minstens 9 mm om het volledige
vermogen van uw persluchtgereedschap te
bereiken. Een te geringe binnendiameter kan het
vermogen aanmerkelijk verminderen.
Let op De persluchtleiding mag geen condenswater bevatten.
Let op Dit gereedschap dient van voldoende
pneumatische olie voorzien te worden om
lang gebruiksklaar te blijven. Dit kan als volgt gebeuren:
– Geoliede perslucht gebruiken door aanbouw van
een olievernevelaar.
– Zonder olievernevelaar: Dagelijks met de hand
via de persluchtaansluiting oliën. Ca. 3-5 druppels pneumatische olie bij 15 minuten continugebruik.
Is het gereedschap meerdere dagen buiten gebruik geweest, de persluchtaansluiting handmatig
vullen met ca. 5 druppels pneumatische olie.
1. Naar keuze smeerleiding (1) of smeerslang (12)
met de klok mee aan de drukkop (4) vastdraaien.
2. Werkdruk bij de compressor instellen (voor
maximaal toelaatbare werkdruk, zie Technische
gegevens).
3. Gereedschap via de snelkoppeling op de pers-
luchtvoorziening aansluiten.
4. Vetspuit tegen een smeernippel plaatsen.
5. Voor vetafgifte de trekker (5) indrukken.
6. Trekker (5) loslaten, zodra een voldoende hoe-
veelheid vet aan de smeernippel is afgegeven.
Page 23

Aanwijzing:
Neem de opgaven van de producent van het te
smeren apparaat in acht betreffende de druk,
smeerintervallen en het type en de hoeveelheid van
het smeermiddel.
.
7. Service en onderhoud
Gevaar! Alvorens u met werkzaamheden
aan het gereedschap begint, persluchtaan-
sluiting losmaken.
Gevaar! Andere dan de in dit hoofdstuk beschreven onderhouds- of reparatiewerkzaam-
heden mogen uitsluitend door geschoold per-
soneel worden uitgevoerd.
- Verzeker u door regelmatig onderhoud van de
veiligheid van het persluchtgereedschap.
- Schroefverbindingen op goede zitting controleren
resp. aantrekken.
- Filter in de persluchtaansluiting tenminste wekelijks reinigen.
- Aanbevolen wordt om bij het persluchtgereedschap een drukregelaar met waterafscheider en
een smeerbus voor te schakelen.
- Bij verhoogde olie- of luchtuittreding het persluchtgereedschap controleren en eventueel laten
repareren. (Zie hoofdstuk 9.)
- Vermijd het contact met gevaarlijke substanties
die zich op het werkstuk hebben afgezet. Draag
een geschikte persoonlijke veiligheidsuitrusting
en verwijder gevaarlijke substanties vóór het
onderhoud met passende maatregelen.
f
8. Toebehoren
Gebruik uitsluitend originele Metabo toebehoren.
Gebruik alleen toebehoren die voor dit persluchtge-
reedschap bestemd zijn en voldoen aan de in deze
gebruiksaanwijzing genoemde eisen en
kenmerken.
Compleet toebehorenprogramma, zie
www.metabo.com of de catalogus.
NEDERLANDS nl
Gebruik milieuvriendelijke vetten.
Voorkom ongecontroleerd uitlekken van vet, zodat
dit niet in het milieu terechtkomt.
11. Technische gegevens
Toelichting bij de gegevens van pagina 3.
Wijzigingen en technische verbeteringen voorbe-
houden.
V
p
A = afmetingen (lengte x breedte x hoogte)
m=gewicht
De vermelde technische gegevens zijn
tolerantiewaarden (overeenkomstig de
toepasselijke norm).
emissie van het gereedschap en een vergelijking
van de verschillende gereedschappen mogelijk.
Afhankelijk van het gebruik, de toestand van het
gereedschap of het inzetgereedschap kan de daadwerkelijke belasting hoger of lager uitvallen. Houd
bij de beoordeling rekening met pauzes en fases
met een lagere belasting. Bepaal op basis van de
betreffende aangepaste taxatiewaarden welke
maatregelen ter bescherming van de gebruiker
dienen te worden genomen, bijv. organisatorische
maatregelen.
Geluidsniveau (EN ISO 15744)
L
L
K
= luchtverbruik per slag
1
= maximaal toelaatbare werkdruk
max.
Emissiewaarden
Deze waarden maken een beoordeling van de
=geluidsdrukniveau
pA
=geluidsvermogensniveau
WA
, KWA= meetonzekerheid
pA
Draag gehoorbescherming!
:
9. Reparatie
Gevaar! Reparaties aan persluchtgereed-
schap mogen alleen door geschoold personeel en met originele Metabo-onderdelen worden
uitgevoerd!
Neem voor persluchtgereedschap van Metabo dat
gerepareerd dient te worden contact op met uw
Metabo-vertegenwoordiging. Zie voor adressen
www.metabo.com.
Onderdeellijsten kunt u downloaden via
www.metabo.com.
10. Milieubescherming
Neem de nationale voorschriften in acht voor een
milieuvriendelijke verwijdering en voor de recycling
van afgedankt persluchtgereedschap, verpakkingen en toebehoren. Personen en leefmilieu
mogen niet in gevaar worden gebracht.
23
Page 24

ESPAÑOLes
Manual original
1. Declaración de conformidad
Mediante la presente declaramos bajo entera
responsabilidad propia: Estas pistolas de grasa
neumáticas, identificadas por tipo y número de
serie *1), cumplen con todas las determinaciones
propias de las directivas *2) y normas *3). Documentaciones técnicas en *4) - ver página 3.
2. Uso según su finalidad
La pistola de grasa es una herramienta neumática
desarrollada para el uso artesanal. Puede utilizarse para lubricar máquinas, vehículos, máquinas
agrícolas, plantas industriales y sistemas de transporte.
Esta herramienta sólo debe activarse con una alimentación neumática. No está permitido exceder
la presión máxima de trabajo indicada en la herramienta. Esta herramienta neumática no debe usarse con gases explosivos, inflamables o nocivos
para la salud.
Cualquier otro uso está en desacuerdo a su finalidad. Mediante un uso contrario a su finalidad, modificaciones en la herramienta neumática o al usar
piezas que no hayan sido controladas ni habilitadas por el productor se pueden producir daños
imprevisibles.
Los posibles daños derivados de un uso inadecuado son responsabilidad exclusiva del usuario.
Deben observarse las normas sobre prevención de
accidentes aceptados de forma general y la información sobre seguridad incluida.
3. Instrucciones generales de
seguridad
Para su propia protección y la de su
herramienta neumática, observe las
partes marcadas con este símbolo.
ADVERTENCIA: Lea el manual de
instrucciones para reducir el riesgo de accidentes.
AVISO Lea íntegramente las indicaciones
de seguridad y las instrucciones. La no
observancia de las instrucciones de seguridad
siguientes puede dar lugar a descargas eléctricas,
incendios y/o lesiones graves.
Guarde estas instrucciones de seguridad en
un lugar seguro.
Si entrega su herramienta neumática a otra
persona, es imprescindible acompañarla de este
documento.
- El usuario o el empleador del usuario debe
evaluar los riesgos específicos que puedan darse
a partir de cada uso de la herramienta.
- Previo a la configuración, el uso, la reparación, el
mantenimiento y el recambio de accesorios así
24
como antes de realizar trabajos cerca de la herramienta neumática, es necesario haber leído y
entendido las indicaciones de seguridad. En caso
contrario, se puede sufrir lesiones corporales
mayores.
- La herramienta neumática debe ser ajustada,
configurada o usada únicamente por usuarios
calificados y capacitados.
- No está permitido modificar la herramienta. Modificaciones pueden reducir el efecto de medidas
de seguridad y aumentar los riesgos para el
usuario.
- Jamás utilice herramientas neumáticas que estén
dañadas. Cuide las herramientas neumáticas con
cuidado. Controle con regularidad, si funcionan
correctamente, sin atascarse, las partes móviles
de la herramienta neumática y si existen piezas
rotas o deterioradas que pudieran afectar su
funcionamiento. Controle si los letreros y los
textos están completos y legibles. Si la herramienta eléctrica estuviese defectuosa, hágala
reparar o recambiar antes de volver a utilizarla.
Muchos de los accidentes se deben a herramientas neumáticas con un mantenimiento deficiente.
4. Instrucciones especiales de
seguridad
4.1 Peligros por piezas que salen despedi-
das
- Separe la herramienta neumática de la alimentación neumática antes de realizar un ajuste, un
mantenimiento o cambiar la herramienta de inserción o accesorios.
- En caso de que una pieza, un accesorio o la
misma herramienta neumática se rompa, estas
piezas pueden salir despedidas a alta velocidad.
- Use siempre gafas protectoras a prueba de
golpes al usar la máquina, cambiar accesorios o
realizar trabajos de reparación o de mantenimiento en la herramienta neumática. El grado de
la protección necesaria debe ser evaluado individualmente antes de cada aplicación de la herramienta.
- Asegúrese de que no se produzcan peligros para
otras personas.
4.2 Peligros durante la marcha
- El operador y el personal de mantenimiento
deben estar en la disposición física para poder
controlar el tamaño, el peso y la potencia de la
herramienta neumática.
- Agarre correctamente la herramienta neumática:
Esté dispuesto a contrarrestar los movimientos
normales y repentinos, sujetando la máquina con
ambas manos.
- Trabaje sobre una base firme y mantenga el equilibrio en todo momento.
- Evite una puesta en marcha fortuita del aparato.
En caso de haber una interrupción de la alimentación neumática, desconecte la herramienta
neumática con el interruptor principal.
Page 25

- Utilice únicamente los lubricantes recomendados
por el productor.
- Utilice un equipo de protección y en todo caso
unas gafas de protección. Usando un equipo de
protección como lo son guantes o ropa de protección, mascarilla, zapatos de seguridad antideslizantes, casco protector o protección auricular,
dependiendo del modo y el uso del aparato, se
reduce el riesgo de sufrir lesiones por lo que se
recomienda hacerlo.
4.3 Peligro por movimientos repetitivos
- Al trabajar con la herramienta neumática pueden
producirse sensaciones incómodas en las
manos, los brazos, los hombros, en el cuello o en
otras partes del cuerpo.
- Posiciónese cómodamente al trabajar con la
herramienta neumática, asegúrese de tener una
posición fija y evite posiciones inadecuadas o
aquellas en las que es difícil mantener el equilibrio. Al realizar trabajos más largos, se recomienda que el operador cambie su posición, lo
cual puede ayudar a evitar incomodidades y el
cansancio.
- En caso de que el operador sienta síntomas
como, por ejemplo, malestar constante, molestias, dolor, comezón, entumecimiento, quemazón
o rigidez, no debe ignorarse estas señales de
aviso. El operador debe informar la situación al
empleador y consultar a un médico calificado.
4.4 Peligros por accesorios
- Separe la herramienta neumática de la alimentación neumática antes de fijar o cambiar la herramienta de inserción o un accesorio.
- Utilice únicamente accesorios que hayan sido
desarrollados para este aparato y que cumple con
los requerimientos y los datos indicados en este
manual de uso.
4.5 Peligros en el puesto laboral
- Los principales motivos para sufrir lesiones en el
puesto laboral es al resbalarse, tropezarse o
caerse. Tenga cuidado con superficies que
puedan haber quedado resbalosas después de
usar la herramienta neumática así como posibles
peligros de tropiezo generados por la manguera
neumática.
- Proceda cuidadosamente al encontrarse en un
entorno desconocido. Puede haber peligros
escondidos por cables de corriente o cualquier
otro tipo de líneas de alimentación.
- La herramienta neumática no ha sido desarrollada para usarse en un entorno explosivo y no
está aislado contra el contacto con fuentes de
corriente eléctrica.
4.6 Peligros por polvos y vapores
- Los polvos y vapores producidos al trabajar con la
herramienta neumática pueden generar daños a
la salud (como p. ej. cáncer, defectos congénitos,
asma y/o dermatitis); es imprescindible realizar
una evaluación de riesgo en relación a estos peligros y aplicar mecanismo de regulación
adecuados.
ESPAÑOL es
-En la evaluación de riesgos deben incluirse el
polvo generado por el uso de la herramienta
neumática así como el polvo que puede arremolinarse por ello.
- Es importante usar y mantener la herramienta
neumática según las recomendaciones presentadas en este manual a fin de reducir la liberación
de polvo y de vapores a un mínimo.
- El aire de salida debe salir de tal manera que las
polvaredas se reduzcan a un mínimo en un
entorno polvoriento.
- En caso de generarse polvos y vapores, es muy
importante controlarlos en el lugar donde se
generan.
- Todos los accesorios previstos para la recolección, aspiración o supresión de polvo volátil o de
vapores en la herramienta neumática deben
usarse y mantenerse correctamente según lo
indique el fabricante.
- Es importante elegir, mantener y recambiar los
materiales de consumo y la herramienta de inserción conforme a las recomendaciones presentadas en este manual a fin de evitar una intensificación de polvo o de vapores.
- Utilice las mascarillas protectoras según las indicaciones del empleador o como se lo indique en
las normas de protección laboral y de la salud.
4.7 Peligros por ruido
- El efecto de altos niveles de ruido puede producir
daños constantes de oído, la pérdida del oído u
otros problemas como, por ejemplo, el tínito
(silbido, sonidos en el oído).
- Es imprescindible realizar una evaluación de
riesgo en relación a estos peligros y aplicar mecanismo de regulación adecuados.
- Parte de los mecanismos adecuados de regulación para reducir el riesgo son medidas como el
uso de materiales aislantes a fin de evitar ruidos
que se generen en las piezas a trabajar.
- Utilice los equipos de protección auricular según
las indicaciones del empleador o como se lo
indique en las normas de protección laboral y de
la salud.
- Debe usarse y mantenerse la herramienta
neumática según las recomendaciones hechas
en este manual a fin de evitar un incremento innecesario del nivel de ruido.
- Es importante elegir, mantener y recambiar los
materiales de consumo y la herramienta de inserción conforme a las recomendaciones presentadas en este manual a fin de evitar un incremento
del nivel de ruido.
- No está permitido retirar el silenciador integrado
en la herramienta y éste siempre debe estar en
perfecto estado de funcionamiento.
4.8 Peligro por vibraciones
-El efecto de vibraciones puede producir daños en
los nervios y problemas en la circulación
sanguínea en manos y brazos.
- Use ropa caliente al trabajar en un entorno frío y
mantenga sus manos calientes y secas.
- En caso de observar que la piel en los dedos o
manos quede insensible, sienta cosquilleos,
dolores o que la piel quede en blanco, interrumpa
25
Page 26

ESPAÑOLes
el trabajo con la herramienta neumática e informe
a su empleador y consulte a un médico.
- Debe usarse y mantenerse la herramienta
neumática según las recomendaciones hechas
en este manual a fin de evitar un incremento innecesario de las vibraciones.
- Es importante elegir, mantener y recambiar los
materiales de consumo y la herramienta de inserción conforme a las recomendaciones presentadas en este manual a fin de evitar un incremento
de las vibraciones.
4.9 Indicaciones adicionales de seguridad
- Aire comprimido puede causar lesiones serias.
- Si la herramienta neumática no está en uso,
previo al cambio de accesorios o al realizar
trabajos de reparación, siempre es recomendable
desconectar la alimentación de aire, despresurizar la manguera neumática y separar la herramienta neumática de la alimentación neumática.
- Jamás dirija el caudal de aire a sí mismo o contra
otras personas.
- Mangueras sueltas pueden causar lesiones
serias. Por lo tanto, controle siempre si las
mangueras y los elementos de soporte estén en
buen estado y que no se hayan soltado.
- Evite tener contacto con aire frío.
- En caso de utilizar acoplamientos giratorios
universales, debe colocarse pernos fijadores y
utilizar seguros de manguera Whipcheck a fin de
proteger la unión de la manguera con la herramienta neumática o con otras mangueras en caso
de que se dañe la unión de la manguera.
- Asegúrese de que no se exceda la presión
máxima indicada en la herramienta neumática.
- Jamás agarre las herramientas neumáticas de la
manguera.
4.10 Otras indicaciones de seguridad
- En caso de ser necesario, observe las normas de
protección laboral y de prevención de accidentes
al trabajar con compresores y herramientas
neumáticas.
- Asegúrese de no exceder la máxima presión
laboral permitida indicada en los datos técnicos.
- No sobrecargue el aparato. Utilice este equipo
solamente dentro de los márgenes de potencia
indicados en las Especificaciones técnicas.
- Utilice lubricantes inofensivos. Ventile adecuadamente su lugar de trabajo. En caso de haber un
desgaste mayor: controle la herramienta neumática y hágala reparar.
- No utilice esta herramienta si no puede concentrarse. Esté atento a lo que hace y emplee la
herramienta eléctrica con prudencia. No utilice la
herramienta si está cansado, ni tampoco después
de haber consumido alcohol, drogas o medicamentos. El no estar atento durante el uso de la
herramienta puede provocarle serias lesiones.
- Mantenga limpio y bien iluminado su puesto de
trabajo. El desorden y una iluminación deficiente
en las áreas de trabajo pueden provocar accidentes.
- Asegure las herramientas neumáticas contra
niños.
- No guarde nunca la máquina a la intemperie sin
protección ni en un ambiente húmedo.
26
- Proteja la herramienta neumática, sobre todo la
conexión neumática así como los elementos de
mando, contra polvo y suciedad.
- Sujete la barra de empuje (9) de un depósito de
grasa atornillado al soltar el cierre de barra de
empuje (10). No permita que la barra de empuje
(9) salte.
- Al activar la pistola, grasa sale a alta presión.
- No tape el tubo (1) y la manguera de engrase
(12) con la mano.
- No dirija la pistola de grasa a personas o a ani-
males.
- Sólo active la pistola de grasa cuando ésta se
encuentre colocada sobre el racor de lubricación.
- Sostenga fijamente la manguera de lubricación
(12) durante el completo proceso de lubricación para evitar que se suelte.
La información de este manual de uso se indica
según sigue:
¡Peligro! Advertencia de daños personales o
medioambientales.
¡Atención! Advertencia de daños materiales.
4.11 Símbolos en la herramienta neumática
Lea el manual de uso antes de la puesta en
marcha.
Use protección ocular
Use auriculares protectores
5. Descripción general
Véase la página 2.
1 Tubo de lubricación
2 Racor de engrase
3 Válvula de ventilación
4 Cabezal de presión
5 Palanca de aplicación
6 Tuerca de mariposa (para desplazar la
empuñadura)
7 Empuñadura
8 Racor de conexión 1/4“ (Conexión de aire
comprimido)
9 Barra de avance
10 Cierre de barra de empuje
11 Depósito de grasa
12 Manguera de lubricación
13 Salida de aire con silenciador
6. Funcionamiento
6.1 Previo a la primera puesta en marcha
Montar los racores de conexión (8).
Page 27

6.2 Llenar depósito de grasa
¡Atención! Llenar el depósito de grasa (11)
únicamente con lubricantes no corrosivos que
han sido habilitados para el uso en pistolas de
grasa. Tenga en cuenta las indicaciones del fabricante de lubricantes.
El émbolo de presión se puede deformar en caso
de utilizar constantemente cartuchos de grasa. Al
cambiar a continuación el método de llenado se
puede causar una fuga y por lo tanto puede salir
grasa. Decida desde un inicio un método continuo
de llenado.
Advertencia:
Al cambiar el tipo de grasa sólo se puede asegurar
un engrase con grasa pura después de haber
limpiado a fondo la pistola de grasa.
Llenar con cartucho
1. Para soltar el depósito de grasa (11) desatorni-
lle en dirección contrarreloj.
2. Ingrese el cartucho con el lado abierto hacia
arriba dentro del depósito de grasa (11) y empujar hacia abajo.
3. Atornille el depósito de grasa (11) en sentido
de reloj. No lo ajuste con demasiada fuerza.
4. Mantenga apretado el cierre de barra de avan-
ce (10) y coloque la barra de avance (9).
Llenar desde bidones
1. Para soltar el depósito de grasa (11) desatorní-
llelo en dirección contrarreloj.
2. Coloque el depósito de grasa (11) aprox. 5 cm
en la grasa y retire lentamente la barra de avance (9) hasta el tope.
3. Atornille el depósito de grasa (11) en sentido
de reloj.
4. Mantenga apretado el cierre de barra de avan-
ce (10) y coloque la barra de avance (9).
ESPAÑOL es
Llenar mediante bomba de llenado
1. Retire la barra de avance (9) hasta el tope.
2. Coloque el racor de llenado (2) con la bomba
de llenado.
3. Active la bomba de llenado y llene por completo el recipiente de grasa (11).
4. Desconecte la unión entre el racor de llenado
(2) y la bomba de llenado.
5. Mantenga apretado el cierre de barra de avance (10) y coloque la barra de avance (9).
6.3 Usar la herramienta neumática
A fin de desarrollar la potencia completa de su
herramienta neumática, utilice siempre mangueras
neumáticas con un diámetro interior de por lo
menos 9 mm. Un diámetro demasiado pequeño
puede reducir claramente la potencia de la herramienta.
¡Atención! La línea neumática no debe contener agua condensada.
¡Atención! A fin de que la herramienta tenga
una larga vida útil, debe alimentársela lo suficiente con aceite neumático. Esto puede suceder
de la siguiente manera:
– Use aire a presión con aceite, montando un vola-
tilizador de aceite.
– Sin volatilizador de aceite: lubricar diariamente a
mano en la conexión de aire a presión. Aprox. 35 gotas de aceite neumático para cada 15 minutos de marcha en caso de una aplicación constante.
En caso de que la herramienta estuvo sin usar durante varios días, aplicar manualmente unas 5 gotas de aceite neumático en el racor de conexión de
aire a presión.
1. Ajuste opcionalmente el tubo de lubricación (1)
o la manguera de lubricación (12) en dirección
de reloj en el cabezal de presión (4).
2. Ajuste la presión de trabajo en el compresor
(máxima presión permitida, véase datos técnicos).
3. Conectar herramienta mediante el acoplamien-
to rápido a la alimentación neumática.
4. Coloque la pistola de grasa en el racor de lubri-
cación.
5. Pulse la palanca de aplicación (5) para aplicar
grasa.
27
Page 28

ESPAÑOLes
6. Suelte la palanca de aplicación (5) tan pronto
haya suficiente grasa en el racor de lubricación.
Advertencia:
Observe las indicaciones de presión, intervalo de
lubricación así como tipo y cantidad de lubricante
del fabricante del aparato a lubricar.
.
7. Mantenimiento y conservación
¡Peligro! Previo a cualquier trabajo en la má-
quina desconecte la conexión neumática.
¡Peligro! Cualquier trabajo de reparación o
de mantenimiento que exceda el descrito en
este capítulo debe ser efectuado exclusivamente
por especialistas.
- Asegure la seguridad de la herramienta neumá-
tica mediante un mantenimiento constante de
ésta.
- Controle la posición fija de los atornillamientos y,
en caso de ser necesario, ajústelos.
- Limpie el filtro en la conexión neumática por lo
menos una vez a la semana.
- Se recomienda montar un reductor de presión con
separador de agua y volatilizador de aceite a la
herramienta neumática.
- En caso de un consumo mayor de aceite o de aire,
controle la herramienta neumática y, en caso de
ser necesario, hágala reparar. (véase el capítulo
9.)
- Evite el contacto con sustancias peligrosas que
pueden haberse ubicado sobre la herramienta.
Use siempre un equipo de protección y elimine
sustancias peligrosas mediante medidas
adecuadas, antes de realizar el mantenimiento.
f
8. Accesorios
Utilice únicamente accesorios Metabo originales.
Utilice únicamente accesorios que hayan sido
desarrollados para esta herramienta neumática y
que cumple con los requerimientos y los datos indicados en este manual de uso.
Programa completo de accesorios véase
www.metabo.com o catálogo.
accesorios usados. No deben producirse peligros
para personas ni para el medio ambiente.
Utilice grasas compatibles con el medio ambiente.
Evite un goteo incontrolado para que no acceda
grasa al medio ambiente.
11. Especificaciones técnicas
Notas explicativas sobre la información de la
página 3.
Nos reservamos el derecho a efectuar modificaciones conforme al avance técnico.
V
p
A = Medidas: Largo x ancho x alto
m=Peso
Las especificaciones técnicas aquí indicadas se
entienden dentro de determinadas tolerancias
(conformes a las normas que rigen actualmente).
de la herramienta y compararla con otras herramientas. Dependiendo de la condición de uso,
estado de la herramienta o de las herramientas de
uso, la carga real puede ser mayor o menor. Considere para la valoración las pausas de trabajo y las
fases de trabajo reducido. Determine a partir de los
valores estimados las medidas de seguridad para
el operador, p. ej. medidas de organización.
Nivel de ruido (EN ISO 15744)
L
L
K
= requerimiento de aire por carrera
1
= Máxima presión de trabajo permitida
max.
Valores de emisión
Estos valores permiten evaluar las emisiones
=Nivel de intensidad acústica
pA
=Nivel de potencia acústica
WA
, KWA= Inseguridad de medición
pA
¡Use auriculares protectores!
:
9. Reparación
¡Peligro! Reparaciones en herramientas
neumáticas sólo deben realizarlas especialistas y usar para ello repuestos originales de
Metabo.
Si su herramienta neumática Metabo necesita ser
reparada sírvase dirigir a su representante de
Metabo. En la página www.metabo.com encontrará
las direcciones necesarias.
En la página web www.metabo.com puede
descargar listas de repuestos.
10. Protección ecológica
Cumpla lo estipulado por las normativas nacionales
relativas a la gestión ecológica de los residuos y al
reciclaje de herramientas neumáticas, embalaje y
28
Page 29

Originalbruksanvisning
1. Samsvarserklæring
Vi erklærer under eget ansvar: Disse trykkluft-fettpressene, identifisert med type- og serienummer
*1), overholder alle relevante bestemmelser i direktivene *2) og standardene *3). Teknisk dokumentasjon ved *4) – se side 3.
2. Hensiktsmessig bruk
Fettpressen er et trykkluftdrevet verktøy til manuell
bruk. Den kan brukes til smøring av maskiner, kjøretøy, landbruksmaskiner, industrianlegg, transport
og transportanlegg.
Dette verktøyet skal bare drives med trykkluftforsyning. Maksimalt tillatt arbeidstrykk angitt på trykkluftverktøyet må ikke overskrides. Dette trykkluftverktøyet må ikke drives med eksplosive,
brennbare eller farlige gasser.
All annen bruk er ikke tiltenkt bruk. Ved endringer
av trykkluftverktøyet i strid med tiltenkt bruk, eller
ved bruk av deler som ikke er kontrollert og godkjent av produsenten, kan det oppstå uforutsigelige skader
Brukeren er alene ansvarlig for skader som oppstår
pga. ikke-forskriftsmessig bruk.
Gjeldende arbeidsmiljøforskrifter og vedlagt sikkerhetsinformasjon må overholdes.
3. Generell
sikkerhetsinformasjon
For din egen sikkerhet og for å beskytte
verktøyet må du ta hensyn til tekst som er
merket med dette symbolet.
ADVARSEL – Les bruksanvisningen for
å minimere skaderisikoen.
ADVARSEL Les gjennom all sikkerhetsinformasjon og alle anvisninger. Dersom
sikkerhetsinformasjonen og anvisningene ikke
overholdes, kan det medføre elektrisk støt, brann
og/eller alvorlige skader.
Oppbevar all sikkerhetsinformasjon og alle
anvisninger for fremtidig bruk.
Lån bare ut trykkluftverktøyet ditt sammen med
disse dokumentene.
- Brukeren eller brukerens arbeidsgiver må vurdere
de spesifikke risikoene som kan oppstå på grunn
av enhver bruk.
- Sikkerhetsanvisningene skal leses og forstås før
konfigurasjon, drift, reparasjon, vedlikehold og
utskifting av tilbehør, samt før arbeid i nærheten av
trykkluftverktøyet. I motsatt fall kan dette resultere
i alvorlig personskade.
- Trykkluftverktøyet skal utelukkende konfigureres,
justeres eller brukes av kvalifiserte og operatører
med riktig opplæring.
NORSK no
- Trykkluftverktøyet skal ikke modifiseres. Modifikasjoner kan redusere effekten av sikkerhetstiltakene og øke risikoen for operatøren.
- Bruk aldri ødelagte trykkluftverktøy. Stell godt
med trykkluftverktøyet. Kontroller regelmessig at
bevegelige maskindeler fungerer feilfritt og ikke
hindres, og om det er deler som er brukket eller
skadet og har negativ innvirkning på trykkluftverktøyets funksjon. Kontroller at skilt og merking er
fullstendige og lesbare. Se til at defekte deler blir
reparert eller skiftet før apparatet tas i bruk. Dårlig
vedlikeholdte trykkluftverktøy er årsaken til mange
uhell.
4. Spesiell
sikkerhetsinformasjon
4.1 Fare på grunn av deler som slynges ut
- Koble trykkluftverktøyet fra trykklufttilførselen før
du bytter innsatsverktøy eller tilbehør, eller før du
foretar justeringer eller vedlikehold.
- Ved brudd på arbeidsemnet, tilbehør eller trykkluftverktøy kan deler slynges ut i høy hastighet.
- Når du bytter tilbehør under drift samt ved reparasjon eller vedlikeholdsarbeid på trykkluftverktøy
må du alltid bruke støtsikre vernebriller. Graden av
beskyttelse som kreves må vurderes separat for
hvert enkelt bruksområde.
- Sørg for at det ikke kan oppstå fare for andre
personer.
4.2 Farer under drift
- Operatøren og vedlikeholdspersonell må fysisk
være i stand til å kontrollere størrelsen, vekten og
effekten av trykkluftverktøyet.
- Holde trykkluftverktøyet riktig: Vær forberedt på å
stå imot vanlige eller plutselige bevegelser – hold
begge hendene klare.
- Sørg for å stå stødig og i balanse.
- Unngå utilsiktet bruk. Ved brudd i lufttilførselen,
slå trykkluftverktøyet av med av/på-bryteren.
- Bruk bare smøremidler anbefalt av produsenten.
- Bruk personlig verneutstyr og husk alltid å bruke
vernebriller. Bruk av personlig verneutstyr som
hansker, verneklær, støvmaske, sklisikre
vernesko, hjelm eller hørselsvern – avhengig av
type og bruk av apparatet – reduserer risikoen for
skader og anbefales.
4.3 Fare ved gjentatte bevegelser
- Når du arbeider med trykkluftverktøy, kan det forekomme ubehag i hendene, armene, skuldrene,
nakken eller andre kroppsdeler.
- Innta en komfortabel posisjon for arbeid med
trykkluftverktøy, sørg for å ha et sikkert grep og
unngå ugunstige stillinger eller stillinger som gjør
det vanskelig å holde balansen. Operatøren bør
endre arbeidsstilling ved langvarig arbeid, noe
som kan bidra til å unngå ubehag og tretthet.
- Hvis brukeren opplever symptomer som vedvarende kvalme, smerter, bankende, smerte, prikking, nummenhet, svie eller stivhet, bør disse
varslene ikke ignoreres. Operatøren må si fra om
29
Page 30

NORSKno
dette til sin arbeidsgiver og kontakte en kvalifisert
lege.
4.4 Fare på grunn av tilbehørsdeler
- Koble trykkluftverktøyet fra trykklufttilførselen før
du bytter eller fester innsatsverktøy eller tilbehør.
- Bruk kun tilbehør som er beregnet for dette apparatet og som oppfyller kravene og spesifikasjonene som er nevnt i denne bruksanvisningen.
4.5 Farer på arbeidsplassen
- Skliing, snubling og fall er hovedårsakene til
skader på arbeidsplassen. Vær forsiktig med
overflater som kan ha blitt glatte på grunn av bruk
av trykkluftverktøy, og med luftslangen på grunn
av snublefare.
- Gå forsiktig inn i ukjente omgivelser. Det kan
finnes skjulte farer i form av strømkabler eller
andre forsyningsledninger.
- Trykkluftverktøyet er ikke beregnet for bruk i
eksplosjonsfarlige atmosfærer og er ikke isolert
mot kontakt med elektriske strømkilder.
4.6 Farer på grunn av støv og damp
- Støv og røyk som resulterer fra bruk av trykkverktøyet, kan føre til helseproblemer (for eksempel
kreft, fødselsdefekter, astma og/eller dermatitt).
Det er viktig å foreta en risikovurdering med
hensyn til disse farene og iverksette egnede
kontrollmekanismer.
- I risikovurderingen må det tas i betraktning støv
som oppstår ved bruk av trykkluftverktøyet og
eventuelt også eksisterende støv som virvles opp.
- Trykkluftverktøyet skal drives og vedlikeholdes i
samsvar med anbefalingene i denne bruksanvisningen for å redusere utslipp av støv og røyk til et
minimum.
- Utblåsingsluften skal føres slik at oppvirvling av
støv i et støvfylt miljø minimaliseres.
- Hvis det oppstår støv eller gasser, må den
viktigste oppgaven være å kontrollere disse der
de oppstår.
- Alle monterings- eller tilbehørsdeler til trykkluftverktøyet som brukes til innsamling, avsug eller
demping av flyvestøv eller røyk skal brukes i
henhold til produsentens instruksjoner og vedlikeholdes riktig.
- Forbruksmateriell og innsatsverktøy skal velges
ut, vedlikeholdes og byttes i samsvar med anbefalingene i denne veiledningen, for å unngå unødvendig intensivering av støv- eller damputvikling.
- Bruk egnet pustemaske i henhold til instruksene
fra din arbeidsgiver eller kravene i HMS-forskriftene.
4.7 Fare på grunn av støy
- Påvirkning av høye støynivåer kan ved manglende
hørselsvern føre til permanent hørselsskade,
hørselstap og andre problemer som tinnitus
(øresus, susing, piping eller brumming i øret).
- Det er viktig å foreta en risikovurdering med
hensyn til disse farene og iverksette egnede
kontrollmekanismer.
- Kontrollmekanismer som er egnet som risikoreduserende tiltak, inkluderer bruk av isolerende materialer for å unngå ringestøy fra arbeidsemnet.
30
- Bruk egnet hørselsvern i henhold til instruksene
fra din arbeidsgiver og kravene i HMS-forskriftene.
- Trykkluftverktøyet skal drives og vedlikeholdes i
samsvar med anbefalingene i denne bruksanvisningen for å unngå unødvendig økning av støynivået.
- Forbruksmateriell og innsatsverktøy skal velges
ut, vedlikeholdes og byttes i samsvar med anbefalingene i denne veiledningen, for å unngå unødvendig høyning av støynivået.
- Den integrerte lyddemperen må ikke fjernes og
må være i god stand.
4.8 Fare på grunn av vibrasjoner
- Virkningene av vibrasjon kan føre til skade på
nerver og forstyrrelser i blodsi rkulasjonen i hender
og armer.
- Bruk varme klær når du arbeider i kalde omgivelser og hold hendene varme og tørre.
- Hvis du oppdager at huden på fingrene eller
hendene er nummen, kribler, verker eller blir
misfarget hvit, må du avbryte arbeidet med trykkluftverktøyet, varsle arbeidsgiver umiddelbart og
oppsøke lege.
- Trykkluftverktøyet skal drives og vedlikeholdes i
samsvar med anbefalingene i denne bruksanvisningen for å unngå unødvendig forsterkning av
vibrasjoner.
- Forbruksmateriell og innsatsverktøy skal velges
ut, vedlikeholdes og byttes i samsvar med anbefalingene i denne veiledningen, for å unngå unødvendig økning av vibrasjoner.
4.9 Ekstra sikkerhetsanvisninger
- Trykkluft kan forårsake alvorlige personskader.
- Når trykkluftverktøyet ikke er i bruk, før du skifter
tilbehør eller når du utfører reparasjoner, må lufttilførselen alltid slås av, luftslangen gjøres trykkløs
og trykkluftverktøyet kobles fra trykklufttilførselen.
- Rett aldri luftstrømmen mot deg selv eller andre
mennesker.
- Slanger som fyker omkring, kan forårsake alvorlige skader. Derfor må du alltid kontrollere at slangene og festene er intakte og ikke har løsnet.
- Kald luft skal føres bort fra hendene.
- Hvis det benyttes universal-rotasjonskoblinger
(klokoblinger), må det brukes låsetapper, og bruk
Whipcheck-slangesikringer som beskyttelse i
tilfelle svikt i forbindelsen mellom slangen og lufttrykkverktøyet eller mellom slangene.
- Sørg for at det angitte maksimaltrykket for trykkluftverktøyet ikke overskrides.
- Bær aldri trykkluftverktøy etter slangen.
4.10 Flere sikkerhetsanvisninger
- Følg eventuelt HMS-forskrifter eller ulykkesforebyggende forskrifter for bruk av kompressorer og
trykkluftverktøy.
- Sørg for at maksimalt arbeidstrykk angitt i de
tekniske spesifikasjonene ikke overskrides.
- Verktøyet må ikke overbelastes – bruk verktøyet
kun i det ytelsesområdet som er oppgitt i de
tekniske data.
- Bruk bare trygge smøremidler. Sørg for at det er
tilstrekkelig ventilasjon på arbeidsplassen. Ved
Page 31

økt utstrømming: Kontroller trykkluftverktøyet og
reparer ved behov.
- Ikke bruk dette verktøyet når du er ukonsentrert.
Vær oppmerksom, pass på hva du gjør, gå
fornuftig frem når du arbeider med et trykkluftverktøy. Ikke bruk verktøyet når du er trett eller er
påvirket av narkotika, alkohol eller medikamenter.
Et øyeblikks uoppmerksomhet ved bruk av verktøyet kan føre til alvorlige skader.
- Hold arbeidsplassen ren og ha tilstrekkelig belysning. Rotete arbeidsområder og arbeidsområder
uten lys kan føre til ulykker.
- Sikre trykkluftverktøy mot barn.
- Ikke oppbevar verktøyet ubeskyttet utendørs eller
i fuktige omgivelser.
- Beskytt trykkluftverktøy, spesielt trykkluftforsyningen og betjeningselementer, mot støv og
smuss.
- Hold fast styrestaget (9) på åpnede fettbeholdere
når du løsner styrestagsikringen (10). Pass på at
styrestaget (9) ikke slår tilbake.
- Når fettpressen løses ut, kommer det ut fett under
høyt trykk.
- Ikke hold for smørerøret (1) og smøreslangen
(12) med hånden.
- Ikke rett fettpressen mot mennesker eller dyr.
- Du må bare aktivere fettpressen når en smøre-
nippel er montert.
- Hold fast smøreslangen (12) under hele smøre-
prosessen for å unngå at den slås vekk.
Informasjoner i denne bruksanvisningen er merket
som følger:
Fare! Advarsel mot personskader eller miljøskader.
OBS! Advarsel mot materielle skader.
4.11 Symboler på trykkluftverktøyet
Les bruksanvisningen før verktøyet tas i
bruk.
Bruk hørselsvern!
Bruk hørselsvern!
NORSK no
13 Lydisolert luftventil
6. Bruk
6.1 Før første gangs bruk
Skru inn innstikksnippelen (8).
6.2 Fylle fettbeholder
OBS! Fyll fettbeholderen (11) kun med ikke-
korrosive smøremidler som er beregnet på
bruk i fettpresser. Se informasjonen fra smøremiddelprodusenten.
Trykkstempelet kan deformeres ved langvarig bruk
av patroner. Dersom du i tillegg endrer påfyllingsmetode, kan det gjøre stempelet utett og føre til fettlekkasjer. Bruk en fast påfyllingsmetode så langt
det er mulig.
Merk:
Dersom du bytter fettype, må det en grundig rengjøring til for å unngå at fetttypene blandes.
Påfylling med patron
1. Løsne fettbeholderen (11) ved å skru den mot
klokken.
2. Før patronen inn i fettbeholderen (11) med den
åpne enden opp, og trykk den ned.
3. Skru på plass fettbeholderen (11) med klokken.
Ikke skru til for hardt.
4. Hold styrestagsikringen (10) inne og skyv inn
styrestaget (9).
Påfylling fra beholdere
5. Oversikt
Se side 2.
1Smørerør
2Fyllestuss
3 Lufteventil
4Trykkhode
5 Avtrekksbøyle
6 Vingemutter (til innstilling av håndtaket)
7 Håndtak
8 Innstikksnippel 1/4 “ (trykklufttilkobling)
9Styrestag
10 Styrestagsikring
11 Fettbeholder
12 Smøreslange
1. Løsne fettbeholderen (11) ved å skru den mot
klokken.
2. Dypp fettbeholderen (11) ca. 5 cm ned i fettet
og trekk styrestaget (9) sakte ut så langt det
går.
3. Skru på plass fettbeholderen (11) med klokken.
31
Page 32

NORSKno
4. Hold styrestagsikringen (10) inne og skyv inn
styrestaget (9).
Påfylling med påfyllingspumpe
1. Trekk ut styrestaget (9) så langt det går.
2. Koble påfyllingsstussen (2) til påfyllingspumpen.
3. Aktiver påfyllingspumpen og fyll fettbeholderen
(11) helt.
4. Koble fra hverandre påfyllingsstussen (2) og
påfyllingspumpen.
5. Hold styrestagsikringen (10) inne og skyv inn
styrestaget (9).
6.3 Bruke trykkluftverktøyet
For å oppnå full effekt med trykkluftverktøyet skal du
alltid bruke en trykkluftslange med en innvendig
diameter på minst 9 mm. For liten innvendig
diameter kan redusere ytelsen betraktelig.
OBS! Trykkluftledningen må ikke inneholde
kondens.
OBS! For at dette verktøyet skal få en lang levetid, må det være tilført pneumatisk olje i til-
strekkelig grad. Dette kan gjøres som følger:
– Bruk smurt trykkluft uten påmontering av tå-
kesmøreapparat.
– Uten tåkesmøreapparat: Tilsett daglig olje via
trykklufttilkoblingen. Ca. 3–5 dråper pneumatikkolje per 15 driftsminutter ved kontinuerlig bruk.
Hvis verktøyet ikke har vært i bruk på flere dager,
må det tilsettes ca. 5 dråper pneumatikkolje for
hånd i trykklufttilkoblingen.
1. Skru fast enten smørerøret (1) eller smøreslangen (12) på trykkhodet (4) ved å vri med klokken.
2. Still inn arbeidstrykket på kompressoren (se
tekniske data for maksimalt tillatt arbeidstrykk).
3. Koble verktøyet til trykklufttilførselen ved hjelp
av hurtigkoblingen.
4. Sett fettpressen på smørenippelen.
5. Trykk på avtrekksbøylen (5) for å fette.
6. Slipp avtrekksbøylen (5) når du har fått nok fett
på smørenippelen.
Merk:
Se informasjonen fra produsenten for å finne ut
hvilket trykk, smøreintervall samt hvilken smøremiddeltype og -mengde du skal bruke på apparatet
som skal smøres.
32
.
7. Vedlikehold og stell
Fare! Koble fra trykklufttilkoblingen før et-
hvert arbeid på verktøyet.
Fare! Vedlikeholds- eller reparasjonsarbeider
utover det som er beskrevet i dette kapittelet,
må kun utføres av fagfolk.
- Sørg for at trykkluftverktøyet er sikkert ved å foreta
regelmessig vedlikehold.
- Kontroller at skruefester sitter fast, trekk til ved
behov.
- Rengjør filteret i trykklufttilkoblingen minst en
gang i uken.
- Det anbefales å koble en trykkreduksjonsenhet
med vannutskiller og smøreapparat før trykkluftverktøyet.
- Ved økt utstrømming av olje elle luft må trykkluftverktøyet kontrolleres og ev. utbedres. (Se kapittel
9.)
- Unngå kontakt med farlige stoffer som kan ha
samlet seg på verktøyet. Bruk egnet personlig
verneutstyr og bortskaff farlige stoffer med
egnede tiltak før vedlikehold.
f
8. Tilbehør
Bruk kun originalt Metabo-tilbehør.
Bruk kun tilbehør som er beregnet for dette trykkluft-
verktøyet og som oppfyller kravene og spesifikasjonene som er nevnt i denne bruksanvisningen.
Det komplette tilbehørsprogrammet finner du på
www.metabo.com eller i katalogen.
9. Reparasjon
Fare! Reparasjoner av trykkluftverktøy skal
bare utføres av fagfolk med originale Metabo-
reservedeler!
Ta kontakt med din Metabo-forhandler dersom du
har Metabo trykkluftverktøy som må repareres.
Adresser på www.metabo.com.
Du kan laste ned reservedelslister fra
www.metabo.com.
10. Miljøvern
Følg nasjonale forskrifter for miljøvennlig kassering
og resirkulering av gamle trykkluftverktøy, emballasjer og tilbehør. Det må ikke oppstå fare fore
personer og miljø.
Bruk miljøvennlig fett.
Unngå at det drypper fett i omgivelsene.
11. Tekniske data
Forklaringer til opplysningene på side 3.
Med forbehold om endringer som følge av tekniske
forbedringer.
V
p
A = Mål: Lengde x bredde x høyde
= Luftbehov per løft
1
= Maksimalt tillatt arbeidstrykk
max.
Page 33

m=vekt
Angitte tekniske data kan variere i henhold til
normene som gjelder til enhver tid.
Emisjonsverdier
Disse verdiene gjør det mulig å beregne utslippene til verktøyet og sammenligne det med andre
verktøy. Den faktiske belastningen kan variere
avhengig av bruksforhold og verktøyets tilstand. Ta
hensyn til arbeidspauser og perioder med mindre
belastning i beregningen. Sett opp vernetiltak for
brukeren i henhold til de beregnede verdiene, f.eks.
organisatoriske tiltak.
Lydnivå (EN ISO 15744)
L
=lydtrykknivå
pA
L
=lydeffektnivå
WA
KpA, KWA= Måleusikkerhet
:
Bruk hørselsvern!
NORSK no
33
Page 34

POLSKIpl
Oryginalna instrukcja obsługi
1. Deklaracja zgodności
Oświadczamy na własną odpowiedzialność: Te
pneumatyczne smarownice, oznaczone typem i
numerem seryjnym *1), spełniają wszystkie
obowiązujące wymogi dyrektyw *2) i norm *3).
Dokumentacja techniczna *4) - patrz strona 3.
2. Użycie zgodne z
przeznaczeniem
Smarownica jest narzędziem napędzanym przez
sprężone powietrze przeznaczonym do zastosowania ręcznego. Może być stosowana do smarowania maszyn, pojazdów mechanicznych, maszyn
rolniczych, urządzeń przemysłowych, urządzeń
transportowych i przewozowych.
Narzędzie to może być zasilane wyłącznie sprężonym powietrzem. Nie wolno przekraczać podanego na narzędziu maksymalnego ciśnienia roboczego. Narzędzia pneumatycznego nie wolno zasilać
wybuchowymi, łatwopalnymi ani szkodliwymi dla
zdrowia gazami.
Każde inne zastosowanie jest niezgodne z przeznaczeniem. Użytkowanie wbrew przeznaczeniu,
modyfikacje narzędzia pneumatycznego lub uży-
wanie części, które nie zostały sprawdzone i dopuszczone przez producenta, mogą spowodować
nieprzewidywalne szkody!
Za szkody powstał
niezgodnego z przeznaczeniem odpowiada
wyłącznie użytkownik.
Należy przestrzegać ogólnie obowiązujących przepisów dotyczących zapobiegania wypadkom oraz
załączonych wskazówek bezpieczeństwa.
3. Ogólne wskazówki
bezpieczeństwa
symbolem!
OSTRZEŻENIE – W celu zminimalizowania
ryzyka odniesienia obrażeń należy zapoznać się z instrukcją obsługi.
OSTRZEŻENIE Należy przeczytać
wszystkie wskazówki bezpieczeństwa i
instrukcje. Nieprzestrzeganie wskazówek bezpie-
czeństwa i instrukcji może spowodować porażenie
prądem, pożar i/lub ciężkie obrażenia ciała.
Wskazówki bezpiecze
zachować na przyszłość.
Narzędzie pneumatyczne przekazywać innym
osobom wyłącznie z dołączoną dokumentacją.
-Użytkownik lub pracodawca użytkownika musi
dokonać oceny szczególnych zagrożeń, które
34
e w wyniku użytkowania
Dla własnego bezpieczeństwa oraz w
celu ochrony użytkowanego urządzenia
pneumatycznego należy zwracać uwagę
na miejsca w tekście oznaczone tym
ństwa i instrukcje należy
mogą wystąpić w przypadku każdego zastosowania.
-Przed przystąpieniem do ustawiania, eksploatacji,
napraw, konserwacji i wymiany osprzętu, a także
przed podjęciem pracy w pobliżu narzędzia pneumatycznego należy przeczytać i zrozumieć wskazówki bezpieczeństwa. W przeciwnym razie może
dojść do poważnych obrażeń ciała.
-Narzędzie pneumatyczne powinno być przygoto-
wywane do eksploatacji, ustawiane i użytkowane
wyłącznie przez wykwalifikowany i przeszkolony
personel.
- Nie wolno dokonywać zmian w narzę
matycznym. Zmiany mogą zmniejszyć skuteczność środków bezpieczeństwa i zwiększyć ryzyko
dla użytkownika.
-Nigdy nie używać uszkodzonych narzędzi pneu-
matycznych. Starannie pielęgnować narzędzia
pneumatyczne. Należy regularnie sprawdzać, czy
ruchome części działają prawidłowo i nie zakleszczają się, czy nie są pęknięte lub uszkodzone w
sposób negatywnie wpływający na funkcjonowanie narzędzia pneumatycznego. Kontrolować,
czy etykiety i napisy są kompletne i czytelne.
Przed użyciem urządzenia uszkodzone części
należy oddać do naprawy lub wymienić. Przyczyną wielu wypadków jest niewłaściwa konserwacja narzędzi pneumatycznych.
dziu pneu-
4. Specjalne wskazówki
bezpieczeństwa
4.1 Zagrożenia stwarzane przez części
wyrzucane w powietrze
-Przed przystąpieniem do wymiany narzędzi robo-
czych i osprzętu lub przeprowadzenia ustawień
lub prac konserwacyjnych należy odłączyć narzę-
dzie pneumatyczne od zasilania sprężonym
powietrzem.
-W razie pęknięcia obrabianego przedmiotu,
osprzętu lub narzędzia pneumatycznego może
dojść do wyrzucenia w powietrze różnych części z
dużą prędkością.
- Podczas pracy, przy wymianie osprzętu oraz
podczas prac konserwacyjnych i naprawczych
przy narzędziach pneumatycznych należy
zawsze nosić okulary ochronne odporne na
uderzenia. Stopień wymaganej ochrony powinien
być oceniany dla każdego zastosowania
oddzielnie.
-Należy upewnić się, czy nie stwarza się zagro-
żenia również dla innych osób.
4.2 Zagrożenia w trakcie eksploatacji
-Użytkownik i personel konserwacyjny muszą być
w stanie opanować fizycznie wielkość, masę
moc narzędzia pneumatycznego.
-Należy prawidłowo trzymać narzędzie pneuma-
tyczne: trzeba być gotowym na przeciwdziałanie
zwykłym lub nagłym ruchom – trzymać obie dłonie
w pogotowiu.
-Należy przyjąć bezpieczną pozycję izawsze
utrzymywać równowagę.
i
Page 35

-Unikać niezamierzonego uruchomienia urzą-
dzenia. W razie przerwania zasilania sprężonym
powietrzem należy wyłączyć narzędzie pneumatyczne za pomocą włącznika/wyłącznika.
-Należy stosować wyłącznie środki smarne zale-
cane przez producenta.
-Należy nosić osobiste wyposażenie ochronne i
zawsze zakładać okulary ochronne. Noszenie
osobistego wyposażenia ochronnego, jak r ękawic
ochronnych, odzieży ochronnej, maski przeciwpyłowej, antypoślizgowego obuwia roboczego,
kasku lub ochraniaczy słuchu, w zależności od
typu i zastosowania urządzenia, zmniejsza ryzyko
obrażeń i jest zalecane.
4.3 Zagrożenia na skutek powtarzających się
ruchów
- Podczas prac z użyciem narzędzia pneumatycz-
nego może pojawić się nieprzyjemne odczucie w
dłoniach, rękach, ramionach, w okolicy szyi lub
innych częś
-Podczas pracy z użyciem narzędzia pneumatycz-
nego należy przyjąć wygodną postawę, zwrócić
uwagę na pewne trzymanie narzędzia i unikać
niewygodnych pozycji lub takich, przy których
trudno jest zachować równowagę. Podczas
długotrwałej pracy użytkownik powinien zmieniać
postawę, ponieważ może to pomóc w uniknięciu
nieprzyjemnych odczuć i zmęczenia.
-Jeśli użytkownik zacznie odczuwać symptomy
takie, jak np. dłuższa niedyspozycja, dolegliwości,
uczucie pulsowania, ból, mrowienie, ogłuszenie,
pieczenie czy sztywność, wówczas nie wolno
ignorować tych objawów ostrzegawczych. Użytkownik powinien zgłosić je swojemu pracodawcy i
skonsultować się z lekarzem.
4.4 Zagrożenia stwarzane przez osprzęt
-Przed przystąpieniem do mocowania lub wymiany
narzędzi roboczych lub osprz
narzędzie pneumatyczne od zasilania sprężonym
powietrzem.
- Wolno stosować wyłącznie osprzęt, który jest
przeznaczony dla tego urządzenia i spełnia
wymogi i parametry opisane w niniejszej instrukcji
obsługi.
4.5 Zagrożenia na stanowisku pracy
-Pośliźnięcie się, potknięcie i przewrócenie są
głównymi przyczynami obrażeń na stanowisku
pracy. Należy uważać na powierzchnie, które ze
względu na użytkowanie narzędzia pneumatycznego mogą stać się śliskie oraz na zagrożenia ze
strony węża pneumatycznego, który może być
przyczyną potknięć.
- W nieznanym otoczeniu należy postępować
ostrożnie. Mog
spowodowane np. obecnością przewodów elektrycznych czy innych przewodów zasilających.
-Narzędzie pneumatyczne nie jest przeznaczone
do użytku w strefach zagrożonych wybuchem i nie
jest izolowane na wypadek styczności ze źródłami
prądu elektrycznego.
ciach ciała .
ętu należy odłączyć
ą występować ukryte zagrożenia
POLSKI pl
4.6 Zagrożenia stwarzane przez pyły i opary
-Pyły i opary powstające przy użytkowaniu narzę-
dzia pneumatycznego mogą spowodować szkody
zdrowotne (jak np. rak, uszkodzenia płodu, astmę
i/lub zapalenia skóry); nieodzowne jest przeprowadzenie oceny ryzyka w odniesieniu do tych
zagrożeń i wprowadzenie odpowiednich mechanizmów zapobiegawczych.
- W ocenie ryzyka uwzględnione powinny być pyły
powstające w trakcie użytkowania narzędzia
pneumatycznego oraz pyły obecne na miejscu,
wzbijające się w powietrze.
-Narzędzie pneumatyczne należy użytkować i
konserwować wed
szej instrukcji, aby do minimum zredukować uwalnianie pyłów i oparów.
- Powietrze powrotne powinno być odprowadzane
w taki sposób, aby do minimum zredukować wzbijanie się pyłów w zapylonym otoczeniu.
-Jeśli dochodzi do uwalniania pyłów lub oparów, to
głównym zadaniem jest kontrolowanie ich w
miejscu ich powstawania.
- Wszystkie elementy podstawowe lub wyposażenie dodatkowe narzędzia pneumatycznego do
wyłapywania, odsysania lub redukcji powstawania lotnych pyłów i oparów powinny być
prawidłowo stosowane i konserwow ane zgodnie z
zaleceniami producenta.
-Materiały podlegające zużyciu oraz narzędzia
robocze należy dobierać, konserwować i wymieniać zgodnie z zaleceniami niniejszej instrukcji,
aby uniknąć niepotrzebnego nasilenia powstawania pyłów lub oparów.
-Należy stosować środki ochrony dróg oddecho-
wych według zaleceń swojego pracodawcy lub
według wymogów BHP.
4.7 Zagrożenia stwarzane przez hałas
- W razie niedostatecznej ochrony słuchu działanie
silnego hał
uszkodzenia słuchu, utraty słuchu i innych problemów, jak np. szumy uszne (dzwonienie, szum,
świst lub brzęczenie w uszach).
- Nieodzowne jest przeprowadzenie oceny ryzyka
w odniesieniu do tych zagrożeń i wprowadzenie
odpowiednich mechanizmów zapobiegawczych.
- Do mechanizmów zapobiegawczych pozwalają-
cych na zmniejszenie zagrożeń należą takie działania jak zastosowanie materiałów izolacyjnych,
aby uniknąć d źwięków dzwonienia występujących
na obrabianych przedmiotach.
-Należy stosować środki ochrony słuchu według
zaleceń swojego pracodawcy lub według
wymogów BHP.
-Narzędzie pneumatyczne należy użytkować i
konserwować zgodnie z zaleceniami niniejszej
instrukcji, aby uniknąć niepotrzebnego zwięk-
szenia natężenia hałasu.
-Materiały podlegające zużyciu oraz narzędzia
robocze należ
niać zgodnie z zaleceniami niniejszej instrukcji,
aby uniknąć niepotrzebnego zwiększenia natę-
żenia hałasu.
- Nie wolno usuwać wbudowanego tłumika, który
powinien znajdować się w dobrym stanie roboczym.
ług zaleceń zawartych w niniej-
asu może prowadzić do trwałego
y dobierać, konserwować i wymie-
35
Page 36

POLSKIpl
4.8 Zagrożenia stwarzane przez drgania
- Oddziaływanie drgań może powodować uszkodzenia nerwów i zakłócenia w cyrkulacji krwi w
dłoniach i ramionach.
- Podczas prac w zimnym otoczeniu należy nosić
ciepłą odzież i zadbać o to, aby dłonie były ciepłe
i suche.
-Jeśli pojawi się wrażenie, że skóra palców lub
dłoni straciła czucie, mrowi, boli lub przebarwiła
się na biało, to należy przerwać pracę z użyciem
narzędzia pneumatycznego, powiadomić
swojego przełożonego i skonsultować się z lekarzem.
-Narzędzie pneumatyczne należy użytkować i
konserwować zgodnie z zaleceniami niniejszej
instrukcji, aby uniknąć niepotrzebnego nasilenia
się drgań.
-Materiały podlegające zużyciu oraz narzędzia
robocze należy dobierać, konserwować i wymieniać zgodnie z zaleceniami niniejszej instrukcji,
aby uniknąć niepotrzebnego nasilenia się drgań.
4.9 Dodatkowe wskazówki bezpieczeństwa
-Sprężone powietrze może powodować poważne
obrażenia.
-Jeśli narzędzie pneumatyczne nie jest używane,
przed przystąpieniem do wymiany osprzętu lub
wykonywania prac naprawczych należy zawsze
odciąć dopływ sprężonego powietrza, spuścić
ciśnienie z węża powietrza i odłączyć narzędzie
pneumatyczne od dopływu sprężonego powietrza.
- Nigdy nie wolno kierować strumienia powietrza na
siebie ani na inne osoby.
-Uderzające dookoła węże mogą spowodować
poważ
ne obrażenia. Dlatego należy zawsze
sprawdzać, czy węże i ich elementy mocujące nie
są uszkodzone i czy się nie poluzowały.
- Zimne powietrze powinno być prowadzone z dala
od dłoni.
-Jeśli stosowane są uniwersalne złącza obrotowe
(złącza pazurowe), to należy użyć kołków blokują-
cych i zabezpieczeń węży Whipcheck, aby
zapewnić ochronę na wypadek, gdyby zawiodło
połączenie węża z narzędziem pneumatycznym
lub poszczególnych węży ze sobą.
-Należy zadbać o to, aby nie przekroczyć maksy-
malnego ciśnienia podanego na narzędziu pneumatycznym.
- Nigdy nie przenosić narzędzia pneumatycznego
trzymając za wąż.
4.10 Pozostałe wskazówki bezpieczeństwa
-Należy przestrzegać
przepisów BHP i przepisów o zapobieganiu
wypadkom dotyczących obchodzenia się z
kompresorami i narzędziami pneumatycznymi.
-Należy upewnić się, że podane w danych tech-
nicznych maksymalne dozwolone ciśnienie
robocze nie zostanie przekroczone.
- Nie wolno przeciążać tego narzędzia – wykorzy-
stywać narzędzie wyłącznie w zakresie wydajności, podanym w danych technicznych.
-Stosować środki smarne nie budzące zastrzeżeń.
Należy zadbać o dostateczną wentylację w
miejscu pracy. W razie zwiększonej emisji do
36
ewentualnych specjalnych
otoczenia: skontrolować narzędzie pneumatyczne i w razie potrzeby zlecić jego naprawę.
-Nie należy używać tego narzędzia bez należytej
koncentracji. Należy być czujnym, uważać na to,
co się robi i do pracy z narzędziem pneumatycznym przystępować
należy używać w przypadku zmęczenia ani pod
wpływem narkotyków, alkoholu lub leków.
Moment nieuwagi przy użyciu tego narzędzia
może doprowadzić do poważnych obrażeń ciała.
-Należy dbać oczystość idobre oświetlenie stano-
wiska pracy. Nieporządek lub brak oświetlenia
wmiejscu pracy mogą prowadzić do wypadków.
-Narzędzia pneumatyczne należy przechowywać
w miejscu niedostępnym dla dzieci.
-Nie przechowywać narzędzia na świeżym powie-
trzu ani w wilgotnym otoczeniu bez odpowiedniego zabezpieczenia.
-Należy chronić narzędzie pneumatyczne, szcze-
gólnie przyłącze sprężonego powietrza i elementy
sterownicze, przed pyłem i brudem.
-Mocno trzymać pręt posuwowy (9) odkręconego
pojemnika na smar podczas zwalniania zabezpieczenia pręta posuwowego (10). Nie dopuści
pręt posuwowy (9) z powrotem gwałtownie odskoczył.
- Uruchomienie smarownicy powoduje wydostawanie się smaru pod wysokim ciśnieniem.
-Nie zatykać ręką rurki smarowej (1) ani węża
smarowego (12).
-Nie kierować smarownicy na ludzi ani zwierzę-
ta.
-Uruchamiać smarownice wyłącznie, gdy zamo-
cowana jest na gnieździe smarowym.
-Podczas całego procesu smarowania mocno
trzymać wąż smarowy (12), aby zapobiec od-
rzutowi węża.
Informacje w niniejszej instrukcji obsługi oznaczone zostały w następujący sposób:
Niebezpieczeństwo! Ostrzeżenie przed
szkodami osobowymi lub szkodliwością dla
środowiska.
Uwaga. Ostrzeżenie przed szkodami mate-
rialnymi.
4.11 Symbole na narzędziu pneumatycznym
Przed uruchomieniem przeczytać instrukcję
obsługi.
Nosić okulary ochronne
Nosić ochraniacze słuchu
z rozwagą. Narzędzia nie
ć, aby
5. Przegląd
Patrz strona 2.
1Rurka smarowa
2Wlew do napełniania
3 Zawór odpowietrzający
4Głowica ciśnieniowa
Page 37

5Spust
6Nakrętka skrzydełkowa (do zmiany położenia
uchwytu)
7Uchwyt
8Złączka wtykowa 1/4“ (przyłącze sprężonego
powietrza)
9Pręt posuwowy
10 Zabezpieczenie pręta posuwowego
11 Pojemnik na smar
12 Wąż smarowy
13 Tłumik dźwięku powietrza wylotowego
POLSKI pl
Napełnianie z ładunku
6. Eksploatacja
6.1 Przed pierwszym uruchomieniem
Wkręcić złączkę wtykową (8).
6.2 Napełnianie pojemnika na smar
Uwaga. Napełniać pojemnik na smar (11)
wyłącznie niekorozyjnymi środkami smar-
nymi, dopuszczonymi do zastosowania w smarownicach. Przestrzegać danych producenta środków
smarnych.
Tłok ciśnieniowy może ulec deformacji na skutek
długotrwałego zastosowania nabojów. Jeśli
następnie zostanie zmieniona metoda napełniania,
może to prowadzić do nieszczelności i wydostawania się smaru. W miarę moż
jedną metodę napełniania.
Wskazówka:
W przypadku zmiany smaru smar jednego rodzaju
można uzyskać wyłącznie poprzez dokładne
wyczyszczenie.
Napełnianie nabojami
1. W celu zdemontowania pojemnika na smar (11)
odkręcić go w kierunku przeciwnym do ruchu
wskazówek zegara.
2. Do pojemnika na smar (11) włożyć nabój otwar-
tym końcem do góry i wcisnąć do dołu.
3. Przykręcić pojemnik na smar (11) w kierunku
zgodnym z ruchem wskazówek zegara. Nie dociągać za mocno.
4. Trzymać wciśnięte zabezpieczenie pręta posu-
wowego (10) i wsunąć pręt posuwowy (9).
liwości stosować
1. W celu zdemontowania pojemnika na smar (11)
odkręcić go w kierunku przeciwnym do ruchu
wskazówek zegara.
2. Pojemnik na smar (11) zanurzyć ok. 5 cm w
smarze i wolno wyciągnąć do oporu pręt posuwowy (9).
3. Przykręcić
zgodnym z ruchem wskazówek zegara.
4. Trzymać wciśnięte zabezpieczenie pręta posuwowego (10) i wsunąć pręt posuwowy (9).
Napełnianie pompą do napełniania
1. Wcisnąć do oporu pręt posuwowy (9).
2. Połączyć wlew do napełniania (2) z pompą do
napełniania.
3. Uruchomić pompę do napełniania i maksymalnie napełnić pojemnik na smar (11).
4. Rozłączyć połączenie między wlewem do napełniania (2) a pompą do napełniania.
5. Trzymać wciśnięte zabezpieczenie pręta posuwowego (10) i wsunąć pręt posuwowy (9).
6.3 Użytkowanie narzędzia pneumatycznego
Aby uzyskać pełną moc narzędzia pneumatycznego, należy zawsze stosować w
tyczne o średnicy wewnętrznej minimum 9 mm.
Zbyt mała średnica węża może znacznie zmniejszyć moc.
stopniu zasilane olejem do pneumatyki. Może się
to odbywać w następujący sposób:
– Zastosowanie oliwionego sprężonego powietrza
poprzez zamontowanie olejarki mgławicowej.
pojemnik na smar (11) w kierunku
ęże pneuma-
Uwaga. W wężu pneumatycznym nie może
być skroplin.
Uwaga. Aby narzędzie pozostało sprawne
przez długi czas, musi być w dostatecznym
37
Page 38

POLSKIpl
– Bez olejarki mgławicowej: oliwić codziennie ręcz-
nie przez przyłącze sprężonego powietrza. Ok.
3-5 kropli oleju do pneumatyki co 15 minut roboczych przy ciągłym użytkowaniu.
Jeśli narzędzie nie było używane przez kilka dni,
wkroplić ręcznie ok. 5 kropli oleju do pneumatyki
do przyłącza sprężonego powietrza.
1. Przykręcić rurkę smarową (1) lub wąż smarowy
(12) w kierunku zgodnym z ruchem wskazówek
zegara do głowicy ciśnieniowej (4).
2. Maksymalne dopuszczalne ciśnienie robocze
patrz rozdział „Dane techniczne“.
3. Za pomocą szybkozłącza podłączyć narzędzie
do zasilania sprężonym powietrzem.
4. Nasadzić smarownicę na gniazdo smarowe.
5. W celu wyciśnięcia smaru nacisnąć spust (5).
6. Puścić spust (5), gdy tylko wystarczająca ilość
smaru dostanie się do gniazda smarowego.
Wskazówka:
Przestrzegać danych producenta urządzenia przeznaczonego do smarowania dotyczących ciśnienia,
okresów smarowania oraz rodzaju i ilości środka
smarowego.
.
7. Konserwacja i pielęgnacja
Niebezpieczeństwo! Przed przystąpieniem
do jakichkolwiek prac przy urządzeniu odłą-
czyć sprężone powietrze.
Niebezpieczeństwo! Inne prace konserwacyjne lub naprawcze, niż opisane w niniej-
szym rozdziale, mogą być przeprowadzane wyłącznie przez wykwalifikowanych pracowników.
-Należy zadbać o bezpieczeństwo narzędzia
pneumatycznego poprzez jego regularną konserwację.
- Kontrolować prawidłowe dociągnięcie złącz gwin-
towych, w razie potrzeby dociągnąć.
-Filtry w przyłączu sprężonego powietrza czyścić
przynajmniej raz na tydzień.
- Zaleca się podłączenie przed narzędziem pneu-
matycznym reduktora ciśnienia z separatorem
wody i olejarką.
- W przypadku zwiększonego wycieku oleju lub
powietrza skontrolować narzędzie pneumatyczne
i w razie potrzeby oddać do naprawy (patrz
rozdział
-Unikać styczności z niebezpiecznymi substan-
f
9.).
cjami, które osadzają się na narzędziu. Przed
przystąpieniem do prac konserwacyjnych należy
założyć osobiste wyposażenie ochronne i usunąć
niebezpieczne substancje za pomocą odpowiednich środków.
8. Osprzęt
Należy stosować wyłącznie oryginalny osprzęt
Metabo.
Wolno stosować wyłącznie osprzęt, który jest przeznaczony dla tego narzędzia pneumatycznego i
spełnia wymogi i parametry opisane w niniejszej
instrukcji obsługi.
38
Pełny zestaw osprzętu, patrz strona
www.metabo.com lub w katalogu.
9. Naprawa
Niebezpieczeństwo! Naprawy narzędzia
pneumatycznego mogą przeprowadzać
wyłącznie wykwalifikowani pracownicy używający
oryginalnych części zamiennych Metabo!
W sprawie naprawy narzędzi pneumatycznych
należy się zwrócić do przedstawicielstwa Metabo.
Adresy są podane na stronie www.metabo.com.
Listę części zamiennych można pobrać pod
adresem www.metabo.com.
10. Ochrona środowiska
Należy przestrzegać krajowych przepisów dotyczą-
cych usuwania i recyklingu zużytych narzędzi pneumatycznych, opakowań i osprzętu. Nie wolno stwarzać zagrożeń dla ludzi i
Używać smarów przyjaznych dla środowiska naturalnego.
Unikać niekontrolowanego skapywania, aby smar
nie przedostał się do środowiska.
środowiska.
11. Dane techniczne
Wyjaśnienia do informacji podanych na stronie 3.
Zastrzegamy sobie prawo do zmian konstrukcyj-
nych.
V
p
A=wymiary: długość x szerokość x wyso-
m=ciężar
Podane dane techniczne są określone w granicach
tolerancji (odpowiednio do obowiązujących
standardów).
narzędzia i porównanie różnych narzędzi. W zależ-
ności od warunków użytkowania, stanu narzędzia
lub narzędzi roboczych rzeczywiste obciążenie
może być większe lub mniejsze. Dla oszacowania
należy uwzględnić przerwy w pracy i fazy mniejszego obciążenia. Ustalić na podstawie odpowiednio dopasowanych wartości szacunkowych
środki ochronne dla użytkownika, np. środki organizacyjne.
Poziom hałasu (EN ISO 15744)
L
L
KpA, KWA= niepewność pomiaru
= zapotrzebowanie powietrza na porcję
1
= maksymalne dopuszczalne ciśnienie
max.
robocze
kość
Wartości emisji
Wartości te umożliwiają oszacowanie emisji
:
=poziom ciśnienia akustycznego
pA
=poziom mocy akustycznej
WA
Nosić ochraniacze słuchu!
Page 39

Eredeti üzemeltetési útmutató
1. Megfelelőségi nyilatkozat
Kizárólagos felelősségünk tudatában kijelentjük:
Ezek a sűrített levegős zsírzóprések – típus és sorozatszám alapján történő azonosítással *1) – megfelelnek az irányelvek *2) és szabványok *3) összes
idevonatkozó rendelkezéseinek. A Műszaki dokumentációt *4) lásd a 3. oldalon.
2. Rendeltetésszerű használat
A zsírzóprés kisipari használatra való, sűrített levegővel működő szerszám. Gépek, gépjárművek,
mezőgazdasági járművek, ipari berendezések,
szállító- és továbbítóberendezések kenésére használható.
A szerszámot csak sűrítettlevegő-tápellátással
szabad üzemeltetni. A sűrített levegős szerszámon
megadott maximális megengedett üzemi nyomást
nem szabad túllépni. A sűrített levegős szerszámot
nem szabad robbanásveszélyes, éghető vagy az
egészségre ártalmas gázokkal üzemeltetni.
Bármely más felhasználás ellentétes a szerszám
rendeltetésével. A nem rendeltetésszerű használat, a sűrített levegős szerszámon végrehajtott módosítások, illetve a gyártó által nem ellenőrzött és
nem engedélyezett módosítások miatt előre nem
látható károk keletkezhetnek!
A nem rendeltetésszerű használatból eredő
mindennemű kárért a felelősség kizárólag a
felhasználót terheli.
Feltétlenül tartsa be az általánosan elfogadott
balesetvédelmi szabályokat, valamint a mellékelt
biztonsági tudnivalókat.
3. Általános biztonsági
tudnivalók
Saját testi épsége és a sűrített levegős
szerszám védelme érdekében tartsa be
az ezzel a szimbólummal jelölt szövegrészekben foglaltakat!
FIGYELMEZTETÉS – A sérülésveszély
csökkentése érdekében olvassa át az
üzemeltetési útmutatót.
FIGYELMEZTETÉS Olvassa át az összes
biztonsági tudnivalót és utasítást. A bizton-
sági tudnivalók és utasítások betartásának elmulasztása elektromos áramütést, tüzet és/vagy
súlyos sérüléseket okozhat.
Gondosan őrizze meg valamennyi biztonsági
tudnivalót és utasítást.
Csak ezekkel a dokumentumokkal együtt adja
tovább másnak a sűrített levegős szerszámot.
- A felhasználónak vagy a felhasználó munkaadójának fel kell becsülnie azokat a specifikus kockázatokat, amelyek az egyes alkalmazások során
felléphetnek.
- A biztonsági tudnivalókat beüzemelés, üzemeltetés, javítások, karbantartások végzése és tartozékalkatrészek cseréje előtt, valamint a sűrített
levegős szerszám közelében végzendő munka
előtt el kell olvasni és meg kell érteni. Ennek elmulasztása súlyos testi sérülésekhez vezethet.
-A sűrített levegős szerszámot kizárólag képesített
és kiképzett kezelőszemélyzet üzemelheti be,
állíthatja be és használhatja.
-A sűrített levegős szerszámon nem szabad módo-
sításokat végrehajtani. A módosítások csökkenthetik a biztonsági óvintézkedések hatékonyságát,
és növelhetik a kezelő veszélyeztetettségét.
- Soha ne használjon sérült sűrített levegős szerszámot. Gondosan ápolja a sűrített levegős szerszámokat. Ellenőrizze rendszeresen a mozgó
alkatrészek kifogástalan működését és szorulásmentességét, továbbá azt, hogy vannak-e törött
vagy olyan mértékben sérült alkatrészek, hogy
azok már a sűrített levegős szerszám működését
akadályozzák. Ellenőrizze a táblák és a feliratok
hiánytalanságát és olvashatóságát. A sérült
részeket a készülék használata előtt javíttassa
meg vagy cseréltesse ki. Sok olyan baleset
történik, amelyet a sűrített levegős szerszám nem
kielégítő karbantartására lehet visszavezetni.
4. Különleges biztonsági
tudnivalók
4.1 Kirepülő alkatrészek miatti veszélyek
- Betétszerszám- vagy tartozékcsere, ill. beállítás
vagy karbantartás végzése előtt válassza le a sűrí-
tett levegős szerszámot a sűrített levegő tápellátásról.
- Munkadarab, tartozékok vagy a sűrített levegős
szerszám törése esetén nagy sebességgel alkatrészek repülhetnek ki.
- Üzemeltetéskor, tartozékalkatrészek cseréjekor,
valamint sűrített levegős szerszámon végzett javítási és karbantartási munkák alkalmával mindig
ütésálló szemvédőt kell viselni. A szükséges
védelem fokozatát minden használat előtt külön
kell megítélni.
-Ügyeljen arra, hogy más személyeket fenyegető
veszélyek se lépjenek fel.
4.2 Üzem közben fennálló veszélyek
-A sűrített levegős szerszám mérete, súlya és telje-
sítménye miatt a kezelőnek és a karbantartó
személyzetnek fizikailag alkalmasnak kell lennie a
szerszám biztos használatára.
- Tartsa helyesen a sűrített levegős szerszámot:
álljon készen arra, hogy ellenhatást fejtsen ki a
normál vagy hirtelen mozgásokkal szemben –
legyen mindkét keze készenlétben.
- Ügyeljen arra, hogy biztosan álljon, és az egyensúlyát mindig tartsa meg.
- Kerülje el a véletlenszerű bekapcsolást. A levegő-
ellátás kimaradása esetén kapcsolja ki a be-/
kikapcsolóval a sűrített levegős szerszámot.
- Csak a gyártó által ajánlott kenőanyagokat használja.
MAGYAR hu
39
Page 40

MAGYARhu
- Viseljen személyi védőfelszerelést és mindig
használjon védőszemüveget. A készülék fajtájának és alkalmazási területének megfelelő
személyi védőfelszerelések, pl. védőkesztyű,
védőöltözék, porvédő maszk, csúszásbiztos
védőcipő, védősisak vagy hallásvédő viselése
csökkenti a sérülések kockázatát, ezért ajánlott.
4.3 Az ismétlődő mozgások okozta veszé-
lyek
-Sűrített levegős szerszámmal végzett munka
során kellemetlen érzet támadhat a kezekben,
karokban, vállakban, nyaki zónában vagy egyéb
testrészekben.
-Sűrített levegős szerszámmal végzett munkához
vegyen fel kényelmes testtartást, ügyeljen a
biztonságos tartásra, és kerülje a kedvezőtlen, ill.
olyan a testhelyzeteket, amelyekben nehéz az
egyensúly megtartása. A kezelőnek hosszú ideig
tartó munka közben változtatnia kell a testtartásán, ez segíthet a kellemetlen következmények
és az elfáradás elkerülésében.
- Ha a felhasználó olyan tüneteket érzékel, mint pl.
tartósan rossz közérzet, panaszok, zakatolás,
fájdalom, bizsergés, süketség, égető érzés vagy
merevség, akkor ne hagyja figyelmen kívül ezeket
a figyelmeztető jeleket. A kezelő tájékoztassa
ezekről a munkaadóját, és konzultáljon szakképzett orvossal.
4.4 A tartozékok okozta veszélyek
- Betétszerszám vagy tartozék rögzítése vagy
cseréje előtt válassza le a sűrített levegős szerszámot a levegőellátásról.
- Csak olyan tartozékot használjon, amely ehhez a
készülékhez készült, és megfelel az ebben az
üzemeltetési útmutatóban megadott követelményeknek és adatoknak.
4.5 Veszélyek a munkahelyen
- A munkahelyi sérülések fő okai a megcsúszás,
megbotlás és az elesés. Ügyeljen az olyan felületekre, amelyek a sű
nálata folytán csúszóssá válhatnak, ügyeljen
továbbá a levegőtömlő miatt fennálló megbotlási
veszélyre.
- Ismeretlen környezetben óvatosan járjon el.
Rejtett veszélyforrást képezhetnek az elektromos
kábelek vagy egyéb tápvezetékek.
-A sűrített levegős szerszámot nem robbanásve-
szélyes légtérben való használatra tervezték, és
nem rendelkezik az elektromos áramforrásokkal
való érintkezés elleni szigeteléssel.
4.6 Por és gőzök okozta veszélyek
-A sűrített levegős szerszám használatakor kelet-
kező porok és gőzök egészségkárosodást (pl.
rák, születési rendellenesség, asztma és/vagy
bőrbetegség) okozhatnak; ezen veszélyek vonatkozásában elengedhetetlen a kockázatok felmérése és megfelelő szabályozási mechanizmusok
életbe léptetése.
- A kockázatfelmérésnél figyelembe be kell venni a
sűrített levegős szerszám használatakor keletkező port és az ekkor esetlegesen felkavarodó
egyéb meglevő port is.
40
rített levegős szerszám hasz-
-A sűrített levegős szerszámot a jelen útmutatóban
szereplő ajánlások szerint kell üzemeltetni és
karbantartani, hogy a felszabaduló porok és
gőzök mennyisége minimumra csökkenjen.
- A távozó levegőt úgy kell elvezetni, hogy poros
környezetben a por felkavarodása minimumra
csökkenjen.
-Ha por vagy gőz keletkezik, a fő feladat azok
ellenőrzés alatt tartása a felszabadulásuk helyén.
- Minden, a szálló por vagy gőz felfogására, elszívására vagy elnyomására szolgáló beépített alkatrészt vagy tartozékot a gyártó utasításainak
megfelelően, szabályszerűen kell használni és
karbantartani.
- A fogyó anyagokat és a betétszerszámot a jelen
útmutató ajánlásainak megfelelően kell kiválasztani, karbantartani és cserélni a por- vagy gőzkép-
z
ődés szükségtelen fokozódásának elkerülése
céljából.
- Használja a munkaadója utasításainak megfelelő,
vagy a munka- és egészségvédelmi előírásokban
megkövetelt, légzőszerveket védő berendezéseket.
4.7 Zaj által okozott veszélyek
- Magas zajszint hatására elégtelen hallásvédelem
esetén tartós halláskárosodás, hallásvesztés és
egyéb problémák léphetnek fel, pl. tinnitus
(csengés, zúgás, sípolás vagy zümmögés a
fülben).
- Ezen veszélyek vonatkozásában elengedhetetlen
a kockázatfelmérés végrehajtása és megfelelő
szabályozási mechanizmusok életbe léptetése.
- A kockázat csökkentésére alkalmas szabályozási
mechanizmusok közé olyan intézkedések
tartoznak, mint a hangcsillapító anyagok alkalmazása, amelyekkel megakadályozható a csengő
zajok fellépése a munkadarabokon.
- Használja a munkaadója utasításai szerinti és a
munka- és egészségvédelmi előírásokban
megkövetelt hallásvédelmi berendezéseket.
-A sűrített levegős szerszámot a jelen útmutatóban
szereplő ajánlások szerint kell üzemeltetni és
karbantartani a zajszint felesleges növekedésének elkerüléséhez.
- A felhasználásra kerülő anyagokat és a betétszerszámot a jelen útmutató ajánlásainak megfelel ően
kell kiválasztani, karbantartani és cserélni a
zajszint szükségtelen növekedésének elkerüléséhez.
- Az integrált hangcsillapítót nem szabad eltávolítani, és annak jó állapotban kell lennie.
4.8 Rezgések által okozott veszélyek
- A rezgések az idegrendszer károsodását okozhatják, ill. a kezekben és a karokban vérkeringési
zavarokat idézhetnek elő.
- Hideg környezetben végzett munka esetén
viseljen meleg ruházatot, tartsa a kezeit melegen
és szárazon.
- Ha azt észleli, hogy a bőr az ujjain vagy a kezein
zsibbad, bizsereg, fáj vagy fehéren elszíneződik,
hagyja abba a munkát a sűrített levegős szerszámmal, tájékoztassa munkaadóját, és forduljon
orvoshoz.
-A sűrített levegős szerszámot a jelen útmutatóban
szereplő ajánlások szerint kell üzemeltetni és
Page 41

karbantartani a rezgések felesleges felerősödé-
sének elkerüléséhez.
- A fogyó anyagokat és a betétszerszámot a jelen
útmutató ajánlásainak megfelelően kell kiválasztani, karbantartani és cserélni a por- vagy gőzkép-
ződés szükségtelen fokozódásának elkerülése
céljából.
4.9 Egyéb biztonsági utasítások
-A sűrített levegő komoly sérüléseket okozhat.
- Ha a sűrített levegős szerszám nincs használatban, tartozékok cseréje vagy javítási munkák
végzése előtt mindig el kell zárni a levegőbeveze-
tést, a levegőtömlőt nyomásmentessé kell tenni,
és a sűrített levegős szerszámot le kell választani
a sűrített levegő bevezetéséről.
- Soha ne irányítsa a levegő áramlását önmagára
vagy más személyekre.
-Az ide-oda vágódó tömlők komoly sérüléseket
okozhatnak. Ezért mindig ellenőrizze a tömlők és
rögzítőeszközeik sérülésmentes állapotát, és azt,
hogy nem oldódtak-e ki.
-A hideg levegőt el kell vezetni a kezektől.
- Univerzális forgó csatlakozók (körmös csatlakozók) használata esetén reteszelőcsapokat kell
alkalmazni és Whipcheck-tömlőrögzítéseket kell
használni védelemként a tömlő és a sűrített
levegős szerszám kapcsolatának, illetve a tömlők
egymás közötti kapcsolatának megszakadása
esetére.
- Gondoskodjon arról, hogy ne lépje túl a sűrített
levegős szerszámon megadott maximális nyomásértéket.
-A sűrített levegő
tömlőnél fogva.
4.10 További biztonsági tudnivalók
- Tartsa be a kompresszorok és a sűrített levegős
szerszámok használatára vonatkozó speciális
munkavédelmi és balesetmegelőzési
előírásokat.
- Ügyeljen arra, hogy ne lépje túl a műszaki
adatokban megadott maximálisan megengedhet ő
üzemi nyomást.
- Ne terhelje túl a szerszámot – csak a műszaki
adatokban megadott teljesítménytartományban
üzemeltesse.
- Problémamentesen használható kenőanyagokat
alkalmazzon. Gondoskodjon a munkahely kielégítő szellőzéséről. Megnövekedett hozam esetén:
vizsgálja meg a sűrített levegős szerszámot,
szükség esetén javíttassa meg.
- Ne dolgozzon a szerszámmal olyankor, amikor
nem tud koncentrálni. Munka közben figyeljen
oda, ügyeljen arra, amit csinál, és meggondoltan
dolgozzon a sűrített levegős szerszámmal. Ne
használja a szerszámot, ha fáradt, ha kábítószerek, alkohol vagy gyógyszerek hatása alatt
van. A szerszámmal végzett munka közben már
egy pillanatnyi figyelmetlenség is komoly sérülésekhez vezethet.
- Tartsa tisztán és jól megvilágítva a munkaterületét. A rendetlen és megvilágítatlan munkaterület
baleseteket eredményezhet.
- Biztosítsa, hogy a sűrített levegős szerszámokhoz
ne férhessenek hozzá gyermekek.
s szerszámokat soha ne tartsa a
MAGYAR hu
- A szabad ég alatt vagy nedves levegőn csak
megfelelő védelemmel ellátva szabad tárolni a
szerszámot.
- Gondoskodjon a sűrített levegős szerszám, kiváltképpen a sűrített levegő csatlakozója és a kezelő-
szervek por és szennyezés elleni védelméről.
- Tartsa erősen a lecsavart zsírtartály dugattyúrúdját (9) a dugattyúrúd biztosításának (10) kioldásakor. Ne hagyja a dugattyúrudat (9) hirtelen
visszarándulni.
- A zsírzóprés működésbe hozásakor nagy
nyomású zsír lép ki.
- Ne fogja be kézzel a zsírzócsövet (1) és a zsír-
zótömlőt (12).
- Ne irányítsa a zsírzóprést emberekre vagy álla-
tokra.
- Csak akkor működtesse a zsírzóprést, ha az
zsírzógombra csatlakozik.
- A zsírzási folyamat közben a csapkodás meg-
akadályozására végig tartsa határozottan a
zsírzótömlőt (12).
Ebben az üzemeltetési útmutatóban az egyes információkat az alábbi jelöléssel láttuk el:
Veszély! Személyi sérülés vagy környezeti
kár keletkezhet.
Figyelem. Anyagi károk keletkezhetnek.
4.11 Szimbólumok a sűrített levegős szerszá-
mon
Üzembe helyezés előtt olvassa el a kezelési
útmutatót.
Viseljen szemvédőt
Viseljen hallásvédő eszközt
5. Áttekintés
Lásd a 2. oldalt.
1Zsírzócső
2Feltöltőcsonk
3Légtelenítő szelep
4Nyomófej
5 Kioldóbillentyű
6 Szárnyas anya (a fogantyú állításához)
7Fogantyú
81/4”-os karmantyú (sűrítettlevegő-csatlakozó)
9 Dugattyúrúd
10 Dugattyúrúd-biztosítás
11 Zsírtartály
12 Zsírzótömlő
13 Hangcsillapított levegőkimenet
6. Üzemeltetés
6.1 Első üzemeltetés előtt
Csavarja be a karmantyút (8).
41
Page 42

MAGYARhu
6.2 A zsírtartály feltöltése
Figyelem. A zsírtartályt (11) kizárólag zsírzó-
présekben való használatra engedélyezett,
nem korrozív kenőanyagokkal töltse fel. Vegye
figyelembe a kenőanyag gyártója által megadott
adatokat.
A nyomódugattyú a patronok tartós használatától
deformálódhat. A feltöltés módjának ezt követő
megváltoztatásakor tömítetlenség és zsírkilépés
fordulhat elő. Lehetőleg állapítson meg egy általános feltöltési módot.
Tudnivaló:
A zsírfajta megváltoztatásakor a fajtatiszta alkalmazás csak alapos tisztítással biztosítható.
Feltöltés patronnal
1. A kioldáshoz csavarja le a zsírtartályt (11) az
óramutató járásával ellentétes irányban.
2. A nyitott végével felfelé helyezze be a patront a
zsírtartályba (11) és nyomja le.
3. Csavarja be a zsírtartályt (11) az óramutató já-
rásával egyező irányban. Ne húzza meg túl erő-
sen.
4. Tartsa nyomva a dugattyúrúd-biztosítást (10)
és tolja be a dugattyúrudat (9).
Feltöltés hordóból
1. A kioldáshoz csavarja le a zsírtartályt (11) az
óramutató járásával ellentétes irányban.
2. Merítse bele a zsírtartályt (11) kb. 5 cm-re a
zsírba és húzza ki lassan ütközésig a dugattyúrudat (9).
3. Csavarja be a zsírtartályt (11) az óramutató já-
rásával egyező irányban.
4. Tartsa nyomva a dugattyúrúd-biztosítást (10)
és tolja be a dugattyúrudat (9).
42
Feltöltés töltőszivattyúval
1. Húzza ki ütközésig a dugattyúrudat (9).
2. Kösse össze a feltöltőcsonkot (2) a töltőszivat-
tyúval.
3. A töltőszivattyút működtetve töltse fel teljesen a
zsírtartályt (11).
4. Válassza le a feltöltőcsonkot (2) a töltőszivat-
tyúról.
5. Tartsa nyomva a dugattyúrúd-biztosítást (10)
és tolja be a dugattyúrudat (9).
6.3 A sűrített levegős szerszám használata
A sűrített levegős szerszám teljes teljesítményének
kihasználásához mindig legalább 9 mm belső átmé-
rőjű sűrítettleveg
belső átmérő esetén lényegesen csökkenhet a
teljesítmény.
Figyelem. A sűrítettlevegő-vezeték nem tar-
talmazhat kondenzvizet.
Figyelem. Ahhoz, hogy a szerszám hosszú
időn át használatra kész maradjon, megfelelően el kell látni pneumatikaolajjal. Ez a következő
módon történhet:
– Olajozott sűrített levegő alkalmazása ködolajozó
felszerelésével.
– Ködolajozó nélkül: kézi olajozás naponta a sűrí-
tett levegő csatlakozóján keresztül. Kb. 3–5
csepp pneumatikaolaj az üzemelés minden 15.
percében folyamatos használat esetén.
Ha a szerszám több napon át üzemen kívül volt,
kb. 5 csepp pneumatikaolajat kell kézzel bejuttatni
a sűrített levegő csatlakozójába.
1. Húzza meg választhatóan a zsírzócsövet (1)
vagy a zsírzótömlőt (12) a nyomófejen (4) az
óramutató járásával egyező irányban.
2. Állítsa be az üzemi nyomást a kompresszoron
(a maximális megengedett üzemi nyomást lásd
a műszaki adatok között).
3. Csatlakoztassa a szerszámot gyorscsatlakozó-
val a sűrítettlevegő-ellátásra.
4. Helyezze a zsírzóprést a zsírzógombra.
5. A zsírzás megindításához nyomja meg a kioldó-
billentyűt (5).
6. Elegendő mennyiségű zsír leadása után enged-
je el a kioldóbillentyűt (5).
Tudnivaló:
A nyomás, a kenési időköz és a kenőanyag fajtája,
illetve mennyisége vonatkozásában vegye figye-
ő-tömlőket használjon. Túl kis
Page 43

lembe a kenendő berendezés gyártója által
megadottakat.
.
7. Karbantartás és ápolás
Veszély! A szerszámon végzendő minden
munka előtt válassza le a sűrített levegő csat-
lakozását.
Veszély! A jelen fejezetben leírtakon túlmenő
javítási vagy karbantartási munkákat csak
szakember végezheti.
- Rendszeres karbantartással gondoskodjon sűrí-
tett levegős szerszám biztonságáról.
- Ellenőrizze a csavarkötések szoros állapotát,
szükség esetén húzza meg őket szorosra.
-A sűrített levegő csatlakozójában levő szűrőt
legalább hetente tisztítani kell.
- Ajánlott a sűrített levegős szerszám elé vízleválasztóval és olajozóval ellátott nyomáscsökkentőt
beiktatni.
- Ha megnövekszik a kilépő olaj és levegő mennyisége, ellenőrizze és szükség esetén javíttassa
meg a sűrített levegős szerszámot. (Lásd a 9. fejezetet)
- Kerülje az érintkezést a szerszámon lerakódott
veszélyes anyagokkal. Viseljen alkalmas
személyi védőfelszerelést, és a karbantartás előtt
megfelelő intézkedésekkel távolítsa el a veszélyes anyagokat.
f
8. Tartozékok
Csak eredeti Metabo tartozékokat használjon.
Csak olyan tartozékot használjon, amely ehhez a
sűrített levegős szerszámhoz készült, és megfelel
az ebben az üzemeltetési útmutatóban megadott
követelményeknek és adatoknak.
A teljes tartozékprogram a www.metabo.com
honlapon vagy a katalógusban található.
MAGYAR hu
11. Műszaki adatok
Az adatok értelmezését lásd a 3. oldalon.
A változtatás jogát a műszaki fejlesztés érdekében
fenntartjuk.
V
p
A = méretek: hossz x szélesség x
m=súly
A fenti adatok (a mindenkor érvényben levő
szabványoknak megfelelően) tűréssel
rendelkeznek.
kibocsátási jellemzőinek becslését, ill. különböző
szerszámok összehasonlítását. Az alkalmazási
feltételektől, a szerszám állapotától vagy a használt
betétszerszámoktól függően a tényleges környezeti
terhelés nagyobb vagy kisebb is lehet. A becsléshez vegye figyelembe a munkaszüneteket és az
alacsonyabb környezeti terheléssel járó fázisokat
is. A megfelelően korrigált becsült értékek alapján
írjon elő védőintézkedéseket a felhasználó
számára, illetve hozzon szervezési intézkedéseket.
Hangszint (EN ISO 15744)
L
L
KpA, KWA= mérési bizonytalanság
= löketenkénti levegőigény
1
= maximálisan megengedett üzemi
max.
nyomás
magasság
Kibocsátási értékek
Ezek az értékek lehetővé teszik a szerszám
=hangnyomásszint
pA
=hangteljesítményszint
WA
:
Viseljen hallásvédő eszközt!
9. Javítás
Veszély! A sűrített levegős szerszámokon
csak szakemberek végezhetnek javításokat
eredeti Metabo pótalkatrészekkel!
A javításra szoruló Metabo sűrített levegős szerszá-
mokkal forduljon Metabo szakkereskedőjéhez. A
címeket a www.metabo.com oldalon találja.
A pótalkatrészek listája letölthető a
www.metabo.com oldalról.
10. Környezetvédelem
A kiöregedett sűrített levegős szerszámok, csomagolások és tartozékok környezetbarát ártalmatlanításával és újrahasznosításával kapcsolatban tartsa
be a helyi előírásokat. Tilos személyek és a
környezet épségének veszélyeztetése.
Használjon környezetkímélő zsírokat.
Akadályozza meg az ellenőrizetlen lecsepegést,
hogy ne kerülhessen zsír a környezetbe.
43
Page 44

РУССКИЙru
Оригинальное руководство по эксплуатации
1. Декларация соответствия
Мы с полной ответственностью заявляем, что
эти пневматические смазочные шприцы с идентификацией по типу и серийному номеру *1)
отвечают всем соответствующим требованиям
директив *2) и норм *3). Техническую документацию к *4) — см. на с. 3.
2. Использование по
назначению
Смазочный шприц представляет собой пневматический инструмент профессионального назначения. Он может применяться для смазки
машин, автомобилей, с/х
ленных установок и транспортеров.
Эксплуатация этого инструмента допускается
только с подачей сжатого воздуха. Запрещается превышать указанное на пневмоинструменте максимально допустимое рабочее давление.
Запрещается эксплуатация этого пневмоинструмента со взрывоопасными, горючими или
опасными для здоровья газами.
Любое другое использование является недопустимым. Использование не по назначению, изменения конструкции пневмоинструмента или
использование деталей, которые не были проверены или допущены производителем, могут
повлечь за собой непредвиденный материальный ущерб!
За ущерб, возникший в результате использования не по назначению, ответственность несет
только пользователь.
Необходимо соблюдать общепринятые правила
техники безопасности, а также указания,
прилагаемые к данному руководству.
агрегатов, промыш-
3. Общие указания по технике
безопасности
Для вашей
и защиты вашего пневмоинструмента
от повреждений соблюдайте
символом.
безопасности. Невыполнение инструкций и
указаний по технике безопасности может
привести к поражению электрическим током,
возгоранию и/или к
Сохраните все инструкции и указания по
технике безопасности.
Передавайте пневмоинструмент следующему
владельцу только вместе с этими документами.
44
указания, отмеченные данным
ПРЕДУПРЕЖДЕНИЕ! Для снижения
риска травмирования прочтите руководство по эксплуатации.
ПРЕДУПРЕЖДЕНИЕ! Прочтите все
инструкции и указания по технике
собственной безопасности
получению тяжелых травм.
- Пользователь или работодатель должны
оценить все потенциальные опасности,
которые могут возникать при каждом использовании инструмента.
- Перед наладкой, эксплуатацией, ремонтом,
техническим обслуживанием и заменой
принадлежностей, а также перед началом
работ
вблизи пневмоинструмента следует
ознакомиться с указаниями по технике
безопасности. В противном случае возможно
получение серьезных телесных повреждений.
- К наладке, регулировке или использованию
пневмоинструмента допускается только
квалифицированный и обученный персонал.
- Изменения конструкции/модификации пневмоинструмента не допускаются. Изменения
конструкции могут снизить эффективность
мер по защите и повысить степень угрозы для
пользователя.
- Категорически запрещается использовать
поврежденные пневмоинструменты. Внимательно следите за состоянием пневмоинструментов. Регулярно проверяйте исправность
функционирования подвижных элементов,
легкость их хода, целостность всех деталей и
отсутствие повреждений, которые могли бы
отрицательно сказаться на работе пневмоинструмента. Проверяйте наличие и разборчивость табличек и надписей. Сдавайте или
заменяйте поврежденные части
в ремонт до его использования. Причиной
большинства несчастных случаев является
несоблюдение правил технического обслуживания пневмоинструментов.
инструмента
4. Специальные указания по
технике безопасности
4.1 Опасности вследствие отлетания
деталей
- Отсоединяйте пневмоинструмент от системы
подачи сжатого воздуха перед заменой сменного инструмента/принадлежностей, перед
регулировкой или техническим обслуживанием.
- В случае поломки заготовки, принадлежностей или пневмоинструмента детали могут
отлетать в разные стороны с высокой скоростью.
- При эксплуатации, замене принадлежностей,
а также в ходе ремонта или технического
обслуживания пневмоинструмента следует
всегда надевать ударопрочные защитные
очки. Степень требуемой защиты следует
оценивать для каждого случая отдельно.
- Убедитесь в отсутствии опасностей для
других лиц.
4.2 Опасности в ходе эксплуатации
- Пользователь и
должны быть в состоянии обращаться с пневмоинструментом с учетом его размеров, веса
и мощности.
обслуживающий персонал
Page 45

- Правильно держите пневмоинструмент:
будьте готовы среагировать на ожидаемые и
неожиданные движения — держите обе руки
наготове!
- Примите устойчивое положение и обеспечьте
надежный хват электроинструмента для
сохранения равновесия в любой рабочей ситуации.
- Избегайте непреднамеренного включения
пневмоинструмента. В случае прерывания
подачи воздуха выключите пневмоинструмент
с помощью выключателя.
- Используйте только рекомендованные изго
товителем СОЖ.
- Пользуйтесь средствами индивидуальной
защиты и всегда надевайте защитные очки.
Использование средств индивидуальной
защиты, например защитных перчаток,
защитной одежды, респиратора, нескользящей защитной обуви, защитного шлема или
защитных наушников, в зависимости от вида и
области применения инструмента снижает
риск травмирования и поэтому настоятельно
рекомендуется.
4.3 Опасности вследствие повторяю-
щихся
действий
- При выполнении работ с пневмоинструментом
возможно появление неприятных ощущений в
кистях рук, предплечьях, плечах, в области
шеи или других частях тела.
- Принимайте правильное положение для
работы с пневмоинструментом, обращайте
внимание на безопасность и избегайте
работы в таких положениях, в которых вам
сложно сохранить равновесие и которые
доставляют вам дискомфорт.
рывной работы пользователь должен менять
положение тела во избежание появления
усталости и дискомфорта.
- Нельзя игнорировать такие симптомы как
продолжительное недомогание, нарушение
сердцебиения, появление болей, «мурашек»,
онемения. Пользователь должен уведомить
об этом своего работодателя и проконсультироваться с врачом-специалистом.
4.4 Опасности от используемой оснастки
(принадлежностей)
- Отсоединяйте пневмоинструмент
подачи сжатого воздуха перед установкой или
заменой сменного инструмента/принадлежностей.
- Используйте только те принадлежности,
которые специально предназначены для этого
инструмента и отвечают требованиям и характеристикам, приводимым в настоящем руководстве по эксплуатации.
4.5 Опасности на рабочем месте
- Поскальзывание, спотыкание и падение являются основными причинами травмирования
на рабочем месте. Обращайте внимание на
поверхности, которые в результате использования пневмоинструмента могут стать сколь-
В ходе непре-
от системы
-
РУССКИЙ ru
зкими, а также на опасность споткнуться о
воздушный шланг.
- При выполнении работ в незнакомых условиях соблюдайте осторожность: возможно
наличие скрытой проводки под электрическим напряжением.
- Пневмоинструмент не предназначен для
использования во взрывоопасной воздушной
среде и не изолирован от контакта с источниками электрического тока.
4.6 Опасность вследствие пыли и паров
- Возникающие в ходе работы с пневмоинструментом пыль и пары могут причинить вред
вашему здоровью (например, способствовать
развитию рака, природных недостатков,
астмы и/или появлению кожных воспалений);
в обязательно порядке оцените возможные
риски с
учетом этих опасностей и примите
соответствующие меры предосторожности.
- При оценке рисков, связанных с возникновением пыли в ходе выполнения работ с пневмоинструментом, следует также учитывать и ту
пыль, которая уже возможно имелась в месте
проведения работ и была поднята в воздух
работающим инструментом.
- Пневмоинструмент следует эксплуатировать
и обслуживать
циями, указанными в настоящем руководстве,
для сведения к минимуму высвобождения
опасных для здоровья пыли и паров.
- Отработанный воздух следует отводить таким
образом, чтобы свести к минимуму завихрение пыли в условиях сильной запыленности
в месте проведения работ.
- При возникновении пыли или паров основной
задачей является контроль
ждения.
- Необходимо правильно использовать и обслуживать всю необходимую для сбора, всасывания или удаления летучей пыли или паров
оснастку пневмоинструмента согласно указаниям изготовителя.
- Расходные материалы и сменный инструмент
следует выбирать, обслуживать и заменять
согласно указаниям из настоящего руководства во избежание ненужного увеличения
пыле- или
- Используйте защитные респираторы
согласно производственным инструкциям или
в соответствии с требованиями по охране
труда и технике безопасности.
4.7 Опасность вследствие шума
- Высокий уровень шумовых нагрузок при
отсутствии должной защиты слуха может
привести к продолжительным нарушениям
слуха, потере слуха и иным проблемам,
например ушному (звенящему, свистящему
или жужжащему) шуму.
- Следует
риски с учетом этих опасностей и принять
соответствующие меры предосторожности.
- В качестве таких мер предосторожности
может выступать, например, применение
изоляционных материалов в целях устра-
в соответствии с рекоменда-
их высвобо-
парообразования.
непременно оценить возможные
45
Page 46

РУССКИЙru
нения звенящих шумов, возникающих на заготовке.
- Используйте защитные наушники согласно
производственным инструкциям или в соответствии с требованиями по охране труда и
технике безопасности.
- Пневмоинструмент следует эксплуатировать
и обслуживать в соответствии с приводимыми
в настоящем руководстве указаниями во
избежание ненужного повышения уровня
шума.
- Расходные материалы и сменный инструмент
следует выбирать, обслуживать и заменять
согласно указаниям из настоящего руководства во избежание ненужного повышения
уровня шума.
- Запрещается удалять встроенный глушитель.
Он должен находиться в технически
исправном состоянии.
4.8 Опасности вследствие вибраций
- Длительное воздействие вибраций может
стать причиной нервных расстройств и нарушений в циркуляции крови в кистях и предплечьях
рук.
- При выполнении работ в условиях низкой
температуры носите теплую одежду и
держите руки в тепле и сухими.
- Если вы почувствуете/увидите, что кожа на
пальцах или кистях рук стала нечувствительной, появились «мурашки», она болит или
побелела, прекратите работу с пневмоинструментом, уведомите об этом своего работодателя
и проконсультируйтесь с врачом.
- Пневмоинструмент следует эксплуатировать
и обслуживать в соответствии с приводимыми
в настоящем руководстве указаниями во
избежание ненужного повышения уровня
вибраций.
- Расходные материалы и сменный инструмент
следует выбирать, обслуживать и заменять
согласно указаниям из настоящего руководства во избежание ненужного повышения
уровня вибраций.
4.9 Дополнительные указания по технике
безопасности
- Сжатый воздух может стать причиной серьезного травмирования.
- Если пневмоинструмент не используется, а
также перед заменой принадлежностей или
при выполнении ремонтных работ всегда
блокируйте подачу воздуха, разгружайте от
давления воздушный шланг и отсоединяйте
пневмоинструмент от системы (источника)
подачи сжатого воздуха.
- Никогда не направляйте воздушный поток на
себя или других
- Отлетающие в сторону шланги могут стать
причиной серьезного травмирования. В связи
с этим всегда проверяйте, не повреждены ли
шланги и не повреждены/расфиксированы ли
их крепежные элементы.
- Не допускайте воздействия (сжатого) холодного воздуха на кисти рук.
- При использовании универсальных поворотных (кулачковых) муфт необходимо
46
лиц.
использовать стопорные штифты
Whipcheck для защиты шлангов от волочения
(захлестывания) в целях обеспечения безопа-
сности на случай разъединения шланговых
соединений.
- Позаботьтесь о том, чтобы не допустить
превышения пневмоинструментом указанного
максимального давления.
- Категорически запрещается переносить
пневмоинструмент за шланг.
4.10 Дополнительные указания по технике
безопасности:
- При необходимости соблюдайте особые предписания по
ждению производственного травматизма при
обращении с компрессорами и
пневмоинструментами.
- Убедитесь в том, что не превышается
указанное в технических характеристиках
макс. допустимое рабочее давление.
- Не перегружайте инструмент, используйте
его только в том диапазоне мощности,
который указан в технических характеристиках.
- Используйте допущенные смазочные материалы/СОЖ.
вентиляции рабочей зоны. При повышенном
расходе сжатого воздуха: проверьте пневмоинструмент, при необходимости отремонтируйте.
- Прекратите работу с этим инструментом, если
вас что-либо отвлекает! Будьте внимательны,
следите за своими действиями и серьезно
относитесь к работе с пневмоинструментом.
Не пользуйтесь инструментом, если вы
устали, находитесь под действием
тиков, алкоголя или лекарств. Невнимательность при работе с инструментом может
привести к серьезным травмам.
- Следите за чистотой и порядком на своем
рабочем месте. Беспорядок на рабочем месте
и плохое освещение могут привести к
несчастным случаям.
- Держите пневмоинструмент в недоступном
для детей месте.
- Запрещается хранение инструмента вне
помещений
соответствующей защиты.
- Защищайте пневмоинструмент, особенно
штуцер подачи сжатого воздуха и органы
управления от попадания пыли и грязи.
- Придерживайте шток (9) у отвинченной
емкости для смазки при расфиксации фиксатора (10) штока. Не допускайте резкого отпускания штока (9).
- При приведении шприца в действие из него
начинает выходить
давлением.
- Не придерживайте смазочную трубку (1) и
смазочный шланг (12) рукой.
- Не направляйте смазочный шприц на людей
или животных.
- Приводите смазочный шприц в действие
лишь тогда, когда он будет установлен на
смазочный ниппель.
безопасности труда или предупре-
Позаботьтесь о достаточной
или во влажных помещениях без
смазка под высоким
и хомуты
нарко-
Page 47

- Надежно удерживайте смазочный шланг
(12) во время всего процесса смазки, чтобы
предотвратить его соскакивание (с ниппеля).
Информация обозначена в данном руководстве по эксплуатации следующим образом:
Опасность! Предупреждение об опасно-
сти травмирования или вреде для окружа-
ющей среды.
Внимание! Предупреждение о возмож-
ном материальном ущербе.
4.11 Символы на пневмоинструменте
Перед
вводом в эксплуатацию прочтите
руководство по эксплуатации.
РУССКИЙ ru
Указание:
При смене вида смазки во избежание смешивания смазки разных сортов требуется
тщательная очистка.
Заполнение с использованием картриджа
Используйте защитные очки
Надевайте защитные наушники
5. Обзор
См. с. 2.
1 Смазочная трубка
2 Заправочный патрубок
3 Воздушный клапан
4 Нагнетательная головка
5 Спусковая скоба
6 Гайка-барашек (для регулировки рукоятки)
7 Рукоятка
8 Ниппельное соединение 1/4" (для подклю-
чения сжатого воздуха)
9 Шток
10 Фиксатор штока
11 Емкость для смазки
12 Смазочный шланг
13 Звукоизолированный выход воздуха
6. Эксплуатация
6.1 Перед
Вверните съемный ниппель (8).
6.2 Заполнение емкости для смазки
смазочными веществами, которые допущены
для использования в смазочных шприцах.
Соблюдайте указания от изготовителя смазки.
Нагнетательный поршень может деформироваться вследствие постоянного использования
картриджей. Последующая смена способа
заполнения может привести к негерметичности
и выходу
используйте один и тот же способ заполнения.
первым использованием
Внимание! Заполняйте емкость (11) для
смазки только не вызывающими коррозию
смазки наружу. По возможности
1. Отверните емкость (11) для смазки в направлении против часовой стрелки и снимите ее.
2. Вставьте картридж в емкость (11) для смазки открытым концом вверх и прижмите его
вниз.
3. Вверните емкость (11) для смазки в направлении по часовой стрелке. Не затягивайте
слишком сильно.
4. Придерживая фиксатор (10) штока в нажатом положении, вставьте шток (9).
Заполнение из резервуаров со смазкой
(бочкотары)
1. Отверните емкость (11) для смазки в направлении против часовой стрелки и сними
те ее.
2. Опустите емкость (11) для смазки примерно
на 5 см в смазку и медленно вытяните шток
(9) до упора.
3. Вверните емкость (11) для смазки в направлении по часовой стрелке.
4. Придерживая фиксатор (10) штока в нажатом положении, вставьте шток (9).
-
47
Page 48

РУССКИЙru
Заполнение посредством заправочного
насоса
1. Вытяните шток (9) до упора.
2. Соедините заправочный патрубок (2) с заправочным насосом.
3. Включите насос и заполните емкость (11)
для смазки полностью.
4. Разъедините соединение между заправочным патрубком (2) и заправочным насосом.
5. Придерживая фиксатор (10) штока в нажатом положении, вставьте шток (9).
6.3 Использование пневмоинструмента
Для обеспечения полной мощности своего
пневмоинструмента
мошланги с внутренним диаметром мин. 9 мм.
Недостаточный внутренний диаметр может
заметно снизить производительность инструмента.
Внимание! В шланге подачи воздуха не
должно быть конденсата.
Внимание! Чтобы этот инструмент оста-
вался функциональным в течение долгого
времени, его необходимо смазывать достаточным количеством смазки. Варианты смазки:
– Установите маслораспылитель для
промасленного сжатого воздуха.
– Без маслораспылителя: ежедневно смазы-
вайте вручную штуцер подачи сжатого воздуха. Прим. 3–5 капель масла для пневмоинструментов через каждые 15 минут работы в
непрерывном режиме.
Если инструмент не использовался в течение
нескольких дней, добавьте вручную в штуцер
подачи сжатого воздуха прим. 5 капель масла
для пневмоинструмента.
1. Навинтите
смазочный шланг (12) в направлении по часовой стрелке на нагнетательную головку
(4).
2. Отрегулируйте рабочее давление на ком-
прессоре (макс. допустимое рабочее давление см. в «Технических характеристиках»).
3. Подсоедините инструмент через быстро-
разъемную муфту к источнику сжатого воздуха.
4. Установите смазочный шприц на смазочный
ниппель.
48
всегда используйте пнев-
подачи
либо смазочную трубку (1), либо
5. Для
выхода смазки нажмите спусковую ско-
бу (5).
6. Отпустите скобу (5), как только выйдет достаточное количество смазки.
Указание:
Соблюдайте указания от изготовителя смазываемого оборудования относительно давления,
периодичности смазки, а также вида и объема
используемой смазки.
.
7. Техническое обслуживание
и уход
Опасность! Перед любыми работами на
инструменте отсоединяйте штуцер подачи
сжатого воздуха.
Опасность! Описанные в настоящем раз-
деле работы по техобслуживанию и ре-
монту должны выполняться только специали-
стами.
- Путем регулярного технического обслужи-
вания обеспечьте безопасность пневмоинструмента.
- Проверяйте надежность резьбовых соединений, при необходимости затягивайте их.
- По крайней мере
фильтр в штуцере подачи сжатого воздуха.
- На входе сжатого воздуха пневмоинструмента рекомендуется установить редукционный клапан с влагоотделителем и масленку.
- При избыточном выходе масла или воздуха
следует проверить пневмоинструмент и при
необходимости отремонтировать. (см. главу
9.)
- Не допускайте контакта с опасными вещест-
вами, которые могли
менте. Используйте подходящие средства
индивидуальной защиты и устраните опасные
вещества путем принятия подходящих мер
перед техническим обслуживанием.
f
раз в неделю очищайте
отложиться на инстру-
8. Принадлежности
Используйте только оригинальные принадлежности Metabo.
Используйте только те принадлежности,
которые предназначены для этого пневмоинструмента и соответствуют требованиям и
параметрам, приводимым в настоящем руководстве по эксплуатации.
Полный ассортимент принадлежностей см. на
сайте www.metabo.com или в каталоге.
9. Ремонт
Опасность! Ремонт пневмоинструментов
должны проводить только квалифицированные специалисты с использованием оригинальных запчастей Metabo!
Для
ремонта пневмоинструментов производства Metabo обращайтесь в ближайшее представительство Metabo. Адреса см. на сайте
www.metabo.com.
Page 49

Списки запасных частей можно скачать на
сайте www.metabo.com.
10. Защита окружающей среды
Выполняйте национальные правила утилизации и переработки отслужившего пневмоинструмента, упаковки и принадлежностей. В
ходе утилизации не должно возникать никаких
угроз для людей и окружающей среды.
Используйте экологически безопасные смазки.
Устраните неконтролируемое стекание
каплями, чтобы смазка не попала во внешнюю
среду.
11. Технические
характеристики
Пояснения к данным
Оставляем за собой право на технические
изменения.
V
p
A=размеры: длина x ширина x высота
m=масса
На указанные технические характеристики
распространяются допуски, предусмотренные
действующими стандартами.
= расход воздуха на ход
1
= макс. допустимое рабочее давление
max.
Значения шума и вибрации
Эти значения позволяют оценивать и сравнивать шум и вибрацию, создаваемые при
работе различных инструментов. В зависимости от условий эксплуатации, состояния
инструмента или сменных инструментов фактическая нагрузка
При определении примерного уровня шума и
вибрации учитывайте перерывы в работе и
фазы работы с пониженной (шумовой)
нагрузкой. Определите перечень организационных мер по защите пользователя с учетом тех
или иных значений шума и вибрации.
Уровень шума (EN ISO 15744)
L
=уровень звукового давления
pA
L
=уровень звуковой мощности
WA
K
, KWA= коэффициент погрешности
pA
Надевайте защитные наушники!
, указанным на с. 3.
может быть выше или ниже.
:
РУССКИЙ ru
49
Page 50

ČESKYcs
Originální návod k použití
1. Prohlášení o shodě
Prohlašujeme s výhradní odpovědností: Tyto pneumatické mazací lisy, určené typem a sériovým
číslem *1), odpovídají všem příslušným ustanovením směrnic *2) a norem *3). Technická dokumentace u *4) – viz strana 3.
2. Použití v souladu s určeným
účelem
Mazací lis je nástroj poháněný stlačeným vzduchem určený pro použití v řemeslné činnosti. Může
se použít k mazání strojů, motorových vozidel, zemědělských strojů, průmyslových zařízení, transportních a přepravních zařízení.
Nářadí smí být poháněno pouze připojením stlačeného vzduchu. Maximální přípustný pracovní tlak
uvedený na pneumatickém nářadí nesmí být pře-
kročen. Toto nářadí se nesmí provozovat
s výbušnými, hořlavými nebo zdraví škodlivými plyny.
Jakékoliv jiné použití je v rozporu s určením. Použitím v rozporu s určením, úpravami na pneumatickém nářadí nebo použitím dílů, které nejsou pře-
zkoušeny a schváleny výrobcem, mohou vzniknout
nepředvídatelné škody!
Za škody způsobené použitím, které je v rozporu
surčeným účelem, přebírá zodpově
uživatel.
Je nutné dodržovat všeobecně uznávané předpisy
pro ochranu před úrazem a přiložené bezpečnostní
pokyny.
3. Všeobecné bezpečnostní
pokyny
Pozor na místa v textu označená tímto
symbolem, slouží k vaší bezpečnosti
akochraně vašeho pneumatického
nářadí!
VÝSTRAHA – Za účelem minimalizace
nebezpečí poranění si přečtěte návod
kpoužití.
VÝSTRAHA Přečtěte si všechny bezpeč-
nostní pokyny a instrukce. Nedodržení
bezpečnostních pokynů ainstrukcí může mít za
následek úraz elektrickým proudem, požár a/nebo
těžká poranění.
Všechny bezpečnostní pokyny a instrukce
uschovejte pro pozdější použití.
Předávejte vaše pneumatické nářadí jen společně
stěmito dokumenty.
- Uživatel nebo zaměstnavatel uživatele musí
posoudit zvláštní rizika spojená s používáním
nářadí.
-Před seřizováním, používáním, opravou, údržbou
nebo výmě
50
prací v blízkosti pneumatického nářadí, si přečtěte
nou dílů příslušenství, jakož i před
dnost pouze
bezpečnostní pokyny, kterým musíte porozumět.
Pokud tomu tak není, může to vést k těžkým
zraněním.
-Pneumatické nářadí by měla seřizovat, nasta-
vovat nebo používat výhradně kvalifikovaná
a vyškolená obsluha.
- Na pneumatickém nářadí se nesmí provádět
žádné úpravy. Změny mohou snížit účinnost
bezpečnostních opatření a zvýšit rizika pro
obsluhu.
- Nikdy nepoužívejte poškozené pneumatické
nářadí. Pneumatické nářadí pečlivě ošetřujte.
Pravidelně kontrolujte, zda pohyblivé díly
bezvadně fungují a nevzpřičují se, zda díly nejsou
zlomené nebo poškozené tak, že je omezena
funkce pneumatického nářadí. Zkontrolujte
úplnost a čitelnost štítků anápisů. Poškozené díly
nechte před použitím nářadí opravit nebo vyměnit.
Mnoho úrazů má pří
pneumatickém nářadí.
činu ve špatně udržovaném
4. Speciální bezpečnostní
pokyny
4.1 Ohrožení vymrštěnými díly
-Před výměnou používaného nástroje nebo dílů
příslušenství, před prováděním nastavení či
údržby odpojte pneumatické nářadí od zásobování stlačeným vzduchem.
-Při prasknutí obrobku, poškození dílů příslušen-
ství nebo pneumatického nářadí mohou být
vysokou rychlostí vymrštěny díly.
-Při provozu, výměně dílů příslušenství, při prová-
dění oprav nebo údržby pneumatického nářadí
noste vždy ochranu očí odolnou proti nárazu.
Stupeň nezbytné ochrany by se měl posuzovat
samostatně pro každé použití.
-Zajistěte, aby také ostatním osobám nehrozilo
nebezpečí.
4.2 Ohrožení za provozu
- Obsluha a pracovníci údržby musí být fyzicky
schopni zvládat velikost, hmotnost a výkon pneumatického nářadí.
-Držte správně pneumatické nářadí: Buďte připra-
veni reagovat na obvyklé nebo náhlé pohyby –
mějte př
-Zajistěte si bezpečný postoj a vždy udržujte
-Zabraňte neúmyslnému uvedení nářadí do
- Používejte pouze maziva doporučená výrobcem.
- Noste osobní ochranné pomůcky a vždy
ipravené obě ruce.
rovnováhu.
provozu. Při přerušení zásobování stlačeným
vzduchem vypněte pneumatické nářadí vypínačem.
ochranné brýle. Nošení osobních ochranných
pomůcek, jako jsou ochranné rukavice, ochranný
oděv, maska proti prachu, bezpečnostní obuv
s protiskluzovou podrážkou, ochranná přilba nebo
ochrana sluchu, podle druhu nasazení nářadí
snižuje riziko poranění a doporučuje se.
Page 51

4.3 Ohrožení opakovanými pohyby
-Při práci s pneumatickým nářadím můžete vnímat
nepříjemné pocity v rukou, pažích, ramenech,
v oblasti krku nebo v jiných částech těla.
- Pro práci s pneumatickým nářadím zaujměte
pohodlný postoj, dbejte na dobrou stabilitu
a vyvarujte se nevhodných pozic při držení těla
a takových pozic, u kterých je obtížné udržovat
rovnováhu. Pracovník obsluhy by měl během
prací, které trvají dlouhou dobu, měnit držení těla,
což může pomoci zabránit únavě anepříjemným
pocitům.
- Pokud se u pracovníka obsluhy objeví symptomy
jako trvalá nevolnost, obtíže, bušení srdce, bolest,
mravenčení, hluchota, pálení nebo ztuhlost,
neměl by tyto varující signály ignorovat. Měl by
tuto skutečnost sdělit zaměstnavateli
a konzultovat s odborným lékařem.
4.4 Ohrožení díly příslušenství
-Před upevňováním nebo výměnou používaného
nástroje nebo dílu příslušenství odpojte pneumatické nářadí od zásobování stlačeným vzduchem.
- Používejte pouze příslušenství určené pro toto
nářadí, které splňuje požadavky a parametry
uvedené v tomto návodu k obsluze.
4.5 Ohrožení na pracovišti
- Uklouznutí, zakopnutí nebo pád jsou hlavní př
zranění na pracovišti. Všímejte si povrchů, které
mohou být používáním pneumatického nářadí
kluzké, nezapomeňte, že můžete zakopnout
o vzduchovou hadici.
-Vneznámém prostředí postupujte opatrně.
Mohou zde hrozit skrytá nebezpečí poranění elektrickým kabelem nebo jinými zásobovacími vedeními.
-Pneumatické nářadí není určeno pro použití ve
výbušných atmosférách a není izolované proti
kontaktu se zdroji elektrické energie.
4.6 Ohrožení prachem a párami
- Prach a páry vznikající při používání pneumatic-
kého nářadí mohou poškodit zdraví (např. rakovina, vrozené vady, astma a/nebo dermatitida); je
nezbytné provést posouzení rizika s ohledem na
tato ohrožení a realizovat vhodná opatření.
- Posouzení rizika by mělo zahrnovat prach vznikající při používání pneumatického nářadí
apřípadný prach v prostředí zvířený používáním
tohoto nářadí.
-Pneumatické nářadí se musí provozovat a jeho
údržba provádět podle doporučení uvedených
v tomto návodu, aby se uvolňování prachu a par
snížilo na minimální možnou úroveň.
- Odpadní vzduch se musí odvádět tak, aby se
zvíření prachu v prašném prostředí snížilo na minimální možnou úroveň.
- Vznikají-li prach nebo páry, je hlavním úkolem
jejich uvolňování v místě
- Namontované díly nebo díly příslušenství pneumatického nářadí určené k zachycení, odsávání
nebo potlačení vzniku polétavého prachu nebo
par by se měly řádně používat a udržovat podle
pokynů výrobce.
kontrolovat.
íčiny
ČESKY cs
-Spotřební materiál a používaný nástroj je třeba
volit, udržovat a měnit podle doporučení tohoto
návodu. Tím zabráníte zvýšenému vytváření
prachu a par.
- Používejte ochranné pracovní pomůcky k ochraně
dýchacích cest podle pokynů zaměstnavatele
nebo tak, jak to vyžadují předpisy ochrany zdraví.
4.7 Ohrožení hlukem
-Vysoká hlučnost může při nedostatečné ochraně
sluchu způsobit trvalá poškození sluchu, ztrátu
sluchu a jiné problémy, jako tinnitus (zvonění,
hučení, pískání nebo bzučení v uchu).
- Je nezbytné provést posouzení rizika s ohledem
na tato ohrožení a realizovat vhodná opatření.
- Mezi vhodná opatření ke snížení rizika patří používání izolace, jež zabraňuje vzniku zvonivého hluku
uobrobků.
- Používejte ochranné pracovní pomůcky k ochraně
sluchu podle pokynů zaměstnavatele a tak, jak to
vyžadují předpisy ochrany zdraví.
- Pneumatické ná
provádějte podle doporučení uvedených v tomto
návodu. Tím zabráníte zbytečnému zvýšení hluč-
nosti.
-Spotřební materiál a používaný nástroj je třeba
volit, udržovat a měnit podle doporučení tohoto
návodu. Tím zabráníte zbytečnému zvýšení hluč-
nosti.
- Integrovaný tlumič hluku se nesmí demontovat
amusí být vdobrém stavu.
4.8 Ohrožení vibracemi
-Působení vibrací může způsobit poškození nervů
a poruchy krevního oběhu v rukách a pažích.
-Při práci v chladném prostředí noste teplé oble-
čení, vaše ruce musí být teplé a suché.
- Pokud zjistíte, že pokožka na prstech nebo rukách
znecitlivěla, brní, bolí nebo zbledla, přestaňte
spneumatickým nářadím pracovat, informujte
svého zaměstnavatele a konzultujte s lékařem.
- Pneumatické nářadí používejte a jeho údržbu
provádějte podle doporučení uvedených v tomto
návodu. Tím zabráníte zbytečnému zesílení
vibrací.
-Spotřební materiál a používaný nástroj je třeba
volit, udržovat a měnit podle doporučení tohoto
návodu. Tím zabráníte zbytečnému zesílení
vibrací.
4.9 Dodatečné bezpečnostní pokyny
-Stla
čený vzduch může způsobit vážná zranění.
-Pokud pneumatické nářadí nepoužíváte, před
výměnou dílů příslušenství nebo při provádění
oprav vždy uzavřete přívod vzduchu, odtlakujte
vzduchovou hadici a odpojte pneumatické nářadí
od přívodu stlačeného vzduchu.
- Proud vzduchu nikdy nesměřujte na sebe nebo
jiné osoby.
-Uvolněné hadice šlehající okolo mohou způsobit
vážná zranění. Vždy proto zkontrolujte, zda
nejsou hadice a jejich upevňovací prvky poško-
zené a zda se neuvolnily.
-Na ruce nesmí být přiváděn studený vzduch.
- Používají-li se univerzální otočné spojky (zubové
spojky), musí se nasadit aretační kolíky
řadí používejte a jeho údržbu
51
Page 52

ČESKYcs
a doporučuje se používat hadicové spojky
Whipcheck, abyste zajistili ochranu v případě
selhání propojení hadice s pneumatickým
nářadím nebo vzájemného propojení hadic.
-Zajistěte, aby nebyl překročen max. tlak uvedený
na pneumatickém nářadí.
- Nikdy nenoste pneumatické nářadí za hadici.
4.10 Další bezpečnostní pokyny
-Dodržujte speciální předpisy bezpečnosti práce
aprevence úrazů při zacházení s kompresory
apneumatickým nářadím.
-Zajistěte, aby nebyl překročen maximální
přípustný pracovní tlak uvedený v Technických
údajích.
-Nepřetěžujte toto nářadí – používejte jej pouze
v rozsahu výkonu, který je uveden v Technických
údajích.
- Používejte nezávadná maziva. Zajistěte dostatečné větrání pracoviště. Při zvýšeném úběru:
nechte pneumatické nářadí zkontrolovat a příp.
opravit.
- Nepoužívejte tento nástroj, když nejste soustře-
děni. Buďte pozorní, dávejte pozor na to, co
děláte a přistupujte k práci s pneumatickým
nářadím rozumně. Nář
jste unavení nebo pod vlivem drog, alkoholu nebo
léků. Moment nepozornosti při použití nářadí
může vést k vážným poraněním.
- Udržujte své pracovní místo čisté a dobře osvět-
lené. Nepořádek nebo neosvětlené pracovní
oblasti mohou vést k úrazům.
-Zajistěte pneumatické nářadí před dětmi.
-Neuchovávejte nářadí nechráněné venku nebo ve
vlhkém prostředí.
-Chraňte pneumatické nářadí, především přípojku
stlačeného vzduchu a ovládací prvky, před
prachem a nečistotou.
- Táhlo (9) odšroubovaného zásobníku maziva při
povolování pojistky táhla (10) pevně držte.
Nenechte táhlo (9) prudce vylétnout dozadu.
-Při spuštění mazacího lisu je mazivo vytlačováno
pod vysokým tlakem.
-Nepřidržujte mazací trubici (1) a mazací hadici
(12) rukou.
- Mazací lis nesměřujte na osoby nebo zvířata.
- Mazací lis spouštějte pouze tehdy, když je na-
sazen na maznici.
-Během celého mazání pevně držte mazací ha-
dici (12), abyste zabránili jejímu odtlačení.
Informace v tomto návodu k obsluze jsou ozna
ny následovně:
Nebezpečí! Varování před nebezpečím úra-
zu nebo poškození životního prostředí.
Pozor. Varování před věcnými škodami.
adí nepoužívejte, pokud
če-
Noste ochranu sluchu
5. Přehled
Viz strana 2.
1Mazací trubice
2Plnicí hrdlo
3Odvzdušňovací ventil
4Tlaková hlava
5Spoušť
6Křídlová matice (k nastavení rukojeti)
7Rukojeť
8 Spojka 1/4“ (přípojka stlačeného vzduchu)
9Táhlo
10 Pojistka táhla
11 Zásobník maziva
12 Mazací hadice
13 Výstup vzduchu s tlumením hluku
6. Provoz
6.1 Před prvním uvedením do provozu
Našroubujte spojku k nasazení hadice (8).
6.2 Plnění zásobníku maziva
Pozor. Zásobník maziva (11) plňte výhradně
nekorozivními mazivy schválenými pro použití
v mazacích lisech. Dodržujte pokyny výrobce
maziva.
Tlakový píst se může trvalým použitím kartuší
zdeformovat. Když poté změníte způsob plnění,
může to vést k netěsnosti a úniku maziva. Rozhodněte se pokud možno pro stálý způsob plnění.
Upozornění:
Při změně druhu maziva je možné vyloučit znečištění jiným druhem maziva pouze důkladným vyčištěním.
Plnění s kartuší
4.11 Symboly na pneumatickém nářadí
Před zprovozněním si přečtěte návod
kobsluze.
Noste ochranu očí
52
1. Odšroubujte zásobník maziva (11) proti směru
hodinových ručiček.
2. Kartuš s otevřeným koncem směřujícím nahoru
zaveďte do zásobníku maziva (11) a zatlačte
dolů.
3. Zásobník maziva (11) zašroubujte ve směru ho-
dinových ručiček. Nedotahujte příliš.
Page 53

4. Držte stisknutou pojistku táhla (10) a táhlo (9)
zasuňte.
Plnění z obalových nádob
1. Odšroubujte zásobník maziva (11) proti směru
hodinových ručiček.
2. Zásobník maziva (11) ponořte cca 5 cm do maziva a pomalu vytahujte táhlo (9) až k dorazu.
3. Zásobník maziva (11) zašroubujte ve směru hodinových ručiček.
4. Držte stisknutou pojistku táhla (10) a táhlo (9)
zasuňte.
Plnění pomocí plnicí pumpy
1. Vytáhněte táhlo (9) až k dorazu.
2. Spojte plnicí hrdlo (2) s plnicí pumpou.
3. Čerpejte plnicí pumpou a zcela naplňte zásobník maziva (11).
4. Rozpojte plnicí hrdlo (2) a plnicí pumpu.
5. Držte stisknutou pojistku táhla (10) a táhlo (9)
zasuňte.
6.3 Používání pneumatického nářadí
Chcete-li dosáhnout max. výkonu pneumatického
nářadí, používejte vždy pneumatické hadice
svnitřním průměrem minimálně 9 mm. Příliš malý
vnitřní průměr může výrazně snížit výkon.
Pozor. Vedení stlačeného vzduchu nesmí
obsahovat kondenzovanou vodu.
Pozor. Scílem, aby zůstalo toto nářadí dlou-
ho provozuschopné, musí být zásobováno
dostatečným množstvím pneumatického oleje. To
se může provádět následovně:
– Používejte stla
mlhou, k tomu namontujte mlhovou maznici.
– Bez mlhové maznice: Mažte ručně olejem každý
den přes přípojku stlačeného vzduchu. Cca 3?5
čený vzduch obohacený olejovou
ČESKY cs
kapek pneumatického oleje na každých 15 minut
při trvalém provozu.
Pokud bylo nářadí několik dnů mimo provoz, ručně
aplikujte 5 kapek pneumatického oleje do přípojky
stlačeného vzduchu.
1. Volitelně utáhněte mazací trubici (1) nebo mazací hadici (12) ve směru hodinových ručiček
na tlakové hlavě (4).
2. Na kompresoru nastavte pracovní tlak (maximální přípustný pracovní tlak viz Technické
údaje).
3. Připojte nástroj pomocí rychlospojky k přívodu
stlačeného vzduchu.
4. Nasaďte mazací lis na maznici.
5. Stisknutím spouště (5) dávkujte mazivo.
6. Po aplikaci dostatečného množství maziva do
maznice spoušť (5) uvolněte.
Upozornění:
Dodržujte údaje od výrobce zařízení, u kterého
provádíte mazání, týkající se tlaku, intervalu
mazání, druhu maziva a jeho množství.
.
7. Údržba a ošetřování
Nebezpečí! Před prováděním všech prací na
nářadí odpojte přípojku stlačeného vzduchu.
Nebezpečí! Údržbu a opravy, které nároč-
ností překračují úkony popsané v této kapito-
le, smí provádět jen odborníci.
-Pravidelnou údržbou zajistěte bezpečnost
aspolehlivost pneumatického nářadí.
- Zkontrolujte dotažení šroubových spojů
avpřípadě potřeby je dotáhněte.
- Minimálně týdně čistěte filtr v přípojce stlačeného
vzduchu.
-Doporučujeme zapojit před pneumatické nářadí
redukční ventil s odlučovačem vody a mlhovou
maznicí.
-Při zvýšeném úniku oleje a vzduchu nechte pneu-
matické nářadí zkontrolovat a příp. opravit. (viz
kapitola 9.)
- Vyvarujte se kontaktu s nebezpečnými látkami
usazenými na nářadí. Noste vhodné osobní
ochranné pomůcky a vhodnými opatř
odstraňte nebezpečné látky před prováděním
údržby.
f
eními
8. Příslušenství
Používejte pouze originální příslušenství Metabo.
Používejte pouze příslušenství určené pro toto
pneumatické nářadí, které splňuje požadavky
a parametry uvedené v tomto návodu k obsluze.
Kompletní nabídku příslušenství najdete na
www.metabo.com nebo v katalogu.
9. Opravy
Nebezpečí! Opravy pneumatického nářadí
smí provádět pouze odborníci s použitím origi-
nálních náhradních dílů Metabo!
53
Page 54

ČESKYcs
Spneumatickým nářadím Metabo vyžadujícím
opravu se prosím obraťte na vaše zastoupení
Metabo. Adresy viz www.metabo.com.
Seznamy náhradních dílů si můžete stáhnout na
adrese www.metabo.com.
10. Ochrana životního prostředí
Řiďte se národními předpisy k ekologické likvidaci
a recyklaci vysloužilého pneumatického nářadí,
obalů apříslušenství. Nesmí být ohroženy osoby
aživotní prostředí.
Používejte ekologická maziva.
Zabraňte tomu, aby mazivo nekontrolovaně odka-
pávalo a unikalo tak do životního prostředí.
11. Technické údaje
Vysvětlivky k údajům na straně 3.
Změny na základě technického pokroku vyhrazeny.
V
p
A=rozměry: délka x šířka x výška
m=hmotnost
U uvedených technických údajů je nutno počítat
s odpovídajícími tolerancemi (dle příslušných
platných norem).
nářadí a porovnat různá nářadí. V závislosti na
podmínkách použití, stavu nářadí nebo použitých
nástrojích může být skutečné zatížení vyšší nebo
nižší. Při odhadování zohledněte přestávky v práci
a fáze nižšího zatížení. Na základě náležitě přizpů-
sobených odhadnutých hodnot stanovte ochranná
opatření pro uživatele, např. organizační opatření.
Hladina akustického tlaku (EN ISO 15744)
L
L
K
=spotřeba vzduchu na zdvih
1
= maximální přípustný pracovní tlak
max.
Emisní hodnoty
Tyto hodnoty umožňují odhadnout emise
=hladina akustického tlaku
pA
=hladina akustického výkonu
WA
, KWA= nejistota měření
pA
Noste ochranu sluchu!
:
54
Page 55

Page 56

Metabowerke GmbH,
72622 Nuertingen, Germany
www.metabo.com
170 27 2710 - 1213
 Loading...