

Page 1

Mealstream EC501, RD501
ENGLISH
FRANÇAIS
DEUTSCH
ESPAÑOL
IMPORTANT INFORMATION
READ BEFORE USE
PLEASE SAVE THESE INSTRUCTIONS
INFORMATIONS IMPORTANTES
LIRE AVANT UTILISATION
INSTRUCTIONS À CONSERVER
WICHTIGE INFORMATIONEN
VOR ANWENDUNG LESEN
DIESE ANLEITUNG AUFBEWAHREN
INFORMACIÓN IMPORTANTE LEER
ANTES DE LA UTILIZACIÓN
SEE
PAGE 2
VOIR
PAGE 18
SIEHE
SEITE 34
VÉASE
PÁGINA 50
GUARDE ESTAS INSTRUCCIONES
1
Page 2

CONTENTS
Safety instructions .............................................3
Electrical supply ................................................3
Precautions ....................................................... 4
Installation instructions ...................................... 5
Suitable cooking utensils ................................... 6
Introduction ........................................................ 8
Main features .....................................................9
Control panel ................................................... 10
Operating instructions:
Manual mode................................................... 11
ENGLISH
Programing number pads ............................... 12
Running a Program ......................................... 13
Manual controls ( RD501 models ) .................. 14
Daily cleaning .................................................. 15
Problem solving ............................................... 16
Technical specification ..................................... 16
Service Contact Details ................................... 17
2
Page 3
IMPORTANT SAFETY INSTRUCTIONS
PLEASE READ THE FOLLOWING SAFETY INSTRUCTIONS CAREFULLY
WARNING: It is hazardous for anyone other than a skilled person to carry out any service or repair operation
which involves the removal of any cover which gives protection against exposure to microwave energy
1. DO NOT operate empty, without food or liquid inside the oven, as this will result in overheating and may
cause damage.
2. NEVER remove any fixed internal parts of the oven.
3. NEVER tamper with the control panel, door, seals, or any other part oven.
4. DO NOT obstruct air vents/filters or steam outlet.
5. NEVER hang tea towels or cloths on any part of the oven.
6. If the door seals are damaged, the oven must be repaired by an approved Engineer.
7. If the power cable is damaged in any way it MUST be replaced by an approved Engineer.
8. When handling hot liquids, foods, and containers, care should be taken to avoid scalds and burns.
9. When heating liquids using microwave only or combination function, the contents should be stirred prior
to heating to avoid eruptive boiling.
10. Feeding bottles and baby food jars should be opened when heating, the contents stirred or shaken and
the temperature checked prior to consumption to avoid burns.
11. Never use the oven to heat alcohol, e.g. brandy, rum etc. Also, food containing alcohol, such as
Christmas pudding, can more easily catch fire if overheated.
12. Never attempt to deep fry in the oven.
13. The appliance is not intended for use by young children or infirm persons without supervision.
14. Young children should be supervised to ensure that they do not play with the appliance
ELECTRICAL SUPPLY
WARNING
This appliance must be earthed. Failure to do so may result in electric shock and death.
The oven must be installed by a
qualified and approved electrician .
This equipment is not suitable for
connection to mains supply via a
standard 13amp plug.
The installation wiring (hard wired or
socket fitting) must be in accordance
with current IEE regulations and safety
standards. The electrical supply lead
is located at the rear of the oven.
WARNING: A double isolating switch
must be fitted. This must have a 3mm
contact break on both poles.
If you are in any doubt about your
electrical supply, seek the advice of a
qualified and approved electrician.
It is essential that the electrical supply
is properly installed and earthed. It
should be fed from a cicuit which is
suitablefor very high power electrical
appliances and it is important that this
circuit is not overloaded.
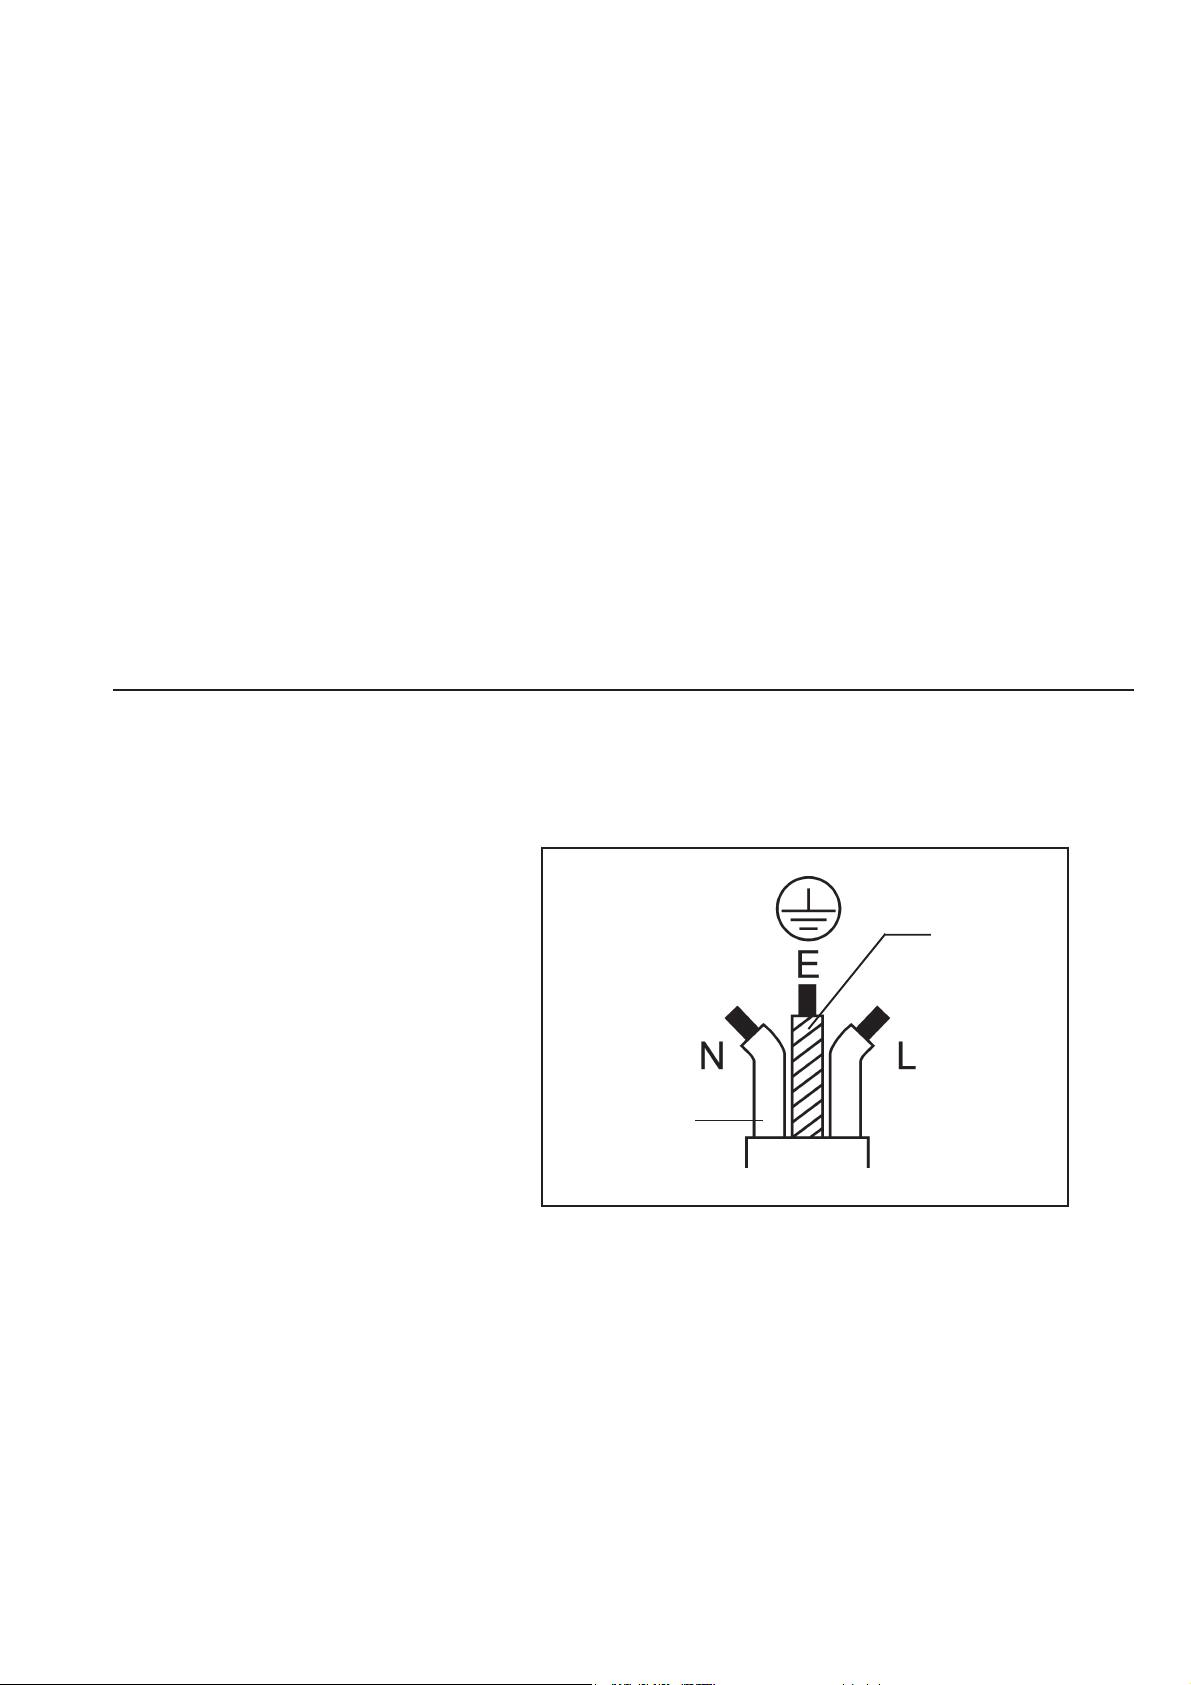
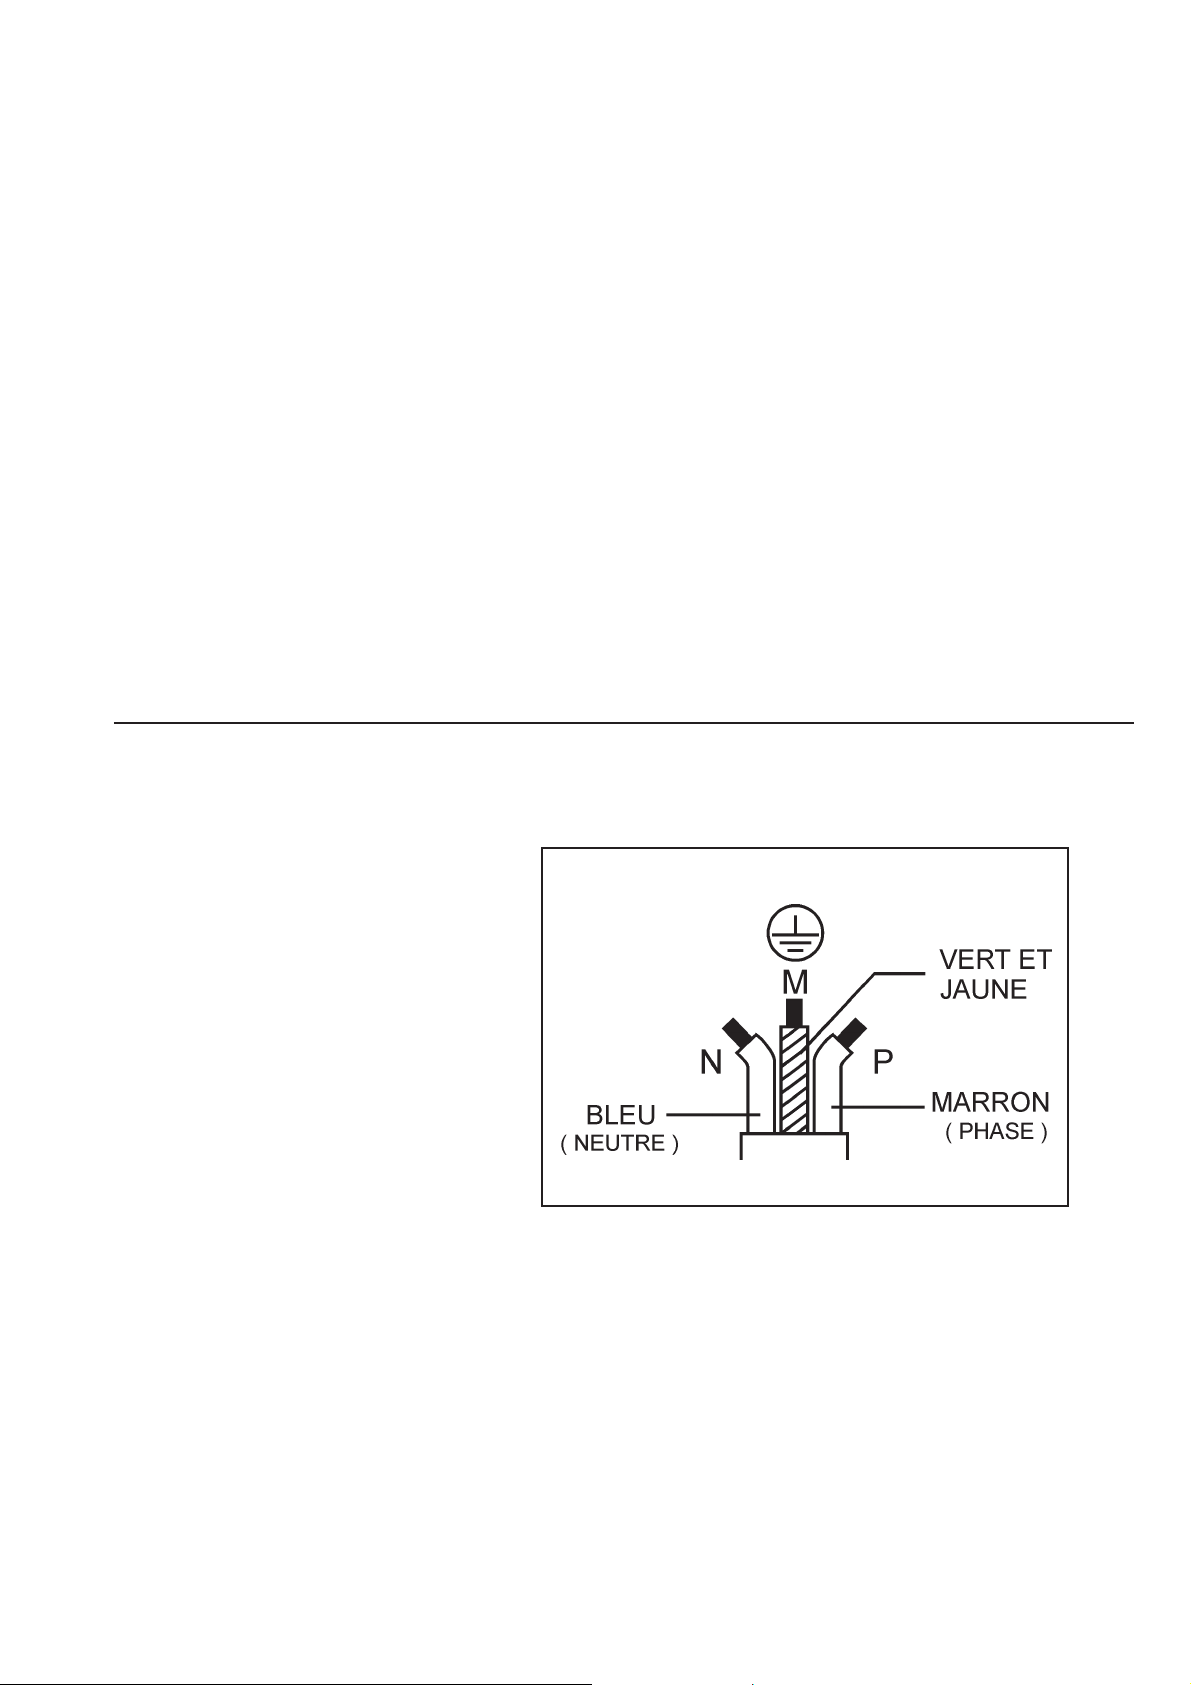
BLUE BROWN
Establishments with standard ( Type
‘B’ ) circuit breakers are sensitive to
‘surges’ which occur on switching on
freezers, refridgerators and other
catering equipment, including
microwave ovens. Because of this ,
we strongly recommend that a
separate Type ‘C’ circuit breaker
( designed specifically for this type
of equipment ) is fitted to each oven
installation.
If fitted with a plug type connection
then the socket should be located in
an easily accessible position.
GREEN
&
SAVE THESE INSTRUCTIONS
3
Page 4

PRECAUTIONS TO BE OBSERVED
1. Read this manual before using your oven.
2. As with all electrical appliances, it wise to have the electrical connections inspected
periodically.
3. The oven interior, door seals should be cleaned frequently, following the instructions
described in the CLEANING section.
4. There is no need to switch off your oven after each function but remember to switch
off at the end of the day or period of operation.
5. Microwave energy should not be used to dry linen or warm plates.
6. As with any cooking appliance, care should be taken to avoid combustion of the
items within the oven.
If smoke is observed:
Switch off
Isolate from the electrical supply
Keep door the closed to stifle any flames
7. Ensure food is placed centrally in cavity for best results.
8. When using the microwave only function, cover the food to prevent splashing the
walls of the cavity.
9. Food in combustible plastic or paper containers should only be used in microwave
only function and checked frequently to avoid the possibility of ignition.
10. Items should be unwrapped when using convection and combination functions.
11. Eggs and whole hard-boiled eggs should not be heated using the microwave or
combination function as they may explode.
12. Food with a skin, e.g. potatoes, apples, sausages etc. should be pierced before
heating.
13. Food should not be heated in a completely sealed container as the build-up of
steam may cause it to explode.
14. Excess fat should be removed during ‘roasting’ and before lifting heavy containers
from the oven.
15. In the event of glass breaking or shattering within the oven, ensure that food is
totally free of glass particles. If in doubt, dispose of any food that was in the oven at
the time of the breakage.
4
Page 5
INSTALLATION
Remove packing material and protective film from the oven.
Check for obvious signs of transit damage. If necessary, inform the
supplier IMMEDIATELY.
LOCATION AND POSITIONING
Choose a site away from major heat sources.
DO NOT position so that hot air is drawn in from fryers, grills, griddles,
etc.
A heat barrier to the height of the oven must be installed if sited next to
a hob, stove or range.
Note:
The air intake is located
under each side of the oven,
even with the clearance
specified below it is
important that airflow is as
cool as possible and not
pre-heated by other
appliances such as fryers,
grills and griddles as this
will deteriorate the life and
performance of the oven.
Note the
minimum
recommended
clearance
required for
air flow
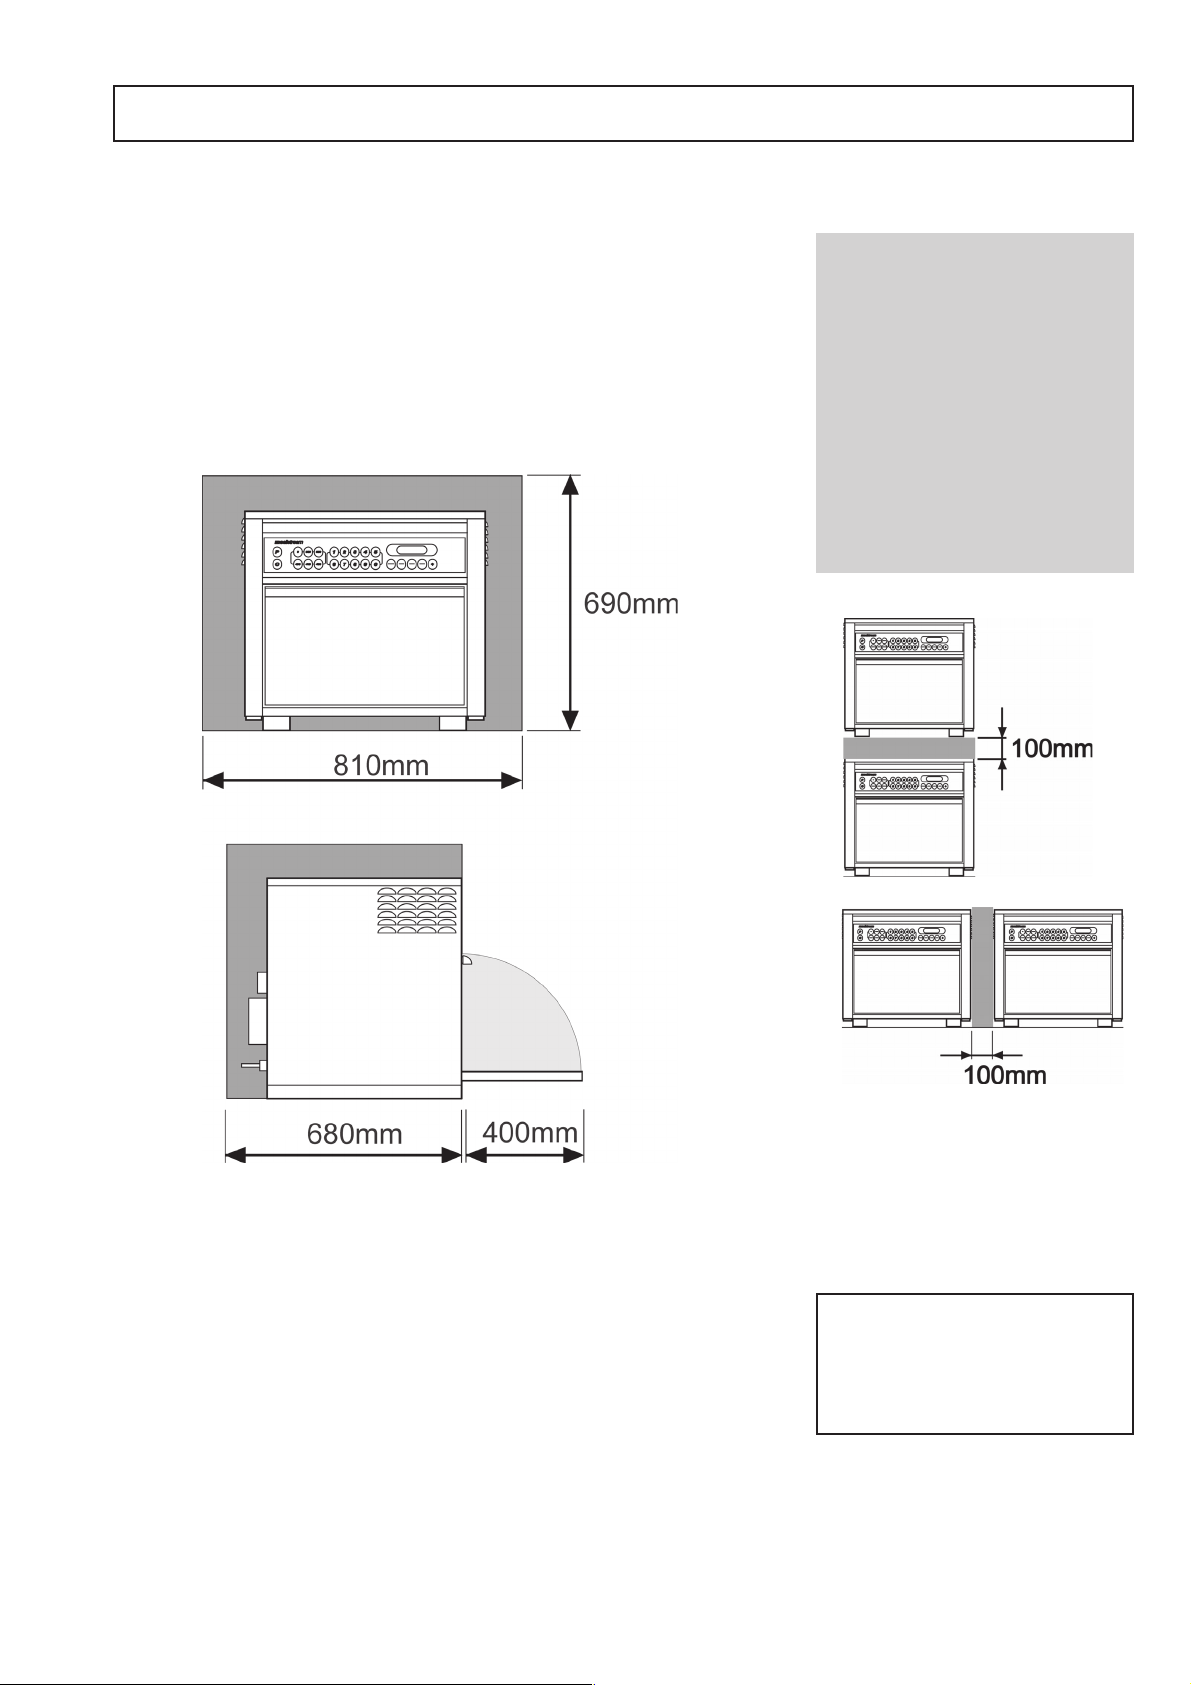
Place the oven on a flat surface that is LEVEL, STRONG and STABLE.
Allow a minimum clearance of 50mm to the rear, top and each side to
allow air to circulate freely.
The air intake is located under each side of the oven, even with the
clearance specified above it is important that airflow is as cool as
possible and not pre heated by other appliances such as fryers, grills or
griddles.
Allow a minimum of 50mm clearance above the oven for hot air to
escape.
Allow sufficient clearance, 400mm in front of the oven for the door to
open fully
Do not affix labels/stickers to oven other than those applied by the
manufacturer
Do not stack the oven
directly on top of another.
Use a separate shelf or
double tiered stand.
WARNING:
Check that the
AIR FILTERS are in place
prior to operation
( see Main Features )
5
Page 6
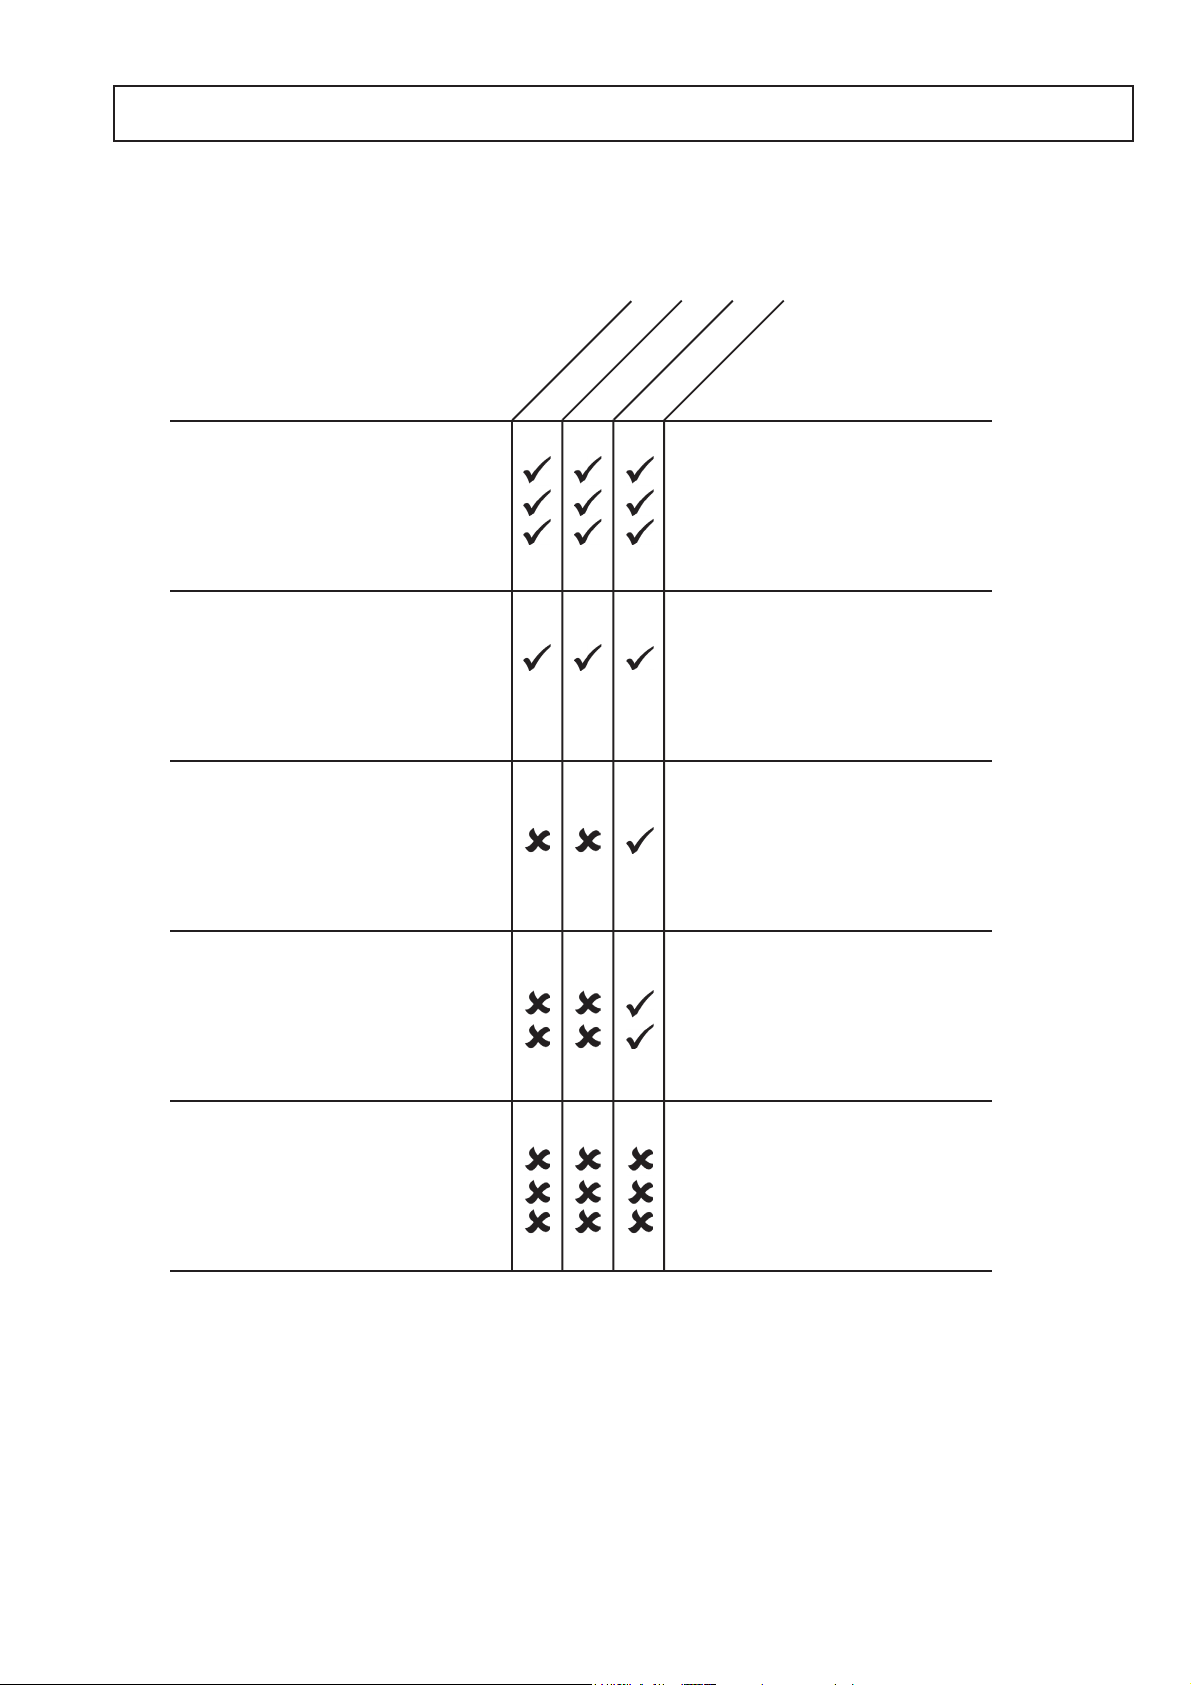
SUITABLE COOKING UTENSILS
Manufacturer’s instructions should be checked to determine the suitability of individual
containers or utensils using each of the cooking functions.
The following chart provides general guidelines:
Heat resistant containers
Toughened glass
Vitreous ceramics
Earthenware
(porcelain, crockery, china etc.)
Metallic Trays
Metallic trays (on oven runners)
DO NOT USE ANY OTHER
METAL CONTAINERS
Plastic containers
Rigid, boilable, plastic
containers
Disposables
combination
convection only
microwave only
Do not use items with metallic
decoration.
Metallic trays may only be used
when placed between the vitrous
runners on each side of the oven
cavity
Dual-ovenable plastic containers
(up to certain temperatures) are now
available.
Check manufacturer’s instructions
before use
Combustibles (paper, card, etc)
Microwave-suitable cling film
Other utensils
Tie tags
Cutlery
Temperature probes
Cling film should not come into
contact with food.
No kitchen utensil should be left in
food while it is cooking
6
Page 7
THE USE OF METALLIC ITEMS IN COMBINATION AND MICROWAVE ONLY FUNCTIONS
Some of the interior panels in Mealstream 501 ovens are vitreous enamel
which acts as an insulator and allows safe use of metal in controlled
conditions.
(The vitreous enamel tray supplied can be upturned and used as a
permanent base.)
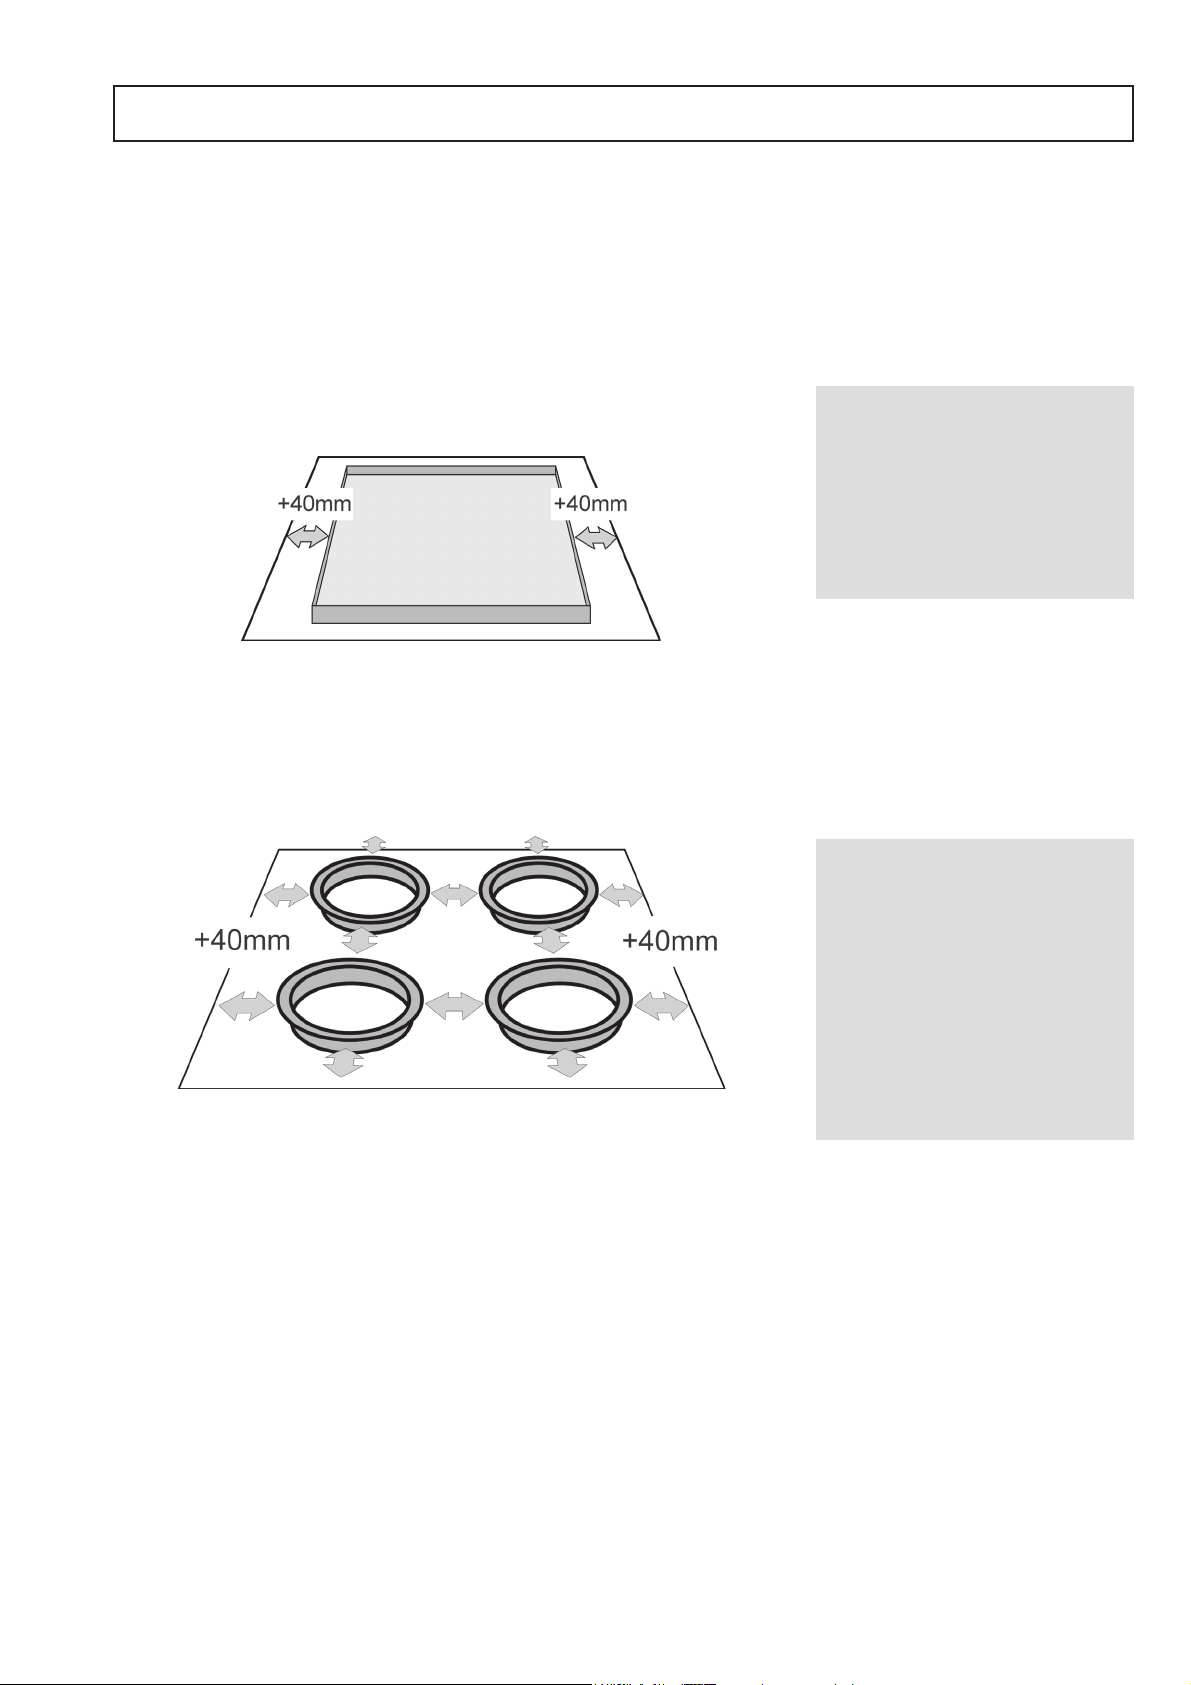
Position large metal pans and trays centrally in the oven
at least 40mm ( 1.5 inches ) from side walls.
Care must be taken to position
If metal containers are placed too
close to each other or the sides of
the oven, arcing may occur which
WARNING:
containers correctly.
may damage the oven.
Position individual metal containers evenly at least 1.5 inches (40mm) from
each other and the side walls
Avoid using metal pans greater than 2.5 inches (65mm) in depth as this may
reflect microwaves and alter the time required to heat the food thoroughly.
WARNING:
If a metallic, crackling sound is
heard during combination or
microwave only functions, open
the door to stop cooking and
reposition containers correctly.
If metal items (including silver
serving flats) become spot burned
due to arcing, discontinue their
use in the oven.
7
Page 8
INTRODUCTION
The Mealstream 501 oven offers catering kitchens the flexibility of three heating functions;
microwave only, convection only, and combination cooking.
Combination cooking enables high quality results to be achieved in a fraction of the time
taken by conventional cooking, particularly when baking, browning, roasting, grilling or
producing gratinee dishes.
Once established, precise instructions for combination or convection cooking of selected
items may be programmed into the ovens memory so that they can be repeated easily
and accurately.
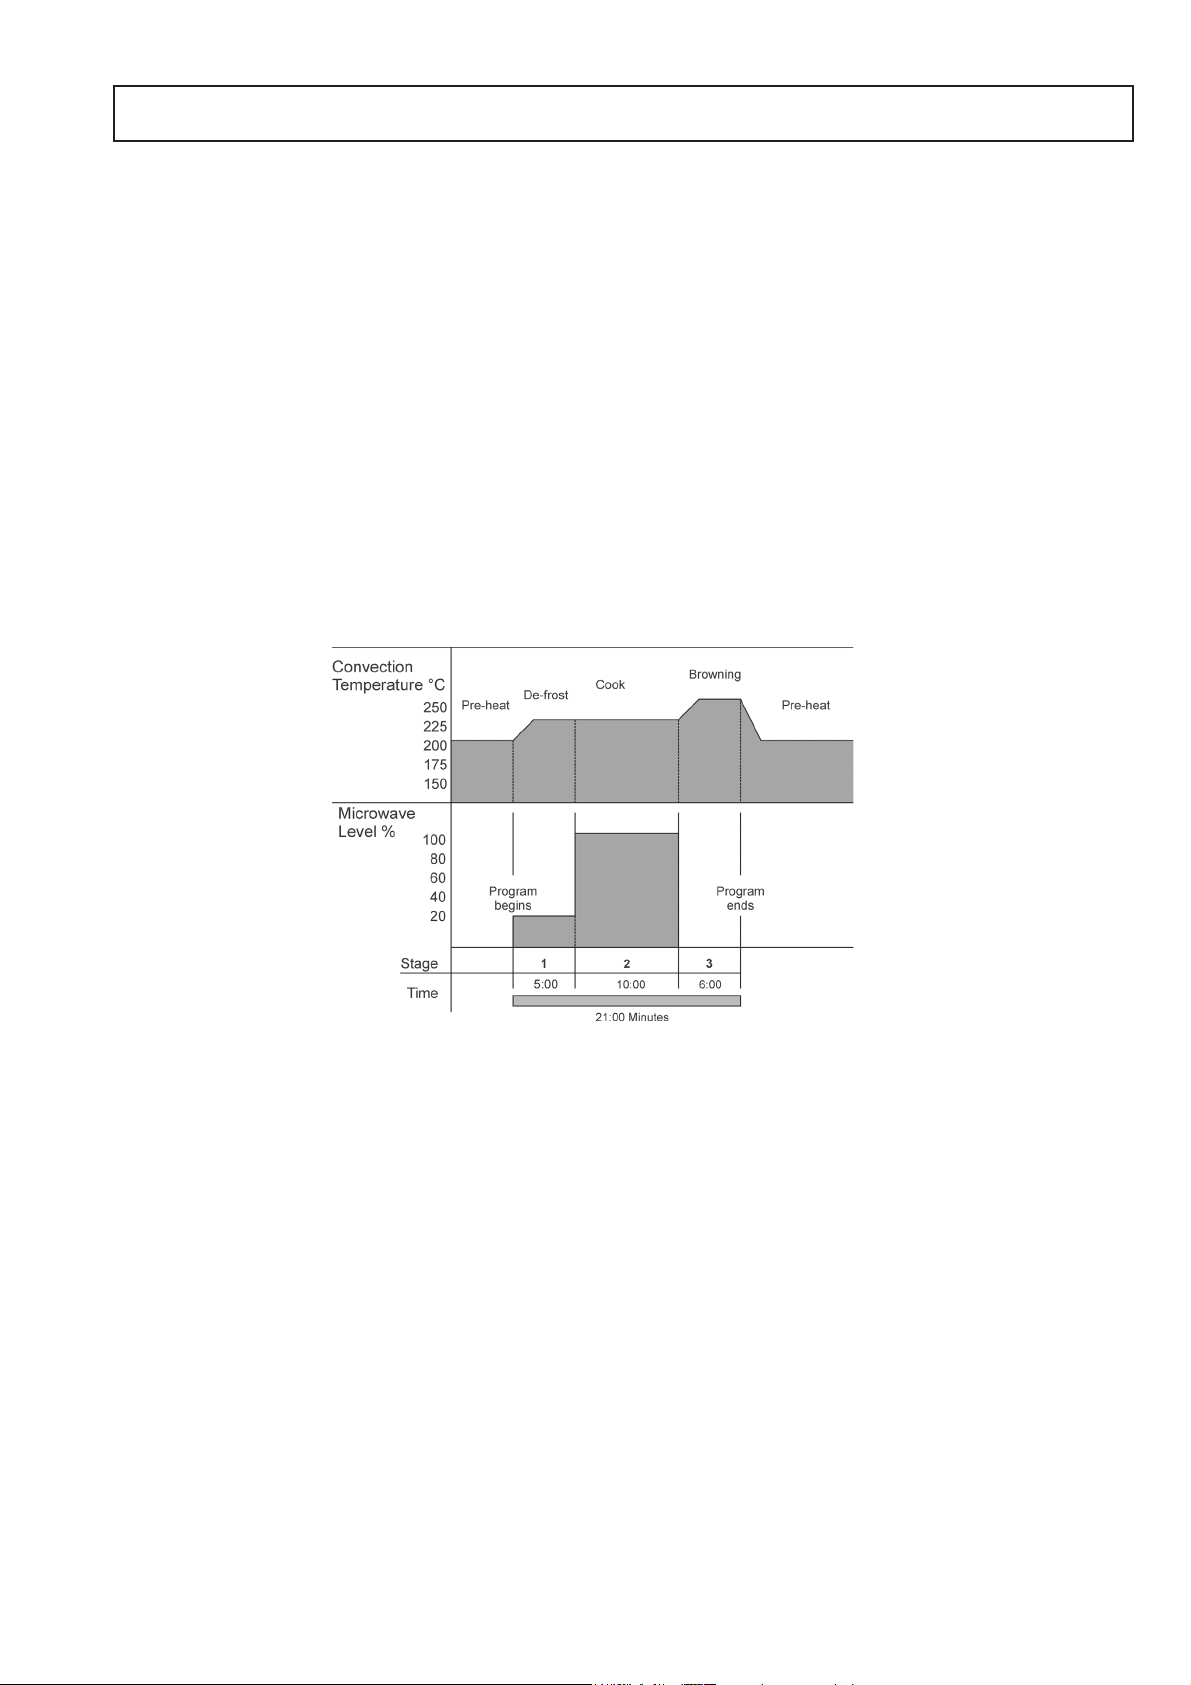
Multi-Stage Programming
The Mealstream EC501 offers even greater flexibility by allowing multi-stage programming.
This enables the exact conditions required for quality results to be set according to the food
type.
A typical 3-stage program is shown. The Oven is pre-heated at 200°C. Stage 1 begins by
applying a gentle microwave power of 25% (ideal for defrosting) while the convection
temperature rises to 225°C. In Stage 2 the microwave power increases to maximum
(100%) . In the final, browning stage the convection temperature is increased to 250°C
with no microwave energy applied.
This is only one example of an infinite number of possible multi-stage programs that can
be created and stored. Programs can have one, two, or three stages.
Note:
Remember convection temperature takes time to change. Do not expect an instant
response when a different temperature is activated.
Care should be taken when de-frosting in a hot oven. Defrost first thing in the morning
when the oven is still cold.
The instructions outlined in this guide are intended to
ensure the safety and long life of your Merrychef oven.
8
Page 9

MAIN FEATURES
7
6
1
2
11
8
3
12
9
4
10
5
1
AIR OUTLETS
These vents on the side and rear panels enable air
which has been used to cool internal components to
escape. It will not allow microwave energy to escape
into the environment. They must be kept free from
obstruction.
2
OVEN CAVITY
The cavity is constructed mainly from stainless steel
and vitreous enamelled panel on the door. It must
be kept clean see CLEANING).
3
CONVECTION FAN
The fan draws air over the heating elements and
into the cavity over the edges of the rear baffle plate,
producing perfect heat distribution for combination
cooking. The metal grill covering the fan must be
kept clean and free of debris (See CLEANING)
AIR INLET FILTERS (LEFT & RIGHT)
4
Situated at the left and right hand side of the base at
the front. These are part of the ventilation system
and must be kept free of obstruction and cleaned on
a daily basis.
DOOR HANDLE
5
This is a rigid bar which is pulled downwards and
towards you to open.
CONTROL PANEL
6
See page 10.
ON/OFF SWITCH
7
When switched ON, the control panel will illuminate.
The fan and ventilation system will also operate.
RATING PLATE
8
Found on the rear panel, this states the serial
number, model type, electrical specifications and
Merrychef address and telephone number.
9
DOOR
This is a precision-made energy barrier with three
microwave safety interlocks. It must be kept clean
(see CLEANING section ). The door should NOT be
used to support heavy dishes.
DOOR SEALS
10
These ensure a tight seal around the door. They
should be kept clean and checked regularly for signs
of damage. At the first sign of wear they should be
replaced by an approved Service engineer.
TEMPERATURE SENSOR
11
This monitors the temperature inside the oven .
Care should be taken when cleaning to prevent
damage.
STEAM VENT (on rear of oven )
12
This enables steam to escape and prevents build up
of condensation. It will not allow microwave energy
to escape.
9
Page 10
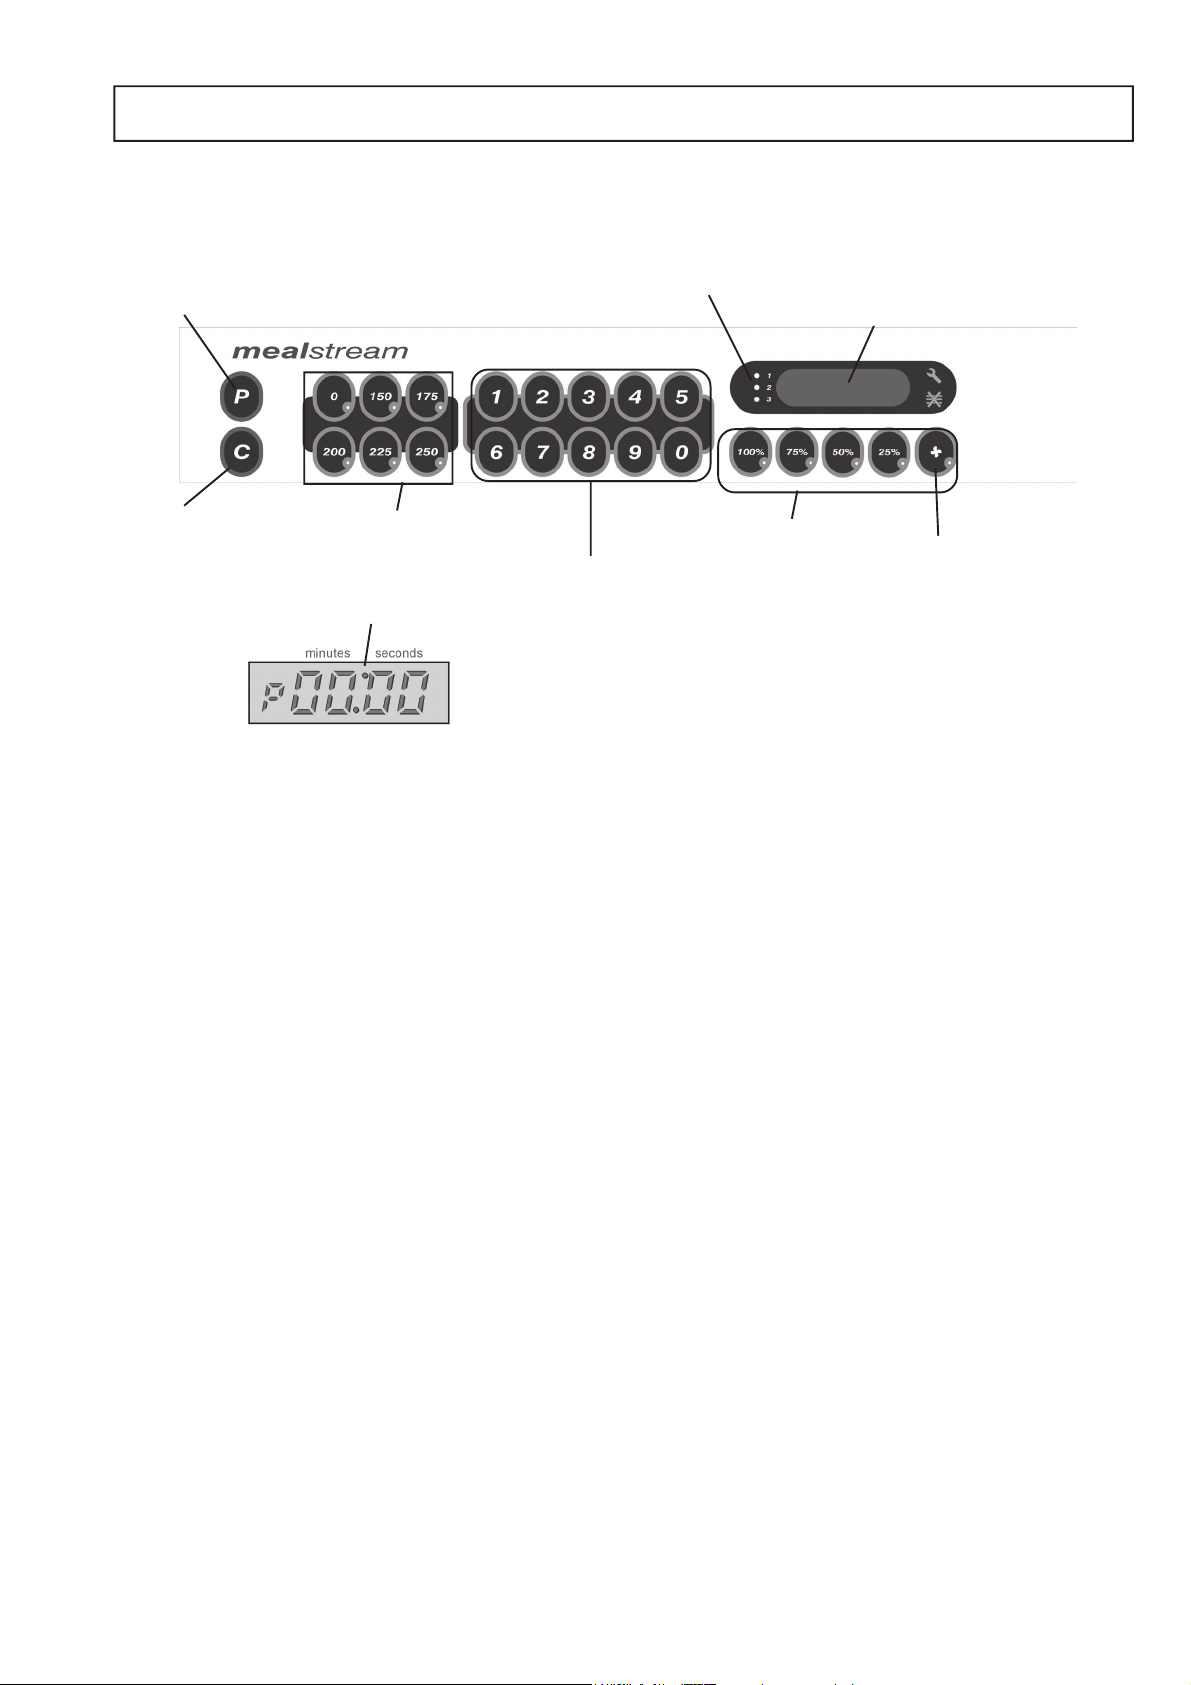
CONTROL PANEL
PROGRAM PAD
CANCEL PAD
POWER PADS
There are 4 Microwave Power Pads to select from: 25%,
50%, 75%, and 100%. A light will indicate the one in use.
CONVECTION PAD
This is used when foods only require browning( no microwave)
Note: when cooking the MICROWAVE and CONVECTION
pads start the cycle and timer. You may alter power levels
during a manual cooking cycle. When cooking is
interrupted, a light will flash as a reminder that the time is
being held (see PAUSE).
TIME/PROGRAM SELECT PADS
These pads are used for setting the cooking time in 1
second steps to a maximum of 30 minutes. They are also
used for programmes from 01-10
TEMPERATURE SETTING PADS
These pads are used to set the convection temperature. A
light will indicate the temperature set. Selecting the ‘0’ key
will switch convection off. If a temperature key is pressed
and held the current oven temperature will be displayed in
the time display window.
TEMPERATURE SETTING PADS
TIME/PROGRAM SELECT PADS
COLON
TIME/ERROR DISPLAY
MULTI-STAGE INDICATOR
TIME/ERROR DISPLAY
POWER PADS
CANCEL/ CALLBACK ‘C’ PAD
Cancels all timed cooking cycles, pre-programmed operations
and stop the microwave energy. It does not alter the oven
temperature . If the oven is hot food will continue to cook and
should be removed from the oven immediately. This pad will
also cancel any incorrect operations. It will not erase programs. It can also be used to view the details of stored programs.
(see CALL BACK)
PROGRAM ‘P’ PAD
Activate or set program
TIME AND PROGRAM DISPLAY
Shows the time set in minutes and seconds and counts down
in 1 second steps during a cooking
cycle.
Also displays error messages and oven temperature.
(PROBLEM SOLVING )
The program display indicates the program number
selected. ‘PP’ indicates programming
MULTI-STAGE INDICATOR
Indicates stage in multi-stage cooking
COLON
When programming the colon will flash to indicate the time
may now be entered.
ON/OFF SWITCH
ERROR DISPLAY
See PROBLEM SOLVING Section 8.
CONVECTION PAD
10
Page 11

OPERATING INSTRUCTIONS: MANUAL MODE
The oven can be operated in
manual or programmed mode. It
is important to understand
DO NOT APPLY MICROWAVE ENERGY WHEN OVEN IS EMPTY
manual mode prior to attempting
program operation.
To familiarise yourself with the controls place a bowl
containing approximately 1.5 litres of water in the oven.
Switch the oven on
1
Set the required oven temperature by pressing one of the
2
TEMPERATURE SETTING PADS 150º, º, 175º, 200º, 250ºC.
The light in the pad will flash to indicate it has been selected.
Note: The temperature within
the oven cavity will now
begin to rise. It may take
up to 15 minutes to reach
the value if the oven is
cold when you start.
When the oven temperature is within 25ºC of the set
3
level the light will no longer flash.
WAIT UNTIL THIS TEMPERATURE IS REACHED
before using the oven.
Set required cooking time by
4
pressing the numeric TIME
SELECT PADS
Example: 2 Minutes 35 seconds
WARNING:
DO NOT USE THE OVEN WITHOUT
CLEAN AIR FILTERS IN POSITION
The cavity temperature can be
checked at any time by pressing
the selected temperature button.
The cavity temperature in ºC
will be displayed.
Convection only cooking can be
carried out without setting a
time
Combination and convection
only cooking may be carried out
on a rising temperature but
extra attention must be given to
timings
TO STOP THE COOK CYCLE
The cycle may be stopped and
cancelled at any time by pressing
the CANCEL PAD
Only valid times of Minutes and Seconds
will be accepted.
e.g. 1minute 1 second not 61 secs
Taking all the necessary precautions to ensure you
5
do not burn yourself, place the food into the cavity
and close the door.
Always keep the period that the door is open to a
minimum.
To cook the food using a
6
combination of convected heat
and microwave press one of the
POWER PADS either 100%,
75%, 50% or 25%.
To cook using convection only
press the button marked with
the fan symbol.
The timer will now count down.
7
When the remaining time
reaches zero an audible signal
will be given. Remove the food
from the cavity.
PAUSE
The cycle may interrupted by
opening the oven door.
On opening the door the timer will
be held at this point and the light
on the relevant POWER PAD
(microwave or convection) will flash
to indicate an interrupted cycle.
TO CONTINUE the cycle close
the door, an audible warning
sounds as a reminder to press
Note:
when the cycle is interrupted or
stopped the oven will remain at
the temperature set and the
food inside the oven will
continue to cook
11
Page 12
PROGRAMMING NUMBER PADS ( 0-9 )
Pre-programming allows repetitive cooking procedures to be stored for ease
of use.
Each program can comprise up to three stages, allowing at each independent
control of Convection temperature, Stage time and Microwave power level.
However, programs must be used with caution since if the food to cook
varies in weight or density then good results and more importantly adequately
cooked food may not be achieved. Therefore, it is vital that all food prepared
for service should be checked to ensure that core temperatures have been
achieved.
1
Press and hold PROGRAM PAD until a flashing ‘P’
appears in the PROGRAM DISPLAY
Lights on the TEMPERATURE
2
SETTING PADS flash to indicate
that a temperature must be
selected.
Press the pad for the required
temperature, the light on the
selected pad will continue to
flash, the others will go out.
3
Enter required cooking time by
pressing the TIME SET PADS
(The display colons flash to
indicate a time is required).
Only valid times of Minutes and
Seconds will be accepted.
e.g. 1 minute 1 second not 61 secs
An amount of experimentation
will be required to determine
the correct program for a
particular product.
Check program details on the
flashing display. Settings can
be changed by stepping back
through the program using the
CANCEL BUTTON.
To cook the food using a combination of
4
convected heat and microwave press
one of the POWER PADS
100%,75%,50% or 25%.
To cook using convection only press the
button marked with the fan symbol.
To save as a single stage program
Press the required number pad
example: stage 1 saved as Program 8
To save as a multi-stage program
Follow steps 1– 4 for each stage
of cooking and on completing
press the PROGRAM PAD to
enter a second and third stage of
cooking to the program.
Press the required number pad to
save the program.
• Enter a valid time up to
30 minutes e.g.
1 minute 1 second not
61 seconds.
• Information may be
programmed into the
memory whether the
oven is hot or cold.
• To review a program
use CALLBACK see
page 14.
We recommend you keep
a note of program
instructions for future
reference.
The program details are
displayed momentarily as the
program is saved.
example: stage 1, stage 2, stage 3
saved as Program 8
12
Page 13

RUNNING A PROGRAM
Using number pad keys to run a programme
Programs 0 to 9 can be recalled using the number pad keys.
The following procedure should be used to activate these
programs.
Pre-heat the oven to the required starting temperature by
1
pressing a TEMPERATURE SETTING PAD. Wait until the
selected temperature light stops flashing.
You can check the oven
temperature by pressing the
Temperature pad again
Avoiding contact with hot surfaces, place the food
2
item to be cooked in to the oven and close the door.
Press the PROGRAM PAD the
3
‘P’ will appear in the PROGRAM
DISPLAY.
Press the number pad key you wish to activate (0-9)
The program number and total cooking time appear
on the display and the first stage indicator will light.
example: 200°C
Note:
If the required starting
temperature has not been
reached, an error code is
displayed (E:6).
If this happens remove food
from the oven IMMEDIATELY
and wait until the required
temperature light stops
flashing.
Begin again from Step 2.
At the end of the programmed
cycle, the oven temperature
will revert to that set before the
cycle began
example: Program 8
The program will now operate
with the total remaining time
displayed counting down on the
display
(all stage time added together).
When the time reaches “0:00”
an audible signal will be given.
Remove the food from the oven and close the door.
4
CALL BACK
CALL BACK to review a program allows the program to be reviewed
stage by stage.
Press and hold the CANCEL
PAD.
After a few seconds the TIME
DISPLAY will blank.
Now press one of the program numbers
on the NUMBER PAD (0-9).
TO STOP THE COOK CYCLE
The cycle may be stopped and
cancelled at any time by pressing
the CANCEL PAD.
PAUSE
The cycle may interrupted by
opening the oven door.
On opening the door the timer will
be held at this point and the light on
the relevant POWER PAD
(microwave or convection) will flash
to indicate an interrupted cycle.
TO CONTINUE the cycle close the
door, an audible warning sounds
as a reminder to press any power
pad to restart the timer.
To review a program use
CALLBACK
The display will show the contents of that program. This will be shown
with temperature, time and power level illuminated one stage at a time
for a few seconds.
13
Page 14
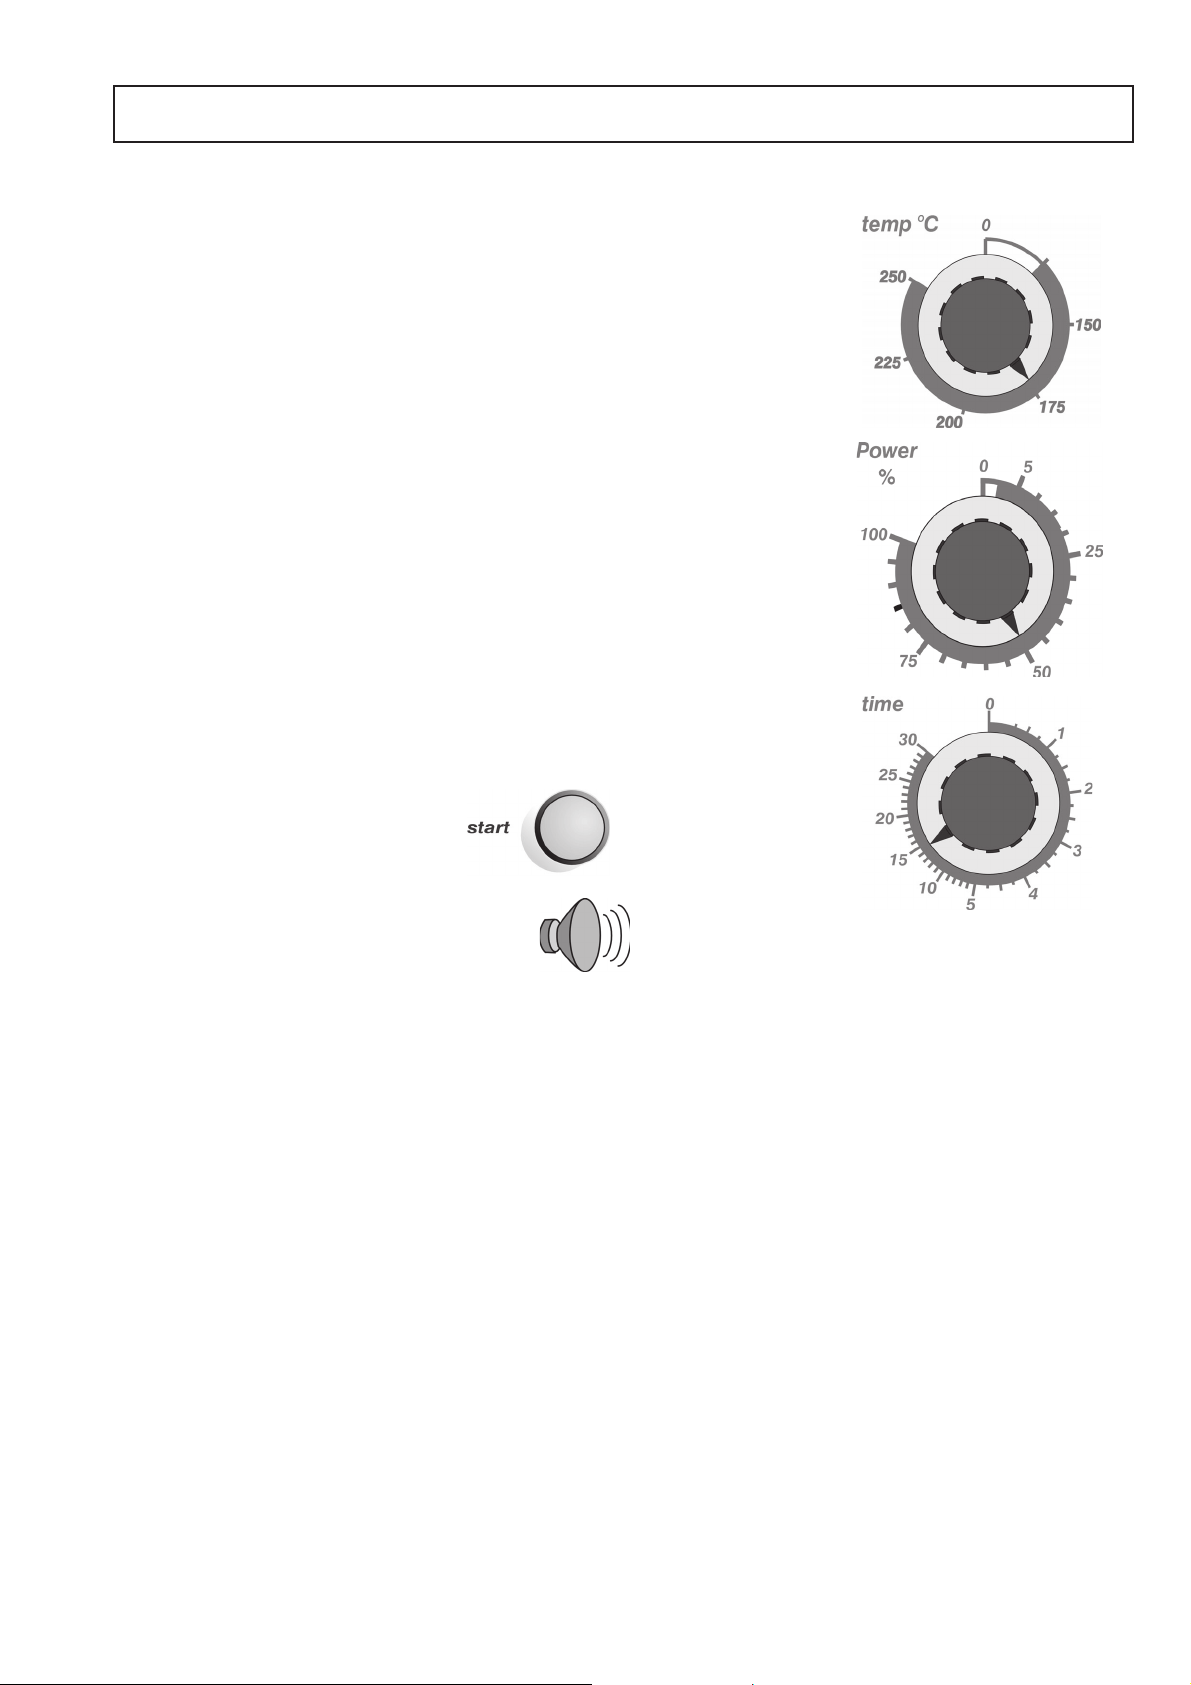
MANUAL CONTROLS ( MODEL RD501 )
Switch on oven.
1
Set required oven temperature by turning the temperature control dial
2
clockwise. The convection temperature indicator will illuminate until the
set temperature is achieved. For best results, wait for this to happen.
The indicator will go on and off as temperaturre within the oven is
maintained.
e.g. 175ºC
Set required microwave power level by turning the microwave control
3
dial.
e.g. 50%
Set required cooking time by turning the time set dial clockwise.
4
e.g. 15 Minutes
Press the START button. The
5
start indicator will illuminate and
timer will count down to zero.
A buzzer alerts the operator
when cooking is completed.
Note:
• For microwave only cooking, the convection temperature dial
should be set to ‘0’. For best results the oven should be cold.
• For convection only cooking, the microwave dial should be set to ‘0’.
Convection only cooking can be carried out without setting a time.
• Care should be taken when defrosting in a hot oven. Products
should be turned frequently to prevent ‘edge- burning’. For best
results, defrost first thing in the morning when the oven is still cold.
• Combination and convection only cooking may be carried out on a
rising temperature but extra attention must be given to timings.
• Microwave heating may be introduced part-way through a manually
set convection only cycle. However, we strongly recommend that
only the most experienced microwave operator uses this facilty as
the microwave energy will then be on a time set for convection
cooking.
• Cooking may be interupted by opening the door ( PAUSE ).
Close the door and touch the start button to continue.
14
Page 15

CLEANING
For the oven to operate at peak efficiency, the cavity, door and air filters must be kept clean.
A daily cleaning routine will ensure that you comply with the required hygiene standards and will help
to maintain and prolong the efficiency of your oven.
Follow the SAFETY INSTRUCTIONS at the beginning of this manual.
• ALWAYS switch off at the electrical supply and allow oven to
cool for at least 20 minutes before cleaning
• As required, remove carousel and wipe out spillages with
disposable paper wipes
• NEVER use steel wool, knives or harsh abrasives on any part
of the oven
As with all electrical appliances, it is wise to have the electrical connections inspected periodically.
1. Remove the air filters from each side of the oven by sliding the
filter out from the front.
2. Wash in clean, warm soapy water, rinse and pat dry. Slide back
into position through slots.
Cleaning the oven cavity and door
1 Remove food particles from the gap between the rear baffle plate
and the floor of the oven with a clean, dry brush.
( Location A )
Remove food particles from between the inside edge of the door
and the front of the oven floor using a clean, dry brush.
( Location B )
Faults arising from neglect or
misuse including use without
clean filters in place are not
covered by the guarantee.
Service visits as a result of
such faults will be chargeable.
DO NOT USE THE OVEN
WITHOUT CLEAN AIR FILTERS
IN POSITION
2. Apply non-caustic oven cleaner to interior surfaces
except door seals. Leave for the recommended time.
Wash off using a clean cloth and plenty of clean, warm
water. Dry using a fresh, clean cloth.
3. Wipe hinges with a clean, damp cloth.
DO NOT apply lubricating oil.
4. Wipe door seals carefully with a clean damp cloth.
Examine for signs of wear or damage.
Cleaning the control panel and exterior surfaces
Wipe down regularly with a damp cloth.
Door
seal
Hints and Tips for stubborn stains in the oven cavity
1. Switch on oven with microwave power only (without heat).
2. Place a container of water (1.5 litres) into the centre of the oven
cavity.
3. Set microwave power to 100%.
4. Set timer to 30 minutes and press start button.
At end of steam cycle, wipe out cavity with a clean cloth.
Baffle
plate
B
A
If the door seals are damaged ,the
oven must be repaired by an
approved Service Engineer
15
Page 16
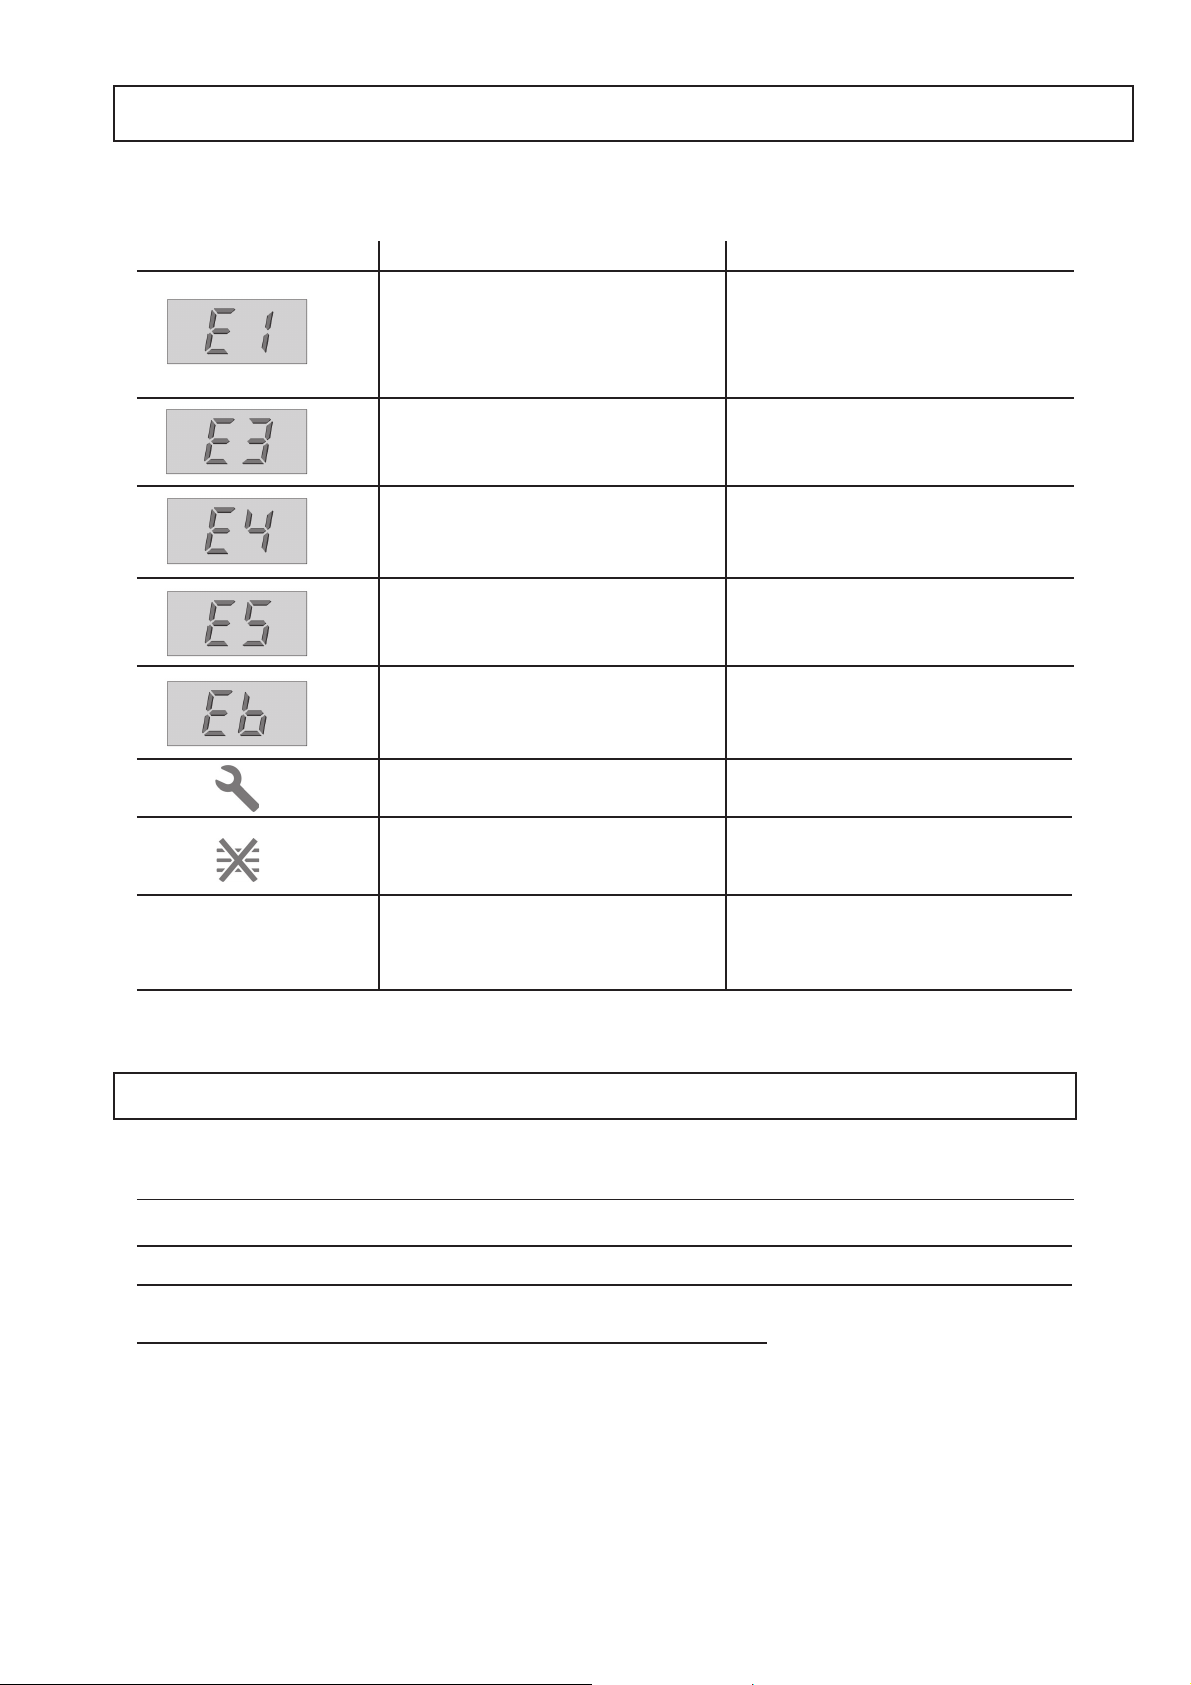
PROBLEM SOLVING
Error code display
The Mealstream EC501 will identify some of the most common problems by flashing an error
message code in the time display window.
Error code display
Fault Recommended action
Door not fully shut.
Possible electrical fault
Oven has overheated
No time has been set.
Invalid time has been set. e.g. 61secs
Oven not heating up to
temperature
Possible component failure
Oven cavity is overheating
Possible component failure
Oven is not at correct temperature
An internal fault has been detected
Oven has overheated
The oven is switched on but the control
panel does not illuminate and fans do
not operate
Close door fully.
Call Merrychef Service Dept.
Clean air filter and vents
Leave oven switched on but not cooking
for 4-5 minutes.
Set a time
Set time in correct format 1:01
Switch off and do not use
ISOLATE FROM ELECTRICAL-SUPPLY
Call Merrychef Service Dept.
Switch off and do not use
ISOLATE FROM ELECTRICAL-SUPPLY
Call Merrychef Service Dept.
Remove food.
Wait until correct temperature light stops
flashing and stays illuminated
Call Merrychef Service Dept.
Clean air filter
Relocate oven to a position with more
ventilation
Check the fuse/circuit breakers and
electrical supply (this should be carried
out by a qualified electrician)
.
Please remember - No servicing or repairs should be carried out other than by an approved Service
Engineer
Technical Specifications
Convection
Power output
( kw )
Mealstream CTM3
Height
( mm )
Width
( mm )
Depth
( mm )
710640 630
Wt.
Power output
( kgs)
90
Microwave
( watts )
1425 2.5
Mealstream CTM5 710640 630 1425 3.090
Manufacturers recommended
clearances
Power Supply: See rating plate at rear of oven
This egiupment comlies with the following EEC directives:
EMC 89/336 EEC
LVD 73/23 EEC
Merrychef reserves the right to alter specifications without prior notice.
810690 680
Pt No. 32Z3313 Issue 05
16
Page 17

MERRYCHEF SERVICE DEPARTMENT
To register for service visits, please complete and return the SERVICE REGISTRATION CARD enclosed
with this guide. Unless this card is received, the terms of the guarantee will commence from the date of despatch from the
manufacturer and NOT from the date of purchase.
If, after referring to the PROBLEM SOLVING section, you need a service engineer, telephone the Merrychef Service Control
Centre.
MERRYCHEF SERVICE DEPARTMENT
Tel. +44(0)1252 378007 Monday-Friday 8.45am-5.00pm
(24hr Answerphone)
Fax +44(0)1252 371007
Please make a note of the following before you call and for future reference:
Model number
Serial number
Proof of purchase
Oven address
Post code
Telephone number:
Name to contact:
Hours of access:
Your nearest Merrychef approved engineer will be notified immediately and will endeavor to respond within 24 hours. However,
ther are certain circumstances when such rapid service may not be possible, e.g. public holidays, weekends, remote areas
etc.
Each engineer is able to carry out repairs and replacements ‘on site’. The oven need not be removed to a workshop unless
access is limited to the engineer, e.g. offshore establishments. On such occasions it is the customer’s responsibility to return
the oven to an authorised service centre for repair.
SERVICE CONTRACTS
Service contracts may be extended at the time of purchase. Contact the Merrychef Service Department for more details.
17
Page 18

SOMMAIRE
Importantes consignes de sécurité ................. 19
Alimentation électrique .....................................19
Précautions d’emploi ....................................... 20
Montage de l’appareil ....................................... 21
Ustensiles de cuisine transparents ................. 22
Introduction ...................................................... 24
Fonctions principales....................................... 25
Panneau de commande .................................. 26
Directives :
Mode manuel ................................................... 27
Pavé numérique de programmation ................ 28
Activer un programme ..................................... 29
Commandes manuelles (modèles RD501) ..... 30
Entretien .......................................................... 31
Résolution de problèmes ................................. 32
Spécifications techniques ................................ 32
Le Service/ l’assistance technique .................. 33
FRANÇAIS
18
Page 19
IMPORTANTES CONSIGNES DE SÉCURITÉ
VEUILLEZ LIRE ATTENTIVEMENT LES CONSIGNES DE SÉCURITÉ SUIVANTES
ATTENTION : Effectuer un contrôle maintenance ou une réparation qui nécessite d’enlever les panneaux de protection contre l’émission de
1. NE PAS faire fonctionner le four à vide, sans nourriture ou liquide à l’intérieur, puisque cela risque de provoquer
2. NE JAMAIS enlever les composants internes du four.
3. NE JAMAIS toucher au panneau de commande, la porte, les joints ou tout autre composant du four.
4. NE PAS obstruer les grilles d’aération/filtres à air ou les sorties de vapeur.
5. NE PAS étendre de torchons ou de serviettes sur quelque partie du four.
6. Si les joints de la porte sont endommagés, le four doit être réparé par un technicien agréé.
7. Si le câble d’alimentation est endommagé d’une manière ou d’une autre, il doit IMPÉRATIVEMENT être remplacé
8. Pour éviter de s’échauder ou se brûler, manipuler avec précaution les liquides, la nourriture et les plats sortant du
9. Pour éviter qu’un liquide en ébullition ne se projette dans la cavité du four, il est préférable de le mélanger avant de
10. Ouvrir les biberons et les petits pots pour bébé avant de les chauffer, mélanger ou secouer le contenu et vérifier la
11. Ne jamais utiliser le four pour chauffer de l’alcool (cognac, rhum, etc.). De même, des préparations alcoolisées,
12. Ne jamais tenter de faire de la friture dans le four.
13. L’utilisation de cet appareil n’est pas adaptée aux enfants et aux personnes infirmes.
14. Surveiller les enfants pour les empêcher de jouer avec cet appareil.
micro-ondes, est une opération dangereuse pour toute personne non-qualifiée.
une surchauffe et d’endommager l’appareil.
par un technicien agréé.
four.
le chauffer.
température avant consommation pour éviter les brûlures.
comme le baba au rhum, peuvent prendre feu plus facilement si elles restent trop longtemps dans le four.
ALIMENTATION ÉLECTRIQUE
ATTENTION : Cet appareil électroménager doit être relié à la masse. Si cela n’est pas le cas, il
existe un risque d’électrocution pouvant être mortel.
Le four doit être installé par un
électricien qualifié et agréé. Cet
appareil ne doit pas être branché sur
le secteur au moyen d’une prise
standard 13 A.
Le câblage (installation des
raccordements fixes ou des prises)
doit être conforme aux
réglementations et normes de sécurité
de l’IEE. Le fil d’alimentation se trouve
à l’arrière du four.
ATTENTION : Un interrupteur
d’isolement double, avec un intervalle
de contact de 3 mm aux deux pôles,
doit être installé.
Si vous avez un doute quelconque sur
votre alimentation électrique, veuillez
demander conseil à un électricien
qualifié et agréé.
Il est essentiel que l’alimentation
secteur soit installée correctement et
mise à la masse. Le circuit électrique
qui alimente le secteur doit être adapté
aux appareils électriques à forte
intensité et ne doit surtout pas être
surchargé.
Les établissements équipés de
disjoncteurs standards (Type ‘B’) sont
sensibles aux surtensions transitoires
qui surviennent en mettant en marche
les congélateurs, réfrigérateurs et
autres appareils de restauration, y
compris les fours à micro-ondes.
C’est pour cela que nous
recommandons vivement d’équiper
chaque four d’un disjoncteur Type ‘C’
séparé (conçu spécialement pour ce
type d’appareil).
La prise électrique, si elle est installée
avec un connecteur à contacts mâles,
doit être située à un endroit facile
d’accès.
INSTRUCTIONS À CONSERVER
19
Page 20

PRÉCAUTIONS D’EMPLOI
1. Lire ce mode d’emploi avant d’utiliser le four.
2. Il est conseillé de faire vérifier ses branchements électriques régulièrement comme
pour tout appareil électrique.
3. L’intérieur du four et les joints de la porte doivent être souvent nettoyés en suivant les
instructions décrites à la section ENTRETIEN.
4. Il n’est pas nécessaire d’éteindre le four après avoir utilisé une fonction, mais il est
important de le faire à la fin de la journée ou après chaque longue période d’utilisation.
5. L’énergie des micro-ondes ne doit pas être utilisée pour sécher du linge ou réchauffer
des assiettes.
6. Faire attention à ce qu’aucun aliment n’entre en combustion dans le four, comme pour
tout autre appareil de cuisson.
Si de la fumée apparaît :
Eteindre l’appareil
Couper l’alimentation électrique de l’appareil
Laisser la porte fermée pour étouffer
d’éventuelles flammes
7. Pour un fonctionnement optimal, placer la nourriture au centre de la cavité du four.
8. Avec la fonction micro-ondes uniquement, couvrir la nourriture pour éviter les
éclaboussures sur les parois de la cavité du four.
9. Pour la nourriture se trouvant dans des récipients en matière plastique ou autre
matériau combustible, n’utiliser que la fonction micro-ondes et surveiller la cuisson
pour empêcher une éventuelle inflammation.
10. En mode convection et mode combiné, les aliments doivent être mis au four sans leur
emballage.
11. Ne jamais faire cuire des oeufs à la coque ou durs avec la fonction micro-ondes ou en
mode combiné, puisqu’ils pourraient exploser.
12. Les aliments recouverts d’une peau, comme les pommes de terre, les pommes, les
saucisses, etc., doivent être percés avant d’être chauffés.
13. Le récipient qui contient les aliments à chauffer ne doit pas être hermétiquement clos
puisque l’accumulation de vapeur risquerait de mettre dangereusement le récipient
sous pression.
14. L’excès de graisse doit être enlevé au cours du rôtissage et avant de retirer les
récipients lourds du four.
15. Si un récipient en verre se casse dans le four, veiller à ce que la nourriture ne
contienne aucun éclat de verre. Si un doute subsiste, jeter tout aliment qui se trouvait
dans le four au moment où le récipient s’est cassé.
20
Page 21

MONTAGE DE L’APPAREIL
Sortir le four de son emballage et enlever le film protecteur.
Vérifier que l’appareil n’a pas été endommagé au cours du transport. Si
tel est le cas, en informer le fournisseur IMMÉDIATEMENT.
EMPLACEMENT ET POSITIONNEMENT
Placer le four loin de toute source de chaleur.
NE PAS positionner l’appareil près de friteuses, grils, poêles à frire,
etc., pour éviter que l’air chaud n’entre dans le four.
Une barrière thermique de la hauteur du four doit être installée si
l’appareil est placé près d’une cuisinière électrique ou à gaz.
Prendre note
de l’espace
minimum
requis pour la
circulation de
l’air
Remarque :
Les prises d’air se trouvent
sous chaque côté du four.
Même en laissant un espace
comme stipulé ci-dessous, il
est important que l’air qui
circule soit le moins chaud
possible. Pour ne pas
détériorer l’appareil et
réduire sa durée de vie, les
appareils comme les
friteuses, grils ou poêles à
frire, ne doivent pas chauffer
l’air qui circule dans le four
avant même utilisation.
Positionner le four sur une surface plane HORIZONTALE, SOLIDE et
STABLE.
Laisser un espace d’au moins 50 mm à l’arrière, au-dessus et de
chaque côté du four pour permettre à l’air de circuler librement.
Les prises d’air se trouvent sous chaque côté du four. Même en laissant
un espace comme stipulé ci-dessus, il est important que l’air qui circule
soit le moins chaud possible. C’est pourquoi des appareils comme les
friteuses, grils ou poêles à frire, ne doivent pas chauffer l’air qui circule
dans le four avant même utilisation.
Laisser un espace d’au moins 50 mm au-dessus du four pour permettre
à l’air chaud de s’échapper.
Laisser suffisamment d’espace, soit 400 mm à l’avant du four, pour que
la porte puisse s’ouvrir complètement.
Ne pas poser d’étiquettes ou d’autocollants sur le four, autres que ceux
posés par le fabricant.
21
Ne pas superposer deux
fours en contact direct.
Utiliser deux étagères
différentes ou un support à
double étage.
ATTENTION :
Vérifier que les FILTRES À
AIR sont bien en place avant
utilisation du four. (voir
Fonctions principales)
Page 22

USTENSILES DE CUISINE TRANSPARENTS
Il est conseillé de se référer aux instructions du fabricant pour déterminer la transparence de
chaque récipient ou ustensile pour chaque mode de cuisson.
Le tableau suivant donne des recommandations générales :
convection uniquement
mode combiné
Récipients résistants à la chaleur
micro-ondes uniquement
Verre trempé
Céramique vitrifiée
Vaisselle
(terre cuite, grés, porcelaine, etc.)
Plateaux métalliques
Plateaux métalliques (sur les
glissières du four)
NE PAS UTILISER D’AUTRES
RÉCIPIENTS MÉTALLIQUES
Récipients en plastique
Récipients en plastique, rigides,
conçus pour la cuisson.
Récipients jetables
Combustibles (papier, carton, etc.)
Papier céllophane allant au four à
micro-ondes
Ne pas utiliser d’objets avec des
ornements métalliques.
Les plateaux métalliques utilisés
doivent être impérativement insérés
dans les glissières en émail sur
chaque côté de la cavité du four.
Les récipients en plastique allant au
four et au micro-ondes (jusqu’à
certaines températures) sont
maintenant disponibles.
Se référer aux instructions du
fabricant avant utilisation.
Le papier céllophane ne doit pas
entrer en contact avec la nourriture.
Autres ustensiles
Attaches
Couverts
Sondes thermiques
Aucun ustensile de cuisine ne doit
être laissé dans la préparation au
cours de la cuisson.
22
Page 23

OBJETS MÉTALLIQUES EN MODE COMBINÉ ET MICRO-ONDES UNIQUEMENT
Certains des panneaux intérieurs des fours Mealstream 501 sont en émail
vitrifié, matériau isolant qui permet l’utilisation sans risque d’objets
métalliques dans des conditions contrôlées.
(Le plateau en émail vitrifié fourni avec l’appareil peut être mis à l’envers et
servir de base permanente.)
Disposer les grands plats et plateaux métalliques au centre du four, à au
moins 40 mm des parois de la cavité.
ATTENTION :
Prendre bien soin de positionner
les récipients correctement.
Si les récipients métalliques
sont trop près les uns des
autres ou des parois de la
cavité, cela peut provoquer des
arcs électriques et endommager
le four.
Disposer de manière égale les récipients individuels en métal en laissant au
moins 40 mm entre chacun d’entre eux ainsi qu’entre les récipients et les
parois du four.
Éviter d’utiliser des plats métalliques de plus de 65 mm de profondeur. Les
micro-ondes pourraient ricocher et le temps de cuisson nécessaire serait
altéré de manière conséquente.
ATTENTION :
Si un grésillement métallique
se fait entendre quand le four
est en mode combiné ou
micro-ondes, ouvrir la porte
pour arrêter la cuisson et
redisposer les récipients
correctement.
Ne pas mettre dans le four des
objets métalliques (y compris
des plats de service en argent)
qui présentent, à certains
endroits, des brûlures
provoquées par des arcs
électriques.
23
Page 24

INTRODUCTION
Les fours Mealstream 501 offrent une grande souplesse d’utilisation aux cuisines des
établissements de restauration, grâce à ces trois modes de cuisson : micro-ondes
uniquement, convection uniquement et combiné.
La cuisson combinée donne des résultats d’excellente qualité en moins de temps qu’il n’en
faut pour les fours traditionnels, tout particulièrement pour faire cuire, dorer, rôtir, griller ou
gratiner des préparations culinaires.
Une fois établies précisément, les instructions de cuisson en mode combiné ou convection
pour les produits sélectionnés doivent être programmées dans la mémoire du four afin d’être
reproduites sans difficulté et avec précision.
Programmation échelonnée (multi-stage)
Le Mealstream EC501 offre une plus grande souplesse d’utilisation grâce à la
programmation échelonnée. Celle-ci permet de cuire les aliments dans les conditions
précisément requises par chaque type d’aliment.
Ceci est un programme type à trois étapes. Préchauffer le four à 200°C. L’étape 1
commence avec une faible puissance des micro-ondes à 25 % (idéale pour la décongélation)
tandis que la température de la convection monte à 225°C. Au cours de l’étape 2, la
puissance des micro-ondes atteint son maximum (100 %). Dans l’étape finale, l’étape de
brunissage, la température monte jusqu’à 250°C sans l’action des micro-ondes.
C’est un exemple parmi tant d’autres de programme échelonné pouvant être créé et
mémorisé. Les programmes peuvent se diviser en une, deux ou trois étapes.
Remarque : Ne pas oublier qu’il faut du temps pour que la température de convection
change. Quand une température différente est réglée, il ne faut donc pas s’attendre à une
réaction instantanée.
Attention à la décongélation dans un four chaud. Il est conseillé de décongeler les produits
le matin, tant que le four est encore froid.
Les instructions de ce mode d’emploi ont pour objectif d’assurer
la sécurité et la durée de vie de votre four à micro-ondes.
24
Page 25

FONCTIONS PRINCIPALES
7
6
1
2
11
8
3
12
9
4
10
5
1
LES SORTIES D’AIR
Ces aérations sur les panneaux latéraux et arrière
permettent à l’air utilisé pour refroidir les
composants internes, de s’échapper. Elles ne
laissent pas les micro-ondes s’échapper dans
l’atmosphère. Ne pas obstruer ces aérations.
2
LA CAVITÉ DU FOUR
La cavité est faite principalement d’acier inoxydable.
Elle doit rester propre (voir ENTRETIEN).
VENTILATEUR POUR LA CIRCULATION DE L’AIR
3
Il fait circuler l’air sur les éléments chauffants et sur
les bords du cache déflecteur arrière, dans la cavité
du four, permettant de distribuer la chaleur
parfaitement pour la cuisson en mode combiné. La
grille métallique qui recouvre le ventilateur doit être
propre et sans débris. (Voir la section ENTRETIEN)
FILTRES D’ENTRÉE DE L’AIR (GAUCHE & DROIT)
4
Situés au gauche et à droite de la base du four, ils
font partie du système de ventilation. Ne pas
obstruer et nettoyer tous les jours.
POIGNÉE DE LA PORTE
5
C’est une barre rigide qu’il faut abaisser et tirer vers
soi pour ouvrir la porte.
PANNEAU DE COMMANDE
6
Voir page 10.
BOUTON MARCHE/ARRÊT
7
Quand le four est en marche, le panneau de
commande s’éclaire. Le ventilateur et tout le
système de ventilation se mettent en marche.
PLAQUE SIGNALÉTIQUE
8
Située sur le panneau arrière, elle indique le
numéro de série, le type de modèle, les
spécifications électriques ainsi que l’adresse et le
numéro de téléphone de Merrychef.
9
PORTE
C’est une barrière thermique fabriquée avec grande
précision équipée de trois verrouillages de
sécurité. Elle doit rester propre (voir la section
ENTRETIEN). NE PAS poser de plats lourds sur la
porte.
JOINTS ÉTANCHES DE LA PORTE
10
Ils permettent de garder le cadre de la porte bien
étanche. Nettoyer et vérifier régulièrement que les
joints sont en bon état. Au premier signe d’usure,
ils devront être remplacés par un technicien agréé.
SONDE THERMIQUE
11
Elle contrôle la température à l’intérieur du four. En
nettoyant le four, faire attention à ne pas
l’endommager.
ORIFICE D’ÉVACUATION DE LA VAPEUR
12
(à l’arrière du four)
Il permet l’évacuation de la vapeur et empêche la
formation de condensation, sans pour autant
laisser passer les micro-ondes.
25
Page 26

PANNEAU DE COMMANDE
TOUCHE PROGRAMME
TÉMOIN PROG. ÉCHELONNÉ
AFFICHAGE TEMPS/ERREUR
TOUCHE
D’ANNULATION
PAVÉ NUMÉRIQUE DE SÉLECTION DE LA PUISSANCE
4 touches permettent de régler la puissance des microondes à 25 %, 50 %, 75 % ou 100 %. Un voyant lumineux
indique à quelle puissance le four est réglé.
TOUCHE CONVECTION
Elle est utilisée quand il s’agit seulement de dorer les
aliments (pas de micro-ondes).
Remarque : Les touches MICRO-ONDES et CONVECTION
déclenchent le cycle de cuisson et la minuterie. Il est
possible de modifier les niveaux de puissance au cours
d’un cycle de cuisson manuel. Quand la cuisson est
interrompue, un voyant clignote pour indiquer que la
minuterie est en attente (voir PAUSE).
PAVÉ NUMÉRIQUE DE SÉLECTION TEMPS/PROGRAMME
Il sert à régler à la seconde près le temps de cuisson allant
jusqu’à 30 minutes.
Il sert également à sélectionner un programme de 1à 10.
PAVÉ NUMÉRIQUE DE RÉGLAGE DE LA TEMPÉRATURE
Il est utilisé pour régler la température de convection. Un
voyant lumineux indique quelle température est réglée. En
appuyant sur la touche ‘0’, le mode convection s’arrête. En
appuyant et en maintenant la pression sur une de ces
touches, la température du four utilisée s’affiche sur l’écran
du timer.
PAVÉ NUMÉRIQUE DE RÉGLAGE
DE LA TEMPÉRATURE
SÉLECTION TEMPS/PRO-
DEUX-POINTS
AFFICHAGE TEMPS/ERREUR
GRAMME
TOUCHES DE
SÉLECTION DE
PUISSANCE
TOUCHE ‘C’ : ANNULER ou RAPPELER UN PROGRAMME
Annule tous les cycles de cuisson minutés, les opérations
pré-programmées et stoppe l’émission de micro-ondes. It
does not alter the oven temperature . Retirer immédiatement
les aliments du four puisqu’ils continueront à cuire si le four
est encore chaud. Cette touche annule également toute
opération incorrecte mais n’efface pas les programmes. Elle
permet enfin de voir les informations relatives aux programmes sauvegardés.
(voir l’encadré RAPPEL )
TOUCHE ‘P’ : PROGRAMME
Pour activer ou régler un programme.
AFFICHAGE DU TEMPS ET DU PROGRAMME
Indique le temps réglé en minutes et secondes, et effectue
un compte à rebours de seconde en seconde durant le cycle
de cuisson. Il affiche également les messages d’erreur et la
température du four. (Voir RÉSOLUTION DES PROBLÈMES)
L’affichage du programme indique le numéro du programme
sélectionné.’PP’ indique qu’il y a programmation.
TÉMOIN PROG. ÉCHELONNÉ
Indique les étapes au cours de la cuisson échelonnée
DEUX-POINTS
Au cours de la programmation, les deux-points clignotent
pour indiquer qu’un temps de cuisson doit être entré.
BOUTON MARCHE/ARRÊT
AFFICHAGE DES ERREURS
Voir RÉSOLUTION DES PROBLÈMES, section 8.
TOUCHE
CONVECTIONPAVÉ NUMÉRIQUE DE
26
Page 27

DIRECTIVES : MODE MANUEL
Le four peut fonctionner en mode
manuel ou programmé. Il est
essentiel de comprendre le mode
NE PAS FAIRE FONCTIONNER LE FOUR À MICRO-ONDES À VIDE
manuel avant de s’essayer à la
programmation.
S’IL N’EST PAS ÉQUIPÉ DE FILTRES À AIR PROPRES
Pour vous familiariser avec les commandes du four, disposer un récipient
Mettre le four en marche.
1
Régler la température du four en appuyant sur une des touches de
2
contenant environ 1,5 litre d’eau dans le four avant de le faire fonctionner.
RÉGLAGE DE LA TEMPÉRATURE 150ºC, 175ºC, 200ºC, 250ºC.
Un voyant lumineux sur la touche clignote pour indiquer quelle
température a été choisie.
Remarque : La température dans
la cavité du four
commence alors à
augmenter. Si le four est
froid au départ, il faudra
peut-être 15 minutes pour
atteindre la température
désirée.
Si la température du four est au niveau requis, à 25ºC
3
près, le voyant cesse de clignoter.
ATTENDRE QUE LA TEMPÉRATURE REQUISE SOIT
ATTEINTE pour utiliser le four.
Régler le temps de cuisson
4
requis en utilisant le pavé
numérique de sélection du
temps.
Exemple : 2 minutes 35 secondes
ATTENTION :
NE PAS UTILISER LE FOUR
Il est possible de contrôler la
température du four à tout
moment en appuyant sur le
bouton qui correspond à la
température sélectionnée.
La température en C°
s’affichera.
La cuisson par convection
uniquement peut être activée
sans régler de temps.
Si la cuisson en mode combiné
et par convection uniquement
peut être opérée avec une
température croissante, il faut
toutefois redoubler de vigilance
quant au réglage du temps.
ARRÊTER LE CYCLE DE CUISSON
Pour arrêter ou annuler le cycle de
cuisson, il suffit d’appuyer sur la
touche d’annulation C.
Le nombre de minutes et de secondes
doit être valide pour être accepté.
Par ex. :
1minute 1 seconde et non 61 secondes
Mettre les aliments dans la cavité du four et fermer la
5
porte, en faisant bien attention à ne pas se brûler.
Toujours essayer de garder la porte ouverte le moins
longtemps possible.
Pour cuire des aliments en
6
utilisant la chaleur convectée et
l’énergie micro-ondes, appuyer
sur une des touches de sélection
de la puissance (100 %, 75 %,
50 % ou 25 %). Pour n’utiliser
que le mode convection, appuyer
sur le bouton portant le symbole
du ventilateur.
La minuterie commence alors
7
son compte à rebours. Quand le
temps restant atteint zéro, la
porte s’ouvre automatiquement.
Retirer la préparation du four.
PAUSE
Il est possible d’interrompre le
cycle de cuisson en ouvrant la
porte du four. Ainsi, la minuterie se
met en pause et le voyant
lumineux de la touche de
puissance adéquate (mode
micro-ondes ou convection)
clignote pour indiquer que le cycle
a été interrompu.
Pour CONTINUER le cycle, fermer
la porte et un signal sonore
rappellera d’appuyer sur une des
touches de puissance pour
redémarrer la minuterie.
REMARQUE :
Quand le cycle est interrompu
ou arrêté, le four reste à la
même température et les
aliments à l’intérieur continuent
à cuire.
27
Page 28

PAVÉ NUMÉRIQUE DE PROGRAMMATION ( 0-9 )
Grâce à la pré-programmation, des modes de cuisson répétitifs peuvent être
enregistrés pour faciliter l’utilisation du four.
Chaque programme peut se diviser en trois étapes. Pour chacune d’entre
elles, la température de convection, le temps et la puissance des microondes peuvent être commandés indépendamment. Toutefois, les programmes
sont à utiliser avec précaution car, si les aliments à cuire varient en poids ou
en densité, il est possible que les résultats soient médiocres et que les
aliments ne soient pas cuits correctement. Il est donc essentiel de contrôler
la température au centre de toutes les préparations avant de les servir.
Appuyer sur la touche de programme et maintenir la
1
pression jusqu’à ce que la lettre ‘P’ clignote sur
l’affichage PROGRAMME.
Les voyants des touches de réglage
2
de la TEMPÉRATURE clignotent
pour indiquer qu’une température
doit être réglée.
Appuyer sur la touche
correspondant à la température
requise. Le voyant de cette touche
sera alors le seul à clignoter.
Régler le temps de cuisson requis en
3
utilisant le pavé numérique de sélection
du temps.
Plusieurs essais seront
nécessaires pour déterminer le
programme approprié à un
produit particulier.
Vérifier les informations sur
le programme qui clignotent
sur l’écran. Les réglages
peuvent être changés en
revenant en arrière dans le
programme grâce au
bouton d’annulation C.
Le nombre de minutes et de secondes doit être
valide pour être accepté. Par ex. : 1minute 1
seconde et non 61 secondes.
Pour cuire des aliments en utilisant la
4
chaleur par convection combinée avec les
micro-ondes, appuyer sur une des touches
de sélection de la puissance (100 %, 75 %,
50 % ou 25 %). Pour n’utiliser que le mode
convection, appuyer sur le bouton portant le
symbole du ventilateur.
Enregistrer en programme simple
Appuyer sur la touche au numéro
requis
exemple : étape 1 enregistrée sous le
numéro de programme 8
Enregistrer en prog. éc`helonné
Suivre les points 1à 4 pour régler
chaque étape de cuisson et
appuyer ensuite sur la touche de
programme pour ajouter une
deuxième et troisième étape de
cuisson au programme. Appuyer
sur le numéro adéquat pour
enregistrer le programme.
• Entrer un temps valide inférieur
à 30 minutes. Par ex. : 1
minute 1 seconde et non 61
secondes.
• Il est possible d’entrer les
informations dans la
mémoire que le four soit
chaud ou froid.
• Pour revisualiser un
programme, utiliser la
touche de RAPPEL (voir
page 14).
Il est conseillé de prendre
note de ces informations et
de les conserver pour
références futures.
Les informations relatives au
programme s’affichent
momentanément lorsque le
programme est enregistré.
exemple : étapes 1, 2 et 3 enregistrées
sous le numéro de programme 8
28
Page 29

ACTIVER UN PROGRAMME
Utiliser le pavé numérique pour activer un programme
Il est possible de sélectionner les programmes de 0 à 9 en
utilisant le pavé numérique.
Pour activer ces programmes, suivre la procédure suivante :
Préchauffer le four à la température de départ requise en
1
appuyant sur la touche de température adéquate. Attendre
que le voyant du bouton selectionné cesse de clignoter.
Pour vérifier la température du
four, appuyer à nouveau sur la
touche de température.
En évitant de toucher les surfaces chaudes, mettre la
2
préparation à cuire dans le four et fermer la porte.
Appuyer sur la touche de pro-
3
gramme. La lettre ‘P’ s’affichera
sur l’écran de programme.
Sélectionner la touche du pavé numérique désirée pour
activer un programme (0-9).Le numéro de programme
et le temps de cuisson total s’affiche sur l’écran et le
voyant lumineux pour la première étape s’allume.
exemple : 200°C
Remarque : Si la température de
départ requise n’a pas été
atteinte, un message d’erreur
s’affiche (E:6).
Si tel est le cas, retirer les
aliments du four
IMMÉDIATEMENT et attendre
que le voyant du bouton
correspondant à la température
requise cesse de clignoter.
Reprendre la procédure au
point 2.
Quand le cycle programmé est
terminé, la température du four
revient à celle qui a été réglée
avant le début du cycle.
exemple : programme 8
Le programme fonctionne alors
pour le temps total restant qui
défile régressivement sur l’écran
(les temps de chaque étape
regroupés).
Quand le temps atteint “0:00”, un
signal sonore se fait entendre.
Retirer la préparation du four et fermer la porte.
4
RAPPEL
La fonction de RAPPEL permet de revisualiser un programme étape par
étape.
Appuyer sur la touche
d’annulation C et maintenir la
pression. Après quelques
secondes, les chiffres de
l’AFFICHAGE DU TEMPS
disparaîtront.
Appuyer alors sur la touche
correspondant au numéro de
programme désiré (0-9).
Le contenu du programme apparaîtra sur l’écran. La température, le
temps et le niveau de puissance de chaque étape s’allumeront sur
l’écran pendant quelques secondes.
ARRÊTER LE CYCLE DE CUISSON
Pour arrêter ou annuler le cycle de
cuisson, il suffit d’appuyer sur la
touche d’annulation C
à tout moment.
PAUSE
Il est possible d’interrompre le
cycle de cuisson en ouvrant la
porte du four. Ainsi, la minuterie se
met en pause et le voyant
lumineux de la touche de
puissance adéquate (mode
micro-ondes ou convection)
clignote pour indiquer que le cycle
a été interrompu.
Pour CONTINUER le cycle, fermer
la porte et un signal sonore
rappellera d’appuyer sur une des
touches de puissance pour
redémarrer la minuterie.
Pour revisualiser un programme,
appuyer sur
CALLBACK.
29
Page 30

COMMANDES MANUELLES (MODÈLE RD401 )
Mettre le four en marche.
1
En tournant le sélecteur de température (temp ºC) dans le sens des
2
aiguilles d’une montre, régler la température du four requise. Le témoin de
la température obtenue par convection reste allumé tant que la
température n’est pas atteinte. Il est préférable d’attendre que le témoin
s’éteigne pour obtenir de meilleurs résultats. Il s’éteindra et s’allumera
selon que la température reste ou non au niveau requis.
En tournant le sélecteur de puissance micro-ondes (Power %), régler la
3
puissance au niveau requis.
par ex. 175ºC
par ex. 50 %
Puissance
En tournant le sélecteur de temps dans le sens des aiguilles d’une
4
montre, régler le temps de cuisson requis (time).
par ex. 15 minutes
Appuyer sur le bouton de
5
démarrage (start). Le témoin
s’allumera et la minuterie
entamera son compte à rebours.
Une sonnerie indique à
l’utilisateur la fin de la cuisson.
Remarque :
• Pour une cuisson par micro-ondes uniquement, le sélecteur de la
température par convection doit être mis sur ‘0’. Pour de meilleurs
résultats, le four doit être froid.
• Pour une cuisson par convection uniquement, le sélecteur de microondes doit être mis sur ‘0’. Ce mode de cuisson ne nécessite pas de
réglage de temps.
• Faire attention pour la décongélation dans un four chaud. Les produits
doivent être tournés régulièrement pour éviter que les bords ne brûlent.
Pour de meilleurs résultats, décongeler les produits le matin quand le
four est encore froid.
• La cuisson par convection uniquement ou en mode combiné peut être
effectuée avec une température croissante mais il faut redoubler de
vigilance quant au réglage du temps.
• Il est possible d’introduire une cuisson par micro-ondes à la moitié du
cycle réglé manuellement en mode convection uniquement.
Cependant, seuls les utilisateurs de micro-ondes avisés peuvent le
faire, puisque le temps de cuisson réglé en mode convection ne sera
pas modifié en mode micro-ondes.
• La cuisson peut être interrompue en ouvrant la porte (PAUSE).
Fermer la porte et appuyer sur le bouton de démarrage pour continuer.
marche
temps
30
Page 31

ENTRETIEN
Pour que le four fonctionne au mieux, la cavité, la porte et les filtres à air doivent rester
propres.
En nettoyant chaque jour le four, les normes d’hygiène requises seront respectées et le four sera
efficace plus longtemps.
Suivre les CONSIGNES DE SÉCURITÉ au début de ce manuel.
Tous les problèmes survenant
• TOUJOURS couper l’alimentation secteur et laisser le four
refroidir pendant au moins 20 minutes avant de le nettoyer.
• Si nécessaire, enlever le chariot à plateau tournant et nettoyer
avec de l’essuie-tout les aliments ayant débordés.
• NE JAMAIS utiliser de paille de fer, de couteaux ou de
matériaux abrasifs solides sur quelque endroit du four.
Il est conseillé, comme pour tous les appareils électriques, de
faire vérifier ses branchements électriques régulièrement.
Nettoyer le filtre à air
1. Enlever le filtre à air qui se trouve à l’arrière du four en le faisant
glisser en dehors des fentes, vers le haut.
2. Nettoyer avec de l’eau savonneuse propre et tiède. Rincer et
tamponner avec un torchon pour sécher. Remettre en place en le
faisant glisser dans les fentes prévus à cet effet.
suite à une négligence ou une
mauvaise utilisation, y compris
l’utilisation du four sans filtres à
air propres, ne sont pas couverts
par la garantie. Les visites de
maintenance résultant de ces
problèmes seront donc facturés.
Nettoyer la cavité et la porte du four
1 Nettoyer les particules alimentaires entre le rebord intérieur de la
porte et le rebord de la base du four à l’aide d’une brosse propre et
sèche.
2. Appliquer un produit à four non caustique sur les surfaces
intérieures, sauf sur les joints de la porte. Laisser agir le
temps conseillé. Passer ensuite un chiffon propre et de
l’eau tiède propre en quantité. Sécher en utilisant un
nouveau chiffon sec.
3. Essuyer les charnières avec un chiffon propre humide.
NE PAS appliquer d’huile lubrifiante.
4. Essuyer les joints de la porte soigneusement avec un
chiffon propre humide et vérifier qu’ils sont en bon état..
B
Nettoyer le panneau de commande et les surfaces
extérieures
Nettoyer régulièrement avec un chiffon humide.
Joint de
la porte
Trucs et astuces contre les taches résistantes dans la
cavité du four
1. Mettre le four en marche sur le mode micro-ondes uniquement (sans
air chaud).
2. Placer un récipient d’eau (1,5 litre) au centre de la cavité du four.
3. Régler la puissance de micro-ondes à 100 %.
4. Régler la minuterie à 30 minutes et appuyer sur le bouton de
démarrage. À la fin du cycle, utiliser un chiffon propre pour nettoyer
la cavité embuée.
NE PAS UTILISER LE FOUR SANS
FILTRES À AIR PROPRES
Cache
déflecteur
A
Si les joints de la porte sont
endommagés, le four doit être
réparé par un technicien de
maintenance agréé.
31
Page 32

RÉSOLUTION DES PROBLÈMES
Affichage des codes
Le Mealstream EC501 peut identifier certains des problèmes récurrents en faisant clignoter un
code d’erreur dans l’écran d’affichage du temps.
Affichage code d’erreur
Porte mal fermée.
Défaut électrique possible
Surchauffe du four
Le temps n’a pas été réglé
Temps réglé non valide (ex : 61s.)
Le four ne chauffe pas à la bonne
température.
Panne des composants possible
La cavité du four est en surchauffe
Panne des composants possible
Le four n’est pas à la bonne
température
Un problème interne a été détecté.
Le four a été en surchauffe
Le four est en marche mais le
panneau de commande ne s’allument
pas et les ventilateurs ne fonctionnent
pas.
Attention - Seul un technicien de maintenance agréé est habilité pour l’entretien et les dépannages sur ces
appareils.
Défaut Action recommandée
Fermer la porte complètement
Contacter le Service Maintenance de Merrychef
Nettoyer le filtre à air et les aérateurs
Laisser le four en marche (sans le mettre en
mode cuisson) pendant 4-5 minutes
Régler le temps
Régler le temps correctement (ex : 1:01)
Éteindre et ne pas utiliser
COUPER L’ALIMENTATION ÉLECTRIQUE
Contacter le Service Maintenance Merrychef
Éteindre et ne pas utiliser
COUPER L’ALIMENTATION ÉLECTRIQUE
Contacter le Service Maintenance Merrychef
Retirer les aliments du four
Attendre que le voyant de la température
réglée cesse de clignoter et reste allumé
Contacter le Service Maintenance de
Merrychef
Nettoyer le filtre à air
Placer le four dans un endroit où l’air circule
plus
Vérifier les disjoncteurs/fusibles et
l’alimentation électrique. Cette opération doit
être effectuée par un électricien qualifié.
Spécifications techniques
Hauteur
(mm)
Mealstream CTM3
Largeur
(mm)
Profondeur
(mm)
710640 630
Poids
(kg)
90
Mealstream CTM5 710640 630 1425 3.090
Espaces pour la circulation de l’air
recommandés par les fabricants
Alimentation électrique : voir la plaque signalétique à l’arrière du four.
Cet appareil est conforme aux directives européennes suivantes :
EMC 89/336 CEE
LVD 73/23 CEE
Merrychef se réserve le droit de modifier les présentes spécifications sans préavis.
810690 680
32
Puissances de
micro-ondes
restituées
(watts)
1425 2.5
N° Pdt : 33Z3313 Édition 05
Puissances
restituées par
convection
(kw)
Page 33

LE SERVICE/ l’ASSISTANCE TECHNIQUE
Pour le service et l’assistance technique, veuillez contacter votre fournisseur Merrychef.
Si vous ne pouvez pas trouver une assistance dans votre pays d’achat, veuillez contacter
Merrychef:
Tél : +44 (0)1252 371000
Fax +44 (0)1252 371007
E-mail info@merrychef.com
33
Page 34

INHALT
Sicherheitsinstruktionen .................................. 35
Stromversorgung ............................................. 35
Sicherheitsmaßnahmen .................................. 36
Aufbau.............................................................. 37
Geeignetes Kochgeschirr ................................ 38
Einleitung ......................................................... 40
Hauptmerkmale ............................................... 41
Bedienfeldl ....................................................... 42
Bedienungsanleitungen:
Manueller Modus .............................................. 43
Programmierung der Nummerntasten............. 44
Ablauf eines Programms ................................. 45
Manuelle Bedienung (RD501 Modelle) ............. 46
Tägliche Reinigung .......................................... 47
Problembehandlung......................................... 48
Technische Daten ............................................ 48
Kundendienstdetails ........................................ 49
DEUTSCH
34
Page 35

WICHTIGE SICHERHEITSINSTRUKTIONEN
DIE FOLGENDEN SICHERHEITSINSTRUKTIONEN BITTE AUFMERKSAM DURCHLESEN.
WARNUNG: Das Ausführen von Service- oder Reparaturarbeiten, bei denen eine Schutzabdeckung zur Abweisung
von Mikrowellenenergie entfernt wird, stellen für jeden, der kein Fachmann ist, eine Gefahr dar.
1. Den Herd NICHT leer verwenden, also ohne Lebensmittel oder Flüssigkeit, da dies zur Überhitzung führt und
Schäden verursachen kann.
2. KEINE festen Bauteile im Innern des Herdes entfernen.
3. Bedienfeld, Tür, Dichtungen oder irgendeinen anderen Teil des Herdes NICHT manipulieren.
4. Abzugsöffnungen/Luftfilter oder Dampfabzug NICHT blockieren.
5. KEINE Trockentücher oder Lappen über irgendeinen Teil des Herdes hängen.
6. Wenn die Türdichtungen beschädigt sind, muss der Herd von einem zugelassenen Techniker repariert
werden.
7. Wenn das Stromkabel auf irgendeine Weise beschädigt ist, MUSS es durch einen zugelassenen Techniker
ersetzt werden.
8. Vorsicht beim Umgang mit heißen Flüssigkeiten, Lebensmitteln und Behältern, um Verbrühungen und
Verbrennungen zu vermeiden.
9. Beim Erwärmen von Flüssigkeiten mit der reinen Mikrowellen- oder der Kombinationsfunktion sollte der Inhalt
vor dem Erwärmen umgerührt werden, um plötzliches Überkochen zu vermeiden.
10. Saugflaschen und Gläser mit Babynahrung vor dem Erwärmen öffnen. Den Inhalt umrühren oder schütteln
und die Temperatur vor dem Verzehr prüfen, um Verbrennungen zu vermeiden.
11. Den Herd auf keinen Fall zum Erwärmen von Alkohol, z. B. Brandy, Rum usw., verwenden. Zudem kann
Nahrung, die Alkohol enthält, leichter Feuer fangen, wenn sie überhitzt wird.
12. Nie im Herd frittieren.
13. Das Gerät ist nicht für den Gebrauch durch kleine Kinder oder gebrechliche Personen gedacht.
14. Kinder sollten beaufsichtigt werden, um sicherzustellen, dass sie nicht mit dem Gerät spielen.
ENERGIEVERSORGUNG
WARNUNG
Dieses Gerät muss geerdet sein. Nichtbeachtung kann einen Stromschlag und Tod zur Folge haben.
Der Herd muss von einem qualifizierten
und zugelassenen Elektriker installiert
werden. Das Gerät eignet sich nicht
für den Anschluss an eine
Netzstromversorgung über einen 13
Ampère Standardstecker.
Die Installationsverdrahtung (festverdrahtet oder Steckdosenanschluss) muss den derzeitigen IEE
Richtlinien und Sicherheitsstandards
entsprechen. Die elektrische
Speiseleitung befindet sich am
hinteren Herdteil.
WARNUNG: Ein doppelter
Trennschalter muss angebracht
werden, der einen Kontaktabstand
von 3 mm an beiden Polen haben
muss.
Sollten Sie Fragen zur Stromversorgung haben, wenden Sie sich an
einen qualifizierten und zugelassenen
Elektriker.
IEs ist wichtig, dass der Netzanschluss richtig installiert und geerdet
ist. Er sollte von einem Stromkreis
gespeist werden, der sich für
Elektrogeräte mit sehr hoher Leistung
eignet. Es ist wichtig, dass dieser
Stromkreis nicht überladen wird.
DIESE ANLEITUNGEN AUFBEWAHREN
Einrichtungen mit Standardlasttrennschaltern (Typ ‘B’) sind empfindlich
gegenüber ‘Stromstößen’, die
auftreten, wenn Gefriertruhen,
Kühlschränke und andere
Gastronomiegeräte, einschließlich
Mikrowellenherde, eingeschaltet
werden. Deshalb empfehlen wir
ausdrücklich, dass ein separater Typ
‘C’ Lasttrennschalter (speziell für diese
Art Ausstattung entworfen) für jeden
Mikrowellenherd angebracht wird.
Wenn das Gerät mit einem
Steckanschluss ausgestattet ist,
sollte sich die Steckdose an einem
leicht zugänglichen Ort befinden.
35
Page 36

ZU BEACHTENDE SICHERHEITSMASSNAHMEN
1. Diese Anleitung vor Benutzung des Mikrowellenherdes durchlesen.
2. Wie bei allen elektrischen Geräten, sollten auch hier die elektrischen Anschlüsse
regelmäßig geprüft werden.
3. Der Innenbereich des Herdes und die Türdichtungen sollten regelmäßig gereinigt
werden. Dabei die Anleitungen des Abschnitts REINIGUNG beachten.
4. Es ist nicht nötig, den Herd nach jeder Funktion abzuschalten. Sie sollten ihn
allerdings abends oder nach der Betriebsperiode abschalten.
5. Mikrowellenenergie sollte nicht zum Trocknen von Stoffen oder dem Aufwärmen von
Tellern verwendet werden.
6. Wie bei allen Kochgeräten, sollte auch hier darauf geachtet werden, eine Verbrennung
von Lebensmitteln und Behältern im Herd zu vermeiden.
Wird Rauch festgestellt:
Abschalten
Von Stromversorgung trennen
Tür geschlossen halten, um etwaige
Flammen zu ersticken
7. Um beste Resultate zu erzielen, Lebensmittel in der Mitte des Garraums platzieren.
8. Bei Benutzung der reinen Mikrowellenfunktion die Lebensmittel abdecken, um ein
Spritzen an die Wände des Garraums zu verhindern.
9. Lebensmittel in brennbaren Plastik- oder Papierbehältern sollten nur bei der reinen
Mikrowellenfunktion verwendet und regelmäßig kontrolliert werden, um mögliches
Entzünden zu vermeiden.
10. Lebensmittel sollten bei Benutzen der Heißluft- und Kombinationsfunktionen nicht
verpackt sein.
11. Rohe und ganze, hartgekochte Eier sollten nicht in der Mikrowelle oder unter
Benutzung der Kombinationsfunktion erhitzt werden, da sie explodieren können.
12. Lebensmittel mit Haut, z. B. Kartoffel, Äpfel, Würstchen usw., sollten vor dem
Erwärmen eingestochen werden.
13. Lebensmittel sollten nicht in einem vollkommen dichten Behälter erhitzt werden, da die
Dampfansammlung dessen Explosion verursachen kann.
14. Überschüssiges Fett sollte während des ‘Bratens’ und vor dem Herausnehmen
schwerer Behälter aus dem Herd entfernt werden.
15. Falls Glas im Herd zerbricht oder zerspringt, sicherstellen, dass die Lebensmittel
keine Glasstückchen enthalten. Sollten Zweifel bestehen, die Lebensmittel, die sich
zum Zeitpunkt des Bruchs im Herd befanden, wegwerfen.
36
Page 37

AUFBAU
Verpackungsmaterial und Schutzfolie vom Herd entfernen.
Auf offensichtliche Transportschäden prüfen. Falls notwendig,
Lieferanten SOFORT informieren.
AUFSTELLUNGSORT UND POSITIONIERUNG
Wählen Sie einen Standort, der sich nicht in der Nähe starker
Wärmequellen befindet.
NICHT so aufstellen, dass heiße Luft von Frittiergeräten, Grills,
Kontaktgrills usw. eingezogen werden kann.
Es muss ein Hitzeschutz in der Höhe des Herdes angebracht werden,
Den
empfohlenen
Mindestabstand
für den
Luftstrom
beachten.
Hinweis:
Der Lufteinlass befindet sich
unter jeder Seite des
Herdes. Auch bei Einhalten
des unten angegebenen
Abstand ist es wichtig, dass
der Luftstrom so kühl wie
möglich ist und nicht durch
andere Geräte, wie z. B.
Fritiergeräte, Grills und
Kontaktgrills vorgeheizt
wird, da das die
Lebensdauer und die
Leistung des Herdes
verschlechtert.
Den Mikrowellenherd auf eine flache, EBENE, FESTE und STABILE
Oberfläche stellen.
Einen Mindestabstand von 50 mm zur Rückwand, Oberseite und allen
Seiten einhalten, um einen freien Luftstrom zu ermöglichen.
Der Lufteinlass befindet sich unter jeder Seite des Herdes. Auch bei
Einhalten des oben angegebenen Abstands ist es wichtig, dass der
Lufstrom so kühl wie möglich ist und nicht durch andere Geräte, wie z.
B. Frittiergeräte, Grills oder Kontaktgrills, vorgeheizt wird.
Einen Mindestabstand von 50 mm über dem Herd zum Entweichen der
heißen Luft einhalten.
Genügend Abstand, 400 mm vor dem Herd, einhalten, um die Tür ganz
öffnen zu können.
Keine Etiketten/Aufkleber am Herd anbringen, mit Ausnahme der vom
Hersteller angebrachten.
37
Herde nicht direkt
übereinander stellen. Ein
separates Regal oder einen
zweistufigen Ständer
WARNUNG:
Kontrollieren, dass alle
LUFTFILTER vor Inbetriebnahme richtig angebracht
sind (siehe Hauptmerkmale).
Page 38

GEEIGNETES KOCHGESCHIRR
Die Anweisungen des Herstellers prüfen, um festzustellen, ob sich bestimmte Behälter oder
bestimmtes Geschirr für die einzelnen Kochfunktionen eignet.
Die folgende Tabelle zeigt allgemeine Richtlinien auf:
Hitzebeständige Behälter
Spezialglas
Glaskeramik
Töpferware
(Porzellan, Steingut usw.)
Metallbleche
Metallbleche (auf Herdschienen)
KEINE ANDEREN
METALLBEHÄLTER
VERWENDEN
Plastikbehälter
Harte, zum Kochen geeignete
Plastikbehälter
Wegwerfartikel
Kombination
nur Heißluft
nur Mikrowelle
Kein Geschirr mit metallischer
Verzierung benutzen.
Metallbleche dürfen nur benutzt
werden, wenn sie in die
Glasschienen auf jeder Seite des
Garraums engeschoben werden.
Mikrowellen- und ofenfeste
Plastikbehälter (bis zu bestimmten
Temperaturen) sind jetzt erhältlich.
Herstelleranweisungen vor
Verwendung prüfen.
Brennbares Material (Papier, Karton
usw.)
Mikrowellengeeignete Frischhaltefolie
Andere Utensilien
Verschlussclips
Besteck
Temperaturfühler
Frischhaltefolie sollte nicht mit
Lebensmitteln in Berührung
kommen.
Während des Kochens darf kein
Kochutensil in den Lebensmitteln
gelassen werden.
38
Page 39

VERWENDUNG METALLISCHER ARTIKEL BEI KOMBINATIONS- UND REINER
MIKROWELLENFUNKTION
Einige der Innenwänder der Herde der Mealstream 501 bestehen aus
Glasemaille, die als Isolierung dient und eine sichere Anwendung von
Metallen unter kontrollierten Bedingungen ermöglicht.
(Das mitgelieferte Blech aus Glasemaille kann umgedreht und als
permanente Unterlage benutzt werden.)
Große Metalltöpfe und -bleche in die Mitte des Herdes stellen und einen
Abstand von mindestens 40 mm von den Seitenwänden einhalten.
Einzelne Metallbehälter gleichmäßig und mit mindestens 40 mm Abstand
voneinander und den Seitenwänden platzieren.
WARNUNG:
Unbedingt darauf achten, dass
die Behälter korrekt
positioniert werden.
Werden Metallbehälter zu
dicht beieinander platziert oder
zu nahe bei den Herdseiten,
kann es zu Funkendurch-
schlag und dadurch zu einer
Beschädigung des Herdes
kommen.
WARNUNG:
Ist ein metallisches,
knisterndes Geräusch während
der Kombinations- oder reinen
Mikrowellenfunktion
vernehmbar, die Tür öffnen, um
den Kochvorgang anzuhalten
und die Behälter korrekt zu
positionieren.
Möglichst keine Metalltöpfe verwenden, die eine Tiefe von mehr als 65 mm
haben, da dies Mikrowellen reflektieren und die zur vollständigen Erwärmung
des Garguts erforderliche Zeit verändern kann.
Wenn Metallartikel
(einschließlich silberner
Serviertabletts) durch
Funkendurchschlag
stellenweise verbrannt werden,
diese nicht mehr im Herd
verwenden.
39
Page 40

EINLEITUNG
Die Herde der Mealstream 501 bieten Gastronomieküchen drei flexible Wärmefunktionen:
nur Mikrowelle, nur Heißluft und Kombinationskochen.
Kombinationskochen ermöglicht es, dass Ergebnisse hoher Qualität in nur einem Bruchteil
der Zeit erreicht werden können, die sonst das herkömmliche Kochen in Anspruch nimmt.
Das ist besonders beim Backen, Bräunen, Braten, Grillen oder Zubereiten von
Gratingerichten der Fall.
Wurden einmal präzise Anleitungen für das Kombinations- oder Heißluftkochen ausgewählter
Lebensmittel festgestellt, können sie in den Speicher des Herdes programmiert werden,
wodurch eine einfache und akkurate Wiederholung möglich wird.
Multistufen-Programmierung
Der Mealstream EC501 bietet eine noch größere Flexibilität, da er eine Multistufen-
Programmierung ermöglicht. Dadurch können die exakten Bedingungen für die qualitativ
hochwertigen Ergebnisse je nach Lebensmittelart eingestellt werden.
Hier wird ein typisches 3-Stufen-Programm gezeigt. Der Herd wurde bei 200°C vorgeheitzt.
Stufe 1 beginnt damit, dass eine geringe Mikrowellenleistung von 25% (ideal zum Auftauen)
verwendet wird, während die Heißlufttemperatur auf 225°C ansteigt. In der Stufe 2 erhöht
sich die Mikrowellenleistung auf das Maximum (100%) . In der abschließenden
Bräunungsstufe wird die Heißlufttemperatur auf 250°C, wobei keine Mikrowellenenergie
verwendet wird.
Hierbei handelt es sich nur um ein Beispiel einer grenzenlosen Zahl an möglichen
Multistufen-Programmen, die erstellt und gespeichert werden können. Programme können
Hinweis: Es bedarf etwas Zeit, ehe sich Heißlufttemperaturen ändern. Erwarten Sie kein
sofortiges Resultat, wenn eine andere Temperatur aktiviert wird.
Beim Auftauen im heißen Herd mit Vorsicht vorgehen. Lebensmittel am besten morgens
auftauen, wenn der Herd noch kalt ist.
Die in dieser Anleitung aufgeführten Anweisungen sind dazu gedacht, die Sicherheit und lange Lebensdauer Ihres
Merrychef-Mikrowellenherdes zu gewährleisten.
40
Page 41

HAUPTMERKMALE
7
6
1
2
11
8
3
12
9
4
10
5
1
LUFTABZÜGE
Diese Abzugsöffnungen an den Seitenwänden und
der Rückwand dienen zum Entweichen der Luft, die
zur Kühlung von Innenbauteilen benutzt wurde. Die
Mikrowellenenergie kann darüber nicht in die
Umwelt gelangen. Sie dürfen nicht blockiert
werden.
2
GARRAUM DES HERDES
Der Garraum besteht hauptsächlich aus Edelstahl
und aus einer Glasemaillescheibe an der Tür. Er
muss sauber gehalten werden (siehe
REINIGUNG).
3
HEISSLUFTGEBLÄSE
Das Gebläse zieht Luft über die Heizelemente und
über die Ränder des rückseitigen Leitblechs in den
Garraum, wodurch eine perfekte Wärmeverteilung
für das Kombinationskochen geschaffen wird. Das
Metallgitter, das das Gebläse abdeckt, muss
sauber und schmutzfrei gehalten werden (siehe
REINIGUNG).
LUFTEINLASSFILTER (LINKS & RECHTS)
4
Befinden sich an der linken und rechten Frontseite
der Unterkante. Sie sind Teil des Ventilationssystems und dürfen nicht blockiert werden. Sie
sollten täglich gereinigt werden.
5
TÜRGRIFF
Es handelt sich um einen harten Griff, der zum
Öffnen nach unten und in Richtung des Benutzers
gezogen wird.
BEDIENFELD
6
Siehe Seite 10.
41
EIN/AUS-SCHALTER
7
Wenn EINgeschaltet, leuchtet das Bedienfeld. Das
Gebläse- und Ventilationssystem ist dann ebenfalls
in Betrieb.
LEISTUNGSSCHILD
8
Es befindet sich an der Rückwand und gibt die
Seriennummer, den Modelltyp, die elektrischen
Daten und Merrychefs Adresse und Telefonnummer
an.
9
TÜR
Hierbei handelt es sich um eine hochpräzis hergestellte Energiebarriere mit drei MikrowellenSicherheitsverriegelungen. Sie muss immer
sauber gehalten werden (siehe Abschnitt
REINIGUNG). Die Tür sollte NICHT zum Abstellen
schwerer Gerichte benutzt werden.
TÜRDICHTUNGEN
10
Dadurch wird eine dichte Abdichtung um die Tür
sichergestellt. Sie sollten sauber gehalten und
regelmäßig auf Anzeichen von Beschädigungen
geprüft werden. Beim ersten Anzeichen von
Abnutzung sollten sie durch einen zugelassenen
Kundendiensttechniker ersetzt werden.
TEMPERATURSENSOR
11
Er überwacht die Temperatur im Herd. Beim
Reinigen mit Vorsicht vorgehen, um
Beschädigungen zu vermeiden.
DAMPFABZUG (am hinteren Herdteil)
12
Dadurch kann Dampf abziehen. Er verhindert eine
Ansammlung von Kondensation. Mikrowellenenergie kann darüber nicht herausgelangen.
Page 42

BEDIENFELD
PROGRAMMTASTE
ABBRUCHTASTE
LEISTUNGSTASTEN
Es stehen 4 Mikrowellenleistungstasten zur Wahl: 25%,
50%, 75% und 100%. Die gerade benutzte wird durch ein
Lämpchen angezeigt.
HEISSLUFTTASTE
Sie wird benutzt, wenn Lebensmittel nur gebräunt werden
sollen (kein Mikrowellenkochen).
Hinweis: Beim Kochen starten die MIKROWELLEN- und die
HEISSLUFTTASTEN den Vorgang und den Timer. Sie
können die Leistungsniveaus während eines manuellen
Kochvorgangs verändern. Wird der Vorgang unterbrochen,
blinkt ein Lämpchen auf, um daran zu erinnern, dass die
Zeit angehalten wird (siehe PAUSE).
ZEIT/PROGRAMMWAHLTASTEN
Diese Tasten werden zur Einstellung der Kochzeit in
Schritten von 1 Sekunde bis zum Maximum von 30 Minuten
benutzt. Sie werden auch für die Programme von 01-10
benutzt.
TEMPERATURWAHLTASTEN
Diese Tasten dienen zur Einstellung der
Heißlufttemperatur. Ein Lämpchen zeigt die eingestellte
Temperatur an. Durch Wahl der Taste “0” wird die
Heißluftfunktion ausgeschaltet. Wird eine Temperaturtaste
gedrückt gehalten, wird die derzeitige Herdtemperatur im
Zeitanzeigefeld angezeigt.
TEMPERATURWAHLTASTEN
ZEIT/PROGRAMMWAHLTASTEN
DOPPELPUNKT
ZEIT/FEHLERANZEIGE
MULTISTUFENANZEIGER
ZEIT/FEHLERANZEIGE
LEISTUNGSTASTEN
ABBRUCH/ ABFRAGE ‘C’ TASTE
Bricht alle zeitgesteuerten Kochvorgänge und
vorprogrammierten Abläufe ab und stoppt die Mikrowellenenergie. Die Herdtemperatur wird nicht durch sie
verändert. Ist der Herd heiß, wird das Essen weiterhin kochen
und sollte sofort aus dem Herd genommen werden. Diese
Taste bricht auch alle Fehlbedienungen ab. Mit ihr können
keine Programm gelöscht werden. Sie kann auch zur Anzeige
der Details gespeicherter Programme benutzt werden.
(siehe ABFRAGE-Funktion)
PROGRAMM ‘P’ TASTE
Aktiviert Programm oder stellt es ein.
ZEIT- UND PROGRAMMANZEIGE
Zeigt die in Minuten und Sekunden eingestellte Zeit an und
zählt die Zeit während eines Kochvorgangs in Schritten von 1
Sekunde.
Zeigt auch Fehlermeldungen und Herdtemperatur an.
(PROBLEMBEHANDLUNG)
Die Programmanzeige zeigt die gewählte
Programmnummer. ‘PP’ zeigt Programmierung an.
MULTISTUFENANZEIGER
Zeigt die Stufe beim Multistufenkochen an.
DOOPELPUNKT
Wird programmiert, blinkt der Doppelpunkt, um
anzuzeigen, dass die Zeit jetzt eingegeben werden kann.
EIN/AUS-SCHALTER
FEHLERANZEIGE
Siehe PROBLEMBEHANDLUNG, Abschnitt 8.
HEISSLUFTTASTE
42
Page 43

BEDIENUNGSANLEITUNGEN: MANUELLER MODUS
Der Herd kann im manuellen oder
programmierten Modus betrieben
werden. Vor Benutzung des
programmierten Betriebs ist es
wichtig, sich mit dem manuellen
Modus bekannt zu machen.
MIKROWELLENENERGIE NICHT BEI LEEREM HERD BENUTZEN
DEN HERD NICHT BENUTZTEN, WENN KEINE SAUBEREN
LUFTFILTER EINGESETZT SIND
Um sich an die Bedientasten zu gewöhnen, vor der Bedienung eine
Schüssel mit etwa 1,5 Liter Wasser in den Herd stellen.
Den Herd anstellen.
1
Die erforderliche Herdtemperatur durch Drücken einer der
2
TEMPERATURWAHLTASTEN, entweder 150º, 175º, 200º oder 250ºC,
einstellen. Das Lämpchen in der Taste wird blinken, um anzuzeigen,
dass diese gewählt wurde.
Hinweis: Die Temperatur im
Garraum steigt jetzt an.
Es kann bei kaltem Herd
bis zu 15 Minuten dauern,
ehe der Wert erreicht wird.
Kommt die Herdtemperatur bis auf 25ºC an den
3
eingestellten Wert heran, wird das Lämpchen nicht
mehr blinken.
WARTEN, BIS DIESE TEMPERATUR ERREICHT
WURDE, ehe der Herd benutzt wird.
Die gewünschte Kochzeit durch
4
Drücken der nummerischen
ZEITWAHLTASTEN einstellen.
Beispiel: 2 Minuten 35 Sekunden
WARNUNG:
Die Garraumtemperatur kann
jederzeit kontrolliert werden,
indem die gewählte
Temperaturtaste gedrückt wird.
Die Garraumtemperatur wird in
ºC angezeigt.
Reines Heißluftkochen ist ohne
Zeiteinstellung möglich.
Kombinations- und reines
Heißuftkochen darf nur bei bei
einer ansteigenden Temperatur
durchgeführt werden. Dabei
besondere Aufmerksamkeit auf
Zeitvorgaben legen.
ANHALTEN DES KOCHVORGANGS
Der Vorgang kann jederzeit durch
Drücken der ABBRUCHTASTE
angehalten und abgebrochen
werden.
Es werden nur gültige Zeiten, also
Minuten und Sekunden, akzeptiert.
z. B. 1 Minute 1 Sekunde nicht 61 Sek.
Mit der notwendigen Vorsicht, um sich nicht zu
5
verbrennen, das Gargut in den Garraum stellen und die
Tür schließen.
Die Zeit, in der die Tür geöffnet ist, immer auf ein
Minimum halten.
Um Lebensmittel mit einer
6
Kombination aus Heißluft und
Mikrowelle zu kochen, wird eine
der LEISTUNGSTASTEN
gedrückt, entweder 100%, 75%,
50% oder 25%.
Um nur mit Heißluft zu kochen,
die Taste mit dem
Gebläsesymbol drücken.
Der Timer wird jetzt absteigend
7
zählen. Wenn die Zeitzählung
Null erreicht, ist ein deutliches
Signal hörbar. Das Gargut aus
dem Garraum nehmen.
PAUSE
Der Vorgang kann durch Öffnen
der Tür unterbrochen werden.
Wird die Tür geöffnet, bleibt der
Timer an diesem Punkt stehen
und das Lämpchen in der
entsprechenden LEISTUNGSTASTE (Mikrowelle oder Heißluft)
wird blinken, um das unter-
brochene Programm anzuzeigen.
ZUM FORTSETZEN des
Programms Tür schließen. Es
ertönt ein Warnton, um an das
Drücken einer beliebigen
Leistungstaste zum erneuten
Starten des Timers zu erinnern.
Hinweis:
Wird der Vorgang
unterbrochen oder angehalten,
bleibt der Herd auf der
eingestellten Temperatur
stehen und das Gargut im
Herd kocht weiter.
43
Page 44

PROGRAMMIERUNG DER NUMMERNTASTEN (0-9)
Das Vorprogrammieren ermöglicht es, dass sich wiederholende Kochvorgänge
zur einfachen Anwendung gespeichert werden können.
Jedes Programm kann sich aus bis zu drei Stufen zusammensetzen, wodurch
bei jeder Stufe eine unabhängige Kontrolle der Heißlufttemperatur, der Zeit
der Stufen und des Niveaus der Mikrowellenleistung möglich ist. Diese
Programme sollten jedoch mit Vorsicht benutzt werden, denn wenn die zu
kochenden Lebensmittel ein unterschiedliches Gewicht oder eine andere
Dichte haben, können eventuell gute Ergebnisse und, noch wichtiger, ein
gleichmäßig gekochtes Essen nicht erreicht werden. Es ist daher wichtig,
dass alle zum Verzehr vorbereiteten Lebensmittel auf Erreichen der
Kerntemperaturen kontrolliert werden.
Die PROGRAMMTASTE gedrückt halten, bis ein
1
blinkendes ‘P’ in der PROGRAMMANZEIGE
erscheint.
Lämpchen in den TEMPERATUR-
2
WAHLTASTEN blinken, um zur
Temperatureinstellung
aufzufordern. Die Taste für die
erforderliche Temperatur drücken.
Das Lämpchen der gewählten
Taste wird weiterblinken, die
anderen gehen aus.
Gewünschte Kochzeit durch
3
Drücken der ZEITWAHLTASTEN
einstellen.
(Die Doppelpunkte blinken, um
zur Zeiteingabe aufzufordern.)
Es werden nur gültige Zeiten, also
Minuten und Sekunden, akzeptiert.
z. B. 1 Minute 1 Sekunde nicht 61 Sek.
Um Lebensmittel mit einer
4
Kombination aus Heißluft und
Mikrowelle zu kochen,
eine der LEISTUNGSTASTEN,
100%, 75%, 50% oder 25%,
drücken.
Um nur mit Heißluft zu kochen,
den Knopf mit dem Gebläsesymbol
drücken.
Speichern eines EinstufenProgramms
Die gewünschte Nummerntaste
drücken.
Speichern eines MultistufenProgramms
Nach den Schritten 1– 4 für jede
Kochstufe vorgehen und nach
Abschluss die PROGRAMMTASTE drücken, um eine zweite
und dritte Kochstufe ins
Programm einzugeben. Die
erforderliche Nummerntaste zum
Speichern des Programms
drücken.
Mehrfaches Ausprobieren ist
notwendig, um das richtige
Programm für ein bestimmtes
Produkt festzulegen.
Programmdetails auf der
Blinkenden Anzeige prüfen.
Einstellungen können durch
Zurückverfolgen der Schritte
des Programms unter
Verwendung der
ABBRUCHTASTE verändert
werden.
• Eine gültige Zeit von bis zu 30
Minuten eingeben, z. B.
1 Minute 1 Sekunde, nicht
61 Sekunden.
• Es können Information
unabhängig davon
einprogrammiert werden, ob
der Herd heiß oder kalt ist.
• Um ein Programm erneut
anzusehen, die ABFRAGEFunktion benutzen, siehe
Seite 14.
Wir empfehlen, dass Sie sich
eine Notiz der Programminstruktionen für späteren
Gebrauch aufbewahren.
Beispiel: Sutfe 1 gespeichert als
Programm 8
The program details are
displayed momentarily as the
program is saved.
example: stage 1, stage 2, stage 3
saved as Program 8
44
Page 45

ABLAUF EINES PROGRAMMS
Verwendung der Nummerntasten zum Ablauf eines Programms
Die Programme 0 bis 9 können mit den Nummerntasten wieder
aufgerufen werden. Um diese Programme zu aktivieren, sind
folgende Schritte zu beachten.
Den Herd auf die erforderliche Anfangstemperatur vorheizen,
1
indem eine TEMPERATURWAHLTASTE gedrückt wird.
Warten, bis das Lämpchen der gewählten Temperaturtaste
nicht mehr blinkt.
Sie können die Herdtemperatur
durch erneutes Drücken der
Temperaturtaste prüfen.
Kontakt mit heißen Oberflächen vermeiden und das zu
2
kochende Gargut in den Herd stellen. Tür schließen.
Die PROGRAMMTASTE drücken.
3
Das ‘P’ erscheint in der
PROGRAMMANZEIGE.
Die gewünschte Nummerntaste drücken (0-9).
Die Programmnummer und die Gesamtkochzeit
erscheinen auf der Anzeige. Der Anzeiger für die erste
Stufe leuchtet auf.
Beispiel: 200°C
Hinweis:
Wurde die erforderliche
Anfangstemperatur nicht
erreicht, erscheint ein
Fehlercode im Anzeigefeld (E:6).
Sollte das geschehen, das
Gargut SOFORT aus dem Herd
nehmen und warten, bis das
entsprechende Temperaturlämpchen nicht mehr blinkt.
Wieder ab Schritt 2 beginnen.
Am Ende des programmierten
Kochvorgangs wird die
Herdtemperatur wieder auf die
vor dem Vorgang eingestellte
Temperatur zurückkehren.
Beispiel: Programm 8
Das Programm läuft jetzt, wobei
die gesamte Restzeit auf der
Anzeige absteigend gezählt wird
(alle Stufenzeiten werden
zusammengezählt).
Wenn die Zeitanzeige “0:00”
erreicht, ertönt ein deutlich
hörbares Signal.
4
Das Gargut aus dem Herd nehmen und die Tür schließen.
ABFRAGE-Funktion
Die Funktion ABFRAGE dient zum erneuten Ansehen eines Programms
und ermöglicht ein Durchgehen von Stufe zu Stufe.
ABBRUCHTASTE gedrückt
halten.
Nach ein paar Sekunden ist die
ZEITANZEIGE leer.
Jetzt eine der
Programmnummern auf den
NUMMERNTASTEN (0-9)
drücken.
ANHALTEN DES KOCHVORGANGS
Der Vorgang kann jederzeit durch
Drücken der ABBRUCHTASTE
angehalten und abgebrochen
werden.
PAUSE
Der Vorgang kann durch Öffnen
der Tür unterbrochen werden.
Wird die Tür geöffnet, bleibt der
Timer an diesem Punkt stehen und
das Lämpchen in der entsprechenden LEISTUNGSTASTE
(Mikrowelle oder Heißluft) wird
blinken, um das unterbrochene
Programm anzuzeigen.
ZUM FORTSETZEN des
Programms Tür schließen. Es
ertönt ein Warnton, um an das
Drücken einer beliebigen
Leistungstaste zum erneuten
Starten des Timers zu erinnern.
Auf der Anzeige wird der Inhalt des Programms angezeigt. Das wird
durch Aufleuchten der Temperatur, Zeit und dem Leistungsniveau für
jeweils eine einzelne Stufe für einige Sekunden geschehen.
45
Um ein Programm erneut
anzusehen, die ABFRAGEFunktion benutzen.
Page 46

MANUELLE STEUERUNGEN (MODELL RD501)
Herd anstellen.
1
Die erforderliche Herdtemperatur (temp ºC) durch Drehen des
2
Temperaturreglers im Uhrzeigersinn einstellen. Der Anzeiger der
Heißlufttemperatur wird aufleuchten, bis die eingestellte Temperatur
erreicht wurde. Um beste Resulate zu erzielen, bis zum Erreichen dieser
Temperatur warten. Der Anzeiger wird bei Temperaturschwankungen anund ausgehen.
Das erforderliche Mikrowellenleistungsniveau (Power %) durch Drehen des
3
Mikrowellenreglers einstellen.
z. B. 175ºC
z. B. 50%
Leistung
%
Die erforderliche Kochzeit (time) durch Drehen des Zeitreglers im
4
Uhrzeigersinn einstellen.
z. B. 15 Minuten
Die START-Taste drücken. Der
5
Startanzeiger leuchtet auf und
der Timer zählt absteigend bis
auf Null.
Ein Summer zeigt dem Benutzer
die Beendigung des
Kochvorgangs an.
Hinweis:
• Für die reine Mikrowellenkochfunktion sollte der
Heißlufttemperaturregler auf “0” eingestellt werden. Um beste
Resultate zu erreichen, sollte der Herd kalt sein.
• Für reines Heißluftkochen sollte der Mikrowellenregler auf “0” eingestellt werden. Reines Heißluftkochen ist ohne Zeiteinstellung möglich.
• Vorsicht beim Auftauen in einem heißen Herd. Die Speisen sollten
häufig bewegt werden, um ein Verbrennen der Ecken zu vermeiden.
Um beste Resultate zu erzielen, Speisen morgens auftauen, wenn der
Herd noch kalt ist.
• Kombinations- und reines Heißluftkochen darf nur bei einer
ansteigenden Temperatur durchgeführt werden. Besondere
Aufmerksamkeit auf Zeitvorgaben legen.
• Ein Erwärmen mit der Mikrowelle kann auf halbem Wege bei einem
manuell eingestellten, reinen Heißluftvorgang eingefügt werden. Wir
empfehlen jedoch ausdrücklich, dass nur die im Umgang mit der
Mikrowelle erfahrenste Person diese Funktion verwendet, da die
Mikrowellenenergie dann auf einer Zeiteinstellung für Heißluftkochen
sein wird.
• Das Kochen kann durch Öffnen der Tür unterbrochen werden (PAUSE).
Die Tür schließen und die Starttaste zum Fortsetzen drücken.
zeit
46
Page 47

REINIGUNG
Damit der Herd mit optimaler Leistung arbeiten kann, müssen Garraum, Tür und Luftfilter
sauber gehalten werden.
Eine tägliche Reinigungsroutine stellt sicher, dass die geforderten Hygienestandards erfüllt werden
und trägt dazu bei, die Arbeitsleistung des Herdes beizubehalten und zu verlängern.
Die SICHERHEITSINSTRUKTIONEN zu Beginn dieser Anleitung beachten.
Fehler, die durch Nachlässigkeit
• Die Stromzufuhr IMMER ausschalten und den Herd vor der
Reinigung mindestens 20 Minuten lang abkühlen lassen.
• Falls nötig, den Drehteller entfernen und verschüttetes Essen
mit Wegwerfpapiertüchern auswischen.
• NIEMALS Stahlwolle, Messer oder raue Scheuermittel an
irgendeinem Teil des Herdes benutzen.
Wie bei allen Elektrogeräten, sollten auch hier die
elektrischen Anschlüsse regelmäßig kontrolliert werden.
1. Die Luftfilter von den beiden Seiten des Herdes durch
Herausziehen der Filter nach vorn entfernen.
2. In sauberer, warmer Seifenlauge reinigen, ausspülen
und trockentupfen. Richtig in die Schlitze zurückschieben.
oder Missbrauch entstehen,
einschließlich der Benutzung
ohne saubere, korrekt
angebrachte Filter, werden nicht
durch die Garantie abgedeckt.
Besuche des Kundendienstes
aufgrund solcher Fehler sind
gebührenpflichtig.
Reinigung des Garraumes und der Tür
1 Speisereste mit einem sauberen, trockenen Pinsel aus dem
Zwischenraum zwischen rückseitigem Leitblech und Garraumboden
entfernen. (Bereich A)
Die Speisereste mit einem sauberen, trockenen Pinsel aus dem
Zwischenraum zwischen Tür und Frontkante des Herdbodens
entfernen. (Bereich B)
2. Nicht-ätzenden Herdreiniger auf den Innenflächen
anbringen, nicht jedoch auf den Türdichtungen. Für den
angegebenen Zeitraum einwirken lassen. Mit einem
sauberen Tuch und viel sauberem, warmen Wasser
abwaschen. Mit einem neuen, sauberen Tuch trocknen.
3. Scharniere mit sauberem, feuchten Tuch abwischen.
KEIN Schmieröl verwenden.
4. Türdichtungen vorsichtig mit einem sauberen, feuchten
Tuch abwischen. Auf Verschleiß und Beschädigungen
kontrollieren..
Reinigung des Bedienfelds und äußerer Oberflächen
Regelmäßig mit einem feuchten Tuch abwaschen.
Türdichtung
Tipps bei hartnäckigen Flecken im Garraum
1. Den Herd nur mit Mikrowellenleistung anstellen (ohne Wärme).
2. Einen Behälter mit Wasser (1,5 Liter) in die Mitte des Garraums
stellen.
3. Mikrowellenleistung auf 100% einstellen.
4. Den Timer auf 30 Minuten einstellen und START drücken.
am Ende des Dampfvorgangs Garraum mit sauberem Tuch
auswischen.
DEN HERD NICHT BENUTZEN,
WENN KEINE SAUBEREN
LUFTFILTER EINGESETZT SIND.
Leitblech
B
A
Sind die Türdichtungen beschädigt,
muss der Herd von einem
zugelassenen Kundendiensttechniker repariert werden.
47
Page 48

PROBLEMBEHANDLUNG
Fehlercodeanzeige
Die Mealstream EC501zeigt einige der am häufigsten auftretenden Probleme durch Aufblinken
einer Fehlermeldung im Feld der Zeitanzeige an.
Fehlercodeanzeige
Fehler Empfohlene Behebung
Tür nicht ganz geschlossen.
Möglicher elektrischer Defekt.
Herd hat sich überhitzt.
Es wurde keine Zeit eingegeben.
Ungültige Zeit wurde eingestellt, z. B.
61 Sek.
Herd erwärmt sich nicht auf
Temperatur.
Mögliches Bauteilversagen
Garraum überheizt.
Mögliches Bauteilversagen
Herd steht nicht auf korrekter
Temperatur.
Es wurde ein innerer Fehler entdeckt.
Herd hat sich überhitzt.
Tür ganz schließen.
Merrychef Kundendienstabt. anrufen.
Luftfilter und Gebläse reinigen.
Herd eingeschaltet lassen, 4-5 Minuten
lang nicht kochen.
Zeit eingeben.
Zeit in korrektem Format 1:01 einstellen.
Ausstellen und nicht benutzen.
VON STROMVERSORGUNG ISOLIEREN.
Merrychef Kundendienstabt. anrufen.
Ausstellen und nicht benutzen.
VON STROMVERSORGUNG ISOLIEREN.
Merrychef Kundendienstabt. anrufen.
Gargut heraus nehmen.
Warten, bis Lämpchen der korrekten Temperatur nicht mehr blinkt und weiterleuchtet.
Merrychef Kundendienstabt. anrufen.
Luftfilter reinigen.
Herd an Ort mit mehr Ventilation stellen.
Der Herd ist eingeschaltet und es
leuchtet weder das Bedienfeld noch
arbeitet das Gebläse.
Bitte beachten: Wartungen oder Reparaturen sollten nur von zugelassenem Kundendiensttechniker ausgeführt
werden.
Sicherung/Lasttrennschalter und
Stromversorgung prüfen. (Das sollte von
einem qualifizierten Elektriker
durchgeführt werden.)
Technische Daten
Heißluftaus-
gangsleistung
(kW)
Mealstream CTM3
Höhe
(mm)
Breite
(mm)
Tiefe
(mm)
710640 630
Gewicht
(kg)
90
Mikrowellen-
ausgangsleistung
(Watt)
1425 2,5
Mealstream CTM5 710640 630 1425 3,090
Vom Hersteller empfohlene Abstände
Stromzufuhr: Siehe Leistungsschild auf der Rückwand des Herdes
Dieses Gerät erfüllt die folgenden EG-Richtlinien:
EMC 89/336 EWG
LVD 73/23 EWG
810690 680
Merrychef behält sich das Recht vor, Daten ohne vorherige Ankündigung zu ändern.
48
Teilenr. 32Z3313 Ausgabe 05
Page 49

KUNDENDIENST / TECHNISCHE UNTERSTÜTZUNG
Wenden Sie sich bei Fragen zum Kundendienst und zur technischen Unterstützung bitte an Ihren
Merrychef Lieferanten.
Sollte Ihnen im Land, in dem Sie das Gerät kauften, nicht geholfen werden können, wenden Sie
sich an Merrychef:
Tel. +44 (0)1252 371000
Fax +44 (0)1252 371007
E-mail info@merrychef.com
49
Page 50

ÍNDICE
Instrucciones de seguridad.............................. 51
Suministro eléctrico ......................................... 51
Precauciones .................................................. 52
Instrucciones de instalación ............................ 53
Utensilios de cocina apropiados ...................... 54
Introducción ..................................................... 56
Características principales .............................. 57
Panel de control ............................................... 58
Instrucciones de funcionamiento:
Modo manual ................................................... 59
Botones numéricos de programación ............. 60
Funcionamiento de un programa..................... 61
Controles Manuales (modelos RD501) ........... 62
Limpieza diaria ................................................ 63
Resolución de problemas ................................ 64
Especificaciones técnicas ............................... 64
Servicio y asistencia tecnica ........................... 65
ESPAÑOL
50
Page 51

INSTRUCCIONES DE SEGURIDAD IMPORTANTES
LEA ATENTAMENTE LAS SIGUIENTES INSTRUCCIONES DE SEGURIDAD
IMPORTANTES
ADVERTENCIA: Es arriesgado que cualquier persona que no sea especializada lleve a cabo cualquier tarea de
mantenimiento o reparación que implique el quitar cualquier tapa que protege contra la exposición de la energía de
microondas
1. NO UTILIZAR el horno si está vacío, sin alimentos o líquido dentro, ya que puede sobrecalentarse y causar perjuicios.
2. NUNCA debe retirarse ninguna parte interna fija del horno.
3. NUNCA debe tratarse de forzar el panel de control, la puerta, las juntas, o cualquier otra parte del horno.
4. NO DEBEN obstruirse los respiraderos/ filtros de ventilación ni la salida de vapor.
5. NUNCA deben colgarse paños de cocina o trapos en ninguna parte del horno.
6. Si las juntas de la puerta están rotas, un técnico autorizado debe reparar el horno.
7. Si el cable de alimentación está estropeado de cualquier forma un técnico autorizado DEBE reemplazarlo.
8. Al manejar líquidos, alimentos, y recipientes calientes, debe prestarse cuidado para evitar escaldaduras y quemaduras.
9. Al calentar liquidos utilizando la función microondas solamente o la de combinación, los contenidos deben
removerse antes de calentarse a fin de evitar una ebullición eruptiva.
10. Los biberones y los potitos de los bebés deben calentarse abiertos, y antes de la consumición deben
removerse o agitarse los contenidos y debe comprobarse la temperatura, a fin de evitar quemaduras.
11. El horno no debe utilzarse nunca para calentar alcohol, p.ej: coñac, ron etc. También, los alimentos que contienen
alcohol, tal como el pudín de Navidad, tienen más facilidad de prenderse fuego si se sobrecalientan.
12. No intentar nunca freír en el horno.
13. El aparato no está diseñado para que lo utilicen niños o personas enfermas.
14. Deben vigilarse los niños para asegurar que no juegan con el aparato
SUMINISTRO ELÉCTRICO
ADVERTENCIA
Este aparato debe conectarse a tierra. Si no se hace así puede causar un electrochoque y la
muerte.
El horno debe ser instalado por un
electricista cualificado y autorizado.
Este equipo no es apropiado para
conectarse al suministro de la red con
un enchufe estándar de 13amperios.
La instalación de los cables (el cableado
o la toma de corriente) debe estar de
acuerdo con las reglamentaciones y
normas de seguridad actuales del IEE.
El conductor del suministro eléctrico se
encuentra en la parte posterior del horno.
ADVERTENCIA: Se debe utilizar un
interruptor aislador doble. Éste debe
tener un intervalo de contacto de 3mm
en ambos polos.
Si tiene alguna duda sobre su
suministro eléctrico, pida consejo a
un electricista cualificado y
autorizado.
Es esencial que la toma de corriente esté
instalada adecuadamente y conectada
a tierra. Debería estar alimentada desde
un circuito que sea adecuado para
electrodomésticos de potencia muy alta
y es importante que este circuito no esté
sobrecargado.
Los establecimientos con cortacircuitos
estándar ( Tipo ‘B’ ) son susceptibles a
las ‘sobretensiones’ que ocurren al poner
en marcha congeladores, frigoríficos y otro
material de equipamiento, incluyendo los
hornos microondas. Por esto,
recomendamos firmemente que la
instalación de cada horno se equipe con
un cortacircuitos aparte, de Tipo ‘C’
(diseñado especifícamente para este tipo
de material).
Si se equipa con una conexión tipo
tapón, la toma de corriente debe estar
colocada en un sitio fácilmente
accesible.
GUARDE ESTAS INSTRUCCIONES
51
Page 52

PRECAUCIONES A TENER EN CUENTA
1. Lea este manual antes de utilizar el horno.
2. Como ocurre con todos los electrodomésticos, es aconsejable que se revisen las
conexiones eléctricas periódicamente.
3. El interior del horno y las juntas de la puerta deben limpiarse con frecuencia,
siguiendo las instrucciones descritas en el apartado de LIMPIEZA.
4. No necesita apagar el horno después de cada función, pero acuérdese de apagarlo al
final del día o del periodo de funcionamiento.
5. La energía del microondas no debe utilizarse para secar paños ni para calentar los
platos.
6. Como ocurre con cualquier aparato de cocina, debe prestarse atención para evitar la
combustión de los artículos que hay dentro del horno.
Si observa humo:
Apáguelo
Aíslelo del suministro eléctrico
Mantenga la puerta cerrada para sofocar las
llamas
7. Para obtener mejores resultados, asegúrese de que la comida está colacada en el
centro de la cavidad .
8. Al utilizar la función de microondas solamente, tape la comida para evitar que salpique
por las paredes de la cavidad.
9. La comida en recipientes combustibles de plástico o de papel sólo debe utilizarse en
la función de microondas solamente y debe comprobarse con frecuencia para evitar la
posibilidad de ignición.
10. Los artículos deben estar destapados al utilizar las funciones de convección y
combinación.
11. No deben calentarse huevos crudos ni huevos duros con la función microondas o
combinación, ya que pueden explotar.
12. Los alimentos con piel, p.ej: patatas, manzanas, embutidos etc. deben pelarse antes
de ser calentados.
13. La comida no debe calentarse en un recipiente completamente precintado, ya que la
acumulación de vapor puede hacerlo explotar.
14. El exceso de grasa debe retirarse durante el ‘asado’ y antes de levantar los
recipientes pesados del horno.
15. En el caso de que se rompa el cristal o se haga pedazos dentro del horno, asegúrese
de que la comida está completamente libre de partículas de vidrio. Si tiene alguna
duda, deshágase de cualquier alimento que estaba en el horno en el momento de la
rotura.
52
Page 53

INSTALACIÓN
Retire el material de embalaje y el plástico protector del horno.
Compruebe si hay señales obvias de averías debido al transporte. Si
es necesario, informe al proveedor INMEDIATAMENTE.
UBICACIÓN Y COLOCACIÓN
Elija un emplazamiento lejos de las fuentes de calor principales.
NO LO COLOQUE de tal modo que le llegue aire caliente de freidoras,
parrillas, planchas, etc.
Si el horno está cerca de una cocina eléctrica o de gas, se debe poner
una pantalla térmica a la altura del horno.
Observe el
espacio
mínimo
recomendado
necesario
para el flujo de
aire
Observación:
La toma de aire se
encuentra bajo cada lateral
del horno. Incluso con el
espacio que se ha
especificado más abajo, es
importante que la corriente
de aire sea tan fría como
sea posible y que el horno
no esté pre-calentado por
otros aparatos tal como
freidoras, parrillas y
planchas, ya que esto
deteriorará su duración y
rendimiento.
Coloque el horno en una superficie plana que esté NIVELADA y sea SÓLIDA y
ESTABLE.
Deje un espacio mínimo de 50mm en la parte trasera, superior y en cada lateral
para permitir que el aire circule libremente.
La toma de aire se encuentra bajo cada lateral del horno. Incluso con el espacio
que se ha especificado más arriba, es importante que la corriente de aire sea
tan fría como sea posible y que el horno no esté precalentado por otros
aparatos tal como freidoras, parrillas o planchas.
Deje un espacio mínimo de 150mm encima del horno para que escape el aire
caliente.
Deje un espacio suficiente, 400mm, delante del horno para que la puerta pueda
abrirse libremente
No pegue etiquetas / adhesivos al horno distintos a aquellos que le proporciona
el fabricante
53
No apile el horno
directamente encima de
otro. Utilice otra estantería o
una de dos pisos
separados.
ADVERTENCIA:
Compruebe que los
FILTROS DE AIRE están en
su sitio antes del
funcionamiento
( consulte el apartado de las
características principales )
Page 54

UTENSILIOS DE COCINA APROPIADOS
Se deberían consultar las instrucciones del fabricante para determinar la conveniencia de
recipientes o utensilios en particular utilizando cada una de las funciones de cocción.
La siguiente tabla proporciona pautas generales:
Recipientes resistentes al
calor
Vidrio templado
Vitrocerámica
Barro
(porcelana, vajilla, loza etc.)
Bandejas de metal
Bandejas de metal (en las guías
del horno)
NO UTILICE NINGÚN OTRO
RECIPIENTE DE METAL
Recipientes de plástico
Recipientes de plástico, rígidos,
útiles para la cocción
Desechables
combinación
convección
solamente
microondas
solamente
No utilice artículos con
decoración metálica.
Las bandejas de metal sólo deben
utilizarse al estar colocadas entre
las guías de vítreo que hay en cada
lateral de la cavidad del horno
Los recipientes de plástico para
ir tanto al horno como al
microondas (hasta ciertas
temperaturas) están ahora
disponibles.
Compruebe las instrucciones del
fabricante antes de la utilización.
Combustibles (papel, cartón, etc)
El plástico transparente
apropiado para microondas
Otros utensilios
Cierres de alambre o plástico para
bolsas
Cubertería
Sensores de temperatura
El plástico transparente no debe
entrar en contacto con la comida.
No debe dejarse ningún utensilio
de cocina dentro de la comida
cuando ésta se está cocinando
54
Page 55

EL USO DE ARTÍCULOS METÁLICOS EN LAS FUNCIONES DE COMBINACIÓN Y
MICROONDAS SOLAMENTE
Algunos de los paneles interiores de los hornos de la serie 501 de
Mealstream son de esmalte vítreo que actúa como aislante y permite un
uso seguro de metales en condiciones controladas.
(La bandeja de esmalte vítreo suministrada puede girarse al revés y
utilizarse como base permanente).
Coloque las cazuelas y las bandejas de metal grandes en el centro del
horno, como mínimo a 40mm ( 1,5 pulgadas ) de las paredes laterales.
Coloque los recipientes de metal individuales de manera regular como
mínimo a 1,5 pulgadas (40mm) uno del otro y de las paredes laterales.
ADVERTENCIA:
Debe tener cuidado en colocar
los recipientes de manera
correcta.
Si los recipientes de metal
están colocados demasiado
cerca uno del otro o de los
laterales del horno, puede
producirse una formación de
arco y averiar el horno.
ADVERTENCIA:
Si se oye un sonido metálico o un
crujido durante las funciones de
combinación o microondas
solamente, abra la puerta para
detener la cocción y vuelva a
colocar los recipientes
correctamente.
Si los artículos de metal (incluso
los utensilios de servir de plata)
tienen trozos quemados debido a
la formación de arco, deje de
utilizarlos en el horno.
Evite utilizar cazuelas de metal más hondas que 2,5 pulgadas (65mm), ya
que esto puede radiar microondas y alterar el tiempo que se necesita para
calentar bien la comida.
55
Page 56

INTRODUCCIÓN
Los hornos de la serie 501 de Mealstream ofrecen a las cocinas de hostelería la flexibilidad
de tres funciones de calentamiento: la cocción por microondas solamente, por convección
solamente, y por combinación.
La cocción por combinación permite que se consigan unos resultados de alta calidad en un
intervalo de tiempo mucho más inferior al que tarda la cocción convencional, particularmente
al cocer al horno, al dorar, al asar, al asar a la parrilla o al preparar platos gratinados.
Una vez establecidas, las instrucciones precisas para la cocción por combinación o por
convección de los alimentos seleccionados pueden programarse en la memoria del horno de
tal modo que puedan repetirse fácilmente y con precisión.
Programación de varias etapas
La serie EC501 de Mealstream ofrece aún una mayor flexibildad al permitir la programación
de varias etapas. Esto permite las condiciones exactas que se necesitan para establecer
resultados de calidad de acuerdo con el tipo de comida.
Se muestra un programa típico de 3 etapas. Se precalienta el horno a 200°C. La etapa 1
empieza utilizando una potencia del microondas suave de 25% (ideal para descongelar)
mientras que la temperatura de la convección incrementa a 225°C.. En la etapa 2 la
potencia del microondas aumenta al máximo (100%). En la etapa final, de dorado, la
temperatura de la convección aumenta a 250°C sin utilizar la energía de microondas.
Este es sólo un ejemplo de un número infinito de los posibles programas de varias etapas
que pueden crearse y guardarse. Los programas pueden tener una, dos, o tres etapas.
Observación:
Recuerde que la temperatura de convección tarda tiempo en cambiar. No espere una
respuesta inmediata al activar una temperatura diferente.
Debe tenerse cuidado al descongelar en un horno caliente. Descongele primero por la
mañana cuando el horno aún está frío.
Las instrucciones que aparecen en esta guía están diseñadas con el
propósito de asegurar la seguridad y larga duración de su horno Merrychef.
56
Page 57

CARACTERÍSTICAS PRINCIPALES
7
6
1
2
11
8
3
12
9
4
10
5
1
SALIDAS DE AIRE
Estos respiraderos en los paneles laterales permiten
que salga el aire que se ha utilizado para enfriar los
componentes internos. No permitirán que la energía de
microondas se escape en el ambiente. No deben
obstruirse.
2
CAVIDAD DEL HORNO
La cavidad está fabricada principalmente con acero
inoxidable y un panel de vítreo esmaltado en la puerta.
Debe mantenerse limpia (consulte el apartado de
LIMPIEZA).
3
VENTILADOR DE CONVECCIÓN
El ventilador expulsa aire sobre los elementos de
calentamiento y dentro de la cavidad sobre los
bordes del deflector posterior, causando una
distribución perfecta del calor para la cocción por
combinación. La rejilla de metal que tapa el
ventilador debe mantenerse limpia y libre de
desechos (Consulte el apartado de LIMPIEZA)
4
FILTROS DE ENTRADA DE AIRE (IZQUIERDO Y
DERECHO)
Situados a la izquierda y a la derecha de la parte
delantera de la base. Éstos forman parte del
sistema de ventilación. No deben obstruirse y deben
mantenerse limpios a diario.
5
MANILLA DE LA PUERTA
Es una barra rígida que para abrirse se tira hacia abajo
y hacia usted.
6
PANEL DE CONTROL
Véase la página 10.
CONMUTADOR DE ENCENDIDO/APAGADO
7
Al estar en marcha, el panel de control se iluminará. El
ventilador y sistema de ventilación estarán también en
marcha.
PLACA DE DATOS DE SERVICIO
8
Se encuentra en el panel posterior, indica el número de
serie, el tipo de modelo, especificaciones eléctricas y la
dirección y número de teléfono de Merrychef.
PUERTA
9
Es una barrera de energía hecha a precisión con tres
cierres de seguridad del microondas. Debe
mantenerse limpia (consulte el apartado de LIMPIEZA).
La puerta NO debe utilizarse para apoyar platos
pesados.
JUNTAS DE ESTANQUIDAD DE LA PUERTA
10
Éstas aseguran un cierre ajustado alrededor de la
puerta. Deben mantenerse limpias y comprobarse con
regularidad por si se observan señales de avería. A la
primera señal de desgaste, un técnico de
mantenimiento autorizado debe reemplazarlas .
11
TERMOSTATO
Éste controla la temperatura de dentro del horno.
Debe tener cuidado al limpiarlo para evitar
estropearlo.
12
RESPIRADERO DE VAPOR (en la parte trasera del
horno )
Éste permite la evacuación del vapor y evita la
formación de condensación. No permitirá que la
energía de microondas se escape.
57
Page 58

PANEL DE CONTROL
BOTÓN DE
PROGRAMACIÓN
BOTÓN DE
CANCELACIÓN
BOTONES DE POTENCIA
Hay cuatro botones de potencia del microondas para elegir
entre: 25%, 50%, 75%, y 100%. Una luz indicará el que está
en uso.
BOTÓN DE CONVECCIÓN
Éste se utiliza cuando la comida sólo necesita dorarse ( no
microondas)
Observación: al cocinar, los botones de MICROONDAS y
CONVECCIÓN inician el ciclo y el temporizador. Durante un
ciclo de cocción manual, puede cambiar los niveles de
potencia. Al interrumpir la cocción, se encenderá una luz de
modo intermitente como aviso de que el tiempo se
mantiene (consulte el apartado de PAUSA).
BOTONES DE SELECCIÓN DEL TIEMPO/ DE LOS
PROGRAMAS
Estos botones se utilizan para establecer el tiempo de
cocción de segundo en segundo hasta un máximo de 30
minutos. También se utilizan para seleccionar los
programas del 01al 10
BOTONES DE SELECCIÓN DE TEMPERATURA
Estos botones se utilizan para seleccionar la temperatura
de la convección. Una luz indicará la selección de
temperatura. Seleccionando el botón ‘0’ apagará la
convección. Si se pulsa y se mantiene pulsado un botón de
temperatura aparecerá la temperatura actual del horno en
la ventana del visualizador del tiempo.
BOTONES DE
SELECCIÓN
DE TEMPERATURA
DOS
PUNTOS
VISUALIZADOR DEL TIEMPO/
DE LOS ERRORES
BOTONES DE SELECCIÓN DEL
TIEMPO/DE LOS PROGRAMAS
INDICADOR
DE VARIAS
ETAPAS
BOTONES DE
POTENCIA
BOTÓN DE CANCELACIÓN/ RELLAMADA ‘C’
Cancela todos los ciclos de cocción programados y las
operaciones pre-programadas y detiene la energía de
microondas. No cambia la temperatura del horno . Si el horno
está caliente la comida continuará cocinándose y debe
retirarse del horno inmediatamente. Este botón anulará
también cualquier operación incorrecta. No borrará los
prograrmas. Puede utilizarse también para ver los detalles
de los programas guardados.
(Consulte el apartado de RELLAMADA)
BOTÓN DE PROGRAMACIÓN ‘P’
Activa o selecciona un programa
VISUALIZADOR DEL TIEMPO Y DE LOS PROGRAMAS
Muestra el tiempo en minutos y segundos y cuenta atrás
de segundo en segundo durante un ciclo de cocción.
También indica mensajes de error y la temperatura del
horno. (RESOLUCIÓN DE PROBLEMAS)
El visualizador de programas indica el número de
progarma seleccionado. ‘PP’ indica programación
INDICADOR DE VARIAS ETAPAS
Indica la etapa en la cocción de varias etapas
DOS PUNTOS
Al programar, los dos puntos se encenderán de modo
intermitente para indicar que ahora puede introducirse el
tiempo.
CONMUTADOR DE ENCENDIDO/APAGADO
VISUALIZADOR DE ERRORES
Consulte el apartado 8 RESOLUCIÓN DE PROBLEMAS.
VISUALIZADOR DEL TIEMPO/
DE LOS ERRORES
BOTÓN DE
CONVECCIÓN
58
Page 59

INSTRUCCIONES DE FUNCIONAMIENTO : MODO MANUAL
El horno puede funcionar en
modo manual o programado. Es
importante primero entender el
modo manual antes de tratar de
NO HAGA FUNCIONAR EL HORNO MICROONDAS CUANDO ESTÁ VACÍO
NO UTILICE EL HORNO SIN LOS FILTROS DE AIRE LIMPIOS
hacer funcionar el programa.
Para familiarizarse con los controles ponga en el horno un bol que contenga
aproximadamente 1,5 litros de agua antes del funcionamiento.
Ponga el horno en marcha.
1
Seleccione la temperatura del horno necesaria al pulsar uno de los
2
BOTONES DE SELECCIÓN DE TEMPERATURA 150º, º, 175º, 200º,
250ºC.
La luz en el botón destellará para indicar que se ha seleccionado.
Observación: La temperatura
dentro de la cavidad del
horno empezará ahora a
incrementar. Puede tardar
hasta 15 minutos en
alcanzar el grado si el
horno está frío al empezar.
Cuando el nivel de temperatura del horno alcance 25ºC
3
del nivel seleccionado la luz ya no destellará más.
ESPERE HASTA QUE SE ALCANCE ESTA
TEMPERATURA antes de utilizar el horno.
ADVERTENCIA:
EN SU SITIO
La temperatura de la cavidad puede
comprobarse en cualquier momento al
pulsar el botón de temperatura
seleccionado.
La temperatura de la cavidad se
visualizará en ºC.
La cocción por convección solamente
puede llevarse a cabo sin poner un tiempo
La cocción por combinación y convección
solamente pueden llevarse a cabo con un
aumento de temperatura, pero debe
prestarse atención extra a los
temporizadores
Seleccione el tiempo de cocción
4
necesario al pulsar los
BOTONES DE SELECCIÓN DEL
TIEMPO numéricos.
Ejemplo: 2 Minutos 35 segundos
Sólo se aceptarán tiempos en minutos y
segundos válidos.
p.ej: 1minuto 1 segundo, no 61 segs
Tomando todas las precauciones necesarias para no
5
quemarse usted, coloque la comida en la cavidad y
cierre la puerta.
Intente tener la puerta abierta el menor tiempo posible
Para cocinar la comida utilizando
6
una combinación del calor de
convección y el microondas
pulse uno de los BOTONES DE
POTENCIA ya sea 100%, 75%,
50% o 25%.
Para cocinar utilizando
convección solamente pulse el
botón que tiene un ventilador
dibujado.
Ahora el temporizador contará
7
atrás. Cuando el tiempo restante
alcance cero se oirá una señal.
Retire la comida de la cavidad.
PARA DETENER EL CICLO DE
COCCIÓN
El ciclo puede detenerse y
cancelarse en cualquier momento
pulsando el BOTÓN DE
CANCELACIÓN
PAUSA
El ciclo puede interrumpirse
abriendo la puerta del horno.
Al abrir la puerta el temporizador
permanecerá en este punto y se
encenderá una luz en el BOTÓN DE
POTENCIA (modo microondas o
convección) para indicar que hay un
ciclo interrumpido.
PARA CONTINUAR el ciclo cierre la
puerta. Suena una señal audible como
aviso de que debe pulsar cualquier
botón de potencia para reiniciar el
temporizador.
Observación:
al interrumpir el ciclo o al pararlo, el
horno se mantendrá a la temperatura
seleccionada y la comida de dentro
del horno continuará cocinándose
59
Page 60

BOTONES NUMÉRICOS DE PROGRAMACIÓN ( 0-9 )
La pre-programación permite que los procedimientos de cocción repetitivos se guarden
para facilidad de uso.
Cada programa puede comprender hasta tres etapas, permitiendo en cada una un
control independiente de la temperatura de la convección, el tiempo de la etapa y el
nivel de potencia del microondas. Sin embargo, los programas deben utilizarse con
precaución, ya que si la comida a cocinar varía en peso o densidad luego pueden
dejar de conseguirse resultados buenos y lo que es más importante, la comida
puede no estar cocida adecuadamente. Por lo tanto, es fundamental que se
compruebe toda la comida preparada para servir para asegurar que se han conseguido
las temperaturas centrales.
Pulse y mantenga pulsado el BOTÓN DE
1
PROGRAMACIÓN hasta que aparezca una ‘P’ intermitente
en el VISUALIZADOR DE PROGRAMAS
Se encienden las luces en los
2
BOTONES DE SELECCIÓN DE
TEMPERATURA para indicar que
debe seleccionarse una temperatura.
Pulse el botón de la temperatura
necesaria, la luz en el botón
seleccionado seguirá encendida, las
otras se apagarán.
Anote el tiempo de cocción
3
necesario pulsando los BOTONES
DE SELECCIÓN DEL TIEMPO
(Los dos puntos del visualizador
destellarán para indicar que se
necesita un tiempo).
Sólo se acepatarán tiempos en minutos
y segundos válidos.
p.ej: 1 minuto 1 segundo, no 61 segs
4
Para cocinar la comida utilizando una
combinación de calor de convección y
microondas pulse unos de los BOTONES
DE POTENCIA 100%,75%,50% o 25%.
Para cocinar utilizando convección
solamente pulse el botón que tiene un
ventilador dibujado.
Para guardar como un programa de
una única etapa
Pulse el botón numérico
necesario
Para guardar como un programa de
varias etapas
Siga los pasos 1– 4 para cada etapa
de cocción y al finalizar pulse el
BOTÓN DE PROGRAMACIÓN para
anotar una segunda y una tercera
etapa de cocción en el programa.
Para guardar el programa, pulse el
botón numérico necesario
Se requiere un poco de
experimentación para determinar
el programa correcto para un
producto en particular.
Compruebe los detalles del
programa en el visualizador
que se ilumina. Las
selecciones pueden
cambiarse volviendo atrás del
programa utilizando el
BOTÓN DE CANCELACIÓN.
• Anote un tiempo válido de
hasta 30 minutos p.ej:
1 minuto 1 segundo, no
61 segundos.
• La información puede
programarse en la
memoria tanto si el horno
está caliente o frío.
• Para revisar un programa
utilice la RELLAMADA.
Véase la página 14.
Le recomendamos que
guarde una anotación de
las instrucciones de los
programas para futura
referencia.
ejemplo: etapa 1 guardada como
programa 8
Los detalles del programa se
visualizan momentáneamente
así como se guarda el programa.
ejemplo: etapa 1, etapa 2, etapa 3
guardadas como programa 8
60
Page 61

FUNCIONAMIENTO DE UN PROGRAMA
Utilizar los botones numéricos para activar un programa
Los programas del 0 al 9 pueden seleccionarse utilizando los botones
numéricos.
Para activar estos programas debe seguirse el procedimiento siguiente
Pre-caliente el horno a la temperatura de inicio necesaria al
1
pulsar un BOTÓN DE SELECCIÓN DE TEMPERATURA..
Espere hasta que la luz de la temperatura seleccionada cese de
destellar.
Puede comprobar la temperatura
del horno al volver a pulsar el
botón de temperatura
Evitando el contacto con las superficies calientes, coloque el
2
alimento a cocinar en el horno y cierre la puerta.
3
Pulse el BOTÓN DE
PROGRAMACIÓN y la ‘P’
aparecerá en el VISUALIZADOR DE
PROGRAMAS.
Pulse el botón numérico que desee activar (0-9)
El número de programa y el tiempo total de cocción
aparecen en el visualizador y se encenderá el indicador
de la primera etapa
ejemplo: 200°C
Observación:
Si no se ha alcanzado la
temperatura de inicio necesaria, se
visualizará un código de error (E:6).
Si esto ocurre, retire la comida del
horno INMEDIATAMENTE y espere
hasta que la luz de la temperatura
necesaria cese de destellar.
Empiece de nuevo desde el paso 2.
Al final del ciclo programado, la
temperatura del horno volverá a la
que era antes de que el ciclo
empezara
ejemplo: Programa 8
El programa funcionará ahora
con el tiempo restante total
contando atrás en el visualizador
(sumando todos los tiempos de
las etapas).
Cuando el tiempo alcance “0:00”,
se oirá una señal.
Retire la comida del horno y cierre la puerta.
4
RELLAMADA
La RELLAMADA para revisar un programa permite revisar el programa
etapa por etapa.
Pulse y mantenga pulsado el
BOTÓN DE CANCELACIÓN.
Después de unos segundos el
VISUALIZADOR DEL TIEMPO se
pondrá en blanco.
Ahora pulse uno de los
números de los programas en
el BOTÓN NUMÉRICO (0-9).
PARA DETENER EL CICLO DE
COCCIÓN
El ciclo puede detenerse y
cancelarse en cualquier momento
pulsando el BOTÓN DE
CANCELACIÓN.
PAUSA
El ciclo puede interrumpirse
abriendo la puerta del horno.
Al abrir la puerta el temporizador
permanecerá en este punto y
destellará la luz en el BOTÓN DE
POTENCIA (modo microondas o
convección) para indicar un ciclo
interrumpido.
PARA CONTINUAR el ciclo cierre la
puerta. Suena una señal audible
como aviso de que para reiniciar el
temporizador se debe pulsar
cualquier botón de potencia.
El visualizador mostrará los contenidos de ese programa. Se mostrarán
la temperatura, el tiempo y el nivel de potencia iluminados durante unos
segundos etapa por etapa.
61
Para revisar un programa utilice la
RELLAMADA
Page 62

CONTROLES MANUALES ( MODELO RD501 )
Ponga el horno en marcha.
1
Establezca la temperatura (temp ºC) del horno necesaria girando la esfera
2
del control de temperatura en el sentido de las agujas del reloj. El
indicador de la temperatura de la convección se iluminará hasta que se
consiga la temperatura seleccionada. Para mejores resultados, espere
que esto ocurra. El indicador se encenderá y se apagará y la temperatura
de dentro del horno se mantendrá.
Establezca el nivel de potencia (Power %) del microondas necesario
3
girando la esfera del control del microondas.
p.ej: 175ºC
p.ej: 50%
Potenciá
%
Establezca el tiempo de cocción necesario (time) girando la esfera de
4
selección del tiempo en el sentido de las agujas del reloj.
p.ej: 15 minutos
Pulse el botón de INICIO (start).
5
El indicador de inicio se
iluminará y el temporizador
contará atrás hasta cero.
Cuando la cocción ha finalizado,
un timbre avisa al operario.
Observación:
• Para la cocción por microondas solamente, la esfera de la
temperatura de la convección debe ponerse a ‘0’. Para obtener
mejores resultados, el horno debería estar frío.
• Para la cocción por convección solamente, la esfera del microondas
debe ponerse a ‘0’. La cocción por convección solamente puede
llevarse a cabo sin poner ningún tiempo.
• Debe tenerse cuidado al descongelar en un horno caliente. Los
productos deben girarse con frecuencia para evitar que se quemen
los costados. Para obtener mejores resultados, descongele primero
por la mañana cuando el horno aún está frío.
• La cocción por combinación y convección solamente puede llevarse
a cabo con un aumento de temperatura pero debe prestarse
atención extra a la temporización.
• Cuando un ciclo de convección solamente programado manualmente
ya está en marcha, puede añadirse el calor de microondas. Sin
embargo, recomendamos firmemente que sólo el operario del
microondas más experimentado utilice esta función, ya que la
energía de microondas estará luego en la selección de tiempo para
la cocción por convección.
• La cocción puede interrumpirse abriendo la puerta (PAUSA ).
Cierre la puerta y toque el botón de inicio para continuar.
inicio
tiempo
62
Page 63

LIMPIEZA
Para que el horno funcione al máximo rendimiento, la cavidad, la puerta y los filtros de aire deben
mantenerse limpios.
Una rutina de limpieza diaria asegurará que cumple con las normas de higiene requeridas y ayudará a mantener
y prolongar la eficacia de su horno.
Siga las INSTRUCCIONES DE SEGURIDAD que hay al principio de este manual.
La garantía no cubre las averías
• DesconécteloSIEMPRE del suministro eléctrico y deje que el horno
se enfríe durante 20 minutos como mínimo antes de limpiarlo
• Como se requiere, retire la parte giratoria y limpie los derrames con
servilletas desechables
• No utilice NUNCA estropajos de acero, cuchillos o abrasivos severos
en ninguna parte del horno
Como en el caso de todos los electrodomésticos, es aconsejable
inspeccionar las conexiones eléctricas cada cierto tiempo.
1. Retire los filtros de aire de cada lateral del horno deslizando el filtro
hacia fuera de la parte delantera.
2. Límpielo en agua limpia, caliente y con jabón, enjuáguelo y
séquelo. Póngalo de nuevo en su sitio a través de las ranuras.
causadas por el descuido o el
manejo inadecuado ni tampoco si
se utiliza sin los filtros de aire
limpios en su sitio.
Las visitas de mantenimiento como
resultado de dichas averías se
cobrarán
Limpieza de la cavidad del horno y de la puerta
1 Retire las partículas de comida del espacio que hay entre el deflector
posterior y el suelo del horno con un cepillo limpio y seco.
( Posición A)
Retire las partículas de comida que haya entre el borde interior de la
puerta y la parte frontal del horno utilizando un cepillo limpio y seco.
( Posición B )
2. Aplique un producto de limpieza para hornos no cáustico a las
superficies interiores excepto a las juntas de la puerta. Déjelo
durante el tiempo recomendado. Límpielo utilizando un trapo
limpio y mucha agua caliente y limpia. Séquelo con un trapo
limpio.
3. Frote las bisagras con un trapo limpio y húmedo.
NO aplique aceite lubricante.
4. Frote las juntas de la puerta con cuidado con un trapo limpio y
húmedo.
Compruebe si hay señales de desgaste o avería.
B
Junta
de la
puerta
Limpieza del panel de control y de las superficies exteriores
Límpielos con un paño húmedo con regularidad.
Consejos y sugerencias para las manchas difíciles en la
cavidad del horno
1. Ponga el horno en marcha con la potencia del microondas solamente (sin
calor).
2. Coloque un recipiente de agua (1,5 litros) en el centro de la cavidad del
horno.
3. Ponga la potencia del microondas al 100%.
4. Ponga el temporizador a 30 minutos y pulse el botón de inicio.
Al final del ciclo de vapor, limpie la cavidad con un paño limpio.
63
NO UTILICE EL HORNO SIN LOS
FILTROS DE AIRE LIMPIOS EN SU
SITIO
Deflector
A
Si se estropean las juntas de la
puerta, un técnico de
mantenimiento autorizado debe
reparar el horno
Page 64

RESOLUCIÓN DE PROBLEMAS
Visualizador del código de errores
El Mealstream EC501 identificará algunos de los problemas más comunes al destellar un código de
mensaje de error en la ventana del visualizador del tiempo.
Visualizador del código
de errores
La puerta no se cierra completamente.
Posible avería eléctrica
El horno se ha sobrecalentado
Avería Acción recomendada
Cierre la puerta completamente.
Llame al Depto. de Mantenimiento
Merrychef
Limpie el filtro de aire y los respiraderos
Deje el horno en marcha pero sin cocinar
durante unos 4 ó 5 minutos.
No se ha programado el tiempo.
Se ha programado el tiempo inválido. p.ej:
61segs
El horno no calienta la temperatura
Posible avería de los componentes
La cavidad del horno se sobrecalienta
Posible avería de los componentes
El horno no está a la temperatura correcta
Se ha detectado una avería interna
El horno se ha sobrecalentado
El horno está en marcha pero el panel de
control no se ilumina y los ventiladores no
funcionan
Recuerde, por favor - Sólo un técnico de mantenimiento puede llevar a cabo las tareas de manteniminento y
reparación
Programe el tiempo
Programe el tiempo en un formato correcto
1:01
Apáguelo y no lo utilice
AÍS LELO DEL SUMINISTRO ELÉCTRICO
Llame al Depto. de Mantenimiento Merrychef
Apáguelo y no lo utilice
AÍSLELO DEL SUMINISTRO ELÉCTRICO
Llame al Dpto. de Mantenimiento Merrychef
Retire la comida.
Espere hasta que la luz de la temperatura
correcta cese de destellar y esté iluminada
Llame al Depto. de Mantenimiento
Merrychef.
Limpie el filtro de aire
Coloque el horno en un sitio con más ventilación
Compruebe el fusible/ el cortacircuitos y el
suministro eléctrico (esto debe realizarlo un
electricista cualificado)
.
Especificaciones técnicas
Alto
( mm )
Mealstream CTM3
Ancho
( mm )
Fondo
( mm )
710640 630
Mealstream CTM5 710640 630 1425 3.090
Espacios recomendados por el
fabricante
Alimentación: Véase la placa de datos de servicio en la parte posterior del horno
Este equipo cumple con las siguientes directivas de la CEE:
EMC 89/336 CEE
LVD 73/23 CEE
Merrychef se reserva el derecho de modificar las especifiaciones sin previo aviso.
810690 680
64
Peso
( kgs)
90
Potencia
microondas
( watios )
Potencia
convección
( kw )
1425 2.5
Número: 32Z3313 Ejemplar 05
Page 65

SERVICIO Y ASISTENCIA TÉCNICA
Servicio y asistencia técnica
Para el Servicio y la Asistencia Técnica, póngase en contacto con su proveedor Merrychef.
Si no puede encontrar asistencia en el país de compra, póngase en contacto con Merrychef:
Tel. +44 (0)1252 371000
Fax +44 (0)1252 371007
E-mail info@merrychef.com
65
 Loading...