

Page 1
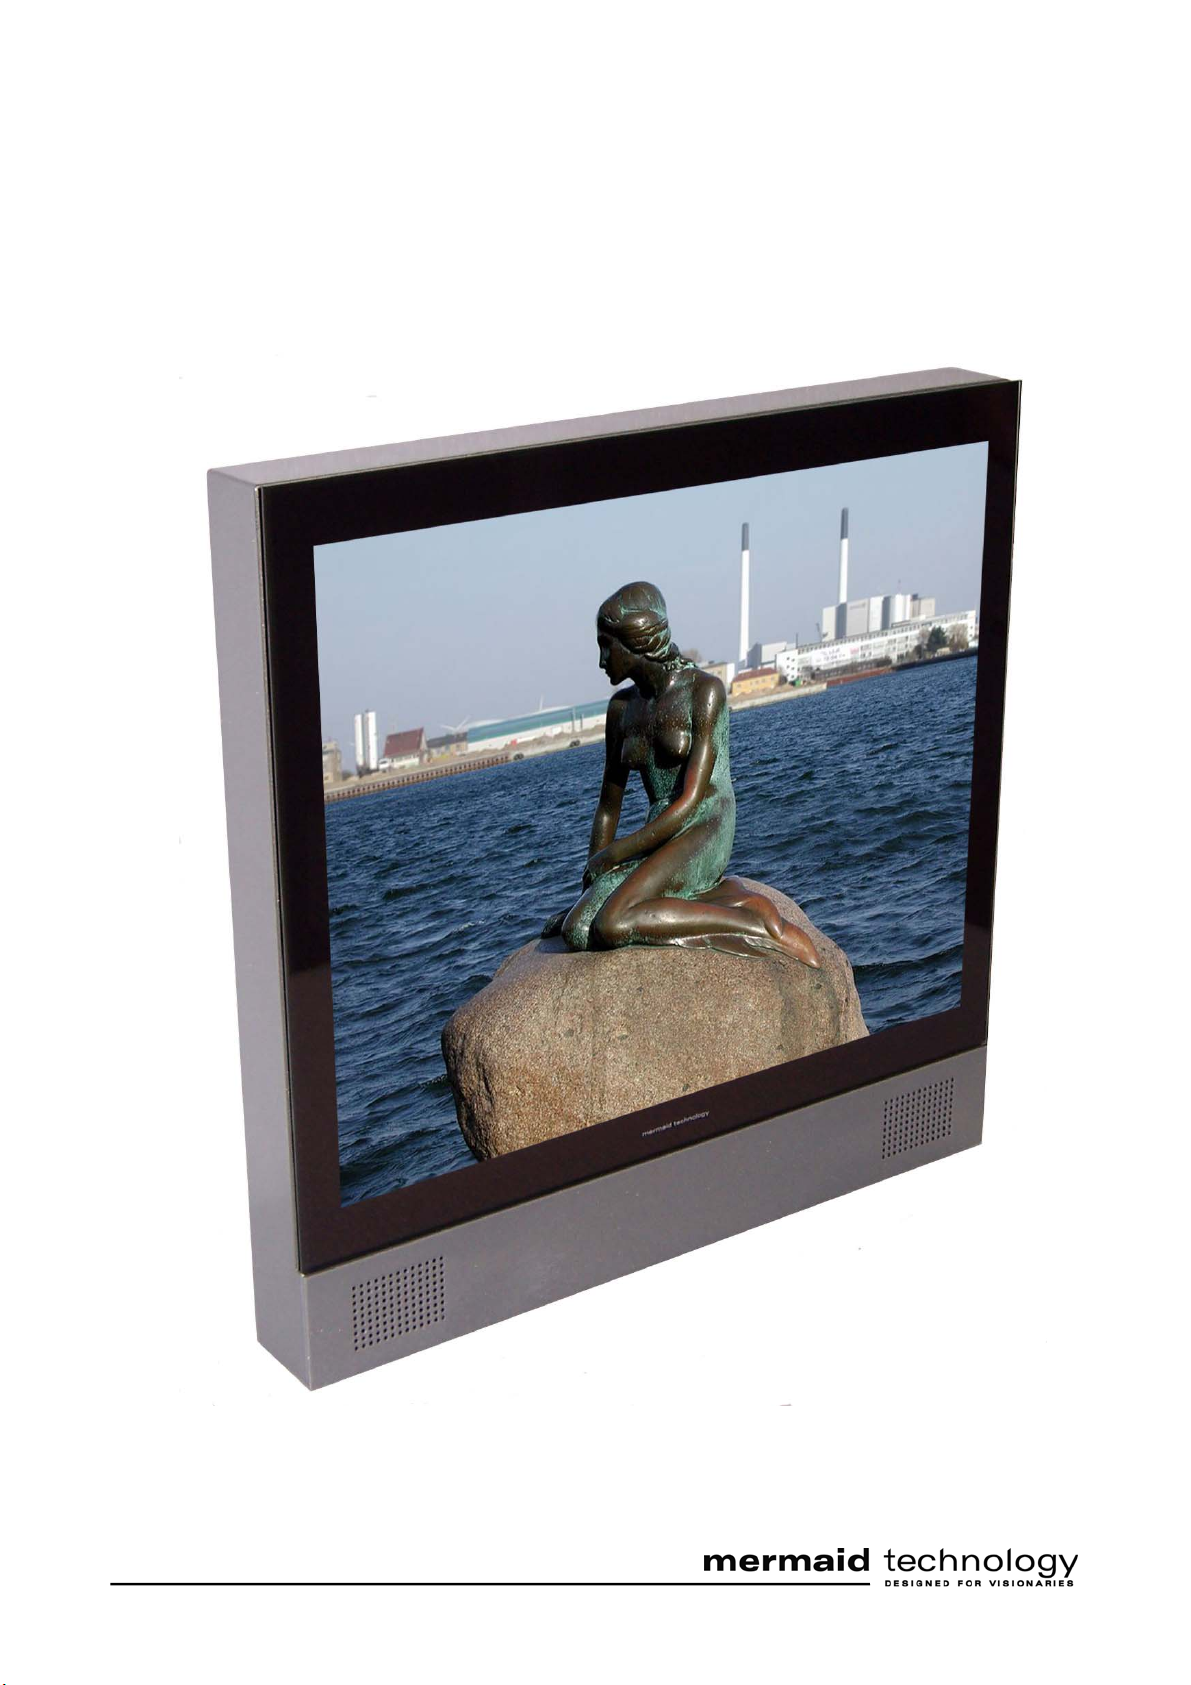
Users Manual
mermaid ActiveMedia
Page 2

Page 3

mermaid ActiveMedia Users Manual ver 2.0
Table of Content:
Table of Content:................................................................................................................................................3
1. Introduction ....................................................................................................................................................5
2. Important Information....................................................................................................................................6
3. Content of the delievered packages................................................................................................................6
Monitor Unit Box: ..........................................................................................................................................6
4. Unpacking, Assembly and Placement............................................................................................................6
Monitor unit:...................................................................................................................................................6
3. Operation........................................................................................................................................................7
Compact Flash/CF card replacement:.............................................................................................................7
Operating the unit – FlashPlayer part: ............................................................................................................7
Operating the unit – FlashPlayer part: Continued...........................................................................................8
Operating the unit – Monitor part:..................................................................................................................8
4. OSD Key Functions (Overview) ....................................................................................................................9
6. OSD Functions & Adjustments....................................................................................................................10
Color Menu...................................................................................................................................................10
Picture menu (Only available when Analog VGA input is selected)............................................................11
Function Menu (Only available when Analog VGA input is selected)........................................................12
OSD Menu....................................................................................................................................................13
Miscellaneous Menu.....................................................................................................................................14
7. Warranty Terms............................................................................................................................................15
8. If you need to contact us! .............................................................................................................................15
9. Troubleshooting............................................................................................................................................16
Appendix A: Connector Specifications............................................................................................................17
Power in........................................................................................................................................................17
Appendix B: Power Management Mode: VESA DPMS protocol applied.......................................................17
Appendix C: Technical Specifications.............................................................................................................18
Input Video and sync signal..........................................................................................................................18
Electrical Parameters ....................................................................................................................................18
Amplifier specifications................................................................................................................................18
Appendix D: Dimentions and weight, ActiveMedia 170 & 190 TFT..............................................................19
Appendix E: Mounting holes/well positions, ActiveMedia 170 & 190 TFT...................................................19
Appendix F: Supported file types.....................................................................................................................20
Photo Slideshow ...........................................................................................................................................20
Movie Playback ............................................................................................................................................20
Appendix G: Optical Characteristics – ActiveMedia 170 TFT........................................................................21
Appendix H: Optical Characteristics – ActiveMedia 190 TFT........................................................................22
P/N: 20-1700-00460 Page 3 of 24
Page 4

mermaid ActiveMedia Users Manual ver 2.0
P/N: 20-1700-00460 Page 4 of 24
Page 5

mermaid ActiveMedia Users Manual ver 2.0
1. Introduction
The mermaid ActiveMedia 170 TFT and 190 TFT are state of the art high-tech flat panel TFT multimedia monitors,
incorporating high quality TFT-LCD panels with maximum resolution of 1280x1024, multimedia FlashPlayer and
active Stereo speakers. They are based on the newest technology with high brightness 4-lamp CCFL backlight units.
The very fast response time provides excellent suitability for video applications. The monitors are made of steel and
hardened glass providing excellent stability and strength. The integrated FlashPlayer means you are able to play back
files within a few seconds, after connecting power as the only needed external source.
Panel technology:
• ActiveMedia 170 TFT: TN (Twisted Nematic)
• ActiveMedia 190 TFT: PVA (Patterned Vertical Alignment)
Connections:
• +12 Volt DC Power (2.5 mm Jack via integrated cable)
Features:
• State of the art high performance picture quality design
• Display digital photos, watch movies, and playback music
• files, all without needing a PC or software
• Auto-detection of different media formats
• JPEG files and EXIF 2.2 support.
• Supports JPEG files up to 19 megapixels.
• 90° clockwise image rotation.
• Digital zoom and pan.
• 9 picture preview mode.
• Automatic slideshow.
• Up to 8 kinds of transition effects, and random transitions mode for slideshows.
• Photo slideshows with background music play back fr om file.
• MPEG-1 and MPEG-2 video and Motion JPEG file playback.
• Music file playback.
• Browse files by Photo, Music, Movie, and File modes.
• Browse all the files using thumbnail previews.
• FlashPlayer: Full control of all relevant display and interface parameters via Remote Control
OSD menu controlled via arrow keys.
Volume up/down and mute.
Previous/next file.
Play, Pause, and Stop.
Output select between VGA, S-Video and composite video
Switch between NTSC and PAL standards.
Special key to play music during slideshow
• Monitor: Full control of all relevant display and interface parameters via OSD
• Monitor: Multi language support
• Compatible with VESA DPMS power saving modes
• +12VDC single power: 45watts AC/DC power adapter recommended. (Supplied)
• Operating temperature: 0 to 50°C
• Internal active stereo speakers (2watt x 2 ch. / 8 ohms)
P/N: 20-1700-00460 Page 5 of 24
Page 6

mermaid ActiveMedia Users Manual ver 2.0
2. Important Information
• Please save the packaging. It has been designed to provide optimal support and protection for the monitor
during transportation.
3. Content of the delievered packages
Monitor Unit Box:
• 17” or 19” ActiveMedia unit equipped with:
• Accessories bag including
- PSU (45 Watt)
- Power cord
- Setup Guide
- ActiveMedia Users Manual (This manual)
4. Unpacking, Assembly and Placement
Note: To avoid condensation, please wait ½-1 hour, before operating the unit.
Monitor unit:
• Open the box and remove the accessories bag.
• Lift out the monitor unit. Remove it from the plastic bag and foam
P/N: 20-1700-00460 Page 6 of 24
Page 7
mermaid ActiveMedia Users Manual ver 2.0
3. Operation
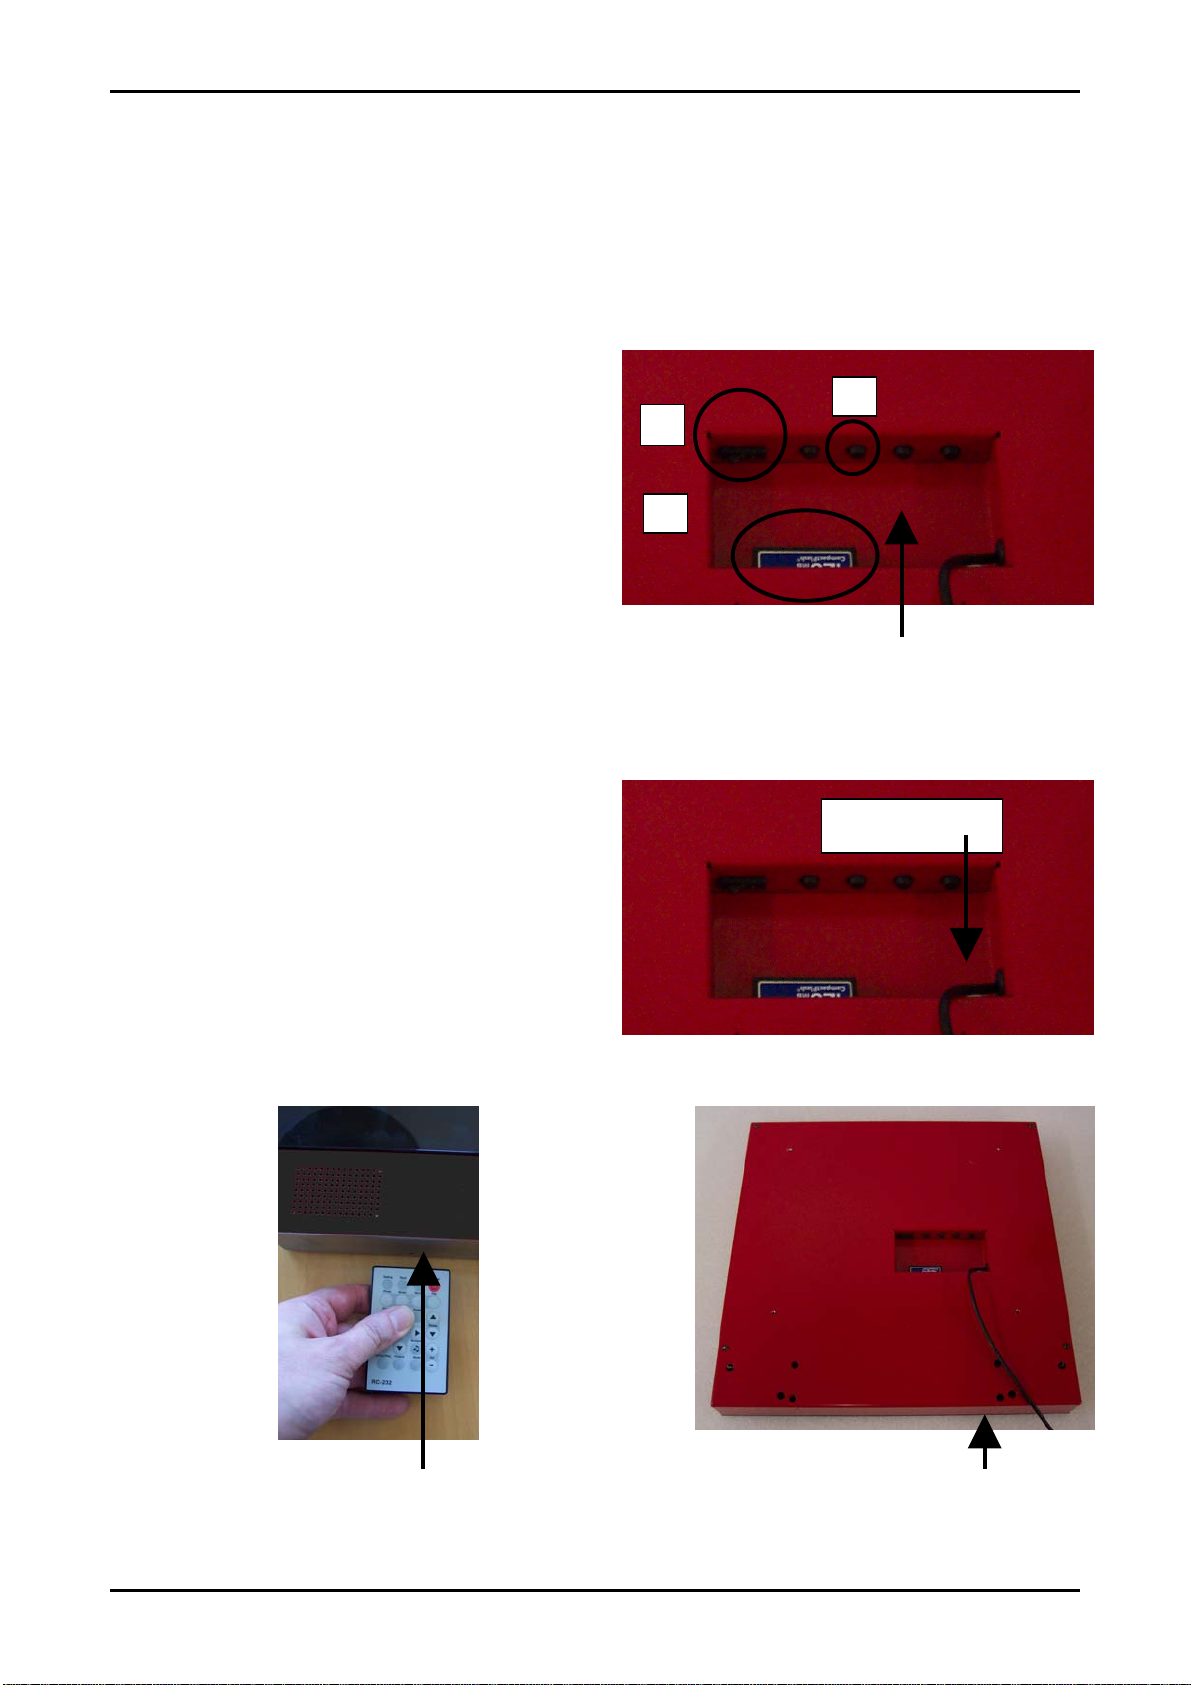
Compact Flash/CF card replacement:
Always turn off the monitor before removing or inserting a CF card!
• Turn off the monitor unit by means of the power
switch, located in the “well” on the backside. (1)
• Gently pull out the CF card in the direction of
arrow (2)
• Gently insert new/replacement CF card with the
label face pointing upwards and the pinhole
connector pointing into the slot.
• Turn on the monitor by means of the power switch.
The playback will start within a few seconds.
• Press “Auto-Config” in order to let the monitor
position the new content properly. (3)
Operating the unit – FlashPlayer part:
The ActiveMedia monitor consists of two individually controlled units:
1. A 4-button operated monitor unit.
2. A remote controlled Flash Player.
• In order to control the FlashPlayer, the
remote control unit must be pointed
directly against the infrared eye located in
the well on the backside.
• In order to ease up operation, a pinhole is
located on the lower left side of the unit
(seem from the front). To operate the
Player by means of this hole, the
transmitter diode on the remote control
unit must be pointed directly into this hole.
Pinhole
1
2
3
Infrared eye
Pinhole
P/N: 20-1700-00460 Page 7 of 24
Page 8
mermaid ActiveMedia Users Manual ver 2.0
Operating the unit – FlashPlayer part: Continued
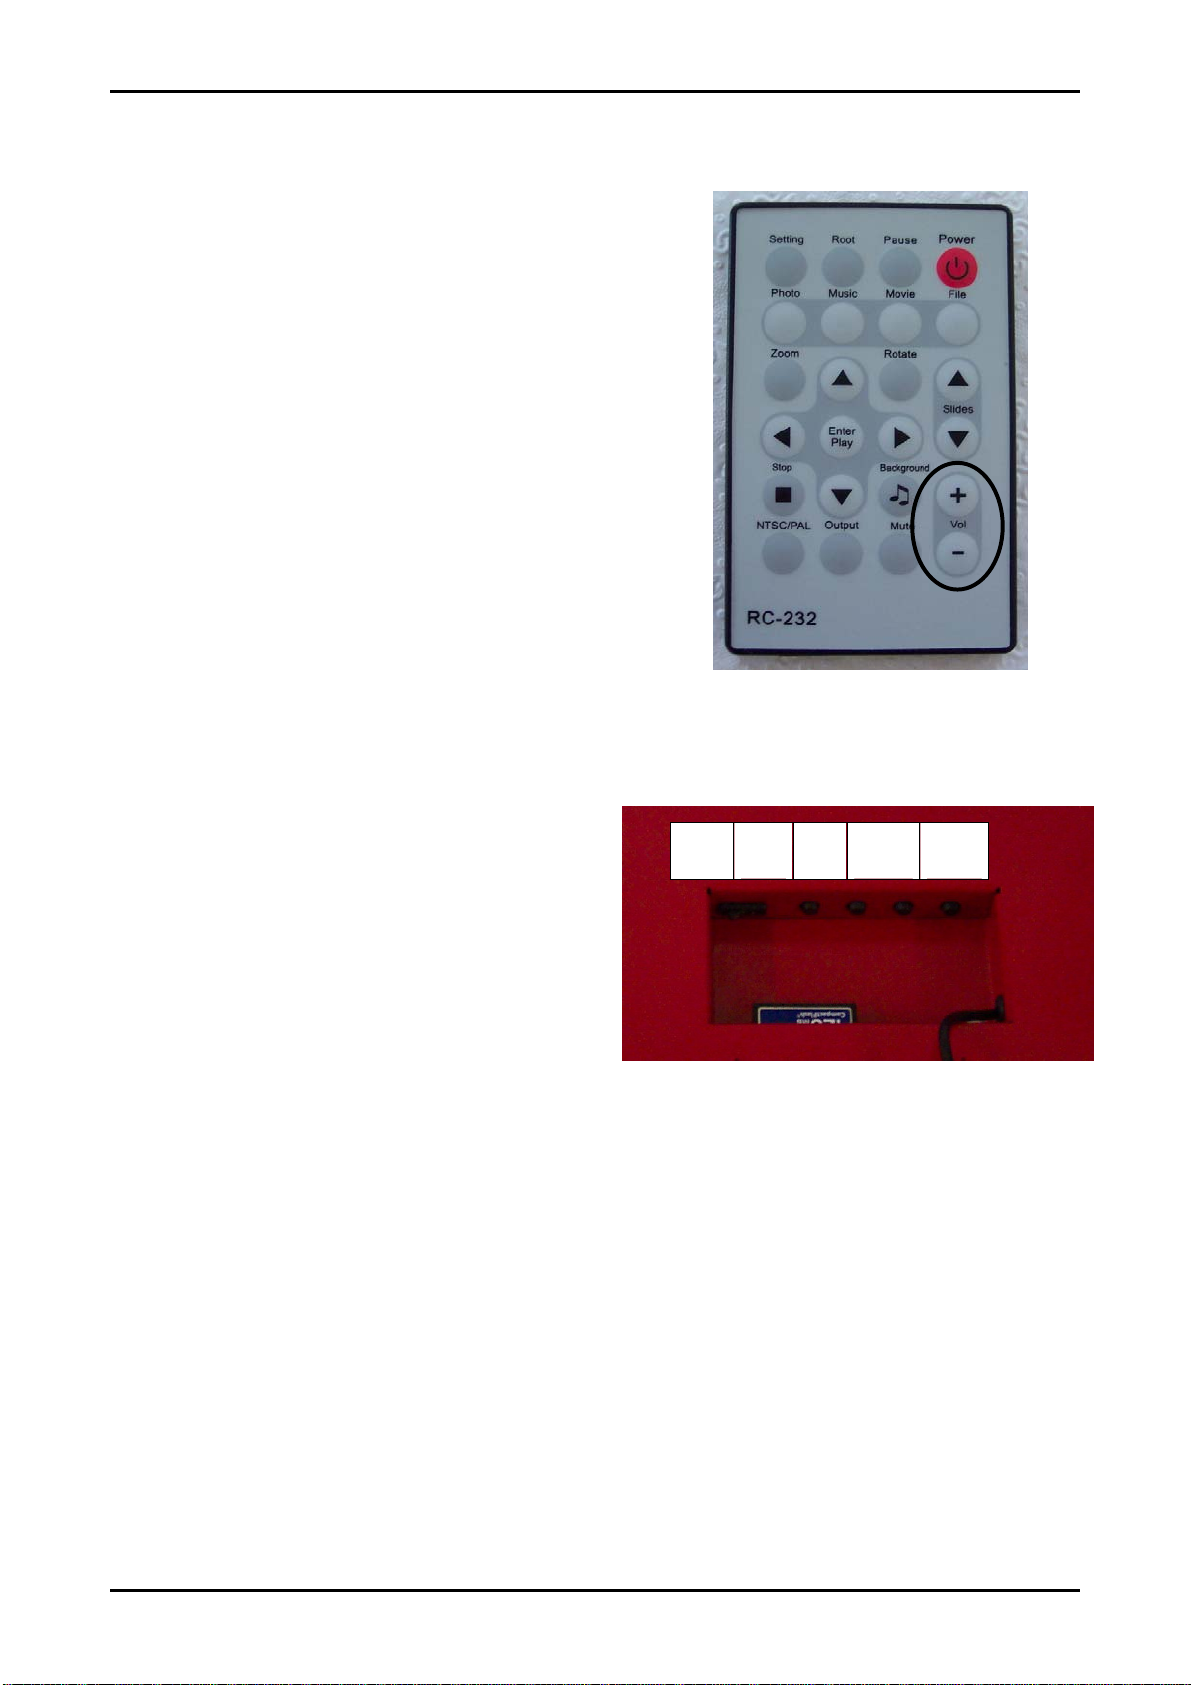
• In order to keep this product in a stable condition, please do
not alter the settings of the FlashPlayer. Only Volume +/- wil
l
be of importance during daily operation.
• lled by means of the
Please note the Volume can also be contro
4-button control panel in the well on the backside. But as these
buttons are not easily accessible during normal operation, it’s a
good idea to select a reference level by means of these buttons,
and then use the remote control unit to alter the volume. A
reference level, which should fit the most common use, has
already been selected, though.
Remote Control Unit
Operating the unit – Monitor part:
• Please refer to next page for an overview off the
OSD button functions.
• tion of the functions, please
For an in-depth explana
refer to section 6.
On/Off Enter/
Escape
Down Decrease
(-)
Increase
(+)
P/N: 20-1700-00460 Page 8 of 24
Page 9
mermaid ActiveMedia Users Manual ver 2.0
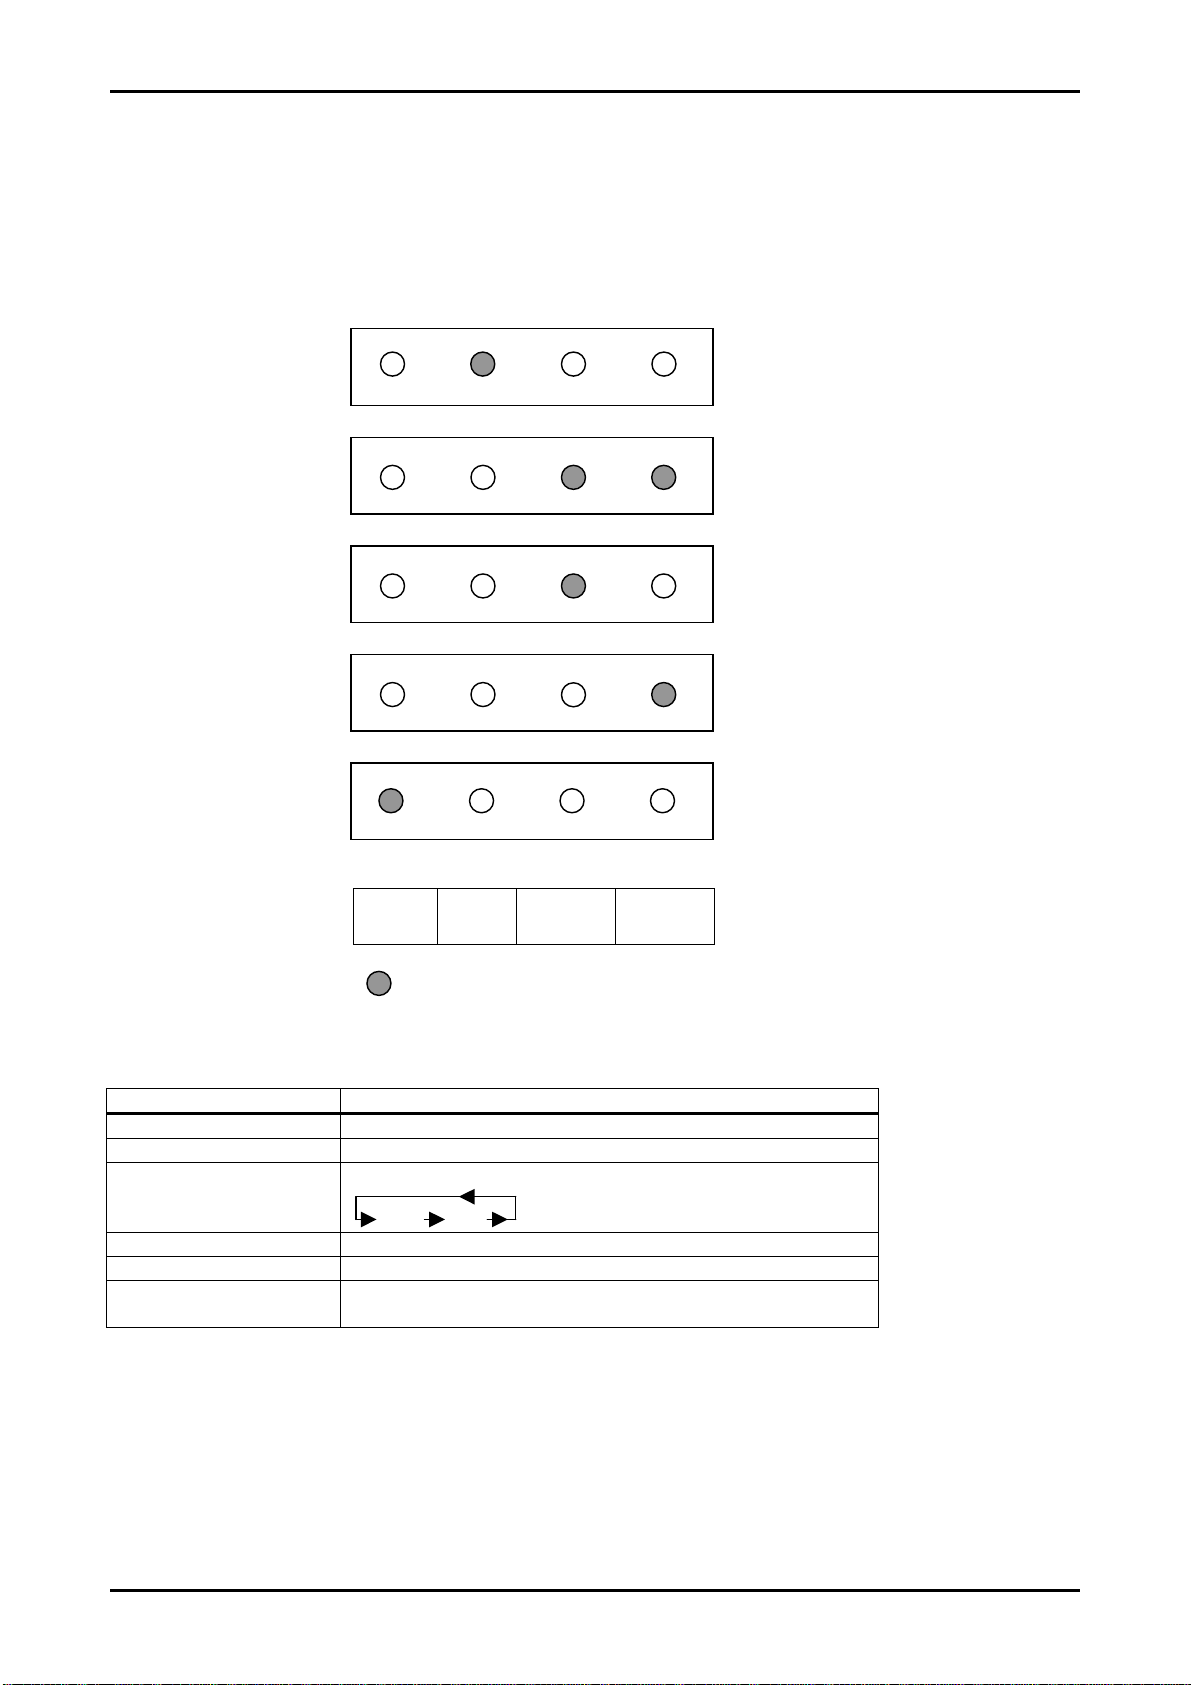
4. OSD Key Functions (Overview)
For detailed description: See Users manual.
4-button
Auto Config:
(Hot key)
Source select:
(Hot key(s))
Volume Dec.:
(Hot key)
Volume Inc.:
(Hot key)
Select OSD Menu:
(Hot key)
OSD Menu selected:
Enter/
Escape
= key(s) which are pressed
Function Description
Menu (Hot Key) Activates the OSD
Auto Config (Hot Key) Auto calibrate the monitor for optimal performance
Source Select *
Enter/Escape Enters or Escapes the highlighted menu.
Decrease (-) Moves the cursor down to the next menu item
Increase (+) Increases the value of the selected.
* When the monitor is turned on, it automatically scans the two different inputs (VGA and DVI) for a valid signal,
It then stops at the first valid input. The scan routine starts from the last used input.
When both keys are pressed, the monitor selects the next source
VGA DVI
Select the next lower level menu.
OSD Panel
Down Decrease(-)
Increase (+)
P/N: 20-1700-00460 Page 9 of 24
Page 10
mermaid ActiveMedia Users Manual ver 2.0
6. OSD Functions & Adjustments
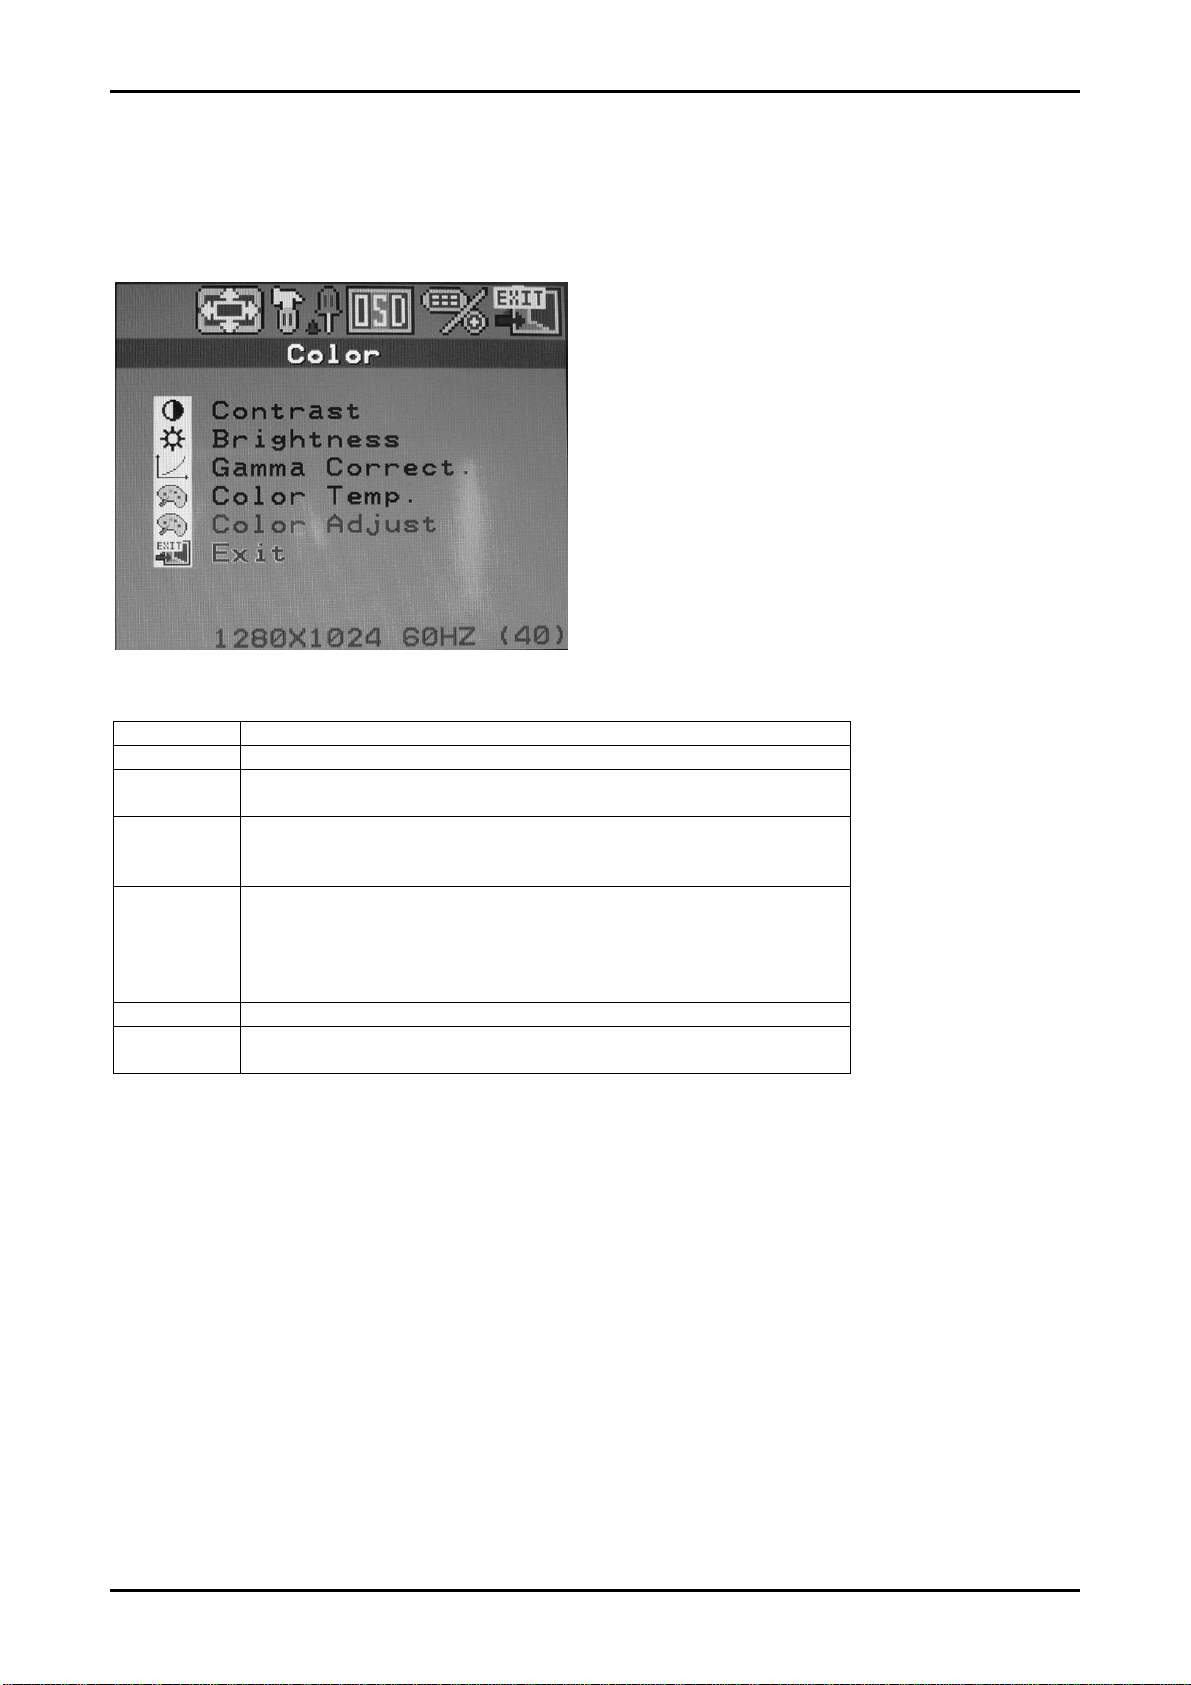
Color Menu
Contrast
Brightness
Gamma
Color temp
Color Adjust
Exit
Info line
Adjustment of contrast (0..100)
Adjustment of brightness (0..100 )
Selection of the appropriate “Gamma curve”
Four different curves are available. (0..3)
Adjustment of the color temperature.
Select between 3 pre-defined temperature (5800K, 6500K or 9300K)
Or use the “User” setting to select the appropriate values yourself.
Manual adjustment of Color Temerature. Available ony, when “User “
setting is selected in “Color Temp.”
Red (0..100)
Green (0..100)
Blue (0..100)
Exits to to main menu
PC: Shows current resolution, refresh rate and VESA mode
Video: Shows current signal type of video input, refresh rate and mode
P/N: 20-1700-00460 Page 10 of 24
Page 11
mermaid ActiveMedia Users Manual ver 2.0
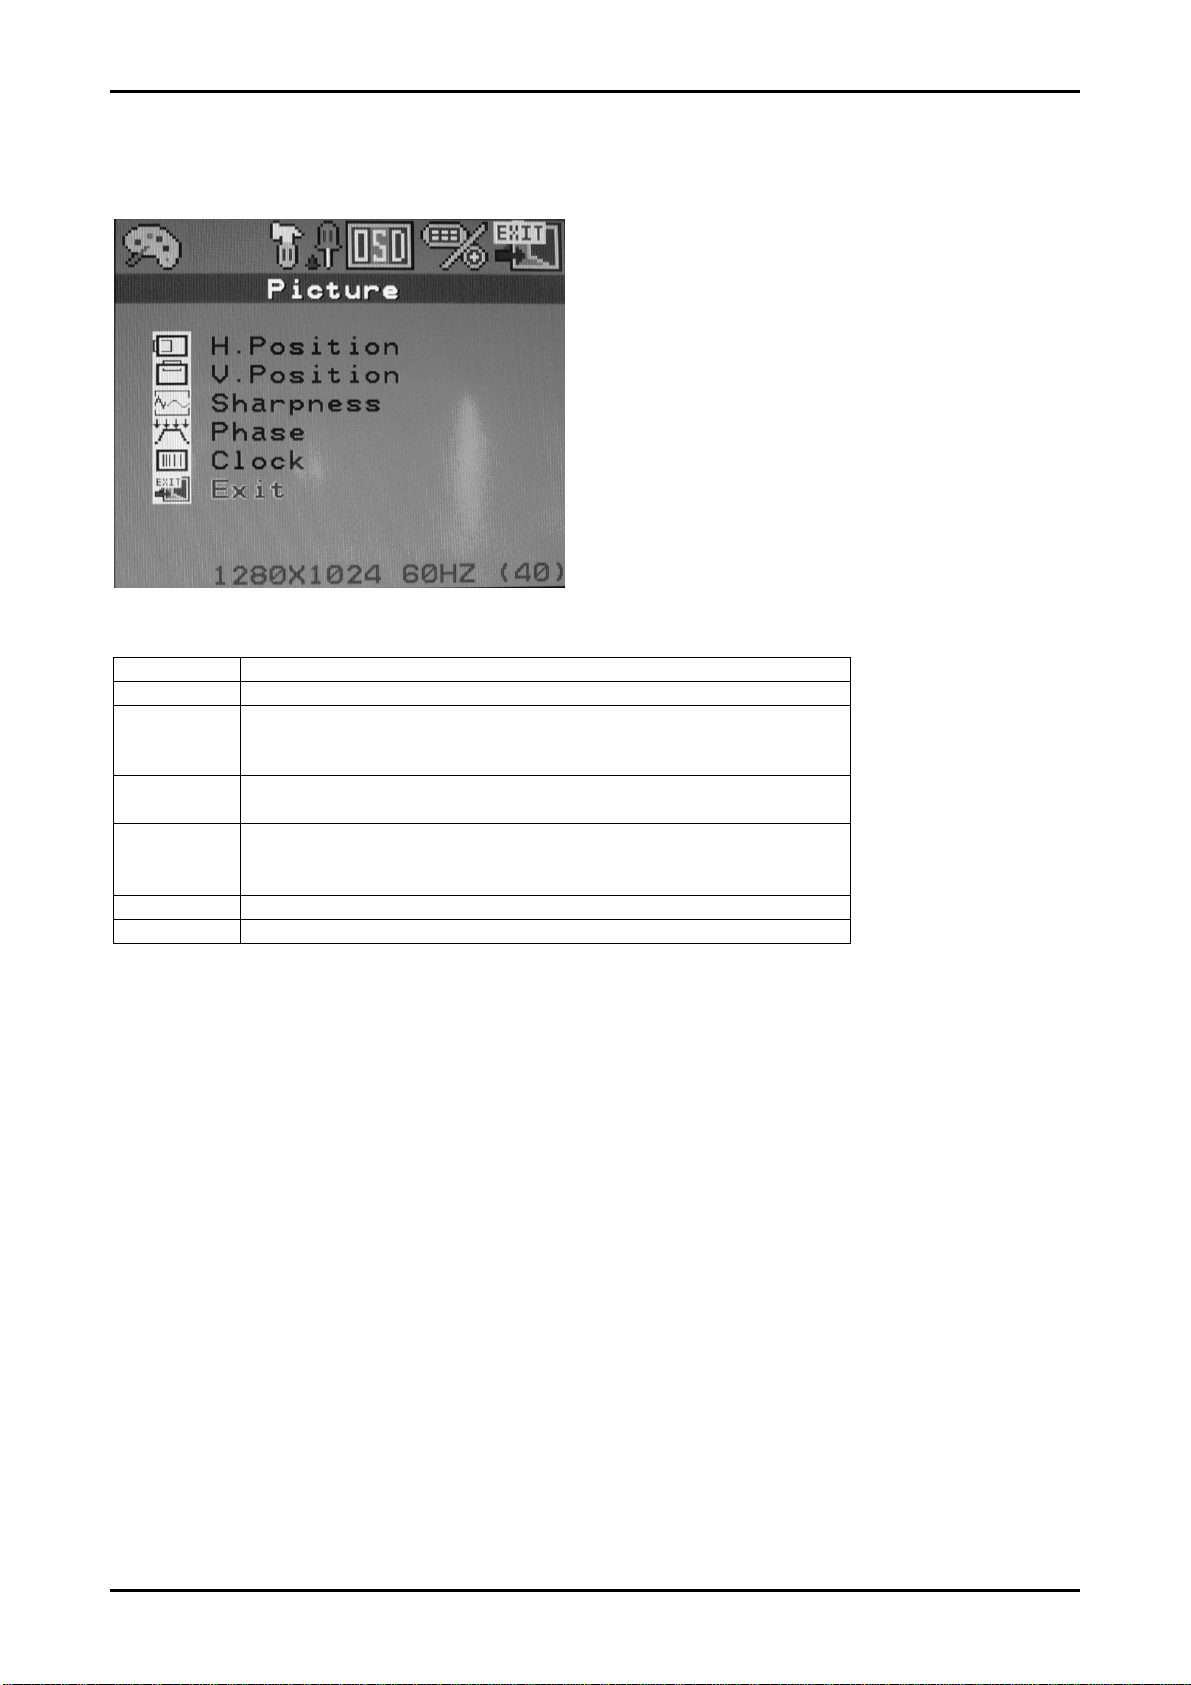
Picture menu (Only available when Analog VGA input is selected)
H-Position
V-Position
Sharpness
Phase
Clock
Exit
Info line
Adjustment of horizontal picture position (0..100)
Adjustment of vertical picture position (0..100)
Adjustment of picture sharpness (0..5)
5 = “Sharp” picture
0 = “Soft” picture
The phase setting allows slight picture disturbances
(snow & shimmering) to be eliminated. (0..31)
The frequency setting allows the pixel clock frequency to be adjusted.
This will only have to be adjusted, if the automatic alignment was unable
to determine the correct pixel clock frequency. (0..200)
Exits to main menu
Shows current resolution, refresh rate and VESA mode
P/N: 20-1700-00460 Page 11 of 24
Page 12
mermaid ActiveMedia Users Manual ver 2.0
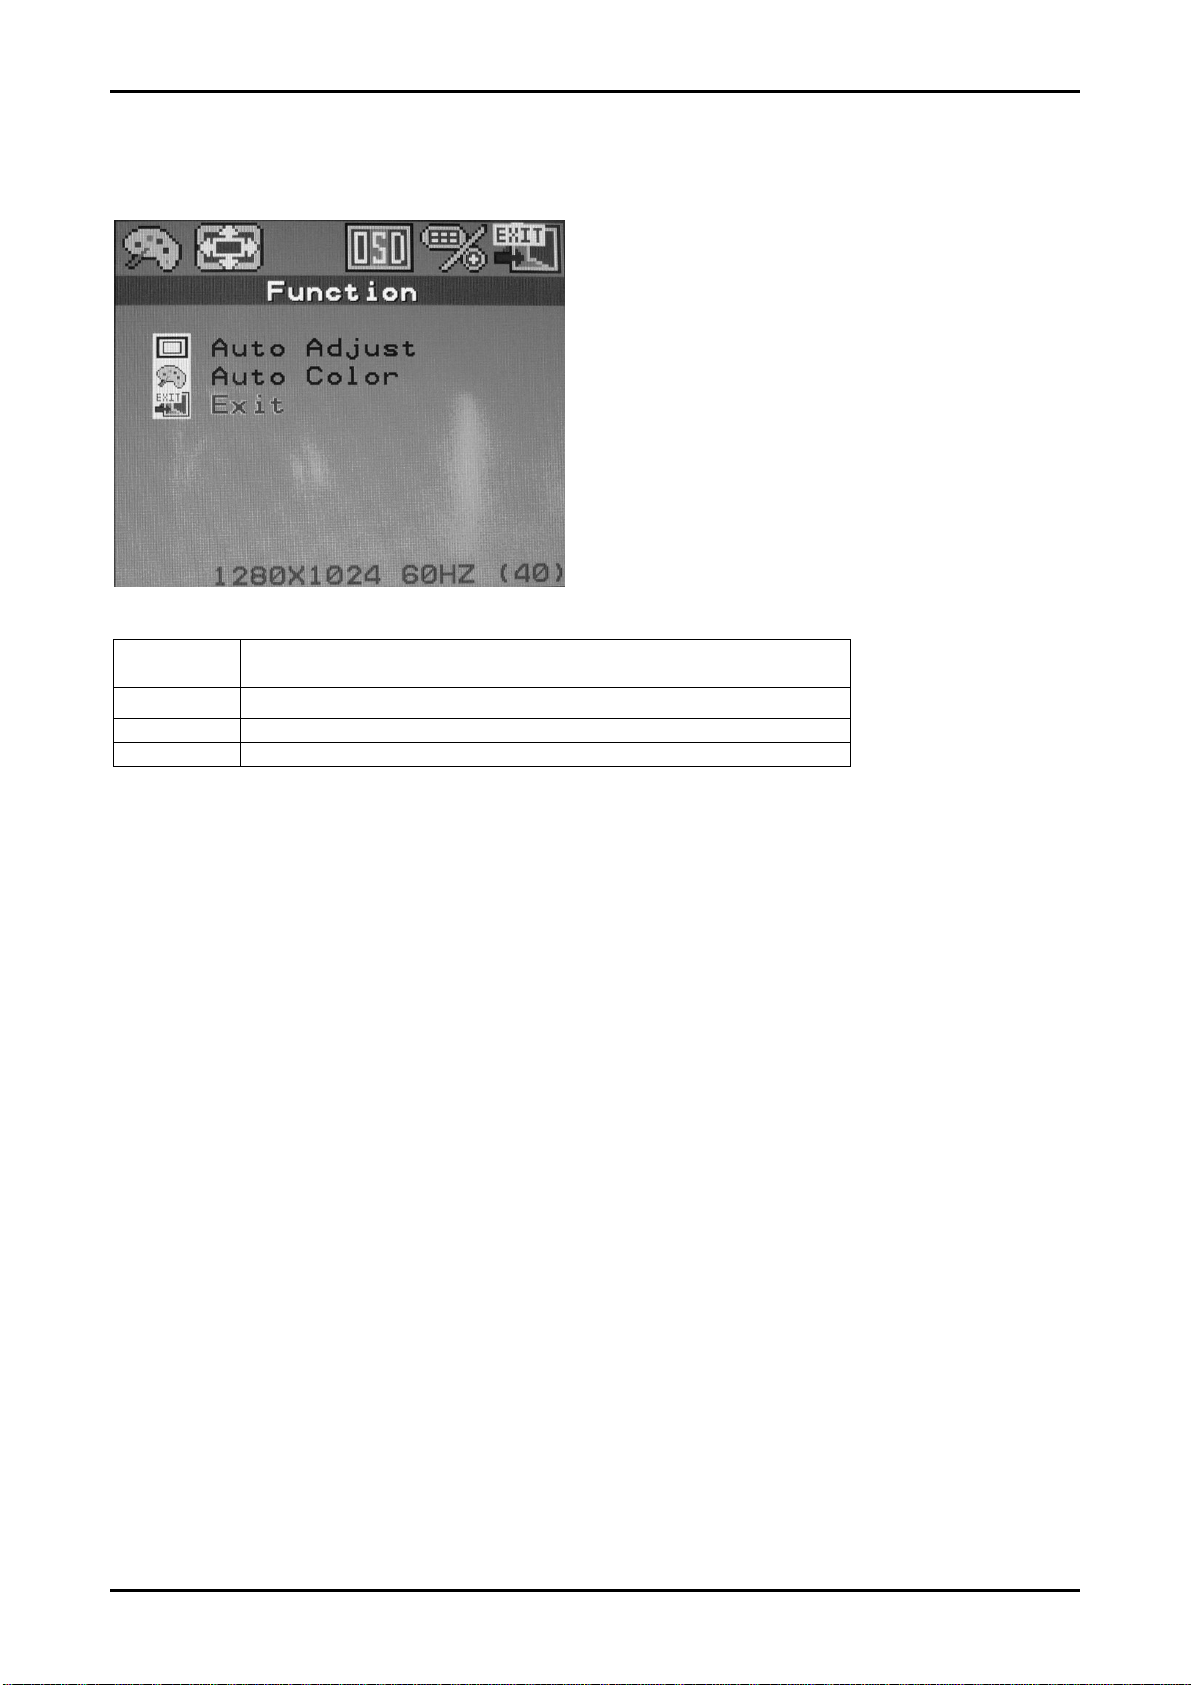
Function Menu (Only available when Analog VGA input is selected)
Auto Adjust
Auto calibrate the monitor for optimal performance
Auto Color
Exit
Info line
Exits to main menu
Shows current resolution, refresh rate and VESA mode
P/N: 20-1700-00460 Page 12 of 24
Page 13
mermaid ActiveMedia Users Manual ver 2.0
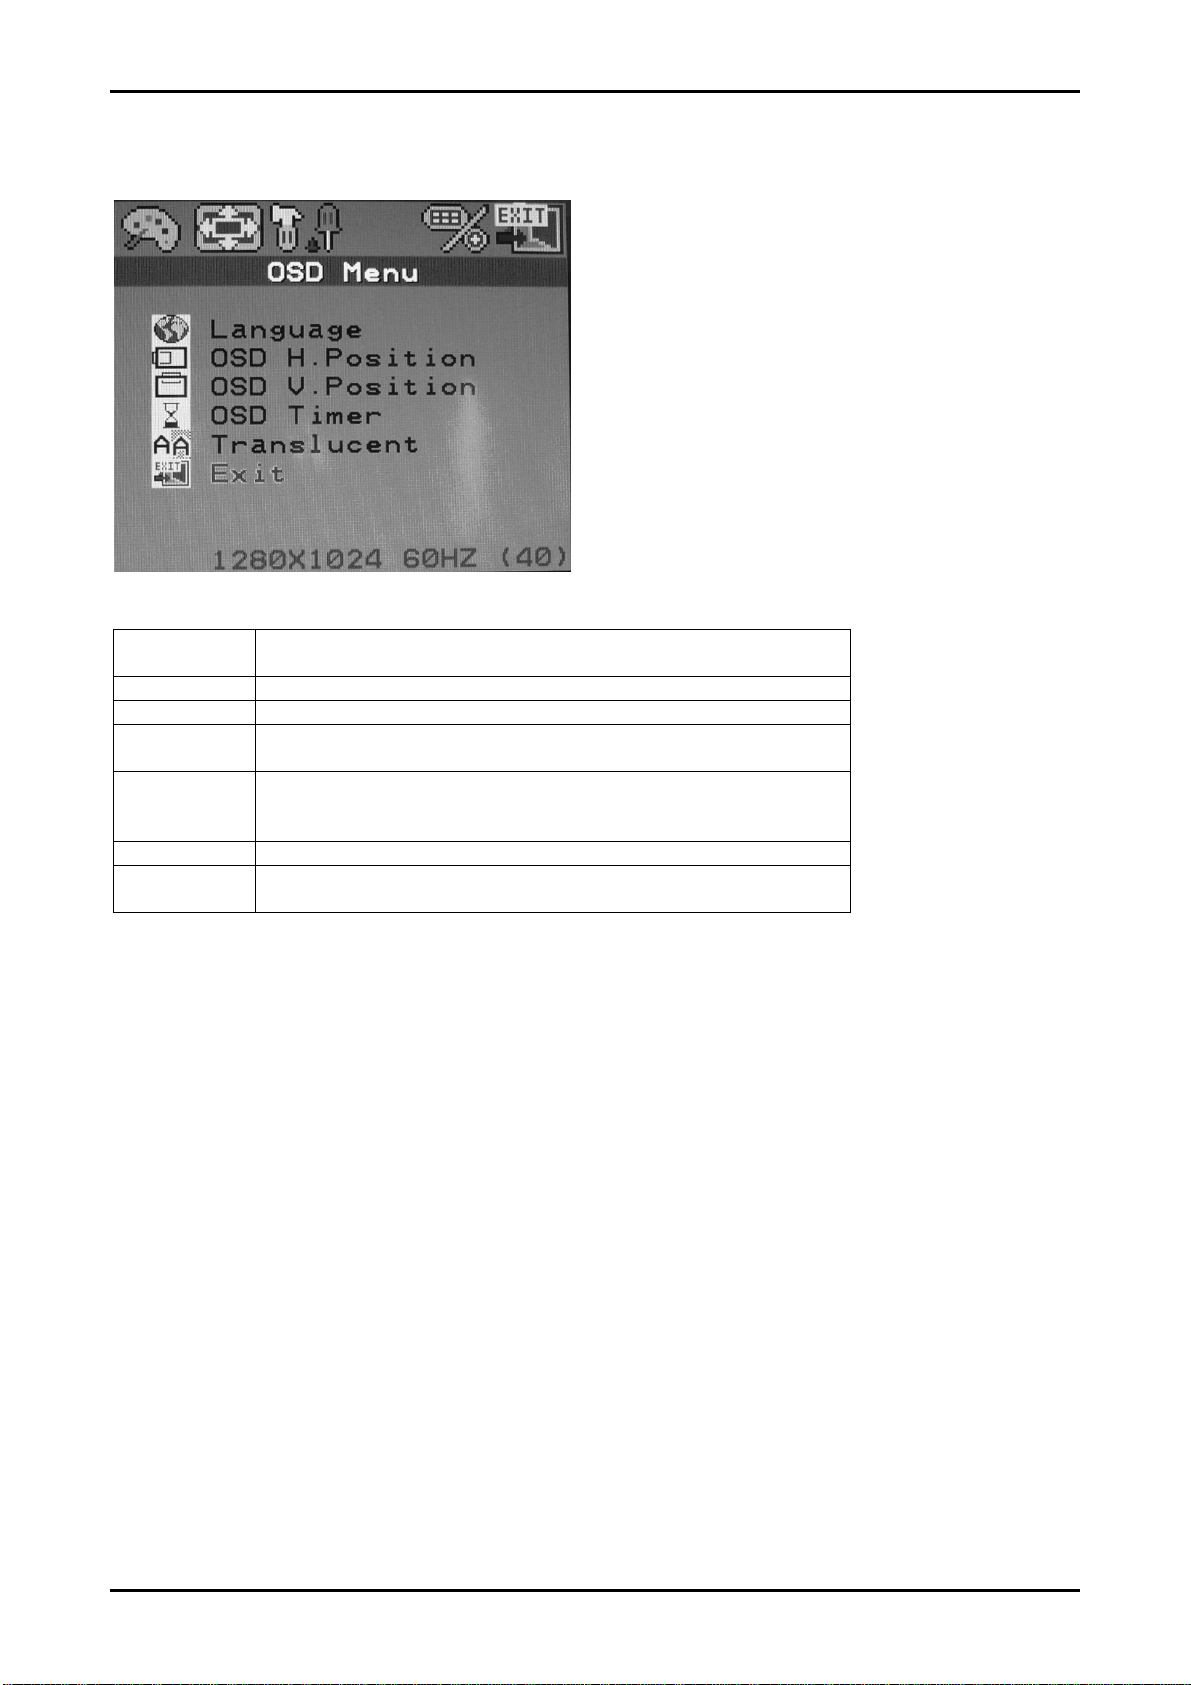
OSD Menu
Language
OSD h-pos
OSD v-pos
OSD timer
Translucent
Exit
Info line
Select OSD language
(English, German, Frech, Italian, Spannish or Danish)
Variable OSD position – horizontal (0..118)
Variable OSD position – vertical (0..116)
Activate OSD time out after last key pressed.
Yes = 15 Sec time out No = No time out
Changes type of the OSD background
Yes = Translucent (tranparent)
No = solid (not transparent)
Exits to main menu
PC: Shows current resolution, refresh rate and VESA mode
Video: Shows current signal type of video input, refresh rate and mode
P/N: 20-1700-00460 Page 13 of 24
Page 14
mermaid ActiveMedia Users Manual ver 2.0
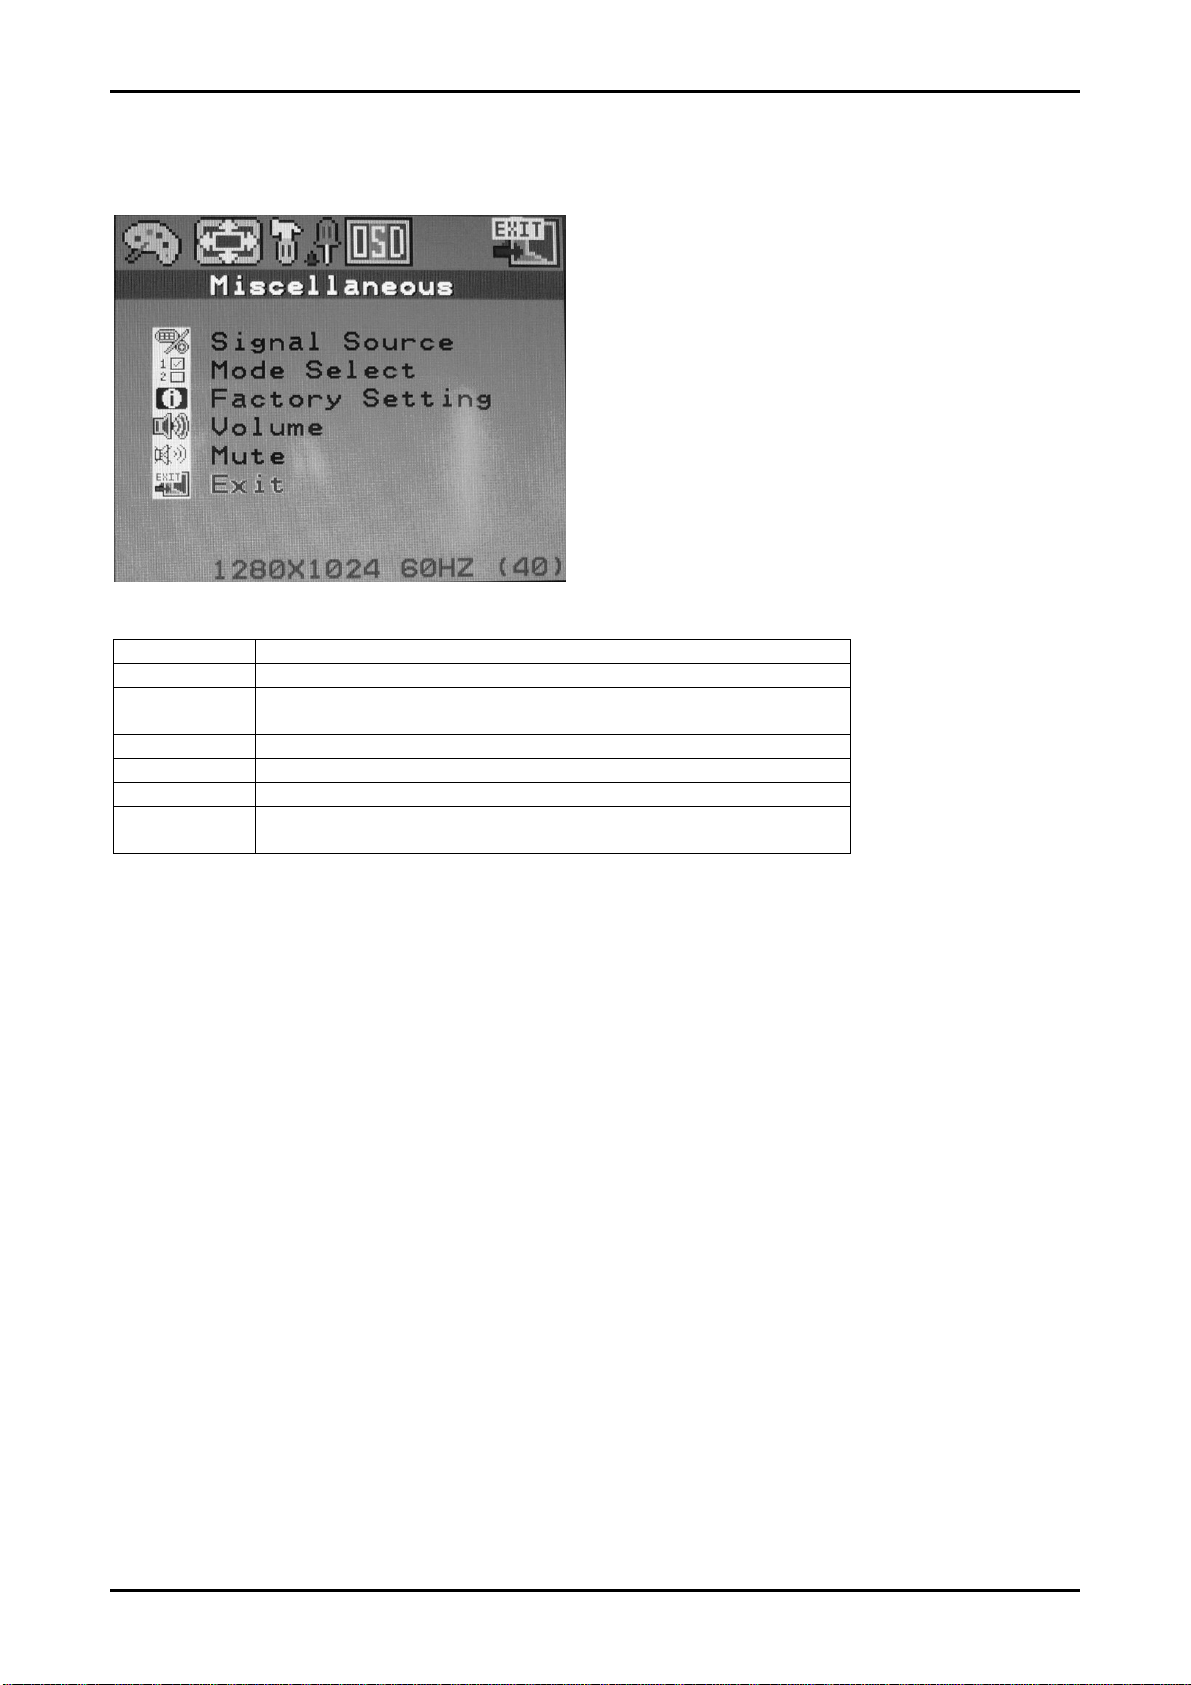
Miscellaneous Menu
Signal Source
Mode Select
Factory
Setting
Volume
Mute
Exit
Info line
Resets all functions to factory default.
Adjustment of Volume
Turns Amplifier on and off
Exits to manin menu
PC: Shows current resolution, refresh rate and VESA mode
Video: Shows current signal type of video input, refresh rate and mode
P/N: 20-1700-00460 Page 14 of 24
Page 15

mermaid ActiveMedia Users Manual ver 2.0
7. Warranty Terms
mermaid ActiveMedia 170 TFT and ActiveMedia 190 TFT are both covered by a 1-year send-in warranty.
Repair
If your mermaid ventura needs repairing, please visit www.mermaid.dk and fill-in the RMA-request. You will then
receive an RMA-number, which you must attach outside the monitor packing before you ship your product to mermaid.
We will return the product to you within 10 to 14 working days.
The guarantee terms set out above apply to Europe only.
8. If you need to contact us!
Contact mermaid customer support.
If you need to get in touch with mermaid technology, please contact us via phone or mail:
Phone
mermaid customer support opening hours are Monday to Friday 8.30-16.30 .
By mail
mermaid technology a/s
Att.: Customer Support
Klingseyvej 15b
DK-2720 Vanløse
Denmark
Telephone
+45 44 52 92 00
Telefax
+45 44 52 92 65
E-mail
Internet
http://www.mermaid.dk
P/N: 20-1700-00460 Page 15 of 24
Page 16

mermaid ActiveMedia Users Manual ver 2.0
9. Troubleshooting
If you have troubles using your ActiveMedia monitor, please refer to following suggestions for troubleshooting.
If you can not rectify the problem yourself, please contact your distributor or place of purchase.
Symptom
Screen is “black”
“Signal out of range”
message
“Media not detected”
message
The image is too dark or
bright
Horizontal or vertical bars
appears and/or the picture is not
centered
Suggestions
1. Ensure that the power cord is connected and the monitor is on.
2. While pointing the remote control unit directly against the infrared
eye located in the well on the backside or the pinhole, press
“NTSC/PAL” once. Wait 2-3 seconds. Note the player must be in
playback mode, as the changes won’t take affect in menu/overview
mode.
3. Press “Output” once. Wait 2-3 second. Repeat step 3 upto 3 times.
The “output” button selects between the internal outputs (VGA, Svideo or CVBS) of the flashplayer. But as only the VGA output is
used, this must be selected as default output. Note that maybe step 2
and 3 must be done in combination.
1. While pointing the remote control unit directly against the infrared
eye located in the well on the backside or the pinhole, press
“NTSC/PAL” once. Wait 2-3 seconds. Note the player must be in
playback mode, as the changes won’t take affect in menu/overview
mode.
1. Ensure that the memory card is proberly inserted.
2. Ensure that the memory card contains valid playable media files. If
the memory card has been removed during operation (with power on),
it is possible, by accident, to erase or corrupt the content. Always
make sure the monitor is turned off while removing or inserting a
memory card.
3. Maybe the contact pins (CF slot only) have been damaged, and the
monitor will need repair.
1. Adjust the brightness and contrast.
1. Press “Auto Config button” on the 4-button OSD panel located on the
monitor backside in the well .
P/N: 20-1700-00460 Page 16 of 24
Page 17
mermaid ActiveMedia Users Manual ver 2.0
Appendix A: Connector Specifications
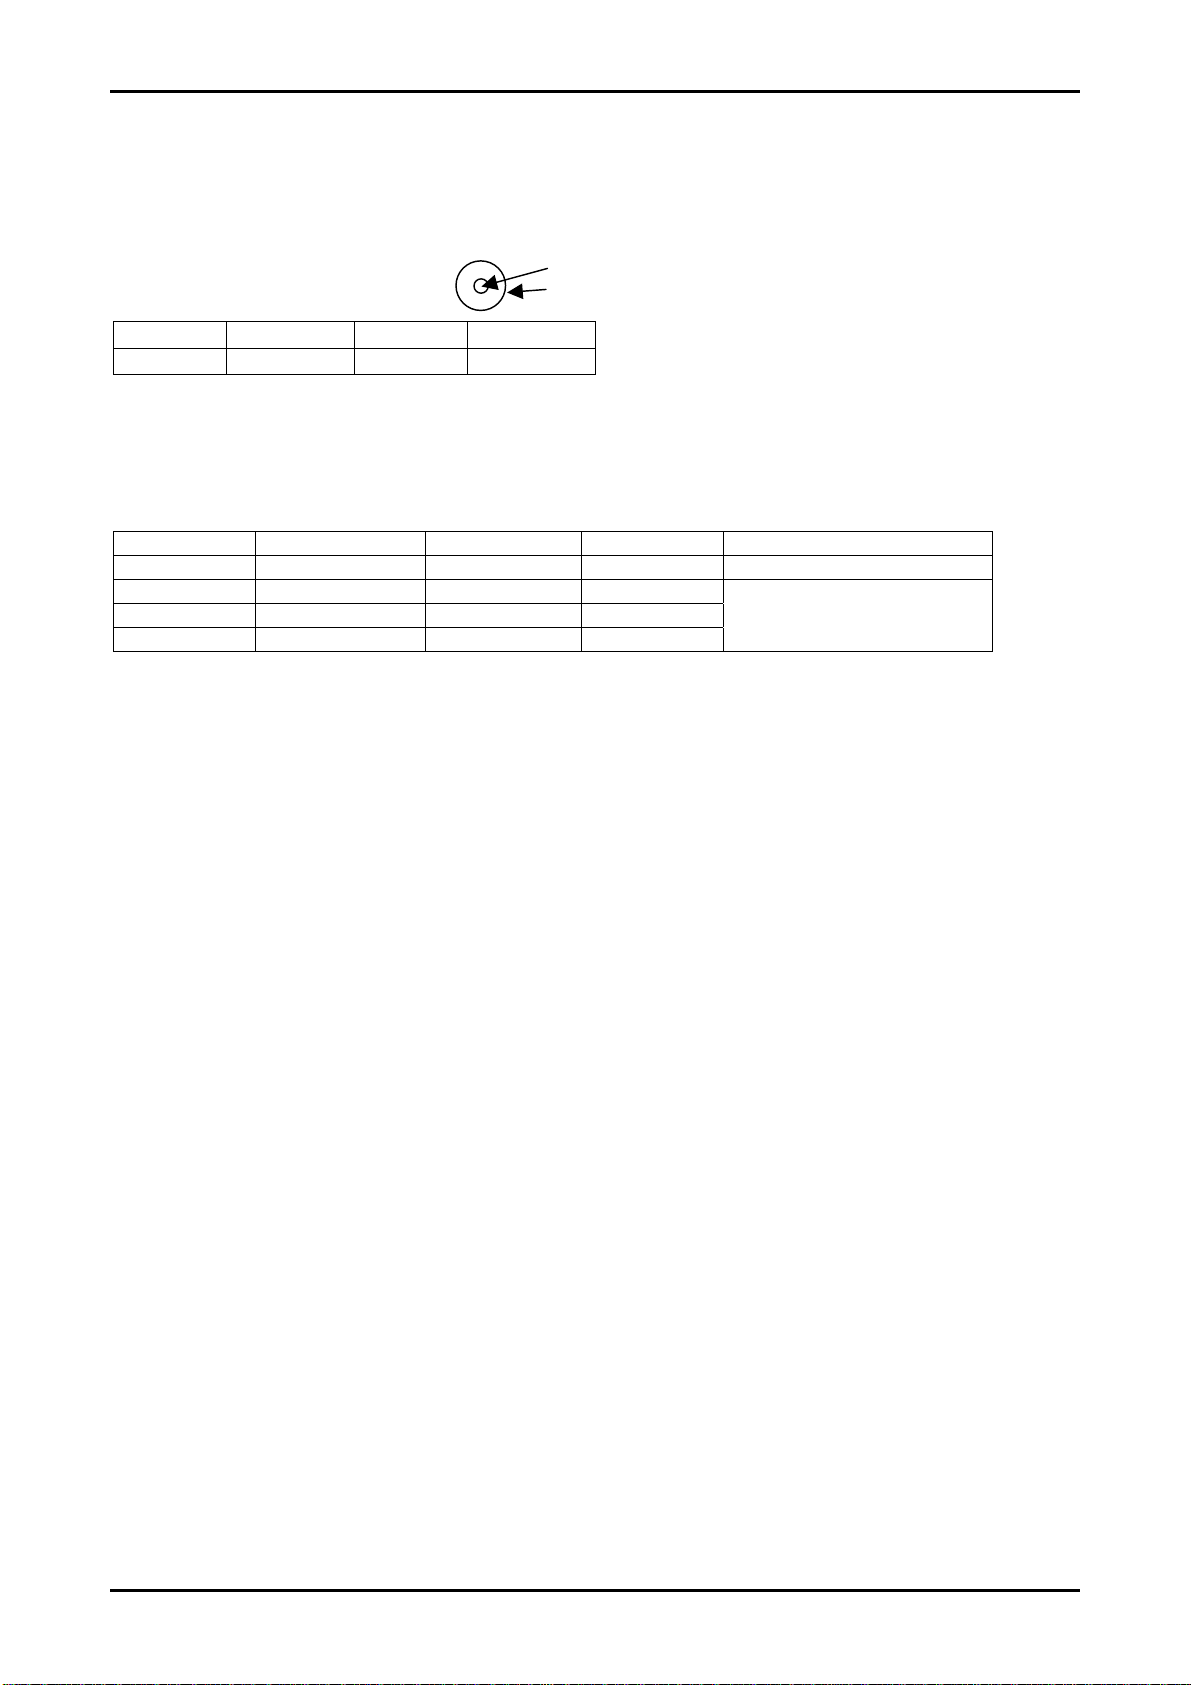
Power in
Power input connector: 2.5 mm DC jack
Pin no Function Pin no Symbol
1 +12 Volt 2 Ground
1
2
Appendix B: Power Management Mode: VESA DPMS protocol applied
Mode Horizontal sync Vertical sync Video signal Power Consumption (max) On Stand.by Suspend Off
Active Active Active 27,5W (15”) 40 W (17”& 19”)
Inactive Active Blanked
Active Inactive Blanked
Inactive Inactive Blanked
< 3 Watts
P/N: 20-1700-00460 Page 17 of 24
Page 18
mermaid ActiveMedia Users Manual ver 2.0
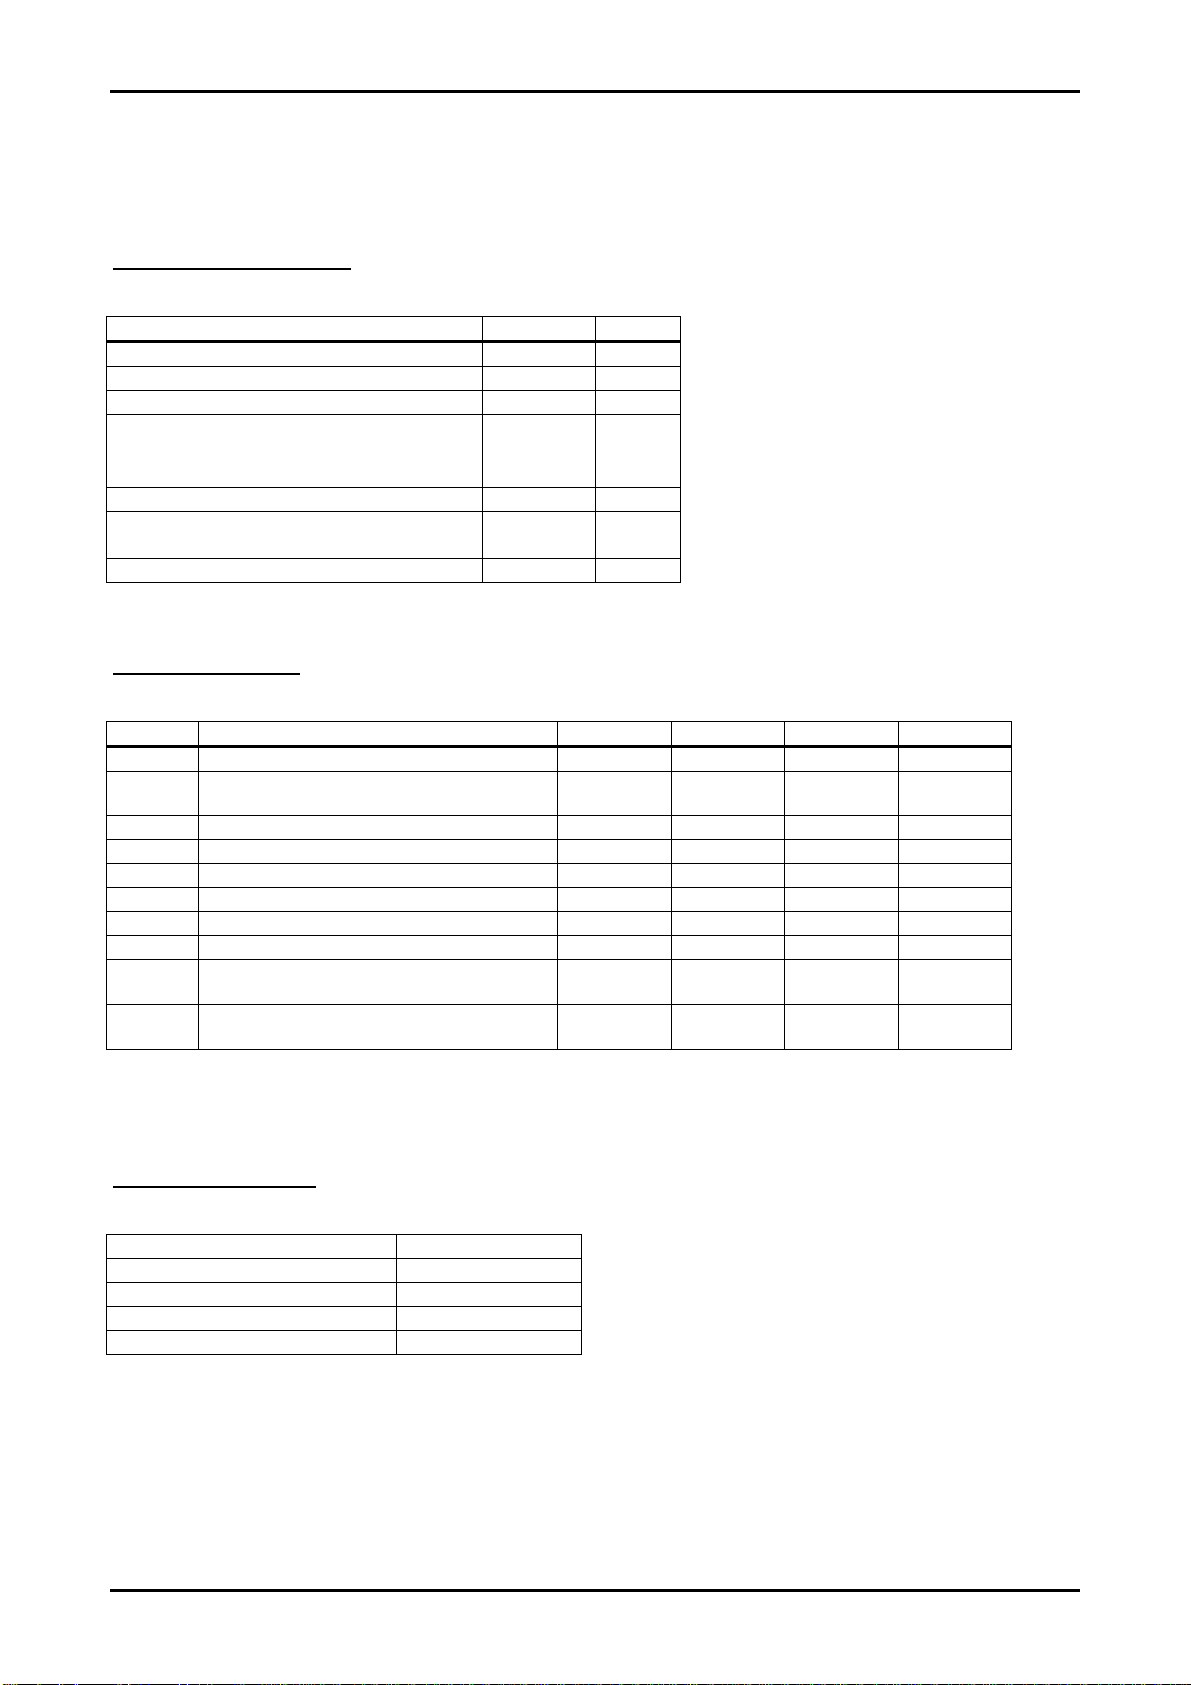
Appendix C: Technical Specifications
Input Video and sync signal
Parameter Value Unit
Max. Output Resolution (17” & 19”) 1280x1024 Pixels
Data Processing 24 Bits
Input impedance
• Video
• Sync
Sync Polarities +/-
Sync Levels TTL
Max. Number of colors 16.7 Mill. Colors
Electrical Parameters
Symbol Description Min Typ Max Unit
V
V
DD
i(RGB)
+12V DC power supply
Video input signal (w.r.t. GND)
f
f
f
F
V
S
HS
vs
SIH
SIL
Video sample rate
Horizontal sync frequency
Vertical sync frequency
Sync input high level
Sync input low level
I
DD2
Supply current @ +12V, ActiveMedia 170 TFT
I
DD2
Supply current @ +12V, ActiveMedia 190 TFT
Note 1. Power consumption measuring condition is 2pixel checkerboard pattern @ XGA 75Hz and maximum
brightness at t
25°C.
A
Amplifier specifications
Max Output 2 x 2watts @ 8ohm
Max Current 450mA max
Input Voltage 12V DC
THD (Total Harmonic Distortion) 0.15%
S/N (Signal to Noise ratio) 105dB
75
470
compatible
10.8 12.0 13.2 V
0.5 0.7 1.0 V
80 MHz
30 60 KHz
56 75 Hz
2.5 V
0.8 VDC
3.0 3.3 A
3.3 A
Ohms
Ohms
reference : t
25 ° C
A
PP
P/N: 20-1700-00460 Page 18 of 24
Page 19
mermaid ActiveMedia Users Manual ver 2.0
Appendix D: Dimentions and weight, ActiveMedia 170 & 190 TFT
Model Dimentions (H x W x D) Weight
ActiveMedia 170 TFT 420mm x 430mm x 53mm 9.5 Kg
ActiveMedia 190 TFT 420mm x 430mm x 53mm 9.5 Kg
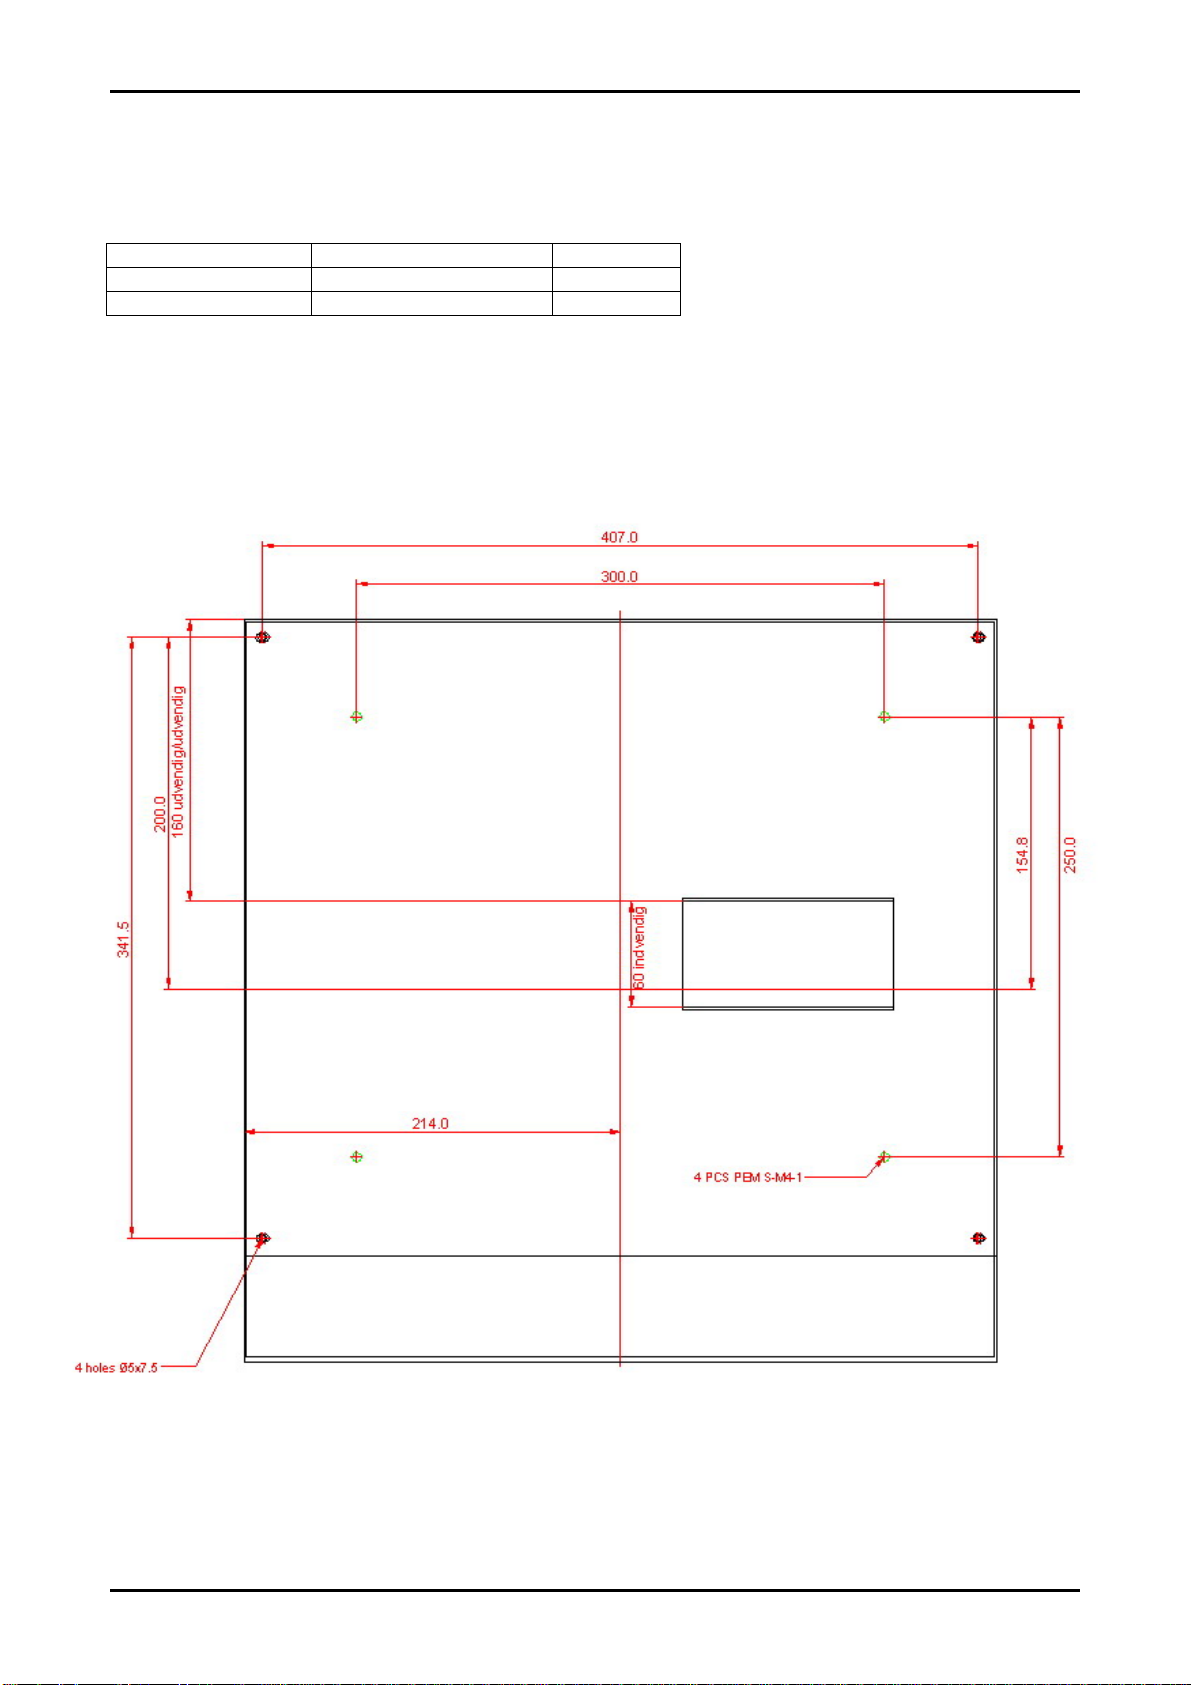
Appendix E: Mounting holes/well positions, ActiveMedia 170 & 190 TFT
P/N: 20-1700-00460 Page 19 of 24
Page 20

mermaid ActiveMedia Users Manual ver 2.0
Appendix F: Supported file types
Photo Slideshow
• JPEG and EXIF 2.2 format upto 19 megapixel
• For best performance – use file resolution at 640 x 480 pixels
Movie Playback
• MPEG-1 and MPEG-2 video Playback
• Motion JPEG file playback
1. Files must consist of a Program-stream including 1 video-track and 1 stereo audio-track
2. Files must not be Elementary-stream or Transport-stream.
3. Recommended file extension is .mpg
4. Use 4:2:0 sampling
5. File resoluton must be 720x480, 60 fields (30 frames) NTSC (VGA 640x480 60 Hz ) or
720x576, 50 fields (25 frames) PAL (VGA 800x600 50Hz) - Recommended
6. It is recommende to use Closed GOB including one I-frame at least each 15
buffer (Video Buffer) should be 224.
7. Both fields must be encoded (Automatic procedure)
8. It is recommeded to use Constant videobitrate larger then 4 Mbit/s, to avoid motion
artifacts. In comparation, DVD’s are typically encoded at 5-6 Mbit/s and satellite TV at 7-8
Mbit/s. In order to achieve optimum picture quality, please encode at 6-8 Mbit/s.
9. Recommended Audio bitrate is 384 kbit/s. Sample rate 48 khz. Recommende sound level I
0 db by means of standard test tone. Max peak should be +6 db.
10. To produce MPEG2 files, it is recommende to use software, with possibility to configure a
standard template, to be used each time a “unknown” content is received. This will ensure
that the output files always are encoded and produced according the the above stated “rules”
E.g. the program “Procoder2” from “Canopus” will suit the common needs.
th
frame. VBV
P/N: 20-1700-00460 Page 20 of 24
Page 21
mermaid ActiveMedia Users Manual ver 2.0
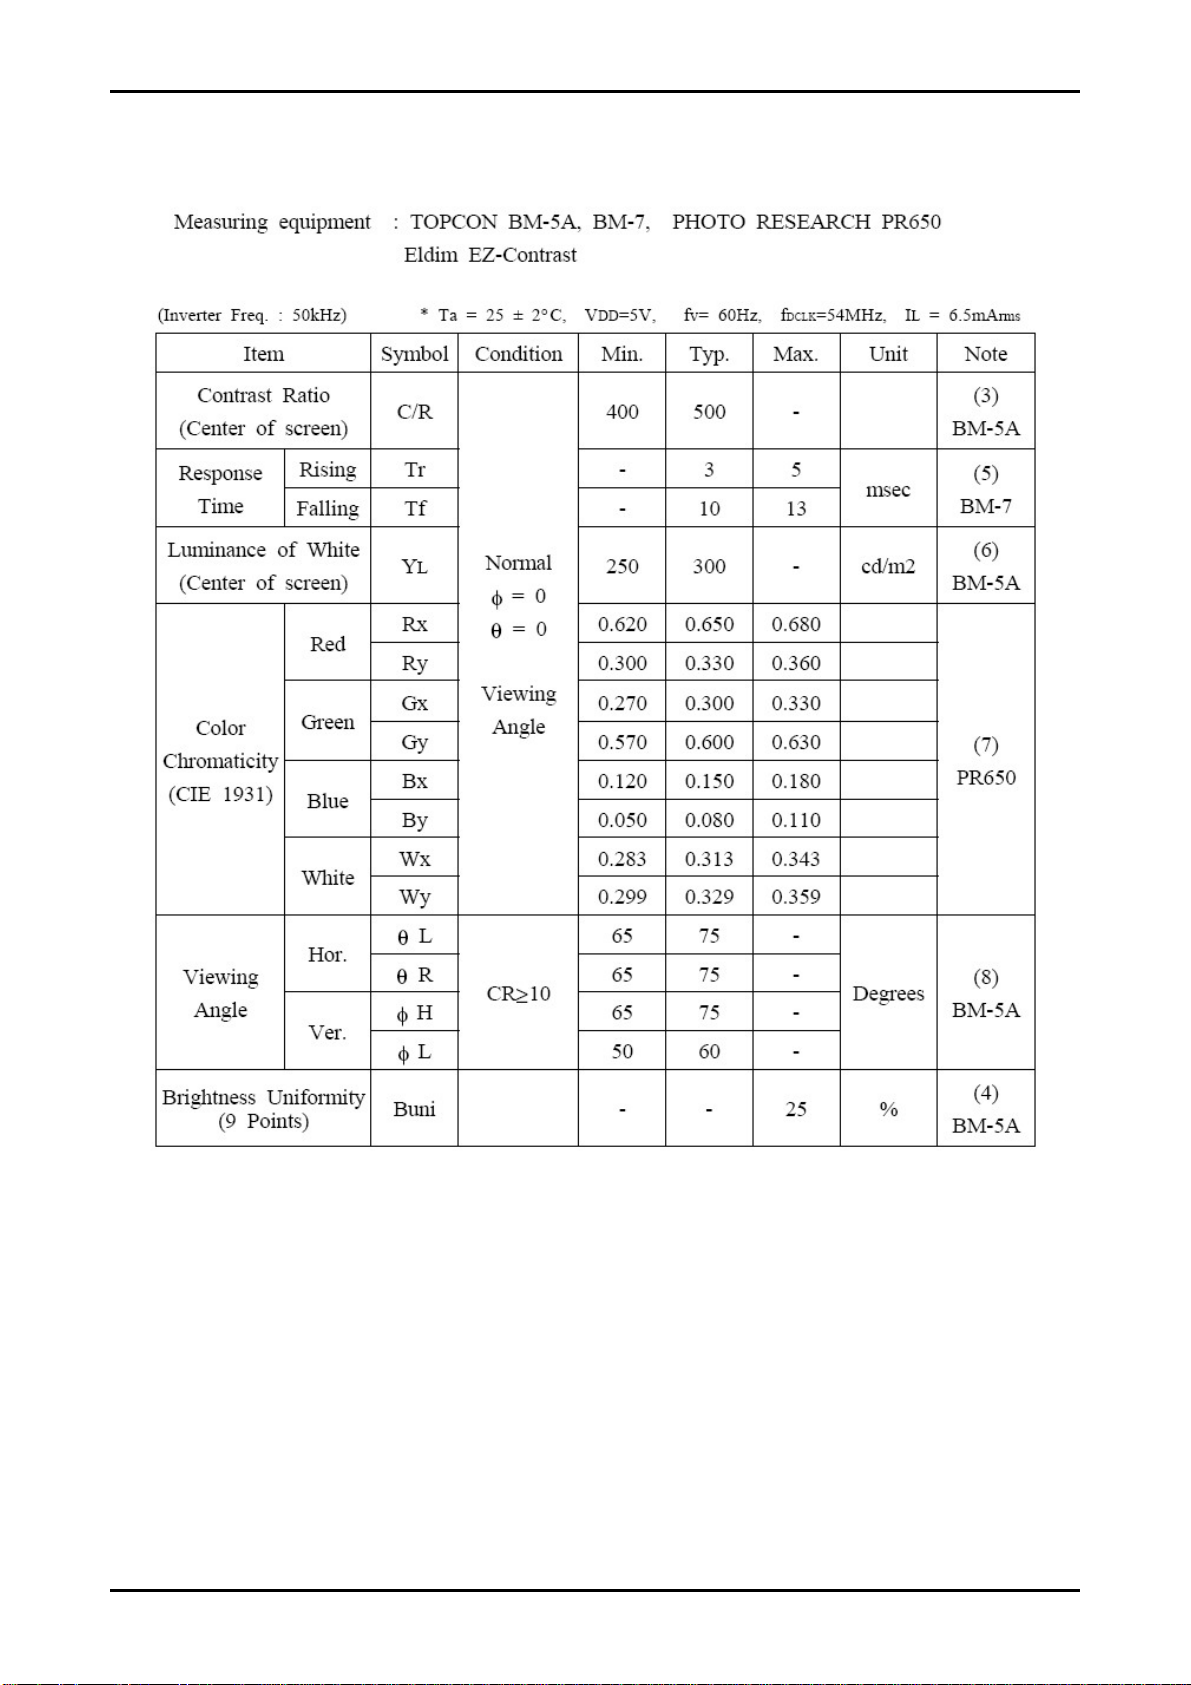
Appendix G: Optical Characteristics – ActiveMedia 170 TFT
P/N: 20-1700-00460 Page 21 of 24
Page 22
mermaid ActiveMedia Users Manual ver 2.0
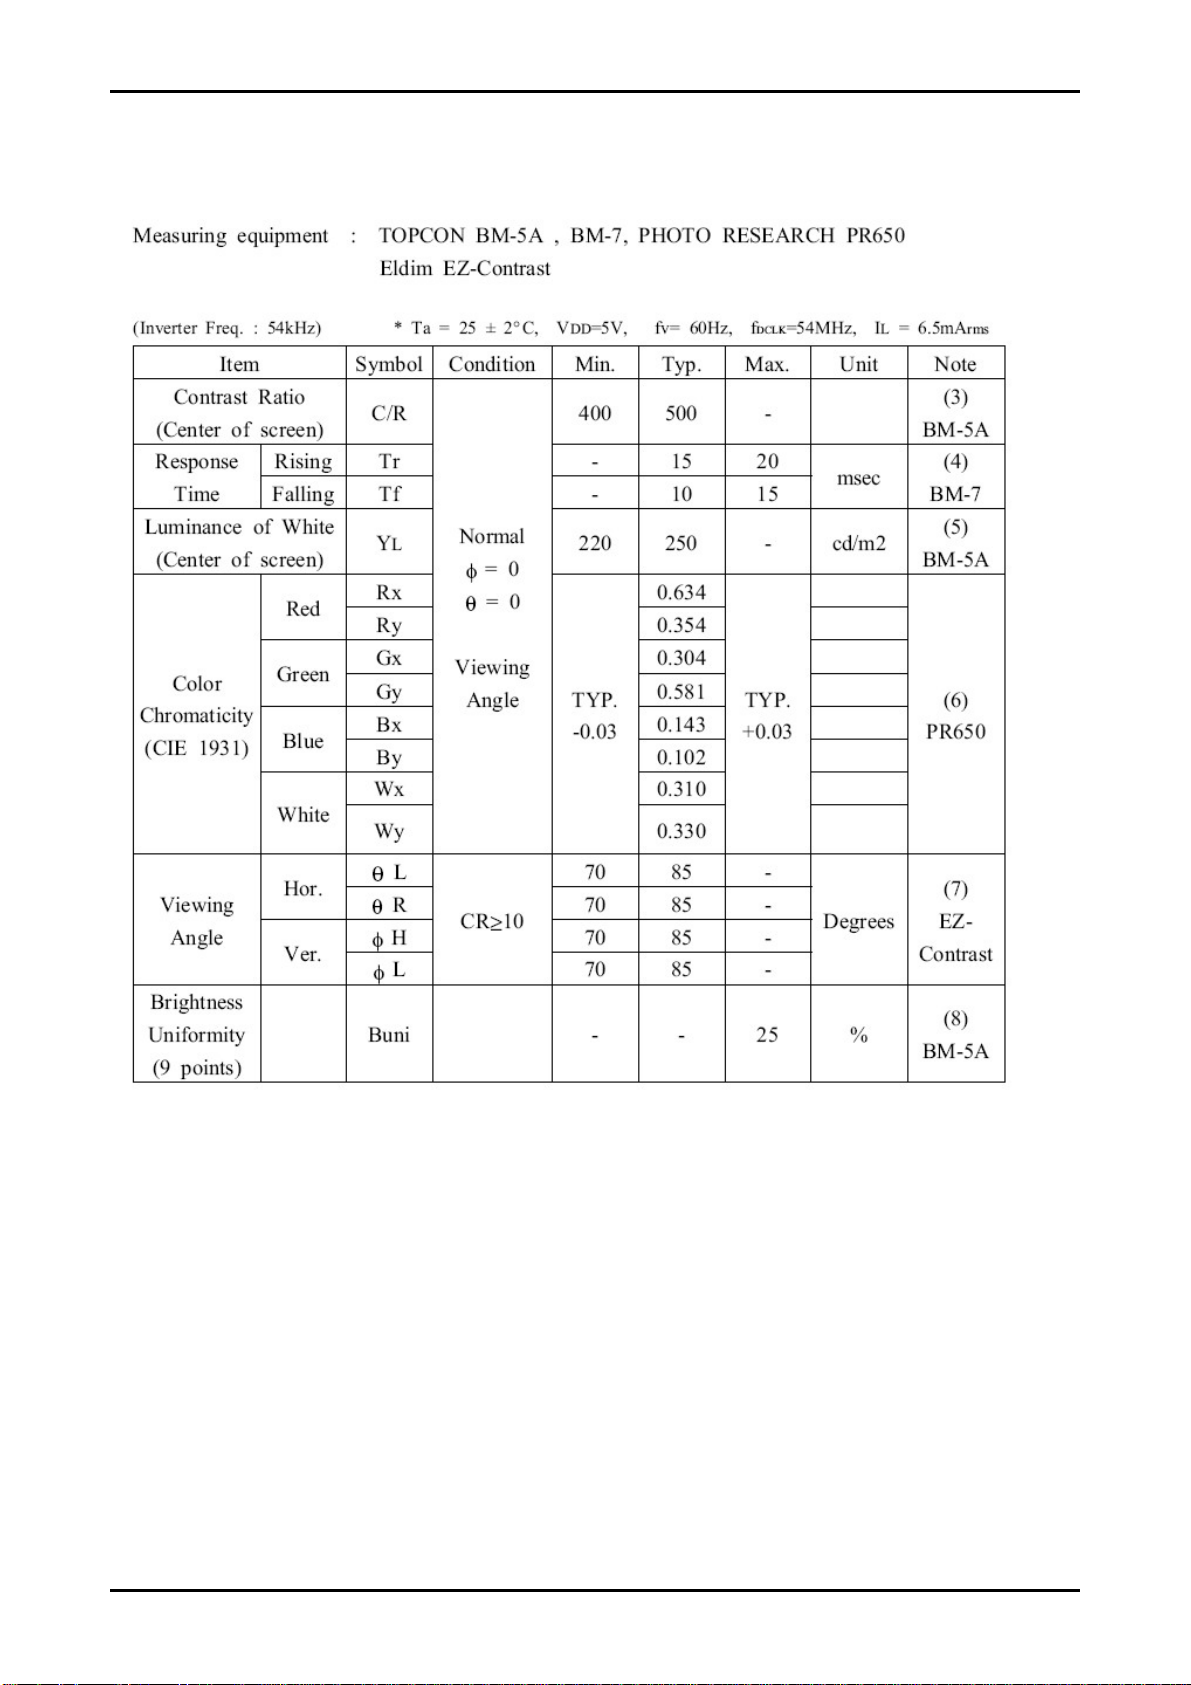
Appendix H: Optical Characteristics – ActiveMedia 190 TFT
P/N: 20-1700-00460 Page 22 of 24
Page 23

mermaid ActiveMedia Users Manual ver 2.0
P/N: 20-1700-00460 Page 23 of 24
Page 24

Klingseyvej 15 B
2720 Vanløse
Denmark
Phone: +45 44 52 92 00
www.mermaid.dk
 Loading...