

Page 1
illumipro‐10Operator’sManual:ENGLISH Page1
Copyright©MeridianBioscience,Inc.
SN11007,REV03/2010
Page 2

Operator’sManual
Table of Contents
Instrument Intended Use and Function ................................................................................................... 3
Installation Procedures and Requirements ............................................................................................. 3
Principles of Operation ............................................................................................................................. 5
Performance Characteristics and Specifications ................................................................................... 5
Operating Instructions .............................................................................................................................. 7
Calibration Procedures ........................................................................................................................... 13
Operational Precautions and Limitations .............................................................................................. 15
Service and Maintenance ........................................................................................................................ 16
illumipro-10 Set-Up and Installation Checklist ........................................................................ Appendix I
illumipro-10 Decontamination Record ..................................................................................... Appendix II
illumipro-10 Error Codes and Troubleshooting ..................................................................... Appendix III
illumipro-10 Barcode Scanner Information ........................................................................... Appendix IV
illumipro-10 Compliance Testing Summary ........................................................................... Appendix V
illumipro-10 Operator’s Manual: ENGLISH Page 2
Copyright© Meridian Bioscience, Inc.
SN11007, REV. 07/2010
Page 3

Operator’sManual
Instrument Intended Use and Function
The illumipro-10 is an automated isothermal amplification and detection system for use with Meridian
Bioscience, Inc. illumigene Loop-Mediated Amplification products.
The illumipro-10 is intended to be used by trained laboratory professional users in laboratory settings.
Installation Procedures and Requirements
The illumipro-10 and its accessories are securely packaged to prevent damage during shipment to the
end user. The illumipro-10 shipping container and packaging should be inspected for damage prior to
installation. Damaged instrumentation should not be installed as this could create a hazard to the end
user. Report any damage to Meridian’s Technical Support staff at 1-800-343-3859.
illumipro-10 Package Contents
c illumipro-10 Automated Isothermal Amplification and Detection System
d illumipro-10 Power Supply and Power Cord
e illumipro-10 Verification Standards
f illumipro-10 Operator’s Manual Binder
g illumipro-10 USB Cable
External Thermal Printer Package Contents (Catalog 610173; shipped separately):
c Printer
d Printer Cable
e Printer Power Supply (12VDC Linear Adaptor)
f Thermal Roll Paper (1 Roll)
illumipro-10 Optional Accessories
c External Keyboard (Catalog 610174, shipped separately.)
illumipro-10 Operator’s Manual (SN11007; shipped separately.)
illumipro-10 Operator’s Manual: ENGLISH Page 3
Copyright© Meridian Bioscience, Inc.
SN11007, REV. 07/2010
Page 4
Operator’sManual
illumipro-10 Installation
Installation of the illumipro-10 and its accessories can be performed after contents have been inspected
and the requirements described in this Operator’s Manual have been reviewed. Appendix I includes a
general Checklist for Set-up and Installation of the illumipro-10.
The illumipro-10 should be placed on a sturdy, level surface. Set-up the instrument for use as described
in the table below.
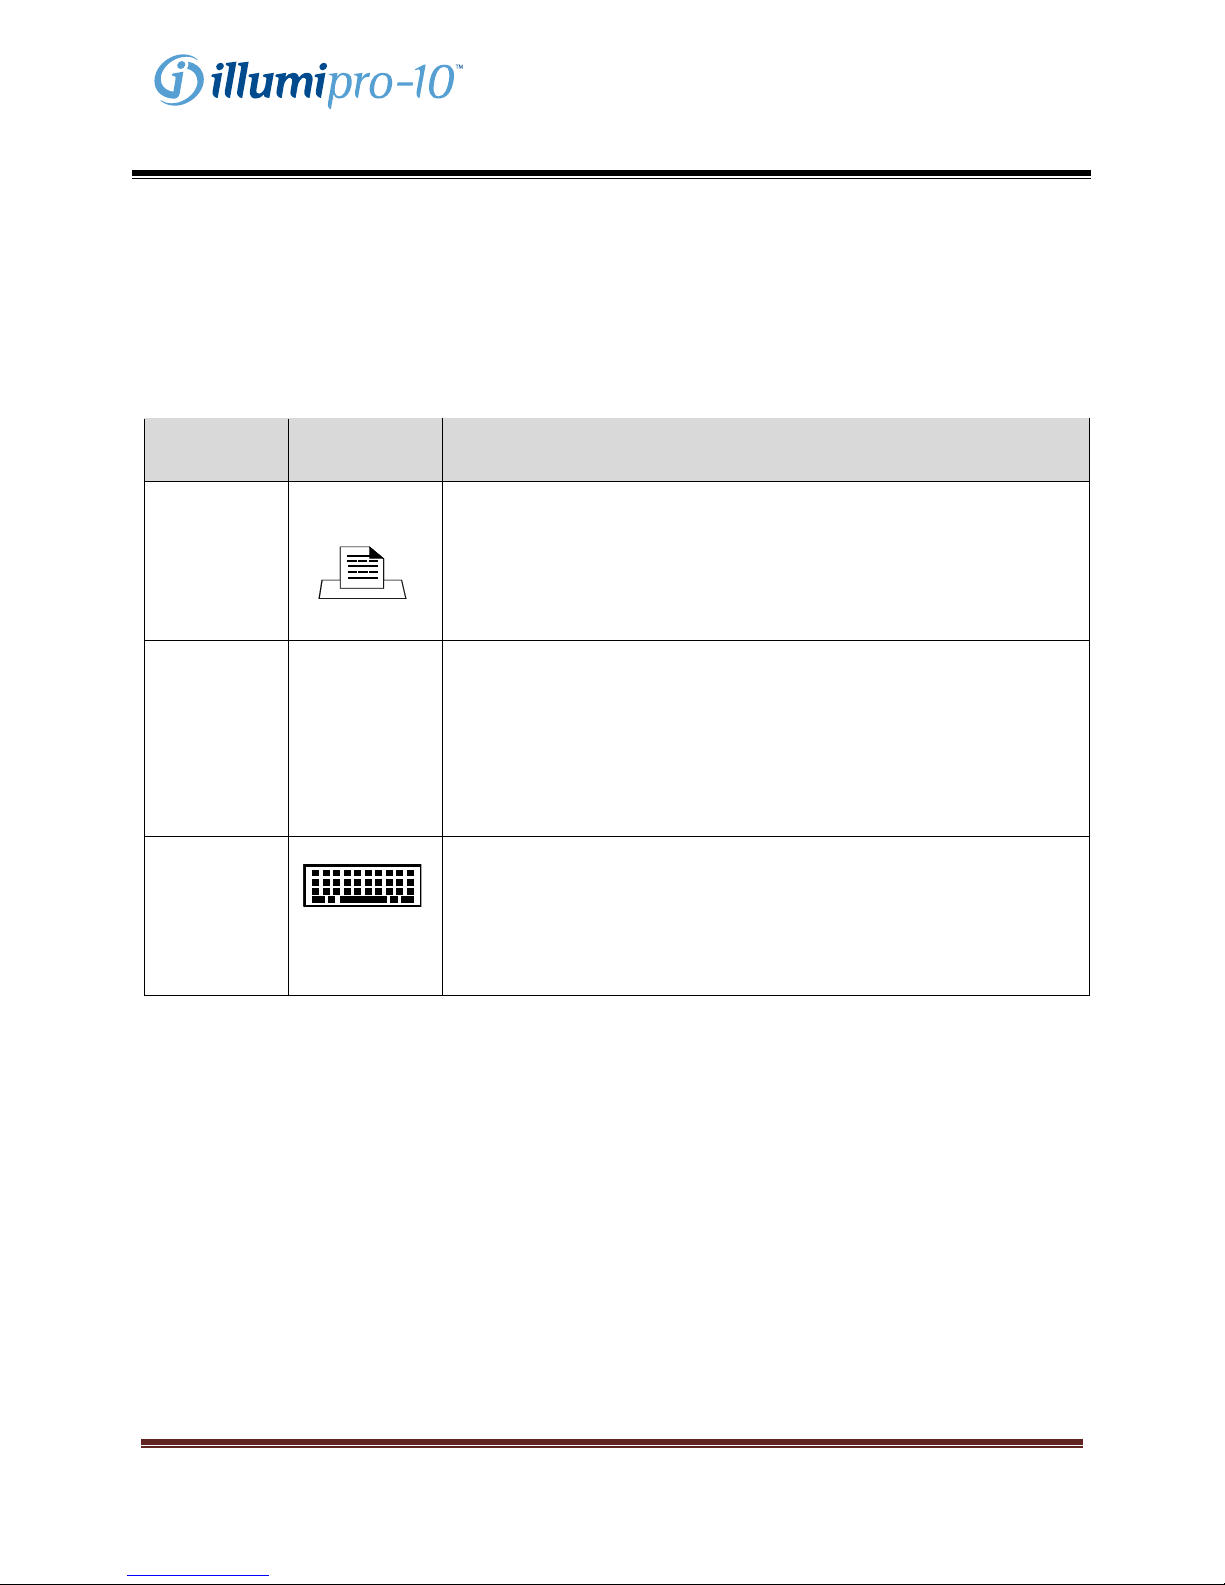
Component Symbol Installation Instruction
Printer
Connect the external printer to the illumipro-10 using the supplied
cabling. The printer connection is located at the back of the
instrument and is identified by the symbol shown.
Secure the printer connection and connect the power supply cable
provided with the printer packaging to the printer.
Power
Supply
12V -----
@4.5A
Connect the power supply cable provided with the illumipro-10
packaging to the unit. The power supply connection is located at the
back of the instrument. The connection port for the power supply is
identified by the symbol shown. Connect the power supply cable to
the power supply box.
Plug the pronged ends of the illumipro-10 and printer power cords to
an appropriate power receptacle.
External
Keyboard
Connect the optional, external keyboard to the unit using the supplied
cabling. The External Keyboard connection is located at the back of
the instrument and is identified by the symbol shown.
NOTE: The Keyboard must be installed with the illumipro-10 powered
off.
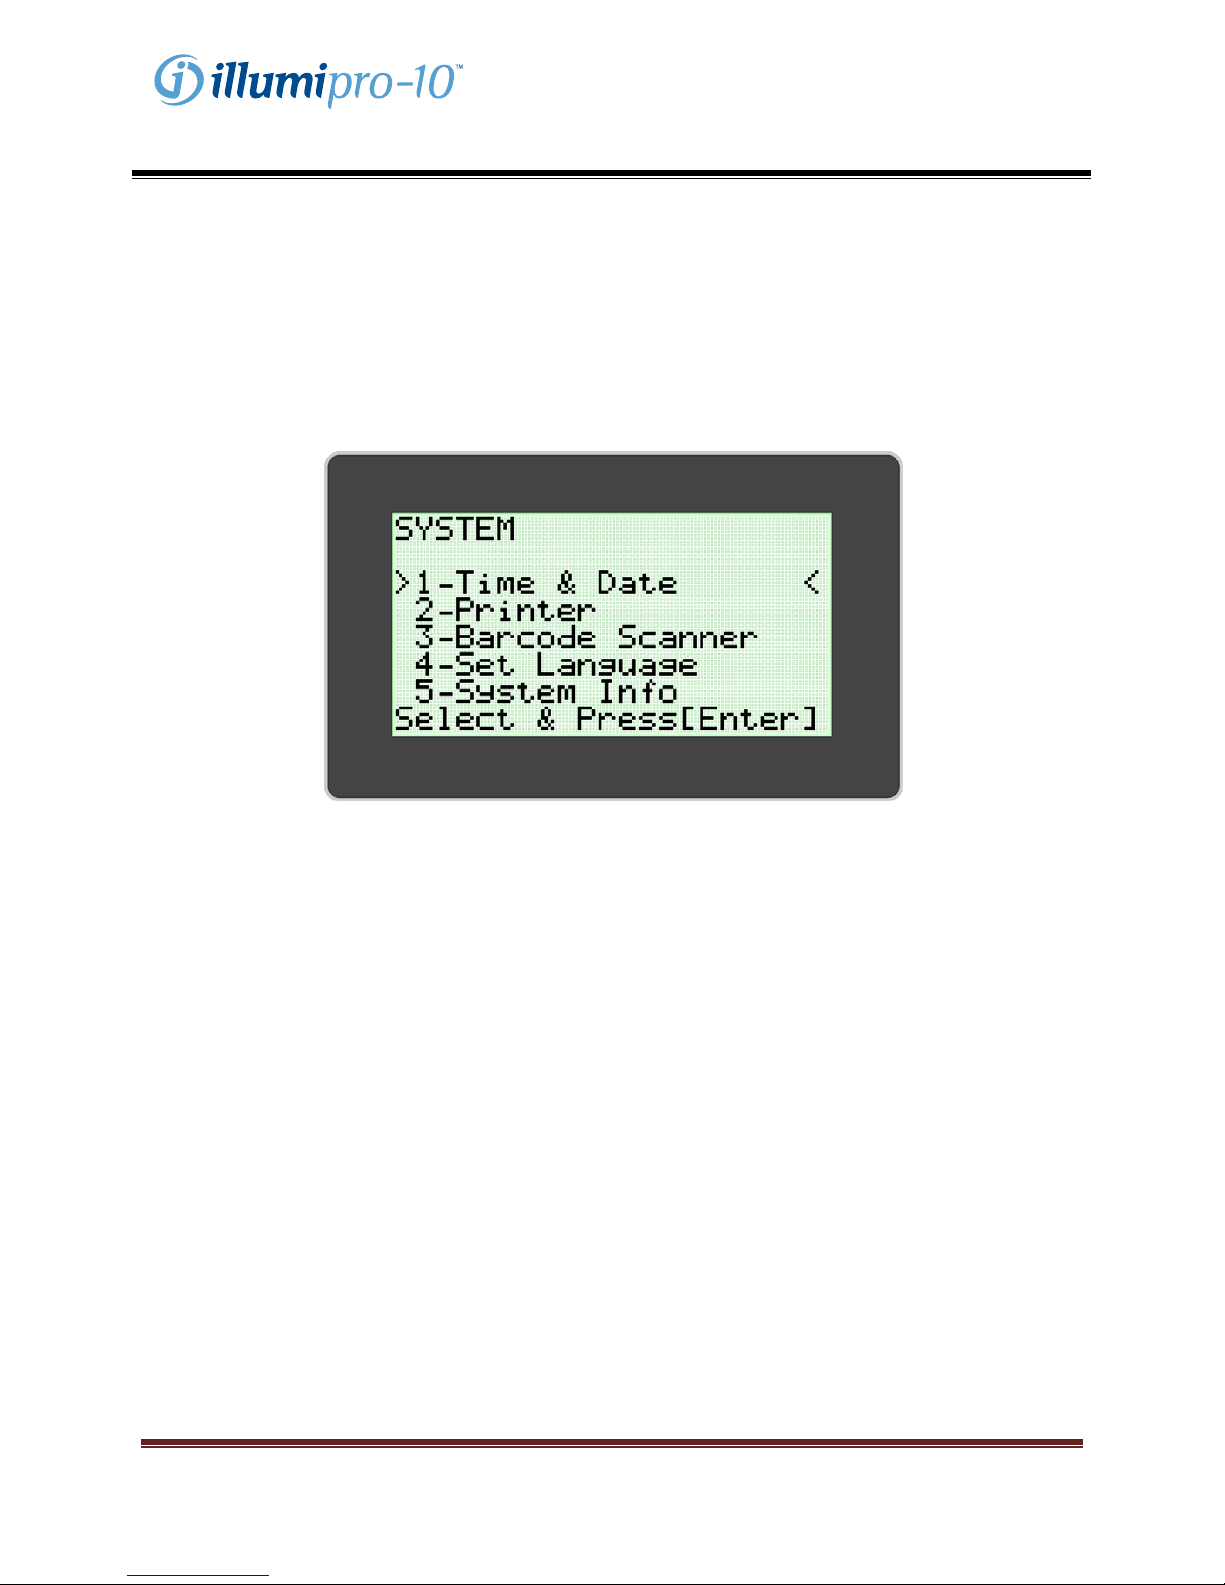
illumipro-10 Set-up
Instrument set-up is completed under the SYSTEM Menu. The user will be able to set the time format,
date format and preferred language.
illumipro-10 Performance Verification
Performance verification must be performed after installation and prior to use. Optical verification is
completed according to the instructions provided under the SERVICE Menu.
illumipro-10 Operator’s Manual: ENGLISH Page 4
Copyright© Meridian Bioscience, Inc.
SN11007, REV. 07/2010
Page 5

Operator’sManual
Principles of Operation
The illumipro-10 is an automated isothermal amplification and detection system for target nucleic acid
sequences found in human specimens. The instrument is used in conjunction with Meridian Bioscience,
Inc’s illumigene LOOP-Mediated Amplification in vitro diagnostic products.
The illumipro-10 is a menu driven laboratory instrument with two independent sample processing blocks,
identified as Block A and Block B. Sample heating and optical detection is carried out for up to five twochambered illumigene devices per Block. Each two-chambered illumigene device contains a Sample
Chamber and a Control Chamber. Amplification of target DNA occurs during the heat cycle and results in
the formation of precipitate detected by the illumipro-10 optics system. The precipitate generated by the
presence of amplified target DNA leads to a turbid Sample/Control reaction solution which is then
measured by absorbance. The illumipro-10 uses the change in turbidity of each Sample/Control reaction
solution to report assay results as INVALID, POSITIVE, or NEGATIVE.
The illumipro-10 operates in four basic modes: ASSAY, RESULTS, SERVICE, and SYSTEM. Assay
Selection and Sample Amplification occurs in the ASSAY mode; Test Results are managed in the
RESULTS mode; basic instrument set-up is performed in the SYSTEM mode; and optical performance
verification is completed in the SERVICE mode.
Performance Characteristics and Specifications
Performance Characteristics
The illumipro-10 is an automated isothermal amplification and detection system for use with Meridian
Bioscience, Inc. illumigene Loop-Mediated Amplification products. The illumipro-10 was designed with a
simple User Interface which includes a keypad, liquid crystal display (LCD), barcode scanner, printer and
optional external keyboard. Menu-driven operating instructions are shown on the display and the user
inputs commands to the instrument by making selections through the keypad.
Isothermal amplification is carried out by two independently controlled heat blocks capable of operating
between 55 C and 65 C, and within 1 C of the temperature set point. The isothermal amplification
temperature set point is dictated by the illumigene Assay selected. Isothermal amplification time is
monitored by the illumipro-10’s internal timer. When in operation, the illumipro-10 will display ‘Test in
Progress’ as well as block temperature and incubation time remaining.
DNA amplification detection is completed by the illumipro-10 optics system. Each illumipro-10 block
contains laser diodes illuminating at 650 ± 20 nm and corresponding detectors monitoring light
transmission across each illumipro-10 well. The illumipro-10 performs an initial check of the optics
system prior to run start. Observed failures in the optics system disable the instrument block until the
failure can be resolved. After successful optics verification, the illumipro-10 checks for the presence of
an illumigene test device in each well. The illumipro-10 automatically enters a Sample ID of ‘EMPTY
WELL’ for all wells that a test device cannot be detected in. The illumipro-10 measures the absorbance
of each illumigene test device at the beginning and end of the isothermal amplification incubation.
Sample results are reported as INVALID, POSITIVE, or NEGATIVE based on the observed change in
absorbance.
illumipro-10 Operator’s Manual: ENGLISH Page 5
Copyright© Meridian Bioscience, Inc.
SN11007, REV. 07/2010
Page 6

Operator’sManual
Performance features of the illumipro-10 include the following:
• Self-diagnostics are performed at power-on and at Run start.
• Self-diagnostic for Test Device Placement and Optics Path Verification.
• Lid Closure Detection and Lid Lock Feature.
• Thermal Heat Block with Optics Detection at each well with Visible Light Emission/Absorbance (650 ±
20 nm).
• Interval Timer with Real-Time Assay Processing Time Display.
• Simple LCD User Interface for Instrument Set-up, Program Selection and Sample Identification Input.
• Barcode Scanner for Sample Identification entry.
• External Keyboard available for Sample Identification entry.
• Attached Printer for results reporting.
• Control of amplification product carry-over through use of the self-contained illumigene Test Device.
illumipro-10 Specifications
• Electrical
Voltage Range: 120 V AC
Operating Range, Supply: 100 – 240 V AC, 50/60 Hz
Voltage and Current Rating: 12 V DC, 4.5 Amp
• Physical
Dimensions: 21 cm x 29.2 cm x 9.5 cm
Weight: 2.95 ± 0.05 kg
• Environmental
Operating Temperature: 15 – 30 C
Storage Temperature: 10 – 40 C
Relative Humidity, Operating: 10 – 90%, non-condensing
Relative Humidity, Storage: 10 – 95%
Printer Specifications
• Electrical
Supply Voltage (SMPS): Input voltage (S, P) 12 V DC
• Environmental
Operating Temperature: 0 – 40 C
Storage Temperature: -10 – 50 C
Relative Humidity, Operating: 30 – 80%
Relative Humidity, Storage: 10 – 90%
illumipro-10 Operator’s Manual: ENGLISH Page 6
Copyright© Meridian Bioscience, Inc.
SN11007, REV. 07/2010
Page 7

Operator’sManual
Operating Instructions
The illumipro-10 operates in four basic modes: ASSAY, RESULTS, SERVICE, and SYSTEM. Assay
Selection and Sample amplification occurs in the ASSAY mode; Test Results are managed in the
‘RESULTS mode; and basic instrument set-up is performed in the SYSTEM mode. The SERVICE mode
is reserved for trained service professionals and is not accessible by the Laboratory User. General
information regarding each mode of operation is provided in this section.
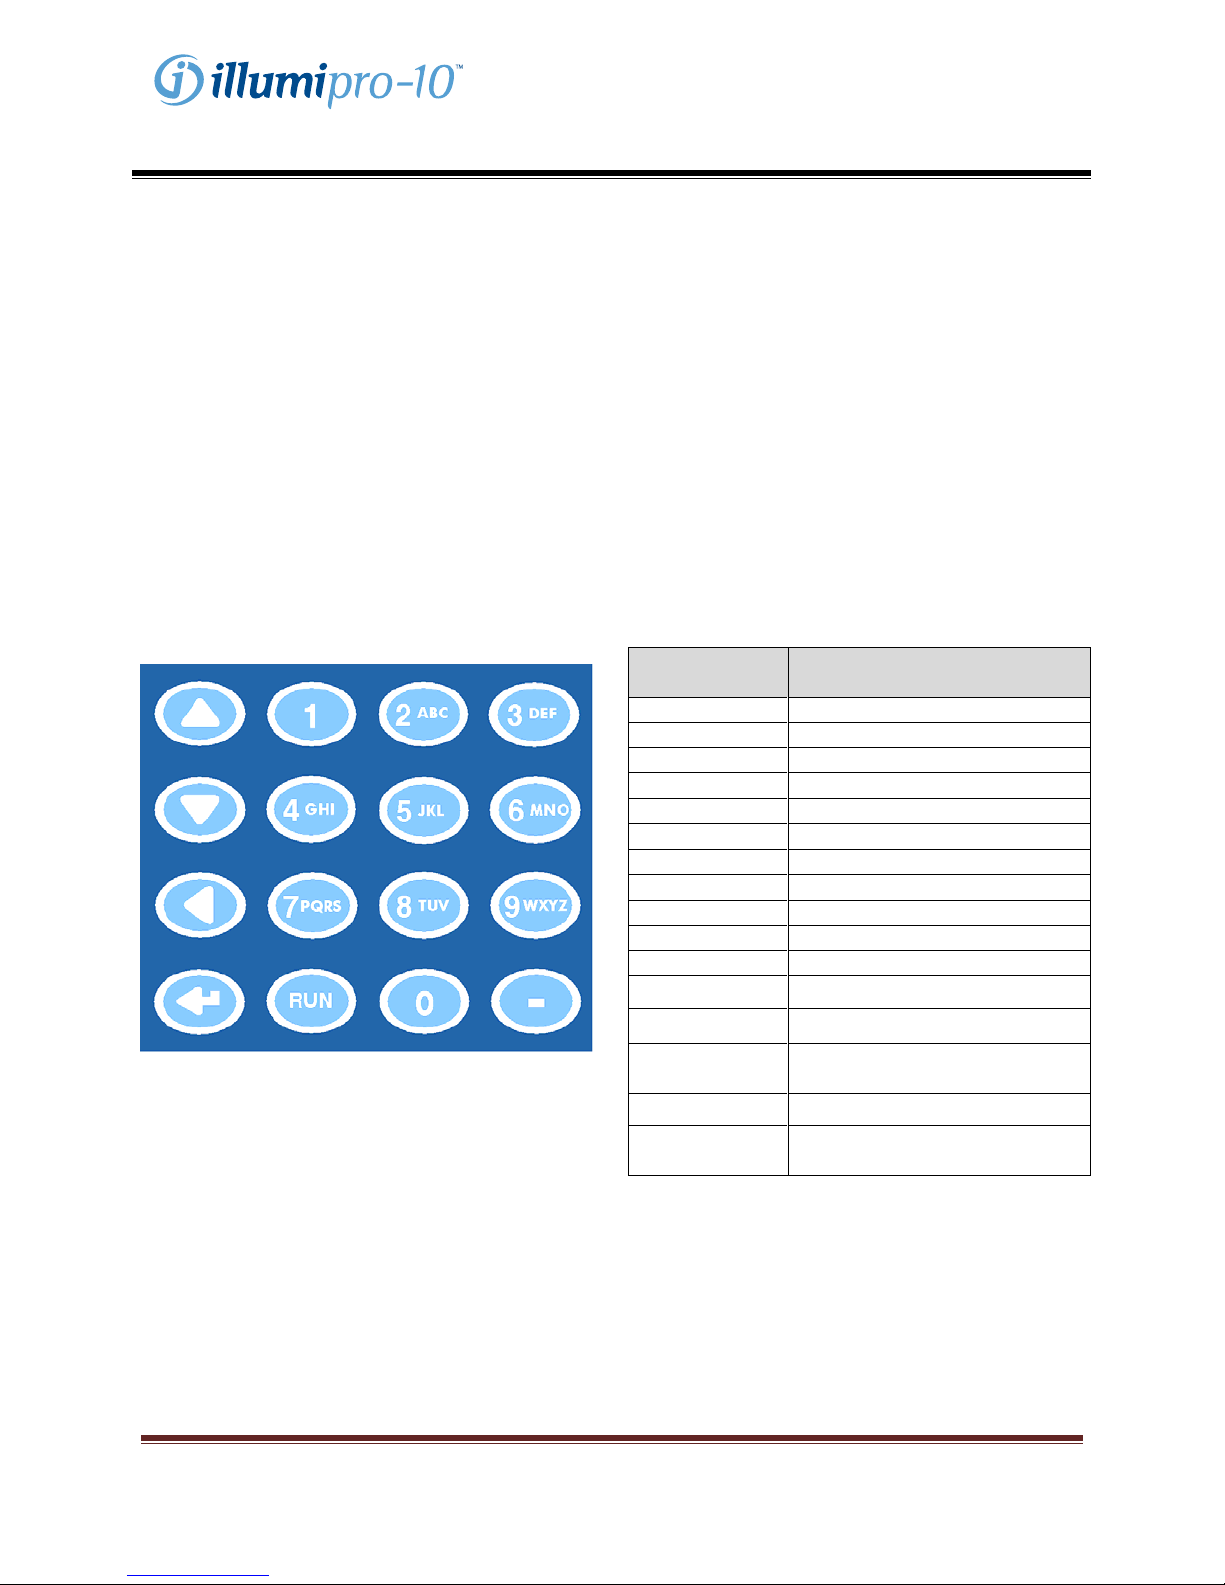
Keypad
The functions of the illumipro-10 are navigated through the keypad. The Keypad provides a simple user
interface and allows for basic menu navigation, input of alphanumeric characters for sample identification,
and Assay RUN initiation. Keypad functions will be referred to throughout this manual; keypad layout and
symbols used are defined below.
Keypad Button Character / Function
1 <SPACE>, 1
2 A, B, C, 2
3 D, E, F, 3
4 G, H, I, 4
5 J, K, L, 5
6 M, N, O, 6
7 P, Q, R, S, 7
8 T, U, V, 8
9 W, X, Y, Z, 9
0 0
- -
RUN Run Selected Assay Protocol
Scroll Up
Scroll Down
Scroll Back, Backspace
Enter
NOTE: For keypad buttons with multiple characters,
scroll by pressing the keypad button multiple times.
illumipro-10 Operator’s Manual: ENGLISH Page 7
Copyright© Meridian Bioscience, Inc.
SN11007, REV. 07/2010
Page 8
Operator’sManual
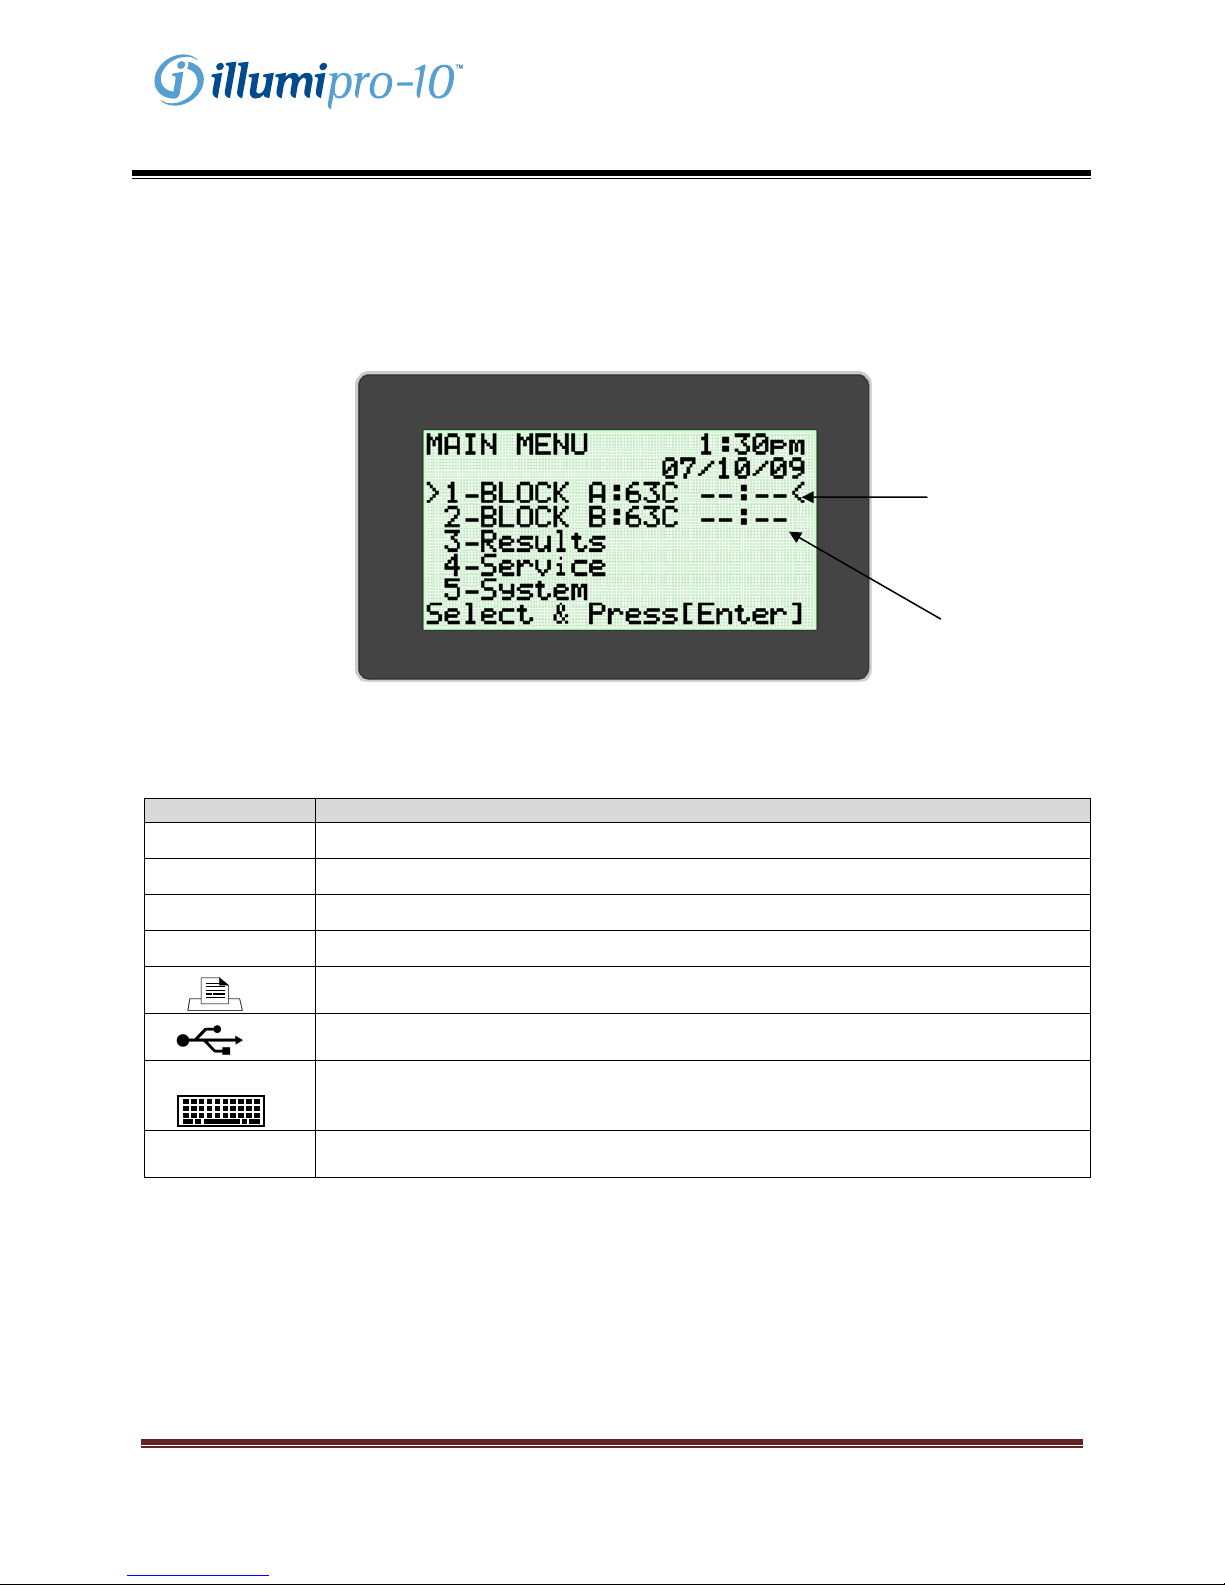
Main Menu
The Main Menu screen allows the user to view Time Date, Assay Status and Block Temperature. The
Main Menu is used to access the Results, Service and System Modes.
BlockStatus
BlockTemperature
Conventions Used:
Graphic Description
**:** BLOCK STATUS: Warming up; Block not at temperature
--:-- BLOCK STATUS: Idle; Block at Temperature
!!! Warning, Instrument Requires Attention
… Assay Menu Expansion Indicator
Printer: Connect Printer to unit at this port.
(Back of instrument)
USB Port: Connect unit to external computer at this port.
(Back of instrument)
External Keyboard: Connect unit to external keyboard (optional) at this port.
(Back of instrument)
illumipro-10 Power Supply: Connect Power Supply to unit at this port.
(Back of instrument)
PS/2
12V -----
@4.5A
illumipro-10 Operator’s Manual: ENGLISH Page 8
Copyright© Meridian Bioscience, Inc.
SN11007, REV. 07/2010
Page 9

Operator’sManual
ASSAY MODE
The ASSAY MODE allows the user to access and run programs on the illumipro-10. The user selects
the Block to be used from the Main Menu and then selects the Assay to be run. Each Block can be
selected and run independently. Upon selection of the Block to be used, the Assay Mode Menu appears.
The User selects the assay to be run and follows the instructions displayed on the illumipro-10 display.
The illumipro-10 display indicates that a test is in process and prompts the user to enter Sample
Identification information or to abort the test. Sample Identification information can be entered directly
using the Keypad, may be scanned using the illumipro-10 barcode scanner or may be entered using the
external keyboard. Additional information regarding the illumipro-10 barcode scanner is provided in
Appendix IV of this manual.
The User enters Sample Identification Information by following the instructions shown on the illumipro-10
display and initiates the Assay Run.
NOTE: Block temperature will appear in the ‘TEMP’ field. The ‘Block Status’ field will display a timer
indicated time until assay completion.
illumipro-10 Operator’s Manual: ENGLISH Page 9
Copyright© Meridian Bioscience, Inc.
SN11007, REV. 07/2010
Page 10
Operator’sManual
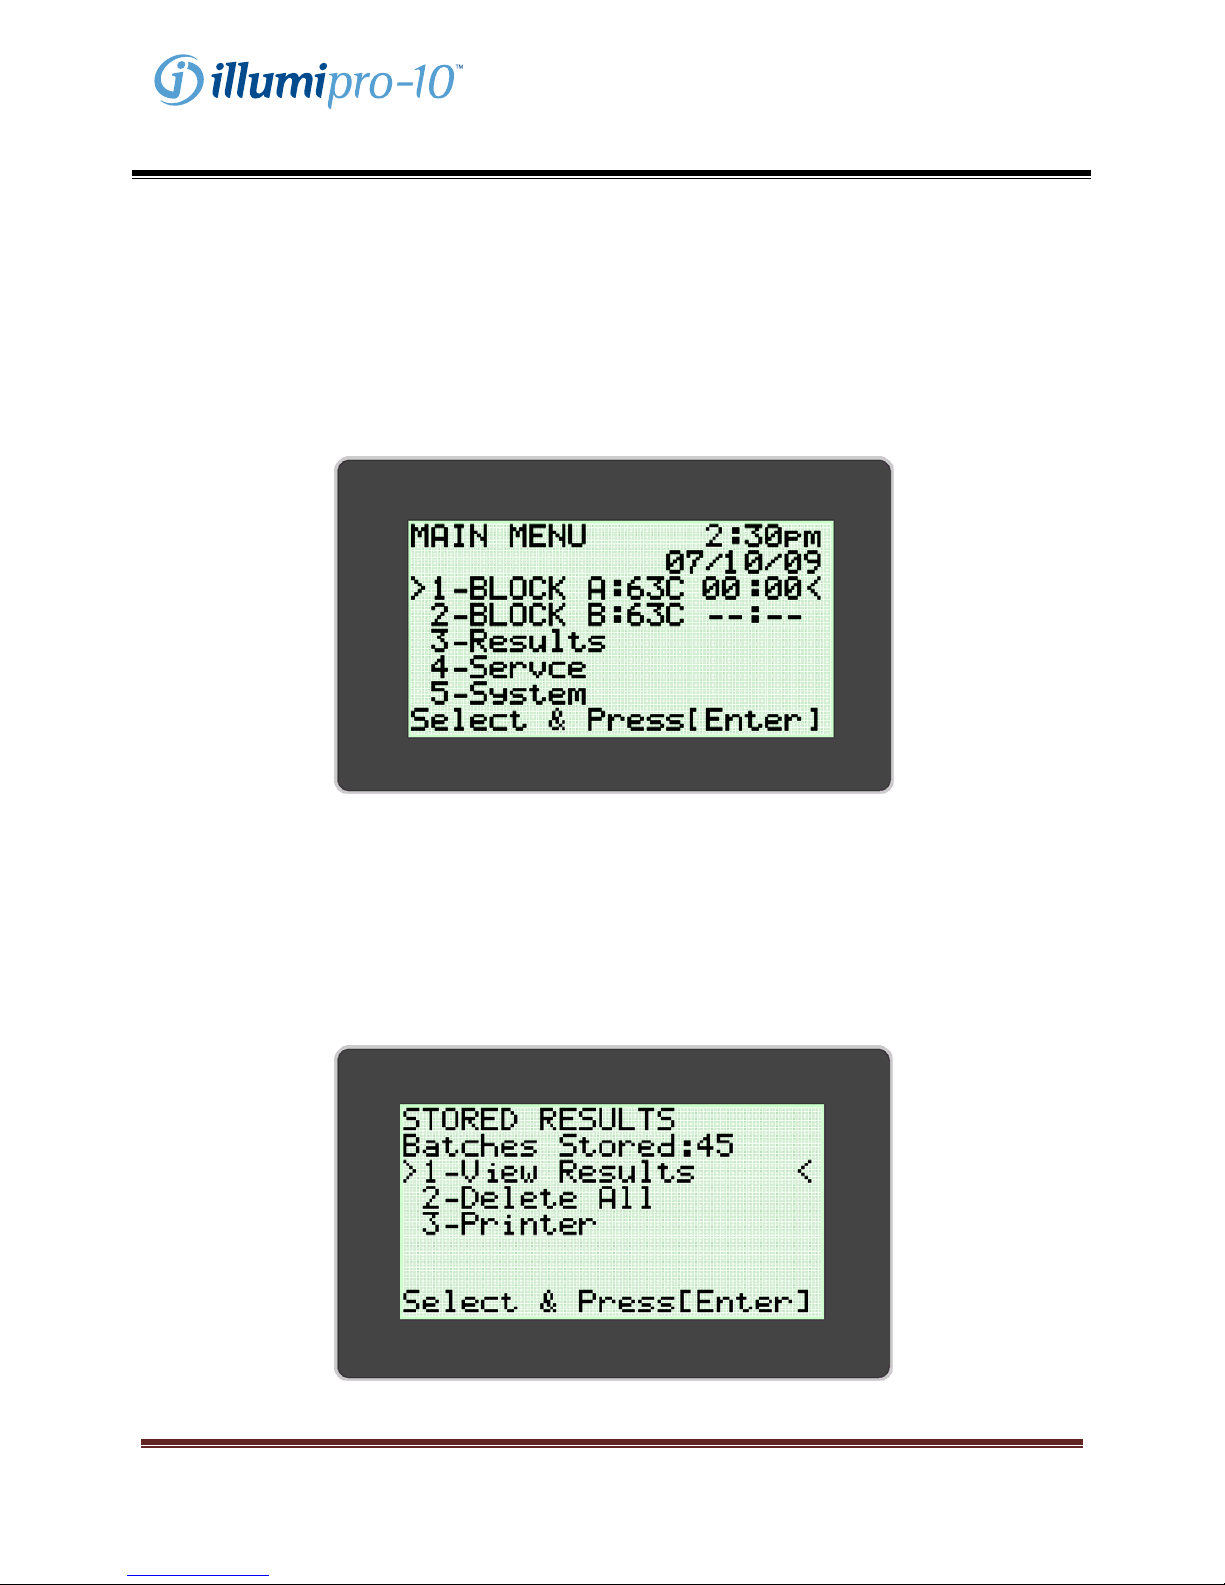
The illumipro-10 will complete the selected assay program and the Block Status on the MAIN MENU will
be shown as ’00:00’. Results for the selected assay can be viewed by selecting the Block displaying
completed status and following the instructions shown on the illumipro-10 display. Results can be
printed manually by selecting the print option at the end of the results display or by enabling the AutoPrint feature during System Set-up.
Upon completion of the assay run, the user must remove the illumigene devices from the unit and
discard appropriately.
NOTE: Care must be taken to avoid contamination of the equipment and workspace by target
and/or amplified nucleic acids. DO NOT open illumigene devices after assay completion.
RESULTS MODE
The RESULTS MODE allows the user to view stored results, delete stored results and enable the autoprinter. The illumipro-10 will store up to 1000 individual test results or 200 Batches. The instrument
displays a warning to the user when result storage is approaching maximum capacity. RESULTS MODE
is accessed by following the instructions shown on the illumipro-10 display.
illumipro-10 Operator’s Manual: ENGLISH Page 10
Copyright© Meridian Bioscience, Inc.
SN11007, REV. 07/2010
Page 11

Operator’sManual
The User can view stored results by selecting the ‘View Results’ option. The ‘View Results’ menu allows
the user to access stored data by Date and Block. Selected Batch Data is displayed and can be printed
manually by selecting the print option at the end of the results display.
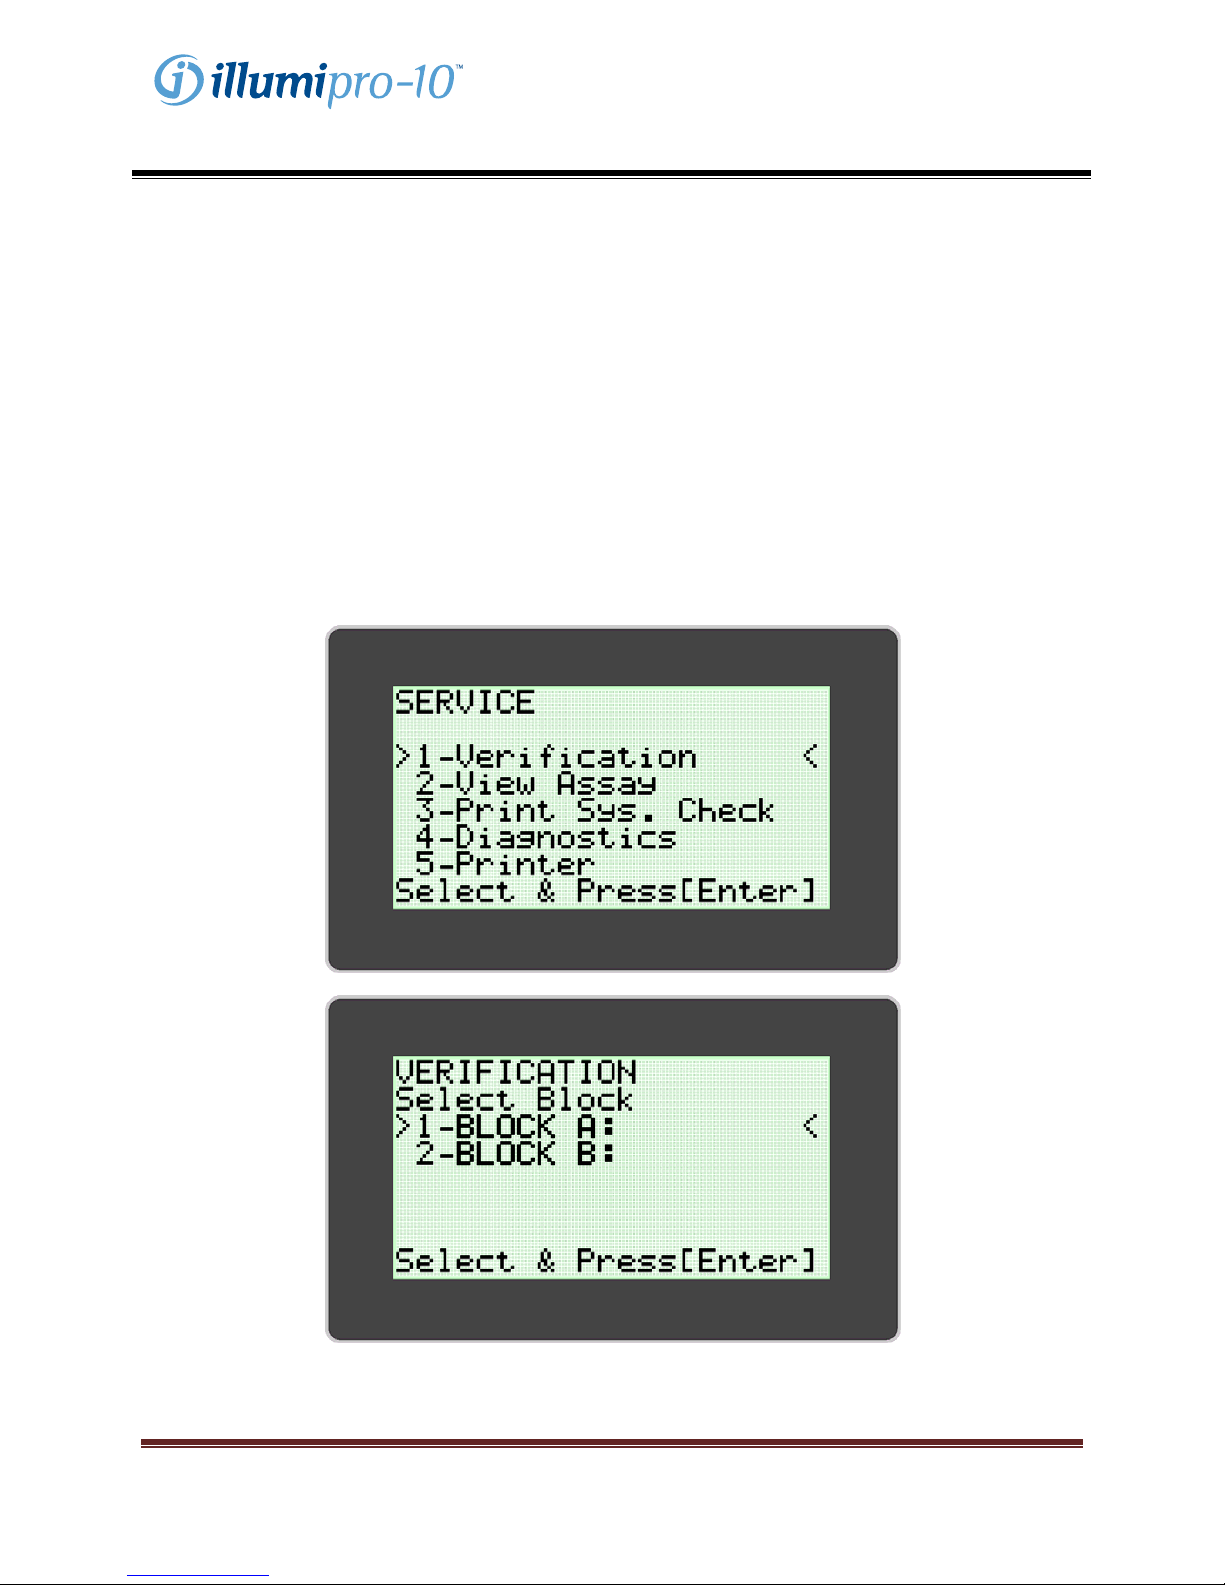
SERVICE MODE
The SERVICE MODE allows the user to perform optics system verification, view assay parameters, print
system check information, and configure the printer. NOTE: The SERVICE MODE menu includes a
‘Diagnostics’ Option which can be accessed only be trained service personnel.
OPTICS SYSTEM VERIFICATION is required to ensure proper function of the illumipro-10. Instructions
for completion of the Optics System Verification are provided within the CALIBRATION PROCEDURE
Section of this manual.
illumipro-10 Operator’s Manual: ENGLISH Page 11
Copyright© Meridian Bioscience, Inc.
SN11007, REV. 07/2010
Page 12
Operator’sManual
SYSTEM MODE
The SYSTEM MODE allows the user to set and format time and date, configure the printer and barcode
scanner, set user language, and view system information. The user may set time, date, or language
(English, Italian, French, Spanish and German) based on local requirements and/or preference. The
SYSTEM MODE allows the user to enable or disable automatic printing and the barcode scanner.
System configuration is completed by following the instructions shown on the illumipro-10 display.
NOTE: Time and Date cannot be modified while a test is in process. Language cannot be
modified while a test is in process.
illumipro-10 Operator’s Manual: ENGLISH Page 12
Copyright© Meridian Bioscience, Inc.
SN11007, REV. 07/2010
Page 13
Operator’sManual
Calibration Procedures
POWER-ON SELF TEST
The illumipro-10 automatically performs an internal Power-On Self Test (POST) each time the
instrument is powered-on. The POST Test confirms that software and hardware components of the
system are performing as expected. Successful completion of the POST Test will be followed by an
audible tone. POST Test failure will be indicated by an Error Code. Additional information regarding
Error Codes is located in Appendix III of this manual.
OPTICS SYSTEM VERIFICATION
Calibration of the illumipro-10 is not required. Verification of the OPTI CS SYSTEM for each Block must
be performed monthly to ensure proper function. Verification is completed using the Red Verification
Standard included with the illumipro-10. Stepwise instructions for Optics System Verification are
provided on the illumipro-10 display, utilizing the SERVICE MODE menu.
illumipro-10 Operator’s Manual: ENGLISH Page 13
Copyright© Meridian Bioscience, Inc.
SN11007, REV. 07/2010
Page 14

Operator’sManual
Optic System Verification includes two stages. The first stage ensures that the optical path is clear and
free of obstruction. The second stage confirms that the optics system is transmitting and detecting
emitted light particles properly. Transmission and detection verification requires the use of the illumipro-
10 Red Verification Standard. The illumipro-10 steps through the Verification prot ocol and prompts the
user for action as necessary.
The Red Verification Standard must be seated firmly in the Heat Block wells. The Verification Standard
should be oriented with the asset number tag at the Well 1 position.
Upon completion of the Verification Protocol, the illumipro-10 will display verification test results as either
‘Pass’ or ‘Fail’. In the event that Verification testing does not give acceptable results, the user should
verify the optical path is free of obstructions, the standard is free of visible defects and repeat the
verification testing. If repeat testing does not give passing verification results, contact Meridian’s
Technical Support Staff for further assistance.
NOTE: Each Block of the illumipro-10 functions independently. For example, a failed verification test for
Block A will not prevent use of Block B when Block B verification testing passes.
WARNING: Do NOT leave verification standards in the illumipro-10. Verification Standards will get
hot and could burn the user. Exposure to temperature may impact the performance of the
Verification Standards.
illumipro-10 Operator’s Manual: ENGLISH Page 14
Copyright© Meridian Bioscience, Inc.
SN11007, REV. 07/2010
Page 15
Operator’sManual
Operational Precautions and Limitations
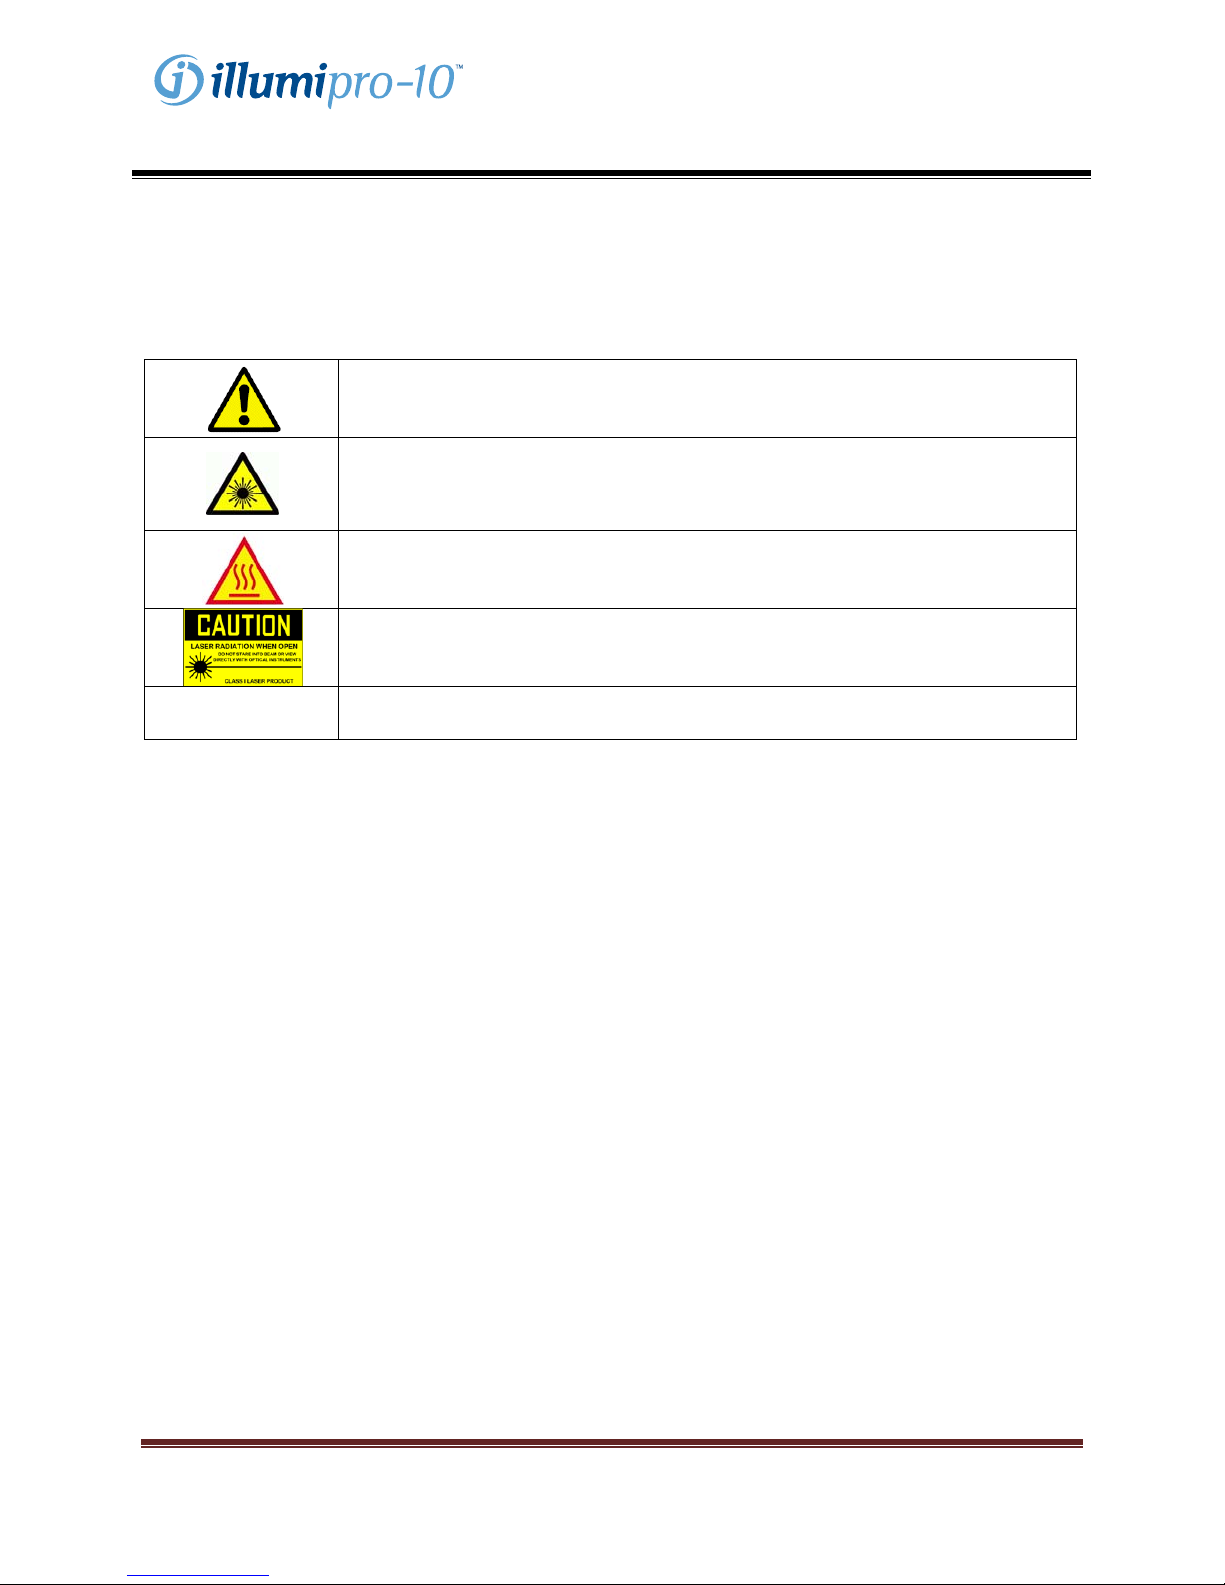
WARNINGS:
CAUTION: Risk of Danger. The illumipro-10 is an electromechanical device
that can cause physical shock or injury to the operator if not used in accordance
IPX-0
PRECAUTIONS:
• The illumipro-10 is an automated instrument that utilizes isothermal Loop-Mediated Amplification
Technology. Care must be taken to avoid contamination of the equipment and workspace by
target and/or amplified nucleic acids. Only qualified personnel should perform molecular testing.
• The illumipro-10 is used in conjunction with Meridian Bioscience, Inc’s illumigene Loop-
Mediated Amplification in vitro diagnostic products. Samples processed in the illumipro-10
should be handled in accordance with the instructions provided in specific illumigene product
instructions for use.
• Selected Language cannot be changed while a run is in process.
• Time and Date cannot be changed while a run is in process
• Optical System Verifiers must be stored in the case provided. The optical verifiers must be
protected from light and damage. Optical system verifiers should not be stored in the illumipro-
10.
• Do not hot swab the optional illumpro-10 keyboard. CAPS Lock will come on at power-up to
indicate keyboard is online.
• The optional Keyboard must be plugged in while the illumipro-10 is powered-off.
• When not in use, the illumipro-10 should be stored with the lid closed.
with the procedures described in this manual.
LASER RADIATION: Avoid Exposure to Beam. The illumipro-10 contains a
class 3R laser product. The laser will not function when the lid is in the open
position,
however, care should be taken in the handling and use of this instrument.
HOT SURFACE: Keep hands Away from Hot Surfaces. The illumipro-10
contains a heat block producing temperatures between 55 – 65 C during
operation. Care should be taken to avoid direct contact with the heat block.
CAUTION: Laser Radiation. The illumipro-10 contains a laser product.
Service of the unit should be performed only by qualified personnel as optical
exposure to the laser beam may cause injury.
CAUTION: Protect from water. The illumipro-10 does not protect from the
egress of water. Do not expose to water or submerge the instrument.
illumipro-10 Operator’s Manual: ENGLISH Page 15
Copyright© Meridian Bioscience, Inc.
SN11007, REV. 07/2010
Page 16

Operator’sManual
Service and Maintenance
Servicing of the illumipro-10 should be performed by qualified professionals only. Contact
Meridian Bioscience Technical Support at (800) 343-3858 for technical support or to make
arrangements for service. DO NOT ATTEMPT TO SERVICE THE illumipro-10.
Surface Cleaning
Cleaning of the exterior surfaces of the illumipro-10 and the immediate work area should be performed
as necessary, no less then daily when in use. Allow instrument to cool and wipe surfaces with a lint-free
cloth moistened with DNAse/RNAse cleaning solution or a 10% Bleach Solution.
WARNING: Surface cleaning should be performed only when the instrument is powered-off AND
disconnected from the power source. DO NOT use saturated clothes for cleaning.
Heat Block Cleaning
Cleaning of the instrument heat block should be performed by qualified personnel only. Cleaning of the
heat block should be performed only when contamination of the heat block is suspected. Contamination
of the heat block may be DNA Sourced, or non-DNA Sourced. The cleaning protocol followed should be
based on the source of the contamination as shown below:
• DNA Contamination Cleaning Protocol
1. Gently wipe heat block chamber with a dry Foam Swab.
2. Gently wipe heat block chamber with a Foam Swab moistened with 10% Bleach Solution.
3. Gently wipe heat block chamber with a dry Foam Swab.
4. Gently wipe heat block chamber with a Foam Swab moistened with 70% Alcohol.
5. Gently wipe heat block chamber with a dry Foam Swab.
DO NOT use saturated Foam Swabs for cleaning.
• non-DNA Contamination Cleaning Protocol
1. Gently wipe heat block chamber with a dry Foam Swab.
2. Gently wipe heat block chamber with a Foam Swab moistened with 70% Alcohol.
3. Gently wipe heat block chamber with a dry Foam Swab.
DO NOT use saturated foam swabs for cleaning.
WARNING: Heat block cleaning should be performed only when the instrument is powered-off AND
disconnected from the power source. DO NOT use saturated swabs for cleaning.
WARNING: Do not attempt to clean the illumipro-10 using compressed air.
ALWAYS perform Optical Verification Testing after Heat Block Cleaning.
illumipro-10 Operator’s Manual: ENGLISH Page 16
Copyright© Meridian Bioscience, Inc.
SN11007, REV. 07/2010
Page 17
Operator’sManual
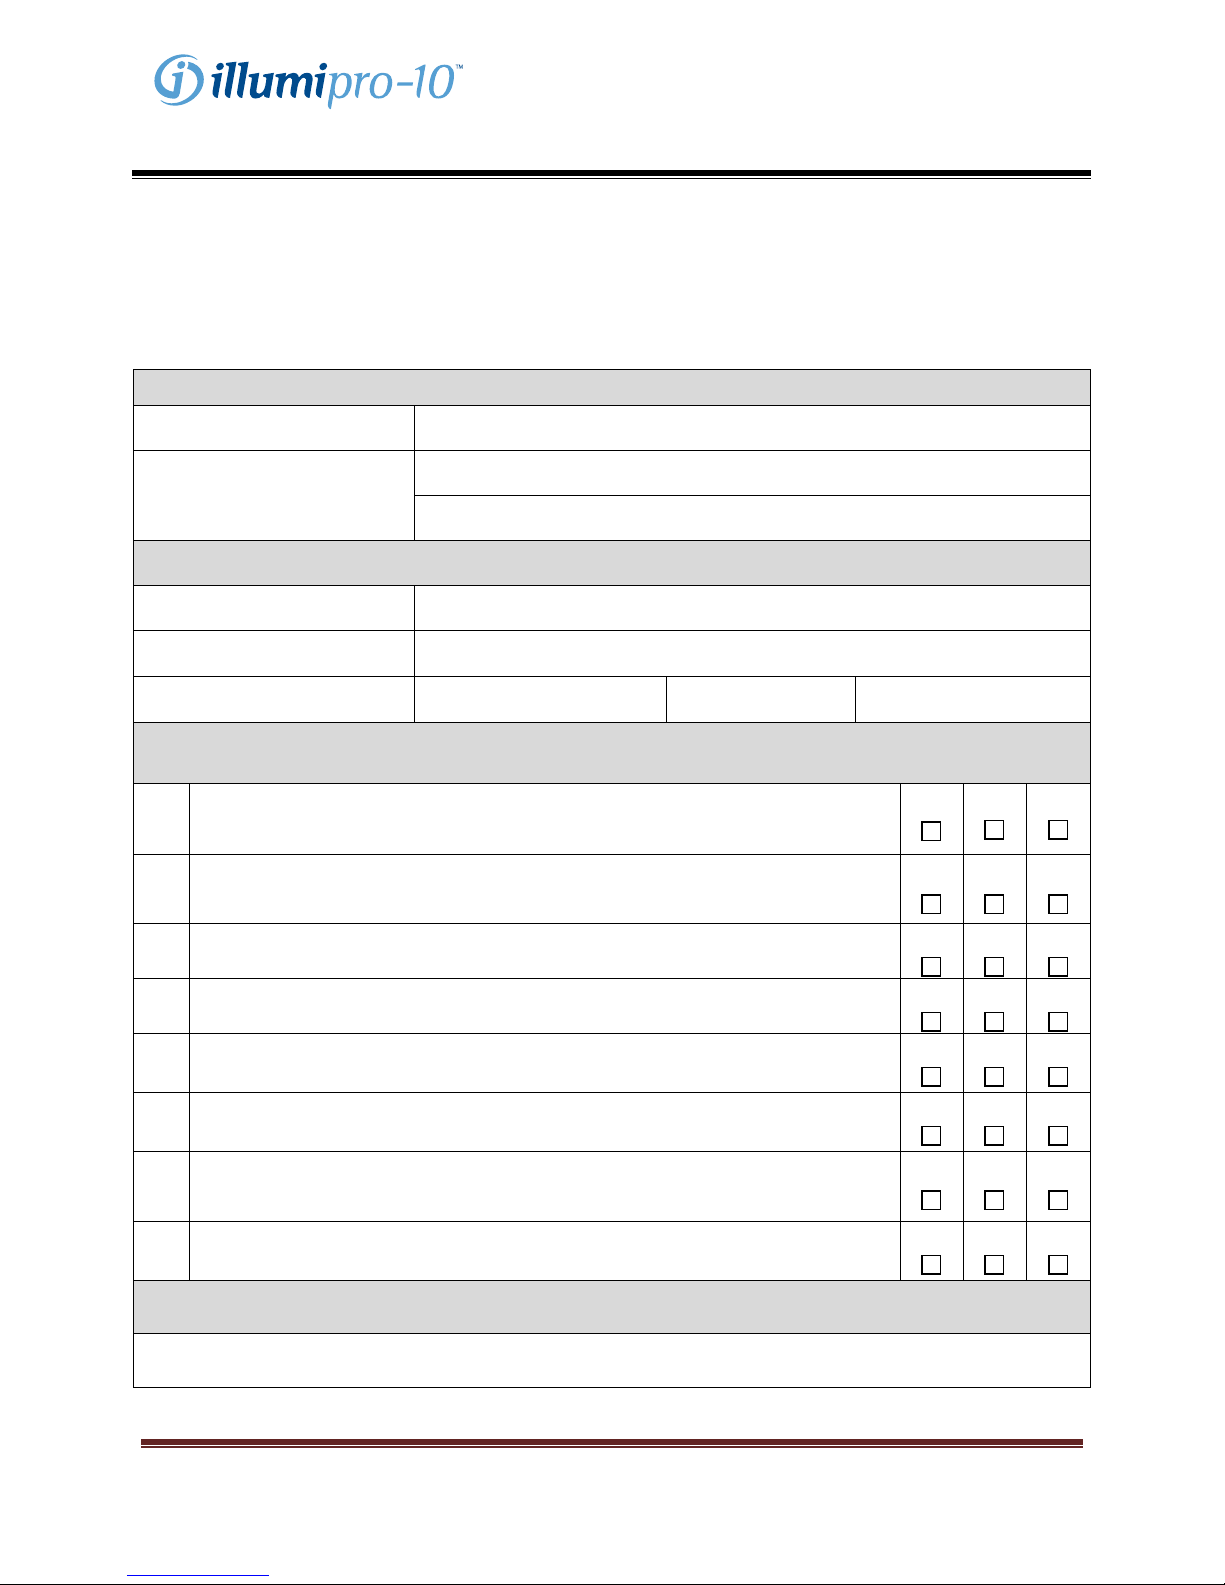
Appendix I
illumipro-10 Set-Up and Installation Checklist
Facility Information
Facility Name:
Facility Address:
Instrument Information
Instrument Serial Number:
Installation Location:
Installation Performed By:
The illumipro-10 shipping container and packaging have been inspected for
1.
damage; no damage found. Installation of damaged could create a hazard
to the end user.
The illumipro-10 Operator’s Manual has been received and reviewed.
2.
Operational Precautions and Limitations have been reviewed and are
understood.
The Installation Location meets Electrical and Environmental Specifications
3.
described in the illumipro-10 Operator’s Manual.
Installation of the illumipro-10 and its accessories has been completed as
4.
described by the Operator’s Manual.
The illumipro-10 has been powered-on and the Power On Self-Test was
5.
successful.
Set-up of the illumipro-10 including Time Format, Date Format, and Preferred
6.
Language has been completed as described in the Operator’s Manual.
illumipro-10 Performance Verification was completed as described in the
7.
Operator’s Manual. Acceptable results were obtained for Block A and Block
B.
A copy of the printout for the System Check and Optics System Verification is
8.
attached to this record.
Set-Up and Installation
Installation Date:
(Room, Floor, Building, et cetera)
(Street Address)
(City, State)
Yes
Yes
Yes
Yes
Yes
Yes
Yes
Yes
No
No N/A
No N/A
No N/A
No N/A
No N/A
No N/A
No N/A
N/A
illumipro-10 Operator’s Manual: ENGLISH Page 17
Copyright© Meridian Bioscience, Inc.
SN11007, REV. 07/2010
Installation Complete
(Signature/Date)
Page 18

Operator’sManual
Appendix II
illumipro-10 Decontamination Record
Decontamination of laboratory equipment must be completed prior to return of the instrument for
servicing. Decontamination must be completed according to the instructions provided. Please
complete the information below and attach the completed record to the instrument prior to return.
Instruments returned for service without evidence of decontamination will not be serviced. If the
instrument is submitted for service without decontamination documentation, it will be shipped
back to the user at the user’s expense.
1. Wipe exterior surfaces of the illumipro-10 with a lint-free towel moistened with a 10% Bleach-based
Disinfecting Solution. Minimum contact exposure time for kill of Bloodborne Pathogens (Hepatitis-A,
HIV-1, MRSA, SARS, et cetera) is 1 minute.
2. Open illumipro-10 Lids A and B. Wipe inside lid surface and Heat Block Surfaces with lint-free towel
moistened with 10% Bleach-based Disinfecting Solution. Minimum contact exposure time is 1
minute.
3. Close Lids. Affix the completed illumipro-10 Decontamination Record to instrument. Package the
instrument in the protective foam packaging and shipping container provided.
Instrument Information
Instrument Serial Number:
Facility Information
Facility Name:
Facility Address:
Contact Information:
The illumipro-10 has been decontaminated as described above. Exterior and Interior contact surfaces
have been wiped with a 10% Bleach-based Disinfecting Solution. Minimum contact exposure times have
been monitored.
Performed By:
(Street Address)
(City, State)
(Name, Title)
(Telephone) (e-mail)
Decontamination Information
(Signature/Date)
illumipro-10 Operator’s Manual: ENGLISH Page 18
Copyright© Meridian Bioscience, Inc.
SN11007, REV. 07/2010
Page 19
Operator’sManual
Appendix III
illumipro-10 Error Codes and Troubleshooting
The illumipro-10 will display Error Codes when system failures are detected. Error Codes, descriptions
and the actions recommended for correction are summarized in the table below.
Error
Code
500 Real time clock not working.
501 Non-Volatile RAM (NVRAM) not working.
504 Voltage out of range.
505 Voltage out of range.
506 Voltage out of range.
Description Action Required
Contact Meridian Bioscience Technical
Support at (800) 343-3858 for technical
support or to make arrangements for
service.
507 Voltage out of range.
508 Interior temperature is too hot. Move unit to a cooler environment
509 Block A temperature is too hot.
Turn unit off and wait for it to cool.
510 Block B temperature is too hot.
502
503
511
512
513
Firmware Error: Heater block is not
heating properly.
Firmware Error: Non-Volatile RAM
(NVRAM) did not initialize properly.
Firmware Error: Test results were not
fetched from Non-Volatile RAM (NVRAM)
properly.
Firmware Error: Device parameters were
not fetched from Non-Volatile RAM
(NVRAM) properly.
Firmware Error: Block status cannot be
read properly.
Power-off instrument.
Turn instrument back on and allow POST
Testing to be completed. Contact Meridian
Bioscience Technical Support at (800) 3433858 for technical support if problem
persists.
illumipro-10 Operator’s Manual: ENGLISH Page 19
Copyright© Meridian Bioscience, Inc.
SN11007, REV. 07/2010
Page 20

Operator’sManual
Appendix IV
illumipro-10 Barcode Scanner Information
The illumipro-10 allows for entry of Sample identification using barcodes. The barcode scanner has
been placed on front of the instrument. The scanner is oriented vertically, next to the keypad.
Sample Identification information is limited to 16 characters. Barcodes containing only the following
characters will be accepted:
A B C D E F G H I J K L M
N O P Q R S T U V W X Y Z
0 1 2 3 4 5 6 7 8 9 -
illumipro-10 Operator’s Manual: ENGLISH Page 20
Copyright© Meridian Bioscience, Inc.
SN11007, REV. 07/2010
Page 21

Operator’sManual
Appendix V
illumipro-10 Compliance Testing Summary
The illumipro-10 has been tested and found to be in compliance with the following requirements and
Standards:
Standard Description
IEC 61010-1
IEC 61010-2-010
IEC 61010-2-081
IEC 61010-2-101
UL 61010-1
CSA C22.2#61010-1
CSA C22.2#61010-2-010
CSA C22.2#61010-2-081
CSA C22.2#61010-2-101
Safety requirements for electrical equipment for measurement, control, and
laboratory use - Part 1: General requirements
Safety requirements for electrical equipment for measurement, control, and
laboratory use - Part 2-010: Particular requirements for laboratory
equipment for the heating of materials
Safety requirements for electrical equipment for measurement, control, and
laboratory use - Part 2-081: Particular requirements for automatic and
semi-automatic laboratory equipment for analysis and other purposes
Safety requirements for electrical equipment for measurement, control and
laboratory use - Part 2-101: Particular requirements for in vitro diagnostic
(IVD) medical equipment
UL standard for Safety Electrical Equipment for Measurement, Control, and
Laboratory Use - Part 1: General Requirements
UL standard for Safety Electrical Equipment for Measurement, Control, and
Laboratory Use - Part 1: General Requirements
Safety requirements for electrical equipment for measurement, control, and
laboratory use - Part 2-010: Particular requirements for laboratory
equipment for the heating of materials
Safety Requirements for Electrical Equipment for Measurement, Control
and Laboratory Use - Part 2-081: Particular Requirements for Automatic
and Semi-Automatic Laboratory Equipment for Analysis and Other
Purposes
Safety Requirements for Electrical Equipment for Measurement, Control,
and Laboratory use - Part 2-101: Particular Requirements for In Vitro
Diagnostic (IVD) Medical Equipment
illumipro-10 Operator’s Manual: ENGLISH Page 21
Copyright© Meridian Bioscience, Inc.
SN11007, REV. 07/2010
Page 22

Operator’sManual
This page intentionally left blank.
illumipro-10 Operator’s Manual: ENGLISH Page 22
Copyright© Meridian Bioscience, Inc.
SN11007, REV. 07/2010
Page 23
Operator’sManual
Manuale dell’operatore
illumipro‐10Manualedell’operatore:ITALIANO Pag.23
Copyright©MeridianBioscience,Inc.
SN11007,REV03/2010
Page 24

Manualedell’operatore
Indice
Destinazione d’uso e funzioni dello strumento ................................................................................... 25
Modalità e requisiti di installazione ....................................................................................................... 25
Principi di funzionamento ...................................................................................................................... 27
Caratteristiche prestazionali e tecniche ............................................................................................... 27
Istruzioni d’uso ....................................................................................................................................... 30
Operazioni di taratura ............................................................................................................................. 36
Precauzioni e limiti di funzionamento ................................................................................................... 38
Interventi e manutenzione ..................................................................................................................... 39
illumipro-10 Elenco di controllo per la configurazione e installazione .............................. Appendice I
illumipro-10 Dati di decontaminazione ................................................................................. Appendice II
illumipro-10 Codici d’errore e risoluzione dei problemi .................................................... Appendice III
illumipro-10 Informazioni sul lettore di codici a barre ...................................................... Appendice IV
illumipro-10 Compliance Testing Summary ........................................................................ Appendice V
illumipro-10 Manuale dell’operatore: ITALIANO Página. 24
Copyright© Meridian Bioscience, Inc.
SN11007, REV. 07/2010
Page 25

Manualedell’operatore
Destinazione d’uso e funzioni dello strumento
L’illumipro-10 è un sistema automatizzato di amplificazione isotermica e di rilevazione destinato all’uso
con i prodotti illumigene per amplificazione mediata da loop Meridian Bioscience, Inc.
L’illumipro-10 deve essere utilizzato in laboratorio da personale specializzato.
Modalità e requisiti di installazione
L’illumipro-10 e i relativi accessori sono contenuti in imballaggi protetti per prevenire danni durante la
spedizione all’utente finale. Prima dell’installazione, verificare il contenitore usato per la spedizione di
illumipro-10 e l’imballaggio per escludere eventuali danni. Non installare strumenti danneggiati, in
quanto possono costituire un pericolo per l’utilizzatore. Segnalare eventuali danni al personale di
Assistenza tecnica Meridian al numero +1 513-271-3700 (USA), al distributore locale, o al Meridian
Bioscience Europe al numero +39 0331 433 636 .
illumipro-10 Contenuto dell’imballaggio
c illumipro-10 Sistema automatizzato di amplificazione isotermica e di rilevazione
d illumipro-10 Alimentazione elettrica e cavo di alimentazione
e illumipro-10 Parametri di verifica
f illumipro-10 Quaderno ad anelli per il Manuale dell’operatore
g illumipro-10 Cavo USB
Stampante termica esterna - Contenuto dell’imballaggio (Catalogo 610173; spedita a parte):
c Stampante
d Cavo stampante
e Alimentazione stampante (Adattatore lineare 12 V CC)
f Rotolo di carta termica (1 rotolo)
illumipro-10 Accessori opzionali
c Tastiera esterna (Catalogo 610174, spedita a parte).
illumipro-10 Manuale dell’operatore (SN11007; spedito a parte).
illumipro-10 Manuale dell’operatore: ITALIANO Página 25
Copyright© Meridian Bioscience, Inc.
SN11007, REV. 07/2010
Page 26
Manualedell’operatore
illumipro-10 Installazione
L’installazione dell’illumipro-10 e dei relativi accessori deve avvenire dopo aver controllato il contenuto e
verificato i requisiti descritti nel presente manuale. Nell’Appendice I è riportato un elenco di controllo
generale per la configurazione e l’installazione dell’illumipro-10.
L’illumipro-10 deve essere collocato su una superficie robusta e piana. Preparare lo strumento per l’uso
nel modo descritto nella tabella di seguito.
Componente Simbolo Istruzioni di installazione
Stampante
Collegare la stampante esterna all’illumipro-10 con il cavo in
dotazione. La presa per il cavo stampante è situata sul retro dello
strumento ed è indicata dal simbolo riportato a sinistra.
Inserire il connettore della stampante e collegare alla stampante il
cavo di alimentazione incluso nell’imballaggio della stampante stessa.
Alimentazione 12 V -----
@4,5 A
Collegare il cavo di alimentazione incluso nell’imballaggio
dell’illumipro-10 all’apparecchio. La presa dell’alimentazione è
situata sul retro dello strumento. La presa dell’alimentazione è
indicata dal simbolo riportato a sinistra. Collegare il cavo di
alimentazione alla scatola di alimentazione.
Inserire le spine dei cavi di alimentazione dell’illumipro-10 e della
stampante in idonee prese di rete.
Tastiera
esterna
Collegare la tastiera esterna opzionale all’apparecchio con il cavo in
dotazione. La presa di collegamento della tastiera esterna è situata
sul retro dello strumento ed è indicata dal simbolo riportato a sinistra.
NOTA: la tastiera deve essere installata quando l’illumipro-10 è
spento.
illumipro-10 Configurazione
La configurazione dello strumento si esegue dal menu SYSTEM. L’utente può impostare il formato
dell’ora e della data e la lingua preferita.
illumipro-10 Verifica prestazionale
La verifica prestazionale deve essere eseguita dopo l’installazione e prima dell’uso. La verifica ottica
deve essere eseguita come da istruzioni fornite nel menu SERVICE.
illumipro-10 Manuale dell’operatore: ITALIANO Página 26
Copyright© Meridian Bioscience, Inc.
SN11007, REV. 07/2010
Page 27

Manualedell’operatore
Principi di funzionamento
L’illumipro-10 è un sistema automatizzato di amplificazione isotermica e di rilevazione di sequenze di
acidi nucleici predefiniti che si trovano in campioni biologici umani. Lo strumento si usa insieme ai
prodotti per amplificazione mediata da loop illumigene per diagnostica in vitro di Meridian Bioscience,
Inc.
L’illumipro-10 è uno strumento da laboratorio organizzato in menu dotato di due blocchi indipendenti di
elaborazione dei campioni, indicati come Blocco A e Blocco B. Il riscaldamento dei campioni e la
rilevazione ottica vengono eseguiti per un massimo di cinque dispositivi illumigene a doppio comparto
per ogni blocco. Ogni dispositivo illumigene a doppio comparto contiene un comparto campione e un
comparto di controllo. L’amplificazione del DNA target avviene durante il ciclo termico e dà luogo a
formazione di precipitato che viene rilevato dal sistema ottico dell’illumipro-10. Il precipitato generato
dalla presenza di DNA target amplificato produce una soluzione torbida di reazione tra campione e
controllo, che viene poi misurata per assorbanza. In base alla variazione di torbidità di ogni soluzione di
reazione campione-controllo, l’illumipro-10 riporta il risultato dell’analisi come NON VALIDO, POSITIVO
o NEGATIVO.
L’illumipro-10 funziona in quattro modalità principali: ASSAY (Analisi), RESULTS (Risultati), SERVICE
(Assistenza) e SYSTEM (Sistema). La scelta dell’analisi e l’amplificazione del campione avvengono in
modalità ASSAY; i risultati dell’analisi vengono gestiti in modalità RESULTS; le principali impostazioni si
inseriscono in modalità SYSTEM; e la verifica prestazionale ottica viene eseguita in modalità SERVICE.
Caratteristiche prestazionali e tecniche
Caratteristiche prestazionali
L’illumipro-10 è un sistema automatizzato di amplificazione isotermica e di rilevazione destinato all’uso
con i prodotti illumigene per amplificazione mediata da loop Meridian Bioscience, Inc. L’illumipro-10 è
dotato di un semplice interfaccia utente costituito da un tastierino, un display a cristalli liquidi (LCD), un
lettore di codici a barre, una stampante e una tastiera esterna opzionale. Le istruzioni di funzionamento,
organizzate in menu, sono visualizzate sul display e l’utente inserisce i comandi allo strumento
scegliendo le opzioni dal tastierino.
L’amplificazione isotermica avviene mediante due blocchi termici, controllati indipendentemente l’uno
dall’altro, in grado di funzionare tra 55 C e 65 C, ed entro 1 C di scostamento dal set point di temperatura.
Il set point di temperatura per l’amplificazione isotermica è determinato dall’analisi illumigene
selezionata. Il tempo di amplificazione isotermica è controllato dal timer interno dell’illumipro-10.
Durante il funzionamento, sul display dell’illumipro-10 compare ‘Test in Progress’ (‘Test in corso’), oltre
alla temperatura di blocco ed il tempo di incubazione residuo.
illumipro-10 Manuale dell’operatore: ITALIANO Página 27
Copyright© Meridian Bioscience, Inc.
SN11007, REV. 07/2010
Page 28

Manualedell’operatore
La rilevazione dell’amplificazione del DNA è eseguita dal sistema ottico dell’illumipro-10. Ogni blocco
illumipro-10 contiene dei diodi laser che si accendono a 6 50 ± 20 nm e dei corrispondenti rilevatori che
monitorizzano la trasmissione della luce attraverso ciascun pozzetto dell’illumipro-10. L’illumipro-10
esegue un primo controllo del sistema ottico prima dell’avvio del ciclo. Eventuali anomalie rilevate nel
sistema ottico fanno disattivare il blocco fino a quando l’anomalia viene risolta. Se la verifica ottica ha
esito positivo, l’illumipro-10 verifica la presenza di un dispositivo per test illumigene in ogni pozzetto.
L’illumipro-10 inserisce automaticamente il codice campione ‘EMPTY WELL’ (‘Pozzetto vuoto’) per tutti i
pozzetti in cui non viene rilevato un dispositivo per test. L’illumipro-10 misura l’assorbanza di ogni
dispositivo per test illumigene all’inizio e al termine dell’incubazione di amplificazione isotermica. I
risultati del campione vengono riferiti come INVALID (non validi), POSITIVE (positivi) o NEGATIVE
(negativi) in funzione della variazione di assorbanza rilevata.
Le caratteristiche prestazionali dell’illumipro-10 sono:
• Test di autodiagnosi all’accensione e all’avvio del ciclo.
• Autodiagnosi per posizionamento dei dispositivi per test e verifica del percorso ottico.
• Rilevazione chiusura coperchio e dispositivo di blocco coperchio.
• Blocco di riscaldamento termico con rilevazione ottica su ogni pozzetto con emissione di luce
visibile/assorbanza (650 ± 20 nm).
• Timer intervalli con display in tempo reale del tempo di analisi.
• Interfaccia utente LCD di semplice utilizzo per la configurazione dello strumento, la scelta del
programma e l’immissione dei dati di identificazione del campione.
• Lettore di codici a barre per l’inserimento dei codici identificativi dei campioni.
• Tastiera esterna disponibile per l’inserimento dei codici identificativi dei campioni.
• Stampante collegata per la stampa dei risultati.
• Prevenzione della contaminazione da prodotti dell’amplificazione residui grazie all’uso di dispositivi
per test indipendenti illumigene.
illumipro-10 Manuale dell’operatore: ITALIANO Página 28
Copyright© Meridian Bioscience, Inc.
SN11007, REV. 07/2010
Page 29

Manualedell’operatore
illumipro-10 Caratteristiche tecniche
• Elettriche
Range di tensione: 120 V AC
Range di funzionamento, alimentazione: 100 – 240 V AC, 50/60 Hz
Tensione e corrente nominale: 12 V CC, 4,5 Amp
• Fisiche
Dimensioni: 21 cm x 29,2 cm x 9,5 cm
Peso: 2,95 ± 0,05 kg
• Ambientali
Temperatura di funzionamento: 15 – 30 C
Temperatura di stoccaggio: 10 – 40 C
Tasso di umidità, funzionamento: 10 – 90%, senza condensa
Tasso di umidità, stoccaggio: 10 – 95%
Caratteristiche tecniche della stampante
• Elettriche
Tensione alimentazione (SMPS): Tensione di entrata (S, P) 12 V CC
• Ambientali
Temperatura di funzionamento: 0 – 40 C
Temperatura di stoccaggio: -10 – 50 C
Tasso di umidità, funzionamento: 30 – 80%
Tasso di umidità, stoccaggio: 10 – 90%
illumipro-10 Manuale dell’operatore: ITALIANO Página 29
Copyright© Meridian Bioscience, Inc.
SN11007, REV. 07/2010
Page 30
Manualedell’operatore
Istruzioni d’uso
L’illumipro-10 funziona in quattro modalità principali: ASSAY (Analisi), RESULTS (Risultati), SERVICE
(Assistenza) e SYSTEM (Sistema). La scelta dell’analisi e l’amplificazione del campione avvengono in
modalità ASSAY; i risultati dell’analisi vengono gestiti in modalità RESULTS; le principali impostazioni si
inseriscono in modalità SYSTEM. La modalità SERVICE è riservata ai tecnici di assistenza specializzati
e non è accessibile da parte dell’utente di laboratorio. In questo capitolo vengono presentate le
informazioni generali relative a ciascuna modalità di funzionamento.
Tastierino
Le funzionalità dell’illumipro-10 si comandano dal tastierino. Il tastierino è un’interfaccia utente di
semplice utilizzo che permette di spostarsi attraverso i menu, di inserire caratteri alfanumerici per dei
campioni e di avviare il ciclo di analisi. Le varie funzioni del tastierino saranno illustrate nel resto del
manuale; la disposizione dei tasti e i simboli usati sono definiti di seguito.
NOTA: per i pulsanti con più caratteri, scorrere
tra i vari caratteri premendo il pulsante più volte.
Pulsante
tastierino
1 <SPAZIO>, 1
2 A, B, C, 2
3 D, E, F, 3
4 G, H, I, 4
5 J, K, L, 5
6 M, N, O, 6
7 P, Q, R, S, 7
8 T, U, V, 8
9 W, X, Y, Z, 9
0 0
- -
RUN Esegue il protocollo di analisi
Carattere / Funzione
Scorri in alto
Scorri in basso
Scorri all’indietro, Indietro di
uno spazio
Invio
selezionato
illumipro-10 Manuale dell’operatore: ITALIANO Página 30
Copyright© Meridian Bioscience, Inc.
SN11007, REV. 07/2010
Page 31

Manualedell’operatore
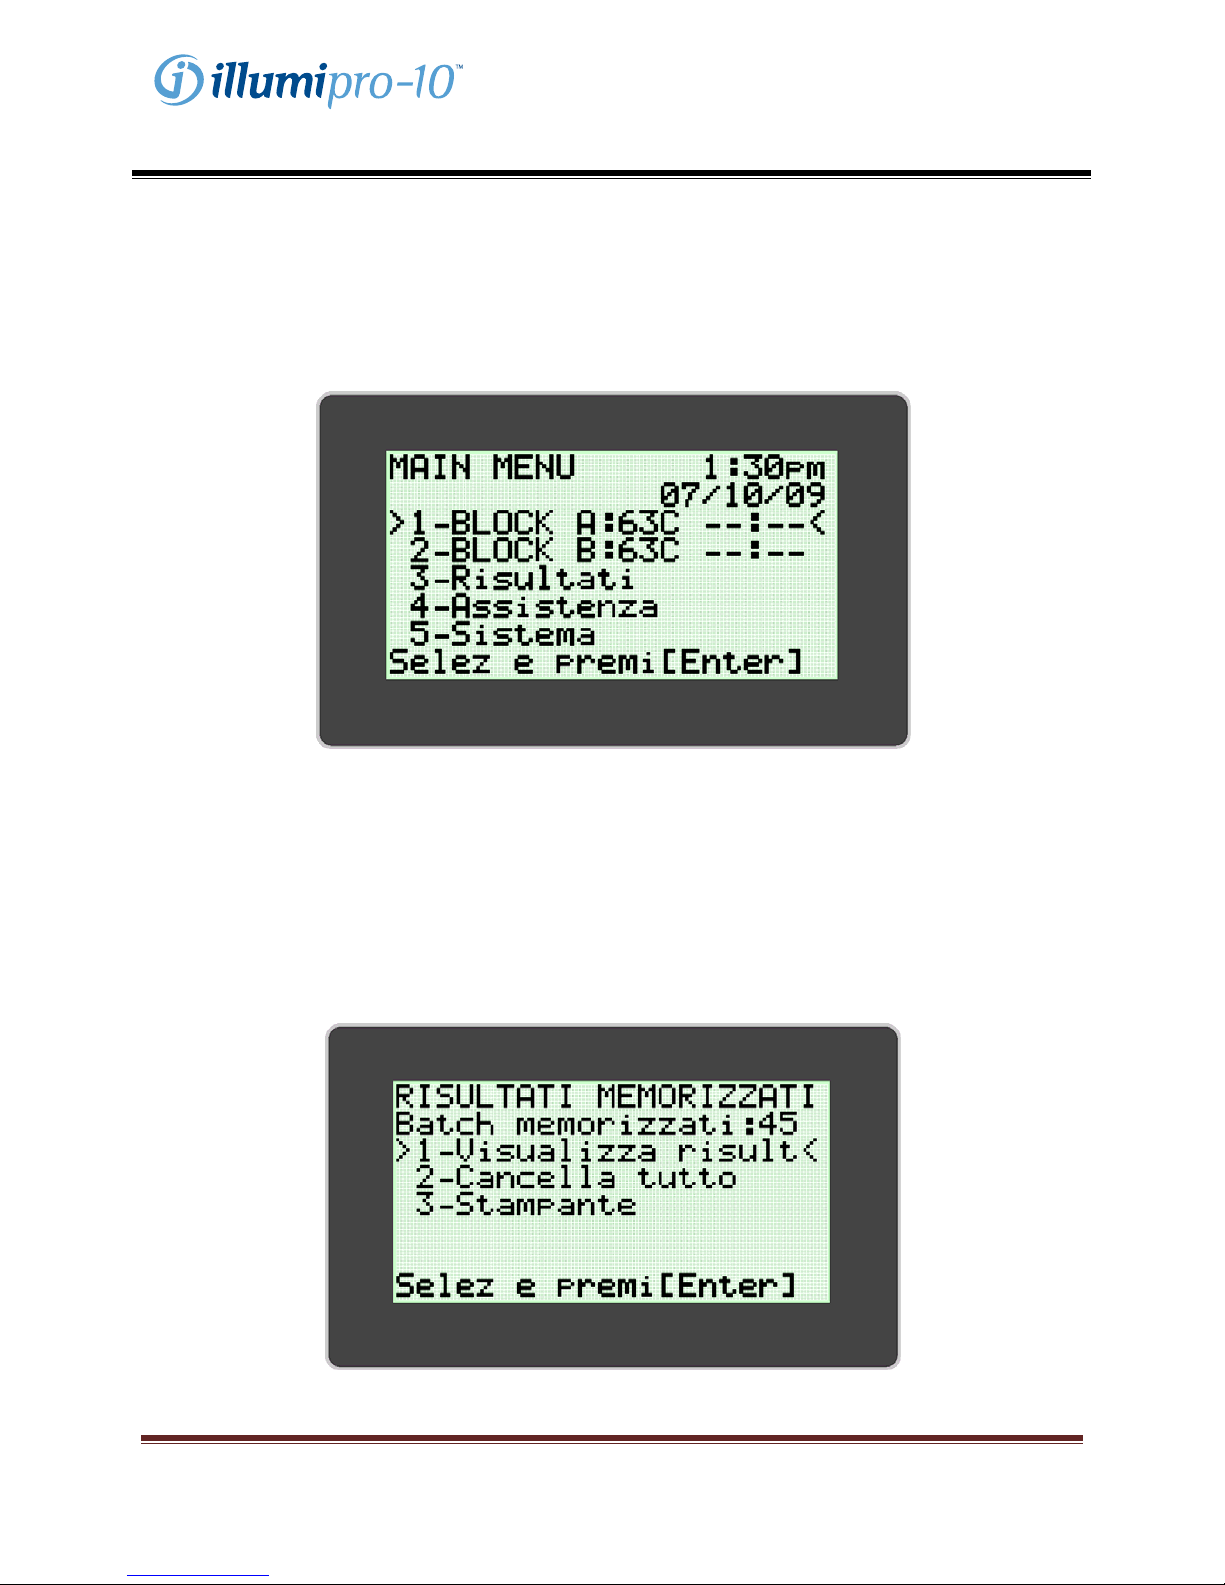
Menu Principale
Nel Menu Principale l’utente può vedere ora, data, stato dell’analisi (Assay Status) e temperatura del
blocco. Dal Menu Principale si accede alle modalità Results, Service e System.
Statoblocco
Temperatura
Simboli convenzionali utilizzati:
Simbolo
grafico
12 V -----
@4,5 A
**:** STATO BLOCCO: in riscaldamento; il blocco non è a temperatura
--:-- STATO BLOCCO: inattivo; il blocco è a temperatura
!!! Attenzione: l’apparecchio richiede interventi
… Indicatore di espansione del Menu Assay (Analisi)
Stampante: collegare la stampante all’apparecchio da questa presa.
Porta USB: collegare l’apparecchio al computer esterno da questa presa.
PS/2
Descrizione
(Retro dello strumento)
(Retro dello strumento)
Tastiera esterna: collegare l’apparecchio alla tastiera esterna (opzionale) da questa
presa.
(Retro dello strumento)
Alimentazione elettrica illumipro-10: collegare l’alimentazione all’apparecchio da
questa presa.
(Retro dello strumento)
illumipro-10 Manuale dell’operatore: ITALIANO Página 31
Copyright© Meridian Bioscience, Inc.
SN11007, REV. 07/2010
Page 32
Manualedell’operatore
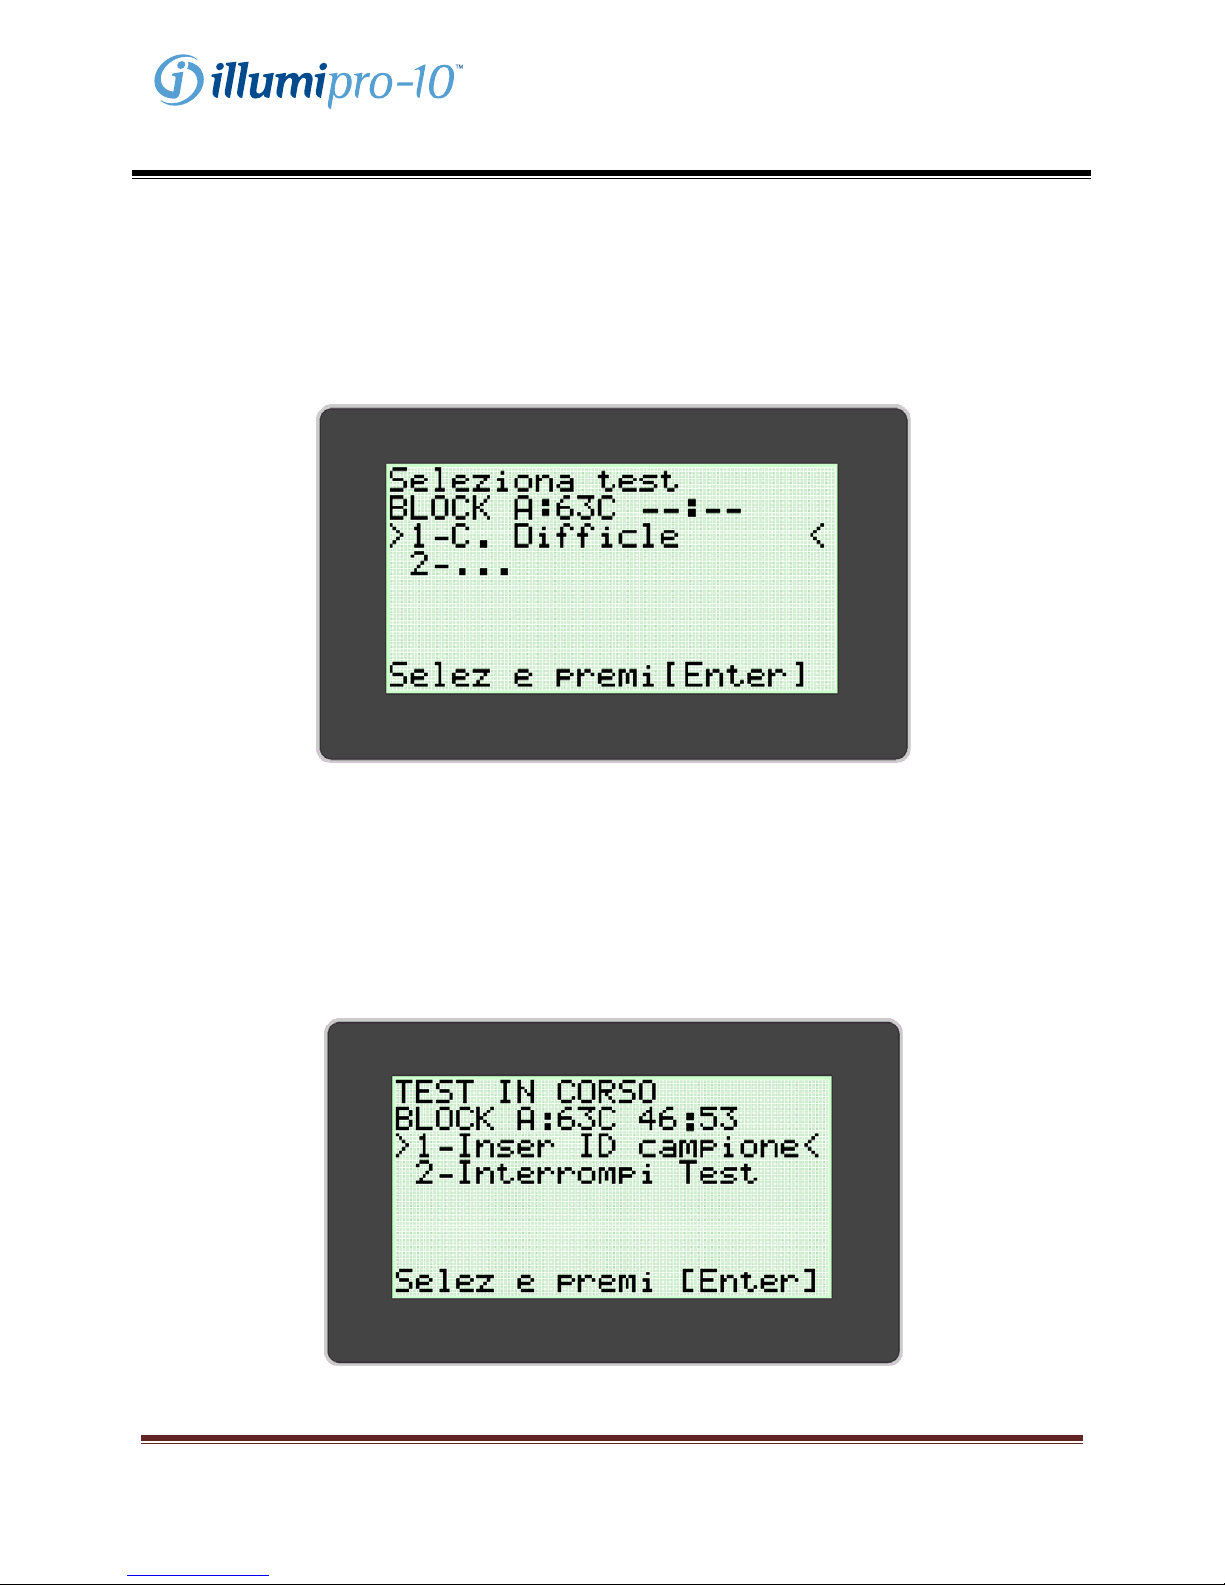
MODALITÀ ASSAY (Analisi)
La MODALITÀ ASSAY permette l’accesso e l’esecuzione di programmi dell’illumipro-10. L’utente
seleziona il blocco da usare dal Menu Principale e poi l’analisi da eseguire. Ciascun blocco si può
selezionare e attivare indipendentemente dall’altro. Quando viene selezionato il blocco da usare, appare
il menu della Modalità Assay. L’utente seleziona l’analisi da eseguire e segue le istruzioni visualizzate sul
display dell’illumipro-10.
Il display illumipro-10 indica che è in esecuzione un test e chiede di inserire i dati di identificazione del
campione oppure annullare l’analisi. I dati di identificazione del campione si possono inserire
direttamente usando il tastierino, oppure mediante il lettore di codici a barre dell’illumipro-10, o ancora da
una tastiera esterna. Per ulteriori informazioni sul lettore di codici a barre illumipro-10 vedere
l’Appendice IV del presente manuale.
L’utente inserisce i dati di identificazione del campione seguendo le istruzioni visualizzate nel display
dell’illumipro-10 e avvia l’esecuzione dell’analisi.
NOTA: la temperatura del blocco compare nel campo ‘TEMP’. Nel campo ‘Stato blocco’ è visualizzato il
tempo mancante al termine dell’analisi, indicato da un timer.
illumipro-10 Manuale dell’operatore: ITALIANO Página 32
Copyright© Meridian Bioscience, Inc.
SN11007, REV. 07/2010
Page 33
Manualedell’operatore
L’illumipro-10 esegue il programma di analisi selezionato e lo stato del blocco sul MENU PRINCIPALE
apparirà come ‘00:00’. I risultati dell’analisi selezionata si possono visualizzare selezionando il blocco il
cui stato è visualizzato come terminato, e seguendo le istruzioni che appaiono sul display dell’illumipro-
10. I risultati si possono stampare manualmente selezionando l’opzione stampa alla fine della
visualizzazione dei risultati o abilitando la funzione Auto-Print durante la configurazione del sistema.
Al termine dell’analisi, i dispositivi illumigene si devono estrarre dall’apparecchio e smaltire
correttamente.
NOTA: fare attenzione a non contaminare le apparecchiature e l’ambiente con acidi nucleici target
e/o amplificati. NON aprire i dispositivi illumigene dopo il termine dell’analisi.
MODALITÀ RESULTS
La MODALITÀ RESULTS permette di visualizzare i risultati memorizzati, di cancellarli e di abilitare la
funzione AutoPrint. L’illumipro-10 è in grado di memorizzare fino a 1000 risultati di singoli test o 200
batch. Lo strumento visualizza un’avvertenza all’utente quando i risultati memorizzati hanno quasi
raggiunto la capacità massima. Per accedere alla MODALITÀ RESULTS MODE seguire le istruzioni che
compaiono sul display dell’illumipro-10 .
illumipro-10 Manuale dell’operatore: ITALIANO Página 33
Copyright© Meridian Bioscience, Inc.
SN11007, REV. 07/2010
Page 34
Manualedell’operatore
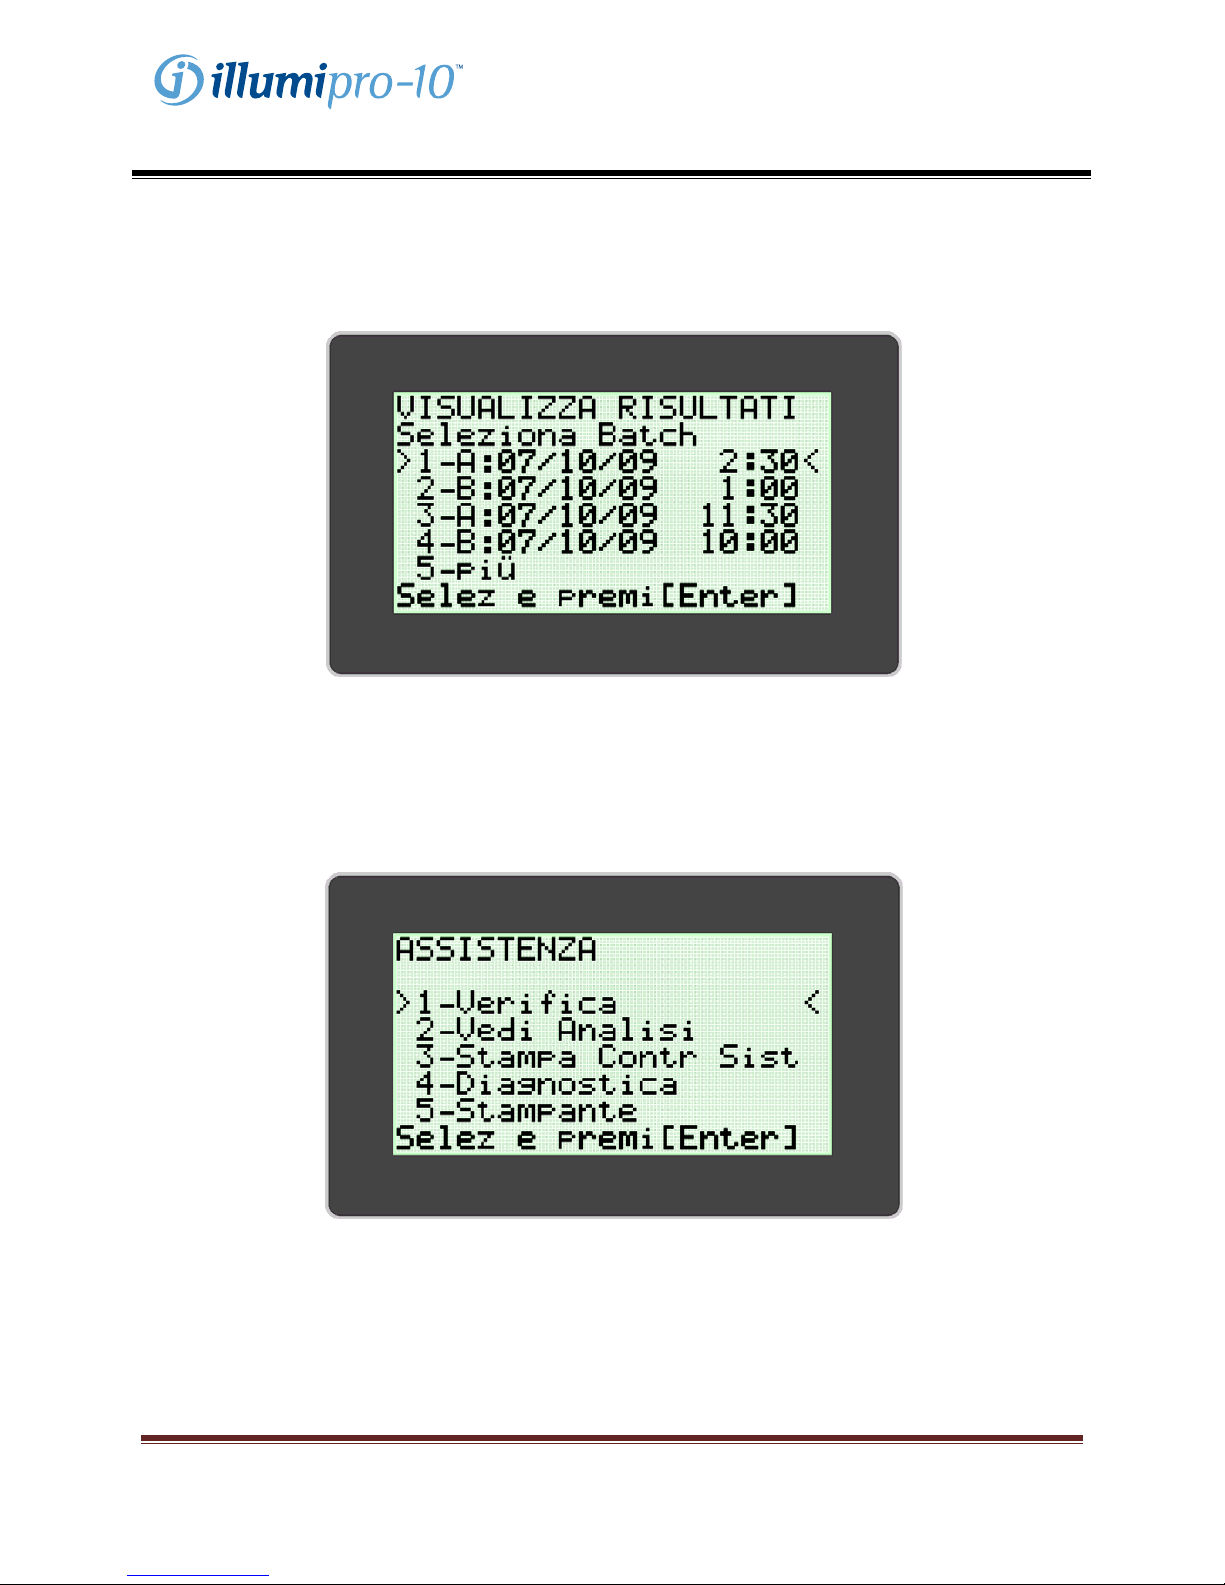
L’utente può visualizzare i risultati memorizzati selezionando l’opzione ‘View Results’ (‘Visualizza
risultati’). Il menu ‘View Results’ permette di accedere ai dati memorizzati per data e per blocco. I dati di
batch selezionati vengono visualizzati e si possono stampare manualmente selezionando l’opzione
stampa al termine della visualizzazione.
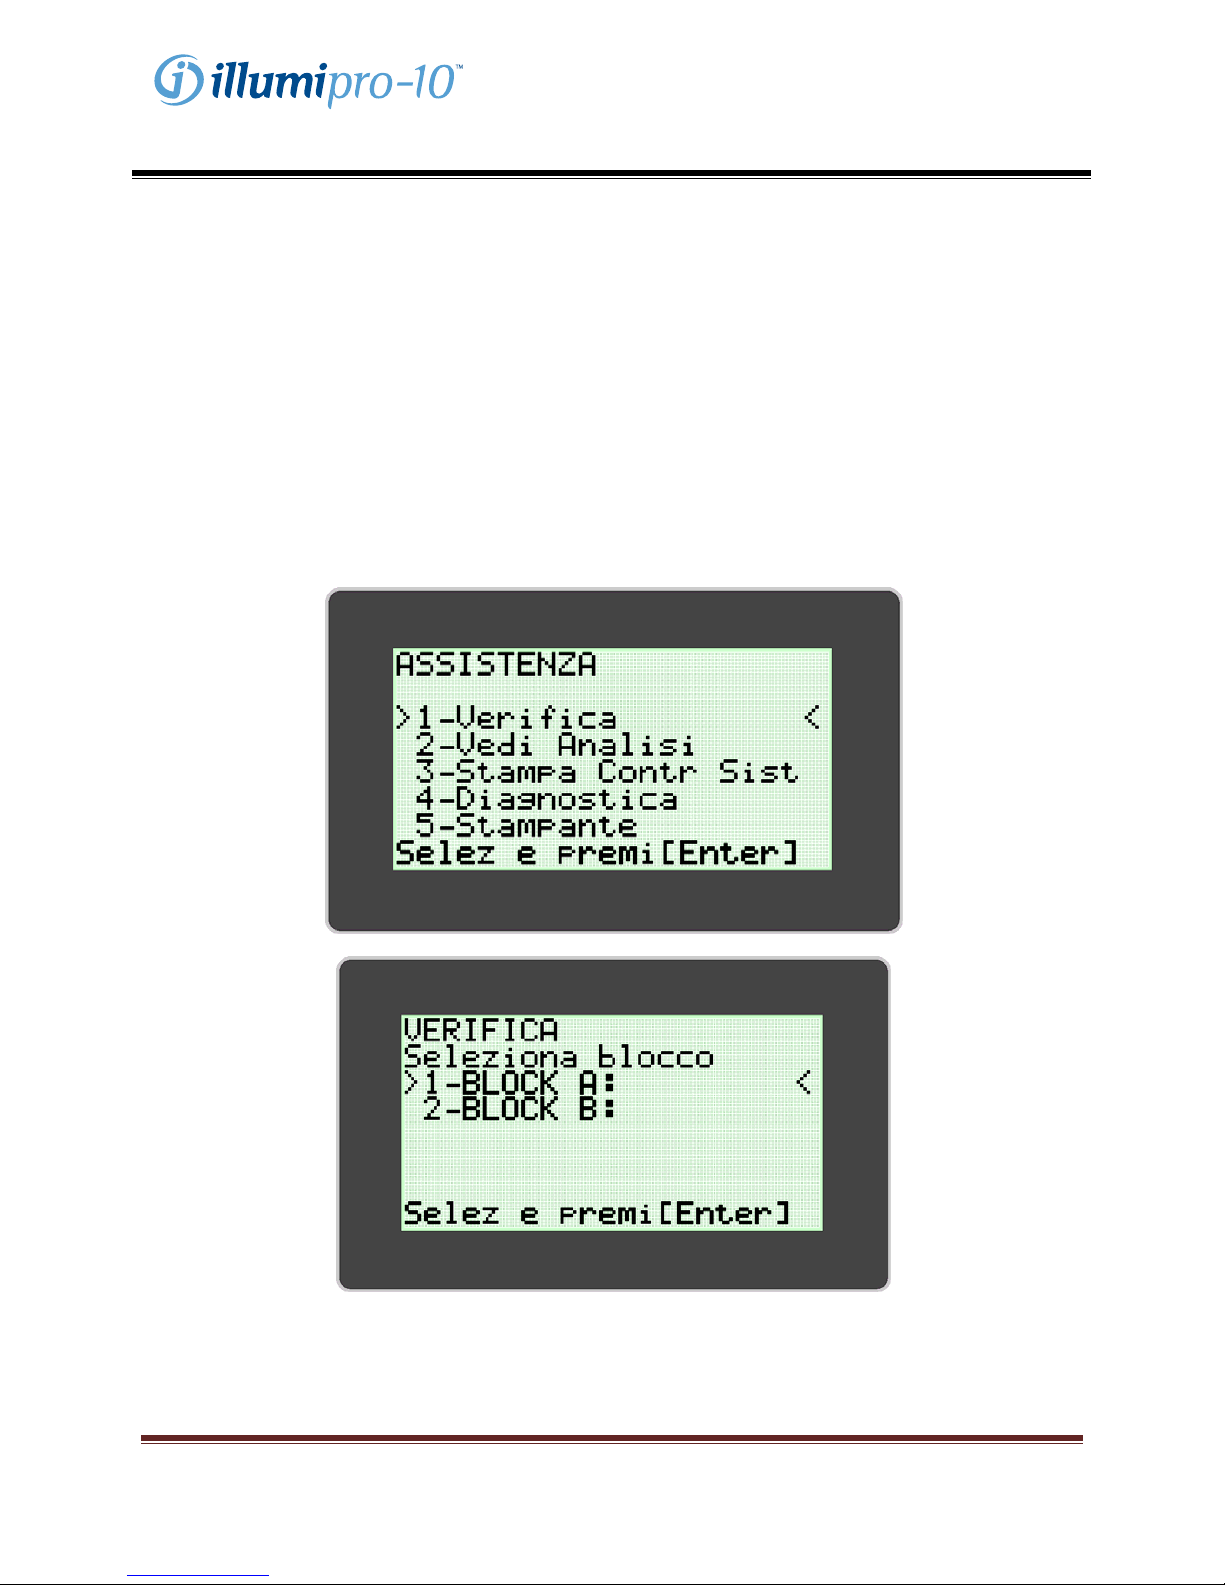
MODALITÀ SERVICE
La MODALITÀ SERVICE consente all’utente di eseguire verifiche del sistema ottico, di visualizzare i
parametri di analisi, di stampare dati di controllo del sistema e di configurare la stampante. NOTA: nel
menu MODALITÀ SERVICE è presente un’opzione ‘Diagnostics’ (‘Diagnostica’) a cui può accedere solo il
personale di assistenza specializzato.
La VERIFICA DEL SISTEMA OTTICO è necessaria per garantire il corretto funzionamento dell’illumipro-
10. Le istruzioni per eseguire la verifica del sistema ottico si trovano nel capitolo OPERAZIONI DI
TARATURA di questo manuale.
illumipro-10 Manuale dell’operatore: ITALIANO Página 34
Copyright© Meridian Bioscience, Inc.
SN11007, REV. 07/2010
Page 35
Manualedell’operatore
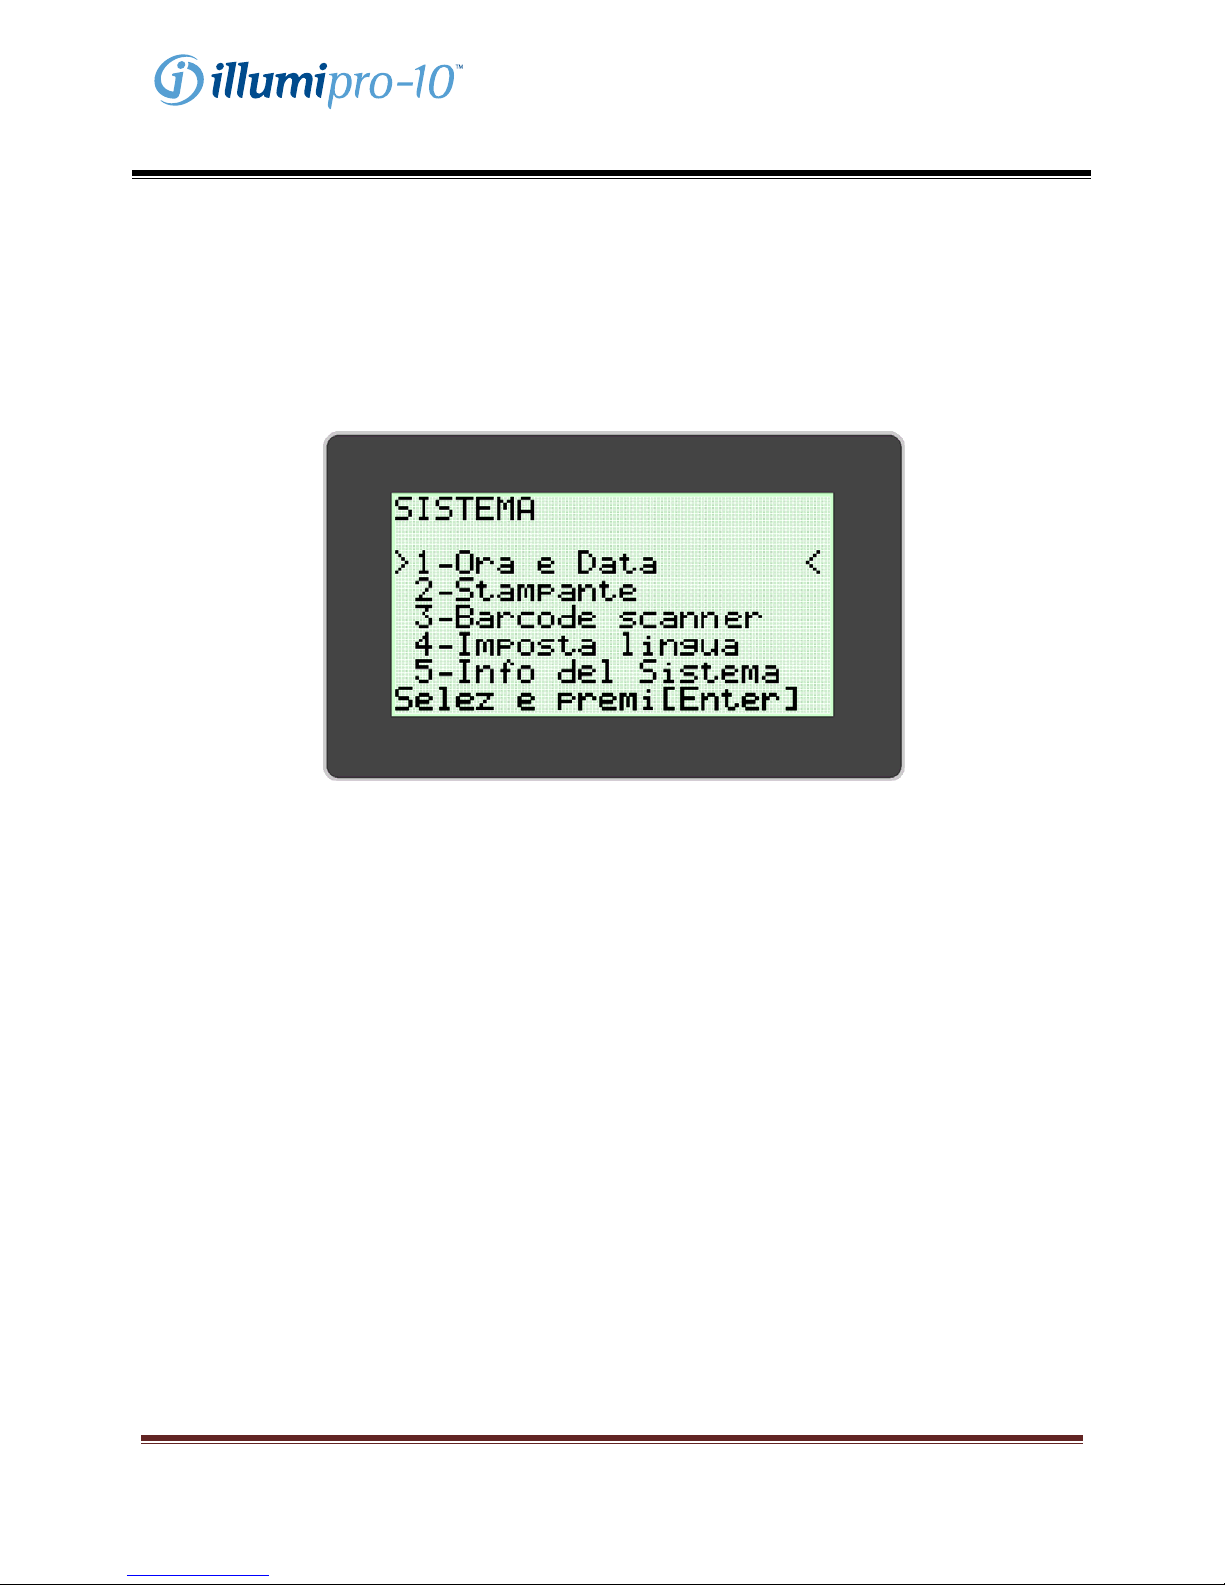
MODALITÀ SYSTEM
La MODALITÀ SYSTEM consente di impostare ora e data e relativi formati, configurare la stampante e il
lettore di codici a barre, impostare la lingua dell’utente e visualizzare i dati di sistema. L’utente può
impostare ora, data e lingua (inglese, italiano, francese, spagnolo e tedesco) in base ai requisiti locali e/o
alle preferenze. La MODALITÀ SYSTEM permette all’utente di abilitare o disabilitare la stampa
automatica e il lettore di codici a barre. La configurazione di sistema si esegue seguendo le istruzioni
visualizzate sul display dell’illumipro-10.
NOTA: ora e data non si possono modificare durante l’esecuzione di un’analisi. La lingua non si può
modificare durante l’esecuzione di un’analisi.
illumipro-10 Manuale dell’operatore: ITALIANO Página 35
Copyright© Meridian Bioscience, Inc.
SN11007, REV. 07/2010
Page 36
Manualedell’operatore
Operazioni di taratura
AUTO-DIAGNOSI ALL’ACCENSIONE
L’illumipro-10 esegue automaticamente un test di auto-diagnosi all’accensione (Power-On Self Test,
POST) ad ogni accensione dello strumento. Il test POST conferma che i componenti software e
hardware del sistema funzionano nel modo previsto. Al termine con esito positivo del test POST
l’apparecchio emette un segnale acustico. Se l’esito del test POST è negativo appare un codice di
errore. Per ulteriori informazioni sui codici di errore consultare l’Appendice III di questo manuale.
VERIFICA DEL SISTEMA OTTICO
L’illumipro-10 non richiede tarature. La verifica del SISTEMA OTTICO per ogni blocco va eseguita una
volta al mese per garantire il corretto funzionamento. La verifica si esegue utilizzando lo Standard di
Verifica rosso compreso nell’illumipro-10. Le istruzioni passo per passo per la verifica del sistema ottico
sono visualizzate sul display dell’illumipro-10 , dal menu MODALITÀ SERVICE.
illumipro-10 Manuale dell’operatore: ITALIANO Página 36
Copyright© Meridian Bioscience, Inc.
SN11007, REV. 07/2010
Page 37

Manualedell’operatore
La verifica del sistema ottico si compone di due fasi. La prima fase verifica che il percorso ottico sia
libero da ostacoli. La seconda fase conferma che il sistema ottico trasmette e rileva correttamente le
particelle di luce emesse. Per la verifica di trasmissione e rilevazione è necessario l’uso dello Standard di
Verifica rosso dell’illumipro-10 . L’illumipro-10 procede attraverso i passaggi del protocollo di Verifica e
richiede all’utente di eseguire le azioni necessarie.
Lo Standard di Verifica rosso deve essere collocato saldamente nei pozzetti del blocco termico. Lo
Standard di Verifica deve essere orientato con la targhetta del numero di pezzo in corrispondenza del
pozzetto 1.
Al termine del Protocollo di Verifica, l’illumipro-10 visualizza il risultato del test di verifica come ‘Pass’
(‘Superato’) o ‘Fail’ (‘Non superato’). Nel caso che il test di verifica non dia un risultato accettabile,
l’utente dovrà verificare che il percorso ottico sia libero da ostruzioni, che lo standard sia esente da difetti
visibili, e ripetere il test di verifica. Se anche ripetendo il test l’esito non è positivo, rivolgersi al Personale
di Assistenza Tecnica Meridian.
NOTA: ogni blocco dell’illumipro-10 funziona in modo indipendente. Ad esempio, un test di verifica con
esito negativo per il blocco A non impedisce di usare il blocco B se questo ha superato il test di verifica.
AVVERTENZA: NON lasciare gli standard di verifica all’interno dell’illumipro-10. Gli Standard di
Verifica si riscaldano e possono causare ustioni. L’esposizione ad alte temperature può
compromettere le prestazioni degli Standard di Verifica.
illumipro-10 Manuale dell’operatore: ITALIANO Página 37
Copyright© Meridian Bioscience, Inc.
SN11007, REV. 07/2010
Page 38
Manualedell’operatore
Precauzioni e limiti di funzionamento
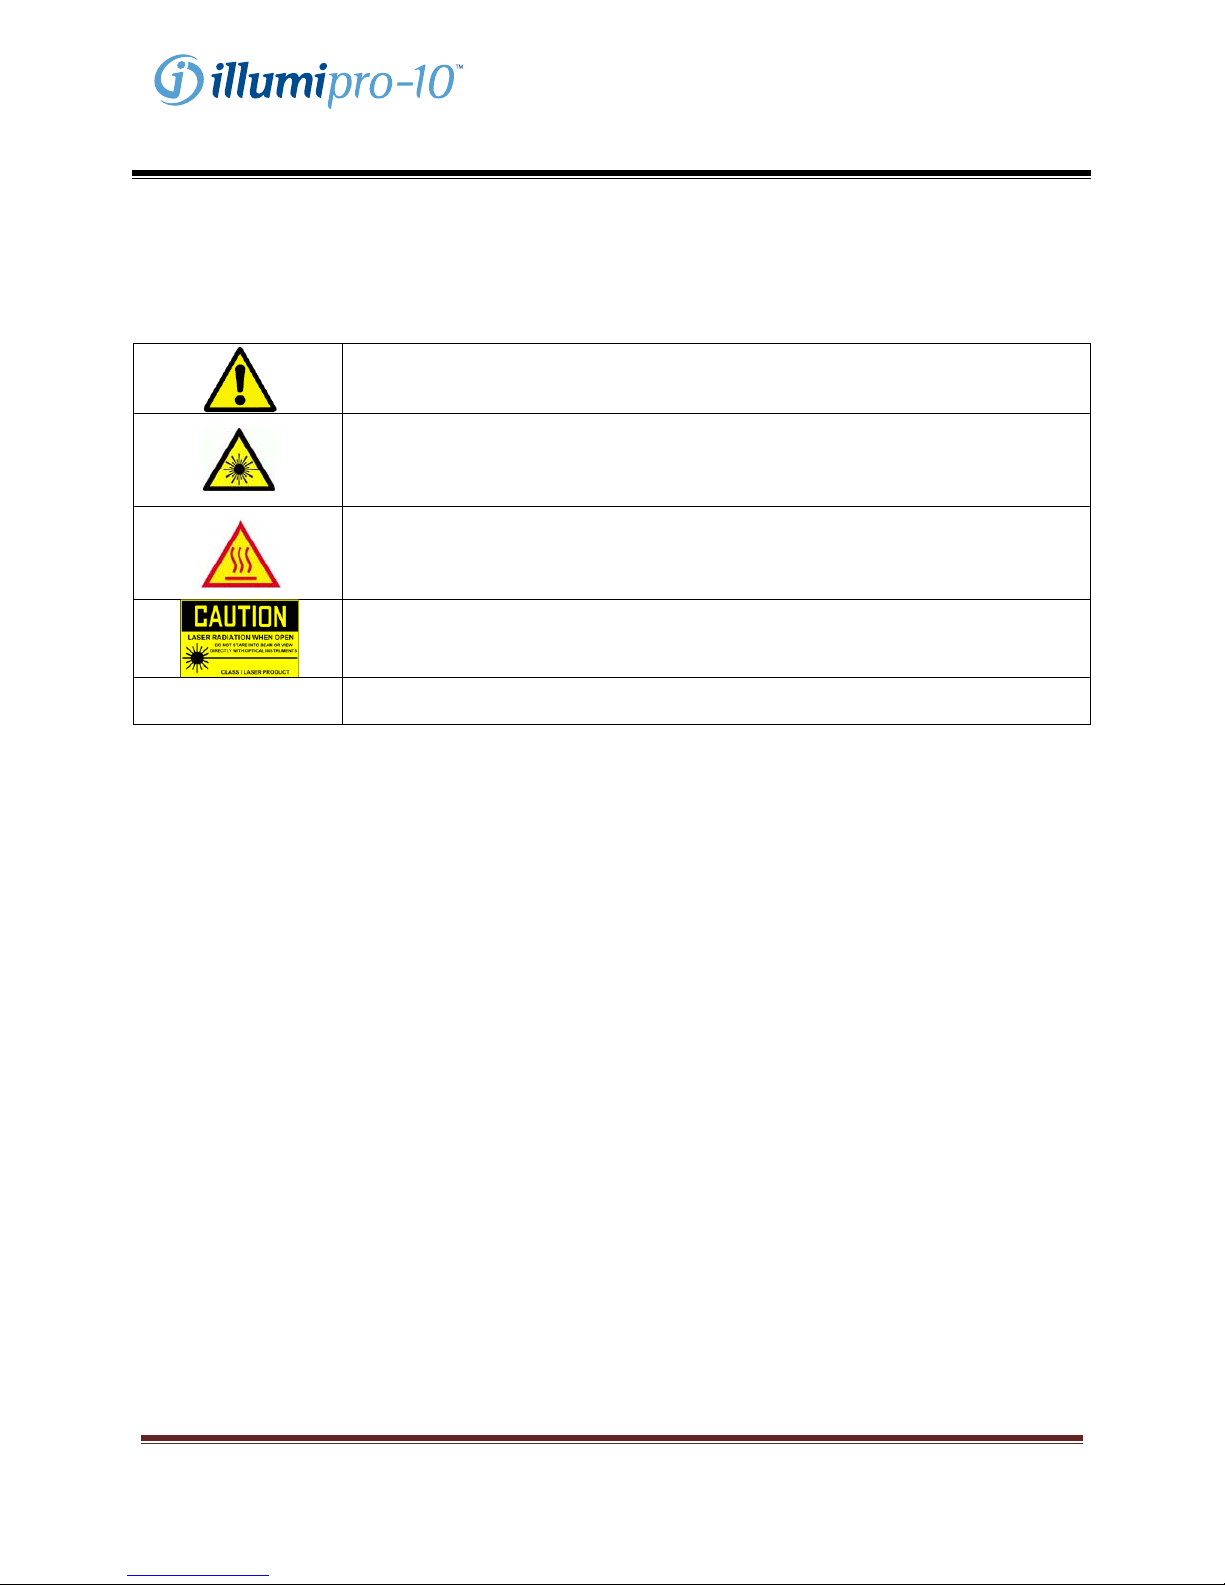
AVVERTENZE:
ATTENZIONE: rischio di pericolo. L’illumipro-10 è un dispositivo
elettromeccanico che può causare scosse o lesioni all’operatore se non è
IPX-0
utilizzato nel modo descritto nel presente manuale.
RADIAZIONI LASER: evitare l’esposizione al raggio. L’illumipro-10 contiene
un prodotto laser di classe 3R. Il laser non funziona quando il coperchio è in
posizione aperta, tuttavia occorre fare attenzione nel maneggiare e utilizzare lo
strumento.
SUPERFICIE CALDA: tenere le mani lontano dalle superfici calde.
L’illumipro-10 contiene un blocco termico che produce temperature tra i 55 e i 65
C durane il funzionamento. Evitare accuratamente il contatto diretto con il blocco
termico.
ATTENZIONE: radiazioni laser. L’illumipro-10 contiene un prodotto laser. Gli
interventi sull’apparecchio devono essere eseguiti esclusivamente da personale
qualificato, in quanto l’esposizione al raggio laser può causare lesioni.
ATTENZIONE: proteggere dall’acqua. L’illumipro-10 non è protetto dall’entrata
di acqua. Evitare il contatto con l’acqua e non immergere l’apparecchio.
PRECAUZIONI
• l’illumipro-10 è uno strumento automatizzato che utilizza la tecnologia ad amplificazione
isotermica mediata da loop. Fare attenzione a non contaminare le apparecchiature e l’ambiente
con acidi nucleici target e/o amplificati. I test molecolari devono essere eseguiti esclusivamente
da personale qualificato.
• L’illumipro-10 si usa insieme ai prodotti per amplificazione mediata da loop illumigene per
diagnostica in vitro di Meridian Bioscience, Inc. I campioni analizzati nell’ illumipro-10 devono
essere manipolati seguendo le istruzioni per l’uso fornite specificamente per i prodotti illumigene.
• La lingua selezionata non si può modificare durante l’esecuzione di un’analisi.
• Ora e data non si possono modificare durante l’esecuzione di un’analisi.
• I verificatori del sistema ottico devono essere riposti nell’apposita custodia. I verificatori ottici
devono essere protetti da luce e agenti dannosi. I verificatori del sistema ottico non vanno riposti
nell’illumipro-10.
• Non collegare/scollegare la tastiera opzionale illumipro-10 ad apparecchio acceso. Il blocco
delle lettere maiuscole (CAPS Lock) si accende all’accensione per indicare che la tastiera è
collegata.
• La tastiera opzionale deve essere installata quando l’illumipro-10 è spento.
• Quando non è in uso, l’illumipro-10 deve essere conservato con il coperchio chiuso.
illumipro-10 Manuale dell’operatore: ITALIANO Página 38
Copyright© Meridian Bioscience, Inc.
SN11007, REV. 07/2010
Page 39

Manualedell’operatore
Interventi e manutenzione
Gli interventi sull’illumipro-10 devono essere eseguiti esclusivamente da personale qualificato.
Rivolgersi all’Assistenza Tecnica Meridian Bioscience al numero +1 513-271-3700 (USA), al
distributore locale, o al Meridian Bioscience Europe al numero +39 0331 433 636, per ricevere
assistenza tecnica o per concordare un intervento. NON CERCARE DI ESEGUIRE INTERVENTI
SULL’illumipro-10.
Pulizia delle superfici
La pulizia delle superfici esterne dell’illumipro-10 e della zona di lavoro immediatamente circostante deve
essere eseguita quando necessario, e comunque almeno una volta al giorno quando l’apparecchio è in
uso. Attendere che lo strumento si sia raffreddato e strofinare le superfici con un panno che non lascia
lanugine, inumidito con soluzione per pulizia DNAse/RNAse o con soluzione di varechina al 10%.
AVVERTENZA: la pulizia delle superfici va eseguita solo quando lo strumento è spento E scollegato
dall’alimentazione. NON usare panni imbevuti per la pulizia.
Pulizia del blocco termico
La pulizia del blocco termico dello strumento deve essere eseguita esclusivamente da personale
qualificato. Il blocco termico deve essere pulito solo qualora se ne sospetti la contaminazione. La
contaminazione del blocco termico può derivare da DNA o da altre fonti. Il protocollo di pulizia da seguire
dipende dalla fonte di contaminazione, come indicato di seguito:
• Protocollo di pulizia per contaminazione da DNA
1. Pulire delicatamente la camera del blocco termico con un tampone di gommapiuma asciutto.
2. Pulire delicatamente la camera del blocco termico con un tampone di gommapiuma inumidito
con soluzione di varechina al 10%.
3. Pulire delicatamente la camera del blocco termico con un tampone di gommapiuma asciutto.
4. Pulire delicatamente la camera del blocco termico con un tampone di gommapiuma inumidito
con alcool al 90%.
5. Pulire delicatamente la camera del blocco termico con un tampone di gommapiuma asciutto.
NON usare per la pulizia tamponi di gommapiuma imbevuti.
• Protocollo di pulizia per contaminazione non da DNA
1. Pulire delicatamente la camera del blocco termico con un tampone di gommapiuma asciutto.
2. Pulire delicatamente la camera del blocco termico con un tampone di gommapiuma asciutto.
3. Pulire delicatamente la camera del blocco termico con un tampone di gommapiuma asciutto.
NON usare per la pulizia tamponi di gommapiuma imbevuti.
AVVERTENZA: la pulizia del bloccho termico va eseguita solo quando lo strumento è spento E
scollegato dall’alimentazione. NON usare tamponi imbevuti per la pulizia.
AVVERTENZA: non cercare di pulire l’illumipro-10 usando aria compressa.
Eseguire SEMPRE il test di verifica ottica dopo la pulizia del blocco termico.
illumipro-10 Manuale dell’operatore: ITALIANO Página 39
Copyright© Meridian Bioscience, Inc.
SN11007, REV. 07/2010
Page 40
Manualedell’operatore
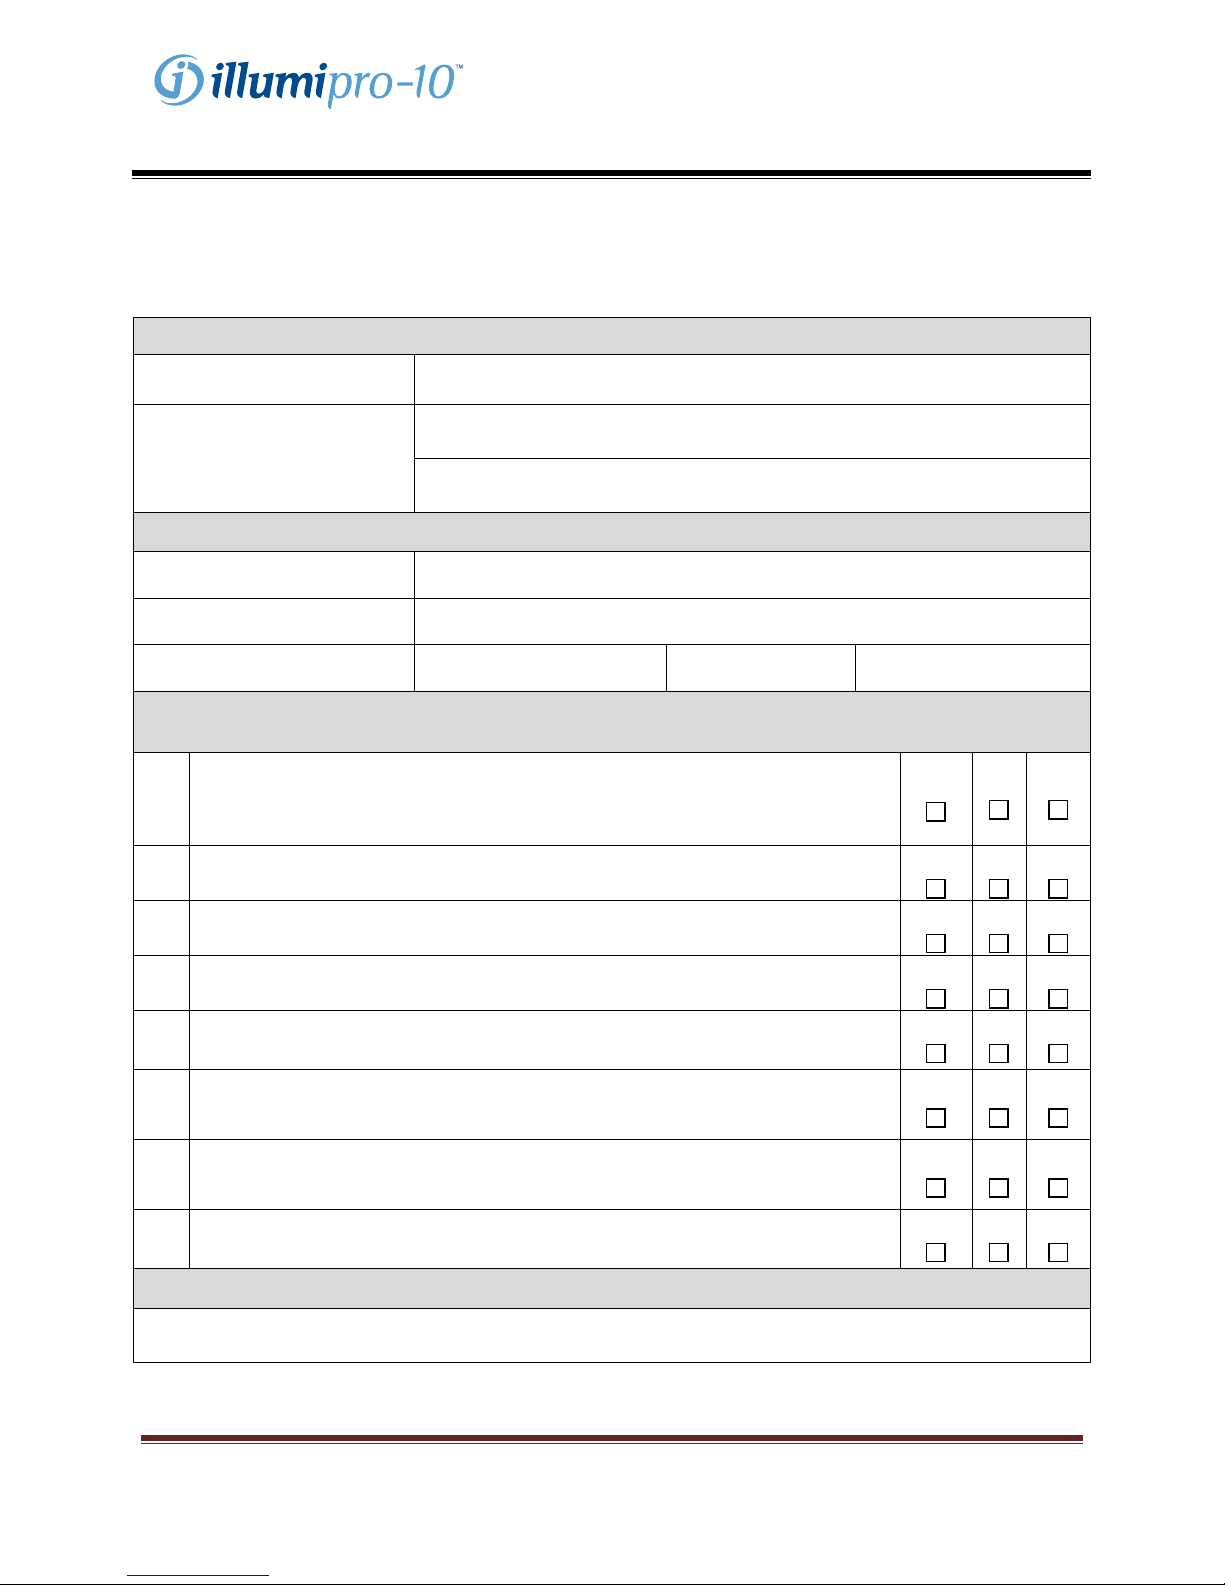
Appendice I
illumipro-10 Elenco di controllo per la configurazione e installazione
Dati della struttura
Nome dalla struttura:
Indirizzo della struttura:
Informazioni sullo strumento
Numero di serie dello
strumento:
Luogo di installazione:
Installazione eseguita da:
Il contenitore usato per la spedizione dell’ illumipro-10 e l’imballaggio sono
stati controllati per eventuali danni; nessun danno riscontrato.
1.
L’installazione di strumenti danneggiati può costituire un pericolo per
l’utilizzatore.
Il Manuale dell’operatore illumipro-10 è stato ricevuto ed esaminato. Le
2.
precauzioni e i limiti di funzionamento sono stati esaminati e compresi.
Il luogo di installazione è conforme alle caratteristiche elettriche e ambientali
3.
descritte nel Manuale dell’operatore illumipro-10 .
L’installazione dell’illumipro-10 e dei relativi accessori è stata completata
4.
come descritto nel Manuale dell’operatore.
L’illumipro-10 è stato acceso e il test di auto-diagnosi è stato eseguito con
5.
esito positivo.
E’ stata eseguita la configurazione dell’illumipro-10, compresi il formato
6.
dell’ora, il formato della data e la lingua preferita come descritto nel Manuale
dell’operatore.
La Verifica Prestazionale illumipro-10 è stata eseguita come descritto nel
7.
Manuale dell’operatore. Sono stati ottenuti risultati accettabili sia per il blocco
A che per il blocco B.
Una copia della stampa del controllo di sistema e della verifica del sistema
8.
ottico è allegata a questa scheda.
Data di
installazione:
Configurazione e installazione
Installazione terminata
(Via, numero civico)
(Città, Stato)
(Stanza, piano, edificio ecc.)
N/P
No
Sì
Sì
Sì
Sì
Sì
Sì
Sì
Sì
No N/P
No N/P
No N/P
No N/P
No N/P
No N/P
No N/P
illumipro-10 Manuale dell’operatore: ITALIANO Página 40
Copyright© Meridian Bioscience, Inc.
SN11007, REV. 07/2010
(Firma/Data)
Page 41

Manualedell’operatore
Appendice II
illumipro-10 Dati di decontaminazione
Le apparecchiature di laboratorio devono essere decontaminate prima di inviare lo strumento per
interventi di riparazione. La decontaminazione deve essere eseguita come da istruzioni fornite.
Si prega di inserire le informazioni di seguito e allegare allo strumento la scheda compilata prima
dell’invio.
Gli strumenti inviati per interventi tecnici senza la documentazione di decontaminazione non
saranno riparati. Se lo strumento viene inviato per interventi tecnici senza documentazione di
decontaminazione sarà rinviato all’utente a spese di quest’ultimo.
1. Pulire le superfici esterne dell’illumipro-10 con un panno che non lascia lanugine, inumidito con una
soluzione disinfettante a base di varechina al 10%. Il tempo minimo di esposizione per contatto per
l’eliminazione di patogeni ematici (epatite A, HIV-1, MRSA, SARS, ecc.) è di 1 minuto.
2. Aprire i coperchi A e B dell’illumipro-10. Pulire la superficie interna del coperchio e le superfici del
bloccho termico con un panno che non lascia lanugine, inumidito con soluzione disinfettante a base
di varechina al 10%. Il tempo minimo di esposizione per contatto è di 1 minuto.
3. Chiudere i coperchi. Allegare la scheda di decontaminazione completata all’illumipro-10 . Imballare
lo strumento nell’imballaggio protettivo di materiale espanso e nel contenitore per spedizione forniti in
dotazione.
Informazioni sullo strumento
Numero di serie dello
strumento:
Dati della struttura
Nome dalla struttura:
Indirizzo della struttura:
Persona di riferimento:
L’illumipro-10 è stato decontaminato come descritto in precedenza. Le superfici di contatto esterne ed
interne sono state pulite con una soluzione disinfettante a base di varechina al 10%. I tempi minimi di
esposizione per contatto sono stati controllati.
(Telefono) (e-mail)
Dati di decontaminazione
(Via, numero civico)
(Città, Stato)
(Nome, qualifica)
Eseguito da:
illumipro-10 Manuale dell’operatore: ITALIANO Página 41
Copyright© Meridian Bioscience, Inc.
SN11007, REV. 07/2010
(Firma/Data)
Page 42

Manualedell’operatore
Appendice III
illumipro-10 Codici d’errore e risoluzione dei problemi
L’illumipro-10 visualizza codici d’errore quando vengono rilevate anomalie di sistema. I codici d’errore,
le relative descrizioni e gli interventi consigliati per la loro correzione sono sintetizzati nella tabella di
seguito.
Codice
d’errore
500 Orologio in tempo reale non funzionante.
Descrizione Intervento necessario
501
504 Tensione fuori range ammesso.
505 Tensione fuori range ammesso.
506 Tensione fuori range ammesso.
507 Tensione fuori range ammesso.
508 Temperatura interna troppo elevata.
509 Temperatura blocco A troppo elevata.
510 Temperatura blocco B troppo elevata.
502
503
511
512
513
RAM Non-Volatile (NVRAM) non
funzionante.
Errore Firmware: il blocco termico non
riscalda correttamente.
Errore Firmware: RAM Non-Volatile
(NVRAM) non inizializzata correttamente.
Errore Firmware: i risultati del test non
sono stati rilevati correttamente dalla
RAM Non-Volatile (NVRAM).
Errore Firmware: i parametri dei
dispositivi non sono stati rilevati
correttamente dalla RAM Non-Volatile
(NVRAM).
Errore Firmware: impossibile leggere
correttamente lo stato del blocco.
Rivolgersi all’Assistenza Tecnica Meridian
Bioscience al numero +1 513-271-3700
(USA), al distributore locale, o al Meridian
Bioscience Europe al numero +39 0331 433
636, per ricevere assistenza tecnica o per
concordare un intervento.
Spostare l’apparecchio in un ambiente più
fresco.
Spegnere l’apparecchio e attendere che si
raffreddi.
Spegnere lo strumento.
Riaccendere lo strumento e attendere il
completamento del test POST. Rivolgersi
all’Assistenza Tecnica Meridian Bioscience
al numero +1 513-271-3700 (USA), al
distributore locale, o al Meridian
Bioscience Europe al numero +39 0331 433
636, per ricevere assistenza tecnica se il
problema persiste.
illumipro-10 Manuale dell’operatore: ITALIANO Página 42
Copyright© Meridian Bioscience, Inc.
SN11007, REV. 07/2010
Page 43

Manualedell’operatore
Appendice IV
illumipro-10 Informazioni sul lettore di codici a barre
L’illumipro-10 consente l’inserimento dei codici identificativi dei campioni mediante codici a barre. Il
lettore di codici a barre è collocato sul davanti dello strumento. Il lettore è orientato verticalmente, vicino
al tastierino.
I dati di identificazione dei campioni sono limitati a 16 caratteri. Sono accettati solo codici a barre
contenenti i seguenti caratteri:
A B C D E F G H I J K L M
N O P Q R S T U V W X Y Z
0 1 2 3 4 5 6 7 8 9 -
illumipro-10 Manuale dell’operatore: ITALIANO Página 43
Copyright© Meridian Bioscience, Inc.
SN11007, REV. 07/2010
Page 44

Manualedell’operatore
Appendice V
illumipro-10 Compliance Testing Summary
The illumipro-10 has been tested and found to be in compliance with the following requirements and
Standards:
Standard Description
IEC 61010-1
IEC 61010-2-010
IEC 61010-2-081
IEC 61010-2-101
UL 61010-1
CSA C22.2# 61010-1
CSA C22.2#61010-2-010
CSA C22.2#61010-2-081
CSA C22.2#61010-2-101
Safety requirements for electrical equipment for measurement, control, and
laboratory use - Part 1: General requirements
Safety requirements for electrical equipment for measurement, control, and
laboratory use - Part 2-010: Particular requirements for laboratory equipment
for the heating of materials
Safety requirements for electrical equipment for measurement, control, and
laboratory use - Part 2-081: Particular requirements for automatic and semiautomatic laboratory equipment for analysis and other purposes
Safety requirements for electrical equipment for measurement, control and
laboratory use - Part 2-101: Particular requirements for in vitro diagnostic
(IVD) medical equipment
UL standard for Safety Electrical Equipment for Measurement, Control, and
Laboratory Use - Part 1: General Requirements
UL standard for Safety Electrical Equipment for Measurement, Control, and
Laboratory Use - Part 1: General Requirements
Safety requirements for electrical equipment for measurement, control, and
laboratory use - Part 2-010: Particular requirements for laboratory equipment
for the heating of materials
Safety Requirements for Electrical Equipment for Measurement, Control and
Laboratory Use - Part 2-081: Particular Requirements for Automatic and
Semi-Automatic Laboratory Equipment for Analysis and Other Purposes
Safety Requirements for Electrical Equipment for Measurement, Control, and
Laboratory use - Part 2-101: Particular Requirements for In Vitro Diagnostic
(IVD) Medical Equipment
illumipro-10 Manuale dell’operatore: ITALIANO Página 44
Copyright© Meridian Bioscience, Inc.
SN11007, REV. 07/2010
Page 45

Operator’sManual
Manuel de l’opérateur
illumipro‐10Manueldel’opérateur:FRANÇAIS Page45
Copyright©MeridianBioscience,Inc.
SN11007,RÉV03/2010
Page 46

Manueldel’opérateur
Table des matières
Fonction et utilisation prévues de l’instrument ................................................................................... 47
Procédures et critères d’installation ...................................................................................................... 47
Principes de fonctionnement .............................................................................................................................. 49
Caractéristiques de performances et spécifications .................................................................................... 49
Instructions d’utilisation ....................................................................................................................................... 52
Procédures d’étalonnage ...................................................................................................................................... 59
Précautions et limites opérationnelles .................................................................................................. 61
Entretien et maintenance ........................................................................................................................ 62
illumipro-10 liste de contrôle pour la configuration et l’installation ......................................... Annexe I
illumipro-10 registre de décontamination .................................................................................. Annexe II
illumipro-10 codes d’erreur et dépannage ............................................................................... Annexe III
illumipro-10 informations sur le lecteur de code à barres ...................................................... Annexe IV
illumipro-10 Compliance Testing Summary ............................................................................... Annexe V
illumipro-10 Manuel de l’opérateur: FRANÇAIS Page 46
Copyright© Meridian Bioscience, Inc.
SN11007, REV. 07/2010
Page 47

Manueldel’opérateur
Fonction et utilisation prévues de l’instrument
L’illumipro-10 est un système automatisé d’amplification isotherme et de détection qui s’utilise avec les
produits d’amplification isotherme induite par la boucle illumigene de Meridian Bioscience, Inc.
L’illumipro-10 est conçu pour être utilisé par des professionnels qualifiés en laboratoires.
Procédures et critères d’installation
L’illumipro-10 et ses accessoires sont correctement emballés pour éviter tout dommage pendant
l’expédition à l’utilisateur final. Avant l’installation, l’emballage d’expédition et le conditionnement
d’illumipro-10 doivent être inspectés afin de détecter les dommages éventuels. Une instrumentation
endommagée ne doit pas être installée, car cela pourrait présenter des risques pour l’utilisateur final.
Signaler tout dommage au service technique de Meridian au 513-271-3700 (États-Unis), à votre
revendeur local, ou à Meridian Bioscience Europe, au 39 0331 433 636.
Contenu de l’emballage de l’illumipro-10
c Système automatisé d’amplification isotherme et de détection illumipro-10
d Bloc et cordon d’alimentation illumipro-10
e Normes de vérification illumipro-10
f Classeur du manuel de l’opérateur illumipro-10
g Câble USB illumipro-10
Contenu de l’emballage de l’imprimante thermique externe (Catalogue 610173; expédié
séparément):
c Imprimante
d Câble d’imprimante
e Bloc d’alimentation de l’imprimante (adaptateur linéaire 12 V c.c.)
f Rouleau de papier thermique (1 rouleau)
Accessoires illumipro-10 en option
c Clavier externe (Catalogue 610174, expédié séparément.)
Manuel de l’opérateur illumipro-10 (SN11007; expédié séparément.)
illumipro-10 Manuel de l’opérateur: FRANÇAIS Page 47
Copyright© Meridian Bioscience, Inc.
SN11007, REV. 07/2010
Page 48

Manueldel’opérateur
Installation d’illumipro-10
L’installation de l’illumipro-10 et de ses accessoires peut s’effectuer après l’inspection du contenu et
l’examen des critères décrits dans le présent manuel de l’utilisateur. L’annexe I contient une liste de
contrôle général pour la configuration et l’installation de l’illumipro-10.
L’illumipro-10 doit être placé sur une surface solide et plane. Configurez l’utilisation de l’instrument tel
que décrit dans le tableau ci-dessous.
Composant Symbole Instructions d’installation
Imprimante
Branchez l’imprimante externe à l’illumipro-10 avec les câbles
fournis. Le raccord de l’imprimante est situé à l’arrière de
l’instrument et est identifié par le symbole illustré.
Sécurisez le branchement de l’imprimante et connectez le câble du
bloc d’alimentation fourni à l’imprimante.
Bloc
d’alimentation
12 V -----
à 4,5 A
Connectez le câble du bloc d’alimentation fourni dans l’emballage
de l’illumipro-10 à l’unité. Le raccord du bloc d’alimentation est
situé à l’arrière de l’instrument. Le port de raccordement du bloc
d’alimentation est identifié par le symbole illustré. Raccordez le
câble du bloc d’alimentation au boîtier du bloc d’alimentation.
Branchez les fiches de l’illumipro-10 et les cordons d’alimentation
de l’imprimante à une prise de courant appropriée.
Clavier externe Connectez le clavier externe en option à l’unité avec les câbles
fournis. Le branchement du clavier externe est situé à l’arrière de
l’instrument et est identifié par le symbole illustré.
REMARQUE: l’installation du clavier doit s’effectuer lorsque
l’illumipro-10 est hors tension.
Configuration d’illumipro-10
La configuration de l’instrument s’effectue dans le menu SYSTÈME. L’utilisateur peut régler le format de
l’heure, de la date et la langue préférée.
Vérification des performances d’illumipro-10
La vérification des performances doit s’effectuer après l’installation et avant l’utilisation de l’illumipro-10.
La vérification optique s’effectue conformément aux instructions fournies dans le menu ENTRETIEN.
illumipro-10 Manuel de l’opérateur: FRANÇAIS Page 48
Copyright© Meridian Bioscience, Inc.
SN11007, REV. 07/2010
Page 49

Manueldel’opérateur
Principes de fonctionnement
L’illumipro-10 est un système automatisé d’amplification isotherme et de détection des séquences
d’acides nucléiques cibles présentes dans des spécimens humains. L’instrument s’utilise avec les
produits de diagnostic in vitro d’amplification induite par la boucle illumigene de Meridian Bioscience, Inc.
L’illumipro-10 est un instrument de laboratoire fonctionnant à l’aide d’un menu équipé de deux blocs
indépendants de traitement d’échantillons, appelés Bloc A et Bloc B. Le chauffage des échantillons et la
détection optique s’effectuent jusqu’à cinq appareils illumigene à deux chambres par bloc. Chaque
appareil illumigene à deux chambres contient une chambre d’échantillons et une chambre de contrôle.
L’amplification de l’ADN cible se produit pendant le cycle de chauffe et entraîne la formation de précipités
détectés par le système optique de l’illumipro-10. Le précipité généré par la présence de l’ADN cible
amplifié entraîne une solution à réaction trouble de l’échantillon/du contrôle, qui est ensuite mesurée par
absorbance. L’illumipro-10 utilise le changement de turbidité de chaque solution à réaction de
l’échantillon/du contrôle pour indiquer les résultats des analyses, tels que NON VALIDE, POSITIF ou
NÉGATIF.
L’illumipro-10 fonctionne en quatre modes de base: ANALYSE, RÉSULTATS, ENTRETIEN et
SYSTÈME. Le choix de l’analyse et l’amplification de l’échantillon s’effectuent dans le mode ANALYSE;
les résultats du test sont gérés dans le mode RÉSULTATS; la configuration de base de l’instrument
s’effectue dans le mode SYSTÈME; et la vérification des performances optiques s’effectue dans le mode
ENTRETIEN.
Caractéristiques de performances et spécifications
Caractéristiques de performances
L’illumipro-10 est un système automatisé d’amplification isotherme et de détection qui s’utilise avec les
produits d’amplification isotherme induite par la boucle illumigene de Meridian Bioscience, Inc. La
conception de l’illumipro-10 intègre une interface utilisateur simple qui comprend un clavier numérique,
un écran à cristaux liquides (LCD), un lecteur de code à barres, une imprimante et un clavier externe en
option. Les instructions de fonctionnement contrôlées par le menu s’affichent et l’utilisateur saisit des
commandes dans l’instrument en sélectionnant des options à partir du clavier.
L’amplification isotherme s’effectue grâce à deux blocs de chauffage contrôlés de manière indépendante,
capables de fonctionner entre 55 et 65 C et à 1 C du point de réglage de la température. Le point de
réglage de la température de l’amplification isotherme est défini par l’analyse illumigene sélectionnée.
La durée de l’amplification isotherme est contrôlée par le minuteur interne de l’illumipro-10. Lorsqu’il est
en cours de fonctionnement, l’illumipro-10 affiche « Test en cours » ainsi que la température du bloc et le
temps d’incubation restant.
illumipro-10 Manuel de l’opérateur: FRANÇAIS Page 49
Copyright© Meridian Bioscience, Inc.
SN11007, REV. 07/2010
Page 50

Manueldel’opérateur
La détection par amplification de l’ADN est effectuée par le système optique de l’illumipro-10. Chaque
bloc illumipro-10 contient des diodes laser qui s’illuminent à 650 ± 20 nm et les détecteurs
correspondants surveillent la transmission de la lumière à travers chaque puits illumipro-10. L’illumipro-
10 effectue une vérification initiale du système optique avant le démarrage. Les défaillances observées
dans le système optique désactivent le bloc de l’instrument jusqu’à la résolution du problème. Après une
vérification réussie du système optique, l’illumipro-10 vérifie la présence d’un dispositif de test
illumigene dans chaque puits. L’illumipro-10 saisit automatiquement une identification de l’échantillon
du « PUITS VIDE » pour tous les puits où le dispositif de test ne peut être détecté. L’illumipro-10
mesure l’absorbance de chaque dispositif de test illumigene au début et à la fin de l’incubation de
l’amplification isotherme. Les résultats de l’échantillon peuvent indiquer NON VALIDE, POSITIF ou
NÉGATIF en fonction des changements observés dans l’absorbance.
Les capacités de l’illumipro-10 sont les suivantes:
• Les autodiagnostics s’effectuent à la mise sous tension et au démarrage.
• L’autodiagnostic de l’évaluation du dispositif du test et la vérification du chemin optique.
• La détection de la fermeture du couvercle et le dispositif de fermeture du couvercle.
• Le bloc de chauffage thermique avec détection optique à chaque puits et émission/absorbance visible
de lumière (650 ± 20 nm).
• Réveil avertisseur avec affichage en temps réel du temps de traitement de l’analyse.
• Interface utilisateur LCD simple pour la configuration de l’instrument, le choix du programme et la
saisie de l’identification d’un échantillon.
• Lecteur de code à barres pour entrer l’identification de l’échantillon.
• Clavier externe disponible pour entrer l’identification de l’échantillon.
• Imprimante auxiliaire pour la notification des résultats.
• Contrôle des rémanences de produits d’amplification à travers l’utilisation du dispositif de test
autonome illumigene.
illumipro-10 Manuel de l’opérateur: FRANÇAIS Page 50
Copyright© Meridian Bioscience, Inc.
SN11007, REV. 07/2010
Page 51

Manueldel’opérateur
Spécifications d’illumipro-10
• Spécifications électriques
Plage de tension: 120 V a.c.
Plage de fonctionnement, alimentation: 100 – 240 V a.c., 50/60 Hz
Tension et courant nominaux: 12 V c.c., 4,5 Amp
• Spécifications physiques
Dimensions : 21 cm x 29,2 cm x 9,5 cm
Poids : 2,95 ± 0,05 kg
• Spécifications environnementales
Température de fonctionnement: 15 – 30 C
Température de stockage: 10 – 40 C
Humidité relative, fonctionnement: 10 – 90 %, sans condensation
Humidité relative, stockage: 10 – 95 %
Spécifications de l’imprimante
• Spécifications électriques
Tension d’alimentation (SMPS) Tension d’entrée (S, P) 12 V c.c.
• Spécifications environnementales
Température de fonctionnement: 0 – 40 C
Température de stockage: -10 – 50 C
Humidité relative, fonctionnement: 30 – 80 %
Humidité relative, stockage: 10 – 90 %
illumipro-10 Manuel de l’opérateur: FRANÇAIS Page 51
Copyright© Meridian Bioscience, Inc.
SN11007, REV. 07/2010
Page 52
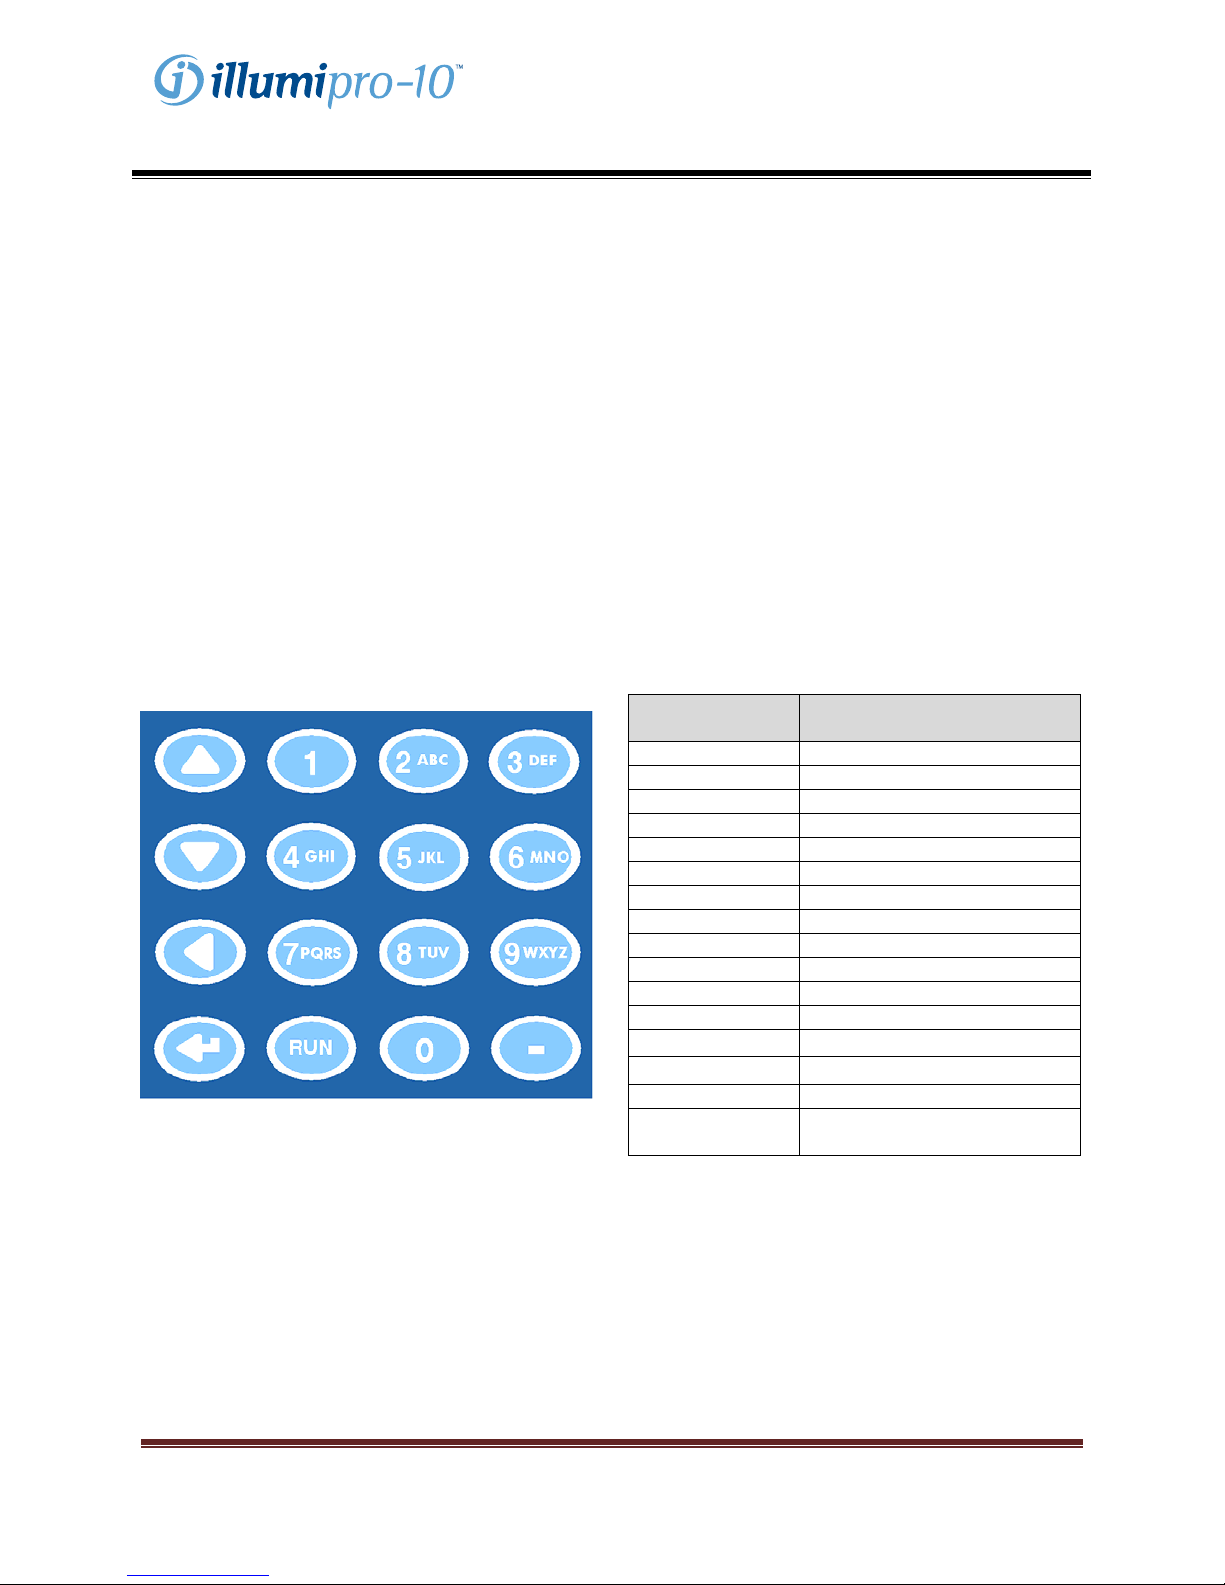
Manueldel’opérateur
Instructions d’utilisation
L’illumipro-10 fonctionne en quatre modes de base: ANALYSE, RESULTATS, ENTRETIEN et
SYSTÈME. Le choix de l’analyse et l’amplification de l’échantillon s’effectuent dans le mode ANALYSE;
les résultats du test sont gérés dans le mode RESULTATS; et la configuration de base de l’instrument
s’effectue dans le mode SYSTEME. Le mode ENTRETIEN est réservé aux professionnels d’entretien
qualifiés et n’est pas accessible à l’utilisateur du laboratoire. Les informations générales relatives à
chaque mode de fonctionnement sont fournies dans cette section.
Clavier numérique
Les fonctions de l’illumipro-10 sont gérées sur le clavier. Le clavier offre une interface utilisateur simple
et permet de naviguer à travers le menu, d’entrer des caractères alphanumériques pour l’identification de
l’échantillon et de lancer l’exécution de l’analyse. Les fonctions du clavier seront mentionnées tout au
long de ce manuel; la disposition du clavier et les symboles utilisés sont définis ci-dessous.
REMARQUE: Pour les boutons du clavier ayant
plusieurs caractères, défilez en appuyant
plusieurs fois sur le bouton.
Bouton du
clavier
1 <ESPACE>, 1
2 A, B, C, 2
3 D, E, F, 3
4 G, H, I, 4
5 J, K, L, 5
6 M, N, O, 6
7 P, Q, R, S, 7
8 T, U, V, 8
9 W, X, Y, Z, 9
0 0
- -
EXÉCUTER Exécuter le protocole
Caractère/Fonction
Défiler vers le haut
Défiler vers le bas
Précédent, espace arrière
Entrée
d’analyse sélectionné
illumipro-10 Manuel de l’opérateur: FRANÇAIS Page 52
Copyright© Meridian Bioscience, Inc.
SN11007, REV. 07/2010
Page 53
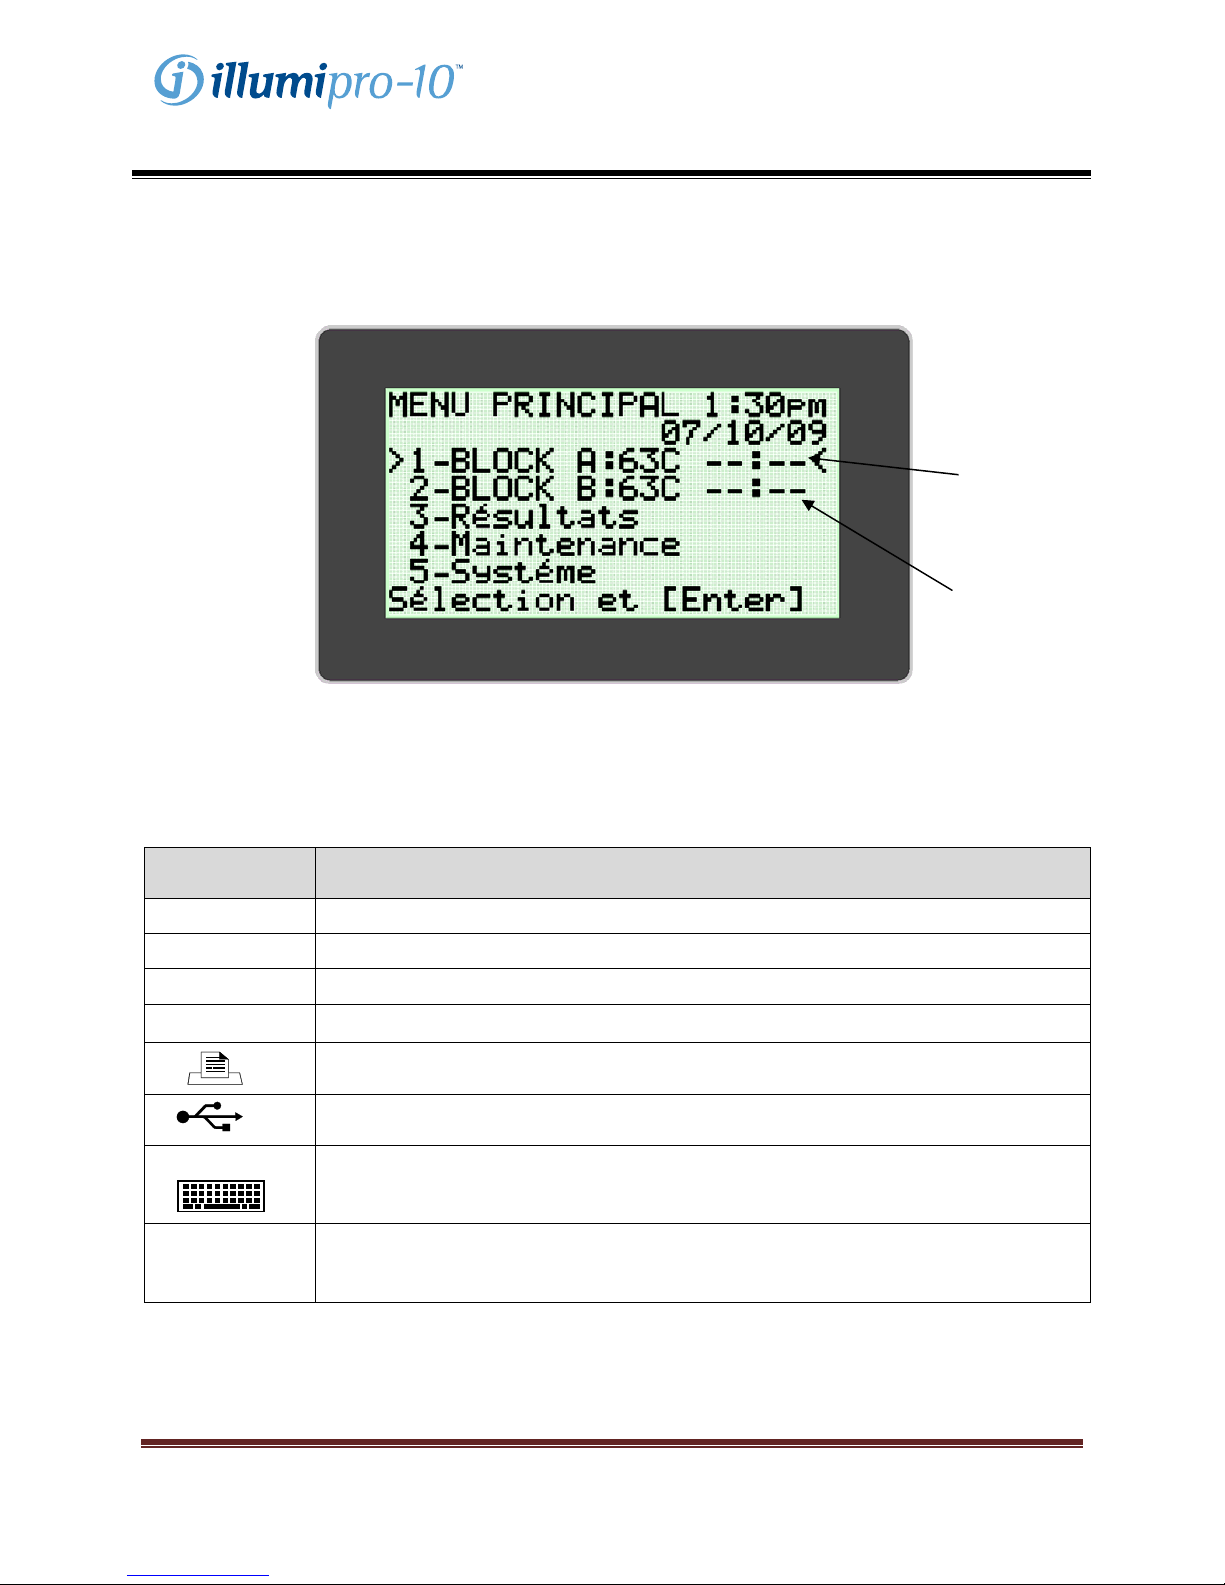
Manueldel’opérateur
Menu principal
L’écran du menu principal permet à l’utilisateur de visualiser l’heure, la date, l’état de l’analyse et la
température du bloc. Le menu principal permet d’accéder aux modes Résultats, Entretien et Système.
Étatdubloc
Températuredu
bloc
Conventions utilisées:
Représentation
graphique
**:** ETAT DU BLOC: réchauffement; le bloc n’est pas à la bonne température
--:-- ETAT DU BLOC: à l’arrêt; le bloc est à la bonne température
!!! Avertissement, l’instrument nécessite votre attention
… Indicateur d’agrandissement du menu d’analyse
Imprimante: connectez l’imprimante à l’unité par ce port.
Port USB: connectez l’unité à l’ordinateur externe par ce port.
PS/2
12 V -----
à 4,5 A
Description
(Arrière de l’instrument)
(Arrière de l’instrument)
Clavier externe: connectez l’unité au clavier externe (en option) par ce port.
(Arrière de l’instrument)
Bloc d’alimentation de l’illumipro-10: raccordez le bloc d’alimentation à l’unité par ce
port.
(Arrière de l’instrument)
illumipro-10 Manuel de l’opérateur: FRANÇAIS Page 53
Copyright© Meridian Bioscience, Inc.
SN11007, REV. 07/2010
Page 54
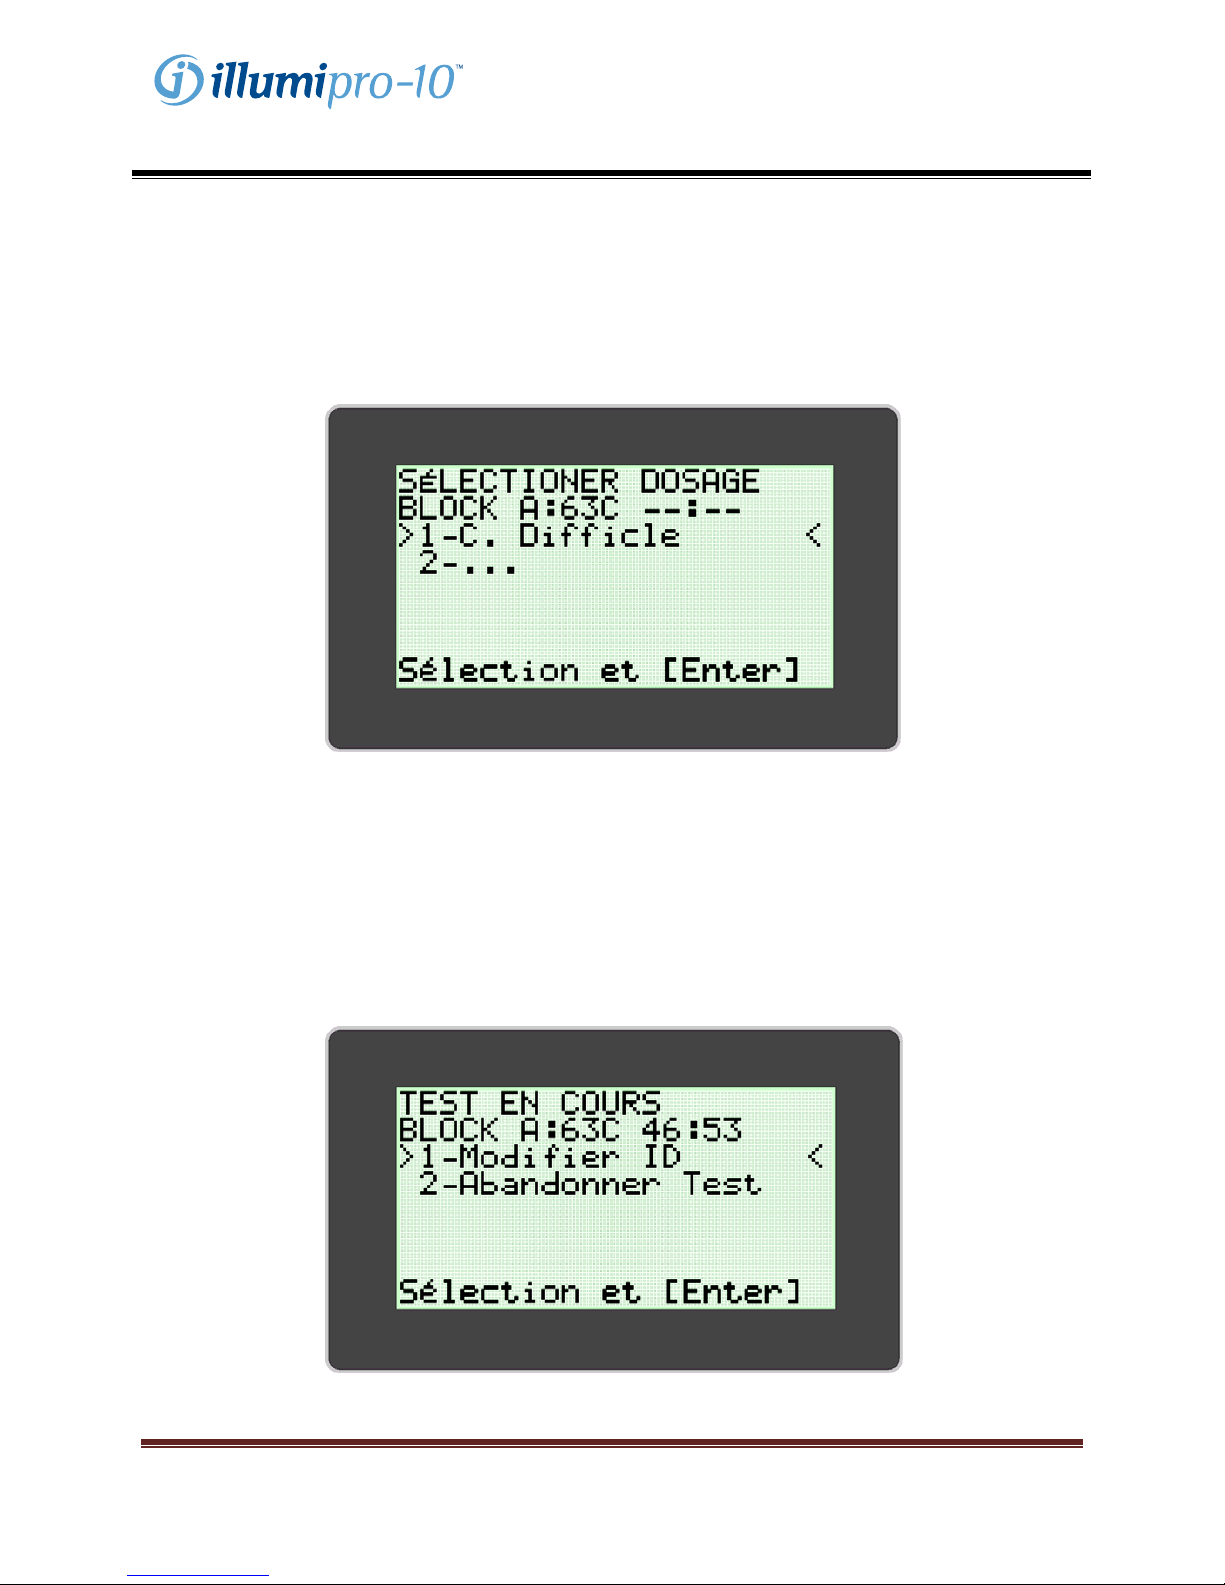
Manueldel’opérateur
MODE ANALYSE
Le MODE ANALYSE permet à l’utilisateur d’accéder aux programmes et de les exécuter sur l’illumipro-
10. L’utilisateur sélectionne le bloc à utiliser dans le menu principal, puis sélectionne l’analyse à
effectuer. Chaque bloc peut être sélectionné et exécuté de manière indépendante. Lors de la sélection
du bloc à utiliser, le menu du Mode Analyse s’affiche. L’utilisateur sélectionne l’analyse à effectuer et suit
les instructions qui s’affichent à l’écran de l’illumipro-10.
L’écran de l’illumipro-10 indique qu’un test est en cours et invite l’utilisateur à entrer les informations
relatives à l’identification de l’échantillon ou à abandonner le test. Les informations relatives à
l’identification de l’échantillon peuvent être saisies directement à l’aide du clavier, numérisées à l’aide du
lecteur de code à barres de l’illumipro-10 ou entrées à l’aide du clavier externe. Les informations
supplémentaires relatives au lecteur de code à barres de l’illumipro-10 sont fournies dans l’Annexe IV du
présent manuel.
L’utilisateur entre les Informations relatives à l’échantillon en suivant les instructions qui s’affichent sur
l’écran de l’illumipro-10 et lance l’exécution de l’analyse.
REMARQUE: la température du bloc s’affiche dans le champ « TEMP ». Le champ « État du bloc »
affiche l’heure indiquée par le minuteur jusqu’à la fin de l’analyse.
illumipro-10 Manuel de l’opérateur: FRANÇAIS Page 54
Copyright© Meridian Bioscience, Inc.
SN11007, REV. 07/2010
Page 55

Manueldel’opérateur
L’illumipro-10 exécute le programme de l’analyse sélectionnée et l’état du bloc sur le MENU PRINCIPAL
affiche « 00:00 ». Les résultats de l’analyse sélectionnée peuvent être visualisés en sélectionnant le bloc
qui indique l’état terminé et en suivant les instructions qui s’affichent à l’écran de l’illumipro-10. Les
résultats peuvent être imprimés manuellement en sélectionnant l’option « Imprimer » à la fin de l’écran
des résultats ou en activant la fonction « Autoimpression » lors de la configuration du système.
À la fin de l’analyse, l’utilisateur doit retirer les dispositifs illumigene de l’unité et les mettre au rebut de
manière appropriée.
REMARQUE: des précautions doivent être prises pour éviter la contamination de l’équipement et
de l’espace de travail par des acides nucléiques cibles et/ou amplifiés. N’ouvrez PAS les
dispositifs illumigene à la fin de l’analyse.
illumipro-10 Manuel de l’opérateur: FRANÇAIS Page 55
Copyright© Meridian Bioscience, Inc.
SN11007, REV. 07/2010
Page 56
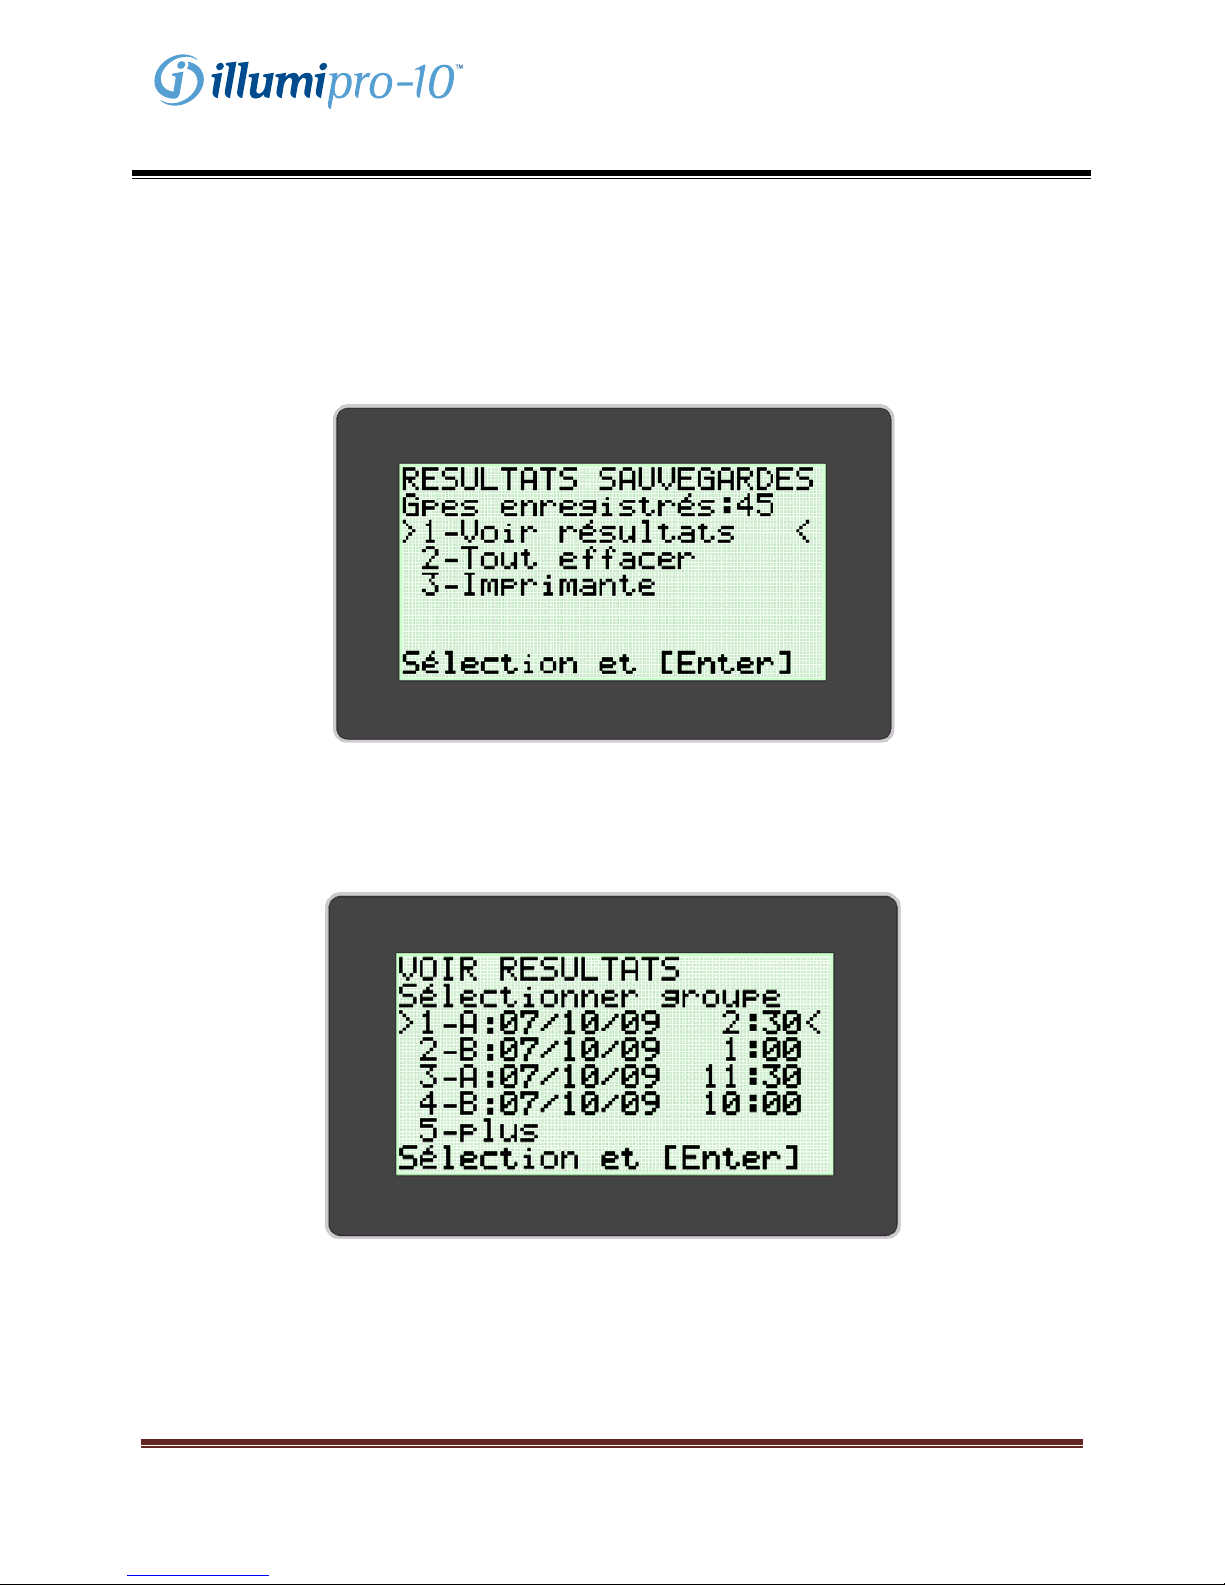
Manueldel’opérateur
MODE RÉSULTATS
Le MODE RÉSULTATS permet à l’utilisateur de visualiser et de supprimer les résultats stockés et
d’activer l’impression automatique. L’illumipro-10 stocke jusqu’à 1000 résultats de test individuels ou
200 lots. L’instrument affiche un avertissement pour l’utilisateur lorsque les résultats stockés approchent
la capacité maximale. Pour accéder au MODE RESULTATS, suivez les instructions qui s’affichent à
l’écran de l’illumipro-10.
L’utilisateur peut visualiser les résultats en sélectionnant l’option « Afficher les résultats ». Le menu
« Afficher les résultats » permet à l’utilisateur d’accéder aux données stockées par date et par bloc. Les
données du lot sélectionné s’affichent et peuvent être imprimées manuellement en sélectionnant l’option
« Impression » à la fin de l’écran des résultats.
illumipro-10 Manuel de l’opérateur: FRANÇAIS Page 56
Copyright© Meridian Bioscience, Inc.
SN11007, REV. 07/2010
Page 57
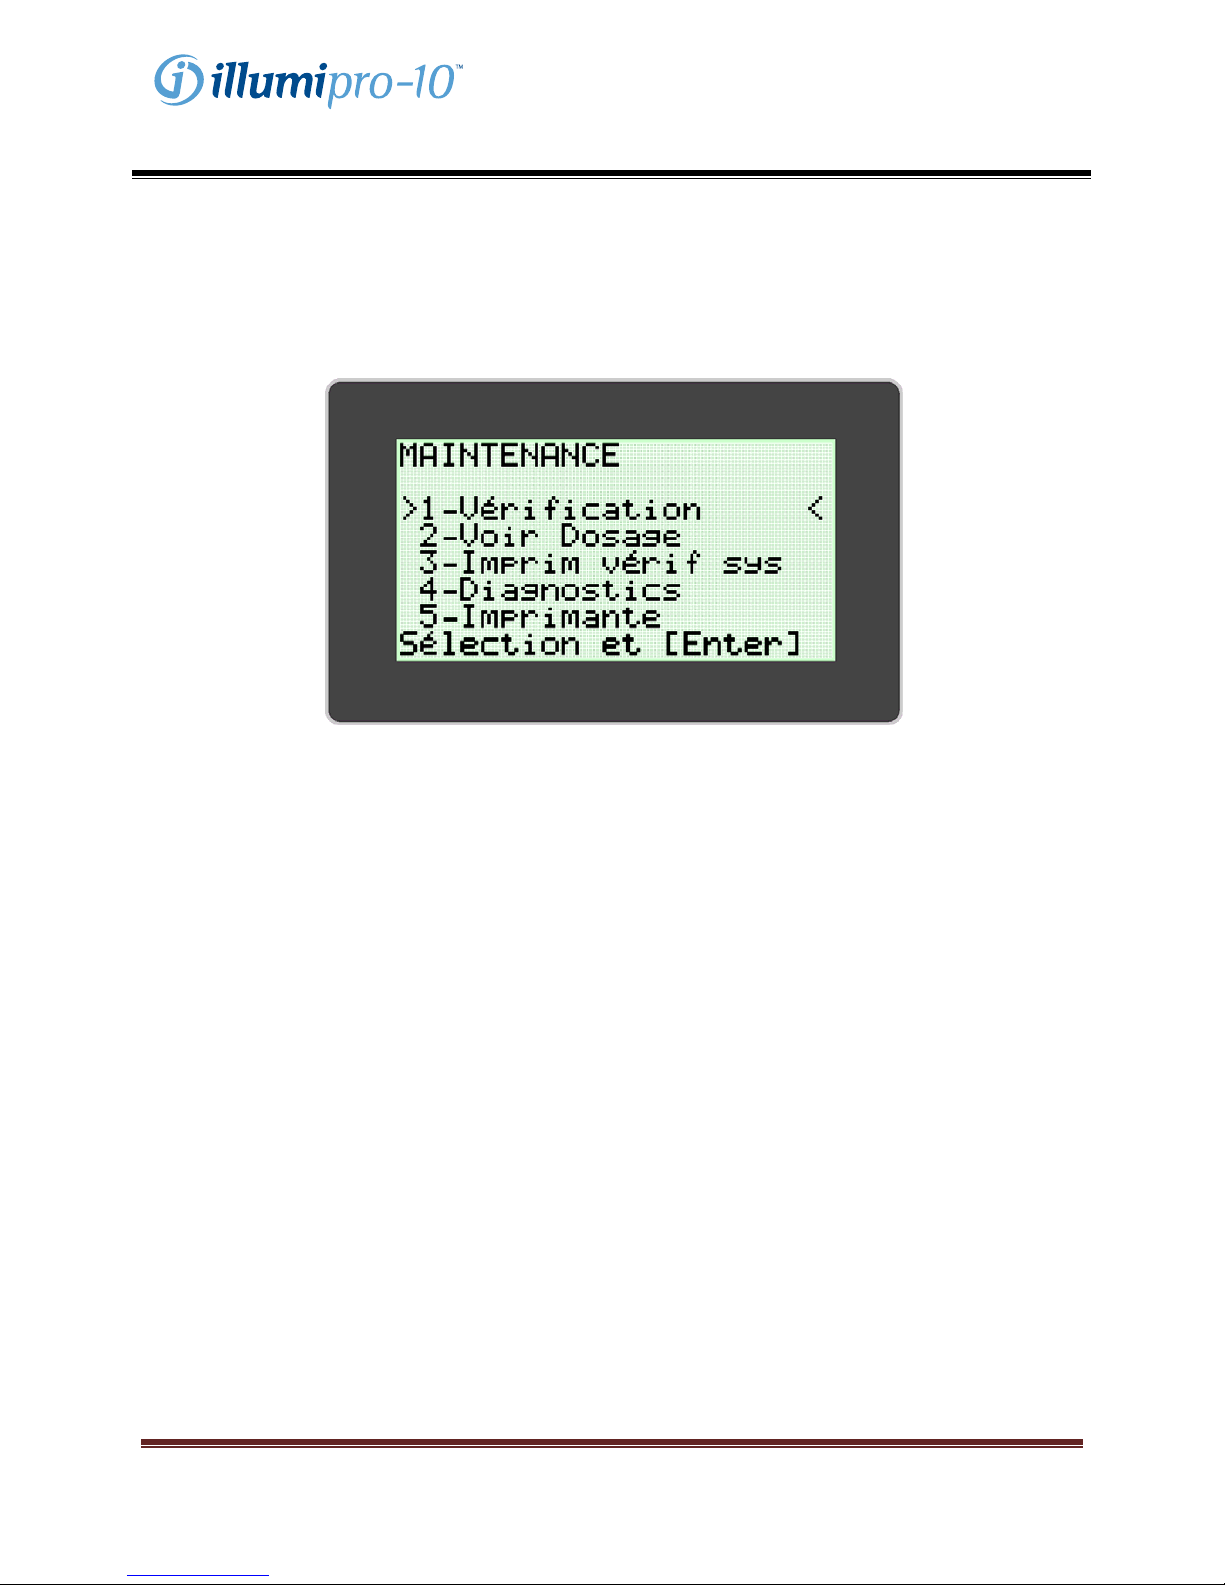
Manueldel’opérateur
MODE ENTRETIEN
Le MODE ENTRETIEN permet à l’utilisateur de procéder à la vérification du système optique, d’afficher
les paramètres d’analyse, d’imprimer les informations relatives à la vérification du système et de
configurer l’imprimante. REMARQUE: le menu du MODE ENTRETIEN contient une option
« Diagnostic », à laquelle seul le personnel d’entretien formé peut accéder.
La VERIFICATION DU SYSTEME OPTIQUE est nécessaire pour assurer le bon fonctionnement de
l’illumipro-10. Les instructions relatives à l’exécution de la vérification du système optique sont fournies
dans la section PROCÉDURE D’ÉTALONNAGE du présent manuel.
illumipro-10 Manuel de l’opérateur: FRANÇAIS Page 57
Copyright© Meridian Bioscience, Inc.
SN11007, REV. 07/2010
Page 58

Manueldel’opérateur
MODE SYSTEME
Le MODE SYSTEME permet à l’utilisateur de régler l’heure et la date, ainsi que leur format, de configurer
l’imprimante et le lecteur de code à barres, de définir la langue de l’utilisateur et d’afficher les informations
du système. L’utilisateur peut régler l’heure, la date ou la langue (anglais, italien, français, espagnol et
allemand) en fonction des exigences locales et/ou des préférences. Le MODE SYSTEME permet à
l’utilisateur d’activer ou de désactiver l’impression automatique et le lecteur de code à barres. La
configuration du système s’effectue en suivant les instructions qui s’affichent à l’écran de l’illumipro-10.
REMARQUE: l’heure et la date ne peuvent pas être modifiées lorsqu’un test est en cours
d’exécution. La langue ne peut pas être modifiée lorsqu’un test est en cours d’exécution.
illumipro-10 Manuel de l’opérateur: FRANÇAIS Page 58
Copyright© Meridian Bioscience, Inc.
SN11007, REV. 07/2010
Page 59

Manueldel’opérateur
Procédures d’étalonnage
AUTOTEST AU DÉMARRAGE
L’illumipro-10 effectue automatiquement en interne un autotest au démarrage (Power-On Self Test,
POST) à chaque mise sous tension de l’instrument. Le test POST confirme que les composantes
logicielles et matérielles du système fonctionnent comme prévu. Un test POST réussi est suivi d’un
signal sonore. L’échec du test POST est indiqué par un code d’erreur. Des informations
supplémentaires sur les codes d’erreur sont disponibles dans l’Annexe III du présent manuel.
VÉRIFICATION DU SYSTEME OPTIQUE
L’étalonnage de l’illumipro-10 n’est pas nécessaire. La vérification du SYSTEME OPTIQUE de chaque
bloc doit s’effectuer tous les mois afin de garantir un fonctionnement correct. La vérification s’effectue à
l’aide de la norme de vérification rouge contenue dans l’illumipro-10. Les instructions relatives aux
étapes de vérification du système optique sont présentées sur l’écran de l’illumipro-10, via le menu du
MODE ENTRETIEN.
illumipro-10 Manuel de l’opérateur: FRANÇAIS Page 59
Copyright© Meridian Bioscience, Inc.
SN11007, REV. 07/2010
Page 60

Manueldel’opérateur
La vérification du système optique comprend deux étapes. La première étape permet de s’assurer que le
chemin optique est propre et non obstrué. La deuxième étape confirme la transmission et la détection
appropriées de légères particules émises. La vérification de la transmission et de la détection nécessite
l’utilisation de la norme de vérification rouge de l’illumipro-10. L’illumipro-10 parcourt le protocole de
vérification et invite l’utilisateur à agir, si nécessaire.
La norme de vérification rouge doit être solidement installée dans les puits du bloc de chauffage. La
norme de vérification doit être orientée par le numéro d’inventaire à la position du Puits 1.
À la fin du protocole de vérification, l’illumipro-10 affiche le résultat du test de vérification qui peut être
« Succès » ou « Échec ». Si le test de vérification ne fournit pas de résultats acceptables, l’utilisateur doit
s’assurer que le chemin optique n’est pas obstrué, que la norme ne comporte pas de défauts visibles et
recommencer le test de vérification. Si le nouveau test ne donne pas de résultats de vérification
probants, contactez l’assistance technique de Meridian pour obtenir de l’aide.
REMARQUE: chaque bloc de l’illumipro-10 fonctionne de manière indépen dante. Par exemple, l’échec
d’un test de vérification du bloc A n’empêche pas l’utilisation du bloc B en cas de réussite du test de
vérification du bloc B.
AVERTISSEMENT: ne laissez PAS de normes de vérification dans l’illumipro-10. Elles peuvent
chauffer et brûler l’utilisateur. L’exposition à la température risque d’affecter la performance des
normes de vérification.
illumipro-10 Manuel de l’opérateur: FRANÇAIS Page 60
Copyright© Meridian Bioscience, Inc.
SN11007, REV. 07/2010
Page 61

Manueldel’opérateur
Précautions et limites opérationnelles
AVERTISSEMENTS:
ATTENTION: risque de danger. L’illumipro-10 est un appareil
électromécanique pouvant provoquer un choc ou des blessures physiques pour
IPX-0
l’utilisateur, s’il n’est pas utilisé conformément aux procédures décrites dans le
présent manuel.
RAYONNEMENT LASER: éviter toute exposition aux rayons. L’illumipro-10
contient un produit laser de catégorie 3R. Le laser ne fonctionne pas lorsque le
couvercle est en position ouverte, toutefois, des précautions doivent être prises
pendant la manipulation et l’utilisation de cet instrument.
SURFACE CHAUDE: éloignez vos mains des surfaces chaudes. L’illumipro-
10 contient un bloc de chauffage qui produit des températures comprises entre 55
– 65 C pendant son fonctionnement. Ous devez faire attention à éviter tout
contact direct avec le bloc de chauffage.
ATTENTION: rayonnement laser. L’illumipro-10 contient un produit laser. Seul
le personnel qualifié doit procéder à l’entretien de l’unité, car l’exposition optique
aux rayons laser peut provoquer des blessures.
ATTENTION: protégez l’instrument de l’eau. L’illumipro-10 ne protège pas de
l’évacuation de l’eau. Ne pas exposer l’instrument à l’eau ni le submerger.
PRÉCAUTIONS:
• L’illumipro-10 est un instrument automatisé qui utilise la technologie d’amplification isotherme
induite par la boucle. Des précautions doivent être prises pour éviter la contamination de
l’équipement et de l’espace de travail par des acides nucléiques cibles et/ou amplifiés. Seul le
personnel qualifié doit effectuer des tests moléculaires.
• L’illumipro-10 est utilisé avec les produits de diagnostic in vitro d’amplification induite par la
boucle illumigene de Meridian Bioscience, Inc. Les échantillons traités dans l’illumipro-10
doivent être manipulés conformément aux instructions d’utilisation fournies pour un produit
illumigene spécifique.
• La langue sélectionnée ne peut pas être modifiée lorsqu’un processus est en cours d’exécution.
• L’heure et la date ne peuvent pas être modifiées lorsqu’un processus est en cours d’exécution.
• Les dispositifs de vérification du système optique doivent être stockés dans le boitier fourni. Les
vérificateurs optiques doivent être protégés de la lumière et des dommages. Les dispositifs de
vérification du système optique ne doivent pas être stockés dans l’illumipro-10.
• N’échangez pas à chaud le clavier illumipro-10 en option. La touche Verrouillage des
majuscules s’illumine à la mise sous tension pour indiquer que le clavier est en ligne.
• Le clavier en option doit être branché lorsque l’illumipro-10 est hors tension.
• Lorsqu’il n’est pas utilisé, l’illumipro-10 doit être stocké le couvercle fermé.
illumipro-10 Manuel de l’opérateur: FRANÇAIS Page 61
Copyright© Meridian Bioscience, Inc.
SN11007, REV. 07/2010
Page 62

Manueldel’opérateur
Entretien et maintenance
L’entretien de l’illumipro-10 doit être effectué uniquement par des professionnels qualifiés.
Contactez le service technique de Meridian Bioscience au 513-271-3700 (États-Unis), votre
revendeur local, ou Meridian Bioscience Europe, au 39 0331 433 636 pour tout service technique
ou pour prendre des dispositions en vue de travaux d’entretien. N’ESSAYEZ PAS D’EFFECTUER
DES TRAVAUX D’ENTRETIEN SUR L’illumipro-10.
Nettoyage de la surface
Le nettoyage des surfaces extérieures de l’illumipro-10 et de la zone de travail immédiate doit s’effectuer
tous les jours si nécessaire, lorsqu’il est utilisé. Laissez l’instrument refroidir et nettoyez les surfaces à
l’aide d’un chiffon non pelucheux trempé dans une solution de nettoyage
désoxyribonucléase/ribonucléase ou une solution de javel à 10 %.
AVERTISSEMENT: le nettoyage des surfaces doit s’effectuer uniquement lorsque l’instrument est hors
tension ET déconnecté de la source d’alimentation. N’utilisez PAS de chiffons saturés pour le nettoyage.
Nettoyage du bloc de chauffage
Le nettoyage du bloc de chauffage de l’instrument doit être effectué par le personnel qualifié uniquement.
Le nettoyage du bloc de chauffage doit être effectué uniquement lorsque vous soupçonnez une
contamination du bloc de chauffage. La source de contamination du bloc de chauffage peut provenir de
l’ADN ou non. Le protocole de nettoyage suivi doit être basé sur la source de contamination comme
l’indique l’illustration ci-dessous :
• Protocole de nettoyage en cas de contamination causée par l’ADN
1. Nettoyez doucement la chambre du bloc de chauffage à l’aide d’un tampon en mousse sec.
2. Nettoyez doucement la chambre du bloc de chauffage à l’aide d’un tampon en mousse trempé
dans une solution de javel à 10 %.
3. Nettoyez doucement la chambre du bloc de chauffage à l’aide d’un tampon en mousse sec.
4. Nettoyez doucement la chambre du bloc de chauffage à l’aide d’un tampon en mousse trempé
dans de l’alcool à 90 %.
5. Nettoyez doucement la chambre du bloc de chauffage à l’aide d’un tampon en mousse sec.
N’utilisez PAS de tampons en mousse saturés pour le nettoyage.
• Protocole de nettoyage en cas de contamination non causée par l’ADN
1. Nettoyez doucement la chambre du bloc de chauffage à l’aide d’un tampon en mousse sec.
2. Nettoyez doucement la chambre du bloc de chauffage à l’aide d’un tampon en mousse sec.
3. Nettoyez doucement la chambre du bloc de chauffage à l’aide d’un tampon en mousse sec.
N’utilisez PAS de tampons en mousse saturés pour le nettoyage.
AVERTISSEMENT: le nettoyage du bloc de chauffage doit s’effectuer uniquement lorsque l’instrument
est hors tension ET déconnecté de la source d’alimentation. N’utilisez PAS de tampons en mousse
saturés pour le nettoyage.
AVERTISSEMENT: n’essayez pas de nettoyer l’illumipro-10 avec de l’air comprimé.
Procédez TOUJOURS au test de vérification optique après le nettoyage du bloc de chauffage.
illumipro-10 Manuel de l’opérateur: FRANÇAIS Page 62
Copyright© Meridian Bioscience, Inc.
SN11007, REV. 07/2010
Page 63

Manueldel’opérateur
Annexe I
illumipro-10: liste de contrôle pour la configuration et l’installation
Informations relatives à l’installation
Nom de l’installation:
Adresse de l’installation:
Informations relatives à l’instrument
Numéro de série de
l’instrument:
Lieu de l’installation:
Installation effectuée par:
Date
d’installation:
Configuration et installation
L’emballage d’expédition et le conditionnement de l’illumipro-10 ont été
inspectés afin de détecter les dommages éventuels. Aucun dommage n’a
1.
été détecté. L’installation d’un instrument endommagé peut présenter
un risque pour l’utilisateur final.
Le manuel de l’opérateur de l’illumipro-10 a été reçu et consulté. Les
2.
précautions et limites opérationnelles ont été consultées et comprises.
Le lieu de l’installation répond à toutes les spécifications électriques et
3.
environnementales décrites dans le manuel de l’opérateur de l’illumipro-10.
L’installation de l’illumipro-10 et de ses accessoires a été effectuée comme
4.
le décrit le manuel de l’opérateur.
5.
L’illumipro-10 a été mis sous tension et l’autotest au démarrage a réussi.
La configuration de l’illumipro-10 et le réglage du format de l’heure, de la
6.
date et de la langue préférée ont été effectués comme le décrit le manuel de
l’opérateur.
La vérification des performances de l’illumipro-10 a été effectuée comme
7.
le décrit le manuel de l’opérateur. Des résultats satisfaisants ont été
obtenus pour les Blocs A et B.
Une copie de l’impression relative au contrôle du système et à la vérification
8.
du système optique est jointe à ce rapport.
(Nom de la rue)
(Ville, État)
(Porte, Étage, Immeuble, etc.)
Oui
Oui
Non
Oui Oui
S.O.
Oui
Oui Oui
Oui
Oui Oui
Oui
Oui Oui
Oui
Oui Oui
Oui
Oui Oui
Oui
Oui Oui
illumipro-10 Manuel de l’opérateur: FRANÇAIS Page 63
Copyright© Meridian Bioscience, Inc.
SN11007, REV. 07/2010
Installation terminée
(Signature/Date)
Page 64
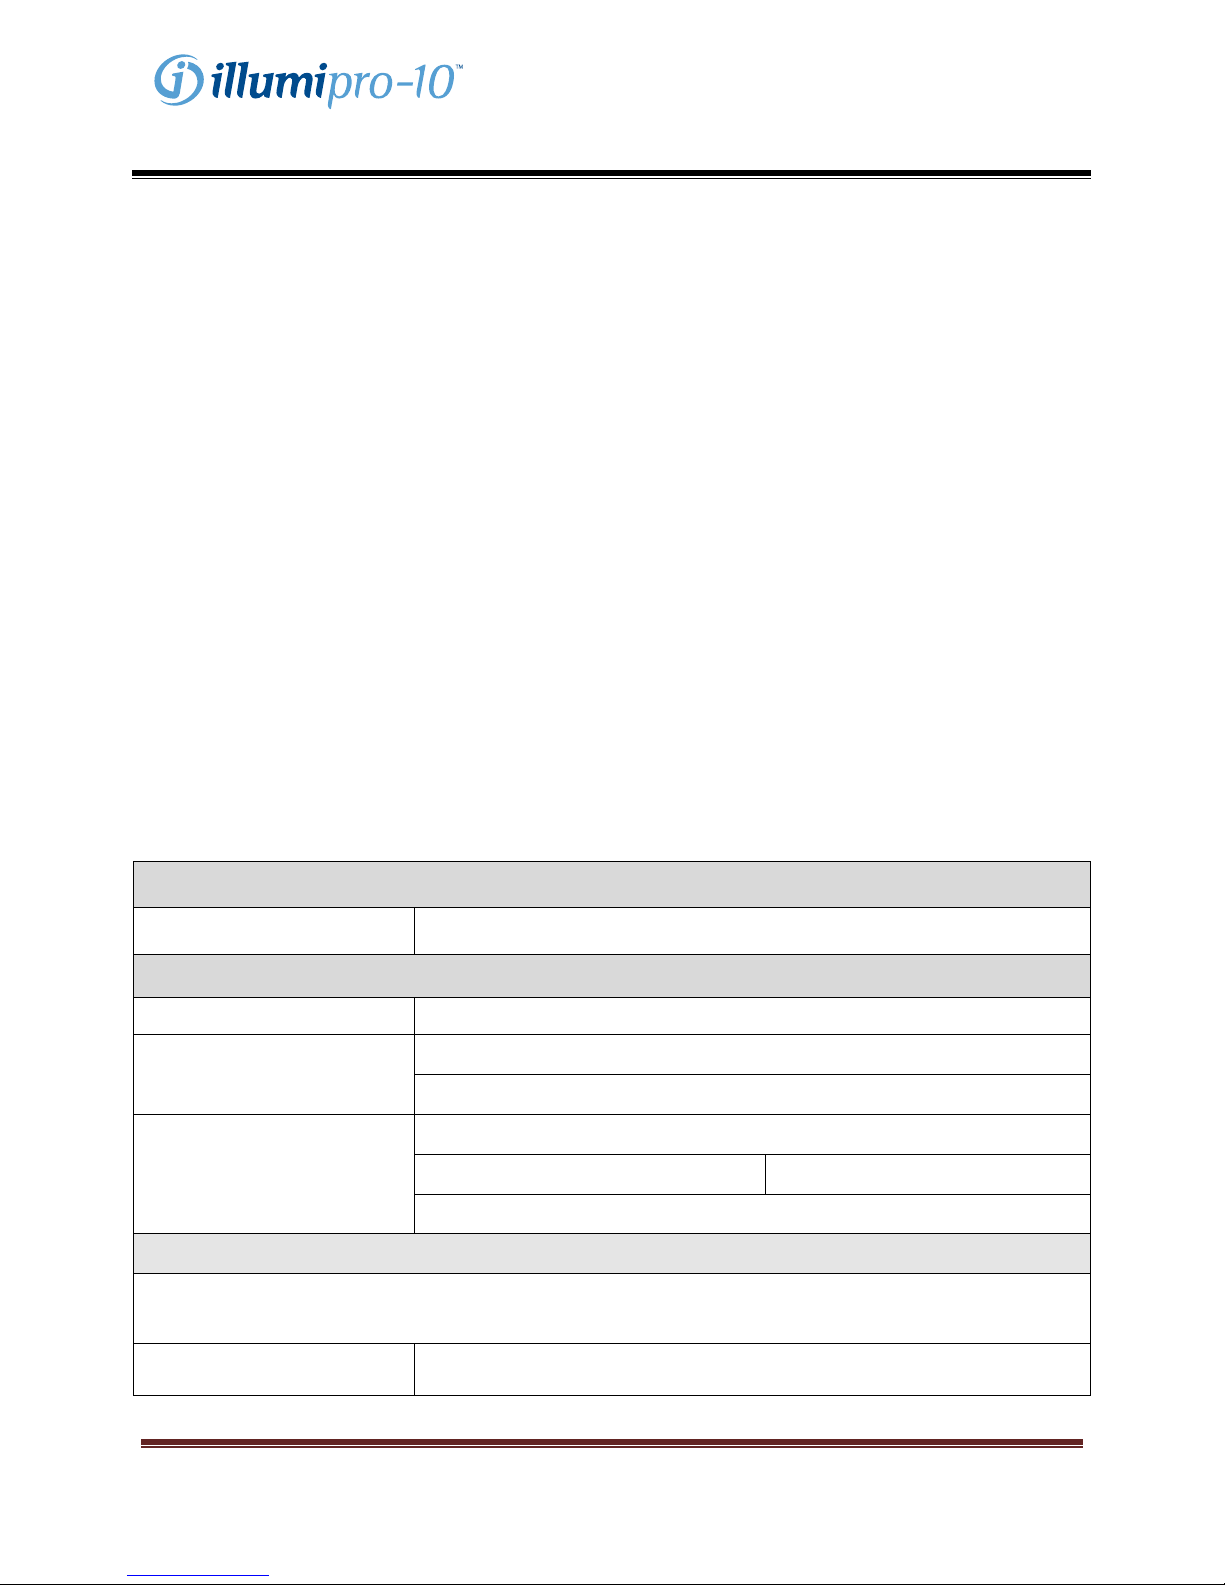
Manueldel’opérateur
Annexe II
illumipro-10: registre de décontamination
La décontamination de l’équipement de laboratoire doit s’effectuer avant l’envoi de l’instrument
pour des travaux d’entretien. Elle doit s’effectuer conformément aux instructions fournies.
Veuillez remplir les informations ci-dessous et joindre à l’instrument le rapport rempli avant de le
retourner.
Les instruments retournés pour des travaux d’entretien sans preuve de décontamination ne
seront pas soumis aux travaux d’entretien. Si l’instrument est envoyé pour des travaux
d’entretien sans documentation sur la décontamination, il sera renvoyé à l’utilisateur à ses frais.
1. Nettoyez les surfaces extérieures de l’illumipro-10 avec un chiffon non pelucheux trempé dans une
solution désinfectante à base de javel à 10 %. La durée minimale d’exposition par contact
nécessaire pour tuer des agents pathogènes à diffusion hématogène (Hépatite-A, VIH-1,
staphylococcus aureus résistant à la méthicilline [SARM], syndrome respiratoire aigu sévère [SRAS],
etc.) est d’une minute.
2. Ouvrez les couvercles A et B de l’illumipro-10. Nettoyez l’intérieur de la surface du couvercle et les
surfaces du bloc de chauffage à l’aide d’une serviette non pelucheuse trempée dans une solution
désinfectante à base de javel à 10 %. La durée minimale d’exposition par contact est d’une minute.
3. Fermez les couvercles. Joignez le rapport de décontamination de l’illumipro-10 à l’instrument.
Emballez l’instrument dans la mousse de protection et l’emballage d’expédition fournis.
Informations relatives à l’instrument
Numéro de série de
l’instrument:
Informations relatives à l’installation
Nom de l’installation:
Adresse de l’installation:
(Nom de la rue)
(Ville, État)
Coordonnées:
(Nom, titre)
(Téléphone) (Adresse électronique)
Information relative à la décontamination
L’illumipro-10 a été décontaminé comme décrit ci-dessus. Les surfaces de contact extérieures et
intérieures ont été nettoyées à l’aide d’une solution désinfectante à base de javel à 10 %. Les durées
minimales d’exposition par contact ont été surveillées.
Effectué par:
illumipro-10 Manuel de l’opérateur: FRANÇAIS Page 64
Copyright© Meridian Bioscience, Inc.
SN11007, REV. 07/2010
(Signature/Date)
Page 65

Manueldel’opérateur
Annexe III
illumipro-10: codes d’erreur et dépannage
L’illumipro-10 affiche des codes d’erreur lorsqu’il détecte des pannes du système. Les codes d’erreur,
les descriptions et les actions recommandées pour la correction sont résumés dans le tableau cidessous.
Code
d’erreur
500
501
504 Tension hors plage.
505 Tension hors plage.
506 Tension hors plage.
Description Action requise
L’horloge en temps réel ne fonctionne
pas.
La mémoire vive non volatile (NVRAM) ne
fonctionne pas.
Contactez le service technique de Meridian
Bioscience au 513-271-3700 (États-Unis),
votre revendeur local, ou Meridian
Bioscience Europe, au 39 0331 433 636
pour tout service technique ou pour
prendre des dispositions en vue de
travaux d’entretien.
507 Tension hors plage.
508 La température intérieure est trop chaude.
509
510
502
503
511
512
513
La température du Bloc A est trop
chaude.
La température du Bloc B est trop
chaude.
Erreur du micrologiciel: le bloc du
radiateur ne chauffe pas correctement.
Erreur du micrologiciel: la mémoire vive
non volatile (NVRAM) ne s’est pas
initialisée correctement.
Erreur du micrologiciel: les résultats du
test n’ont pas été correctement
téléchargés de la mémoire vive non
volatile (NVRAM).
Erreur du micrologiciel: les paramètres de
l’appareil n’ont pas été correctement
téléchargés de la mémoire vive non
volatile (NVRAM).
Erreur du micrologiciel: impossible de lire
correctement l’état du bloc.
Placez l’unité dans un environnement plus
frais
Déconnectez l’unité et attendez qu’elle
refroidisse.
Mettez l’instrument hors tension.
Rebranchez l’instrument et effectuez le
test de POST. Contactez le service
technique de Meridian Bioscience au 513-
271-3700 (États-Unis), votre revendeur
local, ou Meridian Bioscience Europe, au
39 0331 433 636 pour tout service
technique si le problème persiste.
illumipro-10 Manuel de l’opérateur: FRANÇAIS Page 65
Copyright© Meridian Bioscience, Inc.
SN11007, REV. 07/2010
Page 66

Manueldel’opérateur
Annexe IV
illumipro-10: informations sur le lecteur de code à barres
L’illumipro-10 permet d’entrer l’identification de l’échantillon à l’aide de codes à barres. Le lecteur de
code à barres a été placé à l’avant de l’instrument. Le lecteur est orienté verticalement, près du clavier.
Les informations relatives à l’identification de l’échantillon sont limitées à 16 caractères. Les codes à
barres contenant uniquement les caractères suivants seront acceptés :
A B C D E F G H I J K L M
N O P Q R S T U V W X Y Z
0 1 2 3 4 5 6 7 8 9 -
illumipro-10 Manuel de l’opérateur: FRANÇAIS Page 66
Copyright© Meridian Bioscience, Inc.
SN11007, REV. 07/2010
Page 67

Manueldel’opérateur
Annexe V
illumipro-10 Compliance Testing Summary
The illumipro-10 has been tested and found to be in compliance with the following requirements and
Standards:
Standard Description
IEC 61010-1
IEC 61010-2-010
IEC 61010-2-081
IEC 61010-2-101
UL 61010-1
CSA C22.2# 61010-1
CSA C22.2#61010-2-010
CSA C22.2#61010-2-081
CSA C22.2#61010-2-101
Safety requirements for electrical equipment for measurement, control, and
laboratory use - Part 1: General requirements
Safety requirements for electrical equipment for measurement, control, and
laboratory use - Part 2-010: Particular requirements for laboratory equipment
for the heating of materials
Safety requirements for electrical equipment for measurement, control, and
laboratory use - Part 2-081: Particular requirements for automatic and semiautomatic laboratory equipment for analysis and other purposes
Safety requirements for electrical equipment for measurement, control and
laboratory use - Part 2-101: Particular requirements for in vitro diagnostic
(IVD) medical equipment
UL standard for Safety Electrical Equipment for Measurement, Control, and
Laboratory Use - Part 1: General Requirements
UL standard for Safety Electrical Equipment for Measurement, Control, and
Laboratory Use - Part 1: General Requirements
Safety requirements for electrical equipment for measurement, control, and
laboratory use - Part 2-010: Particular requirements for laboratory equipment
for the heating of materials
Safety Requirements for Electrical Equipment for Measurement, Control and
Laboratory Use - Part 2-081: Particular Requirements for Automatic and
Semi-Automatic Laboratory Equipment for Analysis and Other Purposes
Safety Requirements for Electrical Equipment for Measurement, Control, and
Laboratory use - Part 2-101: Particular Requirements for In Vitro Diagnostic
(IVD) Medical Equipment
illumipro-10 Manuel de l’opérateur: FRANÇAIS Page 67
Copyright© Meridian Bioscience, Inc.
SN11007, REV. 07/2010
Page 68

Manueldel’opérateur
Cette page est intentionnellement laissé en blanc.
illumipro-10 Manuel de l’opérateur: FRANÇAIS Page 68
Copyright© Meridian Bioscience, Inc.
SN11007, REV. 07/2010
Page 69
Manual del operador
illumipro‐10Manualdeloperador:ESPAÑOL Página69
Copyright©MeridianBioscience,Inc.
SN11007,REV03/2010
Page 70

Manualdeloperador
Índice
Uso previsto y función instrumento ..................................................................................................... 71
Requisitos y procedimientos de instalación ......................................................................................... 71
Principios de funcionamiento ................................................................................................................. 73
Características del funcionamiento y especificaciones ...................................................................... 73
Instrucciones de funcionamiento ........................................................................................................... 76
Procedimientos de calibración .............................................................................................................. 82
Precauciones y limitaciones de funcionamiento .................................................................................. 84
Reparación y mantenimiento .................................................................................................................. 85
illumipro-10 Lista de control de instalación y configuración ................................................. Apéndice I
illumipro-10 Registro de descontaminación ........................................................................... Apéndice II
illumipro-10 Códigos de error y resolución de problemas ................................................... Apéndice III
illumipro-10 Información del escáner de código de barras ................................................. Apéndice IV
illumipro-10 Compliance Testing Summary ........................................................................... Apéndice V
illumipro-10 Manual del operador: ESPAÑOL Pag. 70
Copyright© Meridian Bioscience, Inc.
SN11007, REV. 07/2010
Page 71

Manualdeloperador
Uso previsto y función del instrumento
El illumipro-10 es un sistema automatizado de detección y amplificación isotérmica para uso con los
productos de amplificación mediada cíclicamente illumigene de Meridian Bioscience, Inc.
El illumipro-10 está previsto para el uso de profesionales capacitados de laboratorio en laboratorios.
Requisitos y procedimientos de instalación
El illumipro-10 y sus accesorios están envasados de manera segura para evitar daños durante el envío
al usuario final. Deben inspeccionarse la caja de envío del illumipro-10 y el embalaje antes de la
instalación por si presentan daños. No debe instalarse instrumentación dañada, ya que ello podría
generar un peligro para el usuario final. Comunique todos los daños al personal de asistencia técnica de
Meridian llamando al 513-271-3700 (EE. UU.), su distribuidor local o Meridian Bioscience Europe al +39
0331 433 636.
illumipro-10 Contenido del paquete
c illumipro-10 Sistema automatizado de amplificación y detección isotérmica
d illumipro-10 Cable de alimentación y fuente de alimentación
e illumipro-10 Normas de verificación
f illumipro-10 Carpeta de anillas del Manual del operador
g illumipro-10 Cable USB
Contenido del paquete de la impresora térmica externa (Catálogo 610173; se envía por separado):
c Impresora
d Cable de la impresora
e Cable de alimentación de la impresora (adaptador lineal de 12 V CC)
f Papel térmico (1 rollo)
illumipro-10 Accesorios opcionales
c Teclado externo (Catálogo 610174, se envía por separado).
illumipro-10 Manual del operador (SN11007; se envía por separado).
illumipro-10 Manual del operador: ESPAÑOL Pag. 71
Copyright© Meridian Bioscience, Inc.
SN11007, REV. 07/2010
Page 72
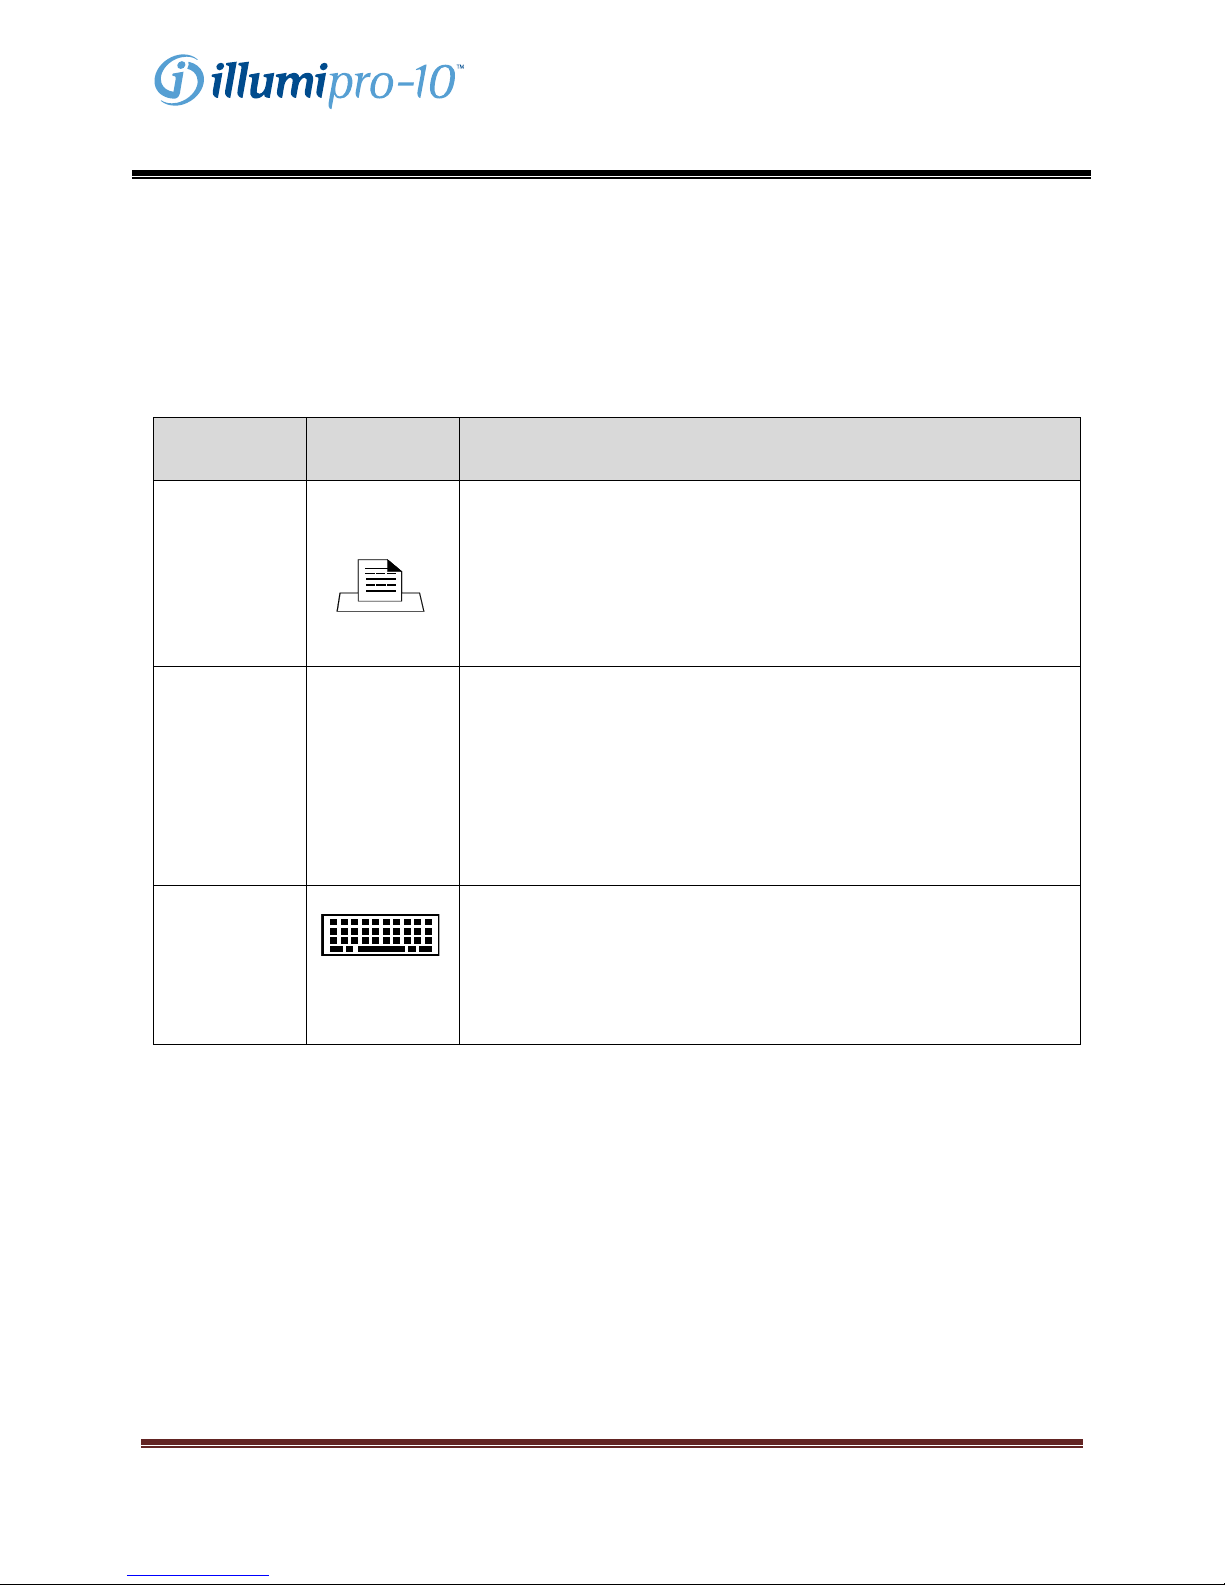
Manualdeloperador
illumipro-10 Instalación
La instalación del illumipro-10 y sus accesorios se puede realizar después de inspeccionar el contenido
y revisar los requisitos descritos en este Manual del usuario. El Apéndice I incluye una lista de control
general para la instalación y configuración del illumipro-10.
El illumipro-10 debe colocarse sobre una superficie firme y nivelada. Configure el instrumento para
usarlo tal como se describe en la siguiente tabla.
Componente Símbolo Instrucciones de instalación
Impresora
Conecte la impresora externa al illumipro-10 utilizando los cables
provistos. La conexión de la impresora se encuentra en la parte
posterior del instrumento y está marcada con el símbolo que se
muestra.
Asegure la conexión de la impresora y conecte a la impresora el
cable de alimentación provisto en el paquete de la impresora.
Fuente de
alimentación
12 V -----
a 4,5 A
Conecte a la unidad el cable de alimentación provisto en el
paquete del illumipro-10. La conexión de la fuente de
alimentación se encuentra en la parte posterior del instrumento. El
puerto de conexión de la fuente de alimentación está marcado con
el símbolo que se muestra. Conecte el cable de alimentación al
bloque de resistencia eléctrica.
Enchufe los extremos de patillas de los cables de alimentación del
illumipro-10 y la impresora al enchufe correspondiente.
Teclado
externo
Conecte el teclado externo opcional a la unidad con los cables
provistos. La conexión del teclado externo se encuentra en la parte
posterior del instrumento y está marcada con el símbolo que se
muestra.
NOTA: Hay que instalar el teclado con el illumipro-10 apagado.
illumipro-10 Configuración
La configuración del instrumento se realiza con el menú SYSTEM (SISTEMA). El usuario podrá
configurar el formato de la hora y de la fecha y el idioma preferido.
illumipro-10 Verificación de funcionamiento
La verificación de funcionamiento debe hacerse antes de la instalación y antes de usar el dispositivo. La
verificación óptica se realiza según las instrucciones provistas en el menú SERVICE (REPARACIÓN).
illumipro-10 Manual del operador: ESPAÑOL Pag. 72
Copyright© Meridian Bioscience, Inc.
SN11007, REV. 07/2010
Page 73

Manualdeloperador
Principios de funcionamiento
El illumipro-10 es un sistema automatizado de amplificaci ón y detección isotérmica para secuencias de
ácido nucleico diana de muestras humanas. El instrumento se usa junto con los productos de
diagnóstico in vitro de amplificación mediada cíclicamente illumigene de Meridian Bioscience, Inc.
El illumipro-10 es un instrumento de laboratorio dirigido por menús y dos bloques independientes de
procesamiento de muestras, identificados como Bloque A y Bloque B. El calentamiento de muestras y la
detección óptica se realizan en cinco dispositivos de dos cámaras illumigene por bloque. Cada
dispositivo de dos cámaras illumigene contiene una cámara de muestras y una cámara de control. La
amplificación del DNA diana se produce durante el ciclo térmico y resulta en la formación de un
precipitado detectado por el sistema óptico illumipro-10. El precipitado generado por la presencia del
DNA diana lleva a una solución de reacción turbia muestra/control que se mide por absorbancia. El
illumipro-10 utiliza el cambio en turbidez de cada solución de reacción muestra/control para informar de
los resultados del ensayo como INVALID, POSITIVE, o NEGATIVE (INVÁLIDO, POSITIVO o
NEGATIVO).
El illumipro-10 funciona en cuatro modos básicos: ASSAY, RESULTS, SERVICE y SYSTEM (ENSAYO,
RESULTADOS, REPARACIÓN Y SISTEMA). La selección del ensayo y la amplificación de muestra se
realizan en el modo ASSAY (ENSAYO); los resultados de la prueba se gestionan en el modo RESULTS
(RESULTADOS); la configuración básica del instrumento se realiza en el modo SYSTEM (SISTEMA); y
la verificación de funcionamiento óptico se completa en el modo SERVICE (REPARACIÓN).
Características del funcionamiento y especificaciones
Características del funcionamiento
El illumipro-10 es un sistema automatizado de detección y amplificación isotérmica de uso con los
productos de amplificación de bucle illumigene de Meridian Bioscience, Inc. El illumipro-10 se diseñó
con una interfaz de usuario sencilla que incluye un teclado numérico, una pantalla de cristal líquido
(LCD), un escáner de código de barras, una impresora y un teclado externo opcional. Las instrucciones
de funcionamiento dirigidas por menús se muestran en la pantalla y el usuario introduce comandos en el
instrumento haciendo selecciones con el teclado numérico.
La amplificación isotérmica se lleva a cabo por dos bloques térmicos controlados independientemente y
capaces de funcionar a temperaturas de entre 55 C y 65 C, y en el rango de 1 C del valor prefijado de
temperatura. El valor prefijado de temperatura de la amplificación isotérmica la determina el ensayo
illumigene seleccionado. El tiempo de amplificación isotérmica se controla con el temporizador interno
del illumipro-10. Cuando esté en funcionamiento el illumipro-10 mostrará el texto “Test in Progress”
(Prueba en marcha), así como la temperatura del bloque y el tiempo de incubación que falta.
illumipro-10 Manual del operador: ESPAÑOL Pag. 73
Copyright© Meridian Bioscience, Inc.
SN11007, REV. 07/2010
Page 74

Manualdeloperador
La detección de la amplificación de DNA la realiza el sistema óptico del illumipro-10. Cada bloque del
illumipro-10 contiene diodos de láser que iluminan a 650 ± 20 nm y detectores correspondientes que
controlan la transmisión de la luz a través de cada pocillo del illumipro-10. El illumipro-10 realiza una
comprobación inicial del sistema óptico antes de ejecutar la puesta en marcha. Los fallos observados en
el sistema óptico desactivan el bloque del instrumento hasta que se pueda resolver el fallo. Después de
llevar a cabo con éxito la verificación óptica, el illumipro-10 comprueba que haya un dispositivo de
prueba illumigene en cada pocillo. El illumipro-10 introduce automáticamente una ID de muestra de
“EMPTY WELL” (POCILLO VACÍO) para todos los pocillos en los que no se pueda detectar un
dispositivo de prueba. El illumipro-10 mide la absorbancia de cada dispositivo de prueba illumigene al
comienzo y al final de la incubación de amplificación isotérmica. Los resultados de la muestra se
comunican como INVALID, POSITIVE o NEGATIVE (INVÁLIDO, POSITIVO o NEGATIVO) según el
cambio observado en la absorbancia.
Las características del funcionamiento del illumipro-10 incluyen las siguientes:
• Autodiagnósticos que se realizan al encendido y al ejecutar la puesta en marcha.
• Autodiagnóstico para la colocación del dispositivo de prueba y la verificación de la trayectoria óptica.
• Detección de tapa cerrada y función de bloqueo de tapa.
• Bloque de calor térmico con detección óptica en cada pocillo con emisión/absorbancia de luz visible
(650 ± 20 nm).
• Temporizador de intervalos con visualización del tiempo del ensayo en tiempo real.
• Interfaz de usuario LCD sencilla para la configuración del instrumento, selección de programa y
entrada de identificación de muestra.
• Escáner de código de barras para la entrada de identificación de muestras.
• Teclado externo disponible para la entrada de identificación de muestras:
• Impresora conectada para los resultados del informe.
• Control del producto de amplificación transferido mediante el uso del dispositivo de prueba
illumigene independiente.
illumipro-10 Manual del operador: ESPAÑOL Pag. 74
Copyright© Meridian Bioscience, Inc.
SN11007, REV. 07/2010
Page 75

Manualdeloperador
Especificaciones del illumipro-10
• Eléctricas
Gama de voltajes: 120 V CA
Régimen de funcionamiento, suministro: 100 – 240 V CA, 50/60 Hz
Gama de voltajes y corriente: 12 V CC; 4,5 A
• Físicas
Dimensiones: 21 cm x 29,2 cm x 9,5 cm
Peso: 2,95 ± 0,05 kg
• Ambientales
Temperatura de funcionamiento: 15 – 30 C
Temperatura de almacenamiento: 10 – 40 C
Humedad relativa, de funcionamiento: 10 – 90%, sin condensación
Humedad relativa, de almacenamiento: 10 – 95%
Especificaciones de la impresora
• Eléctricas
Tensión de alimentación (SMPS): Voltaje de entrada (S, P) 12 V CC
• Ambientales
Temperatura de funcionamiento: 0 – 40 C
Temperatura de almacenamiento: -10 – 50 C
Humedad relativa, de funcionamiento: 30 – 80%
Humedad relativa, de almacenamiento: 10 – 90%
illumipro-10 Manual del operador: ESPAÑOL Pag. 75
Copyright© Meridian Bioscience, Inc.
SN11007, REV. 07/2010
Page 76

Manualdeloperador
Instrucciones de funcionamiento
El illumipro-10 funciona en cuatro modos básicos: ASSAY, RESULTS, SERVICE y SYSTEM (ENSAYO,
RESULTADOS, REPARACIÓN Y SISTEMA). La selección de ensayo y la amplificación de muestra se
realizan en el modo ASSAY (ENSAYO); los resultados de la prueba se gestionan en el modo RESULTS
(RESULTADOS); la configuración básica del instrumento se realiza en el modo SYSTEM (SISTEMA). El
modo SERVICE (REPARACIÓN) se reserva para los profesionales de reparación capacitados y no está
accesible al usuario del laboratorio. En este apartado se da información general referente a cada modo
de funcionamiento.
Teclado numérico
Se navega por las funciones del illumipro-10 mediante el teclado numérico. El teclado numérico brinda
una interfaz de usuario sencilla y permite la navegación básica por menús, la introducción de caracteres
alfanuméricos para identificar las muestras y el inicio de Assay RUN (EJECUTAR Ensayo). Se hablará
de las funciones del teclado numérico a lo largo de este manual; la disposición del teclado y los símbolos
utilizados se definen a continuación.
NOTA: Para los botones del teclado numérico
que tengan múltiples caracteres, desplácese
pulsando el botón del teclado varias veces.
Botón del
teclado
numérico
1 <ESPACIO>, 1
2 A, B, C, 2
3 D, E, F, 3
4 G, H, I, 4
5 J, K, L, 5
6 M, N, O, 6
7 P, Q, R, S, 7
8 T, U, V, 8
9 W, X, Y, Z, 9
0 0
- -
RUN
(EJECUTAR)
Carácter / Función
Desplazarse hacia arriba
Desplazarse hacia abajo
Desplazarse hacia atrás,
Retroceso
Introducir
Ejecutar el protocolo de
ensayo seleccionado
illumipro-10 Manual del operador: ESPAÑOL Pag. 76
Copyright© Meridian Bioscience, Inc.
SN11007, REV. 07/2010
Page 77

Manualdeloperador
Menú Principal
La pantalla del Main Menu (Menú principal) permite al usuario ver la hora, la fecha, el estado del ensayo
y la temperatura del bloque. El Menú principal se utiliza para acceder a los modos de Resultados,
Reparación y Sistema.
Estadodelbloque
Temperaturadel
bloque
Convenciones utilizadas:
Gráfico Descripción
**:** ESTADO DEL BLOQUE: Calentamiento en marcha; el bloque no ha alcanzado la
temperatura
--:-- ESTADO DEL BLOQUE: En reposo; el bloque ha alcanzado la temperatura
!!! Advertencia, revise el instrumento
… Indicador de expansión del menú de ensayos
Impresora: Conectar la impresora a la unidad en este puerto.
(Parte posterior del instrumento)
Puerto USB: Conecte la unidad al ordenador externo en este puerto.
PS/2
12 V -----
a 4,5 A
(Parte posterior del instrumento)
Teclado externo: Conecte la unidad al teclado externo (opcional) en este puerto.
(Parte posterior del instrumento)
illumipro-10 Fuente de alimentación: Conecte la fuente de alimentación a la unidad
en este puerto.
(Parte posterior del instrumento)
illumipro-10 Manual del operador: ESPAÑOL Pag. 77
Copyright© Meridian Bioscience, Inc.
SN11007, REV. 07/2010
Page 78

Manualdeloperador
MODO DE ENSAYO
El ASSAY MODE (MODO DE ENSAYO) permite al usuario acceder y ejecutar programas en el illumipro-
10. El usuario selecciona el bloque que utilizará en el Menú Principal y luego selecciona el ensayo que
va a ejecutar. Cada bloque se puede seleccionar y ejecutar independientemente. Al seleccionar el
bloque que se va a utilizar, aparece el menú del Modo de Ensayo. El usuario selecciona el ensayo que
va a ejecutar y sigue las instrucciones de la pantalla del illumipro-10.
La pantalla del illumipro-10 indica que hay una prueba en marcha e indica al usuario que introduzca la
información de identificación de la muestra o que interrumpa la prueba. La información de identificación
de la muestra se puede introducir directamente usando el teclado numérico, se puede escanear con el
escáner de código de barras del illumipro-10 o se puede introducir utilizando el teclado externo. Se
puede encontrar información adicional sobre el escáner de código de barras del illumipro-10 en el
Apéndice IV de este manual.
El usuario introduce la información de identificación de la muestra siguiendo las instrucciones que
aparecen en la pantalla del illumipro-10 e inicia la Ejecución del Ensayo (Assay Run).
NOTA: La temperatura del bloque aparece en el campo “TEMP” (TEMPERATURA). El campo “Block
Status” (Estado del bloque) muestra un temporizador que indica el tiempo que falta para que finalice el
ensayo.
illumipro-10 Manual del operador: ESPAÑOL Pag. 78
Copyright© Meridian Bioscience, Inc.
SN11007, REV. 07/2010
Page 79

Manualdeloperador
El illumipro-10 realizará el programa de ensayo seleccionado y el estado del bloque del MENÚ
PRINCIPAL indicará “00:00”. Los resultados del ensayo seleccionado se pueden ver seleccionando el
bloque que muestra el estado completado y siguiendo las instrucciones de la pantalla del illumipro-10.
Los resultados se pueden imprimir manualmente seleccionando la opción de impresora al final de la
visualización de los resultados o activando la función Auto-Print (Impresión automática) durante la
configuración del sistema.
Al terminar la ejecución del ensayo, el usuario debe retirar los dispositivos illumigene de la unidad y
desecharlos de forma adecuada.
NOTA: Hay que tener cuidado para evitar la contaminación del equipo y del espacio de trabajo por
los ácidos nucleicos diana y/o amplificados. NO abra los dispositivos illumigene después de
finalizar el ensayo.
MODO DE RESULTADOS
El RESULTS MODE (MODO DE RESULTADOS) permite al usuario ver o borrar los resultados
guardados y activar la función de impresión automática. El illumipro-10 guardará hasta 1000 resultados
de pruebas individuales o 200 lotes. El instrumento mostrará una advertencia al usuario cuando el
almacenamiento de resultados esté llegando al límite de su capacidad máxima. Se accede al MODO DE
RESULTADOS siguiendo las instrucciones indicadas en la pantalla del illumipro-10.
illumipro-10 Manual del operador: ESPAÑOL Pag. 79
Copyright© Meridian Bioscience, Inc.
SN11007, REV. 07/2010
Page 80

Manualdeloperador
El usuario puede ver los resultados guardados seleccionando la opción “View Results” (Ver resultados).
El menú de “View Results” permite al usuario acceder a los datos guardados por fecha y bloque. Los
datos del lote seleccionado se visualizan y se pueden imprimir manualmente seleccionando la opción de
impresión al final de la visualización de los resultados.
MODO DE REPARACIÓN
El SERVICE MODE (MODO DE REPARACIÓN) permite al usuario realizar la verificación del sistema
óptico, ver los parámetros del sistema, imprimir la información de comprobación del sistema y configurar
la impresora. NOTA: El menú del MODO DE REPARACIÓN incluye una opción de “Diagnóstico” a la
que solamente puede acceder el personal de reparación capacitado.
Es necesaria la VERIFICACIÓN DEL SISTEMA ÓPTICO para asegurar el funcionamiento correcto del
illumipro-10. Las instrucciones para realizar la verificación del sistema óptico se encuentran el apartado
PROCEDIMIENTO DE CALIBRACIÓN de este manual.
illumipro-10 Manual del operador: ESPAÑOL Pag. 80
Copyright© Meridian Bioscience, Inc.
SN11007, REV. 07/2010
Page 81

Manualdeloperador
MODO DEL SISTEMA
El SYSTEM MODE (MODO DEL SISTEMA) permite al usuario fijar y elegir el formato de hora y fecha,
configurar la impresora y el escáner de código de barras, fijar el idioma del usuario y ver la información
del sistema. El usuario puede fijar la hora, la fecha o el idioma (inglés, italiano, francés, español y
alemán) según los requisitos o preferencias locales. El MODO DEL SISTEMA permite al usuario activar
o desactivar la impresión automática y el escáner de código de barras. La configuración del sistema se
realiza siguiendo las instrucciones indicadas en la pantalla del illumipro-10.
NOTA: La hora y la fecha no se pueden modificar cuando esté una prueba en marcha. El idioma no se
puede cambiar cuando haya una prueba en marcha.
illumipro-10 Manual del operador: ESPAÑOL Pag. 81
Copyright© Meridian Bioscience, Inc.
SN11007, REV. 07/2010
Page 82
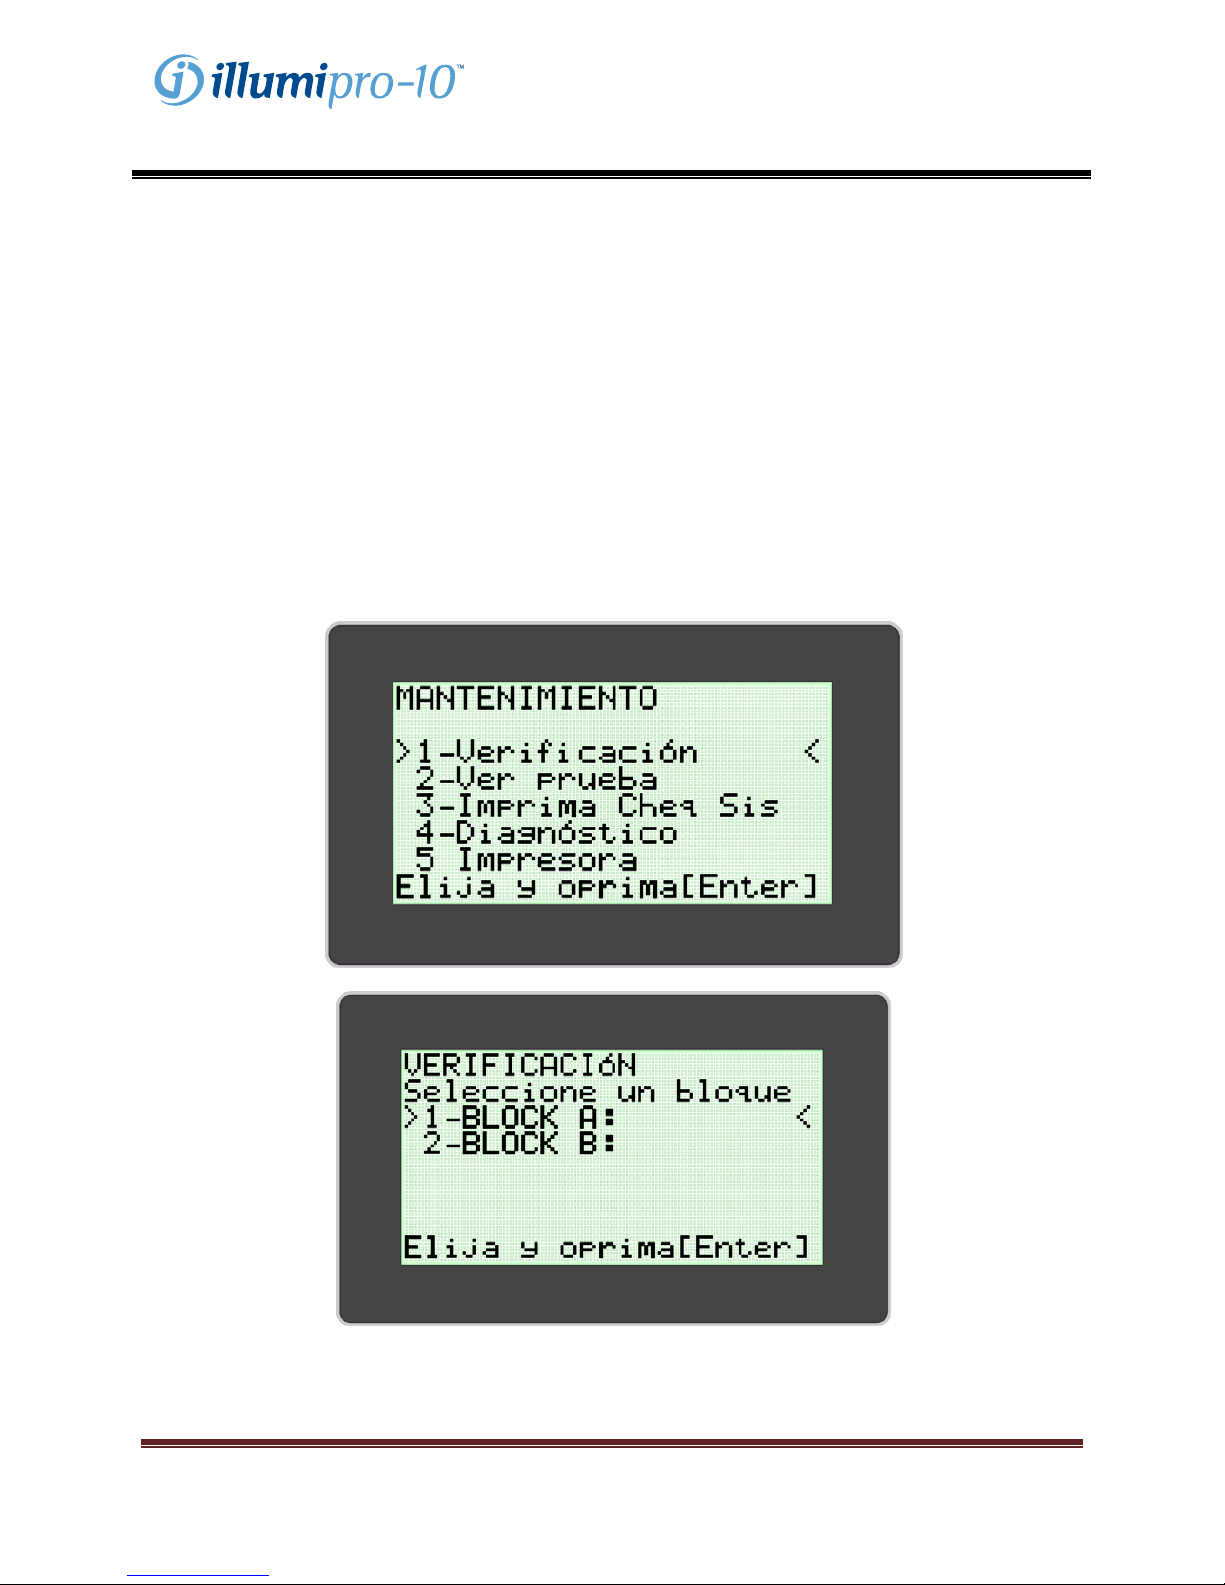
Manualdeloperador
Procedimientos de calibración
AUTOPRUEBA DE ENCENDIDO
El illumipro-10 realiza automáticamente una Prueba de encendido (POST) cada vez que se enciende el
instrumento. La Prueba POST confirma que el software y los componentes del hardware del sistema
están funcionando de la manera correcta. Si el resultado de la prueba POST es positivo, se escuchará
un tono sonoro. El fallo de la Prueba POST se indicará con un código de error. Se puede encontrar
información adicional sobre los Códigos de error en el Apéndice III de este manual.
VERIFICACIÓN DEL SISTEMA ÓPTICO
No es necesaria la calibración del illumipro-10. La verificación del SISTEMA ÓPTICO para cada bloque
debe realizarse mensualmente para asegurar el funcionamiento correcto. La verificación se realiza
utilizando el Estándar Rojo de Verificación incluido con el illumipro-10. Las instrucciones paso a paso
para la verificación del sistema óptico aparecen en la pantalla del illumipro-10, utilizando el menú MODO
DE REPARACIÓN.
illumipro-10 Manual del operador: ESPAÑOL Pag. 82
Copyright© Meridian Bioscience, Inc.
SN11007, REV. 07/2010
Page 83

Manualdeloperador
La verificación del sistema óptico incluye dos etapas: La primera etapa asegura que la trayectoria óptica
esté despejada. La segunda etapa confirma que el sistema óptico está transmitiendo y detectando las
partículas de luz emitidas correctamente. La verificación de la transmisión y detección requiere el uso
del Estándar Rojo de Verificación del illumipro-10. El illumipro-10 recorre el protocolo de verificación e
indica al usuario que tome medidas cuando sea necesario.
El Estándar Rojo de Verificación debe estar asentado firmemente en los pocillos del bloque de calor. El
estándar de verificación debe orientarse con la etiqueta del número de ensayo en la posición de pocillo 1.
Una vez completado el protocolo de verificación, el illumipro-10 visualizará los resultados de la prueba
de verificación como “Pass” o “Fail” (Aprueba o Suspende). En el caso de que la prueba de verificación
no dé resultados aceptables, el usuario debe comprobar que la trayectoria óptica esté despejada y que el
estándar no presente defectos visibles y repetir la prueba de verificación. Si repetir la prueba no da
resultados de verificación aprobada, póngase en contacto con el personal del servicio técnico de
Meridian para que le asistan.
NOTA: Cada bloque del illumipro-10 funciona independientemente. Por ejemplo, una prueba de
verificación fallida para el Bloque A no impedirá el uso del Bloque B si se aprueba la prueba de
verificación de este último.
ADVERTENCIA: NO deje los estándares de verificación en el illumipro-10. Los estándares de
verificación se calentarán mucho y podrían quemar al usuario. La exposición a la temperatura
podría influir en el rendimiento de los estándares de verificación.
illumipro-10 Manual del operador: ESPAÑOL Pag. 83
Copyright© Meridian Bioscience, Inc.
SN11007, REV. 07/2010
Page 84

Manualdeloperador
Precauciones y limitaciones de funcionamiento
ADVERTENCIAS:
PRECAUCIÓN: Riesgo de peligro. El illumipro-10 es un dispositivo
electromecánico que puede causar descargas o lesiones físicas al operador si no se
IPX-0
usa de acuerdo con los procedimientos descritos en este manual.
RADIACIÓN DE LÁSER: Evite la exposición al haz de láser. El illumipro-10
contiene un producto de láser de clase 3R. El láser no funcionará cuando la tapa
esté abierta;
sin embargo, hay que tener cuidado al manipular y usar este instrumento.
SUPERFICIE CALIENTE: Mantenga las manos alejadas de las superficies
calientes. El illumipro-10 contiene un bloque de calor que produce temperaturas
de entre 55 – 65 C durante el funcionamiento. Hay que tener cuidado para evitar el
contacto directo con el bloque de calor.
PRECAUCIÓN: Radiación de láser. El illumipro-10 contiene un producto de láser.
La reparación de la unidad debe ser realizada solamente por personal cualificado,
ya que la exposición óptica al haz de láser podría causar lesiones.
PRECAUCIÓN: Proteger del agua. El illumipro-10 no protege contra la salida de
agua. No exponga el instrumento al agua ni lo sumerja.
PRECAUCIONES:
• El illumipro-10 es un instrumento automatizado que utiliza la tecnología isotérmica de
amplificación mediada cíclicamente. Hay que tener cuidado para evitar la contaminación del
equipo y del espacio de trabajo por los ácidos nucleicos diana y/o amplificados. Solamente
personal cualificado debe realizar la prueba molecular.
• El illumipro-10 se utiliza con los productos de diagnóstico in vitro de amplificación mediada
cíclicamente illumigene de Meridian Bioscience, Inc. Las muestras procesadas en el illumipro-
10 deben ser manipuladas según las instrucciones provistas en las instrucciones de uso
específicas de los productos illumigene.
• El idioma seleccionado no se puede cambiar cuando esté un ensayo en marcha.
• La hora y la fecha no se pueden modificar cuando esté un ensayo en marcha.
• Los verificadores del sistema óptico deben guardarse en el estuche provisto. Los verificadores
ópticos deben protegerse de la luz y de posibles daños. Los verificadores del sistema óptico no
deben guardarse en el illumipro-10.
• No limpie el teclado opcional del illumpro-10 con un bastoncillo caliente. La tecla Bloq Mayús se
iluminará al encender el instrumento para indicar que el teclado está en línea.
• Hay que enchufar el teclado opcional cuando el illumipro-10 esté apagado.
• Cuando no se esté utilizando, el illumipro-10 debe guardarse con la tapa cerrada.
illumipro-10 Manual del operador: ESPAÑOL Pag. 84
Copyright© Meridian Bioscience, Inc.
SN11007, REV. 07/2010
Page 85

Manualdeloperador
Reparación y mantenimiento
La reparación del illumipro-10 debe ser realizada solamente por personal cualificado. Póngase en
contacto con el servicio de asistencia técnica de Meridian Bioscience llamando al 513-271-3700
(EE. UU.), su distribuidor local o Meridian Bioscience Europe al +39 0331 433 636 para recibir
asistencia técnica o para concertar la reparación. NO INTENTE REPARAR EL illumipro-10 usted
mismo.
Limpieza de la superficie
La limpieza de las superficies exteriores del illumipro-10 y del área de trabajo inmediata debe realizarse
según sea necesario, al menos una vez al día cuando se esté usando. Espere a que el instrumento se
enfríe y limpie las superficies con un paño sin pelusa humedecido en una solución de limpieza de
DNAse/RNAse o una solución de lejía al 10%.
ADVERTENCIA: La limpieza de la superficie debe realizarse solamente cuando el instrumento esté
apagado Y desconectado de la fuente de alimentación. NO use paños empapados para limpiarlo.
Limpieza del bloque de calor
La limpieza del bloque de calor del instrumento debe realizarla solamente personal cualificado. La
limpieza del bloque de calor debe realizarse solamente cuando se sospeche que está contaminado. La
contaminación del bloque de calor puede deberse al ADN o no. El siguiente protocolo de limpieza debe
basarse en la fuente de contaminación tal como se indica a continuación:
• Protocolo de limpieza por contaminación de DNA
1. Limpie suavemente la cámara del bloque de calor con un bastoncillo de espuma seco.
2. Limpie suavemente la cámara del bloque de calor con un bastoncillo de espuma humedecido
en una solución de lejía al 10%.
3. Limpie suavemente la cámara del bloque de calor con un bastoncillo de espuma seco.
4. Limpie suavemente la cámara del bloque de calor con un bastoncillo de espuma humedecido
en alcohol al 90%.
5. Limpie suavemente la cámara del bloque de calor con un bastoncillo de espuma seco.
NO use bastoncillos de espuma empapados para la limpieza.
• Protocolo de limpieza por contaminación que no sea debida a DNA
1. Limpie suavemente la cámara del bloque de calor con un bastoncillo de espuma seco.
2. Limpie suavemente la cámara del bloque de calor con un bastoncillo de espuma seco.
3. Limpie suavemente la cámara del bloque de calor con un bastoncillo de espuma seco.
NO use bastoncillos de espuma empapados para la limpieza.
ADERTENCIA: La limpieza del bloque de calor debe realizarse solamente cuando el instrumento esté
apagado Y desconectado de la fuente de alimentación. NO use bastoncillos empapados para la
limpieza.
ADVERTENCIA: No intente limpiar el illumipro-10 con aire comprimido.
Realice SIEMPRE la prueba de verificación óptica después de limpiar el bloque de calor.
illumipro-10 Manual del operador: ESPAÑOL Pag. 85
Copyright© Meridian Bioscience, Inc.
SN11007, REV. 07/2010
Page 86
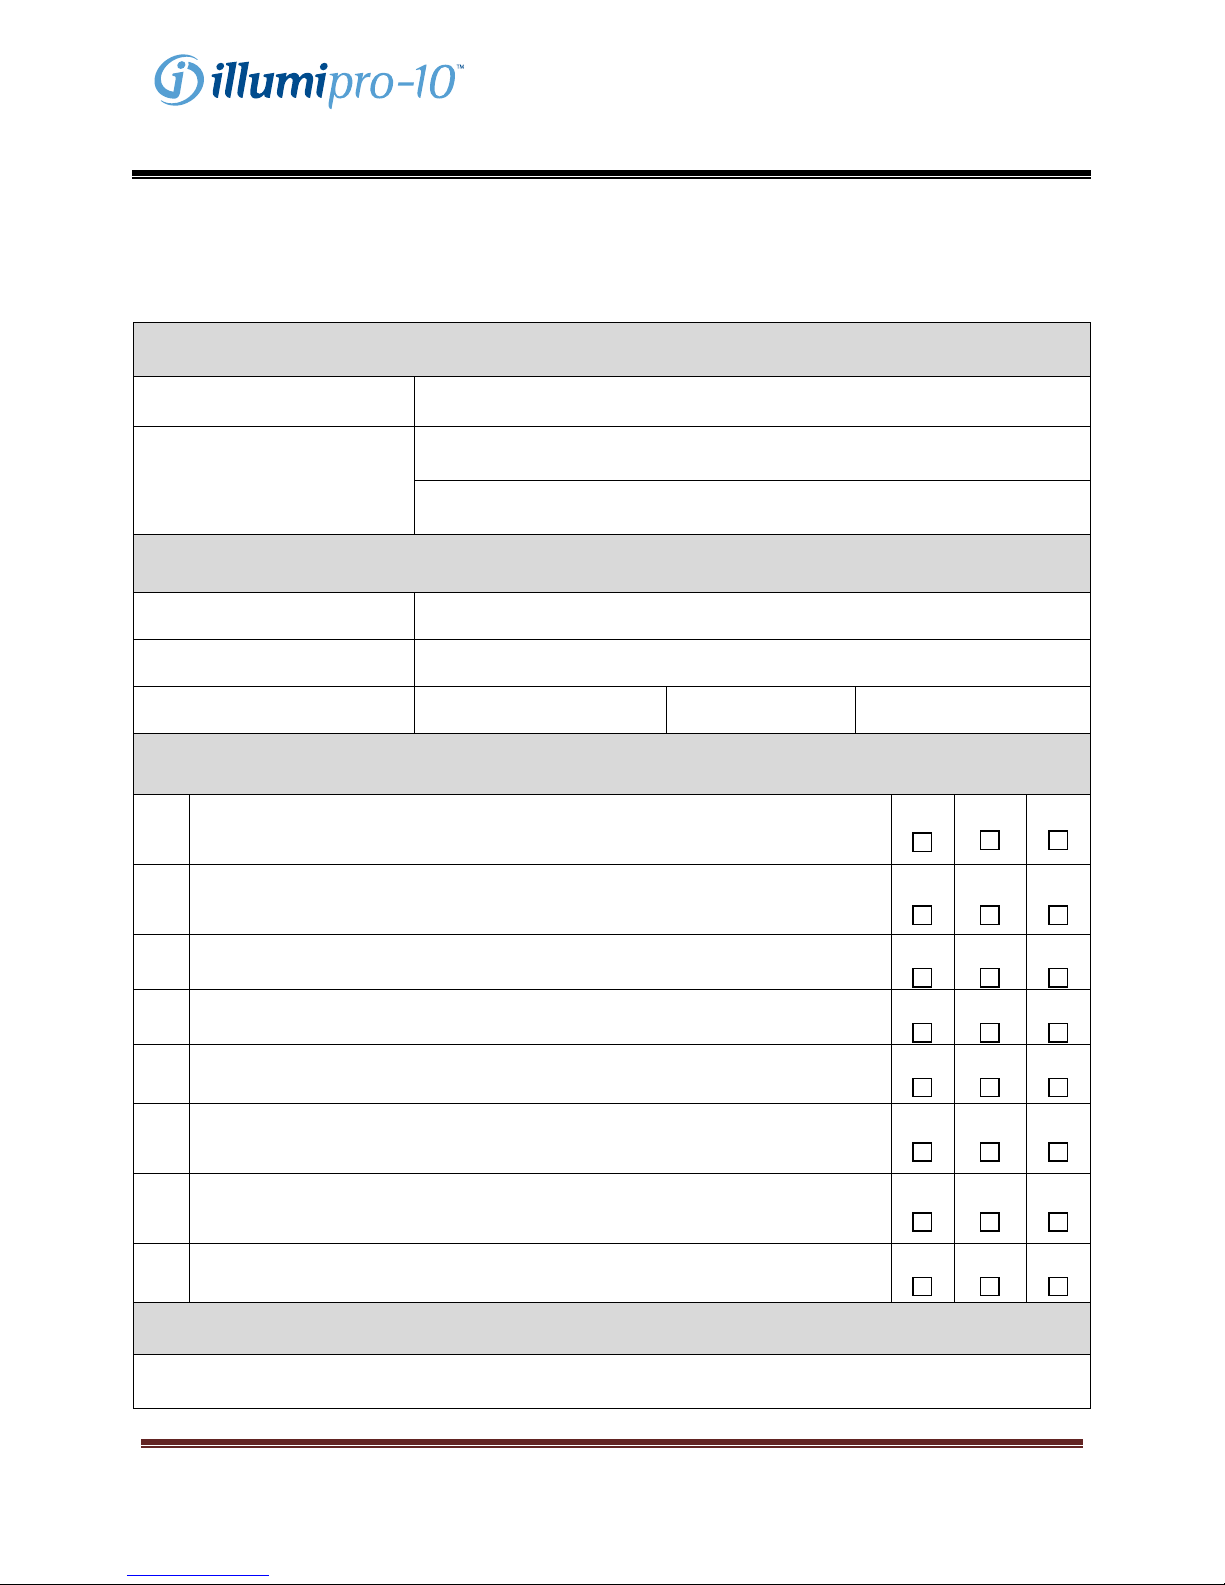
Manualdeloperador
Apéndice I
illumipro-10 Lista de control de instalación y configuración
Información del centro
Nombre del centro:
Dirección del centro:
Número de serie del
instrumento:
Ubicación de la
instalación: (Sala, Piso, Edificio, etcétera)
Instalación realizada por:
El embalaje y la caja de envío del illumipro-10 se han revisado para ver si
1.
presentan daños; no se han encontrado daños. La instalación de un
instrumento dañado podría crear un peligro para el usuario final.
El Manual del operador del illumipro-10 se ha recibido y revisado. Las
2.
precauciones y limitaciones de funcionamiento se han revisado y se han
entendido.
La ubicación de la instalación cumple con las especificaciones eléctricas y
3.
ambientales descritas en el Manual del operador del illumipro-10.
La instalación del illumipro-10 y sus accesorios se ha realizado tal como se
4.
describe en el Manual del operador.
5.
El illumipro-10 se ha encendido y la prueba de autoencendido fue exitosa.
La configuración del illumipro-10, incluidos el formato de la hora, el formato
6.
de la fecha y el idioma preferido, se han llevado a cabo tal como se describe
en el Manual del operador.
La verificación de funcionamiento del illumipro-10 se realizó tal como se
7.
describe en el Manual del operador. Se obtuvieron resultados aceptables
para el Bloque A y el Bloque B.
Se adjunta a este informe una copia impresa de la Comprobación del
8.
sistema y Verificación del sistema óptico.
Información del instrumento
Fecha de
instalación:
Configuración e instalación
(Ciudad, Provincia)
Sí
Sí
Sí
Sí
Sí
Sí
Sí
Sí
(Calle)
No
No NC
No NC
No NC
No NC
No NC
No NC
No NC
NC
illumipro-10 Manual del operador: ESPAÑOL Pag. 86
Copyright© Meridian Bioscience, Inc.
SN11007, REV. 07/2010
Instalación completa
(Firma/Fecha)
Page 87
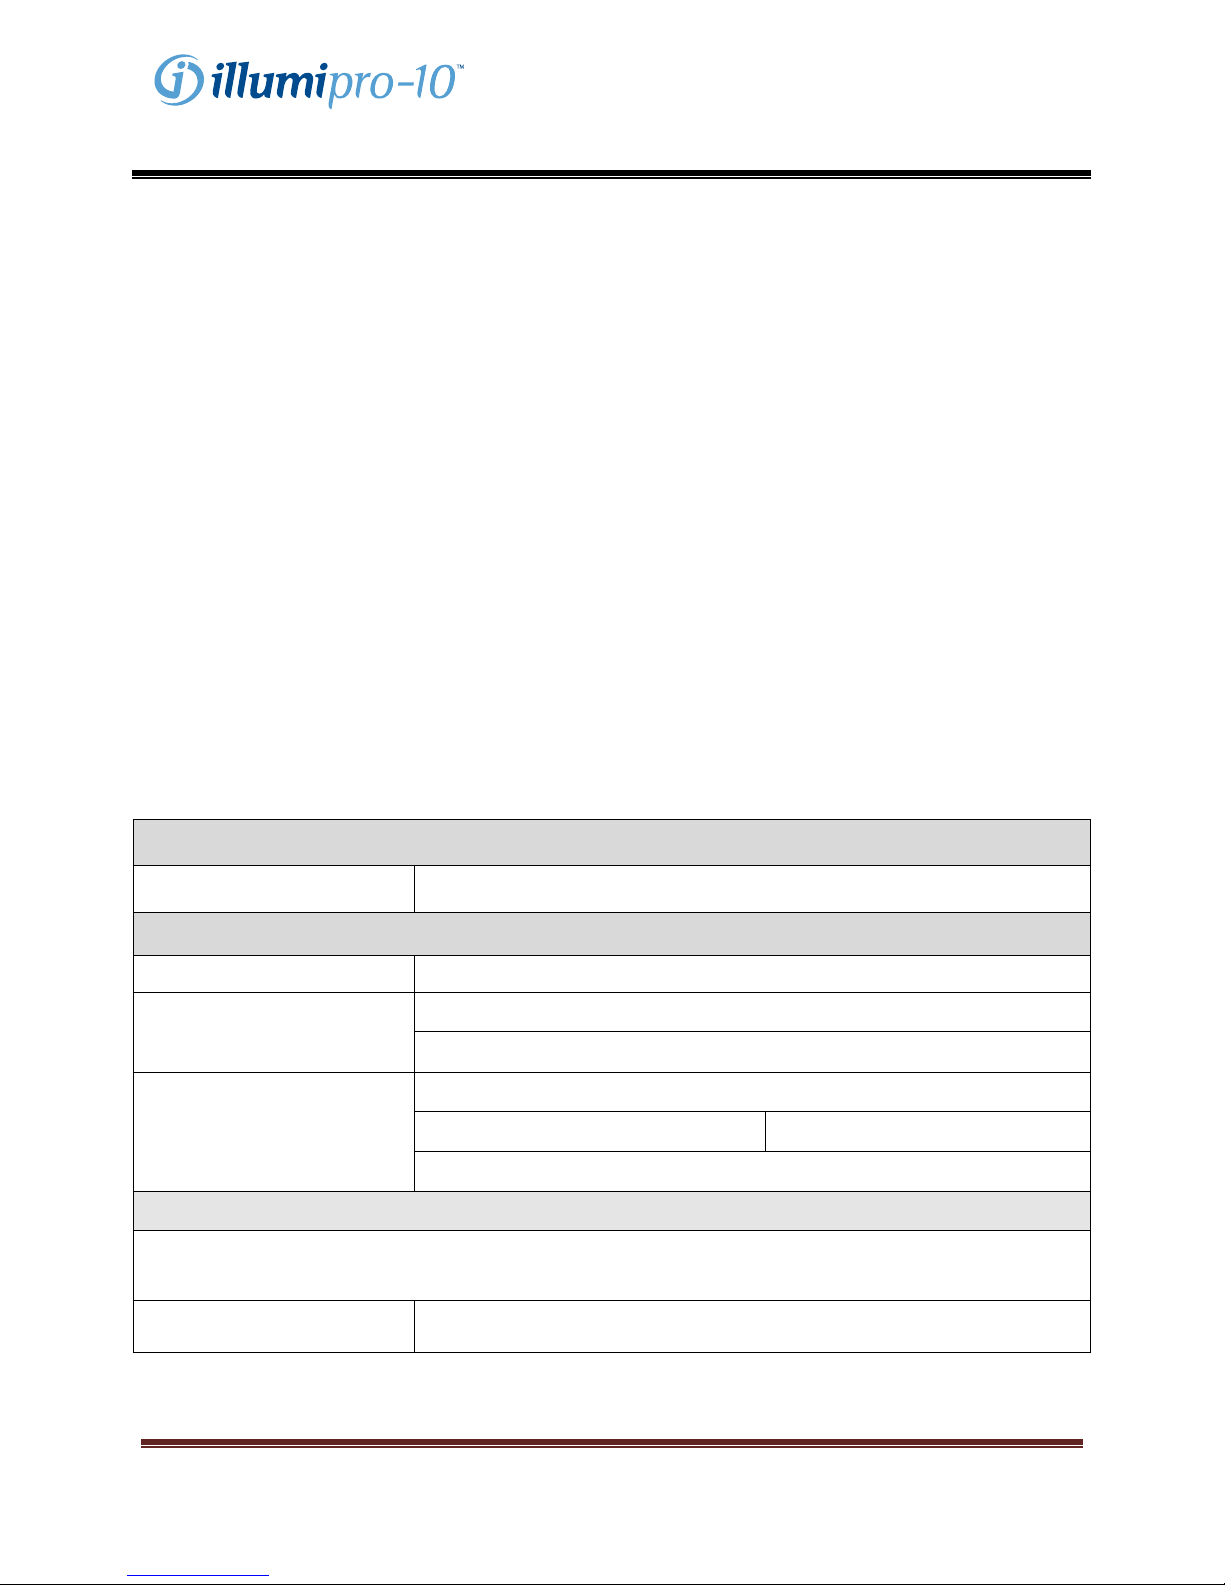
Manualdeloperador
Apéndice II
illumipro-10 Registro de descontaminación
La descontaminación del equipo de laboratorio debe completarse antes de enviar el instrumento
para repararlo. La descontaminación debe llevarse a cabo según las instrucciones provistas.
Complete la siguiente información y adjunte el informe completo al instrumento antes de enviarlo.
Los instrumentos que se envíen para reparación sin pruebas de descontaminación no serán
reparados. Si el instrumento se envía para reparación sin documentación de descontaminación,
será devuelto y los gastos de envío correrán a cargo del usuario.
1. Limpie las superficies exteriores del illumipro-10 con un paño sin pelusa humedecido en una
solución desinfectante a base de lejía del 10%. El tiempo mínimo de exposición de contacto para
matar los patógenos de la sangre (hepatitis-A, VIH-1, SARM, SARS, etcétera) es de 1 minuto.
2. Abra las tapas A y B del illumipro-10. Limpie la superficie interior de la tapa y las superficies del
bloque de calor con un paño sin pelusas humedecido en una solución desinfectante a base de lejía
del 10%. El tiempo mínimo de exposición de contacto es de 1 minuto.
3. Cierre las tapas. Adjunte el Informe de descontaminación completado del illumipro-10 al
instrumento. Empaque el instrumento en la espuma protectora de embalar y la caja de envío
provistas.
Información del instrumento
Número de serie del
instrumento:
Información del centro
Nombre del centro:
Dirección del centro:
Información de contacto:
El illumipro-10 se ha descontaminado tal como se describió anteriormente. Las superficies de contacto
exterior e interior se han limpiado con una solución desinfectante a base de lejía del 10%. Se han
controlado los tiempos de exposición de contacto mínimos.
(Teléfono) (correo electrónico)
Información de descontaminación
(Calle)
(Ciudad, Provincia)
(Nombre, Cargo)
Realizado por:
illumipro-10 Manual del operador: ESPAÑOL Pag. 87
Copyright© Meridian Bioscience, Inc.
SN11007, REV. 07/2010
(Firma/Fecha)
Page 88
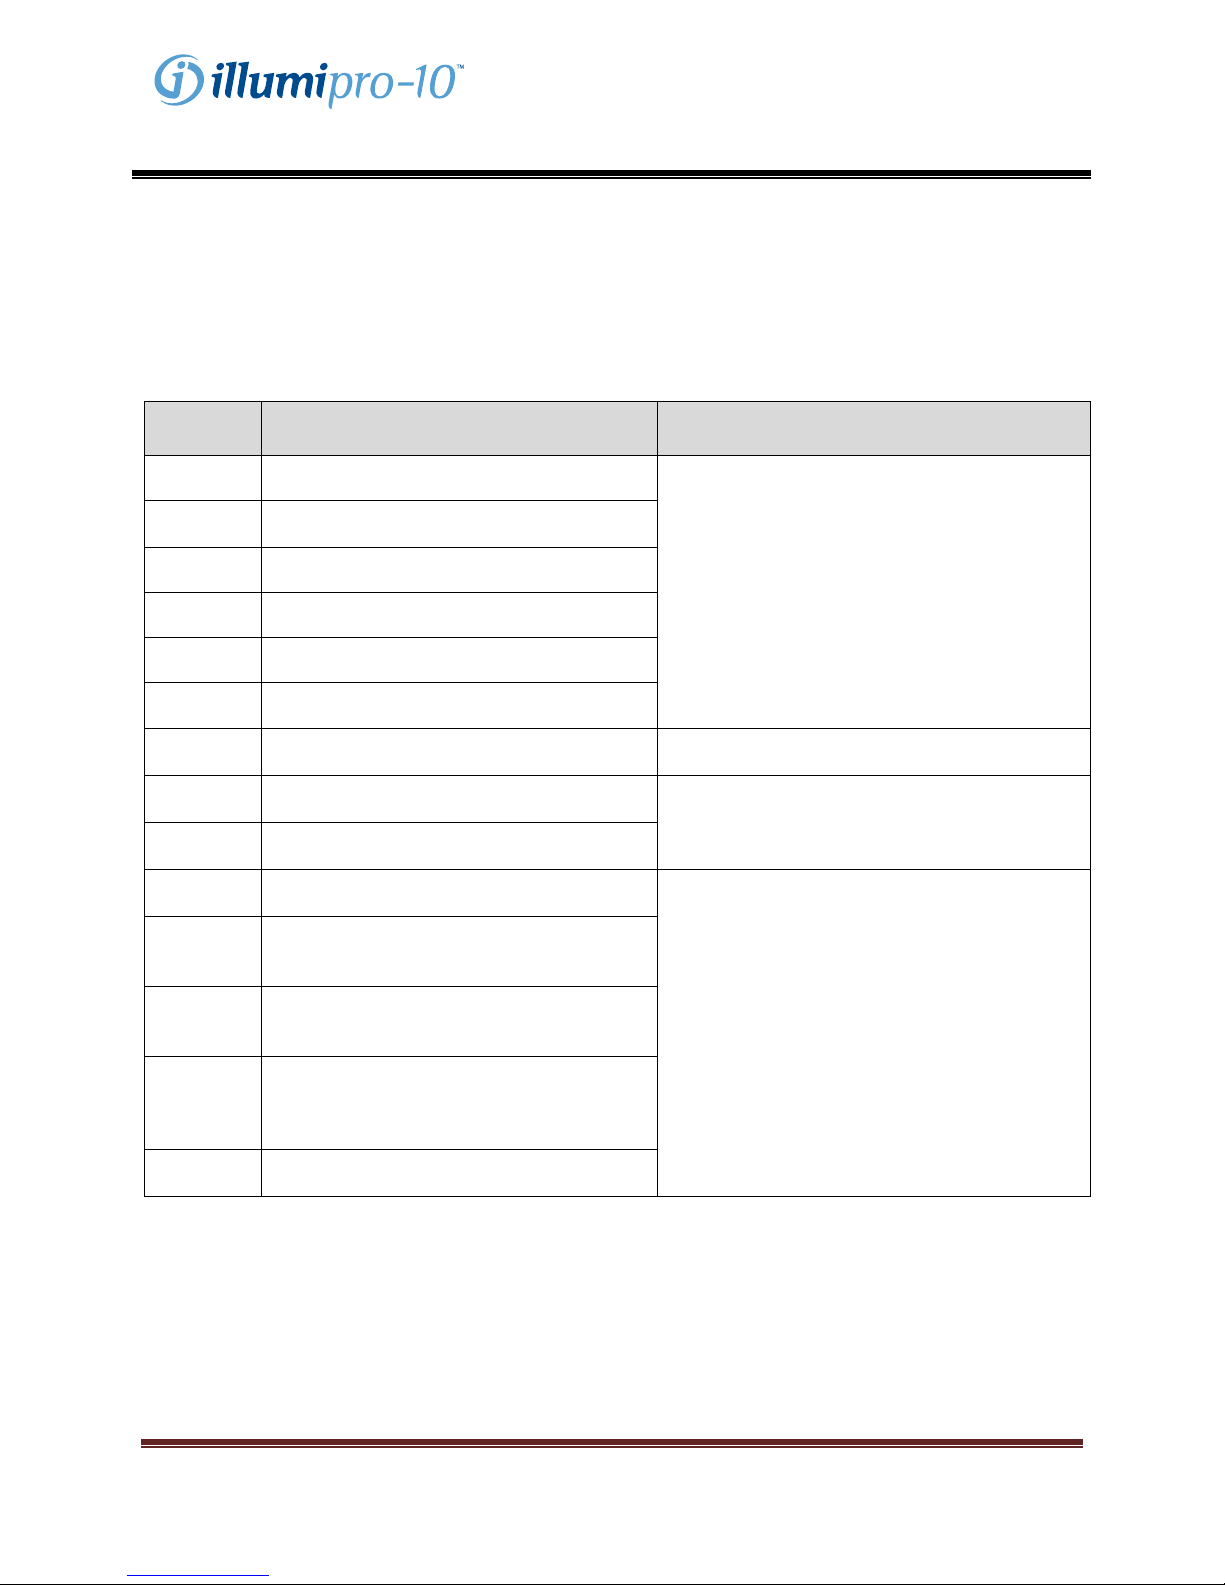
Manualdeloperador
Apéndice III
illumipro-10 Códigos de error y resolución de problemas
El illumipro-10 visualizará los códigos de error cuando se detecten fallos del sistema. Los códigos de
error, las descripciones y las acciones recomendadas para corregirlos se resumen en la siguiente tabla.
Código
de error
500 El reloj de tiempo real no funciona.
501
504 Voltaje fuera de rango.
505 Voltaje fuera de rango.
Descripción Acción necesaria
La memoria RAM no volátil (NVRAM) no
funciona.
Póngase en contacto con el servicio de
asistencia técnica de Meridian Bioscience
llamando al 513-271-3700 (EE. UU.), su
distribuidor local o Meridian Bioscience
Europe al +39 0331 433 636.
506 Voltaje fuera de rango.
507 Voltaje fuera de rango.
508 Temperatura interior demasiado elevada.
509
510
502
503
511
512
513
Temperatura del Bloque A demasiado
elevada.
Temperatura del Bloque B demasiado
elevada.
Error de firmware: El bloque calentador
no está calentando correctamente.
Error de firmware: La memoria RAM no
volátil (NVRAM) no se inicializó
correctamente.
Error de firmware: Los resultados de la
prueba no se obtuvieron correctamente
de la memoria RAM no volátil (NVRAM).
Error de firmware: Los parámetros del
dispositivo no se obtuvieron
correctamente de la memoria RAM no
volátil (NVRAM).
Error de firmware: El estado del bloque
no se puede leer correctamente.
para que le den asistencia técnica o para
concertar la reparación.
Traslade la unidad a un ambiente más
fresco
Apague la unidad y espere a que enfríe.
Apague el instrumento.
Vuelva a encender el instrumento y espere
a que se complete la prueba de
autoencendido. Póngase en contacto con
el servicio de asistencia técnica de
Meridian Bioscience llamando al 513-2713700 (EE. UU.), su distribuidor local o
Meridian Bioscience Europe al +39 0331
433 636 para que le den asistencia técnica
si el problema persiste.
illumipro-10 Manual del operador: ESPAÑOL Pag. 88
Copyright© Meridian Bioscience, Inc.
SN11007, REV. 07/2010
Page 89

Manualdeloperador
Apéndice IV
illumipro-10 Información del escáner de código de barras
El illumipro-10 permite la entrada de la identificación de la muestra usando códigos de barras. El
escáner del código de barras ha sido colocado delante del instrumento. El escáner está orientado
verticalmente, junto al teclado numérico.
La información de la identificación de muestra está limitada a 16 caracteres. Se aceptarán los códigos
de barras que contengan solamente los siguientes caracteres:
A B C D E F G H I J K L M
N O P Q R S T U V W X Y Z
0 1 2 3 4 5 6 7 8 9 -
illumipro-10 Manual del operador: ESPAÑOL Pag. 89
Copyright© Meridian Bioscience, Inc.
SN11007, REV. 07/2010
Page 90

Manualdeloperador
Apéndice V
illumipro-10 Compliance Testing Summary
The illumipro-10 has been tested and found to be in compliance with the following requirements and
Standards:
Standard Description
IEC 61010-1
IEC 61010-2-010
IEC 61010-2-081
IEC 61010-2-101
UL 61010-1
CSA C22.2# 61010-1
CSA C22.2#61010-2-010
CSA C22.2#61010-2-081
CSA C22.2#61010-2-101
Safety requirements for electrical equipment for measurement, control, and
laboratory use - Part 1: General requirements
Safety requirements for electrical equipment for measurement, control, and
laboratory use - Part 2-010: Particular requirements for laboratory
equipment for the heating of materials
Safety requirements for electrical equipment for measurement, control, and
laboratory use - Part 2-081: Particular requirements for automatic and
semi-automatic laboratory equipment for analysis and other purposes
Safety requirements for electrical equipment for measurement, control and
laboratory use - Part 2-101: Particular requirements for in vitro diagnostic
(IVD) medical equipment
UL standard for Safety Electrical Equipment for Measurement, Control, and
Laboratory Use - Part 1: General Requirements
UL standard for Safety Electrical Equipment for Measurement, Control, and
Laboratory Use - Part 1: General Requirements
Safety requirements for electrical equipment for measurement, control, and
laboratory use - Part 2-010: Particular requirements for laboratory
equipment for the heating of materials
Safety Requirements for Electrical Equipment for Measurement, Control
and Laboratory Use - Part 2-081: Particular Requirements for Automatic
and Semi-Automatic Laboratory Equipment for Analysis and Other
Purposes
Safety Requirements for Electrical Equipment for Measurement, Control,
and Laboratory use - Part 2-101: Particular Requirements for In Vitro
Diagnostic (IVD) Medical Equipment
illumipro-10 Manual del operador: ESPAÑOL Pag. 90
Copyright© Meridian Bioscience, Inc.
SN11007, REV. 07/2010
Page 91

Manualdeloperador
Bedienungshandbuch
illumipro-10 Manual del operador: ESPAÑOL Pag. 91
Copyright ©Meridian Bioscience, Inc.
SN11007, REV. 04/2010
Page 92

Bedienungshandbuch
Inhaltsverzeichnis
Vorgesehene Verwendung und Funktion des Instruments ................................................................ 93
Installationsabläufe und Anforderungen ............................................................................................... 93
Funktionsprinzip ...................................................................................................................................... 95
Leistungsmerkmale und Spezifikationen .............................................................................................. 95
Bedienungsanleitung .............................................................................................................................. 98
Kalibrierungsverfahren ........................................................................................................................ 105
Betriebliche Vorsichtshinweise und Beschränkungen ...................................................................... 107
Service und Wartung ............................................................................................................................. 108
illumipro-10 Einrichtungs- und Installations-Checkliste ............................................................ Anlage I
illumipro-10 Dekontaminationsverzeichnung ............................................................................. Anlage II
illumipro-10 Fehlercodes und Fehlersuche .............................................................................. Anlage III
illumipro-10 Barcode-Scanner-Informationen ........................................................................... Anlage IV
illumipro-10 Compliance Testing Summary ................................................................................ Anlage V
illumipro-10 Bedienungshandbuch: DEUTSCH Seite 92
Copyright© Meridian Bioscience, Inc.
SN11007, REV. 07/2010
Page 93

Bedienungshandbuch
Vorgesehene Verwendung und Funktion des Instruments
Das illumipro-10 ist ein automatisiertes isothermales Amplifikations- und Nachweissystem zur
Verwendung mit illumigene Loop-Mediated-Amplifikationsprodukten von Meridian Bioscience, Inc.
Das illumipro-10 ist zur Verwendung durch geschulte Laborfachkräfte in einem Laborumfeld vorgesehen.
Installationsabläufe und Anforderungen
Das illumipro-10 und dessen Zubehör sind sicher verpackt, um Beschädigungen während des Versands
an den Endverbraucher zu vermeiden. Der Versand-Container und die Verpackung des illumipro-10
sollten vor der Installation auf Beschädigungen geprüft werden. Beschädigte Instrumente dürfen nicht
installiert werden, da dies den Endverbraucher gefährden kann. Melden Sie jedwede Beschädigung an
den technischen Kundendienst von Meridian unter +1 513-271-3700 (USA), Ihrem lokalen Händler oder
an Meridian Bioscience Europe unter +39 0331 433 636.
Packungsinhalt des illumipro-10
c illumipro-10 Automatisiertes isothermales Amplifikations- und Nachweissystem
d illumipro-10 Netzteil und Stromkabel
e illumipro-10 Verifizierungsstandards
f illumipro-10 Bedienungshandbuchordner
g illumipro-10 USB-Kabel
Packungsinhalt des externen Thermodruckers (Katalog 610173; separater Versand):
c Drucker
d Druckerkabel
e Drucker-Netzteil (12 V DC Linearer Adapter)
f Thermodruck-Rollenpapier (1 Rolle)
Optionales Zubehör des illumipro-10
c Externe Tastatur (Katalog 610174; separater Versand.)
Bedienungshandbuch des illumipro-10 (SN11007; separater Versand.)
illumipro-10 Bedienungshandbuch: DEUTSCH Seite 93
Copyright© Meridian Bioscience, Inc.
SN11007, REV. 07/2010
Page 94

Bedienungshandbuch
Installation des illumipro-10
Die Installation des illumipro-10 und dessen Zubehörs kann ausgeführt werden, nachdem der Inhalt
geprüft wurde und die in diesem Bedienungshandbuch erläuterten Anforderungen erfüllt wurden. Anlage
I beinhaltet eine allgemeine Checkliste zur Einrichtung und Installation des illumipro-10.
Das illumipro-10 sollte auf einer robusten und stabilen Oberfläche platziert werden. Verbinden Sie das
Instrument entsprechend der Erläuterung in nachfolgender Tabelle.
Komponente Symbol Installationsanweisung
Drucker
Verbinden Sie unter Verwendung der mitgelieferten Kabel den
externen Drucker mit dem illumipro-10. Der Druckeranschluss
befindet sich an der Hinterseite des Instruments und wird durch das
angezeigte Symbol identifiziert.
Sichern Sie die Druckerverbindung und verbinden Sie das im
Lieferumfang des Druckers enthaltene Netzteilkabel mit dem Drucker.
Netzteil 12 V -----
bei 4,5 A
Verbinden Sie das mit dem illumipro-10-Paket bereitgestellte
Netzteilkabel mit dem Gerät. Der Stromversorgungsanschluss
befindet sich an der hinteren Seite des Instruments. Der
Verbindungs-Port für die Stromversorgung wird durch das angezeigte
Symbol identifiziert. Verbinden Sie das Netzteilkabel mit der
Netzteileinheit.
Verbinden Sie die 2-Kontakt-Anschlüsse des illumipro-10- und des
Drucker-Stromkabels mit der entsprechenden Steckdose.
Externe
Tastatur
Verbinden Sie unter Verwendung der beigefügten Kabel die optionale,
externe Tastatur mit dem Instrument. Der externe Tastaturanschluss
befindet sich an der Hinterseite des Instruments und wird durch das
angezeigte Symbol identifiziert.
HINWEIS: Die Tastatur muss bei ausgeschaltetem illumipro-10
installiert werden.
Einrichtung des illumipro-10
Die Einrichtung des Instruments wird unter dem SYSTEM-Menü ausgeführt. Der Benutzer kann die Zeitund Datums-Formate sowie die bevorzugte Sprache einstellen.
Performance-Verifizierung des illumipro-10
Performance-Verifizierung muss nach der Installation und vor der Verwendung erfolgen. Optische
Verifizierung erfolgt im Einklang mit den unter dem SERVICE-Menü bezeichneten Anweisungen.
illumipro-10 Bedienungshandbuch: DEUTSCH Seite 94
Copyright© Meridian Bioscience, Inc.
SN11007, REV. 07/2010
Page 95

Bedienungshandbuch
Funktionsprinzip
Das illumipro-10 ist ein automatisiertes isothermales Amplifikations- und Nachweissystem zum Nachweis
von Nukleinsäuresequenzen aus Proben menschlichen Ursprungs. Das Instrument wird zusammen mit
den illumigene LOOP-Mediated-Amplifikations-In-vitro-Diagnostik-Produkten von Meridian Bioscience,
Inc verwendet.
Das illumipro-10 ist ein menügesteuertes Laborinstrument mit zwei unabhängigen probenverarbeitenden
Blöcken, bezeichnet als Block A und Block B. Probenerhitzung und optischer Nachweis wird für bis zu
fünf 2-Kammer-illumigene-Geräten je Block ausgeführt. Jedes illumigene Instrument mit zwei Kammern
enthält eine Musterkammer und eine Kontrollkammer. Amplifikation der Ziel-DNA tritt während des
Wärmezyklus auf und resultiert in der Bildung von durch das illumipro-10 Optiksystem entdeckten
Ablagerungen. Die durch das Vorhandensein einer amplifizierten Ziel-DNA erzeugten Ablagerungen
erzeugen eine trübe Probe-/Kontroll-Reaktionslösung, welche dann durch Absorption gemessen wird.
Das illumipro-10 nutzt die Änderung der Trübung jeder Probe-/Kontroll-Reaktionslösung zur Meldung
von Assay-Ergebnissen als UNGÜLTIG, POSITIV oder NEGATIV.
Das illumipro-10 funktioniert in vier Basismodi: ASSAY, ERGEBNIS, SERVICE und SYSTEM. AssayAuswahl und Muster-Amplifikation erfolgen im ASSAY-Modus; Testergebnisse werden im ERGEBNISModus verwaltet; die grundlegende Einrichtung des Instruments wird im SYSTEM-Modus ausgeführt;
optische Leistungsverifizierung wird im SERVICE-Modus ausgeführt.
Leistungsmerkmale und Spezifikationen
Leistungsmerkmale
Das illumipro-10 ist ein automatisiertes isothermales Amplifikations- und Nachweissystem zur
Verwendung mit illumigene Loop-Mediated-Amplifikationsprodukten von Meridian Bioscience, Inc. Das
illumipro-10 wurde mit einer einfachen Benutzeroberfläche konzipiert. Dazu gehören eine Tastatur, ein
Flüssigkristallbildschirm (LCD), ein Barcode-Scanner, ein Drucker und eine optionale externe Tastatur.
Menügesteuerte Bedienungsanweisungen werden auf dem Bildschirm angezeigt, und der Benutzer
übergibt durch Auswahl mittels der Tastatur Befehle an das Instrument.
Isothermale Amplifikation wird durch zwei getrennt überwachte Heizblöcke ausgeführt. Jeder dieser
Blöcke kann bei Temperaturen zwischen 55 C und 65 C bzw. innerhalb von 1 C des TemperaturSollwertes operieren. Der Temperatursollwert der isothermalen Amplifikation wird durch das illumigene-
Assay bestimmt. Die Zeit der isothermalen Amplifikation wird durch den internen Timer illumipro-10
überwacht. Im Betriebszustand wird das illumipro-10 „Test wird durchgeführt“, die Blocktemperatur und
verbleibende Inkubationszeit anzeigen.
illumipro-10 Bedienungshandbuch: DEUTSCH Seite 95
Copyright© Meridian Bioscience, Inc.
SN11007, REV. 07/2010
Page 96

Bedienungshandbuch
DNA-Amplifikationsnachweis wird durch das illumipro-10-Optiksystem ausgeführt. Jeder illumipro-10Block enthält Laserdioden mit einer Beleuchtungsstärke von 650 ± 20 nm und zugehörigen Detektoren,
die die Lichtübertragung über jeden illumipro-10-Schacht überwachen. Das illumipro-10 führt vor
Ausführung eine erste Prüfung des Optiksystems durch. Festgestellte Fehler im Optiksystem
deaktivieren den Instrumentenblock, bis der Fehler behoben werden kann. Nach erfolgreicher
Optikverifizierung überprüft das illumipro-10 das Vorhandensein eines illumigene-Testgerätes in jedem
Schacht. Das illumipro-10 gibt automatisch die Proben-ID „LEERER SCHACHT“ für alle Schächte ein, in
denen ein Testgerät nicht erkannt werden kann. Das illumipro-10 misst das Absorptionsvermögen jedes
illumigene-Testgerätes zu Beginn und Ende der isothermalen Amplifikationsinkubation. Die
Probenergebnisse werden abhängig von der erkannten Veränderung der Absorption als UNGÜLTIG,
POSITIV oder NEGATIV berichtet.
Die Leistungsmerkmale des illumipro-10 umfassen unter anderem:
• Eigendiagnosen bei Einschalten des Netzstroms und bei Betriebsbeginn.
• Eigendiagnose für Testgerät-Platzierung und Optikpfad-Verifizierung.
• Deckel-Schließstellungsanzeige und Deckel-Sperre.
• Thermischer Heizblock mit Optiknachweis an jedem Schacht mit Emission/Absorption von sichtbarem
Licht (650 ± 20 nm).
• Intervall-Timer mit Echtzeit-Assayprozesszeit-Display.
• Einfache LCD-Anwenderschnittstelle für Einrichtung des Instruments, Programmwahl und Eingabe
von Probenidentifikation.
• Barcode-Scanner für Probenidentifizierungseintrag.
• Externe Tastatur für Probenidentifizierungseintrag verfügbar.
• Drucker für Ergebnismeldung.
• Steuerung der Übertragung des Amplifikationsprodukts mithilfe des separaten illumigene-Testgeräts.
illumipro-10 Bedienungshandbuch: DEUTSCH Seite 96
Copyright© Meridian Bioscience, Inc.
SN11007, REV. 07/2010
Page 97

Bedienungshandbuch
Spezifikationen des illumipro-10
• Elektrische Kennwerte
Spannungsbereich: 120 V AC
Stromversorgung, Bereich: 100 – 240 V AC, 50/60 Hz
Nennspannung und Nennstrom: 12 V DC, 4,5 A
• Physische Kennwerte
Abmessungen: 21 cm x 29,2 cm x 9,5 cm
Gewicht: 2,95 ± 0,05 kg
• Umgebungskennwerte
Betriebstemperatur: 15 – 30 C
Lagerungstemperatur: 10 – 40 C
Relative Luftfeuchtigkeit, bei Betrieb: 10 – 90 %, nicht-kondensierend
Relative Luftfeuchtigkeit, Lagerung: 10 – 95 %
Drucker-Spezifikationen
• Elektrische Kennwerte
Versorgungsspannung (SMPS): Eingangsspannung (S, P) 12 V DC
• Umgebungskennwerte
Betriebstemperatur: 0 – 40 C
Lagerungstemperatur: -10 – 50 C
Relative Luftfeuchtigkeit, Betrieb: 30 – 80 %
Relative Luftfeuchtigkeit, Lagerung: 10 – 90 %
illumipro-10 Bedienungshandbuch: DEUTSCH Seite 97
Copyright© Meridian Bioscience, Inc.
SN11007, REV. 07/2010
Page 98

Bedienungshandbuch
Bedienungsanleitung
Das illumipro-10 funktioniert in vier Basismodi: ASSAY, ERGEBNIS, SERVICE und SYSTEM. AssayAuswahl und Muster-Amplifikation erfolgen im ASSAY-Modus; Testergebnisse werden im ERGEBNISModus verwaltet; die grundlegende Einrichtung des Instruments wird im SYSTEM-Modus ausgeführt.
Der SERVICE-Modus ist geschultem Service-Personal vorbehalten und ist für Labor-Benutzer nicht
zugänglich. Allgemeine Informationen in Bezug auf jeden Betriebsmodus sind in diesem Abschnitt
enthalten.
Tastatur
Die Funktionen des illumipro-10 werden durch die Tastatur gesteuert. Die Tastatur dient als einfache
Anwender-Schnittstelle für eine Menü-Navigation auf Basisebene, Eingabe alphanumerischer Zeichen für
Probenidentifikation und Assay-AUSFÜHREN-Start. Auf die Tastaturfunktionen wird in diesem Handbuch
durchgehend Bezug genommen. Folgende Tastatur-Zuordnungen und Symbole kommen vor:
HINWEIS: Für Tastatur-Tasten mit mehreren
Zeichen scrollen Sie, indem Sie die TastenfeldTaste mehrfach drücken.
Tastenfeld-
Taste
1 <LEERZEICHEN>, 1
2 A, B, C, 2
3 D, E, F, 3
4 G, H, I, 4
5 J, K, L, 5
6 M, N, O, 6
7 P, Q, R, S, 7
8 T, U, V, 8
9 W, X, Y, Z, 9
0 0
- -
RUN Ausgewähltes Assay-
Eigenschaft / Funktion
Nach oben scrollen
Nach unten scrollen
Zurück scrollen, Backspace
Eingabe
Protokoll ausführen
illumipro-10 Bedienungshandbuch: DEUTSCH Seite 98
Copyright© Meridian Bioscience, Inc.
SN11007, REV. 07/2010
Page 99
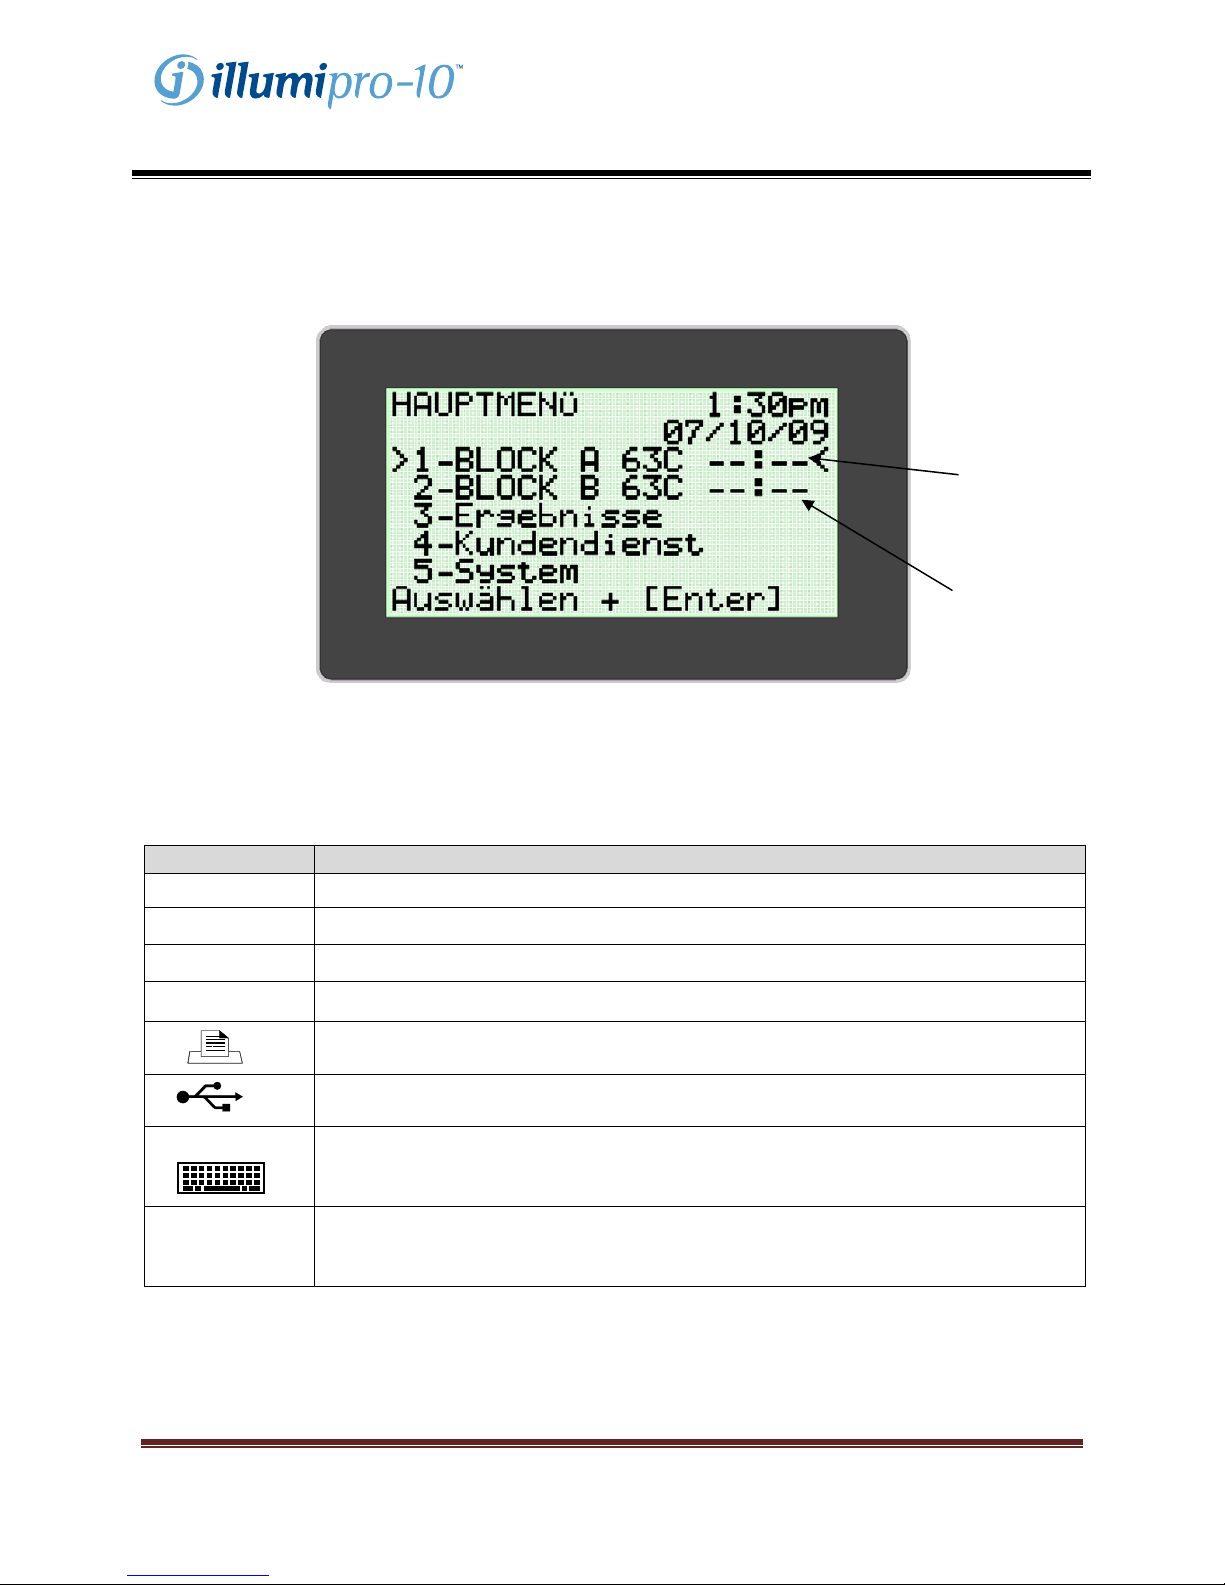
Bedienungshandbuch
Hauptmenü
In der Hauptmenü-Anzeige werden Uhrzeit, Datum, Assay-Status und Blocktemperatur angezeigt. Über
das Hauptmenü erfolgt der Zugang zu den Ergebnis-, Service und Systemmodi.
Blockstatus
Blocktemperatur
Verwendete Konventionen:
Grafik Beschreibung
**:** BLOCKSTATUS: Aufheizen; Block nicht auf Betriebstemperatur
--:-- BLOCKSTATUS: Leerlauf; Block auf Betriebstemperatur
!!! Warnung! Gerät erfordert Aufmerksamkeit
… Assay-Menü-Expansionsanzeige
Drucker: Drucker an diesen Port anschließen.
(Geräte-Rückseite)
USB-Port: Gerät über diesen Port an externen Computer anschließen.
PS/2
12 V ----bei 4,5 A
(Geräte-Rückseite)
Externe Tastatur: Gerät über diesen Port an externe Tastatur (optional) anschließen.
(Geräte-Rückseite)
illumipro-10 Netzteil: Verbinden Sie das Netzteil mit dem Instrument an diesen
Anschluss.
(Geräte-Rückseite)
illumipro-10 Bedienungshandbuch: DEUTSCH Seite 99
Copyright© Meridian Bioscience, Inc.
SN11007, REV. 07/2010
Page 100

Bedienungshandbuch
ASSAY-MODUS
Der ASSAY-MODUS ermöglicht es dem Benutzer, auf Programme auf dem illumipro-10 zuzugreifen und
diese auszuführen. Der Benutzer wählt den zu verwendenden Block aus dem Hauptmenü und
anschließend das auszuführende Assay. Jeder Block kann unabhängig ausgewählt und ausgeführt
werden. Nach Auswahl des zu verwendenden Blocks erscheint das Assay-Modus-Menü. Der Benutzer
wählt das auszuführende Assay und folgt den Anweisungen, die auf dem illumipro-10-Bildschirm
angezeigt werden.
Der illumipro-10-Bildschirm veranschaulicht, dass ein Test durchgeführt wird und fordert den Benutzer
auf, Probenidentifizierungsinformationen einzugeben oder den Test abzubrechen.
Probenidentifizierungsinformationen können direkt mithilfe der Tastatur eingegeben oder mittels des
illumipro-10-Barcode-Scanners gescannt oder mit einer externen Tastatur eingegeben werden. Weitere
Informationen in Bezug auf den illumipro-10-Barcode-Scanner sind in Anlage IV dieser
Bedienungsanleitung enthalten.
illumipro-10 Bedienungshandbuch: DEUTSCH Seite 100
Copyright© Meridian Bioscience, Inc.
SN11007, REV. 07/2010
 Loading...