

Meridian Explorer User Manual
Important
•
Read
these
these
all
all
not
use
only
not
block
not
install
use
this
unused
all
is
damaged,
fallen
exposed
warnings.
servicing
or
instructions.
instructions.
instructions.
this
with a dry
with
heat
amplifiers)
attachments/
apparatus
is
required
in
any
into
has
•
Keep
•
Heed
•
Follow
•
Do
•
Clean
•
Do
accordance
•
Do
radiators,
(including
•
Only
manufacturer.
•
Unplug
when
•
Refer
Servicing
damaged
plug
have
been
normally,
safety instructions
apparatus
any
near
registers,
for
way,
the
to
been
cloth.
ventilation
the
manufacturer's
any
heat
stoves,
that
produce
accessories
during
long
periods
to
qualified
when
such
liquid
has
apparatus,
rain
or
moisture,
dropped.
near
water.
openings.
sources
or
lightning
of
time.
service
the
apparatus
as
power-supply
been
spilled
the
apparatus
does
Install
instructions.
such
other
heat.
specified
storms
personnel.
or
not
in
as
apparatus
by
or
has
been
cord
objects
has
operate
WARNING:
ELECTRIC
APPARATUS
Safety warnings
•
Do
•
Do
vase,
•
Do
candles,
•
To
avoid
equipment
•
Do
the
or
sources
producing
•
To
avoid
strong
a
power
Radio interference
FCC
Warning:
radiate
used
correctly
cause
and
television
complies
TO
SHOCK,
TO
not
expose
not
place
on
the
not
place
on
the
overheating
to
not
position
such
equipment,
interference
electrical
amplifier.
radio
frequency
in
interference
reception.
with
the
REDUCE
DO
NOT
RAIN
OR
the
unit
any
object
unit.
naked
flame
unit.
leave
ensure
sufficient
the
unit
as a radiator,
such
do
or
magnetic
This
equipment
energy
accordance
to
radio
It
limits
set
THE
RISK
OF
EXPOSE
MOISTURE.
to
dripping
with
sources,
at
least
ventilation.
direct
or
directly
as a power
position
radiation,
generates
and
with
our
been
out
in
Subpart
or
liquid,
such
10cm
sunlight,
if
not
instructions
type-tested
filled
in
not
communications
has
FIRE
THIS
splashing.
such
as
around
near
on
top
amplifier.
the
unit
such
as
and
installed
or
J,
Part
OR
as
lighted
heat
of
heat
near
near
can
and
may
radio
and
15
of
FCC
rules
limits
are
intended
against
such
EEC:
This
comply
with
rating:
6YE
us
on
no:
guide
product
with
USB
Audio
Road
the
Explorer
was
to
EN55020.
a
Use
Power
the
Copyright
Meridian
Latham
Huntingdon
Cambridgeshire
PE29
England
Copyright© 2013
Visit
Part
This
Human-Computer
http:/ /www.interface.co.uk!
for a
Class B computing
to
provide
interference
has
been
the
limits
set
1.1,
2, 3 only
5V
2.5W
max.
Ltd
Meridian
web:
http:/
/U 1 (P8841
produced
Interface
device.
These
reasonable
in
home
designed
out
Audio
/www.meridian-audio.com
0)
by:
Ltd,
installations.
and
in
EN55013
Ltd.
protection
type-tested
and
Requirements
Mac
OS X: Requires Mac OS X 1 0.6.4 (Snow
Leopard) or later. No drivers are needed.
Windows: Requires Windows XP SP3,
SP1
Windows 7
required
Explorer page (www.meridian-audio.com).
or Windows 8. Drivers are
and
can
be
downloaded from the
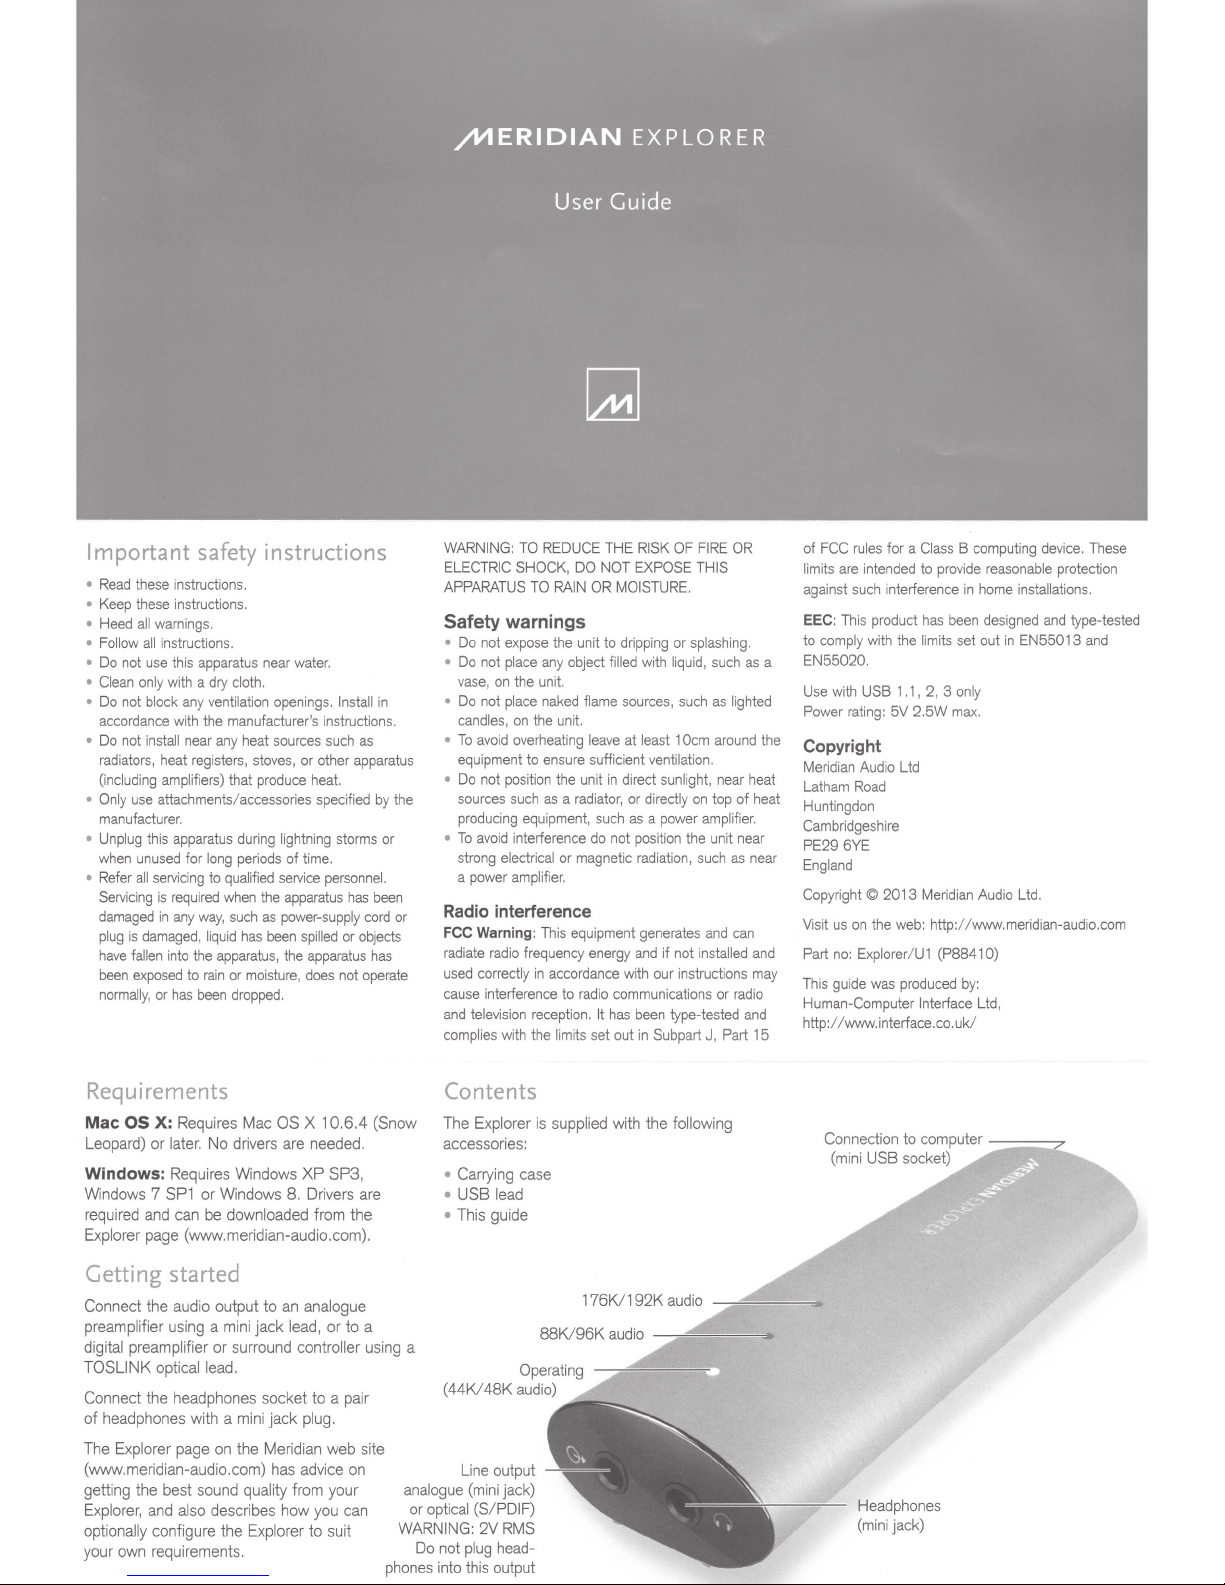
Getting started
Connect the audio output to
preamplifier
digital preamplifier or surround controller using a
TOSLINK optical lead.
Connect the headphones socket to a pair
of
headphones with a mini jack plug.
The
(www.meridian-audio.com) has advice
getting the best sound quality from your
Explorer,
optionally configure the Explorer to suit
your own requirements.
using a mini jack lead, or to a
Explorer page on the Meridian web site
and
also describes how you can
an
analogue
on
analogue
or
WARNING:
phones into this output
Contents
The Explorer
accessories:
• Carrying case
• USB lead
This guide
•
Line output
(mini
optical (S/PDIF)
not
plug
'2V
head-
Do
is
supplied with the following
jack)
RMS
Headphones
(mini
jack)
Setting
up
for
Mac
OS
X
Configure the Explorer
•
Connect
•
Open
•
Click
•
Select
•
Select
from
the
Explorer
via
USB.
System Preferences .
Sound.
the
Output
panel.
Meridian Explorer USB DAC Out
the
list.
Optionally for best sound quality
•
Select
the
Sound Effects
• Set Play sound effects through
panel.
Internal Speakers.
•
Open
the
Audio Midi Setup
the
Applications/Utilities
•
Select
Meridian Explorer USB DAC Out
and
select
the
desired
rate.
required
utility
folder).
bit/sample
to
(found
Setting up for Windows
NOTE:
DO
NOT
connect
running
the
driver
install
Install the USB2 driver
•
Download
suitable
•
Double
enclosed
•
Run
setup.exe
connecting
•
Click
about
testing.
in
•
Click
Windows
Hardware Wizard.
•
Select
•
Select
automatically,
and
save
the
location
such
click
the
.zip
folder.
the
driver
installer
and
follow
the
Explorer
Continue Anyway if
the
Explorer
Finish
will
when
then
not
done.
show
No, not this time,
Install the software
then
the
Explorer
application.
driver
.zip
as
the
Desktop
file
and
open
by
double-clicking
the
installer
instructions,
when
requested.
Windows
passing
Windows
a Found New
then
Next.
Next.
XP
file
the
before
to
a
.
warns
Logo
•
Click
Continue Anyway if
about
the
Explorer
testing.
•
Click
Finish
•
Restart
the
not
when
done.
computer.
passing
Windows
Windows
Configure the Explorer
•
Connect
•
Open
control
the
Explorer.
the
Sounds and Audio Devices
panel
(Start ~ Control Panel
Hardware and Sound ~ Sounds and
Audio Devices).
•
Click
the
Audio
tab.
•
Select
Meridian Explorer USB DAC
Output
Sound playback
•
Click
from
Apply.
the default
box.
device
list
in
Optionally for best sound quality
•
Connect
•
Open
control
the
Explorer.
the
Sounds and Audio Devices
panel
(Start ~ Control Panel
warns
Logo
~
the
~
Hardware and Sound ~ Sounds and
Audio Devices).
•
Select
Meridian Explorer USB DAC
Output
Sound playback
•
Click
•
Select
Scheme
from
the
the
Sounds
No Sounds
drop-down
default
box.
tab.
from
list
device
the
and
list
Sound
click
Apply.
in
the
Setting up for Windows 7 and 8
Install the USB2 driver
•
Download
suitable
•
Connect
USB
notifications.
•
Double
enclosed
•
Run
setup
•
On
location
the
ignoring
click
folder.
the
driver
application.
the
next
and
save
Explorer
any
the
installer
window,
the
such
as
to
Windows
.zip
file
allow
driver
the
the
and
by
.zip
Desktop.
computer
driver
open
double
the
installer
file
to
a
via
installation
the
clicking
to
the
Warranty
The
Explorer
from
one
year
the
limitations
This
warranty
materials
the
Meridian
or a copy
any
claim
Limitations and Conditions
The
Explorer
if
the
defects
from
for
of
made
following
is
covered
in
materials
the
and
covers
any
repair
Service
the
sales
against
is
covered
conditions
by
and
date
of
purchase; subject
conditions
the
cost of
deemed
Team.
receipt
the
under
have
warranty
workmanship
outlined
labour
necessary
Proof of
will
be
warranty.
the
warranty
been
to
be
free
below.
and
purchase
required
met:
for
to
by
for
only
make
•
Click
follow
•
Click
•
Restart
changes
Install
the
Finish
installer
the
to
the
to
start
when
computer
computer.
the
driver
instructions
done.
.
instillation
.
Configure the Explorer
•
Connect
•
Open
the
the
Explorer
Sound
.
control
panel
(Start
~
Control Panel ~ Hardware and Sound
~Sound)
•
Click
the
Playback
•
Find
Meridian Explorer USB DAC audio
in
the
list,
right
click
tab.
and
select
Set
as
Default Device.
•
Click
Apply.
Optionally for best sound quality
•
Connect
•
Open
the
the
Explorer.
Sound
control
panel
(Start
~
Control Panel ~ Hardware and Sound
• It
has
been
used
in
instructions
safety instructions
•
It
has
not
been
•
It
has
not
been
unauthorised
• It
has
not
or
service.
warranty
Explorer
to
make a claim
approved
or
been
is
purchaser
process
replacement
repair
The
of
the
subsequent
In
order
the
for
repair
given
altered
purchased
dealer.
subjected
limited
and
accordance
in
the
elsewhere
or
to
is
not
of
the
against
for
must
with
the
section
Important
in
this
document.
modified
to
the
transferable
returning a faulty
from
an
an
unauthorised
original
product.
the
be
followed.
in
any
purchaser
to
warranty,
a
and
way.
unit
~Sound)
•
Click
in
the
•
Click
• Select No Sounds
Scheme
•
Click
•
Double
audio
•
Click
•
Set
.
Meridian Explorer USB DAC audio
list.
the
Sounds
drop-down
the
Playback
click
in
the
the
Enhancements
tab.
from
the
list
and
tab.
Meridian Explorer USB DAC
list.
tab.
Disable all enhancements
Apply.
•
Click
the
Advanced
• If not
already
Exclusive
• Select
the
Mode
desired
Default Format
set,
tab
.
set
both
box.
bit/sample
drop-down
options
Apply.
Details
of
this
process
can
be
found
Meridian
www.meridian-audio.com
web
site:
Product Registration
Register
www.meridian-support.com
and
discover
your
receive
more
Explorer
Exclusive
about
product
Meridian
the
Meridian
at:
News
Sound
click
Apply.
in
rate
in
list
box
on
and
Collection.
and
the
the
and
the
click
click
Registration Number:
MAOB5L
 Loading...