

Mercedes Benz E Class 2015, C Class 2014, CLA 2015 GLA M G SLK C Coupe C Cab GLK E B COMAND Operator Instruction Manual

É1725845800WËÍ
1725845800
COMAND
Operating Instructions
Order no. 6515 7871 13 Part no. 172 584 58 00 Edition B-2015
COMAND Operating Instructions

Symbols
In this Operator's Manual you will find the following symbols:
WARNING
G
Warning notes make you aware of dangers
which could pose a threat to your health or
life, or to the health and life of others.
Environmental note
H
Environmental notes provide you with information on environmentally aware actions or
disposal.
Publication details
Internet
Further information about Mercedes-Benz
vehicles and about Daimler AG can be found
on the following websites:
http://www.mbusa.com (USA only)
http://www.mercedes-benz.ca (Canada
only)
Editorial office
Notes on material damage alert you to
!
dangers that could lead to damage to your
vehicle.
Practical tips or further information that
i
could be helpful to you.
X
This symbol indicates an instruction
that must be followed.
X
Several of these symbols in succession indicate an instruction with several steps.
(Y
page)
Dis‐Dis‐
playplay
This symbol tells you where you can
find more information about a topic.
This font indicates a display in the
multifunction display/COMAND display.
Parts of the software in the vehicle are protected by copyright©2005
The FreeType Project
http://www.freetype.org. All rights
reserved.
You are welcome to forward any queries or
suggestions you may have regarding this
Operator's Manual to the technical documentation team at the following address:
Daimler AG, HPC: CAC, Customer Service,
70546 Stuttgart, Germany
©
Daimler AG: Not to be reprinted, translated
or otherwise reproduced, in whole or in part,
without written permission from Daimler AG.
Vehicle manufacturer
Daimler AG
Mercedesstraße 137
70327 Stuttgart
Germany
As at 31.01.2014

Welcome to the world of Mercedes-Benz
First, familiarize yourself with your COMAND
system. Read these operating instructions,
particularly the safety and warning notes,
before you drive off.
This will help you to obtain the maximum
pleasure from your COMAND system and to
avoid endangering yourself and others.
The equipment level and functions of your
COMAND system may differ depending on:
R
model
R
order
R
country specification
R
availability
Mercedes-Benz therefore reserves the right
to introduce changes in the following areas:
R
design
R
equipment
R
technical features
The equipment in your vehicle may therefore
differ from that shown in the descriptions and
illustrations.
Consult an authorized Mercedes-Benz Center
if you have further questions.
The Operator's Manual and all supplements
are integral parts of the vehicle. You should
always keep it in the vehicle and pass it on to
the new owner if you sell the vehicle.
The technical documentation team at
Daimler AG wishes you safe and pleasant
motoring.
Mercedes-Benz USA, LLC
Mercedes-Benz Canada, Inc.
A Daimler Company
1725845800
É1725845800WËÍ


Contents
3
Index ....................................................... 4
Operating safety ................................. 14
At a glance ........................................... 19
System settings .................................. 41
Vehicle functions ................................ 49
Navigation ........................................... 59
Telephone .......................................... 123
Online and Internet functions .......... 157
Audio .................................................. 185
Video .................................................. 225
Rear Seat Entertainment System .... 235
SIRIUS Weather ................................ 257

Index
4
1, 2, 3 ...
360° camera
Displaying images ............................ 56
Switching on/off .............................. 56
911 emergency call .......................... 125
A
Access data of the mobile phone
network provider
Deleting .........................................165
Editing ...........................................165
Making entries ............................... 162
Selecting ........................................ 161
Active partition (USB devices only)
Selecting ........................................ 202
Address book
Browsing ........................................ 147
Calling up ....................................... 147
Changing an entry .......................... 149
Connecting a call ........................... 150
Creating an entry ........................... 148
Deleting an entry ........................... 148
Deleting contacts ........................... 153
Details about an entry ................... 149
Entering characters ......................... 33
Entry as a home address ...............103
Hiding contact details .................... 154
Importing contacts ........................ 152
Introduction ................................... 146
Receiving vCards ........................... 153
Searching for an entry ................... 148
Starting route guidance ................. 150
Voice tags ...................................... 151
Address entry menu ............................ 64
Adjusting the sound settings
Balance ............................................ 30
Alternative Route ................................ 93
Audio
Radio mode ................................... 186
Audio CD/DVD and MP3 mode
Switching to (Rear Seat Entertain-
ment System) ................................ 245
Audio format, setting
Video DVD ..................................... 231
Autostore ...........................................189
AUX (audio)
Notes/socket ................................ 223
Switching to ................................... 223
AUX (video)
Setting the volume and sound ....... 232
Showing/hiding the menu ............. 232
Switching to ................................... 232
AUX jacks
CD/DVD drive ............................... 238
Avoiding an area ................................ 115
B
Back button ......................................... 27
Balance, adjusting ............................... 30
Bass, setting ........................................ 30
Bird's-eye view (navigation) ............. 109
Bluetooth®
Activating audio mode ................... 215
Activating/deactivating ................... 45
Conditions (telephone) .................. 125
Connecting another mobile
phone ............................................ 129
Connecting audio devices .............. 212
Device list ...................................... 212
Entering the passcode ................... 128
External authorization .................... 129
General information ......................... 44
Interface ........................................ 124
Introduction ................................... 124
Reconnecting an audio device ....... 214
Searching for a mobile phone ........127
Settings ...........................................44
Telephone basic menu ...................131
Telephony ...................................... 125
Telephony notes ............................ 124
Bluetooth® audio basic display ....... 215
Brightness, setting (TV, video) ......... 226
Buttons on the COMAND control-
ler .......................................................... 27
C
Call
Accepting/ending/rejecting .......... 132
see Telephone
Call lists
Displaying details ........................... 141

Index
5
Opening and selecting an entry ..... 140
Saving an entry in the address
book ..............................................141
Car pool lanes ...................................... 62
Category list (music search) ............ 204
CD
Copy protection .............................204
Fast forward/fast rewind ...............200
General information ....................... 204
Inserting ........................................ 196
Inserting/loading (Rear Seat
Entertainment System) .................. 244
Mode, switching to ........................ 197
Multisession .................................. 203
Notes on discs ............................... 204
Pause function ............................... 198
Removing/ejecting (Rear Seat
Entertainment System) .................. 244
Safety notes .................................. 195
Selecting a media type .................. 198
Selecting a track ............................ 199
Sound settings (balance, bass,
treble) .............................................. 30
CD mode
Playback options ........................... 202
CD/DVD
Inserting ........................................ 196
Removing ....................................... 196
Changing direction
Announcement phase ......................88
Change-of-direction phase ...............88
Preparation phase ............................88
Changing the character set ................ 36
Channel presets ................................ 188
Characters
Changing the character set .............. 35
Changing the language .................... 34
Deleting ...........................................35
Entering ........................................... 35
Entering (address book, phone
book) ............................................... 33
Entering (navigation) ........................ 35
Moving the cursor ............................ 35
Switching to letters .......................... 34
Clear button ......................................... 27
Color, setting (TV, video) .................. 226
COMAND
Active multicontour seat .................. 52
Basic functions ................................ 29
Calling up drive status regulator
(ABC) ............................................... 52
Display ............................................. 21
Examples of operation ..................... 27
Importing POIs ............................... 171
Menu overview ................................. 22
Multicontour seat ............................ 52
Seat functions .................................. 52
Settings ......................................... 183
Switching on/off .............................. 29
COMAND and Internet
see Online and Internet functions
COMAND control panel ....................... 25
COMAND controller ............................. 26
COMAND display
Cleaning instructions ....................... 24
Setting ............................................. 42
Switching on/off .............................. 24
Compass function ............................. 117
Connecting a USB device ................. 197
Contacts
Deleting ......................................... 153
Importing ....................................... 152
Contrast, setting (TV, video) ............ 226
Copy protection (CD/DVD) ............... 204
Country-specific information (nav-
igation) ............................................... 118
D
Data carrier
MUSIC REGISTER ........................... 207
Data medium
CD/DVD ........................................ 204
MP3 ............................................... 202
Date format, setting ............................ 43
Day design, setting ............................. 42
Deleting
Call lists ......................................... 142
Destination
Assigning to an address book
entry .............................................. 105
Destination (navigation)
Displaying information ..................... 94
Entering a destination by address .... 63

Index
6
Entering a destination using the
map .................................................71
Entering a point of interest .............. 76
Entering using geo-coordinates ....... 72
Entering using Mercedes-Benz
Apps ................................................ 72
Saving ............................................ 104
Selecting from the destination
memory ........................................... 70
Selecting from the list of last des-
tinations ........................................... 70
Selecting storage options .............. 105
Storing after destination entry ....... 105
Storing during route guidance ....... 105
Destination memory (navigation)
Deleting an entry ........................... 106
Entering/saving your home
address ............................................ 69
Previous destinations .................... 107
Dialing a number (telephone) ........... 132
DISC button
Activating audio CD or MP3 mode..197
Activating Bluetooth® Audio ......... 215
Switching on the Media Interface .. 219
Switching to the MUSIC REGIS-
TER ................................................ 208
Display
Selecting the design ........................ 42
Displaying the arrival time ................. 94
Displaying the distance to the des-
tination ................................................. 94
Displaying the track and album ....... 201
Dolby® Digital ..................................... 31
DVD
Copy protection ............................. 204
Inserting ........................................ 196
Inserting/loading (Rear Seat
Entertainment System) .................. 244
Notes on discs ............................... 204
Removing/ejecting (Rear Seat
Entertainment System) .................. 244
Sound settings (balance, bass,
treble) .............................................. 30
DVD video
Rear Seat Entertainment System ... 247
E
Entering a street name ....................... 64
Entering an intersection name ........... 67
Entering the address (example) ......... 63
Entering the city .................................. 64
Entering the house number ................ 64
Entry
Deleting ........................................... 36
Storing ............................................. 34
Example display
Audio CD mode .............................. 198
MUSIC REGISTER ........................... 207
F
Factory setting (reset function) ......... 47
Fast forward
Audio mode (CD, MP3) .................. 200
Video DVD ..................................... 228
Fast rewind
Audio mode (CD, MP3) .................. 200
Video DVD ..................................... 228
Favorites (Internet) ........................... 181
Favorites button .................................. 45
Frequencies
Adjusting for radio stations ............ 188
Fuel
Displaying consumption ................... 50
G
Google™ Local Search
Importing a destination/route ....... 168
Popular Searches ........................... 169
Search ........................................... 167
Search history ............................... 169
Selecting a search position ............ 168
Using as the destination ................ 168
GPS reception ...................................... 60
Gracenote® Media Database ........... 200
H
Harman/kardon® Logic 7® surround sound system
see Surround sound (harman/
kardon® surround sound system)
Heading up (navigation) ................... 109

Index
7
Headphones
Changing batteries ........................ 240
Highway information ........................ 112
Home address
Entering and storing ........................ 69
Selecting from the destination
memory ........................................... 70
I
Incident (traffic report) ....................... 99
Interface (USB, iPod®)
see Media Interface
Internet
Calling up the carousel view .......... 176
Conditions for access .................... 158
Creating favorites ..........................181
Entering the URL ............................ 176
Favorites manager ......................... 181
Favorites menu .............................. 181
Menu functions .............................. 179
Opening favorites .......................... 180
Selecting favorites ......................... 177
Selecting/setting access data ....... 160
Internet radio
Calling up ....................................... 175
Searching for stations .................... 175
iPod®
Alphabetic track selection ............. 221
Connecting to the Media Inter-
face ............................................... 218
Selecting a category/playlist ......... 220
iTunes® .............................................. 221
L
Lane recommendations
Explanation ...................................... 89
Presentation .................................... 89
List of access data
New provider ................................. 162
List of mobile phone network providers
Empty ............................................ 160
With the selected provider ............. 161
Lumbar support
Adjusting (COMAND) ....................... 53
M
Map (navigation)
Adjusting the scale ........................ 108
Arrival time/distance to the des-
tination .......................................... 111
City model ..................................... 112
Geo-coordinate display .................. 111
Heading ......................................... 109
Information in the display .............. 111
Map settings .................................. 109
Moving ........................................... 108
North orientation ........................... 109
Notes ............................................. 108
Point of interest symbols ............... 110
Road display .................................. 111
Saving the crosshair position ......... 108
Showing the map data version ....... 118
Topographical map ........................ 112
Updating ........................................ 118
Updating process ........................... 118
Media Interface
Alphabetical track selection .......... 221
Basic menu .................................... 219
Connecting an external audio
source ............................................ 218
Connection options ....................... 217
iPod® ............................................ 217
Mode ............................................. 217
MP3 player .................................... 217
Notes for the MP3 player ............... 223
Playback options ........................... 222
Selecting a music file ..................... 219
Selecting category ......................... 220
Selecting folder ............................. 220
Selecting playlist ............................ 220
Switching to ................................... 218
USB mass storage device .............. 217
Media list ........................................... 198
Microphone, switching on/off ......... 134
Mobile phone
Authorizing .................................... 128
Connecting (Bluetooth® inter-
face) .............................................. 126
De-authorizing ............................... 130
External authorization .................... 129
Registering (authorizing) ................ 128

Index
8
Mobile phone network providers
Calling up ....................................... 160
MP3
Bit/sampling rates ......................... 203
Copyright ....................................... 204
Data medium ................................. 202
Fast forward/fast rewind ............... 200
File systems ................................... 202
Formats .........................................203
Mode, switching to ........................ 197
Notes ............................................. 202
Pause function ............................... 198
Playback options ........................... 202
Safety notes .................................. 195
Selecting a media type .................. 198
Selecting a track ............................ 199
Sound settings (balance, bass,
treble) .............................................. 30
Multifunction steering wheel
Adjusting the volume ....................... 29
Multisession CD ................................ 203
Music files
Importing ....................................... 208
MUSIC REGISTER
Deleting all music files ................... 209
Deleting individual music files ....... 210
General notes ................................ 207
Memory space info ........................ 210
Playback options ........................... 211
Switching to ................................... 207
Music search ..................................... 204
N
Navigation
Adjusting the volume of the navi-
gation announcements .................... 29
Alternative route .............................. 93
Avoiding an area ............................ 114
Basic settings .................................. 62
Blocking a route section affected
by a traffic jam ................................. 92
Compass function .......................... 117
Destination memory ...................... 103
Destination/route download ......... 170
Displaying destination information (arrival time, distance to des-
tination) ........................................... 94
Entering a destination ...................... 63
Entering a destination by address .... 63
Entering a destination using the
map ................................................. 71
Entering a point of interest .............. 76
Entering characters (character
bar) .................................................. 35
Entering/saving your home
address ............................................ 69
Freeway information ...................... 112
General notes .................................. 60
GPS reception .................................. 60
Important safety notes .................... 60
Lane recommendation ..................... 89
List of areas ................................... 115
Map settings .................................. 108
Off-road/off-map (off-road desti-
nation) ............................................. 97
Previous destinations .................... 107
Reading out traffic reports ............. 102
Repeating announcements .............. 91
Route guidance ................................ 87
Search & Send ................................. 86
Selecting a destination from the
destination memory ......................... 70
Selecting a destination from the
list of last destinations ..................... 70
Selecting your home address ........... 70
Setting options for destination/
route download .............................. 173
Setting route options (avoiding:
highways, toll roads, tunnels, fer-
ries) ................................................. 62
Setting the route type (short
route, fast route, dynamic route or
economic route) ............................... 62
Showing/hiding the menu ............... 61
Starting route calculation ................ 69
Switching announcements on/
off .................................................... 91
Switching to ..................................... 61
Navigation announcements
Switching off .................................... 29
Night View Assist Plus
Showing the image on the
COMAND display ............................. 56
Switching automatic activation
on/off .............................................. 56

Index
9
North orientation (navigation) ......... 109
O
Off-map ................................................ 98
Online and Internet functions
Ending the connection ................... 166
Establishing/ending the connec-
tion ................................................ 166
Further Mercedes-Benz Apps ......... 174
Manually setting the access data
of the mobile phone network pro-
vider .............................................. 162
Mercedes-Benz Mobile Website ..... 174
Options menu ................................ 172
Resetting settings .......................... 174
Selecting options for the local
search ............................................ 172
Selecting the access data of the
mobile phone network provider ..... 161
Setting options for destination/
route download .............................. 173
Own address ...................................... 103
P
Pause function
Audio mode (CD, MP3) .................. 198
Video DVD ..................................... 229
Personal POIs
Acoustic notification ........................ 83
Calling up the menu ......................... 82
Displaying on the map ..................... 82
Managing categories ........................ 83
Saving .............................................. 84
Selecting as the destination ............. 85
Settings ........................................... 82
Visual information ............................ 83
Phone book
Adding a number to an address
book entry ..................................... 139
Calling up ....................................... 137
Creating a new entry ..................... 139
Deleting an entry ........................... 138
Entering characters ......................... 33
Searching for an entry ................... 137
Symbol overview ............................ 137
Phone call
Dialing ........................................... 132
Picture settings (TV, video) .............. 226
Picture viewer
Displaying pictures ........................ 233
Introduction ................................... 232
Playback options
Audio mode (CD, MP3) .................. 202
POI (navigation)
Category .......................................... 79
Defining the position for the POI
search .............................................. 78
Entering ........................................... 76
Entering a point of interest using
the map ........................................... 81
List ................................................... 79
ZAGAT® survey service ................... 81
see Personal POIs
POI icons
Setting ........................................... 110
POI list
With character bar ........................... 80
Previous destinations (navigation) .. 107
R
Radio
Overview ........................................ 186
Setting a station ............................ 188
Sound settings (balance, bass,
treble) .............................................. 30
Storing stations ............................. 188
Switching HD Radio on/off ............ 187
Switching on .................................. 186
Switching wavebands .................... 187
Read-aloud function .......................... 102
Reading out
Traffic reports on the route ............ 102
Real-time traffic reports ..................... 99
Rear Seat Entertainment System
Active COMAND source ................. 252
Adjusting sound settings ............... 242
Adjusting the brightness ................ 242
Adjusting the color ........................ 242
Adjusting the contrast ................... 242
AUX mode ...................................... 254
CD/DVD audio and MP3 mode ...... 244
Changing the batteries .................. 240

10
Index
Changing the picture format .......... 243
Cordless headphones .................... 239
Multiple users ................................ 242
Operating with the headphones ..... 241
Picture settings .............................. 242
System settings ............................. 243
Using the main loudspeaker .......... 241
Video DVD mode ........................... 247
Rear view camera
Displaying the image ........................ 55
Rear-compartment screens .............. 237
Receiving vCards ............................... 153
Redialing (telephone) ........................ 133
Remote control
Button lighting ............................... 238
Rear Seat Entertainment System ... 237
Reset function ..................................... 47
Resetting (factory settings) ............... 47
Route
Estimated time of arrival .................. 94
Route (navigation)
Calling up the "Routes" menu .......... 96
Displaying the distance to the des-
tination ............................................ 94
Recording ........................................ 95
Route overview ................................ 94
Selecting an alternative route .......... 93
Setting route options (avoiding:
highways, toll roads, tunnels, fer-
ries) ................................................. 62
Setting the route type (short
route, fast route, dynamic route or
economic route) ............................... 62
Starting calculation .......................... 69
Route demonstration .......................... 95
Route guidance
Canceling ......................................... 92
Continuing ....................................... 92
Destination reached ......................... 92
General notes .................................. 87
Lane recommendations ................... 89
Off-road ........................................... 97
Traffic reports .................................. 99
S
Safety notes
Audio CD and MP3 mode ............... 195
Using the telephone ....................... 124
Video DVD mode ........................... 226
Satellite radio
Displaying information ................... 195
Registering .................................... 191
Switching to ................................... 191
SatRadio
Notes ............................................. 190
Selecting a category ...................... 192
Saving the crosshair position .......... 108
Screen
Selecting for the remote control .... 237
SD memory card
Ejecting .......................................... 196
Inserting ........................................ 196
Search & Send ...................................... 86
Seats
Active multicontour seat .................. 52
Adjusting the lumbar support
(COMAND) ....................................... 53
Balance (seat heating) ..................... 54
Multicontour seat ............................ 52
Resetting settings ............................ 55
Seat functions (COMAND) ............... 52
Selecting for adjustment
(COMAND) ....................................... 52
Selecting a province ........................... 64
Selecting a state .................................. 64
Selecting stations
Radio ............................................. 188
Sending DTMF tones ......................... 134
Setting the audio format
Rear Seat Entertainment System ... 251
Setting the language
COMAND ......................................... 45
Rear Seat Entertainment System ... 251
Setting the night design ..................... 42
Setting the text reader speed ............ 44
Setting the volume
Telephone calls ................................ 30
Video AUX ..................................... 232
Settings
Menu overview ................................. 22
Picture (COMAND) ......................... 226
Sound settings ................................. 30
SIRIUS weather display
5-day forecast ................................ 259

Index
11
Daily forecast ................................. 258
Detail information .......................... 259
Information chart ........................... 258
Selecting a location for the
weather forecast ............................ 259
Switching on/off ........................... 258
Weather map ................................. 262
Sound
Switching on/off .............................. 29
Sound menu ......................................... 30
Sound mode ......................................... 32
Sound settings
Calling up the sound menu .............. 30
Surround sound ............................... 31
Treble and bass ............................... 30
Speed dial list
Saving a phone book entry ............ 142
SPLITVIEW ............................................ 37
Station search ................................... 188
Stop function
Video DVD .....................................229
Storing stations
Radio ............................................. 188
Street View .......................................... 73
Surround sound ................................... 31
Surround sound (harman/
kardon® surround sound system)
Notes ............................................... 31
Switching on/off .............................. 31
Switching between picture for-
mats (TV, video) ................................. 226
Switching between summer time
and standard time ............................... 43
Switching HD Radio on/off
see Radio
Switching the hands-free micro-
phone on/off ..................................... 134
Switching wavebands (radio) ........... 187
System settings
Bluetooth® ...................................... 44
Date ................................................. 42
Language ......................................... 45
Text reader speed ............................ 44
Time ................................................. 42
Time zone ........................................ 43
Voice Control System ......................44
T
Telephone
Accepting/ending a call ................ 132
Adjusting the volume for calls .......... 30
Calling (outgoing call) .................... 132
Calling via speed dial ..................... 133
Conference connection .................. 135
Connecting a mobile phone (gen-
eral information) ............................ 126
De-authorizing a mobile phone ...... 130
Ending an active call ...................... 135
Entering a number ......................... 132
Entering phone numbers ................ 132
External authorization (Blue-
tooth®) .......................................... 129
Function restrictions ...................... 125
General notes ................................ 124
Incoming call ................................. 132
Making a call ................................. 135
Operating options .......................... 124
Overview of functions .................... 133
Reception and transmission vol-
ume ............................................... 131
Redialing ........................................ 133
Rejecting a call .............................. 132
Rejecting/accepting a waiting
call ................................................. 134
Safety notes .................................. 124
Sending DTMF tones ...................... 134
Single call ...................................... 133
Switching hands-free microphone
on/off ............................................ 134
Text messages (SMS) .................... 144
Toggling ......................................... 135
Using the telephone ....................... 132
see Bluetooth®
Telephone basic menu
Bluetooth® interface ..................... 131
Telephone number
Entering ......................................... 132
Text messages (SMS)
Calling the sender .......................... 145
Deleting ......................................... 146
Inbox .............................................. 144
Information and requirements ....... 144
Reading .......................................... 144
Reading aloud ................................ 145

12
Index
Storing sender in address book ..... 146
Storing the sender as a new
address book entry ........................ 146
Time
Setting ............................................. 44
Setting summer/standard time ....... 43
Setting the format ............................ 43
Setting the time ............................... 42
Setting the time manually ................ 42
Setting the time zone ....................... 43
Setting the time/date format .......... 43
Tone settings
Balance and fader ............................ 30
Track
Selecting (CD, MP3) ....................... 199
Selecting using the number key-
pad ................................................ 199
Track information .............................. 247
Traffic jam function ............................. 92
Traffic reports
Calling up a list .............................. 100
Real-time traffic report .................. 101
Treble, adjusting (sound) .................... 30
True Image™ ........................................ 32
TV
Automatic picture shutoff .............. 226
Picture settings .............................. 226
Sound settings (balance, bass,
treble) .............................................. 30
U
Updating the digital map .................. 118
USB
see Media Interface
V
Vehicle
Data acquisition ............................... 15
Video
see Video DVD
Video AUX
Setting the picture ......................... 226
Video DVD
Automatic picture shutoff .............. 226
DVD menu ..................................... 230
Fast forward/rewind ...................... 228
Function restrictions ...................... 227
Interactive content ........................ 231
Notes on discs ............................... 227
Operation ....................................... 226
Pause function ............................... 229
Playing conditions .......................... 227
Safety notes .................................. 226
Selecting ........................................ 230
Selecting a film/title ...................... 229
Selecting a scene/chapter ............ 229
Setting the audio format ................ 231
Setting the language ...................... 231
Setting the picture ......................... 226
Showing/hiding the control
menu ............................................. 228
Showing/hiding the menu ............. 228
Stop function ................................. 229
Subtitles ........................................ 231
Switching to ................................... 227
Voice Control System
Settings ........................................... 44
Volume, adjusting
COMAND ......................................... 29
Navigation messages ....................... 29
W
Way points
Accepting for the route .................... 76
Creating ........................................... 73
Editing .............................................. 75
Entering ........................................... 73
Searching for a gas station when
the fuel level is low .......................... 76
Weather Band
Searching for a channel ................. 189
Switching on .................................. 189
Weather map (SIRIUS)
Activating/deactivating display
levels ............................................. 263
Calling up ....................................... 262
Legend ........................................... 267
Moving ........................................... 262
Showing/hiding the menu ............. 262
Time stamp .................................... 267
Weather memory (SIRIUS)
Selecting an area ........................... 261
Storing an area .............................. 261

Website
Adding to favorites ........................ 180
Z
ZAGAT® rating service ........................ 81
Index
13

Operating safety
14
Important safety notes
WARNING
G
Modifications to electronic components, their
software as well as wiring can impair their
function and/or the function of other networked components. In particular, systems
relevant to safety could also be affected. As a
result, these may no longer function as intended and/or jeopardize the operating safety of
the vehicle. There is an increased risk of an
accident and injury.
Never tamper with the wiring as well as electronic components or their software. You
should have all work to electrical and electronic equipment carried out at a qualified
specialist workshop.
If you make any changes to the vehicle electronics, the general operating permit is rendered invalid.
WARNING
G
If you operate information systems and communication equipment integrated in the vehicle while driving, you will be distracted from
traffic conditions. You could also lose control
of the vehicle. There is a risk of an accident.
Only operate the equipment when the traffic
situation permits. If you are not sure that this
is possible, park the vehicle paying attention
to traffic conditions and operate the equipment when the vehicle is stationary.
You must observe the legal requirements for
the country in which you are currently driving
when operating COMAND.
COMAND calculates the route to the destination without taking account of the following,
for example:
R
traffic lights
R
stop and yield signs
R
merging lanes
R
parking or stopping in a no parking/no
stopping zone
R
other road and traffic rules and regulations
R
narrow bridges
COMAND can give incorrect navigation commands if the actual street/traffic situation
does not correspond with the digital map's
data. Digital maps do not cover all areas nor
all routes in an area. For example, a route may
have been diverted or the direction of a oneway street may have changed.
For this reason, you must always observe
road and traffic rules and regulations during
your journey. Road and traffic rules and regulations always have priority over the system's driving recommendations.
Navigation announcements are intended to
direct you while driving without diverting your
attention from the road and driving.
Please always use this feature instead of consulting the map display for directions. Looking at the icons or map display can distract
you from traffic conditions and driving, and
increase the risk of an accident.
Bear in mind that at a speed of only 30 mph
(approximately 50 km/h) your vehicle covers
a distance of 44 feet (approximately 14 m)
per second.
This equipment complies with FCC radiation
exposure limits set forth for uncontrolled
equipment and meets the FCC radio frequency (RF) Exposure Guidelines in Supplement C to OET65.
This equipment has very low levels of RF
energy that is deemed to comply without
maximum permissive exposure evaluation
(MPE). But it is desirable that it should be
installed and operated with at least 8inches
(20cm) and more between the radiator and a
person's body (excluding extremities: hands,
wrists, feet and legs.)

Declarations of conformity
Vehicle components which receive
and/or transmit radio waves
USA only: The wireless devices of this
i
vehicle comply with Part 15 of the FCC
Rules. Operation is subject to the following
two conditions:
1) These devices may not cause interference, and
2) These devices must accept any interference, including interference that may
cause undesired operation of the device.
Changes or modifications not expressly
approved by the party responsible for compliance could void the user's authority to
operate the equipment.
Canada only: The wireless devices of this
i
vehicle comply with Industry Canada
license-exempt RSS standard(s). Operation
is subject to the following two conditions:
1) These devices may not cause interference, and
2) These devices must accept any interference, including interference that may
cause undesired operation of the device.
Operating safety
Roof antenna functionality (telephone,
i
satellite radio, GPS) can be affected by the
use of roof carrier systems.
Attaching metalized retrofit film to the
windshield may affect radio reception and
have a negative impact on all other antennas (e.g. emergency antenna) in the vehicle
interior.
Therefore, have all work on or modifica-
i
tions to electronic components carried out
at a qualified specialist workshop. This
workshop should have the necessary specialist knowledge and tools to carry out the
work required. Mercedes-Benz recommends that you use an authorized
Mercedes-Benz Center for this purpose. In
particular, work relevant to safety or on
safety-related systems must be carried out
at a qualified specialist workshop.
Protection against theft: this device is
i
equipped with technical provisions to protect it against theft. Further information on
protection against theft can be obtained
from an authorized Mercedes-Benz Center.
Data stored in the vehicle
15
Correct use
Observe the following information when using
COMAND:
R
the safety notes in this manual
R
traffic rules and regulations
R
laws and safety standards pertaining to
motor vehicles
Work improperly carried out on electronic
i
components or systems (e.g. radio, DVD
changer) and associated software could
cause them to cease functioning. Even systems that have not been modified could be
affected because the electronic systems
are connected. Electronic malfunctions
can seriously jeopardize the operational
safety of your vehicle.
A wide range of electronic components in
your vehicle contain data memories.
These data memories temporarily or permanently store technical information about:
R
The vehicle's operating state
R
Incidents
R
Malfunctions
In general, this technical information documents the state of a component, a module, a
system or the surroundings.
These include, for example:
R
operating conditions of system components, e.g. fluid levels
R
the vehicle's status messages and those of
its individual components, e.g. number of
wheel revolutions/speed, deceleration in
Z

Operating safety
16
movement, lateral acceleration, accelerator pedal position
R
malfunctions and defects in important system components, e.g. lights, brakes
R
vehicle reactions and operating conditions
in special driving situations, e.g. air bag
deployment, intervention of stability control systems
R
ambient conditions, e.g. outside temperature
This data is of an exclusively technical nature
and can be used to:
R
assist in recognizing and rectifying malfunctions and defects
R
analyze vehicle functions, e.g. after an accident
R
optimize vehicle function
The data cannot be used to trace the vehicle's
movements.
When your vehicle is serviced, technical information can be read from the event data memory and malfunction data memory.
Services include, for example:
R
repair services
R
service processes
R
warranties
R
quality assurance
It is read by employees of the service network
(including manufacturers) using special diagnostic devices. More detailed information is
obtained from it, if required.
After a malfunction has been rectified, the
information is deleted from the malfunction
memory or is continually overwritten.
When operating the vehicle, situations are
conceivable in which this technical data, in
connection with other information (if necessary, under consultation with an authorized
expert), could be traced to a person.
Examples include:
R
accident reports
R
damage to the vehicle
R
witness statements
Further additional functions that have been
contractually agreed upon with the customer
allow certain vehicle data to be conveyed by
the vehicle as well. The additional functions
include, for example, vehicle location in case
of an emergency.
Qualified specialist workshop
Read the information on qualified specialist
workshops in the vehicle Operator's Manual.
Information on copyright
General information
Information on licenses for free and Open
Source software used in your vehicle and in
the electronic components can be found on
this website: http://www.mercedes-
benz.com/opensource.
Registered trademarks
Registered trademarks:
R
Bluetooth®is a registered trademark of
Bluetooth®SIG Inc.
R
DTS is a registered trademark of DTS, Inc.
R
Dolby and MLP are registered trademarks
of DOLBY Laboratories.
R
BabySmart™, ESP®and PRE-SAFE®are
registered trademarks of Daimler AG.
R
HomeLink®is a registered trademark of
Prince.
R
iPod®and iTunes®are registered trademarks of Apple Inc.
R
Logic7®is a registered trademark of Harman International Industries.
R
Microsoft®and Windows media®are registered trademarks of Microsoft Corporation.
R
SIRIUS is a registered trademark of Sirius
XM Radio Inc.

R
HD Radio is a registered trademark of iBiquity Digital Corporation.
R
Gracenote®is a registered trademark of
Gracenote, Inc.
R
ZAGATSurvey®and related brands are registered trademarks of ZagatSurvey, LLC.
Your COMAND equipment
This manual describes all standard and
optional equipment available for your
COMAND system at the time of purchase.
Country-specific differences are possible.
Please note that your COMAND system may
not be equipped with all the features described. This also applies to safety-relevant systems and functions. Therefore, the equipment on your COMAND system may differ
from that in the descriptions and illustrations.
Should you have any questions concerning
equipment and operation, please consult an
authorized Mercedes-Benz Center.
Operating safety
17
Function restrictions
For safety reasons, some COMAND functions
are restricted or unavailable while the vehicle
is in motion. You will notice this, for example
because either you will not be able to select
certain menu items or COMAND will display a
message to this effect.
Z

18

Your COMAND equipment .................. 20
COMAND operating system ............... 20
Using COMAND ................................... 28
Basic COMAND functions ................... 29
Character entry (telephony) ............... 33
Character entry (navigation) .............. 35
SPLITVIEW ........................................... 37
19
At a glance

COMAND operating system
20
Your COMAND equipment
These operating instructions describe all the
standard and optional equipment for your
COMAND system, as available at the time of
going to print. Country-specific differences
are possible. Please note that your
COMAND system may not be equipped with
At a glance
all the features described.
COMAND operating system
Overview
You can call up the main functions:
R
using the corresponding buttons
R
using the main function bar in the COMAND
display
R
using the remote control
:
COMAND display (Y page 21)
;
COMAND control panel with a single DVD
drive
=
COMAND controller (Y page 26)
You can use COMAND to operate the following main functions:
R
the navigation system
R
the audio function
R
the telephone function
R
the video function
R
the system settings
R
the online and Internet functions
R
the Digital Operator's Manual
(available depending on the vehicle model)

COMAND operating system
COMAND display
Display overview
Example display for radio
:
Status bar
;
Calls up the audio menu
=
Main function bar
?
Display/selection window
A
Radio menu bar
Status bar : displays the time, the current mobile phone network provider and the signal
level.
The main functions – navigation, audio, telephone and video – feature additional menus. This
is indicated by triangle ;. The following table lists the available menu items.
Main function bar = allows you to call up the desired main function. When the main function
is activated, it is identifiable by the white lettering.
In the example, the radio mode is switched on within the audio main function, display/selection window ? is active.
Menu bar A allows you to operate the radio functions.
21
At a glance

COMAND operating system
22
Menu overview
Navi Audio Telephone Video System
Route settings FM/AM
radio (using
HD Radio™)
Telephone Video DVD Calls up the
system
menu
At a glance
Map settings Satellite
radio
Personal POIs Disc Calls up the
Messages
(street name
announcements,
acoustic information during calls,
audio fadeout,
reserve fuel level)
Memory
card
Address
book
AUX Calls up
Symbol ®®
Calls up the
Digital
Operator's
Manual
(available
depending
on the vehicle model)
COMAND
and Internet
weather
service SIRIUS
Weather
Calls up the
MercedesBenz Mobile
website
O Activates/
deactivates alternative routes
Avoids an area USB stor-
SIRIUS service Bluetooth
Map version Media Inter-
MUSIC
REGISTER
age device
Audio
face
AUX

System menu overview
COMAND operating system
23
System Time SPLITVIEW Consump-
tion
®
O
Switches
the automatic time
settings
on/off
time zone
Switches to
summer
time
time setting
time/date
format
Operates
COMAND
functions
from the
passenger
side
Calls up the
fuel consumption
display
Display settings
Text reader speed Sets the
Voice-operated
control settings
Rear view camera Manual
Language Sets the
Favorites button
Activates/deactivates Bluetooth
Automatic volume
adjustment
Seat Display off
Changes
the driver/
frontpassenger
seat settings
Switches
off the display
At a glance
Imports/exports
data
Resets COMAND
Delete your
i
personal data
using this function, for example
before selling
your vehicle.
If equipped with the rear view camera: when the function is activated and COMAND is
switched on, the image from the rear view camera is automatically shown in the COMAND
display when reverse gear is engaged.
If the 360°360° CameraCamera menu item is displayed, DisplayDisplay OffOff can be called up under SystemSystem.
i

COMAND operating system
24
Switching the COMAND display on/off
X
Press the W button.
or
X
Select SystemSystem in the main function bar by
sliding ZV and turning cVd the COMAND
controller and press W to confirm.
In both cases, the system menu appears.
At a glance
X
To switch off: select Display OffDisplay Off and
press W to confirm.
X
To switch on: press one of the buttons,
e.g. W, Ø or the % back button.
Cleaning instructions
Do not touch the display. The display has
!
a very sensitive high-gloss surface; there is
a risk of scratching. If you have to clean the
screen, however, use a mild cleaning agent
and a soft, lint-free cloth.
The display must be switched off and have
cooled down before you start cleaning. Clean
the display screen, when necessary, with a
commercially available microfiber cloth and
cleaning agent for TFT/LCD displays. Do not
apply pressure to the display surface when
cleaning it, as this could cause irreversible
damage. Then, dry the surface with a dry
microfiber cloth.
Avoid using alcoholic thinners, gasoline or
abrasive cleaning agents. These could damage the display surface.

COMAND control panel
COMAND operating system
25
At a glance
Function Page
:
Switches to radio mode 186
Switches wavebands 187
Switches to satellite radio 191
;
Switches to navigation
mode 61
Shows the menu system 61
=
Press h repeatedly
• Switches to audio CD and
MP3 mode 197
• Switches to memory card
mode 197
• Switches to MUSIC REGISTER 207
• Switches to USB storage
device mode 197
• Switches to Media Interface or audio AUX mode 218
• Switches to Bluetooth
audio mode 215
?
Calls up the telephone
basic menu:
• Telephony via the Bluetooth®interface 131
Function Page
B
Selects stations via the station search function 188
Rewinds 200
Selects the previous track 199
C
Disc slot
• To insert CDs/DVDs 196
• To remove CDs/DVDs 196
• Updates the digital map 118
D
Selects stations via the station search function 188
Fast forward 200
Selects the next track 199
E
Clear button
• Deletes characters 36
• Deletes an entry 36
®
A
Load/eject button 196

COMAND operating system
26
Function Page
F
Number pad
• Selects stations via the
station presets 188
• Stores stations manually 188
• Mobile phone authoriza-
At a glance
tion 128
• Telephone number entry 132
• Sends DTMF tones 134
• Character entry 35
• Selects a location for the
weather forecast from the
memory 261
z Displays the current
track being played
g Selects stations by
entering the frequency
manually 188
g Selects a track
G
Switches COMAND on/off 29
Adjusts the volume 29
COMAND controller
Overview
201
199
Function Page
H
SD memory card slot 196
I
Calls up the system menu 42
J
Accepts a call 132
Dials a number 132
Redial 133
Accepts a waiting call 134
K
Switches the sound on or
off 29
Switches the microphone
on/off 134
Cancels the text message
read-aloud function 145
Switches off navigation
announcements 29
L
Rejects a call 132
Ends an active call 135
Rejects a waiting call 134
You can:
R
call up menus or lists
R
scroll within menus or lists and
R
exit menus or lists
:
COMAND controller
You can use the COMAND controller to select
the menu items in the COMAND display.
Operation
Example: operating the COMAND controller

COMAND operating system
27
The COMAND controller can be:
R
pressed briefly or pressed and held W
R
turned clockwise or counter-clockwise
cVd
R
slid left or right XVY
R
slid forwards or backwards ZVÆ
R
slid diagonally aVb
Example of operation
In the instructions, operating sequences are
described as follows:
X
Press the $ button.
Radio mode is activated.
X
Select RadioRadio by sliding VÆ and turning
cVd the COMAND controller and press W
to confirm.
X
Confirm Station ListStation List by pressing W.
The station list appears.
Buttons on the COMAND controller
Overview
Back button
You can use the k button to exit a menu or
to call up the basic display of the current
operating mode.
X
To exit the menu: briefly press the k
back button.
COMAND changes to the next higher menu
level in the current operating mode.
X
To call up the basic display: press and
hold the k back button.
COMAND changes to the basic display of
the current operating mode.
Clear button
X
To delete individual characters: briefly
press the 2 clear button.
X
To delete an entire entry: press and hold
the 2 clear button.
Seat function button
You can use the T button to call up the
following seat functions:
R
Multicontour seat (with 4-way lumbar support)
R
Active multicontour seat (dynamic seat and
massage function)
R
Balance (seat heating distribution)
At a glance
:
Back button (Y page 27)
;
Clear button (Y page 27)
=
Seat function button (Y page 52)
?
Favorites button (Y page 45)
If your vehicle does not have the seat function
button, it will have two Favorites buttons.
For AMG vehicles: the COMAND controller is
configured with the : and ; buttons.
Favorites button
You can assign predefined functions to
the ; favorites button and call them up by
pressing the button (Y page 45).

Using COMAND
28
Using COMAND
Selecting a main function
At a glance
Address entry menu
:
Main function bar
Situation: switching from navigation mode
(address entry menu) to the system settings.
X
To switch on navigation mode: press the
Ø function button.
X
To show the menu: press W the COMAND
controller.
X
Select DestinationDestination by sliding V Æ and
turning cVdthe COMAND controller and
press W to confirm.
X
Select Address EntryAddress Entry and press W to
confirm.
The address entry menu appears.
X
Slide ZVthe COMAND controller and
switch to main function bar :.
X
Select SystemSystem in the main function bar by
turning cVdthe COMAND controller and
press W to confirm.
The system menu appears.
Selecting the menu of a main function
Example display for audio CD mode and audio
menu (below)
:
Calls up the audio menu
If one of the navigation, audio, telephone or
video main functions is switched on, triangle : appears next to the entry in the main
function bar. You can now select an associated menu.
The example describes how to call up the
audio menu from audio CD mode (an audio
CD is playing).
X
Select AudioAudio in the main function bar by
sliding ZV and turning cVd the COMAND
controller and press W to confirm.
The Audio menu appears.
The # dot indicates the currently selected
audio mode.
X
Select another audio mode, e.g. RadioRadio, by
turning cVd the COMAND controller and
press W to confirm.
Radio mode is activated.

Basic COMAND functions
29
Selecting a menu item
X
Select the station by turning cVdthe
COMAND controller and press W to confirm.
The station is set.
Basic COMAND functions
Switching COMAND on/off
X
Press the q control knob.
When you switch on COMAND, a warning
message will appear. COMAND calls up the
previously selected menu.
If you switch off COMAND, playback of the
current audio or video source will also be
switched off.
Switching the sound on or off
Audio/video source sound
X
Press the 8 button on the COMAND
controller or on the multifunction steering
wheel.
The sound from the respective audio or
video source is switched on or off.
When the sound is switched off, you will
i
see the , symbol in the status bar. If you
change the audio or video source or change
the volume, the sound is automatically
switched on.
Even if the sound is switched off, you will
i
still hear navigation system announcements.
Switching off navigation announcements
X
Navigation announcements: press the
8 button during the announcement.
Switching navigation announcements
back on
X
Press the 8 button again.
The navigation announcements are active
again:
R
if COMAND is switched off/on with the
q control knob
R
or after starting route guidance
Adjusting the volume
Adjusting the volume for the audio or
video source
X
Turn the q control knob.
or
X
Press the W or X button on the multifunction steering wheel.
The volume of the currently selected audio
or video source changes.
You can also adjust the volume for the following:
R
Navigation announcements
R
Phone calls
R
Voice output of the Voice Control System
(see the separate operating instructions)
Adjusting the volume for navigation
announcements
During a navigation announcement:
X
Turn the q control knob.
or
X
Press the W or X button on the multifunction steering wheel.
At a glance

Basic COMAND functions
30
Adjusting the volume for phone calls
You can adjust the volume for hands-free
mode during a telephone call.
X
Turn the q control knob.
or
X
Press the W or X button on the multifunction steering wheel.
At a glance
Adjusting the sound settings
Calling up the sound menu
You can make various sound settings for the
different audio and video sources. This means
that it is possible to set more bass for radio
mode than for audio CD mode, for example.
You can call up the respective sound menu
from the menu of the desired mode.
The example describes how to call up the
sound menu in radio mode.
X
Press the $ button.
The radio display appears. You will hear the
last station played on the last waveband.
X
Select SoundSound by sliding VÆ and turning
cVd the COMAND controller and press W
to confirm.
You can now set the treble, bass and balance for radio mode.
Adjusting treble and bass
Setting the bass
X
Select TrebleTreble or BassBass in the sound menu
by turning cVd the COMAND controller
and press W to confirm.
An adjustment scale appears.
X
Select a setting by turning cVd the
COMAND controller and press W to confirm.
The setting is saved.
Adjusting balance and fader
Setting the balance
With the balance function, you can control
whether the sound is louder on the driver's or
front-passenger side.
The fader function is used to control whether
the sound is louder in the front or the rear of
the vehicle.
You can adjust the fader depending on the
vehicle model.

Equipped with Bang & Olufsen sound system: for the best sound focus, choose the
setting 00.
X
Select Bal/FadBal/Fad (balance/fader) in the
sound menu by turning cVd the COMAND
controller and press W to confirm.
X
Select a balance setting by sliding XVY the
COMAND controller and press W to confirm.
Surround
General notes
If your vehicle is equipped with surround
sound, you can use one of two sound systems:
R
harman/kardon®Logic 7®surround sound
system
The harman/kardon®Logic 7®surround
sound system allows you to set the optimum surround sound in the vehicle interior
(Y page 31).
R
Bang & Olufsen sound system
(Y page 32)
Both sound systems are available for the following operating modes:
R
radio (FM only)
R
satellite radio
R
audio CD
R
MP3 (including SD memory card and USB
storage device)
R
Media Interface
R
Bluetooth®audio mode
R
video DVD (PCM, dts and Dolby Digital
audio formats)
R
AUX
Because some DVDs contain both stereo and
multichannel audio formats, it may be necessary to set the audio format (Y page 231).
Discs which support the audio formats mentioned have the following logos:
Basic COMAND functions
harman/kardon®Logic 7®surround
sound system
31
At a glance

Basic COMAND functions
32
The example describes how to set the surround sound for radio mode.
X
To switch surround sound on/off: press
the $ button.
The radio display appears. You will hear the
last station played on the last waveband.
X
Select SoundSound by sliding VÆ and turning
At a glance
cVd the COMAND controller and press W
to confirm.
X
Select SurroundSurround and press W to confirm.
X
Select Logic7Logic7®®OnOn or Logic7Logic7®®OffOff by turn-
ing cVd the COMAND controller and press
W to confirm.
Depending on your selection, surround
sound is switched on or off and the menu is
exited.
X
To exit the menu without saving: press
the k back button or slide XVY the
COMAND controller.
Please note the following: for the opti-
i
mum audio experience for all passengers
when Logic7®is switched on, the balance
should be set to the center of the vehicle
interior.
You will achieve the best sound results by
playing video DVD media.
MP3 tracks should have a bit rate of at least
128 kbit/s.
Surround sound playback does not function for mono signal sources, such as for
AM radio mode.
If radio reception is poor, e.g. in a tunnel,
you should switch off Logic7®, since it may
otherwise switch dynamically between
stereo and mono and cause temporary
sound distortions.
On some stereo recordings, the sound
characteristics may differ from conventional stereo playback.
The Logic7Logic7®®OnOn function creates a sur-
i
round sound experience for every
passenger when playing stereo recordings,
for example. It enables optimum playback
of music and films on CD or video DVD with
multichannel audio formats, such as MLP,
dts or Dolby Digital. This results in sound
characteristics like those intended by the
sound engineer when the original was
recorded.
If you select Logic7Logic7®®OffOff, the sound sys-
i
tem plays the tracks as stored on the
medium. Due to the design of the
passenger compartment, an optimum
audio experience cannot be guaranteed for
all passengers.
Bang & Olufsen sound system
You can optimize the sound in the vehicle with
the Bang & Olufsen sound system and the
TrueTrue ImageImage™ sound technology. The SoundSound
ModeMode function enables you to focus the selec-
ted sound setting within the vehicle.
The example describes how to set the optimum sound for radio mode.
Selecting the sound setting for True
Image™
X
Press a number key, such as $.
X
Select SoundSound by sliding VÆ and turning
cVd the COMAND controller and press W
to confirm.
X
Select Bang&OlufsenBang&Olufsen and press W to con-
firm.
A menu appears. A # dot marks the current
setting for True Image™.
X
Select referencereference or surroundsurround and press
W to confirm.
R
referencereference

Character entry (telephony)
33
This setting provides a crisp, clear, luxury
high-end sound setting for a studio atmosphere in your vehicle.
R
surroundsurround
This setting enables a wide-ranging sound
experience for playing music and videos.
:
Current position of the sound setting
For the optimum musical enjoyment, you can
focus the sound image precisely on one seat.
This means you are right at the center of the
listening experience, with all system parameters being precisely calculated for the selected position. The result is authentic music
reproduction inside the vehicle.
Focusing the sound setting
X
Press the $ button.
X
Select SoundSound by sliding VÆ and turning
cVd the COMAND controller and press W
to confirm.
X
Select Bang&OlufsenBang&Olufsen and press W to con-
firm.
A menu appears. A # dot marks the current
setting for Sound Mode.
Depending on the vehicle model series
X
Select leftleft, allall or rearrear and press W to
confirm.
or
X
Select leftleft, allall or rightright and press W to
confirm.
X
To exit the menu: press the k back
button or slide XVY the COMAND controller.
Please note the following: you will achieve
i
the best sound results on your Bang & Olufsen sound system by playing high-quality
CDs.
MP3 tracks should have a bit rate of at least
224 kbit/s.
When playing using an iPod®, the bit rate
should also be at least 224 kbit/s.
For optimum playback quality:
X
Deactivate the “EQ” setting on the
iPod®.
Surround-sound playback does not function for mono signal sources, such as the
medium wave range (MW) in radio mode.
On some stereo recordings, the sound
characteristics may differ from conventional stereo playback.
Character entry (telephony)
Example: entering characters
: *
Switches the character bar to uppercase/lowercase letters
; p
Switches the character bar from
uppercase/lowercase letters to digits
= B
Changes the language of the character bar
? 2
Deletes a character/an entry
The example describes how to enter the surname “Schulz”.
At a glance

Character entry (telephony)
34
X
Call up the input menu with data fields
(Y page 139).
X
Select SS and confirm W with the COMAND
controller.
SS appears in the data field.
X
Select cc and confirm W with the COMAND
controller.
The letter cc is added to SS in the data field.
At a glance
X
Repeat the process until the name has
been entered in full.
Other input menu functions:
R
Deleting a character/an entry
(Y page 35)
R
Switching between upper/lower-case letters (Y page 34)
R
Changing the character set (Y page 35)
R
Moving the cursor to the next data field
(Y page 35)
X
To enter a phone number: select the dig-
its one by one in the corresponding data
field by turning cVd and sliding ZVÆ the
COMAND controller and press W to confirm.
Option 1
X
Select 4 or 5 in the character bar and
press W to confirm.
The input menu shows the data field selected.
Option 2
X
Slide ZV the COMAND controller repeatedly until the character bar disappears.
X
Select the data field by sliding ZVÆ and
press W to confirm.
Storing the entry
X
After making an entry in the input
menu, e.g. to create a new
entry(Y page 139): select the ¬ sym-
bol in the character bar by turning cVd the
COMAND controller and press W to confirm.
The entry is stored in the address book.
Further functions available in the
character bar
Switching data fields
:
Cursor in the next data field
;
Stores the entry
=
4 and 5 symbols to select a data field
In the input menu, if you want to enter a first
name after you have entered a surname, for
example, proceed as follows to switch
between the data fields:
Changing the language of the character
bar
While making an entry in the input menu
(Y page 139):
X
Select B and press W to confirm.
X
Select a language by turning cVd the
COMAND controller and press W to confirm.
Switching the character bar to letters
While making an entry in the input menu, e.g.
to create a new entry (Y page 139):
X
Select the * (upper case) or E
(lower case) symbol and press W to confirm.

Character entry (navigation)
35
Changing the character set
While making an entry in the input menu
(Y page 139):
X
Select the p symbol and press W to
confirm.
R
ABCABC (upper/lower case)
R
123123 (digits)
R
OtherOther (special characters such as @, €,
etc.)
Moving the cursor to the next data field
:
Cursor (repositioned)
;
2 and 3 symbol to reposition the cursor
While making an entry in the input menu
(Y page 139):
X
Select the 2 or 3 symbol and press W to
confirm.
Deleting a character/an entry
While making an entry in the input menu
(Y page 139):
X
To delete characters: press the $ but-
ton on the control panel.
or
X
Select the 2 symbol by sliding VÆ and
turning cVd the COMAND controller and
press W to confirm.
or
X
Press the 2 button next to the
COMAND controller.
X
To delete an entry: press and hold the
$ button on the control panel until the
entire entry has been deleted.
or
X
Select the 2 symbol and press and hold
W the COMAND controller until the entire
entry has been deleted.
or
X
Press and hold the 2 button next to the
COMAND controller until the entire entry is
deleted.
Character entry (navigation)
General information
The following paragraphs describe how to
enter characters using city input for NEWNEW
YORKYORK as an example.
If you want to use the address entry menu to
enter a city, a street or a house number, for
example, COMAND offers you:
R
a list with a character bar (option 1)
R
a selection list (option 2)
You can enter the characters using either the
character bar or the number keypad. In the
selection list, you select an entry to copy it to
the address entry menu.
Option 1: city list/street list with
character bar
X
Call up the city list with character bar
(Y page 64).
The alphabetically sorted city list shows the
first available entries.
At a glance

Character entry (navigation)
36
At a glance
:
Character NN entered by the user
;
Characters automatically added by
COMAND ANTICOKEANTICOKE
=
List entry that most closely resembles the
current entry by the user
?
Switches to the selection list
A
Deletes an entry
B
Characters not currently available
C
Characters currently available
D
Currently selected character
E
Character bar
F
Cancels an entry
G
List
Entering characters using the character
bar
X
Select NN by turning cVdthe COMAND
controller and press W to confirm.
List G shows all available city names
beginning with NN. The list entry most closely
resembling user's current entry = is
always highlighted at the top of the list
(NANTICOKENANTICOKE in the example).
All characters currently entered by the user
are shown in black (letter NN : in the exam-
ple). Letters added by COMAND are shown
in gray ; (ANTICOKEANTICOKE in the example).
Character bar E shows the letters still
available for selection in black C. These
can be selected. In the example, the letter OO
is highlighted D. The characters available
depend on the entry made by the user so far
and the data contained in the digital map.
Characters that are no longer available B
are shown in gray.
X
Select EE, WW, space, YY in order and confirm
each with W.
Entering characters using the number
keypad
X
To enter the letter NN: press the p num-
ber key twice in quick succession.
The character appears at the bottom of the
display when the key is pressed. The first
available letter is highlighted.
You see which characters you can enter
with that key. Each time the key is pressed,
the next character is selected.
Example: p key:
R
press once = M
R
press twice = N
R
press three times = O
X
Wait until the character display goes out.
The entries matching your input are shown
in the list.
X
Enter EE, WW, space, YY with the corresponding
keys.
The space is entered using number key
i
9.
Further functions in the list with character bar
X
To delete characters: press the $ but-
ton on the control panel.
or
X
Press the 2 button next to the
COMAND controller.
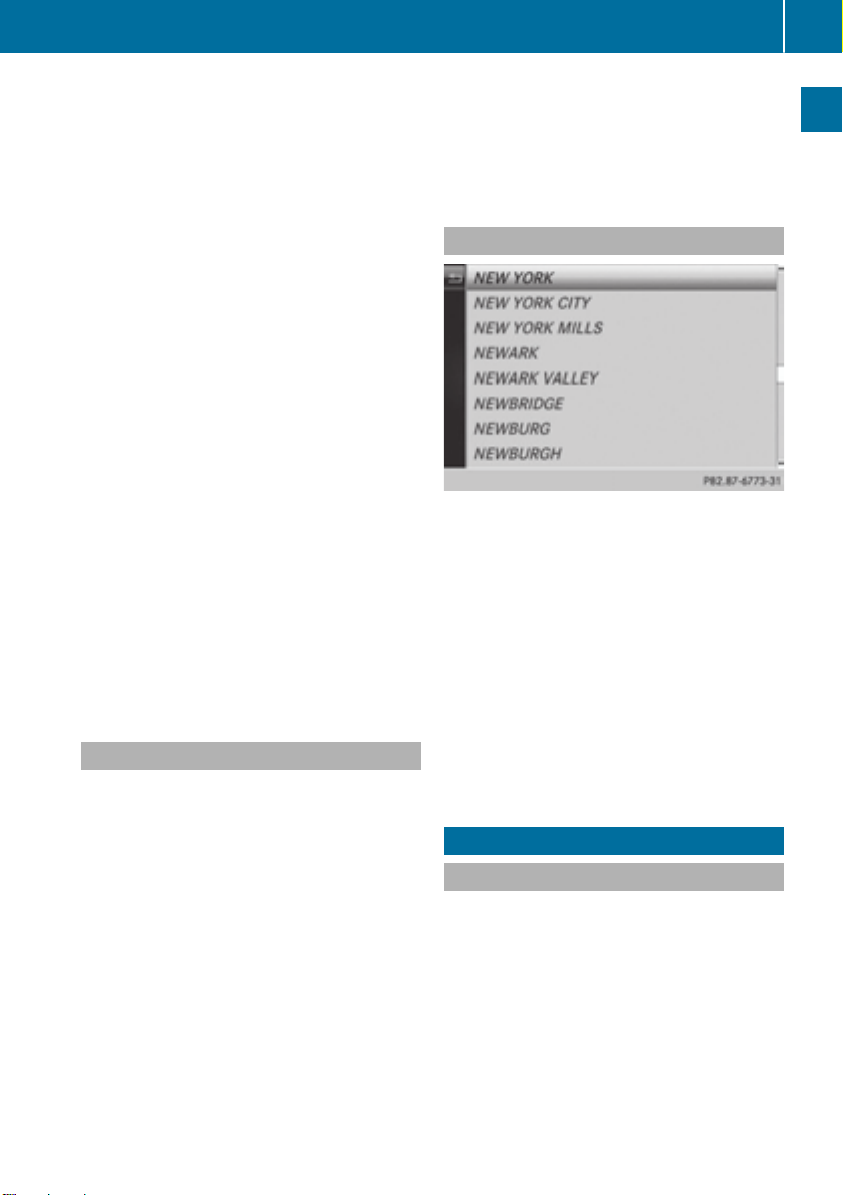
SPLITVIEW
37
or
X
Select the 2 symbol in the character bar
by sliding VÆ and turning cVd the
COMAND controller and press W to confirm.
X
To delete an entry: press and hold the
$ button on the control panel.
or
X
Press and hold the 2 button next to the
COMAND controller until the entire entry is
deleted.
or
X
Select the 2 symbol in the character bar
and press and hold W the COMAND controller until the entire entry is deleted.
X
To cancel an entry: select the & symbol
in the bottom left of the character bar and
press W to confirm.
or
X
Press the k back button.
The address entry menu appears.
X
To accept the first list entry: press and
hold W the COMAND controller until the
address entry menu appears.
The accepted list entry is shown there.
Calling up the list as a selection list
You can switch from the list of cities with the
character bar to the list of cities as a selection
list at any point during character entry.
X
Slide ZV the COMAND controller repeatedly until the city list appears as a selection
list.
Select the desired city from the selection
list.
or
X
Select¬in the character bar by turning
cVd the COMAND controller and press W
to confirm.
If there are several entries for a city or if several cities of the same name are stored, then
¬ is highlighted in the character bar.
X
Press W the COMAND controller.
Option 2: city list as selection list
COMAND either shows the selection list automatically or you can call up the selection list
from the list with the character bar.
The example shows the selection list after the
city NEW YORKNEW YORK has been entered. The entry is
highlighted automatically.
X
Confirm NEW YORKNEW YORK by pressing W the
COMAND controller.
The address entry menu appears. You can
now enter a street, for example.
Observe the information on destination entry
(Y page 63).
SPLITVIEW
Method of operation
SPLITVIEW allows you to simultaneously use
different COMAND functions on the frontpassenger side and on the driver's side. Different content is seen depending on your perspective when viewing the display.
The "Navi" function, for example, can be used
from the driver's side while a video is watched
from the front-passenger side.
SPLITVIEW is operated with the remote control from the front-passenger side.
At a glance

38
SPLITVIEW
To do so, use the special cordless headphones (Y page 239). Using the headphones
on the correct sides ensures an optimal
sound.
You can connect your own headphones to a
special headphones jack. You can use the
remote control to operate them.
At a glance
Points to remember
R
You can only adjust the volume for the
headphones supplied, directly on the headphones.
R
Only entertainment functions, i.e. audio,
TV, video and Internet, for example, may be
used with SPLITVIEW.
R
Different media can be used on the driver
and front-passenger sides as long as they
use different media sources. Example: if a
medium from the single DVD drive is being
played on the driver's side, then another
medium that is also played from the single
DVD drive cannot be played separately on
the front-passenger side. However, other
media can be used at the same time on the
front-passenger side, including radio,
memory card, MUSIC REGISTER, Media
Interface, USB or AUX.
R
If you use the same medium on both sides,
you can both carry out the respective settings.
R
Internet use is only available at any one
time to the driver or the front passenger.
A corresponding message appears on the
display.
R
Internet can only be used, if it is set and
connected via a telephone on the driver's
side.
R
The multifunction steering wheel can only
be used for functions which relate to the
driver's side.
Switching SPLITVIEW on/off
Switching on SPLITVIEW
X
Select SystemSystem in the main function bar by
turning cVdthe COMAND controller and
press W to confirm.
X
Select ; in the menu bar and confirm.
SPLITVIEW symbol : appears in the display and display ; switches to OffOff.
The front passenger sees the display of the
function last activated. If the switch-on
time was longer than 30 minutes previously, the display from the driver's side is
shown.
The front passenger can now call up the
COMAND functions with the remote control.
Switching off SPLITVIEW
X
Select ; in the menu bar by turning cVd
the COMAND controller and press W to
confirm.
SPLITVIEW symbol : disappears from the
display. Display ; switches to OnOn.
If COMAND has already been switched
i
on, you can also use the remote control to
switch SPLITVIEW on and off. Make sure
that the SPLITVIEW symbol is set on the
remote control thumbwheel (Y page 237).
The SPLITVIEW display remains on for approximately 30 minutes after the SmartKey has
been turned to position 0 in the ignition lock.
After this time or after the SmartKey has been
removed, the settings on the front-passenger
side are saved for approximately 30 minutes

SPLITVIEW
39
longer. After this period, reactivation on the
front-passenger side means that the settings
from the driver's side will be used.
Transferring the driver's website
X
To switch on SPLITVIEW: select SystemSystem
from the main function bar by turning cVd
the COMAND controller and press W to
confirm.
X
Select ; in the menu bar and confirm.
SPLITVIEW symbol : appears in the display, and display ; switches to OffOff.
X
Select ® in the main function bar with the
remote control.
A menu appears with the following options:
R
Operator's ManualOperator's Manual
R
Enter URLEnter URL
R
Internet FavoritesInternet Favorites
R
Mercedes-Benz AppsMercedes-Benz Apps
R
Internet RadioInternet Radio
R
Mercedes Mobile WebsiteMercedes Mobile Website
R
Transfer Driver's WebsiteTransfer Driver's Website
X
Select TransferTransfer Driver'sDriver's WebsiteWebsitewith
the remote control.
You see the last website called up by the
driver.
Transferring a destination to the
driver
Using SPLITVIEW you can select a destination
from the front-passenger side and transfer
this to the driver's side.
X
To switch on SPLITVIEW: select SettingsSettings
from the main function bar by turning cVd
the COMAND controller and press W to
confirm.
X
Select ; in the menu bar and confirm.
SPLITVIEW symbol : appears in the display, and display ; switches to OffOff.
X
Select ® in the main function bar with the
remote control.
A menu appears.
X
Select Mercedes-Benz AppsMercedes-Benz Apps with the
remote control.
You see the selection of Mercedes-Benz
Apps.
X
Select Google Local SearchGoogle Local Search with the
remote control.
Using a menu you can select a category for
the destination.
X
Select At Current PositionAt Current Position, for exam-
ple.
Using a menu you can determine the type
of search inquiry.
X
Select EnterEnter SearchSearch Term:Term:, for example.
An input field appears.
X
Enter the destination with the remote control and confirm the entry with b.
You see the results list from Google.
X
Select the exact destination with the
remote control.
An additional menu appears.
X
Select Navigate toNavigate to.
X
A window appears on the driver's side with
the message: Accept the navigationAccept the navigation
data from Mercedes-Benz Apps?data from Mercedes-Benz Apps?
At a glance

40

Your COMAND equipment .................. 42
Display settings .................................. 42
Time settings ....................................... 42
Text reader settings ............................ 44
Voice Control System settings .......... 44
Bluetooth®settings ............................ 44
Setting the system language ............. 45
Assigning a favorites button .............. 45
Importing/exporting data .................. 46
Reset function ..................................... 47
41
System settings
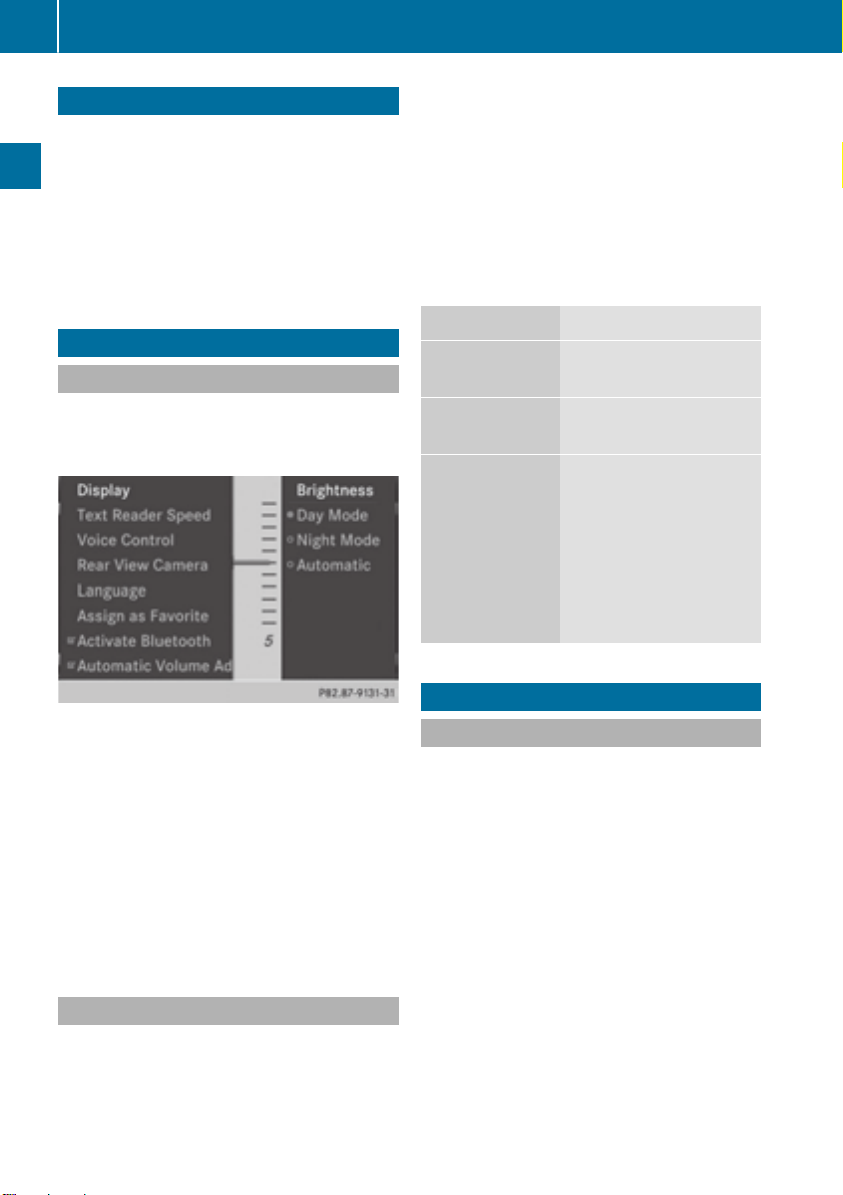
Time settings
42
Your COMAND equipment
These operating instructions describe all the
standard and optional equipment for your
COMAND system, as available at the time of
going to print. Country-specific differences
are possible. Please note that your
COMAND system may not be equipped with
all the features described.
X
Press W.
X
Select SettingsSettings by turning cVd the
COMAND controller and press W to confirm.
X
Select DisplayDisplay and press W to confirm.
X
Select Day ModeDay Mode, Night ModeNight Mode or Auto‐Auto‐
maticmatic by turning cVd the COMAND con-
troller and press W to confirm.
A dot indicates the current setting.
Display settings
System settings
Setting the brightness
The brightness detected by the display light
sensor affects the setting options for this
function.
X
Press W.
X
Select SettingsSettings by turning cVd the
COMAND controller and press W to confirm.
X
Select DisplayDisplay and press W to confirm.
X
Select BrightnessBrightness and press W to con-
firm.
X
Adjust the brightness by turning cVd the
COMAND controller and press W to confirm.
Design Explanation
Day ModeDay Mode
The display is set permanently to day design.
Night ModeNight Mode
The display is set permanently to night design.
AutomaticAutomatic If the AutomaticAutomatic setting
is selected, COMAND
evaluates the readings
from the automatic vehicle light sensor and automatically switches
between the display
designs.
Time settings
General information
If COMAND is equipped with a navigation system and has GPS reception, COMAND automatically sets the time and date. You can
change the time in minute increments. The
date can also be changed.
If you adjust the time in minute incre-
i
ments, any time zone settings and settings
for changing between summer and standard time are lost. Switching between summer and standard time (Y page 43).
Display design
Your COMAND display features optimized
designs for operation during daytime and
night-time hours. You can customize the
design by manually selecting day or night
design, or opt for an automatic setting.

i The following navigation system functions
require the time, time zone and summer/
standard time to be set correctly in order to
work properly:
R
route guidance on routes with timedependent traffic guidance
R
calculation of expected time of arrival
With this function, you can set the time for
i
every display in the vehicle.
Setting the time/date format
X
Press the W button.
X
Select TimeTime by turning cVdthe COMAND
controller and press W to confirm.
X
Select FormatFormat and press W to confirm.
The # symbols show the current settings.
X
Set the format by turning cVdthe
COMAND controller and press W to confirm.
Abbreviation Meaning
DDDD . MMMM . YYYY
Day . Month . Year
(date format, two digits)
MMMM / DDDD / YYYYYYYY
Month/Day/Year
date format, year (all
four digits)
YYYY / MMMM / DDDD
Year/Month/Day
date format, year (two
digits)
HHHH : MMMM
(24 hrs)(24 hrs)
HHHH : MMMM (AM/PM)(AM/PM)
Hours : Minutes
(24 hour time format)
Hours : Minutes
(AM/PM time format)
Adjusting the time zone and switching
to Daylight Savings Time (Summer)
X
Press W.
Time settings
X
Select TimeTime by turning cVdthe COMAND
controller and press W to confirm.
X
Select TimeTime ZoneZone and press W to confirm.
A list of countries or time zones appears.
The # dot indicates the current setting.
X
Select the country or time zone by turning
cVd the COMAND controller and press W
to confirm.
A time zone list may also be displayed,
depending on the country selected.
X
Select the time zone and press W to confirm.
The entry for the Automatic Time Set‐Automatic Time Set‐
tingstings is accepted.
Subsequent operation depends on whether
the automatic changeover function to summer time is available.
X
To change manually: select ONON or OFFOFF and
press W to confirm.
X
To change to automatic time: select
AutomaticAutomatic and press W to confirm.
The entry for the Automatic Time Set‐Automatic Time Set‐
tingstings is accepted.
X
To switch the automatic time setting
off/on: press the W button.
X
Select TimeTime by turning cVdthe COMAND
controller and press W to confirm.
X
Press W to confirm the AutomaticAutomatic TimeTime
SettingsSettings.
Switch the automatic time setting off ª or
on again O.
To switch on: the menu item is switched
on as the default setting. If the AutomaticAutomatic
Time SettingsTime Settings is switched off and you
switch it on again, the last settings for the
time zone and summer time changeover
are selected.
To switch off: the time zone is deselected
and the summer time is switched off. If
AutomaticAutomatic is set for the summer time
changeover, a prompt will appear asking
whether this should be maintained.
X
Select YesYes or NoNo and press W to confirm.
43
System settings

44
Bluetooth®settings
Setting the time manually
X
Press the W button.
System settings
X
Select TimeTime by turning cVdthe COMAND
controller and press W to confirm.
X
Select Set Time ManuallySet Time Manually and press W
to confirm.
X
Set the time by turning cVdthe COMAND
controller and press W to confirm.
The time is accepted.
Text reader settings
X
Press W.
X
Select SystemSystem by turning cVd the
COMAND controller and press W to confirm.
X
Select Voice ControlVoice Control and press W to
confirm.
X
Select Help WindowHelp Window and press W to con-
firm.
You have switched the help window on O
or off ª.
Individualization
Using individualization, you can fine-tune the
Voice Control System to your own voice and
thus improve voice recognition. See the separate operating instructions.
Bluetooth®settings
General information about Blue-
®
tooth
X
Press the W button.
X
Select SystemSystem by turning cVd the
COMAND controller and press W to confirm.
X
Select Text Reader SpeedText Reader Speed and press W
to confirm.
A list appears. The # dot indicates the current setting.
X
Select a setting by turning cVd the
COMAND controller and press W to confirm.
Voice Control System settings
Opening/closing the help window
The help window provides information in addition to the audible instructions during individualization and during the subsequent voice
control.
Bluetooth®-capable devices, e.g. mobile
phones, have to comply with a certain profile
in order to be connected to COMAND. Every
Bluetooth®device has its own specific Bluetooth®name.
Bluetooth®technology is a standard for
short-range wireless data transmissions up to
approximately 10 meters. Bluetooth®allows,
for example, the exchange of vCards.
Bluetooth®is a registered trademark of Bluetooth Special Interest Group (SIG) Inc.

Assigning a favorites button
45
Activating/deactivating Bluetooth
X
Press W.
®
The system menu appears.
X
Select SettingsSettings by turning cVd the
COMAND controller and press W to confirm.
X
Select ActivateActivate BluetoothBluetooth and press W
to confirm.
This switches Bluetooth®on O or off ª.
Setting the system language
This function allows you to determine the language for the menu displays and the navigation announcements. The selected language
affects the characters available for entry.
The navigation announcements are not available in all languages. If a language is not available, the navigation announcements will be in
English.
When you set the system language, the language of the Voice Control System will
change accordingly. If the selected language
is not supported by the Voice Control System,
English will be selected.
X
Press the W button.
X
Select SystemSystem by turning cVd the
COMAND controller and press W to confirm.
X
Select LanguageLanguage and press W to confirm.
The list of languages appears. The # dot
indicates the current setting.
X
Select the language by turning cVd the
COMAND controller and press W to confirm.
COMAND loads the selected language and
sets it.
Assigning a favorites button
X
To assign a favorites button: press the
W button.
X
Select SystemSystem by turning cVd the
COMAND controller and press W to confirm.
X
Select AssignAssign asas FavoriteFavorite and press W
to confirm.
The list of predefined functions appears.
The dot # indicates the currently selected
function.
X
Select the function by turning cVd the
COMAND controller and press W to confirm.
The favorites button is assigned the selected function.
X
Example: to call up a favorite: press the
g favorites button.
This calls up the predefined function.
You can select the following predefined functions in a menu:
R
SplitView on/offSplitView on/off: you can switch the
screen view for the front passenger on or
off.
R
Display On/OffDisplay On/Off: you can switch the dis-
play off or on.
R
Full Screen: 'Clock'Full Screen: 'Clock': you can call up
the full screen with the clock.
R
® MenuMenu: you can call up the online and
Internet functions.
R
360°360° CameraCamera: you can call up the picture of
the 360° camera.
R
Full screen: 'Map'Full screen: 'Map': you can call up the
full screen with the map.
R
Spoken Driving TipSpoken Driving Tip: you can call up the
current driving recommendation.
R
DisplayDisplay TrafficTraffic MessagesMessages: you can call
up traffic reports.
R
Navigate HomeNavigate Home: you can start route guid-
ance to your home address if you have
already entered and saved the address
(Y page 69).
System settings
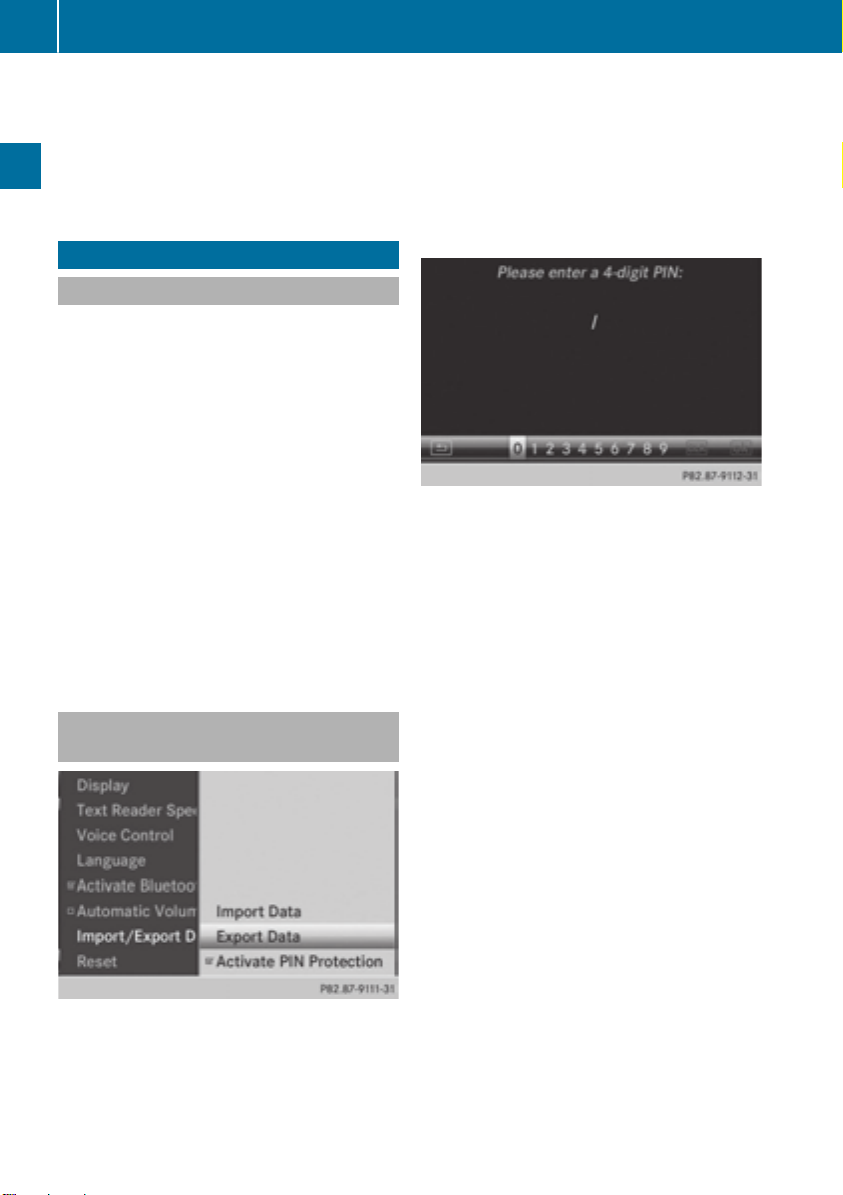
Importing/exporting data
46
R
Detour MenuDetour Menu: you can call up the Detour
menu and then block a section of the route
and recalculate the route (Y page 92).
R
CompassCompass ScreenScreen: you can call up the com-
pass.
Importing/exporting data
General notes
Never remove the stick or card when writ-
!
ing data to the USB stick or the memory
card. You may otherwise lose data.
System settings
Using this function, you can:
R
transfer your personal COMAND data from
one system/vehicle to another.
R
make a backup copy of your personal data
(export data) and load it again (import
data).
R
protect your data from unwanted export by
activating a pin prompt (presetting: deactivated ª).
You can either use an SD memory card or a
USB storage device (e.g. a USB stick) as temporary storage.
X
Select Import/ExportImport/Export DataData and press W
to confirm.
X
Select Activate PIN ProtectionActivate PIN Protection and
press W to confirm.
Activate O or deactivate ª PIN protection. When activating PIN protection, you
will be prompted to enter a PIN.
X
Enter a 4-digit PIN, select¬and press W
to confirm.
You will be prompted to enter the PIN
again.
X
Re-enter the PIN, select ¬ and press W
to confirm.
The PIN prompt now protects your personal
data from unwanted export.
Activating/deactivating PIN protection
X
Press the W button.
The system menu appears.
X
Select SettingsSettings by turning cVd the
COMAND controller and press W to confirm.
If you deactivate your PIN protection, you
i
will first be prompted to enter your PIN. If
you have forgotten your PIN, a MercedesBenz service station can deactivate your
PIN protection for you. Alternatively, you
can deactivate PIN protection by resetting
your personal COMAND data
(Y page 47).

Importing/exporting data
X
Insert the SD memory card (Y page 196).
or
X
Connect a USB device (e.g. a USB memory
stick) (Y page 197).
X
Press W.
The system menu appears.
X
Select SettingsSettings by turning cVd the
COMAND controller and press W to confirm.
X
Select Import/ExportImport/Export DataData and press W
to confirm.
X
Select Import DataImport Data or Export DataExport Data and
press W to confirm.
Reset function
If PIN protection is activated, a PIN prompt
appears when you select Export DataExport Data.
X
Enter the PIN, select¬and press W to
confirm.
You can now proceed in the same way as if
PIN protection was deactivated.
X
To select a preset: select MemoryMemory CardCard or
USB StorageUSB Storage and press W to confirm.
X
Select All DataAll Data and press W to confirm.
This function exports all the data to the
selected disc.
or
X
Select the data type and press W to confirm.
Depending on the previous entry, select the
data type for the export O or not ª.
X
Select Cont.Cont. and press W to confirm.
Personal music files in the MUSIC REGIS-
i
TER cannot be saved and imported again
using this function.
Reset function
You can completely reset COMAND to the
factory settings. Amongst other things, this
will delete all personal COMAND data. This
includes the station presets, entries in the
destination memory and in the list of previous
destinations in the navigation system and
address book entries. In addition, any activated PIN protection, which you have used to
protect your data against unwanted export,
will be deactivated. Resetting is recommen-
47
System settings

Reset function
48
ded before selling or transferring ownership
of your vehicle, for example.
Data on the internal hard drive, e.g. music
files in the MUSIC REGISTER, will be deleted.
You can also delete music files from the
MUSIC REGISTER using the "Delete all music
files" function (Y page 209).
X
Press the W function button.
X
Select SystemSystem by turning cVd the
COMAND controller and press W to confirm.
X
Select ResetReset and press W to confirm.
System settings
A warning message appears asking
whether you wish to reset.
X
Select YesYes or NoNo and press W to confirm.
If you select YesYes, a prompt will appear again
asking whether you really wish to reset to
the factory settings.
X
Select YesYes or NoNo and press W to confirm.
If you select YesYes, a message will be shown.
COMAND is reset and restarted.
If you select NoNo, the process will be can-
celed.

Your COMAND equipment .................. 50
Climate control status display ........... 50
Fuel consumption indicator ............... 50
ON&OFFROAD display ......................... 51
Driving conditions menu (Active
Body Control) ....................................... 51
Seat functions ..................................... 52
Rear view camera ............................... 55
Night View Assist Plus ....................... 56
360° camera ....................................... 56
49
Vehicle functions

Fuel consumption indicator
50
Your COMAND equipment
These operating instructions describe all the
standard and optional equipment for your
COMAND system, as available at the time of
going to print. Country-specific differences
are possible. Please note that your
COMAND system may not be equipped with
all the features described.
Climate control status display
Vehicle functions
The climate status display in the COMAND display
(example)
If you change the settings of the climate control system, the climate status display
appears for three seconds at the bottom of
the screen in the COMAND display. You will
see the current settings of the various climate
control functions.
Overview of climate control systems, see the
separate vehicle operating instructions.
The climate status display appears when:
X
You turn the temperature control and set
the temperature.
or
X
You turn the control to set the airflow.
or
X
You press one of the following buttons:
K Increases air flow
I Decreases air flow
¿ Switches climate control on/off
á Switches the ZONE function on/off
à Controls the air conditioning auto-
matically
ñ Sets the climate control style in auto-
matic mode (FOCUS/MEDIUM/DIFFUSE)
_ Sets the air distribution
M, P or O Sets the air distribu-
tion
¬ Turns on the defrost function
Ù Turns on maximum cooling
The way that the climate control status
i
display is called up depends on your vehicle's climate control system.
Example settings for the defrost function (top) and
for the climate mode in automatic mode
X
To hide the display: turn or press the
COMAND controller.
or
X
Press one of the buttons on COMAND.
Fuel consumption indicator
Overview
Depending on the vehicle equipment and the
engine variant installed, fuel consumption
can be shown in the COMAND display.
If your vehicle is a hybrid vehicle and the
installed engine variant supports it, you can
call up other displays (see the separate operating instructions).

Driving conditions menu (Active Body Control)
51
Calling up/exiting the display
X
To call up the full screen display: press
the W button.
X
In the system menu, slide ZV the
COMAND controller up until the FullFull
ScreenScreen option is selected.
X
Press W the COMAND controller.
The system display is shown as full screen
(without system menu).
X
Slide XVY the COMAND controller repeatedly until the fuel consumption indicator
appears.
The COMAND display shows the fuel consumption for the last 15 minutes of the
journey.
X
To exit the full-screen display: press W
the COMAND controller.
The system menu appears.
Every bar of the graph displays the average
value for one minute.
The fuel consumption display may differ from
the display in the FROM STARTFROM START trip computer
in the TripTrip menu; see the vehicle Operator's
Manual.
ON&OFFROAD display
Overview
Depending on the vehicle model series, the
settings and the status of the ON&OFFROAD
functions can be shown in the COMAND display, e.g.:
R
vehicle's angle of inclination
R
uphill or downhill gradient in percentage
R
steering angle
Further information on the ON&OFFROAD
functions can be found in the vehicle Operator's Manual.
Calling up displays
X
Press W.
X
In the system menu, slide ZV the
COMAND controller up until the display/
selection window is selected.
X
Slide XVY the COMAND controller until
the ON&OFFROAD display appears.
The COMAND display shows the settings
and status of the ON&OFFROAD functions.
Exiting the display
X
Slide XVY the COMAND controller until
the desired display (clock or fuel consumption) is shown.
Driving conditions menu (Active Body
Control)
General notes
On vehicles with Active Body Control (ABC),
you can display some driving systems and
additional information in the COMAND display.
Vehicle functions

Seat functions
52
Calling up drive status regulator (ABC)
X
Press W.
X
In the system menu, slide ZV the
COMAND controller up until the display/
selection window is selected.
X
Slide XVY the COMAND controller repeatedly until the driving conditions menu
(ABC) appears.
The corresponding displays appear in the
COMAND display.
Details on the displays:
R
for all vehicles except AMG vehicles, see
the separate vehicle Operator's Manual
R
for AMG vehicles, see the separate vehicle
Operator's Manual.
Vehicle functions
Exiting the display
X
Slide XVY the COMAND controller until
the desired display (clock or fuel consumption) is shown.
Seat functions
Overview
Using the T button next to the COMAND
controller or the Seat menu item in the system menu, you can call up different setting
functions. The following settings depend on
the type of seat and the vehicle model series:
R
Seat cushion length
R
Backrest side bolsters
R
Lumbar
R
Balance
R
Seat cushion side bolsters
R
Dynamics
R
Massage
You can also store and recall the current
i
seat function settings using the memory
button and the corresponding memory
position switch; see the separate vehicle
Operator's Manual.
The massage function cannot be started or
stopped using the memory button.
Selecting the seat
First select the seat which you wish to adjust.
This function is not available for all vehicles.
X
Press the T or W button.
X
Select SeatSeat and press W to confirm.
X
To switch to the lower line, for both options
slide VÆ the COMAND controller.
X
Select Driver's SeatDriver's Seat or PassengerPassenger
SeatSeat by turning cVd the COMAND con-
troller and press W to confirm.
Adjustment functions
Adjusting the seat cushion length
The availability of this function depends on
the type of seat and the vehicle model series.
This function allows you to adjust the height
of the seat cushion.
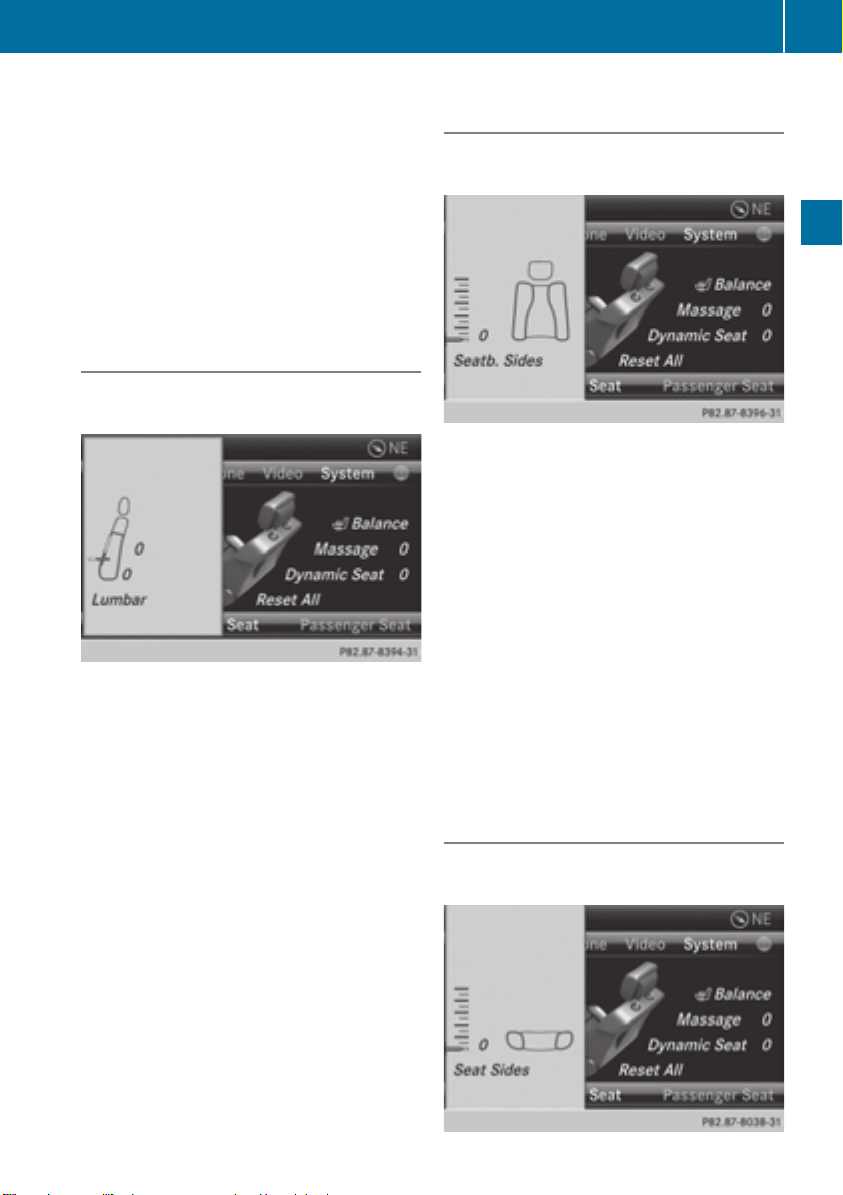
Seat functions
53
X
Select the seat (Y page 52).
X
Select Seat SurfaceSeat Surface by turning cVd the
COMAND Controller and press W to confirm.
A scale appears.
X
Turn cVd or slide ZVÆ the COMAND controller and press W to confirm.
X
To exit the menu: press the k back
button.
Adjusting the seat contour in the lumbar region of the seat backrest
The availability of this function depends on
the type of seat and the vehicle model series.
This function allows you to adjust the air
cushions in the lumbar region of the backrest
(4-way lumbar support).
X
Select the seat (Y page 52).
X
Select LumbarLumbar by turning cVd the
COMAND controller and press W to confirm.
A crosshair appears. You can make two
settings:
R
Vertical: to move the point of greatest
lumbar support up or down
R
Horizontal: to adjust the amount of support
X
Slide ZVÆ or XVY the COMAND controller
and press W to confirm.
X
To exit the menu: press the k back
button.
Adjusting the sides of the seat backrest
(backrest side bolsters)
The availability of this function depends on
the type of seat and the vehicle model series.
X
Select the seat (Y page 52).
X
Select Seatb. SidesSeatb. Sides by turning cVd the
COMAND controller and press W to confirm.
A scale appears.
X
Turn cVd or slide ZVÆ the COMAND controller and press W to confirm.
X
To exit the menu: press the k back
button.
For vehicle model series with a dynamic
i
multicontour seat: if the driving dynamics
are activated and respond to a change of
direction (e.g. when cornering), the backrest side bolsters cannot be temporarily
adjusted.
Adjusting the seat side bolsters
The availability of this function depends on
the type of seat and the vehicle model series.
Vehicle functions

Seat functions
54
This function allows you to adjust the air
cushions in the seat side bolsters.
X
Select the seat (Y page 52).
X
Select Seat SidesSeat Sides by turning cVd the
COMAND controller and press W to confirm.
A scale appears.
X
Turn cVd or slide ZVÆ the COMAND controller and press W to confirm.
X
To exit the menu: press the k back
button.
Balance
The availability of this function depends on
the vehicle model series.
Vehicle functions
The values stand for:
R
00 - backrest and seat cushion are heated
equally to the maximum level
R
11 to 33 - the heat output to the seat cush-
ion is reduced in one-third increments
R
-1-1 to -3-3- the heat output to the backrest
is reduced in one-third increments
X
Turn cVd or slide XVY the COMAND controller and press W to confirm.
X
To exit the menu: press the k back
button.
Massage function
The availability of this function depends on
the type of seat and the vehicle model series.
The Balance function controls the distribution
of heat on the seat backrest and cushion.
The Balance function influences the currently
set heating level of the seat heating; see the
separate vehicle Operator's Manual.
X
Select the seat (Y page 52).
X
Select BalanceBalance by turning cVd the
COMAND controller and press W to confirm.
A scale appears and shows the current setting. Positive values indicate the heat output for the seat backrest, negative values
indicate the heat output for the seat cushion. The intensity is indicated by an orange
bar in the stylized seat above the scale.
Example display (M-Class or GL-Class)
X
Select the seat (Y page 52).
X
Select MassageMassage by turning cVd the
COMAND controller and press W to confirm.
A list appears.
You can select different types of massage
function:
R
0: Off0: Off
R
1: Slow and Gentle1: Slow and Gentle
R
2: Slow and Vigorous2: Slow and Vigorous
R
3: Fast and Gentle3: Fast and Gentle
R
4: Fast and Vigorous4: Fast and Vigorous

X
Turn cVd or slide ZVÆ the COMAND controller and press W to confirm.
The massage function runs for approximately 15 to 25 minutes, depending on the
setting.
X
To exit the menu: press the k back
button.
Adjusting the driving dynamics
This function is available on vehicle model
series with a dynamic multicontour seat.
X
Select the seat (Y page 52).
X
Select Dynamic SeatDynamic Seat by turning cVd the
COMAND controller and press W to confirm.
A scale appears.
You can select:
R
00: Off
R
11: level 1 (medium setting)
R
22: level 2 (high setting)
X
Turn cVd or slide ZVÆ the COMAND controller and press W to confirm.
X
To exit the menu: press the k back
button.
Rear view camera
Resetting all adjustments
X
Select the seat (Y page 52).
X
Select Reset AllReset All by turning cVd the
COMAND controller and press W to confirm.
A prompt appears.
X
Select YesYes or NoNo and press W to confirm.
If you select NoNo, the process will be can-
celed.
After you select YesYes, all seat adjustments
are reset to the default values (factory setting).
Rear view camera
The rear view camera is only an aid. It is not a
replacement for your attention to your immediate surroundings. You are always responsible for safe maneuvering and parking. When
maneuvering or parking, make sure that there
are no persons, animals or objects in the area
in which you are maneuvering.
The image from the rear view camera is
shown in the COMAND display when reverse
gear is engaged if:
R
your vehicle is equipped with a rear view
camera
R
COMAND is switched on
R
the Activation by R gearActivation by R gear function is
activated.
If the function is activated, the COMAND display will automatically switch back to the pre-
55
Vehicle functions

360° camera
56
viously selected display as soon as you shift
out of reverse gear.
For further information on the rear view camera, see the vehicle Operator's Manual.
X
Press the W button.
The system menu appears.
X
Select SettingsSettings by turning cVd the
COMAND controller and press W to confirm.
X
Select RearRear ViewView CameraCamera and press W to
confirm.
X
Select Activation by R gearActivation by R gear and press
W to confirm.
The function is switched on O or off ª,
depending on the previous status.
Vehicle functions
Night View Assist Plus
On vehicles with Night View Assist Plus you
can have the image from Night View Assist
Plus shown on the COMAND display.
X
Switch on COMAND (Y page 29).
X
Activate Night View Assist Plus, see the
separate operating instructions.
The image from Night View Assist Plus
appears in the COMAND display.
X
To adjust the brightness: select Bright‐Bright‐
nessness by turning cVd the COMAND con-
troller and press W to confirm.
X
Turn cVd the COMAND controller and
press W to confirm.
X
Switching automatic activation on/off:
select NightNight ViewView AssistAssist Auto.Auto. Acti‐Acti‐
vationvation and press W to confirm.
Switch the option on O or off ª.
Option switched on: while using other functions e.g. the navigation system, Night View
Assist Plus is active in the background. In
the dark, in unlit surroundings and at
speeds in excess of 37 mph (60 km/h), the
Night View image is automatically displayed as soon as pedestrians or animals
are detected.
X
To switch off the display: select BackBack and
press W to confirm or press the k button.
360° camera
Important notes
The 360° camera is only an aid. It is not a
replacement for your attention to your immediate surroundings. You are always responsible for safe maneuvering and parking. When
maneuvering or parking, make sure that there
are no persons, animals or objects in the area
in which you are maneuvering.
Overview
The 360° camera surveys the vehicle surroundings and assists you, for example when
parking or at exits with reduced visibility.
The 360° camera images can be shown in full
screen mode or in seven different split-screen
views on the COMAND display. A split-screen
view also includes a top view of the vehicle.
This view is calculated from the data supplied
by the installed cameras (virtual camera).
Displaying the 360° camera image
The 360° camera image can be displayed if:
R
your vehicle is equipped with a 360° camera
R
COMAND is switched on (Y page 29)
R
the 360° Camera360° Camera function is activated
You can activate the 360° display by:
R
engaging reverse gear (only possible if the
Activation by R gearActivation by R gear option is activa-
ted)
R
selecting the 360° Camera360° Camera menu item in
the SystemSystem menu
R
pressing and holding the W function
button

360° camera
57
As soon as your vehicle exceeds a speed of
19 mph (30 km/h) with the function activated, the function switches off. The COMAND
display switches back to the previously selected view.
You can also switch the display by selecting
the & symbol in the display and pressing W
the COMAND controller.
X
To switch reverse gear activation on/
off: press the W function button.
The system menu appears.
X
Select SettingsSettings by turning cVd the
COMAND controller and press W to confirm.
X
Select 360° Camera360° Camera and press W to con-
firm.
X
Select Activation by R gearActivation by R gear and press
W to confirm.
The function is switched on O or off ª,
depending on the previous status.
You need only switch this function on if
i
you want the 360° camera image to be displayed when you engage reverse gear. The
other activation options are always available as well.
X
To display the 360° camera image:
press the W function button for at least
2 seconds.
The full-screen display appears.
or
X
Select SettingsSettings by turning cVd the
COMAND controller and press W to confirm.
X
Select 360° Camera360° Camera and press W to con-
firm.
The 360° camera image appears in splitscreen mode.
or
X
Engage reverse gear (only possible if the
Activation by R gearActivation by R gear option is activa-
ted)
The 360° camera split-screen image with
backing up image appears.
For a detailed description of the 360° camera, see the separate vehicle Operator's Manual.
Vehicle functions

58

Your COMAND equipment .................. 60
Introduction ......................................... 60
Basic settings ...................................... 62
Destination entry ................................ 63
Entering a POI ...................................... 76
Personal POIs ...................................... 82
Search & Send ..................................... 86
Route guidance ................................... 87
Traffic reports ..................................... 99
Destination memory ......................... 103
Previous destinations ....................... 107
Map operation and map settings .... 108
Additional settings ........................... 114
Problems with the navigation sys-
tem ..................................................... 120
59
Navigation

Introduction
60
Your COMAND equipment
These operating instructions describe all the
standard and optional equipment for your
COMAND system, as available at the time of
going to print. Country-specific differences
are possible. Please note that your
COMAND system may not be equipped with
all the features described.
Introduction
Important safety notes
WARNING
G
Navigation
If you operate information systems and communication equipment integrated in the vehicle while driving, you will be distracted from
traffic conditions. You could also lose control
of the vehicle. There is a risk of an accident.
Only operate the equipment when the traffic
situation permits. If you are not sure that this
is possible, park the vehicle paying attention
to traffic conditions and operate the equipment when the vehicle is stationary.
You must observe the legal requirements for
the country in which you are currently driving
when operating COMAND.
COMAND calculates the route to the destination without taking account of the following,
for example:
R
traffic lights
R
stop and yield signs
R
merging lanes
R
parking or stopping in a no parking/no
stopping zone
R
other road and traffic rules and regulations
R
narrow bridges
COMAND can give incorrect navigation commands if the actual street/traffic situation
does not correspond with the digital map's
data. Digital maps do not cover all areas nor
all routes in an area. For example, a route may
have been diverted or the direction of a oneway street may have changed.
For this reason, you must always observe
road and traffic rules and regulations during
your journey. Road and traffic rules and regulations always have priority over the system's driving recommendations.
Navigation announcements are intended to
direct you while driving without diverting your
attention from the road and driving.
Please always use this feature instead of consulting the map display for directions. Looking at the icons or map display can distract
you from traffic conditions and driving, and
increase the risk of an accident.
General notes
Operational readiness of the navigation
system
The navigation system must determine the
position of the vehicle before first use or
whenever operational status is restored.
Therefore, you may have to drive for a while
before precise route guidance is possible.
GPS reception
Among other things, correct functioning of
the navigation system depends on GPS reception. In certain situations, GPS reception may
be impaired, there may be interference or
there may be no reception at all, e.g. in tunnels or parking garages.
Using roof carriers may impair the correct
i
functioning of a roof antenna (phone, satellite radio, GPS).
Entry restriction
On vehicles for certain countries, there is a
restriction on entering data.
The restriction is active from a vehicle speed
of above approximately 3 mph (5 km/h). As
soon as the speed falls below approximately

2 mph (3 km/h), the restriction becomes
inactive.
When the restriction is active, certain entries
cannot be made. This will be indicated by the
fact that certain menu items are grayed out
and cannot be selected.
The following entries are not possible, for
example:
R
entering the destination city and street
R
entering a destination via the map
R
entering POIs in the vicinity of a city or via a
name search
R
editing entries
R
using the number keypad for direct entry
Other entries are possible, such as entering
points of interest in the vicinity of the destination or current position.
Switching to navigation mode
Introduction
Map without the menu (route guidance inactive)
:
Current vehicle position
;
Map orientation selected
=
Map scale selected
Route guidance active means that you
i
have entered a destination and that
COMAND has calculated the route. The display shows the route, changes of direction
and lane recommendations. Navigation
announcements guide you to your destination.
Route guidance inactive means that no
destination has been entered yet and no
route has been calculated yet.
61
Navigation
Map showing the menu; route guidance inactive
:
Status bar
;
Main function bar
=
Current vehicle position
?
Navigation menu bar
X
Press the Ø function button.
The map is displayed with the menu either
shown or hidden.
or
X
Select NaviNavi in the main function bar by
sliding ZV and turning cVd the COMAND
controller and press W to confirm.
The map is displayed with the menu shown.
Showing/hiding the menu
You can show or hide the menu on the map.
X
To hide the menu: slide ZV the COMAND
controller and, when the Full ScreenFull Screen
menu item is shown, press W to confirm.
or
X
Press the k back button.
The map can be seen in the full-screen display.
X
To show the menu: press W the COMAND
controller when the map is shown in fullscreen display.
Z

Basic settings
62
Basic settings
Setting route type and route options
Route settings menu (start of menu)
:
To select the route type
Navigation
;
To set the number of persons in the vehicle for the use of carpool lanes
=
To set route options
X
Select NaviNavi in the main function bar by
sliding ZV and turning cVd the COMAND
controller and press W to confirm.
X
Select Route SettingsRoute Settings and press W to
confirm.
The route settings menu appears.
X
Select a route type and press W to confirm.
A filled circle indicates the current setting.
X
Select the route option(s) and press W to
confirm.
The route options are switched on O or off
ª, depending on the previous status.
If you change the route type and/or the
i
route options while route guidance is
active, COMAND will calculate a new route.
If you change the route type and/or the
route options while route guidance is inactive, COMAND uses the new setting for the
next route guidance.
Route guidance active: a destination has
been entered and the route has been calculated.
Route guidance inactive: no destination
has been entered yet and no route has been
calculated yet.
You can select the following route types:
R
Fast RouteFast Route: COMAND calculates a route
with the shortest (minimized) journey time.
R
Dynamic Traffic RouteDynamic Traffic Route: is the same
route type as Fast RouteFast Route. In addition,
COMAND takes into account any relevant
traffic reports received during route guidance. The navigation system can help you
avoid a traffic jam, for example, by recalculating the route.
R
Dynamic TRF. Route Only AfterDynamic TRF. Route Only After
RequestRequest: is the same route type as
Dynamic Traffic RouteDynamic Traffic Route. After recalcu-
lating the route, COMAND asks you
whether you want to adopt the new route or
whether you want to continue along the
original route.
R
Eco RouteEco Route: the Eco RouteEco Route (economical
route) is a variant of the Fast RouteFast Route type.
COMAND will attempt to minimize the journey distance at the expense of a slightly
increased journey time.
R
ShortShort RouteRoute: COMAND calculates a route
with the shortest possible (minimized)
route distance.
The route calculated may, for example,
i
include ferry connections, even if the
Avoid FerriesAvoid Ferries route option is switched
on.
In some cases, COMAND may not be able
to take all the selected route options into
account, e.g. when calculating particularly
long routes.
X
To exit the menu: slide XVY the COMAND
controller.
Setting the number of persons in the
vehicle for the use of carpool lanes
For route calculation, you can take HOV or
carpool lanes into account.
If you use HOV or carpool lanes, please
observe the applicable laws as well as the
local and time limitation conditions.

Carpool lanes may only be used under certain
conditions. They can normally be used when
there are two people in the vehicle. However,
there are also carpool lanes which can only be
used when there are three or more people in
the vehicle. In California, lone drivers can use
a carpool lane if their vehicle's emission level
or fuel consumption is below a fixed threshold.
Carpool lanes may be reserved for specific
times (e.g. during the peak period).
Carpool lanes are identified by HOV symbols
on special road signs and by markings on the
road. The road signs may also include the
designation CARPOOLCARPOOL. The lanes are arranged
as a separate lane next to the others or are
built as a physically separate lane.
Depending on the setting under Number ofNumber of
OccupantsOccupants inin VehicleVehicle, COMAND uses car-
pool lanes when calculating the route.
COMAND then guides you in and out of carpool lanes using visual and acoustic driving
directions.
Destination entry
X
Select 11, 22 or MoreMore than 2than 2by turning cVd
and press W to confirm.
A # dot indicates the current setting.
Destination entry
Important safety notes
WARNING
G
If you operate information systems and communication equipment integrated in the vehicle while driving, you will be distracted from
traffic conditions. You could also lose control
of the vehicle. There is a risk of an accident.
Only operate the equipment when the traffic
situation permits. If you are not sure that this
is possible, park the vehicle paying attention
to traffic conditions and operate the equipment when the vehicle is stationary.
63
Navigation
X
In the route settings menu, select NumberNumber
of Occupants in Vehicleof Occupants in Vehicle by turning
cVd the COMAND controller.
You must observe the legal requirements for
the country in which you are currently driving
when operating COMAND.
Entering a destination by address
Introduction
When entering an address as the destination,
you have the following options:
R
entering the state/province, city/ZIP code
and street
R
entering the state/province, city and center
Z

Destination entry
64
R
entering the state/province, city/ZIP code,
street and house number
R
entering the state/province, city/ZIP code,
street and intersection
R
entering the state/province, street, city
and house number
R
entering the state/province, street and
house number
R
entering the state/province, street and
intersection
You can only enter those cities, streets,
i
ZIP codes etc. that are stored on the digital
map. This means that for some countries,
you cannot enter ZIP codes, for example.
Navigation
The step-by-step instructions for entering an
address use the following example data:
New York (state)
New York (city)
40 Broadway
Of course, you can freely enter information
such as state/province, city, street and
house number, for example to enter your
home address.
Address entry menu
Calling up the address entry menu
X
To switch to navigation mode: press the
Ø button.
X
To show the menu: press W the COMAND
controller.
X
Select DestinationDestination by turning cVd the
COMAND controller and press W to confirm.
Address entry menu
X
Select Address EntryAddress Entry and press W to
confirm.
The address entry menu appears. If you
have previously entered a destination, this
will be shown in the display.
Depending on the amount of the address
entered and the data in the digital map, some
menu items may not be available at all or may
not yet be available.
Example: after entering the state/province,
the menu items MapMap, No.No., CenterCenter, Inter‐Inter‐
sectionsection, SaveSave and StartStart are not available.
The ZIPZIP menu item will not be available
unless the digital map contains zip codes.
Entering the state/province, city, street
and number
Selecting a state/province
X
Call up the address entry menu
(Y page 64).
X
Select State/ProvState/Prov in the address entry
menu by turning cVd the COMAND controller and press W to confirm.
A menu with the available lists appears:
R
Last States/ProvincesLast States/Provinces
R
States (U.S.A.)States (U.S.A.)
R
Provinces (Canada)Provinces (Canada)

X
To select a list: turn cVd the COMAND
controller and press W to confirm.
The list of selected states/provinces
appears.
X
To select a state/province: turn cVd the
COMAND controller and press W to confirm.
The address entry menu appears again. The
state/province selected has now been
entered.
Entering the city
X
Call up the address entry menu
(Y page 64).
X
Select CityCity in the address entry menu by
turning cVd the COMAND controller and
press W to confirm.
You will see the city list either with the
character bar (option 1) or as a selection
list (option 2).
Destination entry
List of cities as selection list
Option 2: city list as selection list
X
Select an entry by turning cVd the
COMAND controller.
X
Irrespective of the option, press W to confirm your selection.
The address entry menu appears again. The
city has now been entered.
Entering the street name
X
Call up the address entry menu
(Y page 64).
X
Select StreetStreet in the address entry menu
by turning cVd and sliding ZVÆ the
COMAND controller and press W to confirm.
You will see the street list either with the
character bar (option 1) or as a selection
list (option 2).
65
Navigation
City list with character bar
Option 1: city list with the character bar
X
Enter NEWNEW YORKYORK. Character entry, using city
input as an example (Y page 35).
Street list with character bar
Option 1: street list with character bar
X
Enter BROADWAYBROADWAY. Character entry, using city
input as an example (Y page 35).
Z

Destination entry
66
Street list as selection list
Option 2: street list as selection list
X
Select a street by turning cVd the
COMAND controller and press W to con-
Navigation
firm.
If an entry has the G symbol, it is ambiguous. You can select the entry you want
from an additional selection list.
COMAND controller and press W to confirm.
You will see the house number list either
with the character bar (option 1) or as a
selection list (option 2).
House number list with character bar
Option 1: house number list with character
bar
X
Enter 44 and 00. Character entry, using city
input as an example (Y page 35).
X
Select an entry by turning cVd the
COMAND controller.
X
Irrespective of the option, press W to confirm your selection.
The address entry menu appears again. The
street has now been entered.
Entering the house number
Entering a house number will delete a previously entered intersection.
X
Call up the address entry menu
(Y page 64).
X
Select No.No. in the address entry menu by
turning cVd and sliding ZVÆ the
House number list as selection list
Option 2: house number list as selection list
X
Select an entry by turning cVd the
COMAND controller.
X
Irrespective of the option, press W to confirm your selection.
The address entry menu appears again. The
house number has now been entered.

Destination entry
67
Entering the ZIP code, center and intersection
Entering the ZIP code
X
Call up the address entry menu
(Y page 64).
X
Select ZIPZIP in the address entry menu by
turning cVd and sliding ZVÆ the
COMAND controller and press W to confirm.
You will see the ZIP code list either with the
character bar (option 1) or as a selection
list (option 2).
List of ZIP codes with character bar
Option 1: ZIP code list with character bar
X
Enter a ZIP code. Character entry, using city
input as an example (Y page 35).
X
Irrespective of the option, press W to confirm your selection.
If COMAND is able to assign the ZIP code
unambiguously to a specific address, the
address entry menu appears again. The ZIP
code appears in place of the city's name.
If COMAND cannot assign the ZIP code
unambiguously to a specific address, the
address entry menu also appears again.
The ZIP code is automatically entered. You
can now enter the street for a more precise
location. Only streets in the area covered
by the entered ZIP code are available.
X
Start route calculation (Y page 69).
Entering the center
Entering a center will, for example, delete a
previously entered street.
X
Call up the address entry menu
(Y page 64).
X
Select CenterCenter in the address entry menu
by turning cVd and sliding ZVÆ the
COMAND controller and pressing W to
confirm.
You will see the center list either with the
character bar (option 1) or as a selection
list (option 2).
Navigation
ZIP code list as selection list
Option 2: ZIP code list as selection list
X
Select the desired ZIP code by turning cVd
the COMAND controller.
City center list with character bar
Option 1: center list with character bar
X
Enter a center. Character entry, using city
input as an example (Y page 35).
Z

Destination entry
68
Center list as selection list
Option 2: center list as selection list
X
Select a center by turning cVd the
COMAND controller.
Navigation
X
Irrespective of the option, press W to confirm your selection.
The address entry menu appears again. The
center selected has been entered.
X
Start route calculation (Y page 69).
Entering the intersection
X
Call up the address entry menu
(Y page 64).
X
Select IntersectionIntersection in the address entry
menu by turning cVd and sliding ZVÆ the
COMAND controller and press W to confirm.
You will see the intersection list either with
the character bar (option 1) or as a selection list (option 2).
Intersection list with character bar
:
List entry most closely resembling the
characters entered so far
;
List
=
Character bar
Option 1: intersection list with character bar
X
Enter an intersection. Character entry,
using city input as an example (Y page 35).
Intersection list as selection list
Option 2: intersection list as selection list
X
Select an intersection by turning cVd the
COMAND controller.
X
Irrespective of the option, press W to confirm your selection.
The address entry menu appears again. The
intersection selected has been entered.
X
Start route calculation (Y page 69).

Destination entry
69
Starting route calculation
Address entry menu with destination address
:
Destination address
;
Starts route calculation
You can have COMAND calculate a route to
the destination address, or you can save the
destination address (for example, as your
home address (My address)) (Y page 69).
X
Call up the address entry menu
(Y page 64).
X
In the address entry menu, confirm StartStart
by pressing W.
If no other route has been calculated, route
calculation starts immediately (option 1). If
another route has already been calculated
(route guidance is active), a prompt
appears (option 2).
The ContinueContinue menu item is displayed
i
instead of StartStart if Calculate Alterna‐Calculate Alterna‐
tivetive RoutesRoutes is activated in the navigation
menu (option 2) (Y page 93).
Option 1 – no route guidance active: route
calculation starts. While route calculation is in
progress, an arrow will indicate the direction
to your destination. Below this, you will see a
message, e.g. Calculating FastCalculating Fast
Route...Route....
Once the route has been calculated, route
guidance begins.
If the vehicle is not on a digitized road, the
following is displayed:
R
the linear distance to the destination
R
the direction to the destination
R
the Off Mapped RoadOff Mapped Road message
Option 2 – route guidance is already
active: if route guidance is already active, a
prompt will appear asking whether you wish
to terminate the currently active route guidance.
X
Select YesYes or NoNo and press W to confirm.
If you select YesYes, COMAND will stop route
guidance and start route calculation for the
new destination.
If you select NoNo, COMAND will continue
with the active route guidance.
Route calculation takes a certain amount
i
of time. The time depends on the distance
from the destination, for example.
COMAND calculates the route using the
digital map data.
The calculated route can differ from the
ideal route, for example because of incomplete map data. Please also refer to the
notes about the digital map (Y page 118).
Entering and saving your home address
You can either enter your home address for
the first time (option 1) or edit a previously
stored home address (option 2).
X
Option 1: enter the address, e.g. a city,
street and house number (Y page 64).
X
After entering the address in the address
entry menu, select SaveSave by turning cVd
and ZVÆsliding the COMAND controller
and press W to confirm.
X
Select Save as "My Address"Save as "My Address" and press
W to confirm.
COMAND stores your home address as MyMy
AddressAddress in the destination memory.
X
Option 2: proceed as described under
"Option 1".
A prompt appears asking whether the current home address should be overwritten.
X
Select YesYes and press W to confirm.
After selecting YesYes, the DataData saved.saved. mes-
sage appears.
Navigation
Z
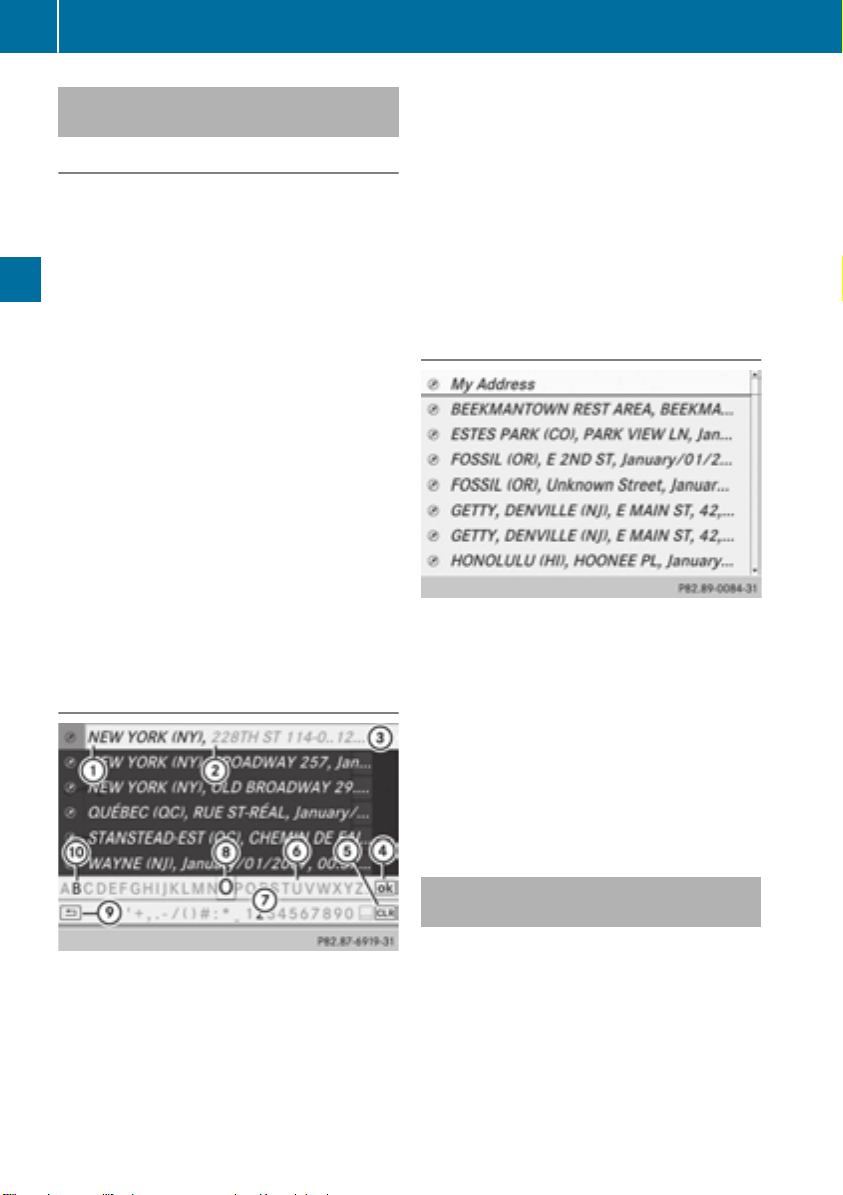
Destination entry
70
Selecting a destination from the destination memory (e.g. My Address)
Introduction
The destination memory always contains an
entry named "My Address". You may wish to
assign your home address to this entry, for
example (Y page 69), and select it for route
guidance. This entry is always located at the
top of the list in the destination memory.
X
To switch to navigation mode: press the
Ø button.
X
To show the menu: press W the COMAND
controller.
Navigation
X
Select DestinationDestination in the navigation sys-
tem menu bar by turning cVd the
COMAND controller and press W to confirm.
X
Select From MemoryFrom Memory and press W to con-
firm.
You will see the destination memory list
either with the character bar (option 1) or
as a selection list (option 2).
Option 1: destination memory list with
character bar
B
Characters not currently available
C
Character bar
D
Currently selected character
E
Cancels an entry
F
Characters currently available
X
Enter a destination, e.g. "My Address".
Character entry, using city input as an
example (Y page 35).
Option 2: destination memory list as
selection list
Destination memory list
X
Select My AddressMy Address by turning cVd the
COMAND controller.
X
Irrespective of the option, press W to confirm your selection.
The address entry menu appears again.
"My Address" has been entered.
X
To start route calculation: select StartStart
and press W to confirm.
:
Character entered by the user
;
Characters automatically added by the
system
=
List entry most closely resembling the
characters entered so far
?
Switches to the selection list
A
Deletes an entry
Entering a destination from the list of
last destinations
X
To switch to navigation mode: press the
Ø button.
X
To show the menu: press W the COMAND
controller.
X
Select DestinationDestination in the navigation sys-
tem menu bar by turning cVd the
COMAND controller and press W to confirm.

X
Select From Last DestinationsFrom Last Destinations and
press W to confirm.
X
Select the desired destination by turning
cVd the COMAND controller and press W
to confirm.
The address entry menu appears again. The
destination address selected has been
entered.
X
To start route calculation: select StartStart
and press W to confirm.
Once the route has been calculated, route
guidance begins (Y page 69).
“Last destinations” memory
i
(Y page 107).
Entering a destination using the map
Calling up the map
X
To switch to navigation mode: press the
Ø button.
X
To show the menu: press W the COMAND
controller.
X
Select DestinationDestination in the navigation sys-
tem menu bar by turning cVd the
COMAND controller and press W to confirm.
Destination entry
:
Current vehicle position
;
Crosshair
=
Details of the crosshair position
?
Map scale selected
X
Select UsingUsing MapMap and press W to confirm.
You will see the map with a crosshair.
Display = depends on the settings selected
in "Map information in the display"
(Y page 111). You can see the current street
name if the digital map contains the necessary data, You can see the coordinates of the
crosshair if the geo-coordinate display is
switched on and the GPS signal is strong
enough.
Moving the map and selecting the destination
X
To scroll the map: slide XVY, ZVÆ or
aVb the COMAND controller.
X
To set the map scale: as soon as you turn
cVd the COMAND controller, the scale bar
appears.
X
Turn cVd until the desired scale is set.
Turning clockwise zooms out from the map;
turning counter-clockwise zooms in.
71
Navigation
Z

Destination entry
72
X
To select a destination: press W the
COMAND controller once or several times.
If COMAND is unable to assign a unique
address, you will see either the address
entry menu with the destination address or
Navigation
a selection list.
X
Select a destination by turning cVd the
COMAND controller and press W to confirm.
If the destination is within the limits of the
digital map, COMAND attempts to assign
the destination to the map.
If the destination can be assigned, you will
see the address entry menu with the
address of the destination. If not, you will
see the Destination From MapDestination From Map entry.
X
To start route calculation: select StartStart
and press W to confirm.
Entering a destination using geo-coordinates
X
To switch to navigation mode: press the
Ø button.
X
To show the menu: press W the COMAND
controller.
X
Select DestinationDestination in the navigation sys-
tem menu bar by turning cVd the
COMAND controller and press W to confirm.
X
Select Using Geo-CoordinatesUsing Geo-Coordinates and
press W to confirm.
An entry menu appears.
You can now enter the latitude and longitude
coordinates with the COMAND controller or
the number keypad (Y page 35).
X
To change a value: turn cVd the
COMAND controller.
X
To move the mark within the line: slide
XVY the COMAND controller.
X
To move the mark between the lines:
slide ZVÆ the COMAND controller.
X
To confirm the value: press W the
COMAND controller.
If the selected position is outside the dig-
i
ital map, COMAND uses the nearest digitized road for route calculation. You will see
the The co-ordinates are outsideThe co-ordinates are outside
the map areathe map area message. If the selected
position is located over a body of water, you
will see the The destination is in aThe destination is in a
body of water. Please selectbody of water. Please select
another destination.another destination. message.
Entering a destination using
Mercedes-Benz Apps
X
To switch to navigation mode: press the
Ø button.
X
To show the menu: press W the COMAND
controller.
X
Select DestinationDestination in the navigation sys-
tem menu bar by turning cVd the

Destination entry
73
COMAND controller and press W to confirm.
X
Select Mercedes-BenzMercedes-Benz AppsApps and press W
to confirm.
If an Internet connection is established, you
will see the message: Do you want toDo you want to
accept the navigation data sentaccept the navigation data sent
via Mercedes-Benz Apps?via Mercedes-Benz Apps?
Street View
X
To switch to navigation mode: press the
Ø button.
X
To show the menu: press W the COMAND
controller.
X
Select DestinationDestination in the lower menu bar
by turning cVd the COMAND controller
and press W to confirm.
X
Select Address EntryAddress Entry and press W to
confirm.
X
Select icon : in the address entry menu
and press W to confirm.
If an Internet connection is established, you
will see the Street View basic display.
X
To explore the view of the street: turn
cVd or slide XVY,
ZVÆ the COMAND controller.
X
To return to navigation: press the k
button.
Entering way points
Introduction
You can map the route yourself by entering up
to four way points. The sequence of the way
points can be changed at any time.
COMAND provides a selection of predefined
destinations in eight categories for this purpose, e.g. GASGAS STATIONSTATION or COFFEECOFFEE SHOPSHOP. You
can also use the destination entry options to
enter way points.
Creating way points
Way point menu (with destination, without way
point)
X
To switch to navigation mode: press the
Ø button.
X
To show the menu: press W the COMAND
controller.
X
Select DestinationDestination in the navigation sys-
tem menu bar by turning cVd the
COMAND controller and press W to confirm.
X
Select Intermediate DestinationsIntermediate Destinations and
press W to confirm.
The destination is entered into the way
points menu. The way points are not yet
entered.
X
Confirm Add:Add: by pressing W the COMAND
controller.
Navigation
Z
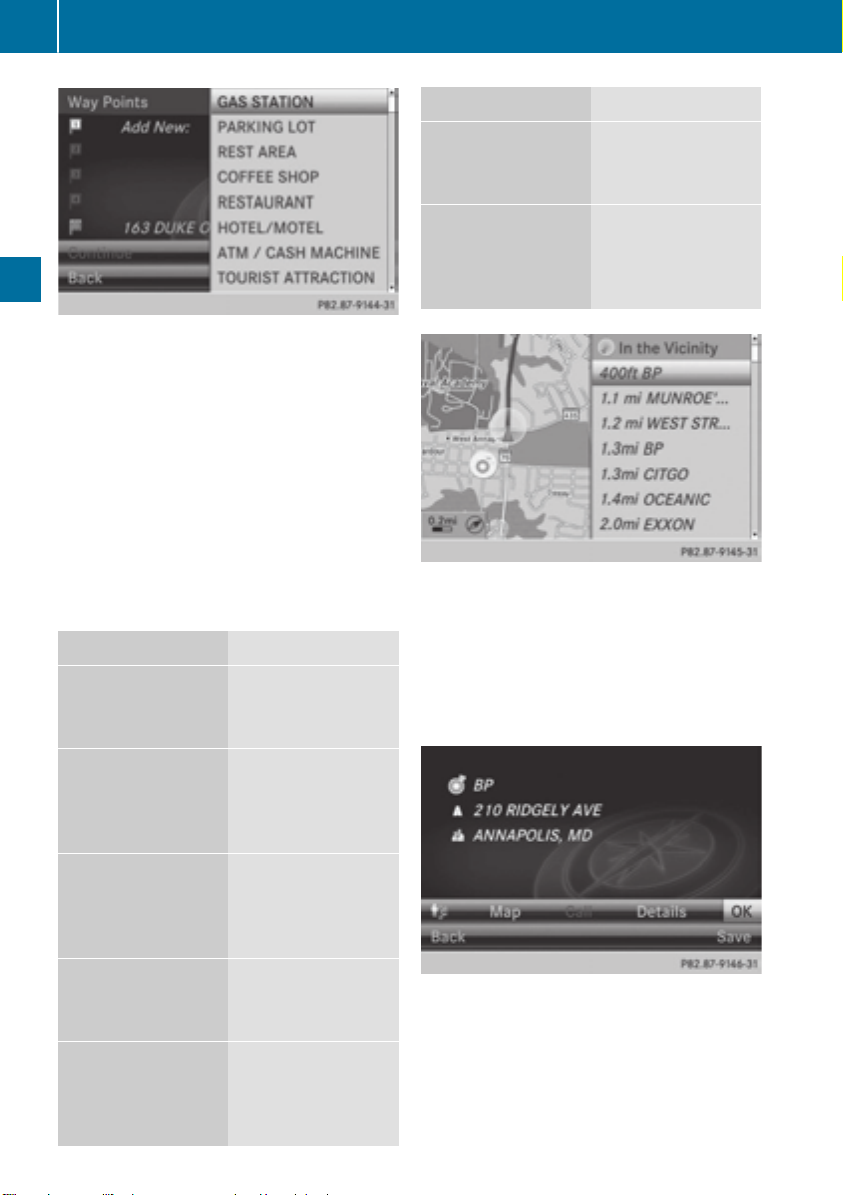
Destination entry
74
X
Select the category or OtherOther by turning
cVd the COMAND controller and press W
to confirm.
After selecting a category, the POIs which
are available along the route and in the
Navigation
vicinity are displayed.
COMAND first searches for destinations
along the route. Searching for destinations
then continues within a radius of approximately 60 miles (100 km) of the vehicle
position.
X
After selecting OtherOther, select one of the
destination entry options from the list.
Selection Step
X
Address EntryAddress Entry
Enter a destination by address
(Y page 63).
Selection Step
X
Using the MapUsing the Map
Enter a destination using the map
(Y page 71).
X
Using Geo-Coor‐Using Geo-Coor‐
dinatesdinates
Enter a destination using the geocoordinates
(Y page 72).
X
Select POI and press W to confirm.
After selecting a POI or entering a destination, the address of the way point is displayed.
After entering a destination using the map,
the address entry menu is displayed. OKOK is
highlighted.
From MemoryFrom Memory
From Last Desti‐From Last Desti‐
nationsnations
From POIsFrom POIs
From PersonalFrom Personal
POIsPOIs
X
Select a destination from the destination memory
(Y page 70).
X
Select a destination from the list
of last destinations (Y page 70).
X
Select a point of
interest
(Y page 76).
X
Enter a destination from the personal POIs
(Y page 85).
X
To accept the way point: confirm OKOK by
pressing W.
Once you have accepted the way point, it is
entered in the way point menu.

X
To display the details: select DetailsDetails by
turning cVd the COMAND controller and
press W to confirm.
X
To make a call: select CallCall with the
COMAND controller and press W to confirm. COMAND switches to telephone
mode (Y page 132).
This menu item is available if the way
i
point has a telephone number and if a
mobile phone is connected to COMAND
(Y page 126).
X
To call up the map: select MapMap with the
COMAND controller and press W to confirm.
X
You can move the map and select the destination.
X
To store the way point in the destination memory: select PresetsPresets with the
COMAND controller and press W to confirm (Y page 105).
Destination entry
X
Select a way point in the way point menu by
turning cVd the COMAND controller and
press W to confirm.
A menu appears.
75
Navigation
Way point menu with two way point entries
Editing way points
Way points can be:
R
changed
R
changed in sequence in the way point menu
R
deleted
To change the sequence, at least one way
point and the destination must be entered.
X
To change a way point: select EditEdit from
the menu and press W to confirm.
X
Change the address, e.g. the city and
street, and confirm with OKOK.
The way point menu appears and displays
the modified way point.
You can change the sequence of the way
points and the destination.
Z

Entering a POI
76
X
To change the sequence: from the menu,
select MoveMove by turning cVd the COMAND
controller and press W to confirm.
X
Turn cVd the COMAND controller and
move the way point or destination to the
desired position, then press W to confirm.
X
To delete way points: from the menu,
select DeleteDelete and press W to confirm.
Accepting way points for the route
X
Select StartStart in the way point menu by
turning cVd the COMAND controller and
press W to confirm.
The route is calculated with the entered
Navigation
way points.
ContinueContinue is displayed instead of StartStart
i
when Calculate Alternative RoutesCalculate Alternative Routes
is activated in the navigation menu
(Y page 93).
If a way point has been passed during
i
route guidance, the way point will be displayed in the way point menu with a green
arrow. Once the route has been recalculated, the way point is deleted from the way
point menu.
If you select NoNo, the search is canceled.
X
Select a gas station and press W to confirm.
The address of the gas station is displayed.
X
Confirm StartStart by pressing W.
The selected gas station is entered into
position 1 of the way points menu. Route
guidance begins.
If the way points menu already contains
four way points, a prompt will be displayed,
asking you whether you wish to enter the
gas station into position 1. If you select
YesYes, the gas station is transferred into the
list and way point 4 is deleted.
Entering a POI
Calling up the POI menu
Searching for a gas station when the
fuel level is low
If the reserve fuel warning is displayed, you
will see the message: Fuel tank reserveFuel tank reserve
level. Do you want to start thelevel. Do you want to start the
search for gas stations?search for gas stations?.
X
Select YesYes or NoNo.
If you select YesYes, the gas station search
starts. When the search is complete, a list
of the gas stations available along the route
or in the vicinity is displayed.
Example: POI menu
POIs are predefined destinations within categories, e.g. a gas station in the AUTOMOTIVEAUTOMOTIVE
category.
X
To switch to navigation mode: press the
Ø button.
X
To show the menu: press W the COMAND
controller.
X
Select DestinationDestination in the navigation sys-
tem menu bar by turning cVd the
COMAND controller and press W to confirm.
X
Select FromFrom POIsPOIs and press W to confirm.
A menu appears.

X
Choose one of the options and press W to
confirm.
Further steps are arranged in a table
according to the option selected
(Y page 78).
Entering a POI
77
Navigation
Z

Entering a POI
78
Defining the position for the POI search
Selection Characteristic Instructions
Near Destina‐Near Destina‐
tiontion
Current Posi‐Current Posi‐
tiontion
Other CityOther City
Navigation
Search By NameSearch By Name
Entry is only possible
when route guidance is
active.
The system looks for a
point of interest in the
vicinity of the current
vehicle position.
After entering a city, the
system looks for the POI
within the city.
You can call up all the
points of interest in the
digital map or focus your
search on the three previously selected positions.
X
Select NearNear DestinationDestination from the POI
menu and press W to confirm.
X
Select a POI category (Y page 79).
X
Select Current PositionCurrent Position in the POI
menu and press W to confirm.
X
Select a POI category (Y page 79).
Option 1
X
Select OtherOther CityCity in the POI menu and
press W to confirm.
X
If desired, select the state/province
(Y page 64).
X
Enter the city. Proceed as described in
the "Entering a city" section (Y page 64).
X
Select a POI category (Y page 79).
Option 2
X
Enter a city in the address entry menu
(Y page 64).
X
Select POIPOI and press W to confirm.
X
Select a point of interest category.
X
Select SearchSearch ByBy NameName in the POI menu
and press W to confirm.
X
Select AllAll POIsPOIs or one of the three pre-
viously selected positions.
The POI list with character bar appears.
X
Proceed as described in the "POI list with
character bar" section (Y page 80).
SearchSearch ByBy PhonePhone
NumberNumber
This function gives you
access to all POIs that
have a phone number.
X
Select Search By Phone NumberSearch By Phone Number and
press W to confirm.
You will see a list of phone numbers.
X
Proceed as described in the "POI list with
character bar" section (Y page 80).
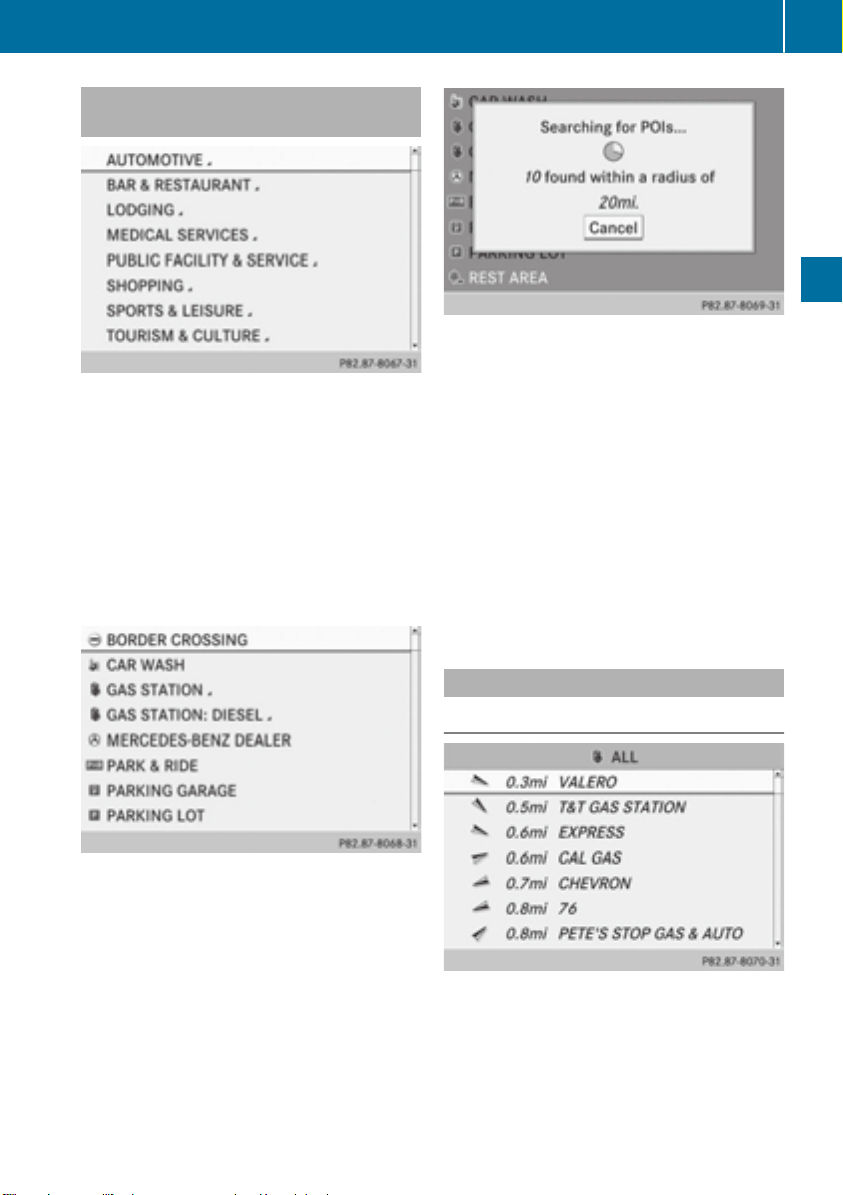
Searching by point of interest category
POI category list
X
Call up the POI menu (Y page 76).
After entering a city, the POI category list
appears after choosing the menu item
Near DestinationNear Destination, Current PositionCurrent Position
or Other CityOther City.
X
Select a POI category by turning cVd the
COMAND controller and press W to confirm. The G arrow behind an entry shows
that other categories are available.
Entering a POI
Point of interest search near the current position
(example)
The POI search is canceled when 50 POIs
have been found.
COMAND searches within a radius of approximately 60 miles (100 km).
Once the search is completed, the POI list is
displayed.
If COMAND does not find any POIs within this
radius, it extends its search range to approximately 125 miles (200 km).
If COMAND finds one POI within this radius, it
finishes the search.
79
Navigation
GAS STATION category selected
X
Select an entry and press W to confirm.
The search for points of interest begins in
the vicinity of the selected position.
POI list
Introduction
POI list (example)
The POI list displays the search results for the
category in the vicinity of the selected position.
Z

Entering a POI
80
The search results display the following information:
R
an arrow that shows the linear direction to
the point of interest
R
the linear distance to the POI
R
the name of the POI
The arrow and linear distance to the des-
i
tination are not visible if you have entered a
POI after entering another city.
The arrow is also not shown when searching for a POI in the vicinity of the destination.
Depending on the POI selected, COMAND
uses different reference points in deter-
Navigation
mining the linear distance to the destination:
R
vicinity of current position: the linear distance is the distance of the point of interest from the current vehicle position.
R
vicinity of destination: the linear distance
is the distance from the destination
entered to the point of interest.
Selecting a POI
Further information on searching via POI categories (Y page 79).
X
Select the POI in the POI list by turning
cVd the COMAND controller and press W
to confirm.
The complete address of the point of interest selected is shown.
X
To start route calculation: select
StartStart ; and press W to confirm.
X
To store an address in the destination
memory: select SaveSave = and press W to
confirm. You can now select storing
options (Y page 105).
X
To show the detailed view: select
DetailsDetails ? and press W to confirm.
X
To make a call: select CallCallA and press
W to confirm. COMAND switches to telephone mode (Y page 132).
This menu item is available if the POI has
i
a telephone number and a mobile phone is
connected to COMAND (Y page 126).
X
To call up the map: select MapMapC and
press W to confirm.
X
You can move the map and select the destination (Y page 71).
:
Point of interest with address
;
To start route calculation
=
To store an address in the destination
memory
?
To display details
A
To make a call (when available)
B
To cancel selection
C
To display a point of interest's position on
the map
POI list with character bar
Search by name in the vicinity of the destination
(example)
If you have selected Search By NameSearch By Name in the
POI menu and then defined the position for
the search (Y page 78), the POI list with character bar appears.

Depending on your selection, you can select
all available points of interest on the digital
map or the points of interest in the vicinity of
the selected position.
X
Proceed as described in "Searching for a
phone book entry" (Y page 137).
If COMAND can assign the characters
entered to one entry unambiguously, the
address entry appears automatically.
X
To start route calculation: select StartStart
and press W to confirm.
ZAGAT®survey service
Entering a POI
ZAGAT example description
X
To show the information: select DetailsDetails
and press W to confirm.
Selecting a POI using the map
81
Navigation
The Z icon before a search result shows that a
ZAGAT®rating is available for this entry.
:
ZAGAT ratings
;
To display details
X
Select an entry with the "Z" icon by turning
cVd the COMAND controller and press W
to confirm.
The ZAGAT evaluations appear.
Point of interest on the map
You can select points of interest that are
available in the selected (visible) section of
the map. The POI is highlighted on the map,
you will see further information on the upper
edge of the display.
X
To switch to navigation mode: press the
Ø button.
X
To show the menu: press W the COMAND
controller.
X
Select GuideGuide in the navigation system
menu bar by turning cVd the COMAND
controller and press W to confirm.
If points of interest are available:
Depending on the map scale selected,
point of interest icons appear on the map.
The scale at which the icons are displayed
Z

Personal POIs
82
on the map varies according to the icon.
You can select the icons that you want
COMAND to display.
If no points of interest are available, you will
see a message to this effect.
You also see this message if you have
i
selected the NoNo SymbolsSymbols menu item under
"Map display" (Y page 110).
X
To confirm the message: press W the
COMAND controller.
X
To select a POI: select NextNext or PreviousPrevious
and press W to confirm.
X
To show details for the selection: select
DetailsDetails and press W to confirm.
Navigation
X
To change to the map: slide ZV the
COMAND controller.
You can move the map and select the map
section.
X
To start route calculation: select StartStart
and press W to confirm.
A prompt appears asking whether the point
of interest should be used as the destination.
X
Select YesYes or NoNo and press W to confirm.
Cont.Cont. is displayed instead of StartStart when
i
Calculate Alternative RoutesCalculate Alternative Routes is acti-
vated in the navigation menu (Y page 93).
Settings
Calling up the "Personal POIs" menu
X
To switch to navigation mode: press the
Ø button.
X
To show the menu: press W the COMAND
controller.
X
Select NaviNavi in the main function bar by
sliding ZV and turning cVd the COMAND
controller and press W to confirm.
X
Select Personal POIsPersonal POIs and press W to
confirm.
Displaying personal POIs on the map
Personal POIs
General notes
The use of personal POIs for displaying
i
traffic surveillance equipment is not permitted in every country. Please observe the
country-specific regulations and adapt
your speed accordingly when driving.
The personal POIs are shown on the map with
an icon according to their category.
X
Call up the "Personal POIs" menu
(Y page 82).
X
Select Display Personal POIs On MapDisplay Personal POIs On Map
in the menu and press W to confirm.
You can select different categories.
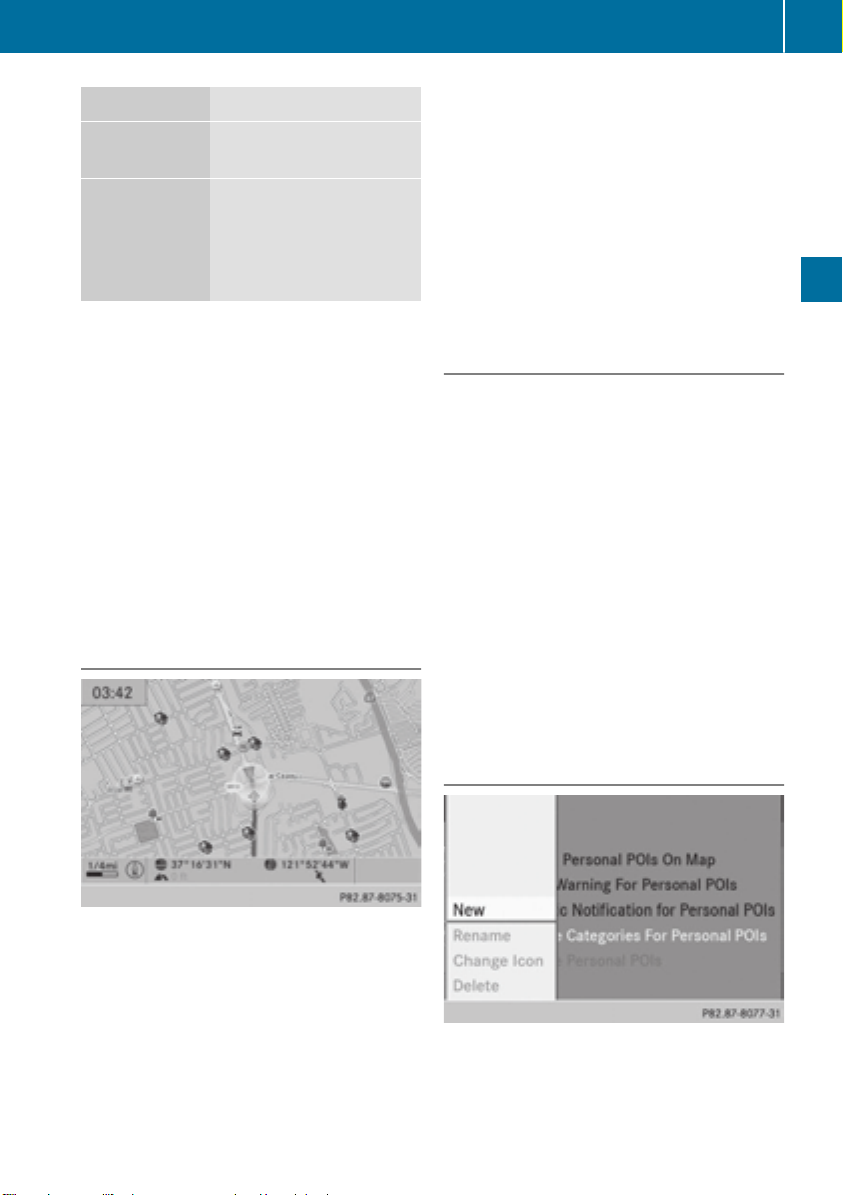
Selection Explanation
ª Not Clas‐Not Clas‐
sifiedsified
ª COMANDCOMAND
Standard entry for personal POIs
Personal POIs (destinations, routes) that you
have imported via the
online function
(Y page 171).
If you have created your own categories (e.g.
"Fishing", "Hotels"), they are also displayed
(Y page 83).
X
Select a category and press W to confirm.
The icon display is switched on O or off ª,
depending on the previous status.
i The icons will be displayed in the following
map scales:
R
1/16 mile (50 m)
R
1/8 mile (100 m)
R
1/4 mile (200 m)
R
1/2 mile (500 m)
Visual warning for personal POIs
Personal POIs
X
Call up the "Personal POIs" menu
(Y page 82).
X
In the "Personal POIs" menu, select Vis‐Vis‐
ual Warning For Personal POIsual Warning For Personal POIs and
press W to confirm.
The menu displays the available categories.
X
Select a category and press W to confirm.
This will switch the visual warning for all
personal POIs of this category on O or off
ª, depending on the previous setting.
Acoustic notification for personal POIs
A gong sounds when the vehicle is approaching a personal POI. The function for the corresponding category must be activated for
this.
X
Call up the "Personal POIs" menu
(Y page 82).
X
In the "Personal POIs" menu, select Acous‐Acous‐
tic Notification for Personal POIstic Notification for Personal POIs
and press W to confirm.
The menu displays the available categories.
X
Select a category and press W to confirm.
This will switch the acoustic notification for
all personal POIs of this category on O or
off ª, depending on the previous setting.
83
Navigation
If the vehicle is approaching a personal POI,
this is highlighted on the map. The display for
the corresponding category must be activated for this.
Managing categories for personal
points of interest
Z

Personal POIs
84
X
Call up the "Personal POIs" menu
(Y page 82).
X
In the "Personal POIs" menu, select Man‐Man‐
age Categories For Personal POIsage Categories For Personal POIs
and press W to confirm.
Navigation
X
To create a new category: select NewNew and
press W to confirm.
X
Enter the name of the category. Character
entry (Y page 33).
X
Select the ¬ icon and press W to confirm.
A list with icons appears. You can assign an
icon to the category.
X
Select a symbol by turning cVd the
COMAND controller and press W to confirm.
You have created a new category with a
name and icon. This category appears
when selecting the display on the map or
when selecting the destination.
X
To rename a category, to change an
icon: select RenameRename or Change IconChange Icon and
press W to confirm.
X
Proceed as described under "To create a
new category".
X
To delete a category: select DeleteDelete and
press W to confirm.
A prompt appears asking whether the category should be deleted.
If you delete a category, all points of inter-
i
est of this category are also deleted.
X
Select YesYes and press W to confirm.
If you select YesYes, the category will be
deleted.
If you select NoNo, the process will be can-
celed.
Managing personal POIs
X
Call up the "Personal POIs" menu
(Y page 82).
X
Select Manage Categories for Per‐Manage Categories for Per‐
sonal POIssonal POIs in the menu and press W to
confirm.
X
Select Not ClassifiedNot Classified, COMANDCOMAND or your
own category and press W to confirm.
X
Select a personal POI and press W to confirm.
The personal point of interest is displayed.
For further information on managing personal
POI categories (Y page 85):
R
Renaming
R
Changing the category
R
Deleting
Saving personal POIs
There are three ways to save personal points
of interest. You must insert an SD memory
card to do so. The NoNo MemoryMemory CardCard message
otherwise appears.
Personal POIs and routes are saved on the
memory card in the same data format in
which the geographical data is stored. This
format is based on the open GPX (GPS
Exchange) format.
Option 1
X
Insert the SD memory card (Y page 196).
X
To switch to navigation mode: press the
Ø button.

X
Hide the menu to show the map in full
screen mode (Y page 61).
X
Press W the COMAND controller for longer
than two seconds.
The current position of the vehicle is saved
as a personal POI on the SD memory card in
the Not ClassifiedNot Classified category.
The crosshair position is saved in the
i
scrolling map function (Y page 108).
Option 2
X
Insert the SD memory card (Y page 196).
X
To switch to navigation mode: press the
Ø button.
X
To show the menu: press W the COMAND
controller.
X
Select PositionPosition in the navigation system
menu bar by turning cVd the COMAND
controller and press W to confirm.
X
Select SaveSave PositionPosition AsAs PersonalPersonal POIPOI
or SaveSave CrosshairCrosshair Pos.Pos. asas PersonalPersonal
POIPOI ("Move map" function active) and press
W to confirm.
The list of personal categories appears.
X
Select a category and press W to confirm.
X
Name for the personal point of interest.
Character entry (Y page 33).
Option 3
X
Insert the SD memory card (Y page 196).
X
To switch to navigation mode: press the
Ø button.
X
Call up the address entry menu
(Y page 64).
X
Select SaveSave from the address entry menu
and press W to confirm.
X
Select Save As Personal POISave As Personal POI and press
W to confirm.
X
Select a category.
X
Enter the name.
The current address is saved as a personal
point of interest on the SD memory card.
Personal POIs
Importing personal POIs via the online
function
You can import personal POIs (destinations,
routes) via the online function (Y page 171).
When importing, you can choose whether to
write files to the SD memory card or to file
them in the address book. The imported personal POIs have their own icon and are filed in
the COMANDCOMAND category.
Selecting as the destination
X
Insert the SD memory card (Y page 196).
X
To switch to navigation mode: press the
Ø button.
X
To show the menu: press W the COMAND
controller.
X
Select DestinationDestination in the navigation sys-
tem menu bar by turning cVd the
COMAND controller and press W to confirm.
X
Select FromFrom PersonalPersonal POIsPOIs and press W
to confirm.
The categories of personal POIs appear.
85
Navigation
Z

Search & Send
86
Selection Explanation
Not Classi‐Not Classi‐
fiedfied
COMANDCOMAND
Standard entry for personal points of interest.
Personal POIs which you
have imported via the
online function
(Y page 171).
CoffeeCoffee ShopsShops
Symbol and category that
you have created yourself
(Y page 83).
Navigation
In the example, the Coffee ShopsCoffee Shops category
is selected.
The personal points of interest for this category are shown.
X
To change to the map: select MapMap and
press W to confirm.
The position of the personal point of interest is shown in the map.
A symbol is displayed according to the
i
"Displaying personal POIs on the map" setting (Y page 82).
X
To start route calculation: select StartStart
and press W to confirm.
If route guidance has been activated, a
prompt will appear asking whether you
wish to accept the personal point of interest as the destination.
If route guidance has not been activated,
route calculation for the personal point of
interest will start immediately.
X
Select YesYes or NoNo and press W to confirm.
If you select YesYes, the personal POI is accep-
ted as the destination.
If you select NoNo, the process will be can-
celed.
X
To make a call: select CallCall and press W to
confirm. COMAND switches to telephone
mode (Y page 133).
CallCall is available if the personal POI has a
i
telephone number and a mobile phone is
connected to COMAND (Y page 126).
X
To delete a personal POI: select DeleteDelete
and press W to confirm.
A prompt appears asking whether you wish
to delete the point of interest.
X
Select YesYes or NoNo and press W to confirm.
If you select YesYes, the personal POI is
deleted.
If you select NoNo, the process will be can-
celed.
X
Select a personal POI and press W to confirm.
X
To rename a personal POI: select RenameRename
and press W to confirm.
X
To change the category: select ChangeChange
CategoryCategory and press W to confirm.
Search & Send
Notes
To use Search & Send, your vehicle needs
i
to be equipped with mbrace, a navigation
system and a valid mbrace subscription.

Route guidance
87
Search & Send is a service assisting you in
entering destinations for the navigation system. This mbrace service can send a destination address directly from the Google Maps
website to the navigation system of your vehicle.
Selecting and sending a destination
address
Please also refer to the notes about address
entry online: maps.google.com.
X
Call up the maps.google.com website and
enter the destination address in the
address entry field.
X
Click the corresponding button to send the
destination address to the e-mail address
registered with mbrace.
X
Enter the e-mail address you specified
when setting up your mbrace account into
the corresponding field in the "Send" dialog
window.
X
Click "Send".
Calling up destination addresses
mation individually for every address to be
downloaded.
®
X
Select YesYes when the prompt for starting the
navigation system is shown. The window
for starting the navigation system appears
(Y page 69).
X
Select StartStart.
or
X
Select NoNo to store the downloaded desti-
nation in the destination memory for later
use.
The destination addresses are downloa-
i
ded in the same order as they are sent.
If you own several Mercedes-Benz vehicles
equipped with mbrace and a valid subscriber account: each destination address
can be downloaded by each vehicle. This
requires each vehicle to be registered with
an e-mail address in your mbrace account.
Navigation
X
Press the ï mbrace information button.
Downloading of the destination address to
the navigation system of your vehicle
begins.
If you have sent more than one destina-
i
tion address to your vehicle's navigation
system, you will need to call up the infor-
Route guidance
Important notes
COMAND calculates the route to the destination without taking account of the following,
for example:
R
traffic lights
R
stop and yield signs
R
merging lanes
R
parking or stopping in a no parking/no
stopping zone
R
other road and traffic rules and regulations
R
narrow bridges
Z

Route guidance
88
COMAND may give differing navigation commands if the actual street/traffic situation
does not correspond with the digital map's
data. For example, if the road layout or the
direction of a one-way street has been
changed.
For this reason, you must always observe
road and traffic rules and regulations during
your journey. Road and traffic rules and regulations always have priority over the system's driving recommendations.
Route guidance begins once a route has been
calculated (Y page 69).
COMAND guides you to your destination by
means of navigation announcements in the
Navigation
form of audible navigation announcements
and route guidance displays.
The route guidance displays can be seen if the
display is switched to navigation mode.
If you do not follow the navigation announcements or if you leave the calculated route,
COMAND automatically calculates a new
route to the destination.
If the digital map contains the corresponding
information, the following applies:
R
during route guidance, COMAND tries to
avoid roads with restricted access. Those
roads, for example, that are closed to
through-traffic.
R
roads that have time restrictions (e.g.
closed on Sundays and public holidays) are
considered for route guidance on days
when they are open. For this purpose, the
relevant times must be correctly stored in
the database.
Example: preparation phase
:
Next road
;
Point at which the change of direction
takes place (light blue dot)
=
Current vehicle position (the tip of the triangle indicates the vehicle’s direction of
travel)
?
Current road
Display ? depends on the setting selected
for "Map information in the display"
(Y page 111).
COMAND prepares you for the upcoming
change of direction. Based on the example
display below, the change of direction is
announced by the Prepare to turn rightPrepare to turn right
message. You see the full-screen map.
Displays during route guidance
Change of direction
Changes of direction have three phases:
R
preparation phase
R
announcement phase
R
change-of-direction phase
Example: announcement phase
:
Next road
;
Change of direction (turn right here)
=
Graphic representation of the distance to
the next change of direction
?
Distance to the next change of direction
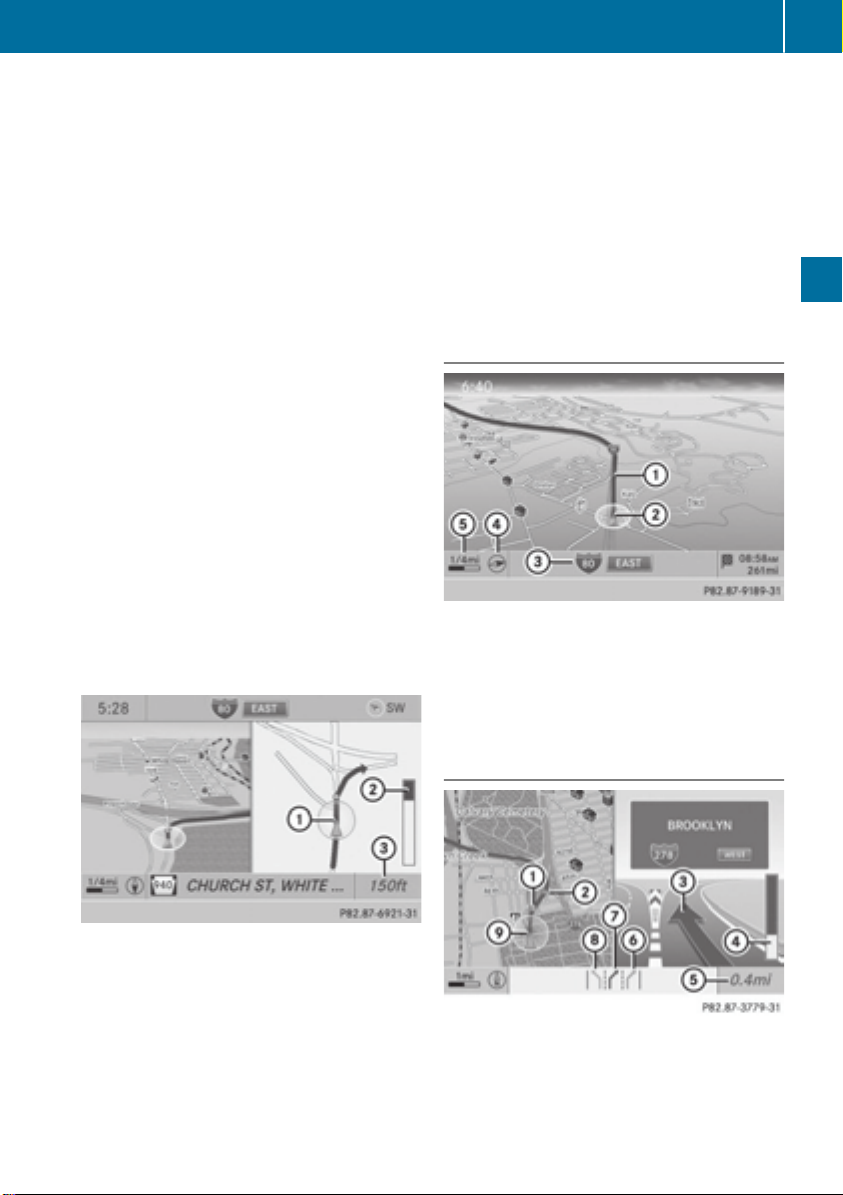
Route guidance
89
A
Route (highlighted in blue, shown in both
the left and right displays)
B
Point at which the change of direction
takes place (light blue dot, shown in both
the left and right displays)
The filled-in section of visual display for
i
distance = gets shorter the nearer you get
to the announced change of direction.
COMAND announces the imminent change of
direction. Based on the example display
below, the change of direction is announced
beforehand by the message: Please turnPlease turn
right in 500 ft. and follow theright in 500 ft. and follow the
<road name><road name>.
The distance announced before the next
change of direction depends on the type of
road and its permissible maximum speed.
The display is now split into two sectors. In
the left half, you see the normal map view.
The right-hand half shows:
R
an enlarged section of the area around the
intersection (crossing zoom) or
R
a 3D image of the road's course with the
route indicating the next change of direction
Based on the example display below, the
change of direction is announced 150 ft
before the change of direction with the NowNow
turn rightturn right message.
The display is split into two halves, as in the
announcement phase.
Once the change of direction is completed,
COMAND automatically switches back to fullscreen display.
Example of a display without changes of
direction
:
Route (highlighted in blue)
;
Current vehicle position
=
Current road
?
Map orientation selected
A
Map scale selected
Navigation
Example: change-of-direction phase
:
Current vehicle position (the tip of the triangle indicates the vehicle’s direction of
travel)
;
Graphic representation of the distance to
the next change of direction
=
Distance to the next change of direction
COMAND announces the imminent change of
direction.
Lane recommendations
Example: lane recommendations
:
Point of the next change of direction
;
Point of the change of direction after next
=
Next change of direction (in this case, turn
off to the right)
Z

Route guidance
90
?
Graphic representation of the distance to
the next change of direction
A
Distance to the next change of direction
B
Possible lane (light blue)
C
Recommended lane (dark blue)
D
Lane not recommended (gray)
E
Current vehicle position, the tip of the triangle indicating the vehicle’s direction of
travel
On multi-lane roads, COMAND can display
lane recommendations for the next change of
direction. The corresponding data must be
available in the digital map.
COMAND displays lane recommendation C
Navigation
based on the next two changes of direction.
The number of lanes applies to the point at
which the next change of direction is
required.
The multifunction display also shows lane
i
recommendations.
Only the recommended lanes are displayed
here, see the separate vehicle Operator's
Manual.
Display and description of lane recommendations
Lane Day
mode
Recommended lane
In this lane, you will
be able to complete
the next two
changes of direction
without changing
lanes.
Possible lane
In this lane, you will
only be able to complete the next
change of direction
without changing
lanes.
Lane not recommended
In this lane, you will
not be able to complete the next
change of direction
without changing
lanes.
Dark
blue
Light
blue
Light
brown or
light gray
Night
mode
Light
blue
Dark
blue
Gray
The colors used in the lane recommenda-
i
tion display vary depending on whether day
or night mode is switched on.

Route guidance
91
HOV or carpool lanes
:
HOV symbol on the road sign
;
HOV symbol on the car pool lane
A route may be calculated taking the use of
HOV or carpool lanes into account. You can
use HOV or carpool lanes depending on the
number of persons in the vehicle as well as
the local and time limitation conditions.
This information is stored in the map data.
i
You can enter the number of people in the
i
vehicle (Y page 62). In this section, you can
also find more information on HOV or carpool lanes.
If the system guides you to or from a carpool
lane, COMAND provides you with visual and
acoustic driving instructions.
Navigation announcements
Repeating navigation announcements
Navigation announcements are intended to
direct you while driving without diverting your
attention from the road and driving. Please
always use this feature instead of consulting
the map display for directions. The symbols or
the map display could distract you from traffic
conditions and driving.
If you have missed an announcement, you can
call up the current announcement at any
time.
X
To show the menu: press W the COMAND
controller.
X
Select RPTRPT in the navigation system menu
bar by turning cVd the COMAND controller and press W to confirm.
Switching navigation announcements
on/off
X
To switch off: press the 8 button dur-
ing an announcement.
You will briefly see the message: TheThe
driving instructions have beendriving instructions have been
muted.muted.
X
To switch on: press W the COMAND con-
troller.
X
Select RPTRPT in the navigation system menu
bar by turning cVd the COMAND controller and press W to confirm.
i COMAND automatically switches the nav-
igation announcements back on when:
R
you have a new route calculated
R
you switch COMAND on again or start the
engine
Switching announcements and audio
fadeout on/off
X
Select NaviNavi in the main function bar by
sliding ZV and turning cVd the COMAND
controller and press W to confirm.
X
Select AnnouncementsAnnouncements and press W to
confirm.
A menu appears.
You can activate/deactivate the following
functions:
R
Announce Street NamesAnnounce Street Names
Street names are announced during
route guidance.
R
Audible Info During Phone CallAudible Info During Phone Call
During a phone call, navigation
announcements and traffic reports are
audible in the background.
R
Audio FadeoutAudio Fadeout
Navigation
Z

Route guidance
92
The volume of an active audio or video
source is automatically reduced during a
navigation announcement.
R
Gas on ReserveGas on Reserve
Once you have reached reserve fuel
level, you will see a prompt asking
whether you wish to start the search for a
gas station (Y page 76).
X
Select the function and press W to confirm.
Switch the function on O or off ª.
Setting the volume manually
X
Adjust the volume using the q control
knob during a navigation announcement.
Navigation
or
X
Select RPTRPT in the map view with the menu
shown and adjust the volume using the q
control knob.
Announce Street Names
If the function is switched on, the name of the
street which you are turning into is
announced.
Announcements are not made in the chosen
language in all countries. They are made when
relevant street names for the selected language are available in the database.
X
To switch to navigation mode: press the
Ø button.
X
To show the menu: press W the COMAND
controller.
X
Select NaviNavi in the main function bar by
sliding ZV the COMAND controller and
press W to confirm.
X
Select AnnounceAnnounce StreetStreet NamesNames and press
W to confirm.
The function is switched on O or off ª,
depending on the previous status.
Exit route guidance
Canceling or continuing route guidance
X
To switch to navigation mode: press the
Ø button.
X
To show the menu: press W the COMAND
controller.
X
Select DestinationDestination in the navigation sys-
tem menu bar by turning cVd the
COMAND controller and press W to confirm.
X
To cancel route guidance: select CancelCancel
Route GuidanceRoute Guidance and press W to confirm.
or
X
To continue route guidance: select Con‐Con‐
tinue Route Guidancetinue Route Guidance and press W to
confirm.
COMAND calculates the route.
Destination or area of destination
reached
When you reach your destination, COMAND
displays a checkered flag and route guidance
is automatically ended.
If the destination is not in close proximity to a
digitized street, the AreaArea ofof destinationdestination
reachedreached message appears when the desti-
nation is reached.
Influencing route guidance
Avoiding a section of the route blocked
by a traffic jam
This function blocks a section of the route
ahead of you. You can set the length of the
blocked route section. If possible, COMAND
calculates a detour around the blocked section of the route.
X
To switch to navigation mode: press the
Ø button.
X
To show the menu: press W the COMAND
controller.

Route guidance
93
X
Select RouteRoute in the navigation system
menu bar by turning cVd the COMAND
controller and press W to confirm.
X
Select DetourDetour and press W to confirm.
X
To block a section of the route: select
LongerLonger or ShorterShorter repeatedly and press
W to confirm until the desired section has
been selected.
The total length of the section that can be
i
blocked is defined by the digital map. The
menu items are available accordingly.
X
To start route calculation: select StartStart
and press W to confirm.
X
To delete the blocked section: select
DeleteDelete while the message is shown and
press W to confirm.
COMAND calculates the route without the
block.
Selecting an alternative route
With the "Alternative Route" function, routes
other than the original one can be calculated.
Routes 1 to 3 are calculated with the current
settings for the route type and route options
and are shown with a dark blue line
(Y page 62).
Route 4 is the economic route (eco route) and
is shown with a green line.
On the right-hand side, you will see information on the currently selected alternative
route, e.g. distance, estimated remaining
driving time and estimated time of arrival.
Route sections used (e.g. highways, tunnels)
are displayed as symbols.
Option 1
X
To switch to navigation mode: press the
Ø button.
X
To show the menu: press W the COMAND
controller.
X
Select RouteRoute in the navigation system
menu bar by turning cVd the COMAND
controller and press W to confirm.
X
Select Alternative RouteAlternative Route and press W
to confirm.
Examples for route 1 (above) and route 4 (eco
route)
Option 2
X
To switch to navigation mode: press the
Ø button.
X
To show the menu: press W the COMAND
controller.
X
Select NaviNavi in the main function bar by
sliding ZV the COMAND controller and
press W to confirm.
X
Select Calculate Alternative RouteCalculate Alternative Route
and press W to confirm.
The function is switched on O or off ª,
depending on the previous status.
Function is activated: alternative routes
are calculated directly after the destination
is entered.
Navigation
Z

Route guidance
94
Menu functions
X
To select the next or previous alternative route: select NextNext or PreviousPrevious and
press W to confirm.
X
To start route guidance using the selected alternative route: select StartStart and
press W to confirm.
COMAND begins route guidance on the
selected alternative route.
Route information
Displaying destination information
Navigation
Example: destination information
The example shows information on distance,
estimated time of arrival and estimated
remaining driving time to the destination O
and two way points.
X
To switch to navigation mode: press the
Ø button.
X
To show the menu: press W the COMAND
controller.
X
Select RouteRoute in the navigation system
menu bar by turning cVd the COMAND
controller and press W to confirm.
X
Select Destination InformationDestination Information and
press W to confirm.
Destination information is displayed.
X
To call up further destination information: turn cVd the COMAND controller.
X
To close the destination information:
slide XVY the COMAND controller or press
the k back button.
You can display destination information
i
for the destination, for both way points and
for the intermediate stop, if they are part of
the route.
If a mobile phone is connected to COMAND
and a phone number is included in the destination information, you can call it
(Y page 126).
Route overview
You can use the route overview to move along
the active route section by section and view
information and details about each section of
the route.
You can see information relevant to the section of the route, such as the length of the
road section you will be driving along and the
road name. The highlighted route section is
marked in white with a red border on the map.
X
To switch to navigation mode: press the
Ø button.
X
To show the menu: press W the COMAND
controller.
X
Select RouteRoute in the navigation system
menu bar by turning cVd the COMAND
controller and press W to confirm.
X
Select Route BrowserRoute Browser and press W to
confirm.
X
To view the next or previous route section: select NextNext or PreviousPrevious and press W
to confirm.
If the first or last route section is high-
i
lighted, you cannot select PreviousPrevious or
NextNext.
X
To zoom in or out of the map: select N or
M and press W to confirm.
X
To close the route overview: select BackBack
and press W to confirm.

Route demonstration
You can see the route before starting your
journey. This function is only available when
the vehicle is stationary.
X
To switch to navigation mode: press the
Ø button.
X
To show the menu: press W the COMAND
controller.
X
Select RouteRoute in the navigation system
menu bar by turning cVd the COMAND
controller and press W to confirm.
X
Select Route DemonstrationRoute Demonstration and press
W to confirm.
The map with the crosshair appears.
X
To get to the destination: press W to
confirm the highlighted symbol.
X
To stop the route demonstration: confirm the Ë symbol by pressing W.
Route guidance
Example: route display stopped
:
Road name and city display when route
display has been stopped
;
Distance of the crosshair from current
vehicle position
X
To get to the current vehicle position:
press W to confirm the symbol for the current vehicle position.
X
To change the map scale: select ScaleScale
and press W to confirm.
The scale bar appears.
X
Turn cVd the COMAND controller and
press W to confirm.
Recording the route
Notes
If you have activated COMAND and the SD
memory card has been inserted, you should
not take it out of the slot.
You can store up to 100 routes.
When you record a route, COMAND uses socalled support points and displays the route
as a series of lines. If the route is then calculated, COMAND attempts to align the recorded route with the digital map.
The support points of the route may not be on
a digitized road.
This is often the case for routes that have
been calculated using map data from other
sources.
95
Navigation
Z
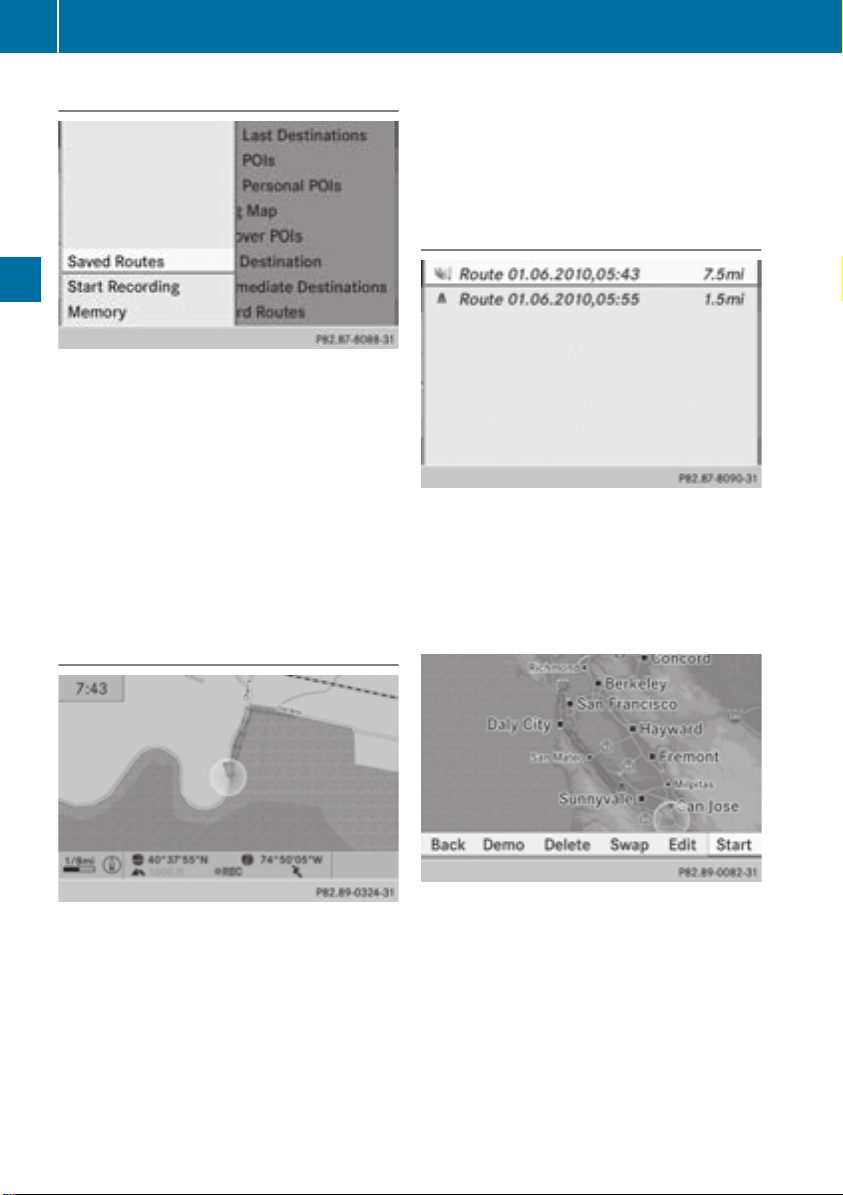
Route guidance
96
Calling up the Routes menu
X
Insert the SD memory card (Y page 196).
X
To switch to navigation mode: press the
Ø button.
Navigation
X
To show the menu: press W the COMAND
controller.
X
Select DestinationDestination in the navigation sys-
tem menu bar by turning cVd the
COMAND controller and press W to confirm.
X
Select RoutesRoutes.
Starting/ending recording
X
To end recording: select StopStop RecordingRecording
in the Routes menu by turning cVd the
COMAND controller and press W to confirm.
Displaying and editing the recorded
route
X
Insert the SD memory card (Y page 196).
X
Call up the Routes menu (Y page 96).
X
Select ListList in the Routes menu by turning
cVd the COMAND controller and press W
to confirm.
Previously recorded routes are displayed.
X
Call up the Routes menu (Y page 96).
X
To start recording : select StartStart
RecordingRecording in the Routes menu by turning
cVd the COMAND controller and press W
to confirm.
During the recording, the recorded route is
shown behind the current vehicle position
with gray strokes (symbol for tire tracks).
X
Select a route and press W to confirm.
The map appears with a menu. The recorded route is shown in the map with a blue
dotted line.
X
To view a demonstration of the route on
the map: select DemoDemo by turning cVd the

Route guidance
97
COMAND controller and press W to confirm.
The map with the crosshair appears.
X
Proceed as described in the "Route demonstration" section (Y page 95).
X
To begin route calculation: select StartStart
in the menu by turning cVd the COMAND
controller and press W to confirm.
COMAND attempts to align the recorded
route with the digital map.
Changing route names and icons
X
Select EditEdit in the menu by turning cVd
the COMAND controller and press W to
confirm.
X
To change the route name: select RenameRename
and press W to confirm.
The name cannot be changed while the
i
vehicle is in motion.
X
To change the icon: select Change IconChange Icon
and press W to confirm.
Observe the further information on managing
categories for personal POIs (Y page 83).
To change direction for route calculation:
you can set the icon for the route to the starting point or to the destination, thereby changing the direction for route calculation.
During route calculation, one-way streets or
turn restrictions, for example, are taken into
account. Therefore, the outward and return
routes may differ from each other.
X
Select SwapSwap in the menu by turning cVd
the COMAND controller and press W to
confirm.
X
To delete a route: select DeleteDelete in the
menu by turning cVd the COMAND controller and press W to confirm.
A prompt appears asking whether the route
should be deleted.
X
Select YesYes or NoNo and press W to confirm.
If you select YesYes, the route will be deleted.
If you select NoNo, the process will be can-
celed.
Scanning the memory
The SD memory card is inserted.
X
Call up the Routes menu (Y page 96).
X
Select MemoryMemory InfoInfo in the Routes menu by
turning cVd the COMAND controller and
press W to confirm.
A message such as Off-roadOff-road RouteRoute Mem‐Mem‐
ory 90% Full.ory 90% Full. is displayed.
Off-road and off-map
Notes
The navigation system may guide you to offroad routes that your vehicle cannot drive on
without causing damage to the tires or wheels
or the vehicle itself. It is the driver’s sole
responsibility to determine the suitability of
the route. The condition of the off-road routes
may vary, and their drivability may be affected
by different factors such as time of day, season and current weather conditions, which
the navigation system cannot judge or take
into account.
Navigation
Z

Route guidance
98
Route guidance to a destination that is
not on a digitized road
Example: route guidance to an off-road destination
:
Off-road destination
Navigation
;
Off-road route section (blue dashes)
=
Current vehicle position (the tip of the triangle indicates the vehicle’s direction of
travel)
?
Off-road (if available)
COMAND can guide you to destinations
which are within the area of the digital map,
but which are not themselves recorded on the
map.
These destinations are known as off-road
destinations, which you can enter using the
map, for example. In these cases, COMAND
guides you for as long as possible with navigation announcements and displays on roads
known to the system.
If the vehicle reaches an area which is not part
of the digital map, the display appears as a
split-screen view. On the right, an arrow
appears that points to off-road destination :. You will hear the announcement:
"Please follow the arrow on the display". As
the vehicle approaches the destination, the
Area of destination reachedArea of destination reached message
appears.
Route guidance from an off-road location to a destination
If the vehicle position is within the area covered by the digital map, but the map does not
contain any information about that location,
the vehicle is in an off-road location.
COMAND is also able to guide you to a destination even from an off-road location.
At the start of route guidance, you will see the
Off Mapped RoadOff Mapped Road message, an arrow and
the distance to the destination. The arrow
shows the compass heading to the actual
destination.
The route is highlighted blue, starting from
the last recognized street the vehicle was on
before it left the map.
As soon as the vehicle is back on a road
known to the system, route guidance continues in the usual way.
Route guidance from an off-map location to a destination
If the vehicle position is outside the area covered by the digital map, then the vehicle is in
an off-map location. COMAND is also able to
guide you to a destination even from an offmap location.
At the start of route guidance, you will see the
Off Mapped RoadOff Mapped Road message, an arrow and
the distance to the destination. The direction
arrow shows the compass heading to the destination.
The route is highlighted in blue from the nearest road known to the system.
As soon as the vehicle is back on a road
known to the system, route guidance continues in the usual way.
Off-road during route guidance
Due to road works, for example, there may be
differences between the data on the digital
map and the actual course of the road.
In such cases, the system will temporarily be
unable to locate the vehicle position on the
digital map. The vehicle is therefore in an offroad position.
In the display, you will see the Off MappedOff Mapped
RoadRoad message, an arrow and the distance to
the destination. The direction arrow shows
the compass heading to the destination.
 Loading...