

Page 1

GL
Operator’s Manual
Page 2

Symbols
Trademarks
R
AdBlue® is a registered trademark of the
®
:
German Association of the Automotive
Industry (VDA).
R
BabySmartTM is a trademark of Siemens
Automotive Corp.
R
Bluetooth® is a registered trademark of
Bluetooth SIG Inc.
R
ESP® and PRE-SAFE® are registered
trademarks of Daimler.
R
HomeLink® is a registered trademark of
Prince, a Johnson Controls Company.
R
SIRIUS and related marks are trademarks
of SIRIUS XM Radio Inc.
The following symbols are found in this
Operator’s Manual:
Warning!
G
Warning notices draw your attention to
hazards that may endanger your health or life,
or the health or life of others.
!
Highlights hazards that may result in
damage to your vehicle.
i
Helpful hints or further information you
may find useful.
X
This symbol points to instructions
for you to follow.
X
A number of these symbols
appearing in succession indicates
a multiple-step procedure.
Y page
This symbol tells you where to look
for further information on a topic.
YY
This continuation symbol marks a
warning or procedure which is
continued on the next page.
Display
Text in displays, such as the control
system, are printed in the type
shown here.
Page 3

Our company and staff congratulate you on
the purchase of your new Mercedes-Benz.
Your selection of our product is a
demonstration of your trust in our company
name. Furthermore, it exemplifies your desire
to own an automobile that will be as easy as
possible to operate and will provide years of
service.
Your Mercedes-Benz represents the efforts of
many skilled engineers and craftsmen. To
help assure your driving pleasure, and also
the safety of you and your passengers, we ask
you to make a small investment of time:
R
Please read this manual carefully, then
return it to your vehicle where it will be
handy for your reference.
R
Please follow the recommendations
contained in this manual. They are
designed to acquaint you with the
operation of your Mercedes-Benz.
R
Please pay attention to the warnings and
cautions contained in this manual. They are
designed to help improve the safety of the
vehicle operator and occupants.
We extend our best wishes for many miles of
safe, pleasurable driving.
Mercedes-Benz USA, LLC
A Daimler Company
1645841583
É1645841583&ËÍ
Page 4

Page 5

Contents
3
Index ....................................................... 4
Introduction ......................................... 20
At a glance ........................................... 25
Safety and security ............................. 35
Controls in detail ................................. 69
Operation ........................................... 225
Practical hints ................................... 283
Technical data ................................... 359
Page 6

Index
4
1, 2, 3 ...
115V AC Socket ................................. 213
3-zone automatic climate control
see Climate control system
4-ETS (Electronic Traction System) ... 64
4MATIC
see All-wheel drive (4MATIC)
A
ABS (Antilock Brake System) ............. 62
Indicator lamp ................................ 315
Messages in the multifunction
display ................................... 288, 300
Accessory weight .............................. 254
Accidents ........................................... 112
Air bags ........................................... 37
Distance warning function ............. 155
Emergency calls (Tele Aid) ............. 215
NECK-PRO active front head
restraints ........................................ 53
Active Bi-Xenon headlamps
Messages in the multifunction
display ........................................... 310
see Headlamps
Adaptive Damping System
see ADS
AdBlue® ...................................... 346, 373
Capacity, AdBlue® tank ................. 369
Refilling ......................................... 347
Additives
Engine oil ....................................... 371
Gasoline ......................................... 372
Address change ................................... 22
ADS (Adaptive Damping System) ..... 159
Advanced Tire Pressure
Monitoring System (Advanced
TPMS) ................................................. 239
Messages in the multifunction
display ................................... 297, 313
Air bags ................................................ 37
Emergency call upon deployment .. 215
Front, driver and passenger ............. 40
Front passenger front air bag off
indicator lamp (Canada
only) ........................................ 46, 322
Front passenger front air bag off
indicator lamp (USA only) ........ 42, 322
Knee bag .......................................... 40
Messages in the multifunction
display ........................................... 291
OCS (Occupant Classification
System) ........................................... 42
Safety guidelines ............................. 39
Side impact ...................................... 41
Window curtain ................................ 42
Air conditioning refrigerant and
lubricant ............................................. 371
Air distribution .......................... 178, 188
Air filter .............................................. 309
Air pressure
see Tire inflation pressure
Air pressure (tires) ............................ 255
Air recirculation mode .............. 180, 190
Air suspension program
Comfortable driving style ............... 159
Introduction ................................... 159
Messages in the multifunction
display ........................................... 301
Sporty driving style ........................ 159
Suspension tuning ......................... 159
Vehicle level control ...................... 159
Air volume ................................. 179, 189
Alarm system
see Anti-theft systems
Alignment bolt (vehicle tool
kit) .............................................. 284, 343
All-wheel drive (4MATIC) .................. 166
Alternator
Messages in the multifunction
display ................................... 296, 308
Alternator (Technical data)
see Vehicle specification
Anticorrosion/antifreeze .................. 374
Antilock Brake System
see ABS
Anti-theft systems ............................... 66
Anti-theft alarm system ................... 66
Immobilizer ...................................... 66
Aquaplaning
see Hydroplaning
Armrest, front
Storage compartment .................... 208
Page 7

Index
5
Ashtrays ............................................. 211
Aspect ratio (tires) ............................ 255
Audio/DVD menu .............................. 129
Auto-dimming rear view mirrors ........ 94
Automatic central locking .......... 74, 138
Automatic headlamp mode ................ 98
Automatic interior lighting control .. 101
Automatic locking when driving ...... 138
Automatic transmission ................... 114
Emergency operation (limp-home
mode) ............................................ 119
Gear range indicator ...................... 118
Gear ranges ................................... 118
Gear selector lever ........................ 114
Hill-start assist system .................. 155
Kickdown ....................................... 117
One-touch gearshifting .................. 118
Shifting procedure ......................... 116
Steering wheel gearshift control .... 118
Towing a trailer .............................. 118
Transmission position indicator ..... 116
Transmission positions .................. 116
AUX socket ........................................ 207
Axle oils .............................................. 369
B
BabySmart™
Air bag deactivation system ............. 46
Self-test ........................................... 47
Backrest
see Seats
Backup lamps
Messages in the multifunction
display ........................................... 310
Bar (air pressure unit) ....................... 255
BAS (Brake Assist System) ................. 63
Batteries, SmartKey
Checking condition .......................... 73
Replacing ....................................... 326
Battery, Vehicle ................................. 348
Charging ........................................ 350
Jump starting ................................. 350
Messages in the multifunction
display ................................... 296, 308
Bead (tire) .......................................... 255
Beverage holders
see Cup holders
Bleeding the fuel system (diesel
engine) ............................................... 345
BlueTEC
AdBlue® tank ................................. 346
AdBlue® tank capacity ................... 369
Brake fluid
Checking level ............................... 233
Messages in the multifunction
display ........................................... 300
Brake lamps
Cleaning lenses ............................. 277
Brake pads
Messages in the multifunction
display ........................................... 299
Brakes ................................................ 260
Parking brake ........................ 112, 261
Warning lamp ................................. 316
Break-in period .................................. 226
Bug cover (Radiator) ......................... 230
Bulbs
see Replacing bulbs
C
CAC (Customer Assistance Center) ... 23
California retail buyers and
lessees, important notice for ............. 21
Calls (phone) ...................................... 142
Can holders
see Cup holders
Capacities and recommended
fuel/lubricants .................................. 368
Cargo compartment
Cargo net ....................................... 206
Cargo volume, expanding .............. 201
Cover blind .................................... 205
Fuse box ........................................ 357
Hooks ............................................ 201
Tie-down rings ............................... 200
Cargo compartment cover blind ...... 205
Cargo net ........................................... 206
Cargo tie-down rings ......................... 200
Carpets, cleaning .............................. 280
Carriers .............................................. 196
Center console
Lower part ....................................... 33
Upper part ....................................... 31
Page 8

Index
6
Central locking
Automatic ................................ 74, 138
KEYLESS-GO .................................... 71
Locking/unlocking from inside ........ 75
SmartKey ......................................... 70
Central locking/unlocking switch ..... 75
Certification label .............................. 360
Children in the vehicle
Air bags ........................................... 37
BabySmart™ air bag deactivation
system ............................................. 46
Child safety locks (rear doors) ......... 60
Child seat anchors – LATCH-type .... 59
Indicator lamp, front passenger
front air bag off (Canada only) ......... 46
Indicator lamp, front passenger
front air bag off (USA only) .............. 42
Infant and child restraint systems .... 56
OCS (Occupant Classification
System) ........................................... 42
Override switch ................................ 60
Safety notes ..................................... 55
Tether anchorage points .................. 58
Top tether ........................................ 58
Child safety
see Children in the vehicle
Child seat anchors – LATCH-type
see Children in the vehicle
Chrome-plated exhaust tip,
cleaning .............................................. 281
Cigarette lighter ................................ 212
Climate control system .................... 172
3-zone automatic climate control .. 181
Air conditioning ..................... 177, 186
Air conditioning refrigerant ............ 371
Air distribution ....................... 178, 188
Air recirculation mode ........... 180, 190
Air volume ............................. 179, 189
Automatic mode .................... 178, 187
Climate control .............................. 175
Deactivating system .............. 177, 185
Front defroster ...................... 179, 189
Residual heat and
ventilation .............................. 180, 191
Temperature .......................... 178, 187
Clock ............................................ 28, 135
Cockpit ................................................. 27
Cold tire inflation pressure .............. 255
Collapsible wheel chock ................... 286
COMAND system
see separate COMAND system
operating instructions
Combination switch .......................... 100
Comfort submenu
Easy-entry/exit feature .................. 139
Fold-in function for exterior rear
view mirrors ................................... 140
Seat belt adjustment feature ......... 139
Compass
Calling up ....................................... 223
Control system .................................. 125
Multifunction display ..................... 127
Multifunction steering wheel ......... 125
Resetting to factory settings .......... 132
Control system menus ...................... 127
Audio/DVD .................................... 129
Distronic ........................................ 131
Navigation ..................................... 130
Off-road ......................................... 131
Settings ......................................... 132
Standard display ............................ 128
Telephone ...................................... 142
Trip computer ................................ 141
Vehicle configuration ..................... 140
Vehicle status message memory ... 131
Control system submenus
Comfort ......................................... 139
Instrument cluster ......................... 133
Lighting .......................................... 136
Time/Date ..................................... 135
Vehicle ........................................... 138
Coolant
Anticorrosion/antifreeze ............... 374
Capacities ...................................... 369
Checking level ............................... 231
Messages in the multifunction
display ........................................... 306
Cruise control .................................... 144
Activating ....................................... 145
Canceling ....................................... 146
Changing the set speed ................. 146
Last stored speed .......................... 147
Lever .............................................. 145
Messages in the mutlifunction
display ........................................... 294
Page 9

Index
7
Resume function ............................ 147
Setting current speed .................... 145
Cup holders ........................................ 209
Curb weight ....................................... 255
Customer Assistance Center (CAC) ... 23
Customer Relations Department ....... 23
D
Dashboard
see Instrument cluster
Data recording ..................................... 24
Date, Setting ...................................... 135
Daytime running lamp mode .............. 99
Switching on or off ......................... 136
Deep water
see Standing water
Defroster
Rear window .................................. 191
Windshield ............................. 179, 189
Delayed shut-off
Exterior lamps ................................ 137
Interior lighting .............................. 138
Department of Transportation
see DOT
Diesel engine
Preglow indicator lamp .................... 29
Diesel fuel
see Fuel
Differential locks ............................... 121
A few words about ......................... 122
Messages in the multifunction
display ................................... 123, 302
Switching ....................................... 122
Difficulties
While driving .................................. 111
With starting .................................. 110
Digital clock
see Clock
Digital speedometer ......................... 129
Dimensions (vehicle)
see Vehicle specification
Direction of rotation (tires) .............. 246
Displays
Digital speedometer ...................... 129
Distronic ........................................ 149
Maintenance service indicator ....... 273
Messages in the multifunction
display ........................................... 287
Multifunction display ..................... 127
Outside temperature ............. 129, 135
Symbol messages .......................... 299
Text messages ............................... 288
Trip computer ................................ 141
Vehicle status message memory ... 131
Vehicle system settings ................. 132
Distronic ............................................ 147
Cleaning system sensor cover ....... 278
Control system .............................. 131
Distance warning function ............. 155
Distance warning
lamp ...................................... 149, 319
Driving with .................................... 153
Menu ............................................. 150
Messages in the multifunction
display ........................................... 294
Resume function ............................ 152
Sensor cover .................................. 278
Speed settings ............................... 151
Door control panel .............................. 34
Door handles ........................................ 34
Doors
Child safety locks ............................ 60
Locking/unlocking (KEYLESS-GO) ... 71
Locking/unlocking (SmartKey) ........ 70
Messages in the multifunction
display ........................................... 304
Opening from inside ......................... 74
Remote door unlock (Tele Aid) ....... 219
Unlocking (Mechanical key) ........... 323
DOT (Department of
Transportation) .................................. 255
Downhill Speed Regulation
see DSR
Drinking and driving ......................... 259
Driving
Abroad ........................................... 272
Hydroplaning ................................. 262
Instructions ........................... 108, 259
In winter ........................................ 258
Off-road ......................................... 262
Problems ....................................... 111
Safety systems ................................ 61
Systems ......................................... 144
Page 10

Index
8
Through standing water ................. 262
With Distronic ................................ 153
Driving and parking
Safety notes .................................. 108
Driving off .................................. 110, 261
Driving safety systems ....................... 61
4-ETS ............................................... 64
ABS .................................................. 62
BAS .................................................. 63
EBP .................................................. 63
ESP® ................................................ 63
Driving systems
Air suspension program ................. 159
All-wheel drive (4MATIC) ................ 166
Cruise control ................................ 144
Distronic ........................................ 147
Downhill Speed Regulation (DSR) .. 155
Hill-start assist system .................. 155
Off-road driving program ............... 158
Parktronic system .......................... 166
Rear view camera .......................... 169
Driving tips, automatic
transmission ...................................... 117
DSR (Downhill Speed Regulation) .... 155
Messages in the multifunction
display ........................................... 303
E
Easy-entry/exit feature .............. 92, 139
EBP (Electronic Brake
Proportioning) ...................................... 63
Electrical system
Improper work on or
modifications ................................... 23
Power outlets ................................. 212
Electrical system (Technical data)
see Vehicle specification
Electronic Stability Program
see ESP®
Electronic Traction System
see 4-ETS
Emergency, in case of
First aid kit ..................................... 284
Flat tire .......................................... 336
Hazard warning flasher .................. 101
Roadside Assistance ................ 21, 216
Towing the vehicle ......................... 352
Emergency calls
Tele Aid .......................................... 215
Emergency engine shutdown ........... 357
Emergency operations
Limp-home mode ........................... 119
Remote door unlock (Tele Aid) ....... 219
Emergency Tensioning Device
see ETD
Emission control ............................... 272
Information label ............................ 361
System warranties ........................... 20
Engine
Break-in recommendations ............ 226
Cleaning ......................................... 276
Compartment ................................ 228
Malfunction indicator
lamp ........................................ 29, 320
Messages in the multifunction
display ........................................... 306
Number .......................................... 361
Starting .......................................... 108
Turning off ..................................... 113
Engine (Technical data)
see Vehicle specification
Engine compartment
Radiator ......................................... 230
Engine coolant
see Coolant
Engine oil
Adding ........................................... 231
Additives ........................................ 371
Checking level ............................... 230
Consumption ................................. 230
Messages in the multifunction
display ........................................... 308
Oil dipstick ..................................... 230
Recommended engine oils and oil
filter ............................................... 370
ESP® (Electronic Stability
Program) .............................................. 63
4-ETS ............................................... 64
Messages in the multifunction
display ................................... 289, 300
Off-road ESP® .................................. 65
Trailer stabilization ........................... 65
Warning lamp ................................. 318
Page 11

Index
9
ETD (Emergency Tensioning
Device) ................................................. 52
Safety guidelines ............................. 39
Express operation
Power windows .............................. 105
Tilt/sliding sunroof ........................ 192
Exterior lamp switch ........................... 97
Exterior rear view mirrors .................. 94
Fold-in function ........................ 95, 140
Parking position ............................... 95
Power-folding ................................... 95
Exterior view of vehicle ...................... 26
F
Fastening the seat belts ..................... 50
First aid kit ......................................... 284
Flat tire ............................................... 336
Lowering the vehicle ...................... 344
Mounting the spare wheel ............. 340
Preparing the vehicle ..................... 336
Spare wheel ........................... 336, 368
TIREFIT (tire repair kit) ................... 337
Floormats ........................................... 223
Fluids
AdBlue® ......................................... 369
Automatic transmission fluid ......... 369
Brake fluid ..................................... 369
Capacities ...................................... 368
Engine coolant ............................... 369
Engine oil ....................................... 369
Power steering fluid ....................... 369
Washer and headlamp cleaning
system ........................................... 370
Fog lamps ............................................. 99
Messages in the multifunction
display ................................... 310, 312
Fold-in function for exterior rear
view mirrors ................................ 95, 140
Four-wheel drive
see All-wheel drive (4MATIC)
Front air bags
see Air bags
Front axle oil ...................................... 369
Front lamps
see Headlamps
Front passenger front air bag ............ 40
Messages in the multifunction
display ........................................... 291
Front passenger front air bag off
indicator lamp (Canada only) ..... 46, 322
Front passenger front air bag off
indicator lamp (USA only) .......... 42, 322
Front seat head restraints
see Head restraints
Fuel ..................................................... 226
Additives ........................................ 372
Capacity, fuel tank ......................... 369
Diesel fuel ............................. 369, 372
Drive sensibly–safe fuel ................. 259
Fuel consumption statistics ........... 141
Fuel filler flap and cap ................... 227
Fuel tank reserve warning
lamp ........................................ 29, 320
Premium unleaded gasoline ... 369, 371
Refueling ........................................ 226
Requirements ................................ 371
Fuel filler flap ..................................... 227
Opening manually .......................... 324
Fuels, coolants, lubricants etc.
Capacities ...................................... 368
Fuel system, bleeding (diesel
engine) ............................................... 345
Fuel tank
Capacity ........................................ 369
Fuel filler flap and cap ................... 227
Refueling ........................................ 226
Fuses .................................................. 355
G
Garage door opener .................... 33, 219
Gasoline
see Fuel
GAWR (Gross Axle Weight Rating) ... 255
Gear range ......................................... 118
Indicator ........................................ 118
Limiting .......................................... 119
Shifting into optimal ...................... 119
Transfer case ................................. 120
Gear selector lever ............................ 114
Cleaning ......................................... 280
Gearshift pattern ........................... 114
Shifting procedure ......................... 116
Page 12

10
Index
Transmission position indicator ..... 116
Transmission positions .................. 116
Generator
see Alternator
Global locking/unlocking
see Key, SmartKey
Glove box ........................................... 207
Gross Axle Weight Rating
see GAWR
Gross Trailer Weight
see GTW
Gross Vehicle Weight
see GVW
Gross Vehicle Weight Rating
see GVWR
GTW (Gross Trailer Weight) .............. 255
GVW (Gross Vehicle Weight) ............ 255
GVWR (Gross Vehicle Weight
Rating) ................................................ 255
H
Halogen headlamps
see Headlamps
Hard plastic trim items, cleaning .... 279
Hazard warning flasher .................... 101
Headlamp cleaning system .............. 101
Headlamps
Active Bi-Xenon headlamps ............. 97
Adjusting aim ................................. 333
Automatic headlamp mode .............. 98
Bi-Xenon .................................. 97, 329
Cleaning lenses ............................. 277
Cleaning system ............................ 101
Daytime running lamp mode ............ 99
Delayed shut-off ............................ 137
Halogen ......................................... 329
High-beam flasher ......................... 101
High-beam headlamps ................... 100
Low-beam headlamps ...................... 98
Replacing bulbs ............................. 328
Switch .............................................. 97
Headliner, cleaning and care of ....... 280
Head restraints .................................... 82
Adjustment ................................ 82, 84
Comfort head restraint .................... 84
NECK-PRO active front head
restraints ......................................... 53
NECK-PRO active front head
restraints, resetting ....................... 325
Heated steering wheel ........................ 93
Height adjustment
Seat belt outlet ................................ 51
Seats ............................................... 82
Vehicle level control ...................... 159
High-beam flasher ............................. 101
High-beam headlamps .............. 100, 329
Indicator lamp .................................. 29
Hill-start assist system ..................... 155
Hinged quarter windows .................. 106
Hood ................................................... 228
Messages in the multifunction
display ........................................... 304
Hooks ................................................. 201
Horn ...................................................... 27
HVAC
see Climate control system
Hydroplaning ..................................... 262
I
Identification labels .......................... 360
Identification number, vehicle
(VIN) ................................................... 361
Ignition ......................................... 80, 109
Immobilizer .......................................... 66
Indicator lamps
see Lamps, indicator and warning
Infant and child restraint systems
see Children in the vehicle
Inflation pressure
see Tires, Inflation pressure
Infrared reflecting windshield ......... 223
Inside door handle .............................. 74
Instrument cluster ............................ 124
Illumination .................................... 124
Lamps ............................................ 314
Multifunction display ..................... 127
Instrument lighting
see Instrument cluster, Illumination
Instrument panel
see Instrument cluster
Instruments and controls
see Cockpit
Page 13

Index
11
Interior lighting
Delayed shut-off ............................ 138
Emergency lighting ........................ 102
Front .............................................. 101
Front reading lamps ....................... 101
Rear ............................................... 102
Rear reading lamps ........................ 102
Interior rear view mirror ..................... 93
Auto-dimming rear view mirrors ....... 94
Interior storage spaces
see Storage compartments
Intermittent wiping
Rain sensor .................................... 103
J
Jack ..................................................... 286
Jump starting ..................................... 350
K
Key, Mechanical
Loss of ............................................. 73
Replacing ......................................... 74
Unlocking/locking manually .......... 323
Key, SmartKey
Battery check lamp .......................... 73
Checking batteries ........................... 73
Factory setting ........................... 71, 72
Global locking (KEYLESS-
GO) .................................................. 73
Global locking (SmartKey) ................ 71
Global unlocking (KEYLESS-
GO) ............................................ 72, 73
Global unlocking
(SmartKey) ....................................... 71
Important notes on KEYLESS-GO ..... 72
Locking/unlocking ........................... 70
Loss of ............................................. 73
Messages in the multifunction
display ........................................... 304
Opening and closing the power
tilt/sliding sunroof ......................... 107
Opening and closing the windows . 107
Remote control ................................ 70
Replacing ......................................... 74
Replacing batteries ........................ 326
Restoring to factory setting ....... 71, 73
Selective setting ........................ 71, 73
Starter switch positions ................... 80
KEYLESS-GO
Starter switch positions ................... 80
Kickdown ........................................... 117
Kilopascal (air pressure unit) ........... 255
Knee bag .............................................. 40
L
Labels
Certification ................................... 360
Emission control information ......... 361
Tire and Loading Information
placard ........................................... 242
Tire inflation pressure .................... 236
Lamps, exterior
Exterior lamp switch ........................ 97
Front .............................................. 329
Messages in the multifunction
display ........................................... 310
Rear ............................................... 329
Switching on/off .............................. 97
Lamps, indicator and warning
ABS .......................................... 28, 315
Brakes ..................................... 28, 316
Center console ................................ 31
Differential locks ............................ 123
Distance warning
lamp .............................. 149, 155, 319
Engine malfunction .................. 29, 320
ESP® ........................................ 28, 318
Fog lamps ........................................ 99
Front passenger front air bag off
(Canada only) .......................... 46, 322
Front passenger front air bag off
(USA only) ................................ 42, 322
Fuel tank reserve ..................... 29, 320
High-beam headlamps ............. 29, 100
Instrument cluster ................... 28, 314
Low-beam headlamps ................ 29, 98
Low tire pressure/TPMS
malfunction telltale .................. 28, 321
Seat belt telltale ................ 29, 51, 317
SRS .................................... 29, 36, 318
Turn signals ..................................... 28
Language, selecting .......................... 134
Page 14

12
Index
LATCH-type child seat anchors
see Children in the vehicle
License plate lamps
Messages in the multifunction
display ........................................... 311
Replacing bulbs ............................. 330
Light alloy wheels, cleaning ............. 279
Lighter
see Cigarette lighter
Lighting ................................................ 97
Daytime running lamp mode ............ 99
Exterior ............................................ 97
Interior ........................................... 101
Limp-home mode .............................. 119
Load index (tires) ...................... 251, 255
Loading
see Vehicle loading
Locator lighting ................................. 136
Lock button
Outside door handle (KEYLESS-
GO) .................................................. 73
Locking the vehicle
KEYLESS-GO .................................... 71
Manually ........................................ 324
SmartKey ......................................... 70
Loss of
Key .................................................. 73
Service and Warranty Information
booklet .......................................... 360
Low-beam headlamps ......................... 98
Exterior lamp switch ........................ 97
Indicator lamp .................................. 29
Switching on .................................... 98
LOW RANGE mode ............................. 120
Messages in the multifunction
display ........................................... 303
Switching ....................................... 121
Lubricants .......................................... 368
Lumbar support ................................... 87
M
Maintenance ........................................ 21
Maintenance System
Service indicator display ................ 274
Service indicator message ............. 273
Service term exceeded .................. 274
Manual headlamp mode (Low-
beam headlamps) ................................ 98
Maximum engine speed
see Vehicle specification
Maximum loaded vehicle weight ..... 256
Maximum load rating (tires) ............. 255
Maximum permissible tire
inflation pressure .............................. 256
Mechanical key .................................. 323
Media interface ................................. 207
Memory function ................................. 96
Menus
see Control system menus
Minispare wheel
see Spare wheel
Mirrors .................................................. 93
Auto-dimming rear view mirrors ....... 94
Exterior rear view mirror parking
position ............................................ 95
Exterior rear view mirrors ................ 94
Interior rear view mirror ................... 93
Memory function .............................. 96
Power-folding exterior rear view
mirrors ............................................. 95
Vanity mirror .................................. 210
MOExtended system ......................... 345
MOExtended tires ..................... 345, 365
MON (Motor Octane Number) .......... 371
Motor Octane Number
see MON
Multicontour seat ................................ 90
Multifunction display ........................ 127
Symbol messages .......................... 299
Text messages ............................... 288
Vehicle status messages ............... 287
Multifunction display messages
ABS ....................................... 288, 300
Active headlamps .......................... 310
Advanced TPMS ..................... 297, 313
Air bags ......................................... 291
Air filter .......................................... 309
Air suspension program ................. 301
Alternator .............................. 296, 308
Automatic
transmission .................................. 296
Battery ................................... 296, 308
Brake fluid ..................................... 300
Page 15

Index
13
Brake pads ..................................... 299
Coolant .......................................... 306
Cruise control ................................ 294
Differential locks ................... 123, 302
Distronic ........................................ 294
Doors ............................................. 304
Downhill Speed Regulation (DSR) .. 303
EBP ................................................ 300
Engine oil ....................................... 308
ESP® ...................................... 289, 300
Fog lamps .............................. 310, 312
Front passenger front air bag ........ 291
Gas cap .......................................... 309
High-beam lamps ........................... 311
Hood .............................................. 304
License plate lamps ....................... 311
Light sensor ................................... 311
Low-beam lamps ............................ 312
LOW RANGE mode ......................... 303
Parking brake ................................ 300
Parking lamps ................................ 311
PRE-SAFE® .................................... 290
Reserve fuel ................................... 309
Reverse lamp ................................. 310
Side marker lamps ......................... 311
SmartKey ....................................... 304
SmartKey with KEYLESS-GO .......... 304
SRS ................................................ 301
Tailgate .......................................... 304
Tail lamps ...................................... 312
Tele Aid .......................................... 301
Tire inflation pressure ............ 297, 313
Tire pressure monitor .................... 297
Tires ...................................... 297, 313
Trailer brake lamps ........................ 312
Trailer tail lamps ............................ 312
Trailer turn signal lamps ................ 312
Turn signals ................................... 313
Washer fluid ................................... 305
Multifunction steering wheel
Adjustment ...................................... 91
Buttons .......................................... 125
Cleaning ......................................... 280
Easy-entry/exit feature ........... 92, 139
Gearshift control ............................ 118
Heating ............................................ 93
Memory function .............................. 96
Overview .......................................... 30
N
Navigation menu ............................... 130
Navigation system
see Separate operating instructions
NECK-PRO active front head
restraints ............................................. 53
Resetting ....................................... 325
Nets, parcel ....................................... 200
Night security illumination .............. 137
Normal occupant weight .................. 256
Number, vehicle identification
(VIN) ................................................... 361
O
Occupant Classification System
see OCS (Occupant Classification
System)
Occupant distribution ....................... 256
Occupant safety
Air bags ........................................... 37
BabySmart™ .................................... 46
Children and air bags ....................... 37
Children in the vehicle ..................... 55
Child seat anchors – LATCH-type .... 59
Fastening the seat belts ................... 50
Front passenger front air bag off
indicator lamp (Canada
only) ........................................ 46, 322
Front passenger front air bag off
indicator lamp (USA only) ........ 42, 322
Infant and child restraint systems .... 56
Introduction ..................................... 36
OCS (Occupant Classification
System) ........................................... 42
PRE-SAFE® ....................................... 52
Seat belts .................................. 39, 48
OCS (Occupant Classification
System) ................................................ 42
Self-test ........................................... 45
Odometer ........................................... 127
Off-road driving ................................. 262
Checklist ............................... 264, 268
Crossing obstacles ........................ 267
Driving instructions ........................ 262
Driving on sand .............................. 267
Driving through water .................... 266
Page 16

14
Index
Returning ....................................... 268
Ruts ............................................... 267
Steep terrain .................................. 264
Off-road driving program .................. 158
Off-road menu ................................... 131
Oil, oil level
see Engine oil
On-board computer
see Control system
One-touch gearshifting ..................... 118
Operating safety .................................. 23
Ornamental moldings, cleaning ....... 277
Outside temperature
see Displays
Overhead control panel ...................... 33
P
Paintwork, cleaning .......................... 276
Paintwork code ................................. 361
Panic alarm .......................................... 61
Panorama roof
Sunshade ....................................... 211
Parcel nets ......................................... 200
Parking ............................................... 112
Parktronic system .......................... 166
Parking brake ............................ 112, 261
Messages in the multifunction
display ........................................... 300
Parking position
Exterior rear view mirrors ................ 95
Transmission position .................... 116
Parktronic system
Cleaning system sensors ............... 278
Malfunction .................................... 169
Minimum distance ......................... 167
Sensor range ................................. 167
Switching on/off ........................... 168
System sensors ............................. 167
Warning indicators ................... 27, 168
Parts service ...................................... 360
PASS AIR BAG OFF indicator lamp
(Canada only)
see Front passenger front air bag
off indicator lamp (Canada only)
PASS AIR BAG OFF indicator lamp
(USA only)
see Front passenger front air bag
off indicator lamp (USA only)
Passenger safety
see Occupant safety
Pedals ................................................. 259
Phone
see Telephone
Plastic parts, cleaning ...................... 279
Power assistance .............................. 259
Power outlets .................................... 212
Power seats
see Seats
Power tailgate
Closing ............................................. 76
Messages in the multifunction
display ........................................... 304
Opening ........................................... 76
Power tilt/sliding sunroof
Operation ....................................... 192
Synchronizing ................................ 194
Power washer .................................... 276
Power windows ................................. 105
Cleaning ......................................... 278
Door windows ................................ 106
Hinged quarter windows ................ 106
Operation ....................................... 105
Rear door window, override
switch .............................................. 60
Synchronizing ................................ 107
Practical hints ................................... 284
Preglow indicator lamp .............. 29, 109
PRE-SAFE® ............................................ 52
Messages in the multifunction
display ........................................... 290
Problems
While driving .................................. 111
With vehicle ..................................... 23
With wipers .................................... 105
Product information ............................ 20
Production options weight ............... 256
Proximity key
see Key, SmartKey
PSI (air pressure unit) ....................... 256
Page 17

Index
15
R
Radiator ..................................... 230, 257
Radio
Selecting stations .......................... 129
Radio transmitters ............................ 272
Rain sensor
see Intermittent wiping
Rear axle oil ....................................... 369
Rear center console ashtray
see Ashtrays
Rear doors
Child safety locks ............................ 60
Rear door window
Override switch ................................ 60
Rear fog lamp
see Fog lamps
Rear lamps
see Tail lamps
Rear seats
see Seats
Rear view camera .............................. 169
Cleaning the camera lens .............. 278
Rear window defroster ..................... 191
Rear window wiper/washer ............. 104
Recommended tire inflation
pressure ..................................... 234, 256
Refilling
AdBlue® ......................................... 347
Refrigerant, air conditioning ............ 371
Refueling ............................................ 226
Regular checks .................................. 228
Reminder, Seat belt
see Seat belts, Telltale
Remote control
see Key, SmartKey
Remote door unlock (Tele Aid) ......... 219
Replacing
Key .................................................. 74
Replacing bulbs ................................. 328
Reporting safety defects .................... 24
Research Octane Number
see RON
Reserve fuel
Messages in the multifunction
display ........................................... 309
Warning lamp ................................... 29
Reset button ................................ 28, 124
Reset tool (NECK-PRO active front
head restraints) ................................. 325
Restraint systems
see Occupant safety
Rims ........................................... 256, 365
Roadside Assistance ................... 21, 216
RON (Research Octane Number) ..... 371
Rubber parts, cleaning ...................... 279
Run-flat tires
see MOExtended tires
S
Safety
Driving safety systems ..................... 61
Occupant safety ............................... 36
Reporting defects ............................ 24
Safety belts
see Seat belts
Seat belt force limiter ......................... 52
Seat belts ............................................. 48
Adjustment function ........................ 51
Children in the vehicle ..................... 55
Cleaning ......................................... 280
Fastening ......................................... 50
Height adjustment ........................... 51
Proper use of ................................... 49
Safety guidelines ............................. 39
Safety notes ..................................... 48
Telltale ..................................... 29, 317
Seat heating ......................................... 90
Seating capacity ................................ 243
Seats ..................................................... 82
Adjustment ...................................... 82
Easy-entry/exit feature .................... 92
Folding (expanding cargo volume) . 201
Heating ............................................ 90
Memory function .............................. 96
Multicontour seat ............................ 90
Rear seats ........................................ 87
Ventilation ....................................... 90
Securing cargo
Cargo tie-down rings ...................... 200
Selective setting
see Key, SmartKey
Selector lever
see Gear selector lever
Page 18

16
Index
Self-test
BabySmart™ .................................... 47
OCS (Occupant Classification
System) ........................................... 45
Tele Aid .......................................... 215
Service
see Maintenance
Service, parts .................................... 360
Service and warranty information ..... 20
Service intervals
see Maintenance System, Service
indicator message
Service life (tires) .............................. 247
Settings
Factory setting (KEYLESS-GO) ......... 72
Factory setting (SmartKey) .............. 71
Memory function .............................. 96
Menu ............................................. 132
Selective setting (KEYLESS-GO) ....... 73
Selective setting (SmartKey) ............ 71
Side impact air bags ........................... 41
Side marker lamps
Cleaning lenses ............................. 277
Messages in the multifunction
display ........................................... 311
Sidewall (tires) .................................. 256
Side windows
see Power windows
SmartKey
see Key, SmartKey
SmartKey with KEYLESS-GO
see Key, SmartKey
Snow chains ...................................... 258
Snow tires
see Winter tires
Spare wheel ....................................... 365
Mounting ....................................... 340
Storage location ............................ 286
Speedometer ............................... 28, 149
Speed settings
Cruise control ................................ 145
Distronic ........................................ 151
Resume function ................... 147, 152
Sport Utility Vehicle
see SUV
SRS
Indicator lamp ................... 29, 36, 318
Messages in the multifunction
display ........................................... 301
Standing water, driving through ...... 262
Starter switch positions
KEYLESS-GO .................................... 80
SmartKey ......................................... 80
Starting difficulties (engine) ............ 110
Starting the engine ........................... 108
Steering column
see Multifunction steering wheel,
Adjustment
Steering wheel
see Multifunction steering wheel
Steering wheel gearshift control ..... 118
Stolen Vehicle Recovery Services ... 219
Storage compartments ..................... 207
Storing tires ....................................... 248
Stranded vehicle ............................... 355
Sunroof
see Power tilt/sliding sunroof
Sunshade
Rear panorama roof ....................... 211
Sun visors .......................................... 210
Suspension tuning
see Air suspension program
SUV (Sport Utility Vehicle) ................. 22
T
Tachometer .................................. 29, 125
Overspeed range ........................... 125
Tailgate
Closing ............................................. 75
Messages in the multifunction
display ........................................... 304
Opening ........................................... 75
Power tailgate .................................. 76
Tail lamps ........................................... 329
Cleaning lenses ............................. 277
Messages in the multifunction
display ........................................... 312
Tar stains ........................................... 276
Technical data
Air conditioning refrigerant ............ 371
Brake fluid ..................................... 371
Page 19

Index
17
Capacities fuels, coolants,
lubricants etc. ................................ 368
Coolant .......................................... 373
Engine oil additives ........................ 371
Engine oils ..................................... 370
Fuel requirements .......................... 371
Gasoline additives .......................... 372
Identification labels ....................... 360
Premium unleaded gasoline ........... 371
Rims and tires ................................ 365
Spare wheel ................................... 368
Vehicle specification
GL 350 BlueTEC ............................. 362
Vehicle specification GL 450 ......... 362
Vehicle specification GL 550 ......... 363
Washer and headlamp cleaning
system ................................... 370, 375
Technical data (dimensions)
see Vehicle specification
Technical data (electrical system)
see Vehicle specification
Technical data (engine)
see Vehicle specification
Technical data (weights)
see Vehicle specification
Tele Aid ............................................... 214
Emergency calls ............................. 215
Information button ......................... 217
Initiating an emergency call
manually ........................................ 216
Messages in the multifunction
display ........................................... 301
Remote door unlock ...................... 219
Roadside Assistance button .......... 216
Search & Send ............................... 218
SOS button .................................... 216
Stolen Vehicle Recovery Services .. 219
System self-test ............................. 215
Telephone ............................................. 30
Answering/ending a call ................ 143
Hands-free microphone ................... 34
Menu ............................................. 142
Operation ....................................... 142
Phone book .................................... 143
Redialing ........................................ 144
Temperature
Interior temperature .............. 178, 187
Outside .................................. 129, 135
Tether anchorage points
see Children in the vehicle
Tie-down rings ................................... 200
Tightening torque
Wheels ........................................... 344
Time setting ....................................... 135
TIN (Tire Identification Number) ...... 256
Tire and Loading Information
placard ............................................... 242
Tire and loading terminology ........... 254
TIREFIT ............................................... 337
Tire Identification Number
see TIN
Tire inflation pressure
Checking ........................................ 237
Important notes on ........................ 235
Label on the inside of fuel filler
flap ................................................ 236
Placard on driver’s door B-pillar ..... 242
Tire labeling ....................................... 250
Tire load rating .................................. 255
Tire ply composition and material
used .................................................... 256
Tire pressure loss warning system . 237
Tire repair kit
see TIREFIT
Tires ........................................... 233, 365
Advanced Tire Pressure
Monitoring System (Advanced
TPMS) ............................................ 239
Air pressure ................................... 234
Care and maintenance ................... 247
Cleaning ......................................... 248
Direction of rotation, spinning ....... 246
Important notes on tire inflation
pressure ........................................ 235
Inflation pressure .................. 236, 237
Information placard ....................... 242
Inspection ...................................... 247
Labeling ......................................... 250
Load index ............................. 251, 255
Load rating .................................... 255
Messages in the multifunction
display ................................... 297, 313
MOExtended .................................. 365
Ply composition and material
used ............................................... 256
Page 20

18
Index
Problems under-/overinflation ...... 236
Retreads ........................................ 233
Rims and tires (technical data) ...... 365
Rotation ......................................... 249
Service life ..................................... 247
Sizes .............................................. 365
Snow chains .................................. 258
Speed rating .......................... 252, 256
Storing ........................................... 248
Temperature .......................... 235, 249
Terminology ................................... 254
TIREFIT (tire repair kit) ................... 337
Tire Identification Number ............. 256
Tire pressure loss warning system . 237
TPMS low tire pressure/
malfunction telltale ........................ 321
Traction ................................. 248, 256
Tread ............................................. 257
Tread depth ........................... 247, 257
Treadwear ...................................... 248
Treadwear indicators ............. 247, 257
Vehicle maximum load on .............. 257
Wear pattern .................................. 249
Winter tires ............................ 257, 365
Tire speed rating ....................... 252, 256
Tongue Weight Rating
see TWR
Top tether
see Children in the vehicle
Total load limit ................................... 256
Towing
Towing eye bolt .............................. 353
Trailer .................................... 118, 269
Vehicle ........................................... 352
Towing eye bolt ................................. 353
Traction ...................................... 248, 256
Trailer towing ............................ 118, 269
Coupling a trailer ........................... 270
Decoupling ..................................... 271
Electrical connections .................... 269
Towing ........................................... 270
Trailer hitch ................................... 269
Weights and ratings ....................... 269
Transfer case ..................................... 119
Gear ranges ................................... 120
LOW RANGE mode ......................... 120
Switching LOW RANGE mode ........ 121
Transmission
see Automatic transmission
Transmission fluid level .................... 231
Transmission gear selector lever
see Gear selector lever
Transmission positions .................... 116
Traveling abroad ............................... 272
Tread (tires) ....................................... 257
Tread depth (tires) .................... 247, 257
Treadwear .......................................... 248
Treadwear indicators (tires) .... 247, 257
Trip computer menu ......................... 141
Trip odometer, resetting ................... 125
Turning off the engine ...................... 113
Turn signals ....................................... 100
Cleaning lenses ............................. 277
Indicator lamps ................................ 28
Messages in the multifunction
display ........................................... 313
TWR (Tongue Weight Rating) ........... 257
U
Uniform Tire Quality Grading
Standards .................................. 248, 257
Units
Selecting digital speedometer
display mode ................................. 134
Selecting speedometer/
odometer display mode ................. 134
Unleaded gasoline, premium ........... 371
Unlocking the vehicle
KEYLESS-GO .................................... 71
Manually ........................................ 323
SmartKey ......................................... 70
Upholstery, cleaning ......................... 280
Useful features .................................. 209
V
Vehicle
Battery ........................................... 348
Care ............................................... 275
Control system .............................. 125
Identification Number (VIN) ........... 360
Locking/unlocking ........................... 70
Lowering (wheel change) ............... 344
Page 21

Index
19
Modifications and alterations,
Operating safety .............................. 23
Towing ........................................... 352
Unlocking/locking manually .......... 323
Vehicle configuration menu ............. 140
Vehicle dimensions
see Vehicle specification
Vehicle Identification Number
(VIN) ................................................... 360
Vehicle jack
see Jack
Vehicle level control
see Air suspension program
Vehicle lighting .................................... 97
Vehicle loading
Cargo tie-down rings ...................... 200
Cargo volume, expanding .............. 201
Carriers .......................................... 196
Instructions .................................... 194
Load limit ....................................... 243
Terminology ................................... 254
Vehicle maximum load on the tire ... 257
Vehicle specification
GL 350 BlueTEC ............................. 362
GL 450 ........................................... 362
GL 550 ........................................... 363
Vehicle status message memory .... 131
Vehicle tool kit .................................. 284
Vehicle washing
see Vehicle care
Vehicle weights
see Vehicle specification
W
Warning lamps
see Lamps, Indicator and warning
Warning sounds
Distance warning function ............. 155
Distronic ........................................ 149
Driver’s or passenger’s seat belt ..... 51
Parking brake ................................ 300
Parktronic system .......................... 169
Seat belt telltale ............................ 317
Warranty coverage ............................ 360
Washer and headlamp cleaning
system ................................................ 375
Washer fluid
Messages in the multifunction
display ........................................... 305
Mixing ratio .................................... 375
Refilling .......................................... 232
Washing the vehicle .......................... 275
Wear pattern (tires) .......................... 249
Weights (vehicle)
see Vehicle specification
Wheel
Changing ....................................... 336
Removing ....................................... 343
Spare ............................................. 336
Tightening torque ........................... 344
Wheels, sizes ..................................... 365
Wheels, Tires and .............................. 233
Window curtain air bags ..................... 42
Windows
see Power windows
Windows, cleaning ............................ 278
Windshield
Cleaning wiper blades .................... 278
Infrared reflecting .......................... 223
Washer fluid ................................... 375
Wipers ........................................... 103
Windshield wipers
Replacing wiper blades .................. 334
Winter cover .............................. 230, 257
Winter driving
Instructions .................................... 258
Radiator cover ............................... 257
Snow chains .................................. 258
Tires ............................................... 257
Winter tires ................................ 257, 365
Wood trims, cleaning ........................ 280
Page 22

Introduction
20
Product Information
Please observe the following in your own best
interest:
We recommend using Genuine MercedesBenz Parts as well as conversion parts and
accessories explicitly approved by us for your
vehicle model.
We have tested these parts to determine their
reliability, safety and special suitability for
Mercedes-Benz vehicles.
We are unable to make an assessment for
other products and therefore cannot be held
responsible for them, even if in individual
cases an official approval or authorization by
governmental or other agencies should exist.
Use of such parts and accessories could
adversely affect the safety, performance or
reliability of your vehicle. Please do not use
them.
Genuine Mercedes-Benz Parts and preapproved conversion parts and accessories
are available at any authorized MercedesBenz Center. In addition, you will receive
comprehensive information on permissible
technical modifications and expert
installations.
Operator’s Manual
Notes
This Operator’s Manual contains a great deal
of useful information. We urge you to read it
carefully and familiarize yourself with the
vehicle before driving.
For your own safety and longer service life of
the vehicle, we urge you to follow the
instructions and warnings contained in this
Operator’s Manual. Ignoring them could
result in damage to the vehicle or personal
injury to you or others. Vehicle damage
caused by failure to follow instructions is not
covered by the Mercedes-Benz Limited
Warranty.
We continuously strive to improve our
product and ask for your understanding that
we reserve the right to make changes in
design and equipment. Therefore,
information, illustrations, and descriptions in
this Operator’s Manual might differ from your
vehicle.
Vehicle equipment
Your vehicle may have some or all of the
equipment described in this manual.
Therefore, you may find explanations for
optional equipment not installed in your
vehicle. If you have any questions about
operating particular equipment, any
authorized Mercedes-Benz Center will be glad
to demonstrate the proper procedures.
Optional equipment is also described in this
manual, including operating instructions
wherever necessary. Since they are specialorder items, the descriptions and illustrations
herein may vary slightly from the actual
equipment of your vehicle.
If there are any equipment details that are not
shown or described in this Operator’s
Manual, any authorized Mercedes-Benz
Center will be glad to inform you of correct
care and operating procedures. The
Operator’s Manual and Maintenance Booklet
are important documents and should be kept
with the vehicle.
Service and warranty information
The Service and Warranty Information
booklet contains detailed information about
the warranties covering your Mercedes-Benz,
including:
R
New Vehicle Limited Warranty
R
Emission System Warranty
R
Emission Performance Warranty
R
California, Connecticut, Maine,
Massachusetts, New York, Pennsylvania,
Page 23

Introduction
21
Rhode Island, and Vermont Emission
Control System Warranty
R
State Warranty Enforcement Laws (Lemon
1
Laws)
Important notice for California retail buyers and lessees of Mercedes-Benz automobiles
Under California law you may be entitled to a
replacement of your vehicle or a refund of the
purchase price or lease price, if after a
reasonable number of repair attempts
Mercedes-Benz USA, LLC and/or its
authorized repair or service facilities fail to fix
one or more substantial defects or
malfunctions in the vehicle that are covered
by its express warranty. During the period of
18 months from original delivery of the
vehicle or the accumulation of 18 000 miles
(approximately 29 000 km) on the odometer
of the vehicle, whichever occurs first, a
reasonable number of repair attempts is
presumed for a retail buyer or lessee if one or
more of the following occurs:
(1) the same substantial defect or
malfunction results in a condition that is
likely to cause death or serious bodily
injury if the vehicle is driven, that defect
or malfunction has been subject to repair
two or more times, and you have directly
notified Mercedes-Benz USA, LLC in
writing of the need for its repair,
(2) the same substantial defect or
malfunction of a less serious nature than
category (1) has been subject to repair
four or more times and you have directly
notified us in writing of the need for its
repair, or
(3) the vehicle is out of service by reason of
repair of the same or different substantial
defects or malfunctions for a cumulative
total of more than 30 calendar days.
Written notification should not be sent to a
dealer, it should be addressed to
Mercedes-Benz USA, LLC
Customer Assistance Center
One Mercedes Drive
Montvale, NJ 07645-0350
Maintenance
The Maintenance Booklet describes all the
necessary maintenance work which should
be performed at regular intervals.
Always have the Maintenance Booklet with
you when you take the vehicle to an
authorized Mercedes-Benz Center for
service. The service advisor will record each
service in the booklet for you.
Roadside Assistance
The Mercedes-Benz Roadside Assistance
Program provides factory-trained technical
help in the event of a breakdown. Calls to the
toll-free Roadside Assistance number
1-800-FOR-MERCedes (in the USA)
1-800-387-0100 (in Canada)
will be answered by Mercedes-Benz
Customer Assistance Representatives
24 hours a day, 365 days a year.
Roadside Assistance will be provided in
accordance with standard program
guidelines which include providing service to
the vehicle up to a reasonable distance from
a paved roadway. We will make every effort
to assist in a breakdown situation, however,
the accessibility of your vehicle will be
determined by our authorized Mercedes-Benz
Center technician or the tow service provider
on a case-by-case basis and may be a factor
in our ability to respond.
Additional charges may be applicable for a
breakdown location determined not to be a
reasonably accessible roadside location as
1
Applicable to vehicles with gasoline engine only.
Z
Page 24

Introduction
22
determined by our authorized technician and
tow service provider.
For additional information refer to the
Mercedes-Benz Roadside Assistance
Program brochure (in the USA) or the
Roadside Assistance section of the Service
and Warranty Information Booklet (in
Canada) in your vehicle literature portfolio.
Change of address or ownership
If you change your address, be sure to send
in the “Change of Address Notice” found in
the Service and Warranty Information
Booklet, or simply call the Mercedes-Benz
Customer Assistance Center (in the USA) at
1-800-FOR-MERCedes (1-800-367-6372), or
Customer Service (in Canada) at
1-800-387-0100. This will assist us in
contacting you in a timely manner should the
need arise.
If you sell your Mercedes, please leave all
literature with the vehicle to make it available
to the next operator.
If you bought this vehicle used, be sure to
send in the “Notice of Purchase of Used
Truck” found in the Service and Warranty
Information Booklet, or call the MercedesBenz Customer Assistance Center (in the
USA) at 1-800-FOR-MERCedes
(1-800-367-6372), or Customer Service (in
Canada) at 1-800-387-0100.
Operating your vehicle outside the USA or Canada
If you plan to operate your vehicle in foreign
countries, please be aware that:
R
Service facilities or replacement parts may
not be readily available.
R
Unleaded gasoline for vehicles with
catalytic converters may not be available;
the use of leaded fuels will damage the
catalysts.
R
Gasoline may have a considerably lower
octane rating, and improper fuel can cause
engine damage.
Sport Utility Vehicle
Warning!
G
This Sport Utility Vehicle is designed for both
on-road and off-road use. It can go places and
perform tasks for which conventional 2-wheel
drive passenger cars are not intended. This
vehicle will handle and maneuver differently
from conventional passenger cars in driving
conditions which may occur on streets,
highways and off-road use.
This vehicle has a higher ground clearance
and a higher center of gravity than many
passenger cars. As with other vehicles of this
type, if you make sharp turns at excessive
speeds or abrupt maneuvers, the vehicle may
roll over or may go out of control and crash.
Utility vehicles have a significantly higher
rollover rate than other types of vehicles.
Failure to operate this vehicle safely may
result in an accident, rollover of the vehicle,
and severe or fatal injury.
Before you start to drive this vehicle, read the
Operator’s Manual. Take time to become
familiar with the driving characteristics of this
vehicle. Be sure you are familiar with all
vehicle controls. Learn how your vehicle
handles on different road surfaces. Do not
attempt sharp turns at excessive speeds or
abrupt maneuvers or other unsafe driving
actions that can cause loss of vehicle control.
When driving off-road or working the vehicle
hard, do not overload it. And, always wear
your seat belts at all times. In a rollover crash,
an unbelted person is significantly more likely
to die than a person wearing a seat belt.
Page 25

Introduction
23
Operating safety
Warning!
G
Work improperly carried out on electronic
components and associated software could
cause them to cease functioning. Because the
vehicle’s electronic components are
interconnected, any modifications made may
produce an undesired effect on other
systems. Electronic malfunctions could
seriously impair the operating safety of your
vehicle.
Contact an authorized Mercedes-Benz Center
for repairs or modifications to electronic
components.
Other improper work or modifications on the
vehicle could also have a negative impact on
the operating safety of the vehicle.
Some safety systems only function while the
engine is running. You should therefore never
turn off the engine while driving.
Warning!
G
Heavy blows against the vehicle underbody or
tires/wheels may cause serious damage and
impair the operating safety of your vehicle.
Such blows can be caused, for example, by
running over an obstacle, road debris or a
pothole. If you feel a sudden significant
vibration or ride disturbance, or you suspect
that damage to your vehicle as occurred:
R
turn on your hazard warning flashers
R
slow down carefully
R
drive with caution to an area which is a safe
distance from the road
Inspect the vehicle underbody and tires/
wheels for possible damage. If the vehicle
appears unsafe, have it towed to the nearest
authorized Mercedes-Benz Center or other
qualified maintenance or repair facility for
further inspection or repairs.
Proper use of the vehicle
Proper use of the vehicle requires that you are
familiar with the following information and
rules:
R
the safety precautions in this manual
R
the “Technical data” section in this manual
R
traffic rules and regulations
R
motor vehicle laws and safety standards
Warning!
G
Various warning labels are attached to your
vehicle. These warning labels are intended to
make you and others aware of various risks.
Do not remove any of these warning labels
unless explicitly instructed to do so by
information on the label itself. Removing
warning labels may cause you and others to
be unaware of certain risks which may result
in an accident and/or personal injury.
Problems with your vehicle
If you should experience a problem with your
vehicle, particularly one that you believe may
affect its safe operation, we urge you to
contact an authorized Mercedes-Benz Center
immediately to have the problem diagnosed
and corrected if required. If the matter is not
handled to your satisfaction, please discuss
the problem with the Mercedes-Benz Center
management or, if necessary, contact us at
one of the following addresses:
In the USA:
Customer Assistance Center
Mercedes-Benz USA, LLC
One Mercedes Drive
Montvale, NJ 07645-0350
In Canada:
Customer Relations Department
Mercedes-Benz Canada, Inc.
98 Vanderhoof Avenue
Toronto, Ontario M4G 4C9
Z
Page 26

Introduction
24
Reporting safety defects
For the USA only:
The following text is published as required of
manufacturers under Title 49, Code of U.S.
Federal Regulations, Part 575 pursuant to the
“National Traffic and Motor Vehicle Safety Act
of 1966”.
Reporting safety defects
If you believe that your vehicle has a defect
which could cause a crash or could cause
injury or death, you should immediately
inform the National Highway Traffic Safety
Administration (NHTSA) in addition to
notifying Mercedes-Benz USA, LLC.
If NHTSA receives similar complaints, it may
open an investigation, and if it finds that a
safety defect exists in a group of vehicles, it
may order a recall and remedy campaign.
However, NHTSA cannot become involved in
individual problems between you, your
dealer, or Mercedes-Benz USA, LLC.
To contact NHTSA, you may call the Vehicle
Safety Hotline toll-free at 1-888-327-4236
(TTY: 1-800-424-9153); go to
www.safercar.gov; or write to:
Administrator, NHTSA Headquarters,
1200 New Jersey Avenue, SE, West Building,
Washington, DC 20590.
You can also obtain other information about
motor vehicle safety from
www.safercar.gov.
This information helps, for example, to
diagnose vehicle systems after a collision and
to continuously improve vehicle safety.
Daimler may access the information and
share it with others
R
for safety research or vehicle diagnosis
purposes
R
with the consent of the vehicle owner or
lessee
R
in response to an official request by law
enforcement or other government agency
R
for use in dispute resolution involving
Daimler, its affiliates or sales/service
organization and/or
R
as otherwise required or permitted by law
Please check the Tele Aid subscription
service agreement for details regarding the
information that may be recorded or
transmitted via that system.
Vehicle data recording
Information regarding electronic recording devices
(Including notice pursuant to California Code
§ 9951)
Please note that your vehicle is equipped with
devices that can record vehicle systems data
and, if equipped with the Tele Aid system, may
transmit some data in certain accidents.
Page 27

Exterior view ....................................... 26
Cockpit ................................................. 27
Instrument cluster .............................. 28
Multifunction steering wheel ............. 30
Center console .................................... 31
Overhead control panel ...................... 33
Door control panel .............................. 34
25
At a glance
Page 28
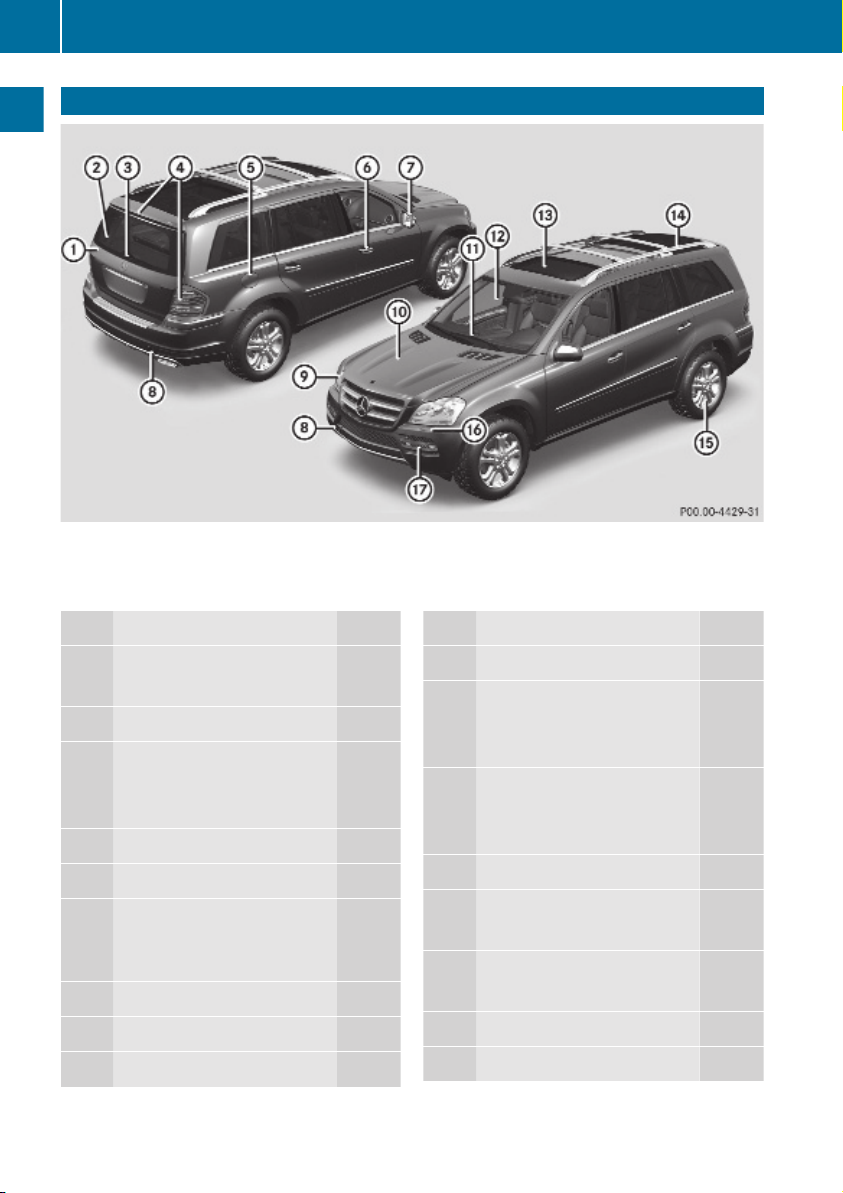
Exterior view
26
Exterior view
At a glance
i
This Operator’s Manual describes all features, standard or optional, potentially available
for your vehicle at the time of purchase. Please be aware that your vehicle might not be
equipped with all features described in this manual.
Function Page
:
Tailgate 75
Power tailgate 76
;
Rear window defroster 191
=
Rear window wiper/washer 104
Wiper blade, replacing 334
Wiper blade, cleaning 278
?
Rear lamps 328
A
Fuel filler flap 226
B
Doors:
Locking and unlocking 70,
C
Exterior rear view mirrors 94
D
Towing eyes 353
E
Front lamps
323
328
Function Page
F
Hood 228
G
Wipers 103
Wiper blades, replacing 334
Wiper blades, cleaning 278
H
Windshield:
Wiping with washer fluid 104
Cleaning 278
I
Power tilt/sliding sunroof 192
J
Carriers 196
Crossbars 196
K
Tires and wheels 233
Rims and tires 365
L
Headlamp cleaning system 101
M
LED daytime running lamps 97
Page 29
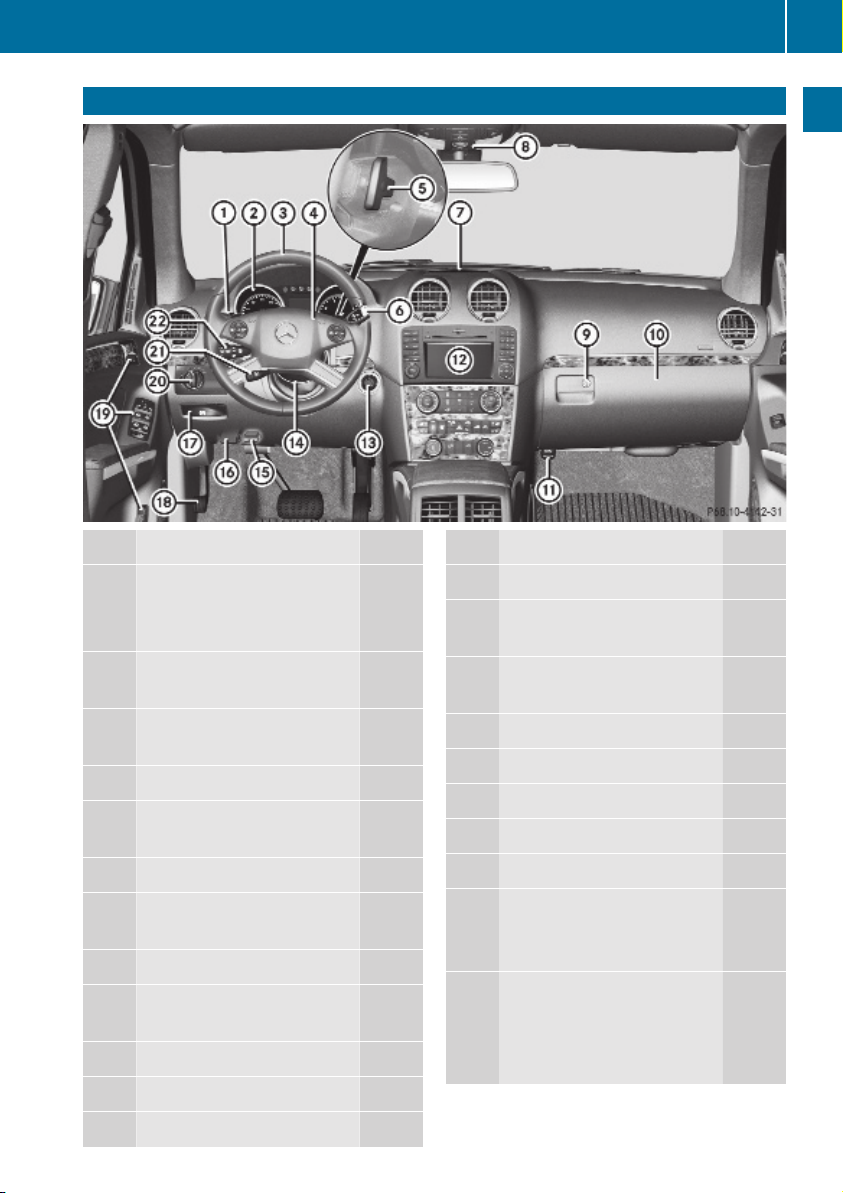
Cockpit
Cockpit
27
At a glance
Function Page
:
Cruise control lever:
Cruise control 144
Distronic 147
;
Instrument cluster 28,
=
Multifunction steering
wheel
?
Horn
A
Steering wheel gearshift
control 118
B
Gear selector lever 114
C
Front Parktronic warning
indicators 166
D
Overhead control panel 33
E
Glove box lid release, glove
box lock 208
F
Glove box 207
G
Power outlet 212
H
Center console
124
30,
125
31
Function Page
I
Starter switch 80
J
Steering wheel adjustment,
manual 91
K
On-board diagnostics
(OBD) socket
L
Hood lock release 228
M
Parking brake release 112
N
Parking brake pedal 112
O
Door control panel 34
P
Exterior lamp switch 97
Q
Steering wheel adjustment,
electrical 91
Heated steering wheel 93
R
Combination switch:
Turn signals 100
Wipers 103
High beam 100
Z
Page 30

Instrument cluster
28
Instrument cluster
At a glance
Function Page
:
# Left turn signal
indicator lamp
;
To dim instrument cluster
illumination 124
=
Reset button for:
Trip odometer 125
Settings 132
?
To brighten instrument
cluster illumination 124
A
! Right turn signal
Function Page
$ Brake warning lamp,
USA only
d ESP® warning lamp
· Distance warning
3
lamp
J Brake warning lamp,
Canada only
h Combination low tire
pressure/TPMS
malfunction telltale, USA
only
indicator lamp
B
Clock 135
C
Speedometer with:
! Antilock Brake
System (ABS) indicator
lamp
315
È Variable speed limiter
indicator lamp
2
Lamp without function. It illuminates when the ignition is on. It should go out when the engine is running.
3
Vehicles without Distronic: Warning lamp without function. It illuminates when the ignition is on. It should
go out when the engine is running.
2
316
318
319
316
239,
321
Page 31
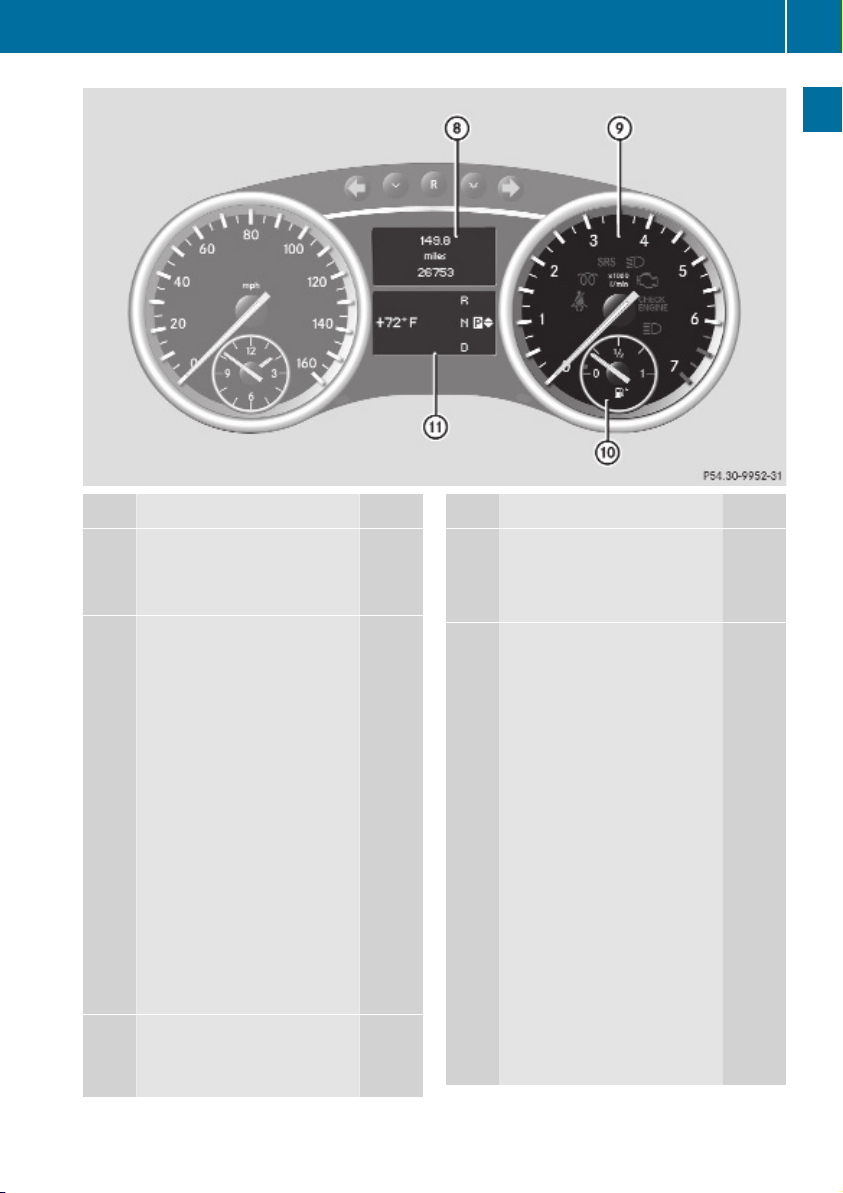
Instrument cluster
29
At a glance
Function Page
D
Multifunction display with:
Trip odometer 125
Main odometer 127
E
Tachometer with:
7 Seat belt telltale 51,
% Preglow indicator
lamp, diesel engine only
+ Supplemental
Restraint System (SRS)
indicator lamp
L Low-beam headlamp
indicator lamp
; Engine malfunction
indicator lamp, Canada only
! Engine malfunction
indicator lamp, USA only
K High-beam headlamp
indicator lamp
F
Fuel gauge with:
Fuel tank reserve warning
lamp 320
317
109
36,
318
98
320
320
100
Function Page
8 Fuel filler flap
indicator: The fuel filler flap
is located on the rear righthand side.
G
Multifunction display with:
Outside temperature
indicator or digital
speedometer (depending
on selected setting in the
control system)
Transmission position
indicator 116
Gear range indicator 118
LOW RANGE mode
indicator 121
Distance warning function
indicator 140
Rear window wiper
indicator 104
Downhill Speed Regulator
(DSR) indicator 157
Off-road driving program
indicator 158
129,
134
Z
Page 32
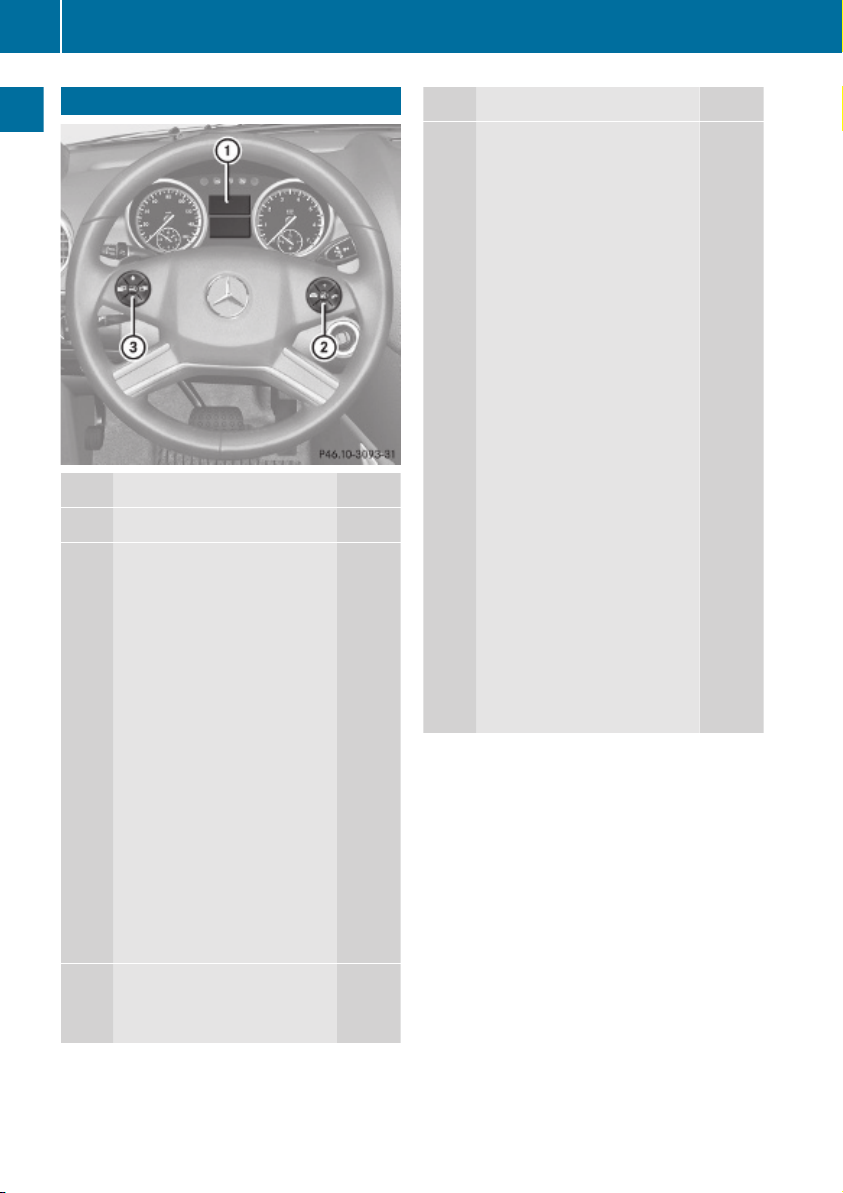
Multifunction steering wheel
30
Multifunction steering wheel
At a glance
Function Page
:
Multifunction display 127
;
Press button ~:
to end a call 142
to reject an incoming call 142
Press button 6:
to answer a call 142
4
to dial
to redial
Press button W or X:
to select submenus in the
Settings menu 133
to set values
to set the volume
Press button ? to turn
the Voice Control System
on5, see separate operating
instructions.
=
Press button V or U
to select next/previous
menu.
4
142
142
125
Function Page
Press button & or *
briefly:
to move within a menu
to select previous or next
track, scene or stored
station within Audio/DVD
menu
129
to switch to the phone book
and select a name or
number within Telephone
menu
142
Press and hold button
& or *:
to select previous or next
track with quick search or
to select previous or next
station in station list or
wave band within Audio/
DVD menu
129
to start the quick search in
the phone book within
Telephone menu
142
Press button A to turn
the Voice Control System
off5, see separate operating
instructions.
4
Function only available in telephone menu.
5
Vehicles without Voice Control System: Button without function.
Page 33
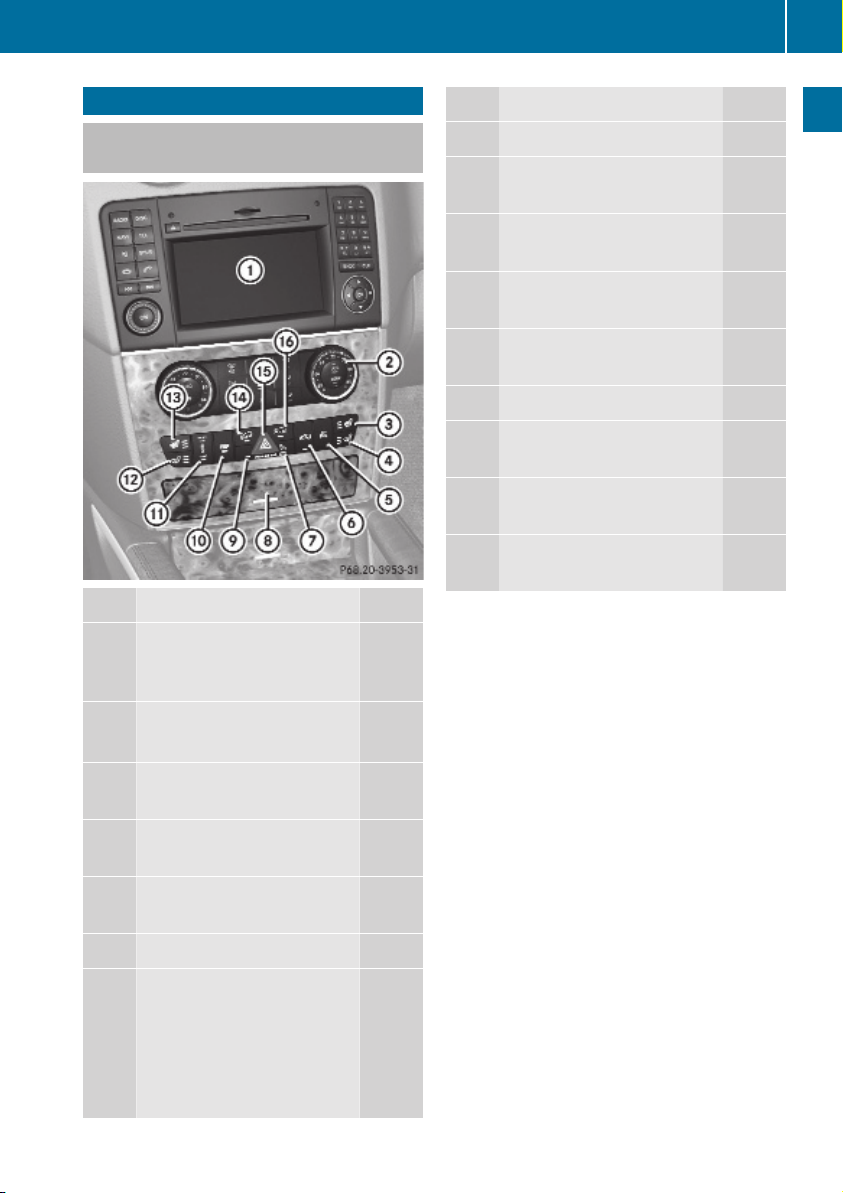
Center console
31
Center console
Upper part (Vehicles without enhanced off-road package)
Function Page
:
COMAND system, see
separate operating
instructions
;
Climate control system 172
Rear window defroster 191
=
Seat heating, front
passenger side 90
?
Seat ventilation, front
passenger side 90
A
Parktronic system
deactivation switch 168
B
Vehicle level control switch 159
C
Front passenger front air
bag off indicator lamp (USA
only)
Front passenger front air
bag off indicator lamp
(Canada only)
42,
322
46,
322
Function Page
D
Storage compartment 207
E
Alarm system indicator
lamp 67
F
Electronic Stability
Program (ESP®) switch 64
G
Adaptive Damping System
(ADS) switch 159
H
Seat ventilation, driver’s
side 90
I
Seat heating, driver’s side 90
J
Switch for Downhill Speed
Regulation (DSR) 155
K
Hazard warning flasher
switch 101
L
Switch for off-road driving
program 158
At a glance
Z
Page 34
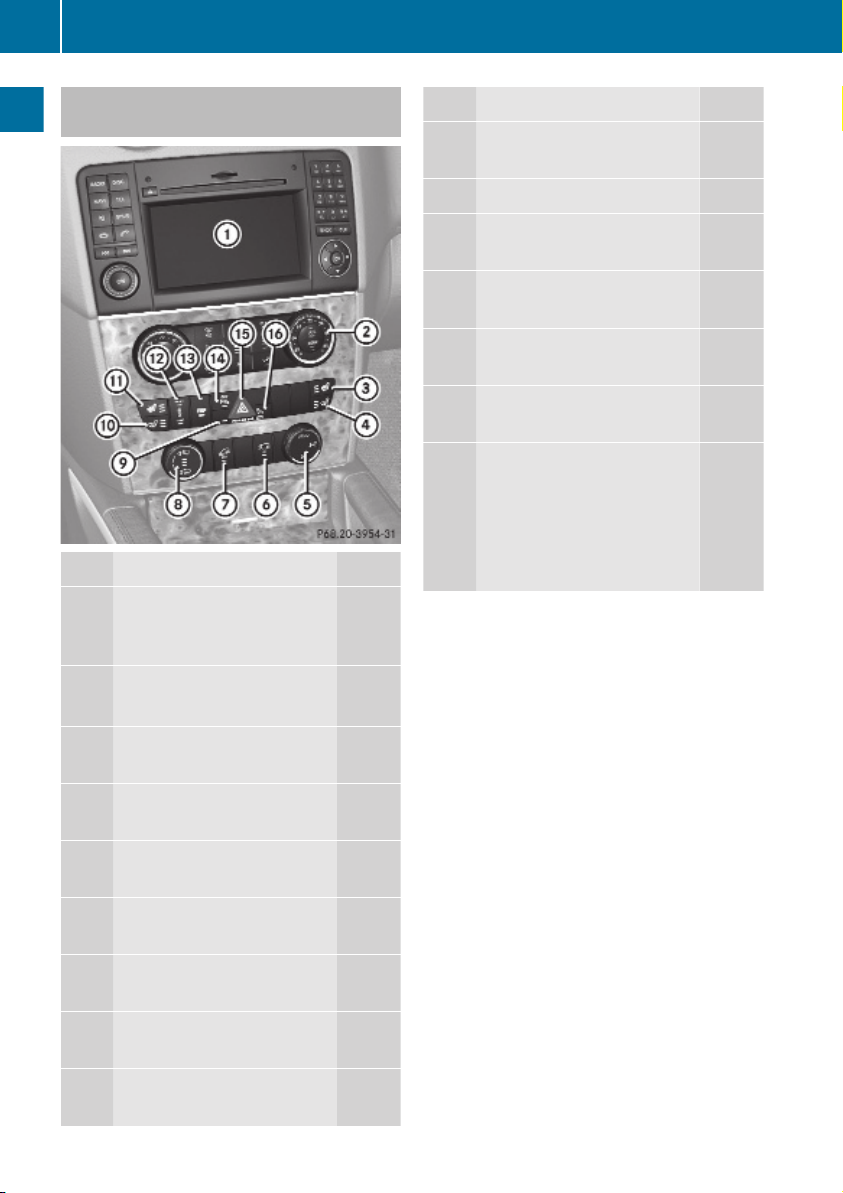
Center console
32
Upper part (Vehicles with enhanced off-road package)
At a glance
Function Page
:
COMAND system, see
separate operating
instructions
;
Climate control system 172
Rear window defroster 191
=
Seat heating, front
passenger side 90
?
Seat ventilation, front
passenger side 90
A
Rotary switch for
differential locks 122
B
Switch for LOW RANGE
mode 120
C
Switch for Downhill Speed
Regulation (DSR) 155
D
Rotary switch for vehicle
level control 159
E
Alarm system indicator
lamp
67
Function Page
F
Seat ventilation, driver’s
side 90
G
Seat heating, driver’s side 90
H
Adaptive Damping System
(ADS) switch 159
I
Electronic Stability
Program (ESP®) switch 64
J
Parktronic system
deactivation switch 168
K
Hazard warning flasher
switch 101
L
Front passenger front air
bag off indicator lamp (USA
only)
Front passenger front air
bag off indicator lamp
(Canada only)
42,
322
46,
322
Page 35
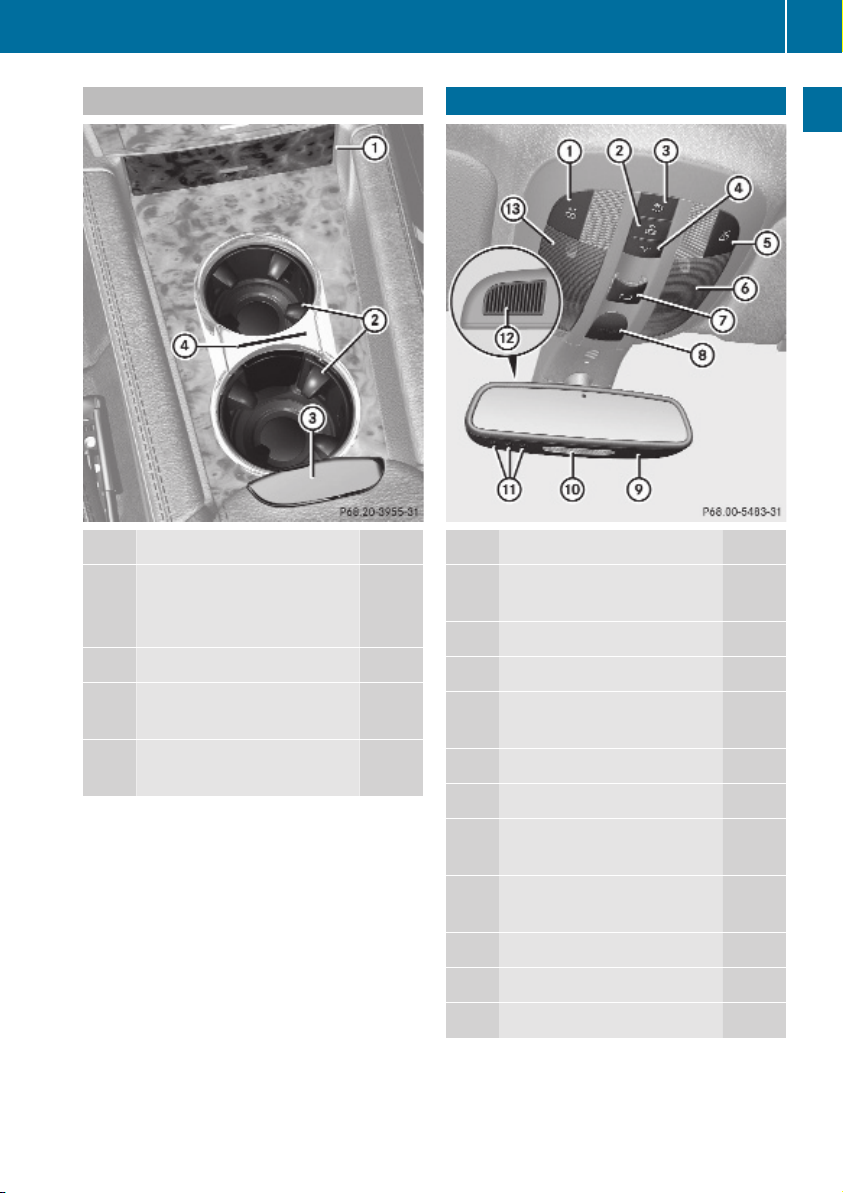
Overhead control panel
33
Lower part
Function Page
:
Ashtray with storage
compartment 211
Cigarette lighter 212
;
Cup holder 209
=
Front armrest storage
compartment 207
?
Removable card/ticket
holder 209
Overhead control panel
Function Page
:
Left front reading lamp on/
off 101
;
Automatic interior lighting 101
=
Rear interior lighting on/off 101
?
Front interior lighting on/
off 101
A
Right reading lamp on/off 101
B
Front right interior lamp 101
C
Power tilt/sliding sunroof
switch 192
D
SOS button (Tele Aid
system) 216
E
Interior rear view mirror 93
F
Reading lamps 101
G
Garage door opener 219
At a glance
Z
Page 36
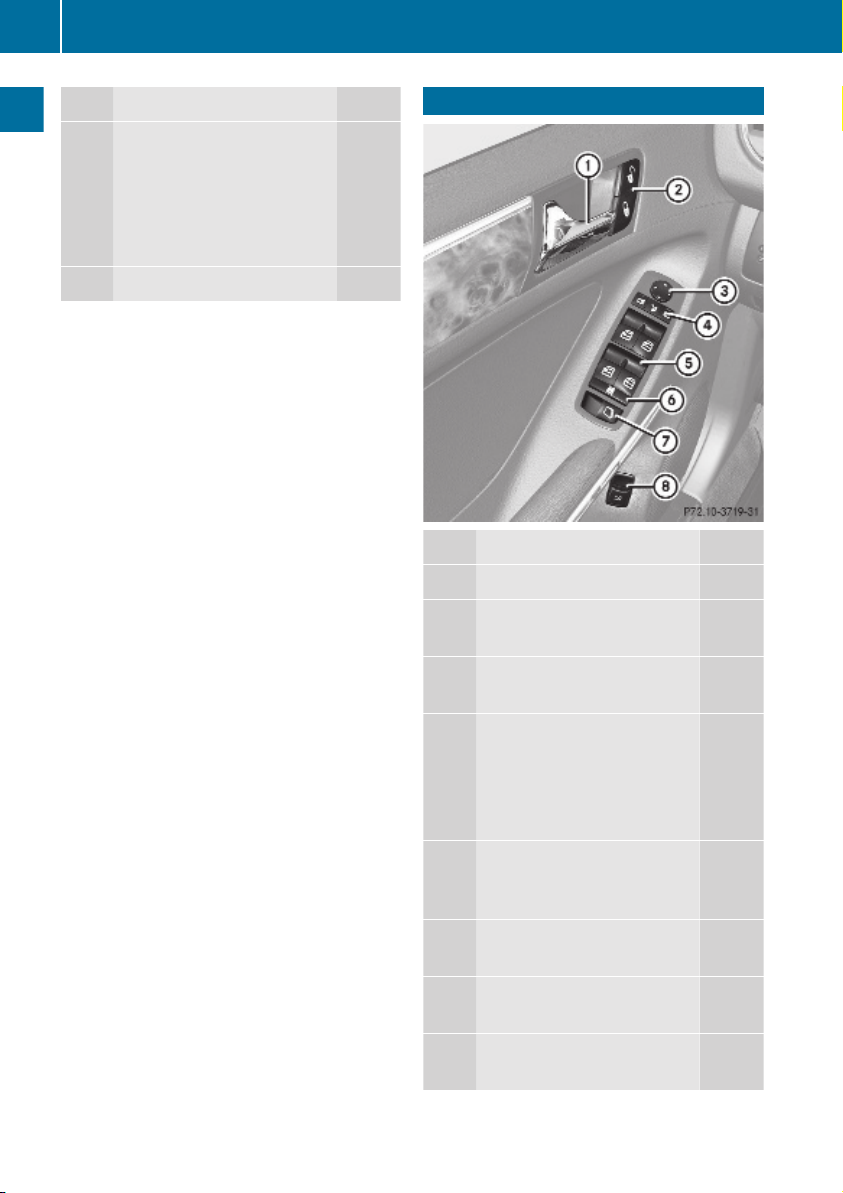
Door control panel
34
Function Page
H
Hands-free microphone for
Tele Aid (emergency call
system), telephone and
Voice Control System, see
separate operating
At a glance
instructions
I
Front left interior lamp 101
Door control panel
Function Page
:
Inside door handle 74
;
Central locking/unlocking
switch 75
=
Exterior rear view mirror
adjustment 94
?
Selection buttons for
exterior rear view mirror
adjustment 94
Power-folding exterior rear
view mirrors 95
A
Switches for opening/
closing front and rear door
windows 105
B
Rear door window override
switch 60
C
Hinged quarter window
switch 105
D
Remote tailgate switch,
power tailgate 79
Page 37
Vehicle equipment .............................. 36
Occupant safety .................................. 36
Panic alarm .......................................... 61
Driving safety systems ....................... 61
Anti-theft systems .............................. 66
35
Safety and security
Page 38
Occupant safety
36
Vehicle equipment
i
This Operator’s Manual describes all
features, standard or optional, potentially
available for your vehicle at the time of
purchase. Please be aware that your
vehicle might not be equipped with all
features described in this manual.
Occupant safety
Introduction
In this section you will learn the most
important facts about the restraint system
Safety and security
components of the vehicle.
The restraint systems are:
R
Seat belts
R
Child restraints
R
Lower Anchors and Tethers for CHildren
(LATCH)
Additional protection potential is provided by:
R
Supplemental Restraint System (SRS) with
-
Air bags
-
Air bag control unit (with crash sensors)
-
Emergency Tensioning Device (ETD) for
seat belts
-
Seat belt force limiter
R
NECK-PRO active front head restraints
R
Preventive occupant safety (PRE-SAFE®)
R
Air bag system components with
-
Front passenger front air bag off
indicator lamp
-
USA only: Front passenger seat with
Occupant Classification System (OCS)
-
Canada only: Front passenger seat with
BabySmart™ air bag deactivation system
Although the systems are independent, their
protective functions work in conjunction with
each other.
Warning!
G
Modifications to or work improperly
conducted on restraint system components
or their wiring, as well as tampering with
interconnected electronic systems, can lead
to the restraint systems no longer functioning
as intended.
Air bags or Emergency Tensioning Devices
(ETDs), for example, could deploy
inadvertently or fail to deploy in accidents
although the deceleration threshold for air
bag deployment is exceeded. Therefore,
never modify the restraint systems. Do not
tamper with electronic components or their
software.
i
See “Children in the vehicle”
(Y page 55) for information on
R
infants and children traveling with you in
the vehicle
R
restraint systems for infants and children
SRS indicator lamp
The SRS system conducts a self-test when
the ignition is switched on and in regular
intervals while the engine is running. This
facilitates detection of system malfunctions.
The SRS indicator lamp + in the
instrument cluster comes on when the
ignition is switched on. It goes out no later
than a few seconds after the engine has been
started.
The SRS components are in operational
readiness when the SRS indicator lamp
+ is not lit while the engine is running.
A malfunction in the system has been
detected if the SRS indicator lamp +
R
fails to go out after approximately
4 seconds after the engine was started
R
does not come on at all
R
comes on after the engine was started or
while driving
Page 39

Occupant safety
37
Warning!
G
The SRS self-check has detected a
malfunction when the SRS indicator lamp
+:
R
does not come on at all
R
does not go out after 4 seconds after the
engine was started
R
comes on while driving
For your safety, we strongly recommend that
you contact an authorized Mercedes-Benz
Center immediately to have the system
checked. Otherwise the SRS may not be
activated when needed in an accident, which
could result in serious or fatal injury. The SRS
might also deploy unexpectedly and
unnecessarily which could also result in injury
as well.
In addition, improper work on the SRS creates
a risk of rendering the SRS inoperative or
causing unintended air bag deployment. Work
on the SRS must therefore only be performed
by qualified technicians. Contact an
authorized Mercedes-Benz Center.
If it is necessary to modify an air bag system
to accommodate a person with disabilities,
contact an authorized Mercedes-Benz Center.
USA only: Call our Customer Assistance
Center at 1-800-FOR-MERCedes
(1-800-367-6372) for details.
Air bags
Warning!
G
Air bags are designed to reduce the potential
of injury and fatality in certain
R
frontal impacts (front air bags and driver’s
side knee bag)
R
side impacts (side impact air bags and
window curtain air bags)
R
rollovers (window curtain air bags)
However, no system available today can
completely eliminate injuries and fatalities.
Deployment of the air bags temporarily
releases a small amount of dust from the air
bags. This dust, however, is neither harmful
to your health, nor does it indicate a fire in the
vehicle. The dust might cause some
temporary breathing difficulty for people with
asthma or other breathing trouble. To avoid
this, you may wish to get out of the vehicle as
soon as it is safe to do so. If you have any
breathing difficulty but cannot get out of the
vehicle after the air bag inflates, then get fresh
air by opening a window or door.
Warning!
G
To reduce the risk of injury when the front air
bags inflate, it is very important for the driver
and front passenger to always be in a properly
seated position and to wear their respective
seat belt.
For maximum protection in the event of a
collision always be in normal seated position
with your back against the seat backrest.
Fasten your seat belt and make sure it is
properly positioned on your body.
Since the air bag inflates with considerable
speed and force, a proper seating position
and correct positioning of the hands on the
steering wheel will help to keep you at a safe
distance from the air bag. Occupants who are
not wearing their seat belt, are not seated
properly or are too close to the air bag can be
seriously injured or killed by an air bag as it
inflates with great force instantaneously:
R
Sit with the seat belt properly fastened in a
position that is as upright as possible with
your back against the seat backrest.
R
Move the driver’s seat as far back as
possible, still permitting proper operation
of vehicle controls. The distance from the
center of the driver’s chest to the center of
the air bag cover on the steering wheel
must be at least 10 inches (25 cm) or more.
You should be able to accomplish this by
adjusting the seat and steering wheel. If
Safety and security
Z
Page 40

Occupant safety
38
you have any difficulties, please contact an
authorized Mercedes-Benz Center.
R
Do not lean your head or chest close to the
steering wheel or dashboard.
R
Keep hands on the outside of the steering
wheel rim. Placing hands and arms inside
the rim can increase the risk and potential
severity of hand/arm injury when the driver
front air bag inflates.
R
Adjust the front passenger seat as far as
possible rearward from the dashboard
when the seat is occupied.
R
Occupants, especially children, should
Safety and security
never place their bodies or lean their heads
in the area of the door where the side
impact air bag inflates. This could result in
serious injuries or death should the side
impact air bag be deployed. Always sit as
upright as possible, wear the seat belt
properly and use an appropriately sized
infant restraint, toddler restraint, or
booster seat recommended for the size and
weight of the child.
R
Canada only: Children 12 years old and
under must never ride in the front seat,
except in a Mercedes-Benz authorized
BabySmart™ compatible child seat, which
operates with the BabySmart™ air bag
deactivation system installed in the vehicle
to deactivate the front passenger front air
bag when it is installed properly. Otherwise
they will be struck by the air bag when it
inflates in a crash. If this happens, serious
or fatal injury will result.
Failure to follow these instructions can result
in severe injuries to you or other occupants.
If you sell your vehicle, it is important that you
make the buyer aware of this safety
information. Be sure to give the buyer this
Operator’s Manual.
Warning!
G
Accident research shows that the safest place
for children in an automobile is in a rear seat.
There is a possibility for a side impact air bagrelated injury if occupants, especially
children, are not properly seated or restrained
when next to a side impact air bag which
needs to deploy rapidly in a side impact in
order to do its job.
To help avoid the possibility of injury, please
follow these guidelines:
(1) Always sit as upright as possible,
wear the seat belt properly, and for
children 12 years old and under,
use an appropriately sized infant
restraint, toddler restraint, or
booster seat recommended for the
size and weight of the child.
(2) Always wear seat belts properly.
Air bags are designed to deploy only in certain
R
frontal impacts (front air bags and driver’s
side knee bag)
R
side impacts (side impact and window
curtain air bags) if the system determines
the need for air bag deployment
R
rollovers (window curtain air bags)
Only in the event of such a situation will they
provide their supplemental protection.
The driver and passengers should always
wear their seat belts. Otherwise it is not
possible for the air bags to provide their
supplemental protection.
In case of other types of impacts and impacts
below air bag deployment thresholds, air
bags will not deploy. The driver and
passengers will then be protected to the
extent possible by a properly fastened seat
belt. A properly fastened seat belt is also
needed to provide the best possible
protection in a rollover.
Air bags are not a substitute for seat belts.
Always wear your seat belt, regardless of
whether or not your vehicle is equipped with
air bags.
It is important to your safety and that of your
passengers to have deployed air bags
Page 41

Occupant safety
39
replaced and to have any malfunctioning air
bags repaired. This will help to make sure the
air bags will continue to provide supplemental
crash protection for occupants.
Safety guidelines for the seat belt,
Emergency Tensioning Device (ETD)
and air bag
Warning!
G
R
Damaged seat belts or seat belts that have
been subjected to stress in an accident
must be replaced. Their anchoring points
must also be checked. Only use seat belts
installed or supplied by an authorized
Mercedes-Benz Center.
R
Air bags and pyrotechnic Emergency
Tensioning Devices (ETDs) contain
perchlorate material, which may require
special handling and regard for the
environment. Check with your local
government’s disposal guidelines.
California residents, see
www.dtsc.ca.gov/HazardousWaste/
Perchlorate/index.cfm.
R
Air bags and ETDs are designed to function
on a one-time-only basis. An air bag or ETD
that has deployed must be replaced. PRESAFE® has electrically operated reversible
pre-tensioners in addition to the
pyrotechnic ETDs.
R
Do not pass seat belts over sharp edges.
They could tear.
R
Do not make any modification that could
change the effectiveness of the seat belts.
R
Do not bleach or dye seat belts as this may
severely weaken them. In a crash they may
not be able to provide adequate protection.
R
No modifications of any kind may be made
to any components or wiring of the SRS.
R
Do no change or remove any component or
part of the SRS.
R
Do not install additional trim material, seat
covers, badges, etc. over the steering
wheel hub, front passenger front air bag
cover, outboard sides of the seat
backrests, door trim panels, or door frame
trims.
R
Do not install additional electrical/
electronic equipment on or near SRS
components and wiring.
R
Keep area between air bags and occupants
free of objects (e.g. packages, purses,
umbrellas, etc.).
R
Do not hang items such as coat hangers
from the coat hooks or handles over the
door. These items may be thrown around in
the vehicle and cause head and other
injuries when the window curtain air bag is
deployed.
R
Air bag system components will be hot after
an air bag has inflated. Do not touch them.
R
Never place your feet on the instrument
panel, dashboard, or on the seat. Always
keep both feet on the floor in front of the
seat.
R
Improper repair work on the SRS creates a
risk of rendering the SRS inoperative or
causing unintended air bag deployment.
Work on the SRS must therefore only be
performed by qualified technicians.
Contact an authorized Mercedes-Benz
Center.
R
For your protection and the protection of
others, when scrapping the air bag unit or
ETD, our safety instructions must be
followed. These instructions are available
from any authorized Mercedes-Benz
Center.
R
Given the considerable deployment speed,
required inflation volume, and the material
of the air bags, there is the possibility of
abrasions or other, potentially more serious
injuries resulting from air bag deployment.
If you sell your vehicle, we strongly
recommend that you inform the subsequent
owner that the vehicle is equipped with SRS.
Safety and security
Z
Page 42
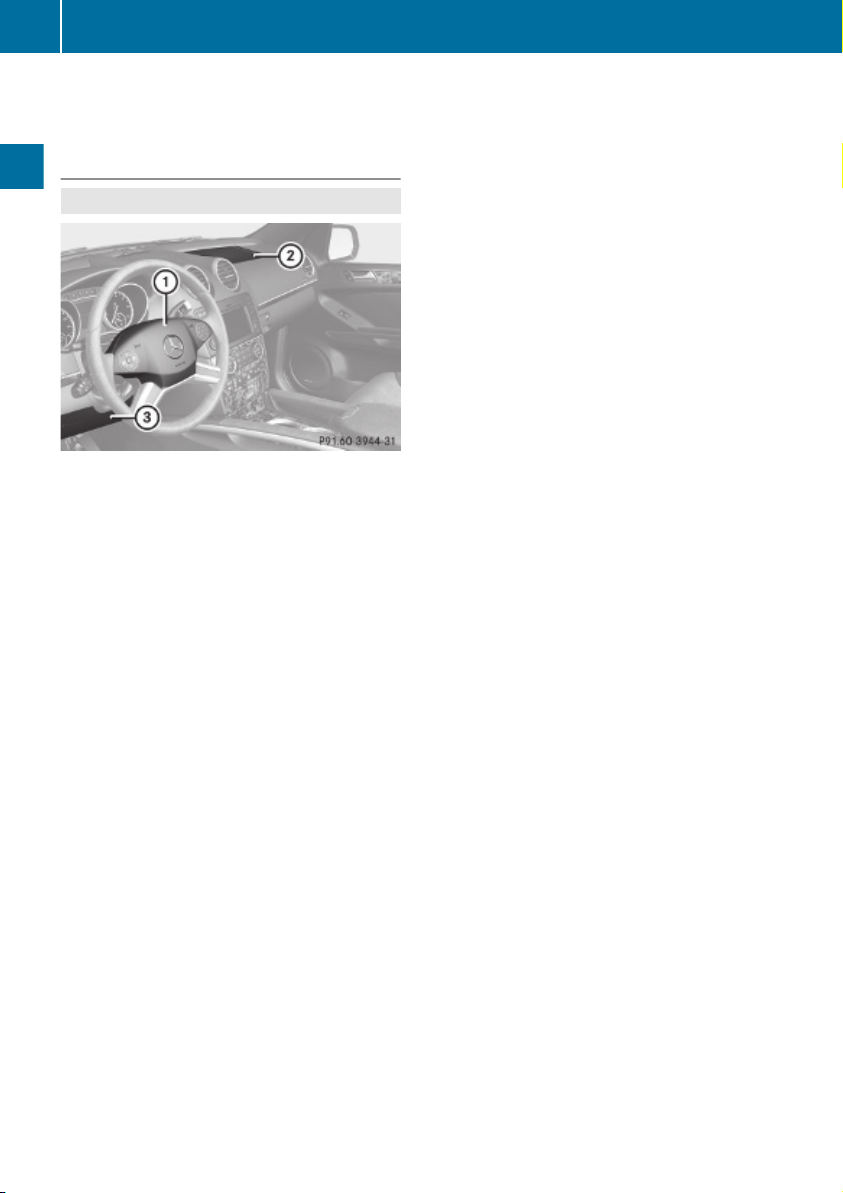
Occupant safety
40
Also refer them to the applicable section in
the Operator’s Manual.
Front air bags
Observe Safety notes, see page 37.
G
Safety and security
Driver’s front air bag : and front passenger
front air bag ; are designed to provide
increased protection for the driver and front
passenger against the risk of injuries to the
head and thorax.
Driver and front passenger front air bag and
driver’s side knee bag are deployed
R
in the event of certain frontal impacts
R
if the system determines that air bag
deployment can offer additional protection
to that provided by the seat belt
R
depending on whether the respective seat
belt is in use
R
independently of the side impact air bags
and/or the window curtain air bags
The front air bags in this vehicle have been
designed to inflate in two stages. This allows
the air bags to have different rates of inflation.
The rate of inflation is based on the vehicle
deceleration rate as assessed by the air bag
control unit.
Vehicles with OCS, USA only: The front
passenger front air bag deployment is
additionally influenced by the passenger’s
weight category as identified by the Occupant
Classification System (OCS) (Y page 42).
Vehicles with OCS, USA only: The lighter the
front passenger-side occupant, the higher the
vehicle deceleration rate required for second
stage inflation of the front passenger front air
bag.
The air bags will not deploy in impacts which
do not exceed the system’s preset
deployment thresholds. You will then be
protected by the fastened seat belts.
The front air bags will not deploy in the event
of a rollover unless the vehicle’s rate of
longitudinal deceleration or acceleration
exceeds the preset deployment threshold for
the front air bags.
The front passenger front air bag will only be
deployed if
R
vehicles with OCS, USA only: the system,
based on OCS weight sensor readings,
detects that the front passenger seat is
occupied
R
the 42 indicator lamp in the
center console is not lit
(USA only: (Y page 42),
Canada only: (Y page 46))
R
the impact exceeds a preset deployment
threshold
!
Vehicles with BabySmart™ air bag
deactivation system (Canada only): Do not
place objects heavier than 20 lb (9 kg) on
the front passenger seat. This could cause
the front or side impact air bag on the front
passenger side to deploy in a crash which
exceeds the system’s deployment
threshold.
Knee bag
Knee bag = is designed to provide increased
protection for the driver against the risk of
injuries to the knees, thighs and lower legs.
Knee bag = is located on the driver side
lower instrument panel. It is designed to
operate together with the driver front air bag
in certain frontal impacts if the system
determines that air bag deployment can offer
additional protection to that provided by the
seat belt. Knee bag = operates best in
Page 43
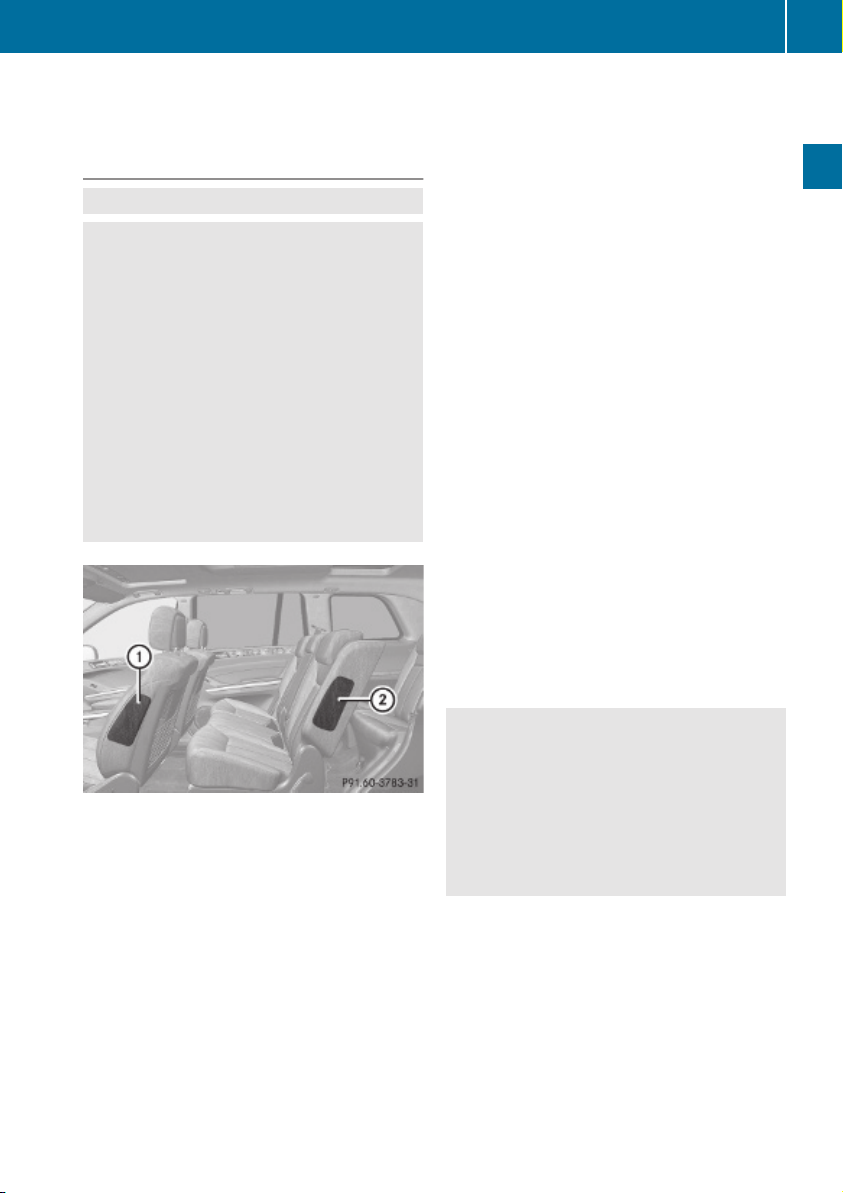
Occupant safety
41
conjunction with a properly positioned and
fastened seat belt.
Side impact air bags
Observe Safety notes, see page 37.
G
Warning!
G
The pressure sensors for side impact air bag
control are located in the doors. Do not
modify any components of the doors or door
trim panels including, for example, the
addition of door speakers.
Improper repair work on the doors or the
modification or addition of components to the
doors create a risk of rendering the side
impact air bags inoperative or causing
unintended air bag deployment. Work on the
doors must therefore only be performed by
qualified technicians. Contact an authorized
Mercedes-Benz Center.
Front side impact air bags : and rear side
impact air bags ; are designed to provide
increased protection for the thorax but not
the head, neck and arms.
The side impact air bags are deployed
R
on the impacted side of the vehicle
R
in instances with a high rate of lateral
vehicle deceleration or acceleration
R
regardless of whether the seat belts on the
impacted side of the vehicle are in use
R
independently of the front air bags
R
independently of the ETDs
Vehicles with OCS (USA only): The front
passenger side impact air bag will not deploy
if the OCS senses that the front passenger
seat is empty and the front passenger seat
belt is not fastened. With the front passenger
seat empty and the seat belt fastened, the
front passenger side impact air bag will
deploy independently of the empty seat.
Whether a seat belt is recognized as fastened
depends on whether or not the latch plate is
properly inserted into the buckle.
The side impact air bags are not deployed in
side impacts which do not exceed the
system’s deployment threshold.
The side impact air bags will not deploy in the
event of a rollover unless the vehicle’s rate of
lateral deceleration or acceleration exceeds
the preset deployment threshold for the side
impact air bags.
!
Vehicles with BabySmart™ air bag
deactivation system (Canada only): Do not
place objects heavier than 20 lb (9 kg) on
the front passenger seat. This could cause
the front or side impact air bag on the front
passenger side to deploy in a crash which
exceeds the system’s deployment
threshold.
Warning!
G
Only use seat covers which have been tested
and approved by Mercedes-Benz for your
vehicle model. Using other seat covers may
interfere with or prevent the deployment of
the side impact air bags. Contact an
authorized Mercedes-Benz Center for
availability.
Safety and security
Z
Page 44
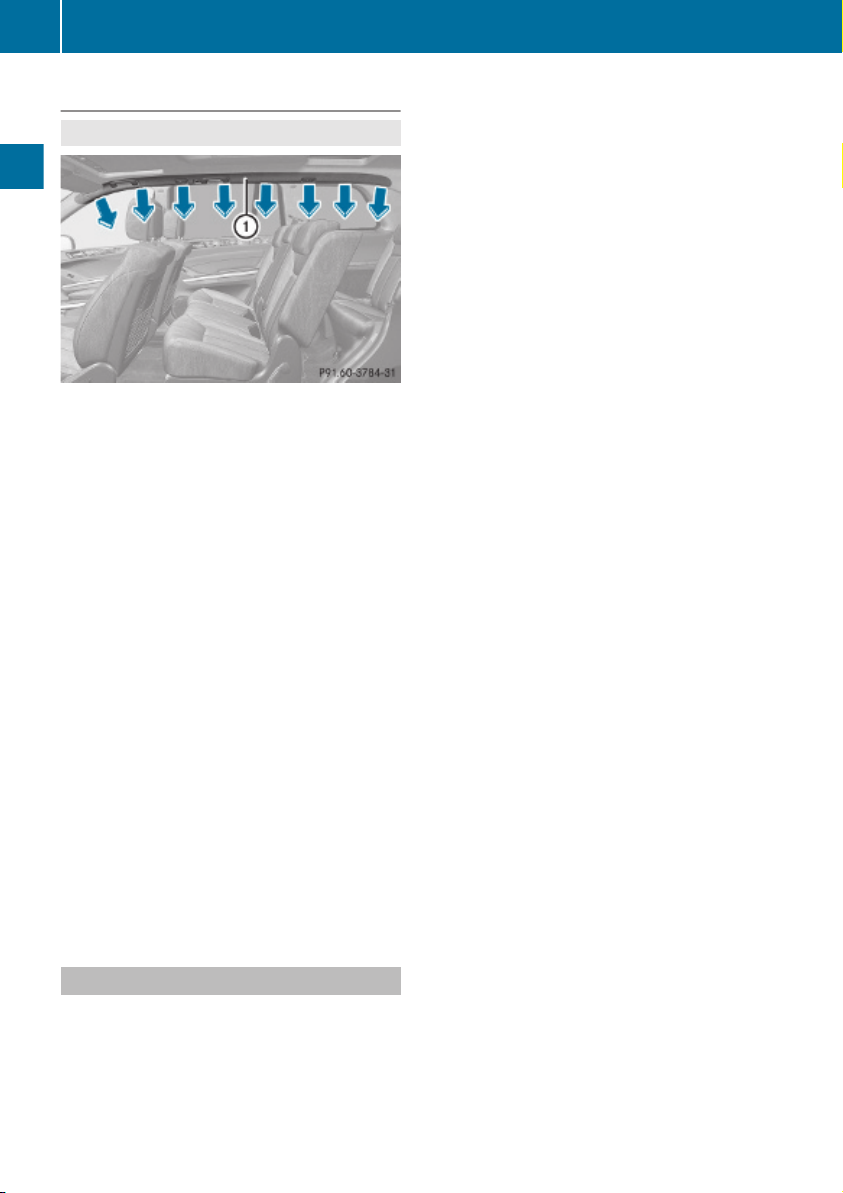
Occupant safety
42
Window curtain air bags
Observe Safety notes, see page 37.
G
Window curtain air bags : are designed to
Safety and security
provide increased protection for the head but
not the chest or arms.
Window curtain air bags : are deployed
R
on the impacted side of the vehicle
R
in instances with a high rate of lateral
vehicle deceleration or acceleration
R
independently of the front air bags
R
regardless of whether the front passenger
seat is occupied
R
regardless of whether the seat belt on the
impacted side of the vehicle is in use
R
in certain vehicle rollovers, if the system
determines that air bag deployment can
offer additional protection to that provided
by the seat belt
Window curtain air bags : are not deployed
in impacts which do not exceed the system’s
deployment threshold.
Window curtain air bags : deploy in the area
indicated by the arrows.
Occupant Classification System
The Occupant Classification System (OCS) is
standard equipment in USA.
The OCS activates or deactivates the front
passenger front air bag automatically. The
respective status is based on the classified
occupant weight category determined by
weight sensor readings from the front
passenger seat.
The system does not deactivate
R
the front passenger side impact air bag
R
the window curtain air bag
R
the Emergency Tensioning Devices (ETDs)
To be classified correctly, the front passenger
must sit
R
with the seat belt properly fastened
R
in a position that is as upright as possible
with the back against the seat backrest
R
with the feet on the floor
If the occupant’s weight is transferred to
another object in the vehicle (e.g. by leaning
on armrests), the OCS may not be able to
properly approximate the occupant’s weight
category.
Furthermore, the occupant weight may
appear to increase or decrease due to the
following:
R
objects hanging on the seat
R
objects lodged underneath the seat
R
objects stuffed between the seat and
middle console
R
objects stuffed between the seat and door
R
other passengers pushing on the seat
R
objects applying pressure to the back of
the seat
Always make sure the seat has clearance
in all directions at all times.
If your seat, including the trim cover and
cushion, needs to be serviced in any way, take
the vehicle to an authorized Mercedes-Benz
Center.
Only seat accessories approved by
Mercedes-Benz may be used.
Both the driver and the front passenger
should always use the 42
indicator lamp as an indication of whether or
not the front passenger is properly
positioned.
Page 45

Occupant safety
43
Warning!
G
If the 42 indicator lamp
illuminates when an adult or someone larger
than a small individual is in the front
passenger seat, have the front passenger
reposition himself or herself in the seat until
the 42 indicator lamp goes out,
or check whether objects are caught under or
around the seat.
In the event of a collision, the air bag control
unit will not allow front passenger front air bag
deployment when the OCS has classified the
front passenger seat occupant as weighting
as much as or less than a typical 12-monthold child in a standard child restraint or if the
front passenger seat is classified as being
empty.
When the OCS senses that the front
passenger seat occupant is classified as
being up to or less than the weight of a typical
12-month-old child in a standard child
restraint, the 42 indicator lamp
will illuminate when the engine is started and
remain illuminated, indicating that the front
passenger front air bag is deactivated.
When the OCS senses that the front
passenger seat is classified as being empty,
the 42 indicator lamp will
illuminate when the engine is started and
remain illuminated, indicating that the front
passenger front air bag is deactivated.
When the OCS senses that the front
passenger seat occupant is classified as
being heavier than the weight of a typical
12-month-old child seated in a standard child
restraint or as being a small individual (such
as a young teenager or a small adult), the
42 indicator lamp will illuminate
for approximately 6 seconds when the engine
is started and then, depending on occupant
weight sensor readings from the seat, remain
illuminated or go out. With the
42 indicator lamp illuminated,
the front passenger front air bag is
deactivated. With the 42
indicator lamp out, the front passenger front
air bag is activated.
When the OCS senses that the front
passenger seat occupant is classified as an
adult or someone larger than a small
individual, the 42 indicator lamp
will illuminate for approximately 6 seconds
when the engine is started and then goes out,
indicating that the front passenger front air
bag is activated.
If the 42 indicator lamp is
illuminated, the front passenger front air bag
is deactivated and will not be deployed.
If the 42 indicator lamp is not
illuminated, the front passenger front air bag
is activated and will be deployed
R
in the event of certain frontal impacts
R
if impact exceeds a preset deployment
threshold
R
independently of the side impact air bags
If the front passenger front air bag is
deployed, the rate of inflation will be
influenced by
R
the rate of relevant vehicle deceleration as
assessed by the air bag control unit
R
the front passenger’s weight category as
identified by the OCS
For more information on air bag display
messages in the multifunction display, see
(Y page 291).
Warning!
G
According to accident statistics, children are
safer when properly restrained in the rear
seating positions than in the front seating
position. Thus, we strongly recommend that
children be placed in the rear seats whenever
possible. Regardless of seating position,
children 12 years old and under must be
seated and properly secured in an appropriate
infant restraint, toddler restraint, or booster
seat recommended for the size and weight of
the child.
Safety and security
Z
Page 46

Occupant safety
44
The infant or child restraint must be properly
secured with the vehicle’s seat belt, the seat
belt and top tether strap, or lower anchors and
top tether strap, fully in accordance with the
child seat manufacturer’s instructions.
Occupants, especially children, should always
sit as upright as possible, wear the seat belt
properly and use an appropriately sized infant
restraint, toddler restraint, or booster seat
recommended for the size and weight of the
child.
Children can be killed or seriously injured by
an inflating air bag. Note the following
important information when circumstances
Safety and security
require you to place a child in the front
passenger seat:
R
Your vehicle is equipped with air bag
technology designed to deactivate the front
passenger front air bag in your vehicle
when the system senses the weight of a
typical 12-month-old child or less along
with the weight of a standard appropriate
child restraint on the front passenger seat.
R
A child in a rear-facing child restraint on the
front passenger seat will be seriously
injured or even killed if the front passenger
front air bag inflates in a collision which
could occur under some circumstances,
even with the air bag technology installed
in your vehicle. The only means to
completely eliminate this risk is to never
place a child in a rear-facing child restraint
in the front seat. We therefore strongly
recommend that you always place a child
in a rear-facing child restraint in a backseat.
R
If you must install a rear-facing child
restraint on the front passenger seat
because circumstances require you to do
so, make sure the 42
indicator lamp is illuminated, indicating
that the front passenger front air bag is
deactivated. Should the 42
indicator lamp not illuminate or go out while
the restraint is installed, please check
installation. Periodically check the
42 indicator lamp while
driving to make sure the 42
indicator lamp is illuminated. If the
42 indicator lamp goes out or
remains out, do not transport a child on the
front passenger seat until the system has
been repaired.
A child in a rear-facing child restraint on the
front passenger seat will be seriously
injured or even killed if the front passenger
front air bag inflates.
R
If you have to place a child in a forwardfacing child restraint on the front passenger
seat, move the seat as far back as possible,
use the proper child restraint
recommended for the age, size and weight
of the child, and secure child restraint with
the vehicle’s seat belt according to the child
seat manufacturer’s instructions. For
children larger than the typical 12-monthold child, the front passenger front air bag
may or may not be activated.
Deployment of the driver front air bag does
not mean that the front passenger front air
bag also should have deployed.
The OCS may have determined
R
that the seat was empty or occupied by the
weight up to or less than that of a typical
12-month-old child seated in a standard
child restraint – both of which are instances
where the system suppresses deployment
of the front passenger front air bag even
though the impact met the criteria and was
of sufficient severity to deploy the driver
front air bag
R
that the seat was occupied by a small
individual (such as a young teenager or a
small adult) or a child who weighs more
than the weight of a typical 12-month-old
child in a standard child restraint – both of
which are instances where the system may
suppress deployment of the front
passenger front air bag even though the
impact met the criteria and was of
Page 47
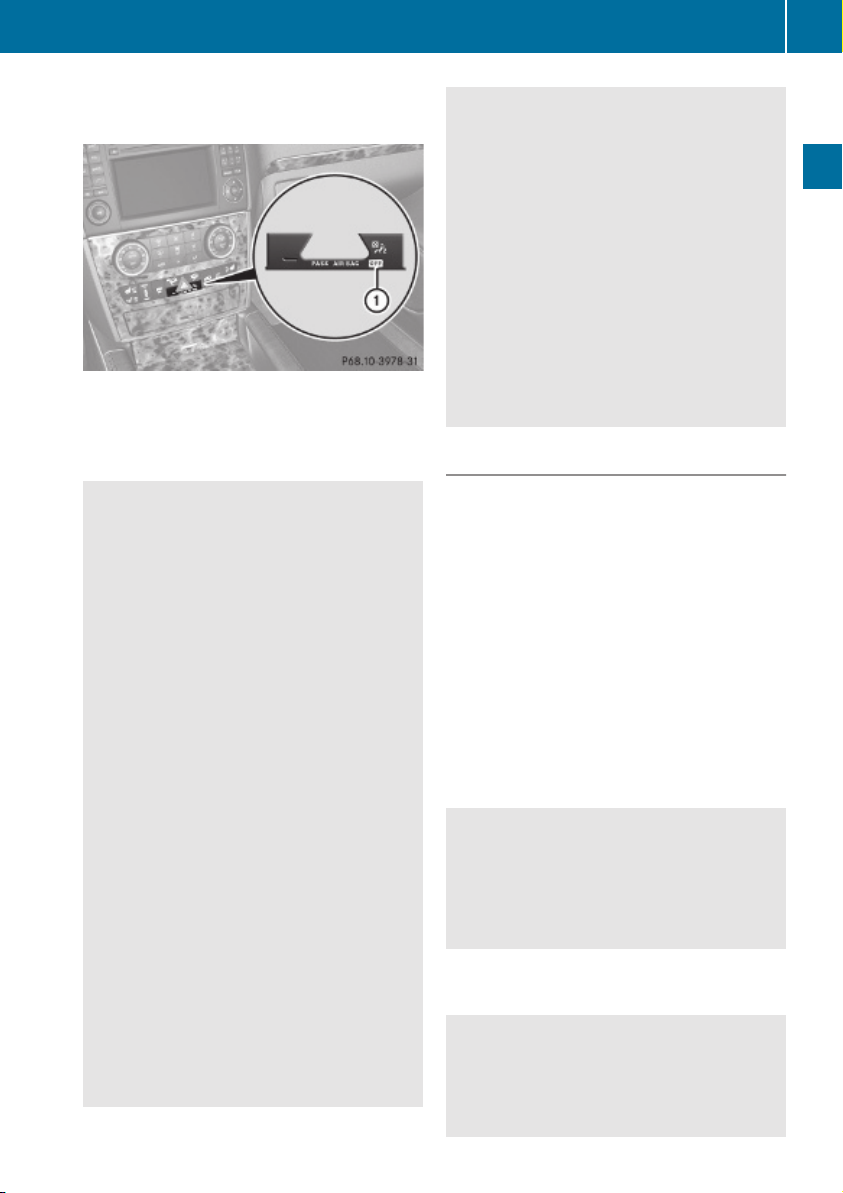
Occupant safety
45
sufficient severity to deploy the driver front
air bag
42 indicator lamp : will be
illuminated, except with the SmartKey
removed from the starter switch or with the
starter switch in position 0.
Warning!
G
If the red SRS indicator lamp + in the
instrument cluster and the 42
indicator lamp are lit at the same time, there
is a malfunction in the OCS. The front
passenger front air bag will be deactivated in
this case. Have the system checked by
qualified technicians as soon as possible.
Contact an authorized Mercedes-Benz
Center.
Only have the seat repaired or replaced at an
authorized Mercedes-Benz Center.
In order to ensure proper operation of the air
bag system and OCS:
R
Do not place more than 4.4 lb (2 kg) into
the parcel net on the back of the front
passenger seat. Otherwise, the OCS may
not be able to properly approximate the
occupant weight category.
R
Do not place objects under and/or around
the front passenger seat.
R
Do not hang anything from or attach any
items to the seats.
R
Do not stuff objects such as books between
the front passenger seat and the center
console or front passenger door.
R
Do not move the front passenger seat
backwards against stiff objects.
R
Sit with the seat belt properly fastened in a
position that is as upright as possible with
your back against the seat backrest.
R
While seated, an occupant should not
position him/herself in such a way as to
cause the occupant’s weight to be lifted
from the seat bottom as this may result in
the OCS being unable to correctly
approximate the occupant’s weight
category.
R
Read and observe all warnings in this
chapter.
OCS Self-test
After turning the SmartKey in the starter
switch to position 1 or 2 or pressing the
KEYLESS-GO start/stop button once or
twice, the
42
indicator lamp
illuminates. If an adult occupant is properly
sitting on the front passenger seat and the
system classifies the occupant as an adult,
the 42 indicator lamp will
illuminate and go out after approximately
6 seconds.
If the seat is not occupied and the system
classifies the front passenger seat as being
empty, the 42 indicator lamp
will illuminate and not go out.
Warning!
G
If the 42 indicator lamp does not
illuminate, the system is not functioning. You
must contact an authorized Mercedes-Benz
Center before seating any child on the front
passenger seat.
For more information, see the “Practical
hints” section (Y page 322).
Warning!
G
Never place anything between seat cushion
and child seat (e.g. pillow), since it reduces
the effectiveness of the OCS. The bottom and
back of the child seat must make full contact
Safety and security
Z
Page 48

Occupant safety
46
with the passenger seat cushion and
backrest.
If necessary, adjust the tilt of the passenger
seat backrest.
An incorrectly mounted child seat could cause
injuries to the child in case of an accident,
instead of increasing protection for the child.
Follow the manufacturer’s instructions for
installation of child seats.
BabySmart™ air bag deactivation system
Safety and security
The BabySmart™ air bag deactivation system
is standard equipment in Canada.
Warning!
G
According to accident statistics, children are
safer when properly restrained in the rear
seating positions than in the front seating
position. Thus, we strongly recommend that
children be placed in the rear seats whenever
possible. Regardless of seating position,
children 12 years old and under must be
seated and properly secured in an appropriate
infant restraint, toddler restraint, or booster
seat recommended for the size and weight of
the child.
The infant or child restraint must be properly
secured with the vehicle’s seat belt, the seat
belt and top tether strap, or lower anchors and
top tether strap, fully in accordance with the
child seat manufacturer’s instructions.
Occupants, especially children, should always
sit as upright as possible, wear the seat belt
properly and use an appropriately sized infant
restraint, toddler restraint, or booster seat
recommended for the size and weight of the
child.
Children can be killed or seriously injured by
an inflating air bag. Note the following
important information when circumstances
require you to place a child in the front
passenger seat:
R
Children 12 years old and under must never
ride in the front seat, except in a MercedesBenz authorized BabySmart™ compatible
child seat, which operates with the
BabySmart™ system installed in the vehicle
to deactivate the front passenger front air
bag when it is installed properly. Otherwise
they will be struck by the air bag when it
inflates in a crash. If this happens, serious
or fatal injury will result.
R
A child in a rear-facing child restraint on the
front passenger seat will be seriously
injured or even killed if the front passenger
front air bag inflates in a collision which
could occur under some circumstances,
even with the air bag technology installed
in your vehicle. The only means to
completely eliminate this risk is to never
place a child in a rear-facing child restraint
in the front seat. We therefore strongly
recommend that you always place a child
in a rear-facing child restraint in a backseat.
R
If you must install a BabySmart™
compatible rear-facing child restraint on
the front passenger seat because
circumstances require you to do so, make
sure the 42 indicator lamp is
illuminated, indicating that the front
passenger front air bag is deactivated.
Should the 42 indicator lamp
not illuminate or go out while the restraint
is installed, please check installation.
Periodically check the 42
indicator lamp while driving to make sure
the 42 indicator lamp is
illuminated. If the 42 indicator
lamp goes out or remains out, do not
transport a child on the front passenger
seat until the system has been repaired.
Page 49
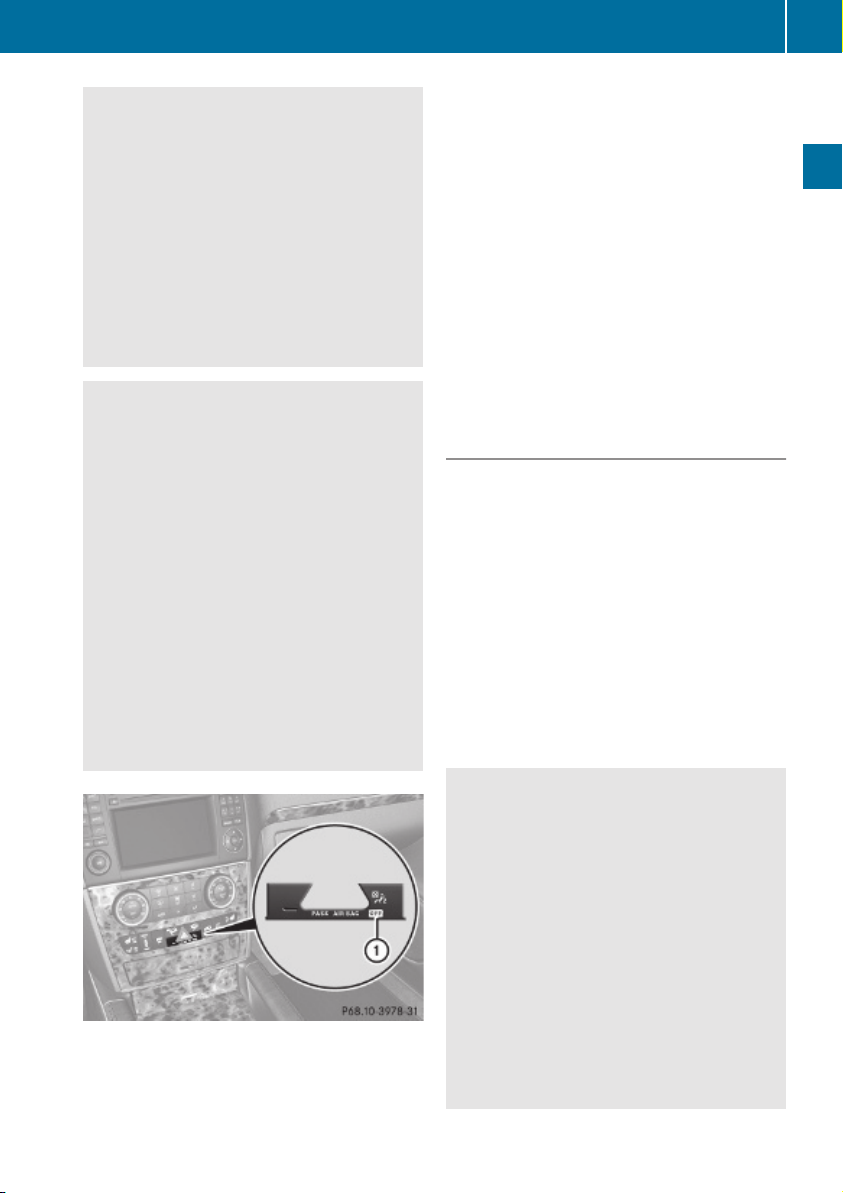
Occupant safety
47
A child in a rear-facing child restraint on the
front passenger seat will be seriously
injured or even killed if the front passenger
front air bag inflates.
R
If you have to place a child in a forwardfacing child restraint on the front passenger
seat, move the seat as far back as possible,
use the proper child restraint
recommended for the age, size and weight
of the child, and secure child restraint with
the vehicle’s seat belt according to the child
seat manufacturer’s instructions.
Warning!
G
When using a BabySmart™ compatible child
seat on the front passenger seat, the front
passenger front air bag will not deploy only if
the 42 indicator lamp remains
illuminated.
Please be sure to check the 42
indicator lamp every time you use a
BabySmart™ compatible child seat on the
front passenger seat. Should the
42 indicator lamp go out while
the restraint is installed, please check
installation. If the 42 indicator
lamp remains out, do not use the
BabySmart™ restraint to transport a child on
the front passenger seat until the system has
been repaired.
Special BabySmart™ compatible child seats,
designed for use with the Mercedes-Benz
system, are required for use with the
BabySmart™ air bag deactivation system.
Please contact an authorized Mercedes-Benz
Center for information on availability. With
the special child seat installed properly, the
front passenger front air bag will not deploy.
The 42 indicator lamp : will be
illuminated, except with the SmartKey
removed from the starter switch or with the
starter switch in position 0.
The system does not deactivate
R
the side impact air bag
R
the window curtain air bag
R
the Emergency Tensioning Device (ETD)
Self-test BabySmart™ without special
child seat installed
After turning the SmartKey in the starter
switch to position 1 or 2 or pressing the
KEYLESS-GO start/stop button once or
twice, the
42
indicator lamp
comes on for approximately 6 seconds and
then goes out.
If the 42 indicator lamp should
not come on or is continuously lit, the system
is not functioning. You must see an
authorized Mercedes-Benz Center before
seating any child on the front passenger seat.
More information can be found in the
“Practical hints” section (Y page 322).
Warning!
G
Do not place powered-on laptops, mobile
phones, electronic tags such as those used in
ski passes and like electronic devices on the
front passenger seat. Signals from such
devices may interfere with the BabySmart™
air bag deactivation system. Such signal
interference may cause the 42
indicator lamp not to come on during self-test.
The SRS indicator lamp + and/or the
42 indicator lamp could be
continuously lit, indicating that the system is
not functioning. The front passenger front air
bag could deploy inadvertently or fail to
deploy in an accident.
Safety and security
Z
Page 50

Occupant safety
48
Warning!
G
The BabySmart™ air bag deactivation system
will ONLY work with a special child seat
designed to operate with it. It will not work
with child seats which are not BabySmart™
compatible.
Never place anything between seat cushion
and child seat (e.g. pillow), since it reduces
the effectiveness off the BabySmart™ air bag
deactivation system. The bottom of the child
seat must make full contact with the front
passenger seat cushion. An incorrectly
mounted child seat could cause injuries to the
child in case of an accident, instead of
Safety and security
protecting the child.
Follow the manufacturer’s instructions for
installation of special child seats.
Seat belts
Safety notes
The use of seat belts and infant and child
restraint systems is required by law in all 50
states, the District of Columbia, the U.S.
territories and all Canadian provinces.
Even where this is not the case, all vehicle
occupants should have their seat belts
fastened whenever the vehicle is in motion.
For information on infants and children
traveling with you in the vehicle and restraint
systems for infants and children, see
“Children in the vehicle” (Y page 55).
Warning!
G
Always fasten your seat belt before driving off.
Always make sure all of your passengers are
properly restrained. You and your passengers
should always wear seat belts.
Failure to wear and properly fasten and
position your seat belt greatly increases your
risk of injuries and their likely severity in an
accident.
If you are ever in an accident, your injuries can
be considerably more severe without your
seat belt properly buckled. Without your seat
belt buckled, you are much more likely to hit
the interior of the vehicle or be ejected from
it. You can be seriously injured or killed.
In the same crash, the possibility of injury or
death is lessened if you are properly wearing
your seat belt. The air bags can only protect
as intended if the occupants are properly
wearing their seat belts.
Warning!
G
Never ride in a moving vehicle with the seat
backrest in an excessively reclined position as
this can be dangerous. You could slide under
the seat belt in a collision. If you slide under
it, the seat belt would apply force at the
abdomen or neck. That could cause serious
or even fatal injuries. The seat backrest and
seat belt provide the best restraint when the
wearer is in a position that is as upright as
possible and the seat belt is properly
positioned on the body.
Warning!
G
Never let more people ride in the vehicle than
there are seat belts available. Make sure
everyone riding in the vehicle is correctly
restrained with a separate seat belt. Never
use a seat belt for more than one person at a
time.
Warning!
G
Damaged seat belts or seat belts that have
been subjected to stress in an accident must
be replaced. Also, the seat belt anchoring
points must be checked.
Only use seat belts which have been approved
by Mercedes-Benz.
Do not make any modifications to the seat
belts. This can lead to unintended activation
of the ETDs or to their failure to activate when
necessary.
Do not bleach or dye seat belts as this may
severely weaken them. In a crash they may
not be able to provide adequate protection.
Page 51

Occupant safety
49
Have all work carried out only by qualified
technicians. Contact an authorized
Mercedes-Benz Center.
Proper use of seat belts
Warning!
G
USE SEAT BELTS PROPERLY
R
Seat belts can only protect when used
properly. Never wear seat belts in any other
way than as described in this section, as
that could result in serious injuries in case
of an accident.
R
Each occupant should wear their seat belt
at all times, because seat belts help reduce
the likelihood of and potential severity of
injuries in accidents, including rollovers.
The integrated restraint system includes
SRS (driver front air bag, driver side knee
bag, front passenger front air bag, side
impact air bags, window curtain air bags for
door windows), Emergency Tensioning
Devices (ETDs), seat belt force limiters, and
front seat knee bolsters.
The system is designed to enhance the
protection offered to properly belted
occupants in certain frontal (front air bags,
driver side knee bag and ETDs) and side
(side impact air bags, window curtain air
bags, and ETDs) impacts which exceed
preset deployment thresholds and in
certain rollovers (window curtain air bags
and ETDs).
R
Never wear the shoulder belt under your
arm, against your neck or off your shoulder.
In a frontal crash, your body would move
too far forward. That would increase the
chance of head and neck injuries. The seat
belt would also apply too much force to the
ribs or abdomen, which could severely
injure internal organs such as your liver or
spleen.
Adjust the seat belt so that the shoulder
section is located as close as possible to
the middle of the shoulder. It should not
touch the neck. Never pass the shoulder
portion of the seat belt under your arm. For
this purpose, you can adjust the height of
the seat belt outlet.
R
Position the lap belt as low as possible on
your hips and not across the abdomen. If
the lap belt is positioned across your
abdomen, it could cause serious injuries in
a crash.
R
Never wear seat belts over rigid or
breakable objects in or on your clothing,
such as eyeglasses, pens, keys etc., as
these might cause injuries.
R
Make sure the seat belt is always fitted
snugly. Take special care of this when
wearing loose clothing.
R
Never use a seat belt for more than one
person at a time. Do not fasten a seat belt
around a person and another person or
other objects at the same time.
R
Seat belts should not be worn twisted. In a
crash, you would not have the full width of
the seat belt to distribute impact forces.
The twisted seat belt against your body
could cause injuries.
R
Pregnant women should also always use a
lap/shoulder belt. The lap belt portion
should be positioned as low as possible on
the hips to avoid any possible pressure on
the abdomen.
R
Place the seat backrest in a position that is
as upright as possible.
R
Check your seat belt during travel to make
sure it is properly positioned.
R
Never place your feet on the instrument
panel, dashboard, or on the seat. Always
keep both feet on the floor in front of the
seat.
R
When using a seat belt to secure infant
restraints, toddler restraints, or children in
booster seats, always follow the child seat
manufacturer’s instructions.
Safety and security
Z
Page 52
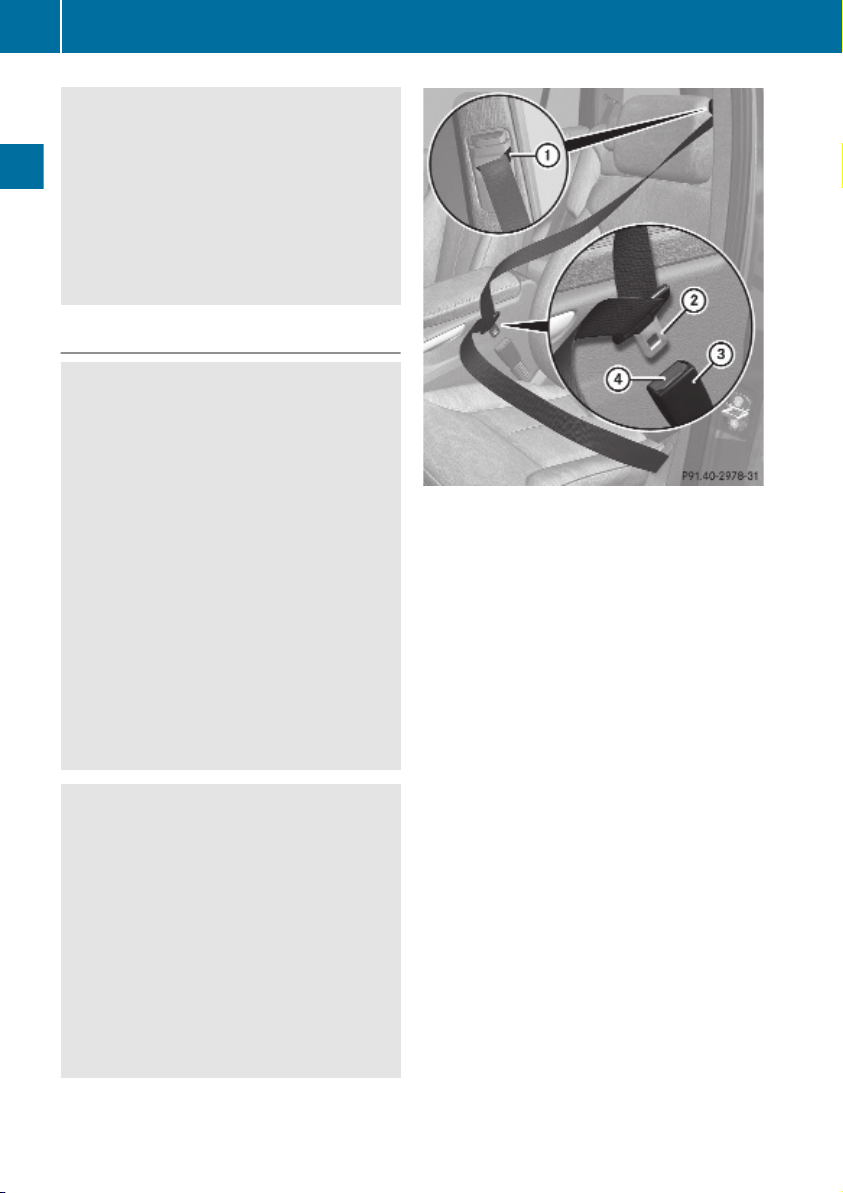
Occupant safety
50
Warning!
G
Do not pass seat belts over sharp edges. They
could tear.
Do not allow the seat belt to get caught in the
door or in the seat adjustment mechanism.
This could damage the seat belt.
Never attempt to make modifications to seat
belts. This could impair the effectiveness of
the seat belts.
Fastening the seat belts
Warning!
G
According to accident statistics, children are
Safety and security
safer when properly restrained in the rear
seating positions than in the front seating
position. Thus, we strongly recommend that
children be placed in the rear seats whenever
possible. Regardless of seating position,
children 12 years old and under must be
seated and properly secured in an
appropriately sized infant restraint, toddler
restraint, or booster seat recommended for
the size and weight of the child. For additional
information, see “Children in the vehicle”.
A child’s risk of serious or fatal injuries is
significantly increased if the child restraints
are not properly secured in the vehicle and/
or the child is not properly secured in the child
restraint.
Warning!
G
Vehicles with BabySmart™ air bag
deactivation system, Canada only: Children
12 years old and under must never ride in the
front seat, except in a Mercedes-Benz
authorized BabySmart™ compatible child
seat, which operates with the BabySmart™
system installed in the vehicle to deactivate
the front passenger front air bag when it is
installed properly. Otherwise they will be
struck by the air bag when it inflates in a
crash. If this happens, serious or fatal injury
will result.
X
With a smooth motion, pull the seat belt out
of seat belt outlet :.
X
Place the shoulder portion of the seat belt
across the top of your shoulder and the lap
portion across your hips.
X
Push latch plate ; into buckle = until it
clicks.
Seat belt adjustment function: The seat
belts on both front seats adjust to the
upper body automatically as necessary
(Y page 51).
X
If necessary, adjust the seat belt to the
correct height (Y page 51).
X
If necessary, tighten the lap portion to a
snug fit by pulling shoulder portion up.
All lap/shoulder belts except the driver’s seat
belt have special seat belt retractors to
secure child restraints properly. For more
information on special seat belt retractors,
see “Infant and child restraint system”
(Y page 56).
To release the seat belt with seat belt release
button ?, see (Y page 51).
Page 53
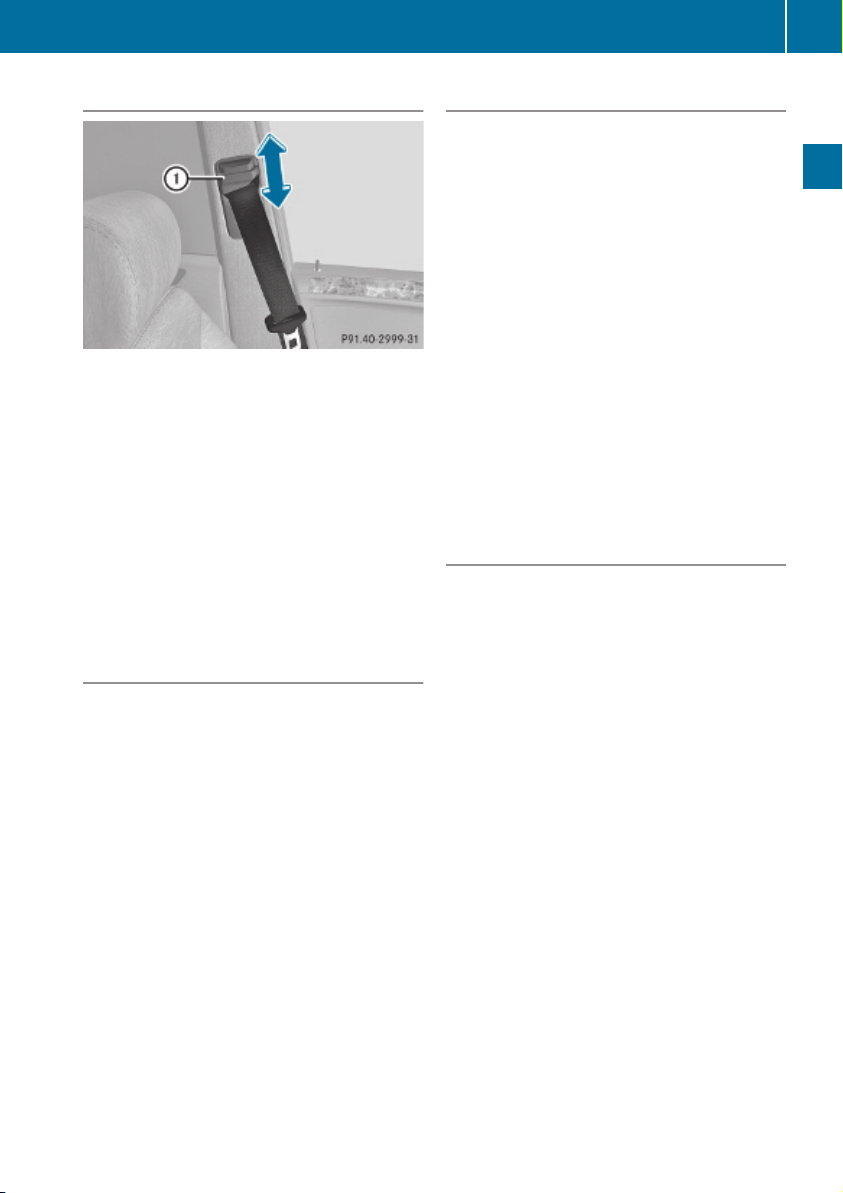
Occupant safety
51
Seat belt outlet height adjustment
X
Raising: Slide the seat belt outlet height
adjuster upward.
The seat belt outlet height adjuster
engages in different positions.
X
Lowering: Press and hold release
button :.
X
Slide the seat belt outlet height adjuster
downward.
X
Release button : and make sure the seat
belt outlet height adjuster engages into
place.
Seat belt adjustment function
The seat belt adjustment function adjusts the
seat belts on both front seats to the upper
body of the respective vehicle occupant. The
seat belt will be pulled slightly tighter for that
purpose when
R
you engage the latch plate into the buckle
and then turn the SmartKey in the starter
switch to position 2
R
the SmartKey in the starter switch is in
position 2 and you then engage the latch
plate in the buckle
The seat belt adjustment function takes place
with a certain amount of retracting force
when the system senses slack between the
vehicle occupant and the seat belt. Do not
retain the seat belt during this procedure. You
can activate or deactivate the seat belt
adjustment function via the control system
(Y page 139).
Releasing the seat belts
X
Press seat belt release button ?
(Y page 50).
Allow the retractor to completely rewind
the seat belt by guiding latch plate ;
(Y page 50).
!
Make sure the seat belt retracts
completely. Otherwise the seat belt and/or
latch plate could get caught or pinched in
the door or in the seat mechanism. This can
damage the seat belt and impair its
effectiveness, and/or cause damage to the
door and/or door trim panel. Such damage
is not covered by the Mercedes-Benz
Limited Warranty.
Damaged seat belts must be replaced.
Contact an authorized Mercedes-Benz
Center.
Enhanced seat belt reminder system
When the engine is started, the seat belt
telltale 7 will always illuminate for
6 seconds to remind you and your passengers
to fasten your seat belts.
If the driver’s seat belt is not fastened when
the engine is started, an additional warning
chime will sound. The warning chime goes out
after approximately 6 seconds or once the
driver’s seat belt is fastened.
If after these 6 seconds the driver’s or the
front passenger’s seat belt (with the front
passenger seat occupied) is not fastened with
front doors closed,
R
the seat belt telltale 7 remains
illuminated for as long as either the driver’s
or front passenger’s seat belt is not
fastened.
R
and if the vehicle speed once exceeds
15 mph (25 km/h), the seat belt telltale
7 starts flashing and a warning chime
sounds with increasing intensity for a
maximum of 60 seconds or until the
driver’s and front passenger’s seat belt are
fastened.
Safety and security
Z
Page 54

Occupant safety
52
If you and/or your passenger release the
seat belt during driving, the seat belt
telltale 7 starts flashing and the
warning chime sounds as described before.
If the driver’s or the front passenger’s seat
belt remains unfastened after 60 seconds,
the warning chime stops sounding, the seat
belt telltale 7 stops flashing but
continues to be illuminated.
After a vehicle standstill, the warning chime
is reactivated and the seat belt telltale
7 is flashing again if the vehicle speed
once exceeds 15 mph (25 km/h).
The seat belt telltale 7 will only go out if
Safety and security
both the driver’s and the front passenger’s
seat belt (with the front passenger seat
occupied) are fastened, or the vehicle is
standing still and a front door is opened.
For more information, see “Practical hints”
(Y page 317).
Emergency Tensioning Device (ETD),
seat belt force limiter
The seat belts for the front seats and second
row outer seats are equipped with ETDs and
seat belt force limiters. The seat belts for the
third-row seats are equipped with ETDs.
The ETDs are designed to activate in the
following cases:
R
in frontal or rear-end impacts exceeding
the system’s preset deployment threshold
R
in side impacts exceeding the system’s
preset deployment threshold on the far
side of the impact
R
in certain vehicle rollovers
R
if the restraint systems are operational and
functioning correctly, see “SRS indicator
lamp” (Y page 36)
The ETDs for the front seats will only activate
if the front seat belts are fastened (latch plate
properly inserted into buckle).
The ETDs for the rear outer seats (second-row
seats) or rear seats (third-row seats) will
activate with or without the respective seat
belts fastened.
In an impact, the ETDs remove slack from the
seat belts in such a way that the seat belts fit
more snugly against the body. Seat belt force
limiters, when activated, are employed to
help reduce the peak force exerted by the
seat belts on occupants during a crash.
i
The ETDs do not correct an incorrect seat
position or incorrectly worn seat belts.
The ETDs do not pull occupants back
toward the seat backrest.
Warning!
G
Pyrotechnic ETDs that were activated must be
replaced.
For your safety, when disposing of the
pyrotechnic ETDs always follow our safety
instructions. These are available at any
authorized Mercedes-Benz Center.
The PRE-SAFE® system has electrically
operated reversible pre-tensioners that do
not require replacement after activation.
Preventive occupant safety (PRESAFE®)
Warning!
G
The PRE-SAFE® system is intended to reduce
the effects of an accident on vehicle
occupants who are wearing their seat belt
properly. Despite your vehicle being equipped
with the PRE-SAFE® system, the possibility of
personal injuries occurring as a result of an
accident cannot be eliminated. Therefore,
always drive carefully and adjust your driving
to the prevailing road, weather, and traffic
conditions.
Page 55

The PRE-SAFE® system takes preventive
measures to better protect the occupants
from the possibility of personal injuries in the
following hazardous situations:
R
emergency braking maneuvers with the
Brake Assist System (BAS) (Y page 63)
activated
R
critical dynamic driving situations, e.g.
when the vehicle has been caused to
understeer or oversteer because it has
exceeded its physical limitations or in case
of evasive steering maneuvers at speeds
above approximately 85 mph (140 km/h)
PRE-SAFE® takes the following measures
when it is activated:
R
The front seat belts are pre-tensioned
automatically.
R
Vehicles with front passenger seat memory
function: If the passenger seat is in an
unfavorable position, the seat will be
adjusted to a position that seeks to better
protect the occupant.
R
If the vehicle is in a critical dynamic driving
situation, the door windows close, except
for a minimal gap that remains open.
R
Vehicles with power tilt/sliding sunroof: If
the vehicle is in a critical dynamic driving
situation, the tilt/sliding sunroof also
closes, except for a minimal gap that
remains open.
If the closing procedure of any of these
elements is blocked, it will stop and open
slightly.
Once the hazardous situation no longer exists
and an accident has been avoided, the seat
belt pre-tensioning is deactivated. All of the
PRE-SAFE® settings can be re-adjusted
following the critical driving event.
If the seat belts do not release:
X
Adjust the seat backrest or seat slightly to
the rear until the seat belt tension is
reduced.
The locking mechanism releases.
Occupant safety
!
When moving the seats, make sure there
are no items in the footwell or behind the
seats. Otherwise, you could damage the
seats and/or the items.
For information on the seat belt adjustment
function as an integrated comfort feature of
PRE-SAFE®, see (Y page 51).
NECK-PRO active front head restraints
The NECK-PRO active front head restraints
are intended to offer the driver and front
passenger increased protection from
whiplash-type injuries. In the event of a rearend collision, the NECK-PRO active front head
restraints on the front seats are designed to
move forward in the direction of travel. They
thus provide the head with increased support
earlier on in the collision sequence. The
NECK-PRO active front head restraints will
move forward whether the seats are occupied
or not.
Warning!
G
Do not attach any objects (e.g. hangers) to the
head restraint posts. Otherwise, the NECKPRO active front head restraints may not be
able to function properly or offer the intended
degree of protection they were designed for
in the event of a rear-end collision.
Warning!
G
Only use seat or head restraint covers which
have been tested and approved by MercedesBenz for your vehicle model.
Using other seat or head restraint covers may
interfere with or prevent the activation of the
NECK-PRO active front head restraints and/
or the deployment of the front side impact air
bags.
Contact an authorized Mercedes-Benz Center
for availability.
When the NECK-PRO active front head
restraints have been triggered in an accident,
the NECK-PRO active front head restraints
53
Safety and security
Z
Page 56
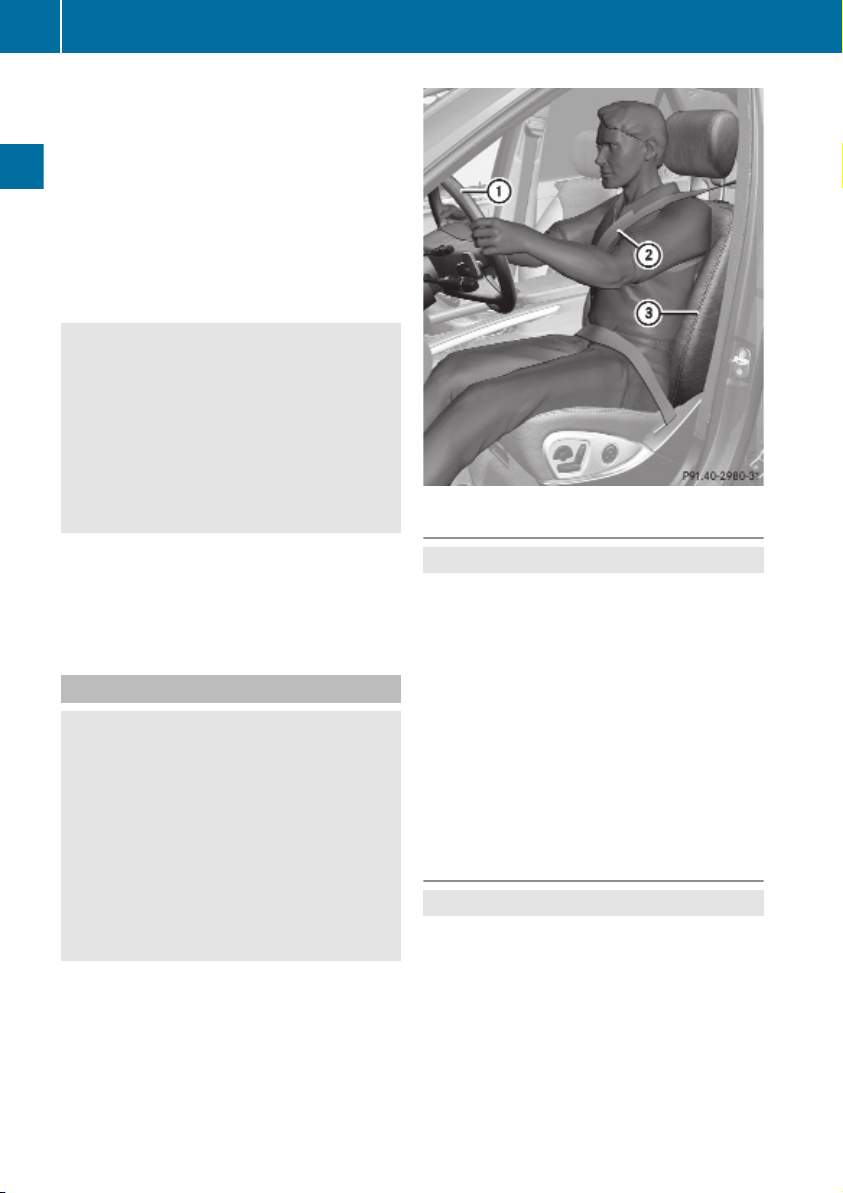
Occupant safety
54
must be reset. Otherwise, the NECK-PRO
active front head restraints cannot offer any
additional protection in the event of another
rear-end collision.
For information on resetting the activated
NECK-PRO active front head restraints, see
“Resetting activated head restraints”
(Y page 325).
You cannot remove the NECK-PRO active
front head restraints.
Warning!
G
For your protection, drive only with properly
positioned head restraints.
Adjust the head restraint so that it is as close
Safety and security
to the head as possible and the center of the
head restraint supports the back of the head
at eye level. This will reduce the potential for
injury to the head and neck in the event of an
accident or similar situation.
For information on head restraint adjustment,
see “Head restraint height” (Y page 83), or
see “Head restraint fore and aft adjustment”
(Y page 84).
Correct driver seat adjustment
Warning!
G
In order to avoid possible loss of vehicle
control the following must be done before the
vehicle is put into motion:
R
seat adjustment
R
head restraint adjustment
R
steering wheel adjustment
R
rear view mirror adjustment
R
fastening of seat belts
Steering wheel
Observe Safety notes, see page 91.
G
X
Position steering wheel : properly. See
(Y page 91) for manual adjustment and
(Y page 92) for electrical adjustment.
Make sure:
R
You can reach the steering wheel with your
arms slightly bent at the elbows.
R
You can move your legs freely.
R
All displays (including malfunction and
indicator lamps) on the instrument cluster
are clearly visible.
Seat belt
Observe Safety notes, see page 48.
G
X
Fasten and position your seat belt ;
correctly (Y page 50).
Page 57

Occupant safety
55
Make sure:
R
The seat belt is always fitted snugly.
R
Adjust the seat belt so that the shoulder
section is located as close as possible to
the middle of the shoulder.
R
Place the lap portion of the seat belt as low
as possible on your hips.
Seat and head restraint
Observe Safety notes, see page 82.
G
X
Position seat = and head restraint
properly. See (Y page 83) for seat and
head restraint adjustment.
Observe the following points:
R
Always be in a properly seated position.
R
The position should be as far rearward from
the front air bag in the steering wheel as
possible, while still permitting proper
operation of vehicle controls.
R
Adjust the seat to a comfortable seating
position that still allows you to reach the
accelerator/brake pedal safely.
R
The seat must be adjusted so that you can
correctly fasten and position your seat belt.
R
The seat backrest must be in a position that
is as nearly upright as possible.
R
Adjust the seat cushion so that the front
edge of the seat cushion lightly supports
your legs.
R
Adjust the head restraint so that it is as
close to the head as possible and the
center of the head restraint supports the
back of the head at eye level.
R
Never place hands under the seat or near
any moving parts while the seat is being
adjusted.
Children in the vehicle
Safety notes
If an infant or child is traveling with you in the
vehicle:
X
Secure the child using an infant or child
restraint appropriate to the age and size of
the child.
X
Make sure the infant or child is properly
secured at all times while the vehicle is in
motion.
Warning!
G
When leaving the vehicle, always remove the
SmartKey from the starter switch. Always
take the SmartKey with you and lock the
vehicle. Do not leave children unattended in
the vehicle, even if they are secured in a child
restraint system, or with access to an
unlocked vehicle. A child’s unsupervised
access to a vehicle could result in an accident
and/or serious personal injury. The children
could
R
injure themselves on parts of the vehicle
R
be seriously or fatally injured through
excessive exposure to extreme heat or cold
R
injure themselves or cause an accident with
vehicle equipment that can be operated
even if the SmartKey is removed from the
starter switch or removed from the vehicle,
such as seat adjustment, steering wheel
adjustment, or the memory function
If children open a door, they could injure other
persons or get out of the vehicle and injure
themselves or be injured by following traffic.
Do not expose the child restraint system to
direct sunlight. The child restraint system’s
metal parts, for example, could become very
hot, and the child could be burned by these
parts.
Safety and security
Warning!
G
Do not carry heavy or hard objects in the
passenger or cargo compartment unless they
are firmly secured in place.
Z
Page 58

Occupant safety
56
Unsecured or improperly positioned cargo
increases a child’s risk of injury in the event
of
R
strong braking maneuvers
R
sudden changes of direction
R
an accident
Infant and child restraint systems
Observe Safety notes, see page 55.
G
We recommend all infants and children be
properly restrained at all times while the
vehicle is in motion.
Safety and security
Canada only:
Only use a BabySmart™ compatible child
restraint for the front passenger seat in this
vehicle.
All lap/shoulder belts except the driver’s seat
belt have special seat belt retractors for
secure fastening of child restraints.
To fasten a child restraint, follow the child
restraint manufacturer’s instructions for
mounting.
To activate the special seat belt retractor:
X
Pull the shoulder belt out completely and
let it retract.
During seat belt retraction, a ratcheting
sound can be heard to indicate that the
special seat belt retractor is activated.
The seat belt is now locked.
X
Push down on child restraint to take up any
slack.
To deactivate the special seat belt retractor:
X
Release the seat belt buckle and let the
seat belt retract completely.
The seat belt can then again be used in the
usual manner.
To deactivate the special seat belt retractor
for the front passenger seat, the front
passenger seat must be in the most backward
position.
Warning!
G
Never release the seat belt buckle while the
vehicle is in motion, since the special seat belt
retractor will be deactivated.
i
Information on child seats with mounting
fittings for tether anchorages
(Y page 58).
For information on LATCH-type child seat
anchors (Y page 59).
The use of infant or child restraints is required
by law in all 50 states, the District of
Columbia, the U.S. territories and all
Canadian provinces.
Infants and small children should be seated
in an appropriate infant or child restraint
system. They must be properly secured in
accordance with the manufacturer’s
instructions for the child restraint. All infant
or child restraint systems must comply with
U.S. Federal Motor Vehicle Safety Standards
213 and 225 and Canadian Motor Vehicle
Safety Standards 213 and 210.2.
A statement by the child restraint
manufacturer of compliance with these
standards can be found on the instruction
label on the restraint and in the instruction
manual provided with the restraint.
When using any infant restraint, toddler
restraint, or booster seat, make sure to
carefully read and follow all manufacturer’s
instructions for installation and use.
Please read and observe warning labels
affixed to the inside of the vehicle and to
infant or child restraints.
Warning!
G
According to accident statistics, children are
safer when properly restrained in the rear
seating positions than in the front seating
position. Thus, we strongly recommend that
children be placed in the rear seats whenever
possible. Regardless of seating position,
children 12 years old and under must be
seated and properly secured in an appropriate
Page 59

Occupant safety
57
infant restraint, toddler restraint, or booster
seat recommended for the size and weight of
the child.
The infant or child restraint must be properly
secured with the vehicle’s seat belt, the seat
belt and top tether strap, or lower anchors and
top tether strap, fully in accordance with the
child seat manufacturer’s instructions.
Occupants, especially children, should always
sit as upright as possible, wear the seat belt
properly and use an appropriately sized infant
restraint, toddler restraint, or booster seat
recommended for the size and weight of the
child.
Children can be killed or seriously injured by
an inflating air bag. Note the following
important information when circumstances
require you to place a child in the front
passenger seat:
R
USA only: Your vehicle is equipped with air
bag technology designed to deactivate the
front passenger front air bag in your vehicle
when the system senses the weight of a
typical 12-month-old child or less along
with the weight of a standard appropriate
child restraint on the front passenger seat.
R
USA only: For children larger than the
typical 12-month-old child, the front
passenger front air bag may or may not be
activated. Always make sure the
42 indicator lamp is
illuminated, indicating that the front
passenger front air bag is deactivated.
R
Canada only: Children 12 years old and
under must never ride in the front seat,
except in a Mercedes-Benz authorized
BabySmart™ compatible child seat, which
operates with the BabySmart™ system
installed in the vehicle to deactivate the
front passenger front air bag when it is
installed properly. Otherwise they will be
struck by the air bag when it inflates in a
crash. If this happens, serious or fatal injury
will result.
R
A child in a rear-facing child restraint on the
front passenger seat will be seriously
injured or even killed if the front passenger
front air bag inflates in a collision which
could occur under some circumstances,
even with the air bag technology installed
in your vehicle. The only means to
completely eliminate this risk is to never
place a child in a rear-facing child restraint
in the front seat. We therefore strongly
recommend that you always place a child
in a rear-facing child restraint in a backseat.
R
If you must install a rear-facing child
restraint on the front passenger seat
because circumstances require you to do
so, make sure the 42
indicator lamp is illuminated, indicating
that the front passenger front air bag is
deactivated. Should the 42
indicator lamp not illuminate or go out while
the restraint is installed, please check
installation. Periodically check the
42 indicator lamp while
driving to make sure the 42
indicator lamp is illuminated. If the
42 indicator lamp goes out or
remains out, do not transport a child on the
front passenger seat until the system has
been repaired.
A child in a rear-facing child restraint on the
front passenger seat will be seriously
injured or even killed if the front passenger
front air bag inflates.
R
If you have to place a child in a forwardfacing child restraint on the front passenger
seat, move the seat as far back as possible,
use the proper child restraint
recommended for the age, size and weight
of the child, and secure child restraint with
the vehicle’s seat belt according to the child
seat manufacturer’s instructions.
Warning!
G
Infants and small children should never share
a seat belt with another occupant. During an
Safety and security
Z
Page 60
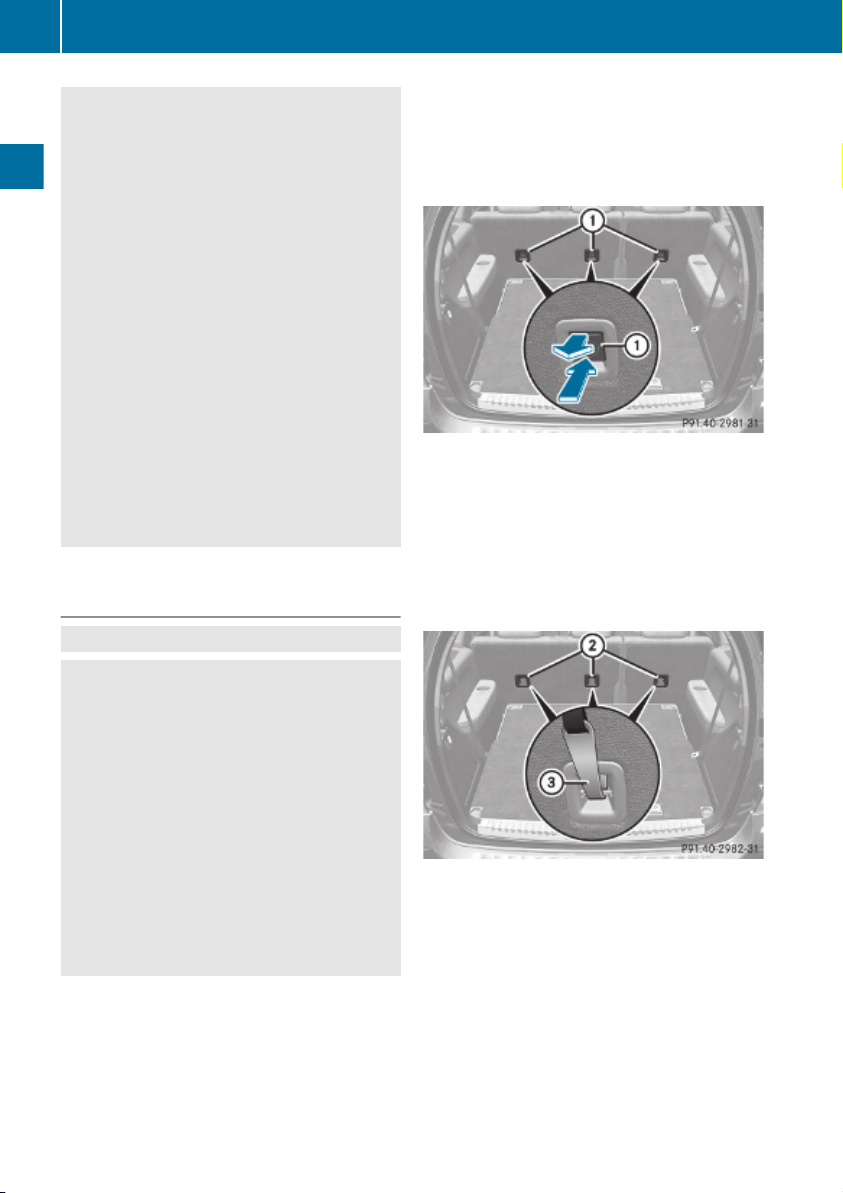
Occupant safety
58
accident, they could be crushed between the
occupant and seat belt.
A child’s risk of serious or fatal injuries is
significantly increased if the child restraints
are not properly secured in the vehicle and/
or the child is not properly secured in the child
restraint.
Children too big for a toddler restraint must
ride in seats using regular seat belts. Position
shoulder belt across chest and shoulder, not
face or neck. A booster seat may be
necessary to achieve proper seat belt
positioning for children over 41 lb (18 kg) until
they reach a height where a lap/shoulder belt
Safety and security
fits properly without a booster.
When the child restraint is not in use, remove
it from the vehicle or secure it with the seat
belt to prevent the child restraint from
becoming a projectile in the event of an
accident.
Installation of infant and child restraint
systems
Observe Safety notes, see page 55.
G
Warning!
G
Always lock the seat backrests in their upright
position when the rear seats are occupied by
passengers. Lock the seat backrests in their
upright position after installing top tether
straps or when the extended cargo
compartment is not in use. Make sure that
seat backrests are secured properly by
pushing and pulling on the seat backrests. If
a seat backrest is not locked properly, the
seat backrest could fold. The child seat would
no longer be supported properly or positioned
to provide its intended benefit. That could
cause serious or even fatal injuries.
Top tether straps enable an additional
connection to be made between child
restraint systems secured with LATCH-type
anchors and rear seats. This can further
reduce the risk of injury.
X
Press in lower part of anchorage ring
cover : on the seat backrest on which a
child seat is to be installed.
X
Pull on upper part of anchorage ring
cover : to remove cover.
X
Store anchorage ring cover : in a
convenient place (e.g. glove box).
X
Move the respective head restraint to its
uppermost position (Y page 88).
This vehicle is equipped with tether
anchorages for a top tether strap at the
second-row seat backrest. For installing an
infant and child restraint system at the
third-row seats, use the cargo tie-down rings
in the cargo compartment (Y page 200).
Page 61
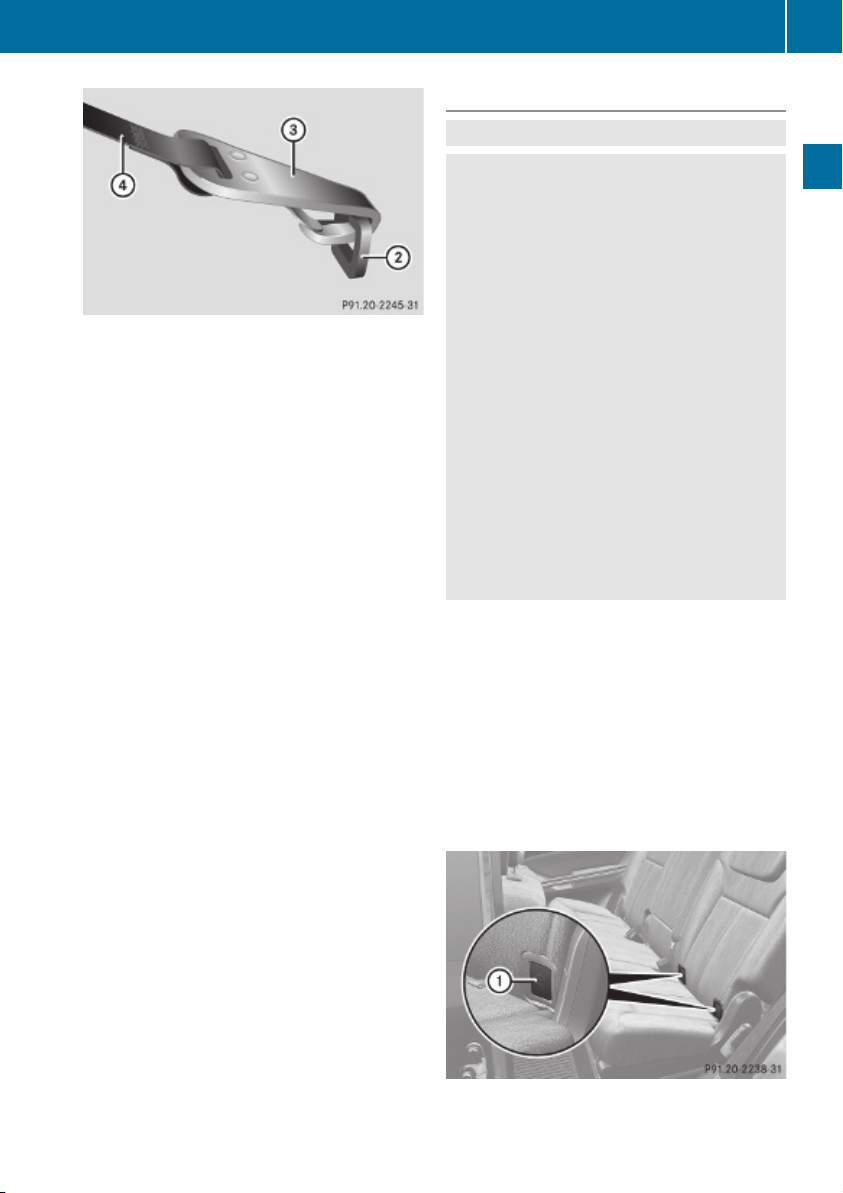
X
Guide top tether strap ? between the
head restraint and top of the seat backrest.
X
Securely fasten hook =, which is part of
top tether strap ?, to anchorage ring ;.
Make sure
R
hook = is attached to anchorage ring ;
beyond the safety catch, as illustrated
R
top tether strap ? is not twisted
R
the head restraint is installed and
positioned such that top tether strap ?
can pass freely between the head restraint
and top of the seat backrest
R
top tether strap ? is positioned between
the seat backrest and the cargo
compartment cover blind (if installed)
R
top tether strap ? is positioned between
the seat backrest and the cargo net (if
installed)
X
Lower the head restraint if necessary
(Y page 88).
Make sure the top tether strap can pass
freely between the head restraint and top
of the seat backrest.
X
Install the child restraint system and
tighten the top tether strap according to
the child restraint manufacturer’s
instructions.
After removing the child restraint system and
top tether strap ?:
X
Reinstall anchorage ring cover :.
Occupant safety
Child seat anchors – LATCH-type
Observe Safety notes, see page 55.
G
Warning!
G
Children too big for a toddler restraint must
ride in seats using regular seat belts. Position
shoulder belt across chest and shoulder, not
face or neck.
A booster seat may be necessary to achieve
proper seat belt positioning for children over
41 lb (18 kg) until they reach a height where
a lap/shoulder belt fits properly without a
booster.
Install child seat according to manufacturer’s
instructions.
The child seat must be firmly attached to both
anchors.
An incorrectly mounted child seat may come
loose during an accident which could result in
serious injury or death to the child.
Damaged or impact damaged child seats or
child seat mounting fittings must be replaced.
Each of the outboard second-row seats and
third-row seats has two LATCH-type anchors
for the installation of a LATCH-type child seat
with matching mounting fittings.
Non-LATCH-type child seats may also be used
and can be installed using the vehicle’s seat
belt system. Install child seat according to the
manufacturer’s instructions.
The LATCH-type anchors are blended with
covers.
Example, second-row seats
59
Safety and security
Z
Page 62
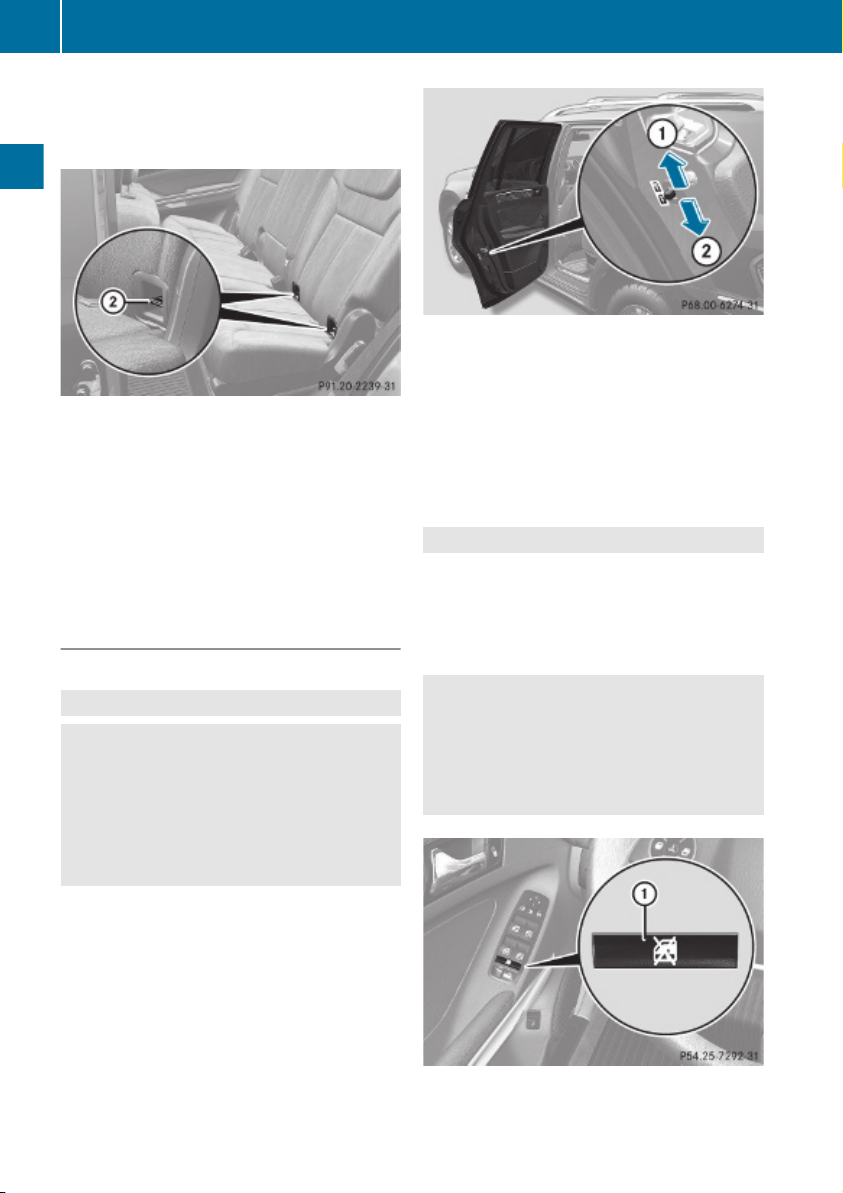
Occupant safety
60
X
Remove anchorage ring covers : from
anchors ; of the seat on which a child seat
is to be installed.
Safety and security
Example, second-row seats
X
Install a LATCH-type child seat according
to the manufacturer’s instructions.
A rigid connection between the child seat
and the body of the vehicle is established.
X
Make sure that the seat belt for the rear
center seat can operate freely with a child
seat installed.
Child safety
Child safety locks
Observe Safety notes, see page 55.
G
Warning!
G
Children could open a rear door from the
inside. This may cause serious personal injury
or an accident. Therefore, secure the rear
doors with the child safety locks whenever
children are riding in the back seats of the
vehicle.
X
Securing: Press the lever down in direction
of arrow ;.
X
Check to make sure the child safety locks
are working properly.
X
Releasing: Press the lever up in direction
of arrow :.
Override switch
Observe Safety notes, see page 55.
G
With the override switch you can disable the
rear door window switches in the rear door
panels. This can be useful, for instance, when
you have children riding in the rear passenger
compartment.
Warning!
G
Activate the override switch when children
are riding in the back seats of the vehicle. The
children may otherwise injure themselves,
e.g. by becoming trapped in the rear door
window opening.
The child safety locks on the rear doors
enable you to secure each rear door
individually. You cannot open a secured rear
door from the inside. You can open the rear
door from the outside when the vehicle is
unlocked.
X
Activating: Press override switch :.
The switch engages in recessed position.
Page 63
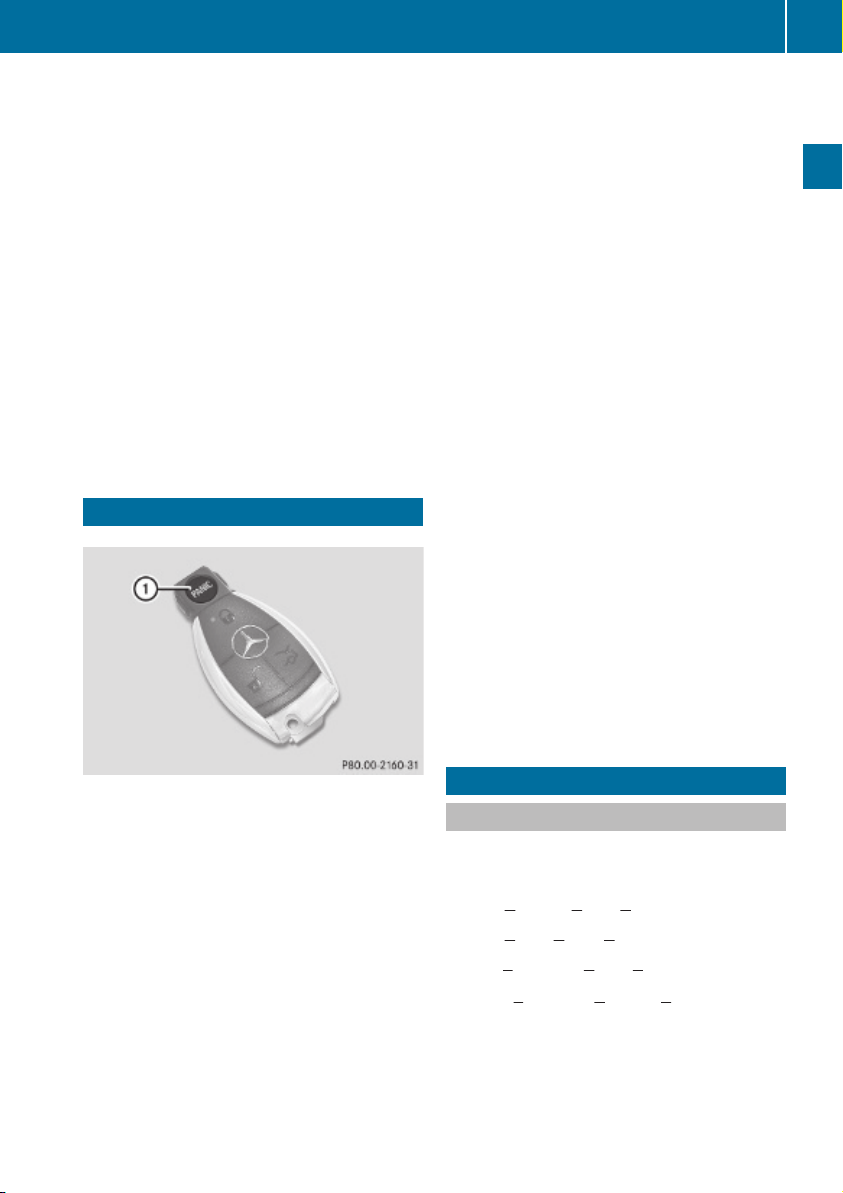
Driving safety systems
61
The rear door windows can no longer be
operated using the respective switch
located in the rear doors.
You can still operate the rear door windows
using the switches located on the door
control panel of the driver’s door.
X
Deactivating: Press override switch :
again.
The switch disengages from its recessed
position back to its original position.
The rear door windows can be operated
again using the respective switch located
in the rear doors.
For more information on power windows, see
the “Controls in detail” section
(Y page 105).
Panic alarm
i USA only:
This device complies with Part 15 of the
FCC Rules. Operation is subject to the
following two conditions:
1. This device may not cause harmful
interference, and
2. this device must accept any
interference received, including
interference that may cause undesired
operation.
Any unauthorized modification to this
device could void the user’s authority to
operate the equipment.
i Canada only:
This device complies with RSS-210 of
Industry Canada. Operation is subject to
the following two conditions:
1. This device may not cause interference,
and
2. this device must accept any
interference received, including
interference that may cause undesired
operation of the device.
Any unauthorized modification to this
device could void the user’s authority to
operate the equipment.
Safety and security
Example illustration: SmartKey with KEYLESS-GO
X
Activating: Press and hold !
button : for at least 1 second.
An audible alarm and flashing exterior
lamps will operate briefly.
X
Deactivating: Press ! button : again.
or
X
Insert the SmartKey into the starter switch.
or
X
Press the KEYLESS-GO start/stop button.
The SmartKey with KEYLESS-GO must be
inside the vehicle.
Driving safety systems
Introduction
This section contains information about the
following driving safety systems:
R
ABS (
Antilock Brake System)
R
BAS (Brake Assist System)
R
EBP (Electronic Brake Proportioning)
R
ESP® (Electronic Stability Program)
i
In winter operation, the maximum
effectiveness of most of the driving
systems described in this section is only
Z
Page 64

Driving safety systems
62
achieved with winter tires, or snow chains
as required.
Safety notes
Warning!
G
The following factors increase the risk of
accidents:
R
Excessive speed, especially in turns
R
Wet and slippery road surfaces
R
Following another vehicle too closely
The driving safety systems described in this
section cannot reduce these risks or prevent
Safety and security
the natural laws of physics from acting on the
vehicle. They cannot increase braking or
steering efficiency beyond that afforded by
the condition of the vehicle brakes and tires
or the traction afforded.
Only a safe, attentive, and skillful driver can
prevent accidents.
The capabilities of a vehicle equipped with the
driving safety systems described in this
section must never be exploited in a reckless
or dangerous manner which could jeopardize
the user’s safety or the safety of others.
Always adjust your driving style to the
prevailing road and weather conditions and
keep a safe distance to other road users and
objects on the street.
If a driving system malfunctions, other driving
safety systems may also switch off. Observe
indicator and warning lamps that may come
on as well as messages in the multifunction
display that may appear.
ABS
Observe Safety notes, see page 62.
G
Warning!
G
Do not pump the brake pedal. Use firm, steady
brake pedal pressure instead. Pumping the
brake pedal defeats the purpose of the ABS
and significantly reduces braking
effectiveness.
The Antilock Brake System (ABS) regulates
the brake pressure so that the wheels do not
lock during braking. This allows you to
maintain the ability to steer your vehicle.
The ABS is functional above a speed of
approximately 5 mph (8 km/h) independent
of road surface conditions.
On slippery road surfaces, the ABS will
respond even to light brake pressure.
The ABS indicator lamp ! indicator lamp
in the instrument cluster comes on when you
switch on the ignition. It goes out when the
engine is running.
Braking
At the instant one of the wheels is about to
lock up, a slight pulsation can be felt in the
brake pedal. The pulsation indicates that the
ABS is in the regulating mode.
X
Keep firm and steady pressure on the brake
pedal while you feel the pulsation.
Continuous, steady brake pedal pressure
yields the advantages provided by the ABS,
namely braking power and the ability to steer
the vehicle.
The pulsating brake pedal can be an
indication of hazardous road conditions and
functions as a reminder to take extra care
while driving.
Emergency brake maneuver
X
Keep continuous full pressure on the brake
pedal.
Warning!
G
If the ABS malfunctions, other driving safety
systems such as the BAS or the ESP® are also
switched off. Observe indicator and warning
lamps that may come on as well as messages
in the multifunction display that may appear.
Page 65

Driving safety systems
63
If the ABS malfunctions, the wheels may lock
during hard braking, reducing steering
capability and extending the braking distance.
Off-road ABS
With the off-road driving program switched
on, or with the transmission in LOW RANGE
mode, the ABS designed for off-road driving
is activated automatically.
When applying the brakes at speeds below
18 mph (30 km/h), the front wheels are
locked cyclically to shorten the braking
distance (dig-in effect). This will restrict
steering the vehicle.
BAS
Observe Safety notes, see page 62.
G
The Brake Assist System (BAS) operates in
emergency situations. If you apply the brakes
very quickly, the BAS provides full brake
boost automatically, thereby potentially
reducing the braking distance.
X
Apply continuous full braking pressure until
the emergency braking situation is over.
The ABS will prevent the wheels from
locking.
When you release the brake pedal, the brakes
function again as normal. The BAS is then
deactivated.
Warning!
G
If the BAS malfunctions, the brake system still
functions, but without the additional brake
boost available that the BAS would normally
provide in an emergency braking maneuver.
Therefore, the braking distance may increase.
of the braking effort in straight-line braking
without a loss of vehicle stability.
Warning!
G
If the EBP malfunctions, the brake system will
still function with full brake boost. However,
the rear wheels could lock up during
emergency braking situations, for example.
You could lose control of the vehicle and
cause an accident.
Adapt your driving style to the changed
driving characteristics.
®
ESP
Observe Safety notes, see page 62.
G
The Electronic Stability Program (ESP®) is
operational as soon as the engine is running.
It monitors the vehicle’s traction (force of
adhesive friction between the tires and the
road surface) and handling.
The ESP® recognizes that the vehicle deviates
from the direction of travel as intended by the
driver. By applying brakes to individual
wheels and by limiting the engine output, the
ESP® works to stabilize the vehicle. The
ESP® is especially useful while driving off and
on wet or slippery road surfaces. The ESP
®
also stabilizes the vehicle during braking and
steering maneuvers.
The ESP® warning lamp d in the
instrument cluster comes on when you switch
on the ignition. It goes out when the engine
is running.
The ESP® warning lamp d in the
instrument cluster flashes when the ESP® is
engaged.
Safety and security
EBP
Observe Safety notes, see page 62.
G
The Electronic Brake Proportioning (EBP)
enhances braking effectiveness by allowing
the rear brakes to supply a greater proportion
Z
Page 66

Driving safety systems
64
Warning!
G
Never switch off the ESP® when you see the
ESP® warning lamp d flashing in the
instrument cluster. In this case proceed as
follows:
R
When driving off, apply as little throttle as
possible.
R
While driving, ease up on the accelerator
pedal.
R
Adapt your speed and driving style to the
prevailing road conditions.
Failure to observe these guidelines could
cause the vehicle to skid. The ESP® cannot
Safety and security
prevent accidents resulting from excessive
speed.
!
Only conduct operational or performance
tests on a two-axle dynamometer. If such
tests are necessary, contact an authorized
Mercedes-Benz Center. You could
otherwise seriously damage the brake
system or the transfer case which is not
covered by the Mercedes-Benz Limited
Warranty.
!
Because the ESP® operates
automatically, the engine and ignition must
be shut off (SmartKey in starter switch
position 0 or 1 or KEYLESS-GO start/stop
button in position 0 or 1) when the parking
brake is being tested on a brake test
dynamometer. Such testing should be no
longer than 10 seconds.
Active braking action through the ESP
may otherwise seriously damage the brake
system which is not covered by the
Mercedes-Benz Limited Warranty.
!
The ESP® will only function properly if you
use wheels of the recommended tire size
as specified in the “Technical data” section
of this Operator’s Manual.
i
The Distronic system and cruise control
switch off automatically when the ESP
engages.
Electronic Traction System (4-ETS)
Observe Safety notes, see page 62.
G
The 4-ETS (four-wheel Electronic Traction
System) is a component of the ESP®. The
4-ETS improves the vehicle’s ability to utilize
available traction, especially under slippery
road conditions by applying the brakes to a
spinning wheel. In addition, more power is
transferred to the wheel(s) with traction.
When you switch off the ESP®, the 4-ETS is
still enabled.
X
If conditions require, switch on the off-road
driving program (Y page 158) or the LOW
RANGE mode (Y page 119).
Off-road 4-ETS
With the off-road driving program switched on
(Y page 158), or the transmission in LOW
RANGE mode (Y page 120), the 4-ETS
designed for off-road use is activated
automatically.
Switching off the ESP
Warning!
G
The ESP® should not be switched off during
normal driving other than in the
circumstances described below. Disabling
the system will reduce vehicle stability in
®
driving maneuvers.
Do not switch off the ESP® when a spare
wheel is mounted.
®
To improve the vehicle’s traction, switch off
the ESP®. This allows the drive wheels to spin
and thus cut into surfaces for better grip, for
example
R
when driving with snow chains
R
in deep snow
R
in sand or gravel
®
Page 67
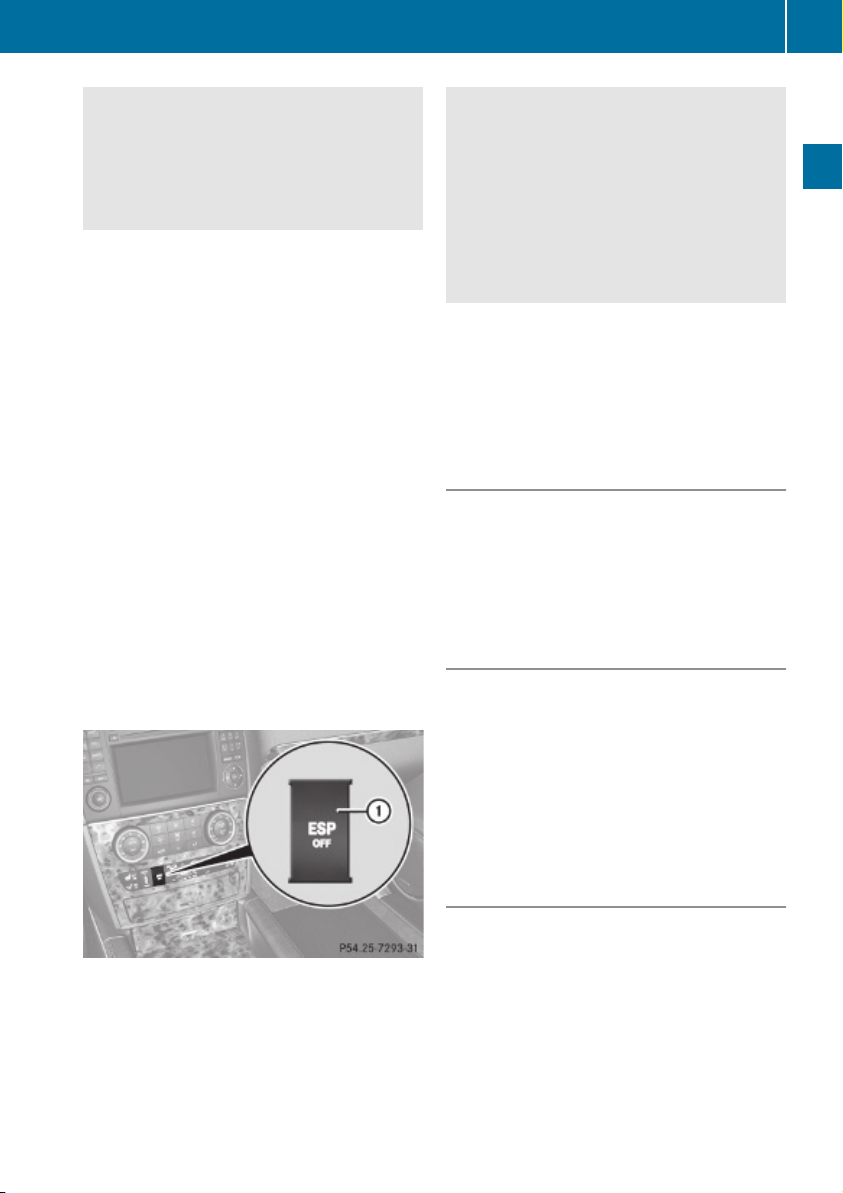
Driving safety systems
65
Warning!
G
Switch on the ESP® immediately if the
aforementioned circumstances do not apply
anymore. Otherwise the ESP® will not
stabilize the vehicle when it is starting to skid
or a wheel is spinning.
When you switch off the ESP®,
R
the ESP® does not stabilize the vehicle
R
the engine output is not limited, which
allows the drive wheels to spin and thus cut
into surfaces for better grip
R
the 4-ETS will still apply the brakes to a
spinning wheel
R
the ESP® continues to operate when you
are braking
R
the cruise control or the Distronic system
cannot be activated
R
the cruise control or the Distronic system
switch off if activated
i
When the ESP® is switched off and one or
more drive wheels are spinning, the ESP
warning lamp d in the instrument
cluster flashes. However, the ESP® will
then not stabilize the vehicle.
Warning!
G
When the ESP® warning lamp d is
illuminated continuously, the ESP® is
switched off or is not operational due to a
malfunction. Vehicle stability in standard
driving maneuvers is reduced.
Adapt your speed and driving to the prevailing
road conditions and to the non-operating
status of the ESP®.
!
Avoid spinning of a drive wheel for an
extended period with the ESP® switched
off. This may cause serious damage to the
drivetrain which is not covered by the
Mercedes-Benz Limited Warranty.
Switching on the ESP
X
Press ESP® switch : until the ESP
®
warning lamp d in the instrument
cluster goes out.
You are now again in normal driving mode
with the ESP® switched on.
®
Off-road ESP®
With the off-road driving program switched on
(Y page 158), or with the transmission in
LOW RANGE mode (Y page 120), the ESP
designed for off-road use is activated
automatically. At speeds below 27 mph
(45 km/h), the ESP® assists in over–
understeering, thus improving vehicle
traction.
Safety and security
®
®
X
With the engine running, press ESP
switch : until the ESP® warning lamp
d in the instrument cluster comes on.
The ESP® is switched off.
ESP® trailer stabilization
If the trailer you are towing should begin to
sway, the rig can only be stabilized by
®
immediately applying the brakes hard.
Steering during this maneuver will not help to
stabilize the rig.
The ESP® will assist you in such situations.
The ESP® recognizes when the trailer starts
swaying and will apply the brakes to reduce
the vehicle speed to a non-critical speed that
Z
Page 68

Anti-theft systems
66
allows the vehicle-trailer combination to
stabilize.
The ESP® trailer stabilization is functional at
vehicle speeds above approximately 40 mph
(65 km/h) when the ESP® is switched on.
Warning!
G
The system will not be able to assist when the
trailer jackknifes
R
if the ESP® has switched off due to a
malfunction
R
on wet or icy roads
R
on roads with slippery surface
Safety and security
R
in sand or gravel
Trailers with a high center of gravity may tip
over before the system recognizes swaying of
the trailer.
Anti-theft systems
Immobilizer
The immobilizer prevents unauthorized
persons from starting your vehicle.
When leaving the vehicle, always take the
SmartKey with you and lock the vehicle. The
engine can be started by anyone with a valid
SmartKey that is left inside the vehicle.
Activating
X
With SmartKey: Remove the SmartKey
from the starter switch.
X
With KEYLESS-GO: Turn off the engine and
open the driver’s door.
Center or call 1-800-FOR-MERCedes (in the
USA) or 1-800-387-0100 (in Canada).
Anti-theft alarm system
Once the alarm system has been armed, a
visual and audible alarm is triggered when
someone opens
R
a door
R
the tailgate
R
the hood
The alarm will stay on even if the activating
element, a door, for example, is closed
immediately.
The alarm system will also be triggered when
R
the vehicle is opened with the mechanical
key
R
a door is opened from the inside
To cancel the alarm after it has been
triggered, see “Canceling the alarm”
(Y page 67).
i If the alarm stays on for more than
30 seconds, the Tele Aid system initiates a
call to the Response Center automatically.
The Tele Aid system will initiate the call
provided that
R
you have subscribed to the Tele Aid
service
R
the Tele Aid service has been activated
properly
R
the necessary mobile phone, power
supply and GPS coverage are available
Deactivating
X
Switch on the ignition.
i
Starting the engine will also deactivate
the immobilizer.
In the event that the engine cannot be
started (yet the vehicle’s battery is
charged), the system is not operational.
Contact an authorized Mercedes-Benz
Page 69
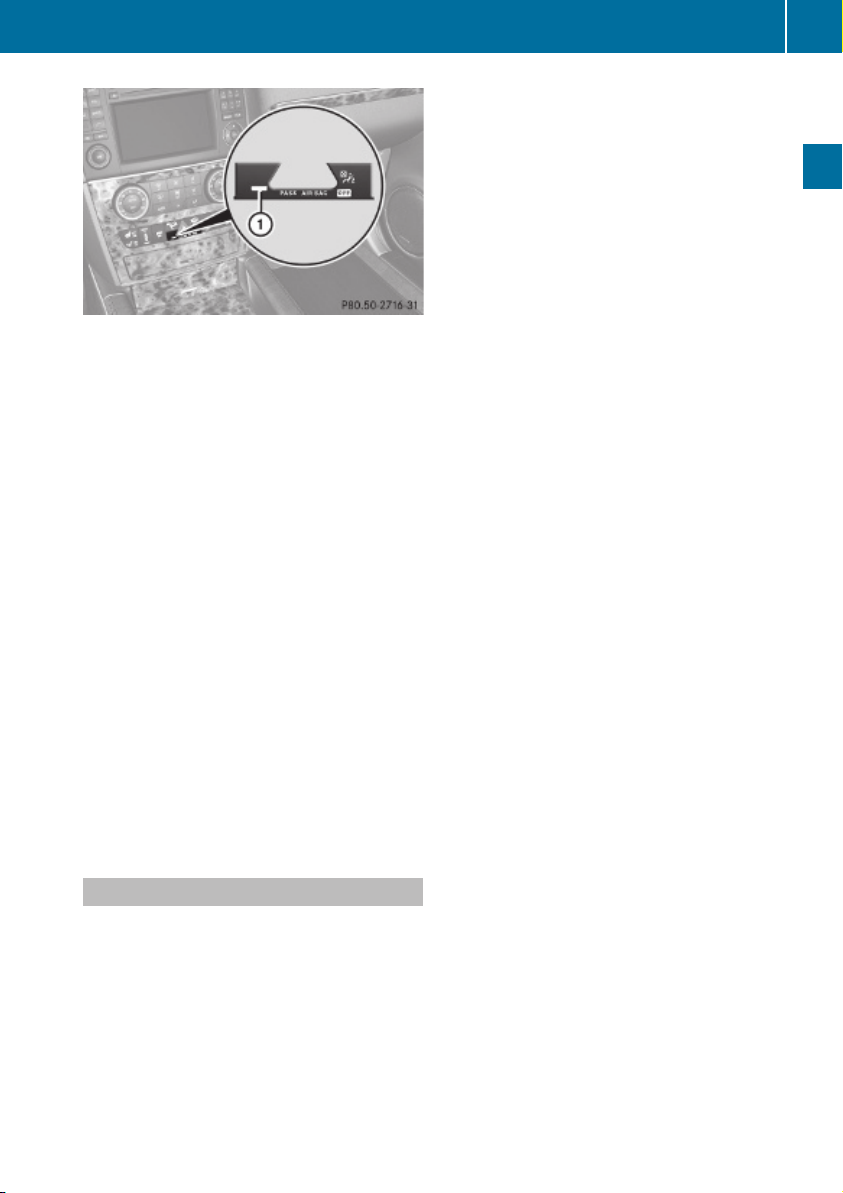
X
Arming: Lock the vehicle with the
SmartKey or with KEYLESS-GO.
The turn signal lamps flash three times to
indicate that the vehicle is locked. Indicator
lamp : flashes to indicate that the alarm
system is armed.
i
If the turn signal lamps do not flash three
times, a door or the tailgate may not be
properly closed.
Close the respective element.
X
Disarming: Unlock the vehicle with the
SmartKey or with KEYLESS-GO.
The turn signal lamps flash once to indicate
that the alarm system is disarmed.
Anti-theft systems
The SmartKey must be within 3 ft (1 m) of
the vehicle.
X
Press the KEYLESS-GO start/stop button.
The SmartKey must be inside the vehicle.
67
Safety and security
i Unless you open a door or the tailgate
within approximately 40 seconds after
unlocking the vehicle:
R
The vehicle will be locked again.
R
The anti-theft alarm system will be
rearmed.
Canceling the alarm
To cancel the alarm, do one of the following:
X
Insert the SmartKey into the starter switch.
X
Press button % or & on the
SmartKey.
In vehicles with KEYLESS-GO:
X
Grasp an outside door handle.
Z
Page 70

68
Page 71
Vehicle equipment .............................. 70
Locking and unlocking ....................... 70
Starter switch positions ..................... 80
Seats .................................................... 82
Multifunction steering wheel ............. 91
Mirrors ................................................. 93
Memory function ................................. 96
Lighting ................................................ 97
Wipers ................................................ 103
Power windows ................................. 105
Driving and parking .......................... 108
Automatic transmission ................... 114
Transfer case .................................... 119
Differential locks .............................. 121
Instrument cluster ............................ 124
Control system .................................. 125
Driving systems ................................ 144
Overview of climate control sys-
tem functions and air vents ............. 172
Climate control ................................. 175
3-zone automatic climate control ... 181
Rear window defroster ..................... 191
Power tilt/sliding sunroof ............... 192
Loading and storing .......................... 194
Useful features ................................. 209
69
Controls in detail
Page 72
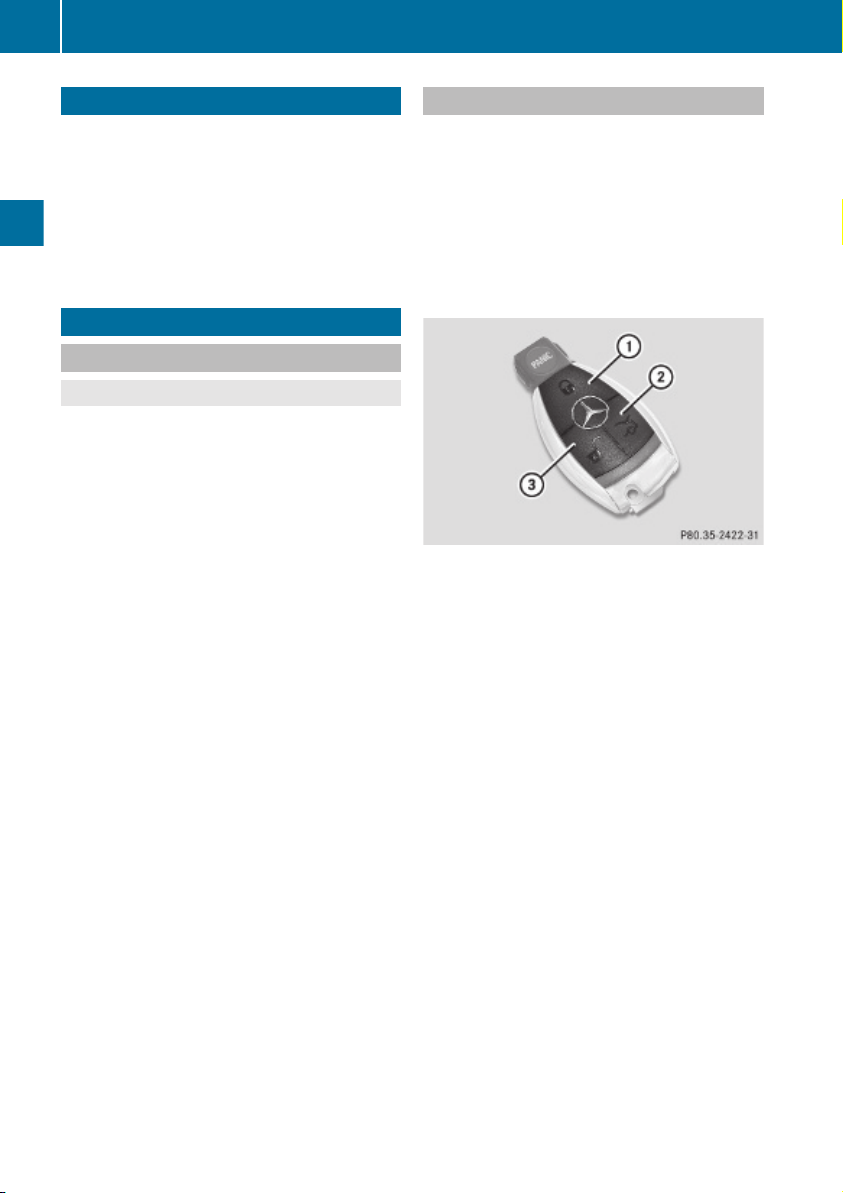
Locking and unlocking
70
Vehicle equipment
i
This Operator’s Manual describes all
features, standard or optional, potentially
available for your vehicle at the time of
purchase. Please be aware that your
vehicle might not be equipped with all
features described in this manual.
Locking and unlocking
Notes
Observe Safety notes, see page 55.
G
When unlocking the vehicle, all turn signal
lamps flash once. The locking knobs in the
Controls in detail
doors move up. The anti-theft alarm system
is disarmed.
When locking the vehicle, all turn signal lamps
flash three times. The locking knobs in the
doors move down. The anti-theft alarm
system is armed.
All doors and the tailgate must be closed.
If you cannot lock or unlock the vehicle with
the SmartKey, the batteries in the SmartKey
are discharged, the SmartKey is
malfunctioning, or the vehicle battery is
drained.
X
Check the batteries in the SmartKey
(Y page 73) and replace them if
necessary.
X
Use the mechanical key to unlock the
driver’s door (Y page 323).
X
Use the mechanical key to lock the vehicle
(Y page 324).
X
Have the vehicle battery and the vehicle
battery connections checked at an
authorized Mercedes-Benz Center.
If the SmartKey is malfunctioning, contact
Roadside Assistance or an authorized
Mercedes-Benz Center.
SmartKey
Your vehicle comes supplied with two
SmartKeys, each with remote control and a
removable mechanical key.
The SmartKey centrally locks and unlocks:
R
the doors
R
the tailgate
R
the fuel filler flap
Example illustration: SmartKey with KEYLESS-GO
: &
; F
= %
Lock button
Unlock button for tailgate
Unlock button
i USA only:
This device complies with Part 15 of the
FCC Rules. Operation is subject to the
following two conditions:
1. This device may not cause harmful
interference, and
2. this device must accept any
interference received, including
interference that may cause undesired
operation.
Any unauthorized modification to this
device could void the user’s authority to
operate the equipment.
Page 73

Locking and unlocking
71
i Canada only:
This device complies with RSS-210 of
Industry Canada. Operation is subject to
the following two conditions:
1. This device may not cause interference,
and
2. this device must accept any
interference received, including
interference that may cause undesired
operation of the device.
Any unauthorized modification to this
device could void the user’s authority to
operate the equipment.
Factory setting
X
Global unlocking: Press button %.
Unless you open a door or the tailgate within
approximately 40 seconds after unlocking
the vehicle:
R
The vehicle will be locked again.
R
The antitheft alarm system will be rearmed.
X
Global locking: Press button &.
Selective setting
If you frequently travel alone, you may wish
to reprogramm the SmartKey. Pressing
button % will then only unlock the driver’s
door and the fuel filler flap.
X
Switching on/off: Press and hold buttons
% and & simultaneously for
approximately 6 seconds until the battery
check lamp (Y page 73) flashes twice.
The SmartKey will then function as follows:
X
Unlocking driver’s door and fuel filler
flap: Press button % once.
X
Global unlocking: Press button %
twice.
X
Global locking: Press button &.
KEYLESS-GO
Vehicles equipped with KEYLESS-GO come
with two SmartKeys with KEYLESS-GO, each
with remote control and a removable
mechanical key.
The KEYLESS-GO function is integrated into
the SmartKey. The validity of the SmartKey is
checked every time you grasp an outside door
handle.
When the SmartKey is valid, your vehicle
unlocks
R
the doors
R
the fuel filler flap
R
the tailgate
i USA only:
This device complies with Part 15 of the
FCC Rules. Operation is subject to the
following two conditions:
1. This device may not cause harmful
interference, and
2. this device must accept any
interference received, including
interference that may cause undesired
operation.
Any unauthorized modification to this
device could void the user’s authority to
operate the equipment.
i Canada only:
This device complies with RSS-210 of
Industry Canada. Operation is subject to
the following two conditions:
1. This device may not cause interference,
and
2. this device must accept any
interference received, including
interference that may cause undesired
operation of the device.
Any unauthorized modification to this
device could void the user’s authority to
operate the equipment.
Controls in detail
Z
Page 74

Locking and unlocking
72
Important notes on using KEYLESS-GO
R
You can also use the SmartKey with
KEYLESS-GO like a normal SmartKey
(Y page 70).
R
You can combine KEYLESS-GO functions
with normal SmartKey functions (e.g.
unlocking with KEYLESS-GO and locking
with button &).
R
Always carry the SmartKey with you.
R
Never store the SmartKey together with:
-
Electronic items such as a mobile phone
or another SmartKey
-
Metallic objects such as coins or metal
foil
Controls in detail
Doing so could impair the function of the
KEYLESS-GO system.
R
To lock or unlock the vehicle, the SmartKey
must be located outside the vehicle within
approximately 3 ft (1 m) of a door or the
tailgate.
R
When the vehicle has been parked for more
than 72 hours, the KEYLESS-GO function is
deactivated. Pull an outside door handle
and switch on the ignition once to activate
the KEYLESS-GO function.
R
If the SmartKey is positioned farther away
from the vehicle, the system may no longer
recognize the SmartKey. The vehicle
cannot be locked or the engine started via
the KEYLESS-GO system.
R
If the SmartKey is removed from the vehicle
(e.g. if a passenger exits the vehicle with
the SmartKey)
-
when pressing the KEYLESS-GO start/
stop button or trying to lock the vehicle
with the lock button on an outside door
handle the message Key Not
Detected appears in the multifunction
display
-
with the engine running, the red message
Key Not Detected appears in the
multifunction display while driving off
Find the SmartKey or change its present
location immediately (e.g. place it on the
front passenger seat or insert it in shirt
pocket).
R
If you have started the engine with the
KEYLESS-GO start/stop button, you can
turn it off again by
-
pressing the KEYLESS-GO start/stop
button
-
inserting the SmartKey into the starter
switch when the vehicle is at a standstill
and the automatic transmission is in park
position P
R
The vehicle could be inadvertently
unlocked if the SmartKey is within 3 ft (1 m)
of the vehicle and
-
an outside door handle is splashed with
water
or
-
you attempt to clean an outside door
handle
R
Remember that the engine can be started
by anyone with a SmartKey that is left
inside the vehicle.
Possibility 1 (One SmartKey in the vehicle,
one SmartKey outside the vehicle):
If you leave the SmartKey behind when
exiting and locking the vehicle, no message
appears in the multifunction display.
Possibility 2 (One SmartKey in the vehicle,
no SmartKey outside the vehicle):
When exiting and trying to lock the vehicle,
the message Key Detected In Vehicle
appears in the multifunction display. The
vehicle will not be locked.
Factory setting
X
Global unlocking: Grasp an outside door
handle.
Page 75
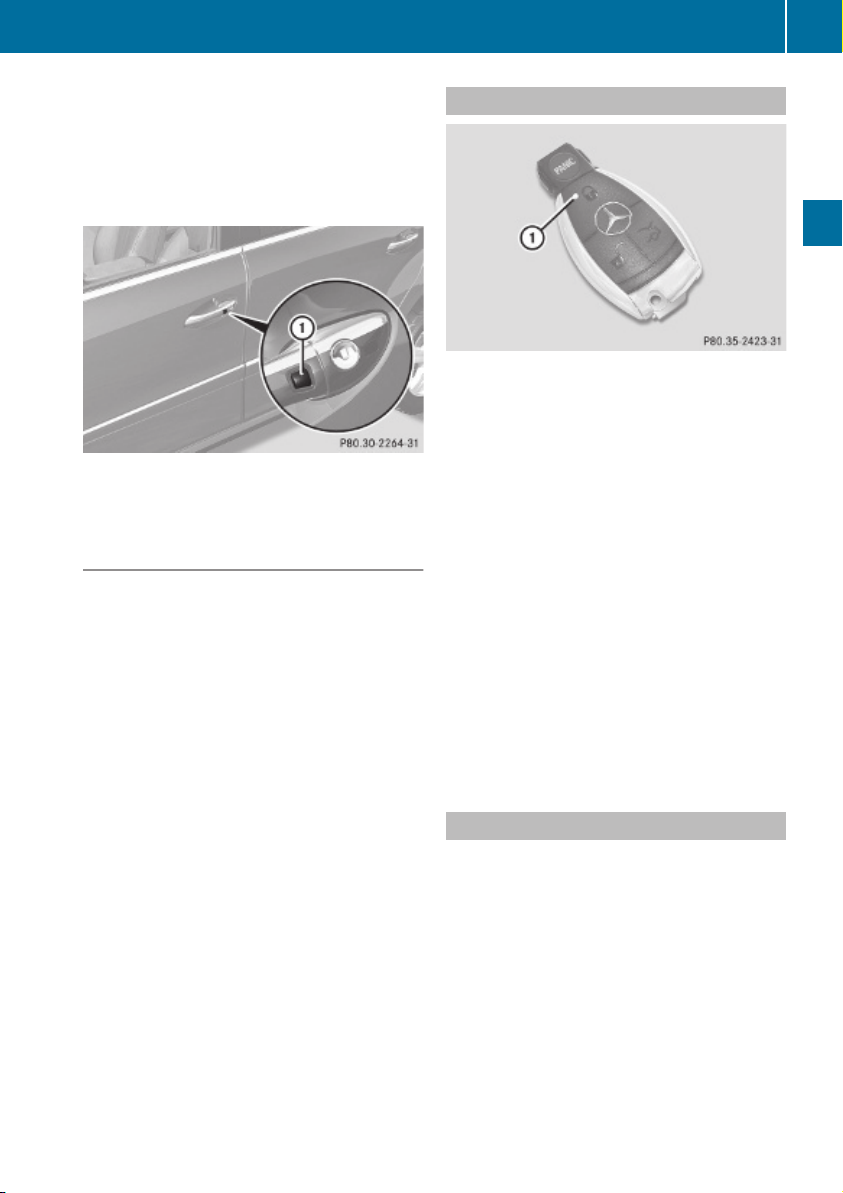
Locking and unlocking
73
Unless you open a door or the tailgate within
approximately 40 seconds after unlocking
the vehicle:
R
The vehicle will be locked again.
R
The antitheft alarm system will be rearmed.
X
Global locking: Press lock button : on an
outside door handle.
Selective setting
If you frequently travel alone, you may wish
to reprogram the SmartKey. Grasping the
driver’s outside door handle will then only
unlock the driver’s door and the fuel filler flap.
X
Switching on/off: Press and hold buttons
% and & simultaneously for
approximately 6 seconds until the battery
check lamp (Y page 73) flashes twice.
The SmartKey will then function as follows:
X
Unlocking driver’s door and fuel filler
flap: Grasp the driver’s outside door
handle.
X
Global unlocking: Grasp any outside door
handle other than the driver’s outside door
handle.
X
Global locking: Press lock button : on an
outside door handle.
Checking SmartKey batteries
Example illustration: SmartKey with KEYLESS-GO
X
Press button & or % on the
SmartKey.
Battery check lamp : comes on briefly to
indicate that the SmartKey batteries are in
order.
If the battery check lamp does not come on
briefly during check, the SmartKey batteries
are discharged.
X
Replace the batteries (Y page 326).
i
You can obtain the required batteries at
any authorized Mercedes-Benz Center.
i
If the batteries are checked within signal
range of the vehicle, pressing button
& or % will lock or unlock the vehicle
accordingly.
Loss of the SmartKey
If you lose your SmartKey or mechanical key,
you should do the following:
X
Have the SmartKey deactivated by an
authorized Mercedes-Benz Center.
X
Report the loss of the SmartKey or the
mechanical key to your car insurance
company immediately.
X
Have the mechanical lock replaced if
necessary.
Any authorized Mercedes-Benz Center will be
glad to supply you with a replacement. For
Controls in detail
Z
Page 76
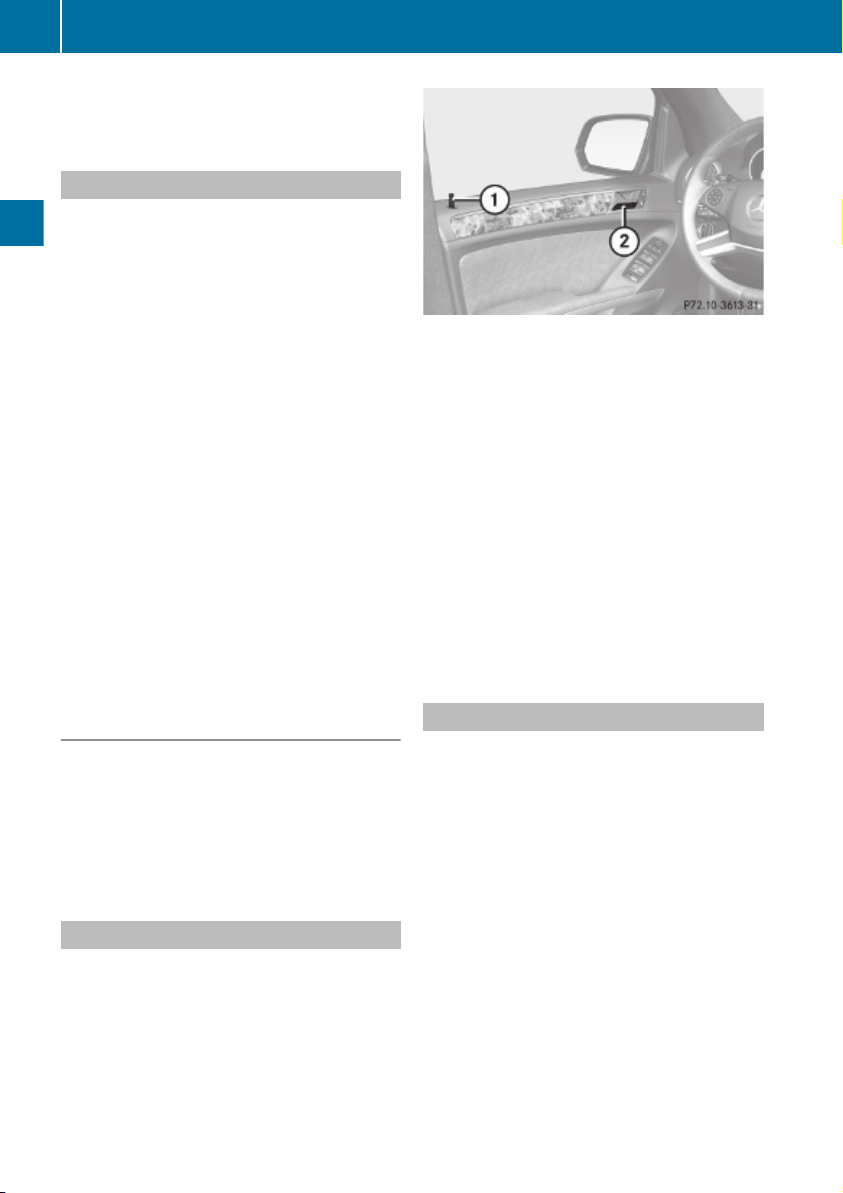
Locking and unlocking
74
information on replacing the SmartKey, see
“Replacing the SmartKey” (Y page 74).
Replacing the SmartKey
Only you, or someone authorized by you can
order a replacement key from any MercedesBenz Center. In order to do so, the MercedesBenz Center will require proof of identity and
vehicle ownership with original documents,
including the following:
If you are the current owner of the vehicle:
R
the vehicle’s current state registration
R
a current identity card, passport, or drivers
license
Controls in detail
If you are an authorized person:
R
the vehicle’s current state registration
R
a current identity card, passport, or drivers
license for the authorized individual
R
signed and dated authorization from the
owner of the vehicle for which the key is
being requested
i
Duplicated or photocopied
documentation will not be accepted.
Example illustration driver’s door
If the vehicle has previously been locked with
the SmartKey or with KEYLESS-GO, opening
a door from the inside will trigger the antitheft alarm system.
To cancel the alarm, see (Y page 67).
X
Front doors: Pull on inside door
handle ; on the respective front door.
If the door was locked, locking knob : will
move up.
X
Rear doors: Pull up locking knob on the
respective rear door to unlock door.
X
Pull on the inside door handle on the
respective rear door.
Activating the key
Once you, or an authorized person, has
provided the appropriate documents, the
Mercedes-Benz Center will need to
synchronize the key to your vehicle before it
can be used. In order to do so, the MercedesBenz Center need access to your vehicle.
Opening the doors from the inside
You can open a door from the inside even
when it is locked unless it is secured with the
child safety lock (Y page 60).
Open door only when conditions are safe to
do so.
Automatic central locking
The doors and the tailgate lock automatically
when the vehicle is set into motion.
You can open a locked front door from the
inside. Open door only when conditions are
safe to do so.
The doors are designed to unlock
automatically after an accident if the force of
the impact exceeds a preset threshold.
The vehicle locks automatically when the
ignition is switched on and the wheels are
turning at vehicle speeds of above 9 mph
(15 km/h). You could therefore lock yourself
out when the vehicle is pushed or towed or is
on a test stand.
i
You can also activate or deactivate the
automatic central locking using the control
system (Y page 138).
Page 77
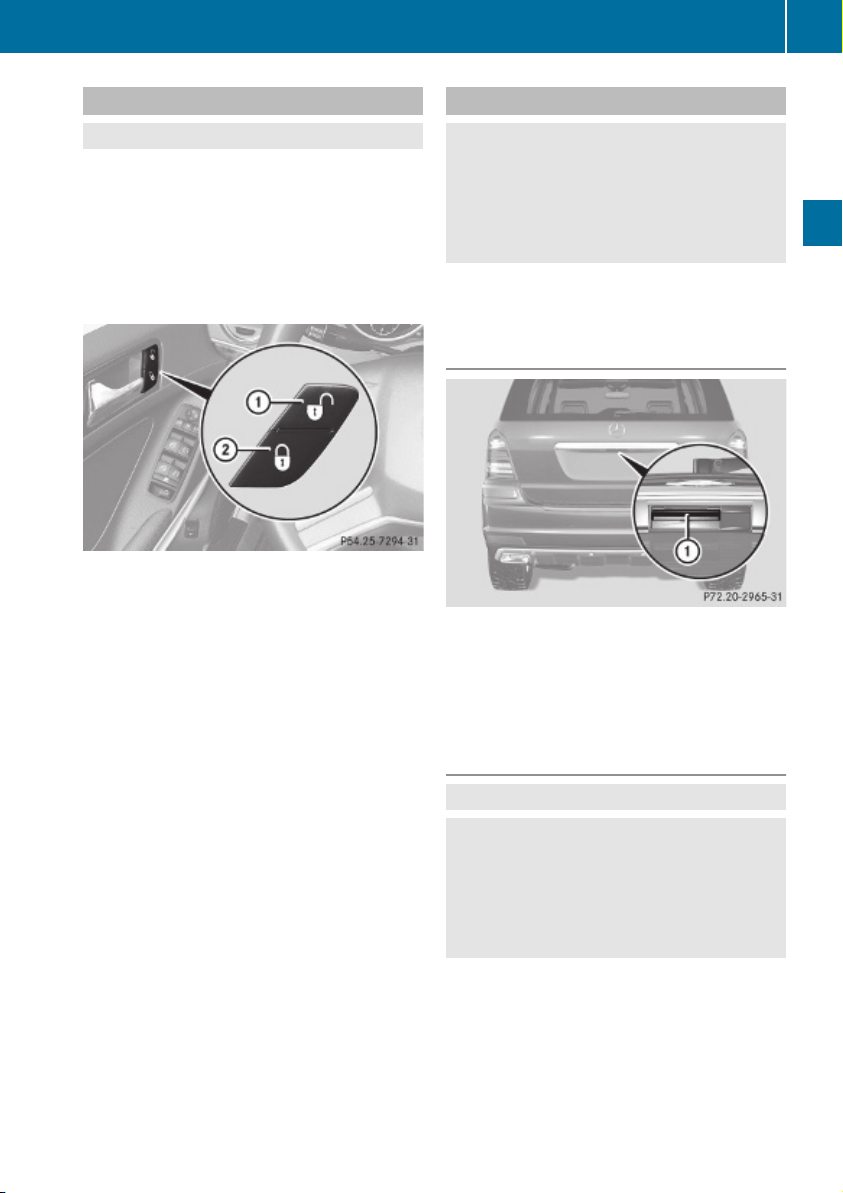
Locking and unlocking
75
Locking and unlocking from the inside
Observe Safety notes, see page 55.
G
You can lock or unlock the vehicle from the
inside using the central locking switches. This
can be useful, for example, if you want to lock
the vehicle before starting to drive.
The central locking switches do not lock or
unlock the fuel filler flap.
The switches are located in each front door.
X
Locking: Press central locking switch ;.
When all doors and the tailgate are closed,
the vehicle locks.
X
Unlocking: Press central unlocking
switch :.
You can open a locked front door from the
inside at any time. Open door only when
conditions are safe to do so.
If the vehicle was previously locked with the
central locking switch
R
and the SmartKey is set to factory settings,
the complete vehicle is unlocked when a
front door is opened from the inside
R
and the SmartKey is set to selective
settings, only the front door opened from
the inside is unlocked
If the vehicle has been locked centrally with
the SmartKey or with KEYLESS-GO, it will not
unlock using the central unlocking switch.
Tailgate
Warning!
G
Make sure the tailgate is closed when the
engine is running and while driving. Among
other dangers, deadly carbon monoxide (CO)
gases may enter vehicle interior resulting in
unconsciousness and death.
A minimum height clearance of 7.40 ft
(2.25 m) is required to open the tailgate.
Opening the tailgate from the outside
X
Pull on handle :.
In vehicles without KEYLESS-GO: The
vehicle must be unlocked.
X
Pull tailgate upwards to open.
Closing the tailgate from the outside
Observe Safety notes, see page 55.
G
Warning!
G
To prevent possible personal injury, always
keep hands and fingers away from the cargo
compartment opening when closing the
tailgate. Be especially careful when small
children are around.
Controls in detail
Z
Page 78
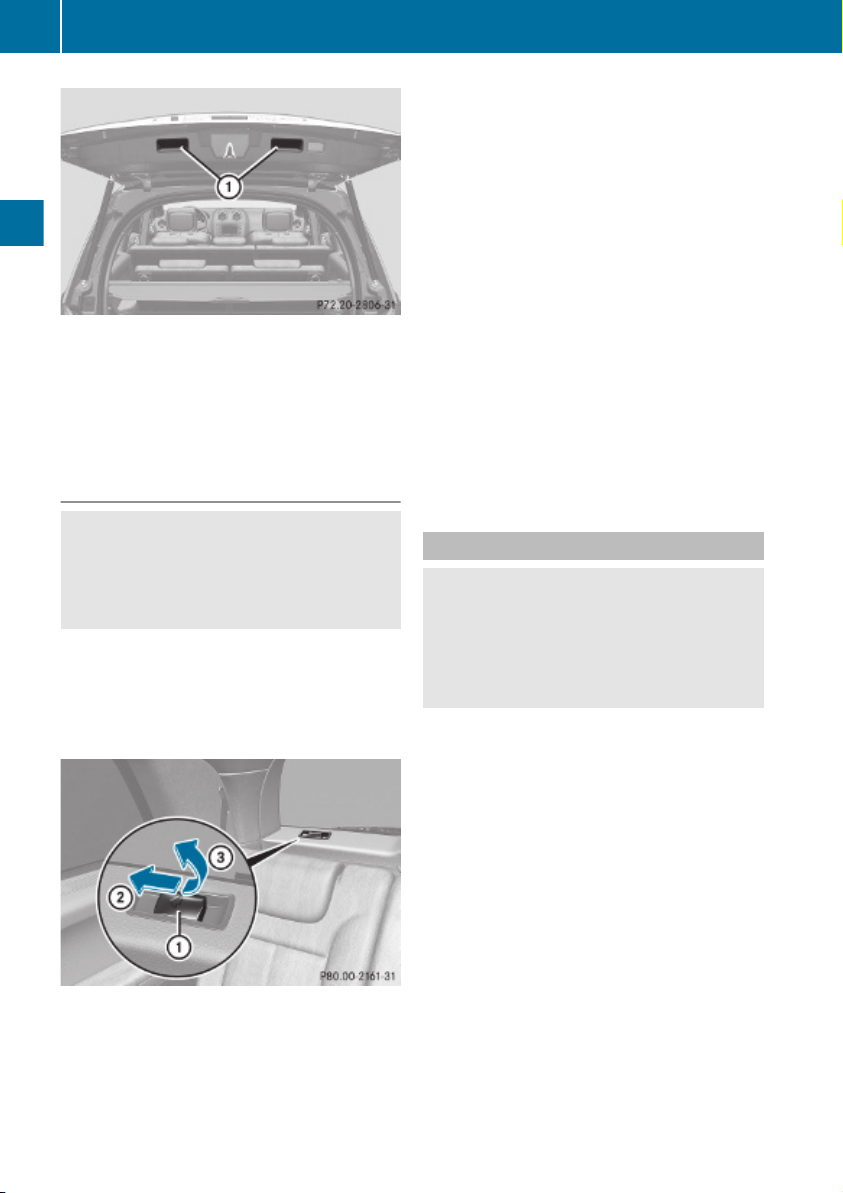
Locking and unlocking
76
X
Lower tailgate by pulling firmly on
handles :.
X
Close tailgate with hands placed flat on it.
Once the tailgate touches the latch, the
tailgate will pull itself shut automatically.
Controls in detail
Opening the tailgate from the inside
Warning!
G
Do not leave children unattended in the
vehicle. Children could open the tailgate from
the inside, which could result in an accident
and/or serious personal injury.
!
Always make sure there is sufficient
overhead clearance.
You can unlock the tailgate from the third-row
seats and then open it manually.
X
Push handle : in direction of arrow ; and
hold it there.
X
From this position, lift handle : in
direction of arrow = and hold it there.
The tailgate is released and can be opened
manually.
i
If you do not open the tailgate within a few
seconds, the tailgate lock will engage again
automatically. Additionally, the tailgate will
relock automatically if the vehicle was
locked when the tailgate was released from
the inside.
If the tailgate lock does not engage
automatically and, if applicable, the tailgate
does not relock after a few seconds, you
have to close the tailgate manually
(Y page 75).
Power tailgate
Warning!
G
Make sure the tailgate is closed when the
engine is running and while driving. Among
other dangers, deadly carbon monoxide (CO)
gases may enter vehicle interior resulting in
unconsciousness and death.
!
The tailgate swings open upwards
automatically. Always make sure there is
sufficient overhead clearance.
A minimum height clearance of 7.40 ft
(2.25 m) is required to open the tailgate.
In vehicles with power tailgate, you can
R
open and close the tailgate from the inside
and the outside electrically
R
limit the opening height of the tailgate
R
interrupt the opening/closing procedure at
any time by
-
pressing or pulling the door-mounted
remote tailgate opening/closing switch
-
pulling the outside handle on the tailgate
Page 79
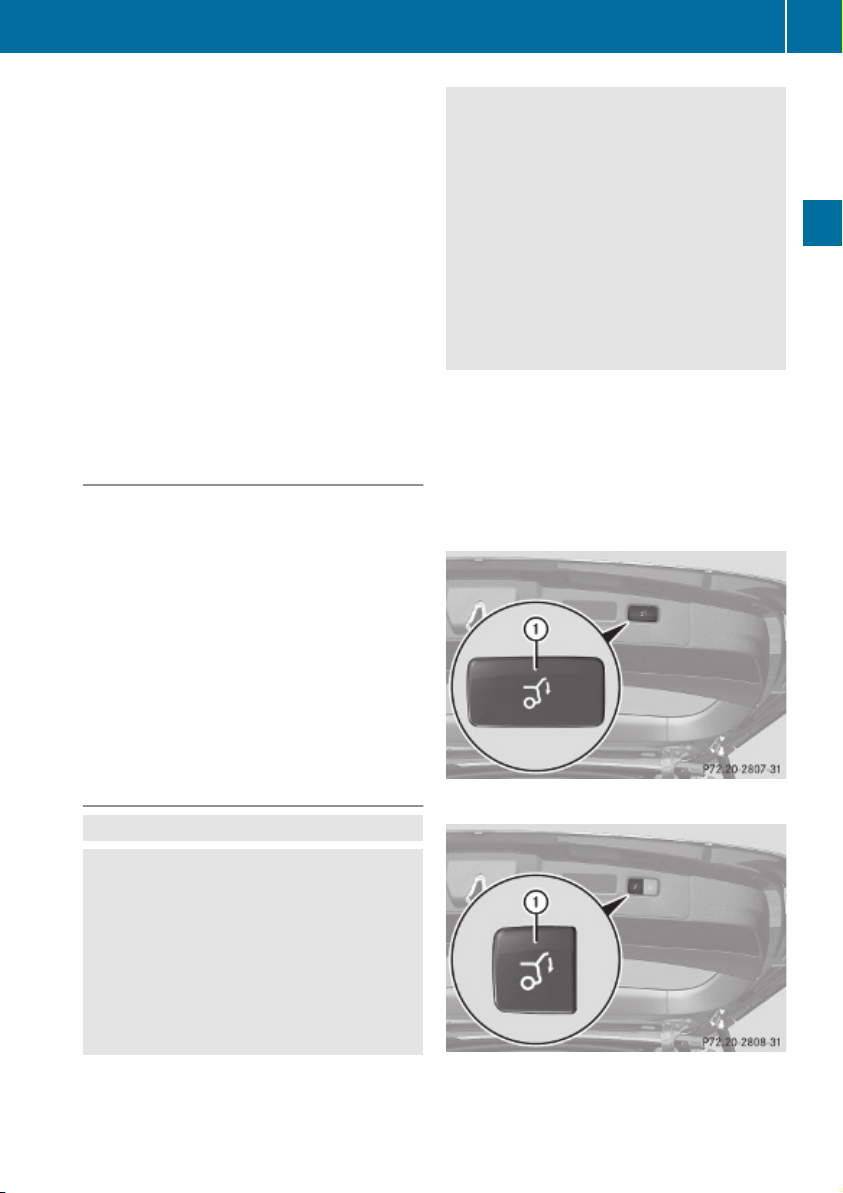
-
pressing the tailgate closing switch
-
pressing the KEYLESS-GO locking/
closing switch
Notes for operating the tailgate with the
SmartKey:
You can also open, close, and stop the
tailgate by pressing button F on the
SmartKey.
The prerequisites for this are:
R
No SmartKey is inserted in the starter
switch.
R
KEYLESS-GO: The vehicle’s on-board
electronics must have status 0
(Y page 80).
Opening the tailgate from the outside
You can unlock and open the tailgate
simultaneously from the outside when the
vehicle is stationary.
X
Press and hold button F on the
SmartKey until the tailgate unlocks and
begins to open.
While the tailgate is opening, an acoustic
warning sounds.
or
X
Vehicles with KEYLESS-GO: Pull on the
handle (Y page 75).
Locking and unlocking
R
Press or pull the remote tailgate opening/
closing switch on the driver’s door.
R
Press the tailgate closing switch.
R
Press the KEYLESS-GO locking/closing
switch.
R
Pull outside handle on the tailgate.
R
When no SmartKey is inserted in the starter
switch (vehicles with KEYLESS-GO: Make
sure the vehicle’s on-board electronics
have status 0): Press button F on the
SmartKey.
Do not leave the SmartKey in the vehicle. You
may lock yourself out.
If the vehicle was previously centrally locked
with the SmartKey or KEYLESS-GO, the
tailgate will lock automatically when it is
closed. The turn signal lamps flash three
times to confirm locking.
77
Controls in detail
Closing the tailgate from the outside
Observe Safety notes, see page 55.
G
Warning!
G
Monitor the closing procedure carefully to
make sure no one is in danger of being
injured. To prevent possible personal injury,
always keep hands and fingers away from the
cargo compartment opening when closing the
tailgate. Be especially careful when small
children are around. To stop the closing
procedure, do one of the following:
Vehicles without KEYLESS-GO
Vehicles with KEYLESS-GO
Z
Page 80
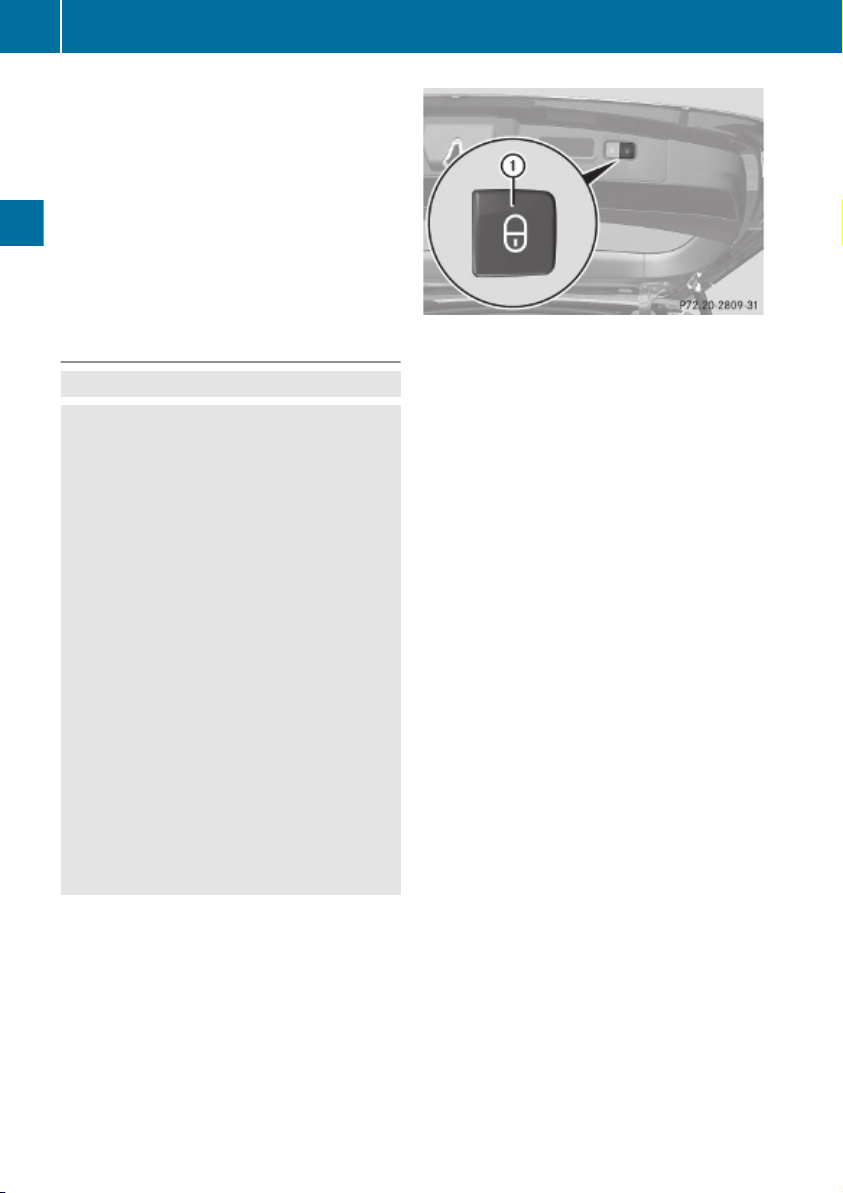
Locking and unlocking
78
X
Press tailgate closing switch : or press
and hold button F on the SmartKey until
the tailgate begins to close.
If the tailgate comes into contact with an
object while closing, the closing procedure is
stopped and the tailgate reopens. This may
happen if luggage has been piled too high, for
example.
Closing the tailgate and locking the
vehicle from the outside (vehicles with
KEYLESS-GO)
Observe Safety notes, see page 55.
G
Warning!
G
Controls in detail
Monitor the closing procedure carefully to
make sure no one is in danger of being
injured. To prevent possible personal injury,
always keep hands and fingers away from the
cargo compartment opening when closing the
tailgate. Be especially careful when small
children are around. To stop the closing
procedure, do one of the following:
R
Press or pull the remote tailgate opening/
closing switch on the driver’s door.
R
Press the tailgate closing switch.
R
Press the KEYLESS-GO locking/closing
switch.
R
Pull outside handle on the tailgate.
R
When no SmartKey is inserted in the starter
switch (vehicles with KEYLESS-GO: Make
sure the vehicle’s on-board electronics
have status 0): Press button F on the
SmartKey.
You can close the tailgate and lock the vehicle
simultaneously from the outside using the
KEYLESS-GO locking/closing switch.
X
Make sure you have the SmartKey with you.
X
Press KEYLESS-GO locking/closing
switch : briefly.
The tailgate closes.
Once the tailgate and all doors are closed:
R
The vehicle locks.
R
The turn signals flash three times to
confirm locking.
R
The locking knobs in the doors move
down.
R
The anti-theft alarm system is armed.
If the tailgate comes into contact with an
object while closing, the closing procedure is
stopped and the tailgate reopens. This may
happen if luggage has been piled too high, for
example.
The closing process is stopped if the system
cannot recognize a SmartKey with KEYLESSGO anymore. Make sure the SmartKey with
KEYLESS-GO is within approximately 3 ft
(1 m) of the tailgate. Repeat the closing
procedure if necessary.
The tailgate remains unlocked when a
SmartKey with KEYLESS-GO is recognized
inside the vehicle to prevent a possible
inadvertent lockout. In this case, the turn
signals will not flash and the anti-theft alarm
will be triggered when the tailgate is opened.
Page 81
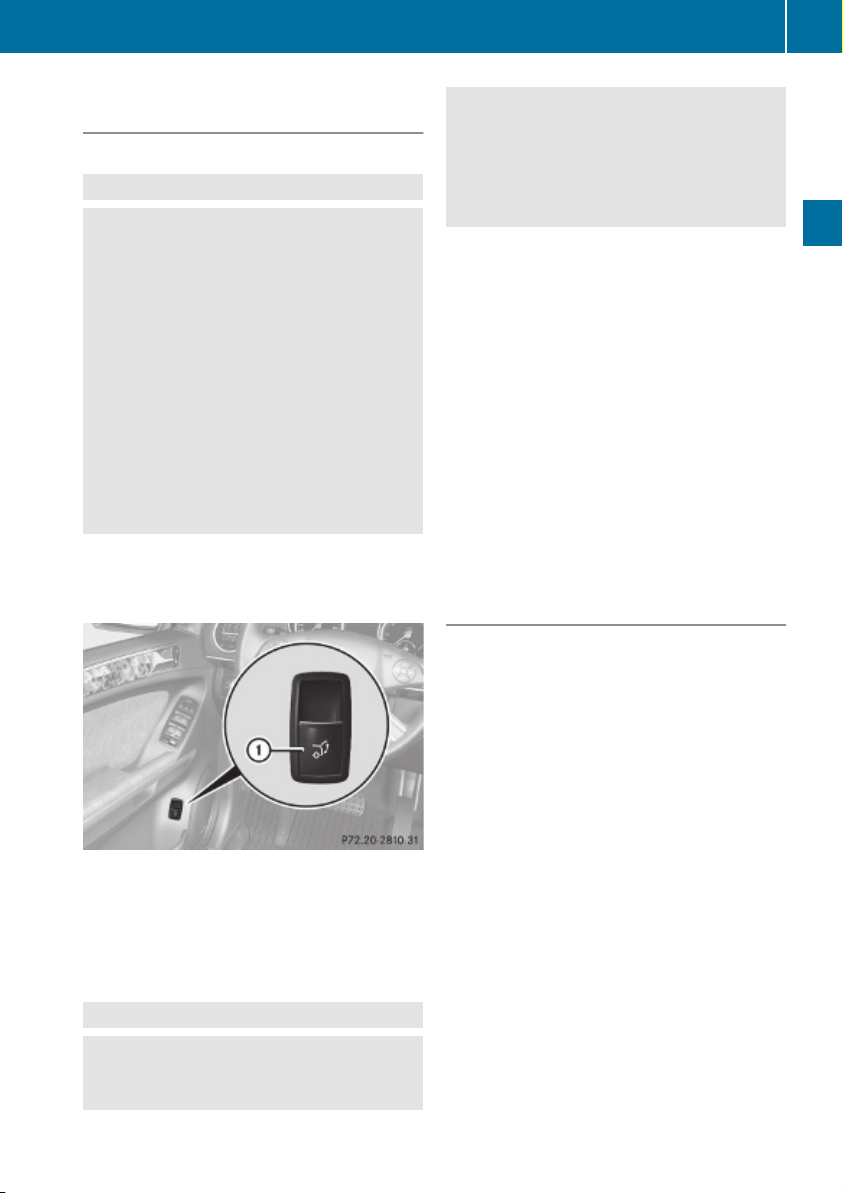
Locking and unlocking
79
Opening/closing the tailgate from the
inside
Opening
Observe Safety notes, see page 76.
G
Warning!
G
Maintain sight of the area around the rear of
the vehicle while operating the tailgate with
the door-mounted remote tailgate switch.
Monitor the opening procedure carefully to
make sure no one is in danger of being
injured.
To interrupt the opening procedure, press or
pull the door-mounted remote tailgate switch.
When the SmartKey is not inserted in the
starter switch (vehicles with KEYLESS-GO:
Make sure the vehicle’s on-board electronics
have status 0): Press button F on the
SmartKey.
You can unlock and open the tailgate
simultaneously from the driver’s seat when
the vehicle is stationary.
the door-mounted remote tailgate switch.
Monitor the closing procedure carefully to
make sure no one is in danger of being
injured.
To interrupt the closing procedure, press or
pull the door-mounted remote tailgate switch.
If the tailgate comes into contact with an
object while closing, the closing procedure is
stopped and the tailgate reopens. This may
happen if luggage has been piled too high, for
example.
X
Turn the SmartKey in the starter switch to
position 1 or 2.
X
Press remote tailgate opening/closing
switch : until the tailgate begins to close.
While the tailgate is closing an acoustic
warning sounds.
X
Interrupting the closing procedure:
Press or pull remote tailgate opening/
closing switch :.
Limiting opening height of tailgate
You can limit the opening height of the
tailgate in the upper opening range. This can
be useful, for example, when the space above
the tailgate is not sufficient.
Controls in detail
X
Pull remote tailgate opening/closing
switch : until the tailgate begins to open.
While the tailgate is opening, an acoustic
warning sounds.
Closing
Observe Safety notes, see page 55.
G
Warning!
G
Maintain sight of the area around the rear of
the vehicle while operating the tailgate with
Activating
X
Open the tailgate: Pull on handle
(Y page 75) or press and hold button
F on the SmartKey until the tailgate
opens.
X
Stop opening procedure: When the
tailgate is in the desired position, press
tailgate closing switch (Y page 78) or pull
on handle once more.
X
You can also press or pull the remote
tailgate opening/closing switch
(Y page 79) to stop the opening procedure.
Z
Page 82
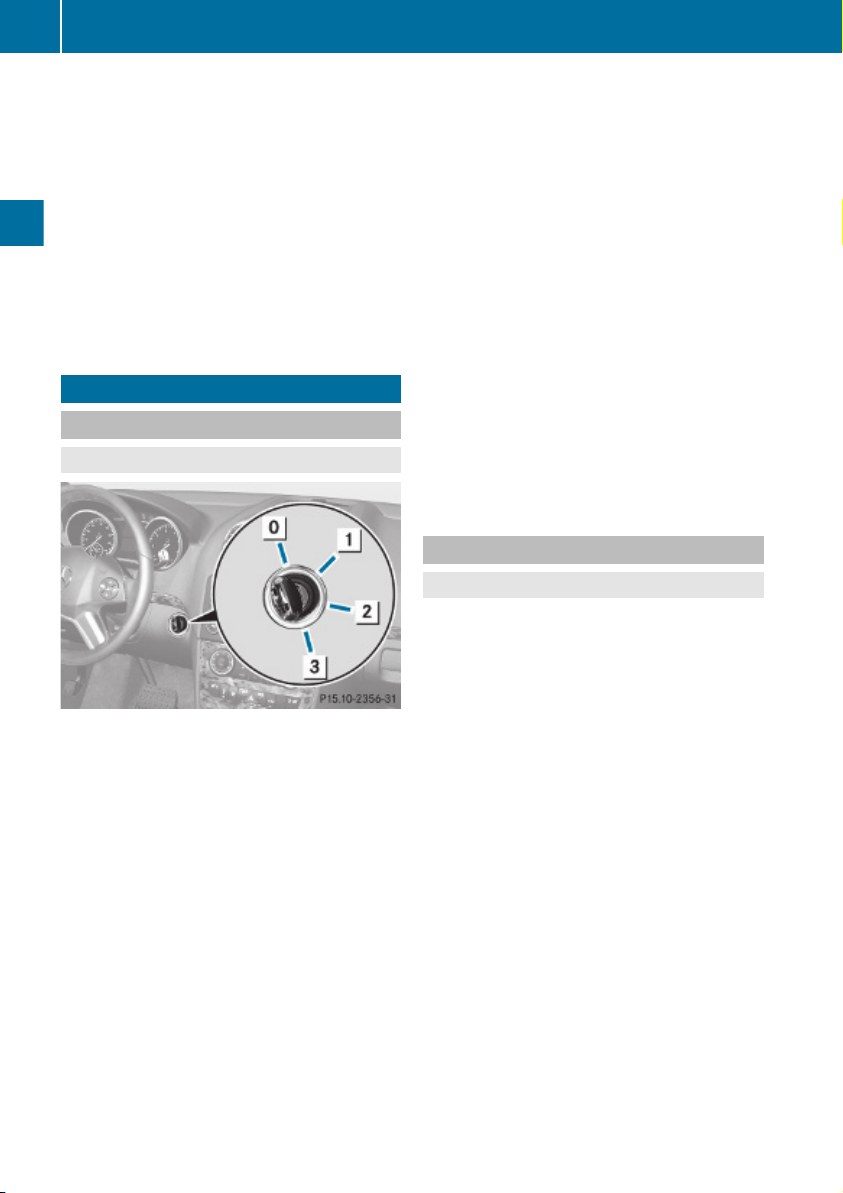
Starter switch positions
80
X
Press and hold the tailgate closing switch
in the tailgate (Y page 78) until you hear a
short acoustic signal.
The opening height of the tailgate is limited.
The tailgate will now stop at the stored
position when opened.
Deactivating
X
Press and hold the tailgate closing switch
in the tailgate (Y page 78) until you hear
two short, consecutive acoustic signals.
Starter switch positions
SmartKey
Controls in detail
Observe Safety notes, see page 55.
G
Starter switch
g
For removing SmartKey
1
Power supply for some electrical
consumers, e.g. radio
2
Ignition (power supply for all electrical
consumers) and driving position
3
Starting position
When you switch on the ignition, all lamps
(except low-beam headlamp indicator lamp,
high-beam headlamp indicator lamp, and turn
signal indicator lamps unless activated) in the
instrument cluster come on. If a lamp in the
instrument cluster fails to come on when the
ignition is switched on, have it checked and
replaced if necessary. If a lamp in the
instrument cluster remains on after starting
the engine or comes on while driving, refer to
“Lamps in instrument cluster” (Y page 314).
X
Always remove the SmartKey from the
starter switch when the engine is not in
operation.
This will help to prevent accelerated vehicle
battery discharge or a completely
discharged vehicle battery.
If the SmartKey cannot be turned in the
starter switch, the vehicle battery may not be
sufficiently charged.
X
Check the vehicle battery and charge it if
necessary.
or
X
Get a jump start.
i
If the SmartKey does not belong to the
vehicle, the SmartKey can be turned in the
starter switch. However, the ignition does
not switch on and the engine does not start.
KEYLESS-GO
Observe Safety notes, see page 55.
G
Vehicles equipped with the KEYLESS-GO
feature are supplied with a SmartKey with
integrated KEYLESS-GO function and a
removable KEYLESS-GO start/stop button.
The KEYLESS-GO start/stop button must be
inserted in the starter switch and the
SmartKey present in the vehicle.
Pressing the KEYLESS-GO start/stop button
without depressing the brake pedal
corresponds to the various starter switch
positions (Y page 80).
Pressing the KEYLESS-GO start/stop button
with the brake pedal firmly depressed will
start the engine (Y page 108).
The KEYLESS-GO start/stop button can be
pulled out of the starter switch easily. You can
then insert the SmartKey into the starter
switch.
i
The KEYLESS-GO start/stop button does
not need to be removed from the starter
switch when you leave the vehicle.
However, always take the SmartKey with
you when you leave the vehicle. As long as
Page 83
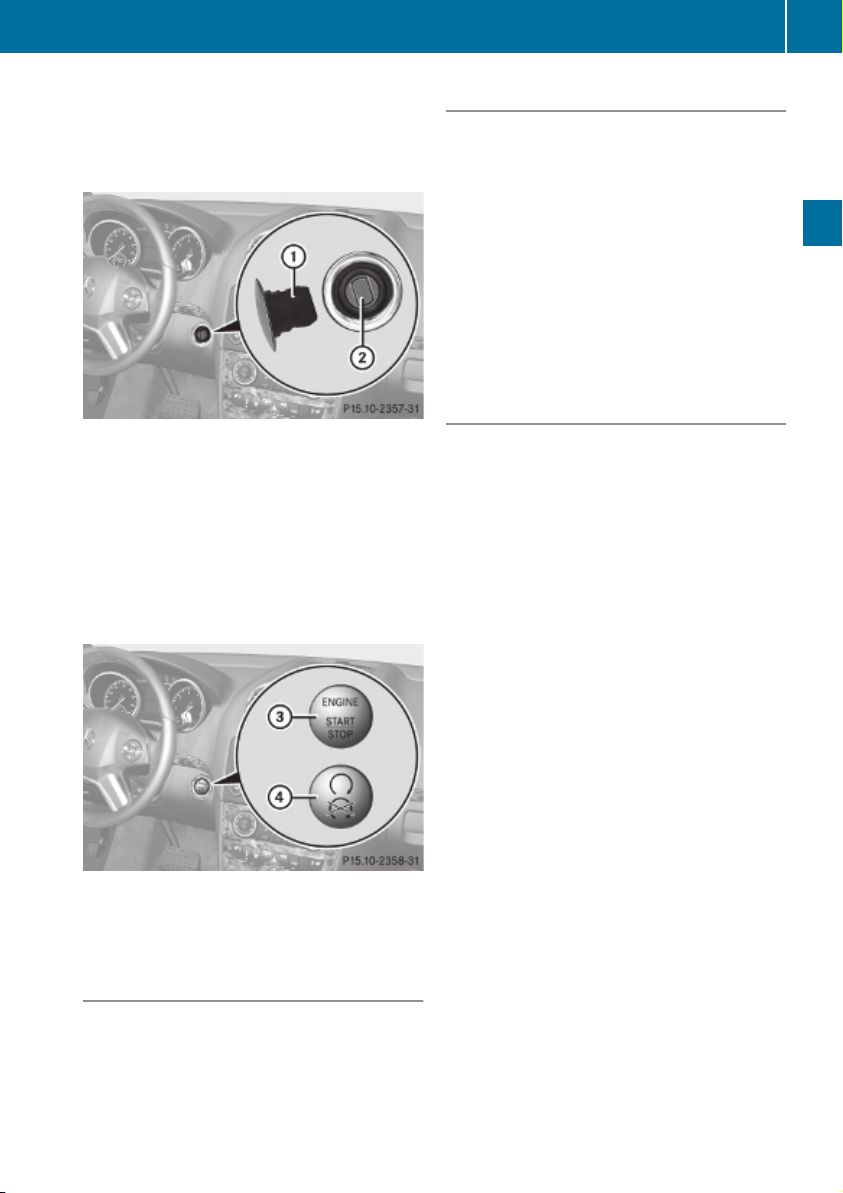
Starter switch positions
81
the SmartKey is in the vehicle, the vehicle’s
electrical systems can be switched on or
the engine can be started using the
KEYLESS-GO start/stop button.
:
KEYLESS-GO start/stop button
;
Starter switch
X
Insert the KEYLESS-GO start/stop button
into the starter switch (if not inserted
already).
X
Make sure the automatic transmission is in
park position P.
X
Do not depress the brake pedal.
Position 1
X
Press the KEYLESS-GO start/stop button
once.
This supplies power for some electrical
consumers, such as radio functions.
i If you now press the KEYLESS-GO start/
stop button
R
once more, the ignition (position 2) is
switched on
R
twice more the power supply is again
switched off
Ignition (or position 2)
X
Press the KEYLESS-GO start/stop button
twice.
This supplies power for all electrical
consumers.
All lamps (except low-beam headlamp
indicator lamp, high-beam headlamp
indicator lamp, and turn signal indicator
lamps unless activated) in the instrument
cluster come on. If a lamp in the instrument
cluster fails to come on when the ignition
is switched on, have it checked and
replaced if necessary. If a lamp in the
instrument cluster remains on after
starting the engine or comes on while
driving, refer to “Lamps in instrument
cluster” (Y page 314).
Controls in detail
KEYLESS-GO start/stop button
=
USA only
?
Canada only
Position 0
Before you press the KEYLESS-GO start/stop
button, the vehicle’s on-board electronics
have status 0 (as with SmartKey removed).
i
If you now press the KEYLESS-GO start/
stop button once, the power supply is again
switched off.
Z
Page 84

82
Seats
Seats
Safety notes
Warning!
G
In order to avoid possible loss of vehicle
control the following must be done before the
vehicle is put into motion:
R
seat adjustment
R
head restraint adjustment
R
steering wheel adjustment
R
rear view mirror adjustment
R
fastening of seat belts
Warning!
G
Controls in detail
Do not adjust the driver’s seat while driving.
Adjusting the seat while driving could cause
the driver to lose control of the vehicle.
Never ride in a moving vehicle with the seat
backrest in an excessively reclined position as
this can be dangerous. You could slide under
the seat belt in a collision. If you slide under
it, the seat belt would apply force at the
abdomen or neck. That could cause serious
or fatal injuries. The seat backrest and seat
belts provide the best restraint when the
wearer is in a position that is as upright as
possible and seat belts are properly
positioned on the body.
Warning!
G
Your seat must be adjusted so that you can
correctly fasten your seat belt.
Observe the following points:
R
Adjust the seat backrest until your arms are
slightly angled when holding the steering
wheel.
R
Adjust the seat to a comfortable seating
position that still allows you to reach the
accelerator/brake pedal safely. The
position should be as far back as possible
with the driver still able to operate the
controls properly.
R
Adjust the head restraint so that it is as
close to the head as possible. The center of
the head restraint must support the back of
the head at eye level.
R
Never place hands under the seat or near
any moving parts while a seat is being
adjusted.
Failure to do so could result in an accident
and/or serious personal injury.
Warning!
G
The power seats can be operated at any time.
Therefore, do not leave children unattended
in the vehicle, or with access to an unlocked
vehicle. A child’s unsupervised access to a
vehicle could result in an accident and/or
serious personal injury.
Warning!
G
According to accident statistics, children are
safer when properly restrained in the rear
seating positions than in the front seating
position. Thus, we strongly recommend that
children be placed in the rear seats whenever
possible. Regardless of seating position,
children 12 years old and under must be
seated and properly secured in an
appropriately sized infant restraint, toddler
restraint, or booster seat recommended for
the size and weight of the child. For additional
information, see “Children in the vehicle”.
A child’s risk of serious or fatal injuries is
significantly increased if the child restraints
are not properly secured in the vehicle and/
or the child is not properly secured in the child
restraint.
Warning!
G
For your protection, drive only with properly
positioned head restraints.
Adjust the head restraint so that it is as close
to the head as possible and the center of the
head restraint supports the back of the head
at eye level. This will reduce the potential for
injury to the head and neck in the event of an
accident or similar situation.
Page 85
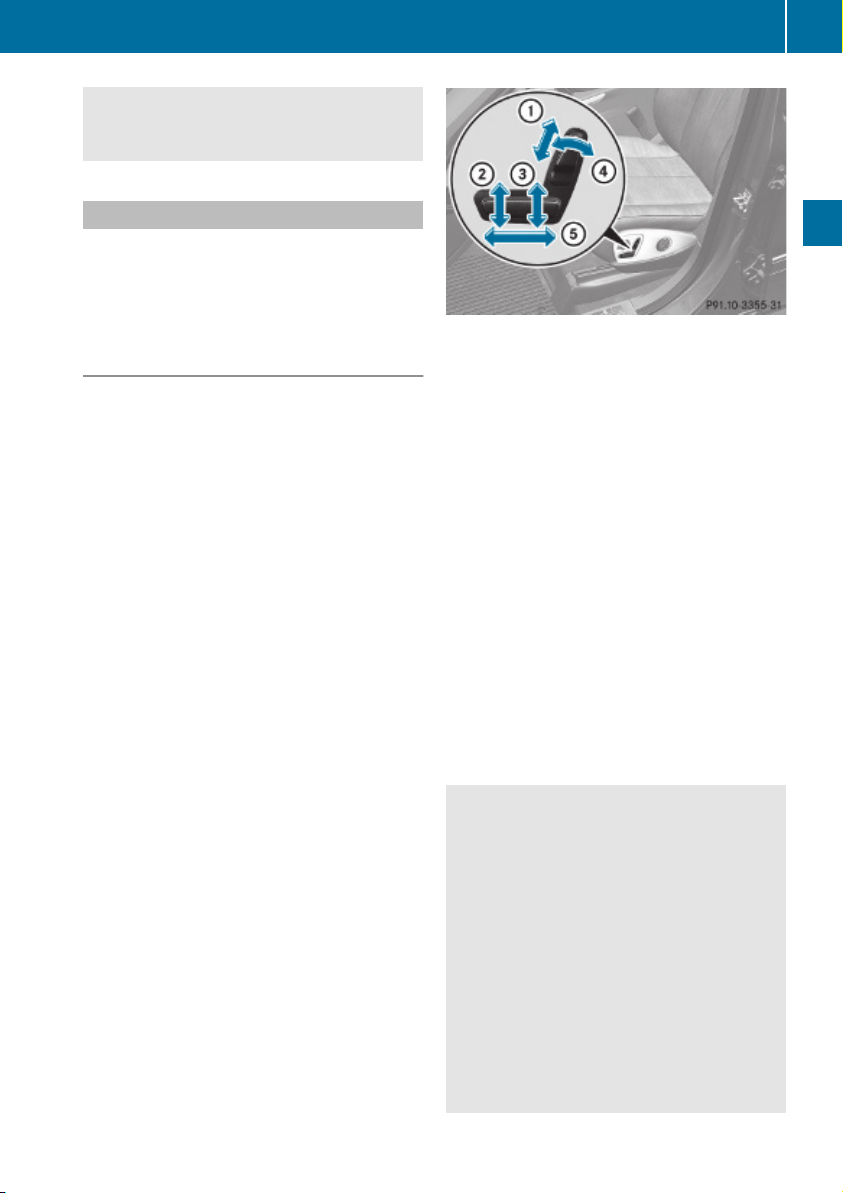
Do not drive the vehicle without the seat head
restraints. Head restraints are intended to
help reduce injuries during an accident.
Seat adjustment
!
When moving the seats, make sure there
are no items in the footwell or behind the
seats. Otherwise, you could damage the
seats and/or the items.
Power seats
!
When the second-row seats are folded
forward, e.g. for cargo volume expansion,
the front seats may not be moved to the
rearmost position. Otherwise you could
damage the front and second-row seats.
!
When adjusting the seat backrest tilt and
head restraint height, make sure the sun
visor is folded up. If the head restraint is in
the uppermost position, it could hit and
damage the sun visor.
i
Vehicles without memory function:
The seats can be adjusted within 5 minutes
after either front door has been opened.
The counter resets each time
R
you open or close a front door
R
you insert the SmartKey into the starter
switch
R
you remove the SmartKey from the
starter switch
R
you switch the ignition on or off
Just like in vehicles with memory function,
the power seats can be operated at any
time when the ignition is switched on.
i
The memory function (Y page 96) lets
you store the settings for the seat position
together with the settings for the steering
wheel (electrical) and exterior rear view
mirrors.
Seats
X
Seat fore and aft adjustment: Press the
switch forward or backward in direction of
arrow A.
X
Seat backrest tilt: Press the switch
forward or backward in direction of
arrow ?.
X
Seat height: Press the switch up or down
in direction of arrow =.
X
Seat cushion tilt: Press the switch up or
down in direction of arrow ; until your
upper legs are lightly supported.
X
Head restraint height (vehicles with
memory function): Press the switch up or
down in direction of arrow :.
Head restraint height adjustment,
manual
This feature is only available in vehicles
without memory function.
Warning!
G
For your protection, drive only with properly
positioned head restraints.
Adjust the head restraint so that it is as close
to the head as possible and the center of the
head restraint supports the back of the head
at eye level. This will reduce the potential for
injury to the head and neck in the event of an
accident or similar situation.
Do not drive the vehicle without the seat head
restraints. Head restraints are intended to
help reduce injuries during an accident.
With a rear seat occupied, make sure to move
the respective head restraint up from the
83
Controls in detail
Z
Page 86
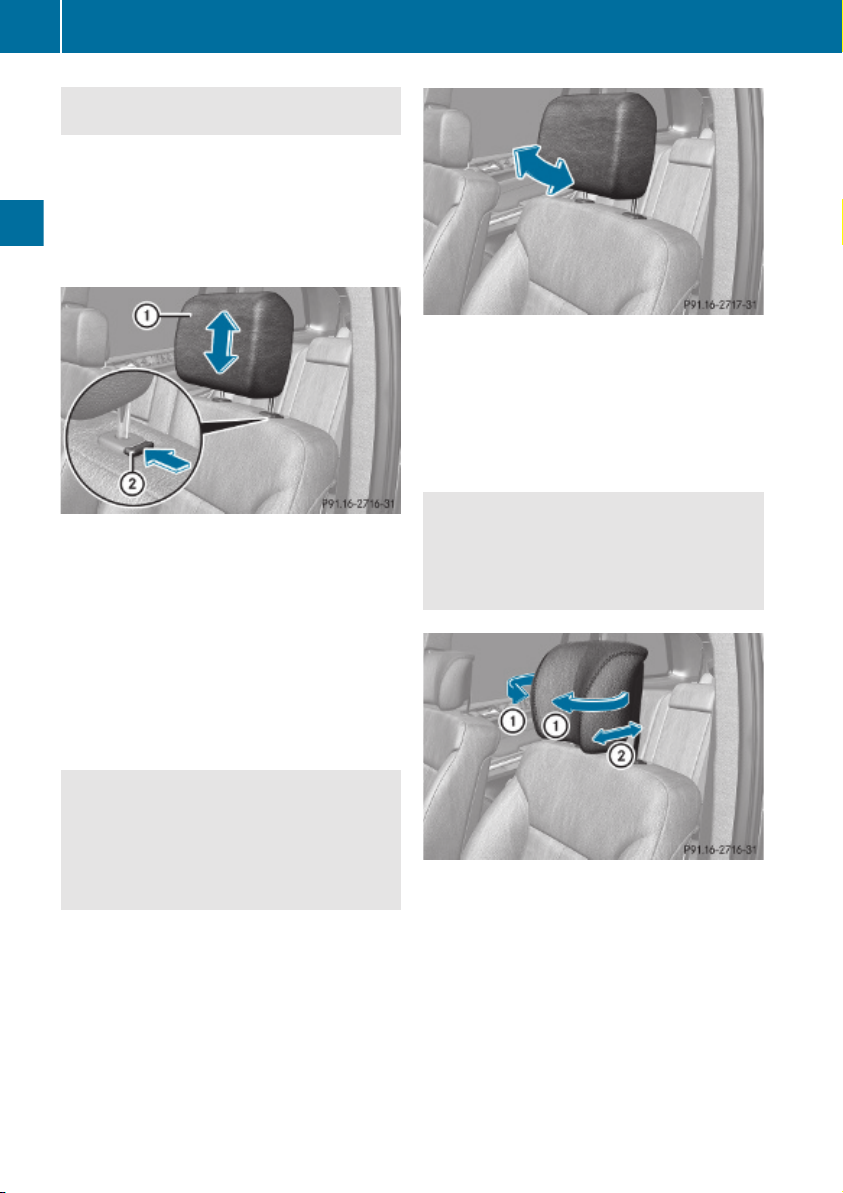
Seats
84
lowest non-use position and have the
occupant adjust the head restraint properly.
!
Do not attempt to remove front seat head
restraints. They can only be removed by
qualified technicians. We recommend that
you have this work carried out by an
authorized Mercedes-Benz Center.
Controls in detail
X
Raising: Adjust the height of head
restraint : by pulling it upward.
If head restraint : is fully retracted, press
release button ; in direction of arrow and
pull head restraint : upward.
X
Lowering: Press release button ; in
direction of arrow and press down on head
restraint :.
X
While seated, reach behind you with both
hands and find lower edge of the head
restraint.
X
Push or pull on the lower edge of the head
restraint cushion to the desired position.
Comfort head restraint
Warning!
G
When folding back the side cushions, never
reach between the side cushion and the
mounting post. You could otherwise be
trapped.
Head restraint fore and aft adjustment
Warning!
G
Vehicles with Rear Seat Entertainment
System: When adjusting the head restraint,
make sure your fingers do not become caught
between the head restraint cushion and the
monitor. Failing to do so may lead to injury.
You can adjust the side cushions of the head
restraints individually.
X
Adjusting side cushions: Pull or push side
cushions : into desired position.
X
Adjusting forward or backward: Pull or
push head restraint in direction of
arrow ;.
Page 87
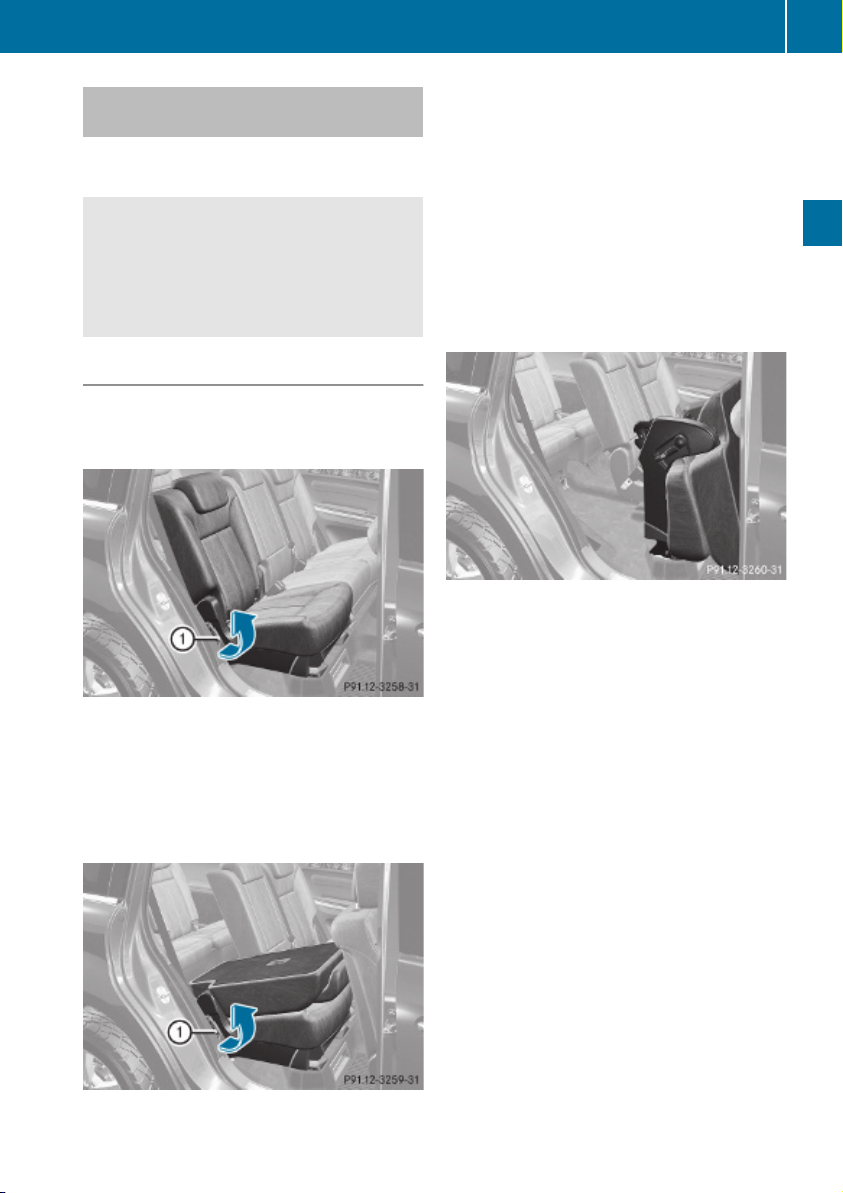
Easy-entry/exit feature for third-row seats
This feature allows for easier access to and
exit from the vehicle’s third-row seats.
Warning!
G
To help avoid personal injury, the second-row
seat backrests must be properly locked either
in the upright position or, when using the
expanded cargo volume, in the fully folded
position while the vehicle is in motion.
Easy-entry feature for third-row seats
The lever for the easy-entry feature is located
on the rear of the seat base of the passenger
side second-row seat.
!
Make sure the head restraint is pushed all
the way down.
X
Pull and hold easy-entry lever : in
direction of arrow at resistance point.
The seat backrest folds forward.
Seats
X
Pull and hold easy-entry lever : once
again in direction of arrow at resistance
point.
X
Lift up the right second-row seat until it
folds forward.
You should now have sufficient space to
access the vehicle’s third-row seat.
i
Vehicles with memory function:
The front passenger seat moves slightly
forward.
Easy-entry/exit position
While the easy-entry feature is activated, you
will see, for example, the following message
in the multifunction display:
2nd Row Of Seats - Right
Not Locked
X
Return seat into its original position.
The message in the multifunction display
disappears.
For setting the front passenger seat back into
the stored position, see “Recalling positions
from memory” (Y page 97).
X
Enter the vehicle.
For information on how to fold down the
second-row seats completely, see
“Expanding cargo volume” (Y page 201).
For setting the front passenger seat back into
the stored position, see “Recalling positions
from memory” (Y page 97).
85
Controls in detail
Z
Page 88
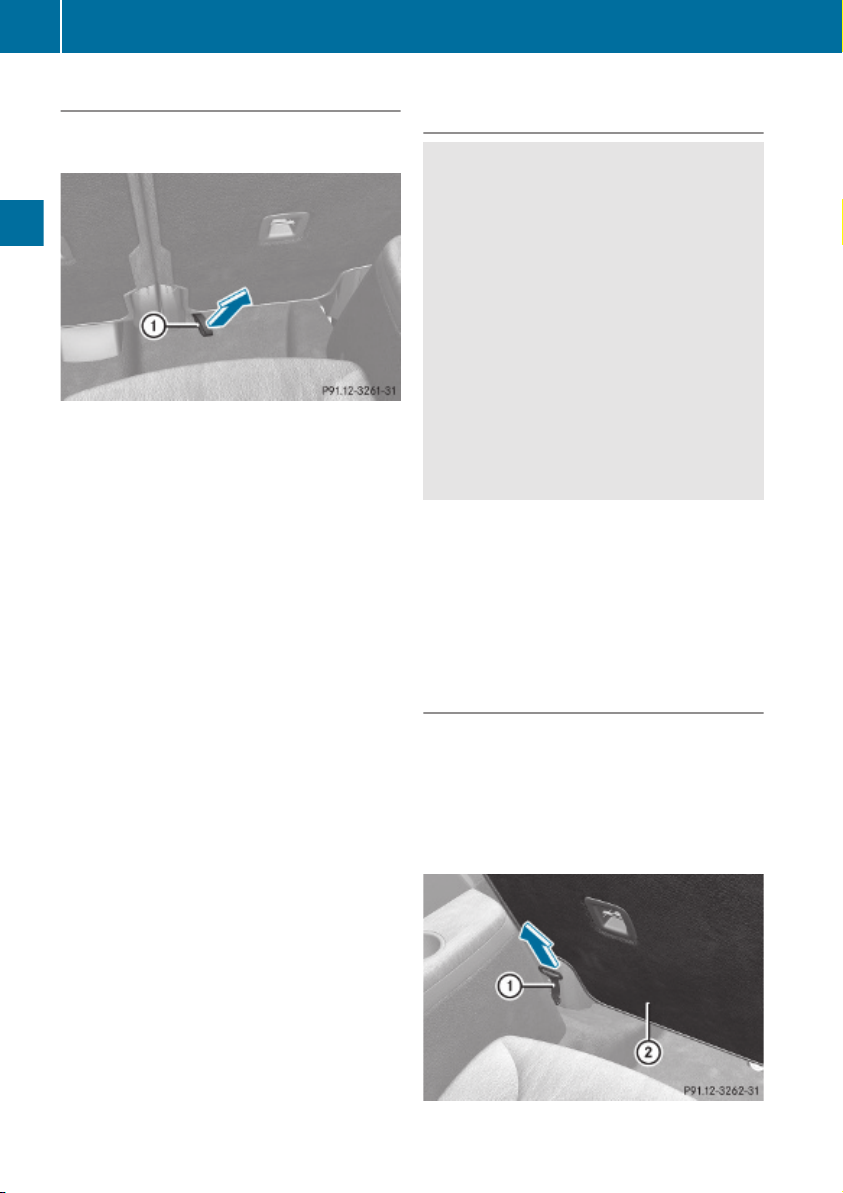
86
Seats
Easy-exit feature for third-row seats
The easy-exit strap is located on the right rear
of the second-row seat base.
Easy-exit strap
Controls in detail
X
To exit the vehicle when seated on a thirdrow seat, pull up and hold easy-exit
strap :.
The right second-row seat backrest folds
forward.
X
Pull and hold once easy-entry strap :.
X
Lift up the right second-row seat until it
folds forward.
You should now have sufficient space to
exit the vehicle’s third-row seat.
i
Vehicles with memory function:
The front passenger seat moves slightly
forward.
While the easy-entry feature is activated, you
will see, for example, the following message
in the multifunction display:
2nd Row Of Seats - Right
Not Locked
X
Return seat into its original position
(Y page 86).
The message in the multifunction display
disappears.
For setting the front passenger seat back into
the stored position, see “Recalling positions
from memory” (Y page 97).
For information on how to fold down the
second-row seats completely, see
“Expanding cargo volume” (Y page 201).
Returning second-row seats to their
original position
Warning!
G
When occupants have entered or exited the
vehicle using the easy-entry/exit feature,
before driving off make sure
R
the seats are properly locked
R
the seat backrests are in an upright position
and are properly locked
If a seat and seat backrest are not properly
locked, the seat could move forward and the
seat backrest could fold. You could slide
under the seat belt during braking, vehicle
maneuvers, or in an accident. If you slide
under it, the seat belt would apply force at the
abdomen or neck. That could cause serious
or even fatal injuries.
X
Fold seat back until it audibly engages.
X
Fold seat backrest back into original
position until it engages.
To make sure the seat backrest has
engaged, lean firmly against the seat
backrest.
Emergency exit for third-row seats
i
If, due to an accident or other situation, it
is not possible for you to exit the vehicle on
the side of the easy-entry seat
(Y page 85), you can fold the left side of the
seat backrest in the second row of seats
down in order to open the left rear door.
Page 89
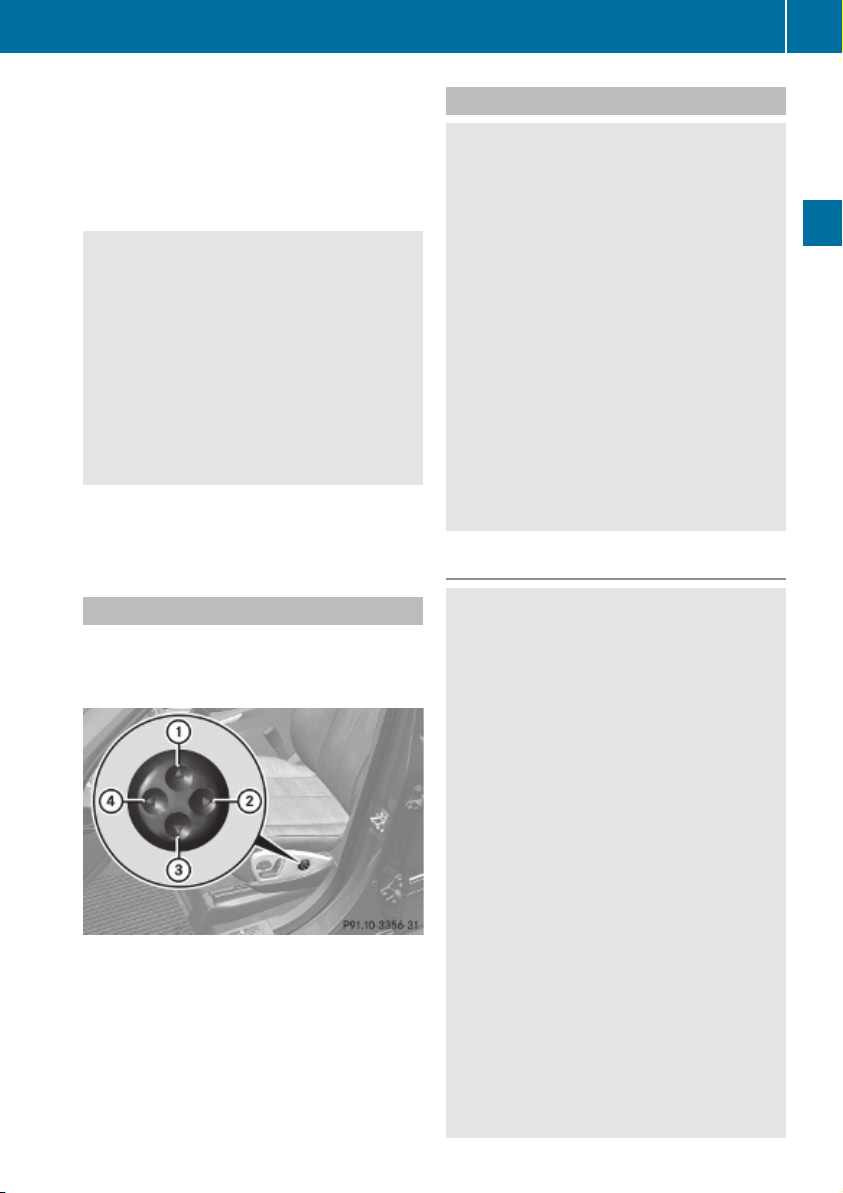
!
Make sure the head restraint is pushed all
the way down.
X
Pull emergency release : in the direction
of arrow.
X
Push seat backrest ; forwards.
Warning!
G
To help avoid personal injury when folding the
seat backrest forward, make sure you move
both feet and legs all the way back and out of
the way to avoid them contacting the seat as
it pivots forward.
In order to prevent an accident or any other
potentially dangerous situations when
opening the rear door and exiting the vehicle,
make sure you are aware of the traffic
situation at all times.
X
Open the left door.
X
Exit the vehicle.
Lumbar support
You can adjust the contour of the driver’s seat
lumbar support to help enhance support to
your spine.
X
Curvature position: Use button : to
move the curvature up and button = to
move it down.
X
Degree of curvature: Use button ; to
lessen the curvature and button ? to
increase it.
Seats
Rear seats
Warning!
G
According to accident statistics, children are
safer when properly restrained in the rear
seating positions than in the front seating
position. Thus, we strongly recommend that
children be placed in the rear seats whenever
possible. Regardless of seating position,
children 12 years old and under must be
seated and properly secured in an
appropriately sized infant restraint, toddler
restraint, or booster seat recommended for
the size and weight of the child. For additional
information, see “Children in the vehicle”.
A child’s risk of serious or fatal injuries is
significantly increased if the child restraints
are not properly secured in the vehicle and/
or the child is not properly secured in the child
restraint.
Rear seat adjustment
Warning!
G
Never ride in a moving vehicle with the seat
backrest in an excessively reclined position as
this can be dangerous. You could slide under
the seat belt in a collision. If you slide under
it, the belt would apply force at the abdomen
or neck. That could cause serious or fatal
injuries. The seat backrest and seat belts
provide the best restraint when the wearer is
in a nearly upright position and seat belts are
properly positioned on the body.
Your seat must be adjusted so that you can
correctly fasten your seat belt.
Never place hands under the seat or near any
moving parts while a seat is being adjusted.
After adjusting rear seats, make sure
R
the seats are properly locked
R
the seat backrests are in an upright position
and are properly locked
Check for secure locking by pushing and
pulling on the seat backrests. If a seat and
seat backrest are not properly locked, the
seat could move forward and the seat
87
Controls in detail
Z
Page 90
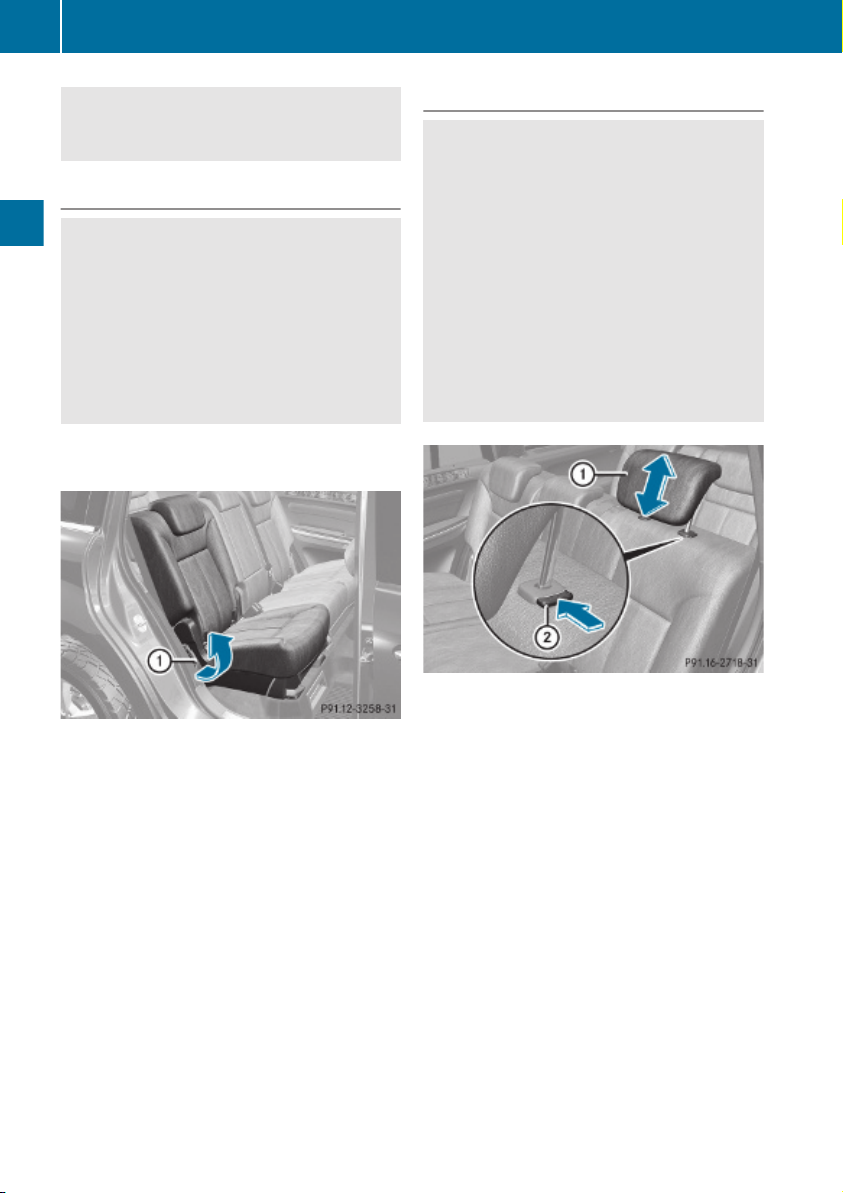
88
Seats
backrest could fold. The child seat would no
longer be properly supported or positioned to
provide its intended benefit.
Seat backrest tilt (second-row seats)
Warning!
G
The seat belt only offers its intended
protection when the seat backrest is in a
nearly vertical position and the occupant is
sitting upright. Avoid sitting in positions that
prevent the seat belt from being properly
positioned against the body. You should
therefore adjust the seat backrest to a
position as upright as possible.
Controls in detail
The seat backrest tilt can be set to five
different positions.
Head restraint height
Warning!
G
With a rear seat occupied, make sure to move
the respective head restraint up from the
lowest non-use position and have the
occupant adjust the head restraint properly.
For your protection, drive only with properly
positioned head restraints.
Adjust the head restraint so that it is as close
to the head as possible and the center of the
head restraint supports the back of the head
at eye level. This will reduce the potential for
injury to the head and neck in the event of an
accident or similar situation.
X
While seated, pull adjustment handle : in
direction of arrow to resistance point and
hold it there.
X
To move seat backrest back, lean lightly
against the seat backrest.
X
To move seat backrest forward, lean
forward with adjustment handle : pulled
and held at resistance point.
The seat backrest will move forward
against your back.
X
Release adjustment handle : when the
seat backrest has reached the desired
position.
To make sure the seat backrest has
engaged, lean firmly against the seat
backrest.
Second-row seat head restraint
X
Raising: Manually adjust the height of head
restraint : by pulling it upward to the
desired position.
X
Lowering: Push release button ; and
press down on head restraint :.
i
The third-row seat head restraints are
adjusted in the same manner.
Page 91
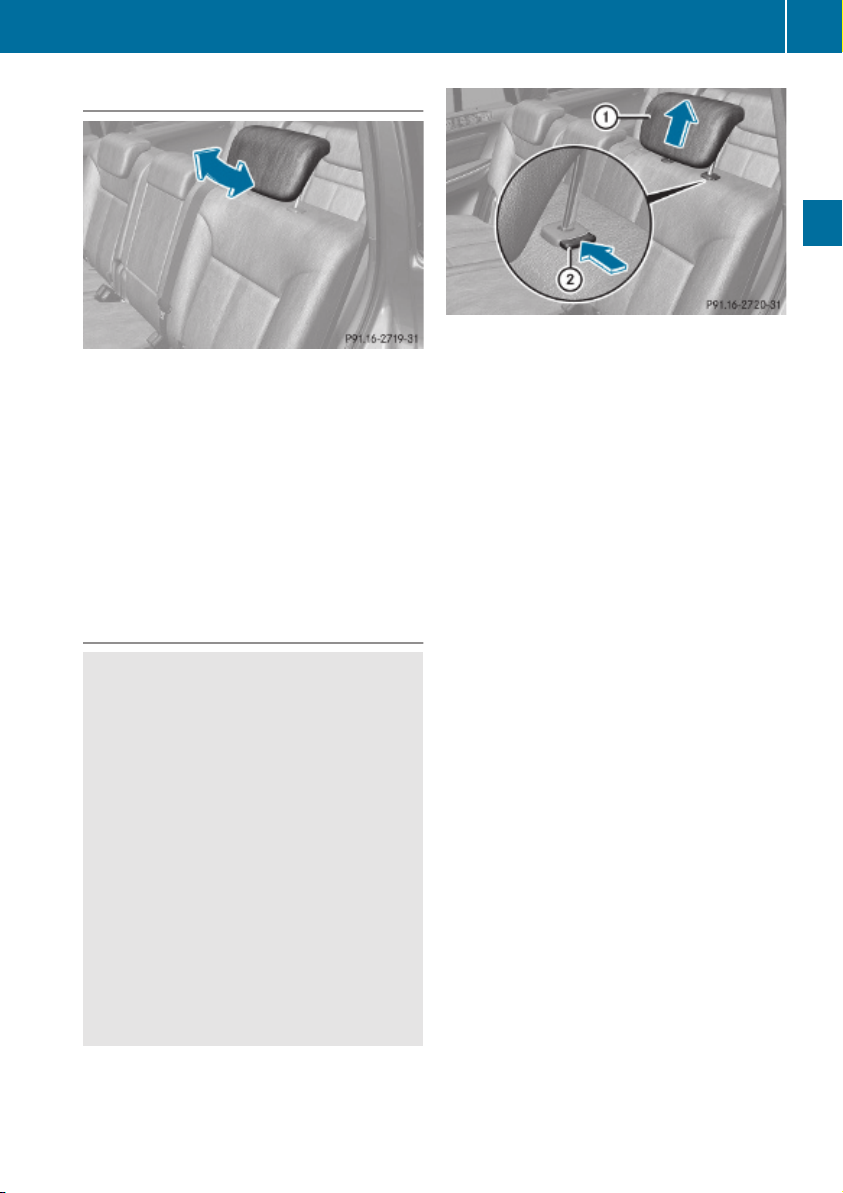
Head restraint fore and aft adjustment
Second-row seat head restraint
Seats
89
The angle of the head restraint for the outer
second-row seats or the third-row seats can
be adjusted manually.
X
While seated, reach behind you with both
hands and find lower edge of the head
restraint.
X
Adjust the head restraint to the desired
position by pushing or pulling on the lower
edge of the head restraint cushion.
Head restraints, removing and
installing
Warning!
G
Do not drive the vehicle without the seat head
restraints installed when the rear seats are
occupied. Head restraints are intended to
help reduce injuries during an accident.
With a rear seat occupied, make sure to move
the respective head restraint up from the
lowest non-use position and have the
occupant adjust the head restraint properly.
For your protection, drive only with properly
positioned head restraints.
Adjust the head restraint in such a way that it
is as close to the head as possible and the
center of the head restraint supports the back
of the head at eye level. This will reduce the
potential for injury to the head and neck in the
event of an accident or similar situation.
Removing
X
Second-row seat: Fold the seat backrest
forward (Y page 88).
X
Third-row seat: Fold the seat backrest
forward (Y page 201).
X
Pull head restraint : to its uppermost
position.
X
Press release button ; and pull out head
restraint :.
X
Second-row seat: Fold the seat backrest
rearward until it engages.
X
Third-row seat: Fold the seat backrest
rearward (Y page 201).
Installing
X
Second-row seat: Fold the seat backrest
forward (Y page 88).
X
Third-row seat: Fold the seat backrest
forward (Y page 201).
X
Insert head restraint : into openings on
the seat backrest.
X
Push head restraint : down until it audibly
engages.
X
Push release button ; and adjust head
restraint : to the desired position
(Y page 88).
X
Second-row seat: Fold the seat backrest
rearward until it engages.
X
Third-row seat: Fold the seat backrest
rearward (Y page 201).
Controls in detail
Z
Page 92
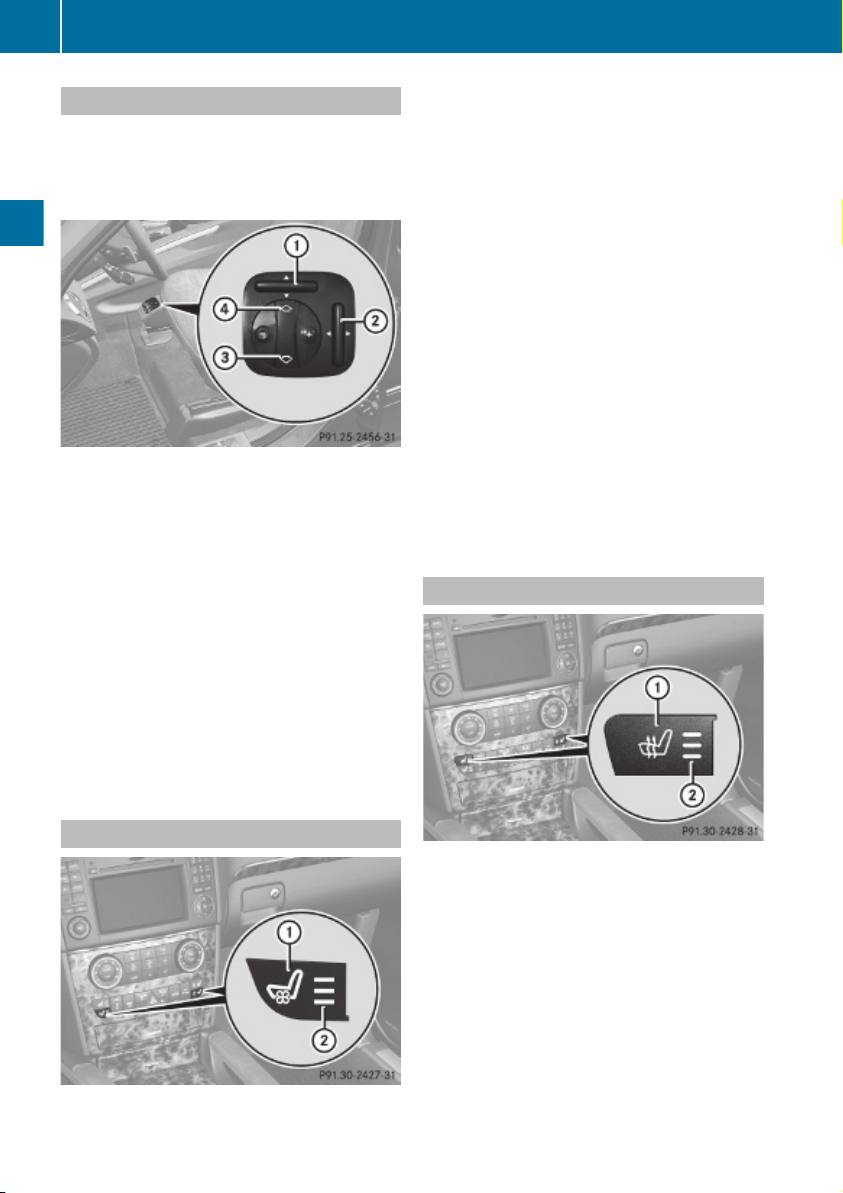
90
Seats
Multicontour seats
The multicontour seat has a movable seat
cushion and inflatable air cushions built into
the seat backrest to provide additional
lumbar and side support.
Controls in detail
X
Switch on the ignition.
X
Seat cushion depth: Adjust the seat
cushion depth to the length of your upper
leg using switch :.
X
Seat backrest contour: Adjust the
contour of the seat backrest to the desired
position using W or X.
X
Move the seat backrest support cushion to
the bottom with button ? or to the center
with button =.
X
Seat backrest side bolsters: Adjust the
side bolsters so that they provide good
lateral support using switch ;.
The blue indicator lamps ; in seat ventilation
switch : come on to show which ventilation
level you have selected.
i
The seat ventilation for the driver’s seat
can be activated using the summer opening
feature (Y page 107).
X
Switch on the ignition.
X
Switching on: Press respective seat
ventilation switch :.
Three blue indicator lamps ; in seat
ventilation switch : come on.
X
Press seat ventilation switch : repeatedly
until the desired ventilation level is set.
X
Switching off: Press seat ventilation
switch : repeatedly until all indicator
lamps ; go out.
If there is insufficient voltage the seat
ventilating switches off automatically.
Seat heating
Seat ventilation
Front seat heating switches
The switches for the outboard second-row
seat heating are located in the rear center
console.
Page 93
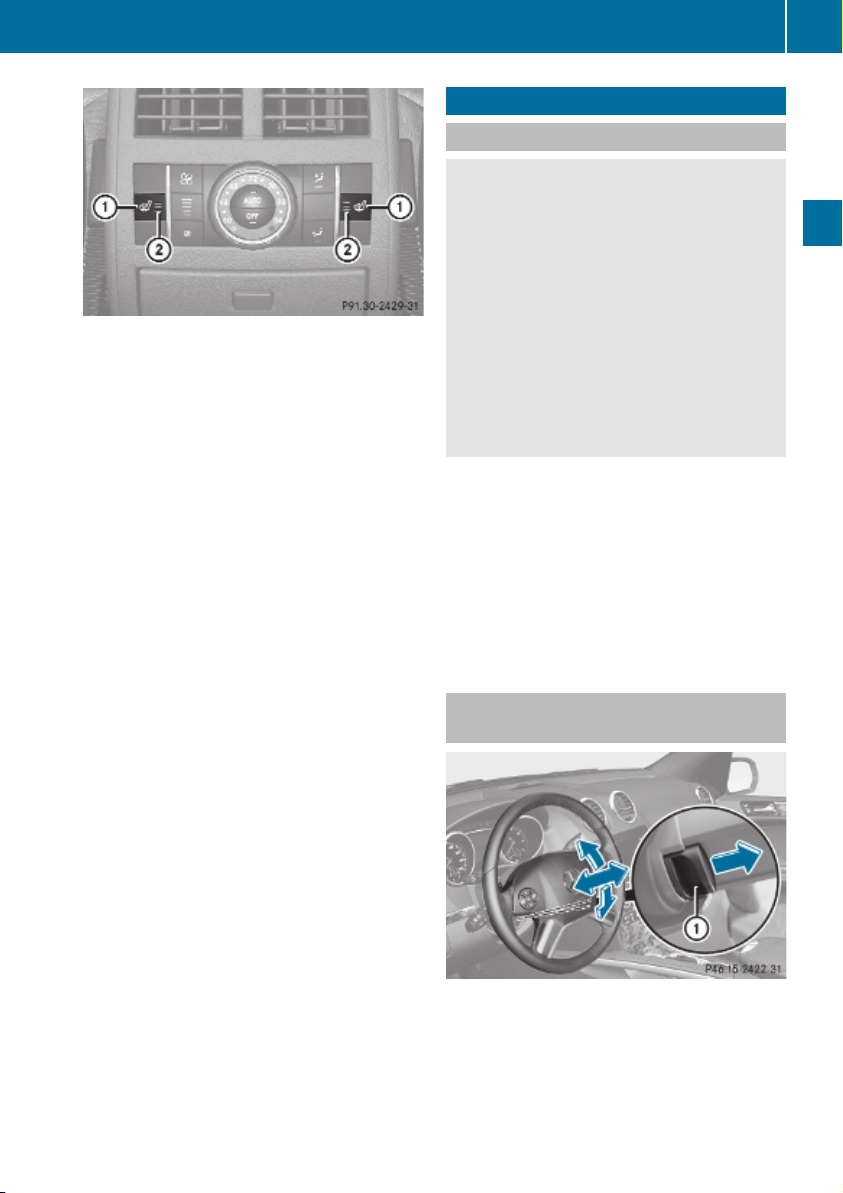
Rear seat heating switches
The red indicator lamps ; in front or rear
seat heating switch : come on to show
which heating level you have selected.
The seat heating switches from level 3 (high)
to level 2 after approximately 5 minutes.
The seat heating switches from level 2 to level
1 (low) after approximately 10 minutes.
After approximately 20 minutes in level 1, the
seat heating switches off automatically.
X
Switch on the ignition.
X
Switching on: Press respective seat
heating switch :.
Three red indicator lamps ; in the
respective seat heating switch : come on.
X
Continue pressing respective seat heating
switch : until desired seat heating level is
reached.
X
Switching off: Press respective seat
heating switch : repeatedly until all
indicator lamps ; go out.
If one or more of indicator lamps ; in
respective seat heating switch : are
flashing, there is insufficient voltage available
since too many electrical consumers are
turned on. The seat heating switches off
automatically.
The seat heating will switch back on again
automatically as soon as sufficient voltage is
available.
Multifunction steering wheel
Multifunction steering wheel
Safety notes
Warning!
G
Do not adjust the steering wheel while driving.
Adjusting the steering wheel while driving, or
driving without the steering wheel adjustment
feature locked could cause the driver to lose
control of the vehicle.
The electrical steering wheel adjustment
feature can be operated at any time.
Therefore, do not leave children unattended
in the vehicle, or with access to an unlocked
vehicle. A child’s unsupervised access to a
vehicle could result in an accident and/or
serious personal injury.
Make sure
R
you can reach the steering wheel with your
arms slightly bent at the elbows
R
you can move your legs freely
R
all displays (including malfunction and
indicator lamps) on the instrument cluster
are clearly visible
Steering wheel adjustment, manual (USA only)
X
Unlocking: Pull release handle : out to
its stop limit.
X
Move steering wheel to the desired
position.
91
Controls in detail
Z
Page 94
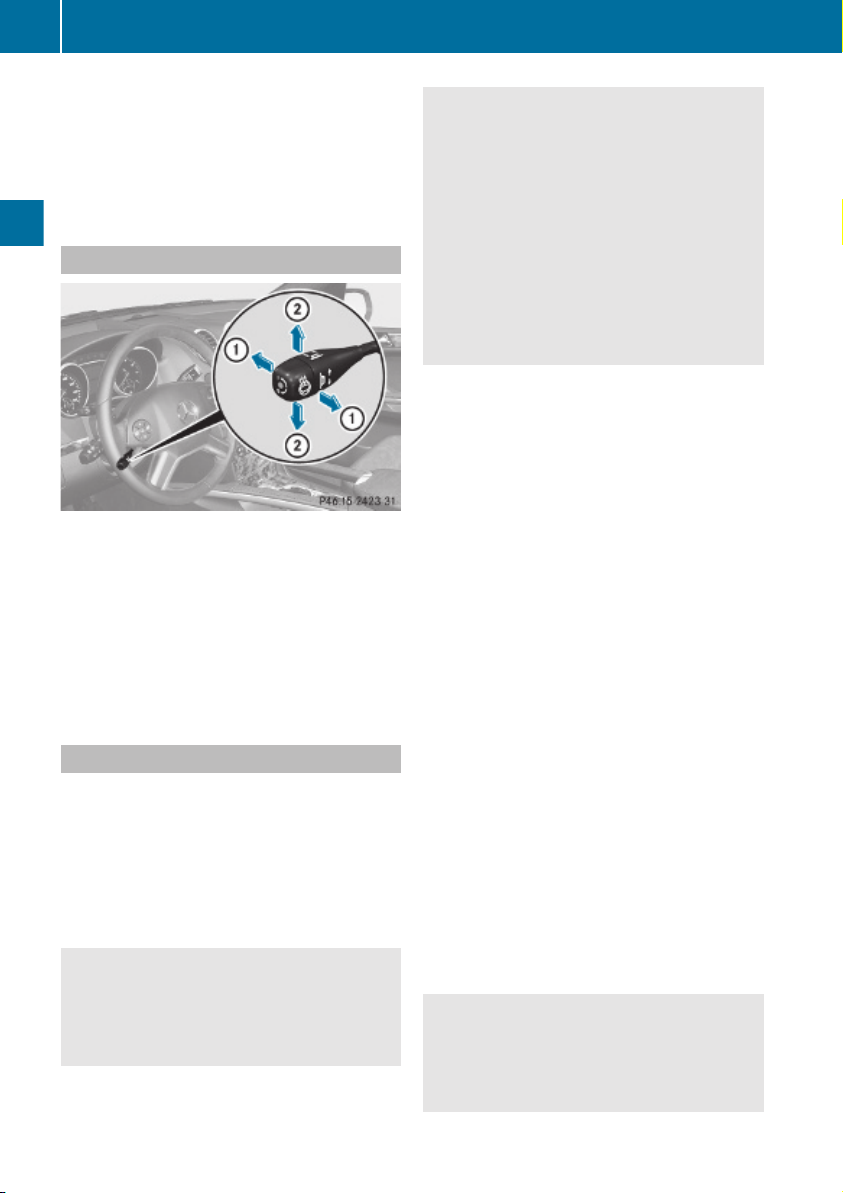
Multifunction steering wheel
92
X
Locking: Push release handle : back to
its original position.
X
Make sure the steering wheel is securely
locked by trying to move it up and down as
well as in and out before driving off.
Steering wheel adjustment, electrical
Controls in detail
X
Adjusting steering wheel in or out: Move
stalk in direction of arrows :.
X
Adjusting steering wheel up or down:
Move stalk in direction of arrows ;.
i
You can store the settings for the steering
wheel with the memory function
(Y page 96).
Easy-entry/exit feature
This feature allows the driver an easier entry
into and exit from the vehicle. When entering
and exiting the vehicle, the steering wheel is
in its uppermost position.
The easy-entry/exit feature can be activated
or deactivated in the Comfort submenu of the
control system (Y page 139).
Warning!
G
You must make sure no one can become
trapped or injured by the moving steering
wheel when the easy-entry/exit feature is
activated.
To stop steering wheel movement do one of
the following:
R
Move steering wheel adjustment stalk.
R
Press one of the memory position buttons.
R
Press memory button M.
Do not leave children unattended in the
vehicle, or with access to an unlocked vehicle.
Children could open the driver’s door and
unintentionally activate the easy-entry/exit
feature, which could result in an accident
and/or serious personal injury.
With the easy-entry/exit feature activated,
the steering wheel will return to its last set
position when you close the driver’s door with
the ignition switched on. The steering wheel
will also return to its last set position when
you insert the SmartKey into the starter
switch or press the KEYLESS-GO start/stop
button once with the driver’s door closed.
i
The last set steering wheel position is
stored when the ignition is switched off or
the position is stored in memory
(Y page 97).
With the easy-entry/exit feature activated,
the steering wheel tilts upwards when you
remove the SmartKey from the starter switch.
The steering wheel also tilts upwards when
you open the driver’s door with the SmartKey
in starter switch position 0 or 1 or the
KEYLESS-GO start/stop button in position 1.
i
When the current position for the steering
wheel is in the uppermost tilt position, the
steering wheel will no longer be able to
move upward when the easy-entry/exit
feature is activated.
The adjustment procedure is briefly
interrupted when the engine is started.
Warning!
G
Let the system complete the adjustment
procedure before setting the vehicle in
motion. All steering wheel adjustment must
be completed before setting the vehicle in
Page 95
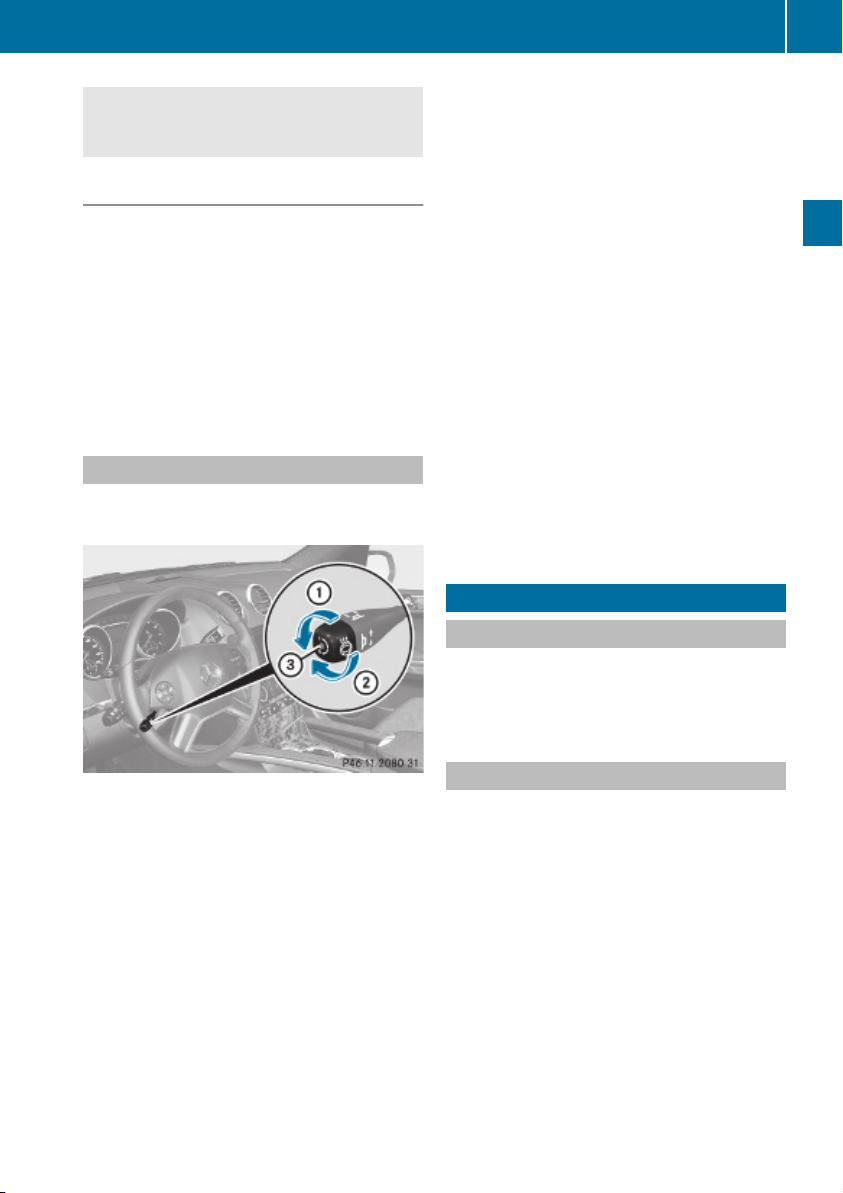
Mirrors
93
motion. Driving off with the steering wheel
still adjusting could cause the driver to lose
control of the vehicle.
Crash-responsive exit aid
When you open the driver’s door after an
accident has occurred, the steering column
moves up. The position of the SmartKey in the
starter switch is insignificant. This function
facilitates exiting as well as rescue of vehicle
occupants.
The crash-responsive exit aid can only be
triggered when the easy-entry/exit feature is
activated via the control system.
Heated steering wheel
The steering wheel heating warms up the
leather area of the steering wheel.
When these conditions do not apply
anymore, steering wheel heating
continues.
X
Switching off: Turn switch at the tip of
stalk in direction of arrow ;.
Indicator lamp = goes out.
i
Indicator lamp = flashes or goes out in
case of power surge or undervoltage or if
the steering wheel heating malfunctions.
i
The steering wheel heating switches off
automatically when you remove the
SmartKey from the starter switch or, on
vehicles with KEYLESS-GO, when you
switch off the ignition and open the driver’s
door.
For more information on the steering wheel,
see “Multifunction steering wheel”
(Y page 125).
Mirrors
Notes
Adjust the interior and exterior rear view
mirrors before driving so that you have a good
view of the road and traffic conditions.
Controls in detail
X
Switch on the ignition.
X
Switching on: Turn switch at the tip of the
stalk in direction of arrow :.
Indicator lamp = comes on.
i
The steering wheel heating may be
suspended temporarily. However, indicator
lamp = remains on. The steering wheel
heating is suspended when the
temperature of the vehicle interior is above
86‡ (30†). It is also suspended when the
temperature of the steering wheel is above
95‡ (35†).
Interior rear view mirror
X
Adjust the interior rear view mirror
manually.
Z
Page 96
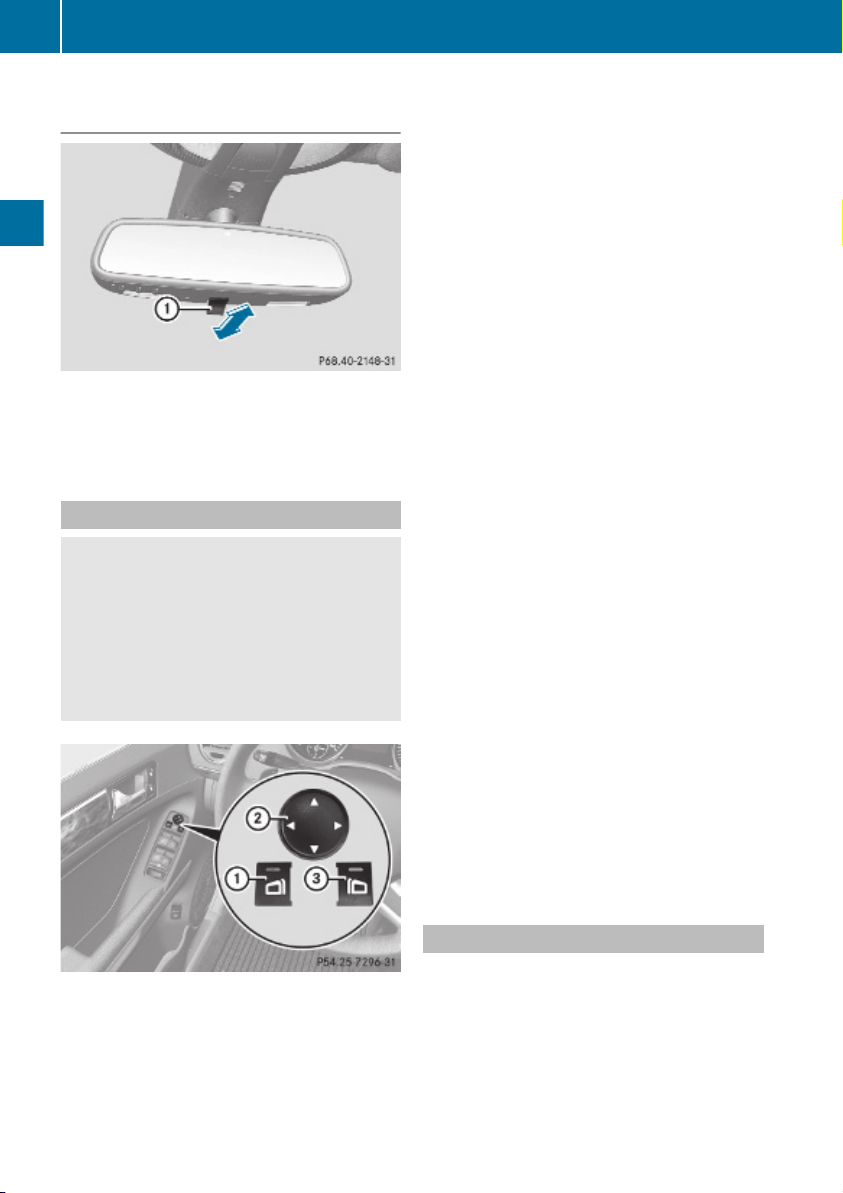
94
Mirrors
Interior rear view mirror, antiglare
position
X
Tilt the mirror to the antiglare position by
moving lever : towards the windshield.
Controls in detail
The interior rear view mirror is dimmed.
Exterior rear view mirrors
Warning!
G
Exercise care when using the passenger-side
exterior rear view mirror. The mirror surface
is convex (outwardly curved surface for a
wider field of view). Objects in mirror are
closer than they appear. Check your interior
rear view mirror and glance over your
shoulder before changing lanes.
the passenger-side exterior rear view
mirror.
The indicator lamp in the respective button
comes on for approximately 15 seconds.
If you do not make adjustments to the
selected exterior rear view mirror within
15 seconds, the indicator lamp goes out.
You will then have to select the desired
exterior rear view mirror again before
adjustments can be made. Adjustments
can only be made with the indicator lamp
for the respective exterior rear view mirror
button illuminated.
X
Press adjustment button ; up, down, left
or right according to the desired setting.
!
If an exterior rear view mirror was forcibly
hit from the front, manually snap it back
into place.
!
Vehicle with power-folding exterior rear
view mirrors:
If an exterior rear view mirror housing is
forcibly pushed forward (hit from the rear)
or forcibly pushed rearward (hit from front),
press fold button to fold mirrors in, then
press fold button again to fold mirrors out.
Do not force mirrors by hand as this may
damage the adjustment mechanism.
The mirror housing is then properly
positioned and you can adjust the mirror in
the usual manner.
X
Switch on the ignition.
X
Press button : for the driver’s side
exterior rear view mirror or button = for
i
At low ambient temperatures, the exterior
rear view mirrors will be heated
automatically.
Auto-dimming rear view mirrors
The exterior rear view mirror on the driver’s
side and the interior rear view mirror will
respond automatically to glare when the
ignition is switched on and incoming light
from headlamps falls on the sensor in the
interior rear view mirror.
Page 97
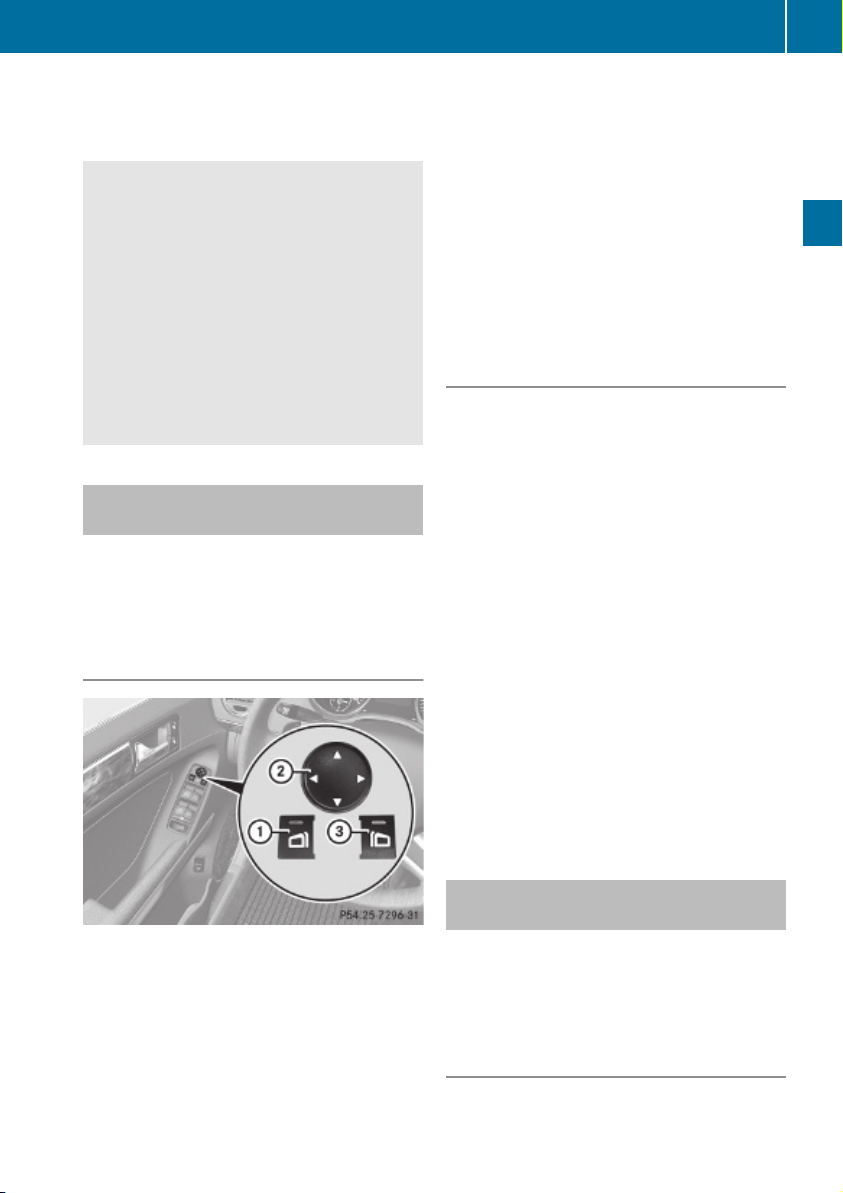
Mirrors
95
The rear view mirrors will not react if the
automatic transmission is set to reverse gear
R or the interior lighting is switched on.
Warning!
G
The auto-dimming function does not react if
incoming light is not aimed directly at sensors
in the interior rear view mirror.
The interior rear view mirror and the exterior
rear view mirror on the driver’s side do not
react, for example, when transporting cargo
which covers the rear window.
Light hitting the mirror(s) at certain angles
(incident light) could blind you. As a result,
you may not be able to observe traffic
conditions and could cause an accident.
Exterior rear view mirror parking position
For more convenient parking, you can set the
passenger-side exterior rear view mirror so
that you can see the rear wheel and the road
curb.
Setting and storing the parking position
X
Shift the automatic transmission into
reverse gear R.
The passenger-side exterior rear view
mirror moves to the preset parking
position.
X
Adjust the passenger-side exterior rear
view mirror with adjustment button ; so
that you see the rear wheel and the road
curb.
The exterior rear view mirror parking
position is stored.
Calling up the parking position
X
Switch on the ignition.
X
Press button =, to select the passengerside exterior rear view mirror.
X
Shift the automatic transmission into
reverse gear R.
The passenger-side exterior rear view
mirror moves to the stored parking
position.
The passenger-side exterior rear view mirror
returns to its previously stored driving
position
R
10 seconds after you have put the gear
selector lever out of reverse gear R
R
immediately once your vehicle exceeds a
speed of approximately 6 mph (10 km/h)
R
immediately when you press button : to
select the driver’s side exterior rear view
mirror
Controls in detail
X
Switch on the ignition.
X
Press button =, to select the passengerside exterior rear view mirror.
Power-folding exterior rear view mirrors
!
Before you drive the vehicle through an
automatic car wash, fold in the exterior rear
view mirrors. Otherwise they may get
damaged.
Folding in and out automatically
The function must be activated in the
Convenience submenu (Y page 140).
Z
Page 98
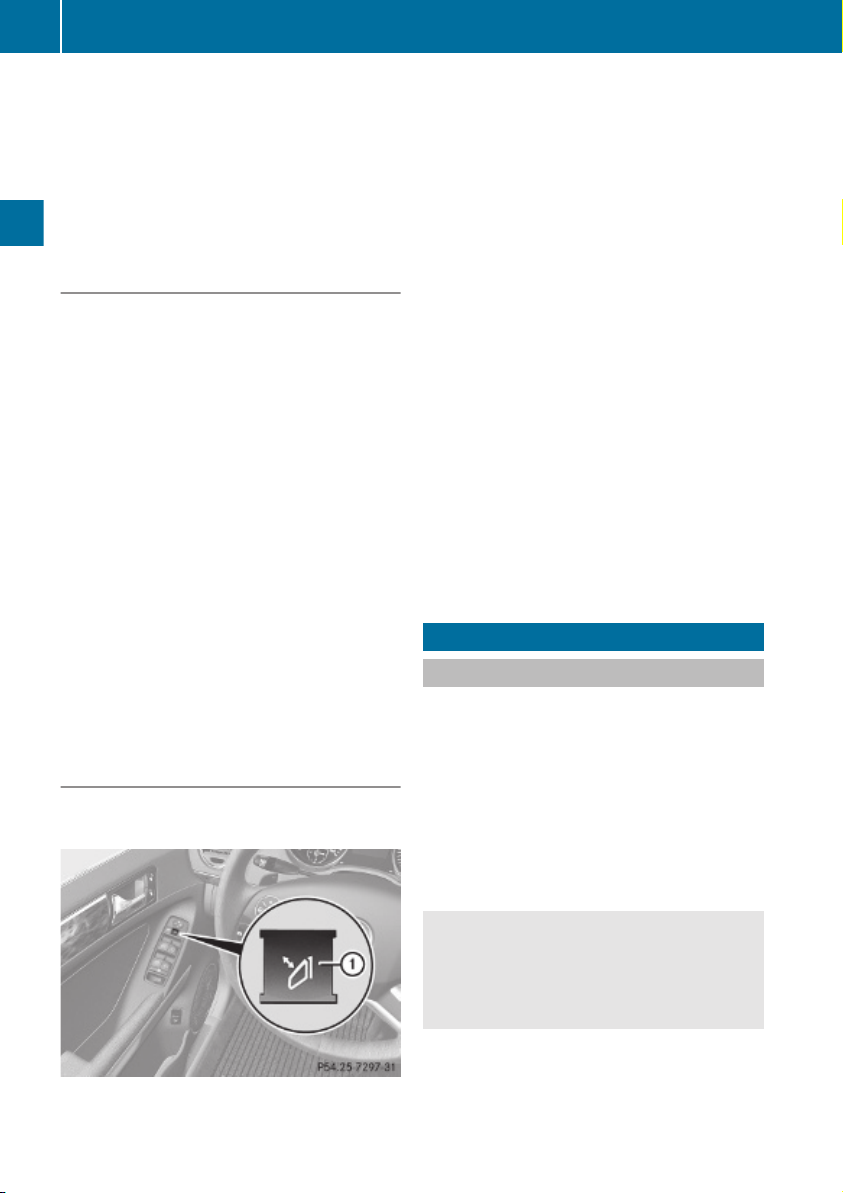
Memory function
96
The exterior rear view mirrors fold in
automatically as soon as the vehicle is locked
from the outside.
The exterior rear view mirrors fold out
automatically as soon as the vehicle is
unlocked and the driver’s or front passenger
door is subsequently opened.
Synchronizing
The power-folding rear view mirrors may have
to be synchronized after the vehicle battery
has been disconnected or discharged. If the
exterior rear view mirrors do not fold properly
upon locking or unlocking the vehicle, do the
following:
Controls in detail
X
Make sure the power-folding function in the
control system is activated (Y page 140).
X
When the power-folding function is
activated and the exterior rear view
mirrors still do not fold properly: Fold
each exterior rear view mirror in completely
(Y page 96).
X
Fold each exterior rear view mirror out
completely (Y page 96).
When the exterior rear view mirrors fold
properly upon locking the vehicle, the exterior
mirrors are synchronized. Otherwise repeat
the above steps.
Folding in and out manually
The exterior rear view mirrors can vibrate if
they are not folded out completely.
X
Switch on the ignition.
X
Folding in: Briefly press button :.
Both exterior rear view mirrors fold in.
i
At speeds above approximately 30 mph
(47 km/h), you will not be able to fold the
exterior mirrors in.
X
Folding out: Briefly press button :.
Both exterior rear view mirrors fold out.
!
If an exterior rear view mirror housing is
forcibly pushed forward (hit from the rear)
or forcibly pushed rearward (hit from the
front), press button : to fold mirrors in.
Then press button : again to fold mirrors
out. Do not force mirrors by hand as this
may damage the adjustment mechanism.
The mirror housing is then properly
positioned and you can adjust the mirror in
the usual manner.
Make sure both rear view mirrors are folded
out before driving off.
Memory function
Notes
With the memory function you can store up
to three different configurations per front
seat.
Each memory position button on the driver’s
side can store all of the following settings:
R
Seat position
R
Steering wheel position
R
Exterior rear view mirrors’ position
Warning!
G
Do not activate the memory function while
driving. Activating the memory function while
driving could cause the driver to lose control
of the vehicle.
Each memory position button on the front
passenger side can store the setting of the
seat position.
Page 99
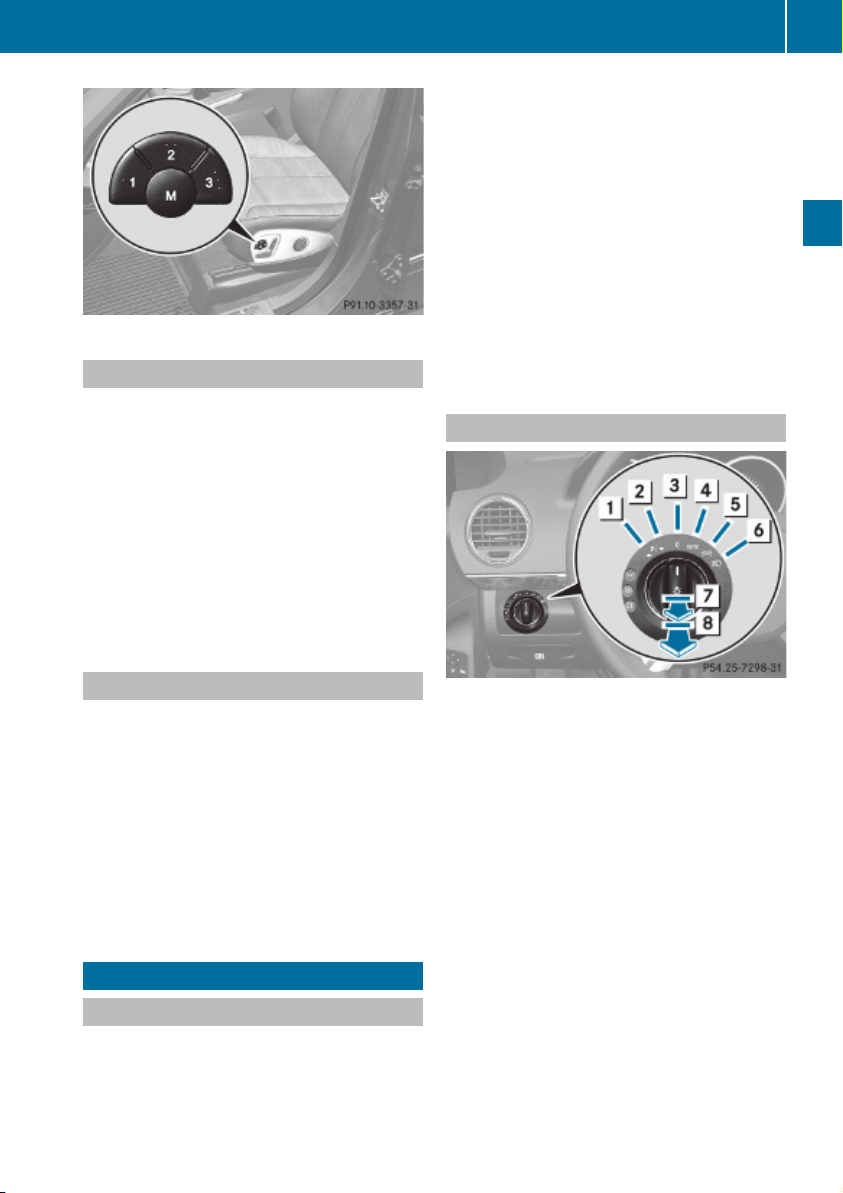
Storing positions into memory
X
Adjust the seats.
X
On the driver’s side, also adjust the
steering wheel and exterior rear view
mirrors to the desired positions.
X
Press memory button M once and within
3 seconds press memory position button
1, 2 or 3.
When the settings are stored to the
selected position, an acknowledgement
signal sounds.
Lighting
modified for symmetrical low beams.
Relevant information can be obtained at
any authorized Mercedes-Benz Center.
i
Vehicles equipped with active Bi-Xenon
headlamps:
The active Bi-Xenon headlamps increase
usable illumination over conventional
headlamps because they follow the
curvature of the road ahead. The beams of
the active Bi-Xenon headlamps shift to
either side according to the vehicle’s
steering angle and speed.
Exterior lamp switch
97
Controls in detail
Recalling positions from memory
X
Press and hold desired memory position
button 1, 2 or 3 until the seat has moved
to the stored position completely. On the
driver’s side, also wait for the steering
wheel and exterior rear view mirrors to
move to the stored position.
i
Releasing the memory position button
stops movement to the stored positions
immediately.
1 W
2 X
3 $
4 Ã
5 T
6 L
7 R
Standing lamps, left
Standing lamps, right
Off
Daytime running lamp mode
Automatic headlamp mode
Daytime running lamp mode
Parking lamps
6
Low-beam headlamps or high-beam
headlamps
Vehicles without front fog lamps:
Rear fog lamp
Lighting
Notes
i
If you drive in countries with left-hand
7 N
8 R
Vehicles with front fog lamps: Front
fog lamps
Vehicles with front fog lamps: Rear
fog lamp
driving, you must have the headlamps
6
When the parking lamps are on, the tail lamps, the license plate lamps, the side marker lamps, and the
instrument cluster illumination are also on.
Z
Page 100

98
Lighting
i
The exterior lamps (except standing
lamps or parking lamps) go out
automatically when you remove the
SmartKey from the starter switch or open
the driver’s door with the ignition switched
off.
When the parking lamps or the rear fog
lamp are switched on and you remove the
SmartKey from the starter switch and open
the driver’s door, an acoustic signal
sounds.
In addition the message Switch Off
Lights appears in the multifunction
display.
Switch off the parking lamps or the rear fog
lamp manually.
Controls in detail
!
Failure to switch off the parking lamps
when leaving the vehicle may result in a
discharged battery.
i
Vehicles without front fog lamps: For
better detection of the vehicle, the LED
daytime running lamps are dimmed to
parking lamp level when the low-beam
headlamps are switched on.
Low-beam headlamps
The low-beam headlamps can be switched on
and off with the exterior lamp switch.
X
Switch on the ignition.
X
Switching on: Turn the exterior lamp
switch to position L.
The following lamps come on:
R
Low-beam headlamps
R
Parking lamps
R
Green indicator lamp L in the
6
instrument cluster
X
Switching off: Turn the exterior lamp
switch to position $.
Automatic headlamp mode
Warning!
G
If the exterior lamp switch is set to Ã, the
headlamps will not automatically come on
under foggy conditions.
To minimize risk to you and to others, activate
headlamps by turning exterior lamp switch to
L when driving or when traffic and/or
ambient lighting conditions require you to do
so.
In low ambient lighting conditions, only switch
from position à to L with the vehicle
at a standstill in a safe location. Switching
from à to L will briefly switch off the
headlamps. Doing so while driving in low
ambient lighting conditions may result in an
accident.
The automatic headlamp feature is only an aid
to the driver. The driver is responsible for the
operation of the vehicle’s lights at all times.
X
Switching on: Turn the exterior lamp
switch to position Ã.
When ambient light is low: When the
SmartKey is in starter switch position 1 or
when the KEYLESS-GO start/stop button has
been pressed once, the parking lamps6 come
on automatically.
When the engine is running, the low-beam
headlamps come on additionally.
When ambient light is bright: When the
SmartKey is in starter switch position 1 or
when the KEYLESS-GO start/stop button has
been pressed once, all lamps are off.
When the engine is running, the daytime
running lamps7 come on automatically.
When the low-beam headlamps are switched
on, the green indicator lamp L in the
instrument cluster comes on.
Once the low-beam headlamps are on, the
high-beam headlamps are also available.
6
When the parking lamps are on, the tail lamps, the license plate lamps, the side marker lamps, and the
instrument cluster illumination are also on.
7
USA only: The daytime running lamp mode must be activated via the control system.
 Loading...