

Page 1
Operating manual
WTB
WTB water bath
www.memmert.com
Page 2

About this manual
Purpose and target audience
Versions
This manual describes the design, function, transport, operation and maintenance of
WTB water baths. It is intended for use by trained personnel of the owner, who have
the task of operating and/or maintaining the respective appliance. If you are asked
to work on the appliance, read this manual carefully before starting. Familiarise yourself with the safety regulations. Only perform work that is described in this manual.
If there is something you do not understand, or certain information is missing, ask
your manager or contact the manufacturer. Do not do anything without authorisation.
The appliance is available in different congurations and sizes. If specic equipment
features or functions are available only for certain congurations, this is indicated at
the relevant points in this manual. The functions described in this manual refer to the
latest rmware version. Due to individual congurations and sizes, illustrations in this
manual may be slightly different to the actual appearance. Function and operation are
identical.
Other documents to be observed:
■ For service and repair work, observe the separate service manual
■ separate operating manual for accessory parts, such as shaking device, cooling unit
and circulation pump device
Storage and resale
This operating manual belongs with the appliance and should always be stored where
persons working on the appliance have access to it. It is the owner's responsibility to
ensure that persons who are working on or are going to work on the appliance know
where to nd the operating manual. We recommend that it is always stored in a protected location close to the appliance. Make sure that the operating manual is not damaged
by heat or humidity. If the appliance is resold or transported and then set up again at
a different location, the operating manual must remain with it. The current version of
this operating manual in PDF format is also available for download from http://www.
memmert.com/
Manufacturer address and customer service
MEMMERT GmbH + Co. KG
Willi-Memmert-Str. 90-96
91186 Büchenbach
Germany
Customer service:
Hotline: +49 (0)9171 9792 911
Service fax: +49(0)91719792979
Email: [email protected]
Phone: +49 (0)9122 925-0
Fax: +49 (0)9122 14585
E-mail: [email protected]
Internet: www.memmert.com
2 02/2021
For service enquiries, please always specify the appliance number
given on the type plate.
Page 3

Content
1. Safety 5
1.1 Terms and signs used ............................................................................................................................................................................ 5
1.2 Product safety and dangers ................................................................................................................................................................... 6
1.3 Requirements of the operating personnel .............................................................................................................................................. 7
1.4 Responsibility of the owner .................................................................................................................................................................... 7
1.5 Intended use ........................................................................................................................................................................................... 7
1.6 Changes and alterations .........................................................................................................................................................................7
1.7 Behaviour in case of malfunctions and irregularities ............................................................................................................................. 8
1.8 Switching off the appliance in an emergency ........................................................................................................................................ 8
2. Construction and description 8
2.1 Design ..................................................................................................................................................................................................... 8
2.2 Description .............................................................................................................................................................................................. 9
2.3 Material ................................................................................................................................................................................................... 9
2.4 Electrical equipment ............................................................................................................................................................................. 10
2.5 Connections and interfaces .................................................................................................................................................................. 10
2.6 Designation (nameplate) ...................................................................................................................................................................... 10
2.7 Technical data ...................................................................................................................................................................................... 11
2.8 Applied directives and standards ......................................................................................................................................................... 12
2.9 Ambient conditions ............................................................................................................................................................................... 12
2.10 Scope of delivery .................................................................................................................................................................................. 12
3. Delivery, Transport and Setting Up 13
3.1 Safety .................................................................................................................................................................................................... 13
3.2 Delivery/unpacking ............................................................................................................................................................................... 13
3.3 Disposing of packaging material .......................................................................................................................................................... 14
3.4 Setting up .............................................................................................................................................................................................. 14
3.5 Lid assembly (accessories) .................................................................................................................................................................. 15
4. Putting into operation 16
4.1 Puttingintooperationforthersttime ................................................................................................................................................ 16
4.2 Connect the appliance to the power supply ......................................................................................................................................... 16
4.3 Filling .................................................................................................................................................................................................... 16
4.4 Waterspecications ............................................................................................................................................................................. 17
4.5 Switching on appliance ......................................................................................................................................................................... 17
5. Operation and control 18
5.1 Home screen ........................................................................................................................................................................................ 18
5.2 Setting the temperature and time .........................................................................................................................................................18
5.3 Settings ................................................................................................................................................................................................. 18
5.4 Outlet valve ........................................................................................................................................................................................... 21
5.5 Calibration .............................................................................................................................................................................................21
6. Malfunctions, warning and error messages 24
302/2021
Page 4

7. Maintenance and Servicing 25
7.1 Cleaning ..............................................................................................................................................................................................25
7.2 Regular maintenance ..........................................................................................................................................................................25
7.3 Repairs and service ............................................................................................................................................................................26
8. Storage and disposal 27
8.1 Storage................................................................................................................................................................................................27
8.2 Disposal ..............................................................................................................................................................................................27
4 02/2021
Page 5
Safety
WARNING
CAUTION
NOTICE
1. Safety
1.1 Terms and signs used
1.1.1 Terms used
In this manual and on the appliance itself, certain common terms and signs are used to
warn you of possible dangers or to give you hints that are important in avoiding injury
or damage. Observe and follow these notes and regulations to avoid accidents and
damage. These terms and signs are explained below.
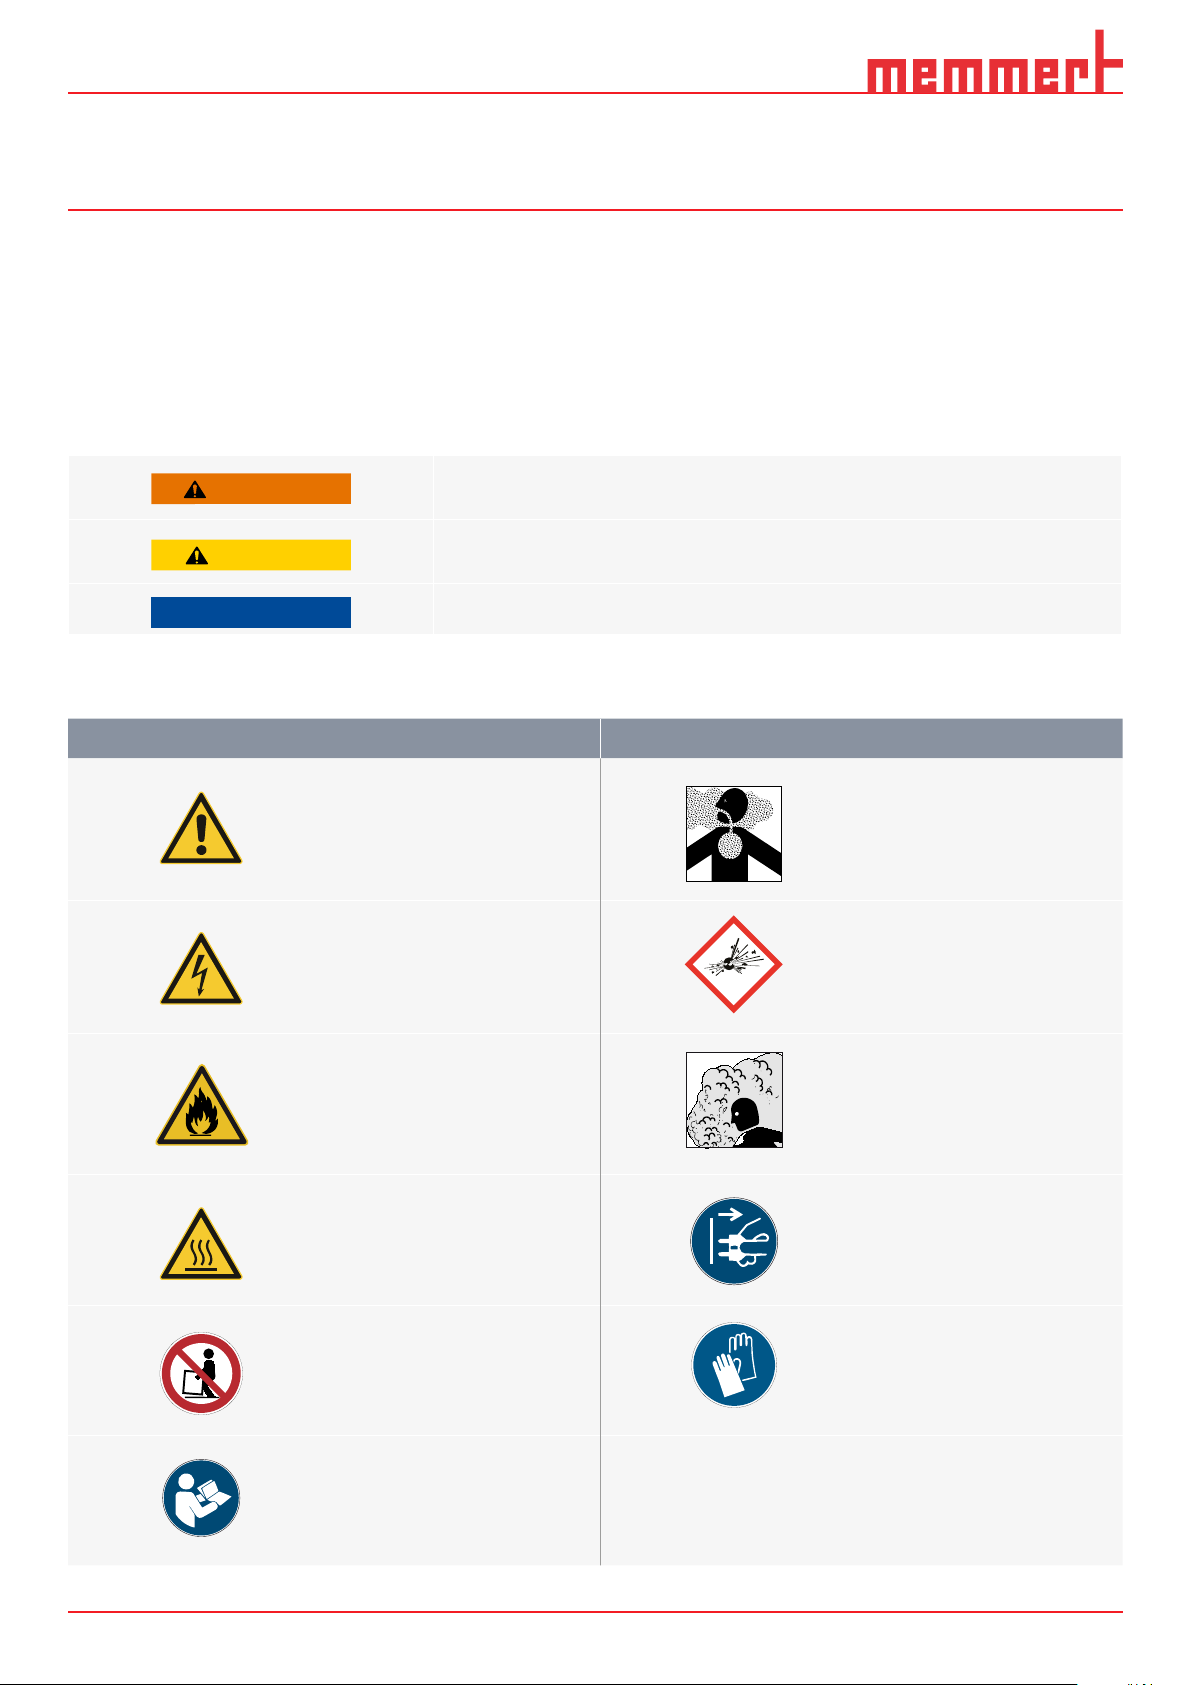
Warns of a dangerous situation that might lead to death or serious injuries.
Warns of a dangerous situation that might lead to moderate or minor injuries.
Warns of material damage
1.1.2 Signs used
Symbol Meaning Symbol Meaning
general warning sign Gases/vapours
Danger of electrocution Danger of explosion
Flammable substance warning Caution: hot steam
Caution: hot Disconnect the mains plug
Do not lift appliance Use gloves
Observe information in separate
manual
502/2021
Page 6
Safety
CAUTION
WARNING
WARNING
WARNING
WARNING
WARNING
1.2 Product safety and dangers
The appliances described in this manual are technically sophisticated, manufactured
using high-quality materials and subject to many hours of testing in the factory. They
reect the state of the art and comply with recognised technical safety regulations.
However, there are still risks involved, even when the appliances are used as intended.
These are described below.
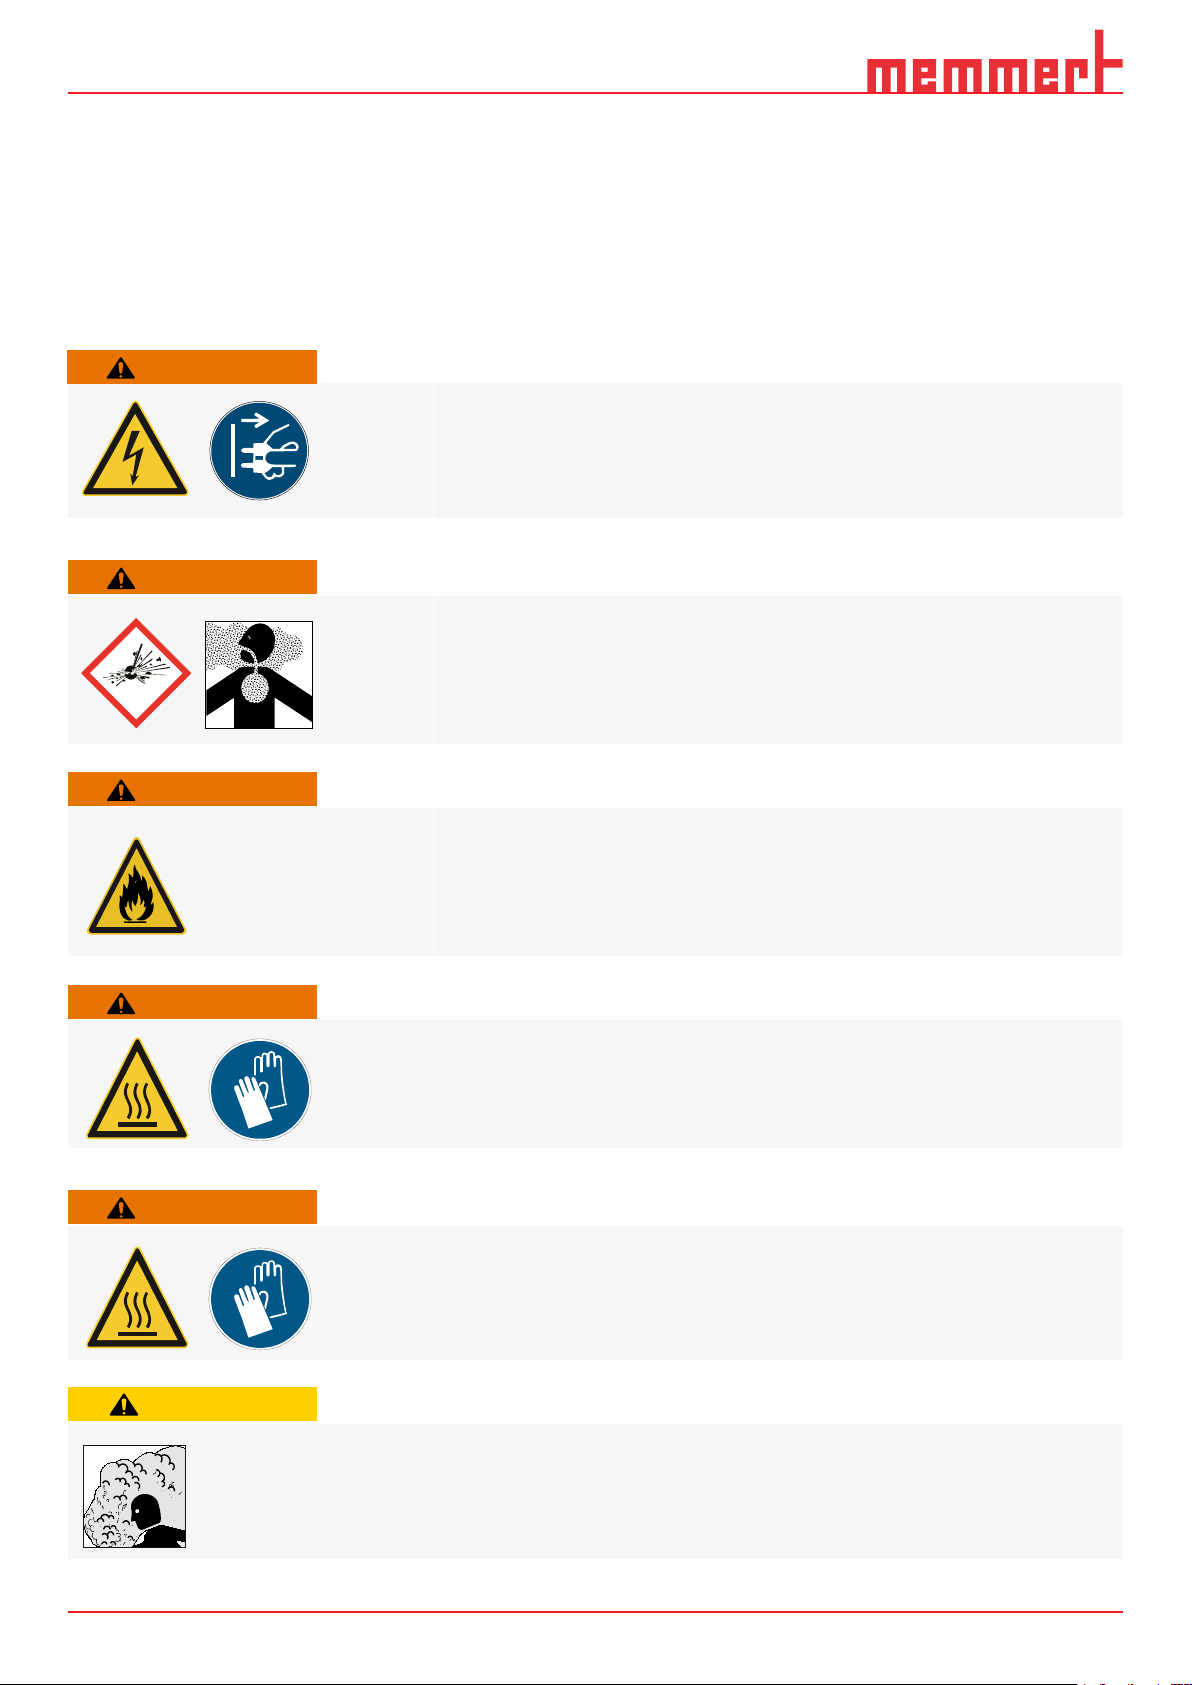
Live components may be exposed once the covers have been removed. Touching
these can lead to an electric shock. Disconnect the mains plug before removing any
covers. Work on the electrical system must only be performed by qualied electricians.
When loading the appliance with an unsuitable load, poisonous or explosive vapours
or gases may be produced. This could cause the appliance to explode, and persons
could be severely injured or poisoned. The appliance may only be loaded with materials / test objects that do not emit any poisonous or explosive vapours when heated
up.
Operating without a tempering medium can cause the appliance to overheat and pose
a re hazard. Do not operate the water bath without a tempering medium. Always
observe the minimum ll level for the tray.
Depending on operation, the surfaces of the appliance and the chamber load may still
be very hot after the appliance is switched off. Touching these surfaces can cause
burns. Wear heat-resistant protective gloves or wait until the appliance cools down
after switching off before touching.
The drain valve can become overheated while emptying the water bath. Touching its
surface can cause burns. Use heat-resistant protective gloves to turn the drain valve
on/off or let the tempering medium cool down rst and empty the water bath when it
has reached a lukewarm temperature.
Hot steam can build up inside the appliance. You may be scalded when opening the lid
or coming into close contact with the surface of the water. Keep a safe distance away
from the water’s surface when opening the lid and when removing.
6 02/2021
Page 7

Safety
1.3 Requirements of the operating personnel
The appliance may only be operated and maintained by persons who are of legal age
and have been instructed accordingly. Personnel who are to be trained, instructed or
who are undergoing general training may only work with the appliance under the contin-
uous supervision of an experienced person. Repairs may only be performed by qualied
electricians. The regulations in the separate service manual must be observed.
1.4 Responsibility of the owner
The owner of the appliance
■ is responsible for the awless condition of the appliance and for it being operated in
accordance with its intended use;
■ is responsible for ensuring that persons who are to operate or service the appliance
are qualied to do this, have been instructed accordingly and are familiar with the operating instructions at hand;
■ must know about the applicable guidelines, requirements and operational safety regu-
lations, and train staff accordingly;
■ is responsible for ensuring that unauthorised persons have no access to the appliance;
■ is responsible for ensuring that the maintenance plan is adhered to and that mainte-
nance work is properly carried out;
■ has to ensure that the appliance and its surroundings are kept clean and tidy, for exam-
ple through corresponding instructions and inspections;
■ is responsible for ensuring that personal protective clothing is worn by operating per-
sonnel, e.g. work clothes, safety shoes and protective gloves.
1.5 Intended use
1.6 Changes and alterations
The Memmert waterbaths are intended for indirect tempering of samples or materials.
Water is meant to be used as the tempering medium. A wide variety of samples are
tempered in a range from approx. 5°C above room temperature to 100 °C. This can be
done in suitable vessels such as test tubes, Erlenmeyer asks etc., or if the sample to
be tempered is suitable, in direct contact with the tempering medium.
It is not possible to include all possible applications. Application is at the operator’s
discretion and under their responsibility.
Any other use is improper and may result in hazards and damage. The appliance is not
explosion-proof (does not comply with the German occupational health and safety regulation VBG 24). The appliance may only be loaded with materials and substances which
cannot form any toxic or explosive vapours at the set temperature and which cannot
explode, burst or ignite. The appliance may not be used for the drying, evaporation and
burning-in of paints or similar materials, the solvents of which could form an explosive
mixture when combined with air. If there is any doubt as to the composition of materials, they must not be loaded into the appliance. Potentially explosive gas-air mixtures
must not form, neither in the working chamber nor in the direct vicinity of the appliance.
No unauthorised changes or alterations may be made to the appliance. No parts may be
added or inserted which have not been approved by the manufacturer.
Unauthorised changes or alterations result in the CE declaration of conformity losing its
validity, and the appliance may no longer be operated.
The manufacturer is not liable for any damage, danger or injuries that result from unauthorised changes or alterations, or from non-compliance with the provisions in this
manual.
702/2021
Page 8
Construction and description
1
2
3
4
4
1.7 Behaviour in case of malfunctions and irregularities
The appliance may only be used in a awless condition. If you, as the operator, notice irregularities, malfunctions or damage, immediately turn off the appliance and inform your superior.
You can nd information on troubleshooting in the chapter 6.
1.8 Switching off the appliance in an emergency
Push the On/Off switch on the appliance and disconnect power plug. This disconnects
the appliance from the power supply at all poles.
2. Construction and description
2.1 Design
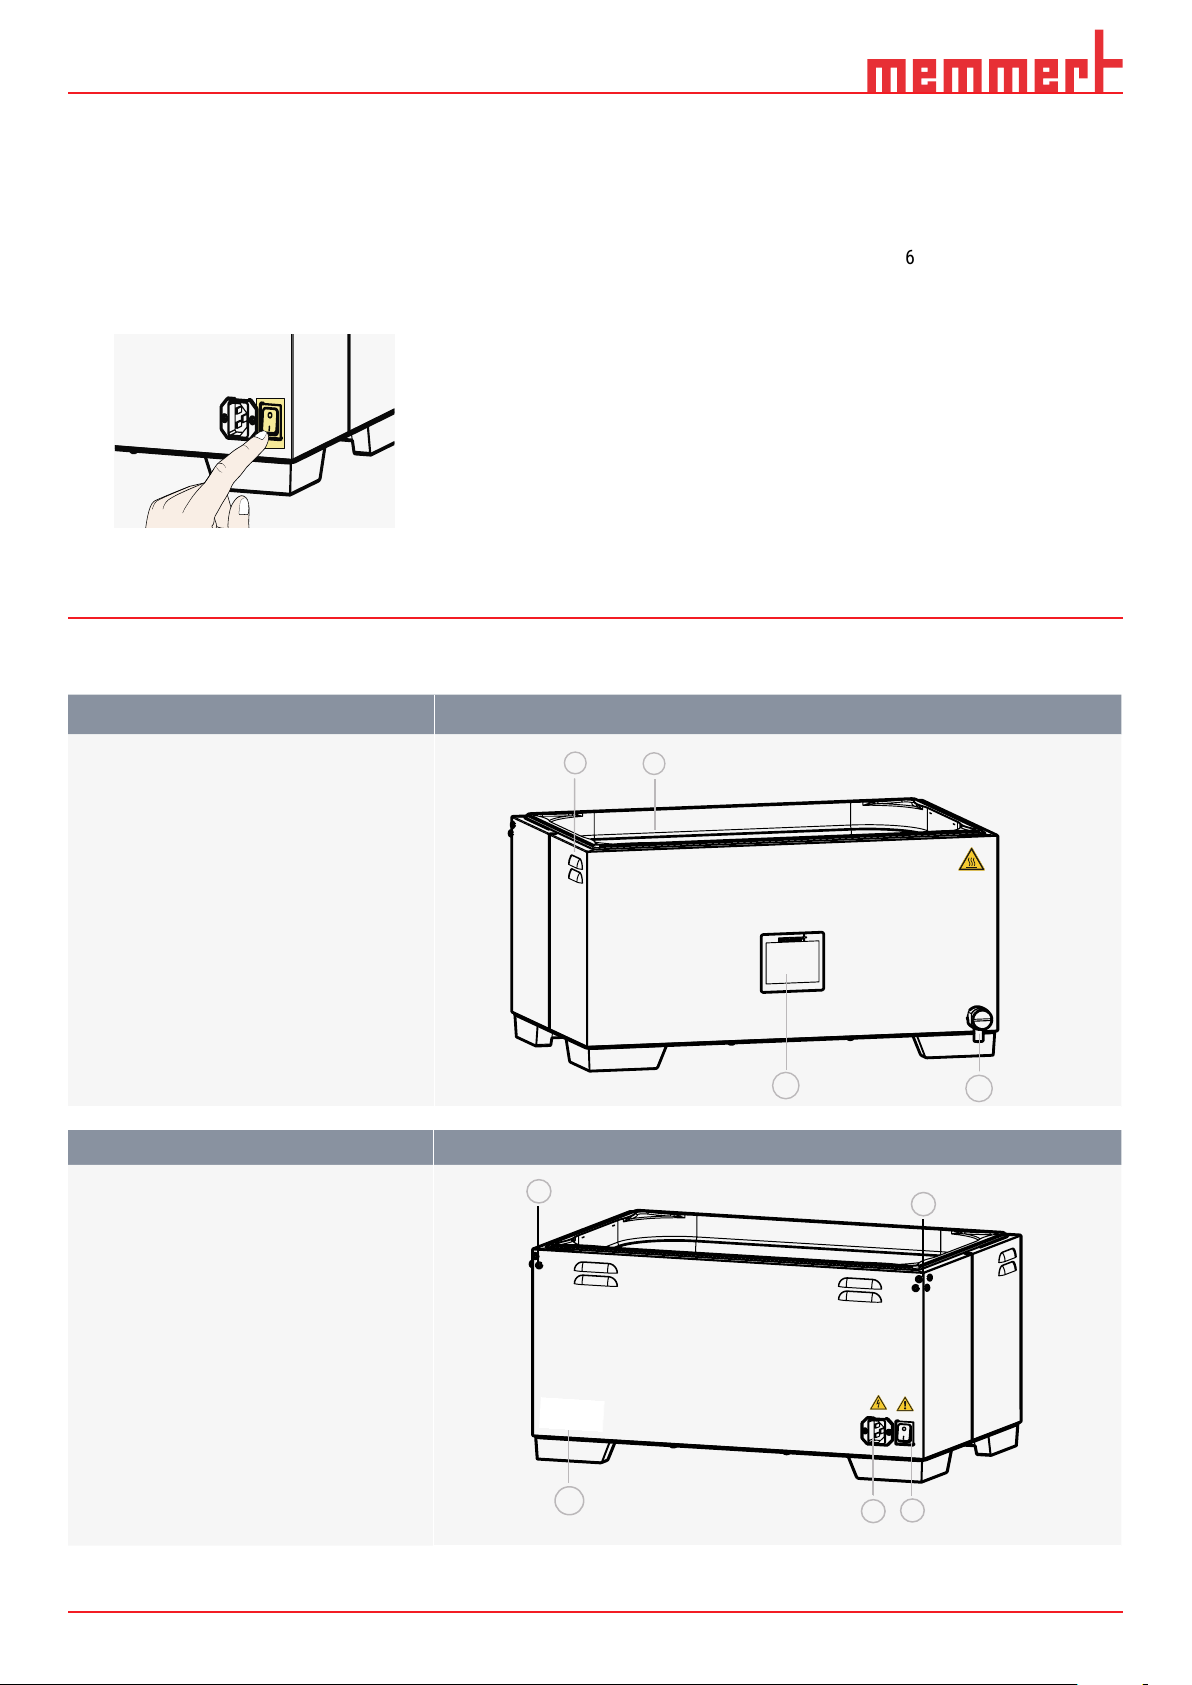
Description Appliance overview
1. Stainless steel tray
2. Cooling ns
3. Touch display 3.5”
4. Outlet valve
Description Overview of rear
1. Mains plug
2. Main switch
2
1
3
4
3. Nameplate
4. Mounting option Lid
(accessory)
8 02/2021
Page 9

Construction and description
2.2 Description
2.2.1 Operation
The temperature control for the Memmert water baths is operated via a silicone
heating mat. A digital sensor measures the temperature at the water bath tray. The
water bath heating mat is resistant to damage through malfunctions or improper use.
Dry-run protection switches the water bath off if it is operating without a tempering
medium at about 180 °C. It also prevents the heating mat from overheating, for example, if the water bath runs empty while unsupervised.
2.3 Material
These appliances full the current requirements of the RoHS Directive. For more information about this and about the Material Compliance of these Memmert GmbH+ Co.KG
appliances in general, please visit our homepage at www.memmert.com.
Components Material
Housing (lid + side panel) Stainless steel 1.4301 - ASTM 304
Interior (tray) Stainless steel 1.4301 - ASTM 304
Accessories (bottom grid, shaking device,
support basket, test tube racks, clamps)
Outlet valve Stainless steel 1.4301 - ASTM 304
Screws and hinges Stainless steel 1.4301 - ASTM 304
Drain system Stainless steel 1.4301 - ASTM 304
Silicone hose Silicone - Shore A translucent
Heating mat Silicone
Stainless steel 1.4301 - ASTM 304
i The chamber load for the appliance must be carefully checked for chemical compati-
bility with the materials mentioned.
902/2021
Page 10
Construction and description
2.4 Electrical equipment
■ Operating voltage and current consumption: See name plate or technical data
■ Protection class I, i.e. operating insulation with PE conductor in accordance with EN
■ Protection type IP 20 acc. to EN 60 529
■ Interference suppression acc. to EN 55011 class B
■ Appliance fuse: Safety fuse 250 V/15 A, quick-blow
■ Electronic overtemperature monitor
■ Heating thermal fuse: 240°C 250V/15A
2.5 Connections and interfaces
2.5.1 Electrical connection
61010
This appliance is intended for operation on an electrical power system with a system
impedance Zmax at the point of transfer (service line) of a maximum of 0.292 Ohm. The
operator must ensure that the appliance is operated only on an electrical power sys-
tem that meets these requirements. If necessary, you can ask your local energy supply
company what the system impedance is. Observe the country-specic regulations when
making connections (e.g. in Germany DIN VDE 0100 with earth leakage circuit breaker).
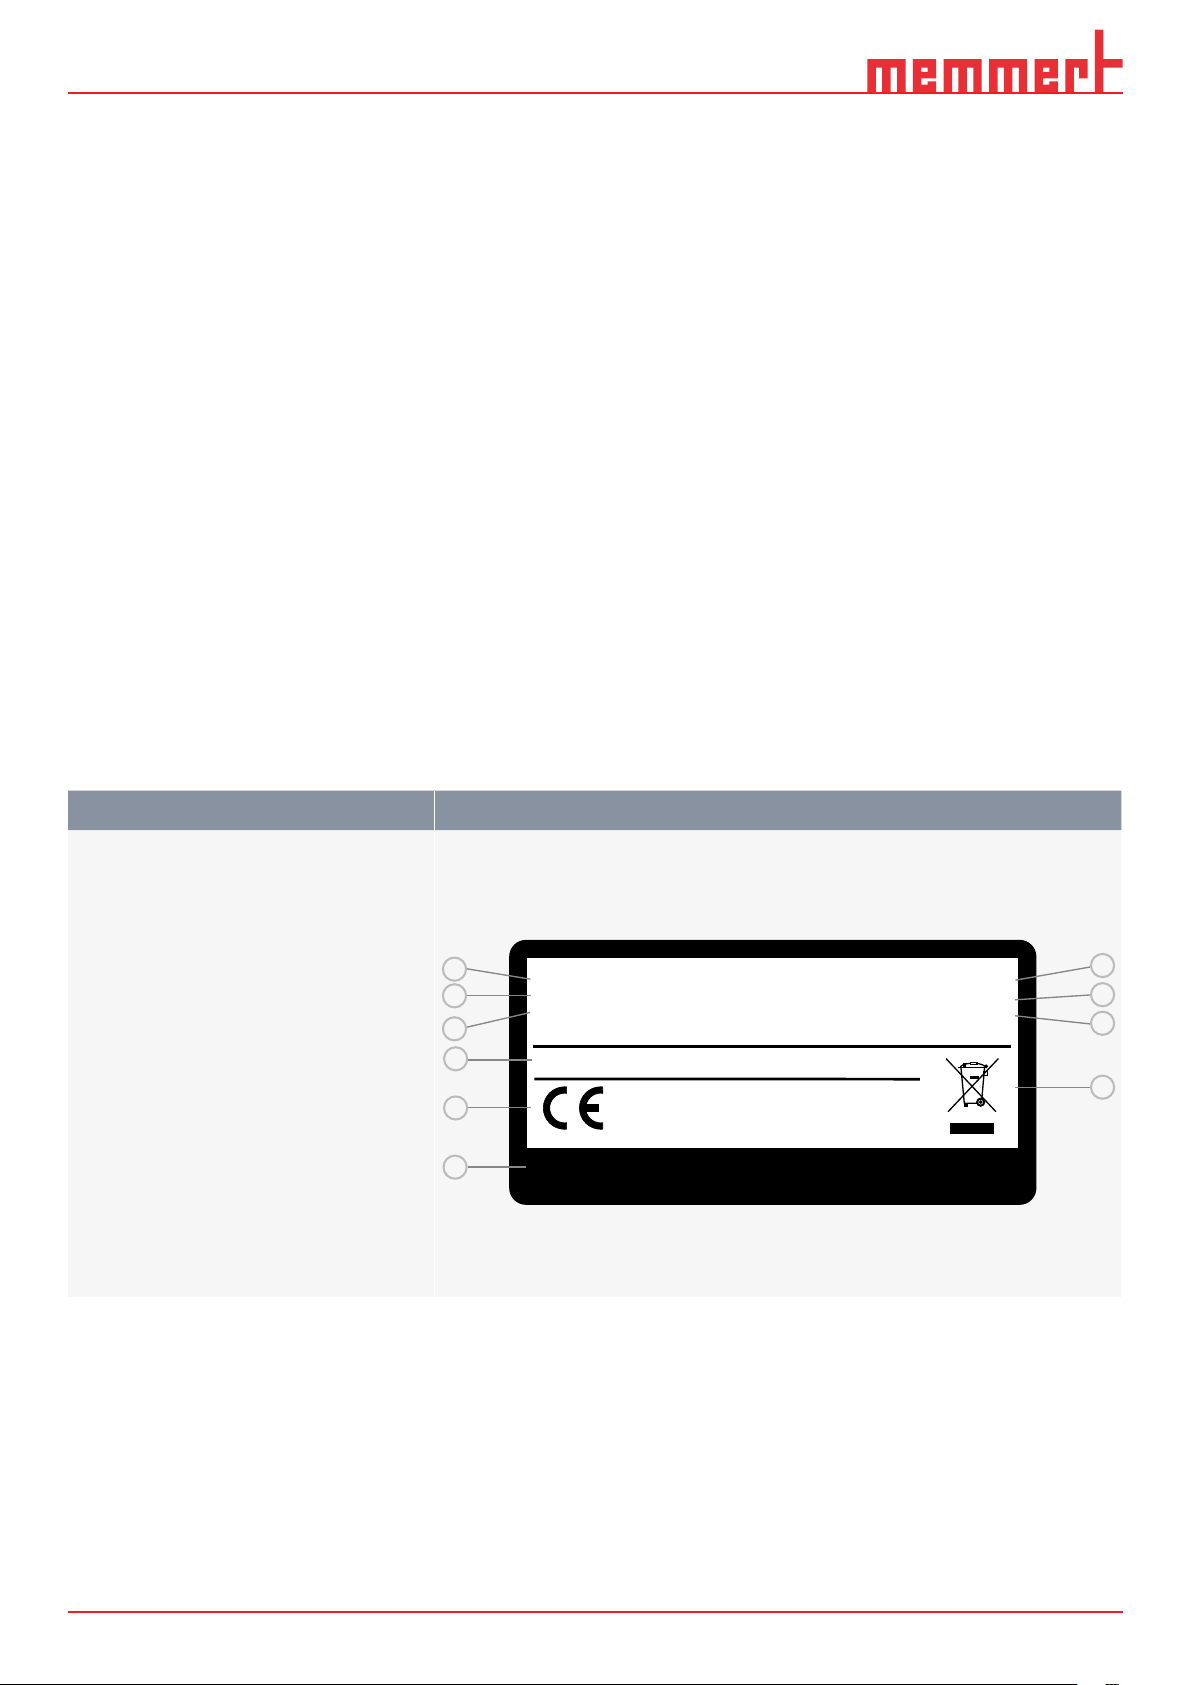
2.6 Designation (nameplate)
The nameplate provides information about the appliance model, manufacturer and technical data. It is attached to the back of the appliance, on the right near the mains plug.
Description Overview
1. Type designation
2. Operating voltage
3. Applied standard
1
4. Protection type
5. CE conformity
6. Address of manufacturer
7. Disposal note
8. Nominal temperature
9. Connection / power ratings
2
3
4
5
6
Typ: WTB50
230 V~ 50/60 Hz
DIN12876-Kl.: 1
Schutzart DIN EN 60529 - IP 20
GmbH+Co.KG D-91126 Schwabach FRG
memmert
Äußere
Rittersbacher Str. 38 Made in Germany
F-Nr.: B618.3008
12,2 A 2800 W
Nenntemp.: 10-100°C
10
9
8
7
10. Serial number
10 02/2021
Page 11

Construction and description
2.7 Technical data
Model sizes 6 11 15 24 35 50
Stainless steel
interior Volume
Length A mm 277 267 482 472 602 592
Width B mm 217 207 277 267 482 472
Height C mm 150 200 150 200 150 200
Structured
stainless steel
housing
Temperature Adjustment precision °C 0.1
electrical data Power 230 V; 50/60 Hz
Width D mm 349 554 679
Height E1 mm 245 295 245 295 245 295
Height E2 mm 328 378 328 378 328 378
Depth F mm 289 349 554
Operating temperature range °C minimum 5 above ambient temperature to +100
Setting temperature range °C +10 to +100
115 V; 50/60 Hz 2000
Current
consumption
230 V; 50/60 Hz A 4.4 6.2 12.2
115 V; 50/60 Hz A 8.7 12.4 17.4
ap-
prox. l7.5 10 17.1 23.1 37.5 51
W 1000 1420
2800
Packaging
data Net weight
Gross weight (in cardboard box)
Length mm 570 670 910
Width mm 450 530 610
Height mm 420 380 400 460 400 460
ap-
prox.
kg
ap-
prox.
kg
6 7 9 10 14 16
10 12 14 16 20 23
1102/2021
Page 12
Construction and description
2.8 Applied directives and standards
■ Directive 2014/30/EU amended (Directive of the council for harmonisation of the laws
of the member states on electromagnetic compatibility)
Standards complied with: DIN EN 61326-1:2013-07 and EN 61326-1:2013
■ Directive 2014/35/EC amended (Directive of the council on harmonisation of the laws
of
member states relating to electrical equipment designed for use within certain voltage limits). Standards complied with:
DIN EN 61010-1:2011-07 EN 61010-1:2010
DIN EN 61010-2-010:2015-05 and EN 61010-2-010:2014
2.8.1 Declaration of conformity
You can download the EC declaration of conformity of the appliance online under:
www.memmert.com/de/downloads/downloads/eu-konformitaetserklaerung
2.9 Ambient conditions
2.10 Scope of delivery
Ambient temperature +5 °C to 40 °C
Air humidity max. 80 % rh (non-condensing)
Overvoltage category II
Pollution degree 2
Altitude of installation max. 2,000 m above sea level
■ The appliance may only be used in enclosed areas and under the ambient conditions
listed below
■ The appliance may not be used in areas where there is a risk of explosion. The ambi-
ent air must not contain any explosive dusts, gases, vapours or gas-air mixtures. The
appliance is not explosion-proof.
■ Heavy dust production or aggressive vapours in the vicinity of the appliance could lead
to sedimentation in the interior and, as a consequence, could result in short circuits or
damage to electrical parts. For this reason, sufcient measures to prevent large clouds
of dust or aggressive vapours from developing should be taken.
Standard
■ Waterbath
■ Network connection
■ Quick guide
Optional
■ Gable/at lid
■ Floor grid
■ Clamps, insert racks and test tube racks
■ Peltier cooling unit
■ Shaking Device
■ Pumping device
■ Factory calibration certicate
■ IQ/OQ document with works test data for appliances
12 02/2021
Page 13
Delivery, Transport and Setting Up
WARNING
CAUTION
CAUTION
CAUTION
3. Delivery, Transport and Setting Up
3.1 Safety
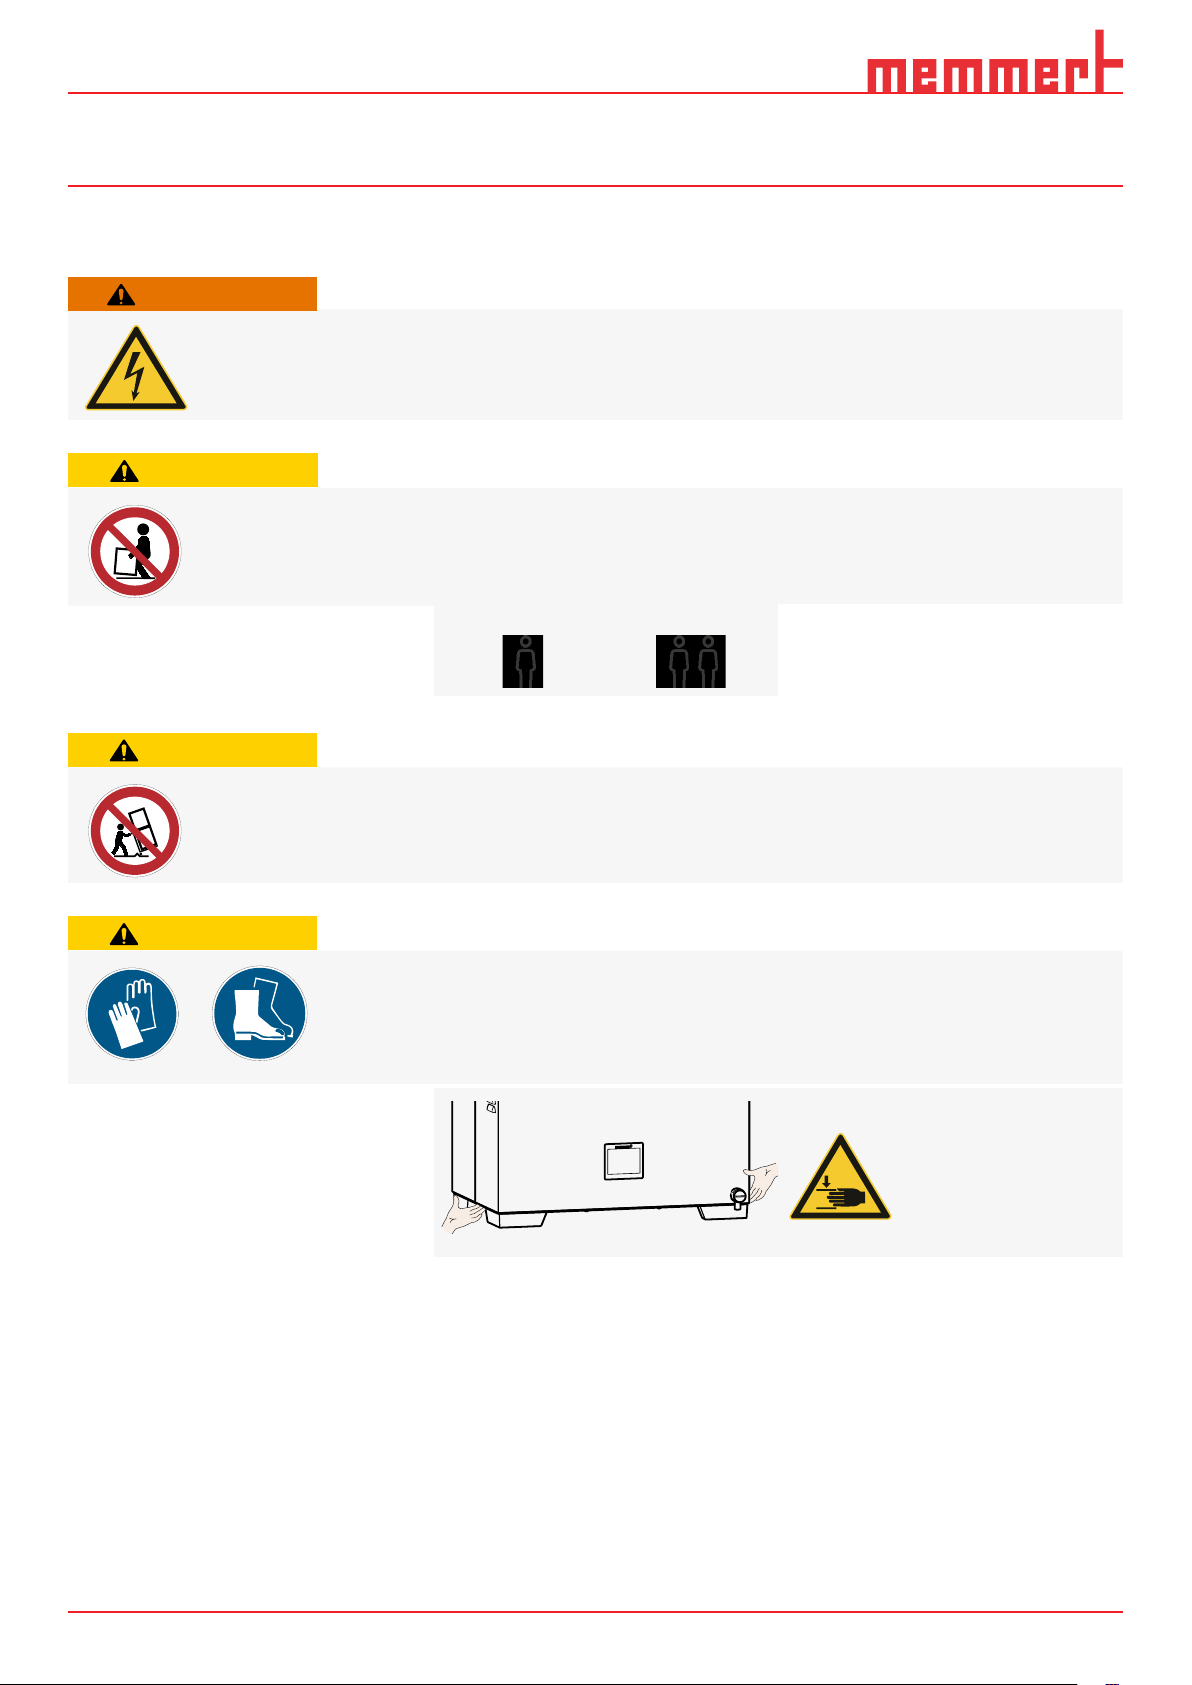
Condensation in the electrical components may cause short circuits. After transporting or storing the appliance under humid conditions, remove it from its packaging and
let it ventilate for at least 24 hours in normal ambient conditions. Do not connect the
appliance to the mains power during this time.
Because of the heavy weight of the appliance, you could injure yourself if you try to
lift it. Observe the required number of people to carry equipment.
< 50 L 50 L
3.2 Delivery/unpacking
The appliance could fall over and injure you. If a lid is mounted, do not transport the
appliance while it is open. Never tilt the appliance and only transport it empty and in
upright position.
You may get your hands or feet squashed when transporting and installing the appliance. Wear protective gloves and safety boots.
Only grasp the appliance below on the sides between the mounted adjustable feet.
■ The appliance is packed in a cardboard box
■ To avoid damage, do not unpack the appliance until you reach the installation site.
■ Remove the cardboard packaging by pulling it upwards or carefully cutting along an
edge
1302/2021
Page 14
Delivery, Transport and Setting Up
CAUTION
CAUTION
memmert
10 cm
10 cm
15 cm
10 cm
75 cm
3.2.1 Product control
■ Check the delivery note to ensure that the scope of delivery is complete
■ Check the appliance for damage
If you notice deviations from the scope of delivery, damage or irregularities, do not put
the appliance into operation but inform the haulage company and the manufacturer.
3.3 Disposing of packaging material
■ Dispose of the packaging material (cardboard, wood, foil) in accordance with the appli-
cable disposal regulations for the respective material in your country
3.4 Setting up
If the appliance is set up on an uneven surface, it can fall over and injure you or other
people. Always place the appliance on an even, load-bearing and non-slip surface.
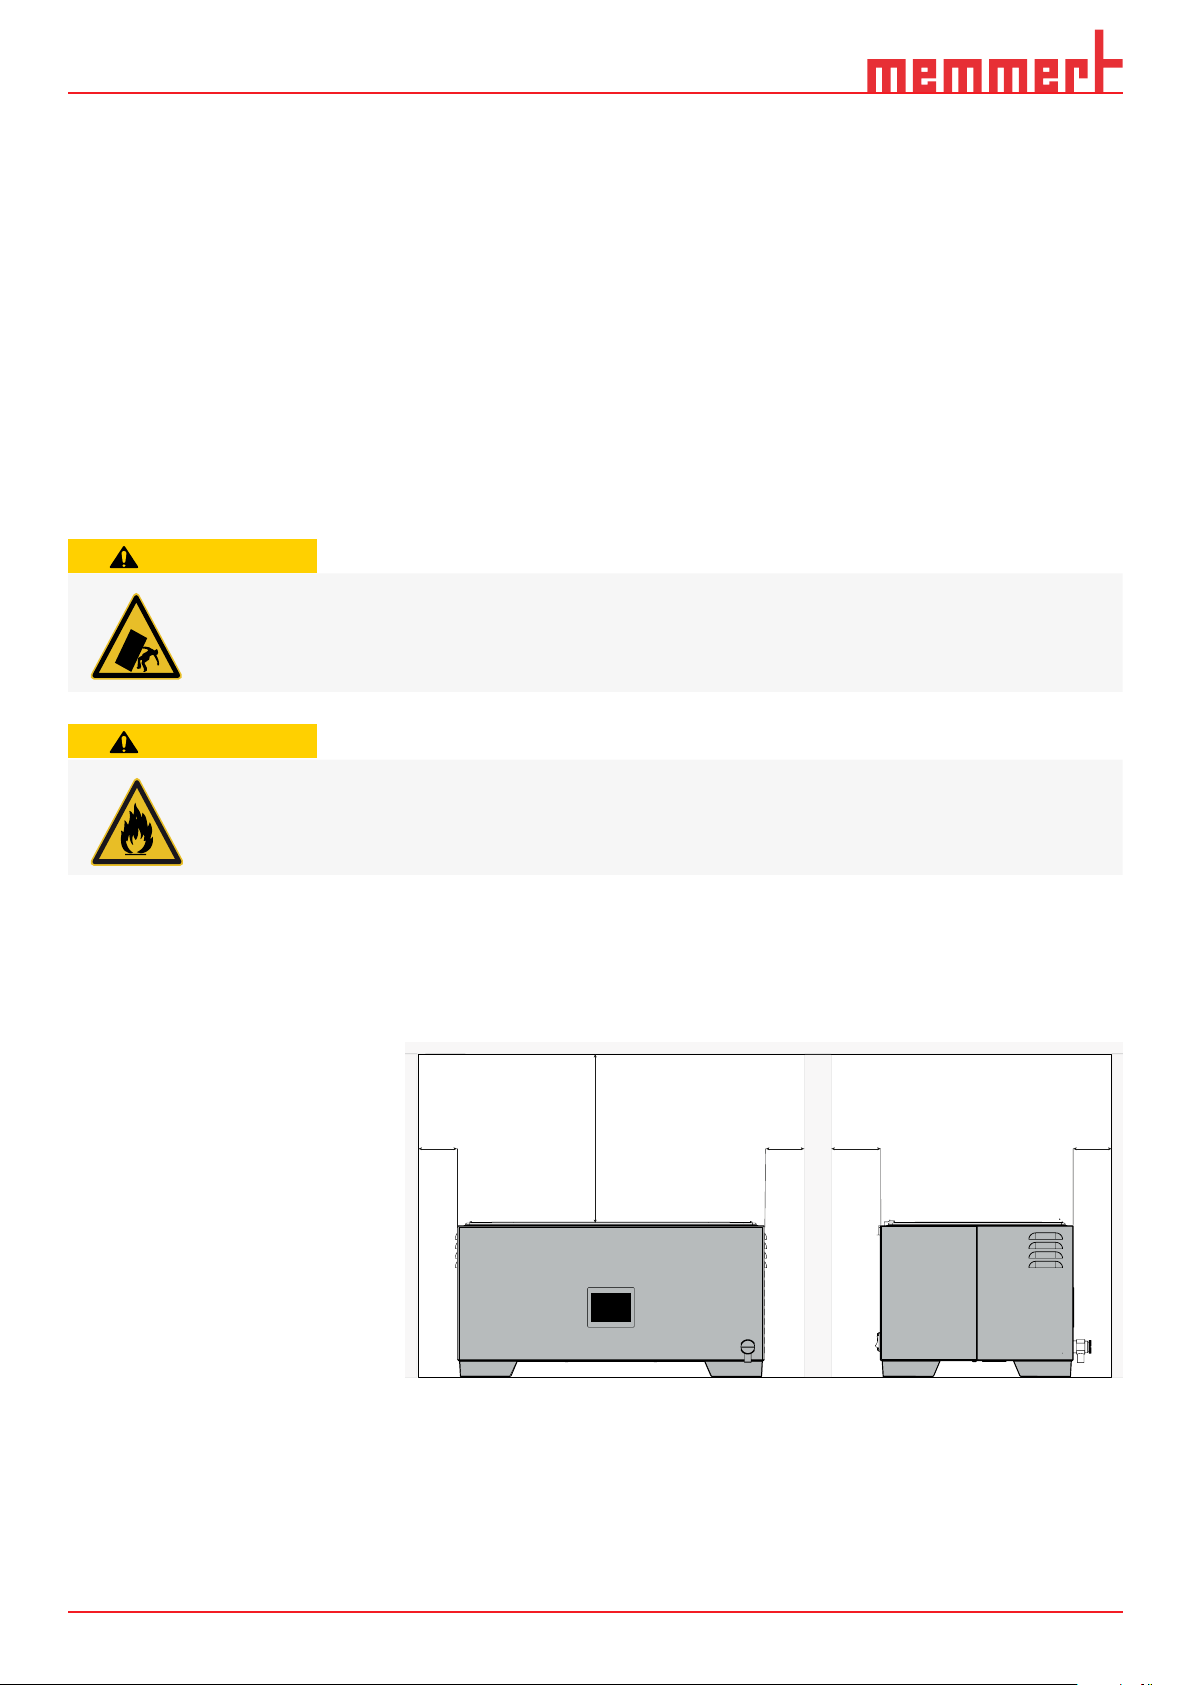
The surfaces of the appliance can overheat during operation and overheat heat-sen-
sitive surfaces in close proximity to the appliance. Always place the appliance on a
heat-resistant surface and maintain the specied clearance around the appliance.
The distance between the wall and the rear of the appliance must be at least 15 cm. The
clearance from the ceiling must not be less than 75 cm and the side clearance from
walls or nearby appliances must not be less than 10 cm. Sufcient air circulation in the
vicinity of the appliance must be guaranteed at all times.
14 02/2021
Page 15
Delivery, Transport and Setting Up
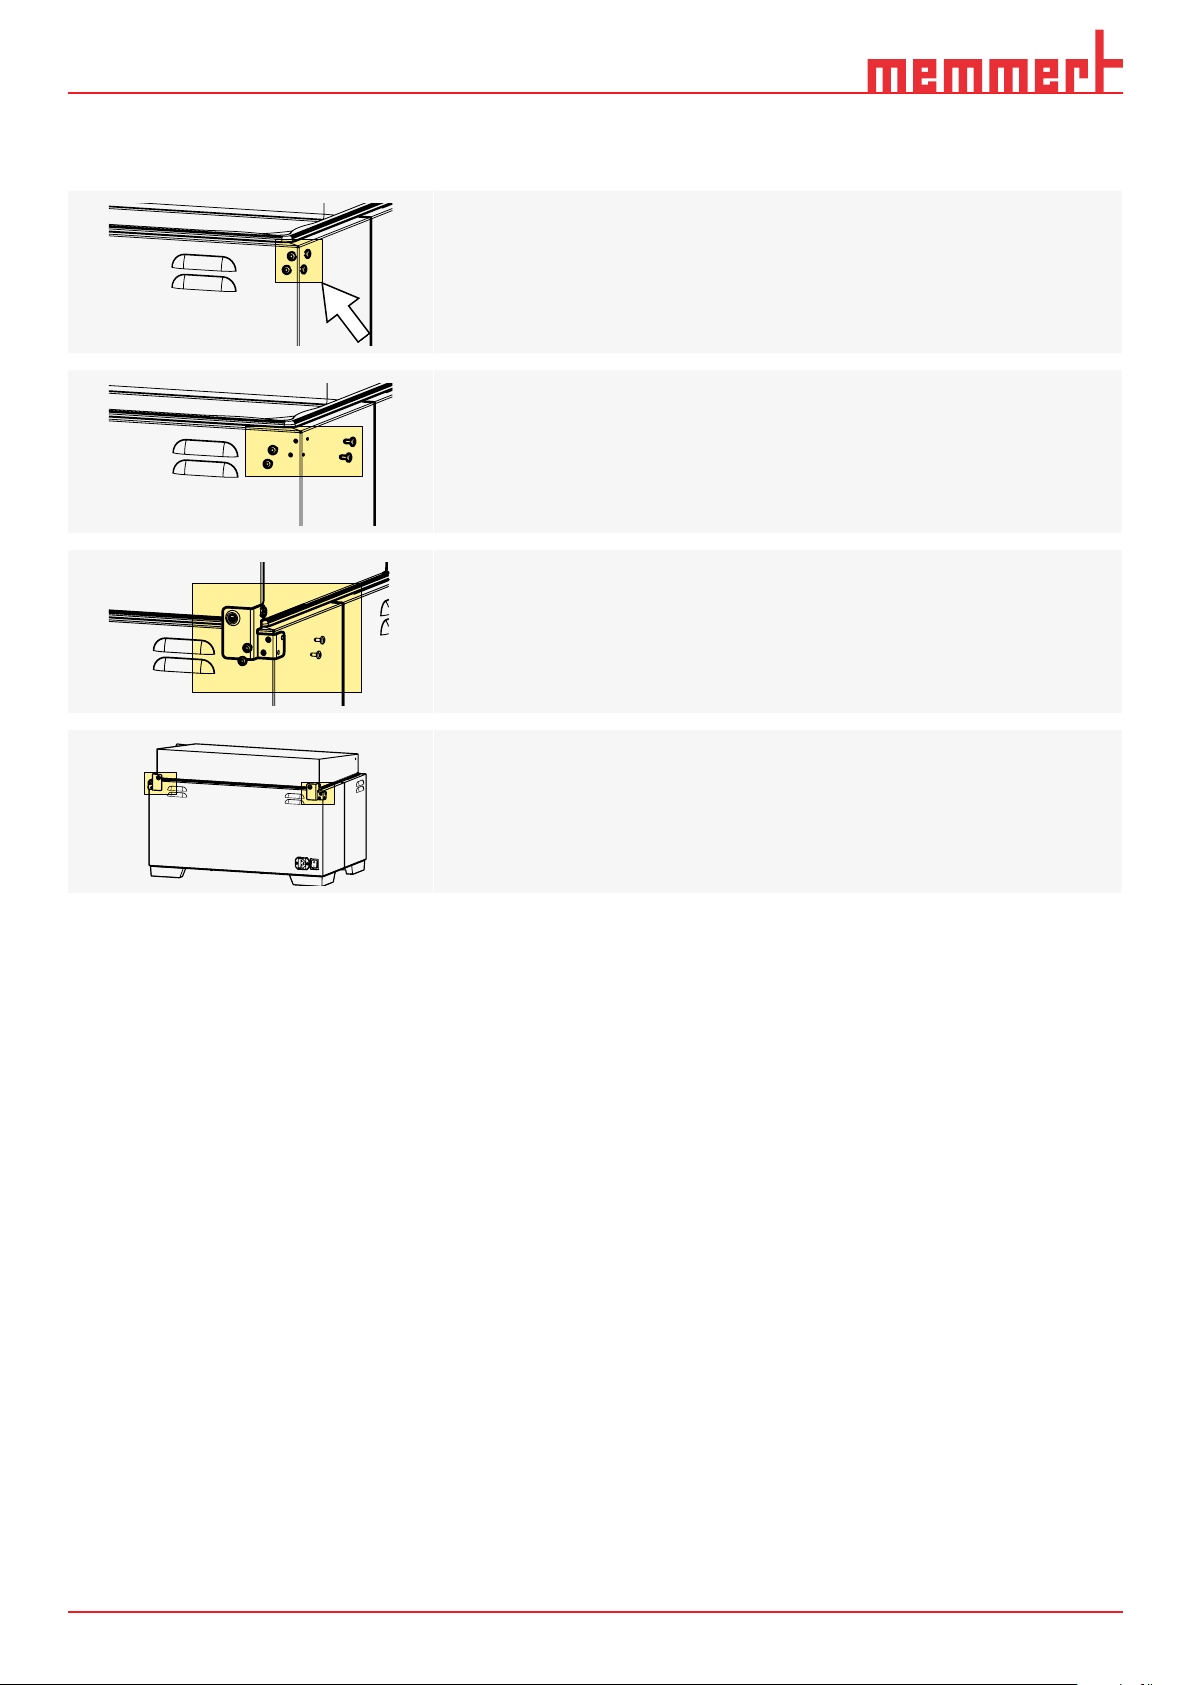
3.5 Lid assembly (accessories)
1. Loosenthescrewsonthexingpoints(leftandright)forthelidonthewaterbath.
2. Remove screws and set aside.
3. Attachthemountingbrackettothelidandxinplacewiththescrews.
4. Tightenscrewsandcheckthatthelidtstightly.
1502/2021
Page 16
Putting into operation
NOTICE
NOTICE
memmert
MIN
MAX
4. Putting into operation
4.1 Putting into operation for the rst time
When putting the appliance into operation for the rst time, do not leave it unattended
until it has reached a steady state.
For connection, please observe the national regulations. Observe the connection and
power ratings (see name plate and technical data). Make sure to establish a safe PE
conductor connection.
4.2 Connect the appliance to the power supply
Place the power cable so that
■ it does not represent a trip hazard
■ it cannot come into contact with any hot parts
■ it is easily accessible at all times and can be pulled off quickly, for example in case of
interference or an emergency
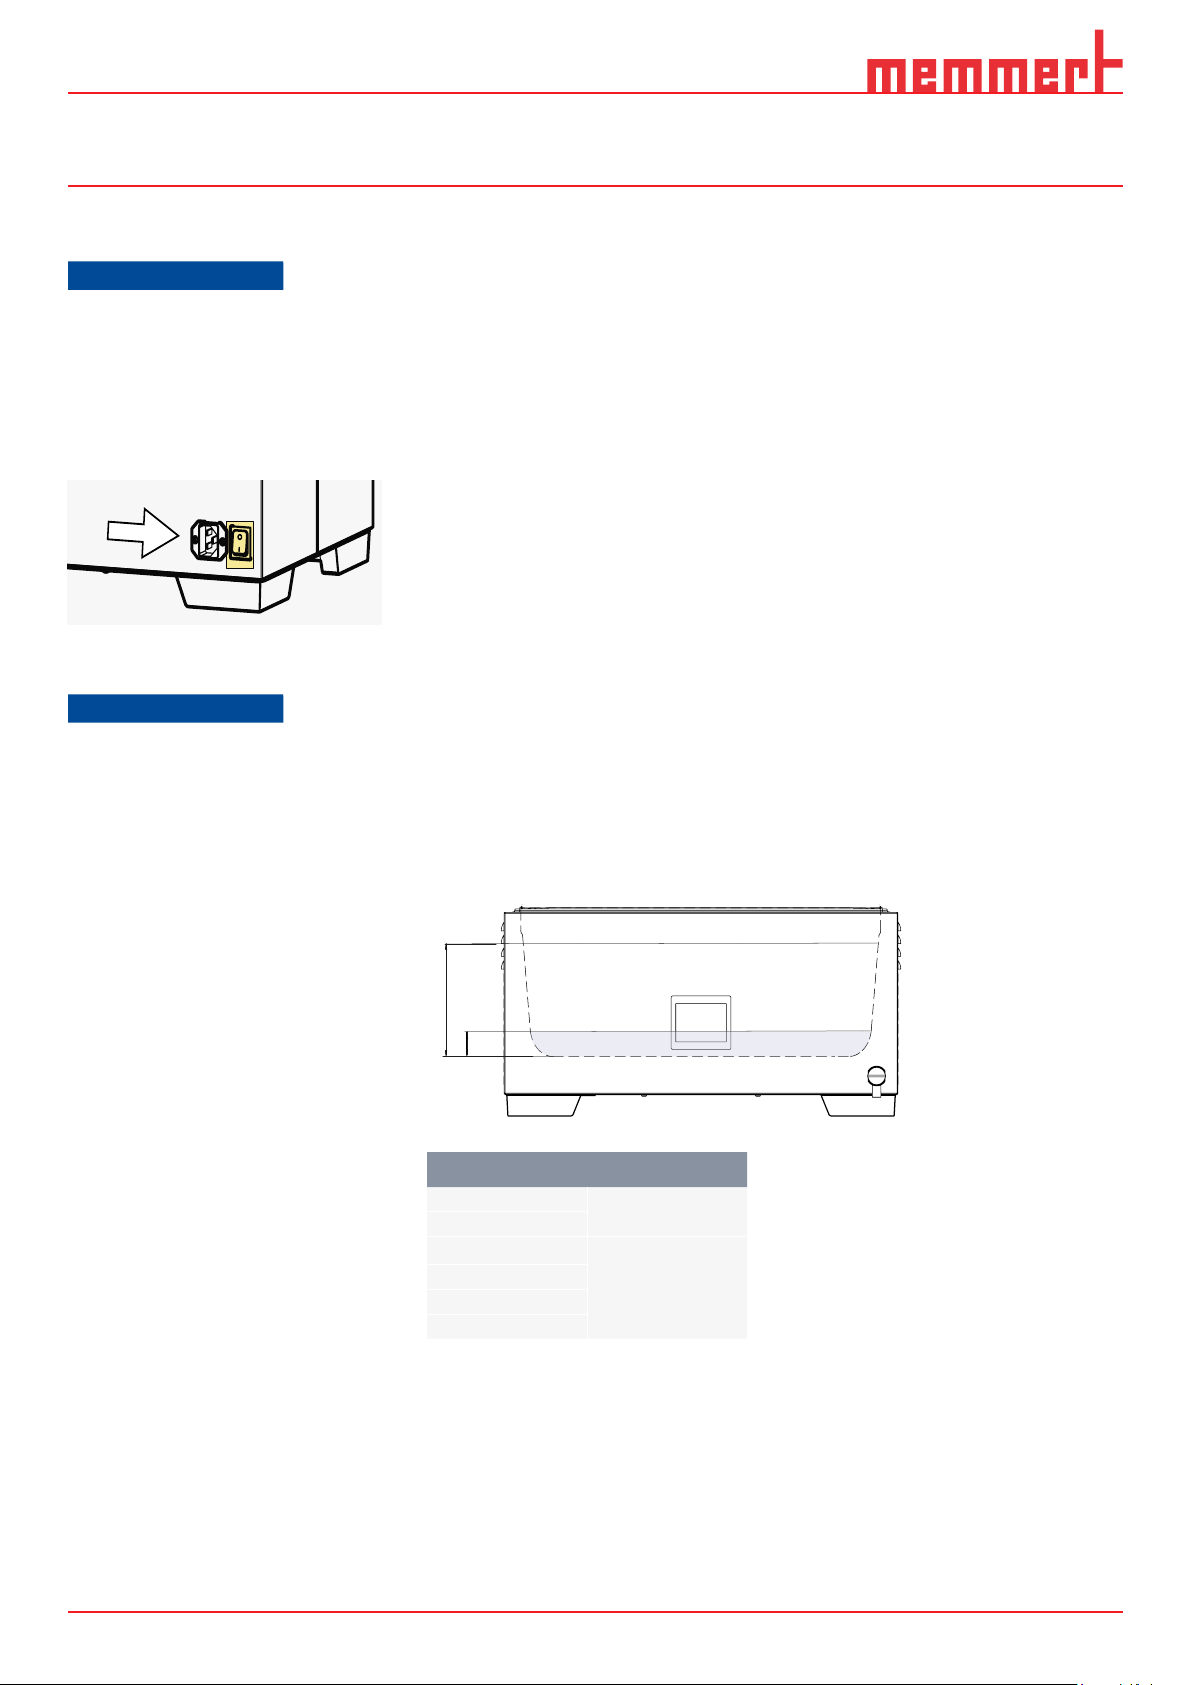
4.3 Filling
Observe the following points before lling the water bath:
■ Water bath may not be operated while empty
■ Check that the outlet valve is closed before lling
■ Observe the minimum ll level for the water bath
■ Observe the maximum lling level when lling and loading the water bath, which is
marked by the edge in the water bath tray
Large WTB Filling level
11
15
24
35
50
6
min. 4 cm
min. 2 cm
16 02/2021
Page 17
Putting into operation
NOTICE
4.4 Water specications
Only demineralised water with the following specications may be used in Memmert appliances:
■ Conductivity of 5 – 10 μS/cm
■ pH value between 5 and 7
The tray may suffer damage if ultrapure water or DI water with an electrical conductance level of below 5 microsiemens is used.
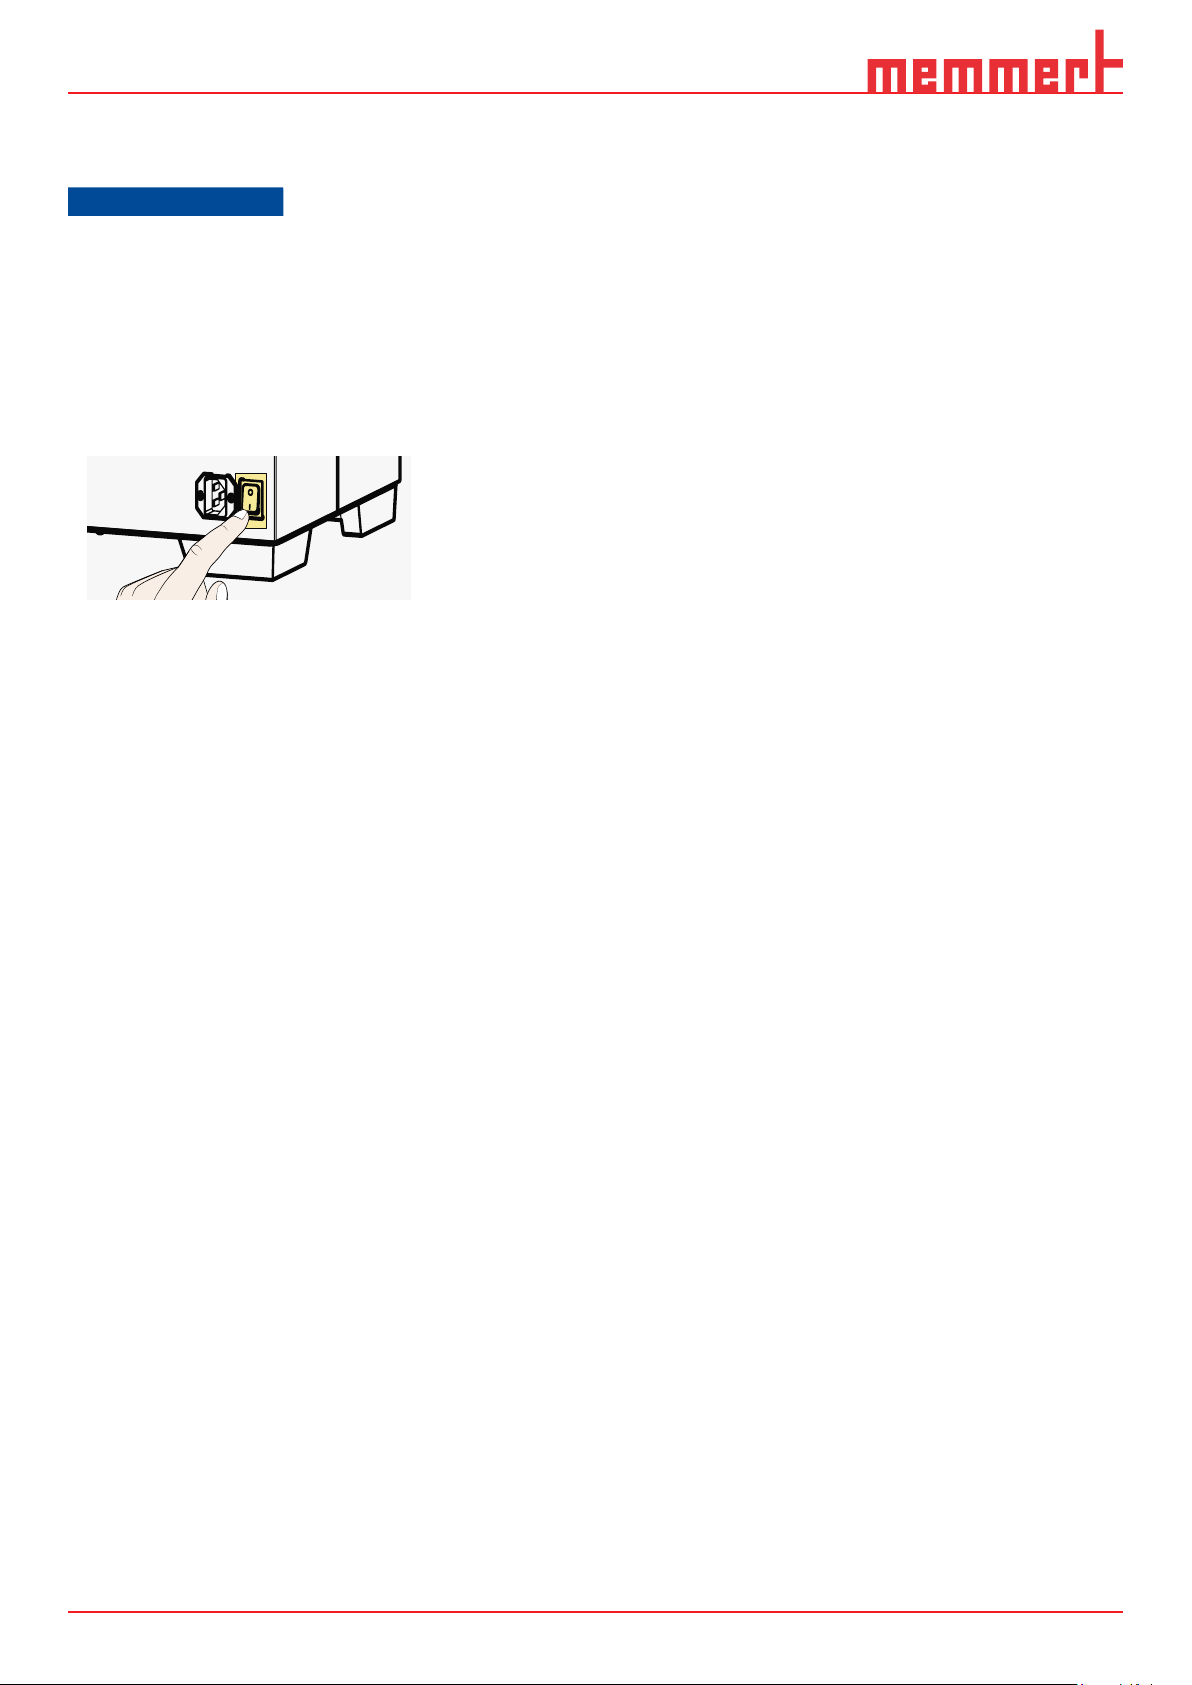
4.5 Switching on appliance
Press main switch on the back of the appliance.
1702/2021
Page 18
Operation and control
Set
1
21
19
0
°C
20
.
CAL°C/°F
Info CustomView
5. Operation and control
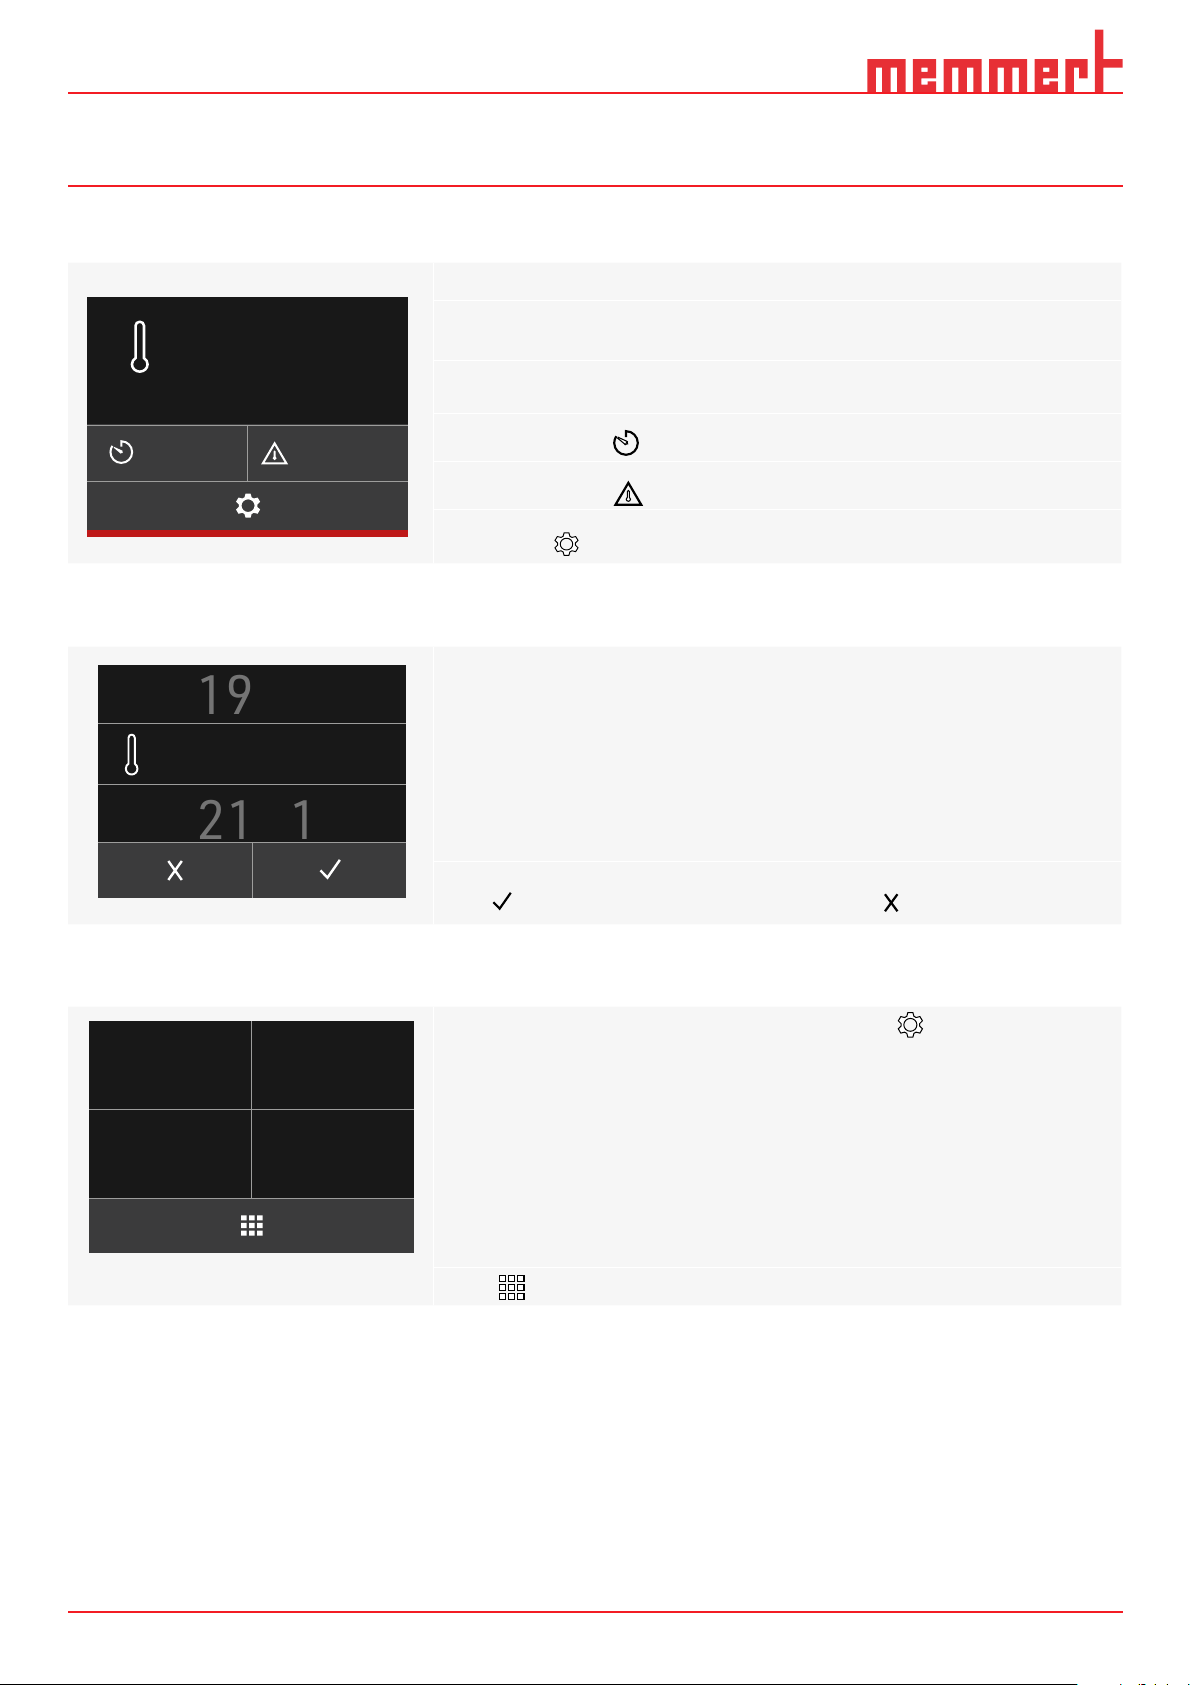
5.1 Home screen
22.0 °C
10.0
Set
°C
CustomView will appear rst after switching the appliance on (5.3.3)
To access the home screen, touch any spot on the TouchDisplay
► Select the set display
to adjust the set temperature
00:00
5.2 Setting the temperature and time
5.3 Settings
h
000.0
°C
► Select the symbol to set the timer
► Select the symbol to set the alarm temperature
► Touch the symbol for other appliance settings.
Set the individual values by scrolling vertically on the
touch display:
► Enter the temperature for the set value in °C/ °F
► Enter the alarm temperature in °C/ °F
► Set time for the timer in minutes/hours
Press to conrm entry. The setting is not saved with
Other settings are possible under the Settings menu item :
► Set the desired temperature unit as °C or °F
► Set 2-point calibration
► Appliance information overview
► CustomView setting
Press to return to the home screen
18 02/2021
Page 19
Operation and control
°C / °F
CAL
°F
1
99
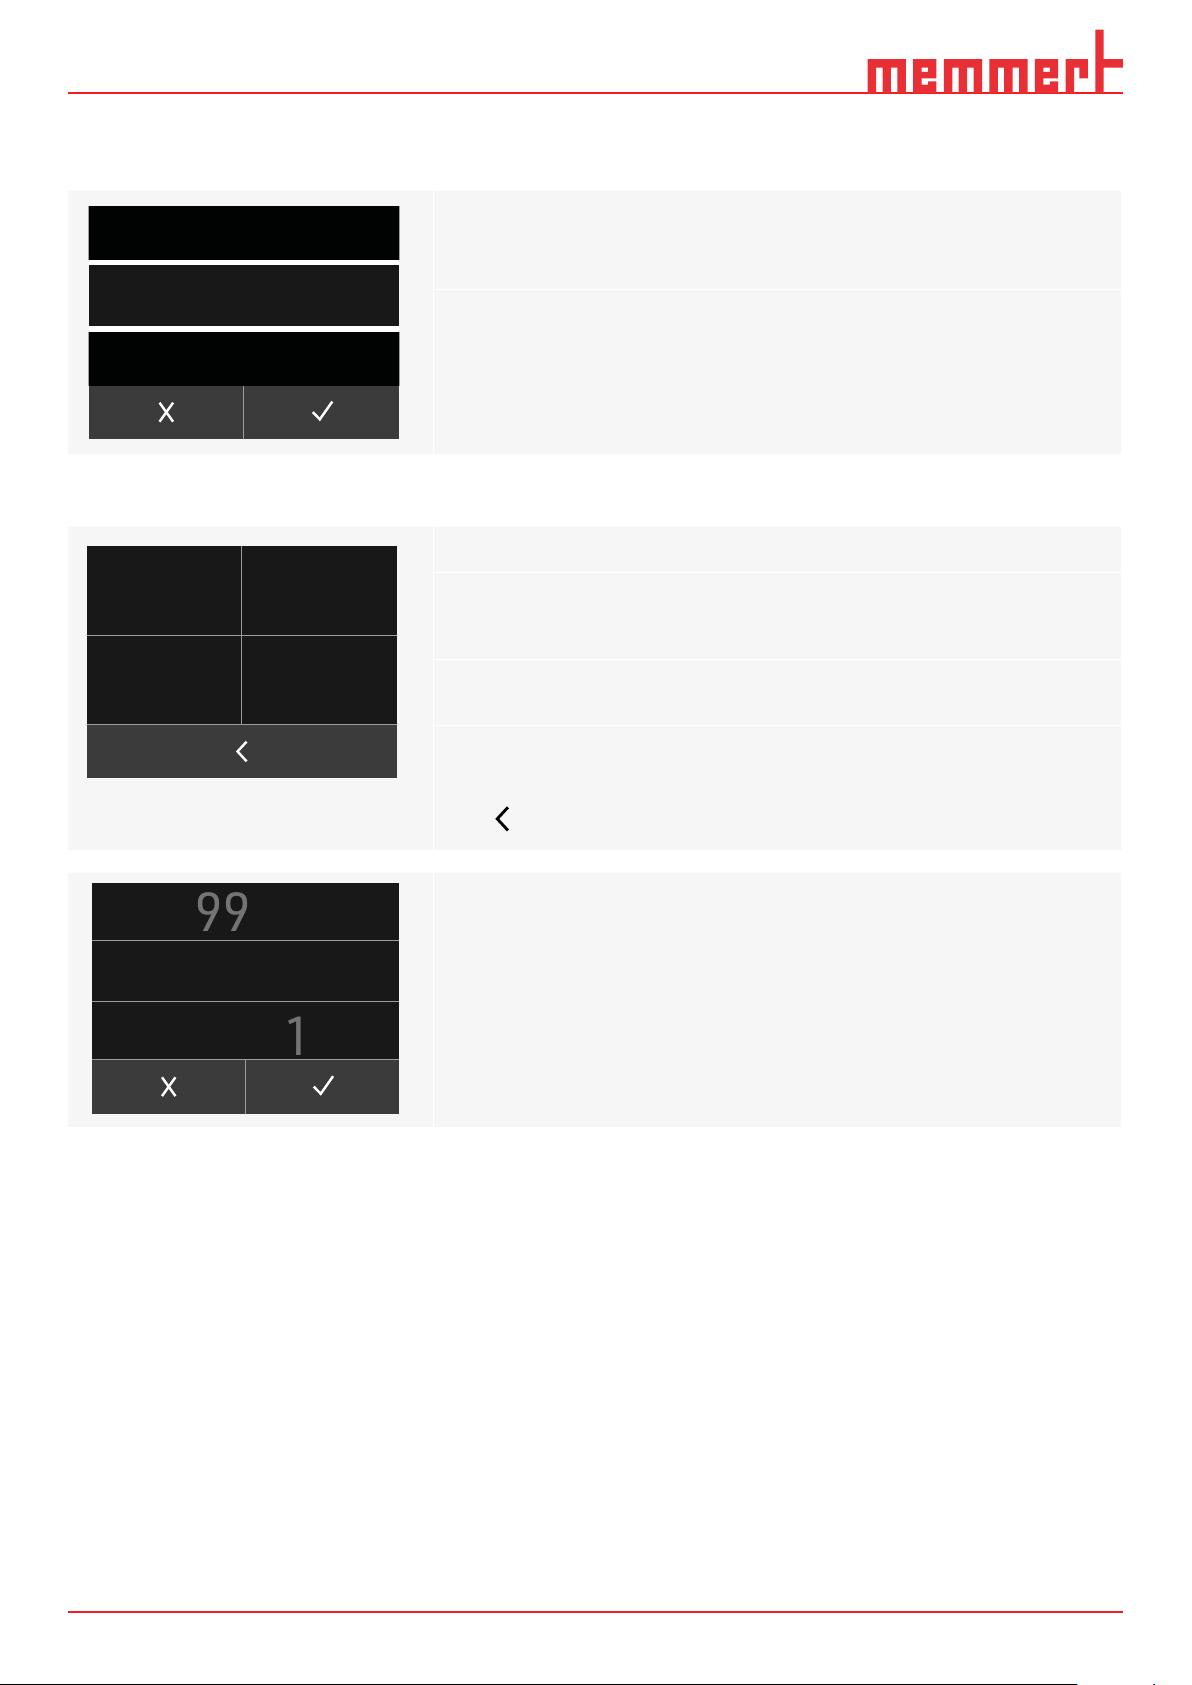
5.3.1 Temperature display unit
Set the temperature unit in the sub-menu on
Temperature
°C
5.3.2 Calibration settings
CAL 1 Temp
00.0
00.0
°C
°C
DEV 1 +/-
0.0
DEV 2 +/-CAL 2 Temp
0.0
Set the values by scrolling vertically on the
touch display:
Make 2-point calibration in the sub-menu on
K
K
► The left side shows the compensation temperature setting
(CAL1 temp / CAL2 temp)
► The right side shows the compensation correction values
(DEV1 / DEV2)
Equipment calibration see chapter 5.5
Press to return to appliance settings
CAL 1
100 .
0
°C
The compensation temperature and compensation correction values are adjusted the
same way as the temperature setting, see chapter 5.2
1902/2021
Page 20
Operation and control
CustomView
Info
22.0
°C
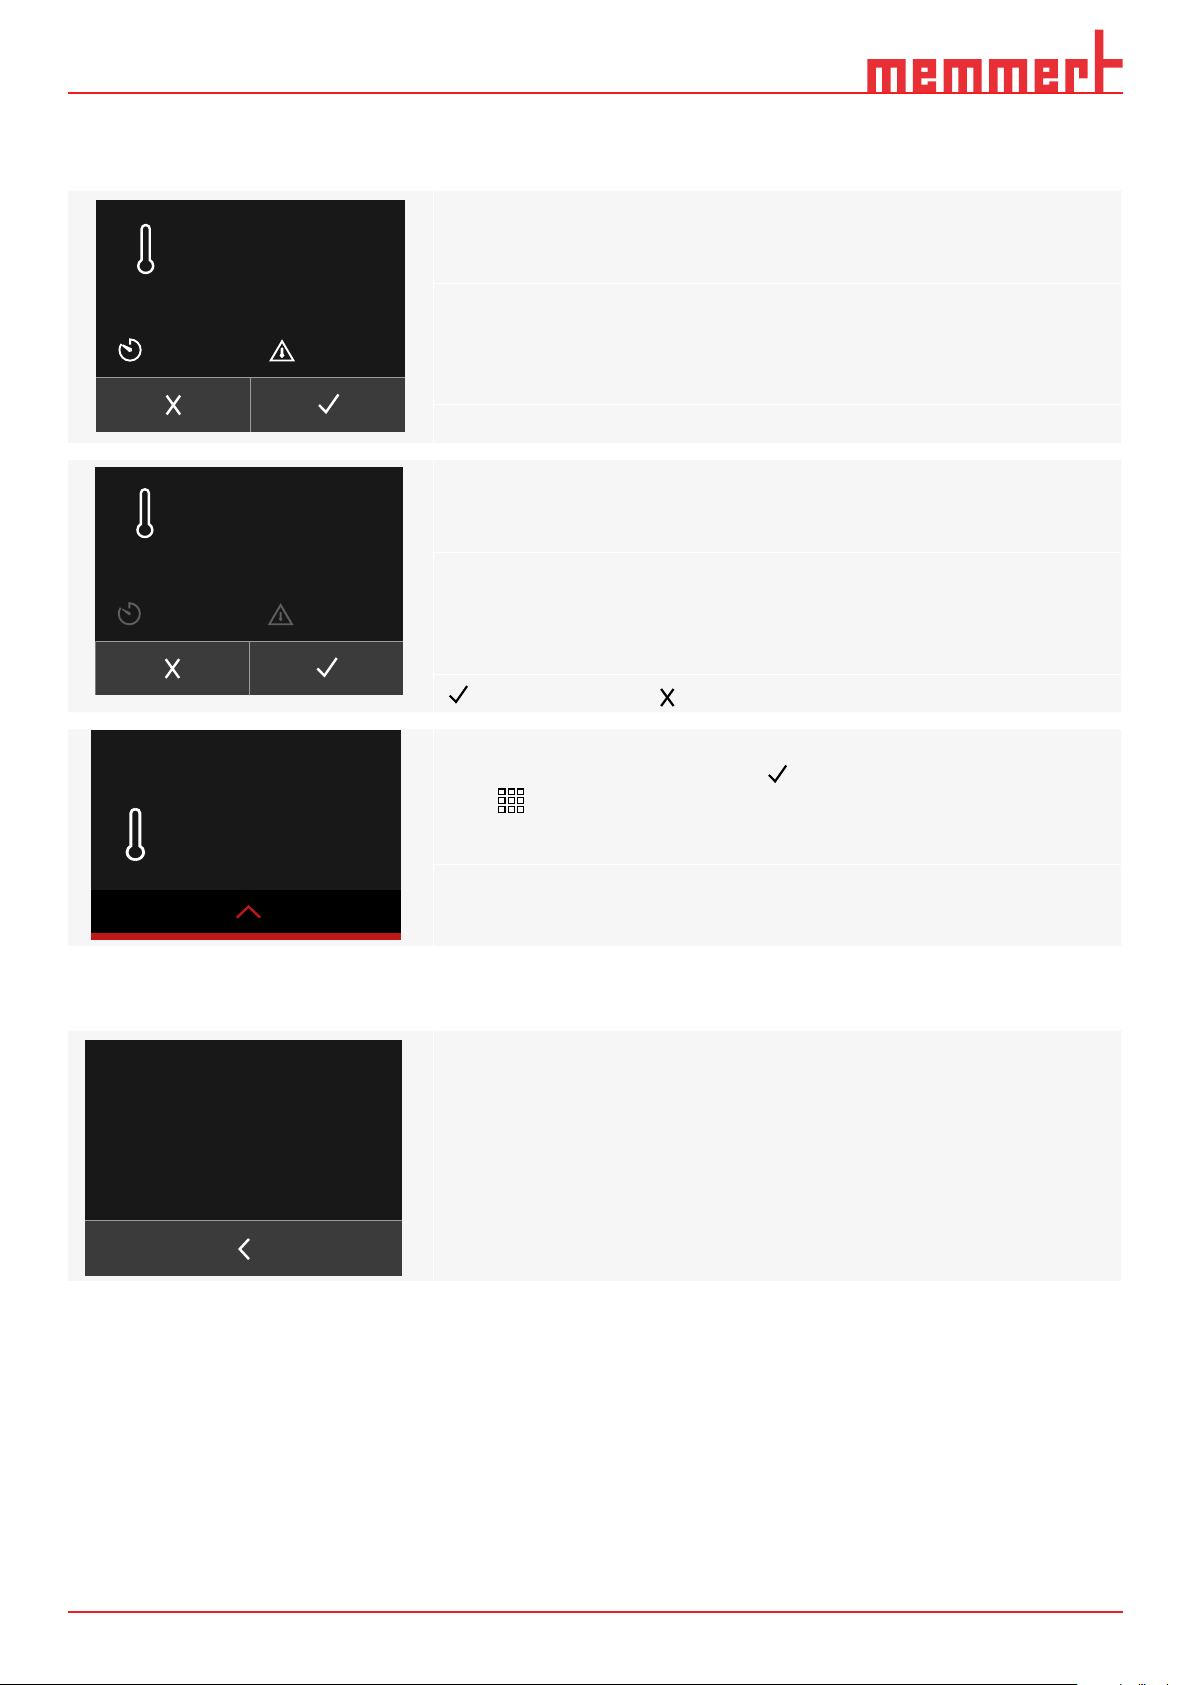
5.3.3 CustomView
22.0
Set 10.0
00:00 h
22.0
Set 10.0
00:00 h
Under the Settings menu item, select
°C
°C
0.0 °C
°C
°C
0.0 °C
display
Selecting the set temperature, timer time or alarm temperature will
activate or deactivate the respective element
The selected element will be greyed out when deactivated
Touching the set temperature, timer time or alarm temperature will
activate or deactivate the respective element
Set temperature, timer time or alarm temperature are deactivated here
conrms the selection; changes will not be accepted
If the selection has been conrmed with ,
touch to return to the home screen,
the personalised CustomView will appear after 30 seconds
to set up the individual
5.3.4 Information
WTB - V1.0.0 - 20201026
Memmert GmbH + Co. KG
Äußere Rittersbacher Straße 38
91126 Schwabach / Germany
Phone: +49 9122 9250
0.0.0
Go to
water bath
under the Settings menu item to view article information for the
20 02/2021
Page 21
Operation and control
NOTICE
WARNING
5.4 Outlet valve
The drain valve can become overheated while emptying the water bath. Touching its
surface can cause burns. Use heat-resistant protective gloves to turn the drain valve
on/off or let the tempering medium cool down rst and empty the water bath when it
has reached a lukewarm temperature.
Observe the following points before emptying the water bath:
■ Allow tempering medium to cool down before draining
■ Outlet valve can overheat during operation, please observe safety instructions
■ Open outlet valve slowly to prevent water from leaking out uncontrolled
When emptying the water bath, let the tempering medium drain either directly into a
suitable and adequately sized container or push a suitable tube onto the outlet valve
(outlet valve diameter: 12 mm), which hooks into a container.
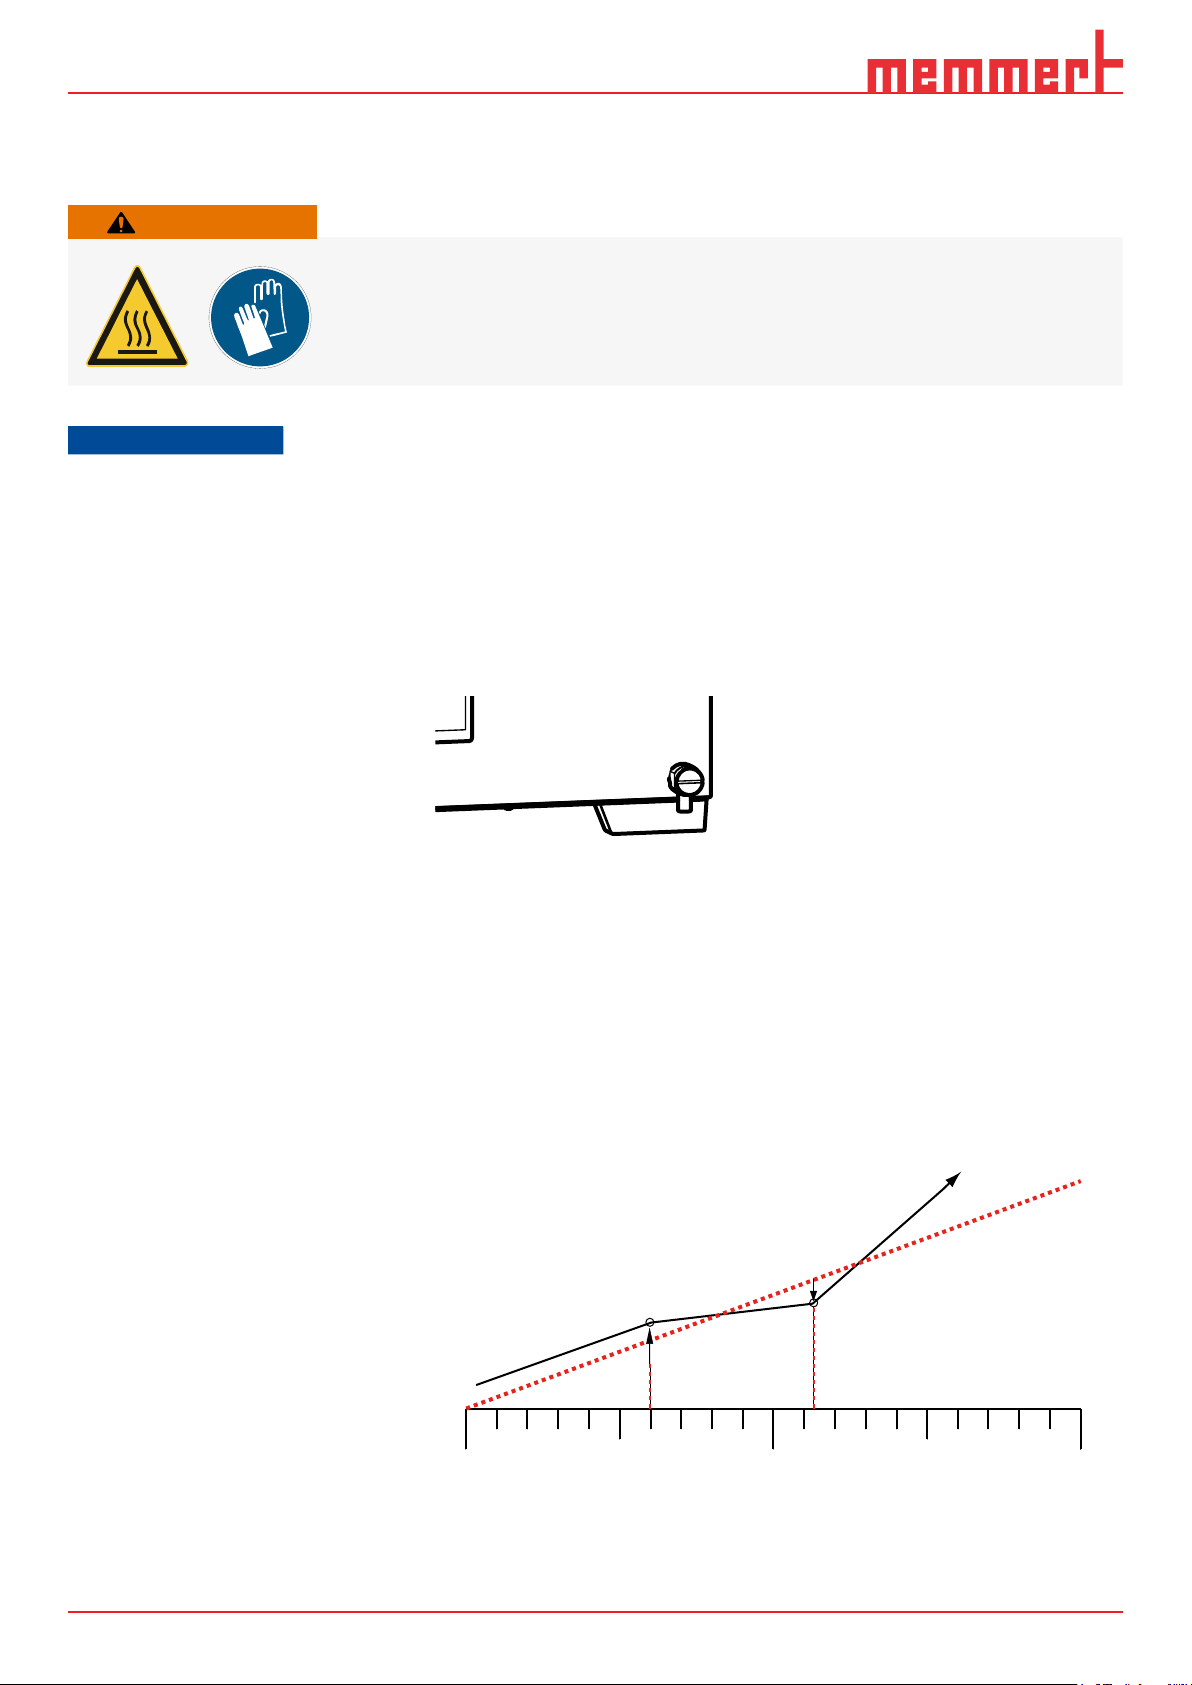
5.5 Calibration
The appliances are temperature calibrated and adjusted at the factory. In case readjust-
ment should be necessary later on – for example due to inuence of the chamber load
– the appliance can be calibrated customer-specically using three calibration temper-
atures of your choice:
■ Cal1 Temperature calibration at low temperature
■ Cal2 Temperature comparison at high temperature
To guarantee perfect control, we recommend calibrating the appliance once a year.
CAL 2
-0,4°C
CAL 1
+1,6°C
werkseitige Kalibrierung
0°C
In the following example, the temperature calibration is performed for the example temperature of 30°C:
30°C
50°C 100°C
2102/2021
Page 22
Operation and control
CAL°C/°F
Info CustomView
CAL
1
29
31
- 0 1
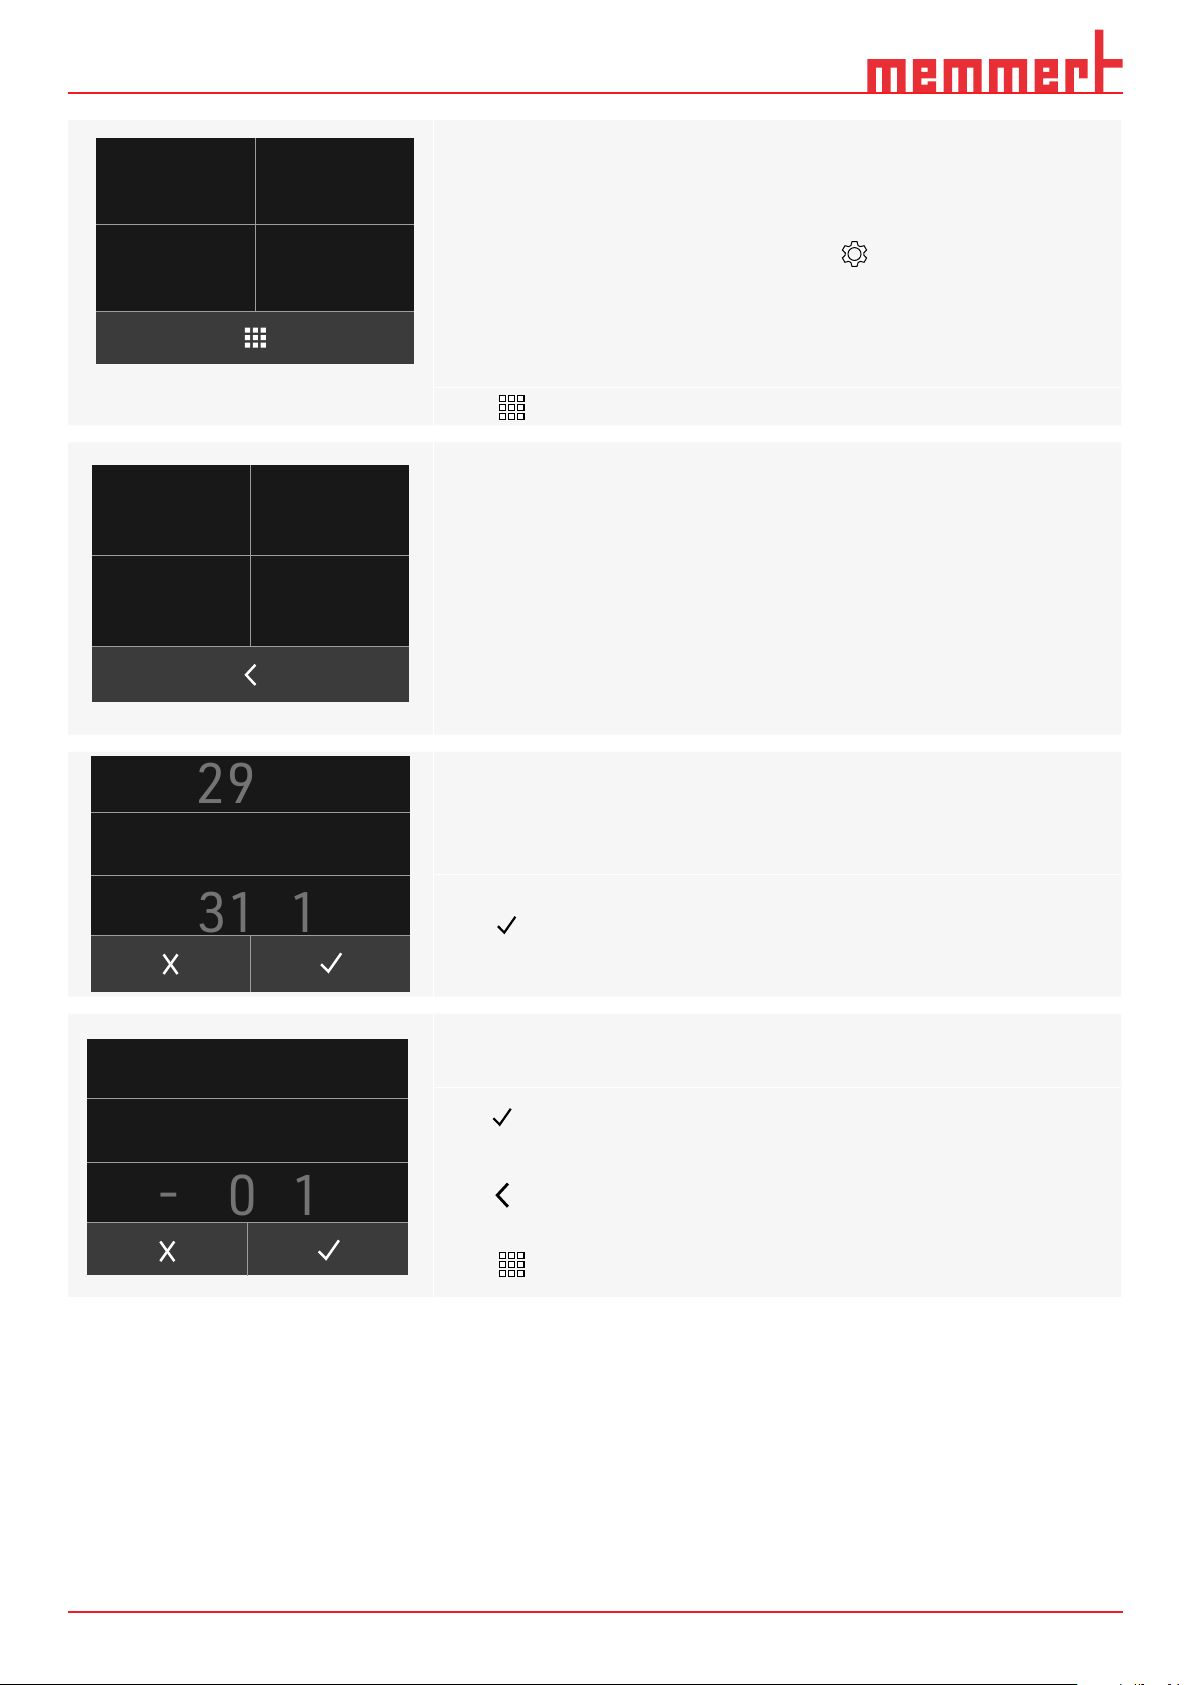
Make 2-point calibration under Appliance Settings on
Press to return to the home screen
CAL 1 Temp
CAL 1
00.0
00.0
30 .
°C
°C
DEV 1 +/-
DEV 2 +/-CAL 2 Temp
0.0
0.0
0
K
Select CAL1Temp to set the compensation temperature CAL1
K
Scroll vertically to set the compensation temperature CAL1 to 30°C
°C
Press to conrm your selection
Scroll vertically to set the compensation correction value to 0.0 K
DEV 1
+ 0.
22 02/2021
Press to conrm your selection
K
0
Press to return to appliance settings
Press to return to the home screen
Page 23
Operation and control
- 2 7
0 5
30.0 °C
DEV 1
+ 1.
memmert
31.6 °C
31.6 °C
K
6
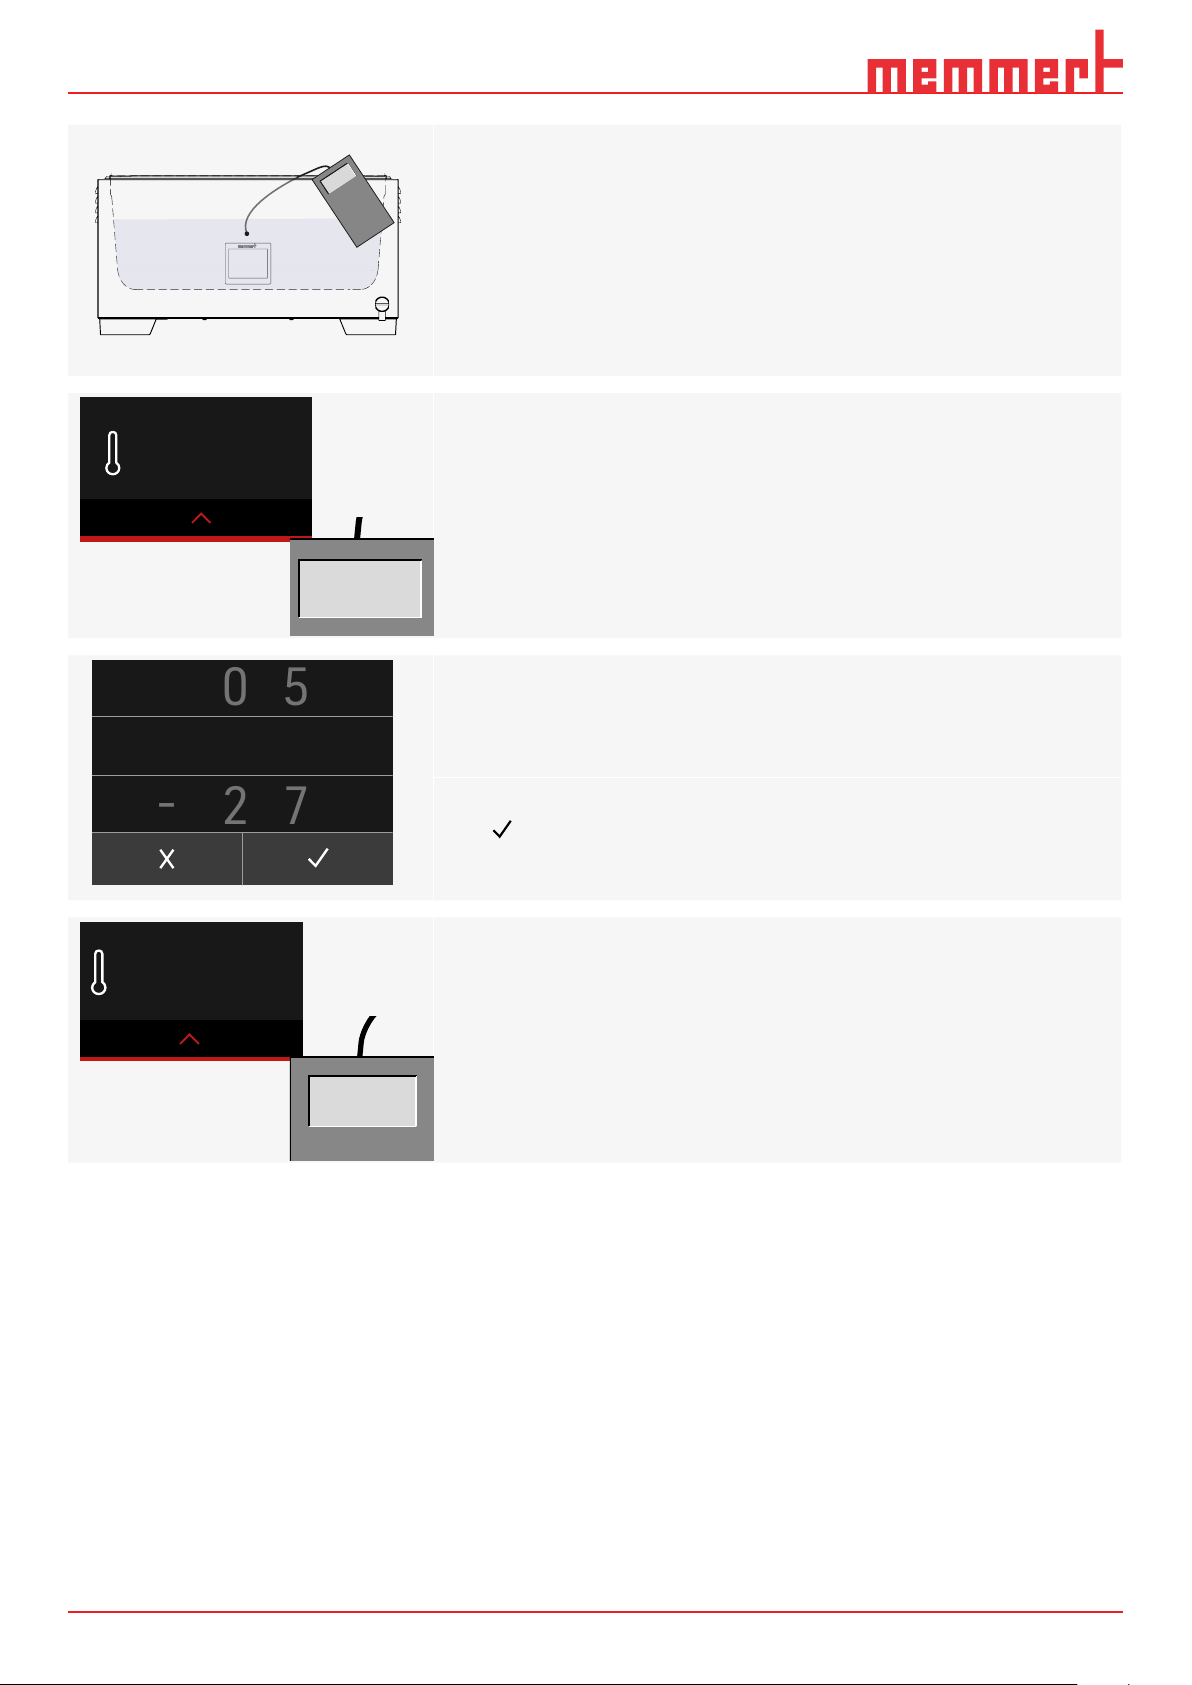
Position the sensor of a calibrated reference instrument centrally in the appliance's
working chamber
Wait until the appliance reaches the set temperature and displays 30 °C.
The reference instrument displays for example 31.6 °C
Set compensation correction value for Cal1 to +1.6K (measured actual value minus
setpoint)
30.0 °C
30,0 °C
Press to conrm your selection
After the calibration procedure, the temperature measured by the reference instrument will now also be 30 °C.
2302/2021
Page 24
Malfunctions, warning and error messages
70.9
°C
E-132
6. Malfunctions, warning and error messages
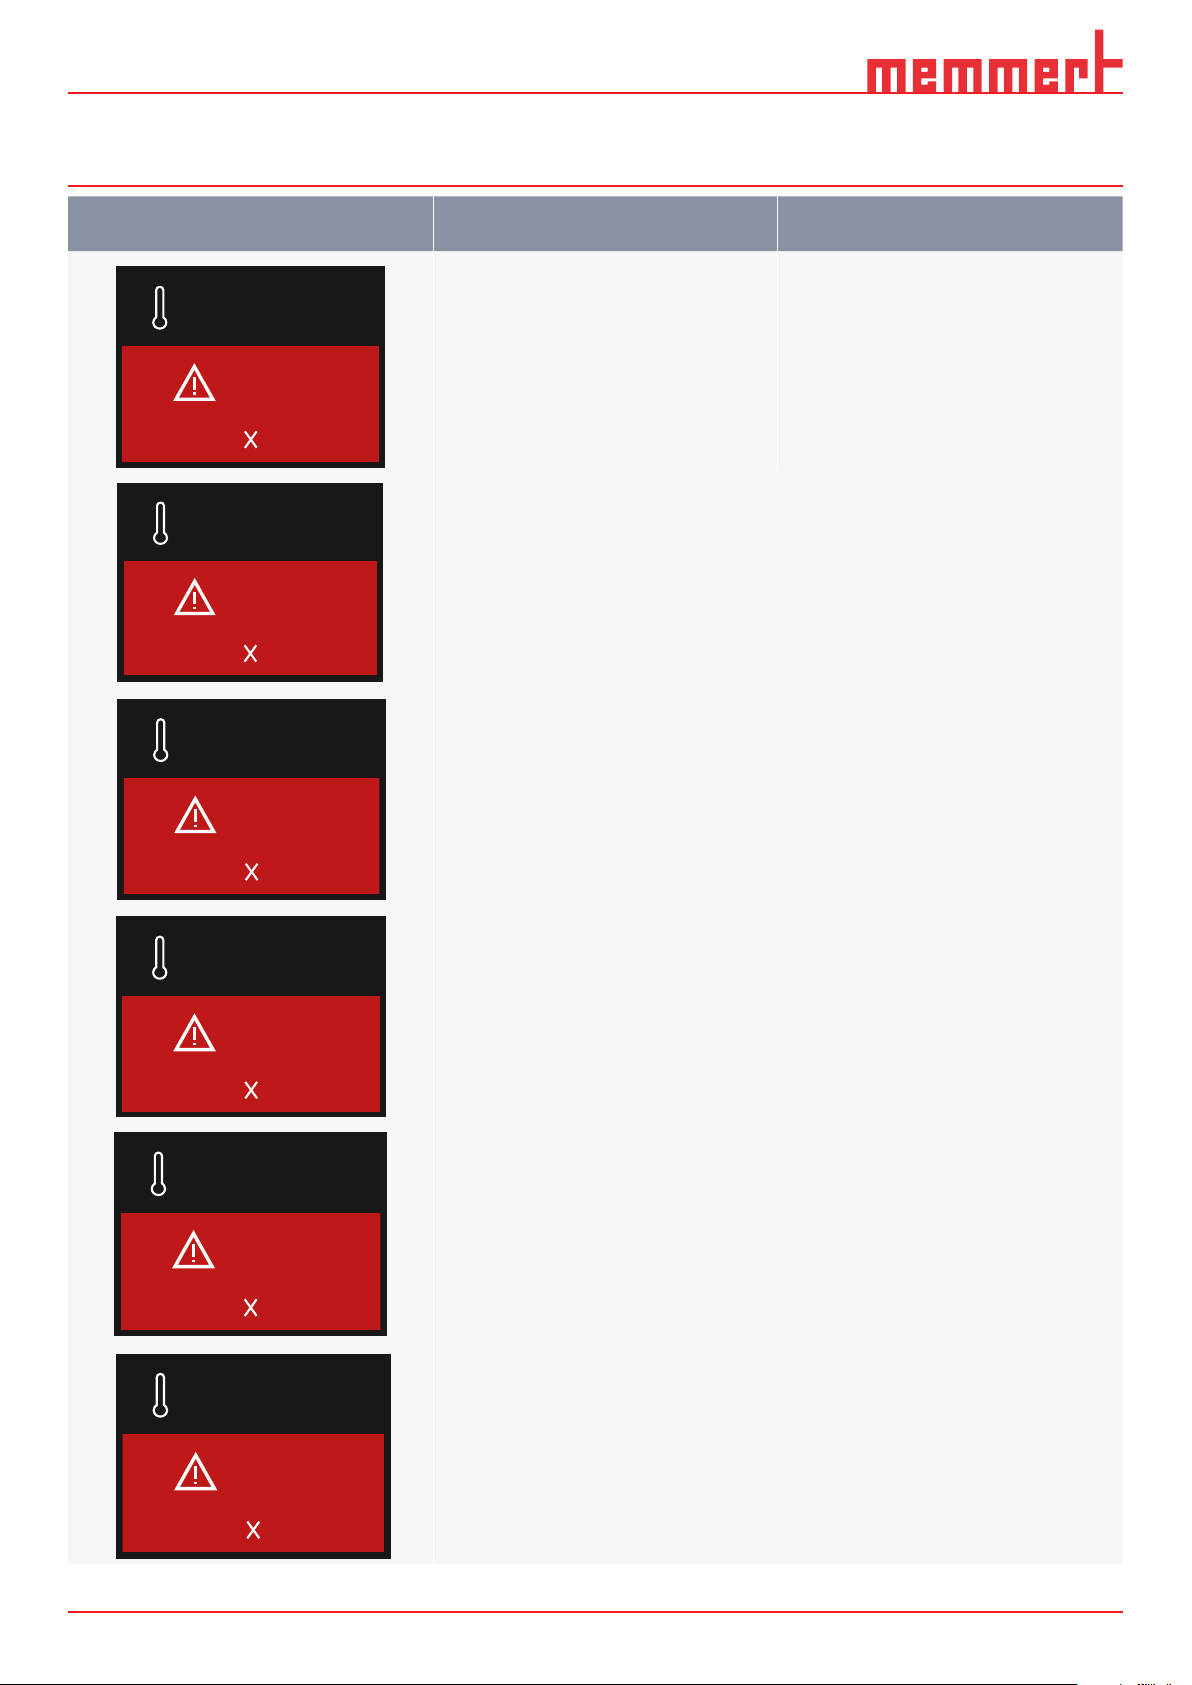
Description Cause Action
70.9 °C
E-113
70.9 °C
E-130
70.9 °C
E-134
Actual temperature has exceeded the set
alarm temperature
The PTC was triggered. Appliance is too
hot, the water level in the appliance may
have been too low during operation
Temperature sensor error
■ Appliance must cool down until the
actual temperature falls below the
set alarm temperature
■ Increase alarm temperature if nec-
essary
■ Switch off appliance
■ Allow to cool down
■ Monitor water level
■ Restart appliance
■ Contact Service
if this occurs frequently
■ Restart appliance
■ Contact Service
if this occurs frequently
70.9 °C
E-111
70.9 °C
E-135
Software error
Memory access error
CRC error (internal memory error)
■ Restart appliance
■ Contact Service
if this occurs frequently
■ Restart appliance
■ Contact Service
if this occurs frequently
■ Restart appliance
■ Contact Service
if this occurs frequently
24 02/2021
Page 25
Maintenance and Servicing
WARNING
CAUTION
7. Maintenance and Servicing
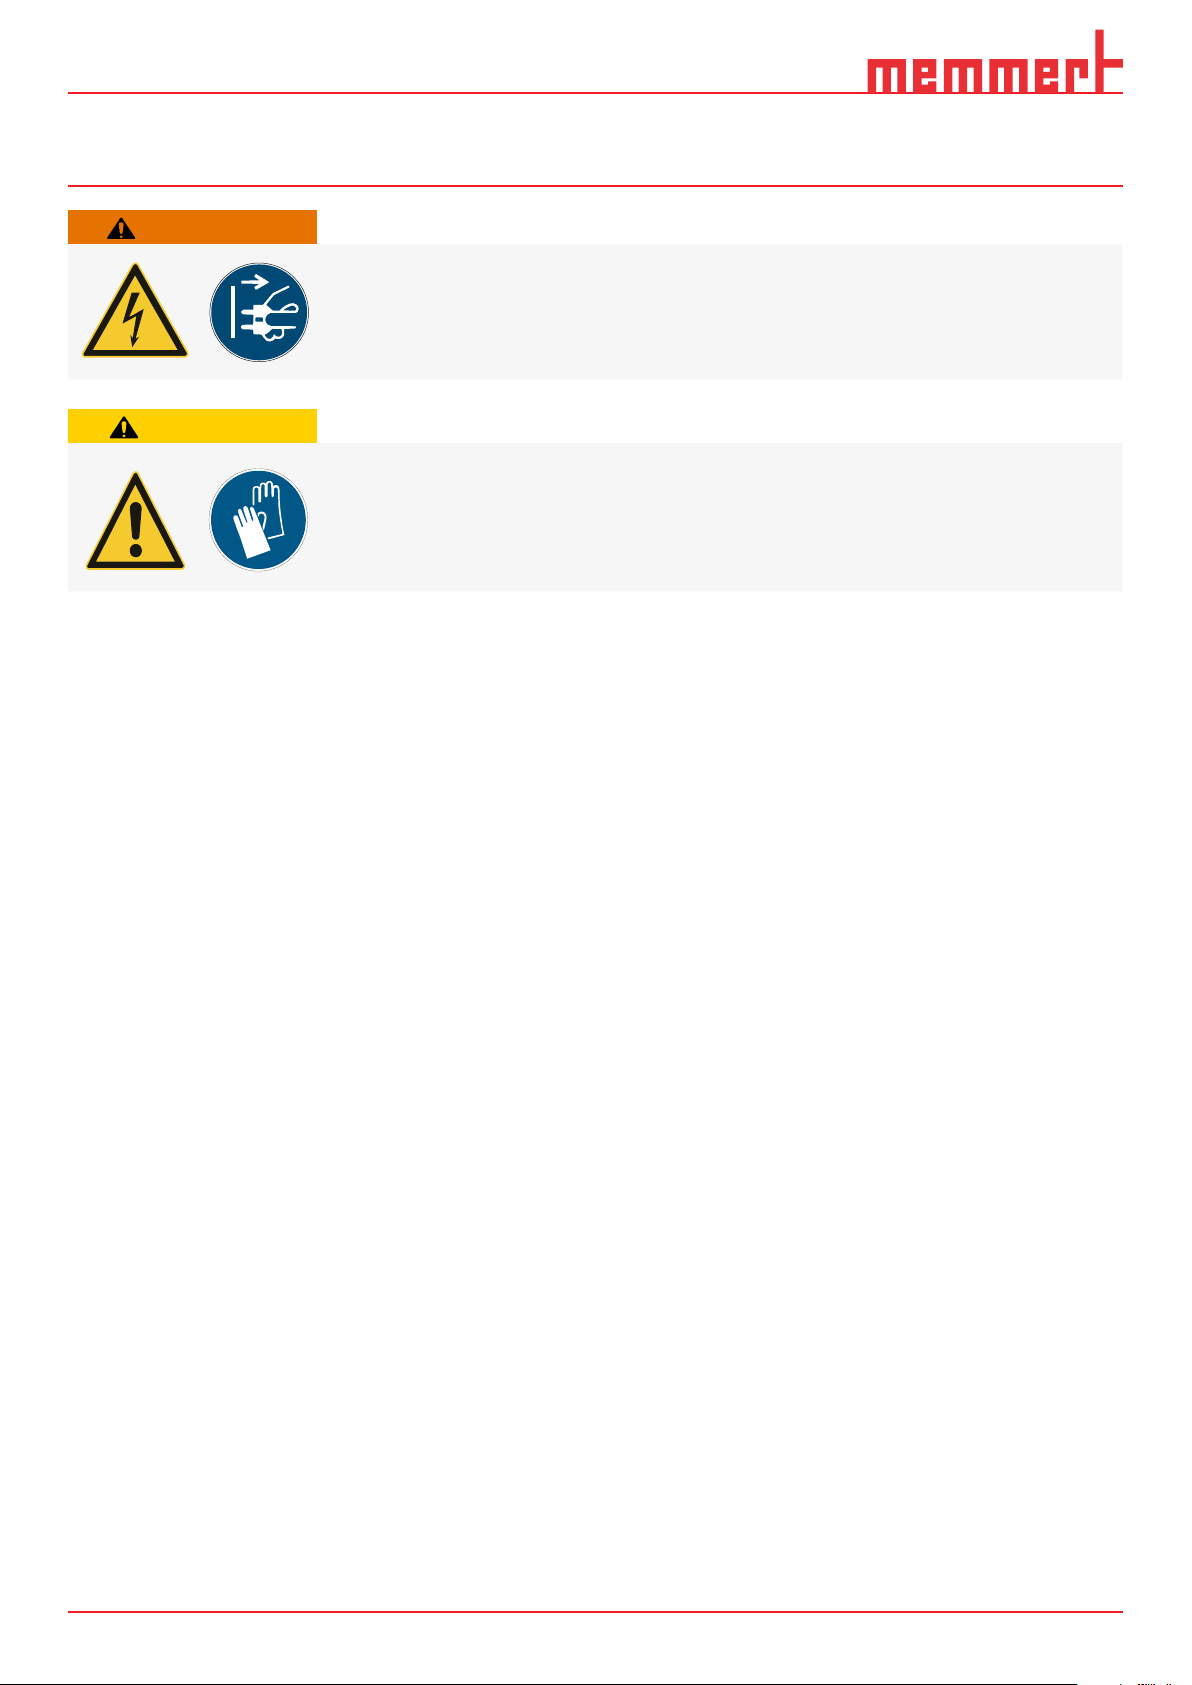
Danger due to electric shock.
Disconnect the mains plug before any cleaning or maintenance work.
Danger of cuts due to sharp edges.
Always wear gloves when working on the appliance.
7.1 Cleaning
7.1.1 Interior and metal surfaces
7.1.2 Plastic parts
7.1.3 Glass surfaces
7.2 Regular maintenance
Regular cleaning of the easy-to-clean bath prevents build up of material residues that
could impair the appearance and functionality of the stainless steel chamber over time.
The metal surfaces of the water bath can be cleaned with normal stainless steel cleaning agents. Make sure that no rusty objects come into contact with the interior or with
the stainless steel housing. Rust deposits can lead to an infection of the stainless steel.
If rust spots should appear on the surface of the interior due to impurities, the affected
area must be immediately cleaned and polished.
Do not clean plastic parts of the water bath with caustic or solvent-based cleaning
agents.
Glass surfaces can be cleaned with a commercially available glass cleaner.
To guarantee perfect control, we recommend calibrating the appliance once a year
2502/2021
Page 26
Maintenance and Servicing
WARNING
7.3 Repairs and service
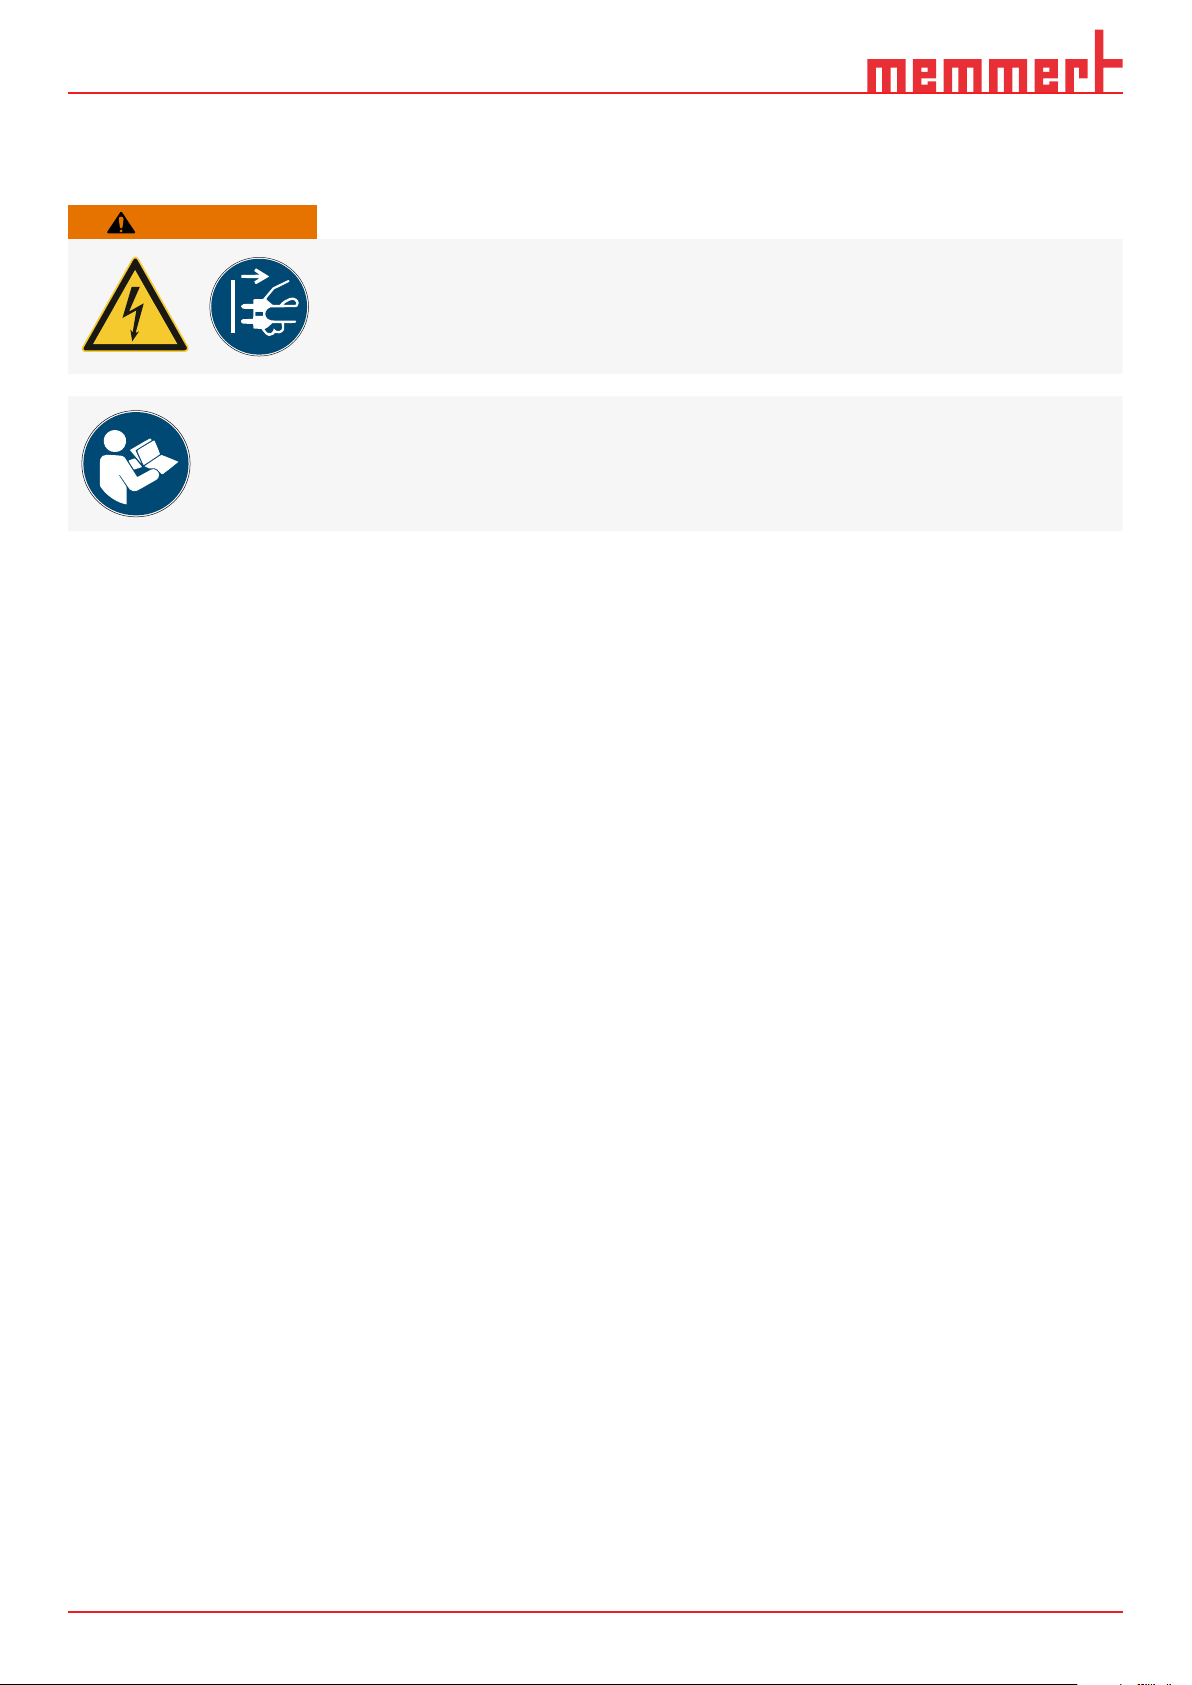
Live components may be exposed once the covers have been removed. Touching these
can lead to an electric shock. Disconnect the mains plug before removing any covers.
Work on the electrical system must only be performed by qualied electricians.
Repairs and service work are described in a separate service manual.
26 02/2021
Page 27
Storage and disposal
8. Storage and disposal
8.1 Storage
■ in a dry and enclosed, dust-free room
■ frost-free
■ disconnected from the power supply
8.2 Disposal
The appliance may only be stored under the following conditions:
Empty water bath before storing.
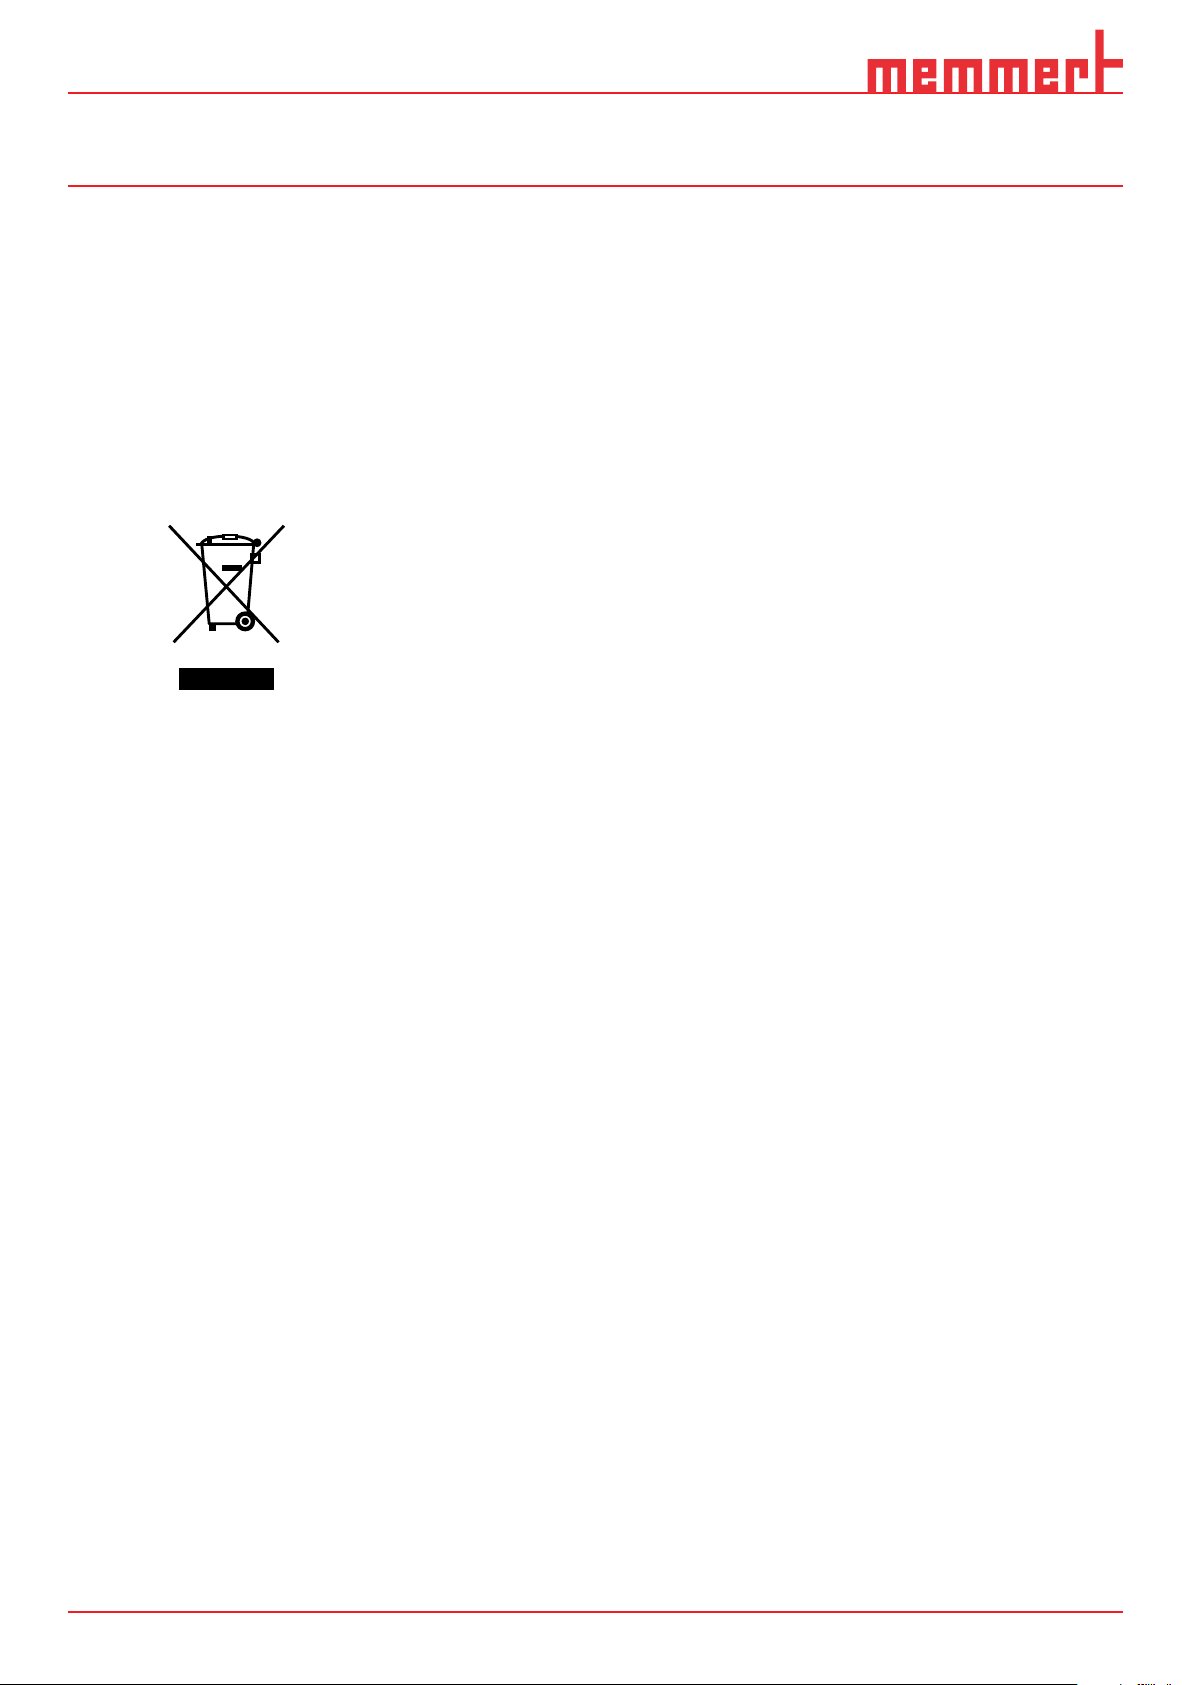
This product is subject to Directive 2012/19/EC on Waste Electrical and Electronic
Equipment (WEEE) of the European Parliament and of the Council of Ministers. This
appliance was placed on the market after 13 August 2005 in countries which have already integrated this Directive into their national laws. It may not be disposed of in
normal household waste. For disposal, please contact your dealer or the manufacturer.
Any appliances that are infected, infectious or contaminated with materials hazardous
to health are excluded from return. Please also observe all other regulations applicable
in this context.
2702/2021
Page 28

WTB water bath Operating manual
D49018 Last updated
01/2021
English
Memmert GmbH + Co. KG | Äußere Rittersbacher Straße 38 | 91126 Schwabach
Tel. +49 9122 925-0 | E-Mail: [email protected] | www.memmert.com
facebook.com/memmert.family | instagram.com/memmert.family
 Loading...