

Mellerware VOGUE User Manual

VOGUE
sewing
machine
makes life easier
13 Stitch functions
Four step
buttonholer
Electric foot
controller
complies with
INTERNATIONAL
IEC60335
SAFETY SPECIFICATIONS
70W
Model:
23000

Dear customer,
Thank you for choosing to purchase a Mellerware
brand product. Thanks to its technology, design and
operation and the fact that it exceeds the strictest
quality standards, a fully satisfactory use and long
product life can be assured.
1. Parts description
1. Reverse stitch lever
2. Stitch selector
3. Bobbin winding stopper
4. Bobbin winding pin
5. Bobbin winding thread guide
6. Thread take up lever
7. Thread guide
8. Thread tension dial
9. Presser foot
10. Needle
11. Needle plate
12. Extension table
13. Handle
14. Spool holder
15. Hand wheel
16. Power/light switch
17. Socket
18. Presse foot lever
19. Bobbin
20. Seam ripper
21. Felt pads
22. Buttonhole presser
23. Needles
24. Sewing machine plug
25. Power plug
26. Foot controller
2. Safety advice and warnings!
Read these instructions carefully before switching
on the appliance and keep them for future reference.
Failure to follow and observe these instructions could
19
20
21
lead to an accident. Clean all the parts of the product
as indicated in the cleaning section, before use.
2.1. Use or working environment:
22
23
2.1.1. Keep the working area clean and well lit. Cluttered and dark areas invite accidents.
2.1.2. Use the appliance in a well ventilated area.
2.1.3. Do not place the appliance on hot surfaces,
such as cooking plates, gas burners, ovens or similar
items.
2.1.4. Keep children and bystanders away when us-
24
25
ing this appliance.
2.1.5. Place the appliance on a horizontal, flat, stable
surface.
26
2.1.6. Do not use the appliance in association with a
programmer, timer or other device that automatically
switches it on.

2.1.7. Do not use the appliance if the cable or plug is
damaged.
2.1.8. Ensure that the voltage indicated on the rating
label matches the mains power supply voltage before
plugging in the appliance.
2.1.9. Connect the appliance to the mains power
supply with an earth socket withstanding a minimum
of 10 amperes.
2.1.10. The appliance’s plug must fit into the mains
power supply socket properly. Do not alter the plug.
2.1.11. If using a multi plug check ratings carefully as
the current used by several appliances could easily
exceed the rating of the multi plug.
2.1.15. If any of the appliance casings breaks, immediately disconnect the appliance from the mains
power supply to prevent the possibility of an electric
shock.
2.1.16. Do not use the appliance if it has fallen on the
floor or if there are visible signs of damage.
2.1.17. Do not force the power cord. Never use the
power cord to lift up, carry or unplug the appliance.
2.1.18. Do not wrap the power cord around the appliance.
2.1.19. Do not clip or crease the power cord.
2.1.20. Do not allow the power cord to hang or to
come into contact with the hot surfaces of the appliance.
2.1.21. Check the state of the power cord. Damaged
or tangled cables increase the risk of electric shock.
2.1.22. The appliance is not suitable for outdoor use.
2.1.23. Power cord should be regularly examined
for signs of damage, and if the cord is damaged, the
appliance must not be used.
2.1.24. Do not touch the plug with wet hands.
2.1.25. Never operate the sewing machine with any
air openings blocked. Keep ventilation openings of
the sewing machine and foot control free from the
accumulation of lint, dust, and loose cloth.
2.1.26. Keep fingers away from all moving parts.
Special care is required around the sewing machine
needle.
2.1.27. Always use the proper needle plate. The
wrong plate can cause the needle to break.
2.1.28. Do not use bent needles.
2.1.29. Do not pull or push fabric while stitching. It
may deflect the needle causing it to break.
2.1.30. Switch the sewing machine off (“O”) when
making any adjustment in the needle area, such as
threading needle, changing needle, threading bobbin,
or changing presser foot, etc.
2.2. Personal safety:
2.2.1. CAUTION: Do not leave the appliance unattended during use as there is a risk of an accident.
2.2.2. This appliance is only for domestic use, not for
industrial or professional use. It is not intended to be
used by guests in hospitality environments such as
bed and breakfast, hotels, motels, and other types of
residential environments, even in farm houses, areas
of the kitchen staff in shops, offices and other work
environments.
2.2.3. This appliance is not intended for use by
persons (including children) with reduced physical,
sensory or mental capabilities, or lack of experience
and knowledge, unless they have been given supervision or instruction concerning use of the appliance by
a person responsible for their safety.
2.2.4. This appliance is not a toy. Children should be
supervised to ensure that they do not play with the
appliance.
2.3. Use and care:
2.3.1. Fully unroll the appliance’s power cable before
each use.
2.3.2. Do not use the appliance if the parts or accessories are not properly fitted.
2.3.3. Do not turn the appliance over while it is in use
or connected to the mains power supply.
2.3.4. Unplug the appliance from the mains power
supply when not in use and before undertaking any
cleaning task.
2.3.5. This appliance should be stored out of reach
of children.
2.3.6. Never leave the appliance unattended when in
use and keep out of the reach of children.
2.3.7. If, for some reason, the appliance were to
catch fire, disconnect the appliance from the mains
power supply and DO NOT USE WATER TO PUT THE
FIRE OUT.
2.4. Service:
2.4.1. Make sure that the appliance is serviced only
by suitably qualified technician, and that only original
spare parts or accessories are used to replace existing parts/accessories.
2.4.2. If the power cord is damaged, the manufacturer or its service agent or a similarly qualified
person must
replace it in order to avoid a hazard.
2.4.3. Any misuse or failure to follow the instructions
for use renders the guarantee and the manufacturer’s
liability null and void.
3. Instructions for use
3.1. Before use:
3.1.1. Connecting the power supply
3.1.1.1. Set power switch to “OFF”.
3.1.1.2. Insert plug into sewing machine socket.
3.1.1.3. Insert the power plug into the mains power
outlet.
3.1.1.4. Set the power switch to “ON”. The power
light will turn on.
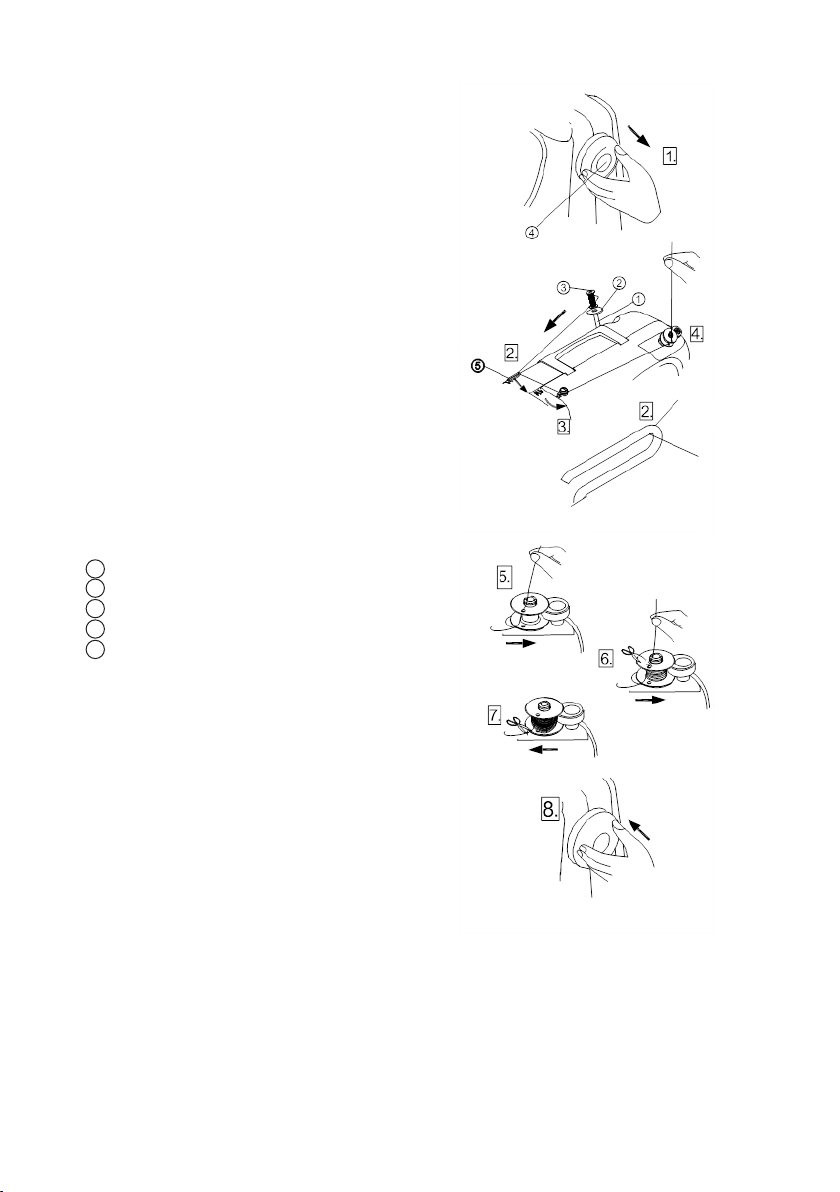
3.1.2. Winding the bobbin
3.1.2.1. Turn the handwheel to release the clutch.
Pull the spool holder out from the back of the
machine, place felt pads and insert the doubling
spindle into spool holder with thread direction shown
in diagram.
Spool holder
1
2
Felt pads
3
Clew
4
Hand wheel
5
Thread guide
3.1.2.8. Turn the handwheel to close the clutch.
3.1.2.2. Pass thread from spool through thread guide
as shown.
3.1.2.3. Wind the thread around bobbin winding
thread guide.
3.1.2.4. Place the bobbin on winding shaft and pass
the bottom thread through the small hole of bobbin
outwards from inside.
3.1.2.5. Push the winding shaft to the right.
3.1.2.6. Hold the thread and start the machine. After
winding some bottom thread round the bobbin, stop
the machine and cut off the thread end near small
hole of bobbin.
3.1.2.7. Restart the machine. After full winding of
the bobbin, it will automatically stop. At that time,
stop the machine, leftwards push winding shaft to its
original position and cut off thread.
3.1.3. Inserting the bobbin
3.1.3.1. When inserting or removing the bobbin, the
needle and presser foot must be fully raised.
3.1.3.2. Hold the bobbin in your right hand with the
thread running clockwise.
3.1.3.3. Insert the bobbin into the case with about 10
cm of thread showing outside the case.
3.1.3.4. Hold the latch open, with locating pin straight
 Loading...