

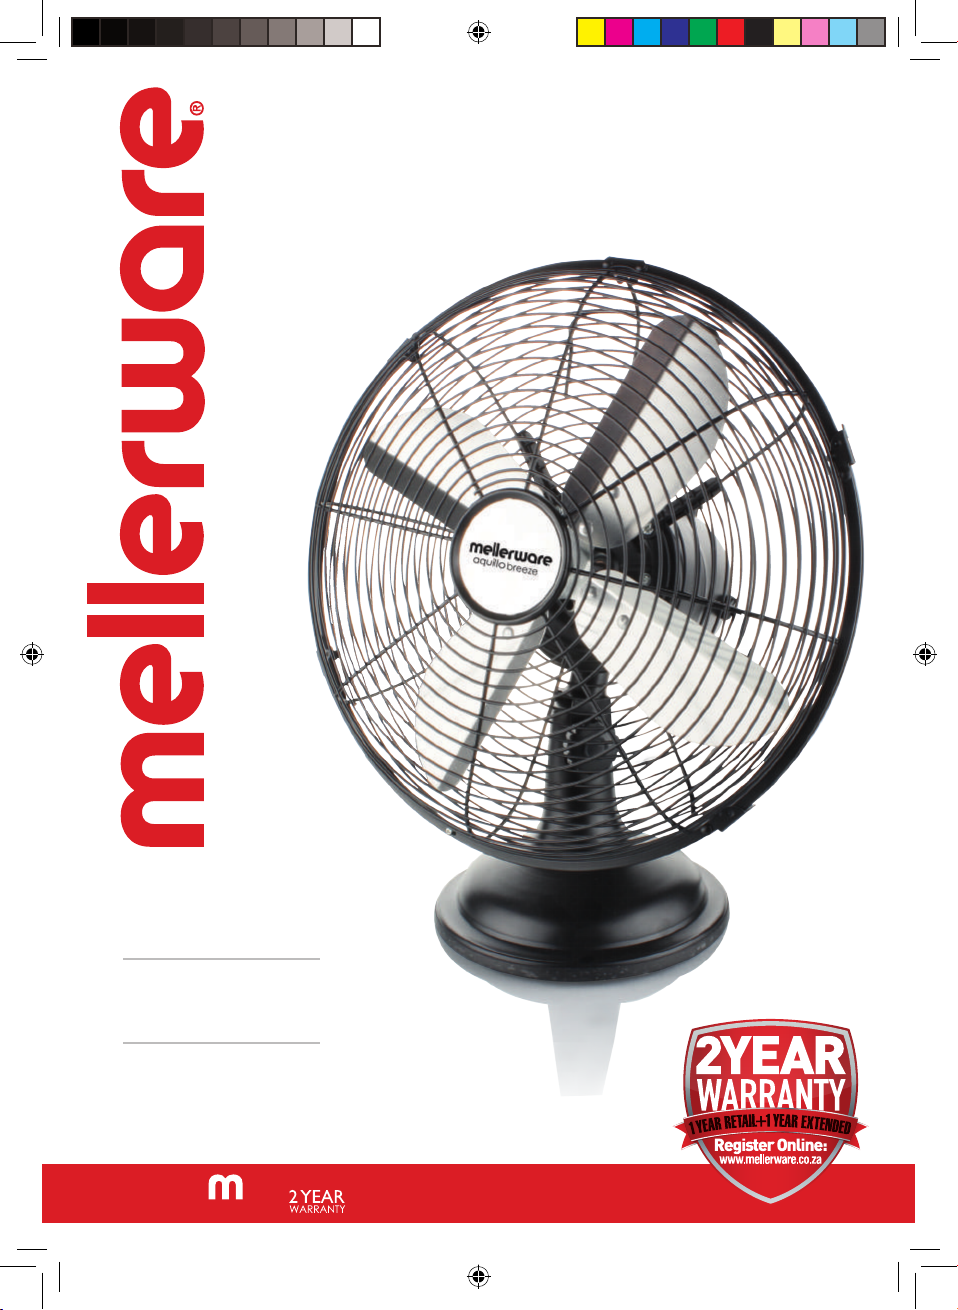
AQUILLO BREEZE
30cm desktop
fan
30cm Diameter
radial grille
Left and right
oscillating fan head
3 Speed selection
complies with
INTERNATIONAL
IEC60335
SAFETY SPECIFICATIONS
35W
makes life easier
Model:
35850
Dear customer,
Thank you for choosing to purchase a Mellerware
brand product. Thanks to its technology, design and
operation and the fact that it exceeds the strictest quality standards, a fully satisfactory use and long product
life can be assured.
54 6 7 8
1 2 3
9
10
11
12
13
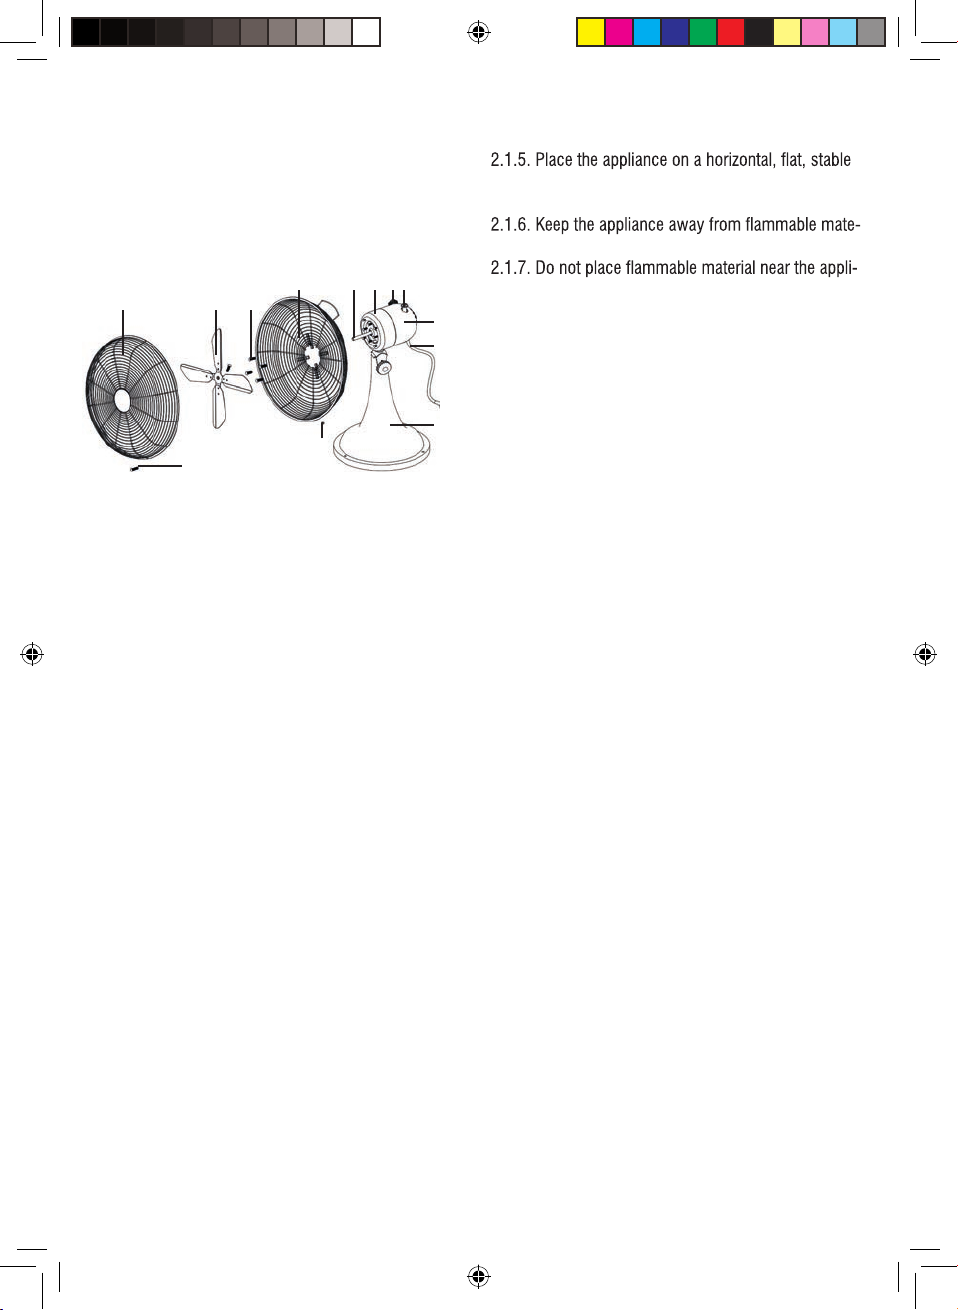
1. Parts description
1. Front guard
2. Blade
3. Screw
4. Rear guard
5. Motor shaft
6. Motor
7. Control switch
8. Tilt adjust lock nut
9. Rear cover
10. Power cord
11. Base
12. Nut
13. Screw
2. Safety advice and warnings!
Read these instructions carefully before switching on
the appliance and keep them for future reference. Failure to follow and observe these instructions could lead
to an accident. Clean all the parts of the product that
will be in contact with food, as indicated in the cleaning
section, before use.
2.1. Use or working environment:
2.1.1. Keep the working area clean and well lit. Cluttered and dark areas invite accidents.
2.1.2. Use the appliance in a well ventilated area.
2.1.3. Do not place the appliance on hot surfaces, such
as cooking plates, gas burners, ovens or similar items.
2.1.4. Keep children and bystanders away when using
this appliance.
surface and away from other heat sources and contact
with water.
-
rial such as textiles, curtains, cardboard or paper, etc.
-
ance.
2.1.8. Do not use the appliance in association with a
programmer, timer or other device that automatically
switches it on.
2.1.9. Do not use the appliance if the cable or plug is
damaged.
2.1.10. Ensure that the voltage indicated on the rating
label matches the mains power supply voltage before
plugging in the appliance.
2.2.11. Connect the appliance to the mains power supply with an earth socket withstanding a minimum of 10
amperes.
power supply socket properly. Do not alter the plug.
2.1.13. If using a multi plug check ratings carefully as
the current used by several appliances could easily
exceed the rating of the multi plug.
2.1.14. If any of the appliance casings breaks, immediately disconnect the appliance from the mains power
supply to prevent the possibility of an electric shock.
2.1.15. Do not use the appliance if it has fallen on the
2.1.16. Do not force the power cord. Never use the
power cord to lift up, carry or unplug the appliance.
2.1.17. Do not wrap the power cord around the appliance.
2.1.18. Do not clip or crease the power cord.
2.1.19. Do not allow the power cord to hang or to
come into contact with the hot surfaces of the appliance.
2.1.20. Check the state of the power cord. Damaged or
tangled cables increase the risk of electric shock.
2.1.21. The appliance is not suitable for outdoor use.
2.1.22. Power cord should be regularly examined for
signs of damage, and if the cord is damaged, the appliance must not be used.
2.1.23. Do not touch the plug with wet hands.
2.2. Personal safety:
2.2.1. CAUTION: Do not leave the appliance unattended
during use as there is a risk of an accident.
2.2.2. Do not touch the rotating parts of the appliance,
as it may cause serious injury.
2.2.3. This appliance is only for domestic use, not for
industrial or professional use. It is not intended to be
used by guests in hospitality environments such as
bed and breakfast, hotels, motels, and other types of
residential environments, even in farm houses, areas
3. Instructions for use
3.1. Before use:
-
plicable).
in the manner described in the cleaning section.
environments.
2.2.4. This appliance is not intended for use by
persons (including children) with reduced physical,
sensory or mental capabilities, or lack of experience
and knowledge, unless they have been given supervision or instruction concerning use of the appliance by
a person responsible for their safety.
2.2.5. This appliance is not a toy. Children should be
supervised to ensure that they do not play with the
appliance.
2.3. Use and care:
2.3.1. Fully unroll the appliance’s power cable before
each use.
2.3.2. Do not use the appliance if the parts or acces-
2.3.3. Do not turn the appliance over while it is in use
or connected to the mains power supply.
2.3.4. Unplug the appliance from the mains power
supply when not in use and before undertaking any
cleaning task.
2.3.5. This appliance should be stored out of reach
of children.
2.3.6. Do not store the appliance if it is still hot.
2.3.7. Never leave the appliance unattended when in
use and keep out of the reach of children.
2.3.8. If for some reason, the appliance were to catch
supply and DO NOT USE WATER TO PUT THE FIRE
OUT.
2.4. Service:
2.4.1. Make sure that the appliance is serviced only
spare parts or accessories are used to replace existing
parts/accessories.
2.4.2. If the power cord is damaged, the manufacturer
3.2. Assembly:
3.2.1. Fit the pole onto the base and secure correctly
using the screws supplied.
3.2.2. Fit the rear grille and secure with the plastic support nut. Make sure that the handle faces upwards and
the plastic pins are aligned to the corresponding holes
on the rear grille for perfect coupling.
3.2.3. Fit the fan propeller and secure with blade support nut. Ensure that the drive pin that goes through the
propeller.
3.2.4. Insert the front grille through the top of the rear
grille. Fit the rear grille clips onto the front grille. Check
that the grille safety screw holes are aligned at the
bottom of the grille. Secure and tighten the grille safety
screw.
3.3. Use and care:
3.3.1. Turning the fan on:
3.3.1.1. Connect the appliance to the mains.
0. Stop fan
3.3.2. Swing and tilt
3.3.2.1.The fan head can swing from right to left,
sweeping air from a certain area. To do so, simply
press the swing control.
3.3.2.2. To set the fan head, pull the swing control and
turn the head to the required position.
3.3.2.3. To tilt the fan head, loosen the tilt adjust lock nut by
holding onto the grille and motor casing with both
hands and resetting it to the required position.
3.3.2.4. The control N can be used to adjust the height.
replace it in order to avoid a hazard.
2.4.3. Any misuse or failure to follow the instructions
for use renders the guarantee and the manufacturer’s
liability null and void.
3.4.1. Allow fan blade to come to a complete stop.
3.4.2. Unplug the appliance from the mains power
supply.
3.4.3. Clean the appliance as described in the cleaning
section.
4. Cleaning
4.1. Disconnect the appliance from the mains power
supply and allow it to cool completely before undertaking any cleaning task.
4.2. Remove the front grill in order to clean the propeller. When removing the front grill to clean the propeller,
make sure that the fan is unplugged before
removing the guard.
4.3. Clean the outer parts of the appliance with a damp
cloth with a few drops of washing-up liquid and then
dry. CAUTION! Do not immerse electrical parts of the
appliance in any liquid.
4.4. Do not use solvents, or products with an acid
or base pH such as bleach, or abrasive products, for
cleaning the appliance.
4.5. Never submerge the appliance in water or any
other liquid or place it under running water.
5. Anomalies and repair
5.1. Take the appliance to an authorised support centre
if product is damaged or other problems arise.
5.2. If the connection to the mains has been damaged,
it must be replaced and you should proceed as you
would in the case of damage.
Geagte Klient,
Dankie vir u keuse om `n Mellerware handelsmerk
produk te koop, Danksy die tegnologie, ontwerp en
werking en die feit dat dit voldoen aan die strengste
gehalte standaarde, is U verseker van `n volle bevredigende gebruik en lang produklewe..
54 6 7 8
1 2 3
9
10
11
12
13
1. Parte beskrywing
1. Voorste Rooster
2. Blade
3. Skroef
4. Agter Rooster
5. Motor Stam
6. Motor
7. Beheer Skakel
8. Swaai Beheer
9. Motor Toestel
10. Krag Draad
11. Staander
12. Neut
13. Skroef
2. Belangrike veiligheids voorsorg:
Voor die toestel vir die eerste keer gebruik word maak
alle parte skoon wat met kos in aanraking kom soos
voorgeskryf in skoonmaak artikel. Lees die instruksies
deeglik en bewaar
2.1. Gebruik en werksomgewing:
2.1.1 Hou die werk oppervlak skoon en helder verlig.
Ongelukke gebeur in donker areas
2.1.2. Gebruik die produk in n goed geventileerde area
2.1.2. Use the appliance in a well ventilated area.
2.1.3. Do not place the appliance on hot surfaces, such
as cooking plates, gas burners, ovens or similar items.
2.1.4. Keep children and bystanders away when using
this appliance.
surface and away from other heat sources and contact
with water.
rial such as textiles, cur tains, cardboard or paper, etc.
ance.
2.1.8. Do not use the appliance in association with a
programmer, timer or other device that automatically
switches it on.
2.1.9. Do not use the appliance if the cable or plug is
damaged.
2.1.10. Ensure that the voltage indicated on the rating
label matches the mains power supply voltage before
plugging in the appliance.
2.2.11. Connect the appliance to the mains power
sup- ply with an ear th socket withstanding a minimum
of 10
2.1.12. die toestel prop moet in die hoof prop pas en
Moenie die prop verander
Indien `n multi prop gebruik word maak seker die
toestel se strome oorskry nie die gradering van die
multi prop
2.1.14 Moenie die toestel gebruik as die prop of koord
beskadig isnie of enige sigbare skade aan die omhulsel
is nie
2.1.15. Moenie die toestel gebruik as dit op die vloer
geval het en daar is sigbare skade.
2.1.16 Moenie die koord gebruik om die toestel te dra,
op te tel of van diemuurprop te ontkoppel nie
2.1.17.Die koord mag nooit om die toestel gedraai
word nie.
2.1.18.moenie die koord plooi nie
2.1.19. Die koord Moenie oor die kant van die tafel of
toonbank hang of aan warm oppervlaktes raak nie.
2.1.20.Maak seker die koord is nie beskadig of verstrengel nie.
2.1.21 Die toestel moet nie buite gebruik word nie
2.1.22. Moenie die prop met nat hande hanteer nie
.
2.2. Persoonlike veiligheid
2.2.1. LET WEL: Moenie die toestel sonder toesig laat
nie
2.2.2. Moenie warm oppervlaktes aanraak nie gebruik
handvatsels of knoppe want dit kan lei tot ernstige
brandwonde
2.2.3 Die toestel is nie geskik vir industriele gebruik
soos kantore,hotelle motelle en gastehuise
2.2.4. Die toestel is nie geskik vir gebruik deur vermin-
ervaring of kennis tensy hulle opleiding gehad het
2.2.5. Die toestel is nie `n speelding and kinders moet
altyd toesig he om te verhoed dat hulle met die toestel
speel
2.3. Gebruik en sorg:
2.3.1. Die kabel moet ten volle afgewikkel word voor
gebruik
2.3.2. Die toestel moet nie gebruik word as die parte of
bykomstighede nie behoorlik pas
2. 3. 3 Die toestel moet nooit leeg gebruik word nie.
2. 3. 4 Die Toestel moet nooit gedraai word terwyl dit in
werking is of in die muurprop gekoppel is
2. 3. 6. Ontkoppel die toestel van die hooftoevoer
as dit nie in gebruik is nie en laat dit heeltemal afkoel
voordat dit skoongemaak word. As dele afgehaal word
of toegevoeg word,moet die toestel nie in werking wees
nie.
2. 3. 7.Die toestel moet buite bereik van kinders
gestoor word
2. 3. 8.Die toestel moet heeltemal afkoel voor dit
gestoor word
2. 3. 9 Die toestel moet altyd onder toesig wees wanneer in gebruik en moet buite bereik van kinders gehou
word
2.4. Diens:
gediens word
2.4.2 As die koord beskadig word moet dit deur die
om brandgevaar te verhoed
2.4.3.Enige misbruik en mislukking om instruksies te
volg lewer die waarborg nul en van gener waarde
3. Instruksies vir gebruik
3.1. Voor gebruik:
3.1.1. Verwyder alle verpakking material voor gebruik
3.1.2. Voor die toestel vir die eerste keer gebruik word
maak alle parte skoon wat met kos in aanraking kom
soos voorgeskryf in skoonmaak artikel
3.2. Hoe om waaier aanmekaar te heg:
3.2.1. Sit die staander op die basis en maak dit vas met
die skroewe wat verskaf word
.3.2.2. Sit die agterste rooster vas en maak dit vas met
die plastieksteunmoer. Maak seker dat die handvatsel
opwaarts kyk en die plastiekpennetjies is in ooreen-
stemming met die ooreenstemmende gate op die
agterste rooster vir perfekte koppeling.
3.2.3. Pas die waaierskroef aan en bevestig dit met
die skroef. Maak seker dat die aandrywingspennetjie
wat deur die motoras beweeg, goed in die bout aan die
agterkant van die propeller pas.
3.2.4. Plaas die voorste rooster deur die bokant van die
voorste rooster. Kontroleer of die rooster veiligheidskroefgate op die onderkant van die rooster gerig is. Heg
en draai die rooster veiligheidskroef.
3.3.1. Skakel die waaier aan:
3.3.1.1. Konnekteer die toestel aan op die kragtoevoer.
3.3.1.2. Kies die benodigde lugvloei met die knoppies:
0. Stop waaier
1. Minimum lugvloei
2. Medium lugvloei
3. Maximum lugvloei
3.3.2. Swaai en kantel
3.3.2.1. Die waaierkop kan van regs na links, lugvloei
van ‘n sekere gebied swaai. Om dit te doen, druk
eenvoudig die swaai beheer.
3.3.2.2. Om die waaierkop in te stel, trek die swaaibeheer
3.3.2.3. Om die waaier kop te kantel, maak die kantelbeheer los deur die hakies en motoromhulsel met albei
hande vas te hou en dit terug te stel na die verlangde
posisie..
3.3.2.4. Die beheer N kan gebruik word om die hoogte
aan te pas.
3.4 : Na gebruik:
3.4.1. Laat waaierlem toe om heeltemal te stop.
3.4.2. ontkoppel die toestel van die kragtoevoer.
3.4.3. Maak die apparaat skoon soos beskryf in die
skoonmaakafdeling
4. Skoonmaak:
4.1. Ontkoppel van muurprop en laat toe om heeltemal
aftekoel.
4.2. Verwyder die voorste rooster om die skroef skoon
te maak. Wanneer u die voorste rooster verwyder om
die skroef skoon te maak, moet u seker maak dat die
waaier onkoppel is van muurprop voor die rooster
verwyder word.

4.3. Maak die buitekant van die toestel skoon met ‘n
klam lap met ‘n paar druppels opwasmiddel en droog
dan. VERSIGTIG! Moet nie elektriese dele van die
toestel in enige vloeistof dompel nie.
4.4. Moet nie oplosmiddels, of produkte met ‘n suur
gebruik nie
Of basis pH soos bleikmiddel, of skuurprodukte, vir die
skoonmaak van die apparaat.
4.5. Moet nooit die apparaat in water of enige ander
vloeistof onderdompel of onder vloeibare water plaas
nie.
.
5. Anomlies en herstel
5.1. Neem die toestel na `n gemagtigde tegniese diens
sentrum as die toestel beskadig is of probleme onstaan
5.2. As konneksie na die muurprop beskadig is, moet
die toestel vervang of herstel word volgens waarborg

Estimado cliente,
Gracias por elegir comprar un producto de la marca
Mellerware. Gracias a su tecnología, diseño y funcionamiento, y al hecho de que supera los más estrictos
estándares de calidad, puede garantizarse un uso
totalmente satisfactorio y una larga vida del producto.
54 6 7 8
1 2 3
9
10
11
12
13
1. Descripción de las piezas
1. Protector frontal
2. Blade
3. Tornillo
4. Protección trasera
5. Eje del motor
6. Motor
7. Interruptor de control
8. Perilla de oscilación
9. Cubierta trasera
10. Cable de alimentación
11. Base
12. Tuerca
13. Tornillo
2. Consejos y advertencias de seguridad!
Lea atentamente estas instrucciones antes de encender
el aparato y guárdelas para futuras consultas. El
incumplimiento y el cumplimiento de estas instrucciones pueden provocar un accidente. Limpie todas las
partes del producto que estarán en contacto con los
alimentos, como se indica en la sección de limpieza,
antes de usarlas.
2.1. Uso o ambiente de trabajo:
2.1.1. Mantenga el área de trabajo limpia y bien
iluminada. Las áreas obstruidas y oscuras invitan a
accidentes.
2.1.2. Utilice el aparato en un lugar bien ventilado.
entes, tales como placas de cocción, quemadores de
gas, hornos o artículos similares.
2.1.4. Mantenga alejados a los niños y transeúntes
cuando utilice este aparato.
tal, plana, estable y alejado de otras fuentes de calor y
en contacto con agua.
2.1.6. Mantenga el aparato alejado de materiales in-
aplicación.
2.1.8. No utilice el aparato en combinación con un
programador, temporizador u otro dispositivo que lo
encienda automáticamente.
2.1.9. No utilice el aparato si el cable o el enchufe
están dañados.
2.1.10. Asegúrese de que la tensión indicada en la
etiqueta de características coincide con la tensión de
red antes de enchufar el aparato.
2.2.11. Conecte el aparato a la red eléctrica con un
enchufe de tierra de un mínimo de 10 amperios.
2.1.12. El enchufe del aparato debe encajar correctamente en la toma de corriente. No altere el enchufe.
2.1.13. Si se utiliza un multi enchufe comprobar las
cación de la multi-enchufe.
2.1.14. Si se rompe alguna de las cubiertas del
aparato, desconecte inmediatamente el aparato de la
red eléctrica para evitar la posibilidad de una descarga
eléctrica.
2.1.15. No utilice el aparato si ha caído en el suelo o si
hay signos visibles de daños.
2.1.16. No fuerce el cable de alimentación. Nunca utilice el cable de alimentación para levantar, transportar
o desenchufar el aparato.
2.1.17. No envuelva el cable de alimentación alrededor
de la aplicación
2.1.18. No sujete ni doble el cable de alimentación.
2.1.19. No permita que el cable de alimentación cuel-
de la aplicación.
2.1.20. Compruebe el estado del cable de alimentación. Los cables dañados o enredados aumentan el
riesgo de descarga eléctrica.
2.1.21. El aparato no es adecuado para uso en exteriores.
2.1.22. El cable de alimentación debe ser examinado
regularmente para detectar signos de daño, y si el

cable está dañado, la aplicación no debe utilizarse.
2.1.23. No toque el enchufe con las manos mojadas.
2.2. Seguridad personal:
2.2.1. PRECAUCIÓN: No deje el aparato desatendido
durante el uso, ya que existe el riesgo de un accidente.
2.2.2. No toque las partes giratorias del aparato, ya
que podría causar lesiones graves.
2.2.3. Este aparato es sólo para uso doméstico, no
para uso industrial o profesional. No está destinada
a ser utilizada por los huéspedes en ambientes de
hospitalidad como bed and breakfast, hoteles, moteles
y otros tipos de ambientes residenciales, incluso en
casas de granja, áreas del personal de cocina en
2.2.4. Este aparato no está destinado a ser utilizado
por personas (incluyendo niños) con capacidades
físicas, sensoriales o mentales reducidas, o por falta
de experiencia y conocimiento, a menos que hayan
recibido supervisión o instrucciones sobre el uso del
aparato por una persona responsable de su uso la
seguridad.
2.2.5. Este aparato no es un juguete. Los niños deben
ser supervisados para asegurarse de que no juegan
con el aparato.
2.3. Uso y cuidado:
2.3.1. Desenrolle completamente el cable de alimentación del aparato antes de cada uso.
2.3.2. No utilice el aparato si las piezas o los accesorios no están bien colocados.
2.3.3. No encienda el aparato mientras esté en uso o
conectado a la red eléctrica.
2.3.4. Desconecte el aparato de la red eléctrica cuando
no esté en uso y antes de realizar cualquier tarea de
limpieza.
2.3.5. Este aparato debe guardarse fuera del alcance
de los niños.
2.3.6. No guarde el aparato si todavía está caliente.
2.3.7. Nunca deje el aparato desatendido cuando esté
en uso y manténgalo fuera del alcance de los niños.
2.3.8. Si por alguna razón, el aparato se incendia,
desconecte el aparato de la red eléctrica y NO USE
AGUA PARA DESCONECTAR EL FUEGO.
2.4. Servicio:
2.4.1. Asegúrese de que el aparato sea reparado
utilicen piezas de repuesto o accesorios originales para
sustituir las piezas / accesorios existentes.
2.4.2. Si el cable de alimentación está dañado, el fabri-
debe reemplazarlo para evitar un peligro.
2.4.3. Cualquier mal uso o incumplimiento de las
instrucciones de uso hace nula la garantía y la responsabilidad del fabricante.
3. Instrucciones de uso
3.1. Antes de usar:
3.1.1. Retire la película protectora del aparato (si es
posible).
3.1.2. Antes de utilizar el producto por primera vez,
limpie de la manera descrita en la sección de limpieza.
3.2. Asamblea:
3.2.1. Coloque la empanada en la base y asegúrela
correctamente utilizando los tornillos suministrados.
3.2.2. Coloque la rejilla trasera y fíjela con la tuerca de
plástico. Asegúrese de que el mango está orientado
hacia arriba y los pasadores de plástico están alineados con los agujeros correspondientes en la rejilla
trasera para un acoplamiento perfecto.
3.2.3. Coloque la hélice del ventilador y asegúrela con
la tuerca de soporte de la cuchilla. Asegúrese de que
el pasador que pasa a través del eje del motor encaja
hélice.
3.2.4. Inserte la rejilla frontal a través de la parte
superior de la parrilla trasera. Coloque los clips de la
rejilla trasera en la rejilla frontal. Compruebe que los
alineados en la parte inferior de la rejilla. Asegure y
apriete el tornillo de seguridad de la rejilla.
3.3. Uso y cuidado:
3.3.1. Encendido del ventilador:
3.3.1.1. Conecte el aparato a la red.
botones:
0. Detenga el ventilador
1. Flujo mínimo de aire
2. Flujo de aire medio
3. Flujo de aire máximo
3.3.2. Oscilación y inclinación
3.3.2.1. La cabeza del ventilador puede oscilar de
derecha a izquierda, barriendo el aire de un área
determinada. Para ello, simplemente pulse el control de
oscilación.
3.3.2.2. Para ajustar la cabeza del ventilador, tire del
control de oscilación y gire la cabeza a la posición
deseada.

control de inclinación sujetando la parrilla y la carcasa
del motor con ambas manos y restableciéndola en la
posición deseada.
3.3.2.4. El control N se puede utilizar para ajustar la
altura.
3.4. Una vez que haya terminado de utilizar el
aparato:
3.4.1. Deje que la cuchilla del ventilador se detenga
completamente.
3.4.2. Desconecte el aparato de la red eléctrica.
3.4.3. Limpie el aparato como se describe en la sección de limpieza.
4. Limpieza
4.1. Desconecte el aparato de la red eléctrica y deje
que se enfríe completamente antes de realizar cualquier
tarea de limpieza.
4.2. Quite la parrilla delantera para limpiar el propulsor. Al retirar la parrilla delantera para limpiar la hélice,
asegúrese de que el ventilador está desenchufado
antes de retirar la protección.
4.3. Limpie las partes exteriores del aparato con un
paño húmedo con unas gotas de detergente y luego
seque. ¡PRECAUCIÓN! No sumerja las partes eléctricas del aparato en ningún líquido.
4.4. No utilice disolventes, ni productos con un pH
ácido o base, tales como lejía, o productos abrasivos,
para limpiar el aparato.
4.5. Nunca sumerja el aparato en agua o cualquier otro
líquido o colóquelo bajo agua corriente.
5. Anomalías y reparación
5.1. Lleve el aparato a un centro de asistencia autorizado si el producto está dañado o si surgen otros
problemas.
5.2. Si la conexión a la red eléctrica se ha dañado,
debe ser sustituida y debe proceder como lo haría en
caso de daños.

Cher client,
Merci d’avoir choisi d’acheter un produit de marque
Mellerware. Grâce à sa technologie, sa conception
et son fonctionnement et le fait qu’elle dépasse les
normes de qualité les plus strictes, une utilisation
parfaitement satisfaisante et une longue durée de vie
du produit peuvent être assurées.
54 6 7 8
1 2 3
9
10
11
12
13
1. Description des pièces
1. Garde avant
2. Lame
3. Vis
4. Pare-arrière
5. Arbre du moteur
6. Moteur
7. Commutateur de commande
8. Bouton d'oscillation
9. Couvercle arrière
10. Cordon d'alimentation
11. Base
12. Écrou
13. Vis
2. Conseils et avertissements de sécurité!
Lisez attentivement ces instructions avant d’allumer
l’appareil et conservez-les pour référence ultérieure.
Le non-respect et l’observation de ces instructions
peuvent entraîner un accident. Nettoyez toutes les parties du produit qui seront en contact avec les aliments,
comme indiqué dans la section de nettoyage, avant
utilisation.
dents.
2.1.2. Utilisez l’appareil dans un endroit bien ventilé.
2.1.3. Ne placez pas l’appareil sur des surfaces
chaudes, telles que des plaques de cuisson, des
brûleurs à gaz, des fours ou des articles similaires.
2.1.4. Gardez à l’écart les enfants et les personnes
présentes lorsque vous utilisez cet appareil.
2.1.5. Placez l’appareil sur une surface horizontale,
plate, stable et éloigné des autres sources de chaleur et
contactez l’eau.
mables tels que les textiles, les rideaux, le carton ou le
papier, etc.
l’appareil.
2.1.8. N’utilisez pas l’appareil en association avec un
programmeur, une minuterie ou un autre appareil qui
l’allume automatiquement.
endommagé.
2.1.10. Assurez-vous que la tension indiquée sur
l’étiquette d’évaluation correspond à la tension
d’alimentation secteur avant de brancher l’appareil.
2.2.11. Connectez l’appareil à l’alimentation secteur
avec une prise de terre résistant à un minimum de 10
ampères.
-
les notes car le courant utilisé par plusieurs appareils pourrait facilement dépasser la note de la prise
multiple.
2.1.14. Si l’une des enveloppes de l’appareil est
en panne, débranchez immédiatement l’appareil de
choc électrique.
2.1.15. N’utilisez pas l’appareil s’il tombe sur le sol ou
s’il y a des signes visibles de dégâts.
2.1.16. Ne forcez pas le cordon d’alimentation.
N’utilisez jamais le cordon d’alimentation pour soulever,
transporter ou débrancher l’appareil.
2.1.17. Ne pas enrouler le cordon d’alimentation autour
de l’appareil.
2.1.18. Ne pas plisser ni plier le cordon d’alimentation.
2.1.19. Ne laissez pas le cordon d’alimentation
s’accrocher ou entrer en contact avec les surfaces
chaudes de l’appareil.
2.1. Environnement d’utilisation ou de travail:
2.1.1. Gardez la zone de travail propre et bien éclairée.
Les zones obsolètes et obscures invitent des acci-
câbles endommagés ou enchevous augmentent le
risque de choc électrique.
2.1.21. L’appareil ne convient pas pour l’utilisation à
l’extérieur.

2.1.22. Le cordon d’alimentation doit être régulièrement examiné pour détecter les signes de dommages
et si le cordon est endommagé, l’appareil ne doit pas
être utilisé.
lées.
secteur et NE PAS UTILISER D’EAU POUR ETEINDRE
LE FEU.
2.4. Entretien:
-
2.4.1. Assurez-vous que l’appareil n’est entretenu que
2.2. Sécurité personnelle:
2.2.1. ATTENTION: Ne laissez pas l’appareil sans surveillance lors de l’utilisation car il y a risque d’accident.
2.2.2. Ne pas toucher les parties tournantes de
l’appareil, car cela peut causer des blessures graves.
2.2.3. Cet appareil n’est utilisé qu’à usage domestique
et non à usage industriel ou professionnel. Il n’est
pas destiné à être utilisé par des invités dans des
environnements d’hôtellerie tels que des chambres
d’hôtes, des hôtels, des motels et d’autres types
d’environnements résidentiels, même dans les maisons
de ferme, les domaines du personnel de cuisine dans
les magasins, les bureaux et autres environnements de
travail.
2.2.4. Cet appareil n’est pas destiné à être utilisé par
des personnes (y compris des enfants) avec des capacités physiques, sensorielles ou mentales réduites,
ou un manque d’expérience et de connaissances, à
moins d’avoir reçu une supervision ou des instructions
concernant l’utilisation de l’appareil par une personne
responsable de leur sécurité.
2.2.5. Cet appareil n’est pas un jouet. Les enfants
devraient être surveillés pour s’assurer qu’ils ne jouent
pas avec l’appareil.
2.3. Utilisation et soin:
rechange d’origine ou les accessoires sont utilisés
pour remplacer les pièces / accessoires existants.
2.4.2. Si le cordon d’alimentation est endommagé, le
fabricant ou son agent d’entretien ou une personne
2.4.3. Toute utilisation abusive ou le non-respect des
instructions d’utilisation rend la garantie et la responsabilité du fabricant nulle et non avenue.
3. Instructions d’utilisation
3.1. Avant utilisation:
saire).
3.1.2. Avant d’utiliser le produit pour la première fois,
nettoyez-le de la manière décrite dans la section de
nettoyage.
3,2. Assemblée:
-
ment à l’aide des vis fournies.
support en plastique. Assurez-vous que la poignée est
orientée vers le haut et que les broches en plastique
sont alignées sur les trous correspondants sur la grille
arrière pour un couplage parfait.
2.3.1. Déroulez complètement le câble d’alimentation
de l’appareil avant chaque utilisation.
2.3.2. N’utilisez pas l’appareil si les pièces ou les accessoires ne sont pas correctement installés.
2.3.3. Ne tournez pas l’appareil lorsqu’il est utilisé ou
connecté à l’alimentation secteur.
2.3.4. Débranchez l’appareil de l’alimentation secteur
lorsqu’il n’est pas utilisé et avant toute tâche de nettoyage.
2.3.5. Cet appareil doit être stocké hors de portée des
enfants.
2.3.6. Ne rangez pas l’appareil s’il est encore chaud.
2.3.7. Ne laissez jamais l’appareil sans surveillance
lorsque vous l’utilisez et gardez-vous hors de portée
des enfants.
2.3.8. Si, pour une raison quelconque, l’appareil devait
prendre feu, débrancher l’appareil de l’alimentation
un écrou de support de lame. Assurez-vous que la
goupille de transmission qui traverse l’axe du moteur
s’adapte bien dans la bosse à l’arrière de l’hélice.
3.2.4. Insérez la grille avant dans le haut de la grille arrière. Montez les clips de grille arrière sur la grille avant.
sont alignés au bas de la grille. Fixez et serrez la vis de
sécurité de la grille.
3.3. Utilisation et soin:
3.3.1. Allumer le ventilateur:
3.3.1.1. Branchez l’appareil sur le secteur.
3.3.1.2. Sélectionnez le débit d’air à l’aide des touches:
0. Arrêtez le ventilateur
1. Circulation minimale d’air
2. Flux d’air moyen

3. Flux d’air maximal
3.3.2. Basculement et inclinaison
3.3.2.1. La tête du ventilateur peut basculer de droite
à gauche, balayant l’air d’une certaine zone. Pour ce
faire, appuyez simplement sur le bouton de réglage.
3.3.2.2. Pour régler la tête du ventilateur, tirez la commande de basculement et tournez la tête à la position
requise.
3.3.2.3. Pour incliner la tête du ventilateur, desserrez
la commande d’inclinaison en tenant sur la grille et le
carter du moteur avec les deux mains et réinitialisez-la
à la position requise.
3.3.2.4. Le contrôle N peut être utilisé pour ajuster la
hauteur.
3.4. Une fois que vous avez terminé l’utilisation de
l’appareil:
3.4.1. Permettre à la lame du ventilateur de s’arrêter
complètement.
3.4.2. Débranchez l’appareil de l’alimentation secteur.
3.4.3. Nettoyez l’appareil comme décrit dans la section
de nettoyage.
4. Nettoyage
elle doit être remplacée et vous devez procéder comme
vous le feriez en cas de dommage.
4.1. Débranchez l’appareil de l’alimentation secteur et
laissez-le refroidir complètement avant d’entreprendre
une tâche de nettoyage.
Lorsque vous retirez le gril avant pour nettoyer l’hélice,
assurez-vous que le ventilateur est débranché avant de
retirer la protection.
4.3. Nettoyez les parties extérieures de l’appareil avec
un chiffon humide avec quelques gouttes de liquide
vaisselle puis séchez. MISE EN GARDE! Ne pas immerger les pièces électriques de l’appareil dans un
liquide quelconque.
4.4. N’utilisez pas de solvants ou de produits avec
acide ou à base de pH tel que l’eau de javel ou des
produits abrasifs pour nettoyer l’appareil.
4.5. Ne jamais immerger l’appareil dans de l’eau ou
tout autre liquide ou le placer sous l’eau courante.
5. Anomalies et réparation
5.1. Prenez l’appareil dans un centre d’assistance
autorisé si le produit est endommagé ou d’autres
problèmes apparaissent.
5.2. Si la connexion au secteur a été endommagée,

Estimado cliente,
Obrigado por escolher comprar um produto da marca
Mellerware. Graças à sua tecnologia, design e operação e ao facto de exceder os padrões de qualidade
mais rigorosos, pode ser assegurado um uso totalmente satisfatório e uma longa vida útil do produto.
54 6 7 8
1 2 3
9
10
11
12
13
1. Descrição das peças
1. Guarda da frente
2. Lâmina
3. Parafuso
4. Guarda traseira
5. Eixo do motor
6. Motor
7. interruptor de controle
8. Botão de oscilação
9. tampa traseira
10. cabo de alimentação
11. Base
12. Porca
13. Parafuso
2. Conselhos e avisos de segurança!
Leia atentamente estas instruções antes de ligar o
aparelho e guarde - as para referência futura. A falha
em seguir e observar estas instruções pode levar a um
acidente. Limpe todas as peças do produto que estarão
em contato com os alimentos, conforme indicado na
seção de limpeza, antes de usar.
2.1. Utilização ou ambiente de trabalho:
2.1.1. Mantenha a área de trabalho limpa e bem
iluminada. As áreas obstruídas e escuras convidam
acidentes.
2.1.2. Utilize o aparelho numa área bem ventilada.
2.1.3. Não coloque o aparelho sobre superfícies quentes, tais como placas de cozinhar, queimadores a gás,
fornos ou artigos semelhantes.
2.1.4. Mantenha as crianças e os espectadores afastados quando utilizar este aparelho.
2.1.5. Coloque o aparelho numa superfície horizontal,
plana e estável, afastado de outras fontes de calor e
em contacto com água.
2.1.6. Mantenha o aparelho afastado de materiais
etc.
aparelho.
2.1.8. Não utilize o aparelho em associação com um
programador, temporizador ou outro dispositivo que o
ligue automaticamente.
antes de ligar o aparelho.
2.2.11. Ligue o aparelho à alimentação eléctrica com
uma tomada de terra com um mínimo de 10 amperes.
-
avaliações cuidadosamente como a corrente utilizada
por vários aparelhos poderia facilmente exceder a clas-
2.1.14. Se qualquer um dos invólucros do aparelho
quebrar, desligue imediatamente o aparelho da corrente eléctrica para evitar a possibilidade de choque
eléctrico.
2.1.15. Não utilize o aparelho se cair no chão ou se
houver sinais visíveis de danos.
2.1.16. Não force o cabo de alimentação. Nunca utilize
o cabo de alimentação para levantar, transportar ou
desligar o aparelho.
2.1.17. Não enrole o cabo de alimentação
2.1.18. Não prenda nem dobre o cabo de alimentação.
pendurado ou entre em contacto com as superfícies
quentes do aparelho.
de choque elétrico.
2.1.21. O aparelho não é adequado para utilização no
exterior.
2.1.22. O cabo de alimentação deve ser examinado
regularmente quanto a sinais de danos e, se o cabo

2.2. Segurança pessoal:
fabricante ou o seu agente de assistência ou uma pes-
2.2.1. CUIDADO: Não deixe o aparelho sem vigilância
durante o uso, pois existe o risco de acidente.
2.2.2. Não toque nas partes rotativas do aparelho, pois
pode causar ferimentos graves.
2.2.3. Este aparelho é apenas para uso doméstico, não
utilizado por hóspedes em ambientes de hospitalidade,
tais como bed and breakfast, hotéis, motéis e outros
tipos de ambientes residenciais, mesmo em casas
de fazenda, áreas do pessoal de cozinha em lojas,
escritórios e outros ambientes de trabalho.
2.2.4. Este aparelho não deve ser utilizado por pessoas
(incluindo crianças) com capacidades físicas, sensoriais ou mentais reduzidas, ou com falta de experiência e
conhecimento, a não ser que tenham recebido supervisão ou instruções sobre a utilização do aparelho por
uma pessoa responsável pela sua segurança.
2.2.5. Este aparelho não é um brinquedo. As crianças
devem ser supervisionadas para garantir que não
brincam com o aparelho.
2.3. Uso e cuidados:
2.3.1. Desenrolar completamente o cabo de alimentação do aparelho antes de cada utilização.
2.3.2. Não utilize o aparelho se as peças ou acessórios
não estiverem correctamente montados.
2.3.3. Não ligue o aparelho enquanto estiver a ser
utilizado ou ligado à rede eléctrica.
2.3.4. Desconecte o aparelho da rede de alimentação
quando não estiver em uso e antes de realizar qualquer
tarefa de limpeza.
2.3.5. Este aparelho deve ser guardado fora do alcance
das crianças.
2.3.6. Não guarde o aparelho se ainda estiver quente.
2.3.7. Nunca deixe o aparelho sem vigilância quando
estiver a ser utilizado e mantenha-os fora do alcance
das crianças.
2.3.8. Se, por algum motivo, o aparelho se incendiar,
desligue o aparelho da rede eléctrica e NÃO USE ÁGUA
PARA DESLIGAR.
2.4. Serviço:
apenas peças sobresselentes ou acessórios originais são utilizados para substituir peças / acessórios
existentes.
para evitar um perigo.
2.4.3. Qualquer mau uso ou falha em seguir as
instruções de uso torna a garantia e a responsabilidade
do fabricante nula e sem efeito.
3. Instruções de utilização
3.1. Antes de usar:
3.1.1. Remova a película protetora do aparelho (se é
possível).
3.1.2. Antes de utilizar o produto pela primeira vez,
limpe da maneira descrita na secção de limpeza.
3.2. Montagem:
utilizando os parafusos fornecidos.
está voltada para cima e os pinos de plástico estão
alinhados com os orifícios correspondentes na grelha
traseira para um acoplamento perfeito.
no bosque na parte de trás da hélice.
3.2.4. Insira a grelha frontal através da parte superior
da grelha traseira. Coloque os grampos da grelha
parafusos de segurança da grade estão alinhados na
parte inferior da grelha. Fixe e aperte o parafuso de
segurança da grade.
3.3. Uso e cuidados:
3.3.1. Ligar o ventilador:
3.3.1.1. Ligue o aparelho à rede eléctrica.
botões:
0. Parar o ventilador
1. Fluxo de ar mínimo
2. Fluxo de ar médio
3. Fluxo de ar máximo
3.3.2. Balanço e inclinação
3.3.2.1. A cabeça do ventilador pode balançar da direita para a esquerda, varrendo o ar de uma determinada
área. Para fazer isso, basta pressionar o controle de
balanço.
3.3.2.2. Para ajustar a cabeça do ventilador, puxe o
controle de balanço e gire a cabeça para a posição

desejada.
3.3.2.3. Para inclinar a cabeça do ventilador, afrouxe o
controle de inclinação segurando a grade ea carcaça
do motor com ambas as mãos e ajustando-a na
posição desejada.
3.3.2.4. O controle N pode ser usado para ajustar a
altura.
3.4. Depois de terminar de usar o aparelho:
3.4.1. Deixe a pá do ventilador parar completamente.
3.4.2. Desligue o aparelho da rede eléctrica.
3.4.3. Limpe o aparelho conforme descrito na secção
de limpeza.
4. Limpeza
4.1. Desligue o aparelho da rede de alimentação e
deixe-o arrefecer completamente antes de realizar
qualquer tarefa de limpeza.
4.2. Remova a grelha frontal para limpar o propulsor. Ao remover a grelha frontal para limpar a hélice,
de retirar a protecção.
4.3. Limpe as partes exteriores do aparelho com um
pano húmido com algumas gotas de detergente e
depois seque. CUIDADO! Não mergulhe as partes
eléctricas do aparelho em qualquer líquido.
4.4. Não utilize solventes, nem produtos com pH ácido
ou básico, tais como lixívia ou produtos abrasivos,
para a limpeza do aparelho.
4.5. Nunca submergir o aparelho em água ou qualquer
outro líquido ou colocá - lo sob água corrente.
5. Anomalias e reparos
5.1. Leve o aparelho a um centro de assistência
outros problemas.
ela deve ser substituída e você deve proceder como
faria em caso de danos.

Thank you for purchasing a Mellerware product. Mellerware guarantees that your
product has been thoroughly inspected and tested before being dispatched and is
free from mechanical and electrical defects and complies with the applicable safety
standards. With every Mellerware product purchased you get a 2 year warranty as detailed
in the terms and conditions below.
First Year – 1 Year Retail Warranty:
Should defects due to faulty parts or workmanship develop, under normal use, within 12 months from the original
purchase date, please return the product to the store from
where it was purchased for repair free of charge. However,
for the custormer’s convenience we will replace products
where the purchase price is equal to or less than R750
incl. VAT
Second Year – 1 Year Extended Warranty
Mellerware takes pride in their product quality and therefore offer an extended 12 month warranty over and above
the 1 Year Retail Warranty. Should defects due to faulty
material or workmanship develop, under normal domestic
use, after the 12 month period and within 24 months from
the original date of purchase, please return the product
postage pre-paid to Mellerware for repair. Mellerware
will repair the product free of charge and return it to you
directly. Mellerware will replace a product with a similar
product in the same or better condition, if the repair cannot be conducted for whatever reason.
NB: The 1 Year Extended Warranty is only valid for customers who have registered their warranty online at www.
purchase. See overleaf for details and instructions.
Before returning your product, check the
following:
• Your household mains supply socket is in good condition, working and switched on.
• The mains supply circuit is not overloaded (White trip
switch on your DB board is off).
• You have read the trouble shooting guide in your
Instructions for Use.
• All accessories and parts are present
The following conditions apply:
1. Please ensure you retain your receipt as this must
be presented when making a claim under the terms
of the guarantee. It is impossible to determine the
guarantee period without proof of purchase, so
please keep this in a safe place. (NB. Your guarantee can be scanned onto the Mellerware web site for
safe storage – see reverse side for details.)
2. If a refund or exchange is required the product must
be complete with all accessories, parts and packaging. Missing parts will render the guarantee void.
3. Upon receipt of your appliance, check it for any
transport damage to ensure it is safe for use. Return
it to the store as soon as possible for exchange if
damaged. The guarantee is void if products are
damaged after use, so please do not use the damaged product.
.
4. Your product is designed for normal domestic
household use. Failure to read and comply with the
instructions for use, cleaning and maintenance will
render your guarantee void, so please read these
instructions carefully to ensure your safety, and to
get the most effective use from the product. (e.g. not
removing lime scale; water deposits; insect infestation, and/or burnt products)
5. Any abuse, negligent, improper or accidental use
or care will render the guarantee void and Creative
Housewares (Pty) Ltd will not be liable for any loss
or damage.
6. Any attempted repair, or replacement of unauthorised parts will render the guarantee void, so please
contact an authorised service centre or service
agent for any service or repair requirements.
7. NB: The guarantee on replaced products will be
from the original date of purchase and not from
when the date replacement was made.
8. All repairs carry a 3 month guarantee even if this falls
outside of the 2 year guarantee period.
9. Mellerware will attempt to conduct repairs within
reasonable time in line with industry standards but
cannot be held responsible or liable for any circumstances not under our control.
10. Terms and Conditions are subject to change without
prior notice.
Repairs Out of the Warranty Period
If service or repair becomes necessary outside the
warranty period, this service is still available however all
transport/postage, spares and labour costs will be for the
customers’ account. All chargeable repairs will require
the customers’ written acceptance of the quote. Once the
go-ahead has been received Mellerware will undertake to
conduct the repair within a reasonable time and maintain
the condition of the product as received. All repairs are
guaranteed for 3 months from the date of the repair.
For any service, enquiries and complaints please contact
our Customer Care on 086 111 5006 or e-mail help@
creativehousewares.co.za from 08h00 to 15h00 Monday
to Friday excluding public holidays. Please also note
that the company is normally closed for 2 weeks around
Christmas and New Year.
Please send all products for repair postage pre-paid to
one of the service centres listed on the back of this page.

ONLINE WARRANTY REGISTRATION
Why register your warranty?
We at Mellerware pride ourselves on bringing premium quality appliances to market, and as a commitment to this
level of quality we offer a 2 year warranty (1 Year Retail + 1 Year Extended) on all of our products. We often hear
that our customers lose their receipts and can therefore no longer claim if they have a problem. To take advantage
order to make a valid claim. Now you can register your product, upload your warranty online, never have to worry
• Incentives and Competitions for registered users
• New recipes or ideas for your products
• nces
• Special offers on promotional items
How to Register your Online Warranty?
STEP1
If you haven’t done so already, simply visit www.mellerware.co.za, click on the
“Product Registration” link and follow the easy instructions. You will receive a username and password once registered. This will give you access to
STEP2 Pick a registration method:
year warranty.
stered
DESKTOP/
LAPTOP
• Open your internet browser and visit
www.mellerware.co.za
• Click on the “Registration” link and
login using your user name
and password.
• Click on “Register your products
and upload receipts” and follow the
ea
• Scan and upload your receipt
Notes:
1. The online warranty system is a safe storage facility for your
receipt.
2. You will be required to register on the Mellerware website.
You will receive a username and password once registered.
have purchased. In order to successfully register your warranty
you will need to either scan and upload, or fax through your
receipt to us.
4. All instructions on how to load your products are available
Cape Town
20 Tekstiel Street, Parow, Cape Town, 7493,
South Africa • P.O. Box 6156 Parow East, 7501,
South Africa Tel: +27 21 931 8117
Fax: +27 21 931 4058
sy instruct
ions.
• Scan the QR code above or visit
www.mellerware.co.za
• Click on the “Registration” link
and login using your user
name and password.
• Click on “Register your products
and upload receipts” and follow
the easy instructions.
• Scan or take a photo and
upload your receipt.
National Service Centre: 086 111 5006
e-mail: help@creativehousewares.co.za
www.creativehousewares.co.za
35 Adrain Road, Windermere,
Durban, South Africa, 4001
Tel: +27 31 303 3465
Fax: +27 31 303 8259
SMART
PHONE/
FAX
TABLET
• Fax the following to 021 931 4058
• First Name and Surname
• Contact telephone and fax number.
• Product Model number and Type.
• Traceability Code (found on a label
on the product)
• A clear and legible copy
of your receipt.
5. Please note that you must check that your receipt has been
uploaded correctly. Creative Housewares cannot be held
6. For assistance with registration please email: marketing@
creativehousewares.co.za.
NB: Your 1 year extended warranty is only valid if your
your Mellerware product. Failure to register your product on-line
Durban
Die Agora Road, Croydon, 1619
Johannesburg
Tel:+27 11 392 5652
Fax:+27 11 392 1694
ing

Durban
35 Adrain Road, Windermere,
Durban, South Africa, 4001
Tell: +27 31 303 3465
Fax: +27 31 303 8259
Johannesburg
Die Agora Road, Croydon, 1619
Tell: +27 11 392 5652
Fax: +27 11 392 1694
HELPLINE
086 111 5006
 Loading...