

Page 1
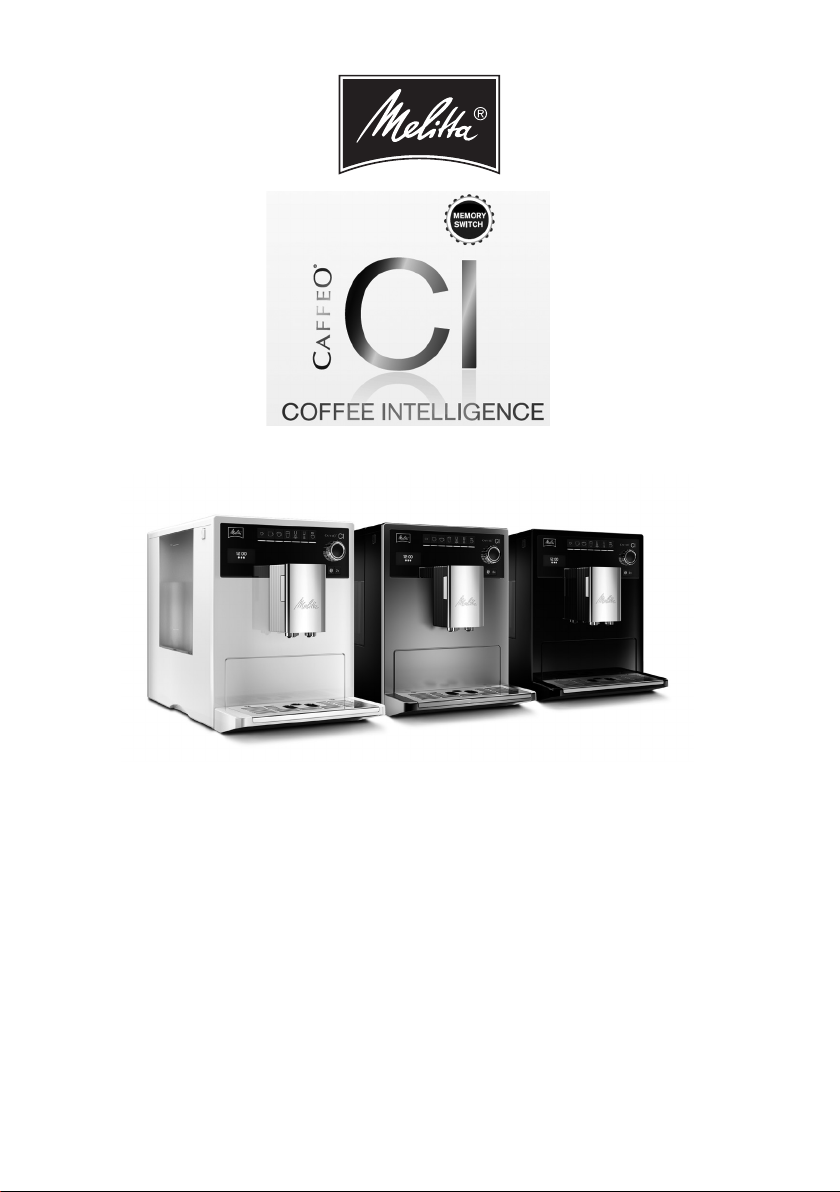
EN Operating Instructions 21
Page 2
7
6
8
9
5
10
4
3
11
2
1
A
13
11
14
B
Page 3
C
E
G
D
F
H
I
3
Page 4
EN
Safety instructions
Warning!
Please carefully read and
comply with the operating
instructions.
The appliance is intended for
home use only and not for
commercial purposes.
Any other use is regarded
as improper and may lead to
personal injury and material
®
damage. Melitta
accepts no
liability for damage which arises
due to improper use of the
appliance.
The appliance conforms to the
following European directives:
– 2014 / 35 / EU (low voltage),
– 2014 / 30 / EU (electromagnetic
compatibility),
– 2011 / 65 / EU (RoHS),
– 2009 / 125 / EC (eco-design / ErP).
The appliance has been built using the
latest technology. Residual dangers
nevertheless exist.
You must observe the safety
instructions to avoid dangers. Melitta
accepts no liability for damage caused
by failure to observe the safety
instructions.
®
Danger due to electrical current
If the appliance or the power cable
is damaged, the risk of a fatal
electric shock is run.
Observe the following safety
instructions to avoid dangers due
to electrical current:
– Do not use a damaged power
cable.
– A damaged power cable
may only be replaced by the
manufacturer, its customer
service or a similarly qualied
person.
– Do not open any covers rmly
screwed onto the appliance
housing.
– Only use the appliance when
it is in a technically awless
condition.
– A defective appliance may only
be repaired by an authorised
workshop. Do not repair the
appliance yourself.
– Do not undertake any changes
to the appliance, its components
or its accessories.
– Do not immerse the appliance in
water.
21
Page 5

Warning!
Risk of burning and scalding
Escaping uids and steam may
be very hot. Parts of the appliance
also become very hot.
Observe the following safety
instructions to avoid scalds and
burns:
– Prevent skin from coming into
contact with escaping uids and
steam.
– Do not touch any nozzles on the
outlet during operation.
Warning!
General safety
Observe the following safety
instructions to avoid personal
injury and material damage:
– Do not reach into the interior of
the appliance during operation.
– The appliance and its power
cable must be kept out of the
reach of children under 8 years
of age.
– This appliance may be used
by children over 8 years of
age and by persons with
reduced physical, sensory or
mental capabilities or a lack
of experience and knowledge
if they are supervised or have
been instructed in using the
appliance safely and understand
the resulting risks.
– hildren must not play with
the appliance. Cleaning and
maintenance must not be
undertaken by children younger
than 8 years of age. Children
over 8 years of age must be
supervised during cleaning and
maintenance.
– Disconnect the appliance from
the power supply when it is left
unsupervised for a long time.
22
Page 6
EN
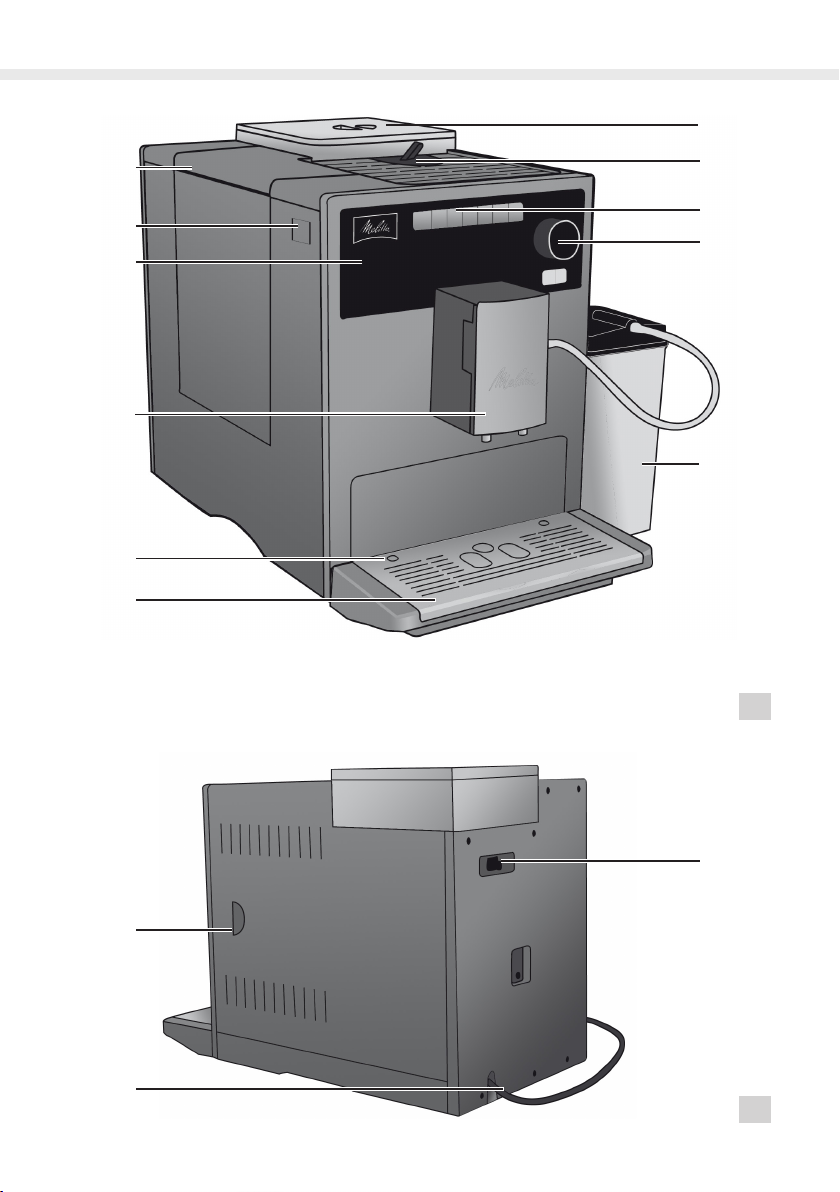
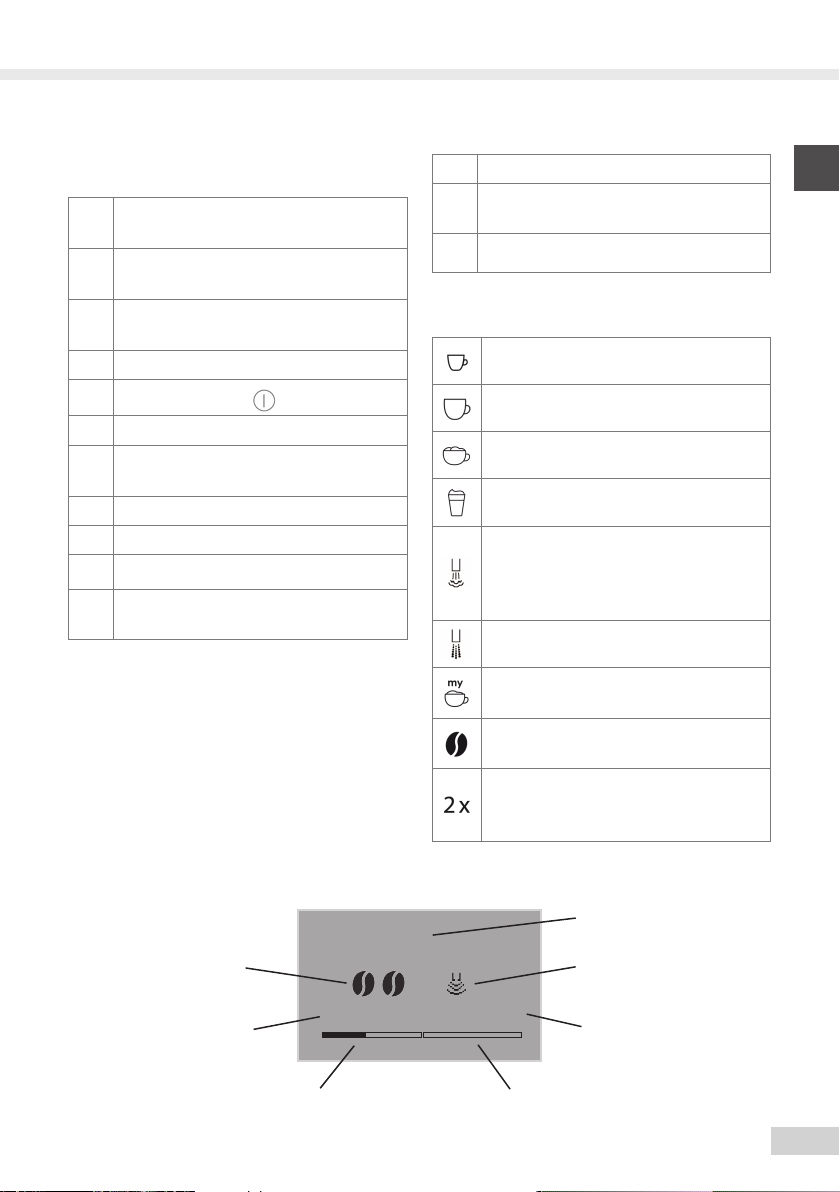
At a glance
Figure B
Figure A
Drip tray with cup plate and coffee
1
grounds container (internal)
Float for the water level indicator
2
in the drip tray
Height-adjustable outlet with LED
3
cup illumination
4 Text display
5
ON /OFF button
6 Water reservoir
Two-chamber "Bean Select"
7
bean container
8 Ground coffee chute with lid
9 Buttons
10 Rotary switch
Milk container (except with Type
11
E 970-306)
12 Power cable
Brewing unit and identication
13
label (behind the cover)
14 Grinding neness adjustment
Buttons
Dispensing espresso.
Dispensing Café Crème.
Dispensing Cappuccino.
Dispensing Latte Macchiato.
Press briey: dispensing milk
froth.
Press and hold: dispensing hot
milk.
Dispensing hot water.
My Coffee: selecting preset
personal settings.
Adjusting the coffee strength in
four levels.
Press before selecting coffee and
speciality coffees: dispensing two
cups of the desired product.
Selected
coffee strength
Selected
dispensed
quantity
Coffee dispensing
progress bar
Text display example
Cappuccino
110 ml 060 ml
Milk froth
progress bar
Selected
coffee specialty
Symbol for
milk froth
Selected
milk froth quantity
23
Page 7
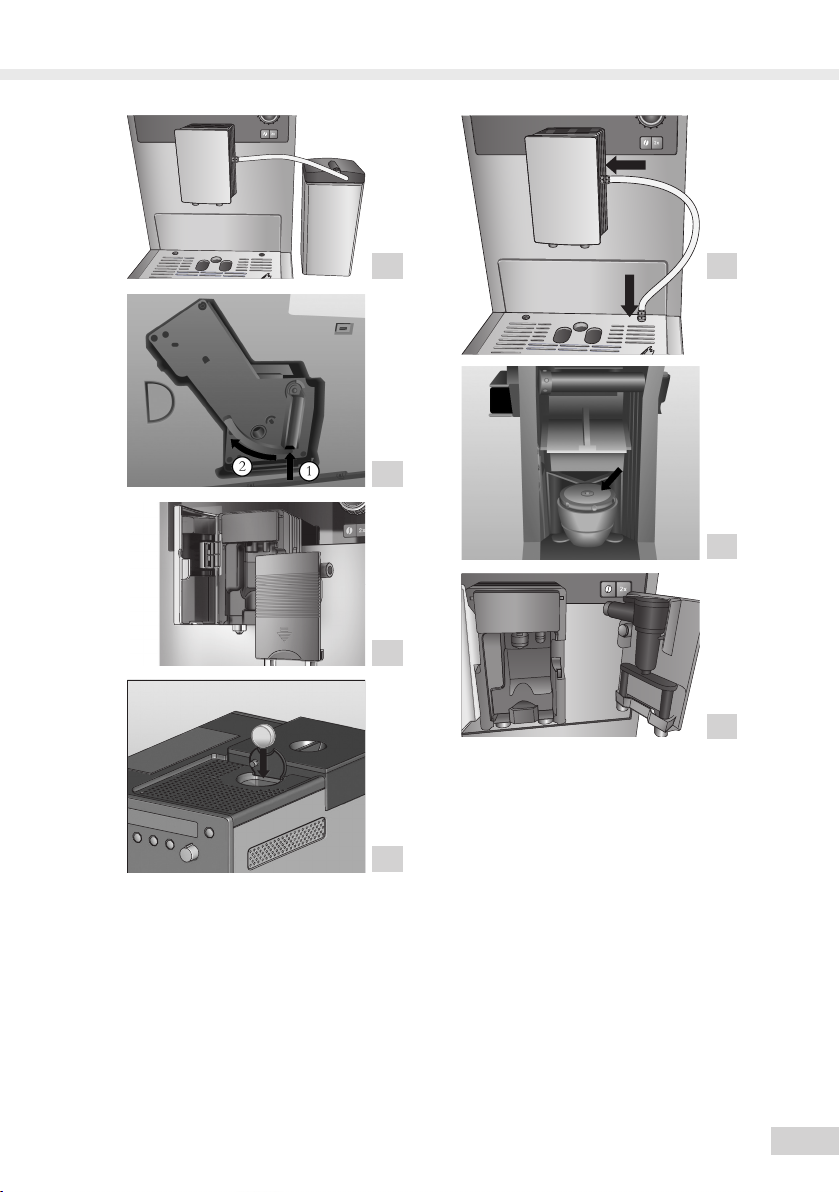
Accessories
• 1 milk tube or 1 milk container including
milk tube (depending on the model)
• 1 Coffee scoop with screw-in aid for the
water lter
Before using for the rst time
General information
• Only use pure water without
carbonation.
• Use the supplied test strip to determine
the hardness of the water used and set
the water hardness (Page 30).
Information for using for the rst
time
When using for the rst time, the
appliance may only be switched on
without a Melitta® Claris® water lter.
Starting up the appliance
Switching on for the rst time
Warning!
Danger of re and electric shock
due to incorrect supply voltage,
incorrect or damaged connections
and power cable.
– Ensure that the supply voltage
corresponds to the supply voltage
specied on the identication label of
the appliance. The identication label is
located on the right side of the appliance
behind the cover (Image B, 13).
– Make sure that the power socket meets
the applicable standards for electrical
safety. If in doubt, contact a qualied
electrician.
– Never use damaged power cables
(damaged insulation, bare wires).
• Place the appliance on a stable, dry and
level surface with sufcient clearance (at
least 10 cm) to the sides.
• Plug the power cable into a suitable
power socket.
• Press the button to switch on the
appliance.
After switching on, rst set the language
and then the time.
• Turn the rotary switch (Fig. A, 10) to
select the respective setting (language,
hour, minute).
• Press the rotary switch to save each
setting.
After making the settings, ll the bean
container:
• Filling the bean container (“Filling the
bean container”, page 25).
Then ll the water reservoir:
• Raise the lid of the water reservoir 6 and
pull the water reservoir up and out of the
appliance.
• Fill the water reservoir with fresh tap
water only up to the max. mark.
• Insert the water reservoir into the
appliance.
• Press the rotary switch.
• Place a vessel under outlet 3.
• Press the rotary switch. First, an
automatic rinsing is carried out. The
appliance is ready for operation when
the buttons illuminate.
24
Page 8

EN
Filling the bean container
Warning!
Hazard for persons allergic to
caffeine.
Since a residual quantity of the
previously used beans remains above
the grinder, the two types of beans
mix when changing to a different bean
type. Consequently, when switching
over to decaffeinated beans, the rst
two cups may still contain coffee that
is not decaffeinated. This means that
only the third cup of coffee prepared
after the switchover is free of caffeine.
The 2-chamber "Bean Select" bean
container can be lled with two different
types of coffee beans. Change the coffee
type by using the tilt lever.
• Fill bean container 7 with fresh coffee
beans (max. 135 g per chamber).
• Select the desired bean type by setting
the tilt lever to the appropriate chamber.
Switching the appliance on and off
• Place a vessel under outlet 3.
• Press the ON/OFF button to switch
the appliance on or off. If necessary, the
appliance performs an automatic rinsing.
Preparation
• Fill the water reservoir with fresh water
every day. The water reservoir must
always be lled with enough water for
the operation of the appliance.
• Fill the bean container preferably with
espresso beans or bean mixtures for
fully automatic coffee machines.
Do not use any ground, glazed,
caramelised or otherwise sugar-coated
coffee beans.
• Beverage dispensing stops automatically
when the set dispensed quantity is
reached.
• Beverage dispensing can be stopped
prematurely by pressing the respective
button again.
Two options are available for the
preparation:
• Standard: Change the settings such as
coffee strength or quantity directly when
dispensing.
• My-Coffee: Call up saved settings with
the
button (Page 27).
Preparing Café Crème or Espresso
• Switch on the appliance.
• Place a vessel under outlet 3.
• Press the button to set the coffee
strength.
• Press the button (for Espresso)
or
button (for Café Crème). The
grinding process and coffee dispensing
starts.
• The dispensed quantity can be adjusted
or prematurely stopped by turning the
rotary switch.
Preparing a cappuccino
• Switch on the appliance.
• Place a vessel under outlet 3.
25
Page 9

• Connect the tube with the outlet and
(depending on the model) the supplied
Melitta® CAFFEO® CI® milk container
(Image C) or insert in a conventional
milk carton.
• Press the button to set the coffee
strength.
• Press the button. The grinding
process and coffee dispensing starts.
• The dispensed quantity (coffee) can
be adjusted or prematurely stopped by
turning the rotary switch.
• The dispensed quantity (milk) can be
adjusted or prematurely stopped by
turning the rotary switch.
• Perform the Easy Cleaning programme
(“Rinsing the milk unit (“Easy Cleaning”
programme)”, page 32) or select
another beverage.
Preparing a latte macchiato
• Switch on the appliance.
• Place a vessel under outlet 3.
• Connect the tube with the outlet and
(depending on the model) the supplied
Melitta® CAFFEO® CI® milk container
(Image C) or insert in a conventional
milk carton.
• Press the button to set the coffee
strength.
• Press the button. The heating and
dispensing of milk starts.
• The dispensed quantity (milk) can be
adjusted or prematurely stopped by
turning the rotary switch.
• The dispensed quantity (coffee) can
be adjusted or prematurely stopped by
turning the rotary switch.
• Perform the Easy Cleaning programme
(Page 32) or select another beverage.
26
Preparing milk froth or warm milk
• Switch on the appliance.
• Place a vessel under outlet 3.
• Connect the tube with the outlet and
(depending on the model) the supplied
Melitta® CAFFEO® CI® milk container
(Image C) or insert in a conventional
milk carton.
• Press the button (briey for milk
froth/long for warm milk). The heating
and dispensing of milk starts.
• The dispensed quantity can be adjusted
or prematurely stopped by turning the
rotary switch.
• Perform the Easy Cleaning programme
(Page 32) or select another beverage.
Preparing 2 cups using the
not possible.
button is
Preparing hot water
• Switch on the appliance.
• Place a vessel under outlet 3.
• Press the button. Hot water will start
dispensing.
• The dispensed quantity can be adjusted
or prematurely stopped by turning the
rotary switch.
Preparing 2 cups using the
not possible.
button is
Preparing beverages with ground
coffee
• Switch on the appliance.
• Open the lid of the ground coffee
chute 8.
• With the supplied coffee scoop, ll
the ground coffee (do not use instant
products) into the ground coffee chute 8
(max. one coffee scoop).
• Close the lid of the ground coffee
chute 8.
• Place a vessel under outlet 3.
Page 10

EN
• Press the button. Coffee dispensing
starts. If no coffee was dispensed from
the appliance within 3 minutes after
opening the ground coffee chute, the
appliance will switch back to coffee bean
operation and will discard the ground
coffee into the coffee grounds container
to prevent later risk of overlling the
brewing chamber.
• The dispensed quantity can be adjusted
or prematurely stopped by turning the
rotary switch.
• The preparation of 2 cups option using
the
button is not possible.
My Coffee button: Preparing
beverages with personal settings
• Switch on the appliance.
• Place a vessel under the outlet.
• Press the My Coffee button
continuously until the desired user name
appears on the display.
• Press the button for the desired
beverage (Page 25). Beverage
dispensing will start.
• To exit the My Coffee mode, press the My
Coffee button continuously until the
time or Ready appears on the display.
Operation of the menus
• With the appliance switched on, press
the rotary switch 10 for longer than two
seconds. The main menu will appear on
the display 4.
• Turn the rotary switch 10 to select a
sub-menu.
• Press the rotary switch 10 to call up a
selected sub-menu.
• Select Exit to exit the respective menu
and to return to the previous menu.
• Select Exit in the main menu or press
any dispensing button to return to
standby mode.
Overview of sub-menus
submenu Meaning
“Exit” To exit the main menu
“My Coffee” To enter personal coffee
“Care” Rinsing, Easy Cleaning,
“EnergySaving Mode”
"Set clock" To change the time
“Auto OFF” To change the settings for
“Water
hardness”
“Language” To change the language
“Statistics”
“System” To reset the appliance to the
settings
Intensive Cleaning, cleaning,
descaling, insert lter
To change the
energy-saving mode settings
automatic switch-off
To set the water hardness
To display the total number
of dispensed beverages
default settings
“My Coffee” sub-menu
Here, different beverage settings can be
set and saved for standard dispensing and
for “My Coffee” dispensing.
• Settings for standard dispensing:
The settings saved in the standard
prole can be directly accessed using
the respective dispensing buttons.
• Settings for My Coffee dispensing:
Denes individual beverage settings for
up to four people. Beverages with the
dened setting can be accessed later by
selecting the respective prole with the
My Coffee button.
27
Page 11

Editing user proles
• Call up the My Coffee sub-menu
• Select the desired user prole. When
using for the rst time, Name 1 to Name
4 as well as Standard are available for
selection.
Entering a user name
• Call up the My Coffee sub-menu
• Select the desired user prole.
• Select Change name in the menu.
• Select the individual letters of the
name. The rst letter is automatically
capitalised. Up to nine characters can be
entered.
• Select to delete a letter.
• Select the empty eld to enter a space.
• Select Exit to save the name.
Entering user settings for beverages
• Call up the My Coffee sub-menu
• Select the desired user prole.
• Select a beverage (e.g., Latte
Macchiato).
• Select a property (e.g., milk quantity).
• Select the desired quantity (e.g., 80 ml).
If the setting for a given property is not
changed, the factory setting will be used.
The following settings are possible:
• Dispensed quantity: 30 ml to 220 ml
• Coffee strength: can be adjusted in four
levels
(from
strong)
• Brewing temperature: low, medium, high
• Milk froth quantity: 10 ml to 220 ml
• Milk quantity: 0 ml to 220 ml
Switching user to enabled/disabled
Users can be switched to disabled.
Disabled users remain stored in the
appliance, but cannot be selected using
the My Coffee button .
• Call up the My Coffee sub-menu
• Select the desired user prole.
• Select Enabled/disabled in the menu.
• Select Disabled in the menu. A tick
appears next to Disabled to conrm.
• Proceed in the same way to switch
a user back to Enabled, only select
Enabled in the menu.
= mild to very
Direct save function
If settings such as the dispensed quantity
or coffee strength are changed during
My Coffee dispensing, the changes will
be directly saved under the current user
name.
28
Page 12

EN
"Care" sub-menu
Here, various integrated care and cleaning
programmes can be started.
Menu
option
“Exit” To exit the sub-menu
"Rinsing" To rinse the coffee unit
“Easy
Cleaning”
“Intensive
Cleaning”
“Cleaning” To start the cleaning
“Descaling” To start the descaling
“Filter” To insert, change and remove
Meaning
To rinse the milk unit
To start the Intensive
Cleaning programme for the
milk unit
programme for the coffee unit
programme for the coffee unit
the water lter
“Energy-saving mode” sub-menu
Here, you can set how much time elapses
before the appliance switches to the
energy-saving mode.
In energy-saving mode, the appliance
consumes much less energy than in
standby mode. However, we recommend
switching the appliance off using the ON/
OFF button
extended period (e.g. overnight).
• Call up the Energy-Saving Mode submenu
• Select the desired time after which the
appliance should switch to energysaving mode. If you do not want the
appliance to switch to energy-saving
mode, select OFF in the menu. The
appliance then returns to the main
menu.
if it will not be used for an
“Set clock” sub-menu
Here, the time can be changed or
disabled.
• Call up the Set clock sub-menu.
• Select the current hours and minutes.
The appliance then returns to the main
menu. The time is saved and displayed
when ready for operation.
• To disable the time display, set the time
at 00:00. No time is displayed when the
appliance is ready for operation.
“Auto-OFF” sub-menu
Here, the elapsed time before the
appliance automatically switches off can
be set. Alternatively, you can also set
a specic time at which the appliance
switches off automatically.
It is not possible to fully disable the AutoOFF function. After the last action, the
appliance switches off at the earliest after
8 minutes and at the latest after 8 hours.
When both an elapsed time (OFF after...)
and a switch OFF time (OFF at...) are set,
the appliance selects the switch-off time
that occurs earlier after the last action.
Setting the switch-off delay
• Call up the Auto OFF sub-menu.
• Select OFF after... in the menu to set the
elapsed time after which the appliance
switches off automatically.
• Set the desired time (e.g. 1 hour). The
appliance then returns to the main
menu.
Setting a specic switch-off time
• Call up the Auto OFF sub-menu.
• Select OFF at... in the menu to set
the time of day at which the appliance
switches off automatically.
• Set the desired time of day (e.g., 23:25).
The appliance then returns to the main
menu.
29
Page 13

“Water hardness” sub-menu
Here, the water hardness can be set. Use
the test strip provided to determine the
water hardness in your area. In doing so,
please comply with the instructions on the
test strip packaging. Water hardness is set
at “Very hard” in the factory.
• Call up the Water hardness sub-menu.
• Select the water hardness range for your
area (e.g. Very hard). The appliance
then automatically returns to the main
menu.
Water
hardness range
Soft
Medium 7.2 - 14 °dH 13 - 25 °f
Hard 14 -21.2 °dH 25 - 38 °f
Very hard > 21.2 °dH >38 °f
°dH °fH
0 - 7.2 °dH 0 - 13 °f
“Language” sub-menu
Here, the language for the display can be
set.
• Call up the Language sub-menu.
• Select the desired language (e.g.
English).
• To conrm the question (e.g. Change
language?), select Yes in the menu. The
appliance then automatically returns to
the main menu.
Resetting the appliance to the default
settings
• Call up the System sub-menu.
• Select Factory settings in the menu.
• Select Reset in the menu. All settings
including the personal settings in the
My Coffee menu are reset to the default
settings.
Overview of default settings:
Espresso Dispensed quantity 50 ml
Coffee strength Strong
Brewing temperature normal
Café Crème Dispensed quantity 120 ml
Coffee strength normal
Brewing temperature normal
Cappuccino Dispensed quantity 60 ml
Milk froth quantity 80 ml
Coffee strength Strong
Brewing temperature high
Latte
Macchiato
Dispensed quantity 70 ml
Milk froth quantity 180 ml
Milk quantity 0 ml
Coffee strength normal
Brewing temperature high
“Statistics” sub-menu
Here, the total number of coffee
specialities prepared since the appliance
was rst started up can be called up.
• Call up the Statistics sub-menu.
• The total number of all prepared
beverages is displayed.
“System” sub-menu
Here, the appliance can be reset to the
default settings and vented.
30
Page 14

EN
Adjusting the grinding
neness
The grinding neness level was optimally
adjusted prior to delivery. It is therefore
recommended to only adjust the grinding
neness after about 1 000 coffee
preparations (about 1 year).
The grinding neness can only be set
while the mill is running. Thus, the
grinding neness should be adjusted
directly after coffee dispensing starts.
If the coffee avour is not sufciently
intense, it is recommended to set a ner
grinding level.
Place the lever 14 in one of the three
positions (as viewed from the rear of the
appliance).
Lever position Grinding neness
Left Fine
Middle Medium
Right Coarse (factory
setting)
Cleaning and maintenance
Warning!
– Pull the power supply plug before
cleaning.
– Never immerse the appliance in
water.
– Do not use a steam cleaner.
Daily cleaning
• Wipe the outside of the appliance with a
soft damp cloth and normal dishwashing
liquid.
• Empty the drip tray.
• Empty the coffee grounds container.
Cleaning the brewing unit
It is recommended to clean the brewing
unit once a week.
• Switch off the appliance.
• Pull off the cover 13 to the right.
• Press and hold the button on the handle
of the brewing unit (Image E).
• Turn the handle clockwise until the stop.
• Pull the brewing unit out of the appliance
by the handle.
• Rinse the brewing unit thoroughly on all
sides with clear water. The area shown
in Image F (arrow) must be free of
coffee residues.
• Let the brewing unit drip dry.
• Remove coffee residues from the
appliance.
• Insert the brewing unit back into the
appliance, press (and hold) the red
button (Image E) and turn the handle of
the brewing unit counterclockwise until
the stop.
• Insert the cover until it clicks in.
31
Page 15

Rinsing the coffee unit (Rinsing)
The appliance performs an automatic
rinsing of the coffee unit when it is
switched on and off. The coffee unit can
also be rinsed in between.
• Place a vessel under outlet 3.
• Call up the Care sub-menu.
• Select Rinsing in the menu.
• Select Start in the menu. The rinsing
starts (hot water will ow out of the outlet
during the process).
Rinsing the milk unit (“Easy
Cleaning” programme)
After each preparation of a beverage with
milk, the appliance will prompt you to
rinse the milk unit (Easy Cleaning?). The
Easy Cleaning programme can also be
performed in between.
• Place a vessel under outlet 3.
• Call up the Care sub-menu.
• Select Easy Cleaning in the menu.
• Connect the tube to the outlet and to the
drip tray (Image D).
• Press the rotary switch 10 to conrm.
The "Easy Cleaning" programme starts
(hot water and hot steam run through
the outlet and the tube during the
process).
Cleaning the milk unit ("Intensive
Cleaning" programme)
With the “Intensive Cleaning” programme,
the milk unit is cleaned thoroughly with a
cleaning agent.
To ensure optimum protection of your
appliance and the best hygiene standards,
it is recommended to perform the
“Intensive Cleaning” programme once a
week.
Only use Melitta
agent.
• Clean the milk tube and the milk outlet
opening.
• Place a vessel (0.5 l capacity) under the
outlet 3.
• Call up the Care sub-menu.
• Select Intensive Cleaning in the menu.
• Fill the milk container with 50 ml of
Melitta® milk system cleaning agent.
• Then add 450 ml of warm tap water to
the milk container.
• Connect the tube to the milk container
and to the outlet (Image C).
• Press the rotary switch 10 to conrm.
The "Intensive Cleaning" programme
starts (hot steam and hot cleaning
liquid runs out of the outlet during the
process).
• Subsequently, the programme interrupts
automatically and prompts for rinsing of
the milk container.
• Rinse out the milk container thoroughly.
• Fill the milk container with 0.5 l of tap
water.
• Connect the tube to the milk container
and to the outlet (Image C).
• Press the rotary switch 10 to conrm.
• Empty the vessel (0.5 l capacity) and
place it under the outlet 3 again.
• Press the rotary switch 10 to conrm.
The “Intensive Cleaning” programme will
continue (hot water runs out of the outlet
during the process). The appliance is
then ready for operation.
®
milk system cleaning
32
Page 16

EN
Cleaning parts of the milk system
It is recommended to clean the milk
container, milk distributor and the cover
of the front milk distributor regularly,
in addition to the intensive cleaning
programme.
• Disconnect the tube from the outlet.
• Flip open the outlet forwards.
• Pull the milk unit downwards in the
direction of the arrow and out of the
outlet (Image G).
• Remove the front cover from the milk
distributor (Image H).
• Rinse the individual parts with hot water.
• Reassemble the parts in reverse order.
Integrated cleaning programme
The integrated cleaning programme (takes
about 10 minutes) removes residues and
coffee oil residues that cannot be removed
by hand. The progress bar on the text
display 4 shows the current progress of
the cleaning programme.
The integrated cleaning programme
should be performed every 2 months or
after 200 brewed cups of coffee, at the
latest, however, when a corresponding
message appears on the text
display 4.
®
Only use Melitta
• Flip up the lid of the water reservoir 6.
• Pull the water reservoir 6 up and out of
the appliance.
• Fill the water reservoir 6 with tap water
up to the max. mark.
• Reinsert the water reservoir 6.
• Connect the tube to the drip tray and to
the outlet (Image D).
• Call up the Care sub-menu.
• Select Cleaning in the menu.
• Select Start in the menu. The cleaning
programme starts.
cleaning tabs.
• Empty the drip tray and coffee grounds
container in between and reinsert them.
• If the message "Place a vessel with 0.7 l
capacity under the outlet“ appears on
the text display 4, place a corresponding
vessel under outlet 3.
• Two rinsing processes will be performed.
• If the message "Add cleaning tab to the
ground coffee chute" appears on the
text display 4, open the lid of the ground
coffee chute, throw in a cleaning tab
(Image I) and close the lid again.
• The cleaning programme will continue
(approx. 5 minutes), water ows out of
the outlet and in the drip tray inside the
appliance.
• When the message "Empty tray and
vessel" appears on the text display 4,
empty the vessel under the outlet and
the drip tray. Then reinsert them both.
• After the cleaning programme is
nished, the appliance is ready for
operation.
33
Page 17

Integrated descaling programme
Warning!
The descaling agent can cause skin
irritations
Comply with the safety instructions
and the dosing information specied
on the descaling agent packaging.
The integrated descaling programme
(takes about 25 minutes) removes lime
residues inside the appliance. The
progress bar on the text display 4 shows
the current progress of the descaling
programme.
The descaling programme should be
performed every 3 months, at the latest,
however, when a corresponding message
appears on the text display 4.
Only use Melitta
• Call up the Care sub-menu.
• Select Descaling in the menu.
• Select Start in the menu. The descaling
programme will start.
• When the message “Empty tray and
vessel” appears on the text display 4,
empty the the drip tray and the coffee
grounds container and reinsert them.
• When the message “Remove water
reservoir” appears on the text display 4,
ip up the lid of the water reservoir 6 and
pull the water reservoir 6 up and out of
the appliance, and empty it.
• If a water lter is used, remove it from
the water reservoir.
• Add the descaling agent to the water
reservoir according to the instructions on
the packaging.
• Reinsert the water reservoir 6.
®
ANTI CALC.
• Place a vessel (min. 0.7 l capacity)
under the outlet 3.
• Press the rotary switch 10 to conrm.
• Connect the tube to the drip tray and to
the outlet (Image D).
• Press the rotary switch 10 to conrm.
The descaling programme will continue
(approx. 20 minutes), water ows out of
the outlet and in the drip tray inside the
appliance.
• When the message “Empty tray and
vessel” appears on the text display 4,
empty the vessel under the outlet and
the drip tray. Then reinsert them both.
• When the message "Rell water
reservoir" appears on the text display 4,
ip up the lid of the water reservoir 6 and
pull the water reservoir 6 up and out of
the appliance.
• Rinse the water reservoir 6 thoroughly.
• Fill the water reservoir 6 with tap water
up to the max. mark.
• Reinsert the water reservoir 6.
• The descaling programme will continue
(approx. 5 minutes), water ows out of
the outlet and in the drip tray inside the
appliance.
• When the message “Empty tray and
vessel” appears on the text display 4,
empty the vessel under the outlet and
the drip tray. Then reinsert them both.
• After the descaling programme is
nished, the appliance is ready for
operation.
34
Page 18

EN
Inserting, changing and
removing the water lter
The Melitta® Claris® water lter removes
lime and other harmful substances from
the water. The water lter should be
changed regularly, at the latest, however,
when the appliance prompts to do so.
The water lter is available in specialised
shops.
When the water lter is inserted, changed
or removed, this must be conrmed in the
Filter sub-menu. Once the water lter is
inserted or changed, the appliance resets
the water lter cycle to zero and is able to
prompt for changing the water lter again
at the right time.
Inserting the water lter
• Put the water lter in a glass with
tap water for several minutes before
inserting it in the appliance.
• Call up the Care sub-menu.
• Select Filter in the menu.
• Select Insert lter in the menu.
• Select Start in the menu.
• Flip up the lid of the water reservoir 6.
• Pull the water reservoir 6 up and out of
the appliance.
• Carefully screw the Melitta® Claris®
water lter into the thread on the base
of the water reservoir using the screwin aid at the bottom end of the coffee
scoop provided.
• Fill the water reservoir 6 with tap water
up to the max. mark.
• Reinsert the water reservoir 6.
• Press the rotary switch 10 to conrm.
• Empty the vessel (min. 0.5 l capacity)
and place it under the outlet 3 again.
• Press the rotary switch 10 to conrm.
The appliance rinses and then returns to
standby mode.
The water hardness is automatically set
to Soft.
Changing the water lter
The water lter should be changed when
a prompt to do so appears on the text
display 4.
• Call up the Care sub-menu.
• Select Filter in the menu.
• Select Change lter in the menu.
• Select Start in the menu.
• Flip up the lid of the water reservoir 6.
• Pull the water reservoir 6 up and out of
the appliance.
• Unscrew the water lter from the thread
on the base of the water lter.
• Carefully screw the new Melitta® Claris®
water lter into the thread on the base
of the water reservoir using the screwin aid at the bottom end of the coffee
scoop provided.
• Fill the water reservoir 6 with tap water
up to the max. mark.
• Reinsert the water reservoir 6.
• Press the rotary switch 10 to conrm.
• Empty the vessel (min. 0.5 l capacity)
and place it under the outlet 3 again.
• Press the rotary switch 10 to conrm.
The appliance rinses and then returns to
standby mode.
35
Page 19

Removing the water lter
The Melitta® Claris® water lter should
not remain dry over an extended period
of time. It is therefore recommended to
store the Melitta
refrigerator in a glass of water when the
appliance will not be in use for extended
periods.
• Flip up the lid of the water reservoir 6.
• Pull the water reservoir 6 up and out of
the appliance.
• Unscrew the water lter from the thread
on the base of the water reservoir.
• Reinsert the water reservoir 6.
• Call up the Care sub-menu.
• Select Filter in the menu.
• Select Remove lter in the menu.
• Select Start in the menu.
• The prompt “Filter has been removed,
set water hardness” is shown appears
on the text display 4.
• Set the water hardness (Page 30).
®
Claris® water lter in the
Transport, Storage and
Disposal
Venting the appliance
Warning!
Danger of burning and scalding
from hot steam
The machine releases hot steam when
it is vented. Never allow any part of
your body, e.g. your face to come into
contact with the hot steam.
It is recommended to vent the appliance
if it will not be used for an extended
period of time and before transport. This
also protects the appliance against frost
damage.
• Remove the water lter if necessary
(Page 36).
• Place a vessel under outlet 3.
• Call up the System sub-menu.
• Select Venting in the menu.
• Select Start in the menu.
• Flip up the lid of the water reservoir 6
and pull the water reservoir 6 up and out
of the appliance.
• Connect the tube to the drip tray and to
the outlet (Image D).
• Press the rotary switch 10 to conrm.
The appliance heats up.
• The appliance is vented and then
switches off completely.
Transport
• Vent the appliance.
• Empty and clean the drip tray and coffee
grounds container.
• Empty the water reservoir and th bean
container. If necessary, vacuum out
beans that are stuck at the bottom.
• Secure loose parts (cup plate etc.) with
suitable adhesive tape.
• If possible, transport the appliance in
the original packaging including the hard
foam elements.
Disposal
This appliance is labelled according to
the European Directive 2002/96/EC on
waste electrical and electronic equipment
(WEEE). The Directive prescribes the
framework for a EU-wide applicable return
and recycling of waste appliances. Please
contact a specialised dealer for current
disposal procedures.
36
Page 20

EN
Fault Cause Measure
Coffee only ows drop-by-
drop.
Coffee does not ow.
Grinder does not grind the
coffee beans.
Loud grinder noise
Bean symbols
ashing although the bean
container is full.
The brewing unit can no
longer be reinserted after
removal.
System error shown on the
text display
are
Troubleshooting
Adjust the grinding neness more
Grinding neness is too ne.
Water reservoir not lled or
incorrectly inserted.
The brewing unit is clogged. Clean the brewing unit.
Beans do not drop into the
grinder (beans are too oily).
Foreign objects in the
grinder.
The tilt lever is vertical.
Foreign objects in the
grinder.
Insufcient quantity of
ground beans in the brewing
chamber
The brewing unit is not
properly locked.
The actuator is not in the
proper position.
Software error
coarse.
Clean the brewing unit.
Perform a descaling or cleaning
programme if necessary.
Fill the water reservoir and make
sure it is properly inserted.
Tap lightly on the bean container.
Call the hotline.
Move the tilt lever to the right or
left.
Call the hotline.
Press the button for cup
dispensing.
Check whether the handle for
locking the brewing unit is correctly
engaged.
Simultaneously press on the ON/
OFF button
Coffee
button
runs the initialisation process.
Switch the appliance off and switch
it on again with the ON/OFF button
; if this does not solve the
problem call the hotline.
and the My
. The appliance now
37
Page 21

GB - Contact
Melitta International GmbH - UK Division
32 A Thorpe Wood Business Park
Thorpe Wood
Peterborough PE3 6SR
United Kingdom
www.international.melitta.de
(+44) 0800 0288002
monday - friday
8 am - 5 pm toll free
EN - Guarantee Conditions
In addition to the end consumer’s statutory guarantee rights
in relation to the seller; for new appliances bought after 01
September 2013 from a dealer authorized due to his expertise
by Melitta, we give a manufacturer’s guarantee based on the
following conditions:
1. The guarantee period begins with the day the product was
sold to the end user. The guarantee period is 24 months. The
purchase date of the device must be veried by a purchase
receipt.
The device was designed and built for use in private
households. For fully automatic machines, from a number
in excess of 7,500 brewing processes a year we assume
commercial use. Commercial use includes using the appliance
to make coffee for customers in ofces, workshops, law ofces
etc. In this case, the guarantee period is 12 months or 15,000
brewing processes, whichever occurs rst.
Guarantee performances lead neither to an extension of the
guarantee period nor to a new beginning of the guarantee
period for the device or installed spare parts.
2. Within the guarantee period we will correct all device defects
that are based on material or manufacturing errors, through
repair or replacement of the device, at our discretion. Replaced
parts become the property of Melitta. If meanwhile components
were revised or software was updated, actualisations of
repaired parts and/or software is permitted unless not waived
by the customer in writing before the repair (order).
3. Defects that occurred due to improper connection, improper
handling, or repair attempts by non-authorized persons are not
covered by the guarantee. The same applies for failure to
comply with the use, care, and maintenance (e.g. calcication)
instructions as well for the use of consumables (e.g. cleaning
and decalcifying agents or water lters) that do not correspond
to the original specications. Wear parts (e.g. seals and valves),
fragile parts like glass, and damage caused by foreign objects
in the grinder (e.g. stones) are excluded from the guarantee.
4. Guarantee performances are processed via the Service
Hotline for the respective country.
5. These guarantee conditions apply for appliances purchased
and used in Germany, Austria, Switzerland, Denmark, France,
The United Kingdom, Spain, The Netherlands and Belgium.
If an appliance is purchased abroad or taken abroad, then
guarantee benets will only be provided as specied in the
guarantee conditions applicable to that country.
235
Page 22

Version 4.0
09/2016
1236-0816
Melitta Europa
GmbH & Co. KG
D-32372 Minden
 Loading...