

Page 1

Place this chapter in the Coffee Machine
section of the Equipment Manual.
®
Manufactured exclusively for McDonald’s
CAFINA Ltd.
Römerstrasse 2
5502 Hunzenschwil
Switzerland
represented by:
MelittaSystemService USA Inc.
665 Tollgate Road, Suite B
Elgin, IL 60123 (EE. UU.)
Phone: (847) 717 8900
Fax: (847) 717 8924
www.melitta-mss.com
Hotline: (866) 910 9105
by
EN
c5-12C FF
TABLE OF CONTENTS
WARRANTY 2
WARRANTY McD 4
INTRODUCTION 5
SAFETY 6
PARTS IDENTIFICATION / FUNCTIONS AND EXPLODED VIEW 10
EQUIPMENT SET-UP AND CLOSE PROCEDURES 12
SYSTEM SETUP / OPERATION 17
MAINTENANCE 26
TROUBLESHOOTING 29
ORDERING PARTS / SERVICE 33
NON-SCHEDULED MAINTENANCE 33
APPENDICES 33
© Cana Ltd. coffee machines
All Rights Reserved
created 06/13/2013
OM V3.0
Page 2

EN
WARRANTY
1. Scope of Warranty
MSS warrants the products as follows:
• All products (other than as specied in the following): 2 years parts and labor;
• Electronic circuit and/or control boards: 3 years parts only.
2. General Conditions of Warranty
The exchange of parts is limited to 3 per year. The warranty period runs from the earlier of (i) the date
of installation or (ii) 6 months after the shipment date from the place of manufacture in Switzerland
or Germany. The warranty covers defects in material or workmanship. Defective products must be
returned prepaid to MSS-USA, 665 Tollgate Road, Suite B, Elgin, IL 60118 or a dealer/repair station
authorized by MSS. A list of authorized dealers/repair stations may be obtained by writing to MSS at the
foregoing address or calling (847) 717-8924. MSS, in its sole discretion, shall determine the scope of
a repair and exchange of parts. Any repair or exchange of parts shall not extend the warranty period.
3. Prerequisites of Warranty
Not covered by this warranty are products that have:
(a) been altered or modied;
(b) been improperly installed by persons not authorized by MSS;
(c) failed due to abuse or inadequate or improper maintenance or care;
(d) been used in violation of the manual or other instructions for use or installation; or
(e) been damaged due to defects or malfunctioning or defects of equipment, parts or installtions
not provided by MSS.
Examples of the foregoing include:
• Defects or malfunctioning resulting from improper cleaning, human errors or mishandling
(such as blocked valves or mixer);
• Defects due to lime-scale build-up or other deposits resulting from the use of water softening
equipment (such as boilers or water pumps);
• Defects or malfunctioning due to electric overloads or power surges (such as burned electronic boards);
• Defects or malfunctioning due to deviations from the quality specications for milk, water and
coffee beans; or
• Defects of malfunctioning due to deviations from the quality settings recommend by MSS.
2
V3.0
OPERATING MANUAL
Page 3

4. Requirements for Water Quality
This Warranty is valid only if the following water quality requirements/ranges are complied with:
• 54 ppm - 125 ppm total dissolved solids
• 3.1 gpg – 7.3 gpg dissolved hardness minerals in water
• 6.8 -7.2 pH acidity/alkalinity
5. Requirements for Power and Plumbing
This Warranty is valid only if the requirements for Power and Plumbing as per Installation Guide
and drawing included in packaging are complied with.
6. Ordinary Wear and Tear Items Excluded From Warranty
Excluded from the warranty are items or parts that are subject to natural wear in the ordinary use
of the equipment, such as
• Seals
• Filters
• Piston sprays
• Piston plunger
• Paint coatings
EN
• Grinding burrs
• Foamer head
7. No Implied Warranties
THE WARRANTY PROVIDED HEREUNDER IS EXPRESSLY IN LIEU OF ANY AND ALL OTHER
WARRANTIES, AND MSS DISCLAIMS ANY AND ALL OTHER EXPRESS WARRANTIES AND ALL
IMPLIED WARRANTIES WITH RESPECT TO THE EQUIPMENT, INCLUDING ANY WARRANTY
OF MERCHANTABILITY OR FITNESS FOR A PARTICULAR PURPOSE.
8. Limitations of Liability
EXCEPT AS EXPRESSLY AGREED UPON, UNDER NO CIRCUMSTANCES SHALL MSS HAVE
ANY LIABILITY, WHETHER DIRECTLY OR BY WAY OF INDEMNITY, FOR SPECIAL, INCIDENTAL,
INDIRECT, CONSEQUENTIAL, PUNITIVE, EXEMPLARY, STATUTORY OR OTHER DAMAGES,
INCLUDING, BUT NOT LIMITED TO, DAMAGES FOR INJURIES TO PERSONS OR TO PROPERTY
OR LOSS OF PROFITS OR LOSS OF FUTURE BUSINESS OR REPUTATION, LOSS OF USE
OF EQUIPMENT, COST OF DOWN TIME OR COST OF SUBSTITUTE EQUIPMENT, WHETHER
BASED ON BREACH OF CONTRACT, BREACH OF WARRANTY, TORT, STRICT OR PRODUCTS
LIABILITY, INFRINGEMENT OF PATENTS, TRADE SECRETS, TRADEMARKS, COPYRIGHTS OR
OTHER PROPRIETARY RIGHTS, OR ANY OTHER LEGAL THEORY IN CONNECTION WITH THE
SALE OF THE EQUIPMENT, ITS USE, INSTALLATION OR APPLICATION OR IN CONNECTION
WITH THE PERFORMANCE BY MSS HEREUNDER.
OPERATING MANUAL
V3.0
3
Page 4

EN
WARRANTY MCD
MSS/Cana represents and warrants that the Products will (1) conform to McD’s current Standards;
(2) be merchantable; (3) be free from defects in design, construction, workmanship, materials and
packaging; (4) be t and sufcient for the purpose for which it is intended and/or which is stated
on any packaging, labeling or advertising; and (5) be equivalent in materials, quality, t, nish,
workmanship, performance and design to samples, if any, submitted to and approved by McD.
EXCEPT AS OTHERWISE PROVIDED IN THE AGREEMENT BETWEEN MSS AND MCD, THE
WARRANTIES PROVIDED IN THIS PARAGRAPH SHALL BE IN LIEU OF ALL OTHER WARRANTIES, EXPRESS OR IMPLIED.
MSS/Cana further represents and warrants that (1) the manufacture, use, distribution or sale of the
Products will not violate or infringe any proprietary or intellectual property rights of any person or
entity; (2) the Products will be produced, packaged, tagged, labeled, packed, shipped and invoiced in
compliance with the applicable requirements of federal, state and local laws, regulations, ordinances
and administrative orders and rules of the United States, its territories and all other countries in
which the Products are produced or delivered; (3) they will strictly adhere to all applicable federal,
state and local laws, regulations, ordinances and administrative orders and rules of the United
States, its territories and all other countries in which the Product are produced or delivered with
respect to the operation of their production facilities and their other business and labor practices,
including laws, regulations and prohibitions governing the working conditions, wages, hours and
minimum age of work force; (4) MSS/Cana will not discriminate based upon gender, race, sexual
orientation, national origin or any other basis prohibited by law in their employment practices and
that the Products are not produced or manufactured, in whole or in part, by child labor or by convict
or forced labor; (5) upon request from McD, MSS/Cana will provide McD with specic information, in such detail as McD may reasonably request, as to the location(s) and methods(s) of the
manufacture of the Products; (6) upon reasonable notice and during regular business hours, McD,
its designated representatives and any independent inspectors approved by McD may inspect any
production facility at which the Products or any components of the Products are being produced;
(7) if McD determines that a Product must be inspected prior to its shipment to the United States
or other country, such inspection will be performed at the sole expense of MSS/Cana by an independent inspector approved by McD and any inspection or documentation thereof, and corrective
actions, if any, taken by MSS/Cana with respect to such Approved Product will not be deemed
an acceptance of any such Product, or a waiver or any nonconformities or defects in any such
Product and will not excuse any failure by MSS/Cana to deliver such Product in accordance with
this Agreement or the terms of any Purchase Order; (8) MSS/Cana will strictly adhere to the
McDonald’ s Code of Conduct for Suppliers, as it may change over time; (9) MSS/Cana will not
use any trade name, trademark, service mark or other intellectual property of McD, or any other
trade name, trademark or service mark incorporating the „Mc“ or „Mac“ formative, in any manner
whatsoever, including, without limitation, on or in connection with any Product or other products or
services, without rst obtaining the written consent of McD; and (10) they will at all times remain
in compliance with the Foreign Corrupt Practices Act, as it may be amended from time to time.
4
V3.0
OPERATING MANUAL
Page 5

INTRODUCTION
The c5 coffee machine is a fully automatic coffee
machine which can dispense pre-programmed
coffee- and milk products through a height-adjustable product outlet into the product cup.
The beverage required is selected via ve beverage selection buttons.
Power Connection
The c5 coffee machine is permanently connected
to main power during normal operation.
Depending on the form of the power connection,
the coffee machine is disconnected from mains
power via power plug and socket, or via a circuit
breaker on the mains panel.
EN
Two separate bean hoppers allow for two different coffee types, e.g. regular and decaffeinated
coffees.
For hot milk processing with integrated, automatic
cleaning, the Cana conforms to NSF/ANSI /
Standard 4.
The patented, Automatic Coffee quality System
(ACS) continually monitors relevant parame-
ters such as neness of grind, coffee powder
weighed-in quantity, infusion time and water
temperature.
The piston system is optimally controlled via a
Variable Pressure System (VPS).
NOTE:
The c5 coffee machine does not have a power
switch of its own.
Water Connection
The c5 is connected to a water purication
system (RO) in the building by a stop valve –
quick disconnect – screen lter – and a backow
preventer. In case of a problem on the c5, the
coffee machine can be shut off or disconnected
quickly from the main water supply.
stop valve
quick disconnect
Water is drained from the c5 into the waste water system with permanent connection to the
sewer.
OPERATING MANUAL
water ow
direction
back ow preventer
V3.0
screen lter
to c5
5
Page 6

SAFETY
Warnings
Safety information in these Operating
Instructions
EN
Warning symbols used
The following warning symbols may be afxed
to the equipment.
Low voltage
• Warning of dangerous electrical
voltage.
• Electric shocks can lead to serious
injury or death.
• Only authorized technical personnel
may perform work on electrical installations.
• The technical safety instructions must
be followed.
• Unplug equipment before carrying out
any work on electrical installations.
Hot surface / hot internal components
• Warning of heat which could lead to
injury.
In these Operating Instructions, you will nd the
following three levels of safety information:
• Level 1
WARNING
• A warning refers to signicant hazards.
Failure to follow the relevant safety
instruction could lead to injury or
death.
Depending on the type of danger, instead of
STOP, one of the following symbols could be
combined with the word WARNING.
WARNING
• Warning of electric shock.
WARNING
• Warning of heat.
• Allow hot surfaces and compo-nents
to cool before carrying out any work
on these component parts.
• If necessary, wear heat resistant
gloves.
Places where warning symbols are af-
xed
NOTE
• The equipment comes supplied with
warning symbols (stickers) afxed
wherever appropriate.
• If any of the warning symbols should
fall off during operation or following
cleaning work, the operator must stick
these warning symbols back again
immediately.
• Level 2
CAUTION
• The CAUTION symbol stresses
important instructions. Failure to
observe these instructions could lead
to damage to the equipment or to
other material assets.
• Level 3
NOTE
• Notes contain additional information
aimed at raising the general level of
safety and at lightening the user’s
workload.
6
V3.0
OPERATING MANUAL
Page 7
Basic safety instructions
Proper use
General
Proper use includes, in addition to the specic
provisions set out below, observing these Operating Instructions and complying with the supplier’s
obligatory maintenance and repair instructions.
c5 coffee machine
The c5 coffee maker is used solely to dispense
coffee products, coffee and milk combined
products, hot water, steam and to heat and froth
milk.
No other use of the c5 coffee maker will be
deemed to be proper.
WARNING
• Hot liquid comes out from the bottom
of the beverage outlet. There is a
danger of scalding.
WARNING
• Never interfere with the electricity
supply connection or modify it. This
could result in fatal injury.
• Never remove the screw- mounted
covers. There is a danger of fatal
injury upon contact with live components.
NOTE
EN
Specic hazards and instructions
c5 coffee machine
WARNING
• Never insert either the hands or any
rod-shaped object into a bean hopper
or into the lling chute while the c5
coffee machine is connected to the
mains power supply.
• Only coffee beans may be introduced
to the bean hopper.
WARNING
• When handling the combination
cleaning tablets „COMBI-Tabs“, the
manufacturer’s warnings and instructions that are printed on the cleaning
tablet container must be observed
and complied with.
• Regardless of type conguration, the
c5 coffee machine should not be used
in large kitchens.
• Electrical equipment which does
not have adequate electro-magnetic
protection should not be operated
close to the c5 coffee machine.
• The drip tray serves solely to collect
drip water. It must not be used as a
sink.
OPERATING MANUAL
V3.0
7
Page 8
EN
CAUTION
• Never interfere with the water mains
connection or modify it. There is a
danger of ooding.
• Only operate the c5 coffee machine
in covered locations, avoid places
where there is a risk of water splash.
There is a risk of damage.
CAUTION
• Never spray the c5 coffee machine
with a water hose during cleaning.
There is a risk of damage.
• Always empty the coffee waste
drawer in the correct manner. There
is a danger of overow.
• Always insert the key card dry and in
the correct position into the slot. Do
not insert any foreign objects or chip
cards for other systems into the slot.
There is a risk of damage.
• Do not leave key card in the slot
during operation.
Key cards
CAUTION
• Keep key cards dry, cool and in
the plastic pockets provided for this
purpose. There is a risk of damage.
• Never put a key card on a hot surface
or expose to direct sunlight. There is
a risk of damage.
• Never put a key card down in an environment where there is a risk of water
splash. There is a risk of damage.
• Always clean key cards including chip
contacts with a clean, slightly moist
cloth without using any household
cleaner. There is a risk of damage.
• Never bend or fold a key card or
use it as a tool. There is a risk of
damage.
• In an environment that is likely to be
electrostatic, always ensure that you
have earthed yourself (e.g. by touching
a radiator) before handling a key card.
There is a risk of damage.
• If the internal relieve pressure valve
Refrigerator
CAUTION
• When relling with milk, always use
• Always close the refrigerator door.
is actuated due to excessive pressure
or temperature increase, switch the
c5 coffee machine off immediately.
Secure the c5 coffee machine against
unintentional switching on and report
to Customer Support.
pre-cooled milk that is no warmer than
40°F. There is a hygiene risk.
There is a hygiene risk.
Personal safety
WARNING
If handled improperly, the equipment
could cause serious or fatal injury.
Anyone using and maintaining the equipment must be trained in the correct
handling of the equipment and must
have read and understood the safety
instructions in these Operating Instructions before starting to use or maintain
the equipment.
8
V3.0
OPERATING MANUAL
Page 9
WARNING
Authorized persons
Never modify or remove any safety
mechanisms.
Do not disable any safety mechanisms
by modifying the equipment.
If there are any warning symbols afxed
to the equipment (dependent on nationality), never remove these. Replace
any lost or defective warnings symbols
immediately.
WARNING
Never operate the equipment in a
damaged condition.
Report any irregularities to your superior immediately, especially if they affect
safety.
Safety mechanisms
As well as the warning symbols (dependent on
nationality) afxed to the equipment, the equipment
also has several active safety mechanisms.
General
EN
Only persons who are authorized to do so may
work on or with the equipment.
A person is deemed to be authorized if he/she
satises the minimum training and knowledge
requirements listed in this chapter and has been
assigned a xed area of responsibility.
Areas of responsibility of personnel
Manager
As the most senior person from a legal point of
view, the manager is responsible for the proper
use of the equipment and for the training and
deployment of authorized personnel.
Se encarga de registrar las competencias
empreHe/she records the competencies of authorized persons, including whether they have the
authority to give orders, for his business.
Power switch
c5 coffee machine power switch.
Activation with key card.
His/her tasks include the following:
• He/she sets or resets the equipment to the
beverages that are currently to be dispen-sed,
if he/she wishes to dispense different beve-
rages than those that the supplier congured
upon delivery or installation of the equipment.
User
He/she is responsible for the following tasks:
• Adjusts the equipment to the beverages
currently to be dispensed.
• Rells consumables, e.g. coffee, milk.
• Starts the equipment and monitors it.
• Cleans and services the equipment.
• Pinpoints problems and organiser problem
rectication.
OPERATING MANUAL
V3.0
9
Page 10
EN
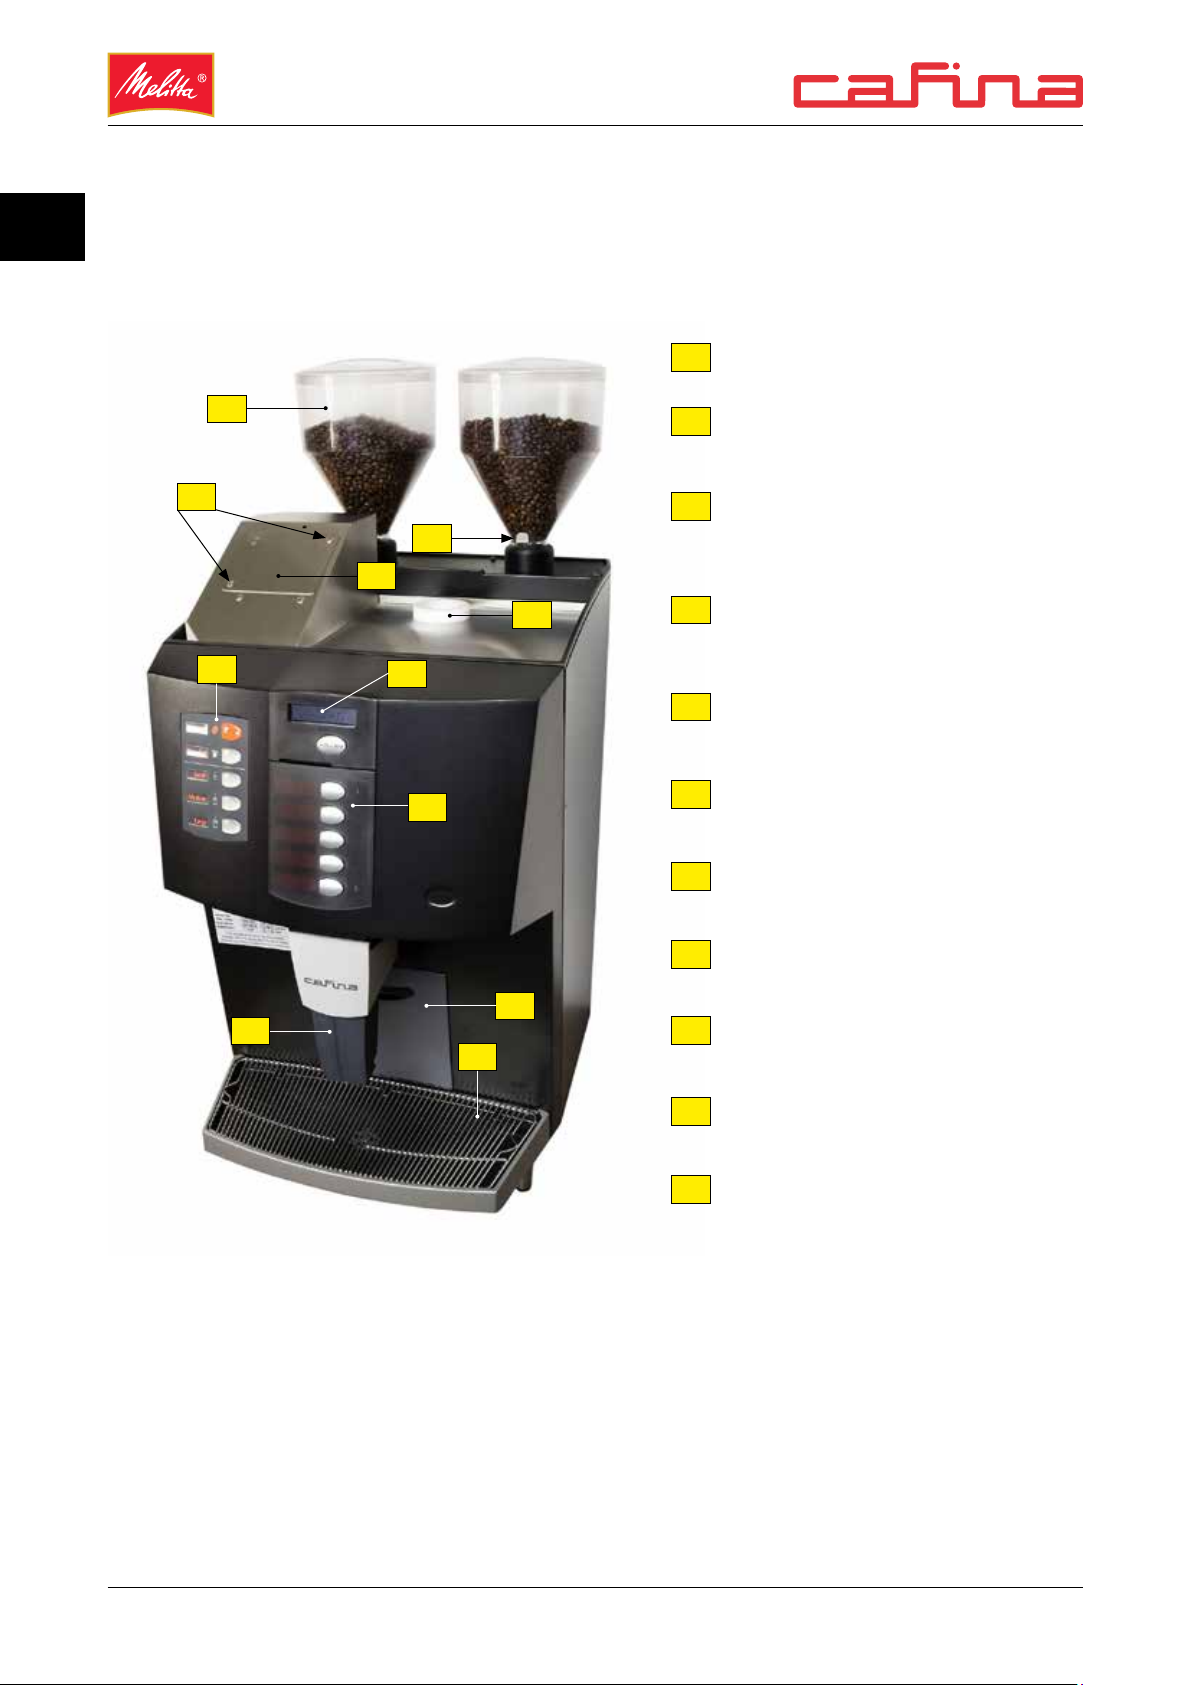
PARTS IDENTIFICATION /
FUNCTIONS AND EXPLODED VIEW
Bean Hopper
1
5
8
1
4
6
7
2
3
Bean Hopper slider
2
3
Chute for coffee cleaning tablets
Foamer head cover
4
5
Holding screw foamer head cover
6
Display
Product selection keypad
7
Preselection keypad
8
9
10
11
Adjustable coffee / milk spout
9
10
Drip tray
Coffee waste drawer
11
10
V3.0
OPERATING MANUAL
Page 11
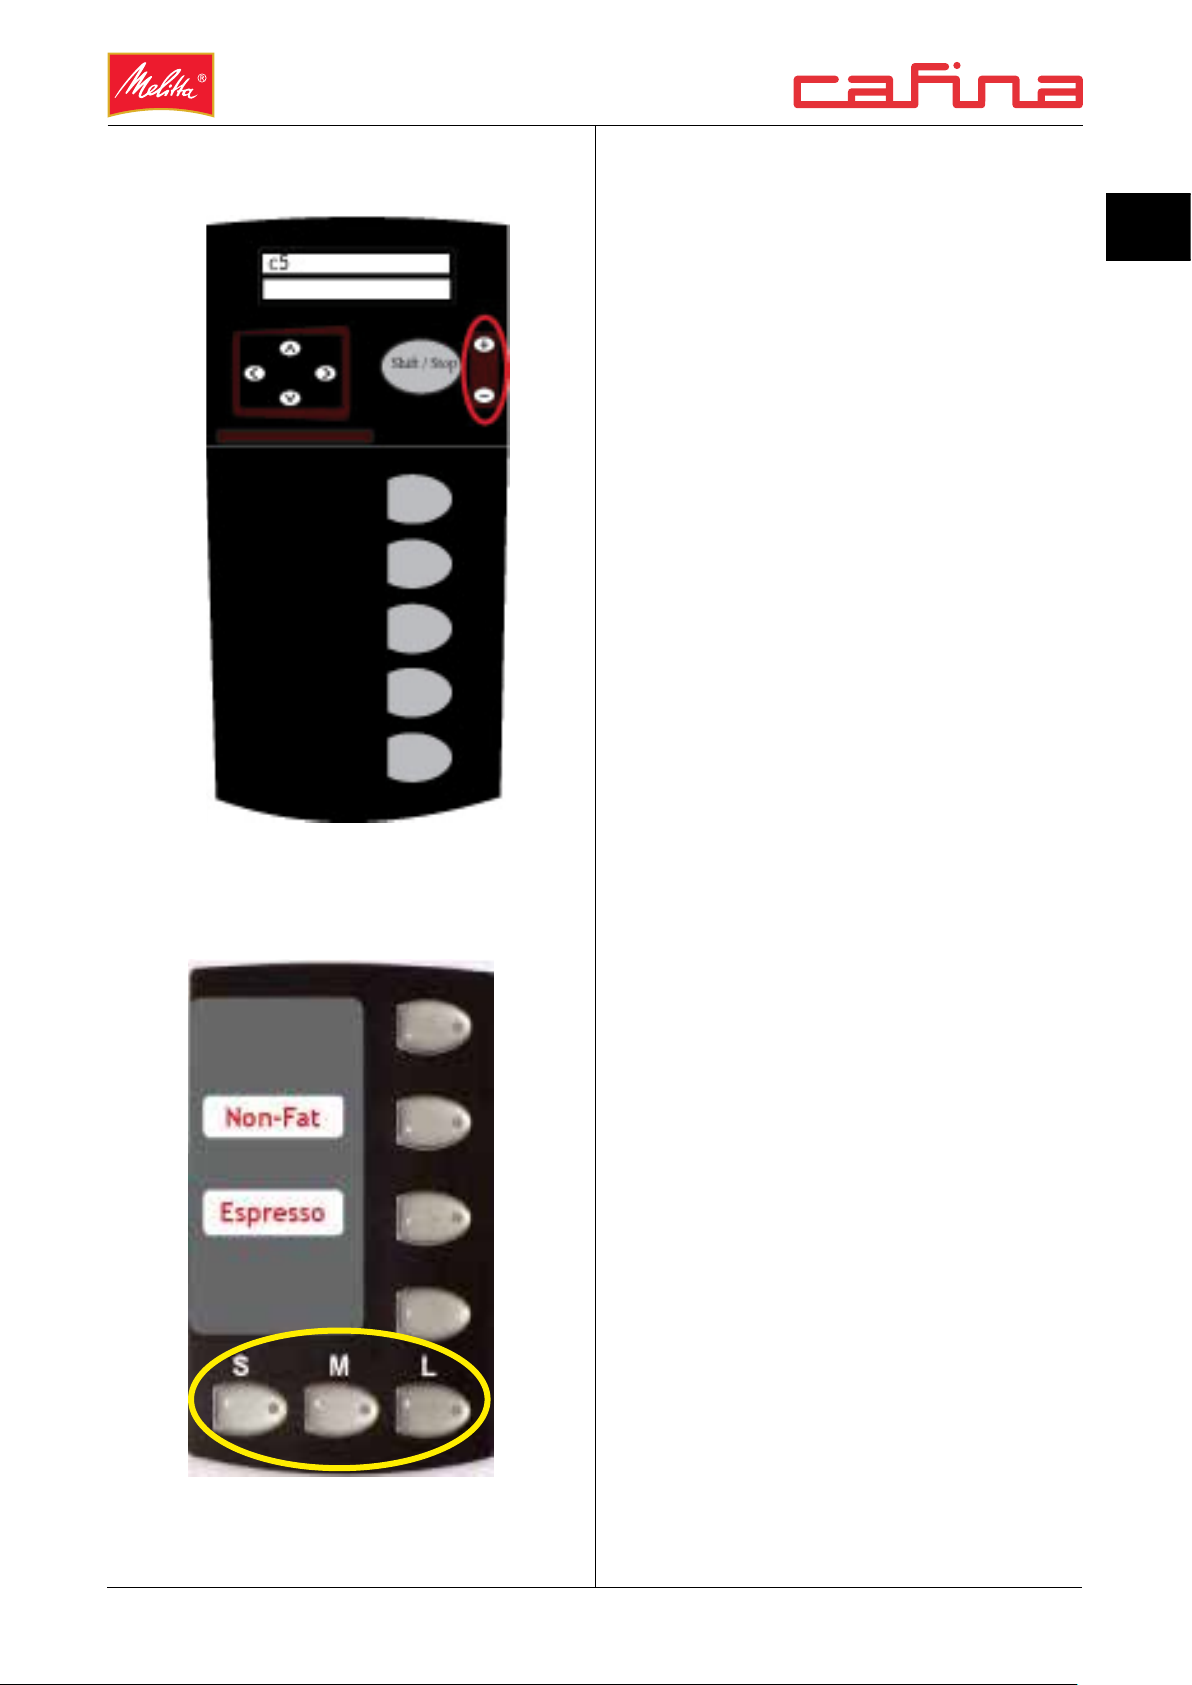
PRODUCT SELECTION
EN
1) Display
PRESELECTION KEYPAD
2) Product selection keys
3) Product labels
1) Not labeled, but function of Decaf
OPERATING MANUAL
2) Non - or low fat milk instead of whole milk
3) Espresso - allows for an extra shot
4) Cup size
V3.0
11
Page 12
EQUIPMENT SET-UP AND
CLOSE PROCEDURES
Fill milk
EN
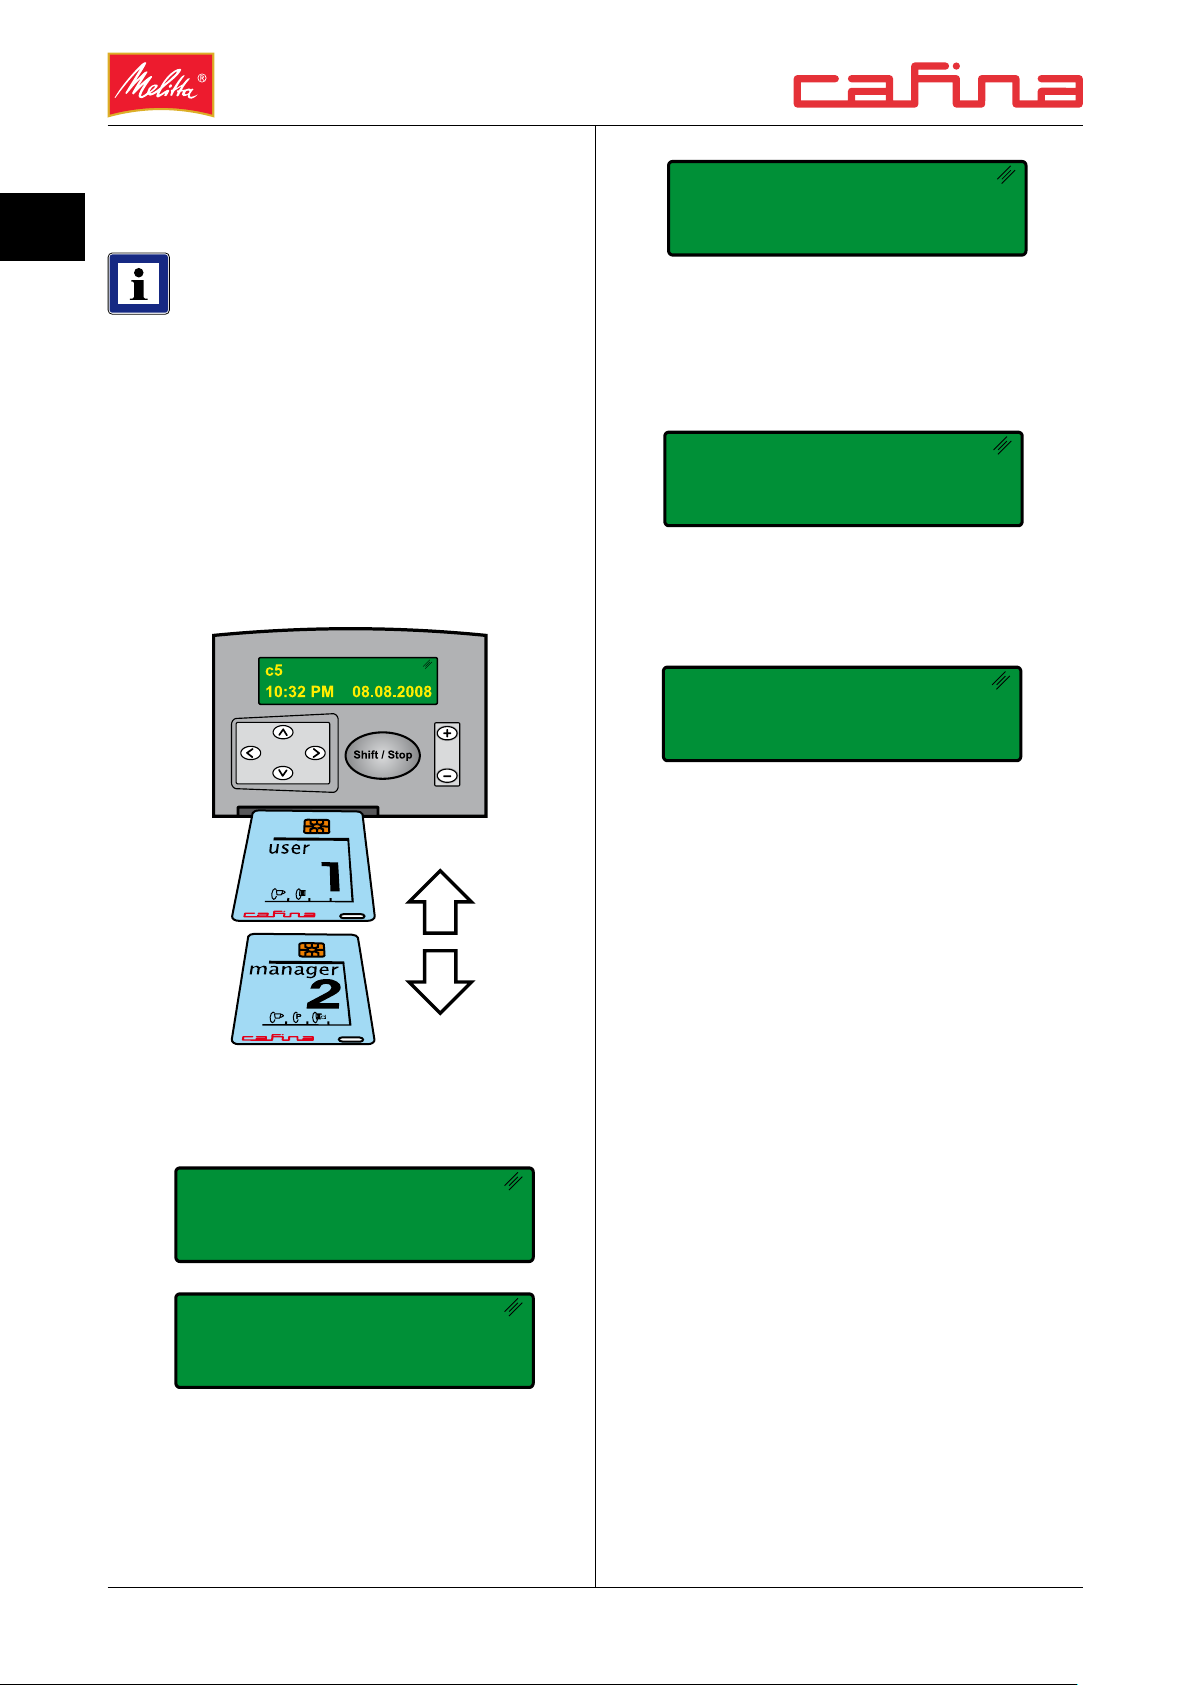
NOTE
• The c5 coffee machine has a „standby“
operating mode.
• None of the product elds are lit up.
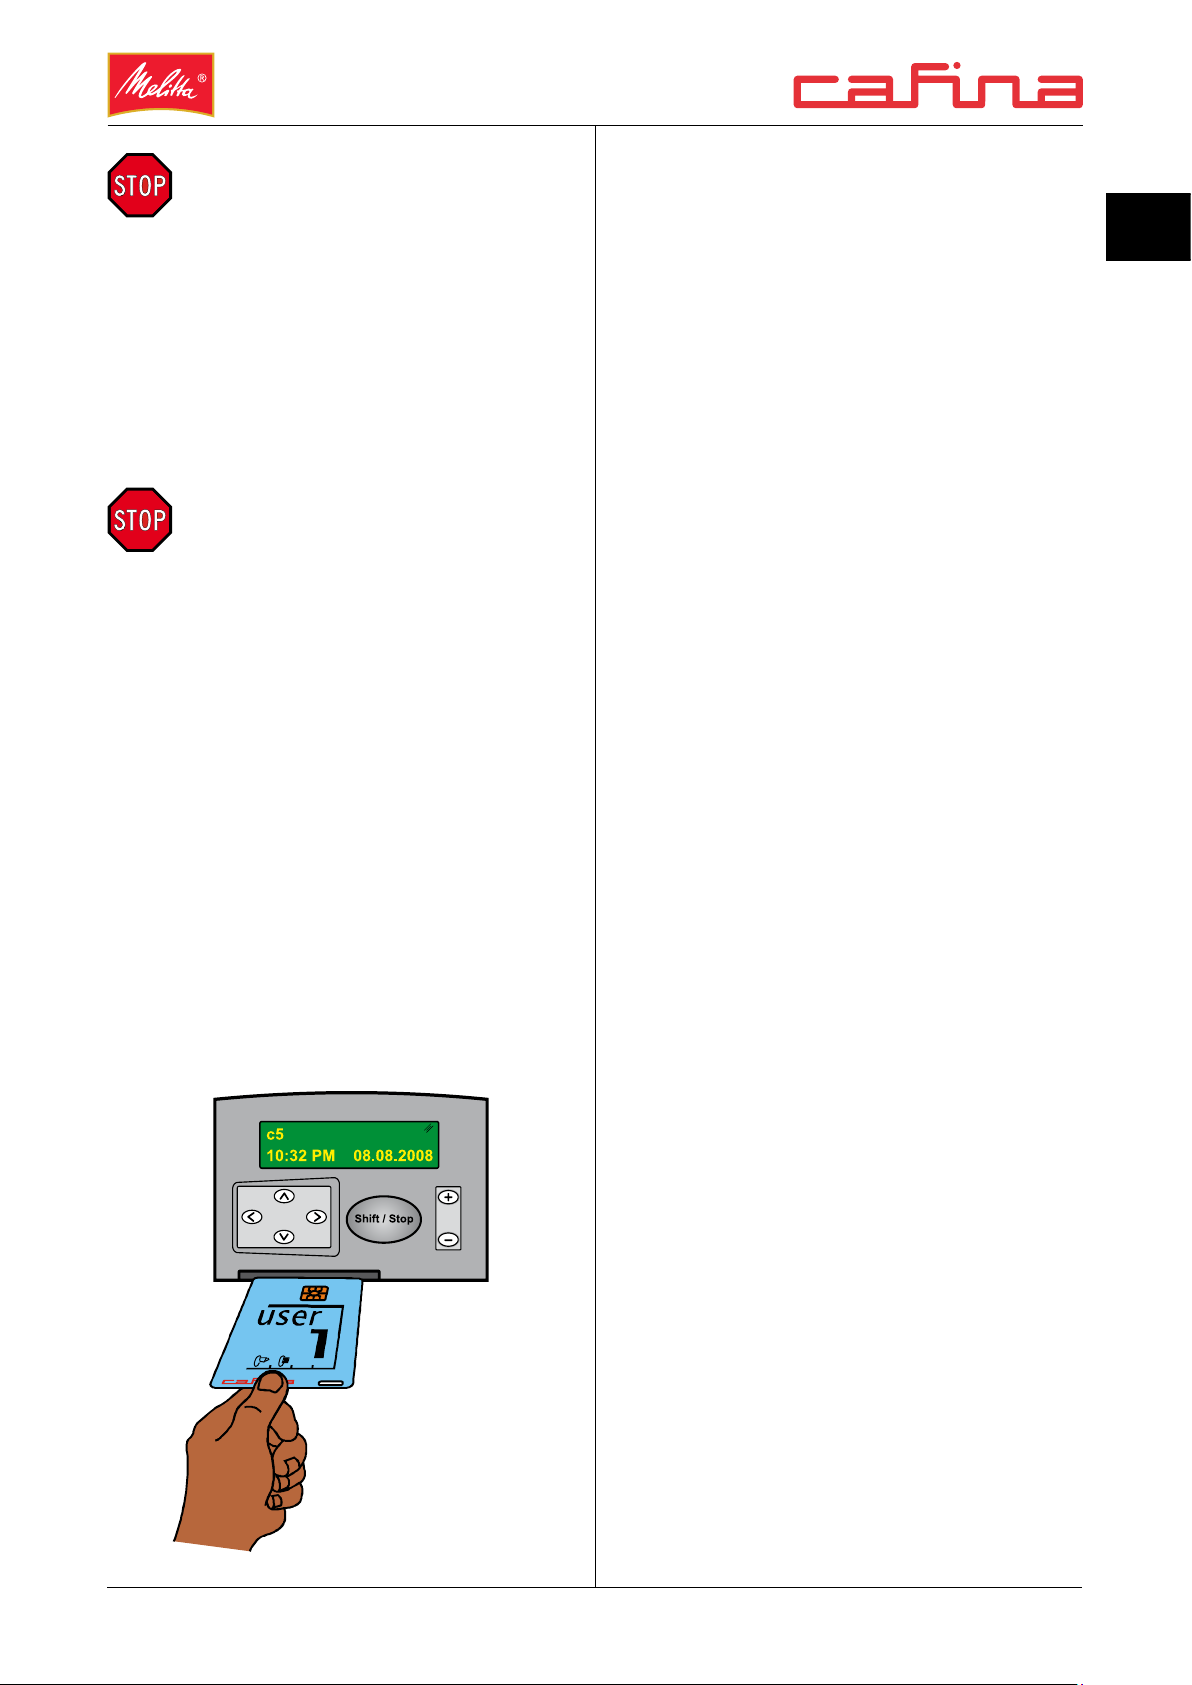
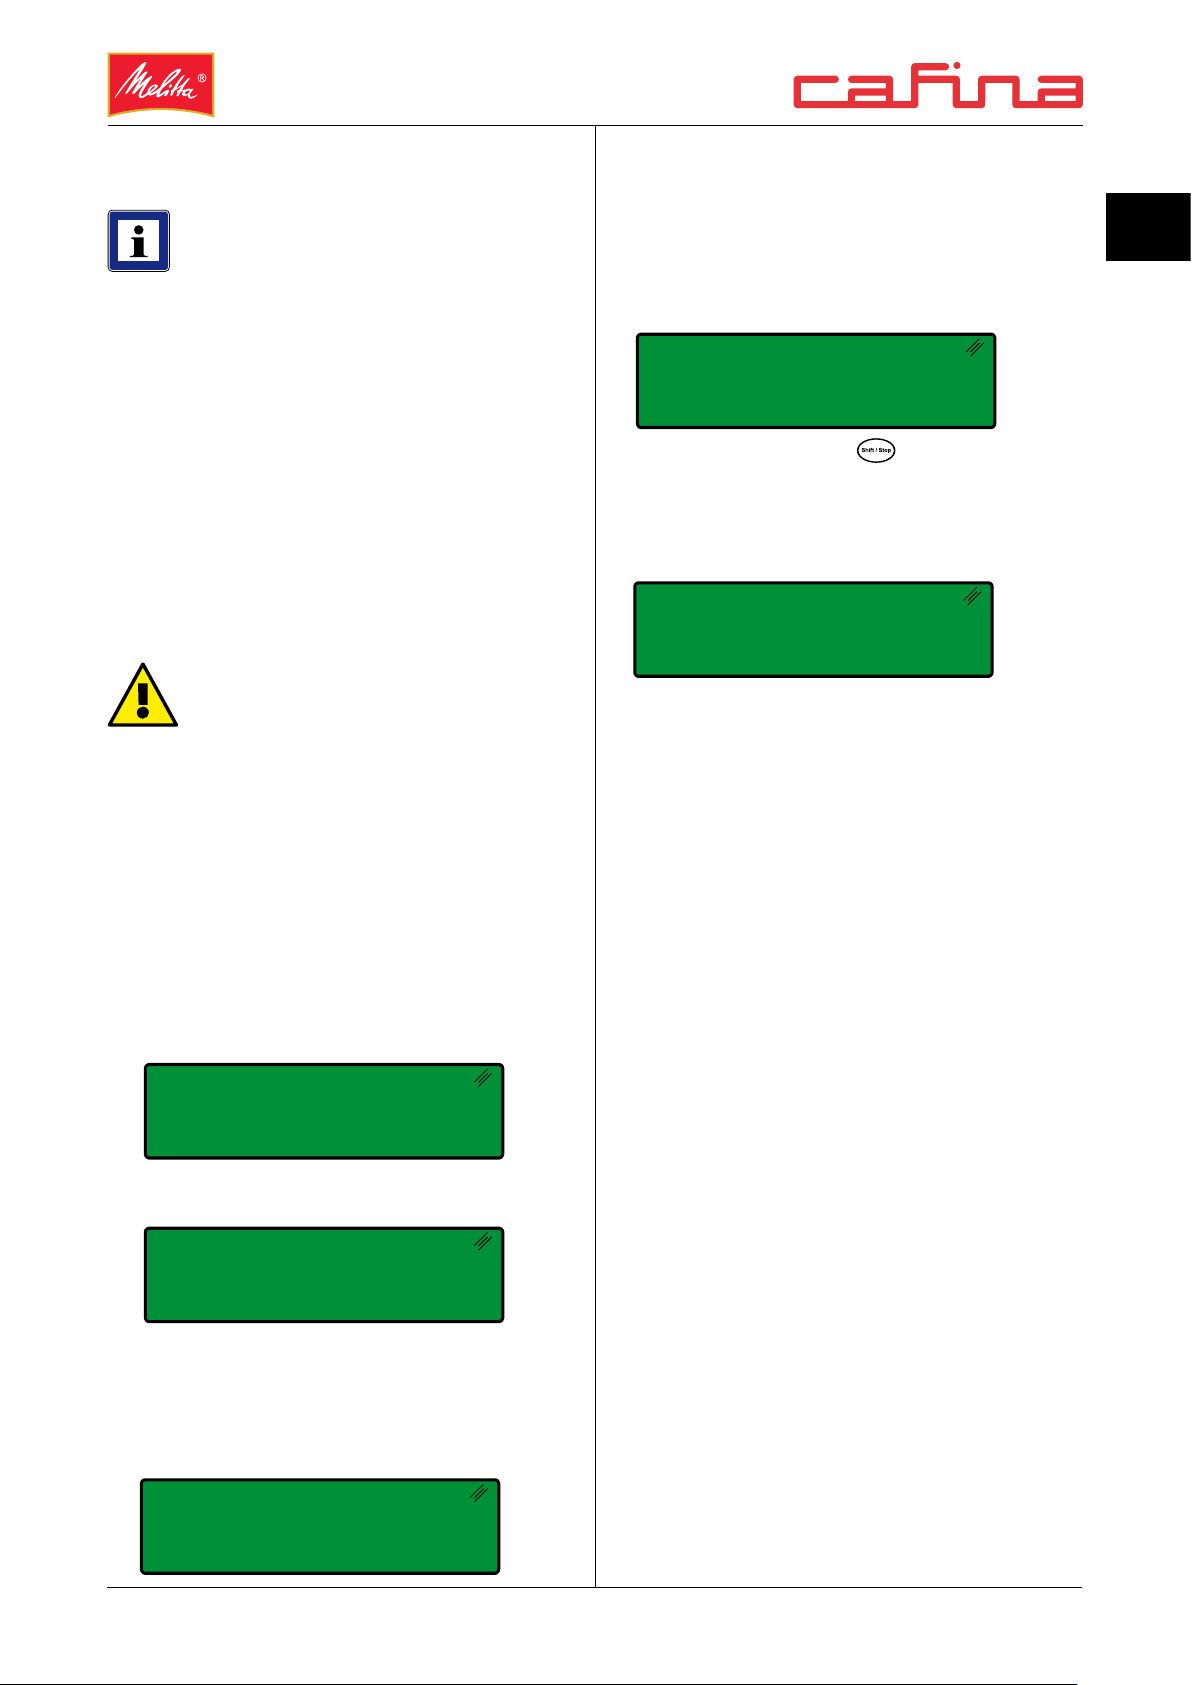
Switching on
1. Insert “user” or “manager” key card and then
remove.
Please conrm (SH)
3. After the coffee machine has heated up,
the “Fill milk” prompt will appear. Insert the
milk bag(s) and put the corresponding milk
connectors into the container and conrm.
4. All ve product elds are illuminated.
Please wait
10:32 PM 08.08.2008
The coffee machine is now lling the milk
system.
Select beverage
10:34 PM 08.08.2008
The coffee machine is now ready to dispense
beverages.
2. The c5 coffee machine heats up. The
second line ashes:
TURN ON
prog.197°F act. 161°F
TURN ON
Steam temp. too low
12
V3.0
OPERATING MANUAL
Page 13
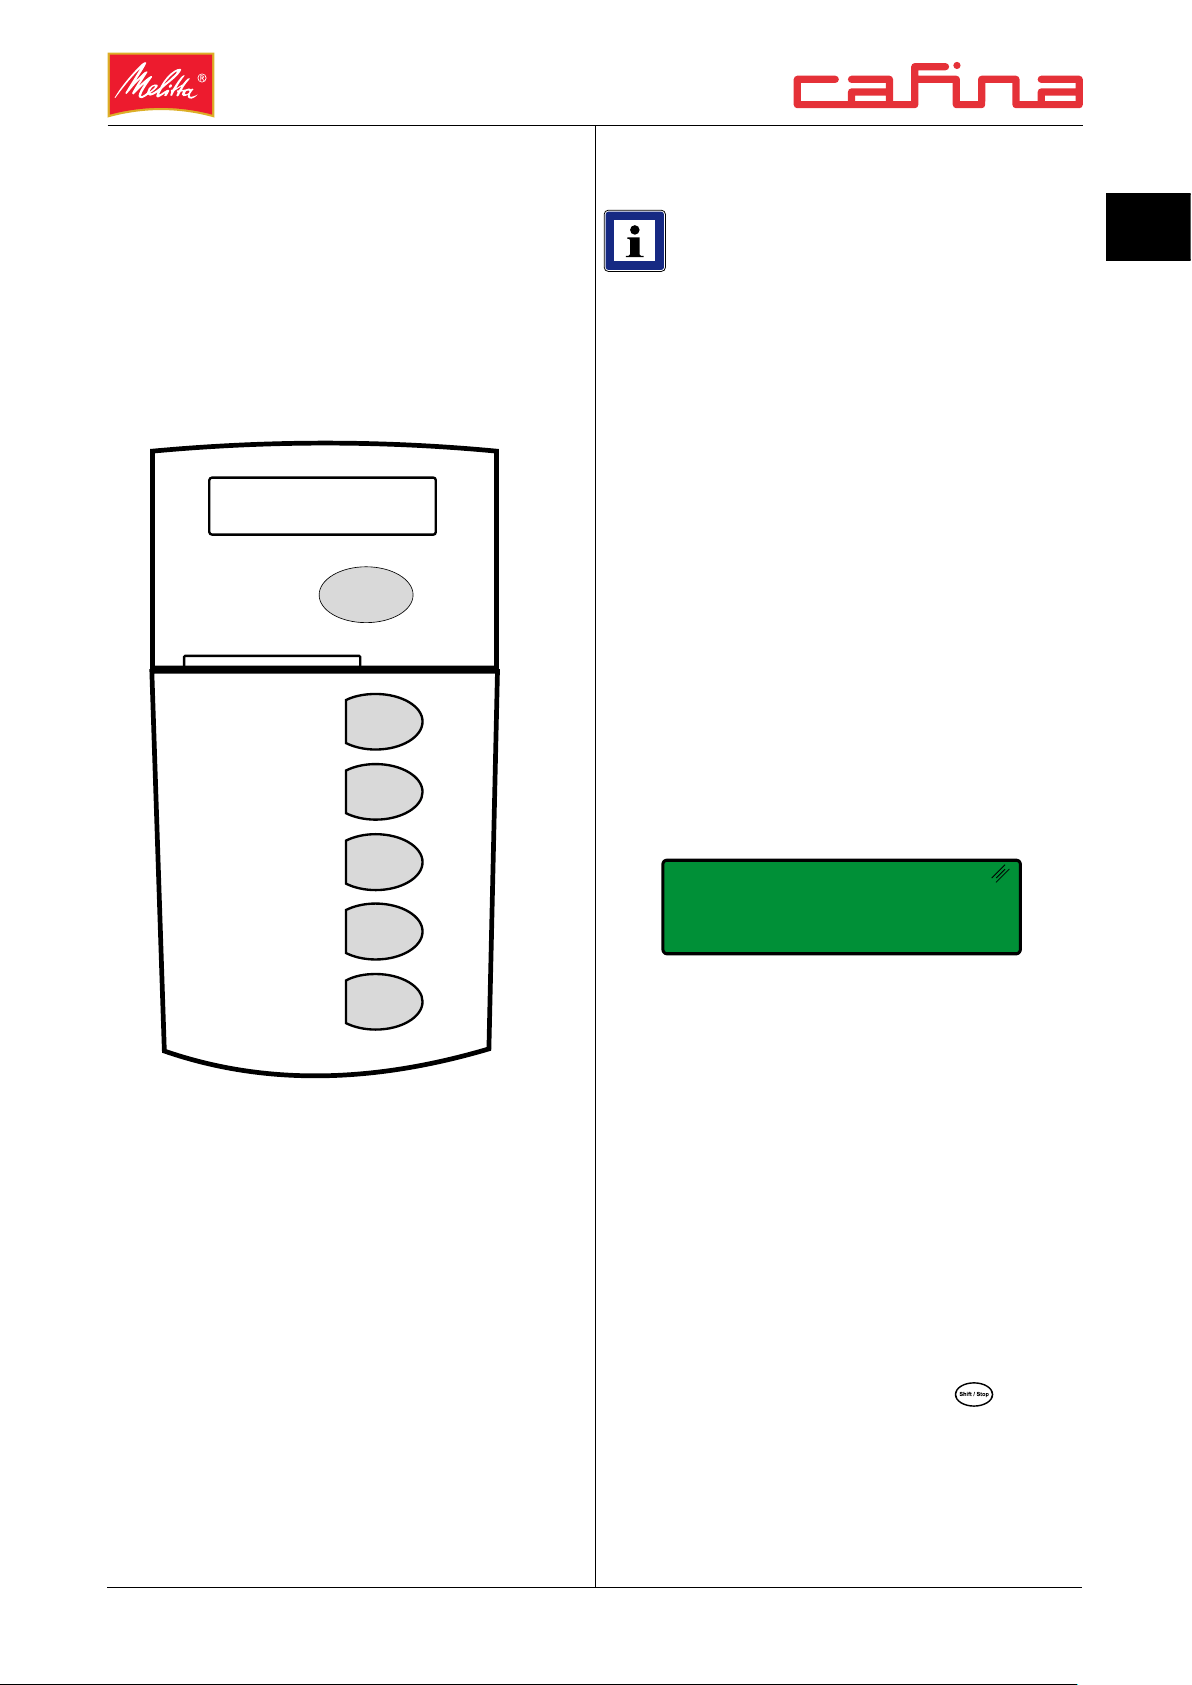
Dispensing of beverages
Reference products
Dispensing normal coffee
The following description of how to dispense
beverages assumes the following allocation to
the beverage selection buttons:
Product elds from top to bottom...
Select Beverage
09:03 AM 06.1.2012
Shift /Stop
Mocha
Latte
NOTE
* after the product in the display
means „reference product from bean
hopper 1“.
** after the product in the display
means „reference product from bean
hopper 2“.
General sequence
1. Push the beverage outlet upwards.
2. Select desired coffee cup.
3. Place 1 coffee cup under the beverage outlet.
4. Push the beverage outlet downwards until the
coffee cup can be removed without having
to push the beverage outlet upwards again.
5. When this message is displayed, the coffee
machine is ready to dispense beverages ...
EN
Iced Mocha /Latte
Hot Chocolate
Add hot milk
Select beverage
10:34 PM 08.08.2008
Select:
• On the preselection keypad:
- Product: Decaf / Non-Fat (if appli-cable).
- Size of beverage: Small / Medium / Large.
• On the product selection keypad:
- Product on key level 1 – direct key stroke.
- Product on key level 2 – “Shift” + product
key.
Stopping the product ow...
You can interrupt the ow of beverage at any time
by pressing the Shift/Stop button [
].
OPERATING MANUAL
V3.0
13
Page 14
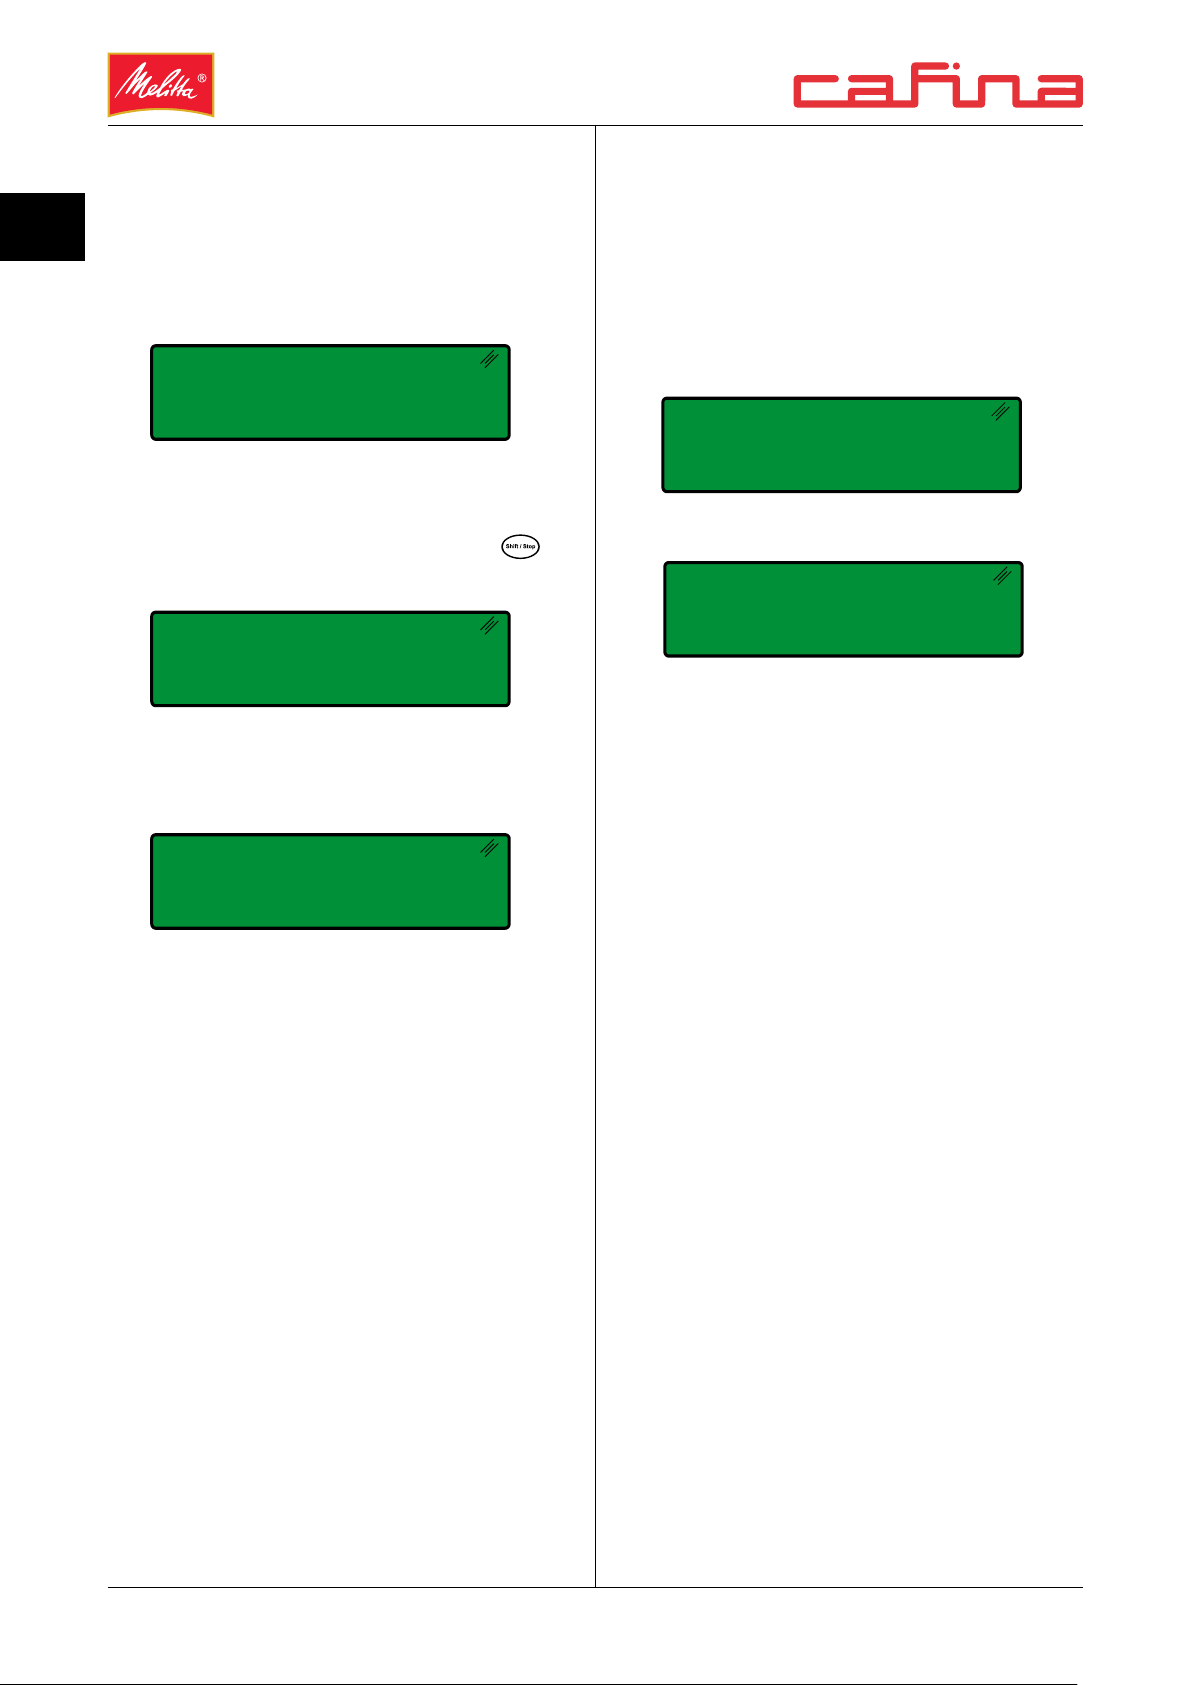
Change milk bag
Rell coffee beans
EN
1. The following message indicates that there is
no milk in the milk bag.
Select beverage
Change milk bag
2. Change the empty milk bag and conrm that
by pressing the Shift/Stop button [
].
Please wait
10:34 PM 08.08.2008
3. The coffee machine is now priming the milk
system.
Select beverage
The bean hoppers are monitored as regards
coffee bean content. If the bean hopper becomes
empty, this is displayed during the dispensing of
a beverage.
The following message appears...
Bean hopper 1 empty
Please conrm
or
Bean hopper 2 empty
Please conrm
1. Fill coffee beans into bean hopper 1, right
hand side.
or ll coffee beans into bean hopper 2, left
hand side
10:34 PM 08.08.2008
You can now dispense beverages as required.
2. Press Shift/Stop button to conrm.
14
V3.0
OPERATING MANUAL
Page 15
Emptying the coffee waste drawer
NOTE
• The coffee waste drawer is full to
capacity when it contains a weight
of 0.7 kg. (1,5 lbs).
When this occurs, the message
„Empty drawer!“ is displayed.
• The coffee waste drawer is 80 %
full when it contains a weight of
0.56 kg. (1,25 lbs).
When this occurs, the message
„Drawer almost full!“ is displayed.
1. Empty the coffee waste drawer, clean with
warm water and dry.
2. Push the coffee waste drawer in. The following message appears...
Drawer emptied?
Please conrm (SH)
Press Shift/Stop button [
3. The following message appears...
].
Select beverage
EN
CAUTION
• If the coffee waste drawer overows,
this will cause serious dirt accumulation inside the c5 coffee machine.
• Always empty the coffee waste drawer
correctly when the c5 coffee machine
is switched on.
1. The following displays indicate how full the
coffee waste drawer is...
...Coffee waste drawer is 80 % full.
Select beverage
Drawer almost full
...Coffee waste drawer is 100 % full.
11:30 PM 08.08.2008
4. You can now dispense beverages as
required.
Select beverage
Empty drawer!
2. Push the beverage outlet all the way up.
3. Pull out the coffee waste drawer. The following
message appears...
Select beverage
Drawer missing!
OPERATING MANUAL
V3.0
15
Page 16
Cleaning the drip tray
Close Procedures
EN
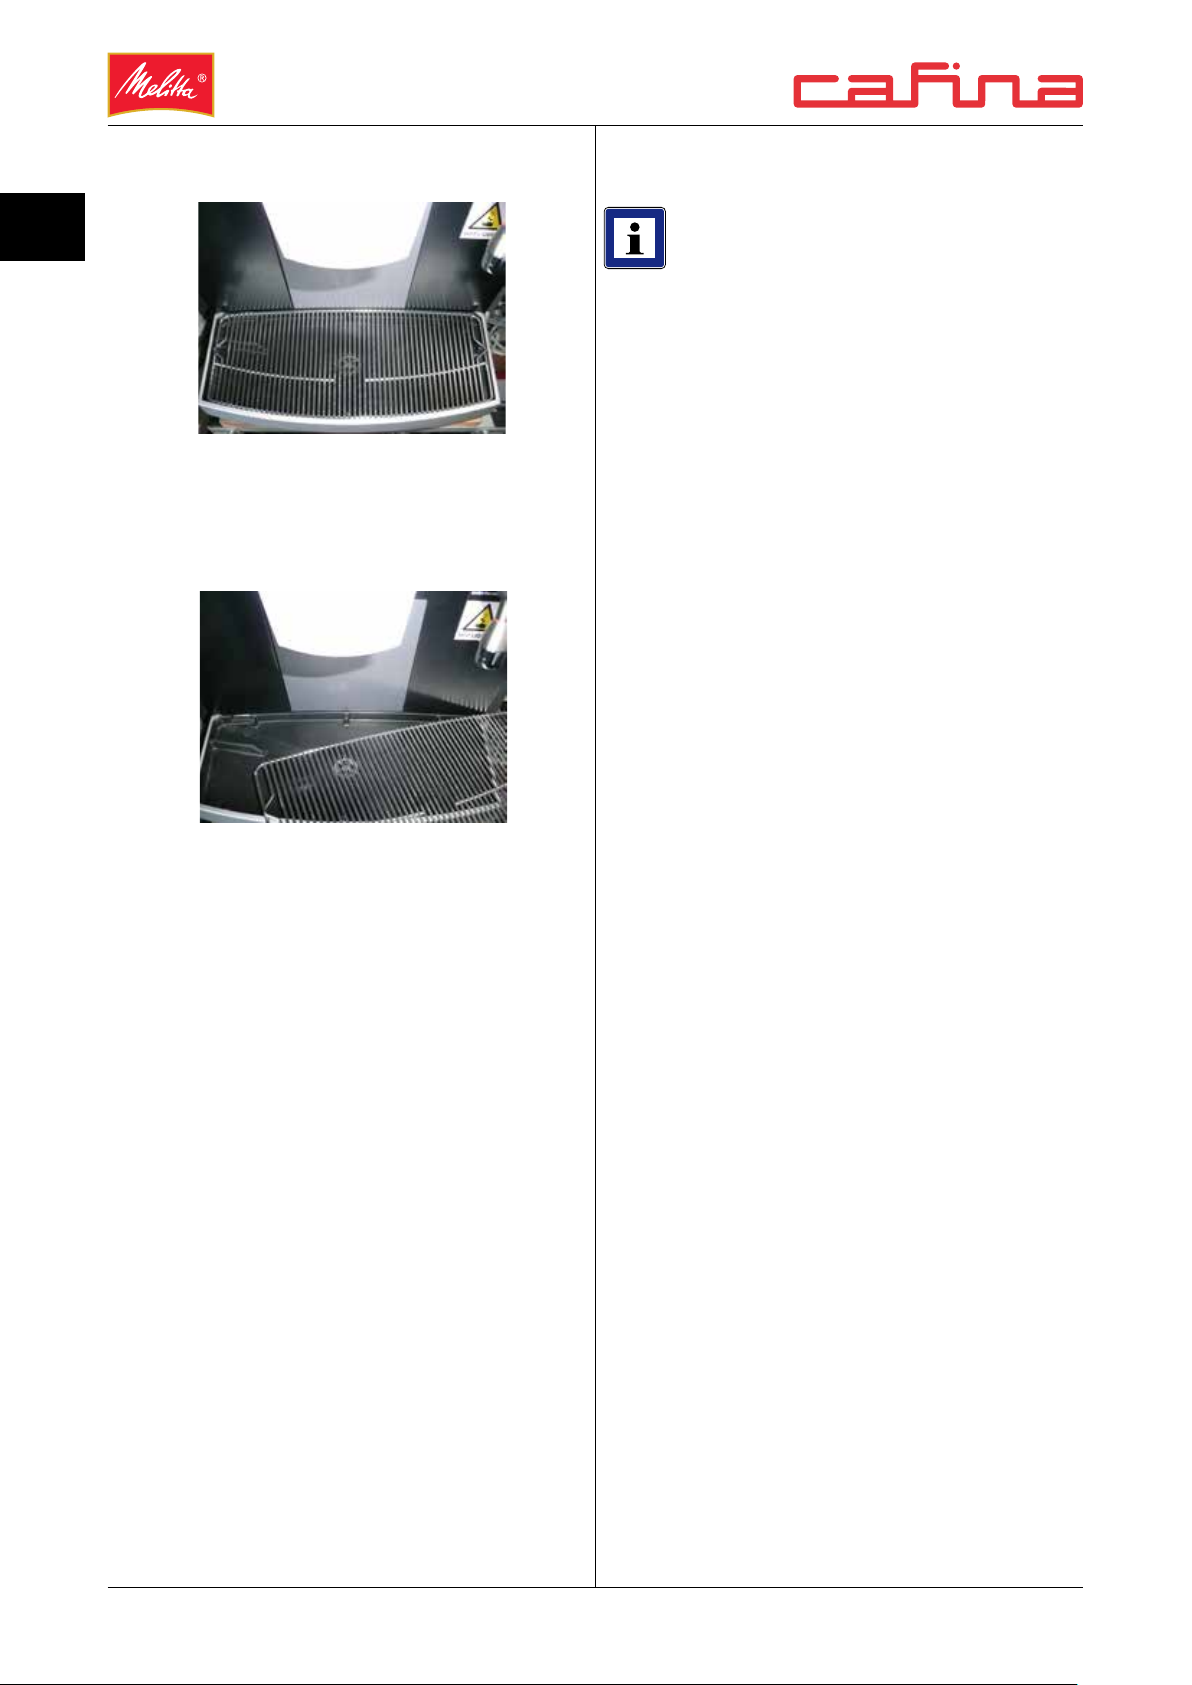
1. The drip grille and drip tray must be cleaned
at regular intervals.
2. Press the drip grille at the back right or back
left corner downwards a little.
NOTE
• Only use combination cleaning tablets
“COMBI-Tabs”.
• Get out three combination cleaning
tablets “COMBI-Tabs”.
• Get the cleaning container
3. Remove drip grille and clean.
4. Clean drip tray and clean out the drain holes
if they are blocked.
5. Place the drip grille in the correct position
on the drip tray, i.e. with the transverse rods
underneath.
16
V3.0
OPERATING MANUAL
Page 17
SYSTEM SETUP /
OPERATION
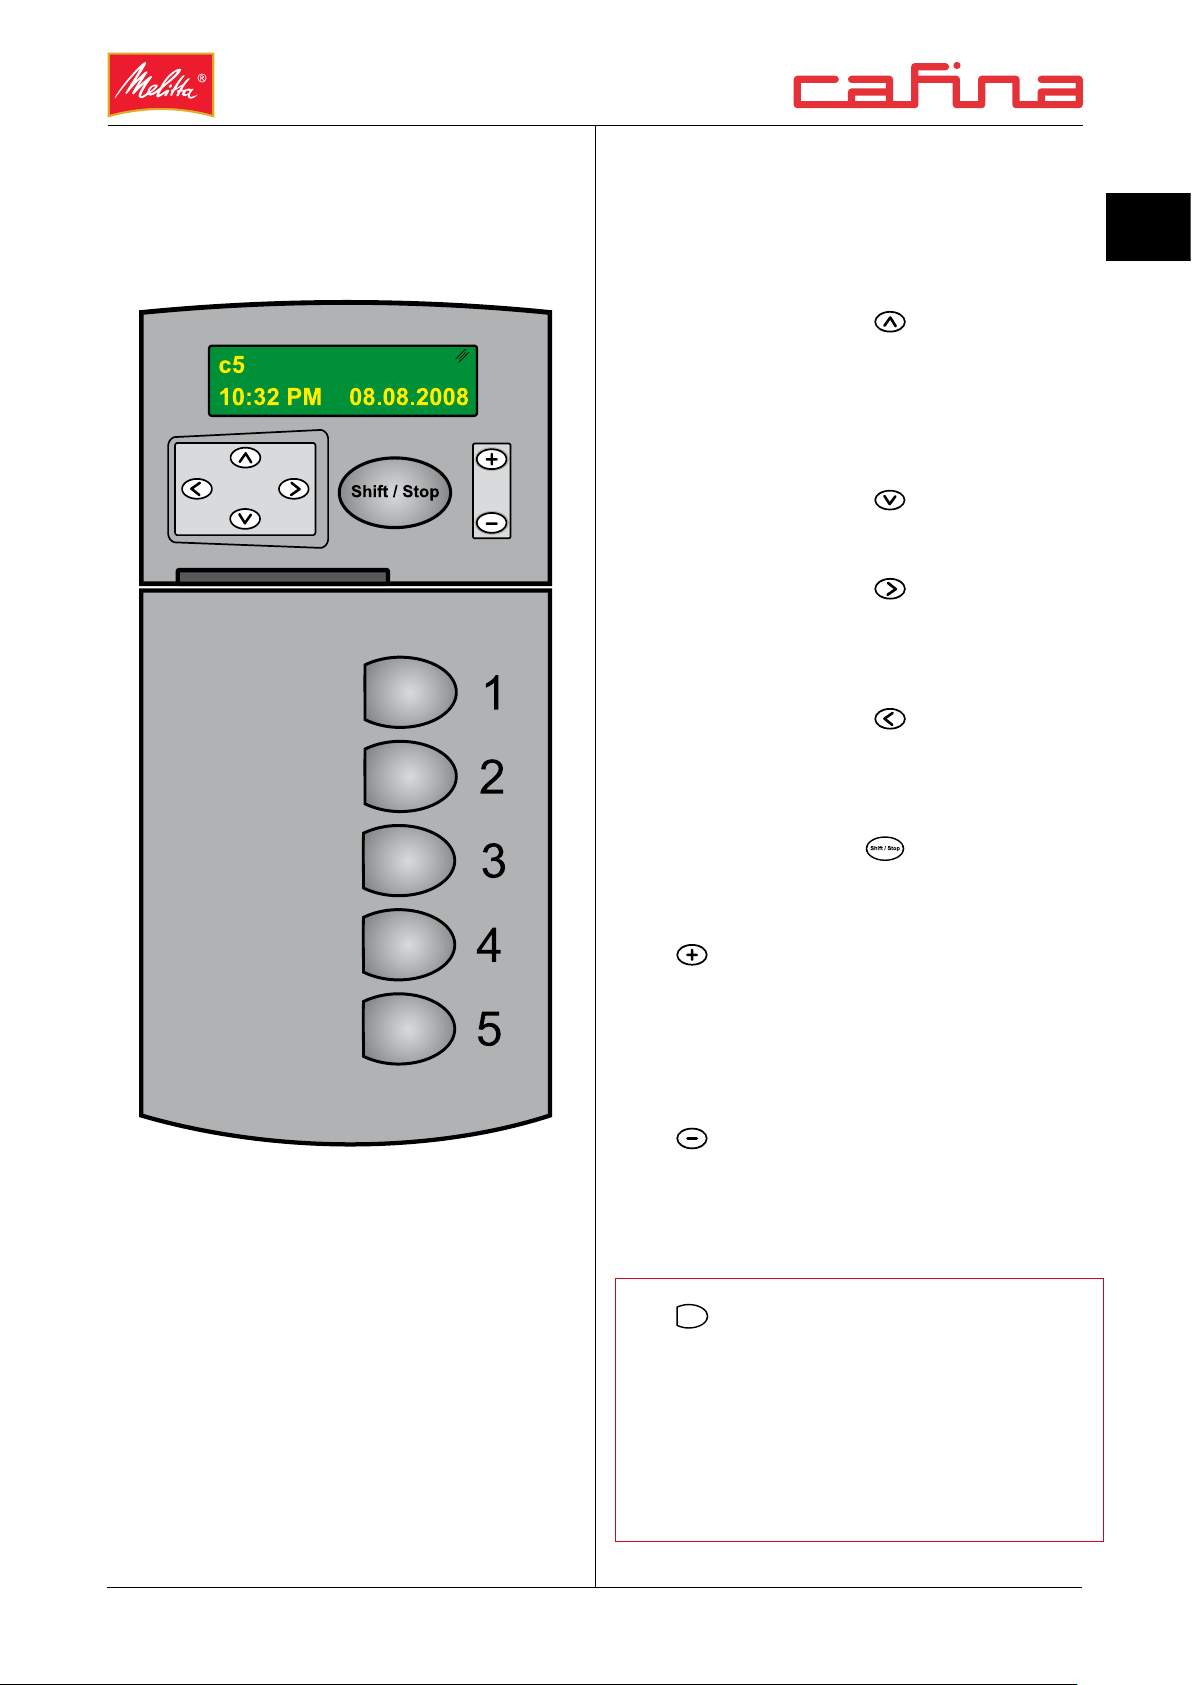
♦ Liquid crystal display
Control panel and button layout
○ Displays information on the correspon-
ding function.
♦ Navigation button [
○ One level higher in the structure
○ Used to conrm queries / or adjusment
values.
♦ Navigation button [
○ One level down in the structure.
♦ Navigation button [
○ One position horizontally to the right in
the structure.
♦ Navigation button [
○ One position horizontally to the left in
the structure.
]
]
]
]
EN
♦ Shift/Stop button [
○ Not allocated.
♦ [
♦ [
♦ [
] button
○ Used to raise the adjustment value in
predened steps.
○ Used to enter “Yes”.
] button
○ Used to lower the adjustment value in
predened steps.
○ Used to enter “No”.
] button (no invisible)
○ 1 = “Yes” in response to textual
questions.
]
OPERATING MANUAL
V3.0
○ 2 to 4 unallocated.
○ 5 = “no” in response to textual
questions.
17
Page 18

EN
Cards
Card handling:
1. Insert key card.
2. Wait until LC-display changes.
3. Remove key card.
♦ “user” key card
• Insertion of the card has the effect
of switching the coffee machine on
or off.
• Insertion of the card has the effect of
granting access to basic functions.
Operation with critical problem
DPxx
• In this condition, the coffee machine is
connected to the main power and water
mains.
• It is not possible to dispense any beverages.
Operation with non-critical problem
♦ “manager” key card
• Insertion of the card has the effect
of granting access to advanced functions.
• Insertion of the card after the adjustment values have been changed
has the effect of conrming the new
settings.
Operating modes
In operation
Select beverage
18:21 PM 08.08.2008
• In this condition, the coffee machine is
connected to the main power and water
mains.
Select beverage
Error coffee part DP16
• In this condition, the coffee machine is
connected to the main power and water
mains.
• There are restrictions on the dispensing of
beverages.
“Stand by” operation (switched off)
c5
18:21 PM 08.08.2008
• In this condition, the coffee machine is
connected to the main power and water
mains.
• There are no restrictions on the dispensing
of beverages.
Out of order (de-energised)
• In this condition, the coffee machine is
disconnected from the main power and water
mains.
• It is not possible to dispense any beverages.
18
V3.0
• It is not possible to dispense any beverages.
OPERATING MANUAL
Page 19

Structure of the functions
Access with the “user” key card
♦
♦ Menu Cleaning
○ Cleaning
♦ Menu Daily counter
○ Coffee total
• Setting 0 - 100 000
○ Other products
• Setting 0 - 100 000
Access with the “manager” key card
♦ Menu Cleaning
○ Cleaning
♦ Menu Daily counter
○ Coffee total
• Setting 0 - 100 000
○ Other products
• Setting 0 - 100 000
♦ Menu Coff. quant. ±1g
○ Coffee products
• Setting ±1g
♦ Menu Flow period water
○ Hot water products
• Setting 0,4 - 120s
♦ Menu Pre-infusion 1 milk
○ Milk / coffee products
• Setting 0 - 50s
♦ Menu Pre-infusion 2 milk
○ Milk / coffee products
• Setting 0 - 50s
♦ Menu Post-infusion milk
○ Milk / coffee products
• Setting 0 - 50s
♦ Menu Flow period milk
○ Milk products
• Setting 0,4 - 120s
EN
○ Reset counter
• Setting yes / no
♦ Menu Total counter
○ Coffee total
• Setting 0 - 1 000 000
○ Milk total
• Setting 0 - 1 000 000
♦ Menu Functions
○ EXTERNAL
• function disabled
○ Self-service
• Setting yes / no
○ ON / OFF timer
• Setting yes / no
○ Memoswitch
• function disabled
○ Milk
• function disabled
♦ Menu Flow period steam
○ disabled
♦ Menu Price do not use
○ For all products
• Setting 0 - 25.00
♦ Menu No charge do not use
○ For all products
• Setting yes / no
♦ Menu Clock / date
○ Hours
• Setting HH
○ Minutes
• Setting MM
○ Day
• Setting DD
○ Month
• Setting MM
○ Disable buttons
• Setting yes / no
♦ Menu Water quantity
○ Coffee products
• Setting 0 - 995ml
OPERATING MANUAL
V3.0
○ Year
• Setting YY
19
Page 20

Brief description of functions
EN
Daily counter
○ With “user” key card
Queries the current counter status for
all products. Deletion of counters is not
possible.
○ With “manager” key card
Queries the current counter status for all
products. Deletion of counters is generally possible.
Total counter
○ Coffee / Milk
Queries the current counter status for
specied products.
Deletion of counters is not possible.
○ EXTERNAL
disabled
○ Memoswitch
disabled
○ Milk
disabled
Water quantity
○ Every individual coffee product
The water quantity can be altered in
predened steps.
Coffee quantity ±1g
○ Every individual coffee product
The powder quantity can be altered in
predened steps.
Functions
○ Self-service
Switches coffee machine to self-service
operation.
The products intended can be dis-pensed
directly.
○ ON/OFF timer
Sets coffee machine to automatic switching on and off.
The switch-on / switch-off times must
have been previously specied by a
service engineer.
○ Disable buttons
Locking and release of the control buttons
on the coffee machine.
Flow period hot water
○ Hot water beverages
The ow time can be altered in predened steps.
Preinfusion 1 milk
○ Every “coffee-milk” beverage
The milk ow time can be altered in
predened steps.
Coffee is then added.
Preinfusion 2 milk
○ Every “coffee-milk” beverage
The milk ow time can be altered in
predened steps.
Coffee is then added.
20
V3.0
OPERATING MANUAL
Page 21

Post-infusion milk
Use of the functions
○ Every “coffee-milk” beverage
The milk ow time can be altered in
predened steps.
Coffee is output rst.
Flow period milk
○ Cold milk
The ow time can be altered in predened steps.
○ Hot milk
The ow time can be altered in predened steps.
Cleaning
• Card: “user” key card
1. Insert / remove card.
Cleaning?
Please conrm (SH)
2. [
3. Start of cleaning procedure.
].button
EN
Flow period steam
disabled
Price do not use
No charge do not use
Clock / date
○ Clock
Used to set the time in the format
«00:10PM»
○ Date
Used to set the date in the format
«Wednesday 10.09.2008»
OPERATING MANUAL
V3.0
21
Page 22

Daily counter
Daily counter
EN
• Card: “user” key card.
1. Insert / remove card.
Cleaning?
Please conrm (SH)
2. 1x [
] button.
Cleaning
3. 1x [
] button.
Daily counter
4. 1x [
] button.
Coffee total
• Card: “manager” key card.
1. Insert / remove card.
Cleaning?
1x
Please conrm (SH)
2. 1x [
] button.
Daily counter
3. 1x [
] button.
Coffee total
xx
4. [
] or [ ] button.
Other beverages
Cleaning
xx
5. [
] or [ ] button.
Other beverages
yy
6. Insert / remove card.
Select beverage
18:21 PM 08.08.2008
yy
5. [
] or [ ] button.
Reset counter
6. 1x [
] button.
Reset counter
7. 1x [
] button.
Daily counter
8. Insert / remove card.
Select beverage
22
V3.0
18:21 PM 08.08.2008
OPERATING MANUAL
Page 23

Total counter
Functions
• Card: “manager” key card.
1. Insert / remove card.
Cleaning
2. 1x [
] button.
Total counter
3. 1x [
] button.
Coffee total
312
4. 1x [
] button.
NOTE
• Only those functions which have
orange background (activated) can
be altered.
• Card: “manager” key card.
1. Insert / remove card.
2. 3x [
] button.
Functions
3. 1x [
] button.
Self-service
1x [
] button.
ON/OFF timer
EN
Tea total
252
5. 1x [
] button.
Steam total
512
6. 1x [
] button.
Milk total
125
7. 1x [
] button.
Total counter
8. Insert / remove card.
1x [
] button.
Disable buttons
4. 1x [
] button.
Self-service
1x [
] button.
ON/OFF timer
1x [
] button.
Disable buttons
5. 1x [
] button.
Functions
Select beverage
18:21 PM 08.08.2008
OPERATING MANUAL
6. IInsert / remove card.
Select beverage
18:21 PM 08.08.2008
V3.0
23
Page 24

EN
Clock / date
• Card: “manager” key card.
8. 1x [
] button.
Clock / date Day
1. Insert / remove card.
Cleaning?
Please conrm (SH)
2. 1x [
] button.
Cleaning
3. 1x [
] button.
Clock / date
4. 1x [
] button.
Clock / date Hours
Wednesday 06.08.2008
9. e.g.1x [
] button.
06
Clock / date Day
Thursday 07.08.2007
10. 1x [
] button.
Clock / date Month
Thursday 03.07.2008
11. e.g.1x [
] button.
07
Clock / date Month
Sunday 03.07.2008
12. 1x [
] button.
08
Clock / date Year
09:27 AM
09
5. e.g.1x [
] button.
Clock / date Hours
09:27 AM
10
6. 1x [
] button.
Clock / date Minutes
10:27 AM
7. e.g.5x [
] button.
Clock / date Minutes
10:27 AM
27
32
Saturday 11.08.2007
13. e.g.1x [
] button.
2007
Clock / date Year
Monday 11.08.2008
14. 1x [
] button.
2008
Clock / date
15. Insert / remove card.
Select beverage
10:32 AM 14.08.2008
After switching off the coffee machine a message
like this appears...
24
V3.0
c5
10:32 AM 14.08.2008
OPERATING MANUAL
Page 25

Resetting to initial installation default
settings
4. The following message appears…
This function is used to reset the coffee machine
software to the default settings that applied upon
rst installation.
The coffee machine reads in from the “memory”
key card all the data which the service technician wrote to the card (“memory” key card) last
time.
NOTE
• All the software modications which
have been made to the functions
using the “manager” card are lost
when machine is reset!
♦ Cards:
c5
Read memory card (+)
10:32 PM 04/16/2008
5. 1x [
] button.
Reading memory card
Remove card
6. Remove “memory” key card.
c5
EN
&
1. To disconnect the coffee machine from the
mains power supply:
○ Pull out the plug
or
○ set separate power switch to OFF.
2. Insert the “memory” key card.
3. To connect the coffee machine from the mains
power supply:
7. Insert / remove “user” key card.
Calibration
Please wait
TURN ON
8. Coffee machine reset is complete.
Select beverage
○ Insert plug
or
○ set separate power switch to ON.
OPERATING MANUAL
V3.0
25
Page 26

EN
MAINTENANCE
This chapter deals exclusively with prevenive maintenance of the equipment. In case of problems,
please consult page 33 “Troubleshooting”
Maintenance schedule
Cleaning intervals
Cleaning area Daily Weekly Monthly
Cover of beverage outlet .................................. ●
Beverage outlet ................................................ ●
Outer panel surfaces ........................................ ●
Control button ................................................... ●
Bean hoppers ................................................... ●
Coffee waste drawer ......................................... ●
Recess for coffee waste drawer ....................... ●
Liquid crystal display ........................................ ●
Milk hoses / refrigerator .................................... ●
Cleaning procedure .......................................... ●
Area underneath the equipment ....................... ●
Drip grille .......................................................... ●
Drip tray ............................................................ ●
Intervals between services
Your c5 coffee machine must be serviced with an
approved McDonald‘s Preventative Maintenance
plan.
26
V3.0
OPERATING MANUAL
Page 27

Cleaning
Cleaning work
CAUTION
• Only use non-corrosive, non-abrasive
household cleaners.
• Only use non-abrasive cloths.
• Do not use any of the normal (rapid)
decalcifying agents.
• Only use combination cleaning tablets
“COMBI-Tabs” for cleaning procedures
Cleaning area
Cover of beverage outlet ..................................
Beverage outlet ................................................
Outer panel surfaces ........................................
Control buttons .................................................
Bean hoppers ...................................................
Coffee waste drawer .........................................
..........................................................................
..........................................................................
Recess for coffee waste drawer .......................
Liquid crystal display ........................................
Milk hoses / refrigerator ....................................
..........................................................................
..........................................................................
Cleaning procedure ..........................................
Drip grille ..........................................................
Drip tray ............................................................
EN
Cleaning work
Clean using damp cloth.
Clean using damp cloth.
Clean using damp cloth.
Clean using damp cloth.
Clean using dry cloth.
Rinse out with warm (not hot) water every time
that it is emptied.
Rub dry with cloth.
Clean using damp cloth.
Clean using dry cloth.
Following the cleaning procedure, clean only the
outside of the milk hose, using a dry cloth.
Clean inside of refrigerator with damp cloth.
For further details, see next point.
Clean using damp cloth.
Clean using damp cloth.
OPERATING MANUAL
V3.0
27
Page 28

EN
Cleaning procedure
Because of the high amount of milk beverages
served from the c5, frequent cleaning cycles are
absolutely required to keep the coffee machine
operational at all times.
The cleaning procedure needs to be performed
daily, and it will start at every shut down procedure. The coffee machine can not be shut off without
cleaning the whole system.
The cleaning process can be performed at any given time by inserting the “user” or “manager” key
card.
The cleaning process consists of a coffee system
cleaning cycle and a milk system cleaning cycle.
The milk cleaning cycle is divided into the actual
system cleaning, the system sanitizing cycle, and
once per week, the system deliming cycle.
a). Coffee cleaning cycle
The coffee cleaning cycle is fully automatic. The
only thing, the operator has to do, is to insert a
cleaning tablet at a prompt in the menu.
b). Milk cleaning cycle
For the milk system cleaning, the operator has to
prepare the sanitizer solution prior to starting the
cleaning process. During the milk cleaning cycle,
the operator will be prompted to change cleaning
jugs by audible and visual messages.
The deliming cycle once a week, using a special
deliming agent, helps to clean the milk system
more thoroughly than with the daily cleaning tablets.
A step by step cleaning procedure is provided with
the coffee machine, and can also be found in the
appendix to this operating manual.
28
V3.0
OPERATING MANUAL
Page 29

TROUBLESHOOTING
Fault display, troubleshooting and fault
acknowledgement
During operation, the control system monitors the operating status continually. Faults are
displayed on the liquid crystal display. In case of
malfunctions, the user or operator can intervene
in accordance with the procedures described
in this chapter an attempt to trouble- shoot the
problem.
Brief description of troubleshooting process:
Checklist for fault diagnosis and troubleshooting
Quick Fix
EN
A quick troubleshooting guide can be found in
the appendix to this operating manual. The same
document should always be available close to the
coffee machine.
More detailed trouble shooting information is
described in the next chapter.
Textual error messages
♦ LCD messages:
- Analyse message on the liquid crystal display.
The possibilities are as follows:
○ Text message.
○ Text message plus diagnosis point (DP)
display.
- First of all insert / remove the “user” or
“manager” key card. If this clears the malfunction, then the coffee machine will be once
more ready to dispense beverages. Otherwise
see below.
- To troubleshoot the problem, proceed as
described in “Textual error messages” and
“Error messages displayed via diagnosis
points (DP)”.
- Insert / remove “user” or “manager” key card
a second time.
○ Temp. too high.
○ Temp. too low.
○ Boiler temp. too high.
○ Boiler temp. too low.
♦ Cause of fault:
○ Unknown hardware or software error.
○ Static charge.
○ Effect of storm (overvoltage due to
storm).
♦ Troubleshooting measure(s):
Disconnect / connect to mains power
supply.
1. Disconnect the coffee machine from the mains
power supply.
2. Wait at least 20 seconds.
3. Connect coffee machine.
- If this clears the malfunction, then the coffee
machine will be once more ready to dispense
beverages. If not, disconnect the coffee
machine from mains power by pulling the plug
from the wall socket and reconnect after about
20 seconds, or via the circuit breaker on the
mains panel.
OPERATING MANUAL
4. Insert “user” or “manager” key card to switch
machine ON.
5. Decision:
If the textual error message is no longer
shown, there is no need for any action.
If the textual error messages are still visible,
notify Customer Support.
V3.0
29
Page 30

♦ LCD messages:
♦ LCD messages:
EN
○ Change milk bag.
♦ Cause of fault:
○ Milk level too low.
♦ Troubleshooting measure(s):
Check if milk connectors are fully inserted in
milk bag.
○ check milk level.
○ change milk bag, if required.
See also “Change milk bag” page 14.
♦ LCD messages:
○ No milk available.
○ No water.
♦ Cause of fault:
○ Check water connection:
Connect Disconnect
♦ Troubleshooting measure(s):
Open stopcock in the external fresh water
feeder hose.
Check that the quick disconnect (can be metal
or white plastic) is fully inserted. Push together to make sure, if is fully connected.
Clean or replace external water lter.
♦ Cause of fault:
○ Acknowledge of message “Milk lled”
with “no”.
○ Shortage of water while cleaning.
♦ Troubleshooting measure(s):
Unplug and reconnect coffee machine and
conrm with “yes”.
♦ LCD messages:
○ Drawer missing!
♦ Cause of fault:
○ Coffee waste drawer not inserted or
not pushed in far enough.
♦ Troubleshooting measure(s):
♦ LCD messages:
○ Bean hoppers (1 or 2).
♦ Cause of fault:
○ Bean hopper 1 or 2 is empty.
♦ Troubleshooting measure(s):
Rell coffee beans, see also “Rell coffee
beans” page 14.
Use coffee waste drawer correctly.
See also “Emptying the coffee waste drawer”
page 15.
30
V3.0
OPERATING MANUAL
Page 31

♦ LCD messages:
♦ Troubleshooting measure(s):
○ Boiler level.
♦ Cause of fault:
○ Water level too low.
○ Too much time elapses during the lling
operation.
♦ Troubleshooting measure(s):
There may be a water leak or the water feed
may be insufcient.
The coffee machine is still in operation;
however it is necessary to keep an eye on
it.
Contact Customer Support.
♦ LCD messages:
○ Filter.
♦ Cause of fault:
The coffee machine is still in operation;
however it is necessary to keep an eye on
it.
Contact Customer Support.
♦ LCD messages:
○ Service Coffee.
○ Service Milk.
♦ Cause of fault:
○ The whole system needs servicing.
○ The milk system needs servicing.
♦ Troubleshooting measure(s):
The coffee machine is still in operation;
however it is necessary to keep an eye on
it.
EN
○ The main water lter has reached the
end of its life cycle and needs to be
replaced.
♦ Troubleshooting measure(s):
The coffee machine is still in operation;
however it is necessary to keep an eye on
it.
Contact Customer Support.
♦ LCD messages:
○ Grinder correction.
♦ Cause of fault:
○ The automatic coffee bean grinding
calibration is not working. This results
in reduced quality of the beverages
dispensed.
Contact Customer Support.
♦ LCD messages:
○ Foamer replacement.
♦ Cause of fault:
○ Cover plate on foamer head casting has
been removed, or has not been xed
property.
♦ Troubleshooting measure(s):
Put cover back and x with 2 screws.
OPERATING MANUAL
V3.0
31
Page 32

♦ LCD messages:
♦ Diagnosis point (DP):
EN
○ Reboot system.
♦ Cause of fault:
○ Fatal system error.
♦ Troubleshooting measure(s):
Unplug machine or switch off at circuit breaker
on mains panel. Wait for 20 seconds and
reconnect.
Error messages displayed via diagnosis
points (DP)
♦ Diagnosis point (DP):
○ 0 / 1 / 2 / 4 / 5
♦ Cause of fault:
○ 8 / 9 / 10 / 16 / 17 / 18 / 22 / 23
♦ Cause of fault:
○ System fault.
♦ Troubleshooting measure(s):
Contact Customer Support.
Extended Troubleshooting functions with
“Troubleshooter” key card
Delivered with every c5 coffee machine is a “Troubleshooter” or “Machine status” key card.
This card can be used between the service organization and the coffee machine user to track down
a specic problem on the coffee machine.
○ System fault.
♦ Troubleshooting measure(s):
Contact Customer Support.
♦ Diagnosis point (DP):
○ 7
♦ Cause of fault:
○ Coffee waste block too high.
♦ Troubleshooting measure(s):
Check coffee waste drawer:
○ empty coffee waste drawer correctly.
More details can be found on the separate chart
in the appendix to this document.
see also “Emptying the coffee waste drawer”
page 15.
If the fault persists, contact Customer
Support.
32
V3.0
OPERATING MANUAL
Page 33

ORDERING PARTS / SERVICE
Technical information
The c5 coffee machine representative for the
USA:
Melitta USA Inc.
665 Tollgate Road, Suite B
Elgin, IL 60123 (EE. UU.)
Teléfono: (847) 214 8088
Fax: (847) 214 8061
www.melitta.com
For quick reference when calling service, please
note the following:
c5 machine serial number:
NON-SCHEDULED MAINTENANCE
EN
WARNING
• Inspection, testing, and repair of
electrical equipment should only
be performed by qualied service
personnel.
WARNING
• All electrical connections should be
disconnected and the hood circuit
breaker should be turned off when
servicing the clamshell grill.
McD store number:
APPENDICES
♦ Circuit diagram c5-FF 34
♦ Circuit diagram FOST PCB 35
♦ QUICK OPERATING MANUAL 36
♦ Daily Cleaning 47
♦ Weekly Cleaning 49
♦ Sanitizing Procedure 51
♦ Foamer head 53
♦ Machine status key card 55
OPERATING MANUAL
V3.0
33
Page 34

EN
34
V3.0
OPERATING MANUAL
Page 35

EN
OPERATING MANUAL
V3.0
35
Page 36

Short Cupping/Low Temp Basic Troubleshooting
EN
Drinks are short lling
Drink temperatures are low
● Change foamer head
● Clean the lower foamer head tting with
a clean brush
● Run a cleaning cycle
Check refrigerator temperature
● No cooler than 36 f.
● No warmer than 40 f.
If problem persists, a service
call is required
Fault Reset Basic Troubleshooting
Insert the user card to clear a fault
and restart the machine
Use the 5 Button Reset Procedure if
the machine can not be restarted with
the User Card
● Any DP code on the screen
● Buttons are not functioning
● Steam temp too low
● No hot water
● No coffee from spout
● Change/No milk will not clear
● Bean Hopper error will not clear
● Boiler level low message
● Piston Normal position message
Press these 5 Buttons Simultaneously
1. 2. 3. 4. 5.
c5
Shi / Stop
A successful restart will make the screen
go blank and restart the machine
36
V3.0
OPERATING MANUAL
Page 37

No Water Basic Troubleshooting
Ensure that there is water
owing to the machine
● Check the water ltration/ R.O. system
● Is the water supply valve open?
● Check that the water line for the ma-
chine is not pinched and restricting
water ow
● Disconnect and Reconnect the water
line quick disconnect coupling. Push
together both ends of coupling until a
click is heard
● Still No Water?
A service call may be required.
Coffee Stick
Open Position
Quick disconnect
EN
Change Milk Bag/No Milk Basic Troubleshooting
Milk Bags
● Change empty milk bag
● Check that the milk bag
tops are pushed all the
way down in the slot
● Check that the lines
routed from the milk box
to the milk bags are not
pinched
● Check that milk connectors are pushed all the
way into the bag
● Check milk type
Was a yogurt bag used
by mistake?
Check refrigerator
temperature
● No cooler than 36 f.
● No warmer than 40 f.
● Check that milk lines are
not frozen
Swap milk bag connectors
Place whole milk connector
on non-fat milk bag
Place non-fat milk connector
on whole milk bag
Does the drink selection
work with the connectors
swapped?
● No, call for a service visit
● Yes, swap milk bags.
The machine may be used
with only one bag
until serviced
Non-emergency
service call required
OPERATING MANUAL
V3.0
37
Page 38

Wrong Card Basic Troubleshooting
EN
Clean the User card with a sanitizing towel User Card Still Does Not Work
● Try a different User or Manager card
● If a different card works, the rst User
card is bad
● A card from a different store may be
used
Dry and re-insert the cleaned User card
Call for a service technician if you are
unable to start or clean the machine
Replace Foamer Head Basic Troubleshooting
Check for proper connection of hose
ttings to the foamer head
● Verify that the cover plate is
seated correctly
● Check that cover plate screws
are fully tightened
Note: Foamer cover plate has a safety switch in-
stalled in the machine. If the limit switch screw does
not make contact with the safety switch,
the message will not clear.
Adjusting the foamer cover plate
limit switch screw
● Loosen retaining nut. Back off until it
touches the bottom of the screw head
● Tighten screw until it is fully seated
(should look like picture above)
● Loosen limit switch screw 2 full
revolutions and tighten nut
Note: Do not allow the limit switch screw
to turn while tightening the nut
38
V3.0
OPERATING MANUAL
Page 39

Drawer Missing/Empty Basic Troubleshooting
Drawer Missing
● Is the grounds drawer
pushed all the way in?
● If drawer is fully installed, clean the coffee
grounds drawer
● Clean area outside and
behind the coffee grounds
drawer to remove any
build up that may prevent
the drawer from closing
● Clean inside the coffee
grounds drawer
Empty Drawer
● Empty the coffee grounds
drawer
● Press the shift button to
con rm that drawer was
emptied
● Drawer must be removed
for ten seconds or the
message will not clear
EN
Bean Hopper Empty Basic Troubleshooting
Are there coffee beans
in the hopper?
● Stir the coffee beans and
check for obstruction.
● Is the bean gate open?
Remove the bean hopper
● Push beans down the
tube with a long handled
stirring spoon
● Replace hopper
● Open bean gate
● Make another drink
Note: Alternate grinder may be
used until service is available
Try the opposite Grinder
● Place hopper onto the
other hopper holder, and
open the bean gate
● Press the top button on
the Pre-selection pad
● Run an espresso drink
Note: Service is required if
grinders do not work or hopper
must be swapped to continue
production
OPERATING MANUAL
V3.0
39
Page 40

EN
Water leak Basic Troubleshooting
After cleaning cycle:
Approximately 2-3 ounces of water
is normal in:
● Waste drawer
● Milk box
During Normal Use:
Is water lling the drip tray and spilling
onto the refrigerator?
If drip tray is full:
● check for debris blocking drain
Remove and dry any excess water
from the waste drawer
Tilt milk box outside of the refrigerator to
drain condensation
Wait 1-2 hours and check for new water
If new water is found, a service call is
required
● verify that drain hose is not kinked,
pinched, or excessively sagging
Melitta SystemService
Service Hotline
866-910-9105
40
V3.0
OPERATING MANUAL
Page 41

without running a complete cleaning
cycle. Please follow the cleaning
instructions on page 7.
Insert User or Manager card face up.
Remove after the display shows please
conrm.
NOTE: Machine can not be switched OFF
Bean hopper 1
Bean hopper
slider
Operating panel
WARNING:
When beverages are dispensed,
there is a risk of scalding from
steam and hot liquids!
Proceed with care!
Coffee waste
drawer
Drip tray
EN
Revised 01/2010
Press preselect buttons for specia-1.
lity and cup size
Press product button. 2.
Press „Shift/Stop“ button rst to
access second level of products.
Select the desired beverage:
Display
Shift/Stop
button
Product
buttons
The c5 is ready to serve
beverages when the
display shows Select
beverage.
If message Fill milk is
displayed, refer to pro-
cedure on page 2 of this
document.
Specialty Coffee Machine
Insert User or
Manager card face up.
Remove card when
display shows Turn on.
Do not leave card in
machine.
-1-
Turn ON Machine Machine ready Turn OFF Machine
BASIC DAILY OPERATION
access cover
Foamer head
Bean hopper 2
WARNING:
Risk of scalding.
Hot water and steam ow from spout
during start up.
Display
Preselection
keypad
Drip grate
Beverage spout
Preselect
Machine Overview
Place one cup of the desired size
under the spout.
Dispensing Beverages
buttons
Adjust the spout height to be
approximately ½ inch above the
cup rim.
OPERATING MANUAL
V3.0
41
Page 42

EN
Revised 01/2010
If message „Bean Hopper em-
pty“ appears on display, Lift
the lid from the empty bean
hopper. Rell with fresh coffee
beans. Make sure to ll beans
evenly on both sides of insert
in the bean hopper.
Topping Up Coffee Beans
Slider
To remove a bean hopper for rell
or cleaning, move the slider all the
way in, hold bean hopper with both
hands on the conical section rotate
it slightly forth and back and lift it
Removal of Bean Hopper
upwards.
The mandatory daily system
cleaning procedure is described in
page 5 and 6 of this document.
Specialty Coffee Machine
If message „Fill milk“ or „Change Milk bag“ appears
open door on refrigerator, pull milk connector out of
the empty milk container and reinsert milk connector
into new bag. Close door to fridge. Push Shift/Stop
button to conrm.
Fill Milk / Change Milk bag
-2-
TOPPING UP AND MACHINE CLEANING
When the message „Empty
drawer“ appears on the display,
move the spout all the way up,
pull the waste drawer out and
empty it in the waste bin. Rinse
the drawer with warm water and
wipe dry with a cloth.
Emptying Coffee Waste Drawer
- Cover of beverage spout, spout itself
- Both bean hoppers
- Recess for coffee waste drawer
- Control panels
Daily Cleaning Daily System Cleaning
In addition to the automatic
cleaning cycle, the following parts
must be cleaned, using a
sanitizer soaked towel.
42
V3.0
OPERATING MANUAL
Page 43

c5
06:19 AM 12/01/2009
7.
Restart the machine with the User card
Select beverage
Error coffee part DP_ _
6. FAULT MESSAGE
Clear the fault with the User card
TURN ON
prog.197°F act. 191°F
Fault conrmed
Select beverage
06:20 AM 12/01/2009
c5
06:18 AM 12/01/2009
OK?
866-910-9105
NO? ( CALL SERVICE CENTER
EN
Revised 01/2010
Specialty Coffee Machine
4.
Check the milk level ►Are both bags full?
Select beverage
06:15 AM 12/01/2009
Are both milk pick up tubes fully inserted?
-3-
QUICK FIX
Coffee machine not working:
1.
Check power ►Is the Display lighted?
2.
Check water hose quick connector
5.
Check waste drawer
3.
Check bean hoppers ►Are both hoppers
Connected Disconnected
full?
Drawer pushed all the way in?
Check slider
must be open
OPERATING MANUAL
V3.0
43
Page 44

EN
tors and push Shift
Open bean hopper slider
are fully inserted and push Shift
To bean hopper up with coffee beans.
Check quick disconnect. Insert „User“ card
Check water connection to coffee machine.
power
Run complete cleaning cycle
before reinserting. Try another card
Revised 01/2010
Empty coffee waste drawer.
If fault persists, contact technical service
Put full milk container in fridge, make sure connectors
Place milk container(s) into refrigerator, insert connec-
Causes of Faults Steps to be Taken for Remedy
Reinsert card face up. Wipe card with damp cloth, dry
Specialty Coffee Machine
Disconnect / reconnect coffee machine from / to main
Drink temperature too low
Underlling / short cupping
<Display and buttons Frozen> Unplug unit for 3 sec.
44
Message
<Fill Milk> Start up message
<Change milk bag> Milk container in refrigerator is empty
LC-Display - Plain Text Error
-4-
Checklist for Tracking and Rectifying of Faults
ALARM HANDLING AND TROUBLESHOOTING
<No water> Fresh water ow insufcient
<Drawer missing> Coffee waste drawer missing or inserted incorrectly Insert coffee waste drawer correctly
<Wrong card> Key card inserted upside down or backwards
<Reboot System> System Error
<Bean hopper (1 or 2) empty> Coffee bean hopper 1 or 2 is empty
V3.0
<DP 7> Coffee waste drawer is over lled
Diagnostic Point Causes of Fault Steps to be taken for Remedy
Fault Display via Diagnostic Points (DP)
A number of machine faults are being displayed by „Diagnostic Points“ (DP). Most of these faults can only be rectied by trained service personnel.
Generally, to recover from a DP-error, insert the „User“ or „Manager“ card twice. If the error persists, contact technical service.
<DP 0 - DP 24> System fault Contact technical service
OPERATING MANUAL
Page 45

EN
Revised 01/2010
Specialty Coffee Machine
Lower Volume Stores (fewer than 500 drinks per week)
Follow this chart for machines that produce fewer than 500 drinks each week
The machine must also be cleaned two (2) times any single day producing more than 85 drinks
Monday Tuesday Wednesday Thursday Friday Saturday Sunday
-5-
top for coffee
LOWER VOLUME STORES
Cleaning tablet in
pitcher
1 bag Delimer
in milk cleaning
2 Cleaning tablets
powder in milk
pitcher
cleaning pitcher
Empty sanitizer
Install Clean
Foamer head
OPERATING MANUAL
V3.0
45
Page 46

EN
Revised 01/2010
Daytime Cleaning Night Cleaning
Specialty Coffee Machine
Follow this chart for machines that produce more than 500 drinks each week
Higher Volume Stores (more than 500 drinks per week)
See pages 7 & 8
Cleaning tablet in top for coffee
-6-
HIGHER VOLUME STORES
See pages 7 & 8
2 Cleaning tablets in milk cleaning pitcher
See pages 9 & 10
1 bag Delimer powder in milk cleaning pitcher
See pages 11 & 12
Empty Sanitizer pitcher
See page 13
Install Clean Foamer head
46
V3.0
OPERATING MANUAL
Page 47

Daily Cleaning
Why Daily cleaning of the machine
Time required 1 minutes to prepare 24 minutes to complete
Time of day at closing of store For 24-hour restaurants
Hazard icons
Tools and supplies
Mon. / Tues. /
Thurs. / Fri. / Sat.
Between 12:00 AM till 4:00 AM
nd
2
daily cleaning for higher volume stores
Anytime during the day - Managers preference
BE51D1
Cana c5-12C FF Daily BE51D1
Revised 01/2010
EN
«user» chip
card
Melitta Combi
Tabs
Procedure
Step 1
Insert the «user» card (chip
facing up) to start the clea-
ning cycle.
Specialty Coffee Machine
Step 2
Remove the card and
replace in the holder on the
side of the machine.
Step 3
Push button
Cleaning-Jug
«Delimer»
Step 4
Push
Step 5
Display alternates between
button to conrm
and
Push button
Drawer emptied
Please conrm (
Clean milk with
cleaner
Please conrm (SH)
SH
)
Lift the spout.
Empty and replace the cof-
fee waste drawer
-7-
DAILY CLEANING
OPERATING MANUAL
V3.0
47
Page 48

EN
Daily Cleaning (continued)
Step 6
Open the refrigerator and
remove the milk connectors
from the milk bags. Place the
milk lines in a empty jug. Make
sure the connectors are at the
bottom of the jug. Immediately
carry the remaining milk to the
walk-in cooler for storage.
Step 7
Step 12
Proceed to sanitizing
procedure
Cana c5-12C FF Daily BE51D1
Revised 01/2010
Push button
Step 8
Put 1 Melitta Combi Tablet in
the top of the machine after
the machine prompts «put
1 cleaning tab for coffee in
top» (after 4 min.).
Step 9
Push button
Step 10
to conrm
to conrm
Please conrm (SH)
Please conrm (SH)
Specialty Coffee Machine
Put 2 Melitta Combi Tablet
in the jug after machine
prompts «put 2 cleaning
tabs into jug».
48
Step 11
Push button
-8-
DAILY CLEANING - cont.
to conrm
Please conrm (SH)
WARNING: Never put Delimer Powder in the top of the machine.
Use only one Melitta Combi Tablet in the top.
V3.0
OPERATING MANUAL
Page 49

Weekly (Deliming 2x Week) Weds./Sun. BE51W1
Why Weekly cleaning of the machine remove milk stone
Time required 1 minutes to prepare 24 minutes to complete
Time of day at closing of store For 24-hour restaurants
Between 12:00 AM till 4:00 AM
nd
2
daily cleaning for higher volume stores
Anytime during the day - Managers preference
Hazard icons
Tools and supplies
Cana c5-12C FF Weekly BE51W1
Revised 01/2010
EN
«user» chip
card
Melitta Combi
Tabs
Procedure
Step 1
Insert the «user» card (chip
facing up) to start the clea-
Specialty Coffee Machine
Step 2
Remove the card and
replace in the holder on the
side of the machine.
Step 3
Push button
Cleaning-Jug
McD Delimer
ning cycle.
«Delimer»
bag
Step 4
Push
Step 5
Display alternates between
button to conrm
and
Push button
Drawer emptied
Please conrm (SH)
Clean milk with
delimer
Please conrm (SH)
Lift the spout.
Empty and replace the cof-
fee waste drawer
-9-
WEEKLY CLEANING
OPERATING MANUAL
V3.0
49
Page 50

EN
Weekly Deliming (continued)
Step 6
Open the refrigerator and
remove the milk connectors
from the milk bags. Place the
milk lines in a empty jug. Make
sure the connectors are at the
bottom of the jug. Immediately
carry the remaining milk to the
walk-in cooler for storage.
Step 7
Step 12
Proceed to sanitizing
procedure
Cana c5-12C FF Weekly BE51W1
Revised 01/2010
(4 min.
to conrm
).
to conrm
Please conrm (SH)
Please conrm (SH)
Push button
Step 8
Put 1 Melitta Combi Tablet in
the top of the machine after
the machine prompts «put 1
cleaning tab for coffee in top»
Step 9
Push button
Step 10
Specialty Coffee Machine
Put 1 bag McD Delimer in
the jug.
50
Step 11
Push button
-10-
WEEKLY CLEANING - cont.
to conrm
Please conrm (SH)
WARNING: Never put Delimer Powder in the top of the machine.
Use only one Melitta Combi Tablet in the top.
V3.0
OPERATING MANUAL
Page 51

Sanitizing procedure Daily BE51D2
Why to sanitize to the machine after daily or weekly cleaning cycle
Time required 1 minutes to prepare 3 minutes to complete
Time of day after daily or weekly cleaning cycle
Cana c5-12C FF Daily BE51D2
Revised 01/2010
EN
Hazard icons
Tools and supplies
Cleaning-Jug
«Sanitizer»
Procedure
Once the daily or weekly
cleaning cycle is completed,
the machine will beep and the
display alternates between
Specialty Coffee Machine
Step 1
and
Insert the empty jug for
sanitizing into fridge
Please conrm (SH)
Step 2
Push button to conrm
Display reads
Sanitizing with hot
water Temp. 200°F
Insert both milk tubes into the
cleaning jug labelled «Sani-
tizer», and making sure the
tubes are reaching the bottom
of the jug.
-11-
SANITIZING PROCEDURE
After the sanitizing cycle is
completed, the coffee machine
will be turned off and the dis-
play reads
The pitcher will be ¼ full of hot
water at the end of the sanitizing
cycle.
c5
7:21 PM 06/20/2008
OPERATING MANUAL
V3.0
51
Page 52

EN
Sanitizing procedure (continued)
Step 3
Remove the cleaning jug
containing hot water and wipe
the milk connectors with a sani-
tizer soaked towel.
Step 4
Wash the inside of the refrige-
rator and the milk hoses.
Allow to air dry.
Step 5
Take the coffee waste drawer
and the drip grille to the 3 com-
partment sink.
Wash, rinse, sanitize, allow
to air dry and replace on the
machine
Step 6
Wipe the beverage spout with
a Sanitizer towel, and allow to
air dry.
To start up the machine see
start up procedure.
Cana c5-12C FF Daily BE51D2
Revised 01/2010
Step 7
Specialty Coffee Machine
Wash the been hopper in warm
soapy water at the 3 compart-
ment sink. Do not place in ware
washer. Allow to dry before
lling with beans.
-12-
SANITIZING PROCEDURE - cont.
52
V3.0
OPERATING MANUAL
Page 53

Foamer head changing and cleaning
Why cleaning necessary, blocked unit
Time required 5 minutes to prepare 10 minutes to complete
Time of day after daily cleaning / deliming
Daily
Cana c5-12C FF Daily
EN
Revised 01/2010
Hazard icons
Tools and supplies
screwdriver milk jet unit milk jet unit brushes
Procedure
Step 1
Unscrew the 2 cover screws
with a screwdriver and re-
move the cover.
Specialty Coffee Machine
Step 2
Move all sliders back from
foamer head.
Step 4
Plug in the clen foamer head
into the lower connector,
push it over the pins and
move the sliders back into
position.
Step 5
Replace the cover and ligh-
ten the screws. Align pins
with the holes on left side.
Step 3
Lift the foamer head out,
then pull it out of the lower
-13-
FOAMER HEAD CHANGE
OPERATING MANUAL
connector.
V3.0
53
Page 54

EN
Foamer head changing and cleaning (continued)
Step 6
Clean dirty foamer head with
brush and soapy water as
shown.
Rinse with sanitizer and air
dry.
Cana c5-12C FF Daily
Revised 01/2010
Specialty Coffee Machine
-14-
FOAMER HEAD CLEANING
54
V3.0
OPERATING MANUAL
Page 55

EN
Troubleshooter / Machine Status Key Card
Besides the User-; Manager- and Memory key cards, the Cafina coffee machine is being shipped with either a “Troubleshooter” or a “Machine
Status” key card. The function of both cards is the same. The card helps the service organisation to define machine errors or preventative
maintenance work that is coming up in the near future. The card is being used in an interactive task by telephone between the support person of
the service organisation and someone using the key card on the coffee machine.
Listed below are the functions and data that can be accessed with the “Troubleshooter / Machine Status” key card:
Cleanings ► Grinding period ► Grinder corr. ► Reference 1 ►
◄ ◄ ◄ ◄
▼▲ ▼▲ ▼▲ ▼▲
Coffee 22 Grinder 1. 0.180s/g Grinder 1 +10 Latte* SML 12 ► Latte* SML 12 +
Milk 20 Grinder 2 0.263s/g Grinder 2 -5 Water quantity 55 ml ◄ System time Stop
Start +
Latte* SML 12
System time Handling
Latte* SML 12
System time 13.6s
Display of the coffee-
and milk system
cleaning cycles
performed.
Display of the actual
grinding times for
grinders 1 and 2
Display of the actual
grinder adjustment of
grinders 1 and 2
Run system time
Reference 1
Start the function with
the + button.
Reference 2 ► DP quantity ► Filter ► Service Coffee ►
Service Milk
◄ ◄ ◄ ◄
▼▲ ▼▲ ▼▲ ▼▲
Espresso** 13 ► Espresso** 13 DP quantity Total filter capacity Service Coffee interval Service Milk interval
Water quantity 45 ml ◄ System time Stop DP 8: 13 800.0l ► 50000 15000
Start +
◄► ◄► ◄► ◄►
Espresso** 13 DP quantity Eff. filter capacity Service Coffee actual Service Milk actual
System time Handling DP 8: 13 36.5l 232 120
Espresso** 13
System time 13.6s Delete eff. filter cap?
no + -
Run system time
Reference 2
Start the function with
the + button.
Recall all DP’s which
have occurred.
Delition not possible.
Display and delete
water filter capacity
Display coffee service
interval and actual
coffee products counter.
Display milk
serviceinterval and
actual milk products
counter
Instruction Machine Status Key Card (MSKC) V 1.0 P./N. 2954114 date 04/25/2007
OPERATING MANUAL
V3.0
55
Page 56

OPERATING MANUAL c5-FF USA
Cana Ltd.
Coffee machines
CH-5502 Hunzenschwil
www.cana.ch part of the melitta group
Responsible department:
ITS
Prepared:
06/13/2013 Roger Kurz
Valid for:
c5-12C FF USA
Take-over department: Revision:
V3.0
Checked: Approved: Languages:
Derived from:
V2.2
Replaces:
V2.2
Doc.-type:
Manual
File name:
OM_EN_V3.0.pdf
Classication:
Public
english
Document:
P./N. 2954111
Pages:
108
 Loading...