

Page 1

Operating manual
for MELAG-Autoclaves
Type 15 Type 17 Type 23
Dear Doctor:
Thank you very much for the trust which you have shown by purchasing this
autoclave.
For 50 years now, MELAG - a medium-sized family-owned and -operated company has specialised in the production of sterilization equipment for medical practice.
During this period, MELAG has succeeded in becoming a leading manufacturer of
sterilization equipment. More than 335 000 MELAG units sold throughout the world
testify to the exceptional quality of our products, which are manufactured exclusively
in Germany.
As all other MELAG products, this autoclave was manufactured and tested according
to strict quality criteria. Before placing this unit into operation, please read this
Operating Manual carefully. The long-term functional effectiveness and the
preservation of the value of your autoclave will depend on careful preparation of
instruments before sterilization, and on proper care of the unit.
The staff and management of MELAG
Page 2

To ensure the functional effectiveness of this unit and to
preserve its value:
1. Prepare the instruments to be sterilized carefully
2. Take proper care of the autoclave
3. Use only pure distilled or demineralised water
Content:
Page
1 INTRODUCTION.........................................................................................................................................2
1.1 F
1.2 TECHNICAL DATA ....................................................................................................................................2
1.3 PREPARING INSTRUMENTS FOR STERILIZATION .........................................................................................3
1.4 RUST FORMATION = DRAG-IN RUST..........................................................................................................3
1.5 TAKING CARE OF YOUR AUTOCLAVE .........................................................................................................3
1.6 INSTRUCTIONS FOR INSPECTION AND CARE OF THE DOOR AND DOOR-LOCK COMPONENTS...........................4
1.7 CHECKING THE AUTOCLAVE.....................................................................................................................5
2 INSTALLATION ..........................................................................................................................................5
2.1 S
2.2 FILLING THE STORAGE CONTAINER...........................................................................................................6
2.3 VDE - REGULATIONS ..............................................................................................................................6
RONT OF THE AUTOCLAVE .....................................................................................................................2
ETTING UP THE AUTOCLAVE...................................................................................................................5
3 FOR EACH STERILIZATION .....................................................................................................................6
TEMS TO BE STERILIZED .........................................................................................................................6
3.1 I
3.2 STERILIZATION PROCESS.........................................................................................................................7
3.3 PROCESS CONTROL ................................................................................................................................7
3.4 PROGRAM TERMINATION .........................................................................................................................7
3.5 R
EMOVING DRY LOADS............................................................................................................................7
3.6 STERILIZATION FREQUENCY.....................................................................................................................7
4 FURTHER INFORMATION ABOUT STERILIZATION ..............................................................................8
4.1 D
URATION OF STERILIZATION (COMPLETE PROCESS).................................................................................8
4.2 USE OF DISTILLED OR DEMINERALISED WATER ..........................................................................................9
5 NOTES ON OPERATING MALFUNCTIONS ...........................................................................................10
5.1 L
OW PRESSURE READING FROM THE PRESSURE GAUGE..........................................................................10
5.2 PRESSURE READING FROM PRESSURE GAUGE TOO HIGH.........................................................................10
5.3 P
5.4 O
RESSURE READING TOO LOW...............................................................................................................11
VERHEATING IN THE CHAMBER............................................................................................................11
5.5 RESIDUAL WATER IN THE CHAMBER........................................................................................................12
5.6 SIGNAL LAMP 'POWER' STAYS ON CONTINUOUSLY ...................................................................................12
5.7 SIGNAL LAMP 'POWER' DOESN'T LIGHT UP ..............................................................................................12
6 SAFETY INSTRUCTIONS ........................................................................................................................12
7 TAKING THE AUTOCLAVE OUT OF OPERATION/TRANSPORT/RE-INSTALLATION ......................12
8 ANNEX ......................................................................................................................................................13
8.1 S
8.2 I
PARE PARTS.......................................................................................................................................13
NSIDE THE AUTOCLAVE.........................................................................................................................13
Content
Page 3
Operating manual for type 15/17/23
1 Introduction
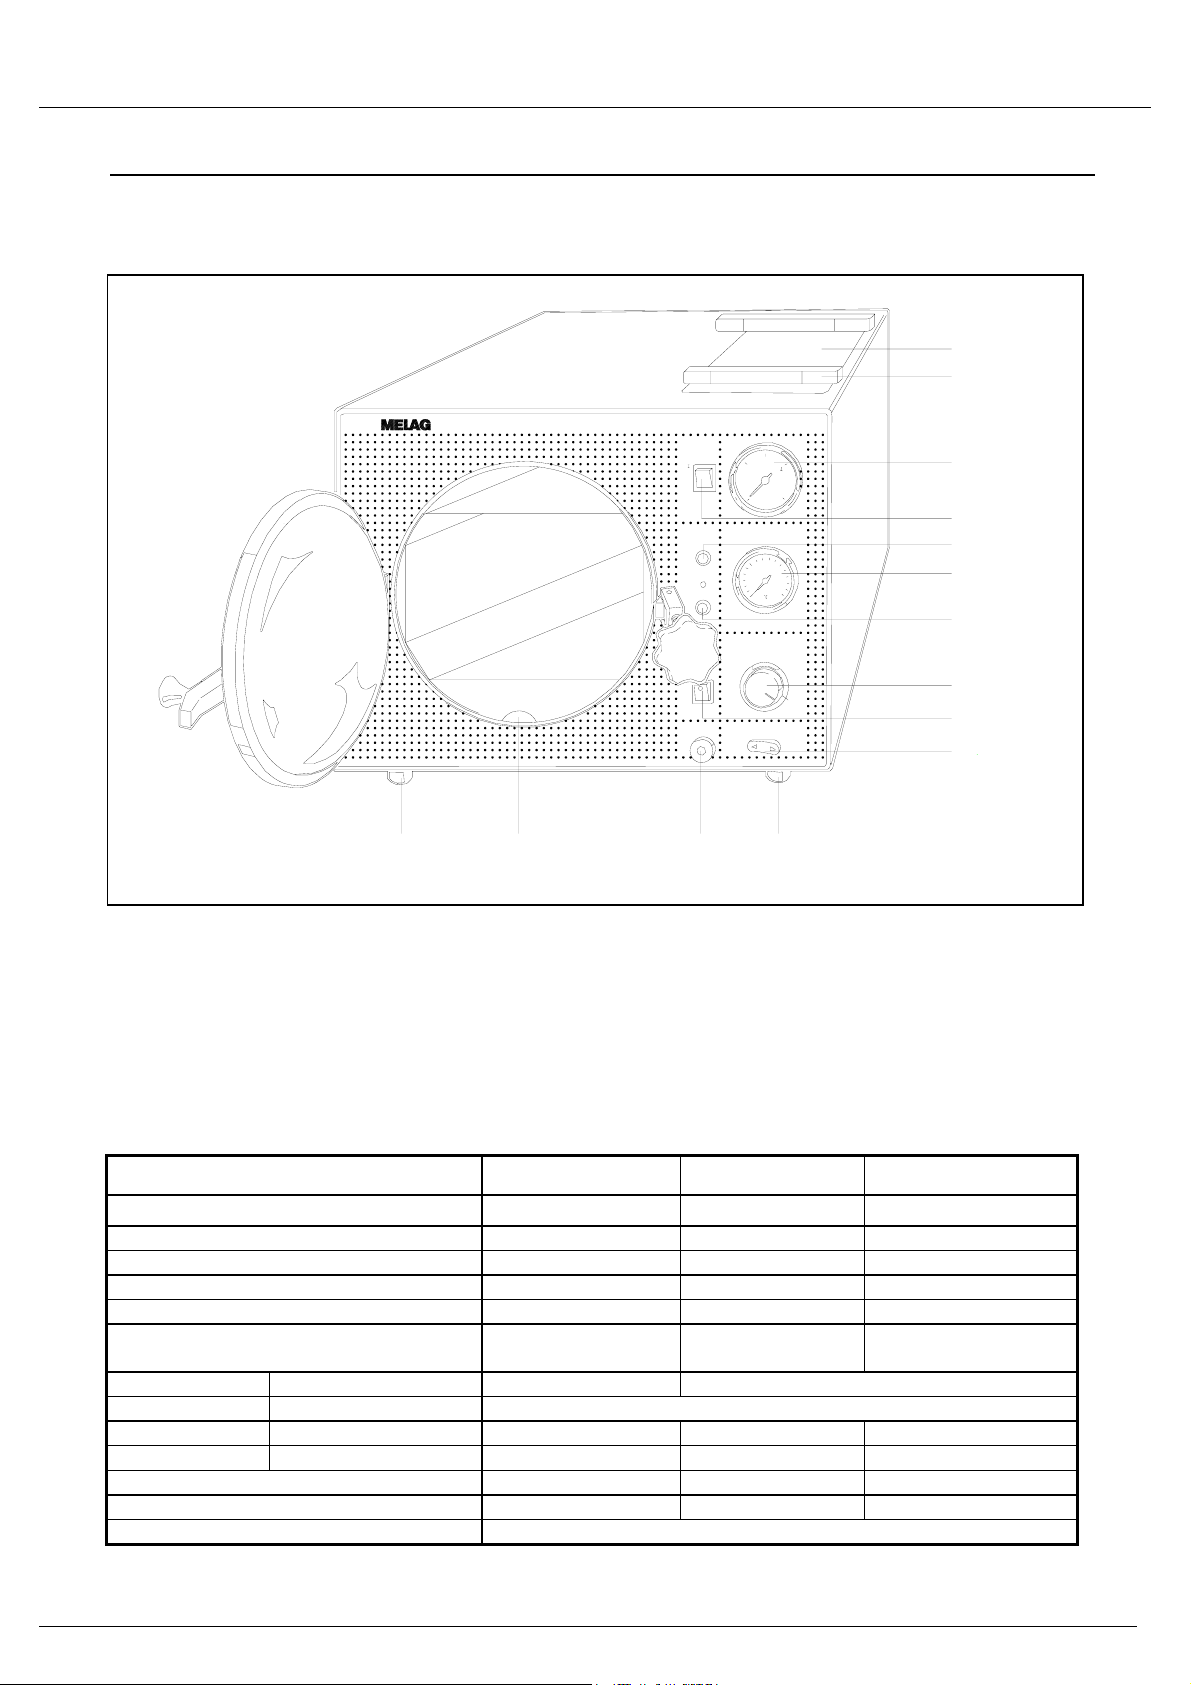
1.1 Front of the autoclave____________________________________________________
1
2
Autoklav23
Trocknen
Manometer
3
2
-1
Thermometer
5-
6
0
Netz
3
4
5
100
15O
200
6
7
8
9
10
Wasserentleerung
Zeitschaltuhr
Druckschalter
b
2
r
a
5030
0
1 bar
11121311
1 Housing lid 6 Thermometer 12 Outlet for draining
2 Cooling rests 7 Signal lamp "Heating" distilled or demineralised water
(for trays, etc.) 8 Timer switch 13 Inspection cut-away for
3 Pressure gauge 9 Switch "Water inlet" examining the water level
4 Switch "Drying" 10 Pressure selection
5 Signal lamp "Power" 11 Adjustable feet
1.2 Technical data __________________________________________________________
Type 15 Type 17 Type 23
Sterilization chamber (diameter X depth) 15 X 38 cm 18 X 42 cm 23 X 45 cm
Max. load:
Instruments (with trays) 2 kg 3 kg 4 kg
Textiles 150 g 200 g 500 g
Electrical power supply, (AC) 230 V / 1560 W 230 V / 1350 W 230 V / 1970 W
Water consumption per sterilization
280 ml 300 ml 300 ml
cycle
Pressure range: 1 bar program - 1.0 bar (121°C) up to 1.4 bar (126°C)
Pressure range: 2 bar program 2.0 bar (134°C) up to 2.5 bar (138°C)
Operating time: 1 bar program - 50 minutes 50 minutes
Operating time: 2 bar program 30 minutes 30 minutes 30 minutes
Break between 2 sterilization cycles 30 minutes 30 minutes 30 minutes
Mains-fuse 2x 12,5A/T 12,5A/T 12,5A/T
Drying time As required
Page 2
Page 4

1.3 Preparing instruments for sterilization ______________________________________
MELAG - non-rusting materials
All parts of MELAG autoclaves which come into
contact with steam are made of non-rusting
materials. The pressure chamber, storage container,
and tray rack assembly are of stainless steel, pipes
carrying steam are made of copper, the chamber
door is made of chrome-plated brass, and the trays
are made of eloxated aluminium.
Drag-in rust
The use of non-rusting materials excludes the
formation of rust as a result of the components of
the autoclave. Where rust forms in the autoclave or
on the items being sterilized, investigations have
repeatedly shown that this rust has been brought in
from other sources. It should be borne in mind that
rust can form even on the best quality stainless steel
instruments, for example as a result of improper
treatment with chemical agents or disinfectant
during preparation for sterilization.
Preparations of items for sterilization
The example of drag-in rust shows how important it
is to prepare items properly for sterilization. In
particular, the following points should be observed:
The instruments should be disinfected and cleaned
immediately after use in accordance to UVV/VBG
103 with a disinfectant and/or cleaning solution. The
solutions should be used in the correct
concentration and care should be taken to adhere
precisely to the correct immersion times! It is
advisable to make use of appropriate cleaning aids
such as an ultrasound cleaning unit, or a thermodesinfector.
Cleaning the instruments before sterilization is also
very important in order to avoid introducing dirt and
contamination which can separate from the
instruments under steam pressure and block the
filters, jets, and valves of the autoclave! Above all,
locks, joints and hinges of instruments must be
thoroughly cleaned with a brush. Cleaning and
disinfecting agents should be washed off thoroughly
with clear water, again using a brush. Residues of
cleaning and disinfectant chemicals must under no
circumstances find their way into the autoclave,
since they can give rise to corrosion! Finally, swill
with demineralised water and then dry the
instruments well.
Brand-new instruments
The cleaning procedures described above are also
necessary for brand-new instruments, since these
often carry small amounts of oil, fat and soiling from
the manufacturing process.
1.4 Rust formation = Drag-in rust _____________________________________________
As already explained, the non-rusting materials used
in the autoclave cannot give rise to rust formation in
the autoclave!
Where rust forms this is "drag-in rust". This
originates from instruments or other metallic objects
carrying traces of rust, even though they are made
of stainless steel, or are made of normal steel but
have a damaged galvanic coating. Often a single
rusty instrument is enough to pass rust on to other
instruments or to lead to film rust forming in the
autoclave and resulting to corrosion damage.
Therefore the pressure chamber should be wiped
out regularly, in order to avoid the formation of film
rust. Rust which forms on the pressure chamber,
storage container, or on the tray rack assembly must
be removed using small amounts of a mild
commercial cleaning agent for stainless steel. Do
not use steel wool or a steel brush! In order to clean
the pressure chamber withdraw the tray rack
assembly. Dispose of instruments which are causing
rust!
1.5 Taking care of your autoclave _____________________________________________
Every week
Cleaning the autoclave chamber
The autoclave chamber and the door surfaces
should be cleaned at least once a week. To do this,
the trays and the tray rack assembly should be
withdrawn from the chamber. The chamber can then
be wiped out with a soft cloth or a (non-abrasive)
sponge. Stubborn spots can be removed using small
quantities of a mild commercial steel cleaning agent,
taking care that none gets into the pipes attached to
the autoclave chamber. Do not use abrasive
cleaners such as steel wool or a wire brush. Alkaline
cleaning agents or products containing chlorine
alkaline must not be used. Spots on stainless steel
can be removed using 5% oxalic acid.
Door gasket
The door gasket should be checked once a week for
signs of wear and damage. It should be
cleaned with a mild commercial cleaning agent.
Every two weeks
Demineralized/distilled water storage container
Every two weeks, the demineralised/distilled water
storage container should be emptied by opening the
outlet (12). If necessary clean the container, e.g.
using a bottle cleaning brush and warm water with a
detergent additive. Swill out well with water and refill
with demineralized/distilled water (for the water
quality see Section 4.2).
Note!
Door spindle
The spindle of the door lock is important for the safe
operation of the autoclave, and must be regularly
lubricated with silicone grease. Any signs of wear
should be reported immediately to an authorised
technician, who will examine and if necessary
replace it.
Page 3
Page 5
Operating manual for type 15/17/23
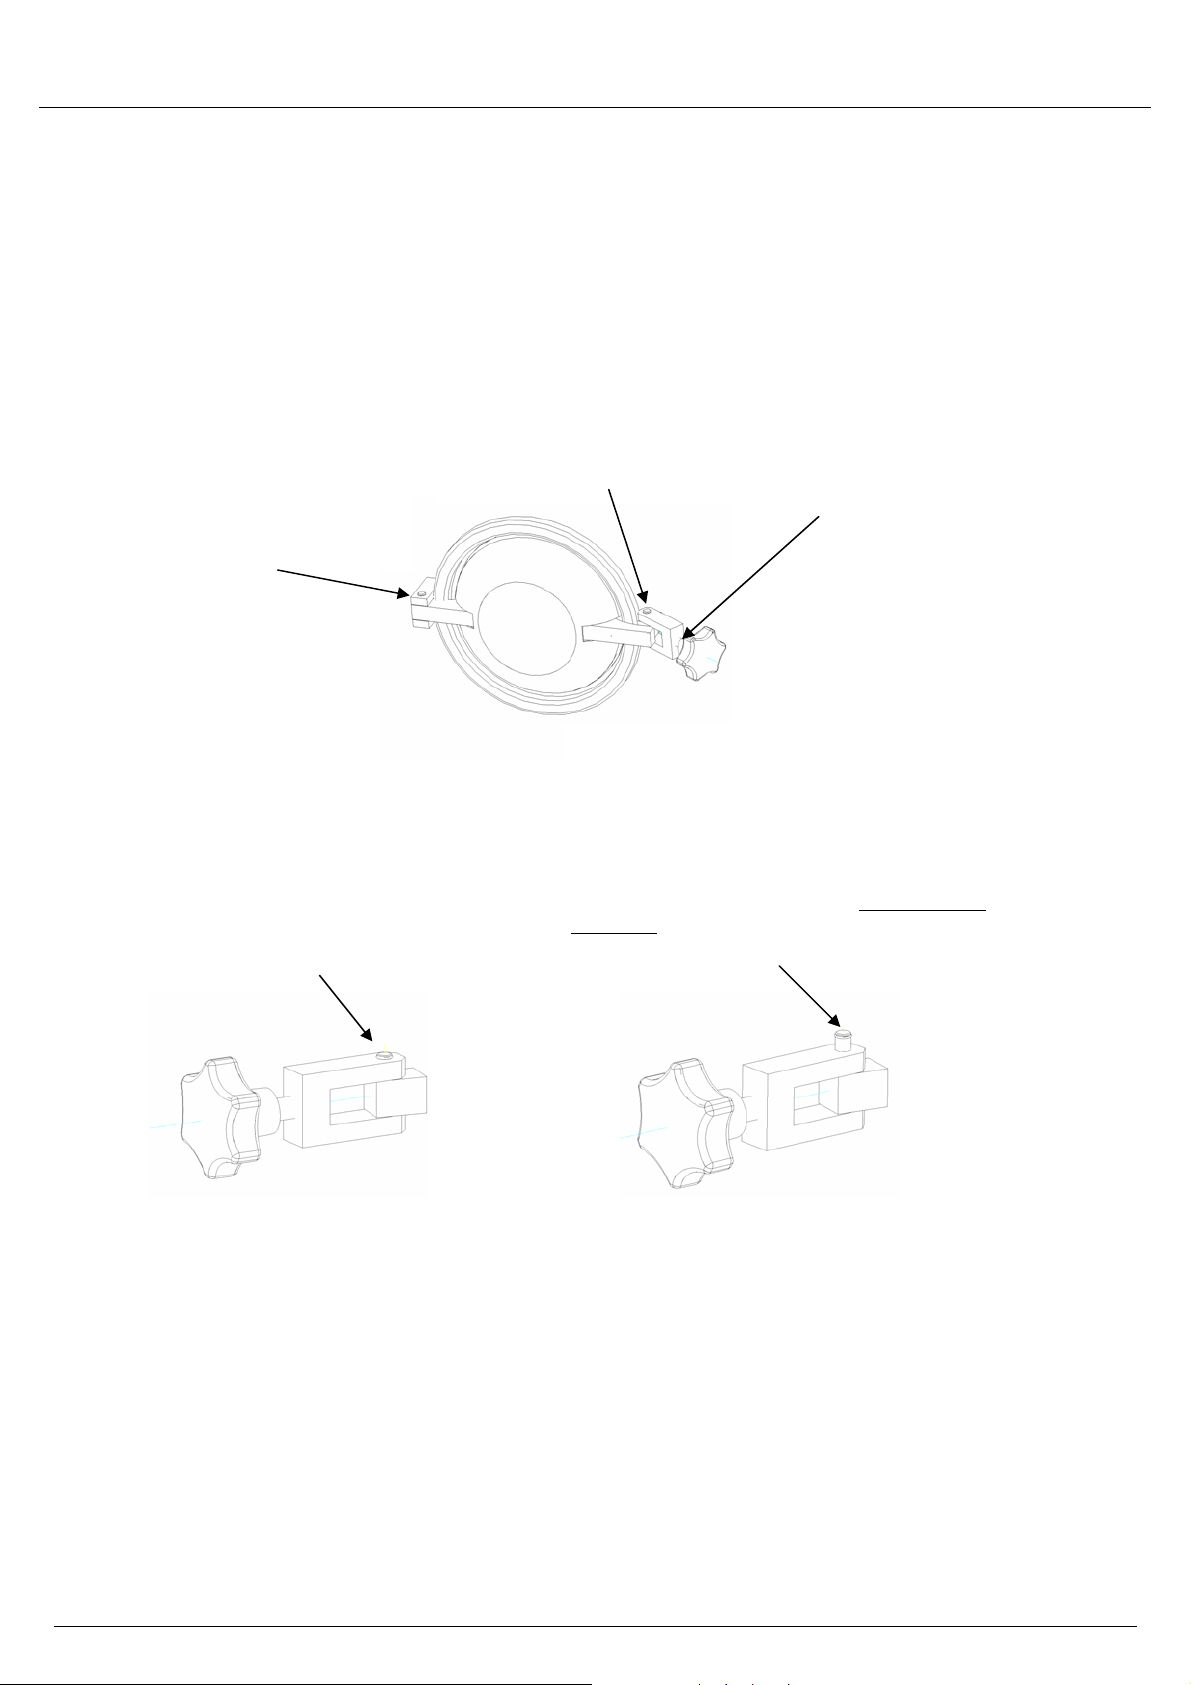
1.6 Instructions for inspection and care of the door and door-lock components ______
In order to prevent premature wear, it is absolutely necessary to keep the following components well
lubricated at all times: the threaded spindle of the palm grip hand knob, the hinges of the lock yoke, and the
pressure locking bar. Use the following lubricant: plain-bearing grease (Gleitfett, MELAG art. no. 24355), or
an equivalent silicone grease, or Molykote
The signs in the diagrams below indicate that the lock components of the door have become subject to
excessive wear. If any of the following signs appear, then the device must be inspected by a MELAG
customer-service representative, or an authorized technician from a specialist dealer:
• There is too much play in the
hinge of the pressure locking
bar (the door “hangs”)
Warning!
The hinge bolts must absolutely
remain completely inserted (flush) in
the latch and in the hinge yoke of the
locking pressure bar (left side)
®
.
• There is too much play in
the hinge of the lock yoke.
• Hard-metal screw-thread insert
which has been screwed out of the
latch
Warning!
If the bolt moves out of place upward or downward
as shown here, and is not flush, do not use the
autoclave. Call the technical customer service for
repair before using the device.
• Too much play in the
threaded spindle of the
palm grip hand knob (the
spindle rattles in the latch)
• The threaded spindle
become definitely hard to
turn
Page 4
Page 6

1.7 Checking the autoclave __________________________________________________
Regular check
The operator of the autoclave can use the control
instruments and the sterilization times as a check
that the sterilization is effective. In Program 2 bar the
pressure gauge should show between 2 and 2.1 bar
(or for 1 bar between 1 and 1.1 bar) for at least 5
minutes (20 minutes) and at the same time the
thermometer should read 134 to 135
121°C).
Periodical check (every half year )
DIN 58 946 Part 8 Section 3.2 recommends:
"The periodical inspection shall be carried out in situ
at regular intervals, e.g. every six months. This shall
establish that the small sterliser when used in
accordance with the operating instructions sterlises
properly."
Hygiene Institutes and other official medicinal test
laboratories are able to supply test spores, evaluate
these after sterilization, and provide confirmation of
the results on a test certificate.
In accordance with DIN 58 946 Part 4 and DAB 10
(Deutsches Arzneimittelbuch) the testing of steamautoclaves shall be carried out with spores of
"Bacillus Stearothermophilus" (e.g. ATCC 7953,
Paper Spore Strips, Oxoid, Cd. No.: BR 23).
{
C (120 to
For the MELAG Types 15, 17 and 23 (chamber
volume >5 dm³), DIN 58 946 Part 8 specifies the use
of five bioindicators (plus one positive control
sample).
Prepacked test spores (e.g. spore strips in packed in
paper, or test tubes, e.g. "Attest") shall not be
packed again before being placed in the
autoclave.
Note:
If the spores are contained in a tube which only has
perforations at one end (e.g. "Attest", 3M, which has
the perforations in the brown end cap), then this
should never be placed in the autoclave so that the
perforations are on top. The autoclave works using
gravitation drainage, so the perforations should be
at the bottom, or at least on the side, as is the case
if the tubes are laid in the autoclave.
If you receive "hand made" spore samples, which
have already been sealed in a paper-foil packaging,
then care must be taken that the steam has full
access to the paper side of the packaging. As
above, the items to be sterilized should be placed in
the autoclave with the paper either facing
downwards or to the side.
2 Installation
2.1 Setting up the autoclave__________________________________________________
Space requirements
The autoclave must be installed at least 10 cm away
from an adjacent wall or upright surface on each
side. The clear space above the autoclave shall be
at least 30 cm. The correct positioning of the
autoclave is very important for good sterilization
results. The installation, and reinstallation if the
autoclave is moved to another position, should be
carried out with great care.
Setting up correctly - horizontally
This MELAG autoclave is filled directly with water.
This convenient feature requires that the autoclave
is set up horizontally on a flat, stable surface. The
chamber is installed in the autoclave at a slight
angle so that the distilled / demineralised water can
only be seen in the inspection cut-away (13) when
the necessary quantity of water has been filled in the
chamber.
Setting up incorrectly - "sloping forward"
However, if the surface on which the autoclave has
been installed slopes forward, then the distilled or
demineralised water will already be visible at the
inspection cut-away before the necessary amount
has been introduced into the chamber. This means
that there will not be enough distilled or
demineralised water to reach the required pressure
in the chamber, and the pressure of 2 bar will not be
reached and held for approx. 5 minutes, or the
constant pressure of 1 bar will not be maintained for
the necessary 20 minutes.
Setting up incorrectly - "sloping backward"
If the autoclave is set up on a surface that slopes
backwards, then too much distilled or demineralised
water will be filled into the autoclave. The distilled or
demineralised water not used during the sterilization
will remain in the autoclave, but this will not be
harmful for the operation of the autoclave.
Adjusting
In order to check that the autoclave is set up
properly, a graduated measuring beaker is provided.
The autoclave has been set up properly when: for
Type 15: 280 ml , or for Types 17 and 23: 300 ml
distilled / demineralised water has been filled into
the empty autoclave from the front and the water
can be seen in the inspection cut-away (13). If
necessary, the feet at the front of the autoclave (11)
should be adjusted until the water is visible.
Page 5
Page 7

Operating manual for type 15/17/23
2.2 Filling the storage container ______________________________________________
To fill the storage container, remove the housing lid
(1) on top of the autoclave and take off the lid of the
storage container underneath it (see Sections 1.1
and 8.2).
The storage container should be filled with
approximately 3 litres of demineralised/distilled
water. Care should be taken to ensure that the water
does not exceed the "MAX" level (C, 8.2), because
the opening for the cooling loop (E) of flow nozzle at
(B) must not be covered with water, otherwise it will
not be possible to reach the necessary pressure. In
order to condense the steam and to avoid excess
steam emission and the resultant increased use of
distilled / demineralised water, the cooling loop (E)
of the flow injector (B) and the pressure release (G)
in the storage container should be well covered with
water. The distilled / demineralised water should
therefore be refilled at regular intervals, or even
better, residual water should be drained away by
opening the drainage tap (12) and the autoclave
filled up with new distilled / demineralised water.
2.3 VDE - regulations _______________________________________________________
Under current VDE-regulations, this autoclave is not
suited for use in areas where there are risks of
explosion.
The autoclave must only be serviced and repaired
by MELAG or by its authorised representatives
(specialist dealers or customer services).
Warning !
The door frame, the autoclave chamber and the
sterilized items are hot during and after the
sterilization!
3 For each sterilization
3.1 Items to be sterilized_____________________________________________________
Tray rack assembly
In order to prevent the items being sterilized from
overheating as a result of the radiated heat in the
chamber, the autoclave must not be operated
without using the enclosed MELAG tray rack
assembly. Trays or racks on which the items to be
sterilized are laid, or containers (with or without lid)
must be perforated (as described in detail in the
BGA-Guidelines "Carrying out Sterilization 2.1.4.a
Containers, as Annex to Section 7.1 of the
"Richtlinie für die Erkennung, Verhütung und
Bekämpfung von Krankenhausinfektionen").
Sterilization wrapping
The items to be sterilized can be sealed in a
transparent foil packaging, e.g. MELAfol
paper, one side foil). The paper side of the
packaging must face downwards. These sealed
items must not be placed one on top of another on a
tray. In order to improve drying, it is advisable to
using a MELAG drying rack for the items in
transparent packaging (MELAG Art. No. 283; fits
only in Type 23). When sealing items, ensure that
(one side
the seal itself is in accordance with German
standard DIN 58953 Part 7 and has a minimum
width of 8 mm. The MELAG foil sealing machine
MELAseal
Sterilizing plastic articles
When sterilizing plastic articles pay careful
attention to the maximum sterilization
temperature specified by the manufacturer.
Direct contact of the products with the tray rack
assembly should be avoided, since the items being
sterilized may be damaged by the heat given off by
the autoclave.
Plastic articles such as pipette tips should always be
placed on the middle tray if possible. it is advisable
to place them on a sheet of filter paper in order to
avoid direct contact with the tray or container.
Liquids
These autoclaves are not suitable for the
sterilization of liquids!
101 produces a seal that is 10 mm wide.
Page 6
Page 8

3.2 Sterilization process ____________________________________________________
1. Max. pressure indicator
Reset the red maximum pressure indicator of the
pressure gauge (3) to "0".
2. Loading
Trays or containers should be filled loosely with
the instruments to be sterilized and inserted.
Textiles should not be folded tightly or pressed
into the sterilization containers. The maximum
load for textiles must not be exceeded.
3. Pressure selection (only type 17 and type 23)
Depending on the type of load, the pressure
selection (10) should be set to 1 bar or 2 bar (1
bar =120°C) is for rubber, textiles, etc.; 2 bar
(=134°C) is for metal, glass, etc.; type 15 has
only the 2 bar program).
4. Filling with water
The "water inlet" switch (9) is then set to "I".
When water is visible in the inspection cut-out
(13) return the switch to the "0" setting.
5. Timer switch
The timer switch (8) is set to correspond to the
selected pressure (10) at either the 30 minutes
or 50 minutes mark (Type 15: only 30 minutes).
When the power is then switched on, the signal
lamps (5) and (7) will light up. The electronic
temperature regulator controls by means of the
heating the temperature and the pressure; the
white signal lamp "Heating" (7) goes on and off
correspondingly.
6. Close the door tightly
Important! Only close the door after the timer
switch has been set.
7. End of the sterilization
At the end of the time set with the timer (8) the
power will be switched off and the solenoid valve
for the "Rapid pressure release" opens
automatically. The signal lamps (5) and (7) go
out.
Warning! Do not open the door until the moving
pressure gauge indicator has returned to "0".
8. Drying
In order to be able to cope with difficult drying
tasks, the autoclave has a switch for "Drying" (4).
It is possible to preselect the drying option before
beginning the sterilization or to select it after the
automatic rapid pressure release. The "Power"
signal lamp will be on permanently and the
"Heating" signal lamp will go on and off at
intervals in order to maintain a temperature of
approx. 120°C in the autoclave chamber until the
"Drying" switch is returned to the "0" setting (the
"Power" and "Heating" signal lamps will go out).
For best drying results the door should be kept
slightly open.
Warning! The chamber, door, trays, and
sterilized instruments are hot! During the drying
phase the thermometer will not display the
temperature in the autoclave chamber.
3.3 Process control _________________________________________________________
The red indicator on the pressure gauge (3) shows
the maximum pressure reading during the
sterilization cycle, which should correspond to the
pressure selected with the switch (10).
3.4 Program termination_____________________________________________________
A program can be terminated at any time. Proceed
as follows:
1. Turn timer switch (8) to "0"
2. Turn "Drying" switch (4) to "0" (if drying had been
selected)
3. Observe the pressure gauge (3) until the display
falls to "0"
4. The door can now be opened.
3.5 Removing dry loads _____________________________________________________
A way of ensuring that the load removed from the
autoclave is dry and ready for use is to set "Drying"
switch (4) to "I" immediately after the automatic
release of pressure (pressure gauge reading "0").
The "Power" signal lamp (5) will be on continuously
and the "Heating" signal lamp will go on and off at
regular intervals. The door of the autoclave chamber
should be kept ajar. The drying can go on as long as
required for the load in question. To end the drying
phase the "Drying" switch should be returned to "0".
The "Power" and "Heating" signal lamps go out.
Warning! Door, chamber and load are hot!
During the drying the thermometer will not display
the temperature in the autoclave chamber.
Filter paper
It has proved helpful to place a layer of filter paper in
the tray on which to lay the instruments to be
sterilized, and then to cover these with another
sheet of filter paper.
Cellulose or gauze
Soaked cellulose or gauze should not be used to lay
instruments on or to cover them, because the steam
can dissolve out substances which can leave spots
and discolorations on the items being sterilized.
3.6 Sterilization frequency ___________________________________________________
Page 7
Page 9

The MELAG autoclaves can be used for
approximately 8 sterilization cycles every day. This
large number of cycles is possible because of the
MELAG system, which only involves a relatively
small amount of distilled / demineralised water being
turned into steam for the sterilization and then
condensed again afterwards.
Breaks between cycles
A sterilization cycle is completed when the timer has
4 Further information about sterilization
4.1 Duration of sterilization (complete process) _________________________________
returned to "O" or the "Drying" switch (4) has been
switched off. It is important to allow a break of at
least 30 minutes before starting the next sterilization
cycle. Otherwise the residual heat in the thick-walled
autoclave chamber can lead to the thermostat
switching off too soon during the following
sterilization cycle so that the desired pressure will
not be reached, or will not be maintained for a
sufficiently long period.
Running time
at 2 bar (134°C) : 30 min
at 1 bar (120°C) : 50 min
Once the switch (8) has been set to 1 bar or 2 bar,
the sterilization proceeds automatically until the
rapid pressure release, without any need for further
manual intervention. For the autoclave type 15,
which is fixed at 2 bar (134°C), the running time is
30 minutes.
Operational phases
The overall running time for a sterilization cycle
consists of various phases: a heating phase,
ventilation phase, rise and equalisation phases, as
well as the sterilization proper and an extra safety
period which together make up the sterilization
phase.
Autoclave temperature
The specified operating times must always be
adhered to, whether starting with a cold or a hot
autoclave, in order to ensure that the chamber is
filled with saturated steam. Air is expelled through
the flow nozzle (B) and the time required for this is
constant, even if the autoclave is not starting from
cold.
Drying time and temperature
Drying time: as required
Temperature: approx. 120°C
After operating the "Drying" switch (4) the autoclave
chamber is heated to 120°C, and this temperature is
maintained until the drying is switched off again.
Warning! The chamber, door, trays, and sterilized
instruments are hot!
Seite 8
Page 10

4.2 Use of distilled or demineralised water _____________________________________
Quality requirements
For the steam sterilization it is important to use
either distilled or demineralised water of sufficient
quality.
A guideline for the preferred water quality is given in
the following table which lists values in accordance
with the European CEN Standard EN 285.
Conductivity
Evaporation residues
Silicone , SiO2
Iron
Cadmium
Lead
Other heavy metals
Chloride
Phosphate
15
≤
10 mg/l
≤
1 mg/l
≤
0,2 mg/l
≤
0,005 mg/l
≤
0,05 mg/l
≤
0,1 mg/l
≤
2 mg/l
≤
0,5 mg/l
≤
µS/cm*
pH - value 5 bis 7
Appearance colourless, clear, without
residues
Hardness
0,02 mmol/l
≤
*) µS/cm = Mikro Siemens per centimeter
However, for the Type 15, 17 and 23 autoclaves it is
also sufficient to use demineralised water in
accordance with VDE 510, as long as the VDE
requirements are strictly adhered to (conductivity on
demineralisation ≤ 10 µS/cm*
≤ 30 µS/cm*
identical with EN 285, and for evaporation residues
similar).
)
Demineralised water meeting the specifications of
VDE 510 or a local equivalent is widely available.
The quality of the water (compliance with VDE 510)
must be specifically mentioned on the label.
Problems with impure water
If water is used which is not sufficiently pure this can
lead to the formation of scaling in the steam piping,
on valves, and in the flow nozzle, and as a result the
autoclave will no longer operate properly. The use of
aggressive water (pH < 5 or > 7) can result in
corrosion and other harmful effects in the autoclave.
Formation of surface marks
The extent to which marks are formed on the
surface of the instruments being sterilized depends
also on the quality of the water used for steam
generation.
Use only demineralised or distilled water for the
steam sterilization.
)
)
. Specifications for the pH-value are
, as well as before use
4.2.1 Consumption _________________________________________________________
The amount of water in the storage container is
reduced for every sterilization by the amount which
is not recovered but escapes as steam. The extent
of such losses is dependent on various factors.
Frequency of sterilization
If sterilizations are carried out very frequently, this
can result in the distilled / demineralised water in the
storage container becoming too warm to cool the
steam from the autoclave chamber sufficiently for
this to condense, and some steam will escape from
the storage container.
Cooling coils
If the storage container has not been refilled with
distilled / demineralised water for a long time, the
water level may drop so low that the cooling coils
(E,G) are not covered, and the outgoing steam will
again not condense properly.
4.2.2 Exchanging the water in the storage container _____________________________
If impurities are found
If there are impurities in the water in the storage
container this is usually because the instruments
have not been cleaned properly before sterilization.
It is important to check at regular intervals that the
water is still clean. If there are signs of impurities,
cloudiness, or if a surface film has formed or there is
scaling on the walls and base of the storage
container, then it is essential that the distilled /
demineralised water be exchanged. The storage
container must be cleaned before it is refilled. Fatty
deposits can be removed using small amounts of a
mild detergent cleaner and warm water and a softbristled bottle-brush. Then rinse out the storage
container with clear water (on the water quality see
Section 4.2).
4.2.3 Emptying the storage container __________________________________________
After opening the screw stopper of the outlet (12) by
turning anti-clockwise, the water to be discarded can
be allowed to run out into a suitable container.
Then replace the screw stopper of the water outlet
and refill the storage container up to the "MAX" level
(C) with approximately 3 litres of unused
demineralised or distilled water.
Page 9
Page 11

Operating manual for type 15/17/23
5 Notes on operating malfunctions
The following notes on operating malfunctions are
intended to help with repairing small defects or to
describe problems in more detail to the authorised
dealer / depot / customer services.
5.1 Low pressure reading from the pressure gauge ______________________________
After a sterilization, if the red maximum pressure
indicator does not show at least the pressure
corresponding to the program that has been
selected, then the following points should be
checked.
Connection to the power supply
Is the autoclave connected to the mains power
supply, and is the power switched on? When the
timer is turned on the "Power" and "Heating" signal
lamps should light up.
Pressure gauge
Is the pressure gauge (3) working properly? If the
thermometer (6) is showing a temperature that is
appropriate for the selected program, but the
pressure gauge is not showing any pressure
reading, then the pressure gauge is probably
defective. In order to generate dry steam, at a
temperature of 134°C there should be a pressure of
2.0 bar. Otherwise, the pressure gauge may need to
be exchanged.
5.2 Pressure reading from pressure gauge too high ______________________________
"Pressure swing"
The most common cause of excessive pressure in
the autoclave is the "pressure swing". This usually
happens if the autoclave is still very hot from a
previous sterilization and is then restarted with only
a small load. This combination means that the
heating causes the pressure to rise very rapidly so
that the required pressure is reached before it has
been physically possible to expel all the air from the
chamber. This results in an additional increase in
pressure until the overall pressure rises above the
selected sterilization pressure. The steam in the
chamber is not saturated, and the values shown on
the pressure gauge (3) and thermometer (6) deviate
from the values for the production of saturated
steam. However, because all MELAG autoclaves
are fitted with an electronic temperature control, the
selected sterilization temperature will still not be
exceeded and the "pressure swing" will balance
itself out before the end of the sterilization period by
the continued exclusion of air. This can be
determined by checking that the reading of the
pressure gauge (white indicator) 5 minutes before
the end of the program (2 bar program) is within the
selected pressure range.
Max. pressure indicator is sticking
If the red maximum pressure indicator gets stuck, it
can obstruct the moving indicator of the pressure
gauge (3). If the max. pressure indicator then
suddenly becomes unstuck, the momentum can
send it some way past the correct pressure reading.
In this case it might, for example, appear to indicate
that there had been a maximum pressure of 4.5 bar,
even though the pressure had in fact been normal
throughout the sterilization. This can be checked by
observing the pressure gauge during a sterilization
cycle.
Clogging of the flow nozzle
If instruments are not prepared carefully before
sterilization, this can result in partial or total
blockage of the flow nozzle (B). During the heating
up phase air is expelled through this nozzle. If it is
totally or partially blocked then the air that remains in
the autoclave chamber exerts an additional partial
pressure during the sterilization phase. The flow
nozzle can be unblocked carefully using a wire or
similar instrument with a diameter of less than 0.5
mm. An indicator of a clogged flow nozzle and
residual air in the autoclave chamber is a
thermometer reading of less than 134 °C for a
pressure gauge reading of 2 bar or higher.
Page 10
Page 12

5.3 Pressure reading too low _________________________________________________
Load
If the autoclave has a load that is appreciably above
the maximum load specified in the technical data
section (1.2) then it will take longer to heat up and
as a result there will not be sufficient time for the
actual sterilization process, or the necessary
pressure may not be reached at all. The specified
maximum load (see Section 1.2) should therefore
never be exceeded.
Breaks between sterilization
If the break between sterilization cycles is less than
30 minutes, then too much heat will be retained in
the autoclave and the heater will switch off too early,
so that the necessary pressure will either not be
reached, or will not be maintained throughout the
sterilization phase.
Safety valve
Is the safety valve (D) leaking? The safety valve is
located in the storage container underneath the
"Max" water level marker. If it is already releasing
steam when the pressure gauge shows 2.5 bar or
less, then the safety valve should be replaced.
Timer knob
If the timer knob (8) is turned too quickly and forced
past the stopper then this can lead to the knob
rotating relative to its axis. In this case the timer will
no longer point to the correct time. Does the knob
point exactly to the "0" when the autoclave is
switched off? To adjust this, lift the cap on the timer
knob, and loosen the fastening nut slightly (do not
remove it!). Reposition the knob, retighten the nut
and replace the cap.
5.4 Overheating in the Chamber ______________________________________________
Overheating is almost always a result of insufficient
water in the autoclave chamber.
If your autoclave overheats:
- Switch the power off
- Turn the timer knob to "0"
- Open the door and leave it to cool for half-an-
hour
Before starting operations again check for the
following possible causes and take appropriate
steps.
Flow nozzle
If instruments are not prepared properly for the
sterilization then the distilled / demineralised water
and thus also the steam will contain impurities and
after frequent use of the autoclave or after a long
period, the flow nozzle (B) will become worn by the
passage of the solid particles and its diameter will
be increased. This can lead to an excessive loss of
steam. The flow nozzle must be replaced.
Solenoid valves
Soiling as a result of inadequate preparation of
instruments can leads to leaks through the solenoid
valves for the water inlet and the rapid pressure
release.
Rapid pressure release
If there is a leak of the solenoid valve for the rapid
pressure release then during the pressure phase
steam or water droplets form at the end of the
cooling loop for the rapid pressure release (G). If a
lot of steam or water is emitted then the solenoid
valve is defective, or dirt particles have collected on
the seal of the solenoid valve which the
maintenance technician will be able to remove.
Water inlet
If there is a leak of the solenoid valve for the water
inlet then during the phase of pressure increase air
bubbles will be seen forming at the filter of the water
inlet (F). It is often possible to remove a dirt particle
from the seal of the solenoid valve that is
responsible for causing the leak as follows: After
reaching the maximum possible pressure, the switch
for the water inlet (9) can be turned on and the
steam flowing through the solenoid valve will blow
the seal clean. This leads to a loss of pressure in the
chamber. It is very important that after the switch
has been returned to the "0" position, the timer is
also turned back to "0". Otherwise the shortage of
water or of steam in the chamber can lead to
overheating.
Timer knob
The timer knob (8) no longer has the correct
alignment (see Section 5.3).
Textiles
Textiles retain large quantities of condensed steam,
so that when they are being sterilized it is very
important to ensure that the autoclave is not
overloaded (for maximum load, see above, 1.2).
Safety valve
The safety valve is located in the storage container
under the MAX water level marker. If it already
releases steam when the pressure gauge is reading
less than 2.5 bar then it must be exchanged.
Page 11
Page 13

Operating manual for type 15/17/23
5.5 Residual water in the chamber ____________________________________________
A small amount of residual water in the autoclave
chamber is unavoidable. As the chamber cools
down, steam in it condenses on those parts which
cool first (door, chamber floor).
Larger amounts of residual water can have various
causes:
Chamber filter
After completion of the operating cycle a small
amount of water remains in all MELAG autoclaves,
which serves during the sterilization to prevent
overheating of the steel chamber vessel. At the end
of the time set for the cycle using the timer switch,
the water will be pressed down with the outflowing
steam back into the water storage container. A filter
is installed at the outlet to prevent dirt and impurities
from entering into the piping system, and if this
becomes clogged then a residual amount of water
will remain in the chamber.
Solenoid valve - Water inlet
If instruments have not been prepared properly then
dirt and impurities can prevent the solenoid valve of
the water inlet from closing properly so that small
drops of water still enter the chamber from the
storage container after the sterilization. In this case,
this is not actually residual water. This can be
checked by removing the tray rack assembly and
wiping the chamber out with a dry cloth. It should still
be dry after some hours. If it is wet again, then the
solenoid valve should be cleaned (see also 5.4.
"Water inlet").
5.6 Signal lamp 'Power' stays on continuously __________________________________
The "Power" signal lamp (5) lights continuously,
and the "Heating" signal lamp (7) lights at intervals.
The pressure gauge shows a pressure of no more
than 0.3 bar with the door closed after the timer
switch has switched off (8). Check the "Drying"
switch (4) and if appropriate switch it to "0". The
pressure should then decline, and both signal
lamps go out. The door can then be opened.
5.7 Signal lamp 'Power' doesn't light up ________________________________________
The "Power" signal lamp (5) does not light up
although there is a power supply to the mains
socket. The autoclave does not work and there are
no displays. This can occur if one of the screw-in
fuses (on the rear-side of the autoclave) has
blown as a result of a short-circuit in the
autoclave. As this malfunction can indicate a
serious fault, you should inform customer
services.
6 Safety instructions
After opening the door of the autoclave do not
touch exposed metal parts. These may be hot and
could cause burns! To remove and handle hot
trays you should use a tray lifter, and for other
sterilization containers use suitable hand
protection.
Empty the water storage container before any
transport, do not tilt the autoclave if it is filled with
water.
Do not open the door until the pressure in the
autoclave has been equalised (pressure gauge
display shows "0"): Small amounts of residual
steam may be released from the autoclave
chamber when the door is opened.
The autoclave may only be serviced by persons
authorised by MELAG, using original spare parts.
Before opening the enclosure of the autoclave
ensure that the plug is removed from the mains
power socket.
This autoclave is not suitable for the
sterilization of liquids.
7 Taking the autoclave out of operation/Transport/Re-installation
When taking the autoclave out of operation for a
longer period or before transportation of the
autoclave proceed as follows:
• Disconnect from the mains power supply and
allow the autoclave to cool down
• Empty the water from the storage container
by opening the "Outlet" valve (12).
• If the autoclave is to be transported with tray
rack and/or trays in place, then place a foam
sheet or similar protection between the door
and the pressure chamber to avoid scratching
and other damage.
• After moving it to another location or after
repairs, then reinstall the autoclave in
accordance with the "installation" procedure
(see above).
Note! To avoid damage during transport use
the original packing for the autoclave.
Page 12
Page 14

A
8 Annex
8.1 Spare parts ____________________________________________________________
Art.-no. Name of spare part
34125 Flow nozzle (M6, width 8 mm)
16005 Safety valve (calibrated)
32150 Door gasket for type 15
32670 Door gasket for type 17
34150 Door gasket for type 23
34010 Filter for pressure chamber
33890 Timer switch
34165 Pressure gauge
40100 Thermometer
29560 Solenoid for solenoid valve
587400 Overheating protection switch (mounted on pressure chamber )
34365 Door locking latch ( always exchange latch and star grip knob together)
34360 Door star grip knob
12690 Mains fuse 12,5A/T (2x)
8.2 Inside the autoclave _____________________________________________________
Q
GEBCD
K
L
H
P
I
M
15- 23
N
A Drainage outlet of storage container I Control electronics
B Flow nozzle K NTC Temperature sensor for control electronics
C Water level ("MAX") L filter for pressure chamber
D Safety valve M Mains-fuse
E Cooling coil N Potentiometer
F Impurity filter (for the water inlet) O Solenoid valve - water inlet
G Cooling loop (of rapid pressure release) P Solenoid valve pressure release
H Capillary tube controller „drying“ Q Flow line filter(screwed in from inside)
Page 13
F
O
Page 15

Operating manual for type 15/17/23
15-23BA-eng.doc Revision 9 - 02/170 Page 14
 Loading...