

MEGAPOWER MVP-886 User Manual

Manual Of
Multi-functional
High resolution Visualizer
Please read this manual carefully before use.

CONTENTS
1 WARNING ...........................................................................................- 1 -
2 FEATURES.........................................................................................- 2 -
3 ACCESSORIES..................................................................................- 3 -
4 STRUCTURES....................................................................................- 4 -
4.1 STRUCTURES...............................................................................- 4 -
4.2 BACK PORTS................................................................................- 5 -
4.3 SIDE PORTS.................................................................................. - 5 -
4.4 CONTROL PANEL / REMOTE CONTROL.................................- 6 -
5 CONNECTION....................................................................................- 8 -
5.1 SIDE PANEL CONNECTION ................................................................- 8 -
5.2 BACK PANEL CONNECTION ..............................................................- 8 -
5.3 SETUP THE VISUALIZER....................................................................- 9 -
6 OPERATION.....................................................................................- 10 -
6.1 SET UP.........................................................................................- 10 -
6.2 STAND BY...................................................................................- 12 -
6.3 HOW TO START UP SYSTEM ......................................................- 12 -
6.4 HOW TO SHUT DOWN SYSTEM................................................. - 12 -
6.5 HOW TO SELECT LIGHT ..........................................................- 12 -
6.6 VIDEO SIGNAL INPUT/OUTPUT.............................................- 13 -
6.6.1 【VGA】.............................................................................- 13 -
6.6.2 【MONITOR】..................................................................- 13 -
6.6.3 【PROJECTOR】............................................................- 14 -
6.6.4 【CVBS】..........................................................................- 15 -
6.7 AUDIO INPUT/OUTPUT............................................................ - 16 -
6.7.1 MICROPHONE..................................................................- 16 -
6.7.2 AUDIO OUTPUT................................................................- 16 -
6.8 ZOOM IN / OUT...........................................................................- 17 -
6.9 FOCUS.........................................................................................- 17 -

6.9.1 【AUTO FOCUS】...........................................................- 17 -
6.9.2 MANUAL FOCUS..............................................................- 17 -
6.10 MODE ........................................................................................- 18 -
7 IMAGE FUNCTION..........................................................................- 19 -
7.1 【SAVE】...................................................................................- 19 -
7.2 【DELETE】 ..............................................................................- 19 -
7.3 【PLAY】...................................................................................- 19 -
7.4 【CONTRAST】 ........................................................................- 20 -
7.5 BRIGHTNESS/ CONTRAST/ SATURATION/ SHARPNESS...- 21 -
7.6 COLOR.........................................................................................- 21 -
7.7 IMAGE EFFECT..........................................................................- 22 -
7.7.1 【FREEZE】.....................................................................- 22 -
7.7.2 【NEGATIVE】.................................................................- 22 -
7.7.3 【MONOCHROME】.......................................................- 22 -
7.7.4 【TEXT】...........................................................................- 22 -
7.7.5 【MIRROR】.....................................................................- 23 -
8 SET UP 2...........................................................................................- 23 -
8.1 AUTO EXPO (ON/OFF) ..............................................................- 23 -
8.2 AUTO WB (ON/OFF)..................................................................- 23 -
8.3 VGA OUTPUT ................................................................................- 23 -
8.4 PAL / NTSC..................................................................................- 24 -
8.5 FACTORY....................................................................................- 24 -
9 EXPAND CENTER CONTROL SYSTEM .................................................- 24 -
10 RS-232.............................................................................................- 24 -
11 USB SOFTWARE..........................................................................- 25 -
12 DAILY MAINTENANCE................................................................- 25 -
13 Q&A..................................................................................................- 26 -
14 SOLUTION OF BLACK SCREEN (IN 1080P FORMAT)........- 27 -

15 EZPREVIEW-USB SOFTWARE..................................................- 28 -
15.1 INSTALLATION....................................................................... - 28 -
15.2 SOLUTION OF EZPREVIEW INSTALLATION ABNORMITY ............... - 36 -
16 RS232 SOFTWARE INSTALLATION ........................................- 42 -
16.1 INSTALLATION....................................................................... - 42 -
16.2 RS232 OPERATION.......................................................................- 46 -

1 WARNING
TO AVOID FIRE OR LEAKAGE OF ELECTRICITY, PLEASE
KEEP THIS VISUALIZER DRY. REFER SERVICING TO
QUALIFIED PERSONNEL. DO NOT TRY TO FIX IT BY
YOURSELF.
1.Check the voltage and frequency before any operation. Please
make sure that the supply power is dynatron. 0-wire, live wire,
and ground wire must be fine connected.
2.To avoid static high-volt strike, please connect ground wires
correctly. Do not move cables without shutting off the electricity.
3.Do not try to change the structure. Do not operate with shell
open.
4.Keep it away from tinderbox, liquid, or metal. Do not capture
image when it is facing to the sun. It is recommended to operate
in gloomy surroundings.
5 . Keep this instrument away from bad situation like high
temperature, wet, caustic gases, dusty, or shaky. Place it on a
STABLE desk. Object weight should be less than 1kg.
6.Cut off electricity before cleaning. Please clean it with dry cloth.
Do not use thinner, volatile gas, or insecticide.
7.Release the power plug when it is left unused.
8.Keep children away from this instrument.
9.Cut off electricity when abnormal signal occurs such as noise or
smoke, plug needs to be removed too.
- 1 -

2 FEATURES
1.LED lamps are used in both upper lights and base lights.
2.When connected, computer signals can be achieved without
turn on the visualizer.
3.With 1/3″ line-by-line scan Image Sensor. No flicker or shaking
problems when display small characters. It can be connected
straightly with projector or other display device, which makes it
especially suitable for teaching and presentation.
4.Image process: Freeze, Black/White, Negative, Mirror, Text,
Brightness, Contrast, Color saturation, Sharpness, RGB
adjustment, Save, Delete, Play, Split.
5 . Several input/output ports make it easily to get fine
demonstration by connected with other multimedia.
6. Unique MODE SAVE/MODE RECALL function makes the
demonstration more efficient.
7.Signal switch can be carried out separately or combined.
8.The camera can be rotated 350° horizontally and vertically.
9.Operation: Control panel; Remote control, RS-232, USB.
10.Adjustable Volume with wire or wireless microphone.
- 2 -
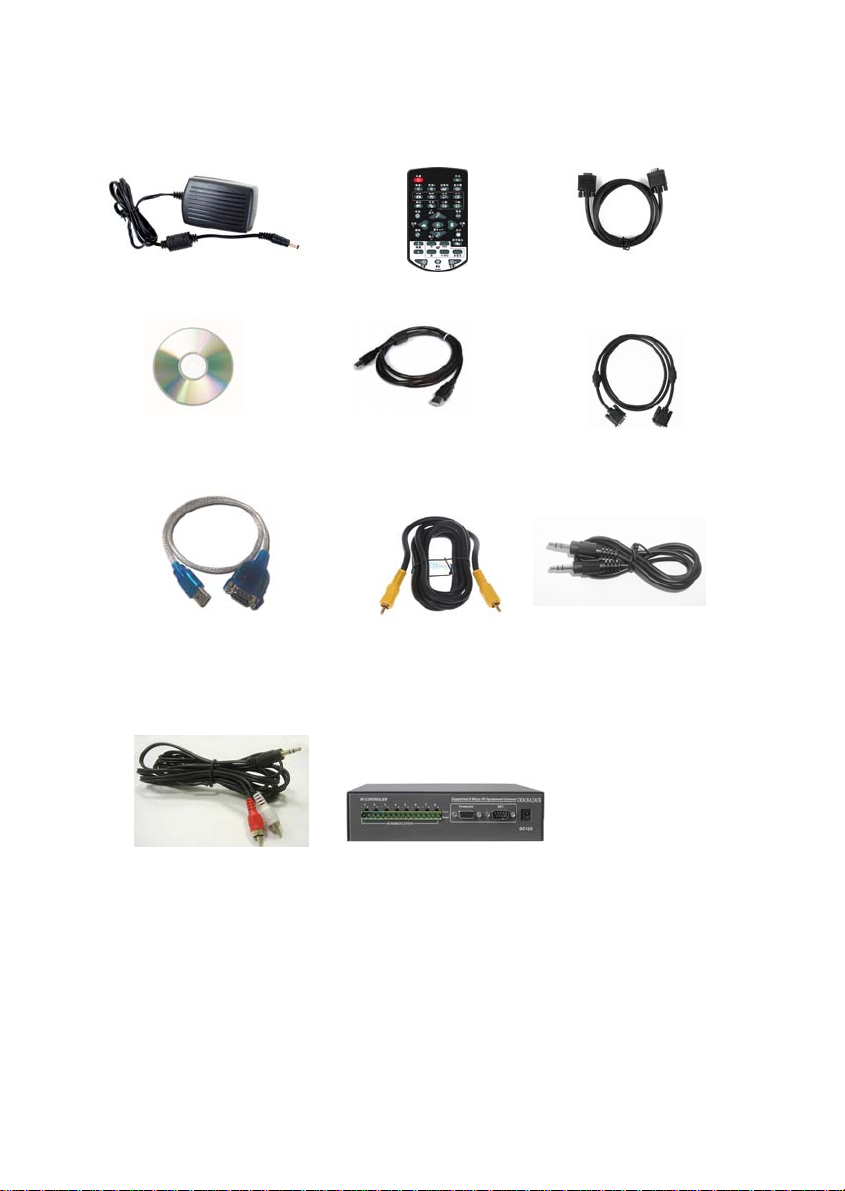
3 ACCESSORIES
Adapter
Software
USB to RS232 cable
(Optional)
3.5mm~RCA
Audio cable (Optional)
Remote control
USB cable
(Only for USB)
Video cable
(Optional)
Center control
(Optional)
VGA cable
RS232 cable
(Optional)
3.5mm audio cable
(Optional)
- 3 -
4 STRUCTURES
4.1 STRUCTURES
4 Revolve joint
5 Pole
7 Arms
9
6 upper lights
8 Base lights
11 Control
(Cutline 1)
1 Infrared receiver
2 Camera box
3 Camera
10 Ports
- 4 -

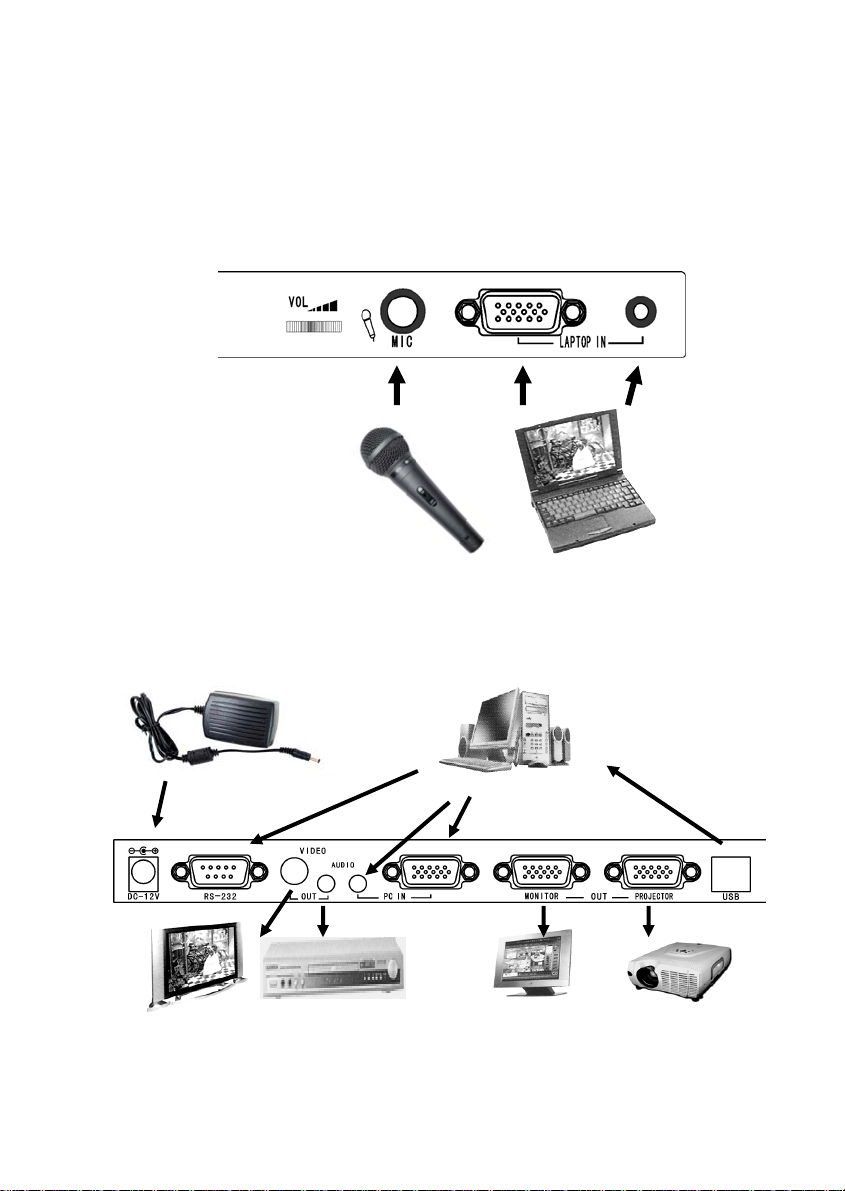
4.2 BACK PORTS
1 2 3 6 7 84 5 9 14
(Cutline 2)
4.3 SIDE PORTS
10 11 12 13
Description of Image2 and Image3
NO. PORTS DESCRIPTION
1 DC-12V Power input
2 RS-232 For connection with computer
3 VIDEO OUT Output image signal to monitor
4 AUDIO OUT Output audio signal
(Cutline 3)
5 PC AUDIO IN For connection with PC Audio
6 PC VGA IN For connection with PC VGA
7 MONITOR VGA OUT For connection with PC monitor
8 PROJECTOR VGA OUT For connection with projector
9 USB For connection with PC USB port
10 LAPTOP VGA IN For connection with laptop VGA
11 LAPTOP AUDIO IN For connection with laptop audio
12 MIC IN For connection with microphone
13 MIC VOL Microphone volume
14 HDMI OUT
For connection with HDMI Display(Only
For HDMI Model)
- 5 -

4.4 CONTROL PANEL / REMOTE CONTROL
(Cutline 4)
⑿
(Cutline 5)
⒀ ⒂
⒁
⒃
1
9
10
12
11
21
17
18
23
7
19 20
27
25
28
26
32 33
34
⑽
⑹
⑺
- 6 -
⑼
⑻
⑶
(35)
4
13
14
15
16
6
5
8
24
29
22
30
31
⑵
⑴
⑸
3
2
⑷

NO. ICON DESCRIPTION
①
①
①
①
1⑴
2⑵
3⑶
4⑷
5⑸
6⑹/7⑺
8⑻
9⑼/10⑽
11⑾
12⑿
13⒀
14⒁
15⒂/16⒃
17
18
19
20
21
22
23,24
25,26
27
28
29
30
31
32,33
34
35(35) INDICATOR LIGHTS Front control panel indicator lights on/off
【POWER】
【MONITOR】
【PROJECTOR】
【LIGHT】
【MENU】
【ZOOM IN/OUT】
【FOCUS】
【BRIGHTNESS+/-】
【SAVE】
【DELETE】
【PLAY】
【SPLIT】
【PRE/NEXT】
【BW】
【FREEZE】
【MIRROR】
【NEGATIVE】
【TEXT】
【VGA/CVBS OUTPUT】
【WIDE/FAR】
【SCREEN↑/↓】
【SCREEN ON】
【SCREEN OFF】
【VGA】
【VIDEO】
【CUSTOM】
【VOLUME-/+】
【MUTE】
Power on/off
Computer signal
Projector signal
Light on/off
Call out MENU
Image zoom in/out ②Menu select
Auto focus ②Menu confirmation
Brightness control ②Menu select
Save image
Delete image
Review image
Contrast image
Chose saved image
Black/White
Freeze effect
Mirror effect
Negative effect
Text effect
VGA/CVBS output switch
Manual focus②Menu select
Screen open/shut*
Turn on projector*
Turn off projector*
Projector VGA signal input*
Projector VIDEO signal input*
Projecor custom function*
Volume adjustment*
Audio on/off*
Items with “*” mean Expand Center Control System is needed to
realize the function.
- 7 -
5 CONNECTION
p
Note: Make sure the system is fine connected before turn the
power on.
5.1 Side panel connection
Laptop
com
uter
Microphone
5.2 Back panel connection
Adapter
TV
Amplifier
- 8 -
PC
Projector Monitor
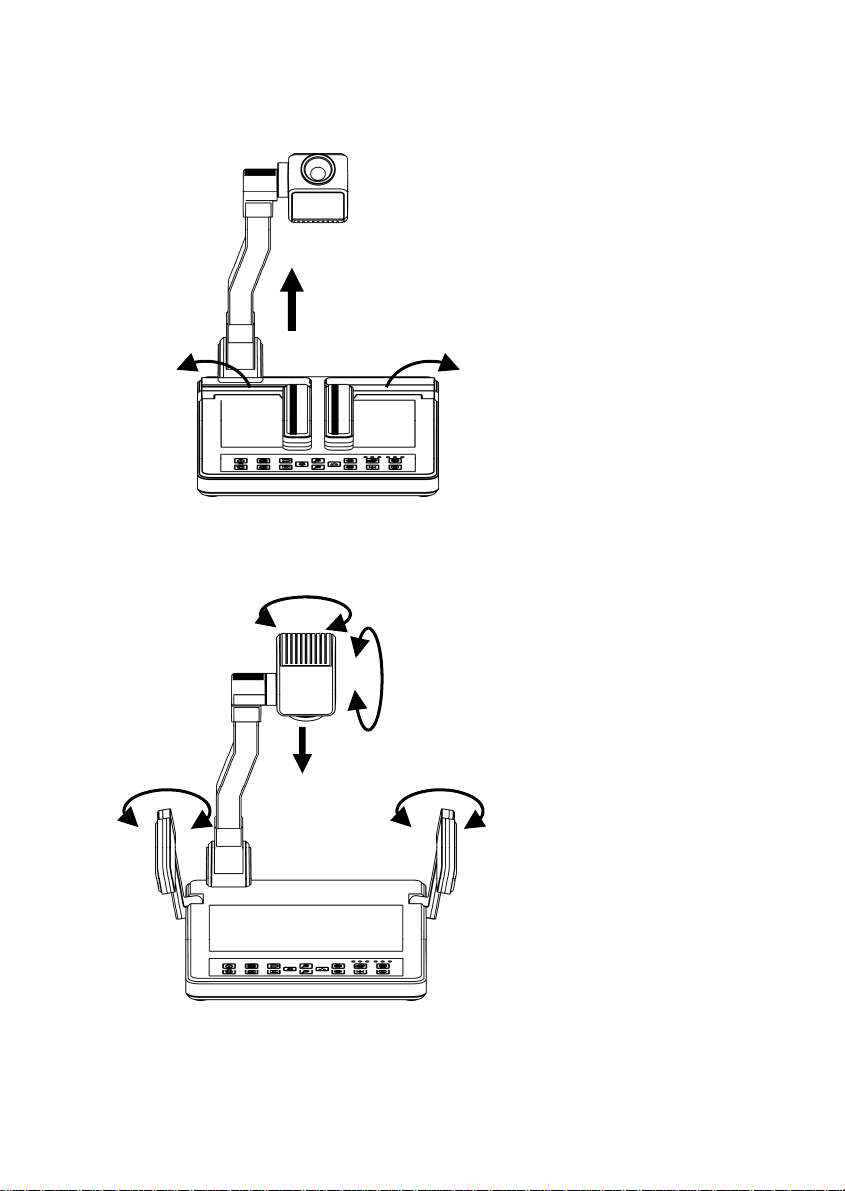
5.3 Setup the visualizer
1
2 2
4
3
6
3
1. Pull up the main pole;
2. Pull up the upper lights to the
proper position
5
3/4/5. Adjust the camera head and
upper lights
6. Take off the camera cover
- 9 -

6 OPERATION
This visualizer can be operated by:
1. Front control panel
2. Infrared remote control
3. Computer (by RS232)
4. USB
Those methods can be carried out separately or combined.
Note: The following instructions are only about operation with
front control panel and remote control. For RS-232 and USB
operation, please refer to corresponding instructions.
6.1 SET UP
1.Press 【MENU】to call out Menu list.
2.Use 【ZOOM IN】, 【ZOOM OUT】,【FAR】/【BRT-】
Or【NEAR】/【BRT+】to select item.
3.Press 【FOCUS】 to confirm your selection.
4.Press【MENU】 to quit Menu.
Note: ①Press【MENU】button to quit Menu.
②Gray means the function is unchangeable.
- 10 -
MENU
ITEM INFO
FREEZE ON / OFF
NEGATIVE NEGATIVE ON/NEGATIVE OFF
EFFECT
IMAGE
SETUP1
SETUP2
MONOCHROME ON / OFF
MIRROR ON / OFF
TEXT ON / OFF
Play 01~20
Contrast Empty / 01~20
Save to Empty / 01~20
Delete Empty / ALL / 01~20
Brightness
Contrast
Saturation
Sharpness
Color Normal / Cold tune / warm tune / Custom
Red 00~15
Green 00~15
Blue 00~15
MODE RECALL Default / 0~10
MODE SAVE Default / 0~10
AUTO EXPO ON / OFF
AUTO WB ON / OFF
OUTPUT VGA / CVBS
RESOLUTION 1280X1024@60/ 1024X768@60/
1360X768@60/ 1080P
TV SYSTEM PAL/NTSC
FACTORY Yes/No
00~63(30)
00~63(30)
00~31(15)
00~15(03)
- 11 -
 Loading...