

Page 1

User’s Manual
MODEL MVP732
DIGITAL PRESENTER
DIGITAL PRESENTER
Page 2

Chapter 1
Chapter 5
Introduction
1.1 About Your Digital Presenter
The MVP-732 Digital Presenter is a convenient, versatile, state-of-the-art
presentation system. It is an effective and valuable tool for presenting printed material,
slides or 3-D objects on a digital display such as plasma monitor or LCD monitor TV etc.
or through a multimedia projector onto a large screen. The digital output from the presenter
delivers crystal sharp, color rich and extremely stable image. The enlarged display
allows large groups to simultaneously view the object clearly and lively, and is
particularly well suited for business meetings, conferences and group instruction.
The following lists some of the specific features of the MVP-732 Digital Presenter:-
- Format Compatible: JPEG Photo, MP3 Music, Divx, Xvid, VCD and DVD video Playback
- The 16 times optical motorized zoom together with automatic focusing keeps the
displayed object always clearly in focus.
- High sensitivity and low illumination.
- Goose Neck Upper lighting units for even and bright illumination.
- Perfect Positive/Negative function gives very good color reproduction for negatives.
- Image Storage Function (Image Freeze) allows for display of image while changing the
displayed object. This is an indispensable feature for professional presentations.
- Stores 8 picture images.
- 90 degrees image rotation plus scrolling.
- Vertical or Horizontal image flip.
- USB for image downloading.
- The Digital Presenter has a RS-232C connector and driver for PC remote control under
Microsoft Windows environment.
1.2 Safety Information
Troubleshooting Guide
If you are having a problem operating the Digital Presenter, firstr make sure you have set
it up according to the instruction in Chapter 3. You should also check the adjustments and
the INPUT connections. Verify that all power is switched on. Before calling for service,
check the troubleshooting suggestions in this chapter.
Problem Solutions
No image on the Monitor Check VGA cable connections. Check INPUT source
selection is correct.
Remote Control does not function Check that there are no obdyscles between the remote
control and the Digital Presenter.
Check the batteries in the remote control.
The Focus cannot be controlled Control the focus manually.
Automatically
There is no sound Check that the Audio cable is properly connected to the
PC IN port on the rear panel.
Check the speaker.
The lights cannot be switched on Checkthat the AC power cord is plugged into the wall
socket.
Check that the light bulb is not damaged.
There is no suoud from the Check that the microphone is properly connected to
microphone the Microphone Port on the rear panel.
Check to ensure that the Microphone is functioning
properly.
Please read these instructions before using your Digital Presenter. Failure to comply with
these instructions could result in electric shock, fire, personal injury or damage to your
Digital Presenter.
Power Source
Check the power specification plate on the back of the Digital Presenter. Ensure that your
line voltage matches with the rating of the Digital Presenter. The Digital Presenter accepts
AC power 100-240V, 50-60 Hz, three-wired type grounded sources. Operate the Digital
Presenter only from a three-wired grounding type power source.
1
14
Page 3
1.3 System Contents
Handle your Digital Processor carefully as you remove it from the shipping box.
Accessories
Restoring the Initial Values
If the color and brightness is not desirable, press "INITIAL" button will restore the initial setting values.
It is recommended that each time the digtital presenter is power on, the "INITIAL" button be pressed
to bring the Auto White Balance and Auto Focus etc. back to the initial value for optimum operation.
AA Batteries
Optional
Accessories
Power Adaptor
S-Video CableAV/Audio Cable
ER
ITAL PRESENT
DIG
Software Driver
Driver Software
RS-232 Cable VGA CablePower Cord
USB Cable
User's Guide
User's Guide
Remote Control
Close Up Lens
& Lens Cover
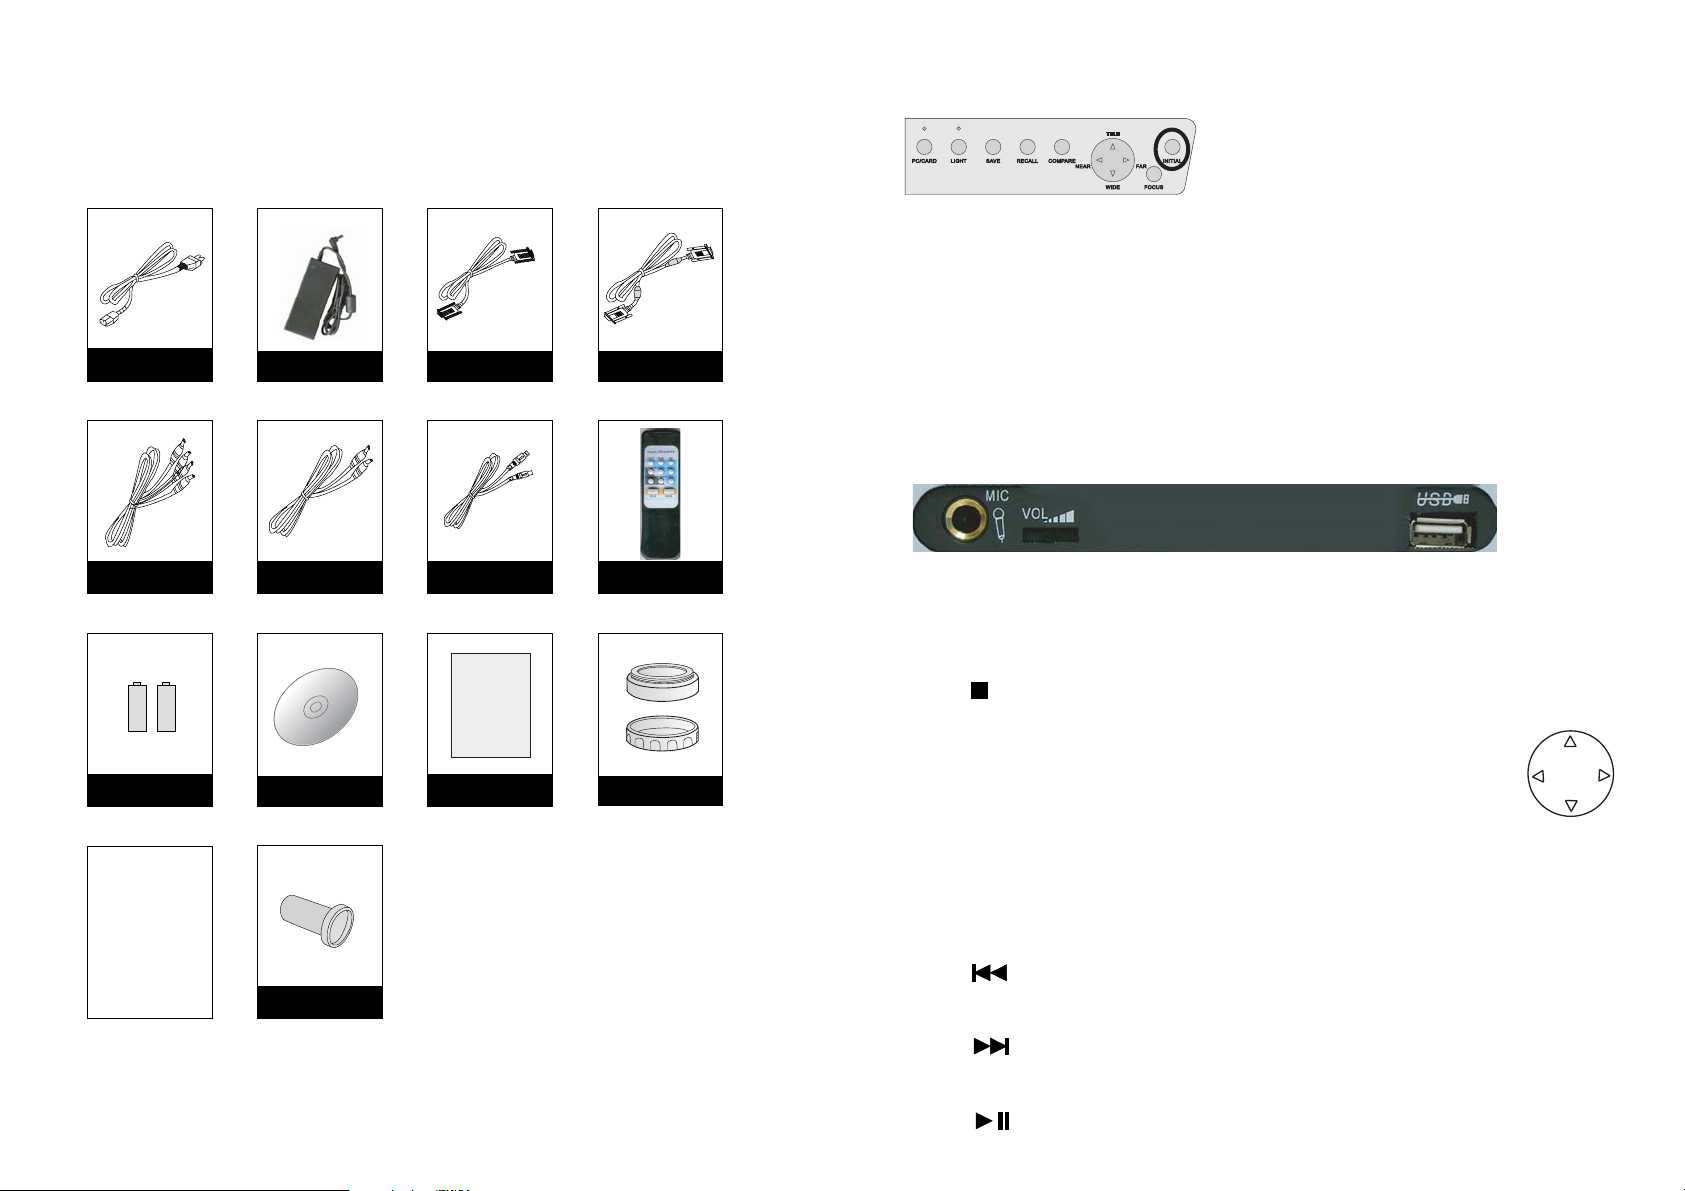
MVP-732 supports USB 2.0 External Memory card (CF/SD/MMC/MS/XD) and the USB port is
on the side of the presenter. As shown below.
Insert external card into the USB port and press "PC/CARD" button, the presenter would read
DIGITAL MEMORY CARD
the card.
CF SD/MMC/MS/XD
SCREEN MENU
Press the " " Screen will show the Menu and files stored.
ARROW
Use the "Up", "Down", "Left" and "Right" arrow buttons to browse the files..
ENTER
Press the "ENTER" button to select the thumbnail files.
MENU/SETUP
Press the "MODE" button to enter the system setup.
Microscopic Adapter
If any included accessories are missing, please contact your dealer immediately.
3
PREV IMAGE
Press the " " to show the previous image.
NEXT IMAGE
Press the " " to show the next image.
PLAY/PAUSE
Press the " " button to start and stop the slideshow of the thumbnail files.
12
Page 4

3. Adjust by rotating the two Upper Lamps to a suitable position.
4. Push the Arm Lock Button and slide the arm upward to the preset position.
3 4
3.7 Image Adjustment
Adjusting the Size
Press the "WIDE" or "TELE" button to change the size of the displayed object.
LIGHT
5. Rotate the CCD camera head and adjust its angle to a suitable position.
6. Remove the Lens Cover (anticlockwise) and attach other accessories if required.
5 6
2.2 Connector Panel
This illustration shows the connector panel on your Digital Presenter. Refer to this figure
when connecting the Digital Presenter.
RGB Out
(connect to Presenter
RGB In
(connect to PC
VGA output port)
RGB IN
RS-232C
RS-232C Socket
or PC Monitor)
RGB OUT-1
RGB OUT-2
Power Inlet Socket
USB Socket
USB
12V DC IN
(DC 12V)
Composite
Video In
VIDEO
S-VIDEO
Audio In (L & R)
IN
VIDEO
L
12
R
AUDIO
S-VIDEO
S-Video In
Composite Video Out
VIDEO
L
R
AUDIO
S-VIDEO
Audio Out (L & R)
OUT
VIDEO
L
12
R
AUDIO
S-VIDEO
S-Video Out
L
R
AUDIO
WIDE TELE
Negative/Positive Film Selection
If you are viewing negative film, press "NEGATIVE" button
to get the right color. Press this button once more to return
to the normal state.
Positive Film Negative Film
Adjusting the Brightness
Press "BRIT+/-" to change the brightness of the image.
Adjusting the Focus
Press "FOCUS" to automatically adjust the focus.
Press "FAR" or "NEAR" to adjust the focus.
LIGHT
Image Rotate
Press "ROTATE" button to rotate the image vertically.
5
10
Page 5

3.2 Remote Control
3.3 PC Control (USB) & RS-232C Control Setup
The following describes the control button on the remote control of the Digital Presenter.
1
3
2
4
5
7
6
9
8
11
10
+
-
PC
Notebook
RGB IN
RS-232C
RGB OUT-1
RGB OUT-2
USB
12V DC IN
IN
VIDEO
S-VIDEO
VIDEO
L
12
R
AUDIO
S-VIDEO
L
R
AUDIO
OUT
VIDEO
S-VIDEO
VIDEO
L
12
R
AUDIO
S-VIDEO
AUDIO
Use the USB cable to connect the USB port of the digital presenter
L
R
and the PC. Install the USB Driver Software onto the PC.
Presenter can be controlled by the PC via the USB port
Use the RS-232C cable to connect the RS-232C port of the digital presenter to
COM1 port on the PC. The Digital Presenter can be controlled via the RS-232C
through the installed RS232C driver software.
3.4 RS-232C Control Operation
Load the RS-232C Driver Software onto any folder on the hard disk of the PC. Execute the driver
to activate the RS-232C control software.
The RS-232C control window will be displayed on the PC. The use is identical to the buttons on
the digital presenter or remote control.
The application software is compatible with Win98, WinME, Windows 2000 & Windows XP.
3.5 Connecting to External Equipments
Connecting to PC Monitor or Multimedia Projector
1
POWER turns Power to the digital Presenter On/Off
2
INP selects Video signal:- Video 1, Video 2
3
BRIT+ increases the brightness of the image
4
ROTATE switches image from Left to Right
5
STORE stores images
6
BRIT- decreases the brightness of the image
7
FREEZE freezes the current image
8
NEGATIVE negative function button
9
FOCUS automatically adjusts focus to mantain a
sharp image
10
TELE zooms in and enlarges size of object
11
WIDE zooms out and reduces size of object
7
RGB, Composite Video or
S-Video output signal
+
-
PC Monitor
or TV
RGB IN
RS-232C
RGB OUT-1
RGB OUT-2
USB
12V DC IN
IN
VIDEO
S-VIDEO
VIDEO
L
12
R
AUDIO
S-VIDEO
AUDIO
VIDEO
L
12
R
S-VIDEO
AUDIO
OUT
L
R
VIDEO
S-VIDEO
L
R
AUDIO
Multimedia Projector
VGA Cable: Connect one end to the PC Monitor or Multimedia Projector and the other
end to the PC Out port of the Visual Presenter
Stereo Audio Cable: Connect one end to the audio equipment (or Multimedia Projector) and
the other end to the PC Out (Audio) port of the Visual Presenter
RCA Cable: Plug the yellow connector into the video port of the TV or Multimedia
Projector
S-Video Cable: A better image will be obtained through the S-Video signal, which only
delivers internal signal from the Visual Presenter
8
Page 6

Connecting to External VGA Input
Chapter 3
+
-
RGB IN
RS-232C
RGB OUT-1
RGB OUT-2
USB
12V DC IN
IN
VIDEO
S-VIDEO
VIDEO
L
12
R
AUDIO
S-VIDEO
L
R
AUDIO
OUT
VIDEO
S-VIDEO
VIDEO
L
12
R
AUDIO
S-VIDEO
AUDIO
L
R
PC
Notebook
Connect one end of the VGA cable to the PC (or notebook) VGA out put port and the
other end to the VGA IN on the Digital Presenter. The VGA signal from the PC or
notebook can then be selected through the Digital Presenter.
3.6 Operating the Digital Presenter
1. Setup the digital presenter on a flat surface and connect it to a proper AC power source.
2. Connect the required external equipment to the digital presenter.
3. Switch the Power ON/Off switch on the rear panel to ON position. Switch on the external
equipment such as notebook or multimedia projector.
4. Check to ensure that the cables are properly connected. Press "RGB" button to select
the desired source to be displayed. The default selection is Body or Internal source.
5. Place the object or document to be displayed on the base platform. Adjust the camera
head so it is directed towards the object.
6. If necessary, remove the close up lens. This depends on the distance of the object from
the camera. If the object is placed on the base platform, then the close up lens must be
used. If the object exceeds this distance, then remove the close up lens from the camera.
7. Light Source Selection: select the light source by pressing LIGHT to obtain the best image.
In a dark environment, please select and turn on the upper lights. When displaying positive
or negative film, press LIGHT to turn on the base light. Off---Upper Light---Base Light---Off-
8. Focus Adjustment: in most cases, the CCD camera will automatically adjust the focus to get
a clear and sharp image. In critical situation when it does not deliver a very sharp image,
press FOCUS button to activate the automatic focus function again. If this still does not produce
the best result, use manual focus by pressing "FAR" or "NEAR" to get a sharp image.
9. Freezing of image: press the "FREEZE" button to freeze the current image of the CCD
camera. The image can then be studied and viewed clearly. Press "FREEZE" button to cancel
the freeze function.
10. Selecting External Equipment: selects the external equipment as the source for display
through the RGB OUT port of the Digital Presenter. If no image is displayed, please check
that the cables are properly connected. Press "RGB" button on ther remote control to select
the desired source for display.
Using the Digital Prsesnter
3.1 Control Panel
The following describes the control button on the control panel of the Digital Presenter.
FUNCTION OF BUTTONS
MODE
ENTER
PC / CARD
LIGHT
SAVE
RECALL
COMPARE
TELE
WIDE
NEAR
FAR
Focus
INITIAL
Media Card menu setup
Selects the image when use Media Card
Selects the images when Media Card display
Show "PREV" the Card image
Show "NEXT" the Card image
Toggles between Play or Pause the Card Images
Enter the Media Card menu or Stop image
Selects RGB signal:- internal, VGA and Media Card
Selects Light sources:- Upper Light, Base Light and Off
Stores images
Recalls stored images
Split screen display for comparison
Zooms In and Enlarges size of object
Zooms Out and Reduces size of object
Focus In
Focus Out
Automatically adjusts focus to maintain a sharp image
Restores the initial value
9
6
Page 7

Save Image
You can store up to 8 images in the digital presenter. When required these 8 images can be
retrieved one by one on screen.
Chapter 2
Installation
Press " SAVE" or "STORE" button to store the current image into
the memory of the digital presenter. Each time the "SAVE" or
"STORE" button is pressed, another image is stored. When all
the 8 images are stored, the next saved image will overwrite the first image.
Note: due to the data size of the stored image, it may take up to 1-2 second to save one image.
Image Retrieval
Press "RECALL" button to display the stored image.
Press "RECALL" button to retrieve the stored images one after the other.
Press RECALL
Freeze Image
Press the "FREEZE" button to freeze the current image display.
Press the "FREEZE" button again to exit this mode.
FREEZE
2.1 Structure
CCD Camera Head
Front View
Infra Red Receiver Window
Arm Lock Button
Goose Neck
Upper Light
Base Light
Control Panel
1. Pull the Main Lock Switch towards the front and pull the arm up to the preset position.
2. Lift up the two Goose Neck Upper Lamps.
Close Up Lens
Arm
Main Lock Switch
Media Card Slot
1 2
Compare Image
Press "COMPARE" button to freeze image on the right hand side.
Press "COMPARE" button to freeze image on the top half and
press "COMPARE" button again to exit this mode.
Original
Image
11
Right hand
side freeze
Freeze
Top half
side freeze
Freeze
Original
Image
4
Page 8

Chapter 4
Care and Maintenance
The information in this chapter describes how to care for and prevent accidental damage to
your Digital Presenter . You should treat your Digital Presenter with the same care you would
give to any other valuable equipment.
Power cord
Use only the power cord supplied with the Digital Presenter. Do not use the power cord if
it has become damaged or frayed. For a replacement power cord, contact your authorized
dealer.
Do not allow anything to rest on the power cord. Do not place this projector where the cord
may be abused by persons walking on it.
Grounding
This Digital Presenter is grounded through the conductor of the power cord. To avoid electric
shock, plug the power cord into a properly wired receptacle. Do not defeat the safety purpose
of the grounding type plug.
4.1 Cleaning the Digital Presenter Housing
DO NOT try to service the Digital Presenter. Except for the lamps, the interior of the Digital
Presenter contains no user-serviceable parts. Refer all Digital Presenter servicing to your
dealer. Failure to do so can result in serious personnel injury or damage to the Digital
Presenter.
DO NOT clean the housing with organic solvents, such as those containing acetone. Wipe
the exterior of the housing wiht a soft, damp cloth. Protect the Digital Presenter from rain,
snow or extreme temperature.
4.2 Cleaning the CCD Camera Lens
To clean the camera lens:
1. Remove the lens cover and set it aside.
2. Apply a non-abrasive glass cleaner to a soft, dry cleaning cloth. Be careful not to use
exessive amount of liquid glass cleaner. Also, do not use abrasive cleaners, solvents,
or other harsh chemicals that might scratch the lens.
3. Lightly wipe the cleaning cloth over the lens from center to the edge in circular motion.
4. Replace the lens cover.
4.3 Transporting the Digital Presenter
The Digital Presenter is a highly sophisticated piece of electronic equipment that is sensitive
to impact, excessive heat, cold and humidity. When transporting the Digital Presenter, use a
protective carrying bag or use the original packing carton to minimize shock and impact.
Store and transport the Digital Presenter at temperature between 0 and 140 degrees
Fahrenheit (-17 to 60 degrees Centigrade). Avoid storage in automobiles during seasonal
temperature extremes. Automobile interior temperatures can exceed 160 degree Fahrenheit
(70 degrees Centigrade) in summer. If the Digital Presenter has been exposed to extremely
hot, cold or humid conditions, allow it to stand at room temperature for 30 minutes befroe use.
Fuse
Use only fuse of correct type, voltage rating, and current rating as specified on the fuse holder.
Overloading
Do not overload wall outlets and extension cords as this can result in the risk of fire or electric
shock.
Cabinet Slots
Never insert objects of any kind into the Digital Presenter through cabinet slots as they may
touch dangerous voltage points or short out parts that could result in a risk of fire or electric
shock.
Liquid Spills
Do not set drinks or other liquids on top of the Digital Presenter. Do not place the Digital
Presenter near water, for example, near a bathtub, washbowl, kitchen, sink, or laundry tub, in
a wet basement, or near a swimming pool. Spilled liquids can flow inside the Digital Presenter
and cause damage.
Repair
Do not disassemble the Digital Presenter. Take it to an authorized technical staff when service
or repair work is required. Opening or removing the cover may expose you to dangerous
voltages or other risks. Incorrect re-assembly can cause electric shock when the appliance
is subsequently used.
Technical Service
Unplug this Digital Presenter from the wall outlet and refer servicing to authorized technical
staff under the following conditions:
1. When the power cord or plug is damaged or frayed.
2. If liquid has been spilled into the Digital Presenter.
3. If the Digital Presenter has been exposed to rain or water.
4. If the Digital Presenter does not operate normally by following the operating instructions.
Adjust only those controls, which are covered by the operating instructions. Improper
adjustment of other controls may result in damage and will often require extensive work
by the authorized technical staff to restore the Digital Presenter to normal operation.
5. If the Digital Presenter has been dropped or the cabinet has been damaged.
6. If the Digital Presenter exhibits a distinct change in performance.
213
Page 9

Appendix 1
TABLE OF CONTENTS
Product Specifications
MVP-732
Projection Lens
Zoom
Total Effective Pixels
Resolution
Shooting Area
Focusing
Illumination
Negative / Positive
Image Rotate
White Balance
Image Freeze
Brightness Control
Color / B & W
Image Save and Recall
Text / Image mode selection
OSD
Lighting
External Memory Port
Format Compatible
Input Ports
Output ports
TV System
Head Rotation
Size (in use)
Weight
Power
Included Accessories
Optional Accessories
f=3.9-63mm, F=1.6~3.8
16 X Optical, 8 X Digital
Up to 1280(H) x 1024(V)
More than 550 TV Lines with RGB output
360 x 275 mm max. ; 30 x 23 mm min.
Auto / Manual
0.5 Lux min.
Selectable
Yes
Auto / Manual
Yes
Manual
Selectable
8 images
Yes
Yes
Upper Light x 2 + Bottom Light
USB 2.0
JEPG, MP3, MPEG4 (Divx, Xvid), VCD & DVD
RGB x 1, C-Video x 2, S-Video x 2, Audio x 2, RS232 x 1
RGB x 2 (XGA), C-Video x 2, C-Video x 2, Audio x 2, USB x 1
PAL
Vertical 330 degree, Horizontal 330 degree
445~630 (L) x 450 (W) x 600 (H) mm
6 kg / 13 Ib.
AC 100-240 (50/60 Hz)
User's Manual, VGA Cable, Remote Control, Power Cord,
Power Adaptor, S-Video Cable, AV/Audio Cable, RS-232 Cable
Software Drivers, AA Batteries & Close Up Lens
Microscope Adapter, 60X Lens
Chapter 1 - Introduction ---------------------------------------------------------------------- 1-3
1.1 About Your Digital Visual Presenter ---------------------------------------------------- 1
1.2 Safety Information -------------------------------------------------------------------------- 1
1.3 System Contents --------------------------------------------------------------------------- 3
Chapter 2 - Installation ----------------------------------------------------------------------- 4-5
2.1 Structure -------------------------------------------------------------------------------------- 4
2.2 Connector Panel----------------------------------------------------------------------------- 5
Chapter 3 - Using the Visual Presenter ------------------------------------------------- 6-12
3.1 Control Panel --------------------------------------------------------------------------------- 6
3.2 Remote Control------------------------------------------------------------------------------- 7
3.3 PC Control (USB) & RS-232C Control Setup----------------------------------------- 8
3.4 RS-232C Control Operation--------------------------------------------------------------- 8
3.5 Connecting to External Equipments----------------------------------------------------- 8
3.6 Operating the Digital Presenter----------------------------------------------------------- 9
3.7 Image Adjustment--------------------------------------------------------------------------- 10
Adjusting the Size -------------------------------------------------------------------------- 10
Negative / Positive Film Selection------------------------------------------------------ 10
Adjusting the Brightness ------------------------------------------------------------------ 10
Adjusting the Focus------------------------------------------------------------------------- 10
Image Rotate---------------------------------------------------------------------------------- 10
Save Image------------------------------------------------------------------------------------ 11
Image Retrieval------------------------------------------------------------------------------- 11
Freeze Image--------------------------------------------------------------------------------- 11
Compare Image ----------------------------------------------------------------------------- 11
Restoring the Initial Values---------------------------------------------------------------- 12
USB 2.0 External Memory Port --------------------------------------------------------- 12
Chapter 4 - Care and Maintenance ---------------------------------------------------------- 13
4.1 Cleaning the Digital Presenter Housing ----------------------------------------------- 13
4.2 Cleaning the CCD Camera Lens -------------------------------------------------------- 13
4.3 Transporting the Digital Presenter ------------------------------------------------------ 13
Chapter 5 - Troubleshooting Guide ---------------------------------------------------------- 14
Appendix 1 - Product Specifications for MVP732 ---------------------------------------- 15
15
 Loading...