

Page 1
DE
Luftbefeuchter AH 670
GB
Air humidier AH 670
FR
Humidicateur d’air AH 670
IT
Umidicatore AH 670
ES
Humidicador AH 670
PT
Humidicador AH 670
NL
Luchtbevochtiger AH 670
FI
Ilmankostutin AH 670
SE
Luftfuktare AH 670
GR
Υγραντήρας AH 670
Art. 60054
Gebrauchsanweisung
Instruction Manual
Mode d’emploi
Istruzioni per l´uso
Instrucciones de manejo
Bitte sorgfältig lesen!
Please read carefully!
A lire attentivement s.v.p.!
Da leggere con attenzione!
¡Por favor lea con cuidado!
Manual de instruções
Gebruiksaanwijzing
Käyttöohje
Bruksanvisning
Οδηγίες χρήσης
Por favor, ler cuidadosamente!
A.u.b. zorgvuldig lezen!
Lue huolellisesti läpi!
Läses noga!
Παρακαλούμε διαβάσετε με προσοχή!
Page 2

DE Gebrauchsanweisung
1 Sicherheitshinweise.....................
2 Wissenswertes............................
3 Anwendung.................................
4 Verschiedenes............................
5 Garantie......................................
11
1
4
5
8
PT Manual de instruções
1 Avisos de segurança...................
2 Informações gerais......................
3 Aplicação.....................................
4 Generalidades.............................
5 Garantia......................................
56
59
60
63
66
GB Instruction Manual
1 Safety Information.......................
2 Useful Information.......................
3 Operating....................................
4 Miscellaneous.............................
5 Warranty......................................
FR Mode d’emploi
1 Consignes de sécurité................
2 Informations utiles.......................
3 Utilisation.....................................
4 Divers..........................................
5 Garantie......................................
IT Istruzioni per l‘uso
1 Norme di sicurezza.....................
2 Informazioni Iinteressanti............
3 Modalità d’impiego......................
4 Varie............................................
5 Garanzia......................................
ES Instrucciones de uso
1 Indicaciones de seguridad..........
2 Informaciones interesantes.........
3 Aplicación....................................
4 Generalidades.............................
5 Garantía......................................
12
15
16
19
22
23
26
27
30
33
34
37
38
41
44
45
48
49
52
55
NL Gebruiksaanwijzing
1 Veiligheidsmaatregelen...............
2 Wetenswaardigheden.................
3 Het Gebruik.................................
4 Diversen......................................
5 Garantie......................................
FI Käyttöohje
1 Turvallisuusohjeita.......................
2 Tietämisen arvoista.....................
3 Käyttö..........................................
4 Sekalaista....................................
5 Takuu...........................................
SE Bruksanvisning
1 Säkerhetshänvisningar................
2 Värt att veta.................................
3 Användning.................................
4 Övrigt...........................................
5 Garanti.........................................
GR Οδηγίες χρήσης
1 Οδηγίες για την ασφάλεια...........
2 Χρήσιμες πληροφορίες...............
3 Εφαρμσγή...................................
4 Διάφορα......................................
5 Εγγύηση.....................................
67
70
71
74
77
78
81
82
85
88
89
92
93
96
99
100
103
104
107
110
Page 3
Gerät und Bedienelemente Device and controls
Appareil et éléments de commande Apparecchio ed elementi per la regolazione
Dispositivo y elementos de control Aparelho e elementos de comando
Toestel en bedieningselementen Laite ja käyttölaitteet
Apparaten och komponenter Συσκευή και στοιχεία χειρισμού
1
r
4
7
9
0
e
2
3
5
6
8
q
w
t z
u
i
o
H
1
MIST
HI LO
LIGHT
4H 2H 1H
p
TIMER
2H 4H
Page 4
DE
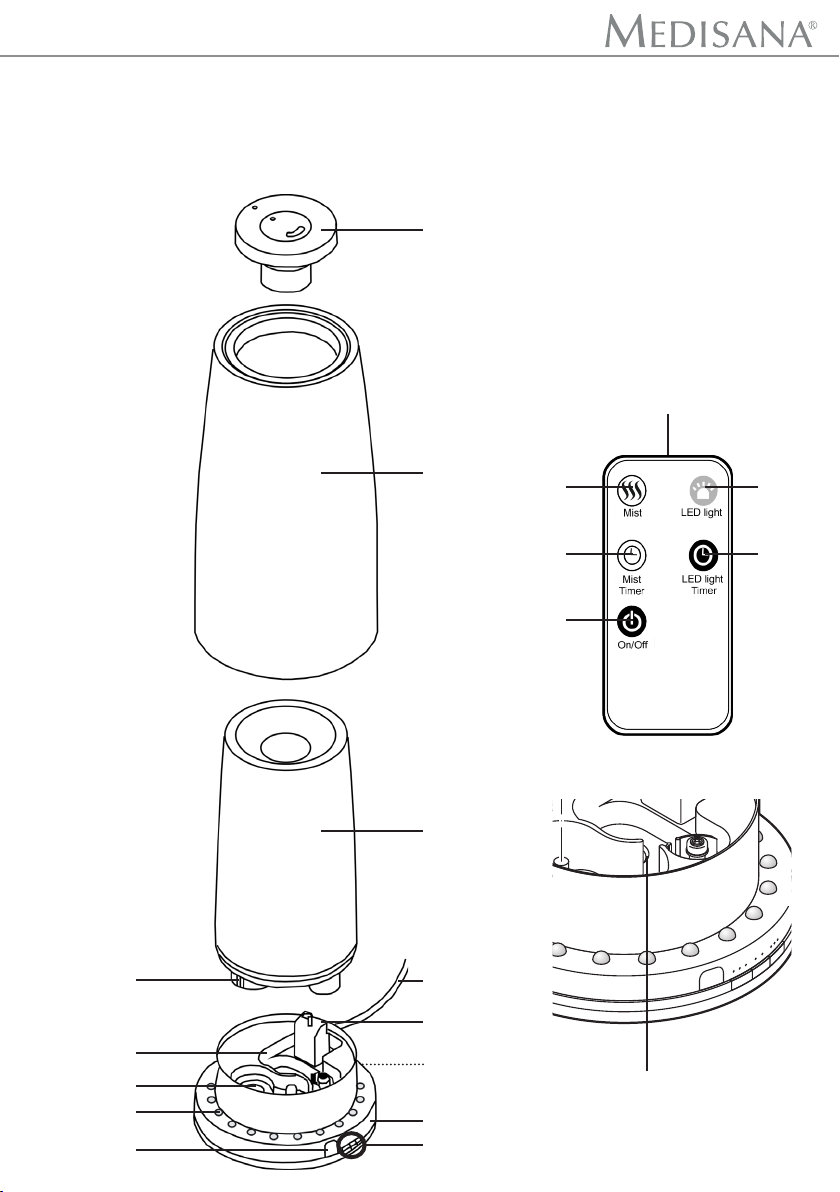
Drehbare Vernebleröffnung
1
Kunststoffaufsatz
2
Wassertank
3
Tankdeckel mit Ventil
4
Netzkabel
5
Lüfterauslass
6
Tankkammer
7
Aromaschublade
8
Filter
9
LED-Beleuchtung
0
Basis
q
3 Tasten: / /
w
Infrarot-Sensor
e
Infrarot-LED
r
Verneblerleistung wählen
t
Beleuchtung ein-/ausschalten bzw.
z
dimmen
Verneblerausschaltzeit wählen
u
Beleuchtungsausschaltzeit wählen
i
Gerät ein-/ausschalten
o
Ultraschall-Geber
p
GB
Turnable vent opening
1
Plastic cover
2
Water tank
3
Tank cover with valve
4
Mains cord
5
Air vent
6
Tank chamber
7
Aroma compartment
8
Filter
9
LED lighting
0
Base
q
3 buttons: / /
w
Infrared sensor
e
Infrared LED
r
Select atomiser level
t
Lighting: Switch on/off or dim
z
Select switch off time for atomiser
u
Select switch off time for lighting
i
Switch the appliance on/off
o
Ultrasonic transducer
p
FR
Ouverture rotative du nébuliseur
1
Embout en plastique
2
Réservoir d’eau
3
Bouchon de réservoir avec valve
4
Câble secteur
5
Sortie ventilateur
6
Chambre du réservoir
7
Tiroir pour essences aromatiques
8
Filtre
9
Éclairage LED
0
Base
q
3 touches: / /
w
Capteur infrarouge
e
LED infrarouge
r
Sélectionner la capacité du nébuliseur
t
Allumer/éteindre l’éclairage ou varier l’intensité lumineuse
z
Sélectionner le temps d’arrêt du nébuliseur
u
Sélectionner le temps d’arrêt de l’éclairage
i
Mise en marche/arrêt de l’appareil
o
Transducteur à ultrasons
p
Page 5
IT
PT
Apertura rotante nebulizzatore
1
Involucro in plastica
2
Serbatoio dell’acqua
3
Coperchio del serbatoio con valvola
4
Cavo di rete
5
Scarico ugello di aerazione
6
Camera del serbatoio
7
Cassetto per aromi
8
Filtro
9
Illuminazione a LED
0
Base
q
3 Tasti: / /
w
Sensore a infrarossi
e
LED a infrarossi
r
Selezione potenza nebulizzatore
t
Accensione/spegnimento o variazi-
z
one illuminazione
Selezione durata di nebulizzazione
u
Selezione durata di illuminazione
i
Accensione/spegnimento
o
Generatore di ultrasuoni
p
Abertura de nebulizador rotativa
1
Acessório de plástico
2
Tanque de água
3
Tampa do tanque com válvula
4
Cabo de alimentação
5
Saída de ventilador
6
Compartimento de tanque
7
Gaveta de aroma
8
Filtro
9
Iluminação LED
0
Base
q
3 Interruptores: / /
w
Sensor de infravermelhos
e
LED de infravermelhos
r
Escolher potência de nebulizador
t
Ligar/desligar a iluminação ou
z
reduzir
Escolher a hora para desligar o
u
nebulizador
Escolher a hora para desligar a
i
iluminação
Ligar/desligar o aparelho
o
Emissor de ultrassom
p
ES
NL
oricio giratorio del nebulizador
1
elemento de plástico
2
depósito de agua
3
tapa del depósito con válvula
4
cable de red
5
salida del ventilador
6
cámara del depósito
7
cajón para aroma
8
ltro
9
iluminación LED
0
base
q
3 botones: / /
w
sensor infrarrojo
e
LED infrarrojo
r
selección de potencia de
t
nebulización
encender/apagar o regular la ilumi-
z
nación
selección de tiempo de nebulización
u
selección de tiempo de apagado de
i
la iluminación
encender/apagar el aparato
o
transmisor de ultrasonidos
p
Draaibare opening vernevelaar
1
Kunststof opzetstuk
2
Watertank
3
Tankdeksel met klep
4
Netwerkkabel
5
Ventilatoruitlaat
6
Tankkamer
7
Aromalade
8
Filter
9
Ledverlichting
0
Basis
q
3 Toetsen: / /
w
Infraroodsensor
e
Infraroodled
r
Vernevelaarstand selecteren
t
Verlichting in-/uitschakelen resp. dim-
z
men
Vernevelaaruitschakeltijd selecteren
u
Verlichtingsuitschakeltijd selecteren
i
Apparaat in-/uitschakelen
o
Ultrasone sensor
p
Page 6
FI
Käännettävä sumuttimen aukko
1
Muovisuojus
2
Vesisäiliö
3
Säiliön kansi ja venttiili
4
Virtajohto
5
Tuulettimen ulostulo
6
Säiliön kammio
7
Tuoksulaatikko
8
Suodatin
9
LED-valo
0
Jalusta
q
3 painiketta: / /
w
Infrapuna-anturi
e
Infrapuna-LED
r
Sumutustehon valinta
t
Valon kytkentä päälle/pois tai him-
z
mennys
Sumuttimen poiskytkentäajan valinta
u
Valon poiskytkentäajan valinta
i
Laitteen kytkentä päälle/pois
o
Ultraäänianturi
p
SE
Vridbar nebuleringsöppning
1
Plastskydd
2
Vattentank
3
Tanklock med ventil
4
Nätkabel
5
Fläktöppning
6
Tankkammare
7
Doftfack
8
Filter
9
LED-belysning
0
Bas
q
3 knappar: / /
w
Infraröd-sensor
e
Infraröd-LED
r
Val av effekt på nebulisatorn
t
Stänga av och på belysning resp.
z
dimra
Välj avstängningstid för nebulisator
u
Välj avstängningstid för belysningen
i
Stänga av och på apparaten
o
Ultraljudsgivare
p
GR
Περιστρεφόμενο άνοιγμα νεφελοποιητή
1
Πλαστικό κάλυμμα
2
Δεξαμενή νερού
3
Καπάκι δεξαμενής με βαλβίδα
4
Καλώδιο ρεύματος
5
Έξοδος αερισμού
6
Θάλαμος δεξαμενής
7
Συρτάρι αρώματος
8
Φίλτρο
9
Φωτισμός LED
0
Βάση
q
3 πλήκτρα: / /
w
Αισθητήρας υπέρυθρων
e
LED υπέρυθρων
r
Επιλογή ισχύος νεφελοποίησης
t
Ενεργοποίηση/απενεργοποίηση ρύθμιση έντασης φωτισμού
z
Επιλογή χρόνου απενεργοποίησης νεφελοποίησης
u
Επιλογή χρόνου απενεργοποίησης φωτισμού
i
Ενεργοποίηση/απενεργοποίηση συσκευής
o
Γεννήτρια υπερήχων
p
Page 7
1 Sicherheitshinweise
WICHTIGE HINWEISE!
UNBEDINGT AUFBEWAHREN!
Lesen Sie die Gebrauchsanweisung, insbesondere die Sicherheitshinweise, sorgfältig durch, bevor Sie das Gerät einsetzen
und bewahren Sie die Gebrauchsanweisung für die weitere
Nutzung auf. Wenn Sie das Gerät an Dritte weitergeben, geben
Sie unbedingt diese Gebrauchsanweisung mit.
Zeichenerklärung
Diese Gebrauchsanweisung gehört zu diesem Gerät.
Sie enthält wichtige Informationen zur Inbetriebnahme und Handhabung. Lesen Sie diese Gebrauchsanweisung vollständig. Die Nichtbeachtung dieser Anweisung kann zu schweren Verletzungen oder Schäden am Gerät führen.
WARNUNG
Diese Warnhinweise müssen eingehalten werden,
um mögliche Verletzungen des Benutzers zu verhindern.
DE
ACHTUNG
Diese Hinweise müssen eingehalten werden, um
mögliche Beschädigungen am Gerät zu verhindern.
HINWEIS
Diese Hinweise geben Ihnen nützliche Zusatzinformationen zur Installation oder zum Betrieb.
Schutzklasse II
LOT-Nummer
Hersteller
1
Page 8
DE
1 Sicherheitshinweise
zur Stromversorgung
• Bevor Sie das Gerät an Ihre Stromversorgung anschließen,
achten Sie darauf, dass die auf dem Typenschild angegebene
Netzspannung mit der Ihres Stromnetzes übereinstimmt.
• Stecken Sie den Netzstecker nur in die Steckdose, wenn das
Gerät ausgeschaltet ist.
• Tragen, ziehen oder drehen Sie das Gerät nie am Netzkabel
und klemmen Sie das Kabel nicht ein.
• Positionieren Sie das Netzkabel so, dass keine Sturzgefahr besteht.
• Fassen Sie den Netzstecker nicht an, wenn Sie im Wasser
stehen und fassen Sie den Stecker stets mit trockenen Händen
an.
• Wenn die Netzanschlussleitung dieses Gerätes beschädigt
wird, muss sie durch eine besondere Anschlussleitung ersetzt
werden, die vom Hersteller oder seinem Kundendienst erhältlich ist.
für besondere Personen
• Dieses Gerät kann von Kindern ab 8 Jahren und darüber sowie von Personen mit verringerten physischen, sensorischen
oder mentalen Fähigkeiten oder Mangel an Erfahrung und
Wissen benutzt werden, wenn sie beaufsichtigt oder bezüglich
des sicheren Gebrauchs des Gerätes unterwiesen wurden und
die daraus resultierenden Gefahren verstehen.
• Kinder dürfen nicht mit dem Gerät spielen.
• Im Falle einer allergischen Atemwegserkrankung halten Sie vor
Anwendung des Gerätes Rücksprache mit Ihrem Hausarzt.
• Sprechen Sie mit Ihrem Arzt, wenn bei Gebrauch gesundheitliche Beschwerden auftreten sollten. Stellen Sie in diesem Fall
sofort die Benutzung des Gerätes ein.
Bei elektrischen Geräten beachten Sie bitte besonders:
Verwenden Sie das Gerät nur in geschlossenen
Räumen!
2
Page 9
1 Sicherheitshinweise
• Benutzen Sie das Gerät nicht, wenn das Gerät oder das Zuleitungskabel beschädigt ist, wenn es nicht einwandfrei funktioniert, wenn es herunter oder ins Wasser gefallen war.
• Halten Sie das Gerät einschließlich des Netzkabels von heißen
Oberächen fern.
• Wenn das Netzkabel beschädigt ist, darf es nur durch
MEDISANA, einen autorisierten Fachhändler oder durch eine
entsprechend qualizierte Person ersetzt werden, um Gefährdungen zu vermeiden.
für den Betrieb des Gerätes
• Das Gerät ist nicht für den kommerziellen Gebrauch bestimmt.
• Benutzen Sie das Gerät nur entsprechend seiner Bestimmung
laut Gebrauchsanweisung. Bei Zweckentfremdung erlischt der
Garantieanspruch.
• Halten Sie Tiere vom Gerät fern.
• Stellen Sie das Gerät zum Gebrauch auf eine feste, feuchtig-
keitsunempndliche und ebene Fläche, so dass es nicht kippen
kann.
• Platzieren Sie das Gerät mindestens 2 m entfernt von TV- und
Radiogeräten, um Interferenzen zu vermeiden.
• Greifen Sie nicht nach einem Gerät, das ins Wasser gefallen
ist. Ziehen Sie sofort den Netzstecker.
• Betreiben Sie das Gerät nicht, wenn der Wassertank keine
oder zu wenig Flüssigkeit enthält. Das Wasser im Tank darf
nicht gefroren oder heiß sein.
• Blockieren Sie niemals den Nebelauslass bzw. die Luftaustrittsöffnung.
• Blockieren Sie auch nicht den Lufteintritt auf der Unterseite des
Gerätes.
• Vergewissern Sie sich stets, dass beim Transport, Befüllen und
Entleeren des Wassertanks das Gerät ausgeschaltet und der
Netzstecker gezogen sind.
• Stecken Sie keine metallischen Gegenstände in das Produkt.
• Schalten Sie alle Funktionen nach dem Gebrauch aus und ziehen Sie den Stecker aus der Steckdose.
DE
3
Page 10
DE
1 Sicherheitshinweise / 2 Wissenswertes
für Wartung und Reinigung
• Sie selbst dürfen an dem Gerät nur Reinigungsarbeiten ausführen. Im Falle von Störungen reparieren Sie das Gerät nicht
selbst, da dadurch jeglicher Garantieanspruch erlischt. Fragen
Sie Ihren Fachhändler und lassen Sie Reparaturen nur vom
MEDISANA Service durchführen.
• Reinigung und Benutzer-Wartung dürfen nicht von Kindern
ohne Beaufsichtigung durchgeführt werden.
• Zerlegen Sie das Gerät nicht - es besteht Feuergefahr und die
Gefahr eines elektrischen Schlages.
• Kratzen Sie bei der Reinigung nicht am Ultraschall-Geber p.
• Tauchen Sie das Gerät nicht in Wasser oder andere Flüssigkeiten.
• Sollte dennoch einmal Flüssigkeit in das Gerät gelangen, ziehen Sie sofort den Netzstecker.
• Bewahren Sie das Gerät in trockener Umgebung auf.
• Wenn das Wasser nicht regelmäßig erneuert und der Wassertank nicht regelmäßig und gründlich gereinigt wird, können sich
Mikroorganismen im Wasserbehälter vermehren, in die Umgebungsluft gelangen und ein ernsthaftes Gesundheitsrisiko darstellen.
2 Wissenswertes
2.1
Lieferumfang
und
Verpackung
4
Bitte prüfen Sie zunächst, ob das Gerät vollständig ist und keinerlei Beschädigung aufweist. Im Zweifelsfalle nehmen Sie das Gerät nicht in Betrieb und wenden Sie sich an Ihren Händler oder an Ihre Servicestelle.
Zum Lieferumfang gehören:
• 1 MEDISANA Luftbefeuchter AH 670 inkl. Fernbedienung
• 1 Gebrauchsanweisung
Verpackungen sind wiederverwendbar oder können dem Rohstoffkreislauf
zurückgeführt werden. Bitte entsorgen Sie nicht mehr benötigtes Verpackungsmaterial ordnungsgemäß. Sollten Sie beim Auspacken einen Transportschaden bemerken, setzen Sie sich bitte sofort mit Ihrem Händler in Verbindung.
WARNUNG
Achten Sie darauf, dass die Verpackungsfolien nicht in die Hände
von Kindern gelangen. Es besteht Erstickungsgefahr!
Page 11
2 Wissenswertes / 3 Anwendung
DE
2.2
Ultraschalltechnologie
Zu trockene Raumluft erhöht die Anfälligkeit für Infektions- und Atemwegserkrankungen und führt zu Müdigkeit und Konzentrationsschwäche.
Gesunde Luft sollte eine relative Luftfeuchtigkeit von 40 bis 55 % haben.
Die geräuscharme und energiesparende Ultraschalltechnologie des Luftbefeuchters verwandelt Wasser durch Schwingungen in feinsten Nebel,
der den Feuchtigkeitsgrad der Luft erhöht. Dies verbessert die Luftqualität
und beugt einer Austrocknung der Schleimhäute und der Haut vor.
ACHTUNG
Ein zu intensiver Betrieb kann zu einer Übersättigung der Raumluft
mit Feuchtigkeit führen, die sich an Wänden, Fenstern und Gegenständen im Raum niederschlagen kann. Überprüfen Sie deshalb
regelmäßig mittels eines Hygrometers, dass der Wert der relativen
Luftfeuchtigkeit 55 % nicht übersteigt.
3 Anwendung
ACHTUNG
Stellen Sie sicher, dass der Luftbefeuchter kippsicher auf einer
feuchtigkeitsunempndlichen Oberäche betrieben wird.
Insbesondere bei Betrieb mit mineralstoffhaltigem Wasser kann
es zu Niederschlägen / Ablagerungen kommen. Achten Sie darauf,
dass der austretende Nebel nicht auf andere elektrische Geräte,
Möbel oder Wände gerichtet ist.
3.1
Befüllen
des
Wassertanks
Das Gerät sollte für eine halbe Stunde bei Raumtemperatur stehengelassen werden, bevor Sie es das
erste Mal einschalten.
1. Nehmen Sie den Kunststoffaufsatz 2 und den
Wassertank 3 von der Basis q.
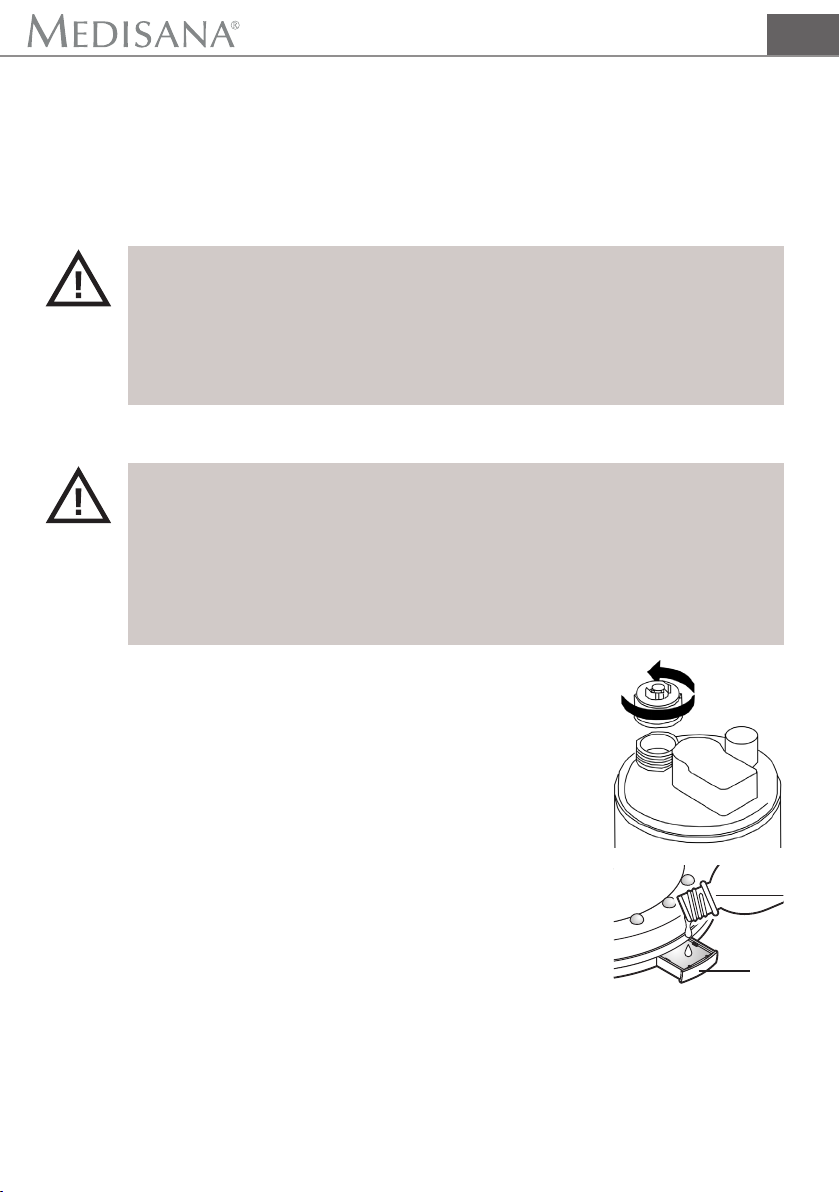
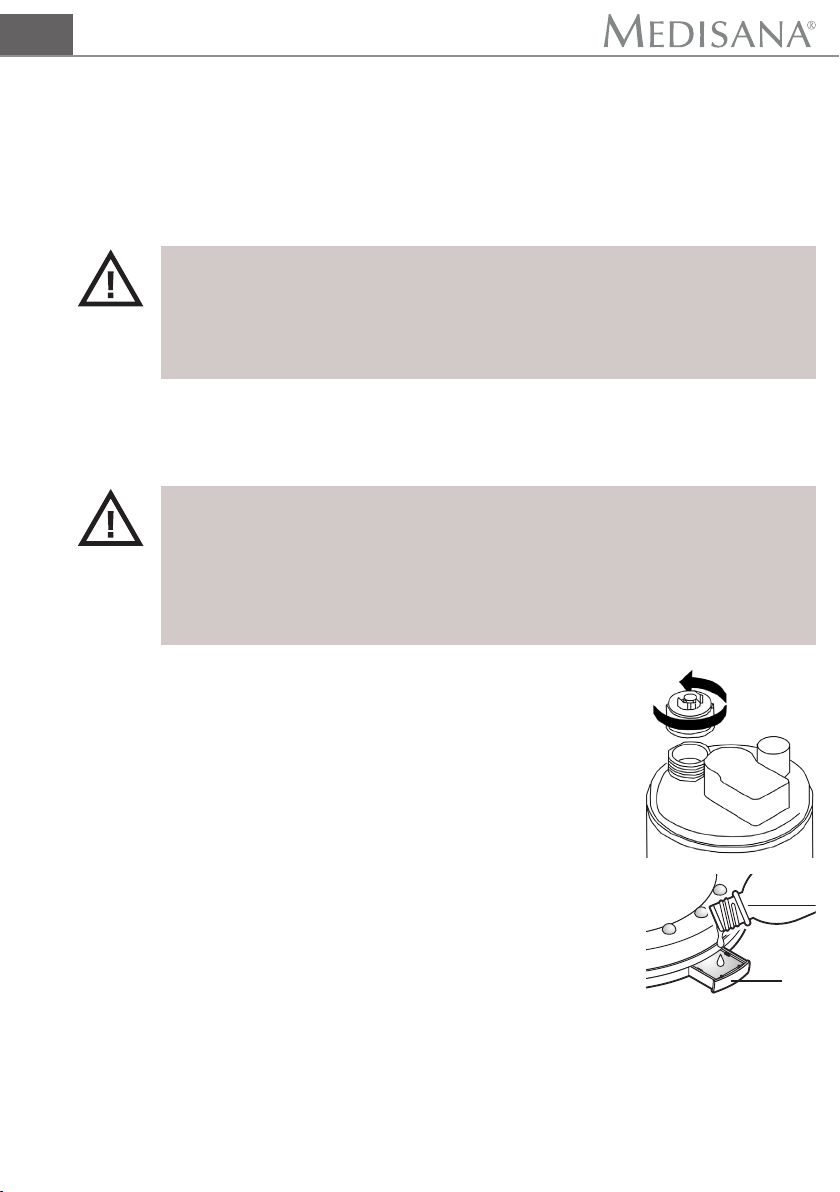
2. Drehen Sie den Wassertank 3 auf den Kopf und
drehen Sie den Tankdeckel 4 gegen den
Uhrzeigersinn ab.
3. Befüllen Sie den Wassertank 3 mit frischem
Trinkwasser oder destilliertem Wasser.
Maximale Füllmenge: ca. 1,8 Liter.
4. Wenn Sie eine wasserlösliche Aromaessenz ver wenden möchten, geben Sie 5 Tropfen der Essenz
in den voll gefüllten Wassertank 3 oder auf das
Vlies in der Aromaschublade 8.
Wenn Sie die Aromaessenz mit in den Wassertank geben, kann sich
während des Gebrauchs rund um das Gerät Niederschlag bilden.
Aromaessenzen können Sie über den Handel beziehen. Beachten Sie
die Herstellerhinweise.
8
5
Page 12
DE
3 Anwendung
3.1
Befüllen
des
Wassertanks
3.2
Batteriewechsel
(Fernbedienung)
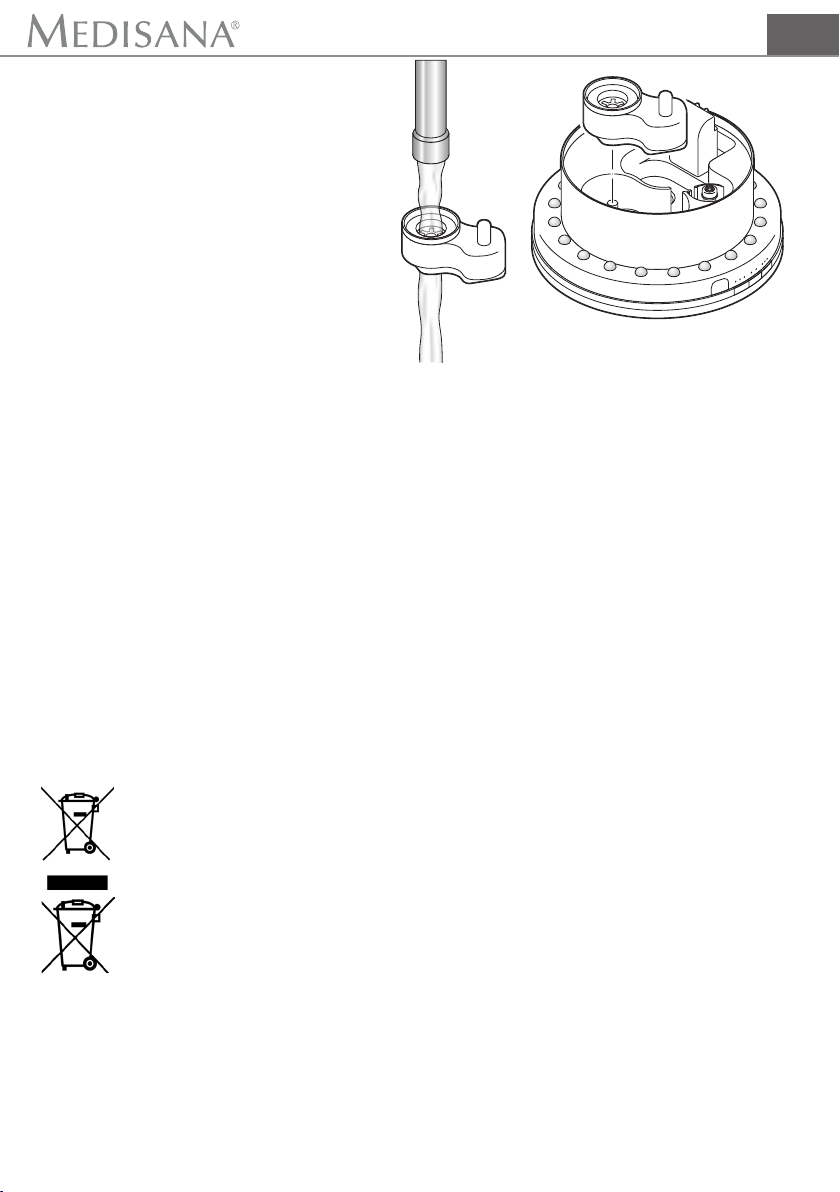
5. Drehen Sie den Tankdeckel 4 wieder auf das Gewinde und setzen Sie
den Wassertank 3 wieder auf das Gerät. Sobald der Tank richtig
platziert ist, drückt der Dorn im Filter das Ventil im Tankdeckel nach oben.
6. Die Tankkammer füllt sich nun mit Wasser. Setzen Sie die Kunststoffauf satz 2 über den Wassertank auf die Basis. Stecken Sie den Netz stecker in eine Steckdose.
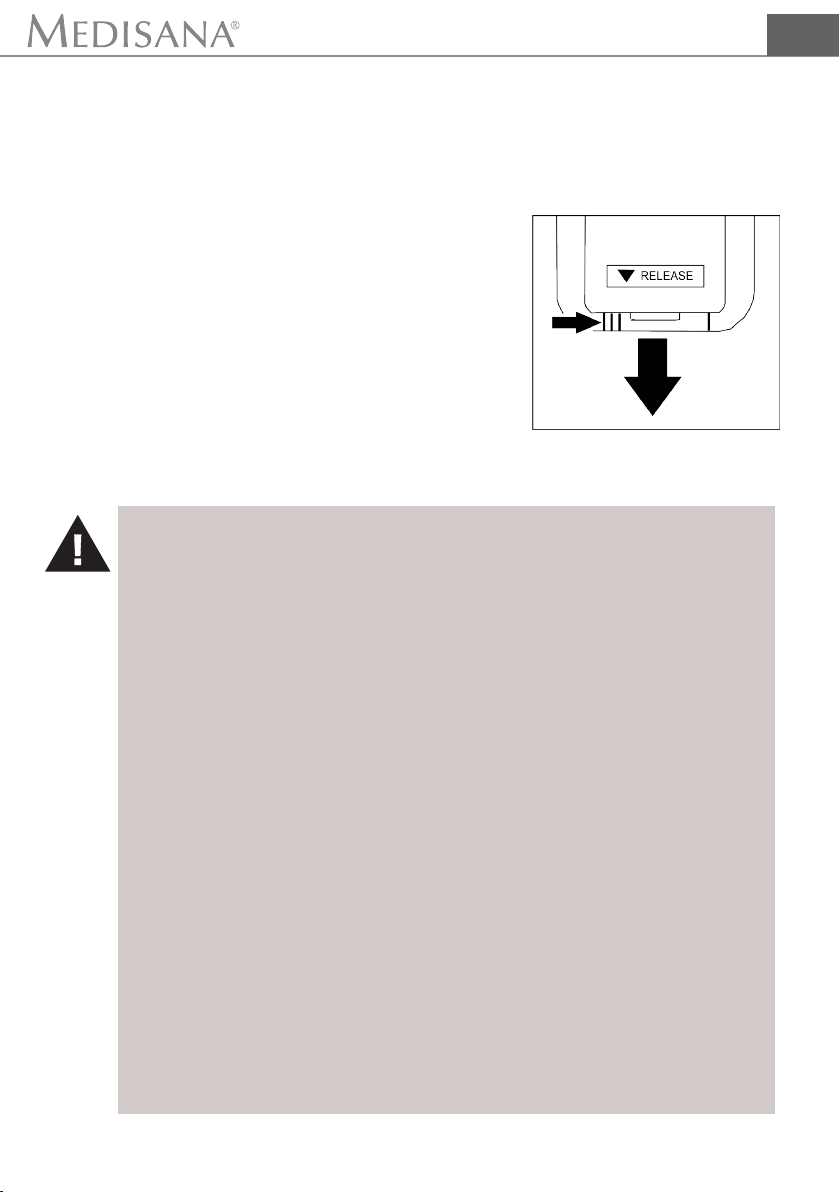
Bevor Sie das Gerät in Betrieb nehmen können, müssen Sie den Isolationsstreifen aus
dem Batteriefach der Fernbedienung ziehen.
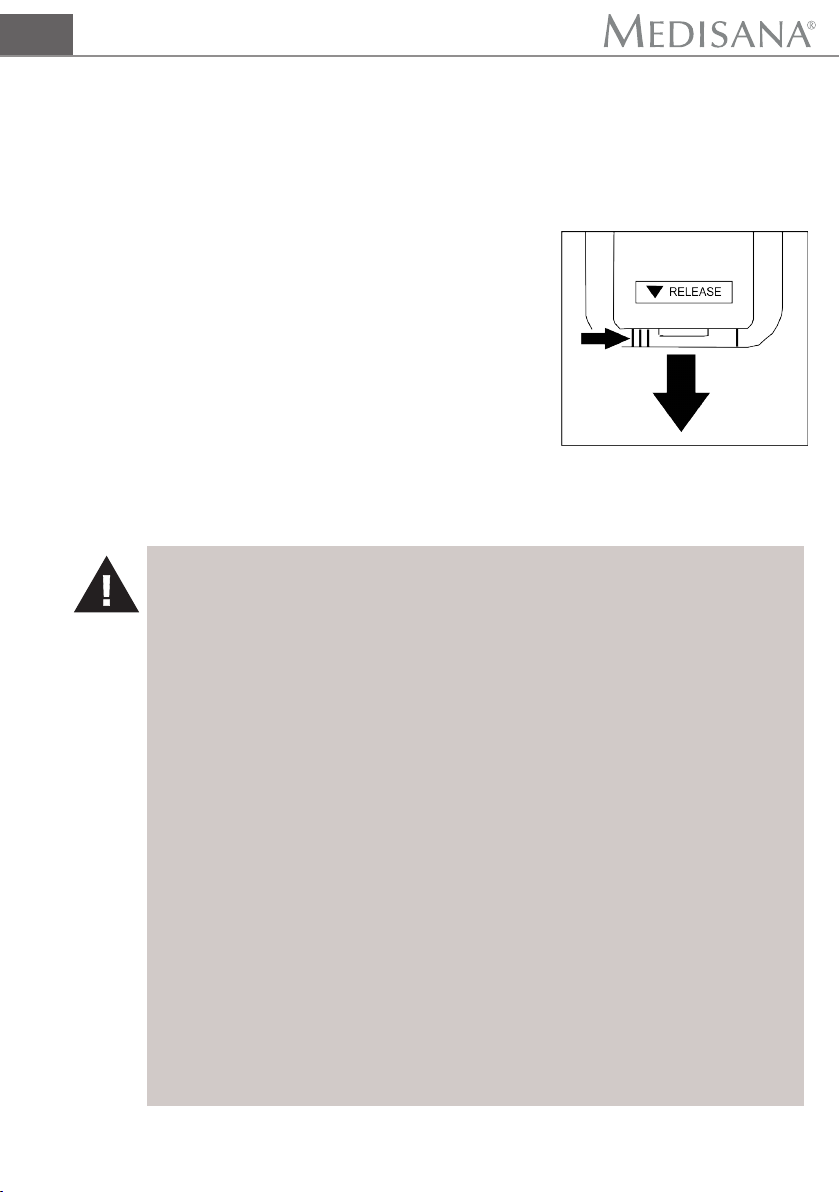
Wenn der Luftbefeuchter nicht mehr auf die
Fernbedienung reagiert, muss die Batterie
gewechselt werden. Drücken Sie die Arretierung in Pfeilrichtung und ziehen Sie die
Batteriehalterung heraus. Tauschen Sie die
verbrauchte gegen eine neue Batterie (CR
2025 Lithium Batterie), achten Sie dabei auf
korrekte Polarität (“+” nach oben). Schieben
Sie die Batteriehalterung wieder herein, bis
sie hörbar einrastet.
WARNUNG - BATTERIE-SICHERHEITSHINWEISE
• Batterien nicht auseinandernehmen!
• Batterie- und Gerätekontakte vor dem Einlegen bei Bedarf
reinigen!
• Erschöpfte Batterien umgehend aus dem Gerät entfernen!
• Erhöhte Auslaufgefahr, Kontakt mit Haut, Augen und Schleimhäuten vermeiden! Bei Kontakt mit Batteriesäure die betroffenen Stellen sofort mit reichlich klarem Wasser spülen und
umgehend einen Arzt aufsuchen!
• Sollte eine Batterie verschluckt worden sein, ist sofort ein Arzt
aufzusuchen!
• Legen Sie Batterie korrekt ein, beachten Sie die Polarität!
• Halten Sie das Batteriefach verschlossen!
• Batterie bei längerer Nichtverwendung aus dem Gerät entfernen!
• Batterien von Kindern fernhalten!
• Batterien nicht wiederauaden! Explosionsgefahr!
• Nicht kurzschließen! Explosionsgefahr!
• Nicht ins Feuer werfen! Explosionsgefahr!
• Lagern Sie ungebrauchte Batterien in der Verpackung und
nicht in der Nähe von metallischen Gegenständen, um einen
Kurzschluss zu vermeiden!
6
Page 13

3 Anwendung
DE
3.3
Gebrauch
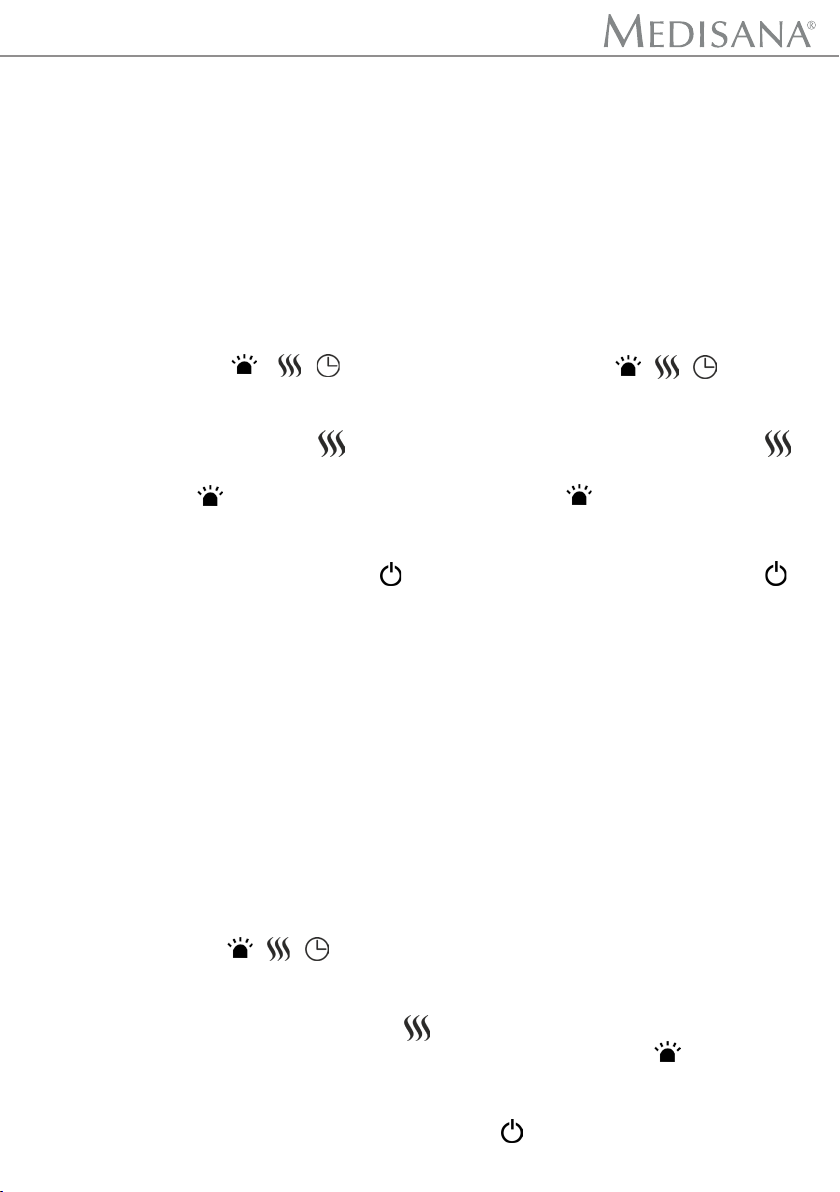
1. Drücken Sie kurz die Taste o , um den Vernebler und die Beleuchtung einzuschalten. Die Beleuchtung und der Vernebler schalten sich
auf hoher Leistungsstufe ein.
2. Verändern Sie die Position des äußeren bzw. inneren Kreises der
Vernebleröffnung, um Richtung und Höhe des Wassernebels zu
verändern bzw. einzustellen.
3. Die Taste w am Gerät bzw. die Taste t auf der Fernbedienung haben folgende Funktion:
1 x drücken: hohe Leistungsstufe (Kontrollleuchte HI leuchtet) = viel
Wassernebel / Vernebler im Dauerbetrieb.
2 x drücken: niedrige Leistungsstufe (Kontrollleuchte LO leuchtet) =
wenig Wassernebel / Vernebler im Dauerbetrieb.
3 x drücken: Vernebler ausschalten.
4. Drücken Sie während der Verneblung die Taste w am Gerät bzw.
die Taste MIST Timer u auf der Fernbedienung, damit der Vernebler
sich nach einer bestimmten Zeit (1, 2 oder 4 Stunden) automatisch
ausschaltet.
5. Drücken Sie ggf. mehrmals kurz die Taste w am Gerät bzw. die
Taste LED Light z auf der Fernbedienung, um die LED-Beleuchtung zuzuschalten:
1 x drücken: helles Licht
2 x drücken: mittleres Licht
3 x drücken: wenig Licht
4 x drücken: Beleuchtung ausschalten
6. Drücken Sie während der eingeschalteten Beleuchtung die Taste LED
LIGHT TIMER i auf der Fernbedienung, damit die Beleuchtung sich
nach einer bestimmten Zeit (1, 2 oder 4 Stunden) automatisch ausschaltet.
7. Durch Druck auf o schalten Sie den Vernebler und die Beleuchtung wieder aus.
3.4
Nach
dem Gebrauch
1. Ziehen Sie den Netzstecker aus der Steckdose.
2. Nehmen Sie den Kunststoffaufsatz 2 und den Wassertank 3 ab.
Gießen Sie das Restwasser aus. Spülen Sie den Tank mit Frischwasser aus.
3. Trocknen Sie den Wassertank und ggf. den Kunststoffaufsatz mit einem weichen, saugfähigen Tuch ab.
4. Bei längerem Nichtgebrauch: Entfernen Sie auch das restliche Wasser
aus der Basis 1, indem Sie diese über einem Waschbecken auskippen. ACHTUNG! Dabei darf kein Wasser in den Lüfterauslass 6
gelangen! Restfeuchtigkeit können Sie mit einem weichen, saugfähigen Tuch aufnehmen.
7
Page 14

DE
3 Anwendung / 4 Verschiedenes
3.5
Fehler
und Behebung
• Gerät piept wiederholt beim Einschalten bzw. während des Betriebs:
Wassertank füllen.
• Ungewöhnlicher Geruch:
Verschmutztes oder abgestandenes Wasser, Tank reinigen und frisch
befüllen.
• Ungewöhnliches Geräusch:
Zu wenig Wasser im Tank, Wasser nachfüllen / Gerät steht auf keiner
festen Fläche, auf stabile und ebene Fläche stellen.
Falls sich ein Fehler auf die beschriebene Art nicht beseitigen lässt,
setzen Sie sich mit Ihrem Servicecenter in Verbindung.
4 Verschiedenes
4.1
Reinigung
und
Pege
• Bei täglichem Betrieb empfehlen wir Ihnen, das Gerät mindestens alle
drei Tage gründlich zu reinigen. Das Gerät und den Tank bei längerem
Nichtbenutzen entleeren um Verkeimung/Veralgung von vornherein
vorzubeugen. Ab und an mit Alkohol desinzieren. Reinigen Sie das
Gerät auch vor und nach längeren Aufbewahrungszeiten.
• Bevor Sie das Gerät reinigen, vergewissern Sie sich, dass das Gerät
ausgeschaltet und der Netzstecker aus der Steckdose gezogen ist.
• Nehmen Sie den Wassertank vom Gerät ab und entleeren Sie ihn.
• Reinigen Sie das Gerät äußerlich mit einem feuchten, weichen Tuch.
• Benutzen Sie keine aggressiven Substanzen, wie z. B. Scheuermilch
oder andere Mittel für die Reinigung. Das könnte die Oberäche angreifen und die Vernebelung verringern.
• Den Wassertank können Sie mit heißem Wasser (>65 °C) oder einem
mindestens 75-%igen Alkohol gründlich ausspülen. Die Verneblerkammer reinigen Sie mittels eines in Alkohol getränkten Tuches und eines
Wattestäbchens. Achten Sie darauf, dass kein Wasser in das Geräteinnere gelangt.
• Der Ultraschall-Geber p ist das empndlichste Bauteil des Gerätes.
Es ist wichtig, dass er sauber gehalten und peglich behandelt wird.
Verwenden Sie z. B. einen Reinigungspinsel, um die Auslässe von
Ablagerungen und Schmutzpartikeln zu befreien. Verwenden Sie zur
Reinigung des Ultraschall-Gebers keinesfalls metallische Hilfsmittel.
• Wenn Sie das Gerät längere Zeit nicht benutzen, entleeren Sie das
restliche Wasser aus dem Wassertank und trocknen das Gerät ab.
• Lagern Sie das Gerät an einem trockenen, kühlen Platz, am besten in
der Originalverpackung.
• Bewahren Sie die Verschlusskappe des Wassertanks lose auf, um ein
Verkleben oder Festhaften der Dichtungsmanschette zu vermeiden.
8
Page 15
4 Verschiedenes
DE
4.2
Filter
reinigen
4.3
Entkalkung
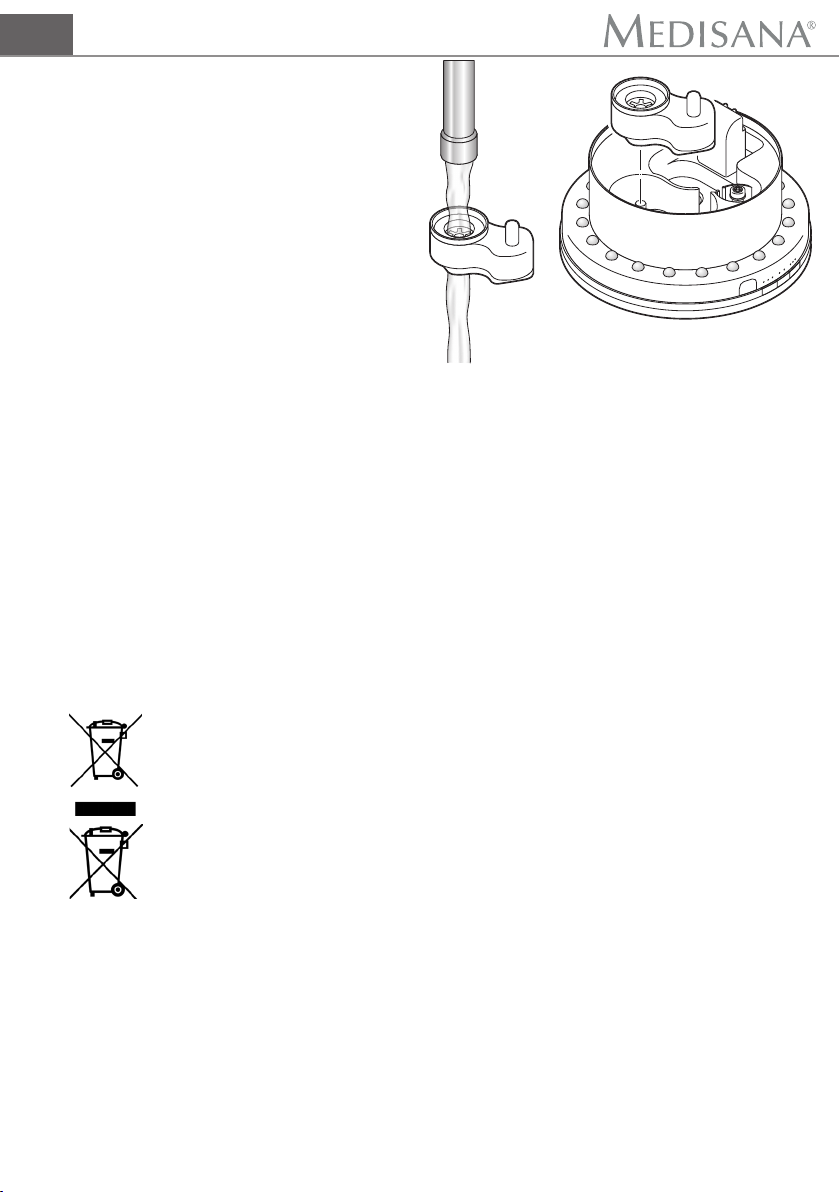
1. Spülen Sie den Filter 9
unter ießendem, warmem
Wasser aus.
2. Trocknen Sie ihn wieder
sorgfältig ab und setzen
ihn wieder in die Basis
ein.
MIST
HI LO
LIGHT
4H 2H 1H
Eventuelle Kalkreste können Sie durch ein mildes Entkalkungsmittel
(Zitronensäure) entfernen:
1. Entnehmen Sie den Filter 9.
2. Rühren Sie das Entkalkungsmittel nach Herstellerangaben an.
3. Gießen Sie eine kleine Menge in die Tankkammer 7 und lassen es
dort einige Minuten einwirken.
4. Gießen Sie das Entkalkungsmittel aus und spülen Sie einige Male
mit klarem Wasser nach. ACHTUNG! Dabei darf kein Wasser in
den Lüfterauslass 6 gelangen! Achten Sie darauf, dass sich kein
Entkalkungsmittel mehr im Gerät bendet.
TIMER
2H 4H
H
1
4.4
Hinweis
zur Entsorgung
Dieses Gerät darf nicht zusammen mit dem Hausmüll entsorgt werden.
Jeder Verbraucher ist verpichtet, alle elektrischen oder elektronischen
Geräte, egal, ob sie Schadstoffe enthalten oder nicht, bei einer Sammelstelle seiner Stadt oder im Handel abzugeben, damit sie einer umweltschonenden Entsorgung zugeführt werden können.Wenden Sie sich hinsichtlich der Entsorgung an Ihre Kommunalbehörde oder Ihren Händler.
Entnehmen Sie die Batterie (Fernbedienung), bevor Sie das Gerät entsorgen. Werfen Sie verbrauchte Batterien nicht in den Hausmüll, sondern in
den Sondermüll oder in eine Batterie-Sammelstation im Fachhandel.
9
Page 16
DE
4 Verschiedenes
4.5
Technische
Daten
Name und Modell
Stromversorgung
Leistung
Tankinhalt
Vernebler-Kapazität
Laufzeit
Abmessungen
Gewicht
Anschlusskabellänge
Lagerbedingungen
Artikel Nr.
EAN Nummer
Zubehörteile
Im Zuge ständiger Produktverbesserungen behalten wir uns
technische und gestalterische Änderungen vor.
Die jeweils aktuelle Fassung dieser Gebrauchsanweisung nden Sie unter
:
MEDISANA Luftbefeuchter AH 670
:
220-240V~ 50/60Hz
:
35 W
:
ca. 1.800 ml
:
maximal ca. 200 ml/h
:
maximal ca. 9 Stunden
:
ca. 18 x 18 x 30,3 cm
:
ca. 1,3 kg
:
ca. 150 cm
:
sauber und trocken, bei +10°C bis +40°C
:
60054
:
40 15588 60054 8
:
Ersatzlter, Artikel Nr. 60057
EAN 40 15588 60057 9
www.medisana.com
10
Page 17
5 Garantie
DE
Garantieund
Reparaturbedingungen
Bitte wenden Sie sich im Garantiefall an Ihr Fachgeschäft oder direkt an die
Servicestelle. Sollten Sie das Gerät einschicken müssen, geben Sie bitte den
Defekt an und legen eine Kopie der Kaufquittung bei.
Es gelten dabei die folgenden Garantiebedingungen:
1. Auf MEDISANA Produkte wird ab Verkaufsdatum eine Garantie für 3 Jahre
gewährt. Das Verkaufsdatum ist im Garantiefall durch Kaufquittung oder
Rechnung nachzuweisen.
2. Mängel infolge von Material- oder Fertigungsfehlern werden
innerhalb der Garantiezeit kostenlos beseitigt.
3. Durch eine Garantieleistung tritt keine Verlängerung der Garantiezeit, weder
für das Gerät noch für ausgewechselte Bauteile, ein.
4. Von der Garantie ausgeschlossen sind:
a. alle Schäden, die durch unsachgemäße Behandlung, z.B. durch
Nichtbeachtung der Gebrauchsanweisung, entstanden sind.
b. Schäden, die auf Instandsetzung oder Eingriffe durch den Käufer oder
unbefugte Dritte zurückzuführen sind.
c. Transportschäden, die auf dem Weg vom Hersteller zum Verbraucher
oder bei der Einsendung an die Servicestelle entstanden sind.
d. Zubehörteile, die einer normalen Abnutzung unterliegen.
5. Eine Haftung für mittelbare oder unmittelbare Folgeschäden, die durch das
Gerät verursacht werden, ist auch dann ausgeschlossen, wenn der Schaden
an dem Gerät als ein Garantiefall anerkannt wird.
MEDISANA AG
Jagenbergstraße 19
41468 NEUSS
DEUTSCHLAND
E-Mail: info@medisana.de
Internet: www.medisana.de
Die Service-Adresse nden Sie auf dem separaten Beilegeblatt.
11
Page 18
GB
1 Safety Information
IMPORTANT INFORMATION!
RETAIN FOR FUTURE USE!
Read the instruction manual carefully before using this device,
especially the safety instructions, and keep the instruction
manual for future use. Should you give this device to another
person, it is vital that you also pass on these instructions for
use.
Explanation of symbols
This instruction manual belongs to this device.
It contains important information about starting up
and operation. Read the instruction manual thoroughly. Non-observance of these instructions can result in
serious injury or damage to the device.
WARNING
These warning notes must be observed to prevent any
injury to the user.
12
CAUTION
These notes must be observed to prevent any damage
to the device.
NOTE
These notes give you useful additional information on
the installation and operation.
Protection category II
LOT number
Manufacturer
Page 19
1 Safety Information
Power supply
• Before connecting the device to your power supply, please ensure that the supply voltage stated on the rating plate is compatible with your mains supply.
• Only connect the mains plug to the wall socket when the device
is switched off.
• Never carry, pull or turn the device by the electricity cable and
do not squeeze the cable.
• Position the mains cable so as to avoid the danger of falling.
• Do not touch the mains plug when you are standing in water
and always take hold of the plug with dry hands.
• If the mains cable of this device is damaged, it needs to be
replaced by a special mains cable, which is available from the
manufacturer or its customer service.
For special people
• This appliance can be used by children aged from 8 years and
above and persons with reduced physical, sensory or mental
capabilities or lack of experience and knowledge if they have
been given supervision or instruction concerning use of the appliance in a safe way and understand the hazards involved.
• Children shall not play with the appliance.
• In the event of an allergic respiratory problem, consult your
doctor before using the appliance.
• Should you experience medical complaints during use talk to
your doctor. Should this be the case, stop using the device immediately.
GB
Please note the following in particular concerning electrical
equipment:
Only use the unit in enclosed spaces!
• Do not use the device if it or the power supply cable is damaged, if it does not work properly or if it has been dropped or
fallen into water.
• Keep the device and its power cable away from hot surfaces.
13
Page 20
GB
1 Safety Information
• If the power supply cable is damaged, it may only be replaced
by MEDISANA, an authorised dealer or by qualied personnel.
In order to prevent hazards, always send the unit in to the service centre.
Operating the device
• The device is not determined for commercial use.
• Only use the device for its intended use as in the instruction
manual. If misused, all guarantee rights shall become null and
void.
• Keep pets away from the device.
• Place the device on a rm, oor area which is insensitive to
moisture when in use so that it cannot tip over.
• Place the appliance at least 2 meters away from TV or radio
devices to avoid interferences.
• Do not take hold of a device if it falls into water. Unplug the
mains cable immediately.
• Do not use the device if the water tank is empty or does not
contain enough liquid. The water inside the tank must not be
frozen or hot.
• Never block the mist or the air outlet.
• Never block the air inlet on the underside of the device.
• Always make sure that the device is switched off and unplug-
ged from the socket when transporting, lling and emptying the
water tank.
• Never insert metallic objekts into the appliance.
• Switch off all functions after use and remove the plug from the
mains supply.
14
Page 21
1 Safety Information / 2 Useful Information
Maintenance and cleaning
• You may only clean the device yourself. If the device malfunctions do not repair it yourself as this leads to the automatic expiry of all guarantee rights. Ask your specialist dealer and have
repairs carried out by the MEDISANA service.
• Cleaning and user maintenance shall not be made by children
without supervision.
• Do not disassemble the device - there is danger of eletric shock
and re.
• Do not scratch the ultrasonic transducer p when cleaning.
• Do not immerse the device in water or other uids.
• If, nonetheless, liquid should penetrate the device, unplug the
mains cable immediately.
• Store the unit in a dry place.
• If the water is not renewed and the water tank is not thoroughly
cleaned on a regularly base, microorganisms may breed inside
the water tank and may get into the ambient air, which is a serious health risk.
GB
2 Useful Information
2.1
Scope
of delivery
and
packaging
Please check rst of all that the device is complete and is not damaged in
any way. In case of doubt, do not use the appliance and contact your supplier or your service centre.
The following parts are included:
• 1 MEDISANA air humidier AH 670 incl. remote control
• 1 instruction manual
The packaging can be reused or recycled. Please dispose properly of any
packaging material no longer required. If you notice any transport damage
during unpacking, please contact your supplier without delay.
WARNING
Please ensure that the polythene packing is kept away from the
reach of children! Risk of suffocation!
15
Page 22
GB
2 Useful Information / 3 Operating
2.2
Ultrasound
technology
Very dry air increases susceptibility to infection and respiratory diseases
and leads to fatigue and lack of concentration. Healthy air should have a
relative atmospheric humidity of 40 to 55 %. The quiet, energy-saving ul-
trasound technology of the personal humidier uses oscillation to convert
water into a ne mist that increases the moisture level of the air. This im-
proves the air quality and prevents the mucous membranes and skin from
drying out.
CAUTION
Over-intensive operation can result in saturating the room with
moisture, which can affect the walls, windows and objects in the
room. Therefore, use a hygrometer at regular intervals to check
that the level of relative air humidity does not exceed 55%.
3 Operating
CAUTION
Make sure that the MEDISANA air humidier is operated on a
surface which is resistant to water, and that it cannot tip over. In
particular, when operated with mineralised water, condensation /
residues may be produced. Make sure that the mist being issued is
not directed towards electronic appliances, furniture or walls.
16
3.1
Filling
the
water
tank
Before you switch on the device for the rst time,
leave it for half an hour at room temperature.
1. Remove the plastic cover 2 and the water
tank 3 from the base q.
2. Turn the watertank 3 upside down and
unscrew the tank cover 4 anticlockwise and
remove.
3. Fill the watertank 3 with fresh drinking water
or distilled water. Maximum capacity approx. 1.8 l.
4. If you wish to use a water-soluble aroma essence,
add 5 drops of the essence to the fully lled water
tank 3 or onto the eece in the aroma
compartment 8. If you add the aroma essence to
the water tank, sediment may form around the
device during use. Aroma essences are commercially available.
Follow the manufacturers instructions.
8
Page 23
3 Operating
GB
3.1
Filling
the
water
tank
3.2
Changing the
battery
(remote
control)
5. Screw the tank cover 4 back onto the thread and place the water tank
3 on the appliance. As soon as the tank is correctly positioned, the pin
will push the valve in the tank cover upwards.
6. The tank chamber now lls with water. Place the plastic cover 2 over
the water tank on the base. Insert the mains plug into a wall socket.
Before you can use the device, you need to
remove the insulation foil from the battery
compartment of the remote control. If the air
humidier no longer responds to the remote
control, the battery needs to be replaced.
Press the locking tab in the direction of the
arrow and pull out the battery holder.
Replace the used battery with a new one
(CR 2025 lithium battery). Make sure, that
the polarity is correct (“+” facing upwards).
Slide the battery holder all the way back in,
until it clicks into place.
WARNING - BATTERY SAFETY INFORMATION
• Do not disassemble batteries!
• Clean the battery and device contacts if necessary before
putting in the battery!
• Remove discharged batteries from the device immediately!
• Increased risk of leakage, avoid contact with skin, eyes and
mucous membranes! If battery acid comes in contact with any
of this parts, rinse the affected area with copious amounts of
fresh water and seek medical attention immediately!
• If a battery has been swallowed seek medical attention immediately!
• Only replace with a battery of the same type!
• Insert the battery correctly, observing the polarity!
• Keep the battery compartment well sealed!
• Remove the battery from the device if it is not going to be
used for an extended period!
• Keep batteries out of children‘s reach!
• Do not attempt to recharge batteries! There is a danger of
explosion!
• Do not short circuit! There is a danger of explosion!
• Do not throw into a re!
There is a danger of explosion!
• Keep unused batteries in their packaging away from metal
objects in order to prevent short circuiting!
17
Page 24
GB
3 Operating
3.3
Use
1. Briey press the button o , to switch on the atomiser and the lighting. The lighting and atomiser will switch on at the highest power level.
2. Change the position of the vent opening in the outer or inner circle to
set or adjust the direction and height of the mist output.
3. The button w on the appliance resp. the button t on the
remote control have the following function:
press 1x: high atomiser level (HI indicator light lights up) = produces
a lot of mist / atomiser in constant operation.
press 2x: low atomiser level (LO indicator light lights up) = produces
a little mist / atomiser in constant operation.
press 3x: switch off atomiser.
4. During atomisation, briey press the button w on the appliance
resp. the MIST Timer button u on the remote control in order to have
the atomiser switch off after a certain amount of time (1, 2 or 4 hours)
automatically.
5. Briey press the button w on the appliance resp. the LED Light
button z on the remote control in order to switch on the LED lighting:
press 1x: bright light
press 2x: medium brightness
press 3x: soft light
press 4x: switch off lighting
6. During active LED lighting, press the LED LIGHT TIMER button i on
the remote control as many times as necessary in order to have the
lighting switch off automatically after a certain amount of time (1, 2 or
4 hours).
7. Briey press the button o again to switch off the atomiser and the
lighting.
18
3.4
After
use
1. Remove the mains plug from the socket.
2. Remove the plastic cover 2 and the water tank 3. Pour out any remaining water. Rinse out the tank with fresh water.
3. Dry the water tank and plastic cover if necessary with a soft, absorbent
cloth.
4. If you do not intend to use the appliance for a prolonged period: Also pour
away any remaining water in the base 1 by tipping it over a wash basin.
CAUTION! Water must not get into the air vent 6! You can use a
soft, absorbent cloth to remove any moisture left inside.
Page 25
3 Operating / 4 Miscellaneous
GB
3.5
Faults
and
Fault
Remedying
• The appliance beeps repeatedly when switched on and during use:
Fill water tank.
• Unusual smell:
Polluted or stagnant water, clean the tank and ll up with fresh water.
• Unusual noise:
Insufcient water in the tank, ll up with water/device is not on a solid
surface, place on a stable and level surface.
If a fault cannot be remedied using the described method, please contact
your service centre.
4 Miscellaneous
4.1
Cleaning and
maintenance
• During everyday use it is advisable to give the device a thorough cleaning at least every three days. Also clean device before and after long
storage periods.
• Before cleaning the device, make sure that it is turned off and the mains
plug is removed from the socket.
• Remove the water tank from the device and empty it.
• Clean the outside of the unit with a soft, damp cloth.
• Please do not use any aggressive substances for cleaning, such as
scouring cream or other detergents, as these may damage the surfaces and reduce the atomisation effect.
• You can rinse out the water tank with hot water (>65 °C) or an alcohol
of at least 75 % vol. The atomiser chamber should be cleaned using an
alcoholsoaked cloth and cotton bud. Take care to ensure that no water
gets inside the humidier.
• The ultrasonic transducer p is the most sensitive component in the
device. It is important for it to be kept clean and handled with care. Use
e.g. a cleaning brush to remove all the residue and dirt particles. Never
clean the ultrasound generator using metal objects.
• If you do not intend to use the unit for an extended period of time,
empty any remaining water from the tank and dry off the unit.
• Store the unit in a cool, dry place, preferably in its original packaging.
• Remove cap from underside of the water tank and store separately to
prevent sleeve gasket from sticking.
19
Page 26
GB
4 Miscellaneous
4.2
Cleaning
the lter
4.3
Descaling
4.4
Disposal
1. Rinse out the lter 9
under warm, running
water.
2. Then dry it carefully and
re-insert it into the base.
TIMER
2H 4H
H
1
MIST
HI LO
LIGHT
4H 2H 1H
Any limescale residue may be removed using a descaler (citric acid) :
1. Remove the lter 9.
2. Use the descaler according to the manufacturer’s instructions.
3. Pour a small amount into the tank chamber 7 and leave for a few
minutes to take effect.
4. Pour out the descaler and rinse several times with clear water.
CAUTION! Water must not get into the air vent 6! Take care that
there is no more descaler left inside the appliance.
This product must not be disposed of together with domestic waste. All
users are obliged to hand in all electrical or electronic devices, regardless
of whether or not they contain toxic substances, at a municipal or commercial collection point so that they can be disposed of in an environmentally
acceptable manner. Consult your municipal authority or your dealer for information about disposal.
20
Please remove the battery before disposing of the device/unit. Do not dispose of old batteries with your household waste, but at a battery collection
station at a recycling site or in a shop.
Page 27
4 Miscellaneous
GB
4.5
Technical
specications
Name and model
Power supply
Output
Tank contents
Atomizer capacity
Duration
Dimensions
Weight
Connection cable length
Storage conditions
Item number
EAN number
Accessory parts
In accordance with our policy of continual product improvement, we reserve the right for technical and design changes
The current version of this instruction manual can be found under
:
MEDISANA Air humidier AH 670
:
220-240V~ 50/60Hz
:
35 W
:
approx. 1,800 ml
:
max. approx. 200 ml/h
:
max. approx. 9 hours
:
approx. 18 x 18 x 30.3 cm
:
approx. 1.3 kg
:
approx. 150 cm
:
clean and dry, at +10°C to +40°C
:
60054
:
40 15588 60054 8
:
Replacement lter, item number 60057
EAN 40 15588 60057 9
without notice.
www.medisana.com
21
Page 28
GB
5 Warranty
Warranty
and
repair
terms
Please contact your supplier or the service centre in case of a claim under the
warranty. If you have to return the unit, please enclose a copy of your receipt and
state what the defect is.
The following warranty terms apply:
1. The warranty period for MEDISANA products is three years from date of
purchase. In case of a warranty claim, the date of purchase has to be
proven by means of the sales receipt or invoice.
2. Defects in material or workmanship will be corrected free of charge within
the warranty period.
3. Repairs under warranty do not extend the warranty period either for the
unit or for the replacement parts.
4. The following is excluded under the warranty:
a. All damage which has arisen due to improper treatment, e.g.
non-observance of the user instructions.
b. All damage which is due to repairs or tampering by the customer or
unauthorised third parties.
c. Damage which has arisen during transport from the manufacturer to
the consumer or during transport to the service centre.
d. Accessories which are subject to normal wear and tear.
5. Liability for direct or indirect consequential losses caused by the unit are
excluded even if the damage to the unit is accepted as a warranty claim.
22
MEDISANA AG
Jagenbergstraße 19
41468 NEUSS
Germany
The service centre address is shown on the attached leaet.
Page 29
1 Consignes de sécurité
FR
REMARQUE IMPORTANTE!
TOUJOURS CONSERVER!
Lisez attentivement le mode d’emploi, et en particulier les
consignes de sécurité, avant d’utiliser l’appareil. Conservez bien
ce mode d’emploi. Vous pourriez en avoir besoin par la suite.
Lorsque vous remettez l’appareil à un tiers, mettez-lui impérativement ce mode d’emploi à disposition.
Légende
Ce mode d’emploi fait partie du contenu de l’appareil.
Elle contient des informations importantes concernant sa mise en service et sa manipulation. Lisez
l’intégralité de ce mode d’emploi. Le non respect de
cette notice peut provoquer de graves blessures ou
des dommagesde l’appareil.
AVERTISSEMENT
Ces avertissements doivent être respectés an d’éviter d’éventuelles blessures de l’utilisateur.
ATTENTION
Ces remarques doivent être respectées an d’éviter
d’éventuels dommages de l’appareil.
REMARQUE
Ces remarques vous donnent des informations
supplémentaires utiles pour l’installation ou l’utilisation.
Classe de protection II
N° de lot
Fabricant
23
Page 30
FR
1 Consignes de sécurité
Alimentation en courant
• Avant de raccorder l’appareil à l’alimentation électrique, veillez
à ce que la tension indiquée sur la plaque signalétique corresponde à celle de l’alimentation secteur.
• Vérier que l‘appareil est éteint avant d‘insérer la che secteur
dans une prise de courant.
• Ne pas porter, traîner ou tordre l‘appareil en tirant sur le cordon
secteur et veiller à ne pas pincer le cordon.
• Positionner le câble secteur de manière à éviter tout trébuchement.
• Ne touchez pas la che secteur si vous avez les pieds dans
l‘eau et veillez toujours à manipuler la prise de la che avec les
mains sèches.
• Si le câble d’alimentation de cet appareil est endommagé, il
doit être remplacé par un câble de raccordement spécial disponible auprès du fabricant ou de son service après-vente.
Pour certaines personnes
• Cet appareil peut être utilisé par des enfants à partir de 8 ans et
plus ainsi que par des personnes dont les capacités physiques,
sensorielles ou mentales sont réduites ou qui manquent d‘expérience et de connaissance, à partir du moment où elles sont
surveillées ou qu’on leur a montré comment utiliser l’appareil
en toute sécurité et qu’elles comprennent les dangers qui en
résultent.
• Les enfants ne doivent pas jouer avec l’appareil.
• En cas d’affection des voies respiratoires de nature allergique,
consultez votre médecin avant d’utiliser l’appareil.
• Si l’utilisation provoque des problèmes de santé, interrompez
immédiatement l’utilisation et consultez votre médecin.
Pour tout appareil électrique, il convient de respecter notam-
ment les consignes suivantes:
Utilisez l’appareil en lieu clos uniquement !
24
Page 31

1 Consignes de sécurité
• Ne pas utiliser l‘appareil si celui-ci ou son cordon secteur est
endommagé, s‘il ne fonctionne pas correctement ou s‘il est
tombé dans l‘eau.
• Tenir l‘appareil, câble secteur compris, à l‘écart des surfaces
chaudes.
• Si le câble secteur est endommagé, seul MEDISANA, un re-
vendeur autorisé ou une personne qualiée peut le remplacer.
Pour éviter tout risque, envoyez dans ce cas l’appareil au service clientèle pour le faire réparer.
Fonctionnement de l’appareil
• L’appareil n’est pas prévu pour une utilisation professionnelle.
• Uniquement utiliser cet appareil conformément au but d‘utilisa-
tion décrit dans ce mode d‘emploi. Tout emploi non conforme
annule les droits de garantie.
• Éloignez les animaux de l’appareil.
• Pour l’utilisation, placez l’appareil sur une surface stable, plane
et résistante à l’humidité an qu’il ne puisse pas basculer.
• Placez l’appareil à au moins à 2 m de distance du téléviseur et
des appareils de radio pour éviter les interférences.
• Ne jamais essayer de rattraper un appareil tombé dans l‘eau.
Retirer la che secteur immédiatement.
• N’utilisez pas l’appareil si le réservoir d’eau ne contient pas ou
pas assez de liquide. L’eau du réservoir doit être ni gelée ni
chaude.
• Ne bloquez jamais le nébuliseur ou l’ouverture de sortie d‘air.
• Ne bloquez pas non plus l’entrée d’air sur la face inférieure de
l’appareil.
• Assurez-vous toujours que pendant le transport, le remplis-
sage et la vidange du réservoir d‘eau, l‘appareil est éteint et
débranché.
• N’introduisez aucun objet métallique dans le produit.
• Après l‘utilisation, éteindre toutes les fonctions et débrancher la
che secteur de la prise de courant.
FR
25
Page 32

FR
1 Consignes de sécurité / 2 Informations utiles
Entretien et nettoyage
• Vous-même êtes seulement autorisés à nettoyer l‘appareil.
En cas de pannes, ne réparez pas l‘appareil vousmême, ceci
supprime tous vos droits de garantie. Renseignez-vous auprès
de votre spécialiste et conez uniquement les réparations au
service technique MEDISANA.
• Le nettoyage et l’entretien de la part de l’utilisateur ne doivent
pas être effectués par des enfants sans surveillance.
• Ne démontez pas l’appareil - il y a risque de choc électrique et
de feu.
• Lors du nettoyage, ne rayez pas le transducteur à ultrasons p.
• N’immergez pas l’appareil dans l’eau ou d’autres liquides.
• Si des liquides s’inltrent dans l’appareil, débranchez immédia-
tement la che secteur.
• Conservez l’appareil dans un endroit sec.
• Si l’eau n’est pas renouvelée fréquemment et le réservoir d’eau
n’est pas nettoyé régulièrement et en profondeur, les microorganismes peuvent se multiplier dans le réservoir d’eau, pénétrer dans l’air ambiant et poser un risque sérieux pour la santé.
2 Informations utiles
2.1
Éléments
fournis
et emballage
26
Veuillez vérier si l’appareil est au complet et ne présente aucun dommage.
En cas de doute, ne faites pas fonctionner l’appareil et adressez-vous à
votre revendeur ou à un point de service après-vente.
La fourniture comprend:
• 1 MEDISANA Humidicateur d’air AH 670 avec télécommande
• 1 Notice d’utilisation
Les emballages sont réutilisables ou peuvent être recyclés an de récupérer les matières premières. Respectez les règles de protection de
l’environnement lorsque vous jetez les emballages dont vous n’avez plus
besoin. Si vous remarquez lors du déballage un dommage survenu durant
le transport, contactez immédiatement votre revendeur.
AVERTISSEMENT
Veillez à garder les lms d’emballage hors de portée des
enfants ! Ils risqueraient de s’étouffer !
Page 33

2 Informations utiles / 3 Utilisation
FR
2.2
Technologie
à ultrasons
Une atmosphère trop sèche augmente les risques de maladies infectieuses ou des voies respiratoires et entraîne fatigue et difculté de concentration. Un air sain doit avoir une humidité relative comprise entre 40 et
55 %. La technologie à ultrasons silencieuse et peu gourmande en énergie de cet appareil de nébulisation transforme par vibrations l’eau en une
brume extrêmement ne qui accroît le degré d’humidité de l’air.
Cela améliore la qualité de l’air et prévient un desséchement des
muqueuses et de la peau.
ATTENTION
Une utilisation intensive risque d’entraîner la sursaturation de l’air
ambiant en humidité, qui peut alors apparaître sur les murs,
fenêtres objets de la pièce. Pour cette raison, à l’aide d’un
hygromètre, et vérier que la valeur de l’humidité relative de l’air
ne dépasse pas 55%.
3 Utilisation
ATTENTION
Assurez-vous que l’humidicateur d’air est utilisé sur une surface
résistant à l’humidité et qu’il ne peut pas se renverser. L’utilisation
avec de l’eau minéralisée peut en particulier entraîner des retombées / dépôts. Faites attention à ce que la brume qui s’échappe de
l’appareil ne soit pas dirigée vers d’autres appareils électriques,
des meubles ou des murs.
3.1
Remplissage
du
réservoir
d’eau
Avant d’allumer l’appareil pour la première fois,
laissez-le pendant une demi-heure à la température
ambiante.
1. Retirez l’embout en plastique 2 et le réservoir
d’eau 3 de la base q.
2. Retournez le réservoir d’eau 3 et tournez le
bouchon du réservoir 4 contre le sens des
aiguilles d’une montre.
3. Remplissez le réservoir d’eau 3 avec de
l’eau potable ou de l’eau distillée. Quantité
maximale de remplissage : environ 1,8 litre.
4. Si vous voulez utiliser une essence aromatique
soluble dans l’eau, mettez 5 gouttes de cette
essence dans le réservoir d’eau 3 entièrement
rempli ou sur le feutre dans le tiroir 8.
Si vous ajoutez de l’essence aromatique au réservoir d’eau, des dépôts
peuvent se former autour de l’appareil pendant l’utilisation. Vous pouvez
obtenir des essences aromatiques dans le commerce.
Respectez les instructions du fabricant !
8
27
Page 34

3 Utilisation
FR
28
3.1
Remplissage du
réservoir
d’eau
3.2
Changement
des piles
(télécommande)
5. Revissez le bouchon du réservoir 4 et remettez le réservoir d’eau 3
sur l’appareil. Dès que le réservoir est correctement positionné, le
mandrin dans le ltre pousse la valve dans le bouchon du réservoir
vers le haut.
6. La chambre du réservoir se remplit d’eau. Placez l’embout en plastique
2 au-dessus du réservoir d’eau sur la base. Branchez la
che d’alimentation dans une prise électrique.
Avant de pouvoir utiliser l’appareil, vous
devez retirer la bande isolante du compartiment des piles de la télécommande.
Si l’humidicateur d’air ne répond plus à la
télécommande, la pile doit être remplacée.
Appuyez sur le verrou dans le sens de la
èche et retirez le porte-pile. Remplacez
la pile usagée par une pile neuve (pile au
lithium CR 2025), en vous assurant que la
polarité soit correcte « + » vers le haut).
Remettez le porte-pile en place jusqu’à ce
qu’il s’enclenche.
AVERTISSEMENT
INSTRUCTIONS DE SECURITE RELATIVES AUX PILES
• Ne désassemblez pas les piles !
• Nettoyez le cas échéant les contacts de l’appareil et des piles
avant de placer celles-ci !
• Retirez immédiatement les piles usagées de l‘appa-reil !
• Danger accru de fuite ! Evitez tout contact avec la peau, les
yeux et les muqueuses ! En cas de contact avec l‘électrolyte,
rincez tout de suite les endroits concernés à l‘eau claire en
abondance et consultez immédiatement un médecin !
• En cas d‘ingestion d‘une pile, consultez immédiatement un
médecin !
• N‘utilisez que des piles de type identique!
• Introduisez correctement la pile en faisant attention à la polarité !
• Veillez à ce que le compartiment des piles soit par-faitement
fermé !
• Retirez-les de l‘appareil lors d‘une non-utilisation prolongée !
• Conservez les piles hors de portée des enfants !
• Ne rechargez pas les piles ! Risque d‘explosion !
• Ne pas les court-circuiter ! Risque d‘explosion !
• Ne pas les jeter au feu ! Risque d‘explosion !
• Stockez les piles que vous n’utilisez pas dans leur emballage
et veillez à ce qu’elles restent éloignées d’objets métalliques
an d’éviter des courts-circuits !
Page 35

3 Utilisation
FR
3.3
Utilisation
1. Appuyez brièvement sur la touche o , pour allumer le nébuliseur et
l’éclairage. L’éclairage et le nébuliseur s’allument à un niveau de puissance élevé.
2. Changez la position du cercle extérieur ou intérieur de l’ouverture du
nébuliseur pour changer ou ajuster la direction et la hauteur du brouillard d’eau.
3. La touche w sur l’appareil et/ou la touche t de la télécommande ont les fonctions suivantes :
Appuyer 1 x : niveau de puissance élevé (témoin de contrôle HI
s’allume) = beaucoup de brouillard d’eau / nébuliseur en fonc tionnement continu.
Appuyer 2 x : niveau de puissance bas (témoin de contrôle LO
s’allume) = peu de brouillard d’eau / nébuliseur en fonctionnement
continu.
Appuyer 3 x : éteindre le nébuliseur.
4. Pendant la nébulisation, appuyez sur la touche w de l’appareil
et/ou sur la touche MIST Timer u de la télécommande pour que le
nébuliseur s’éteigne automatiquement après un certain temps (1, 2
ou 4 heures).
5. Si nécessaire, appuyez plusieurs fois sur la touche w de
l’appareil ou sur la touche LED Light z de la télécommande pour
allumer l’éclairage LED :
Appuyer 1 x : lumière vive
Appuyer 2 x : lumière moyenne
Appuyer 3 x : lumière faible
Appuyer 4 x : éteindre l’éclairage
6. Lorsque l’éclairage est allumé, appuyez sur la touche LED LIGHT
TIMER i de la télécommande pour que l’éclairage s’éteigne automatiquement après un certain temps (1, 2 ou 4 heures).
7. En appuyant sur o , vous éteignez le nébuliseur et l’éclairage.
3.4
Après
l’utilisation
1. Débranchez la che d’alimentation de la prise électrique.
2. Retirez l’embout en plastique 2 et le réservoir d’eau 3. Versez le
reste de l’eau dans l’évier. Rincez le réservoir avec de l’eau fraîche du
robinet.
3. Séchez le réservoir d’eau et, si nécessaire, l’embout en plastique à
l’aide d’un chiffon doux et absorbant.
4. En cas de non-utilisation prolongée : retirez également l’eau restante
de la base 1 en la déversant dans l’évier. ATTENTION ! Ce faisant,
ne laissez pas de l’eau pénétrer dans la sortie du ventilateur 6
! L’humidité résiduelle peut être absorbée avec un chiffon doux et ab-
sorbant.
29
Page 36

3 Utilisation / 4 Divers
FR
3.5
Erreurs
et comment y
remédier
4 Divers
4.1
Nettoyage et
entretien
• L’appareil émet des bips répétés lors de la mise en marche ou pen-
dant le fonctionnement : Remplissez le réservoir d’eau.
• Odeur inhabituelle : Eau sale ou stagnante, nettoyez le réservoir et le
remplir d’eau fraîche.
• Bruit inhabituel : Trop peu d’eau dans le réservoir, remplissez-le avec
de l’eau. / L’appareil ne se trouve pas sur une surface solide, posez-le
sur une surface stable et horizontale.
Si vous ne parvenez pas à remédier à une erreur en procédant comme
indiqué ci-contre, veuillez contacter le service clientèle.
• En cas d’utilisation quotidienne, nous vous recommandons de nettoyer
l’appareil à fond au moins tous les trois jours. Nettoyez aussi l’appareil
avant de le ranger et après l’avoir entreposé de manière prolongée.
• Avant de nettoyer l’appareil, vériez qu’il soit éteint, refroidi et que le
cordon secteur soit débranché de la prise de courant.
• Retirez le réservoir d’eau de l’appareil et videz-le.
• Nettoyez l’extérieur de l’appareil avec un chiffon doux humide.
• N’utilisez pas de produits agressifs, par exemple de la crème à récurer
ou tout autre détergent pour le nettoyage. Ceci peut endommager la
surface et réduire la nébulisation.
• Vous pouvez rincer soigneusement le réservoir d’eau à l’eau chaude (>
65 °C) ou avec un alcool 75 % au moins. La chambre de nébulisation
se nettoie au moyen d’un chiffon imprégné d’alcool et d’un cotontige.
Faites attention à ce qu’il n’y ait pas d’eau qui pénètre dans l’appareil.
• L’émetteur d’ultrasons p est la partie la plus sensible de l’appareil.
Il est important qu’il soit propre et bien entretenu. Utilisez par ex. un
pinceau de nettoyage pour retirer les dépôts et les particules de saletés sur le nébuliseur. N’utilisez en aucun cas de produits métalliques
pour nettoyer l’émetteur d’ultrasons.
• Si l’appareil reste inutilisé durant une période prolongée, vider l’eau
résiduelle du réservoir d’eau et sécher l’appareil.
• Entreposez l’appareil dans un endroit frais et sec, de préférence dans
l’emballage original.
• Conservez le bouchon sous le réservoir d’eau à part pour empêcher
qu’il ne colle ou n’adhère à la manchette d’étanchéité.
30
Page 37

4 Divers
FR
4.2
Nettoyer
le ltre
4.3
Détartrage
1. Rincez le ltre 9 sous
l’eau chaude courante du
robinet.
2. Séchez-le soigneusement
et réinsérez-le dans la
base.
MIST
HI LO
LIGHT
4H 2H 1H
Les résidus de calcaire peuvent être éliminés avec un détartrant doux
(acide citrique) :
1. Enlevez le ltre 9.
2. Préparez le détartrant selon les instructions du fabricant.
3. Versez une petite quantité dans la chambre du réservoir 7 et laissez-le agir pendant quelques minutes.
4. Déversez le détartrant dans l’évier et rincez-le plusieurs fois avec de
l’eau fraîche du robinet. ATTENTION ! Ce faisant, ne laissez pas de
l’eau pénétrer dans la sortie du ventilateur 6 ! Assurez-vous qu’il
n’y ait plus de détartrant dans l’appareil.
TIMER
2H 4H
H
1
4.4
Élimination de
l’appareil
Cet appareil ne doit pas être placé avec les ordures ménagères.
Chaque consommateur doit ramener les appareils électriques ou électroniques, qu’ils contiennent des substances nocives ou non, à un point de
collecte de sa commune ou dans le commerce an de permettre leur élimination écologique. Pour plus de renseignements sur l’élimination des
déchets, veuillez vous adresser aux services de votre commune ou bien à
votre revendeur.
Retirez la pile (télécommande) avant d’éliminer l’appareil. Ne jetez pas les
piles usagées dans les déchets ménagers, dans le feu ou dans l’eau, mais
éliminez-les de façon conforme avec les déchets spéciaux ou apportez-les
dans un point de collecte des piles dans un commerce spécialisé.
31
Page 38

FR
4 Divers
4.5
Caractéristiques
techniques
Nom et modèle
Alimentation électrique
Puissance
Contenance du réservoir
Capacité nébulisateur
Durée
Dimensions
Poids
Longueur du câble de
raccordement
Conditions de rangement
N° d’article
N° EAN
Pièces de rechange
Dans le cadre du travail continu dʼamélioration des
produits, nous nous réservons le droit de procéder à
des modications techniques et de design.
La dernière version de ce mode dʼemploi est disponible sur le site
:
MEDISANA humidicateur d’air AH 670
:
220-240V~ 50/60Hz
:
35 W
:
env. 1.800 ml
:
maximum env. 200 ml/h
:
maximum env. 9 heures
:
env. 18 x 18 x 30,3 cm
:
env. 1,3 kg
:
env. 150 cm
:
propre et sec, entre +10°C et +40°C
:
60054
:
40 15588 60054 8
:
Filtres de rechange, N° d’article 60057
EAN 40 15588 60057 9
www.medisana.com
32
Page 39

5 Garantie
FR
Conditions
de garantie
et de
réparation
En cas de recours à la garantie, veuillez vous adresser à votre revendeur
spécialisé ou contactez directement le service clientèle. S’il est nécessaire
d’expédier l’appareil, veuillez indiquer le défaut constaté et joindre une copie
du justicatif d’achat.
Les conditions de garantie sont les suivantes:
1. Une garantie de trois ans à compter de la date d’achat est accordée sur les
produits MEDISANA. En cas d’intervention de la garantie, la date d’achat
doit être prouvée en présentant le justicatif d’achat ou la facture.
2. Durant la période de garantie, les défauts liés à des erreurs de matériel ou
de fabrication sont éliminés gratuitement.
3. Les services effectués sous garantie n’entraînent pas de prolongation de la
période de garantie, ni pour l’appareil, ni pour les composants remplacés.
4. Sont exclus de la garantie:
a. tous les dommages dus à un usage incorrect, par exemple au nonrespect
de la notice d’utilisation.
b. les dommages dus à une remise en état ou des interventions effectuées
par l’acheteur ou par de tierces personnes non autorisées.
c. les dommages survenus durant le transport de l’appareil depuis le site
du fabricant jusque chez l’utilisateur ou lors de l’expédition de l’appareil
au service clientèle.
d. les accessoires soumis à une usure normale.
5. Nous déclinons toute responsabilité pour les dommages consécutifs
causés directement ou indirectement par l’appareil, y compris lorsque le
dommage survenu sur l’appareil est couvert par la garantie.
MEDISANA AG
Jagenbergstraße 19
41468 NEUSS
ALLEMAGNE
Vous trouverez l’adresse du SAV sur la che jointe séparément.
33
Page 40

1 Norme di sicurezza
IT
NOTE IMPORTANTI!
CONSERVARE IN MANIERA SCRUPOLO
Prima di utilizzare l’apparecchio, leggere attentamente leistruzioni per l’uso, soprattutto le indicazioni di sicurezza, e conservare
le istruzioni per l’uso per gli impieghi successivi. Se l’apparecchio viene ceduto a terzi, allegare sempre anche
queste istruzioni per l’uso.
Spiegazione dei simboli
Queste istruzioni per l’uso si riferiscono a questo apparecchio. Contengono informazioni importanti per la
messa in funzione e l’uso. Leggere interamente queste
istruzioni per l’uso. L’inosservanza delle presenti istruzioni può causare ferite gravi o danni all’apparecchio.
AVVERTENZA
Attenersi a queste indicazioni di avvertimento per
evitare che l’utente si ferisca.
ATTENZIONE
Attenersi a queste indicazioni per evitare danni
all’apparecchio.
SA!
34
NOTA
Queste note forniscono ulteriori informazioni utili
relative all’istallazione o al funzionamento.
Classe di protezione II
Numero LOT
Produttore
Page 41

1 Norme di sicurezza
Informazioni sull’alimentazione di corrente
• Prima di collegare l‘apparecchio all‘alimentazione di corrente,
accertarsi che la tensione di rete indicata sulla targhetta corrisponda a quella della rete di alimentazione.
• Inserire la spina di rete nella presa solo ad apparecchio spento.
• Non portare, tirare o ruotare mai l’apparecchio utilizzando il
cavo di alimentazione e non bloccare il cavo.
• Posizionare il cavo di alimentazione in modo che non intralci il
passaggio.
• Non afferrare la spina di rete quando si è in acqua e afferrare
sempre la presa con le mani asciutte.
• Se il tubo di collegamento alla rete di questo apparecchio viene
danneggiato deve essere rimpiazzato con un speciale tubo di
collegamento disponibile presso il produttore o il suo servizio
clienti.
Per persone con esigenze particolari
• Questo dispositivo può essere utilizzato da bambini a partire
dagli 8 anni di età e da persone con capacità siche, sensoriali
o mentali ridotte oppure con mancanza di esperienza o cono-
scenze, purché siano sorvegliati o informati a proposito dell‘uso
sicuro del dispositivo e comprendano i pericoli derivanti.
• I bambini non possono giocare con il dispositivo.
• In caso di bronchite allergica, contattare il proprio medico prima
di utilizzare l‘apparecchio.
• Nel caso dovessero comparire dei disturbi sici durante l’utilizzo, rivolgersi al proprio medico. In questo caso sospendere
immediatamente l’uso dell’apparecchio.
IT
Nel caso di apparecchi elettrici osservate in particolare le se-
guenti disposizioni:
Utilizzare l’apparecchio solo in ambienti chiusi!
• Non utilizzare l‘apparecchio quando l‘apparecchio o il cavo
di alimentazione è danneggiato, non funziona correttamente,
quando è caduto a terra o in acqua.
35
Page 42

1 Norme di sicurezza
IT
• Tenere lontano l‘apparecchio e il cavo di alimentazione da
superci calde.
• Se il cavo di alimentazione è danneggiato, esso può essere
sostituito unicamente da MEDISANA, da un rivenditore speci-
alizzato autorizzato o da una persona qualicata. Per evitare
pericoli, inviare l‘apparecchio al centro di assistenza per la ri-
parazione.
Informazioni sul funzionamento dell’apparecchio
• L’apparecchio non è destinato all’uso commerciale.
• Utilizzare l’apparecchio esclusivamente secondo le modalità
riportate nelle istruzioni per l’uso. In caso di uso diverso, si estingue qualsiasi diritto di garanzia.
• Tenere gli animali lontani dal dispositivo.
• Per l‘utilizzo posizionare l‘apparecchio su una supercie solida,
piana e resistente all‘umidità, in modo che non possa ribaltarsi.
• Posizionare il dispositivo ad almeno 2 m di distanza da TV e
impianti stereo per evitare le interferenze.
• Non afferrare mai un apparecchio caduto in acqua. Estrarre
immediatamente la spina di rete.
• Non mettere in funzione l‘apparecchio, se il serbatoio non cont-
iene acqua o se la quantità di acqua è insufciente. L’acqua nel
serbatoio non deve essere né gelata né bollente.
• Non ostruire mai lo scarico di nebbia o l’apertura per l’uscita
dell’aria.
• Bisogna anche evitare di bloccare l’entrata d’aria sulla parte
inferiore dell’apparecchio.
• Assicurarsi sempre che durante il trasporto, il riempimento e lo
scarico del serbatoio dell’acqua il dispositivo sia disattivato e la
spina sia scollegata.
• Non inserire mai oggetti metallici nell’apparecchio.
• Dopo l‘utilizzo, disattivare tutte le funzioni ed estrarre la spina
dalla presa.
36
Page 43

1 Norme di sicurezza / 2 Informazioni interessanti
Informazioni sulla manutenzione e la pulizia
• L‘utilizzatore può effettuare solo interventi di pulizia sull‘apparecchio. In caso di guasti, non riparare l‘apparecchio personalmente, pena l‘estinzione di qualsiasi diritto a garanzia.
Consultare il proprio rivenditore specializzato e fare eseguire le riparazioni esclusivamente dal servizio di assistenza
MEDISANA.
• I bambini non possono effettuare la pulizia e la manutenzione
utente se non sono sorvegliati.
• Non smontare il dispositivo - pericolo di elettroshock e incendio.
• Durante la pulizia non grafare il generatore di ultrasuoni p.
• Non immergere l’apparecchio in acqua o in altri liquidi.
• Qualora nell’apparecchio entrasse dell’acqua, disinserire immediatamente la spina dalla presa di alimentazione elettrica.
• Conservare l’apparecchio in un luogo asciutto.
• Se l’acqua non viene cambiata regolarmente e il serbatoio dell’acqua non viene regolarmente pulito bene i microorganismi
possono moltiplicarsi nel contenitore dell‘acqua, contaminare
l‘aria circostante e mettere seriamente a rischio la salute.
IT
2 Informazioni interessanti
2.1
Materiale in
dotazione e
imballaggio
Vericare in primo luogo che l’apparecchio sia completo e che non vi siano
segni di danni. In caso di dubbi non mettere in funzione l’apparecchio e
rivolgersi al proprio rivenditore o al proprio centro di assistenza.
Il materiale consegnato consta di:
• 1 Umidicatore MEDISANA AH 670 con telecomando
• 1 Istruzioni per l’uso
Le confezioni sono riutilizzabili o possono essere riciclate. Smaltire il
materiale d’imballaggio non più necessario in conformità alle disposizioni
vigenti. In caso di danneggiamenti dovuti al trasporto, mettersi immediatamente in contatto con il proprio rivenditore.
AVVERTENZA
Assicurarsi che i sacchetti d’imballaggio non siano alla
portata dei bambini. Pericolo di soffocamento!
37
Page 44

2 Informazioni interessanti / 3 Modalità d’impiego
IT
2.2
Tecnologia a
ultrasuoni
Se l’aria dell’ambiente è troppo secca si è più soggetti a malattiee infettive
o delle vie respiratorie portando a stanchezza e incapacità di concentrazione. L’aria salubre dovrebbe avere un tasso di umidità relativa compreso
fra il 40 e il 55 %. La tecnologia a ultrasuoni dell’umidicatore, silenziosa e
a basso consumo energetico, trasforma l’acqua in vapore nissimo attra-
verso vibrazioni, aumentando il grado di umidità dell’aria. In questo modo
si migliora la qualità dell’aria e si previene la disidratazione delle mucose
e della pelle.
ATTENZIONE
Un esercizio troppo intenso può portare a una saturazione di umi-
dità nell’aria dell’ambiente, che si deposita sulle pareti, le nestre
egli oggetti nell’ambiente. Controllare quindi regolarmente con un
igrometro che il valore dell’umidità relativa nell’aria non è superiore al 55 %.
3 Modalità d’impiego
ATTENZIONE
Assicurarsi che umidicatore MEDISANA venga utilizzato su una
supercie resistente all’umidità senza rischio che si rovesci. In par-
ticolare l’uso con acqua contenente sostanze minerali può determinare dei depositi / precipitati. Accertarsi che il vapore in uscita non
sia rivolto verso altre apparecchiature elettriche, mobili o pareti.
38
3.1
Riempimento
del serbatoio
dell’acqua
Prima di attivare il dispositivo per la prima volta,
lasciarlo una mezz’ora a temperatura ambiente.
1. Staccare l’involucro di plastica 2 e il serbatoio
dell’acqua 3 dalla base q.
2. Ruotare il serbatoio dell’acqua 3 sulla testata
e ruotare il coperchio del serbatoio 4 in
senso antiorario.
3. Riempire il serbatoio dell’acqua 3 con acqua
potabile pulita o con acqua distillata.
Capacità massima: ca. 1,8 litri.
4. Volendo utilizzare un’essenza idrosolubile,
versare 5 gocce di essenza nel serbatoio pieno
d’acqua 3 oppure sul non-tessuto nel cassetto
per aromi 8.
Se si versa l’essenza nel serbatoio dell’acqua durante l’uso può formarsi
un deposito attorno all’apparecchio. Le essenze sono reperibili in
commercio. Rispettare le indicazioni del produttore.
8
Page 45

3 Modalità d’impiego
IT
3.1
Riempimento
del serbatoio
dell’acqua
3.2
Sostituzione
della
batteria
(telecomando)
5. Ruotare nuovamente il coperchio del serbatoio 4 sulla lettatura e
riposizionare il serbatoio dell’acqua 3 sull’apparecchio. Non appena
il serbatoio è saldamente in posizione il perno nel ltro spinge verso
l’alto la valvola nel coperchio del serbatoio.
6. La camera del serbatoio si riempie d’acqua. Collocare l’involucro di
plastica 2 sopra il serbatoio dell’acqua sulla base. Inserire la spina
nella presa.
Prima di mettere in funzione l’apparecchio
bisogna estrarre il nastro isolatore dal vano
delle batterie del telecomando. Quando
l’umidicatore non risponde più all’impulso
del telecomando è necessario cambiare la
batteria. Premere l’arresto nella direzione
della freccia ed estrarre il vano batteria. Sostituire la batteria usata con una nuova (batteria al litio CR 2025), prestando attenzione
alla corretta polarità (“+” verso l’alto). Richi-
udere il vano batteria no a sentire lo scatto
di chiusura.
AVVERTENZA
INDICAZIONI DI SICUREZZA PER LA BATTERIA
• Non smontare le batterie!
• Se necessario, pulire i contatti delle batterie e dell’apparecchio prima di inserire le batterie!
• Rimuovere immediatamente le batterie esaurite dal dispositivo!
• Elevato rischio di fuoriuscita di liquidi, evitare il contatto con
la pelle, gli occhi e le mucose! In caso di contatto con gli acidi
delle batterie risciacquare subito i punti interessati con abbondante acqua pulita e consultare subito un medico!
• In caso di ingerimento di una batteria chiamare immediatamente un medico!
• Impiegare unicamente batterie dello stesso tipo.
• Inserire correttamente le batterie, prestare attenzione alla
polarità!
• Il vano batteria deve essere ben chiuso!
• In caso di lungo periodo di inutilizzo, rimuovere le batterie dal
dispositivo!
• Tenere le batterie lontano dalla portata dei bambini!
• Non ricaricare le batterie! Pericolo di esplosione!
• Non cortocircuitare! Pericolo di esplosione!
• Non gettare nel fuoco! Pericolo di esplosione!
• Tenere le batterie non utilizzate nella confezione e lontano da
oggetti metallici, in modo da evitare cortocircuiti!
39
Page 46

3 Modalità d’impiego
IT
3.3
Utilizzo
1. Premere brevemente il tasto
l’illuminazione. Il nebulizzatore e l’illuminazione si avviano a potenza
elevata.
2. Modicare la posizione dell’anello esterno o interno dell’apertura del
nebulizzatore per modicare o regolare la direzione e l’altezza dello
spruzzo di acqua nebulizzata.
3. Il tasto w sull’apparecchio o il tasto t sul telecomando hanno
la seguente funzione:
premendo 1 volta: potenza elevata (spia luminosa di controllo HI
accesa) = molta acqua nebulizzata / funzionamento continuo del
nebulizzatore.
premendo 2 volte: bassa potenza (spia luminosa di controllo LO
accesa) = poca acqua nebulizzata / funzionamento continuo del
nebulizzatore.
premendo 3 volte: spegnimento del nebulizzatore.
4. Durante la nebulizzazione premere il tasto
tasto MIST Timer u del telecomando per spegnere automaticamente
il nebulizzatore dopo un determinato tempo (1, 2 o 4 ore).
5. Premere più volte brevemente il tasto
LED Light z del telecomando per attivare l’illuminazione a LED:
premendo 1 volta: luce intensa
premendo 2 volte: luminosità media
premendo 3 volte: luce ridotta
premendo 4 volte: l’illuminazione si disattiva
6. A illuminazione attivata premere il tasto LED LIGHT TIMER i del telecomando per disattivare automaticamente l’illuminazione dopo un determinato tempo (1, 2 o 4 ore).
7. Premendo o si disattiva sia il nebulizzatore sia l’illuminazione.
o
per attivare il nebulizzatore e
w
w
sull’apparecchio o il
sull’apparecchio o il tasto
40
3.4
Dopo
l’uso
1. Estrarre la spina dalla presa.
2. Rimuovere l’involucro di plastica 2 e il serbatoio dell’acqua 3. Eliminare il residuo di acqua. Sciacquare il serbatoio con acqua pulita.
3. Asciugare il serbatoio dell’acqua ed eventualmente il coperchio con un
panno morbido e assorbente.
4. In caso di mancato uso per periodi prolungati: eliminare l’acqua residua dalla base 1, inclinandola sopra il lavabo. ATTENZIONE! Evi-
tare di far penetrare acqua nello scarico dell’aeratore 6! Assorbire
l’umidità residua con un panno morbido assorbente.
Page 47

3 Modalità d’impiego / 4 Varie
IT
3.5
Malfunzionamento e
soluzione
4 Varie
4.1
Pulizia
e cura
• Bip ripetuti all’accensione o durante il funzionamento:
riempire il serbatoio dell’acqua.
• Odore sgradevole:
acqua sporca o stagnante, pulire il serbatoio e riempirlo con acqua
pulita.
• Rumorosità:
poca acqua nel serbatoio, aggiungere acqua / apparecchio collocato
su una supercie instabile, collocare l’apparecchio su una supercie
piana e stabile.
Se non si riesce a risolvere un malfunzionamento nel modo descritto,
contattare il Servicecenter.
• In caso di utilizzo giornaliero dell’apparecchio, si consiglia di pulirlo a
fondo almeno ogni tre giorni. Pulire l’apparecchio anche prima e dopo
lunghi periodi di inattività.
• Prima di pulire l’apparecchio assicurarsi che sia spento e che la spina
non sia inserita nella presa di alimentazione elettrica.
• Rimuovere il serbatoio dall’apparecchio e svuotarlo.
• Pulire esternamente l’apparecchio con un panno umido e morbido.
• Per la pulizia non utilizzare sostanze aggressive come ad es. creme
abrasive o altri detergenti simili, perché potrebbero grafare la supercie e diminuire la vaporizzazione.
• Il serbatoio dell’acqua può essere lavato con acqua calda (> 65 °C) o
con almeno il 75 % di alcool. La camera di nebulizzazione deve essere
pulita con un panno imbevuto di alcool e un bastoncino di cotone. Accertarsi che non penetri acqua all’interno dell’apparecchio.
• Il generatore a ultrasuoni p è il componente più delicato
dell’apparecchio. È importante che venga tenuto pulito e trattato con
cura. Per rimuovere i residui e le particelle di sporco dallo scarico utilizzare ad es. un pennello per la pulizia. Per la pulizia del trasmettitore a
ultrasuono non utilizzare in alcun caso strumenti metallici.
• Se non si intende utilizzare l’apparecchio per un lungo periodo, svuotare l’acqua residua dal serbatoio e asciugare l’apparecchio.
• Posizionare l’apparecchio in un luogo asciutto e fresco, possibilmente
nell’imballo originale.
• Conservare il tappo del fondo del serbatoio a parte, per evitare che la
guarnizione ad anello si incolli o aderisca.
41
Page 48

IT
4 Varie
4.2
Pulizia
del ltro
4.3
Decalcicazione
1. Sciacquare il ltro 9 in
acqua corrente calda.
2. Asciugarlo con cura e
riposizionarlo nella base.
MIST
HI LO
LIGHT
4H 2H 1H
Eventuali residui di calcare possono essere eliminati con un anticalcare
delicato (acido citrico):
1. Estrare il ltro 9.
2. Preparare la miscela anticalcare secondo le istruzioni del produttore.
3. Versarne una piccola quantità nella camera del serbatoio 7 e lasciar
agire per qualche minuto.
4. Eliminare l’anticalcare, quindi sciacquare più volte con acqua pulita.
ATTENZIONE! Evitare di far penetrare acqua nello scarico
dell’aeratore 6! Vericare che non rimangano residui di calcare
nell’apparecchio.
TIMER
2H 4H
H
1
42
4.4
Smaltimento
L’apparecchio non può essere smaltito insieme ai riuti domestici.
Ogni utilizzatore ha l’obbligo di gettare tutte le apparecchiature elettroniche o elettriche, contenenti o prive di sostanze nocive, presso un punto di
raccolta della propria città o di un rivenditore specializzato, in modo che
vengano smaltite nel rispetto dell’ambiente. Per lo smaltimento rivolgersi
alle autorità comunali o al proprio rivenditore.
Rimuovere la batteria (telecomando) prima di smaltire l’apparecchio. Non
smaltire le batterie usate con i riuti domestici bensì con i riuti speciali o
consegnarle presso i centri di raccolta nei punti vendita specializzati.
Page 49

4 Varie
IT
4.5
Dati
tecnici
Nome e modello
Alimentazione
Potenza
Contenuto del serbatoio
Capacità del nebulizzatore
Funzionamento
Dimensioni
Peso
Lunghezza del cavo di
collegamento
Condizioni di magazzinaggio
Articolo n°
EAN-n°
Accessori
Alla luce dei costanti miglioramenti dei prodotti, ci riser-
viamo la facoltà di apportare qualsiasi modica tecnica e
La versione attuale di queste istruzioni per l’uso si trova all’indirizzo:
:
MEDISANA Umidicatore AH 670
:
220-240V~ 50/60Hz
:
35 W
:
circa 1,800 ml
:
max. circa 200 ml/h
:
max. circa 9 orario
:
circa 18 x 18 x 30.3 cm
:
circa 1,3 kg
:
circa 150 cm
:
in luogo pulito e asciutto da +10°C a +40°C
:
60054
:
40 15588 60054 8
:
Filtro di sostituzione, articolo n° 60057
EAN-n° 40 15588 60057 9
strutturale.
www.medisana.com
43
Page 50

5 Garanzia
IT
Condizioni
di garanzia
e di
riparazione
In caso di garanzia, contattare il vostro rivenditore di ducia o direttamente il
centro di assistenza. Se dovesse essere necessario spedire l’apparecchio,
specicare il guasto e allegare una copia della ricevuta di acquisto.
Valgono le seguenti condizioni di garanzia:
1. I prodotti MEDISANA hanno una garanzia di tre anni a partire dalla data
di vendita. La data di acquisto deve essere comprovata in caso di garanzia
dalla ricevuta di acquisto o dalla fattura.
2. Durante il periodo di garanzia, i guasti dovuti a difetti di materiale o di
lavorazione vengono eliminati gratuitamente.
3. Una prestazione di garanzia non da diritto al prolungamento del periodo
di garanzia, né per l’apparecchio né per i componenti sostituiti.
4. La garanzia non include:
a. tutti i danni risultanti da uso improprio, ad esempio dall’inosservanza
delle istruzioni d’uso,
b. i danni riconducibili a manutenzione o ad interventi effettuati dall’acquirente
o da terzi non autorizzati,
c. danni di trasporto vericati durante il trasporto dal produttore al consumatore
o durante l’invio al servizio clienti,
d. gli accessori soggetti a normale usura.
44
5. È altresì esclusa qualsiasi responsabilità per danni secondari diretti o indiretti
causati dall’apparecchio anche se il danno all’apparecchio viene
riconosciuto come caso di garanzia.
MEDISANA AG
Jagenbergstraße 19
41468 NEUSS
GERMANIA
L’indirizzo del servizio di assistenza è riportato nel foglio allegato separato.
Page 51

1 Indicaciones de seguridad
ES
¡NOTAS IMPORTANTES!
¡CONSERVAR SIN FALTA!
Antes de utilizar el aparato, lea detenidamente las instrucciones
de manejo, especialmente las indicaciones de seguridad; guarde
estas instrucciones para su consulta posterior. Si cede el aparato a terceras personas, entregue también estas instrucciones de
manejo.
Leyenda:
Estas instrucciones forman parte de este aparato. Contienen información importante relativa a la puesta en
funcionamiento y manejo. Lea estas instrucciones en su
totalidad. Si no se respetan estas instrucciones se pueden
producir graves lesiones o daños en el aparato.
ADVERTENCIA
Las indicaciones de advertencia se deben respetar para
evitar la posibilidad de que el usuario sufra lesiones.
ATENCIÓN
Estas indicaciones se deben respetar para evitar
posibles daños en el aparato.
NOTA
Estas indicaciones le ofrecen información adicional que
le resultará útil para la instalación y para el funcionamiento.
Clase de protección II
Número de LOTE
Fabricante
45
Page 52

ES
1 Indicaciones de seguridad
fuente de alimentación
• Antes de conectar el aparato a la red de suministro, compruebe que la tensión indicada en la placa de características se
corresponda con la tensión de su red de suministro.
• Conecte el enchufe a una toma de corriente sólo cuando el
aparato está apagado.
• No sujete, tire o gire el aparato mediante el cable de alimentación y no apriete el cable.
• Coloque el cable de alimentación de tal manera que no haya
ningún riesgo de caídas.
• No toque el enchufe, si está con el pies en el agua; toque el
enchufe siempre con las manos secas.
• Si se daña el cable de alimentación del aparato, deberá sustituirse por un cable de conexión especial, que podrá solicitar al
fabricante o a su servicio de atención al cliente.
personas con necesidades especiales
• Este equipo lo pueden emplear niños a partir de 8 años, personas con minusvalías físicas, sensoriales o metales o personas
sin experiencia ni conocimientos, siempre que estén bajo supervisión o se les haya mostrado el funcionamiento del dispositivo y se les hayan indicado claramente los posibles riesgos.
• Los niños no podrán jugar con el dispositivo.
• En caso de sufrir de una enfermedad alérgica de las vías respiratorias, consulte con su médico antes de utilizar el aparato.
• Consulte con su médico si tiene molestias durante la utilización
del aparato. En tal caso apáguelo inmediatamente.
Tenga presente lo siguiente en lo referente a aparatos
eléctricos:
¡Utilice el aparato solamente en espacios cerrados!
• No utilice el aparato si el aparato o el cable de alimentación
están defectuosos, si el aparato no funciona perfectamente, si
se ha caído al suelo o al agua.
• Mantenga el aparato y el cable de red alejados de supercies
calientes.
46
Page 53

1 Indicaciones de seguridad
• Si el cable de red está dañado, sólo deberá ser reemplazado
por MEDISANA, por un comercio autorizado o por una persona
con la cualicación correspondiente. Para evitar peligros, envíe el aparato al Servicio Técnico para repararlo.
funcionamiento del dispositivo
• Este aparato no ha sido destinado para un uso comercial.
• Utilice el aparato exclusivamente según su uso previsto descrito en las instrucciones de manejo. En caso de utilizarlo para
nes distintos, ya no será aplicable la garantía.
• Mantenga a los animales alejados del dispositivo.
• Para utilizar el aparato, colóquelo sobre una base rme, resistente a la humedad y plana, de manera que no pueda volcar.
• Coloque el aparato como mínimo a 2 m de distancia de los televisores y las radios, para evitar interferencias.
• No trate de agarrar un aparato que haya caído al agua. Desconecte de inmediato el enchufe de la red.
• No haga funcionar el aparato sin líquido o con un nivel de líqui-
do insuciente en el tanque de agua. El agua del depósito no
debe estar congelada ni caliente.
• No bloquee nunca la salida de neblina ni el oricio de salida
del aire.
• Evite bloquear la entrada de aire en la parte inferior del aparato.
• Al transportar, llenar o vaciar el depósito de agua, cerciórese
siempre de que el aparato esté desconectado y desenchufado
de la toma de corriente.
• No introduzca ningún objeto metálico en el producto.
• Desconecte todas las funciones después del uso y retire el enchufe de la toma de corriente.
ES
47
Page 54

ES
1 Indicaciones de seguridad / 2 Informaciones interesantes
mantenimiento y limpieza
• Usted únicamente podrá realizar los trabajos de limpieza del
aparato. En caso de avería, no intente reparar el aparato usted
mismo, puesto que en este caso ya no será aplicable la garantía. Póngase en contacto con su establecimiento especializado y haga reparar el aparato únicamente por los centros de
servicio de MEDISANA.
• Los niños no podrán limpiar ni poner a punto el dispositivo sin
supervisión.
• No desmonte el aparato, correría peligro de descarga eléctrica
e incendio.
• Durante la limpieza, no raspe el transistor ultrasónico p.
• No sumerja el aparato en agua o en cualquier otra sustancia
líquida.
• Si a pesar de ello penetrara alguna sustancia líquida en el aparato desconecte inmediatamente el cable de red.
• Guarde el aparato en un entorno seco.
• Si el agua no se renueva con regularidad y el depósito de agua
no se limpia a fondo de manera periódica, pueden multiplicarse
microorganismos en el contenedor de agua, introducirse en el
aire ambiental y convertirse en un grave riesgo para la salud.
2 Informaciones interesantes
2.1
Volumen de
suministros
y embalaje
48
Compruebe primero si el aparato está completo y si no presenta daño alguno. En caso de dudas, no ponga el aparato en funcionamiento y diríjase
a su proveedor o punto de atención al cliente.
El volumen de entrega comprende:
• 1 humidicador AH 670 de MEDISANA incl. mando a distancia
• 1 instrucciones de manejo
El embalaje es reutilizable o puede reciclarse. Deshágase del material
de embalaje que no se necesite, siguiendo las normas pertinentes. Si al
desembalar observara algún daño causado durante el transporte, póngase
inmediatamente en contacto con el comerciante.
ADVERTENCIA
¡Asegúrese de que los plásticos de embalaje no caigan en
manos de niños! ¡Existe el peligro de asxia!
Page 55

2 Informaciones interesantes / 3 Aplicatión
ES
2.2
Tecnología
ultrasónica
El aire ambiente demasiado seco aumenta la probabilidad de sufrir enfermedades infecciosas y respiratorias, y provoca cansancio y una disminución de la concentración. La humedad relativa del aire en un ambiente
sano debería situarse entre 40 y 55 %. La tecnología silenciosa y económi-
ca del humidicador por ultrasonidos convierte mediante oscilaciones el
agua en una niebla muy na que aumenta el grado de humedad relativa.
Así se mejora la calidad del aire, lo que previene la desecación de las mucosas y de la piel.
ATENCIÓN
Un funcionamiento demasiado intenso puede provocar una
sobresaturación de humedad en el aire ambiente; esta humedad
podría condensarse en las paredes, ventanas y objetos situados en
la sala. Por ello, compruebe regularmente mediante un higrómetro
que el valor de la humedad relativa del aire no supere el 55 %.
3 Aplicación
ATENCIÓN
Asegúrese de que el humidicador MEDISANA sea instalado sobre
una supercie resistente a la humedad y asegurado contra vuel-
cos. Especialmente si el aparato funciona con agua mineral pueden producirse depósitos / condensaciones. Asegúrese de que la
niebla que sale no esté dirigida hacia otros aparatos eléctricos,
muebles o paredes.
3.1
Rellenando
el
depósito
de agua
Antes de conectar el aparato por primera vez,
déjelo durante media hora a temperatura ambiente.
1. Retire la tapa de plástico 2 y el depósito de
agua 3 de la base q.
2. Gire el depósito de agua 3 y póngalo boca abajo
y saque la tapa 4 girando en sentido antihorario.
3. Rellene el depósito 3 con agua potable fresca o
con agua destilada. Cantidad máxima de llenado:
aprox. 1,8 litros.
4. Si quiere utilizar esencias aromáticas con base
acuosa eche 5 gotas de la esencia en el depósito
de agua lleno 3 o sobre el vellón del cajón para
aroma 8. Cuando introduce la esencia aromática
en el depósito de agua, durante el uso se puede
empañar el aparato. Puede adquirir las esencias aromáticas en su
comercio habitual. Respete las instrucciones del fabricante.
8
49
Page 56

ES
3 Aplicación
3.1
Rellenando
el
depósito
de agua
3.2
Cambio
de las
pilas
(mando
a distancia)
5. Ponga la tapa 4 de nuevo sobre la rosca y coloque el depósito de agua
3 de nuevo sobre el aparato. Tan pronto como el depósito esté en la
posición correcta, el guijo del ltro empuja la válvula de la tapa del
depósito hacia arriba.
6. La cámara del depósito se llena ahora de agua. Coloque el elemento
de plástico 2 sobre el depósito de agua en la base. Enchufe el aparato.
Antes de poder poner en funcionamiento
el aparato, debe quitar las cintas aislantes
del compartimento de la batería del mando
a distancia. Cuando el humidicador ya no
reacciona al mando a distancia hay que
cambiar las pilas del mando. Presione el an-
claje en la dirección de la echa y extraiga
el soporte de las pilas tirando hacia afuera.
Cambie la pila usada por una nueva (pila de
litio CR 2025), controlando que se ha colocado con la polaridad correcta (“+” hacia
arriba). Vuelva a meter el soporte de la pila
hasta oír como engarza.
ADVERTENCIA
ADVERTENCIAS DE SEGURIDAD SOBRE LAS PILAS
• No desmonte las baterías!
• ¡Limpie los contactos de las pilas y del dispositivo antes de
colocar las pilas!
• Retire inmediatamente las baterías descargadas!
• ¡Peligro elevado de fuga del líquido; evite el contacto con la
piel, los ojos y las mucosas! ¡En caso de contacto con el ácido de las baterías, lave inmediatamente las zonas afectadas
con agua limpia y abundante y vaya de inmediato al médico!
• ¡En el caso de que alguien se tragara una batería, habría que
ir inmediatamente al médico!
• ¡Coloque las baterías de forma correcta teniendo en cuenta la
polaridad!
• ¡Mantenga bien cerrado el compartimento de las pilas!
• ¡Retire las baterías del aparato, si no lo va a utilizar durante
un tiempo!
• ¡Mantenga las baterías fuera del alcance de los niños!
• ¡No vuelva a cargar las baterías! ¡Peligro de explosión!
• ¡No las ponga en cortocircuito! ¡Peligro de explosión!
• ¡No las tire al fuego! ¡Peligro de explosión!
• ¡Guarde las pilas sin usar en el envase y no en la cercanía de
objetos metálicos, para así evitar un cortocircuito!
50
Page 57

3 Aplicatión
ES
3.3
Uso
1. Pulse brevemente el botón o , para encender el nebulizador y la
iluminación. La iluminación y el nebulizador se encienden en el nivel
más alto.
2. Cambie la posición del circuito externo o interno del oricio del nebulizador, para cambiar o regular la dirección y la altura de la neblina.
3. El botón w en el aparato o el botón t en el mando a distancia
tienen la siguiente función:
1 pulsación: nivel de potencia alto (piloto HI iluminado) = mucha
neblina acuosa / nebulizador en modo continuo.
2 pulsaciones: nivel de potencia bajo (piloto LO iluminado) = poca
neblina acuosa / nebulizador en modo continuo.
3 pulsaciones: apagar el nebulizador.
4. Pulse el botón w en el aparato durante la nebulización o el botón
MIST Timer u en el mando a distancia, para que el nebulizador se
apague automáticamente tras un intervalo concreto (1, 2 o 4 horas).
5. Si hace falta, pulse brevemente varias veces el botón w en el
aparato o el botón LED Light z en el mando a distancia, para
encender la iluminación LED:
1 pulsación: luz clara
2 pulsaciones: luz media
3 pulsaciones: luz tenue
4 pulsaciones: apagar la iluminación
6. Pulse el botón LED LIGHT TIMER i en el mando a distancia con
la iluminación encendida, para que la iluminación se apague automáticamente tras un intervalo concreto (1, 2 o 4 horas).
7. Pulsando sobre o se apagan el nebulizador y la iluminación.
3.4
Después
del uso
1. Desenchufe el aparato.
2. Retire la tapa de plástico 2 y el depósito de agua 3. Vacíe el agua
que haya podido quedar en el depósito. Aclare el depósito con agua
fresca.
3. Seque el depósito y, si hace falta, el elemento de plástico con un paño
suave, absorbente.
4. Si no se utiliza durante mucho tiempo: Saque el agua restante de la
base 1, volcando la base sobre un fregadero o lavabo. ¡ATENCIÓN!
¡Durante el vaciado no debe entrar nada de agua en la salida del
ventilador 6! La humedad restante la puede retirar con un paño
suave, absorbente.
51
Page 58

ES
3 Aplicación / 4 Generalidades
3.5
Problemas y
su solución
• El aparato pita repetidamente al encender o durante el funcionami-
ento: llenar el depósito de agua.
• Olor raro: agua sucia o estancada, limpiar el depósito y llenarlo con
agua fresca.
• Ruido inusual: muy poca agua en el depósito, rellenar con agua / el
aparato no está sobre una supercie rme, colocar el aparato en una
supercie estable y llana.
Si no es posible resolver un problema de la manera descrita, póngase en
contacto con el centro de servicios.
4 Generalidades
4.1
Limpieza y
mantenimiento
• Si el aparato se usa a diario, recomendamos limpiarlo con cuidado por
lo menos cada tres días. Limpie su aparato también antes y después
de guardarlo durante mucho tiempo.
• Antes de limpiar el aparato asegúrese de que esté apagado y de que
el cable de red no esté conectado a ningún enchufe.
• Retire el tanque de agua del aparato y vacíelo.
• Limpie el exterior del aparato con un paño suave, ligeramente húmedo.
• Por favor no utilice sustancias agresivas para la limpieza, como por
ejemplo sustancias abrasivas u otros agentes de lavado, ya que de lo
contrario se podrían dañar las supercies y disminuir la generación de
niebla.
• Lave el tanque de agua, utilizando agua caliente (>65 °C) o alcohol
del 75 % como mínimo y procediendo con cuidado. La cámara de pulverización puede limpiarse con un paño empapado en alcohol o un
bastoncillo de algodón. No permita que agua penetre en el interior del
aparato.
• El transmisor ultrasónico p es el componente más sensible del aparato. Es importante mantenerlo limpio y manejarlo con cuidado. Utilice p.
ej. un pincel para retirar los sedimentos y la suciedad de las salidas.
No utilice nunca dispositivos metálicos para limpiar el transmisor ultrasónico.
• Si no va a utilizar el aparato por un largo período de tiempo vacíe el
agua restante del tanque de agua y seque el aparato.
• Guarde el aparato en un lugar seco y frío; si es posible, en su embalaje
original.
• Guarde la tapa de cierre del lado inferior del tanque de agua suelta
para evitar que el anillo de junta se pegue o adhiere a la rosca.
52
Page 59

4 Generalidades
ES
4.2
Limpiar
el ltro
4.3
Descalcicación
1. Aclare el ltro 9 debajo de
agua corriente, caliente.
2. Vuelva a secarlo y colócalo
de nuevo en la base.
TIMER
2H 4H
H
1
MIST
HI LO
LIGHT
4H 2H 1H
Los posibles residuos de cal se pueden eliminar con un descalcicador
suave (ácido cítrico):
1. Retire el ltro 9.
2. Prepare el descalcicador según las instrucciones del fabricante.
3. Introduzca una pequeña cantidad en la cámara del depósito 7 y deje
que haga efecto durante unos minutos.
4. Vierta el descalcicador y aclare varias veces con agua limpia.
¡ATENCIÓN! ¡Durante el vaciado no debe entrar nada de agua en
la salida del ventilador 6! Cuide que no quede ningún descalcica-
dor en el aparato.
4.4
Indicaciones
para la
eliminación
Este aparato no se debe eliminar por medio de la recogida de basuras doméstica. Todos los usuarios están obligados a entregar todos los aparatos
eléctricos o electrónicos, independientemente de si contienen substancias
dañinas o no, en un punto de recogida de su ciudad o en el comercio especializado, para que puedan ser eliminados sin dañar el medio ambiente.
Para más información sobre cómo deshacerse de su aparato, diríjase a su
ayuntamiento o a su establecimiento especializado.
Antes de desechar el aparato saque la pila (mando a distancia). No tire
las pilas usadas en la basura doméstica, entréguelas en una estación de
recogida de pilas usadas o en un punto limpio.
53
Page 60

ES
4 Generalidades
4.5
Datos
técnicos
Denominación y modelo
Alimentación eléctrica
Potencia
Capacidad del tanque
Capacidad del nebulizador
Tiempo de funcionamiento
Dimensiones
Peso
Longitud del cable
Condiciones de almacenaje
N° de articolo
EAN-N°
Accesorios
Debido a la constante evolución técnica del producto nos
reservamos el derecho a introducir modicaciones técnicas
En www.medisana.com encontrará la versión más actual de estas
:
MEDISANA Humidicador AH 670
:
220-240V~ 50/60Hz
:
35 W
:
aprox. 1.800 ml
:
máxima aprox. 200 ml/h
:
máxima aprox. 9 horas
:
aprox. 18 x 18 x 30,3 cm
:
aprox. 1,3 kg
:
aprox. 150 cm
:
en un lugar limpio y seco, de +10°C a +40°C
:
60054
:
40 15588 60054 8
:
Filtro de repuesto, N° de articolo 60057
EAN 40 15588 60057 9
y de diseño.
instrucciones de uso.
54
Page 61

5 Garantía
ES
Condiciones
de garantía
y reparación
Le rogamos consulte con su distribuidor especializado o directamente con el
centro de servicio técnico en caso de una reclamación. Si tuviera que remitirnos
el dispositivo, le rogamos indique el defecto y adjunte una copia del
recibo de compra.
En este caso, se aplicarán las siguientes condiciones de garantía:
1. Con relación a los productos de MEDISANA, se ofrece una garantía por
un período de tres años a partir de la fecha de compra. En caso de una
reclamación, la fecha de compra debe probarse mediante el recibo de
compra o la factura.
2. Los defectos de material o de fabricación se eliminarán de forma gratuita
dentro del período de garantía.
3. La aplicación de la garantía no conlleva una extensión del período de
garantía, ni con respecto al dispositivo ni con respecto a los componentes
sustituidos.
4. Esta garantía no cubre:
a. todos los daños causados por abuso, por ej. por incumplimiento del
manual de uso;
b. los daños debidos a reparaciones o intervenciones por parte del
comprador o terceros no autorizados;
c. los daños de transporte causados durante el transporte del domicilio
del fabricante al consumidor o durante el envío al servicio técnico;
d. accesorios sometidos a un desgaste normal.
5. Se excluye cualquier responsabilidad por los daños directos o indirectos
causados por el dispositivo, aunque el daño en el dispositivo haya sido
considerado como una reclamación justicada.
MEDISANA AG
Jagenbergstraße 19
41468 NEUSS
ALEMANIA
Encontrará la dirección de nuestra asistencia técnica en la hoja anexa.
55
Page 62

1 Avisos de segurança
PT
NOTAS IMPORTANTES!
GUARDAR SEM FALTA!
Antes de utilizar o aparelho, leia atentamente o manual de instruções, em especial as indicações de segurança e guarde-o
para uma utilização posterior. Se entregar o aparelho a terceiros,
faculte também este manual de instruções.
Descrição dos símbolos:
Este manual de instruções pertence a este aparelho.
Ele contém informações importantes para a colocação
em funcionamento e a operação. Leia completamente
este manual de instruções. O incumprimento destas
instruções pode causar lesões graves ou danos no
aparelho.
AVISO
Estas indicações de aviso têm de ser cumpridas para
evitar possíveis lesões do utilizador.
56
ATENÇÃO
Estas indicações têm de ser cumpridas para evitar
possíveis danos no aparelho.
NOTA
Estas notas fornecem informações adicionais úteis
para a instalação ou a operação.
Classe de protecção II
Número de lote
Fabricante
Page 63

1 Avisos de segurança
para a alimentação de corrente
• Antes de conectar o aparelho à sua alimentação de corrente,
tenha atenção para que a tensão eléctrica indicada na chapa
de identicação corresponda à da sua rede eléctrica.
• Insira apenas a cha de rede na tomada quando o aparelho
estiver desligado.
• Não transporte, puxe ou rode o aparelho através do cabo de
alimentação e não entale o cabo.
• Posicione o cabo de rede de modo a que não exista um perigo
de queda.
• Não toque na cha de rede quando se encontrar na água e
toque-o sempre com as mãos secas.
• Se o cabo de ligação à rede deste aparelho for danicado, o
mesmo deverá ser substituído por um cabo de ligação especial, que pode ser adquirido junto do fabricante ou da sua assistência ao cliente.
para pessoas especiais
• Este aparelho não pode ser utilizado por crianças a partir de 8
anos de idade e por pessoas com capacidades físicas, sensoriais ou mentais limitadas ou com falta de experiência e conhecimento, desde que vigiadas ou que tenham sido instruídas
sobre o uso do aparelho com segurança e, consequentemente, entendam o funcionamento do mesmo.
• As crianças não podem brincar com o aparelho.
• No caso de uma doença alérgica das vias respiratórias, consulte o seu médico de família antes da utilização.
• Consulte o seu médico se, durante a utilização, ocorrerem
queixas a nível da saúde. Nesse caso, deixe imediatamente
de utilizar o aparelho.
PT
Tenha presente o seguinte no que diz respeito a aparelhos
eléctricos:
Utilize o aparelho apenas em espaços fechados!
57
Page 64

1 Avisos de segurança
PT
• Não utilize o aparelho quando o mesmo ou o cabo de alimentação apresentar danos, quando não funcionar correctamente
e quando caiu no chão ou na água.
• Mantenha o aparelho afastado das superfícies quentes.
• Se o cabo de rede estiver danicado, ele apenas deve ser
substituído pela MEDISANA, um revendedor autorizado ou por
uma pessoa respectivamente qualicada. Para evitar perigos,
envie o aparelho para o centro de assistência para ser reparado.
antes da utilização do aparelho
• O aparelho não se destina ao uso comercial.
• Utilize o aparelho apenas de acordo com as prescrições das
instruções de utilização. Em caso de utilização não adequada,
o direito à garantia perde a sua validade.
• Manter o aparelho longe do alcance de animais.
• Para a sua utilização, coloque o aparelho numa superfície rme, à prova de água e plana, de forma a não poder tombar.
• Posicione o aparelho pelo menos a 2 metros de distância de
aparelhos de TV e de rádio para evitar interferências.
• Não tente agarrar um aparelho que caiu para dentro da água.
Retire imediatamente a cha de rede da tomada.
• Não utilize o aparelho quando o tanque de água não conter
• líquido ou conter pouco líquido. A água no depósito não deve
estar congelada nem quente.
• Nunca bloqueie a saída de névoa ou a abertura de saída de ar.
• Também não bloqueie a entrada de ar na parte inferior do aparelho.
• Certique-se sempre de que, durante o transporte, enchimento
e esvaziamento do reservatório de água, o aparelho está desli-
gado e que a respetiva cha está retirada da tomada.
• Não introduza nenhum objeto metálico no produto.
• Após a utilização, desligue todas as funções e retire a cha da
tomada.
58
Page 65

1 Avisos de segurança / 2 Informações gerais
para a manutenção e limpeza
• Você apenas deve realizar trabalhos de limpeza no aparelho.
Em caso de falhas, não tente reparar o aparelho, pois, caso
contrário, qualquer direito à garantia perde a sua validade.
Consulte o seu revendedor especializado e mande reparar o
aparelho pelo serviço de assistência da MEDISANA.
• A limpeza e manutenção não podem ser executadas por
crianças sem supervisão.
• Não desmonte o aparelho – há perigo de choque elétrico e
incêndio.
• Durante a limpeza, não raspe o emissor de ultrassons p.
• Nunca mergulhe o aparelho em água ou outros líquidos.
• Se alguma vez penetrar água no aparelho, retire imediatamen-
te a cha de rede da tomada.
• Guarde o aparelho num local seco.
• Se não substituir a água com regularidade e não lavar o tanque de água regularmente e a fundo, podem multiplicar-se
micro-organismos no tanque de água que entram no ar ambiente e representam um grave risco para a saúde.
PT
2 Informações gerais
2.1
Material
fornecido e
embalagem
Por favor, em primeiro lugar, verique se o aparelho está completo e não
apresenta qualquer dano. Em caso de dúvida, não coloque o aparelho em
funcionamento e consulte o seu revendedor ou o seu centro de assistência. Do volume de fornecimento fazem parte:
• 1 Humidicador MEDISANA AH 670 incl. comando à distância
• 1 Instruções de utilização
As embalagens podem ser reutilizadas ou podem ser eliminadas através
da reciclagem. Por favor, elimine adequadamente o material da embalagem não necessário. Se, durante o desembalamento, vericar danos devido ao transporte, por favor, entre imediatamente em contacto com o seu
revendedor.
AVISO
Tenha atenção para que as películas da embalagem não se
tornem brincadeiras para crianças! Existe perigo de asxia!
59
Page 66

2 Informações gerais / 3 Aplicação
PT
2.2
Tecnologia ultrasónica
O ar ambiente demasiado seco aumenta a vulnerabilidade a infecções e
doenças do foro respiratório, causa cansaço e a diminuição da concentração. O ar saudável deve possuir uma humidade relativa do ar de 40
até 55 %. Graças às vibrações, a tecnologia ultra-sónica sem ruídos e
económica do humidicador de ar transforma a água em névoa na que
aumenta o grau de humidade do ar. Esse processo aumenta a qualidade
do ar e previne a secagem das mucosas nasais e da pele.
ATENÇÃO
Um funcionamento demasiado intensivo pode causar uma saturação do ar ambiente com humidade que, por sua vez, pode
formar condensação nas paredes, janelas e objectos na sala. Por
isso, verique regularmente através de um higrómetro que o valor
da humidade relativa do ar não exceda os 55 %.
3 Aplicação
ATENÇÃO
Certique-se de que o humidicador MEDISANA é colocado em
funcionamento em cima de uma superfície estável e insensível à
humidade. Sobretudo no funcionamento com água com teor de
sais minerais pode dar-se origem à formação de condensação /
sedimentos. Tenha atenção para que a névoa que sai do aparelho
não esteja direccionada para outros aparelhos eléctricos, móveis
ou paredes.
60
3.1
Encher
o tanque
de água
Antes de ligar o aparelho pela primeira vez, mantenha-o
à temperatura ambiente durante meia hora.
1. Retire o acessório de plástico 2 e o tanque
de água 3 da Base q.
2. Vire o tanque de água 3 ao contrário e rode
a tampa do tanque 4 no sentido contrário
aos ponteiros do relógio.
3. Encha o tanque de água 3 com água potável
fresca ou água destilada. Volume de enchimento
máximo: cerca de 1,8 litros.
4. Se quiser usar uma essência de aroma, verta 5
gotas da essência para dentro do tanque cheio
de água 3 ou sobre o tecido na gaveta do aroma
8. Caso verta a essência de aroma juntamente
para o tanque de água, pode formar-se um sedimento à volta do
aparelho durante a utilização. Pode adquirir as essências de aroma
nas lojas.
Respeite as indicações do fabricante.
8
Page 67

3 Aplicação
PT
3.1
Encher
o tanque
de água
3.2
Substituição
da pilha
(comando à distância)
5. Rode a tampa do tanque 4 novamente sobre a rosca e coloque o
tanque de água 3 novamente sobre o aparelho. Assim que o tanque
estiver corretamente colocado, o mandril que está no ltro empurra a
válvula na tampa do tanque para cima.
6. O compartimento do tanque enche-se agora com água. Coloque o
acessório de plástico 2 sobre o tanque de água na base. Coloque a
cha elétrica numa tomada.
Antes de poder colocar o aparelho em funcionamento, tem de retirar a ta de isolamento do compartimento das pilhas do
comando à distância. Quando o humidicador já não reage ao comando à distância,
a pilha tem de ser substituída. Pressione o
bloqueio na direção da seta e retire o suporte da pilha. Substitua a pilha descarregada
por uma nova (pilha de lítio CR 2015), tenha
em atenção a polaridade correta (“+” para
cima). Volte a colocar o suporte da pilha até
que este encaixe (ouve um clique).
ADVERTÊNCIA
INDICAÇÕES DE SEGURANÇA SOBRE AS PILHAS
• Não abra as pilhas!
• Eventualmente, limpar os contactos da bateria e do aparelho
antes da inserção!
• Remova imediatamente as pilhas gastas do aparelho!
• Elevado perigo de pilhas babadas, evite o contacto com a
pele, olhos e mucosas! No caso de contacto com ácido das
pilhas, lave o local com água potável abundante e consulte
imediatamente um médico!
• Se a pilha foi engolida, consulte imediatamente um médico!
• Coloque correctamente as pilhas, atenção à polaridade!
• Mantenha o compartimento das pilhas bem fechado!
• No caso de não utilização prolongada, remova as pilhas do
aparelho!
• Mantenha as pilhas afastadas das crianças!
• Não volte a carregar as pilhas! Existe perigo de explosão!
• Não conecte as pilhas em curto-circuito! Existe perigo de
explosão!
• Não coloque as pilhas no fogo! Existe perigo de explosão!
• Guarde as pilhas não utilizadas na embalagem e não na proximidade de objectos metálicos para evitar um curto-circuito!
61
Page 68

PT
3 Aplicação
3.3
Utilização
1. Pressione brevemente a tecla o , para ligar o nebulizador e a iluminação. A iluminação e o nebulizador ligam-se na potência máxima.
2. Altere a posição externa ou interna do círculo da abertura do nebulizador, para alterar a direção e a altura da nebulização de água ou para
a regular.
3. A tecla
têm as seguintes funções:
Pressionar 1 x: posição de potência alta (luz de controlo HI brilha) =
muita nebulização / nebulizador em funcionamento contínuo.
Pressionar 2 x: posição de potência baixa (luz de controlo LO brilha)
= pouca nebulização / nebulizador em funcionamento contínuo.
Pressionar 3 x: Desligar o nebulizador
4. Durante a nebulização, pressione a tecla
tecla MIST Timer u no comando à distância, para que o nebulizador se desligue automaticamente passado algum tempo (1, 2 ou 4
horas).
5. Eventualmente pressione brevemente a tecla
a tecla LED Light z no comando à distância, para ligar também a
iluminação LED:
Pressionar 1 x: luz intensa
Pressionar 2 x: luz média
Pressionar 3 x: pouca luz
Pressionar 4 x: Desligar a iluminação
6. Enquanto a iluminação estiver ligada, pressione a tecla LED LIGHT
TIMER i no comando à distância, para que a iluminação se desligue
automaticamente passado algum tempo (1, 2 ou 4 horas).
7. Ao pressionar a tecla o desliga novamente o nebulizador e a
iluminação.
no aparelho ou a tecla t no comando à distância,
w
w
no aparelho ou a
no aparelho ou
w
62
3.4
Após
a utilização
1. Desligue a cha elétrica da tomada.
2. Retire o acessório de plástico 2 e o tanque de água 3. Despeje a
água restante. Enxague o tanque com água potável.
3. Seque o tanque de água e eventualmente o acessório de plástico com
um pano macio e absorvente.
4. No caso de uma não-utilização prolongada: Retire a água restante
também da base 1, vertendo a mesma para um lavatório. ATENÇÃO!
Neste processo não pode entrar água para a saída do humidicador 6! Pode secar a restante humidade com um pano macio e
absorvente.
Page 69

3 Aplicação / 4 Generalidades
PT
3.5
Erros e
solução
de problemas
• O aparelho apita repetidamente quando liga ou quando está em fun-
cionamento: Encher o tanque de água.
• Cheiro estranho: Água suja ou velha - limpar o tanque e voltar a en-
cher com água limpa.
• Ruído estranho: Pouca água no tanque - encher com mais água /
aparelho não está sobre uma superfície rme - colocar numa superfície estável e plana.
Se não for possível eliminar um erro do modo descrito, entre em contacto
com o seu centro de assistência.
4 Generalidades
4.1
Limpeza
e manutenção
• Na utilização diária, recomendamos que limpe o aparelho, pelo menos,
todos os três dias. Limpe o aparelho também antes e após prolongados tempos de armazenamento.
• Antes de limpar o aparelho, certique-se de que o aparelho está desli-
gado e de que a cha de rede não está inserida na tomada.
• Remova o tanque de água do aparelho e esvazie-o.
• Limpe o exterior do aparelho com um pano húmido e macio.
• Por favor, para a limpeza não utilize substâncias agressivas como,
por exemplo, cremes de limpeza ou outros detergentes. Tais produtos
podem corroer a superfície e diminuir a nebulização.
• O tanque de água pode ser lavado com água quente (>65 °C) ou com
álcool de, pelo menos, 75 %. Limpe a câmara do atomizador com um
pano embebido em álcool e um cotonete. Tenha atenção para que a
água não penetre no interior do aparelho.
• O sensor por ultra-sons é o componente mais sensível do aparelho. É
muito importante que ele seja utilizado de modo limpo e conservado.
Utilize um pincel de limpeza, por exemplo, para eliminar depósitos e
partículas de sujeira das saídas. Para limpar o sensor de ultra-sons
, não utilize meios auxiliares metálicos.
p
• Se não quiser utilizar o aparelho por muito tempo, esvazie o resto de
água do reservatório de água e seque o aparelho.
• Guarde o aparelho num local seco e fresco. A melhor maneira é na
embalagem original.
• Guarde a tampa no lado inferior do tanque de água de modo solto para
evitar que a braçadeira de vedação que colada ou presa.
63
Page 70

4 Generalidades
PT
4.2
Limpar
o ltro
4.3
Descal-
cica-
ção
1. Limpe o ltro 9 sob água
corrente e morna.
2. Volte a secá-lo cuidado samente e volte a colocá-lo
sobre a base.
TIMER
2H 4H
H
1
MIST
HI LO
LIGHT
4H 2H 1H
Pode remover eventuais resíduos de calcário com um produto descalcicante suave (ácido cítrico):
1. Retire o ltro 9.
2. Mexa o produto descalcicante de acordo com as indicações do
fabricante.
3. Verta uma pequena quantidade para o compartimento do tanque 7 e
deixe-o atuar durante alguns minutos.
4. Despeje o produto descalcicante e enxague várias vezes com água
limpa. ATENÇÃO! Neste processo não pode entrar água para a
saída do humidicador 6! Certique-se de que não resta nada do
produto descalcicante no aparelho.
64
4.4
Indicações
sobre a
eliminação
Este aparelho não pode ser eliminado em conjunto com o lixo doméstico.
Cada consumidor tem o dever de entregar qualquer aparelho eléctrico ou
electrónico com ou sem substâncias nocivas nos postos de recolha públicos da sua cidade ou no seu revendedor especializado, para que possam
ser eliminados ecologicamente. Para mais informações sobre as formas
de descarte, contacte as autoridades locais ou o seu revendedor.
Antes de proceder à eliminação do aparelho, retire a bateria (comando
à distância). Não coloque pilhas usadas no lixo doméstico, mas sim nos
resíduos especícos ou num ponto de recolha de pilhas no comércio especializado.
Page 71

4 Generalidades
PT
4.5
Dados
técnicos
Nome e modelo
Fonte de alimentação
Potência
Volume do tanque
Capacidade do nebulizador:
Tempo de funcionamento
Dimensões
Peso
Comprimento do cabo de
ligação
Condições de armazenamento
Número de artigo
Número EAN
Peças acessórias
Devido aos constantes melhoramentos do produto,
reservamos o direito a proceder a alterações técnicas e
A respetiva versão atual deste manual de utilização pode ser consultada
em www.medisana.com
:
MEDISANA Humidicador AH 670
:
220 - 240V~ 50/60Hz
:
35 W
:
aprox. 1.800 ml
:
máximo aprox. 200 ml/h
:
máximo aprox. 9 horas
:
aprox. 18 x 18 x 30,3 cm
:
aprox. 1,3 kg
:
aprox. 150 cm
:
armazene em local limpo e seco, entre
+10°C e +40°C
:
60054
:
40 15588 60054 8
:
Filtro de substituição , Número de artigo
60057, EAN 40 15588 60057 9
estéticas.
65
Page 72

PT
5 Garantia
Garantia e
condições
de reparação
Por favor, em caso de garantia, contacte o seu revendedor especializado ou
directamente o centro de assistência. Se for necessário enviar o aparelho, por
favor, envie o aparelho indicando a avaria e acompanhado de uma cópia do
recibo de compra.
Em caso de garantia aplicam-se as seguintes condições:
1. Aos produtos MEDISANA concedemos uma garantia de três anos a
partir da data de compra. Em caso de garantia, a data de compra tem de
ser comprovada através do recibo de compra ou factura.
2. As deciências devido a erros de material ou de fabricação são eliminadas
gratuitamente dentro do prazo de garantia.
3. Após um serviço de garantia, o prazo da garantia não é prolongado, nem
para o aparelho nem para as peças substituídas.
4. A garantia exclui:
a. todos os danos resultantes de manuseamento inadequado como,
p.ex., devido ao não cumprimento do manual de instruções.
b. danos resultantes de reparações ou intervenções pelo comprador ou
por terceiros não autorizados.
c. danos de transporte resultantes do percurso entre o fabricante e o
consumidor ou durante o envio para o serviço de assistência a clientes.
d. componentes exteriores sujeitos a um desgaste normal.
66
5. Não nos responsabilizamos por danos consequentes directos ou indirectos
que são causados pelo aparelho mesmo quando o dano no aparelho
é reconhecido como um caso de garantia.
MEDISANA AG
Jagenbergstraße 19
41468 NEUSS
ALEMANHA
Encontra o endereço da assistência técnica na folha em anexo.
Page 73

1 Veiligheidsmaatregelen
NL
BELANGRIJKE AANWIJZINGEN!
ABSOLUUT BEWAREN!
Lees de gebruiksaanwijzing, in het bijzonder de veiligheidsinstructies, zorvuldig door voordat u het apparaat gebruikt en
bewaar de gebruiksaanwijzing voor verder gebruik. Als u het
toestel aan derden doorgeeft, geef dan deze gebruiksaanwijzing
absoluut mee.
Verklaring van de symbolen:
Deze gebruiksaanwijzing behoort bij dit toestel. Ze
bevat belangrijke informatie over de ingebruikneming
en het gebruik. Lees deze gebruiksaanwijzing helemaal. Het niet naleven van deze instructie kan zware
verwondingen of schade aan het toestel veroorzaken.
WAARSCHUWING
Deze waarschuwingen moeten in acht genomen
worden om mogelijk letsel van de gebruiker te
verhinderen.
OPGELET
Deze aanwijzingen moeten in acht genomen worden
om mogelijke schade aan het toestel te verhinderen.
AANWIJZING
Deze aanwijzingen geven u nuttige bijkomende
informatie bij de installatie of het gebruik.
Beschermingsklasse II
LOT-nummer
Producent
67
Page 74

1 Veiligheidsmaatregelen
NL
over de stroomvoorziening
• Voor u het apparaat aansluit op uw stroomtoevoer, dient u erop
te letten dat de netspanning, die op het typeaanduidingsplaatje
staat aangegeven overeenkomt met die van uw stroomnet.
• Steek de stekker alleen in het stopcontact, als het apparaat
uitgeschakeld is.
• Draag, trek of draai het apparaat nooit aan het snoer en knel
het snoer niet af.
• Positioneer het snoer zo dat er geen struikelgevaar ontstaat.
• Raak de stekker nooit aan als u in het water staat en raak de
stekker altijd met droge handen aan.
• Als de netaansluitkabel van dit apparaat wordt beschadigd, dan
moet deze worden vervangen door een speciale aansluitkabel,
die via de fabrikant of zijn klantendienst te verkrijgen is.
voor bijzondere personen
• Dit toestel kan worden gebruikt door kinderen vanaf de leeftijd
van 8 jaar, alsook door mensen met een fysieke, sensorische
of mentale beperking, of mensen met gebrek aan kennis of ervaring, op voorwaarde dat zij onder supervisie staan of dat zij
behoorlijk worden geïnformeerd over het veilige gebruik van
het toestel en zij de daaruit voorvloeiende mogelijke gevaren
begrijpen.
• Dit toestel is géén speelgoed.
• In geval van een allergische aandoening van de luchtwegen
dient u vóór gebruik van het apparaat ruggespraak te houden
met uw huisarts.
• Neem contact op met uw arts, wanneer er zich tijdens gebruik
gezondheidsproblemen voordoen. Staak in dat geval onmiddellijk het gebruik van het instrument.
Besteed bij elektrische apparaten vooral aandacht aan het
volgende:
68
Gebruikt u het apparaat alleen in gesloten ruimten!
Page 75

1 Veiligheidsmaatregelen
• Gebruik het apparaat niet als het apparaat of het snoer beschadigd is, als het niet overtuigend functioneert, als het naar
beneden of in het water gevallen is.
• Houdt het apparaat en het snoer zover mogelijk uit de buurt
van hete oppervlakten.
• Als het netsnoer beschadigd is, mag het alleen door MEDISANA,
een geautoriseerde speciaalzaak of door een gekwaliceerde persoon vervangenworden. Om gevaren te vermijden
stuurt u het toestel naar de serviceplaats voor herstel.
bij gebruik van het apparaat
• Het instrument is niet voor commercieel gebruik bestemd.
• Gebruik het apparaat alleen voor doeleinden zoals gesteld in
de gebruiksaanwijzing. In alle andere gevallen vervalt de garantie.
• Buiten bereik van dieren houden.
• Plaats het apparaat voor gebruik op een vast, vochtbestendig
en effen vlak zodat het niet kan kantelen.
• Plaats het apparaat op tenminste 2 m afstand van televisie- en
radiotoestellen om storingen te vermijden.
• Raakt nooit een apparaat aan dat in het water gevallen is. Trek
• meteen de stekker uit het stopcontact.
• Gebruik het apparaat niet, wanneer de watertank geen of te
• weinig vloeistof bevat. Het water in de tank mag niet bevroren
of heet zijn.
• Nooit de stoomuitlaat of luchtuitlaatopening blokkeren.
• Blokkeer ook de luchtinlaat niet aan de onderzijde van het apparaat.
• Controleer steeds of bij transport, vullen en legen van de
watertank het toestel wordt uitgeschakeld en de netstekker uitgetrokken.
• Geen metalen voorwerpen in het product steken.
• Schakel alle functies na het gebruik uit en trek de stekker uit
het stopcontact.
NL
69
Page 76

1 Veiligheidsmaatregelen / 2 Wetenswaardigheden
NL
voor onderhoud en reiniging
• U mag aan het apparaat enkel reinigingswerkzaamheden uitvoeren. Repareer het apparaat in het geval van storingen niet
zelf, omdat hierdoor de garantie vervalt. Vraag uw vakhandel
en laat de reparaties alleen door de MEDISANA-Service verrichten.
• Kinderen mogen het toestel niet schoonmaken of onderhouden, wanneer ze niet onder supervisie staan.
• Het apparaat niet demonteren - dit kan een elektrische schok
of brand veroorzaken.
• Kras tijdens de reiniging niet aan de ultrasone sensor p.
• Dompel het instrument niet onder in water of andere vloeistoffen.
• Indien er toch per ongeluk vocht in het instrument is binnengedrongen, koppel dan onmiddellijk het netsnoer los van de
wandcontactdoos.
• Bewaart u het apparaat in een droge omgeving.
• Als het water niet regelmatig wordt ververst en de watertank
niet regelmatig en grondig wordt gereinigd, dan kunnen er zich
micro-organismen in de waterreservoir verspreiden, in de omgevingslucht geraken en een ernstig risico voor de gezondheid
vormen.
2 Wetenswaardigheden
2.1
Levering en
verpakking
70
Gelieve eerst te controleren of het instrument volledig is en volledig vrij
van beschadigingen is. In geval van twijfel neemt u het toestel niet in bedrijf en neemt u contact op met uw handelaar of uw servicepunt.
Bij de levering horen:
• 1 MEDISANA Luchtbevochtiger AH 670 incl. afstandsbediening
• 1 Gebruiksaanwijzing
Het verpakkingsmateriaal kan opnieuw worden gebruikt of gerecycled.Zorg
ervoor dat het gebruikte verpakkingsmateriaal bij de daarvoor bestemde afvalverwerking terechtkomt. Indien u tijdens het uitpakken transportschade
constateert, neem dan direct contact op met uw leverancier.
WAARSCHUWING
Let er op dat het verpakkingsmateriaal niet in handen
komt van kinderen! Zij kunnen er in stikken!
Page 77

2 Wetenswaardigheden / 3 Het Gebruik
NL
2.2
Ultrasone
technologie
Een te droge lucht in de ruimte verhoogt de vatbaarheid voor infecties en
aandoeningen aan de luchtwegen en leidt tot vermoeidheid en concentratiemoeilijkheden. Gezonde lucht dient een relatieve luchtvochtigheid van
40 à 55 % te hebben. De geluidsarme en energiebesparende ultrasone
technologie van de luchtbevochtiger verandert door trillingen water in zeer
jne nevel, die het vochtigheidsgehalte van de lucht verhoogt. Dit verbetert
de luchtkwaliteit en voorkomt het uitdrogen van de slijmvliezen en de huid.
OPGELET
Een te intensief gebruik kan tot oververzadiging van de ruimte
lucht met vochtigheid leiden, die op de wanden, ramen en voorwerpen in de ruimte kan neerslaan. Controleer daarom regelmatig met
een hygrometer, dat de waarde van de relatieve luchtvochtigheid
niet hoger stijgt dan 55 %.
3 Het Gebruik
OPGELET
Zorg ervoor dat de MEDISANA luchtbevochtiger op een voor vocht
ongevoelig oppervlak gebruikt wordt en dat de bevochtiger niet kan
omvallen. Vooral bij het gebruik met mineraalhoudend water kan het
tot afzettingen komen. Let erop, dat de eruit komende damp niet op
andere elektrische apparaten, meubels of wanden is gericht.
3.1
Vullen
van de
watertank
Alvorens het toestel de eerste keer wordt
ingeschakeld, het eerst een half uur bij ruimtetemperatuur laten staan.
1. Neem het kunststof opzetstuk 2 en de
watertank 3 van de basis q.
2. Draai de watertank 3 op de kop en draai het
tankdeksel 4 naar links af.
3. Vul de watertank 3 met vers drinkwater of
gedestilleerd water. Maximale vulhoeveelheid:
ca. 1,8 liter.
4. Als u een in water oplosbare aroma essence wilt
gebruiken, voegt u 5 druppels van de essence toe
aan de volledig gevulde watertank 3 of op het
vlies in de aromalade 8.
Als u de aroma essence aan de watertank toevoegt, dan kan er zich
tijdens het gebruik rond het apparaat een neerslag vormen. Aroma
essences kunt u in de winkel kopen. Let op de instructies van de
fabrikant.
8
71
Page 78

3 Het Gebruik
NL
3.1
Vullen
van de
watertank
3.2
Batterijwissel
(afstandsbediening)
5. Draai het tankdeksel 4 weer op de schroefdraad en plaats de watertank
3 weer op het apparaat. Zodra de tank correct geplaatst is, drukt de
doorn in het lter de klep in het tankdeksel naar boven.
6. De tankkamer vult zich nu met water. Plaats het kunststof opzetstuk 2
boven de watertank op de basis. Steek de netwerkstekker in een stop
contact.
Alvorens u het apparaat in werking kunt
nemen, moet u de isolatiestrook uit het batterijvak van de afstandsbediening trekken.
Als de luchtbevochtiger niet meer op de afstandsbediening reageert, moet de batterij
worden vervangen. Druk de arrêtering in de
richting van de pijl en trek de batterijhouder
uit. Vervang de verbruikte door een nieuwe
batterij (CR 2025 lithium batterij), let daarbij op correcte polariteit (“+” naar boven).
Schuif de batterijhouder weer in, tot deze
hoorbaar vastklikt.
WAARSCHUWING
VEILIGHEIDSAANWIJZINGEN T.A.V. DE BATTERIJ
• Batterien niet uit elkaar halen!
• Batterij- en toestelcontacten voor het plaatsen van de batterijen indien nodig reinigen!
• Lege batterijen onmiddellijk uit het toestel verwijderen!
• Verhoogd uitloopgevaar, contact met huid, ogen en slijmhuid
vermijden! Bij contact met accuzuur de betreffende plaatsen
onmiddellijk met overvloedig helder water spoelen en onmiddellijk een arts opzoeken!
• Mocht er een batterij ingeslikt zijn, dan moet onmiddellijk een
arts opgezocht worden!
• Plaats de batterijen correct, neem de polariteit in acht!
• Houd het batterijvak goed gesloten!
• Batterijen bij langer niet-gebruik uit het toestel verwijderen!
• Batterijen uit de buurt van kinderen houden!
• Batterijen niet heropladen! Er bestaat explosiegevaar!
• Niet kortsluiten! Er bestaat explosiegevaar!
• Niet in het vuur werpen! Er bestaat explosiegevaar!
• Bewaar ongebruikte batterijen in de verpakking en niet in de
buurt van metalen voorwerpen om een kortsluiting te vermijden!
72
Page 79

3 Het Gebruik
NL
3.3
Gebruik
1. Druk kort op de toets o , om de vernevelaar en de verlichting in
te schakelen. De verlichting en de vernevelaar schakelen naar een
hogere stand.
2. Verander de positie van de buitenste resp. binnenste cirkel van de
vernevelaarsopening om richting en hoogte van de waternevel te veranderen resp. in te stellen.
3. De toets w op het apparaat resp. de toets t op de afstandsbediening hebben volgende functie:
1 x drukken: hoge stand (controlelampje HI brandt) = veel waternevel
/ vernevelaar in continue werking.
2 x drukken: lage stand (controlelampje LO brandt) = weinig
waternevel / vernevelaar in continue werking.
3 x drukken: vernevelaar uitschakelen.
4. Druk tijdens de verneveling op de toets w op het apparaat resp. de
toets MIST Timer u op de afstandsbediening zodat de vernevelaar
zich na een bepaalde tijd (1, 2 of 4 uur) automatisch uitschakelt.
5. Druk evt. meermaals kort op de toets w op het apparaat resp. de
toets LED Light z op de afstandsbediening om de led-verlichting
in te schakelen:
1 x drukken: helder licht
2 x drukken: gemiddeld licht
3 x drukken: weinig licht
4 x drukken: verlichting uitschakelen
6. Druk tijdens de ingeschakelde verlichting op de toets LED LIGHT TIMER i op de afstandsbediening zodat de verlichting na een bepaalde
tijd (1, 2 of 4 uur) automatisch uitschakelt.
7. Door te drukken op o schakelt u de vernevelaar en de verlichting
weer uit.
3.4
Na het
gebruik
1. Trek de netstekker uit het stopcontact.
2. Neem het kunststof opzetstuk 2 en de watertank 3 af. Giet het resterend water uit. Spoel de tank met vers water uit.
3. Droog de watertank en evt. het kunststof opzetstuk af met een zachte,
absorberende doek.
4. Bij langer niet-gebruik: verwijder ook het resterende water uit de basis
door deze via een wastafel uit te gieten. LET OP! Daarbij mag er
1
geen water in de ventilatoruitlaat 6 geraken! Resterend vocht kunt
u met een zachte, absorberende doek opnemen.
73
Page 80

3 Het Gebruik / 4 Diversen
NL
3.5
Fouten
en het
verhelpen
ervan
• Apparaat piept herhaald bij het inschakelen resp. tijdens de werking:
• Ongewone geur: Verontreinigd of stilstaand water, tank reinigen en
• Ongewoon geluid: Te weinig water in de tank, water bijvullen / appa-
Indien een fout volgens de beschrijving niet is te verhelpen, moet u contact op nemen met uw servicecenter.
4 Diversen
4.1
Reiniging
en onderhoud
• Bij dagelijks gebruik raden wij u aan, het apparaat tenminste om de
• Koppel het netsnoer los van de wandcontactdoos en schakel het in-
• Haal de watertank van het apparaat en maak hem leeg.
• Reinig het apparaat van buiten met een vochtig, zacht doekje.
• Gebruik voor de reiniging geen bijtende of schurende reinigingsmid-
• De watertank kunt u met heet water (>65 °C) of een alcoholoplossing
• De ultrasone sensor p is het meest kwetsbare onderdeel van het ap-
• Verwijder, als u het instrument voor een langere periode niet gaat ge-
• Bewaar het apparaat op een droge, koele plaats, het beste in de origi-
• Bewaar de afsluitdop van de onderkant van de watertank los, om het
Watertank vullen.
met vers water vullen.
raat staat niet op een vast oppervlak, op een stevig en effen oppervlak plaatsen.
drie dagen grondig te reinigen. Reinig het apparaat ook voor en na een
periode, waarin het apparaat niet wordt gebruikt.
strument uit voordat u het reinigt.
delen, omdat deze het oppervlak aantasten en de verneveling verminderen.
van ten minste 75 % grondig uitspoelen. De vernevelaarkamer reinigt u
door middel van een in alcohol gedrenkt doekje en een wattenstaafje.
Let u op, dat er geen water in het inwendige van het apparaat komt.
paraat. Het is belangrijk, dat hij schoon is en met zorg wordt behandeld. Gebruik een schoonmaakkwastje om vuilafzetting en vuildeeltjes
aan de stoomuitlaat te verwijderen. Gebruik voor het reinigen van de
ultrasoondetector beslist geen metalen hulpmiddelen.
bruiken, waterresten uit de watertank en veeg het instrument droog.
nele verpakking.
vastplakken of vast gaan zitten van de afdichtingsmanchet te vermijden.
74
Page 81

4 Diversen
NL
4.2
Filter
reinigen
4.3
Ontkalken
1. Spoel het lter 9 uit onder
stromend, warm water.
2. Droog het weer zorgvuldig
af en plaats het weer in
de basis.
TIMER
2H 4H
H
1
MIST
HI LO
LIGHT
4H 2H 1H
Eventuele kalkresten kunt u door een mild ontkalkingsmiddel (citroenzuur)
verwijderen:
1. Verwijder het lter 9.
2. Roer het ontkalkingsmiddel volgens de gegevens van de fabrikant.
3. Giet een kleine hoeveelheid in de tankkamer 7 en laat het daar
enkele minuten inwerken.
4. Giet het ontkalkingsmiddel uit en spoel enkele keren na met helder
water. LET OP! Daarbij mag er geen water in de ventilatoruitlaat
geraken! Let erop dat er zich geen ontkalkingsmiddel meer in het
6
apparaat bevindt.
4.4
Afvalbeheer
Dit apparaat mag niet samen met het huishoudelijk afval worden aangeboden. Iedere consument is verplicht, alle elektrische of elektronische apparaten, ongeacht of die schadelijke stoffen bevatten of niet, bij een milieudepot
in zijn stad of bij de handelaar af te geven, zodat ze op een milieuvriendelijke manier kunnen worden verwijderd. Wendt u zich betreffende het
afvalbeheer tot uw gemeente of handelaar.
Verwijder de batterij (afstandsbediening), alvorens het toestel af te voeren.
Gooi verbruikte batterijen niet bij het huisvuil maar bij het bijzonder afval of
in een batterij-inzamelstation in de vakhandel.
75
Page 82

NL
4 Diversen
4.5
Technische
specicaties
Benaming en model
Netvoeding
Vermogen
Tankinhoud
Luchtbevochtigingscapaciteit
Looptijd
Afmetingen
Gewicht
Lengte van de aansluitkabel
Opbergcondities
Artikel-nummer
EAN-nummer
Accessoires
In het kader van onze voortdurende inspanningen naar
verbeteringen, behouden wij ons het recht voor om qua
vormgeving en op technisch gebied veranderingen aan ons
product door te voeren.
De actuele versie van deze gebruiksaanwijzing vindt u op
:
MEDISANA Luchtbevochtiger AH 670
:
220-240V~ 50/60Hz
:
35 W
:
ca. 1.800 ml
:
maximaal ca. 200 ml/uur
:
maximaal ca. 9 uur
:
ca. 18 x 18 x 30,3 cm
:
ca. 1,3 kg
:
ca. 150 cm
:
schoon en droog, bij +10°C tot +40°C
:
60054
:
40 15588 60054 8
:
Reservelter, Artikel-nummer 60057
EAN 40 15588 60057 9
www.medisana.com
76
Page 83

5 Garantie
NL
Garantie en
reparatievoorwaarden
Wendt u zich voor garantiegevallen altijd tot uw leverancier of tot onze
klantendienst. Moet u het apparaat opsturen, stuur het dan samen met de
klacht en een kopie van de aankoopbon naar onze klantendienst.
Voor garantie gelden de volgende voorwaarden:
1. Voor de producten van MEDISANA geldt een garantietermijn van drie
jaar vanaf de datum van aankoop. Deze kan door middel van de verkoopbon
of factuur worden aangetoond.
2. Alle klachten, die het gevolg zijn van materiaal- en/of fabricagefouten
worden binnen de garantietermijn kosteloos verholpen.
3. Een geval van garantie leidt niet tot automatische verlenging van de
garantietermijn, noch voor het apparaat zelf noch voor de vervangbare
onderdelen.
4. Uitgesloten van garantie zijn:
a. Alle schade die ontstaan is door ondeskundige behandeling, b.v. het
niet op de juiste wijze volgen van de gebruiksaanwijzing
b. Beschadigingen, die zijn ontstaan door reparaties door de koper of
een ander onbevoegd persoon.
c. Transportschade, die is ontstaan op weg van de verkoper naar de
verbruiker of tijdens het opsturen naar de klantendienst.
d. Toebehoren, die onderhevig zijn aan slijtage.
5. De fabrikant neemt geen verantwoording voor directe of indirecte vervolgschade
die door het apparaat veroorzaakt wordt. Ook niet als de
schade aan het apparaat als garantiegeval erkend is.
MEDISANA AG
Jagenbergstraße 19
41468 NEUSS
DUITSLAND
Het serviceadres vindt u op het afzonderlijk bijgevoegde blad.
77
Page 84

1 Turvallisuusohjeita
FI
TÄRKEITÄ TIETOJA!
SÄILYTÄ NÄMÄ OHJEET!
Lue seuraavat käyttöohjeet huolellisesti kokonaan, erityisesti
turvallisuusohjeet, ennen kuin käytät laitetta ja säilytä ohjeet
mahdollista myöhempää käyttöä varten. Jos annat laitteen
eteenpäin, anna myös aina tämä käyttäohje mukana.
Kuvan selitys:
Tämä käyttöohje kuuluu tähän laitteeseen.
Siinä on tärkeitä tietoja käyttöönottoa ja käsittelyä
koskien. Lue tämä käyttöohje kokonaan. Näiden ohjeiden noudattamatta jättäminen voi aiheuttaa
loukkaantumisen tai laitteen vaurioitumisen.
VAROITUS
Noudata näitä varoitusohjeita niin voit estää käyttäjän
mahdollisen loukkaantumisen.
78
HUOMIO
Noudata näitä ohjeita niin voit estää laitteen
mahdollisen vaurioitumisen.
OHJE
Näistä ohjeista saat hyödyllistä tietoa asennusta ja
käyttöä koskien.
Kotelointiluokka II
LOT-numero
Laatija
Page 85

1 Turvallisuusohjeita
Virransyöttö
• Ota huomioon, että tyyppikilvessä mainittu sähköjännite vastaa
verkkovirtaasi, ennen kuin liität laitteen virransyöttöön.
• Työnnä verkkopistoke pistorasiaan vain, kun laite on kytkettynä
pois päältä.
• Älä kanna, vedä tai käännä laitetta koskaan verkkojohdosta
äläkä aseta johtoa puristuksiin.
• Aseta verkkojohto siten, että se ei aiheuta kompastumisvaaraa.
• Älä kosketa verkkopistoketta, jos seisot vedessä ja kosketa sitä
aina ainoastaan kuvin käsin.
• Jos tämän laitteen virtajohto vaurioituu, se täytyy korvata erityisellä liitäntäjohdolla, jonka saa valmistajalta tai sen asiakaspalvelulta.
Erityishenkilöt
• Tätä laitetta voivat käyttää 8-vuotiaat tai sitä vanhemmat lapset sekä henkilöt, joilla on rajoittuneet fyysiset, aistimukselliset
tai henkiset kyvyt, jotka kärsivät aliravitsemuksesta tai joiden
kokemus ja tietämys on puutteellinen, mikäli heitä valvotaan
tai on neuvottu laitteen turvalliseen käyttöön, ja he ymmärtävät
käyttöön liittyvät vaarat.
• Laitteella leikkiminen ei ole sallittua.
• Jos kärsit allergisesta hengitystiesairaudesta, käänny kotilääkärisi puoleen ennen laitteen käyttämistä..
• Käänny lääkärisi puoleen, jos käytöstä aiheutuu terveydellisiä vaivoja. Lopeta tällaisessa tapauksessa laitteen käyttö välittömästi.
FI
Sähkölaitteita käytettäessä on erityisesti huomioitava:
Käytä laitetta vain suljetuissa tiloissa!
• Älä käytä laitetta, jos laite tai sen syöttöjohto ei ole moitteettomassa kunnossa, jos laite ei toimi moitteettomasti tai jos se on
pudonnut tai joutunut veteen.
• Pidä laite ja sen verkkojohto kaukana kuumista pinnoista.
79
Page 86

1 Turvallisuusohjeita
FI
• Vaurioituneen verkkojohdon saa vaihtaa ainoastaan MEDISANA,
valtuutettu alan liike tai muutoin vastaavasti pätevöitynyt henkilö.
Silloin pitää vaarojen välttämiseksi lähettää laite korjattavaksi
huoltopisteeseen.
Laitteen käyttö
• Laitetta ei ole tarkoitettu kaupalliseen käyttöön.
• Käytä laitetta ainoastaan sen tarkoituksen mukaan käyttöohjetta noudattaen. Takuuvaatimukset raukeavat, jos laitetta käytetään väärin.
• Pidä eläimet etäällä laitteesta.
• Sijoita laite käyttöä varten lujalle, kosteutta kestävälle ja tasaiselle alustalle niin, ettei se pääse kaatumaan.
• Sijoita laite vähintään 2 metrin päähän televisio- ja radiolaitteista interferenssihäiriöiden välttämiseksi.
• Älä tartu laitteeseen, joka on pudonnut veteen. Irrota heti verkkopistoke.
• Älä käytä laitetta, jos vesisäiliössä ei ole vettä tai vettä on liian
vähän. Säiliössä oleva vesi ei saa olla jäätynyttä tai kuumaa.
• Älä koskaan tuki sumuaukkoa tai ilma-aukkoa.
• Älä tuki laitteen alla olevaa ilma-aukkoa.
• Varmista aina, että vesisäiliön kuljetuksen, täytön ja tyhjennyksen aikana laite on sammutettu ja pistoke irrotettu pistorasiasta.
• Älä aseta metalliesineitä tuotteen sisään.
• Kytke kaikki toiminnot käytön jälkeen pois päältä ja vedä pistoke pois pistorasiasta.
80
Page 87

1 Turvallisuusohjeita / 2 Tietämisen arvoista
Huolto ja puhdistus
• Saat itse ainoastaan puhdistaa laitteen. Jos laitteeseen tulee
vikaa, älä korjaa sitä itse, muuten takuuvaatimukset eivät ole
enää voimassa. Käänny kauppiaasi puoleen ja anna ainoastaan MEDISANA -huoltoliikkeiden korjata laitetta.
• Lapset eivät saa puhdistaa tai huoltaa laitetta ilman valvontaa.
• Älä pura laitetta – siihen liittyy sähköiskun ja tulipalon vaara.
• Varottava laitteesta purkautuvaa kuumaa vesihöyryä.
• Älä upota laitetta koskaan veteen tai muihin nesteisiin.
• Jos laitteeseen kuitenkin joutuu nestettä, irrota verkkopistoke
välittömästi.
• Säilytä laite kuivassa ympäristössä.
• Jos vettä ei vaihdeta säännöllisesti ja vesisäiliötä puhdisteta
säännöllisesti ja perusteellisesti, mikro-organismit voivat lisääntyä vesisäiliössä, päästä ilmaan ja aiheuttaa vakavan terveysriskin.
FI
2 Tietämisen arvoista
2.1
Pakkauksen
sisältö
ja pakkaus
Tarkasta ensin, että laite on täydellinen eikä siinä ole mitään vaurioita.
Jos sinulla on kysymyksiä, älä ota laitetta käyttöön, vaan käänny kauppiaasi tai huoltoliikkeen puoleen.
Pakkauksesta pitää löytyä:
• 1 MEDISANA-ilmankostutin AH 670 ja kaukosäädin
• 1 Käyttöohje
Pakkauksia voidaan käyttää uudelleen tai ne voidaan kierrättää takaisin
raakaainekiertoon. Hävitä tarpeeton pakkausmateriaali asianmukaisella tavalla. Mikäli pakkausta avatessasi havaitset kuljetusvaurion, ota heti
yhteyttä tuotteen myyneeseen liikkeeseen.
VAROITUS
Huolehdi siitä, etteivät pakkausmuovit joudu lasten käsiin!
On olemassa tukehtumisvaara!
81
Page 88

2 Tietämisen arvoista / 3 Käyttö
FI
2.2
Intensiivinen
ilmankostutin
3 Käyttö
3.1
Vesisäiliön täyttäminen
Liian kuiva sisäilma lisää infektio- ja hengityselinsairauksien vaaraa ja
aiheuttaa väsymystä sekä keskittymisvaikeuksia. Terveellisen ilman
suhteellisen kosteuden tulisi olla 40 - 55 %. Ilmankostuttimen äänetön ja
energiaa säästävä tekno-logia muuttaa vettä värähtelyjen avulla mitä hienoimmaksi sumuksi, joka lisää ilman kosteutta. Tämä parantaa ilman laatua
ja estää sekä limakalvojen että ihon kuivumista.
HUOMIO
Liian intensiivinen käyttö voi johtaa huoneen liikakosteuteen, joka
taas voi vaikuttaa seiniin, ikkunoihin ja huoneen esineisiin. Tarkasta sen vuoksi kosteusmittarilla säännöllisesti, ettei suhteellinen
ilmankosteus ylitä 55 %.
HUOMIO
Varmista, että MEDISANAn -ilmankostutinta käytetään
kosteudenkestävällä alustalla siten, että laite ei pääse kaatumaan.
Erityisesti mineraalipitoista vettä käytettäessä saattaa muodostua
sakkaa / saostumia. Huolehdi siitä, että laitteesta tulevaa sumua
ei suunnattu muihin sähköisiin laitteisiin, huonekaluihin tai seiniin
päin.
Ennen kuin kytket laitteen päälle ensimmäistä
kertaa, anna sen olla puolen tunnin ajan
huonelämpötilassa.
1. Ota muovisuojus 2 ja vesisäiliö 3 jalustasta q.
2. Käännä vesisäiliö 3 ylösalaisin ja kierrä
säiliön kantta 4 vastapäivään.
3. Täytä vesisäiliö 3 raikkaalla juomavedellä tai
tislatulla vedellä.
Enimmäistäyttömäärä: n. 1,8 litraa.
4. Jos haluat käyttää vesiliukoista aromiesanssia,
laita 5 pisaraa esanssia täyteen täytettyyn
vesisäiliöön 3 tai tuoksulaatikon huopaan 8.
Kun lisäät aromiesanssia vesisäiliöön, käytön
aikana voi muodostua laskeuma laitteen ympärille.
Voit hankkia aromiesansseja kaupasta.
Noudata valmistajan ohjeita.
8
82
Page 89

3 Käyttö
FI
3.1
Vesisäiliön täyttäminen
3.2
Pariston
vaihto
(kaukosäädin)
5. Kierrä säiliön kansi 4 takaisin kierteeseen ja aseta vesisäiliö 3 takaisin
laitteeseen. Heti, kun säiliö on asetettu oikein, suodattimessa oleva
piikki työntää säiliön kannen venttiilin ylös.
6. Säiliön kammio täyttyy nyt vedellä. Aseta muovisuojus 2 vesisäiliön
päälle jalustalle. Kytke virtajohto pistorasiaan.
Eristysnauha on irrotettava kaukosäätimen
paristolokerosta ennen laitteen käyttöönottoa. Jos ilmankostutin ei enää reagoi kaukosäätimeen, paristo on vaihdettava. Paina
lukitusta nuolen suuntaan ja vedä paristopidike ulos. Vaihda käytetyn pariston tilalle
uusi (CR 2025 -litiumparisto). Tarkista oikea
napaisuus (”+” ylös). Työnnä paristopidike
taas sisään, kunnes se lukittuu kuuluvasti.
VAROITUS
PARISTO-TURVAOHJEITA
• Akkuja ja paristoja ei saa purkaa!
• Puhdista pariston ja laitteen kontaktipisteet tarvittaessa ennen paristojen asetusta!
• Poista tyhjät akut ja paristot välittömästi laitteesta!
• Kohonnut vuotovaara, vältä kontaktia ihon, silmien ja limakalvojen kanssa! Jos joudut akkuhapon kanssa kosketuksiin,
huuhtele vastaavat kohdat välittömästi runsaalla vedellä ja
hakeudu lääkärin hoitoon!
• Jos paristo tai akku nielaistaan, hakeudu välittömästi lääkärin
hoitoon!
• Aseta paristot oikein paikalleen, huomioi napaisuus!
• Pidä paristolokero aina suljettuna!
• Poista paristot ja akut laitteesta jos et käytä sitä pitkään aikaan!
• Pidä paristot poissa lasten ulottuvilta!
• Akkuja ja paristoja ei saa ladata! Räjähdysvaara!
• Liitä oikein! Räjähdysvaara!
• Älä heitä tuleen! Räjähdysvaara!
• Säilytä käyttämättömät paristot pakkauksessa. Älä säilytä
niitä metalliesineiden lähellä, ettei synny oikosulkua!
83
Page 90

FI
3 Käyttö
3.3
Käyttö
1. Paina lyhyesti painiketta o , jotta sumutin ja valo kytkeytyvät päälle.
Valo ja sumutin kytkeytyvät päälle suurella tehotasolla.
2. Muuta sumuttimen aukon ulko- tai sisäympyrää muuttaaksesi tai
säätääksesi vesisumun suuntaa ja korkeutta.
3. Painikkeella w laitteessa tai painikkeella t kaukosäätimessä
on seuraava tehtävä:
1 painallus: suuri tehotaso (merkkivalo HI palaa) = paljon vesisumua /
sumutin jatkuvasti toiminnassa.
2 painallusta: alhainen tehotaso (merkkivalo LO palaa) = vähän
vesisumua / sumutin jatkuvasti toiminnassa.
3 painallusta: sumuttimen kytkentä pois päältä.
4. Paina sumutuksen aikana painiketta
MIST Timer u kaukosäätimessä, jotta sumutin kytkeytyy automaattisesti pois päältä tietyn ajan (1, 2 tai 4 tuntia) jälkeen.
5. Paina tarvittaessa useita kertoja lyhyesti painiketta w laitteessa tai
painiketta LED Light z kaukosäätimessä kytkeäksesi LED-valon:
1 painallus: kirkas valo
2 x painallusta: keskitasoinen valo
3 x painallusta: vähän valoa
4 x painallusta: valon kytkentä pois päältä
6. Kun valo on päällä, paina painiketta LED LIGHT TIMER i kaukosäätimessä, jolloin valo kytkeytyy automaattisesti pois päältä tietyn ajan (1,
2 tai 4 tuntia) jälkeen.
7. Kun painat painiketta o , sumutin ja valo kytkeytyvät pois päältä.
w
laitteessa tai painiketta
84
3.4
Käytön
jälkeen
1. Irrota virtajohto pistorasiasta.
2. Irrota muovisuojus 2 ja vesisäiliö 3. Kaada jäljellä oleva vesi pois.
Huuhtele säiliö puhtaalla vedellä.
3. Kuivaa vesisäiliö ja tarvittaessa muovisuojus pehmeällä, imukykyisellä
liinalla.
4. Jos laitetta ei käytetä pitkään aikaan: Poista myös jäljellä oleva vesi
jalustasta 1 kallistamalla sitä pesualtaan päällä. HUOMAUTUS!
Vettä ei saa päätyä tuulettimen ulostuloon 6! Voit poistaa lopun
kosteuden pehmeällä, imukykyisellä liinalla.
Page 91

3 Käyttö / 4 Sekalaista
FI
3.5
Viat ja
niiden
poisto
• Laite piippaa koko ajan käynnistettäessä tai käytön aikana:
Täytä vesisäiliö.
• Epätavallinen haju:
Likainen tai seisonut vesi. Puhdista säiliö ja täytä uudelleen.
• Epätavallinen ääni:
Liian vähän vettä säiliössä. Lisää vettä. / Laite ei ole tasaisella
alustalla. Sijoita se tukevalle ja tasaiselle pinnalle.
Jos et pysty poistamaan vikoja kuvatulla tavalla, käänny huoltokeskuksesi
puoleen.
4 Sekalaista
4.1
Puhdistus ja
hoito
• Päivittäisen käytön yhteydessä suosittelemme, että puhdistat laitteen
• Varmista ennen laitteen puhdistamista, että laite on kytketty pois päältä
• Ota vesisäiliö pois laitteesta ja tyhjennä se.
• Puhdista laite ulkoa kostealla, pehmeällä liinalla.
• Älä käytä laitteen puhdistamiseen mitään voimakasvaikutteisia aineita
• Voit huuhdella vesisäiliön perusteellisesti kuumalla vedellä ( > 65 °C )
• Ultraäänianturi p on laitteen herkin rakenneosa. On tärkeää, että sitä
• Jos et käytä laitetta pitkään aikaan, kaada loppuvesi pois vesisäiliöstä
• Säilytä laitetta kuivassa, viileässä paikassa, mieluiten sen alku-
• Säilytä vesisäiliön alapinnalla oleva sulkukorkki löysästi kiinnitettynä,
ainakin joka kolmas päivä. Puhdista laite myös aina ennen pidempiä
säilytysaikoja ja niiden jälkeen.
ja että verkkopistoke on vedetty irti pistorasiasta.
kuten esim. hankausnestettä tai muita vastaavia aineita. Se saattaa
vahingoittaa laitteen pintaa ja heikentää sumunsynnytystehoa.
tai ainakin 75-prosenttisella alkoholilla. Puhdista sumuttimen kammio
alkoholiin kostutetulla liinalla ja vanupuikolla. Huolehdi siitä, että vettä
ei pääse laitteen sisään.
käsitellään puhtaasti ja huolellisesti. Käytä esimerkiksi puhdistuspensseliä ulostuloaukkojen puhdistamiseen kerrostumista ja likahiukkasista. Älä missään tapauksessa käytä ultraäänianturin puhdistamiseen
metallista valmistettuja apuvälineitä.
ja kuivaa laite.
peräisessä pakkauksessa.
jotta tiivistemansetti ei liimaudu tai tartu kiinni.
85
Page 92

4 Sekalaista
FI
4.2
Suodattimen
puhdistaminen
4.3
Kalkinpoisto
1. Huuhtele suodatin 9
juoksevan lämpimän veden
alla.
2. Kuivaa se jälleen
huolellisesti ja aseta
takaisin jalustaan.
MIST
HI LO
LIGHT
4H 2H 1H
Mahdolliset kalkkijäämät voi poistaa miedolla kalkinpoistoaineella (sitruunahappo):
1. Irrota suodatin 9.
2. Sekoita kalkinpoistoaine valmistajan ohjeiden mukaan.
3. Kaada pieni määrä säiliön kammioon 7 ja anna sen vaikuttaa muutama minuutti.
4. Kaada kalkinpoistoaine pois ja huuhtele muutaman kerran puhtaalla
vedellä. HUOMAUTUS! Vettä ei saa päätyä tuulettimen ulostuloon
! Varmista, ettei laitteessa ole enää kalkinpoistoainetta.
6
TIMER
2H 4H
H
1
86
4.4
Hävittämisohjeita
Tätä laitetta ei saa hävittää talousjätteiden mukana.
Jokainen kuluttaja on velvoitettu luovuttamaan kaikki sähköiset tai elektroniset laitteet, sisältävätpä ne haitallisia aineita tai eivät, kaupunkinsa tai
liikkeen keräyspisteeseen, jotta laitteet voitaisiin hävittää ympäristöystävällisesti. Ota yhteyttä paikalliseen viranomaiseen tai myyjäliikkeeseen hävityksen suorittamiseksi.
Poista paristo (kaukosäädin), ennen kuin hävität laitteen. Älä laita käytettyjä paristoja kotitalousjätteeseen, vaan erikoisjätteeseen, tai vie ne kaupassa olevaan paristonkeräyspisteeseen.
Page 93

4 Sekalaista
FI
4.5
Tekniset
tiedot
Nimi ja malli
Sähköverkko
Teho
Säiliön sisältö
Sumuttimen kapasiteetti
Käyttöaika
Mitat
Paino
Liitäntäkaapeli
Säilytysolosuhteet
Tuote-nro.
EAN-tuotenumero
Lisäosia
Jatkuvan tuotekehittelyn myötä pidätämme itsellämme
oikeuden teknisiin ja muotoilullisiin muutoksiin.
Tämän käyttöohjeen kulloinkin ajantasaisen laitoksen löydät osoitteesta
:
MEDISANA Ilmankostutin AH 670
:
220-240V~ 50/60Hz
:
35 W
:
n. 1.800 ml
:
korkeintaan n. 200 ml/h
:
korkeintaan n. 9 tuntia
:
n. 18 x 18 x 30,3 cm
:
n. 1,3 kg
:
n. 150 cm
:
puhtaassa ja kuivassa paikassa, +10 - +40 °C
:
60054
:
40 15588 60054 8
:
Vaihtosuodatin, Tuote-nro. 60057
EAN 40 15588 60057 9
www.medisana.com
87
Page 94

FI
5 Takuu
Takuu- ja
korjausehdot
Käänny takuutapauksessa alan liikkeen tai suoraan asiakaspalveluhuollon
puoleen. Jos laite tulee lähettää huoltoon, ilmoita vika ja lähetä laitteen
mukana kopio ostokuitista.
Tällöin ovat voimassa seuraavat takuuehdot:
1. MEDISANA-tuotteille myönnetään kolmen vuoden takuu myyntipäiväyksestä.
Myyntipäiväys tulee todistaa takuutapauksessa ostokuitilla tai laskulla.
2. Materiaali- tai valmistusvioista johtuvat puutteet korjataan takuuaikana
maksutta.
3. Takuukorjaus ei pidennä takuuaikaa, ei laitteelle eikä vaihdetulle rakenneosalle.
4. Takuun ulkopuolelle jäävät:
a. kaikki vahingot, jotka syntyvät asiattomasta käsittelystä, esim.
käyttöohjeen noudattamatta jättämisestä.
b. Vahingot, joiden syyksi voidaan jäjittää ostajan tai asiattoman
kolmannen osapuolen suorittama kunnossapito tai toimet.
c. Kuljetusvauriot, jotka ovat syntyneet matkalla valmistajalta kuluttajalle
tai asiakaspalveluun lähetettäessä.
d. Lisäosat, jotka ovat alttiina normaalille kulutukselle.
5. Vastuu laitteen aiheuttamista välittömistä tai välillisistä seurausvahingoista
on myös poissuljettu, jos laitteelle aiheutunut vahinko hyväksytään
takuutapaukseksi.
88
MEDISANA AG
Jagenbergstraße 19
41468 NEUSS
SAKSA
Huolto-osoite löytyy erillisestä liitelehtisestä.
Page 95

1 Säkerhetshänvisningar
SE
OBSERVERA!
SPARA!
Läs igenom bruksanvisningen, särskilt säkerhetsanvisningarna,
noga innan du använder apparaten och spara bruksanvisningen
för framtida bruk. Om apparaten lämnas vidare till en annan person måste bruksanvisningen följa med.
Teckenförklaring:
Bruksanvisningen hör till apparaten.
Den innehåller viktig information om igångsättning
och användning. Läs igenom hela bruksanvisningen.
Om anvisningarna i bruksanvisningen inte följs kan
det leda till svåra personskador eller skador på
apparaten.
VARNING
Varningstexterna måste beaktas, annars kan det
nnas risk för personskador.
OBSERVERA
De här anvisningarna måste beaktas, annars kan
det nnas risk för skador på apparaten.
ANVISNING
De här texterna innehåller praktisk information
om installation eller användning.
Skyddsklass II
LOT-nummer
Tillverkare
89
Page 96

SE
1 Säkerhetshänvisningar
Strömförsörjning
• Kontrollera att elspänningen som anges på typskylten stämmer
överens med elspänningen på plats innan apparaten ansluts.
• Anslut endast nätkontakten till eluttaget när apparaten är avstängd.
• Bär, dra eller vrid inte apparaten genom att dra i kabeln, kläm
inte fast kabeln.
• Lägg kabeln så att man inte kan snubbla på den.
• Vidrör aldrig kontakten med våta eller fuktiga händer, eller om
du står med fötterna i vatten/på vått underlag.
• Om elkabeln till apparaten är skadad måste den bytas ut mot
en speciell anslutningsledning som erhålles hos tillverkaren eller dess kundtjänst.
Särskilda grupper
• Denna apparat kan användas av barn fr.o.m. 8 år samt av personer med förminskad fysisk, sensorisk eller mental förmåga
eller bristande erfarenhet och kunskap, om de är under uppsikt
eller har informerats om hur apparaten används säkert och om
de förstår vilka faror som kan uppstå om den används felaktigt.
• Barn får inte leka med apparaten.
• Om du lider av någon allergisk luftvägssjukdom: fråga din läkare innan du använder apparaten.
• Rådgör med din läkare om du upplever besvär i samband med
användningen. Använd inte apparaten i sådana fall.
Vänligen ta särskild hänsyn till nedanstående när elektrisk
utrustning används:
Apparaten får endast användas i slutna rum!
• Använd inte apparaten om apparaten eller strömkabeln uppvisar skador eller om apparaten inte fungerar riktigt längre efter
det att den ramlat ned på golvet eller i vattnet.
• Skydda apparaten och nätkabeln mot värme, ställ den inte när
heta ytor.
90
Page 97

1 Säkerhetshänvisningar
• Om nätkabeln är skadad får den endast bytas ut av MEDISANA,
auktoriserade återförsäljare eller motsvarande behörig person.
För att minimera risken för skador ska apparaten lämnas in för
reparation.
Om användningen
• Apparaten är inte avsedd för kommersiellt bruk.
• Använd endast apparaten för avsett ändamål och på det sätt
som beskrivs i bruksanvisningen. Garantin upphör att gälla om
den används för andra ändamål än de som anges här.
• Håll djur borta från apparaten.
• Ställ apparaten på ett fast och fukttålig jämn yta så att den inte
kan vippa innan du tar den i drift.
• Placera apparaten minst 2 m bort från TV- och radioapparater
för att undvika störningar.
• Ta inte upp apparaten om den faller ned i vattnet. Dra genast
ut nätkontakten.
• Använd inte apparaten om det inte nns någon vätska, eller för
lite vätska i vattentanken. Vattnet i tanken får inte vara fruset
eller hett.
• Blockera aldrig ångutsläppet resp. luftöppningen.
• Blockera inte luftintaget på undersidan av apparaten.
• Säkerställ alltid att enheten är avstängd och att nätkontakten
dragits ut vid transport, påfyllning eller tömning av vattentanken.
• Stick inte in några metallföremål i produkten.
• Stäng av alla funktioner efter användningen och dra ut kontakten ur eluttaget.
SE
91
Page 98

SE
1 Säkerhetshänvisningar / 2 Värt att veta
Underhåll och rengöring
• Du får endast rengöra apparaten själv. Försök inte reparera apparaten själv om det uppstår fel/ störningar - garantin upphör då
att gälla. Fråga återförsäljaren och låt endast ett MEDISANA serviceställe utföra reparationer.
• Rengöring och användarunderhåll får inte utföras av barn utan
uppsikt.
• Plocka inte isär apparaten - det nns risk för elektriska stötar
och brand.
• Se till att inte skrapa ultraljudsgivaren p i samband med rengöring.
• Doppa aldrig ned apparaten i vatten eller i annan vätska.
• Dra genast ut kontakten om det skulle komma in vätska i apparaten.
• Förvar apparaten i ett torrt utrymme.
• Om man inte byter ut vattnet med jämna mellanrum och rengör
tanken noggrant kan det bildas mikroorganismer i vattenbehållaren som sedan sprids i omgivningsluften och kan innebära en
allvarlig hälsorisk.
2 Värt att veta
2.1
Leveransomfång
och
förpackning
92
Kontrollera först om apparaten är komplett och att den inte uppvisar några
skador. I tveksamma fall ska apparaten inte tas i bruk utan skickas in till
återförsäljaren eller ett serviceställe.
Följande delar skall medfölja vid leverans:
• 1 MEDISANA Luftfuktare AH 670 inkl. fjärrkontroll
• 1 Bruksanvisning
Förpackningar kan återanvändas eller lämnas till återvinning. Se till att
förpackningsmaterial som inte längre behövs tas omhand på korrekt
sätt. Upptäcks skador när produkten packas upp så kontakta omgående
inköpsstället
VARNING
Se till att förpackningsmaterial i plast hanteras utom räckhåll
för barn! Kvävningsrisk!
Page 99

2 Värt att veta / 3 Användning
SE
2.2
Ultraljudsteknik
Alltför torr rumsluft leder till ökad risk för infektions- och luftvägssjukdomar
och förorsakar trötthet och koncentrationssvårigheter. Hälsosam luft har en
relativ luftfuktighet på 40 till 55 %. Med den tystgående och energisparande
ultraljudstekniken förvandlas vattnet till n dimma av vibrationerna; denna
dimma höjer luftfuktigheten. Luftkvaliteten förbättras vilket minskar risken
för torr hy och torra slemhinnor.
OBSERVERA
Om luftfuktaren används för intensivt kan det leda till att rums
luften blir mättad vilket i sin tur leder till att fukten avsätts på föremål, väg gar och fönster i rummet. Använd därför en hygrometer
(fuktmätare) för att regelbundet kontrollera att den relativa luftfuktigheten inte blir högre än 55%.
3 Användning
OBSERVERA
Se till att MEDISANA luftfuktaren alltid står stabilt på en säker,
fukttålig yta. Särskilt vid användning av mineralhaltigt vatten kan
det förekomma avsättning / avlagringar. Se till att den fuktiga dimman som kommer ut ur apparaten inte riktas mot andra elektriska
apparater, möbler eller väggar.
3.1
Fylla på
vattentanken
Innan du slår på enheten för första gången ska
du låta den stå i rumstemperatur under en
halvtimme.
1. Ta bort plastskyddet 2 och vattentanken 3
från basen q.
2. Vänd vattentanken 3 upp och och vrid
tankens lock 4 moturs.
3. Fyll på vattentanken 3 med färskt dricksvatten
eller destillerat vatten.
Maximal påfyllningsmängd: ca. 1,8 liter.
4. Om du vill använda en vattenlöslig doftessens
häller du i 5 droppar av essensen i den fulla
vattentanken 3 eller på väven i doftfacket 8.
Om du häller doftessensen i vattnet kan det avge
rester runt om apparaten. Doftessenser nns att beställa i olika butiker.
Följ tillverkarens anvisningar.
8
93
Page 100

SE
3 Användning
3.1
Fylla på
vattentanken
3.2
Batteribyte
(fjärrkontroll)
5. Skruva på tanklocket 4 på gängorna igen och sätt tillbaka vattentanken
3 på apparaten igen. När tanken sitter som den ska trycker piggen
i ltret upp ventilen i tanklocket.
6. Tankkammaren fylls med vatten nu. Sätt på plastinsatsen 2 på basen
via vattentanken. Stick in kontakten i kontaktuttaget.
Innan du tar apparaten i drift måste du dra
bort isoleringsremsan från batterifacket till
fjärrkontrollen.
Om luftfuktaren inte reagerar på fjärrkontrollen måste batteriet bytas ut. Tryck spärren i
pilens riktning och dra ut batterihållaren. Byt
ut det gamla batteriet mot ett nytt (CR 2025
lithiumbatteri), tänk på att polerna sitter som
de ska (“+” uppåt). Skjut i batterihållaren
igen tills du hör att den hakar fast.
VARNING
SÄKERHETSANVISNINGAR FÖR BATTERI
• Montera inte isär batterierna!
• Rengör vid behov batteriernas och apparatens kontakter innan batterierna sätts in!
• Ta genast ut tomma batterier ur apparaten!
• Risk för läckage - undvik kontakt med hud, ögon och slemhin-
nor! Om du får batterisyra på något av ovanstående ställen:
skölj genast rikligt med rent vatten och kontakta läkare!
• Kontakta läkare omedelbart om någon råkar svälja ett batteri!
• Byt alltid ut samtliga batterier samtidigt!
• Sätt in batterierna rätt; beakta polariteten!
• Se till att batterifacket är ordenligt stängt!
• Ta ut batterierna ur apparaten om den inte ska användas under en längre tid!
• Förvara batterierna utom räckhåll för barn!
• Ladda inte batterierna! Explosionsrisk!
• Se till att batterierna inte kortsluts! Explosionsrisk!
• Släng inte batterierna i öppen eld! Explosionsrisk!
• Förvara oanvända batterier i förpackningen och inte i närheten av metallföremål - risk för kortslutning!
94
 Loading...