

Page 1
Kurzanleitung
Guide de démarrage rapide
Guida rapida
Korte handleiding
Quick Start Guide
Ultra HD Smart-TV
MEDION® LIFE
X14020 (MD 31420) / X14321 (MD 31421) / X15022 (MD 31422) / X15523 (MD 31423) / X16524 (MD 31424) /
X15080 (MD 31380) / X15581 (MD 31381) / X16582 (MD 31382)
®
Page 2

Inhalt
1. Lieferumfang ........................................................................................................................ 3
2. Geräteübersicht .................................................................................................................... 4
2.1. Vorderseite .................................................................................................................................................4
2.2. Rückseite und rechte Seite ...................................................................................................................5
2.3. Fernbedienung .........................................................................................................................................6
3. Inbetriebnahme .................................................................................................................... 8
3.1. Auspacken ..................................................................................................................................................8
3.2. Montage ......................................................................................................................................................8
3.3. Batterien in die Fernbedienung einlegen .......................................................................................9
3.4. Antenne anschließen..............................................................................................................................9
3.5. Stromversorgung anschließen .........................................................................................................10
3.6. Smart-TV ein- und ausschalten ........................................................................................................ 10
3.7. Sendersuche nach dem ersten Einschalten ................................................................................10
4. Problembehebung .............................................................................................................14
4.1. Benötigen Sie weitere Unterstützung? ......................................................................................... 16
5. Serviceinformationen ........................................................................................................16
6. Impressum & Download Bedienungsanleitung ............................................................... 18
7. Produktdatenblatt .............................................................................................................. 19
1
DE
Page 3

2
Page 4

1. Lieferumfang
Bitte überprüfen Sie die Vollständigkeit der Lieferung und benachrichtigen Sie uns innerhalb von
14 Tagen nach dem Kauf, falls die Lieferung nicht komplett ist.
Mit dem von Ihnen erworbenen Produkt haben Sie erhalten:
• Ultra HD Smart-TV
• Fernbedienung (RC1818) inkl. 2 Batterien Typ LR03 (AAA) 1,5V
• Standfuß inkl. Befestigungsschrauben
• Dokumentation
GEFAHR!
Erstickungsgefahr!
Verpackungsfolien können verschluckt oder unsachgemäß benutzt werden, daher
besteht Erstickungsgefahr!
Halten Sie das Verpackungsmaterial, wie z.B. Folien oder Plastikbeutel von Kin-
dern fern.
3
DE
Page 5
2. Geräteübersicht
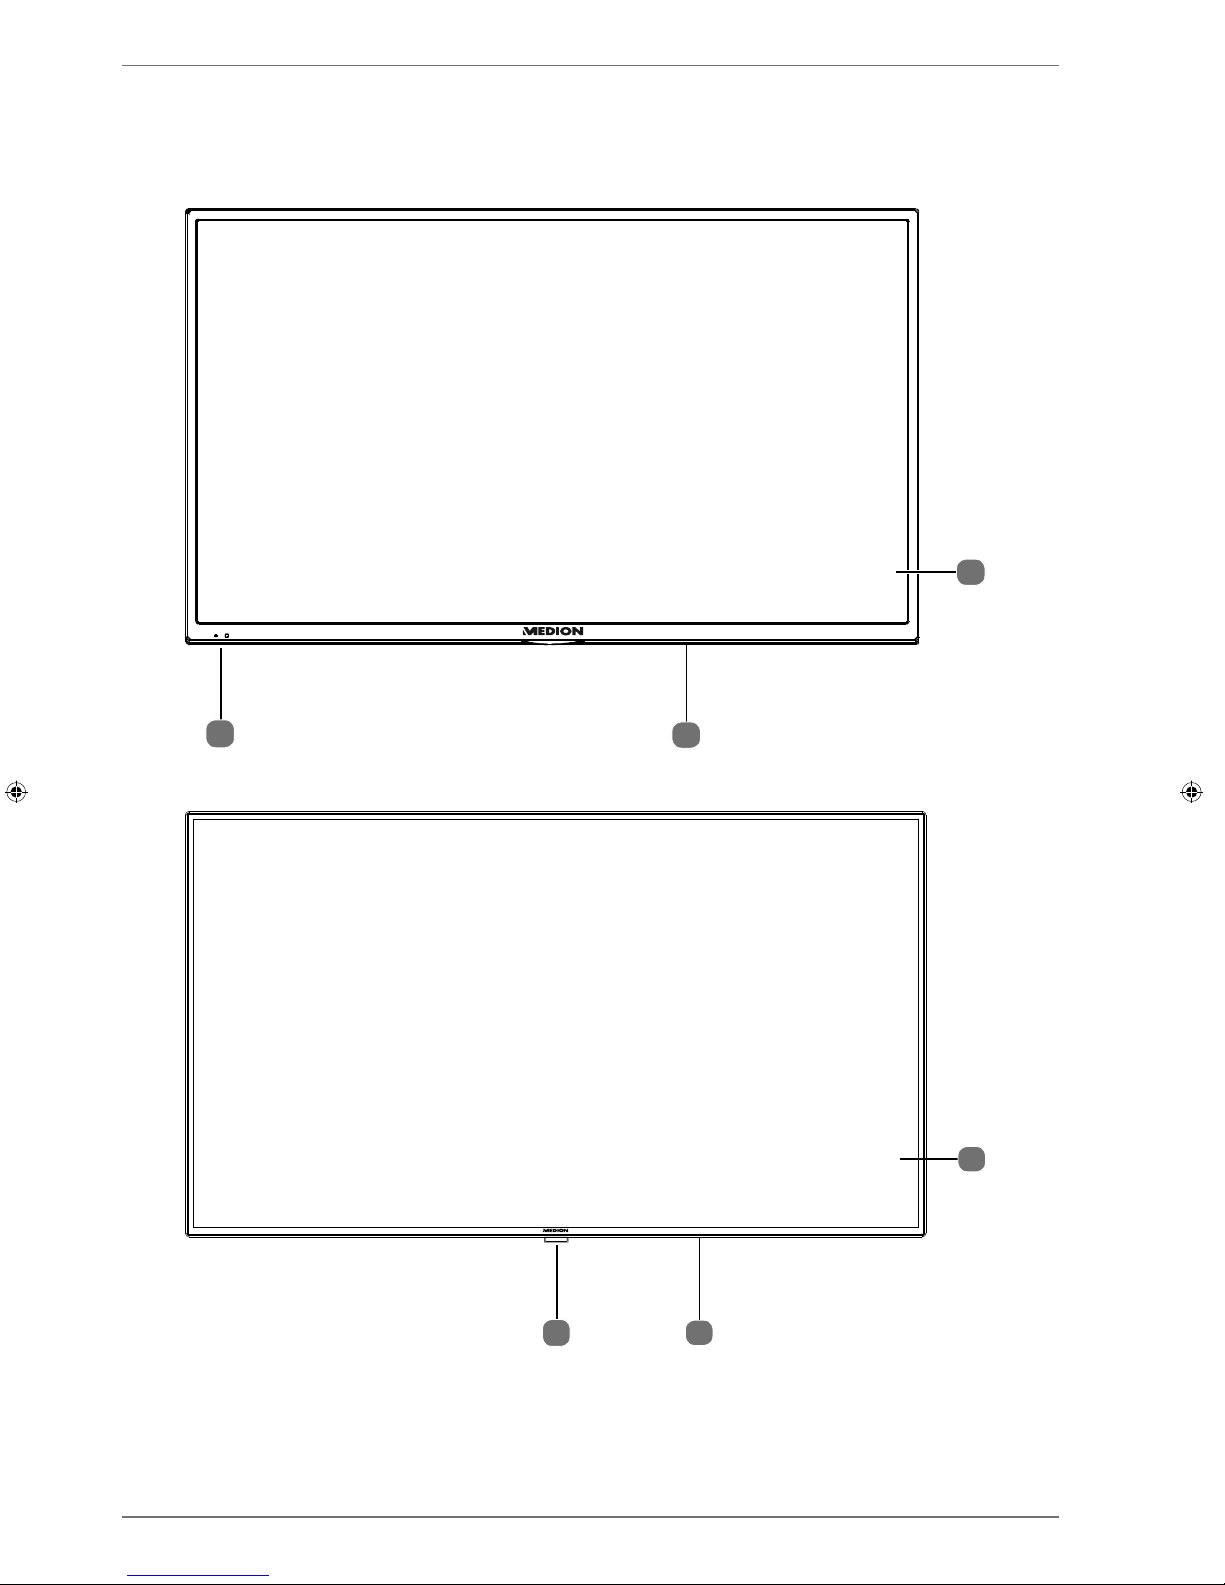
2.1. Vorderseite
MD31380 / MD31381 / MD31420 / MD31421 / MD31422 / MD31423:
3
2
1
OFF/ON
MD31382 / MD31424:
3
2
1
OFF/ON
1) Bildschirm
2) Netzschalter
3) Infrarot-Sensor: Empfangsfeld für die Infrarot-Signale der Fernbedienung.
Betriebsanzeige: leuchtet auf, wenn sich das Gerät im Standby-Modus befindet.
4
Page 6

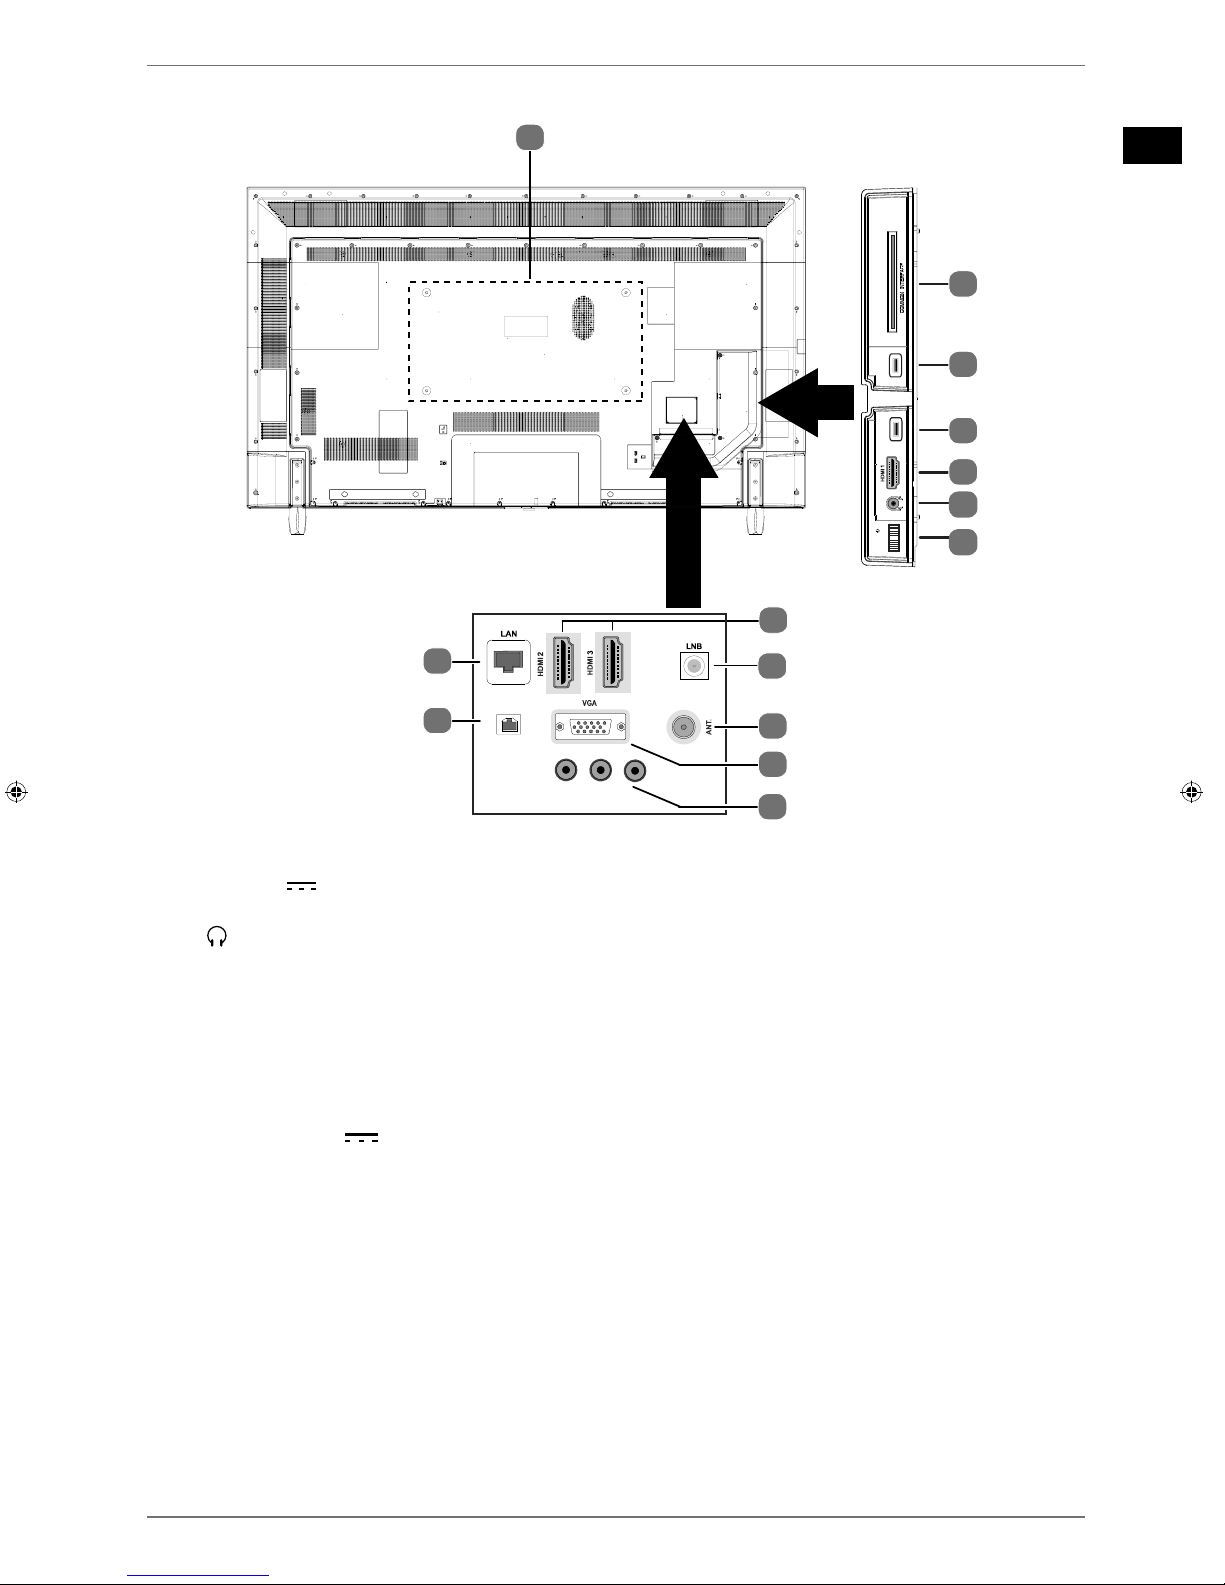
2.2. Rückseite und rechte Seite
13
(ARC)
MODE - / I
- O +
USB
5Vdc
Max. 500mA
USB
5Vdc
Max. 500mA
1
6
8
9
11
12
2
2
3
4
5
SPDIF
Optic. out
10
L
R
Video
BACK AV IN
13 Vdc/18 Vdc
300mA Max.
7
1) COMMON INTERFACE (CI+): Einschubfach zur Nutzung von Pay-TV-Karten
2) USB (5V
, 500 mA max.): USB-Anschluss für Medienwiedergabe/Aufnahme (PVR)
3) HDMI 1: HDMI-Anschluss für Geräte mit HDMI-Ausgang
4)
: Zum Anschluss eines Kopfhörers mit 3,5-mm-Klinkenstecker
5) MODE: Multifunktionschalter für Kanalumschaltung, Eingangsquellenanwahl oder Lautstär-
keeinstellung. Durch Kippen nach oben (+) bzw. unten (-) werden die Einstellungen vorgenommen. Durch kurzes Drücken des Schalters wird innerhalb der Funktionen gewechselt.
Langes Drücken schaltet das Gerät in den Standby-Modus bzw. in den Betriebsmodus.
6) HDMI 2-3: HDMI-Anschluss für Geräte mit HDMI-Ausgang (HDMI 2 kann für CEC/ARC genutzt
werden)
7) LNB (13 V/18 V
, 300 mA max.): Zum Anschluss der Antenne (Satellit)
8) ANT.: Zum Anschluss der Antenne (analog, DVB-T oder DVB-C)
9) VGA: VGA Anschluss zum Anschluss eines PCs/eines YUV-Adapters (optional)
10) BACK AV IN: Audio/Video-Eingang (Cinch)
11) SPDIF Optic. OUT: Digitaler Audio-Ausgang (optisch)
12) LAN: Netzwerkanschluss zur Verbindung mit dem Internet
13) Befestigungslöcher für eine Wandhalterung
1
MD 31380, MD 31420, MD 31421, MD 31422: Vesa Standard, Lochabstand 200 x 200 mm
MD 31381, MD 31423: Vesa Standard, Lochabstand 400 x 200 mm
MD 31382, MD 31424: Vesa Standard, Lochabstand 400 x 400 mm
1
Wandhalterung nicht im Lieferumfang enthalten. Achten Sie bei der Montage darauf, dass Schrauben der Größe M6 verwendet werden. Die
maximale Länge der Schrauben ergibt sich aus der Dicke der Wandhalterung zuzüglich 10 mm
5
DE
Page 7

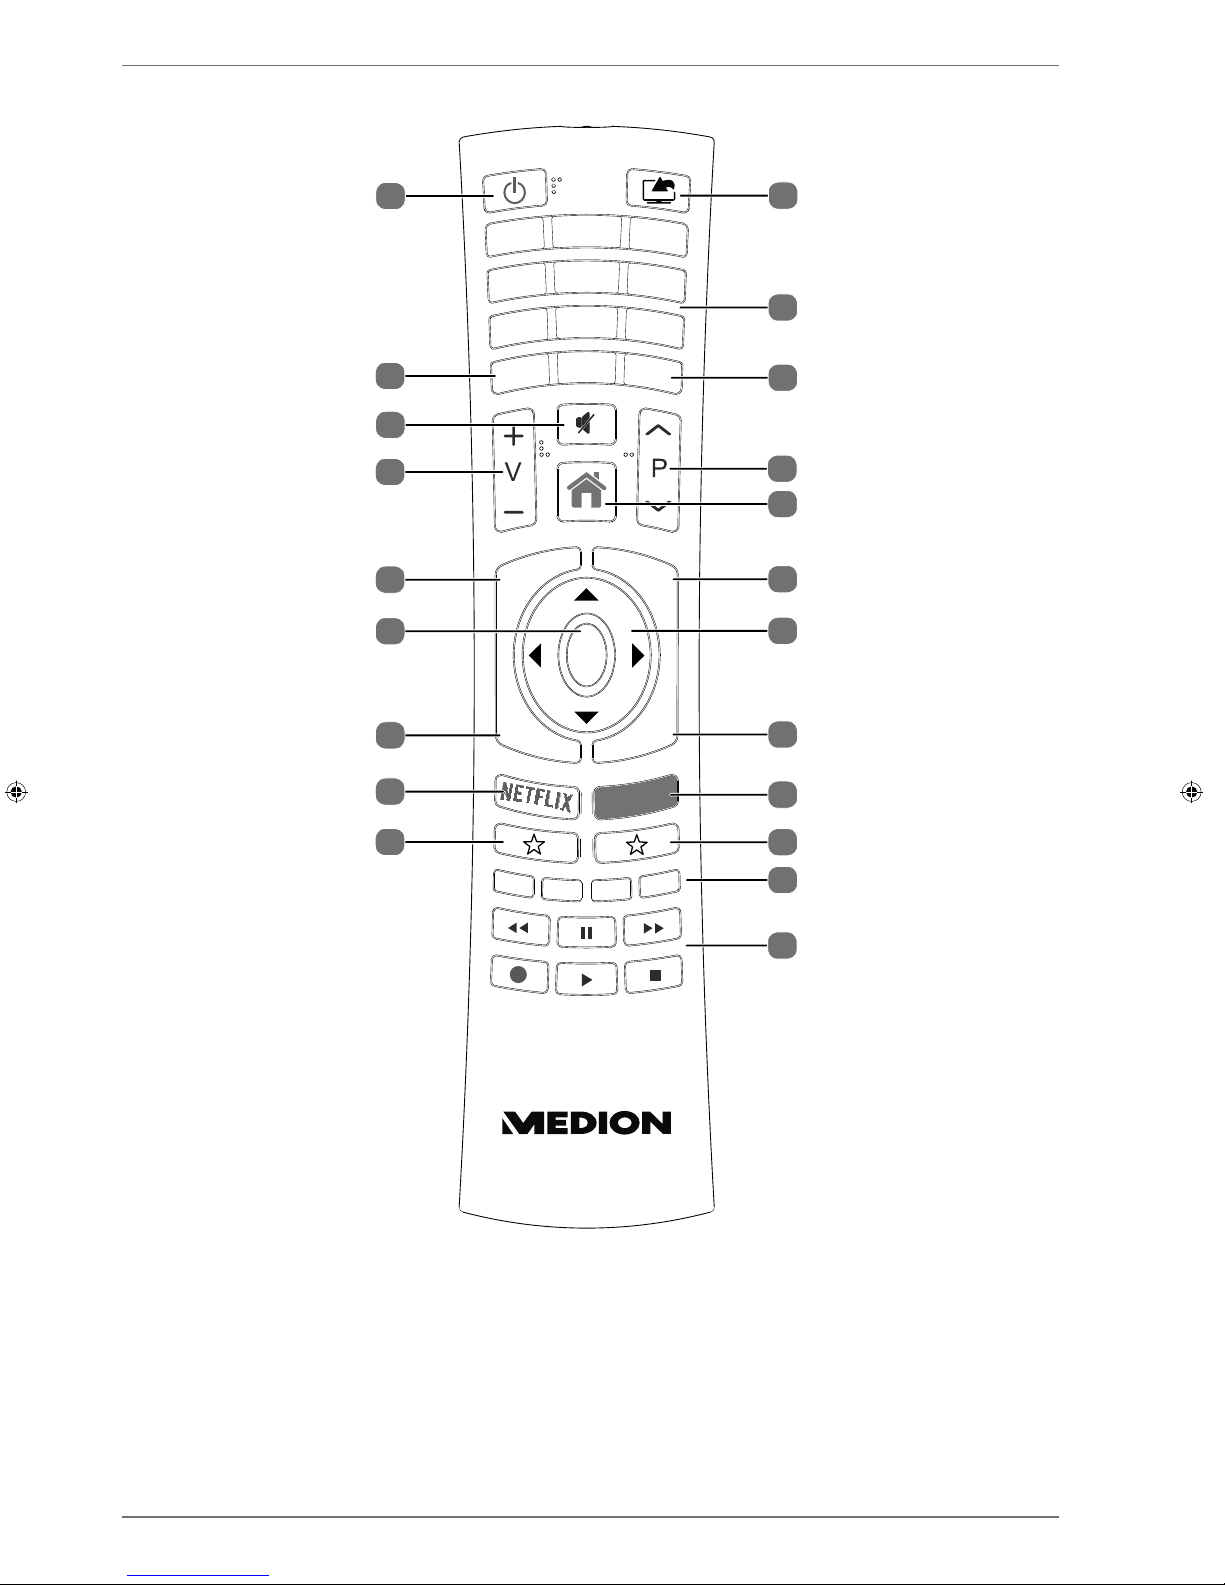
2.3. Fernbedienung
MEDION
1
2
1
21
2
3
4
6
8
9
10
11
12
13
14
15
17
18
20
7
16
5
19
6
Page 8
1) (SOURCE): Eingangssignal angeschlossener Geräte anwählen
2) Zifferntasten:
TV: Programmwahl, Videotext: Seitenwahl
3)
TXT : Videotext einschalten
2 x drücken = transparent stellen
3 x drücken = schließen
4)
P / : Programmwahltasten
TV: nächste (+) / vorherige (-) Programm auswählen; Videotext: nächste (+) / vorherige (-) Seite auswählen
5)
(MENU): Menü öffnen und schließen
6)
INFO: Digital-TV: Anzeigen von Informationen (z. B. aktuelle Programmnummer)
7) Richtungstaste : Im Menü nach oben
Digital-TV: Infoleiste des aktuellen Programms auswählen, Videotext: die nächste Seite auswählen;
Richtungstaste : Im Menü nach unten,
Digital-TV: Infoleiste des aktuellen Programms auswählen, Videotext: die vorherige Seite auswählen;
Richtungstaste : Im Menü nach links
Videotext: Unterseite aufrufen;
Richtungstaste : Im Menü nach rechts
Videotext: Unterseite aufrufen
8)
EXIT: Menü verlassen
9)
MEDION: Öffnen des MEDION®-Portals
10)
2
: Multifunktionstaste für Programmplatz, Eingangsquelle, Umschalten zwischen DVB-S,
DVB-T, DVB-C Sendungen
11) Rote Taste: Für Teletext oder Menüs, HbbTV
Grüne Taste: Für Teletext oder Menüs
Gelbe Taste: Für Teletext oder Menüs
Blaue Taste: Für Teletext oder Menüs
12) Medientasten
: Schneller Rücklauf;
: Schneller Vorlauf;
: Aufnahme starten (PVR);
: Wiedergabe stoppen;
: Wiedergabe starten;
: Wiedergabe unterbrechen
13)
1
: YouTube /Multifunktionstaste für Programmplatz oder Eingangsquelle
14)
NETFLIX: Netflix-Portal aufrufen
15)
BACK: In Menüs einen Schritt zurück
16)
OK: In bestimmten Menüs Auswahl bestätigen
17)
EPG: Digital-TV: elektronisches TV-Programm aufrufen
18)
V-/+ : Lautstärke erhöhen (+) oder verringern (-).
19)
: Stummschalten
20)
LANG.: Analog-TV: Stereo/Mono ;
Digital-TV: Audiosprache auswählen (sofern verfügbar)
21)
: Smart-TV ein-/ausschalten (Standby-Modus ein-/ausschalten)
.
7
DE
Page 9
2.3.1. Programmierung der Multifunktionstasten 1 und
2
Die Tasten 1 und 2 können auf einen beliebigen Programmplatz oder eine bestimmte Eingangsquelle programmiert werden.
Wählen Sie zuerst die gewünschte Funktion aus und halten danach die entsprechende Taste für
5 Sekunden gedrückt, bis
MEIN SCHALTER WURDE GESETZT auf dem Bildschirm angezeigt
wird. Dies bestätigt die neue Programmierung.
Nach jeder
ERSTINSTALLATION wird die persönliche Tastenprogrammierung gelöscht
und in den Auslieferungszustand zurückgesetzt.
3. Inbetriebnahme
Lesen Sie vor der Inbetriebnahme bitte unbedingt die „Sicherheitshinweise“.
3.1. Auspacken
• Wählen Sie vor dem Auspacken einen geeigneten Platz zum Aufstellen.
• Öffnen Sie den Karton sehr vorsichtig, um eine mögliche Beschädigung des Gerätes zu verhindern. Dies kann passieren, wenn zum Öffnen ein Messer mit einer langen Klinge verwendet wird.
• In der Verpackung befinden sich verschiedene Kleinteile (Batterien, u. a.). Halten Sie diese von
Kindern fern, es besteht Verschluckgefahr.
• Bewahren Sie das Verpackungsmaterial bitte gut auf und benutzen Sie ausschließlich dieses, um
den Fernseher zu transportieren.
GEFAHR!
Erstickungsgefahr!
Verpackungsfolien können verschluckt oder unsachgemäß benutzt werden, daher
besteht Erstickungsgefahr!
Halten Sie das Verpackungsmaterial, wie z.B. Folien oder Plastikbeutel von Kin-
dern fern.
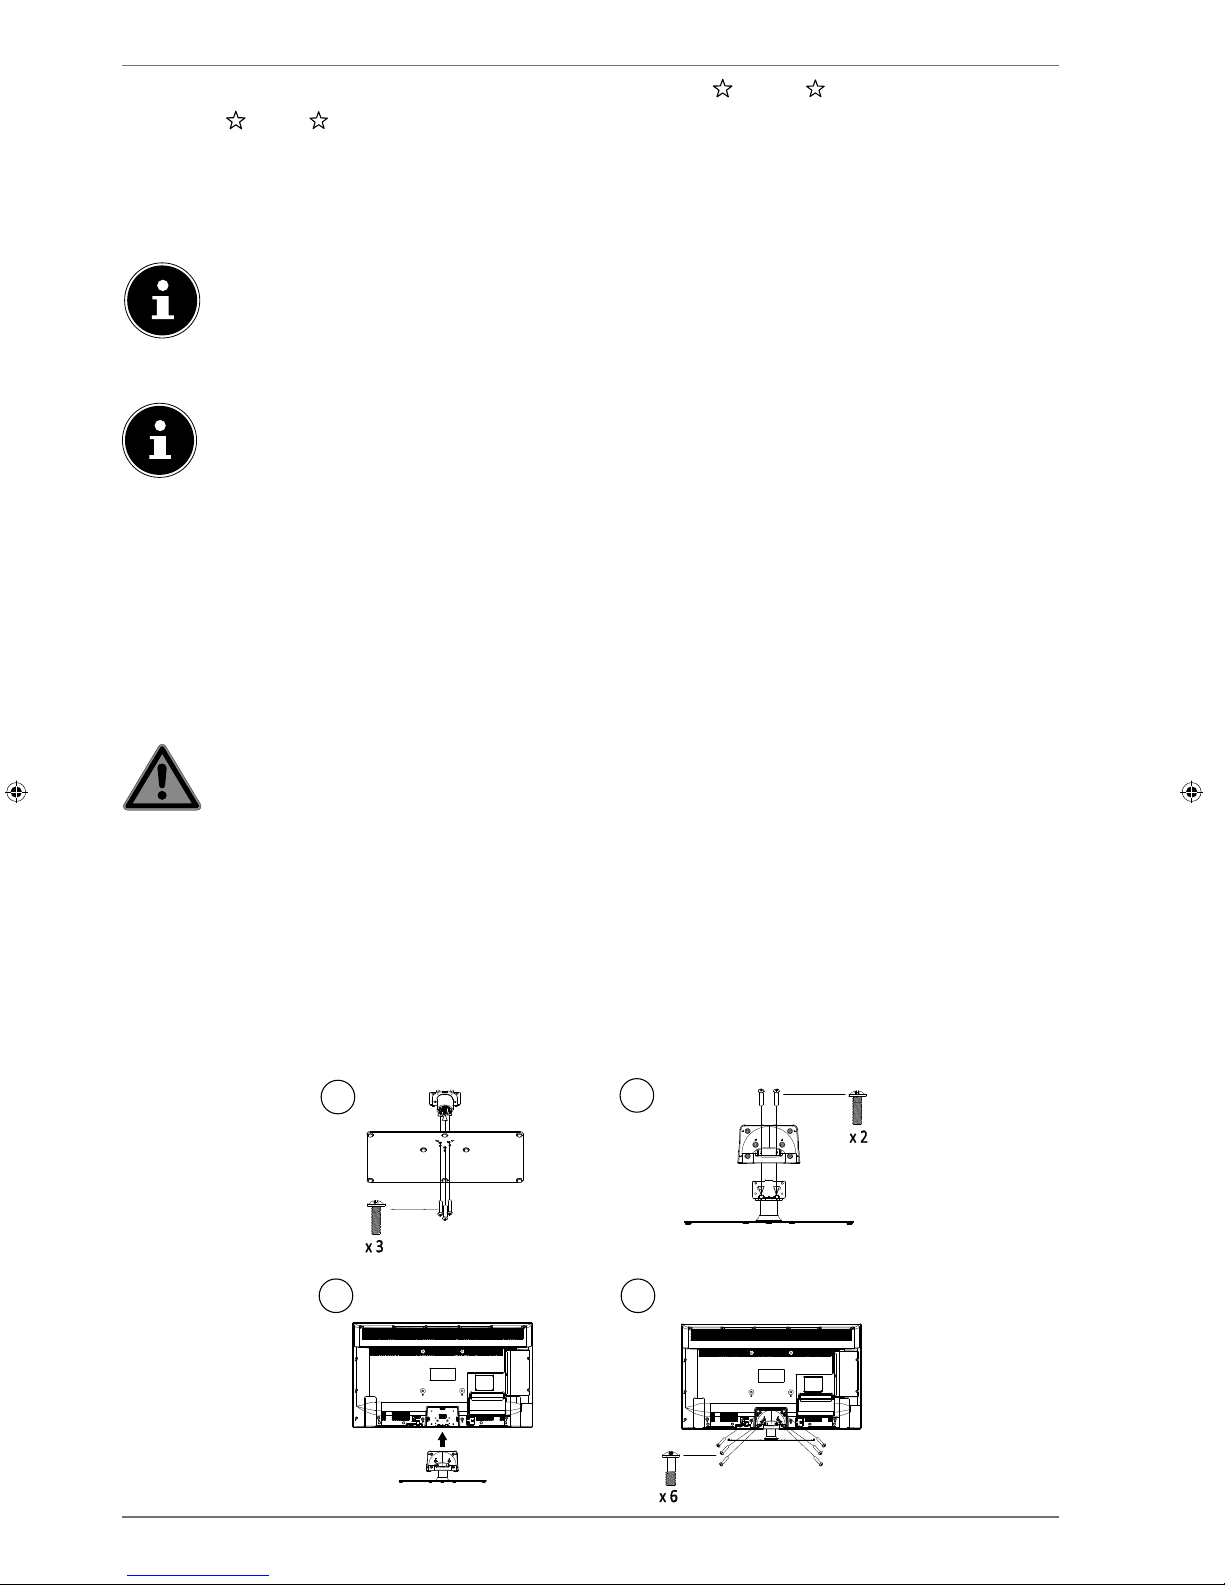
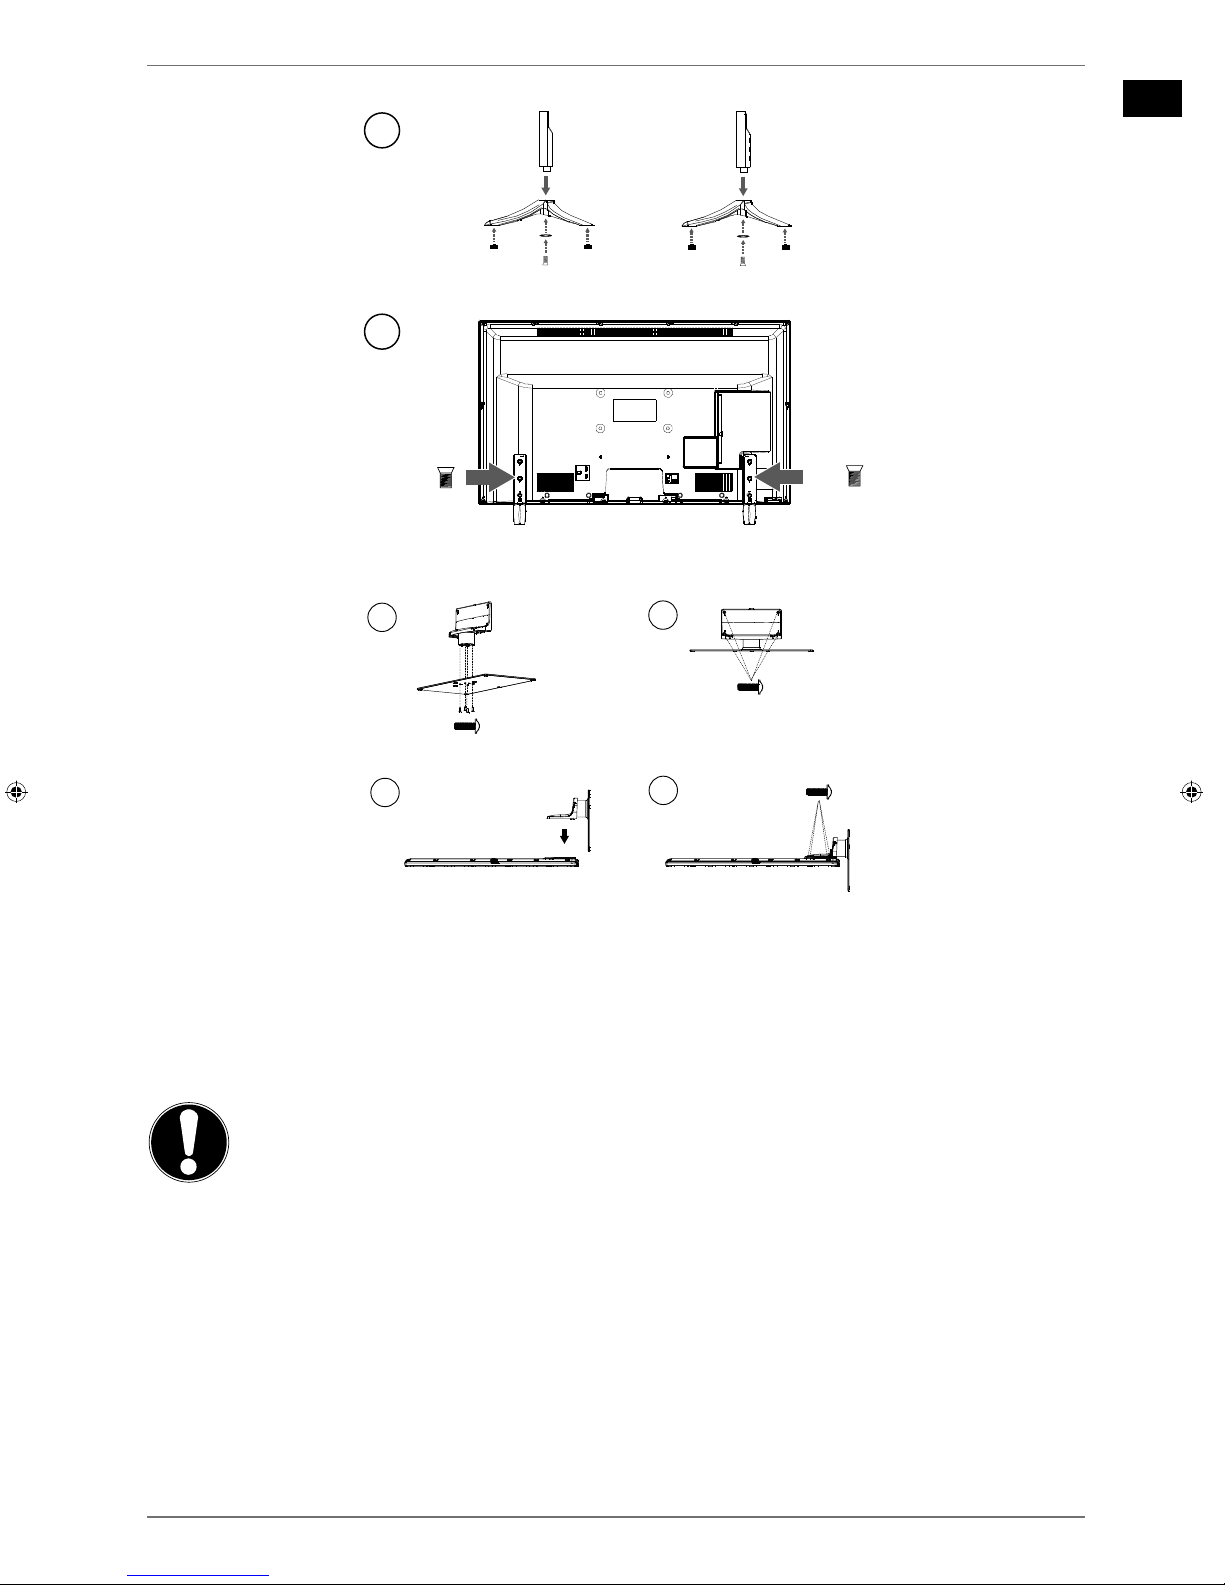
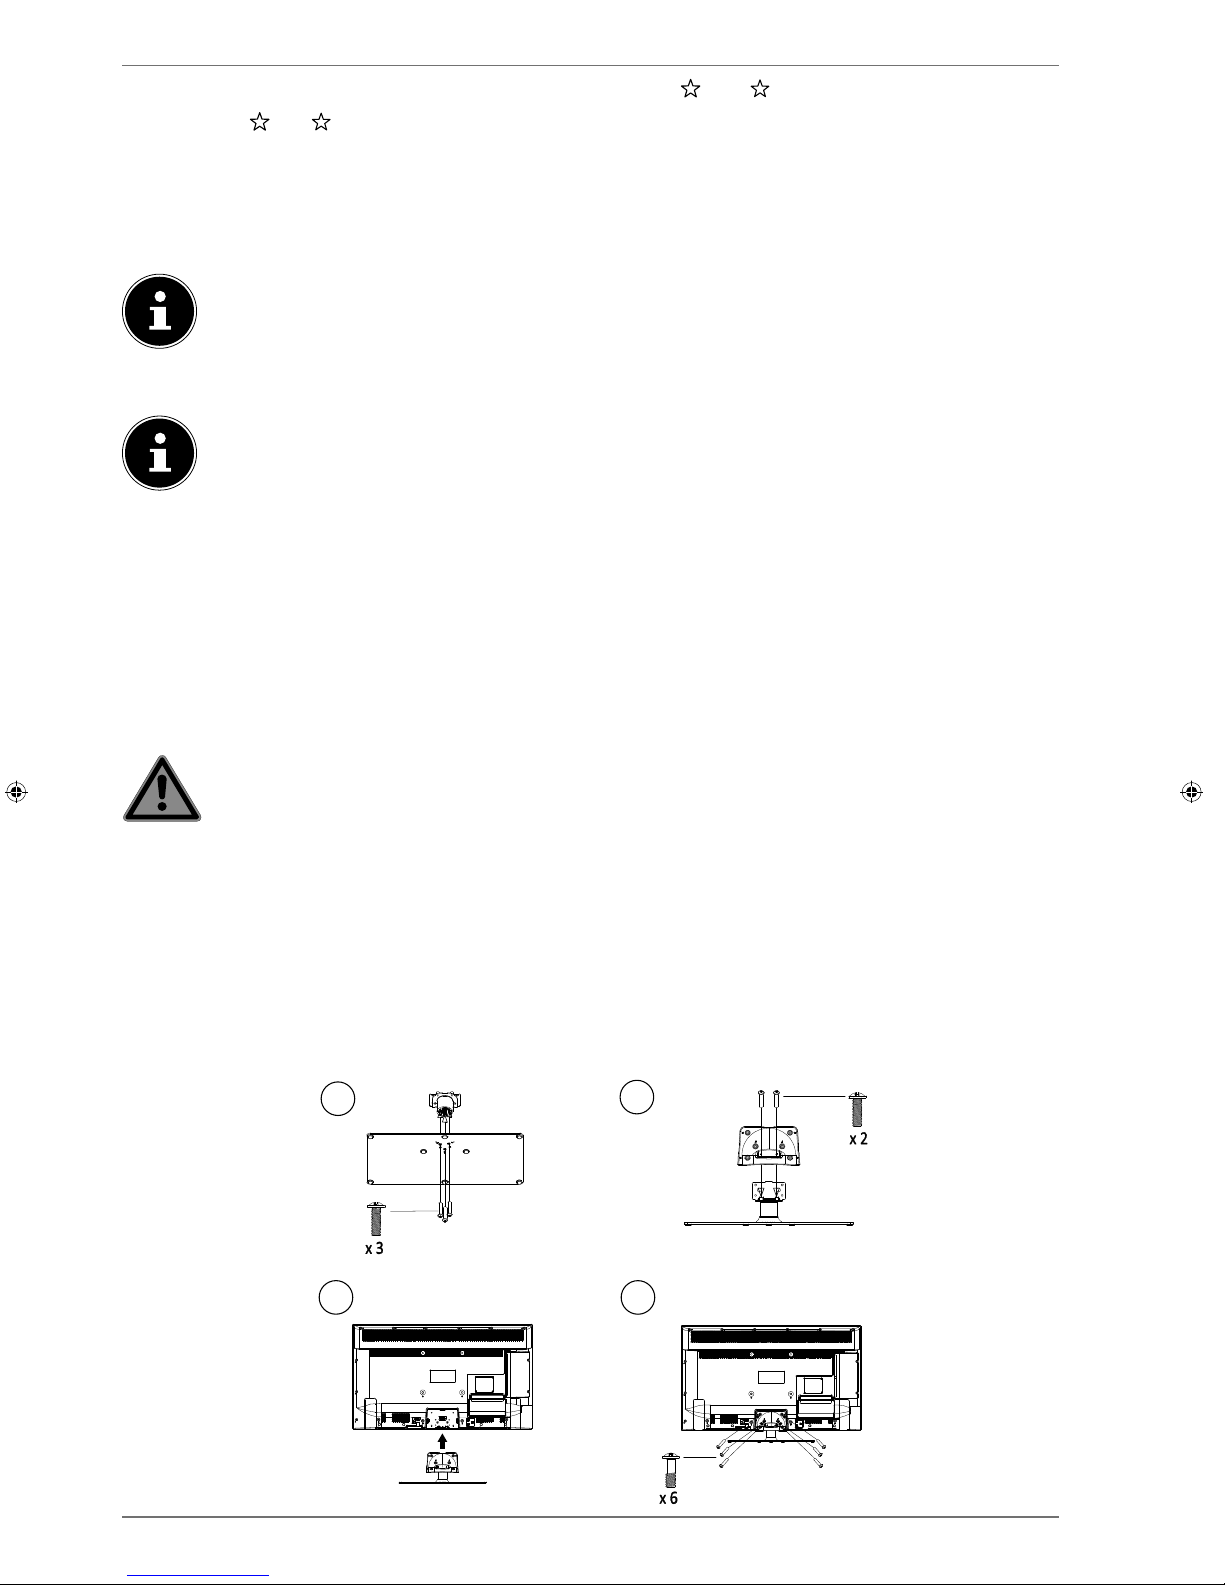
3.2. Montage
Befestigen Sie den Fuß wie in der Zeichnung abgebildet. Führen Sie diesen Schritt vor dem Anschluss des Smart-TVs durch.
MD31421 / MD31422 / MD31423:
1
2
3
4
8
Page 10
MD31380 / MD31381 / MD31382 / MD31420:
(optional)
1
2
3x
3x
MD31424:
4 x M4 x 16
1
2
3
4
4 x M4 x 16
4 x M6 x 20
3.3. Batterien in die Fernbedienung einlegen
Entfernen Sie die Batteriefachabdeckung auf der Rückseite der Fernbedienung.
Legen Sie zwei Batterien vom Typ LR03 / AAA/ 1,5V in das Batteriefach der Fernbedienung ein.
Beachten Sie dabei die Polung der Batterien (im Batteriefachboden markiert).
Schließen Sie das Batteriefach.
HINWEIS!
Beschädigungsgefahr!
Die Fernbedienung könnte durch auslaufende Batterien beschädigt werden, wenn
Sie sie längere Zeit nicht benutzen!
Nehmen Sie die Batterien aus der Fernbedienung heraus, wenn das Gerät länge-
re Zeit nicht benutzt wird.
3.4. Antenne anschließen
Ihr Smart-TV unterstützt unterschiedliche Antennensignale.
An den Anschluss mit der Bezeichnung ANT. können Sie folgende Bildsignale einspeisen:
• über Analog Kabel / eine Analoge Hausantenne,
• über eine DVB-T2/ DVB-T
2
Antenne oder
• über einen DVB-C
2
Anschluss (digitaler Kabelanschluss)
2
Dieser Service muss in Ihrer Region verfügbar sein.
9
DE
Page 11
Stecken Sie ein Antennenkabel entweder von der Hausantenne / vom analogen Kabelanschluss,
von der DVB-T Antenne oder vom DVB-C Anschluss in den Antennenanschluss am Smart-TV.
An den Anschluss mit der Bezeichnung LNB haben Sie zusätzlich noch die Möglichkeit eine digitale
Satellitenanlage anzuschließen.
Schrauben Sie den F-Stecker eines Koaxialantennenkabels an den Anschluss am Smart-TV fest.
Um verschlüsselte/kostenpflichtige Programme empfangen zu können, ist der Einsatz eines CI-Moduls (Conditional Access Module) und einer entsprechenden Karte erforderlich. Setzen Sie dazu ein CI-Modul (im Fachhandel erhältlich) in den dafür
vorgesehenen Schacht an der linken Geräteseite ein (COMMON INTERFACE). In
das CI-Modul stecken Sie anschließend die Karte Ihres Anbieters.
3.5. Stromversorgung anschließen
Verbinden Sie den Netzstecker am Gerät mit einer gut erreichbaren Netzsteckdose 220 - 240 V ~
50 Hz.
3.6. Smart-TV ein- und ausschalten
Stellen Sie den Netzschalter auf der unteren Seite des Geräts auf ON. Das Gerät geht in den
Standby-Modus und die Anzeige an der Vorderseite leuchtet auf.
Um das Gerät einzuschalten, drücken Sie
− an der Fernbedienung: die Standby/Ein-Taste, eine Zifferntaste oder eine der
P / Tasten;
− am Gerät: der Multifunktionsschalter
.
Mit der Standby/Ein-Taste der Fernbedienung schalten Sie das Gerät wieder in den Standby-Mo-
dus. Das Gerät wird zwar ausgeschaltet, aber es wird weiterhin Strom verbraucht.
Mit dem Netzschalter schalten Sie das Gerät aus (Position OFF). Solange das Gerät mit dem
Stromnetz verbunden ist, verbraucht es jedoch weiterhin Strom.
Bei fehlendem Eingangssignal schaltet das Gerät automatisch in den Standby-Modus. Auf
dem Bildschirm wird bis dahin ein Countdown-Timer eingeblendet. Diese Funktion steht
nicht bei allen Quellen zur Verfügung.
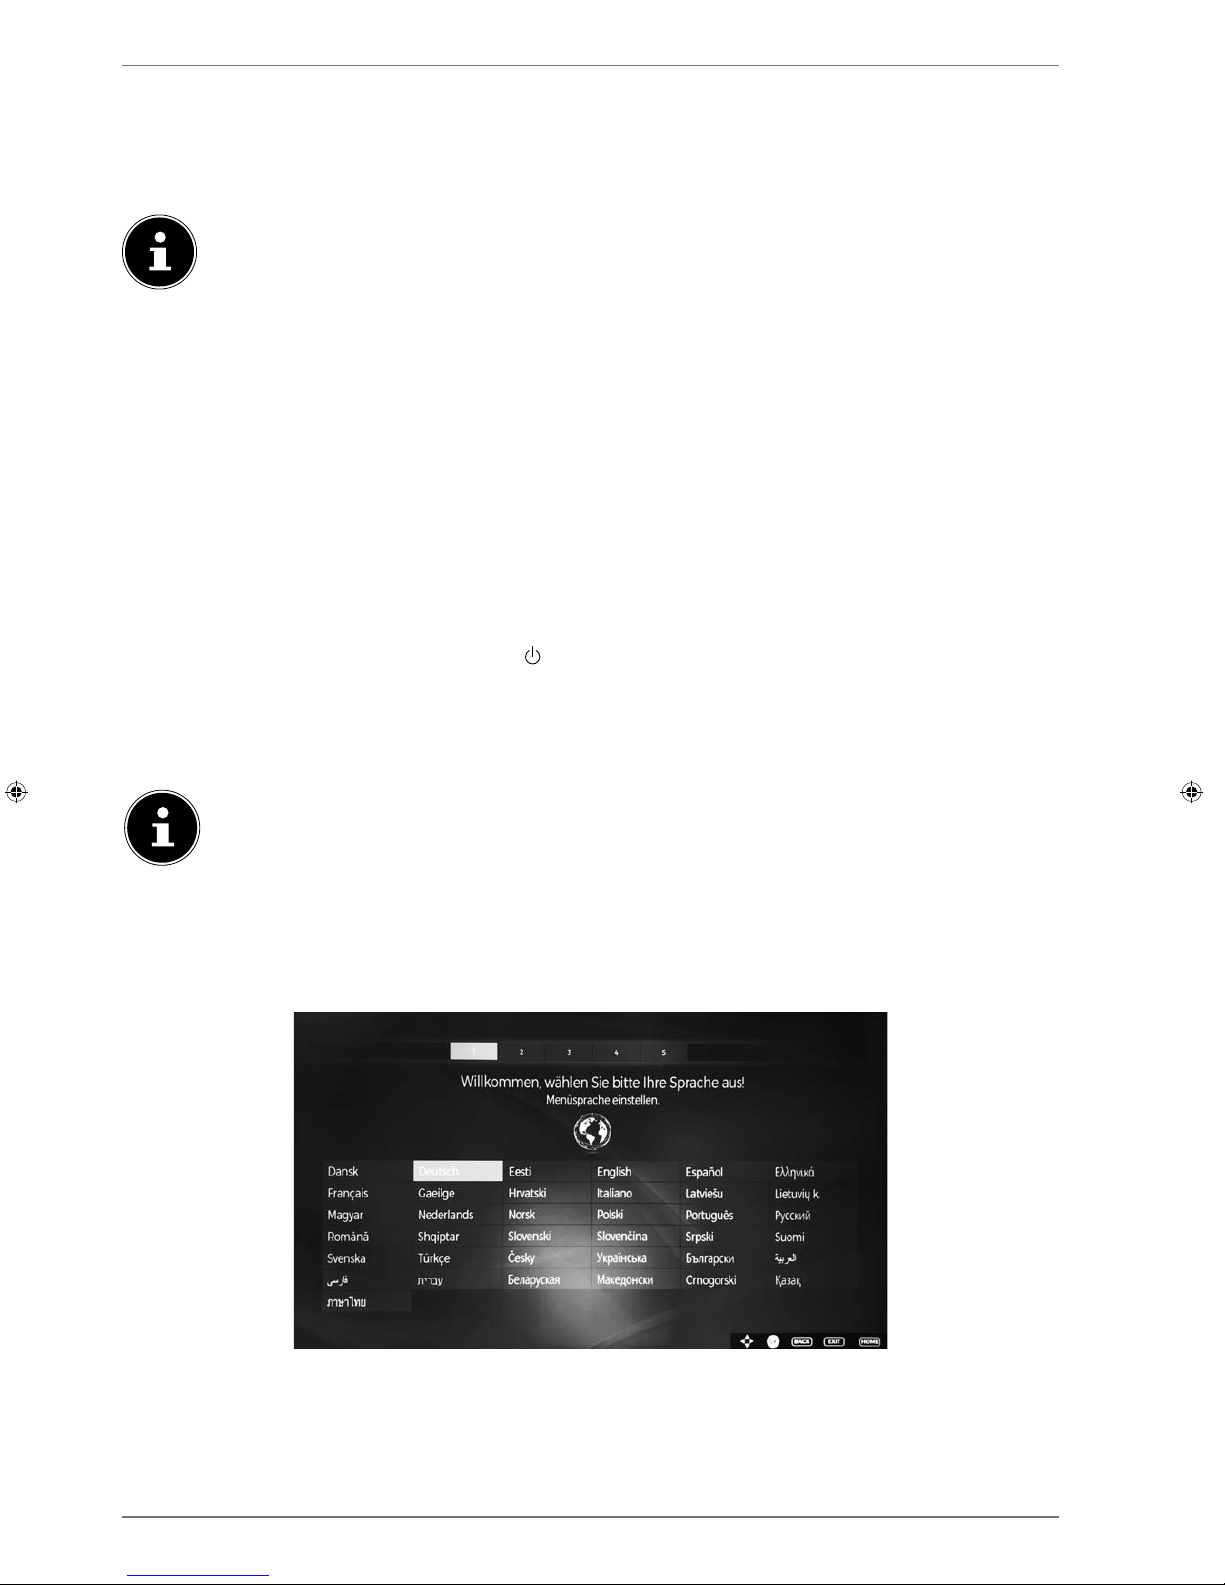
3.7. Sendersuche nach dem e rsten Einschalten
Wenn Sie Ihr Gerät zum ersten Mal einschalten, werden Sie durch die Erstinstallation geführt. Sie
können die Erstinstallation jederzeit über das Menü EINSTELLUNGEN > INSTALLATION > ERSTE
INSTALLATION aufrufen und erneut durchführen.
Mit den Tasten wählen Sie die Sprache.
Nachdem Sie die Auswahl der Sprache mit
OK bestätigt haben, startet die Erstinstallation.
10
Page 12

Wählen Sie dann mit das gewünschte Land. Die Ländereinstellung hat Einfluss auf die
Reihenfolge, in der die Programme gespeichert werden. Außerdem sind für die einzelnen Länder
die übrigen Optionen voreingestellt.
Drücken Sie anschließend auf
OK, um fortzufahren.
Daraufhin werden Sie aufgefordert, den MEDION® Smart-TV Datenschutzbestimmungen zuzu-
stimmen. Dies ist notwendig, wenn Sie beabsichtigen, die Netzwerk/Internet/HbbTV-Dienste in
Anspruch zu nehmen. Lesen Sie die Datenschutzeinstellungen sorgfältig durch. Wählen Sie mit
die einzelnen Punkte aus und bestätigen Sie sie ggf. mit
OK. Wenn Sie bzgl. der Da-
tenschutzerklärung und der Durchführung noch Fragen, Beschwerden oder Anmerkungen haben sollten, nehmen Sie unter smarttvsecurity@vosshub.com per E-Mail Kontakt auf.
Anschließend bestätigen Sie mit
JA. Wenn Sie NEIN wählen, können Sie diese Dienste nicht ver-
wenden, ohne nachträglich den Bestimmungen zuzustimmen.
Wählen Sie zum Schluss mit die Schaltfläche
WEITER und drücken Sie OK, um zum nächs-
ten Punkt zu gelangen.
3.7.1. Netzwerk/Internet-Einstellungen
11
DE
Page 13
Netzwerk-Einstellungen
NETZWERKTYP
Wählen Sie mit den Netzwerk-Typ WLAN oder NETZWERKKABEL.
Nach der Auswahl von WEITER mit den Richtungstasten und Bestätigen
mit der Taste OK erscheint eine Übersicht aller verfügbarer Netzwerke. Treffen Sie eine Auswahl und bestätigen Sie mit der Taste OK. Sollte für ein Netzwerk ein Passwort erforderlich sein, erscheint daraufhin eine virtuelle Tastatur,
wo Sie dieses mit Hilfe den Richtungstasten und der Taste OK ein-
geben können. Nach Eingabe des Passworts wählen Sie auf der Tastatur OK
und bestätigen Sie mit der Taste OK.
DRÜCKEN SIE
WPS AUF IHREM WLAN
ROUTER
(nur bei WLAN)
Diese Option ermöglicht eine WPS Schnellverbindung über ein kabelloses
Netzwerk (WLAN). Halten Sie die WPS-Taste an Ihrem Router gedrückt und bestätigen mit der Taste
OK. Daraufhin wird die WPS-Verbindung hergestellt.
INTERNET
GESCHWINDIGKEIT TESTEN
Drücken Sie die Taste OK, um die Geschwindigkeit der Internetverbindung zu
prüfen.
ERWEITERTE
EINSTELLUNGEN
Drücken Sie die Taste OK, um weitere Optionen zur Netzwerk-Konfiguration
aufzurufen
IP
KONFIGURATION
Wählen Sie hier die Einstellung AUTOMATISCHE
IP-ADRESSE oder MANUELLE IP-ADRESSE. Haben
Sie MANUELLE IP-ADRESSE angewählt, erscheinen
drei weitere Zeilen, in denen Sie die Daten für IP-AD-
RESSE, SUBNETZ MASKE und STANDARD GATEWAY manuell mit Hilfe der Richtungstasten und
der Zifferntasten eingeben können.
IP
KONFIGURATION
Wählen Sie hier zwischen DYNAMISCHE DNS oder
MANUELLE DNS. Haben Sie MANUELLE DNS ange-
wählt, erscheinen zwei weitere Zeilen, in denen Sie die
Daten für DNS-SERVER 1 und DNS-SERVER 2 ma-
nuell mit Hilfe der Richtungstasten und der Zif-
ferntasten eingeben können.
Eine bestehende Netzwerkverbindung kann durch Betätigen
der roten Taste wieder getrennt werden.
WAKE ON
Aktivieren/Deaktivieren der Wake-On-LAN/Wake-On-Wireless LAN-Funktion
(WoL/WoWLAN). Diese ermöglicht das Einschalten des Smart-TVs über ein anderes Gerät (z.B. über ein Smartphone mit der MEDION® Life Remote App).
Beide Geräte müssen hierfür über LAN oder WLAN mit dem gleichen Netzwerk verbunden sein. Wählen Sie die Einstellung
EIN, um die Funktion zu ak-
tivieren. Das Gerät zur Fernsteuerung muss einmalig mit dem eingeschalteten
TV-Gerät verbunden werden. Die Steuerung funktioniert daraufhin nur, wenn
sich das TV-Gerät im Standby-Modus befindet. Wird dieses mit dem Netzschalter aus- und wieder eingeschaltet, wird die Verbindung der beiden Geräte automatisch wiederhergestellt.
Beenden Sie die Netzwerkeinstellungen, indem Sie auf
OK drücken.
12
Page 14
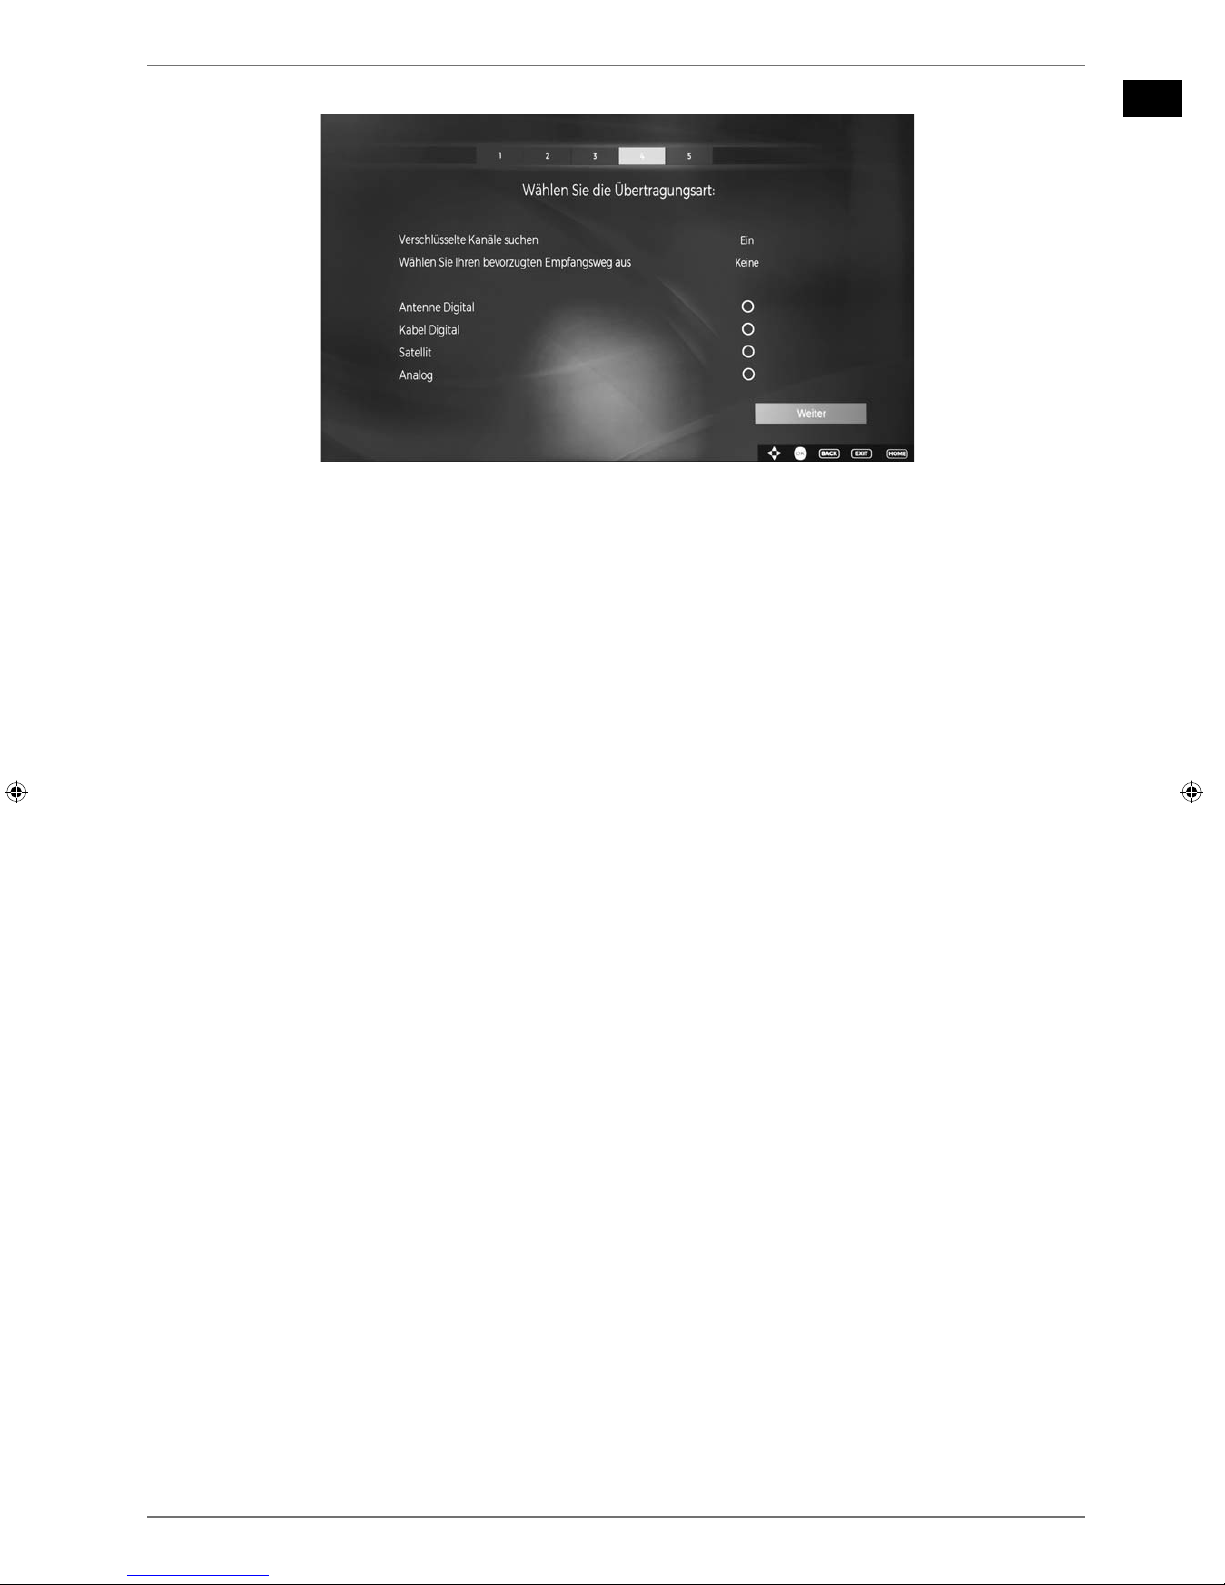
3.7.2. Übertragungsart
Bevor der Sendersuchlauf startet, wählen Sie folgende Optionen:
VERSCHLÜSSELTE KANÄLE SUCHEN: Wählen Sie mit , ob auch verschlüsselte Kanäle ge-
sucht werden sollen.
WÄHLEN SIE IHREN BEVORZUGTEN EMPFANGSWEG AUS: Wählen Sie mit die bevor-
zugt genutzte Empfangsart. Sollten Sie mehrere Empfangsarten nutzen, können Sie mit die
unten stehenden Arten wählen und mit OK aktivieren.
Wählen Sie mit
WEITER aus und bestätigen mit OK.
3.7.3. Kabel Digital
Sollten Sie zuvor die Empfangsart KABEL DIGITAL aktiviert haben, können Sie nun noch Einstellungen zum Netzwerksuchlauf vornehmen. Wenn es notwendig sein sollte, können Sie hier das
NETZWERK, die FREQUENZ, die SENDER-NETZWERK ID und die SUCHINTERVALLE entspre-
chend anpassen.
3.7.4. Satellit
Sollten Sie zuvor die Empfangsart SATELLIT aktiviert haben, können Sie nun noch Einstellungen
zum Antennentyp vornehmen:
Um den Antennentyp einzustellen , wählen Sie zwischen einem der nachstehenden Antennenty-
pen:
−
DIREKT: Wenn Sie einen Einzelreceiver und eine Satellitenantenne haben, wählen Sie diesen
Antennentyp. Drücken Sie die Taste OK und wählen Sie anschließend den gewünschten Satelliten aus (hier können Sie mit der Taste OK auch die Transponderliste aufrufen). Drücken Sie
anschließend nochmals die Taste OK, um den Suchlauf zu starten. Entscheiden Sie anschließend, ob die Programmliste geladen werden soll oder nicht.
−
EINKABELLÖSUNG: Wenn Sie mehrere Receiver und ein Einkabelsystem haben, wählen Sie
diesen Antennentyp. Drücken Sie die Taste
OK und nehmen Sie alle notwendigen Einstel-
lungen zu
SATELLITENPOSITION 1/2, BENUTZER-BAND und BANDFREQUENZ vor (hier
können Sie mit der blauen Taste auch die Transponderliste aufrufen). Drücken Sie anschlie-
ßend nochmals die Taste
OK, um den Suchlauf zu starten. Entscheiden Sie anschließend, ob
die Programmliste geladen werden soll oder nicht.
−
DISEQC-SCHALTER: Wenn Sie mehrere Satellitenantennen und einen DiSEqC-Schalter haben,
wählen Sie diesen Antennentyp. Drücken Sie die Taste OK und aktivieren Sie die gewünschten DISEQC-Schalter 1 - 4 (hier können Sie mit der Taste OK auch die entsprechenden Transponderlisten aufrufen). Drücken Sie anschließend nochmals die Taste OK, um den Suchlauf
zu starten. Entscheiden Sie anschließend, ob die Programmliste geladen werden soll oder
nicht.
Während des Suchlaufes wird der Fortschritt der Suche angezeigt. Außerdem wird die Anzahl der
bereits gefundenen TV- und Radiosender angezeigt.
13
DE
Page 15
Drücken Sie anschließend auf OK, um fortzufahren.
Nach dem Ende der automatischen Programmspeicherung wird ein Fernsehprogramm wiedergegeben.
Die hier beschriebene Erstinstallation entspricht der Option ERSTE INSTALLATION
im Menü
INSTALLATION.
4. Problembehebung
Fehlfunktionen können manchmal banale Ursachen haben, aber manchmal auch von defekten
Komponenten ausgehen. Wir möchten Ihnen hiermit einen Leitfaden an die Hand geben, um das
Problem zu lösen. Wenn die hier aufgeführten Maßnahmen keinen Erfolg bringen, helfen wir Ihnen
gerne weiter. Rufen Sie uns an!
Fehler Maßnahmen
Es erscheint kein Bild
und es ist kein Ton zu
hören.
• Überprüfen Sie, ob das Netzkabel richtig an der Steckdose angeschlossen ist.
• Überprüfen Sie, ob der Signalempfang auf TV eingestellt ist.
• Kontrollieren Sie, ob der Netzschalter auf der Unterseite des Geräts
eingeschaltet ist.
Es erscheint kein Bild
von AV.
• Überprüfen Sie, ob Kontrast und Helligkeit korrekt eingestellt sind.
• Überprüfen Sie, ob alle externen Geräte korrekt angeschlossen sind.
• Überprüfen Sie, ob die richtige AV-Quelle angewählt ist.
• Eine Eingangsquelle, die Sie mit
oder (SOURCE) anwählen
möchten, muss im Menü QUELLEN > QUELLEN-EINSTELLUNGEN
aktiviert sein.
Es ist kein Ton zu hören.
• Vergewissern Sie sich, dass die Lautstärke nicht auf Minimum steht.
• Vergewissern Sie sich, dass die Stummschaltung nicht aktiviert ist.
Drücken Sie dazu die Taste auf der Fernbedienung mit dem durchgestrichenen Lautsprechersymbol.
Es gibt kein Bild oder
keinen Ton. Es sind
aber Geräusche zu
hören.
• Der Empfang ist möglicherweise schlecht. Kontrollieren Sie, ob die
Antenne angeschlossen ist.
Das Bild ist nicht
deutlich.
• Der Empfang ist möglicherweise schlecht.
• Kontrollieren Sie, ob die Antenne angeschlossen ist.
Das Bild ist zu hell
oder zu dunkel.
• Überprüfen Sie die Einstellungen von Kontrast und Helligkeit.
Das Bild ist nicht
scharf.
• Der Empfang ist möglicherweise schlecht.
• Kontrollieren Sie, ob die Antenne angeschlossen ist.
• Überprüfen Sie die Einstellungen der Schärfe und Rauschreduktion
im Menü
BILD.
Es erscheint ein Doppel- oder Dreifachbild.
• Kontrollieren Sie, ob die Antenne richtig ausgerichtet ist.
• Es gibt möglicherweise von Bergen oder Gebäuden reflektierte Wellen.
Das Bild ist gepunktet.
• Es liegen möglicherweise Interferenzen von Autos, Zügen, Leitungen,
Neonleuchten, etc. vor.
• Es besteht möglicherweise eine Interferenz zwischen dem Antennenund Stromkabel. Legen Sie die Kabel weiter auseinander.
14
Page 16
Fehler Maßnahmen
Es erscheinen Streifen am Bildschirm
oder die Farben verblassen.
• Liegt eine Interferenz von einem anderen Gerät vor?
• Übertragungsantennen von Radiostationen oder Antennen von
Funkamateuren und tragbare Telefone können auch Interferenzen
verursachen.
• Betreiben Sie das Gerät so weit weg wie möglich von dem Gerät, das
die Interferenz möglicherweise verursacht.
Der Multifunktionsschalter MODE am Gerät funktioniert nicht
• Eventuell ist die Kindersicherung aktiviert.
TV-Gerät schaltet sich
aus
• Prüfen Sie, ob unter
WEITERE EINSTELLUNGEN die automatische TV
Abschaltung aktiviert ist.
Kein Empfang/
schlechter Empfang
über eine kabellose
Netzwerkverbindung
(WLAN).
• Vergewissern Sie sich, dass alle notwendigen Einstellungen vorge-
nommen wurden.
WIRELESS DISPLAY
Verbindung kann
nicht aufgebaut werden.
• Vergewissern Sie sich, dass alle notwendigen Einstellungen vorge-
nommen wurden.
Die Fernbedienung
funktioniert nicht.
• Überprüfen Sie, ob die Batterien in der Fernbedienung funktionstüch-
tig und richtig eingelegt sind.
• Vergewissern Sie sich, dass das Sensorfenster nicht starker Lichtein-
strahlung ausgesetzt ist.
• Schalten Sie das Gerät mit dem Netzschalter an der Unterseite des
Gerätes aus und wieder ein.
Menü kann nicht geöffnet werden.
• Prüfen Sie, ob CEC aktiviert ist. In diesem Fall kann das Menü nicht ge-
öffnet werden, was keinen Defekt darstellt. Gegebenenfalls öffnet
sich das Menü des über HDMI2 angeschlossenen Gerätes. Dies ist abhängig vom Zuspieler und muss entsprechend unterstützt werden.
• Wechseln Sie die Eingangsquelle.
Keine Bluetooth®Verbindung
• Stellen Sie sicher, das am Gerät alle Einstellungen korrekt vorgenom-
men wurden und die Bluetooth-Funktion aktiviert ist.
• Prüfen Sie, ob das zu verbindende Gerät eingeschaltet ist und sich im
Suchmodus befindet.
• Stellen Sie sicher, das alle Einstellungen am zu verbindenden korrekt
vorgenommen wurden und die Bluetooth-Funktion aktiviert ist. Nehmen Sie gegebenenfalls die Bedienungsanleitung des entsprechenden Geräts zur Hilfe.
Zur weiteren Problembehebung lesen Sie gegebenenfalls die ausführliche Online-Bedienungsanleitung, da hier gewisse Maßnahmen und Vorgehensweisen detaillierter beschrieben werden.
15
DE
Page 17

4.1. Benötigen Sie weitere Unterstützung?
Wenn die Vorschläge in den vorangegangenen Abschnitten Ihr Problem nicht behoben haben,
nehmen Sie bitte Kontakt mit uns auf. Sie würden uns sehr helfen, wenn Sie uns folgende Informationen zur Verfügung stellen:
• Welche externen Geräte sind angeschlossen?
• Welche Meldungen erscheinen auf dem Bildschirm?
• Bei welchem Bedienungsschritt ist das Problem aufgetreten?
• Falls Sie einen PC an das Gerät angeschlossen haben:
− Wie sieht Ihre Rechnerkonfiguration aus?
− Welche Software haben Sie beim Auftreten des Fehlers verwendet?
• Welche Schritte haben Sie zur Lösung des Problems bereits unternommen?
• Wenn Sie bereits eine Kundennummer erhalten haben, teilen Sie uns diese mit.
5. Serviceinformationen
Sollte Ihr Gerät einmal nicht wie gewünscht und erwartet funktionieren, wenden Sie sich zunächst
an unseren Kundenservice. Es stehen Ihnen verschiedene Wege zur Verfügung, um mit uns in Kontakt zu treten:
• In unserer Service Community treffen Sie auf andere Benutzer sowie unsere Mitarbeiter und können dort Ihre Erfahrungen austauschen und Ihr Wissen weitergeben.
Sie finden unsere Service Community unter http://community.medion.com.
• Gerne können Sie auch unser Kontaktformular unter www.medion.com/contact nutzen.
• Selbstverständlich steht Ihnen unser Serviceteam auch über unsere Hotline oder postalisch zur
Verfügung.
Deutschland
Öffnungszeiten Haushalt & Heimelektronik
Mo. - Fr.: 07:00 23:00
Sa. / So.: 10:00 18:00
0201 22099-222
Serviceadresse
MEDION AG
45092 Essen
Deutschland
Österreich
Öffnungszeiten Rufnummer
Mo. - Fr.: 08:00 21:00
Sa. / So.: 10:00 18:00
01 9287661
Serviceadresse
MEDION Service Center
Franz-Fritsch-Str. 11
4600 Wels
Österreich
16
Page 18

Schweiz
Öffnungszeiten Haushalt & Heimelektronik
Mo. - Fr.: 09:00 19:00
0848 - 24 24 26
Serviceadresse
MEDION/LENOVO Service Center
Ifangstrasse 6
8952 Schlieren
Schweiz
Belgien
Öffnungszeiten Rufnummer
Mo. - Fr.: 09:00 19:00
02 - 200 61 98
Serviceadresse
MEDION B.V.
John F.Kennedylaan 16a
5981 XC Panningen
Nederland
Luxemburg
Öffnungszeiten Rufnummer
Mo. - Fr.: 09:00 19:00
34-20 808 664
Serviceadresse
MEDION B.V.
John F.Kennedylaan 16a
5981 XC Panningen
Nederland
17
DE
Page 19

6. Impressum & Download Bedienungsanleitung
Copyright © 2018
Stand: 28.08.2018
Alle Rechte vorbehalten.
Diese Bedienungsanleitung ist urheberrechtlich geschützt.
Vervielfältigung in mechanischer, elektronischer und jeder anderen Form ohne die schriftliche Genehmigung des Herstellers ist verboten.
Das Copyright liegt bei der Firma:
Medion AG
Am Zehnthof 77
45307 Essen
Deutschland
Technische und optische Änderungen sowie Druckfehler vorbehalten.
Die Bedienungsanleitung kann über die Service Hotline nachbestellt werden und steht über das
Serviceportal zum Download zur Verfügung.
Suchen Sie im Service-Portal bitte anhand der entsprechenden MSN des Geräts nach der
gewünschten Anleitung. Die MSN finden Sie auf dem Typenschild des Geräts oder unter
Kapitel „Produktdatenblatt“.
Sie können auch den unten stehenden QR Code scannen und die Anleitung über das Serviceportal
auf Ihr mobiles Endgerät laden.
URL QR Code
DE www.medion.com/de/service/start/
AT www.medion.com/at/service/start/
BE www.medion.com/be/de/service/start/
CH www.medion.com/ch/de/service/start/
LUX www.medion.com/lu/de/
18
Page 20
7. Produktdatenblatt
Gemäß Verordnung 1062/2010
Markenzeichen
MSN-Nr.
30025264 30025263 30025262 30025384 30025368 30025366 30025364 30025383
Modell-Nr.
(MD)
31380 31381 31382 31420 31421 31422 31423 31424
Energieeffizienzklasse
A+ A++ A++ A+ A+ A+ A++ A++
Sichtbare
Bildschirmgröße (diagonal,ca.)
(cm/Zoll)
125,7 cm
(50“)
138,8 cm
(55“)
163,9 cm
(65“)
101,6 cm
(40“)
108 cm
(43“)
125,7 cm
(50“)
138,8 cm
(55“)
163,8 cm
(65“)
Durchschnittlicher
Stromverbrauch im
eingeschaltetem Zustand (Watt)
65 53 75 44 48 65 53 74
Jährlicher
Energieverbrauch
(kWh/Jahr)
94 77 109 64 70 94 78 108
Standby-Stromverbrauch
(Watt)
0,48 0,48 0,48 0,48 0,48 0,48 0,48 0,48
Stromverbrauch im
ausgeschaltetem Zustand (Watt)
0,01 0,01 0,01 0,01 0,01 0,01 0,01 0,01
Display-Auflösung (px)
3840 x
2160
3840 x
2160
3840 x
2160
3840 x
2160
3840 x
2160
3840 x
2160
3840 x
2160
3840 x
2160
19
DE
Page 21

20
Page 22

FR
1
Répertoire
1. Contenu de l’emballage ....................................................................................................... 3
2. Vue d’ensemble de l’appareil ............................................................................................... 4
2.1. Vue avant ....................................................................................................................................................4
2.2. Vue arrière et côté droit .........................................................................................................................5
2.3. Télécommande .........................................................................................................................................6
3. Mise en service ..................................................................................................................... 8
3.1. Déballage ...................................................................................................................................................8
3.2. Montage ......................................................................................................................................................8
3.3. Insertion des piles dans la télécommande .....................................................................................9
3.4. Raccordement de l’antenne .................................................................................................................9
3.5. Raccordement au secteur .................................................................................................................. 10
3.6. Allumer et éteindre le téléviseur Smart ........................................................................................ 10
3.7. Recherche des chaînes après la première mise en marche ................................................... 10
4. Dépannage rapide .............................................................................................................. 14
4.1. Vous avez besoin d’une aide supplémentaire? ......................................................................... 16
5. Informations relatives au service après-vente ................................................................. 16
6. Mentions légales et téléchargement du mode d’emploi ................................................. 18
7. Fiche du produit .................................................................................................................. 19
Page 23

2
Page 24

FR
3
1. Contenu de l’emballage
Veuillez vérifier si la livraison est complète et nous informer dans un délai de deux semaines à
compter de la date d’achat si ce n’est pas le cas.
Avec le produit que vous venez d’acheter, vous recevez:
• Ultra HD-Smart-TV
• Télécommande (RC1818) avec 2 piles LR03 (AAA) / 1,5 V, RC1818
• Pied avec vis
• Documentation
DANGER !
Risque de suffocation!
Les films d’emballage peuvent être avalés ou utilisés dans un autre but que celui
prévu et présentent donc un risque de suffocation !
Conservez les emballages tels que les films ou sachets en plastique hors de la
portée des enfants.
Page 25

4
2. Vue d’ensemble de l’appareil
2.1. Vue avant
MD31380 / MD31381 / MD31420 / MD31421 / MD31422 / MD31423:
3
2
1
OFF/ON
MD31382 / MD31424:
3
2
1
OFF/ON
1) Écran
2) Interrupteur d’alimentation
3) Capteur infrarouge: Champ de réception pour les signaux infrarouges de la télécommande
Voyant de fonctionnement: Est allumé lorsque l’appareil se trouve en mode Veille
Page 26
FR
5
2.2. Vue arrière et côté droit
13
(ARC)
MODE - / I
- O +
USB
5Vdc
Max. 500mA
USB
5Vdc
Max. 500mA
1
6
8
9
11
12
2
2
3
4
5
SPDIF
Optic. out
10
L
R
Video
BACK AV IN
13 Vdc/18 Vdc
300mA Max.
7
1) COMMON INTERFACE (CI+) : Emplacement pour le module d’interface commune
2) USB (5V
, 500 mA max.) : Pour le branchement d’appareils USB/l’enregistrement (PVR)
3) HDMI 1 : Port HDMI pour appareils avec sortie HDMI
4) : Pour le branchement d’un casque avec connecteur jack 3,5 mm
5) MODE: Bouton multifonctions pour changer de canal, sélectionner la source d‘entrée ou ré-
gler le volume. Basculement vers le haut (+) ou le bas (-) pour procéder aux réglages. Pression
brève pour alterner entre les fonctions. Pression longue pour mettre l‘appareil en mode Veille
ou de fonctionnement.
6) HDMI 2-3 : Port HDMI pour appareils avec sortie HDMI (HDMI 2 peut être utilisé pour CEC/
ARC)
7) LNB (13 V/18 V , 300mA Max.) : Pour le branchement sur une installation satellite numérique
8) ANT. : Pour le branchement de l’antenne (analogique, DVB-T et DVB-C)
9) VGA : Prise VGA pour le branchement d’un ordinateur/adaptateur YUV (en option)
10) BACK AV IN : Entrée audio/vidéo (Cinch)
11) SPDIF Optic. OUT: Sortie audio numérique (optique)
12) LAN : Prise réseau pour la connexion à Internet
13) Trous de fixation pour un montage mural
1
MD 31380, MD 31420, MD 31421, MD 31422:
Standard Vesa, distance entre les trous : 200 x 200 mm
MD 31381, MD 31423: Standard Vesa, distance entre les trous : 400 x 200 mm
MD 31382, MD 31424: Standard Vesa, distance entre les trous : 400 x 400 mm
1
Support mural non fourni. Lors du montage, veillez à utiliser des vis de la taille M6. La longueur de la vis résulte de l’épaisseur du support mural
plus 10 mm.
Page 27
6
2.3. Télécommande
MEDION
1
2
1
21
2
3
4
6
8
9
10
11
12
13
14
15
17
18
20
7
16
5
19
Page 28
FR
7
1) (SOURCE): sélectionner le signal d’entrée d’appareils raccordés
2) Touches numériques:
TV : sélection de chaîne, télétexte : sélection de page
3)
TXT : activer le télétexte
Appuyer 2 x = mettre en transparence
Appuyer 3 x = fermer
4)
P / : touches de sélection des chaînes
TV: sélectionner la chaîne suivante (+)/précédente (-) ; télétexte : sélectionner la page suivante (+)/précédente (-)
5)
(MENU): ouvrir et fermer un menu
6)
INFO: TV numérique : affichage d’informations (p. ex. numéro de la chaîne en cours).
7) Touche directionnelle : vers le haut dans le menu
TV numérique: sélectionner la barre d’informations de la chaîne en cours, télétexte: sélectionner la page suivante
Touche directionnelle : vers le bas dans le menu
TV numérique: sélectionner la barre d’informations de la chaîne en cours, télétexte: sélectionner la page précédente
Touche directionnelle : à gauche dans le menu
Télétexte: afficher la sous-page
Touche directionnelle : à droite dans le menu
Télétexte: afficher la sous-page
8)
EXIT: quitter un menu
9)
MEDION : Ouverture du portail de MEDION®
10)
2
: Touche multifonctions pour emplacement de programme ou source d’entrée, commuter
entre émissions DVB-S, DVB-T et DVB-C
11) Touche rouge: pour télétexte ou menus
Touche verte : pour télétexte ou menus
Touche jaune: pour télétexte ou menus
Touche bleue: pour télétexte ou menus
12) Touches média
: retour rapide
: avance rapide
: démarrage de l’enregistrement (PVR)
: arrêter la lecture
: démarrer la lecture
: interrompre la lecture
13)
1
: YouTube / touche multifonctions pour emplacement de programme ou source d’entrée
14)
NETFLIX: Afficher le portail Netflix
15)
BACK: un niveau en arrière dans les menus
16)
OK: confirmer une sélection dans certains menus
17)
EPG : TV numérique: ouvrir le guide électronique des programmes
18)
V-/+ : augmenter (+) ou réduire (-) le volume
19)
: désactivation du haut-parleur
20)
LANG.: TV analogique : stéréo/mono ;
TV numérique: sélectionner la langue audio (si disponible)
21)
: allumer/éteindre le téléviseur Smart (allumer/éteindre le mode Veille)
Page 29
8
2.3.1. Modification des fonctions des touches
1
et
2
Les touches
1
et
2
peuvent être programmées librement (emplacement de programme
ou source d‘entrée).
Sélectionnez tout d‘abord la fonction souhaitée puis maintenez les touches enfoncée
pendant 5 secondes jusqu‘à ce que
MON BOUTON EST RÉGLÉ s‘affiche. Cela confirme la
nouvelle programmation
Après chaque INSTALLATION INITIALE, la programmation personnelle des touches est
supprimée et la fonction des touches par défaut est restaurée.
3. Mise en service
Avant de mettre l‘appareil en marche, lisez impérativement les « Consignes de sécurité ».
3.1. Déballage
Avant le déballage, choisissez un endroit adapté pour l’installation de l’appareil.
Ouvrez le carton avec précaution pour éviter d’endommager l’appareil, par exemple avec un
couteau à longue lame.
L’emballage contient différentes petites pièces (piles, etc.). Conservez-les hors de la portée des
enfants: ils pourraient s’étouffer!
Conservez soigneusement les emballages et utilisez uniquement ceux-ci pour transporter le té-
léviseur.
DANGER !
Risque de suffocation!
Les films d’emballage peuvent être avalés ou utilisés dans un autre but que celui
prévu et présentent donc un risque de suffocation !
Conservez les emballages tels que les films ou sachets en plastique hors de la
portée des enfants.
3.2. Montage
Fixez le pied sur l’appareil comme illustré ci-dessous avant de procéder au branchement du Téléviseur Smart.
MD31421 / MD31422 / MD31423:
1
2
3
4
Page 30

FR
9
MD31380 / MD31381 / MD31382 / MD31420:
(en option)
1
2
3x
3x
MD31424:
4 x M4 x 16
1
2
3
4
4 x M4 x 16
4 x M6 x 20
3.3. Insertion des piles dans la télécommande
Retirez le couvercle du compartiment à piles au dos de la télécommande.
Insérez deux piles de type LR03 / AAA / 1,5 V dans le compartiment à piles de la télécommande.
Prenez soin de bien respecter la polarité (indiquée au fond du compartiment à piles).
Remettez le couvercle du compartiment à piles en place.
REMARQUE !
Risque de dommages !
Si la télécommande n’est pas utilisée pendant un certain temps, les piles peuvent
couler et l’endommager!
Sortez donc les piles de la télécommande si vous n’utilisez pas l’appareil pen-
dant une période prolongée.
3.4. Raccordement de l’antenne
Votre téléviseur Smart supporte différents signaux d’antenne.
Sur la prise avec la désignation ANT., vous pouvez capter les signaux d’image suivants:
• via câble analogique/une antenne domestique analogique,
• via une antenne DVB-T2/ DVB-T
2
ou
• via une prise DVB-C
2
.
2
Ce service doit être disponible dans votre région.
Page 31

10
Branchez un câble d’antenne de l’antenne domestique, de l’antenne DVB-T ou de la prise DVB-C
sur la prise d’antenne du téléviseur Smart.
Sur la prise avec la désignation LNB, vous avez en plus la possibilité de raccorder une installation satellite numérique.
Vissez le connecteur F d‘un câble antenne coaxial sur la prise du téléviseur Smart.
Pour pouvoir capter les chaînes cryptées/payantes, vous devez utiliser la carte correspondante requise. Pour cela, introduisez un module CA (disponible dans le commerce) dans
l’emplacement prévu à cet effet sur le côté droit du téléviseur (
COMMON INTERFACE).
Ensuite, introduisez la carte de votre prestataire dans le module CA.
3.5. Raccordement au secteur
Branchez la fiche d’alimentation de l’appareil sur une prise de courant de 220 - 240 V ~ 50 Hz fa-
cilement accessible.
3.6. Allumer et éteindre le téléviseur Smart
Mettez l’interrupteur d’alimentation situé en bas de l’appareil sur ON. L’appareil passe en mode
Veille et le voyant sur la face avant s’allume.
Pour allumer l’appareil, appuyez
− sur la télécommande: sur la touche Standby/ON, une touche numérique ou une des touches
P /
;
− sur l’appareil: le bouton multifonctions .
La touche Standby/ON de la télécommande vous permet de remettre l’appareil en mode Veille.
L’appareil est certes éteint, mais continue à consommer du courant.
Pour éteindre l’appareil, mettez l’interrupteur d’alimentation en position OFF. Tant que l’appareil
est raccordé au réseau électrique, il consomme cependant toujours du courant.
En l’absence d’un signal d’entrée, l’appareil passe automatiquement en mode Veille au
bout de cinq minutes. Un compte à rebours est affiché à l’écran jusqu’au passage en mode
Veille. Cette fonction n’est pas disponible avec toutes les sources.
3.7. Recherche des chaînes après la p remière mise en marche
Lorsque vous allumez votre appareil pour la première fois, vous êtes guidé à travers l’INSTALLATION
INITIALE.
Utilisez les touches pour sélectionner la langue.
Une fois que vous avez confirmé la sélection de la langue en appuyant sur OK, l’installation initiale démarre.
Page 32

FR
11
Sélectionnez alors le pays souhaité avec . Le réglage du pays influence l’ordre de mé-
morisation des chaînes. Les autres options pour les différents pays sont en outre préréglées.
Puis appuyez sur
OK pour continuer.
Vous serez invité à accepter la politique de confidentialité de MEDION® Smart TV. Ceci est néces-
saire si vous avez l’intention d’utiliser les services Réseau / Internet / HbbTV. Lisez attentivement
les paramètres de confidentialité. Sélectionnez les points individuels avec
et confirmez
avec
OK si nécessaire. Si vous avez d’autres questions, des plaintes ou des remarques concer-
nant la déclaration de protection des données et l’exécution, prenez contact par e-mail sur
smarttvsecurity@vosshub.com.
SAISIR UN CODE PIN: si l‘appareil vous demande de saisir un mot de passe pour accéder aux
autres options de menu, veuillez utiliser le mot de passe maître 4725 ou définissez un mot de
passe de 4 caractères de votre choix. Veuillez noter que le mot de passe 0000 ne fonctionne
pas dans ce cas.
Si vous deviez oublier le mot de passe, veuillez utiliser le mot de passe maître
4725.
Il vous est ensuite demandé si vous voulez régler des paramètres réseau/Internet/HbbTV. Sélec-
tionnez NON si vous voulez sauter cette étape. Si vous avez sélectionné ici NON, vous ne pouvez
ensuite avoir recours à aucun service réseau/Internet/HbbTV.
3.7.1. Paramètres de réseau/Internet
Page 33

12
Paramètres de réseau
TYPE DE
RÉSEAU
Sélectionnez ici le type de réseau PÉRIPHÉRIQUE SANS FIL ou PÉRIPHÉ-
RIQUE CÂBLÉ
. Une fois que vous avez sélectionné l'option souhaitée avec les
touches directionnelles et confirmé avec la touche OK, vous voyez apparaître la liste de tous les réseaux disponibles. Sélectionnez un réseau et confirmez avec la touche OK. Si un réseau exige un mot de passe, vous voyez ensuite apparaître un clavier virtuel sur lequel vous pouvez saisir ce mot de passe
à l'aide des touches directionnelles et de la touche OK. Une fois le
mot de passe saisi, sélectionnez OK sur le clavier et confirmez avec la touche
OK.
APPUI SUR
WPS SITUÉ SUR
ROUTEUR WIFI
(uniquement
avec WiFi)
Cette option permet une connexion WPS rapide via un réseau sans fil (WiFi).
Maintenez la touche WPS de votre routeur enfoncée et confirmez
OK pour
cette option en appuyant sur la touche OK. La connexion WPS est alors établie.
TEST DE VITESSE INTERNET
Appuyez sur la touche OK pour tester la vitesse de la connexion Internet.
RÉGLAGES
AVANCÉS
Appuyez sur la touche OK pour afficher d'autres options pour la configuration
du réseau.
CONFIGURATION
Sélectionnez ici le réglage AUTOMATIQUE IP ou MA-
NUEL IP. Si vous avez sélectionné MANUEL IP, vous
voyez apparaître trois autres lignes dans lesquelles vous
pouvez saisir manuellement les données pour ADRESSE
IP, SUBNET MASK et DEFAULT GATEWAY à l'aide des
touches directionnelles et des touches numériques.
CONFIGURATION
Sélectionnez ici
AUTOMATIQUE DNS
ou
MANUEL DNS.
Si vous avez sélectionné MANUEL DNS, vous voyez apparaître deux autres lignes dans lesquelles vous pouvez
saisir manuellement les données pour SERVEUR DNS 1
et SERVEUR DNS 2 à l'aide des touches directionnelles
et des touches numériques.
Une connexion réseau en cours peut être coupée en appuyant sur la
touche rouge
WAKE ON
Activation/Désactivation de la fonction Wake-On-LAN/Wake-On-Wireless LAN
(WoL/WoWLAN). Cette opération permet d‘activer la Smart-TV à partir d‘un
autre appareil (par ex. à partir d‘un smartphone avec l‘application MEDION®
Life Remote). Les deux appareils doivent être connectés sur le même réseau
avec une connexion LAN ou WLAN. Sélectionnez le réglage MARCHE pour activer cette fonction. L‘appareil utilisé pour la télécommande doit être connecté une fois avec le téléviseur allumé. La commande ne fonctionne que lorsque
le téléviseur se trouve en mode Veille Lorsque ce dernier est éteint puis rallumé
à l‘aide du bouton d‘alimentation, la connexion des deux appareils est rétablie
automatiquement.
Quittez les paramètres réseau en appuyant sur OK.
Page 34

FR
13
3.7.2. Type de diffusion
Avant de commencer la recherche de la station, sélectionnez les options suivantes:
RECHERCHE CHAÎNES CRYPTÉES: Utilisez pour sélectionner si les canaux cryptés doivent
également être recherchés.
SÉLECTIONNEZ LE TYPE DE RÉSEAU FAVORI: Utilisez pour sélectionner la méthode de
réception préférée. Si vous utilisez plusieurs types de réception, vous pouvez sélectionner les
types ci-dessous avec
et les activer avec OK.
Sélectionnez
SUIVANT avec et confirmez avec OK.
3.7.3. Câble
Si vous avez activé auparavant le type de réception CÂBLE, vous pouvez maintenant encore effectuer des réglages pour la recherche de réseaux. Si nécessaire, vous pouvez adapter ici en conséquence les options RÉSEAU, FRÉQUENCE, ID RÉSEAU et RECHERCHER ÈTAPE.
3.7.4. Satellite
Si vous avez activé auparavant le type de réception SATELLITE, vous pouvez maintenant encore ef-
fectuer des réglages pour le type d‘antenne :
Régler le type d‘antenne. Sélectionnez l‘un des types d‘antenne suivants :
−
DIRECT : si vous avez un récepteur individuel et une antenne satellite, sélectionnez ce type
d‘antenne. Appuyez sur la touche OK puis sélectionnez le satellite souhaité (vous pouvez ici
également afficher la liste des transpondeurs avec la touche bleue). Appuyez ensuite encore
une fois sur la touche OK pour lancer la recherche. Puis déterminez si la liste des chaînes doit
être chargée ou non.
−
CÂBLE DE SATELLITE UNIQUE : si vous avez plusieurs récepteurs et un système à un seul
câble, sélectionnez ce type d‘antenne. Appuyez sur la touche OK et effectuez tous les ré-
glages nécessaires pour POSITION DE SATELLITE NO 1/2, BANDE UTILISATEUR et
FRÉQUENCE BANDE (vous pouvez ici également afficher la liste des transpondeurs avec la
touche bleue). Appuyez ensuite encore une fois sur la touche
OK pour lancer la recherche.
Puis déterminez si la liste des chaînes doit être chargée ou non.
−
COMMUTATEUR DISEQC : si vous avez plusieurs antennes satellites et un commutateur
DiSEqC, sélectionnez ce type d‘antenne. Appuyez sur la touche
OK et activez les commuta-
teurs DISEQC 1 - 4 souhaités (vous pouvez ici également afficher les listes des transpondeurs correspondantes avec la touche bleue). Appuyez ensuite encore une fois sur la touche
OK pour lancer la recherche. Puis déterminez si la liste des chaînes doit être chargée ou non.
Pendant la recherche, l’avancement de la recherche est affiché. De plus, le nombre de stations de
télévision et de radio déjà trouvées est affiché.
Appuyez ensuite sur
OK pour continuer.
Après la fin du programme de stockage automatique est un programme de télévision est lu.
L’installation initiale décrite ici correspond à l’option
INSTALLATION INITIALE dans le
menu INSTALLATION.
Page 35

14
4. Dépannage rapide
Les dysfonctionnements ont parfois des causes banales, mais peuvent aussi résulter de composants
défectueux. Vous trouverez ci-après un petit guide destiné à vous aider à solutionner certains problèmes. Si les solutions proposées ne donnent aucun résultat, nous vous aiderons volontiers. Il vous
suffit de nous téléphoner!
Erreur Solution
Aucune image ne s'affiche et il n'y a pas de
son.
• Vérifiez si le cordon d'alimentation est correctement relié à la prise
de courant.
• Vérifiez si la réception de signal est bien réglée sur TV.
• Contrôlez si l'interrupteur d'alimentation au bas de l'appareil est
bien allumé.
Aucune image ne s’affiche
depuis la source AV.
• Vérifiez si le contraste et la luminosité sont bien réglés.
• Vérifiez si tous les appareils externes sont correctement branchés.
• Vérifiez si la bonne source AV a été choisie.
• Une source d’entrée que vous souhaitez sélectionner avec
ou
(SOURCE) doit être marquée dans le menu SOURCES.
Il n'y a pas de son. • Assurez-vous que le volume n'est pas réglé sur le minimum.
• Assurez-vous que l'option de désactivation du haut-parleur n'est
pas activée. Appuyez pour cela sur la touche avec le symbole de
haut-parleur barré située en haut à gauche sur la télécommande.
• Vérifiez si un casque est raccordé.
Il n'y a pas d'image ou
pas de son. Mais des
bruits sont audibles.
• La réception est peut-être mauvaise. Contrôlez si l'antenne est
bien raccordée.
L'image n'est pas distincte.
• La réception est peut-être mauvaise.
• Contrôlez si l'antenne est bien raccordée.
L'image est trop claire ou
trop sombre.
• Vérifiez les réglages du contraste et de la luminosité.
L'image n'est pas nette. • La réception est peut-être mauvaise.
• Contrôlez si l'antenne est bien raccordée.
• Vérifiez le réglage de la netteté de l'image et de la réduction du
bruit dans le menu IMAGE.
Une image double ou
triple est affichée.
• Contrôlez si l'antenne est bien orientée.
• Des ondes se réfléchissent peut-être sur des montagnes ou des
immeubles.
L'image est parsemée de
points.
• Il est possible que des interférences soient émises par des voitures,
trains, lignes électriques, lampes néon, etc.
• Il y a peut-être des interférences entre le câble d'antenne et le
câble électrique. Essayez de les éloigner davantage.
Des bandes apparaissent
sur l'écran ou les couleurs perdent de leur intensité.
• Un autre appareil génère-t-il des interférences ?
• Les antennes de transmission des stations de radio ou les antennes des radioamateurs et des téléphones portables peuvent
également provoquer des interférences.
• Utilisez votre téléviseur le plus loin possible de l'appareil susceptible de générer les interférences.
Le bouton multifonctions MODE de l’appareil
ne fonctionne pas.
• La protection enfants est éventuellement activée.
Page 36

FR
15
Erreur Solution
Téléviseur s‘éteint • Vérifiez si l‘option d‘arrêt automatique du téléviseur n‘est pas acti-
vée sous PLUS....
Pas de réception/mauvaise réception via une
connexion réseau sans
fil (WiFi).
• Assurez-vous que tous les réglages nécessaires ont été effectués.
WIRELESS DISPLAY ne
apparaît pas dans le
menu déroulant
• Assurez-vous que tous les réglages nécessaires ont été effectués.
La télécommande ne
fonctionne pas.
• Vérifiez si les piles de la télécommande sont chargées et correcte-
ment insérées.
• Assurez-vous que la fenêtre de capteur n'est pas exposée à un fort
rayonnement lumineux.
• Éteignez puis rallumez l'appareil avec l'interrupteur d'alimentation
situé au bas de l'appareil.
Impossible d‘ouvrir le
menu.
• Vérifiez si CEC est activé. Le menu ne peut alors pas être ouvert, il
ne s‘agit pas d‘un défaut du téléviseur. Il se peut que le menu de
l‘appareil raccordé via HDMI2 s‘ouvre. Cela dépend de l‘appareil
source, qui doit également supporter cette fonction.
• Changez de source d‘entrée.
Pas de connexion Bluetooth®.
• Vérifiez si tous les réglages ont été correctement effectués sur l'ap-
pareil et si la fonction Bluetooth est activée.
• Vérifiez si l'appareil à connecter est bien allumé et en mode Re-
cherche.
• Vérifiez si tous les réglages ont été correctement effectués sur l'ap-
pareil à connecter et si la fonction Bluetooth est activée. Consultez
éventuellement le mode d'emploi de l'appareil correspondant.
Pour résoudre d‘autres problèmes, lisez le cas échéant le mode d‘emploi en ligne complet,
dans lequel certaines mesures et manières de procéder sont décrites plus en détail.
Page 37

16
4.1. Vous avez besoin d’une aide supplémentaire ?
Si les solutions proposées aux paragraphes précédents n’ont donné aucun résultat, veuillez nous
contacter. Les informations suivantes nous seraient alors très utiles:
• Quels périphériques externes sont raccordés à l’appareil?
• Quels sont les messages affichés à l’écran?
• Au cours de quelle commande le problème s’est-il produit?
• Si vous avez raccordé un ordinateur à l’appareil:
− Quelle est la configuration de votre ordinateur?
− Quel logiciel utilisiez-vous lorsque l’erreur s’est produite?
• Qu’avez-vous déjà tenté pour résoudre le problème?
• Si vous possédez déjà un numéro de client, veuillez nous le communiquer.
5. Informations relatives au service après-vente
Si votre appareil ne fonctionne pas de la manière dont vous le souhaitez, veuillez d’abord vous
adresser à notre service après-vente. Vous disposez des moyens suivants pour entrer en contact
avec nous:
• Au sein de notre Service Community, vous pouvez discuter avec d’autres utilisateurs ainsi
qu’avec nos collaborateurs pour partager vos expériences et vos connaissances.
Vous pouvez accéder à notre Service Community ici:
http://community.medion.com.
• Vous pouvez également utiliser notre formulaire de contact disponible ici:
www.medion.com/contact.
• Notre équipe du service après-vente se tient également à votre disposition via notre assistance
téléphonique ou par courrier.
France
Horaires d’ouverture Hotline SAV
Lun - Ven: 9h00 à 19h00
02 43 16 60 30
Adresse du service après-vente
MEDION France
75 Rue de la Foucaudière
72100 LE MANS
France
Suisse
Horaires d’ouverture Électroménager et électronique grand public
Lun - Ven: 7h00 à 23h00
Sam/Dim: 10h00 à
18h00
0848 - 24 24 26
Adresse du service après-vente
MEDION/LENOVO Service Center
Ifangstrasse 6
8952 Schlieren
Suisse
Page 38

FR
17
Belgique
Horaires d’ouverture
Hotline SAV
Lun - Ven: 9h00 à
19h00
02 - 200 61 98
Adresse du service après-vente
MEDION B.V.
John F.Kennedylaan 16a
5981 XC Panningen
Nederland
Luxembourg
Horaires d’ouverture
Hotline SAV
Lun - Ven: 9h00 à
19h00
34 - 20 808 664
Adresse du service après-vente
MEDION B.V.
John F.Kennedylaan 16a
5981 XC Panningen
Nederland
Page 39

18
6. Mentions légales et téléchargement du mode d’emploi
Copyright © 2018
Situation: 28. août 2018, 8:26 AM
Tous droits réservés.
Le présent mode d‘emploi est protégé par le copyright.
La reproduction sous forme mécanique, électronique ou sous toute autre forme que ce soit est interdite sans l‘autorisation écrite du fabricant.
Le copyright est la propriété de la société :
Medion AG
Am Zehnthof 77
45307 Essen
Allemagne
Sous réserve de modifications techniques et visuelles ainsi que d’erreurs d’impression.
Le mode d‘emploi peut être à nouveau commandé via la hotline de service et téléchargé sur le portail de service.
Vous pouvez rechercher la documentation associée à l’appareil sur le portail d’assistance à l’aide du numéro MSN de l’appareil. Le numéro MSN de l’appareil est indiqué sur l’éti-
quette d’identification de l’appareil ou au chapitre « Fiche du produit ».
Vous pouvez aussi scanner le code QR ci-dessous et charger le mode d‘emploi sur votre terminal
mobile via le portail de service.
URL QR Code
FR www.medion.com/fr/service/accueil/
CH www.medion.com/ch/fr/service/start/
BE www.medion.com/be/fr/service/start/
LUX www.medion.com/lu/fr/
Page 40

FR
19
7. Fiche du produit
Conformément au Règlement n° 1062/2010
Marque commerciale
MSN N°
30025264 30025263 30025262 30025384 30025368 30025366 30025364 30025383
Modèle N°
(MD)
31380 31381 31382 31420 31421 31422 31423 31424
Classe d‘efficacité énergétique
A+ A++ A++ A+ A+ A+ A++ A++
Taille d‘écran
visible (diagonale, approx.)
(cm/pouces)
125,7 cm
(50“)
138,8 cm
(55“)
163,9 cm
(65“)
101,6 cm
(40“)
108 cm
(43“)
125,7 cm
(50“)
138,8 cm
(55“)
163,8 cm
(65“)
Consommation énergétique
moyenne
en mode
„marche“
(Watt)
65 53 75 44 48 65 53 74
Consommation énergétique annuelle
(kWh/annuel)
94 77 109 64 70 94 78 108
Consommation d‘énergie en veille
(Watt)
0,48 0,48 0,48 0,48 0,48 0,48 0,48 0,48
Consommation d‘énergie
en mode „arrêt“ (Watt)
0,01 0,01 0,01 0,01 0,01 0,01 0,01 0,01
Résolution de
l‘écran (px)
3840 x
2160
3840 x
2160
3840 x
2160
3840 x
2160
3840 x
2160
3840 x
2160
3840 x
2160
3840 x
2160
Page 41

20
Page 42

IT
1
Sommario
1. Contenuto della confezione ................................................................................................. 3
2. Caratteristiche dell‘apparecchio ......................................................................................... 4
2.1. Lato anteriore ............................................................................................................................................4
2.2. Lato posteriore e lato destro ................................................................................................................5
2.3. Telecomando .............................................................................................................................................6
3. Messa in funzione ................................................................................................................. 8
3.1. Apertura della confezione ....................................................................................................................8
3.2. Montaggio .................................................................................................................................................8
3.3. Inserire le pile nel telecomando .........................................................................................................9
3.4. Collegamento dell’antenna ..................................................................................................................9
3.5. Collegare l’alimentazione .................................................................................................................. 10
3.6. Accendere e spegnere il televisore Smart .................................................................................... 10
3.7. Ricerca dei canali dopo la prima accensione .............................................................................. 10
4. Risoluzione dei problemi ................................................................................................... 14
4.1. Serve ulteriore assistenza?.................................................................................................................16
5. Informazioni relative al servizio di assistenza ................................................................. 16
6. Note legali e istruzioni per il download ............................................................................ 17
7. Scheda prodotto ................................................................................................................. 18
Page 43

2
Page 44

IT
3
1. Contenuto della confezione
Verificare l’integrità della confezione ed entro 14 giorni dall’acquisto comunicare l’eventuale incompletezza della fornitura.
La confezione del prodotto acquistato include quanto segue:
• Televisore Smart Ultra HD
• Telecomando (RC1818) incluse 2 pile di tipo LR03 (AAA) da 1,5V
• Piedo di supporto (comprese viti di fissaggio)
• Documentazione
PERICOLO!
Pericolo di soffocamento!
Le pellicole dell’imballaggio possono essere inghiottite o utilizzate in modo improprio con rischio di soffocamento!
Tenere il materiale dell’imballaggio, ad es. le pellicole o i sacchetti di plastica,
fuori dalla portata dei bambini.
Page 45

4
2. Caratteristiche dell‘apparecchio
2.1. Lato anteriore
MD31380 / MD31381 / MD31420 / MD31421 / MD31422 / MD31423:
3
2
1
OFF/ON
MD31382 / MD31424:
3
2
1
OFF/ON
1) Schermo
2) Interruttore generale
3) Sensore a infrarossi: Ricevitore per i segnali a infrarossi del telecomando.
Spia di funzionamento: si illumina quando l’apparecchio è in modalità standby.
Page 46

IT
5
2.2. Lato posteriore e lato destro
13
(ARC)
MODE - / I
- O +
USB
5Vdc
Max. 500mA
USB
5Vdc
Max. 500mA
1
6
8
9
11
12
2
2
3
4
5
SPDIF
Optic. out
10
L
R
Video
BACK AV IN
13 Vdc/18 Vdc
300mA Max.
7
1) COMMON INTERFACE (CI+): Vano di inserimento per schede di Pay-TV
2) USB (5V
, 500 mA max.): porta USB per la riproduzione multimediale/registrazione (PVR)
3) HDMI 1: porta HDMI per dispositivi con uscita HDMI
4)
: Per collegare una cuffia con jack da 3,5 mm
5) MODE: interruttore multifunzione per cambiare canale, selezionare la sorgente d’ingresso o
regolare il volume. Spingendolo verso l’alto (+) o il basso (-) si definiscono le impostazioni.
Con una breve pressione dell’interruttore si passa da una funzione all’altra. Una lunga pressione mette l’apparecchio in modalità standby o in modalità di funzionamento.
6) HDMI 2-3: porta HDMI per dispositivi con uscita HDMI (L‘HDMI 2 può essere utilizzata per
CEC/ARC)
7) LNB (13 V/18 V
, 300mA max.): per collegare l‘antenna (satellite)
8) ANT.: Per collegare l’antenna (analogica, DVB-T o DVB-C)
9) VGA: porta VGA per collegare un PC/adattatore YUV (opzionale)
10) BACK AV IN: ingresso audio/video (RCA)
11) SPDIF Optic. OUT: uscita audio digitale (ottico)
12) LAN: porta di rete per il collegamento a Internet
13) Fori per il fissaggio di una staffa da parete
1
MD 31380, MD 31420, MD 31421, MD 31422: Standard Vesa, distanza tra i fori 200 x 200 mm
MD 31381, MD 31423: Standard Vesa, distanza tra i fori 400 x 200 mm
MD 31382, MD 31424: Standard Vesa, distanza tra i fori 400 x 400 mm
1
Sta e da parete non fornite in dotazione. Durante il montaggio, assicurarsi di utilizzare viti di dimensione M6. La lunghezza della vite si ottiene
aggiungendo 10 mm allo spessore della sta a da parete.
Page 47

6
2.3. Telecomando
MEDION
1
2
1
21
2
3
4
6
8
9
10
11
12
13
14
15
17
18
20
7
16
5
19
Page 48

IT
7
1) (SOURCE): selezione del segnale di ingresso per i dispositivi collegati.
2) Tasti numerici:
TV: selezione del canale, televideo: selezione della pagina.
3)
TXT : attivazione del televideo;
premere 2 volte per impostare la visualizzazione trasparente;
premere 3 volte per chiuderlo.
4)
P / : Tasti di selezione dei canali.
selezione del canale successivo (+) / precedente (-); Televideo: selezione della pagina successiva (+) / precedente (-)
5)
(MENU): apertura e chiusura del menu.
6)
INFO: TV digitale: visualizzazione di informazioni (ad es. numero del canale attuale)
7) Tasto direzionale : verso l‘alto nel menu
TV digitale: Selezione della barra informativa per il canale attuale, Televideo: selezione della
pagina successiva;
Tasto direzionale : verso il basso nel menu
TV digitale: Selezione della barra informativa per il canale attuale, Televideo: selezione della
pagina precedente;
Tasto direzionale : verso sinistra nel menu
Televideo: Apertura della sottopagina;
Tasto direzionale : verso destra nel menu
Televideo: apertura della sottopagina.
8)
EXIT: uscita dal menu
9)
MEDION: Aprire il portale MEDION®
10)
2
: Tasto multifunzione per posizioni di memoria o sorgenti di ingresso, per alternare tra
DVB-T, DVB-S e DVB-C
11) Tasto rosso: Per televideo o menu;
Tasto verde: Per televideo o menu;
Tasto giallo: Per televideo o menu;
Tasto blu: per televideo o menu.
12) Tasti multimediali
: Ritorno veloce;
: Avanzamento veloce ;
: Avvio della registrazione (PVR);
: Arresto della riproduzione;
: Avvio della riproduzione;
: Interruzione della riproduzione
13)
1
: YouTube / tasto multifunzione per posizioni di memoria o sorgenti di ingresso
14)
NETFLIX: Aprire il portale Netflix
15)
BACK: un passo indietro nel menu.
16)
OK: conferma della selezione in determinati menu.
17)
EPG: TV digitale: apertura della guida elettronica ai programmi TV.
18)
V-/+: aumento (+) o riduzione (-) del volume
19)
: esclusione dell’audio.
20)
LANG.: TV analogica: stereo/mono ;
TV digitale: selezione della lingua per la riproduzione audio (quando disponibile).
21)
: accensione/spegnimento del Smart-TV (attivazione/disattivazione della modalità standby).
Page 49

8
2.3.1. Modifica delle funzioni dei tasti 1 e
2
Il tasto 1 e 2 può essere programmato a piacere (posizione di un canale o sorgente d‘ingresso).
Selezionare innanzi tutto la funzione desiderata, quindi tenere premuto il tasto per 5 se-
condi, finché compare
MY BUTTON É STATO IMPOSTATO. In questo modo è confermata
la nuova programmazione
.
A ogni
PRIMA INSTALLAZIONE viene cancellata la programmazione personalizzata dei
tasti e ripristinata quella predefinita.
3. Messa in funzione
Prima di iniziare, leggere le „Istruzioni di sicurezza“.
3.1. Apertura della confezione
• Prima di aprire la confezione, scegliere un posto adatto per posizionare l‘apparecchio.
• Aprire la scatola con molta cautela per evitare di danneggiare l‘apparecchio. Questo potrebbe
succedere se per aprire la scatola si utilizza un coltello a lama lunga.
• La confezione contiene diversi pezzi piccoli (pile, viti, ecc.). Tenerli fuori dalla portata dei bambini,
pericolo di soffocamento!
• Conservare il materiale d‘imballaggio in buone condizioni e utilizzare soltanto questo per trasportare il televisore.
PERICOLO!
Pericolo di soffocamento!
Le pellicole dell’imballaggio possono essere inghiottite o utilizzate in modo improprio con rischio di soffocamento!
Tenere il materiale dell’imballaggio, ad es. le pellicole o i sacchetti di plastica,
fuori dalla portata dei bambini.
3.2. Montaggio
Fissare il piede come raffigurato nel disegno. Eseguire questa operazione prima di collegare il
Smart-TV.
MD31421 / MD31422 / MD31423:
1
2
3
4
Page 50

IT
9
MD31380 / MD31381 / MD31382 / MD31420:
(opzionale)
1
2
3x
3x
MD31424:
4 x M4 x 16
1
2
3
4
4 x M4 x 16
4 x M6 x 20
3.3. Inserire le pile nel telecomando
Rimuovere il coperchio del vano pile sul retro del telecomando.
Posizionare due pile da 1,5 V di tipo LR03 / AAA nel vano pile del telecomando. Durante questa
operazione fare attenzione alla polarità delle pile (indicata sul fondo del vano pile).
Chiudere il vano pile.
AVVISO!
Pericolo di danni!
Se il telecomando rimane a lungo inutilizzato, il liquido che fuoriesce dalle pile potrebbe danneggiarlo.
Rimuovere le pile dal telecomando se l’apparecchio rimane a lungo inutilizzato.
3.4. Collegamento dell’antenna
Il televisore Smart supporta diversi segnali antenna.
La connessione denominata ANT. può ricevere i seguenti segnali video:
• tramite cavo analogico / un‘antenna analogica esterna
• tramite un‘antenna DVB-T2/ DVB-T
2
o
• tramite una connessione DVB-C
2
(cavo digitale)
2
È necessario che il servizio sia disponibile nella propria regione
Page 51

10
Inserire nella connessione antenna del televisore Smart un cavo antenna proveniente dall’anten-
na esterna, dalla connessione via cavo analogica, dall’antenna DVB-T o dalla connessione DVB-C.
Alla connessione denominata LNB è possibile collegare anche un impianto satellitare digitale.
Avvitare il connettore F di un’antenna coassiale alla porta del televisore Smart.
Per ricevere canali criptati/a pagamento, è necessario utilizzare un modulo CAM e una
scheda speci ca. Inserire il modulo CAM (acquistabile in un negozio specializzato) nell’apposito vano posto sul lato sinistro dell’apparecchio (
COMMON INTERFACE). Inserire
quindi la scheda del fornitore nel modulo CAM.
3.5. Collegare l’alimentazione
Inserire la spina in una presa elettrica da 220 - 240 V ~ 50 Hz ben raggiungibile.
3.6. Accendere e spegnere il televisore Smart
Posizionare l‘interruttore che si trova sul lato inferiore dell‘apparecchio su ON. L‘apparecchio pas-
sa in modalità standby e sul lato anteriore si illumina la spia di funzionamento.
Per accendere l‘apparecchio, premere
− sul telecomando: il tasto Standby/On, un tasto numerico o uno dei tasti
P / ;
− sull’apparecchio: l‘interruttore multifunzione
.
Con il tasto Standby/On del telecomando è possibile rimettere l‘apparecchio in standby. L‘appa-
recchio si spegne, ma continua a consumare corrente.
Con l‘interruttore generale si spegne l‘apparecchio (posizione OFF). Finché l‘apparecchio è colle-
gato alla rete elettrica continua a consumare corrente.
Dopo cinque minuti di mancato segnale di ingresso, l’apparecchio passa automaticamente alla modalità standby. Fino a quel momento sullo schermo viene visualizzato un timer
per il conto alla rovescia. Questa funzione non è disponibile per tutte le sorgenti
.
3.7. Ricerca dei canali dopo la prima accensione
Quando si accende l’apparecchio per la prima volta, si viene guidati attraverso la PRIMA INSTAL-
LAZIONE.
Utilizzare i tasti per selezionare la lingua.
Dopo avere confermato la scelta della lingua premendo
OK inizia la prima installazione.
Page 52

IT
11
Con selezionare il paese desiderato. L’impostazione del paese influisce sulla sequenza
in cui i canali vengono memorizzati. Inoltre, le restanti opzioni sono preimpostate in base al paese.
Quindi premere
OK per continuare.
Ti verrà chiesto di accettare l’informativa sulla privacy di MEDION® Smart TV. Questo è necessario
se si intende utilizzare i servizi di rete / Internet / HbbTV. Leggi attentamente le impostazioni sulla privacy. Selezionare i singoli punti con
e confermare con OK, se necessario. Se si han-
no ancora domande, reclami o note relativamente all‘Informativa sulla privacy e all‘esecuzione, è
possibile inviare un‘e-mail all‘indirizzo smarttvsecurity@vosshub.com.
IMPOSTA PIN: Se viene richiesto di inserire una password per passare alle altre opzioni del
menu, utilizzare la password master 4725 o definire una password di 4 cifre a piacere. Tenere
presente che in questo caso la password 0000 non funziona.
Nel caso in cui si dovesse dimenticare la password, utilizzare la password master
4725.
In seguito viene richiesto se si desidera definire le impostazioni di rete/Internet/HbbTV. Selezio-
nare NO per saltare questa operazione. Se qui è stato selezionato NO, in seguito non si potrà
usufruire dei servizi di rete Internet/HbbTV.
3.7.1. Impostazioni di rete / Internet
Page 53

12
Impostazioni di rete
TIPO DI SEGNALE
Selezionare il tipo di rete
DISPOSITIVO WIRELESS
o
DISPOSITIVO CABLA-
TO
. Dopo avere effettuato la selezione con i tasti direzionali e confermato con il tasto OK, viene visualizzato un riepilogo di tutte le reti disponibili. Effettuare una selezione e confermare con il tasto OK. Nel caso sia necessaria una
password per la rete, verrà visualizzata una tastiera virtuale sulla quale è possibile inserirla utilizzando i tasti direzionali e il tasto OK. Dopo avere immesso la password, selezionare OK sulla tastiera e confermare con il tasto
OK
.
PREMERE WPS
SUL PROPRIO
ROUTER WIFI
(solo per WLAN)
Questa opzione consente di effettuare una connessione veloce WPS tramite una rete senza fili (WLAN). Tenere premuto il tasto WPS sul router e per questa opzione confermare OK con il tasto
OK. A questo punto verrà instaurata la
connessione WPS.
TEST VELOCITÀ
INTERNET
Premere il tasto
OK per verificare la velocità della connessione Internet
IMPOSTAZIONI
AVANZATE
Premere il tasto OK per richiamare altre opzioni relative alla configurazione di
rete
CONFIGURAZIONE Selezionare l'impostazione IP AUTOMATICO o IP MANUALE.
Se è stato selezionato IP MANUALE, verranno visualizzate
altre tre righe nelle quali si possono inserire i dati per IN-
DIRIZZO IP, SUBNET MASK e GATEWAY PREDEFINITO ma-
nualmente con i tasti direzionali e i tasti numerici.
CONFIGURAZIONE
Scegliere
DNS AUTOMATICO
o
DNS MANUALE. Se è stato selezionato DNS MANUALE, verranno visualizzate altre due ri-
ghe nelle quali si possono inserire i dati per SERVER DNS 1
e SERVER DNS 2 manualmente con i tasti direzionali e
i tasti numerici.
È possibile interrompere una connessione di rete attiva premendo il tasto rosso.
WAKE ON
Attivazione/disattivazione della funzione Wake On LAN/Wake On Wireless LAN
(WoL/WoWLAN). Consente di accendere lo Smart TV mediante un altro dispositivo (ad es. utilizzano uno smartphone con l‘app MEDION® Life Remote). A tale
scopo entrambi gli apparecchi devono essere collegati alla stessa rete tramite
LAN o WLAN. Selezionare l’impostazione
ACCESO per attivare la funzione. Il di-
spositivo per il controllo remoto deve essere collegato la prima volta al televisore acceso. In seguito il controllo funziona solo quando il televisore si trova in
modalità standby. Se viene spento e riacceso, il collegamento dei due apparecchi viene ripristinato automaticamente.
Uscire dalle impostazioni di rete premendo OK.
Page 54

IT
13
3.7.2. Tipo di trasmissione
Prima di avviare la ricerca della stazione, selezionare le seguenti opzioni:
RICERCA CANALI CODIFICATI: Utilizzare per selezionare se ricercare o meno i canali cripta-
ti.
SELEZIONARE IT TIPO DI RETE PREFERITO: Usa per selezionare il metodo di ricezione
preferito. Se si utilizzano diversi tipi di ricezione, è possibile selezionare i tipi seguenti con e
attivare con OK.
Selezionare
SUCCESSIVO con e confermare con OK.
3.7.3. Cavo
Se prima è stato attivato il tipo di ricezione CAVO DIGITALE, ora si possono definire altre imposta-
zioni per la ricerca sulla rete. Se necessario, qui si possono modificare le voci FREQUENCA INITIA-
LE, FREQUENCA FINALE
e FACE DI RICERCA.
3.7.4. Satellite
Se prima è stato attivato il tipo di ricezione SATELLITE, ora si possono definire altre impostazioni re-
lative al tipo di antenna.
Per impostare il tipo di antenna, sceglierne uno tra i seguenti:
−
DIRETTA: se si possiedono un ricevitore singolo e un’antenna satellitare, scegliere questo tipo
di antenna. Premere il tasto OK e in seguito selezionare il satellite desiderato (qui è possibile
anche richiamare l’elenco dei transponder con il tasto blu). In seguito premere di nuovo il tasto
OK per avviare la ricerca. Decidere quindi se l’elenco dei canali deve essere caricato oppu-
re no.
−
CAVO SATELLITE SINGOLO: Se si possiedono più ricevitori e un sistema a cavo unico, sce-
gliere questo tipo di antenna. Premere il tasto OK e definire tutte le impostazioni necessarie
per
POSIZIONE SATELLITE 1/2, BANDA UTENTE e FREQUENZA DI BANDA (qui è possi-
bile richiamare anche l’elenco dei transponder con il tasto blu). In seguito premere di nuovo il
tasto
OK per avviare la ricerca. Decidere quindi se l’elenco dei canali deve essere caricato op-
pure no.
−
SWITCH DISEQC: se si possiedono più antenne satellitari e un commutatore DiSEqC, sceglie-
re questo tipo di antenna. Premere il tasto
OK e attivare il commutatore DISEQC desidera-
to
1 - 4 (qui è possibile richiamare anche il relativo elenco di transponder con il tasto blu). In
seguito premere di nuovo il tasto OK per avviare la ricerca. Decidere quindi se l’elenco dei ca-
nali deve essere caricato oppure no.
Durante la ricerca, viene visualizzato l’avanzamento della ricerca. Inoltre, viene visualizzato il numero di stazioni TV e radio già rilevate.
Premere quindi
OK per continuare.
Dopo il completamento della memorizzazione automatica del programma, viene riprodotto un
programma TV.
La prima installazione qui descritta corrisponde all’opzione
INSTALLAZIONE nel menu
PRIMA INSTALLAZIONE.
Page 55

14
4. Risoluzione dei problemi
Talvolta i malfunzionamenti possono essere dovuti a cause banali, ma qualche volta possono anche
essere la conseguenza di componenti difettosi. Di seguito si trova una guida che consente di risolvere diversi problemi. Nel caso in cui le soluzioni qui elencate non consentissero di risolvere il problema, saremo lieti di fornire assistenza.
Errore Soluzione
Non viene visualizzata l'immagine e manca l'audio.
• Verificare che il cavo di alimentazione sia collegato correttamente alla presa elettrica e all'apparecchio.
• Verificare che la ricezione del segnale sia impostata su TV.
Non viene visualizzata l'immagine. Non viene visualizzata l'immagine di AV.
• Verificare che il contrasto e la luminosità siano impostati correttamente.
• Verificare che tutti i dispositivi esterni siano collegati correttamente.
• Verificare che sia selezionata la sorgente AV corretta.
• La sorgente di ingresso che si desidera selezionare con
o
(SOURCE) deve essere indicata nel menu SorgentI.
Manca l'audio. • Assicurarsi che il volume non sia impostato al minimo.
• Assicurarsi che non sia attivata l‘esclusione dell‘audio. A tale
scopo premere il tasto in alto a sinistra sul telecomando che
raffigura un altoparlante sbarrato.
Non viene visualizzata l'immagine oppure manca l'audio. Si sentono però dei rumori.
• La ricezione è probabilmente disturbata. Verificare che l'antenna sia collegata.
L'immagine non è pulita. • La ricezione è probabilmente disturbata.
• Verificare che l'antenna sia collegata.
L'immagine è troppo chiara
o scura.
• Verificare le impostazioni di contrasto e luminosità.
L'immagine non è nitida. • La ricezione è probabilmente disturbata.
• Verificare che l'antenna sia collegata.
• Controllare le impostazioni della nitidezza e del filtro di rumore nel menu
IMMAGINE.
L'immagine è doppia o tripla.
• Verificare che l'antenna sia orientata correttamente.
• Probabilmente vi sono onde riflesse da montagne o edifici.
L'immagine è puntinata. • Potrebbero esserci interferenze causate da auto, treni, condut-
ture, luci al neon, ecc.
• È possibile che vi sia un'interferenza tra il cavo dell'antenna e
quello di alimentazione. Distanziare i cavi uno dall'altro.
Sullo schermo vengono visualizzate strisce oppure i
colori sono sbiaditi.
• È possibile che un altro dispositivo causi un'interferenza.
• Anche le antenne di trasmissione delle stazioni radio, dei radioamatori e dei telefoni portatili possono causare interferenze.
• Utilizzare l'apparecchio il più possibile lontano dal dispositivo
che probabilmente causa l'interferenza.
Page 56

IT
15
Errore Soluzione
L‘interruttore multifunzione MODE dell‘apparecchio
non funziona
• È possibile che sia attivato il sistema di sicurezza per bambini.
Il televisore si spegne • Controllare che in
ALTRE IMPOSTAZIONI sia attivata lo spe-
gnimento TV automatico.
Ricezione assente/scadente
su una connessione di rete
senza fili (WLAN)
• Assicurarsi di avere configurato tutte le impostazioni necessarie.
WIRELESS DISPLAY non
compare nel menu di selezione
• Assicurarsi di avere configurato tutte le impostazioni necessarie.
Il telecomando non funziona.
• Verificare che le pile del telecomando siano cariche e inserite
correttamente.
• Assicurarsi che la finestra del sensore non sia esposta a una
forte luce.
• Verificare che la funzione TV del telecomando universale sia
attivata: premere il tasto TV sul telecomando.
Non è possibile aprire il
menu.
• Verificare se la funzione CEC è attivata. In caso lo sia, non sarà
possibile aprire il menu e ciò non rappresenta un difetto. È
possibile che si apra il menu del dispositivo collegato tramite HDMI2. Questo dipende dal dispositivo di riproduzione che
deve supportare tale funzione.
• Cambiare la sorgente d‘ingresso
Nessuna connessione Bluetooth®
• Accertarsi che tutte le impostazioni sull'apparecchio siano state eseguite correttamente e che la funzione Bluetooth sia attivata.
• Verificare se il dispositivo da collegare è acceso ed è in modalità di ricerca.
• Accertarsi che tutte le impostazioni sul dispositivo da collegare siano state eseguite correttamente e che la funzione Bluetooth sia attivata. Se necessario, consultare le istruzioni per l'uso
del dispositivo.
Per un’ulteriore risoluzione dei problemi, leggere eventualmente le istruzioni per l’uso
dettagliate online, dove certi provvedimenti e procedure vengono descritti in modo più
particolareggiato.
Page 57

16
4.1. Serve ulteriore assistenza?
Se i suggerimenti contenuti nei paragrafi precedenti non hanno consentito di eliminare il problema, contattateci. Le seguenti informazioni possono esserci d‘aiuto:
• Quali dispositivi esterni sono collegati?
• Quali messaggi vengono visualizzati sullo schermo?
• In quale fase di funzionamento si è verificato il problema?
• S e è stato collegato un PC all‘apparecchio:
− Qual è la configurazione del computer?
− Quale software era in uso quando si è verificato l‘errore?
• Quali operazioni sono già state effettuate per tentare di risolvere il problema?
• Se siete già in possesso di un codice cliente, vi preghiamo di comunicarcelo.
5. Informazioni relative al servizio di assistenza
Nel caso in cui il dispositivo non funzioni come desiderato o come previsto, per prima cosa contattare il nostro servizio clienti. Esistono diversi modi per mettersi in contatto con noi.
• In alternativa è possibile compilare il modulo di contatto disponibile alla pagina www.medion.
com/contact.
• Il nostro team di assistenza è raggiungibile anche via telefonicamente.
Italia
Orari di apertura Assistenza Post-Vendita
Lun.-ven.: 9.00-19.00
02 - 360 003 40
Svizzera
Orari di apertura Elettronica di consumo
Lun.-ven.: 9.00-19.00
0848 - 24 24 26
Indirizzo del servizio di assistenza
MEDION/LENOVO Service Center
Ifangstrasse 6
8952 Schlieren
Svizzera
Page 58

IT
17
6. Note legali e istruzioni per il download
Copyright © 2018
Ultimo aggiornamento: 28. agosto 2018, 8:27 m.
Tutti i diritti riservati.
Il presente manuale di istruzioni è protetto da copyright.
È vietata la riproduzione in forma meccanica, elettronica e in qualsiasi altra forma senza l’autorizzazione scritta da parte del produttore.
Il copyright appartiene all’azienda:
Medion AG
Am Zehnthof 77
45307 Essen
Germania
Con riserva di modifiche tecniche, grafiche ed errori di stampa.
Il manuale può essere ordinato alla hotline dell‘assistenza e scaricato dal portale.
Nel portale dei servizi immettere il codice MSN dell’apparecchio per cercare le istruzioni
desiderate. Il codice MSN si trova sulla targhetta identificativa dell’apparecchio o al capitolo “Scheda prodotto”.
È inoltre possibile effettuare una scansione del codice QR riportato e scaricare il
manuale dal portale dell‘assistenza utilizzando un dispositivo portatile.
URL QR Code
IT www.medion.com/it/
CH www.medion.com/ch/de/service/start/
Page 59

18
7. Scheda prodotto
In conformità con il regolamento 1062/2010
Marchio commerciale
Numero MSN
30025264 30025263 30025262 30025384 30025368 30025366 30025364 30025383
Numero modello (MD)
31380 31381 31382 31420 31421 31422 31423 31424
Classe di efficienza energetica
A+ A++ A++ A+ A+ A+ A++ A++
Dimensioni
visibili dello
schermo (diagonale,circa)
(cm/pollici)
125,7 cm
(50“)
138,8 cm
(55“)
163,9 cm
(65“)
101,6 cm
(40“)
108 cm
(43“)
125,7 cm
(50“)
138,8 cm
(55“)
163,8 cm
(65“)
Consumo di
corrente medio da accesa
(Watt)
65 53 75 44 48 65 53 74
Consumo annuale di energia (kWh/annuo)
94 77 109 64 70 94 78 108
Consumo di
corrente in
modalità standby (Watt)
0,48 0,48 0,48 0,48 0,48 0,48 0,48 0,48
Consumo di
corrente da
spenta (Watt)
0,01 0,01 0,01 0,01 0,01 0,01 0,01 0,01
Risoluzione
del display
(px)
3840 x
2160
3840 x
2160
3840 x
2160
3840 x
2160
3840 x
2160
3840 x
2160
3840 x
2160
3840 x
2160
Page 60

1
NL
Inhoudsopgave
1. Inhoud van de verpakking.....................................................................................................3
2. Apparaatoverzicht .................................................................................................................. 4
2.1. Voorkant ..........................................................................................................................................................4
2.2. Achterzijde en rechterzijde .......................................................................................................................5
2.3. Afstandsbediening .......................................................................................................................................6
3. Ingebruikname ....................................................................................................................... 8
3.1. Uitpakken ........................................................................................................................................................8
3.2. Montage .........................................................................................................................................................8
3.3. Batterijen in de afstandsbediening plaatsen......................................................................................9
3.4. Antenne aansluiten .....................................................................................................................................9
3.5. Voeding aansluiten ...................................................................................................................................10
3.6. De Smart-tv in- en uitschakelen ........................................................................................................... 10
3.7. Zenders zoeken na de eerste keer inschakelen ..............................................................................10
3.8. Netwerk-/internetinstellingen .............................................................................................................. 11
4. Problemen oplossen ............................................................................................................ 14
4.1. Heeft u nog verdere ondersteuning nodig? .................................................................................... 16
5. Service-informatie ................................................................................................................ 16
6. Colofon en bedieningshandleiding voor downloaden ..................................................... 17
7. Productfiche ......................................................................................................................... 18
Page 61

2
Page 62

3
NL
1. Inhoud van de verpakking
Controleer of alles in de verpakking zit en stel ons binnen 14 dagen na aanschaf op de hoogte van
eventueel ontbrekende onderdelen.
De levering van het door u aangeschafte product omvat:
• Ultra HD-Smart-TV
• Afstandsbediening (RC1818) incl. 2 batterijen van type LR03 (AAA) 1,5V
• Voet incl. schroeven
• Documentatie
GEVAAR!
Verstikkingsgevaar!
Verpakkingsfolie kan worden ingeslikt of verkeerd worden gebruikt. Hierdoor bestaat gevaar voor verstikking!
Houd het verpakkingsmateriaal, zoals folie of plastic zakken, uit de buurt van
kinderen.
Page 63

4
2. Apparaatoverzicht
2.1. Voorkant
MD31380 / MD31381 / MD31420 / MD31421 / MD31422 / MD31423:
3
2
1
OFF/ON
MD31382 / MD31424:
3
2
1
OFF/ON
1) Beeldscherm
2) Netschakelaar
3) Infraroodsensor: Het ontvangstveld voor de infraroodsignalen van de afstandsbediening.
Bedrijfsindicatie: licht op wanneer het apparaat in stand-bymodus is.
Page 64

5
NL
2.2. Achterzijde en rechterzijde
13
(ARC)
MODE - / I
- O +
USB
5Vdc
Max. 500mA
USB
5Vdc
Max. 500mA
1
6
8
9
11
12
2
2
3
4
5
SPDIF
Optic. out
10
L
R
Video
BACK AV IN
13 Vdc/18 Vdc
300mA Max.
7
1) COMMON INTERFACE (CI+): Sleuf voor gebruik van CAM modules en smartcards
2) USB (5V
, 500 mA max.): USB-aansluiting voor mediaweergave/opname (PVR)
3) HDMI 1: HDMI-aansluiting voor apparaten met HDMI-uitgang
4)
: Voor aansluiting van een hoofdtelefoon met 3,5mm mini-jackplug
5) MODE: Multifunctionele schakelaar voor het omschakelen van de zender, het kiezen van de
ingangsbron en de volumeregeling. Het instellen gebeurt door de schakelaar omhoog (+)
resp. omlaag (-) te kantelen. De functie wordt gekozen door de schakelaar kort in te drukken.
Door de schakelaar langer ingedrukt te houden wordt het toestel in de stand-by modus gezet, resp. ingeschakeld.
6) HDMI 2-3: HDMI-aansluiting voor apparaten met HDMI-uitgang (HDMI 2 kan worden gebruikt
voor CEC/ARC)
7) LNB (13 V/18 V
, 300 mA max.): Aansluiting voor een digitale SAT-installatie.
8) ANT.: Voor aansluiting van een antenne (analoog, DVB-T of DVB-C)
9) VGA: VGA-aansluiting voor aansluiting van een pc/een YUV-adapter (optineel)
10) BACK AV IN: Audio/Video-ingang (Cinch)
11) SPDIF Optic. OUT: Digitale Audio-uitgang (optisch)
12) LAN: Netwerkaansluiting voor verbinding met het internet
13) Bevestigingsgaten voor een wandhouder
1
MD 31380, MD 31420, MD 31421, MD 31422: Vesa-norm, gatafstand 200 x 200 mm
MD 31381, MD 31423: Vesa-norm, gatafstand 400 x 200 mm
MD 31382, MD 31424: Vesa-norm, gatafstand 400 x 400 mm
1
Wandhouder niet meegeleverd. Let er bij de montage op dat schroeven van maat M6 worden gebruikt. De schroe engte wordt berekend door
de dikte van de wandhouder te nemen plus 10 mm.
Page 65

6
2.3. Afstandsbediening
MEDION
1
2
1
21
2
3
4
6
8
9
10
11
12
13
14
15
17
18
20
7
16
5
19
Page 66

7
NL
1) (SOURCE): Ingangssignaal van aangesloten apparaten selecteren.
2) Cijfertoetsen:
TV: Zenderkeuze, teletekst: paginakeuze.
3)
TXT : Teletekst inschakelen
2 x drukken = transparant maken
3 x drukken = sluiten.
4)
P / : Toetsen voor zenderkeuze.
TV: volgende (+) / vorige (-) zender selecteren; Teletekst: volgende (+) / vorige (-) pagina selecteren
5)
(MENU): Menu openen en sluiten.
6)
INFO: Digitale tv: informatie weergeven (bv. het huidige zendernummer).
7) Pijltoets
: In het menu naar boven gaan
Digitale tv: Infobalk van de huidige zender selecteren, teletekst: de volgende pagina selecteren;
Pijltoets
: In het menu naar beneden gaan
Digitale tv: Infobalk van de huidige zender selecteren, teletekst: de vorige pagina selecteren;
Pijltoets
: In het menu naar links gaan
Teletekst: Subpagina oproepen;
Pijltoets : In het menu naar rechts gaan
Teletekst: Subpagina oproepen.
8)
EXIT: Menu verlaten.
9)
MEDION: MEDION®-portal openen
10)
2
: Multifunctionele toets voor zenderlocatie of invoerbron, Omschakelen tussen DVB-S,
DVB-T- en DVB-C-uitzendingen
11) Rode toets: Voor teletekst of menu’s
Groene toets: Voor teletekst of menu’s
Gele toets: Voor teletekst of menu’s
Blauwe toets: Voor teletekst of menu’s
12) Mediatoetsen
: Snel terugspoelen;
: Snel doorspoelen ;
: Opname starten (PVR);
: Afspelen stopzetten;
: Afspelen starten;
: Afspelen onderbreken
13)
1
: YouTube/Multifunctionele toets voor zendergeheugen of invoerbron.
14)
NETFLIX: Netflix-portal openen
15)
BACK: Terugkeren naar de vorige stap in het menu.
16)
OK: In bepaalde menu’s de selectie bevestigen.
17)
EPG: Digitale TV: elektronische programmagids openen.
18)
V-/+ : Volume verhogen (+) of verlagen (-).
19)
: Geluid dempen.
20)
LANG.: Analoge TV: Stereo/Mono ;
digitale tv: Audiotaal selecteren (indien beschikbaar).
21)
: De Smart-tv in- en uitschakelen (stand-by modus in-/uitschakelen)
Page 67

8
2.3.1. Wijzigingen van de toetsfuncties 1 en
2
De toetsen 1 en 2 kunnen naar eigen inzicht worden geprogrammeerd (zenderlocatie of invoerbron)
Selecteer eerst de gewenste functie en houd daarna de betreffende toets 5 seconden lang inge-
drukt totdat
MIJN KNOP IS INGESTELD wordt weergegeven. Hiermee wordt de nieuwe pro-
grammering bevestigd.
Na elke
EERSTE INSTALLATIE wordt de persoonlijke toetsprogrammering gewist en te-
ruggezet in de fabrieksstand.
3. Ingebruikname
Lees zorgvuldig de „Veiligheidsadviezen“ voordat u het toestel in gebruik neemt.
3.1. Uitpakken
• Kies vóór het uitpakken een geschikte plaats om het apparaat op te stellen.
• Open de doos zeer zorgvuldig om mogelijke schade aan het apparaat te voorkomen. Wanneer
een mes met een te lang lemmet wordt gebruikt om de doos te openen kan het apparaat worden beschadigd.
• In de verpakking bevinden zich verschillende kleine onderdelen (batterijen, etc.). Houd deze uit
de buurt van kinderen. Er bestaat gevaar voor inslikken.
• Bewaar het verpakkingsmateriaal goed en gebruik alleen dit om de televisie te vervoeren.
GEVAAR!
Verstikkingsgevaar!
Verpakkingsfolie kan worden ingeslikt of verkeerd worden gebruikt. Hierdoor bestaat gevaar voor verstikking!
Houd het verpakkingsmateriaal, zoals folie of plastic zakken, uit de buurt van
kinderen.
3.2. Montage
Bevestig de voet zoals afgebeeld in de onderstaande afbeelding. Voer deze stap uit vooraleer u de
Smart-tv aansluit
MD31421 / MD31422 / MD31423:
1
2
3
4
Page 68

9
NL
MD31380 / MD31381 / MD31382 / MD31420:
(fakultatief)
1
2
3x
3x
MD31424:
4 x M4 x 16
1
2
3
4
4 x M4 x 16
4 x M6 x 20
3.3. Batterijen in de afstandsbediening plaatsen
Verwijder het deksel van het batterijvak aan de achterkant van de afstandsbediening.
Plaats twee LR03 / AAA-batterijen van 1,5V in het batterijvak van de afstandsbediening. Let op
de polariteit van de batterijen (deze is op de bodem van het batterijvak aangegeven).
Sluit het batterijvak.
OPMERKING!
Gevaar voor beschadiging!
De afstandsbediening zou door lekkende batterijen beschadigd kunnen raken als
de afstandsbediening langere tijd niet wordt gebruikt!
Haal de batterijen uit de afstandsbediening als het toestel langere tijd niet
wordt gebruikt.
3.4. Antenne aansluiten
Uw Smart-tv ondersteunt verschillende antennesignalen.
Via de aansluiting met de aanduiding ANT. kunt u als volgt beeldsignalen invoeren:
• via een analoge huisantenne / analog kabel,
• via een DVB-T2/ DVB-T
2
antenne of
• via een DVB-C
2
-aansluiting (digitale kabelaansluiting).
2
Deze service moet beschikbaar zijn in uw regio.
Page 69

10
Sluit een antennekabel aan tussen analoge huisantenne / analog kabel aansluiting, DVB-T anten-
ne of DVB-C aansluiting en de antenneaansluiting van de Smart-tv.
Op de met LNB aangegeven aansluiting kunt u bovendien nog een digitale satellietinstallatie aansluiten.
Schroef de F-stekker van een coax antennekabel aan de aansluiting op de TV.
Om gecodeerde zenders of Pay-TV te kunnen ontvangen moet u een CAM-module en een
bijbehorende kaart gebruiken. Hiertoe plaatst u een (in de handel verkrijgbare) CAM-module in de daartoe bestemde lezer links op het apparaat (Common Interface). Plaats de
kaart van uw aanbieder vervolgens in de CAM-module.
3.5. Voeding aansluiten
Steek de stekker van het apparaat in een goed bereikbaar stopcontact 220 - 240 V ~ 50 Hz. De
stand-by modus wordt geactiveerd en het lampje aan de voorkant gaat branden.
3.6. De Smart-tv in- en uitschakelen
Zet de netschakelaar in de onderhoek van het apparaat op ON. De stand-by modus wordt geac-
tiveerd en het lampje aan de voorkant gaat branden.
Om het apparaat in te schakelen, drukt u
− op de afstandsbediening: op de Stand-by/Aan toets
, een cijfertoets of een van de toetsen
P / ;
− op het apparaat: de multifunctionele toets
.
Met de Stand-by/Aan toets
op de afstandsbediening kunt u het apparaat in stand-by zetten.
Het apparaat wordt uitgeschakeld, maar verbruikt nog wel stroom.
Met de netschakelaar schakelt u het toestel uit (
OFF positie). Het apparaat wordt uitgeschakeld,
maar verbruikt nog wel stroom.
Als er geen ingangssignaal is, wordt het apparaat na vijf minuten automatisch op standby gezet. Op het scherm wordt tot dan een aftellende timer weergegeven. Deze functie is
niet bij alle bronnen beschikbaar.
3.7. Zenders zoeken na de e erste keer inschakelen
Wanneer u het toestel voor het eerst inschakelt, wordt u door de EERSTE INSTALLATIE geleid.
Gebruik de toetsen om de taal te selecteren.
Nadat u de taalkeuze met
OK heeft bevestigd, wordt de eerste installatie gestart.
Page 70

11
NL
Kies vervolgens met het gewenste land. De landinstelling bepaalt de volgorde waarin de
zenders worden opgeslagen. Voor de verschillende landen zijn bovendien de overige opties
vooraf ingesteld.
Druk vervolgens op
OK om door te gaan.
U wordt gevraagd om akkoord te gaan met het MEDION® Smart TV-privacybeleid. Dit is nodig als
u van plan bent om de netwerk / internet / HbbTV-services te gebruiken. Lees de privacy-instellingen zorgvuldig door. Selecteer de afzonderlijke punten met
en bevestig ze indien no-
dig met OK. Als u nog vragen, klachten of opmerkingen heeft over de privacyverklaring en de
uitvoering hiervan, kunt u via smarttvsecurity@vosshub.com per e-mail contact met ons opnemen.
Bevestig vervolgens met
JA. Als u NEE kiest, kunt u deze services niet gebruiken zonder later ak-
koord te gaan met de voorwaarden.
Druk tenslotte op de
VOLGENDE-knop met en druk op OK om naar het volgende punt te
gaan.
3.8. Netwerk-/internetinstellingen
Page 71

12
Netwerkinstellingen
UITZENDING
TYPE
Kies hier het type netwerk DRAADLOS, BEDRAAD of UITGESCHAKELD. Na
de keuze met de pijltjestoetsen 56en bevestigen met de toets
OK verschijnt
er een overzicht met alle beschikbare netwerken. Maak een keuze en bevestig met de toets OK. Wanneer er voor een netwerk een wachtwoord nodig is,
verschijnt er vervolgens een virtueel toetsenbord waar u het wachtwoord met
behulp van de pijltjestoetsen en de toets OK kunt invoeren. Na in-
voeren van het wachtwoord kiest u OK op het toetsenbord en bevestigt u de
invoer met OK.
DRUK OP WPS
OP UW WIFI-ROUTER
(alleen bij WLAN)
Met deze optie kunt u via WPS snel een verbinding maken met een draadloos
netwerk (WLAN). Houd de WPS-toets op uw router ingedrukt en bevestig bij
deze optie
OK met de toets OK. Vervolgens wordt er met WPS een verbinding
gemaakt.
SNELHEIDSTEST
INTERNET
Druk op de toets OK om de snelheid van de internetverbinding te controleren
GEAVANCEERDE
INSTELLINGEN
Druk op de toets OK om verdere opties voor de netwerkconfiguratie op te vragen
CONFIGURATIE
Kies hier de instelling AUTOMATISCH IP of HANDMA-
TIG IP. Wanneer u HANDMATIG IP heeft gekozen, ver-
schijnen er nog drie regels waarop u de gegevens voor IP-
ADRES
, SUBNETMASKER en STANDAARD GATEWAY
handmatig met behulp van de pijltjestoetsen en de
cijfertoetsen kunt invoeren.
CONFIGURATIE
Kies hier uit AUTOMATISCH DNS of HANDMATIG
DNS.
Wanneer u
HANDMATIG
DNS heeft gekozen, verschij-
nen er nog twee regels waarop u de gegevens voor de
DNS-SERVER 1 en de DNS-SERVER 2 handmatig kunt
invoeren met behulp van de pijltjestoetsen en de cij-
fertoetsen.
Een bestaande netwerkverbinding kan door indrukken van de rode
toets weer worden verbroken.
WAKE ON
Het activeren/deactiveren van de functie Wake-On-LAN/Wake-On-Wireless
LAN (WoL/WoWLAN). Deze maakt het mogelijk de Smart-tv in te schakelen via
een ander apparaat (bijvoorbeeld via een smartphone met de MEDION® Life
Remote App). Beide apparaten moeten hiervoor via LAN of WLAN met hetzelfde netwerk zijn verbonden. Kies de instelling
AAN om de functie te active-
ren. Het apparaat voor afstandsbediening moet eenmalig met het ingeschakelde tv-toestel worden verbonden. De besturing werkt vervolgens alleen als het
tv-toestel zich in de modus Stand-by bevindt. Als dit via de netschakelaar worden uitgeschakeld en vervolgens opnieuw ingeschakeld, wordt de verbinding
tussen beide apparaten automatisch hersteld.
Verlaat de netwerkinstellingen door op
OK te drukken.
Page 72

13
NL
3.8.1. Uitzendingstype
Selecteer de volgende opties voordat het zoeken naar zenders begint:
GECODEERDE SCANNEN: Gebruik om te selecteren of gecodeerde kanalen ook moeten
worden gezocht.
SELECTEER FAVORIET UITZENDING TYPE: Gebruik om de gewenste ontvangstmethode
te selecteren. Als u verschillende soorten ontvangst gebruikt, kunt u de onderstaande typen selecteren met en activeren met OK.
Selecteer
VOLGENDE met en bevestig met OK.
3.8.2. Kabel
Wanneer u eerder de ontvangstmethode DIGITALE KABEL heeft geactiveerd, kunt u nu nog de in-
stelling voor zoeken via het netwerk aanpassen. Wanneer het nodig mocht zijn, kunt u hier de NET-
WERK, de FREQUENTIE en de NETWERK-ID aanpassen.
3.8.3. Satelliet
Indien u vooraf de ontvangstmodus SATELLIET geactiveerd heeft, kunt u alleen nog de instellingen
voor het antennetype wijzigen:
Kies een van de onderstaande antennetypes om het antennetype in te stellen:
−
DIRECT: Als u een enkele receiver en een satellietschotel heeft, kiest u dit antennetype. Druk
op de toets OK en kies vervolgens de gewenste satelliet (u kunt hier met de blauwe toets ook
de transponderlijst weergeven). Druk nogmaals op de toets OK om het zoeken te starten.
Kies vervolgens of de zenderlijst moet worden geladen of niet.
−
ENKELVOUDIGE SATELLIETKABEL: Als u meerdere receivers en een eenkabelsysteem heeft,
kiest u dit antennetype. Druk op de toets OK en voer alle benodigde instellingen uit voor de
SATELLIETPOSITIE 1/2, GEBRUIKERSBAND en BANDFREQUENTIE (u kunt hier met de
blauwe toets ook de transponderlijst weergeven). Druk nogmaals op de toets
OK om het
zoeken te starten. Kies vervolgens of de zenderlijst moet worden geladen of niet.
−
DISEQC-SCHAKELAAR: Als u meerdere satellietschotels en een DiSEqC-schakelaar heeft,
kiest u dit antennetype. Druk op de toets OK en activeer de gewenste DISEQC-schakelaar 1 4 (u kunt hier met de blauwe toets ook de bijbehorende transponderlijsten weergeven). Druk
nogmaals op de toets OK om het zoeken te starten. Kies vervolgens of de zenderlijst moet
worden geladen of niet.
Tijdens het zoeken wordt de voortgang van het zoeken weergegeven. Bovendien wordt het aantal
reeds gevonden tv- en radiostations weergegeven.
Druk vervolgens op
OK om door te gaan.
Aan het einde van de automatische programmaopslag wordt een tv-programma afgespeeld.
De hier beschreven eerste installatie komt overeen met de optie
EERSTE INSTALLATIE in
het menu INSTALLATIE.
Page 73

14
4. Problemen oplossen
Storingen kunnen soms een eenvoudige oorzaak hebben, maar soms ook worden veroorzaakt door
defecte onderdelen. We willen u hiermee een gids aanreiken om het probleem mee op te lossen.
Als de hier genoemde maatregelen geen succes zijn helpen we u graag verder.
Fout Oplossing
Er is beeld noch geluid.
• Controleer of het netsnoer correct is aangesloten op het stopcontact en
op het apparaat.
• Controleer of de signaalontvangst op
TV is ingesteld.
• Controleer of de netschakelaar aan de onderkant van het toestel is ingeschakeld.
Er is geen beeld. Er
is geen beeld via
AV.
• Controleer of contrast en helderheid correct zijn ingesteld.
• Controleer of alle externe apparaten correct zijn aangesloten.
• Controleer of de juiste AV-bron is geselecteerd.
• Een ingangsbron die u met
(SOURCE) wilt selecteren, moet zijn ge-
markeerd in het menu BRONNEN.
Er is geen geluid. • Controleer of het volume niet op de laagste stand staat.
• Controleer of de mutefunctie is ingeschakeld. Druk daarvoor op de toets
linksboven op de afstandsbediening (de toets met het doorgestreepte
luidsprekersymbool).
Er is beeld noch geluid. Er is echter
wel ruis te horen.
• De ontvangst kan slecht zijn. Controleer of de antenne is aangesloten.
Het beeld is niet
duidelijk.
• De ontvangst kan slecht zijn.
• Controleer of de antenne is aangesloten.
Het beeld is te
licht of te donker.
• Controleer de instellingen van contrast en helderheid.
Het beeld is niet
scherp.
• De ontvangst kan slecht zijn.
• Controleer of de antenne is aangesloten.
• Controleer de instellingen van scherpte en ruisonderdrukking in het
menu
BEELD.
Er wordt een dubbel of drievoudig
beeld weergegeven.
• Controleer of de antenne correct is uitgericht.
• Mogelijk wordt het signaal weerkaatst door bergen of gebouwen.
Het beeld vertoont ruis.
• Er kan interferentie van auto's, treinen, lijnen, TL-verlichting etc. aanwezig zijn.
• Mogelijk is er sprake van interferentie tussen de antenne- en stroomkabel. Leg de kabels verder uit elkaar.
Er zijn strepen
zichtbaar op het
scherm of de kleuren verbleken.
• Is er sprake van interferentie door een ander apparaat?
• Zendantennes van radiostations of antennes van radioamateurs en
draagbare telefoons kunnen eveneens interferentie veroorzaken.
• Gebruik het apparaat zo ver mogelijk uit de buurt van het apparaat dat
de storing mogelijk veroorzaakt.
De multifunctionele toets MODE van
het apparaat werkt
niet.
• Mogelijk is het kinderslot geactiveerd.
Page 74

15
NL
Tv-toestel wordt
uitgeschakeld
• Controleer of onder ANDERE INSTELLINGEN het automatisch uitscha-
kelen van de tv is geactiveerd.
Geen ontvangst/
slechte ontvangst
via een draadloze
netwerkverbinding
(WLAN).
• Controleer of alle benodigde instellingen zijn uitgevoerd.
WIRELESS DIS
PLAY niet weergegeven in het keuzemenu
• Controleer of alle benodigde instellingen zijn uitgevoerd.
De afstandsbediening werkt niet.
• Controleer of de batterijen in de afstandsbediening evt. leeg of onjuist
geplaatst zijn.
• Controleer of er evt. sprake is van sterke lichtinstraling bij het sensor-
venster.
• Controleer of de televisiefunctie van de universele afstandsbediening is
ingeschakeld door op de toets TV op de afstandsbediening te drukken.
Het menu kan niet
worden geopend..
• Controleer of CEC is ingeschakeld. In dit geval kan het menu niet worden geopend. Dit is geen storing of defect. Het menu kan mogelijk worden geopend via het apparaat dat is aangesloten op HDMI2. Dit is af-
hankelijk van de signaalbron en moet correct worden ondersteund.
• Verwissel de signaalbron op de ingang.
Geen Bluetooth®-verbinding
• Controleer of alle instellingen op het toestel correct zijn uitgevoerd en
of de Bluetooth-functie is ingeschakeld.
• Controleer of het apparaat dat u wilt koppelen is ingeschakeld en in de
zoekmodus staat.
• Controleer of alle instellingen op het toestel dat u wilt koppelen correct
zijn uitgevoerd en of de Bluetooth-functie is ingeschakeld. Raadpleeg
eventueel de handleidingen van het apparaat.
Voor verdere probleemoplossing leest u eventueel de uitgebreide online bedieningshandleiding, aangezien hierin specifieke maatregelen en werkwijzen nader worden beschreven.
Page 75

16
4.1. Heeft u nog verdere ondersteuning nodig?
Neem voor verdere ondersteuning contact met ons op, wanneer de suggesties in de voorgaande
paragrafen uw probleem niet opgelost hebben. Gelieve de volgende informatie bij de hand te houden:
• Welke externe apparaten zijn aangesloten?
• Welke meldingen verschijnen op het beeldscherm?
• Tijdens welke bedieningsstap is het probleem opgetreden?
• A ls er een PC op het apparaat is aangesloten:
− Hoe ziet uw systeemconfiguratie eruit?
− Welke software gebruikte u toen het probleem zich voordeed?
• Welke stappen heeft u reeds ondernomen om het probleem op te lossen?
• Geef ons uw klantnummer door wanneer u dit al heeft ontvangen.
5. Service-informatie
Wanneer uw apparaat niet zoals gewenst of verwacht functioneert, neem dan contact op met onze
klantenservice. U heeft verschillende mogelijkheden, om met ons contact op te nemen:
• In onze Service Community vindt u andere gebruikers en onze medewerkers en daar kunt u uw
ervaringen uitwisselen en uw kennis delen.
U vindt onze Service Community onder http://community.medion.com.
• U kunt natuurlijk ook ons contactformulier gebruiken onder
www.medion.com/contact.
• En bovendien staat ons serviceteam ook via de hotline of per post ter beschikking.
Nederland
Openingstijden Service Hotline
Ma - vr: 07:00 - 23:00
Za / zo: 10:00 - 18:00
0900 - 2352534
Serviceadres
MEDION B.V.
John F.Kennedylaan 16a
5981 XC Panningen
Nederland
België
Openingstijden Service Hotline
Ma - vr: 09:00 - 19:00
02 - 200 61 98
Serviceadres
MEDION B.V.
John F.Kennedylaan 16a
5981 XC Panningen
Nederland
Luxemburg
Openingstijden Service Hotline
Ma - vr: 09:00 - 19:00
34 - 20 808 664
Serviceadres
MEDION B.V.
John F.Kennedylaan 16a
5981 XC Panningen
Nederland
Page 76

17
NL
6. Colofon en bedieningshandleiding voor downloaden
Copyright © 2018
Uitgave: 28. augustus 2018, 8:27 AM
Alle rechten voorbehouden.
Deze handleiding is auteursrechtelijk beschermd.
Vermenigvuldiging in mechanische, elektronische of enige andere vorm zonder schriftelijke toestemming van de fabrikant is verboden.
Het copyright berust bij de firma:
Medion AG
Am Zehnthof 77
45307 Essen
Duitsland
Technische wijzigingen voorbehouden.
De handleiding is via de Service Hotline te bestellen en is via het serviceportal
beschikbaar voor download.
Zoek in de serviceportal aan de hand van het bijbehorende MSN van het apparaat naar de
gewenste handleiding. Het MSN vindt u op het typeplaatje van het apparaat of onder het
hoofdstuk “Productfiche“.
U kunt ook de bovenstaande QR-code scannen en de handleiding via het serviceportal naar uw
mobiele toestel downloaden.
URL QR Code
NL www.medion.com/nl/service/start/
BE www.medion.com/be/nl/service/start/
LUX www.medion.com/lu/fr/
Page 77

18
7. Productfi che
Conform verordening 1062/2010
Commercieel
merk.
MSN-nr.
30025264 30025263 30025262 30025384 30025368 30025366 30025364 30025383
Modelnr. (MD)
31380 31381 31382 31420 31421 31422 31423 31424
Energie efficientie klasse
A+ A++ A++ A+ A+ A+ A++ A++
Zichtbare
schermgrootte
(diagonaal,ca.) (cm/inches)
125,7 cm
(50“)
138,8 cm
(55“)
163,9 cm
(65“)
101,6 cm
(40“)
108 cm
(43“)
125,7 cm
(50“)
138,8 cm
(55“)
163,8 cm
(65“)
Aan-modus
gemiddeld
stroomverbruik (Watt)
65 53 75 44 48 65 53 74
Jaarlijks energieverbruik
(kWh/Jaarlijks )
94 77 109 64 70 94 78 108
Stand-by
stroomverbruik (Watt)
0,48 0,48 0,48 0,48 0,48 0,48 0,48 0,48
Uit-modus
stroomverbruik (Watt)
0,01 0,01 0,01 0,01 0,01 0,01 0,01 0,01
Schermresolutie (px)
3840 x
2160
3840 x
2160
3840 x
2160
3840 x
2160
3840 x
2160
3840 x
2160
3840 x
2160
3840 x
2160
Page 78

Contents
1. Package contents .................................................................................................................. 3
2. Overview of the device ......................................................................................................... 4
2.1. Front .............................................................................................................................................................4
2.2. Rear and right-hand side .......................................................................................................................5
2.3. Remote control .........................................................................................................................................6
3. Using the device for the first time ....................................................................................... 8
3.1. Unpacking ..................................................................................................................................................8
3.2. Mounting ....................................................................................................................................................8
3.3. Inserting batteries in the remote control ........................................................................................9
3.4. Connecting the antenna .......................................................................................................................9
3.5. Connecting the power supply .........................................................................................................10
3.6. Switching the smart TV on and off .................................................................................................10
3.7. Channel search when switching on for the first time .............................................................. 10
4. Troubleshooting ................................................................................................................. 14
4.1. Do you need more help? .................................................................................................................... 16
5. Service information ............................................................................................................ 16
6. Legal notice & operating instructions download ............................................................ 17
7. Product data sheet ............................................................................................................. 18
1
EN
Page 79

2
Page 80

1. Package contents
Please check your purchase to ensure that all the items are included and contact us within 14 days
of purchase if any parts are missing.
The following items are supplied with your product:
• Ultra HD Smart TV
• Remote control (RC1818) incl. 2 x 1.5V batteries (type LR03/AAA)
• Stand including fastening screws
• Documentation
DANGER!
Risk of suffocation!
Packaging film can be swallowed or used improperly. Therefore, there is a risk of
suffocation!
Keep packaging material such as plastic film or plastic bags away from children.
3
EN
Page 81

2. Overview of the device
2.1. Front
MD31380 / MD31381 / MD31420 / MD31421 / MD31422 / MD31423:
3
2
1
OFF/ON
MD31382 / MD31424:
3
2
1
OFF/ON
1) LCD screen
2) Mains switch
3) Infrared sensor: Reception field for the infrared TV signals.
Operating light: Lights up when the device is in standby mode.
4
Page 82

2.2. Rear and right-hand side
13
(ARC)
MODE - / I
- O +
USB
5Vdc
Max. 500mA
USB
5Vdc
Max. 500mA
1
6
8
9
11
12
2
2
3
4
5
SPDIF
Optic. out
10
L
R
Video
BACK AV IN
13 Vdc/18 Vdc
300mA Max.
7
1) COMMON INTERFACE (CI+): Card slot for connecting pay TV cards
2) USB (5V
, 500 mA max.): USB connection for media playback/recording (PVR)
3) HDMI 1: HDMI connection for devices with a HDMI output
4)
: For connecting headphones with 3.5 mm jack
5) MODE: Multifunction button for channel switching, input source selection or volume
adjustment. Settings are made by tilting upwards (+) or downwards (-). Pressing the button
briefly switches between functions. A long press switches the device into standby mode or
operating mode.
6) HDMI 2-3: HDMI connection for devices with a HDMI output (HDMI 2 can be used for CEC/
ARC)
7) LNB (13 V/18 V
, 300 mA max.): For connecting the antenna (satellite)
8) ANT.: For connecting an aerial (analogue, DVB-T or DVB-C)
9) VGA: VGA port for connecting a PC or a YUV adapter (optional)
10) BACK AV IN: Audio/video input (cinch)
11) SPDIF Optic. OUT: Digital audio output (optical)
12) LAN: Network connection to connect to the Internet
13) Fixing holes for a wall mount
1
MD 31380, MD 31420, MD 31421, MD 31422: Vesa standard, hole spacing 200 x 200 mm
MD 31381, MD 31423: Vesa standard, hole spacing 400 x 200 mm
MD 31382, MD 31424: Vesa standard, hole spacing 400 x 400 mm
1
Wall mount not supplied. When mounting the device, make sure that you use M6 screws. The length of the screws corresponds to the thickness
of the wall bracket plus 10 mm.
5
EN
Page 83

2.3. Remote control
MEDION
1
2
1
21
2
3
4
6
8
9
10
11
12
13
14
15
17
18
20
7
16
5
19
6
Page 84

1) (SOURCE): Select input signal of connected devices
2) Number buttons:
TV: programme selection, teletext: page selection
3)
TXT : Activate teletext
Press 2 x = set transparent;
Press 3 x = close
4)
P / : Programme selection buttons
TV: select next (+) / previous (−) programme;
teletext: select next (+) / previous (−) page
5)
(MENU): Open and close menu
6)
INFO: Digital TV: show information (e.g. current channel number)
7) Direction button : Move up in menu
Digital TV: Select info bar for the current programme, teletext: select next page;
Direction button : Move down in menu
Digital TV: Select info bar for the current programme, teletext: select previous page;
Direction button : Move left in menu
Teletext: Call up subpages;
Direction button : Move right in menu
Teletext: Call up subpages
8)
EXIT: Exiting the menu
9)
MEDION: Open the MEDION® portal
10)
2
: Multifunction button for channel position or input source, switching between DVB-S,
DVB-T and DVB-C channels
11) Red button: For teletext or menus
Green button: For teletext or menus
Yellow button: For teletext or menus
Blue button: For teletext or menus
12) Media buttons
: Fast rewind;
: Fast forward;
: Start recording (PVR);
: Stop playback;
: Start playback;
: Pause playback
13)
1
: YouTube / multifunction button for programme channel or input source
14)
NETFLIX: Call up Netflix site
15)
BACK: Go one level back in menus
16)
OK: Confirm selection in certain menus
17)
EPG: Digital TV: call up the electronic programme guide
18)
V-/+ : Increase (+) or decrease (−) volume.
19)
: Mute
20)
LANG.: Analogue TV: stereo/mono ;
Digital TV: select audio language (if available)
21)
: Switch smart TV on/off (switch standby mode on/off)
7
EN
Page 85

2.3.1. Programming the multifunction buttons 1 and
2
The 1 and 2 buttons can be programmed to any channel position or a particular input source
Start by selecting the function you require and then hold down the corresponding button for 5
seconds until
MY BUTTON IS SET appears on the screen. This confirms the new programming.
After each INITIAL INSTALLATION your customised button programming is
deleted and reset to the factory defaults
3. Using the device for the fi rst time
Before using for the first time, be sure to read the section “Safety instructions”.
3.1. Unpacking
• Select a suitable place for setting up the device before unpacking.
• Open the box very carefully to avoid damaging the device. The device could be damaged if you
use a knife with a long blade to open the box.
• The box contains a number of small items (including batteries). Keep these out of the reach of
children as they represent a choking hazard.
• Store the packaging material in a safe place; only use this box to transport the TV.
DANGER!
Risk of suffocation!
Packaging film can be swallowed or used improperly. Therefore, there is a risk of
suffocation!
Keep packaging material such as plastic film or plastic bags away from children.
3.2. Mounting
Attach the stand as shown in the illustration. Carry out this step before connecting the smart TV.
MD31421 / MD31422 / MD31423:
1
2
3
4
8
Page 86

MD31380 / MD31381 / MD31382 / MD31420:
(optional)
1
2
3x
3x
MD31424:
4 x M4 x 16
1
2
3
4
4 x M4 x 16
4 x M6 x 20
3.3. Inserting batteries in the remote control
Loose the screw of the battery compartment cover on the back of the remote control and
remove the cover.
Insert two LR03 (AAA) 1.5 V batteries in the battery compartment of the remote control. Check
the battery polarity (inscribed on the bottom of the battery compartment).
Close the battery compartment by fixing the cover with the screw.
NOTICE!
Risk of damage!
The remote control can be damaged by leaking batteries if not used for a long
period of time!
Remove the batteries from the remote control if the device is not going to be
used for a long period.
3.4. Connecting the antenna
Your smart TV supports different antenna signals.
You can feed the following picture signals via the connection labelled ANT.
• via analogue cable/an analogue house antenna,
• via a DVB-T/ DVB-T 2
2
antenna or
• via a DVB-C
2
connector (digital cable)
2
This service must be available in your region.
9
EN
Page 87

Connect the antenna cable from either the house aerial/the analogue cable connection, the
DVB-T antenna or the DVB-C connection to the antenna connection on the smart TV
You also have the option of connecting a digital satellite system to the connection labelled LNB.
Screw the F connector of a coaxial antenna cable onto the connection on the smart TV.
To receive encrypted/subscription channels you will need to use a CI module and
an appropriate card. Insert a CI module (available in specialist shops) into the slot
provided for this purpose on the left-hand side of the device (Common Interface).
You can then insert the card from your provider into the CI module.
3.5. Connecting the power supply
Connect the mains plug on the device to an easily accessible 220 - 240 V ~ 50 Hz mains socket.
3.6. Switching the smart TV on and off
Set the power switch on the bottom of the device to ON. The device switches to standby mode
and the display on the front will light up.
To switch on the device, press
− on the remote control: the Standby/On button
, one of the number buttons or one of the
P / buttons;
− on the device: the multifunction button
.
Use the Standby/On button
on the remote control to switch the device back into standby
mode. Although the device has been switched off, it will continue to consume electricity.
Use the mains switch to turn off the device (OFF position). The device will continue to consume
power as long as it is connected to the mains network.
If the device is not receiving an input signal, it will automatically switch to standby
mode after five minutes. A countdown timer will appear on the screen until this
time. This function is not available for all sources.
3.7. Channel search when switching on for the fi rst time
When you switch the device on for the first time, you will be guided through the FIRST TIME
INSTALLATION menu.You can call up and carry out the first-time installation again at any time via
the menu INSTALLATION > FIRST TIME INSTALLATION .
Use the keys to select the language..
After confirming the selected language with OK the initial installation will begin
10
Page 88

Use to select the desired country. The country setting will influence the order in which
the channels are stored. Also, there are a number of options preset for the individual countries.
Afterwards, press
OK to continue.
You will be asked to agree to the MEDION® Smart TV Privacy Policy. This is necessary if you
intend to use the Network / Internet / HbbTV services. Read the privacy settings carefully. Select
the individual points with and confirm them with
OK, if necessary. If you have any
questions, complaints or comments regarding this privacy policy or its enforcement, please
contact by email at smarttvsecurity@vosshub.com.
Then confirm with
YES. If you choose NO, you will not be able to use these services without later
agreeing to the terms.
Finally, press the
NEXT button with and press OK to go to the next point.
3.7.1. Network/Internet settings
11
EN
Page 89

Network settings
NETWORK
TYPE
Here you select the network type: WIRELESS DEVICE or WIRED DEVICE.
After making a selection
NEXT with the direction buttons and
confirming with the OK button, an overview of all available networks
appears. Make a selection and confirm with the OK button. If a password is
required for a network, a virtual keyboard appears which you can use to enter
this with the help of the direction buttons and the
OK button.
After entering the password, select
OK on the keyboard and confirm with the
OK button.
PRESS WPS
ON YOUR WI-
FI ROUTER
(only for WLAN)
This option enables you to quickly establish a WPS connection via a wireless
network (Wi-Fi). Hold down the WPS button on your router and confirm this
option
OK using the OK button. Then the WPS connection will be made.
INTERNET
SPEED TEST
Press the OK button in order to test the Internet speed.
ADVANCED
SETTINGS
Press the OK button to call up further network configuration options.
CONFIGURATION
Choose the setting AUTOMATIC IP or MANUAL IP. If
you select
MANUAL IP, three additional lines appear
in which you can manually enter the data for the IP
ADRESS, SUBNET MASK
and DEFAULT GATEWAY
using the direction buttons and the number
buttons.
CONFIGURATION
Select here between AUTOMATIC DNS or MANUAL
DNS. If you select MANUAL DNS, two additional lines
appear in which you can manually enter the data for
the
DNS SERVER 1 and DNS SERVER 2 using the
direction buttons and the number buttons.
An existing network connection can be terminated by pressing
the red button.
WAKE ON
Activate/deactivate the Wake-On LAN/Wake-On Wireless LAN function (WoL/
WoWLAN). This enables you to switch on the smart TV via a different device
(e.g. a smartphone with the MEDION® Life Remote App). Both devices must
be connected to the same network via LAN or Wi-Fi for this purpose. Select
the ON setting to activate this function. The device being used as a remote
control needs to be connected to the TV once when it is switched on. The
control function only works when the TV is in standby mode. If the TV is
turned off and on again at the mains switch, the connection between the two
devices will be automatically restored.
Exit the network settings by pressing
OK.
12
Page 90

3.7.2. Übertragungsart
Before the station search starts, select the following options:
SCAN ENCRYPTED CHANNELS: Use to select whether encrypted channels should also be
searched for.
SELECT FAVOURITE NETWORK TYPE: Use to select the preferred reception method. If you
use several types of reception, you can select the types below with and activate with OK.
Select
NEXT with and confirm with OK.
3.7.3. Cable digital
If you have previously activated the reception type DIGITAL CABLE, you can now make settings
for the network search. If it should be necessary, you can adjust the NETWORK, FREQUENCY, the
NETWORK ID and the SEARCH STEP correspondingly.
3.7.4. Satellite
If you have previously activated the reception type SATELLITE, you can now make settings for the
antenna type.
To set the antenna type, select one of the following antenna types:
−
DIRECT: Select this antenna type if you have a single receiver and a satellite antenna. Press
the OK button and then choose the desired satellite (you can also call up the transponder list
using the blue button). Afterwards, press the OK button again to start the search. After that,
decide whether or not the channel list should be loaded.
−
UNICABLE: Select this antenna type if you have multiple receivers and a single-cable system.
Press the
OK button and make all the necessary settings regarding SATELLITE POSITION
1/2, USER BAND
and BAND FREQUENCY (here you can also call up the transponder list
using the blue button). Afterwards, press the OK button again to start the search. After that,
decide whether or not the channel list should be loaded.
−
DISEQC SWITCH: Select this antenna type if you have multiple satellite antennas and a
DiSEqC switch. Press the OK button and activate the desired DISEQC switch 1 - 4 (here you
can also call up the corresponding transponder list using the blue button). Afterwards, press
the OK button again to start the search. After that, decide whether or not the channel list
should be loaded.
During the search, the scan progress is displayed. In addition, the number of found TV and radio
stations is displayed.
Afterwards, press
OK to continue.
At the end of automatic program storage, a TV programme is shown.
The initial installation described here corresponds to the FIRST TIME
INSTALLATION option in the INSTALLATION menu.
13
EN
Page 91

4. Troubleshooting
Malfunctions can sometimes have quite trivial causes, but they may also be the result of defective
components. We have included a brief troubleshooting guide below which may help to solve any
problems. If these tips don’t solve the problem then we’ll be more than pleased to help you out.
Just give us a call!
Error Measures
There is no picture and no
sound.
• Check if the power cable is inserted properly into the socket.
• Check if signal reception is set to
TV.
• Check whether the power switch on the bottom of the device
is turned on.
There is no AV picture. • Check to ensure that the contrast and brightness settings are
correct.
• Check to ensure that all external devices have been connected
properly.
• Check to ensure that you have selected the correct AV source.
• Any input source that you want to select with
or
(
SOURCE) must be marked in the SOURCES > SOURCE
SETTINGS
menu.
There is no sound. • Ensure that the volume has not been set to the minimum
level.
• Ensure the mute setting is not active. Do this by pressing the
button in the top left of the remote control with the crossed
out loudspeaker symbol.
There is no picture and no
sound. I can hear noise,
though.
• The reception might be poor. Check if the antenna is
connected properly.
The picture is not clear. • The reception might be poor.
• Check if the antenna is connected properly.
The picture is too bright or
too dark.
• Check the settings for contrast and brightness.
The picture is not sharp. • The reception might be poor.
• Check if the antenna is connected properly.
• Check the settings for sharpness and noise reduction in the
PICTURE menu.
There is a double/triple
picture.
• Check if the antenna is aligned properly.
• Waves might be reflected off buildings or mountains.
The picture is pixellated. • There might be interference from cars, trains, power lines,
neon lights, etc.
• There might be interference between the antenna and power
cables. Position the cables further apart.
There are stripes on the
screen or the colours are
faded.
• Is there interference from another device?
• Transmission antennae on radio stations, ham radios and
portable phones can also cause interference.
• Operate the device as far away as possible from the device
that might be causing the interference.
The MODE multifunction
button on the device is not
working.
• The child lock might be on.
14
Page 92

TV switches off • Check whether the automatic TV switch off function is
activated under MORE...
No reception/poor reception
via a wireless network
connection (WLAN).
• Ensure that all necessary settings have been made.
WIRELESS DISPLAY cannot
be established.
• Check that all necessary settings have been
made. Read the
section “Wireless Display”.
The remote control is not
working.
• Check whether the batteries in the remote control are
functional and have been inserted the right way round.
• Ensure the sensor field is not exposed to strong light.
• Turn the device off and on again using the power switch on
the bottom of the device.
Menu cannot be opened. • Check whether CEC is enabled. In this case, the menu cannot
be opened. This is not a defect. In some cases, the menu of the
device connected via HDMI2 opens. This is dependent on the
source device and must be supported accordingly.
• Change the input source.
No Bluetooth® connection • Make sure that all settings have been correctly specified on
the device and that the Bluetooth® function is enabled.
• Check whether the device to be connected is switched on and
is in discoverable mode.
• Make sure that all settings have been correctly specified
on the device to be connected and that the Bluetooth®
function is enabled. Consult the operating instructions of the
corresponding device, if necessary.
For further information on troubleshooting, read where applicable the comprehensive
operating instructions available online because certain measures and procedures are
described there in more detail.
15
EN
Page 93

4.1. Do you need more help?
If the suggestions in the previous section did not solve your problem, please contact us. To make it
easier for us to help you, please have the following information to hand:
• What external devices are connected?
• What messages appear on the screen?
• When operating the device, at which step did the problem occur?
• If you have a PC connected to the device:
− How is your computer configured?
− What software were you using when the problem occurred?
• What steps have you already taken to try and rectify the problem?
• Please provide us with your customer number if you have one.
5. Service information
Please contact our Customer Service team if your device ever stops working the way you want or
expect it to. There are several ways for you to contact us:
• In our Service Community, you can meet other users, as well as our staff, and you can exchange
your experiences and pass on your knowledge there.
You will find our Service Community at http://community.medion.com.
• Alternatively, use our contact form at www.medion.com/contact.
• You can also contact our Service team via our hotline or by post.
Opening times Hotline number UK
Mon – Fri: 08.00 –
20.00
Sat – Sun: 10.00 –
16.00
0333 3213106
Hotline number Ireland
1 800 992508
Service address
MEDION Electronics Ltd.
120 Faraday Park, Faraday Road, Dorcan
Swindon SN3 5JF, Wiltshire
United Kingdom
16
Page 94

6. Legal notice & operating instructions download
Copyright © 2018
Date: 28.08.2018
All rights reserved.
These operating instructions are protected by copyright.
Mechanical, electronic and any other forms of reproduction are prohibited without the written
permission of the manufacturer.
Copyright is owned by the company:
Medion AG
Am Zehnthof 77
45307 Essen
Germany
Subject to technical and optical changes as well as printing errors.
The operating instructions can be downloaded from the service portal.
On the service portal, use the device’s MSN device to look for the associated instructions.
You will find the MSN on the device’s type plate or in the “Product Data Sheet” section.
You can also scan the QR code below to download the instructions onto your mobile device from
the service portal.
URL QR code
GB www.medion.com/gb/service/start/
AUS www.medion.com/au/contact.php.
US www.medion.com/us/
17
EN
Page 95

7. Product data sheet
According to Directive 1062/2010
Trademarks
MSN no.
30025264 30025263 30025262 30025384 30025368 30025366 30025364 30025383
Model no.
(MD)
31380 31381 31382 31420 31421 31422 31423 31424
Energy
efficiency
class
A+ A++ A++ A+ A+ A+ A++ A++
Visible
screen size
(diagonal,
approx.)
125,7 cm
(50“)
138,8 cm
(55“)
163,9 cm
(65“)
101,6 cm
(40“)
108 cm
(43“)
125,7 cm
(50“)
138,8 cm
(55“)
163,8 cm
(65“)
Average
power
consumption
when
switched on
(Watt)
65 53 75 44 48 65 53 74
Annual
power
consumption
(kWh/year)
94 77 109 64 70 94 78 108
Power
consumption
in standby
(Watt)
0,48 0,48 0,48 0,48 0,48 0,48 0,48 0,48
Power
consumption
when
switched off
(Watt)
0,01 0,01 0,01 0,01 0,01 0,01 0,01 0,01
Display
resolution
(px)
3840 x
2160
3840 x
2160
3840 x
2160
3840 x
2160
3840 x
2160
3840 x
2160
3840 x
2160
3840 x
2160
18
Page 96

Ultra HD Smart-TV
MEDION
X14020 (MD 31420) / X14321 (MD 31421) / X15022 (MD 31422) / X15523 (MD 31423) / X16524 (MD 31424) /
X15080 (MD 31380) / X15581 (MD 31381) / X16582 (MD 31382)
 Loading...